Intro to Shadersdmgregory.ca/misc/shadercheatsheet.pdf · Shader Variant Vertex Shader Fragment...
23
Intro to Shaders in Unity Douglas Gregory @D_M_Gregory Shader Cheatsheet
Transcript of Intro to Shadersdmgregory.ca/misc/shadercheatsheet.pdf · Shader Variant Vertex Shader Fragment...
Intro to Shadersin Unity
Douglas Gregory@D_M_Gregory
Shader Cheatsheet
FragmentShader
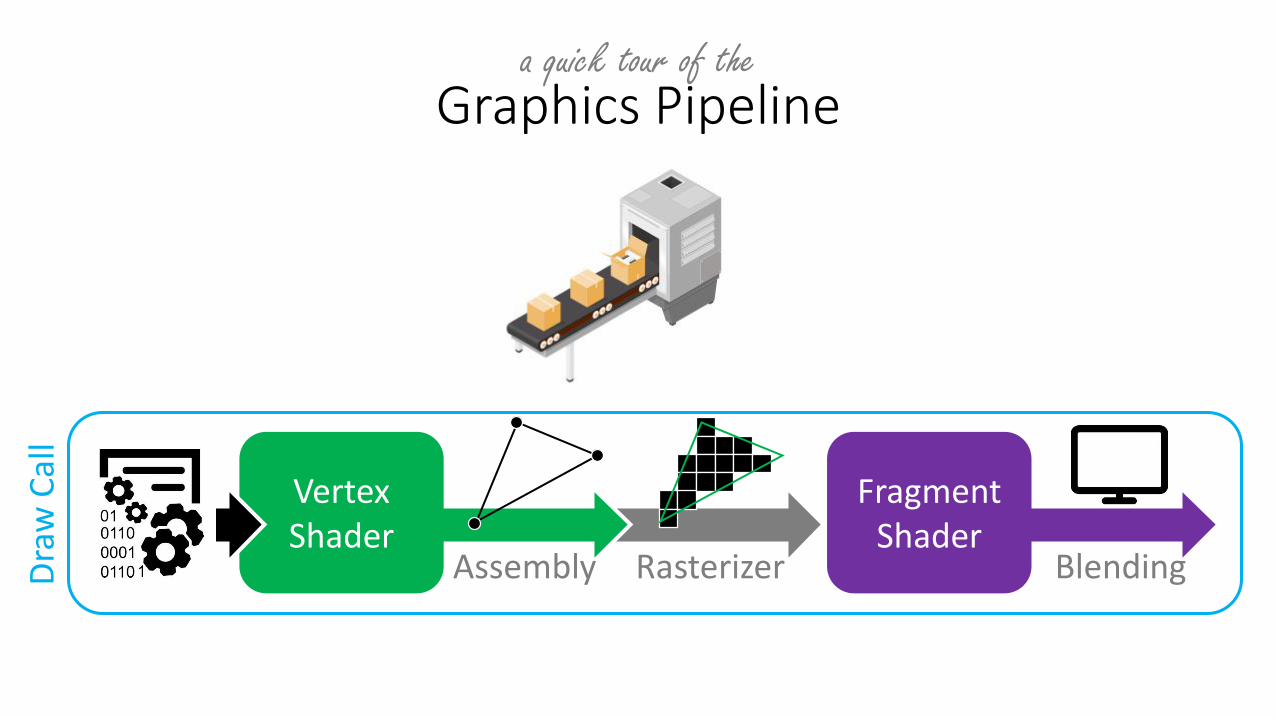
Graphics PipelineD
raw
Cal
l
VertexShader
Rasterizer Blending
a quick tour of the
Assembly
Assembly Line & Semantics
SV_POSITION
TEXCOORD0
NORMAL0
VPOS
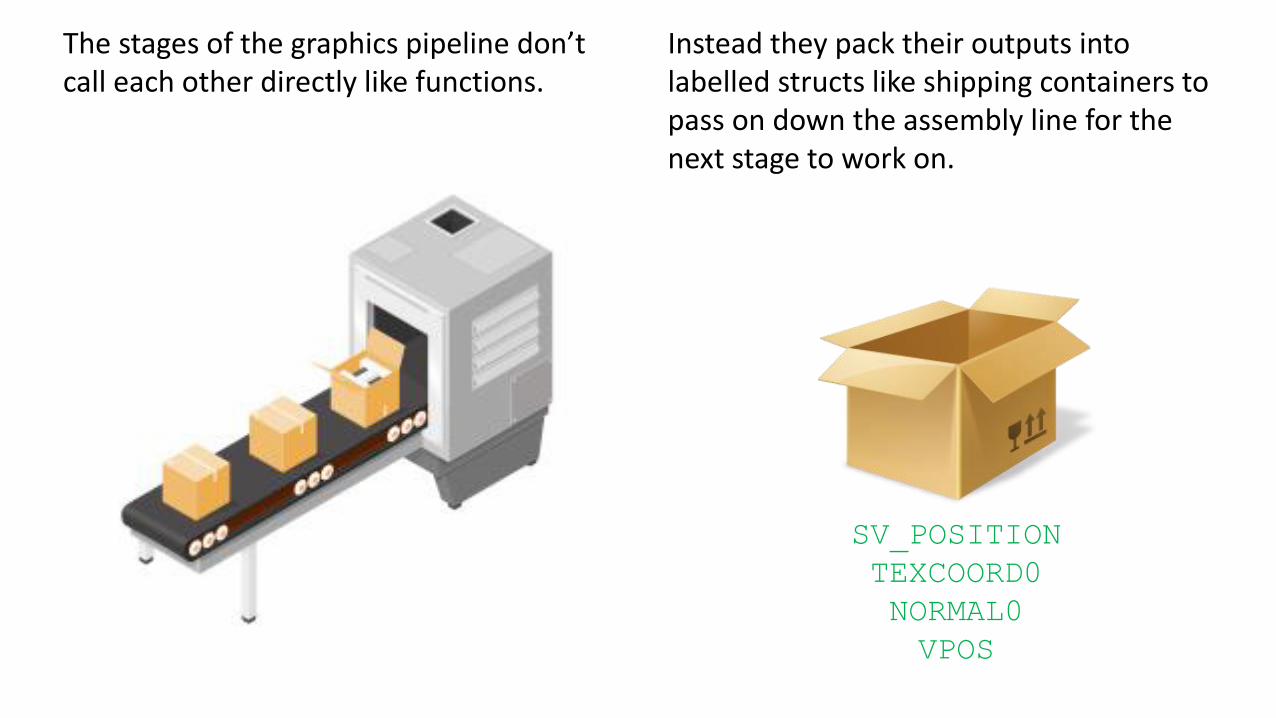
The stages of the graphics pipeline don’t call each other directly like functions.
Instead they pack their outputs into labelled structs like shipping containers to pass on down the assembly line for the next stage to work on.
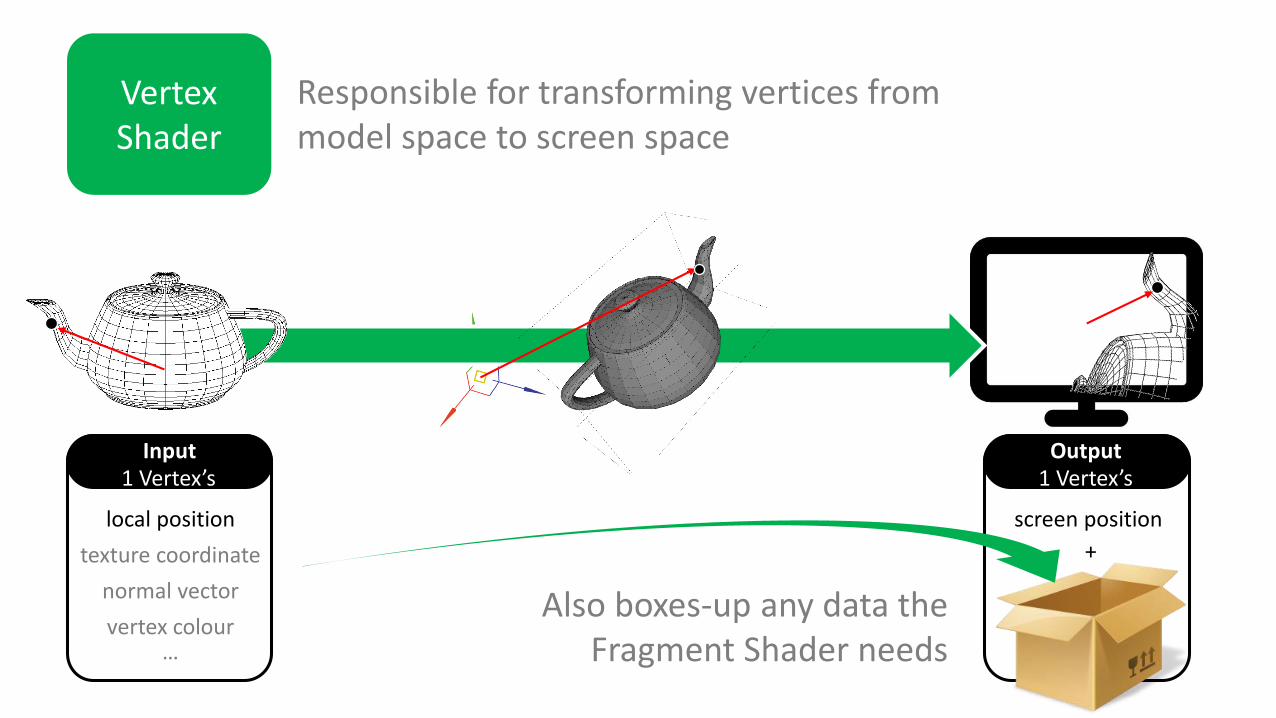
Vertex ShaderVertexShader
Responsible for transforming vertices from model space to screen space
Also boxes-up any data the Fragment Shader needs
Input1 Vertex’s
local position
texture coordinate
normal vector
vertex colour…
screen position
Output1 Vertex’s
+
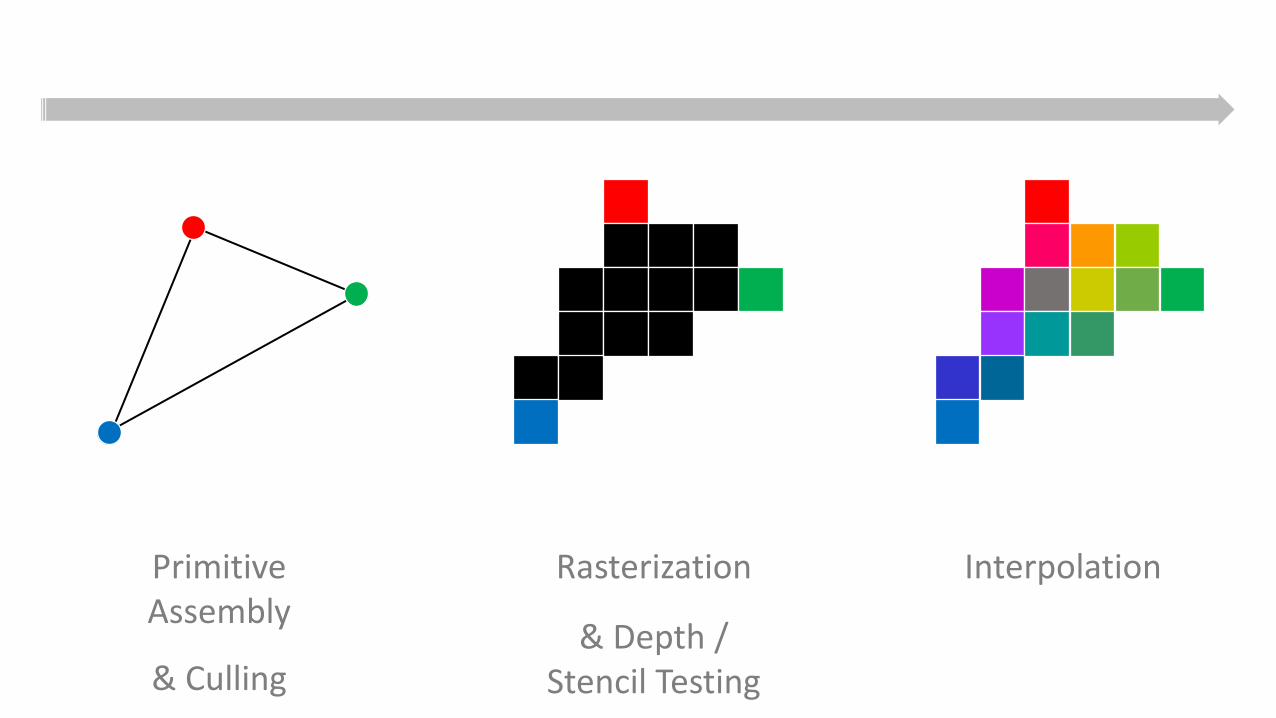
Between Vertices and Fragments
Rasterization
& Depth / Stencil Testing
PrimitiveAssembly
& Culling
Interpolation
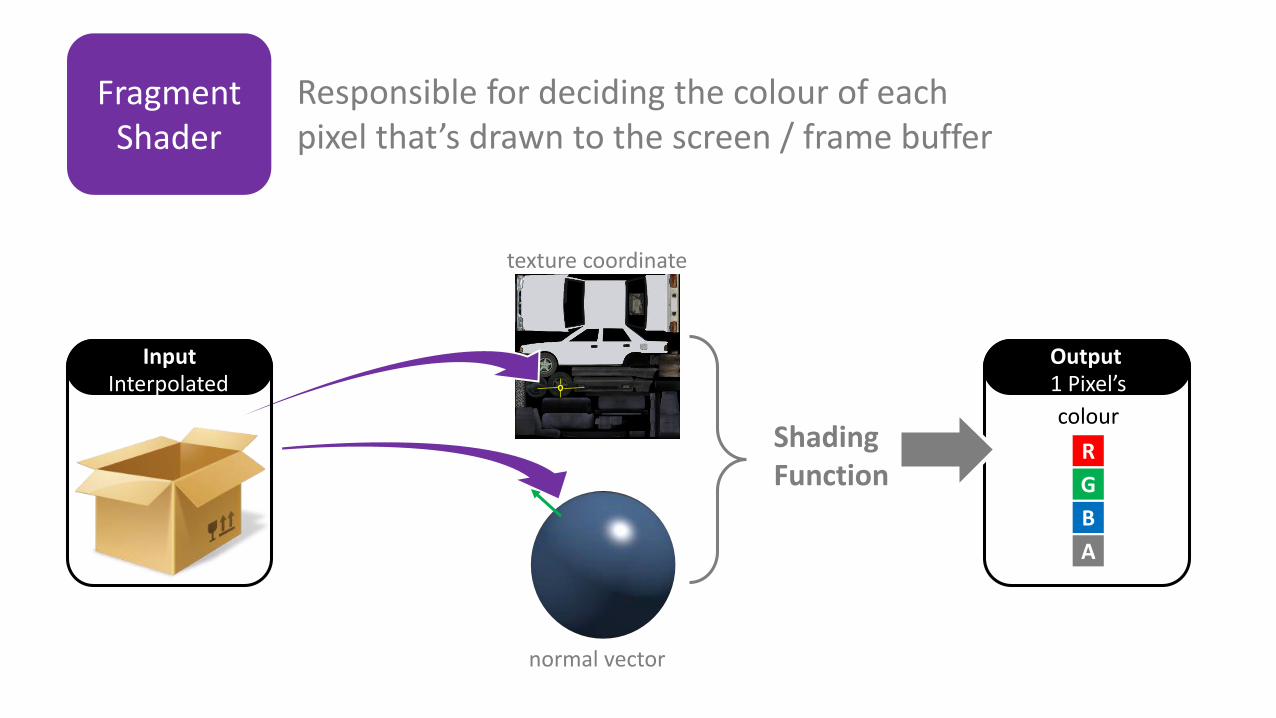
Fragment ShaderFragmentShader
Responsible for deciding the colour of each pixel that’s drawn to the screen / frame buffer
InputInterpolated
colour
Output1 Pixel’s
R
G
B
A
texture coordinate
normal vector
Shading Function
Shader Variant
VertexShader
FragmentShader
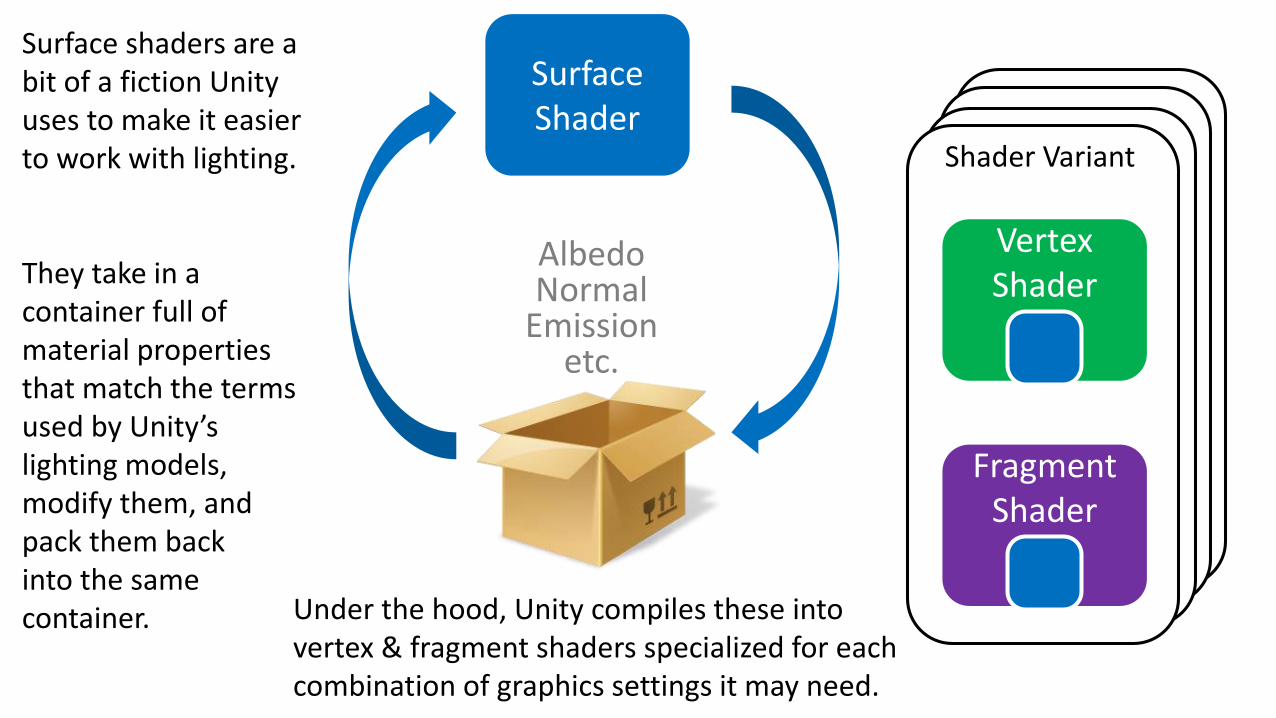
Surface ShaderSurfaceShader
AlbedoNormal
Emissionetc.
Surface shaders are a bit of a fiction Unity uses to make it easier to work with lighting.
They take in a container full of material properties that match the terms used by Unity’s lighting models, modify them, and pack them backinto the same container. Under the hood, Unity compiles these into
vertex & fragment shaders specialized for each combination of graphics settings it may need.
Anatomy of a typical vertex / fragment shader
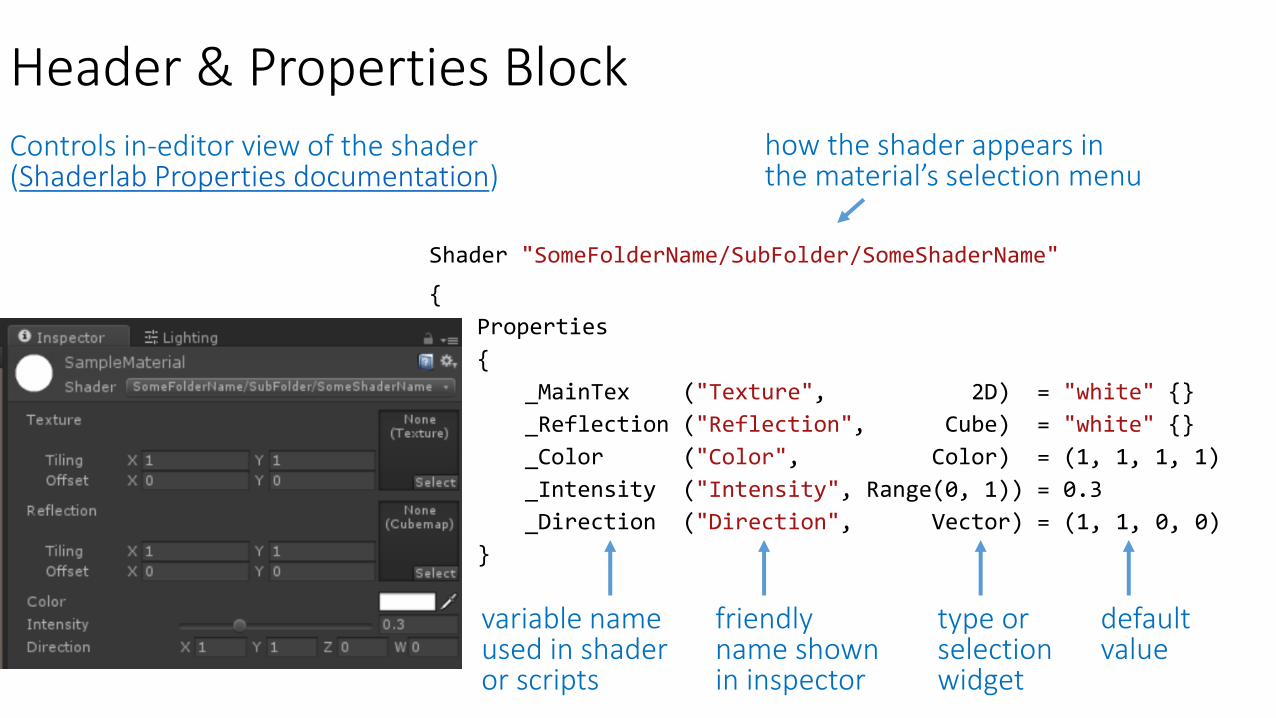
Header & Properties Block
Shader "SomeFolderName/SubFolder/SomeShaderName"
{
Properties
{
_MainTex ("Texture", 2D) = "white" {}
_Reflection ("Reflection", Cube) = "white" {}
_Color ("Color", Color) = (1, 1, 1, 1)
_Intensity ("Intensity", Range(0, 1)) = 0.3
_Direction ("Direction", Vector) = (1, 1, 0, 0)
}
how the shader appears in the material’s selection menu
variable nameused in shaderor scripts
friendly name shown in inspector
type or selection widget
default value
Controls in-editor view of the shader(Shaderlab Properties documentation)
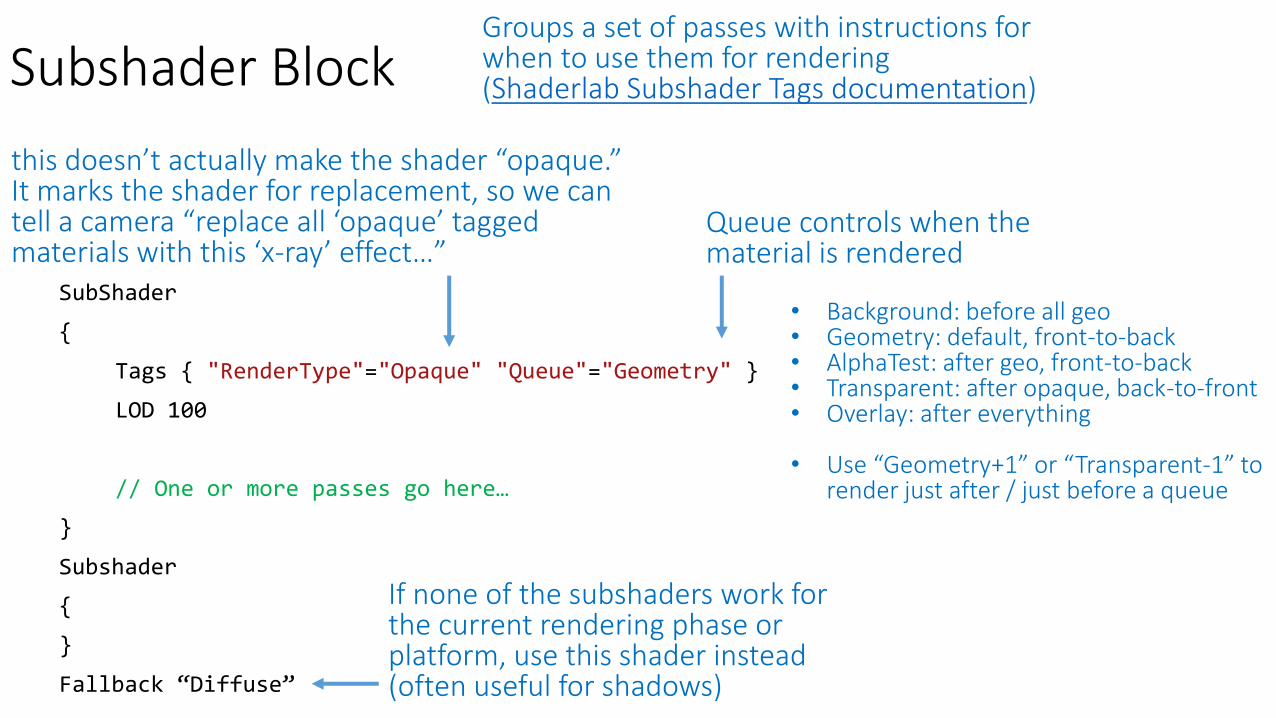
Subshader Block
SubShader
{
Tags { "RenderType"="Opaque" "Queue"="Geometry" }
LOD 100
// One or more passes go here…
}
Subshader
{
}
Fallback “Diffuse”
this doesn’t actually make the shader “opaque.” It marks the shader for replacement, so we can tell a camera “replace all ‘opaque’ tagged materials with this ‘x-ray’ effect…”
If none of the subshaders work for the current rendering phase or platform, use this shader instead(often useful for shadows)
Groups a set of passes with instructions for when to use them for rendering(Shaderlab Subshader Tags documentation)
Queue controls when the material is rendered
• Background: before all geo• Geometry: default, front-to-back• AlphaTest: after geo, front-to-back• Transparent: after opaque, back-to-front• Overlay: after everything
• Use “Geometry+1” or “Transparent-1” to render just after / just before a queue

Blending
Define this either per SubShader or inside each Pass separately
(Shaderlab Blend documentation)
(See also culling & depth testing documentation)
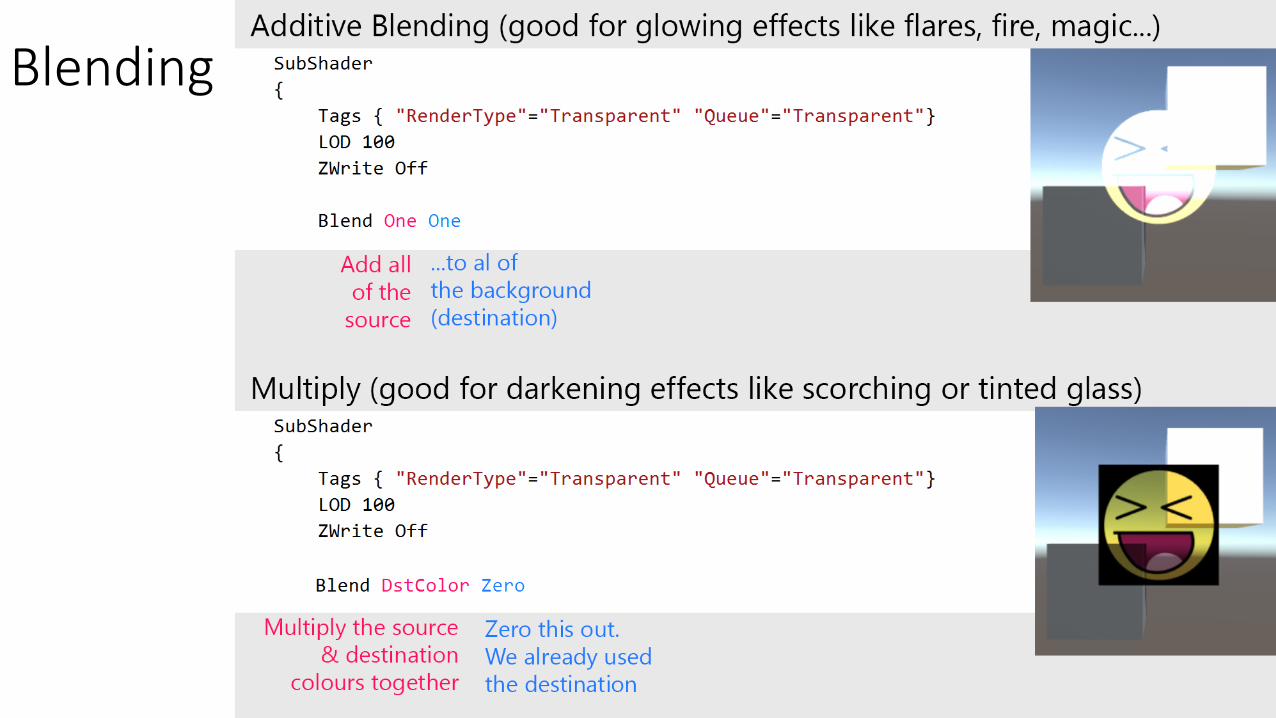
Blending

Blending
Blend One OneMinusSrcAlpha
If we author our textures with the transparency pre-multiplied into
the colour channels, then we can combine additive and layered
blending into a single effect!
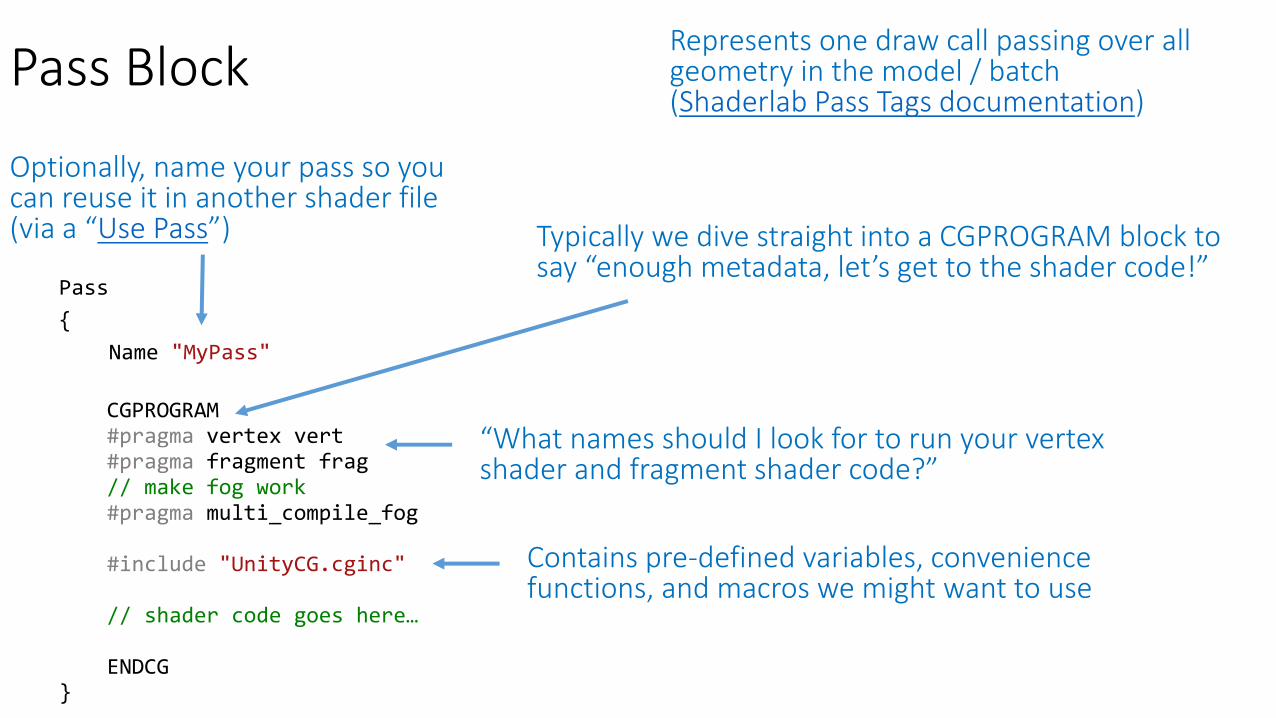
Pass Block
Pass
{
Name "MyPass"
CGPROGRAM#pragma vertex vert#pragma fragment frag// make fog work#pragma multi_compile_fog
#include "UnityCG.cginc"
// shader code goes here…
ENDCG}
Represents one draw call passing over all geometry in the model / batch(Shaderlab Pass Tags documentation)
Typically we dive straight into a CGPROGRAM block to say “enough metadata, let’s get to the shader code!”
“What names should I look for to run your vertex shader and fragment shader code?”
Contains pre-defined variables, convenience functions, and macros we might want to use
Optionally, name your pass so you can reuse it in another shader file(via a “Use Pass”)
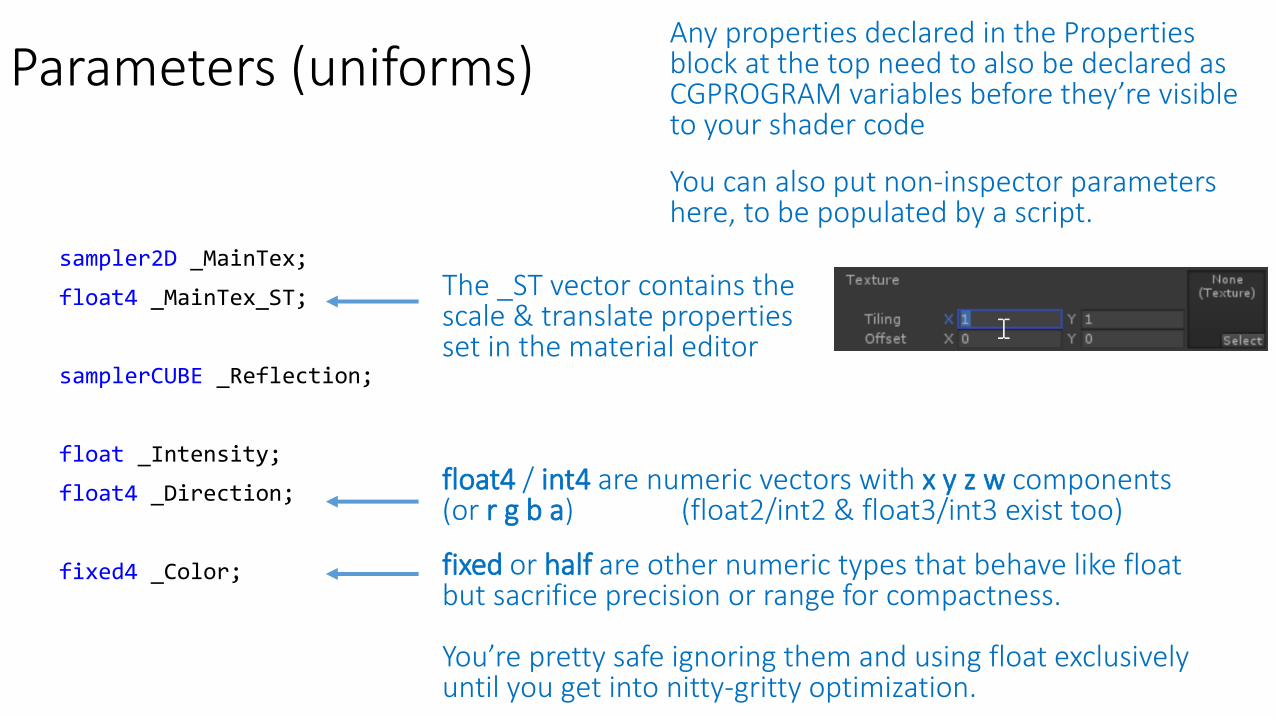
Parameters (uniforms)
sampler2D _MainTex;
float4 _MainTex_ST;
samplerCUBE _Reflection;
float _Intensity;
float4 _Direction;
fixed4 _Color;
Any properties declared in the Properties block at the top need to also be declared as CGPROGRAM variables before they’re visible to your shader code
The _ST vector contains the scale & translate properties set in the material editor
float4 / int4 are numeric vectors with x y z w components(or r g b a) (float2/int2 & float3/int3 exist too)
fixed or half are other numeric types that behave like floatbut sacrifice precision or range for compactness.
You’re pretty safe ignoring them and using float exclusively until you get into nitty-gritty optimization.
You can also put non-inspector parameters here, to be populated by a script.
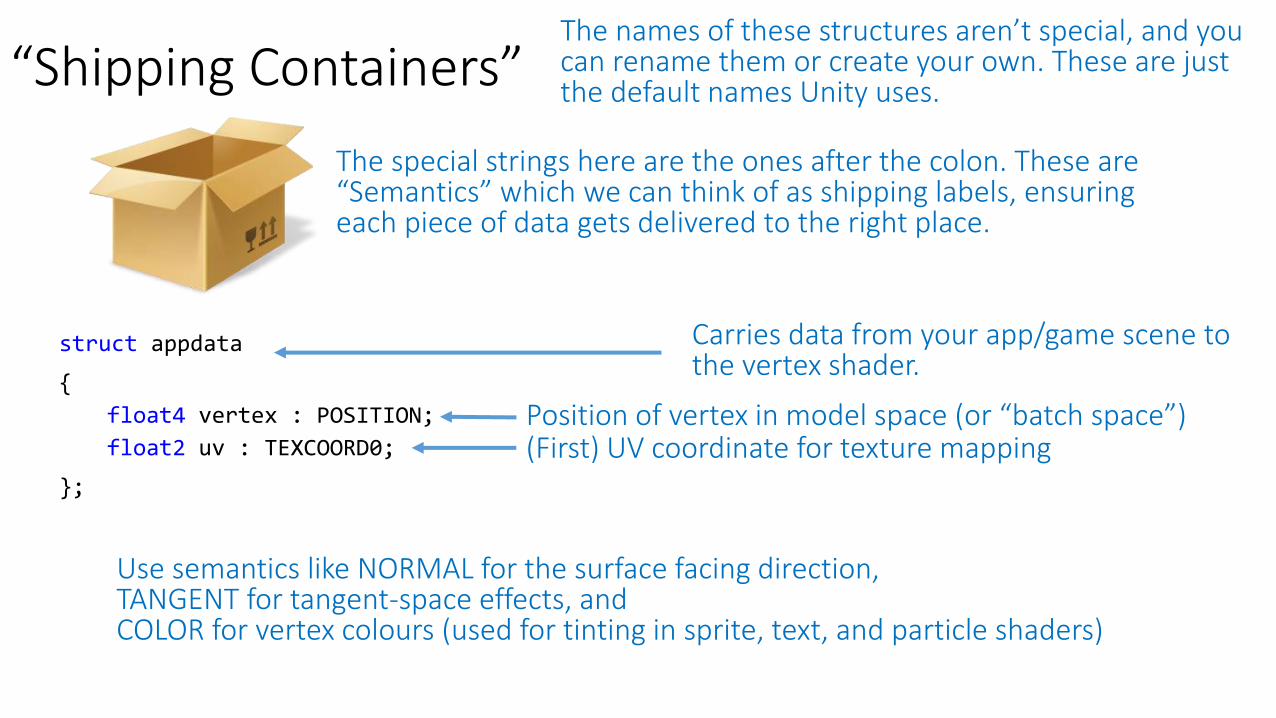
“Shipping Containers”
struct appdata
{
float4 vertex : POSITION;
float2 uv : TEXCOORD0;
};
Carries data from your app/game scene to the vertex shader.
The names of these structures aren’t special, and you can rename them or create your own. These are just the default names Unity uses.
The special strings here are the ones after the colon. These are “Semantics” which we can think of as shipping labels, ensuring each piece of data gets delivered to the right place.
Position of vertex in model space (or “batch space”)(First) UV coordinate for texture mapping
Use semantics like NORMAL for the surface facing direction,TANGENT for tangent-space effects, andCOLOR for vertex colours (used for tinting in sprite, text, and particle shaders)
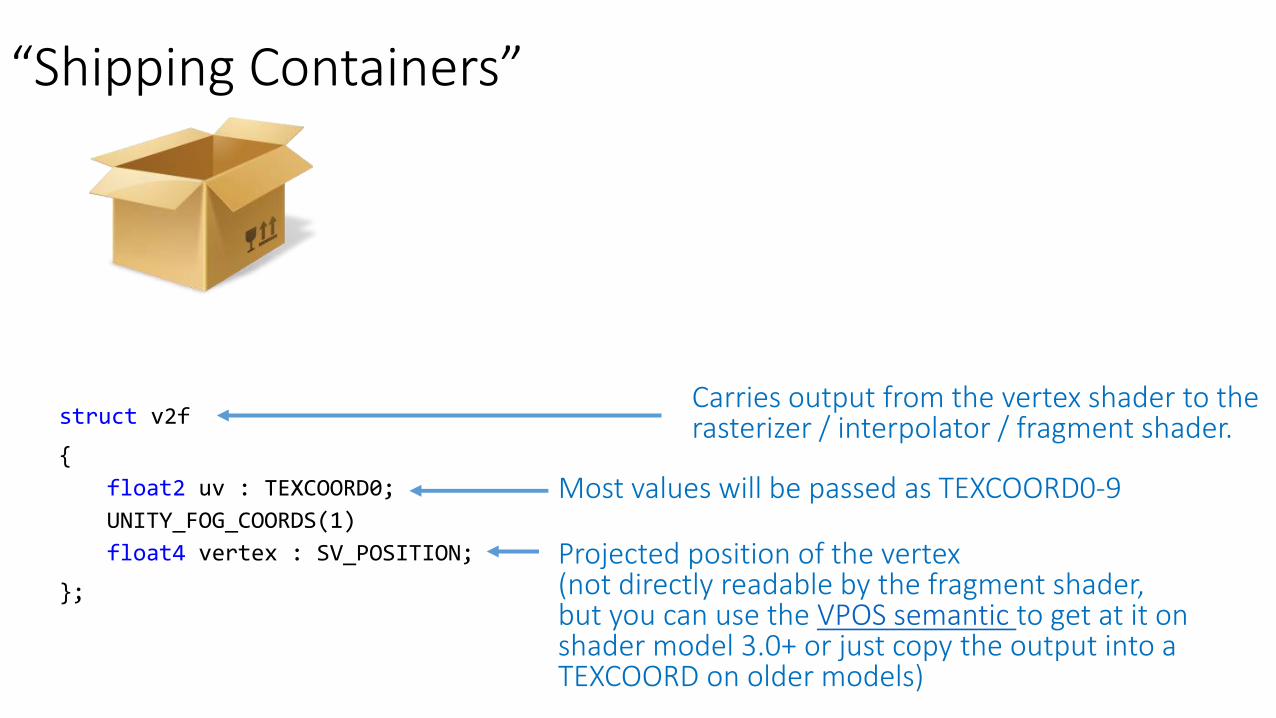
“Shipping Containers”
struct v2f
{
float2 uv : TEXCOORD0;
UNITY_FOG_COORDS(1)
float4 vertex : SV_POSITION;
};
Carries output from the vertex shader to the rasterizer / interpolator / fragment shader.
Projected position of the vertex (not directly readable by the fragment shader, but you can use the VPOS semantic to get at it on shader model 3.0+ or just copy the output into a TEXCOORD on older models)
Most values will be passed as TEXCOORD0-9
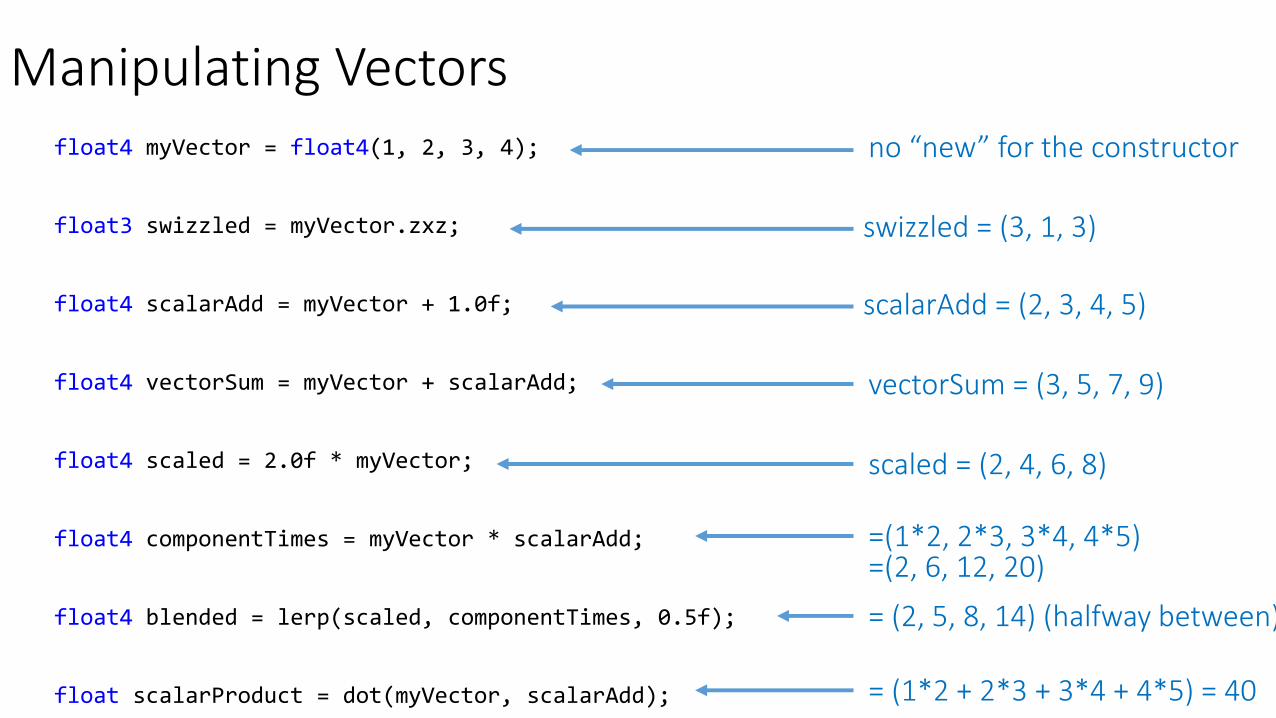
Manipulating Vectorsfloat4 myVector = float4(1, 2, 3, 4);
float3 swizzled = myVector.zxz;
float4 scalarAdd = myVector + 1.0f;
float4 vectorSum = myVector + scalarAdd;
float4 scaled = 2.0f * myVector;
float4 componentTimes = myVector * scalarAdd;
float4 blended = lerp(scaled, componentTimes, 0.5f);
float scalarProduct = dot(myVector, scalarAdd);
no “new” for the constructor
vectorSum = (3, 5, 7, 9)
swizzled = (3, 1, 3)
scalarAdd = (2, 3, 4, 5)
scaled = (2, 4, 6, 8)
=(1*2, 2*3, 3*4, 4*5)=(2, 6, 12, 20)
= (2, 5, 8, 14) (halfway between)
= (1*2 + 2*3 + 3*4 + 4*5) = 40
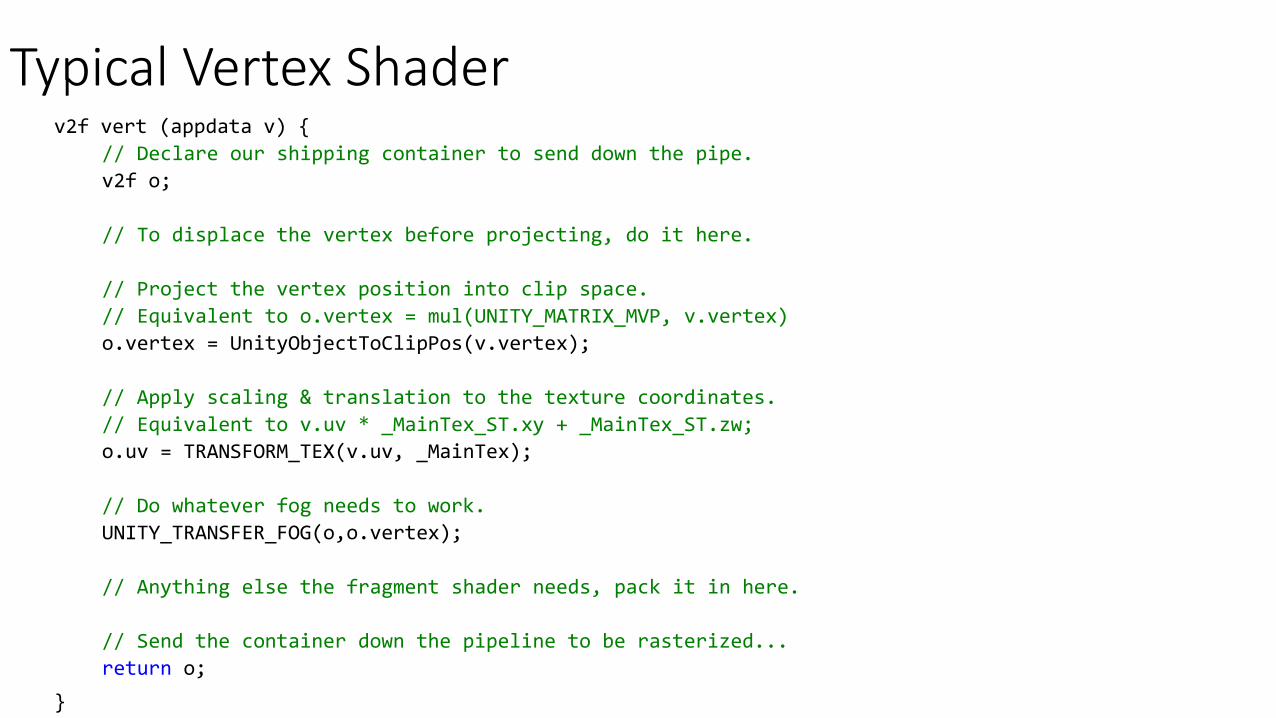
Typical Vertex Shaderv2f vert (appdata v) {
// Declare our shipping container to send down the pipe.
v2f o;
// To displace the vertex before projecting, do it here.
// Project the vertex position into clip space.
// Equivalent to o.vertex = mul(UNITY_MATRIX_MVP, v.vertex)
o.vertex = UnityObjectToClipPos(v.vertex);
// Apply scaling & translation to the texture coordinates.
// Equivalent to v.uv * _MainTex_ST.xy + _MainTex_ST.zw;
o.uv = TRANSFORM_TEX(v.uv, _MainTex);
// Do whatever fog needs to work.
UNITY_TRANSFER_FOG(o,o.vertex);
// Anything else the fragment shader needs, pack it in here.
// Send the container down the pipeline to be rasterized...
return o;
}
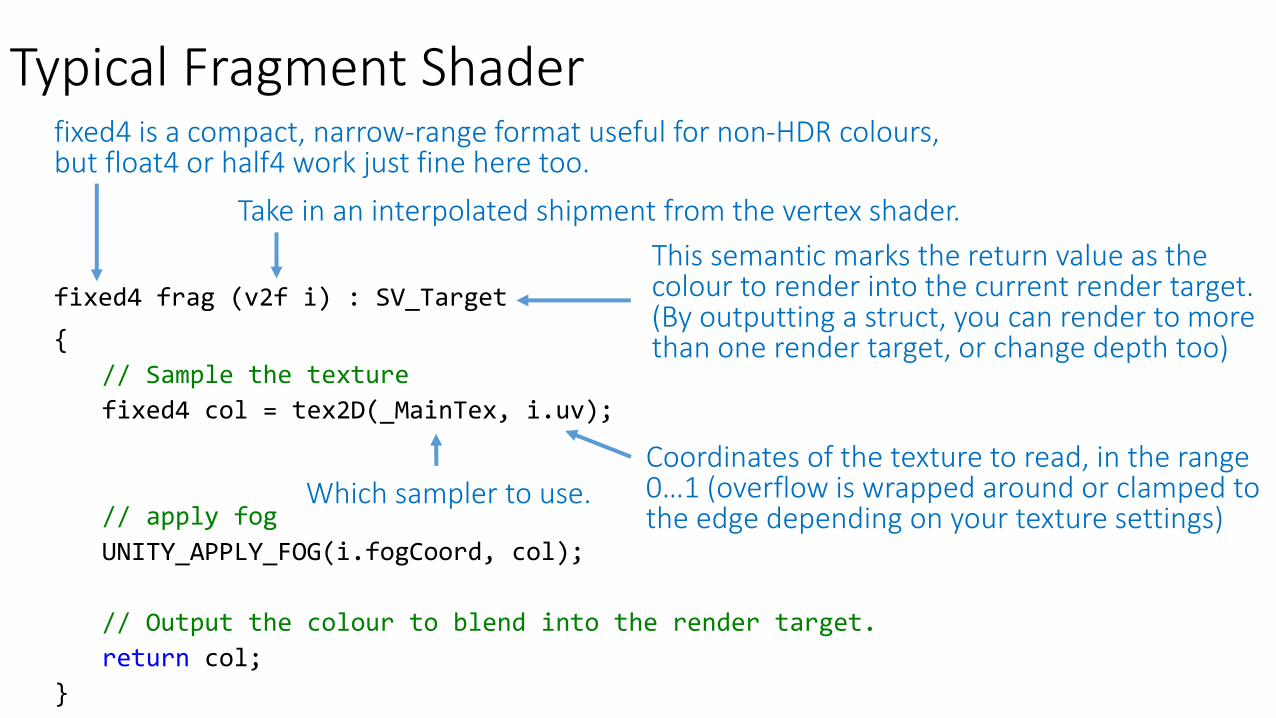
Typical Fragment Shader
fixed4 frag (v2f i) : SV_Target
{
// Sample the texture
fixed4 col = tex2D(_MainTex, i.uv);
// apply fog
UNITY_APPLY_FOG(i.fogCoord, col);
// Output the colour to blend into the render target.
return col;
}
fixed4 is a compact, narrow-range format useful for non-HDR colours,but float4 or half4 work just fine here too.
Take in an interpolated shipment from the vertex shader.
This semantic marks the return value as the colour to render into the current render target.(By outputting a struct, you can render to more than one render target, or change depth too)
Which sampler to use.Coordinates of the texture to read, in the range 0…1 (overflow is wrapped around or clamped to the edge depending on your texture settings)
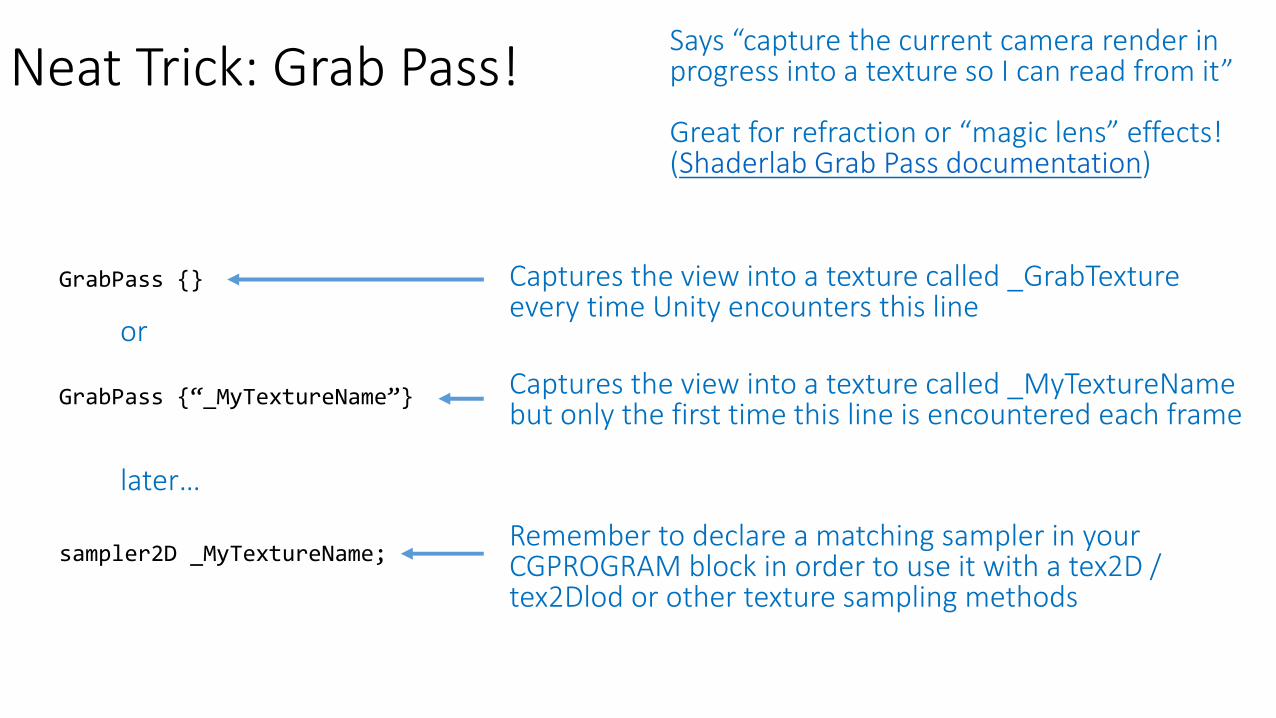
Neat Trick: Grab Pass!
GrabPass {}
GrabPass {“_MyTextureName”}
sampler2D _MyTextureName;
Says “capture the current camera render in progress into a texture so I can read from it”
Great for refraction or “magic lens” effects!(Shaderlab Grab Pass documentation)
Captures the view into a texture called _GrabTextureevery time Unity encounters this line
Captures the view into a texture called _MyTextureNamebut only the first time this line is encountered each frame
or
Remember to declare a matching sampler in your CGPROGRAM block in order to use it with a tex2D / tex2Dlod or other texture sampling methods
later…

What else can we access?
Scene depth & normals!
See the presentation “Special Effects With Depth” for inspiration and how-to examples.
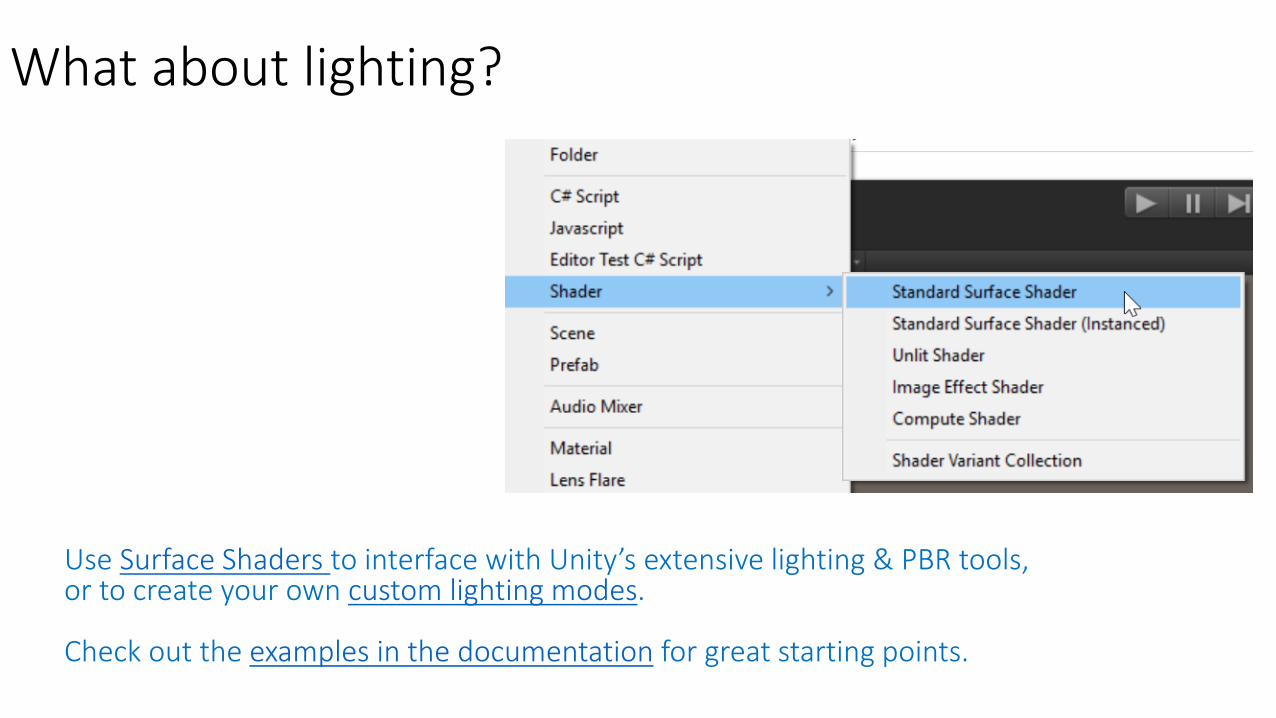
What about lighting?
Use Surface Shaders to interface with Unity’s extensive lighting & PBR tools, or to create your own custom lighting modes.
Check out the examples in the documentation for great starting points.