INTRO TO PAINTING WITH GOUACHE · 2019-09-03 · Lesson 2: Basic Gouache Techniques OUTLINE In this...
15
Lesson 2: Basic Gouache Techniques OUTLINE In this 2nd video, we are going to talk about 3 essential gouache techniques, and we will outline a few exercises that can be done to practice and get more familiar with the medium. The 3 techniques we will talk about are Mixing, Blending, and Layering. SUPPLY LIST • Paper: Strathmore 500 Series Ready Cut Cold Press Watercolor Paper Strathmore 500 Series Ready Cut Hot Press Watercolor Paper Strathmore 400 Series White Mixed Media Paper Strathmore 400 Series Black Mixed Media Paper INTRO TO PAINTING WITH GOUACHE with Myriam Tillson
Transcript of INTRO TO PAINTING WITH GOUACHE · 2019-09-03 · Lesson 2: Basic Gouache Techniques OUTLINE In this...

Lesson 2: Basic Gouache Techniques
OUTLINE In this 2nd video, we are going to talk about 3 essential gouache techniques, and we will outline a few exercises that can be done to practice and get more familiar with the medium. The 3 techniques we will talk about are Mixing, Blending, and Layering.
SUPPLY LIST
• Paper: Strathmore 500 Series Ready Cut Cold Press Watercolor Paper Strathmore 500 Series Ready Cut Hot Press Watercolor Paper Strathmore 400 Series White Mixed Media Paper Strathmore 400 Series Black Mixed Media Paper
INTRO TO PAINTING WITH GOUACHE with Myriam Tillson

• Brushes: Princeton Velvetouch Angle Shader size 3/8”
Princeton Umbria Angular Bright size 4 3/8” • Paints: Daler Rowney Aquafine range. Minimum 2 colors, and some Titanium White • Mixing palette • 2 jars of water • Paper towel
• Optional : Tape or pencil for drawing grids

TECHNIQUES AND EXERCISES 1. MIXING The technique Gouache can be used thin and diluted, like watercolor, or very thick and opaque. To be used opaquely, it has an ideal consistency that is thin enough to layer smoothly and evenly, but still thick enough that it covers what's underneath thoroughly. The ideal consistency of gouache is : - Similar to double cream - Drops for the brush slowly - Covers the palette evenly and smoothly, without leaving too much of a wake when mixed and without revealing the white of the palette underneath Your gouache mix is too thin to be used opaquely when it flows on the palette and you can see the white of the palette when you move it around. It is too thick to layer smoothly and evenly when it sticks in clumps on your brush. Thin paint is great when painting under-layers or if you like using gouache like watercolor. However, if your goal it so paint opaquely, you don't want your paint to be too thin as the more water is in your paint, the more likely it is to reactivate your previous layers of paint and muddy your piece. Plus, the more watered down your mix is, the less it will stand out against your previous layers. Thick paint is great for painting details that need to stand out, such as highlights, but is also more likely to reactivate easily, and gouache can also crack and flake off if applied too thickly on a flexible surface. It is also more difficult to spread and is more likely to be affected by the texture of your paper. When painting, there are 2 ways to play with the opacity of your paint : - Using water to dilute your mix - Adding white to your color to make is more opaque The less water is in your mix, the more opaque it will be, but sometimes, it can still be difficult to layer a color over another one, especially if they are similar in value. That is where adding white to your color can help it become more opaque and layer better.
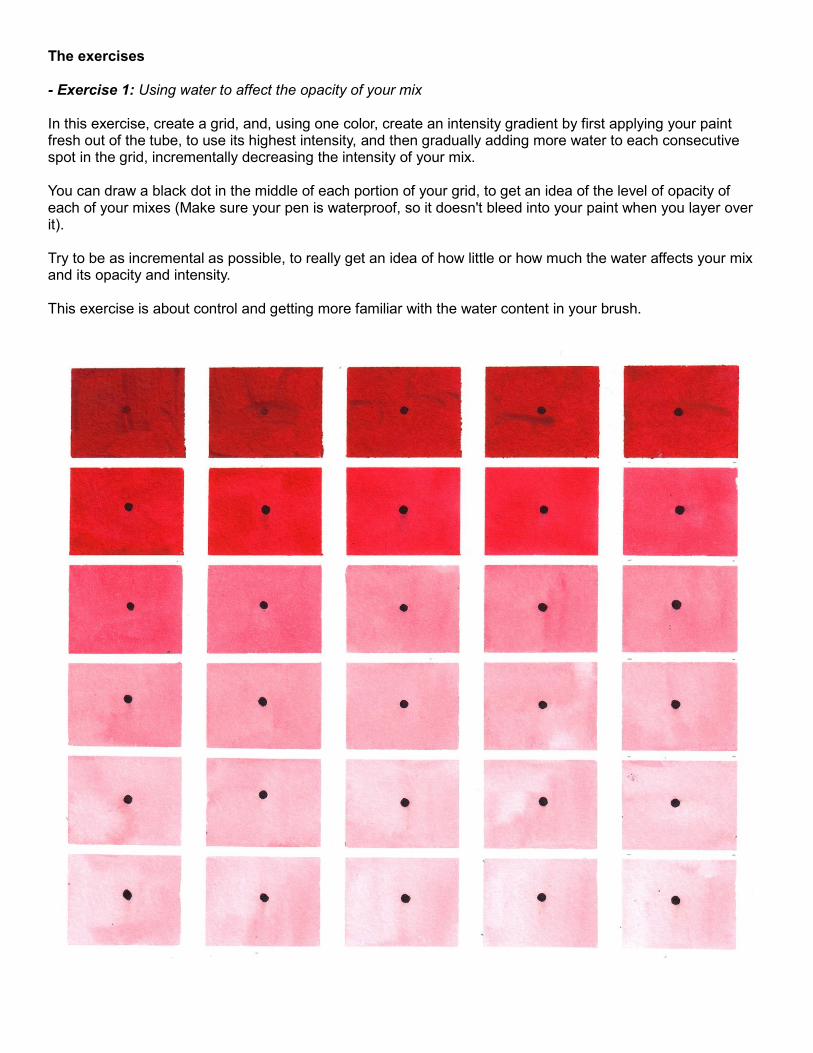
The exercises - Exercise 1: Using water to affect the opacity of your mix In this exercise, create a grid, and, using one color, create an intensity gradient by first applying your paint fresh out of the tube, to use its highest intensity, and then gradually adding more water to each consecutive spot in the grid, incrementally decreasing the intensity of your mix. You can draw a black dot in the middle of each portion of your grid, to get an idea of the level of opacity of each of your mixes (Make sure your pen is waterproof, so it doesn't bleed into your paint when you layer over it). Try to be as incremental as possible, to really get an idea of how little or how much the water affects your mix and its opacity and intensity. This exercise is about control and getting more familiar with the water content in your brush.

- Exercise 2: Using White to affect the opacity of your mix This exercise is similar in concept to the previous water content exercise, but instead of varying the water you add to your mix, you will be adding Titanium White. Use a dark colored paper, preferably black, and create a grid once again. We are using black paper because it will force us to make sure our mix is opaque enough to cover the color of the paper and stand out. It will also allow us to see more easily how intense our mix is, and how white affects the opacity of it. Keeping your mix at the ideal gouache consistency as much as possible, use your pure color to color in your first spot in your grid, and then, gradually mix in more and more white to paint the other spots. Notice how much white increases the intensity and opacity of your mix as you add more of it.

2. LAYERING The technique Layering with gouache is probably the trickier technique to master. Gouache reactivates very easily when any amount of water is applied to it, and, although it can definitely be used to your advantage, it can just as easily ruin a painting. Here are a few tips to help avoid unwanted reactivation - Tip 1: Use very diluted layers in the beginning, and gradually increase the opacity of your paint as you add layers. The less paint there is in your layer, the less likely it is to reactivate easily.
- Tip 2 : Use as little water in your brush as you can. The more water is in your brush, the more likely it is to affect your lower layers. The “dryer” and more opaque your paint is, the easier it will layer without reactivating previous layers.

- Tip 3 : Work your new layers in as little as possible. Be decisive with your strokes and avoid rubbing your paint in.
- Tip 4 : Before you layer on more paint, make sure your previous layers are thoroughly dry.

The exercises To practice layering, we will be setting up 4 exercises. You can do all of them on the same sheet of paper if you set up a grid with 4 rows. Try to have at least 5 or 6 spots per row. [Note : Most of these exercises are about experiencing how your layers reactivate, so they are most beneficial when performed rather than watched.] - Exercise 1 : Layering on an increasingly thick under-layer For this exercise, paint each of your spots with an increasingly thick layer of gouache, starting with very diluted to the ideal gouache consistency or thicker. Once your layers are dry, go in with another color (mix in some white if possible, it will help you see what is happening better. I forgot to do so myself in my demo), and, mixing it to the ideal gouache consistency, layer it on top of each of your spaces. Notice how much of your under-layer reactivates and mixes into your new layer the thicker your under-layer is.
- Exercise 2 : Experimenting with working new layers into previous layers For this exercise, apply the same, opaque layer of gouache on all your row. Then, mix another color with some white, until you get your ideal gouache consistency. Once your row has dried, experiment with layering that new mix onto it, alternating between quick, decisive strokes, slow ones, and working and rubbing your new layer in versus applying it with as little rubbing as possible.

- Exercise 3: Layering on top of an under-layer with an increasingly watered down mix For our third exercise, repeat the preparation we did for exercise 2 by applying an even layer of opaque gouache over your whole row and waiting for it to dry completely. Then, using your color and white mix, apply it to your row and gradually increase its water content. Notice how your under-layer reactivates more the more water is in your mix.
- Exercise 4: Layering on top of layers at different stages of drying For this final exercise, apply your under-layer opaquely to your whole row, and either dry part of it with a hair-dryer, or time it so that some of your spots are still wet, and some are completely dry. Notice how much your wet under-layer mixes into your new layer, versus how much more easily your new mix layers onto your dry under-layer.

3. BLENDING The techniques Blending gouache can be somewhat tricky, mainly because of how layering can be difficult and how easily gouache reactivates, which can both help or hinder the process. There are several ways to blend gouache, which all lead to slightly different results, and require a certain degree of control over water content, as well as some understanding of the drying process of gouache. The exercises - Technique 1: This blending technique relies on your paint being only slightly wet, and using a slightly damp brush to blend the divide between the two tones you want to have a smooth transition between. Mix two color and apply them opaquely on each side of your paper until they touch each other. Wait until your paint is not fully wet, but still a little shiny, and use a clean, slightly damp brush, to smooth the transition area between the two colors, and blend them together. This is almost a dry brush technique, so your brush should have very little water on it, as too much water will only lead to muddying your transition, and can even remove so much paint that you might see the paper through them. You could use a fully dry brush, if you want to blend while your colors are still fully wet. Make sure to wipe off the excess paint on your brush on a paper towel every so often, or you run the risk of muddying everything up

Example of working your transition in with too much water on your brush :
- Technique 2: This technique requires mixing your transition tones and applying them next to each other to create a color gradient. Mix both of the colors you want to blend, and apply one on your paper. Gradually mix your second color into your first one on your palette, creating gradual colors shifts and applying them next to each other to create your color gradient on your paper. This might result in more of a tiled effect rather than a smooth transition, although you can use the previous blending technique to smooth it all out.

- Technique 3: The third technique is a sort of mix of both previous ones, and requires mixing your color together gradually on our paper, taking advantage of your paint still being wet. Apply one of your two colors onto your paper, and while it is still wet, use a tiny amount of your second color and apply it on top of your first color, gradually upping the amount of second color that you add to your page.
- Technique 4: This last technique is reminiscent of blending watercolor, and requires adding a lot of water to your mixes, to turn them into washes, and relies on the water in your mixes making the two tones flow together. This technique has its uses, but is more unreliable than the previous ones when it comes to creating smooth, even gradients. The more water is in your mix, the less you can control where your paint goes and how evenly it dries. This technique also makes it more likely that you will end up with a muddy result, especially when using pure colors, that contain no added white. It is also not a type of blending that can be added on top of existing layers of paint, especially opaque ones.

EXERCISE SHEET TEMPLATES Mixing exercise 1 (8x10” grid)
Mixing exercise 2 (5x1.8” grid)

Layering Exercise Grid (8x10” grid)
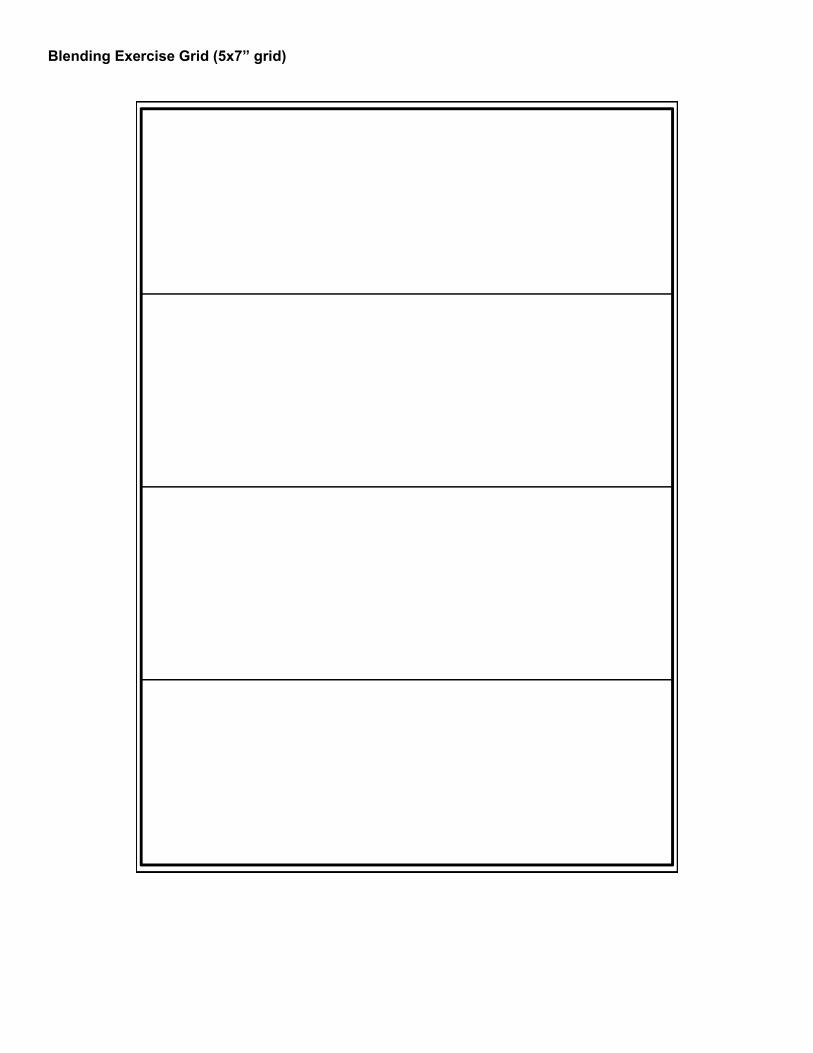
Blending Exercise Grid (5x7” grid)