Intro Book Multimedia
35
An Introduction to Multimedia Fusion 2 Lessons to Create 2D Games Karen Hult, Multimedia Technology Teacher T erry Byfield, Curriculum Resource Specialist
-
Upload
shalaka-patil -
Category
Documents
-
view
219 -
download
0
Transcript of Intro Book Multimedia

7/27/2019 Intro Book Multimedia
http://slidepdf.com/reader/full/intro-book-multimedia 1/34
An Introduction toMultimedia Fusion 2
Lessons to Create 2D Games
Karen Hult, Multimedia Technology Teacher Terry Byfield, Curriculum Resource Specialist

7/27/2019 Intro Book Multimedia
http://slidepdf.com/reader/full/intro-book-multimedia 2/34
Table of Contents
An Introduction to Multimedia Fusion 2.....................................................................1
Playing Games in Multimedia Fusion 2.....................................................................2
Chapter One: Getting Started with a Space Shooter Game................................3
Chapter Two: Star Fighter Game ......................................................................25
Chapter Three: Adding Side Shooters and Sound to Your Game........................33
Chapter Four: Changing to a Moving Backgroundand Adding Scores and Lives .....................................................41
Chapter Five: Creating Power-Ups Using Alterable Values ..............................55
Chapter Six: The Ship Respawns (Recreating Star Fighter) ...........................67
Chapter Seven: Designing the Title Screenand Instruction Screen of Your Game.........................................75
Chapter Eight: Creating Waves of Enemies ......................................................87
Chapter Nine: Creating a Boss Enemy, Adding Transition
Screens and Adding Finishing Touches to Your Game..............93
Chapter Ten: A New Type of Game -- The Maze Game.................................105
Chapter Eleven: A New Game – The Platform/Side-Scroller Game....................121
Chapter Twelve: Breakout ...................................................................................133
Additional Resources ............................................................................................143
The exercises included in these chapters are to be used with Multimedia Fusion 2, Build R243. When thesoftware is first installed, allow the program to check through the internet for updates. There may be minor differences depending upon the MMF2 Build Version that is currently installed on your computer.
Copyright 2007Shawnee Mission, Kansas
7/27/2019 Intro Book Multimedia
http://slidepdf.com/reader/full/intro-book-multimedia 3/34
An Introduction to Multimedia Fusion 2 Lessons to Create 2D Games
- 1 -
An Introduction to Multimedia Fusion 2
Have you ever wanted to create a computer game where you can let your creativity run wild andmake a game that others want to play? Maybe you have a unique idea for your game?
Welcome to the world of Multimedia Fusion 2 and two-dimensional game creation. MultimediaFusion 2 is an easy-to-use game authoring environment that will allow you to make wonderfully,creative games. It is an authoring tool that allows you to create many types of computer games,screensavers, educational programs, utilities or other applications, all quite easily.
The chapters in this book are specifically designed for students in a classroom situation usingMultimedia Fusion 2. The first nine chapters of instructions are designed to teach the basics of theMultimedia Fusion 2 program as you create your first game. The remaining chapters continuethrough different types of games with instruction in additional Multimedia Fusion 2 features.
Because Multimedia Fusion 2 is an object-oriented program, you do not need to learn a computer programming language. You work in a completely visual environment. You are bound only by your
creativity!
These chapters will assist you in learning important features of MMF2, and if you are interested inmaking other types of applications in MMF, you will find this guide invaluable for getting to know theprogram and how it works. Many of the principles explored are common to all types of applications.
After completing the exercises in the book, you can combine the features in endless ways to createnew and exciting games for others to enjoy.
Do not skip chapters or sections in a chapter. These units build upon one another. Once you havecompleted a chapter, the next chapter assumes you know the information. You can refer back tospecific chapters if you forget how to apply a specific feature in Multimedia Fusion 2.
Have fun creating your games!
Karen Hult Terry ByfieldMultimedia Technology Teacher Career and Tech Ed Resource Specialist

7/27/2019 Intro Book Multimedia
http://slidepdf.com/reader/full/intro-book-multimedia 4/34
An Introduction to Multimedia Fusion 2 Lessons to Create 2D Games
- 2 -
Playing Games in Multimedia Fusion 2
The best way to introduce you to Multimedia Fusion 2 is to have you play some games that werecreated in Multimedia Fusion 2. The location of the games on your computer may differ slightlydepending on how the software was installed.
1. Locate the Multimedia Fusion 2 icon on your desktop and double click on it.
2. Select File > Open. Look in: Local Disk (C:) > MMFusion > Examples > GAMES. (TheMMFusion folder may be found under Program Files.) You should now see a number of different folders. These folders represent the games that are provided with MultimediaFusion 2.
3. Double click on the Solitaire folder. Select the file “Solitaire.mfa” and click on Open. Thisaction opens the application. The different panels and windows that you see will bediscussed later. For now, just play the Solitaire game! (The extension for a MultimediaFusion Application is .mfa).
4. To run the game, select Run > Application from the Menu Bar or press F8. The title screenappears, but once you click, the game automatically goes to another screen.
Click on the instructions icon located in the top right corner. Once you have finishedreading the instructions on how to play the Solitaire game, play the game to discover howwell you can do!
5. When you have finished, select File > Close to close this game and select another to play. Toopen a second game, select File > Open and locate another game that comes withMultimedia Fusion 2. Some games are easier than others. Romeo is a platform game. Mathis a math game for younger students.
When you have free time, play all the games to find out what types of games have been created withMultimedia Fusion 2. Have fun! Remember to read the instructions, because it truly helps to knowhow to play the game!
7/27/2019 Intro Book Multimedia
http://slidepdf.com/reader/full/intro-book-multimedia 5/34
An Introduction to Multimedia Fusion 2 Lessons to Create 2D Games
- 3 -
Chapter One: Getting Started with a Space Shooter Game
Objectives:
In Chapter One, you will:
y Start a new application in Multimedia Fusion 2;y Learn about features of the Workspace Toolbar and Editor Screens,
including the Storyboard Editor, Event Editor, Frame Editor, Animation Editor and Picture Editor;
y Learn features of the Holding Area and Object Window;y Insert objects from the Library to the Playfield;y Use the Toolbars;y Change Preferences;y Insert Comments in the Event Editor;y Establish New Conditions in the Event Editor; andy Test your Game.
Begin by opening Multimedia Fusion 2.1. Locate the Multimedia Fusion 2 icon on your desktop. Double click on the icon to open the
program. (If there is not an icon on your desktop, locate the Multimedia Fusion 2 program bygoing to Start > All Programs > Multimedia Fusion 2 > Multimedia Fusion 2).
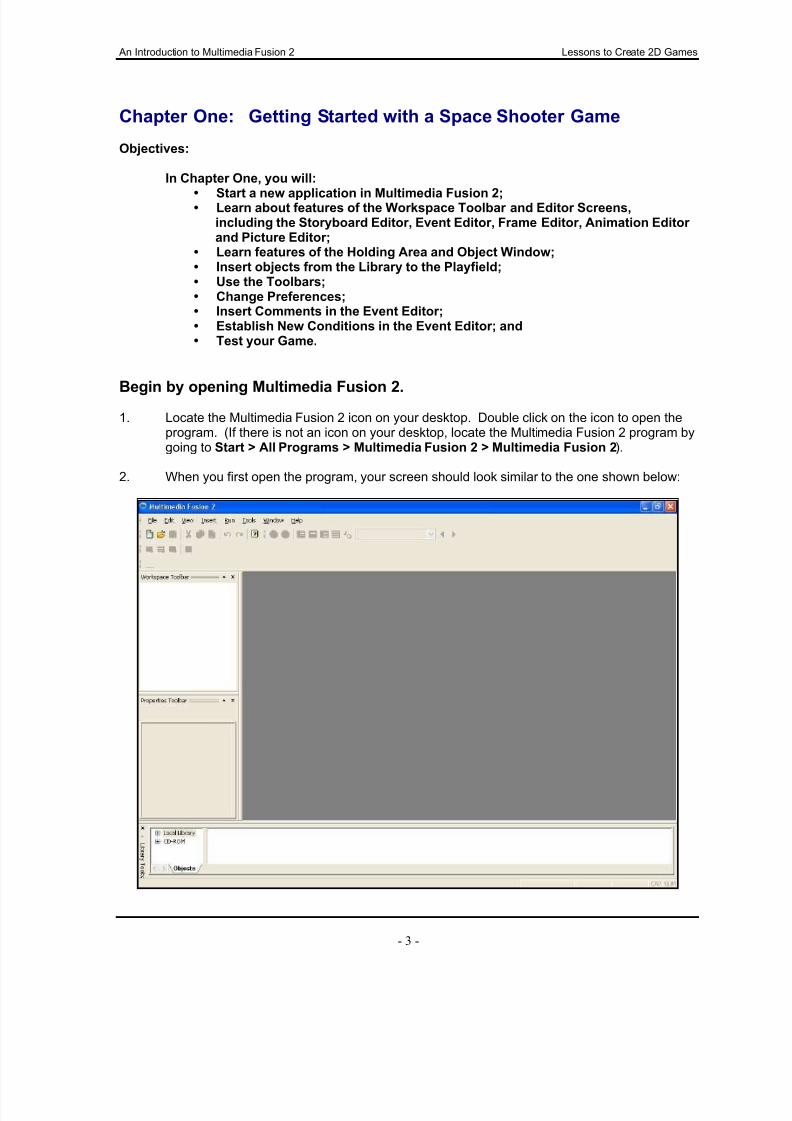
2. When you first open the program, your screen should look similar to the one shown below:
7/27/2019 Intro Book Multimedia
http://slidepdf.com/reader/full/intro-book-multimedia 6/34
An Introduction to Multimedia Fusion 2 Lessons to Create 2D Games
- 4 -
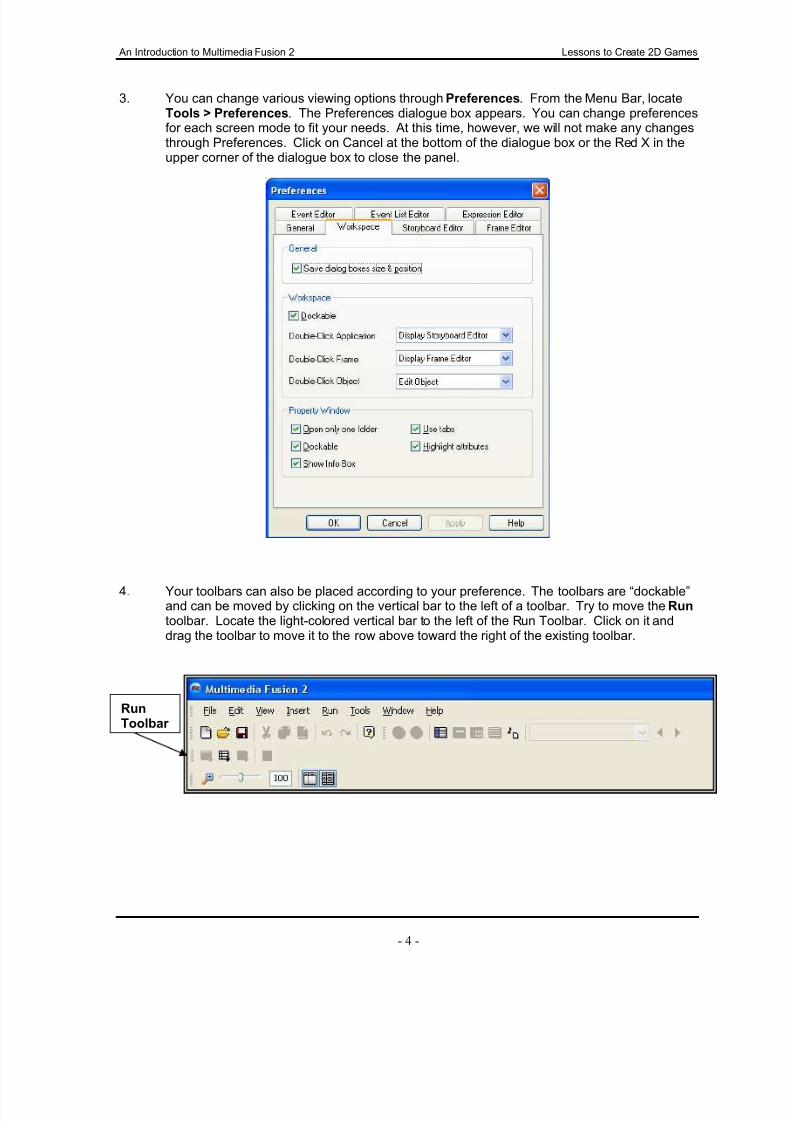
3. You can change various viewing options through Preferences. From the Menu Bar, locateTools > Preferences. The Preferences dialogue box appears. You can change preferencesfor each screen mode to fit your needs. At this time, however, we will not make any changesthrough Preferences. Click on Cancel at the bottom of the dialogue box or the Red X in theupper corner of the dialogue box to close the panel.
4. Your toolbars can also be placed according to your preference. The toolbars are “dockable”and can be moved by clicking on the vertical bar to the left of a toolbar. Try to move the Runtoolbar. Locate the light-colored vertical bar to the left of the Run Toolbar. Click on it anddrag the toolbar to move it to the row above toward the right of the existing toolbar.
RunToolbar

7/27/2019 Intro Book Multimedia
http://slidepdf.com/reader/full/intro-book-multimedia 7/34
An Introduction to Multimedia Fusion 2 Lessons to Create 2D Games
- 5 -
Now the Run Toolbar has been docked in a new location.
5. If you close a toolbar, you can locate it again from the Menu Bar by selecting View >Toolbars. Use this method to learn the names of your toolbars. Select View > Toolbars >Standard. See which toolbar disappears. Select View > Toolbar > Standard again. Watch aStandard Toolbar reappear. The toolbars include: Standard, Workspace, Properties,Navigate, Run and Editor.
Multimedia Fusion 2: Screen Layout
The Workspace Toolbar
One of the most important panels you will use when working on a game is the Workspace Toolbar .The Workspace Toolbar allows you to select the frames with which to work. The frames appear inthe order that you entered them. From the Workspace Toolbar, you can rename frames, resizeframes, change the order of your frames, insert new frames, copy frames and delete frames. Some
prefer to use the Storyboard Editor panel as an option to the Workspace Toolbar panel.
In the Workspace Toolbar, you will define the levels that exist in your game and manage the levels bycopying, deleting, inserting and setting up default properties for each level. Multimedia Fusion 2levels are also referred to as frames. A frame is one section of the game you are creating. It mightbe a title screen, an instruction screen, a game level, a transition level, a bonus screen, a high scorescreen, a game over screen, a winner screen or any other screen you need in your game. You cancreate and use frames for any purpose.
Up to this point, you have opened the Multimedia Fusion 2 program, but you have not started a newapplication. The information mentioned above will become clearer during the next few steps.Remember – do not skip sections of the chapters.
It is time to start!
RunToolbar
7/27/2019 Intro Book Multimedia
http://slidepdf.com/reader/full/intro-book-multimedia 8/34
An Introduction to Multimedia Fusion 2 Lessons to Create 2D Games
- 6 -
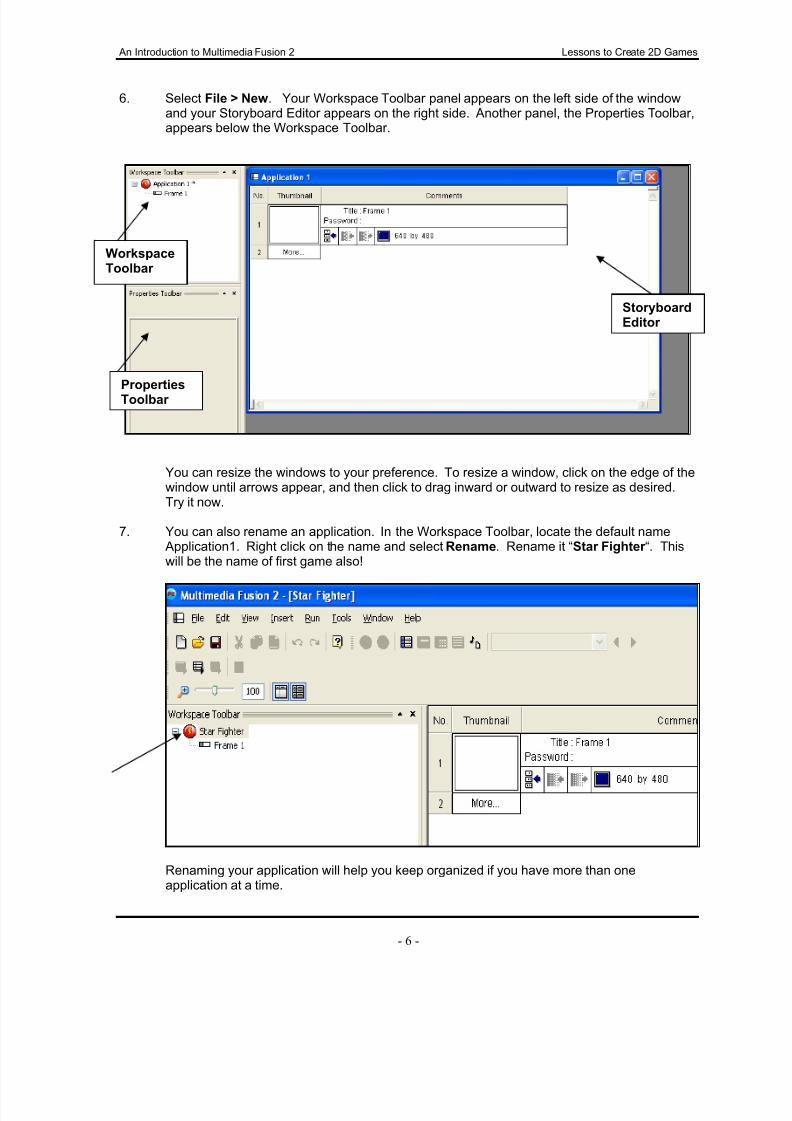
6. Select File > New. Your Workspace Toolbar panel appears on the left side of the windowand your Storyboard Editor appears on the right side. Another panel, the Properties Toolbar,appears below the Workspace Toolbar.
You can resize the windows to your preference. To resize a window, click on the edge of thewindow until arrows appear, and then click to drag inward or outward to resize as desired.Try it now.
7. You can also rename an application. In the Workspace Toolbar, locate the default name Application1. Right click on the name and select Rename. Rename it “Star Fighter “. Thiswill be the name of first game also!
Renaming your application will help you keep organized if you have more than oneapplication at a time.
StoryboardEditor
PropertiesToolbar
WorkspaceToolbar

7/27/2019 Intro Book Multimedia
http://slidepdf.com/reader/full/intro-book-multimedia 9/34
An Introduction to Multimedia Fusion 2 Lessons to Create 2D Games
- 7 -
The Multimedia Fusion 2 Editor Screens
When creating games in Multimedia Fusion 2, you will work in four main editor screens. In theseeditors, you will create and edit various components of your game. An editor is a self-containedworking area that allows you to work on a specific element in your application. The four main editors
are:
¾ The Storyboard Editor
¾ The Frame Editor
¾ The Event Editor
¾ The Animation/Picture Editor
The Storyboard Editor
The Storyboard Editor is the central location in which all frames can be organized and accessed.This editor can be useful for looking at the frames in your game and viewing common settings for each frame.
After you become familiar enough with creating games in Multimedia Fusion 2, you will notice that theWorkspace Toolbar and the Storyboard Editor provide similar information. Eventually it will become apersonal preference as to which window you want to use to accomplish the necessary tasks.
For these games, you will be using both the Storyboard Editor and the Workspace Toolbar, so youbecome familiar with both. After you are comfortable with the features, you can select Tools >Preferences to uncheck the Show Storyboard option on the Storyboard Editor tab.
The Storyboard Editor shows one frame with a thumbnail, the current title of the frame(Frame 1), and the size of the frame. You can also set transitions to fade in or fade out.
8. Name the first frame in your Storyboard Editor. Click on words “Frame 1.” Highlight thewords and press delete. Type in “Level 1”. This is the frame on which you will be creatingyour first level of your Star Fighter game.

7/27/2019 Intro Book Multimedia
http://slidepdf.com/reader/full/intro-book-multimedia 10/34
An Introduction to Multimedia Fusion 2 Lessons to Create 2D Games
- 8 -
Notice how both the Storyboard Editor and the Workspace Toolbar reflect the title change for this level or frame. As you become more comfortable with Multimedia Fusion 2, you may findmore than one way to add or change parts of your game. You can also change the name of a frame in the Workspace Toolbar by right clicking on the frame and selecting Rename.
The Frame Editor
In the Frame Editor , you will place your game backgrounds and objects (background images andcharacter images, sprites, artwork, animations, buttons, and other types). You can build entire gamelevels, place all your treasures to collect and position all the monsters that wait to get you! Also in theFrame Editor you can change the properties of each object to define how it will behave. Everything isdone with a click of the mouse. You can insert pre-made objects supplied with the program or youcan create new objects.
It is time to create your game.
9. In the Storyboard Editor , click on the number 1.

7/27/2019 Intro Book Multimedia
http://slidepdf.com/reader/full/intro-book-multimedia 11/34
An Introduction to Multimedia Fusion 2 Lessons to Create 2D Games
- 9 -
10. A new window appears. This is your Frame Editor . Your Layer Toolbar may also appear when you select Frame Editor. You may close it for now and resize all of your windows to fitin the screen as shown below.
Maximize the Frame Editor and then locate the Frame Editor Toolbar to make further adjustments to the size (change to 50% or 100%).
Depending on the size of your monitors, you may have to adjust the Zoom level to 50% towork comfortably with your Frame Editor.
11. Before moving on, save the game. Select File > Save As > type in Star Fighter 1.
The extension Multimedia Fusion 2 uses is .mfa. You do not need to type the extension.The application will automatically save your file as “Star Fighter 1.mfa”.
As you progress through the chapters, you will be saving the files as a different name in eachchapter. For instance, in Chapter 2, you will save your game as Star Fighter 2; in Chapter 3,you will save your game as Star Fighter 3, etc.
By saving each revision of the game as a new name (changing the number at the end), youwill always be able to go back to a previous chapter version if necessary. You are currentlyworking on Chapter 1, so you saved the application as Star Fighter 1.
FrameEditor
Toolbar Layer Toolbar
7/27/2019 Intro Book Multimedia
http://slidepdf.com/reader/full/intro-book-multimedia 12/34
An Introduction to Multimedia Fusion 2 Lessons to Create 2D Games
- 10 -
Playfield
One of the most important parts of the Frame Editor is the Playfield. This is the white box thatoccupies the majority of the window.
Any objects placed in the Playfield area, such as characters, scores, lives or counters will be visible
on screen when running the game. It is possible to change the properties of the objects so they arenot visible when your game is playing. It is also possible to create scrolling games that have manyobjects not visible until the player scrolls to that point. The scrolling game will be covered in a later chapter.
Again, it is helpful to size the Playfield to 50%, especially when adding a Backdrop. From your FrameEditor Toolbar, change from 100% to 50%.
Now for the fun!
The Multimedia Fusion 2 Library -- Adding a Backdrop
The Library for Multimedia Fusion 2 contains many options for backdrops, object sprites for characters or props, tiles for landscaping and platforms, and much more.
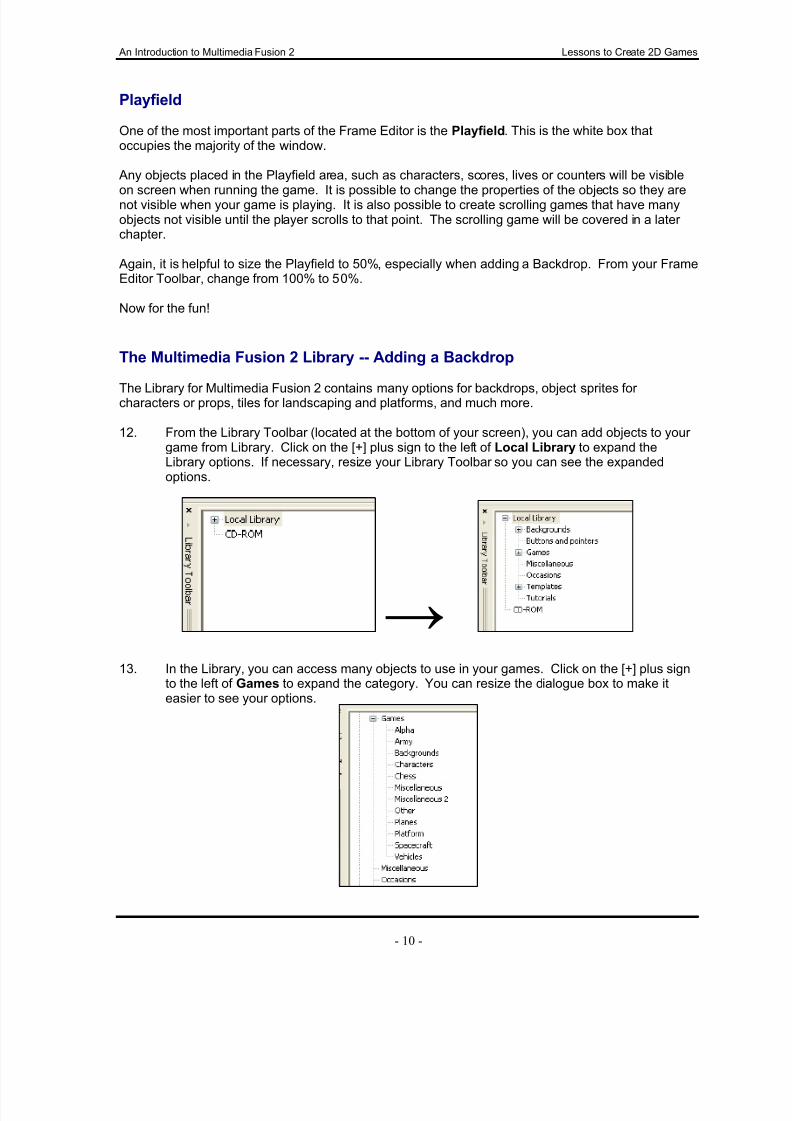
12. From the Library Toolbar (located at the bottom of your screen), you can add objects to your game from Library. Click on the [+] plus sign to the left of Local Library to expand theLibrary options. If necessary, resize your Library Toolbar so you can see the expandedoptions.
ĺ
13. In the Library, you can access many objects to use in your games. Click on the [+] plus signto the left of Games to expand the category. You can resize the dialogue box to make iteasier to see your options.

7/27/2019 Intro Book Multimedia
http://slidepdf.com/reader/full/intro-book-multimedia 13/34
An Introduction to Multimedia Fusion 2 Lessons to Create 2D Games
- 11 -
14. Under the Games category, click on Backgrounds to access the available backgroundoptions in the Library.
15. Double click on Games > Space – Backdrops. Locate Backdrop Object 7 and drag it to
the Playfield in the Frame Editor.
16. Position the space backdrop over the Playfield area (white canvas) so it fits nicely. If youhave not already done so, you might change the viewing size of the Playfield to 50%, so youcan be sure you are covering the entire Playfield area. Note: when you double click on anobject in the Library, it will display a larger view of the object.
17. Save your file again (File > Save).
Notice now that you see the backdrop to the left of the Playfield. Any object you include inyour game will appear in this area. This area is referred to as your Object Window. Youhave easy access to all objects on each level from the Object Window. That topic will becovered more soon. Notice also in the Workspace Toolbar under Level 1 that your backdrop
appears.
Adding an Object: A Spaceship
Now you are going to add a spaceship to your game – a ship that you will be able to control.
18. In the Library, double click on Spacecraft and then double click on Space crafts.
19. Locate the space craft named Star Fighter All Direc (stands for Star Fighter All Directions)and drag it to the upper-left part of the Playfield.

7/27/2019 Intro Book Multimedia
http://slidepdf.com/reader/full/intro-book-multimedia 14/34
An Introduction to Multimedia Fusion 2 Lessons to Create 2D Games
- 12 -
Holding Area
The gray around surrounding the Playfield is called the Holding Area. When creating your game, itbecomes as important as the Playfield. When you play your game, you will never be able to see theobjects that are in the Holding Area unless they move into the Playfield. The Holding Area is used for
just that – holding objects that you use in your game but that are not always viewable.
Inserting an Object: A Weapon
20. Your ship will need an object to shoot. Look in the Library to find a weapon –find a comet.
In the Local Library, double click on Games, double click on Miscellaneous, select Space –Asteroids & Comets and select Comet 2 by dragging it to the Holding Area (the gray areaaround the Playfield).
Now, do a screen check to see if you have everything that you should have. Compare your frame editor to the one below:

7/27/2019 Intro Book Multimedia
http://slidepdf.com/reader/full/intro-book-multimedia 15/34
An Introduction to Multimedia Fusion 2 Lessons to Create 2D Games
- 13 -
Object Window
All objects that are added to the frame will be listed in the Object Window. Duplicates will notappear. For example, if you have ten identical Comet2 objects in your frame, it will only show oneComet2 object in the Object Window.
If you cannot find an object on the Playfield or in the Holding Area, you should be able to locate it inthe Object Window.
You can add a duplicate of an object to the Playfield, by dragging it from the Object Window anddropping it in position.
To make the Object Window easier to view, you can click on the divider line between it and theHolding Area and drag the divider line to make the Object Window larger.
You can also right click in the Object Window to change the size of the object icons from small tolarge and to specify the arrangement of objects on the Object Window. This will be helpful as youadd more objects to your game.
21. Save your file again. Remember, it is always best to save often.
Before moving on, there are several navigational items to mention.
The Holding
Area
The
Object
Window

7/27/2019 Intro Book Multimedia
http://slidepdf.com/reader/full/intro-book-multimedia 16/34
An Introduction to Multimedia Fusion 2 Lessons to Create 2D Games
- 14 -
Toolbar Options
Located under the Menu Bar are some Toolbars that contain icons that you may be able to usefrequently.
Main Toolbar Navigate Toolbar
Frame Editor Toolbar Run Toolbar
When you hold your mouse over an icon, the name will pop up to remind you of the function.
The Main Toolbar contains basic Windows-based functions: New, Open, Save, Cut, Copy, Paste,Undo, Redo, and Content Help.
The Navigate Toolbar contains shortcuts to go back and forward between frames, shortcuts to theStoryboard Editor, Frame Editor, Event Editor, Event List Editor, and Data Elements. Some of theicons are only available when you are editing in the Frame Editor.
The Frame Editor Toolbar contains Zoom, Grid Information, Font and attribute options (Bold, Italics,Underline, Color) as well as Alignment options (left, center, right).
The Run Toolbar contains shortcuts to Run Project, Run Application, Run Frame, and a Stop controlfor playing your game.
You can customize the toolbars to access the features used most. It is best to do this later when youfeel more comfortable with the program. As you hold your mouse over an icon, the keyboard shortcutwill be noted to the right of the icon name. Sometimes it is much quicker to create your game if youremember the keyboard shortcuts that are available.
Become very familiar with the Navigate Toolbar! You will use it a lot.

7/27/2019 Intro Book Multimedia
http://slidepdf.com/reader/full/intro-book-multimedia 17/34
An Introduction to Multimedia Fusion 2 Lessons to Create 2D Games
- 15 -
The Event Editor
Objects are an element that you add to your game. Each object can have any number of events,conditions, actions, and functions associated with it. In the Event Editor you can define what shouldhappen when a particular condition is present. A condition is a test within your game that triggers
actions. When the condition is true, an action will execute. When a condition is false, the action willnot execute.
All events depend upon detecting a specific condition and executing an action. Collisions, movement,and visibility are all examples of conditions. If something is true, then something else happens. For example, if two objects collide, then one object might begin to bounce.
There are several ways to get to the Event Editor:
y To move to the Event Editor from the Menu Bar, you select View > Event Editor.
y You can right click on a frame name in the Workspace Toolbar and select
Event Editor.
y You can use the keyboard shortcut CTRL+E.
y Click the Event Editor icon on the Navigation Bar.
You will find it beneficial to learn the keyboard shortcuts to help you work faster. Use CTRL+E onthe keyboard to go to the Event Editor and CTRL+M to go back to the Frame Editor. Additionalkeyboard shortcuts appear in the Resource Section at the end of the booklet.
OKAY – It is time to get back to working on the game!
22. The Event Editor is where you make everything happen. This is the heart of your game.This is where you create all your actions. Let us say that you want your Star Fighter ship toshoot the comet. Go to the Event Editor by clicking on the icon located on the NavigateToolbar.
Across the top of the Event Editor are a number of boxes which contain different icons. Therows that appear in the Event Editor are the comments or conditions that you will specify asyou create your game. Clicking on New Condition will open up a dialogue box containingobjects that you will use to input conditions without needing to know a programming
language.

7/27/2019 Intro Book Multimedia
http://slidepdf.com/reader/full/intro-book-multimedia 18/34
An Introduction to Multimedia Fusion 2 Lessons to Create 2D Games
- 16 -
Inserting Comments in Your Event Editor
One of the most important tasks you can do as you enter information in your Event Editor is to includecomments. Comments will assist you and others in finding information more quickly about what isoccurring in your game and where it is happening. This will speed up the problem-solving process
later as well.
23. In the Event Editor, right click on the 1 to the left of the words New Condition.
24. Select Insert > A comment.
25. A new dialogue box appears.
26. Set the back color to dark green and set the font color to white. Leave the default alignmentof left and change your font size to a 12-point Arial. Type the following text in the box:
Star Fighter to Shoot Comet.
27. Select OK. The comment now appears on Line 1. Line 2 is ready to accept a new commentor a new condition.
7/27/2019 Intro Book Multimedia
http://slidepdf.com/reader/full/intro-book-multimedia 19/34
An Introduction to Multimedia Fusion 2 Lessons to Create 2D Games
- 17 -
Establishing a Condition in Your Event Editor: Upon Pressing a Key
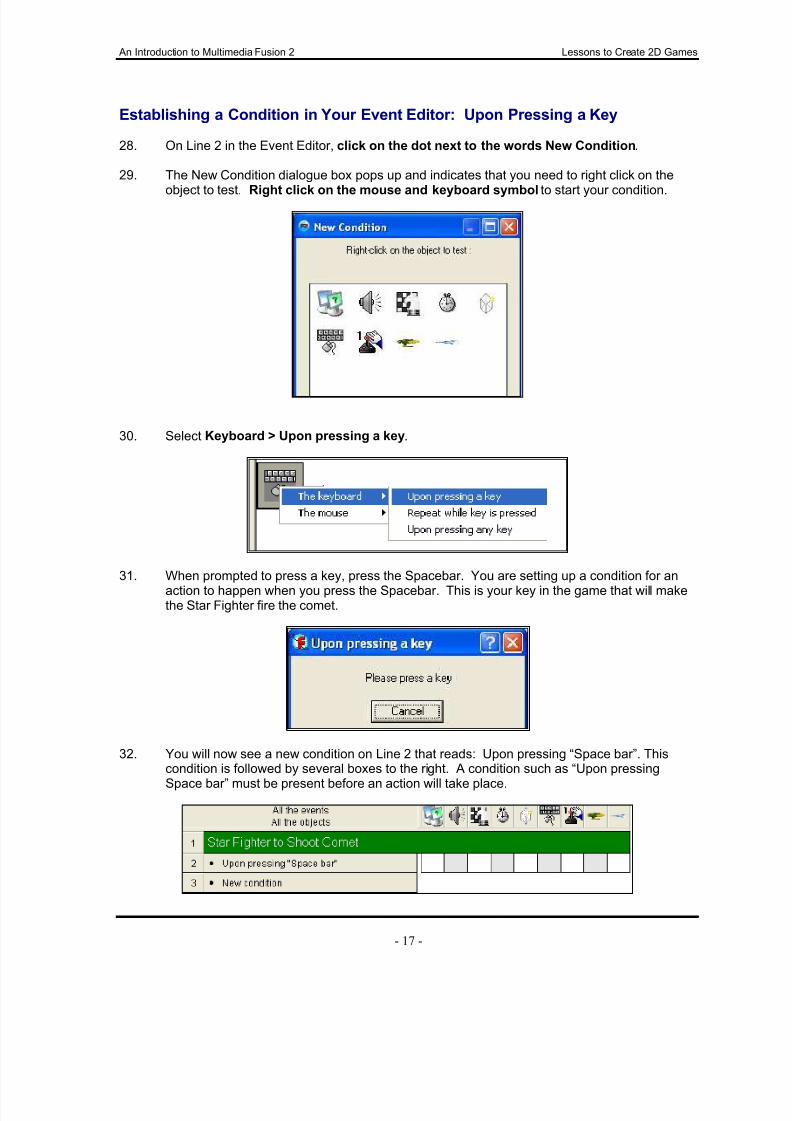
28. On Line 2 in the Event Editor, click on the dot next to the words New Condition.
29. The New Condition dialogue box pops up and indicates that you need to right click on the
object to test. Right click on the mouse and keyboard symbol to start your condition.
30. Select Keyboard > Upon pressing a key.
31. When prompted to press a key, press the Spacebar. You are setting up a condition for an
action to happen when you press the Spacebar. This is your key in the game that will makethe Star Fighter fire the comet.
32. You will now see a new condition on Line 2 that reads: Upon pressing “Space bar”. Thiscondition is followed by several boxes to the right. A condition such as “Upon pressing
Space bar” must be present before an action will take place.

7/27/2019 Intro Book Multimedia
http://slidepdf.com/reader/full/intro-book-multimedia 20/34
An Introduction to Multimedia Fusion 2 Lessons to Create 2D Games
- 18 -
33. Now that you have told the game that you want something to happen (Upon Pressing SpaceBar), you must define the action that will occur.
On Line 2, place your cursor in the square under the space ship and right click.
The following dialogue box appears:
34. Select Shoot an Object.
35. In the Shoot an Object dialogue box, make sure Level 1 is highlighted and in the box to theright of Level 1, select Comet2 and click on OK.

7/27/2019 Intro Book Multimedia
http://slidepdf.com/reader/full/intro-book-multimedia 21/34
An Introduction to Multimedia Fusion 2 Lessons to Create 2D Games
- 19 -
36. Another dialogue box appears asking for the desired speed of the object and the directiondesired. For now, leave the speed set at 100, choose “Shoot in selected directions” and clickOK.
37. Another new dialogue box appears. Since you specified to “Shoot in selected directions,” you
need to specify those directions now. The default direction is up.
38. Locate the button that erases all directions and click on it to erase current directions.

7/27/2019 Intro Book Multimedia
http://slidepdf.com/reader/full/intro-book-multimedia 22/34
An Introduction to Multimedia Fusion 2 Lessons to Create 2D Games
- 20 -
39. To set a new direction, click on the black square located in the direction you want the cometto be shot (as shown below). Click OK twice.
40. You now have a checkmark showing in your Event Editor in the box underneath the ship.Move your mouse over the checkmark and you should see the following:
Testing Your Game
41. To test your game, locate the Run Frame on the Run Toolbar or from the Menu Bar, selectRun > Frame. You could use F7 to Run Frame as well. Press the spacebar and watch your ship fire comets. Cool, huh? The comets may appear to be coming from the middle of your ship, but that will be fixed soon.
42. Save your game again. You are almost done with the first chapter of your Star Fighter shoot‘em game. There are a few additional items that need to be addressed.
Adding an Object to Take the Comet Hits
It is great to have a Star Fighter shooting a comet, but now your game needs a target at which toshoot.
43. To switch to your Frame Editor, locate the Frame Editor icon on your Menu Bar or pressCTRL-M.
7/27/2019 Intro Book Multimedia
http://slidepdf.com/reader/full/intro-book-multimedia 23/34
An Introduction to Multimedia Fusion 2 Lessons to Create 2D Games
- 21 -
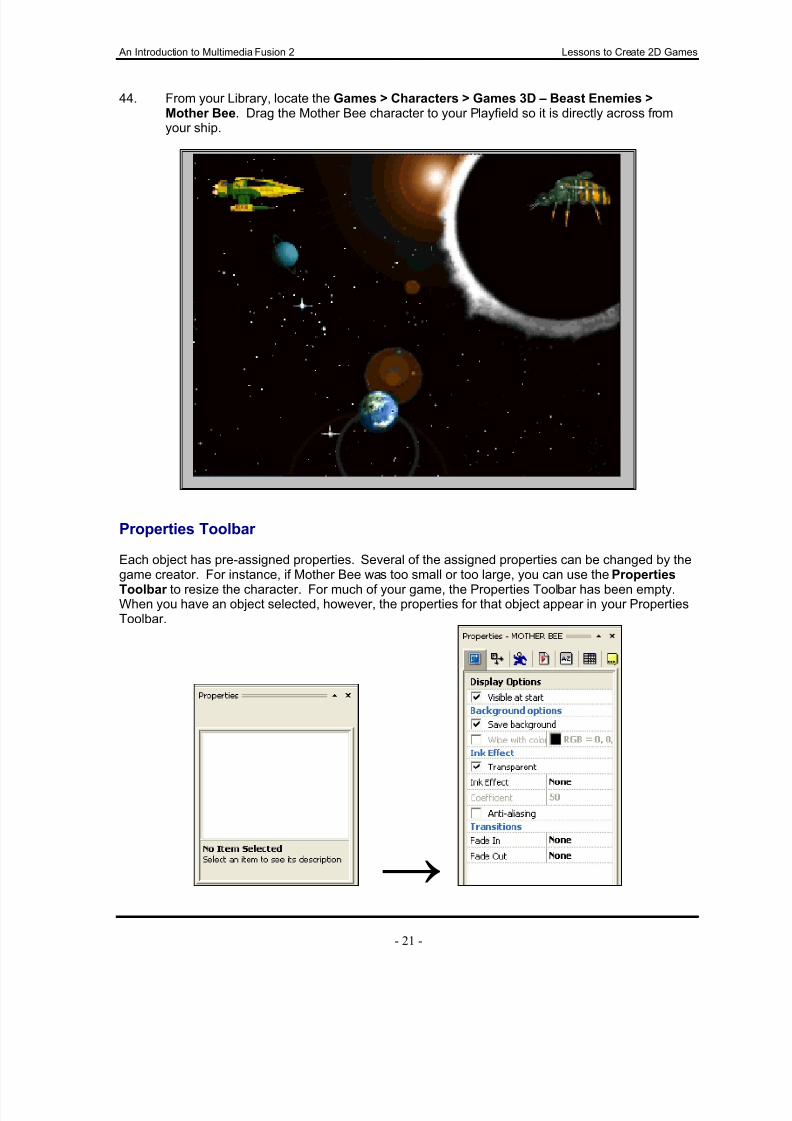
44. From your Library, locate the Games > Characters > Games 3D – Beast Enemies >Mother Bee. Drag the Mother Bee character to your Playfield so it is directly across fromyour ship.
Properties Toolbar
Each object has pre-assigned properties. Several of the assigned properties can be changed by thegame creator. For instance, if Mother Bee was too small or too large, you can use the Properties
Toolbar to resize the character. For much of your game, the Properties Toolbar has been empty.When you have an object selected, however, the properties for that object appear in your PropertiesToolbar.
ĺ

7/27/2019 Intro Book Multimedia
http://slidepdf.com/reader/full/intro-book-multimedia 24/34
An Introduction to Multimedia Fusion 2 Lessons to Create 2D Games
- 22 -
A little closer look at the Properties Toolbar will show additional tabs with more propertyinformation about an object.
45. Click one time on Mother Bee. (You should get a solid blue box with a little number at the topleft of the box.) Look at your Properties Panel. It should be similar to the panel informationshown above.
Now click on the second tab (the Size/Position tab). From this panel, you can set a specificposition for your object, a specific width and height, and even angle your object. It is good toknow that you can do this, but recall that you can do most things in more than one way.
46. Sometimes you do not know the exact size that you want your object. You want to be able to
size it by eyeing it.
Click one more time on Mother Bee. This time you getnodes placed around the box.
You can click on a single node and drag it to resize your object. If you select a corner node, your object will resizeproportionately. If you select a node other than a corner node, your object will skew in proportion.
Resize your Mother Bee to a size you prefer.
47. Save your file again.
Insert a New Comment
48. Return to the Event Editor to insert a Comment on Line 3 that reads:
Comet collides with Mother Bee and destroys both.
(Remember, to insert a comment, right click on the line number.) Make the new comment tomatch the first comment (same back color, font color and font size).
Establish a Condition for Collision
49. Add a new condition on Line 4. (Right click on the dot to the left of New Condition.)
50. Right click on Comet2. Select Collision—Another object.
51. Choose the Mother Bee and click OK.

7/27/2019 Intro Book Multimedia
http://slidepdf.com/reader/full/intro-book-multimedia 25/34
An Introduction to Multimedia Fusion 2 Lessons to Create 2D Games
- 23 -
52. On this condition line, locate the box under the Mother Bee. Since you want the Mother Beeto be destroyed when the comet collides with it, right click and select Destroy.
53. You also want the Comet to be destroyed in this same condition statement. Right click inthe box under the comet and select Destroy.
Your Event Editor should look like the following:
All the objects you add to your game will appear in the Event Editor across the top.
If there are objects you do not want to see, right click on the object in the
Event Editor and select Hide.
You can change the order that the objects are shown in the Event Editor at the top of the screen by dragging the icons with the mouse anddropping them in between any other icon. The events associated withthe object transfer as you transfer an object.
54. Yeah! You have completed Chapter 1. Save your game again right now!

7/27/2019 Intro Book Multimedia
http://slidepdf.com/reader/full/intro-book-multimedia 26/34
An Introduction to Multimedia Fusion 2 Lessons to Create 2D Games
- 24 -
Feel free to explore Multimedia Fusion 2 on your own, but please make sure thatyou save Chapter 1 as is and do not make any other changes to it until Chapter 2.
It is important to back up your work so that you have copies of your game in case anything should gowrong. You do not want to learn this lesson the hard way!
You can choose to set an automatic backup option under the Preferences dialogue box (Tools >Preferences > General Tab). Click on Autobackup and indicate how many backup copies you wantthe system to keep. At least one backup copy is good.
Sometimes it is also a good idea to save your own backup file at the end of each chapter. You justwant to be sure you do not lose all your hard work.
Test Your GameIt is time to test your game again to make sure your Star Fighter is shooting comets at the Mother Bee. You can do this one of three ways.
¾ You can run the entire application from start to finish; however, you only haveone frame at this time, so you will not see the effect of running an entireapplication.
¾ You can run the current frame that you are editing, or
¾ You can run the current frame in debug mode directly in the Frame Editor.
55. Run the current frame. Press F7 or click the Run Frame icon on the Run Toolbar.
The result will be a new window that opens titled the same name as your frame (Star Fighter). You will see your Star Fighter and the Mother Bee on your space backdrop.
Press the space bar to shoot the comet. When the comet collides with the Mother Bee, bothwill be destroyed.

7/27/2019 Intro Book Multimedia
http://slidepdf.com/reader/full/intro-book-multimedia 27/34
An Introduction to Multimedia Fusion 2 Lessons to Create 2D Games
- 25 -
Chapter Two: Star Fighter Game
Objectives:
In Chapter Two, you will:
y Establish an eight-directional movement for your spaceship;y Use the Animation Editor to change the direction and action point of an
object;y Establish a path movement for your enemy;y Use the Event Editor to establish a collision condition.
In Chapter 1, you set up your ship to shoot a comet at Mother Bee (the enemy) and you destroyedthe enemy and the comet upon collision. Now it is time to take your game one step further toestablish movement for your spaceship as well as movement for the enemy Mother Bee.
1. Open Star Fighter 1.
2. Save it right now as Star Fighter 2. This step will make it so that you will be working in anew file called Star Fighter 2, and your Star Fighter 1 will remain in its original saved version.If you need to go back to it for any reason, you will be able to do so.
Movement for Your Spaceship: Eight Directions
These next steps make it so you will be able to move your spaceship around using the cursor keys.
3. Click on Star Fighter to select it. In the Properties Toolbar, locate and click on the Movement
icon.
4. You are going to change the Movement Type to Eight Directions. Click on the Stop sign
(Static Movement).
5. Select Eight Directions. The new Movement has different properties associated with it.Find and click on the Directions information (*0,4,8,12,16,etc.).

7/27/2019 Intro Book Multimedia
http://slidepdf.com/reader/full/intro-book-multimedia 28/34
An Introduction to Multimedia Fusion 2 Lessons to Create 2D Games
- 26 -
6. The Eight Directions box appears. If you want the Star Fighter movement to go all eightdirections, then it will remain the same as the image above. If you only want up and down or
just left and right movement, you would take away the directions by click on the black squareassociated with the direction in which you do not want your object to move. Since you wantyour ship to move all eight directions, just click in the gray area to go back to move on.
7. You are doing great. Now, click Try Movement.
Another new window pops up. Stretch this new window as wide as necessary to see the ship
on your background. Use your cursor keys to move your ship, up, down, left and right. Takenotice that when you press left, your ship flips and faces a new direction. You will changethis direction soon.
After you have tested the movement for all four arrow keys, close this window by locating theSTOP window (in the upper left-hand corner of your screen) and pressing on the STOPbutton.
8. To view the additional information in the Properties Toolbar, you may have to resize the
toolbar. Stretch it so you can view all the information about Movement of the object. You canchange the movement speed, the deceleration and acceleration speed, and whether your object is moving at the start. For now, leave the defaults as they are shown.

7/27/2019 Intro Book Multimedia
http://slidepdf.com/reader/full/intro-book-multimedia 29/34
An Introduction to Multimedia Fusion 2 Lessons to Create 2D Games
- 27 -
Working in the Animation Editor: Ship Direction and Action Point
When you tested the left arrow key, the ship flipped itself to the left. You want to make sure the shipdoes not turn its back on the enemy creature when the left arrow key is pressed, so you have to makechanges.
9. Go back to the Frame Editor and select your ship.
10. Once the ship is selected, right click on it and select Edit. This will take you to the AnimationEditor. (A quick double click on the object also brings you to this point.)
Animation Editor

7/27/2019 Intro Book Multimedia
http://slidepdf.com/reader/full/intro-book-multimedia 30/34
An Introduction to Multimedia Fusion 2 Lessons to Create 2D Games
- 28 -
11. In the Animation Editor window, notice that there is a dot to the left of “Stopped” under Animations. The animation consists of two directions, right and left (noted by the darksquares to the left and right in the directions box). Click on left direction dark square. Thedirection of the ship in the Frames area now changes.
To delete this direction, select all the Frames from Frame 1 to Frame 12 (click on the firstFrame then scroll down to Frame 12, hold down Shift and click on Frame 12). This actionselects all the frames. Press the Delete key and click OK to confirm this action. You shouldhave one blank frame remaining.
12. Click back on the right direction dark square.
The Action Point
Remember when you ran your frame and pressed the space bar? The comet appeared to be comingfrom the middle of your ship. The Action Point determines where the comet exits from the ship.
13. You need to change the Action Point of the ship. By changing this, you can better controlyour game. Single click on the picture named Frame 1.
In your Animation Editor, locate the View Action Point icon.
Click on the View Action Point. (Pressing the letter Q also makes the Action Point appear.)
14. Now click at the far right tip of the ship to move the Action Point. (To zoom in closer on theship, use the scroller on the mouse or press F2. F3 will zoom out).

7/27/2019 Intro Book Multimedia
http://slidepdf.com/reader/full/intro-book-multimedia 31/34
An Introduction to Multimedia Fusion 2 Lessons to Create 2D Games
- 29 -
15. Now you need to change the Action Point for each individual frame of this Star Fighter. Youcan do so by selecting each Frame from the images or clicking on the right arrow to movethrough each Frame.
16. Click on the right arrow. Change the Action Point on the second frame.
17. Click on the right arrow again and change the Action Point.
18. Continue to click through all the images to change the Action Point. There are 12 Framestotal for this space ship animation.
19. Click OK when you have finished. This closes the animation editor, saves the changes, andtakes you back to the Frame Editor.
20. Save your game.
21. To test your movement and to shoot your comet, press F7 to Run the Frame. Now your shipwill always face the right direction with any cursor movement and your comets will be shotfrom the front of your ship.
Movement for the Enemy (Mother Bee): Path Movement
It is easy to shoot the comet at the enemy Mother Bee right now, because the Mother Bee does notmove. It is time to make the Mother Bee move around, so your game will be more difficult.
22. Drag the Mother Bee to the bottom right of your screen.

7/27/2019 Intro Book Multimedia
http://slidepdf.com/reader/full/intro-book-multimedia 32/34
An Introduction to Multimedia Fusion 2 Lessons to Create 2D Games
- 30 -
23. With the Mother Bee selected, look at the Properties Toolbar. Click on the Movement icon.
24. Select the Path Movement option. You are going to put your enemy on a particular path thatit will move along.
25. Select Edit. The Path Movement Setup dialogue box appears.
26. You first need to change the color of the path line before you draw a path line, because of thedark space backdrop. Click on the line color icon to select the yellow so that you can see thepath on the dark background.

7/27/2019 Intro Book Multimedia
http://slidepdf.com/reader/full/intro-book-multimedia 33/34
An Introduction to Multimedia Fusion 2 Lessons to Create 2D Games
- 31 -
27. Click the New Line button.
Draw a line straight up until you almost reach the top of the stage.
28. Click the Reverse at End Button. This will automatically reverse the movement of theMother Bee when it reaches the end of the path.
29. Click the Loop the Movement Button. This action will continuously loop the movementso when the Mother Bee reaches the beginning of the path, it will run the path again.
30. Set a Speed of 80 and click Try Movement. You may have to adjust your screen to see themovement of your enemy. Your enemy should be moving up and down on the right side of your screen. To exit from the Try Movement Mode, click the STOP in the top left corner of the screen. Click OK to close the Path Movement Setup window.
31. Save your game again. Make sure you are saving it as Star Fighter 2.
7/27/2019 Intro Book Multimedia
http://slidepdf.com/reader/full/intro-book-multimedia 34/34
An Introduction to Multimedia Fusion 2 Lessons to Create 2D Games
Establishing a New Collision Condition
It is time to establish a new condition that will destroy your spaceship if it collides with the enemy.
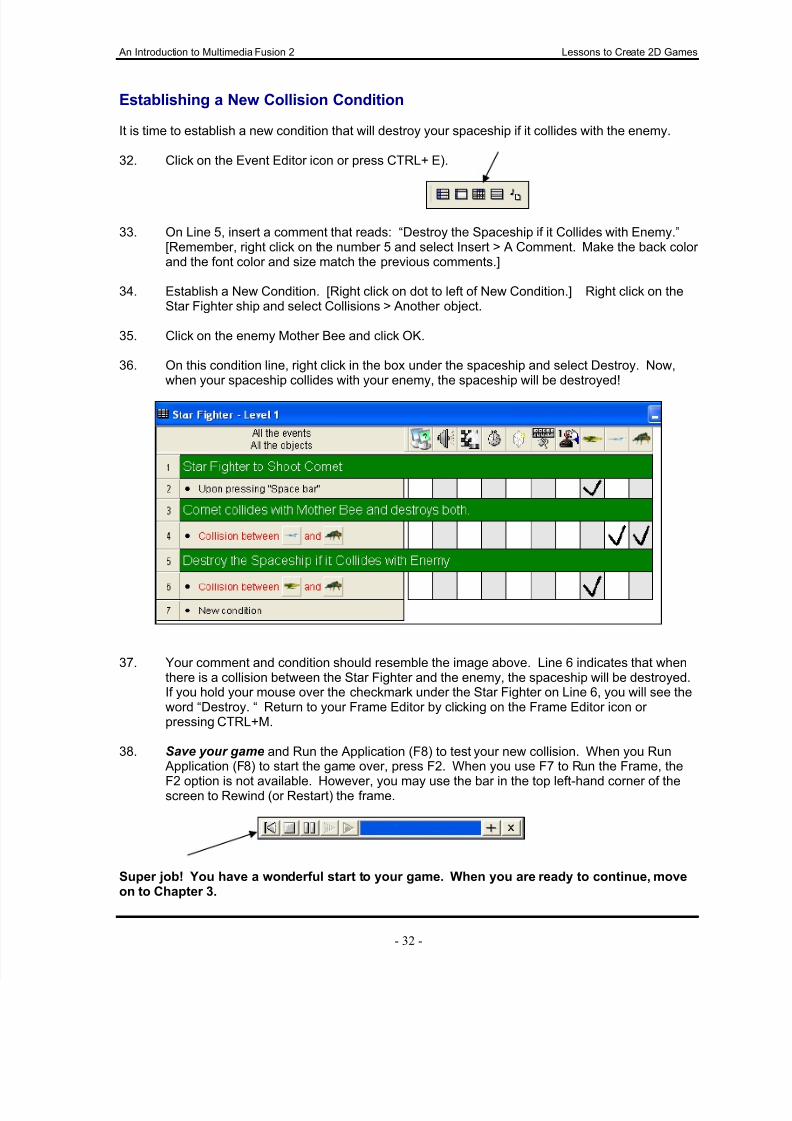
32. Click on the Event Editor icon or press CTRL+ E).
33. On Line 5, insert a comment that reads: “Destroy the Spaceship if it Collides with Enemy.”[Remember, right click on the number 5 and select Insert > A Comment. Make the back color and the font color and size match the previous comments.]
34. Establish a New Condition. [Right click on dot to left of New Condition.] Right click on theStar Fighter ship and select Collisions > Another object.
35. Click on the enemy Mother Bee and click OK.
36. On this condition line, right click in the box under the spaceship and select Destroy. Now,when your spaceship collides with your enemy, the spaceship will be destroyed!
37. Your comment and condition should resemble the image above. Line 6 indicates that whenthere is a collision between the Star Fighter and the enemy, the spaceship will be destroyed.If you hold your mouse over the checkmark under the Star Fighter on Line 6, you will see theword “Destroy. “ Return to your Frame Editor by clicking on the Frame Editor icon or pressing CTRL+M.
38. Save your game and Run the Application (F8) to test your new collision. When you Run Application (F8) to start the game over, press F2. When you use F7 to Run the Frame, the
F2 option is not available. However, you may use the bar in the top left-hand corner of thescreen to Rewind (or Restart) the frame.
Super job! You have a wonderful start to your game. When you are ready to continue, moveon to Chapter 3.