InTouch HMI Alarms and Events Guide - Logic Control · 6 Contents InTouch HMI Alarms and Events...
358
InTouch HMI Alarms and Events Guide
Transcript of InTouch HMI Alarms and Events Guide - Logic Control · 6 Contents InTouch HMI Alarms and Events...

InTouch HMI Alarms and Events Guide
© 2018 AVEVA Group plc and its subsidiaries. All rights reserved.
No part of this documentation shall be reproduced, stored in a ret rieval system, or transmitted by any means, electronic, mechanical, photocopying, recording, or otherwise, without the prior written permission of AVEVA. No liability is assumed with respect to the use of the information contained herein.
Although precaution has been taken in the preparation of this documentation, AVEVA assumes no responsibility for errors or omissions. The information in this documentation is subject to change without notice and does not represent a commitment on the part of AVEVA. The software described in this
documentation is furnished under a license agreement. This software may be used or copied only in accordance with the terms of such license agreement.
ArchestrA, Aquis, Avantis, Citect, DYNSIM, eDNA, EYESIM, InBatch, InduSoft, InStep, IntelaTrac,
InTouch, OASyS, PIPEPHASE, PRiSM, PRO/II, PROVISION, ROMeo, SIM4ME, SimCentral, SimSci, Skelta, SmartGlance, Spiral Software, Termis, WindowMaker, WindowViewer, and Wonderware are trademarks of AVEVA and/or its subsidiaries. An extensive listing of AVEVA trademarks can be found at:
https://sw.aveva.com/legal. All other brands may be trademarks of their respective owners.
Publication date: 11/23/2018
Contact Information
AVEVA Group plc High Cross Madingley Road
Cambridge CB3 OHB. UK
https://sw.aveva.com/
For information on how to contact sales, customer training, and technical support, see https://sw.aveva.com/contact.
InTouch HMI Alarms and Events Guide
3
Chapter 1 Overview of Alarms and Events...................................................................... 17
About Alarms and Events ........................................................................................................ 17
About InTouch Alarms ............................................................................................................. 18
Alarm Priorities.................................................................................................................. 18 Alarm Sub-States .............................................................................................................. 18 Alarm Acknowledgement ................................................................................................... 19 Alarm Groups.................................................................................................................... 19
About InTouch Events ............................................................................................................. 19
Types of InTouch Alarms ......................................................................................................... 20
Discrete Alarms ................................................................................................................. 20 Analog Alarms .................................................................................................................. 21
Value Alarms............................................................................................................... 21 Deviation Alarms ......................................................................................................... 21 Rate of Change Alarms ................................................................................................ 22
InTouch Distributed Alarm System ........................................................................................... 22
Alarm Providers and Consumers ........................................................................................ 24 Alarm Provider ............................................................................................................ 24 Alarm Consumer ......................................................................................................... 24
Distributed Alarm Group Lists............................................................................................. 25 Summary Alarms versus Historical Alarms .......................................................................... 25 Alarm Disablement, Inhibition, and Suppression .................................................................. 25 Terminal Services Alarm Support ....................................................................................... 26 Distributed Alarm System Data Storage .............................................................................. 26
Chapter 2 Configuring Alarms ........................................................................................... 29
About Configuring Alarms ........................................................................................................ 29
Defining Alarm Hierarchies ...................................................................................................... 29
Creating an Alarm Group ................................................................................................... 29 Modifying an Alarm Group ................................................................................................. 31 Deleting an Alarm Group ................................................................................................... 31
Configuring Tags with Alarm Conditions ................................................................................... 31
Configuring Discrete Alarms ............................................................................................... 31 Configuring Value Alarms .................................................................................................. 32 Configuring Deviation Alarms ............................................................................................. 33 Configuring Rate of Change Alarms ................................................................................... 34 Disabling Alarms ............................................................................................................... 35 Inhibiting Alarms ............................................................................................................... 35
Setting Event Properties for Individual Tags .............................................................................. 36
Configuring Global Settings for Alarms and Events.................................................................... 37
Configuring the Alarm Buffer Size....................................................................................... 37 Enabling Events ................................................................................................................ 38 Making Alarm Enabling Retentive ....................................................................................... 38
Contents
Contents InTouch HMI Alarms and Events Guide
4
Creating an Alarm Group List File ............................................................................................ 39
Chapter 3 Alarm Queries .................................................................................................... 41
About Alarm Queries ............................................................................................................... 41
Example Alarm Queries ........................................................................................................... 42
Getting More InTouch Query Information .................................................................................. 43
Chapter 4 Viewing Current Alarms ................................................................................... 45
About Viewing Current Alarms ................................................................................................. 45
Configuring an Alarm Viewer Control ........................................................................................ 45
Configuring the Appearance of the Grid .............................................................................. 46 Configuring the Font Display .............................................................................................. 48 Configuring Display Column Details .................................................................................... 48 Controlling Access to Features at Run Time........................................................................ 50 Selecting the Alarms to Display .......................................................................................... 52 Using Query Favorites to Create Custom Saved Queries ..................................................... 53 Using Colors for Various Types of Alarm Records ............................................................... 53 Configuring the Shown Time Format of Alarm Records ........................................................ 55 Configuring the Sort Order of Alarm Records ...................................................................... 56
Using an Alarm Viewer Control at Run Time ............................................................................. 57
Viewing Status Bar Information .......................................................................................... 58 Using Query Favorites at Run Time .................................................................................... 58
Using Alarm Viewer Control ActiveX Properties......................................................................... 60
Configuring Colors for ActiveX Controls .............................................................................. 65
Using Alarm Viewer Control ActiveX Methods ........................................................................... 66
Acknowledging Alarms During Run Time ............................................................................ 66 AckSelected() Method.................................................................................................. 66 AckAll() Method ........................................................................................................... 67 AckVisible() Method..................................................................................................... 67 AckSelectedGroup() Method ........................................................................................ 67 AckSelectedTag() Method ............................................................................................ 68 AckSelectedPriority() Method ....................................................................................... 68 AckGroup() Method ..................................................................................................... 68 AckPriority() Method .................................................................................................... 69 AckTag() Method ......................................................................................................... 69
Suppressing Alarms During Run Time ................................................................................ 70 ShowSuppression() Method ......................................................................................... 70 SuppressSelected() Method ......................................................................................... 70 SuppressAll() Method .................................................................................................. 70 SuppressVisible() Method ............................................................................................ 71 SuppressSelectedGroup() Method ................................................................................ 71 SuppressSelectedTag() Method ................................................................................... 71 SuppressSelectedPriority() Method............................................................................... 71 UnSuppressAll() Method .............................................................................................. 71 SuppressGroup() Method............................................................................................. 72 SuppressPriority() Method............................................................................................ 72 SuppressTag() Method ................................................................................................ 72
Retrieving Information About a Particular Alarm .................................................................. 73 GetItem() Method ........................................................................................................ 73
Running Alarm Queries ..................................................................................................... 73 ShowQueryFavorites() Method ..................................................................................... 73
Contents InTouch HMI Alarms and Events Guide
5
Requery() Method ....................................................................................................... 73 ApplyQuery() Method................................................................................................... 74 ApplyDefaultQuery() Method ........................................................................................ 74 SetQueryByName() Method ......................................................................................... 74
Moving and Freezing the Display........................................................................................ 75 MoveWindow() Method ................................................................................................ 75 FreezeDisplay() Method ............................................................................................... 76
Sorting Alarm Records....................................................................................................... 76 ShowSort() Method...................................................................................................... 76 SetSort() Method ......................................................................................................... 76
Showing Additional Information .......................................................................................... 76 AboutBox() Method...................................................................................................... 77 ShowStatistics() Method .............................................................................................. 77
Selecting Specific Alarms .................................................................................................. 77 SelectGroup() Method.................................................................................................. 77 SelectPriority() Method ................................................................................................ 78 SelectTag() Method ..................................................................................................... 78 SelectAll() Method ....................................................................................................... 78 SelectItem() Method .................................................................................................... 79 UnSelectAll() Method ................................................................................................... 79
Showing the Context Menu at Run Time ............................................................................. 79 ShowContext() Method ................................................................................................ 79
Handling Errors when Using Methods and Properties ................................................................ 79
Using ActiveX Events to Trigger Scripts .................................................................................... 79
Running a Script When a New Alarm is Detected ................................................................ 80
Chapter 5 Acknowledging Alarms in Real Time ............................................................. 81
About Acknowledging Alarms in Real Time ............................................................................... 81
Understanding Alarm Acknowledgement Models ....................................................................... 81
Condition Acknowledgement Alarm Model .......................................................................... 81 Expanded Summary Alarm Model ...................................................................................... 82
Expanded Summary Alarm Records ............................................................................. 82 Using Expanded Summary Alarms ............................................................................... 82
Event -Based Alarm Model ................................................................................................. 83 Checking the Acknowledgement Model of a Tag at Run Time .............................................. 83
.AlarmAckModel Dotfield .............................................................................................. 83
Using Dotfields to Acknowledge Alarms .................................................................................... 84
Acknowledging Alarms or Alarm Groups ............................................................................. 84 .Ack Dotfield................................................................................................................ 84 .UnAck Dotfield ........................................................................................................... 85
Acknowledging Value Alarms ............................................................................................. 85 .AckValue Dotfield ....................................................................................................... 85
Acknowledging Discrete Alarms ......................................................................................... 86 .AckDsc Dotfield .......................................................................................................... 86
Acknowledging Deviation Alarms........................................................................................ 87 .AckDev Dot field.......................................................................................................... 87
Acknowledging Rate-of-Change Alarms .............................................................................. 88 .AckROC Dotfield ........................................................................................................ 88
Using Script Functions to Acknowledge Alarms ......................................................................... 88
Ack() Function................................................................................................................... 89
Contents InTouch HMI Alarms and Events Guide
6
Using Automatic Acknowledgement When the Tag Value Returns to Normal .............................. 89
Using Alarm Clients to Acknowledge Alarms ............................................................................. 90
Using Alarm and Acknowledgement Comments ........................................................................ 90
Chapter 6 Controlling Alarm Properties of Tags and Groups at Run Time ................ 93
About Controlling Alarm Properties of Tags and Groups at Run Time ......................................... 93
Determining if Tags or Alarm Groups are in anAlarm Condition .................................................. 97
$NewAlarm System Tag .................................................................................................... 98 $System System Tag ........................................................................................................ 98 .Alarm Dot field .................................................................................................................. 99 .Normal Dot field ................................................................................................................ 99 .AlarmDsc Dot field........................................................................................................... 100 .AlarmDev Dotfield .......................................................................................................... 101 .AlarmROC Dotfield ......................................................................................................... 101 .LoStatus Dot field ............................................................................................................ 102 .LoLoStatus Dotfield ........................................................................................................ 103 .HiStatus Dotfield ............................................................................................................ 103 .HiHiStatus Dot field ......................................................................................................... 104 .MinorDevStatus Dot field ................................................................................................. 105 .MajorDevStatus Dot field ................................................................................................. 105 .ROCStatus Dotfield ........................................................................................................ 106
Reverting Alarm Status Handling to InTouch 7.1 Behavior ....................................................... 106
Determining if Alarm Limits Are Set for Tags ........................................................................... 107
.LoLoSet Dot field............................................................................................................. 107
.LoSet Dot field ................................................................................................................ 108
.HiSet Dotfield ................................................................................................................. 108
.HiHiSet Dotfield.............................................................................................................. 109
.MinorDevSet Dotfield...................................................................................................... 109
.MajorDevSet Dotfield...................................................................................................... 110
.ROCSet Dot field............................................................................................................. 110
Enabling and Disabling Alarms for a Tag or Alarm Group ........................................................ 111
Enabling/Disabling All Alarms........................................................................................... 111 .AlarmEnabled Dot field .............................................................................................. 111 .AlarmDisabled Dot field.............................................................................................. 112
Enabling/Disabling LoLo Alarms ....................................................................................... 112 .AlarmLoLoEnabled Dotfield ....................................................................................... 112 .AlarmLoLoDisabled Dotfield ...................................................................................... 113
Enabling/Disabling Low Alarms ........................................................................................ 114 .AlarmLoEnabled Dot field........................................................................................... 114 .AlarmLoDisabled Dotfield .......................................................................................... 114
Enabling/Disabling High Alarms ....................................................................................... 115 .AlarmHiEnabled Dotfield ........................................................................................... 115 .AlarmHiDisabled Dotfield .......................................................................................... 116
Enabling/Disabling HiHi Alarms ........................................................................................ 117 .AlarmHiHiEnabled Dot field ........................................................................................ 117 .AlarmHiHiDisabled Dot field ....................................................................................... 117
Enabling/Disabling Discrete Alarms .................................................................................. 118 .AlarmDscEnabled Dot field......................................................................................... 118 .AlarmDscDisabled Dot field ........................................................................................ 119
Enabling/Disabling Minor Deviation Alarms ....................................................................... 119 .AlarmMinDevEnabled Dot field ................................................................................... 120
Contents InTouch HMI Alarms and Events Guide
7
.AlarmMinDevDisabled Dot field .................................................................................. 120
Enabling/Disabling Major Deviation Alarms ....................................................................... 121 .AlarmMajDevEnabled Dot field ................................................................................... 121 .AlarmMajDevDisabled Dot field .................................................................................. 122
Enabling/Disabling Rate-Of-Change Alarms ...................................................................... 122 .AlarmROCEnabled Dotfield ....................................................................................... 123 .AlarmROCDisabled Dotfield ...................................................................................... 123
Changing a Tag's Alarm Limits............................................................................................... 124
.LoLoLimit Dot field........................................................................................................... 124
.LoLimit Dot field .............................................................................................................. 125
.HiLimit Dot field ............................................................................................................... 125
.HiHiLimit Dotfield............................................................................................................ 126
.MinorDevPct Dotfield ...................................................................................................... 126
.MajorDevPct Dotfield ...................................................................................................... 127
.DevTarget Dotfield ......................................................................................................... 128
.ROCPct Dot field............................................................................................................. 128
Changing a Tag's Alarm Deadbands ...................................................................................... 129
.AlarmValDeadband Dot field ............................................................................................ 129
.AlarmDevDeadband Dotfield ........................................................................................... 129
Changing the Alarm Comment Associated with a Tag ............................................................. 130
.AlarmComment Dot fields ................................................................................................ 130
Associating User-Defined Information with an Alarm Instance .................................................. 130
.AlarmUserDefNumX Dot fields ......................................................................................... 130
.AlarmUserDefStr Dot field ................................................................................................ 131
Determining the Inhibitor Tag of a Tag or Alarm Group ............................................................ 132
.AlarmDscInhibitor Dotfield............................................................................................... 132
.AlarmLoLoInhibitor Dot field ............................................................................................. 133
.AlarmLoInhibitor Dotfield................................................................................................. 134
.AlarmHiInhibitor Dot field ................................................................................................. 135
.AlarmHiHiInhibitor Dotfield .............................................................................................. 135
.AlarmMinDevInhibitor Dotfield ......................................................................................... 136
.AlarmMajDevInhibitor Dotfield ......................................................................................... 137
.AlarmROCInhibitor Dot field ............................................................................................. 137
Counting the Number of Active or Unacknowledged Alarms ..................................................... 138
.AlarmTotalCount Dotfield ................................................................................................ 138
.AlarmUnAckCount Dot field.............................................................................................. 139
.AlarmValueCount Dotfield ............................................................................................... 140
.AlarmValueUnAckCount Dot field ..................................................................................... 140
.AlarmDscCount Dotfield.................................................................................................. 141
.AlarmDscUnAckCount Dot field ........................................................................................ 142
.AlarmDevCount Dotfield ................................................................................................. 142
.AlarmDevUnAckCount Dotfield........................................................................................ 143
.AlarmROCCount Dotfield ................................................................................................ 143
.AlarmROCUnAckCount Dotfield ...................................................................................... 144
Chapter 7 Viewing Alarm Hierarchies............................................................................. 145
About Viewing Alarm Hierarchies ........................................................................................... 145
Configuring an Alarm Tree Viewer Control .............................................................................. 146
Configuring the Appearance and Colors............................................................................ 146 Configuring Fonts ............................................................................................................ 147 Configuring Automatic Refresh......................................................................................... 148
Contents InTouch HMI Alarms and Events Guide
8
Tuning the Alarm Tree View Refresh .......................................................................... 148 AlarmTreeFastRetryMax ............................................................................................ 148 AlarmTreeSlowRetry Interval ....................................................................................... 149 AlarmTreeTotalRetryMax ........................................................................................... 149 Retry Behavior with the Default Settings ..................................................................... 149 When the Refresh Is Considered Complete ................................................................. 149
Managing Access to Features at Runtime ......................................................................... 149 Configuring Which Providers and Groups to Show............................................................. 150 Creating Custom Saved Queries Using Query Favorites .................................................... 151 Configuring the Sort Order for Alarm Groups ..................................................................... 152
Using an Alarm Tree Viewer Control at Run Time ................................................................... 152
Understanding Alarm Tree Viewer Control Status Bar Information ...................................... 153 Using Query Favorites ..................................................................................................... 153
Using Alarm Tree Viewer Control ActiveX Properties ............................................................... 153
Using Alarm Tree Viewer Control ActiveX Methods ................................................................. 155
Retrieving Information About the Control ........................................................................... 155 AboutBox()................................................................................................................ 155 GetElementCount() Method........................................................................................ 155
Retrieving Information About Specific Entries .................................................................... 156 CheckElementMembership() Method .......................................................................... 156 GetElementCount() Method........................................................................................ 156 GetElementName() Method........................................................................................ 156 GetElementPath() Method.......................................................................................... 157 GetSelectedElementCount() Method........................................................................... 157 GetSelectedElementName() Method........................................................................... 157 GetSelectedElementPath() Method............................................................................. 157 GetSubElementCount() Method.................................................................................. 158 GetSubElementName() Method.................................................................................. 158 GetSubElementPath() Method.................................................................................... 159
Freezing the Tree ............................................................................................................ 159 Freeze() Method........................................................................................................ 159
Creating a Query String from a Selection .......................................................................... 160 GetAlarmQueryFromSelection() Method ..................................................................... 160
Running Queries ............................................................................................................. 160 SetQueryByName() Method ....................................................................................... 160 SetQueryByString() Method ....................................................................................... 160
Error Handling While Using Methods and Properties ............................................................... 161
Using Alarm Tree Viewer Control ActiveX Events to Trigger Scripts ......................................... 161
Chapter 8 Printing Alarms ................................................................................................ 163
About Printing Alarms ............................................................................................................ 163
Configuring Alarm Printing and Logging.................................................................................. 163
Configuring Printer Settings ............................................................................................. 164 Configuring Alarm Print Commands ............................................................................ 165 Print Command Settings ............................................................................................ 165 Sample Printer Command Sequences ........................................................................ 166 Printer Command Escape Sequences Syntax ............................................................. 166 Entering Names of Control Characters ........................................................................ 167 Entering Printable Characters ..................................................................................... 167 Entering a Character’s Decimal Number ..................................................................... 167 Entering a Character’s Hexadecimal Number .............................................................. 167
Contents InTouch HMI Alarms and Events Guide
9
Configuring Which Alarms to Print .................................................................................... 167 Configuring the Format of Print and File Output ................................................................. 168 Configuring Log Files for Alarms ...................................................................................... 171 Saving and Loading Configuration Files ............................................................................ 173
About Printing Alarms With the Alarm Printer .......................................................................... 173
Logging Alarms to a File ........................................................................................................ 174
Starting Alarm Printer with a Specific Configuration ................................................................. 174
Controlling the Alarm Printer Using Scripting........................................................................... 175
Stopping and Starting an Alarm Printer Instance or Query .................................................. 176 APUStartInstance() Function ...................................................................................... 176 APUStartQuery() Function ......................................................................................... 176 APUStopInstance() Function ...................................................................................... 177 APUStopQuery() Function.......................................................................................... 178
Querying Alarm Query Information ................................................................................... 178 APUGetAlarmGroupText() Function............................................................................ 178 APUGetQueryFromPriority() Function ......................................................................... 179 APUGetQueryToPriority() Function ............................................................................. 179 APUGetConfigurationFilePath() Function .................................................................... 180 APUGetPrinterJobCount() Function ............................................................................ 181 APUGetQueryAlarmState() Function........................................................................... 181 APUGetQueryProcessingState() Function ................................................................... 182
Querying Instance Information ......................................................................................... 182 APUFindAlarmGroupInstance() Function..................................................................... 183 APUFindFileInstance() Function ................................................................................. 183 APUFindPrinterInstance() Function............................................................................. 184 APUGetInstanceCount() Function............................................................................... 184 APUIsInstanceUsed() Function................................................................................... 185
Querying Printer Information ............................................................................................ 185 APUGetPrinterName() Function ................................................................................. 186 APUGetPrinterStatus() Function ................................................................................. 186
Setting Alarm Query Information ...................................................................................... 187 APUSetAlarmGroupText() Function ............................................................................ 187 APUSetQueryAlarmState() Function ........................................................................... 188 APUSetQueryFromPriority() Function ......................................................................... 188 APUSetQueryToPriority() Function ............................................................................. 189 APUSetTimeoutValues() Function .............................................................................. 189
Handling Alarm Printer Errors........................................................................................... 190 APUTranslateErrorCode() Function ............................................................................ 190
Chapter 9 Recording Alarms into an Alarm Database ................................................. 191
About Recording Alarms into an Alarm Database .................................................................... 191
SQL Server Accounts for Alarm DB Logger Manager .............................................................. 191
Using the Alarm DB Logger Manager ..................................................................................... 192
Configuring Alarm Database Logging ..................................................................................... 192
Establishing the Database Connection.............................................................................. 192 Configuring Which Alarms to Log ..................................................................................... 194 Configuring the Logging Interval ....................................................................................... 195 Configuring Alarm DB Logger as a Service ....................................................................... 196
Starting and Stopping Alarm Database Logging ...................................................................... 197
Alarm Database Views .......................................................................................................... 198
Contents InTouch HMI Alarms and Events Guide
10
Alarm History View .......................................................................................................... 198 Example Query - Alarm History View .......................................................................... 200
Event History View .......................................................................................................... 200 Alarm Event History View................................................................................................. 201
Example Query - Alarm Event History View ................................................................. 203
Alarm Database Stored Procedures ....................................................................................... 204
Calling a Stored Procedure .............................................................................................. 204 AlarmCounter Database Stored Procedure ....................................................................... 204 EventCounter Database Stored Procedure ....................................................................... 205
Chapter 10 Viewing Recorded Alarms ........................................................................... 207
About Viewing Recorded Alarms ............................................................................................ 207
Configuring the Alarm DB View Control .................................................................................. 207
Connecting the Alarm DB View to the Alarm Database ...................................................... 208 Configuring the Appearance Properties of the Grid ............................................................ 209 Configuring the Display Font ............................................................................................ 210 Choosing Alarm or Event Data ......................................................................................... 210 Selecting and Configuring Display Columns ...................................................................... 211 Controlling Which Features You Can Access at Run Time ................................................. 213 Configuring the Shown Time Format and Time Zone for Alarm Records ............................. 214 Selecting the Time Period of Data from the Alarm Database .............................................. 216
About Query Time Zones ........................................................................................... 217
Creating Custom Filters and Using Filter Favorites ............................................................ 217 Defining the Column Filter Criteria .............................................................................. 219 Grouping Alarm Columns ........................................................................................... 220 Copying or Moving Query Filters................................................................................. 220 Values for the State Column....................................................................................... 221
Configuring Colors for Various Types of Alarm Records ..................................................... 221 Configuring the Sort Order for Alarm Records ................................................................... 223
Using an Alarm DB View Control at Run Time......................................................................... 223
Sorting Records .............................................................................................................. 223 Understanding Status Bar Information .............................................................................. 224
Using Alarm DB View ActiveX Properties ................................................................................ 224
AckAlmBackColor Property .............................................................................................. 224 AckAlmBackColorRange1 Property .................................................................................. 224 AckAlmBackColorRange2 Property .................................................................................. 225 AckAlmBackColorRange3 Property .................................................................................. 225 AckAlmBackColorRange4 Property .................................................................................. 225 AckAlmForeColor Property .............................................................................................. 226 AckAlmForeColorRange1 Property ................................................................................... 226 AckAlmForeColorRange2 Property ................................................................................... 226 AckAlmForeColorRange3 Property ................................................................................... 227 AckAlmForeColorRange4 Property ................................................................................... 227 AckRtnBackColor Property .............................................................................................. 227 AckRtnForeColor Property ............................................................................................... 228 AlmRtnBackColor Property .............................................................................................. 228 AlmRtnForeColor Property ............................................................................................... 228 Authentication Property ................................................................................................... 228 AuthenticationMode Property ........................................................................................... 229 AutoConnect Property ..................................................................................................... 229 ColorPriorityRange1 Property........................................................................................... 229 ColorPriorityRange2 Property........................................................................................... 230 ColorPriorityRange3 Property........................................................................................... 230
Contents InTouch HMI Alarms and Events Guide
11
ColumnResize Property ................................................................................................... 230 ConnectStatus Property ................................................................................................... 230 CustomMessage Property................................................................................................ 231 DatabaseName Property ................................................................................................. 231 DisplayMode Property ..................................................................................................... 231 DisplayedTimeZone Property ........................................................................................... 232 Duration Property ............................................................................................................ 232 EndTime Property ........................................................................................................... 233 EventBackColor Property ................................................................................................. 233 EventForeColor Property ................................................................................................. 234 FilterFavoritesFile Property .............................................................................................. 234 FilterMenu Property ......................................................................................................... 234 FilterName Property ........................................................................................................ 234 FromPriority Property ...................................................................................................... 235 GroupExactMatch Property .............................................................................................. 235 GroupName Property ...................................................................................................... 235 MaxRecords Property ...................................................................................................... 236 Password Property .......................................................................................................... 236 PrimarySort Property ....................................................................................................... 236 ProviderExactMatch Property ........................................................................................... 237 ProviderName Property ................................................................................................... 237 QueryTimeZoneName Property........................................................................................ 237 RefreshMenu Property..................................................................................................... 238 ResetMenu Property........................................................................................................ 238 RowCount Property ......................................................................................................... 238 RowSelection Property .................................................................................................... 238 SecondarySort Property................................................................................................... 239 ServerName Property ...................................................................................................... 239 ShowFetch Property ........................................................................................................ 239 ShowGrid Property .......................................................................................................... 240 ShowHeading Property .................................................................................................... 240 ShowMessage Property ................................................................................................... 240 ShowStatusBar Property.................................................................................................. 240 SilentMode Property ........................................................................................................ 241 SortMenu Property .......................................................................................................... 241 SortOrder Property .......................................................................................................... 241 SpecificTime Property...................................................................................................... 242 StartTime Property .......................................................................................................... 242 Time Property ................................................................................................................. 242 ToPriority Property .......................................................................................................... 243 TotalRowCount Property.................................................................................................. 243 UnAckAlmBackColor Property.......................................................................................... 243 UnAckAlmBackColorRange1 Property .............................................................................. 244 UnAckAlmBackColorRange2 Property .............................................................................. 244 UnAckAlmBackColorRange3 Property .............................................................................. 244 UnAckAlmBackColorRange4 Property .............................................................................. 245 UnAckAlmForeColor Property .......................................................................................... 245 UnAckAlmForeColorRange1 Property............................................................................... 245 UnAckAlmForeColorRange2 Property............................................................................... 246 UnAckAlmForeColorRange3 Property............................................................................... 246 UnAckAlmForeColorRange4 Property............................................................................... 246 UnAckOrAlarmDuration Property ...................................................................................... 247 UserID Property .............................................................................................................. 247
Using Alarm DB View ActiveX Methods .................................................................................. 247
Controlling Alarm Database Connections .......................................................................... 247 Connect().................................................................................................................. 248
Contents InTouch HMI Alarms and Events Guide
12
Disconnect().............................................................................................................. 248
Retrieving Alarm Records from the Database .................................................................... 248 SelectQuery() ............................................................................................................ 248 GetPrevious() ............................................................................................................ 248 GetNext() .................................................................................................................. 249 Refresh() .................................................................................................................. 249
Retrieving Information About an Alarm .............................................................................. 249 GetItem() Method ...................................................................................................... 249 GetSelectedItem() Method ......................................................................................... 250
Sorting the Alarm Records ............................................................................................... 250 SortOnCol() Method................................................................................................... 250 ShowSort() Method.................................................................................................... 250 Reset() Method ......................................................................................................... 251
Showing the Context Menu .............................................................................................. 251 ShowContext() Method .............................................................................................. 251
Accessing Filter Favorites ................................................................................................ 251 ShowFilter() Method .................................................................................................. 251
Showing Other Information .............................................................................................. 251 AboutBox() Method.................................................................................................... 251
Handling Errors With Using Methods and Properties ............................................................... 252
GetLastError() Method ..................................................................................................... 252
Using Alarm DB View ActiveX Events to Trigger Scripts .......................................................... 252
Chapter 11 Analyzing Alarm Distribution Across Tags ................................................ 253
About Analyzing Alarm Distribution Across Tags ..................................................................... 253
Configuring an Alarm Pareto ActiveX Control .......................................................................... 253
Configuring the Connection to the Alarm Database............................................................ 253 Configuring the Appearance and Colors of the Alarm Pareto Control .................................. 255 Configuring the Display of the Font ................................................................................... 257 Configuring Which Features Users can Access at Run Time .............................................. 257 Configuring Which Alarms to Analyze ............................................................................... 258
Selecting Alarm or Event Data.................................................................................... 258 Selecting the Time Period .......................................................................................... 259
Creating Custom Filters Using Filter Favorites ................................................................... 260 Defining the Column Filter Criteria .............................................................................. 261 Grouping Alarm Columns ........................................................................................... 262 Copying or Moving Query Filters................................................................................. 263
Configuring the Presentation of the Analysis Results ......................................................... 263
Using an Alarm Pareto Control at Run Time............................................................................ 264
Understanding Information Shown on the Status Bar ......................................................... 264
Using Alarm Pareto ActiveX Properties ................................................................................... 264
Using Alarm Pareto ActiveX Methods ..................................................................................... 266
Controlling Database Connections.................................................................................... 266 Connect() Method...................................................................................................... 266
Retrieving Records from the Database ............................................................................. 267 Refresh() Method ...................................................................................................... 267 SelectQuery() Method ................................................................................................ 267
Retrieving Information About Specific Pareto Bars ............................................................. 267 GetItemAlarmName() Method..................................................................................... 267 GetItemAlarmType() Method ...................................................................................... 268

Contents InTouch HMI Alarms and Events Guide
13
GetItemCount() Method ............................................................................................. 268 GetItemTotalTime() Method ....................................................................................... 268 GetItemEventType() Method ...................................................................................... 269 GetItemProviderName() Method ................................................................................. 269
Showing Miscellaneous Information.................................................................................. 269 AboutBox() Method.................................................................................................... 269
Error Handling When Using Methods and Properties ............................................................... 269
Using Alarm Pareto ActiveX Events to Trigger Scripts ............................................................. 269
Chapter 12 Maintaining the Alarm Database ................................................................ 271
About Maintaining the Alarm Database ................................................................................... 271
Configuring Purge or Archive Settings .................................................................................... 271
Connecting to the Alarm Database ................................................................................... 272 Configuring How Much Data to Purge from the Server ....................................................... 273 Configuring the Archive of Purged Data ............................................................................ 274 Configuring Log File Settings ........................................................................................... 275 Manually Purging and Archiving the Database .................................................................. 276 Setting a Schedule for Automatic Purging ......................................................................... 277
Restoring the Alarm Database ............................................................................................... 279
Configuring the Database Connection............................................................................... 279 Configuring Which Files to Restore................................................................................... 281 Starting a Database Restore Operation ............................................................................ 282
Chapter 13 Enhancing Plant Security Through Alarm Redundancy ......................... 283
About Enhancing Plant Security Through Alarm Redundancy .................................................. 283
Understanding Hot Backups .................................................................................................. 284
Specifying the Alarm Providers for Hot Backup.................................................................. 284 About the Hot Backup Manager........................................................................................ 285 Using the Alarm Hot Backup Manager in TSE Sessions ..................................................... 285
Configuring a Hot Backup Pair ............................................................................................... 285
Creating a Hot Backup Pair.............................................................................................. 285 Setting Alarm Key Fields for a Hot Backup Pair ................................................................. 288 Creating an Alarm Record Mapping File ............................................................................ 289 Importing an Alarm Record Mapping File .......................................................................... 292
Troubleshooting Alarm Mapping File Import Problems ................................................. 293
Example of a Hot Backup Pair ............................................................................................... 294
Acknowledgement Synchronization Example .................................................................... 297
Notes Regarding Hot Backup Pairs ........................................................................................ 298
Chapter 14 Creating an Alarm Audit Trail ...................................................................... 299
About Creating an Alarm Audit Trail ....................................................................................... 299
Acknowledging Alarms that Require Authentication ................................................................. 299
About Acknowledging Alarms in WindowViewer that Require Authentication ....................... 300 Alarm Acknowledgement Basic Run-Time Behavior........................................................... 300
Appendix A Working with the Distributed Alarm Display Object ................................ 303
About Working With the Distributed AlarmDisplay Object ......................................................... 303
About the Distributed Alarm Display Object ............................................................................. 303
Distributed Alarm Display Object Guidelines ..................................................................... 303
Contents InTouch HMI Alarms and Events Guide
14
Configuring a Distributed Alarm Display Object at Design Time ................................................ 304
Creating a Distributed Alarm Display Object ...................................................................... 304 Configuring the Display Properties of the Grid ................................................................... 304 Controlling Which Features Users Can Access at Run Time .............................................. 305 Configuring Which Alarms to Show................................................................................... 306 Configuring a Default Alarm Comment .............................................................................. 307 Configuring the Time Format for Alarm Records ................................................................ 308 Configuring the Font for Alarm Records ............................................................................ 309 Configuring the Columns for Alarm Records ...................................................................... 310 Configuring Colors for Alarm Records ............................................................................... 311 Configuring the Display Type ........................................................................................... 312 Using the Distributed Display to Monitor Local Alarms ....................................................... 313
Using a Distributed Alarm Display Object at Run Time............................................................. 313
Sizable Display Columns ................................................................................................. 314 Multiple Selection ............................................................................................................ 314 Alarm Message Colors .................................................................................................... 314 Status Bar....................................................................................................................... 314 Shortcut Menu ................................................................................................................ 315 Selecting and Configuring Alarm Query Favorites .............................................................. 315
Controlling the Distributed Alarm Display Object Using Functions and Dotfields ........................ 318
Getting or Setting Properties ............................................................................................ 318 Acknowledging Alarms .................................................................................................... 318
almAckAll() Function .................................................................................................. 318 almAckDisplay() Function........................................................................................... 319 almAckGroup() Function ............................................................................................ 319 almAckPriority() Function ........................................................................................... 320 almAckRecent() Function ........................................................................................... 320 almAckTag() Function ................................................................................................ 321 almAckSelect() Function ............................................................................................ 321 almAckSelectedGroup() Function ............................................................................... 322 almAckSelectedPriority() Function .............................................................................. 322 almAckSelectedTag() Function ................................................................................... 323
Selecting Alarms ............................................................................................................. 323 almSelectAll() Function .............................................................................................. 323 almUnselectAll() Function .......................................................................................... 324 almSelectionCount() Function .................................................................................... 324 almSelectGroup() Function......................................................................................... 325 almSelectItem() Function ........................................................................................... 325 almSelectPriority() Function ....................................................................................... 325 almSelectTag() Function ............................................................................................ 326
Retrieving Information about a Selected Alarm Record ...................................................... 327 .AlarmTime Dotfield ................................................................................................... 327 .AlarmDate Dot field ................................................................................................... 328 .AlarmName Dotfield.................................................................................................. 328 .AlarmValue Dot field .................................................................................................. 329 .AlarmClass Dotfield .................................................................................................. 329 .AlarmType Dotfield ................................................................................................... 330 .AlarmState Dot field................................................................................................... 331 .AlarmLimit Dot field ................................................................................................... 331 .AlarmPri Dotfield ...................................................................................................... 332 .AlarmGroupSel Dotfield ............................................................................................ 332 .AlarmAccess Dotfield ................................................................................................ 333 .AlarmProv Dotfield.................................................................................................... 334 .AlarmOprName Dot field ............................................................................................ 334
Contents InTouch HMI Alarms and Events Guide
15
.AlarmOprNode Dot field ............................................................................................. 335
.AlarmComment Dot field ............................................................................................ 335
Setting the Alarm Query................................................................................................... 336 almDefQuery() Function ............................................................................................. 336 almQuery() Function .................................................................................................. 336 almSetQueryByName() Function ................................................................................ 337
Checking the Current Query Properties ............................................................................ 338 .AlarmGroup Dot field ................................................................................................. 338 .QueryType Dot field................................................................................................... 339 .QueryStateDot field ................................................................................................... 339 .Successful Dotfield ................................................................................................... 340 .PriFrom Dotfield ....................................................................................................... 341 .PriTo Dot field ........................................................................................................... 341
Checking for Updates to the Distributed Alarm Display Object ............................................ 341 .ListChanged Dot field ................................................................................................ 342 .PendingUpdates Dot field........................................................................................... 342
Suppressing Alarms ........................................................................................................ 343 almSuppressAll() Function ......................................................................................... 343 almUnsuppressAll() Function...................................................................................... 344 almSuppressDisplay() Function .................................................................................. 344 almSuppressGroup() Function.................................................................................... 344 almSuppressPriority() Function................................................................................... 345 almSuppressTag() Function ....................................................................................... 345 almSuppressSelected() Function ................................................................................ 346 almSuppressSelectedGroup() Function....................................................................... 347 almSuppressSelectedPriority() Function...................................................................... 347 almSuppressSelectedTag() Function .......................................................................... 348 almSuppressRetain() Function ................................................................................... 348 .SuppressRetain Dot field ........................................................................................... 349
Scrolling the Alarm Display .............................................................................................. 349 almMoveWindow() Function ....................................................................................... 349 .Freeze Dotfield ......................................................................................................... 350 .PrevPage Dotfield..................................................................................................... 351 .NextPage Dotfield..................................................................................................... 351
Showing Alarm Statistics and Counts ............................................................................... 352 almShowStats() Function ........................................................................................... 352 .PageNum Dotfield .................................................................................................... 352 .TotalPages Dotfield .................................................................................................. 353 .NumAlarms Dot field .................................................................................................. 354 .ProvidersReq Dot field ............................................................................................... 354 .ProvidersRet Dotfield ................................................................................................ 355
Error Descriptions ........................................................................................................... 355
Appendix B Migrating from Legacy Alarm Systems ..................................................... 357
About Migrating from Legacy Alarm Systems .......................................................................... 357
Migrating from the Standard Alarm System to the Distributed Alarm System ............................. 357
Index ....................................................................................................................................... 358

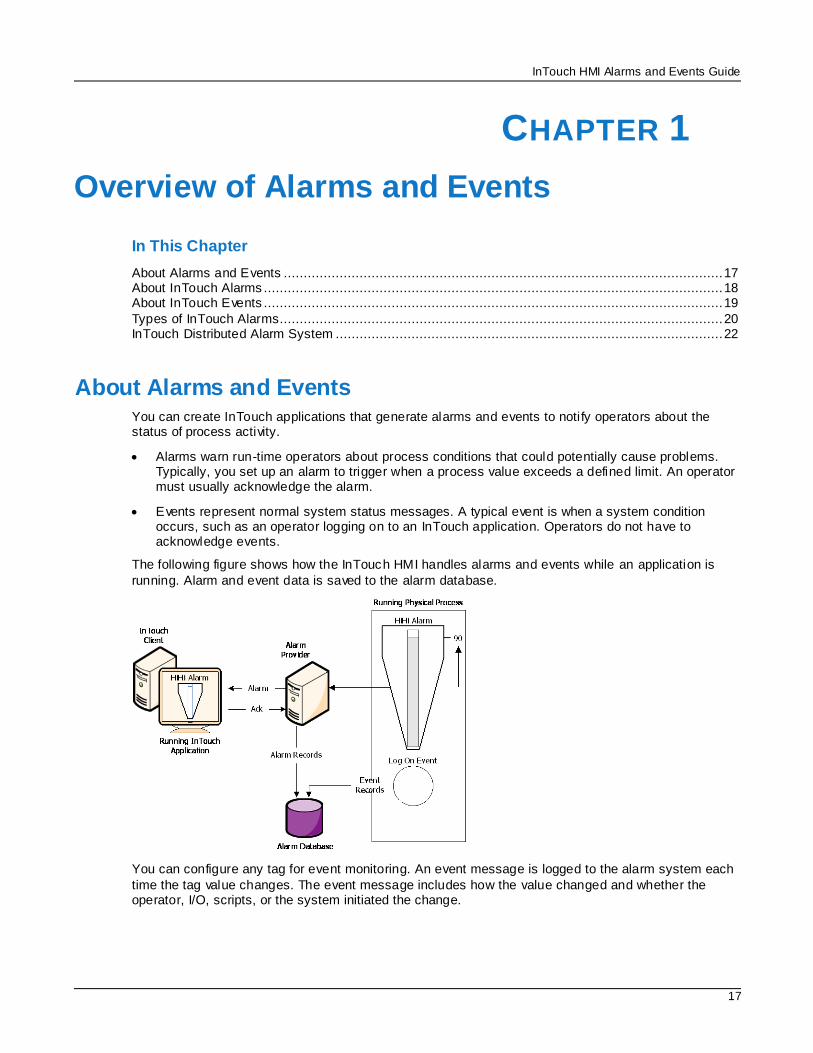
InTouch HMI Alarms and Events Guide
17
In This Chapter
About Alarms and Events .............................................................................................................. 17 About InTouch Alarms ................................................................................................................... 18 About InTouch Events ................................................................................................................... 19
Types of InTouch Alarms............................................................................................................... 20 InTouch Distributed Alarm System ................................................................................................. 22
About Alarms and Events You can create InTouch applications that generate alarms and events to notify operators about the status of process activity.
Alarms warn run-time operators about process conditions that could potentially cause problems. Typically, you set up an alarm to trigger when a process value exceeds a defined limit. An operator must usually acknowledge the alarm.
Events represent normal system status messages. A typical event is when a system condition occurs, such as an operator logging on to an InTouch application. Operators do not have to acknowledge events.
The following figure shows how the InTouch HMI handles alarms and events while an application is
running. Alarm and event data is saved to the alarm database.
You can configure any tag for event monitoring. An event message is logged to the alarm system each
time the tag value changes. The event message includes how the value changed and whether the operator, I/O, scripts, or the system initiated the change.
CHAPTER 1
Overview of Alarms and Events
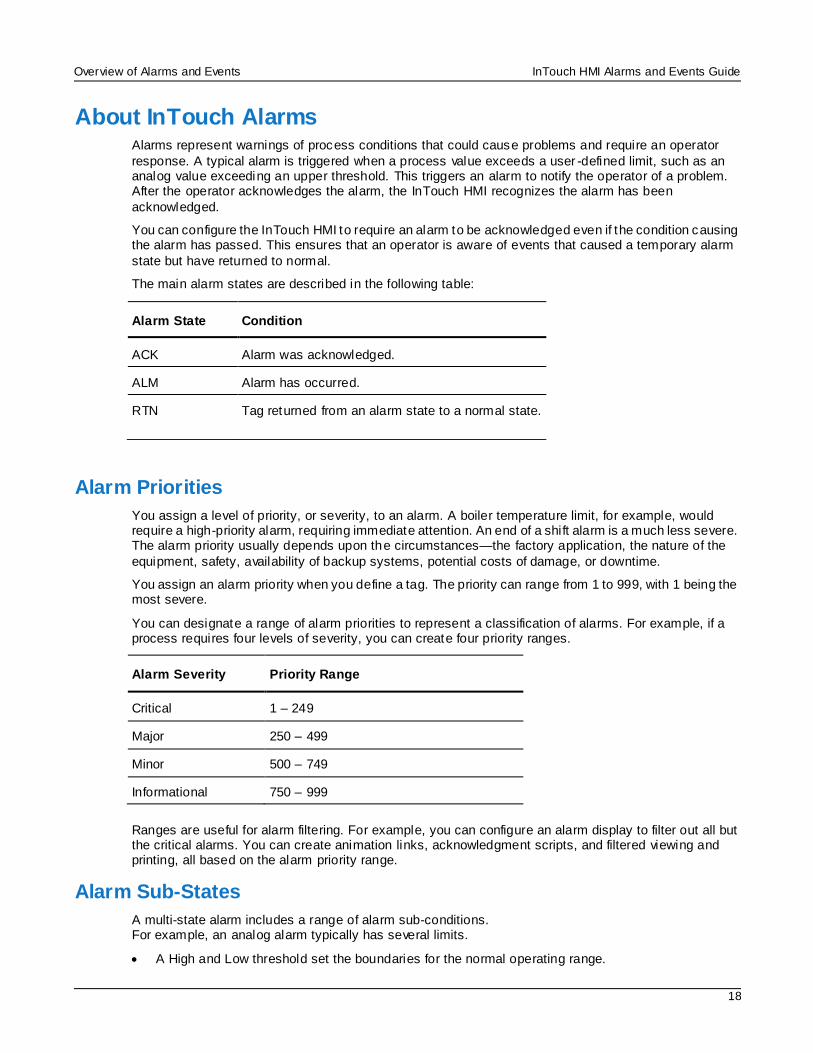
Overview of Alarms and Events InTouch HMI Alarms and Events Guide
18
About InTouch Alarms Alarms represent warnings of process conditions that could cause problems and require an operator
response. A typical alarm is triggered when a process value exceeds a user -defined limit, such as an analog value exceeding an upper threshold. This triggers an alarm to notify the operator of a problem. After the operator acknowledges the alarm, the InTouch HMI recognizes the alarm has been
acknowledged.
You can configure the InTouch HMI to require an alarm to be acknowledged even if the condition causing the alarm has passed. This ensures that an operator is aware of events that caused a temporary alarm
state but have returned to normal.
The main alarm states are described in the following table:
Alarm State Condition
ACK Alarm was acknowledged.
ALM Alarm has occurred.
RTN Tag returned from an alarm state to a normal state.
Alarm Priorities
You assign a level of priority, or severity, to an alarm. A boiler temperature limit, for example, would require a high-priority alarm, requiring immediate attention. An end of a shift alarm is a much less severe. The alarm priority usually depends upon the circumstances—the factory application, the nature of the
equipment, safety, availability of backup systems, potential costs of damage, or downtime.
You assign an alarm priority when you define a tag. The priority can range from 1 to 999, with 1 being the most severe.
You can designate a range of alarm priorities to represent a classification of alarms. For example, if a process requires four levels of severity, you can create four priority ranges.
Alarm Severity Priority Range
Critical 1 – 249
Major 250 – 499
Minor 500 – 749
Informational 750 – 999
Ranges are useful for alarm filtering. For example, you can configure an alarm display to filter out all but the critical alarms. You can create animation links, acknowledgment scripts, and filtered viewing and printing, all based on the alarm priority range.
Alarm Sub-States
A multi-state alarm includes a range of alarm sub-conditions. For example, an analog alarm typically has several limits.
A High and Low threshold set the boundaries for the normal operating range.
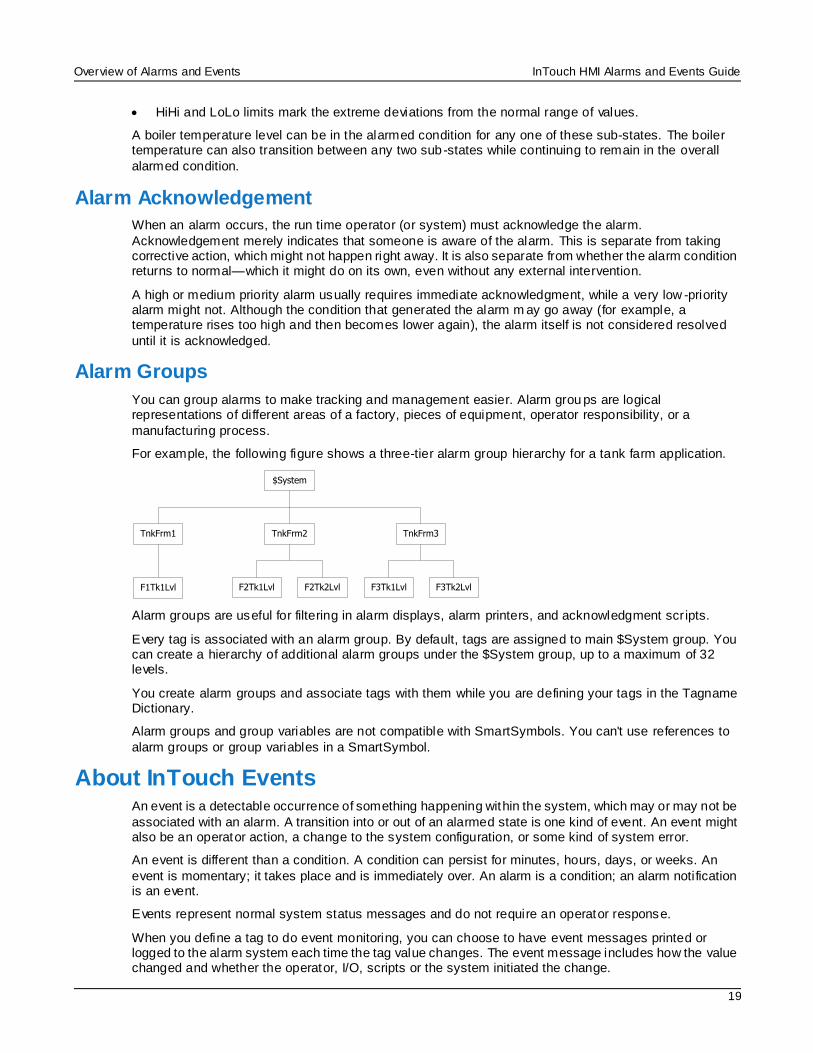
Overview of Alarms and Events InTouch HMI Alarms and Events Guide
19
HiHi and LoLo limits mark the extreme deviations from the normal range of values.
A boiler temperature level can be in the alarmed condition for any one of these sub-states. The boiler temperature can also transition between any two sub-states while continuing to remain in the overall
alarmed condition.
Alarm Acknowledgement
When an alarm occurs, the run time operator (or system) must acknowledge the alarm.
Acknowledgement merely indicates that someone is aware of the alarm. This is separate from taking corrective action, which might not happen right away. It is also separate from whether the alarm condition returns to normal—which it might do on its own, even without any external intervention.
A high or medium priority alarm usually requires immediate acknowledgment, while a very low -priority alarm might not. Although the condition that generated the alarm m ay go away (for example, a temperature rises too high and then becomes lower again), the alarm itself is not considered resolved
until it is acknowledged.
Alarm Groups
You can group alarms to make tracking and management easier. Alarm grou ps are logical representations of different areas of a factory, pieces of equipment, operator responsibility, or a
manufacturing process.
For example, the following figure shows a three-tier alarm group hierarchy for a tank farm application.
$System
TnkFrm1 TnkFrm2 TnkFrm3
F3Tk1Lvl F3Tk2LvlF2Tk1Lvl F2Tk2LvlF1Tk1Lvl
Alarm groups are useful for filtering in alarm displays, alarm printers, and acknowledgment scripts.
Every tag is associated with an alarm group. By default, tags are assigned to main $System group. You can create a hierarchy of additional alarm groups under the $System group, up to a maximum of 32 levels.
You create alarm groups and associate tags with them while you are defining your tags in the Tagname Dictionary.
Alarm groups and group variables are not compatible with SmartSymbols. You can't use references to
alarm groups or group variables in a SmartSymbol.
About InTouch Events An event is a detectable occurrence of something happening within the system, which may or may not be
associated with an alarm. A transition into or out of an alarmed state is one kind of event. An event might also be an operator action, a change to the system configuration, or some kind of system error.
An event is different than a condition. A condition can persist for minutes, hours, days, or weeks. An
event is momentary; it takes place and is immediately over. An alarm is a condition; an alarm notification is an event.
Events represent normal system status messages and do not require an operator response.
When you define a tag to do event monitoring, you can choose to have event messages printed or logged to the alarm system each time the tag value changes. The event message includes how the value changed and whether the operator, I/O, scripts or the system initiated the change.
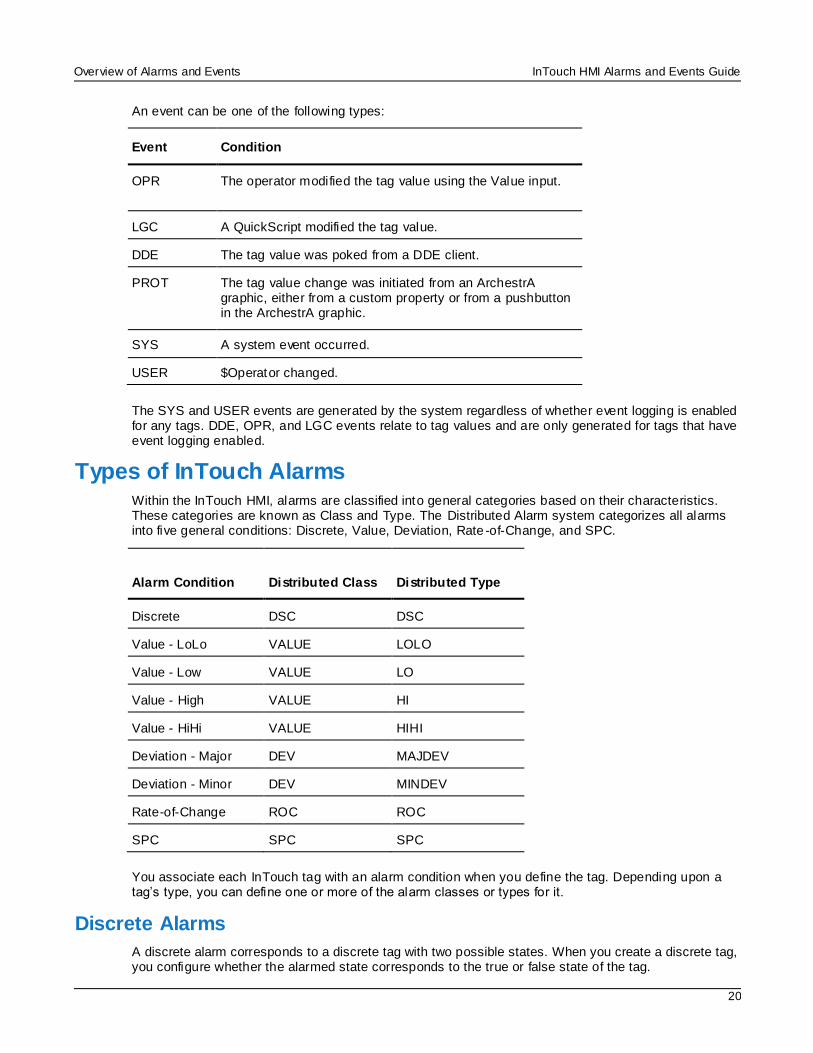
Overview of Alarms and Events InTouch HMI Alarms and Events Guide
20
An event can be one of the following types:
Event Condition
OPR The operator modified the tag value using the Value input.
LGC A QuickScript modified the tag value.
DDE The tag value was poked from a DDE client.
PROT The tag value change was initiated from an ArchestrA graphic, either from a custom property or from a pushbutton in the ArchestrA graphic.
SYS A system event occurred.
USER $Operator changed.
The SYS and USER events are generated by the system regardless of whether event logging is enabled for any tags. DDE, OPR, and LGC events relate to tag values and are only generated for tags that have event logging enabled.
Types of InTouch Alarms Within the InTouch HMI, alarms are classified into general categories based on their characteristics. These categories are known as Class and Type. The Distributed Alarm system categorizes all alarms into five general conditions: Discrete, Value, Deviation, Rate -of-Change, and SPC.
Alarm Condition Distributed Class Distributed Type
Discrete DSC DSC
Value - LoLo VALUE LOLO
Value - Low VALUE LO
Value - High VALUE HI
Value - HiHi VALUE HIHI
Deviation - Major DEV MAJDEV
Deviation - Minor DEV MINDEV
Rate-of-Change ROC ROC
SPC SPC SPC
You associate each InTouch tag with an alarm condition when you define the tag. Depending upon a tag’s type, you can define one or more of the alarm classes or types for it.
Discrete Alarms
A discrete alarm corresponds to a discrete tag with two possible states. When you create a discrete tag, you configure whether the alarmed state corresponds to the true or false state of the tag.
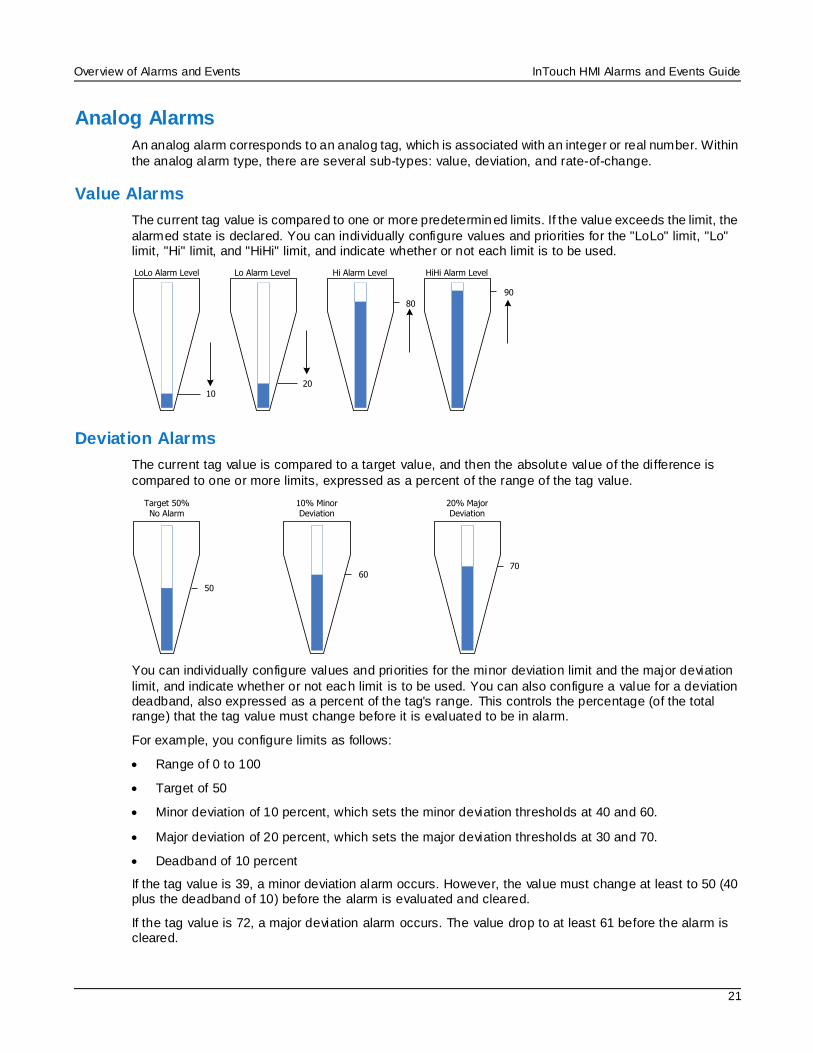
Overview of Alarms and Events InTouch HMI Alarms and Events Guide
21
Analog Alarms
An analog alarm corresponds to an analog tag, which is associated with an integer or real number. Within
the analog alarm type, there are several sub-types: value, deviation, and rate-of-change.
Value Alarms
The current tag value is compared to one or more predetermined limits. If the value exceeds the limit, the
alarmed state is declared. You can individually configure values and priorities for the "LoLo" limit, "Lo" limit, "Hi" limit, and "HiHi" limit, and indicate whether or not each limit is to be used.
80
Lo Alarm Level
20
LoLo Alarm Level
10
Hi Alarm Level
90
HiHi Alarm Level
Deviation Alarms
The current tag value is compared to a target value, and then the absolute value of the difference is
compared to one or more limits, expressed as a percent of the range of the tag value.
50
Target 50% No Alarm
6070
10% Minor Deviation
20% Major Deviation
You can individually configure values and priorities for the minor deviation limit and the major deviation
limit, and indicate whether or not each limit is to be used. You can also configure a value for a deviation deadband, also expressed as a percent of the tag's range. This controls the percentage (of the total range) that the tag value must change before it is evaluated to be in alarm.
For example, you configure limits as follows:
Range of 0 to 100
Target of 50
Minor deviation of 10 percent, which sets the minor deviation thresholds at 40 and 60.
Major deviation of 20 percent, which sets the major deviation thresholds at 30 and 70.
Deadband of 10 percent
If the tag value is 39, a minor deviation alarm occurs. However, the value must change at least to 50 (40 plus the deadband of 10) before the alarm is evaluated and cleared.
If the tag value is 72, a major deviation alarm occurs. The value drop to at least 61 before the alarm is cleared.
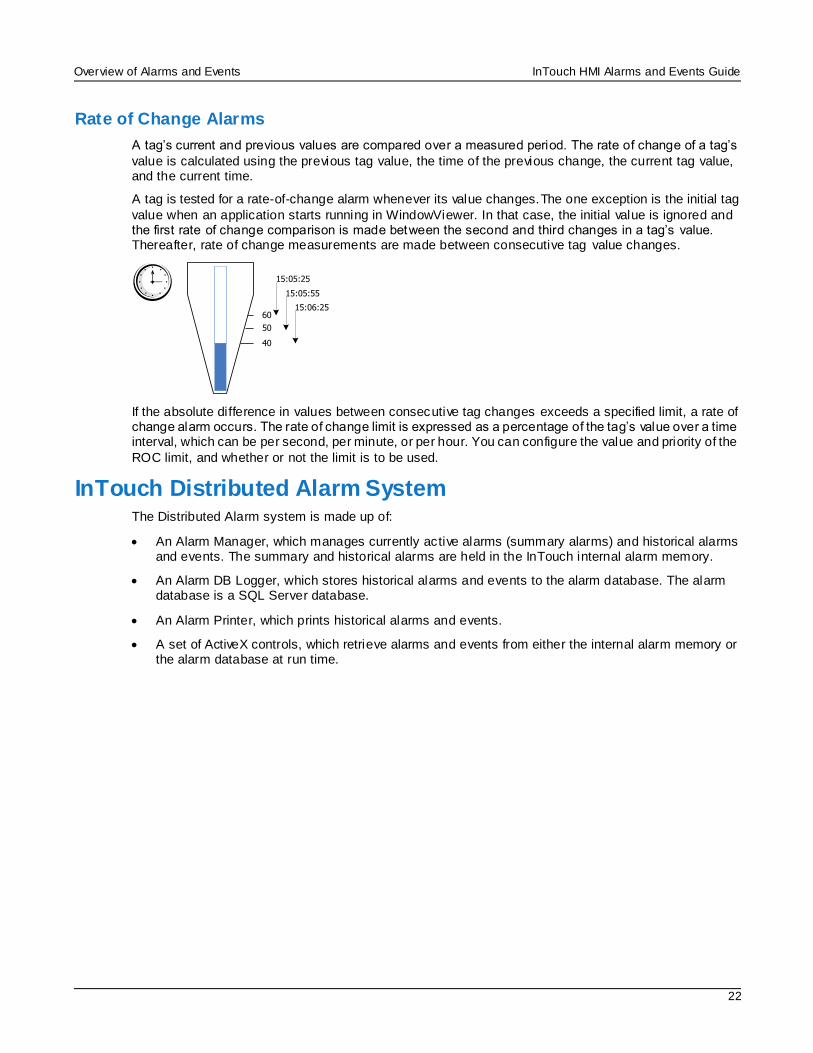
Overview of Alarms and Events InTouch HMI Alarms and Events Guide
22
Rate of Change Alarms
A tag’s current and previous values are compared over a measured period. The rate of change of a tag’s
value is calculated using the previous tag value, the time of the previous change, the current tag value, and the current time.
A tag is tested for a rate-of-change alarm whenever its value changes.The one exception is the initial tag
value when an application starts running in WindowViewer. In that case, the initial value is ignored and the first rate of change comparison is made between the second and third changes in a tag’s value. Thereafter, rate of change measurements are made between consecutive tag value changes.
60
50
40
15:05:25
15:05:55
15:06:25
If the absolute difference in values between consecutive tag changes exceeds a specified limit, a rate of change alarm occurs. The rate of change limit is expressed as a percentage of the tag’s value over a time interval, which can be per second, per minute, or per hour. You can configure the value and priority of the
ROC limit, and whether or not the limit is to be used.
InTouch Distributed Alarm System The Distributed Alarm system is made up of:
An Alarm Manager, which manages currently active alarms (summary alarms) and historical alarms and events. The summary and historical alarms are held in the InTouch internal alarm memory.
An Alarm DB Logger, which stores historical alarms and events to the alarm database. The alarm database is a SQL Server database.
An Alarm Printer, which prints historical alarms and events.
A set of ActiveX controls, which retrieve alarms and events from either the internal alarm memory or the alarm database at run time.
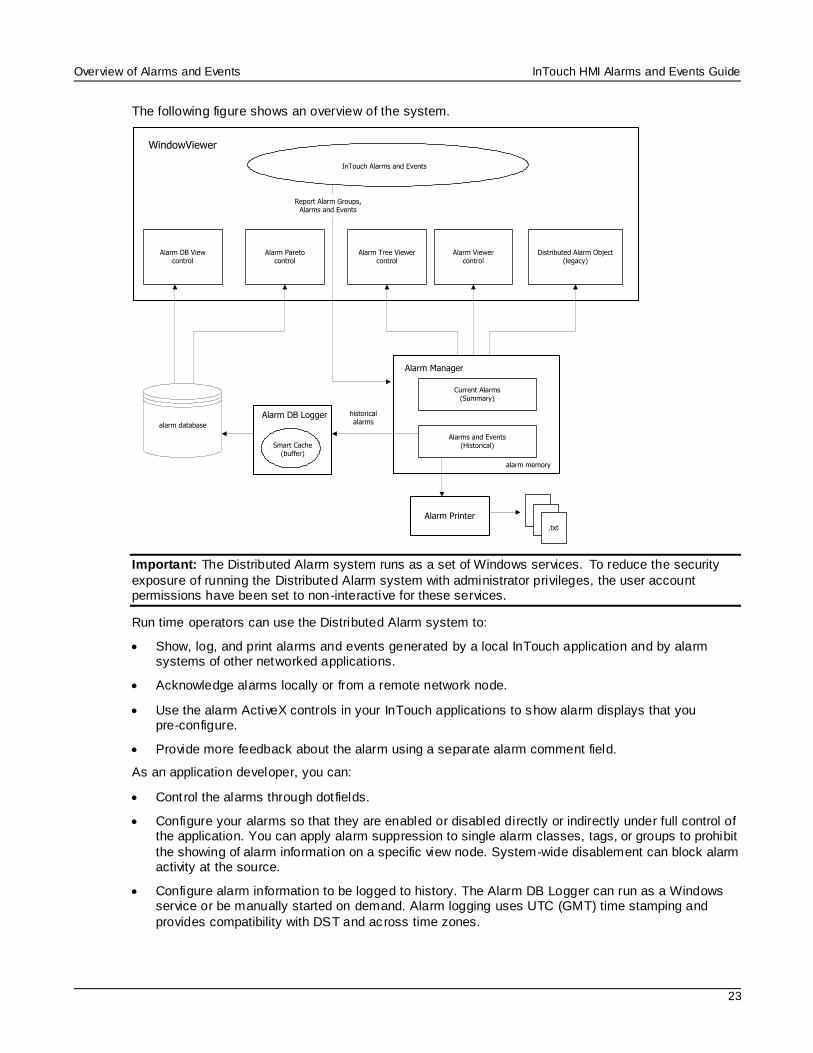
Overview of Alarms and Events InTouch HMI Alarms and Events Guide
23
The following figure shows an overview of the system.
Alarm Manager
Alarm Viewercontrol
Alarm Tree Viewer control
Alarm DB View control
Alarm Pareto control
historical alarmsalarm database
Distributed Alarm Object (legacy)
.txt
.txt.txt
Alarm DB Logger
Smart Cache(buffer)
Alarm Printer
WindowViewer
InTouch Alarms and Events
Current Alarms(Summary)
Alarms and Events(Historical)
Report Alarm Groups, Alarms and Events
alarm memory
Important: The Distributed Alarm system runs as a set of Windows services. To reduce the security
exposure of running the Distributed Alarm system with administrator privileges, the user account permissions have been set to non-interactive for these services.
Run time operators can use the Distributed Alarm system to:
Show, log, and print alarms and events generated by a local InTouch application and by alarm systems of other networked applications.
Acknowledge alarms locally or from a remote network node.
Use the alarm ActiveX controls in your InTouch applications to show alarm displays that you pre-configure.
Provide more feedback about the alarm using a separate alarm comment field.
As an application developer, you can:
Control the alarms through dot fields.
Configure your alarms so that they are enabled or disabled directly or indirectly under full control of the application. You can apply alarm suppression to single alarm classes, tags, or groups to prohibit
the showing of alarm information on a specific view node. System-wide disablement can block alarm activity at the source.
Configure alarm information to be logged to history. The Alarm DB Logger can run as a Windows service or be manually started on demand. Alarm logging uses UTC (GMT) time stamping and
provides compatibility with DST and across time zones.
Overview of Alarms and Events InTouch HMI Alarms and Events Guide
24
Set up failover alarm providers. If a primary alarm provider fails, the Distributed Alarm system seamlessly acquires alarm information from the backup system. On reconnection of the primary node, the Distributed Alarm system ensures that alarm acknowledgements are re-synchronized prior
to the returning primary system becoming live.
The Distributed Alarm system:
Sends data through the SuiteLink protocol and uses a minimal amount of CPU and network
resources.
Time stamps the alarm at the time the alarm occurs, not when the consumer receives the alarm. The time stamp includes milliseconds.
Alarm Providers and Consumers
On any given node there can be a collection of Alarm Providers (Publishers) and Alarm Consumers (Subscribers). The InTouch Distributed Alarm system provides the communication link to pass alarm information between nodes and software components.
Alarm Provider
An alarm provider:
Keeps track of alarmable items—that is, items that can transition into an alarmed condition—and provides the Distributed Alarm system with the list of these items, including information on any
hierarchical grouping of the items.
Notifies the Distributed Alarm system when the status of an alarm item changes. Status changes include whether the item is in or out of the alarmed state and whether the most recent alarm has
been acknowledged.
Keeps track of whether an alarm item is disabled.
The InTouch HMI supports external alarm providers, such as QI Analyst, an ArchestrA Galaxy, and other
software built with the Alarm API toolkit. The date/time stamp for these alarm records is provided by the alarm provider, and is not generated by the Distributed Alarm system.
Alarm Consumer
An alarm consumer:
Provides the Distributed Alarm system with a set of queries identifying alarmable items about which it wishes to receive notifications. A query remains active until changed or removed by the alarm consumer, and specifies an alarm provider or group of alarms - much like a SQL query with
"wildcards." Whenever an alarm provider issues notification of a chan ge, the Distributed Alarm system checks the alarm for matches with all registered queries and passes updates to the corresponding alarm consumers.
Upon receiving updates, shows or logs information relating to the status of the items or their transitions.
Acknowledges alarms. The alarm consumer sends an acknowledgement notification to the Distributed Alarm system, identifying the alarm and the alarm provider. The notification is passed to
the alarm provider, which then updates the status of the item to acknowledged (if appropriate) and in turn notifies the Distributed Alarm system, thereby ensuring that the update gets distributed to all interested alarm consumers.
Note: The majority of communication in the Distributed Alarm system consists of sending alarm queries and alarm records from one node to another. Within a node, alarm queries and alarm records are tracked
and buffered by the internal alarm memory to minimize network traffic.
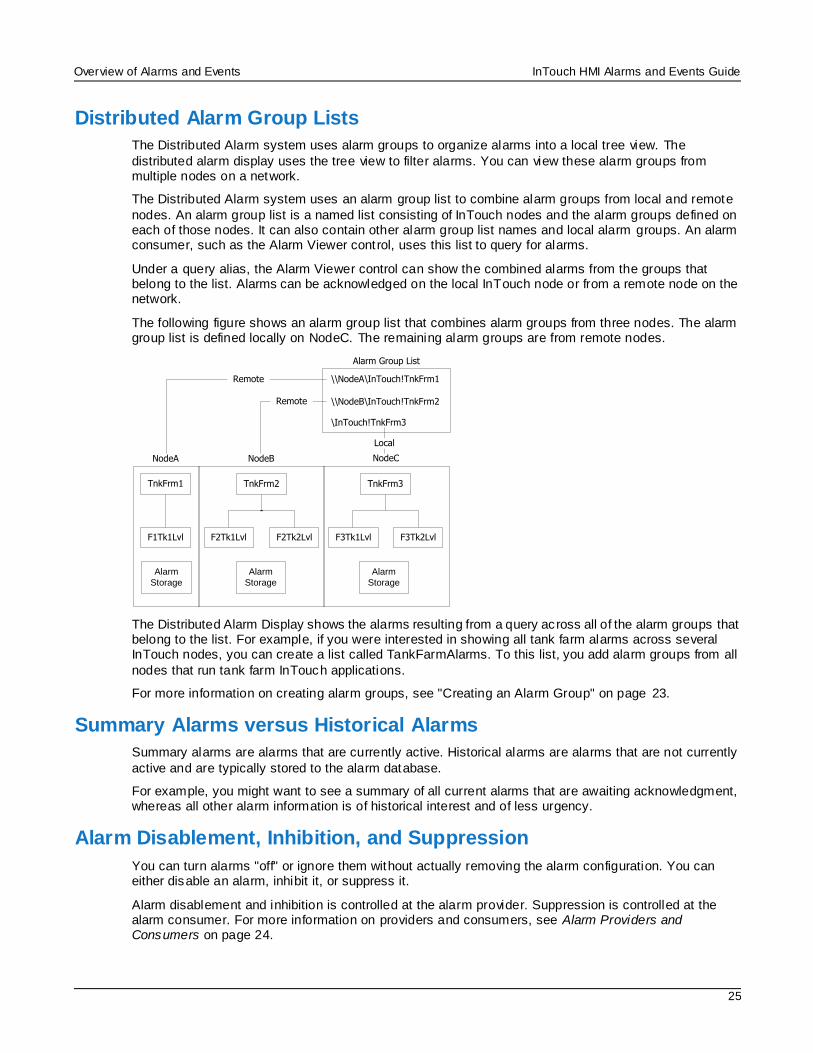
Overview of Alarms and Events InTouch HMI Alarms and Events Guide
25
Distributed Alarm Group Lists
The Distributed Alarm system uses alarm groups to organize alarms into a local tree view. The
distributed alarm display uses the tree view to filter alarms. You can view these alarm groups from multiple nodes on a network.
The Distributed Alarm system uses an alarm group list to combine alarm groups from local and remote
nodes. An alarm group list is a named list consisting of InTouch nodes and the alarm groups defined on each of those nodes. It can also contain other alarm group list names and local alarm groups. An alarm consumer, such as the Alarm Viewer control, uses this list to query for alarms.
Under a query alias, the Alarm Viewer control can show the combined alarms from the groups that belong to the list. Alarms can be acknowledged on the local InTouch node or from a remote node on the network.
The following figure shows an alarm group list that combines alarm groups from three nodes. The alarm group list is defined locally on NodeC. The remaining alarm groups are from remote nodes.
TnkFrm1
F1Tk1Lvl
TnkFrm2
F2Tk1Lvl F2Tk2Lvl
-
TnkFrm3
F3Tk1Lvl F3Tk2Lvl
NodeA NodeB NodeC
\InTouch!TnkFrm3
\\NodeB\InTouch!TnkFrm2
\\NodeA\InTouch!TnkFrm1
Alarm Group List
Local
Remote
Remote
Alarm
Storage
Alarm
Storage
Alarm
Storage
The Distributed Alarm Display shows the alarms resulting from a query across all of the alarm groups that belong to the list. For example, if you were interested in showing all tank farm alarms across several InTouch nodes, you can create a list called TankFarmAlarms. To this list, you add alarm groups from all
nodes that run tank farm InTouch applications.
For more information on creating alarm groups, see "Creating an Alarm Group" on page 23.
Summary Alarms versus Historical Alarms
Summary alarms are alarms that are currently active. Historical alarms are alarms that are not currently
active and are typically stored to the alarm database.
For example, you might want to see a summary of all current alarms that are awaiting acknowledgment, whereas all other alarm information is of historical interest and of less urgency.
Alarm Disablement, Inhibition, and Suppression
You can turn alarms "off" or ignore them without actually removing the alarm configuration. You can either disable an alarm, inhibit it, or suppress it.
Alarm disablement and inhibition is controlled at the alarm provider. Suppression is controlled at the alarm consumer. For more information on providers and consumers, see Alarm Providers and Consumers on page 24.
Overview of Alarms and Events InTouch HMI Alarms and Events Guide
26
Disablement. You disable an alarm at the alarm provider by setting a flag that marks it as disabled. No matter what alarm conditions occur, the item is never put into an alarmed state. For information on dot fields you can use to disable an alarm, see Enabling and Disabling Alarms for a Tag or Alarm
Group on page 111.
You can disable or enable all of a tag’s alarms at one time. Also, for an alarm that has sub-states, you can disable each sub-state individually.
Inhibition. You inhibit an alarm by:
a. Adding an "inhibitor" tag to the alarm configuration in WindowMaker. The inhibitor tag is used at run time to mark the alarm as inhibited.
b. Setting the inhibitor tag to True or False at run time. When the inhibitor tag is False, the alarm is handled normally. When the inhibitor tag is True, the item cannot alarm.
Each alarm sub-state can be inhibited by a different tag, and you can leave some sub-states with no
inhibitor tag assigned.
Assigning a tag as an inhibitor tag for an alarm increases its cross-reference use count.
Suppression. Suppression causes an alarm consumer to ignore certain alarms. If an alarm matches the exclusion criteria, it is not visible. That is, it is not shown on a display, printed, or logged at that
particular alarm consumer.
The actual alarm generation is completely unaffected by suppression. Alarm records can still be logged into alarm history.
If an alarm becomes disabled or actively inhibited while the item is in an alarmed state, the item is forced to a different (valid) state. What that state should be depends upon which states are available and whether they have also been disabled. This activity is handled by the alarm provider according to the
type of alarm, limit values, and so on.
An alarm that is disabled or actively inhibited is not waiting for an acknowledgment. If the alarm has sub-states, it can only be waiting for an acknowledgment on sub -states that are still available.
Terminal Services Alarm Support
By using the Distributed Alarm system with Terminal Services for InTouch, alarm clients running on different terminal sessions can select what alarm data to show and how to present it.
Alarm Providers identify themselves by a name that uniquely identifies their application, and the instance of their application. This information is made available to the Distributed Alarm system when the Alarm Provider or the Alarm Consumer registers with the Distributed Alarm system.
The node on which an Alarm Provider is running is identified by a name that uniquely identifies the computer node in the system. The alarm records that are generated by Terminal Services Edition (TSE) client sessions include an expanded node name in the format Node: IP Address; for example,
serverAlarm:192.168.1.23. This information is made available to the Distributed Alarm system when an instance of it starts up on the computer node.
When an alarm event is logged, the node and complete Alarm Provider name identify the source of the
alarm.
When an alarm is acknowledged in a Terminal Services environment, the Operator Node that gets recorded will be the name of the client machine that the respective operator established the Terminal
Services session from. If the node name can't be retrieved, the node's IP address will be used instead.
A terminal server client session cannot be an InTouch alarm provider.
Distributed Alarm System Data Storage
There are several forms of data storage used in the Distributed Alarm system:
Overview of Alarms and Events InTouch HMI Alarms and Events Guide
27
Internal alarm memory (buffer)
Most information about current and recent alarms is held in memory on various computer nodes. InTouch uses two memory locations: one for summary alarms (current) and one for historical alarms
and events. This model is also used in the Distributed Alarm system.
The memory for summary alarms grows as needed to accommodate all current alarms up to the limit of available memory. The memory for historical alarms can grow only to a pre-determined limit. After
the historical memory reaches this limit, the oldest alarm records are discarded as new ones are added. In a multi-node environment, the alarm memory on the various nodes constitute a single collective of alarm memory.
For information about setting the limit, see "Configuring the Alarm Buffer Size" on page 36.
Alarm database
The Alarm DB Logger creates a database, keeping track of when an alarm occurs, makes a
sub-state transition, is acknowledged, and when it returns to normal. Essentially, these records constitute a history of alarms in the system.
Because it is based on the use of queries, the Distributed Alarm system supports using one computer
node to log alarms for several other nodes.

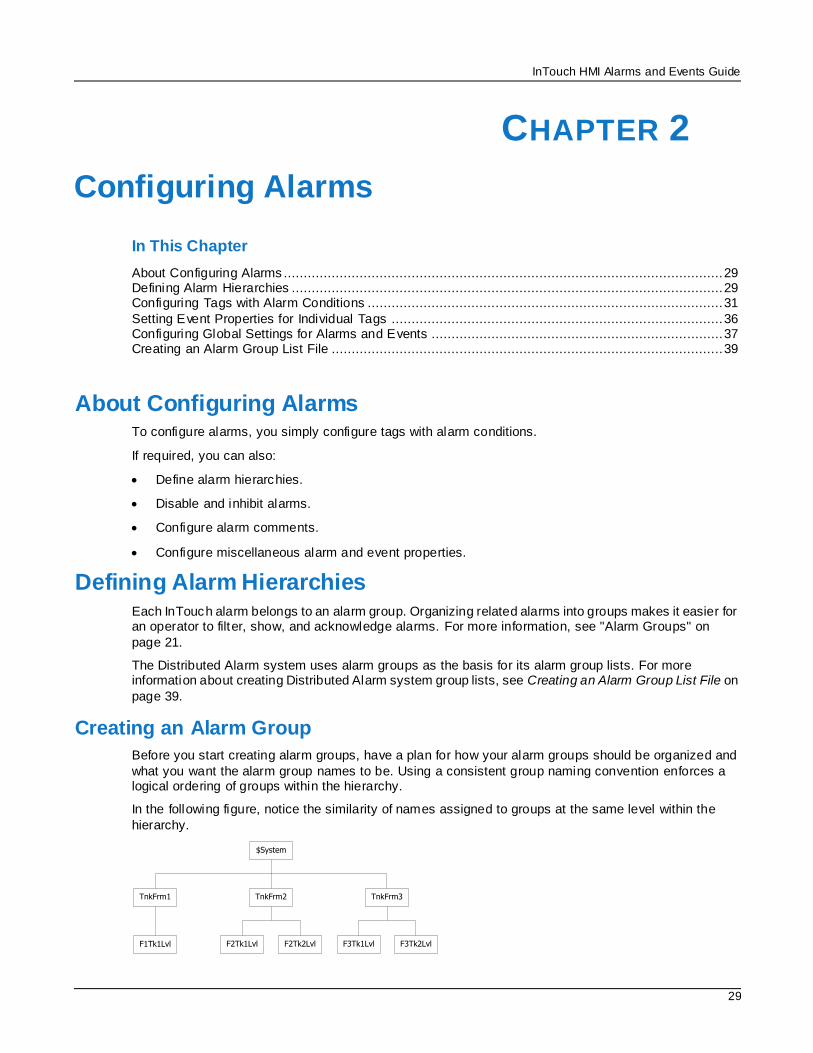
InTouch HMI Alarms and Events Guide
29
In This Chapter
About Configuring Alarms .............................................................................................................. 29 Defining Alarm Hierarchies ............................................................................................................ 29 Configuring Tags with Alarm Conditions ......................................................................................... 31
Setting Event Properties for Individual Tags ................................................................................... 36 Configuring Global Settings for Alarms and Events ......................................................................... 37 Creating an Alarm Group List File .................................................................................................. 39
About Configuring Alarms To configure alarms, you simply configure tags with alarm conditions.
If required, you can also:
Define alarm hierarchies.
Disable and inhibit alarms.
Configure alarm comments.
Configure miscellaneous alarm and event properties.
Defining Alarm Hierarchies Each InTouch alarm belongs to an alarm group. Organizing related alarms into groups makes it easier for an operator to filter, show, and acknowledge alarms. For more information, see "Alarm Groups" on
page 21.
The Distributed Alarm system uses alarm groups as the basis for its alarm group lists. For more information about creating Distributed Alarm system group lists, see Creating an Alarm Group List File on
page 39.
Creating an Alarm Group
Before you start creating alarm groups, have a plan for how your alarm groups should be organized and
what you want the alarm group names to be. Using a consistent group naming convention enforces a logical ordering of groups within the hierarchy.
In the following figure, notice the similarity of names assigned to groups at the same level within the
hierarchy.
$System
TnkFrm1 TnkFrm2 TnkFrm3
F3Tk1Lvl F3Tk2LvlF2Tk1Lvl F2Tk2LvlF1Tk1Lvl
CHAPTER 2
Configuring Alarms
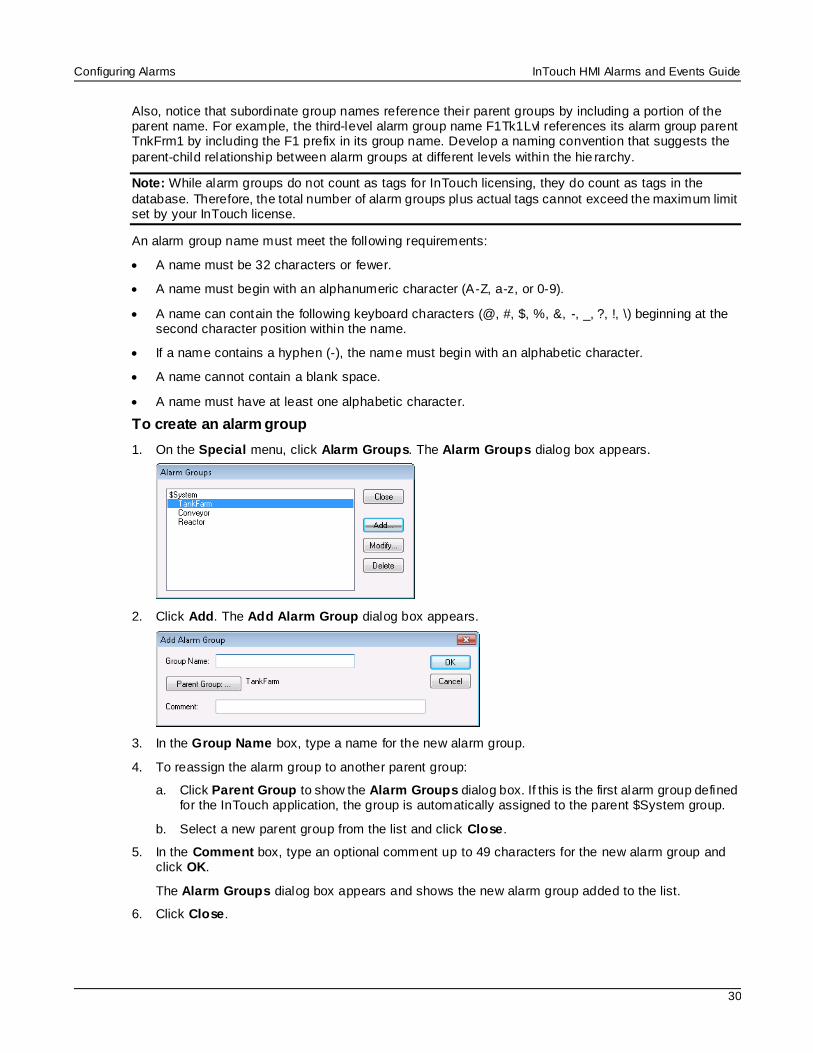
Configuring Alarms InTouch HMI Alarms and Events Guide
30
Also, notice that subordinate group names reference their parent groups by including a portion of the parent name. For example, the third-level alarm group name F1Tk1Lvl references its alarm group parent TnkFrm1 by including the F1 prefix in its group name. Develop a naming convention that suggests the
parent-child relationship between alarm groups at different levels within the hie rarchy.
Note: While alarm groups do not count as tags for InTouch licensing, they do count as tags in the
database. Therefore, the total number of alarm groups plus actual tags cannot exceed the maximum limit set by your InTouch license.
An alarm group name must meet the following requirements:
A name must be 32 characters or fewer.
A name must begin with an alphanumeric character (A-Z, a-z, or 0-9).
A name can contain the following keyboard characters (@, #, $, %, &, -, _, ?, !, \) beginning at the second character position within the name.
If a name contains a hyphen (-), the name must begin with an alphabetic character.
A name cannot contain a blank space.
A name must have at least one alphabetic character.
To create an alarm group
1. On the Special menu, click Alarm Groups. The Alarm Groups dialog box appears.
2. Click Add. The Add Alarm Group dialog box appears.
3. In the Group Name box, type a name for the new alarm group.
4. To reassign the alarm group to another parent group:
a. Click Parent Group to show the Alarm Groups dialog box. If this is the first alarm group defined for the InTouch application, the group is automatically assigned to the parent $System group.
b. Select a new parent group from the list and click Close.
5. In the Comment box, type an optional comment up to 49 characters for the new alarm group and click OK.
The Alarm Groups dialog box appears and shows the new alarm group added to the list.
6. Click Close.
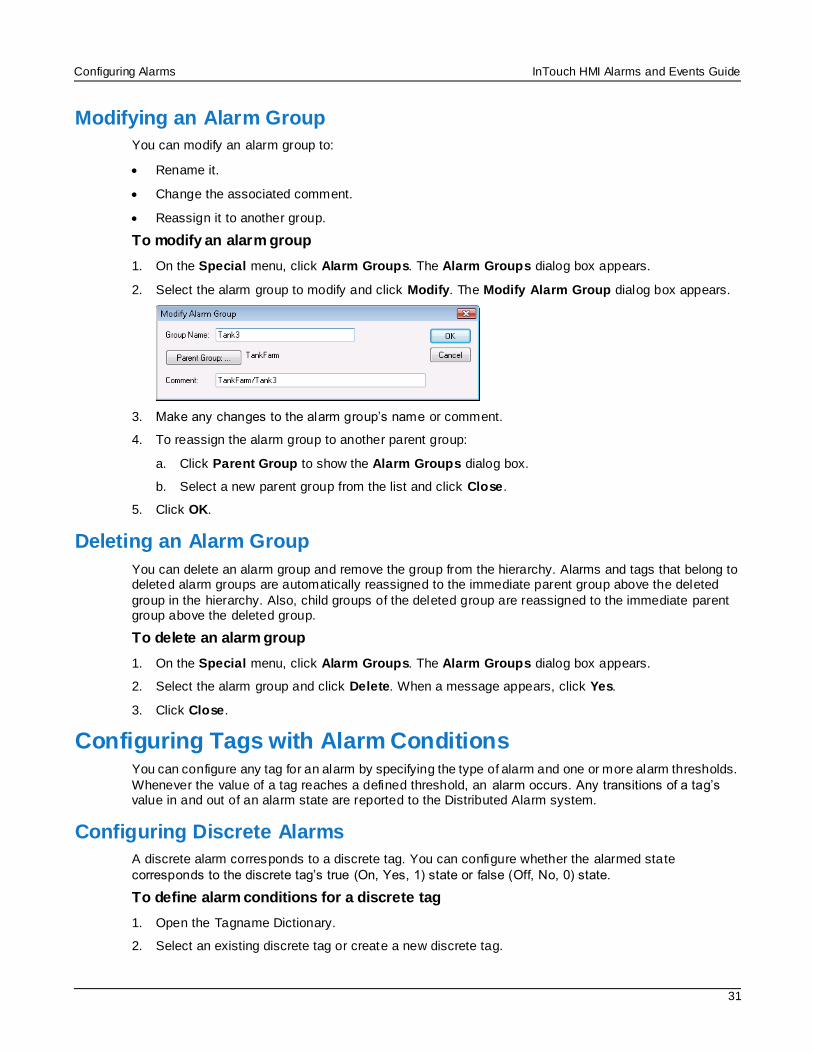
Configuring Alarms InTouch HMI Alarms and Events Guide
31
Modifying an Alarm Group
You can modify an alarm group to:
Rename it.
Change the associated comment.
Reassign it to another group.
To modify an alarm group
1. On the Special menu, click Alarm Groups. The Alarm Groups dialog box appears.
2. Select the alarm group to modify and click Modify. The Modify Alarm Group dialog box appears.
3. Make any changes to the alarm group’s name or comment.
4. To reassign the alarm group to another parent group:
a. Click Parent Group to show the Alarm Groups dialog box.
b. Select a new parent group from the list and click Close.
5. Click OK.
Deleting an Alarm Group
You can delete an alarm group and remove the group from the hierarchy. Alarms and tags that belong to deleted alarm groups are automatically reassigned to the immediate parent group above the deleted
group in the hierarchy. Also, child groups of the deleted group are reassigned to the immediate parent group above the deleted group.
To delete an alarm group
1. On the Special menu, click Alarm Groups. The Alarm Groups dialog box appears.
2. Select the alarm group and click Delete. When a message appears, click Yes.
3. Click Close.
Configuring Tags with Alarm Conditions You can configure any tag for an alarm by specifying the type of alarm and one or more alarm thresholds.
Whenever the value of a tag reaches a defined threshold, an alarm occurs. Any transitions of a tag’s value in and out of an alarm state are reported to the Distributed Alarm system.
Configuring Discrete Alarms
A discrete alarm corresponds to a discrete tag. You can configure whether the alarmed state
corresponds to the discrete tag’s true (On, Yes, 1) state or false (Off, No, 0) state.
To define alarm conditions for a discrete tag
1. Open the Tagname Dictionary.
2. Select an existing discrete tag or create a new discrete tag.
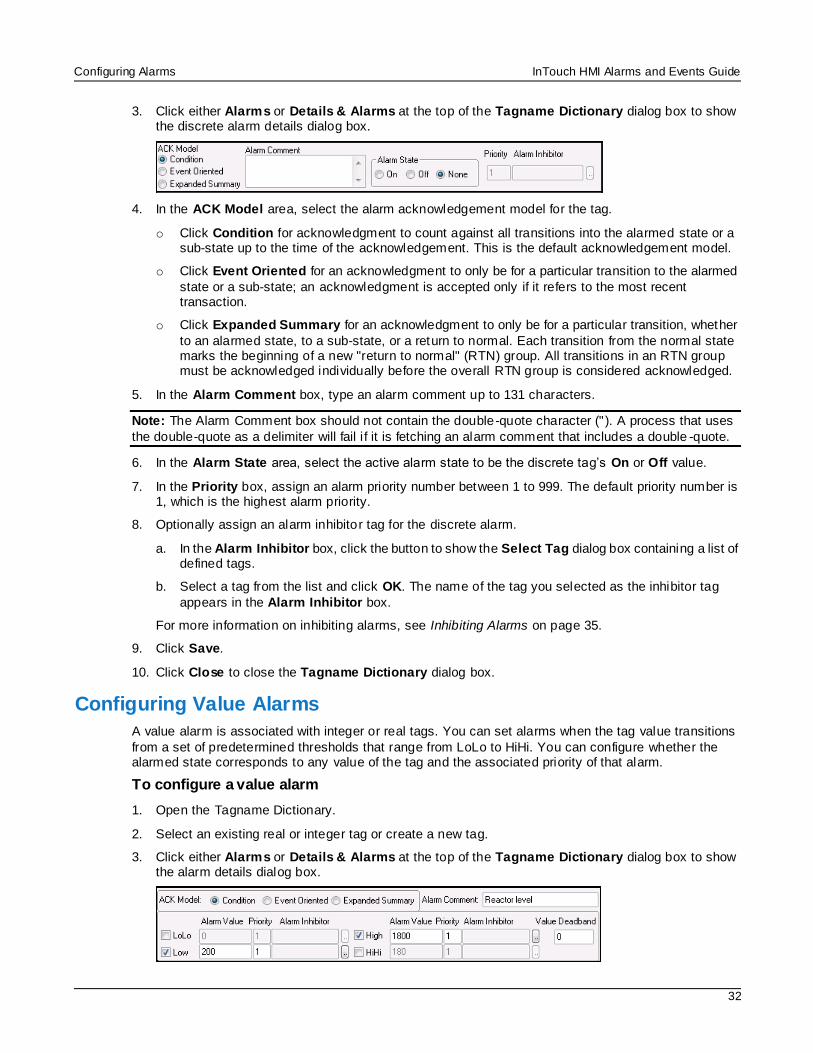
Configuring Alarms InTouch HMI Alarms and Events Guide
32
3. Click either Alarms or Details & Alarms at the top of the Tagname Dictionary dialog box to show the discrete alarm details dialog box.
4. In the ACK Model area, select the alarm acknowledgement model for the tag.
o Click Condition for acknowledgment to count against all transitions into the alarmed state or a sub-state up to the time of the acknowledgement. This is the default acknowledgement model.
o Click Event Oriented for an acknowledgment to only be for a particular transition to the alarmed
state or a sub-state; an acknowledgment is accepted only if it refers to the most recent transaction.
o Click Expanded Summary for an acknowledgment to only be for a particular transition, whether
to an alarmed state, to a sub-state, or a return to normal. Each transition from the normal state marks the beginning of a new "return to normal" (RTN) group. All transitions in an RTN group must be acknowledged individually before the overall RTN group is considered acknowledged.
5. In the Alarm Comment box, type an alarm comment up to 131 characters.
Note: The Alarm Comment box should not contain the double-quote character (" ). A process that uses
the double-quote as a delimiter will fail i f it is fetching an alarm comment that includes a double -quote.
6. In the Alarm State area, select the active alarm state to be the discrete tag’s On or Off value.
7. In the Priority box, assign an alarm priority number between 1 to 999. The default priority number is 1, which is the highest alarm priority.
8. Optionally assign an alarm inhibitor tag for the discrete alarm.
a. In the Alarm Inhibitor box, click the button to show the Select Tag dialog box containing a list of defined tags.
b. Select a tag from the list and click OK. The name of the tag you selected as the inhibitor tag
appears in the Alarm Inhibitor box.
For more information on inhibiting alarms, see Inhibiting Alarms on page 35.
9. Click Save.
10. Click Close to close the Tagname Dictionary dialog box.
Configuring Value Alarms
A value alarm is associated with integer or real tags. You can set alarms when the tag value transitions
from a set of predetermined thresholds that range from LoLo to HiHi. You can configure whether the alarmed state corresponds to any value of the tag and the associated priority of that alarm.
To configure a value alarm
1. Open the Tagname Dictionary.
2. Select an existing real or integer tag or create a new tag.
3. Click either Alarms or Details & Alarms at the top of the Tagname Dictionary dialog box to show the alarm details dialog box.
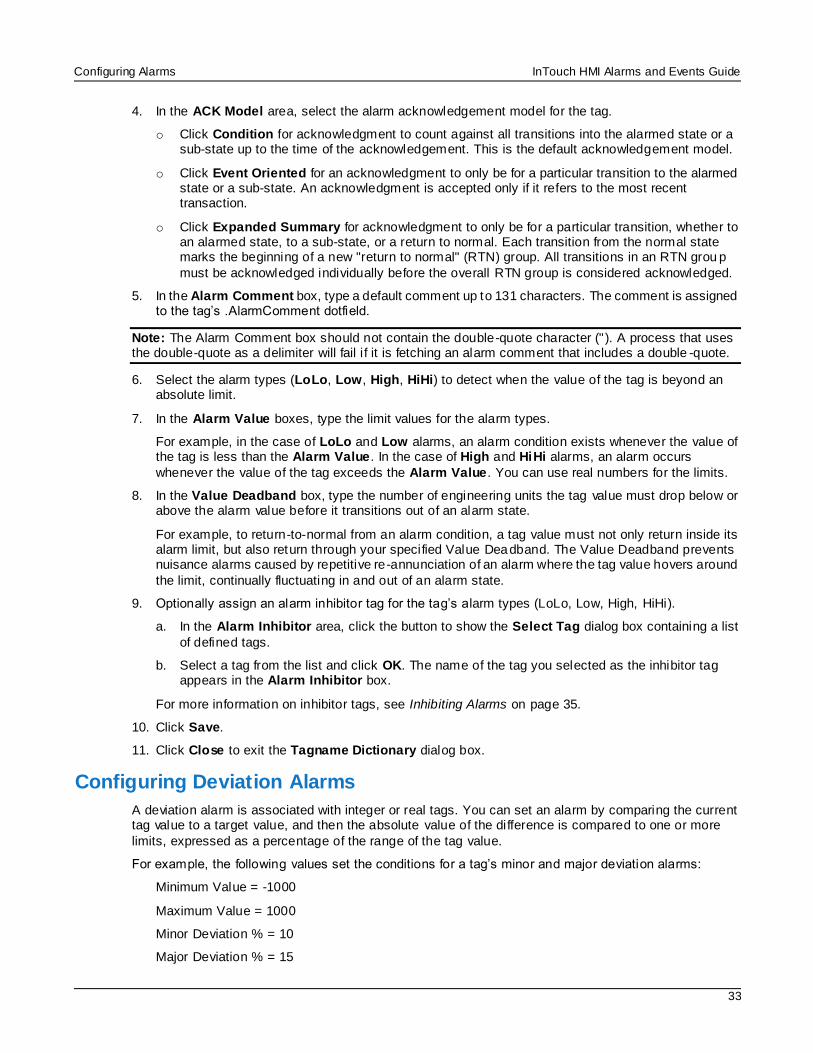
Configuring Alarms InTouch HMI Alarms and Events Guide
33
4. In the ACK Model area, select the alarm acknowledgement model for the tag.
o Click Condition for acknowledgment to count against all transitions into the alarmed state or a sub-state up to the time of the acknowledgement. This is the default acknowledgement model.
o Click Event Oriented for an acknowledgment to only be for a particular transition to the alarmed state or a sub-state. An acknowledgment is accepted only if it refers to the most recent transaction.
o Click Expanded Summary for acknowledgment to only be for a particular transition, whether to an alarmed state, to a sub-state, or a return to normal. Each transition from the normal state marks the beginning of a new "return to normal" (RTN) group. All transitions in an RTN grou p
must be acknowledged individually before the overall RTN group is considered acknowledged.
5. In the Alarm Comment box, type a default comment up to 131 characters. The comment is assigned to the tag’s .AlarmComment dotfield.
Note: The Alarm Comment box should not contain the double-quote character (" ). A process that uses the double-quote as a delimiter will fail i f it is fetching an alarm comment that includes a double -quote.
6. Select the alarm types (LoLo, Low, High, HiHi) to detect when the value of the tag is beyond an absolute limit.
7. In the Alarm Value boxes, type the limit values for the alarm types.
For example, in the case of LoLo and Low alarms, an alarm condition exists whenever the value of the tag is less than the Alarm Value. In the case of High and HiHi alarms, an alarm occurs
whenever the value of the tag exceeds the Alarm Value. You can use real numbers for the limits.
8. In the Value Deadband box, type the number of engineering units the tag value must drop below or above the alarm value before it transitions out of an alarm state.
For example, to return-to-normal from an alarm condition, a tag value must not only return inside its alarm limit, but also return through your specified Value Deadband. The Value Deadband prevents nuisance alarms caused by repetitive re-annunciation of an alarm where the tag value hovers around
the limit, continually fluctuating in and out of an alarm state.
9. Optionally assign an alarm inhibitor tag for the tag’s alarm types (LoLo, Low, High, HiHi).
a. In the Alarm Inhibitor area, click the button to show the Select Tag dialog box containing a list
of defined tags.
b. Select a tag from the list and click OK. The name of the tag you selected as the inhibitor tag appears in the Alarm Inhibitor box.
For more information on inhibitor tags, see Inhibiting Alarms on page 35.
10. Click Save.
11. Click Close to exit the Tagname Dictionary dialog box.
Configuring Deviation Alarms
A deviation alarm is associated with integer or real tags. You can set an alarm by comparing the current tag value to a target value, and then the absolute value of the difference is compared to one or more
limits, expressed as a percentage of the range of the tag value.
For example, the following values set the conditions for a tag’s minor and major deviation alarms:
Minimum Value = -1000
Maximum Value = 1000
Minor Deviation % = 10
Major Deviation % = 15
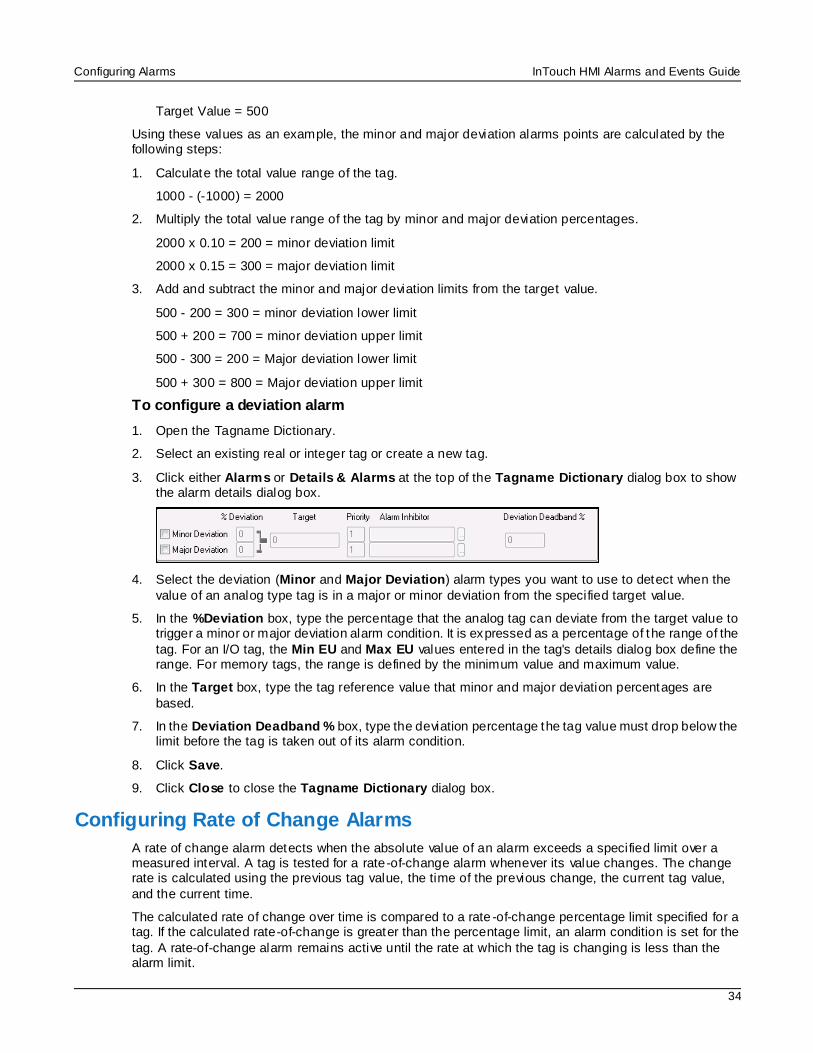
Configuring Alarms InTouch HMI Alarms and Events Guide
34
Target Value = 500
Using these values as an example, the minor and major deviation alarms points are calculated by the following steps:
1. Calculate the total value range of the tag.
1000 - (-1000) = 2000
2. Multiply the total value range of the tag by minor and major deviation percentages.
2000 x 0.10 = 200 = minor deviation limit
2000 x 0.15 = 300 = major deviation limit
3. Add and subtract the minor and major deviation limits from the target value.
500 - 200 = 300 = minor deviation lower limit
500 + 200 = 700 = minor deviation upper limit
500 - 300 = 200 = Major deviation lower limit
500 + 300 = 800 = Major deviation upper limit
To configure a deviation alarm
1. Open the Tagname Dictionary.
2. Select an existing real or integer tag or create a new tag.
3. Click either Alarms or Details & Alarms at the top of the Tagname Dictionary dialog box to show the alarm details dialog box.
4. Select the deviation (Minor and Major Deviation) alarm types you want to use to detect when the
value of an analog type tag is in a major or minor deviation from the specified target value.
5. In the %Deviation box, type the percentage that the analog tag can deviate from the target value to trigger a minor or major deviation alarm condition. It is expressed as a percentage of the range of the
tag. For an I/O tag, the Min EU and Max EU values entered in the tag's details dialog box define the range. For memory tags, the range is defined by the minimum value and maximum value.
6. In the Target box, type the tag reference value that minor and major deviation percentages are
based.
7. In the Deviation Deadband % box, type the deviation percentage the tag value must drop below the limit before the tag is taken out of its alarm condition.
8. Click Save.
9. Click Close to close the Tagname Dictionary dialog box.
Configuring Rate of Change Alarms
A rate of change alarm detects when the absolute value of an alarm exceeds a specified limit over a measured interval. A tag is tested for a rate-of-change alarm whenever its value changes. The change rate is calculated using the previous tag value, the time of the previous change, the current tag value,
and the current time.
The calculated rate of change over time is compared to a rate -of-change percentage limit specified for a tag. If the calculated rate-of-change is greater than the percentage limit, an alarm condition is set for the
tag. A rate-of-change alarm remains active until the rate at which the tag is changing is less than the alarm limit.
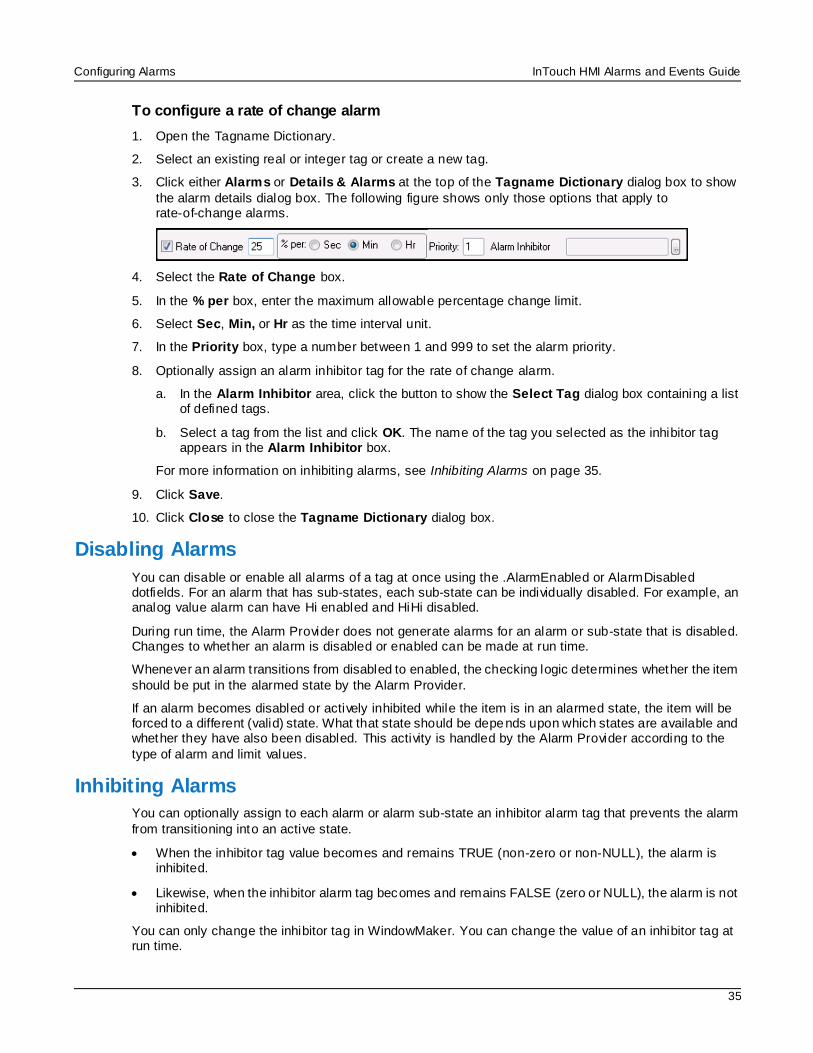
Configuring Alarms InTouch HMI Alarms and Events Guide
35
To configure a rate of change alarm
1. Open the Tagname Dictionary.
2. Select an existing real or integer tag or create a new tag.
3. Click either Alarms or Details & Alarms at the top of the Tagname Dictionary dialog box to show
the alarm details dialog box. The following figure shows only those options that apply to rate-of-change alarms.
4. Select the Rate of Change box.
5. In the % per box, enter the maximum allowable percentage change limit.
6. Select Sec, Min, or Hr as the time interval unit.
7. In the Priority box, type a number between 1 and 999 to set the alarm priority.
8. Optionally assign an alarm inhibitor tag for the rate of change alarm.
a. In the Alarm Inhibitor area, click the button to show the Select Tag dialog box containing a list of defined tags.
b. Select a tag from the list and click OK. The name of the tag you selected as the inhibitor tag appears in the Alarm Inhibitor box.
For more information on inhibiting alarms, see Inhibiting Alarms on page 35.
9. Click Save.
10. Click Close to close the Tagname Dictionary dialog box.
Disabling Alarms
You can disable or enable all alarms of a tag at once using the .AlarmEnabled or AlarmDisabled dotfields. For an alarm that has sub-states, each sub-state can be individually disabled. For example, an analog value alarm can have Hi enabled and HiHi disabled.
During run time, the Alarm Provider does not generate alarms for an alarm or sub-state that is disabled. Changes to whether an alarm is disabled or enabled can be made at run time.
Whenever an alarm t ransitions from disabled to enabled, the checking logic determines whether the item
should be put in the alarmed state by the Alarm Provider.
If an alarm becomes disabled or actively inhibited while the item is in an alarmed state, the item will be forced to a different (valid) state. What that state should be depends upon which states are available and whether they have also been disabled. This activity is handled by the Alarm Provider according to the
type of alarm and limit values.
Inhibiting Alarms
You can optionally assign to each alarm or alarm sub-state an inhibitor alarm tag that prevents the alarm
from transitioning into an active state.
When the inhibitor tag value becomes and remains TRUE (non-zero or non-NULL), the alarm is inhibited.
Likewise, when the inhibitor alarm tag becomes and remains FALSE (zero or NULL), the alarm is not inhibited.
You can only change the inhibitor tag in WindowMaker. You can change the value of an inhibitor tag at run time.
Configuring Alarms InTouch HMI Alarms and Events Guide
36
You can assign inhibitor tags to individual alarm sub-states. Each sub-state can be inhibited by a different tag, and you can leave some sub-states with no inhibitor tag assigned.
An alarm that is inhibited (and for which the tag is TRUE) is not waiting for an acknowledgment. If the
alarm has sub-states, it can only be waiting for an acknowledgment on sub -states that are still available.
An alarm or sub-state can be independently disabled, inhibited, or both. Only if the alarm is both enabled and not actively inhibited is the alarm capable of becoming active.
If an alarm or sub-state has no inhibitor tag assigned to it, the effect is the same as if it had an inhibitor tag that is always FALSE.
Whenever the transition causes an alarm to change from being actively inhibited, the checking logic
determines whether InTouch should put the item in the alarmed state.
If an alarm becomes actively inhibited while the item is in an alarmed state, the item must be forced to a different (valid) state. What that state should be depends upon which states are available and whether
they have also been disabled or actively inhibited. This activity is handled by InTouch according to the type of alarm, limit values, and so on.
If an alarm (or an alarm sub-state) becomes actively inhibited while waiting for an acknowledgment, the
item must be forced to a different (valid) state. As with whether the item is alarmed, InTouch must determine what this state should be.
Alarm inhibitor tags are included in use counts and license limitations.
Use the following read-only tag dotfields to get the name of the alarm inhibitor tag:
AlarmDscInhibitor
AlarmLoLoInhibitor
AlarmLoInhibitor
AlarmHiHiInhibitor
AlarmHiInhibitor
AlarmMajDevInhibitor
AlarmMinDevInhibitor
AlarmRocInhibitor
These fields return the name of a tag. Therefore, you can use the name in an indirect tag reference in an InTouch QuickScript to find out the current value of the alarm inhibitor tag, or to change the value of the
alarm inhibitor tag. By doing this, you can force groups of alarms to be enabled or actively inhibited during run time.
Setting Event Properties for Individual Tags When you define a tag to do event monitoring, an event message is logged to the alarm system each
time the tag's value changes. The event message logs how the value changed. For example, whether the operator, I/O, QuickScripts, or the system initiated the change.
1. Open the Tagname Dictionary.
2. Select an existing tag or create a new tag associated with data that will be recorded as an event.
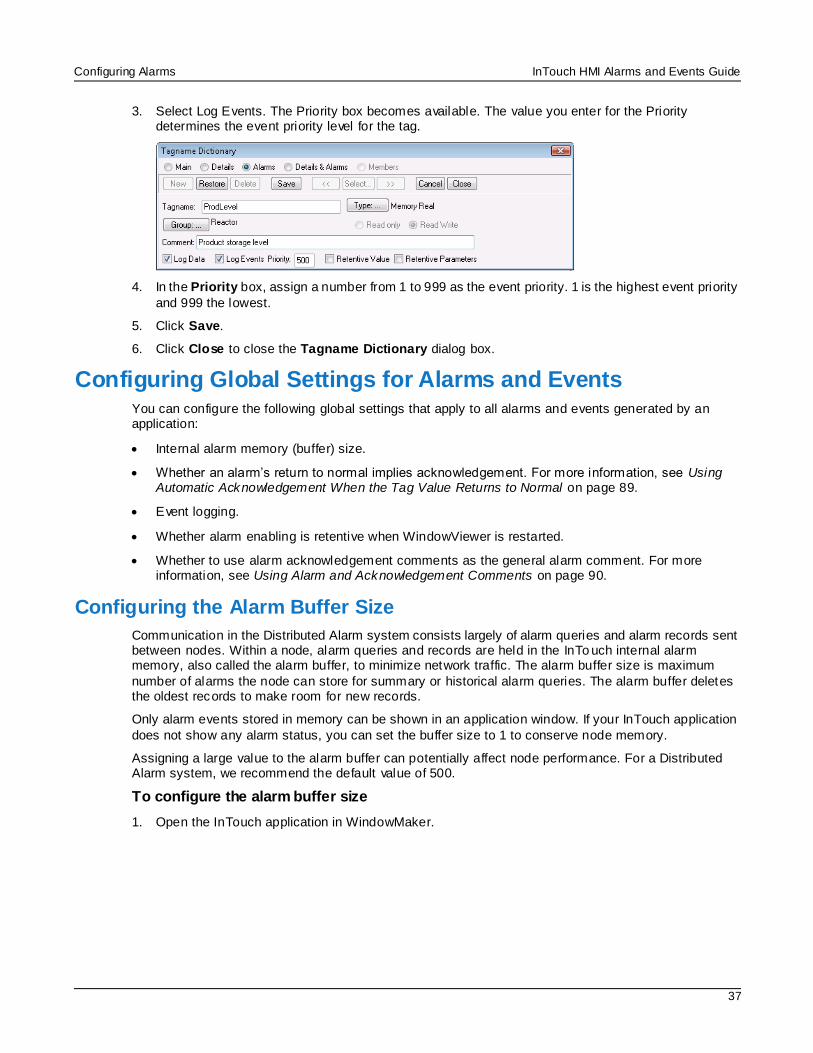
Configuring Alarms InTouch HMI Alarms and Events Guide
37
3. Select Log Events. The Priority box becomes available. The value you enter for the Priority determines the event priority level for the tag.
4. In the Priority box, assign a number from 1 to 999 as the event priority. 1 is the highest event priority
and 999 the lowest.
5. Click Save.
6. Click Close to close the Tagname Dictionary dialog box.
Configuring Global Settings for Alarms and Events You can configure the following global settings that apply to all alarms and events generated by an application:
Internal alarm memory (buffer) size.
Whether an alarm’s return to normal implies acknowledgement. For more information, see Using Automatic Acknowledgement When the Tag Value Returns to Normal on page 89.
Event logging.
Whether alarm enabling is retentive when WindowViewer is restarted.
Whether to use alarm acknowledgement comments as the general alarm comment. For more information, see Using Alarm and Acknowledgement Comments on page 90.
Configuring the Alarm Buffer Size
Communication in the Distributed Alarm system consists largely of alarm queries and alarm records sent between nodes. Within a node, alarm queries and records are held in the InTo uch internal alarm memory, also called the alarm buffer, to minimize network traffic. The alarm buffer size is maximum
number of alarms the node can store for summary or historical alarm queries. The alarm buffer deletes the oldest records to make room for new records.
Only alarm events stored in memory can be shown in an application window. If your InTouch application
does not show any alarm status, you can set the buffer size to 1 to conserve node memory.
Assigning a large value to the alarm buffer can potentially affect node performance. For a Distributed Alarm system, we recommend the default value of 500.
To configure the alarm buffer size
1. Open the InTouch application in WindowMaker.

Configuring Alarms InTouch HMI Alarms and Events Guide
38
2. On the Special menu, point to Configure, and then click Alarms. The Alarm Properties dialog box appears.
3. In the Alarm Buffer Size box, type the maximum number of alarm entries that can be stored in the
memory alarm buffer for summary or historical queries.
4. Click OK.
Enabling Events
You can enable events to be logged within the application. An event represents a recognized change in application data resulting from an operator action, QuickScript, or I/O.
A tag’s Log Events property must be set from the Tagname Dictionary before the tag’s associated
events are stored in the internal alarm memory or logged to the alarm database. For more information about specifying event logging for a tag, see Setting Event Properties for Individual Tags on page 36.
To enable events
1. Open the InTouch application in WindowMaker.
2. On the Special menu, point to Configure, and then click Alarms. The Alarm Properties dialog
box appears.
3. Select the Events Enabled check box to log all events that occur while an InTouch application is running.
4. Click OK.
Making Alarm Enabling Retentive
You can select to retain the current value assigned to a tag’s .AlarmEnabled dotfield when the InTouch
application is stopped and then restarted.
The value assigned to the .AlarmEnabled dotfield toggles alarm and event logging on or off. The .AlarmEnabled dotfield can be assigned to tags or alarm groups. When the .AlarmEnabled dotfield is
assigned to an alarm group, it determines whether all alarms associated with the tags within the specified alarm group are logged or not.
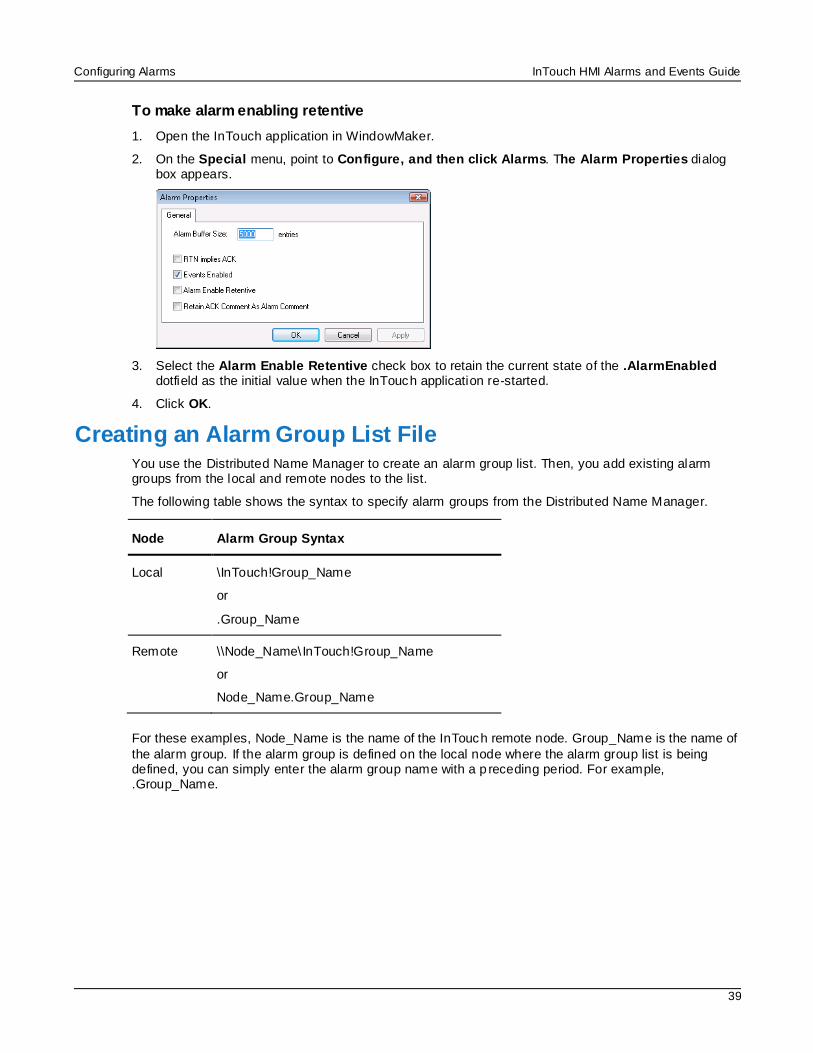
Configuring Alarms InTouch HMI Alarms and Events Guide
39
To make alarm enabling retentive
1. Open the InTouch application in WindowMaker.
2. On the Special menu, point to Configure, and then click Alarms. The Alarm Properties dialog box appears.
3. Select the Alarm Enable Retentive check box to retain the current state of the .AlarmEnabled dotfield as the initial value when the InTouch application re-started.
4. Click OK.
Creating an Alarm Group List File You use the Distributed Name Manager to create an alarm group list. Then, you add existing alarm groups from the local and remote nodes to the list.
The following table shows the syntax to specify alarm groups from the Distributed Name Manager.
Node Alarm Group Syntax
Local \InTouch!Group_Name
or
.Group_Name
Remote \\Node_Name\InTouch!Group_Name
or
Node_Name.Group_Name
For these examples, Node_Name is the name of the InTouch remote node. Group_Name is the name of
the alarm group. If the alarm group is defined on the local node where the alarm group list is being defined, you can simply enter the alarm group name with a p receding period. For example, .Group_Name.
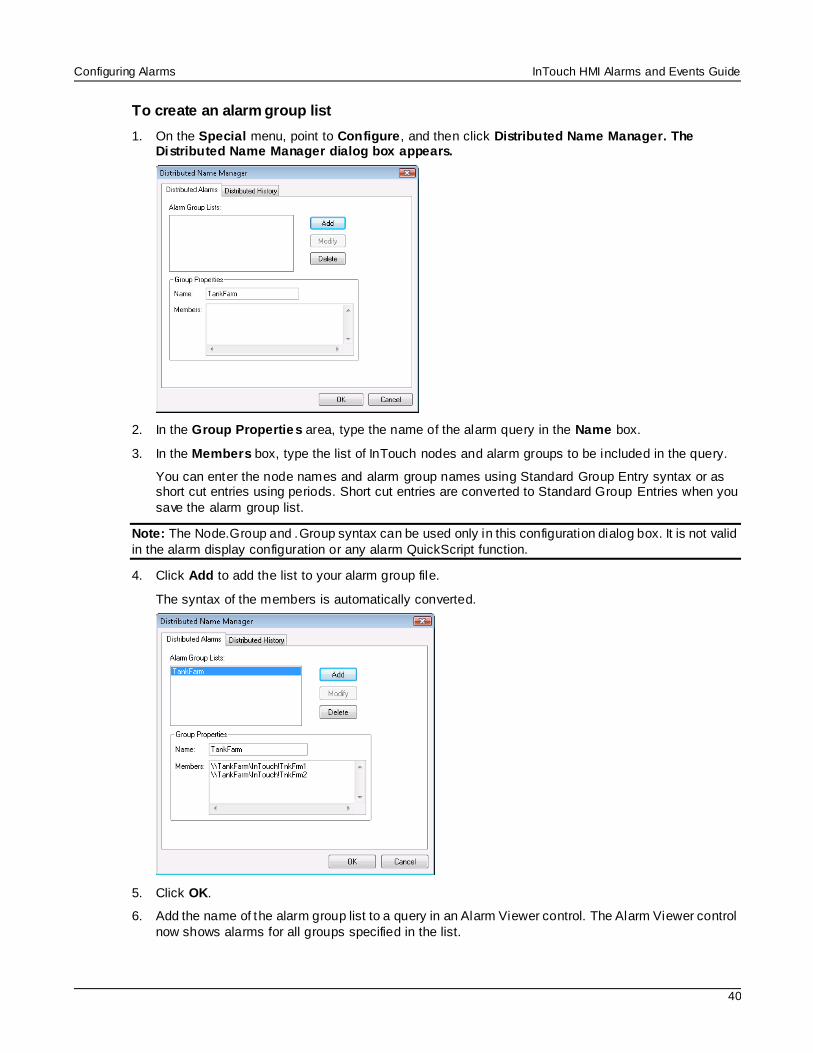
Configuring Alarms InTouch HMI Alarms and Events Guide
40
To create an alarm group list
1. On the Special menu, point to Configure, and then click Distributed Name Manager. The Distributed Name Manager dialog box appears.
2. In the Group Properties area, type the name of the alarm query in the Name box.
3. In the Members box, type the list of InTouch nodes and alarm groups to be included in the query.
You can enter the node names and alarm group names using Standard Group Entry syntax or as short cut entries using periods. Short cut entries are converted to Standard Group Entries when you
save the alarm group list.
Note: The Node.Group and .Group syntax can be used only in this configuration dialog box. It is not valid
in the alarm display configuration or any alarm QuickScript function.
4. Click Add to add the list to your alarm group file.
The syntax of the members is automatically converted.
5. Click OK.
6. Add the name of the alarm group list to a query in an Alarm Viewer control. The Alarm Viewer control
now shows alarms for all groups specified in the list.
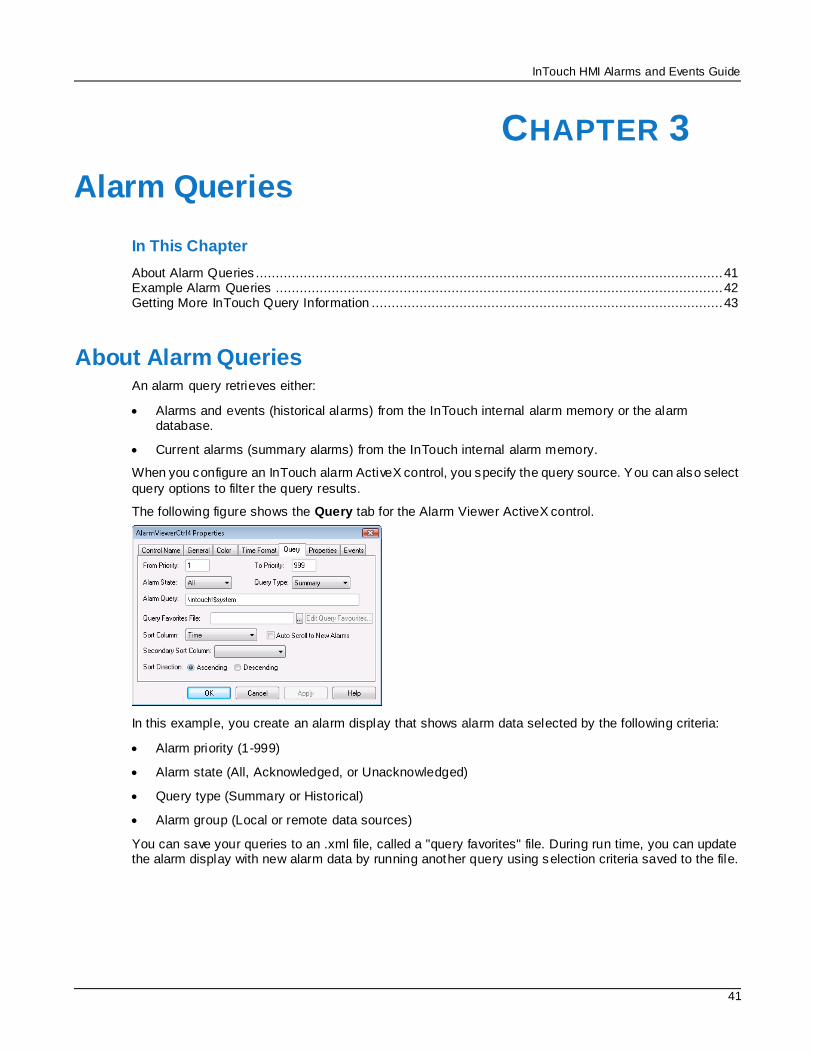
InTouch HMI Alarms and Events Guide
41
In This Chapter
About Alarm Queries ..................................................................................................................... 41 Example Alarm Queries ................................................................................................................ 42 Getting More InTouch Query Information ........................................................................................ 43
About Alarm Queries An alarm query retrieves either:
Alarms and events (historical alarms) from the InTouch internal alarm memory or the alarm database.
Current alarms (summary alarms) from the InTouch internal alarm memory.
When you configure an InTouch alarm ActiveX control, you specify the query source. You can also select
query options to filter the query results.
The following figure shows the Query tab for the Alarm Viewer ActiveX control.
In this example, you create an alarm display that shows alarm data selected by the following criteria:
Alarm priority (1-999)
Alarm state (All, Acknowledged, or Unacknowledged)
Query type (Summary or Historical)
Alarm group (Local or remote data sources)
You can save your queries to an .xml file, called a "query favorites" file. During run time, you can update the alarm display with new alarm data by running another query using selection criteria saved to the file.
CHAPTER 3
Alarm Queries
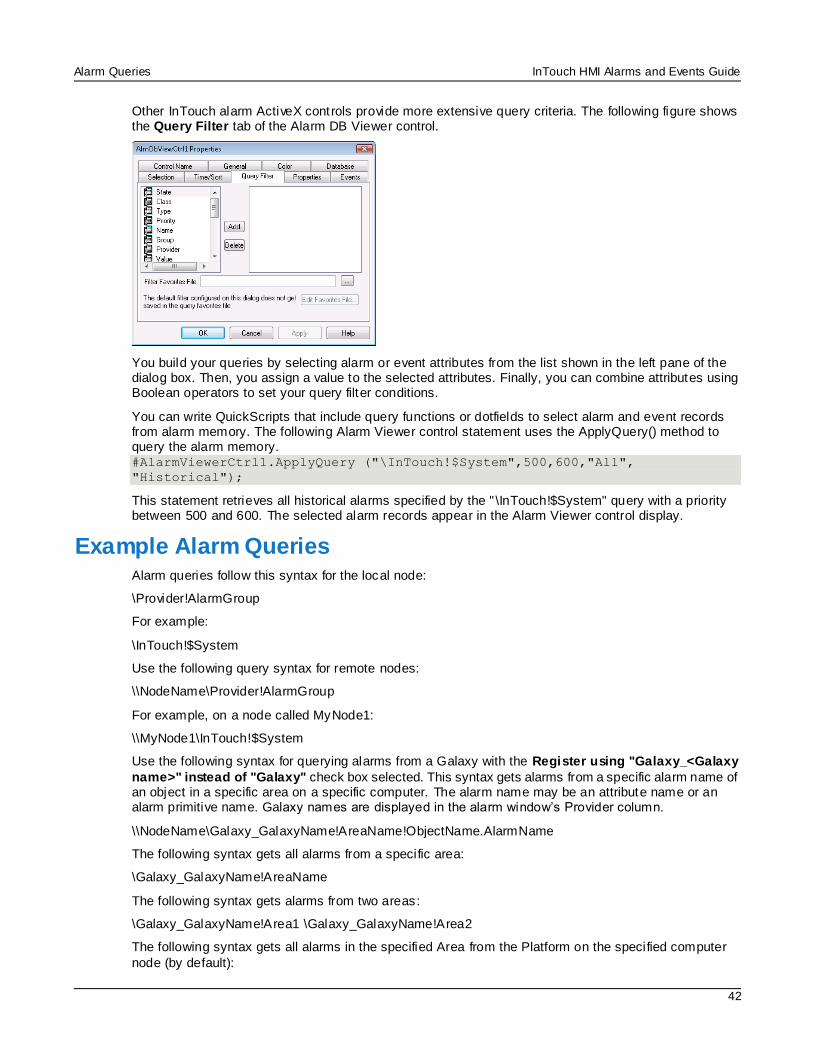
Alarm Queries InTouch HMI Alarms and Events Guide
42
Other InTouch alarm ActiveX controls provide more extensive query criteria. The following figure shows the Query Filter tab of the Alarm DB Viewer control.
You build your queries by selecting alarm or event attributes from the list shown in the left pane of the dialog box. Then, you assign a value to the selected attributes. Finally, you can combine attributes using Boolean operators to set your query filter conditions.
You can write QuickScripts that include query functions or dotfields to select alarm and event records from alarm memory. The following Alarm Viewer control statement uses the ApplyQuery() method to query the alarm memory. #AlarmViewerCtrl1.ApplyQuery ("\InTouch!$System",500,600,"All",
"Historical");
This statement retrieves all historical alarms specified by the " \InTouch!$System" query with a priority between 500 and 600. The selected alarm records appear in the Alarm Viewer control display.
Example Alarm Queries Alarm queries follow this syntax for the local node:
\Provider!AlarmGroup
For example:
\InTouch!$System
Use the following query syntax for remote nodes:
\\NodeName\Provider!AlarmGroup
For example, on a node called MyNode1:
\\MyNode1\InTouch!$System
Use the following syntax for querying alarms from a Galaxy with the Register using "Galaxy_<Galaxy
name>" instead of "Galaxy" check box selected. This syntax gets alarms from a specific alarm name of an object in a specific area on a specific computer. The alarm name may be an attribute name or an alarm primitive name. Galaxy names are displayed in the alarm window’s Provider column.
\\NodeName\Galaxy_GalaxyName!AreaName!ObjectName.AlarmName
The following syntax gets all alarms from a specific area:
\Galaxy_GalaxyName!AreaName
The following syntax gets alarms from two areas:
\Galaxy_GalaxyName!Area1 \Galaxy_GalaxyName!Area2
The following syntax gets all alarms in the specified Area from the Platform on the specified computer
node (by default):
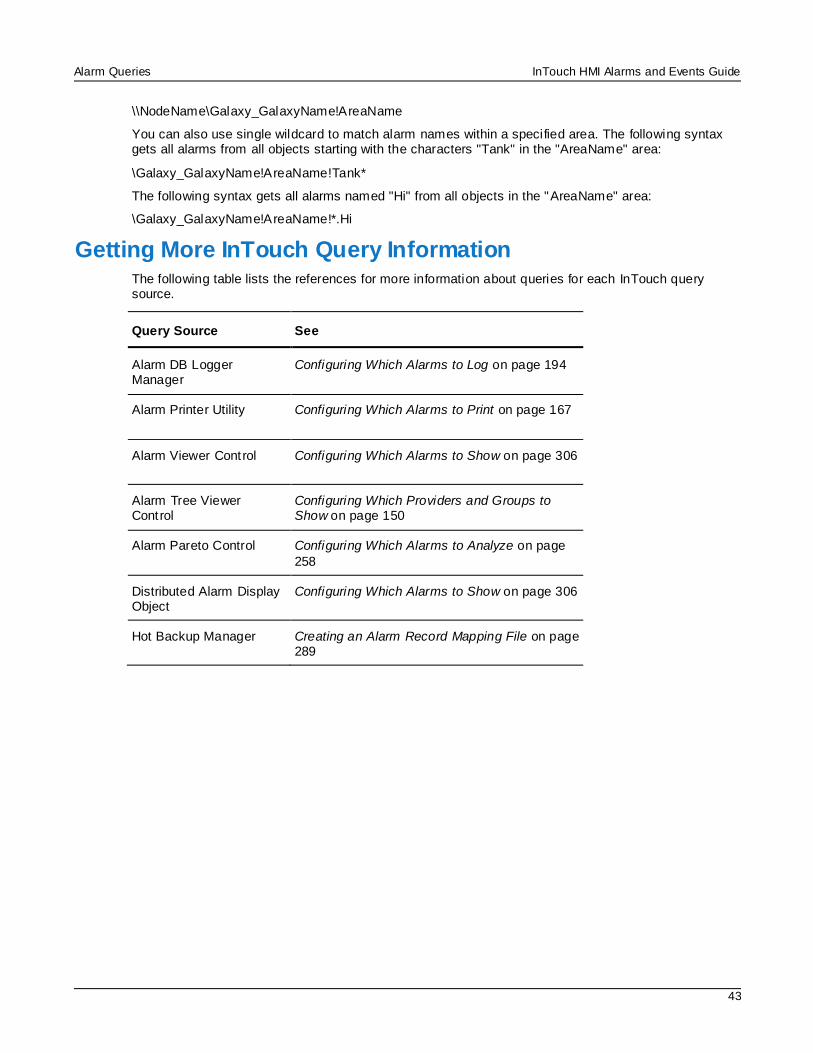
Alarm Queries InTouch HMI Alarms and Events Guide
43
\\NodeName\Galaxy_GalaxyName!AreaName
You can also use single wildcard to match alarm names within a specified area. The following syntax gets all alarms from all objects starting with the characters "Tank" in the "AreaName" area:
\Galaxy_GalaxyName!AreaName!Tank*
The following syntax gets all alarms named "Hi" from all objects in the "AreaName" area:
\Galaxy_GalaxyName!AreaName!*.Hi
Getting More InTouch Query Information The following table lists the references for more information about queries for each InTouch query source.
Query Source See
Alarm DB Logger Manager
Configuring Which Alarms to Log on page 194
Alarm Printer Utility Configuring Which Alarms to Print on page 167
Alarm Viewer Control Configuring Which Alarms to Show on page 306
Alarm Tree Viewer Control
Configuring Which Providers and Groups to Show on page 150
Alarm Pareto Control Configuring Which Alarms to Analyze on page
258
Distributed Alarm Display Object
Configuring Which Alarms to Show on page 306
Hot Backup Manager Creating an Alarm Record Mapping File on page 289

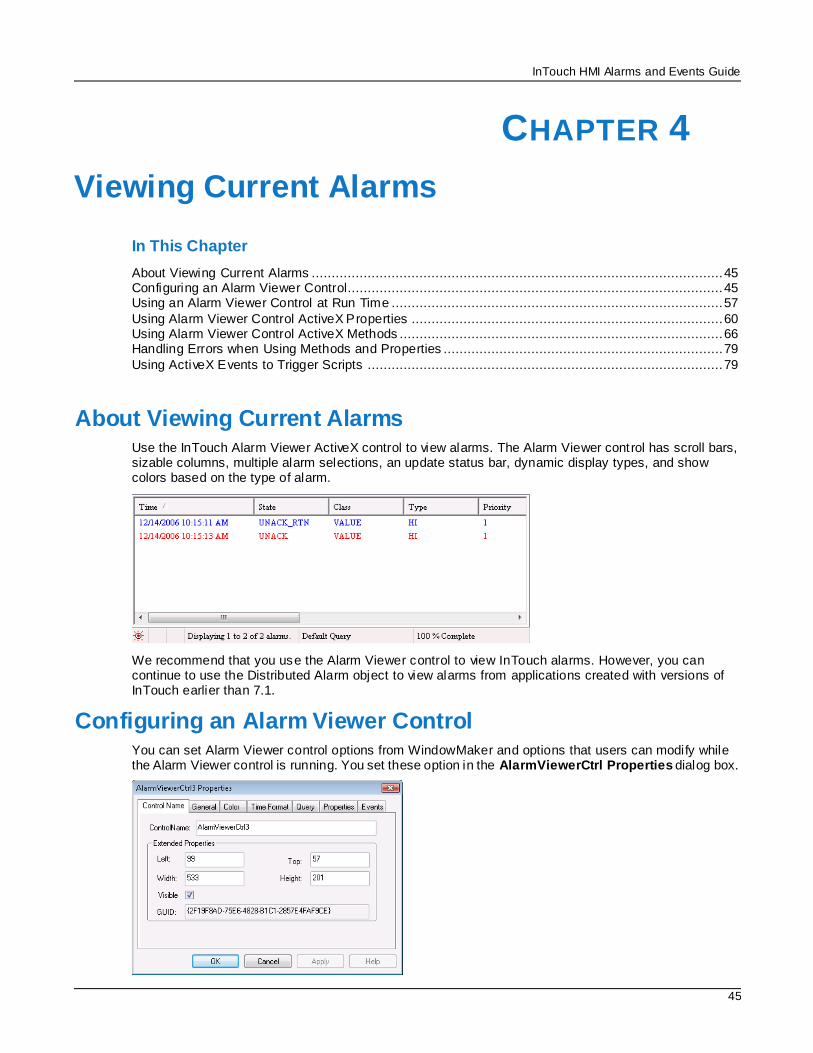
InTouch HMI Alarms and Events Guide
45
In This Chapter
About Viewing Current Alarms ....................................................................................................... 45 Configuring an Alarm Viewer Control.............................................................................................. 45 Using an Alarm Viewer Control at Run Time ................................................................................... 57
Using Alarm Viewer Control ActiveX Properties .............................................................................. 60 Using Alarm Viewer Control ActiveX Methods ................................................................................. 66 Handling Errors when Using Methods and Properties ...................................................................... 79
Using ActiveX Events to Trigger Scripts ......................................................................................... 79
About Viewing Current Alarms Use the InTouch Alarm Viewer ActiveX control to view alarms. The Alarm Viewer control has scroll bars, sizable columns, multiple alarm selections, an update status bar, dynamic display types, and show colors based on the type of alarm.
We recommend that you use the Alarm Viewer control to view InTouch alarms. However, you can continue to use the Distributed Alarm object to view alarms from applications created with versions of InTouch earlier than 7.1.
Configuring an Alarm Viewer Control You can set Alarm Viewer control options from WindowMaker and options that users can modify while the Alarm Viewer control is running. You set these option in the AlarmViewerCtrl Properties dialog box.
CHAPTER 4
Viewing Current Alarms
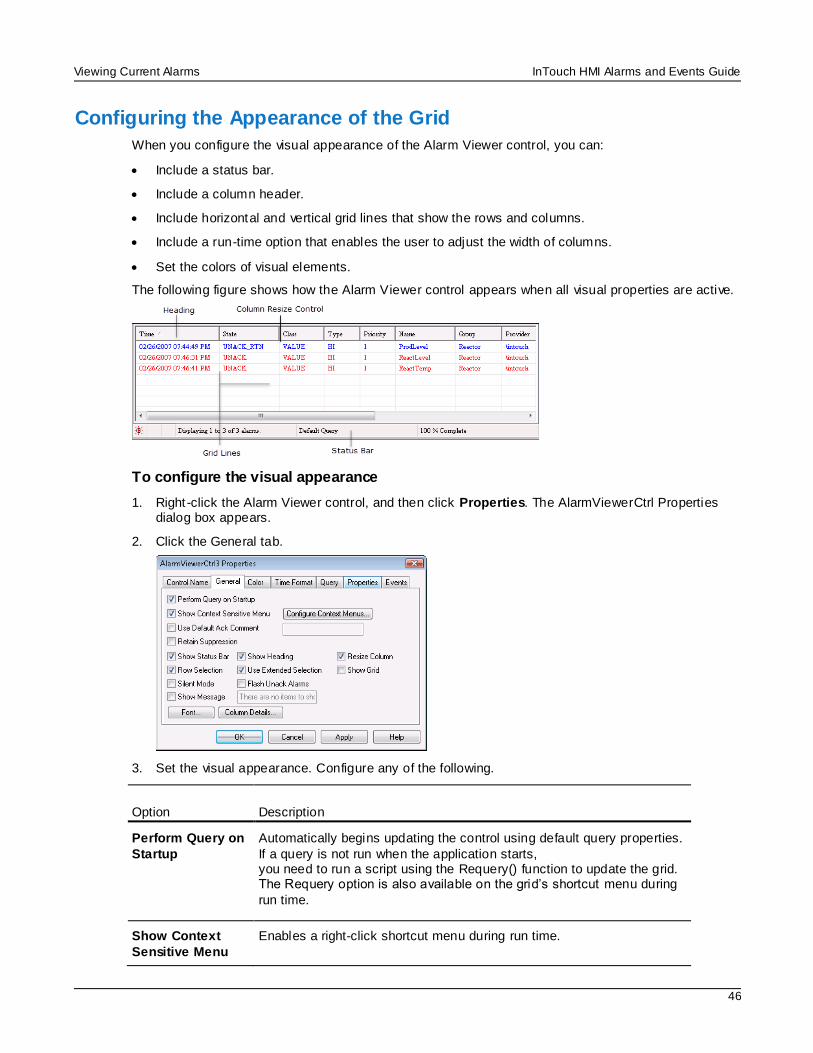
Viewing Current Alarms InTouch HMI Alarms and Events Guide
46
Configuring the Appearance of the Grid
When you configure the visual appearance of the Alarm Viewer control, you can:
Include a status bar.
Include a column header.
Include horizontal and vertical grid lines that show the rows and columns.
Include a run-time option that enables the user to adjust the width of columns.
Set the colors of visual elements.
The following figure shows how the Alarm Viewer control appears when all visual properties are active.
To configure the visual appearance
1. Right -click the Alarm Viewer control, and then click Properties. The AlarmViewerCtrl Properties dialog box appears.
2. Click the General tab.
3. Set the visual appearance. Configure any of the following.
Option Description
Perform Query on
Startup
Automatically begins updating the control using default query properties.
If a query is not run when the application starts, you need to run a script using the Requery() function to update the grid. The Requery option is also available on the grid’s shortcut menu during
run time.
Show Context
Sensitive Menu
Enables a right-click shortcut menu during run time.
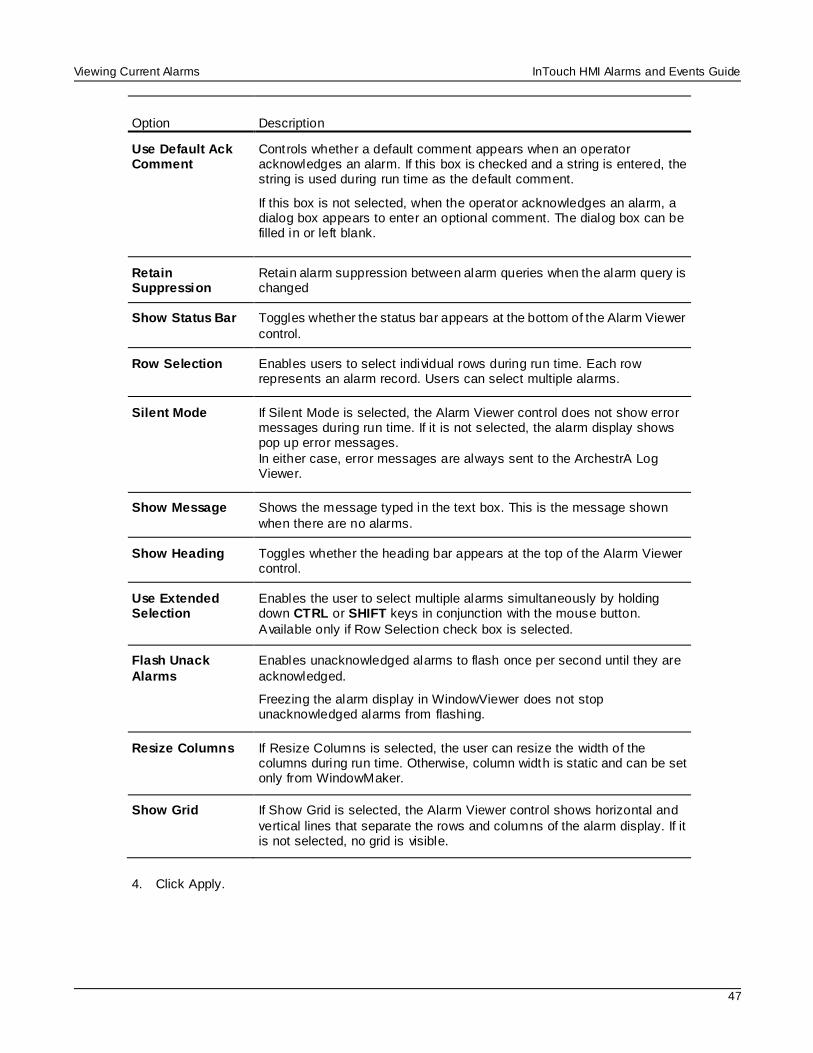
Viewing Current Alarms InTouch HMI Alarms and Events Guide
47
Option Description
Use Default Ack Comment
Controls whether a default comment appears when an operator acknowledges an alarm. If this box is checked and a string is entered, the string is used during run time as the default comment.
If this box is not selected, when the operator acknowledges an alarm, a dialog box appears to enter an optional comment. The dialog box can be filled in or left blank.
Retain Suppression
Retain alarm suppression between alarm queries when the alarm query is changed
Show Status Bar Toggles whether the status bar appears at the bottom of the Alarm Viewer
control.
Row Selection Enables users to select individual rows during run time. Each row represents an alarm record. Users can select multiple alarms.
Silent Mode If Silent Mode is selected, the Alarm Viewer control does not show error messages during run time. If it is not selected, the alarm display shows pop up error messages.
In either case, error messages are always sent to the ArchestrA Log Viewer.
Show Message Shows the message typed in the text box. This is the message shown
when there are no alarms.
Show Heading Toggles whether the heading bar appears at the top of the Alarm Viewer control.
Use Extended Selection
Enables the user to select multiple alarms simultaneously by holding down CTRL or SHIFT keys in conjunction with the mouse button.
Available only if Row Selection check box is selected.
Flash Unack
Alarms
Enables unacknowledged alarms to flash once per second until they are
acknowledged.
Freezing the alarm display in WindowViewer does not stop unacknowledged alarms from flashing.
Resize Columns If Resize Columns is selected, the user can resize the width of the columns during run time. Otherwise, column width is static and can be set only from WindowMaker.
Show Grid If Show Grid is selected, the Alarm Viewer control shows horizontal and
vertical lines that separate the rows and columns of the alarm display. If it is not selected, no grid is visible.
4. Click Apply.
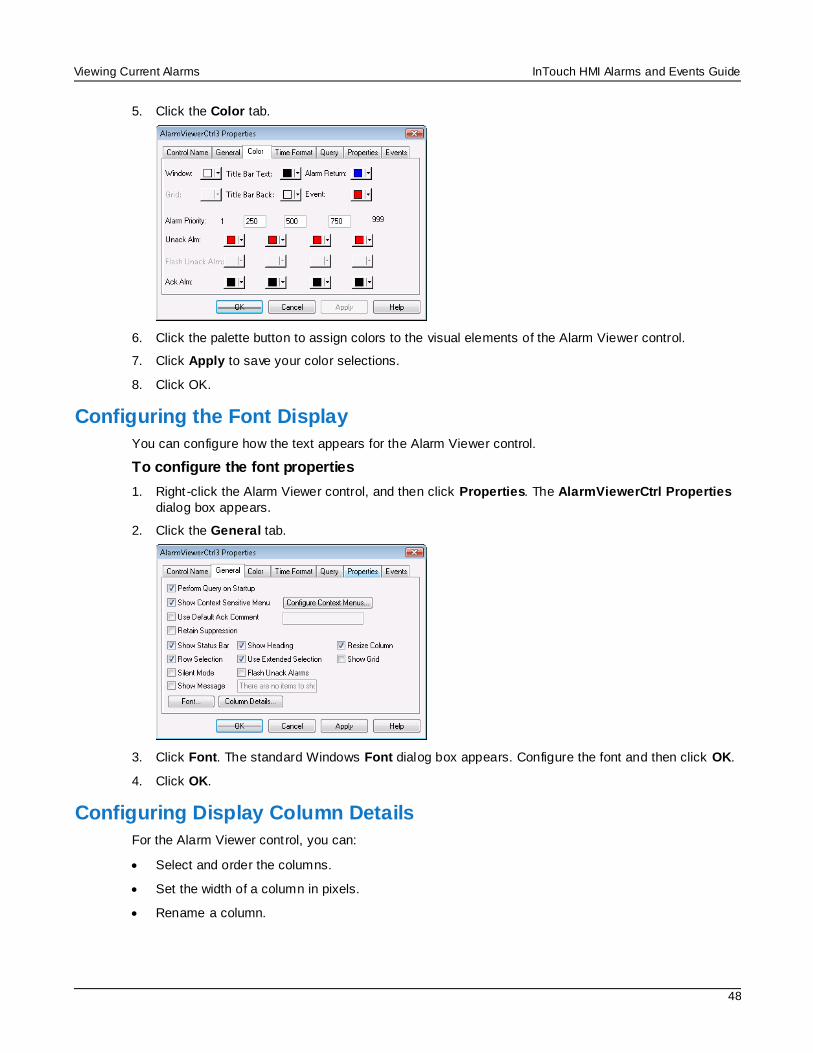
Viewing Current Alarms InTouch HMI Alarms and Events Guide
48
5. Click the Color tab.
6. Click the palette button to assign colors to the visual elements of the Alarm Viewer control.
7. Click Apply to save your color selections.
8. Click OK.
Configuring the Font Display
You can configure how the text appears for the Alarm Viewer control.
To configure the font properties
1. Right -click the Alarm Viewer control, and then click Properties. The AlarmViewerCtrl Properties
dialog box appears.
2. Click the General tab.
3. Click Font. The standard Windows Font dialog box appears. Configure the font and then click OK.
4. Click OK.
Configuring Display Column Details
For the Alarm Viewer control, you can:
Select and order the columns.
Set the width of a column in pixels.
Rename a column.
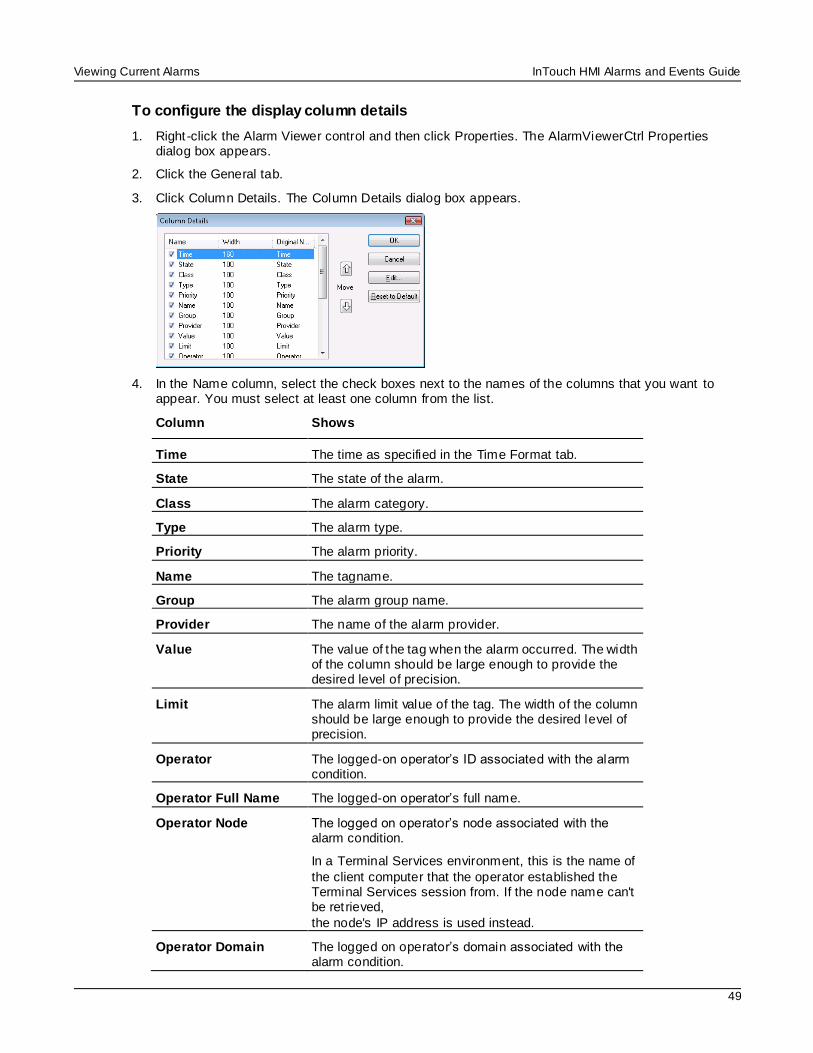
Viewing Current Alarms InTouch HMI Alarms and Events Guide
49
To configure the display column details
1. Right -click the Alarm Viewer control and then click Properties. The AlarmViewerCtrl Properties dialog box appears.
2. Click the General tab.
3. Click Column Details. The Column Details dialog box appears.
4. In the Name column, select the check boxes next to the names of the columns that you want to appear. You must select at least one column from the list.
Column Shows
Time The time as specified in the Time Format tab.
State The state of the alarm.
Class The alarm category.
Type The alarm type.
Priority The alarm priority.
Name The tagname.
Group The alarm group name.
Provider The name of the alarm provider.
Value The value of the tag when the alarm occurred. The width of the column should be large enough to provide the desired level of precision.
Limit The alarm limit value of the tag. The width of the column should be large enough to provide the desired level of precision.
Operator The logged-on operator’s ID associated with the alarm condition.
Operator Full Name The logged-on operator’s full name.
Operator Node The logged on operator’s node associated with the alarm condition.
In a Terminal Services environment, this is the name of
the client computer that the operator established the Terminal Services session from. If the node name can't be ret rieved,
the node's IP address is used instead.
Operator Domain The logged on operator’s domain associated with the alarm condition.
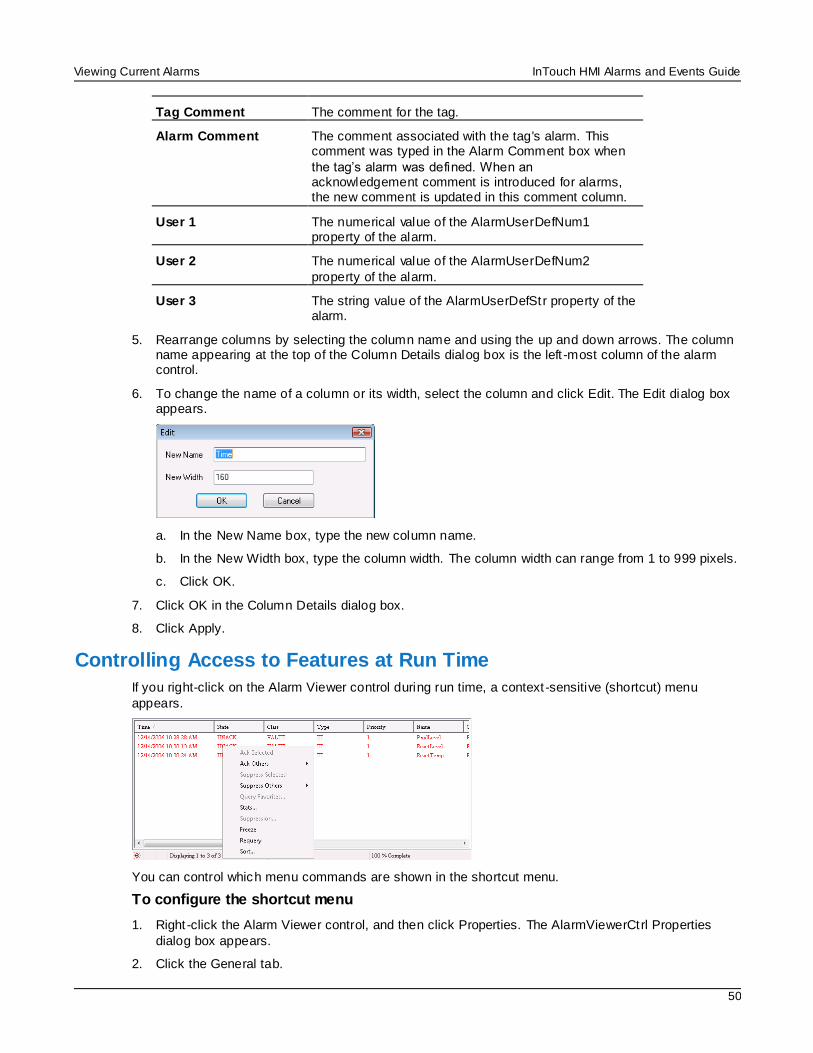
Viewing Current Alarms InTouch HMI Alarms and Events Guide
50
Tag Comment The comment for the tag.
Alarm Comment The comment associated with the tag's alarm. This comment was typed in the Alarm Comment box when
the tag’s alarm was defined. When an acknowledgement comment is introduced for alarms, the new comment is updated in this comment column.
User 1 The numerical value of the AlarmUserDefNum1 property of the alarm.
User 2 The numerical value of the AlarmUserDefNum2
property of the alarm.
User 3 The string value of the AlarmUserDefStr property of the alarm.
5. Rearrange columns by selecting the column name and using the up and down arrows. The column name appearing at the top of the Column Details dialog box is the left -most column of the alarm control.
6. To change the name of a column or its width, select the column and click Edit. The Edit dialog box appears.
a. In the New Name box, type the new column name.
b. In the New Width box, type the column width. The column width can range from 1 to 999 pixels.
c. Click OK.
7. Click OK in the Column Details dialog box.
8. Click Apply.
Controlling Access to Features at Run Time
If you right-click on the Alarm Viewer control during run time, a context-sensitive (shortcut) menu
appears.
You can control which menu commands are shown in the shortcut menu.
To configure the shortcut menu
1. Right -click the Alarm Viewer control, and then click Properties. The AlarmViewerCtrl Properties
dialog box appears.
2. Click the General tab.
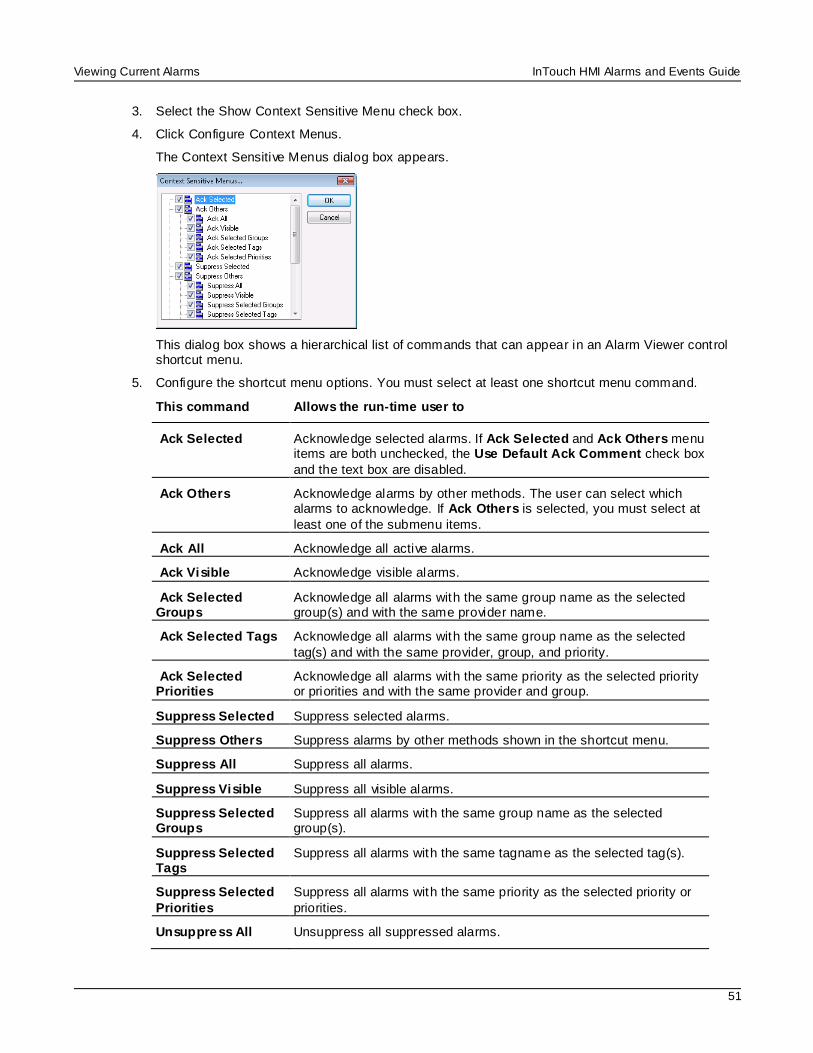
Viewing Current Alarms InTouch HMI Alarms and Events Guide
51
3. Select the Show Context Sensitive Menu check box.
4. Click Configure Context Menus.
The Context Sensitive Menus dialog box appears.
This dialog box shows a hierarchical list of commands that can appear in an Alarm Viewer control shortcut menu.
5. Configure the shortcut menu options. You must select at least one shortcut menu command.
This command Allows the run-time user to
Ack Selected Acknowledge selected alarms. If Ack Selected and Ack Others menu items are both unchecked, the Use Default Ack Comment check box
and the text box are disabled.
Ack Others Acknowledge alarms by other methods. The user can select which alarms to acknowledge. If Ack Others is selected, you must select at
least one of the submenu items.
Ack All Acknowledge all active alarms.
Ack Visible Acknowledge visible alarms.
Ack Selected Groups
Acknowledge all alarms with the same group name as the selected group(s) and with the same provider name.
Ack Selected Tags Acknowledge all alarms with the same group name as the selected
tag(s) and with the same provider, group, and priority.
Ack Selected Priorities
Acknowledge all alarms with the same priority as the selected priority or priorities and with the same provider and group.
Suppress Selected Suppress selected alarms.
Suppress Others Suppress alarms by other methods shown in the shortcut menu.
Suppress All Suppress all alarms.
Suppress Visible Suppress all visible alarms.
Suppress Selected Groups
Suppress all alarms with the same group name as the selected group(s).
Suppress Selected Tags
Suppress all alarms with the same tagname as the selected tag(s).
Suppress Selected
Priorities
Suppress all alarms with the same priority as the selected priority or
priorities.
Unsuppress All Unsuppress all suppressed alarms.
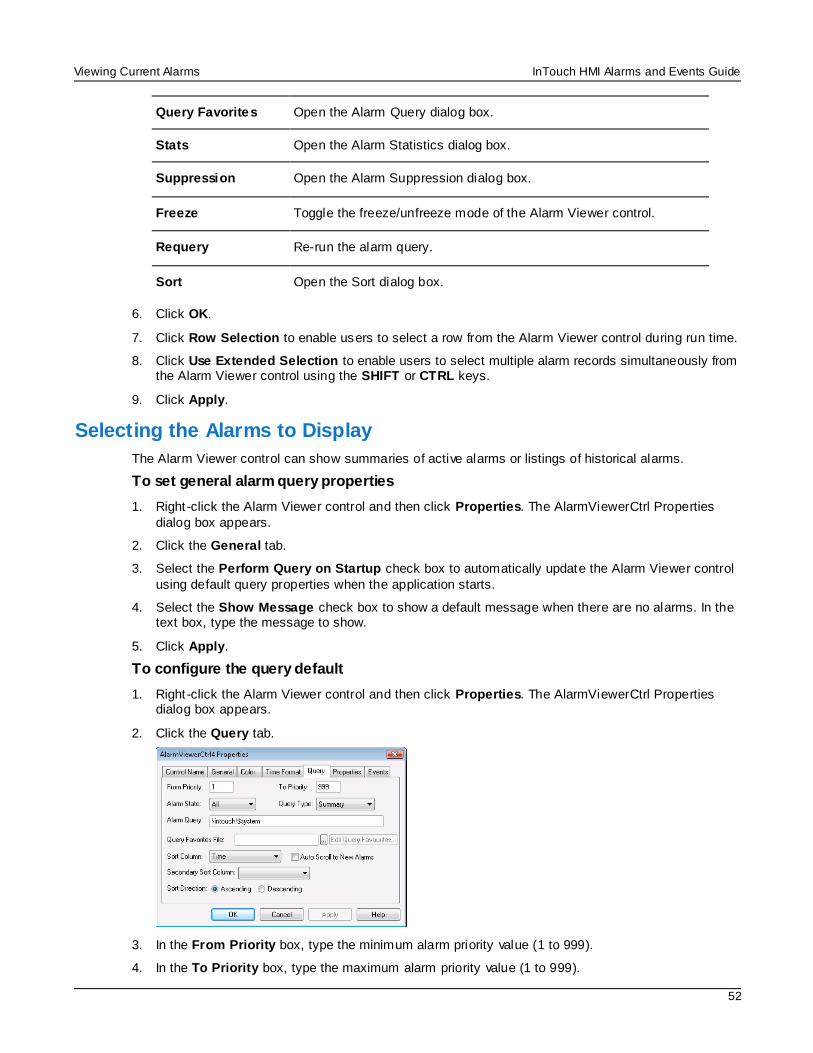
Viewing Current Alarms InTouch HMI Alarms and Events Guide
52
Query Favorites Open the Alarm Query dialog box.
Stats Open the Alarm Statistics dialog box.
Suppression Open the Alarm Suppression dialog box.
Freeze Toggle the freeze/unfreeze mode of the Alarm Viewer control.
Requery Re-run the alarm query.
Sort Open the Sort dialog box.
6. Click OK.
7. Click Row Selection to enable users to select a row from the Alarm Viewer control during run time.
8. Click Use Extended Selection to enable users to select multiple alarm records simultaneously from the Alarm Viewer control using the SHIFT or CTRL keys.
9. Click Apply.
Selecting the Alarms to Display
The Alarm Viewer control can show summaries of active alarms or listings of historical alarms.
To set general alarm query properties
1. Right -click the Alarm Viewer control and then click Properties. The AlarmViewerCtrl Properties
dialog box appears.
2. Click the General tab.
3. Select the Perform Query on Startup check box to automatically update the Alarm Viewer control
using default query properties when the application starts.
4. Select the Show Message check box to show a default message when there are no alarms. In the text box, type the message to show.
5. Click Apply.
To configure the query default
1. Right -click the Alarm Viewer control and then click Properties. The AlarmViewerCtrl Properties dialog box appears.
2. Click the Query tab.
3. In the From Priority box, type the minimum alarm priority value (1 to 999).
4. In the To Priority box, type the maximum alarm priority value (1 to 999).
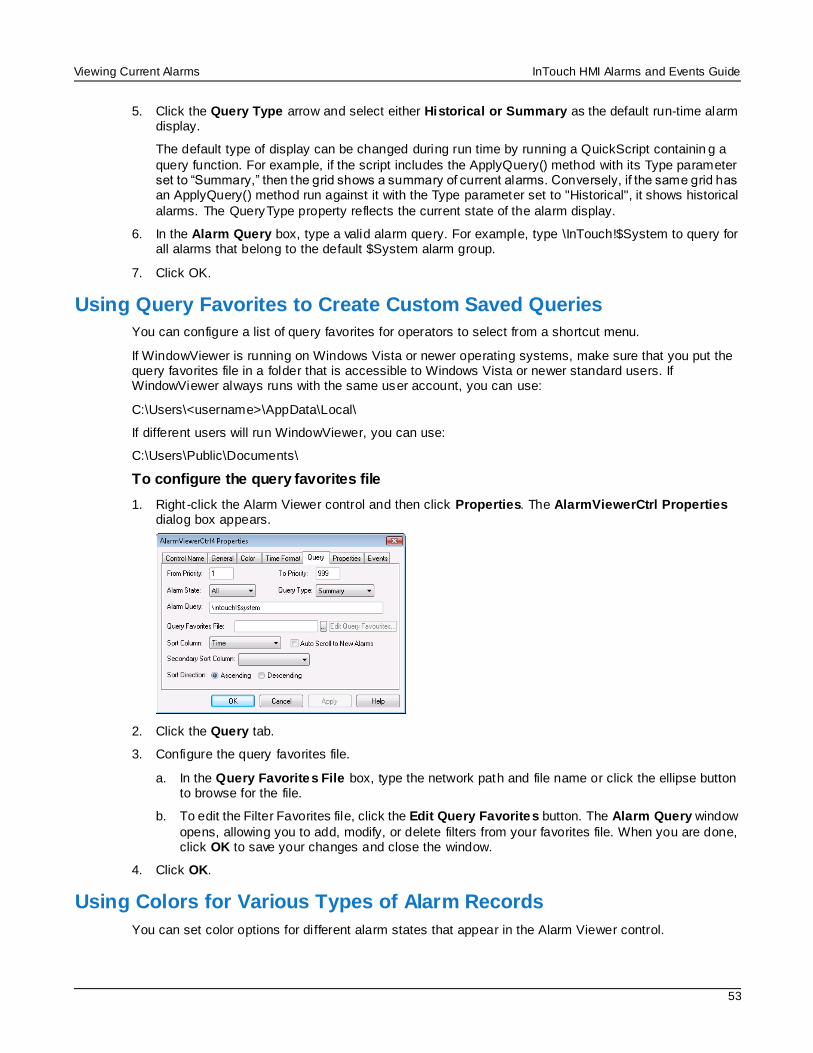
Viewing Current Alarms InTouch HMI Alarms and Events Guide
53
5. Click the Query Type arrow and select either Historical or Summary as the default run-time alarm display.
The default type of display can be changed during run time by running a QuickScript containin g a
query function. For example, if the script includes the ApplyQuery() method with its Type parameter set to “Summary,” then the grid shows a summary of current alarms. Conversely, if the same grid has an ApplyQuery() method run against it with the Type parameter set to "Historical", it shows historical
alarms. The QueryType property reflects the current state of the alarm display.
6. In the Alarm Query box, type a valid alarm query. For example, type \InTouch!$System to query for all alarms that belong to the default $System alarm group.
7. Click OK.
Using Query Favorites to Create Custom Saved Queries
You can configure a list of query favorites for operators to select from a shortcut menu.
If WindowViewer is running on Windows Vista or newer operating systems, make sure that you put the query favorites file in a folder that is accessible to Windows Vista or newer standard users. If WindowViewer always runs with the same user account, you can use:
C:\Users\<username>\AppData\Local\
If different users will run WindowViewer, you can use:
C:\Users\Public\Documents\
To configure the query favorites file
1. Right -click the Alarm Viewer control and then click Properties. The AlarmViewerCtrl Properties dialog box appears.
2. Click the Query tab.
3. Configure the query favorites file.
a. In the Query Favorites File box, type the network path and file name or click the ellipse button to browse for the file.
b. To edit the Filter Favorites file, click the Edit Query Favorites button. The Alarm Query window
opens, allowing you to add, modify, or delete filters from your favorites file. When you are done, click OK to save your changes and close the window.
4. Click OK.
Using Colors for Various Types of Alarm Records
You can set color options for different alarm states that appear in the Alarm Viewer control.
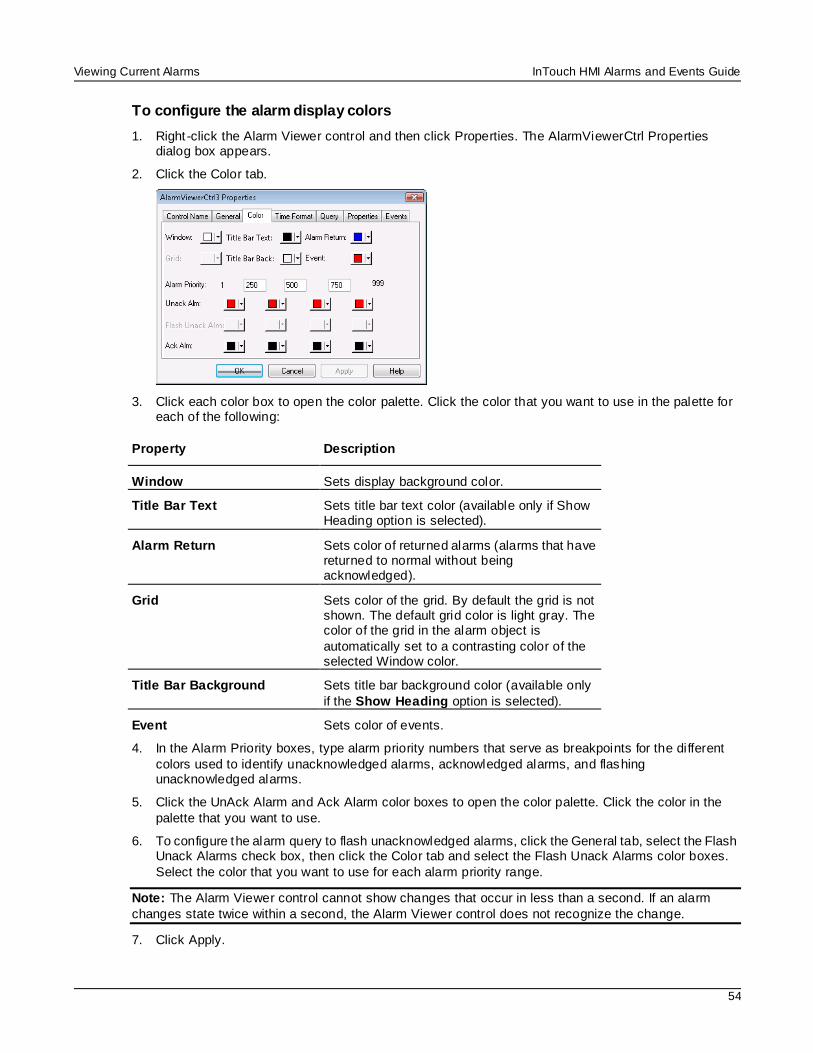
Viewing Current Alarms InTouch HMI Alarms and Events Guide
54
To configure the alarm display colors
1. Right -click the Alarm Viewer control and then click Properties. The AlarmViewerCtrl Properties dialog box appears.
2. Click the Color tab.
3. Click each color box to open the color palette. Click the color that you want to use in the palette for each of the following:
Property Description
Window Sets display background color.
Title Bar Text Sets title bar text color (available only if Show Heading option is selected).
Alarm Return Sets color of returned alarms (alarms that have returned to normal without being acknowledged).
Grid Sets color of the grid. By default the grid is not shown. The default grid color is light gray. The color of the grid in the alarm object is
automatically set to a contrasting color of the selected Window color.
Title Bar Background Sets title bar background color (available only
if the Show Heading option is selected).
Event Sets color of events.
4. In the Alarm Priority boxes, type alarm priority numbers that serve as breakpoints for the different
colors used to identify unacknowledged alarms, acknowledged alarms, and flashing unacknowledged alarms.
5. Click the UnAck Alarm and Ack Alarm color boxes to open the color palette. Click the color in the
palette that you want to use.
6. To configure the alarm query to flash unacknowledged alarms, click the General tab, select the Flash Unack Alarms check box, then click the Color tab and select the Flash Unack Alarms color boxes.
Select the color that you want to use for each alarm priority range.
Note: The Alarm Viewer control cannot show changes that occur in less than a second. If an alarm
changes state twice within a second, the Alarm Viewer control does not recognize the change.
7. Click Apply.

Viewing Current Alarms InTouch HMI Alarms and Events Guide
55
Configuring the Shown Time Format of Alarm Records
You can configure the time format for shown alarm records.
For the Alarm Viewer control, the original alarm time is the date/time stamp of the onset of the alarm. If tag is an I/O tag, then it is the time stamp from the I/O Server if that server is capable of passing time stamps.
To configure the time format
1. Right -click the Alarm Viewer control and then click Properties. The AlarmViewerCtrl Properties dialog box appears.
2. Click the Time Format tab.
3. In the Time Format list, click the desired time format. The Time Format box shows a set of strings consisting of characters separated by the % symbol for the format you selected.
String character Description
d Two-digit day of the month.
b Three-letter month abbreviation.
Y Four-digit year.
m Two-digit month.
y Two-digit year.
#x Full day and date. For example: Friday, August 10, 2007
B Complete month name.
H Hours in 24 hour time format.
M Minute.
p AM or PM (for 12 hour time format).
Viewing Current Alarms InTouch HMI Alarms and Events Guide
56
String character Description
S Seconds.
s Fractions of a second.
I Hours in 12 hour time format.
4. In the Displayed Time list, select the shown time:
OAT The original alarm time, which is the date/time stamp of the onset of
the alarm.
LCT The last changed time, which is the date/time stamp of the most recent change of state for the instance of the alarm: onset of the alarm, change of sub-state, return to normal, or acknowledgment.
LCT But OAT on ACK
The last changed time, but the original alarm time on acknowledge. The last changed time is used while the alarm is unacknowledged, then the original alarm time is used after the alarm has been
acknowledged.
5. In the Displayed Time Zone list, select the time zone:
GMT Greenwich Mean Time, also known as Coordinated Universal Time, UTC, or Zulu.
Local Time Alarm time adjusted for the local time zone.
Origin Time Alarm time adjusted for the time zone of the alarm source.
6. Click Apply.
Configuring the Sort Order of Alarm Records
You can sort the alarm records in the list. By default, the Alarm Viewer control lists alarm records by time
in ascending order.
You can sort alarm records in ascending or descending order based on a primary column and an optional secondary sort column.
To configure the sort order of alarm records
1. Right -click the Alarm Viewer control, and then click Properties. The AlarmViewerCtrl Properties dialog box appears.
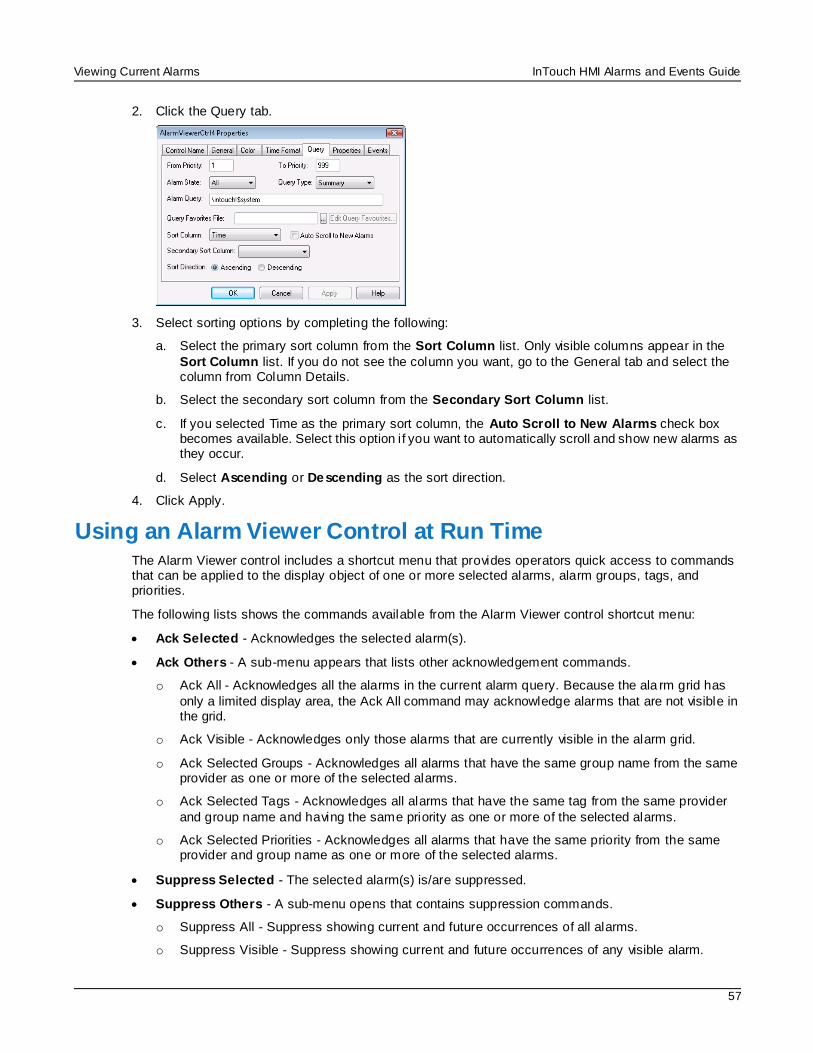
Viewing Current Alarms InTouch HMI Alarms and Events Guide
57
2. Click the Query tab.
3. Select sorting options by completing the following:
a. Select the primary sort column from the Sort Column list. Only visible columns appear in the
Sort Column list. If you do not see the column you want, go to the General tab and select the column from Column Details.
b. Select the secondary sort column from the Secondary Sort Column list.
c. If you selected Time as the primary sort column, the Auto Scroll to New Alarms check box becomes available. Select this option if you want to automatically scroll and show new alarms as they occur.
d. Select Ascending or Descending as the sort direction.
4. Click Apply.
Using an Alarm Viewer Control at Run Time The Alarm Viewer control includes a shortcut menu that provides operators quick access to commands that can be applied to the display object of one or more selected alarms, alarm groups, tags, and priorities.
The following lists shows the commands available from the Alarm Viewer control shortcut menu:
Ack Selected - Acknowledges the selected alarm(s).
Ack Others - A sub-menu appears that lists other acknowledgement commands.
o Ack All - Acknowledges all the alarms in the current alarm query. Because the ala rm grid has
only a limited display area, the Ack All command may acknowledge alarms that are not visible in the grid.
o Ack Visible - Acknowledges only those alarms that are currently visible in the alarm grid.
o Ack Selected Groups - Acknowledges all alarms that have the same group name from the same provider as one or more of the selected alarms.
o Ack Selected Tags - Acknowledges all alarms that have the same tag from the same provider
and group name and having the same priority as one or more of the selected alarms.
o Ack Selected Priorities - Acknowledges all alarms that have the same priority from the same provider and group name as one or more of the selected alarms.
Suppress Selected - The selected alarm(s) is/are suppressed.
Suppress Others - A sub-menu opens that contains suppression commands.
o Suppress All - Suppress showing current and future occurrences of all alarms.
o Suppress Visible - Suppress showing current and future occurrences of any visible alarm.

Viewing Current Alarms InTouch HMI Alarms and Events Guide
58
o Suppress Selected Groups - Suppress showing current and future occurrences of any alarm that belongs to the same groups of one or more selected alarms having the same Provider name.
o Suppress Selected Tags - Suppress showing current and future occurrences of any alarm that
belongs to the same tag name of one or more selected alarms having the same Provider name, Group name and Priority range.
o Suppress Selected Priorities - Suppress showing current and future occurrences of any alarm
that belongs to the same priorities of one or more selected alarms having the same Provider name and Group name.
o Unsuppress All - Clears the suppression settings.
Query Favorites - Shows the Alarm Query dialog box to select a previously saved alarm query. You can also add, modify and delete alarm queries.
Stats - Shows the Alarm Statistics dialog box.
Suppression - Shows the Alarm Suppression dialog box.
Freeze - Freezes the current display.
Requery - Queries the alarm provider again.
Sort - Shows the Secondary Sort dialog box.
Viewing Status Bar Information
If you select the Show Status Bar option from the General properties page, a status bar appears at the bottom of an Alarm Viewer control during run time.
The status bar contains three indicators: A status message, current alarm query, and a progress bar.
These indicators provide an overview of the current state of the display query and pro vide details about the suppression available in the Alarm Viewer control. The right pane of the status bar is red when the control is frozen and the left pane of the status bar is red when one or more alarms are suppressed. The
word "suppression" is shown in the left pane when suppression is in effect.
Using Query Favorites at Run Time
Use the Query Favorites command on the Alarm Viewer control’s shortcut menu to quickly select an
alarm query from a list of previously defined alarm queries. You can also create new named queries, edit an existing query, or delete an existing query.
Changes to an alarm query are not automatically applied to other Alarm Viewer controls using the same
query. Deleting an alarm query does not automatically remove the query from other Alarm Viewer controls using the same query.
Note: For multi-line alarm queries appearing in the Alarm Viewer control, line separations appear as
"garbage" characters. This does not affect the function.
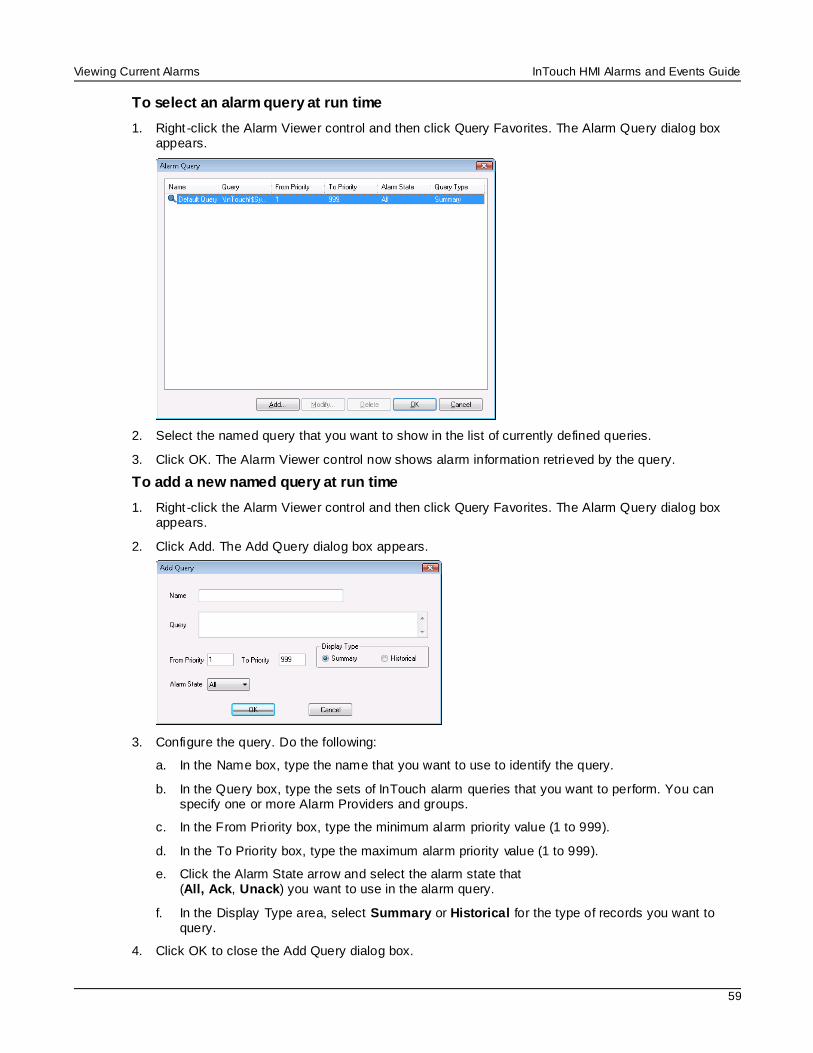
Viewing Current Alarms InTouch HMI Alarms and Events Guide
59
To select an alarm query at run time
1. Right -click the Alarm Viewer control and then click Query Favorites. The Alarm Query dialog box appears.
2. Select the named query that you want to show in the list of currently defined queries.
3. Click OK. The Alarm Viewer control now shows alarm information retrieved by the query.
To add a new named query at run time
1. Right -click the Alarm Viewer control and then click Query Favorites. The Alarm Query dialog box appears.
2. Click Add. The Add Query dialog box appears.
3. Configure the query. Do the following:
a. In the Name box, type the name that you want to use to identify the query.
b. In the Query box, type the sets of InTouch alarm queries that you want to perform. You can specify one or more Alarm Providers and groups.
c. In the From Priority box, type the minimum alarm priority value (1 to 999).
d. In the To Priority box, type the maximum alarm priority value (1 to 999).
e. Click the Alarm State arrow and select the alarm state that (All, Ack, Unack) you want to use in the alarm query.
f. In the Display Type area, select Summary or Historical for the type of records you want to query.
4. Click OK to close the Add Query dialog box.
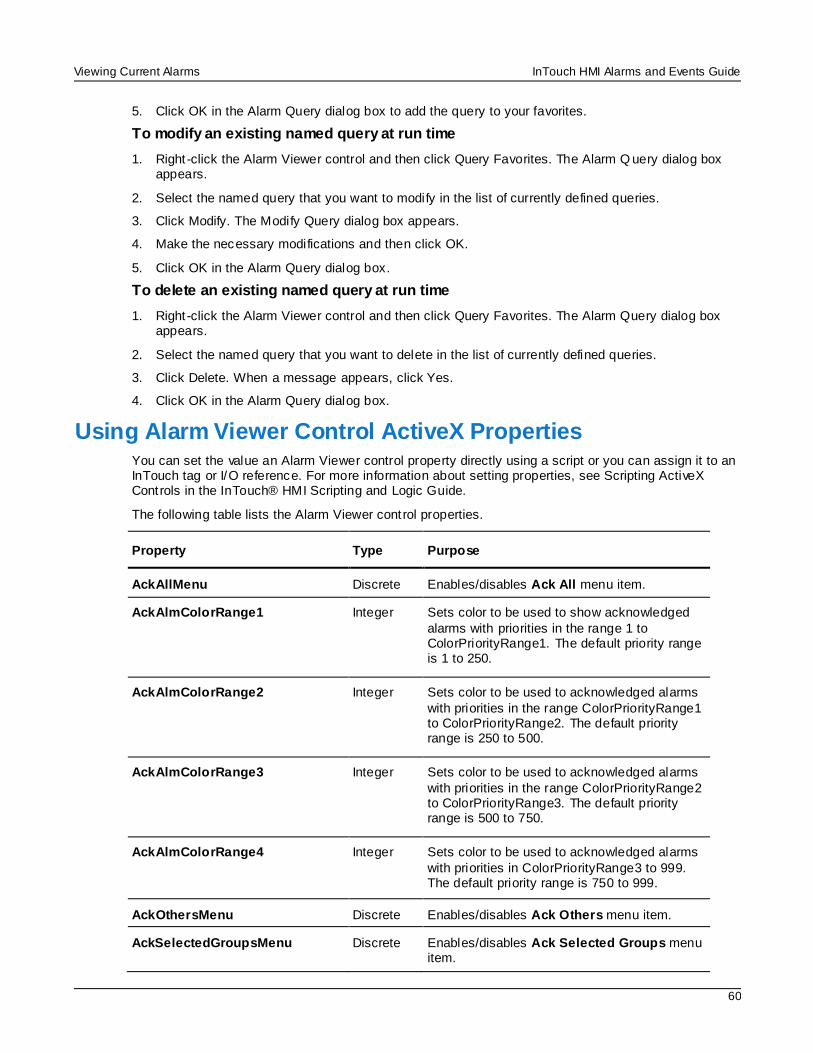
Viewing Current Alarms InTouch HMI Alarms and Events Guide
60
5. Click OK in the Alarm Query dialog box to add the query to your favorites.
To modify an existing named query at run time
1. Right -click the Alarm Viewer control and then click Query Favorites. The Alarm Q uery dialog box appears.
2. Select the named query that you want to modify in the list of currently defined queries.
3. Click Modify. The Modify Query dialog box appears.
4. Make the necessary modifications and then click OK.
5. Click OK in the Alarm Query dialog box.
To delete an existing named query at run time
1. Right -click the Alarm Viewer control and then click Query Favorites. The Alarm Query dialog box appears.
2. Select the named query that you want to delete in the list of currently defined queries.
3. Click Delete. When a message appears, click Yes.
4. Click OK in the Alarm Query dialog box.
Using Alarm Viewer Control ActiveX Properties You can set the value an Alarm Viewer control property directly using a script or you can assign it to an InTouch tag or I/O reference. For more information about setting properties, see Scripting ActiveX Controls in the InTouch® HMI Scripting and Logic Guide.
The following table lists the Alarm Viewer control properties.
Property Type Purpose
AckAllMenu Discrete Enables/disables Ack All menu item.
AckAlmColorRange1 Integer Sets color to be used to show acknowledged
alarms with priorities in the range 1 to ColorPriorityRange1. The default priority range is 1 to 250.
AckAlmColorRange2 Integer Sets color to be used to acknowledged alarms
with priorities in the range ColorPriorityRange1 to ColorPriorityRange2. The default priority range is 250 to 500.
AckAlmColorRange3 Integer Sets color to be used to acknowledged alarms
with priorities in the range ColorPriorityRange2 to ColorPriorityRange3. The default priority range is 500 to 750.
AckAlmColorRange4 Integer Sets color to be used to acknowledged alarms
with priorities in ColorPriorityRange3 to 999. The default priority range is 750 to 999.
AckOthersMenu Discrete Enables/disables Ack Others menu item.
AckSelectedGroupsMenu Discrete Enables/disables Ack Selected Groups menu item.
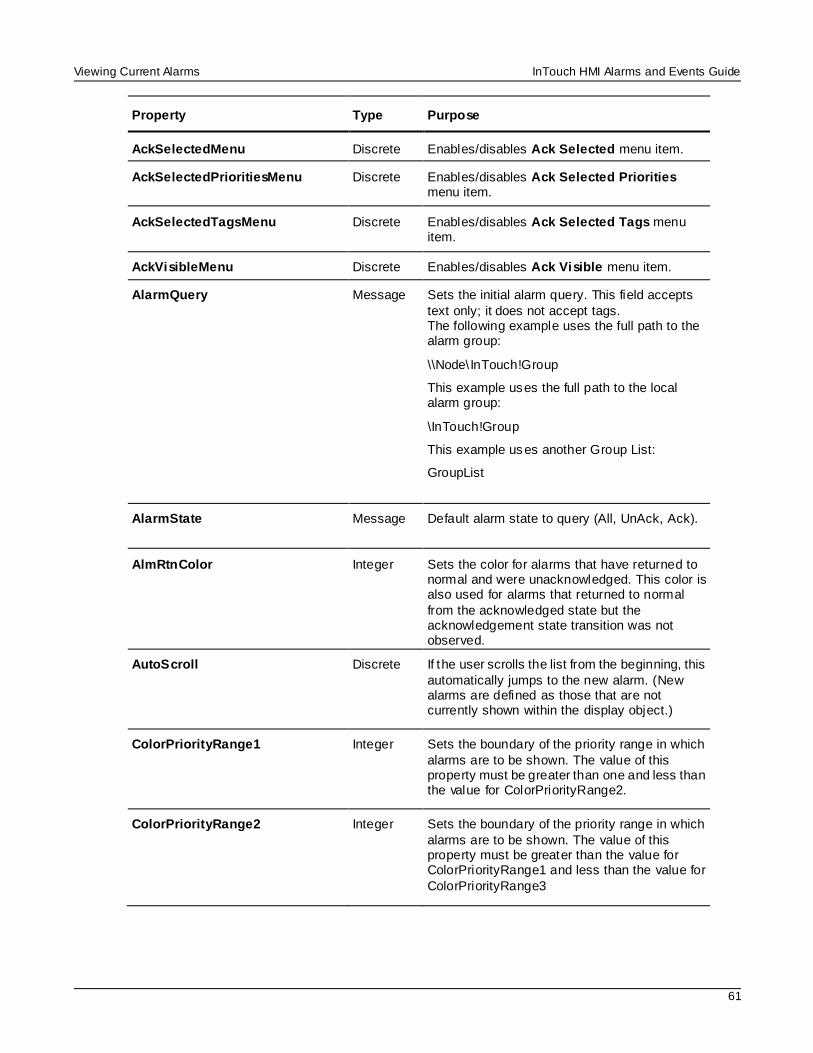
Viewing Current Alarms InTouch HMI Alarms and Events Guide
61
Property Type Purpose
AckSelectedMenu Discrete Enables/disables Ack Selected menu item.
AckSelectedPrioritiesMenu Discrete Enables/disables Ack Selected Priorities menu item.
AckSelectedTagsMenu Discrete Enables/disables Ack Selected Tags menu item.
AckVisibleMenu Discrete Enables/disables Ack Visible menu item.
AlarmQuery Message Sets the initial alarm query. This field accepts
text only; it does not accept tags. The following example uses the full path to the alarm group:
\\Node\ InTouch!Group
This example uses the full path to the local alarm group:
\InTouch!Group
This example uses another Group List:
GroupList
AlarmState Message Default alarm state to query (All, UnAck, Ack).
AlmRtnColor Integer Sets the color for alarms that have returned to normal and were unacknowledged. This color is also used for alarms that returned to normal
from the acknowledged state but the acknowledgement state transition was not observed.
AutoScroll Discrete If the user scrolls the list from the beginning, this
automatically jumps to the new alarm. (New alarms are defined as those that are not currently shown within the display object.)
ColorPriorityRange1 Integer Sets the boundary of the priority range in which
alarms are to be shown. The value of this property must be greater than one and less than the value for ColorPriorityRange2.
ColorPriorityRange2 Integer Sets the boundary of the priority range in which
alarms are to be shown. The value of this property must be greater than the value for ColorPriorityRange1 and less than the value for
ColorPriorityRange3
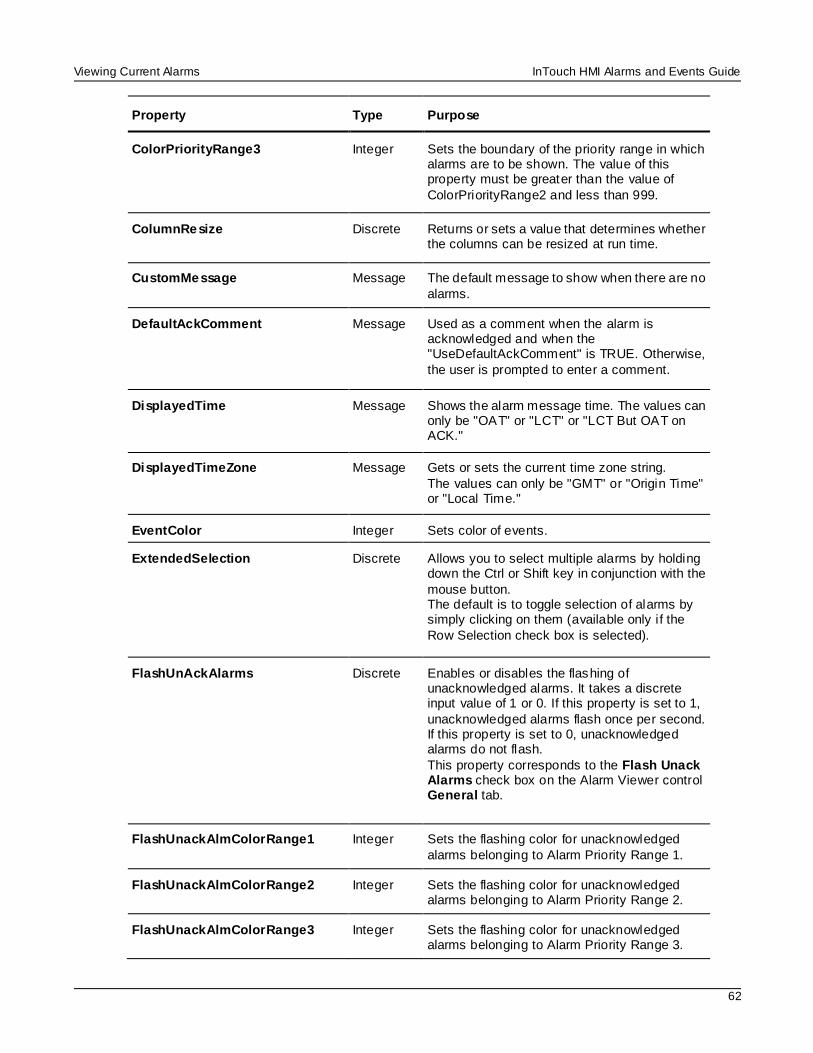
Viewing Current Alarms InTouch HMI Alarms and Events Guide
62
Property Type Purpose
ColorPriorityRange3 Integer Sets the boundary of the priority range in which alarms are to be shown. The value of this property must be greater than the value of
ColorPriorityRange2 and less than 999.
ColumnResize Discrete Returns or sets a value that determines whether the columns can be resized at run time.
CustomMessage Message The default message to show when there are no
alarms.
DefaultAckComment Message Used as a comment when the alarm is acknowledged and when the "UseDefaultAckComment" is TRUE. Otherwise,
the user is prompted to enter a comment.
DisplayedTime Message Shows the alarm message time. The values can only be "OAT" or "LCT" or "LCT But OAT on ACK."
DisplayedTimeZone Message Gets or sets the current time zone string.
The values can only be "GMT" or "Origin Time" or "Local Time."
EventColor Integer Sets color of events.
ExtendedSelection Discrete Allows you to select multiple alarms by holding down the Ctrl or Shift key in conjunction with the
mouse button. The default is to toggle selection of alarms by simply clicking on them (available only if the
Row Selection check box is selected).
FlashUnAckAlarms Discrete Enables or disables the flashing of unacknowledged alarms. It takes a discrete input value of 1 or 0. If this property is set to 1,
unacknowledged alarms flash once per second. If this property is set to 0, unacknowledged alarms do not flash.
This property corresponds to the Flash Unack Alarms check box on the Alarm Viewer control General tab.
FlashUnackAlmColorRange1 Integer Sets the flashing color for unacknowledged
alarms belonging to Alarm Priority Range 1.
FlashUnackAlmColorRange2 Integer Sets the flashing color for unacknowledged alarms belonging to Alarm Priority Range 2.
FlashUnackAlmColorRange3 Integer Sets the flashing color for unacknowledged alarms belonging to Alarm Priority Range 3.

Viewing Current Alarms InTouch HMI Alarms and Events Guide
63
Property Type Purpose
FlashUnackAlmColorRange4 Integer Sets the flashing color for unacknowledged alarms belonging to Alarm Priority Range 4.
Font None Sets the font for the records and the header in the control.
FreezeMenu Discrete Enables/disables the Freeze menu item.
FromPriority Integer Sets the low priority value of the default query.
GridColor Integer Sets the color of the background grid.
NewAlarmEventMode Integer Controls the triggering of the NewAlarm event.
0 = The NewAlarm event can not be triggered. (Default).
1 = The NewAlarm event is active.
2 = The NewAlarm event is active and continually triggers when at least one new
unacknowledged alarm arrives.
QueryFavoritesFile Message Returns or sets the query favorites file name.
QueryFavoritesMenu Discrete Enables/disables the Query Favorites menu item.
QueryName String Returns the current query name.
QueryStartup Discrete Automatically begins updating the grid using
default query properties, if set. Otherwise, you must run the ApplyDefaultQuery or ApplyQuery method in a script to update the
grid.
QueryType Message Sets the display type as either Summary or Historical.
RequeryMenu Discrete Enables/disables Requery shortcut menu item.
RetainSuppression Discrete Retains alarm suppression between alarm
queries when the alarm query is changed.
RowSelection Discrete Allows user to select alarms during run time.
SecondarySortColumn Message Returns or sets the current secondary sort column.
SelectedCount Integer Returns the total number of selected alarms.
ShowContextMenu Discrete Enables the activation of the shortcut menu.
ShowGrid Discrete Returns or sets a value that determines whether the grid lines are shown in the control.
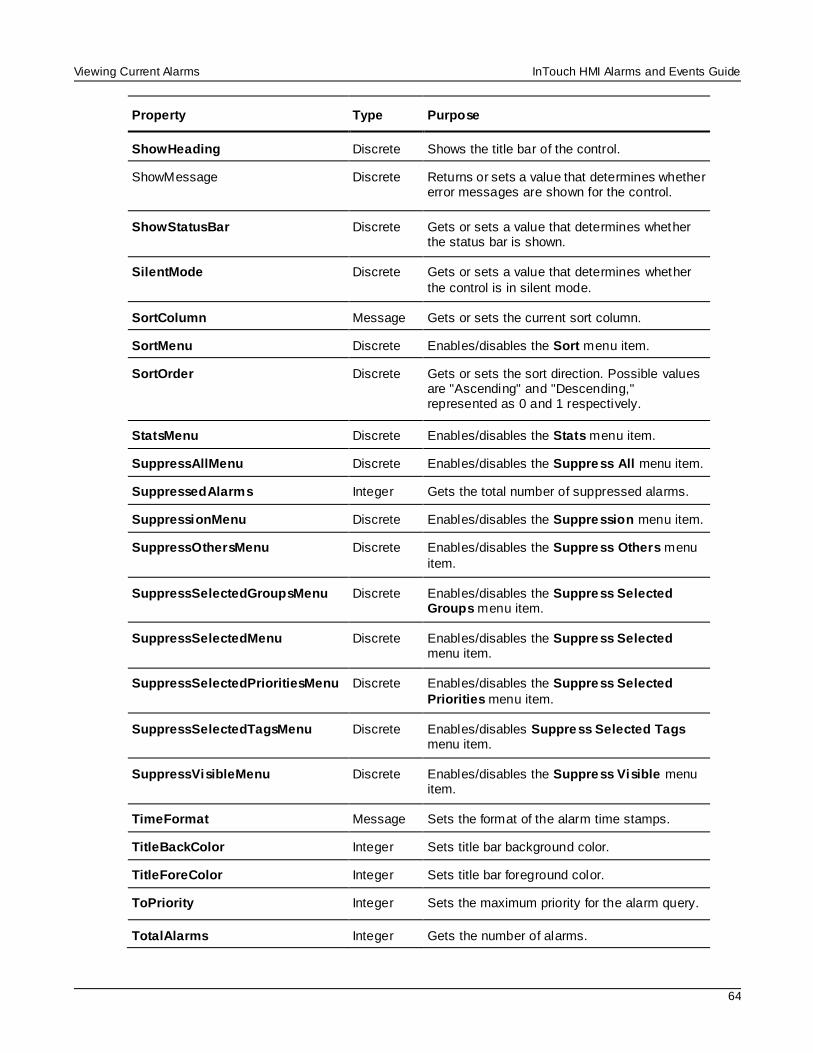
Viewing Current Alarms InTouch HMI Alarms and Events Guide
64
Property Type Purpose
ShowHeading Discrete Shows the title bar of the control.
ShowMessage Discrete Returns or sets a value that determines whether error messages are shown for the control.
ShowStatusBar Discrete Gets or sets a value that determines whether the status bar is shown.
SilentMode Discrete Gets or sets a value that determines whether
the control is in silent mode.
SortColumn Message Gets or sets the current sort column.
SortMenu Discrete Enables/disables the Sort menu item.
SortOrder Discrete Gets or sets the sort direction. Possible values are "Ascending" and "Descending," represented as 0 and 1 respectively.
StatsMenu Discrete Enables/disables the Stats menu item.
SuppressAllMenu Discrete Enables/disables the Suppress All menu item.
SuppressedAlarms Integer Gets the total number of suppressed alarms.
SuppressionMenu Discrete Enables/disables the Suppression menu item.
SuppressOthersMenu Discrete Enables/disables the Suppress Others menu
item.
SuppressSelectedGroupsMenu Discrete Enables/disables the Suppress Selected Groups menu item.
SuppressSelectedMenu Discrete Enables/disables the Suppress Selected menu item.
SuppressSelectedPrioritiesMenu Discrete Enables/disables the Suppress Selected
Priorities menu item.
SuppressSelectedTagsMenu Discrete Enables/disables Suppress Selected Tags menu item.
SuppressVisibleMenu Discrete Enables/disables the Suppress Visible menu item.
TimeFormat Message Sets the format of the alarm time stamps.
TitleBackColor Integer Sets title bar background color.
TitleForeColor Integer Sets title bar foreground color.
ToPriority Integer Sets the maximum priority for the alarm query.
TotalAlarms Integer Gets the number of alarms.
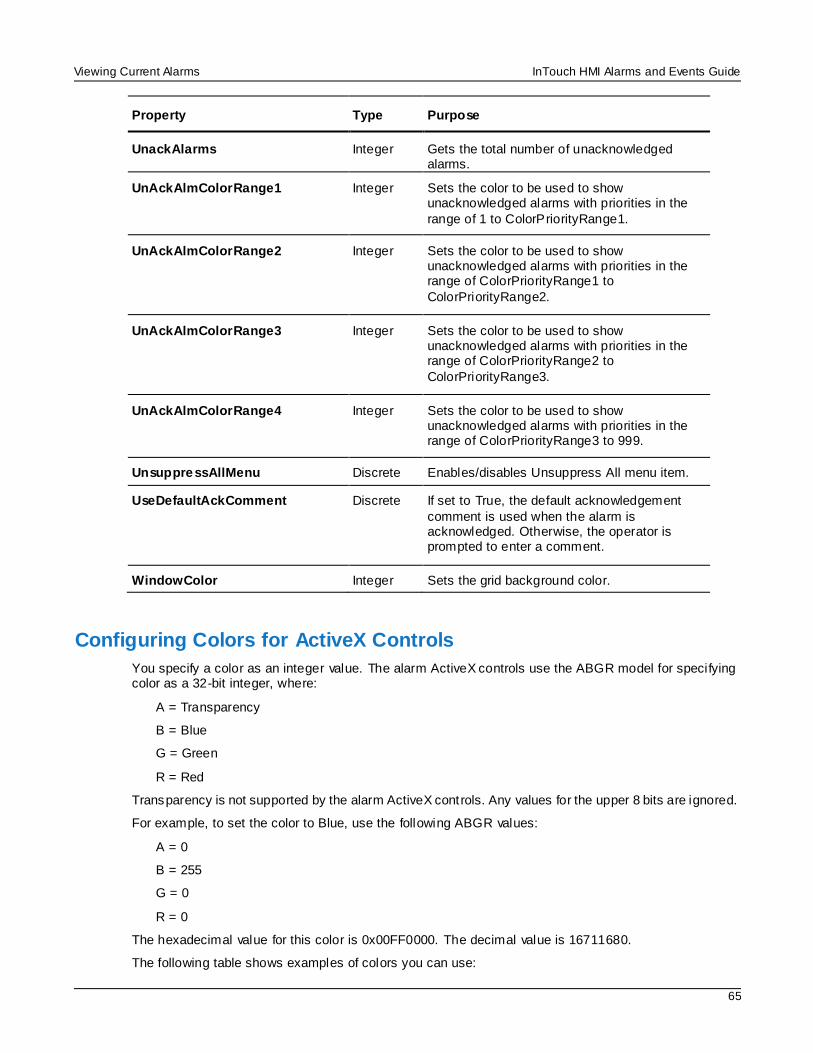
Viewing Current Alarms InTouch HMI Alarms and Events Guide
65
Property Type Purpose
UnackAlarms Integer Gets the total number of unacknowledged alarms.
UnAckAlmColorRange1 Integer Sets the color to be used to show unacknowledged alarms with priorities in the
range of 1 to ColorPriorityRange1.
UnAckAlmColorRange2 Integer Sets the color to be used to show unacknowledged alarms with priorities in the range of ColorPriorityRange1 to
ColorPriorityRange2.
UnAckAlmColorRange3 Integer Sets the color to be used to show unacknowledged alarms with priorities in the range of ColorPriorityRange2 to
ColorPriorityRange3.
UnAckAlmColorRange4 Integer Sets the color to be used to show unacknowledged alarms with priorities in the range of ColorPriorityRange3 to 999.
UnsuppressAllMenu Discrete Enables/disables Unsuppress All menu item.
UseDefaultAckComment Discrete If set to True, the default acknowledgement
comment is used when the alarm is acknowledged. Otherwise, the operator is prompted to enter a comment.
WindowColor Integer Sets the grid background color.
Configuring Colors for ActiveX Controls
You specify a color as an integer value. The alarm ActiveX controls use the ABGR model for specifying color as a 32-bit integer, where:
A = Transparency
B = Blue
G = Green
R = Red
Transparency is not supported by the alarm ActiveX controls. Any values for the upper 8 bits are ignored.
For example, to set the color to Blue, use the following ABGR values:
A = 0
B = 255
G = 0
R = 0
The hexadecimal value for this color is 0x00FF0000. The decimal value is 16711680.
The following table shows examples of colors you can use:
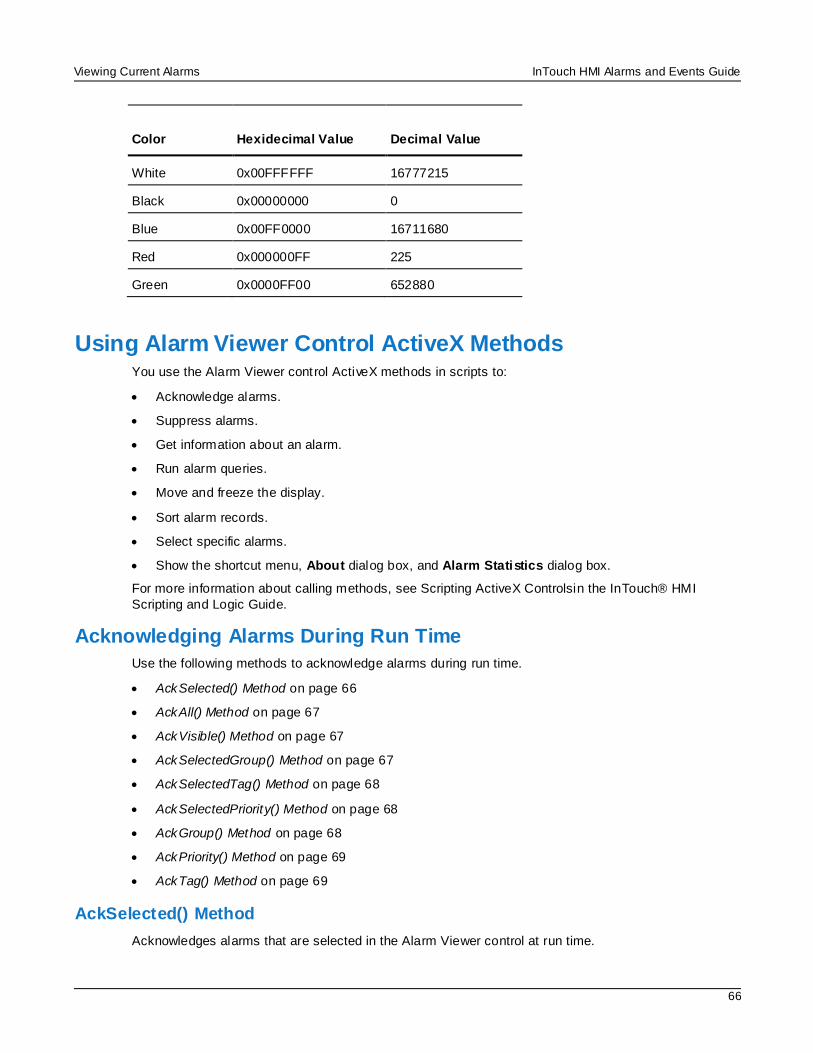
Viewing Current Alarms InTouch HMI Alarms and Events Guide
66
Color Hexidecimal Value Decimal Value
White 0x00FFFFFF 16777215
Black 0x00000000 0
Blue 0x00FF0000 16711680
Red 0x000000FF 225
Green 0x0000FF00 652880
Using Alarm Viewer Control ActiveX Methods You use the Alarm Viewer control ActiveX methods in scripts to:
Acknowledge alarms.
Suppress alarms.
Get information about an alarm.
Run alarm queries.
Move and freeze the display.
Sort alarm records.
Select specific alarms.
Show the shortcut menu, About dialog box, and Alarm Statistics dialog box.
For more information about calling methods, see Scripting ActiveX Controlsin the InTouch® HMI
Scripting and Logic Guide.
Acknowledging Alarms During Run Time
Use the following methods to acknowledge alarms during run time.
AckSelected() Method on page 66
AckAll() Method on page 67
AckVisible() Method on page 67
AckSelectedGroup() Method on page 67
AckSelectedTag() Method on page 68
AckSelectedPriority() Method on page 68
AckGroup() Method on page 68
AckPriority() Method on page 69
AckTag() Method on page 69
AckSelected() Method
Acknowledges alarms that are selected in the Alarm Viewer control at run time.
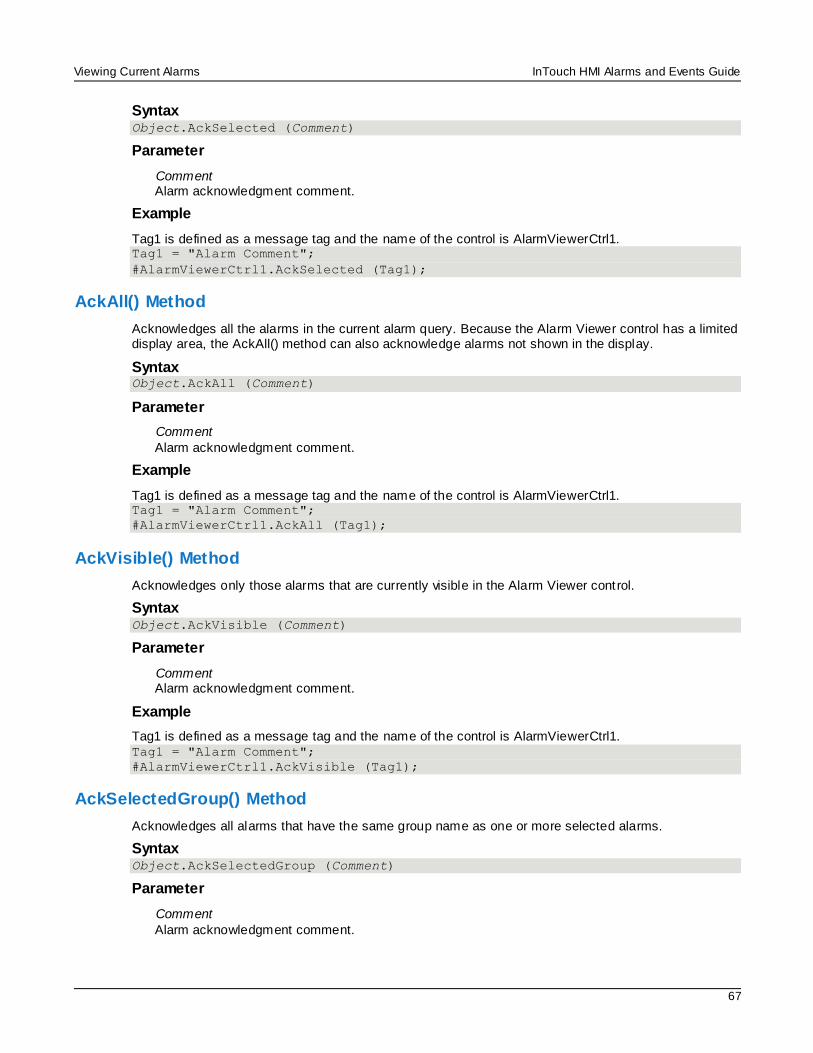
Viewing Current Alarms InTouch HMI Alarms and Events Guide
67
Syntax Object.AckSelected (Comment)
Parameter
Comment Alarm acknowledgment comment.
Example
Tag1 is defined as a message tag and the name of the control is AlarmViewerCtrl1. Tag1 = "Alarm Comment";
#AlarmViewerCtrl1.AckSelected (Tag1);
AckAll() Method
Acknowledges all the alarms in the current alarm query. Because the Alarm Viewer control has a limited display area, the AckAll() method can also acknowledge alarms not shown in the display.
Syntax Object.AckAll (Comment)
Parameter
Comment
Alarm acknowledgment comment.
Example
Tag1 is defined as a message tag and the name of the control is AlarmViewerCtrl1. Tag1 = "Alarm Comment";
#AlarmViewerCtrl1.AckAll (Tag1);
AckVisible() Method
Acknowledges only those alarms that are currently visible in the Alarm Viewer control.
Syntax Object.AckVisible (Comment)
Parameter
Comment Alarm acknowledgment comment.
Example
Tag1 is defined as a message tag and the name of the control is AlarmViewerCtrl1. Tag1 = "Alarm Comment";
#AlarmViewerCtrl1.AckVisible (Tag1);
AckSelectedGroup() Method
Acknowledges all alarms that have the same group name as one or more selected alarms.
Syntax Object.AckSelectedGroup (Comment)
Parameter
Comment
Alarm acknowledgment comment.
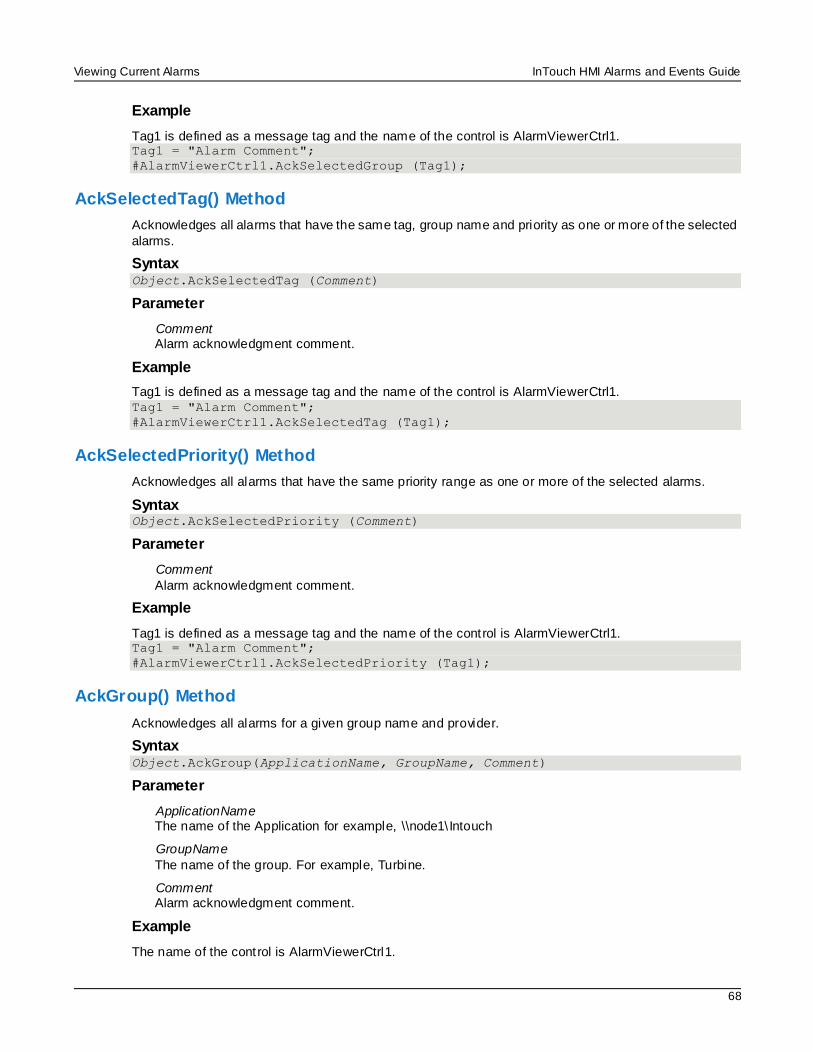
Viewing Current Alarms InTouch HMI Alarms and Events Guide
68
Example
Tag1 is defined as a message tag and the name of the control is AlarmViewerCtrl1. Tag1 = "Alarm Comment";
#AlarmViewerCtrl1.AckSelectedGroup (Tag1);
AckSelectedTag() Method
Acknowledges all alarms that have the same tag, group name and priority as one or more of the selected
alarms.
Syntax Object.AckSelectedTag (Comment)
Parameter
Comment Alarm acknowledgment comment.
Example
Tag1 is defined as a message tag and the name of the control is AlarmViewerCtrl1. Tag1 = "Alarm Comment";
#AlarmViewerCtrl1.AckSelectedTag (Tag1);
AckSelectedPriority() Method
Acknowledges all alarms that have the same priority range as one or more of the selected alarms.
Syntax Object.AckSelectedPriority (Comment)
Parameter
Comment
Alarm acknowledgment comment.
Example
Tag1 is defined as a message tag and the name of the control is AlarmViewerCtrl1. Tag1 = "Alarm Comment";
#AlarmViewerCtrl1.AckSelectedPriority (Tag1);
AckGroup() Method
Acknowledges all alarms for a given group name and provider.
Syntax Object.AckGroup(ApplicationName, GroupName, Comment)
Parameter
ApplicationName The name of the Application for example, \\node1\ Intouch
GroupName
The name of the group. For example, Turbine.
Comment Alarm acknowledgment comment.
Example
The name of the control is AlarmViewerCtrl1.
Viewing Current Alarms InTouch HMI Alarms and Events Guide
69
#AlarmViewerCtrl1.AckGroup ("\Intouch", "Turbine", "Turbine acknowledgement
Comment");
AckPriority() Method
Acknowledges all of the alarms specified priority range having same provider name and group name.
Syntax Object.AckPriority(ApplicationName, GroupName, FromPriority, ToPriority,
Comment)
Parameter
ApplicationName
The name of the application. For example, \\node1\ Intouch
GroupName The name of the group. For example, Turbine.
FromPriority Starting priority of alarms. For example, 100.
ToPriority
Ending priority of alarms. For example, 900.
Comment Alarm acknowledgment comment.
Example
The name of the control is AlarmViewerCtrl1. #AlarmViewerCtrl1.AckPriority ("\Intouch", "Turbine", 100, 900, "Turbine
acknowledgement Comment");
AckTag() Method
Acknowledges the alarms of the given tag name having the same provider name and group name within
the given priority range.
Syntax Object.AckTag(ApplicationName, GroupName, tag, FromPriority, ToPriority,
Comment)
Parameter
ApplicationName The name of the Application for example, \\node1\ Intouch
GroupName The name of the group. For example, Turbine.
tag
The name of the alarm tag. For example, Val ve1.
FromPriority Starting priority of alarms. For example, 100.
ToPriority Ending priority of alarms. For example, 900.
Comment
Alarm acknowledgment comment.
Example
The name of the control is AlarmViewerCtrl1.
Viewing Current Alarms InTouch HMI Alarms and Events Guide
70
#AlarmViewerCtrl1.AckTag ("\Intouch", "Turbine", "Valve1", 100, 900, "Turbine
acknowledgement Comment");
Suppressing Alarms During Run Time
Use the following methods to suppress alarms during run time:
ShowSuppression() Method on page 70
SuppressSelected() Method on page 70
SuppressAll() Method on page 70
SuppressVisible() Method on page 71
SuppressSelectedGroup() Method on page 71
SuppressSelectedTag() Method on page 71
SuppressSelectedPriority() Method on page 71
UnSuppressAll() Method on page 71
SuppressGroup() Method on page 72
SuppressPriority() Method on page 72
SuppressTag() Method on page 72
ShowSuppression() Method
Shows the suppression dialog box, which contains all suppressed alarms.
Syntax Object.ShowSuppression()
Example
The name of the control is AlarmViewerCtrl1. #AlarmViewerCtrl1.ShowSuppression();
SuppressSelected() Method
Suppresses showing current and future occurrences of the selected alarm(s).
Syntax Object.SuppressSelected()
Example
The name of the control is AlarmViewerCtrl1. #AlarmViewerCtrl1.SuppressSelected();
SuppressAll() Method
Suppresses showing current and future occurrences of all active alarms.
Syntax Object.SuppressAll()
Example
The name of the control is AlarmViewerCtrl1. #AlarmViewerCtrl1.SuppressAll();
Viewing Current Alarms InTouch HMI Alarms and Events Guide
71
SuppressVisible() Method
Suppress showing current and future occurrences of any visible alarm.
Syntax Object.SuppressVisible()
Example
The name of the control is AlarmViewerCtrl1. #AlarmViewerCtrl1.SuppressVisible();
SuppressSelectedGroup() Method
Suppresses showing current and future occurrences of any alarm that belongs to the same Group and
Provider of one or more selected alarms.
Syntax Object.SuppressSelectedGroup()
Example
The name of the control is AlarmViewerCtrl1. #AlarmViewerCtrl1.SuppressSelectedGroup();
SuppressSelectedTag() Method
Suppresses showing current and future occurrences of any ala rm that belongs to the same tag name of
one or more selected alarms having the same Group name, Provider name, and Priority range.
Syntax Object.SuppressSelectedTag()
Example
The name of the control is AlarmViewerCtrl1. #AlarmViewerCtrl1.SuppressSelectedTag();
SuppressSelectedPriority() Method
Suppresses showing current and future occurrences of any alarm that belongs to the same priority range of one or more selected alarms.
Syntax Object.SuppressSelectedPriority()
Example
The name of the control is AlarmViewerCtrl1. #AlarmViewerCtrl1.SuppressSelectedPriority();
UnSuppressAll() Method
Clears alarm suppression.
Syntax Object.UnSuppressAll()
Example
The name of the control is AlarmViewerCtrl1. #AlarmViewerCtrl1.UnSuppressAll();
Viewing Current Alarms InTouch HMI Alarms and Events Guide
72
SuppressGroup() Method
Suppresses showing current and future occurrences of any alarm that belongs to a given Group name.
Syntax Object.SuppressGroup(ApplicationName, GroupName)
Parameter
ApplicationName The name of the Application for example, \\node1\ Intouch
GroupName
The name of the group. For example, Turbine.
Example
The name of the control is AlarmViewerCtrl1. #AlarmViewerCtrl1.SuppressGroup ("\Intouch", "Turbine");
SuppressPriority() Method
Suppresses showing current and future occurrences of any alarm of the specified priority range, having
the same Provider name and Group name.
Syntax Object.SuppressPriority(ApplicationName, GroupName, FromPriority, ToPriority)
Parameter
ApplicationName The name of the Application for example, \\node1\ Intouch
GroupName The name of the group. For example, Turbine.
FromPriority
Starting priority of alarms. For example, 100.
ToPriority Ending priority of alarms. For example, 900.
Example
The name of the control is AlarmViewerCtrl1. #AlarmViewerCtrl1.SuppressPriority ("\Intouch", "Turbine", 100, 900);
SuppressTag() Method
Suppresses showing current and future occurrences of any alarm emitted by a given tag name or group name and in the specified priority range.
Syntax Object.SuppressTag(ApplicationName, GroupName, tag, FromPriority, ToPriority)
Parameter
ApplicationName The name of the Application for example, \\node1\ Intouch.
GroupName
The name of the group. For example, Turbine.
tag The name of the alarm tag. For example, valve 1.
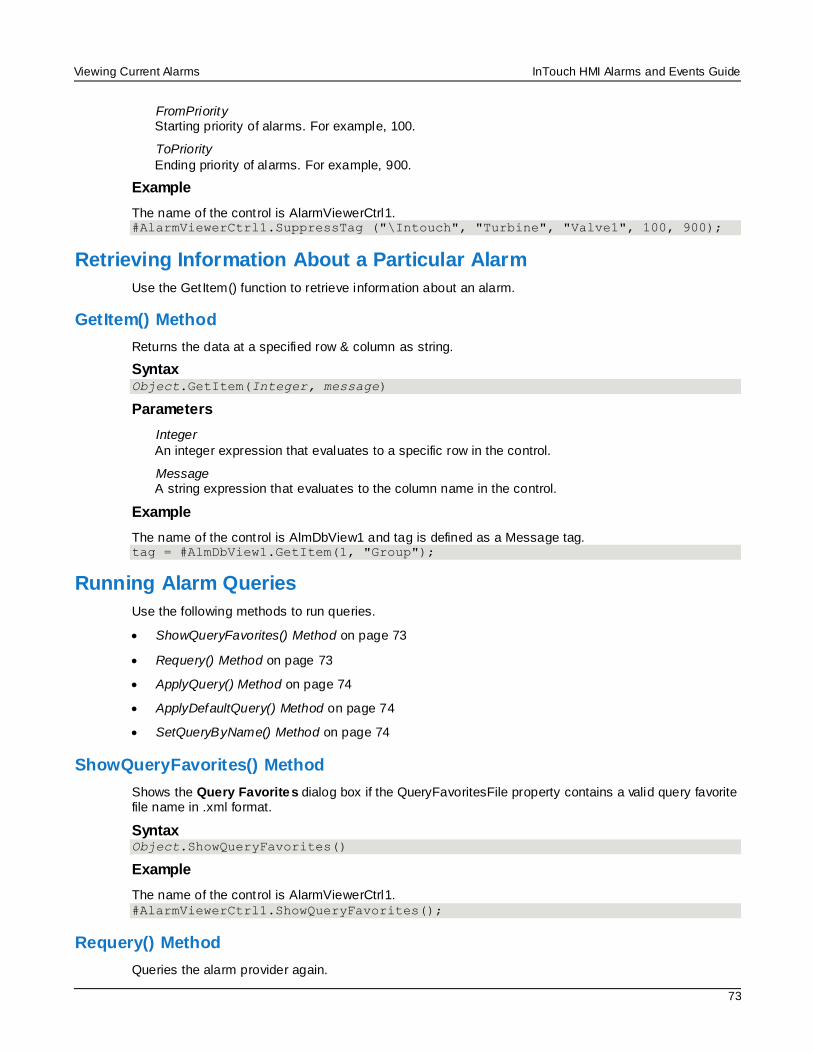
Viewing Current Alarms InTouch HMI Alarms and Events Guide
73
FromPriority Starting priority of alarms. For example, 100.
ToPriority
Ending priority of alarms. For example, 900.
Example
The name of the control is AlarmViewerCtrl1. #AlarmViewerCtrl1.SuppressTag ("\Intouch", "Turbine", "Valve1", 100, 900);
Retrieving Information About a Particular Alarm
Use the Get Item() function to retrieve information about an alarm.
GetItem() Method
Returns the data at a specified row & column as string.
Syntax Object.GetItem(Integer, message)
Parameters
Integer
An integer expression that evaluates to a specific row in the control.
Message A string expression that evaluates to the column name in the control.
Example
The name of the control is AlmDbView1 and tag is defined as a Message tag. tag = #AlmDbView1.GetItem(1, "Group");
Running Alarm Queries
Use the following methods to run queries.
ShowQueryFavorites() Method on page 73
Requery() Method on page 73
ApplyQuery() Method on page 74
ApplyDefaultQuery() Method on page 74
SetQueryByName() Method on page 74
ShowQueryFavorites() Method
Shows the Query Favorites dialog box if the QueryFavoritesFile property contains a valid query favorite file name in .xml format.
Syntax Object.ShowQueryFavorites()
Example
The name of the control is AlarmViewerCtrl1. #AlarmViewerCtrl1.ShowQueryFavorites();
Requery() Method
Queries the alarm provider again.
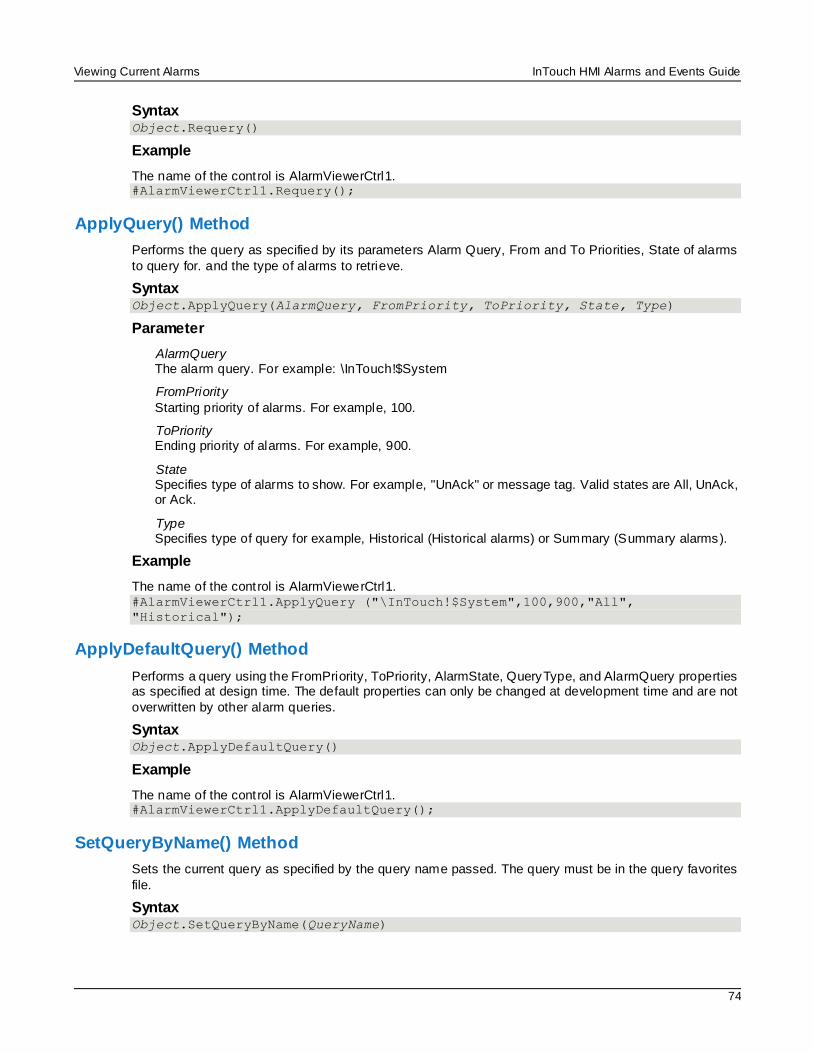
Viewing Current Alarms InTouch HMI Alarms and Events Guide
74
Syntax Object.Requery()
Example
The name of the control is AlarmViewerCtrl1. #AlarmViewerCtrl1.Requery();
ApplyQuery() Method
Performs the query as specified by its parameters Alarm Query, From and To Priorities, State of alarms
to query for. and the type of alarms to retrieve.
Syntax Object.ApplyQuery(AlarmQuery, FromPriority, ToPriority, State, Type)
Parameter
AlarmQuery The alarm query. For example: \InTouch!$System
FromPriority
Starting priority of alarms. For example, 100.
ToPriority Ending priority of alarms. For example, 900.
State Specifies type of alarms to show. For example, "UnAck" or message tag. Valid states are All, UnAck, or Ack.
Type Specifies type of query for example, Historical (Historical alarms) or Summary (Summary alarms).
Example
The name of the control is AlarmViewerCtrl1. #AlarmViewerCtrl1.ApplyQuery ("\InTouch!$System",100,900,"All",
"Historical");
ApplyDefaultQuery() Method
Performs a query using the FromPriority, ToPriority, AlarmState, QueryType, and AlarmQuery properties as specified at design time. The default properties can only be changed at development time and are not
overwritten by other alarm queries.
Syntax Object.ApplyDefaultQuery()
Example
The name of the control is AlarmViewerCtrl1. #AlarmViewerCtrl1.ApplyDefaultQuery();
SetQueryByName() Method
Sets the current query as specified by the query name passed. The query must be in the query favorites
file.
Syntax Object.SetQueryByName(QueryName)
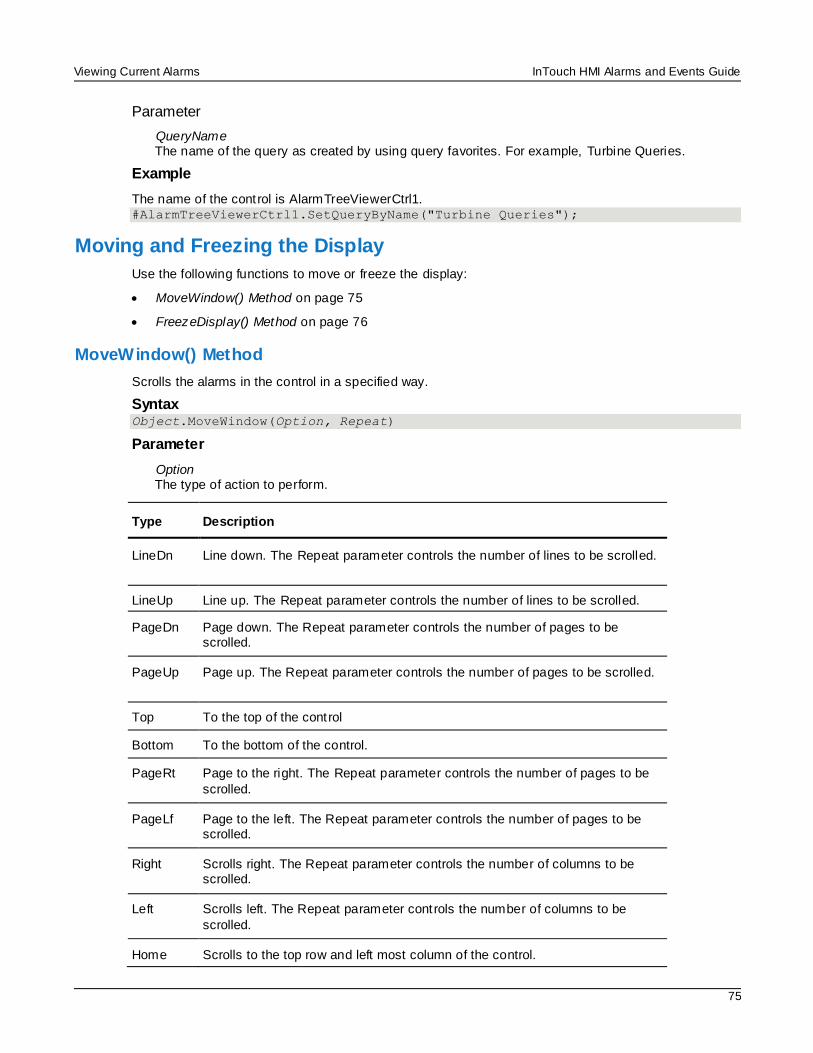
Viewing Current Alarms InTouch HMI Alarms and Events Guide
75
Parameter
QueryName The name of the query as created by using query favorites. For example, Turbine Queries.
Example
The name of the control is AlarmTreeViewerCtrl1. #AlarmTreeViewerCtrl1.SetQueryByName("Turbine Queries");
Moving and Freezing the Display
Use the following functions to move or freeze the display:
MoveWindow() Method on page 75
FreezeDisplay() Method on page 76
MoveWindow() Method
Scrolls the alarms in the control in a specified way.
Syntax Object.MoveWindow(Option, Repeat)
Parameter
Option The type of action to perform.
Type Description
LineDn Line down. The Repeat parameter controls the number of lines to be scrolled.
LineUp Line up. The Repeat parameter controls the number of lines to be scrolled.
PageDn Page down. The Repeat parameter controls the number of pages to be scrolled.
PageUp Page up. The Repeat parameter controls the number of pages to be scrolled.
Top To the top of the control
Bottom To the bottom of the control.
PageRt Page to the right. The Repeat parameter controls the number of pages to be
scrolled.
PageLf Page to the left. The Repeat parameter controls the number of pages to be scrolled.
Right Scrolls right. The Repeat parameter controls the number of columns to be scrolled.
Left Scrolls left. The Repeat parameter controls the number of columns to be
scrolled.
Home Scrolls to the top row and left most column of the control.
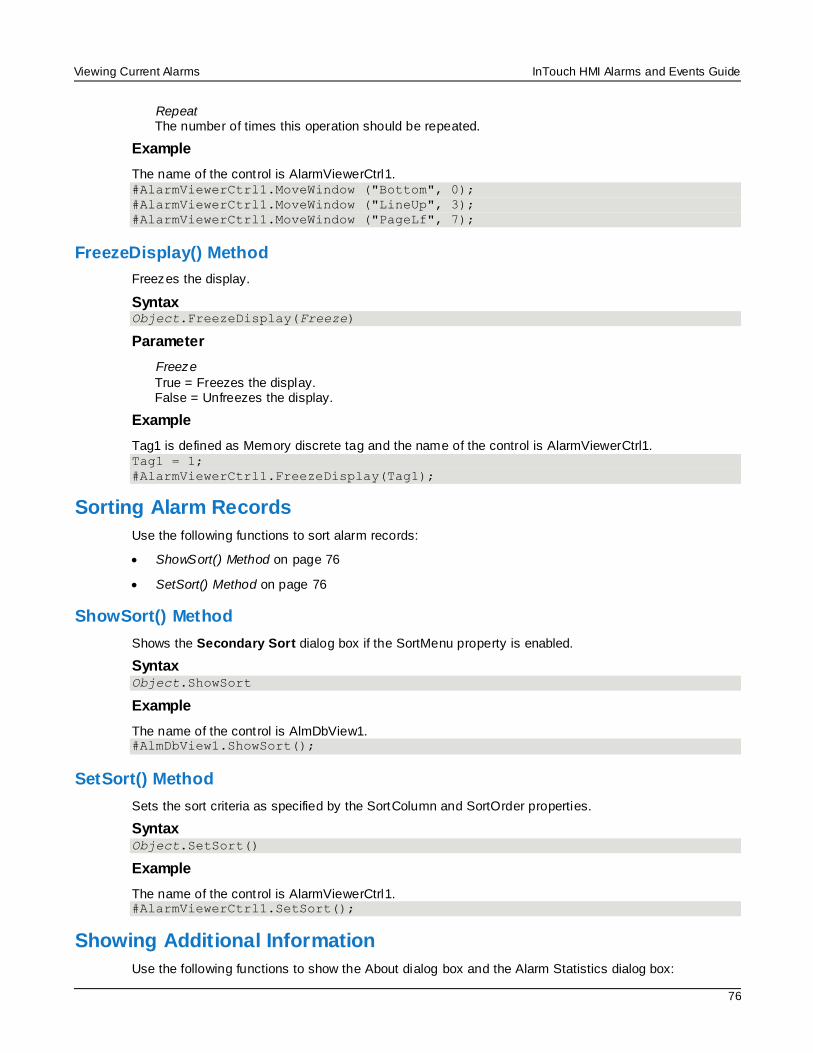
Viewing Current Alarms InTouch HMI Alarms and Events Guide
76
Repeat The number of times this operation should be repeated.
Example
The name of the control is AlarmViewerCtrl1. #AlarmViewerCtrl1.MoveWindow ("Bottom", 0);
#AlarmViewerCtrl1.MoveWindow ("LineUp", 3);
#AlarmViewerCtrl1.MoveWindow ("PageLf", 7);
FreezeDisplay() Method
Freezes the display.
Syntax Object.FreezeDisplay(Freeze)
Parameter
Freeze
True = Freezes the display. False = Unfreezes the display.
Example
Tag1 is defined as Memory discrete tag and the name of the control is AlarmViewerCtrl1. Tag1 = 1;
#AlarmViewerCtrl1.FreezeDisplay(Tag1);
Sorting Alarm Records
Use the following functions to sort alarm records:
ShowSort() Method on page 76
SetSort() Method on page 76
ShowSort() Method
Shows the Secondary Sort dialog box if the SortMenu property is enabled.
Syntax Object.ShowSort
Example
The name of the control is AlmDbView1. #AlmDbView1.ShowSort();
SetSort() Method
Sets the sort criteria as specified by the SortColumn and SortOrder properties.
Syntax Object.SetSort()
Example
The name of the control is AlarmViewerCtrl1. #AlarmViewerCtrl1.SetSort();
Showing Additional Information
Use the following functions to show the About dialog box and the Alarm Statistics dialog box:
Viewing Current Alarms InTouch HMI Alarms and Events Guide
77
AboutBox() Method on page 77
ShowStatistics() Method on page 77
AboutBox() Method
Shows the About dialog box.
Syntax Object.AboutBox()
Example
The name of the control is AlarmPareto1. #AlarmPareto1.AboutBox();
ShowStatistics() Method
Shows the Alarm Statistics dialog box.
Syntax Object.ShowStatistics()
Example
The name of the control is AlarmViewerCtrl1. #AlarmViewerCtrl1.ShowStatistics();
Selecting Specific Alarms
Use the following functions to select specific alarms:
SelectGroup() Method on page 77
SelectPriority() Method on page 78
SelectTag() Method on page 78
SelectAll() Method on page 78
SelectItem() Method on page 79
UnSelectAll() Method on page 79
SelectGroup() Method
Selects all of the alarms that contain the same alarm group name and provider name.
Syntax Object.SelectGroup(ApplicationName, GroupName)
Parameter
ApplicationName The name of the Application for example, \\node1\ Intouch
GroupName The name of the group. For example, Turbine.
Example
The name of the control is AlarmViewerCtrl1. #AlarmViewerCtrl1.SelectGroup ("\Intouch", "Turbine");
Viewing Current Alarms InTouch HMI Alarms and Events Guide
78
SelectPriority() Method
Selects all of the alarms that are of the specified priority range, having the same provider name and
group name.
Syntax Object.SelectPriority(ApplicationName, GroupName, FromPriority, ToPriority)
Parameter
ApplicationName The name of the Application for example, \\node1\ Intouch
GroupName The name of the group. For example, Turbine.
FromPriority
Starting priority of alarms. For example, 100.
ToPriority Ending priority of alarms. For example, 900.
Example
The name of the control is AlarmViewerCtrl1. #AlarmViewerCtrl1.SelectPriority ("\Intouch", "Turbine", 100, 900);
SelectTag() Method
Selects all of the alarms from a specific Provider/Group/Tag. You can also specify a Priority range, or use 1-999.
Syntax Object.SelectTag(ApplicationName, GroupName, tag, FromPriority, ToPriority)
Parameter
ApplicationName The name of the Application for example, \\node1\ Intouch
GroupName
The name of the group. For example, Turbine.
tag The name of the alarm tag. For example, valve 1.
FromPriority Starting priority of alarms. For example, 100.
ToPriority
Ending priority of alarms. For example, 900.
Example
The name of the control is AlarmViewerCtrl1. #AlarmViewerCtrl1.SelectTag ("\Intouch", "Turbine", "Valve1",100, 900);
SelectAll() Method
Toggles the selection of all the alarms in a display. Because the alarm display has only a limited display
area, the SelectAll() function may select alarms that are not visible in the display.
Syntax Object.SelectAll()
Viewing Current Alarms InTouch HMI Alarms and Events Guide
79
Example #AlarmViewerCtrl1.SelectAll();
SelectItem() Method
Toggles the selection of an alarm record at a given row.
Syntax Object.SelectItem(RowNumber)
Parameter
RowNumber An integer value that is the row number for the alarm record to select. The first row in the control is 0.
Example
The name of the control is AlarmViewerCtrl1 and Tag1 is defined as a memory integer. This toggles the selection of the tenth alarm record in the Alarm Viewer control. Tag1 = 9;
#AlarmViewerCtrl1.SelectItem (Tag1);
UnSelectAll() Method
Unselects all the selected records.
Syntax Object.UnSelectAll()
Example
The name of the control is AlarmViewerCtrl1. #AlarmViewerCtrl1.UnSelectAll();
Showing the Context Menu at Run Time
Use the ShowContext() method to show the shortcut menu at run time.
ShowContext() Method
Shows the shortcut menu if any one of RefreshMenu or ResetMenu or SortMenu property is enabled.
Syntax Object.ShowContext
Example
The name of the control is AlmDbView1. #AlmDbView1.ShowContext();
Handling Errors when Using Methods and Properties You can use the SilentMode property to hide errors during run time. If the SilentMode property is set to 1, the Alarm Viewer control does not show error messages in during run time. If it is set to 0, the Alarm
Viewer control shows error messages. Error messages are always sent to the ArchestrA Log Viewer.
Using ActiveX Events to Trigger Scripts You can assign QuickScripts to Alarm Viewer control events, such as a mouse click or double-click. When the event occurs, the QuickScript runs.
The Alarm Viewer control supports the following events:
Viewing Current Alarms InTouch HMI Alarms and Events Guide
80
Click
DoubleClick
NewAlarm
ShutDown
StartUp
The Click event has one parameter called ClicknRow, which identifies the row that is clicked at run time.
The DoubleClick event has one parameter called DoubleClicknRow, which identifies the row that is
double-clicked at run time.
Click and DoubleClick events are zero-based. When Click and/or DoubleClick events are published for the user, the row count in the display starts with 0.
Note: The Alarm Viewer control ignores the user interface methods when they are called from StartUp event because the control is not visible yet. These include: ShowSort(), ShowContext(),
GetSelectedItem(), GetNext(), GetPrevious() and AboutBox().
For more information about scripting ActiveX events, see Scripting ActiveX Controlsin the InTouch® HMI
Scripting and Logic Guide.
Running a Script When a New Alarm is Detected
You can configure the Alarm Viewer control to run an ActiveX event script when the Alarm Viewer control detects a new unacknowledged alarm (that is, any alarm that transitions from a normal state to an
unacknowledged state and meets the control's query and priority filtering criteria).
The NewAlarmEventMode property controls triggering the NewAlarm event.
If you set NewAlarmEventMode property to 0, the NewAlarm event does not trigger. This is the
default.
If you set the NewAlarmEventMode property to 1, and a new alarm occurs:
o An event is triggered.
o The ActiveX event script associated with the NewAlarm event runs.
o The NewAlarmEventMode property is set to 0.
You must change the NewAlarmEventMode property back to 1 to process subsequent events.
Use this setting if the application performs an action that should not be performed again until the condition has been corrected or acknowledged. For example, when the event triggers, the ActiveX script can play an alarm sound until the alarm is acknowledged. Then the alarm sound can play
again the next time a new alarm is received.
If you set the NewAlarmEventMode property to 2, the NewAlarm event is active and continually triggers when at least one new unacknowledged alarm arrives. You do not need to change the value to process subsequent events. The new event triggers at most one time per second, regardless of
how many additional new alarms arrive in the same second.
InTouch HMI Alarms and Events Guide
81
In This Chapter
About Acknowledging Alarms in Real Time..................................................................................... 81 Understanding Alarm Acknowledgement Models ............................................................................ 81 Using Dotfields to Acknowledge Alarms ......................................................................................... 84
Using Script Functions to Acknowledge Alarms .............................................................................. 88 Using Automatic Acknowledgement When the Tag Value Returns to Normal .................................... 89 Using Alarm Clients to Acknowledge Alarms................................................................................... 90
Using Alarm and Acknowledgement Comments .............................................................................. 90
About Acknowledging Alarms in Real Time When tag data transitions from a normal to an alarm state, a new instance of its alarm is generated. The InTouch Distributed Alarm system tracks each alarm instance through the following states:
When the tag first enters the alarmed state
When the alarm makes a sub-state transition, if the alarm is a multi-state alarm
When the alarm returns to normal
Whether the alarm is waiting for an acknowledgment
When the alarm is acknowledged
The life cycle of an alarm instance ends when the tag value associated with the alarm returns to a
normal, unalarmed state. A subsequent transition to the alarmed state generates a new alarm instance.
Understanding Alarm Acknowledgement Models The InTouch HMI supports three models of alarm acknowledgement:
For condition-oriented alarms, an acknowledgment counts against all entries into the alarmed state up to the time of the acknowledgment.
For expanded summary alarms, an acknowledgment is only for a particular transition, whether to an alarmed state, to a sub-state, or a return to normal. All transitions into different alarm sub-states must
be acknowledged before the overall alarm is considered acknowledged.
For event-oriented alarms (as in OPC), an acknowledgment is accepted only if it refers to the most recent activation event.
Condition Acknowledgement Alarm Model
For condition-oriented alarms, an acknowledgment counts against all entries into the alarmed state up to the time of the acknowledgment.
CHAPTER 5
Acknowledging Alarms in Real Time
Acknowledging Alarms in Real Time InTouch HMI Alarms and Events Guide
82
Acknowledgment is for the instance of the alarm. An alarm instance waits for an acknowledgement when it first enters the alarmed state. If the alarm is acknowledged and subsequently transitions to a new alarmed sub-state (for example from "Hi" to HiHi"), it begins waiting for another acknowledgement.
Whenever the acknowledgement is received, it is accepted and applies to all transitions of the alarm that have occurred so far.
The alarm is considered acknowledged when the most recent instance is acknowledged.
Expanded Summary Alarm Model
For expanded summary alarms, an acknowledgment is only for a particular transition, whether to an alarmed state, to a sub-state, or a return to normal. All transitions into different alarm sub-states must be
acknowledged before the overall alarm is considered acknowledged.
The initial entry to the alarmed state must be acknowledged, and the return to normal must also be separately acknowledged.
Any transition to a new alarm sub-state is treated as a new occurrence that must be acknowledged, and whose return to normal must also be acknowledged. Sub-state transitions are treated as belonging to a "return to normal group," starting with the first entry into an alarmed state when the item was previously
normal.
If the item returns to normal and subsequently enters the alarmed state again, a new return to normal group is created.
Each transition must be acknowledged individually and explicitly; and the alarm is considered acknowledged only when the item has returned to normal and all transitions in all pending return to normal groups have been acknowledged.
Note: The term "summary" means "awaiting acknowledgment." Alarms in this model are also known as "ring-back" alarms.
Expanded Summary Alarm Records
For expanded summary alarms, when an alarm occurs, a record is generated in the alarm display object
showing that an alarm condition has occurred. The record shows the date and time stamp of the alarm. This record remains visible until an operator acknowledges the alarm and a return-to-normal state has occurred. If the return-to-normal state occurs before the alarm is acknowledged, then two records are shown in the alarm object.
For example, a boiler’s temperature exceeds the high limit state and triggers an alarm. Later, the boiler returns to its normal temperature range before an operator can acknowledge the alarm. The alarm system generates a record that a high limit alarm occurred and an another record indicating the alarm
was not acknowledged.
Using Expanded Summary Alarms
When you define a tag and select Expanded Summary as its acknowledgement model, an operator
must acknowledge that an alarm occurred even if the state triggering the alarm has returned to normal. Acknowledging an alarm changes the color of the alarm entry but does not change the time stamp. Alarms only clear from the display when they are acknowledged and the alarm has returned to a normal
state.
Note: When you define a tag with the expanded summary acknowledgement mode, the RTN Implies
ACK option in the Alarm Properties dialog box does not apply to the tag.
Acknowledging Alarms in Real Time InTouch HMI Alarms and Events Guide
83
Event-Based Alarm Model
For event-oriented alarms (as in OPC), an acknowledgment is accepted only if it refers to the most recent
activation event.
An alarm instance begins waiting for an acknowledgement when it first enters the alarmed state. If the instance is acknowledged and subsequently transitions to a new alarmed sub-state, it begins waiting for
another acknowledgement. Each subsequent transition is assigned a sequence number, and the acknowledgement must have attached to it the sequence number of the transition to which it i s responding.
The acknowledgement is accepted only if it is for the most recent transition. If it is accepted, it applies to all transactions of the alarm that have occurred so far. The alarm is considered acknowledged when the most recent instance is acknowledged.
A rejected acknowledgement may be logged for diagnostic purposes, but is not otherwise tracked in the system.
The event-oriented model ensures that if an alarm is changing between different states, the
acknowledgement corresponds to current information. In systems with small latency times, this may look just like condition-oriented alarms. In other environments, such as the Internet, the features of this model may become important.
Checking the Acknowledgement Model of a Tag at Run Time
Use the .AlarmAckModel dot field to monitor the acknowledgement model associated with a tag.
.AlarmAckModel Dotfield
Monitors the acknowledgment model associated with a tag as follows:
0 = condition (default)
1 = event oriented
2 = expanded summary
Category
Alarms
Usage Tagname.AlarmAckModel
Parameter
Tagname Any discrete, integer, real, indirect discrete and analog tag.
Remarks
This dotfield defaults to 0 (condition acknowledgment model).
Data Type
Analog (read-only)
Valid Values
0, 1 or 2
Example
The body of this IF-THEN statement is processed if the PumpStation tag is associated with an event alarm: IF (PumpStation.AlarmAckModel == 1) THEN
Acknowledging Alarms in Real Time InTouch HMI Alarms and Events Guide
84
MyAlarmMessage="PumpStation is an Event alarm";
ENDIF;
See Also
.Alarm, .Ack, .UnAck, .AckDev, .AckDSC, .AckROC
Using Dotfields to Acknowledge Alarms You can create scripts that use dotfields to acknowledge all current alarms, selected alarms, or only
alarms of a specific type.
Acknowledging Alarms or Alarm Groups
You can create scripts that use the following dotfields to acknowledge alarms of specified local tags or
alarms within specified alarm groups.
.Ack Dotfield on page 84
.UnAck Dotfield on page 85
You cannot acknowledge alarms that originate from the Application Server using these dotfields.
To acknowledge all local alarms of the running InTouch application, use the $System alarm group in combination with the appropriate .Ack dotfield.
.Ack Dotfield
Monitors or controls the alarm acknowledgment status of all types of local alarms.
Category
Alarms
Usage TagName.Ack=1;
Parameter
TagName Any discrete, integer, real, indirect discrete and analog tag, or alarm group.
Remarks
Set this dotfield to a value of 1 to acknowledge any outstanding alarms associated with a specified tag or
alarm group. When the specified tag is an alarm group, all unacknowledged alarms associated with the tags within the specified group are acknowledged. When the specified tag is of any type other than alarm group, only the unacknowledged alarm associated with that tag is acknowledged. Setting the .Ack
dotfield to a value other than 1 has no meaning.
Data Type
Discrete (read/write)
Valid Values
1
Example
The following statement acknowledges an alarm associated with the Tag1 tag: Tag1.Ack=1;
This next example would be used to acknowledge all unacknowledged alarms within the PumpStation alarm group: PumpStation.Ack=1;
Acknowledging Alarms in Real Time InTouch HMI Alarms and Events Guide
85
Note: The .ACK dotfield has an inverse dot field called .UnAck. When an unacknowledged alarm occurs, .UnAck is set to 1. .UnAck can then be used with animation links or in condition scripts to trigger
annunciators for any unacknowledged alarms.
See Also
Alarm, UnAck, AckDev, AckROC, AckDSC, AckValue, AlarmAckModel
.UnAck Dotfield
Monitors or controls the alarm acknowledgment status of local alarms.
Category
Alarms
Usage TagName.UnAck=0;
Parameter
TagName
Any discrete, integer, real, indirect discrete and analog tag, or alarm group.
Remarks
Set this dotfield to a value of 0 to acknowledge any outstanding alarms associated with the specified tag or alarm group. When the specified tag is an alarm group, all unacknowledged alarms associated with the tags within the specified group are acknowledged. When the specified tag is any other type, only the
unacknowledged alarm associated with that tag is acknowledged. Setting this dotfield to a value other than 0 has no meaning.
Data Type
Discrete (read/reset) only
Valid Values
0
Example
The following statement acknowledges any alarm associated with the Tag1 tag. Tag1.UnAck=0;
This statement acknowledges all unacknowledged alarms within the alarm group named PumpStation. PumpStation.UnAck=0;
.UnAck has an inverse dotfield called .Ack. When an alarm has been acknowledged, the value of the
.Ack dotfield is set to 1.
See Also
.Ack, Ack(), .Alarm, .AlarmAckModel
Acknowledging Value Alarms
You can create scripts that use the .AckValue dotfield to acknowledge all value alarms of a specified local tag or all value alarms in a specified alarm group.
.AckValue Dotfield
Monitors and controls the acknowledgment of local value alarms.
Acknowledging Alarms in Real Time InTouch HMI Alarms and Events Guide
86
Usage TagName.AckValue=1;
Parameter
TagName Any integer, real, indirect analog tag, or alarm group.
Remarks
Set the .AckValue dotfield to 1 to acknowledge any outstanding value alarms associated the specified tag/group. When the specified tag is an alarm group, all unacknowledged value alarms associated with
the tags within the specified group are acknowledged. When the specifie d tag is of any type, only the unacknowledged value alarm associated with that tag is acknowledged.
Setting this dotfield to a value other than 1 has no meaning.
Data Type
Discrete (read/write)
Valid Values
1
Examples
The following statement acknowledges a value alarm associated with the Tag1 tag: Tag1.AckValue=1;
This example acknowledges all unacknowledged value alarms within the alarm group named PumpStation: PumpStation.AckValue=1;
An indirect alarm group (using GroupVar) can be used to acknowledge value alarms. For example, using
an assignment such as: StationAlarms.Name = "PumpStation";
Where StationAlarms is defined as an alarm group type tag and is then associated with PumpStation. Thus, the statement below is similar to the above examples, except it is used to acknowledge any
unacknowledged value alarms within the alarm group PumpStation, which is currently associated with the StationAlarms alarm group tag. StationAlarms.AckValue=1;
See Also
.Alarm, .AlarmValue, .Ack, .UnAck, .AckDev, .AckDSC, .AckROC, .AlarmAckModel
Acknowledging Discrete Alarms
You can create scripts that use the .AckDsc dotfield to acknowledge the discrete alarm of a specified tag or all discrete alarms of a specified alarm group.
.AckDsc Dotfield
Acknowledges the discrete alarm of a specified tag or all discrete alarms of a specified alarm group.
Usage TagName.AckDsc=1;
Parameter
TagName Name assigned to the discrete tag or the name of an alarm group.
Acknowledging Alarms in Real Time InTouch HMI Alarms and Events Guide
87
Remarks
Set to 1 to acknowledge an active discrete alarm associated with the specified tag or alarm group. When the specified tag is an alarm group, all unacknowledged discrete alarms associated with the tags within the specified group are acknowledged. When the specified tag is of any type other tha n alarm group, only
the unacknowledged discrete alarm associated with that tag is acknowledged. Setting this dot field to a value other than 1 has no meaning.
Data Type
Discrete (read/write)
Valid Values
0 or 1
Examples
The following statement verifies if Tag1 has an active discrete alarm associated with it: IF (Tag1.AlarmDsc == 1) THEN
MyAlarmMessage="The pumping station currently has an ALARM!";
ENDIF;
This dotfield is not linked to the .Ack or .UnAck dotfield. Therefore, even when an active alarm has been
acknowledged, this dotfield remains equal to 1.
See Also
.Alarm, .AlarmDSC, .Ack, .UnAck, .AckDev, .AckDSC, .AckROC, .AckValue, .AlarmAckModel
Acknowledging Deviation Alarms
You can create scripts that use the .AckDev dot field to acknowledge the minor or major deviation alarm
of a specified local tag or the deviation alarms of a specified alarm group.
.AckDev Dotfield
Acknowledges the minor or major deviation alarms of a specified local tag or all deviation alarms of a specified alarm group.
Category
Alarm
Usage TagName.AckDev=1;
Parameter
TagName Any integer, real, indirect analog tag, or alarm group.
Remarks
Set this dotfield to a value of 1 to acknowledge any outstanding deviation alarms associated with the
specified tag or alarm group. When the specified tag is an alarm group, all unacknowledged deviation alarms associated with the tags within the specified group are acknowledged. Setting this dot field to a value other than 1 has no meaning.
Data Type
Discrete (read/write)
Valid Values
1
Acknowledging Alarms in Real Time InTouch HMI Alarms and Events Guide
88
Example
The following statement acknowledges a deviation alarm associated with the Tag1 tag: Tag1.AckDev=1;
This next example would be used to acknowledge all unacknowledged deviation alarms within the alarm group named PumpStation: PumpStation.AckDev=1;
See Also
.Alarm, .AlarmDev, .Ack, .UnAck, .AckDSC, .AckROC, .AckValue, .AlarmAckModel
Acknowledging Rate-of-Change Alarms
You can create scripts that use the .AckROC dot field to acknowledge the rate-of-change alarm of a
specified local tag or the rate-of-change alarms of a specified alarm group.
.AckROC Dotfield
Acknowledges the rate-of-change alarm of a specified local tag or all rate-of-change alarms of a specified alarm group.
Usage TagName.AckROC=1;
Parameter
TagName Name assigned to the integer, real, or indirect analog tag or the name of an alarm group.
Remarks
Set this dotfield to a value of 1 to acknowledge any outstanding rate -of-change alarms associated with a specified tag or alarm group. When the specified tag is an alarm group, all unacknowledged
rate-of-change alarms associated with the tags within the specified group are acknowledged. When the specified tag is of any type other than alarm group, only the unacknowledged rate-of-change alarm associated with that tag is acknowledged. Setting this dotfield to a value other than 1 has no meaning.
Data Type
Discrete (read/write)
Valid Values
1
Examples
The following statement acknowledges a rate-of-change alarm associated with a tag named Tag1. Tag1.AckROC=1;
This next example acknowledges all unacknowledged rate -of-change alarms within the alarm group named PumpStation: PumpStation.AckROC=1;
See Also
.Alarm, .AlarmROC, .Ack, .UnAck, .AckDev, .AckDSC, .AckValue, .AlarmAckModel
Using Script Functions to Acknowledge Alarms You can use the Ack() script function to acknowledge all alarms for a tag or group.
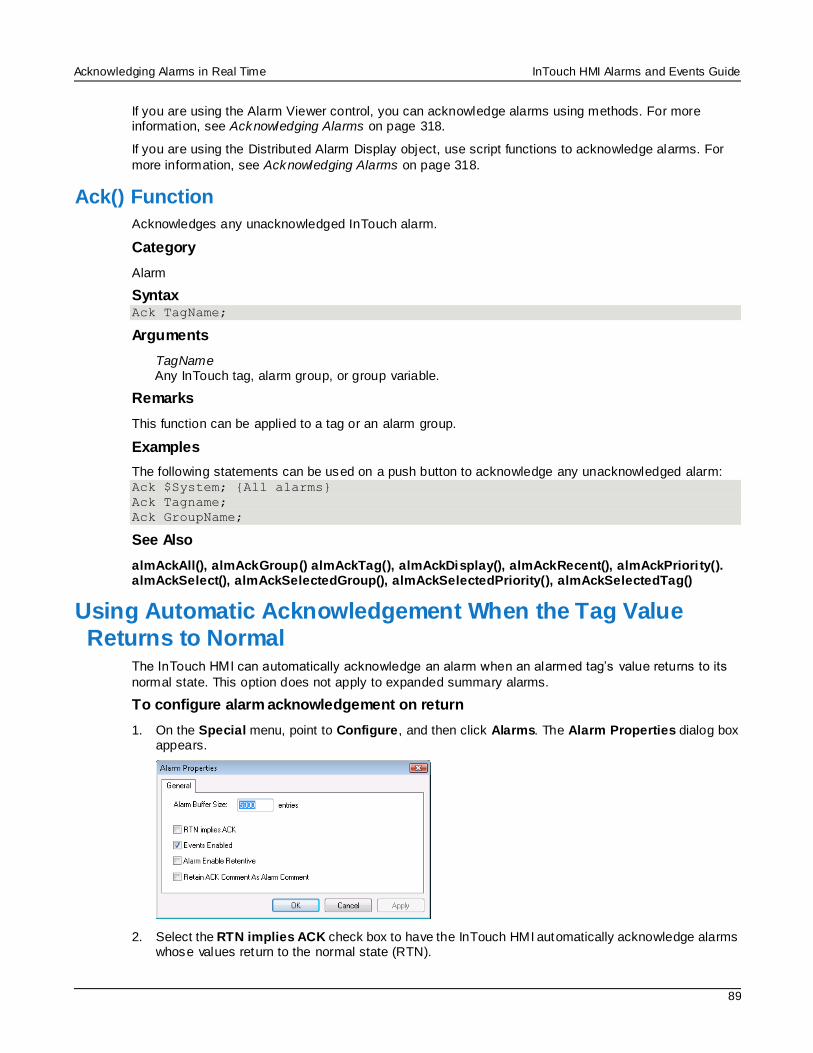
Acknowledging Alarms in Real Time InTouch HMI Alarms and Events Guide
89
If you are using the Alarm Viewer control, you can acknowledge alarms using methods. For more information, see Acknowledging Alarms on page 318.
If you are using the Distributed Alarm Display object, use script functions to acknowledge alarms. For
more information, see Acknowledging Alarms on page 318.
Ack() Function
Acknowledges any unacknowledged InTouch alarm.
Category
Alarm
Syntax Ack TagName;
Arguments
TagName Any InTouch tag, alarm group, or group variable.
Remarks
This function can be applied to a tag or an alarm group.
Examples
The following statements can be used on a push button to acknowledge any unacknowledged alarm: Ack $System; {All alarms}
Ack Tagname;
Ack GroupName;
See Also
almAckAll(), almAckGroup() almAckTag(), almAckDisplay(), almAckRecent(), almAckPriori ty(). almAckSelect(), almAckSelectedGroup(), almAckSelectedPriority(), almAckSelectedTag()
Using Automatic Acknowledgement When the Tag Value
Returns to Normal The InTouch HMI can automatically acknowledge an alarm when an alarmed tag’s value returns to its
normal state. This option does not apply to expanded summary alarms.
To configure alarm acknowledgement on return
1. On the Special menu, point to Configure, and then click Alarms. The Alarm Properties dialog box appears.
2. Select the RTN implies ACK check box to have the InTouch HMI automatically acknowledge alarms whose values return to the normal state (RTN).
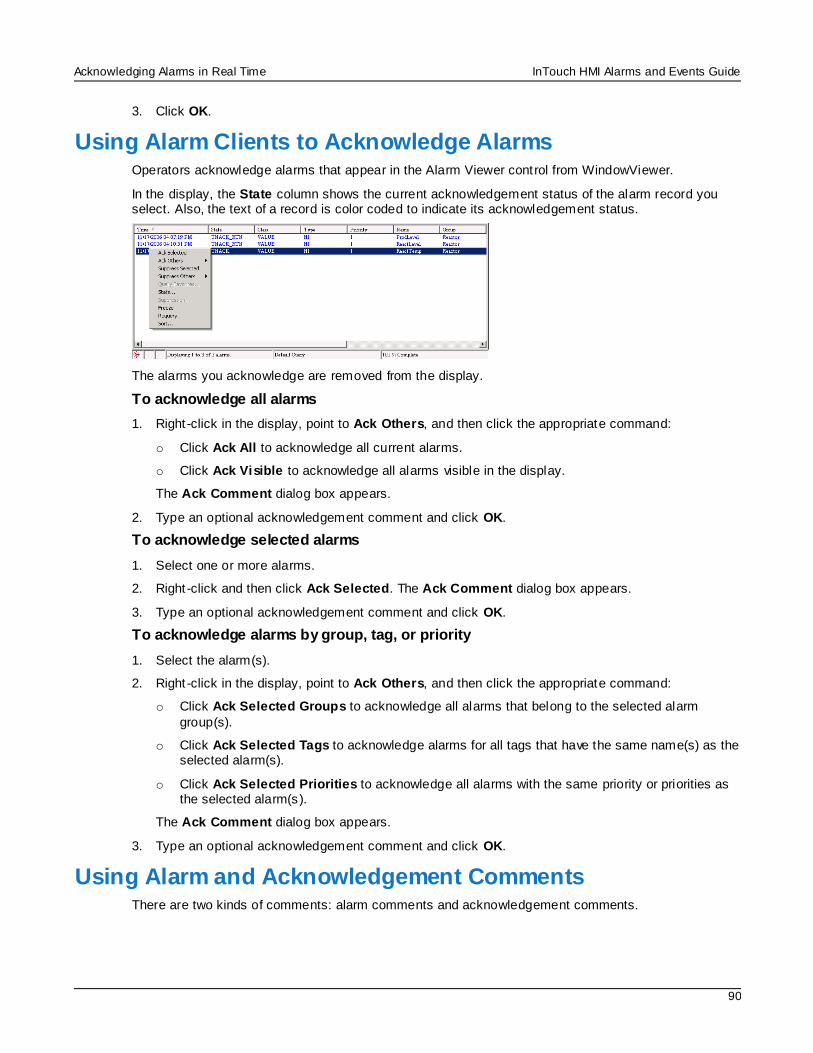
Acknowledging Alarms in Real Time InTouch HMI Alarms and Events Guide
90
3. Click OK.
Using Alarm Clients to Acknowledge Alarms Operators acknowledge alarms that appear in the Alarm Viewer control from WindowViewer.
In the display, the State column shows the current acknowledgement status of the alarm record you select. Also, the text of a record is color coded to indicate its acknowledgement status.
The alarms you acknowledge are removed from the display.
To acknowledge all alarms
1. Right -click in the display, point to Ack Others, and then click the appropriate command:
o Click Ack All to acknowledge all current alarms.
o Click Ack Visible to acknowledge all alarms visible in the display.
The Ack Comment dialog box appears.
2. Type an optional acknowledgement comment and click OK.
To acknowledge selected alarms
1. Select one or more alarms.
2. Right -click and then click Ack Selected. The Ack Comment dialog box appears.
3. Type an optional acknowledgement comment and click OK.
To acknowledge alarms by group, tag, or priority
1. Select the alarm(s).
2. Right -click in the display, point to Ack Others, and then click the appropriate command:
o Click Ack Selected Groups to acknowledge all alarms that belong to the selected alarm
group(s).
o Click Ack Selected Tags to acknowledge alarms for all tags that have the same name(s) as the selected alarm(s).
o Click Ack Selected Priorities to acknowledge all alarms with the same priority or priorities as the selected alarm(s).
The Ack Comment dialog box appears.
3. Type an optional acknowledgement comment and click OK.
Using Alarm and Acknowledgement Comments There are two kinds of comments: alarm comments and acknowledgement comments.
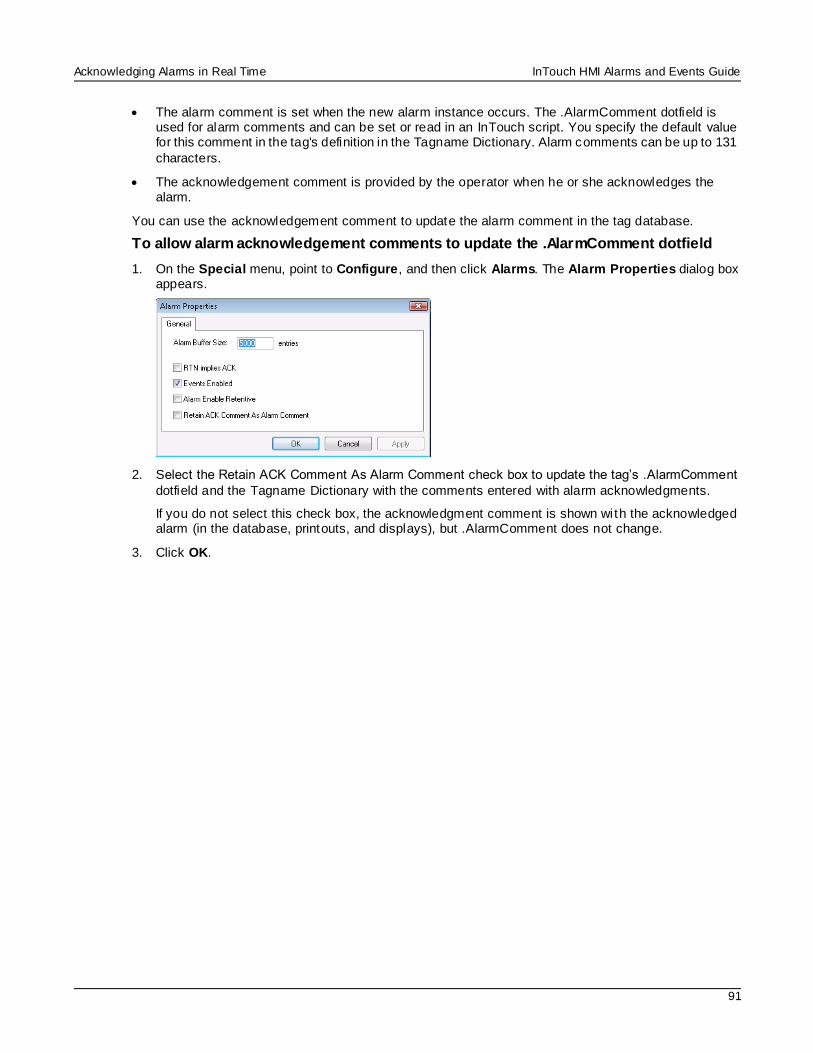
Acknowledging Alarms in Real Time InTouch HMI Alarms and Events Guide
91
The alarm comment is set when the new alarm instance occurs. The .AlarmComment dotfield is used for alarm comments and can be set or read in an InTouch script. You specify the default value for this comment in the tag's definition in the Tagname Dictionary. Alarm comments can be up to 131
characters.
The acknowledgement comment is provided by the operator when he or she acknowledges the alarm.
You can use the acknowledgement comment to update the alarm comment in the tag database.
To allow alarm acknowledgement comments to update the .AlarmComment dotfield
1. On the Special menu, point to Configure, and then click Alarms. The Alarm Properties dialog box appears.
2. Select the Retain ACK Comment As Alarm Comment check box to update the tag’s .AlarmComment
dotfield and the Tagname Dictionary with the comments entered with alarm acknowledgments.
If you do not select this check box, the acknowledgment comment is shown wi th the acknowledged alarm (in the database, printouts, and displays), but .AlarmComment does not change.
3. Click OK.

InTouch HMI Alarms and Events Guide
93
In This Chapter
About Controlling Alarm Properties of Tags and Groups at Run Time ............................................... 93 Determining if Tags or Alarm Groups are in anAlarm Condition........................................................ 97 Reverting Alarm Status Handling to InTouch 7.1 Behavior ............................................................. 106
Determining if Alarm Limits Are Set for Tags................................................................................. 107 Enabling and Disabling Alarms for a Tag or Alarm Group .............................................................. 111 Changing a Tag's Alarm Limits .................................................................................................... 124
Changing a Tag's Alarm Deadbands ............................................................................................ 129 Changing the Alarm Comment Associated with a Tag ................................................................... 130 Associating User-Defined Information with an Alarm Instance........................................................ 130
Determining the Inhibitor Tag of a Tag or Alarm Group.................................................................. 132 Counting the Number of Active or Unacknowledged Alarms........................................................... 138
About Controlling Alarm Properties of Tags and Groups at
Run Time You can use alarm dotfields to dynamically manage alarm conditions. Many of these dot fields are accessible using I/O, expressions, and scripts. Through I/O access, you can monitor and control a specific tag’s alarm information using other Windows applications, such as Excel, or WindowViewer
running on a remote node.
To access dotfields associated with a tag, use this syntax:
tag.dot field
For example, if you want to allow run-time changes to the HiHi alarm limit on a tag named Analog_tag, you can create an Analog - User Input touch link to a button and enter Analog_tag.HiHiLimit as the expression in the link’s dialog box. During run time, the operator simply clicks the button and types in a
new value for the HiHi alarm limit assigned to the Analog_tag.
The following table briefly describes each alarm dotfield.
Dotfield Description
.Ack Monitors/controls the alarm acknowledgment status of tags and alarm groups.
.Ack has an inverse tag dot field called .UnAck. When an unacknowledged alarm occurs, .UnAck is set to 1. The .UnAck dot field can be used in
animation links or condition scripts to trigger annunciators for any unacknowledged alarms.
.AckDev Monitors/controls the alarm acknowledgment status of deviation type alarms active on an analog tag or alarm group.
CHAPTER 6
Controlling Alarm Properties of Tags and
Groups at Run Time
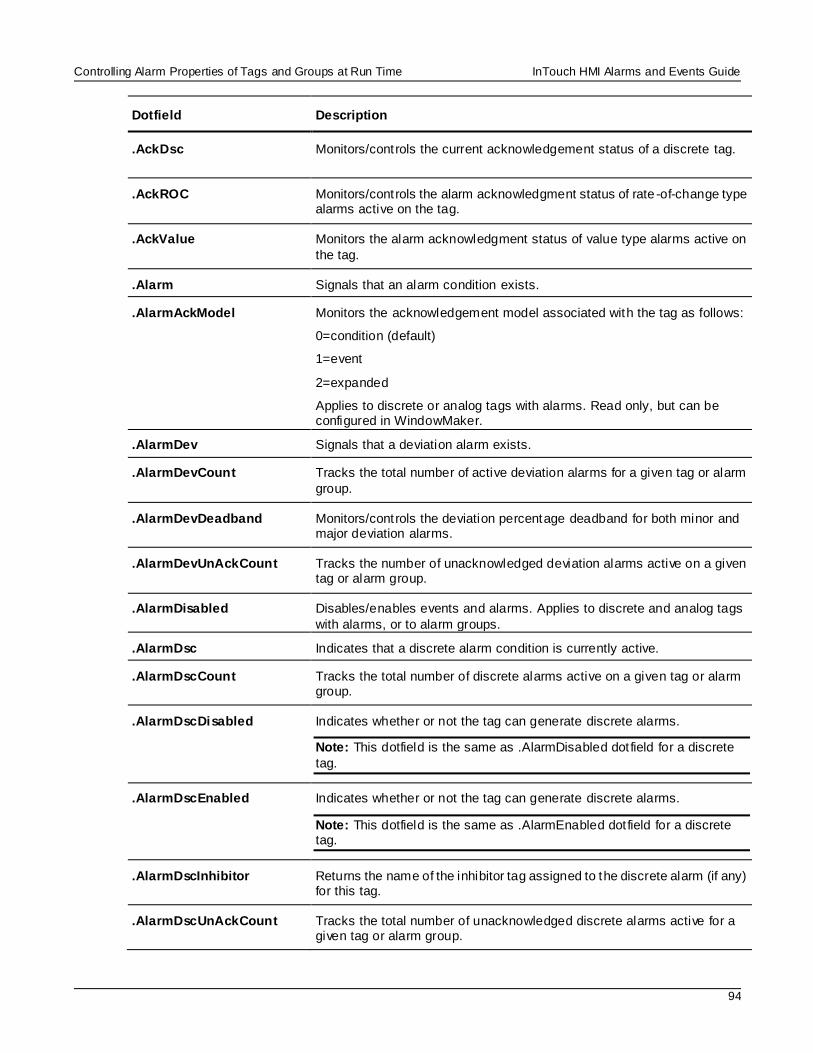
Controlling Alarm Properties of Tags and Groups at Run Time InTouch HMI Alarms and Events Guide
94
Dotfield Description
.AckDsc Monitors/controls the current acknowledgement status of a discrete tag.
.AckROC Monitors/controls the alarm acknowledgment status of rate -of-change type alarms active on the tag.
.AckValue Monitors the alarm acknowledgment status of value type alarms active on
the tag.
.Alarm Signals that an alarm condition exists.
.AlarmAckModel Monitors the acknowledgement model associated with the tag as follows:
0=condition (default)
1=event
2=expanded
Applies to discrete or analog tags with alarms. Read only, but can be configured in WindowMaker.
.AlarmDev Signals that a deviation alarm exists.
.AlarmDevCount Tracks the total number of active deviation alarms for a given tag or alarm
group.
.AlarmDevDeadband Monitors/controls the deviation percentage deadband for both minor and major deviation alarms.
.AlarmDevUnAckCount Tracks the number of unacknowledged deviation alarms active on a given tag or alarm group.
.AlarmDisabled Disables/enables events and alarms. Applies to discrete and analog tags
with alarms, or to alarm groups.
.AlarmDsc Indicates that a discrete alarm condition is currently active.
.AlarmDscCount Tracks the total number of discrete alarms active on a given tag or alarm group.
.AlarmDscDisabled Indicates whether or not the tag can generate discrete alarms.
Note: This dotfield is the same as .AlarmDisabled dot field for a discrete
tag.
.AlarmDscEnabled Indicates whether or not the tag can generate discrete alarms.
Note: This dotfield is the same as .AlarmEnabled dot field for a discrete tag.
.AlarmDscInhibitor Returns the name of the inhibitor tag assigned to the discrete alarm (if any) for this tag.
.AlarmDscUnAckCount Tracks the total number of unacknowledged discrete alarms active for a given tag or alarm group.
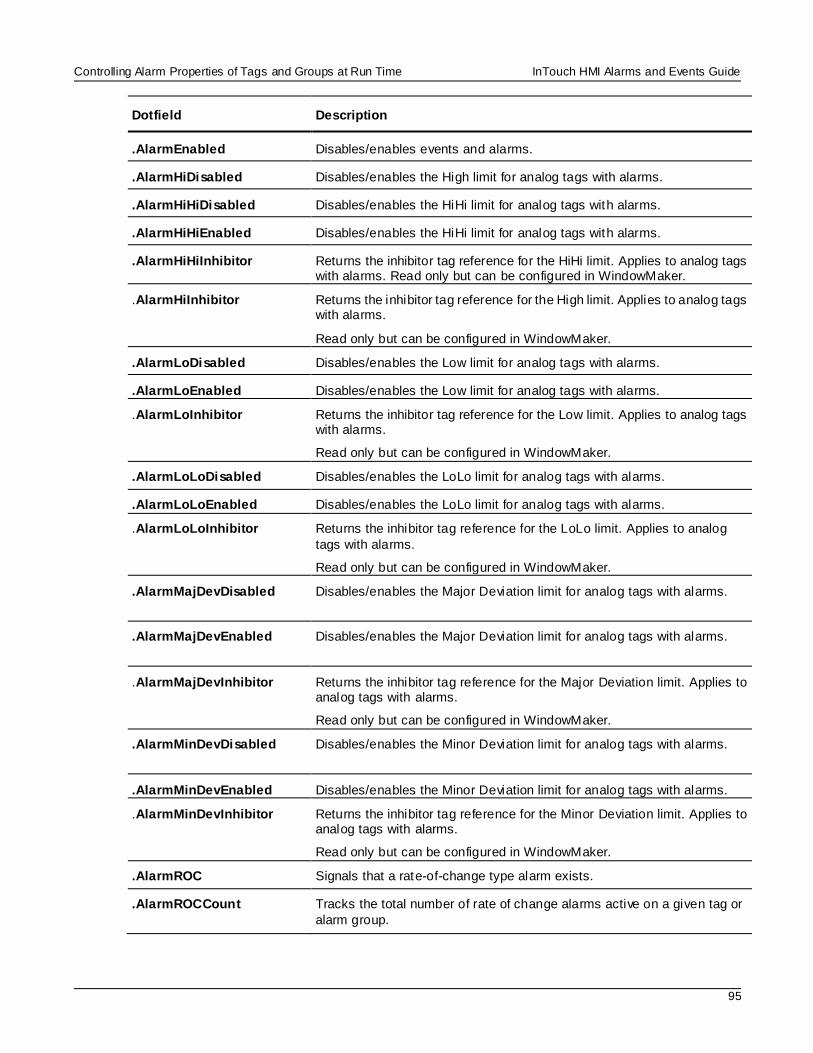
Controlling Alarm Properties of Tags and Groups at Run Time InTouch HMI Alarms and Events Guide
95
Dotfield Description
.AlarmEnabled Disables/enables events and alarms.
.AlarmHiDisabled Disables/enables the High limit for analog tags with alarms.
.AlarmHiHiDisabled Disables/enables the HiHi limit for analog tags with alarms.
.AlarmHiHiEnabled Disables/enables the HiHi limit for analog tags with alarms.
.AlarmHiHiInhibitor Returns the inhibitor tag reference for the HiHi limit. Applies to analog tags with alarms. Read only but can be configured in WindowMaker.
.AlarmHiInhibitor Returns the inhibitor tag reference for the High limit. Applies to analog tags with alarms.
Read only but can be configured in WindowMaker.
.AlarmLoDisabled Disables/enables the Low limit for analog tags with alarms.
.AlarmLoEnabled Disables/enables the Low limit for analog tags with alarms.
.AlarmLoInhibitor Returns the inhibitor tag reference for the Low limit. Applies to analog tags with alarms.
Read only but can be configured in WindowMaker.
.AlarmLoLoDisabled Disables/enables the LoLo limit for analog tags with alarms.
.AlarmLoLoEnabled Disables/enables the LoLo limit for analog tags with alarms.
.AlarmLoLoInhibitor Returns the inhibitor tag reference for the LoLo limit. Applies to analog
tags with alarms.
Read only but can be configured in WindowMaker.
.AlarmMajDevDisabled Disables/enables the Major Deviation limit for analog tags with alarms.
.AlarmMajDevEnabled Disables/enables the Major Deviation limit for analog tags with alarms.
.AlarmMajDevInhibitor Returns the inhibitor tag reference for the Major Deviation limit. Applies to analog tags with alarms.
Read only but can be configured in WindowMaker.
.AlarmMinDevDisabled Disables/enables the Minor Deviation limit for analog tags with alarms.
.AlarmMinDevEnabled Disables/enables the Minor Deviation limit for analog tags with alarms.
.AlarmMinDevInhibitor Returns the inhibitor tag reference for the Minor Deviation limit. Applies to analog tags with alarms.
Read only but can be configured in WindowMaker.
.AlarmROC Signals that a rate-of-change type alarm exists.
.AlarmROCCount Tracks the total number of rate of change alarms active on a given tag or
alarm group.

Controlling Alarm Properties of Tags and Groups at Run Time InTouch HMI Alarms and Events Guide
96
Dotfield Description
.AlarmROCDisabled Disables/enables the rate of change limit for analog tags with alarms.
.AlarmROCEnabled Disables/enables the rate of change limit for analog tags with alarms.
.AlarmROCInhibitor Returns the inhibitor tag reference for the rate of change limit. Applies to
analog tags with alarms.
Read only but can be configured in WindowMaker.
.AlarmROCUnAckCount Tracks the total number of unacknowledged rate of change alarms on a given tag or alarm group.
.AlarmTotalCount Tracks the total number of alarms active for a given tag or alarm group.
.AlarmUnAckCount Tracks the total number of unacknowledged alarms active for a tag or alarm group.
.AlarmUserDefNum1Set Read/write real (floating point), default 0 and value not set. Applies to discrete tags with alarms, to analog tags with alarms, or to alarm groups.
Note: The value of this dot field is attached to the alarm, but ONLY if a value has been set, for example, by a script or a POKE.
.AlarmUserDefNum2 Read/write real (floating point), default 0 and value not set. Applies to discrete tags with alarms, to analog tags with alarms, or to alarm groups.
Note: The value of this dot field is attached to the alarm, but ONLY if a
value has been set, for example, by a script or a POKE.
.AlarmUserDefNum2Set Read/write discrete. TRUE if a script has defined the .AlarmUserDefNum2
for the corresponding tag. To disassociate the value of .AlarmUserDefNum2 for the tag, set this dotfield to FALSE. The default is FALSE.
.AlarmUserDefStr Read/write text string, default "" and value not set.
Applies to discrete tags with alarms, to analog tags with alarms, or to alarm groups.
Note: The value of this dot field is attached to the alarm, but ONLY if a
value has been set, for example, by a script or a POKE.
.AlarmUserDefStrSet Read/write discrete. TRUE if a script has defined the .AlarmUserDefStr for
the corresponding tag. To disassociate the value of .AlarmUserDefStr for the tag, set this dotfield to FALSE. The default is FALSE.
.AlarmValDeadband Monitors/controls the value of an alarm’s value deadband.
.AlarmValueCount Tracks the total number of value alarms active on a given tagname or
alarm group.
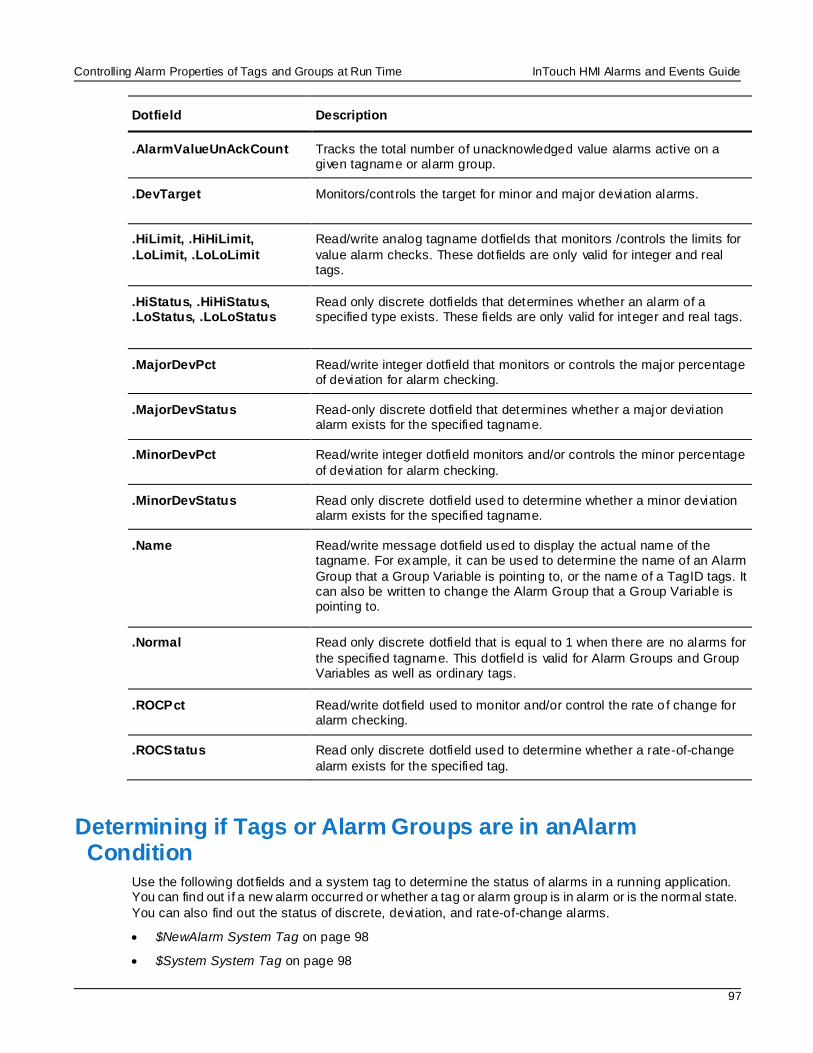
Controlling Alarm Properties of Tags and Groups at Run Time InTouch HMI Alarms and Events Guide
97
Dotfield Description
.AlarmValueUnAckCount Tracks the total number of unacknowledged value alarms active on a given tagname or alarm group.
.DevTarget Monitors/controls the target for minor and major deviation alarms.
.HiLimit, .HiHiLimit,
.LoLimit, .LoLoLimit
Read/write analog tagname dotfields that monitors /controls the limits for
value alarm checks. These dot fields are only valid for integer and real tags.
.HiStatus, .HiHiStatus,
.LoStatus, .LoLoStatus Read only discrete dotfields that determines whether an alarm of a specified type exists. These fields are only valid for integer and real tags.
.MajorDevPct Read/write integer dotfield that monitors or controls the major percentage of deviation for alarm checking.
.MajorDevStatus Read-only discrete dotfield that determines whether a major deviation alarm exists for the specified tagname.
.MinorDevPct Read/write integer dotfield monitors and/or controls the minor percentage
of deviation for alarm checking.
.MinorDevStatus Read only discrete dotfield used to determine whether a minor deviation alarm exists for the specified tagname.
.Name Read/write message dot field used to display the actual name of the tagname. For example, it can be used to determine the name of an Alarm
Group that a Group Variable is pointing to, or the name of a TagID tags. It can also be written to change the Alarm Group that a Group Variable is pointing to.
.Normal Read only discrete dotfield that is equal to 1 when there are no alarms for
the specified tagname. This dotfield is valid for Alarm Groups and Group Variables as well as ordinary tags.
.ROCPct Read/write dot field used to monitor and/or control the rate o f change for alarm checking.
.ROCStatus Read only discrete dotfield used to determine whether a rate-of-change
alarm exists for the specified tag.
Determining if Tags or Alarm Groups are in anAlarm Condition
Use the following dot fields and a system tag to determine the status of alarms in a running application. You can find out i f a new alarm occurred or whether a tag or alarm group is in alarm or is the normal state.
You can also find out the status of discrete, deviation, and rate-of-change alarms.
$NewAlarm System Tag on page 98
$System System Tag on page 98
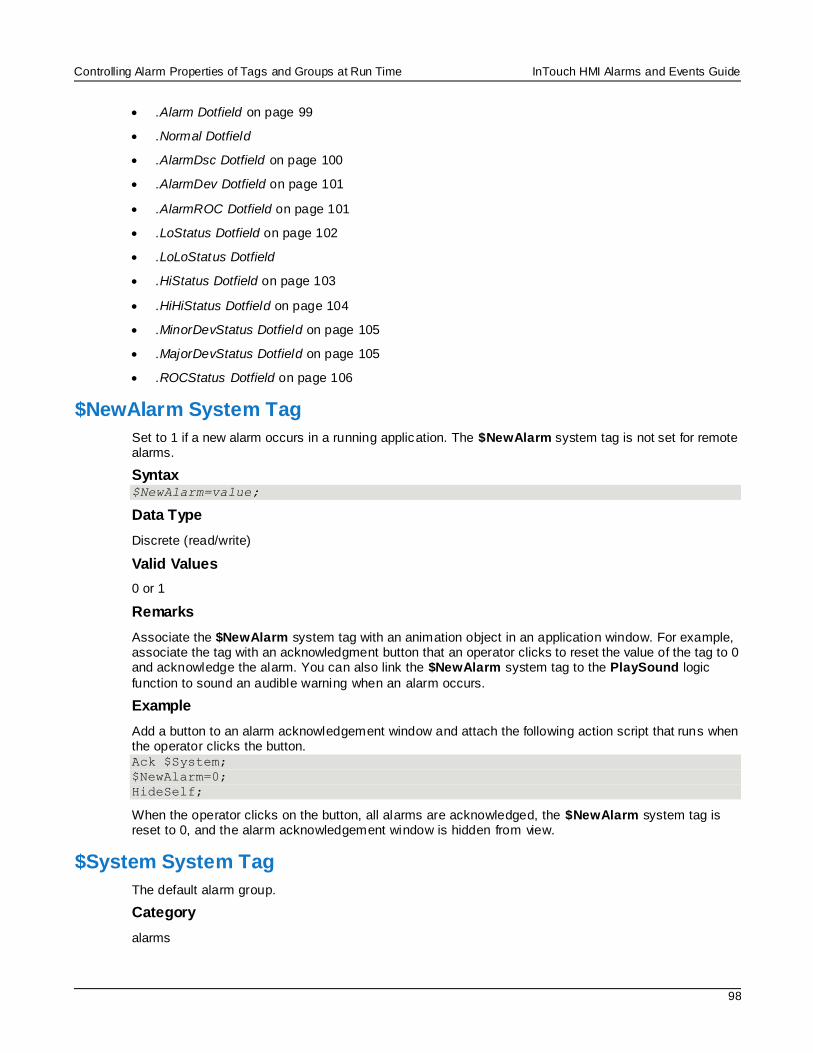
Controlling Alarm Properties of Tags and Groups at Run Time InTouch HMI Alarms and Events Guide
98
.Alarm Dotfield on page 99
.Normal Dotfield
.AlarmDsc Dotfield on page 100
.AlarmDev Dotfield on page 101
.AlarmROC Dotfield on page 101
.LoStatus Dotfield on page 102
.LoLoStatus Dotfield
.HiStatus Dotfield on page 103
.HiHiStatus Dotfield on page 104
.MinorDevStatus Dotfield on page 105
.MajorDevStatus Dotfield on page 105
.ROCStatus Dotfield on page 106
$NewAlarm System Tag
Set to 1 if a new alarm occurs in a running application. The $NewAlarm system tag is not set for remote alarms.
Syntax $NewAlarm=value;
Data Type
Discrete (read/write)
Valid Values
0 or 1
Remarks
Associate the $NewAlarm system tag with an animation object in an application window. For example, associate the tag with an acknowledgment button that an operator clicks to reset the value of the tag to 0 and acknowledge the alarm. You can also link the $NewAlarm system tag to the PlaySound logic
function to sound an audible warning when an alarm occurs.
Example
Add a button to an alarm acknowledgement window and attach the following action script that runs when the operator clicks the button. Ack $System;
$NewAlarm=0;
HideSelf;
When the operator clicks on the button, all alarms are acknowledged, the $NewAlarm system tag is reset to 0, and the alarm acknowledgement window is hidden from view.
$System System Tag
The default alarm group.
Category
alarms
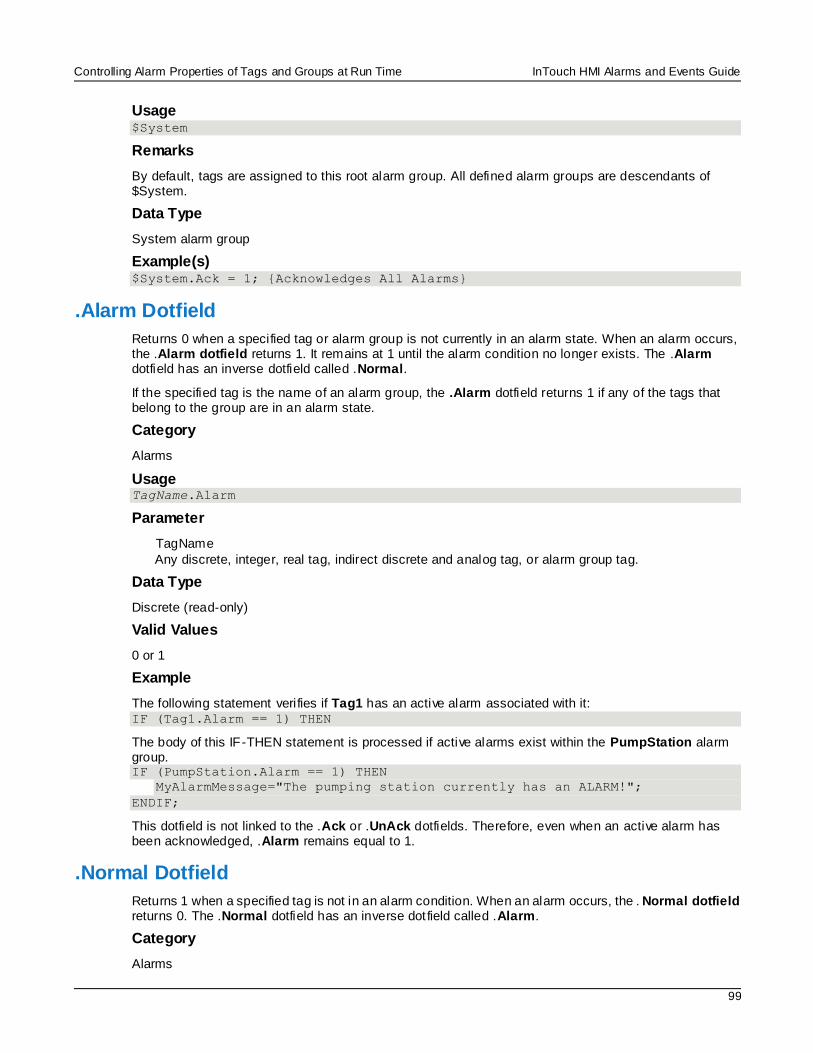
Controlling Alarm Properties of Tags and Groups at Run Time InTouch HMI Alarms and Events Guide
99
Usage $System
Remarks
By default, tags are assigned to this root alarm group. All defined alarm groups are descendants of $System.
Data Type
System alarm group
Example(s) $System.Ack = 1; {Acknowledges All Alarms}
.Alarm Dotfield
Returns 0 when a specified tag or alarm group is not currently in an alarm state. When an alarm occurs, the .Alarm dotfield returns 1. It remains at 1 until the alarm condition no longer exists. The .Alarm dotfield has an inverse dotfield called .Normal.
If the specified tag is the name of an alarm group, the .Alarm dotfield returns 1 if any of the tags that belong to the group are in an alarm state.
Category
Alarms
Usage TagName.Alarm
Parameter
TagName
Any discrete, integer, real tag, indirect discrete and analog tag, or alarm group tag.
Data Type
Discrete (read-only)
Valid Values
0 or 1
Example
The following statement verifies if Tag1 has an active alarm associated with it: IF (Tag1.Alarm == 1) THEN
The body of this IF-THEN statement is processed if active alarms exist within the PumpStation alarm group. IF (PumpStation.Alarm == 1) THEN
MyAlarmMessage="The pumping station currently has an ALARM!";
ENDIF;
This dotfield is not linked to the .Ack or .UnAck dotfields. Therefore, even when an active alarm has been acknowledged, .Alarm remains equal to 1.
.Normal Dotfield
Returns 1 when a specified tag is not in an alarm condition. When an alarm occurs, the . Normal dotfield returns 0. The .Normal dotfield has an inverse dot field called .Alarm.
Category
Alarms
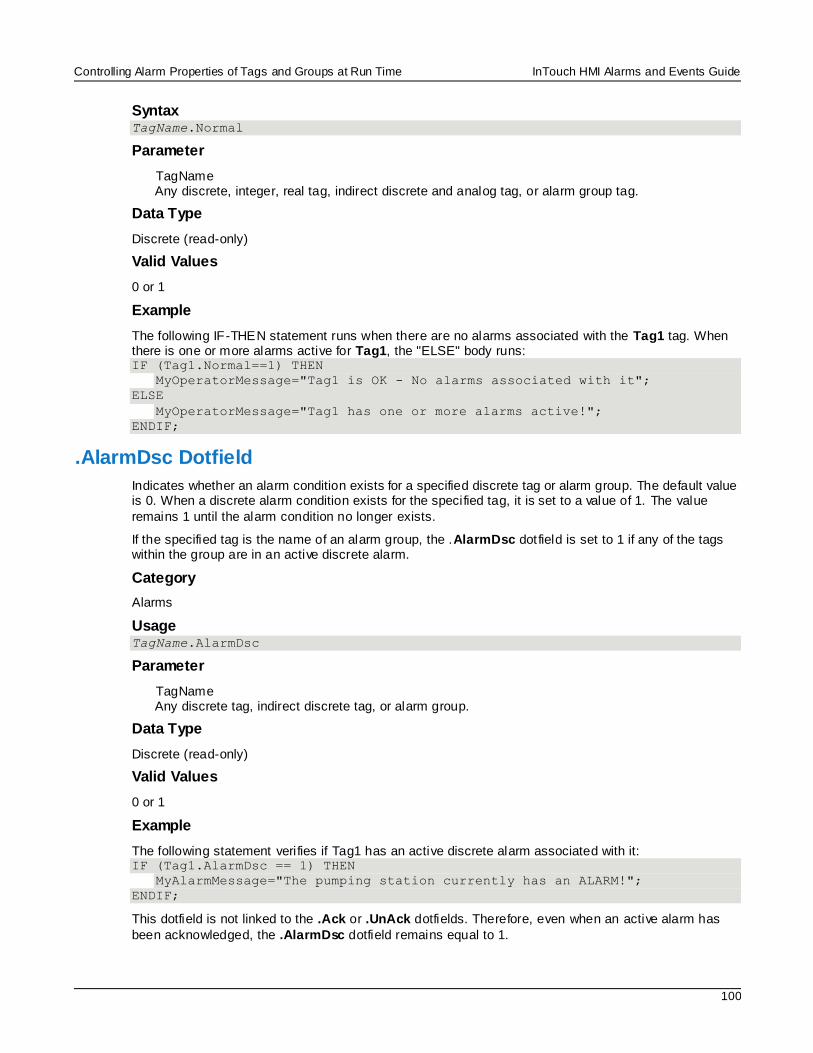
Controlling Alarm Properties of Tags and Groups at Run Time InTouch HMI Alarms and Events Guide
100
Syntax TagName.Normal
Parameter
TagName Any discrete, integer, real tag, indirect discrete and analog tag, or alarm group tag.
Data Type
Discrete (read-only)
Valid Values
0 or 1
Example
The following IF-THEN statement runs when there are no alarms associated with the Tag1 tag. When there is one or more alarms active for Tag1, the "ELSE" body runs: IF (Tag1.Normal==1) THEN
MyOperatorMessage="Tag1 is OK - No alarms associated with it";
ELSE
MyOperatorMessage="Tag1 has one or more alarms active!";
ENDIF;
.AlarmDsc Dotfield
Indicates whether an alarm condition exists for a specified discrete tag or alarm group. The default value is 0. When a discrete alarm condition exists for the specified tag, it is set to a value of 1. The value
remains 1 until the alarm condition no longer exists.
If the specified tag is the name of an alarm group, the .AlarmDsc dot field is set to 1 if any of the tags within the group are in an active discrete alarm.
Category
Alarms
Usage TagName.AlarmDsc
Parameter
TagName Any discrete tag, indirect discrete tag, or alarm group.
Data Type
Discrete (read-only)
Valid Values
0 or 1
Example
The following statement verifies if Tag1 has an active discrete alarm associated with it: IF (Tag1.AlarmDsc == 1) THEN
MyAlarmMessage="The pumping station currently has an ALARM!";
ENDIF;
This dotfield is not linked to the .Ack or .UnAck dotfields. Therefore, even when an active alarm has
been acknowledged, the .AlarmDsc dotfield remains equal to 1.
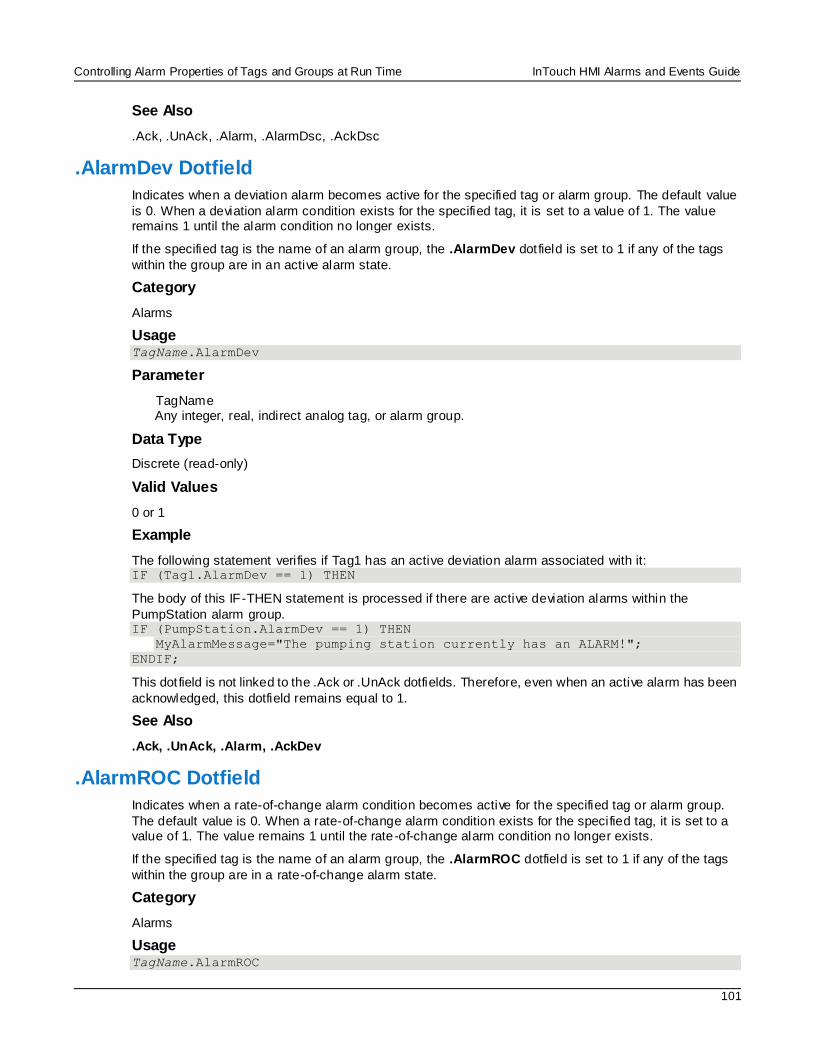
Controlling Alarm Properties of Tags and Groups at Run Time InTouch HMI Alarms and Events Guide
101
See Also
.Ack, .UnAck, .Alarm, .AlarmDsc, .AckDsc
.AlarmDev Dotfield
Indicates when a deviation alarm becomes active for the specified tag or alarm group. The default value
is 0. When a deviation alarm condition exists for the specified tag, it is set to a value of 1. The value remains 1 until the alarm condition no longer exists.
If the specified tag is the name of an alarm group, the .AlarmDev dot field is set to 1 if any of the tags
within the group are in an active alarm state.
Category
Alarms
Usage TagName.AlarmDev
Parameter
TagName Any integer, real, indirect analog tag, or alarm group.
Data Type
Discrete (read-only)
Valid Values
0 or 1
Example
The following statement verifies if Tag1 has an active deviation alarm associated with it: IF (Tag1.AlarmDev == 1) THEN
The body of this IF-THEN statement is processed if there are active deviation alarms within the
PumpStation alarm group. IF (PumpStation.AlarmDev == 1) THEN
MyAlarmMessage="The pumping station currently has an ALARM!";
ENDIF;
This dot field is not linked to the .Ack or .UnAck dotfields. Therefore, even when an active alarm has been
acknowledged, this dotfield remains equal to 1.
See Also
.Ack, .UnAck, .Alarm, .AckDev
.AlarmROC Dotfield
Indicates when a rate-of-change alarm condition becomes active for the specified tag or alarm group.
The default value is 0. When a rate-of-change alarm condition exists for the specified tag, it is set to a value of 1. The value remains 1 until the rate-of-change alarm condition no longer exists.
If the specified tag is the name of an alarm group, the .AlarmROC dotfield is set to 1 if any of the tags
within the group are in a rate-of-change alarm state.
Category
Alarms
Usage TagName.AlarmROC
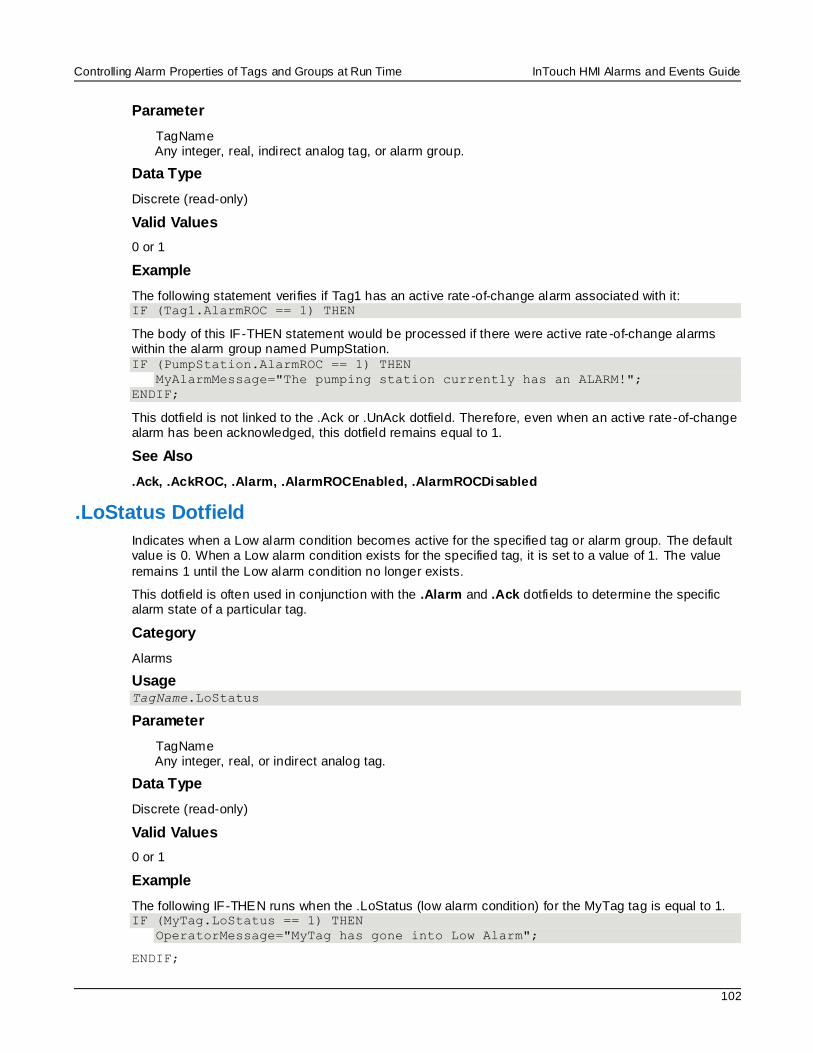
Controlling Alarm Properties of Tags and Groups at Run Time InTouch HMI Alarms and Events Guide
102
Parameter
TagName Any integer, real, indirect analog tag, or alarm group.
Data Type
Discrete (read-only)
Valid Values
0 or 1
Example
The following statement verifies if Tag1 has an active rate -of-change alarm associated with it: IF (Tag1.AlarmROC == 1) THEN
The body of this IF-THEN statement would be processed if there were active rate -of-change alarms within the alarm group named PumpStation. IF (PumpStation.AlarmROC == 1) THEN
MyAlarmMessage="The pumping station currently has an ALARM!";
ENDIF;
This dotfield is not linked to the .Ack or .UnAck dotfield. Therefore, even when an active rate-of-change alarm has been acknowledged, this dotfield remains equal to 1.
See Also
.Ack, .AckROC, .Alarm, .AlarmROCEnabled, .AlarmROCDisabled
.LoStatus Dotfield
Indicates when a Low alarm condition becomes active for the specified tag or alarm group. The default value is 0. When a Low alarm condition exists for the specified tag, it is set to a value of 1. The value
remains 1 until the Low alarm condition no longer exists.
This dotfield is often used in conjunction with the .Alarm and .Ack dotfields to determine the specific alarm state of a particular tag.
Category
Alarms
Usage TagName.LoStatus
Parameter
TagName Any integer, real, or indirect analog tag.
Data Type
Discrete (read-only)
Valid Values
0 or 1
Example
The following IF-THEN runs when the .LoStatus (low alarm condition) for the MyTag tag is equal to 1. IF (MyTag.LoStatus == 1) THEN
OperatorMessage="MyTag has gone into Low Alarm";
ENDIF;
Controlling Alarm Properties of Tags and Groups at Run Time InTouch HMI Alarms and Events Guide
103
See Also
.Alarm, .AlarmValue, .Ack, .LoLimit, .LoSet, .AlarmDisabled, .AlarmEnabled, .AlarmLoDisabled,
.AlarmLoEnabled, .AlarmLoInhibitor
.LoLoStatus Dotfield
Indicates when a LoLo alarm condition becomes active for the specified tag or alarm group. The default value is 0. When a LoLo alarm condition exists for the specified tag, it is set to a value of 1. The value remains 1 until the LoLo alarm condition no longer exists.
This dotfield is often used in conjunction with the .Alarm and .Ack dotfields to determine the exact nature of the alarm status of a particular tag within the system.
Category
Alarms
Usage TagName.LoLoStatus
Parameter
TagName
Any integer, real, or indirect analog tag.
Data Type
Discrete (read-only)
Valid Values
0 or 1
Example
The following IF-THEN statement runs when the .LoLoStatus (LoLo alarm limit) for the MyTag tag is equal to 1. IF (MyTag.LoLoStatus == 1) THEN
OperatorMessage="MyTag has gone into LoLo Alarm";
ENDIF;
See Also
.Alarm, .AlarmValue, .Ack, .LoLoLimit, .LoLoSet, .AlarmDisabled, .AlarmEnabled, .AlarmLoLoDisabled,
.AlarmLoLoEnabled, .AlarmLoLoInhibitor
.HiStatus Dotfield
Indicates when a High alarm condition becomes active for the specified tag or alarm group. The default value is 0. When a High alarm condition exists for the specified tag, it is set to a value of 1. The value
remains 1 until the High alarm condition no longer exists.
This dotfield is often used in conjunction with the .Alarm and .Ack dotfields to determine the specific alarm state of a tag.
Category
Alarms
Usage TagName.HiStatus
Controlling Alarm Properties of Tags and Groups at Run Time InTouch HMI Alarms and Events Guide
104
Parameter
TagName Any integer, real, or indirect analog tag.
Data Type
Discrete (read-only)
Valid Values
0 or 1
Example
This script calls another script to stop a pump motor output if the MotorAmps tag goes into high limit alarm status. IF (MotorAmps.HiStatus == 1) THEN
CALL PumpShutdown( );
ENDIF;
See Also
.Alarm, .AlarmValue, .Ack, .HiLimit, .HiSet, .AlarmDisabled, .AlarmEnabled, .AlarmHiDisabled,
.AlarmHiEnabled, .AlarmHiInhibitor
.HiHiStatus Dotfield
Indicates when a HiHi alarm condition becomes active for the specified tag or alarm group. The default
value is 0. When a HiHi alarm condition exists for the specified tag, it is set to a value of 1. The value remains 1 until the HiHi alarm condition no longer exists.
This dotfield is often used in conjunction with the .Alarm and .Ack dotfields to determine the specific
alarm state of a tag.
Category
Alarms
Usage TagName.HiHiStatus
Parameter
TagName Any integer, real, or indirect analog tag.
Data Type
Discrete (read-only)
Valid Values
0 or 1
Example
The following IF-THEN statement runs when the .HiHiStatus (HiHi alarm) for the MyTag tag is 1. IF (MyTag.HiHiStatus == 1) THEN
OperatorMessage="MyTag has gone into HiHi Alarm";
ENDIF;
See Also
.Alarm, .AlarmValue, .Ack, .HiHiLimit, .HiHiSet, .AlarmDisabled, .AlarmEnabled, .AlarmHiHiDisabled,
.AlarmHiHiEnabled, .AlarmHiHiInhibitor
Controlling Alarm Properties of Tags and Groups at Run Time InTouch HMI Alarms and Events Guide
105
.MinorDevStatus Dotfield
Indicates when a minor deviation alarm becomes active for the specified tag or alarm group. The default
value is 0. When a minor deviation alarm condition exists for the specified tag, it is set to a value of 1. The value remains 1 until the minor deviation alarm condition no longer exists.
This dotfield is often used in conjunction with the .Alarm and .Ack dotfields to determine the specific
alarm state of a tag.
Category
Alarms
Usage TagName.MinorDevStatus
Parameter
TagName Any integer, real, or indirect analog tag.
Data Type
Discrete (read-only)
Valid Values
0 or 1
Example
The following IF-THEN statement runs when the .MinorDevStatus (minor deviation alarm) for the tag MyTag is equal to 1. IF (MyTag.MinorDevStatus == 1) THEN
OperatorMessage="MyTag has gone into a Minor Deviation Alarm";
ENDIF;
See Also
.AckDev, .AlarmDev, .AlarmMinDevDisabled, .AlarmMinDevEnabled, .AlarmMinDevInhibitor,
.MinorDevPct, .MajorDevStatus
.MajorDevStatus Dotfield
Indicates when a major deviation alarm becomes active for the specified tag or alarm group. The de fault value is 0. When a major deviation alarm condition exists, the specified dotfield is set to 1. The value remains 1 until the major deviation alarm condition no longer exists.
This dotfield is often used in conjunction with the .Alarm and .Ack dotfields to determine the specific alarm state of a tag.
Category
Alarms
Usage TagName.MajorDevStatus
Parameter
TagName
Any integer, real, or indirect analog tag.
Data Type
Discrete (read-only)
Controlling Alarm Properties of Tags and Groups at Run Time InTouch HMI Alarms and Events Guide
106
Valid Values
0 or 1
Example
The following IF-THEN statement runs when the .MajorDevStatus (Major deviation alarm) for the MyTag tag is equal to 1. IF (MyTag.MajorDevStatus == 1) THEN
OperatorMessage="MyTag has gone into a Major Deviation Alarm";
ENDIF;
See Also
.AckDev, .AlarmDev, .AlarmMajDevDisabled, .AlarmMajDevEnabled, .AlarmMajDevInhibitor,
.MajorDevPct, .MajorDevSet, .MinorDevStatus
.ROCStatus Dotfield
Indicates when a rate-of-change alarm becomes active for the specified tag or alarm group. The default value is 0. When a rate-of-change alarm condition exists for the specified tag, it is set to a value of 1. The value remains 1 until the rate-of-change alarm condition no longer exists.
This dotfield is often used in conjunction with the .Alarm and .Ack dotfields to determine the specific alarm state of a tag.
Category
Alarms
Usage TagName.ROCStatus
Parameter
TagName
Any integer, real, or indirect analog tag.
Data Type
Discrete (read-only)
Valid Values
0 or 1
Example
The following IF-THEN statement runs when the .ROCStatus (rate-of-change alarm) for the MyTag tag is
equal to 1. IF (MyTag.ROCStatus == 1) THEN
OperatorMessage="MyTag has gone into a Rate-Of-Change alarm";
ENDIF;
See Also
.ROCPct, .ROCSet
Reverting Alarm Status Handling to InTouch 7.1 Behavior For InTouch 7.11 and later, the default behavior when a HiHi, LoLo, MinDev, or MajDev alarm occurs is to reset the In Alarm, ACK, and $NewAlarm status of Hi, Lo, MajDev, or MinDev alarms, respectively. For InTouch 7.1 and older versions, these alarm statuses were not affected by the occurence of a HiHi, LoLo,
MinDev, or MajDev alarm.
Controlling Alarm Properties of Tags and Groups at Run Time InTouch HMI Alarms and Events Guide
107
To support legacy applications that expect Hi, Lo, MajDev, or MinDev alarms to maintain their In Alarm, ACK, and $NewAlarm status despite the occurrence of the other alarms, the InTo uch.ini file can include an IT71StatusFlag parameter.
To force the alarm handling to operate as it did in InTouch 7.1 and older versions
Enter the following line in the InTouch.ini file: IT71StatusFlags=1
To change the alarm handling back to the default operation for InTouch 7.11 and later
Enter the following line in the InTouch.ini file: IT71StatusFlags=0
For more information about how to edit the InTouch.ini file to configure this and other InTouch operating
parameters, see the InTouch HMI Application Management and Extension Guide.
Determining if Alarm Limits Are Set for Tags The following dot fields indicate whether alarm limits are set for a tag while a n application is running.
.LoLoSet Dotfield on page 107
.LoSet Dotfield on page 108
.HiSet Dotfield on page 108
.HiHiSet Dotfield on page 109
.MinorDevSet Dotfield on page 109
.MajorDevSet Dotfield on page 110
.ROCSet Dotfield on page 110
.LoLoSet Dotfield
Indicates whether a LoLo alarm limit has been set for an integer or real tag.
Category
Alarms
Usage TagName.LoLoSet
Parameter
TagName Any integer, real, or indirect analog tag.
Data Type
Discrete (read-only)
Valid Values
0 or 1
Example
The THEN block executes if the LoLo alarm limit is set for the MyTag tag: IF (MyTag.LoLoSet== 1) THEN
MsgTag="LoLo alarm limit has been set for MyTag";
ENDIF;
Controlling Alarm Properties of Tags and Groups at Run Time InTouch HMI Alarms and Events Guide
108
See Also
.Alarm, .AlarmValue, .Ack, .LoLoStatus, .LoLoLimit, .AlarmDisabled, .AlarmEnabled,
.AlarmLoLoDisabled, .AlarmLoLoEnabled, .AlarmLoLoInhibitor
.LoSet Dotfield
Indicates whether a Low alarm limit has been set for an integer or real tag.
Category
Alarms
Usage TagName.LoSet
Parameter
TagName Any integer, real, or indirect analog tag.
Data Type
Discrete (read-only)
Valid Values
0 or 1
Example
The THEN block executes if the Low alarm limit is set for the MyTag tag: IF (MyTag.LoSet== 1) THEN
MsgTag="Low alarm limit has been set for MyTag";
ENDIF;
See Also
.Alarm, .AlarmValue, .Ack, .LoStatus, .LoLimit, .AlarmDisabled, .AlarmEnabled, .AlarmLoDisabled,
.AlarmLoEnabled, .AlarmLoInhibitor
.HiSet Dotfield
Indicates whether a High alarm limit has been set for an integer or real tag.
Category
Alarms
Usage TagName.HiSet
Parameter
TagName Any integer, real, or indirect analog tag.
Data Type
Discrete (read-only)
Valid Values
0 or 1
Example
The THEN block executes if the High alarm limit is set for the MyTag tag:
Controlling Alarm Properties of Tags and Groups at Run Time InTouch HMI Alarms and Events Guide
109
IF (MyTag.HiSet== 1) THEN
MsgTag="High alarm limit has been set for MyTag";
ENDIF;
See Also
.Alarm, .AlarmValue, .Ack, .HiHiStatus, .HiHiLimit, .AlarmDisabled, .AlarmEnabled, .AlarmHiHiDisabled,
.AlarmHiHiEnabled, .AlarmHiHiInhibitor
.HiHiSet Dotfield
Indicates whether a HiHi alarm limit has been set for an integer or real tag.
Category
Alarms
Usage TagName.HiHiSet
Parameter
TagName
Any integer, real, or indirect analog tag.
Data Type
Discrete (read-only)
Valid Values
0 or 1
Example
The THEN block executes if the HiHi alarm limit is set for the MyTag tag: IF (MyTag.HiHiSet== 1) THEN
MsgTag="HiHi alarm limit has been set for MyTag";
ENDIF;
See Also
.Alarm, .AlarmValue, .Ack, .HiHiStatus, .HiHiLimit, .AlarmDisabled, .AlarmEnabled, .AlarmHiHiDisabled,
.AlarmHiHiEnabled, .AlarmHiHiInhibitor
.MinorDevSet Dotfield
Indicates whether a minor deviation alarm limit has been set for an integer or real tag.
Category
Alarms
Usage TagName.MinorDevSet
Parameter
TagName Any integer, real, or indirect analog tag.
Data Type
Discrete (read-only)
Valid Values
0 or 1
Controlling Alarm Properties of Tags and Groups at Run Time InTouch HMI Alarms and Events Guide
110
Example
The THEN block executes if the minor deviation percentage alarm limit is set for the MyTag tag: IF (MyTag.MinorDevSet== 1) THEN
MsgTag="Minor deviation alarm limit has been set for MyTag";
ENDIF;
See Also
.AckDev, .AlarmDev, .AlarmMinDevDisabled, .AlarmMinDevEnabled, .AlarmMinDevInhibitor,
.MinorDevPct, .MinorDevStatus
.MajorDevSet Dotfield
Indicates whether a major deviation alarm limit has been set for an integer or real tag.
Category
Alarms
Usage TagName.MajorDevSet
Parameter
TagName
Any integer, real, or indirect analog tag.
Data Type
Discrete (read-only)
Valid Values
0 or 1
Example
The THEN block executes if the major deviation percentage alarm limit is set for the MyTag tag: IF (MyTag.MajorDevSet== 1) THEN
MsgTag="Major deviation alarm limit has been set for MyTag";
ENDIF;
See Also
.AckDev, .AlarmDev, .AlarmMajDevDisabled, .AlarmMajDevEnabled, .AlarmMajDevInhibitor,
.MajorDevPct, .MajorDevStatus
.ROCSet Dotfield
Indicates whether a rate-of-change alarm limit has been set for an integer or real tag.
Category
Alarms
Usage TagName.ROCSet
Parameter
TagName Any integer, real, or indirect analog tag.
Data Type
Discrete (read-only)
Controlling Alarm Properties of Tags and Groups at Run Time InTouch HMI Alarms and Events Guide
111
Valid Values
0 or 1
Example
The THEN block executes if the rate-of-change alarm limit is set for the MyTag tag: IF (MyTag.ROCSet == 1) THEN
MsgTag="Rate-of-change alarm limit has been set for MyTag";
ENDIF;
See Also
.Alarm, .Ack, .LoLimit, .LoLoLimit, .HiHiLimit, .HiLimit, .HiSet, .LoSet, .LoLoSet, .HiStatus, .HiHiStatus,
.ROCPct, .ROCStatus
Enabling and Disabling Alarms for a Tag or Alarm Group The InTouch HMI provides a set of dotfields that can enable or disable alarms that are set for a tag while
an application is running.
Enabling/Disabling All Alarms
The .AlarmEnabled and .AlarmDisabled dotfields enable or disable alarms for a tag or alarm group based upon their respective values. The alarm states associated with both dotfields are the inverse of
each other. In the case of .AlarmEnabled, a value of 1 enables alarms for a tag or alarm group. An .AlarmDisabled value of 1 disables alarms for a tag or alarm group.
When either dot field enables alarms for an alarm group, all tags that belong to the group have alarming
enabled. When either dot field disables alarms, all events and alarms are ignored. The alarms are not stored in alarm memory, nor are they written to disk.
.AlarmEnabled Dotfield
Enables or disables alarms for a tag or an alarm group.
Category
Alarms
Usage TagName.AlarmEnabled
Parameter
TagName Any discrete, integer, real, indirect discrete, indirect analog tag, or alarm group.
Remarks
When .AlarmEnabled is set to 0, all events and alarms are ignored. They are not stored in alarm memory, nor are they written to disk. It is very important to re-enable events/alarms, whenever possible, to avoid data loss.
When the specified tag is an alarm group, all alarms associated with the tags within the specified alarm group are enabled.
Data Type
Discrete (read/write)
Valid Values
0 = Disable alarms
Controlling Alarm Properties of Tags and Groups at Run Time InTouch HMI Alarms and Events Guide
112
1 = Enable alarms (default )
Example
The following example disables the alarms of the Tag1 tag: Tag1.AlarmEnabled=0;
See Also
.AlarmDisabled
.AlarmDisabled Dotfield
Enables or disables alarms for a tag or an alarm group.
Category
Alarms
Usage TagName.AlarmDisabled
Parameter
TagName
Any discrete, integer, real, indirect discrete, indirect analog tag, or alarm group.
Remarks
When .AlarmDisabled is set to 1, all events and alarms are ignored. They are not stored in alarm memory, nor are they written to disk. It is very important to re-enable events/alarms, whenever possible, to avoid data loss.
When the specified tag is an alarm group, all alarms associated with the tags within the specified alarm group are disabled.
This is the opposite of the .AlarmEnabled dotfield.
Example
The following example enables the alarms of the Tag1 tag. Tag1.AlarmDisabled=0;
See Also
.AlarmEnabled
Enabling/Disabling LoLo Alarms
The .AlarmLoLoEnabled and .AlarmLoLoDisabled dotfields enable or disable LoLo alarms for a tag or
alarm group based upon their respective values. The LoLo alarm states associated with both dot fields are the inverse of each other. In the case of .AlarmLoLoEnabled, a value of 1 enables LoLo alarms for a tag or alarm group. An .AlarmLoLoDisabled value of 1 disables LoLo alarms for a tag or alarm group.
When either dot field enables LoLo alarms for an alarm group, all tags that belong to the group have LoLo alarms enabled. When either dotfield disables LoLo alarms, all LoLo alarms are ignored. The alarms are not stored in alarm memory, nor are they written to disk.
.AlarmLoLoEnabled Dotfield
Enables or disables LoLo condition events and alarms.
Category
Alarms
Controlling Alarm Properties of Tags and Groups at Run Time InTouch HMI Alarms and Events Guide
113
Usage TagName.AlarmLoLoEnabled
Parameter
TagName Any integer, real, indirect analog tag, or alarm group.
Remarks
When .AlarmLoLoEnabled is set to 0, all LoLo condition events and alarms are ignored. They are not stored in alarm memory, nor are they written to disk. It is very important to re-enable events/alarms,
whenever possible, to avoid data loss.
Data Type
Discrete (read/write)
Valid Values
0 = Disable alarms
1 = Enable alarms (default )
Example
The following example disables the LoLo alarms of the Tag1 tag: Tag1.AlarmLoLoEnabled=0;
See Also
.AlarmDisabled, .AlarmEnabled, .AlarmLoLoDisabled
.AlarmLoLoDisabled Dotfield
Enables or disables LoLo condition events and alarms.
Category
Alarms
Usage TagName.AlarmLoLoDisabled
Parameter
TagName Any integer, real, indirect analog tag, or alarm group.
Remarks
When .AlarmLoLoDisabled is set to 1, all LoLo condition events and alarms are ignored. They are not
stored in alarm memory, nor are they written to disk. It is very important to re-enable events/alarms, whenever possible, to avoid data loss.
Data Type
Discrete (read/write)
Valid Values
1 = Disable alarms
0 = Enable alarms (default )
Example
The following example enables LoLo alarms of the Tag2 tag:
Controlling Alarm Properties of Tags and Groups at Run Time InTouch HMI Alarms and Events Guide
114
Tag2.AlarmLoLoDisabled=0;
See Also
.AlarmDisabled, .AlarmEnabled, .AlarmLoLoEnabled
Enabling/Disabling Low Alarms
The .AlarmLoEnabled and .AlarmLoDisabled dotfields enable or disable Low alarms for a tag or alarm
group based upon their respective values. The Low alarm states associated with both dotfields are the inverse of each other. In the case of .AlarmLoEnabled, a value of 1 enables Low alarms for a tag or alarm group. An .AlarmLoDisabled value of 1 disables Low alarms for a tag or alarm group.
When either dot field enables Low alarms for an alarm group, all tags that belong to the group have Low alarms enabled. When either dot field disables Low alarms, all Low alarms are ignored. The alarms are not stored in alarm memory, nor are they written to disk.
.AlarmLoEnabled Dotfield
Enables or disables Low condition events and alarms.
Category
Alarms
Usage TagName.AlarmLoEnabled
Parameter
TagName
Any integer, real, indirect analog tag, or alarm group.
Remarks
When .AlarmLoEnabled is set to 0, all Low condition events and alarms are ignored. They are not stored in alarm memory, nor are they written to disk. It is very important to re-enable events/alarms, whenever possible, to avoid data loss.
Data Type
Discrete (read/write)
Valid Values
0 = Disable alarms
1 = Enable alarms (default )
Example
The following example disables the Low alarms of the Tag1 tag: Tag1.AlarmLoEnabled=0;
See Also
.AlarmDisabled, .AlarmEnabled, .AlarmLoDisabled
.AlarmLoDisabled Dotfield
Enables or disables Low condition events and alarms.
Category
Alarms
Controlling Alarm Properties of Tags and Groups at Run Time InTouch HMI Alarms and Events Guide
115
Usage TagName.AlarmLoDisabled
Parameter
TagName Any integer, real, indirect analog tag, or alarm group.
Remarks
When .AlarmLoDisabled is set to 1, all Low condition events and alarms are ignored. They are not stored in alarm memory, nor are they written to disk. It is very important to re-enable events/alarms, whenever
possible, to avoid data loss.
Data Type
Discrete (read/write)
Valid Values
1 = Disable alarms
0 = Enable alarms (default )
Example
The following example enables Low alarms of the Tag2 tag: Tag2.AlarmLoDisabled=0;
See Also
.AlarmDisabled, .AlarmEnabled, .AlarmLoEnabled
Enabling/Disabling High Alarms
The .AlarmHiEnabled and .AlarmHiDisabled dotfields enable or disable High alarms for a tag or alarm group based upon their respective values. The High alarm states associated with both dotfields are the inverse of each other. In the case of .AlarmHiEnabled, a value of 1 enables High alarms for a tag or
alarm group. An .AlarmHiDisabled value of 1 disables High alarms for a tag or alarm group.
When either dotfield enables High alarms for an alarm group, all tags that belong to the group have High alarms enabled. When either dotfield disables High alarms, all High alarms are ignored. The High alarms
are not stored in alarm memory, nor are they written to disk.
.AlarmHiEnabled Dotfield
Enables or disables High condition events and alarms.
Category
Alarms
Usage TagName.AlarmHiEnabled
Parameter
TagName
Any integer, real, indirect analog tag, or alarm group.
Remarks
When .AlarmHiEnabled is set to 0, all High condition events and alarms are ignored. They are not stored in alarm memory, nor are they written to disk. It is very important to re-enable events/alarms, whenever
possible, to avoid data loss.
Controlling Alarm Properties of Tags and Groups at Run Time InTouch HMI Alarms and Events Guide
116
This is the opposite of the .AlarmHiDisabled dot field.
Data Type
Discrete (read/write)
Valid Values
0 = Disable alarms
1 = Enable alarms (default )
Example
The following example disables the High alarms of the tag Tag1: Tag1.AlarmHiEnabled=0;
See Also
.AlarmHiDisabled, .AlarmEnabled
.AlarmHiDisabled Dotfield
Enables or disables High condition events and alarms.
Category
Alarms
Usage TagName.AlarmHiDisabled
Parameter
TagName Any integer, real, indirect analog tag, or alarm group.
Remarks
When .AlarmHiDisabled is set to 1, all High condition events and alarms are ignored. They are not stored
in alarm memory, nor are they written to disk. It is very important to re-enable events/alarms, whenever possible, to avoid data loss.
This is the opposite of the .AlarmHiEnabled dot field.
Data Type
Discrete (read/write)
Valid Values
1 = Disable alarms
0 = Enable alarms (default )
Example
The following example enables High alarms of the Tag2 tag: Tag2.AlarmHiDisabled=0;
See Also
.AlarmHiEnabled, .AlarmDisabled
Controlling Alarm Properties of Tags and Groups at Run Time InTouch HMI Alarms and Events Guide
117
Enabling/Disabling HiHi Alarms
The .AlarmHiHiEnabled and .AlarmHiHiDisabled dotfields enable or disable HiHi alarms for a tag or
alarm group based upon their respective values. The HiHi alarm states associated with both dot fields are the inverse of each other. In the case of .AlarmHiHiEnabled, a value of 1 enables HiHi alarms for a tag or alarm group. An .AlarmHiHiDisabled value of 1 disables HiHi alarms for a tag or alarm group.
When either dot field enables HiHi alarms for an alarm group, all tags that belong to the group have HiHi alarms enabled. When either dotfield disables HiHi alarms, all HiHi alarms are ignored. The HiHi alarms are not stored in alarm memory, nor are they written to disk.
.AlarmHiHiEnabled Dotfield
Enables and/or disables HiHi condition events and alarms.
Category
Alarms
Usage TagName.AlarmHiHiEnabled
Parameter
TagName
Any integer, real, indirect analog tag, or alarm group.
Remarks
When .AlarmHiHiEnabled is set to 0, all HiHi condition events and alarms are ignored. They are not stored in alarm memory, nor are they written to disk. It is very important to re-enable events/alarms,
whenever possible, to avoid data loss.
Data Type
Discrete (read/write)
Valid Values
0 = Disable alarms
1= Enable alarms (default)
Example
The following example disables the HiHi alarms of the Tag1 tag: Tag1.AlarmHiHiEnabled=0;
See Also
.AlarmHiHiDisabled, .AlarmEnabled
.AlarmHiHiDisabled Dotfield
Enables or disables HiHi condition events and alarms.
Category
Alarms
Usage TagName.AlarmHiHiDisabled
Controlling Alarm Properties of Tags and Groups at Run Time InTouch HMI Alarms and Events Guide
118
Parameter
TagName Any integer, real, indirect analog tag, or alarm group.
Remarks
When .AlarmHiHiDisabled is set to 1, all HiHi condition events and alarms are ignored. They are not
stored in alarm memory, nor are they written to disk. It is very important to re-enable events/alarms, whenever possible, to avoid data loss.
This is the opposite of the .AlarmHiHiEnabled dotfield.
Data Type
Discrete (read/write)
Valid Values
1 = Disable alarms
0 = Enable alarms (default )
Example
The following example enables HiHi alarms of the Tag2 tag: Tag2.AlarmHiHiDisabled=0;
See Also
.AlarmHiHiEnabled, .AlarmDisabled
Enabling/Disabling Discrete Alarms
The .AlarmDscEnabled and .AlarmDscDisabled dotfields enable or disable discrete alarms for a tag or alarm group based upon their respective values. The discrete alarm states associated with both dotfields
are the inverse of each other. In the case of .AlarmDscEnabled, a value of 1 enables discrete alarms for a tag or alarm group. An .AlarmDscDisabled value of 1 disables discrete alarms for a tag or alarm group.
When either dot field enables discrete alarms for an alarm group, all tags that belong to the group have discrete alarms enabled. When either dotfield disables discrete alarms, all discrete alarms are ignored. The discrete alarms are not stored in alarm memory, nor are they written to disk.
.AlarmDscEnabled Dotfield
Indicates indicates whether or not the tag can generate discrete alarms.
Category
Alarms
Usage TagName.AlarmDscEnabled
Parameter
TagName Any discrete or indirect discrete tag or alarm group.
Remarks
When .AlarmDscEnabled is set to 0, all discrete condition alarms and events are ignored. They are not stored in alarm memory, nor are they written to a disk. It is very important to re-enable events/alarms, whenever possible, to avoid data loss.
Controlling Alarm Properties of Tags and Groups at Run Time InTouch HMI Alarms and Events Guide
119
This is the opposite of the .AlarmDscDisabled dotfield.
Data Type
Discrete (read/write)
Valid Values
0 = Disable alarms
1= Enable alarms (default)
Example
The following example disables the discrete alarms of the Tag1 tag: Tag1.AlarmDscEnabled=0;
See Also
.AlarmDscDisabled
.AlarmDscDisabled Dotfield
Indicates whether or not the tag can generate discrete alarms.
Category
Alarms
Usage TagName.AlarmDscDisabled
Parameter
TagName Any discrete or indirect discrete tag or alarm group.
Remarks
When .AlarmDscDisabled is set to 1, all discrete condition alarms and events are ignored. They are not
stored in alarm memory, nor are they written to a disk. It is very important to re-enable events/alarms, whenever possible, to avoid data loss.
This is the opposite of the .AlarmDscEnabled dotfield.
Data Type
Discrete (read/write)
Valid Values
1 = Disable alarms
0 = Enable alarms (default )
Example
The following example enables discrete alarms of the Tag2 tag: Tag2.AlarmDscDisabled=0;
Enabling/Disabling Minor Deviation Alarms
The .AlarmMinDevEnabled and .AlarmMinDevDisabled dotfields enable or disable minor deviation alarms for a tag or alarm group based upon their respective values. The minor deviation alarm states
associated with both dot fields are the inverse of each other. In the case of .AlarmMinDevEnabled, a value of 1 enables minor deviation alarms for a tag or alarm group. An .AlarmMinDevDisabled value of 1 disables minor deviation alarms for a tag or alarm group.
Controlling Alarm Properties of Tags and Groups at Run Time InTouch HMI Alarms and Events Guide
120
When either dotfield enables minor deviation alarms for an alarm group, all tags that belong to the group have minor deviation alarms enabled. When either dotfield disables minor deviation alarms, all minor deviation alarms are ignored. The minor deviation alarms are not stored in alarm memory, nor are they
written to disk.
.AlarmMinDevEnabled Dotfield
Enables or disables minor deviation events and alarms.
Category
Alarms
Usage TagName.AlarmMinDevEnabled
Parameter
TagName Any integer, real, indirect analog tag, or alarm group.
Remarks
When .AlarmMinDevEnabled is set to 0, all minor deviation events and alarms are ignored. They are
not stored in alarm memory, nor are they written to disk. It is very important to re-enable events/alarms, whenever possible, to avoid data loss.
Data Type
Discrete (read/write)
Valid Values
0 = Disable alarms
1= Enable alarms (default)
Example
The following example disables the minor deviation alarms of the Tag1 tag: Tag1.AlarmMinDevEnabled=0;
See Also
.AlarmDisabled, .AlarmEnabled, .AlarmMinDevDisabled
.AlarmMinDevDisabled Dotfield
Enables or disables minor deviation events and alarms.
Category
Alarms
Usage TagName.AlarmMinDevDisabled
Parameter
TagName Any integer, real, or indirect analog tag, or alarm group.
Remarks
When .AlarmMinDevDisabled is set to 1, all minor deviation events and alarms are ignored. They are not stored in alarm memory, nor are they written to disk. It is very important to re-enable events/alarms, whenever possible, to avoid data loss.
Controlling Alarm Properties of Tags and Groups at Run Time InTouch HMI Alarms and Events Guide
121
This is the opposite of the .AlarmMinDevEnabled dotfield.
Data Type
Discrete (read/write)
Valid Values
1 = Disable alarms
0 = Enable alarms (default )
Example
The following example enables minor deviation alarms of the Tag2 tag: Tag2.AlarmMinDevDisabled=0;
See Also
.AlarmDisabled, .AlarmEnabled, .AlarmMinDevEnabled
Enabling/Disabling Major Deviation Alarms
The .AlarmMajDevEnabled and .AlarmMajDevDisabled dotfields enable or disable major deviation alarms for a tag or alarm group based upon their respective values. The major deviation alarm states associated with both dot fields are the inverse of each other. In the case of .AlarmMajDevEnabled, a
value of 1 enables major deviation alarms for a tag or alarm group. An .AlarmMajDevDisabled value of 1 disables major deviation alarms for a tag or alarm group.
When either dotfield enables major deviation alarms for an alarm group, all tags that belong to the group
have major deviation alarms enabled. When either dotfield disables major deviation alarms, all major deviation alarms are ignored. The major deviation alarms are not stored in alarm memory, nor are they written to disk.
.AlarmMajDevEnabled Dotfield
Enables or disables major deviation events and alarms.
Category
Alarms
Usage TagName.AlarmMajDevEnabled
Parameter
TagName Any integer, real, indirect analog tag, or alarm group.
Remarks
When .AlarmMajDevEnabled is set to 0, all major deviation events and alarms are ignored. They are not stored in alarm memory, nor are they written to disk. It is very important to re-enable events/alarms, whenever possible, to avoid data loss.
This is the opposite of the .AlarmMajDevDisabled dotfield.
Data Type
Discrete (read/write)
Valid Values
0 = Disable alarms
1= Enable alarms (default)
Controlling Alarm Properties of Tags and Groups at Run Time InTouch HMI Alarms and Events Guide
122
Example
The following example disables major deviation alarms of the Tag1 tag: Tag1.AlarmMajDevEnabled=0;
See Also
.AlarmDisabled, .AlarmEnabled, .AlarmMajDevDisabled
.AlarmMajDevDisabled Dotfield
Enables or disables major deviation events and alarms.
Category
Alarms
Usage TagName.AlarmMajDevDisabled
Parameter
TagName Any integer, real, indirect analog tag, or alarm group.
Remarks
When .AlarmMajDevDisabled is set to 1, all major deviation events and alarms are ignored. They are not
stored in alarm memory, nor are they written to disk. It is very important to re-enable events/alarms, whenever possible, to avoid data loss.
This is the opposite of the .AlarmMajDevEnabled dotfield.
Data Type
Discrete (read/write)
Valid Values
1 = Disable alarms
0 = Enable alarms (default )
Example
The following example enables major deviation alarms of the Tag2 tag: Tag2.AlarmMajDevDisabled=0;
See Also
.AlarmDisabled, .AlarmEnabled, .AlarmMajDevEnabled
Enabling/Disabling Rate-Of-Change Alarms
The .AlarmROCEnabled and .AlarmROCDisabled dotfields enable or disable rate-of-change alarms for a tag or alarm group based upon their respective values. The rate-of-change alarm states associated
with both dot fields are the inverse of each other. In the case of .AlarmROCEnabled, a value of 1 enables rate-of-change alarms for a tag or alarm group. An .AlarmROCDisabled value of 1 disables rate-of-change alarms for a tag or alarm group.
When either dot field enables rate-of-change alarms for an alarm group, all tags that belong to the group have rate-of-change alarms enabled. When either dot field disables rate-of-change alarms, all rate-of-change alarms are ignored. The rate-of-change alarms are not stored in alarm memory, nor are
they written to disk.
Controlling Alarm Properties of Tags and Groups at Run Time InTouch HMI Alarms and Events Guide
123
.AlarmROCEnabled Dotfield
Enables or disables rate-of-change events and alarms.
Category
Alarms
Usage TagName.AlarmROCEnabled
Parameter
TagName Any integer, real, indirect analog tag, or alarm group.
Remarks
When .AlarmROCEnabled is set to 0, all rate-of-change condition events and alarms are ignored. They
are not stored in alarm memory, nor are they written to disk. It is very important to re-enable events/alarms, whenever possible, to avoid data loss.
This is the opposite of the .AlarmROCDisabled dot field.
Data Type
Discrete (read/write)
Valid Values
0 = Disable alarms
1 = Enable alarms (default )
Example
The following example disables the rate-of-change alarms of the Tag1 tag: Tag1.AlarmROCEnabled=0;
See Also
.AlarmDisabled, .AlarmEnabled, .AlarmROCDisabled
.AlarmROCDisabled Dotfield
Disables or enables rate-of-change events and alarms.
Category
Alarms
Usage TagName.AlarmROCDisabled
Parameter
TagName
Any integer, real, indirect analog tag, or alarm group.
Remarks
When .AlarmROCDisabled is set to 1, all rate-of-change events and alarms are ignored. They are not stored in alarm memory, nor are they written to disk. It is very important to re-enable events/alarms,
whenever possible, to avoid data loss.
This is the opposite of the .AlarmROCEnabled property.
Controlling Alarm Properties of Tags and Groups at Run Time InTouch HMI Alarms and Events Guide
124
Data Type
Discrete (read/write)
Valid Values
1= Disable alarms
0= Enable alarms (default)
Example
The following example enables rate-of-change alarms of the Tag2 tag: Tag2.AlarmROCDisabled=0;
See Also
.AlarmDisabled, .AlarmEnabled, .AlarmROCEnabled
Changing a Tag's Alarm Limits Use the following dotfields to change a tag’s alarm limits while an application is running. You can change
the limit for LoLo, Low, High, and HiHi alarms, the major and minor deviation percentage and target, and the rate-of-change deviation.
.LoLoLimit Dotfield on page 124
.LoLimit Dotfield on page 125
.HiLimit Dotfield on page 125
.HiHiLimit Dotfield on page 126
.MinorDevPct Dotfield on page 126
.MajorDevPct Dotfield on page 127
.DevTarget Dotfield on page 128
.ROCPct Dotfield on page 128
.LoLoLimit Dotfield
Changes a tag’s LoLo alarm limit.
Category
Alarms
Usage TagName.LoLoLimit
Parameter
TagName Any integer, real, or indirect analog tag.
Remarks
If you want to continue to use the run-time value of this dotfield after an intentional or accidental shutdown of WindowViewer, select the Retentive Parameters option in the Tagname Dictionary.
Data Type
Analog (read/write)
Controlling Alarm Properties of Tags and Groups at Run Time InTouch HMI Alarms and Events Guide
125
Valid Values
Must be in value range configured for the specified tag.
Example
This statement decreases the LoLo alarm limit for the MyTag1 tag by a value of 10: MyTag1.LoLoLimit=MyTag1.LoLoLimit - 10;
See Also
.Alarm, .AlarmValue, .Ack, .LoLoStatus, .LoLoSet, .AlarmDisabled, .AlarmEnabled,
.AlarmLoLoDisabled, .AlarmLoLoEnabled, .AlarmLoLoInhibitor
.LoLimit Dotfield
Changes a tag’s Low alarm limit.
Category
Alarms
Usage Tagname.LoLimit
Parameter
Tagname
Any integer, real, or indirect analog tag.
Remarks
If you want to continue to use the run-time value of this dotfield after an intentional or accidental shutdown of WindowViewer, select the Retentive Parameters option in the Tagname Dictionary.
Data Type
Analog (read/write)
Valid Values
Must be in value range configured for the specified tag.
Example
This statement decreases the Low alarm limit for the MyTag tag by a value of 10: MyTag.LoLimit=MyTag.LoLimit - 10;
See Also
.Alarm, .AlarmValue, .Ack, .LoStatus, .LoSet, .AlarmDisabled, .AlarmEnabled, .AlarmLoDisabled,
.AlarmLoEnabled, .AlarmLoInhibitor
.HiLimit Dotfield
Changes a tag’s High alarm limit.
Category
Alarms
Usage TagName.HiLimit
Parameter
TagName
Any integer, real, or indirect analog tag.
Controlling Alarm Properties of Tags and Groups at Run Time InTouch HMI Alarms and Events Guide
126
Remarks
If you want to continue to use the run-time value of this dotfield after an intentional or accidental shutdown of WindowViewer, select the Retentive Parameters option in the Tagname Dictionary.
Data Type
Analog (read/write)
Valid Values
Must be in value range configured for the specified tag.
Example
This statement sets the High limit alarm for the PumpTemp tag to 212: PumpTemp.HiLimit = 212;
See Also
.Alarm, .AlarmValue, .Ack, .HiHiStatus, .HiHiSet, .AlarmDisabled, .AlarmEnabled, .AlarmHiHiDisabled,
.AlarmHiHiEnabled, .AlarmHiHiInhibitor
.HiHiLimit Dotfield
Changes a tag’s HiHi alarm limit.
Category
Alarms
Usage TagName.HiHiLimit
Parameter
TagName Any integer, real, or indirect analog tag.
Remarks
If you want to continue to use the run-time value of this dotfield after an intentional or accidental shutdown of WindowViewer, select the Retentive Parameters option in the Tagname Dictionary.
Data Type
Analog (read/write)
Valid Values
Must be in value range configured for the specified tag.
Example
The following statement increases the HiHi alarm limit for the MyTag tag by a value of 5: MyTag.HiHiLimit=MyTag.HiHiLimit + 5;
See Also
.Alarm, .AlarmValue, .Ack, .HiHiStatus, .HiHiSet, .AlarmDisabled, .AlarmEnabled, .AlarmHiHiDisabled,
.AlarmHiHiEnabled, .AlarmHiHiInhibitor
.MinorDevPct Dotfield
Changes a tag’s minor deviation alarm limit.
Controlling Alarm Properties of Tags and Groups at Run Time InTouch HMI Alarms and Events Guide
127
Category
Alarms
Usage TagName.MinorDevPct
Parameter
TagName Any integer, real, or indirect analog tag.
Remarks
If you want to continue to use the run-time value of this dotfield after an intentional or accidental
shutdown of WindowViewer, select the Retentive Parameters option in the Tagname Dictionary.
Data Type
Real (read/write)
Valid Values
0 to 100
Example
The following statement sets the minor deviation limit property for the MyTag tag to 25 percent: MyTag.MinorDevPct=25;
See Also
.AckDev, .AlarmDev, .AlarmMinDevDisabled, .AlarmMinDevEnabled, .AlarmMinDevInhibitor,
.MinorDevSet, .MinorDevStatus
.MajorDevPct Dotfield
Changes a tag’s major alarm deviation limit.
Category
Alarms
Usage TagName.MajorDevPct
Parameter
TagName Any integer, real, or indirect analog tag.
Remarks
If you want to continue to use the run-time value of this dotfield after an intentional or accidental
shutdown of WindowViewer, select the Retentive Parameters option in the Tagname Dictionary.
Data Type
Real (read/write)
Valid Values
0 to 100
Example
The following statement sets the major deviation limit property for the MyTag tag to 25 percent: MyTag.MajorDevPct=25;
Controlling Alarm Properties of Tags and Groups at Run Time InTouch HMI Alarms and Events Guide
128
See Also
.AckDev, .AlarmDev, .AlarmMajDevDisabled, .AlarmMajDevEnabled, .AlarmMajDevInhibitor,
.MajorDevSet, .MajorDevStatus
.DevTarget Dotfield
Changes the target for a tag’s minor and major deviation alarms.
Category
Alarms
Usage TagName.DevTarget
Parameter
TagName Any integer, real, or indirect analog tag.
Remarks
If you want to continue to use the run-time value of this dotfield after an intentional or accidental
shutdown of WindowViewer, select the Retentive Parameters option in the Tagname Dictionary.
Data Type
Real (read/write)
Valid Values
Must be in value range specified for the tag
Example
The following statement sets the deviation target for the MyTag tag to 500; MyTag.DevTarget=500;
See Also
.AckDev, .AlarmDev, .AlarmMajDevDisabled, .AlarmMajDevEnabled, .AlarmMajDevInhibitor,
.MajorDevSet, .MajorDevStatus
.ROCPct Dotfield
Changes a tag’s rate-of-change alarm limit.
Category
Alarms
Usage TagName.ROCPct
Parameter
TagName Any integer, real, or indirect analog tag.
Remarks
The dotfield corresponds directly to the same field configured within the alarm section of the Tagname
Dictionary.
Data Type
Integer (read/write)
Controlling Alarm Properties of Tags and Groups at Run Time InTouch HMI Alarms and Events Guide
129
Valid Values
0 to 100
Example
The following statement sets the rate-of-change alarm limit of the MyTag tag to 25 percent: MyTag.ROCPct=25;
See Also
.ROCStatus, .ROCSet
Changing a Tag's Alarm Deadbands Use the following dot fields to change a tag’s alarm deadband range while an application is running:
.AlarmValDeadband Dotfield on page 129
.AlarmDevDeadband Dotfield on page 129
.AlarmValDeadband Dotfield
Changes a tag’s deadband value while an InTouch application is running.
Category
Alarms
Usage TagName.AlarmValDeadband
Parameter
TagName Any integer, real, or indirect analog tag.
Remarks
If you want to continue to use the run-time value of this dotfield after an intentional or accidental shutdown of WindowViewer, select the Retentive Parameters option in the Tagname Dictionary.
Data Type
Analog (read/write)
Valid Values
Must be in value range specified for the tag
Example
The following statement changes the deadband for Tag1 tag to a value of 25: Tag1.AlarmValDeadband=25;
See Also
.AlarmDevDeadband
.AlarmDevDeadband Dotfield
Changes a tag’s deviation percentage deadband for both minor and major deviation alarms.
Category
Alarms
Controlling Alarm Properties of Tags and Groups at Run Time InTouch HMI Alarms and Events Guide
130
Usage TagName.AlarmDevDeadband
Parameter
TagName Any integer, real, or indirect analog tag.
Remarks
If you want to continue to use the run-time value of this dotfield after an intentional or accidental shutdown of WindowViewer, select the Retentive Parameters option in the Tagname Dictionary.
Data Type
Integer (read/write)
Valid Values
0 to 100
Example
The following statement changes the deviation deadband percentage to 25 percent: tag.AlarmDevDeadband=25;
See Also
.AlarmValDeadband, .AlarmDev
Changing the Alarm Comment Associated with a Tag The .AlarmComment dotfield returns a comment text string that is associated with the alarm of a tag or alarm group.
.AlarmComment Dotfields
Returns a comment text string that is associated with the alarm of a tag or alarm group. By default, it is empty in a new application.
Associating User-Defined Information with an Alarm Instance You can attach three items to an alarm record: two numbers and a string. Use the following dot fields to add information to an alarm record.
.AlarmUserDefNumX Dotfields on page 130
.AlarmUserDefStr Dotfield on page 131
.AlarmUserDefNumX Dotfields
To simplify setting user values, you can set these dotfields on an alarm group as well as on a specific tag. For example, InBatch could set the batch number in .AlarmUserDefNum1 all the way up at the $System
alarm group, causing all alarms to have the batch number attached.
The .AlarmUserDefNum1 and .AlarmUserDefNum2 dotfields correspond to the User1 and User2 columns in the Alarm Viewer control, respectively.
If you set .AlarmUserDefNum1 on an alarm group, it applies to all alarms in that group and any of its sub-groups. You can also specifically set the value of .AlarmUserDefNum1 on a tag. In this case, it applies only to that tag and overwrites any setting of .AlarmUserDefNum1 in the tag's alarm group.
Category
Alarms
Controlling Alarm Properties of Tags and Groups at Run Time InTouch HMI Alarms and Events Guide
131
Usage TagName.AlarmUserDefNum1
TagName.AlarmUserDefNum2
Parameter
TagName Any discrete, integer, real, indirect discrete, indirect analog tag, or alarm group.
Remarks
This user-defined dotfield is enabled for a wide range of tags, particularly discrete tags, analog tags, and
alarm groups (whether or not they have alarms defined). You can leave these items unset, set all of them, or set only some of them for any individual tag, group, or parent group.
The value of this dot field is attached to the alarm, but ONLY if a value has been set, for example, by a
script or a POKE.
Data Types
Analog (read/write)
Valid Values
Any real value and not set (default)
Examples
The following examples use constant values. However, you can use InTouch QuickScripts to copy the
value of another tag to any of these user-defined fields. You can also use PtAcc to set or inspect them, or use InTouch as an I/O Server to get or set the values. $System.AlarmUserDefNum1 = 4;
GroupA.AlarmUserDefNum1 = 27649;
In concept, the lowest-level setting prevails, when an alarm notification is sent to the Distributed Alarm
system. That is, if the tag has .AlarmUserDefNum1 set to some value, the alarm record should be populated using that setting. However, if the tag doesn't have one, WindowViewer checks if the tag's alarm group has one, and so on up the line until the root group $System is reached. If no setting is found
at any level, the entry in the alarm record will be left empty (zero for numbers, an empty string for strings).
Note: This hierarchical search is handled independently for each item. Therefore, if a tag has a setting
for .AlarmUserDefNum2 but not for .AlarmUserDefNum1, but its parent group has a setting for .AlarmUserDefNum1, the tag will inherit the setting for .AlarmUserDefNum1 from its parent group.
See Also
.AlarmUserDefStr
.AlarmUserDefStr Dotfield
The .AlarmUserDefStr dot field is attached to the information recorded for each alarm by Alarm DB Logger in the alarm database. The .AlarmUserDefStr dotfield corresponds to database field User3. You
can use the "user-defined" columns in a SELECT statement to select particular collections of alarms for database operations. For example, i f $System.AlarmUserDefStr is set to a Batch String and is changed each time the Batch changes, a selection involving the database field User3 can be used to select alarms
for particular batches.
Category
Alarms
Usage Tagname.AlarmUserDefStr
Controlling Alarm Properties of Tags and Groups at Run Time InTouch HMI Alarms and Events Guide
132
Parameter
Tagname Any discrete, integer, real, indirect discrete, or indirect analog tag, or alarm group.
Remarks
This user-defined dotfield is enabled for a wide range of tags, particularly discrete tags, analog tags, and
alarm groups (whether or not they have alarms defined). You can leave these items unset, set all of them, or set only some of them for any individual tag, group, or parent group.
The value of this dotfield is attached to the alarm, but ONLY if a value has been set, for example, using a
script or a POKE.
Data Type
Message (read/write)
Valid Values
NULL and any valid string
Examples
This example uses a constant value. However, you can use InTouch QuickScripts to copy the value of another tag to any of these user-defined fields. You can also use PtAcc to set or inspect them, or use
InTouch as an I/O Server to get or set the values. Tag04.AlarmUserDefStr = "Joe";
In concept, the lowest-level setting prevails, when an alarm notification is sent to the Distributed Alarm
system. That is, if the tag has .AlarmUserDefStr set to some value, the alarm record should be populated using that setting. However, if the tag doesn't have one, WindowViewer will check if the tag's alarm group has one, and so on up the line until the root group $System is reached. If no setting is found at any level,
the entry in the alarm record will be left empty (zero for numbers, an empty string for strings).
Also note that this hierarchical search is handled independently for each item. Therefore, if a tag has a setting for .AlarmUserDefNum1 but not for .AlarmUserDefStr, but its parent group has a setting for
.AlarmUserDefStr, that setting is used in the alarm record.
See Also
.AlarmUserDefNumX
Determining the Inhibitor Tag of a Tag or Alarm Group Use the following dot fields to determine the inhibitor tag of various types of alarms.
.AlarmDscInhibitor Dotfield on page 132
.AlarmLoLoInhibitor Dotfield on page 133
.AlarmLoInhibitor Dotfield on page 134
.AlarmHiInhibitor Dotfield on page 135
.AlarmHiHiInhibitor Dotfield on page 135
.AlarmMinDevInhibitor Dotfield on page 136
.AlarmMajDevInhibitor Dotfield on page 137
.AlarmROCInhibitor Dotfield on page 137
.AlarmDscInhibitor Dotfield
Returns the name of the inhibitor tag assigned to a discrete alarm.
Controlling Alarm Properties of Tags and Groups at Run Time InTouch HMI Alarms and Events Guide
133
Category
Alarms
Usage TagName.AlarmDscInhibitor
Parameter
TagName Any discrete tag or alarm group.
Remarks
Configured in WindowMaker. Cannot be changed during run time.
Data Types
Message (read-only)
Examples
The .AlarmDSCInhibitor dot field is used by setting .Name to an Indirect tag that is equal to the value of the .AlarmDscInhibitor tag then manipulating the value of the Indirect tag.
The following statement returns the name of the alarm inhibitor tag for a discrete alarm (assuming
SomeIndirectTag is an analog indirect tag): SomeIndirectTag.Name = AlarmedTag.AlarmDscInhibitor;
The inhibition state of the alarmed tag can be controlled by setting the value of the indirect tag as follows: SomeIndirectTag = 1;
Turns on inhibition. Discrete alarms are disabled for AlarmedTag SomeIndirectTag = 0;
Turns off inhibition Discrete alarms can be generated for AlarmedTag
.AlarmLoLoInhibitor Dotfield
Returns the name of the inhibitor tag assigned to a LoLo alarm.
Category
Alarms
Usage TagName.AlarmLoLoInhibitor
Parameter
TagName
Any integer, real, indirect analog tag, or alarm group tag.
Remarks
Configured in WindowMaker. Cannot be changed during run time.
Data Types
Message (read-only)
Examples
The .AlarmLoLoInhibitor dotfield is used by setting .Name to an Indirect tag that is equal to the value of
the .AlarmLoLoInhibitor tag then manipulating the value of the Indirect tag.

Controlling Alarm Properties of Tags and Groups at Run Time InTouch HMI Alarms and Events Guide
134
The following statement returns the name of the alarm inhibitor tag for a LoLo alarm limit (assuming SomeIndirectTag is an analog indirect tag): SomeIndirectTag.Name = AlarmedTag.AlarmLoLoInhibitor;
The inhibition state of the alarmed tag can be controlled by setting the value of the Indirect tag as follows: SomeIndirectTag = 1;
Turns on inhibition LoLo alarms are disabled for AlarmedTag SomeIndirectTag = 0;
Turns off inhibition LoLo alarms can be generated for AlarmedTag
See Also
.AlarmHiInhibitor, .AlarmHiHiInhibitor, .AlarmLoInhibitor
.AlarmLoInhibitor Dotfield
Returns the name of the inhibitor tag assigned to a Low alarm.
Category
Alarms
Usage TagName.AlarmLoInhibitor
Parameter
TagName
Any integer, real, indirect analog tag, or alarm group tag.
Remarks
Configured in WindowMaker. Cannot be changed during run time.
Data Types
Message (read-only)
Examples
The .AlarmLoInhibitor dotfield is used by setting .Name to an Indirect tag that is equal to the value of the .AlarmLoInhibitor tag then manipulating the value of the Indirect tag.
The following statement returns the name of the alarm inhibitor tag for a Low alarm limit (assuming SomeIndirectTag is an analog indirect tag): SomeIndirectTag.Name = AlarmedTag.AlarmLoInhibitor;
The inhibition state of the alarmed tag can be controlled by setting the value of the Indirect tag as follows: SomeIndirectTag = 1;
Turns on inhibition Low alarms are disabled for AlarmedTag SomeIndirectTag = 0;
Turns off inhibition Low alarms can be generated for AlarmedTag
See Also
.AlarmHiInhibitor, .AlarmHiHiInhibitor, .AlarmLoLoInhibitor
Controlling Alarm Properties of Tags and Groups at Run Time InTouch HMI Alarms and Events Guide
135
.AlarmHiInhibitor Dotfield
Returns the name of the inhibitor tag assigned to a High alarm.
Category
Alarms
Usage TagName.AlarmHiInhibitor
Parameter
TagName Any integer, real, indirect analog tag, or alarm group tag.
Remarks
Configured in WindowMaker. Cannot be changed during run time.
Data Types
Message (read-only)
Example
The .AlarmHiInhibitor dot field is used by setting .Name to an Indirect tag that is equal to the value of the .AlarmHiInhibitor tag then manipulating the value of the Indirect tag.
The following statement returns the name of the alarm inhibitor tag for a High alarm limit (assuming
SomeIndirectTag is an analog indirect tag): SomeIndirectTag.Name = AlarmedTag.AlarmHiInhibitor;
The inhibition state of the alarmed tag can be controlled by setting the value of the Indirect tag as follows: SomeIndirectTag = 1;
Turns on inhibition High alarms are disabled for AlarmedTag SomeIndirectTag = 0;
Turns off inhibition
High alarms can be generated for AlarmedTag
See Also
.AlarmHiHiInhibitor, .AlarmLoInhibitor, .AlarmLoLoInhibitor
.AlarmHiHiInhibitor Dotfield
Returns the name of the inhibitor tag assigned to a HiHi alarm condition.
Category
Alarms
Usage TagName.AlarmHiHiInhibitor
Parameter
TagName Any integer, real, indirect analog tag, or alarm group tag.
Remarks
Configured in WindowMaker. Cannot be changed during run time.

Controlling Alarm Properties of Tags and Groups at Run Time InTouch HMI Alarms and Events Guide
136
Data Types
Message (read-only)
Example
The .AlarmHiHiInhibitor dotfield is used by setting .Name to an Indirect tag that is equal to the value of the .AlarmHiHiInhibitor tag then manipulating the value of the Indirect tag. The following statement returns
the name of the alarm inhibitor tag for a HiHi alarm limit (assuming SomeIndirectTag is an analog indirect tag): SomeIndirectTag.Name = AlarmedTag.AlarmHiHiInhibitor;
The inhibition state of the alarmed tag can be controlled by setting the value of the indirect tag as follows: SomeIndirectTag = 1;
Turns on inhibition HiHi alarms are disabled for AlarmedTag SomeIndirectTag = 0;
Turns off inhibition
HiHi alarms can be generated for AlarmedTag
See Also
.AlarmHiInhibitor, .AlarmLoInhibitor, .AlarmLoLoInhibitor
.AlarmMinDevInhibitor Dotfield
Returns the name of the alarm inhibitor tag associated with a minor deviation alarm condition.
Category
Alarms
Usage TagName.AlarmMinDevInhibitor
Parameter
TagName Any integer, real, indirect analog tag, or alarm group tag.
Remarks
Configured in WindowMaker. Cannot be changed during run time.
Data Types
Message (read-only)
Example
The .AlarmMinDevInhibitor dot field is used by setting .Name to an Indirect tag that is equal to the value of the .AlarmMinDevInhibitor tag then manipulating the value of the Indirect tag. The following statement
returns the name of the alarm inhibitor tag for a minor deviation alarm limit (assuming SomeIndirectTag is an analog indirect tag): SomeIndirectTag.Name = AlarmedTag.AlarmMinDevInhibitor;
The inhibition state of the alarmed tag can be controlled by setting the value of the Indirect tag as follows: SomeIndirectTag = 1;
Turns on inhibition Minor deviation alarms are disabled for AlarmedTag SomeIndirectTag = 0;
Turns off inhibition
Minor deviation alarms can be generated for AlarmedTag
Controlling Alarm Properties of Tags and Groups at Run Time InTouch HMI Alarms and Events Guide
137
See Also
.AlarmMajDevInhibitor
.AlarmMajDevInhibitor Dotfield
Returns the name of the alarm inhibitor tag associated with a major deviation alarm condition.
Category
Alarms
Usage TagName.AlarmMajDevInhibitor
Parameter
TagName Any integer, real, indirect analog tag, or alarm group tag.
Data Types
Message (read-only)
Example
The .AlarmMajDevInhibitor dot field is used by setting .Name to an Indirect tag that is equal to the value of
the .AlarmMajDevInhibitor tag then manipulating the value of the Indirect tag. The following statement returns the name of the alarm inhibitor tag for a major deviation alarm limit (assuming SomeIndirectTag is an analog indirect tag): SomeIndirectTag.Name = AlarmedTag.AlarmMajDevInhibitor;
The inhibition state of the alarmed tag can be controlled by setting the value of the Indirect tag as follows: SomeIndirectTag = 1;
Turns on inhibition Major deviation alarms are disabled for AlarmedTag SomeIndirectTag = 0;
Turns off inhibition Major deviation alarms can be generated for AlarmedTag
See Also
.AlarmMinDevInhibitor
.AlarmROCInhibitor Dotfield
Returns the name of the alarm inhibitor tag associated with a rate-of-change alarm condition.
Category
Alarms
Usage TagName.AlarmROCInhibitor
Parameter
TagName
Any integer, real, indirect analog tag, or alarm group tag.
Data Types
Message (read-only)
Controlling Alarm Properties of Tags and Groups at Run Time InTouch HMI Alarms and Events Guide
138
Example
The .AlarmROCInhibitor dotfield is used by setting .Name to an Indirect tag that is equal to the value of the .AlarmROCInhibitor tag then manipulating the value of the Indirect tag. The following statement returns the name of the alarm inhibitor tag for a rate-of-change alarm limit (assuming SomeIndirectTag is
an analog indirect tag): SomeIndirectTag.Name = AlarmedTag.AlarmROCInhibitor;
The inhibition state of the alarmed tag can be controlled by setting the value of the Indirect tag as follows: SomeIndirectTag = 1;
Turns on inhibition Rate-of-change alarms are disabled for AlarmedTag SomeIndirectTag = 0;
Turns off inhibition
Rate-of-change alarms can be generated for AlarmedTag
Counting the Number of Active or Unacknowledged Alarms Use the following dot fields to find out the number of active or unacknowledged alarms while the application is running.
Dotfield Description
.AlarmTotalCount Dotfield on page 138
Counts the number of alarms associated with a tag or alarm group.
.AlarmUnAckCount Dotfield
on page 139
Counts the number of unacknowledged alarms associated with
a tag or alarm group.
.AlarmValueCount Dotfield on page 140
Counts the number of value alarms associated with a tag.
.AlarmValueUnAckCount
Dotfield on page 140
Counts the number of unacknowledged value alarms
associated with a tag.
.AlarmDscCount Dotfield on page 141
Counts the number of discrete alarms.
.AlarmDscUnAckCount Dotfield on page 142
Counts the number of unacknowledged discrete alarms.
.AlarmDevCount Dotfield on
page 142
Counts the number of deviation alarms.
.AlarmDevUnAckCount Dotfield on page 143
Counts the number of unacknowledged deviation alarms.
.AlarmROCCount Dotfield on page 143
Counts the number of rate-of-change alarms.
.AlarmROCUnAckCount
Dotfield on page 144
Counts the number of unacknowledged rate-of-change alarms.
.AlarmTotalCount Dotfield
Tracks the total number of active alarms for a specified tag or alarm group.
Controlling Alarm Properties of Tags and Groups at Run Time InTouch HMI Alarms and Events Guide
139
Category
Alarms
Usage TagName.AlarmTotalCount
Parameter
TagName Any type of tag or alarm group.
Remarks
The count includes value, deviation, rate-of-change, and discrete alarms. It includes both acknowledged
and unacknowledged alarms.
Data Types
Integer (read-only)
Valid Values
0 or any positive integer
Example
Tag1 is an analog tag configured for alarms. ATC is also an analog tag, which gets the total number of all
active alarms (both UnAck and Ack) present in Tag1. ATC = Tag1.AlarmTotalCount;
See Also
.AlarmDevCount, .AlarmDevUnAckCount, .AlarmDSCCount, .AlarmDSCUnAckCount,
.AlarmValueCount, .AlarmUnAckCount, .AlarmValueUnAckCount, .AlarmROCCount,
.AlarmROCUnACkCount
.AlarmUnAckCount Dotfield
Tracks the total number of unacknowledged alarms for a specified tag or alarm group.
Category
Alarms
Usage TagName.AlarmUnAckCount
Parameter
TagName
Any type of tag or alarm group.
Remarks
The count includes unacknowledged value, deviation, rate-of-change, and discrete alarms.
Data Types
Integer (read-only)
Valid Values
0 or any positive integer
Controlling Alarm Properties of Tags and Groups at Run Time InTouch HMI Alarms and Events Guide
140
Example
Tag1 is an analog or discrete tag configured for alarms. AUC is an analog tag, which gets the total number of unacknowledged alarms present in Tag1. AUC = Tag1.AlarmUnAckCount;
See Also
.AlarmDevCount, .AlarmDevUnAckCount, .AlarmDscCount, .AlarmDscUnAckCount, .AlarmValueCount,
.AlarmTotalCount, .AlarmValueUnAckCount, .AlarmROCCount, .AlarmROCUnACkCount
.AlarmValueCount Dotfield
Tracks the total number of active value alarms for a specified tag or alarm group.
Category
Alarms
Usage TagName.AlarmValueCount
Parameter
TagName Any integer, real, indirect analog tag, or alarm group.
Remarks
This includes the count of HiHi, High, Low, and LoLo alarms. It includes both acknowledged and unacknowledged alarms. For non-expanded summary alarm tags, this count will not exceed 1. However,
the count may vary with alarm groups.
Data Types
Integer (read-only)
Valid Values
0 or any positive integer
Example
Tag1 is an analog tag configured for value alarms. AVC is also an analog tag, which gets the total
number of all alarm values present in Tag1. AVC = Tag1.AlarmValueCount;
See Also
.AlarmDevCount, .AlarmDevUnAckCount, .AlarmDscCount, .AlarmDscUnAckCount, .AlarmROCCount,
.AlarmTotalCount, .AlarmValueUnAckCount, .AlarmROCUnAckCount, .AlarmUnAckCount
.AlarmValueUnAckCount Dotfield
Tracks the total number of unacknowledged value alarms for a specified tag or alarm group. This includes the count of HiHi, High, Low, and LoLo alarms.
Category
Alarms
Usage TagName.AlarmValueUnAckCount
Controlling Alarm Properties of Tags and Groups at Run Time InTouch HMI Alarms and Events Guide
141
Parameter
TagName Any integer, real, indirect analog tag, or alarm group.
Data Types
Integer (read-only)
Valid Values
0 or any positive integer
Example
Tag1 is an analog tag configured for value alarms. AVUC is also an analog tag, which gets the total number of all unacknowledged value alarms present in Tag1. AVUC = Tag1.AlarmValueUnAckCount;
See Also
.AlarmDevCount, .AlarmDevUnAckCount, .AlarmDscCount, .AlarmDscUnAckCount, .AlarmROCCount,
.AlarmTotalCount, .AlarmValueCount, .AlarmROCUnAckCount, .AlarmUnAckCount
.AlarmDscCount Dotfield
Tracks the total number of active discrete alarms for a specified tag or alarm group.
Category
Alarms
Usage TagName.AlarmDscCount;
Parameter
TagName
Any discrete tag, indirect discrete tag, or alarm group.
Remarks
The count assigned to The AlarmDscCount dotfield includes both acknowledged and unacknowledged alarms. For non-expanded summary alarm tags, this count is always 1. However, the count can vary for
alarm groups.
Data Types
Integer (read-only)
Valid Values
0 or any positive integer
Example
Tag1 is a discrete tag configured for discrete alarms. ADC is an analog tag, which gets the total number
of active discrete alarms (both unacknowledged and acknowledged) present in Tag1. ADC = Tag1.AlarmDSCCount;
See Also
.AlarmDevCount, .AlarmDevUnAckCount, .AlarmValueCount, .AlarmROCUnAckCount,
.AlarmTotalCount, .AlarmDscUnAckCount, .AlarmValueUnAckCount, .AlarmROCUnAckCount,
.AlarmUnAckCount

Controlling Alarm Properties of Tags and Groups at Run Time InTouch HMI Alarms and Events Guide
142
.AlarmDscUnAckCount Dotfield
Tracks the total number of unacknowledged discrete alarms for a specified tag or alarm group.
Category
Alarms
Usage TagName.AlarmDscUnAckCount
Parameter
TagName Any discrete tag, indirect discrete tag, or alarm group.
Data Types
Integer (read-only)
Valid Values
0 or any positive integer
Example
Tag1 is a discrete tag configured for discrete alarms. ADUC is an analog tag, which gets the total number of unacknowledged discrete alarms present in Tag1. ADUC = Tag1.AlarmDscUnAckCount;
See Also
.AlarmDevCount, .AlarmDevUnAckCount, .AlarmDscCount, .AlarmValueCount, .AlarmROCCount,
.AlarmTotalCount, .AlarmValueUnAckCount, .AlarmROCUnAckCount, .AlarmUnAckCount
.AlarmDevCount Dotfield
Tracks the total number of active deviation alarms for a specified tag or alarm group.
Category
Alarms
Usage TagName.AlarmDevCount
Parameter
TagName Any real tag, integer tag, indirect analog tag, or alarm group.
Remarks
This includes the count of minor and major deviation alarms. It includes both acknowledged and unacknowledged alarms. For non-expanded summary alarm tags, this count is always 1. However, the
count can vary with alarm groups.
Data Types
Analog (read-only)
Valid Values
0 or any positive integer

Controlling Alarm Properties of Tags and Groups at Run Time InTouch HMI Alarms and Events Guide
143
Example
Tag1 is an analog tag configured for Deviation alarms. ADC is also an analog tag, which gets the total number of active deviation (both unacknowledged and acknowledged) alarms present in Tag1. ADC=Tag1.AlarmDevCount;
See Also
.AlarmDSCCount, .AlarmValueCount, .AlarmROCUnAckCount, .AlarmTotalCount,
.AlarmDSCUnAckCount, .AlarmValueUnAckCount, .AlarmDevUnAckCount, .AlarmROCUnAckCount,
.AlarmUnAckCount
.AlarmDevUnAckCount Dotfield
Tracks the total number of unacknowledged deviation alarms for a specified tag or alarm group. This
includes the count of minor and major deviation alarms.
Category
Alarms
Usage TagName.AlarmDevUnAckCount
Parameter
TagName
Any real tag, integer tag, indirect analog tag, or alarm group.
Data Types
Analog (read-only)
Valid Values
0 or any positive integer
Example
Tag1 is an analog tag configured for Deviation alarms. ADUC is also an analog tag, which gets the total number of unacknowledged deviation alarms present in Tag1. ADUC = Tag1.AlarmDevUnAckCount;
See Also
.AlarmDevCount, .AlarmDSCCount, .AlarmValueCount, .AlarmROCUnAckCount, .AlarmTotalCount,
.AlarmDSCUnAckCount, .AlarmValueUnAckCount, .AlarmROCUnAckCount, .AlarmUnAckCount
.AlarmROCCount Dotfield
Tracks the total number of active rate-of-change alarms for a specified tag or alarm group. It includes both acknowledged and unacknowledged alarms. For non-expanded summary alarm tags, this count will always be 1. However, the count may vary with alarm groups.
Category
Alarms
Usage TagName.AlarmROCCount
Parameter
TagName Any real tag, integer tag, indirect analog tag, or alarm group.
Controlling Alarm Properties of Tags and Groups at Run Time InTouch HMI Alarms and Events Guide
144
Data Types
Integer (read-only)
Valid Values
0 or any positive integer
Example
Tag1 is an analog tag configured for rate-of-change alarms. ARC is also an analog tag, which gets the total number of active rate-of-change alarms (both unacknowledged and acknowledged) present in
Tag1. ARC = Tag1.AlarmROCCount;
See Also
.AlarmDevCount, .AlarmDevUnAckCount, .AlarmDscCount, .AlarmDscUnAckCount, .AlarmValueCount,
.AlarmTotalCount, .AlarmValueUnAckCount, .AlarmROCUnAckCount, .AlarmUnAckCount
.AlarmROCUnAckCount Dotfield
Tracks the total number of unacknowledged rate-of-change alarms for a specified analog tag or alarm group.
Category
Alarms
Usage TagName.AlarmROCUnAckCount
Parameter
TagName Any real tag, integer tag, indirect analog tag, or alarm group.
Data Types
Integer (read-only)
Valid Values
0 or any positive integer
Example
Tag1 is an analog tag configured for rate-of-change alarms. ARUC is also an analog tag, which gets the total number of unacknowledged rate-of-change alarms present in Tag1. ARUC = Tag1.AlarmROCUnAckCount;
See Also
.AlarmDevCount, .AlarmDevUnAckCount, .AlarmDscCount, .AlarmDscUnAckCount, .AlarmValueCount,
.AlarmTotalCount, .AlarmValueUnAckCount, .AlarmROCCount, .AlarmUnAckCount
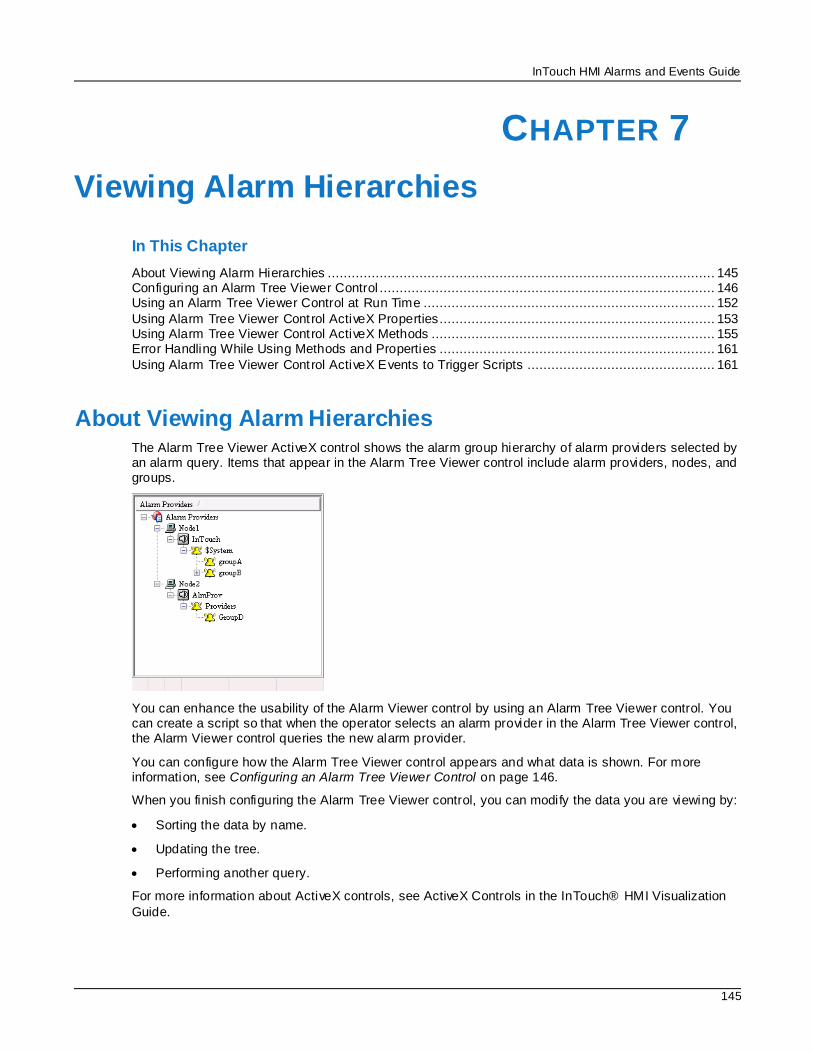
InTouch HMI Alarms and Events Guide
145
In This Chapter
About Viewing Alarm Hierarchies ................................................................................................. 145 Configuring an Alarm Tree Viewer Control .................................................................................... 146 Using an Alarm Tree Viewer Control at Run Time ......................................................................... 152
Using Alarm Tree Viewer Control ActiveX Properties..................................................................... 153 Using Alarm Tree Viewer Control ActiveX Methods ....................................................................... 155 Error Handling While Using Methods and Properties ..................................................................... 161
Using Alarm Tree Viewer Control ActiveX Events to Trigger Scripts ............................................... 161
About Viewing Alarm Hierarchies The Alarm Tree Viewer ActiveX control shows the alarm group hierarchy of alarm providers selected by an alarm query. Items that appear in the Alarm Tree Viewer control include alarm providers, nodes, and groups.
You can enhance the usability of the Alarm Viewer control by using an Alarm Tree Viewer control. You can create a script so that when the operator selects an alarm provider in the Alarm Tree Viewer control, the Alarm Viewer control queries the new alarm provider.
You can configure how the Alarm Tree Viewer control appears and what data is shown. For more information, see Configuring an Alarm Tree Viewer Control on page 146.
When you finish configuring the Alarm Tree Viewer control, you can modify the data you are viewing by:
Sorting the data by name.
Updating the tree.
Performing another query.
For more information about ActiveX controls, see ActiveX Controls in the InTouch® HMI Visualization
Guide.
CHAPTER 7
Viewing Alarm Hierarchies
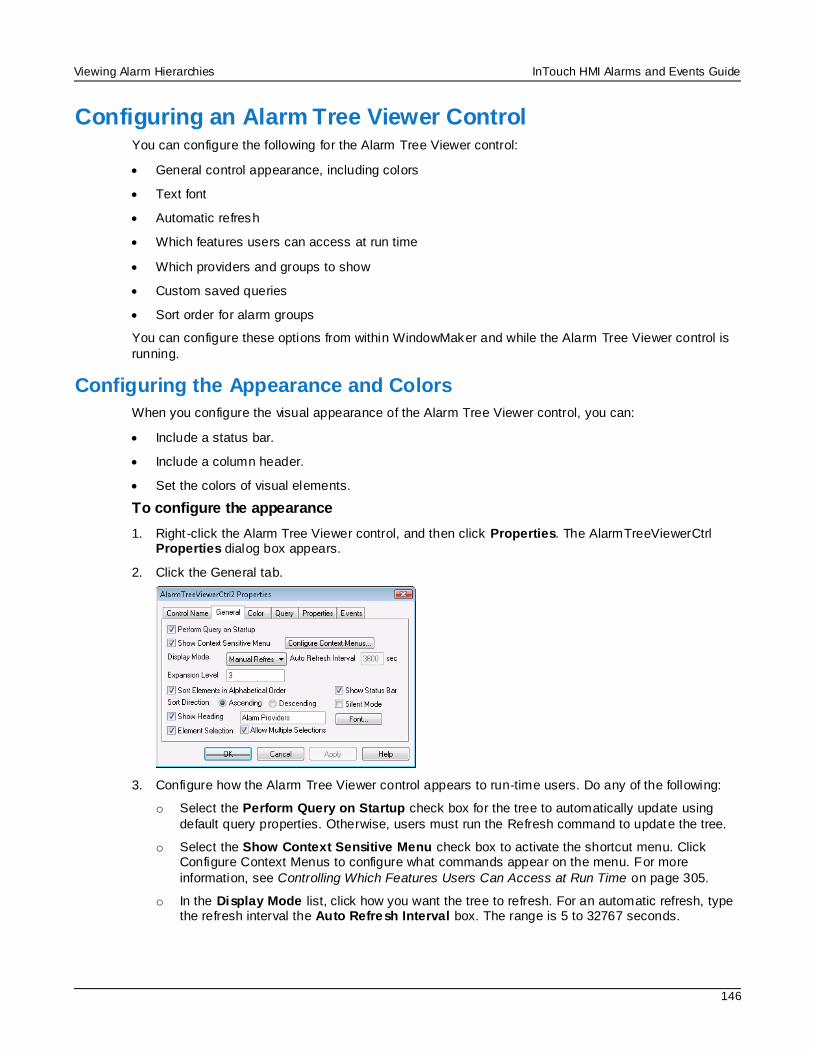
Viewing Alarm Hierarchies InTouch HMI Alarms and Events Guide
146
Configuring an Alarm Tree Viewer Control You can configure the following for the Alarm Tree Viewer control:
General control appearance, including colors
Text font
Automatic refresh
Which features users can access at run time
Which providers and groups to show
Custom saved queries
Sort order for alarm groups
You can configure these options from within WindowMaker and while the Alarm Tree Viewer control is
running.
Configuring the Appearance and Colors
When you configure the visual appearance of the Alarm Tree Viewer control, you can:
Include a status bar.
Include a column header.
Set the colors of visual elements.
To configure the appearance
1. Right -click the Alarm Tree Viewer control, and then click Properties. The AlarmTreeViewerCtrl Properties dialog box appears.
2. Click the General tab.
3. Configure how the Alarm Tree Viewer control appears to run-time users. Do any of the following:
o Select the Perform Query on Startup check box for the tree to automatically update using
default query properties. Otherwise, users must run the Refresh command to update the tree.
o Select the Show Context Sensitive Menu check box to activate the shortcut menu. Click Configure Context Menus to configure what commands appear on the menu. For more
information, see Controlling Which Features Users Can Access at Run Time on page 305.
o In the Display Mode list, click how you want the tree to refresh. For an automatic refresh, type the refresh interval the Auto Refresh Interval box. The range is 5 to 32767 seconds.
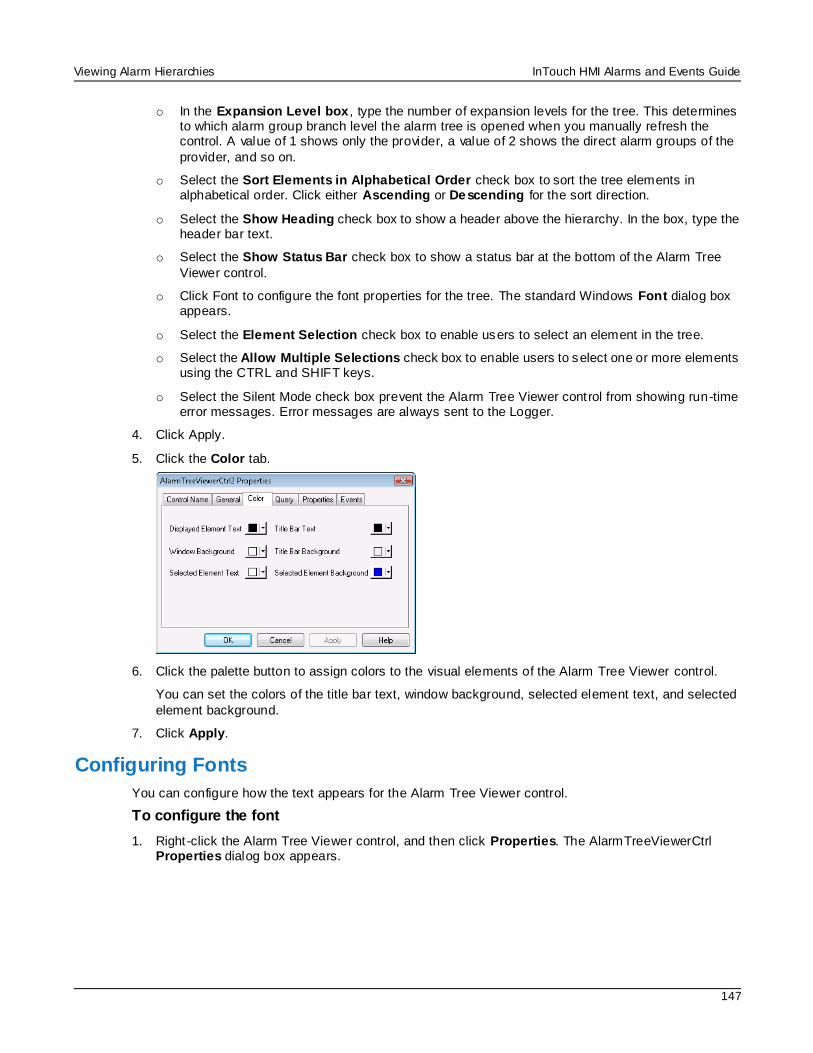
Viewing Alarm Hierarchies InTouch HMI Alarms and Events Guide
147
o In the Expansion Level box , type the number of expansion levels for the tree. This determines to which alarm group branch level the alarm tree is opened when you manually refresh the control. A value of 1 shows only the provider, a value of 2 shows the direct alarm groups of the
provider, and so on.
o Select the Sort Elements in Alphabetical Order check box to sort the tree elements in alphabetical order. Click either Ascending or Descending for the sort direction.
o Select the Show Heading check box to show a header above the hierarchy. In the box, type the header bar text.
o Select the Show Status Bar check box to show a status bar at the bottom of the Alarm Tree
Viewer control.
o Click Font to configure the font properties for the tree. The standard Windows Font dialog box appears.
o Select the Element Selection check box to enable users to select an element in the tree.
o Select the Allow Multiple Selections check box to enable users to select one or more elements using the CTRL and SHIFT keys.
o Select the Silent Mode check box prevent the Alarm Tree Viewer control from showing run-time error messages. Error messages are always sent to the Logger.
4. Click Apply.
5. Click the Color tab.
6. Click the palette button to assign colors to the visual elements of the Alarm Tree Viewer control.
You can set the colors of the title bar text, window background, selected element text, and selected
element background.
7. Click Apply.
Configuring Fonts
You can configure how the text appears for the Alarm Tree Viewer control.
To configure the font
1. Right -click the Alarm Tree Viewer control, and then click Properties. The AlarmTreeViewerCtrl Properties dialog box appears.
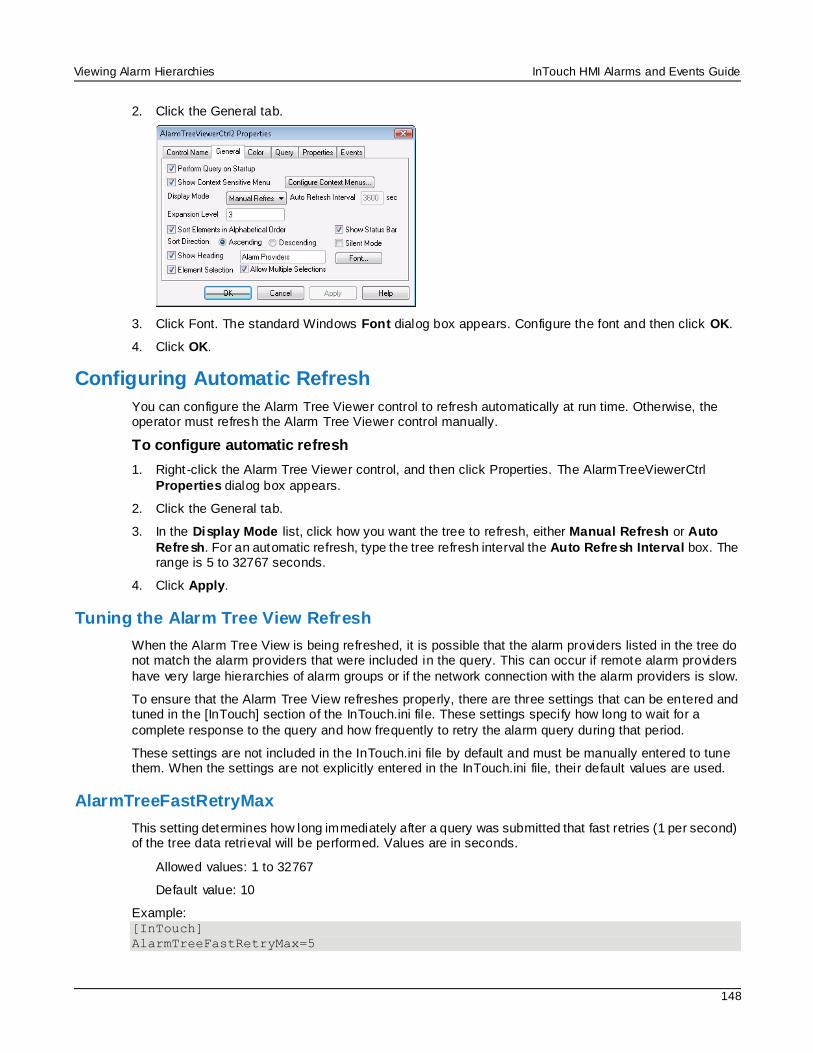
Viewing Alarm Hierarchies InTouch HMI Alarms and Events Guide
148
2. Click the General tab.
3. Click Font. The standard Windows Font dialog box appears. Configure the font and then click OK.
4. Click OK.
Configuring Automatic Refresh
You can configure the Alarm Tree Viewer control to refresh automatically at run time. Otherwise, the operator must refresh the Alarm Tree Viewer control manually.
To configure automatic refresh
1. Right -click the Alarm Tree Viewer control, and then click Properties. The AlarmTreeViewerCtrl
Properties dialog box appears.
2. Click the General tab.
3. In the Display Mode list, click how you want the tree to refresh, either Manual Refresh or Auto
Refresh. For an automatic refresh, type the tree refresh interval the Auto Refresh Interval box. The range is 5 to 32767 seconds.
4. Click Apply.
Tuning the Alarm Tree View Refresh
When the Alarm Tree View is being refreshed, it is possible that the alarm providers listed in the tree do not match the alarm providers that were included in the query. This can occur if remote alarm providers
have very large hierarchies of alarm groups or if the network connection with the alarm providers is slow.
To ensure that the Alarm Tree View refreshes properly, there are three settings that can be entered and tuned in the [InTouch] section of the InTouch.ini file. These settings specify how long to wait for a
complete response to the query and how frequently to retry the alarm query during that period.
These settings are not included in the InTouch.ini file by default and must be manually entered to tune them. When the settings are not explicitly entered in the InTouch.ini file, their default values are used.
AlarmTreeFastRetryMax
This setting determines how long immediately after a query was submitted that fast retries (1 per second) of the tree data retrieval will be performed. Values are in seconds.
Allowed values: 1 to 32767
Default value: 10
Example: [InTouch]
AlarmTreeFastRetryMax=5
Viewing Alarm Hierarchies InTouch HMI Alarms and Events Guide
149
AlarmTreeSlowRetryInterval
Once the fast retries have been completed, this setting determines the frequency, in seconds, with which
additional retries of the tree data retrieval will be performed.
Allowed values: 1 to 32767
Default value: 5
Example: [InTouch]
AlarmTreeSlowRetryInterval=10
AlarmTreeTotalRetryMax
This setting specifies the maximum duration, in seconds, for which both types of retries will be performed.
Allowed values: 1 to 32767
Default value: 30
Example: [InTouch]
AlarmTreeTotalRetryMax=60
Retry Behavior with the Default Settings
For example, using the default retry settings and the default maximum retry duration of 30 seconds:
1. During the fast retry interval, the ret rieval will be retried for 10 seconds, once every second.
2. During the slow retry interval, the retrieval will be ret ried every 5 seconds for another 20 seconds.
When the Refresh Is Considered Complete
The display will continue retrying until:
Connections are completed to all of the providers specified in the alarm query, and
The hierarchy trees are shown for all the providers requested
The display refresh timers are reset to their modified or default values each time a query is submitted.
Managing Access to Features at Runtime
The Alarm Tree Viewer control includes a shortcut menu that operators can open by right -clicking on the control during run time. You can configure what commands appear on the menu.
To configure the run-time shortcut menu
1. Right -click the Alarm Tree Viewer control, and then click Properties. The AlarmTreeViewerCtrl Properties dialog box appears.
2. Click the General tab.
3. Select the Show Context Sensitive Menu check box to activate the shortcut menu.
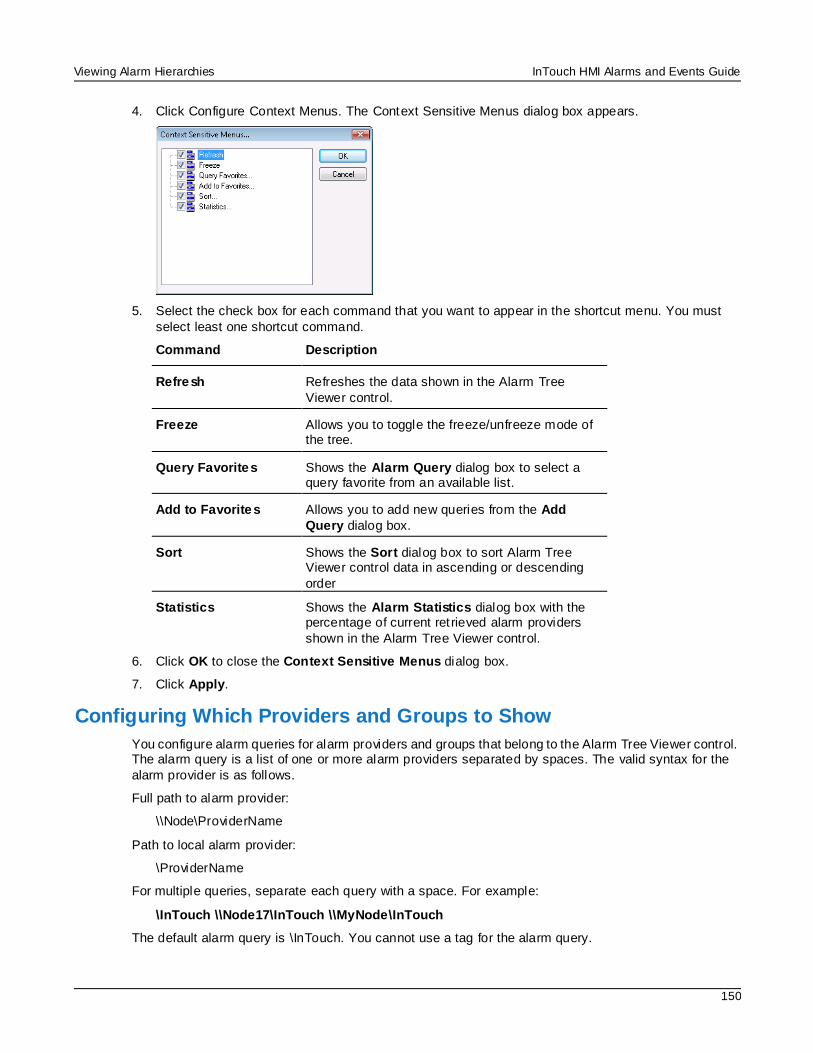
Viewing Alarm Hierarchies InTouch HMI Alarms and Events Guide
150
4. Click Configure Context Menus. The Context Sensitive Menus dialog box appears.
5. Select the check box for each command that you want to appear in the shortcut menu. You must
select least one shortcut command.
Command Description
Refresh Refreshes the data shown in the Alarm Tree
Viewer control.
Freeze Allows you to toggle the freeze/unfreeze mode of the tree.
Query Favorites Shows the Alarm Query dialog box to select a query favorite from an available list.
Add to Favorites Allows you to add new queries from the Add
Query dialog box.
Sort Shows the Sort dialog box to sort Alarm Tree Viewer control data in ascending or descending
order
Statistics Shows the Alarm Statistics dialog box with the percentage of current ret rieved alarm providers
shown in the Alarm Tree Viewer control.
6. Click OK to close the Context Sensitive Menus dialog box.
7. Click Apply.
Configuring Which Providers and Groups to Show
You configure alarm queries for alarm providers and groups that belong to the Alarm Tree Viewer control. The alarm query is a list of one or more alarm providers separated by spaces. The valid syntax for the
alarm provider is as follows.
Full path to alarm provider:
\\Node\ProviderName
Path to local alarm provider:
\ProviderName
For multiple queries, separate each query with a space. For example:
\InTouch \\Node17\InTouch \\MyNode\InTouch
The default alarm query is \InTouch. You cannot use a tag for the alarm query.
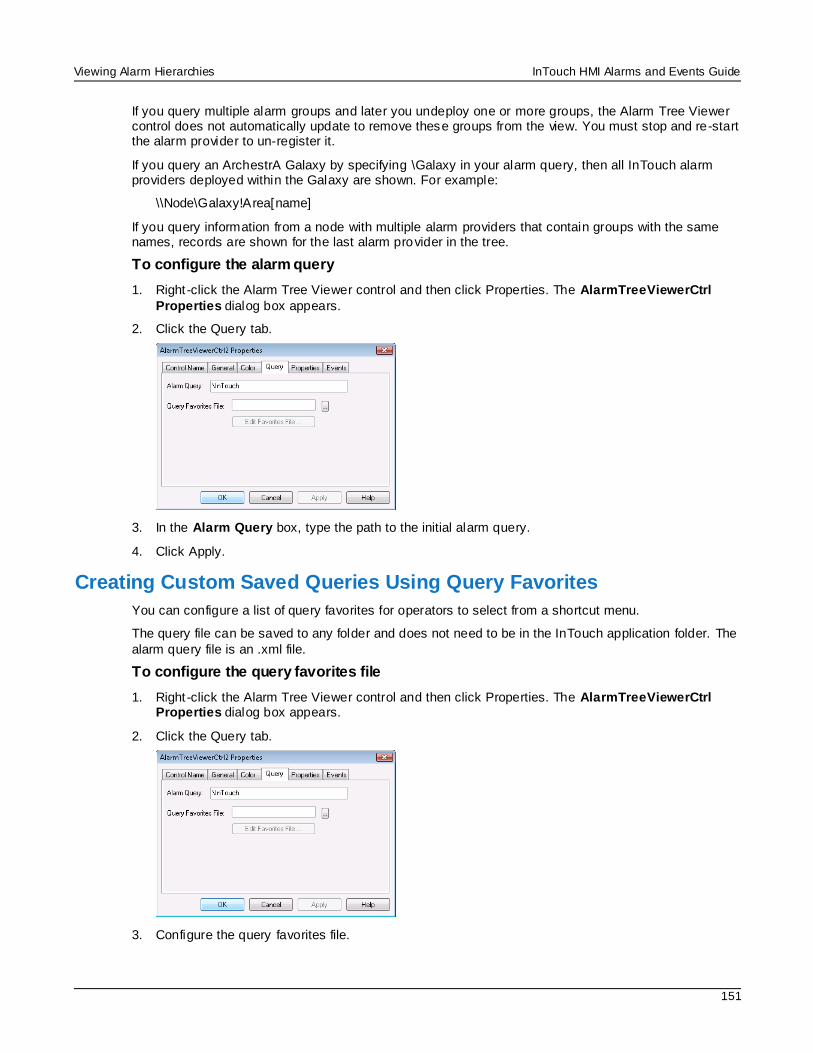
Viewing Alarm Hierarchies InTouch HMI Alarms and Events Guide
151
If you query multiple alarm groups and later you undeploy one or more groups, the Alarm Tree Viewer control does not automatically update to remove these groups from the view. You must stop and re-start the alarm provider to un-register it.
If you query an ArchestrA Galaxy by specifying \Galaxy in your alarm query, then all InTouch alarm providers deployed within the Galaxy are shown. For example:
\\Node\Galaxy!Area[name]
If you query information from a node with multiple alarm providers that contain groups with the same names, records are shown for the last alarm provider in the tree.
To configure the alarm query
1. Right -click the Alarm Tree Viewer control and then click Properties. The AlarmTreeViewerCtrl
Properties dialog box appears.
2. Click the Query tab.
3. In the Alarm Query box, type the path to the initial alarm query.
4. Click Apply.
Creating Custom Saved Queries Using Query Favorites
You can configure a list of query favorites for operators to select from a shortcut menu.
The query file can be saved to any folder and does not need to be in the InTouch application folder. The
alarm query file is an .xml file.
To configure the query favorites file
1. Right -click the Alarm Tree Viewer control and then click Properties. The AlarmTreeViewerCtrl Properties dialog box appears.
2. Click the Query tab.
3. Configure the query favorites file.
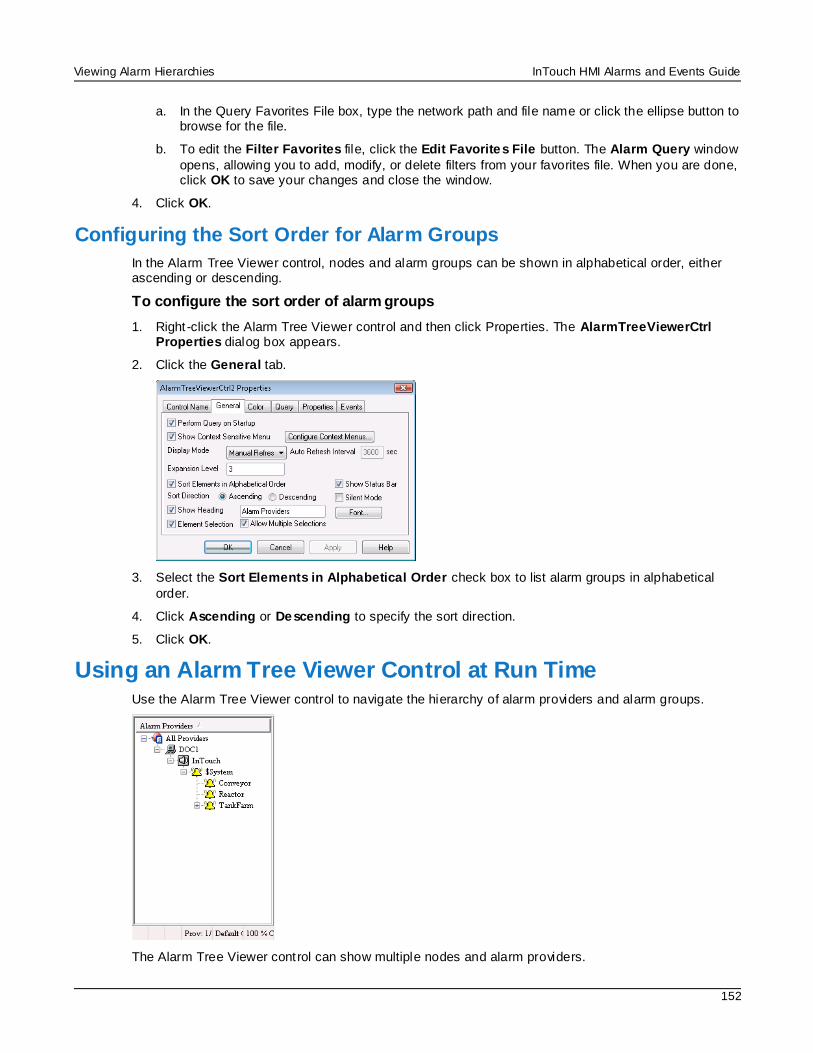
Viewing Alarm Hierarchies InTouch HMI Alarms and Events Guide
152
a. In the Query Favorites File box, type the network path and file name or click the ellipse button to browse for the file.
b. To edit the Filter Favorites file, click the Edit Favorites File button. The Alarm Query window
opens, allowing you to add, modify, or delete filters from your favorites file. When you are done, click OK to save your changes and close the window.
4. Click OK.
Configuring the Sort Order for Alarm Groups
In the Alarm Tree Viewer control, nodes and alarm groups can be shown in alphabetical order, either ascending or descending.
To configure the sort order of alarm groups
1. Right -click the Alarm Tree Viewer control and then click Properties. The AlarmTreeViewerCtrl Properties dialog box appears.
2. Click the General tab.
3. Select the Sort Elements in Alphabetical Order check box to list alarm groups in alphabetical
order.
4. Click Ascending or Descending to specify the sort direction.
5. Click OK.
Using an Alarm Tree Viewer Control at Run Time Use the Alarm Tree Viewer control to navigate the hierarchy of alarm providers and alarm groups.
The Alarm Tree Viewer control can show multiple nodes and alarm providers.

Viewing Alarm Hierarchies InTouch HMI Alarms and Events Guide
153
Nodes are represented by a computer icon.
Alarm providers are represented by a speaker icon.
Alarm groups are represented by a bell icon.
With one or more alarm groups selected, you can generate queries for alarms that can be used in the
Alarm Tree Viewer control and the Alarm DB View controls. To select multiple alarm groups, hold down the shift key while clicking on a group. To un-select all groups, click on an empty area.
One or more of the following commands appears on the run-time shortcut menu, depending on how the
control is configured:
Refresh – Forces a manual update of the alarms.
Freeze – Stops the alarms from updating.
Query Favorites – Opens the Alarm Query dialog box where you can select an alarm query from a list of previously defined alarm queries.
Add to Favorites – Opens the Add Query dialog box with a query string entered based on the selected Groups (if any).
Sort – Opens the Sort dialog box with options to alphabetically sort alarm groups in ascending or descending order.
Statistics – Opens the Alarm Statistics dialog box to show the percentage of retrieved alarm
providers.
Understanding Alarm Tree Viewer Control Status Bar Information
The Alarm Tree Viewer control status bar appears at the bottom of the window and shows the following information:
Name of the current query
Percentage complete status of the current query
Using Query Favorites
Use the Query Favorites command on the Alarm Tree Viewer control’s shortcut menu to quickly select
and run and alarm query from a list of previously defined alarm queries. You can also create new named queries, edit an existing query, or delete an existing query.
To select and run an alarm query
1. Right -click the Alarm Tree Viewer control at run time.
2. Click Query Favorites. The Alarm Query dialog box appears.
3. Select the named query that you want to show in the list of currently defined queries.
4. Click OK. The Alarm Tree Viewer control shows alarm group information from the selected query.
Using Alarm Tree Viewer Control ActiveX Properties You can set the value an Alarm Tree Viewer control property directly using a script or you can assign it to an InTouch tag or I/O reference. For more information about setting properties, see Scripting A ctiveX Controlsin the InTouch® HMI Scripting and Logic Guide.
The following table lists all Alarm Tree Viewer control properties. For more information on setting color values, see Configuring Colors for ActiveX Controls on page 65.
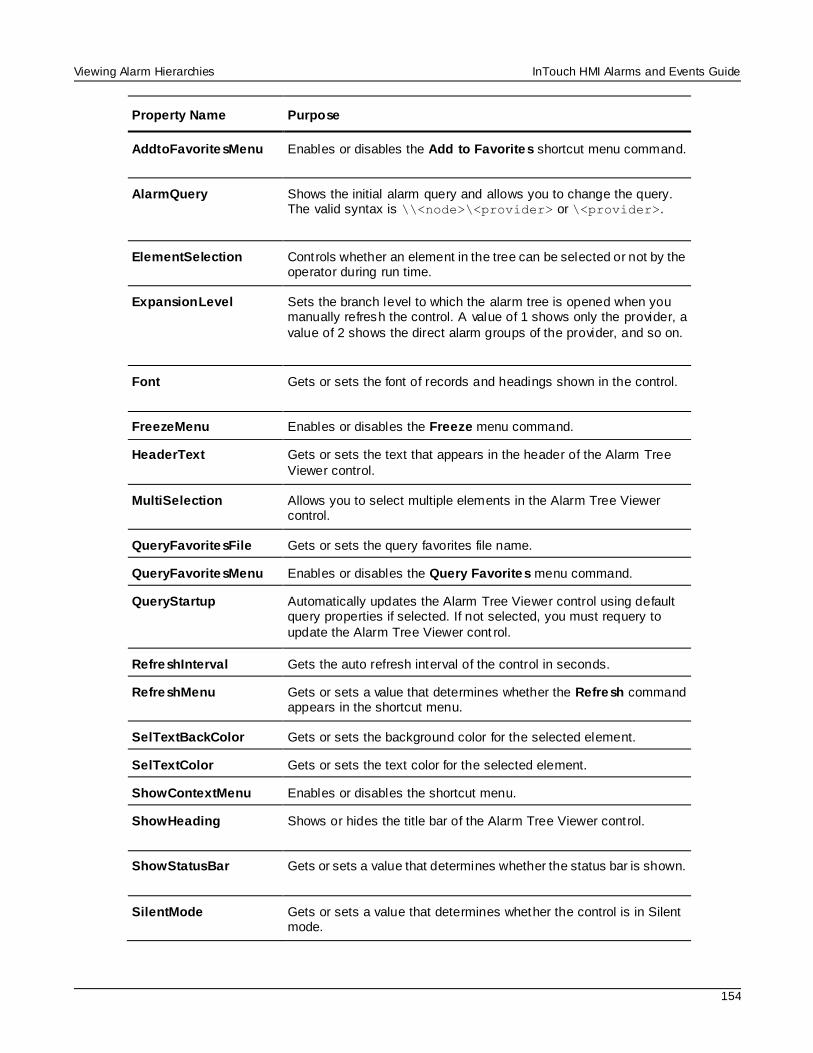
Viewing Alarm Hierarchies InTouch HMI Alarms and Events Guide
154
Property Name Purpose
AddtoFavoritesMenu Enables or disables the Add to Favorites shortcut menu command.
AlarmQuery Shows the initial alarm query and allows you to change the query. The valid syntax is \\<node>\<provider> or \<provider>.
ElementSelection Controls whether an element in the tree can be selected or not by the operator during run time.
ExpansionLevel Sets the branch level to which the alarm tree is opened when you manually refresh the control. A value of 1 shows only the provider, a
value of 2 shows the direct alarm groups of the provider, and so on.
Font Gets or sets the font of records and headings shown in the control.
FreezeMenu Enables or disables the Freeze menu command.
HeaderText Gets or sets the text that appears in the header of the Alarm Tree
Viewer control.
MultiSelection Allows you to select multiple elements in the Alarm Tree Viewer control.
QueryFavoritesFile Gets or sets the query favorites file name.
QueryFavoritesMenu Enables or disables the Query Favorites menu command.
QueryStartup Automatically updates the Alarm Tree Viewer control using default query properties if selected. If not selected, you must requery to
update the Alarm Tree Viewer cont rol.
RefreshInterval Gets the auto refresh interval of the control in seconds.
RefreshMenu Gets or sets a value that determines whether the Refresh command appears in the shortcut menu.
SelTextBackColor Gets or sets the background color for the selected element.
SelTextColor Gets or sets the text color for the selected element.
ShowContextMenu Enables or disables the shortcut menu.
ShowHeading Shows or hides the title bar of the Alarm Tree Viewer control.
ShowStatusBar Gets or sets a value that determines whether the status bar is shown.
SilentMode Gets or sets a value that determines whether the control is in Silent mode.

Viewing Alarm Hierarchies InTouch HMI Alarms and Events Guide
155
Property Name Purpose
SortElements Enables or disables sorting in the Alarm Tree Viewer control.
SortMenu Enables or disables the Sort menu command.
SortOrder Gets or sets the sort direction. Possible values are "Ascending" and "Descending," represented as 0 and 1 respectively.
StatsMenu Enables or disables the Statistics menu command.
TextColor Gets or sets the text color the Alarm Tree Viewer control.
TitleBackColor Gets or sets the title bar background color. Available only if the ShowHeading property is set.
TitleForeColor Gets or sets the title bar foreground color. Available only if the ShowHeading property is set.
WindowColor Gets or sets the window background color of the Alarm Tree Viewer
control.
Using Alarm Tree Viewer Control ActiveX Methods You can use the Alarm Tree Viewer control methods in scripts to:
Retrieve information about the control.
Retrieve information about specific entries in the alarm hierarchy.
Freeze the control.
Create query strings.
Run queries.
For more information about calling methods, see Scripting ActiveX Controls in the InTouch® HMI Scripting and Logic Guide.
Retrieving Information About the Control
You can use these methods to retrieve information about the Alarm Tree Viewer control.
AboutBox() Method on page 77
GetElementCount() Method on page 155
AboutBox()
Shows the Alarm Tree Viewer About dialog box.
GetElementCount() Method
Gets the total number of elements in the tree.
Syntax Object.GetElementCount()
Viewing Alarm Hierarchies InTouch HMI Alarms and Events Guide
156
Example
The name of the control is AlarmTreeViewerCtrl1 and nTag1 is an integer or real tag. nTag1 = #AlarmTreeViewerCtrl1.GetElementCount();
Retrieving Information About Specific Entries
You can use a set of methods to retrieve information about elements shown in the Alarm Tree Viewer
control window.
CheckElementMembership() Method on page 156
GetElementCount() Method on page 155
GetElementName() Method on page 156
GetElementPath() Method on page 157
GetSelectedElementCount() Method on page 157
GetSelectedElementName() Method on page 157
GetSelectedElementPath() Method on page 157
GetSubElementCount() Method on page 158
GetSubElementName() Method on page 158
GetSubElementPath() Method on page 159
CheckElementMembership() Method
Checks if the descendant tree element is part of the ancestor tree element.
Syntax Object.CheckElementMembership(PathName, DescendantElementName,
AncestorElementName)
Parameter
PathName The name of the path. For example, \InTouch or \\NodeName.
DescendantElementName
The name of the descendant element name. For example, GroupA.
AncestorElementName The name of the ancestor element name. For example, GroupB.
GetElementCount() Method
Gets the total number of elements in the tree.
Syntax Object.GetElementCount()
Example
The name of the control is AlarmTreeViewerCtrl1 and nTag1 is an integer or real tag. nTag1 = #AlarmTreeViewerCtrl1.GetElementCount();
GetElementName() Method
Gets the element name corresponding to the index.
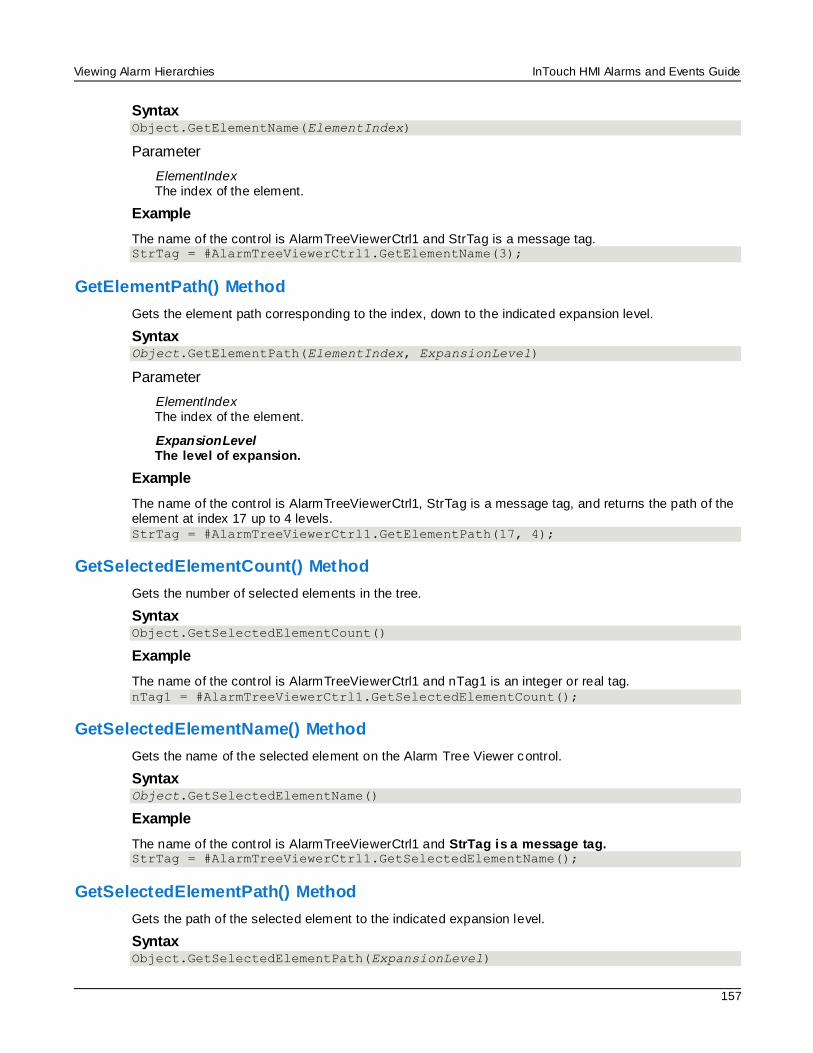
Viewing Alarm Hierarchies InTouch HMI Alarms and Events Guide
157
Syntax Object.GetElementName(ElementIndex)
Parameter
ElementIndex The index of the element.
Example
The name of the control is AlarmTreeViewerCtrl1 and StrTag is a message tag. StrTag = #AlarmTreeViewerCtrl1.GetElementName(3);
GetElementPath() Method
Gets the element path corresponding to the index, down to the indicated expansion level.
Syntax Object.GetElementPath(ElementIndex, ExpansionLevel)
Parameter
ElementIndex The index of the element.
ExpansionLevel The level of expansion.
Example
The name of the control is AlarmTreeViewerCtrl1, StrTag is a message tag, and returns the path of the element at index 17 up to 4 levels. StrTag = #AlarmTreeViewerCtrl1.GetElementPath(17, 4);
GetSelectedElementCount() Method
Gets the number of selected elements in the tree.
Syntax Object.GetSelectedElementCount()
Example
The name of the control is AlarmTreeViewerCtrl1 and nTag1 is an integer or real tag. nTag1 = #AlarmTreeViewerCtrl1.GetSelectedElementCount();
GetSelectedElementName() Method
Gets the name of the selected element on the Alarm Tree Viewer control.
Syntax Object.GetSelectedElementName()
Example
The name of the control is AlarmTreeViewerCtrl1 and StrTag is a message tag. StrTag = #AlarmTreeViewerCtrl1.GetSelectedElementName();
GetSelectedElementPath() Method
Gets the path of the selected element to the indicated expansion level.
Syntax Object.GetSelectedElementPath(ExpansionLevel)
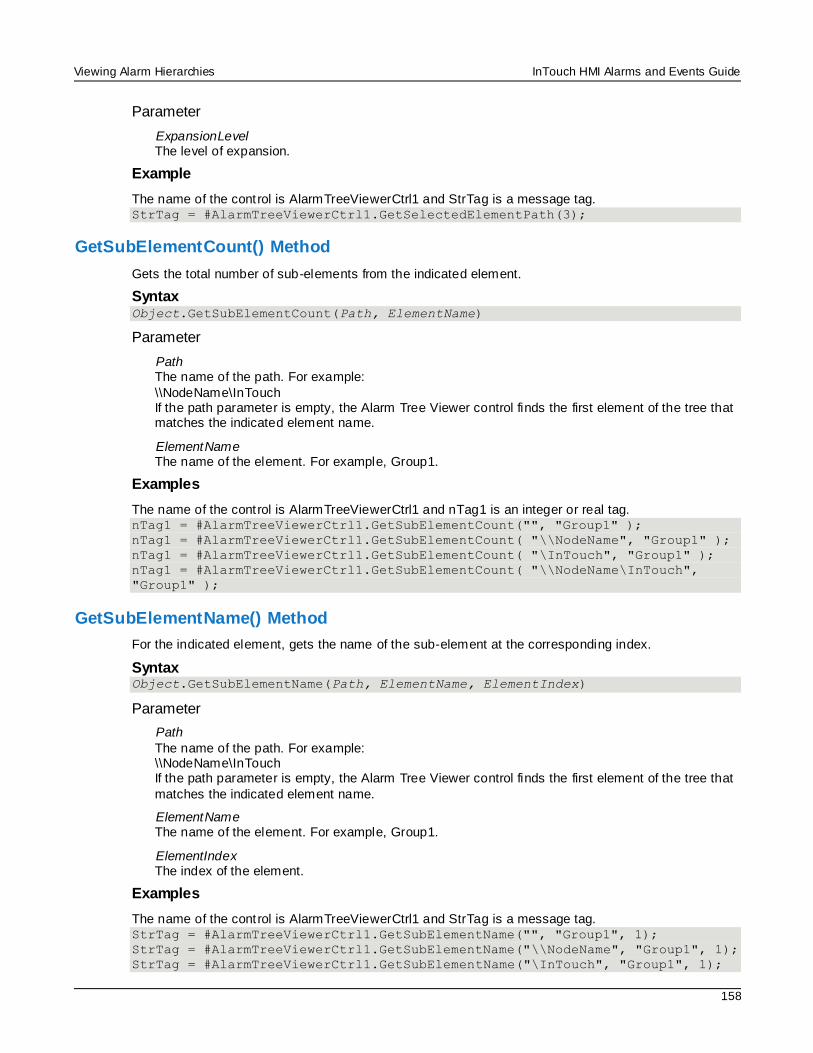
Viewing Alarm Hierarchies InTouch HMI Alarms and Events Guide
158
Parameter
ExpansionLevel The level of expansion.
Example
The name of the control is AlarmTreeViewerCtrl1 and StrTag is a message tag. StrTag = #AlarmTreeViewerCtrl1.GetSelectedElementPath(3);
GetSubElementCount() Method
Gets the total number of sub-elements from the indicated element.
Syntax Object.GetSubElementCount(Path, ElementName)
Parameter
Path The name of the path. For example:
\\NodeName\InTouch If the path parameter is empty, the Alarm Tree Viewer control finds the first element of the tree that matches the indicated element name.
ElementName The name of the element. For example, Group1.
Examples
The name of the control is AlarmTreeViewerCtrl1 and nTag1 is an integer or real tag. nTag1 = #AlarmTreeViewerCtrl1.GetSubElementCount("", "Group1" );
nTag1 = #AlarmTreeViewerCtrl1.GetSubElementCount( "\\NodeName", "Group1" );
nTag1 = #AlarmTreeViewerCtrl1.GetSubElementCount( "\InTouch", "Group1" );
nTag1 = #AlarmTreeViewerCtrl1.GetSubElementCount( "\\NodeName\InTouch",
"Group1" );
GetSubElementName() Method
For the indicated element, gets the name of the sub-element at the corresponding index.
Syntax Object.GetSubElementName(Path, ElementName, ElementIndex)
Parameter
Path
The name of the path. For example: \\NodeName\InTouch If the path parameter is empty, the Alarm Tree Viewer control finds the first element of the tree that
matches the indicated element name.
ElementName The name of the element. For example, Group1.
ElementIndex The index of the element.
Examples
The name of the control is AlarmTreeViewerCtrl1 and StrTag is a message tag. StrTag = #AlarmTreeViewerCtrl1.GetSubElementName("", "Group1", 1);
StrTag = #AlarmTreeViewerCtrl1.GetSubElementName("\\NodeName", "Group1", 1);
StrTag = #AlarmTreeViewerCtrl1.GetSubElementName("\InTouch", "Group1", 1);
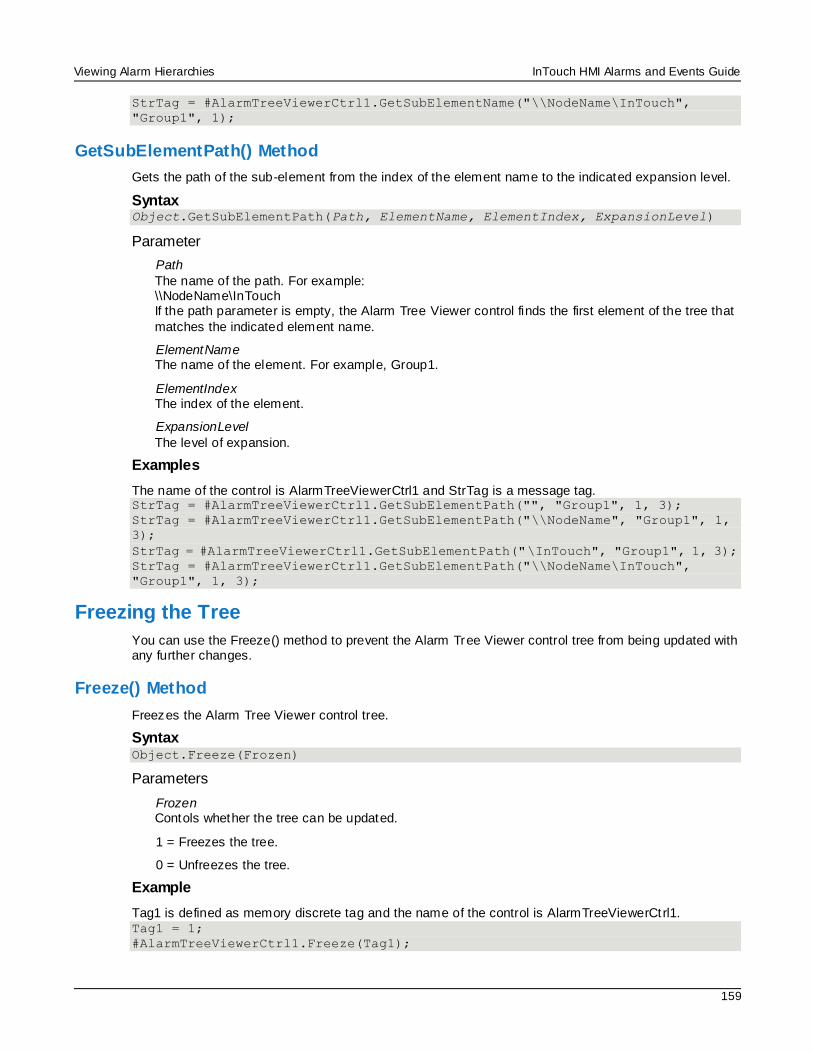
Viewing Alarm Hierarchies InTouch HMI Alarms and Events Guide
159
StrTag = #AlarmTreeViewerCtrl1.GetSubElementName("\\NodeName\InTouch",
"Group1", 1);
GetSubElementPath() Method
Gets the path of the sub-element from the index of the element name to the indicated expansion level.
Syntax Object.GetSubElementPath(Path, ElementName, ElementIndex, ExpansionLevel)
Parameter
Path
The name of the path. For example: \\NodeName\InTouch If the path parameter is empty, the Alarm Tree Viewer control finds the first element of the tree that
matches the indicated element name.
ElementName The name of the element. For example, Group1.
ElementIndex The index of the element.
ExpansionLevel
The level of expansion.
Examples
The name of the control is AlarmTreeViewerCtrl1 and StrTag is a message tag. StrTag = #AlarmTreeViewerCtrl1.GetSubElementPath("", "Group1", 1, 3);
StrTag = #AlarmTreeViewerCtrl1.GetSubElementPath("\\NodeName", "Group1", 1,
3);
StrTag = #AlarmTreeViewerCtrl1.GetSubElementPath("\InTouch", "Group1", 1, 3);
StrTag = #AlarmTreeViewerCtrl1.GetSubElementPath("\\NodeName\InTouch",
"Group1", 1, 3);
Freezing the Tree
You can use the Freeze() method to prevent the Alarm Tree Viewer control tree from being updated with any further changes.
Freeze() Method
Freezes the Alarm Tree Viewer control tree.
Syntax Object.Freeze(Frozen)
Parameters
Frozen Contols whether the tree can be updated.
1 = Freezes the tree.
0 = Unfreezes the tree.
Example
Tag1 is defined as memory discrete tag and the name of the control is AlarmTreeViewerCtrl1. Tag1 = 1;
#AlarmTreeViewerCtrl1.Freeze(Tag1);
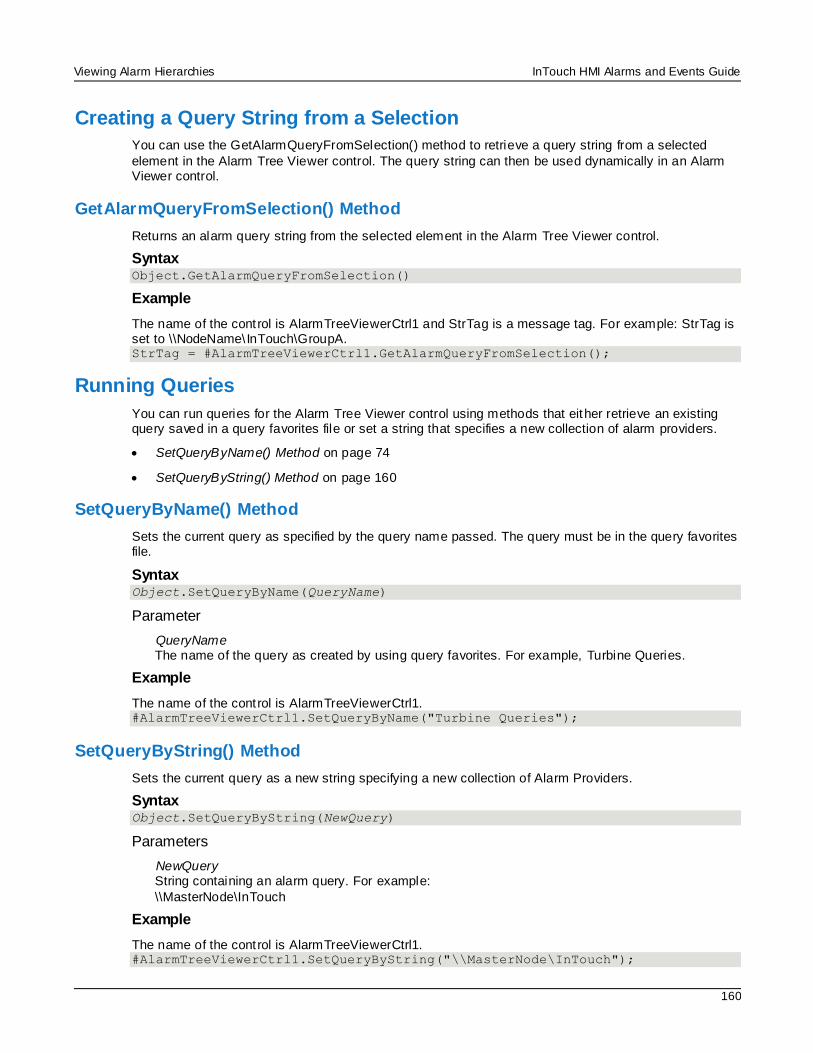
Viewing Alarm Hierarchies InTouch HMI Alarms and Events Guide
160
Creating a Query String from a Selection
You can use the GetAlarmQueryFromSelection() method to retrieve a query string from a selected
element in the Alarm Tree Viewer control. The query string can then be used dynamically in an Alarm Viewer control.
GetAlarmQueryFromSelection() Method
Returns an alarm query string from the selected element in the Alarm Tree Viewer control.
Syntax Object.GetAlarmQueryFromSelection()
Example
The name of the control is AlarmTreeViewerCtrl1 and StrTag is a message tag. For example: StrTag is set to \\NodeName\InTouch\GroupA. StrTag = #AlarmTreeViewerCtrl1.GetAlarmQueryFromSelection();
Running Queries
You can run queries for the Alarm Tree Viewer control using methods that either retrieve an existing query saved in a query favorites file or set a string that specifies a new collection of alarm providers.
SetQueryByName() Method on page 74
SetQueryByString() Method on page 160
SetQueryByName() Method
Sets the current query as specified by the query name passed. The query must be in the query favorites file.
Syntax Object.SetQueryByName(QueryName)
Parameter
QueryName The name of the query as created by using query favorites. For example, Turbine Queries.
Example
The name of the control is AlarmTreeViewerCtrl1. #AlarmTreeViewerCtrl1.SetQueryByName("Turbine Queries");
SetQueryByString() Method
Sets the current query as a new string specifying a new collection of Alarm Providers.
Syntax Object.SetQueryByString(NewQuery)
Parameters
NewQuery String containing an alarm query. For example:
\\MasterNode\InTouch
Example
The name of the control is AlarmTreeViewerCtrl1. #AlarmTreeViewerCtrl1.SetQueryByString("\\MasterNode\InTouch");
Viewing Alarm Hierarchies InTouch HMI Alarms and Events Guide
161
Error Handling While Using Methods and Properties All Alarm Tree Viewer control error messages are sent to the Logger. If you configure the Alarm Tree
Viewer control to run in silent mode, no run-time errors are shown.
Using Alarm Tree Viewer Control ActiveX Events to Trigger Scripts
You can assign QuickScripts to Alarm Tree Viewer control events, such as a mouse click or double -click. When the event occurs, the QuickScript runs.
The Alarm Tree Viewer control supports the following events:
Click
DoubleClick
ShutDown
StartUp
The Click event has one parameter called ClicknElementID, which identifies the element in the tree that is clicked at run time.
The DoubleClick event has one parameter called DoubleClicknElementID, which identifies the element in the tree that is double-clicked at run time.
For the Click and DoubleClick events, an ElementID of -1 is returned for the "All Providers" node.
Note: The Alarm Tree Viewer control ignores the user interface methods when they are called from the StartUp event, because the control is not visible yet. These methods include: AboutBox(),
CheckElementMembership(), Freeze(), GetAlarmQueryFromSelection(), GetElementCount(), GetElementName(), GetElementPath(), GetSelectedElementCount(), GetSelectedElementName(), GetSelectedElementPath(), GetSubElementCount(), GetSubElementName(), GetSubElementPath(),
and Refresh().
For more information about scripting ActiveX events, see Scripting ActiveX Controls in the InTouch®
HMI Scripting and Logic Guide.

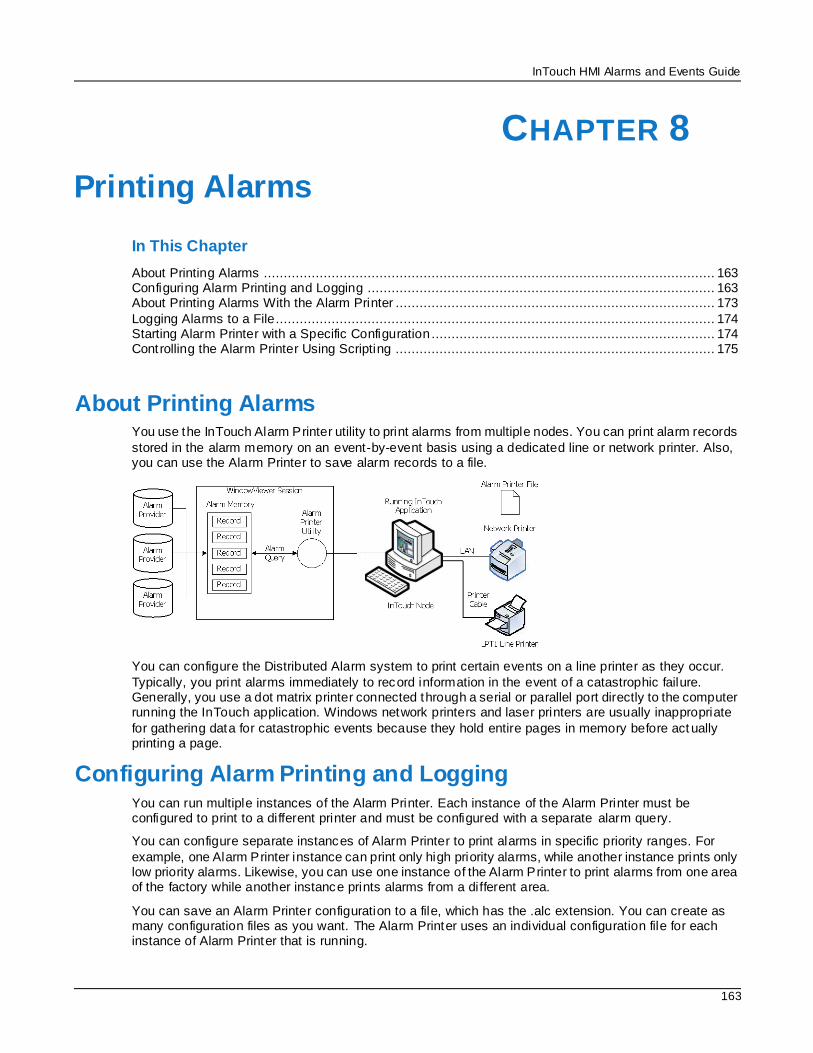
InTouch HMI Alarms and Events Guide
163
In This Chapter
About Printing Alarms ................................................................................................................. 163 Configuring Alarm Printing and Logging ....................................................................................... 163 About Printing Alarms With the Alarm Printer ................................................................................ 173
Logging Alarms to a File.............................................................................................................. 174 Starting Alarm Printer with a Specific Configuration ....................................................................... 174 Controlling the Alarm Printer Using Scripting ................................................................................ 175
About Printing Alarms You use the InTouch Alarm Printer utility to print alarms from multiple nodes. You can print alarm records
stored in the alarm memory on an event-by-event basis using a dedicated line or network printer. Also, you can use the Alarm Printer to save alarm records to a file.
You can configure the Distributed Alarm system to print certain events on a line printer as they occur.
Typically, you print alarms immediately to record information in the event of a catastrophic failure. Generally, you use a dot matrix printer connected through a serial or parallel port directly to the computer running the InTouch application. Windows network printers and laser printers are usually inappropriate
for gathering data for catastrophic events because they hold entire pages in memory before act ually printing a page.
Configuring Alarm Printing and Logging You can run multiple instances of the Alarm Printer. Each instance of the Alarm Printer must be configured to print to a different printer and must be configured with a separate alarm query.
You can configure separate instances of Alarm Printer to print alarms in specific priority ranges. For
example, one Alarm Printer instance can print only high priority alarms, while another instance prints only low priority alarms. Likewise, you can use one instance of the Alarm Printer to print alarms from one area of the factory while another instance prints alarms from a different area.
You can save an Alarm Printer configuration to a file, which has the .alc extension. You can create as many configuration files as you want. The Alarm Printer uses an individual configuration file for each instance of Alarm Printer that is running.
CHAPTER 8
Printing Alarms
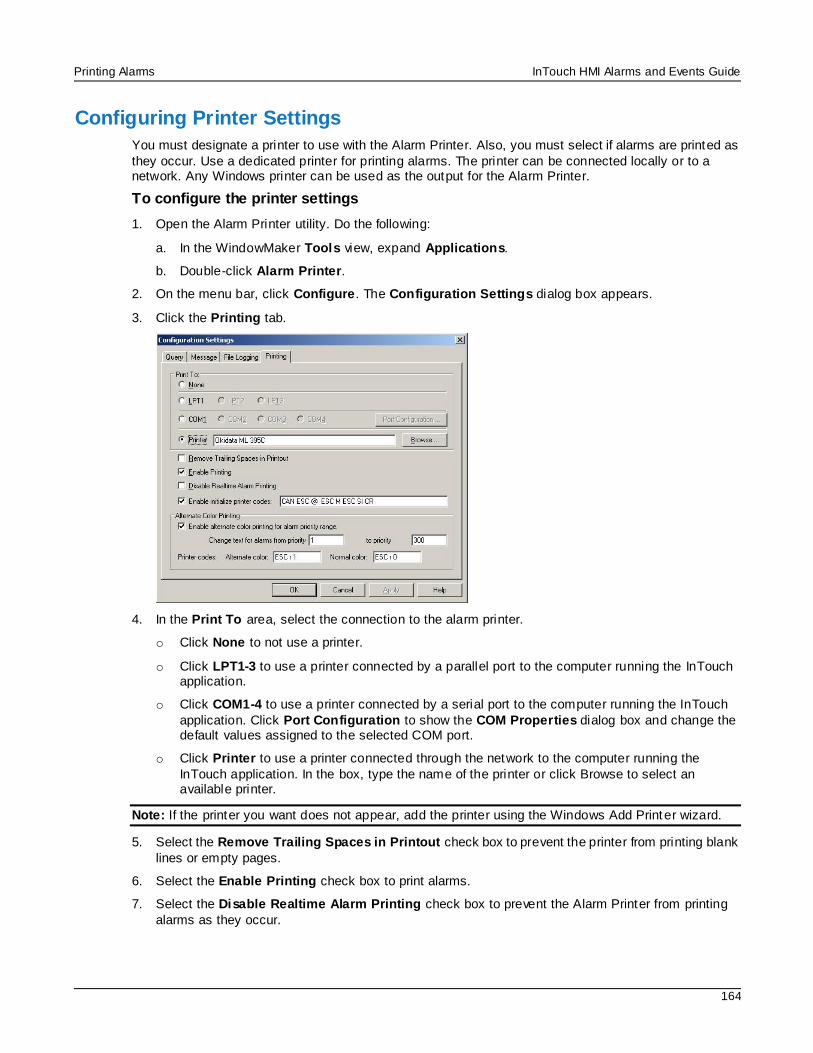
Printing Alarms InTouch HMI Alarms and Events Guide
164
Configuring Printer Settings
You must designate a printer to use with the Alarm Printer. Also, you must select if alarms are printed as
they occur. Use a dedicated printer for printing alarms. The printer can be connected locally or to a network. Any Windows printer can be used as the output for the Alarm Printer.
To configure the printer settings
1. Open the Alarm Printer utility. Do the following:
a. In the WindowMaker Tools view, expand Applications.
b. Double-click Alarm Printer.
2. On the menu bar, click Configure. The Configuration Settings dialog box appears.
3. Click the Printing tab.
4. In the Print To area, select the connection to the alarm printer.
o Click None to not use a printer.
o Click LPT1-3 to use a printer connected by a parallel port to the computer running the InTouch application.
o Click COM1-4 to use a printer connected by a serial port to the computer running the InTouch
application. Click Port Configuration to show the COM Properties dialog box and change the default values assigned to the selected COM port.
o Click Printer to use a printer connected through the network to the computer running the
InTouch application. In the box, type the name of the printer or click Browse to select an available printer.
Note: If the printer you want does not appear, add the printer using the Windows Add Printer wizard.
5. Select the Remove Trailing Spaces in Printout check box to prevent the printer from printing blank
lines or empty pages.
6. Select the Enable Printing check box to print alarms.
7. Select the Disable Realtime Alarm Printing check box to prevent the Alarm Printer from printing
alarms as they occur.
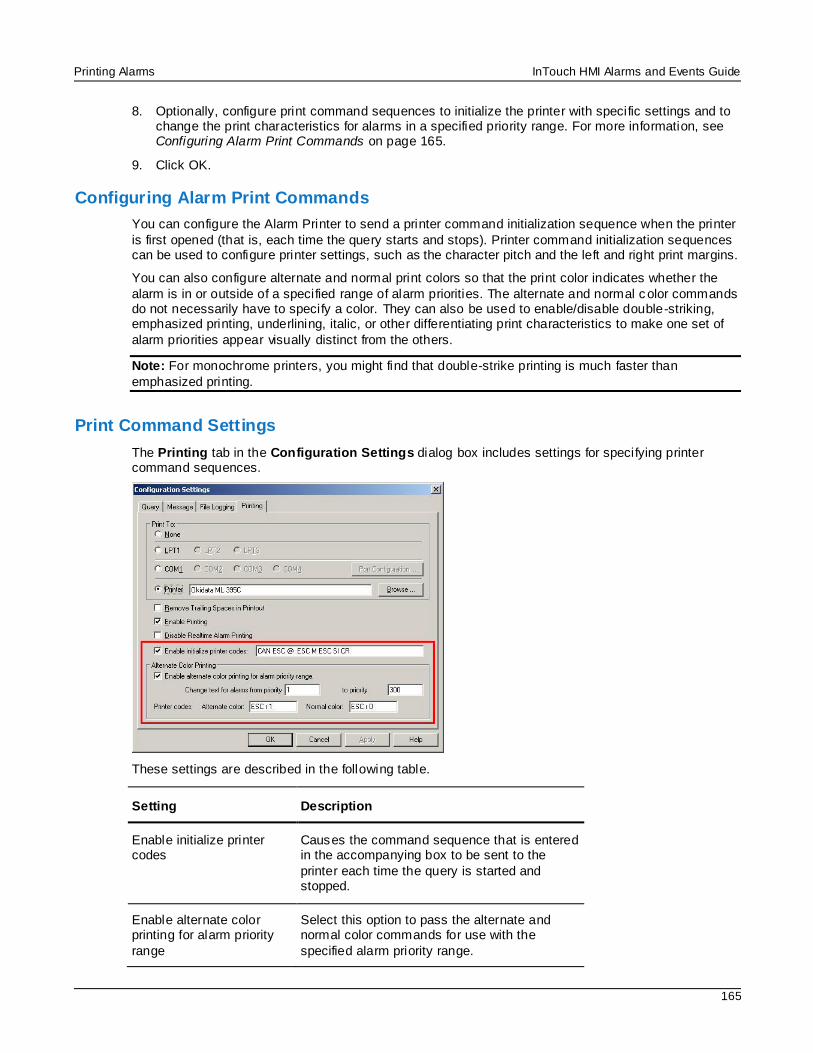
Printing Alarms InTouch HMI Alarms and Events Guide
165
8. Optionally, configure print command sequences to initialize the printer with specific settings and to change the print characteristics for alarms in a specified priority range. For more information, see Configuring Alarm Print Commands on page 165.
9. Click OK.
Configuring Alarm Print Commands
You can configure the Alarm Printer to send a printer command initialization sequence when the printer
is first opened (that is, each time the query starts and stops). Printer command initialization sequences can be used to configure printer settings, such as the character pitch and the left and right print margins.
You can also configure alternate and normal print colors so that the print color indicates whether the
alarm is in or outside of a specified range of alarm priorities. The alternate and normal c olor commands do not necessarily have to specify a color. They can also be used to enable/disable double-striking, emphasized printing, underlining, italic, or other differentiating print characteristics to make one set of
alarm priorities appear visually distinct from the others.
Note: For monochrome printers, you might find that double-strike printing is much faster than
emphasized printing.
Print Command Settings
The Printing tab in the Configuration Settings dialog box includes settings for specifying printer command sequences.
These settings are described in the following table.
Setting Description
Enable initialize printer codes
Causes the command sequence that is entered in the accompanying box to be sent to the
printer each time the query is started and stopped.
Enable alternate color printing for alarm priority
range
Select this option to pass the alternate and normal color commands for use with the
specified alarm priority range.
Printing Alarms InTouch HMI Alarms and Events Guide
166
Setting Description
Change text for alarms from priority … to priority
Enter the alarm priority range from a low number (representing higher priority alarms) to a higher number (representing lower priority
alarms).
Alternate color The printer command sequence that will be sent each time a row of alarm text is sent to the printer when the alarm priority is in the specified
range.
Normal color The printer command sequence that will be sent each time a row of alarm text is sent to the printer when the alarm priority is not in the
specified range.
Sample Printer Command Sequences
As an example, the following printer command sequences are for an Okidata Microline 395C color dot
matrix printer. Refer to the documentation that accompanied your printer for its command sequences.
Printer initialization command: CAN ESC @ ESC M ESC SI CR
where the commands are as follows:
CAN – Cancel any remaining data in the printer’s internal buffer.
ESC @ – Reset the printer to menu defaults.
ESC M – Set the printing to 12 CPI (Elite).
ESC SI – Set printing to compressed to obtain 20 CPI.
CR – Move the print head back to the left margin.
Alternate color command that sets the print color to red: ESC r 1
Normal color command that sets the print color to black: ESC r 0
Printer Command Escape Sequences Syntax
Each printer command escape sequence consists of one or more bytes. Information about these bytes should be available in the printer’s documentation or by knowing that the printer can parse ESC/P or
ESC/P2 syntax. Information about these syntaxes is publicly available on the Internet.
Generally, there is no limitation on the length of the printer command escape sequence text. The parser interprets the stream of text tokens and converts them to a sequence of contiguous byte values. The byte
values are then streamed to the printer, unmodified, at the appropriate time, such as at printer initialization or when the printer setting for the alarm must be modified and restored.
When specifying the printer command escape sequence as text, each byte character must be separated
by a space character. The space character indicates to the parser where a token begins and ends. For example, if the printer’s draft mode can be activated by ESCx0, then the command sequence is entered as: ESC x 0
Printing Alarms InTouch HMI Alarms and Events Guide
167
If you need to send a space character to the printer, then use the abbreviation SP to represent that byte.
Note: The parser is case-sensitive, so all abbreviations must be entered in capital letters. For example,
use ESC, not esc or Esc.
The following types of items can be included in the command sequence:
The abbreviated name of the control characters
The number, letter, or other printable character
The decimal number for the ASCII character
The hexadecimal number for the ASCII character
For a list of the hexadecimal or decimal numbers for the control and printable characters, refer to a publicly available ASCII table.
Entering Names of Control Characters
You can enter the names of control characters, as these are not easily typed from the keyboard. For a list of control character names, refer to the Abbr column of a publicly available ASCII table. The only
character that is not typically listed in an ASCII table is the space character, which must be entered as SP.
Note: The parser does not process common C language escape characters (for example, \r, \n, and \t).
Entering Printable Characters
Enter any printable character by typing it in the box. The only exception is the space character (hexadecimal 0x20, decimal 32), which must be entered as SP. The character’s value is interpreted as
the number that represents it in the ASCII table, and that is the value sent to the printer.
For a list of printable characters, refer to a publicly available ASCII table.
Entering a Character’s Decimal Number
Enter the character’s decimal number by typing it in the box. The maximum decimal value that can be
entered is 255 (hexadecimal 0xFF). There is no warning if you enter a decimal number that is too large, such as 497; it will cause 255 to be returned. Negative numbers are not supported.
Entering a Character’s Hexadecimal Number
Enter the character’s hexadecimal number by typing it in the box. The allowable range of values is 0x00 to 0xFF.
Configuring Which Alarms to Print
The Alarm Printer queries the alarm memory to select records to print or save to a log file. The query
selects records from the internal alarm memory based upon:
Alarm priority
Current alarm state (unacknowledged/acknowledged)
Alarm group membership
Each alarm has an assigned priority number that represents the severity of the alarm. An alarm priority ranges from 1 to 999. The most severe alarm is assigned a priority of 1. The least severe alarm is assigned a priority of 999.
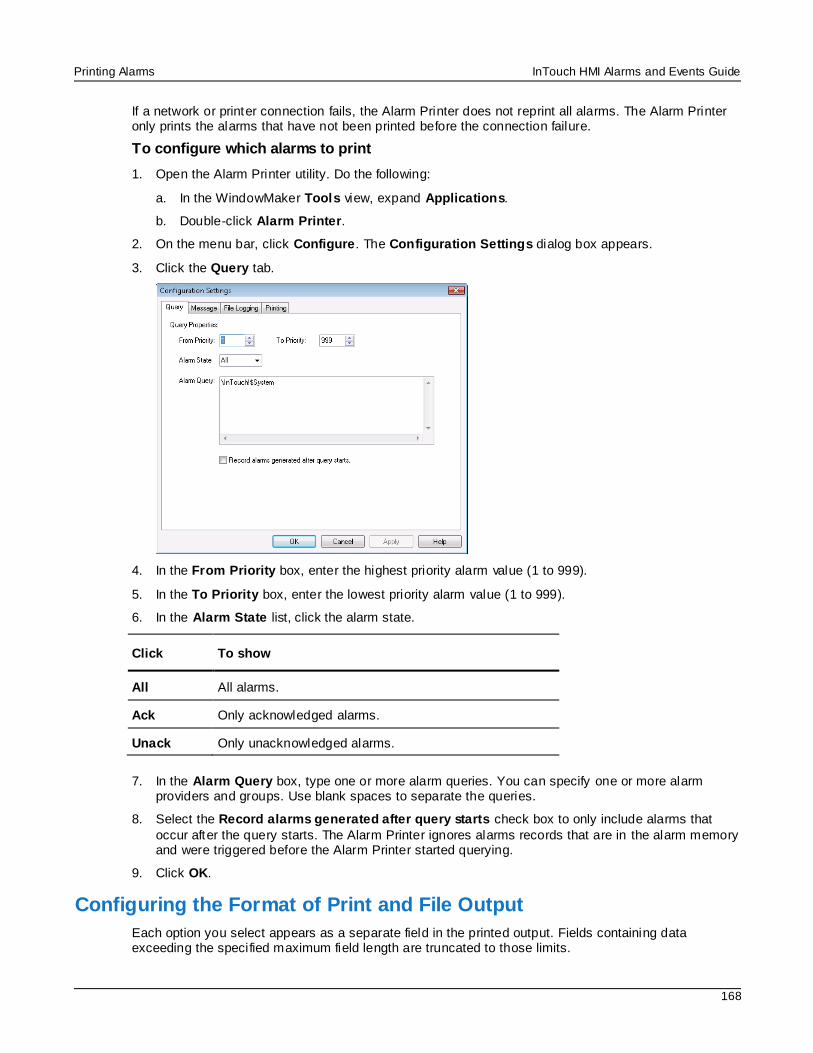
Printing Alarms InTouch HMI Alarms and Events Guide
168
If a network or printer connection fails, the Alarm Printer does not reprint all alarms. The Alarm Printer only prints the alarms that have not been printed before the connection failure.
To configure which alarms to print
1. Open the Alarm Printer utility. Do the following:
a. In the WindowMaker Tools view, expand Applications.
b. Double-click Alarm Printer.
2. On the menu bar, click Configure. The Configuration Settings dialog box appears.
3. Click the Query tab.
4. In the From Priority box, enter the highest priority alarm value (1 to 999).
5. In the To Priority box, enter the lowest priority alarm value (1 to 999).
6. In the Alarm State list, click the alarm state.
Click To show
All All alarms.
Ack Only acknowledged alarms.
Unack Only unacknowledged alarms.
7. In the Alarm Query box, type one or more alarm queries. You can specify one or more alarm providers and groups. Use blank spaces to separate the queries.
8. Select the Record alarms generated after query starts check box to only include alarms that
occur after the query starts. The Alarm Printer ignores alarms records that are in the alarm memory and were triggered before the Alarm Printer started querying.
9. Click OK.
Configuring the Format of Print and File Output
Each option you select appears as a separate field in the printed output. Fields containing data exceeding the specified maximum field length are truncated to those limits.
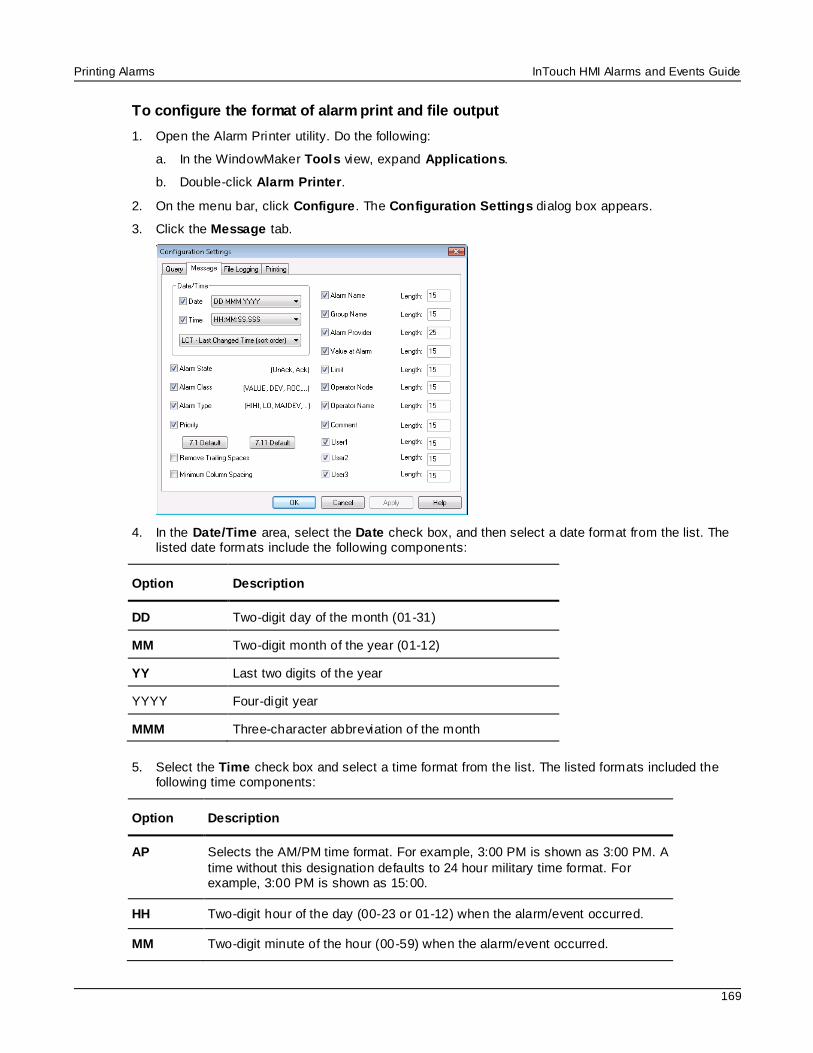
Printing Alarms InTouch HMI Alarms and Events Guide
169
To configure the format of alarm print and file output
1. Open the Alarm Printer utility. Do the following:
a. In the WindowMaker Tools view, expand Applications.
b. Double-click Alarm Printer.
2. On the menu bar, click Configure. The Configuration Settings dialog box appears.
3. Click the Message tab.
4. In the Date/Time area, select the Date check box, and then select a date format from the list. The listed date formats include the following components:
Option Description
DD Two-digit day of the month (01-31)
MM Two-digit month of the year (01-12)
YY Last two digits of the year
YYYY Four-digit year
MMM Three-character abbreviation of the month
5. Select the Time check box and select a time format from the list. The listed formats included the following time components:
Option Description
AP Selects the AM/PM time format. For example, 3:00 PM is shown as 3:00 PM. A
time without this designation defaults to 24 hour military time format. For example, 3:00 PM is shown as 15:00.
HH Two-digit hour of the day (00-23 or 01-12) when the alarm/event occurred.
MM Two-digit minute of the hour (00-59) when the alarm/event occurred.
Printing Alarms InTouch HMI Alarms and Events Guide
170
Option Description
SS Two-digit second of the minute (00-59) when the alarm/event occurred.
SSS Three-digit millisecond of the second when the alarm/event occurred.
6. Select the order that alarms appear in the alarm record according to the onset time of the alarm:
Option Description
OAT (Original Alarm Time) The date/time stamp of the onset of the alarm.
LCT (Last Changed Time) The date/time stamp of the most recent change of status for the instance of the alarm: onset of the alarm, change of sub-state, return to normal, or acknowledgment.
LCT But OAT on ACK
(Last Changed Time, but Original Alarm Time on acknowledgement ) The last changed time is used while the alarm is unacknowledged, then original alarm time is used after the alarm has been acknowledged.
7. Select the alarm information to be printed.
Option Description
Alarm State Prints the alarm state. For example, UnAck, Ack.
Alarm Class Prints the alarm class. For example, VALUE, DEV, ROC.
Alarm Type Prints the alarm type. For example, HIHI, LO, MAJDEV.
Priority Prints the alarm priority (1-999).
7.1 Default (button) Selects the default settings for the Alarm Printer utility for InTouch
version 7.1.
7.11 Default (button) Selects the default settings for the Alarm Printer utility for InTouch version 7.11.
Remove Trailing Spaces
Removes the extra trailing spaces from a printed field when the length of the actual field value is less than the value configured for
that field.
Minimum Column Spacing
Reduces the spacing between columns so that more fields can fit on the printed page.
Alarm Name Prints the alarm name (tag). In the Length box, type the number of characters
(64 characters maximum) for the alarm name.
Printing Alarms InTouch HMI Alarms and Events Guide
171
Option Description
Group Name Prints the alarm group name. In the Length box, type the number of characters (64 characters maximum) for the alarm group name.
Alarm Provider Prints the name of the alarm provider. In the Length box, type the
number of characters (64 characters maximum) for the alarm provider name.
Value at Alarm Prints the value of the tag. In the Length box, type the number of
characters (32 characters maximum) for the alarm value.
Limit Prints the tag’s alarm limit. In the Length box, type the number of characters (32 characters maximum) allowed for alarm limit. The number should
be large enough to provide the desired level of precision.
Operator Node Prints the operator node associated with the alarm condition. In the Length box, type the number of characters (64 characters maximum) allowed for the operator’s node.
In a Terminal Services environment, this is the name of the client computer that the respective operator established the Terminal Services session from. If the node name can't be retrieved, the
node's IP address is used instead.
Operator Name Prints the operator name associated with the alarm condition. In the
Length box, type the number of characters (16 characters maximum) allowed for the operator’s name.
Comment Prints the alarm comment associated with the tag. In the Length box,
type the number of characters (131 characters maximum) allowed for the comment.
User1 Prints the numerical values of User Defined Number 1
corresponding to the alarm.
User2 Prints the numerical values of User Defined Number 2 corresponding to the alarm.
User3 Prints the string value of the user-defined string property associated with the alarm. The maximum number of characters is 131.
8. Click Apply.
Configuring Log Files for Alarms
You can log alarm records to a file. By default, the Alarm Printer assigns names to log files based upon
the following naming convention:
YYMMDDHH.ALG

Printing Alarms InTouch HMI Alarms and Events Guide
172
Notation Description
YY Last two digits of the year when the log file is created.
MM Two-digit number of the month (01-12) when the log file is created.
DD Two-digit day of the month (01-31) when the log file is created.
HH Two-digit hour of the day (00-23) when the log file is created.
To configure alarm record logging
1. Open the Alarm Printer utility. Do the following:
a. In the WindowMaker Tools view, expand Applications.
b. Double-click Alarm Printer.
2. On the menu bar, click Configure. The Configuration Settings dialog box appears.
3. Click the File Logging tab.
4. Select the Enable Alarm File Logging check box to save alarm records to log files.
5. In the Directory box, type the path or browse to a folder location to save the alarm log files.
6. In the Number of Hours to Cycle Filename box, enter the number of hours worth of alarm records
to save to an individual log file.
Valid entries are 1 to 24. If your InTouch application runs continuously, select a file logging interval that creates a set of equal length daily log files. For example, setting Number of Hours to Cycle
Filename to 6 creates 4 equal length daily log files.
7. In the Starting at Hour box, enter the starting hour to begin logging alarm records to a file each day.
Valid entries are 0 to 23.
Printing Alarms InTouch HMI Alarms and Events Guide
173
For example, an oil refinery operates three daily work shifts. The first shift begins at 06:00. Management wants alarm records logged for each shift. To do this, enter 8 for the Number of Hours to Cycle Filename option. Enter 6 for the Starting at Hour (0-23) option. The Alarm Printer creates
a log file from 06:00 to 14:00, another from 14:00 to 22:00, and a third from 22:00 to 06:00.
8. In the Keep Log Files for box, enter the number of days to retain log files.
The Alarm Printer saves log files for the number of specified days plus the current day. The Alarm
Printer deletes log files older than the retention period. To save log files indefinitely, enter 0.
9. In the Log File Name Extension box, accept the default ALG file name extension or assign another three-character extension to log files.
If you use a .csv extension, you can import the log file directly into Excel or Notepad.
10. To remove spaces at the end of entries within a log file, select the Remove Trailing Spaces in Log Entries check box.
You can also specify a field separator character placed at the end of each record in the log file.
11. Select the Original Column Ordering check box to maintain the same order from the alarm display to log file records.
12. Click Apply.
Saving and Loading Configuration Files
When you start the Alarm Printer from WindowMaker, the Alarm Printer dialog box shows the default
configuration settings. These configuration settings are saved in an alarm configuration file (.alc ).
You can save your printer configuration settings to a file that can be loaded before printing alarms.
A specific alarm configuration file can be shown if it is opened in run time from the command prompt or by
double-clicking its *.alc file name.
To create a new Alarm Printer configuration file
1. Open the Alarm Printer utility. Do the following:
a. In the WindowMaker Tools view, expand Applications.
b. Double-click Alarm Printer.
2. On the File menu, click New to show the Alarm Printer with its default values.
3. On the menu bar, click Configure. The Configuration Settings dialog box appears.
4. Configure the alarm settings.
5. On the File menu, select Save.
To edit an existing Alarm Printer configuration file
1. On the File menu, select Open.
2. Select the Alarm Printer Configuration file that you want to edit.
3. Edit the file.
4. On the File menu, select Save. Select Save as to save the changes to a new file without changing the existing file.
About Printing Alarms With the Alarm Printer Each query logs all of the alarms specified in the Alarm Printer configuration file (.alc) that is currently open. If no file has been specified, the settings currently selected during Alarm Printer configuration are
used.
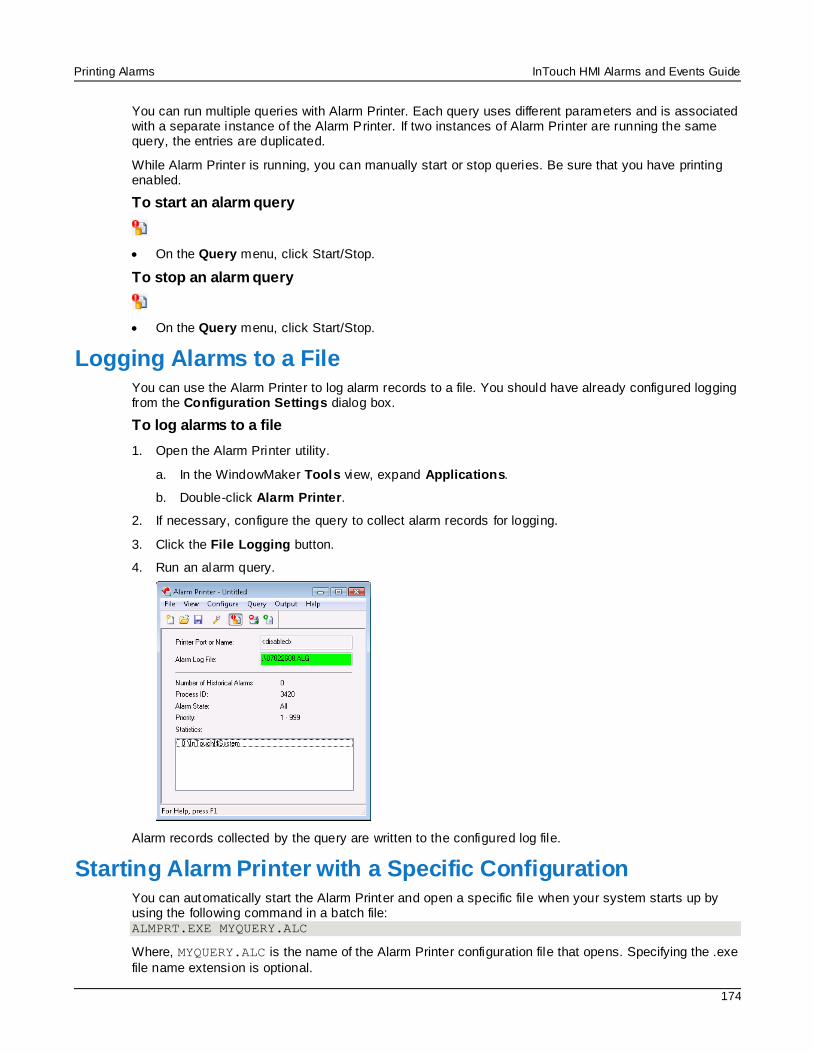
Printing Alarms InTouch HMI Alarms and Events Guide
174
You can run multiple queries with Alarm Printer. Each query uses different parameters and is associated with a separate instance of the Alarm Printer. If two instances of Alarm Printer are running the same query, the entries are duplicated.
While Alarm Printer is running, you can manually start or stop queries. Be sure that you have printing enabled.
To start an alarm query
On the Query menu, click Start/Stop.
To stop an alarm query
On the Query menu, click Start/Stop.
Logging Alarms to a File You can use the Alarm Printer to log alarm records to a file. You should have already configured logging from the Configuration Settings dialog box.
To log alarms to a file
1. Open the Alarm Printer utility.
a. In the WindowMaker Tools view, expand Applications.
b. Double-click Alarm Printer.
2. If necessary, configure the query to collect alarm records for logging.
3. Click the File Logging button.
4. Run an alarm query.
Alarm records collected by the query are written to the configured log file.
Starting Alarm Printer with a Specific Configuration You can automatically start the Alarm Printer and open a specific file when your system starts up by using the following command in a batch file: ALMPRT.EXE MYQUERY.ALC
Where, MYQUERY.ALC is the name of the Alarm Printer configuration file that opens. Specifying the .exe
file name extension is optional.
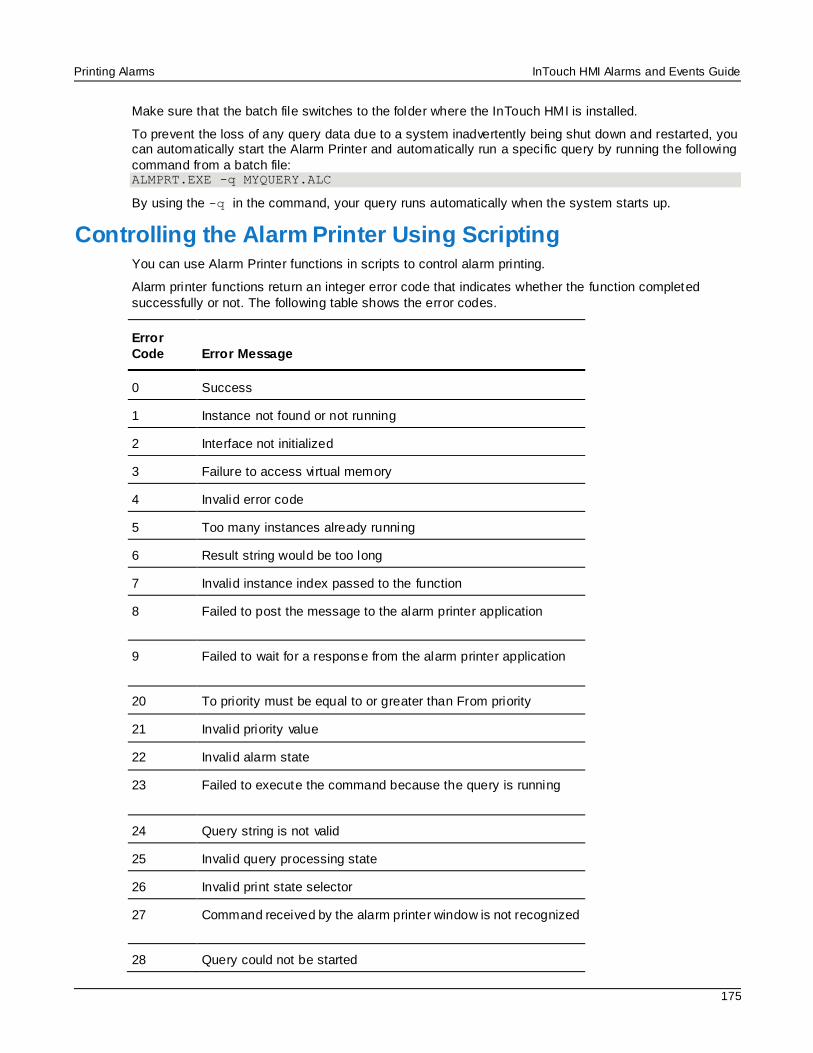
Printing Alarms InTouch HMI Alarms and Events Guide
175
Make sure that the batch file switches to the folder where the InTouch HMI is installed.
To prevent the loss of any query data due to a system inadvertently being shut down and restarted, you can automatically start the Alarm Printer and automatically run a specific query by running the following
command from a batch file: ALMPRT.EXE -q MYQUERY.ALC
By using the -q in the command, your query runs automatically when the system starts up.
Controlling the Alarm Printer Using Scripting You can use Alarm Printer functions in scripts to control alarm printing.
Alarm printer functions return an integer error code that indicates whether the function completed
successfully or not. The following table shows the error codes.
Error
Code Error Message
0 Success
1 Instance not found or not running
2 Interface not initialized
3 Failure to access virtual memory
4 Invalid error code
5 Too many instances already running
6 Result string would be too long
7 Invalid instance index passed to the function
8 Failed to post the message to the alarm printer application
9 Failed to wait for a response from the alarm printer application
20 To priority must be equal to or greater than From priority
21 Invalid priority value
22 Invalid alarm state
23 Failed to execute the command because the query is running
24 Query string is not valid
25 Invalid query processing state
26 Invalid print state selector
27 Command received by the alarm printer window is not recognized
28 Query could not be started
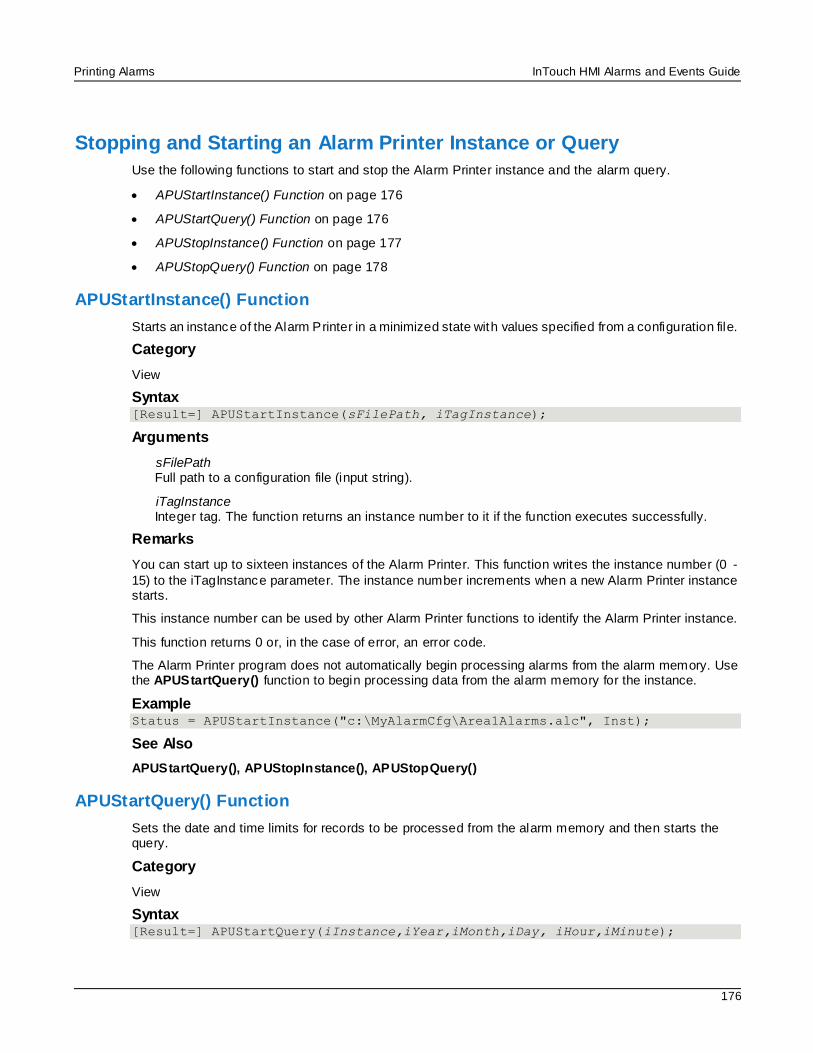
Printing Alarms InTouch HMI Alarms and Events Guide
176
Stopping and Starting an Alarm Printer Instance or Query
Use the following functions to start and stop the Alarm Printer instance and the alarm query.
APUStartInstance() Function on page 176
APUStartQuery() Function on page 176
APUStopInstance() Function on page 177
APUStopQuery() Function on page 178
APUStartInstance() Function
Starts an instance of the Alarm Printer in a minimized state with values specified from a configuration file.
Category
View
Syntax [Result=] APUStartInstance(sFilePath, iTagInstance);
Arguments
sFilePath Full path to a configuration file (input string).
iTagInstance Integer tag. The function returns an instance number to it if the function executes successfully.
Remarks
You can start up to sixteen instances of the Alarm Printer. This function writes the instance number (0 -
15) to the iTagInstance parameter. The instance number increments when a new Alarm Printer instance starts.
This instance number can be used by other Alarm Printer functions to identify the Alarm Printer instance.
This function returns 0 or, in the case of error, an error code.
The Alarm Printer program does not automatically begin processing alarms from the alarm memory. Use the APUStartQuery() function to begin processing data from the alarm memory for the instance.
Example Status = APUStartInstance("c:\MyAlarmCfg\Area1Alarms.alc", Inst);
See Also
APUStartQuery(), APUStopInstance(), APUStopQuery()
APUStartQuery() Function
Sets the date and time limits for records to be processed from the alarm memory and then starts the query.
Category
View
Syntax [Result=] APUStartQuery(iInstance,iYear,iMonth,iDay, iHour,iMinute);
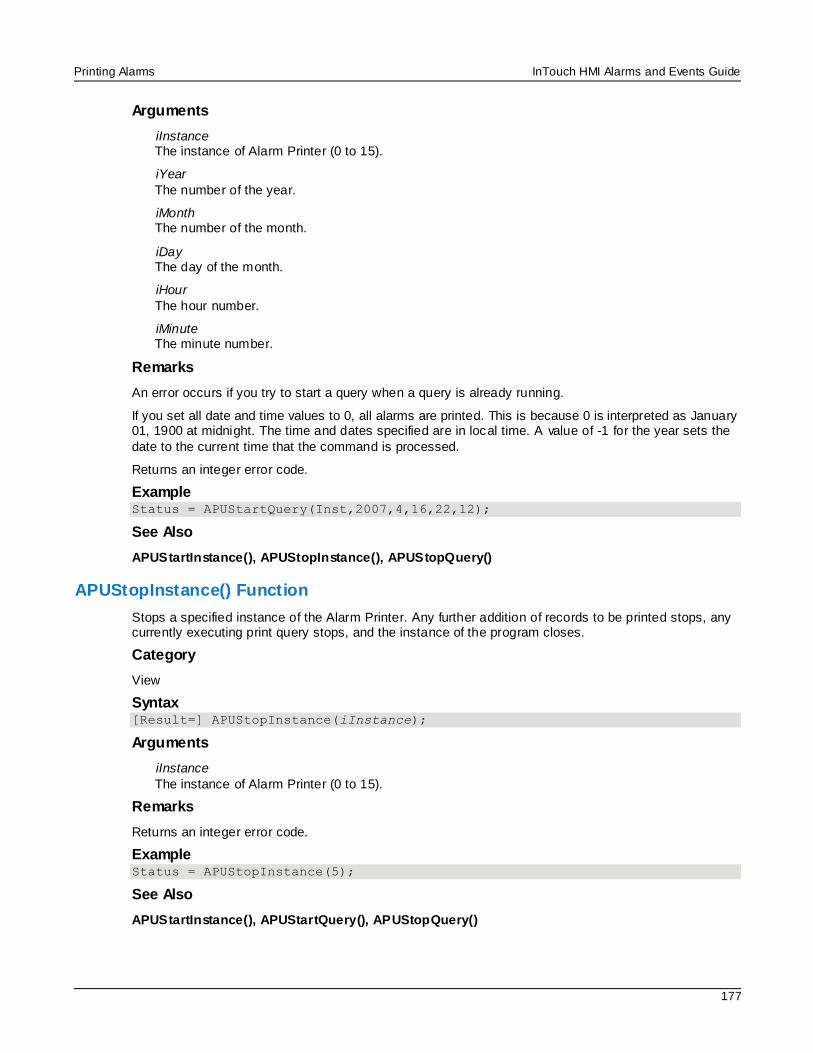
Printing Alarms InTouch HMI Alarms and Events Guide
177
Arguments
iInstance The instance of Alarm Printer (0 to 15).
iYear
The number of the year.
iMonth The number of the month.
iDay The day of the month.
iHour
The hour number.
iMinute The minute number.
Remarks
An error occurs if you try to start a query when a query is already running.
If you set all date and time values to 0, all alarms are printed. This is because 0 is interpreted as January 01, 1900 at midnight. The time and dates specified are in local time. A value of -1 for the year sets the
date to the current time that the command is processed.
Returns an integer error code.
Example Status = APUStartQuery(Inst,2007,4,16,22,12);
See Also
APUStartInstance(), APUStopInstance(), APUStopQuery()
APUStopInstance() Function
Stops a specified instance of the Alarm Printer. Any further addition of records to be printed stops, any currently executing print query stops, and the instance of the program closes.
Category
View
Syntax [Result=] APUStopInstance(iInstance);
Arguments
iInstance
The instance of Alarm Printer (0 to 15).
Remarks
Returns an integer error code.
Example Status = APUStopInstance(5);
See Also
APUStartInstance(), APUStartQuery(), APUStopQuery()
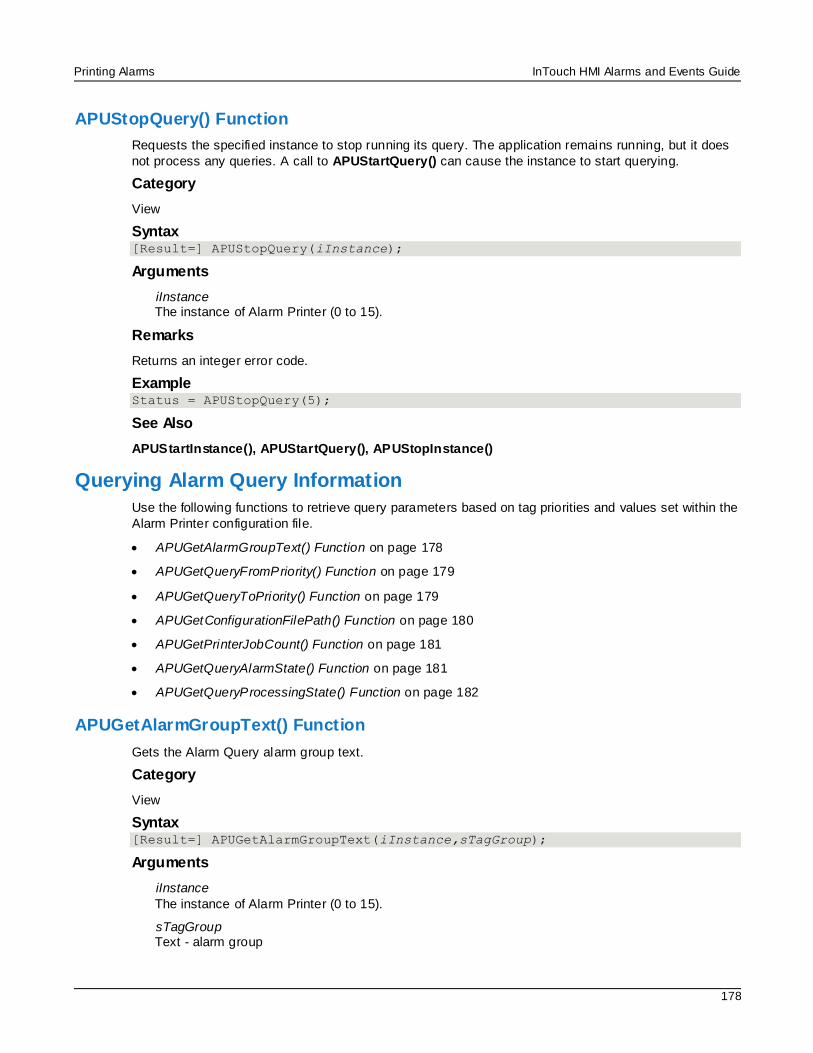
Printing Alarms InTouch HMI Alarms and Events Guide
178
APUStopQuery() Function
Requests the specified instance to stop running its query. The application remains running, but it does
not process any queries. A call to APUStartQuery() can cause the instance to start querying.
Category
View
Syntax [Result=] APUStopQuery(iInstance);
Arguments
iInstance The instance of Alarm Printer (0 to 15).
Remarks
Returns an integer error code.
Example Status = APUStopQuery(5);
See Also
APUStartInstance(), APUStartQuery(), APUStopInstance()
Querying Alarm Query Information
Use the following functions to retrieve query parameters based on tag priorities and values set within the
Alarm Printer configuration file.
APUGetAlarmGroupText() Function on page 178
APUGetQueryFromPriority() Function on page 179
APUGetQueryToPriority() Function on page 179
APUGetConfigurationFilePath() Function on page 180
APUGetPrinterJobCount() Function on page 181
APUGetQueryAlarmState() Function on page 181
APUGetQueryProcessingState() Function on page 182
APUGetAlarmGroupText() Function
Gets the Alarm Query alarm group text.
Category
View
Syntax [Result=] APUGetAlarmGroupText(iInstance,sTagGroup);
Arguments
iInstance
The instance of Alarm Printer (0 to 15).
sTagGroup Text - alarm group
Printing Alarms InTouch HMI Alarms and Events Guide
179
Remarks
The initial alarm group text is read from the .alc configuration file that the Alarm Printer with the specified instance is using. The alarm group text is passed to the sTagGroup parameter into an InTouch message tag.
Returns an integer error code.
Example
The TagGroup message tag can contain the following value after the function is run: \intouch!$system Status = APUGetAlarmGroupText(Inst,TagGroup);
See Also
APUGetConfigurationFilePath(), APUGetPrinterJobCount(), APUGetQueryAlarmState(), APUGetQueryFromPriori ty(), APUGetQueryProcessingState(), APUGetQueryToPriori ty()
APUGetQueryFromPriority() Function
Gets the From Priority value for a query.
Category
View
Syntax [Result=] APUGetQueryFromPriority(iInstance, iTagPriority );
Arguments
iInstance
The instance of Alarm Printer (0 to 15).
iTagPriority An integer tag that receives the From Priority value.
Remarks
The initial priority is read from the .alc file that the Alarm Printer with the specified instance is using. The From Priority value is passed to the iTagPriority parameter into an InTouch integer tag.
Returns an integer error code.
Example
In this example, FromPri is an integer tag that contains the From Priority value, such as 1. Status = APUGetQueryFromPriority(Inst, FromPri);
See Also
APUGetAlarmGroupText(), APUGetConfigurationFilePath(), APUGetPrinterJobCount(), APUGetQueryAlarmState(), APUGetQueryProcessingState(), APUGetQueryToPriority()
APUGetQueryToPriority() Function
Gets the To Priority from the query.
Category
View
Syntax [Result=] APUGetQueryToPriority(iInstance,iPriority );
Printing Alarms InTouch HMI Alarms and Events Guide
180
Arguments
iInstance The instance of Alarm Printer (0 to 15).
iPriority
An integer tag that receives the To Priority value.
Remarks
Another query cannot be running at the same time as the script that includes the APUGetQueryToPriority() function. The To Priority value is writ ten to the iPriority parameter of the
function, which is an integer tag.
Returns an integer error code.
Example
The integer tag ToPri receives the To Priority value, such as 999. Status = APUGetQueryToPriority(Inst,ToPri);
See Also
APUGetAlarmGroupText(), APUGetConfigurationFilePath(), APUGetPrinterJobCount(),
APUGetQueryAlarmState(), APUGetQueryFromPriority(), APUGetQueryProcessingState()
APUGetConfigurationFilePath() Function
Returns the full file path of the .alc configuration file used for a query.
Category
View
Syntax [Result=] APUGetConfigurationFilePath(iInstance, sTagFilePath);
Arguments
iInstance The instance of Alarm Printer (0 to 15).
sTagFilePath
A message tag to retrieve the name of the file path to the configuration file the Alarm Printer instance is using.
Remarks
The file path text is returned to an message tag that you can specify as sTagFilePath parameter of this function.
Returns an integer error code.
Example
The CfgFilePath message tag receives the file path of the configuration file associated with the Alarm Printer instance contained in the Inst integer tag. For example: c: \MyAlarmCfg\Area1Alarms.alc Status = APUGetConfigurationFilePath(Inst, CfgFilePath);
See Also
APUGetAlarmGroupText(), APUGetPrinterJobCount(), APUGetQueryAlarmState(), APUGetQueryFromPriori ty(), APUGetQueryProcessingState(), APUGetQueryToPriori ty()
Printing Alarms InTouch HMI Alarms and Events Guide
181
APUGetPrinterJobCount() Function
Returns the most recent Windows printer status job count for the printer used by this instance.
Category
View
Syntax [Result=] APUGetPrinterJobCount(iInstance, iTagCount);
Arguments
iInstance The instance of Alarm Printer (0 to 15).
iTagCount
An integer tag that receives the count value.
Remarks
This function returns the count value in the iTagCount parameter, which is an integer tag.
The results are not current unless a query is running. The results are not current unless an alarm has
been printed - the job count is typically updated when the printer is initially opened, and then each time an alarm line is printed.
The returned job count value is only valid for Windows printers and does not have much meaning for
printers associated with a parallel or serial port.
Returns an integer error code.
Example
PJCount is an integer tag that receives the count value from the specified instance. Status = APUGetPrinterJobCount(Inst, PJCount);
See Also
APUGetAlarmGroupText(), APUGetConfigurationFilePath(), APUGetQueryAlarmState(), APUGetQueryFromPriori ty(), APUGetQueryProcessingState(), APUGetQueryToPriori ty()
APUGetQueryAlarmState() Function
Returns the alarm state for the query.
Category
View
Syntax [Result=] APUGetQueryAlarmState(iInstance, iTagState );
Arguments
iInstance The instance of Alarm Printer (0 to 15).
iTagState
An integer tag that receives the alarm state of the query associated with the specified instance. The value has following meanings:
0 = All
1 = Acknowledged
2 = Unacknowledged
Printing Alarms InTouch HMI Alarms and Events Guide
182
Remarks
The initial alarm state is read from the .alc file. This function returns it in the iTagState parameter of the function which is an integer tag.
Returns an integer error code.
Example
AlmState is an integer tag that contains 0, 1 or 2. Status = APUGetQueryAlarmState(Inst,AlmState);
See Also
APUGetAlarmGroupText(), APUGetConfigurationFilePath(), APUGetPrinterJobCount(), APUGetQueryFromPriori ty(), APUGetQueryProcessingState(), APUGetQueryToPriori ty()
APUGetQueryProcessingState() Function
Returns the status of the alarm query processing.
Category
View
Syntax [Result=] APUGetQueryProcessingState(iInstance, iTagState);
Arguments
iInstance The instance of Alarm Printer (0 to 15).
iTagState
An integer tag that receives the processing state from the function. It has following meaning:
0 = Stop
1 = Start
Remarks
This function returns an integer value to the iTagState parameter, which is an integer tag.
Returns an integer error code.
Example
ProcState is an integer tag that is set to 0 if the query is not running, or 1 if the query is running. Status = APUGetQueryProcessingState(Inst, ProcState);
See Also
APUGetAlarmGroupText(), APUGetConfigurationFilePath(), APUGetPrinterJobCount(), APUGetQueryAlarmState(), APUGetQueryFromPriority(), APUGetQueryToPriori ty()
Querying Instance Information
Use the following functions to return the current status of an instance of the Alarm Printer.
APUFindAlarmGroupInstance() Function on page 183
APUFindFileInstance() Function on page 183
APUFindPrinterInstance() Function on page 184
APUGetInstanceCount() Function on page 184
Printing Alarms InTouch HMI Alarms and Events Guide
183
APUIsInstanceUsed() Function on page 185
APUFindAlarmGroupInstance() Function
Returns the first instance of the Alarm Printer using the specified alarm group string.
Category
View
Syntax [Result=] APUFindAlarmGroupInstance(sGroup, iInstance);
Arguments
sGroup The name of the alarm group to be found among the instances.
iInstance
An integer tag that receives the value of a found instance that uses the specified group name.
Remarks
This function returns the instance number to an integer tag as the iInstance parameter. The initial alarm group string is read from the .alc file. If no instance is found, the function returns 1 as the error code (no instance available) and writes 0 to the integer tag parameter.
Returns an integer error code.
Example
FoundInstance is an integer tag that receives the number of the first instance found that uses the $System as its query. Status = APUFindAlarmGroupInstance("$System", FoundInstance);
See Also
APUFindFileInstance(), APUFindPrinterInstance(), APUGetInstanceCount(), APUIsInstanceUsed()
APUFindFileInstance() Function
Finds the first instance of the Alarm Printer using the specified .alc configuration file.
Category
View
Syntax [Result=] APUFindFileInstance(sFilePath,iInstance);
Arguments
sFilePath The path of the .alc configuration file for which the instance is to be found.
iInstance An integer tag that receives the number of the instance.
Remarks
This function returns the instance number to an integer tag as the iInstance parameter. Use this function to initially obtain the desired instance of the Alarm Printer. The file path string match is not case-sensitive.
If no instance is found, the function returns 1 as the error code (no instance available) and writes 0 to the integer tag parameter.
Printing Alarms InTouch HMI Alarms and Events Guide
184
Returns an integer error code.
Example
InstFound is an integer tag that receives the number of the first instance that uses the configuration file c:\MyAlarmCfg\Area1Alarms.alc. Status = APUFindFileInstance("c:\MyAlarmCfg\Area1Alarms.alc", InstFound);
See Also
APUFindAlarmGroupInstance(), APUFindPrinterInstance(), APUGetInstanceCount(), APUIsInstanceUsed()
APUFindPrinterInstance() Function
Finds the first instance of the Alarm Printer using the specified printer name or port.
Category
View
Syntax [Result=] APUFindPrinterInstance(sPrinter,iInstance);
Arguments
sPrinter The name of the printer for which the instance is to be found.
iInstance An integer tag that receives the number of the instance.
Remarks
This function returns the instance number to an integer tag as the iInstance parameter. Use this function to initially obtain the desired instance of an Alarm Printer. The printer name is s tored and read from the
.alc file. The printer name string match is not case-sensitive. If no instance is found, the function returns 1 as the error code (no instance available) and writes 0 to the integer tag parameter.
Returns an integer error code.
Example
FoundInst is an integer tag that receives the number of the first instance that uses LPT1 as printer name in its associated .alc file. Status = APUFindPrinterInstance("LPT1", FoundInst);
See Also
APUFindAlarmGroupInstance(), APUFindFileInstance(), APUGetInstanceCount(),
APUIsInstanceUsed()
APUGetInstanceCount() Function
Returns the number of running instances of the Alarm Printer, up to a maximum of 16 instances.
Category
View
Syntax [Result=] APUGetInstanceCount(iCount);
Printing Alarms InTouch HMI Alarms and Events Guide
185
Arguments
iCount An integer tag that receives the number of instances.
Remarks
This function returns the number of instances to an integer tag as parameter. Any instances beyond the
first sixteen running simultaneously are not dynamically controlled nor can their status be obtained.
Returns an integer error code.
Example
ICount is an integer tag. A run-time value of 7 means that there are currently seven instances of Alarm Printer running. Status = APUGetInstanceCount( iCount );
See Also
APUFindAlarmGroupInstance(), APUFindFileInstance(), APUFindPrinterInstance(), APUIsInstanceUsed()
APUIsInstanceUsed() Function
Returns a discrete value that indicates the instance is currently in use.
Category
View
Syntax [Result=] APUIsInstanceUsed(iInstance);
Arguments
iInstance The number of an instance of Alarm Printer (0 to 15).
Remarks
The result is either 0 or 1:
0 = instance is not used.
1 = instance is used.
Example
InUse is a discrete tag that is set to true (1), if instance 5 is in use, or set to false (0), if instance 5 is not in
use. InUse = APUIsInstanceUsed(5);
See Also
APUFindAlarmGroupInstance(), APUFindFileInstance(), APUFindPrinterInstance(), APUGetInstanceCount()
Querying Printer Information
Use the following functions to return the status of the Alarm Printer.
APUGetPrinterName() Function on page 186
APUGetPrinterStatus() Function on page 186
Printing Alarms InTouch HMI Alarms and Events Guide
186
APUGetPrinterName() Function
Returns the Windows printer name or port name of the printer used by this instance.
Category
View
Syntax [Result=] APUGetPrinterName(iInstance, sTagPrinter);
Arguments
iInstance The number of the Alarm Printer instance (0 to 15).
sTagPrinter
A message tag that receives the printer name or port name of the configuration associated with the specified instance.
Remarks
This function returns the value NONE if no printer is configured for an instance. The printer name is
stored and read from the .alc file. This function returns the printer name or port name to a message tag as the sTagPrinter parameter.
Returns an integer error code.
Example
PrtName is a message tag that receives the printer name or port name of the configuration associated with instance 3 of Alarm Printer. Status = APUGetPrinterName(3,PrtName);
See Also
APUGetPrinterStatus()
APUGetPrinterStatus() Function
Returns the most recent status of the Windows printer used by this instance.
Category
View
Syntax [Result=] APUGetPrinterStatus(iInstance,iSelector, iTagStatus);
Arguments
iInstance The instance of Alarm Printer (0 to 15).
iSelector An integer value specifying the following:
0 = Get status for Alarm Printer Error
1 = Get status for Alarm Printer No Paper
2 = Get status for Alarm Printer Offline
3 = Get status for Alarm Printer Overflow

Printing Alarms InTouch HMI Alarms and Events Guide
187
iTagStatus An integer or real tag that receives the status of the printer associated with specified instance number and the type of selection made by the iSelector parameter.
Remarks
This function returns the printer status to an integer or real tag as the iTagStatus parameter. The results are not current unless a query is running and an alarm has been printed. The status typically updates when the printer initially opens, and then each time an alarm line prints.
This status information is being queried to the printer based on Microsoft or Windows driver standards. Not all printer manufacturers follow these standards. Therefore, not all printers return status information.
Returns an integer error code.
Example
PrtStat is an integer tag that receives the "Printer Offline" status from the printer associated with instance 5. Status = APUGetPrinterStatus(5, 2, PrtStat);
See Also
APUGetPrinterName()
Setting Alarm Query Information
Use the following functions to set parameters used in the Alarm Printer query.
APUSetAlarmGroupText() Function on page 187
APUSetQueryAlarmState() Function on page 188
APUSetQueryFromPriority() Function on page 188
APUSetQueryToPriority() Function
APUSetTimeoutValues() Function on page 189
APUSetAlarmGroupText() Function
Sets the Alarm Query alarm group text.
Category
View
Syntax [Result=] APUSetAlarmGroupText(iInstance,sGroup);
Arguments
iInstance The instance of Alarm Printer (0 to 15).
sGroup
Alarm group text.
Remarks
A query cannot be running for this function to succeed.
Returns an integer error code.
Example
This example sets the query of the Alarm Printer instance 1 to \InTouch!GroupA.
Printing Alarms InTouch HMI Alarms and Events Guide
188
Status = APUSetAlarmGroupText(1, "\intouch!GroupA");
See Also
APUSetQueryAlarmState(), APUSetQueryFromPriority(), APUSetQueryToPriority(), APUSetTimeoutValues()
APUSetQueryAlarmState() Function
Sets the alarm state for the query.
Category
View
Syntax [Result=] APUSetQueryAlarmState(iInstance, iState);
Arguments
iInstance The instance of Alarm Printer (0 to 15).
iState An integer with following possible values:
0 = All
1 = Acknowledged
2 = Unacknowledged
Remarks
A query cannot be running simultaneously while running a script using the APUSetQueryAlarmState()
function.
Returns an integer error code.
Example
This example sets the query of the Alarm Printer instance 3 to query for acknowledged alarms only. Status = APUSetQueryAlarmState(3, 1);
See Also
APUSetAlarmGroupText(), APUSetQueryFromPriori ty(), APUSetQueryToPriority(),
APUSetTimeoutValues()
APUSetQueryFromPriority() Function
Sets the lower boundary or from priority of an alarm query.
Category
View
Syntax [Result=] APUSetQueryFromPriority(iInstance,iPriority);
Arguments
iInstance The instance of Alarm Printer (0 to 15).
iPriority
An integer value for the From Priority (1 to 999).

Printing Alarms InTouch HMI Alarms and Events Guide
189
Remarks
A query cannot be running for this function to succeed.
Returns an integer error code.
Example
This example sets the From Priority value of the query associated with the instance value of the Inst
integer tag to the value of the FromPri integer tag. Status = APUSetQueryFromPriority(Inst, FromPri);
See Also
APUSetAlarmGroupText(), APUSetQueryAlarmState(), APUSetQueryToPriority(), APUSetTimeoutValues()
APUSetQueryToPriority() Function
Sets the To Priority for the query.
Category
View
Syntax [Result=] APUSetQueryToPriority(iInstance,iPriority);
Arguments
iInstance The instance of Alarm Printer (0 to 15).
iPriority An integer value for the To Priority in the range of 1 to 999. It should also be set higher than or equal to the From Priority value of the same query of the specified instance.
Remarks
The To priority must be equal to or greater than the From priority to set a valid alarm priority range. A script containing the APUSetQueryToPriority() function cannot run at the same time as a query.
Returns an integer error code.
Example
This example sets the To Priority value of the query associated with the instance 0 to 240. Status = APUSetQueryToPriority(0,240);
See Also
APUSetAlarmGroupText(), APUSetQueryAlarmState(), APUSetQueryFromPriority(), APUSetTimeoutValues()
APUSetTimeoutValues() Function
The APUSetTimeoutValues() function sets time-out intervals in seconds. A time-out interval controls how many errors caused by memory access or failing to obtain valid responses are observed while program is running.
The default memory access time-out is two seconds. The default short response wait time is 10 second and the default long response wait time is 20 seconds.
Category
View
Printing Alarms InTouch HMI Alarms and Events Guide
190
Syntax [Result=] APUSetTimeoutValues(iMemory,iShort, iLong);
Arguments
iMemory Integer - access time out
iShort
Short response wait time (integer)
iLong Long response wait time (integer)
Example Status = APUSetTimeoutValues(iMemory,iShort,iLong);
See Also
APUSetAlarmGroupText(), APUSetQueryAlarmState(), APUSetQueryFromPriority(),
APUSetQueryToPriority()
Handling Alarm Printer Errors
Use the APUTranslateErrorCode() function to convert an Alarm Printer error code to an error message.
APUTranslateErrorCode() Function
Converts an error code returned by one of the APU functions into an English string that briefly describes the error code.
Category
View
Syntax [Result=] APUTranslateErrorCode(iErrorCode,sTagMessage);
Arguments
iErrorCode An integer error code, normally returned by most other APU functions.
sTagMessage
A message tag that receives the error message.
Remarks
This function returns the error message to a message tag as sTagMessage parameter. This function can fail if an unknown error code is passed.
Returns an integer error code.
Example
This example sets the message tag errmsg to "No instance available." if there is no instance 15 of Alarm Printer currently running. Status = APUTranslateErrorCode(APUSetAlarmGroupText(15,"$system"), ErrMsg);

InTouch HMI Alarms and Events Guide
191
In This Chapter
About Recording Alarms into an Alarm Database.......................................................................... 191 SQL Server Accounts for Alarm DB Logger Manager .................................................................... 191 Using the Alarm DB Logger Manager ........................................................................................... 192
Configuring Alarm Database Logging ........................................................................................... 192 Starting and Stopping Alarm Database Logging ............................................................................ 197 Alarm Database Views ................................................................................................................ 198
Alarm Database Stored Procedures ............................................................................................. 204
About Recording Alarms into an Alarm Database The InTouch Distributed Alarm system includes the Alarm DB Logger utility that logs alarms and events to the alarm database.
Alarm DB Logger is an alarm consumer. You configure it with one or more queries to select alarms from
InTouch alarm providers. The alarms selected by the queries are stored in a transient memory cache, called the Smart Cache. The Alarm DB Logger writes the contents of the Smart Cache to the alarm database as alarm and event records at a periodic interval.
A InTouch Alarm Database
Smart Cache
Alarms
A
B C
Alarm Query
Alarm DB Logger
B
C
A
B C
The Alarm DB Logger can auto-reconnect. When the connection to the database is lost, the logger checks for the database connection at regular intervals. Logging resumes when the connection to the alarm database is re-established.
The Alarm DB Logger reports all errors whether running as a service or a normal application to the ArchestrA Logger.
SQL Server Accounts for Alarm DB Logger Manager The Alarm DB Logger Manager creates and uses the following accounts in the SQL Server database:
Account Password
wwAdmin wwadmin
wwPower wwpower
wwUser wwuser
CHAPTER 9
Recording Alarms into an Alarm Database
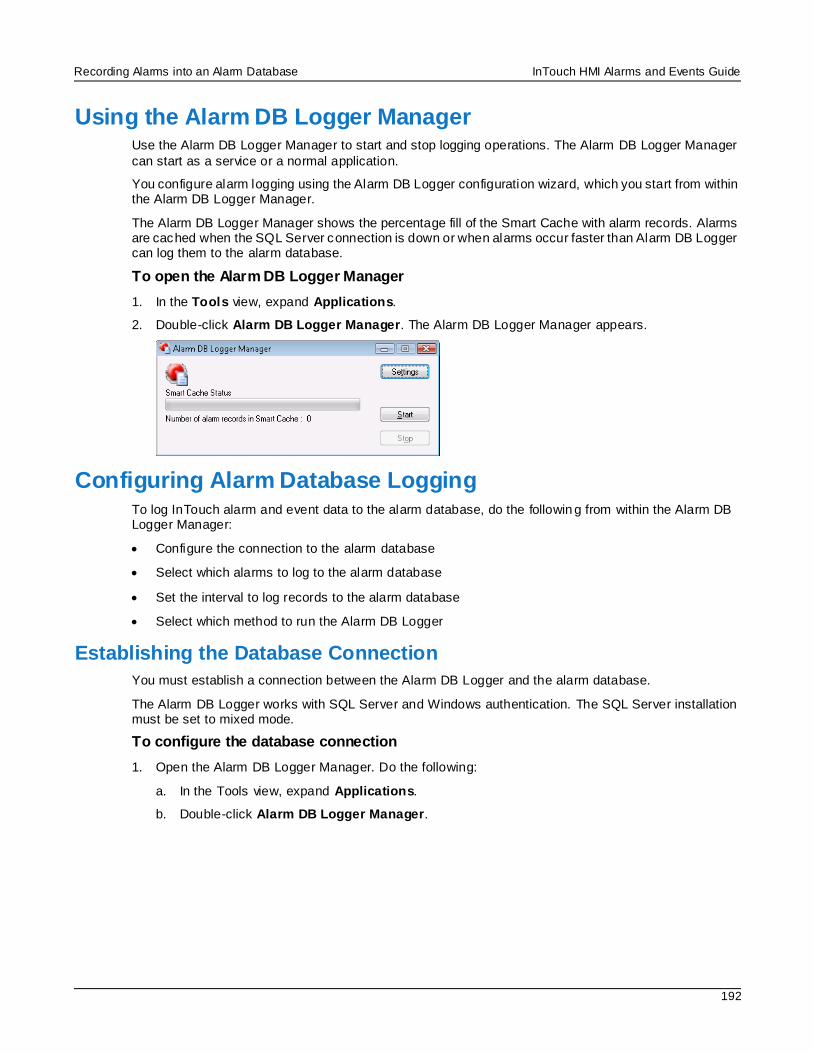
Recording Alarms into an Alarm Database InTouch HMI Alarms and Events Guide
192
Using the Alarm DB Logger Manager Use the Alarm DB Logger Manager to start and stop logging operations. The Alarm DB Logger Manager
can start as a service or a normal application.
You configure alarm logging using the Alarm DB Logger configuration wizard, which you start from within the Alarm DB Logger Manager.
The Alarm DB Logger Manager shows the percentage fill of the Smart Cache with alarm records. Alarms are cached when the SQL Server connection is down or when alarms occur faster than Alarm DB Logger can log them to the alarm database.
To open the Alarm DB Logger Manager
1. In the Tools view, expand Applications.
2. Double-click Alarm DB Logger Manager. The Alarm DB Logger Manager appears.
Configuring Alarm Database Logging To log InTouch alarm and event data to the alarm database, do the followin g from within the Alarm DB Logger Manager:
Configure the connection to the alarm database
Select which alarms to log to the alarm database
Set the interval to log records to the alarm database
Select which method to run the Alarm DB Logger
Establishing the Database Connection
You must establish a connection between the Alarm DB Logger and the alarm database.
The Alarm DB Logger works with SQL Server and Windows authentication. The SQL Server installation must be set to mixed mode.
To configure the database connection
1. Open the Alarm DB Logger Manager. Do the following:
a. In the Tools view, expand Applications.
b. Double-click Alarm DB Logger Manager.
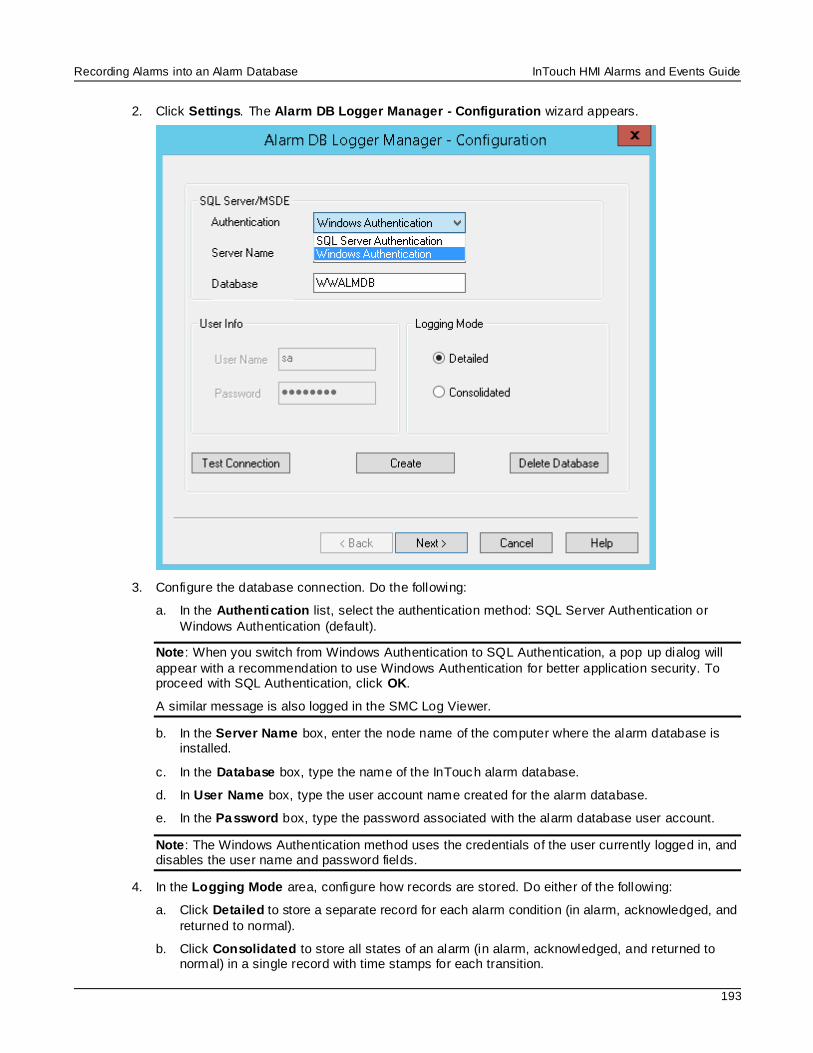
Recording Alarms into an Alarm Database InTouch HMI Alarms and Events Guide
193
2. Click Settings. The Alarm DB Logger Manager - Configuration wizard appears.
3. Configure the database connection. Do the following:
a. In the Authentication list, select the authentication method: SQL Server Authentication or
Windows Authentication (default).
Note: When you switch from Windows Authentication to SQL Authentication, a pop up dialog will
appear with a recommendation to use Windows Authentication for better application security. To proceed with SQL Authentication, click OK.
A similar message is also logged in the SMC Log Viewer.
b. In the Server Name box, enter the node name of the computer where the alarm database is installed.
c. In the Database box, type the name of the InTouch alarm database.
d. In User Name box, type the user account name created for the alarm database.
e. In the Password box, type the password associated with the alarm database user account.
Note: The Windows Authentication method uses the credentials of the user currently logged in, and disables the user name and password fields.
4. In the Logging Mode area, configure how records are stored. Do either of the following:
a. Click Detailed to store a separate record for each alarm condition (in alarm, acknowledged, and
returned to normal).
b. Click Consolidated to store all states of an alarm (in alarm, acknowledged, and returned to normal) in a single record with time stamps for each transition.
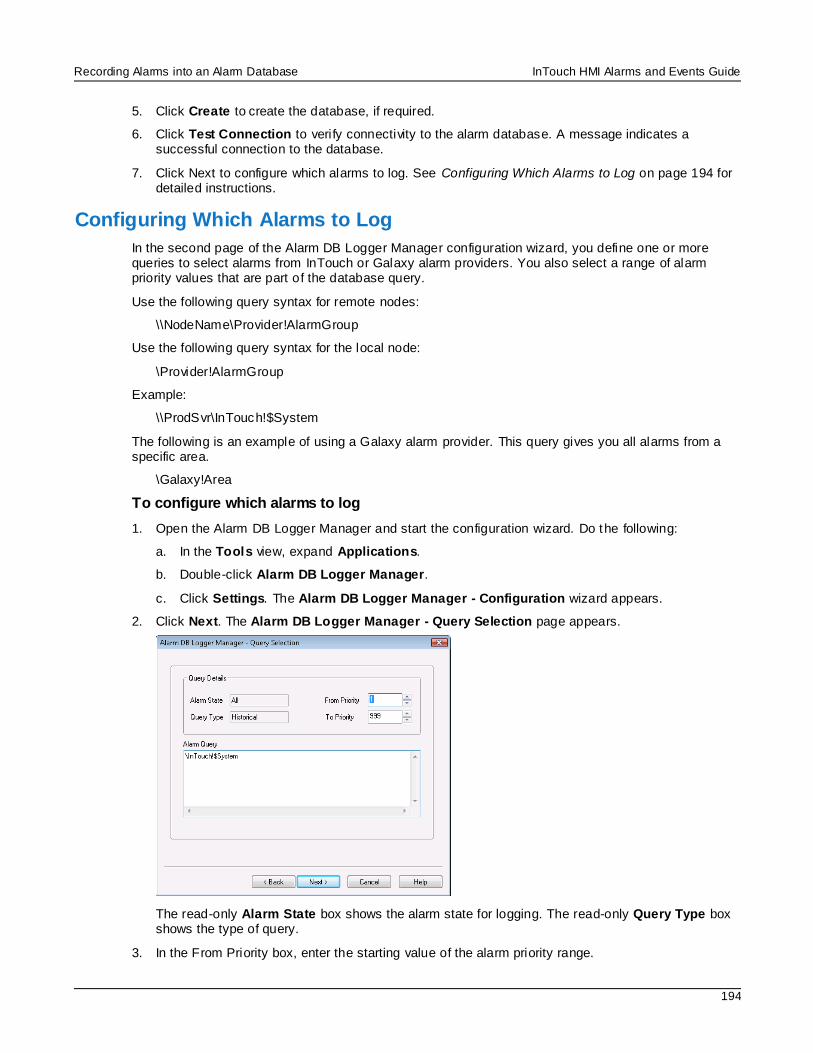
Recording Alarms into an Alarm Database InTouch HMI Alarms and Events Guide
194
5. Click Create to create the database, if required.
6. Click Test Connection to verify connectivity to the alarm database. A message indicates a successful connection to the database.
7. Click Next to configure which alarms to log. See Configuring Which Alarms to Log on page 194 for detailed instructions.
Configuring Which Alarms to Log
In the second page of the Alarm DB Logger Manager configuration wizard, you define one or more queries to select alarms from InTouch or Galaxy alarm providers. You also select a range of alarm priority values that are part of the database query.
Use the following query syntax for remote nodes:
\\NodeName\Provider!AlarmGroup
Use the following query syntax for the local node:
\Provider!AlarmGroup
Example:
\\ProdSvr\InTouch!$System
The following is an example of using a Galaxy alarm provider. This query gives you all alarms from a specific area.
\Galaxy!Area
To configure which alarms to log
1. Open the Alarm DB Logger Manager and start the configuration wizard. Do the following:
a. In the Tools view, expand Applications.
b. Double-click Alarm DB Logger Manager.
c. Click Settings. The Alarm DB Logger Manager - Configuration wizard appears.
2. Click Next. The Alarm DB Logger Manager - Query Selection page appears.
The read-only Alarm State box shows the alarm state for logging. The read-only Query Type box shows the type of query.
3. In the From Priority box, enter the starting value of the alarm priority range.
Recording Alarms into an Alarm Database InTouch HMI Alarms and Events Guide
195
4. In the To Priority box, enter the ending value of the alarm priority range.
5. In the Alarm Query box, type the alarm queries that you want to use to store or retrieve data from the alarm database.
6. Click Next to configure the logging interval. See Configuring the Logging Interval on page 195.
Configuring the Logging Interval
In the third page of the Alarm DB Logger Manager configuration wizard, you configure advanced query
settings. You can log events to the alarm database. You can also tune the performance of alarm logging by setting the frequency at which the alarm records are written from internal alarm memory to the database.
The logging interval is not the same as the reconnect rate for the SQL Server. The logging interval is the interval at which alarms should be read. The reconnect rate depends on the time out for a connection attempt associated with the SQL Server.
Setting the logging interval too low impacts system performance.
To configure the logging interval
1. Open the Alarm DB Logger Manager and start the configuration wizard. Do the following:
a. In the Tools view, expand Applications.
b. Double-click Alarm DB Logger Manager.
c. Click Settings. The Alarm DB Logger Manager - Configuration wizard appears.
2. Click Next. The Alarm DB Logger Manager - Query Selection page appears.
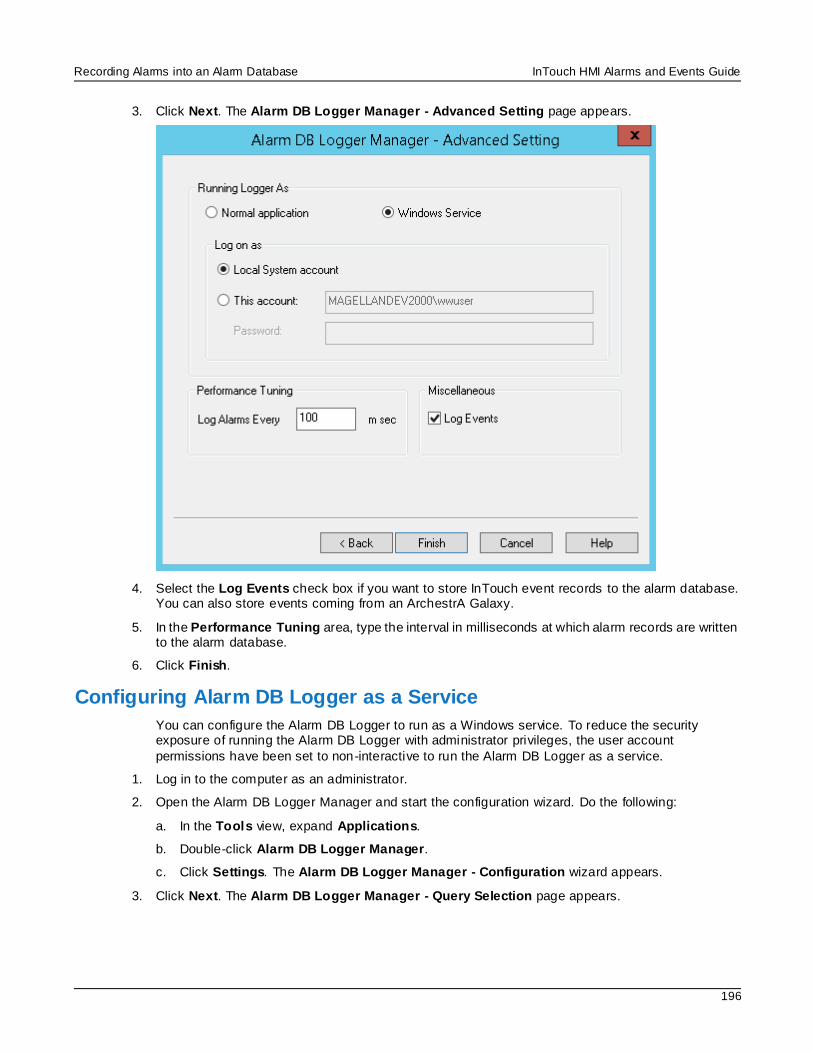
Recording Alarms into an Alarm Database InTouch HMI Alarms and Events Guide
196
3. Click Next. The Alarm DB Logger Manager - Advanced Setting page appears.
4. Select the Log Events check box if you want to store InTouch event records to the alarm database. You can also store events coming from an ArchestrA Galaxy.
5. In the Performance Tuning area, type the interval in milliseconds at which alarm records are written to the alarm database.
6. Click Finish.
Configuring Alarm DB Logger as a Service
You can configure the Alarm DB Logger to run as a Windows service. To reduce the security exposure of running the Alarm DB Logger with administrator privileges, the user account
permissions have been set to non-interactive to run the Alarm DB Logger as a service.
1. Log in to the computer as an administrator.
2. Open the Alarm DB Logger Manager and start the configuration wizard. Do the following:
a. In the Tools view, expand Applications.
b. Double-click Alarm DB Logger Manager.
c. Click Settings. The Alarm DB Logger Manager - Configuration wizard appears.
3. Click Next. The Alarm DB Logger Manager - Query Selection page appears.
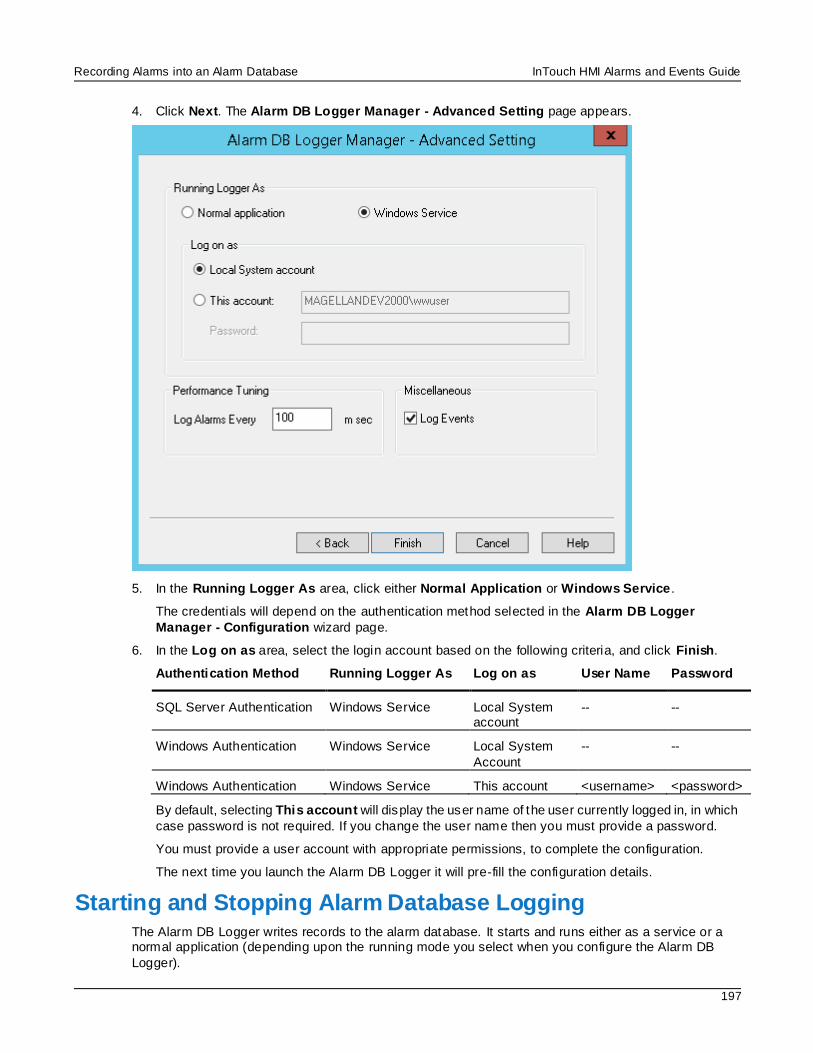
Recording Alarms into an Alarm Database InTouch HMI Alarms and Events Guide
197
4. Click Next. The Alarm DB Logger Manager - Advanced Setting page appears.
5. In the Running Logger As area, click either Normal Application or Windows Service.
The credentials will depend on the authentication method selected in the Alarm DB Logger
Manager - Configuration wizard page.
6. In the Log on as area, select the login account based on the following criteria, and click Finish.
Authentication Method Running Logger As Log on as User Name Password
SQL Server Authentication Windows Service Local System account
-- --
Windows Authentication Windows Service Local System
Account
-- --
Windows Authentication Windows Service This account <username> <password>
By default, selecting This account will display the user name of the user currently logged in, in which
case password is not required. If you change the user name then you must provide a password.
You must provide a user account with appropriate permissions, to complete the configuration.
The next time you launch the Alarm DB Logger it will pre-fill the configuration details.
Starting and Stopping Alarm Database Logging The Alarm DB Logger writes records to the alarm database. It starts and runs either as a service or a normal application (depending upon the running mode you select when you configure the Alarm DB
Logger).
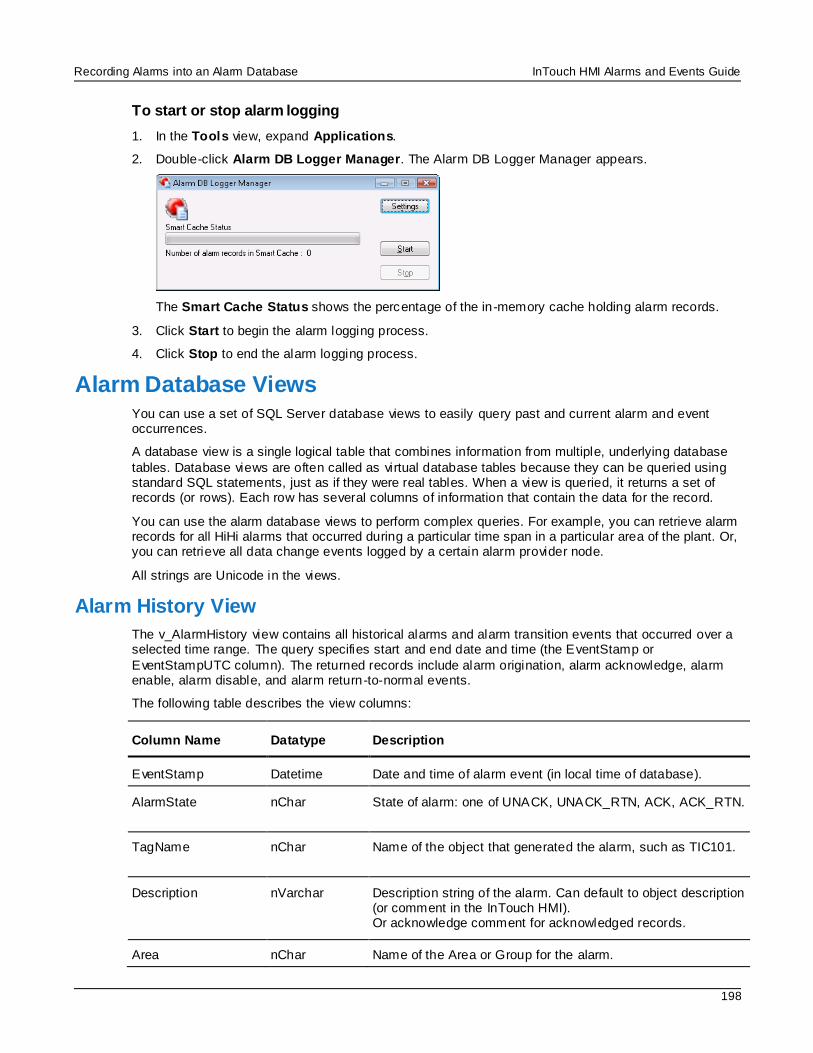
Recording Alarms into an Alarm Database InTouch HMI Alarms and Events Guide
198
To start or stop alarm logging
1. In the Tools view, expand Applications.
2. Double-click Alarm DB Logger Manager. The Alarm DB Logger Manager appears.
The Smart Cache Status shows the percentage of the in-memory cache holding alarm records.
3. Click Start to begin the alarm logging process.
4. Click Stop to end the alarm logging process.
Alarm Database Views You can use a set of SQL Server database views to easily query past and current alarm and event occurrences.
A database view is a single logical table that combines information from multiple, underlying database
tables. Database views are often called as virtual database tables because they can be queried using standard SQL statements, just as if they were real tables. When a view is queried, it returns a set of records (or rows). Each row has several columns of information that contain the data for the record.
You can use the alarm database views to perform complex queries. For example, you can retrieve alarm records for all HiHi alarms that occurred during a particular time span in a particular area of the plant. Or, you can retrieve all data change events logged by a certain alarm provider node.
All strings are Unicode in the views.
Alarm History View
The v_AlarmHistory view contains all historical alarms and alarm transition events that occurred over a selected time range. The query specifies start and end date and time (the EventStamp or
EventStampUTC column). The returned records include alarm origination, alarm acknowledge, alarm enable, alarm disable, and alarm return-to-normal events.
The following table describes the view columns:
Column Name Datatype Description
EventStamp Datetime Date and time of alarm event (in local time of database).
AlarmState nChar State of alarm: one of UNACK, UNACK_RTN, ACK, ACK_RTN.
TagName nChar Name of the object that generated the alarm, such as TIC101.
Description nVarchar Description string of the alarm. Can default to object description (or comment in the InTouch HMI). Or acknowledge comment for acknowledged records.
Area nChar Name of the Area or Group for the alarm.
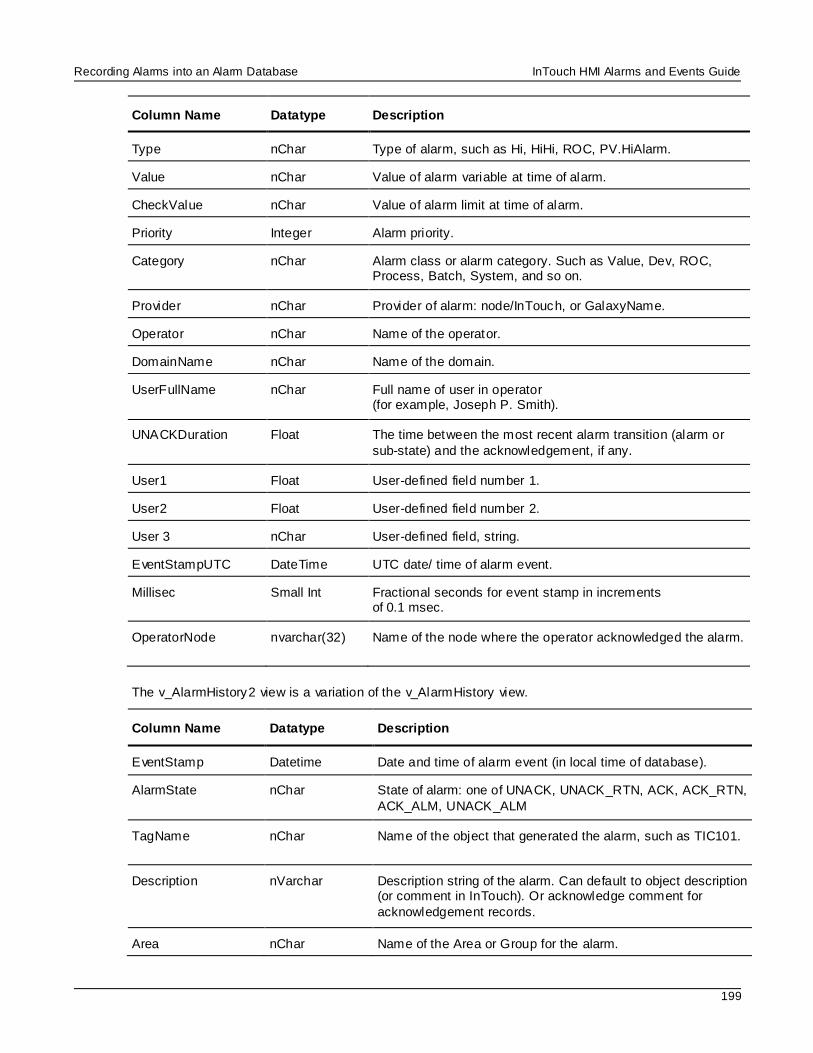
Recording Alarms into an Alarm Database InTouch HMI Alarms and Events Guide
199
Column Name Datatype Description
Type nChar Type of alarm, such as Hi, HiHi, ROC, PV.HiAlarm.
Value nChar Value of alarm variable at time of alarm.
CheckValue nChar Value of alarm limit at time of alarm.
Priority Integer Alarm priority.
Category nChar Alarm class or alarm category. Such as Value, Dev, ROC, Process, Batch, System, and so on.
Provider nChar Provider of alarm: node/InTouch, or GalaxyName.
Operator nChar Name of the operator.
DomainName nChar Name of the domain.
UserFullName nChar Full name of user in operator (for example, Joseph P. Smith).
UNACKDuration Float The time between the most recent alarm transition (alarm or
sub-state) and the acknowledgement, if any.
User1 Float User-defined field number 1.
User2 Float User-defined field number 2.
User 3 nChar User-defined field, string.
EventStampUTC DateTime UTC date/ time of alarm event.
Millisec Small Int Fractional seconds for event stamp in increments of 0.1 msec.
OperatorNode nvarchar(32) Name of the node where the operator acknowledged the alarm.
The v_AlarmHistory2 view is a variation of the v_AlarmHistory view.
Column Name Datatype Description
EventStamp Datetime Date and time of alarm event (in local time of database).
AlarmState nChar State of alarm: one of UNACK, UNACK_RTN, ACK, ACK_RTN,
ACK_ALM, UNACK_ALM
TagName nChar Name of the object that generated the alarm, such as TIC101.
Description nVarchar Description string of the alarm. Can default to object description (or comment in InTouch). Or acknowledge comment for
acknowledgement records.
Area nChar Name of the Area or Group for the alarm.
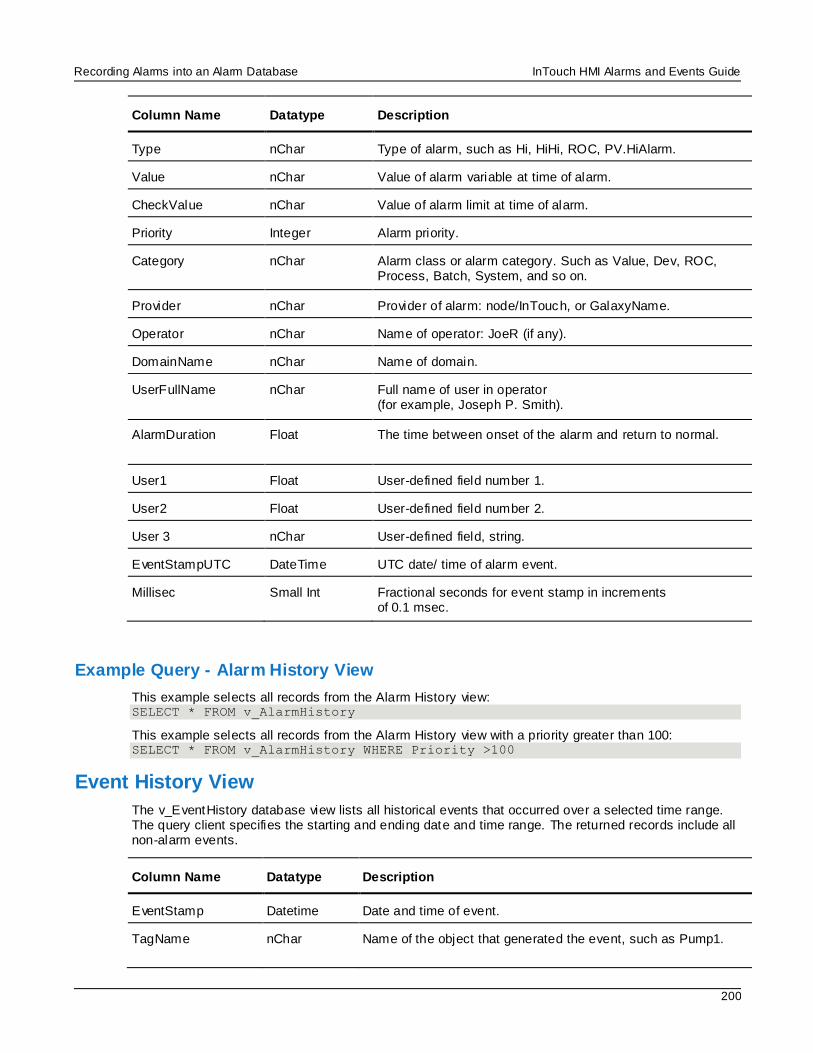
Recording Alarms into an Alarm Database InTouch HMI Alarms and Events Guide
200
Column Name Datatype Description
Type nChar Type of alarm, such as Hi, HiHi, ROC, PV.HiAlarm.
Value nChar Value of alarm variable at time of alarm.
CheckValue nChar Value of alarm limit at time of alarm.
Priority Integer Alarm priority.
Category nChar Alarm class or alarm category. Such as Value, Dev, ROC, Process, Batch, System, and so on.
Provider nChar Provider of alarm: node/InTouch, or GalaxyName.
Operator nChar Name of operator: JoeR (if any).
DomainName nChar Name of domain.
UserFullName nChar Full name of user in operator (for example, Joseph P. Smith).
AlarmDuration Float The time between onset of the alarm and return to normal.
User1 Float User-defined field number 1.
User2 Float User-defined field number 2.
User 3 nChar User-defined field, string.
EventStampUTC DateTime UTC date/ time of alarm event.
Millisec Small Int Fractional seconds for event stamp in increments of 0.1 msec.
Example Query - Alarm History View
This example selects all records from the Alarm History view: SELECT * FROM v_AlarmHistory
This example selects all records from the Alarm History view with a priority greater than 100: SELECT * FROM v_AlarmHistory WHERE Priority >100
Event History View
The v_EventHistory database view lists all historical events that occurred over a selected time range. The query client specifies the starting and ending date and time range. The returned records include all non-alarm events.
Column Name Datatype Description
EventStamp Datetime Date and time of event.
TagName nChar Name of the object that generated the event, such as Pump1.
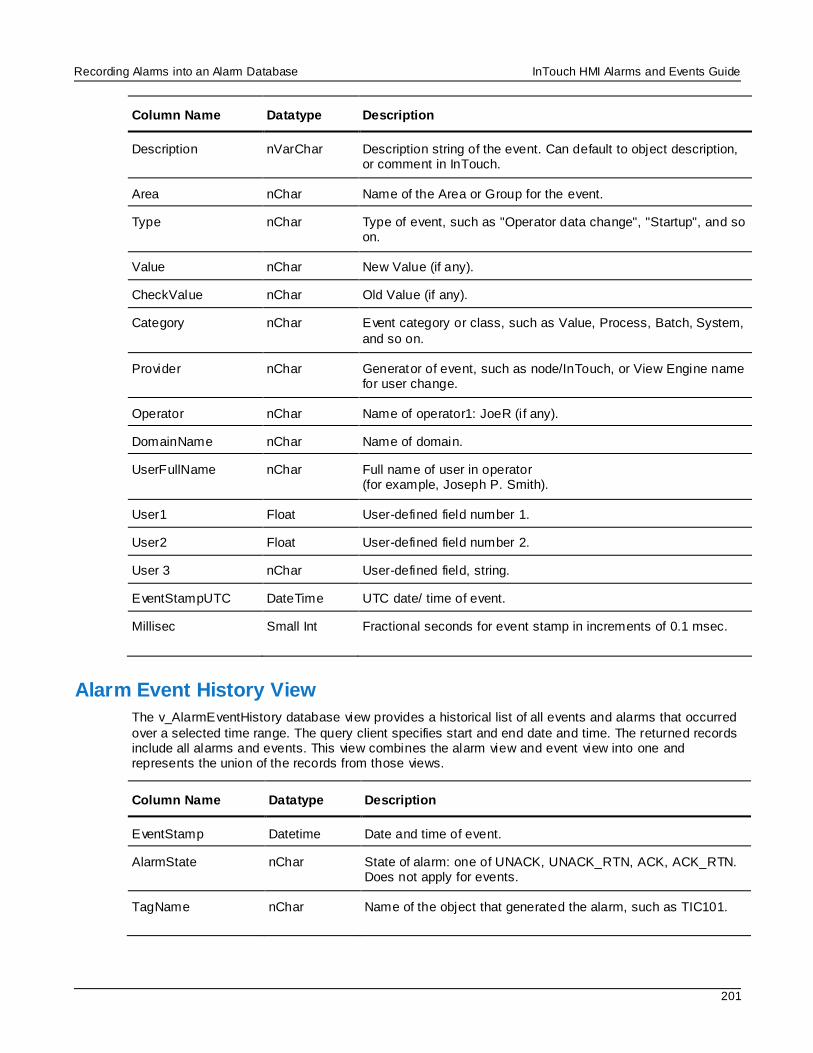
Recording Alarms into an Alarm Database InTouch HMI Alarms and Events Guide
201
Column Name Datatype Description
Description nVarChar Description string of the event. Can default to object description, or comment in InTouch.
Area nChar Name of the Area or Group for the event.
Type nChar Type of event, such as "Operator data change", "Startup", and so on.
Value nChar New Value (if any).
CheckValue nChar Old Value (if any).
Category nChar Event category or class, such as Value, Process, Batch, System,
and so on.
Provider nChar Generator of event, such as node/InTouch, or View Engine name for user change.
Operator nChar Name of operator1: JoeR (if any).
DomainName nChar Name of domain.
UserFullName nChar Full name of user in operator (for example, Joseph P. Smith).
User1 Float User-defined field number 1.
User2 Float User-defined field number 2.
User 3 nChar User-defined field, string.
EventStampUTC DateTime UTC date/ time of event.
Millisec Small Int Fractional seconds for event stamp in increments of 0.1 msec.
Alarm Event History View
The v_AlarmEventHistory database view provides a historical list of all events and alarms that occurred
over a selected time range. The query client specifies start and end date and time. The returned records include all alarms and events. This view combines the alarm view and event view into one and represents the union of the records from those views.
Column Name Datatype Description
EventStamp Datetime Date and time of event.
AlarmState nChar State of alarm: one of UNACK, UNACK_RTN, ACK, ACK_RTN. Does not apply for events.
TagName nChar Name of the object that generated the alarm, such as TIC101.
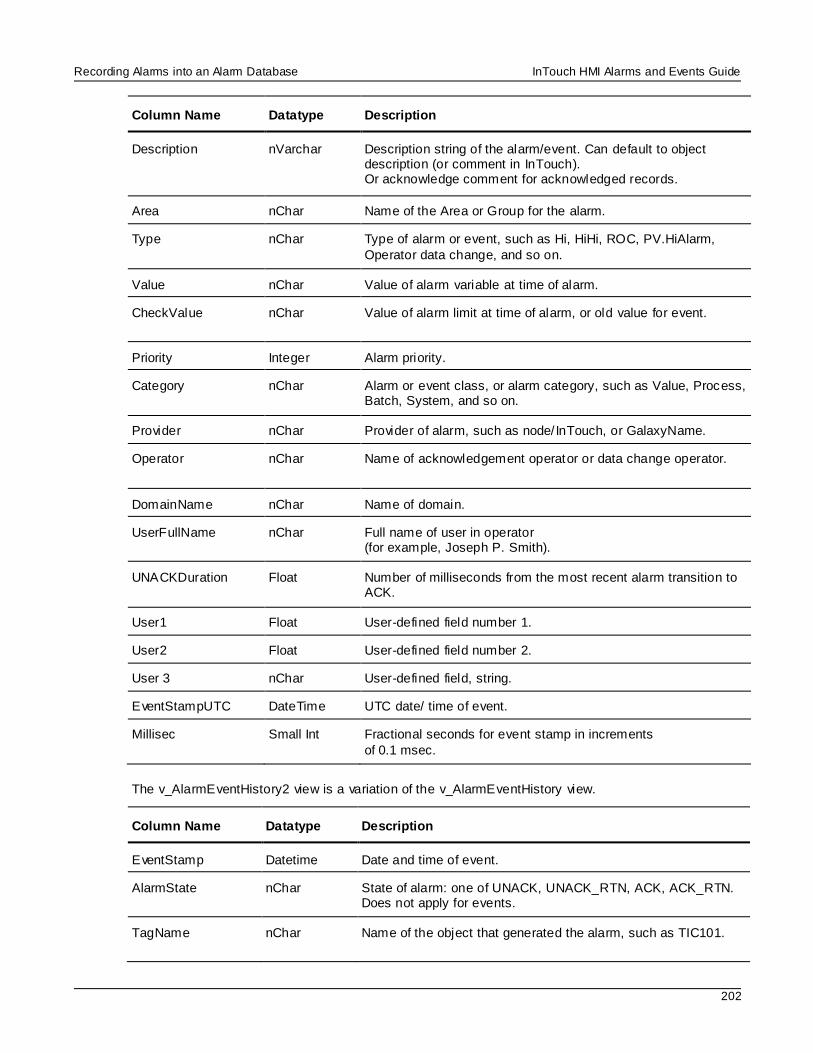
Recording Alarms into an Alarm Database InTouch HMI Alarms and Events Guide
202
Column Name Datatype Description
Description nVarchar Description string of the alarm/event. Can default to object description (or comment in InTouch). Or acknowledge comment for acknowledged records.
Area nChar Name of the Area or Group for the alarm.
Type nChar Type of alarm or event, such as Hi, HiHi, ROC, PV.HiAlarm,
Operator data change, and so on.
Value nChar Value of alarm variable at time of alarm.
CheckValue nChar Value of alarm limit at time of alarm, or old value for event.
Priority Integer Alarm priority.
Category nChar Alarm or event class, or alarm category, such as Value, Process, Batch, System, and so on.
Provider nChar Provider of alarm, such as node/ InTouch, or GalaxyName.
Operator nChar Name of acknowledgement operator or data change operator.
DomainName nChar Name of domain.
UserFullName nChar Full name of user in operator (for example, Joseph P. Smith).
UNACKDuration Float Number of milliseconds from the most recent alarm transition to ACK.
User1 Float User-defined field number 1.
User2 Float User-defined field number 2.
User 3 nChar User-defined field, string.
EventStampUTC DateTime UTC date/ time of event.
Millisec Small Int Fractional seconds for event stamp in increments
of 0.1 msec.
The v_AlarmEventHistory2 view is a variation of the v_AlarmEventHistory view.
Column Name Datatype Description
EventStamp Datetime Date and time of event.
AlarmState nChar State of alarm: one of UNACK, UNACK_RTN, ACK, ACK_RTN. Does not apply for events.
TagName nChar Name of the object that generated the alarm, such as TIC101.
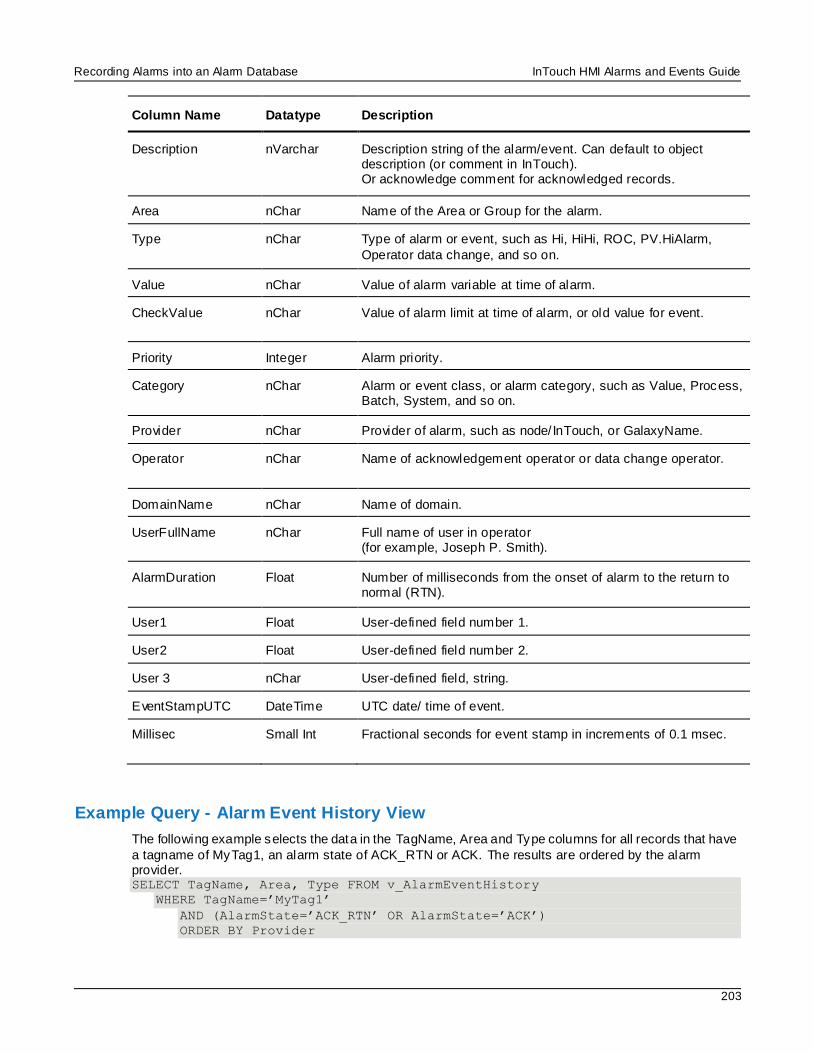
Recording Alarms into an Alarm Database InTouch HMI Alarms and Events Guide
203
Column Name Datatype Description
Description nVarchar Description string of the alarm/event. Can default to object description (or comment in InTouch). Or acknowledge comment for acknowledged records.
Area nChar Name of the Area or Group for the alarm.
Type nChar Type of alarm or event, such as Hi, HiHi, ROC, PV.HiAlarm,
Operator data change, and so on.
Value nChar Value of alarm variable at time of alarm.
CheckValue nChar Value of alarm limit at time of alarm, or old value for event.
Priority Integer Alarm priority.
Category nChar Alarm or event class, or alarm category, such as Value, Process, Batch, System, and so on.
Provider nChar Provider of alarm, such as node/ InTouch, or GalaxyName.
Operator nChar Name of acknowledgement operator or data change operator.
DomainName nChar Name of domain.
UserFullName nChar Full name of user in operator (for example, Joseph P. Smith).
AlarmDuration Float Number of milliseconds from the onset of alarm to the return to normal (RTN).
User1 Float User-defined field number 1.
User2 Float User-defined field number 2.
User 3 nChar User-defined field, string.
EventStampUTC DateTime UTC date/ time of event.
Millisec Small Int Fractional seconds for event stamp in increments of 0.1 msec.
Example Query - Alarm Event History View
The following example selects the data in the TagName, Area and Type columns for all records that have
a tagname of MyTag1, an alarm state of ACK_RTN or ACK. The results are ordered by the alarm provider. SELECT TagName, Area, Type FROM v_AlarmEventHistory
WHERE TagName=’MyTag1’
AND (AlarmState=’ACK_RTN’ OR AlarmState=’ACK’)
ORDER BY Provider
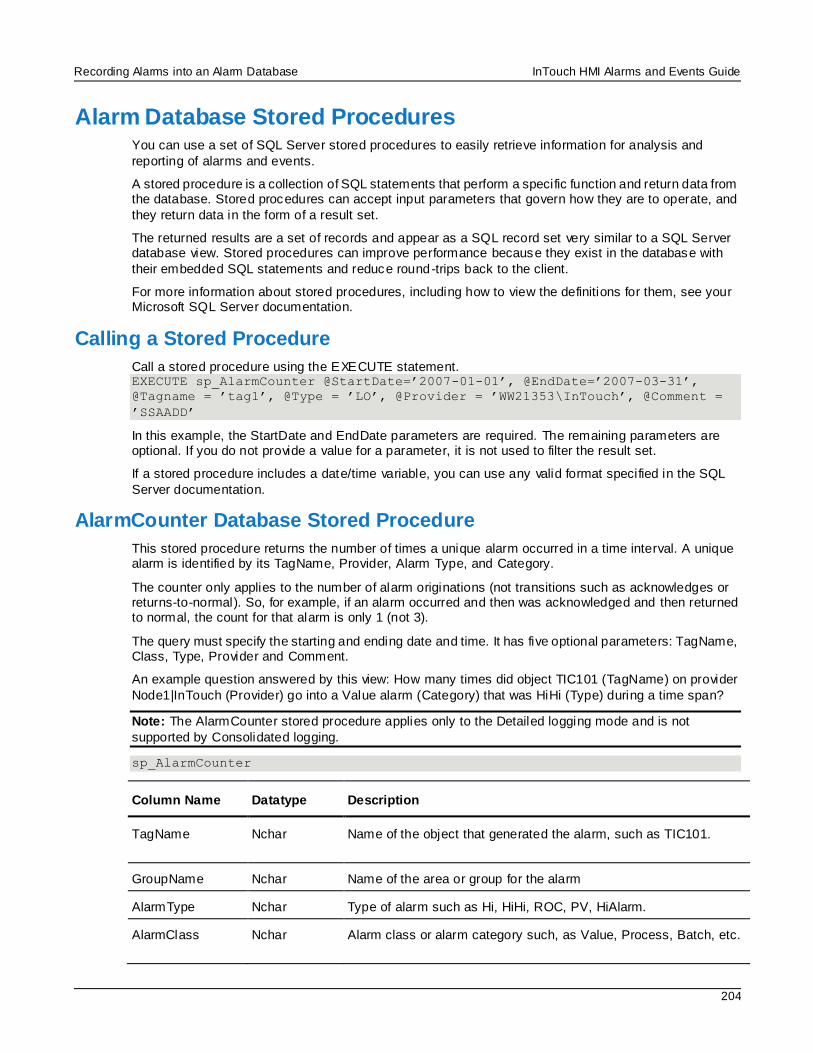
Recording Alarms into an Alarm Database InTouch HMI Alarms and Events Guide
204
Alarm Database Stored Procedures You can use a set of SQL Server stored procedures to easily retrieve information for analysis and
reporting of alarms and events.
A stored procedure is a collection of SQL statements that perform a specific function and return data from the database. Stored procedures can accept input parameters that govern how they are to operate, and
they return data in the form of a result set.
The returned results are a set of records and appear as a SQL record set very similar to a SQL Server database view. Stored procedures can improve performance because they exist in the database with
their embedded SQL statements and reduce round-trips back to the client.
For more information about stored procedures, including how to view the definitions for them, see your Microsoft SQL Server documentation.
Calling a Stored Procedure
Call a stored procedure using the EXECUTE statement. EXECUTE sp_AlarmCounter @StartDate=’2007-01-01’, @EndDate=’2007-03-31’,
@Tagname = ’tag1’, @Type = ’LO’, @Provider = ’WW21353\InTouch’, @Comment =
’SSAADD’
In this example, the StartDate and EndDate parameters are required. The remaining parameters are optional. If you do not provide a value for a parameter, it is not used to filter the result set.
If a stored procedure includes a date/time variable, you can use any valid format specified in the SQL
Server documentation.
AlarmCounter Database Stored Procedure
This stored procedure returns the number of times a unique alarm occurred in a time interval. A unique alarm is identified by its TagName, Provider, Alarm Type, and Category.
The counter only applies to the number of alarm originations (not transitions such as acknowledges or returns-to-normal). So, for example, if an alarm occurred and then was acknowledged and then returned to normal, the count for that alarm is only 1 (not 3).
The query must specify the starting and ending date and time. It has five optional parameters: TagName, Class, Type, Provider and Comment.
An example question answered by this view: How many times did object TIC101 (TagName) on provider
Node1|InTouch (Provider) go into a Value alarm (Category) that was HiHi (Type) during a time span?
Note: The AlarmCounter stored procedure applies only to the Detailed logging mode and is not
supported by Consolidated logging.
sp_AlarmCounter
Column Name Datatype Description
TagName Nchar Name of the object that generated the alarm, such as TIC101.
GroupName Nchar Name of the area or group for the alarm
AlarmType Nchar Type of alarm such as Hi, HiHi, ROC, PV, HiAlarm.
AlarmClass Nchar Alarm class or alarm category such, as Value, Process, Batch, etc.
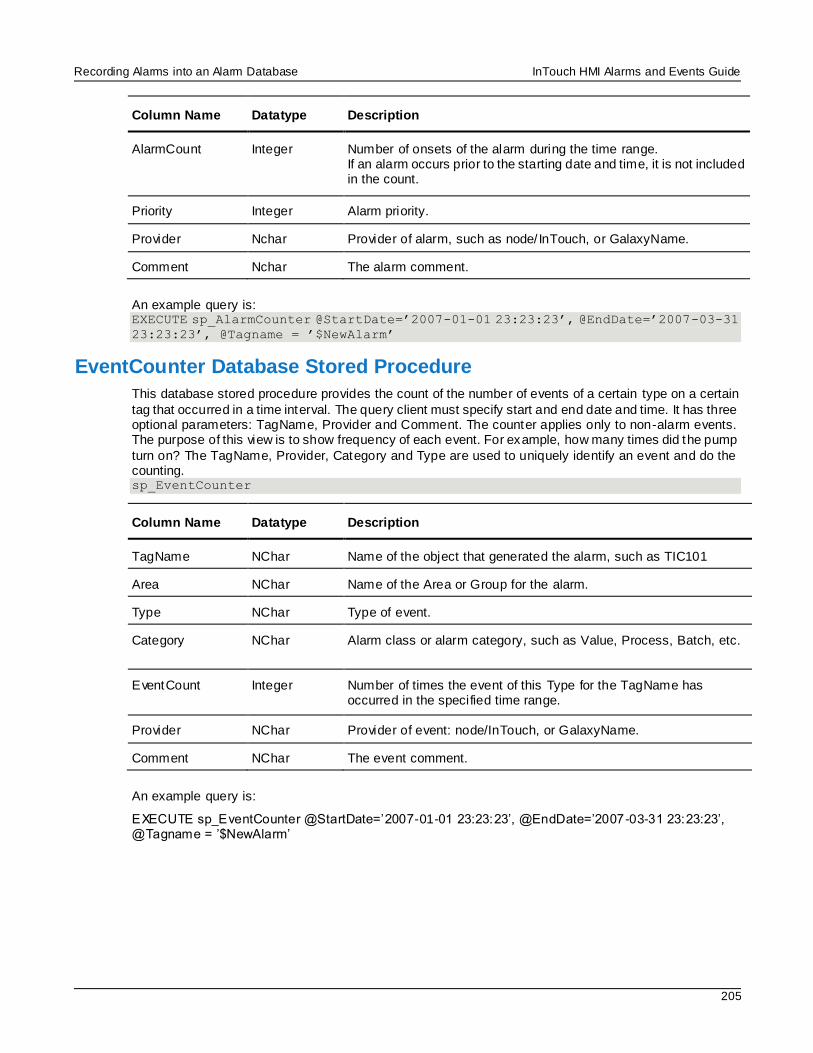
Recording Alarms into an Alarm Database InTouch HMI Alarms and Events Guide
205
Column Name Datatype Description
AlarmCount Integer Number of onsets of the alarm during the time range. If an alarm occurs prior to the starting date and time, it is not included in the count.
Priority Integer Alarm priority.
Provider Nchar Provider of alarm, such as node/ InTouch, or GalaxyName.
Comment Nchar The alarm comment.
An example query is: EXECUTE sp_AlarmCounter @StartDate=’2007-01-01 23:23:23’, @EndDate=’2007-03-31
23:23:23’, @Tagname = ’$NewAlarm’
EventCounter Database Stored Procedure
This database stored procedure provides the count of the number of events of a certain type on a certain
tag that occurred in a time interval. The query client must specify start and end date and time. It has three optional parameters: TagName, Provider and Comment. The counter applies only to non-alarm events. The purpose of this view is to show frequency of each event. For example, how many times did the pump
turn on? The TagName, Provider, Category and Type are used to uniquely identify an event and do the counting. sp_EventCounter
Column Name Datatype Description
TagName NChar Name of the object that generated the alarm, such as TIC101
Area NChar Name of the Area or Group for the alarm.
Type NChar Type of event.
Category NChar Alarm class or alarm category, such as Value, Process, Batch, etc.
EventCount Integer Number of times the event of this Type for the TagName has occurred in the specified time range.
Provider NChar Provider of event: node/InTouch, or GalaxyName.
Comment NChar The event comment.
An example query is:
EXECUTE sp_EventCounter @StartDate=’2007-01-01 23:23:23’, @EndDate=’2007-03-31 23:23:23’, @Tagname = ’$NewAlarm’

InTouch HMI Alarms and Events Guide
207
In This Chapter
About Viewing Recorded Alarms .................................................................................................. 207 Configuring the Alarm DB View Control ........................................................................................ 207 Using an Alarm DB View Control at Run Time .............................................................................. 223
Using Alarm DB View ActiveX Properties ..................................................................................... 224 Using Alarm DB View ActiveX Methods ........................................................................................ 247 Handling Errors With Using Methods and Properties ..................................................................... 252
Using Alarm DB View ActiveX Events to Trigger Scripts ................................................................ 252
About Viewing Recorded Alarms You use the Alarm DB View ActiveX control to visualize data from the alarm database. Use this control to show all alarm and event information generated from an InTouch application during run time.
For this control, you can configure:
Context sensitive menu features
Display mode
List control options
Colors for different properties
Font type, style and size
Database specifications (server name, user ID and password)
Query filters
Column management
Sorting
Run-time users can change options while the application is running to select the data they are viewing. They can:
Sort the information within a column
Update the display
Perform a query
Resize the width of a column
For more information about ActiveX controls, see ActiveX Controlsin the InTouch® HMI Visualization
Guide.
Configuring the Alarm DB View Control When you configure the Alarm DB View control, you:
Configure the connection to the alarm database.
CHAPTER 10
Viewing Recorded Alarms
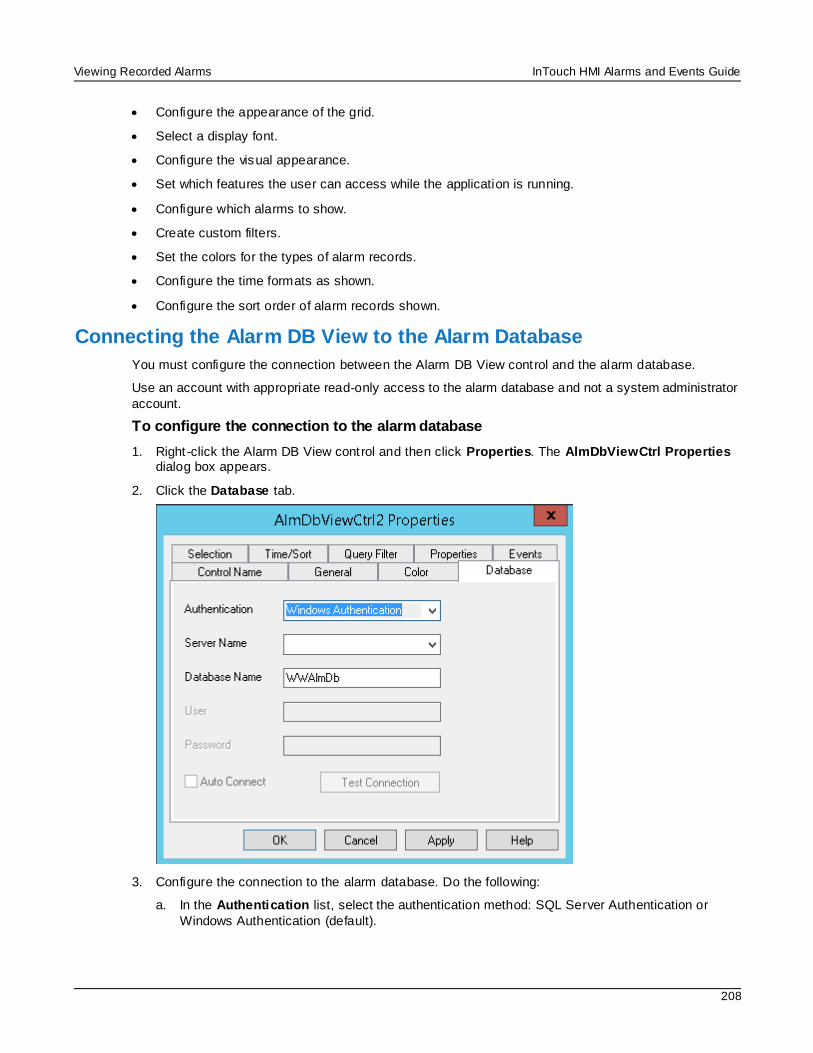
Viewing Recorded Alarms InTouch HMI Alarms and Events Guide
208
Configure the appearance of the grid.
Select a display font.
Configure the visual appearance.
Set which features the user can access while the application is running.
Configure which alarms to show.
Create custom filters.
Set the colors for the types of alarm records.
Configure the time formats as shown.
Configure the sort order of alarm records shown.
Connecting the Alarm DB View to the Alarm Database
You must configure the connection between the Alarm DB View control and the alarm database.
Use an account with appropriate read-only access to the alarm database and not a system administrator
account.
To configure the connection to the alarm database
1. Right -click the Alarm DB View control and then click Properties. The AlmDbViewCtrl Properties dialog box appears.
2. Click the Database tab.
3. Configure the connection to the alarm database. Do the following:
a. In the Authentication list, select the authentication method: SQL Server Authentication or
Windows Authentication (default).
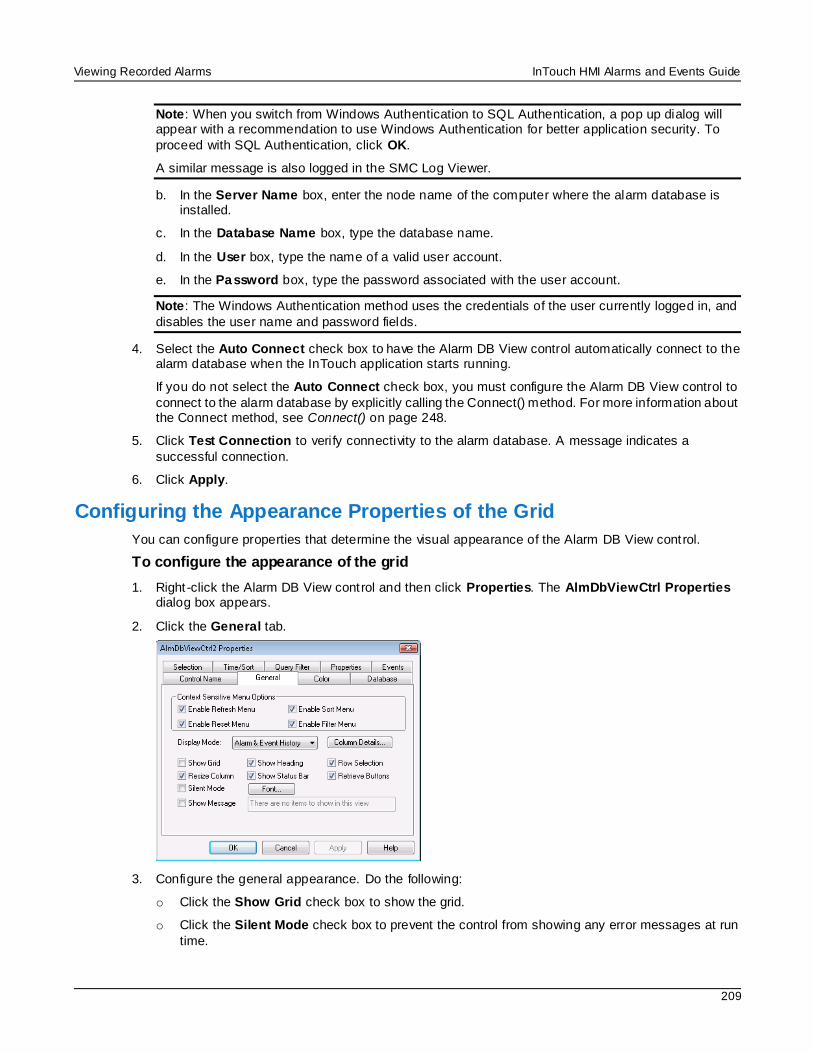
Viewing Recorded Alarms InTouch HMI Alarms and Events Guide
209
Note: When you switch from Windows Authentication to SQL Authentication, a pop up dialog will appear with a recommendation to use Windows Authentication for better application security. To
proceed with SQL Authentication, click OK.
A similar message is also logged in the SMC Log Viewer.
b. In the Server Name box, enter the node name of the computer where the alarm database is installed.
c. In the Database Name box, type the database name.
d. In the User box, type the name of a valid user account.
e. In the Password box, type the password associated with the user account.
Note: The Windows Authentication method uses the credentials of the user currently logged in, and
disables the user name and password fields.
4. Select the Auto Connect check box to have the Alarm DB View control automatically connect to the alarm database when the InTouch application starts running.
If you do not select the Auto Connect check box, you must configure the Alarm DB View control to
connect to the alarm database by explicitly calling the Connect() method. For more information about the Connect method, see Connect() on page 248.
5. Click Test Connection to verify connectivity to the alarm database. A message indicates a
successful connection.
6. Click Apply.
Configuring the Appearance Properties of the Grid
You can configure properties that determine the visual appearance of the Alarm DB View control.
To configure the appearance of the grid
1. Right -click the Alarm DB View control and then click Properties. The AlmDbViewCtrl Properties dialog box appears.
2. Click the General tab.
3. Configure the general appearance. Do the following:
o Click the Show Grid check box to show the grid.
o Click the Silent Mode check box to prevent the control from showing any error messages at run
time.
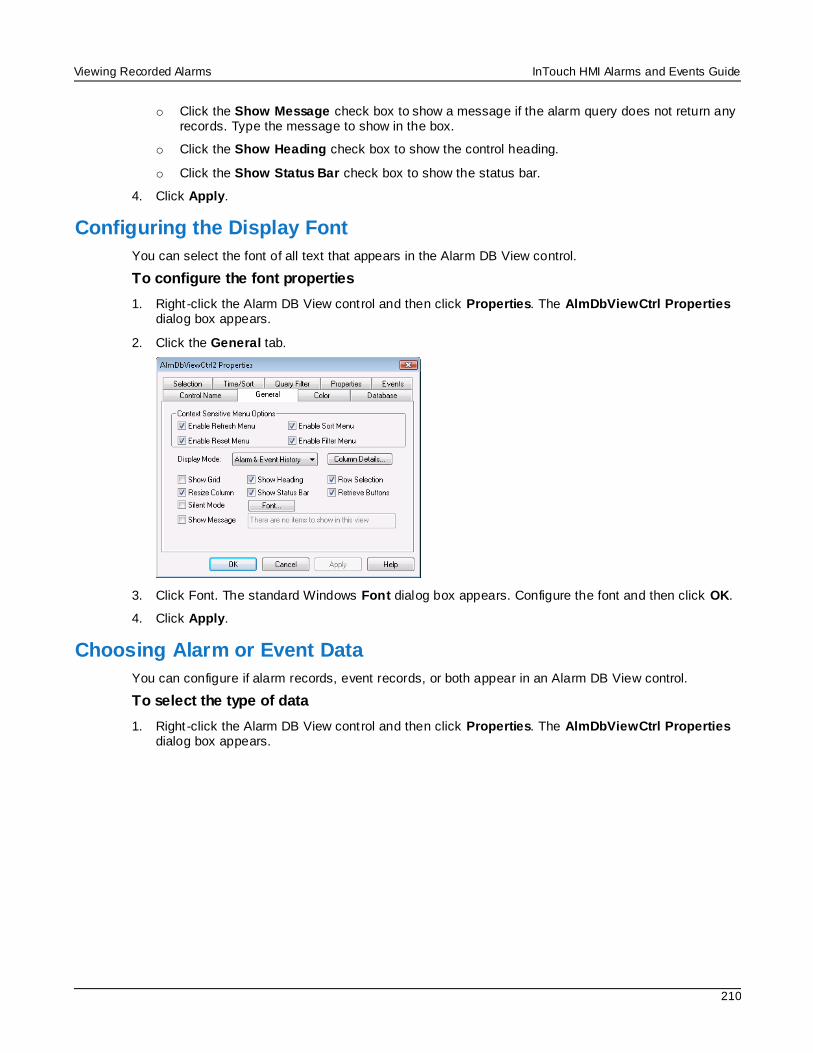
Viewing Recorded Alarms InTouch HMI Alarms and Events Guide
210
o Click the Show Message check box to show a message if the alarm query does not return any records. Type the message to show in the box.
o Click the Show Heading check box to show the control heading.
o Click the Show Status Bar check box to show the status bar.
4. Click Apply.
Configuring the Display Font
You can select the font of all text that appears in the Alarm DB View control.
To configure the font properties
1. Right -click the Alarm DB View control and then click Properties. The AlmDbViewCtrl Properties dialog box appears.
2. Click the General tab.
3. Click Font. The standard Windows Font dialog box appears. Configure the font and then click OK.
4. Click Apply.
Choosing Alarm or Event Data
You can configure if alarm records, event records, or both appear in an Alarm DB View control.
To select the type of data
1. Right -click the Alarm DB View control and then click Properties. The AlmDbViewCtrl Properties dialog box appears.
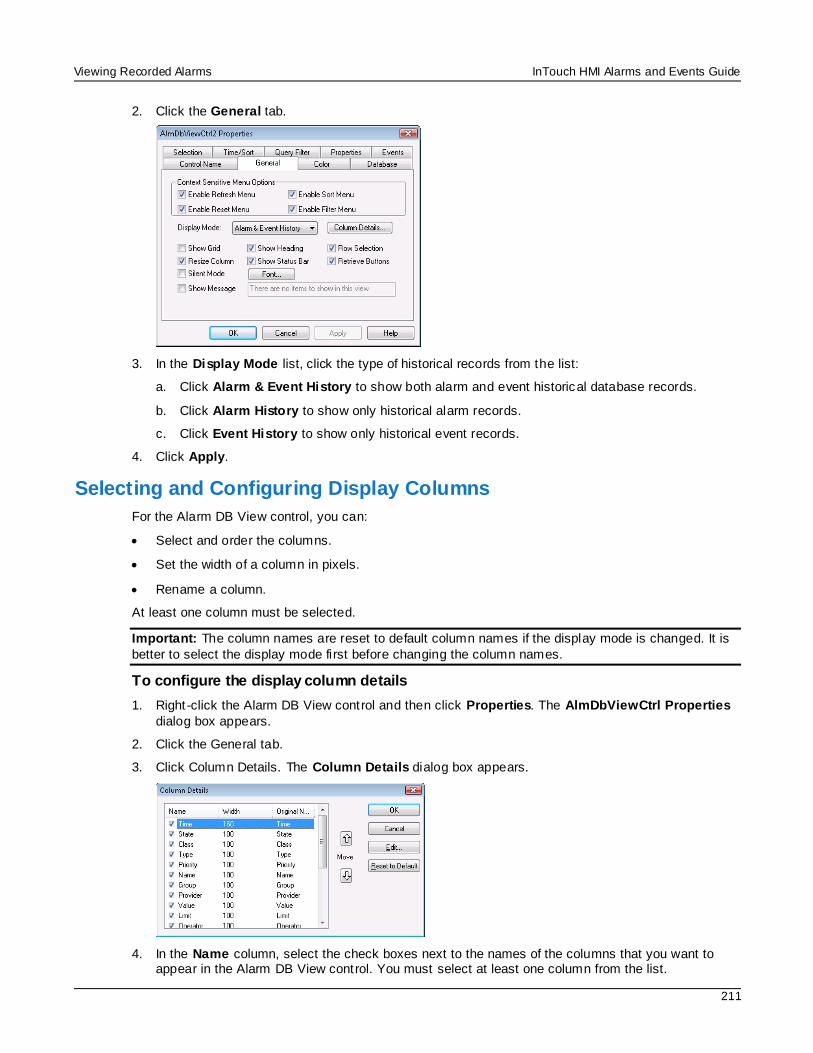
Viewing Recorded Alarms InTouch HMI Alarms and Events Guide
211
2. Click the General tab.
3. In the Display Mode list, click the type of historical records from the list:
a. Click Alarm & Event History to show both alarm and event historical database records.
b. Click Alarm History to show only historical alarm records.
c. Click Event History to show only historical event records.
4. Click Apply.
Selecting and Configuring Display Columns
For the Alarm DB View control, you can:
Select and order the columns.
Set the width of a column in pixels.
Rename a column.
At least one column must be selected.
Important: The column names are reset to default column names if the display mode is changed. It is
better to select the display mode first before changing the column names.
To configure the display column details
1. Right -click the Alarm DB View control and then click Properties. The AlmDbViewCtrl Properties
dialog box appears.
2. Click the General tab.
3. Click Column Details. The Column Details dialog box appears.
4. In the Name column, select the check boxes next to the names of the columns that you want to appear in the Alarm DB View control. You must select at least one column from the list.
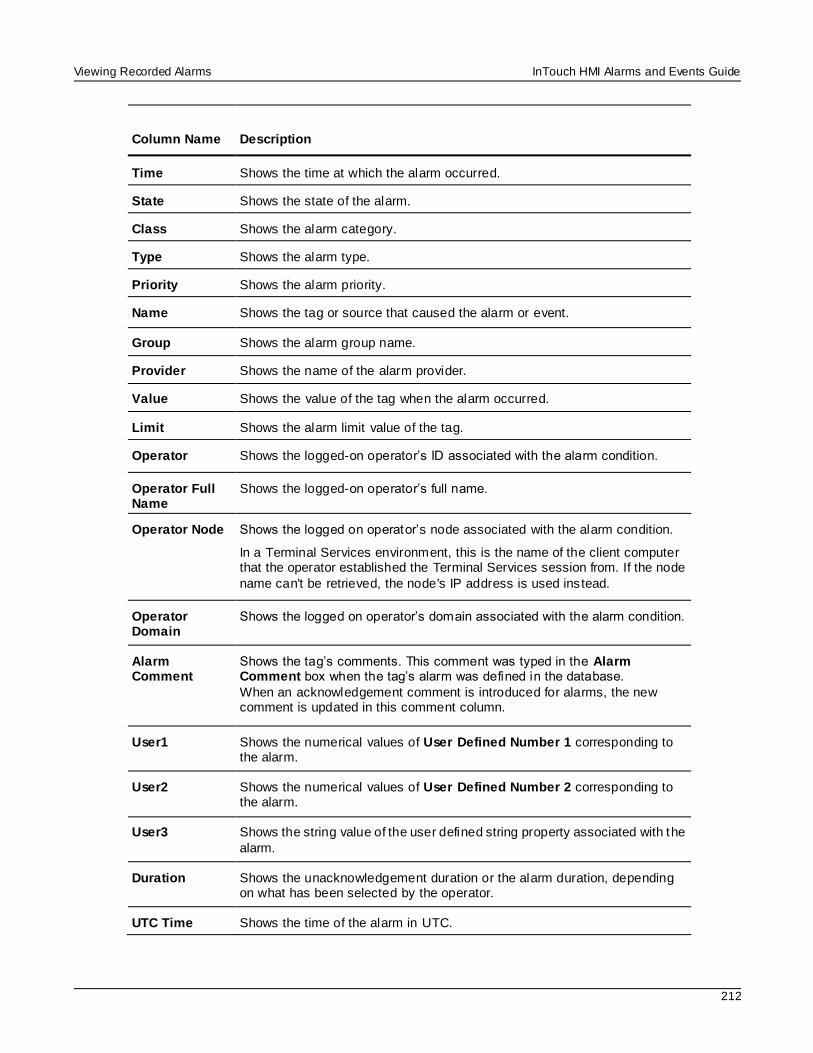
Viewing Recorded Alarms InTouch HMI Alarms and Events Guide
212
Column Name Description
Time Shows the time at which the alarm occurred.
State Shows the state of the alarm.
Class Shows the alarm category.
Type Shows the alarm type.
Priority Shows the alarm priority.
Name Shows the tag or source that caused the alarm or event.
Group Shows the alarm group name.
Provider Shows the name of the alarm provider.
Value Shows the value of the tag when the alarm occurred.
Limit Shows the alarm limit value of the tag.
Operator Shows the logged-on operator’s ID associated with the alarm condition.
Operator Full Name
Shows the logged-on operator’s full name.
Operator Node Shows the logged on operator’s node associated with the alarm condition.
In a Terminal Services environment, this is the name of the client computer that the operator established the Terminal Services session from. If the node
name can't be retrieved, the node's IP address is used instead.
Operator Domain
Shows the logged on operator’s domain associated with the alarm condition.
Alarm Comment
Shows the tag’s comments. This comment was typed in the Alarm Comment box when the tag’s alarm was defined in the database.
When an acknowledgement comment is introduced for alarms, the new comment is updated in this comment column.
User1 Shows the numerical values of User Defined Number 1 corresponding to the alarm.
User2 Shows the numerical values of User Defined Number 2 corresponding to the alarm.
User3 Shows the string value of the user defined string property associated with the
alarm.
Duration Shows the unacknowledgement duration or the alarm duration, depending on what has been selected by the operator.
UTC Time Shows the time of the alarm in UTC.
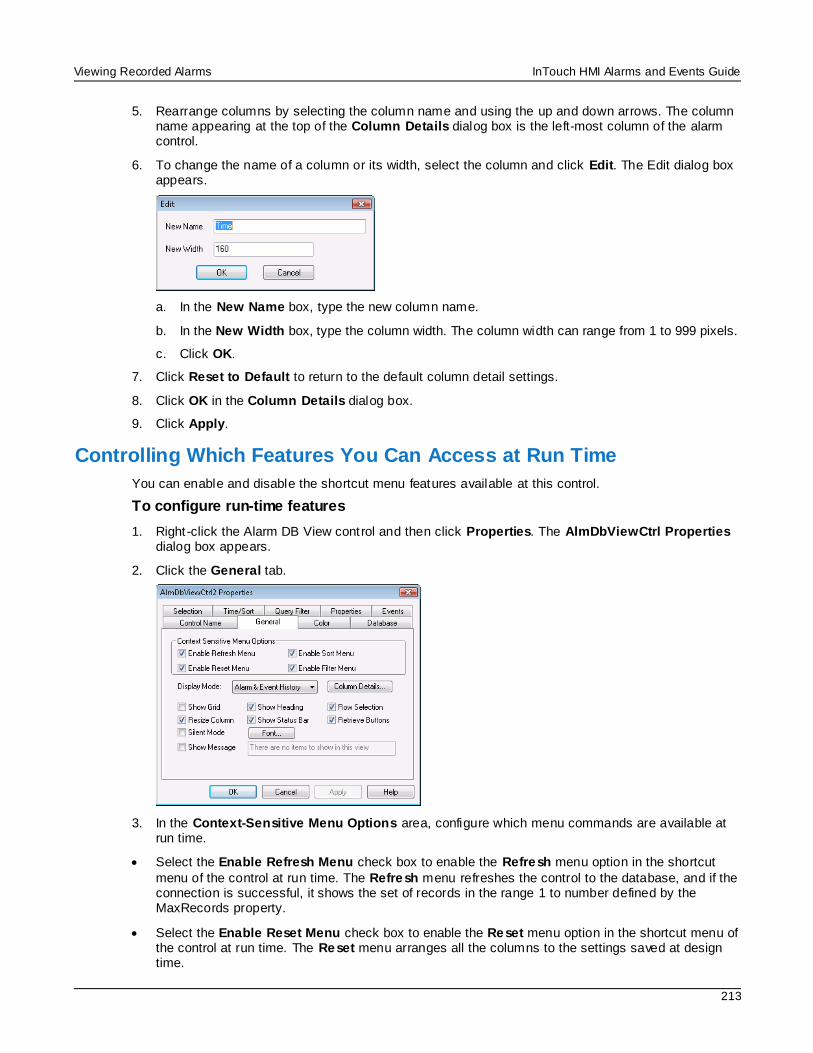
Viewing Recorded Alarms InTouch HMI Alarms and Events Guide
213
5. Rearrange columns by selecting the column name and using the up and down arrows. The column name appearing at the top of the Column Details dialog box is the left-most column of the alarm control.
6. To change the name of a column or its width, select the column and click Edit. The Edit dialog box appears.
a. In the New Name box, type the new column name.
b. In the New Width box, type the column width. The column width can range from 1 to 999 pixels.
c. Click OK.
7. Click Reset to Default to return to the default column detail settings.
8. Click OK in the Column Details dialog box.
9. Click Apply.
Controlling Which Features You Can Access at Run Time
You can enable and disable the shortcut menu features available at this control.
To configure run-time features
1. Right -click the Alarm DB View control and then click Properties. The AlmDbViewCtrl Properties dialog box appears.
2. Click the General tab.
3. In the Context-Sensitive Menu Options area, configure which menu commands are available at run time.
Select the Enable Refresh Menu check box to enable the Refresh menu option in the shortcut
menu of the control at run time. The Refresh menu refreshes the control to the database, and if the connection is successful, it shows the set of records in the range 1 to number defined by the MaxRecords property.
Select the Enable Reset Menu check box to enable the Reset menu option in the shortcut menu of the control at run time. The Reset menu arranges all the columns to the settings saved at design time.
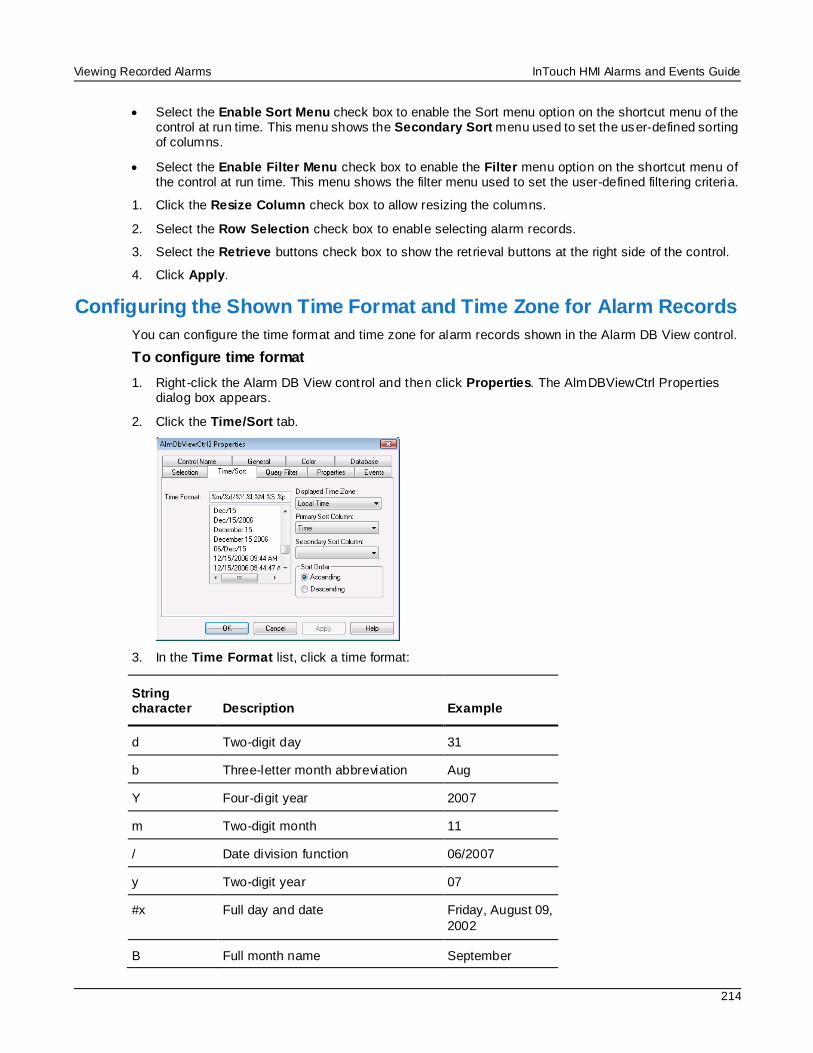
Viewing Recorded Alarms InTouch HMI Alarms and Events Guide
214
Select the Enable Sort Menu check box to enable the Sort menu option on the shortcut menu of the control at run time. This menu shows the Secondary Sort menu used to set the user-defined sorting of columns.
Select the Enable Filter Menu check box to enable the Filter menu option on the shortcut menu of the control at run time. This menu shows the filter menu used to set the user-defined filtering criteria.
1. Click the Resize Column check box to allow resizing the columns.
2. Select the Row Selection check box to enable selecting alarm records.
3. Select the Retrieve buttons check box to show the ret rieval buttons at the right side of the control.
4. Click Apply.
Configuring the Shown Time Format and Time Zone for Alarm Records
You can configure the time format and time zone for alarm records shown in the Alarm DB View control.
To configure time format
1. Right -click the Alarm DB View control and then click Properties. The AlmDBViewCtrl Properties dialog box appears.
2. Click the Time/Sort tab.
3. In the Time Format list, click a time format:
String character Description Example
d Two-digit day 31
b Three-letter month abbreviation Aug
Y Four-digit year 2007
m Two-digit month 11
/ Date division function 06/2007
y Two-digit year 07
#x Full day and date Friday, August 09,
2002
B Full month name September
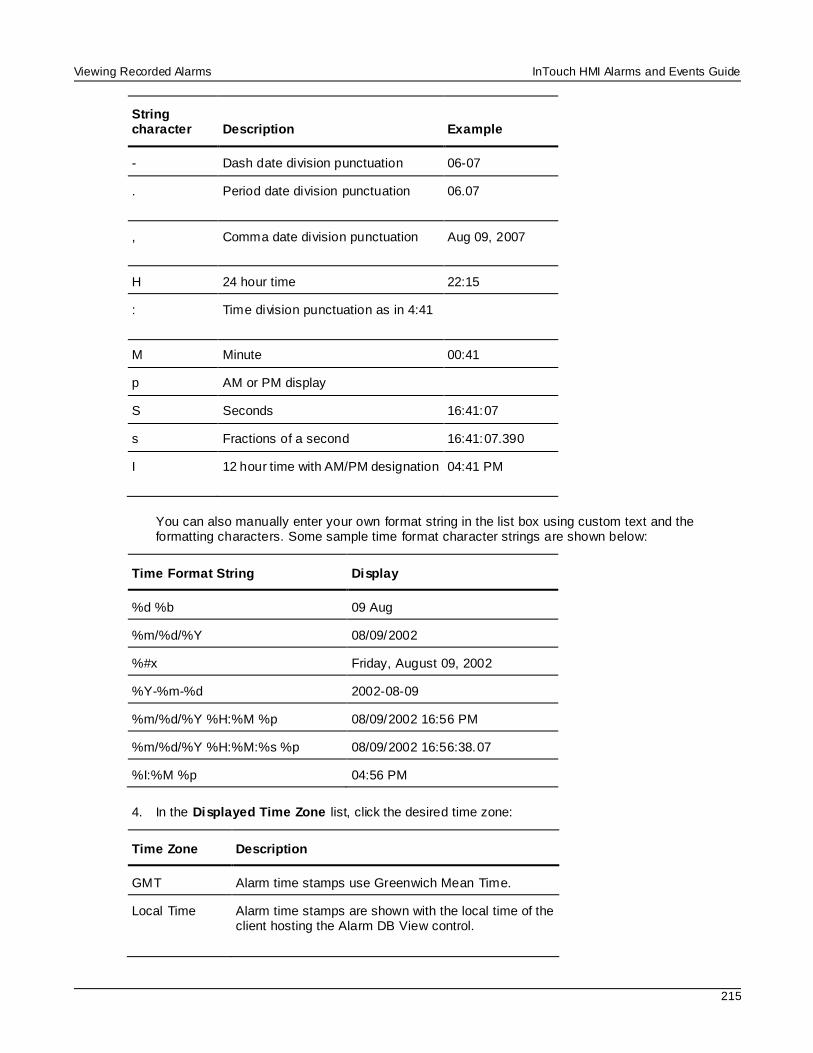
Viewing Recorded Alarms InTouch HMI Alarms and Events Guide
215
String character Description Example
- Dash date division punctuation 06-07
. Period date division punctuation 06.07
, Comma date division punctuation Aug 09, 2007
H 24 hour time 22:15
: Time division punctuation as in 4:41
M Minute 00:41
p AM or PM display
S Seconds 16:41:07
s Fractions of a second 16:41:07.390
I 12 hour time with AM/PM designation 04:41 PM
You can also manually enter your own format string in the list box using custom text and the formatting characters. Some sample time format character strings are shown below:
Time Format String Display
%d %b 09 Aug
%m/%d/%Y 08/09/2002
%#x Friday, August 09, 2002
%Y-%m-%d 2002-08-09
%m/%d/%Y %H:%M %p 08/09/2002 16:56 PM
%m/%d/%Y %H:%M:%s %p 08/09/2002 16:56:38.07
%I:%M %p 04:56 PM
4. In the Displayed Time Zone list, click the desired time zone:
Time Zone Description
GMT Alarm time stamps use Greenwich Mean Time.
Local Time Alarm time stamps are shown with the local time of the client hosting the Alarm DB View control.
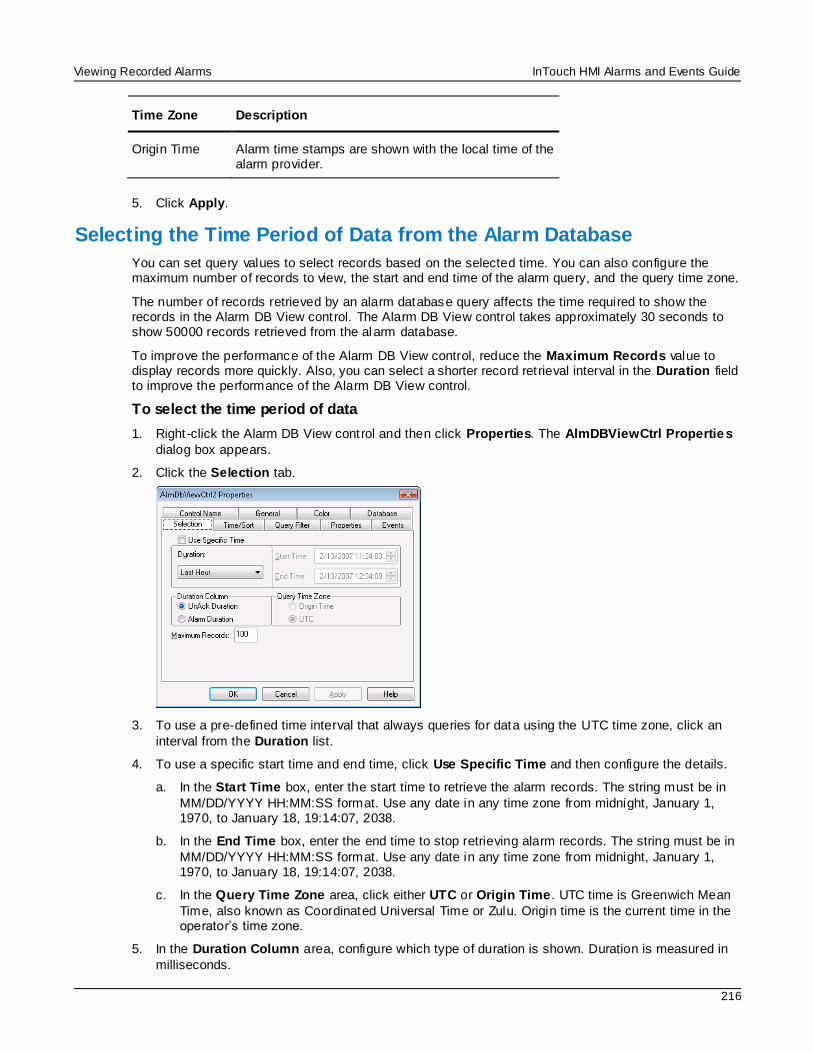
Viewing Recorded Alarms InTouch HMI Alarms and Events Guide
216
Time Zone Description
Origin Time Alarm time stamps are shown with the local time of the alarm provider.
5. Click Apply.
Selecting the Time Period of Data from the Alarm Database
You can set query values to select records based on the selected time. You can also configure the maximum number of records to view, the start and end time of the alarm query, and the query time zone.
The number of records retrieved by an alarm database query affects the time required to show the records in the Alarm DB View control. The Alarm DB View control takes approximately 30 seconds to show 50000 records retrieved from the alarm database.
To improve the performance of the Alarm DB View control, reduce the Maximum Records value to display records more quickly. Also, you can select a shorter record ret rieval interval in the Duration field to improve the performance of the Alarm DB View control.
To select the time period of data
1. Right -click the Alarm DB View control and then click Properties. The AlmDBViewCtrl Properties
dialog box appears.
2. Click the Selection tab.
3. To use a pre-defined time interval that always queries for data using the UTC time zone, click an
interval from the Duration list.
4. To use a specific start time and end time, click Use Specific Time and then configure the details.
a. In the Start Time box, enter the start time to retrieve the alarm records. The string must be in
MM/DD/YYYY HH:MM:SS format. Use any date in any time zone from midnight, January 1, 1970, to January 18, 19:14:07, 2038.
b. In the End Time box, enter the end time to stop retrieving alarm records. The string must be in
MM/DD/YYYY HH:MM:SS format. Use any date in any time zone from midnight, January 1, 1970, to January 18, 19:14:07, 2038.
c. In the Query Time Zone area, click either UTC or Origin Time. UTC time is Greenwich Mean
Time, also known as Coordinated Universal Time or Zulu. Origin time is the current time in the operator’s time zone.
5. In the Duration Column area, configure which type of duration is shown. Duration is measured in
milliseconds.
Viewing Recorded Alarms InTouch HMI Alarms and Events Guide
217
o Click UnAck Duration to show the time between the most recent alarm transition (alarm or sub-state) and the acknowledgement, if any.
o Click Alarm Duration to show the amount of time elapsed between the initial occurrence of an
alarm and the time at which it returned to a normal state.
6. In the Maximum Records box, type the number of records to view from the control at one instance. The valid range of maximum records is from 1 to 1000.
7. Click Apply.
About Query Time Zones
The Query Time Zone options are Origin Time and UTC.
Origin time is the local time in the operator’s time zone.
UTC time is Greenwich Mean Time, also known as Coordinated Universal Time or Zulu.
If Use Specific Time is selected, you can select between the two query time zone options. If Use Specific Time is not selected, the selected Duration predefined time interval always queries for data using the
UTC time zone.
To avoid problems during the Daylight Saving Time switch, we recommend that you always use UTC in Query Time Zone. If you use Local Time instead, it is possible that alarm records will be missing for the
transition period from Daylight Saving Time to Normal Time.
If you are running several different computers with different time zone settings, and they are all logging to the same alarm database, each record will get the time stamps in UTC, plus the time zone offset and
daylight saving adjustment needed to convert that time stamp to the corresponding Origin Time. As a result, every entry in the database has two time stamps: the UTC time and the Origin Time from the computer that did the logging. This makes retrievals faster. In the table entries, the UTC time is identified
as the "Transition Time" and the Origin Time is identified as the "EventStamp."
Creating Custom Filters and Using Filter Favorites
You can select which records are included in your query results. For example, you can select a filter by
the date of a record or the state of the alarm. You can select multiple fields to limit or expand your query results.
If you do not define a custom filter, all records are returned.
If you translated strings for language switching, you cannot use those strings as filter criteria. Translated strings are stored outside of the alarm database.
To create custom filters
1. Right -click the Alarm DB View control and then click Properties. The AlmDBViewCtrl Properties dialog box appears.
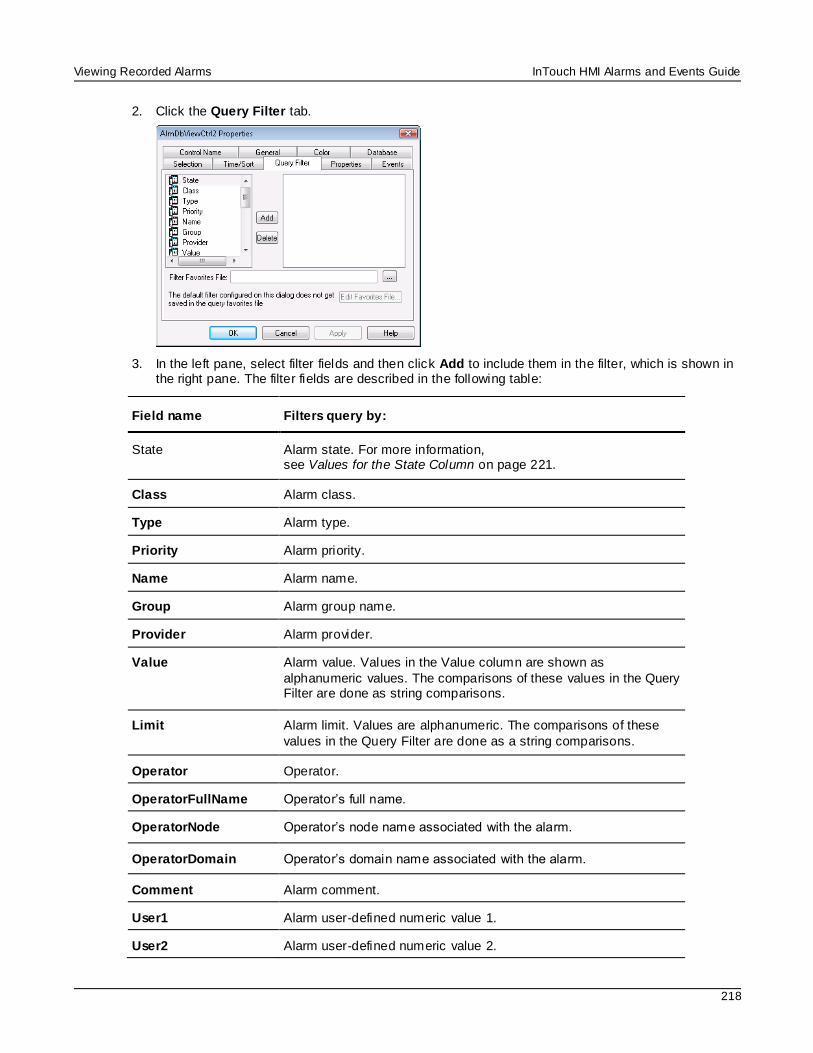
Viewing Recorded Alarms InTouch HMI Alarms and Events Guide
218
2. Click the Query Filter tab.
3. In the left pane, select filter fields and then click Add to include them in the filter, which is shown in the right pane. The filter fields are described in the following table:
Field name Filters query by:
State Alarm state. For more information, see Values for the State Column on page 221.
Class Alarm class.
Type Alarm type.
Priority Alarm priority.
Name Alarm name.
Group Alarm group name.
Provider Alarm provider.
Value Alarm value. Values in the Value column are shown as
alphanumeric values. The comparisons of these values in the Query Filter are done as string comparisons.
Limit Alarm limit. Values are alphanumeric. The comparisons of these
values in the Query Filter are done as a string comparisons.
Operator Operator.
OperatorFullName Operator’s full name.
OperatorNode Operator’s node name associated with the alarm.
OperatorDomain Operator’s domain name associated with the alarm.
Comment Alarm comment.
User1 Alarm user-defined numeric value 1.
User2 Alarm user-defined numeric value 2.
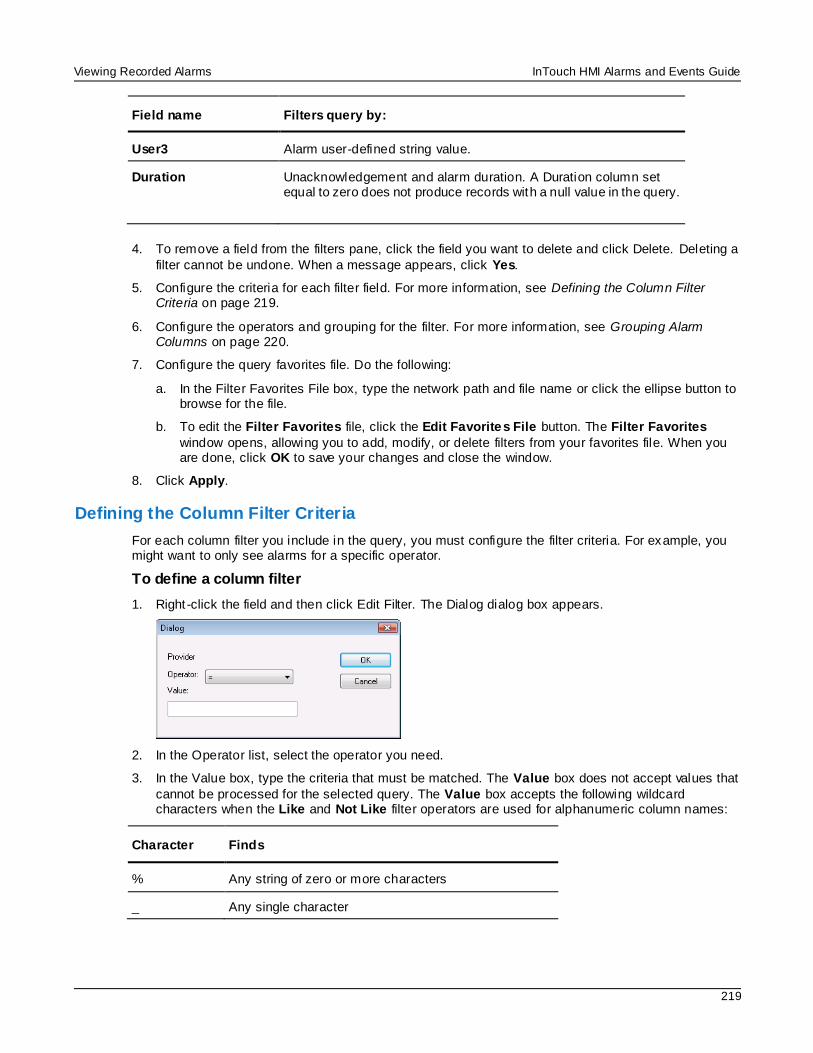
Viewing Recorded Alarms InTouch HMI Alarms and Events Guide
219
Field name Filters query by:
User3 Alarm user-defined string value.
Duration Unacknowledgement and alarm duration. A Duration column set equal to zero does not produce records with a null value in the query.
4. To remove a field from the filters pane, click the field you want to delete and click Delete. Deleting a
filter cannot be undone. When a message appears, click Yes.
5. Configure the criteria for each filter field. For more information, see Defining the Column Filter Criteria on page 219.
6. Configure the operators and grouping for the filter. For more information, see Grouping Alarm Columns on page 220.
7. Configure the query favorites file. Do the following:
a. In the Filter Favorites File box, type the network path and file name or click the ellipse button to browse for the file.
b. To edit the Filter Favorites file, click the Edit Favorites File button. The Filter Favorites
window opens, allowing you to add, modify, or delete filters from your favorites file. When you are done, click OK to save your changes and close the window.
8. Click Apply.
Defining the Column Filter Criteria
For each column filter you include in the query, you must configure the filter criteria. For example, you might want to only see alarms for a specific operator.
To define a column filter
1. Right -click the field and then click Edit Filter. The Dialog dialog box appears.
2. In the Operator list, select the operator you need.
3. In the Value box, type the criteria that must be matched. The Value box does not accept values that
cannot be processed for the selected query. The Value box accepts the following wildcard characters when the Like and Not Like filter operators are used for alphanumeric column names:
Character Finds
% Any string of zero or more characters
_ Any single character
Viewing Recorded Alarms InTouch HMI Alarms and Events Guide
220
Character Finds
[ ] Any single character within the specified range, for example [a-f], or within a set, for example [abcdef].
[ ] Any single character not within the specified range, for
example [^a-f], or set, for example [ abcdef].
The following Value box limits apply to different fields:
Field Limit
All fields All alphanumeric characters except User1, User2 and Priority.
Priority Accepts integer values from 1 to 999.
User1,
User2
Accepts only negative, positive or fractional numbers.
4. Click OK.
Grouping Alarm Columns
When more than one field is defined, the columns are combined using Boolean operators.
The AND operator returns records that meet all values of the selected fields.
The OR operator returns records that meet the values of any of the selected fields.
To use AND/OR operators to set the filter selection criteria, the respective fields must be grouped together. Only a single filter expression can be created on an item in the filters pane. If multiple
expressions are needed, then the item must be added to the filters pane again.
By default, the grouped fields have the AND operator.
The AND and OR operators are parent nodes. The fields selected under each parent node are child
nodes. You cannot drag fields parent nodes to child nodes.
To group alarm columns
1. Right -click the field and then click Group.
2. Drag a field onto another field.
Copying or Moving Query Filters
If you have more than one instance of Alarm Pareto control and want to use the same filters for multiple instances, you can copy or cut the defined filters from one instance and paste them to another filter.
To copy filters
1. Define the filters in the first instance of the Alarm Pareto control.
2. Right -click the filters and click Copy. To move the filters, click Cut.
3. Close the first instance of the Alarm Pareto control.
4. Open the next instance of the Alarm Pareto control and click the Query Filter tab.
Viewing Recorded Alarms InTouch HMI Alarms and Events Guide
221
5. Position the arrow in the right pane. Right-click on a selected filter and click Paste.
Values for the State Column
When you add the State column to your filter query, you may assign values from the Value menu in the
Define Filter dialog box. The values available are described in the following table:
Value Description
ACK Produces a query of all system
acknowledgements.
ACK_ALM Produces a query of all acknowledged alarms.
UNACK_ALM Produces a query of all unacknowledged alarms.
ACK_RTN Produces a query of all acknowledged alarms that
have returned to normal.
UNACK_RTN Produces a query of unacknowledged alarms that have returned to normal.
All UNACK Records Produces a query of all unacknowledged records.
All ACK Records Produces a query of all acknowledgement records.
All ALM Records Produces a query of all alarm records.
All RTN Records Produces a query of all alarms that have returned to normal.
Note: When a tag in expanded summary alarm mode is used to create an alarm, which returns to normal
when the main alarm is acknowledged, two records are created. The first record is the "acknowledged and returned to normal" record as the new alarm is already in a returned to normal state. The second record is acknowledged, which corresponds to acknowledging the main alarm. The previous
implementation of ACK_ALM has been changed to ACK.
Configuring Colors for Various Types of Alarm Records
You can set the colors for alarm and event records.
To configure alarm display colors
1. Right -click the Alarm DB View control and then click Properties. The AlmDBViewCtrl Properties dialog box appears.
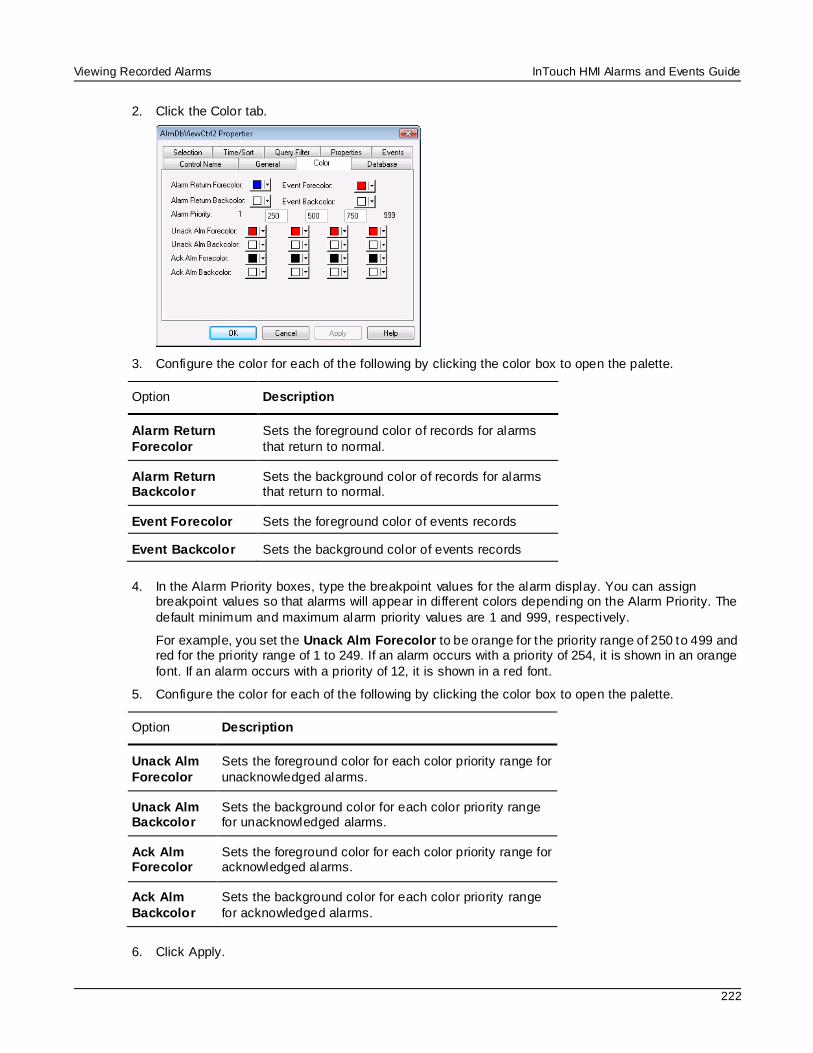
Viewing Recorded Alarms InTouch HMI Alarms and Events Guide
222
2. Click the Color tab.
3. Configure the color for each of the following by clicking the color box to open the palette.
Option Description
Alarm Return
Forecolor
Sets the foreground color of records for alarms
that return to normal.
Alarm Return Backcolor
Sets the background color of records for alarms that return to normal.
Event Forecolor Sets the foreground color of events records
Event Backcolor Sets the background color of events records
4. In the Alarm Priority boxes, type the breakpoint values for the alarm display. You can assign breakpoint values so that alarms will appear in different colors depending on the Alarm Priority. The
default minimum and maximum alarm priority values are 1 and 999, respectively.
For example, you set the Unack Alm Forecolor to be orange for the priority range of 250 to 499 and red for the priority range of 1 to 249. If an alarm occurs with a priority of 254, it is shown in an orange
font. If an alarm occurs with a priority of 12, it is shown in a red font.
5. Configure the color for each of the following by clicking the color box to open the palette.
Option Description
Unack Alm
Forecolor
Sets the foreground color for each color priority range for
unacknowledged alarms.
Unack Alm Backcolor
Sets the background color for each color priority range for unacknowledged alarms.
Ack Alm Forecolor
Sets the foreground color for each color priority range for acknowledged alarms.
Ack Alm
Backcolor
Sets the background color for each color priority range
for acknowledged alarms.
6. Click Apply.
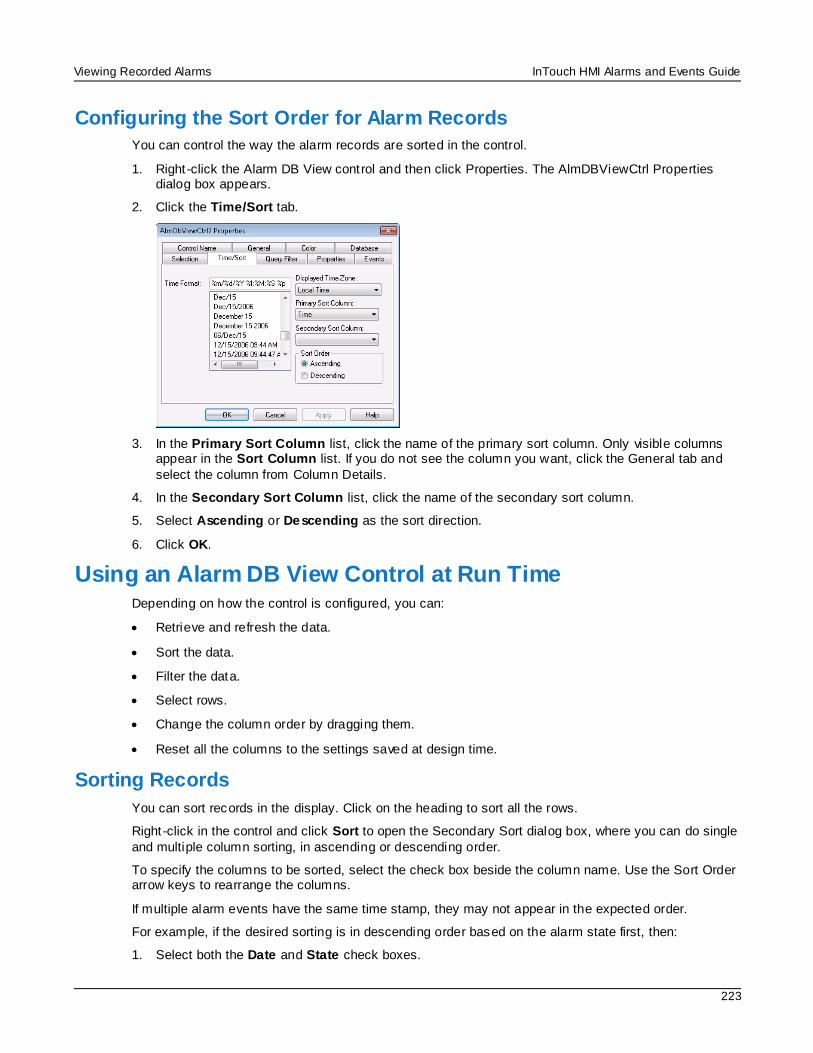
Viewing Recorded Alarms InTouch HMI Alarms and Events Guide
223
Configuring the Sort Order for Alarm Records
You can control the way the alarm records are sorted in the control.
1. Right -click the Alarm DB View control and then click Properties. The AlmDBViewCtrl Properties dialog box appears.
2. Click the Time/Sort tab.
3. In the Primary Sort Column list, click the name of the primary sort column. Only visible columns appear in the Sort Column list. If you do not see the column you want, click the General tab and
select the column from Column Details.
4. In the Secondary Sort Column list, click the name of the secondary sort column.
5. Select Ascending or Descending as the sort direction.
6. Click OK.
Using an Alarm DB View Control at Run Time Depending on how the control is configured, you can:
Retrieve and refresh the data.
Sort the data.
Filter the data.
Select rows.
Change the column order by dragging them.
Reset all the columns to the settings saved at design time.
Sorting Records
You can sort records in the display. Click on the heading to sort all the rows.
Right -click in the control and click Sort to open the Secondary Sort dialog box, where you can do single
and multiple column sorting, in ascending or descending order.
To specify the columns to be sorted, select the check box beside the column name. Use the Sort Order arrow keys to rearrange the columns.
If multiple alarm events have the same time stamp, they may not appear in the expected order.
For example, if the desired sorting is in descending order based on the alarm state first, then:
1. Select both the Date and State check boxes.
Viewing Recorded Alarms InTouch HMI Alarms and Events Guide
224
2. Select the State row.
3. Click the up sort order arrow.
4. In the Sort Type area, click Descending.
5. Click OK.
Understanding Status Bar Information
The status bar shows the current status of the control.
The left frame shows the server name and the database connected.
The middle frame shows the number of the records that is shown out of the total number of records that is returned by the query.
The right side of the frame shows the connection status with the server.
Using Alarm DB View ActiveX Properties You can set the value an Alarm DB View control property directly using a script or you can assign it to an InTouch tag or I/O reference. For more information about setting properties, see Scripting ActiveX
Controls in the InTouch® HMI Scripting and Logic Guide.
For more information on setting color values, see Configuring Colors for ActiveX Controls on page 65.
AckAlmBackColor Property
Gets or sets the acknowledged alarm background color. This setting overrides the individual range color
settings for acknowledged alarms (AckAlmBackColorRange1 to AckAlmBackColorRange4).
Type
Integer
Default
White
Syntax Object.AckAlmBackColor [= color]
Value
color
A value or constant that determines the color of the background.
AckAlmBackColorRange1 Property
Gets or sets the acknowledged alarm background color. This color applies to the records shown in the control with state ACK_ALM with priorities in the range 1 to ColorPriorityRange1.
Type
Integer
Default
White
Syntax Object.AckAlmBackColorRange1 [= color]

Viewing Recorded Alarms InTouch HMI Alarms and Events Guide
225
Value
color A value or constant that determines the color of the background.
AckAlmBackColorRange2 Property
Gets or sets the acknowledged alarm background color. This color applies to the records shown in the control with state ACK_ALM with priorities in the range ColorPriorityRange1 to ColorPriorityRange2.
Type
Integer
Default
White
Syntax Object.AckAlmBackColorRange2 [= color]
Value
color
A value or constant that determines the color of the background.
AckAlmBackColorRange3 Property
Gets or sets the acknowledged alarm background color. This color applies to the records shown in the
control with state ACK_ALM with priorities in the range ColorPriorityRange2 to ColorPriorityRange3.
Type
Integer
Default
White
Syntax Object.AckAlmBackColorRange3 [= color]
Value
color
A value or constant that determines the color of the background.
AckAlmBackColorRange4 Property
Gets or sets the acknowledged alarm background color. This color applies to the records shown in the control with state ACK_ALM with priorities in the range ColorPriorityRange3 to 999.
Type
Integer
Default
White
Syntax Object.AckAlmBackColorRange4 [= color]

Viewing Recorded Alarms InTouch HMI Alarms and Events Guide
226
Value
color A value or constant that determines the color of the background.
AckAlmForeColor Property
Gets or sets the acknowledged alarm foreground color. This setting overrides the individual range color settings for acknowledged alarms (AckAlmForeColorRange1 to AckAlmForeColorRange4).
Type
Integer
Default
Black
Syntax Object.AckAlmForeColor [= color]
Value
color
A value or constant that determines the color of the text.
AckAlmForeColorRange1 Property
Gets or sets the acknowledged alarm foreground color. The color applies to the records shown in the
control with state ACK_ALM with priorities in the range 1 to ColorPriorityRange1.
Type
Integer
Default
Black
Syntax Object.AckAlmForeColorRange1 [= color]
Value
color
A value or constant that determines the color of the text.
AckAlmForeColorRange2 Property
Gets or sets the acknowledged alarm foreground color. The color applies to the records shown in the control with state ACK_ALM with priorities in the range ColorPriorityRange1 to ColorPriorityRange2.
Type
Integer
Default
Black
Syntax Object.AckAlmForeColorRange2 [= color]
Viewing Recorded Alarms InTouch HMI Alarms and Events Guide
227
Value
color A value or constant that determines the color of the text.
AckAlmForeColorRange3 Property
Gets or sets the acknowledged alarm foreground color. The color applies to the records shown in the control with state ACK_ALM with priorities in the range ColorPriorityRange2 to ColorPriorityRange3.
Type
Integer
Default
Black
Syntax Object.AckAlmForeColorRange3 [= color]
Value
color
A value or constant that determines the color of the text.
AckAlmForeColorRange4 Property
Gets or sets the acknowledged alarm foreground color. The color applies to the records shown in the
control with state ACK_ALM with priorities in the range ColorPriorityRange3 to 999.
Type
Integer
Default
Black
Syntax Object.AckAlmForeColorRange4 [= color]
Value
color
A value or constant that determines the color of the text.
AckRtnBackColor Property
Gets or sets the background color of acknowledged alarms that return to normal (ACK_RTN).
Type
Integer
Default
White
Syntax Object.AckRtnBackColor [= color]
Value
color A value or constant that determines the color of the background.
Viewing Recorded Alarms InTouch HMI Alarms and Events Guide
228
AckRtnForeColor Property
Gets or sets the text color of acknowledged alarms that return to normal (ACK_RTN).
Type
Integer
Default
Blue
Syntax Object.AckRtnForeColor [= color]
Value
color A value or constant that determines the color of the text.
AlmRtnBackColor Property
Gets or sets the returned alarm background color. This color applies to the records shown with state ALM_RTN.
Type
Integer
Default
White
Syntax Object.AlmRtnBackColor [= color]
Value
color A value or constant that determines the color of the background.
AlmRtnForeColor Property
Gets or sets the returned alarm foreground color. This color applies to the records shown with state ALM_RTN.
Type
Integer
Default
Blue
Syntax Object.AlmRtnForeColor [= color]
Value
color A value or constant that determines the color of the text.
Authentication Property
Returns the Authentication Type selected in the Database tab.
Viewing Recorded Alarms InTouch HMI Alarms and Events Guide
229
Type
Message
Syntax AType = AlarmDBCtrl1.Authentication;
Value
AType A message value; either 'SQL Authentication' or 'Windows Authentication'.
AuthenticationMode Property
Sets the Authentication Mode.
Type
Integer
Syntax Object.AuthenticationMode = [Int]
Value
Int A integer value of 0 or 1. 0 denotes SQL Authentication and 1 denotes Windows Authentication.
AutoConnect Property
Gets or sets a value that determines whether the control automatically connects to the database at run time.
Data Type
Integer
Default
False
Syntax Object.AutoConnect [= Integer]
Value
Integer
An integer expression specifying whether the control connects to the database at run time. True = Connects to the database. False = (Default) Does not connect to the database.
Remarks
You must explicitly call the Connect() method to connect to the database.
ColorPriorityRange1 Property
Sets the boundary of the priority range in which alarms are to be shown. The value of this property must be greater than one and less than the value for ColorPriorityRange2.
Type
Integer
Viewing Recorded Alarms InTouch HMI Alarms and Events Guide
230
Default
250
Syntax Object.ColorPriorityRange1 [= integer or priority]
ColorPriorityRange2 Property
Sets the boundary of the priority range in which alarms are to be shown. The value of this property must be greater than the value for ColorPriorityRange1 and less than the value for ColorPriorityRange3.
Type
Integer
Default
500
Syntax Object.ColorPriorityRange2 [= integer or priority]
ColorPriorityRange3 Property
Sets the boundary of the priority range in which alarms are to be shown. The value of this property must
be greater than the value of ColorPriorityRange2 and less than 999.
Type
Integer
Default
750
Syntax Object.ColorPriorityRange3 [= integer or priority]
ColumnResize Property
Returns or sets a value that determines whether the columns can be resized.
Type
Discrete
Default
True
Syntax Object.ColumnResize [= Discrete]
Value
Discrete
True = (Default) Columns can be resized at runtime. False = Columns cannot be resized.
ConnectStatus Property
Returns the status of the connection. This property is read-only.
Viewing Recorded Alarms InTouch HMI Alarms and Events Guide
231
Data Type
Message
Syntax Object.ConnectStatus
Values Connected = The control is connected to the database. Not Connected = The control is not connected to the database. In Progress = The control is connecting to the database.
Example
The name of the control is AlmDbView1 and tagname is a message tag. Tagname = #AlmDbView1.ConnectStatus;
CustomMessage Property
Gets or sets the message that the Alarm DB View control shows when no alarm records can be ret rieved
from the alarm database.
Type
Message
Default
There are no items to show in this view.
Syntax Object.CustomMessage [= string]
DatabaseName Property
Specifies the database to connect to.
Type
Message
Syntax Object.DatabaseName [= text]
DisplayMode Property
Returns the display mode of the control, which determines if just alarms, just events, or both alarms and
events are shown. This property is read-only.
Type
String
Default
Alarms & Events History
Syntax Object.DisplayMode
Remarks
Possible values are: Alarms & Events History
Alarms History
Viewing Recorded Alarms InTouch HMI Alarms and Events Guide
232
Events History
Example
The name of the control is AlmDbView1 and tag is a message tag. tag = #AlmDbView1.DisplayMode;
DisplayedTimeZone Property
Gets or sets the shown time zone.
Type
String
Default
Local Time
Syntax Object.DisplayedTimeZone [= message]
Remarks
Possible values are:
GMT - Alarm time stamps use Greenwich Mean Time.
Local Time - Alarm time stamps are shown with the local time of the client hosting the Alarm DB View control.
Origin Time - Alarm time stamps are shown with the local time of the alarm provider.
Duration Property
Gets or sets the duration used to set the start and end time.
Type
Message
Default
"Last Hour"
Syntax Object.Duration [= text]
Viewing Recorded Alarms InTouch HMI Alarms and Events Guide
233
Value
text A string expression that contains the duration. This property must have one of the following strings: Last Minute
Last 5 Minutes Last 15 Minutes Last Half Hour
Last Hour Last 2 Hours Last 4 Hours
Last 8 Hours Last 12 Hours Last Day
Last 2 Days Last 3 Days Last Week
Last 2 Weeks Last 30 days Last 90 days
EndTime Property
Returns or sets the end time.
Type
Message
Syntax Object.EndTime [= text]
Value
text
A string expression that evaluates to the end time. The string returned is always in the format (MM/DD/YYYY HH:MM:SS). The same format is also required to set the value of the string. This property handles date in any time zone from midnight, January 1, 1970, to January 18, 19:14:07,
2038.
EventBackColor Property
Gets or sets the event alarm background color. This color applies to the records shown in the control with state EVT_EVT.
Type
Integer
Default
White
Syntax Object.EventBackColor [= color]
Value
color A value or constant that determines the color of the background.
Viewing Recorded Alarms InTouch HMI Alarms and Events Guide
234
EventForeColor Property
Gets or sets the event alarm foreground color. This color applies to the records shown in the control with
state EVT_EVT.
Type
Integer
Default
Red
Syntax Object.EventForeColor [= color]
Value
color
A value or constant that determines the color of the text.
FilterFavoritesFile Property
Gets or sets the filter favorites file. This file is used by the Filter Favorites dialog box to read or write filter
favorites.
Type
String
Default
Null
Syntax Object.FilterFavoritesFile [= String]
FilterMenu Property
Gets or sets a value that determines whether the Filter menu item is shown in the shortcut menu.
Type
Discrete
Default
True
Syntax Object.FilterMenu [= Discrete]
Value
True = Filter menu item is shown (default).
False = Filter menu item is not shown.
FilterName Property
Returns the name of the current filter (i f any).
Type
String (read-only)
Viewing Recorded Alarms InTouch HMI Alarms and Events Guide
235
Default
Null
Syntax Object.FilterName [= String]
FromPriority Property
Gets or sets the From Priority value of the control.
Type
Integer
Default
1
Syntax Object.FromPriority [= integer]
Remarks
You can use this property to filter which alarm records are shown. For example, if you set this property to 760, then only alarms with priority from 760 to the ToPriority property value are shown.
GroupExactMatch Property
When the GroupExactMatch property is true, only alarms with alarm group names that exactly match the GroupName property value are shown. When it is false, then the group name need only specify part of the alarm group names it is filtering for.
Type
Discrete
Default
False
Syntax Object.GroupExactMatch [= discrete]
Remarks
Use this property together with the GroupName property to filter the Alarm DB View control.
Example
For example: #AlarmDBViewCtrl1.GroupName = "Group"
#AlarmDBViewCtrl1.GroupExactMatch = 0;
#AlarmDBViewCtrl1.Refresh();
GroupName Property
Gets or sets a alarm group name filter for the current Alarm DB View control.
Type
String
Default
(none)
Viewing Recorded Alarms InTouch HMI Alarms and Events Guide
236
Syntax Object.GroupName [= GroupName]
Remarks
Setting this property to "GroupA" and re-querying the display shows only tags belonging to the GroupA alarm group.
MaxRecords Property
Returns or sets the maximum records to be retrieved.
Type
Integer
Default
100
Syntax Object.MaxRecords [=integer]
Value
integer An integer expression specifying the number of records to be retrieved at a given time. The
maximum records can be in the range from 1 to 1000. For best performance keep this value as small as needed.
Password Property
Returns or sets the SQL Server password for retrieving data.
Type
Message
Syntax Object.Password [= text]
Value
text A string expression that evaluates to the password.
PrimarySort Property
Gets or sets the primary column name used to sort the alarm display.
Type
Message
Default
(none)
Syntax Object.PrimarySort [= message]
Viewing Recorded Alarms InTouch HMI Alarms and Events Guide
237
ProviderExactMatch Property
When the ProviderExactMatch property is true, only alarms with alarm provider names that exactly
match the ProviderName property value are shown. When it is false, then the provider name need only specify part of the alarm provider names it is filtering fo r.
Type
Discrete
Default
False
Syntax Object.ProviderExactMatch [= discrete]
Remarks
Use this property together with the ProviderName property to filter the Alarm DB View control.
Example
For example: #AlarmDBViewCtrl1.ProviderName = "Provider"
#AlarmDBViewCtrl1.ProviderExactMatch = 0;
#AlarmDBViewCtrl1.Refresh();
ProviderName Property
Gets or sets a alarm provider name filter for the current Alarm DB View control.
Type
String
Default
(none)
Syntax Object.ProviderName [= ProviderName]
Remarks
If a tag belongs to the Provider1 alarm provider, then setting this property to "Provider1" and re-querying
the display shows only tags belonging to the Provider1 alarm provider.
QueryTimeZoneName Property
Gets or sets the time zone when a specific time is used for the query.
Type
Discrete
Default
False
Syntax Object.QueryTimeZone [= Discrete]
Value
True = GMT
Viewing Recorded Alarms InTouch HMI Alarms and Events Guide
238
False = Origin time, which is the local time of the alarm provider.
RefreshMenu Property
Gets or sets a value that determines whether the Refresh menu item is shown in the shortcut menu.
Type
Discrete
Default
True
Syntax Object.RefreshMenu [= Discrete]
Value
True = Refresh menu item is shown (default ).
False = Refresh menu item is not shown.
ResetMenu Property
Gets or sets a value that determines whether the Reset menu item is shown in the shortcut menu.
Type
Discrete
Default
True
Syntax Object.ResetMenu [= Discrete]
Value
True = Reset menu item is shown (default).
False = Reset menu item is not shown.
RowCount Property
Returns the number of records shown in the control. This property is read -only.
Type
Integer
Syntax Object.RowCount
Example
The name of the control is AlmDbView1 and tagname an integer tag. tagname = #AlmDbView1.RowCount;
RowSelection Property
Returns or sets a value that determines whether the row selection is allowed at run time.
Type
Discrete
Viewing Recorded Alarms InTouch HMI Alarms and Events Guide
239
Default
True
Syntax Object.RowSelection [= Discrete]
Value
Discrete
True = (Default) Row selection is allowed.
False = Row Selection is not allowed.
Remarks
If row selection is not allowed, no Click or DoubleClick events are generated.
SecondarySort Property
Gets or sets the secondary column name used to sort the alarm display.
Type
Message
Default
(none)
Syntax Object.SecondarySort [= text]
ServerName Property
Returns or sets the server name to which the control connects to retrieve data.
Type
Message
Syntax Object.ServerName [= text]
ShowFetch Property
Returns or sets a value that determines whether the retrieval buttons are shown.
Type
Discrete
Default
True
Syntax Object.ShowFetch [= Discrete]
Value
Discrete
True = (Default) Retrieve buttons are shown. False = Retrieve buttons are not shown.
Viewing Recorded Alarms InTouch HMI Alarms and Events Guide
240
ShowGrid Property
Returns or sets a value that determines whether the grid lines are shown.
Type
Discrete
Default
False
Syntax Object.ShowGrid [= Discrete]
Value
Discrete True = Grid lines are shown.
False = (Default) Grid lines are not shown.
ShowHeading Property
Returns or sets a value that determines whether the column headings are shown.
Type
Discrete
Default
True
Syntax Object.ShowHeading [= Discrete]
Value
Discrete True = (Default) Column headings are shown. False = Column headings are not shown.
ShowMessage Property
Determines if the customized message for "There are no items to show in this view" is shown when there are no records in the alarm database.
Type
Discrete
Default
False
Syntax Object.ShowMessage [= discrete]
ShowStatusBar Property
Returns or sets a value that determines whether the status bar is shown.
Type
Discrete
Viewing Recorded Alarms InTouch HMI Alarms and Events Guide
241
Default
True
Syntax Object.ShowStatusBar [= Discrete]
Value
Discrete True = (Default) Status bar is shown. False = Status bar is not shown.
SilentMode Property
Gets or sets a value that determines whether the control is in Silent mode.
Type
Discrete
Default
False
Syntax Object.SilentMode [= Discrete]
Value
True = Silent mode is on.
False = Silent mode is off (default).
SortMenu Property
Returns or sets a value that determines whether the Sort menu item is shown in the shortcut menu.
Type
Discrete
Default
True
Syntax Object.SortMenu [= Discrete]
Value
A discrete expression.
True = (Default) Sort menu item is shown
False = Sort menu item is not shown.
SortOrder Property
Gets or sets the sort order of the alarms according to the column to be sorted (the primary sort column).
Type
Discrete
Default
True
Viewing Recorded Alarms InTouch HMI Alarms and Events Guide
242
Syntax Object.SortOrder [= discrete]
Value
An discrete expression.
True = Ascending order.
False = Descending order.
SpecificTime Property
Returns or sets a value that determines whether the control uses the StartTime and EndTime properties, or computes the start time and end time based on the value of the Duration property.
Type
Discrete
Default
False
Syntax Object.SpecificTime [= Discrete]
Value
True = StartTime and EndTime properties are used.
False = (Default) StartTime and EndTime are computed based on the "Duration" property.
StartTime Property
Returns or sets the start time.
Type
Message
Syntax Object.StartTime [= text]
Value
text A string expression that evaluates to the Start Time. The string returned is always in the format (MM/DD/YYYY HH:MM:SS). The same format is also required to set the value of the string. This
property handles date in any time zone from midnight, January 1, 1970, to January 18, 19:14:07, 2038
Time Property
Gets and sets the time format to be used in the display.
Type
Message
Default
%m/%d/%Y %I:%M:%S %p
Syntax Object.Time [= message]
Viewing Recorded Alarms InTouch HMI Alarms and Events Guide
243
Remarks
For more information on the time format strings, see Configuring the Shown Time Format and Time Zone for Alarm Records on page 214.
ToPriority Property
Gets or sets the To Priority value of the control.
Type
Integer
Default
999
Syntax Object.ToPriority [= integer]
Remarks
Use this property to filter which alarm records are shown. For example, i f you set this property to 900, then only alarms with priority from the FromPriority property value to 900 are shown.
TotalRowCount Property
Returns the total number of records for the current query. This property is read-only.
Type
Integer
Syntax Object.TotalRowCount
Remarks
The row count is the number of rows returned in the current query, which usually would be same as
MaxRecords property except for the case when number of records retrieved are less than the MaxRecords property. For example, if there are 950 records for a specific criterion and the MaxRecords property is 100, then in the last page there would be 50 records and the row count would be 50. In the
same example, the TotalRowCount property would always be 950.
Example
The name of the control is AlmDbView1 and tagname is an integer tag. tagname = #AlmDbView1.TotalRowCount;
UnAckAlmBackColor Property
Gets or sets the unacknowledged alarm background color. This color applies to all records shown in the control with state UNACK_ALM. It overrides any settings made by the UnAckAlmBackColorRange1 to UnAckAlmBackColorRange4 property values.
Type
Integer
Default
White
Syntax Object.UnAckAlmBackColor [= color]
Viewing Recorded Alarms InTouch HMI Alarms and Events Guide
244
Value
color A value or constant that determines the color of the specified object.
UnAckAlmBackColorRange1 Property
Gets or sets the unacknowledged alarm background color. This color applies to the records shown in the control with state UNACK_ALM with priorities in the range 1 to ColorPriorityRange1.
Type
Integer
Default
White
Syntax Object.UnAckAlmBackColorRange1 [= color]
Value
color
A value or constant that determines the color of the specified object.
UnAckAlmBackColorRange2 Property
Gets or sets the unacknowledged alarm background color. This color applies to the records shown in the
control with state UNACK_ALM with priorities in the range ColorPriorityRange1 to ColorPriorityRange2.
Type
Integer
Default
White
Syntax Object.UnAckAlmBackColorRange2 [= color]
Value
color
A value or constant that determines the color of the specified object.
UnAckAlmBackColorRange3 Property
Gets or sets the unacknowledged alarm background color. This color applies to the records shown in the control with state UNACK_ALM with priorities in the range ColorPriorityRange2 to ColorPriorityRange3.
Type
Integer
Default
White
Syntax Object.UnAckAlmBackColorRange3 [= color]
Viewing Recorded Alarms InTouch HMI Alarms and Events Guide
245
Value
color A value or constant that determines the color of the specified object.
UnAckAlmBackColorRange4 Property
Gets or sets the unacknowledged alarm background color. This color applies to the records shown in the control with state UNACK_ALM with priorities in the range ColorPriorityRange3 to 999.
Type
Integer
Default
White
Syntax Object.UnAckAlmBackColorRange4 [= color]
Value
color
A value or constant that determines the color of the specified object.
UnAckAlmForeColor Property
Gets or sets the unacknowledged alarm text color. This color applies to all records shown in the control
with state UNACK_ALM. It overrides any settings made by the UnAckAlmForeColorRange1 to UnAckAlmForeColorRange4 property values.
Type
Integer
Default
Red
Syntax Object.UnAckAlmBackColor [= color]
Value
color A value or constant that determines the color of the text.
UnAckAlmForeColorRange1 Property
Gets or sets the unacknowledged alarm foreground color. This color applies to the records shown in the
control with state UNACK_ALM with priorities in the range 1 to ColorPriorityRange1.
Type
Integer
Default
Red
Syntax Object.UnAckAlmForeColorRange1 [= color]
Viewing Recorded Alarms InTouch HMI Alarms and Events Guide
246
Value
color A value or constant that determines the color of the specified object.
UnAckAlmForeColorRange2 Property
Gets or sets the unacknowledged alarm foreground color. This color applies to the records shown in the control with state UNACK_ALM with priorities in the range ColorPriorityRange1 to ColorPriorityRange2.
Type
Integer
Default
Red
Syntax Object.UnAckAlmForeColorRange2 [= color]
Value
color
A value or constant that determines the color of the specified object.
UnAckAlmForeColorRange3 Property
Gets or sets the unacknowledged alarm foreground color. This color applies to the records shown in the
control with state UNACK_ALM with priorities in the range ColorPriorityRange2 to ColorPriorityRange3.
Type
Integer
Default
Red
Syntax Object.UnAckAlmForeColorRange3 [= color]
Value
color
A value or constant that determines the color of the specified object.
UnAckAlmForeColorRange4 Property
Gets or sets the unacknowledged alarm foreground color. This color applies to the records shown in the control with state UNACK_ALM with priorities in the range ColorPriorityRange3 to 999.
Type
Integer
Default
Red
Syntax Object.UnAckAlmForeColorRange4 [= color]

Viewing Recorded Alarms InTouch HMI Alarms and Events Guide
247
Value
color A value or constant that determines the color of the specified object.
UnAckOrAlarmDuration Property
The duration column shows either UNACK Duration or Alarm Duration. FALSE (0) is UNACK Duration and TRUE (1) is Alarm Duration.
Type
Integer
Default
False
Syntax Object.UnAckOrAlarmDuration [= integer]
UserID Property
Returns or sets the user ID used as the control to connect to the SQL Server to retrieve the data.
Type
Message
Syntax Object.UserID [= text]
Value
text A string expression that evaluates the user ID.
Using Alarm DB View ActiveX Methods Use the Alarm DB View ActiveX methods to:
Control the database connection.
Retrieve records from the alarm database.
Retrieve information about an alarm.
Reset the display appearance.
Sort alarm records.
Show the Context menu.
Access filter favorites.
For more information about calling methods, see Scripting ActiveX Controls in the InTouch® HMI Scripting and Logic Guide.
Controlling Alarm Database Connections
Use the Connect() method to connect to the alarm database and the Disconnect() method to disconnect.
Viewing Recorded Alarms InTouch HMI Alarms and Events Guide
248
Connect()
Connects the control to the database and if the connection is successful, shows the set of records in the
range 1 to MaxRecords.
Syntax Object.Connect
Example
The name of the control is AlmDbView1. #AlmDbView1.Connect();
Disconnect()
Disconnects the control from the database.
Syntax Object.Disconnect
Example
The name of the control is AlmDbView1. #AlmDbView1.Disconnect();
Retrieving Alarm Records from the Database
Use the following methods to select a query, retrieve records from the database, and refresh the display:
SelectQuery() on page 248
GetPrevious() on page 248
GetNext() on page 249
Refresh() on page 249
SelectQuery()
Sets the current display to the query name specified in the .xml file.
Syntax Object.SelectQuery(“QueryName”);
Parameters
QueryName Name of a query defined in the filter favorites file.
Example
This example applies the filter criteria defined by the query called "HighPriority" in the filter favorites file that is currently associated with the AlmDbView1 control. #AlmDbView1.SelectQuery("HighPriority");
GetPrevious()
Retrieves the previous set of records from the database (if any).
Syntax Object.GetPrevious();
Viewing Recorded Alarms InTouch HMI Alarms and Events Guide
249
Example
The name of the control is AlmDbView1. #AlmDbView1.GetPrevious();
GetNext()
Retrieves the next set of records from the database (if any).
Syntax Object.GetNext
Example
The name of the control is AlmDbView1. #AlmDbView1.GetNext();
Refresh()
Refreshes the control from the database, and if the connection is successful, displays the set of records in the range 1 to MaxRecords.
Syntax Object.Refresh
Remarks
After initiating a refresh of the Alarm DB View control's display by calling its Refresh() method, the value of the RowCount and TotalRowCount properties change to -1 until the refresh is complete (that is, all relevant records are retrieved from the database). When the refresh is complete, both properties are
updated with the correct, current row count.
The Refresh() method works asynchronously - it returns control to the calling script immediately and continues working in the background. This means that querying the value of RowCount and
TotalRowCount immediately after calling Refresh() most likely returns -1, as their value is queried at a time when the refresh still hasn't completed. One way to get the correct values would be to use scripting to determine when the value of either property changes from -1 to a different value; this tells you that the
correct values are now available.
Example
The name of the control is AlmDbView1. #AlmDbView1.Refresh();
Retrieving Information About an Alarm
Use the following methods to retrieve records from the database about a particular alarm:
GetItem() Method on page 73
GetSelectedItem() Method on page 250
GetItem() Method
Returns the data at a specified row & column as string.
Syntax Object.GetItem(Integer, message)
Parameters
Integer An integer expression that evaluates to a specific row in the control.
Viewing Recorded Alarms InTouch HMI Alarms and Events Guide
250
Message A string expression that evaluates to the column name in the control.
Example
The name of the control is AlmDbView1 and tag is defined as a Message tag. tag = #AlmDbView1.GetItem(1, "Group");
GetSelectedItem() Method
Returns the data for the selected row, given column as string
Syntax Object.GetSelectedItem(message)
Parameters
Message An string expression that evaluates to the column name in the control
Example
The name of the control is AlmDbView1 and tag is defined as Message tag. tag = #AlmDbView1.GetSelectedItem("State");
Sorting the Alarm Records
Use the following methods to sort alarm records and reset column resizing:
SortOnCol() Method on page 250
ShowSort() Method on page 76
Reset() Method on page 251
SortOnCol() Method
Performs primary sorting on alarm records that are shown.
Syntax Object.SortOnCol(message, Integer)
Parameters
Message A string expression that evaluates to the column name in the control
Integer
Sort direction to be used. 0 = ascending, 1 = descending.
Example
The name of the control is AlmDbView1. tag = #AlmDbView1.SortOnCol("Name",1);
ShowSort() Method
Shows the Secondary Sort dialog box if the SortMenu property is enabled.
Syntax Object.ShowSort
Example
The name of the control is AlmDbView1.
Viewing Recorded Alarms InTouch HMI Alarms and Events Guide
251
#AlmDbView1.ShowSort();
Reset() Method
Resets all the columns to the settings saved at design time.
Syntax Object.Reset
Example
The name of the control is AlmDbView1.
#AlmDbView1.Reset();
Showing the Context Menu
Use the ShowContext() method to show the shortcut menu.
ShowContext() Method
Shows the shortcut menu if any one of RefreshMenu or ResetMenu or SortMenu property is enabled.
Syntax Object.ShowContext
Example
The name of the control is AlmDbView1. #AlmDbView1.ShowContext();
Accessing Filter Favorites
Use the ShowFilter() method to show the Filter Favorites dialog box.
ShowFilter() Method
Shows the Filter Favorites dialog box.
Syntax Object.ShowFilter
Example
The name of the control is AlmDbView1. #AlmDbView1.ShowFilter();
Showing Other Information
Use the AboutBox() method to show the About dialog box.
AboutBox() Method
Shows the About dialog box.
Syntax Object.AboutBox()
Example
The name of the control is AlarmPareto1. #AlarmPareto1.AboutBox();
Viewing Recorded Alarms InTouch HMI Alarms and Events Guide
252
Handling Errors With Using Methods and Properties Use the SilentMode property to determine whether the control is in silent mode or not. When the control
is in silent mode, no error messages are shown. To see the error, call the GetLastError() method to return the error message.
GetLastError() Method
Returns the last error message if the Alarm DB View control is in silent mode.
Syntax Object.GetLastError()
Example
The name of the control is AlmDbView1 and tagname is defined as variant or string. Tagname = #AlmDbView1.GetLastError();
Using Alarm DB View ActiveX Events to Trigger Scripts You can assign QuickScripts to Alarm DB View control events, such as a mouse click or double-click.
When the event occurs, the QuickScript runs.
The Alarm DB View control supports the following events:
Click
DoubleClick
ShutDown
StartUp
The Click event has one parameter called ClicknRow, which identifies the row that is clicked at run time.
The DoubleClick event has one parameter called DoubleClicknRow, which identifies the row that is double-clicked at run time.
Click and DoubleClick events are zero-based. When Click and/or DoubleClick events are published, the
bar count in the display starts with 0.
Note: The Alarm DB View control ignores the user interface methods when they are called from StartUp
event, because the control is not visible yet. These methods include: ShowSort(), ShowContext(), GetSelectedItem(), GetNext(), GetPrevious(), and AboutBox().
For more information about scripting ActiveX events, see Scripting ActiveX Controls in the InTouch® HMI Scripting and Logic Guide.
InTouch HMI Alarms and Events Guide
253
In This Chapter
About Analyzing Alarm Distribution Across Tags ........................................................................... 253 Configuring an Alarm Pareto ActiveX Control ................................................................................ 253 Using an Alarm Pareto Control at Run Time ................................................................................. 264
Using Alarm Pareto ActiveX Properties ........................................................................................ 264 Using Alarm Pareto ActiveX Methods ........................................................................................... 266 Error Handling When Using Methods and Properties ..................................................................... 269
Using Alarm Pareto ActiveX Events to Trigger Scripts ................................................................... 269
About Analyzing Alarm Distribution Across Tags Using the Alarm Pareto ActiveX control, you can analyze which alarms and events occur most frequently in a given production system. You can also analyze alarm frequency by the time periods during which they occur.
The analysis capabilities of the Alarm Pareto control identify the largest issues of your production systems. The Alarm Pareto control helps you recognize where you should focus your efforts to achieve the most significant improvements.
The Alarm Pareto control shows a bar chart representing alarm activity.
For more information about ActiveX controls, see ActiveX Controls in the InTouch® HMI Visualization Guide.
Configuring an Alarm Pareto ActiveX Control When you configure an Alarm Pareto control, you specify:
The connection to the alarm database.
The appearance of the pareto control, including colors and fonts.
Which features users can access at run time.
Which alarms are shown in the chart and how they are presented.
Configuring the Connection to the Alarm Database
You must configure the connection between the Alarm Pareto control and the alarm database.
It is good practice to use an account with appropriate read-only access to the alarm database and not a system administrator account.
To configure the connection to the alarm database
1. Right -click the Alarm Pareto control and then click Properties. The AlarmPareto Properties dialog box appears.
CHAPTER 11
Analyzing Alarm Distribution Across Tags

Analyzing Alarm Distribution Across Tags InTouch HMI Alarms and Events Guide
254
2. Click the Database tab.
3. Configure the connection. Do the following:
a. In the Authentication list, select the authentication method: SQL Server Authentication or
Windows Authentication (default).
Note: When you switch from Windows Authentication to SQL Authentication, a pop up dialog will
appear with a recommendation to use Windows Authentication for better application security. To proceed with SQL Authentication, click OK.
A similar message is also logged in the SMC Log Viewer.
b. In the Server Name box, enter the node name of the computer where the alarm database is installed.
c. In the Database Name box, type the name of the alarm database.
d. In the User box, type the name of a valid user account for the alarm database.
e. In the Password box, type the password associated with the alarm database user account.
Note: The Windows Authentication method uses the credentials of the user currently logged in, and disables the user name and password fields.
4. Select the Auto Connect check box if you want the Alarm Pareto control to automatically connect to the alarm database as soon as WindowViewer starts up.
If you don’t select the Auto Connect check box, you must configure the Alarm Pareto control to connect to the alarm database by explicitly calling the Connect() method. For more information about the Connect method, see Connect() Method on page 266.
5. Click Test Connection to verify connectivity to the alarm database. A message indicates a successful connection.
6. Click Apply.
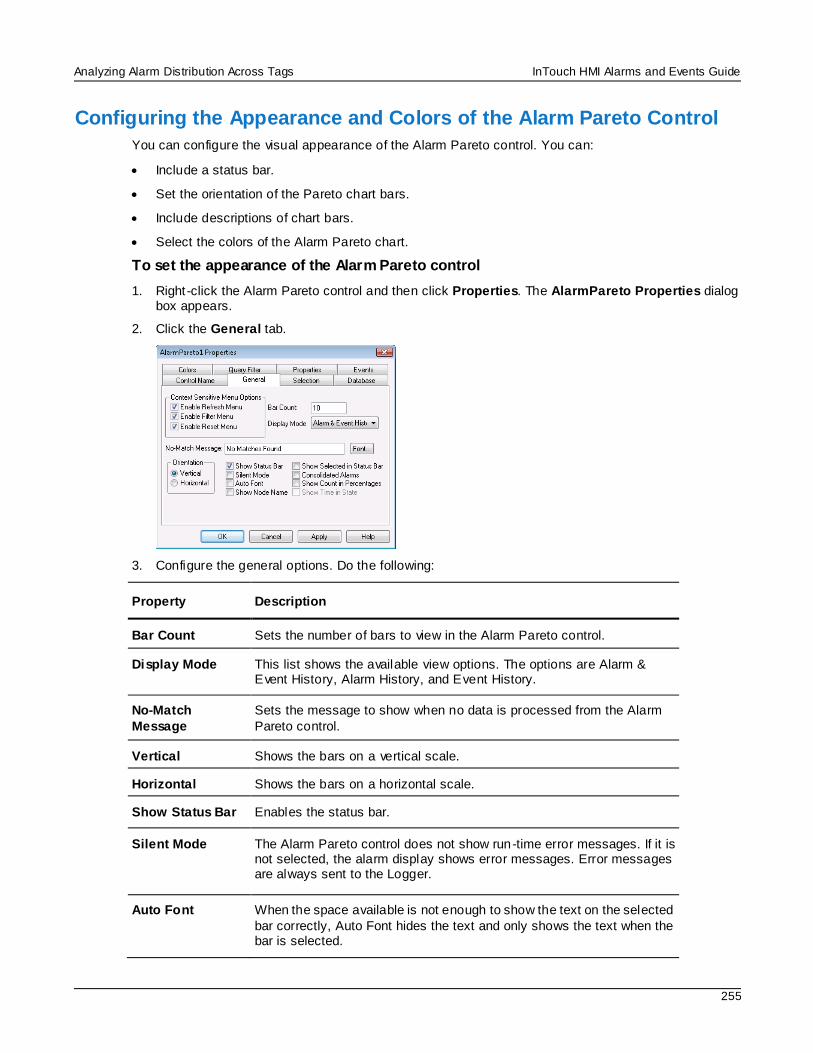
Analyzing Alarm Distribution Across Tags InTouch HMI Alarms and Events Guide
255
Configuring the Appearance and Colors of the Alarm Pareto Control
You can configure the visual appearance of the Alarm Pareto control. You can:
Include a status bar.
Set the orientation of the Pareto chart bars.
Include descriptions of chart bars.
Select the colors of the Alarm Pareto chart.
To set the appearance of the Alarm Pareto control
1. Right -click the Alarm Pareto control and then click Properties. The AlarmPareto Properties dialog box appears.
2. Click the General tab.
3. Configure the general options. Do the following:
Property Description
Bar Count Sets the number of bars to view in the Alarm Pareto control.
Display Mode This list shows the available view options. The options are Alarm & Event History, Alarm History, and Event History.
No-Match
Message
Sets the message to show when no data is processed from the Alarm
Pareto control.
Vertical Shows the bars on a vertical scale.
Horizontal Shows the bars on a horizontal scale.
Show Status Bar Enables the status bar.
Silent Mode The Alarm Pareto control does not show run-time error messages. If it is not selected, the alarm display shows error messages. Error messages are always sent to the Logger.
Auto Font When the space available is not enough to show the text on the selected
bar correctly, Auto Font hides the text and only shows the text when the bar is selected.
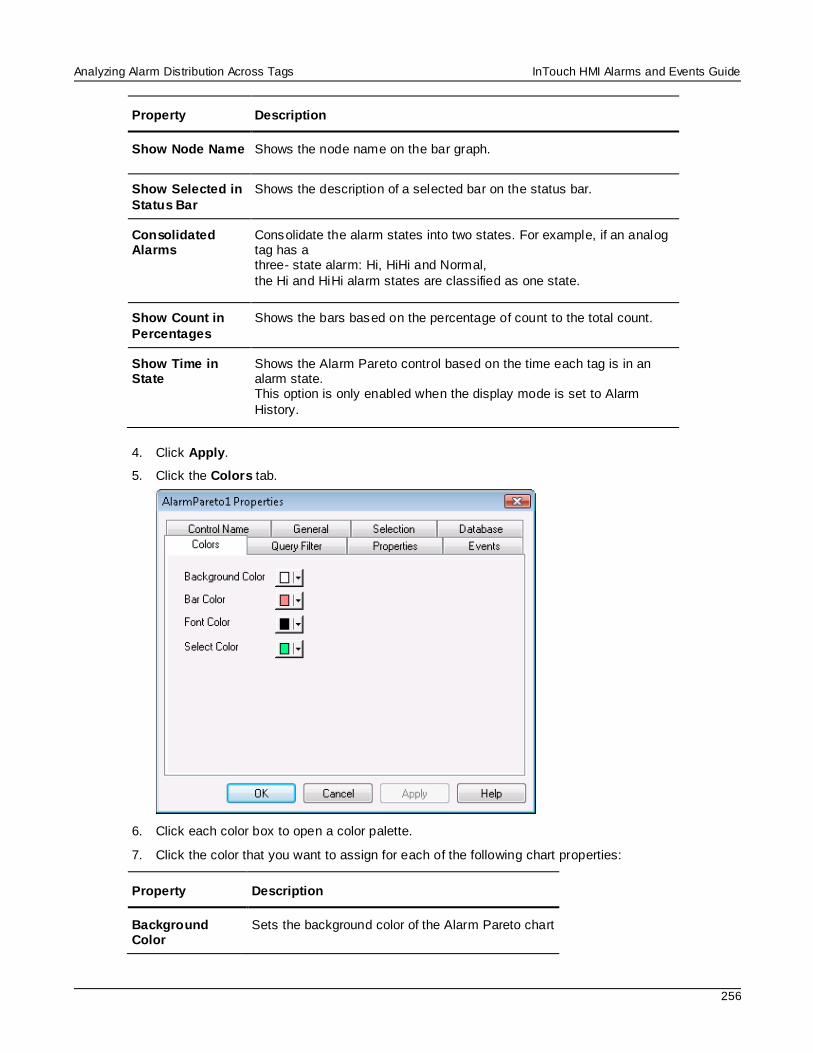
Analyzing Alarm Distribution Across Tags InTouch HMI Alarms and Events Guide
256
Property Description
Show Node Name Shows the node name on the bar graph.
Show Selected in
Status Bar
Shows the description of a selected bar on the status bar.
Consolidated Alarms
Consolidate the alarm states into two states. For example, if an analog tag has a three- state alarm: Hi, HiHi and Normal,
the Hi and HiHi alarm states are classified as one state.
Show Count in
Percentages
Shows the bars based on the percentage of count to the total count.
Show Time in State
Shows the Alarm Pareto control based on the time each tag is in an alarm state. This option is only enabled when the display mode is set to Alarm
History.
4. Click Apply.
5. Click the Colors tab.
6. Click each color box to open a color palette.
7. Click the color that you want to assign for each of the following chart properties:
Property Description
Background Color
Sets the background color of the Alarm Pareto chart
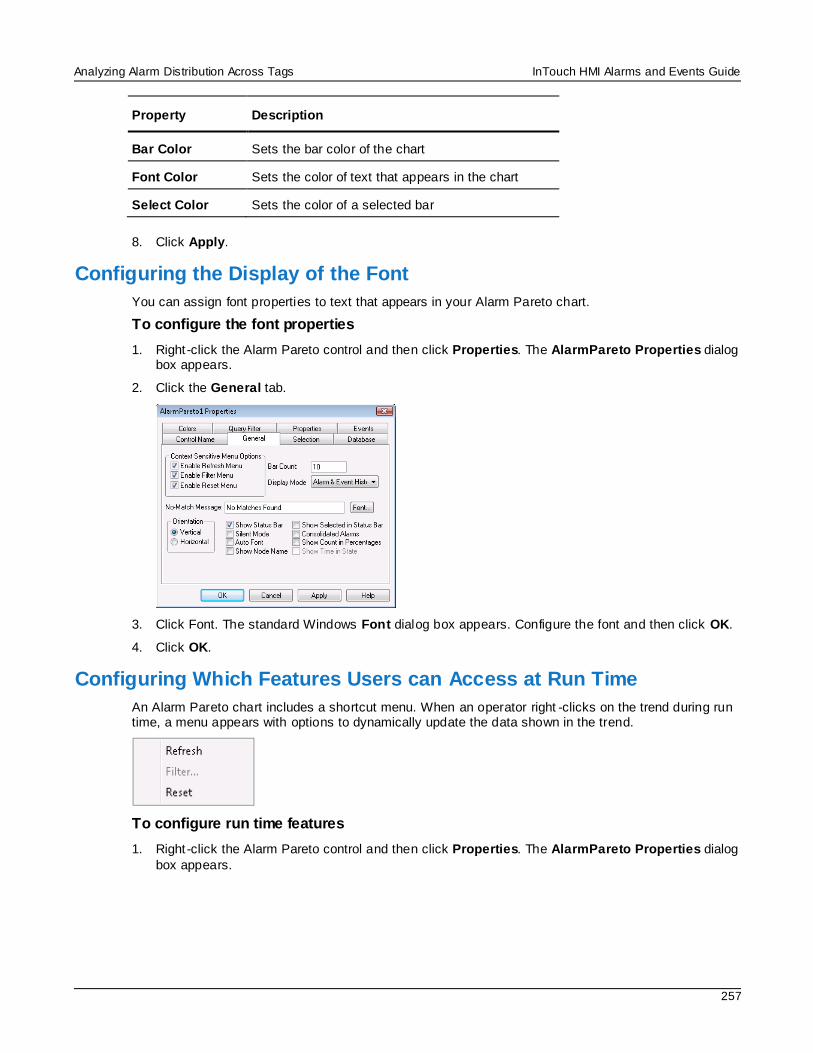
Analyzing Alarm Distribution Across Tags InTouch HMI Alarms and Events Guide
257
Property Description
Bar Color Sets the bar color of the chart
Font Color Sets the color of text that appears in the chart
Select Color Sets the color of a selected bar
8. Click Apply.
Configuring the Display of the Font
You can assign font properties to text that appears in your Alarm Pareto chart.
To configure the font properties
1. Right -click the Alarm Pareto control and then click Properties. The AlarmPareto Properties dialog box appears.
2. Click the General tab.
3. Click Font. The standard Windows Font dialog box appears. Configure the font and then click OK.
4. Click OK.
Configuring Which Features Users can Access at Run Time
An Alarm Pareto chart includes a shortcut menu. When an operator right -clicks on the trend during run time, a menu appears with options to dynamically update the data shown in the trend.
To configure run time features
1. Right -click the Alarm Pareto control and then click Properties. The AlarmPareto Properties dialog
box appears.
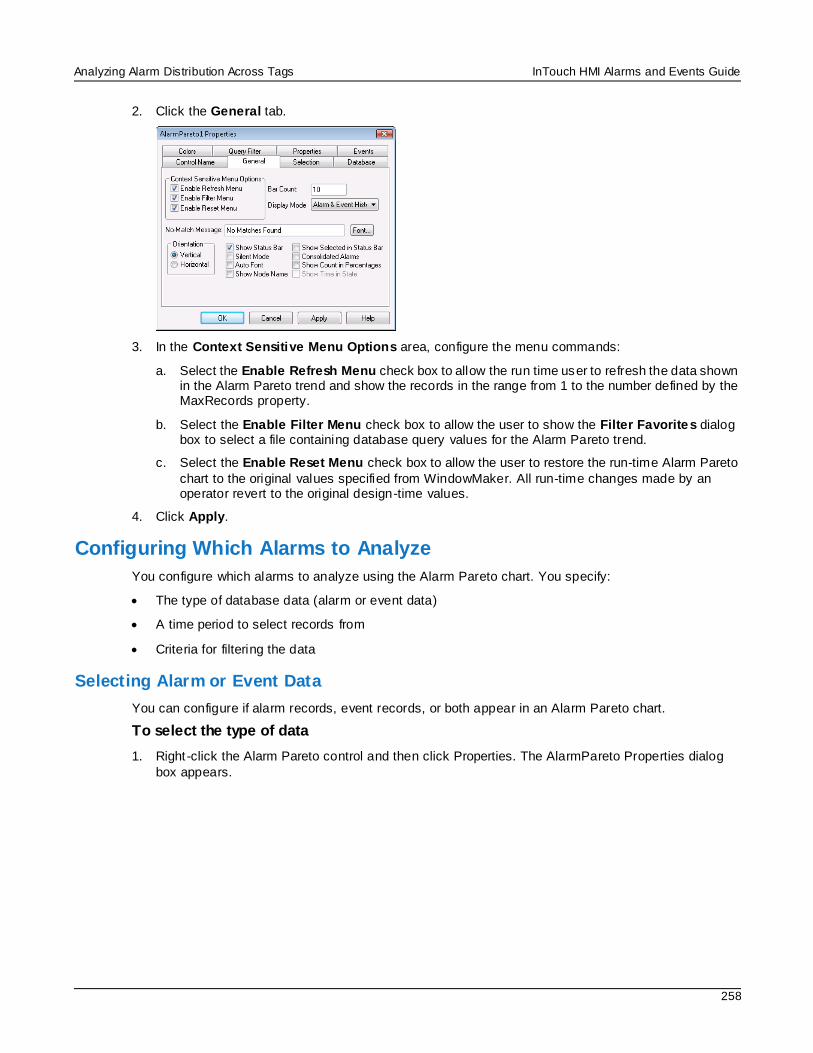
Analyzing Alarm Distribution Across Tags InTouch HMI Alarms and Events Guide
258
2. Click the General tab.
3. In the Context Sensitive Menu Options area, configure the menu commands:
a. Select the Enable Refresh Menu check box to allow the run time user to refresh the data shown in the Alarm Pareto trend and show the records in the range from 1 to the number defined by the MaxRecords property.
b. Select the Enable Filter Menu check box to allow the user to show the Filter Favorites dialog box to select a file containing database query values for the Alarm Pareto trend.
c. Select the Enable Reset Menu check box to allow the user to restore the run-time Alarm Pareto
chart to the original values specified from WindowMaker. All run-time changes made by an operator revert to the original design-time values.
4. Click Apply.
Configuring Which Alarms to Analyze
You configure which alarms to analyze using the Alarm Pareto chart. You specify:
The type of database data (alarm or event data)
A time period to select records from
Criteria for filtering the data
Selecting Alarm or Event Data
You can configure if alarm records, event records, or both appear in an Alarm Pareto chart.
To select the type of data
1. Right -click the Alarm Pareto control and then click Properties. The AlarmPareto Properties dialog
box appears.
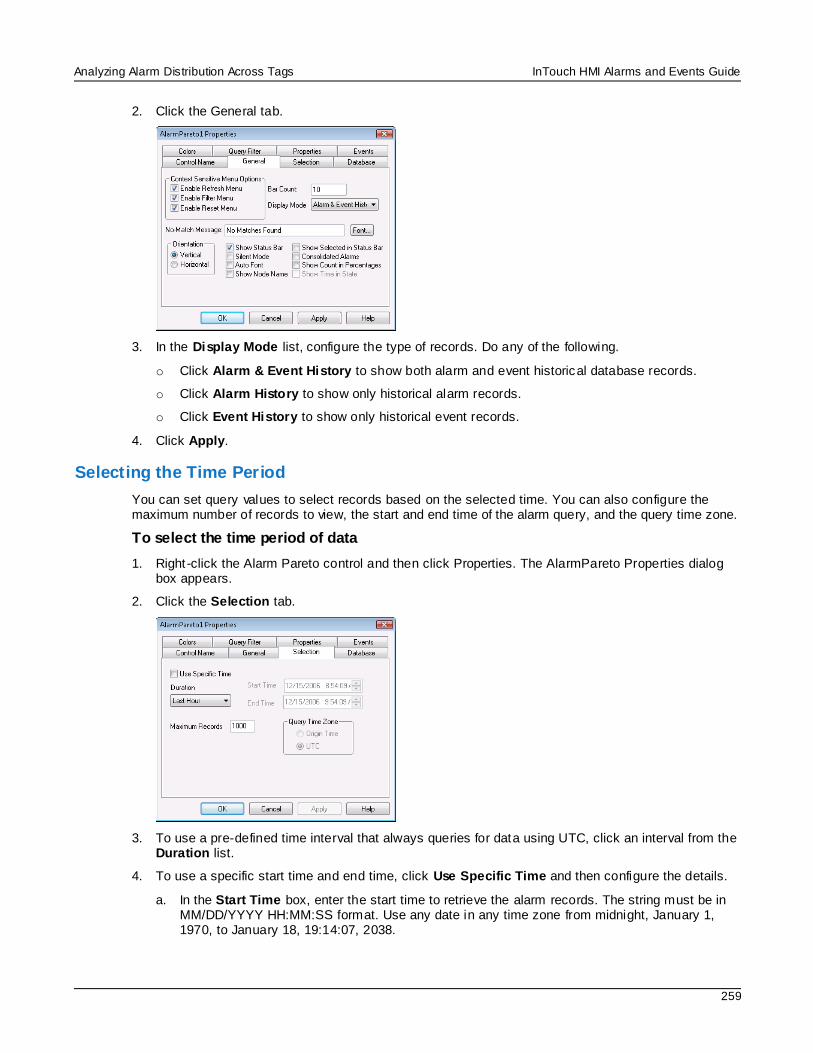
Analyzing Alarm Distribution Across Tags InTouch HMI Alarms and Events Guide
259
2. Click the General tab.
3. In the Display Mode list, configure the type of records. Do any of the following.
o Click Alarm & Event History to show both alarm and event historical database records.
o Click Alarm History to show only historical alarm records.
o Click Event History to show only historical event records.
4. Click Apply.
Selecting the Time Period
You can set query values to select records based on the selected time. You can also configure the maximum number of records to view, the start and end time of the alarm query, and the query time zone.
To select the time period of data
1. Right -click the Alarm Pareto control and then click Properties. The AlarmPareto Properties dialog box appears.
2. Click the Selection tab.
3. To use a pre-defined time interval that always queries for data using UTC, click an interval from the Duration list.
4. To use a specific start time and end time, click Use Specific Time and then configure the details.
a. In the Start Time box, enter the start time to retrieve the alarm records. The string must be in MM/DD/YYYY HH:MM:SS format. Use any date in any time zone from midnight, January 1, 1970, to January 18, 19:14:07, 2038.
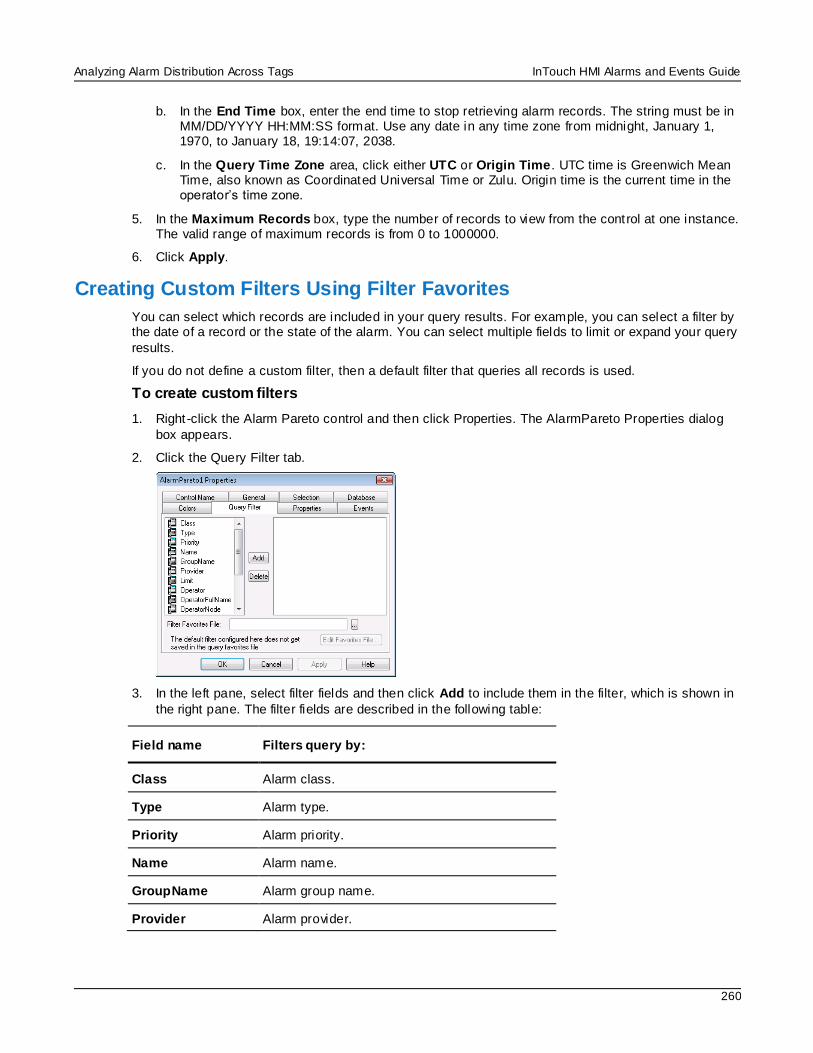
Analyzing Alarm Distribution Across Tags InTouch HMI Alarms and Events Guide
260
b. In the End Time box, enter the end time to stop retrieving alarm records. The string must be in MM/DD/YYYY HH:MM:SS format. Use any date in any time zone from midnight, January 1, 1970, to January 18, 19:14:07, 2038.
c. In the Query Time Zone area, click either UTC or Origin Time. UTC time is Greenwich Mean Time, also known as Coordinated Universal Time or Zulu. Origin time is the current time in the operator’s time zone.
5. In the Maximum Records box, type the number of records to view from the control at one instance. The valid range of maximum records is from 0 to 1000000.
6. Click Apply.
Creating Custom Filters Using Filter Favorites
You can select which records are included in your query results. For example, you can select a filter by the date of a record or the state of the alarm. You can select multiple fields to limit or expand your query
results.
If you do not define a custom filter, then a default filter that queries all records is used.
To create custom filters
1. Right -click the Alarm Pareto control and then click Properties. The AlarmPareto Properties dialog
box appears.
2. Click the Query Filter tab.
3. In the left pane, select filter fields and then click Add to include them in the filter, which is shown in
the right pane. The filter fields are described in the following table:
Field name Filters query by:
Class Alarm class.
Type Alarm type.
Priority Alarm priority.
Name Alarm name.
GroupName Alarm group name.
Provider Alarm provider.
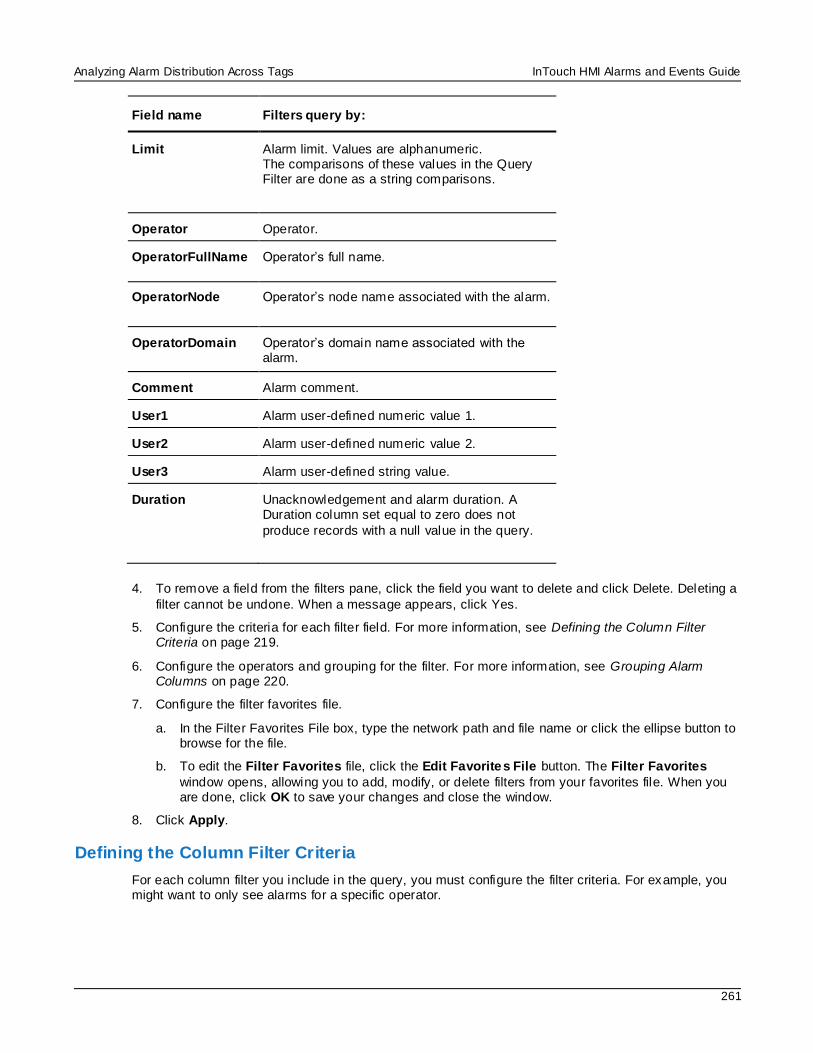
Analyzing Alarm Distribution Across Tags InTouch HMI Alarms and Events Guide
261
Field name Filters query by:
Limit Alarm limit. Values are alphanumeric. The comparisons of these values in the Query Filter are done as a string comparisons.
Operator Operator.
OperatorFullName Operator’s full name.
OperatorNode Operator’s node name associated with the alarm.
OperatorDomain Operator’s domain name associated with the alarm.
Comment Alarm comment.
User1 Alarm user-defined numeric value 1.
User2 Alarm user-defined numeric value 2.
User3 Alarm user-defined string value.
Duration Unacknowledgement and alarm duration. A Duration column set equal to zero does not
produce records with a null value in the query.
4. To remove a field from the filters pane, click the field you want to delete and click Delete. Deleting a
filter cannot be undone. When a message appears, click Yes.
5. Configure the criteria for each filter field. For more information, see Defining the Column Filter Criteria on page 219.
6. Configure the operators and grouping for the filter. For more information, see Grouping Alarm Columns on page 220.
7. Configure the filter favorites file.
a. In the Filter Favorites File box, type the network path and file name or click the ellipse button to browse for the file.
b. To edit the Filter Favorites file, click the Edit Favorites File button. The Filter Favorites
window opens, allowing you to add, modify, or delete filters from your favorites file. When you are done, click OK to save your changes and close the window.
8. Click Apply.
Defining the Column Filter Criteria
For each column filter you include in the query, you must configure the filter criteria. For example, you might want to only see alarms for a specific operator.
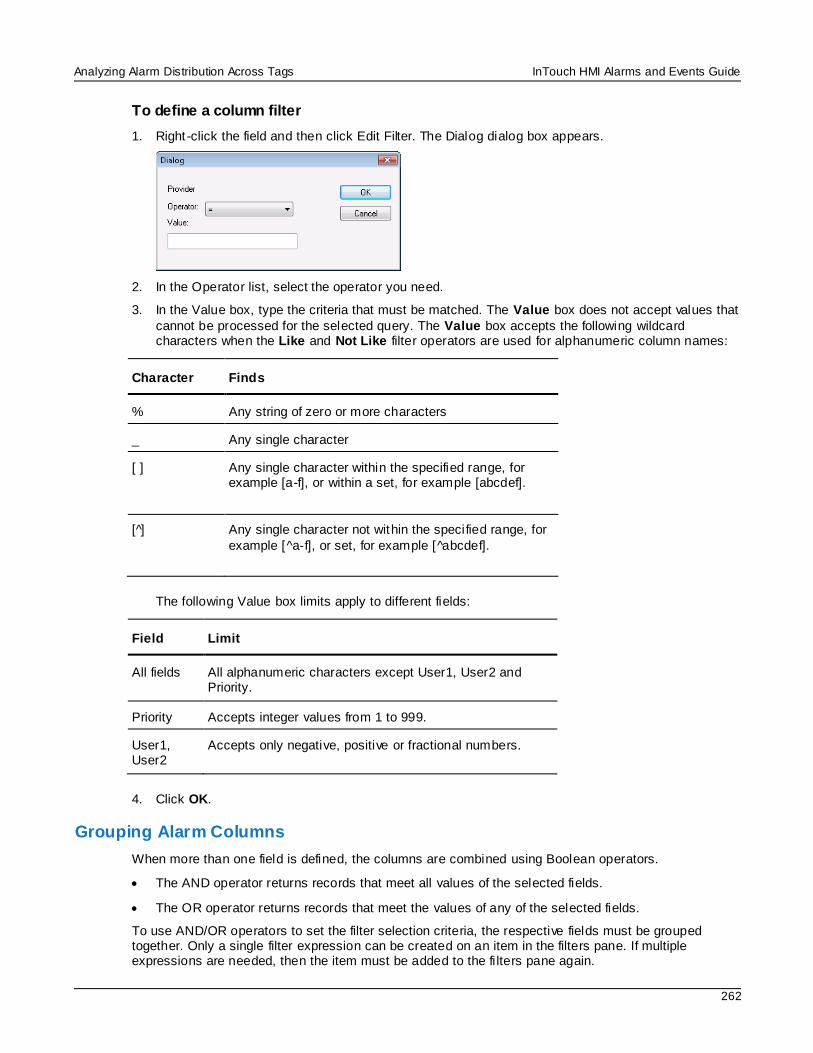
Analyzing Alarm Distribution Across Tags InTouch HMI Alarms and Events Guide
262
To define a column filter
1. Right -click the field and then click Edit Filter. The Dialog dialog box appears.
2. In the Operator list, select the operator you need.
3. In the Value box, type the criteria that must be matched. The Value box does not accept values that
cannot be processed for the selected query. The Value box accepts the following wildcard characters when the Like and Not Like filter operators are used for alphanumeric column names:
Character Finds
% Any string of zero or more characters
_ Any single character
[ ] Any single character within the specified range, for example [a-f], or within a set, for example [abcdef].
[ ] Any single character not within the specified range, for
example [^a-f], or set, for example [ abcdef].
The following Value box limits apply to different fields:
Field Limit
All fields All alphanumeric characters except User1, User2 and Priority.
Priority Accepts integer values from 1 to 999.
User1, User2
Accepts only negative, positive or fractional numbers.
4. Click OK.
Grouping Alarm Columns
When more than one field is defined, the columns are combined using Boolean operators.
The AND operator returns records that meet all values of the selected fields.
The OR operator returns records that meet the values of any of the selected fields.
To use AND/OR operators to set the filter selection criteria, the respective fields must be grouped together. Only a single filter expression can be created on an item in the filters pane. If multiple expressions are needed, then the item must be added to the fi lters pane again.
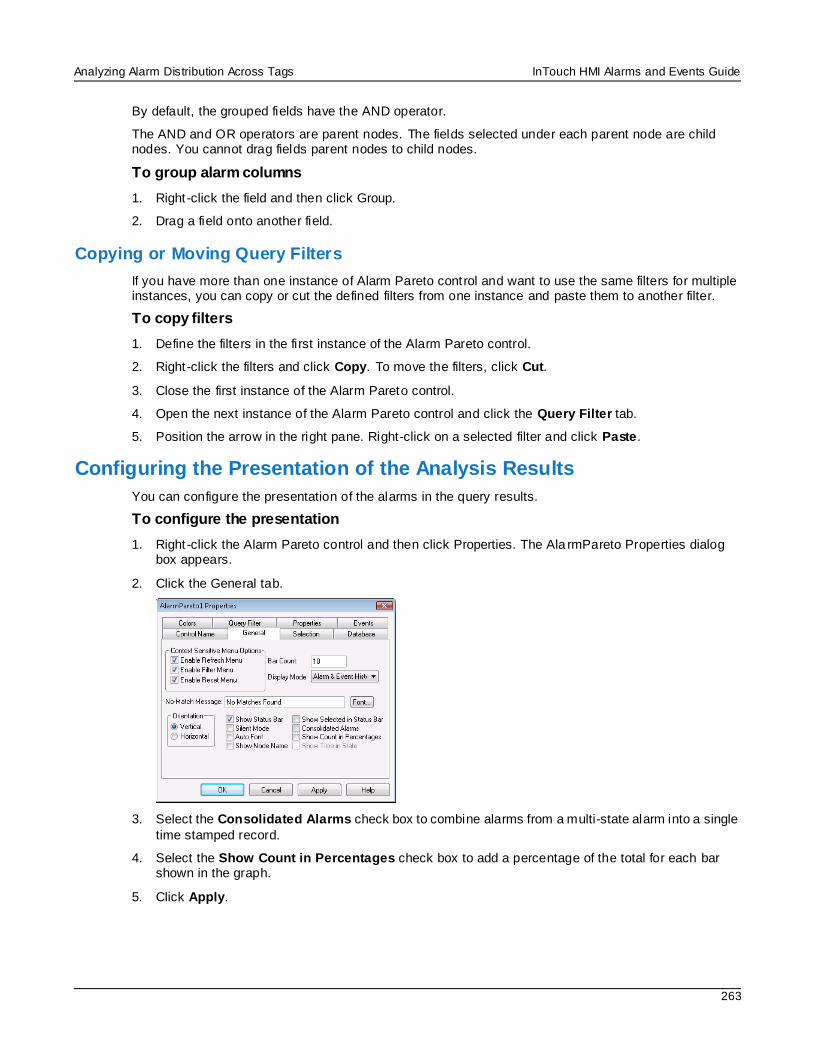
Analyzing Alarm Distribution Across Tags InTouch HMI Alarms and Events Guide
263
By default, the grouped fields have the AND operator.
The AND and OR operators are parent nodes. The fields selected under each parent node are child nodes. You cannot drag fields parent nodes to child nodes.
To group alarm columns
1. Right -click the field and then click Group.
2. Drag a field onto another field.
Copying or Moving Query Filters
If you have more than one instance of Alarm Pareto control and want to use the same filters for multiple instances, you can copy or cut the defined filters from one instance and paste them to another filter.
To copy filters
1. Define the filters in the first instance of the Alarm Pareto control.
2. Right -click the filters and click Copy. To move the filters, click Cut.
3. Close the first instance of the Alarm Pareto control.
4. Open the next instance of the Alarm Pareto control and click the Query Filter tab.
5. Position the arrow in the right pane. Right-click on a selected filter and click Paste.
Configuring the Presentation of the Analysis Results
You can configure the presentation of the alarms in the query results.
To configure the presentation
1. Right -click the Alarm Pareto control and then click Properties. The Ala rmPareto Properties dialog box appears.
2. Click the General tab.
3. Select the Consolidated Alarms check box to combine alarms from a multi-state alarm into a single
time stamped record.
4. Select the Show Count in Percentages check box to add a percentage of the total for each bar shown in the graph.
5. Click Apply.
Analyzing Alarm Distribution Across Tags InTouch HMI Alarms and Events Guide
264
Using an Alarm Pareto Control at Run Time Right -click on the Alarm Pareto control during run time to open a shortcut menu. The following table lists
all possible options that appear in the shortcut menu.
Menu Option Description
Refresh Refreshes the display.
Filter Allows you to edit the filter to change the data received
by the Pareto control. This menu item is only available if a filter favorites file is set up.
Reset Resets the graph to the default query.
Understanding Information Shown on the Status Bar
The status bar for the Alarm Pareto control shows:
The status of the database connection between the control and the alarm database.
The update status of the graph to refresh the data shown in the graph.
Using Alarm Pareto ActiveX Properties You can set the value an Alarm Pareto control property directly using a script or you can assign it to an InTouch tag or I/O reference. For more information about setting properties, see Scripting ActiveX Controls in the InTouch® HMI Scripting and Logic Guide.
The following table list the Alarm Pareto properties. For information on setting color values, see Configuring Colors for ActiveX Controls on page 65.
Property Name Purpose
Authentication Returns the Authentication Type selected in the Database tab.
AuthenticationMode Sets a value that determines the Authentication Type (0 for
SQL Authentication, 1 for Windows Authentication)
AutoConnect Returns or sets a value that determines whether the control
connects to the database as soon as the control is in run-time mode.
AutoFont When the space available is not enough to show the text on the
selected bar correctly, Auto Font hides the text and only shows the text on the selected bar when the bar is selected.
BackGndColor Sets the background color of the Alarm Pareto chart
BarColor Sets the bar color of the Alarm Pareto control.
Analyzing Alarm Distribution Across Tags InTouch HMI Alarms and Events Guide
265
Property Name Purpose
BarCount Sets the number of bars that appear on the Alarm Pareto control.
BarSelectColor Sets the color of the selected bar in the Alarm Pareto Control.
Connected Determines if the Alarm Pareto control is connected to a database.
ConsolidatedAlarms Consolidates the alarm states into two states. For example, if
an analog tag has a three state alarm: Hi, HiHi and Normal, the Hi and HiHI alarm states are classified as one state.
DatabaseName Sets the database name to which the Alarm Pareto control has
to connect.
DisplayMode Sets the display mode. The display mode options are Alarm & Event History, Alarm History or Event History.
Duration Returns or sets the duration used by the control to set the "Start Time" and "End Time".
EnableRefresh Enables or disables the context menu to refresh the Alarm
Pareto control.
EnableReset Enables or disables the context menu used to reset the Alarm Pareto control.
EnableSilentMode Enables or disables the Silent Mode. If Silent Mode is disabled, the Alarm Pareto control shows error
message boxes. If Silent Mode is enabled, the error message boxes do not appear. Error information is written to the logger.
EndTime Returns or sets the end date and time.
FilterMenu Enables or disables the context menu where you can edit the
filter to change the data received by the Pareto control. This property is only enabled if Filter Menu Files is set.
FilterFavoritesFile Specifies the filter favorites file, as a string.
Font Sets the font for the records and the heading in the control.
FontColor Sets the font color for the view of records in the Alarm Pareto
control.
HorizontalChart Shows the chart as horizontal bars. If HorizontalChart is disabled, the chart shows vertical bars.
MaxRecords Returns or sets a value that specifies the maximum records to be ret rieved at a given time.
Analyzing Alarm Distribution Across Tags InTouch HMI Alarms and Events Guide
266
Property Name Purpose
NoMatchMessage Sets the message that appears when there is no data to be processed for the Alarm Pareto control.
QueryTimeZone Sets the time zone to either UTC Time or Origin Time.
ServerName Returns the current server name.
ShowCountPercentage If selected, shows the count for each bar as a percentage of the total count. If not selected, shows the actual count for each bar.
ShowNodeName Sets the Alarm Pareto control to show the node name in addition to the other information on the bar.
ShowSelectedInStatusBar Enables or disables to show the information from the selected
bar on the status bar.
ShowStatusBar Returns or sets a value that determines whether the status bar
is shown.
ShowTimeinState Returns or sets a value that determines whether the Alarm Pareto control shows the bars based on the time in which the tag has remained in alarm state.
If disabled, the control shows the bars based on the number of times an alarm has occurred.
SpecificTime Returns or sets a value that determines whether the control uses the "start time" and "end time" properties, or computes the
start time and end time based on the value of the Duration property.
StartTime Returns or sets the start date and time.
User Returns or sets the User used as the control to connect to the SQL Server.
Using Alarm Pareto ActiveX Methods Use the Alarm Pareto ActiveX methods to:
Control the database connection.
Retrieve records from the database.
Retrieving information about specific pareto bars.
For more information about calling methods, see Scripting ActiveX Controls in the InTouch® HMI Scripting and Logic Guide.
Controlling Database Connections
Use the Connect() method to connect to the alarm database.
Connect() Method
Connects to the database configured from the Database tab of the Alarm Pareto control properties.
Analyzing Alarm Distribution Across Tags InTouch HMI Alarms and Events Guide
267
Syntax Object.Connect()
Example
The name of the control is AlarmPareto1. #AlarmPareto1.Connect();
Retrieving Records from the Database
Use the following functions to retrieve records from the database:
Refresh() Method on page 267
SelectQuery() Method on page 267
Refresh() Method
Refreshes the control from the database, and if the connection is successful, shows the set of records in
the range from 1 to the number defined by the MaxRecords property.
Syntax Object.Refresh()
Example #AlarmPareto1.Refresh();
SelectQuery() Method
Selects a filter that is configured as a query favorite file.
Syntax Object.SelectQuery(Filter)
Parameter
Filter
The name of the query filter.
Example
The name of the control is AlarmPareto1. #AlarmPareto1.SelectQuery("MyFilter");
Retrieving Information About Specific Pareto Bars
Use the following functions to retrieve information about specific pareto bars:
GetItemAlarmName() Method on page 267
GetItemAlarmType() Method on page 268
GetItemCount() Method on page 268
GetItemTotalTime() Method on page 268
GetItemEventType() Method on page 269
GetItemProviderName() Method on page 269
GetItemAlarmName() Method
Gets the name of the alarm for a specific bar.
Analyzing Alarm Distribution Across Tags InTouch HMI Alarms and Events Guide
268
Syntax Object.GetItemAlarmName(BarIndex)
Parameter
BarIndex The index of the bar.
Example
The name of the control is AlarmPareto1. #AlarmPareto1.GetItemAlarmName(1);
GetItemAlarmType() Method
Gets the type of alarm for a specific bar.
Syntax Object.GetItemAlarmType(BarIndex)
Parameter
BarIndex The index of the bar.
Example
The name of the control is AlarmPareto1. #AlarmPareto1.GetItemAlarmType(1);
GetItemCount() Method
Gets the number of alarms in a bar.
Syntax Object.GetItemCount(BarIndex)
Parameter
BarIndex
The index of the bar.
Example
The name of the control is AlarmPareto1. #AlarmPareto1.GetItemCount(1);
GetItemTotalTime() Method
Gets the total time, in seconds, of a tag in an alarm state.
Syntax Object.GetItemTotalTime(BarIndex)
Parameter
BarIndex The index of the bar.
Example
The name of the control is AlarmPareto1. #AlarmPareto1.GetItemTotalTime(1);
Analyzing Alarm Distribution Across Tags InTouch HMI Alarms and Events Guide
269
GetItemEventType() Method
Gets the type of event for a specific bar.
Syntax Object.GetItemEventType(BarIndex)
Parameter
BarIndex The index of the bar.
Example
The name of the control is AlarmPareto1. #AlarmPareto1.GetItemEventType(1);
GetItemProviderName() Method
Gets the name of the provider from the generated alarms for a specific bar.
Syntax Object.GetItemProviderName(BarIndex)
Parameter
BarIndex The index of the bar.
Example
The name of the control is AlarmPareto1. #AlarmPareto1.GetItemProviderName(1);
Showing Miscellaneous Information
Use the AboutBox() method to show the About dialog box.
AboutBox() Method
Shows the About dialog box.
Syntax Object.AboutBox()
Example
The name of the control is AlarmPareto1. #AlarmPareto1.AboutBox();
Error Handling When Using Methods and Properties The Alarm Pareto control handles run-time error messages based upon the Silent Mode option. For
more information, see Configuring the Appearance and Colors of the Alarm Pareto Control on page 255.
If Silent Mode is selected, the Alarm Pareto control does not show run-time error messages. If it is not selected, the alarm display shows error messages. All Alarm Pareto error messages are sent to the
Logger.
Using Alarm Pareto ActiveX Events to Trigger Scripts You can assign QuickScripts to Alarm Pareto control events, such as a mouse click or double -click.
When the event occurs, the QuickScript runs.
Analyzing Alarm Distribution Across Tags InTouch HMI Alarms and Events Guide
270
The Alarm Pareto control supports the following events:
Click
DoubleClick
ShutDown
StartUp
The Click event has one parameter called ClicknBarIndex, which identifies the index of the bar that is clicked at run time.
The DoubleClick event has one parameter called DoubleClicknBarIndex, which identifies the index of the bar that is double-clicked at run time.
Click and DoubleClick events are zero-based. When Click and/or DoubleClick events are published, the
bar count in the display starts with 0.
Note: The Alarm Pareto control ignores the user interface methods when they are called from the
StartUp event, because the control is not visible yet. These methods include: AboutBox() and Refresh().
For more information about scripting ActiveX events, see Scripting ActiveX Controls in the InTouch®
HMI Scripting and Logic Guide.
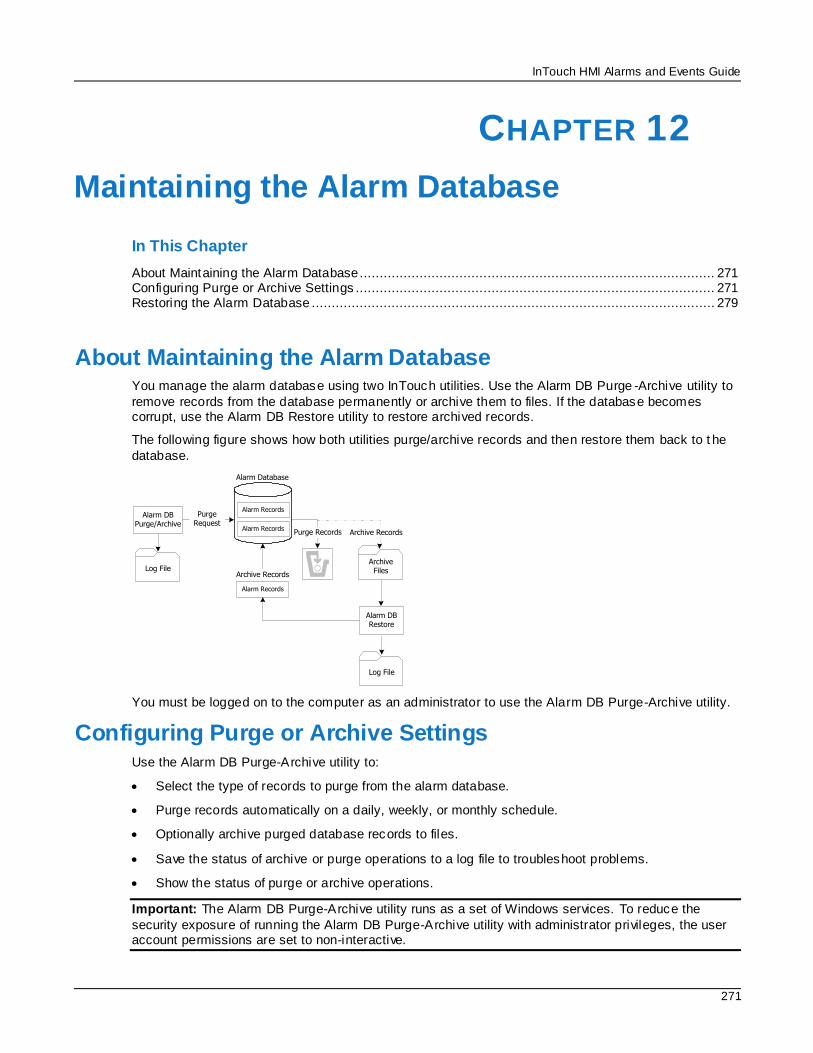
InTouch HMI Alarms and Events Guide
271
In This Chapter
About Maintaining the Alarm Database......................................................................................... 271 Configuring Purge or Archive Settings .......................................................................................... 271 Restoring the Alarm Database ..................................................................................................... 279
About Maintaining the Alarm Database You manage the alarm database using two InTouch utilities. Use the Alarm DB Purge -Archive utility to
remove records from the database permanently or archive them to files. If the database becomes corrupt, use the Alarm DB Restore utility to restore archived records.
The following figure shows how both utilities purge/archive records and then restore them back to t he
database.
Archive FilesLog File
Archive RecordsPurge Records
Purge Request
Log File
Alarm DB Purge/Archive
Alarm DB Restore
Archive Records
Alarm Records
Alarm Database
Alarm Records
Alarm Records
You must be logged on to the computer as an administrator to use the Alarm DB Purge-Archive utility.
Configuring Purge or Archive Settings Use the Alarm DB Purge-Archive utility to:
Select the type of records to purge from the alarm database.
Purge records automatically on a daily, weekly, or monthly schedule.
Optionally archive purged database records to files.
Save the status of archive or purge operations to a log file to troubleshoot problems.
Show the status of purge or archive operations.
Important: The Alarm DB Purge-Archive utility runs as a set of Windows services. To reduce the
security exposure of running the Alarm DB Purge-Archive utility with administrator privileges, the user account permissions are set to non-interactive.
CHAPTER 12
Maintaining the Alarm Database
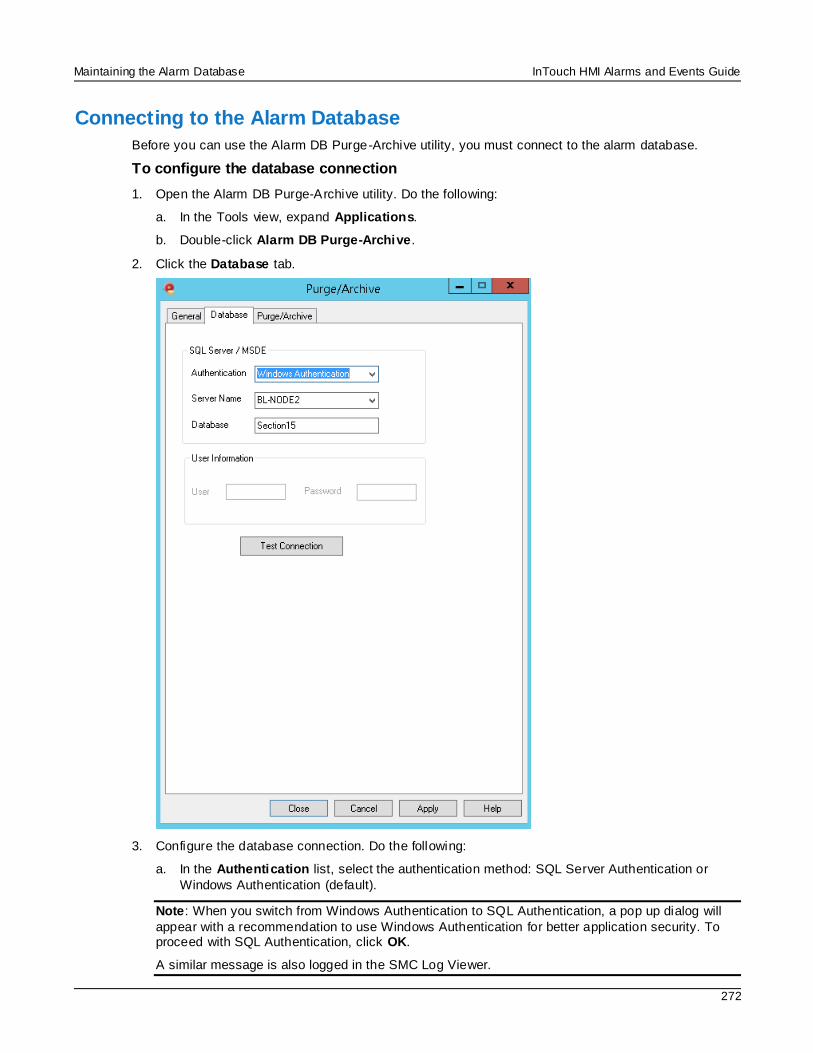
Maintaining the Alarm Database InTouch HMI Alarms and Events Guide
272
Connecting to the Alarm Database
Before you can use the Alarm DB Purge-Archive utility, you must connect to the alarm database.
To configure the database connection
1. Open the Alarm DB Purge-Archive utility. Do the following:
a. In the Tools view, expand Applications.
b. Double-click Alarm DB Purge-Archive.
2. Click the Database tab.
3. Configure the database connection. Do the following:
a. In the Authentication list, select the authentication method: SQL Server Authentication or
Windows Authentication (default).
Note: When you switch from Windows Authentication to SQL Authentication, a pop up dialog will
appear with a recommendation to use Windows Authentication for better application security. To proceed with SQL Authentication, click OK.
A similar message is also logged in the SMC Log Viewer.
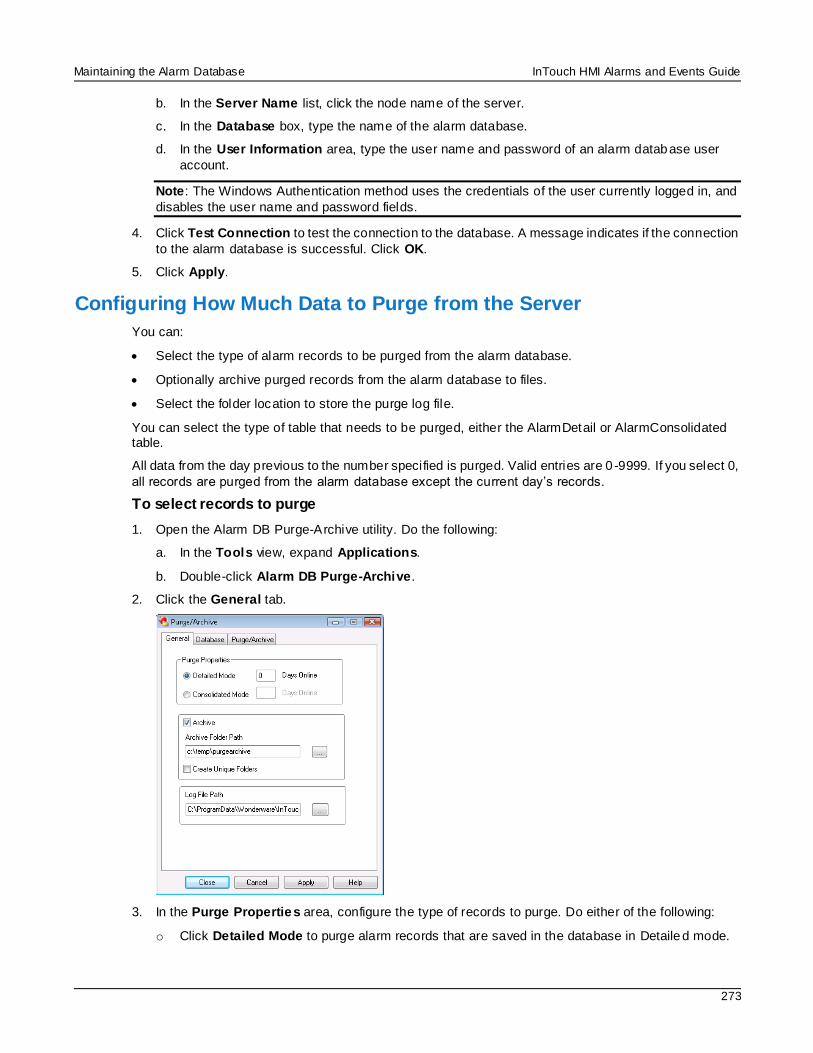
Maintaining the Alarm Database InTouch HMI Alarms and Events Guide
273
b. In the Server Name list, click the node name of the server.
c. In the Database box, type the name of the alarm database.
d. In the User Information area, type the user name and password of an alarm database user
account.
Note: The Windows Authentication method uses the credentials of the user currently logged in, and
disables the user name and password fields.
4. Click Test Connection to test the connection to the database. A message indicates if the connection
to the alarm database is successful. Click OK.
5. Click Apply.
Configuring How Much Data to Purge from the Server
You can:
Select the type of alarm records to be purged from the alarm database.
Optionally archive purged records from the alarm database to files.
Select the folder location to store the purge log file.
You can select the type of table that needs to be purged, either the AlarmDetail or AlarmConsolidated table.
All data from the day previous to the number specified is purged. Valid entries are 0 -9999. If you select 0,
all records are purged from the alarm database except the current day’s records.
To select records to purge
1. Open the Alarm DB Purge-Archive utility. Do the following:
a. In the Tools view, expand Applications.
b. Double-click Alarm DB Purge-Archive.
2. Click the General tab.
3. In the Purge Properties area, configure the type of records to purge. Do either of the following:
o Click Detailed Mode to purge alarm records that are saved in the database in Detailed mode.
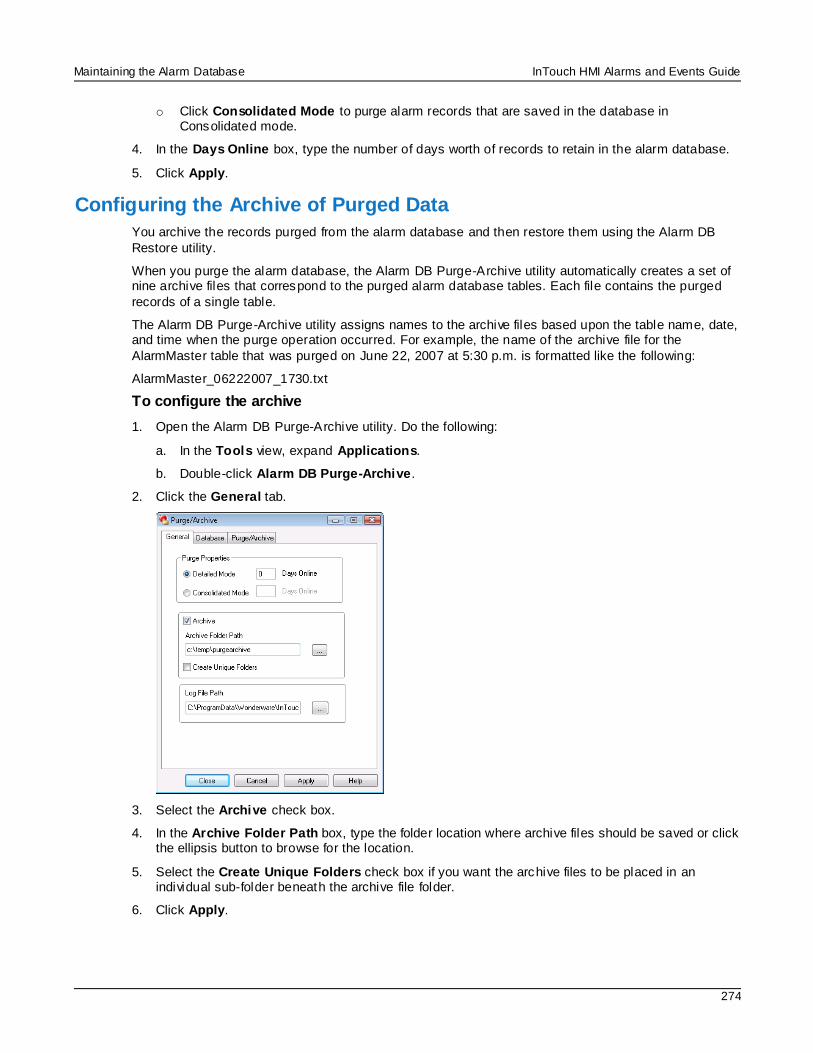
Maintaining the Alarm Database InTouch HMI Alarms and Events Guide
274
o Click Consolidated Mode to purge alarm records that are saved in the database in Consolidated mode.
4. In the Days Online box, type the number of days worth of records to retain in the alarm database.
5. Click Apply.
Configuring the Archive of Purged Data
You archive the records purged from the alarm database and then restore them using the Alarm DB
Restore utility.
When you purge the alarm database, the Alarm DB Purge-Archive utility automatically creates a set of nine archive files that correspond to the purged alarm database tables. Each file contains the purged
records of a single table.
The Alarm DB Purge-Archive utility assigns names to the archive files based upon the table name, date, and time when the purge operation occurred. For example, the name of the archive file for the
AlarmMaster table that was purged on June 22, 2007 at 5:30 p.m. is formatted like the following:
AlarmMaster_06222007_1730.txt
To configure the archive
1. Open the Alarm DB Purge-Archive utility. Do the following:
a. In the Tools view, expand Applications.
b. Double-click Alarm DB Purge-Archive.
2. Click the General tab.
3. Select the Archive check box.
4. In the Archive Folder Path box, type the folder location where archive files should be saved or click the ellipsis button to browse for the location.
5. Select the Create Unique Folders check box if you want the archive files to be placed in an individual sub-folder beneath the archive file folder.
6. Click Apply.
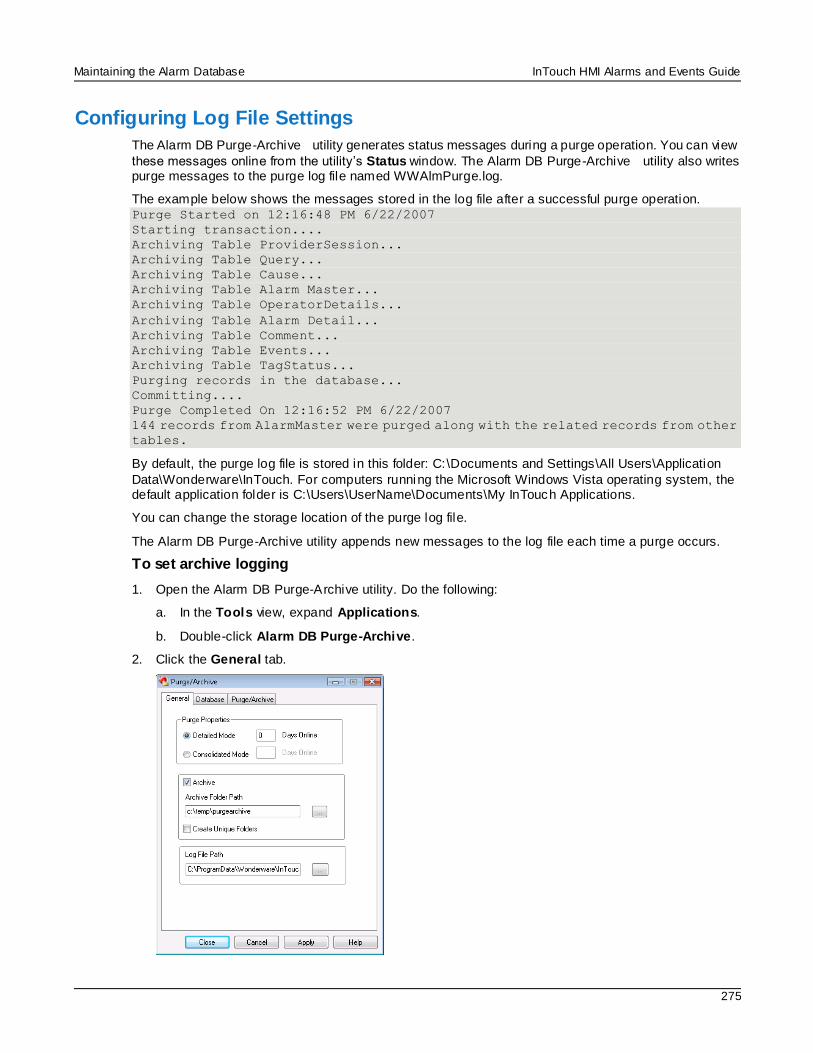
Maintaining the Alarm Database InTouch HMI Alarms and Events Guide
275
Configuring Log File Settings
The Alarm DB Purge-Archive utility generates status messages during a purge operation. You can view
these messages online from the utility’s Status window. The Alarm DB Purge-Archive utility also writes purge messages to the purge log file named WWAlmPurge.log.
The example below shows the messages stored in the log file after a successful purge operation. Purge Started on 12:16:48 PM 6/22/2007
Starting transaction....
Archiving Table ProviderSession...
Archiving Table Query...
Archiving Table Cause...
Archiving Table Alarm Master...
Archiving Table OperatorDetails...
Archiving Table Alarm Detail...
Archiving Table Comment...
Archiving Table Events...
Archiving Table TagStatus...
Purging records in the database...
Committing....
Purge Completed On 12:16:52 PM 6/22/2007
144 records from AlarmMaster were purged along with the related records from other
tables.
By default, the purge log file is stored in this folder: C:\Documents and Settings\All Users\Application
Data\Wonderware\InTouch. For computers running the Microsoft Windows Vista operating system, the default application folder is C:\Users\UserName\Documents\My InTouch Applications.
You can change the storage location of the purge log file.
The Alarm DB Purge-Archive utility appends new messages to the log file each time a purge occurs.
To set archive logging
1. Open the Alarm DB Purge-Archive utility. Do the following:
a. In the Tools view, expand Applications.
b. Double-click Alarm DB Purge-Archive.
2. Click the General tab.

Maintaining the Alarm Database InTouch HMI Alarms and Events Guide
276
3. In the Log File Path box, type the folder location where the purge log file should be placed or click the ellipsis button to browse for the location.
4. Click Apply.
Manually Purging and Archiving the Database
You can purge and archive your alarm database manually. This overrides the activation time and starts the purging and archiving immediately.
The purge operation checks for the presence of an archive file and appends to the same. If the archive file is not present, the file is created as per the naming convention and then used for archiving.
The purge operation does not delete entries in tables such as ProviderSession, Query, and Cause that
are linked to the main tables such as AlarmMaster through foreign key constraints. The related records in these tables are written to the files to maintain the data consistency and also retained in the database.
Caution: Manually purge all records (the Purge All Now option) only when the Alarm DB Logger service
is stopped. If the purge operation is committed successfully while the Alarm DB Logger service is running, the Alarm DB Logger service stops logging and starts caching records.
To manually purge and archive records from the alarm database
1. Open the Alarm DB Purge-Archive utility. Do the following:
a. In the Tools view, expand Applications.
b. Double-click Alarm DB Purge-Archive.
2. Click the Purge/Archive tab.
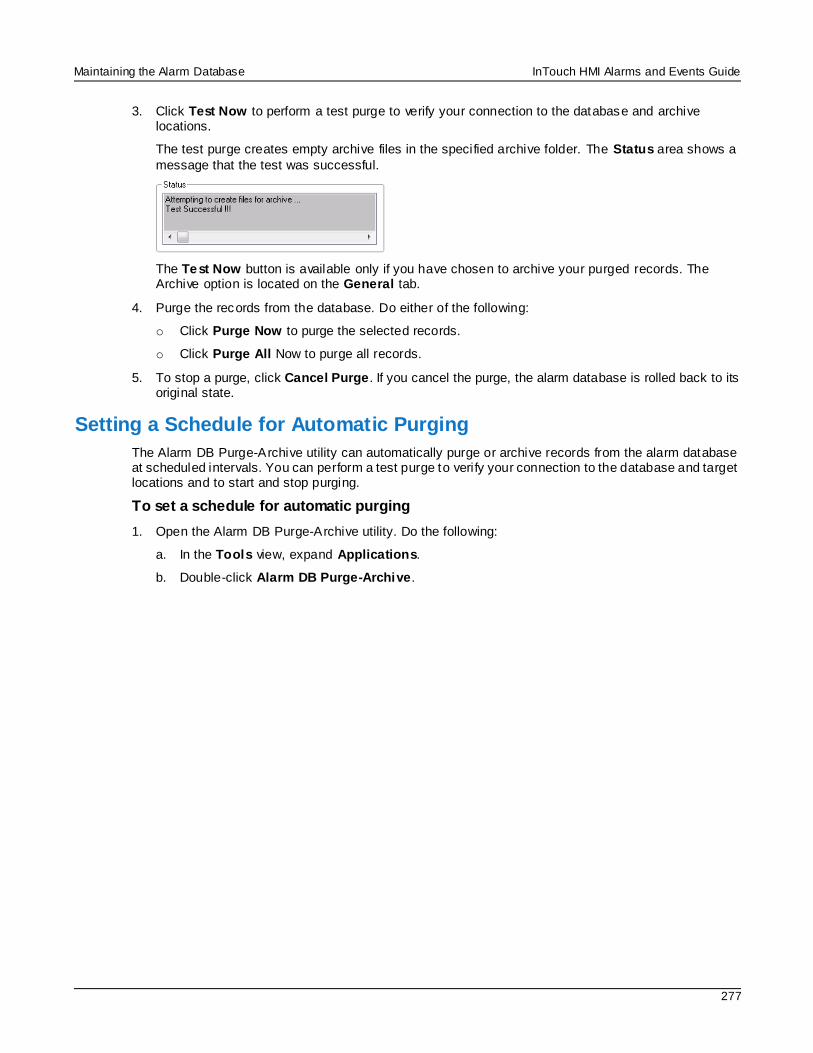
Maintaining the Alarm Database InTouch HMI Alarms and Events Guide
277
3. Click Test Now to perform a test purge to verify your connection to the database and archive locations.
The test purge creates empty archive files in the specified archive folder. The Status area shows a
message that the test was successful.
The Test Now button is available only if you have chosen to archive your purged records. The Archive option is located on the General tab.
4. Purge the records from the database. Do either of the following:
o Click Purge Now to purge the selected records.
o Click Purge All Now to purge all records.
5. To stop a purge, click Cancel Purge. If you cancel the purge, the alarm database is rolled back to its original state.
Setting a Schedule for Automatic Purging
The Alarm DB Purge-Archive utility can automatically purge or archive records from the alarm database at scheduled intervals. You can perform a test purge to verify your connection to the database and target locations and to start and stop purging.
To set a schedule for automatic purging
1. Open the Alarm DB Purge-Archive utility. Do the following:
a. In the Tools view, expand Applications.
b. Double-click Alarm DB Purge-Archive.
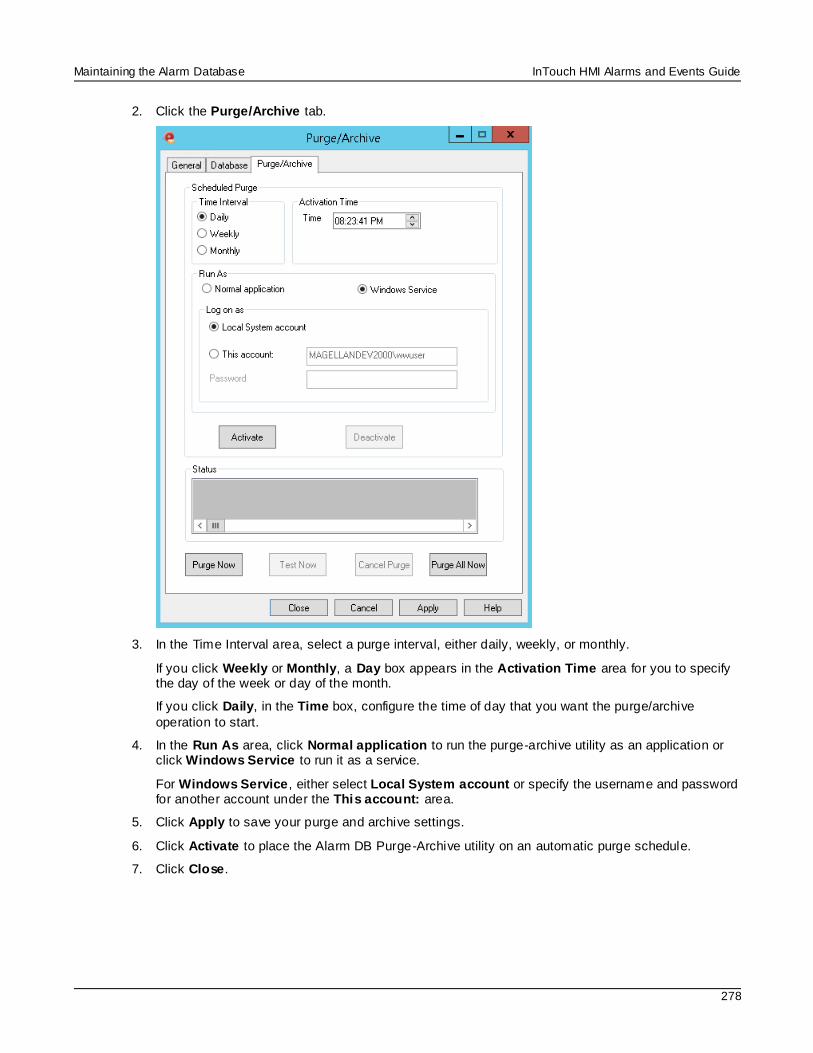
Maintaining the Alarm Database InTouch HMI Alarms and Events Guide
278
2. Click the Purge/Archive tab.
3. In the Time Interval area, select a purge interval, either daily, weekly, or monthly.
If you click Weekly or Monthly, a Day box appears in the Activation Time area for you to specify the day of the week or day of the month.
If you click Daily, in the Time box, configure the time of day that you want the purge/archive
operation to start.
4. In the Run As area, click Normal application to run the purge-archive utility as an application or click Windows Service to run it as a service.
For Windows Service, either select Local System account or specify the username and password for another account under the This account: area.
5. Click Apply to save your purge and archive settings.
6. Click Activate to place the Alarm DB Purge-Archive utility on an automatic purge schedule.
7. Click Close.
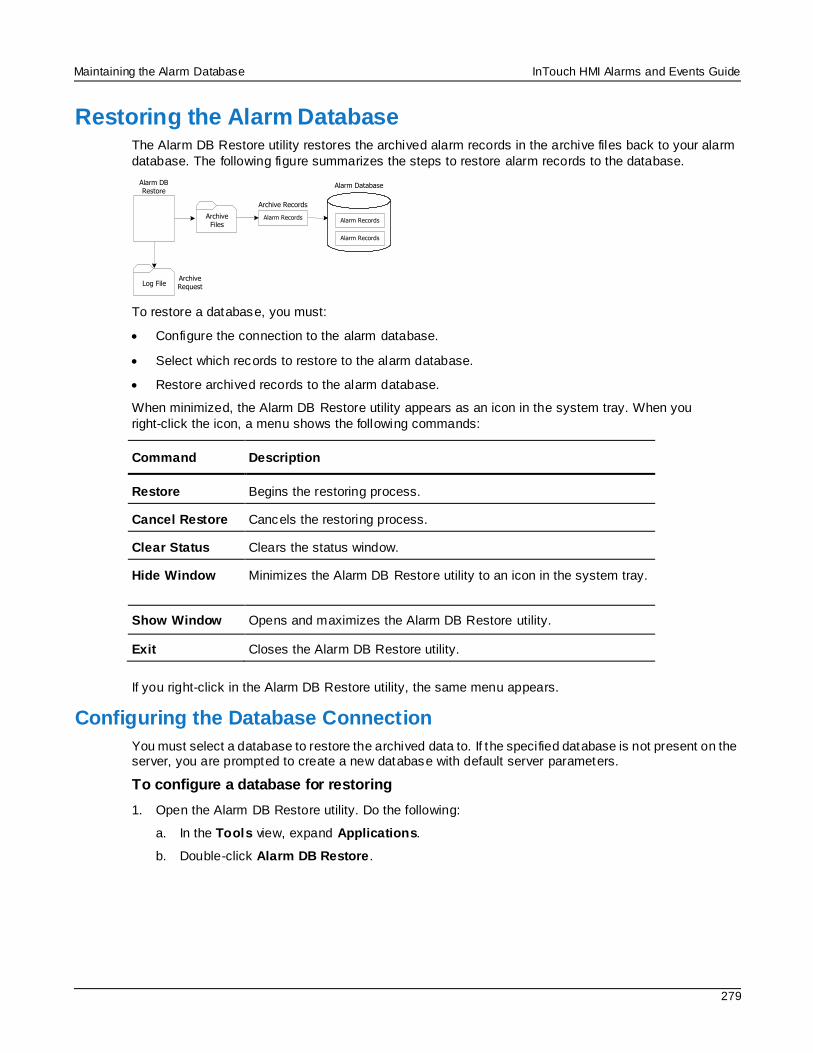
Maintaining the Alarm Database InTouch HMI Alarms and Events Guide
279
Restoring the Alarm Database The Alarm DB Restore utility restores the archived alarm records in the archive files back to your alarm
database. The following figure summarizes the steps to restore alarm records to the database.
Alarm Database
Alarm Records
Alarm Records
Archive Records
Archive Request
Alarm DB Restore
Archive Files
Log File
Alarm Records
To restore a database, you must:
Configure the connection to the alarm database.
Select which records to restore to the alarm database.
Restore archived records to the alarm database.
When minimized, the Alarm DB Restore utility appears as an icon in the system tray. When you
right-click the icon, a menu shows the following commands:
Command Description
Restore Begins the restoring process.
Cancel Restore Cancels the restoring process.
Clear Status Clears the status window.
Hide Window Minimizes the Alarm DB Restore utility to an icon in the system tray.
Show Window Opens and maximizes the Alarm DB Restore utility.
Exit Closes the Alarm DB Restore utility.
If you right-click in the Alarm DB Restore utility, the same menu appears.
Configuring the Database Connection
You must select a database to restore the archived data to. If the specified database is not present on the server, you are prompted to create a new database with default server parameters.
To configure a database for restoring
1. Open the Alarm DB Restore utility. Do the following:
a. In the Tools view, expand Applications.
b. Double-click Alarm DB Restore.
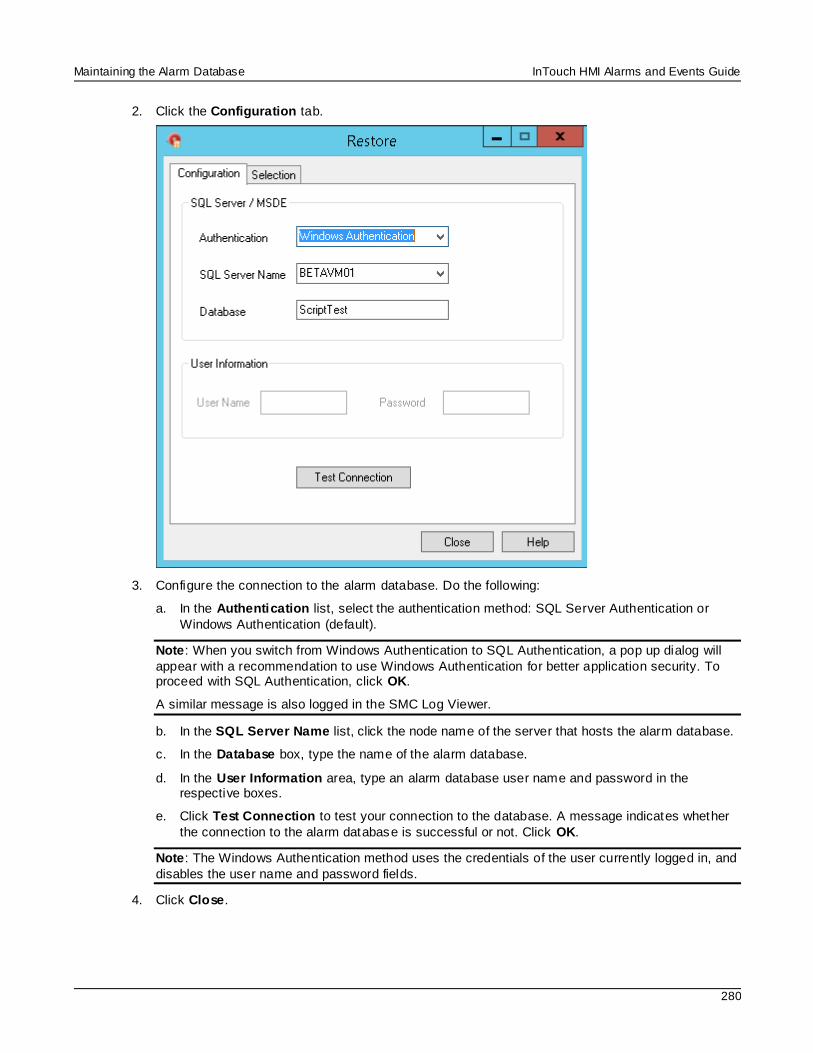
Maintaining the Alarm Database InTouch HMI Alarms and Events Guide
280
2. Click the Configuration tab.
3. Configure the connection to the alarm database. Do the following:
a. In the Authentication list, select the authentication method: SQL Server Authentication or
Windows Authentication (default).
Note: When you switch from Windows Authentication to SQL Authentication, a pop up dialog will
appear with a recommendation to use Windows Authentication for better application security. To proceed with SQL Authentication, click OK.
A similar message is also logged in the SMC Log Viewer.
b. In the SQL Server Name list, click the node name of the server that hosts the alarm database.
c. In the Database box, type the name of the alarm database.
d. In the User Information area, type an alarm database user name and password in the respective boxes.
e. Click Test Connection to test your connection to the database. A message indicates whether
the connection to the alarm database is successful or not. Click OK.
Note: The Windows Authentication method uses the credentials of the user currently logged in, and
disables the user name and password fields.
4. Click Close.
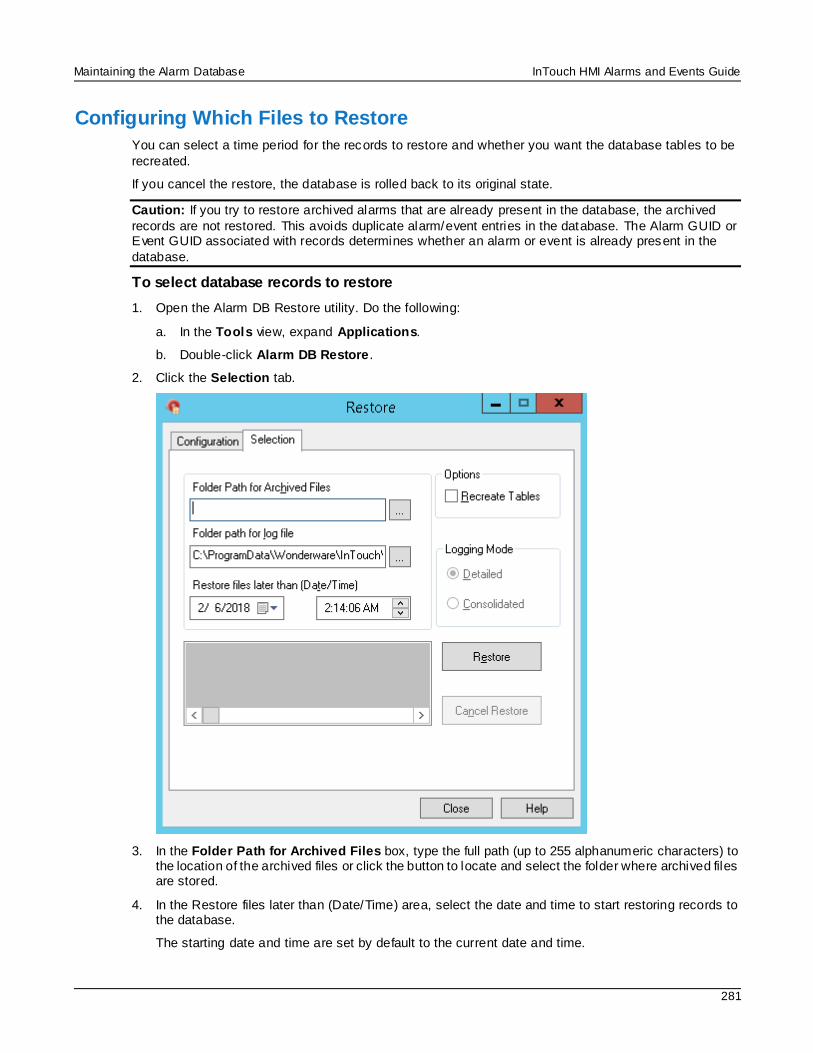
Maintaining the Alarm Database InTouch HMI Alarms and Events Guide
281
Configuring Which Files to Restore
You can select a time period for the records to restore and whether you want the database tables to be
recreated.
If you cancel the restore, the database is rolled back to its original state.
Caution: If you try to restore archived alarms that are already present in the database, the archived
records are not restored. This avoids duplicate alarm/event entries in the database. The Alarm GUID or Event GUID associated with records determines whether an alarm or event is already present in the
database.
To select database records to restore
1. Open the Alarm DB Restore utility. Do the following:
a. In the Tools view, expand Applications.
b. Double-click Alarm DB Restore.
2. Click the Selection tab.
3. In the Folder Path for Archived Files box, type the full path (up to 255 alphanumeric characters) to the location of the archived files or click the button to locate and select the folder where archived files are stored.
4. In the Restore files later than (Date/Time) area, select the date and time to start restoring records to the database.
The starting date and time are set by default to the current date and time.
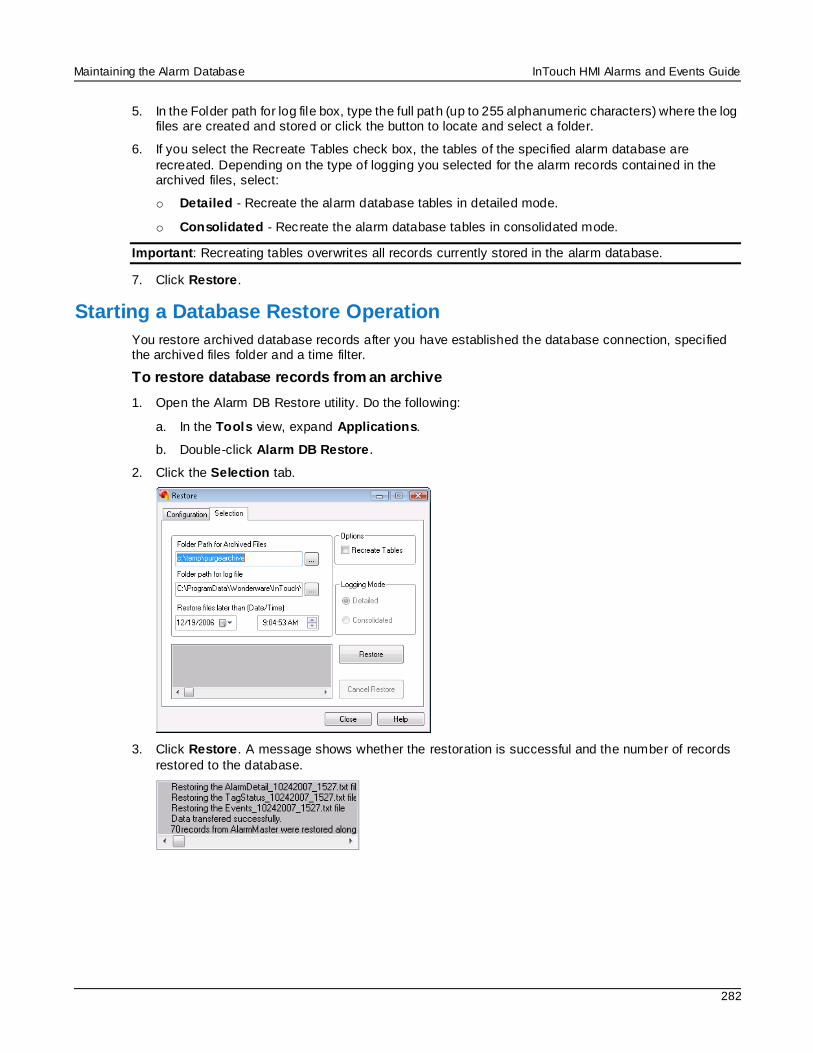
Maintaining the Alarm Database InTouch HMI Alarms and Events Guide
282
5. In the Folder path for log file box, type the full path (up to 255 alphanumeric characters) where the log files are created and stored or click the button to locate and select a folder.
6. If you select the Recreate Tables check box, the tables of the specified alarm database are
recreated. Depending on the type of logging you selected for the alarm records contained in the archived files, select:
o Detailed - Recreate the alarm database tables in detailed mode.
o Consolidated - Recreate the alarm database tables in consolidated mode.
Important: Recreating tables overwrites all records currently stored in the alarm database.
7. Click Restore.
Starting a Database Restore Operation
You restore archived database records after you have established the database connection, specified the archived files folder and a time filter.
To restore database records from an archive
1. Open the Alarm DB Restore utility. Do the following:
a. In the Tools view, expand Applications.
b. Double-click Alarm DB Restore.
2. Click the Selection tab.
3. Click Restore. A message shows whether the restoration is successful and the number of records
restored to the database.
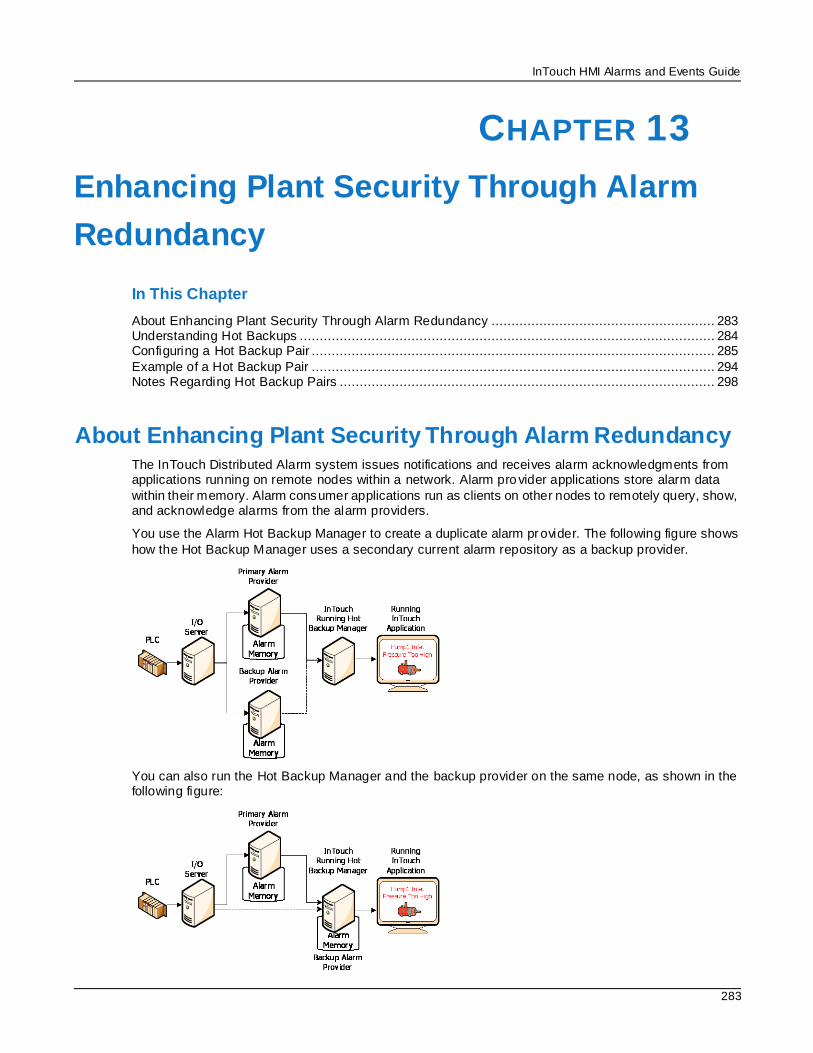
InTouch HMI Alarms and Events Guide
283
In This Chapter
About Enhancing Plant Security Through Alarm Redundancy ........................................................ 283 Understanding Hot Backups ........................................................................................................ 284 Configuring a Hot Backup Pair ..................................................................................................... 285
Example of a Hot Backup Pair ..................................................................................................... 294 Notes Regarding Hot Backup Pairs .............................................................................................. 298
About Enhancing Plant Security Through Alarm Redundancy The InTouch Distributed Alarm system issues notifications and receives alarm acknowledgments from applications running on remote nodes within a network. Alarm provider applications store alarm data
within their memory. Alarm consumer applications run as clients on other nodes to remotely query, show, and acknowledge alarms from the alarm providers.
You use the Alarm Hot Backup Manager to create a duplicate alarm provider. The following figure shows
how the Hot Backup Manager uses a secondary current alarm repository as a backup provider.
You can also run the Hot Backup Manager and the backup provider on the same node, as shown in the following figure:
CHAPTER 13
Enhancing Plant Security Through Alarm
Redundancy
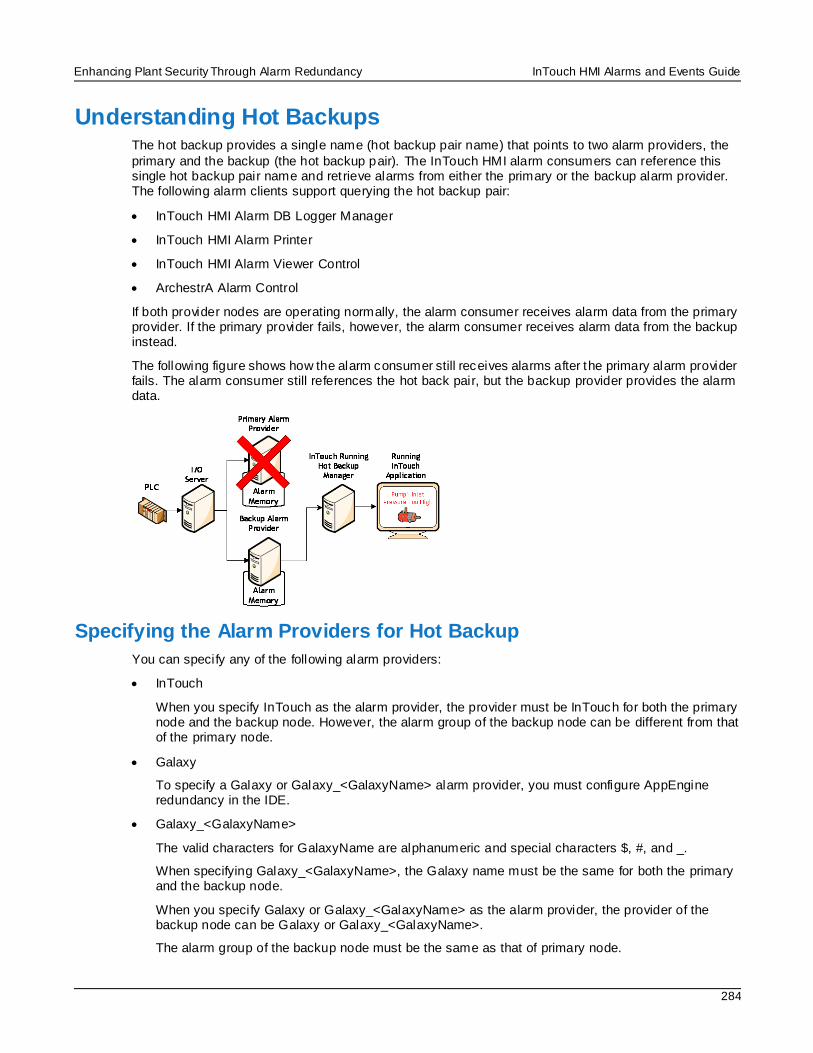
Enhancing Plant Security Through Alarm Redundancy InTouch HMI Alarms and Events Guide
284
Understanding Hot Backups The hot backup provides a single name (hot backup pair name) that points to two alarm providers, the
primary and the backup (the hot backup pair). The InTouch HMI alarm consumers can reference this single hot backup pair name and ret rieve alarms from either the primary or the backup alarm provider. The following alarm clients support querying the hot backup pair:
InTouch HMI Alarm DB Logger Manager
InTouch HMI Alarm Printer
InTouch HMI Alarm Viewer Control
ArchestrA Alarm Control
If both provider nodes are operating normally, the alarm consumer receives alarm data from the primary provider. If the primary provider fails, however, the alarm consumer receives alarm data from the backup instead.
The following figure shows how the alarm consumer still receives alarms after the primary alarm provider fails. The alarm consumer still references the hot back pair, but the backup provider provides the alarm data.
Specifying the Alarm Providers for Hot Backup
You can specify any of the following alarm providers:
InTouch
When you specify InTouch as the alarm provider, the provider must be InTouch for both the primary node and the backup node. However, the alarm group of the backup node can be different from that of the primary node.
Galaxy
To specify a Galaxy or Galaxy_<GalaxyName> alarm provider, you must configure AppEngine redundancy in the IDE.
Galaxy_<GalaxyName>
The valid characters for GalaxyName are alphanumeric and special characters $, #, and _.
When specifying Galaxy_<GalaxyName>, the Galaxy name must be the same for both the primary and the backup node.
When you specify Galaxy or Galaxy_<GalaxyName> as the alarm provider, the provider of the backup node can be Galaxy or Galaxy_<GalaxyName>.
The alarm group of the backup node must be the same as that of primary node.
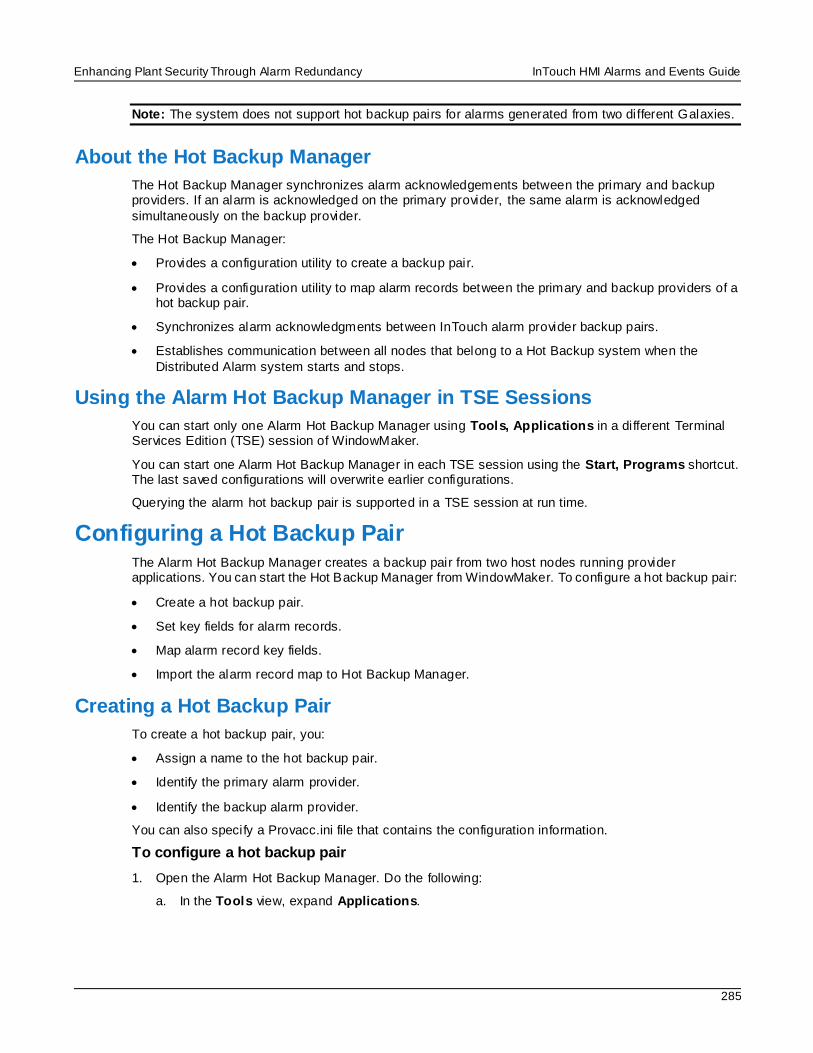
Enhancing Plant Security Through Alarm Redundancy InTouch HMI Alarms and Events Guide
285
Note: The system does not support hot backup pairs for alarms generated from two different Galaxies.
About the Hot Backup Manager
The Hot Backup Manager synchronizes alarm acknowledgements between the primary and backup providers. If an alarm is acknowledged on the primary provider, the same alarm is acknowledged
simultaneously on the backup provider.
The Hot Backup Manager:
Provides a configuration utility to create a backup pair.
Provides a configuration utility to map alarm records between the primary and backup providers of a hot backup pair.
Synchronizes alarm acknowledgments between InTouch alarm provider backup pairs.
Establishes communication between all nodes that belong to a Hot Backup system when the
Distributed Alarm system starts and stops.
Using the Alarm Hot Backup Manager in TSE Sessions
You can start only one Alarm Hot Backup Manager using Tools, Applications in a different Terminal Services Edition (TSE) session of WindowMaker.
You can start one Alarm Hot Backup Manager in each TSE session using the Start, Programs shortcut. The last saved configurations will overwrite earlier configurations.
Querying the alarm hot backup pair is supported in a TSE session at run time.
Configuring a Hot Backup Pair The Alarm Hot Backup Manager creates a backup pair from two host nodes running provider applications. You can start the Hot Backup Manager from WindowMaker. To configure a hot backup pair:
Create a hot backup pair.
Set key fields for alarm records.
Map alarm record key fields.
Import the alarm record map to Hot Backup Manager.
Creating a Hot Backup Pair
To create a hot backup pair, you:
Assign a name to the hot backup pair.
Identify the primary alarm provider.
Identify the backup alarm provider.
You can also specify a Provacc.ini file that contains the configuration information.
To configure a hot backup pair
1. Open the Alarm Hot Backup Manager. Do the following:
a. In the Tools view, expand Applications.
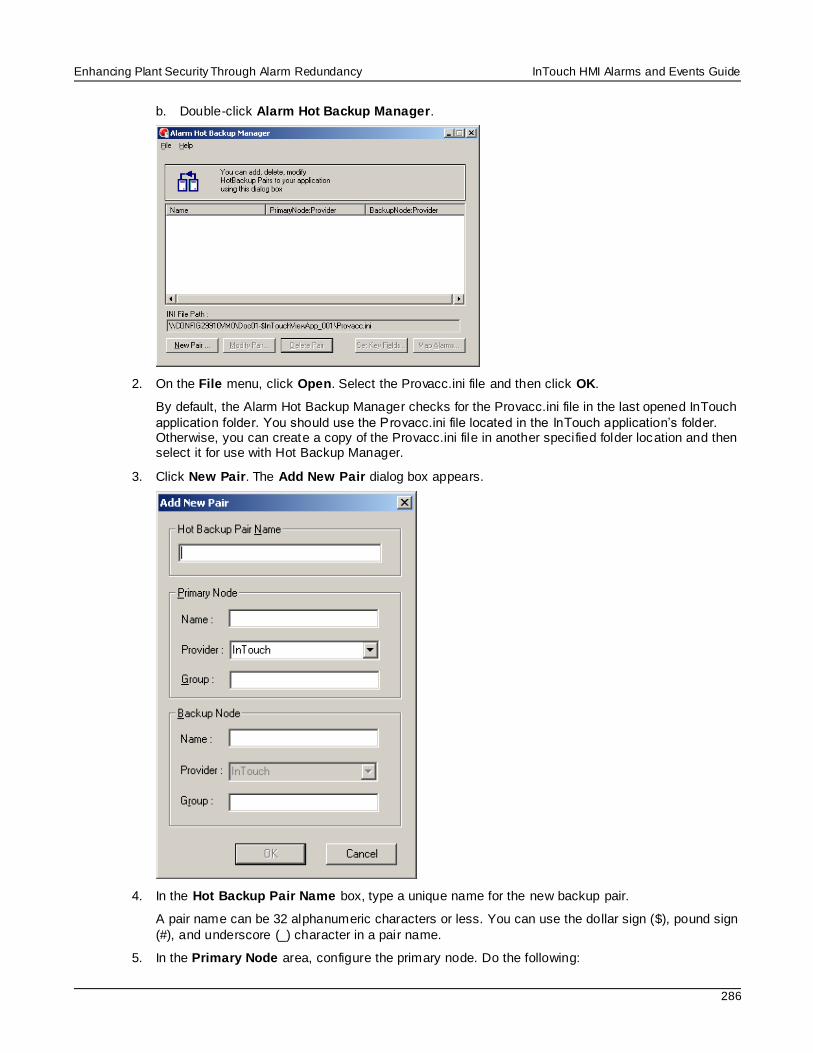
Enhancing Plant Security Through Alarm Redundancy InTouch HMI Alarms and Events Guide
286
b. Double-click Alarm Hot Backup Manager.
2. On the File menu, click Open. Select the Provacc.ini file and then click OK.
By default, the Alarm Hot Backup Manager checks for the Provacc.ini file in the last opened InTouch
application folder. You should use the Provacc.ini file located in the InTouch application’s folder. Otherwise, you can create a copy of the Provacc.ini file in another specified folder location and then select it for use with Hot Backup Manager.
3. Click New Pair. The Add New Pair dialog box appears.
4. In the Hot Backup Pair Name box, type a unique name for the new backup pair.
A pair name can be 32 alphanumeric characters or less. You can use the dollar sign ($), pound sign
(#), and underscore (_) character in a pair name.
5. In the Primary Node area, configure the primary node. Do the following:
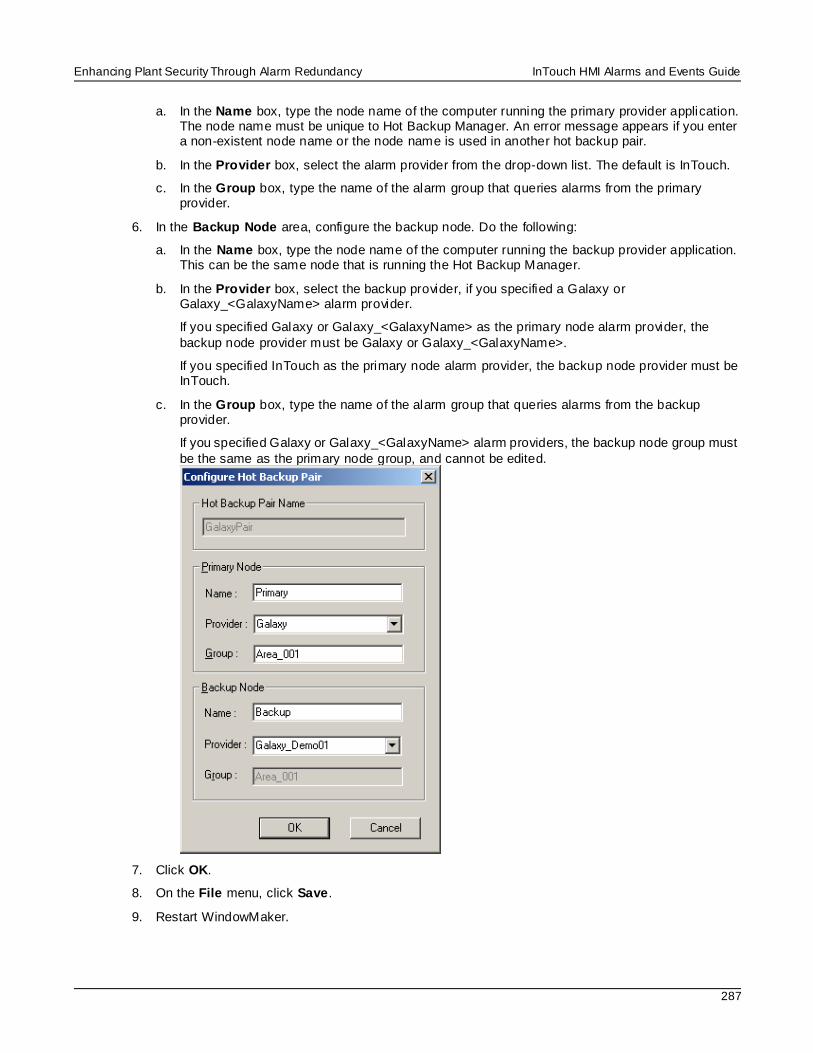
Enhancing Plant Security Through Alarm Redundancy InTouch HMI Alarms and Events Guide
287
a. In the Name box, type the node name of the computer running the primary provider application. The node name must be unique to Hot Backup Manager. An error message appears if you enter a non-existent node name or the node name is used in another hot backup pair.
b. In the Provider box, select the alarm provider from the drop-down list. The default is InTouch.
c. In the Group box, type the name of the alarm group that queries alarms from the primary provider.
6. In the Backup Node area, configure the backup node. Do the following:
a. In the Name box, type the node name of the computer running the backup provider application. This can be the same node that is running the Hot Backup Manager.
b. In the Provider box, select the backup provider, if you specified a Galaxy or Galaxy_<GalaxyName> alarm provider.
If you specified Galaxy or Galaxy_<GalaxyName> as the primary node alarm provider, the
backup node provider must be Galaxy or Galaxy_<GalaxyName>.
If you specified InTouch as the primary node alarm provider, the backup node provider must be InTouch.
c. In the Group box, type the name of the alarm group that queries alarms from the backup provider.
If you specified Galaxy or Galaxy_<GalaxyName> alarm providers, the backup node group must
be the same as the primary node group, and cannot be edited.
7. Click OK.
8. On the File menu, click Save.
9. Restart WindowMaker.
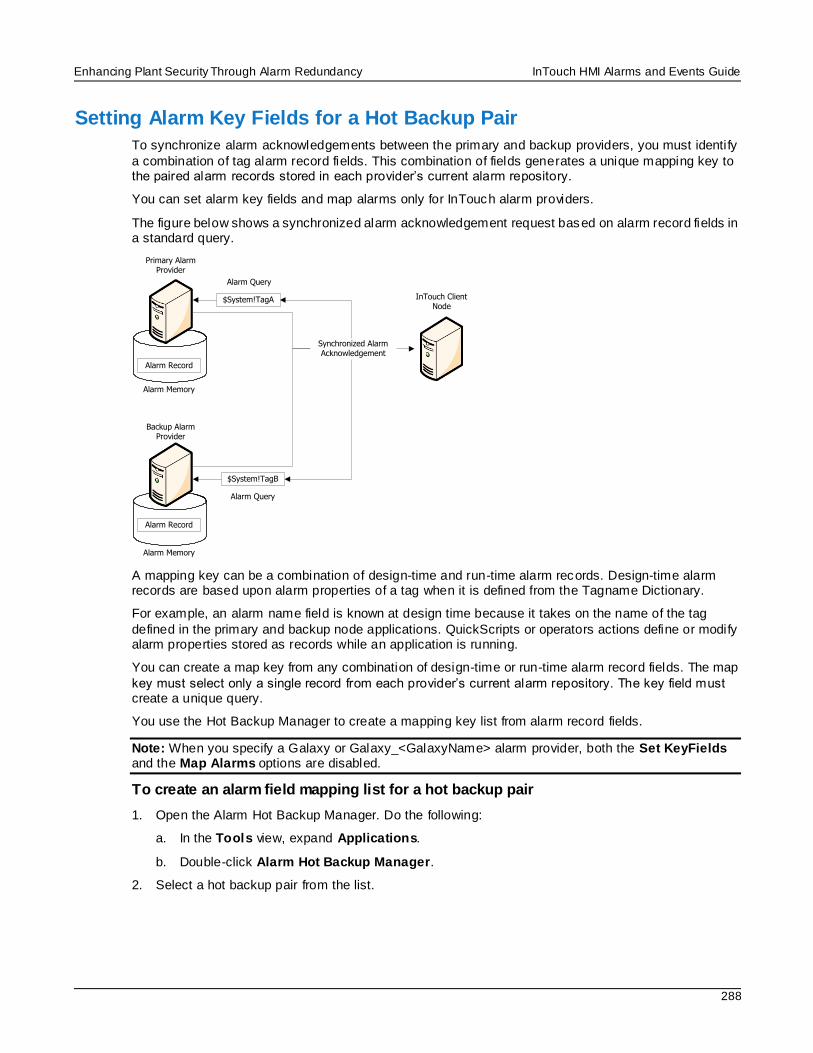
Enhancing Plant Security Through Alarm Redundancy InTouch HMI Alarms and Events Guide
288
Setting Alarm Key Fields for a Hot Backup Pair
To synchronize alarm acknowledgements between the primary and backup providers, you must identify
a combination of tag alarm record fields. This combination of fields generates a unique mapping key to the paired alarm records stored in each provider’s current alarm repository.
You can set alarm key fields and map alarms only for InTouch alarm providers.
The figure below shows a synchronized alarm acknowledgement request based on alarm record fields in a standard query.
Primary Alarm Provider
Backup Alarm Provider
InTouch Client Node
Alarm Memory
Alarm Record
Alarm Memory
Alarm Record
Alarm Query
$System!TagB
Alarm Query
$System!TagA
Synchronized Alarm Acknowledgement
A mapping key can be a combination of design-time and run-time alarm records. Design-time alarm records are based upon alarm properties of a tag when it is defined from the Tagname Dictionary.
For example, an alarm name field is known at design time because it takes on the name of the tag
defined in the primary and backup node applications. QuickScripts or operators actions define or modify alarm properties stored as records while an application is running.
You can create a map key from any combination of design-time or run-time alarm record fields. The map
key must select only a single record from each provider’s current alarm repository. The key field must create a unique query.
You use the Hot Backup Manager to create a mapping key list from alarm record fields.
Note: When you specify a Galaxy or Galaxy_<GalaxyName> alarm provider, both the Set KeyFields and the Map Alarms options are disabled.
To create an alarm field mapping list for a hot backup pair
1. Open the Alarm Hot Backup Manager. Do the following:
a. In the Tools view, expand Applications.
b. Double-click Alarm Hot Backup Manager.
2. Select a hot backup pair from the list.
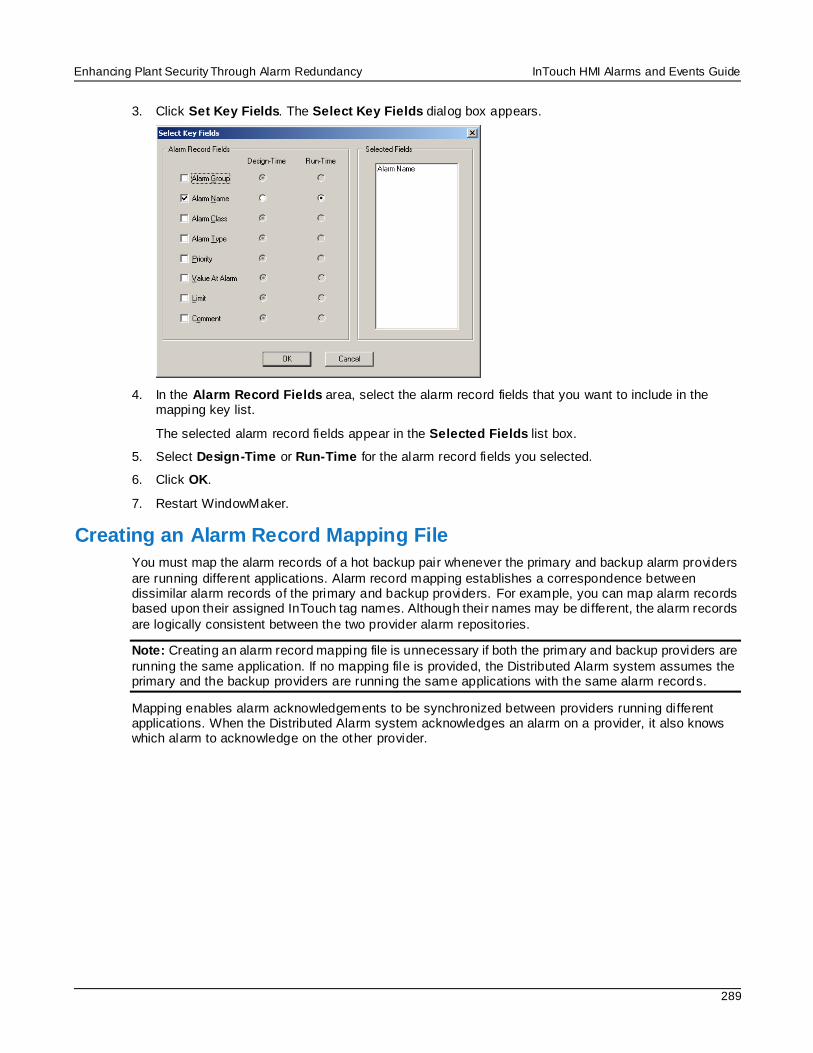
Enhancing Plant Security Through Alarm Redundancy InTouch HMI Alarms and Events Guide
289
3. Click Set Key Fields. The Select Key Fields dialog box appears.
4. In the Alarm Record Fields area, select the alarm record fields that you want to include in the mapping key list.
The selected alarm record fields appear in the Selected Fields list box.
5. Select Design-Time or Run-Time for the alarm record fields you selected.
6. Click OK.
7. Restart WindowMaker.
Creating an Alarm Record Mapping File
You must map the alarm records of a hot backup pair whenever the primary and backup alarm providers
are running different applications. Alarm record mapping establishes a correspondence between dissimilar alarm records of the primary and backup providers. For example, you can map alarm records based upon their assigned InTouch tag names. Although their names may be different, the alarm records
are logically consistent between the two provider alarm repositories.
Note: Creating an alarm record mapping file is unnecessary if both the primary and backup providers are
running the same application. If no mapping file is provided, the Distributed Alarm system assumes the primary and the backup providers are running the same applications with the same alarm records.
Mapping enables alarm acknowledgements to be synchronized between providers running different applications. When the Distributed Alarm system acknowledges an alarm on a provider, it also knows which alarm to acknowledge on the other provider.
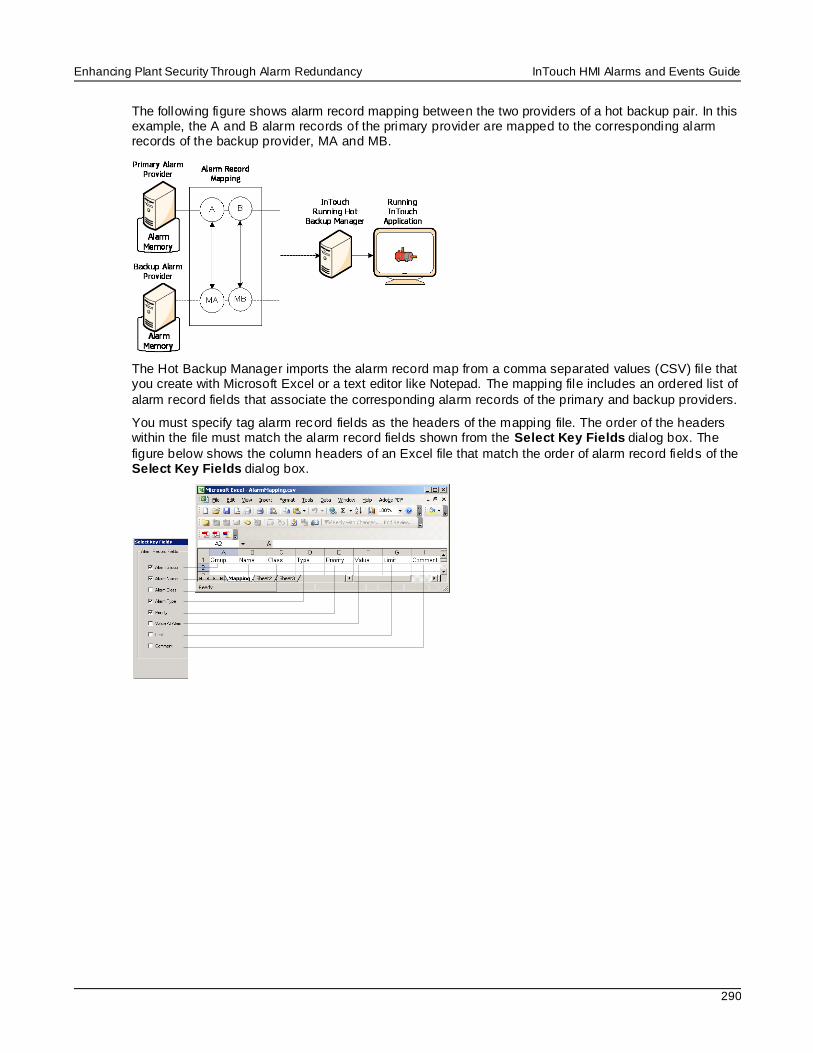
Enhancing Plant Security Through Alarm Redundancy InTouch HMI Alarms and Events Guide
290
The following figure shows alarm record mapping between the two providers of a hot backup pair. In this example, the A and B alarm records of the primary provider are mapped to the corresponding alarm records of the backup provider, MA and MB.
The Hot Backup Manager imports the alarm record map from a comma separated values (CSV) file that you create with Microsoft Excel or a text editor like Notepad. The mapping file includes an ordered list of
alarm record fields that associate the corresponding alarm records of the primary and backup providers.
You must specify tag alarm record fields as the headers of the mapping file. The order of the headers within the file must match the alarm record fields shown from the Select Key Fields dialog box. The
figure below shows the column headers of an Excel file that match the order of alarm record fields of the Select Key Fields dialog box.
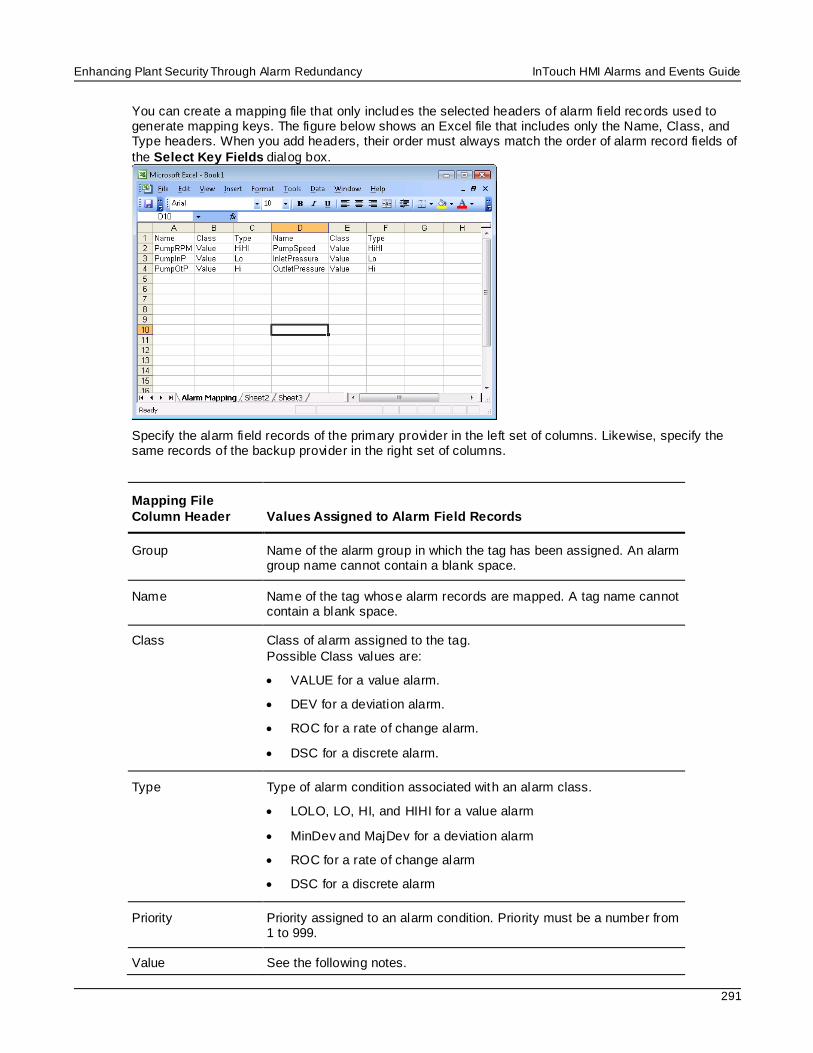
Enhancing Plant Security Through Alarm Redundancy InTouch HMI Alarms and Events Guide
291
You can create a mapping file that only includes the selected headers of alarm field records used to generate mapping keys. The figure below shows an Excel file that includes only the Name, Class, and Type headers. When you add headers, their order must always match the order of alarm record fields of
the Select Key Fields dialog box.
Specify the alarm field records of the primary provider in the left set of columns. Likewise, specify the same records of the backup provider in the right set of columns.
Mapping File
Column Header Values Assigned to Alarm Field Records
Group Name of the alarm group in which the tag has been assigned. An alarm group name cannot contain a blank space.
Name Name of the tag whose alarm records are mapped. A tag name cannot contain a blank space.
Class Class of alarm assigned to the tag.
Possible Class values are:
VALUE for a value alarm.
DEV for a deviation alarm.
ROC for a rate of change alarm.
DSC for a discrete alarm.
Type Type of alarm condition associated with an alarm class.
LOLO, LO, HI, and HIHI for a value alarm
MinDev and MajDev for a deviation alarm
ROC for a rate of change alarm
DSC for a discrete alarm
Priority Priority assigned to an alarm condition. Priority must be a number from 1 to 999.
Value See the following notes.
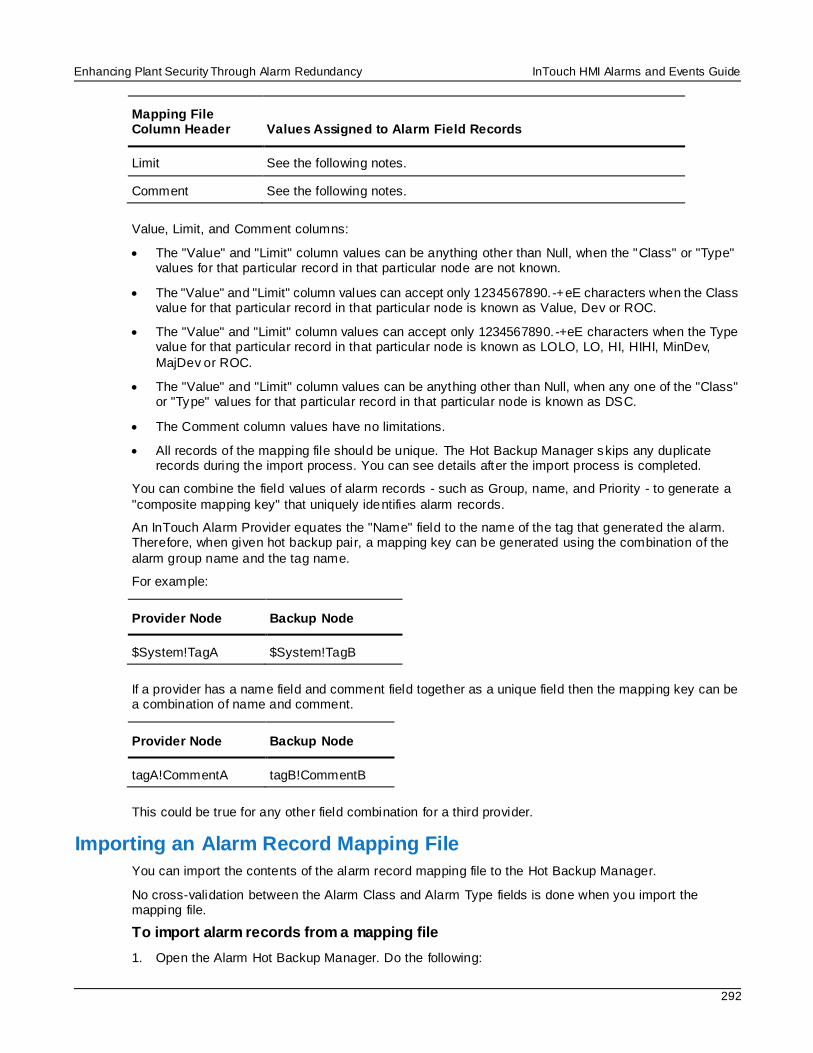
Enhancing Plant Security Through Alarm Redundancy InTouch HMI Alarms and Events Guide
292
Mapping File Column Header Values Assigned to Alarm Field Records
Limit See the following notes.
Comment See the following notes.
Value, Limit, and Comment columns:
The "Value" and "Limit" column values can be anything other than Null, when the "Class" or "Type" values for that particular record in that particular node are not known.
The "Value" and "Limit" column values can accept only 1234567890.-+eE characters when the Class value for that particular record in that particular node is known as Value, Dev or ROC.
The "Value" and "Limit" column values can accept only 1234567890.-+eE characters when the Type value for that particular record in that particular node is known as LOLO, LO, HI, HIHI, MinDev,
MajDev or ROC.
The "Value" and "Limit" column values can be anything other than Null, when any one of the "Class" or "Type" values for that particular record in that particular node is known as DSC.
The Comment column values have no limitations.
All records of the mapping file should be unique. The Hot Backup Manager skips any duplicate records during the import process. You can see details after the import process is completed.
You can combine the field values of alarm records - such as Group, name, and Priority - to generate a
"composite mapping key" that uniquely identifies alarm records.
An InTouch Alarm Provider equates the "Name" field to the name of the tag that generated the alarm. Therefore, when given hot backup pair, a mapping key can be generated using the combination of the
alarm group name and the tag name.
For example:
Provider Node Backup Node
$System!TagA $System!TagB
If a provider has a name field and comment field together as a unique field then the mapping key can be a combination of name and comment.
Provider Node Backup Node
tagA!CommentA tagB!CommentB
This could be true for any other field combination for a third provider.
Importing an Alarm Record Mapping File
You can import the contents of the alarm record mapping file to the Hot Backup Manager.
No cross-validation between the Alarm Class and Alarm Type fields is done when you import the mapping file.
To import alarm records from a mapping file
1. Open the Alarm Hot Backup Manager. Do the following:
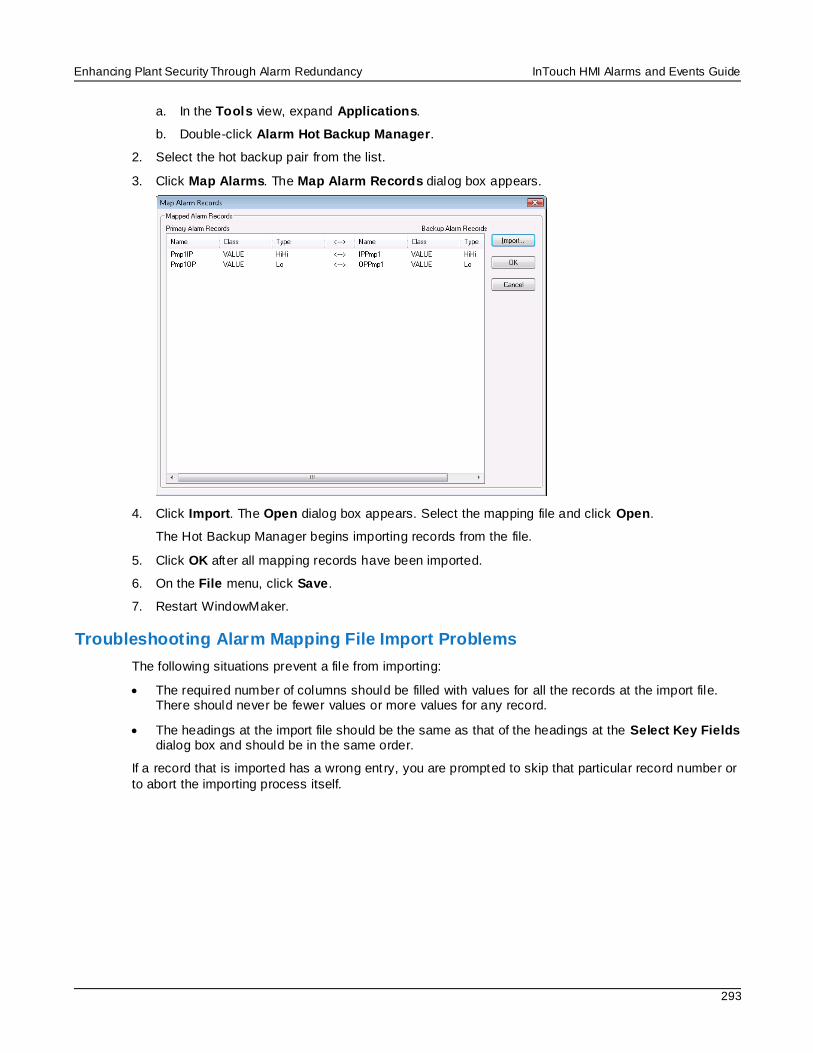
Enhancing Plant Security Through Alarm Redundancy InTouch HMI Alarms and Events Guide
293
a. In the Tools view, expand Applications.
b. Double-click Alarm Hot Backup Manager.
2. Select the hot backup pair from the list.
3. Click Map Alarms. The Map Alarm Records dialog box appears.
4. Click Import. The Open dialog box appears. Select the mapping file and click Open.
The Hot Backup Manager begins importing records from the file.
5. Click OK after all mapping records have been imported.
6. On the File menu, click Save.
7. Restart WindowMaker.
Troubleshooting Alarm Mapping File Import Problems
The following situations prevent a file from importing:
The required number of columns should be filled with values for all the records at the import file. There should never be fewer values or more values for any record.
The headings at the import file should be the same as that of the headings at the Select Key Fields dialog box and should be in the same order.
If a record that is imported has a wrong entry, you are prompted to skip that particular record number or
to abort the importing process itself.
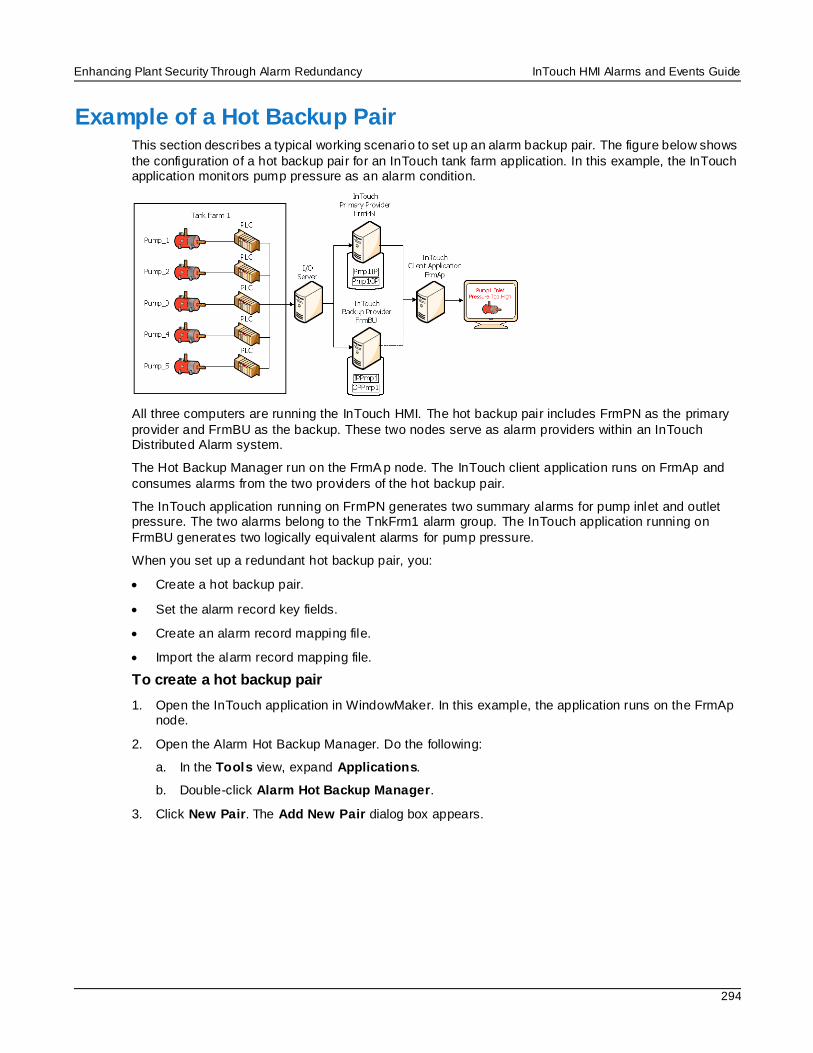
Enhancing Plant Security Through Alarm Redundancy InTouch HMI Alarms and Events Guide
294
Example of a Hot Backup Pair This section describes a typical working scenario to set up an alarm backup pair. The figure below shows
the configuration of a hot backup pair for an InTouch tank farm application. In this example, the InTouch application monitors pump pressure as an alarm condition.
All three computers are running the InTouch HMI. The hot backup pair includes FrmPN as the primary
provider and FrmBU as the backup. These two nodes serve as alarm providers within an InTouch Distributed Alarm system.
The Hot Backup Manager run on the FrmA p node. The InTouch client application runs on FrmAp and
consumes alarms from the two providers of the hot backup pair.
The InTouch application running on FrmPN generates two summary alarms for pump inlet and outlet pressure. The two alarms belong to the TnkFrm1 alarm group. The InTouch application running on
FrmBU generates two logically equivalent alarms for pump pressure.
When you set up a redundant hot backup pair, you:
Create a hot backup pair.
Set the alarm record key fields.
Create an alarm record mapping file.
Import the alarm record mapping file.
To create a hot backup pair
1. Open the InTouch application in WindowMaker. In this example, the application runs on the FrmAp node.
2. Open the Alarm Hot Backup Manager. Do the following:
a. In the Tools view, expand Applications.
b. Double-click Alarm Hot Backup Manager.
3. Click New Pair. The Add New Pair dialog box appears.
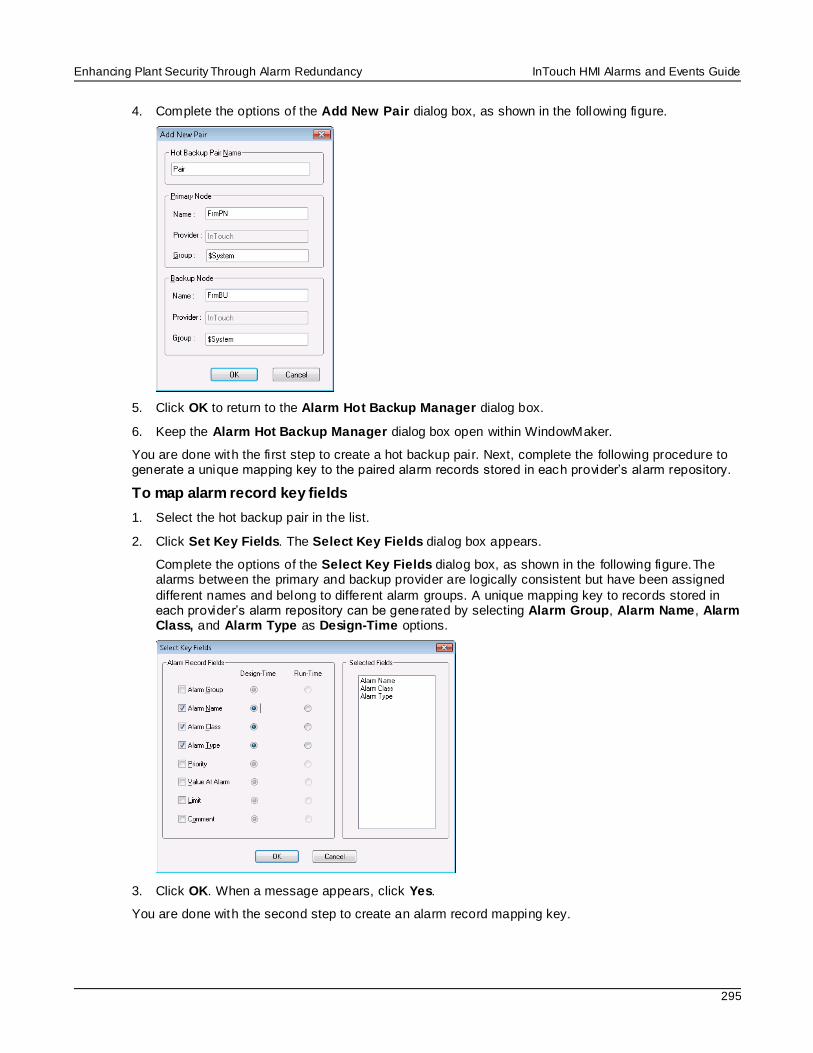
Enhancing Plant Security Through Alarm Redundancy InTouch HMI Alarms and Events Guide
295
4. Complete the options of the Add New Pair dialog box, as shown in the following figure.
5. Click OK to return to the Alarm Hot Backup Manager dialog box.
6. Keep the Alarm Hot Backup Manager dialog box open within WindowMaker.
You are done with the first step to create a hot backup pair. Next, complete the following procedure to generate a unique mapping key to the paired alarm records stored in each provider’s alarm repository.
To map alarm record key fields
1. Select the hot backup pair in the list.
2. Click Set Key Fields. The Select Key Fields dialog box appears.
Complete the options of the Select Key Fields dialog box, as shown in the following figure.The alarms between the primary and backup provider are logically consistent but have been assigned
different names and belong to different alarm groups. A unique mapping key to records stored in each provider’s alarm repository can be gene rated by selecting Alarm Group, Alarm Name, Alarm Class, and Alarm Type as Design-Time options.
3. Click OK. When a message appears, click Yes.
You are done with the second step to create an alarm record mapping key.
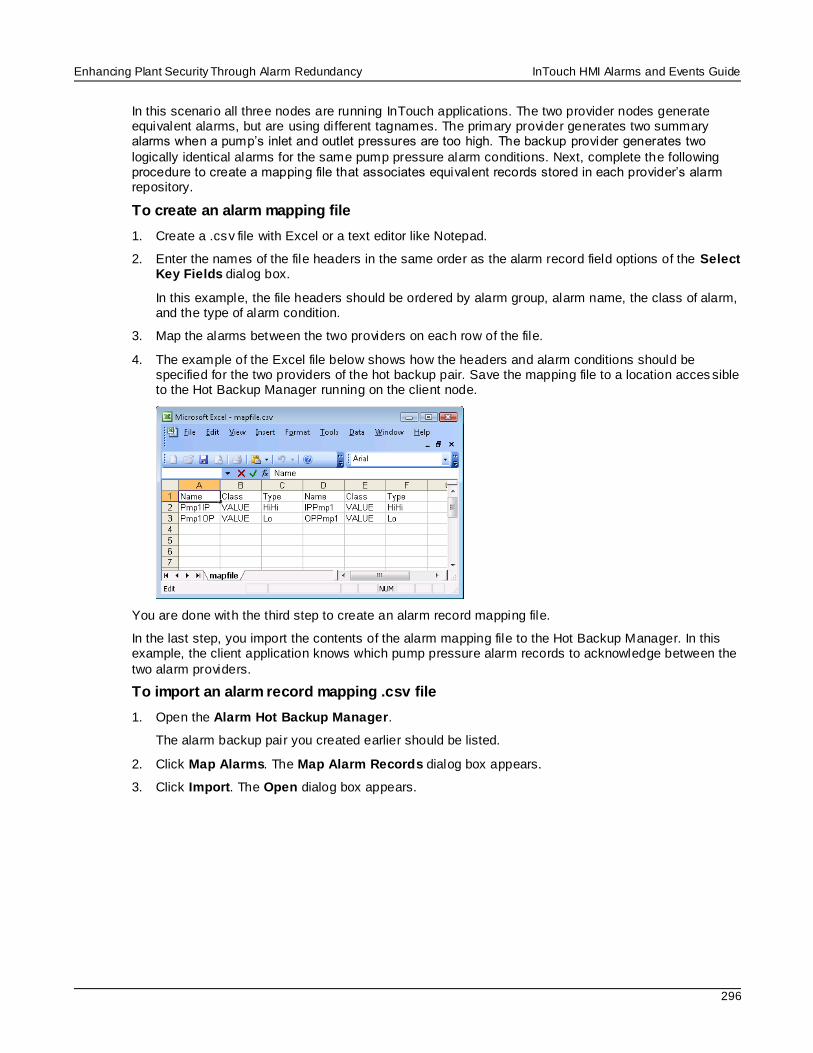
Enhancing Plant Security Through Alarm Redundancy InTouch HMI Alarms and Events Guide
296
In this scenario all three nodes are running InTouch applications. The two provider nodes generate equivalent alarms, but are using different tagnames. The primary provider generates two summary alarms when a pump’s inlet and outlet pressures are too high. The backup provider generates two
logically identical alarms for the same pump pressure alarm conditions. Next, complete the following procedure to create a mapping file that associates equivalent records stored in each provider’s alarm repository.
To create an alarm mapping file
1. Create a .csv file with Excel or a text editor like Notepad.
2. Enter the names of the file headers in the same order as the alarm record field options of the Select Key Fields dialog box.
In this example, the file headers should be ordered by alarm group, alarm name, the class of alarm, and the type of alarm condition.
3. Map the alarms between the two providers on each row of the file.
4. The example of the Excel file below shows how the headers and alarm conditions should be specified for the two providers of the hot backup pair. Save the mapping file to a location acces sible to the Hot Backup Manager running on the client node.
You are done with the third step to create an alarm record mapping file.
In the last step, you import the contents of the alarm mapping file to the Hot Backup Manager. In this example, the client application knows which pump pressure alarm records to acknowledge between the
two alarm providers.
To import an alarm record mapping .csv file
1. Open the Alarm Hot Backup Manager.
The alarm backup pair you created earlier should be listed.
2. Click Map Alarms. The Map Alarm Records dialog box appears.
3. Click Import. The Open dialog box appears.
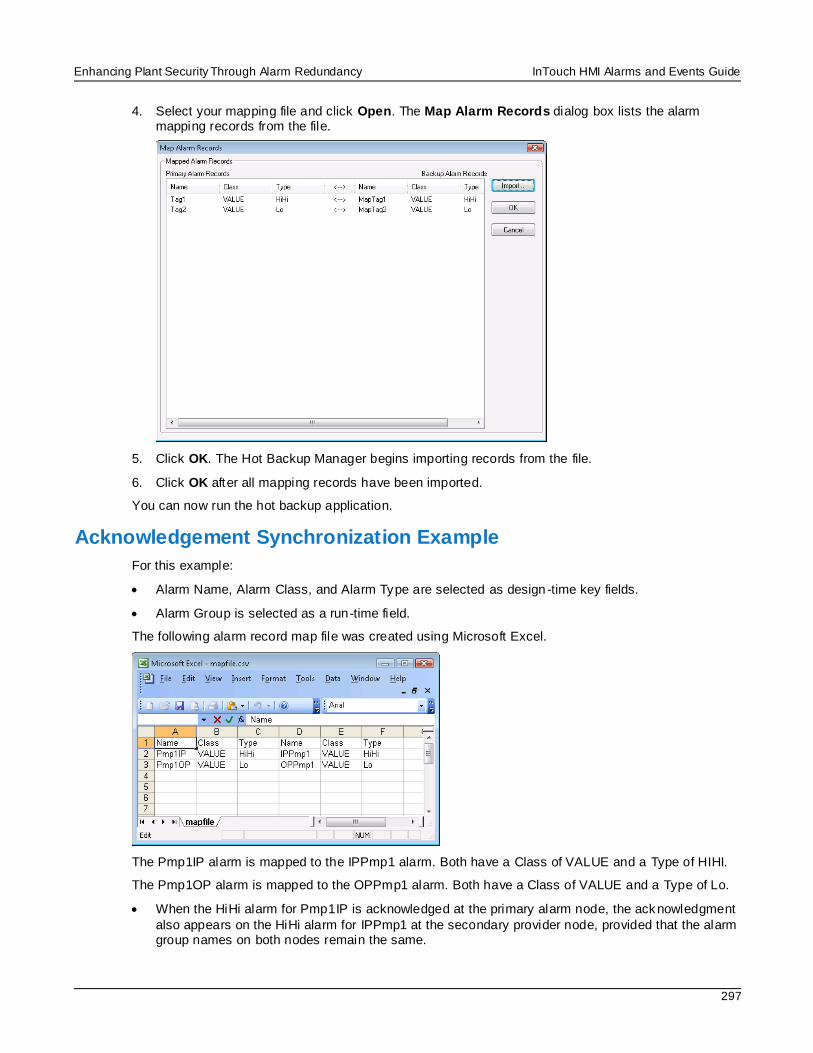
Enhancing Plant Security Through Alarm Redundancy InTouch HMI Alarms and Events Guide
297
4. Select your mapping file and click Open. The Map Alarm Records dialog box lists the alarm mapping records from the file.
5. Click OK. The Hot Backup Manager begins importing records from the file.
6. Click OK after all mapping records have been imported.
You can now run the hot backup application.
Acknowledgement Synchronization Example
For this example:
Alarm Name, Alarm Class, and Alarm Type are selected as design -time key fields.
Alarm Group is selected as a run-time field.
The following alarm record map file was created using Microsoft Excel.
The Pmp1IP alarm is mapped to the IPPmp1 alarm. Both have a Class of VALUE and a Type of HIHI.
The Pmp1OP alarm is mapped to the OPPmp1 alarm. Both have a Class of VALUE and a Type of Lo.
When the HiHi alarm for Pmp1IP is acknowledged at the primary alarm node, the acknowledgment
also appears on the HiHi alarm for IPPmp1 at the secondary provider node, provided that the alarm group names on both nodes remain the same.
Enhancing Plant Security Through Alarm Redundancy InTouch HMI Alarms and Events Guide
298
When the Low alarm for Pmp1OP is acknowledged at the primary alarm node, the acknowledgment also appears on the Low alarm for OPPmp1 at the secondary provider node, provided that the alarm group names on both nodes remain the same.
Acknowledgement synchronization occurs only if the design -time and run-time mapping match.
You can select any combination of design-time and run-time alarm record fields for mapping. However, make sure that the mappings do not result in multiple references.
For example, if two alarm record fields such as Class and Priority are selected, it is very possible that more than one alarm matches the criteria. In such a case, the Hot Backup synchronization is not guaranteed to work. In the process of propagating the acknowledgment, a random alarm that matches
the criteria may also be picked up, while other matching alarms may be left unacknowledged.
Notes Regarding Hot Backup Pairs You can use a hot backup only for InTouch 7.11 and later clients.
Expanded summary alarms or event-oriented alarms are not supported.
If the Distributed Alarm Display object queries a hot backup pair and then queries the primary provider again separately, the Distributed Alarm Display object shows duplicate records.
Do not configure a provider as a primary or secondary of more than one hot backup pair.
If a record at the primary provider is acknowledged and the secondary provider (which was down
when the acknowledgment took place) starts up at a later time, the time stamp of the acknowledged record is identical with the record in the primary provider.
The alarm consumer querying a hot backup pair shows the individual node name as the provider.
You can choose any combination of design-time and run-time alarm record fields for mapping. However, be sure that the mappings do not result in multiple references.
When mapping the Value and Limit key fields, the values are rounded off to the fourth decimal place and then mapped.
An alarm record that does not have the specific combination of design -time and run-time mapping uses the default runtime mapping.
InTouch HMI Alarms and Events Guide
299
In This Chapter
About Creating an Alarm Audit Trail ............................................................................................. 299 Acknowledging Alarms that Require Authentication ....................................................................... 299
About Creating an Alarm Audit Trail When you configure an InTouch alarm provider to use either operating system or ArchestrA authentication and an alarm occurs, the alarm display contains the full name of the operator in the
Operator Full Name column, assuming the operator is logged on.
For example, if a user is registered in the PLANT_FLOOR domain with a user ID of JohnS and a full name of John Smith, the Operator Full Name column contains John Smith. If the alarm is subsequently
acknowledged, and the node performing the acknowledgement is set to use operating system or ArchestrA security, the Operator Full Name column is updated to show the full name of the acknowledgement operator. Otherwise, the alarm display shows a computer name concatenated with
whatever is in the $Operator tag.
InTouch security can include an operator’s full name with alarm acknowledgements. This is also possible on records pertaining to alarm detection. In most organizations, a logon ID is not a person's full name, but
rather an abbreviation or role classification.
When you configure operating system authentication for the provider and consumer InTouch nodes:
The alarm display shows full names when alarms are generated and when acknowledgements are
performed.
The alarm printer prints full names when alarms are generated and when acknowledgements are performed.
The Alarm DB Logger records domain name, log on user ID, and full user name with each alarm
record for both Operator and AckOperator fields. This allows for unique identification even if an organization has two employees with identical full names.
The Operator field shows the user account in the DomainName\UserName format.
Acknowledging Alarms that Require Authentication Some industries require that an explicit "signature" or user authentication be performed when acknowledging certain types of alarms. InTouch takes advantage of the Alarm Client control or script functionality to perform this type of authentication operation. The alarm priority is the key factor used to
determine if the alarm or alarms to be acknowledged require a specific user signature.
You can configure alarms to require authentication so that users can acknowledge them. Alarms configured with authentication required means that the run time user must enter his or her credentials in
order to acknowledge the alarm or group of alarms. If the system is configured with a smart card reader, the user can enter smart card credentials.
This section describes how to acknowledge alarms in WindowViewer that require authentication.
CHAPTER 14
Creating an Alarm Audit Trail

Creating an Alarm Audit Trail InTouch HMI Alarms and Events Guide
300
For information about configuring the Alarm Client to require authentication for acknowledging alarms, see the Guide to the ArchestrA Alarm Control, Chapter 3, "Using the Alarm Control at Run Time".
For information about using the SignedAlarmAck() function to configure authentication behavior for
acknowledging alarms, see the Creating and Managing ArchestrA Graphics User’s Guide, Chapter 11 "Adding and Maintaining Symbol Scripts".
About Acknowledging Alarms in WindowViewer that Require
Authentication
Acknowledging alarms configured for authentication requires the following:
Security must be enabled for the Galaxy.
Security must be enabled for a deployed InTouchViewApp.
The InTouchViewApp must include at least one Alarm Client control configured to display alarms and events and to require a signature (authentication) for alarm acknowledgement, and with minimum
and maximum values for the alarm priority range.
Run-time operators must have the appropriate user name, password, and operational permissions configured within the Galaxy: An operator must have sufficient privileges to run WindowViewer.
Regardless of who is currently logged on as the run-time user for the InTouch application, alarms configured to require a signature for alarm acknowledgement always require user authentication. This does not affect the session of the logged-on user.
Alarm Acknowledgement Basic Run-Time Behavior
When the operator selects one or more alarms and attempts to acknowledge them:
The Alarm Client will check whether it has been configured to require acknowledgement signatures. If so, it checks whether any selected alarm falls within the configured priority range. If so, it requires
a signature to acknowledge all the selected alarms.
If no signature is required, a pop-up acknowledgement dialog displays. It may have a text box for an acknowledgement comment if so configured.
If the operator credentials are valid, the Alarm Client attempts to acknowledge all of the selected alarms.
In the Alarm Client grid, the signing user is identified as the person who acknowledged all of the selected alarms.
The Alarm Client prefixes the text "Signed ACK" at the beginning of the acknowledgement comment to indicate that this was a signed acknowledgement.
If none of the selected alarms had priority in the required range, the Alarm Client prefixes the text
"Std ACK" at the beginning of the acknowledgement comment to indicate that this was a standard acknowledgement.
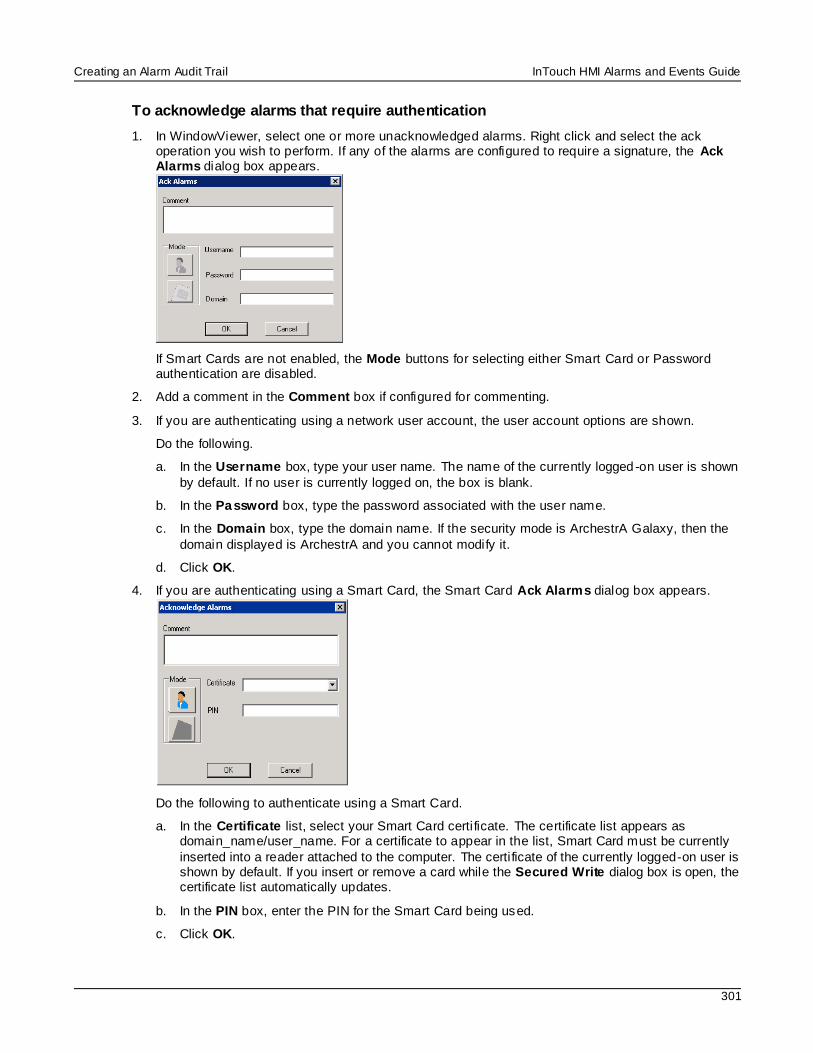
Creating an Alarm Audit Trail InTouch HMI Alarms and Events Guide
301
To acknowledge alarms that require authentication
1. In WindowViewer, select one or more unacknowledged alarms. Right click and select the ack operation you wish to perform. If any of the alarms are configured to require a signature, the Ack Alarms dialog box appears.
If Smart Cards are not enabled, the Mode buttons for selecting either Smart Card or Password authentication are disabled.
2. Add a comment in the Comment box if configured for commenting.
3. If you are authenticating using a network user account, the user account options are shown.
Do the following.
a. In the Username box, type your user name. The name of the currently logged-on user is shown
by default. If no user is currently logged on, the box is blank.
b. In the Password box, type the password associated with the user name.
c. In the Domain box, type the domain name. If the security mode is ArchestrA Galaxy, then the
domain displayed is ArchestrA and you cannot modify it.
d. Click OK.
4. If you are authenticating using a Smart Card, the Smart Card Ack Alarms dialog box appears.
Do the following to authenticate using a Smart Card.
a. In the Certificate list, select your Smart Card certi ficate. The certificate list appears as domain_name/user_name. For a certificate to appear in the list, Smart Card must be currently
inserted into a reader attached to the computer. The certi ficate of the currently logged-on user is shown by default. If you insert or remove a card while the Secured Write dialog box is open, the certificate list automatically updates.
b. In the PIN box, enter the PIN for the Smart Card being used.
c. Click OK.

Creating an Alarm Audit Trail InTouch HMI Alarms and Events Guide
302
To authenticate using your name, password, and domain instead, click the Mode button. Go to Step 3.
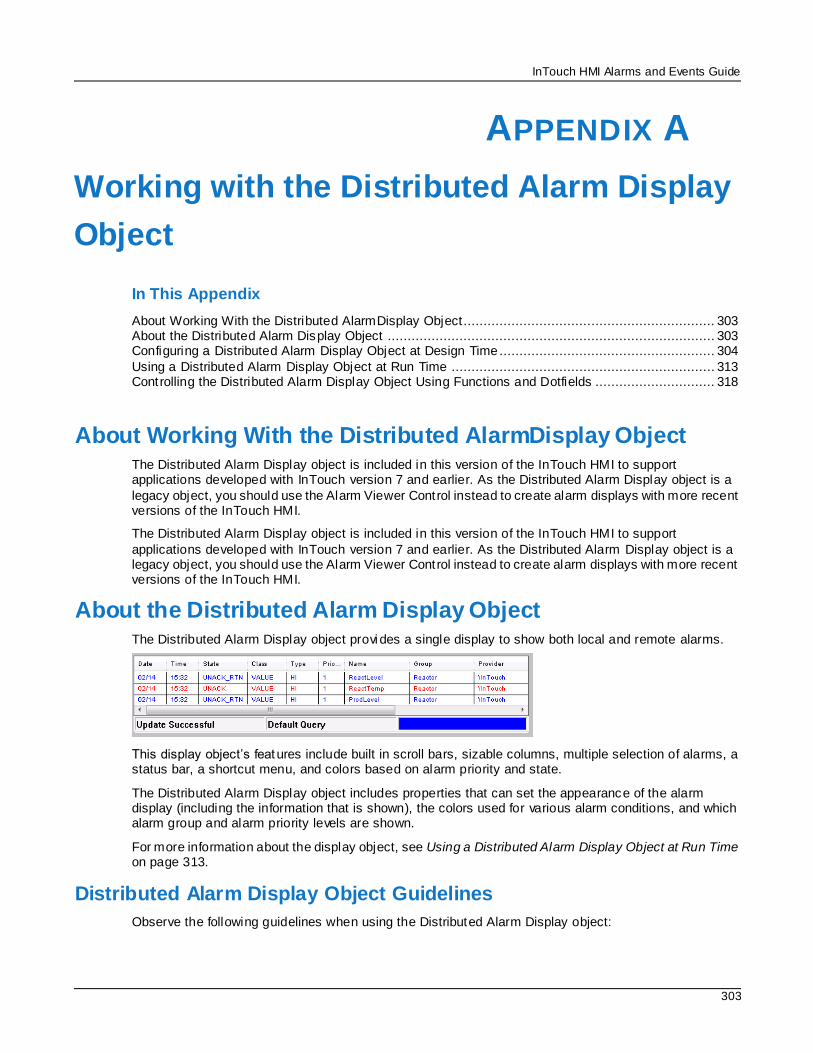
InTouch HMI Alarms and Events Guide
303
In This Appendix
About Working With the Distributed AlarmDisplay Object............................................................... 303 About the Distributed Alarm Display Object .................................................................................. 303 Configuring a Distributed Alarm Display Object at Design Time ...................................................... 304
Using a Distributed Alarm Display Object at Run Time .................................................................. 313 Controlling the Distributed Alarm Display Object Using Functions and Dotfields .............................. 318
About Working With the Distributed AlarmDisplay Object The Distributed Alarm Display object is included in this version of the InTouch HMI to support applications developed with InTouch version 7 and earlier. As the Distributed Alarm Display object is a
legacy object, you should use the Alarm Viewer Control instead to create alarm displays with more recent versions of the InTouch HMI.
The Distributed Alarm Display object is included in this version of the InTouch HMI to support
applications developed with InTouch version 7 and earlier. As the Distributed Alarm Display object is a legacy object, you should use the Alarm Viewer Control instead to create alarm displays with more recent versions of the InTouch HMI.
About the Distributed Alarm Display Object The Distributed Alarm Display object provi des a single display to show both local and remote alarms.
This display object’s features include built in scroll bars, sizable columns, multiple selection of alarms, a status bar, a shortcut menu, and colors based on alarm priority and state.
The Distributed Alarm Display object includes properties that can set the appearance of the alarm display (including the information that is shown), the colors used for various alarm conditions, and which alarm group and alarm priority levels are shown.
For more information about the display object, see Using a Distributed Alarm Display Object at Run Time on page 313.
Distributed Alarm Display Object Guidelines
Observe the following guidelines when using the Distributed Alarm Display object:
APPENDIX A
Working with the Distributed Alarm Display
Object
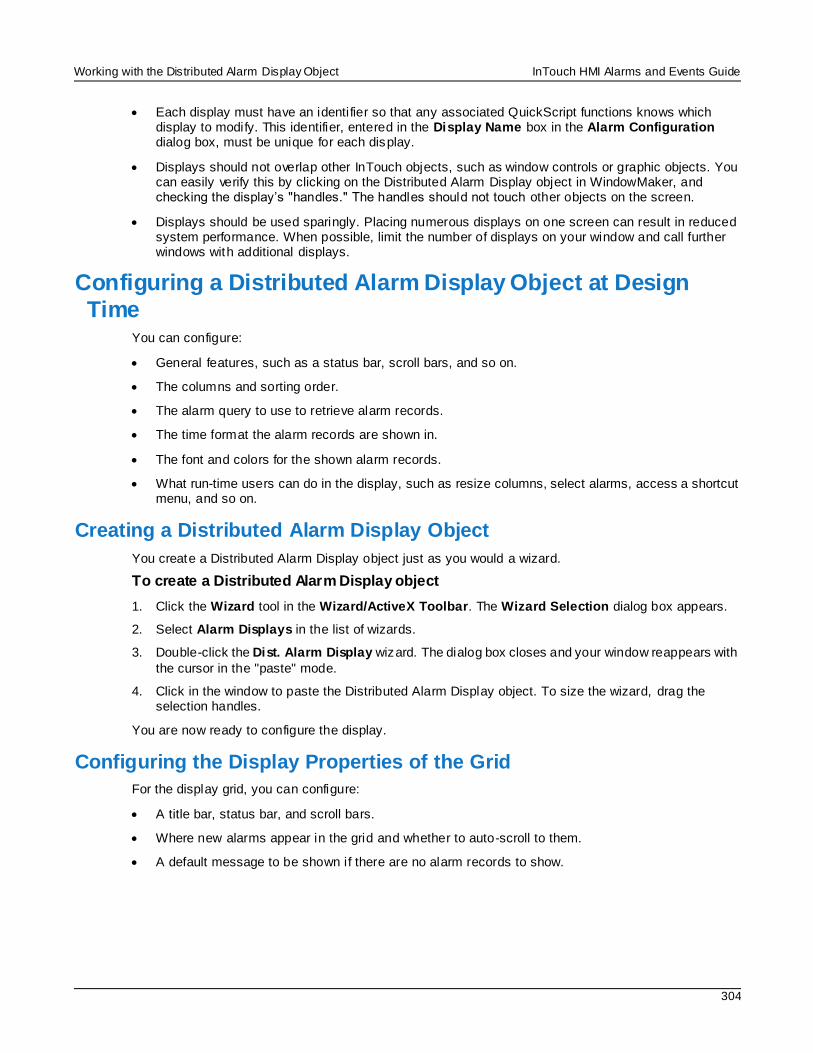
Working with the Distributed Alarm Display Object InTouch HMI Alarms and Events Guide
304
Each display must have an identifier so that any associated QuickScript functions knows which display to modify. This identifier, entered in the Display Name box in the Alarm Configuration dialog box, must be unique for each display.
Displays should not overlap other InTouch objects, such as window controls or graphic objects. You can easily verify this by clicking on the Distributed Alarm Display object in WindowMaker, and checking the display’s "handles." The handles should not touch other objects on the screen.
Displays should be used sparingly. Placing numerous displays on one screen can result in reduced system performance. When possible, limit the number of displays on your window and call further windows with additional displays.
Configuring a Distributed Alarm Display Object at Design
Time You can configure:
General features, such as a status bar, scroll bars, and so on.
The columns and sorting order.
The alarm query to use to retrieve alarm records.
The time format the alarm records are shown in.
The font and colors for the shown alarm records.
What run-time users can do in the display, such as resize columns, select alarms, access a shortcut menu, and so on.
Creating a Distributed Alarm Display Object
You create a Distributed Alarm Display object just as you would a wizard.
To create a Distributed Alarm Display object
1. Click the Wizard tool in the Wizard/ActiveX Toolbar. The Wizard Selection dialog box appears.
2. Select Alarm Displays in the list of wizards.
3. Double-click the Dist. Alarm Display wizard. The dialog box closes and your window reappears with
the cursor in the "paste" mode.
4. Click in the window to paste the Distributed Alarm Display object. To size the wizard, drag the selection handles.
You are now ready to configure the display.
Configuring the Display Properties of the Grid
For the display grid, you can configure:
A title bar, status bar, and scroll bars.
Where new alarms appear in the grid and whether to auto-scroll to them.
A default message to be shown if there are no alarm records to show.
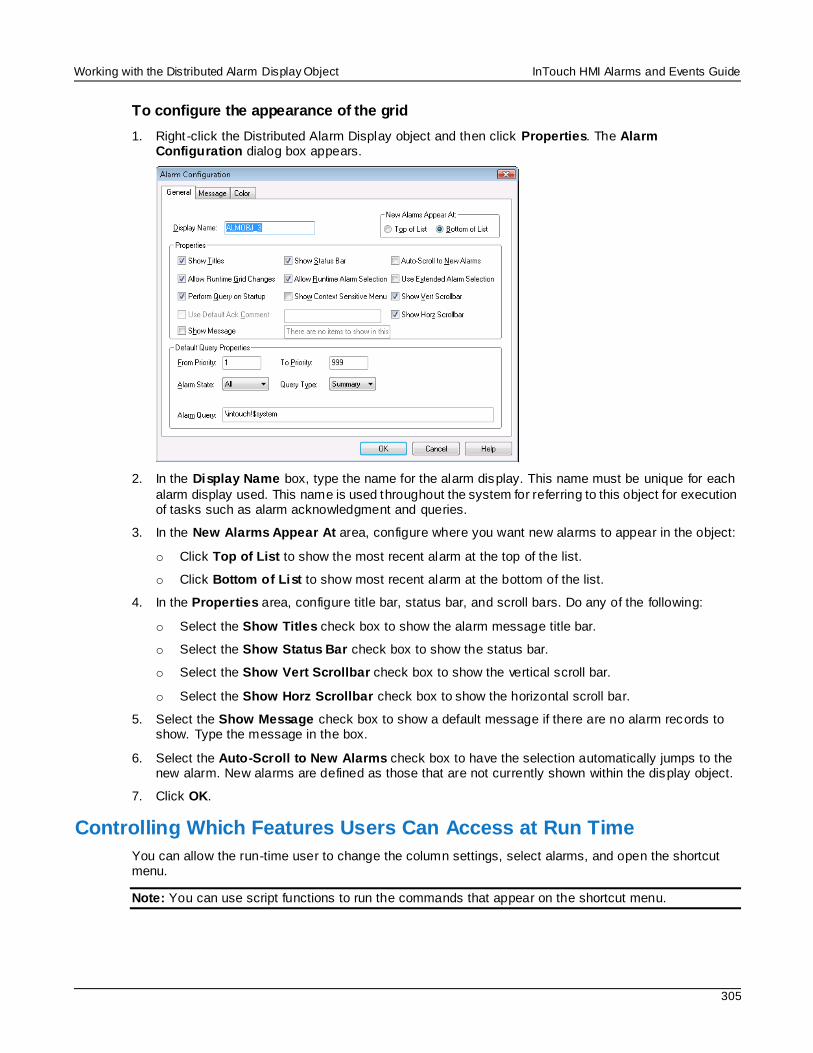
Working with the Distributed Alarm Display Object InTouch HMI Alarms and Events Guide
305
To configure the appearance of the grid
1. Right -click the Distributed Alarm Display object and then click Properties. The Alarm Configuration dialog box appears.
2. In the Display Name box, type the name for the alarm display. This name must be unique for each
alarm display used. This name is used throughout the system for referring to this object for execution of tasks such as alarm acknowledgment and queries.
3. In the New Alarms Appear At area, configure where you want new alarms to appear in the object:
o Click Top of List to show the most recent alarm at the top of the list.
o Click Bottom of List to show most recent alarm at the bottom of the list.
4. In the Properties area, configure title bar, status bar, and scroll bars. Do any of the following:
o Select the Show Titles check box to show the alarm message title bar.
o Select the Show Status Bar check box to show the status bar.
o Select the Show Vert Scrollbar check box to show the vertical scroll bar.
o Select the Show Horz Scrollbar check box to show the horizontal scroll bar.
5. Select the Show Message check box to show a default message if there are no alarm records to show. Type the message in the box.
6. Select the Auto-Scroll to New Alarms check box to have the selection automatically jumps to the new alarm. New alarms are defined as those that are not currently shown within the display object.
7. Click OK.
Controlling Which Features Users Can Access at Run Time
You can allow the run-time user to change the column settings, select alarms, and open the shortcut menu.
Note: You can use script functions to run the commands that appear on the shortcut menu.
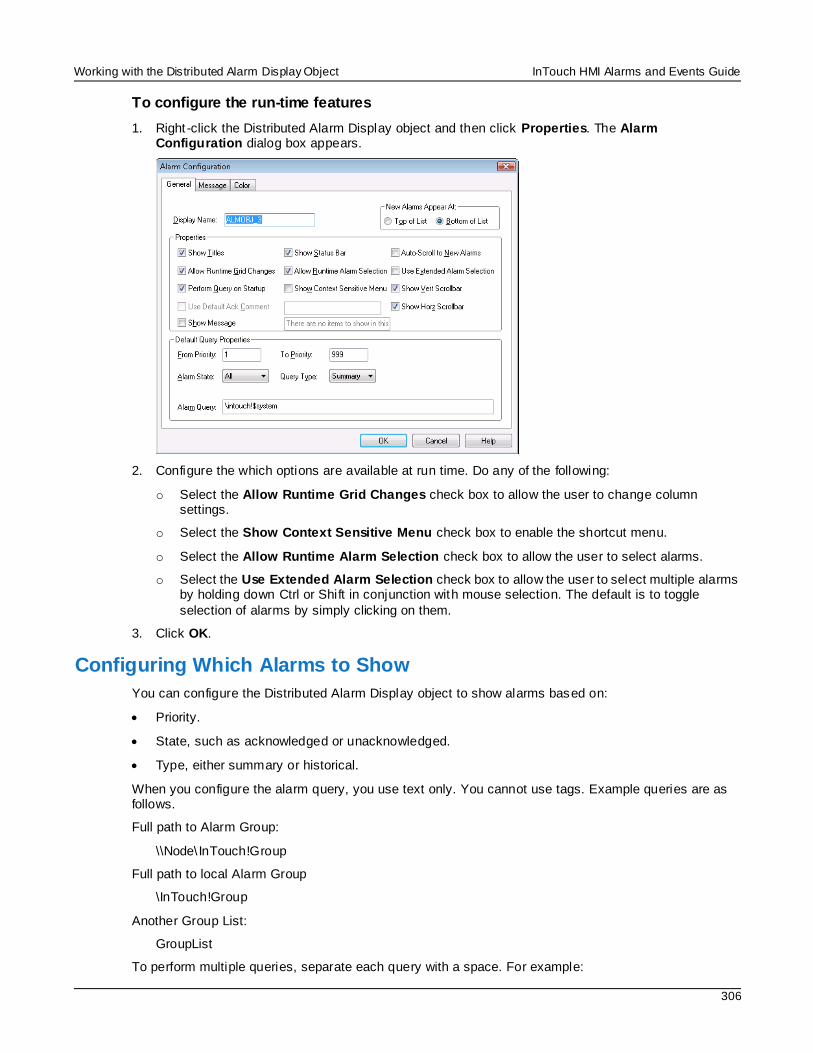
Working with the Distributed Alarm Display Object InTouch HMI Alarms and Events Guide
306
To configure the run-time features
1. Right -click the Distributed Alarm Display object and then click Properties. The Alarm Configuration dialog box appears.
2. Configure the which options are available at run time. Do any of the following:
o Select the Allow Runtime Grid Changes check box to allow the user to change column settings.
o Select the Show Context Sensitive Menu check box to enable the shortcut menu.
o Select the Allow Runtime Alarm Selection check box to allow the user to select alarms.
o Select the Use Extended Alarm Selection check box to allow the user to select multiple alarms by holding down Ctrl or Shift in conjunction with mouse selection. The default is to toggle
selection of alarms by simply clicking on them.
3. Click OK.
Configuring Which Alarms to Show
You can configure the Distributed Alarm Display object to show alarms based on:
Priority.
State, such as acknowledged or unacknowledged.
Type, either summary or historical.
When you configure the alarm query, you use text only. You cannot use tags. Example queries are as follows.
Full path to Alarm Group:
\\Node\ InTouch!Group
Full path to local Alarm Group
\InTouch!Group
Another Group List:
GroupList
To perform multiple queries, separate each query with a space. For example:
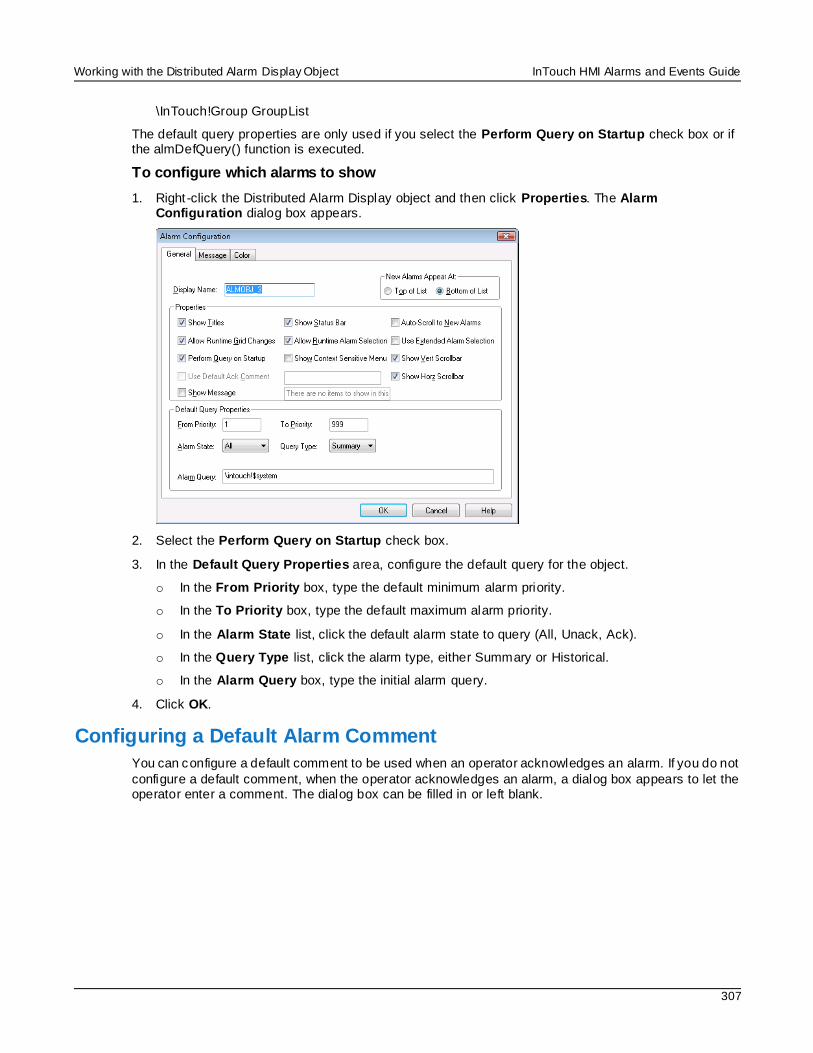
Working with the Distributed Alarm Display Object InTouch HMI Alarms and Events Guide
307
\InTouch!Group GroupList
The default query properties are only used if you select the Perform Query on Startup check box or if the almDefQuery() function is executed.
To configure which alarms to show
1. Right -click the Distributed Alarm Display object and then click Properties. The Alarm Configuration dialog box appears.
2. Select the Perform Query on Startup check box.
3. In the Default Query Properties area, configure the default query for the object.
o In the From Priority box, type the default minimum alarm priority.
o In the To Priority box, type the default maximum alarm priority.
o In the Alarm State list, click the default alarm state to query (All, Unack, Ack).
o In the Query Type list, click the alarm type, either Summary or Historical.
o In the Alarm Query box, type the initial alarm query.
4. Click OK.
Configuring a Default Alarm Comment
You can configure a default comment to be used when an operator acknowledges an alarm. If you do not
configure a default comment, when the operator acknowledges an alarm, a dialog box appears to let the operator enter a comment. The dialog box can be filled in or left blank.
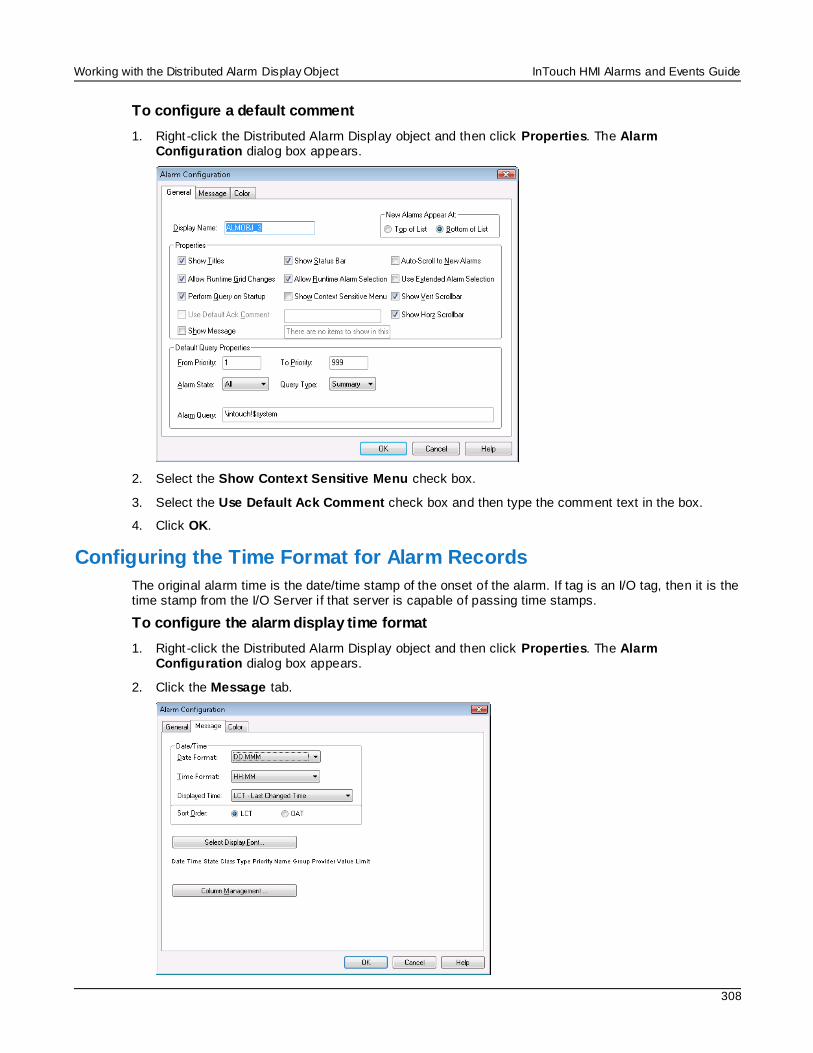
Working with the Distributed Alarm Display Object InTouch HMI Alarms and Events Guide
308
To configure a default comment
1. Right -click the Distributed Alarm Display object and then click Properties. The Alarm Configuration dialog box appears.
2. Select the Show Context Sensitive Menu check box.
3. Select the Use Default Ack Comment check box and then type the comment text in the box.
4. Click OK.
Configuring the Time Format for Alarm Records
The original alarm time is the date/time stamp of the onset of the alarm. If tag is an I/O tag, then it is the time stamp from the I/O Server i f that server is capable of passing time stamps.
To configure the alarm display time format
1. Right -click the Distributed Alarm Display object and then click Properties. The Alarm Configuration dialog box appears.
2. Click the Message tab.

Working with the Distributed Alarm Display Object InTouch HMI Alarms and Events Guide
309
3. In the Date Format list, click the format for the date. Available formats are:
Selection Shows Selection Shows
DD MMM 28 Feb MM/DD 02/28
DD MM YYYY 28 Feb 2007 MM/DD/YY 02/28/07
DD/MM 28/07 MMM DD Feb 28
DD/MM/YY 28/02/07 MMM DD YYYY Feb 28 2007
YY/MM/DD 07/02/28 YYYY/MM/DD 2007/02/28
4. In the Time Format list, click the format for the time. Use the values in this list as a template to specify the format of the time. For example, to specify the time as 10:24:30 AM, use HH:MM:SS AP. The template characters are as follows:
Character Description
AP Selects the AM/PM format. For example, three o’clock in the afternoon is shown as 3:00 PM. A time without this designation defaults to 24 hour
military time format. For example, three o’clock in the afternoon is shown as 15:00.
HH Shows the hour the alarm/event occurred.
MM Shows the minute the alarm/event occurred.
SS Shows the second the alarm/event occurred.
SSS Shows the millisecond the alarm/event occurred.
5. In the Sort Order area, configure the order in which you want the alarms to be sorted in the object:
o Click OAT to use the original alarm time, which is the date/time stamp of the onset of the alarm.
o Click LCT to use the last alarm change time, which is the date/time stamp of the most recent change of status for the instance of the alarm: onset of the alarm, change of sub-state, return to
normal, or acknowledgment.
6. Click OK.
Configuring the Font for Alarm Records
You can set the font for the records and the heading in the control.
To configure the font properties
1. Right -click the Distributed Alarm Display object and then click Properties. The Alarm Configuration dialog box appears.
2. Click the Message tab.
3. Click Select Display Font. The standard Windows Font dialog box appears.
4. Configure the font and then click OK.
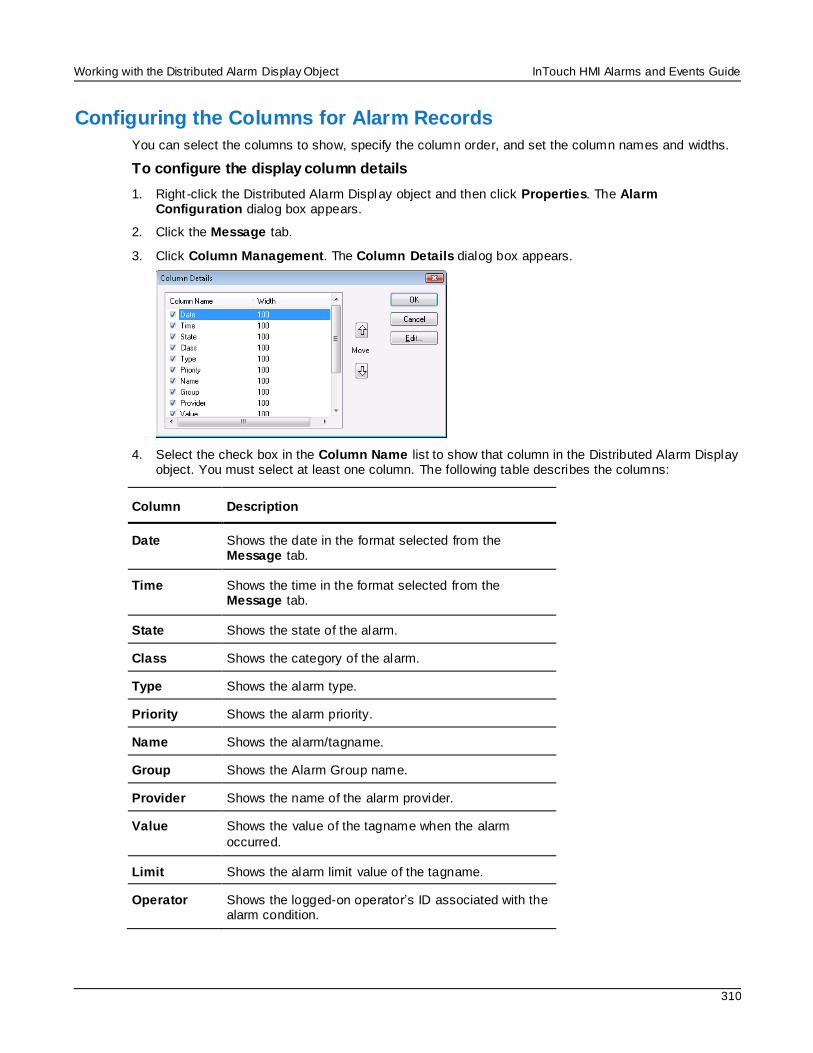
Working with the Distributed Alarm Display Object InTouch HMI Alarms and Events Guide
310
Configuring the Columns for Alarm Records
You can select the columns to show, specify the column order, and set the column names and widths.
To configure the display column details
1. Right -click the Distributed Alarm Display object and then click Properties. The Alarm Configuration dialog box appears.
2. Click the Message tab.
3. Click Column Management. The Column Details dialog box appears.
4. Select the check box in the Column Name list to show that column in the Distributed Alarm Display object. You must select at least one column. The following table describes the columns:
Column Description
Date Shows the date in the format selected from the Message tab.
Time Shows the time in the format selected from the Message tab.
State Shows the state of the alarm.
Class Shows the category of the alarm.
Type Shows the alarm type.
Priority Shows the alarm priority.
Name Shows the alarm/tagname.
Group Shows the Alarm Group name.
Provider Shows the name of the alarm provider.
Value Shows the value of the tagname when the alarm
occurred.
Limit Shows the alarm limit value of the tagname.
Operator Shows the logged-on operator’s ID associated with the alarm condition.
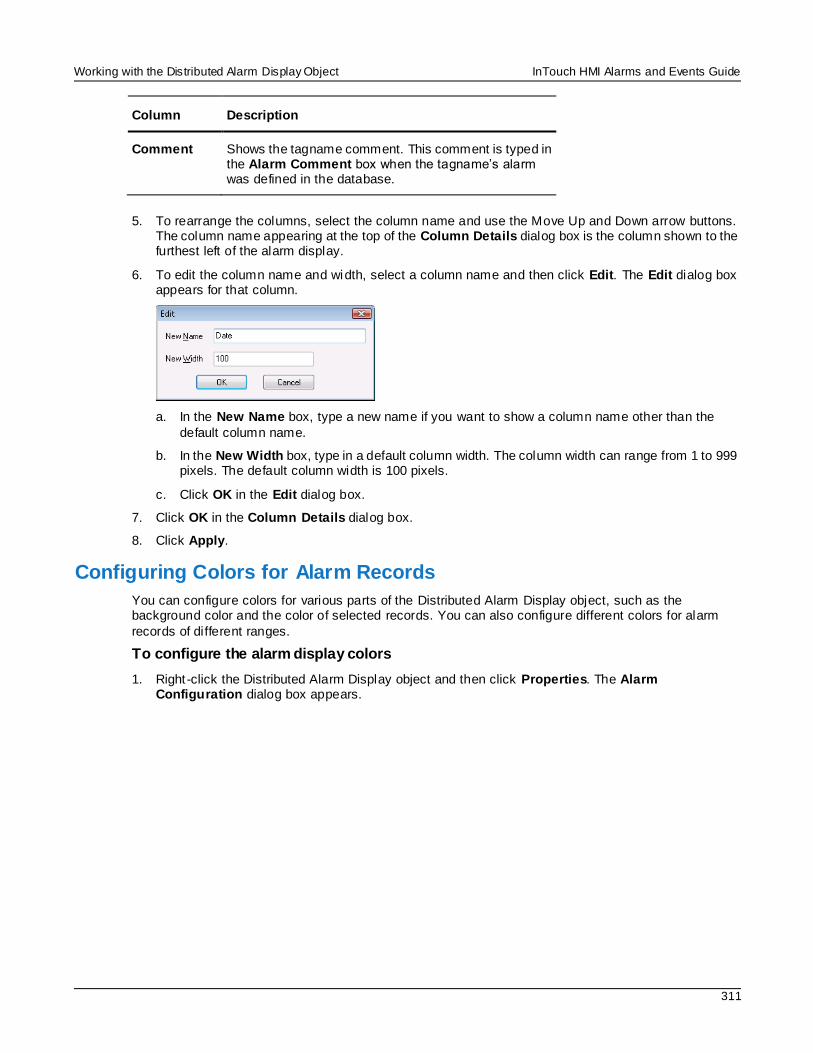
Working with the Distributed Alarm Display Object InTouch HMI Alarms and Events Guide
311
Column Description
Comment Shows the tagname comment. This comment is typed in the Alarm Comment box when the tagname’s alarm was defined in the database.
5. To rearrange the columns, select the column name and use the Move Up and Down arrow buttons. The column name appearing at the top of the Column Details dialog box is the column shown to the furthest left of the alarm display.
6. To edit the column name and width, select a column name and then click Edit. The Edit dialog box appears for that column.
a. In the New Name box, type a new name if you want to show a column name other than the
default column name.
b. In the New Width box, type in a default column width. The column width can range from 1 to 999 pixels. The default column width is 100 pixels.
c. Click OK in the Edit dialog box.
7. Click OK in the Column Details dialog box.
8. Click Apply.
Configuring Colors for Alarm Records
You can configure colors for various parts of the Distributed Alarm Display object, such as the background color and the color of selected records. You can also configure different colors for alarm
records of different ranges.
To configure the alarm display colors
1. Right -click the Distributed Alarm Display object and then click Properties. The Alarm Configuration dialog box appears.
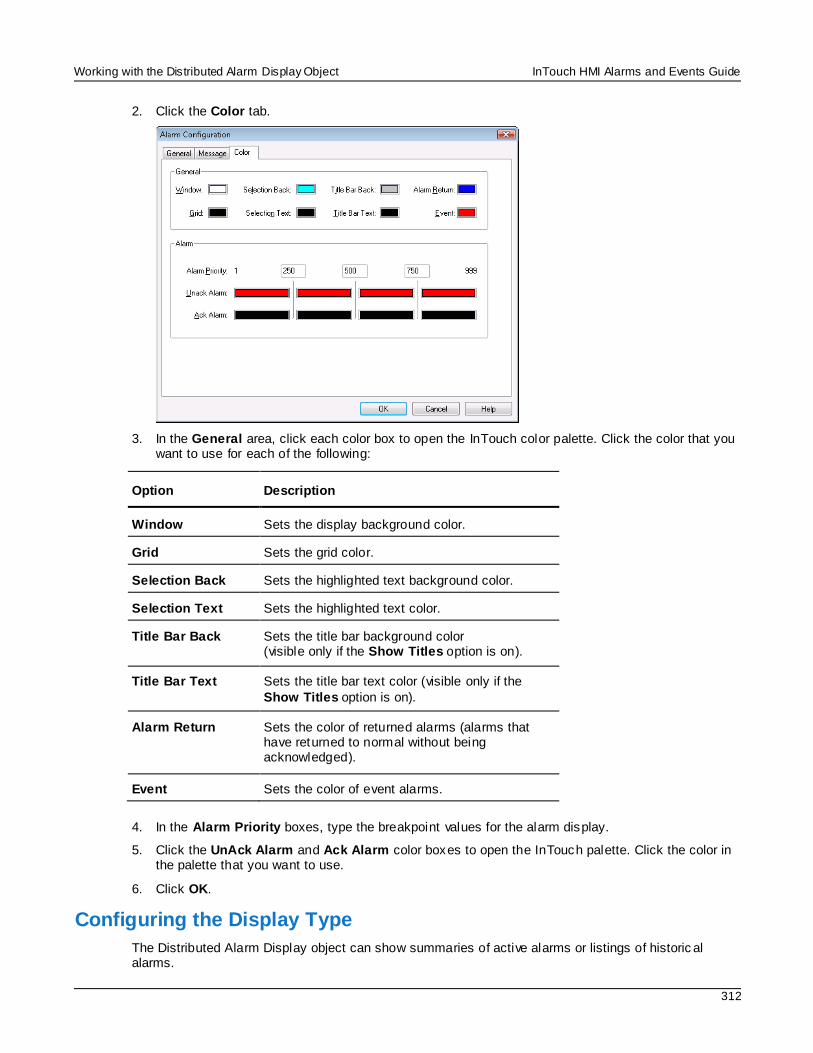
Working with the Distributed Alarm Display Object InTouch HMI Alarms and Events Guide
312
2. Click the Color tab.
3. In the General area, click each color box to open the InTouch color palette. Click the color that you want to use for each of the following:
Option Description
Window Sets the display background color.
Grid Sets the grid color.
Selection Back Sets the highlighted text background color.
Selection Text Sets the highlighted text color.
Title Bar Back Sets the title bar background color (visible only if the Show Titles option is on).
Title Bar Text Sets the title bar text color (visible only if the
Show Titles option is on).
Alarm Return Sets the color of returned alarms (alarms that have returned to normal without being acknowledged).
Event Sets the color of event alarms.
4. In the Alarm Priority boxes, type the breakpoint values for the alarm display.
5. Click the UnAck Alarm and Ack Alarm color boxes to open the InTouch palette. Click the color in the palette that you want to use.
6. Click OK.
Configuring the Display Type
The Distributed Alarm Display object can show summaries of active alarms or listings of historic al alarms.
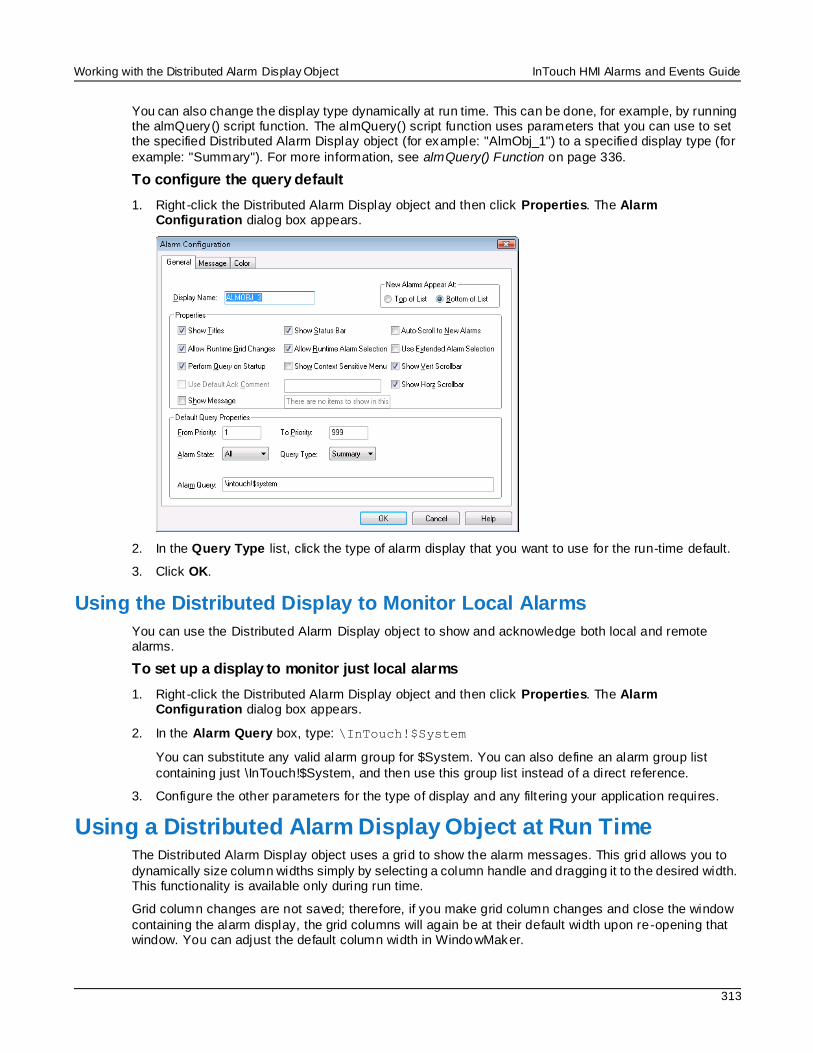
Working with the Distributed Alarm Display Object InTouch HMI Alarms and Events Guide
313
You can also change the display type dynamically at run time. This can be done, for example, by running the almQuery() script function. The almQuery() script function uses parameters that you can use to set the specified Distributed Alarm Display object (for example: "AlmObj_1") to a specified display type (for
example: "Summary"). For more information, see almQuery() Function on page 336.
To configure the query default
1. Right -click the Distributed Alarm Display object and then click Properties. The Alarm Configuration dialog box appears.
2. In the Query Type list, click the type of alarm display that you want to use for the run-time default.
3. Click OK.
Using the Distributed Display to Monitor Local Alarms
You can use the Distributed Alarm Display object to show and acknowledge both local and remote alarms.
To set up a display to monitor just local alarms
1. Right -click the Distributed Alarm Display object and then click Properties. The Alarm Configuration dialog box appears.
2. In the Alarm Query box, type: \InTouch!$System
You can substitute any valid alarm group for $System. You can also define an alarm group list
containing just \InTouch!$System, and then use this group list instead of a direct reference.
3. Configure the other parameters for the type of display and any filtering your application requires.
Using a Distributed Alarm Display Object at Run Time The Distributed Alarm Display object uses a grid to show the alarm messages. This grid allows you to
dynamically size column widths simply by selecting a column handle and dragging it to the desired width. This functionality is available only during run time.
Grid column changes are not saved; therefore, if you make grid column changes and close the window
containing the alarm display, the grid columns will again be at their default width upon re-opening that window. You can adjust the default column width in WindowMaker.
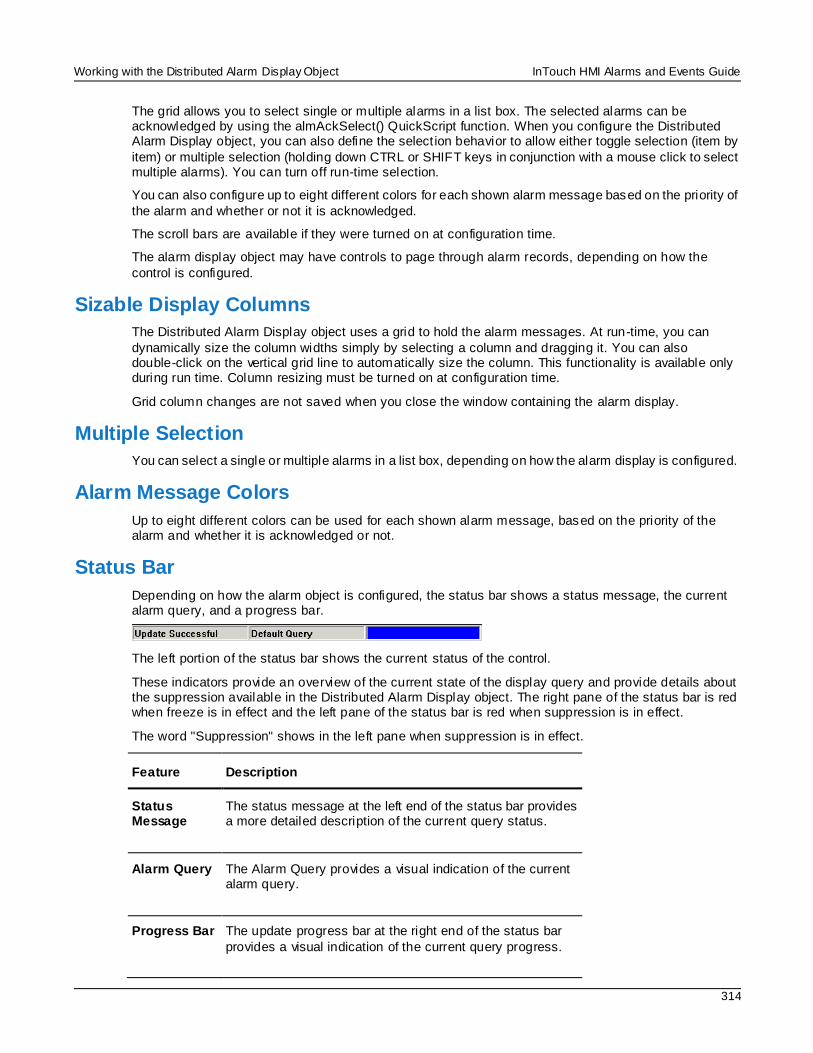
Working with the Distributed Alarm Display Object InTouch HMI Alarms and Events Guide
314
The grid allows you to select single or multiple alarms in a list box. The selected alarms can be acknowledged by using the almAckSelect() QuickScript function. When you configure the Distributed Alarm Display object, you can also define the select ion behavior to allow either toggle selection (item by
item) or multiple selection (holding down CTRL or SHIFT keys in conjunction with a mouse click to select multiple alarms). You can turn off run-time selection.
You can also configure up to eight different colors for each shown alarm message based on the priority of
the alarm and whether or not it is acknowledged.
The scroll bars are available if they were turned on at configuration time.
The alarm display object may have controls to page through alarm records, depending on how the
control is configured.
Sizable Display Columns
The Distributed Alarm Display object uses a grid to hold the alarm messages. At run-time, you can
dynamically size the column widths simply by selecting a column and dragging it. You can also double-click on the vertical grid line to automatically size the column. This functionality is available only during run time. Column resizing must be turned on at configuration time.
Grid column changes are not saved when you close the window containing the alarm display.
Multiple Selection
You can select a single or multiple alarms in a list box, depending on how the alarm display is configured.
Alarm Message Colors
Up to eight different colors can be used for each shown alarm message, based on the priority of the alarm and whether it is acknowledged or not.
Status Bar
Depending on how the alarm object is configured, the status bar shows a status message, the current alarm query, and a progress bar.
The left portion of the status bar shows the current status of the control.
These indicators provide an overview of the current state of the display query and provide details about the suppression available in the Distributed Alarm Display object. The right pane of the status bar is red when freeze is in effect and the left pane of the status bar is red when suppression is in effect.
The word "Suppression" shows in the left pane when suppression is in effect.
Feature Description
Status Message
The status message at the left end of the status bar provides a more detailed description of the current query status.
Alarm Query The Alarm Query provides a visual indication of the current alarm query.
Progress Bar The update progress bar at the right end of the status bar
provides a visual indication of the current query progress.
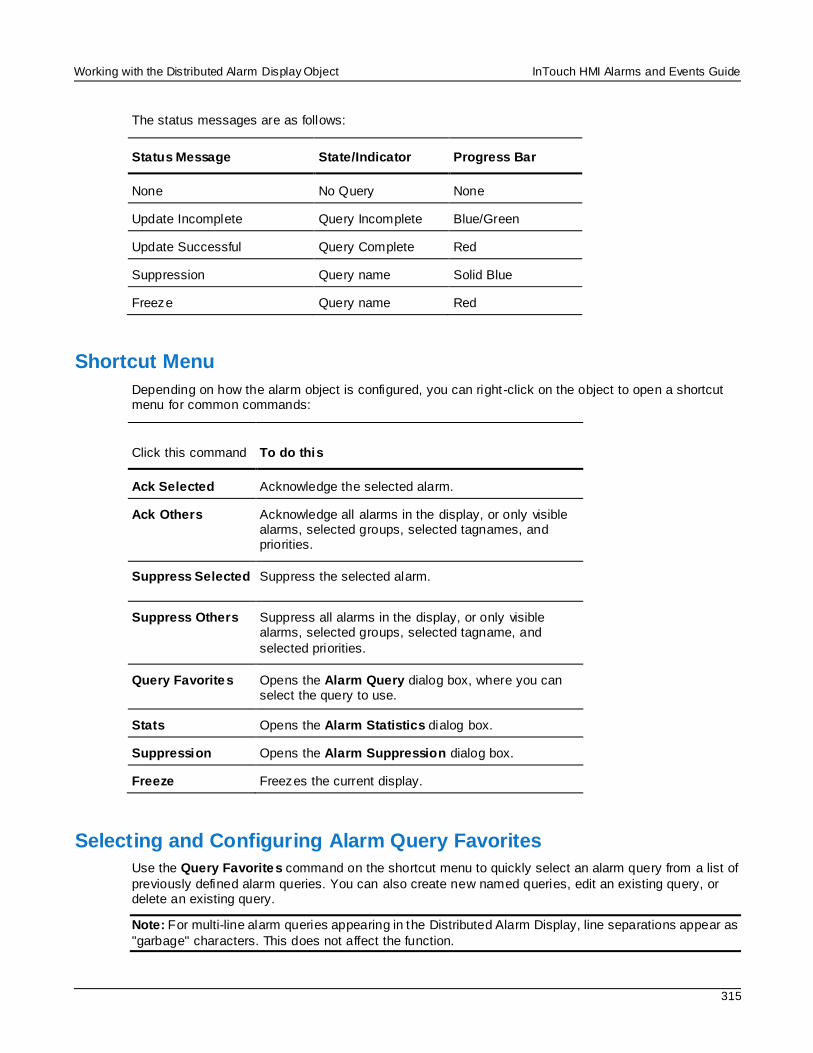
Working with the Distributed Alarm Display Object InTouch HMI Alarms and Events Guide
315
The status messages are as follows:
Status Message State/Indicator Progress Bar
None No Query None
Update Incomplete Query Incomplete Blue/Green
Update Successful Query Complete Red
Suppression Query name Solid Blue
Freeze Query name Red
Shortcut Menu
Depending on how the alarm object is configured, you can right-click on the object to open a shortcut menu for common commands:
Click this command To do this
Ack Selected Acknowledge the selected alarm.
Ack Others Acknowledge all alarms in the display, or only visible alarms, selected groups, selected tagnames, and priorities.
Suppress Selected Suppress the selected alarm.
Suppress Others Suppress all alarms in the display, or only visible alarms, selected groups, selected tagname, and
selected priorities.
Query Favorites Opens the Alarm Query dialog box, where you can select the query to use.
Stats Opens the Alarm Statistics dialog box.
Suppression Opens the Alarm Suppression dialog box.
Freeze Freezes the current display.
Selecting and Configuring Alarm Query Favorites
Use the Query Favorites command on the shortcut menu to quickly select an alarm query from a list of
previously defined alarm queries. You can also create new named queries, edit an existing query, or delete an existing query.
Note: For multi-line alarm queries appearing in the Distributed Alarm Display, line separations appear as
"garbage" characters. This does not affect the function.
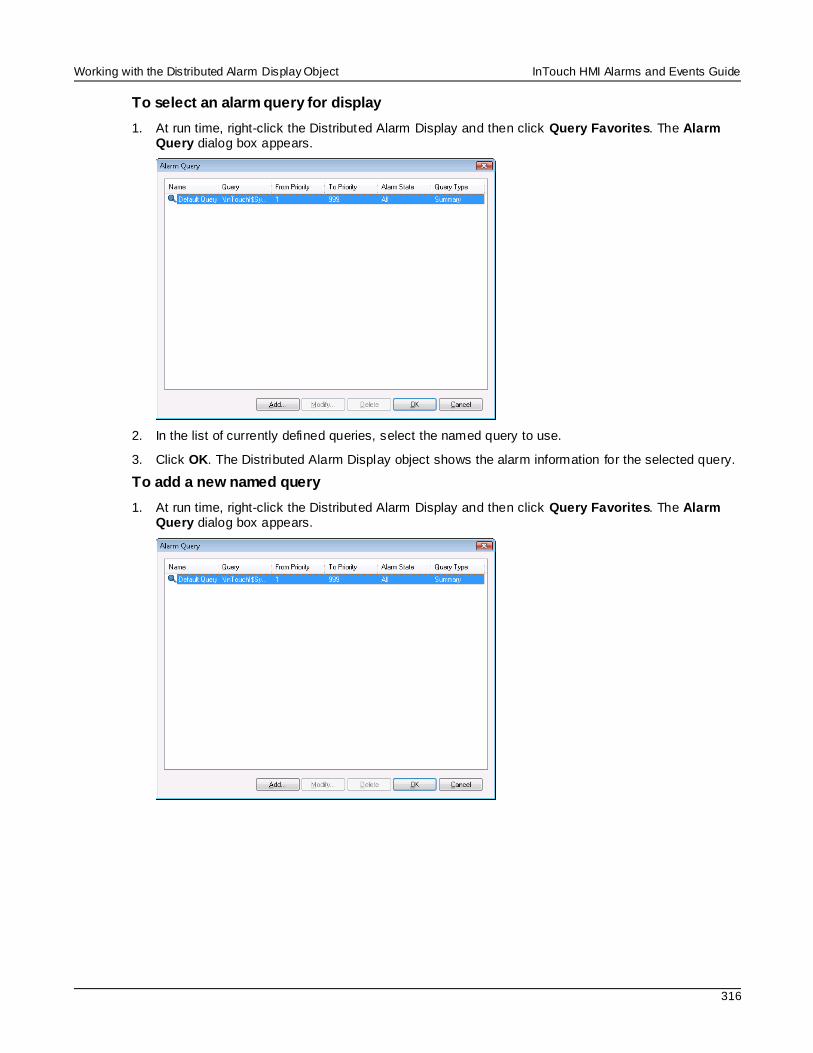
Working with the Distributed Alarm Display Object InTouch HMI Alarms and Events Guide
316
To select an alarm query for display
1. At run time, right-click the Distributed Alarm Display and then click Query Favorites. The Alarm Query dialog box appears.
2. In the list of currently defined queries, select the named query to use.
3. Click OK. The Distributed Alarm Display object shows the alarm information for the selected query.
To add a new named query
1. At run time, right-click the Distributed Alarm Display and then click Query Favorites. The Alarm Query dialog box appears.
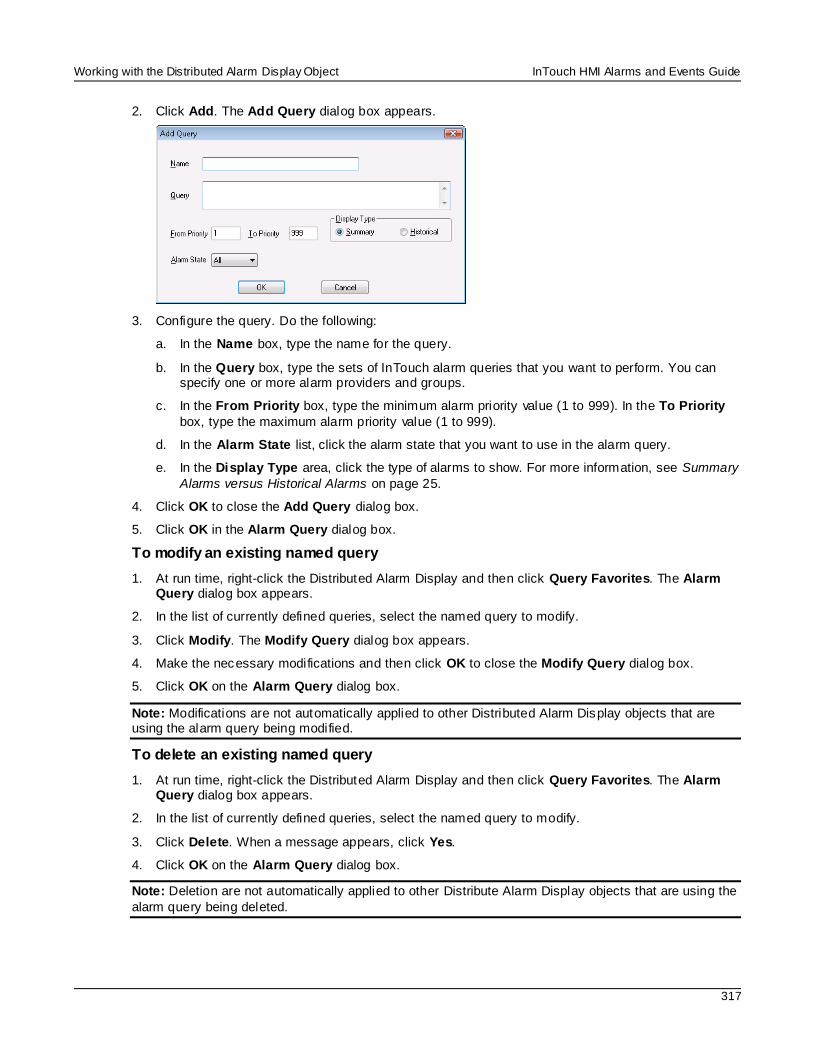
Working with the Distributed Alarm Display Object InTouch HMI Alarms and Events Guide
317
2. Click Add. The Add Query dialog box appears.
3. Configure the query. Do the following:
a. In the Name box, type the name for the query.
b. In the Query box, type the sets of InTouch alarm queries that you want to perform. You can specify one or more alarm providers and groups.
c. In the From Priority box, type the minimum alarm priority value (1 to 999). In the To Priority
box, type the maximum alarm priority value (1 to 999).
d. In the Alarm State list, click the alarm state that you want to use in the alarm query.
e. In the Display Type area, click the type of alarms to show. For more information, see Summary
Alarms versus Historical Alarms on page 25.
4. Click OK to close the Add Query dialog box.
5. Click OK in the Alarm Query dialog box.
To modify an existing named query
1. At run time, right-click the Distributed Alarm Display and then click Query Favorites. The Alarm Query dialog box appears.
2. In the list of currently defined queries, select the named query to modify.
3. Click Modify. The Modify Query dialog box appears.
4. Make the necessary modifications and then click OK to close the Modify Query dialog box.
5. Click OK on the Alarm Query dialog box.
Note: Modifications are not automatically applied to other Distributed Alarm Display objects that are using the alarm query being modified.
To delete an existing named query
1. At run time, right-click the Distributed Alarm Display and then click Query Favorites. The Alarm Query dialog box appears.
2. In the list of currently defined queries, select the named query to modify.
3. Click Delete. When a message appears, click Yes.
4. Click OK on the Alarm Query dialog box.
Note: Deletion are not automatically applied to other Distribute Alarm Display objects that are using the
alarm query being deleted.
Working with the Distributed Alarm Display Object InTouch HMI Alarms and Events Guide
318
Controlling the Distributed Alarm Display Object Using Functions and Dotfields
You can control the Distributed Alarm Display object at run time using functions and .dot fields.
For a list of returned error numbers for functions, see Error Descriptions on page 355.
Getting or Setting Properties
Properties are accessible through the GetPropertyX() function, where X is the data type (D for Discrete, I for Integer, and M for Message). For example: GetPropertyM(ControlName.Property, MsgTag)
For more information on the GetPropertyX() functions, see "Built -In Functions"in the InTouch® HMI Scripting and Logic Guide.
When you run the script that includes the GetPropertyX() function, the property value is saved to the
MsgTag. If multiple rows are selected, the property assigned to MsgTag is the tag value in the first row of the multiple selection.
Acknowledging Alarms
The Distributed Alarm Display object is capable of acknowledging any ala rms that it can query (summary display only). The Distributed Alarm Display object includes alarm acknowledgment functions. These functions supplement the .Ack dotfield used to acknowledge local alarms and alarm groups. Use these
functions to acknowledge all alarms, shown alarms, and selected alarms.
You can also acknowledge alarms by their characteristics. such as group membership, priority, application name, and tag name.
almAckAll() Function on page 318
Controlling the Distributed Alarm Display Object Using Functions and Dotfields on page 318
almAckGroup() Function on page 319
almAckPriority() Function on page 320
almAckRecent() Function on page 320
almAckTag() Function on page 321
almAckSelect() Function on page 321
almAckSelectedGroup() Function on page 322
almAckSelectedPriority() Function on page 322
almAckSelectedTag() Function on page 323
almAckAll() Function
Acknowledges all alarms in a current query, including those not currently shown in the Distributed Alarm Display object in summary mode.
Category
Alarms
Syntax [Result=]almAckAll(ObjectName,Comment);
Working with the Distributed Alarm Display Object InTouch HMI Alarms and Events Guide
319
Arguments
ObjectName The name of the alarm object. For example, AlmObj_1.
Comment
Alarm acknowledgment comment.
Examples MessageTag = "Acknowledge All by " + $Operator;
almAckAll("AlmObj_1",MessageTag);
See Also
Ack(), almAckGroup(), almAckTag(), almAckDisplay(), almAckRecent(), almAckSelect(), almAckSelectedGroup(), almAckSelectedPriority(), almAckSelectedTag()
almAckDisplay() Function
Acknowledges only those alarms currently visible in the Distributed Alarm Display object in summary mode.
Category
Alarms
Syntax [Result=]almAckDisplay(ObjectName,Comment);
Arguments
ObjectName
The name of the alarm object. For example, AlmObj_1.
Comment Alarm acknowledgment comment.
Example almAckDisplay("AlmObj_1","Display Acknowledgement");
See Also
Ack(), almAckAll(), almAckGroup(), almAckTag(), almAckRecent(), almAckSelect(), almAckSelectedGroup(), almAckSelectedPriority(), almAckSelectedTag ()
almAckGroup() Function
Acknowledges all alarms shown in the named Distributed Alarm object that match the specified provider and group name.
Category
Alarms
Syntax [Result=]almAckGroup( “ObjectName”, ApplicationName, GroupName, Comment);
Arguments
ObjectName
The name of the alarm object. For example, AlmObj_1.
ApplicationName The name of the Application for example, \\node1\ Intouch
Working with the Distributed Alarm Display Object InTouch HMI Alarms and Events Guide
320
GroupName The name of the InTouch alarm group, such as $System.
Comment
Alarm acknowledgment comment.
Example MessageTag = “Acknowledge group, Turbines, by ” + $Operator;
almAckGroup(“AlmObj_1”, “\Intouch”, “Turbine”, MessageTag);
almAckPriority() Function
Acknowledges all alarms shown in the named Distributed Alarm object as a result of the last query that
match the alarm’s application name, alarm group, and priority range.
Category
Alarms
Syntax [Result=]almAckPriority(ObjectName, ApplicationName, GroupName, FromPri,
ToPri, Comment);
Arguments
ObjectName
The name of the alarm object. For example, AlmObj_1.
ApplicationName The name of the Application for example, \\node1\ Intouch
GroupName The name of the Group for example, $System
FromPri
Starting number of the alarm priority range. For example, 100.
ToPri Ending number of the alarm priority range. For example, 900.
Comment Alarm acknowledgment comment.
Example almAckPriority(“AlmObj_1”, “\\node1\Intouch”, “Turbines”, 10, 100, “Range 10 to
100 acknowledged”);
almAckRecent() Function
Acknowledges the most recent alarms that have occurred.
Syntax [Result=]almAckRecent(ObjectName, Comment)
Arguments
ObjectName The name of the alarm object. For example, AlmObj_1.
Comment
Alarm acknowledgment comment.
Example almAckRecent("AlmObj_1",$DateString);
Working with the Distributed Alarm Display Object InTouch HMI Alarms and Events Guide
321
almAckTag() Function
Acknowledges all alarms shown in the named Distributed Alarm Display object as a result of the last
query. The alarm must match the application name, group name, tag name, and priority range specified by the query.
Category
Alarms
Syntax [Result=]almAckTag("ObjectName", ApplicationName, GroupName, TagName, FromPri,
ToPri, Comment);
Arguments
ObjectName The name of the alarm object. For example, AlmObj_1.
ApplicationName
The name of the application. For example, \\node1\ Intouch.
GroupName The name of the alarm group. For example, $System.
TagName The name of the tag whose value is in an alarm state.
FromPri
Starting number of the alarm priority range. For example, 100.
ToPri Ending number of the priority range. For example, 900.
Comment Alarm acknowledgment comment.
Example almAckTag("AlmObj_1", "\\node1\Intouch", "Turbines", "Valve1", 10, 100,
"Acknowledged for Valve1");
See Also
Ack(), almAckAll(), almAckGroup(), almAckDisplay(), almAckRecent(), almAckSelect(),
almAckSelectedGroup(), almAckSelectedPriority(), almAckSelectedTag()
almAckSelect() Function
Acknowledges only those alarms selected in the Distributed Alarm Display object in summary mode.
Category
Alarms
Syntax [Result=]almAckSelect(ObjectName,Comment);
Arguments
ObjectName
The name of the alarm object. For example, AlmObj_1.
Comment Alarm acknowledgment comment.
Working with the Distributed Alarm Display Object InTouch HMI Alarms and Events Guide
322
Example
This example acknowledges only those alarms that occurred during the day shift or the night shift. IF ($Hour >= 0 and $Hour < 8) THEN
AckTag = "Night Shift";
ELSE
AckTag = "Day Shift";
ENDIF;
almAckSelect ("AlmObj_1",AckTag);
See Also
Ack(), almAckAll(), almAckGroup(), almAckTag(), almAckDisplay(), almAckRecent(),
almAckSelectedGroup(), almAckSelectedPriority(), almAckSelectedTag()
almAckSelectedGroup() Function
Acknowledges all alarms with same provider and group names that have the same group name as one or
more of the alarms that are selected within the named Distributed Alarm Display object.
Category
Alarms
Syntax [Result=]almAckSelectedGroup(ObjectName,Comment);
Arguments
ObjectName The name of the alarm object. For example, AlmObj_1.
Comment Alarm acknowledgment comment.
Example MessageTag = "Acknowledge selected groups by " + $Operator;
almAckSelectedGroup ("AlmObj_1", MessageTag);
See Also
Ack(), almAckAll(), almAckGroup(), almAckTag(), almAckDisplay(), almAckRecent(), almAckSelect(),
almAckSelectedPriority(), almAckSelectedTag()
almAckSelectedPriority() Function
Acknowledges all alarms with same provider and group names that have the same priority value as one
or more of the alarms that are selected within the named Distributed Alarm Display object. The priorities are calculated from the minimum and maximum priorities of the selected alarm records.
Category
Alarms
Syntax [Result=]almAckSelectedPriority(ObjectName, Comment);
Arguments
ObjectName
The name of the alarm object. For example, AlmObj_1.
Comment Alarm acknowledgment comment.
Working with the Distributed Alarm Display Object InTouch HMI Alarms and Events Guide
323
Example MessageTag = "Acknowledge selected priorities by " + $Operator;
almAckSelectedPriority ("AlmObj_1", MessageTag);
See Also
Ack(), almAckAll(), almAckGroup(), almAckTag(), almAckDisplay(), almAckRecent(), almAckSelect(), almAckSelectedGroup(), almAckSelectedTag()
almAckSelectedTag() Function
Acknowledges all alarms that have the same Tagname from the same provider and group name and having the same priority as one or more of the selected alarms within the named Distributed Alarm Display object. This function works only if InTouch is the alarm provider.
Category
Alarms
Syntax [Result=]almAckSelectedTag(ObjectName,Comment);
Arguments
ObjectName The name of the alarm object. For example, AlmObj_1.
Comment
Alarm acknowledgment comment.
Example MessageTag = "Acknowledge selected tagnames by " + $Operator;
almAckSelectedTag ("AlmObj_1", MessageTag);
See Also
Ack(), almAckAll(), almAckGroup(), almAckTag(), almAckDisplay(), almAckRecent(), almAckSelect(), almAckSelectedGroup(), almAckSelectedPriority()
Selecting Alarms
You can create scripts to select alarms from a Distributed Alarm Display object. You can select all alarms, only selected alarms, or obtain a count of current alarms.
almSelectAll() Function on page 323
almUnselectAll() Function on page 324
almSelectionCount() Function on page 324
almSelectGroup() Function on page 325
almSelectItem() Function on page 325
almSelectPriority() Function on page 325
almSelectTag() Function on page 326
You can also select specific alarms based upon the data source, alarm priority, and InTouch tags.
almSelectAll() Function
Toggles the selection of all the alarms in a named Distributed Alarm Display object.

Working with the Distributed Alarm Display Object InTouch HMI Alarms and Events Guide
324
Category
Alarms
Syntax [Result=]almSelectAll(ObjectName);
Argument
ObjectName The name of the alarm object. For example, AlmObj_1.
Example If $AccessLevel > 8000 THEN
almSelectAll("AlmObj_1");
almAckSelect("AlmObj_1", "Ack Selected by a Manager");
ENDIF;
See Also
almSelectItem(), almSelectGroup(), almSelectPriority(), almSelectTag(), almUnSelectAll()
almUnselectAll() Function
Unselects all selected alarms in a named Distributed Alarm Display object.
Category
Alarms
Syntax [Result=]almUnselectAll(ObjectName);
Argument
ObjectName The name of the alarm object. For example, AlmObj_1.
Example If $AccessLevel == 9999 THEN
almAckSelect("AlmObj_1", "Comment");{This alarm can be acknowledged by only
Administrator}
ELSE
almUnselectAll("AlmObj_1");
ENDIF;
See Also
almSelectAll(), almSelectItem(), almSelectGroup(), almSelectPriority(), almSelectTag()
almSelectionCount() Function
Returns the number of alarms selected by the operator in the Distributed Alarm Display object.
Category
Alarms
Syntax [Result=]almSelectionCount(ObjectName);
Argument
ObjectName
The name of the alarm object. For example, AlmObj_1.
Working with the Distributed Alarm Display Object InTouch HMI Alarms and Events Guide
325
Example
The AlarmCount tag is assigned the number of alarms selected by the operator from the Distributed Alarm Display object. AlarmCount = almSelectionCount("AlmObj_1");
almSelectGroup() Function
Toggles the selection of all alarms that are contained by a named Distributed Alarm Display object as a result of the display’s last query and where the resultant alarm contains the same alarm group name.
Category
Alarms
Syntax [Result=]almSelectGroup(ObjectName, ApplicationName,GroupName);
Argument
ObjectName
The name of the alarm object. For example, AlmObj_1.
ApplicationName The name of the Application. For example, \\node1\Intouch.
GroupName The name of the Group. For example, $System.
Example almSelectGroup("AlmObj_1","\InTouch","Turbine");
See Also
almSelectAll(), almSelectItem(), almSelectPriority(), almSelectTag(), almUnSelectAll()
almSelectItem() Function
Toggles the selection of the last selected or unselected item in an alarm display object.
Syntax [Result=]almSelectItem(ObjectName);
Argument
ObjectName The name of the alarm object. For example, AlmObj_1.
Example almSelectItem("AlmObj_1");
See Also
almSelectAll(), almSelectGroup(), almSelectPriority(), almSelectTag(), almUnSelectAll()
almSelectPriority() Function
Toggles the selection of all alarms in a named Distributed Alarm Display object as a result of the display’s last query and where the resultant alarms are within the specified priority range.
Category
Alarms
Working with the Distributed Alarm Display Object InTouch HMI Alarms and Events Guide
326
Syntax [Result=]almSelectPriority( "objectName", ApplicationName, GroupName, FromPri,
ToPri );
Argument
ObjectName The name of the alarm object. For example, AlmObj_1.
ApplicationName
The name of the Application. For example, \\node1\Intouch.
GroupName The name of the Group. For example, $System.
FromPri Starting priority of alarms. For example, 100 or integer tag.
ToPri
Ending priority of alarms. For example, 900 or integer tag.
Example almSelectPriority("AlmObj_1","\\node1\Intouch", "Turbines",10,100);
See Also
almSelectAll(), almSelectItem(), almSelectGroup(), almSelectTag(), almUnSelectAll()
almSelectTag() Function
Toggles the selection of all alarms in a named Distributed Alarm Display object as a result of the display’s
last query and given tag name.
Category
Alarms
Syntax [Result=]almSelectTag (ObjectName, ApplicationName, GroupName, TagName,
FromPri, ToPri);
Arguments
ObjectName
The name of the alarm object. For example, AlmObj_1.
ApplicationName The name of the Application. For example, \\node1\Intouch.
GroupName The name of the Group. For example, $System.
TagName
The name of the alarm tag.
FromPri Starting priority of alarms. For example, 100 or integer tag.
ToPri Ending priority of alarms. For example, 900 or integer tag.
Example almSelectTag("AlmObj_1","\\node1\Intouch","Turbines","Valve1",10,100);
See Also
almSelectAll(), almSelectItem(), almSelectGroup(), almSelectPriority(), almUnSelectAll()
Working with the Distributed Alarm Display Object InTouch HMI Alarms and Events Guide
327
Retrieving Information about a Selected Alarm Record
You can create scripts that return information about selected alarms. Use the following dotfields in your script:
.AlarmTime Dotfield on page 327
.AlarmDate Dotfield on page 328
.AlarmName Dotfield on page 328
.AlarmValue Dotfield on page 329
.AlarmClass Dotfield on page 329
.AlarmType Dotfield on page 330
.AlarmState Dotfield on page 331
.AlarmLimit Dotfield on page 331
.AlarmPri Dotfield on page 332
.AlarmGroupSel Dotfield on page 332
.AlarmAccess Dotfield on page 333
.AlarmProv Dotfield on page 334
.AlarmOprName Dotfield on page 334
.AlarmOprNode Dotfield on page 335
.AlarmComment Dotfield on page 335
.AlarmTime Dotfield
Returns the time when an alarm occurred. The alarm must be selected in Distributed Alarm Display
object in summary mode.
Category
Alarms
Usage [ErrorNumber=]GetPropertyM( "ObjectName.AlarmTime",TagName);
Parameters
ObjectName Name of the Distributed Alarm Display object. For example, AlmObj_1.
TagName Any message tag.
Data Type
String (read-only)
Example
In this example, AlmObj_1 is the name of the Distributed Alarm Display object and almTime is a memory
message tag. GetPropertyM("AlmObj_1.AlarmTime",almTime);
If used in a Touch Pushbutton QuickScript, this statement returns the time when the alarm occurred to
the almTime tag.
Working with the Distributed Alarm Display Object InTouch HMI Alarms and Events Guide
328
See Also
GetPropertyM(), .AlarmAccess, .AlarmClass, .AlarmComment, .AlarmDate, .AlarmLimit, .AlarmName, .AlarmOprName, .AlarmOprNode, .AlarmPri, .AlarmProv, .AlarmState, .AlarmType, .AlarmValue
.AlarmDate Dotfield
Returns the date associated with a selected alarm. The alarm has to be selected by clicking on the Distributed Alarm Display object in summary mode.
Category
Alarms
Usage [ErrorNumber=]GetPropertyM("ObjectName.AlarmDate",TagName);
Parameters
ObjectName
Name of the Distributed Alarm Display object. For example, AlmObj_1.
TagName Any message tag.
Data Type
String (read-only)
Example
If used in a Touch Pushbutton QuickScript, this statement returns the date to the almDate tag. GetPropertyM("AlmObj_1.AlarmDate",almDate);
AlmObj_1 is the name of the Distributed Alarm Display object and almDate is a memory message tag that retrieves the date for the tag associated with the selected alarm.
See Also
GetPropertyM(), .AlarmAccess, .AlarmClass, .AlarmComment, .AlarmLimit, .AlarmName, .AlarmOprName, .AlarmOprNode, .AlarmPri, .AlarmProv, .AlarmState, .AlarmTime, .AlarmType, .AlarmValue
.AlarmName Dotfield
Returns the name of the tag associated with a selected alarm. The alarm has to be selected by clicking the Distributed Alarm Display object in summary mode.
Category
Alarms
Usage [ErrorNumber=]GetPropertyM("ObjectName.AlarmName",TagName);
Parameters
ObjectName
Name of the Distributed Alarm Display object. For example, AlmObj_1.
TagName Any message tag.
Data Type
String (read-only)
Working with the Distributed Alarm Display Object InTouch HMI Alarms and Events Guide
329
Example
If used in a Touch Pushbutton QuickScript, this statement returns the name of the alarm to almName. GetPropertyM("AlmObj_1.AlarmName",almName);
Where AlmObj_1 is the name of the Distributed Alarm Display object and almName is a memory message tag that retrieves the name of the tag associated with the selected alarm.
See Also
GetPropertyM(), .AlarmAccess, .AlarmClass, .AlarmComment, .AlarmDate, .AlarmLimit, .AlarmOprName, .AlarmOprNode, .AlarmPri, .AlarmProv, .AlarmState, .AlarmTime, .AlarmType, .AlarmValue
.AlarmValue Dotfield
Returns the value of the alarm for the tag associated with the selected alarm. The alarm has to be selected by clicking the Distributed Alarm Display object in summary mode.
Category
Alarms
Usage [ErrorNumber=]GetPropertyM("ObjectName.AlarmValue,TagName);
Parameters
ObjectName Name of the Distributed Alarm Display object. For example, AlmObj_1.
TagName
Any message tag.
Data Type
String (read-only)
Remarks
This function uses a message tag to retrieve the numeric value. This is because the GetProperty functions do not support real numbers. You can use the StringToReal() function to assign the result to a
real tag.
Example
If used in a Touch Pushbutton QuickScript, this statement returns the value to almValue. GetPropertyM("AlmObj_1.AlarmValue", almValue);
Where AlmObj_1 is the name of the Distributed Alarm Display object and almValue is a memory
message tag containing the alarm value for the tag associated with the selected alarm.
See Also
GetPropertyM(), .AlarmAccess, .AlarmClass, .AlarmComment, .AlarmDate, .AlarmLimit, .AlarmOprName, .AlarmOprNode, .AlarmPri, .AlarmProv, .AlarmState, .AlarmTime, .AlarmType, .AlarmValue
.AlarmClass Dotfield
Returns the class of alarm for the tag associated with a selected alarm. The alarm must be selected from the Distributed Alarm Display object in summary mode.
Category
Alarms
Working with the Distributed Alarm Display Object InTouch HMI Alarms and Events Guide
330
Usage [ErrorNumber=]GetPropertyM("ObjectName.AlarmClass",Tagname);
Parameters
ObjectName Name of the Distributed Alarm Display object. For example, AlmObj_1.
TagName
Any message tag.
Data Type
String (read-only)
Example
The following statement returns the alarm class associated with the selected alarm. GetPropertyM("AlmObj_1.AlarmClass",almClass);
AlmObj_1 is the name of the Distributed Alarm Display object and almClass is a memory message tag
containing the class of alarm for the tag associated with the selected alarm.
If used in a Touch Pushbutton QuickScript, this statement returns the alarm class of the alarm to the almClass tag.
See Also
GetPropertyM(), .AlarmAccess, .AlarmComment, .AlarmDate, .AlarmLimit, .AlarmName, .AlarmOprName, .AlarmOprNode, .AlarmPri, .AlarmProv, .AlarmState, .AlarmTime, .AlarmType, .AlarmValue
.AlarmType Dotfield
Returns the alarm type for the tag associated with a selected alarm. The alarm has to be selected by clicking the Distributed Alarm Display object in summary mode.
Category
Alarms
Usage [ErrorNumber=]GetPropertyM("ObjectName.AlarmType",TagName);
Parameters
ObjectName Name of the Distributed Alarm Display object. For example, AlmObj_1.
TagName
Any message tag.
Data Type
String (read-only)
Example
If used in a Touch Pushbutton QuickScript, this statement returns the type of the selected alarm to the almType tag when the operator acknowledges the alarm. GetPropertyM("AlmObj_1.AlarmType",almType);
Where AlmObj_1 is the name of the Distributed Alarm Display object and almType is a memory message tag containing the alarm type for the tag associated with the selected alarm.
Working with the Distributed Alarm Display Object InTouch HMI Alarms and Events Guide
331
See Also
GetPropertyM(), .AlarmAccess, .AlarmClass, .AlarmComment, .AlarmDate, .AlarmLimit, .AlarmName, .AlarmOprName, .AlarmOprNode, .AlarmPri, .AlarmProv, .AlarmState, .AlarmTime, .AlarmValue
.AlarmState Dotfield
Returns the state of the selected alarm. The alarm has to be selected by clicking the Distributed Alarm Display object in summary mode.
Category
Alarms
Usage [ErrorNumber=]GetPropertyM( "ObjectName.AlarmState",TagName);
Parameters
ObjectName
Name of the Distributed Alarm Display object. For example, AlmObj_1.
TagName Any message tag.
Data Type
String (read-only)
Example
If used in a Touch Pushbutton QuickScript, this statement returns the state of the selected alarm to the almState tag. GetPropertyM("AlmObj_1.AlarmState",almState);
Where AlmObj_1 is the name of the Distributed Alarm Display object and almState is a memory
message tag containing the alarm state for the tag associated with the selected alarm.
See Also
GetPropertyM(), .AlarmAccess, .AlarmClass, .AlarmComment, .AlarmDate, .AlarmLimit, .AlarmName, .AlarmOprName, .AlarmOprNode, .AlarmPri, .AlarmProv, .AlarmTime, .AlarmType, .AlarmValue
.AlarmLimit Dotfield
Returns the limit for the tag associated with a selected alarm. The alarm has to be selected by clicking the Distributed Alarm Display object in summary mode.
Category
Alarms
Usage [ErrorNumber=]GetPropertyM ("ObjectName.AlarmLimit",TagName);
Parameters
ObjectName
Name of the Distributed Alarm Display object. For example, AlmObj_1.
TagName Any message tag.
Data Type
String (read-only)
Working with the Distributed Alarm Display Object InTouch HMI Alarms and Events Guide
332
Remarks
This function uses a message tag to retrieve the numeric value. This is because the GetProperty functions do not support real numbers. You can use the StringToReal() function to assign the result to a real tag.
Example
If used in a pushbutton QuickScript, this statement returns the limit of the selected alarm to the almLimit tag. GetPropertyM("AlmObj_1.AlarmLimit",almLimit);
Where AlmObj_1 is the name of the Distributed Alarm Display object and almLimit is a memory
message containing the alarm limit for the tag associated with the selected alarm.
See Also
GetPropertyM(), .AlarmAccess, .AlarmClass, .AlarmComment, .AlarmDate, .AlarmName, .AlarmOprName, .AlarmOprNode, .AlarmPri, .AlarmProv, .AlarmState, .AlarmTime, .AlarmType, .AlarmValue
.AlarmPri Dotfield
Returns the priority (1-999) for the tag associated with a selected alarm. The alarm must be selected by clicking the Distributed Alarm Display object in summary mode.
Category
Alarms
Usage [ErrorNumber=]GetPropertyM("ObjectName.AlarmPri", TagName);
Parameters
ObjectName Name of the Distributed Alarm Display object. For example, AlmObj_1.
TagName
Any message tag.
Data Type
String (read-only)
Example
If used in a Touch Pushbutton QuickScript, this statement returns the alarm priority to the almPrilvl tag. GetPropertyM("AlmObj_1.AlarmPri",almPrilvl);
Where AlmObj_1 is the name of the Distributed Alarm Display object and almPrilvl is a memory message tag containing the priority level of the tag associated with the selected alarm.
See Also
GetPropertyM(), .AlarmAccess, .AlarmClass, .AlarmComment, .AlarmDate, .AlarmLimit, .AlarmName, .AlarmOprName, .AlarmOprNode, .AlarmProv, .AlarmState, .AlarmTime, .AlarmType, .AlarmValue
.AlarmGroupSel Dotfield
Returns the alarm group of the tag associated with a selected alarm. The alarm has to be selected by clicking on the Distributed Alarm Display object in summary mode.
Category
Alarms
Working with the Distributed Alarm Display Object InTouch HMI Alarms and Events Guide
333
Usage [ErrorNumber=]GetPropertyM( "ObjectName.AlarmGroupSel",TagName);
Parameter
ObjectName Name of the Distributed Alarm Display object. For example, AlmObj_1.
TagName
Any message tag.
Data Type
String (read-only)
Example
If used in a Touch Pushbutton QuickScript, this statement returns the name of the alarm group to the almGroup tag. GetPropertyM("AlmObj_1.AlarmGroupSel",almGroup);
Where AlmObj_1 is the name of the Distributed Alarm Display object and almGroup is a memory message tag containing the alarm group of the tag associated with the selected alarm.
See Also
GetPropertyM(), .AlarmGroup, .AlarmName
.AlarmAccess Dotfield
Returns the Access Name of the tag associated with a selected alarm. The alarm record must be selected by clicking on the Distributed Alarm Display object in summary mode.
Category
Alarms
Usage GetPropertyM("Objectname.AlarmAccess",TagName);
Parameter
ObjectName Name of the Distributed Alarm Display object. For example, AlmObj_1.
TagName
Any message tag.
Data Type
String (read-only)
Example
If used in a Touch Pushbutton QuickScript, this statement returns the Access Name of the tag associated with the alarm to the almAccess tag. GetPropertyM("AlmObj_1.AlarmAccess",almAccess);
Where AlmObj_1 is the name of the Distributed Alarm Display object and almAccess is a memory message tag containing the Access Name of the tag associated with the selected alarm.
See Also
GetPropertyM(), .AlarmClass, .AlarmComment, .AlarmDate, .AlarmLimit, .AlarmName, .AlarmOprName,
.AlarmOprNode, .AlarmPri, .AlarmProv, .AlarmState, .AlarmTime, .AlarmType
Working with the Distributed Alarm Display Object InTouch HMI Alarms and Events Guide
334
.AlarmProv Dotfield
Returns the alarm provider for the tag associated with a selected alarm. The alarm has to be selected by
clicking the Distributed Alarm Display object in summary mode.
Category
Alarms
Usage [ErrorNumber=]GetPropertyM( "ObjectName.AlarmProv",TagName);
Parameter
ObjectName Name of the Distributed Alarm Display object. For example, AlmObj_1.
TagName Any message tag.
Data Type
String (read-only)
Example
If used in a Touch Pushbutton QuickScript, this statement returns the provider name to the almProv tag. GetPropertyM("AlmObj_1.AlarmProv", almProv);
AlmObj_1 is the name of the Distributed Alarm Display object and almProv is a memory message tag containing the name of the provider for the tag associated with the selected alarm.
See Also
GetPropertyM(), .AlarmAccess, .AlarmClass, .AlarmComment, .AlarmDate, .AlarmLimit, .AlarmName, .AlarmOprName, .AlarmOprNode, .AlarmPri, .AlarmState, .AlarmTime, .AlarmType, .AlarmValue
.AlarmOprName Dotfield
Returns the name of the logged on operator who acknowledged the selected alarm. The alarm has to be
selected by clicking the Distributed Alarm Display object in summary mode.
Category
Alarms
Usage [ErrorNumber=]GetPropertyM( "ObjectName.AlarmOprName",TagName);
Parameter
ObjectName Name of the Distributed Alarm Display object. For example, AlmObj_1.
TagName Any message tag.
Data Type
String (read-only)
Example GetPropertyM("AlmObj_1.AlarmOprName",almOprName);
Where AlmObj_1 is the name of the Distributed Alarm Display object and almOprName is a memory message tag containing the name of the operator responding to the alarm associated with the tag.
Working with the Distributed Alarm Display Object InTouch HMI Alarms and Events Guide
335
If used in a Touch Pushbutton QuickScript, this statement returns the name of the operator to the almOprName tag.
See Also
GetPropertyM(), .AlarmAccess, .AlarmClass, .AlarmComment, .AlarmDate, .AlarmLimit, .AlarmName,
.AlarmOprNode, .AlarmPri, .AlarmProv, .AlarmState, .AlarmTime, .AlarmType, .AlarmValue
.AlarmOprNode Dotfield
Returns the operator node for the tag associated with a selected alarm. The alarm must be selected by
clicking the Distributed Alarm Display object in summary mode.
When an alarm is acknowledged in a Terminal Services environment, the Operator Node is the name of the client machine that the respective operator established the Terminal Services session from. If the
node name cannot be retrieved, the node's IP address is used instead.
Category
Alarms
Usage [ErrorNumber=]GetPropertyM( "ObjectName.AlarmOprNode",TagName);
Parameter
ObjectName Name of the Distributed Alarm Display object. For example, AlmObj_1.
TagName Any message tag.
Data Type
String (read-only)
Example GetPropertyM("AlmObj_1.AlarmOprNode",almOprNode);
Where AlmObj_1 is the name of the Distributed Alarm Display object and almOprNode is a memory
message tag containing the name of the operator's node for the tag associated with the selected alarm.
If used in a Touch Pushbutton QuickScript, this statement returns the operator’s node to the almOprNode tag.
See Also
GetPropertyM(), .AlarmAccess, .AlarmClass, .AlarmComment, .AlarmDate, .AlarmLimit, .AlarmName, .AlarmOprName, .AlarmPri, .AlarmProv, .AlarmState, .AlarmTime, .AlarmType, .AlarmValue
.AlarmComment Dotfield
Returns the alarm comment, which is a read/write text string that describes the alarm, not the tag. By
default, the comment is empty in a new application.
However, when an old InTouch application is converted to InTouch version 7.11 or later, the tag comment is copied to the .AlarmComment dotfield for backward compatibility.
Category
Alarms
Usage [ErrorNumber=]GetPropertyM( "ObjectName.AlarmComment",TagName);
Working with the Distributed Alarm Display Object InTouch HMI Alarms and Events Guide
336
Parameter
ObjectName Name of the Distributed Alarm Display object. For example, AlmObj_1.
TagName
Any message tag.
Data Type
String (read-only)
Example
The following example returns the alarm comment for a tag selected in the AlmObj_1 Distributed Alarm Display object and places it in the almComment tag : GetPropertyM("AlmObj_1.AlarmComment", almComment);
See Also
GetPropertyM(), .AlarmAccess, .AlarmClass, .AlarmDate, .AlarmLimit, .AlarmName, .AlarmOprName, .AlarmOprNode, .AlarmPri, .AlarmProv, .AlarmState, .AlarmTime, .AlarmType, .AlarmValue
Setting the Alarm Query
Use the following query functions to retrieve records from the alarm memory.
almDefQuery() Function on page 336
almQuery() Function on page 336
almSetQueryByName() Function on page 337
almDefQuery() Function
Performs a query using default properties to update a named Distributed Alarm Display object.
Category
Alarms
Syntax [Result=]almDefQuery(ObjectName);
Argument
ObjectName The name of the Distributed Alarm Display object. For example, AlmObj_1.
Remarks
The default query properties are specified while developing the Distributed Alarm Display object in WindowMaker.
Example almDefQuery("AlmObj_1");
See Also
almQuery(), almSetQueryByName()
almQuery() Function
Performs a query to update a named Distributed Alarm Display object and uses the specified parameters.
Working with the Distributed Alarm Display Object InTouch HMI Alarms and Events Guide
337
Category
Alarms
Syntax [Result=]almQuery(ObjectName,AlarmList,FromPri,ToPri,State,Type);
Arguments
ObjectName The name of the alarm object. For example, AlmObj_1.
AlarmList
Sets the Alarm Query/Name Manager alias to perform the query against, for example, "\intouch!$System" or a Message tag.
FromPri
Starting priority of alarms to show. For example, 100 or integer tag.
ToPri Ending priority of alarms to show. For example, 900 or integer tag.
State Specifies type of alarms to show. For example, "UnAck" or Message tag. Valid states are All, UnAck or Ack.
Type The type of alarm records that appear in the updated display: "Hist" = Historical alarms
"Summ" = Summary alarms
Example
This statement retrieves all historical alarms specified in MyAlarmListGroup with a priority of 500 to 600. The alarms appear in the AlmObj_1 alarm display. almQuery("AlmObj_1","MyAlarmListGroup",500,600,"All","Hist");
In this example, MyAlarmListGroup is an alarm list configured from the Name Manager setup.
See Also
almDefQuery(), almSetQueryByName()
almSetQueryByName() Function
Starts a new alarm query for the named instance of the Distributed Alarm Display object using the parameters from a user-defined query favorite file.
Category
Alarms
Syntax [Result=]almSetQueryByName(ObjectName, QueryName);
Arguments
ObjectName
The name of the alarm object. For example, AlmObj_1.
QueryName The name of the query created by using Query Favorites.
Working with the Distributed Alarm Display Object InTouch HMI Alarms and Events Guide
338
Remarks
This is a query for the particular instance of the Distributed Alarm Display object. There may be several such displays on the screen, each with its own query.
Example
This example starts a new query using parameters from the query named "Turbine Queries." almSetQueryByName("AlmObj_1","Turbine Queries");
See Also
almQuery(), almDefQuery()
Checking the Current Query Properties
Use the following dot fields to return the status of alarm memory queries.
.AlarmGroup Dotfield on page 338
.QueryType Dotfield on page 339
.QueryStateDotfield on page 339
.Successful Dotfield on page 340
.PriFrom Dotfield on page 341
.PriTo Dotfield on page 341
.AlarmGroup Dotfield
Contains the current query used to populate a Distributed Alarm Display object.
Category
Alarms
Usage [ErrorNumber=]GetPropertyM( "ObjectName.AlarmGroup",TagName);
Arguments
ObjectName
The name of the alarm object. For example, AlmObj_1.
TagName Any message tag.
Remarks
This read-only dotfield contains the current alarm query used by the named Distributed Alarm Display
object. This query can be a list of alarm groups or direct alarm provider references.
Data Type
String (read-only)
Example
This statement returns the current alarm query used by the AlmObj_1 Distributed Alarm Display object to
the CurrentQuery tag: GetPropertyM("AlmObj_1.AlarmGroup",CurrentQuery);
See Also
GetPropertyM(), .AlarmGroupSel, .AlarmName
Working with the Distributed Alarm Display Object InTouch HMI Alarms and Events Guide
339
.QueryType Dotfield
Shows the current type of alarm query.
Category
Alarms
Usage [ErrorNumber=]GetPropertyI( "ObjectName.QueryType",TagName);
Arguments
ObjectName The name of the alarm object. For example, AlmObj_1.
TagName
Any integer tag
Remarks
This read-only dotfield contains the current query type used by a named Distributed Alarm Display object.
Data Type
Integer (read-only)
Valid Values
1 = Historical
2 = Summary
Example
The following statement returns the current query type of the AlmObj_1 Distributed Alarm Display object
to the AlmQueryType tag: GetPropertyI("AlmObj_1.QueryType",AlmQueryType);
See Also
GetPropertyI(), .QueryState
.QueryStateDotfield
Shows the current alarm state query filter.
Category
Alarms
Usage [ErrorNumber=]GetPropertyI( "ObjectName.QueryState",TagName);
Arguments
ObjectName The name of the alarm object. For example, AlmObj_1.
TagName
Any integer tag
Remarks
This read-only dotfield contains the current query filter used by a named Distributed Alarm Display object.
Working with the Distributed Alarm Display Object InTouch HMI Alarms and Events Guide
340
Data Type
Integer (read-only)
Valid Values
0 = All
1 = Unacknowledged
2 = Acknowledged
Example
The following statement returns the current query filter of the AlmObj_1 Distributed Alarm Display object to the AlmQueryState tag: GetPropertyI("AlmObj_1.QueryState", AlmQueryState);
See Also
GetPropertyI(), .QueryType
.Successful Dotfield
Indicates whether the current query is successful or not.
Category
Alarms
Usage [ErrorNumber=]GetPropertyD( "ObjectName.Successful",TagName);
Arguments
ObjectName
The name of the alarm object. For example, AlmObj_1.
TagName A discrete tag that holds the property value when the function is processed.
Remarks
This read-only dotfield contains the state of the last query used by a named Distributed Alarm Display
object.
Data Type
Discrete (read-only)
Valid Values
0 = Error in query
1 = Successful query
Example
The following statement returns the status of the last query of the AlmObj_1 Distributed Alarm Display object to the AlmFlag tag: GetPropertyD("AlmObj_1.Successful",AlmFlag);
See Also
GetPropertyD()
Working with the Distributed Alarm Display Object InTouch HMI Alarms and Events Guide
341
.PriFrom Dotfield
Returns the minimum value of an alarm priority range used by the current query.
Category
Alarms
Usage [ErrorNumber=]GetPropertyI("ObjectName.PriFrom", Tagname);
Parameters
ObjectName Name of the Distributed Alarm Display object. For example, AlmObj_1.
TagName
Any integer tag.
Data Type
Integer (read-only)
Example
The following statement returns the minimum priority value of the query used by Distributed Alarm
Display object AlmObj_1to the MinPri integer tag: GetPropertyI("AlmObj_1.PriFrom",MinPri);
See Also
GetPropertyI(), .PriTo, .AlarmPri
.PriTo Dotfield
Contains the maximum value of the alarm priority range used by the current query.
Usage [ErrorNumber=]GetPropertyI("ObjectName.PriTo", Tagname);
Parameter
ObjectName Name of the Distributed Alarm Display object. For example, AlmObj_1.
TagName
An integer tag that holds the property value when the function is processed.
Data Type
Integer (read-only)
Example
The following statement returns the maximum priority value of the query used by AlmObj_1 Distributed Alarm Display object to the MaxPri integer tag: GetPropertyI("AlmObj_1.PriTo",MaxPri);
See Also
GetPropertyI(), .PriFrom, .AlarmPri
Checking for Updates to the Distributed Alarm Display Object
Use the following dot fields to find out whether the Distributed Alarm Display object contains all current alarms or if there are pending updates.
Working with the Distributed Alarm Display Object InTouch HMI Alarms and Events Guide
342
.ListChanged Dotfield on page 342
.PendingUpdates Dotfield on page 342
.ListChanged Dotfield
Indicates whether there are any new alarms or updates for the Distributed Alarm Display object.
Category
Alarms
Usage [ErrorNumber=]GetPropertyD("ObjectName.ListChanged",TagName);
Arguments
ObjectName The name of the alarm object. For example, AlmObj_1.
TagName
A discrete tag that holds the property value when the function is processed.
Remarks
This read-only dotfield contains the status about whether there have been any changes that need to be updated in the Distributed Alarm Display object. This property is automatically reset on reading the
property.
Data Type
Discrete (read-only)
Valid Values
0 = No new alarms or updates for the display object
1 = New updates for the display object
Example The following statement returns the status of any new alarms or updates for the
AlmObj_1 Distributed Alarm Display object to the AlmDispStat tag:
GetPropertyD("AlmObj_1.ListChanged",AlmDispStat);
See Also
GetPropertyD()
.PendingUpdates Dotfield
Indicates the number of pending updates to the Distributed Alarm Display object. There are pending
updates usually when the display is frozen and new alarm records are created. These do not show, but the pending updates count is increased.
Category
Alarms
Usage [ErrorMessage=]GetPropertyI( "ObjectName.PendingUpdates", TagName);
Arguments
ObjectName
The name of the alarm object. For example, AlmObj_1.
Working with the Distributed Alarm Display Object InTouch HMI Alarms and Events Guide
343
TagName An integer tag that holds the property value when the function is processed.
Remarks
This read-only dotfield contains the number of pending updates for a named Distributed Alarm Display
object. Any value greater than zero indicates the Distributed Alarm Display object has new alarm data. This value is reset each time the object is refreshed.
Data Type
Integer (read-only)
Example
The following statement returns an integer 1 or greater i f there are any pending updates for the AlmObj_1
Distributed Alarm Display object to the AlarmPendingUpdates tag: GetPropertyI( "AlmObj_1.PendingUpdates",AlarmPendingUpdates);
See Also
GetPropertyI()
Suppressing Alarms
The Distributed Alarm Display object can suppress one or more alarms at an alarm consumer that match exclusion criteria. If an alarm matches the exclusion criteria, it does not appear in the instance of the display.
You can use QuickScript functions to suppress alarms.
almSuppressAll() Function on page 343
almUnsuppressAll() Function on page 344
almSuppressDisplay() Function on page 344
almSuppressGroup() Function on page 344
almSuppressPriority() Function on page 345
almSuppressTag() Function on page 345
almSuppressSelected() Function on page 346
almSuppressSelectedGroup() Function on page 347
almSuppressSelectedPriority() Function on page 347
almSuppressSelectedTag() Function on page 348
almSuppressRetain() Function on page 348
.SuppressRetain Dotfield on page 349
almSuppressAll() Function
Suppresses the showing of all current and future instances of the alarms in the current query, including those not currently shown in the Distributed Alarm Display object in summary mode.
Syntax [Result=] almSuppressAll(ObjectName);
Argument
ObjectName
The name of the alarm object. For example, AlmObj_1.

Working with the Distributed Alarm Display Object InTouch HMI Alarms and Events Guide
344
Remarks
This function works like almAckAll(), identifying which alarms to suppress by identifying all alarms that you would see if you looked at the display and scrolled up and down to look at them all.
Example almSuppressAll("AlmObj_1");
See Also
almSuppressGroup(), almSuppressTag(), almSuppressDisplay(), almSuppressPriority(), almSuppressRetain(), almSuppressSelected(), almSuppressSelectedGroup(),
almSuppressSelectedPriority(), almSuppressSelectedTag(), almUnSuppressAll()
almUnsuppressAll() Function
Clears all suppressed alarms.
Syntax [Result=] almUnSuppressAll(ObjectName);
Argument
ObjectName The name of the alarm object. For example, AlmObj_1.
Example almUnSuppressAll("AlmObj_1");
See Also
almSuppressAll(), almSuppressGroup(), almSuppressTag(), almSuppressDisplay(), almSuppressPriority(), almSuppressRetain(), almSuppressSelected(), almSuppressSelectedGroup(),
almSuppressSelectedPriority(), almSuppressSelectedTag()
almSuppressDisplay() Function
Suppresses the showing of current and future occurrences of alarms visible in the Distributed Alarm
Display object in summary mode.
Syntax [Result=]almSuppressDisplay(ObjectName);
Argument
ObjectName The name of the alarm object. For example, AlmObj_1.
Remarks
This function works like the corresponding almAckDisplay() function, identifying which alarms to
suppress by identifying all alarms that are currently shown.
Example almSuppressDisplay("AlmObj_1");
almSuppressGroup() Function
Suppresses the showing of current and future occurrences of any alarm with the specified provider and group name.
Syntax [Result=]almSuppressGroup(ObjectName, ApplicationName,GroupName);
Working with the Distributed Alarm Display Object InTouch HMI Alarms and Events Guide
345
Argument
ObjectName The name of the alarm object. For example, AlmObj_1.
ApplicationName
The name of the application. For example, \\node1\ InTouch
GroupName The name of the alarm group. For example, $System
Example almSuppressGroup( "AlmObj_1","\InTouch","Turbines");
See Also
almSuppressAll(), almSuppressTag(), almSuppressDisplay(), almSuppressPriority(),
almSuppressRetain(), almSuppressSelected(), almSuppressSelectedGroup(), almSuppressSelectedPriority(), almSuppressSelectedTag(), almUnSuppressAll()
almSuppressPriority() Function
Suppresses the showing of current and future occurrences of any alarm of the specified priority range having the same provider name and Group name.
Syntax [Result=]almSuppressPriority(ObjectName, ApplicationName, GroupName, FromPri,
ToPri);
Arguments
ObjectName
The name of the alarm object. For example, AlmObj_1.
ApplicationName The name of the application. For example, \\node1\ InTouch
GroupName The name of the Group. For example, $System
FromPri
Starting priority of alarms. For example, 100 or Integer tag.
ToPri Ending priority of alarms. For example, 900 or Integer tag.
Example almSuppressPriority("AlmObj_1","\\node1\Intouch", "Turbines",10,100);
See Also
almSuppressAll(), almSuppressGroup(), almSuppressTag(), almSuppressDisplay(),
almSuppressRetain(), almSuppressSelected(), almSuppressSelectedGroup(), almSuppressSelectedPriority(), almSuppressSelectedTag(), almUnSuppressAll()
almSuppressTag() Function
Suppresses the showing of current and future occurrences of any alarm that belongs to the specified tagname having the same provider name, group name, and priority range.
Category
Alarms
Working with the Distributed Alarm Display Object InTouch HMI Alarms and Events Guide
346
Syntax [Result=]almSuppressTag(ObjectName, ApplicationName, GroupName, TagName,
FromPri, ToPri, AlarmClass, AlarmType);
Arguments
ObjectName The name of the alarm object. For example, AlmObj_1.
ApplicationName
The name of the application. For example, \\node1\ InTouch
GroupName The name of the Group. For example, $System
TagName The name of the alarm tag.
FromPri
Starting priority of alarms. For example, 100 or Integer tag.
ToPri Ending priority of alarms. For example, 900 or Integer tag.
AlarmClass The class of the alarm. For example, "Value."
AlarmType
The alarm type of the alarm. For example, "HiHi."
Example almSuppressTag("AlmObj_1","\\node1\Intouch",
"Turbines","Valve1",10,100,"Value","LoLo");
See Also
almSuppressAll(), almSuppressGroup(), almSuppressDisplay(), almSuppressPriority(), almSuppressRetain(), almSuppressSelected(), almSuppressSelectedGroup(),
almSuppressSelectedPriority(), almSuppressSelectedTag(), almUnSuppressAll()
almSuppressSelected() Function
Suppresses the showing of current and future occurrences of the alarms selected in the Distributed
Alarm Display object in summary mode.
Category
Alarms
Syntax [Result=]almSuppressSelected(ObjectName);
Arguments
ObjectName The name of the alarm object. For example, AlmObj_1.
Remarks
This functions works like the almAckSelect() function, identifying the alarms by the ones selected in the
display object.
Example almSuppressSelected("AlmObj_1");
Working with the Distributed Alarm Display Object InTouch HMI Alarms and Events Guide
347
See Also
almSuppressAll(), almSuppressGroup(), almSuppressTag(), almSuppressDisplay(), almSuppressPriority(), almSuppressSelectedGroup(), almSuppressSelectedPriority(), almSuppressSelectedTag(), almUnSuppressAll()
almSuppressSelectedGroup() Function
Suppresses the showing of current and future occurrences of the alarms that belong to the same groups of one or more selected alarms having the same provider name within the named Distributed Alarm
Display object.
Category
Alarms
Syntax [Result=]almSuppressSelectedGroup(ObjectName);
Arguments
ObjectName The name of the alarm object. For example, AlmObj_1.
Remarks
This functions works like the almAckSelectedGroup() function, identifying the alarms that are selected,
then identifying the groups to which they belong, and suppressing future occurrences of the alarms from those groups.
Example almSuppressSelectedGroup("AlmObj_1");
See Also
almSuppressAll(), almSuppressGroup(), almSuppressTag(), almSuppressDisplay(),
almSuppressSelected(), almSuppressSelectedPriority(), almSuppressSelectedTag()
almSuppressSelectedPriority() Function
Suppresses the showing of current and future occurrences of the alarms that belong to the same priority of one or more selected alarms having the same provider name and Group tag within the named
Distributed Alarm Display object.
Category
Alarms
Syntax [Result=]almSuppressSelectedPriority(ObjectName);
Arguments
ObjectName The name of the alarm object. For example, AlmObj_1.
Remarks
The priorities are calculated from the minimum and maximum of the selected alarm records.
This function works like the almAckSelectedPriority() function, identifying the alarms selected in the display, then identifying the corresponding priorities of those alarms, and suppressing future
occurrences of alarms with the same priorities.
Working with the Distributed Alarm Display Object InTouch HMI Alarms and Events Guide
348
Example almSuppressSelectedPriority("AlmObj_1");
See Also
almSuppressAll(), almSuppressGroup(), almSuppressTagName(), almSuppressDisplay(), almSuppressSelected(), almSuppressSelectedGroup(), almSuppressSelectedTag(), almAckSelectedPriority()
almSuppressSelectedTag() Function
Suppresses the showing of current and future occurrences of any alarm that belongs to the same Tagname name of one or more selected alarms having the same provider name, group name, and priority range.
Category
Alarms
Syntax [Result=]almSuppressSelectedTag(ObjectName);
Arguments
ObjectName The name of the alarm object. For example, AlmObj_1.
Example almSuppressSelectedTag("AlmObj_1");
See Also
almSuppressAll(), almSuppressGroup(), almSuppressTag(), almSuppressDisplay(),
almSuppressSelectedAlarm(), almSuppressSelectedGroup(), almSuppressSelectedPriority(), almAckSelectedTag(), almUnSuppressAll()
almSuppressRetain() Function
Suppresses all alarms raised by subsequent queries.
Category
Alarms
Syntax [Result=]almSuppressRetain(ObjectName,SuppressionRetainFlag);
Arguments
ObjectName The name of the alarm object. For example, AlmObj_1.
SuppressionRetainFlag Any discrete or analog tag, 0, or non-zero value. TRUE if suppression information is retained for following queries, FALSE otherwise.
Remarks
If the flag is 0 when the alarm query is changed, the suppression filters are removed.
Example almSuppressRetain("AlmObj_1", 0);
Working with the Distributed Alarm Display Object InTouch HMI Alarms and Events Guide
349
See Also
almSuppressAll(), almSuppressGroup(), almSuppressTag(), almSuppressDisplay(), almSuppressPriority(), almSuppressSelected(), almSuppressSelectedGroup(), almSuppressSelectedPriority(), almSuppressSelectedTag(), almUnSuppressAll()
.SuppressRetain Dotfield
Reads/writes the status of the feature that retains the suppression for the Distributed Alarm Display object.
Category
Alarms
Usage [ErrorNumber=]GetPropertyD( "ObjectName.SuppressRetain",TagName);
[ErrorNumber=]SetPropertyD( "ObjectName.SuppressRetain",TagName);
Parameters
ObjectName Name of the Distributed Alarm Display object. For example, AlmObj_1.
Tagname
A discrete tag that holds the property value when the script is processed.
Data Type
Discrete (read-write)
Valid Values
0 = Retain Off
1 = Retain On
Example(s)
The following statement sets the status of suppression retainer for the "AlmObj_1" from the SupRtn discrete tag: SetPropertyD("AlmObj_1.SuppressRetain", SupRtn);
See Also
GetPropertyD(), SetProperty()
Scrolling the Alarm Display
Use the following function and dotfields to scroll the alarm list within the Distributed Alarm Display object vertically or horizontally. You can also freeze the display.
almMoveWindow() Function on page 349
.Freeze Dotfield on page 350
.PrevPage Dotfield on page 351
.NextPage Dotfield on page 351
almMoveWindow() Function
Scrolls the alarm list of the Distributed Alarm Display object vertically or horizontally.
Working with the Distributed Alarm Display Object InTouch HMI Alarms and Events Guide
350
Category
Alarms
Syntax [Result=]almMoveWindow(ObjectName,Option,Repeat);
Arguments
ObjectName The name of the alarm object. For example, AlmObj_1.
Option
The type of scrolling action to perform:
Type Description
LineDn One line down.
LineUp One line up.
PageDn One page down.
PageUp One page up.
Top To the top of the list.
Bottom To the bottom of the list.
PageRt One page to the right.
PageLf One page to the left.
Right To the end of the list (right side).
Left To the beginning of the list (left side).
Repeat
The number of times this operation should be repeated.
Example almMoveWindow("AlmObj_1", "Bottom", 0);
almMoveWindow("AlmObj_1", "LineDn", 3);
almMoveWindow("AlmObj_1", "PageUp", 0);
.Freeze Dotfield
The .Freeze dotfield reads the freeze status or freezes/unfreezes the Distributed Alarm Display object.
Category
Alarms
Usage [ErrorNumber=]GetPropertyD("ObjectName.Freeze", TagName);
[ErrorNumber=]SetPropertyD("ObjectName.Freeze", TagName);
Arguments
ObjectName The name of the alarm object. For example, AlmObj_1.
Working with the Distributed Alarm Display Object InTouch HMI Alarms and Events Guide
351
TagName A discrete tag that holds the property value when the function is processed.
Remarks
A read-write dot field that contains or changes the freeze status of a Distributed Alarm Display object.
When the alarm display object is frozen, the shown alarms cannot be updated nor can new alarms be added. Freeze has no effect on whether the alarms flash or not.
Data Type
Discrete (read-write)
Valid Values
0 = Freeze OFF
1 = Freeze ON
Example
The following statement sets the Freeze property for the "AlmObj_1" from the AlmFreeze discrete tag. SetPropertyD("AlmObj_1.Freeze",AlmFreeze);
See Also
GetPropertyD(), SetPropertyD()
.PrevPage Dotfield
Scrolls the Distributed Alarm Display object one page (one screen full of alarms) up.
Category
Alarms
Usage [ErrorNumber=]SetPropertyD("ObjectName.PrevPage",0);
Arguments
ObjectName The name of the alarm object. For example, AlmObj_1.
Remarks
When this property is set, the Distributed Alarm Display object shows the previous page. After the previous page is shown, the variable is automatically set to 1, unless the top of the list has been reached. In this case, the value remains 0.
Data Type
Discrete (read/write)
See Also
GetPropertyD(), SetPropertyD(), .NextPage, .PageNum, .TotalPages
.NextPage Dotfield
Scrolls the Distributed Alarm Display object one page (one screen full of alarms) down.
Category
Alarms
Usage [ErrorNumber=]SetPropertyD("ObjectName.NextPage",0);
Working with the Distributed Alarm Display Object InTouch HMI Alarms and Events Guide
352
Arguments
ObjectName The name of the alarm object. For example, AlmObj_1.
Remarks
When this property is set, the Distributed Alarm Display object shows the next page. After the next page
is shown, the variable is automatically set to 1, unless the bottom of the list has been reached. In this case, the value remains 0.
Data Type
Discrete (read/write)
See Also
GetPropertyD(), SetPropertyD(), .PrevPage, .PageNum, .TotalPages
Showing Alarm Statistics and Counts
Use the following functions and dot fields to show statistical information about the current Distributed Alarm Display object.
almShowStats() Function on page 352
.PageNum Dotfield on page 352
.TotalPages Dotfield on page 353
.NumAlarms Dotfield on page 354
.ProvidersReq Dotfield on page 354
.ProvidersRet Dotfield on page 355
almShowStats() Function
Shows the Alarm Statistics dialog box of the specified Distributed Alarm Display object.
Category
Alarms
Syntax [Result=]almShowStats(ObjectName);
Argument
ObjectName
The name of the alarm object. For example, AlmObj_1.
Example almShowStats("AlmObj_1");
.PageNum Dotfield
Contains the current page number shown in the alarm object.
Category
Alarms
Syntax [ErrorNumber=]GetPropertyI("ObjectName.PageNum",TagName);
Working with the Distributed Alarm Display Object InTouch HMI Alarms and Events Guide
353
Parameters
ObjectName Name of the Distributed Alarm Display object. For example, AlmObj_1.
TagName
An integer tag that holds the number of the page currently shown from the Distributed Alarm Display object.
Remarks
This read-only dotfield returns the number of the currently shown page in a named Distributed Alarm
Display object.
Data Type
Integer (read-only)
Example
The following statement returns the number of the page currently shown from the AlmObj_1 Distributed Alarm Display object to the AlarmPage integer tag: GetPropertyI("AlmObj_1.PageNum",AlarmPage);
See Also
GetPropertyI(), .NextPage, .PrevPage, .TotalPages
.TotalPages Dotfield
Contains the total number of pages in the Distributed Alarm Display object.
Category
Alarms
Syntax [ErrorNum=]GetPropertyI("ObjectName.TotalPages", TagName);
Parameters
ObjectName
Name of the Distributed Alarm Display object. For example, AlmObj_1.
TagName An integer tag that retrieves the total number of alarm pages contained in the named Distributed
Alarm Display object.
Remarks
This dotfield returns the total number of alarm pages contained in a named Distributed Alarm Display object. One page equals to all alarms shown in the object on the screen at any given time.
Data Type
Integer (read-only)
Example
The following statement returns the total number of pages contained in the AlmObj_1 Distributed Alarm Display object to the AlmTotalPages integer tag: GetPropertyI( "AlmObj_1.TotalPages",AlmTotalPages);
See Also
GetPropertyI(), NextPage, PrevPage, PageNum
Working with the Distributed Alarm Display Object InTouch HMI Alarms and Events Guide
354
.NumAlarms Dotfield
Contains the number of alarms within a Distributed Alarm Display object.
Category
Alarms
Syntax [ErrorNum=]GetPropertyI("ObjectName.NumAlarms", Tagname);
Parameters
ObjectName Name of the Distributed Alarm Display object. For example, AlmObj_1.
TagName
An integer tag that holds the current number of alarms registered in a named Distributed Alarm Display object. This includes not only those alarms shown, but all alarms registered.
Remarks
This read-only dotfield returns the total number of alarms within a Distributed Alarm Display object.
Data Type
Integer (read-only)
Example
The following statement returns the current number of alarms used by the AlmObj_1 Distributed Alarm Display object to the AlarmCount integer tag: GetPropertyI("AlmObj_1.NumAlarms",AlarmCount);
See Also
GetPropertyI()
.ProvidersReq Dotfield
Contains the number of alarm providers required by the current query used by a named Distributed Alarm Display object.
Category
Alarms
Syntax [ErrorNumber=]GetPropertyI( "ObjectName.ProvidersReq",TagName);
Parameters
ObjectName Name of the Distributed Alarm Display object. For example, AlmObj_1.
TagName
An integer tag that holds the current number of alarm providers registered in a named Distributed Alarm Display object. This includes not only those alarms shown, but all alarms registered.
Data Type
Integer (read-only)
Example
The following statement returns the number of alarm providers required by the current query used by
Distributed Alarm Display object "AlmObj_1". This value is written to the TotalProv integer tag:
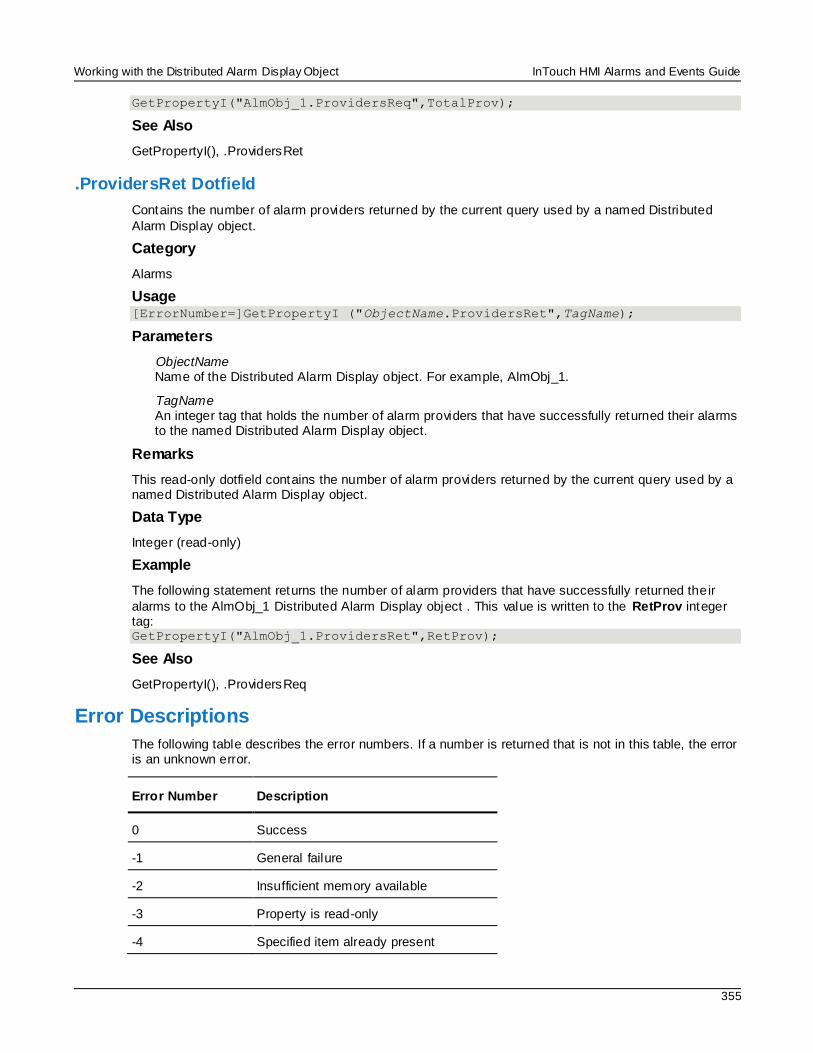
Working with the Distributed Alarm Display Object InTouch HMI Alarms and Events Guide
355
GetPropertyI("AlmObj_1.ProvidersReq",TotalProv);
See Also
GetPropertyI(), .ProvidersRet
.ProvidersRet Dotfield
Contains the number of alarm providers returned by the current query used by a named Distributed
Alarm Display object.
Category
Alarms
Usage [ErrorNumber=]GetPropertyI ("ObjectName.ProvidersRet",TagName);
Parameters
ObjectName Name of the Distributed Alarm Display object. For example, AlmObj_1.
TagName An integer tag that holds the number of alarm providers that have successfully returned their alarms to the named Distributed Alarm Display object.
Remarks
This read-only dotfield contains the number of alarm providers returned by the current query used by a named Distributed Alarm Display object.
Data Type
Integer (read-only)
Example
The following statement returns the number of alarm providers that have successfully returned their
alarms to the AlmObj_1 Distributed Alarm Display object . This value is written to the RetProv integer tag: GetPropertyI("AlmObj_1.ProvidersRet",RetProv);
See Also
GetPropertyI(), .ProvidersReq
Error Descriptions
The following table describes the error numbers. If a number is returned that is not in this table, the error is an unknown error.
Error Number Description
0 Success
-1 General failure
-2 Insufficient memory available
-3 Property is read-only
-4 Specified item already present

Working with the Distributed Alarm Display Object InTouch HMI Alarms and Events Guide
356
Error Number Description
-5 Object name unknown
-6 Property name unknown

InTouch HMI Alarms and Events Guide
357
You can migrate your applications built using the Standard Alarm System or AlarmSuite.
In This Appendix
About Migrating from Legacy Alarm Systems................................................................................ 357 Migrating from the Standard Alarm System to the Distributed Alarm System ................................... 357
About Migrating from Legacy Alarm Systems You can migrate your applications built using the Standard Alarm System or AlarmSuite.
Migrating from the Standard Alarm System to the Distributed
Alarm System When you migrate a Standard Alarm system to the Distributed Alarm system, all of the Standard Alarm Displays in the master/slave application are migrated to Distributed Alarm Display objects.
Colors, fonts, the expressions, and the alarm query settings are not migrated. The new Distributed Alarm
Display object has the following default query, where node name is the name of the master node:
\\nodename\intouch!$system
The acknowledgement and alarm status dotfields continue to work as before. Depending if the I/O tag
was configured for NetDDE or SuiteLink, you may need to enable NetDDE. However, you may decide you no longer need separate controls for issuing acknowledgements, as the alarms can now be acknowledged using the Distributed Alarm Display object.
APPENDIX B
Migrating from Legacy Alarm Systems
A alarm status handling, InTouch 7.11 and later vs. 7.1 and older • 106
Alarm Tree Viewer
automatic refresh, configuring • 148
refresh, tuning • 148
alarms
authentication • 299
AlarmTreeFastRetryMax setting, InTouch.ini file • 148
AlarmTreeSlowRetry Interval setting, InTouch.ini file • 149
AlarmTreeTotalRetryMax setting, InTouch.ini file • 149
N non-interactive permissions to run alarm services • 22, 196, 271
S signed acknowledgement • 300
SignedAlarmAck() function • 299
Index