Internet Banking User Guide - Winona National Bank Banking User Guide Jack Henry & Associates, Inc....
23
2011.11 Internet Banking User Guide Jack Henry & Associates, Inc.
Transcript of Internet Banking User Guide - Winona National Bank Banking User Guide Jack Henry & Associates, Inc....

2011.11
Internet Banking
User Guide
Jack Henry & Associates, Inc.

Contents
Login ............................................................................................................................................................. 1 Login Screen ................................................................................................................................ 1 Password Change ........................................................................................................................ 2 Watermark Selection .................................................................................................................. 2 Multi-Factor Authentication Security Question Selection .......................................................... 3 My Internet Banking ................................................................................................................... 4
My Internet Banking Page Configuration ................................................................................ 4 My Internet Banking Widget Configuration ............................................................................ 6
Account Listing ......................................................................................................................................... 7 Transactions ................................................................................................................................ 8 Download .................................................................................................................................... 9 Transfers ................................................................................................................................... 10
Add Transfer ..........................................................................................................................10 Pending Transfers ..................................................................................................................10
Stop Payments .......................................................................................................................... 11 View Existing Stop Payments .................................................................................................11
Statements ................................................................................................................................ 12 Account Info .............................................................................................................................. 13
Settings ..................................................................................................................................................... 14 Personal .................................................................................................................................... 14 Account ..................................................................................................................................... 15 Display ....................................................................................................................................... 15 Alerts ......................................................................................................................................... 16
Event Alerts ............................................................................................................................16 Balance Alerts ........................................................................................................................16 Item Alerts .............................................................................................................................16 Personal Alerts .......................................................................................................................16
Reset Password ..................................................................................................................................... 17
Message Center...................................................................................................................................... 18 Sending New Message .............................................................................................................. 18 Message Received ..................................................................................................................... 18
Internet Banking Enrollment ........................................................................................................... 19

2011.11 Page 1 of 21
Login
Login Screen
Home: Directs to Winona National Bank’s website.
Test Browser: Tests browser for 128-bit encryption.
Enroll: Allows submission of an Internet Banking application to Winona National Bank.
Internet Banking ID: 12-digit Internet Banking ID number or (if not a first time user) alias. Alias
is not case sensitive.
Internet Banking Password: For first time login, password is the last four digits of your Social
Security Number.
Reset Password: Allows you to create a new password if your Internet Banking account is
locked or you have forgotten your password.

2011.11 Page 2 of 21
Password Change At first log in or if your password has been reset, you must create a new password. If desired,
you can also change your Internet Banking ID.
Change your Internet Banking Password (required): Enter current password then new
password twice to confirm accuracy.
Change your Internet Banking ID (optional): Enter a new alias or personal ID.
Watermark Selection After the password change screen, you may be prompted to select a watermark image. This
same image appears at all future logins.

2011.11 Page 3 of 21
Multi-Factor Authentication Security Question Selection After Password Change screen, you may be prompted to select three security questions.
Step 1: Select Continue.
Step 2: Select a question from each drop-down menu and input answer. Select Submit. Answers
are not case sensitive.
Step 3: Review selected questions and answers. Select Confirm.
If needed, edit answers before clicking Confirm. Once Confirm is selected, questions and
answers cannot be modified.
2011.11 Page 4 of 21
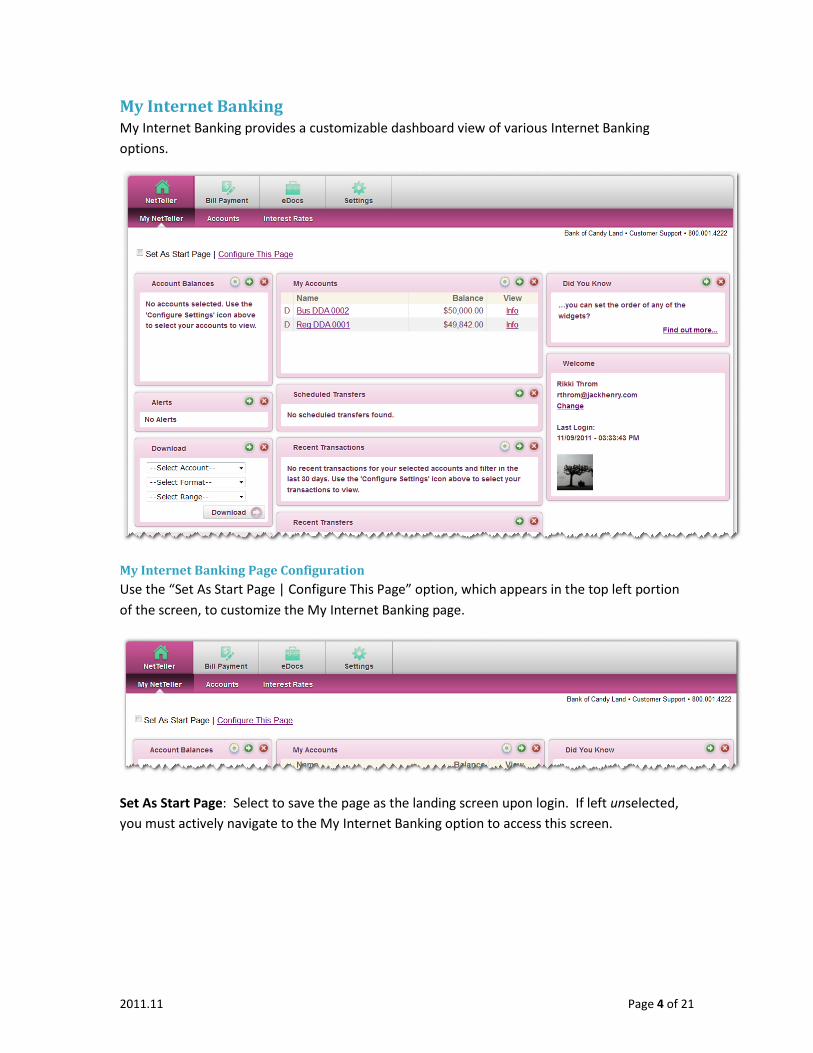
My Internet Banking My Internet Banking provides a customizable dashboard view of various Internet Banking
options.
My Internet Banking Page Configuration
Use the “Set As Start Page | Configure This Page” option, which appears in the top left portion
of the screen, to customize the My Internet Banking page.
Set As Start Page: Select to save the page as the landing screen upon login. If left unselected,
you must actively navigate to the My Internet Banking option to access this screen.

2011.11 Page 5 of 21
Configure This Page: Upon clicking this link, a lightbox window appears allowing control over
which widgets to display. Any widgets not currently displayed are listed in the right column of
the lightbox window and can be added.
To configure the page:
Step 1: Choose a column to work with from the Select Column To Configure drop-down field.
The names of widgets (items) assigned to that column appear below.
My Internet Banking has a Left, Center, and Right column. The default selection is Left
Column. Widgets are pre-assigned into specific columns on the My Internet Banking
page and cannot be moved to different columns.
Step 2: Add or remove widgets and change the order of display, if desired.
Step 3: Return to Step 1 until all columns have been set up.
Step 4: Click Save to retain changes made to all columns. The Configure This Page lightbox
closes and the My Internet Banking page reloads to reflect the changes.

2011.11 Page 6 of 21
My Internet Banking Widget Configuration
While the configuration concept for each widget is the same, the content within the
configuration lightbox window varies based on the purpose of the widget.
The Configure icon does not appear on widgets where configuration is not applicable.
To configure a widget:
Step 1: Click the Configure icon on the widget. The Configure lightbox appears:
Step 2: Review the items being displayed (left side of lightbox) and items not currently
displayed (right side of lightbox).
Step 3: Add or remove items and change the order of display, if desired.
Step 4: Click Save to retain changes made to the widget. The Configure lightbox closes and the
widget reloads to reflect the changes.

2011.11 Page 7 of 21
Account Listing Displays list of accounts linked to Internet Banking and balance of those accounts. If My
Internet Banking is not selected as the landing page, Account Listing serves as the landing page
upon login.
Contact: Direct to Message Center.
Policies (optional): Displays Internet Agreement, Privacy Statement, and Security Statement.
Log Out: Signs user out of Internet Banking and deletes the session cookie on the computer.
Internet Banking logs out automatically after 10 minutes of inactivity. Warning
message displays after 9 minutes. An option to Continue or Log Out is provided with
one minute to take action.
Account Listing: Displays account pseudo name, balance, and status (Closed, Dormant, etc.).
Select Option: Allows you to select Transactions, Download, Stop Payments, Transfers,
Statements, and Account Info for the account.
Customer Summary Information: Displays the quantity of accounts tied to the Internet Banking
ID and a login summary.

2011.11 Page 8 of 21
Transactions Displays transaction history and balance information for a selected account.
Current Transactions: Appear in date order and include item number (if applicable), transaction
description, amount of the transaction, and the running balance.
View Transactions for: Navigate between the transactions listing of other accounts.
Current Balance: Displays the current balance of the account.
Available Funds: Displays the available balance of the account. The link displays the makeup of
the available funds.
View Range: View transactions since last statement, last 7 days, last 15 days, last 30 days, or All.
Search: Look for specific transactions.

2011.11 Page 9 of 21
Download
Download Transactions for Account: Use the dropdown box to navigate between accounts.
Select Download Range: Options include transactions since last download, since last statement,
or between two dates.
Download Format: Options include:
Microsoft Money (.ofx)
Intuit QuickBooks (.iif) (old version of QuickBooks software)
Intuit QuickBooks (.qbo)
Standard Personal Finance (.qif) (old version of Quicken)
Quicken (.qfx)
Spreadsheet (.csv)
Word Processing (.txt)
Select Number of Transaction Description Lines: (not shown) Select to download one, two,
three, or all lines of information on the transaction.
Click Submit to display instructions for downloading or viewing the results.
2011.11 Page 10 of 21
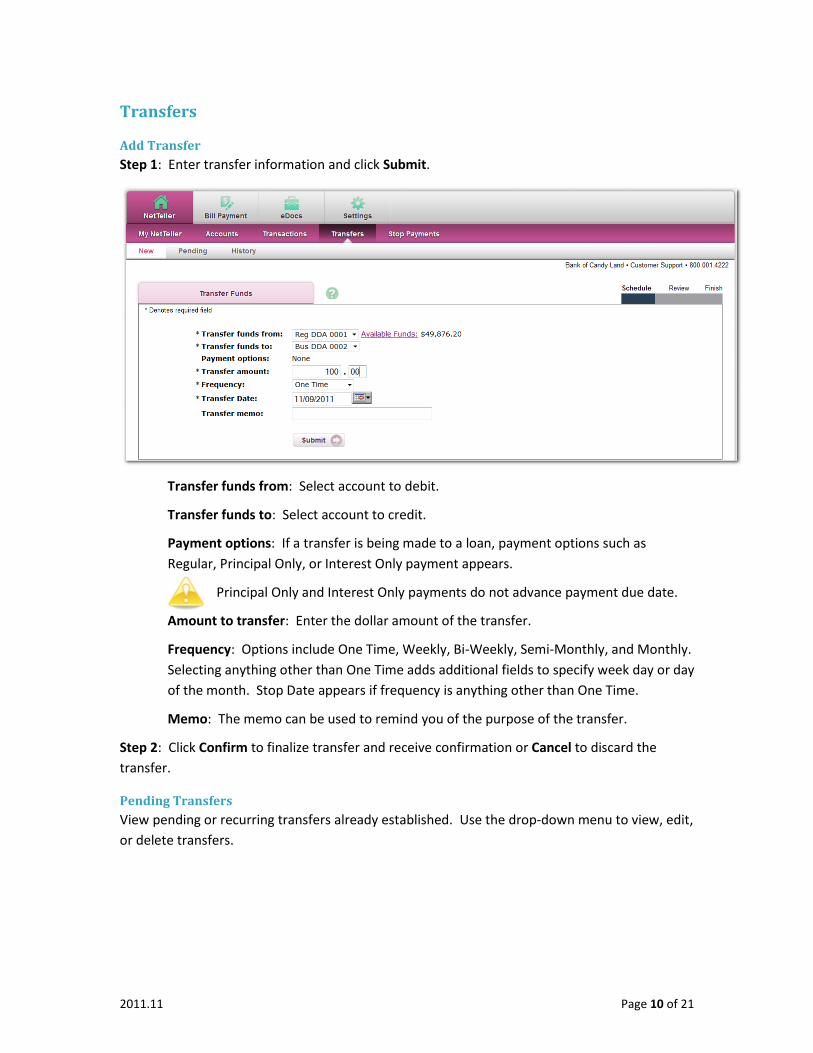
Transfers
Add Transfer
Step 1: Enter transfer information and click Submit.
Transfer funds from: Select account to debit.
Transfer funds to: Select account to credit.
Payment options: If a transfer is being made to a loan, payment options such as
Regular, Principal Only, or Interest Only payment appears.
Principal Only and Interest Only payments do not advance payment due date.
Amount to transfer: Enter the dollar amount of the transfer.
Frequency: Options include One Time, Weekly, Bi-Weekly, Semi-Monthly, and Monthly.
Selecting anything other than One Time adds additional fields to specify week day or day
of the month. Stop Date appears if frequency is anything other than One Time.
Memo: The memo can be used to remind you of the purpose of the transfer.
Step 2: Click Confirm to finalize transfer and receive confirmation or Cancel to discard the
transfer.
Pending Transfers
View pending or recurring transfers already established. Use the drop-down menu to view, edit,
or delete transfers.

2011.11 Page 11 of 21
Stop Payments View existing stop payments and create new stop payments.
Step 1: Select New, then complete the fields and click Submit.
Step 2: Review stop payment information. Click Confirm.
Final confirmation displays indicating stop payment has been placed. If check has already
cleared your account or if a stop payment already exists for the item, a message shows stating
the stop could not be placed.
View Existing Stop Payments
Click View to see details of the stop payment.
Stop payments cannot be edited or deleted in Internet Banking.

2011.11 Page 12 of 21
Statements Basic account statements are available for viewing in Internet Banking. These statements do not
include check images.
2011.11 Page 13 of 21
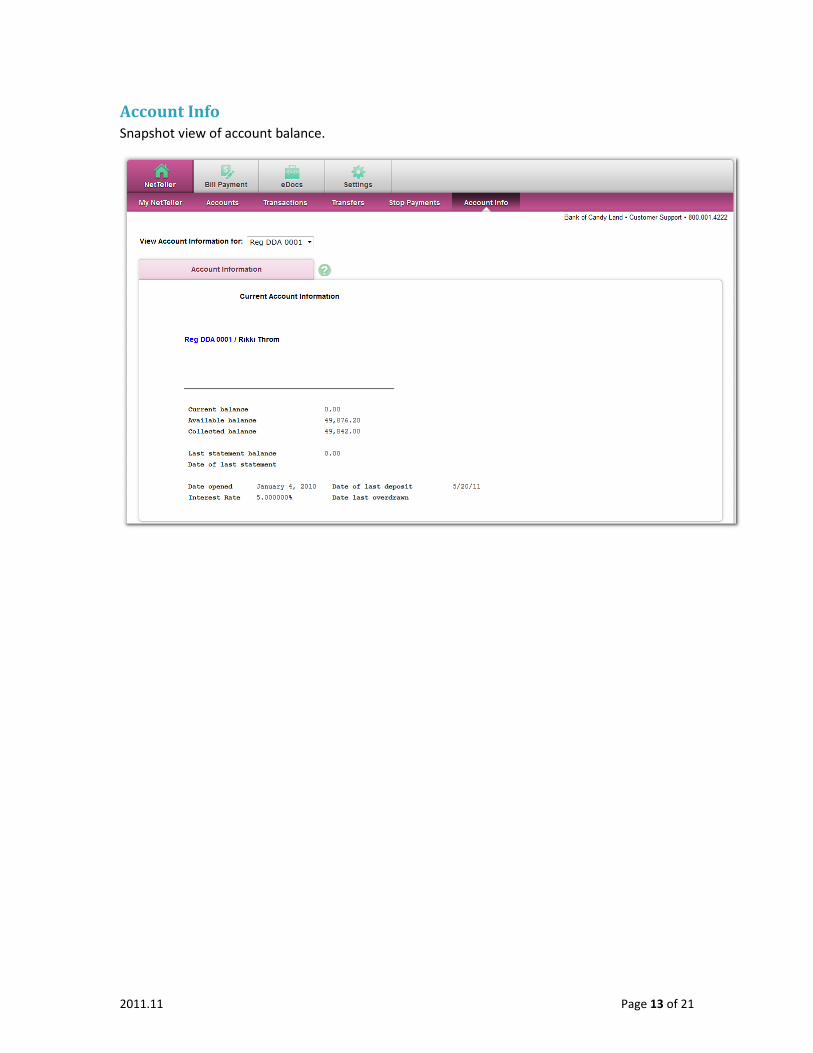
Account Info Snapshot view of account balance.

2011.11 Page 14 of 21
Settings
Personal Make changes to login information, email address, and password reset settings.
Modify Personal Settings: Change email address.
Password Reset Question: Self-established question.
Password Reset Answer: Self-established answer. Answer is case sensitive.
Modify Login Information: Change Internet Banking ID (alias) and Internet Banking password.
2011.11 Page 15 of 21
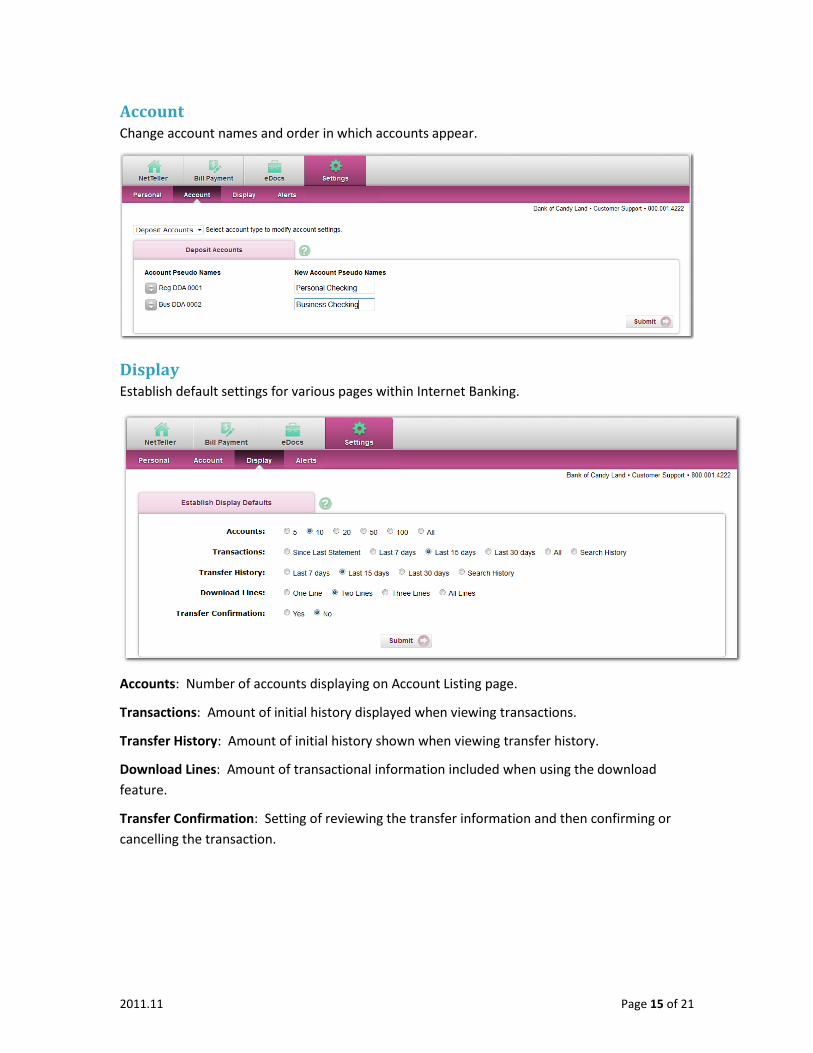
Account Change account names and order in which accounts appear.
Display Establish default settings for various pages within Internet Banking.
Accounts: Number of accounts displaying on Account Listing page.
Transactions: Amount of initial history displayed when viewing transactions.
Transfer History: Amount of initial history shown when viewing transfer history.
Download Lines: Amount of transactional information included when using the download
feature.
Transfer Confirmation: Setting of reviewing the transfer information and then confirming or
cancelling the transaction.

2011.11 Page 16 of 21
Alerts Four types of alerts exist: Event, Balance, Item, and Personal.
Alerts can be received one of two ways:
Log In: Link displays on the Account Listing and My Internet Banking page indicating a new alert
exists. Click the link to view the details of the alert.
Email: Receive an email indicating a new alert exists in Internet Banking. The email column is
not visible if Winona National Bank does not allow email alerts.
Event Alerts
Watch for account activities.
Event Alerts remain active until deleted.
Balance Alerts
Watch for when an account falls above or below a specified balance.
Select the Account Name from the drop down-box, choose Above/Below and enter an Amount
to watch for.
Balance Alerts remain active until deleted.
Item Alerts
Watch for a specified item number to clear your account.
Enter the Item Number and select the Account Name from the drop-down box.
Item Alerts delete once the alert has been generated and viewed.
Personal Alerts
To be reminded of a self-defined message on a specific date.
Enter the Date the alert is to be active and the Text to include in the alert.
Item Alerts delete once the alert has been generated and viewed.
2011.11 Page 17 of 21
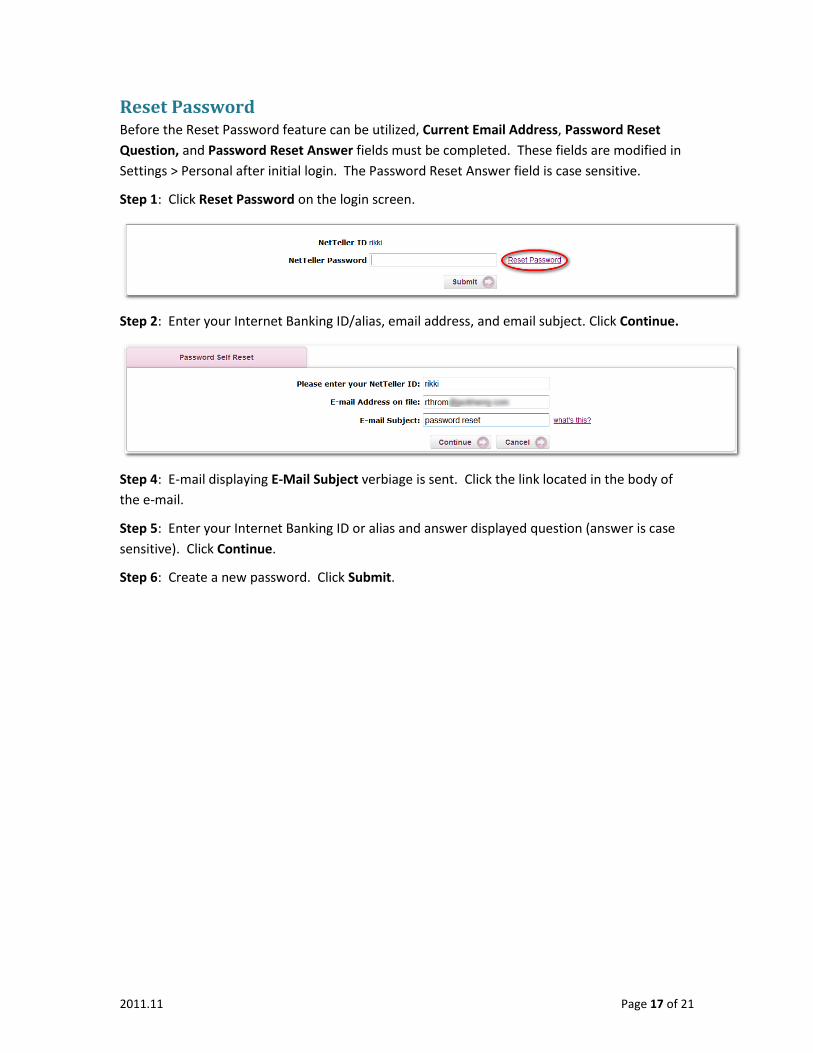
Reset Password Before the Reset Password feature can be utilized, Current Email Address, Password Reset
Question, and Password Reset Answer fields must be completed. These fields are modified in
Settings > Personal after initial login. The Password Reset Answer field is case sensitive.
Step 1: Click Reset Password on the login screen.
Step 2: Enter your Internet Banking ID/alias, email address, and email subject. Click Continue.
Step 4: E-mail displaying E-Mail Subject verbiage is sent. Click the link located in the body of
the e-mail.
Step 5: Enter your Internet Banking ID or alias and answer displayed question (answer is case
sensitive). Click Continue.
Step 6: Create a new password. Click Submit.

2011.11 Page 18 of 21
Message Center Send and receive secure messages to Winona National Bank.
Sending New Message Step 1: Select Contact Us.
Step 2: Click New. Fill out message information. Click Submit.
From: Your Internet Banking ID.
E-mail: E-mail address as entered in Settings. E-mail address is used to send an
automated email notifying you when Winona National Bank responds to your message.
Name: Full name.
Subject: Enter a subject for the message.
Urgency: The level selected flags the message accordingly.
Message: Enter the message.
Attachment: Browse for a file and attach to the message. Possible types are PDF, Text,
HTML, Word, and Excel.
Message Received An automated email is sent informing you of a message from Winona National Bank.
After a successful login, a red flashing icon followed by a link that reads You have X new
messages displays. Click the link to view the message within the Message Center.
2011.11 Page 19 of 21
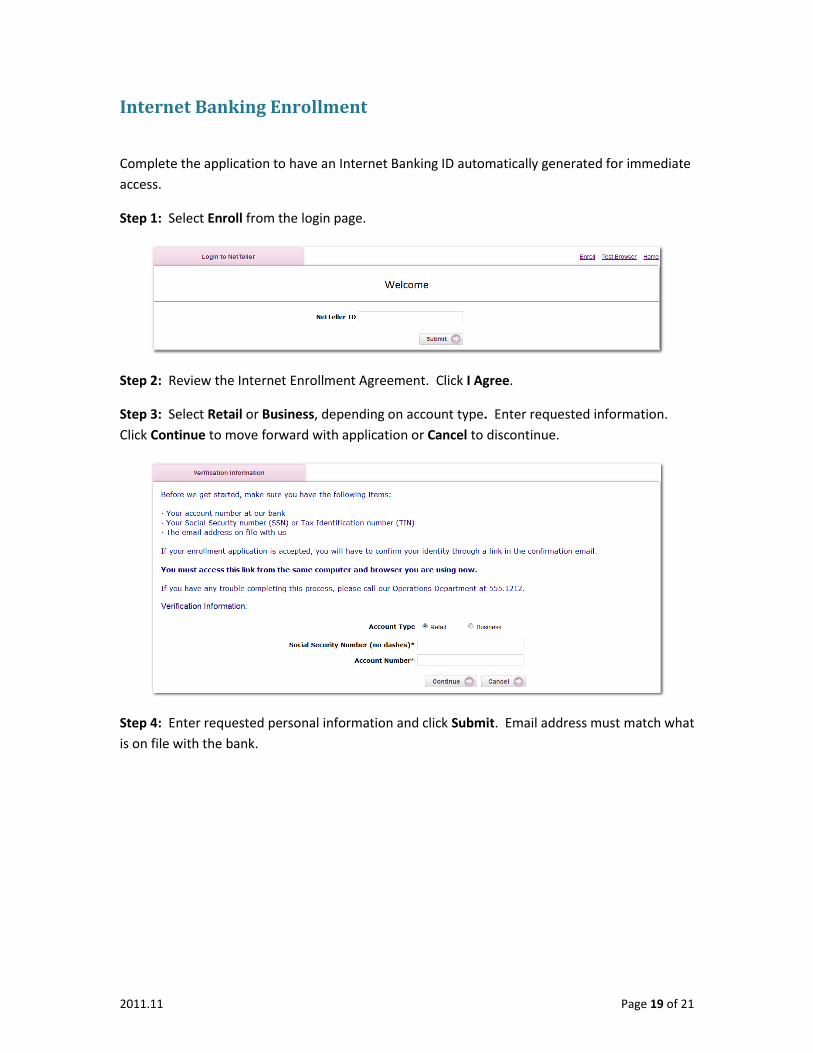
Internet Banking Enrollment
Complete the application to have an Internet Banking ID automatically generated for immediate
access.
Step 1: Select Enroll from the login page.
Step 2: Review the Internet Enrollment Agreement. Click I Agree.
Step 3: Select Retail or Business, depending on account type. Enter requested information.
Click Continue to move forward with application or Cancel to discontinue.
Step 4: Enter requested personal information and click Submit. Email address must match what
is on file with the bank.
2011.11 Page 20 of 21
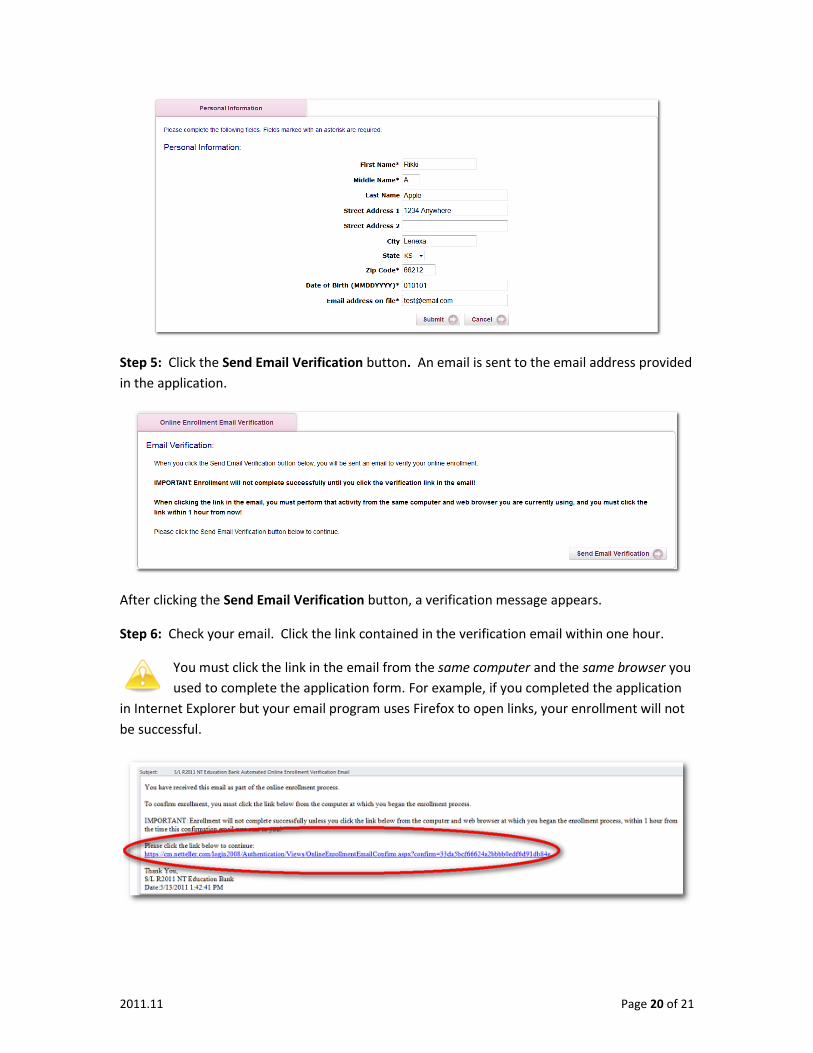
Step 5: Click the Send Email Verification button. An email is sent to the email address provided
in the application.
After clicking the Send Email Verification button, a verification message appears.
Step 6: Check your email. Click the link contained in the verification email within one hour.
You must click the link in the email from the same computer and the same browser you
used to complete the application form. For example, if you completed the application
in Internet Explorer but your email program uses Firefox to open links, your enrollment will not
be successful.

2011.11 Page 21 of 21
Step 7: A confirmation screen displays your new Internet Banking ID. Select Login to complete
the enrollment process. The initial password is the last four digits of your Social Security
number (SSN) or Tax ID number (TIN).