International Scout 80/800 - Softopper · International Scout 80/800 Tools needed: sockets wrenches...
8
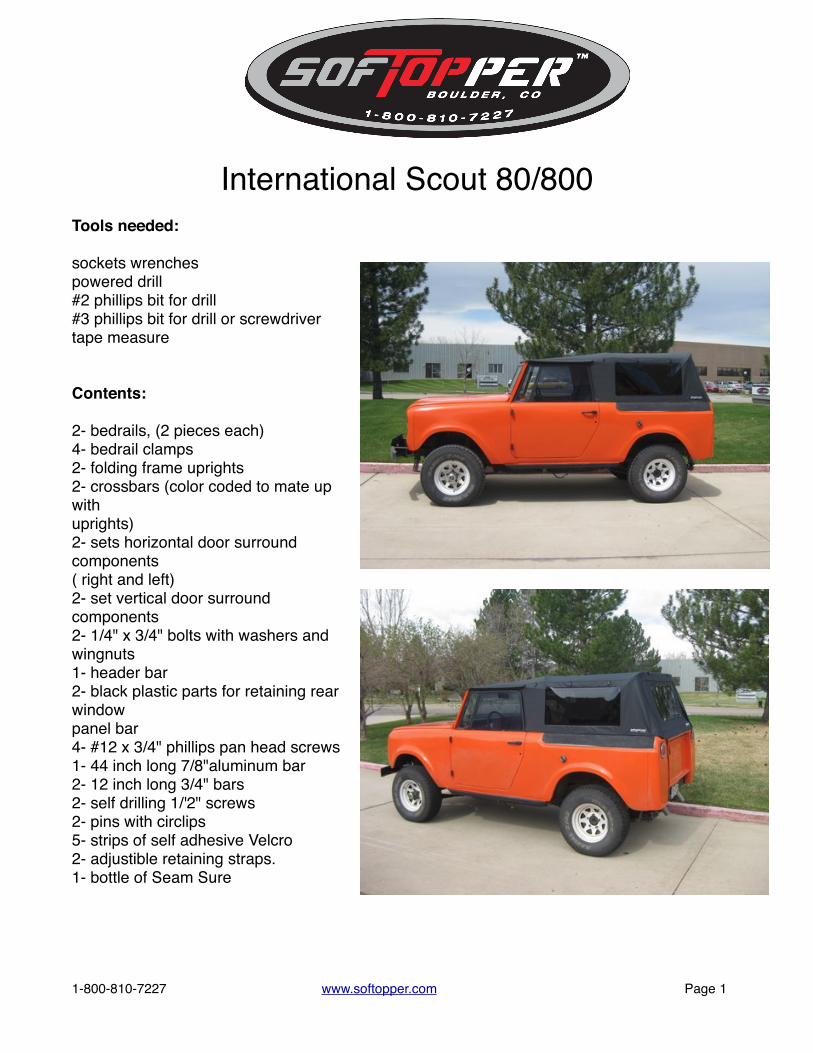
International Scout 80/800 Tools needed: sockets wrenches powered drill #2 phillips bit for drill #3 phillips bit for drill or screwdriver tape measure Contents: 2- bedrails, (2 pieces each) 4- bedrail clamps 2- folding frame uprights 2- crossbars (color coded to mate up with uprights) 2- sets horizontal door surround components ( right and left) 2- set vertical door surround components 2- 1/4" x 3/4" bolts with washers and wingnuts 1- header bar 2- black plastic parts for retaining rear window panel bar 4- #12 x 3/4" phillips pan head screws 1- 44 inch long 7/8"aluminum bar 2- 12 inch long 3/4" bars 2- self drilling 1/'2" screws 2- pins with circlips 5- strips of self adhesive Velcro 2- adjustible retaining straps. 1- bottle of Seam Sure 1-800-810-7227 www.softopper.com Page 1
-
Upload
nguyencong -
Category
Documents
-
view
218 -
download
0
Transcript of International Scout 80/800 - Softopper · International Scout 80/800 Tools needed: sockets wrenches...
International Scout 80/800Tools needed:
sockets wrenchespowered drill#2 phillips bit for drill#3 phillips bit for drill or screwdrivertape measure
Contents:
2- bedrails, (2 pieces each)4- bedrail clamps2- folding frame uprights2- crossbars (color coded to mate up withuprights)2- sets horizontal door surround components( right and left)2- set vertical door surround components2- 1/4" x 3/4" bolts with washers and wingnuts1- header bar2- black plastic parts for retaining rear windowpanel bar4- #12 x 3/4" phillips pan head screws1- 44 inch long 7/8"aluminum bar2- 12 inch long 3/4" bars2- self drilling 1/'2" screws2- pins with circlips5- strips of self adhesive Velcro2- adjustible retaining straps.1- bottle of Seam Sure
1-800-810-7227 www.softopper.com Page 1

Step 1 Join the front and rear portions of the square bedrail tubes. Attach the black plastic parts to the bedrails using the 4- #12 screws. The parts are marked with an "A" or a "B". "A" goes on the driver side bedrail and "B" goes on the passenger side bedrail. Remove the white protective tape from the weatherstripping on the bottom of each bedrail.
Step 2 Place the bedrails into position on the vehicle and align each bedrail side to side and front to rear as shown in the photos and clamp in place. The clamps will allow you move the bedrails slighty later if necessary.
1-800-810-7227 www.softopper.com Page 2

Step 3 Assemble the folding frame arms and the 2 crossbars using the color codes. Slip the small loops of the provided webbing straps around the rear crossbar (the crossbar with the snaps) before joining. These straps are used to helpsupport the canopy and frame between the two crossbars. Best placement for the straps is between the 2nd and 3rd snapson each end. Attach the adjustable ends of the straps around the forward crossbarloosely. Ensure that the push buttons at the frame connection point have popped into place.
Step 4 Attach the completed frameassembly to the pivot points on the bedrails by removing the circlips and fitting the pivot pins through the holes in the bottom of the folding frame. Reinstall the circlips. Lay the folding frame rearward and loosely attach the 3'4" webbing strap hooks to the black plastic parts at the rear of the bedrails
Step 5 Install the windshield header bar to the top of the windshield using the hardtop bolts. The black plastic deck hinges should be facing rearward.Be sure to remove the white paperbacking from the weather stripping.
Step 6 Join the two vertical andhorizontal components of the doorsurrounds using the 1/4" bolts andwingnuts as shown.
1-800-810-7227 www.softopper.com Page 3
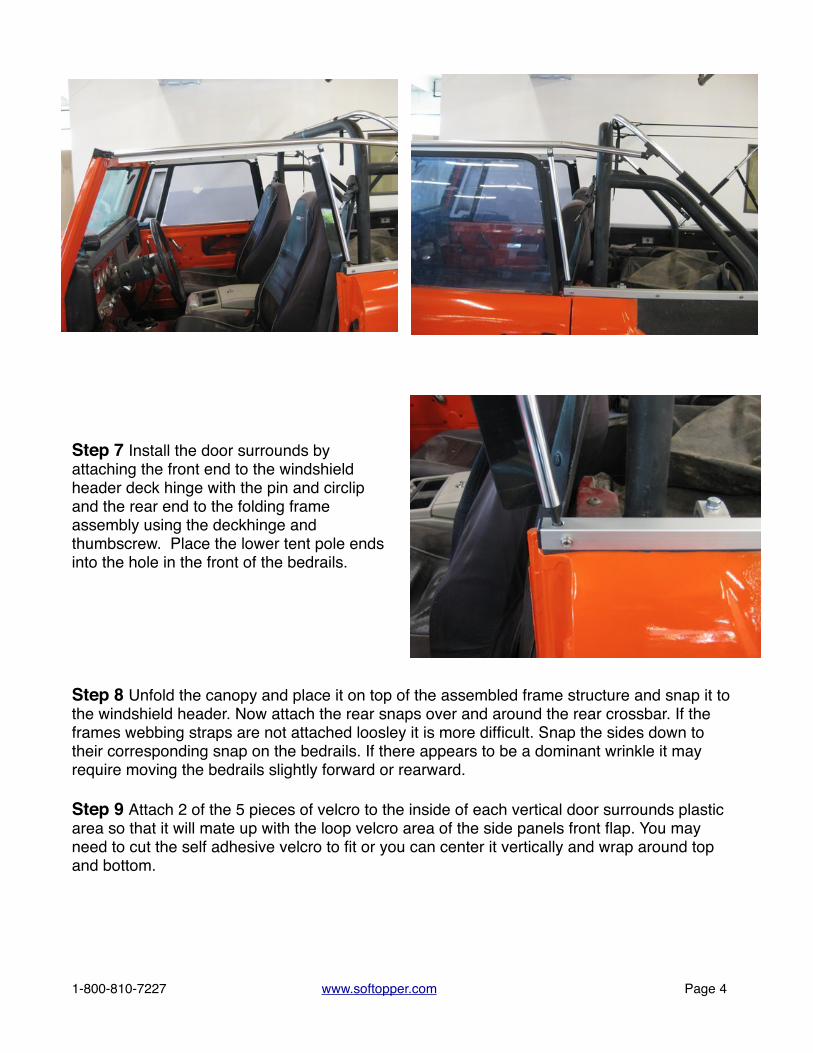
Step 7 Install the door surrounds byattaching the front end to the windshieldheader deck hinge with the pin and circlip and the rear end to the folding frame assembly using the deckhinge and thumbscrew. Place the lower tent pole ends into the hole in the front of the bedrails.
Step 8 Unfold the canopy and place it on top of the assembled frame structure and snap it tothe windshield header. Now attach the rear snaps over and around the rear crossbar. If theframes webbing straps are not attached loosley it is more difficult. Snap the sides down totheir corresponding snap on the bedrails. If there appears to be a dominant wrinkle it mayrequire moving the bedrails slightly forward or rearward.
Step 9 Attach 2 of the 5 pieces of velcro to the inside of each vertical door surrounds plasticarea so that it will mate up with the loop velcro area of the side panels front flap. You mayneed to cut the self adhesive velcro to fit or you can center it vertically and wrap around topand bottom.
1-800-810-7227 www.softopper.com Page 4

Step 10 Insert the 2- 12 inch 3/4" bars into each end of the longer 44" bar with the plastic end caps out. Press the bar assembly into the black plastic snap fit parts on the rear of the bedrail, adjusting the total length as necessary for a tight side to side fit. It is ideal to have the larger tube centered and have as little side to side movement as possible. Using the drill and the #2 phillips drill bit carefully screw in the 2 self drilling screws to join the large and small bars. There are 2 predrilled holes in each end of the large bar. Insert the finished tube into the rear window panels inside sleeve. Press the rear bar into the snap fit parts again and check fit.! ! ! ! ! ! ! ! ! ! Not to Scale
Step 11 Install the velcro to the outside of the tailgate to better secure the rear window panel in place. It is recommended that you clean the surface with a 50/50 mixof water and isopropyl alcohol.
RetractingWhen retracting the top it is recommended that you flip the sides and rear neatly up onto the roof and carefully fold the canopy rearward as neatly as possible. It is highly recommended that the boot cover / storage bag is used when the topper is in the retracted position. This will prevent the top from catching the wind. If you decide to use the supplied Seam sure, be sure to apply it to the inside of the canopy. Do not allow the liquid to come in contact with the outer vinyl coating of the canopy.
1-800-810-7227 www.softopper.com Page 5
WarrantyWe warrant our 4Runner, Jeep Wrangler, Blazer, Jimmy, Scout and Bronco Softoppersto be free from defects in material and workmanship for a period of one year, with theexception of vinyl windows and zippers, provided there has been normal use andproper maintenance.
Vinyl Windows are warranted for a period of 3 months from the date of purchase.
Zippers are guaranteed to be in perfect working condition when leaving the factory.Due to atmospheric conditions, dirt, sand, road grime, dust, and abrasive cleaners,etc., zippers are warranted for a period of 6 months from the date of purchase.
Side curtain windows are warranted for 45 days from the date of purchase.
Important: Retracting or closing the top when the temperature is below 40 degrees isasking for trouble. This will void the warranty on the windows, as clear vinyl plasticcan crack very easily at these temperatures. This top is meant to be a warm-weathertopper. It is not intended to be used during cold temperatures or winter months.
Returns must be pre-approved and have Softoppers issued RGA number attached.Any defective items must be returned with proof of purchase to Softopper 4750 Nautilus Court South, Unit B, Boulder CO 80301, freight pre-paid. Items returned must be carefullypacked, in clean condition, with plastic windows protected from scratching andcreasing. This warranty does not cover damage resulting from abuse, misuse,alteration, accident or damage in transit. Softoppers obligations under this warrantyare limited to the aforementioned repair or replacement of warranty defects forwhich return authorization has been received during the warranty period, andSoftopper SHALL NOT BE LIABLE FOR ANY INCIDENTAL OR CONSEQUENTIAL DAMAGES ARISING FROM BREACH OF THIS OR ANY IMPLIED WARRANTY. This warranty applies to the original purchaser only. All remedies under this warranty are limited to repair or replacement of any item or items found to be defective by the factory within the time periodspecified.
For further information or request for repair work, please contact:Softopper LLC, customer service (800) 810-7227 or (303) 304-0533
1-800-810-7227 www.softopper.com Page 6

Softopper Care and MaintenanceYour top is made of the finest materials available. To keep it looking new and forproduct longevity and durability, it will need periodic cleaning and maintenance.Washing: The fabric should be washed from time to time using a mild soap and warmwater. Be sure to rinse all soap off the top when washing is complete.
Vinyl Windows: Windows should be kept clean to avoid scratching. Wash with awater-soaked sponge or cloth and a mild dishwashing detergent. Do not use acoarse brush on the windows and never wipe the windows when they are dry.
Cold weather: As with all automotive and marine clear vinyls, extreme care must betaken when rolling up or folding in cold temperatures. This point cannot be stressedenough! Clear vinyl becomes stiff in cold temperatures and may crack. Retractingthe Softopper in cold temperatures is not recommended. When opening the rear ofthe Softopper in cold weather, be sure to raise the zippers as high as possible so thatany folding will occur to the topper fabric and not to the clear vinyl window.
Zippers: Keeping the zippers clean and lubricated with a silicone lubricant will helpprevent damage and keep the zippers in smooth working condition.
Leakage: As with any sewn automotive top there is always a slight risk of leakage.Right out of the box the Softopper will not be waterproof. Water seeping throughat the seams may be stopped by applying Seam Sure (supplied), on the inside of theaffected seams. Shake Seam Sure well and apply liberally to the inside seamsconcentrating on areas where needle and thread penetrated the fabric.
Snaps: Keep snaps clean and lubricated with a silicone lubricant to help prevent snapsfrom sticking to the studs. If a snap does become stuck to a stud, use a screwdriverand gently pry apart to prevent damage to the snap or top fabric. If any snaps need tobe replaced due to sticking or damage please call Softopper and we can send out asmall do-it-yourself repair kit.
For further information please contact:Softopper LLC, customer service(800) 810-7227 or (303) 304-0533
1-800-810-7227 www.softopper.com Page 7

This product is designed to shield the occupants from ordinaryweather conditions.
Do not rely in any way on the soft top to contain occupants within the vehicle, or to protect against injury or death in the event of an accident or a roll-over.
This top will not protect the occupants from falling or flyingobjects.
Never operate vehicle in excess of manufacturersrecommendations or specifications.
Please call us at 1-800-810-7227 if you have any questions.Or email us at [email protected]
1-800-810-7227 www.softopper.com Page 8