Interactive User Manual June 2007 (updated Sept 2007) · Interactive User Manual June 2007 (updated...
39
Page 1 of 39 MIS019.001.1 - BusinessObjects XI - Interactive User Manual.doc Management Services Business Objects XI – Interactive User Manual Interactive User Manual June 2007 (updated Sept 2007)
-
Upload
trinhthien -
Category
Documents
-
view
226 -
download
0
Transcript of Interactive User Manual June 2007 (updated Sept 2007) · Interactive User Manual June 2007 (updated...

Page 1 of 39 MIS019.001.1 - BusinessObjects XI - Interactive User Manual.doc
Management Services
Business Objects XI – Interactive User Manual
Interactive User Manual
June 2007(updated Sept 2007)

Page 2 of 39 MIS019.001.1 - BusinessObjects XI - Interactive User Manual.doc
Management Services
Business Objects XI – Interactive User Manual
1. INTRODUCTION TO BUSINESS OBJECTS..............................................................................4
2. OPERATING SYSTEMS AND WEB BROWSERS SUPPORTED ..............................................4
3. WHAT IS INFOVIEW?................................................................................................................4
4. INTERACTIVE FUNCTIONALITY AVAILABLE .........................................................................5
5. TURNING ON INTERACTIVE FUNCTIONALITY .......................................................................6
6. INTERACTIVE TOOLBARS .......................................................................................................6
7. INTERACTIVE DOCUMENT INFORMATION.............................................................................7
A. Document Properties...........................................................................................................7
B. Context Panel.......................................................................................................................8i. Document Summary ................................................................................................................................................................. 9ii. Data Summary......................................................................................................................................................................... 10iii. Chart & Table Types ............................................................................................................................................................... 11iv. Available Objects .................................................................................................................................................................... 12v. Document Structures & Filters............................................................................................................................................... 13vi. Navigation Map Option ........................................................................................................................................................... 13vii. User Prompt Input................................................................................................................................................................... 14viii. Find.......................................................................................................................................................................................... 14
8. INTERACTIVE FUNCTIONALITY EXPLAINED ....................................................................... 14
A. Filters..................................................................................................................................14i. To Define A Quick Report Filter ............................................................................................................................................. 14ii. Viewing, Editing and Deleting Report Filters ........................................................................................................................ 15iii. To Edit A Report Filter ............................................................................................................................................................ 15iv. To Remove a Report Filter...................................................................................................................................................... 15
B. Sorts ...................................................................................................................................16i. Applying and Removing Sorts ............................................................................................................................................... 16ii. To Apply a Sort to a Table or Section .................................................................................................................................... 16iii. To Apply a Custom Sort ......................................................................................................................................................... 17iv. To Remove a Custom Sort ..................................................................................................................................................... 17v. To View Sorts Defined on Table ............................................................................................................................................. 17
C. Breaks.................................................................................................................................18i. Breaks Explained .................................................................................................................................................................... 18ii. How Data is Sorted with Breaks............................................................................................................................................. 20iii. Inserting, Removing & Prioritising Breaks ............................................................................................................................ 20iv. Setting Display Properties & Page Layout for Breaks .......................................................................................................... 21
D. Calculations ....................................................................................................................... 24i. Insert Standard Calculations.................................................................................................................................................. 24ii. Inserting and Removing Calculations ................................................................................................................................... 24

Page 3 of 39 MIS019.001.1 - BusinessObjects XI - Interactive User Manual.doc
Management Services
Business Objects XI – Interactive User Manual
E. Adding, Removing and Formatting Data Displayed ........................................................ 25i. Available Table Types............................................................................................................................................................. 25ii. Inserting Tables & Free Standing Cells ................................................................................................................................. 26iii. Transforming Tables to Different Table Types...................................................................................................................... 27iv. Including Tables Headers & Footers ..................................................................................................................................... 28v. Adding & Removing Rows & Columns .................................................................................................................................. 29vi. Moving & Swapping Rows & Columns .................................................................................................................................. 29vii. Modifying Data Included in Tables &Cells............................................................................................................................. 31viii. Removing Tables & Cells ....................................................................................................................................................... 32
F. Drilling ................................................................................................................................ 33i. Hierarchies .............................................................................................................................................................................. 33ii. Activating Drill Mode .............................................................................................................................................................. 33iii. Drilling Down........................................................................................................................................................................... 35iv. Drilling Up................................................................................................................................................................................ 37v. Drilling on a Chart (Graph) ..................................................................................................................................................... 38vi. Drill Information ...................................................................................................................................................................... 39vii. Saving a View with a Snapshot .............................................................................................................................................. 39

Page 4 of 39 MIS019.001.1 - BusinessObjects XI - Interactive User Manual.doc
Management Services
Business Objects XI – Interactive User Manual
1. Introduction to Business Objects
Business Objects is the standard reporting tool for use with Business Systems in University College Dublin, implemented in 1999. It isused to deliver reports based primarily on the systems below:
Banner (Student Information System)
CoreHR (HR/Payroll System)
eFinancials (Finance System)
CMIS (Timetabling & Room Scheduling System)
FRS (Funded Research System)
Business Objects Reports are written by trained reporter writers with a proficient understanding of the data structures of these systems.These pre-written reports are then refreshed by the Business Objects Readers campus-wide. The Business Objects application has inthe past been accessed through NAL and required an installation on the user’s PC. With the new version of Business Objects (XI)users can now easily access the tool through a standard web browser eliminating the need for an installation on their desktop PC.
2. Operating Systems and Web Browsers Supported
The following operating systems and web browsers are recommended for Business Objects XI:
Operating System Browser
Windows 2000/XP Internet Explorer 6.0 SP1/SP2 or Firefox 1.04
Mac OS X Safari 1.3
Note:- Adobe Acrobat Reader V6 or above must be installed in order to be able to print from Business Objects XI- Certain pieces of Interactive Functionality appear not to work in correctly in the Firefox Browser e.g. drag and drop tables.
3. What is InfoView?
InfoView is a Portal that acts as a window to your Business Objects XI Documents – see Figure 1. To access InfoView, all you need is astandard Web Browser with no additional software needed on your PC. The InfoView Portal allows to you to perform the following tasks:
Open and refresh XI documents.
Search for reports by title or type.
Organise reports and folders in the ‘My Folders’ Area.
Print reports.
Save reports directly into different formats e.g. Excel, PDF and CSV.
Set your own preferences for the look and feel of InfoView.

Page 5 of 39 MIS019.001.1 - BusinessObjects XI - Interactive User Manual.doc
Management Services
Business Objects XI – Interactive User Manual
Figure 1: InfoView Home Page
4. Interactive Functionality Available
Business Objects XI allows users to view, refresh and navigate through available reports. In addition to this, all users also have theability to interact or explore data within an existing report. This level of interactive analysis can potentially make a reports’ data moremeaningful and flexible to suit a user’s own needs. These interactive capabilities incorporate a suite of functions outlined below – manyof which are available via a simple right-mouse click:
Filtering
Sorting
Breaking
Adding Calculations
Adding, Removing and Formatting Data Displayed
Drilling
Note: You cannot amend and save reports that reside in Public Folders – however you can take a copy of existing pre-builtreports from the Public Folders area and place them in your ‘Favourites’ folder and make interactive amendments to thesecopies there.
This Interactive Manual explains how users can use and apply these interactive functions to their best advantage. This manual shouldbe read as a follow-on to the two documents below which explain the basic principles of accessing and refreshing reports via XI.
XI General Documentation – Quick Guide
XI General Documentation – Detailed Instructions
These documents are available from the web site below and also within the Documentation Folder within the XI Tool:
i. http://www.ucd.ie/msu/boxi.html

Page 6 of 39 MIS019.001.1 - BusinessObjects XI - Interactive User Manual.doc
Management Services
Business Objects XI – Interactive User Manual
5. Turning on Interactive Functionality
Interactive Functionality should be turned on and available to all users by default. To ensure this, follow the steps below:
i. Login to Business Objects XI
ii. Click on the Preferences Icon in the header panel on the top right hand side of the screen – see Figure 2.
iii. Click on the Web Intelligence Document Tab
iv. The Web Intelligence Preference Page appears.
v. Ensure that the Interactive option is clicked on – see Figure 3 below.
Figure 2: Header Panel
Figure 3: Interactive Options
6. Interactive Toolbars
Most Interactive functions are available to users via a right-mouse click or via a standard XI Toolbar. To turn on all toolbars, open an XIReport and go to View | Toolbars and ensure that the Formatting, Report and Formula Toolbars are checked on as per Figure 4 below.
Figure 4: Activating Toolbars
Page 7 of 39 MIS019.001.1 - BusinessObjects XI - Interactive User Manual.doc
Management Services
Business Objects XI – Interactive User Manual
Your XI Header Toolbar should now look something like Figure 5 below.
Figure 5: XI Header Toolbar
A summary of the available Interactive Icons is given in Figure 6. Their functionality will be explained in more detail in the followingsections.
Icon Name Function
Remove Remove an entire cell or table, or invoke a drop-down menu to remove a row orcolumn from a table.
Apply Filter Apply a filter to an object within the existing table.
Sort Ascendingor Descending
Sort the data values in ascending or descending order. To see the sort priorities,right-click the table (not the cell) and select Sort | Properties from the pop-up menu.
Insert Break Insert a break to an object within the existing table.
Calculations Insert a sum, count, average, minimum, maximum, percentage to a table or crosstab.
Insert Row orColumn
Insert a row or column when you wish to add a new variable or formula to the table.
Duplicate Duplicate a table when you want to view the same data set in a different style.
Figure 6: Interactive Icons
7. Interactive Document Information
A. Document PropertiesYou can view information about the current XI report by choosing Properties from the Document Toolbar. This option will allow yousee information like the report author, report description, keywords and last refresh date. See Figure 7 and Figure 8 below.
Figure 7: Document Toolbar

Page 8 of 39 MIS019.001.1 - BusinessObjects XI - Interactive User Manual.doc
Management Services
Business Objects XI – Interactive User Manual
Figure 8: Document Properties
B. Context PanelThe Context Panel appears on the left-hand side of an open report – see Figure 9 below. It provides you with information on thequeries and data behind the reports. It also shows you how the document is structured into reports and sections, and lists the filtersand prompts that fine tune the results. It lists the objects that are used in a report along with objects that you can add to reports toinclude more data. Table and chart types are also available for you to use to format the data into meaningful results. You can alsoselect to print out information in each section of the Context Panel if required
Figure 9: Context Panel

Page 9 of 39 MIS019.001.1 - BusinessObjects XI - Interactive User Manual.doc
Management Services
Business Objects XI – Interactive User Manual
Options available from the Context Panel are outlined below:
i. Document SummaryGeneral information available about the current report properties and prompt values that have been entered when the reportwas last refreshed. See Figure 10.
Figure 10: Document Summary

Page 10 of 39 MIS019.001.1 - BusinessObjects XI - Interactive User Manual.doc
Management Services
Business Objects XI – Interactive User Manual
ii. Data SummaryDisplays the Universe used for current report, how long it took to last refresh and the number of rows it has returned. Alsodisplays each query in the report, and the objects and their descriptions that have been used. See Figure 11.
Figure 11: Data Summary
Page 11 of 39 MIS019.001.1 - BusinessObjects XI - Interactive User Manual.doc
Management Services
Business Objects XI – Interactive User Manual
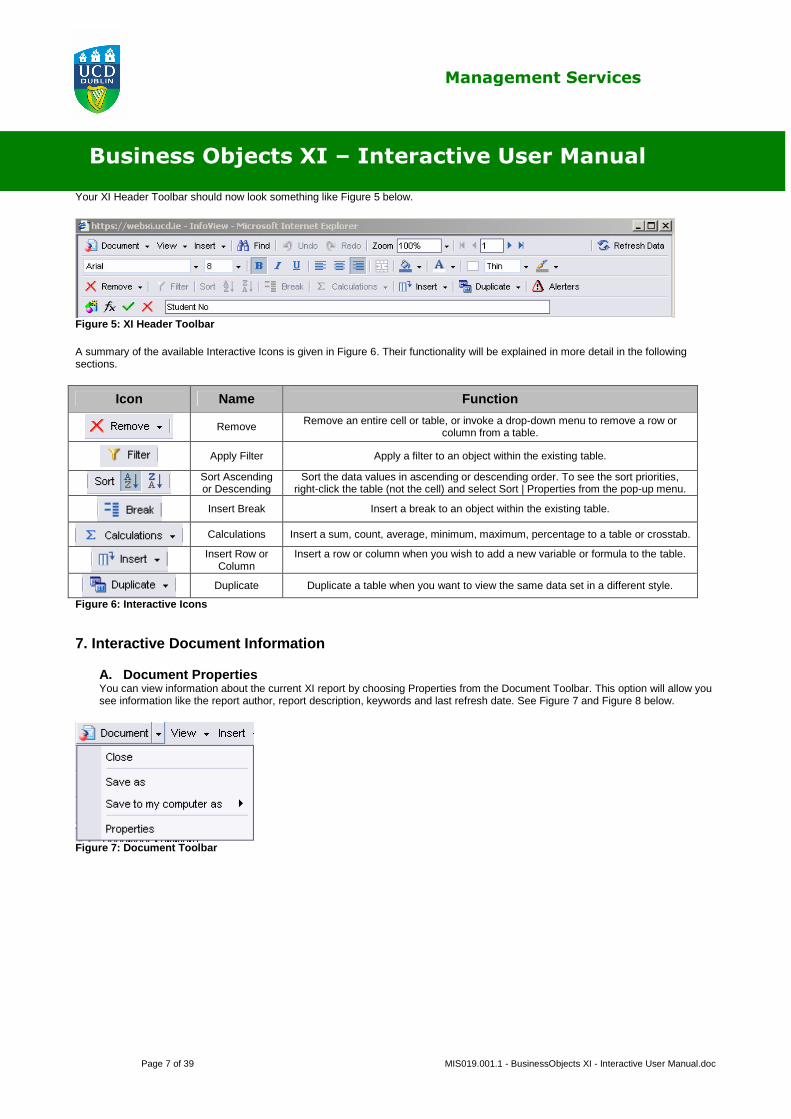
iii. Chart & Table TypesDisplays predefined charts, tables, forms and cells types that can be dragged and dropped for use in current report.
Figure 12: Chart and Table Types

Page 12 of 39 MIS019.001.1 - BusinessObjects XI - Interactive User Manual.doc
Management Services
Business Objects XI – Interactive User Manual
iv. Available ObjectsDisplays the objects that are available in the Report Query. Some of these objects may be displayed on the report alreadyand some may not. For those that are not, it is possible to drag and drop them into the report to display them. See Figure 13.
Figure 13: Available Objects

Page 13 of 39 MIS019.001.1 - BusinessObjects XI - Interactive User Manual.doc
Management Services
Business Objects XI – Interactive User Manual
v. Document Structures & FiltersDisplays an outline of how the report is structured and displays information on any filters that are used to finetune the results.See Figure 14.
Figure 14: Document Structures and Filters
vi. Navigation Map OptionDisplays hyperlinked bookmarks to the reports and sections in the current report. This can be used to navigate to particularsections if required. See Figure 15.
Figure 15: Navigation Map
Page 14 of 39 MIS019.001.1 - BusinessObjects XI - Interactive User Manual.doc
Management Services
Business Objects XI – Interactive User Manual
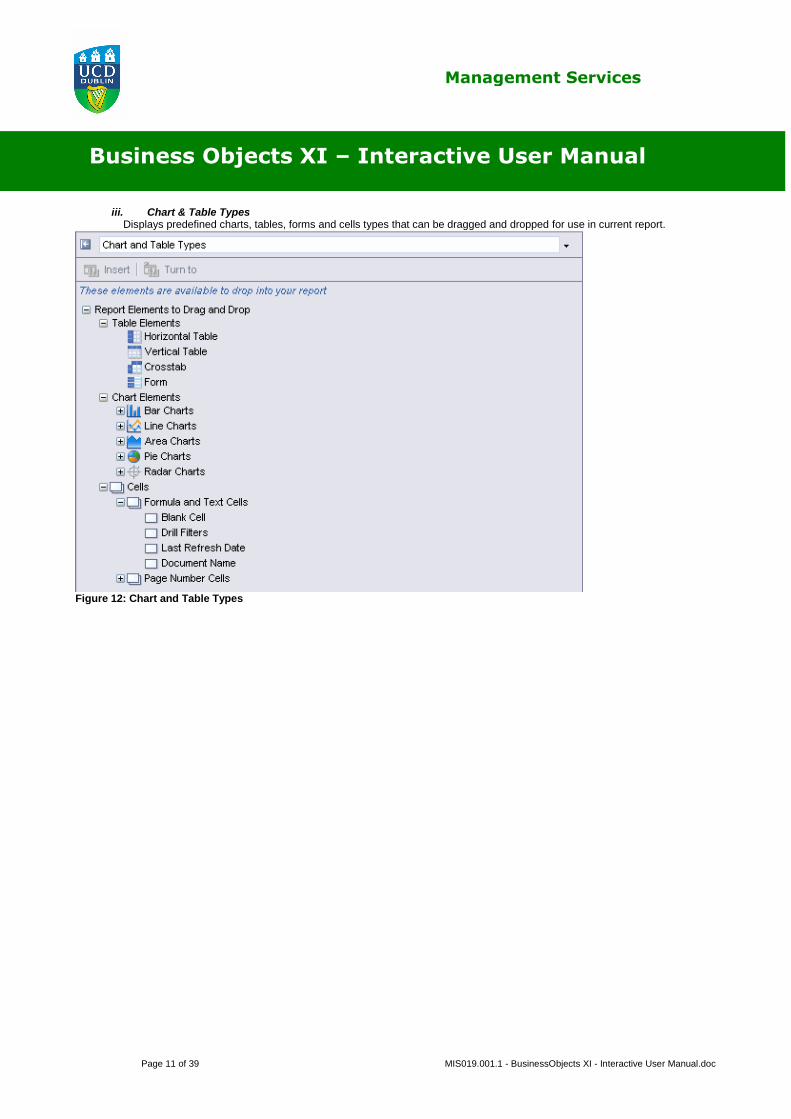
vii. User Prompt InputDisplays information on any prompts that filter the results on the current report - you can input different values for the promptsand so retrieve different results. See Figure 16.
Figure 16: User Prompt Input
viii. FindAllows for search options to find a specific character or numeric string on the selected report page. See Figure 17.To search for a specific character or numeric string on the whole report, choose View | Draft and then enter your Findparameters.
Figure 17: Find
8. Interactive Functionality ExplainedThis section explains how you can use the Interactive functionality of XI to analyse information in an existing report at the click of amouse.
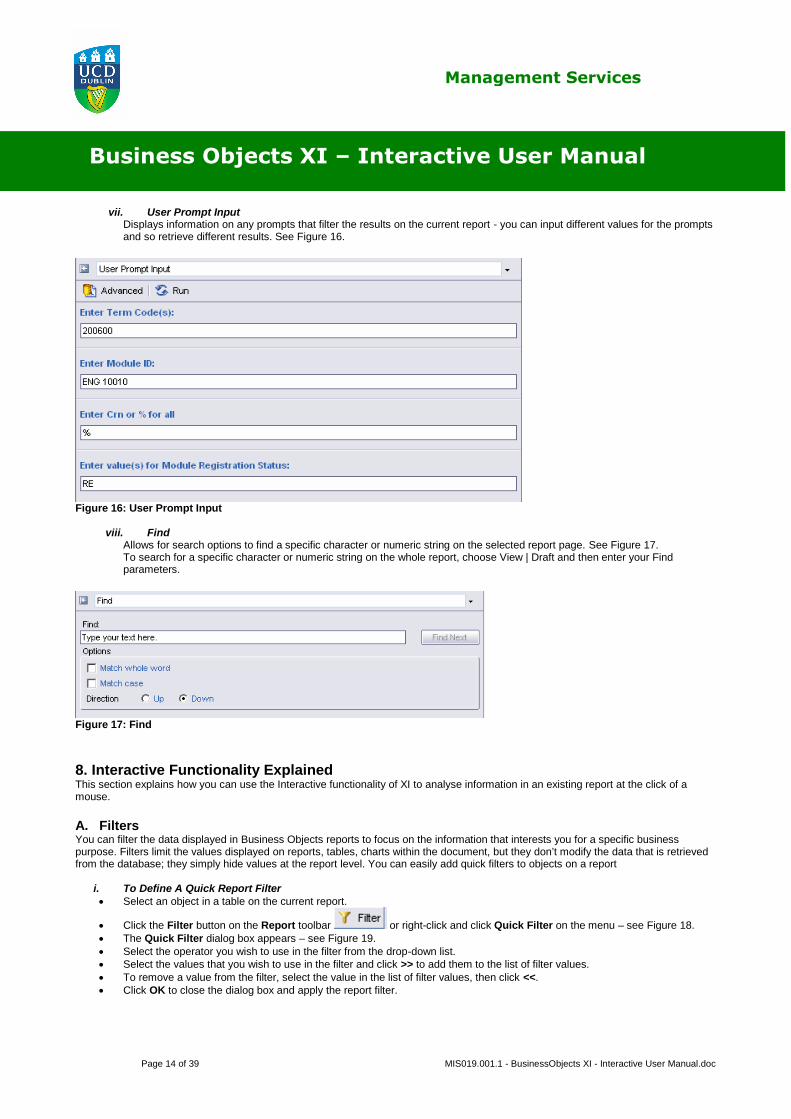
A. FiltersYou can filter the data displayed in Business Objects reports to focus on the information that interests you for a specific businesspurpose. Filters limit the values displayed on reports, tables, charts within the document, but they don’t modify the data that is retrievedfrom the database; they simply hide values at the report level. You can easily add quick filters to objects on a report
i. To Define A Quick Report Filter Select an object in a table on the current report.
Click the Filter button on the Report toolbar or right-click and click Quick Filter on the menu – see Figure 18. The Quick Filter dialog box appears – see Figure 19. Select the operator you wish to use in the filter from the drop-down list. Select the values that you wish to use in the filter and click >> to add them to the list of filter values. To remove a value from the filter, select the value in the list of filter values, then click <<. Click OK to close the dialog box and apply the report filter.

Page 15 of 39 MIS019.001.1 - BusinessObjects XI - Interactive User Manual.doc
Management Services
Business Objects XI – Interactive User Manual
Figure 18: Quick Filter Menu
Figure 19: Quick Filter Dialog Box
ii. Viewing, Editing and Deleting Report FiltersViewing the filters applied to reports helps understand the context of the results displayed on the tables, charts, and sections. You canedit or delete filters from reports at any time.
To view the filters applied to reports Display the Document Structure and Filters by selecting Left panel from the View menu then selecting Document
Structure and Filters from the drop down list at the top of the Left panel. The Document Structure and Filters displays the overview of the filters in the report.
iii. To Edit A Report Filter Select the table on which the filter is applied in the Left panel and click Edit Filter. The Edit Filter dialog box appears. Edit the filter as required.
iv. To Remove a Report Filter Display the Document Structure and Filters overview by selecting Left panel from the View menu then selecting
Document Structure and Filters from the drop down list at the top of the Left panel. Select the filter you want to remove. Click Remove. You can also remove individual parts of the filter by selecting the object individually then clicking Remove.

Page 16 of 39 MIS019.001.1 - BusinessObjects XI - Interactive User Manual.doc
Management Services
Business Objects XI – Interactive User Manual
B. SortsYou can organize the information displayed in reports, by using sorts, so that reports are easy to read and navigate. Sorts enable you toorder results alphabetically or numerically. You can apply sorts to the results displayed in:
• section cells – to organise the order in which sections are displayed on a report• tables – to organise the order in which results are displayed in a column or row
Tip: You can apply multiple sorts to a table or section and then prioritize the sorts, so that the information is sorted in the order yourequire.
The following sort orders are available:Sort order DescriptionDefault: This is sometimes referred to as the “natural” order. Depending on the type of data in the column or row, the results are sortedas follows:
• ascending numeric order for numeric data• ascending chronological order for date• alphabetical order for alphanumeric data
Tip: To sort months in chronological order, apply the Default sort order.
Ascending: When selected, results are arranged in ascending order: The smallest value at the top of the column moving to the highestvalue at the bottom. For example: 100, 200, 300 or California, Colorado, Florida.
Descending: When selected, results are arranged in descending order: The highest value at the top of the column moving to thesmallest value at the bottom. For example: 300, 200, 100 or Florida, Colorado, California.
Custom When you define a custom sort, you choose your own sort order for the data.
i. Applying and Removing SortsYou can apply sorts to data on tables or sections of reports. Sorting objects helps you organise results chronologically or allows you tosee the highest or lowest results at a glance.
ii. To Apply a Sort to a Table or Section Click the table column/row or section cell you want to sort, and then click the Ascending or Descending sort button on the
Report toolbar. Or Right-click the table column/row or section cell you want to sort, and then on the contextual menu, click Sort > Descending
or Sort > Ascending. See Figure 20. Business Objects applies the ascending or descending order to the results on the table or section, as you specified.
Figure 20: Quick Sort Menu
Page 17 of 39 MIS019.001.1 - BusinessObjects XI - Interactive User Manual.doc
Management Services
Business Objects XI – Interactive User Manual
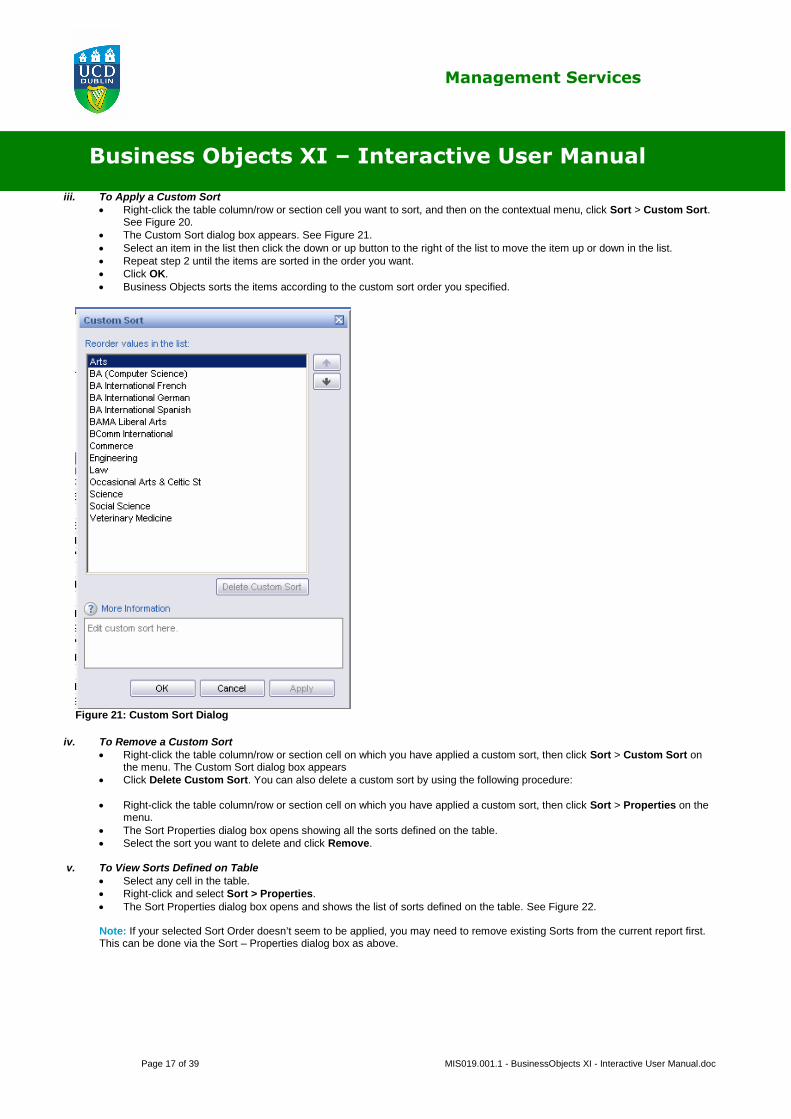
iii. To Apply a Custom Sort Right-click the table column/row or section cell you want to sort, and then on the contextual menu, click Sort > Custom Sort.
See Figure 20. The Custom Sort dialog box appears. See Figure 21. Select an item in the list then click the down or up button to the right of the list to move the item up or down in the list. Repeat step 2 until the items are sorted in the order you want. Click OK. Business Objects sorts the items according to the custom sort order you specified.
Figure 21: Custom Sort Dialog
iv. To Remove a Custom Sort Right-click the table column/row or section cell on which you have applied a custom sort, then click Sort > Custom Sort on
the menu. The Custom Sort dialog box appears Click Delete Custom Sort. You can also delete a custom sort by using the following procedure:
Right-click the table column/row or section cell on which you have applied a custom sort, then click Sort > Properties on themenu.
The Sort Properties dialog box opens showing all the sorts defined on the table. Select the sort you want to delete and click Remove.
v. To View Sorts Defined on Table Select any cell in the table. Right-click and select Sort > Properties. The Sort Properties dialog box opens and shows the list of sorts defined on the table. See Figure 22.
Note: If your selected Sort Order doesn’t seem to be applied, you may need to remove existing Sorts from the current report first.This can be done via the Sort – Properties dialog box as above.

Page 18 of 39 MIS019.001.1 - BusinessObjects XI - Interactive User Manual.doc
Management Services
Business Objects XI – Interactive User Manual
Figure 22: Sort Properties
C. Breaks
i. Breaks ExplainedBreaks enable you to group related information together in tables and divides up data with the same results to make it more readable.
Example: How can I show student information grouped by their relevant programme in a table?The table in Figure 23 below shows standard student information with Programme Code and Programme Description with no breaksapplied.
The table in Figure 24 below shows the same data but with a break on Programme Code and Programme Description. In this table, thestudent numbers relevant for a particular programme are grouped together and allows us to place a sub total count of the number ofstudents on each programme at the bottom of each group.
Inserting breaks in tables enables you to:
• organise how information is presented, by grouping related information together• display subtotals for each group of information

Page 19 of 39 MIS019.001.1 - BusinessObjects XI - Interactive User Manual.doc
Management Services
Business Objects XI – Interactive User Manual
Figure 23: Student Information – No Breaks
Figure 24: Student Information with Break on Programme Code & Description

Page 20 of 39 MIS019.001.1 - BusinessObjects XI - Interactive User Manual.doc
Management Services
Business Objects XI – Interactive User Manual
ii. How Data is Sorted with BreaksWhen you insert a break on an object, the values for the object are automatically sorted in ascending order. If the values are numeric,the lowest value appears in the first row of the table and the highest result appears in the last row. If the values are alphabeticalcharacters, then the values are sorted in alphabetical order from top to bottom. You can change this sort order at any time – seeapplying Sorts section.
iii. Inserting, Removing & Prioritising BreaksYou can insert one or multiple breaks on a table or crosstab. You can prioritize breaks on tables to organize groups of data on tableswithin other groups. For example, if you want to group data on a table by Programme and then, within each Programme, group that databy Major, you need to insert a break on the [Programme] object and on the [Major] object, and then give first priority to the break on[Programme].
To insert or remove a break Click the table cell containing the results you want to group together, and then click the Break button on the Report toolbar
.Or Right-click the table cell containing the results you want to group together, and then on the contextual menu, click Break >
Insert. See Figure 25. Business Objects groups the selected data together on the table, by inserting a break, and inserts a footer at the end of each
break.
Figure 25: Break Shortcut Menu
To prioritise breaks on a table With a report open, right-click the cells in the table break. The contextual menu appears. Click Break > Properties – see Figure 26. The Break Properties dialog box appears. Each break on the selected table is listed in the pane on the left. Select the break you want to move, and then click either the Move break up or the Move break down arrow to set the priority
of the breaks. Click OK. Business Objects reorders the breaks on the table, as you have specified.

Page 21 of 39 MIS019.001.1 - BusinessObjects XI - Interactive User Manual.doc
Management Services
Business Objects XI – Interactive User Manual
Figure 26: Break Properties
iv. Setting Display Properties & Page Layout for BreaksWhen you first insert a break on a table, certain display options are applied by default. You can edit these default settings and applyoptions for the following:
• Display properties – how the results display on the break• Page layout properties – how the breaks display on the report page
Break display propertiesYou can set the following display properties for a break:Form

Page 22 of 39 MIS019.001.1 - BusinessObjects XI - Interactive User Manual.doc
Management Services
Business Objects XI – Interactive User Manual
at option en selected...Format Option What Happens When Selected
Break header A header is displayed for each group of results or break onthe table. For example, this table has a break on“Programme” so each value for programme has a separatebreak header:
Break footer A footer is added below each group of results or break on thetable. When you apply a calculation to the results, the result isshown in the footer. For example, this table has a break on“Programme,” so each value for programme has a separatebreak footer showing the total count of students on thatprogramme.
Remove duplicates Removes all duplicate values from the data in a table whenyou insert a break. For example, this table has duplicatevalues not removed for each break in the properties sectionso the programme code appears multiple times.

Page 23 of 39 MIS019.001.1 - BusinessObjects XI - Interactive User Manual.doc
Management Services
Business Objects XI – Interactive User Manual
Center value across break Active when Remove Duplicates is selected. It mergesempty cells and centers the values for the object in eachbreak on the table. See table below.
Apply sorts Applies an ascending sort to the values in the break.
Break page layout propertiesYou can set the following page layout properties for breaks:Page layout property Description
Page Layout Option What Happens When SelectedStart on a new page Displays each part of the table crosstab, or form created by a
break on a new page.
Avoid page breaks in blocks Where possible, keeps each break section on the same page.This option is not taken into account when a table is largerthan one page.

Page 24 of 39 MIS019.001.1 - BusinessObjects XI - Interactive User Manual.doc
Management Services
Business Objects XI – Interactive User Manual
Repeat header on every page Repeats the header at the top of the table on every new pagewhen a table goes over onto a new page.
Repeat break value on new page Repeats the current value on each new page.
To set properties for a break With a report open, right-click the cells in the table break. The contextual menu appears – see Figure 27. Click Break > Properties The Break Properties dialog box appears. In the Break Display Properties section, select the appropriate break display properties you require. In the Page Layout section, select the appropriate page layout properties. Click OK. Business Objects applies the properties to the break, as you have specified.
Figure 27: Break Shortcut Menu
D. Calculations
i. Insert Standard CalculationsYou can insert predefined calculations into Business Objects reports. These predefined calculations allow you to perform standardbusiness calculations on your data. The available predefined calculations are outlined below.
Calculation DescriptionCalculation Description
Sum Calculates the sum of the numbers in the column.
Count Counts the number of rows within a break.Average Calculates the average of the numbers in the column.Min Returns the smallest number in the column.Max Returns the largest number in the column.Percentage Displays each row’s data as a percentage of the total. Business Objects adds an additional row to the
table to hold the percentages.
ii. Inserting and Removing CalculationsYou add calculations from the toolbar or from the right-click menu to insert predefined calculations into Business Objects reports.
To insert a calculation from the toolbar Select the column to which you wish to add the calculation.
Click the Calculations button on the toolbar to insert the default calculation (SUM) Or Click the arrow at the right of the calculation button, and then select the calculation you want from the list of predefined
calculations – see Figure 28. Business Objects adds a footer to the column and places the calculation formula and result in it. (In the case of the
PERCENTAGE calculation Business Objects adds an additional column to the table to hold the results of the calculation.)

Page 25 of 39 MIS019.001.1 - BusinessObjects XI - Interactive User Manual.doc
Management Services
Business Objects XI – Interactive User Manual
Figure 28: Calculations Shortcut Menu
To insert a calculation from the menu Select a cell in the column to which you want to add a calculation. Right-click, select Calculation then select the calculation from the sub menu. The calculations that you have already added are marked in the menu. To remove a calculation that you added previously,
select it again from the menu. See Figure 29 for example of a count inserted on Student Number.
Figure 29: Inserting Count on Student Number
E. Adding, Removing and Formatting Data DisplayedWhen you create a new document, Business Objects generates a new report with a vertical table and standard formatting. This initialtable includes all of the data in the query behind the document. You can insert more tables onto the same report or onto new reportswithin the same document.
i. Available Table TypesBusiness Objects allows you to include four types of tables in your reports.
Vertical TableVertical tables display header cells at the top of the table and the corresponding data in columns. By default, the header cells displaythe names of the objects included in the table. The body cells display the corresponding values. See Figure 30.
Figure 30: Vertical Table Sample
Page 26 of 39 MIS019.001.1 - BusinessObjects XI - Interactive User Manual.doc
Management Services
Business Objects XI – Interactive User Manual
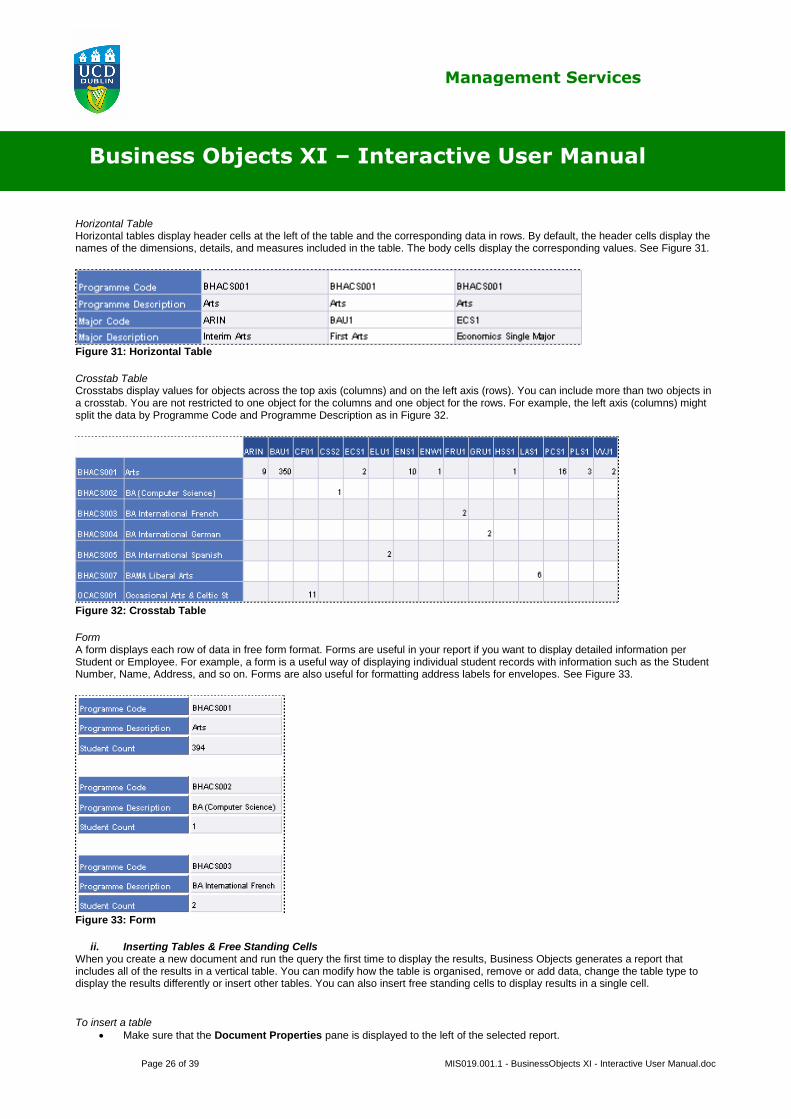
Horizontal TableHorizontal tables display header cells at the left of the table and the corresponding data in rows. By default, the header cells display thenames of the dimensions, details, and measures included in the table. The body cells display the corresponding values. See Figure 31.
Figure 31: Horizontal Table
Crosstab TableCrosstabs display values for objects across the top axis (columns) and on the left axis (rows). You can include more than two objects ina crosstab. You are not restricted to one object for the columns and one object for the rows. For example, the left axis (columns) mightsplit the data by Programme Code and Programme Description as in Figure 32.
Figure 32: Crosstab Table
FormA form displays each row of data in free form format. Forms are useful in your report if you want to display detailed information perStudent or Employee. For example, a form is a useful way of displaying individual student records with information such as the StudentNumber, Name, Address, and so on. Forms are also useful for formatting address labels for envelopes. See Figure 33.
Figure 33: Form
ii. Inserting Tables & Free Standing CellsWhen you create a new document and run the query the first time to display the results, Business Objects generates a report thatincludes all of the results in a vertical table. You can modify how the table is organised, remove or add data, change the table type todisplay the results differently or insert other tables. You can also insert free standing cells to display results in a single cell.
To insert a table Make sure that the Document Properties pane is displayed to the left of the selected report.

Page 27 of 39 MIS019.001.1 - BusinessObjects XI - Interactive User Manual.doc
Management Services
Business Objects XI – Interactive User Manual
To display the Document Properties pane, click the Show left pane arrow at the top left of the report. Select Chart and Table Types from the drop down list. See Figure 34. The Left panel now displays all the types of tables, charts and free standing cells that you can add to the report. Select the table type that you want to add to the report in the Left panel and drag the table onto the report. Right-click the table in the report, select Insert from the menu, then select New column or New row to add rows or columns
to the table. Select Available Objects from the drop-down list at the top of the left panel. Drag the object that you want to associate with a column to the column in the report table. The column is populated with the data from the report object. Continue dragging objects to table columns until you have associated objects with all columns.
To insert a free standing cell Make sure that the Document Properties pane is displayed to the left of the selected report. To display the Document Properties pane, click the Show left pane arrow at the top left of the report. Select Chart and Table Types from the drop down list – see Figure 34 below.
Figure 34: Chart and Table Types
The Left panel now displays all the types of tables, charts and free standing cells that you can add to the report. Open the free standing Cells item in the report template hierarchy to display the types of free standing cell you can add. Drag the type of free standing cell you want to add to the report. If you choose Blank Cell, the cell remains blank. If you choose any other type of cell, the cell is populated based on the type of information that the cell displays. For example,
if you choose Last Refresh Date, the cell contains the formula LastExecutionDate() which populates it with the date thereport was last refreshed.
iii. Transforming Tables to Different Table TypesThere are two ways to change the type of format for a table already displayed on a report:
using ‘Turn To’ dragging a different table type onto a table
To modify a table using Turn To Right-click inside the table and select Turn table to... from the menu – See Figure 35.

Page 28 of 39 MIS019.001.1 - BusinessObjects XI - Interactive User Manual.doc
Management Services
Business Objects XI – Interactive User Manual
Figure 35: Turn To Shortcut Menu
The Turn To dialog box appears – See Figure 36 below.
Figure 36: Turn To Dialog
Make sure that Tables is selected in the left pane. Select the type of table to which you want to change the current table in the Available Formats area on the right. Click OK. Business Objects changes the table to the type you selected.
To apply a different table type using drag-and-drop Make sure that the Document Properties pane is displayed to the left of the selected report. To display the Document Properties pane, click the Show left pane arrow at the top left of the report. Select Chart and Table Types from the drop down list at the top of the Left panel. Select the table type to which you want to change the existing table and drag it over the existing table. Business Objects changes the table to the type you selected.
iv. Including Tables Headers & Footers

Page 29 of 39 MIS019.001.1 - BusinessObjects XI - Interactive User Manual.doc
Management Services
Business Objects XI – Interactive User Manual
To show or hide a table header or footer Right-click inside the table and select Format from the menu, then select Table. The Format Table dialog box appears – see Figure 37 below.
Figure 37: Format Table Dialog
Select the General tab on the Format Table dialog box. Check/uncheck Table headers to display/hide table headers. Check/uncheck Table footers to display/hide table footers.
Note: If the table is a crosstab, you have the option to hide either or both of the vertical (left) and horizontal (top) headers. In this casethe options Left header and Top header appear in place of Table headers.
v. Adding & Removing Rows & ColumnsAfter you have created a table you can modify it by changing the rows and columns.
To add a row to a table Select a row in the table and right-click. Select Insert from the menu, select New Row, then select Above or Below, depending on whether you want to insert the row
above or below the selected row.
To add a column to a table Select a column in the table and right-click. Select Insert from the menu, select New Column, then select Left or Right, depending on whether you want to insert the
column to the left or right of the selected column.
To remove a row from a table Select a cell in the row and right-click. Select Remove from the menu, then select Row.
To remove a column from a table Select the column and right-click. Select Remove from the menu, then select Column.
vi. Moving & Swapping Rows & ColumnsTo reorganise how information is displayed on tables, you can move or swap the table rows and columns. You can also swap the axeson crosstabs to gain a different perspective on results.
To move columns in a table Right-click in the table, select Format from the menu, and then select Table.

Page 30 of 39 MIS019.001.1 - BusinessObjects XI - Interactive User Manual.doc
Management Services
Business Objects XI – Interactive User Manual
The Format Table dialog box appears. Select the Pivot tab – see Figure 38.
Figure 38: Format Table – Pivot Tab
Select objects in the Available Objects area, and click >> to add them to the table. Select objects in the Column(s) area and click << to remove them from the table. Drag objects in the Column(s) area to set the order of columns in the table. Click OK.
To move columns in a crosstab Right-click in the crosstab, select Format from the menu, then select Table. The Format Table dialog box appears. Select the Pivot tab – see Figure 39 below. The Pivot tab has sections for the row(s), column(s) and body of the crosstab.

Page 31 of 39 MIS019.001.1 - BusinessObjects XI - Interactive User Manual.doc
Management Services
Business Objects XI – Interactive User Manual
Figure 39: Format Table – Pivot Crosstab
Select objects in the Available Objects area, click Row(s), Column(s) or Body and click >> to add the objects to the rows,columns or body of the crosstab.
Click Row(s), Column(s) or Body and click << to remove objects from the rows, columns or body of the crosstab. Drag objects in the Row(s), Column(s) or Body area to set the object order. Click OK.
To swap rows or columns on a crosstab Select the crosstab. Right-click and select Swap axis from the menu. Business Objects swaps the rows and columns of the crosstab.
vii. Modifying Data Included in Tables &Cells Once you have created a table or free standing cell you can modify the data in it by adding or removing objects, clearing the
data that the table or cell contains, or deleting the table or cell.
To add objects to a table Make sure that the Document Properties pane is displayed to the left of the selected report. To display the Document Properties pane, click the Show left pane arrow at the top left of the report. Select Available Objects from the drop down list at the top of the Left panel. Select the object you want to add and drag it over to the table so that a red bar appears where you want to place the object. Release the object. Business Objects adds the object to the table – See Figure 40.

Page 32 of 39 MIS019.001.1 - BusinessObjects XI - Interactive User Manual.doc
Management Services
Business Objects XI – Interactive User Manual
Figure 40: Add Objects
To clear table or cell contents Select the cell or column within a table. Display the Formula bar by selecting View from the menu, then selecting Toolbars, then Formula. Delete the cell formula in the Formula bar. Business Objects removes the data from the cell(s).
viii. Removing Tables & Cells
To remove a table Select the table. Right-click and select Remove from the menu, then select Table.
To remove a cell Select the cell. Right-click and select Remove Cell from the menu. Note: You can only remove free standing cells. You cannot remove single cells from a table.

Page 33 of 39 MIS019.001.1 - BusinessObjects XI - Interactive User Manual.doc
Management Services
Business Objects XI – Interactive User Manual
F. DrillingDrill mode lets you break down data and view it from different angles and at different levels of detail. The structure used for thispurpose is known as a hierarchy.
i. HierarchiesA hierarchy is a group of objects that have been placed in a specific order from highest level of detail to lowest.
Example of hierarchy relating to student reports: Term Year Level Description Programme Description Stage Major Description Student No
Drilling allows you to view data at a high level (Term Year in example above), then drill down, using the hierarchical structureto the lower levels (Student No in the example above), rather than displaying all levels of data at once in a large report that isdifficult to interpret.
A measure object, such as Student Count, would be aggregated according to the level of data being displayed.
ii. Activating Drill Mode
Click the Drill button on the top right of the Standard Tool bar to activate Drill mode.
The open report tab is now in Drill mode
Drillable objects are underlined in tables and graphs and may have a bent arrow beside them. See Figures 41 and 42.
Figure 41 – Drillable Objects

Page 34 of 39 MIS019.001.1 - BusinessObjects XI - Interactive User Manual.doc
Management Services
Business Objects XI – Interactive User Manual
Figure 42 – Drillable Graph

Page 35 of 39 MIS019.001.1 - BusinessObjects XI - Interactive User Manual.doc
Management Services
Business Objects XI – Interactive User Manual
iii. Drilling DownDrillable objects are now underlined to indicate they have become hyperlinks. When you place your cursor over one of theselinks, a yellow message window will appear telling you what the next level down in the hierarchy is. See Figure 43.
Figure 43 – Drilling Down
Click on the hyperlink to drill down to the next level. See Figure 44.
Figure 44 – Drilled Down
A Drill Toolbar has appeared on screen below the existing Toolbars. See Figure 45. This shows the current level of detail.
Figure 45 – Drill Toolbar
If you cannot see the Drill Toolbar, you need to turn it on in the View | Toolbars menu. See Figure 46.
Figure 46 – View Drill Toolbars
Page 36 of 39 MIS019.001.1 - BusinessObjects XI - Interactive User Manual.doc
Management Services
Business Objects XI – Interactive User Manual
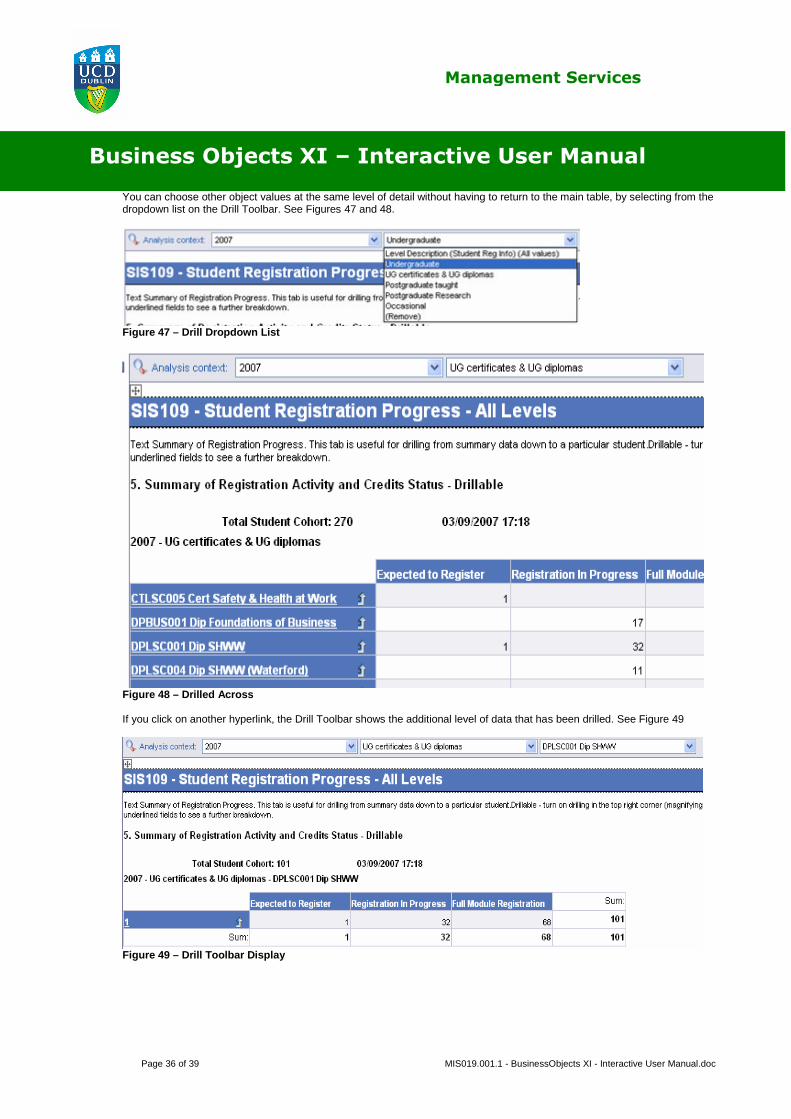
You can choose other object values at the same level of detail without having to return to the main table, by selecting from thedropdown list on the Drill Toolbar. See Figures 47 and 48.
Figure 47 – Drill Dropdown List
Figure 48 – Drilled Across
If you click on another hyperlink, the Drill Toolbar shows the additional level of data that has been drilled. See Figure 49
Figure 49 – Drill Toolbar Display

Page 37 of 39 MIS019.001.1 - BusinessObjects XI - Interactive User Manual.doc
Management Services
Business Objects XI – Interactive User Manual
iv. Drilling UpTo return to the highest level of data you will have to Drill Up through the hierarchy.
Click on the Backup arrow that has appeared in the column header for the objects that have been drilled. A yellowlabel will appear telling you the next level up in the hierarchy. See Figure 50.
Figure 50 – Drilling Up
Clicking on the arrow will bring you back up to the next level in the hierarchy. See Figure 51.
Figure 51 – Drilled Up

Page 38 of 39 MIS019.001.1 - BusinessObjects XI - Interactive User Manual.doc
Management Services
Business Objects XI – Interactive User Manual
v. Drilling on a Chart (Graph)You can drill on Charts as well as on tables, if this was set up when the report was created. See Figures 52 and 53.
Figure 52 – Drilling Down (Graph)
Figure 53 – Drilled Down (Graph)
Page 39 of 39 MIS019.001.1 - BusinessObjects XI - Interactive User Manual.doc
Management Services
Business Objects XI – Interactive User Manual
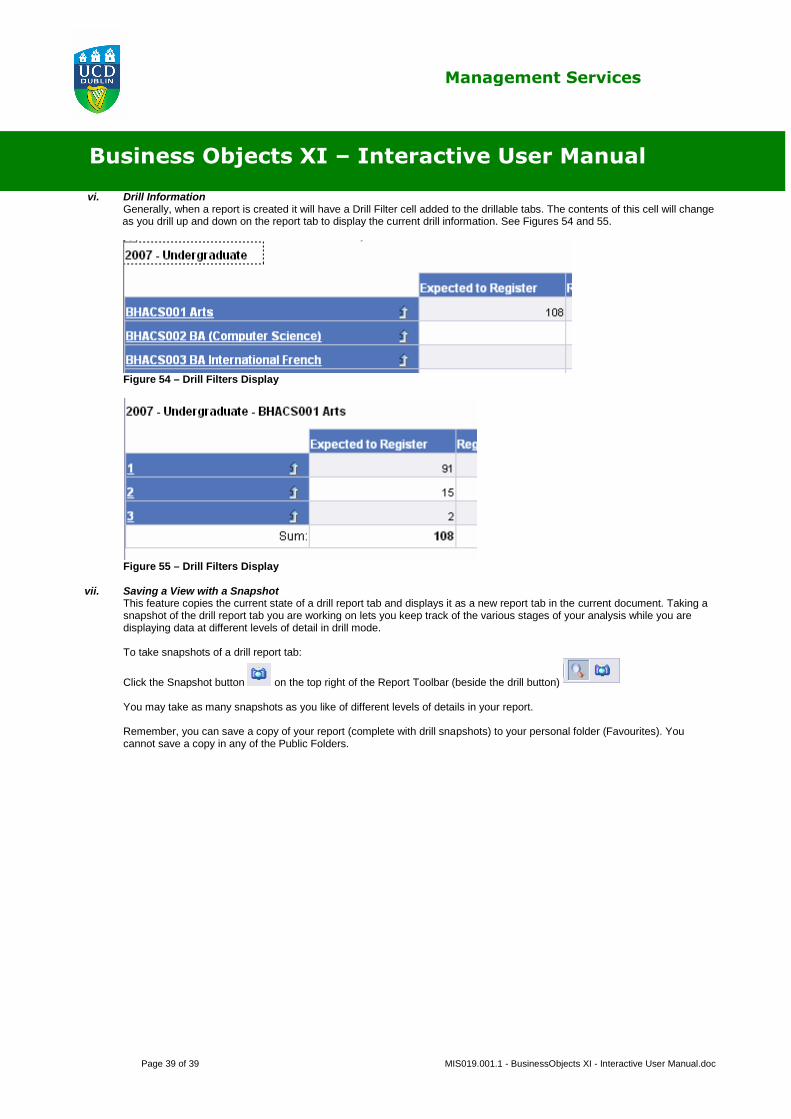
vi. Drill InformationGenerally, when a report is created it will have a Drill Filter cell added to the drillable tabs. The contents of this cell will changeas you drill up and down on the report tab to display the current drill information. See Figures 54 and 55.
Figure 54 – Drill Filters Display
Figure 55 – Drill Filters Display
vii. Saving a View with a SnapshotThis feature copies the current state of a drill report tab and displays it as a new report tab in the current document. Taking asnapshot of the drill report tab you are working on lets you keep track of the various stages of your analysis while you aredisplaying data at different levels of detail in drill mode.
To take snapshots of a drill report tab:
Click the Snapshot button on the top right of the Report Toolbar (beside the drill button)
You may take as many snapshots as you like of different levels of details in your report.
Remember, you can save a copy of your report (complete with drill snapshots) to your personal folder (Favourites). Youcannot save a copy in any of the Public Folders.