Interaction Administrator's Manual - Avaya Support 4 - Use of this Manual Introduction Introduction...
86
MultiMedia Module Administrator's Manual 40DHB0002USEB – Issue 1a (05/29/2003)
Transcript of Interaction Administrator's Manual - Avaya Support 4 - Use of this Manual Introduction Introduction...

MultiMedia Module Administrator's Manual
40DHB0002USEB – Issue 1a (05/29/2003)
Page 2 - Contents
Contents Introduction........................................................................................................... 4
Use of this Manual ................................................................................................................. 4 Resource Manager User's Guide ........................................................................ 5
How it works .......................................................................................................................... 5 How the guide is organized .......................................................................................................... 6
Resource Manager Navigation .............................................................................................. 7 Getting Started ...................................................................................................................... 8
Starting and Ending Resource Manager....................................................................................... 8 Synchronizing User Information.................................................................................................... 9 Setting Media Priorities................................................................................................................. 9 Resource Manager iServer Settings........................................................................................... 10 Services ...................................................................................................................................... 12
Multimedia Queue Administration........................................................................................ 13 Viewing Multimedia Queues ....................................................................................................... 14 Adding a new Multimedia Queue................................................................................................ 14
Interaction Result Administration ......................................................................................... 21 Domain Administration......................................................................................................... 22 Configuring New User and Mailbox Setup ........................................................................... 26
User Setup.................................................................................................................................. 26 Mailbox Setup............................................................................................................................. 27
Proactive Manager User's Guide....................................................................... 28 Overview.............................................................................................................................. 28
Who should use this guide.......................................................................................................... 28 Proactive List Manager Interface ......................................................................................... 29
Overview..................................................................................................................................... 29 Navigation Bars .......................................................................................................................... 29
Getting started ..................................................................................................................... 32 Overview..................................................................................................................................... 32
Draft Lists ............................................................................................................................ 33 Overview..................................................................................................................................... 33 Viewing an Existing List .............................................................................................................. 33 Importing/Loading a list............................................................................................................... 34 Selecting Fields to Import/Load .................................................................................................. 37 Defining Data Type..................................................................................................................... 38 Deleting a Draft List .................................................................................................................... 38
Proactive Campaigns........................................................................................................... 39 Overview..................................................................................................................................... 39 Viewing the Campaign Information Window............................................................................... 40 Viewing Proactive Campaign Lists ............................................................................................. 41 Attaching and Detaching Lists .................................................................................................... 42 Running Campaigns ................................................................................................................... 43
Account Update Wizard ....................................................................................................... 44 Overview..................................................................................................................................... 44 Selecting and Importing data source types................................................................................. 44 Selecting desired data fields to import........................................................................................ 46 Mapping Fields ........................................................................................................................... 47 Field Verification ......................................................................................................................... 50 Duplicate Records ...................................................................................................................... 50 Confirmation Window.................................................................................................................. 51 Final Confirmation Window......................................................................................................... 51
Page 2 - Contents MultiMedia Module Administrator's Manual 40DHB0002USEB – Issue 1a (05/29/2003)
Contents - Page 3
Contents (Cont.) Rules Wizard User’s Guide................................................................................ 52
Processes You Can Automate with Rules Wizard ............................................................... 53 Overview.............................................................................................................................. 53 Getting Started .................................................................................................................... 54
Starting the Program................................................................................................................... 54 Exiting the Program .................................................................................................................... 54
Email Rules Wizard ............................................................................................................. 55 Chat Rules Wizard............................................................................................................... 59
Introduction................................................................................................................................. 59 Chat Call Flow ............................................................................................................................ 60 HTML Page Preparation ............................................................................................................. 60 Creating Chat Rules ................................................................................................................... 61
Web Callback Rules Wizard ................................................................................................ 65 Web Callback Call Flow.............................................................................................................. 66 HTML Page Preparation ............................................................................................................. 67 Building a Rule Set ..................................................................................................................... 68 Editing a Rule Set ....................................................................................................................... 78 Exiting Web Callback Rules Wizard ........................................................................................... 78 Implementing a Rule Set ............................................................................................................ 78
Outlook Rules Wizard .......................................................................................................... 79 Setting Up a Mailbox and Profile in NT....................................................................................... 80 Creating Auto-Reply Rules in Outlook ........................................................................................ 80
Glossary .............................................................................................................. 81 Index .................................................................................................................... 83
MultiMedia Module Administrator's Manual Contents - Page 3 40DHB0002USEB – Issue 1a (05/29/2003)

Page 4 - Use of this Manual Introduction
Introduction This MultiMedia Module Administrator's Manual is divided into three chapters. • Resource Manager User's Guide
This User's Guide provides the administrator with powerful tools for maintaining and updating the Multimedia Module. It furnishes the information required to enable users to utilize the various communications functions resident in the iContact desktop communications terminal including Telephone, e-mail, chat and Web contact responses.
• Proactive Manager User's Guide This User's Guide provides the administrator with the knowledge to manage outbound Proactive Campaign Lists. It describes the steps required to create draft calling lists, attach them to campaigns and run the campaigns. This module is designed to work as a companion to the Resource Manager support module. For information on the Resource Manager support module, refer to Resource Manager User's Guide.
• Rules Wizard User's Guide This User's Guide is for administrators and supervisors who are responsible for managing the multimedia customer interaction center. The Interaction Rules Wizard applies pre-defined business rules to Web, Email, Chat and telephone incoming media contacts. Rules are a combination of conditions and actions that process and organize interactions. Each rule consists of two elements: one or more conditions that specify what the rules apply to; and one or more actions that specify what should be done with the qualifying interactions.
Use of this Manual This manual covers administration of Avaya's MultiMedia Module (MMM) at software Level 2.1+. on an the following communications platforms:
• INDeX operating Software Level 10.0+ • IP Office operating Software Level 1.4+
This guide is intended for use by administrators who are familiar with the relevant communications platform and have successfully completed the appropriate training courses.
Ensure that you have read and understood this Guide before beginning administration.
Page 4 - Introduction MultiMedia Module Administrator's Manual Use of this Manual 40DHB0002USEB – Issue 1a (05/29/2003)

Resource Manager User's Guide How it works - Page 5
Resource Manager User's Guide Welcome to the Resource Manager User's Guide. This user's guide provides the administrator with powerful tools for maintaining and updating the Multimedia Module. It furnishes the information required to enable users to utilize the various communications functions resident in the iContact desktop communications terminal including Telephone, e-mail, chat and Web contact responses.
How it works A business can be organized into multiple divisions. Some divisions may focus primarily on administrative functions like purchasing or billing. Others may be responsible for managing internal assets like IT, while another department or division may be involved in the creation or manufacturing of the company’s products and services. And other groups may interface with the company’s customer base as in sales or customer service. The Resource Manager enables each of these groups to automate the management of their internal and external interactions according to predefined rules for contact handling. Some groups may only be assigned to handle e-mail contacts, while others may be tasked with web contact, e-mail, chat, and telephone responsibilities, based on their job functions and skill sets. Within groups, users can be assigned different priorities for contact handling. Furthermore, users can be defined as to how they receive contacts, whether they can preview before responding and whether they can select contacts at their discretion. How does it work? Resource Manager consists of several components that enable you to add queues, define interaction results, define media priority, assign human resources to those queues and assign properties to users, all from a single, unified console. There are two ways to view the Resource Manager interface: in the standard Windows view and in the Windows browser view. The two may be viewed together or each one separately. Either one gives you flexibility to view different items or jump back and forth between different tasks. In setting up the Resource Manager for the first time, you would begin by defining your Multimedia Queues from the list of media types supported by the system. Typically, a company might have different phone numbers for general inquiries, sales and tech support. In addition, they could have 2 e-mail addresses, one for sales and one for tech support. Each of these would have its own media queue in Resource Manager. After creating these media accesses, the company would need to assign staff to handle responses to all of them. These assignments would be based on workgroup assignments A group, like Order Entry, could be assigned to handle telephone and e-mail inquiries related to sales. The company’s service technicians could be mapped to both e-mail and telephone support queues. For each media type, Interaction Result codes would be designated to track the outcome of each contact transaction. A technician could then assign a Problem Resolved or Escalated result before completing the contact. And if follow-up is required, the staff could reschedule another contact with a customer.
MultiMedia Module Administrator's Manual Resource Manager User's Guide - Page 5 40DHB0002USEB – Issue 1a (05/29/2003) How it works

Page 6 - How it works Resource Manager User's Guide
How the guide is organized The Resource Manager guide has been divided into six sections. • Resource Manager Navigation
This chapter introduces the Resource Manager interface including menu commands and windows utilized in operating Resource Manager.
• Getting Started This chapter shows you how to start the application, synchronize data and modify database settings.
• Multimedia Queue Administration This chapter facilitates the creation and assignment of media queues to groups of users. Media supported include inbound telephone, chat, Web callback, e-mail and preview dialing. This chapter describes the steps to create and run outbound media campaigns.
• Interaction Result Administration This chapter supports the creation and maintenance of Interaction Results associated with various multimedia types. Interaction Results are used to track the outcomes interactions and are media independent.
• Domain Administration This chapter pertains to all information related to user, group and domain assignments and facilitates the assignment of User Rights to individual users. The module also supports that mapping of Multimedia Queues to Groups. For adding and disabling Users and Groups, refer to your documentation on User and Group setup in Microsoft NT.
Who should use this guide This guide is for administrators and supervisors who are responsible for managing the multimedia customer interaction center.
Document symbols and conventions To help you locate and interpret information easily, this manual uses Microsoft set of Standard Windows terminology such as icon, window, text box and menu. Following are some specific symbols and conventions standard throughout the manual: Conventions Descriptions Bold Used to designate menu selections, buttons and commands to
enter. Initial Capitals Names of applications, programs, files, servers, and named
windows; and directory names and paths. Italic Information you need to provide.
Page 6 - Resource Manager User's Guide MultiMedia Module Administrator's Manual How it works 40DHB0002USEB – Issue 1a (05/29/2003)

Resource Manager User's Guide Resource Manager Navigation - Page 7
Resource Manager Navigation The Resource Manager is designed to enable the supervisor/administrator to effectively manage the resources of the enterprise through a menu driven or browser driven application. A typical Resource Manager menu is as follows:
Menu Bar The Menu Bar displays program commands and menus. Click to dropdown menu options to modify, view and enter information as requested. Item Description/Function File Contains commands to add new Queues, Interaction Results, and Exit. Preferences Provides shortcuts to iServer Settings, User Properties, Synchronize and Set
Media Priorities. View Allows you to show/ hide the view List and view Tree through check boxes. Help Provides access to on line help files and information about the program.
Vertical Icon Bar The Icon Bar provides shortcuts to Resource Manager modules and indicates the total number of list items available in each module. For example, the number (7) under the Multimedia queues icon denotes that there are 7 Multimedia queues that are currently active and available for assignment to groups. Icon Description/Function Multimedia Queues
Displays the number of Multimedia Queues. Clicking the icon brings you to Multimedia queues.
Interaction Results
Displays the number of Interaction Results. Clicking the icon brings you to the Interaction Results.
Domain Displays the number of Domains. Clicking on domain allows you to view domains.
Tree The Tree provides a graphical representation of the different Resource Manager modules and can be used to access any of them. To expand the Tree, click on the icons or the (+) sign in the box beside each icon. To collapse the tree, click on the (-) sign in the box beside each icon.
Status Bar The status bar displays information about how many items are under the selected group, which SQL server and which database is in use. Label Description/Function Items Displays the total number of items associated with the currently selected window. SQL Server The name or type of server in use. Database The name of database.
MultiMedia Module Administrator's Manual Resource Manager User's Guide - Page 7 40DHB0002USEB – Issue 1a (05/29/2003) Resource Manager Navigation

Page 8 - Getting Started Resource Manager User's Guide
Getting Started Before you can add or modify Resources in Resource Manager, there are pre-requisites to satisfy. All user setup is handled in accordance with setting up users in your local area network. Refer to Microsoft NT manuals for all information regarding User setup. You will also need to configure the servers. This Chapter will cover the following topics. • iServer Settings (see page 10) • Starting and Ending the program • Synchronizing the Data • Setting Media Priorities • Services
Starting and Ending Resource Manager Starting the Resource manager depends on the operating software being used. • INDeX operating software:
Select the Resource Manager from Windows Start menu under Programs | CCM | Avaya MultiMedia Module | Resource Manager.
• IP Office operating software: Select the Resource Manager from Windows Start menu under Programs | CCC | Avaya MultiMedia Module | Resource Manager
To exit the program, choose Exit on the file menu, or click the Close icon in the top right corner. Note: Only one Administrator can be logged on at a time. The system can
detect multiple users who are logged on possessing administrative rights. It will notify you and the other user signed on as Administrator of the duplication. You may need to log off the other administrator to start your own session.
Page 8 - Resource Manager User's Guide MultiMedia Module Administrator's Manual Getting Started 40DHB0002USEB – Issue 1a (05/29/2003)

Resource Manager User's Guide Getting Started - Page 9
Synchronizing User Information
Whenever you make changes to the Domains, Groups or Users (add, modify or delete) it is necessary to synchronize data between the iServer and the NT server. Note: If you are using Resource Manager for the first time, you must
synchronize before attempting to run iService. 1. Select the Preferences Menu. 2. Click Synchronize. 3. Select Domain from the pop-up menu. 4. Click Synchronize.
The system will inform you that the process will take a few minutes. 5. When the process is complete, click Close. Note: Whenever you make changes to the Domains, Groups or Users in
Windows NT (add, modify or delete) it is necessary to synchronize the domain in Resource Manager.
Setting Media Priorities You are able to change the priority given to any media type except for Telephone and Chat. Media priority is set to determine the order in which the various media types are delivered to the desktop by the server.
Each media type can have a priority range between 3 and 8 (Telephone is set at 1 and Chat is set at 2). The grayed out media will be implemented in future releases. More than one media type can have the same priority level. If several media types are set to the same priority level, the iServer will deliver the contacts to the iContact in the order in which they arrived. Telephone must always retain the highest priority of any media type. 1. Click setting Media Priorities from the Preferences menu. 2. Use the up and down arrows to change the priority given to the different
media types; where 1 is the highest. 3. Click OK to Close.
MultiMedia Module Administrator's Manual Resource Manager User's Guide - Page 9 40DHB0002USEB – Issue 1a (05/29/2003) Getting Started
Page 10 - Getting Started Resource Manager User's Guide
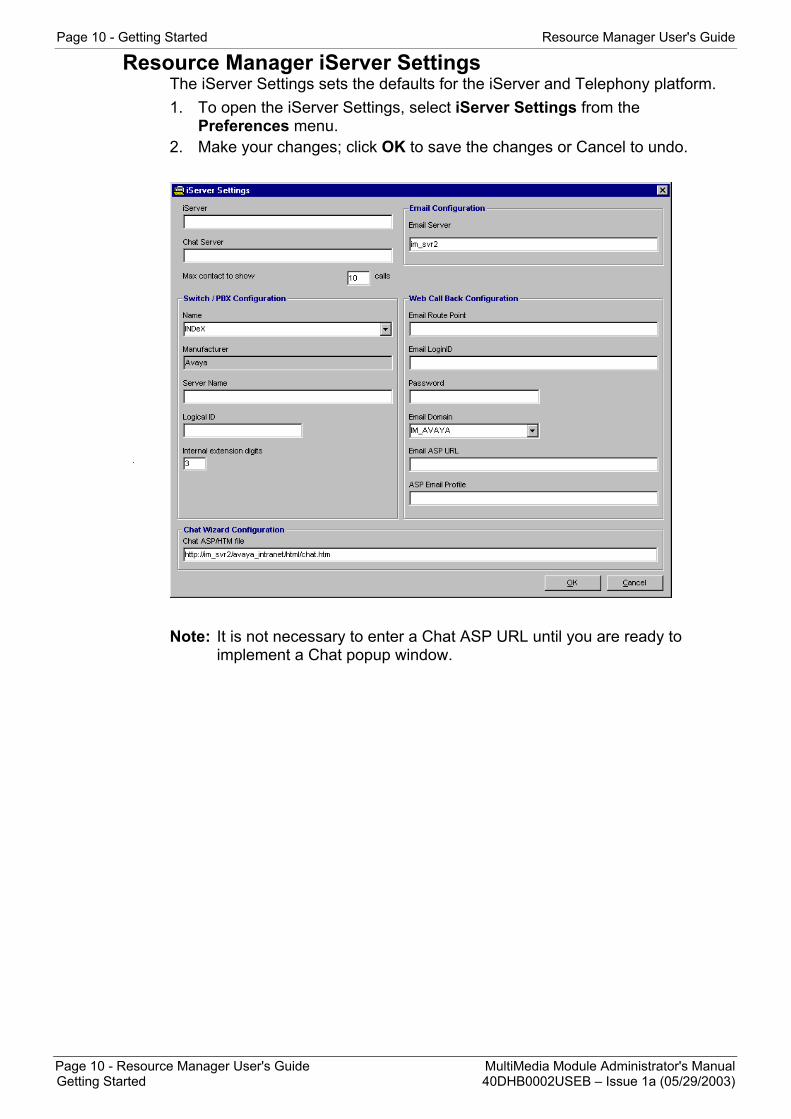
Resource Manager iServer Settings The iServer Settings sets the defaults for the iServer and Telephony platform. 1. To open the iServer Settings, select iServer Settings from the
Preferences menu. 2. Make your changes; click OK to save the changes or Cancel to undo.
Note: It is not necessary to enter a Chat ASP URL until you are ready to
implement a Chat popup window.
Page 10 - Resource Manager User's Guide MultiMedia Module Administrator's Manual Getting Started 40DHB0002USEB – Issue 1a (05/29/2003)

Resource Manager User's Guide Getting Started - Page 11
Interaction Server Values Location Description/Function Default Server Server on which iServer is installed
The server that the iContact and other Services modules automatically connects to.
Chat Server Server on which MS Exchange is installed
The server where the Chat Service is running.
Max Contact to Show Default value: 10 contacts Sets the number of contacts the iContact module displays in the Inbox at a time.
Chat Wizard Configuration Chat ASP URL e.g.
http:\\iServername\iCosmchat\Chat.asp
The location of the ASP file that is used to handle Chat pages set up by the Chat Wizard.
Switch PBX Configuration Name Name of the Switch/PBX supported
by iServer to be selected from the dropdown menu.
Manufacturer Supplied by entering switch selection.
Server Name Where the switch and driver are installed
Name of the server.
Logical ID Dependent on the switching fabric. Set by switch administrator
Either, TSAPI, CT-Connect, CSTA or TAPI.
Internal Extension Digits The number of digits used for internal extensions.
Web Callback Configuration Email Route Point
The e-mail address of a symbolic user created for this purpose: e.g. [email protected]
The e-mail address that Web Callback requests are sent to.
Password
Password of the symbolic user created for Web Callback
The password for this e-mail account per Exchange.
Email LoginID Login ID of the symbolic user e.g. wwwemail
The login ID for this e-mail account per Exchange.
Email Domain Select from the dropdown list The domain this e-mail account belongs to.
Email ASP URL
http://iServername/webcallback/cdomail.asp
The location of the ASP file (CDOmail.asp) that is used to handle Web Callbacks. This file is part of the installation package and is copied to your IIS server during the installation process.
ASP e-mail profile
The e-mail address of the symbolic user created as the sender of Web Callback
The external e-mail address that Web Callback requests are sent to.
Email Configuration Exchange Server The name of the Exchange Server.
MultiMedia Module Administrator's Manual Resource Manager User's Guide - Page 11 40DHB0002USEB – Issue 1a (05/29/2003) Getting Started

Page 12 - Getting Started Resource Manager User's Guide
Services When the iServer service is interrupted, it is necessary stop and start the NT services. Have all users exit from iContact. Starting services takes 50 seconds. After waiting 50 seconds, users may log back into the iContact application and resume normal operations.
Stop/Restart
1. Log out all iContact users. 2. Go to Control Panel. 3. Select Services. 4. Select iService and click Stop. 5. Wait. Click Start. 6. Repeat steps for iPhone, iE-mail and iChat services. 7. Close Services.
Page 12 - Resource Manager User's Guide MultiMedia Module Administrator's Manual Getting Started 40DHB0002USEB – Issue 1a (05/29/2003)
Resource Manager User's Guide Multimedia Queue Administration - Page 13
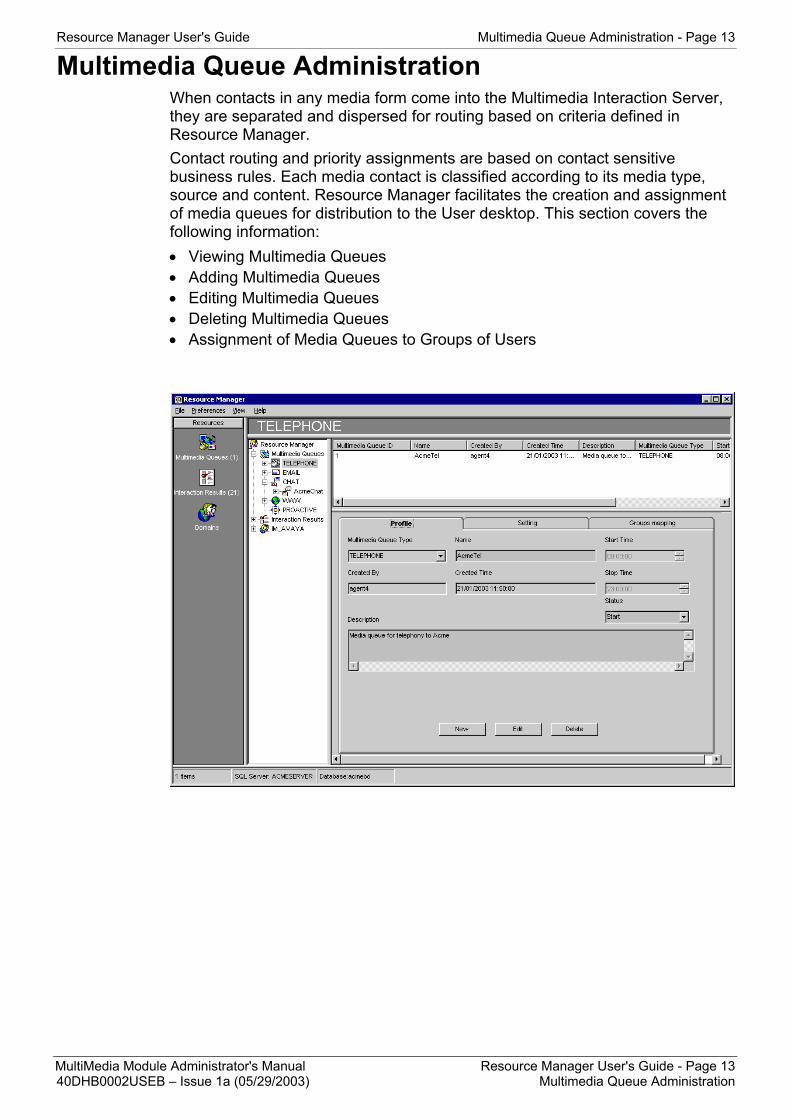
Multimedia Queue Administration When contacts in any media form come into the Multimedia Interaction Server, they are separated and dispersed for routing based on criteria defined in Resource Manager. Contact routing and priority assignments are based on contact sensitive business rules. Each media contact is classified according to its media type, source and content. Resource Manager facilitates the creation and assignment of media queues for distribution to the User desktop. This section covers the following information: • Viewing Multimedia Queues • Adding Multimedia Queues • Editing Multimedia Queues • Deleting Multimedia Queues • Assignment of Media Queues to Groups of Users
MultiMedia Module Administrator's Manual Resource Manager User's Guide - Page 13 40DHB0002USEB – Issue 1a (05/29/2003) Multimedia Queue Administration
Page 14 - Multimedia Queue Administration Resource Manager User's Guide
Viewing Multimedia Queues To see the list of Multimedia Queues, their attendant properties and the groups that have been assigned, do the following: 1. Select Multimedia Queues from the Vertical Icon Bar or click Multimedia
on the Tree View. This will open Multimedia Queue List Window. The List Window displays Queue ID, Name, Created By, Created Time, Description, Multimedia Queue Type, Start Time, Stop Time and Status. You can use the horizontal scroll bar to view all fields.
2. Click the (+) or double click the Multimedia Queue icon to expand the Tree View’s list of Multimedia Queues. Click the icon of the Multimedia Queue type you wish to view.
3. Select a Queue from the List or Tree to view the Queue Profile, Settings and Group Mappings.
Media Type Description/Function Telephone Voice contacts originating from the PSTN. E-mail E-mail contact requests. Chat Requests of live chat sessions. WWW WWW contact request. Proactive Outbound calling list media queues.
Adding a new Multimedia Queue Adding a new Multimedia Queue is a three-stage process. 1. Adding a Media Profile
This remains constant for all multimedia types. This stage involves defining and describing the media type e.g. “e-mail technical support”, determining when the queue will be active and assigning a status.
2. Settings These are unique to each media type. Therefore, the information you are required to supply will vary from one media type to another. For example, for telephone queues, you would supply information regarding the telephone-switching platform. For e-mail, you would supply domain and address information. Settings also ask you to compose messages that are sent to confirm the receipt of e-mails, Web Callback requests and Chat requests. These are automatic responses a sender or caller would receive acknowledging receipt of his contact request. No settings are required for the WWW Profile.
3. Group Mapping Selecting a Group or Groups of users to which the queue will be mapped.
Page 14 - Resource Manager User's Guide MultiMedia Module Administrator's Manual Multimedia Queue Administration 40DHB0002USEB – Issue 1a (05/29/2003)

Resource Manager User's Guide Multimedia Queue Administration - Page 15
Stage 1 - Adding a Media Profile With the resource Manager opened, right-click the Multimedia Queues Icon in the tree and select New Multimedia Queue from the pop up menu, or click New Multimedia Queue from the File menu. The Profile tab fields will open. These are similar for Telephone, Email, Chat and Proactive as show below:
1. Click Edit and select the Multimedia Queue Type from the dropdown menu. 2. Enter the Multimedia Queue Name. 3. Created By and Created Date and Time are automatically inserted by the
system. 4. Enter a Description, giving a brief description of the new Multimedia Queue. 5. Enter Start Time, setting the time when the queue will be in operation. 6. Enter Stop Time, setting the time for the queue to close operations. 7. Select the 'Start' option for Status to begin the flow of contacts to the users’
desktops. The 'Pause' and 'Stop' options are both used to close the queue. 'Stop' terminates all contacts in progress. 'Pause' allows users to complete the contacts in which they are engaged before closing the application.
8. The Profile field tab for WWW is shown below. Enter the URL in WWW Callback CSS Reference URL.
9. When all information is entered, click the Add and open the Settings
Window. Proceed from Stage 2 - Settings.
MultiMedia Module Administrator's Manual Resource Manager User's Guide - Page 15 40DHB0002USEB – Issue 1a (05/29/2003) Multimedia Queue Administration

Page 16 - Multimedia Queue Administration Resource Manager User's Guide
Stage 2 - Settings The various media settings are described in the following paragraphs:
Telephone Settings The defaults (as set during installation of the Multimedia Module) are shown. To change theses default settings, click either Edit or New.
1. Enter the Switch Name. 2. Enter the ACD: the Automatic Call Distribution Number. 3. Add the CDN: Control Directory Number (if the telephone switch requires). 4. Click Add. The new queue will be added to the Multimedia Queue List.
Note: The ACD numbers are switch dependent variables. Consult with
whoever is responsible for installing, programming or maintaining the telephony platform or enter a valid extension if known.
Page 16 - Resource Manager User's Guide MultiMedia Module Administrator's Manual Multimedia Queue Administration 40DHB0002USEB – Issue 1a (05/29/2003)
Resource Manager User's Guide Multimedia Queue Administration - Page 17
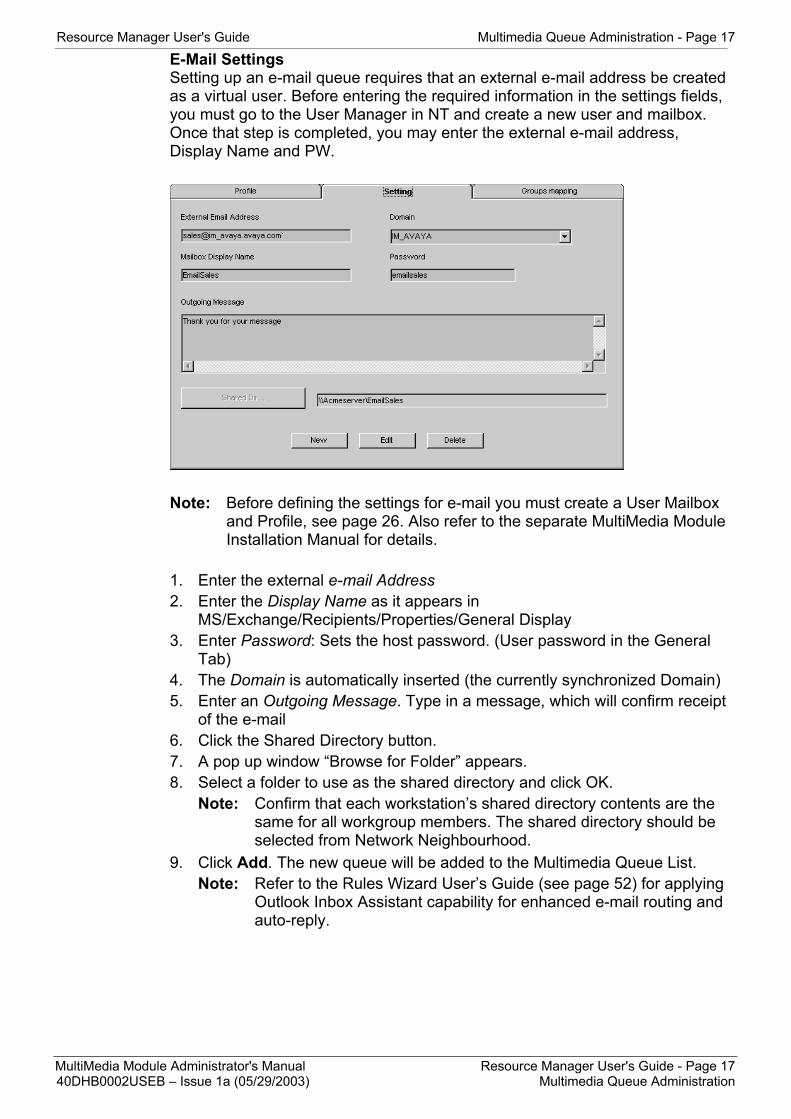
E-Mail Settings Setting up an e-mail queue requires that an external e-mail address be created as a virtual user. Before entering the required information in the settings fields, you must go to the User Manager in NT and create a new user and mailbox. Once that step is completed, you may enter the external e-mail address, Display Name and PW.
Note: Before defining the settings for e-mail you must create a User Mailbox
and Profile, see page 26. Also refer to the separate MultiMedia Module Installation Manual for details.
1. Enter the external e-mail Address 2. Enter the Display Name as it appears in
MS/Exchange/Recipients/Properties/General Display 3. Enter Password: Sets the host password. (User password in the General
Tab) 4. The Domain is automatically inserted (the currently synchronized Domain) 5. Enter an Outgoing Message. Type in a message, which will confirm receipt
of the e-mail 6. Click the Shared Directory button. 7. A pop up window “Browse for Folder” appears. 8. Select a folder to use as the shared directory and click OK.
Note: Confirm that each workstation’s shared directory contents are the same for all workgroup members. The shared directory should be selected from Network Neighbourhood.
9. Click Add. The new queue will be added to the Multimedia Queue List. Note: Refer to the Rules Wizard User’s Guide (see page 52) for applying
Outlook Inbox Assistant capability for enhanced e-mail routing and auto-reply.
MultiMedia Module Administrator's Manual Resource Manager User's Guide - Page 17 40DHB0002USEB – Issue 1a (05/29/2003) Multimedia Queue Administration

Page 18 - Multimedia Queue Administration Resource Manager User's Guide
Chat Settings The name of the Chat Server is automatically inserted from the name defined as the Chat Server that has been defined in the iServer Setting. Note: Do not put any space in fields.
1. Enter the Chat Room: The name of the chat room. 2. Enter the Host Name: The name of the server that hosts the MS Chat
service. 3. Enter the Host Password : The password for the host named above. 4. Add Client Authentication Required: If this box is checked, the client is
required to enter a password before being let in to the chat room. 5. Enter Room Password: Enter client password if Authentication box is
checked. 6. Enter an Outgoing Message: Type in a courtesy message that will be
displayed to the sender if all users are busy when a client is requesting a chat.
7. Click Add. The new queue will be added to the Multimedia Queue List.
Page 18 - Resource Manager User's Guide MultiMedia Module Administrator's Manual Multimedia Queue Administration 40DHB0002USEB – Issue 1a (05/29/2003)

Resource Manager User's Guide Multimedia Queue Administration - Page 19
Proactive Settings
1. Enter the From Date: The date the Proactive Campaign is to commence. 2. Enter the To Date: The date the Proactive is scheduled to terminate. 3. Enter Wait Time (Min): Busy, No Answer, Modem , Fax and Answering
Machine. These Interaction Result codes set the thresholds for automatic redialing for each outcome.
4. Enter Max Tries: Denotes the number of times the system will re-offer a proactive record where the Busy, No Answer, Modem, Fax or Answering Interaction Result has been accessed by the iContact user. Once the Max Tries threshold has been reached, the call will be cancelled.
5. Click Add. Note: The default status of Proactive queues is Stopped. After you have
created your Draft list and attached it to the queue in the Proactive List Manager, you must change the status to Start.
MultiMedia Module Administrator's Manual Resource Manager User's Guide - Page 19 40DHB0002USEB – Issue 1a (05/29/2003) Multimedia Queue Administration
Page 20 - Multimedia Queue Administration Resource Manager User's Guide
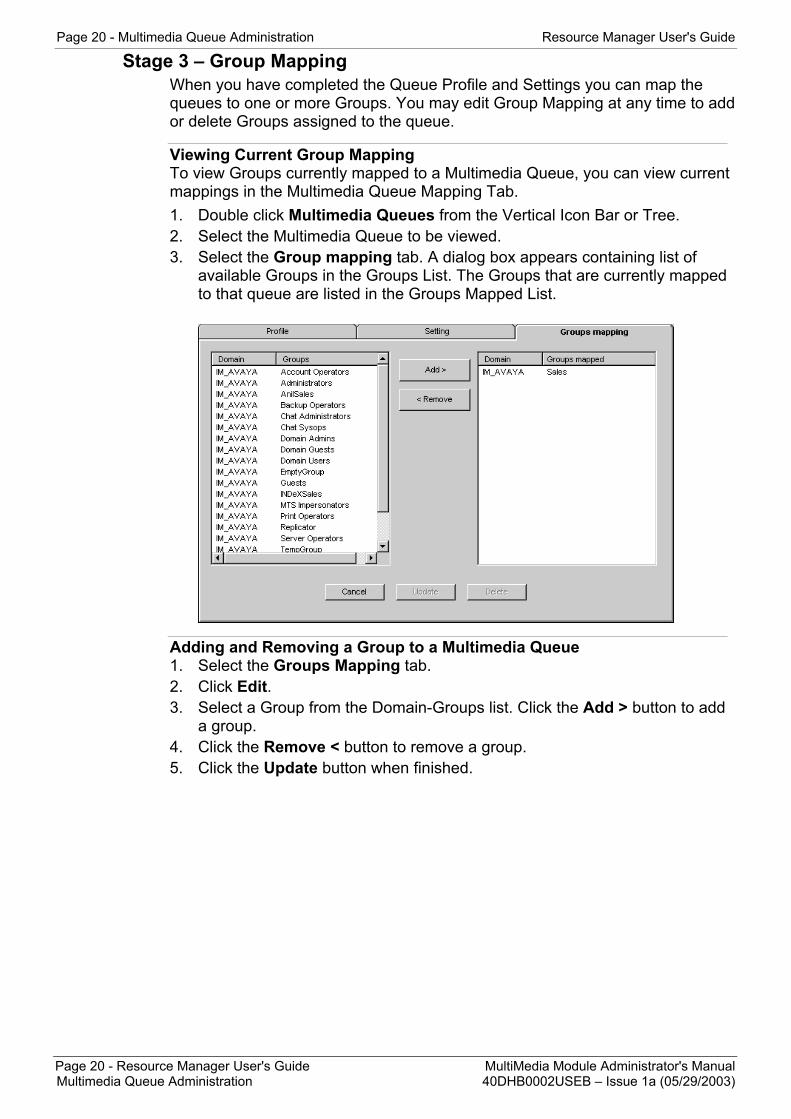
Stage 3 – Group Mapping When you have completed the Queue Profile and Settings you can map the queues to one or more Groups. You may edit Group Mapping at any time to add or delete Groups assigned to the queue.
Viewing Current Group Mapping To view Groups currently mapped to a Multimedia Queue, you can view current mappings in the Multimedia Queue Mapping Tab. 1. Double click Multimedia Queues from the Vertical Icon Bar or Tree. 2. Select the Multimedia Queue to be viewed. 3. Select the Group mapping tab. A dialog box appears containing list of
available Groups in the Groups List. The Groups that are currently mapped to that queue are listed in the Groups Mapped List.
Adding and Removing a Group to a Multimedia Queue 1. Select the Groups Mapping tab. 2. Click Edit. 3. Select a Group from the Domain-Groups list. Click the Add > button to add
a group. 4. Click the Remove < button to remove a group. 5. Click the Update button when finished.
Page 20 - Resource Manager User's Guide MultiMedia Module Administrator's Manual Multimedia Queue Administration 40DHB0002USEB – Issue 1a (05/29/2003)
Resource Manager User's Guide Interaction Result Administration - Page 21
Interaction Result Administration Before completing any interaction in iContact, the User must provide input regarding the end result of the contact or contact attempt. Interaction Results can be associated with a single media type or with all media types. There are Interaction Results that have been configured in the system specific to telephony. This section provides information on how to add, edit Interaction Results and how to delete those that you have created.
Viewing Current Interaction Results 1. Double click on Interaction Results Tree. 2. Select an Interaction Result from the List or the Tree.
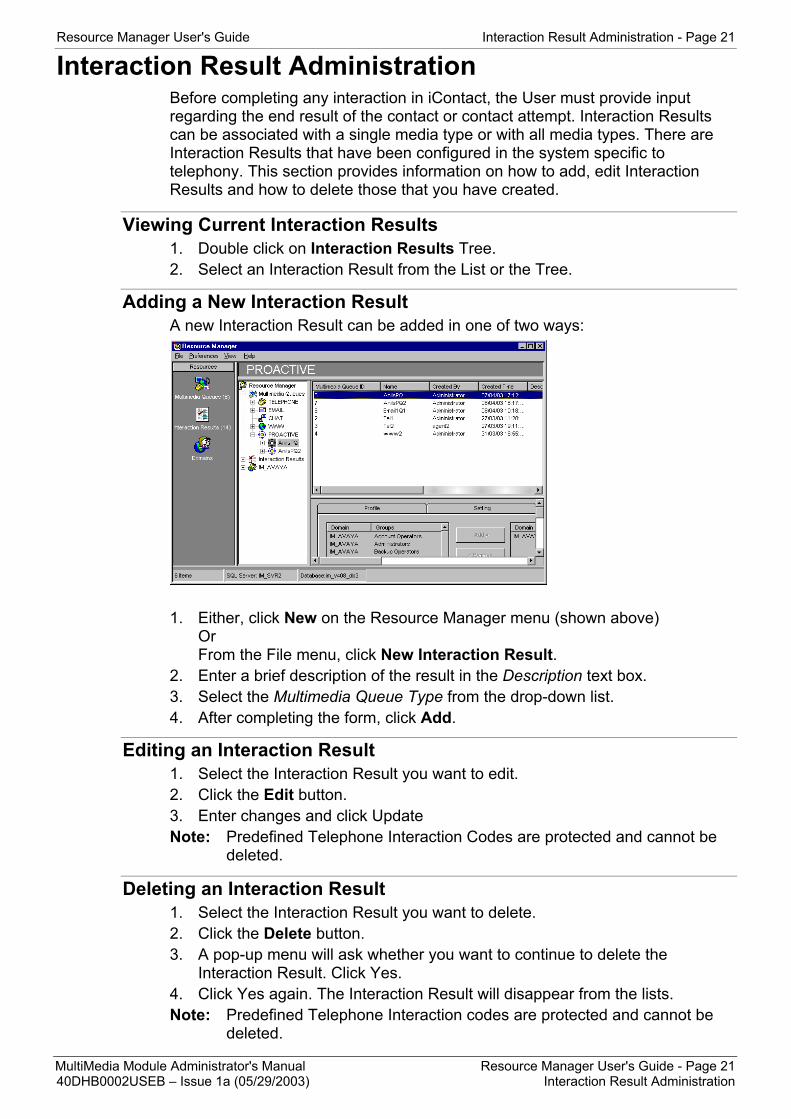
Adding a New Interaction Result A new Interaction Result can be added in one of two ways:
1. Either, click New on the Resource Manager menu (shown above)
Or From the File menu, click New Interaction Result.
2. Enter a brief description of the result in the Description text box. 3. Select the Multimedia Queue Type from the drop-down list. 4. After completing the form, click Add.
Editing an Interaction Result 1. Select the Interaction Result you want to edit. 2. Click the Edit button. 3. Enter changes and click Update Note: Predefined Telephone Interaction Codes are protected and cannot be
deleted.
Deleting an Interaction Result 1. Select the Interaction Result you want to delete. 2. Click the Delete button. 3. A pop-up menu will ask whether you want to continue to delete the
Interaction Result. Click Yes. 4. Click Yes again. The Interaction Result will disappear from the lists. Note: Predefined Telephone Interaction codes are protected and cannot be
deleted.
MultiMedia Module Administrator's Manual Resource Manager User's Guide - Page 21 40DHB0002USEB – Issue 1a (05/29/2003) Interaction Result Administration

Page 22 - Domain Administration Resource Manager User's Guide
Domain Administration The Domain Administration Module provides the administrator with information regarding the human resources assigned to the MultiMedia Module Server. All Users are assigned to Groups as part of their setup in Windows 2000/NT. These Group assignments provide the basis for assigning contact media handling duties.
Viewing Group Profiles Users are assigned to Groups in Windows. Groups are assigned to Media queues in Resource Manager. To view the current mapping: 1. Double Click the Domains icon or click (+) beside the Domains icon to open
the Tree View. 2. Click the (+) sign beside or double click the Domain you wish to view. The
Group Icon and User Icons will appear. 3. Double click the Group icon. Groups and users in the synchronized
domains will be available. The Users within that Group appear in the Tree View. In the Group List Window the Group ID, Name, and Domain are displayed.
Adding, Editing, Removing Group Multimedia Mapping
1. Select the Group Icon from the Tree to open the Group List Window and
Group Tree. The Group Window will display all Groups belonging to the Domain.
2. To add a Group to a Queue, click Add arrow. 3. To remove a Queue from a Group, click Remove arrow. 4. Click Update.
Page 22 - Resource Manager User's Guide MultiMedia Module Administrator's Manual Domain Administration 40DHB0002USEB – Issue 1a (05/29/2003)
Resource Manager User's Guide Domain Administration - Page 23
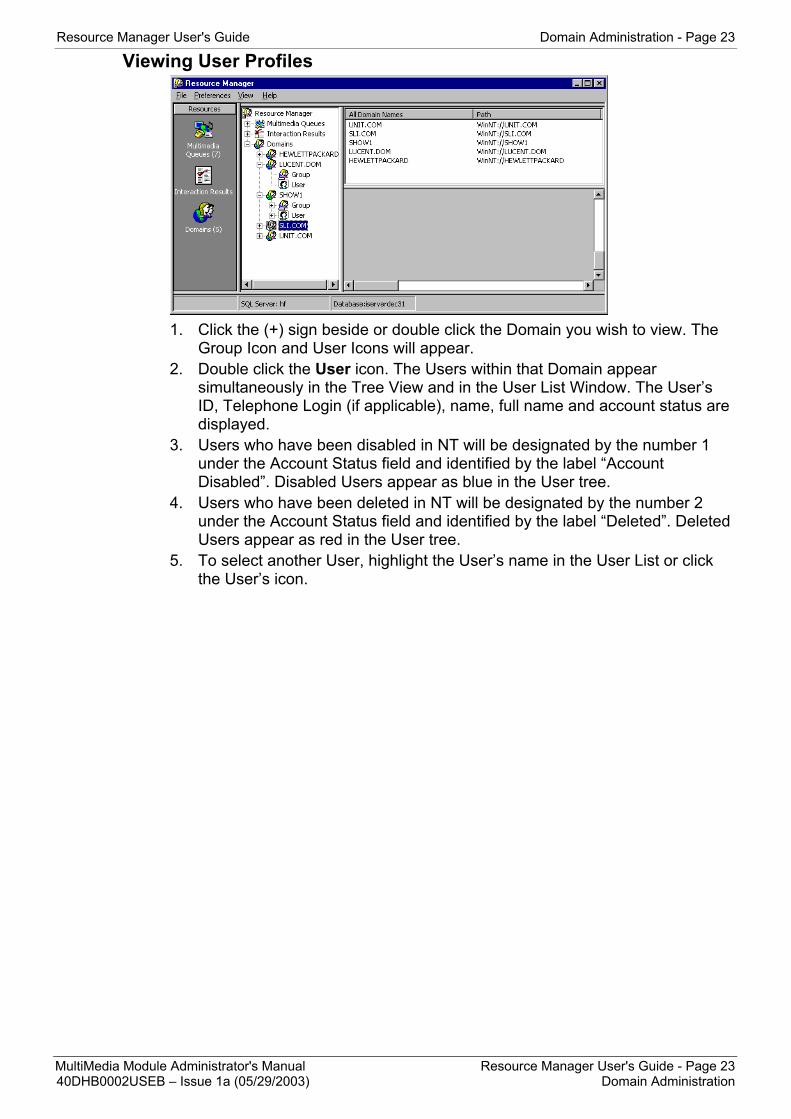
Viewing User Profiles
1. Click the (+) sign beside or double click the Domain you wish to view. The
Group Icon and User Icons will appear. 2. Double click the User icon. The Users within that Domain appear
simultaneously in the Tree View and in the User List Window. The User’s ID, Telephone Login (if applicable), name, full name and account status are displayed.
3. Users who have been disabled in NT will be designated by the number 1 under the Account Status field and identified by the label “Account Disabled”. Disabled Users appear as blue in the User tree.
4. Users who have been deleted in NT will be designated by the number 2 under the Account Status field and identified by the label “Deleted”. Deleted Users appear as red in the User tree.
5. To select another User, highlight the User’s name in the User List or click the User’s icon.
MultiMedia Module Administrator's Manual Resource Manager User's Guide - Page 23 40DHB0002USEB – Issue 1a (05/29/2003) Domain Administration

Page 24 - Domain Administration Resource Manager User's Guide
Setting User Properties
User Properties provides a range of flexibility in determining how Users interact with their iContact interface. Features can be applied to individual Users or to entire Groups. This facilitates individualization in Properties assignment according to job function or contact media responsibility. 1. Select the User whose settings you wish to view from the list by highlighting
the name of the User in the User Window List Box or from the User Tree. 2. Select User Properties from the Preferences Menu or click the Properties
button on the User Window. 3. Each Property’s check box indicates the current setting for that User in the
Default Value section. If the Default Value can be changed by the User, a check mark appears beside it in the Allowed to Change section.
4. To make changes to the setup of an individual user, check the Apply to Selected User Only radio button. Or select the Apply to All or the Multi select radio button to change setup for an group of users.
5. Click Apply and then OK. Property Description/Function Enable AutoDial The system auto-dials a phone number for the contact that the
User has selected. The phone number appears in the dial box on the toolbar. If this preference is not checked, a manual click of the Dial button is required to place an outbound call.
Auto Accept Media In Auto Accept mode, an audible tone signals connection to outside caller. If this box is not checked, incoming calls are answered by clicking the Answer icon.
Auto Answer DN Applies Auto Answer/Non-Auto Answer rules to contacts on a secondary incoming telephone line.
Selective Mode Allows the user to review requests from any Media queue before selecting a contact for treatment.
Request Mode Requires the user to respond to the contact that is presented by the system.
Preview Time Displays the time permitted to review a contact request before accepting it. If enabled, the user can increase or decrease the Preview Time interval.
Page 24 - Resource Manager User's Guide MultiMedia Module Administrator's Manual Domain Administration 40DHB0002USEB – Issue 1a (05/29/2003)

Resource Manager User's Guide Domain Administration - Page 25
Viewing a User’s Group/Multimedia Assignments
1. Open the Domain Tree and select your Domain Name. 2. Open the Domain Tree selected. 3. Open the User Tree and select the user you want to view. 4. Click on user icon to view Group/Media Assignments of the selected user. A
text box will appear that lists the Groups the highlighted User belongs to on the left and the Media queues to which the Groups are mapped, on the right.
MultiMedia Module Administrator's Manual Resource Manager User's Guide - Page 25 40DHB0002USEB – Issue 1a (05/29/2003) Domain Administration

Page 26 - Configuring New User and Mailbox Setup Resource Manager User's Guide
Configuring New User and Mailbox Setup When creating a new e-mail queue it is necessary to set up the queue as a user in NT. In order to be able to receive an e-mail and route it to iContact, iEmail needs a user account in Exchange. This section provides directions for configuring a new user in NT.
User Setup 1. Return to the MS Server(s) where MS Exchange is installed. 2. Log in as Administrator. 3. To start Mailbox Setup, from the task bar Click Programs | Administrative
Tools | User Manager for Domains.
4. Select New User from User on menu bar.
5. Enter the Username. The name should be the same as the name of the
email queue, for example, “marketing email”. An optional Full Name may also be entered.
6. Enter the Password. 7. Confirm Password. 8. Check the “User Cannot Change Password” option. 9. Check the “Password Never Expires” option. 10. Click Add.
Page 26 - Resource Manager User's Guide MultiMedia Module Administrator's Manual Configuring New User and Mailbox Setup 40DHB0002USEB – Issue 1a (05/29/2003)

Resource Manager User's Guide Configuring New User and Mailbox Setup - Page 27
Mailbox Setup 1. From the start menu select programs/Microsoft exchange/exchange
Administrator 2. From the Properties window, select the General tab.
3. Enter the e-mail address of the queue e.g. “marketing email” in the First Name, Display and Alias fields.
4. After making changes click Apply and then OK. 5. To add more e mail address users click Add. 6. Ensure that any account used to access the mailbox has the necessary
permissions. This includes the email service account. It may be necessary to turn on the Permissions detail from within the Microsoft Exchange Administrator before the tab is displayed.
7. Click Close.
MultiMedia Module Administrator's Manual Resource Manager User's Guide - Page 27 40DHB0002USEB – Issue 1a (05/29/2003) Configuring New User and Mailbox Setup

Page 28 - Overview Proactive Manager User's Guide
Proactive Manager User's Guide Welcome to the MultiMedia Module Proactive Manager User's Guide. The Proactive List Manager module facilitates the importing and assignment of outbound calling lists to Proactive Campaigns. Outbound calling campaigns can be undertaken to increase sales, service customers, send company news, conduct research, or increase company exposure. This User's Guide provides the administrator with the knowledge to manage outbound Proactive Campaign Lists. It describes the steps required to create draft calling lists, attach them to campaigns and run the campaigns. This module is designed to work as a companion to the Resource Manager support module. For information on the Resource Manager support module, refer to Resource Manager User's Guide (see page 5). When planning an outbound media campaign, you first create a new Proactive Campaign in the Resource Manager module. This involves naming the campaign and determining specific contact parameters, e.g. the number of retries or the interval time at which a re-dial should be attempted. The Resource Manager module is also used for assigning resources to the campaigns. Once the campaign parameters are defined and users are assigned, you can attach calling lists to and activate the campaigns from the Proactive List Manager module.
Overview The Proactive List Manager Guide helps administer the Proactive lists. The guide provides the following information: • How to Log on to Proactive Manager module • How to view calling lists • How to import and load lists from existing documents or databases • How to modify and/or create lists • How to attach lists to Proactive Campaigns • How to detach lists from Proactive Campaigns • How to view the status of Proactive Campaigns already in progress.
Who should use this guide This guide is for administrators and supervisors who are responsible for managing the multimedia customer interaction center.
Document symbols and conventions To help you locate and interpret information easily, this manual uses Microsoft set of Standard Windows terminology such as icon, window, text box and menu. Following are some specific symbols and conventions standard throughout the manual: Conventions Descriptions Bold Used to designate menu selections, buttons and commands to enter. Initial Capitals Names of applications, programs, files, servers, and named windows;
and directory names and paths. Italic Information you need to provide.
Page 28 - Proactive Manager User's Guide MultiMedia Module Administrator's Manual Overview 40DHB0002USEB – Issue 1a (05/29/2003)

Proactive Manager User's Guide Proactive List Manager Interface - Page 29
Proactive List Manager Interface The Proactive List Manager allows the administrator/supervisor to effectively create and manage Proactive Campaign lists through a menu driven application. It provides management with maximum flexibility to attach lists to existing Proactive Campaigns and load or import new calling lists.
Overview This section provides the following information: • Descriptions of all menus, tools, icons and trees that are utilized in the
creation, import and attachment of lists to launch a campaign.
Navigation Bars The icons and menu commands offered on the Proactive Interface Navigation Bars enable you to view information and perform common tasks. Navigation Bars Description Menu Bar Displays program commands and menus. Toolbar Displays icons and toolbars to manage Proactive lists. Icon Bar Displays icons accessible to you to view Proactive Campaigns
and Draft Lists. Tree Displays graphical representation of Proactive Campaigns and
Draft Lists. Status bar Displays current time.
MultiMedia Module Administrator's Manual Proactive Manager User's Guide - Page 29 40DHB0002USEB – Issue 1a (05/29/2003) Proactive List Manager Interface

Page 30 - Proactive List Manager Interface Proactive Manager User's Guide
Menu Bar Menu bar displays program commands and menus. File Menu Commands Description Synchronize Synchronizes the data when a change is made or a Proactive
Campaign is added in Resource Manager module. db Properties Allows you to view and modify the current database settings for
connection values in Proactive List Manager. Update Accounts Wizard Imports data from Microsoft text, Excel or Access files into your
customer table. Exit Exits the Proactive List Manager module.
List Menu New List Brings up the New List Window to begin the process of importing
or loading a new Draft List. Delete List Delete the list. View List Brings the selected list into view. Refresh Allows you to refresh the contents of a specific list as it is being
treated in iContact.
Proactive Menu Start Proactive Allows you to start the Proactive Campaign. Stop Proactive Allows you to stop the Proactive Campaign. View Details
Allows you to view or hide the details of a specific Proactive Campaign.
Attach List Attaches the selected Draft List to a Proactive Campaign. Detach List Detaches a list from a Proactive Campaign.
Help Menu Contents Displays directions for on-line Help. About Provides information regarding the software.
Page 30 - Proactive Manager User's Guide MultiMedia Module Administrator's Manual Proactive List Manager Interface 40DHB0002USEB – Issue 1a (05/29/2003)
Proactive Manager User's Guide Proactive List Manager Interface - Page 31
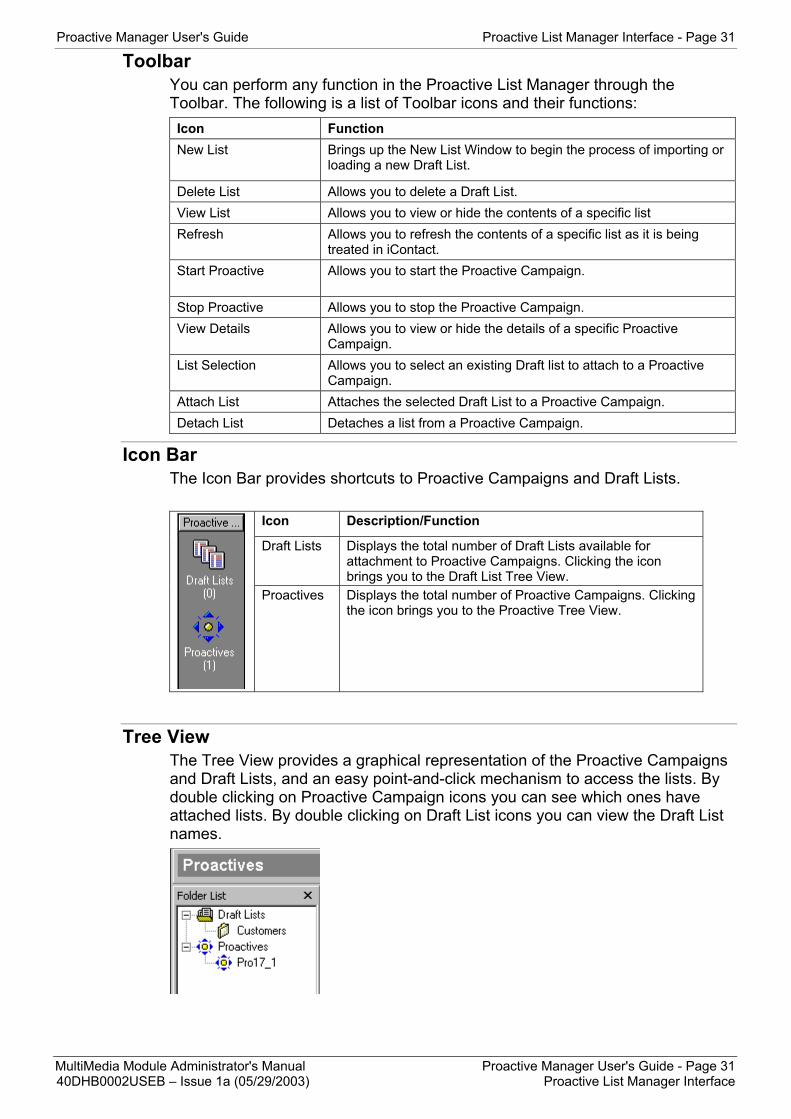
Toolbar You can perform any function in the Proactive List Manager through the Toolbar. The following is a list of Toolbar icons and their functions: Icon Function New List
Brings up the New List Window to begin the process of importing or loading a new Draft List.
Delete List Allows you to delete a Draft List. View List Allows you to view or hide the contents of a specific list Refresh Allows you to refresh the contents of a specific list as it is being
treated in iContact. Start Proactive Allows you to start the Proactive Campaign.
Stop Proactive Allows you to stop the Proactive Campaign. View Details Allows you to view or hide the details of a specific Proactive
Campaign. List Selection Allows you to select an existing Draft list to attach to a Proactive
Campaign. Attach List Attaches the selected Draft List to a Proactive Campaign. Detach List Detaches a list from a Proactive Campaign.
Icon Bar The Icon Bar provides shortcuts to Proactive Campaigns and Draft Lists.
Icon Description/Function
Draft Lists Displays the total number of Draft Lists available for attachment to Proactive Campaigns. Clicking the icon brings you to the Draft List Tree View.
Proactives Displays the total number of Proactive Campaigns. Clicking the icon brings you to the Proactive Tree View.
Tree View The Tree View provides a graphical representation of the Proactive Campaigns and Draft Lists, and an easy point-and-click mechanism to access the lists. By double clicking on Proactive Campaign icons you can see which ones have attached lists. By double clicking on Draft List icons you can view the Draft List names.
MultiMedia Module Administrator's Manual Proactive Manager User's Guide - Page 31 40DHB0002USEB – Issue 1a (05/29/2003) Proactive List Manager Interface
Page 32 - Getting started Proactive Manager User's Guide
Getting started Overview
This section covers the following information: • How to Start, Logon and Exit the Proactive List Manager • How to view and modify database settings.
Starting and Ending the Program To start the Proactive List Manager module: 1. Select the Proactive List Manager from the Windows Start menu, or
double click the Proactive List Manager icon on the desktop. 2. To exit the program, select Exit from the File menu, or click the close icon
in the top right corner of the interface screen.
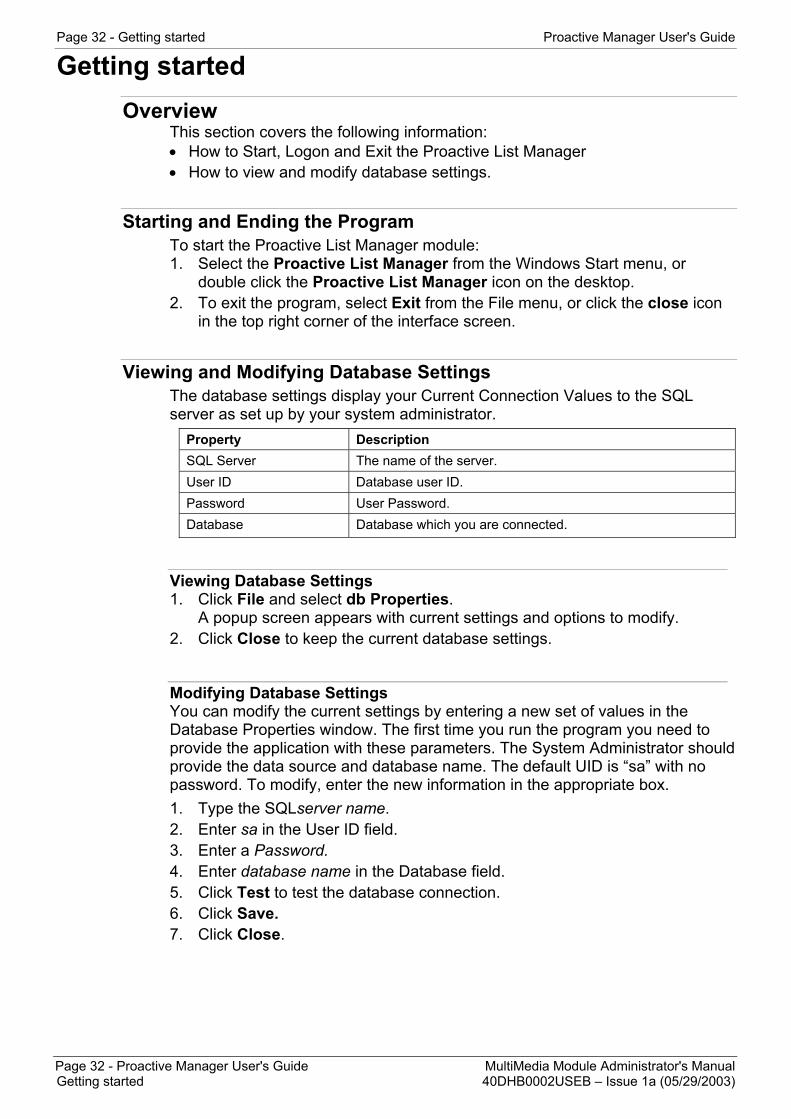
Viewing and Modifying Database Settings The database settings display your Current Connection Values to the SQL server as set up by your system administrator.
Property Description SQL Server The name of the server. User ID Database user ID. Password User Password. Database Database which you are connected.
Viewing Database Settings 1. Click File and select db Properties.
A popup screen appears with current settings and options to modify. 2. Click Close to keep the current database settings.
Modifying Database Settings You can modify the current settings by entering a new set of values in the Database Properties window. The first time you run the program you need to provide the application with these parameters. The System Administrator should provide the data source and database name. The default UID is “sa” with no password. To modify, enter the new information in the appropriate box. 1. Type the SQLserver name. 2. Enter sa in the User ID field. 3. Enter a Password. 4. Enter database name in the Database field. 5. Click Test to test the database connection. 6. Click Save. 7. Click Close.
Page 32 - Proactive Manager User's Guide MultiMedia Module Administrator's Manual Getting started 40DHB0002USEB – Issue 1a (05/29/2003)

Proactive Manager User's Guide Draft Lists - Page 33
Draft Lists Proactive List Manager module assists you to create calling lists for attachment to Proactive Campaigns. You are able to import lists from a variety of internal and external sources and prepare the calling records for uploading to specific Proactive Campaigns.
Overview This section covers the following topics: • How to view the properties of an existing Draft List • How to import and create a draft list from a Microsoft text, Excel or Access
files • How to load a list from an ODBC database • How to modify data field types • How to delete a Draft List.
Viewing an Existing List The Draft List icon on the Icon Bar displays the number of Draft Lists available for viewing. To view the contents of an existing Draft List, employ the following steps. 1. Click Draft List icon on the Icon Bar or the Tree. 2. Click the “+” sign next to the Draft List icon on the Tree, or double click on
Draft List to expand the Tree to view all Draft Lists. 3. Select the list from the Draft List Tree. 4. Click View List on the toolbar, or right click on the list and select View List
from the popup menu, or simply double click on the list. A window will open that displays the list name and ID, and the records and fields in the list.
5. To view all the field contents, use the scroll button at the bottom of the window.
6. To hide the list again, click Hide List on the toolbar, or right click on the list and select Hide List from the popup menu. Note: If there are no lists to view, refer to the next section to create or
load/import new lists.
Fields Definition Rec_No. Priority number Status Status of a proactive call Name User Identified field for customer name Phone Number User identified field for telephone number Fax Number User identified field for fax number E-mail User Identified field for E-mail address Customer ID Customer identification field General User identified field not associated with a system generated data type
MultiMedia Module Administrator's Manual Proactive Manager User's Guide - Page 33 40DHB0002USEB – Issue 1a (05/29/2003) Draft Lists

Page 34 - Draft Lists Proactive Manager User's Guide
Importing/Loading a list Creating a New List is a multi-step process that provides maximum flexibility as to what fields are included, how they are organized and the sources of the data. You can import a new list from a database as a comma-delimited ASCII text file, a Microsoft Excel file or an Microsoft Access file. 1. Click New List icon on the toolbar. A pop up window called New List will
appear. 2. Assign a name to the new list in the Name text box.
The name must conform to the SQL naming convention, e.g. 15 characters max., must not contain spaces or non-alpha characters. It may contain the underscore character.
3. Click the Import button. If you are importing a comma-delimited ASCII text file, a Microsoft Excel file, or a Microsoft Access file. Follow the instructions below in the section “Importing ASCII, Excel, Access Files.”
4. Click Load. If you are importing an ODBC database file. Follow the instructions below in the section “Loading ODBC tables from Other Databases”.
Page 34 - Proactive Manager User's Guide MultiMedia Module Administrator's Manual Draft Lists 40DHB0002USEB – Issue 1a (05/29/2003)

Proactive Manager User's Guide Draft Lists - Page 35
Importing ASCII, Excel, Access Files 1. Click Import. The Open dialog box will appear. 2. Choose the proper file type in the Files of Type box (Text, Excel or Access)
from the dropdown window. 3. Locate the file you want to import and highlight it. The filename should
appear in the File Name field. 4. Click Open. 5. If you are importing an Excel file, a pop-up window will ask you to type the
worksheet name/number that you are importing. Once selected, click OK. 6. If you are importing an Access file, a pop-up window will ask you to type the
Access table name/number that you are importing. Once selected, click OK. 7. Continue with the instructions in the “Selecting Fields to Import/Load”
section.
MultiMedia Module Administrator's Manual Proactive Manager User's Guide - Page 35 40DHB0002USEB – Issue 1a (05/29/2003) Draft Lists

Page 36 - Draft Lists Proactive Manager User's Guide
Loading ODBC database tables from iServer database To load a list from an ODBC table database: 1. Click the Current Database tab if the database table you are loading
resides in the iServer database. A list of the available tables appears. 2. Select the table name and click OK. 3. Follow the instructions below for “Selecting Fields to Load”.
Loading ODBC tables from Other Databases To load a list from other databases: 1. Click the Other Databases tab if you are loading ODBC tables. 2. Click Select DB button. A dropdown window will appear. 3. Enter the DSN, UID (user ID), Password and Database. 4. Click Test. 5. Click Close. 6. You are back at the Load Table window. Click the “+ “ icon next to the
database name to show all the tables in that database. 7. Select the appropriate table. The table name will appear automatically in the
Table Name field. 8. Click OK. 9. Follow the instructions below in the “Selecting Fields to Import” section. Note: The data type of all fields in the source table should have an identifiable
information (string format).
Page 36 - Proactive Manager User's Guide MultiMedia Module Administrator's Manual Draft Lists 40DHB0002USEB – Issue 1a (05/29/2003)

Proactive Manager User's Guide Draft Lists - Page 37
Selecting Fields to Import/Load You have to select identifying fields for each list imported/loaded. Follow the instructions below to complete creation of the new list: 1. Once you have completed loading/importing of a list, a new popup window
called Create List will appear, displaying available fields that you can import from the original list.
2. To select a field to import, highlight a field from the Available Fields window
and click Add. 3. Repeat this procedure for each field that you want to import. Minimally, you
should have a field that contains the name and contact number for the person you are calling.
4. To select all fields all at once, click the double Right Arrow “>>” button. 5. To remove single fields, highlight the field and click the Remove button. To
remove all fields all at once, click the double Left Arrow “<<” button. 6. To change the order of display for the selected fields, highlight the field you
want to move and click Move Up and Move Down buttons as appropriate. 7. To choose the criteria by which the list rows are to be sorted, select the field
in the Sort Item drop-down box, and choose Ascending or Descending. 8. To view the contents of the list, click Show List. Two lists will appear at the
bottom of the form. The upper shows your source list, and the lower shows the list you are creating. Whenever fields are added or removed, click Apply to refresh the view.
9. Click OK to create the list. The New List window will reappear displaying the contents of the newly populated Draft List. The next step is to define Data Type Fields as explained in the next section.
10. Click Cancel if you do not want to proceed with the list creation. 11. Click Save.
Note: There are two system-generated fields that appear automatically in the new list: Rec_No and Status. Rec_No is the sequence number of the call. The Status shows list status as it is being run by the Proactive Campaign. It will initially be set to zero.
MultiMedia Module Administrator's Manual Proactive Manager User's Guide - Page 37 40DHB0002USEB – Issue 1a (05/29/2003) Draft Lists

Page 38 - Draft Lists Proactive Manager User's Guide
Defining Data Type To convert the new Draft List to a format that can be recognized by the iServer, it is necessary to define the Data type.
Defining Data Type Fields All user-defined fields will appear as data type General. To specify a type for a field: 1. Right click on the field heading. A popup menu will list all available fields. 2. Select your Data Types. You must designate at least the Name field and
the phone number field or email address field. The yellow heading will convert to the new data type.
Note: Rec_No and Status are system generated and no type definition is required for them.
3. Click Save . 4. Click Cancel if you want to cancel it. Note: If you check the Save Contact Information box, you must designate a
Customer ID field.
Deleting a Draft List You can delete a Draft List at any time. 1. Select the Draft List to delete in the Tree View. 2. Click Delete button on the Toolbar or right click on delete list. 3. A pop-up window will appear, asking if the list is to be deleted. 4. Click Yes. 5. Another pop-up window will confirm that the list was successfully deleted.
6. Click OK.
Page 38 - Proactive Manager User's Guide MultiMedia Module Administrator's Manual Draft Lists 40DHB0002USEB – Issue 1a (05/29/2003)

Proactive Manager User's Guide Proactive Campaigns - Page 39
Proactive Campaigns Proactive Campaigns are created in the Resource Manager module (see User Guide for Resource Manager). Once a Proactive Campaign has been started it is not possible to delete it in Resource Manager module, nor is it possible to detach a list from a Proactive Campaign once the campaign is active and running. After a Proactive Campaign is defined in the Resource Manager module, the new campaign will not appear in the Proactive List Manager until you synchronize the data.
Overview This section covers the following topics: • Viewing information on Proactive Campaigns. • Attaching and Detaching Draft Lists to Proactive Campaigns. • Starting and stopping a Proactive Campaign.
MultiMedia Module Administrator's Manual Proactive Manager User's Guide - Page 39 40DHB0002USEB – Issue 1a (05/29/2003) Proactive Campaigns

Page 40 - Proactive Campaigns Proactive Manager User's Guide
Viewing the Campaign Information Window The Campaign Information Window allows you to view the attributes and lists associated with a specific Campaign . If you wish to modify attributes or assign new users, you need to perform those actions in Resource Manager module. To view a Proactive Campaign: 1. Click the Proactives icon on the Icon Bar or the Tree. 2. Click the “+” sign next to the Proactives icon or double click on Proactives
on the Tree to expand the Tree and view list of all Campaigns. 3. Select the Campaign you want to view from the Tree. 4. Click View Details on the Toolbar, or right click on the Campaign and
select View Details from the popup menu. A window will open that displays detailed Campaign records and information as listed below.
5. To view all the field contents, use the scroll button at the bottom of the window.
6. To hide the details, click Hide Details on the Toolbar, or right click on the list and select Hide Details from the popup menu.
Field Description Proactive Name Displays the Campaign name. ID Displays the Campaign ID number. Status Displays the status of the Campaign. List Name Displays the List name. List ID The ID associates with the attached list. From Date The date the Proactive Campaign starts. To Date The date the Proactive campaign ends. Start Time Displays the Campaign start time in hours and minutes. End Time Displays the Campaign end time in hours and minutes. Wait Time Min Displays the automatic retry intervals associated with the following
call attempt outcomes. No Answer Interval associated with reaching a no answer. Answering Machine Interval associated with reaching an answering machine. Busy Interval associated with reaching a busy signal. Modem Interval associated with reaching a modem. Fax Interval associated with reaching a fax machine.
Page 40 - Proactive Manager User's Guide MultiMedia Module Administrator's Manual Proactive Campaigns 40DHB0002USEB – Issue 1a (05/29/2003)

Proactive Manager User's Guide Proactive Campaigns - Page 41
Viewing Proactive Campaign Lists You can view detailed information of every Proactive Campaign, the corresponding attached list, and the current status of the list as it is being run. If there is a list attached to the Proactive Campaign, a list icon appears in the Proactive Campaign Detail Window, displaying the Name and ID of the attached list. 1. Click Proactives icon on the Icon Bar or the Tree. 2. Click the “+” sign next to the Proactives icon or double click on Proactives
on the Tree to expand the Tree and view list of all Campaigns. 3. Select the Campaign you want to view from the Tree. 4. Click the “+” sign next to the Campaign, or double click on it to expand the
Campaign and view the attached list. 5. Select the attached list. 6. Click View List on the toolbar, or right click on the list and select View List
from the popup menu, or simply double click on the list. A window will open that displays detailed list records, data fields and current status of the Campaign.
7. To view all the field contents, use the scroll button at the bottom of the window.
8. To hide the details, click Hide List on the toolbar, or right click on the list and select Hide List from the popup menu.
MultiMedia Module Administrator's Manual Proactive Manager User's Guide - Page 41 40DHB0002USEB – Issue 1a (05/29/2003) Proactive Campaigns

Page 42 - Proactive Campaigns Proactive Manager User's Guide
Attaching and Detaching Lists You can attach Proactive lists to, and detach them Campaigns, as required.
Attaching Lists If a Proactive Campaign has no list associated with it, you can attach a Draft List to it. To attach a list to a Proactive Campaign: 1. Select the Proactive Campaign from the Proactive Tree. 2. Click Attach List on Toolbar, or right click on the list and select Attach
List from the popup menu. 3. Click the dropdown List button on the Toolbar. From the dropdown list,
select the list to attach. 4. A pop up window will ask if the selected list is to be attached. 5. Click Yes. The Tree will display a “+” sign next to the Campaign confirming
that the Draft list has been successfully attached.
The list icon will appear in the Campaign Information window, indicating that a list has been attached to the Proactive Campaign. It will also appear in the Proactive Campaign Tree.
Once the list is attached to a Campaign, the list will disappear from the Draft List branch of the tree. Note: Only one list at a time can be attached to each Proactive Campaign.
Detaching Lists You can only detach a list from a Proactive Campaign if the Proactive Campaign is not running. 1. Select the Proactive Campaign from the Tree. 2. Click the Detach List icon on the Toolbar, or right click on the name of the
campaign and select Detach List from the popup menu. 3. A pop up window will ask if the attached list from the Proactive Campaign is
to be detached. 4. Click Yes. The “+” sign will disappear from the Campaign on the Tree
confirming that the list has been successfully detached. The list icon will disappear from the Campaign Information window, indicating that the list has been detached from the Proactive Campaign and there is no list attached to this Campaign. It will also disappear from the Proactive Campaign Tree. Once the list has been detached from the Campaign, the list will reappear on the Draft List branch of the Tree. The draft list is now available to be re-attached to any other Campaign.
Page 42 - Proactive Manager User's Guide MultiMedia Module Administrator's Manual Proactive Campaigns 40DHB0002USEB – Issue 1a (05/29/2003)

Proactive Manager User's Guide Proactive Campaigns - Page 43
Running Campaigns Once the appropriate lists are attached to the Proactive Campaigns, the campaign is ready to be started. Once started, the status of the campaign can be reviewed at any time.
Starting and Stopping a Proactive Campaign When you are ready to run a Proactive Campaign, you can start and stop a campaign from the List Manager. You may stop a Proactive Campaign in run mode at any point. When you restart the Proactive Campaign, the Proactive List Manager will send only the untreated records to the users assigned to the campaign. 1. To run or start the Proactive Campaign, click the Start button on the
Toolbar, or right click on the Campaign and select Start Proactive from the popup menu.
2. To stop or end the Proactive Campaign, click the Stop button on the Toolbar, or right click on the Campaign and select Stop Proactive from the popup menu.
Viewing Record Status You can monitor the progress of a Proactive Campaign while it is running. The Status field in the record will indicate whether that record is waiting in the queue, has been treated, rescheduled for a retry or if it qualifies as a completed contact. The following codes represent the status of contacts:
Status Codes Descriptions New Contact record is new and not treated yet. Waiting Contact record is in the queue but not yet offered. Answered A user has opened the Contact record. Completed Contact is completed by user.( User has closed the Contact). Callback Scheduled Contact record is scheduled for future handling. Cancelled Contact is cancelled because max. tries exceeded from assigned
number. Offered Contact in the queue is offered.
1. Select a Proactive Campaign. 2. Select a Proactive Campaign List. 3. Click View List followed by Refresh.
Show Results If you right-click on a record with the status of Completed and select Show Results on the pop-up menu, a window will appear at the bottom of the form that displays the Interaction Result associated with that record.
MultiMedia Module Administrator's Manual Proactive Manager User's Guide - Page 43 40DHB0002USEB – Issue 1a (05/29/2003) Proactive Campaigns

Page 44 - Account Update Wizard Proactive Manager User's Guide
Account Update Wizard The Update Accounts Wizard allows you to import data from Microsoft text, Excel, and Access files into your customer account table. The Wizard is a simple, step by step procedure that translates the imported data to a compatible destination table format and “iContact” table.
Overview This section covers the following topics: • Selecting and importing text, Excel, or Access files • Selecting desired data fields to import • Mapping data fields to destination table fields
Selecting and Importing data source types The Wizard assists you in the creation of Customer Account Tables: 1. Click File on the Menu bar. 2. Select Update Accounts Wizard from the dropdown menu. Follow step by step Wizard instructions to complete the creation of Customer Account Tables.
Selecting data source types You can select data files from the three data source types provided: Microsoft Text, Microsoft Excel, or Microsoft Access files. 1. Select one of the three data source types provided. 2. Click Next to continue. 3. If you want to change a selection, click Back to return to the previous page.
Change your selection, click Next to continue. 4. Click Cancel at any time to interrupt or cancel the procedure.
Page 44 - Proactive Manager User's Guide MultiMedia Module Administrator's Manual Account Update Wizard 40DHB0002USEB – Issue 1a (05/29/2003)

Proactive Manager User's Guide Account Update Wizard - Page 45
Importing files Once you have selected the data source type, you are required to identify the file name you want to import. If uncertain of a file name, browse the database and choose the file you want to import. Follow the Wizard instructions to complete this step. 1. Type your file name in the box provided, or click Browse to view all files
and locate the file of your choice. 2. Highlight the file selected and click Open to accept your selection. The file
name will appear in the window box provided. 3. If satisfied with your file selection, click Next to continue. 4. To change, click Back to return to the previous page. Change your
selection and repeat steps 1 and 2. Click Next to continue. 5. Click Cancel at any time to interrupt or cancel the procedure.
MultiMedia Module Administrator's Manual Proactive Manager User's Guide - Page 45 40DHB0002USEB – Issue 1a (05/29/2003) Account Update Wizard
Page 46 - Account Update Wizard Proactive Manager User's Guide
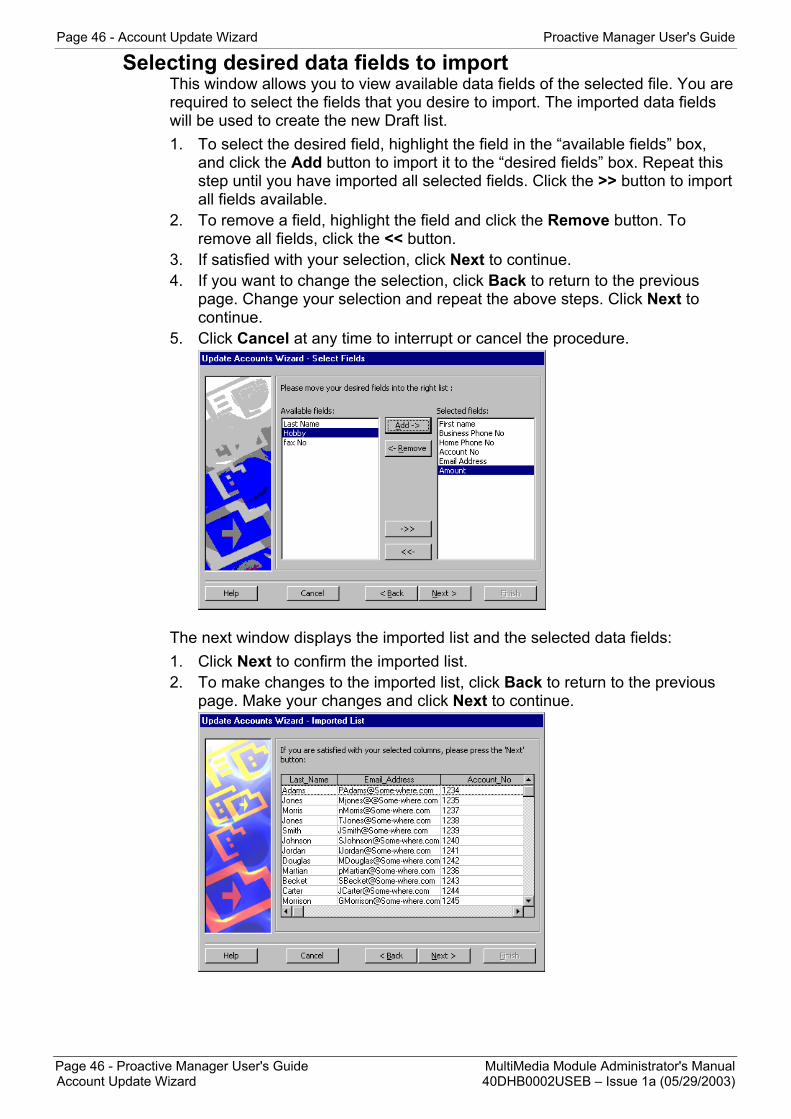
Selecting desired data fields to import This window allows you to view available data fields of the selected file. You are required to select the fields that you desire to import. The imported data fields will be used to create the new Draft list. 1. To select the desired field, highlight the field in the “available fields” box,
and click the Add button to import it to the “desired fields” box. Repeat this step until you have imported all selected fields. Click the >> button to import all fields available.
2. To remove a field, highlight the field and click the Remove button. To remove all fields, click the << button.
3. If satisfied with your selection, click Next to continue. 4. If you want to change the selection, click Back to return to the previous
page. Change your selection and repeat the above steps. Click Next to continue.
5. Click Cancel at any time to interrupt or cancel the procedure.
The next window displays the imported list and the selected data fields: 1. Click Next to confirm the imported list. 2. To make changes to the imported list, click Back to return to the previous
page. Make your changes and click Next to continue.
Page 46 - Proactive Manager User's Guide MultiMedia Module Administrator's Manual Account Update Wizard 40DHB0002USEB – Issue 1a (05/29/2003)

Proactive Manager User's Guide Account Update Wizard - Page 47
Mapping Fields Mapping data fields to destination table fields
This window requires that you map the imported fields to the destination table fields. Please note that you must map columns to at least the Customer Name and Account Number fields. 1. Right click on each column in the list and map it to the appropriate field
name. If a field is of a general nature, map it as “Comments”. 2. To make changes repeat the same process. 3. If satisfied with your selection, click Next to continue.
Mandatory Field ID: Customer Name Field If you missed mapping a column to the mandatory Customer Name field, the system will ask you to return to the previous page and map that field. 1. Click Back to return to the previous page. 2. Right click on the column in the list and map Customer Name to the
appropriate field. 3. If you want to change the field name, select “not defined” and map another
field to that column. 4. Once completed, click Next to continue.
MultiMedia Module Administrator's Manual Proactive Manager User's Guide - Page 47 40DHB0002USEB – Issue 1a (05/29/2003) Account Update Wizard

Page 48 - Account Update Wizard Proactive Manager User's Guide
Mandatory Field ID: Account Number Field If you missed mapping a column to the mandatory Account Number field, the system will remind you and provide you with two choices: Return to the previous page and map that field 1. Click Back to return to the previous page. 2. Right click on the column in the list and map Account Number to the
appropriate field. 3. Once completed, click Next to continue.
OR Have the system assign the Account Number field for you. 1. Check the appropriate box to have the system assign the key field. 2. Click Next to continue. 3. The next window will provide instructions to define the “Key” field. Refer to
the section called System Generated Account Number Field for instructions.
Page 48 - Proactive Manager User's Guide MultiMedia Module Administrator's Manual Account Update Wizard 40DHB0002USEB – Issue 1a (05/29/2003)

Proactive Manager User's Guide Account Update Wizard - Page 49
System Generated Account Number Field This window provides two options to define the Account Number field: Let the system generate incremental values 1. Check the appropriate box. 2. Define the database prefix. 3. Click Next to continue.
OR Use an existing list of table fields from the dropdown menu 1. Check the appropriate box to use an existing table field. 2. Select the field name from the dropdown menu. 3. Define the database Prefix. 4. Click Next to continue.
MultiMedia Module Administrator's Manual Proactive Manager User's Guide - Page 49 40DHB0002USEB – Issue 1a (05/29/2003) Account Update Wizard

Page 50 - Account Update Wizard Proactive Manager User's Guide
Field Verification A window will display the final list with corresponding fields as mapped by you. 1. Check the mapped fields, if satisfied with your selection click Next to
continue. 2. Click Back to return to the previous page. Change your selection. Click
Next to continue.
Duplicate Records If there are duplicate records in the imported list, a window will display the key fields of those records that also exist in the destination table. You are required to select those records that are to be updated in the destination table. You can view the records as they exist in the destination table in the window called “Records in the destination table”. 1. Check the corresponding box to select the records you want to update or
click Select All button to update all records listed. 2. To clear all boxes, click Reset. 3. To change selection, click Reset to clear all boxes and enter your new
selection, or double click on the checked box to uncheck/clear it. Make your new selections.
4. Click Next to continue.
Page 50 - Proactive Manager User's Guide MultiMedia Module Administrator's Manual Account Update Wizard 40DHB0002USEB – Issue 1a (05/29/2003)
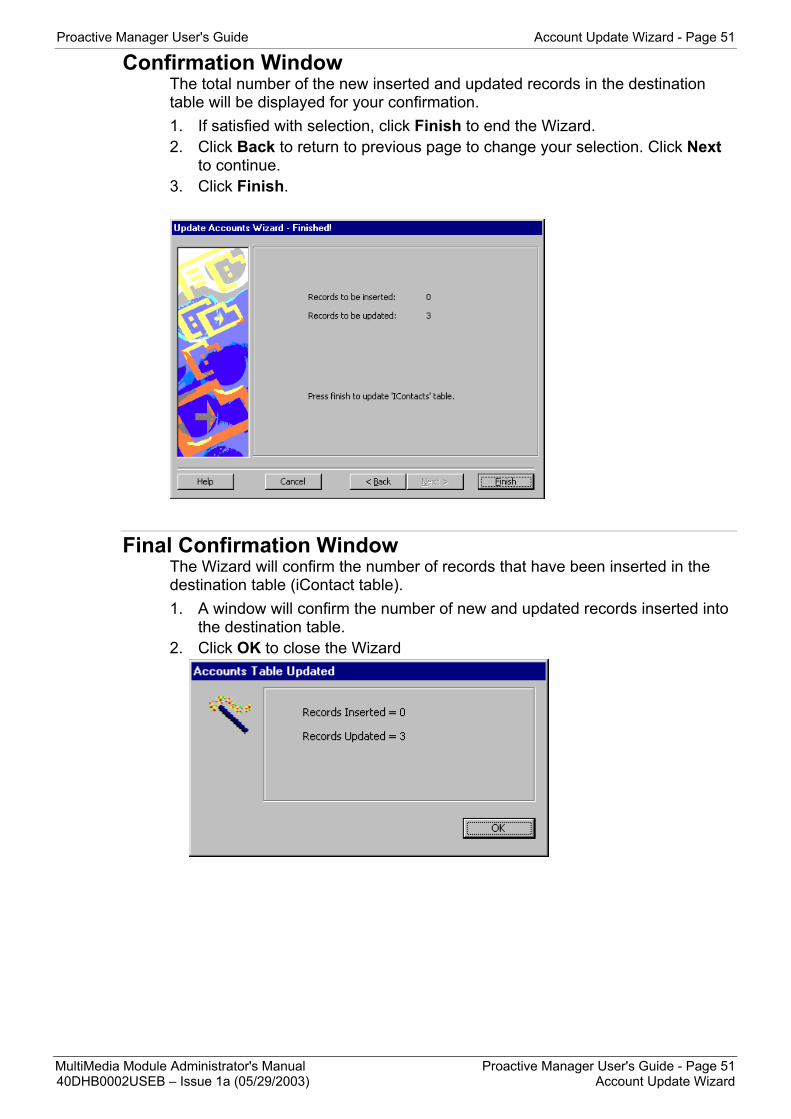
Proactive Manager User's Guide Account Update Wizard - Page 51
Confirmation Window The total number of the new inserted and updated records in the destination table will be displayed for your confirmation. 1. If satisfied with selection, click Finish to end the Wizard. 2. Click Back to return to previous page to change your selection. Click Next
to continue. 3. Click Finish.
Final Confirmation Window The Wizard will confirm the number of records that have been inserted in the destination table (iContact table). 1. A window will confirm the number of new and updated records inserted into
the destination table. 2. Click OK to close the Wizard
MultiMedia Module Administrator's Manual Proactive Manager User's Guide - Page 51 40DHB0002USEB – Issue 1a (05/29/2003) Account Update Wizard
Page 52 - Account Update Wizard Rules Wizard User’s Guide
Rules Wizard User’s Guide Welcome to the Interaction Rules Wizard User’s Guide. The Interaction Rules Wizard applies pre-defined business rules to Web, Email and Chat incoming media contacts. Rules are a combination of conditions and actions that process and organize interactions. Each rule consists of two elements: one or more conditions that specify what the rules apply to; and one or more actions that specify what should be done with the qualifying interactions. For example, a rule could define when a Web site visitor should receive an invitation to chat with a representative from your company. Another rule could specify routing to a workgroup or department within your organization, when a request for callback is generated on the Web. Used in conjunction with the e-mail Rules Wizard in Microsoft’s Outlook, Multimedia Module’s rule-defining functionality can be extended to e-mail management. You can create rules that furnish automatic replies to senders based on sender’s address, subject or message content and route other e-mail messages to specific queues based on a variety of criteria. The Interaction Rules Wizard is designed as an easy-to-use, dynamic administration tool that uses English sentences to customize interaction-handling rules. By linking multiple conditions in the same rule, you can generate hundreds of rule combinations for defining rules. The Rules Wizard supports modification to existing rules while the server is in operation accepting interactions and the creation of new routing rules with deferred activation. A new rule can be introduced and its changes rolled back quickly, if necessary. You can also turn on or off the rules you create, and change the order in which the rules are applied. The Rules Wizard enables you to create and save rules to a database that can be renamed, copied or deleted, as required.
Page 52 - Rules Wizard User’s Guide MultiMedia Module Administrator's Manual Account Update Wizard 40DHB0002USEB – Issue 1a (05/29/2003)

Rules Wizard User’s Guide Processes You Can Automate with Rules Wizard - Page 53
Processes You Can Automate with Rules Wizard • Create rules that transfer calls to a specific location for non-working hours. • Enable technical support staff to offer solicitations for live technical
assistance to Web site visitors accessing problem-solving information. • Route your most valued customers to the staff members most able to assist
them. • Capacitate your Web site visitors to contact your organization via the Internet
by e-mail, chat or callback request. • Turn your static Web page into an interactive medium. • Change your normal call routing scripts to respond to emergencies, outages
or variations in calling patterns. • Develop priority routing based on specific campaigns.
Overview The Interaction Rules Wizard helps you manage your interactions by using rules to automatically perform actions on each interaction. Currently, the following types of Interaction Rules Wizard are available: • Email • Chat • Web Callback
Who should use this guide This guide is for administrators and supervisors who are responsible for managing the multimedia customer interaction center.
Document symbols and conventions To help you locate and interpret information easily, this manual uses Microsoft set of Standard Windows terminology such as icon, window, text box and menu. Following are some specific symbols and conventions standard throughout the manual: Conventions Descriptions Bold Used to designate menu selections, buttons and commands to enter. Initial Capitals Names of applications, programs, files, servers, and named windows;
and directory names and paths. Italic Information you need to provide.
MultiMedia Module Administrator's Manual Rules Wizard User’s Guide - Page 53 40DHB0002USEB – Issue 1a (05/29/2003) Processes You Can Automate with Rules Wizard
Page 54 - Getting Started Rules Wizard User’s Guide
Getting Started Prior to setting up rules with the Interaction Rules Wizard, default routing for incoming telephone calls is established by the programming in the PBX. The Chat and Web Wizards both require preparation of the Web pages before accessing the Wizard. The following diagram depicts the environment in which interaction enabled media is devised. Web media resides on the Web server. In order to provide the interactive capability to Chat and Web Callback pages it is necessary to copy them to the machine where the Rules Wizard is operating. Once you have completed the rules creation process in the Wizards, you need to copy the new “enabled” pages back on to the Web server for the rules to take effect.
Starting the Program Select the Interaction Rules Wizard from Windows Start menu, or double click the Interaction Rules Wizard icon on the desktop.
Exiting the Program To exit the program, select Exit under the Rules menu, or click the Close Window icon in the top right corner.
Page 54 - Rules Wizard User’s Guide MultiMedia Module Administrator's Manual Getting Started 40DHB0002USEB – Issue 1a (05/29/2003)

Rules Wizard User’s Guide Email Rules Wizard - Page 55
Email Rules Wizard Responding individually to each and every e-mail request can be costly and ineffective, especially when your resources are limited. Many of the e-mails your company may receive may fall into the category of routine inquiries that do not require complex, personalized responses. These could include requests for brochures, branch locations, service policies, price lists or information regarding company-sponsored events. You can create standardized auto-replies with attachments as fulfillment vehicles for these and other situations. By applying Outlook rules based on message or subject content, you can construct a model that prescreens an e-mail as it arrives, so that only inquiries that require the services of staff with specialized knowledge reach the queue for a “live” reply. Select the Interaction Rules Wizard from Windows Start menu, or double click the Interaction Rules Wizard icon on the desktop. Select Email wizard and click Next.
Important Notes: 1. The user must setup an Email profile on the PC running the Rules Wizard.
The name of this profile must be the same as the name of the router Email account and point to this mail box.
2. When specifying the Router Email account from Exchange, the logged on User account must have appropriate rights / permissions to access the Router Email account's mailbox and apply Outlook Rules to it. Perform the following:
For an Exchange v5.5 environment 1. Run up the Exchange Administrator and select the Router Email account.
Double click it & select the Permissions tab. 2. In the section "Windows NT accounts with permissions", press the Add
button & add the Logged On user account. 3. As a minimum, the rights associated with the "User" role should be allowed.
Apply the change. It may take some time for the change to filter through.
MultiMedia Module Administrator's Manual Rules Wizard User’s Guide - Page 55 40DHB0002USEB – Issue 1a (05/29/2003) Email Rules Wizard

Page 56 - Email Rules Wizard Rules Wizard User’s Guide
For an Exchange 2000 environment 1. Run up the Active Directory Users and Computer program & select the
Router Email account. 2. Right Click & select Properties. 3. Select Exchange Advanced Tab & click Mailbox Rights. If the tab is not
there, you will need to enable the Advanced Features selection in the View menu of the MMC Snapin.
4. Select Add & add the Logged On User account. 5. As a minimum, "Full Mailbox access" should be enabled. 6. Apply change & wait for change to take effect. Select the Email account (as defined previously) to which you want to apply your rules to and click Next. You will get the Outlook Rules Wizard window. Use Outlook to create rules for auto-response and routing criteria for those e-mails you want to forward to queues for personalized treatment. For additional information on applying Outlook rules consult your Outlook user manuals. The following example shows the procedure for creating Auto-Reply Rules in Outlook (specific word).
Page 56 - Rules Wizard User’s Guide MultiMedia Module Administrator's Manual Email Rules Wizard 40DHB0002USEB – Issue 1a (05/29/2003)

Rules Wizard User’s Guide Email Rules Wizard - Page 57
Example:
1. Click New.
2. Type in the specific words or phrases to which you want to apply a rule. 3. Click Next.
MultiMedia Module Administrator's Manual Rules Wizard User’s Guide - Page 57 40DHB0002USEB – Issue 1a (05/29/2003) Email Rules Wizard

Page 58 - Email Rules Wizard Rules Wizard User’s Guide
1. Select your auto reply template and click Finish.
1. Click OK After creating rules in Outlook, you will get the Email Rules Wizard screen and you can create new rules or edit existing rules.
Page 58 - Rules Wizard User’s Guide MultiMedia Module Administrator's Manual Email Rules Wizard 40DHB0002USEB – Issue 1a (05/29/2003)

Rules Wizard User’s Guide Chat Rules Wizard - Page 59
Chat Rules Wizard Introduction
The Chat Wizard converts a static Web page into a dynamic, interactive tool. The Wizard gives your staff the ability to answer customer questions and offer assistance in real-time, providing your customers with immediate help when they need it most. By combining the collaborative capabilities of the Web with the power of live human assistance, Chat Wizard can help convert e-shoppers into buyers, reduce the amount of time and resources to resolve problems and provide instant access to individuals and departments, without requiring visitors to disconnect from the Web. The Chat Wizard can be used to enable a Contact page or any page on your site with Chat functionality by providing a popup window invitation. A visitor can choose to initiate a Chat request that is instantly channeled to a queue manned by individuals who have the appropriate skills and resources to provide real-time assistance. Or, any page can be enabled to send an invitation to the visitor to engage in a one-on-one Chat with a representative from your organization. By “sensing” when a visitor is browsing your site, the Wizard extends the reach of your company. A solicitation can be extended for any length of time you designate as appropriate. Perhaps a visitor has been viewing your technical support pages. The Wizard can advance the visitor’s course to a solution by offering an invitation of live help after the visitor has remained on the page for 30 seconds. If you are offering e-commerce applications and a visitor has not completed an order form, the Chat Wizard can pop an offer of “live” help after one minute. The Chat Wizard can be used to enable a single page or multiple pages on your Web site. To prepare a Web page with Click-to-Chat functionality (that a allows a customer surfing your web site to hit a button that will open a text chat session with a company representative) involves embedding an HTML application that runs on the customer's browser, and a chat window that is integrated with the agent's desktop software. You need to copy the HTML file from your Web server to the client machine on which the Rules Wizard is running. Select a destination queue from among the chat queues created in Resource Manager. Enter the length of time that the system will allow before popping a chat invitation. Rename your original file and create a name for the popup file window. To activate the new page, you must stop and start iChat Service for the database to upload the rule into memory.
MultiMedia Module Administrator's Manual Rules Wizard User’s Guide - Page 59 40DHB0002USEB – Issue 1a (05/29/2003) Chat Rules Wizard

Page 60 - Chat Rules Wizard Rules Wizard User’s Guide
Chat Call Flow This chapter outlines the steps for creating rules in the Chat Wizard. The material covered includes: How to customize your Web page to create popup windows that allow visitors to Chat on-demand with representatives of your company. How to create a popup window on your Web page that provides an invitation to engage in a Chat session.
B a c k O ff ic eE n v iro n m e n t
iS e rv e riC h a t S e rv ic e
iC o n ta c t
L A N
1 . C u s to m e r b ro w s e s C h a t e n a b le d p a g e
3 . C h a t.a s p is in v o k e d
4 . iC h a t S e rv ic e d e te c ts C h a t
2 . C h a t p o p w in d o w a p p e a rs
W e b S e rv e r
5 . C a ll a p p e a rs o n iC o n ta c t c lie n t
R u le s W iz a rd S e rv e r C o m p o n e n ts
HTML Page Preparation Copying an HTML Page to Chat Wizard
Your Web site may be hosted on-site or on a remote server. The following steps should be implemented by the Webmaster or whoever is responsible for maintaining your Web pages. This sequence must be followed for each Web page you want to enable with Chat pop capabilities. The Interaction Rules Wizard generally resides on a client machine. The pages you want to enable must be copied onto the computer where the Wizard is running. 1. Go to the directory in the Web server where the Web pages are stored and
select an HTML page: Example: (C:\inetpubwwwroot\ File name). 2. Copy the page to Program Files/Multimedia Module/Interaction Rules
Wizard on the client machine. 3. Click Close.
Page 60 - Rules Wizard User’s Guide MultiMedia Module Administrator's Manual Chat Rules Wizard 40DHB0002USEB – Issue 1a (05/29/2003)

Rules Wizard User’s Guide Chat Rules Wizard - Page 61
Creating Chat Rules Starting Chat Wizard
1. Click Next.
Selecting an HTML page Once you have copied the page or pages you wish to enable with Chat properties into the Interaction Rules Wizard client, you can select them from the Applications Files. You can either choose to view the content or proceed to the next stage immediately after making a selection. The Chat Wizard provides a sample page to test the application prior to enabling your actual HTML pages.
1. Click the Open button beside the HTML file name dialog box. 2. Select an HTML file from the Applications Files. 3. Click Open. 4. Click the View file in browser button, to view the selected page. 5. Click Next or return to Open to select a different page.
Note: When installing Chat Wizard you may select a sample page to test the
application: Chat Wizard SamplePage.htm
MultiMedia Module Administrator's Manual Rules Wizard User’s Guide - Page 61 40DHB0002USEB – Issue 1a (05/29/2003) Chat Rules Wizard

Page 62 - Chat Rules Wizard Rules Wizard User’s Guide
Routing to a Multimedia Queue How long do you want visitors to browse your Web page before initiating an invitation to engage in a Chat with a member of your organization? This step includes selecting multimedia queue from the list of active queues to route the positive responses from the Chat invitations. Each multimedia queue has a group or groups of users assigned to it in the Resource Manager. These are the individuals assigned to handle the responses.
1. Select a multimedia queue from the combo box. 2. Use the arrows to increase or decrease the number of seconds in which a
Chat invitation should be activated. 3. Click Next.
Note: If you are creating a Chat Request window, set the number of seconds
to “1”. This will produce immediate activation of the Chat invitation once the request has been initiated.
Page 62 - Rules Wizard User’s Guide MultiMedia Module Administrator's Manual Chat Rules Wizard 40DHB0002USEB – Issue 1a (05/29/2003)
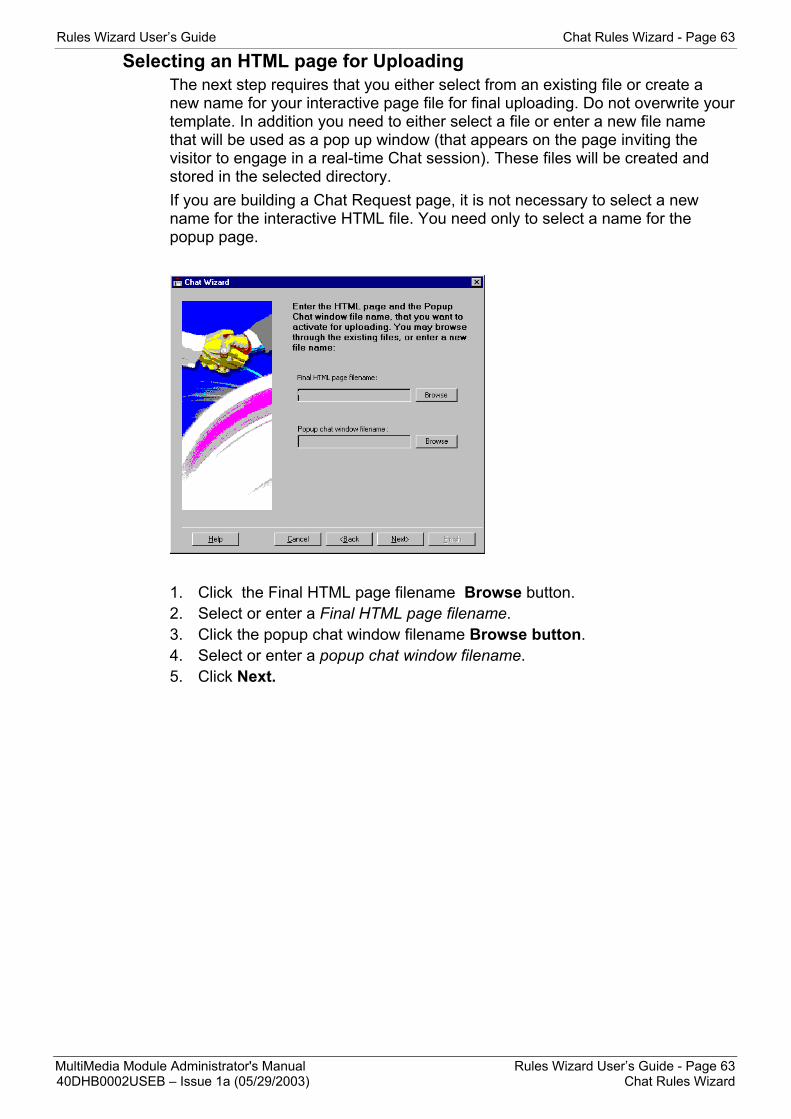
Rules Wizard User’s Guide Chat Rules Wizard - Page 63
Selecting an HTML page for Uploading The next step requires that you either select from an existing file or create a new name for your interactive page file for final uploading. Do not overwrite your template. In addition you need to either select a file or enter a new file name that will be used as a pop up window (that appears on the page inviting the visitor to engage in a real-time Chat session). These files will be created and stored in the selected directory. If you are building a Chat Request page, it is not necessary to select a new name for the interactive HTML file. You need only to select a name for the popup page.
1. Click the Final HTML page filename Browse button. 2. Select or enter a Final HTML page filename. 3. Click the popup chat window filename Browse button. 4. Select or enter a popup chat window filename. 5. Click Next.
MultiMedia Module Administrator's Manual Rules Wizard User’s Guide - Page 63 40DHB0002USEB – Issue 1a (05/29/2003) Chat Rules Wizard
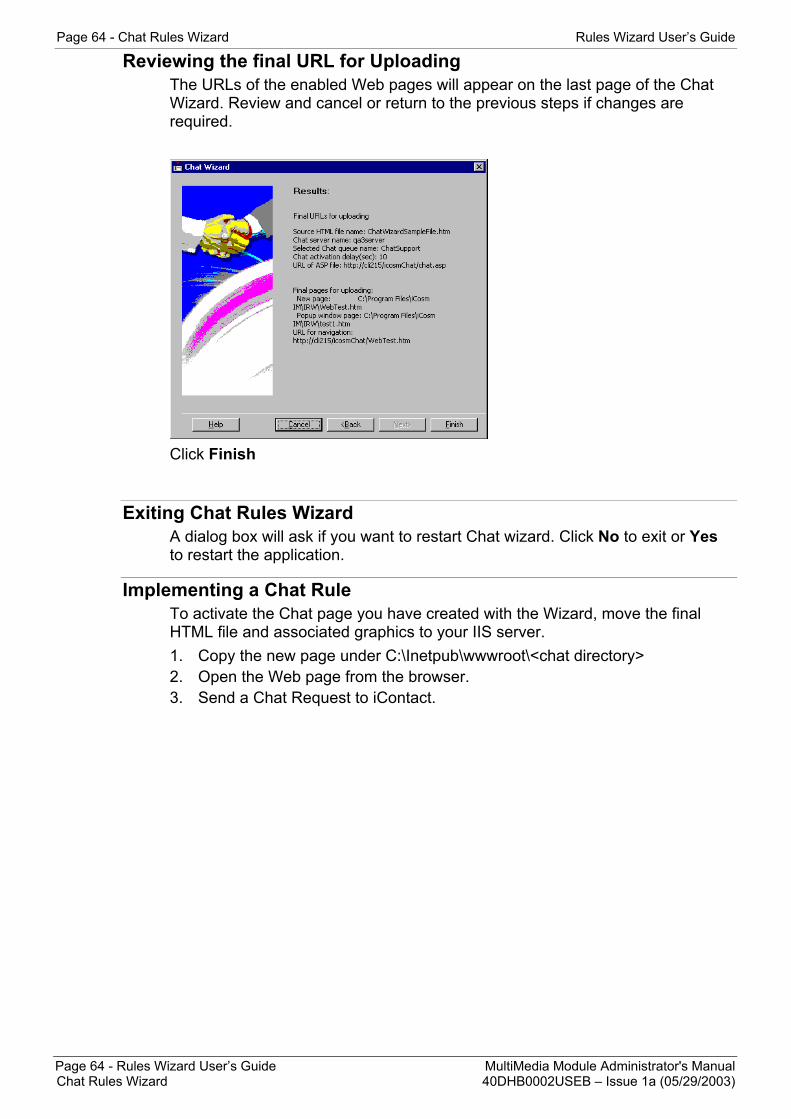
Page 64 - Chat Rules Wizard Rules Wizard User’s Guide
Reviewing the final URL for Uploading The URLs of the enabled Web pages will appear on the last page of the Chat Wizard. Review and cancel or return to the previous steps if changes are required.
Click Finish
Exiting Chat Rules Wizard A dialog box will ask if you want to restart Chat wizard. Click No to exit or Yes to restart the application.
Implementing a Chat Rule To activate the Chat page you have created with the Wizard, move the final HTML file and associated graphics to your IIS server. 1. Copy the new page under C:\Inetpub\wwwroot\<chat directory> 2. Open the Web page from the browser. 3. Send a Chat Request to iContact.
Page 64 - Rules Wizard User’s Guide MultiMedia Module Administrator's Manual Chat Rules Wizard 40DHB0002USEB – Issue 1a (05/29/2003)

Rules Wizard User’s Guide Web Callback Rules Wizard - Page 65
Web Callback Rules Wizard Click-to-Callback involves the customer requesting a PSTN call back from a company representative, either immediately or at a scheduled time and date. The request is routed from the web server to the representative's desktop; when the request is accepted, the call is dialed by CT link with the switch. The Web Callback Wizard converts your static Web pages to interactive media. Without having to re-code, you can select the fields on your current HTML form page that are used as routing criteria. You can route Web Callback requests by name, e-mail address, account numbers, phone numbers, message content or any combination of those factors. Pages can be set up to channel requests to specific groups within the organization. The Web site visitor can send his request and phone number directly from the page. When the request arrives, it is queued like any other media for treatment. When the Web Callback request arrives on the desktop, it comes complete with the URL of that page. You can create a new Rule Set in an easy five-step process. A Rule Set consists of one or more rules governing the distribution of the Web Callback requests. First, you designate a name and description for a Rule Set. The Rule Set Name should be identical to the URL of the page. The description, like the name, should depict the type of Rule Set you intend to create. You must also designate a default transfer point for any Web Callback requests that do not match any rule criteria. The second step requires that you select a HTML page from an applications file. In the third step, you designate a name for an individual rule and the fields from your web form to which you wish to apply the conditions. Then, decide what action should be taken when those conditions are matched by an incoming web call back request. Which multimedia queue do you wish the request to be forwarded to? The last step is rule activation. You need not activate a rule at the time of creation. You have the choice of implementing it at any time. You also can determine the order in which the rules within the Rule Set are applied. Rules Wizard always invokes the first condition in the list of rules before applying those below.
MultiMedia Module Administrator's Manual Rules Wizard User’s Guide - Page 65 40DHB0002USEB – Issue 1a (05/29/2003) Web Callback Rules Wizard

Page 66 - Web Callback Rules Wizard Rules Wizard User’s Guide
Web Callback Call Flow This chapter outlines the steps for creating and editing rules in the Web Callback Wizard. The material covered includes: • Copying a HTML page into Web Callback Wizard • Building a New Rule Set • Activating and setting the order in which rules are applied • Modifying, Renaming, Copying and Deleting Rules • Editing an existing Rule Set • Implementing a Rule Set.
Back OfficeEnvironment
iServeriEmail Service
iContact
LAN
1. Customer requests Web Callback
2. Cdomail.asp is invoked
3. Callback is sent via e-mail to Exchange
4. iEmail Service detects e-mail
5. Callback request is checked against database
6. Call appears on iContact client
Web Server
Rules Wizard Server Components
Page 66 - Rules Wizard User’s Guide MultiMedia Module Administrator's Manual Web Callback Rules Wizard 40DHB0002USEB – Issue 1a (05/29/2003)

Rules Wizard User’s Guide Web Callback Rules Wizard - Page 67
HTML Page Preparation Your Web site may be hosted on-site or on a remote server. The following steps should be implemented by the Webmaster or whoever is responsible for maintaining your Web pages. This sequence must be followed for each Web page you want to enable with callback capabilities. The Interaction Rules Wizard generally resides on a client machine. The pages you want to enable must be copied onto the computer where the Wizard is running. Once you have created your Web Callback rules, you must copy the new page to the Web server.
Copying an HTML Page to Web Callback Wizard 1. Open Windows Explorer on the Web server machine. 2. Go to the directory in the Web server where the Web pages are stored and
select an HTML page: Example: (C:\inetpubwwwroot. File name). 3. Copy the page to C:\Program Files\Multimedia Module\Interaction Rules
Wizard on the client machine. 4. Click Close.
Opening the Web Callback Rules Wizard
1. Click Next.
MultiMedia Module Administrator's Manual Rules Wizard User’s Guide - Page 67 40DHB0002USEB – Issue 1a (05/29/2003) Web Callback Rules Wizard

Page 68 - Web Callback Rules Wizard Rules Wizard User’s Guide
Building a Rule Set The opening screen gives you the option to Build a New Rule Set or Edit or Delete a current Set. If you do not want to edit the current one you may delete it and then select the Build a New Rule Set radio button.
1. Select Build a New Rule Set. 2. Click Next.
Page 68 - Rules Wizard User’s Guide MultiMedia Module Administrator's Manual Web Callback Rules Wizard 40DHB0002USEB – Issue 1a (05/29/2003)

Rules Wizard User’s Guide Web Callback Rules Wizard - Page 69
Specifying a URL Address and Description
You must first specify the URL of your Web page to which the Web Callback Wizard will apply rules. You may also enter an optional description of the Rule Set. The description should indicate what type of requests the Rule Set is being applied to. If the Rule Set is routing contacts from a particular group of customers, you could describe it as your Gold Customers Rule Set. You are also asked to supply a Default transfer point. The Default is used to route Web Callback requests when none of the specified conditions apply. For example, if one of your rules identifies and routes by account number and no account number is supplied, the request would be handled by the default queue. The default, in this case, would handle all new accounts.
URL, Description and Default 1. Enter the name (URL address). 2. Type a Rule Set description. 3. Select a Default Web Callback Queue from the list. 4. Enter the Email Server Address (server name or IP address). 5. Click Next. Note: The Rule set must only contain forward slashes, (i.e. /) as back
slashes are not recognised. E.g. http://im_svr2/avaya-intranet/index.htm
MultiMedia Module Administrator's Manual Rules Wizard User’s Guide - Page 69 40DHB0002USEB – Issue 1a (05/29/2003) Web Callback Rules Wizard

Page 70 - Web Callback Rules Wizard Rules Wizard User’s Guide
Specifying the HTML page file
1. Select a HTML page from the browser. Use the scroll bars to view the entire
contents of the page. You may search the browser until you find an appropriate page.
2. Select a page from the list of files in the browser. The page you choose must have fields to fill in, a submit button and an action.
3. View the contents of the page. 4. Click Next to continue.
Create a New Rule
1. Click New to create a new rule.
Page 70 - Rules Wizard User’s Guide MultiMedia Module Administrator's Manual Web Callback Rules Wizard 40DHB0002USEB – Issue 1a (05/29/2003)

Rules Wizard User’s Guide Web Callback Rules Wizard - Page 71
Specifying a Rule Name/Selecting the Fields Begin by specifying a name for your rule. The selected Web page already contains a form with one or more fields that ask for visitor input. You may base your rules on the content of these fields. You can select the fields by entering a check in the box beside the Tag Name. After selecting a field, you can change the Description and Value Types, as described in the following sections, before proceeding to the next step.
Web Callback Wizard Field Name
Description
Tag Name The Tag name is the name given to the field in the HTML page.
Type Refers to the type of field: text, radio button or checkbox. Description The description uses free-form text to describe the content
of the field. Value Type The Value Type is used by the Wizard to route e-mail to
the correct multimedia queue. There are five fixed value types: name, phone number, e-mail, account number and general.
MultiMedia Module Administrator's Manual Rules Wizard User’s Guide - Page 71 40DHB0002USEB – Issue 1a (05/29/2003) Web Callback Rules Wizard
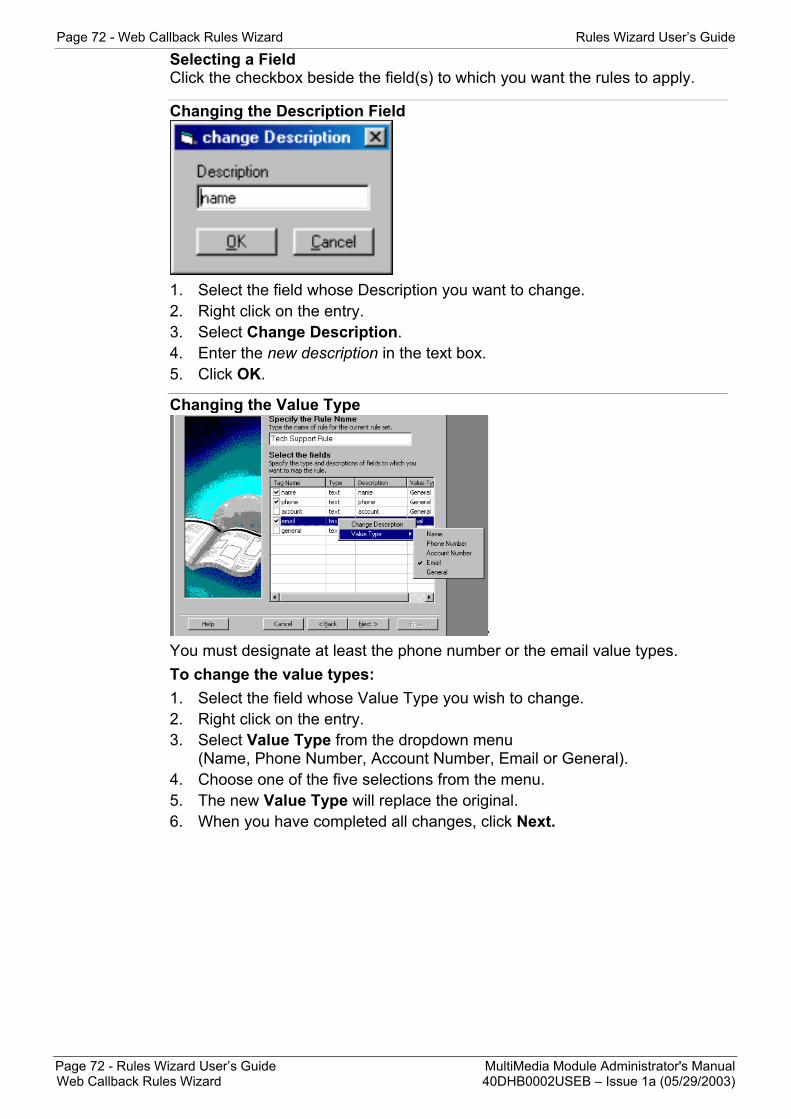
Page 72 - Web Callback Rules Wizard Rules Wizard User’s Guide
Selecting a Field Click the checkbox beside the field(s) to which you want the rules to apply.
Changing the Description Field
1. Select the field whose Description you want to change. 2. Right click on the entry. 3. Select Change Description. 4. Enter the new description in the text box. 5. Click OK.
Changing the Value Type
You must designate at least the phone number or the email value types. To change the value types: 1. Select the field whose Value Type you wish to change. 2. Right click on the entry. 3. Select Value Type from the dropdown menu
(Name, Phone Number, Account Number, Email or General). 4. Choose one of the five selections from the menu. 5. The new Value Type will replace the original. 6. When you have completed all changes, click Next.
Page 72 - Rules Wizard User’s Guide MultiMedia Module Administrator's Manual Web Callback Rules Wizard 40DHB0002USEB – Issue 1a (05/29/2003)
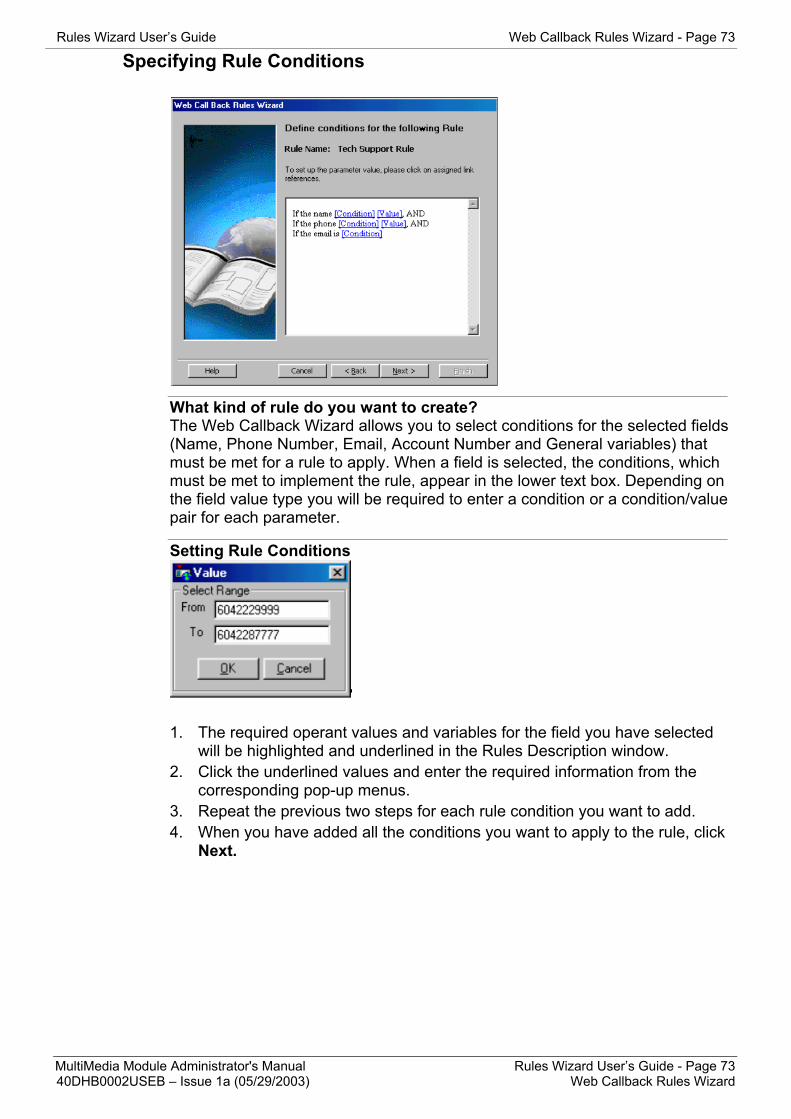
Rules Wizard User’s Guide Web Callback Rules Wizard - Page 73
Specifying Rule Conditions
What kind of rule do you want to create? The Web Callback Wizard allows you to select conditions for the selected fields (Name, Phone Number, Email, Account Number and General variables) that must be met for a rule to apply. When a field is selected, the conditions, which must be met to implement the rule, appear in the lower text box. Depending on the field value type you will be required to enter a condition or a condition/value pair for each parameter.
Setting Rule Conditions
1. The required operant values and variables for the field you have selected
will be highlighted and underlined in the Rules Description window. 2. Click the underlined values and enter the required information from the
corresponding pop-up menus. 3. Repeat the previous two steps for each rule condition you want to add. 4. When you have added all the conditions you want to apply to the rule, click
Next.
MultiMedia Module Administrator's Manual Rules Wizard User’s Guide - Page 73 40DHB0002USEB – Issue 1a (05/29/2003) Web Callback Rules Wizard

Page 74 - Web Callback Rules Wizard Rules Wizard User’s Guide
Setting Up Rule Actions
What do you want to do with the request? After you have described the conditions, you must define an action. The Web Callback Rules Wizard gives you a choice of destinations. You can send a callback request to a designated multimedia queue from the list. You could have one queue responsible for responding to tech support requests, another for general inquiries and another for sales.
Specifying Rule Actions 1. Select the multimedia queue to which you want the callback request to go
for treatment. 2. Click Next.
Page 74 - Rules Wizard User’s Guide MultiMedia Module Administrator's Manual Web Callback Rules Wizard 40DHB0002USEB – Issue 1a (05/29/2003)
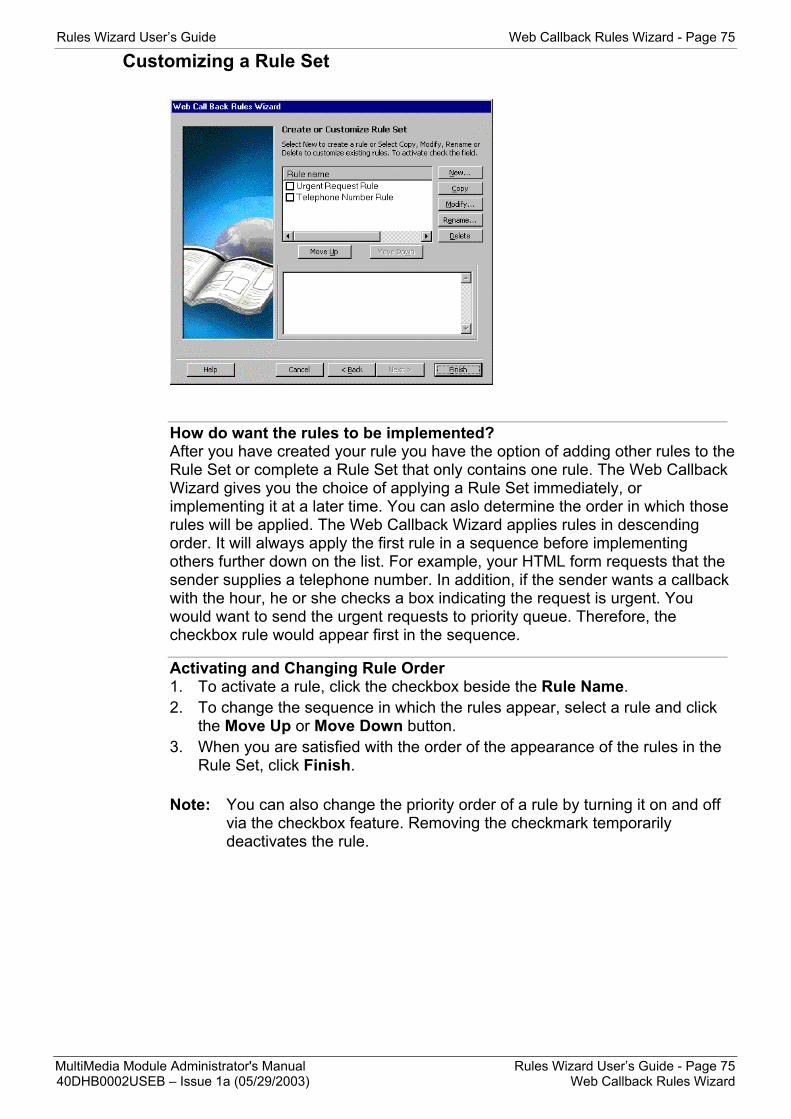
Rules Wizard User’s Guide Web Callback Rules Wizard - Page 75
Customizing a Rule Set
How do want the rules to be implemented? After you have created your rule you have the option of adding other rules to the Rule Set or complete a Rule Set that only contains one rule. The Web Callback Wizard gives you the choice of applying a Rule Set immediately, or implementing it at a later time. You can aslo determine the order in which those rules will be applied. The Web Callback Wizard applies rules in descending order. It will always apply the first rule in a sequence before implementing others further down on the list. For example, your HTML form requests that the sender supplies a telephone number. In addition, if the sender wants a callback with the hour, he or she checks a box indicating the request is urgent. You would want to send the urgent requests to priority queue. Therefore, the checkbox rule would appear first in the sequence.
Activating and Changing Rule Order 1. To activate a rule, click the checkbox beside the Rule Name. 2. To change the sequence in which the rules appear, select a rule and click
the Move Up or Move Down button. 3. When you are satisfied with the order of the appearance of the rules in the
Rule Set, click Finish.
Note: You can also change the priority order of a rule by turning it on and off via the checkbox feature. Removing the checkmark temporarily deactivates the rule.
MultiMedia Module Administrator's Manual Rules Wizard User’s Guide - Page 75 40DHB0002USEB – Issue 1a (05/29/2003) Web Callback Rules Wizard

Page 76 - Web Callback Rules Wizard Rules Wizard User’s Guide
Saving a Rule Set
You may save the changes to the original HTML file or specify another HTML file name. If you choose the original file you will overwrite it. 1. Select file to be saved. 2. Click Save. You will get a message indicating that your Rule Set was
successfully completed. 3. You can exit or restart Web Callback Wizard to add or modify rules.
Page 76 - Rules Wizard User’s Guide MultiMedia Module Administrator's Manual Web Callback Rules Wizard 40DHB0002USEB – Issue 1a (05/29/2003)
Rules Wizard User’s Guide Web Callback Rules Wizard - Page 77
Options Copying a Rule You can copy rules that include all or some of the characteristics you would want to incorporate in another rule to eliminate some of the steps involved in the creation of a new rule. You can then make the modifications to the copy. 1. In the Customize Rule Set screen, highlight the rule you want to copy. 2. Click the Copy button. A copy of the rule will appear below the original rule.
Modifying a Rule Making modifications to existing rules is very similar to the steps in creating a rule. You can use this feature to make changes to your original rule or a copy. You can modify both conditions that apply and desired actions. 1. Select the rule you want to modify. 2. Click Modify. 3. Click Back. 4. Follow the steps for creating a New Rule.
Renaming a Rule Once you have copied and/or modified a rule, you can use this feature to give it a new name and a unique identity. 1. Select the rule you want to rename. 2. Click Rename. 3. In the New Name of Rule dialog box, type a name. 4. Click OK.
Deleting a Rule When you want to eliminate a rule, you can use the delete function. This permanently removes a rule from the Rules Wizard. 1. Highlight the rule you want to delete. 2. Click the Delete button. The rule will disappear.
MultiMedia Module Administrator's Manual Rules Wizard User’s Guide - Page 77 40DHB0002USEB – Issue 1a (05/29/2003) Web Callback Rules Wizard

Page 78 - Web Callback Rules Wizard Rules Wizard User’s Guide
Editing a Rule Set
Instead of going through the steps of building a new Rule Set, Web Callback Wizard gives you the option of editing an existing one. The name of the current Rule Set appears in the text box. If you want to proceed with editing, click Next and follow the steps. If you want to delete the Rule Set, click Delete. You will then be able to build a new Rule Set.
Exiting Web Callback Rules Wizard
1. Click Exit. 2. A dialog box will ask if you want to restart Web Callback Rules Wizard.
Click No.
Implementing a Rule Set In order to activate the Callback page you have created with the Wizard, move the final HTML file and associated graphics to your IIS server. 1. Copy the new rule under C:\Inetpub\wwwroot\<webcallback directory>. 2. Open the Web page from the browser. 3. Send a Web Callback Request to iContact.
Page 78 - Rules Wizard User’s Guide MultiMedia Module Administrator's Manual Web Callback Rules Wizard 40DHB0002USEB – Issue 1a (05/29/2003)

Rules Wizard User’s Guide Outlook Rules Wizard - Page 79
Outlook Rules Wizard When you or your Webmaster are enabling your Web pages with interaction capability you are creating a link to a specific e-mail address. With Multimedia Module, that link directs an e-mail to a group mailbox that can be accessed by anyone in the organization authorized to respond to correspondence arriving in that queue. However, if you want to layer-in conditions for routing that go beyond the Send To criteria, you can invoke the Rules Wizard supplied with Outlook. Microsoft Outlook is equipped with its own Rules Wizard designed for personal e-mail management. Referred to as either Rules Wizard or Inbox Assistant in Outlook, it is possible to apply additional functionality to Multimedia Module’s groupware enabled routing in conjunction with the Resource Manager administration module. You can use the Outlook Rules Wizard to create auto-replies sent with customized attachments and forward messages to specific queues based on message or subject content, sender’s address, or “send to” address. Or you can create rules based on a combination of those or other supported criteria. For example, you can create a rule that forwards an e-mail addressed to Tech. Support to the sales queue if it contains the word “price” in either the subject or body of the message. Or, e-mails addressed to Marketing requesting a brochure can be fulfilled automatically without human intervention. Other rules can specify that e-mails that include a range of account numbers can be channeled to queues staffed by representatives to whom those account numbers have been assigned. You can forward e-mails from one queue to another based on date. E-mails destined for technical support on weekends can be directed to customer service. Routing can be either simple or complex dictated by the rule requirements of your business. After specifying the conditions for modifications in the routing, you determine the treatment based on the e-mail address of the queue you have designated in Resource Manager.
MultiMedia Module Administrator's Manual Rules Wizard User’s Guide - Page 79 40DHB0002USEB – Issue 1a (05/29/2003) Outlook Rules Wizard

Page 80 - Outlook Rules Wizard Rules Wizard User’s Guide
Setting Up a Mailbox and Profile in NT Prior to creating e-mail rules in Outlook, it is necessary to configure a New User and Mailbox in Microsoft Exchange for each e-mail address you intend to create. This user name is actually the E-mail address of the queue. Consult your Windows NT administration manual or the Resource Manager User Guide for instructions on configuring user mailboxes. Note: When you want an e-mail to forward from one queue to another, you
should create a separate User and Mailbox for each queue.
Creating Auto-Reply Rules in Outlook Responding individually to each and every e-mail request can be costly and ineffective, especially when your resources are limited. Many of the e-mails your company may receive may fall into the category of routine inquiries that do not require complex, personalized responses. These could include requests for brochures, branch locations, service policies, price lists or information regarding company sponsored events. You can create standardized auto-replies with attachments as fulfillment vehicles for these and other situations. By applying Outlook rules based on message or subject content, you can construct a model that prescreens e-mail as it arrives, so that only inquiries that require the services of staff with specialized knowledge reach the queue for “live” reply. For additional information on applying Outlook rules to e-mail management, consult you Outlook user manuals. 1. Open iEmail Config.exe from the Program /Multimedia Module. 2. Configure to Non-Auto Reply. 3. Create a user and mailbox in NT for each auto-reply queue. 4. Use Outlook to create rules for auto-response and routing criteria for those
and e-mails you want to forward to queues for personalized treatment.
Note: When setting up rules to forward e-mails to appropriate queues for personalized handling, ensure that the forward method is set to “Leave Message Intact”. Otherwise, all forwarded e-mails will bear the Inbox as the sender’s address rather than the actual sender’s.
Page 80 - Rules Wizard User’s Guide MultiMedia Module Administrator's Manual Outlook Rules Wizard 40DHB0002USEB – Issue 1a (05/29/2003)
Glossary - Page 81
Glossary BDC Backup Domain Controller is a server in a network domain that keeps and uses a copy by a
computer without interrupting its current or primary task. For Windows NT Server domains, BDC refers to a computer that receives a copy of the domain’s security policy and domain database and authenticates logons. Also see Domain and PDC.
CTI Computer Telephony Integration, a technology that acts as an electronic bridge connecting telephones or switches with computers. CTI controls or coordinates business processes and related applications through the exchange of commands and messages between computers and telephone systems.
Domain The part of the computer network in which the data processing resources are under common control. See PDC and BDC.
DHCP Dynamic Host Configuration Protocol, a standards-based protocol for dynamically allocating and managing IP addresses. DHCP runs between individual computers and a DHCP server to allocate and assign IP addresses to the computers and also limits the time computers can use the address. When time expires on the use of the IP address, the computers contact the DHCP server again to obtain an address.
GUI Graphical User Interface.
HTML HyperText Markup Language, the authoring language used to create hypertext documents for the World Wide Web.
HTTP HyperText Transfer Protocol, the application protocol for moving hypertext files across the Internet. The protocol requires an HTTP client program on one end of a connection and an HTTP server program on the other.
iChat iChat is a service that forwards chat requests to the chat queues. iContact Converts the PC to an all-in-one communications and data tool by allowing enterprise knowledge workers to prioritize and manage all interactions from one interface. An agent can see queued E-mails, Web calls, chats, and can communicate with group members from one centralized view.
iEmail iEmail is a service that is responsible for forwarding incoming E-mail messages to the E-mail queue or to the agent. iEmail also forwards web callback requests to the web callback queue.
MMMAP Internet Mail Access Protocol, an essential Internet protocol for E-mail communication. MMMAP4, which is both a client and server protocol, can enable voice and fax message access and storage through a PC interface. MMMAP4 also complements SMTP for retrieval/access of messages.
Interaction Rules With the simplicity of an Outlook Wizard look and feel, the Interaction Rules Wizard Wizard (client side) defines the rules for incoming contact treatment for telephone, chat and Web Callbacks contact.
Interaction Rules This module includes necessary folders and files for web callback and chat requests Wizard (server side) on the web server. IP Internet Protocol. The network layer of TCP/IP, containing the network address.
MultiMedia Module Administrator's Manual Glossary - Page 81 40DHB0002USEB – Issue 1a (05/29/2003)

Page 82 - Glossary
Glossary (cont.) iPhone iPhone is a service that applies telephony rules.
iServer iServer consists of two parts. One is WT service, and the other is a combination of different server
components, that run on the Microsoft transaction server.
LAN Local Area Network.
LDAP Lightweight Directory Access Protocol, a protocol used to access a directory listing. LDAP support is being implemented in Web-enabled and E-mail programs, which can query an LDAP-compliant directory. LDAP has become the Internet standard for directory infrastructure and is expected to provide a common method for searching E-mail addresses on the Internet.
MAC address The address of a device identified at the media access control (MAC) layer of the network architecture.
PDC Primary Domain Controller. For a Windows NT Server domain, the computer that authenticates domain logons and maintains the security policy and the master database for a domain. See BDC and domain.
Proactive List The Proactive List Manager module facilitates the importing and assignment of outbound Manager calling lists to Proactive Campaigns. It provides the administrator with the ability to manage
outbound Proactive Campaign Lists. It furnishes the tools to create draft calling lists, attach them to campaigns and run the campaigns.
Reporting The browser-based Reporting module provides complete enterprise management reporting through textual and graphical reports. These reports provide enterprise managers with a record of every step in the customer interaction process, and allow them to view and analyze how effectively interactions are being handled and how resources are being deployed. The reports can also provide a better understanding of how their operation and performance affects your networks, resources and people.
Resource Manager The Resource Manager administration module consists of components that enable you to add queues, define interaction results, and assign human resources to all from a single, unified console. Resource Manager has a user-friendly Microsoft Explorer look and feel interface.
ITAPI Telephone Application Programming Interface. Allows Windows applications to program telephone line based devices.
TCP/IP Transmission Control Protocol/Internet Protocol is a networking protocol that provides communication across interconnected networks, between computers with diverse hardware architecture and various operating systems.
SQL Structured Query Language is a database language used for creating, maintaining and viewing database data.
URL Universal Resource Locator is an address that can lead you to a file on any computer connected to the Internet.
Page 82 - Glossary MultiMedia Module Administrator's Manual 40DHB0002USEB – Issue 1a (05/29/2003)

Index - Page 83
Index A D About .............................................................................. 30 Data source types ........................................................... 44 Access ................................................ 30 , 33 , 34 , 35 , 44 Data Type................................................................. 37 , 38 Account Number ............................................... 47 , 48 , 49 Database......................................................................... 32 Account Status field ........................................................ 23 Database settings..................................................... 30 , 32 Actions....................................................................... 4 , 52 Delete List ................................................................ 30 , 31 Add ................................................................................. 46 Deleting a Draft List......................................................... 38 Adding a Media Profile Descending ..................................................................... 37
Destination table................................................ 44 , 50 , 51 Description.......................................................................... 15 name. Created By and Created Date and Time ................. 15 Destination table fields ............................................. 44 , 47 Start Time ........................................................................... 15 Detach List ........................................................ 30 , 31 , 42 Status.................................................................................. 15 Display............................................................................. 27 Stop Time ........................................................................... 15 Domain Administration .................................................... 22 Alias................................................................................ 27 Adding, Editing, Removing Group Multimedia Mapping ..... 22
Answered........................................................................ 43 Viewing a User’s Group/Multimedia Assignments .............. 25 Answering Machine ........................................................ 40 Viewing Group Profiles ....................................................... 22 Application files............................................................... 70 Draft List ............................................................ 31 , 33 , 38 Applications Files............................................................ 61 Duplicate Records ........................................................... 50 Ascending....................................................................... 37 E ASCII .............................................................................. 34 e-mail................................................................. 11 , 14 , 17 Attach List ......................................................... 30 , 31 , 42 E-mail ............................. 33 , 52 , 53 , 65 , 71 , 73 , 79 , 80 Auto-response ................................................................ 80 Email Configuration ......................................................... 11 B Exchange Server ................................................................ 11 Build a New Rule ............................................................ 68 E-Mail Settings Busy................................................................................ 40 Confirmation Reply ............................................................. 17 C Domain................................................................................ 17
e-mail Address .................................................................... 17 Callback Scheduled ........................................................ 43 Login ID............................................................................... 17 Campaign Detail Window ............................................... 41 PW ...................................................................................... 17 Campaign Information Window....................................... 40 Shared Directory ................................................................. 17 Chat Settings .................................................................. 18 End Time......................................................................... 40 Chat Room.......................................................................... 18 Excel ................................................... 30 , 33 , 34 , 35 , 44 Client Authentication Required ........................................... 18
Exchange ........................................................................ 11 Host Name.......................................................................... 18 Exit ........................................................................... 30 , 32 PW: ..................................................................................... 18 Exiting the Program......................................................... 54 Room PW ........................................................................... 18 F Chat Wizard ............................................................. 59 , 60 Fax .................................................................................. 40 Routing to a Multimedia Queue .......................................... 62
Selecting an HTML page for Uploading.............................. 63 Fax Number..................................................................... 33 Chat Wizard Configuration.............................................. 11 Fields............................................................................... 46
Chat ASP URL.................................................................... 11 File .................................................................................. 32 Completed ...................................................................... 43 File Name........................................................................ 35 Conditions.................................................................. 4 , 52 Forward .................................................................... 79 , 80 Copying an HTML Page ................................................. 67 From Date ....................................................................... 40 Create List ...................................................................... 37 G CT-Connect .................................................................... 11 General............................................................................ 38 Current Database ........................................................... 36 Getting Started .................................................................. 6 Customer account table.................................................. 44 Group Mapping................................................................ 20 Customer ID............................................................. 33 , 38 Viewing Current Group Mapping......................................... 20 Customer Name.............................................................. 47 Groups.............................................................. 6 , 7 , 9 , 14 Customize Rule Set ........................................................ 77
MultiMedia Module Administrator's Manual Index - Page 83 40DHB0002USEB – Issue 1a (05/29/2003)
Page 84 - Index H O Hide Details .................................................................... 40 ODBC................................................................ 33 , 34 , 36 Hide List................................................................... 33 , 41 Other Databases ............................................................. 36
P HTML....................... 61 , 63 , 64 , 65 , 67 , 70 , 71 , 75 , 78 I Password.................................................................. 32 , 36
Phone Number ................................................................ 33 Icon Bar ......................................................................... 29 iContact .. 4 , 5 , 9 , 11 , 12 , 19 , 21 , 24 , 26 , 30 , 31 , 44 , 51 , 64 , 78
Preferences....................................................... 7 , 9 , 10 , 24 Proactive Name............................................................... 40
ID ........................................... 32 , 33 , 36 , 40 , 41 , 47 , 48 Proactive Settings ........................................................... 19 IIS server ........................................................................ 64 From Date ........................................................................... 19
To Date ............................................................................... 19 Import ............................. 28 , 29 , 33 , 34 , 35 , 37 , 44 , 46 Wait Time (Min)................................................................... 19 Interaction Result Administration ...................................... 6
Proactives.......................................................... 31 , 40 , 41 Editing an Interaction Result............................................... 21 Profile. ............................................................................. 17 Interaction Result codes ................................................... 5 Properties .......................................................... 24 , 27 , 30 Interaction Results .......................................................... 21 R Adding a New Interaction Result ........................................ 21
Interaction Results Administration Rec_No ............................................................. 33 , 37 , 38 Record Status.................................................................. 43 Deleting an Interaction Result............................................. 21
Viewing Current Interaction Results ................................... 21 Refresh.............................................................. 30 , 31 , 43 iServer Settings........................................................ 7 , 8 , 10 Remove.................................................................... 37 , 46
Chat Server......................................................................... 11 Resource Manager.................. 4 , 28 , 30 , 39 , 40 , 62 , 79 Default Server..................................................................... 11 Resource Manager Navigation .................................. 4 , 7 Max Contact to Show.......................................................... 11 Rule activation................................................................. 65 iService........................................................................... 12 Rule Set........................................................................... 65 L Running Campaigns........................................................ 43
List ID ............................................................................. 40 S List Name........................................................................ 40 Selecting Fields ........................................................ 35 , 36 Load........................................................... 28 , 29 , 33 , 36 Services...................................................................... 8 , 12 Load Table...................................................................... 36 Setting Media Priorities ..................................................... 9 M Show List......................................................................... 37 Mailbox ........................................................................... 79 Start................................................................................. 32 Mailbox Setup .......................................................... 26 , 27 Start Proactive................................................... 30 , 31 , 43 Main Contact............................................................ 37 , 38 Start Time................................................................. 14 , 40 Mandatory Field ....................................................... 47 , 48 Starting the Program ....................................................... 54 Mapping Fields ............................................................... 47 Status ......................................................... 33 , 37 , 38 , 40 Max Tries ........................................................................ 19 Status bar ........................................................................ 29 Menu Bar ................................................................... 7 , 30 Status Bar.......................................................................... 7
File ................................................................................. 7 , 15 Database ............................................................................... 7 Help....................................................................................... 7 Items...................................................................................... 7 View ...................................................................................... 7 SQL Server ............................................................................ 7
Microsoft .................................................... 30 , 33 , 34 , 44 Stop Proactive ................................................... 30 , 31 , 43 Modem............................................................................ 40 Switch PBX Configuration ............................................... 11 Modify ............................................................................. 30 Internal Extension Digits ..................................................... 11 Move Down..................................................................... 37 Logical ID ............................................................................ 11 Move Up ......................................................................... 37 Manufacturer....................................................................... 11 MS Exchange .......................................................... 11 , 26 Name .................................................................................. 11 Multimedia queue .................................................... 62 , 74 Server Name....................................................................... 11
Synchronize..................................................................... 30 Multimedia Queue Administration ..................................... 6 Synchronizing User Information ........................................ 9 Multimedia Queues.......................................... 5 , 6 , 7 , 14 System Administrator ...................................................... 32 Adding a new Multimedia Queue........................................ 14
N System Generated ................................................... 48 , 49 Name ....................................................................... 33 , 34 Name Field ..................................................................... 38 Navigation Bars .............................................................. 29 New ......................................................................... 43 , 70 New List ............................................................ 30 , 31 , 34 No Answer ...................................................................... 40
Page 84 - Index MultiMedia Module Administrator's Manual 40DHB0002USEB – Issue 1a (05/29/2003)

Index - Page 85
Index (Cont.) T V Table Name .................................................................... 36 Value Type ...................................................................... 72 TAPI................................................................................ 11 Vertical Icon Bar ......................................................... 7 , 20 Telephone Settings......................................................... 16 Domain.......................................................... 6 , 7 , 9 , 11 , 25
Follow up Reasons................................................................. 7 ACD .................................................................................... 16 Interaction Results.................................................................. 7 Switch Name....................................................................... 16 Responsibilities ...................................................................... 7 To Date........................................................................... 40
View Details....................................................... 30 , 31 , 40 Toolbar ........................................ 29 , 31 , 38 , 40 , 42 , 43 View List .............................................. 30 , 31 , 33 , 41 , 43 Transfer point.................................................................. 69 W Tree ............................................................. 7 , 29 , 31 , 40 Wait Time Min ................................................................. 40 U Waiting ............................................................................ 43 UID .......................................................................... 32 , 36 Web Callback Configuration............................................ 11 Underlined values ........................................................... 73
ASP e-mail .......................................................................... 11 Update Accounts Wizard ......................................... 30 , 44 Email ASP URL................................................................... 11 URL ......................................................................... 64 , 69 Email Domain...................................................................... 11 User Mailbox................................................................... 17 Email LoginID...................................................................... 11
User Properties ............................................................. 7 , 24 Email Route Point ............................................................... 11 Apply to All.......................................................................... 24 Password ............................................................................ 11 Apply to Selected User Only............................................... 24 Web Callback Wizard Auto Accept Media.............................................................. 24 Activating and Changing Rule Order .................................. 75 Auto Answer DN ................................................................. 24 Changing the Description Field........................................... 72 Default Value ...................................................................... 24 Changing the Value Type ................................................... 72 Enable AutoDial .................................................................. 24 Copying a Rule ................................................................... 77 Preview Time...................................................................... 24 Customizing a Rule Set ...................................................... 75 Request Mode .................................................................... 24 Deleting a Rule ................................................................... 77 Selective Mode ................................................................... 24 Editing a Rule Set ............................................................... 78 User Rights ....................................................................... 6 Implementing a Rule Set..................................................... 78 Users............................................................................. 7 , 9 Modifying a Rule ................................................................. 77
Renaming a Rule ................................................................ 77 Saving a Rule Set ............................................................... 76 Selecting the Fields............................................................. 71 Setting Rule Conditions ...................................................... 73 Setting Up Rule Actions ...................................................... 74 Specifying a Rule Name ..................................................... 71 Specifying Rule Conditions ................................................. 73
Web Callback Wizard Field Name................................... 71 Description ................................................................... 71 , 72 Tag Name ........................................................................... 71 Type.................................................................................... 71 Value Type................................................................... 71 , 72
Windows NT ............................................................. 79 , 80 Wizard ............................................................................. 44 WWW Setting .................................................................. 20
MultiMedia Module Administrator's Manual Index - Page 85 40DHB0002USEB – Issue 1a (05/29/2003)

Performance figures and data quoted in this document are typical, and must be specifically confirmed in writing by Avaya before they become
applicable to any particular order or contract. The company reserves the right to make alterations or amendments to the detailed specifications at
its discretion. The publication of information in this document does not imply freedom from patent or other protective rights of Avaya, or others.
Intellectual property related to this product (including trademarks) and registered to Lucent Technologies has been transferred or licensed to
Avaya. All trademarks identified by ® or TM are registered marks or trademarks,
respectively, of Avaya Inc. All other trademarks are the property of their respective owners.
This document contains propriety information of Avaya and is not to be disclosed or used except in accordance with applicable agreements.
Any comments or suggestions regarding this document should be sent to "[email protected]".
© Copyright 2003 Avaya
All rights reserved.
Avaya Sterling Court
15 - 21 Mundells Welwyn Garden City
Hertfordshire AL7 1LZ England
Tel: +44 (0) 1707 392200 Fax: +44 (0) 1707 376933
Email: [email protected] Web: http://www.avaya.com.
MultiMedia Module Administrator's Manual 40DHB0002USEB – Issue 1a (05/29/2003)