Intelligent Provisioning User Guide for HPE ProLiant Gen10...
53
Intelligent Provisioning User Guide for HPE ProLiant Gen10 Servers and HPE Synergy Part Number: 881706-002 Published: February 2018 Edition: 1 Abstract This document details how to access and use the Intelligent Provisioning software, including tasks such as installing an OS, updating firmware, software, and drivers, and to performing some diagnostic tests. Intelligent Provisioning is included in the optimized server support software from the Service Pack for ProLiant (SPP). This document is intended for administrators experienced in using ProLiant Gen10 servers and HPE Synergy compute modules.
Transcript of Intelligent Provisioning User Guide for HPE ProLiant Gen10...
Intelligent Provisioning User Guide forHPE ProLiant Gen10 Servers and HPESynergy
Part Number: 881706-002Published: February 2018Edition: 1
AbstractThis document details how to access and use the Intelligent Provisioning software, includingtasks such as installing an OS, updating firmware, software, and drivers, and to performingsome diagnostic tests. Intelligent Provisioning is included in the optimized server supportsoftware from the Service Pack for ProLiant (SPP). This document is intended foradministrators experienced in using ProLiant Gen10 servers and HPE Synergy computemodules.

© Copyright 2017, 2018 Hewlett Packard Enterprise Development LP
NoticesThe information contained herein is subject to change without notice. The only warranties for HewlettPackard Enterprise products and services are set forth in the express warranty statements accompanyingsuch products and services. Nothing herein should be construed as constituting an additional warranty.Hewlett Packard Enterprise shall not be liable for technical or editorial errors or omissions containedherein.
Confidential computer software. Valid license from Hewlett Packard Enterprise required for possession,use, or copying. Consistent with FAR 12.211 and 12.212, Commercial Computer Software, ComputerSoftware Documentation, and Technical Data for Commercial Items are licensed to the U.S. Governmentunder vendor's standard commercial license.
Links to third-party websites take you outside the Hewlett Packard Enterprise website. Hewlett PackardEnterprise has no control over and is not responsible for information outside the Hewlett PackardEnterprise website.
AcknowledgmentsMicrosoft® and Windows® are either registered trademarks or trademarks of Microsoft Corporation in theUnited States and/or other countries.
Linux® is the registered trademark of Linus Torvalds in the U.S. and other countries.
Red Hat® is a registered trademark of Red Hat, Inc. in the United States and other countries.

Contents
Introduction............................................................................................. 5Intelligent Provisioning.................................................................................................................. 5Accessing Intelligent Provisioning from the iLO web interface .................................................... 5
Always On Intelligent Provisioning .................................................................................... 6Accessing Intelligent Provisioning using an iLO remote console session.....................................6F10/Remote console features.......................................................................................................7Intelligent Provisioning operation.................................................................................................. 7Navigating Intelligent Provisioning ............................................................................................... 8
Completing initial configuration and registration tasks ...................10Initial configuration and registration tasks...................................................................................10Software installed with Intelligent Provisioning........................................................................... 10Using the First Time Setup wizard.............................................................................................. 10
Setting preferences.......................................................................................................... 10Re-enabling Intelligent Provisioning............................................................................................12Reinstalling Intelligent Provisioning ........................................................................................... 12
Reinstalling from an ISO image....................................................................................... 12Reinstalling from an RPM package (Linux only).............................................................. 13
Configuring the server and installing an operating system ............ 14Configuring the server and installing an OS............................................................................... 14Server support and special characters....................................................................................... 14Source media types and installation methods supported for each OS....................................... 14Selecting hardware settings........................................................................................................14Selecting the OS......................................................................................................................... 17Reviewing your settings.............................................................................................................. 18Checking installation parameters................................................................................................18
Performing maintenance...................................................................... 20Updating Intelligent Provisioning and component firmware ....................................................... 20
Determining the installed Intelligent Provisioning version................................................ 21Setting Intelligent Provisioning Preferences .............................................................................. 21Downloading Active Health System data ................................................................................... 22
Downloading an Active Health System log...................................................................... 23Uploading an AHS log to AHSV....................................................................................... 23
Using Deployment Settings ........................................................................................................24Creating a Deployment Settings package........................................................................24Using Deployment Settings package to configure a single server................................... 25Deployment Settings package-level actions.................................................................... 26Deployment Settings package individual settings............................................................ 27
Version Information................................................................................................28Entering operating system information..................................................................28Entering Intelligent Provisioning Preferences .......................................................29Array Configuration settings.................................................................................. 30Entering ROM settings.......................................................................................... 30
Using the BIOS Configuration (RBSU) utility.............................................................................. 30
Contents 3

Using the iLO Configuration Utility ............................................................................................. 31Viewing iLO summary information....................................................................................31Running an iLO self-test...................................................................................................32Editing iLO Management Settings....................................................................................32Editing network interface settings.................................................................................... 33Editing User Account settings.......................................................................................... 36Resetting iLO....................................................................................................................38
Using Secure Erase and Reset...................................................................................................38System Erase and Reset options.....................................................................................38Using Secure Erase......................................................................................................... 39
Using HPE Smart Storage Administrator (HPE SSA)................................................................. 39HPE SSA features............................................................................................................39Accessing HPE SSA........................................................................................................ 40Configuration....................................................................................................................40Diagnostics/SmartSSD.....................................................................................................40
Using the USB Key Utility.....................................................................42
Troubleshooting.................................................................................... 45Basic troubleshooting techniques............................................................................................... 45Troubleshooting general issues ................................................................................................. 45
iLO log on required during Intelligent Provisioning F10 boot........................................... 45Intelligent Provisioning does not launch when F10 is pressed.........................................45OS Host name field missing.............................................................................................46Accessing version information in deployment settings.....................................................46A browser does not import a deployment profile correctly............................................... 46Some Legacy BIOS Mode installs need specific instructions.......................................... 46NIC ports not saved Intelligent Provisioning Preferences................................................ 47Always On Intelligent Provisioning does not display status of NICs................................ 47Cannot create a custom partition size..............................................................................47
Troubleshooting Windows-specific issues ................................................................................. 47No information on the System Management home page.................................................47Windows Essentials does not install from USB source....................................................48
Troubleshooting Linux-specific issues ....................................................................................... 48Unable to proceed with Assisted installation of Red Hat Enterprise Linux 7....................48Assisted installation of Red Hat OS hangs...................................................................... 48
Troubleshooting VMware-specific issues ...................................................................................49Server reboots during VMware Assisted installation........................................................49
Websites................................................................................................ 50
Support and other resources...............................................................51Accessing Hewlett Packard Enterprise Support......................................................................... 51Accessing updates......................................................................................................................51Customer self repair....................................................................................................................52Remote support.......................................................................................................................... 52Warranty information...................................................................................................................52Regulatory information................................................................................................................53Documentation feedback............................................................................................................ 53
4 Contents

IntroductionTIP:
The information in this guide is for using Intelligent Provisioning with ProLiant Gen10 servers andHPE Synergy compute modules. For information on using Intelligent Provisioning with ProLiantGen8 and Gen9 Servers, see the Intelligent Provisioning user guides available on the InformationLibrary (http://www.hpe.com/info/intelligentprovisioning/docs).
Intelligent ProvisioningIntelligent Provisioning is a single-server deployment tool embedded in ProLiant servers and HPESynergy compute modules. Intelligent Provisioning simplifies server setup, providing a reliable andconsistent way to deploy servers.
Intelligent Provisioning prepares the system for installing original, licensed vendor media and HewlettPackard Enterprise-branded versions of OS software. Intelligent Provisioning also prepares the system tointegrate optimized server support software from the Service Pack for ProLiant (SPP). SPP is acomprehensive systems software and firmware solution for ProLiant servers, server blades, theirenclosures, and HPE Synergy compute modules. These components are preloaded with a basic set offirmware and OS components that are installed along with Intelligent Provisioning.
IMPORTANT:
HPE ProLiant XL servers do not support operating system installation with Intelligent Provisioning,but they do support the maintenance features. For more information, see "Performing Maintenance"in the Intelligent Provisioning User Guide and online help.
After the server is running, you can update the firmware to install additional components. You can alsoupdate any components that have been outdated since the server was manufactured.
To access Intelligent Provisioning:
• Press F10 from the POST screen.
• From the iLO web browser user interface using Always On. Always On allows you to accessIntelligent Provisioning without rebooting your server.
Accessing Intelligent Provisioning from the iLO webinterface
Procedure
1. Open a browser and enter https://<iLO host name or IP address> to log in to the iLO webinterface.
2. Enter a user account name and password, and click Log In.
3. Click Intelligent Provisioning in the navigation tree.
4. Click Always On.The Intelligent Provisioning web interface opens in a new browser window.
Introduction 5

Always On Intelligent ProvisioningAlways On Intelligent Provisioning allows you to:
• Perform functions when the server is off.
• Perform tasks when running an operating system without powering off the server.
In the Always On Intelligent Provisioning version, Perform Maintenance contains only utilities that arenot available in iLO. See the iLO user guide for more information. Utilities available are:
• Firmware Update
• Intelligent Provisioning Preferences
NOTE:
NICs show inactive, but you can configure the item.
• Deployment Settings
• BIOS Configuration (RBSU)
• System Erase and Reset
NOTE:
To install an OS in Always On mode, extract the installation ISO on the FTP server.
Accessing Intelligent Provisioning using an iLO remoteconsole session
Procedure
1. Open a browser and enter https://<iLO host name or IP address> to log in to the iLO webinterface.
2. From the iLO web interface, navigate to the Remote Console & Media page.
3. Verify that your system meets the requirements for using the remote console application you want touse.
4. Click the launch button for your selected application.
Alternatively, you can click an Integrated Remote Console link on the Information - iLO Overviewpage.
5. Restart or power on the server.
The server restarts and the POST screen appears.
6. Press F10 when prompted during the server POST.
When accessing Intelligent Provisioning, one of the following happens:
6 Always On Intelligent Provisioning

• If you are using Intelligent Provisioning for the first time, the First Time Setup wizard will guide youthrough initial configuration and registration tasks. For more information, see Using the First TimeSetup wizard on page 10.
• If Intelligent Provisioning was previously accessed and the initial configuration and registration tasksare complete, the Intelligent Provisioning home page is displayed. In the home screen, select one ofthe following options to use Intelligent Provisioning:
◦ Express OS Install
NOTE: The Express OS Install option is not available on ProLiant XL series server models.
◦ Perform Maintenance
To exit Intelligent Provisioning, reboot the server by clicking the power icon at the top right of the page.
F10/Remote console featuresF10/Remote console allows you to:
• Access HPE Smart Storage Administrator for disk configuration.
• Perform a full set-up of Intelligent Provisioning
F10/Remote console has more options than Always On Intelligent Provisioning. F10/Remote consoleoptions include the following:
• Firmware Update
• Intelligent Provisioning Preferences
• Active Health System Log
• Deployment Settings
• BIOS Configuration (RBSU)
• iLO Configuration
• System Erase and Reset
• RAID Configuration
Intelligent Provisioning operationIntelligent Provisioning includes the following components:
• Critical boot drivers
• Active Health System (AHS)
• Erase Utility
• Deployment Settings
F10/Remote console features 7

IMPORTANT:
• Although your server is pre-loaded with firmware and drivers, you should update the firmwareupon initial setup to ensure you have the latest versions. Also, downloading and updating thelatest version of Intelligent Provisioning ensures the latest supported features are available.
• For ProLiant servers, firmware is updated using the Intelligent Provisioning Firmware Updateutility.
• Do not update firmware if the version you are currently running is required for compatibility.
NOTE:
Intelligent Provisioning does not function within multihomed configurations. A multihomed host is one thatis connected to two or more networks or has two or more IP addresses.
Intelligent Provisioning provides installation help for the following operating systems:
• Microsoft Windows Server
• Red Hat Enterprise Linux
• SUSE Linux Enterprise Server
• VMware ESXi/vSphere Custom Image
Not all versions of an OS are supported. For information about specific versions of a supported operatingsystem, see the OS Support Matrix on the Hewlett Packard Enterprise website (http://www.hpe.com/info/ossupport).
Navigating Intelligent ProvisioningTo navigate through and modify settings in this menu-driven interface, use the navigation icons displayedat the top right-hand corner and bottom left- and right-hand corners of the Intelligent Provisioning window.
These navigation icons are screen sensitive and are not displayed on all screens.
Icon Function
Language Enables you to select the language to use.
Home Returns to the Intelligent Provisioning home page, with the Express OS Install andPerform Maintenance menus. This icon is available only after completing the initialconfiguration and registration tasks.
Job Cart Displays the job configuration viewer screen, which displays the status of jobs in thequeue. You can use this screen to monitor configuration tasks and jobs as they areprocessed.
Table Continued
8 Navigating Intelligent Provisioning

Icon Function
Help Opens the online help to the section about the current screen.
SystemInformation
Displays system information, including the Intelligent Provisioning version.
Power Off Powers down or reboots the server.
Log Out Logs the current user out of Intelligent Provisioning.
NOTE:
This icon is only displayed in Always On mode.
Previous Returns you to the previous screen after validating and saving your choices.
Continue Takes you forward to the next screen after validating and saving your choices.
Introduction 9

Completing initial configuration and registrationtasks
When using Intelligent Provisioning for the first time, follow the on-screen prompts to perform initialconfiguration and registration tasks.
Initial configuration and registration tasksProcedure
See Using the First Time Setup wizard on page 10 to perform initial configuration and registration.
Software installed with Intelligent ProvisioningWhen a Windows system is installed using Intelligent Provisioning with Internet access, all the softwareapplications are automatically downloaded and installed. On other operating systems or on a Windowssystem without Internet access, the following applications are not automatically installed with IntelligentProvisioning. To install the following applications, run SPP.
• ProLiant Agentless Management Service (AMS)
• Network Configuration Utility for Windows
• HPE Smart Storage Administrator (HPE SSA)
• Lights-Out Online Configuration Utility
Using the First Time Setup wizardThe first time Intelligent Provisioning runs on a server, the First Time Setup wizard guides you throughselecting preferences for your system.
Setting preferences
Procedure
1. On the preferences screen, select your Interface Language and Keyboard Language, or accept thedefaults.
2. Select a BIOS boot mode, or accept the default.
NOTE:
Changes to the system boot mode are implemented during the OS installation process or in the nextPOST.
3. Click NEXT.
4. Click READ EULA, and read the EULA.
a. To continue using Intelligent Provisioning, click Accept Intelligent Provisioning EULA, and clickNEXT.
10 Completing initial configuration and registration tasks

A link is included in the EULA that contains a list of open source and proprietary softwaredeveloped or obtained through third parties. This link and all other links in the EULA are notenabled. To access a link, enter it into a browser.
b. To cancel using Intelligent Provisioning, click Reboot.
The server reboots. Intelligent Provisioning remains accessible.
5. Automatically optimize your server.
NOTE:
To enable settings with a selection button, move the selection button to the right. Selected items turnthe button green.
a. Select an option for how you plan to use this server.
b. (Optional) Enable automatic application of software and firmware updates to this system.
6. Click NEXT.
7. Enter network settings.
a. Under Network Settings, select a network interface for updates and installations. Then enable ordisable (or accept the default settings) for the following.
• DHCP Auto-Configuration—(Recommended) DHCP automatically assigns IP addresses toyour server.
• Use Proxy—Configures a network proxy for use with features that communicate across thenetwork. Enter a proxy address and port.
• IPv4/IPv6—Works as a mask field for the IP address.
b. Under iLO Network Settings, enable or disable (or accept the default settings) for the following:
• DHCP Auto-Configuration—(Recommended) DHCP automatically assigns IP addresses toyour server.
• Off—Makes the server unavailable to iLO.
8. Select a System Software Update delivery option.
• Update from HPE.com—(Recommended) Prompts you when updates are available, and thendownloads all software updates for your server from Hewlett Packard Enterprise website.
• Update from custom URL—Prompts you to specify a website from which software updates aredownloaded.
9. Click NEXT.
NOTE: To change preferences at a later time, open the Perform Maintenance menus, and then clickIntelligent Provisioning Preferences.
Completing initial configuration and registration tasks 11

Re-enabling Intelligent ProvisioningProcedure
1. Reboot the server and, when prompted, press F9 to access the UEFI System Utilities.
2. From the System Utilities screen, select System Configuration > BIOS/Platform Configuration(RBSU) > Server Security > Intelligent Provisioning (F10 Prompt) and press Enter.
3. Select Enabled.
Reinstalling Intelligent ProvisioningNOTE:
Changes to the HPE website and the firmware update process will cause firmware updates to time out forversions below 1.63 (for Gen8) and below 2.50 (for Gen9). The older web sites associated with hp.comhave been retired and Intelligent Provisioning will be unable to find updates.
Older installations can be updated with the Intelligent Provisioning Recovery DVD.
You can reinstall Intelligent Provisioning instead of using the Firmware Update Utility to ensure you havethe latest version. There are two methods for reinstalling Intelligent Provisioning.
Reinstalling from an ISO image
Procedure
1. Download the ISO image file for the latest Intelligent Provisioning recovery media by clickingDownload from the Intelligent Provisioning website. (http://www.hpe.com/info/intelligentprovisioning).
NOTE:
The following servers and Intelligent Provisioning versions are supported:
• Gen8 supports Intelligent Provisioning 1.x.
• Gen9 supports Intelligent Provisioning 2.x.
• Gen10 supports Intelligent Provisioning 3.x.
2. To download the ISO image file, complete the on-screen instructions.
3. Use the ISO file to boot the server by:
• Using iLO virtual media.
• Burning the ISO file to a DVD and booting the server from DVD.
12 Re-enabling Intelligent Provisioning

CAUTION:
Ensure that Intelligent Provisioning recovery media is mounted through one of the followingways:
◦ iLO Virtual Media.
◦ Burn the Intelligent Provisioning recovery media ISO file to a DVD and place it in theCD/DVD drive of the server.
4. Press ON to power up the server.
5. To display the boot menu, press F11 during server POST.
6. Press 1 on the keyboard to boot from the CD/DVD.
7. To update or reinstall Intelligent Provisioning, select the interactive method. The server continuesbooting from the Intelligent Provisioning recovery media.
8. Select Reinstall Intelligent Provisioning when the window opens.
9. Reboot the server when the installation is complete by pressing F10.
Reinstalling from an RPM package (Linux only)
Procedure
1. Download the RPM package file for the latest Intelligent Provisioning recovery RPM package from theSDR website (https://downloads.linux.hpe.com/SDR/repo/ip/).
2. Execute the command:
rpm -i firmware-intelligentprovisioning-ip-3.10-1.22.x86_64.rpm3. Execute the command:
cd /usr/lib/x86_64-linux-gnu/firmware-intelligentprovisioning-ip-3.10-1.22/4. Execute the command:
#./setup5. Execute the command:
#reboot
Example
As an alternative to steps 2-4:
1. Execute the command:
export FIRMWARE_FLASH_NOW=1
2. Execute the command:
rpm -i firmware-intelligentprovisioning-ip-<version>.x86_64.rpm
Reinstalling from an RPM package (Linux only) 13

Configuring the server and installing anoperating system
Configuring the server and installing an OSFollow the on-screen prompts in the Express OS Install menu to complete the following tasks:
Procedure
1. Selecting hardware settings on page 14
2. Selecting the OS on page 17
3. Reviewing your settings on page 18
Server support and special characters• ProLiant XL Servers do not support operating system installations with Intelligent Provisioning. These
servers do support the maintenance features described in Performing maintenance on page 20,except deploying the operating systems installations.
• You can only use special characters in passwords. Do not use special characters in any other datafields. Special characters, punctuation, and spaces are not supported in any pathname.
Source media types and installation methods supportedfor each OS
Each Express OS Install screen provides a guided method for configuring the server, installing an OS,and updating the system software.
IMPORTANT:
Intelligent Provisioning only supports original, licensed vendor media or Hewlett Packard Enterprise-branded versions. Demo or developer versions of the OS, or media that has been modified toslipstream custom software or service packs, are not supported and might not be correctly identifiedby the installation process.
For more information about source media and installation methods supported by each OS, see theIntelligent Provisioning Release Notes.
Selecting hardware settings
Procedure
1. Select Express OS Install on the Intelligent Provisioning home screen.
The Operating System Installation screen appears.
2. Select a RAID Configuration option.
14 Configuring the server and installing an operating system

• Recommended settings—HPE SSA polls any drives that are present, and builds an appropriatearray for those drives. Hewlett Packard Enterprise recommends selecting this option when initiallyprovisioning a server.
CAUTION:
Selecting this option resets all disks (and arrays, if any are present). Because no arrays ordisk data are present during a first-time setup, this does not affect your server. However, ifyou choose this option when reprovisioning your server, you can lose your data and any diskarrays. For more information about HPE SSA, see the HPE Smart Storage Administrator UserGuide.
• Keep current settings—Uses existing settings to maintain any previously constructed arrays. Usethis option when reprovisioning a server. This option is displayed only when valid logical drives arepresent on the server. For new server installations, this option is not displayed.
CAUTION:
In Legacy BIOS mode, drives that are 2.2 TB or larger will not be detected during OS installation.
• If you want to use Legacy BIOS mode, use HPE SSA to create a logical drive to boot withless than 2.2 TB. To access HPE SSA, select RAID Configuration from the IntelligentProvisioning Perform Maintenance home screen.
• If you want to use logical drives of 2.2 TB capacity or more for OS installation, use UEFImode instead. See the UEFI System Utilities User Guide for more information.
3. Select a Controller from the list. Controller selections are based on your operating environment.
4. Select a Disk from the list. Disk selections are based on your operating environment.
5. Select an Install Source from the list. The options and the required information and action for eachare described in the following table.
NOTE:
Always On Intelligent Provisioning is limited to only using network install sources.
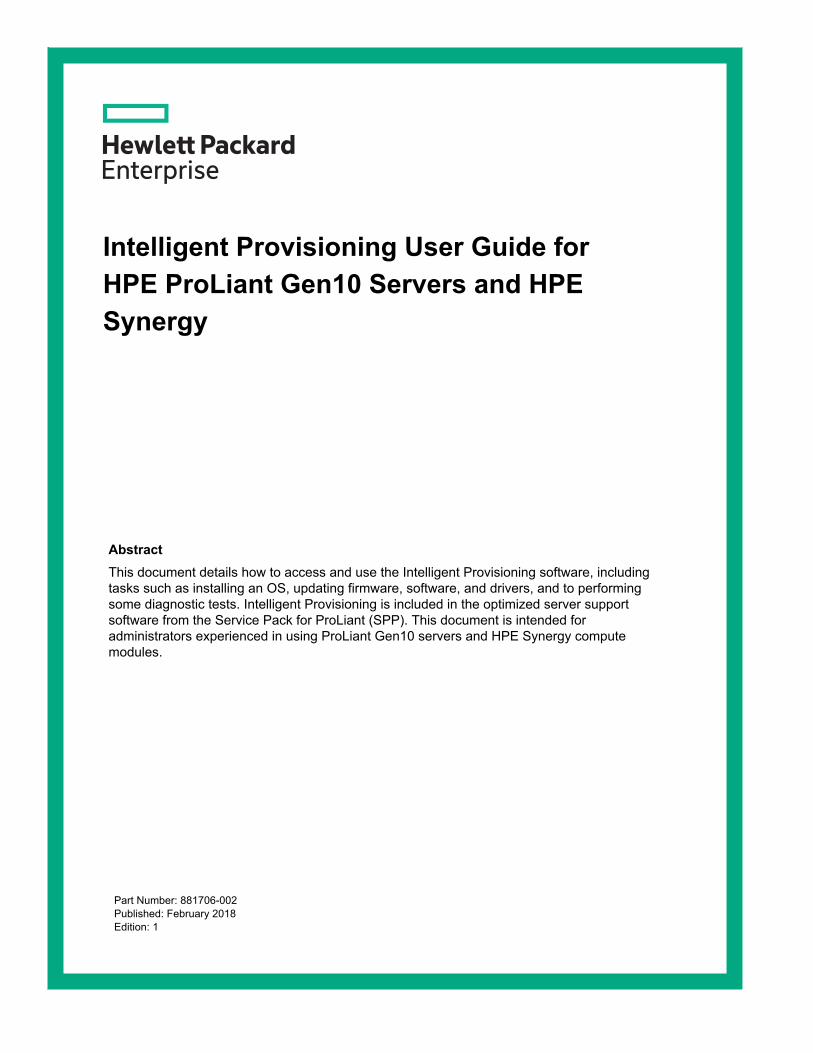
Media type Required information/action
DVD-ROM Media Insert the DVD.
File on a USB drive Insert the USB drive and browse to the location of the OSinstallation files on the USB drive. Then, double-click the ISO file.
NOTE:
Only FAT or exFAT-formatted USB drives are supported. For OSimage files that cannot copy to the USB unless it is NTFS-formatted, use a different source media.
Table Continued
Configuring the server and installing an operating system 15
Media type Required information/action
SMB/CIFS (Windows Share) Enter network connection information, including:
• Server Name or IP Address—Server name or IP address of theserver that hosts the OS contents. If a server name is specified, aDNS entry is also required.
• Share Name—The name of the network share using ServerMessage Block (SMB) protocol that hosts the OS contents.
• Network Share User—User name used to access the networkshare.
• Network Share Password (not encrypted)—Password for theuser name used to access the network share.
An anonymous FTP server Enter network connection information, including:
Server Name or IP Address—FTP server name or IP address ofthe server that hosts the OS contents. FTP support requiresanonymous access to the FTP server and does not supportconnecting to an FTP server through a proxy.
IMPORTANT:
When entering an FTP path, remove spaces and punctuation.The FTP server directory structure cannot contain spaces orspecial characters (including punctuation).
6. Select whether to do a Firmware Update.
• Skip Update—Default. No firmware updates are performed before the OS installation.
• Update before OS Install—Firmware updates available according to the baseline defined in thelatest SPP are done before OS installation.
7. Select an Install Method.
NOTE:
If using Always On (Intelligent Provisioning accessed from the iLO web page), only the Assisted Installoption is listed.
• Assisted Install—An express installation process uses Hewlett Packard Enterprise-defineddefaults to configure the server software and firmware, partition storage, and install the OS withdrivers. It also performs a software and firmware update if the network is available at your location.Hewlett Packard Enterprise recommends selecting this option for first-time server setup.
16 Configuring the server and installing an operating system

NOTE:
Agentless Management Service (AMS) and the ProLiant iLO 5 Channel Interface Driver areinstalled automatically if you use the Intelligent Provisioning Assisted Install method for Windowsinstallation. The ProLiant iLO 5 Channel Interface Driver is standard for SUSE Linux EnterpriseServer and Red Hat Enterprise.
• Manual—Installs the OS from a custom OS CD/DVD without searching the web. After selecting thisoption, insert the provided CD/DVD so that the server can reboot from the OS CD/DVD. IntelligentProvisioning partitions storage based on OS recommendations.
NOTE:
The Legacy BIOS boot order cannot be changed by pressing F10. If doing an assisted or a manualinstall in Legacy BIOS mode, you must ensure that:
◦ On Windows, the system boots to a hard drive (SMB or CIFS).
◦ On Linux/VMware, the system boots to the hard drive.
Do this by changing the boot order or by pressing F11 to choose at boot.
8. To proceed to Selecting the OS, click the Continue right arrow.
IMPORTANT:If an unsupported media device is selected, you will not be able to continue to the next screen.To resolve the issue, remove the unsupported media device, and make sure that you have asupported install source when prompted.
Selecting the OSAlways On mode supports installing an OS from an FTP, SMB, or CIFS source.
Prerequisites
To install an OS in Always On mode from an FTP server, extract the installation ISO. An ISO that is notextracted it too large to install from an FTP source.
Procedure
1. Select an operating system or choose the default. OS Language, OS Keyboard, and Time Zone areautomatically filtered.
Supported OS families include:
• Microsoft Windows
• VMware vSphere Custom Image
• SUSE Linux Enterprise Server
• Red Hat Enterprise Linux
• ClearOS
Selecting the OS 17

NOTE:
Certain ProLiant servers require an HPE Customized image for a successful VMware ESXiinstallation. For more information or to download an image, see the Hewlett Packard Enterprisewebsite at http://www.hpe.com/info/esxidownload.
2. Enter information into the following fields (automatically selected in manual installations):
• Organization Name
• Owner Name
• Optional Password
• Confirm Password
NOTE:
Punctuation is not allowed when setting an optional password.
a. For manual installations, select the operating system again after entering the product key.
3. Enter Hyper-V role for the system.
4. Enable Windows Firewall.
5. To proceed to Reviewing your settings, click the Continue right arrow.
Reviewing your settingsCAUTION:Continuing past this screen resets the drives to a newly installed state and installs the selected OS.Any existing information on the server is erased. This does not affect a first-time setup, becausethere is no data present on the server.
Procedure
1. Review and confirm your deployment settings.
2. Click the Continue right arrow to begin the automated installation and configuration process.Depending on the deployment settings, a variety of screens are displayed, providing progressinformation about the installation.
Checking installation parametersDuring the installation and configuration process, consider the following:
• A EULA might be displayed for Windows installations.
• The Firmware Update screen might be displayed at this time, depending on the following two systemsettings:
18 Reviewing your settings

◦ In the Preferences screen, System Software Update must have been enabled. See Settingpreferences for more information.
◦ In the Operating System Installation screen, Update before OS Install must have beenselected. See Selecting hardware settings for more information.
If the Firmware Update screen is displayed, follow the on-screen prompts to obtain and install thelatest firmware on server components. When the updates are complete, the Installing OS page isdisplayed, ready to begin the OS installation.
• If you attempt to deploy an OS on a server with no installed drives, the server reboots and, afterPOST, a page is displayed indicating that the settings are being applied. The deployment does notproceed, but messages are written to the IML.
• For Windows installations, messages about an untested Windows version and hpkeyclick messagesmight be displayed while the drivers are installed. This is expected behavior. No action is required.
Configuring the server and installing an operating system 19

Performing maintenanceThe Perform Maintenance window contains the following maintenance-related tasks:
• Updating Intelligent Provisioning and component firmware
• Setting Intelligent Provisioning Preferences
• Downloading Active Health System data
• Using Deployment Settings
• Using the BIOS Configuration (RBSU) utility
• Using the iLO Configuration Utility
• Using Secure Erase and Reset
• Using HPE Smart Storage Administrator (HPE SSA)
NOTE:
The following maintenance tasks are not supported on an HPE Synergy compute module:
• Downloading Active Health System data
• Updating firmware
• Using iLO Configuration Utility
• Using the Erase Utility
To perform these tasks on an HPE Synergy compute module, you must use HPE OneView.
Updating Intelligent Provisioning and component firmwareHPE servers and their installed hardware options are pre-loaded with the latest firmware. However,updated firmware might be available. For ProLiant servers, use the Firmware Update utility to find andapply the latest firmware. For HPE Synergy compute modules, use HPE OneView to update the firmware.Intelligent Provisioning updates can be performed when an SPP update is available.
NOTE:
Firmware Update reflects the latest updates available as per the baseline defined in the latest SPP.Newer updates that were added outside of the latest SPP baseline do not appear on the updates list.
Procedure
1. On the Intelligent Provisioning home screen, click Perform Maintenance.
2. Select Firmware Update from the maintenance options.
The system searches for firmware on the source configured in the System Software Update settings.This might take a few minutes; wait for the display to generate the results.
20 Performing maintenance

NOTE:
Alternatively, you can download and copy the SPP ISO to a DVD or USB key. To download SPP, seethe website (http://www.hpe.com/servers/spp/download). For instructions on using the ISO, see theSPP quick start guide on the website (http://www.hpe.com/support/SPP_UG_en).
3. After the system retrieves the firmware data, it checks the installed hardware components to suggestitems to update. Depending on the search, you might be prompted to click Continue to begin thehardware components check.
4. This might take a few minutes; wait for the display to generate the results.
NOTE:
If no new firmware is available, the current version is displayed in the Firmware Update screen.
5. Select the items to update, and then click Install.
6. The Review Updates screen displays the selected items.
NOTE:
Intelligent Provisioning does not detect all hard disk driver firmware updates. If you need to updateHDD firmware, and Intelligent Provisioning does not detect the firmware update, deploy updates fromthe SPP.
7. To install all of the selected components, click Continue.
To perform the update, click Continue on the notification that the installation cannot be canceled.
8. Click Launch now to initiate the firmware update process.
9. Click Reboot at the completion of the firmware update process.
Determining the installed Intelligent Provisioning version
To check the Intelligent Provisioning version, click the System Information Intelligent ProvisioningImage version is listed.
Setting Intelligent Provisioning PreferencesUse Intelligent Provisioning Preferences to change basic preferences, including the interface andkeyboard languages, network and share setting, system date and time, and software update settings. Inaddition, the EULA is accessible from this screen.
Procedure
1. On the Intelligent Provisioning home screen, click Perform Maintenance.
2. Select Intelligent Provisioning Preferences from the maintenance options.
3. Select an Interface Language.
4. To change the date and time select Current Date-Time (UTC).
5. In Network Settings select one of the following:
Determining the installed Intelligent Provisioning version 21

• Network port adapter
• DHCP Auto-Configuration, IPv4 Static, or IPv6 Static
• Proxy Address and Port, if applicable
6. In iLO Network Settings select one of the following:
• DHCP Auto-Configuration
• IPv4 Static
• Off
7. In System Software Update, select the update system update source.
8. In Time Zone, set the time zone.
9. In System Boot Mode, choose UEFI boot mode or Legacy boot mode.
10. In Keyboard Language, choose a language.
When Intelligent Provisioning is run for the first time on a server, this is the first screen that is displayedwithin Intelligent Provisioning. For more information about the fields on this screen, see Step 1: SettingIntelligent Provisioning preferences.
Downloading Active Health System dataHPE Support uses the Active Health System (AHS) log file for problem resolution.
Use the Active Health System Log screen to download AHS telemetry data from the server onto a USBkey in the form of an AHS log file case number or a default string with an .ahs extension. Use this screento select the duration for which data needs to be extracted and the USB key as destination media. Youcan select a specific start and end date to limit the duration of data extraction.
If connected through iLO, locally connected USB keys shared through virtual devices can also be used forsaving AHS log information.
The high level steps for submitting a case are:
Procedure
1. Download an AHS Log from the server experiencing a support issue. See Downloading an ActiveHealth System log.
2. Upload the AHS Log to the Active Health System Viewer at http://www.hpe.com/servers/AHSV. SeeUploading an AHS log to AHSV.
3. Review the Fault Detection Analytics for any self-repair actions/recommendations. See the AHSV UserGuide for more information.
4. Create a support case using the AHSV Navigation menu. See the AHSV User Guide for moreinformation.
22 Downloading Active Health System data
Downloading an Active Health System log
Procedure
1. Insert a USB key into the server.
2. Press the F10 during the boot to go directly to Intelligent Provisioning.
3. On the Intelligent Provisioning home screen, click Perform Maintenance.
4. From the maintenance options, select Active Health System Log from the maintenance options.
The Active Health System Log screen appears.
5. Select the USB key from the Removable Device to Save Log to list.
6. Define the period for which to retrieve data by selecting the From and To dates. Hewlett PackardEnterprise recommends retrieving seven days of data, which creates a 10 to 15 MB file.
7. If there is an associated HPE Support Case Number, enter it. You can also enter a Contact Nameand E-mail address. The contact information helps HPE Support to provide assistance.
8. Click Download Logs to save the data to the USB key.
Once the data has been downloaded, upload it to the Active Health System Viewer at http://www.hpe.com/servers/AHSV.
Uploading an AHS log to AHSVThe maximum file size limit is 250 MB. For logs that are larger than 250 MB, contact the HPE SupportCenter for assistance.
This task in done from the AHSV, not from System Utilties.
Prerequisites
IMPORTANT:The server from which the AHS log was created must have a valid warranty. If the server is out ofwarranty, an error message is displayed: "Server is not Entitled. Check these options for renewingyour license." The options include:
• Buy more licenses.
• Find partner for license purchase.
• Contact HPE Support.
Procedure
1. Select Upload AHS Log.
2. Navigate to your log file and click Open.
A window is displayed that shows parsing and log loading states. As the AHS log loads, the screendisplays the estimated time of completion.
Downloading an Active Health System log 23

TIP:
This window also displays videos for different platforms. You can search and play different videoswhile you are waiting for the log file to load.
To cancel the load process, click Cancel.
Using Deployment SettingsDeployment Settings enable you to create a server configuration package that you can deploy to one ormore ProLiant servers or HPE Synergy compute modules using a USB key and iLO Scripting. UsingDeployment Settings is an alternative to using the Scripting Toolkit.
NOTE:
Some browsers do not import Deployment Profiles correctly. Use the extension .txt to ensure browsercompatibility.
Procedure
1. On the Intelligent Provisioning home screen, click Perform Maintenance.
2. Select Deployment Settings from the maintenance options.
When you open Deployment Settings, you can choose to manage an existing Deployment Settingsprofile or create a new one based on existing deployment settings.
Creating a Deployment Settings package
Procedure
1. On the Deployment Settings screen, do one of the following:
a. To import a new Deployment Settings profile, click Import and use one of the following options:
• From Network Share enter:
◦ Server Name or IP Address—Server name or IP address of the server that hosts the OScontents. If a server name is specified, a DNS entry is also required.
◦ Share Name—The name of the network share using Server Message Block (SMB) protocolthat hosts the OS contents.
◦ Domain Name—Name of the domain that hosts the network share.
◦ Network Share User—User name used to access the network share.
◦ Network Share Password (not encrypted)—Password for the user name used to accessthe network share.
• From USB Drive—Insert the USB key containing the deployment:
24 Using Deployment Settings

I. Save the deployment from the USB key to the local server.
II. On the Select a Deployment screen, select the deployment from the list, and click Deploy.If the USB key and their stored deployments are not displayed, click Rescan.
Specify a file path, and then go to Step 8.
b. Or, to create a new, custom profile, click Create New Deployment, and navigate the deploymentsettings screens to complete the settings in the following steps.
2. Enter a Deployment Name—Enter a name for this deployment package. Do not include spaces.
3. Enter the Version Information—Enter User Notes and Captured From details, and click Done. See Entering version information.
4. Enter an Operating System—Do one of the following:
• To leave the OS details as shown, click Done.
• To add an operating system, click Edit. On the Operating System Installation screen, select anInstall Source, complete the fields required on the resulting screens, and click Done. See Entering operating system information.
5. Enter the ROM Settings—Do one of the following:
• To leave the ROM configuration as shown, click Done.
• To edit ROM settings, click Edit. On the RBSU Profile Editing screen, complete your edits, and clickDone. See Entering ROM settings.
6. Enter the Array Configuration—Review or select new settings. See Entering array configurationsettings.
7. Enter Intelligent Provisioning Preferences—See Setting Intelligent Provisioning Preferences.
8. Click Save. When prompted, enter a name and navigate to a network share or a USB key to save theDeployment Settings.
Using Deployment Settings package to configure a single server
IMPORTANT:
• Before using a deployment to install an OS, be sure that the drives and arrays are configured.
• Do not interrupt the configuration process.
Procedure
1. Do one of the following:
a. To use the deployment you created on the server, click Deploy.
b. To use a previously created deployment:
Select Deployment Settings > Import
Using Deployment Settings package to configure a single server 25

• From Network Share enter:
◦ Server Name or IP Address—Server name or IP address of the server that hosts the OScontents. If a server name is specified, a DNS entry is also required.
◦ Share Name—The name of the network share using Server Message Block (SMB) protocolthat hosts the OS contents.
◦ Domain Name—Name of the domain that hosts the network share.
◦ Network Share User—User name used to access the network share.
◦ Network Share Password (not encrypted)—Password for the user name used to accessthe network share.
• From USB Drive—Insert the USB key containing the deployment:
I. Save the deployment from the USB key to the local server.
II. On the Select a Deployment screen, select the deployment from the list, and click Deploy.If the USB key and their stored deployments are not displayed, click Rescan.
2. As the deployment runs, a validation screen applies settings for the following elements:
• ROM Settings
• Array Settings
• System Options
• Firmware Update
Deployment Settings package-level actionsPackage-level actions manipulate the Deployment Settings package, not individual settings within adeployment.
After making a selection on the initial page, the Select a Deployment screen opens.
On the Select a Deployment screen, existing Deployment Settings packages that are stored on the serverare displayed in the left pane, existing Deployment Settings packages that are stored on an installed USBdrive are displayed in the right pane, and package-level action icons are displayed in the center of thescreen. If a USB drive is installed, its name is displayed near the top of the screen in the Target USB Keyfield.
• To perform a package-level action on a Deployment Settings package, select one of the displayedpackages, and then select an action icon in the middle pane.
• To open a specific Deployment Settings package to change individual settings, double-click one of thedisplayed packages.
The following table defines the available actions.
26 Deployment Settings package-level actions
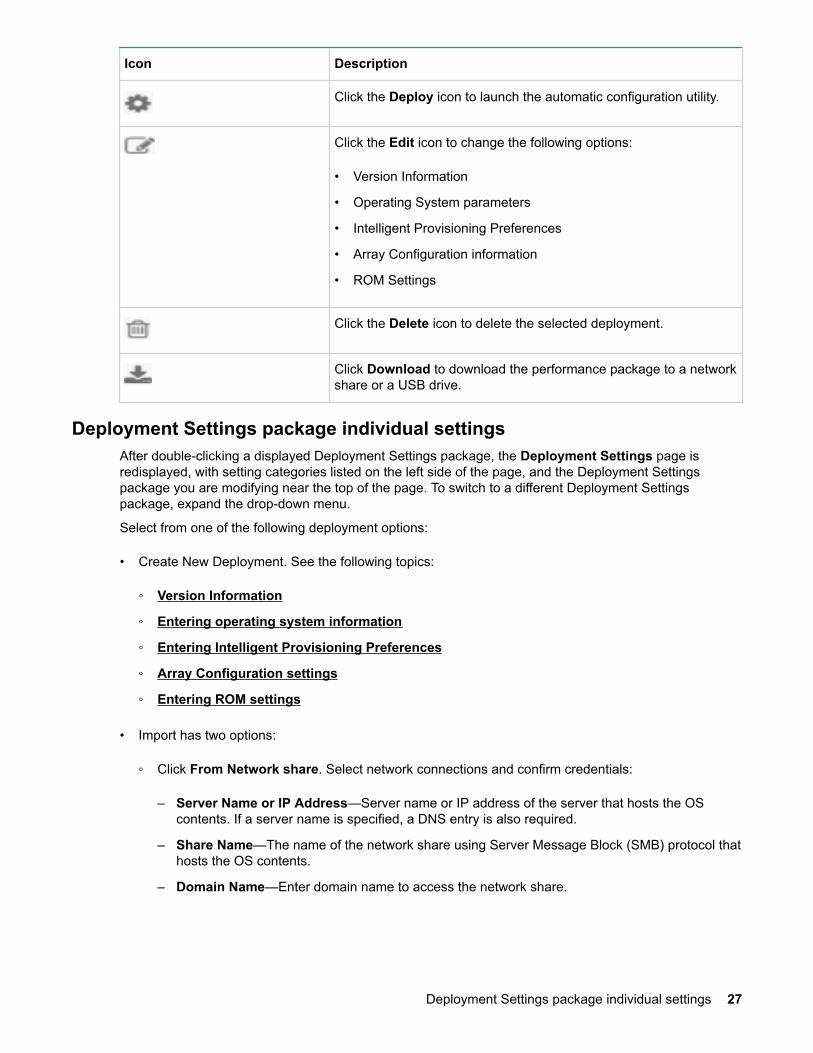
Icon Description
Click the Deploy icon to launch the automatic configuration utility.
Click the Edit icon to change the following options:
• Version Information
• Operating System parameters
• Intelligent Provisioning Preferences
• Array Configuration information
• ROM Settings
Click the Delete icon to delete the selected deployment.
Click Download to download the performance package to a networkshare or a USB drive.
Deployment Settings package individual settingsAfter double-clicking a displayed Deployment Settings package, the Deployment Settings page isredisplayed, with setting categories listed on the left side of the page, and the Deployment Settingspackage you are modifying near the top of the page. To switch to a different Deployment Settingspackage, expand the drop-down menu.
Select from one of the following deployment options:
• Create New Deployment. See the following topics:
◦ Version Information
◦ Entering operating system information
◦ Entering Intelligent Provisioning Preferences
◦ Array Configuration settings
◦ Entering ROM settings
• Import has two options:
◦ Click From Network share. Select network connections and confirm credentials:
– Server Name or IP Address—Server name or IP address of the server that hosts the OScontents. If a server name is specified, a DNS entry is also required.
– Share Name—The name of the network share using Server Message Block (SMB) protocol thathosts the OS contents.
– Domain Name—Enter domain name to access the network share.
Deployment Settings package individual settings 27

– Network Share User—User name used to access the network share.
– Network Share Password (not encrypted)—Password for the user name used to access thenetwork share.
◦ Click From USB Drive: Specify a file path and click Save.
Version InformationUse the Version Information screen to enter any type of user-defined identifying information that youwant to assign to the deployment.
Entering operating system informationUse the Operating System screens to enter OS information and installation settings. The included fieldsmatch the Assisted installation method.
Not all source media types are supported for every OS.
IMPORTANT:
The operating system settings you apply are sent to iLO, and the system reboots. Disc drives thatyou previously deployed might be erased.
Procedure
1. Select an OS family.
2. Enter the OS media path, which can be a Windows share or an FTP site on the local network.Installation of Windows from an FTP site is not supported.
a. For a Windows share location, enter the following network connection settings:
• Server Name or IP Address—Server name or IP address of the server that hosts the OScontents. If a server name is specified, a DNS entry is also required.
• Share Name—The name of the network share using Server Message Block (SMB) protocol thathosts the OS contents.
• Network Share User—User name used to access the network share.
• Network Share Password—Password for the user name used to access the network share.
b. For an FTP site, enter:
• Server Name or IP Address—FTP server name or IP address of the server that hosts the OScontents. FTP support requires anonymous access to the FTP server and does not supportconnecting to an FTP server through a proxy.
28 Version Information
IMPORTANT:
◦ When entering an FTP path, do not include spaces and punctuation. The FTP serverdirectory structure cannot contain spaces or special characters (including punctuation).
◦ Windows and SLES FTP installation, and RHEL network share installation are notsupported.
The system automatically pulls the ISO from the specified location to install it.
3. Enter the user name and password for the Deployment Settings package to use to access the networkshare.
This password is not encrypted. For a more secure access method, use FTP.
4. Select the OS and the keyboard language.
5. Enter the product key.
If you do not enter a product key and one is required, the OS installation pauses indefinitely, promptingyou to enter the key. The installation resumes after you enter the product key.
6. Click Deploy, and verify that you are ready to create the OS.
7. Click Apply to install the OS.
Entering Intelligent Provisioning PreferencesTo enter basic system settings, click Create New Deployment > Intelligent Provisioning Preferences >Edit .
Procedure
1. Select the user interface and keyboard language.
2. Enter Boot BIOS Mode.
3. Select a System Software Update option:
• Update from HPE website
• Update From Custom URL
4. Select Time Zone, System Date, and System Time.
5. Choose your network interface for updates and installs.
6. In the Choose network interface for updates and installs section, choose the following based on yoursetup:
• Use Proxy—Configures a network proxy for use with features that communicate across thenetwork. Enter a proxy address and port.
• DHCP Auto-Configuration—(Recommended) DHCP automatically assigns IP addresses to yourserver.
Entering Intelligent Provisioning Preferences 29
NOTE:
DHCP auto-configuration does not support IPv6 networks.
• IPv4/IPv6—Works as a mask field for the IP address.
7. Accept the Intelligent Provisioning EULA.
8. Click Update.
Array Configuration settingsUse the Array Configuration screen to enter the following RAID settings.
• RAID Level.
• Stripe Size.
• Read and Write Cache ratios. Make sure that these values total 100%.
Entering ROM settingsFor information on ROM settings, see Using the BIOS Configuration (RBSU) utility.
Using the BIOS Configuration (RBSU) utilityThe BIOS configuration page allows you to change system configurations from Intelligent Provisioning.For example, you can update:
• Jitter Smoothing
• Workload Matching
• Core Boosting
• Workload profiles
• Boot options
• Storage options
• Network options
• Virtualization options
Procedure
1. On the Intelligent Provisioning home screen, click Perform Maintenance.
2. Select BIOS configuration (RBSU) from the maintenance options. The BIOS configuration (RBSU)screen displays the following information:
• ROM version
• If a pending update follows valid RBSU dependency rules
• Number of pending changes
30 Array Configuration settings

• Number of items changes automatically due to dependency rules
• Resetting the BIOS
• Workload profile
3. To reset the BIOS for this server, click Reset BIOS.
4. To update the workload profile, click Workload Profile
5. To change RBSU configurations, select from the menu on the left, and then select the section thatcontains the configuration you want to change.
For a description of RBSU options, see the UEFI System Utilities User Guide.
6. To save changes, click Update.
7. To return to the Perform Maintenance home screen, click the Previous left arrow.
Using the iLO Configuration UtilityUse the iLO Configuration Utility to view and change iLO settings through Intelligent Provisioning, insteadof through the iLO web interface. For more information about iLO, see the HPE iLO 5 User Guide.
When changing iLO settings, if the display is not as expected or an undefined error message is displayed,press F5 to refresh the screen display. It is possible that the change was being made at the same timethrough the iLO web interface.
CAUTION:
If the ROM changes settings, the GUI will show differences.
Procedure
1. On the Intelligent Provisioning home screen, click Perform Maintenance.
2. Select iLO Configuration from the maintenance options.
The iLO Configuration Utility window is displayed.
Viewing iLO summary information
Procedure
1. On the Perform Maintenance screen, click iLO Configuration.
The iLO Configuration Utility screen opens.
2. Click Summary. The following information is displayed:
• iLO Firmware Version—The version and date of the installed iLO firmware.
• FQDN—The fully qualified domain name (FQDN) of the iLO subsystem.
• iLO IPV4 Address—The network IPV4 address of the iLO subsystem
• iLO IPV6 Address—The network IPV6 address of the iLO subsystem
Using the iLO Configuration Utility 31

You can also view this information on the Overview screen in the iLO web interface. For more information,see the HPE iLO 5 User Guide.
Running an iLO self-testRunning an iLO self-test checks the status of certain server hardware components.
Procedure
1. On the iLO Configuration Utility screen, click iLO Self-Test.
The self-tests are run, and the results screen appears.
• Tests that ran successfully are followed by a green checkmark.
• Tests that failed are followed by a red "X".
For more information about iLO self-tests and about how to interpret and troubleshoot the results, seethe HPE iLO 5 User Guide.
Editing iLO Management SettingsYou can edit various iLO management settings from the three tabs on the Management screen.
• Manager
• Manager Network Service
• SNMP Service
TIP:
To display a field description, hover the pointer over the field until the info tip is displayed.
For more detailed information about the tab fields, see the HPE iLO 5 User Guide.
Procedure
• To edit management settings on the Manager tab:
1. On the iLO Configuration Utility screen, click Management Settings.
The Manager tab appears. It includes options for Federation configuration, iLO service port,Command Shell, Graphical console, and serial console.
2. Edit the options.
3. Click Configure Manager in the upper right portion of the iLO Configuration screen to savechanges.
• To edit management settings on Manager Network Services:
1. On the iLO Configuration Utility screen, click Manager Network Services.
32 Running an iLO self-test

The Manager Network Services tab appears. It includes settings for alert mail, HTTP, HTTPS, IPMI,KVMIP, SNMP, SSDP, SSH, and virtual media.
2. Edit the options.
3. Click Configure Manager Network Services in the upper right portion of the iLO Configurationscreen to save changes.
• To edit management settings on the SNMP Service tab:
1. On the iLO Configuration Utility screen, click SNMP Service.
The SNMP Service tab appears. It includes settings for alerts, read only communities, SNMP v1traps, trap communities, and users.
TIP:
To see the description of a field, hover the pointer over the field until the info tip is displayed.For more detailed information about the SNMP Service tab fields, see the HPE iLO 5 UserGuide.
2. Edit the options.
3. Click Configure SNMP Service in the upper right portion of the iLO Configuration screen to savechanges.
Editing network interface settings
Procedure
1. Click iLO Configuration Utility, and then click Network Settings.
2. Edit the settings on each tab.
3. Click Apply.
Summary—This tab displays the current iLO information.
• NIC in use—The current NIC configuration you are using (for example, iLO Dedicated Network Port,or Shared Network Port).
• iLO Host Name—The DNS name of the iLO subsystem (for example, iLO instead ofilo.example.com). This name can be used only if DHCP and DNS are configured to connect to the iLOsubsystem name instead of the IP address. For more information, see the iLO 4 user guide.
• MAC Address—The NIC MAC address.
• Link State—The current link state (iLO Dedicated Network Port only).
• Duplex Option—The current duplex option (Full Duplex or Half Duplex).
• DHCPv4 Status—Enabled or Disabled.
• IPv6 Stateless Address Auto-Configuration (SLAAC)—Enabled or Disabled.
• SLAAC Address—Physical address of IPv6 created by iLO.
General tab:
Editing network interface settings 33
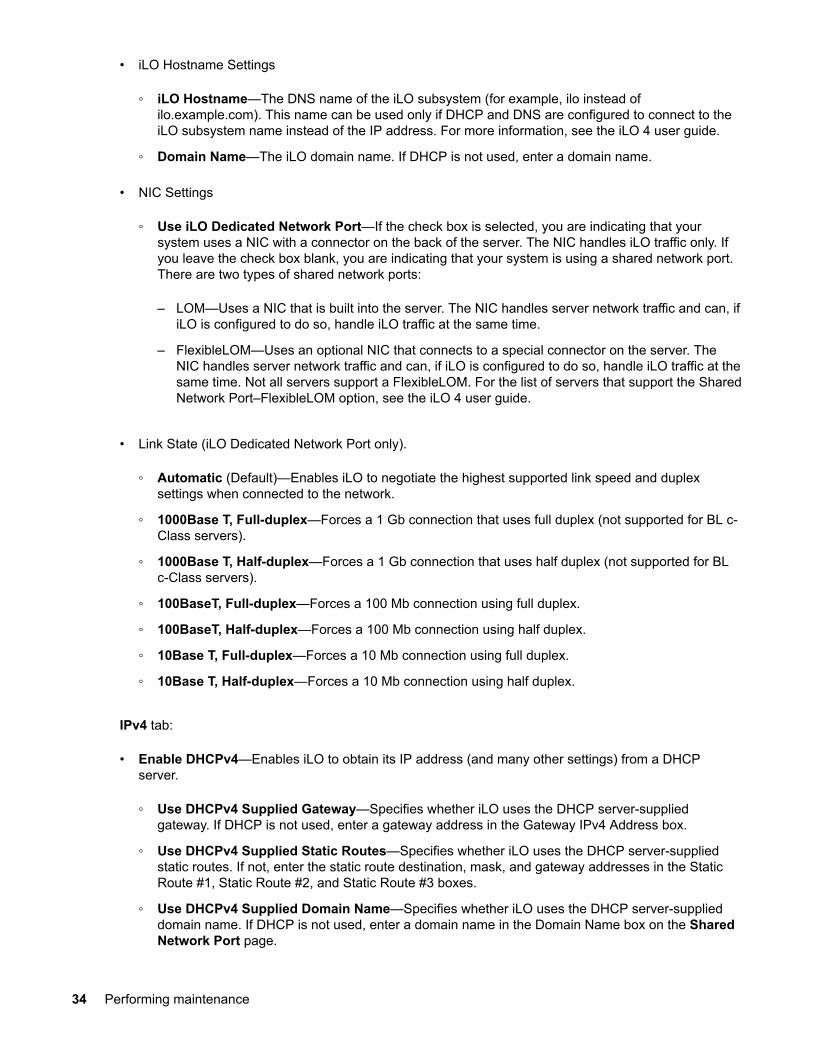
• iLO Hostname Settings
◦ iLO Hostname—The DNS name of the iLO subsystem (for example, ilo instead ofilo.example.com). This name can be used only if DHCP and DNS are configured to connect to theiLO subsystem name instead of the IP address. For more information, see the iLO 4 user guide.
◦ Domain Name—The iLO domain name. If DHCP is not used, enter a domain name.
• NIC Settings
◦ Use iLO Dedicated Network Port—If the check box is selected, you are indicating that yoursystem uses a NIC with a connector on the back of the server. The NIC handles iLO traffic only. Ifyou leave the check box blank, you are indicating that your system is using a shared network port.There are two types of shared network ports:
– LOM—Uses a NIC that is built into the server. The NIC handles server network traffic and can, ifiLO is configured to do so, handle iLO traffic at the same time.
– FlexibleLOM—Uses an optional NIC that connects to a special connector on the server. TheNIC handles server network traffic and can, if iLO is configured to do so, handle iLO traffic at thesame time. Not all servers support a FlexibleLOM. For the list of servers that support the SharedNetwork Port–FlexibleLOM option, see the iLO 4 user guide.
• Link State (iLO Dedicated Network Port only).
◦ Automatic (Default)—Enables iLO to negotiate the highest supported link speed and duplexsettings when connected to the network.
◦ 1000Base T, Full-duplex—Forces a 1 Gb connection that uses full duplex (not supported for BL c-Class servers).
◦ 1000Base T, Half-duplex—Forces a 1 Gb connection that uses half duplex (not supported for BLc-Class servers).
◦ 100BaseT, Full-duplex—Forces a 100 Mb connection using full duplex.
◦ 100BaseT, Half-duplex—Forces a 100 Mb connection using half duplex.
◦ 10Base T, Full-duplex—Forces a 10 Mb connection using full duplex.
◦ 10Base T, Half-duplex—Forces a 10 Mb connection using half duplex.
IPv4 tab:
• Enable DHCPv4—Enables iLO to obtain its IP address (and many other settings) from a DHCPserver.
◦ Use DHCPv4 Supplied Gateway—Specifies whether iLO uses the DHCP server-suppliedgateway. If DHCP is not used, enter a gateway address in the Gateway IPv4 Address box.
◦ Use DHCPv4 Supplied Static Routes—Specifies whether iLO uses the DHCP server-suppliedstatic routes. If not, enter the static route destination, mask, and gateway addresses in the StaticRoute #1, Static Route #2, and Static Route #3 boxes.
◦ Use DHCPv4 Supplied Domain Name—Specifies whether iLO uses the DHCP server-supplieddomain name. If DHCP is not used, enter a domain name in the Domain Name box on the SharedNetwork Port page.
34 Performing maintenance

◦ Use DHCPv4 Supplied DNS Servers—Specifies whether iLO uses the DHCP server-suppliedDNS server list. If not, enter the DNS server addresses in the Primary DNS Server, SecondaryDNS Server, and Tertiary DNS Server boxes.
◦ Use DHCPv4 Supplied Time Settings—Specifies whether iLO uses the DHCPv4 server-suppliedtime.
◦ Use DHCPv4 Supplied WNS Servers—Specifies whether iLO uses the DHCP server-suppliedWINS server list. If not, enter the WINS server addresses in the Primary WINS Server andSecondary WINS Server boxes.
• IPv4 Address—The iLO IP address. If DHCP is used, the iLO IP address is supplied automatically. IfDHCP is not used, enter a static IP address.
• Subnet Mask—The subnet mask of the iLO IP network. If DHCP is used, the subnet mask is suppliedautomatically. If DHCP is not used, enter a subnet mask for the network.
• Gateway IPv4 Address—The iLO gateway IP address. If DHCP is used, the iLO gateway IP addressis supplied automatically. If DHCP is not used, enter the iLO gateway IP address.
• Static Route #1, Static Route #2, and Static Route #3—The iLO static route destination, mask, andgateway addresses. If Use DHCPv4 Supplied Static Routes is used, these values are suppliedautomatically. If not, enter the static route values.
• Primary DNS Server—Enter the IPv4 address for the primary DNS service.
• Secondary DNS Server—Enter the IPv4 address for the secondary DNS service.
• Tertiary DNS Server—Enter the IPv4 address for the tertiary DNS service.
NOTE:
When DNS server locations are configured in both IPv4 and IPv6, both sources are used, withpreference given according to the iLO Client Applications use IPv6 first configuration option, primarysources, then secondary, and then tertiary.
• Enable DNS Server Registration—Select this option to enable iLO to register its IPv4 address andname with a DNS server.
• Primary WINS Server—Enter the IPv4 address for the primary WINS server.
• Secondary WINS Server—Enter the IPv4 address for the secondary WINS server.
• Enable WINS Server Registration—Select this check box to enable iLO to register the IPv4 addressfor the WINS server(s).
• Ping Gateway on Startup—Select this check box to have iLO send request packets to the gatewaywhen iLO initializes.
IPv6 tab:
• iLO Client Applications use IPv6 first—When both IPv4 and IPv6 service addresses are configuredfor iLO client applications, this option specifies which protocol iLO tries first when accessing a clientapplication. This setting also applies to lists of addresses received from the name resolver when usingFQDNs to configure NTP.
Performing maintenance 35

◦ Select this check box if you want iLO to use IPv6 first.
◦ Clear this check box if you want iLO to use IPv4 first.
If communication fails using the first protocol, iLO automatically tries the second protocol.
• Enable Stateless Address Auto Configuration (SLAAC)—Select this check box to enable iLO tocreate IPv6 addresses for itself from router advertisement messages.
NOTE:
iLO will create its own link-local address even when this option is not selected.
• Primary DNS Server, Secondary DNS Server, Tertiary DNS Server—Enter the IPv6 addresses forthe DNS service. When DNS server locations are configured in both IPv4 and IPv6, both sources areused, with preference given according to the iLO Client Applications use IPv6 first configuration option,primary sources, then secondary, and then tertiary.
• Use DHCPv6 Supplied NTP Servers—This option determines whether iLO uses the DHCPv6 server-supplied time.
• Enable DDNS Server Registration—This option determines whether iLO registers its IPv6 addressand name with a DNS server.
• Static IPv6 Address 1–4—Enter up to four static IP addresses if they are not automatically assigned.You must specify the prefix length for the addresses.
• Static Default Gateway—Enter a default IPv6 gateway address for cases in which no routeradvertisement messages are present in the network.
• Static Route #1 (Destination/Gateway), Static Route #2 (Destination), Static Route #3—Enter staticIPv6 route destination prefix and gateway address pairs. You must specify the prefix length for thedestination. Link-local addresses are not allowed for the destination, but are allowed for the gateway.
SNTP tab:
• Use DHCPv4 Supplied Time Settings—Specifies whether iLO uses the DHCP server-supplied time.
• Use DHCPv6 Supplied Time Settings—Specifies whether iLO uses version 6 of the DHCP server-supplied time.
• Propagate NTP Time to Host—Specifies whether ILO uses NTP time instead of the DHCP server-supplied time.
• Primary Time Server—If DHCPv4 or DHCPv6 SNTP is not used, enter a time server address in thePrimary Time Server box.
• Secondary Time Server—If DHCPv4 or DHCPv6 SNTP is not used, enter a secondary time serveraddress in the Secondary Time Server box.
• Time Zone—A drop-down list of worldwide time zones.
Editing User Account settings
Procedure
• To add a new user:
1. On the iLO Configuration Utility screen, click User Accounts.
36 Editing User Account settings

The User Accounts screen appears.
2. Click New.
The Add User screen appears.
3. Enter a User Name.
This is the name that appears in the user list on the User Accounts page, and on the iLO Overviewpage. It does not have to be the same as the Login Name. The maximum length for a user name is39 characters. The user name must use printable characters.
4. Enter a Login Name. The maximum length for a login name is 39 characters. The login name mustuse printable characters.
IMPORTANT:
The Login Name cannot be modified once it is set.
5. Enter the password. The minimum length for a password is set on the Access Settings page. Themaximum length for a password is 39 characters.
6. Re-enter the password to confirm it.
7. Select the appropriate permissions for the user you are adding.
◦ Login—Enables a user to log in to iLO.
◦ Host BIOS—Enables a user to configure the host BIOS settings by using the UEFI SystemUtilities.
◦ Host NIC—Enables a user to configure the host storage settings.
◦ Host Storage—Enables a user to configure to host storage settings.
◦ Recovery Set—Enables a user to manage the recovery install set.
◦ Administer User Accounts—Enables a user to add, edit, and delete local iLO user accounts.A user with this privilege can change privileges for all users. If you do not have this privilege,you can view your own settings and change your own password.
◦ Configure iLO Settings—Enables a user to configure most iLO settings, including securitysettings, and to remotely update the iLO firmware. This privilege does not enable local useraccount administration.
◦ Remote Console Access—Enables a user to remotely access the host system RemoteConsole, including video, keyboard, and mouse control.
◦ Virtual Media —Enables a user to use the Virtual Media feature on the host system.
◦ Virtual Power and Reset—Enables a user to power-cycle or reset the host system. Theseactivities interrupt the system availability. A user with this privilege can diagnose the system byusing the button.
8. Click Add.
• To edit an existing user’s account:
1. On the iLO Configuration Utility screen, click User Accounts.
The User Accounts screen appears.
2. Click Edit.
Performing maintenance 37

The Edit User screen appears.
3. Enter the User Name for the user’s account you are editing.
4. Enter the user’s password. Re-enter the password to confirm it.
5. Select the check boxes to modify the user’s permissions.
6. Click Update.
• To delete a user account:
1. On the iLO Configuration Utility screen, click User Accounts.
The User Accounts screen appears.
2. On the User Accounts list, select the user account you want to delete.
3. Click Delete, and then click OK.
Resetting iLO
Procedure
1. On the iLO Configuration Utility screen, click Reset.
The Reset iLO screen appears.
2. Select one of the following options:
• Reset iLO—Resets (reboots) iLO.
• Reset to Factory Default Settings—Restores factory default settings.
When iLO is reset, and you must log in again.
Using Secure Erase and ResetUse Secure Erase and Reset to clear hard drives and Intelligent Provisioning Preferences.
System Erase and Reset optionsThe following table includes the options in the System Erase and Reset menu and a description of whatselecting each option will do.
Option Description
All hard drives Erase all hard drives on this server.
Wipe hard drives Displays if All Hard Drives is selected.
Writes a data pattern over all sectors. This will take several hours perhard drive.
Table Continued
38 Resetting iLO

Option Description
Secure Erase of Non-VolatileStorage1
Triggers a secure hardware erase of all user and warrantyinformation. This may take up to 24 hours and cannot be aborted untilit completes.
IMPORTANT:
The Secure Erase of Non-Volatile Storage feature needs aniLO Advanced Secure License in order to be displayed andfunctioning in the GUI. See the HPE iLO Licensing Guide formore information.
Intelligent ProvisioningPreferences
Clear Intelligent Provisioning preferences.
1 Erases using the guidelines from DoD 5220.22-M Data Wipe.
Using Secure EraseIntelligent Provisioning provides secure erase functionality for the internal system storage and hard disksfollowing the guidelines outlined in DoD 5220.22-M. Secure erase overwrites all block devices attachedto the system through applying random patterns in a three-pass process. These block devices includehard disks, storage systems attached to the server, as well as the internal storage used by iLO. Depending on the amount of storage installed on a system, the secure erase process can take manyhours or even days to complete.
CAUTION:
• Secure Erase should be used with extreme caution, and only when a system is beingdecommissioned. The secure erase process resets iLO and deletes all licenses stored there,resets BIOS settings in many cases, and deletes all AHS and warranty data stored on thesystem. The secure erase process also deletes any deployment settings profiles. iLO rebootsmultiple times after the process is complete.
• Disconnect any FCoE, iSCSI, external SAS, and Fibre Channel storage before using secureerase, unless they should also be erased.
Using HPE Smart Storage Administrator (HPE SSA)HPE SSA provides high-availability configuration, management, and diagnostic capabilities for all SmartArray products.
HPE SSA featuresHPE SSA is a browser-based utility that runs in either offline or online mode. HPE SSA:
• Supports online array capacity expansion, logical drive extension, assignment of online spares, andRAID or stripe size migration.
• Suggests the optimum configuration for an unconfigured system.
Using Secure Erase 39

• Provides different operating modes, enabling faster configuration or greater control over theconfiguration options.
• Displays on-screen tips for individual steps of a configuration procedure.
In HPE SSA, you can select a controller from the menu at the top left-hand side of the screen, or you canchoose to configure or diagnose an available controller from the same menu.
Accessing HPE SSA
Procedure
1. On the Intelligent Provisioning home screen, click Perform Maintenance.
2. Select Raid Configuration from the maintenance options.
The Smart Storage Administrator window is displayed.
ConfigurationOn the Smart Storage Administrator screen, under Actions, click Configure. Options include:
• Controller settings—Configures the supported controller settings. Depending on the controller, thesecan include setting the array accelerator cache ratio, transform and rebuild priorities, and surface scandelay.
• Caching settings—Configures the supported caching settings which can help increase performanceby taking advantage of cache memory. Caching also helps protect data integrity when used with abattery or capacitor.
• Clear configuration—Resets the controller's configuration to its default state. Existing arrays orlogical drives are deleted, and data on the logical drives is lost. Confirm this is the preferred actionbefore proceeding.
• Physical drive write cache settings—Enables or disables the write cache on physical drivesattached to a controller. This feature can improve performance but precautions must be taken toensure data integrity.
• Modify spare activation mode—Switches the spare activation mode from the default behavior(activate on failure only) to predictive spare activation and back.
• Set Bootable Logical Drive/Volume—Sets the primary and secondary boot logical drives andvolumes. Local logical drives as well as remote logical drives and volumes are listed for selection.
• Manage License Keys—Enables the user to add or remove license keys. Depending on the keysentered or removed, various features can be enabled or disabled.
• More information—Provides an in-depth display of available information for the currently selecteddevice and all of its child devices, when applicable.
Diagnostics/SmartSSDOn the Smart Storage Administrator screen, under Actions, click Diagnose. Options include.
• Array Diagnostics Report—Runs reports on selected controllers to display available diagnostictasks. Reports include SmartSSD Wear Gauge information for supported solid state drives.
40 Accessing HPE SSA

◦ View Diagnostic Report—Generates and displays a diagnostic report for the selected devices.The report includes SmartSSD Wear Gauge information for supported Solid State Drives, andusage and estimated lifetime information.
◦ Save Diagnostic Report —Generates a diagnostic report for the selected devices for exportwithout presenting a graphical display.
• SmartSSD Wear Gauge Report—View or generate a report:
◦ View SmartSSD Wear Gauge Report—Displays SSD usage and estimated lifetime information.
◦ Save SmartSSD Wear Gauge Report—Generates a report for export, without presenting agraphical display.
Performing maintenance 41

Using the USB Key UtilityThe USB Key Utility is a Windows application that copies Intelligent Provisioning or SPP contents, andother CD or DVD images to a USB flash drive. After copying data to the USB flash drive, you can runIntelligent Provisioning or SPP from the USB flash drive instead of from a CD or DVD. This process isbeneficial in headless-server operations. It also simplifies the storage, transportation, and usage of thecontents by allowing you to retrieve their images from the web and customize them as needed.
Installing the utility adds a shortcut in System Tools in the Programs Start menu folder.
Features
The USB Key Utility supports:
• ISO files larger than 1 GB.
• Quick Formatting on USB flash drives.
• USB flash drives up to a maximum of 32 GB. USB flash drives larger than 32 GB are not displayed inthe utility.
PrerequisitesInstalling applications onto a USB flash drive requires a supported source CD, DVD, or ISO, and a USBflash drive with adequate storage space for storing the source contents. The USB Key Utility requires aUSB 2.0 flash drive with a storage size larger than the media or ISO image (2 GB or greater).
NOTE:
Version 2.0 and later of the USB Key Utility does not support a 32-bit operating system.
AutoRun files
AutoRun files do not start automatically from the utility. To start an AutoRun file, double-click theautorun.exe file in the appropriate CD or DVD folder on the USB Key.
Creating a bootable USB keyInstalling the utility adds a shortcut in USB Key Utility program group in the Programs Start menu folder.
Procedure
1. Double-click the USB Key Utility shortcut in the USB Key Utility folder.
2. Complete each step as presented by the application:
a. Click Next at the splash screen.
b. Read the End-User License Agreement, and then select Agree and click Next.
c. Select Create a bootable USB key from CD/DVD, and then click Next.
NOTE:
Do not select the Add an additional CD/DVD to a bootable USB key option with SUM 6.2.0,SPP 2014.02.0, or Intelligent Provisioning 1.60 and later, which no longer support multiple-bootenvironments on a single device.
42 Using the USB Key Utility

d. Place the USB flash drive in an available USB port. Insert the media in the optical drive or mountthe ISO image, and then click Next.
e. Choose the drive letter of the source, choose the drive letter of the target USB flash drive, and clickNext.
TIP: If you do not see your drive key, click Rescan Target or insert a new one.
CAUTION:
All data on the target USB key will be deleted.
f. Click Next on the warning message screen.
The USB flash drive is formatted, and the source contents are copied to the USB flash drive.
g. To display the README.TXT file, click Finish.
NOTE:
The README.TXT file is only displayed if the ISO has one to view.
Adding content to a bootable USB keyThe USB Key Utility supports multiple images on a single USB flash drive if there is adequate spaceavailable on the USB flash drive and you are not loading content that works with a UEFI bootloader,which does not support multiple images due to security reasons.
NOTE:
SUM 6.20, SPP 2014.02.0, and Intelligent Provisioning 1.60 and later no longer support multiple-bootenvironments on a single device. SUM, SPP, and Intelligent Provisioning contain signed parts that workwith the UEFI boot loader. This change no longer allows for multi-boot setups on a single device, such asa USB key.
Procedure
1. Follow the instructions for creating a bootable USB key.
2. Double-click the USB Key Utility shortcut in the USB Key Utility folder.
3. Complete each step presented by the application:
a. Click Next at the splash screen.
b. Select Agree, and then click Next after reading the End-User License Agreement.
c. Select Add an additional CD/DVD to a bootable USB key, and then click Next.
d. Place the USB flash drive in an available USB port. Insert the media into the optical drive or mountthe ISO image, and then click Next.
e. Choose the drive letter of the source, choose the drive letter of the target USB flash drive, and thenclick Next.
f. Click Next on the informational screen.
Adding content to a bootable USB key 43

The source contents are copied to the USB flash drive.
g. To display the README.TXT file, click Finish.
NOTE:
The README.TXT file is only displayed if the ISO has one to view.
4. Repeat steps 2-3 for each source media or image to be transferred to the USB key.
44 Using the USB Key Utility

TroubleshootingBasic troubleshooting techniques
Intelligent Provisioning provides basic troubleshooting tools you can use to resolve issues.
Troubleshooting general issues
iLO log on required during Intelligent Provisioning F10 boot
Symptom
Cannot log on to Intelligent Provisioning without providing iLO user name and password during F10 boot.
Cause
The RBSU BIOS Admin password has been set.
Action
1. Force a shutdown and then boot to the RBSU.
2. Delete the Admin password.
3. Click Save and exit.
4. Select System Utilities > Embedded Application > Intelligent Provisioning.
5. Launch Intelligent Provisioning.
Intelligent Provisioning does not launch when F10 is pressed
Symptom
Intelligent Provisioning allows service personnel and customers to press the F10 key during SystemPower-On Self-Test (POST) to load the latest Intelligent Provisioning automatically. If IntelligentProvisioning does not launch as expected, it might be necessary to reinstall Intelligent Provisioning.
Cause
There is an issue with the current Intelligent Provisioning files.
Action
1. Download the Intelligent Provisioning ISO image and the USB Key Utility from hpe.com. See Usingthe USB Key Utility for more information.
2. Create a bootable USB key and copy the ISO image.
3. Insert the USB key and power up the unit.
4. To boot from the USB key, press F11, and select Option 3: One Time Boot to USB Drive Key.
The system boots from the USB key and installs IP Recovery. When the installation is complete, theutility prompts you to remove the USB key.
Troubleshooting 45

5. Remove the USB key.
6. Reboot the system and press F10 (IP Recovery) to verify IP Recovery launches properly.
OS Host name field missing
Symptom
The OS Host name field on the Intelligent Provisioning Assisted Install > OS selection page ismissing.
Action
OS Host name has been replaced with Computer name which performs the same function.
Accessing version information in deployment settings
Symptom
Version information for the Deployment settings utility is blank.
Cause
Version information is no longer located in the Deployment settings utility.
Action
Click the System Information icon at the top of the screen for version information.
A browser does not import a deployment profile correctly
Symptom
Intelligent Provisioning does not import a deployment profile correctly.
Action
Verify that the profile is saved as a .txt file format.
Some Legacy BIOS Mode installs need specific instructionsIf the server boot mode is set to Legacy BIOS Mode, some operating systems need specific installations.
NOTE:
Legacy BIOS Mode behavior cannot be modified by pressing F10. If you are doing a manual installationin Legacy BIOS Mode, ensure that:
• On Windows systems, the system boots to the DVD.
• On Linux and VMware systems, the system boots to the hard drive.
46 OS Host name field missing

NOTE:
Change the boot order, or press F11 during the boot process.
NIC ports not saved Intelligent Provisioning Preferences
Symptom
NIC ports are not saved in Intelligent Provisioning Preferences after clicking Submit.
Cause
The server requires a reboot to save NIC ports.
Action
1. Select the NIC port under Choose network interface for updates and installs.
2. Click Submit.
3. Reboot the server to save the NIC port.
Always On Intelligent Provisioning does not display status of NICs
Symptom
When viewing NICs in Always On Intelligent Provisioning, the NIC does not display the status.
Action
1. Check the status of the NIC options in the iLO page or RBSU.
2. Select the port in AOIP, and then continue with the installation.
Cannot create a custom partition size
Symptom
When installing an OS, you cannot create a custom partition size.
Action
No action. Intelligent Provisioning does not support creating a custom partition size when installing theoperating system.
Troubleshooting Windows-specific issues
No information on the System Management home page
Symptom
No information is displayed on the System Management home page after an assisted installation ofWindows.
NIC ports not saved Intelligent Provisioning Preferences 47

Cause
No displayed information on the System Management home page is expected behavior because, bydefault, only AMS is installed.
Action
1. Install WBEM or SNMP agents.
2. Verify that information appears on the System Management home page.
Windows Essentials does not install from USB source
Symptom
Windows Essentials does not install from a USB source.
Cause
USB installations are not supported for Windows Essentials.
Action
Install Windows Essentials from an ISO source.
Troubleshooting Linux-specific issues
Unable to proceed with Assisted installation of Red Hat Enterprise Linux 7
Symptom
When installing Red Hat Enterprise Linux 7, you are unable to proceed with the Assisted installation withvalid OS images through FTP source media.
Cause
Required Red Hat OS files are missing or incorrectly placed.
Action
1. Make sure that all the required Red Hat OS files are present in the OS flat file folder.
2. Make sure that two TRANS.TBL files are present in the Red Hat OS flat files folder. One file must bepresent in the main OS file folder, and another must be present inside the Server folder inside themain OS file folder.
3. Retry the installation.
Assisted installation of Red Hat OS hangs
Symptom
When using the Assisted installation method for Red Hat OS installation with FTP source media, one ofthe following problems occurs:
48 Windows Essentials does not install from USB source

• The installation hangs during reboot and a The Red Hat Enterprise Linux Server CD wasnot found error is displayed.
• The installation hangs and a Could not allocate requested partitions error is displayed.
• The installation does not complete successfully.
• The installation completes successfully even if there are missing flat files for the OS installation.
Cause
Using the Assisted installation method for Red Hat OS installation with FTP source media might not workreliably.
Action
1. Obtain the DUD from the HPE Support Center.
2. Install the OS outside of Intelligent Provisioning.
Troubleshooting VMware-specific issues
Server reboots during VMware Assisted installation
Symptom
When performing a VMware Assisted installation with DVD as source media, after Pre-installation iscomplete, the server reboots and the server begins loading the ESXi installer again rather than openingthe OS.
Cause
VMware OS installed on HDD continuously reboots if a USB is connected to SUT.
Action
1. Remove the USB device.
2. Continue the installation.
Troubleshooting VMware-specific issues 49

WebsitesGeneral websitesHewlett Packard Enterprise Information Library
www.hpe.com/info/EILSingle Point of Connectivity Knowledge (SPOCK) Storage compatibility matrix
www.hpe.com/storage/spockStorage white papers and analyst reports
www.hpe.com/storage/whitepapers
For additional websites, see Support and other resources.
50 Websites
Support and other resources
Accessing Hewlett Packard Enterprise Support• For live assistance, go to the Contact Hewlett Packard Enterprise Worldwide website:
http://www.hpe.com/assistance
• To access documentation and support services, go to the Hewlett Packard Enterprise Support Centerwebsite:
http://www.hpe.com/support/hpesc
Information to collect
• Technical support registration number (if applicable)
• Product name, model or version, and serial number
• Operating system name and version
• Firmware version
• Error messages
• Product-specific reports and logs
• Add-on products or components
• Third-party products or components
Accessing updates• Some software products provide a mechanism for accessing software updates through the product
interface. Review your product documentation to identify the recommended software update method.
• To download product updates:
Hewlett Packard Enterprise Support Centerwww.hpe.com/support/hpesc
Hewlett Packard Enterprise Support Center: Software downloadswww.hpe.com/support/downloads
Software Depotwww.hpe.com/support/softwaredepot
• To subscribe to eNewsletters and alerts:
www.hpe.com/support/e-updates
• To view and update your entitlements, and to link your contracts and warranties with your profile, go tothe Hewlett Packard Enterprise Support Center More Information on Access to Support Materialspage:
Support and other resources 51

www.hpe.com/support/AccessToSupportMaterials
IMPORTANT:
Access to some updates might require product entitlement when accessed through the HewlettPackard Enterprise Support Center. You must have an HPE Passport set up with relevantentitlements.
Customer self repairHewlett Packard Enterprise customer self repair (CSR) programs allow you to repair your product. If aCSR part needs to be replaced, it will be shipped directly to you so that you can install it at yourconvenience. Some parts do not qualify for CSR. Your Hewlett Packard Enterprise authorized serviceprovider will determine whether a repair can be accomplished by CSR.
For more information about CSR, contact your local service provider or go to the CSR website:
http://www.hpe.com/support/selfrepair
Remote supportRemote support is available with supported devices as part of your warranty or contractual supportagreement. It provides intelligent event diagnosis, and automatic, secure submission of hardware eventnotifications to Hewlett Packard Enterprise, which will initiate a fast and accurate resolution based on yourproduct's service level. Hewlett Packard Enterprise strongly recommends that you register your device forremote support.
If your product includes additional remote support details, use search to locate that information.
Remote support and Proactive Care informationHPE Get Connected
www.hpe.com/services/getconnectedHPE Proactive Care services
www.hpe.com/services/proactivecareHPE Proactive Care service: Supported products list
www.hpe.com/services/proactivecaresupportedproductsHPE Proactive Care advanced service: Supported products list
www.hpe.com/services/proactivecareadvancedsupportedproducts
Proactive Care customer informationProactive Care central
www.hpe.com/services/proactivecarecentralProactive Care service activation
www.hpe.com/services/proactivecarecentralgetstarted
Warranty informationTo view the warranty for your product or to view the Safety and Compliance Information for Server,Storage, Power, Networking, and Rack Products reference document, go to the Enterprise Safety andCompliance website:
www.hpe.com/support/Safety-Compliance-EnterpriseProducts
52 Customer self repair

Additional warranty informationHPE ProLiant and x86 Servers and Options
www.hpe.com/support/ProLiantServers-WarrantiesHPE Enterprise Servers
www.hpe.com/support/EnterpriseServers-WarrantiesHPE Storage Products
www.hpe.com/support/Storage-WarrantiesHPE Networking Products
www.hpe.com/support/Networking-Warranties
Regulatory informationTo view the regulatory information for your product, view the Safety and Compliance Information forServer, Storage, Power, Networking, and Rack Products, available at the Hewlett Packard EnterpriseSupport Center:
www.hpe.com/support/Safety-Compliance-EnterpriseProducts
Additional regulatory information
Hewlett Packard Enterprise is committed to providing our customers with information about the chemicalsubstances in our products as needed to comply with legal requirements such as REACH (Regulation ECNo 1907/2006 of the European Parliament and the Council). A chemical information report for this productcan be found at:
www.hpe.com/info/reach
For Hewlett Packard Enterprise product environmental and safety information and compliance data,including RoHS and REACH, see:
www.hpe.com/info/ecodata
For Hewlett Packard Enterprise environmental information, including company programs, productrecycling, and energy efficiency, see:
www.hpe.com/info/environment
Documentation feedbackHewlett Packard Enterprise is committed to providing documentation that meets your needs. To help usimprove the documentation, send any errors, suggestions, or comments to Documentation Feedback([email protected]). When submitting your feedback, include the document title, part number,edition, and publication date located on the front cover of the document. For online help content, includethe product name, product version, help edition, and publication date located on the legal notices page.
Regulatory information 53