Intelligent Cash Box System ICB Web Reports Program · ICB® Web Reports Program . Version 2.X.X...
74
© 2012, Japan CashMachine Co., Limited Support: http://www.jcmglobal.com/en/contact/default.aspx Web-Site: http://www.jcmglobal.com Intelligent Cash Box System ICB ® Web Reports Program Operator Instruction Manual Software Release P/N 960-100917R_Rev. 1 {EDP #214112} Version 2.X.X Issue #ICB-SME-02-01
Transcript of Intelligent Cash Box System ICB Web Reports Program · ICB® Web Reports Program . Version 2.X.X...

Support: http://www.jcmglobal.com/en/contact/default.aspx Web-Site: http://www.jcmglobal.com
Intelligent Cash Box System
ICB® Web Reports ProgramOperator Instruction Manual
Software Release
P/N 960-100917R_Rev. 1 {EDP #214112}
Version 2.X.X
© 2012, Japan CashMachine Co., LimitedIssue #ICB-SME-02-01

Intelligent Cash Box System ICB® Web Reports Program Operator Instruction Manual
International Compliance• RoHS Directives
• CE Mark
REVISION HISTORY
Rev №. Date Reason for Update Comment
A 04/22/10 Initial Software Version 2.0.0 Prime
1 06/14/10 Software Version 2.0.7 Prime Rev. 5 of Original
2 4/03/12 Software Version 2.X.X Prime Update with Subscription Version 2.5.X as Appendix A
3
or or or or
Issue #ICB-SME-02-01
This product document (hereinafter referred to as “Manual”) is fully covered by legal Copyrights owned by the Japan Cash Machine, Co., Ltd., (hereinafter referred to as “JCM”) under Japanese laws and foreign countries. This Manual contains many copyrighted, patented or properly registered equipment items manufactured by JCM, that are prohibited and illegal to duplicate, replicate or copy in whole, or in part, without the express authorization by JCM with the following exceptions:
1. When an authorized JCM agency or distributor duplicates the Manual for sales promotion and/or service maintenance of the product, or technical service personnel education as required; and2. When an end user duplicates the Manual to maintain operation of the product or operate the product in general. JCM retains all rights to amend, alter, change or delete any portion of this Manual in whole, or in part, or add items thereto without notice regarding the product or its related products.
JCM is a registered trademark of Japan CashMachine Co, Limited. All other product names mentioned herein may be registered trademarks or trademarks of their respective companies. Furthermore, ™, ® and © are not always mentioned in each case throughout this publication.
Copyright © 2012 By Japan CashMachine Co, Limited

ICB® Web Reports Program Version 2.X.X Operator Instruction Manual
Table of Contents
PageTOC1 GENERAL INFORMATION.................................................................................. 1-1
Description................................................................................................................... 1-1Typical Hardware Components .................................................................................. 1-1Introduction.................................................................................................................. 1-2
Program Setup and Initialization ...............................................................................................1-22 BROWSER SECURITY........................................................................................ 2-1
Connecting to Web Reports using the Internet Explorer SSL Feature................... 2-1Connecting to Web Reports using Firefox................................................................ 2-3
Working with Scripted Windows ................................................................................................2-43 HELP FUNCTION................................................................................................. 3-1
On-Line Help Function ................................................................................................ 3-1
4 ADMINISTRATION............................................................................................... 4-1Administration Screen ................................................................................................ 4-1Personal Account: Change Password....................................................................... 4-3
Changing a Currently Assigned Password:...............................................................................4-3Changing a Password that's about To Expire:...........................................................................4-3First Time Login Password change: ..........................................................................................4-4
Users and Roles: Users .............................................................................................. 4-5Adding a New User to the System ............................................................................................4-5Deleting a User from the System ..............................................................................................4-6Making Changes to an Existing User ........................................................................................4-6Resetting a User Password.......................................................................................................4-6Unlocking a User Account .........................................................................................................4-6
Users and Roles: Roles .............................................................................................. 4-7Adding a New Role to the System.............................................................................................4-7Deleting a Role from the System...............................................................................................4-8Modifying an existing Role on the System ................................................................................4-8
Settings: Log In Settings ............................................................................................ 4-9Settings: Denomination Settings ............................................................................. 4-12
Updating the 'Default' Denomination Table .............................................................................4-12Settings: Product Configurations ............................................................................ 4-13
To Set Product Configurations.................................................................................................4-13Settings: System Settings ........................................................................................ 4-14Admin Reports: Activity Log .................................................................................... 4-16Summary Fields......................................................................................................... 4-16Data Fields ................................................................................................................. 4-16
5 PERFORMANCE FUNCTIONS............................................................................ 5-1Performance Related Reports .................................................................................... 5-1Report Display and Output Options .......................................................................... 5-2Main Report Screen..................................................................................................... 5-5Asset Data Report Screen .......................................................................................... 5-6Performance: Acceptance Rate Report ..................................................................... 5-7
Summary Fields ........................................................................................................................5-7
P/N 960-100917R_Rev. 1 {EDP #214112} © 2012, Japan CashMachine Co., Limited i

Table of Contents
ICB® Web Reports Program Version 2.X.X Operator Instruction Manual
PageData Fields................................................................................................................................ 5-7
Performance: Acceptor Version Report .................................................................... 5-9Summary Fields........................................................................................................................ 5-9Data Fields................................................................................................................................ 5-9
Performance: Duplicate Asset Report..................................................................... 5-10Data Fields.............................................................................................................................. 5-10
Performance: Error Codes Report ............................................................................5-11Summary Fields.......................................................................................................................5-11Data Fields...............................................................................................................................5-11
Performance: Revenue Report................................................................................. 5-13Summary Fields...................................................................................................................... 5-13Data Fields.............................................................................................................................. 5-14
Performance: System Log Report ........................................................................... 5-15Summary Fields...................................................................................................................... 5-15Data Fields.............................................................................................................................. 5-15
6 MY HOME FUNCTIONS ....................................................................................... 6-1My Home Screen ......................................................................................................... 6-1
My Home: Summary Report ..................................................................................................... 6-27 LOG OUT FUNCTION .......................................................................................... 7-1
Application Logout...................................................................................................... 7-1
8 INDEX ................................................................................................................... 8-1A SUBSCRIPTION VERSION................................................................................. A-1
Start-Up and Log-In .....................................................................................................A-1Users and Roles: Roles ..............................................................................................A-2Administration: System Settings...............................................................................A-4Performance: Last Dropped Time Report .................................................................A-5
Data Fields................................................................................................................................A-5My Home: E-mail Subscriptions ................................................................................A-6My Home: Report Designer ........................................................................................A-8
Modifying Existing Reports (Refer to Figure A-7) .....................................................................A-8Creating New Reports (Refer to Figure A-8) ...........................................................A-10
B FAQS & TROUBLESHOOTING .......................................................................... B-1C GLOSSARY ........................................................................................................ C-1
P/N 960-100917R_Rev. 1 {EDP #214112} © 2012, Japan CashMachine Co., Limited ii

ICB® Web Reports Program Version 2.X.X Operator Instruction Manual
List of Figures
PageLOFFigure 1-1 Typical Intelligent Cash Box System Hardware ..................................... 1-1Figure 1-2 Intelligent Cash Box Types Available..................................................... 1-2Figure 1-3 Initial ICB Web Reports Log In Screen .................................................. 1-3Figure 2-1 Continue to this website (not recommended) Radio Button Selection ... 2-1Figure 2-2 Making Certificate Error Selection.......................................................... 2-1Figure 2-3 Making View Certificates Selection ........................................................ 2-1Figure 2-4 Making Install Certificate Selection ........................................................ 2-1Figure 2-5 Certificate Import Wizard Screen ........................................................... 2-2Figure 2-6 Making the Radio & Browse Button Selections...................................... 2-2Figure 2-7 Making the Folder & OK Screen Button Selections ............................... 2-2Figure 2-8 Trusted Root Certification Authorities Selected Screen ......................... 2-2Figure 2-9 Completing the Certificate Import Wizard Screen .................................. 2-2Figure 2-10 Security Warning Screen ....................................................................... 2-3Figure 2-11 Import Successful Dialog Screen........................................................... 2-3Figure 2-12 Certificate OK Screen Button Selection ................................................. 2-3Figure 2-13 Firefox Untrusted Connection Screen.................................................... 2-3Figure 2-14 Firefox Untrusted Connection Screen.................................................... 2-3Figure 2-15 Confirm Security Exception Dialog Screen ............................................ 2-4Figure 2-16 Allow Scripted Windows Selection Screen ............................................ 2-4Figure 3-1 On-Line Help Window Screen................................................................ 3-1Figure 4-1 Initial Administration Screen................................................................... 4-1Figure 4-2 Adding/Changing Password Screen ...................................................... 4-3Figure 4-3 Users and Roles: Users Screen............................................................. 4-5Figure 4-4 Users and Roles: Roles Screen ............................................................. 4-7Figure 4-5 Log In Settings Screen........................................................................... 4-9Figure 4-6 Denomination Settings Screen............................................................. 4-12Figure 4-7 Product Configuration Screen.............................................................. 4-13Figure 4-8 System Settings Screen....................................................................... 4-14Figure 4-9 Typical Activity Log Report Screen ...................................................... 4-16Figure 5-1 Performance Screen .............................................................................. 5-1Figure 5-2 Report Options Screen Area.................................................................. 5-2Figure 5-3 No Records Found Message ................................................................. 5-2Figure 5-4 Report Date Options Screen Area ......................................................... 5-2Figure 5-5 Cash Box Options Select Menu ............................................................. 5-2Figure 5-6 Time Period Select Menu....................................................................... 5-3Figure 5-7 Custom Range Selection Menu ............................................................. 5-3Figure 5-8 Filter Selection Menus............................................................................ 5-3Figure 5-9 Data Field Selection Menu..................................................................... 5-3Figure 5-10 Delimiter Selection Menu ....................................................................... 5-4Figure 5-11 Filter In Use Screen ............................................................................... 5-4
P/N 960-100917R_Rev. 1 {EDP #214112} © 2012, Japan CashMachine Co., Limitediii

List of Figures
ICB® Web Reports Program Version 2.X.X Operator Instruction Manual
PageFigure 5-12 Multiple Filter Add/Delete Buttons .......................................................... 5-4Figure 5-13 Main Report Screen ............................................................................... 5-5Figure 5-14 Asset Data Report Screen...................................................................... 5-6Figure 5-15 Acceptance Rate Report Screen............................................................ 5-7Figure 5-16 Acceptor Version Report Screen............................................................ 5-9Figure 5-17 Duplicate Asset Number Report Screen .............................................. 5-10Figure 5-18 Error Codes Report Screen.................................................................. 5-11Figure 5-19 Revenue Report Screen....................................................................... 5-13Figure 5-20 System Log Report Screen .................................................................. 5-15Figure 6-1 My Home Screen.................................................................................... 6-1Figure 6-2 Summary Report Screen Table .............................................................. 6-2Figure 7-1 Application Logout Screen...................................................................... 7-1Figure A-1 Web Reports V2.X.X Log In Screen .......................................................A-1Figure A-2 Web Reports V2.5.X Log In Screen .......................................................A-1Figure A-3 Email Notifications Checkbox Locator Screen........................................A-2Figure A-4 Version 2.5.X System Settings Screen...................................................A-4Figure A-5 Last Dropped Time Report Screen.........................................................A-5Figure A-6 E-mail Subscriptions Screen ..................................................................A-6Figure A-7 Report Designer - Existing Report Screen .............................................A-8Figure A-8 Report Designer - New Report Screen.................................................A-10
P/N 960-100917R_Rev. 1 {EDP #214112} © 2012, Japan CashMachine Co., Limitediv

ICB® Web Reports Program Version 2.X.X Operator Instruction Manual
S e c t i o n 1
DescriptionThis manual provides a general overview of the various ICB Web Reports Software Applications (Version 2.X.X Prime) available which are an in-tegral part of the JCM Intelligent Cash Box System (ICB®). Typical hardware components used with the Intelligent Cash Box System are shown in Fig-ure 1-1. This section of the Manual is designed to help you navigate through each Section with ease and provides the following information regarding this, and the remaining Sections of this Manual:
• Introduction• Help• Program Setup and Startup
• Administration Functions• My Home Functions• Performance Functions.
In order to make operation of this device easier and make navigation within this manual simpler, the following illustrations were used within the text:
• Safety Instructions, which need to be observed in order to protect the operators and equipment, have been written in bold text and have been given the
pictographs: • Special Notes, which affect the use of the Banknote
Acceptor, have been written in italic text and have been given the pictograph:
• Steps, requiring the operator to perform specific actions are given sequential numbers (1., 2., 3., etc).
1 GENERAL INFORMATION
Typical Hardware Components
Figure 1-1 Typical Intelligent Cash Box System Hardware
Printer Station
Docking Station
Cash Box (Metal or Plastic)
(aka: Read-Write Tool)
(TSP-02, PayCheck4, etc.)
P/N 960-100917R_Rev. 1 {EDP #214112} © 2012, Japan CashMachine Co., Limited 1 - 1

P
Section 1 ICB® Web Reports Program Version 2.X.X Operator Instruction Manual General Information
IntroductionThe ICB Web Reports Application is an Internet Based data tracking and reporting module that works in conjunction with the JCM Intelligent Cash Box® (ICB®) System. To understand the data being presented by the Web Reports Application, a brief description of the JCM ICB System, and where the data initially originates is provided as follows:
• The JCM Intelligent Cash Box® (ICB®) System is a combination of Hardware and Software that work together to increase efficiency in the Soft-drop and Soft-count process for Casinos.
This is accomplished by equipping JCM Banknote Validators such as the iVIZION, UBA (Universal Banknote Acceptor) and the WBA (World Banknote Acceptor) with Intelligent Cashboxes. An Intelligent Cash Box contains a combination Micro-controller and Memory Circuit powered by a long-life Lithium Battery or RFID Circuit. This circuitry allows the Cash Box to keep an active transaction record of all Banknotes and/or Tickets accepted by the Validator and stored into the Cash Box. An Optical Interface or RFID on both the Banknote Validator and the Cash Box allow the two Units to communicate with one another. Several Intelligent Cash Box Types are shown in Figure 1-2.
• The ICB Print Ticket (a Software Application) allows for printing Machine Set Tickets from an ICB compatible Ticket Printer Station. The printed Tickets are then inserted into a Banknote Validator to both enable the ICB Interface Circuitry, as-well-as assigning the associated Machine ID Number. The Machine ID Number is stored in the Cash Box Memory along with the subsequent transaction data. During the Soft Drop Process, the Intelligent Cash Box is removed from the Validator and 'docked' to an ICB Docking Station (aka: Read/Write Tool) which is also connected to a Printer Station. The Read/Write Tool downloads the data from the Cash Box and transmits inform-ation to the Printer Station, which then gen-erates a Ticket containing the Machine ID number in a Bar Code Format. The Read/Write Tool then re-initializes the Cash Box fields to Zero (0), at which point the ICB Cash Box is ready to be reinstalled again into any compatible Machine.
MDM (Multi Download Module) collects the transaction data from the Docking Station (Read/Write Tool) and writes the data into a Comma Separated Values (CSV) File, a Data-base, and a Text File.The ICB WEB Reports Application uses the MDM data files created as its source for its
data reporting capability. The user accesses the Web Reports Application by starting their Web Browser, selecting the ICB Web Reports Web-site Address, and then logs into the application on the ICB Web Reports Login page.
PROGRAM SETUP AND INITIALIZATIONWeb Reports Version V2.X.X Prime is an improved version set of predecessor Version V1.0.0, and ICB/MDM Internet Reporting Mod-ules. New features include additional reports, enhanced data reporting, the ability to generate custom designed reports, an interactive user-friendly interface, on-line help, and strong pass-word security and more. JCM recommends that Web Reports & MDM2 be installed on the PC Computer or Main Server in the Soft Count Room. The Application is Internet Browser based, and works with both Mozilla Firefox and Microsoft Internet Explorer (Version 8 or higher). Casino IT Personnel will need to assign an available Static IP Address in order to access the Program. Contact JCM if you have questions concerning System requirements or the installation process.
Figure 1-2 Intelligent Cash Box Types Available
Standard MetalWBA SS ICB
Standard PlasticiVIZION ICB
Large PlasticiVIZION ICB
Standard PlasticUBA ICB
Large PlasticUBA ICB
/N 960-100917R_Rev. 1 {EDP #214112} © 2012, Japan CashMachine Co., Limited 1 - 2

General Information ICB® Web Reports Program Version 2.X.X Operator Instruction Manual Section 1
Once installed, users may access the ICB Web Reports Application as follows:
1. Enter the Web Browser (e.g., via Internet Explorer or Firefox) and Mouse-click on the ICB Web Reports Web Site Address. The “Login” Screen shown in Figure 1-3 will appear.
2. Enter a 'User Name:' (See Figure 1-3 ) and 'Password:' (See Figure 1-3 ) and then select the ‘Enter’ Screen Button (See Figure 1-3 ) or press the 'ENTER' Keyboard Key. Upon Login, the User will be taken to the Sum-mary Report Screen which provides a quick snapshot report of Revenue, Acceptance, Perfor-mance, and Error Data information.
Figure 1-3 Initial ICB Web Reports Log In Screen
NOTE: The 'ICB 2.0 PRIME' logo shown in Figure 1-3 appears for Customers logging into ICB Web Reports Version 2.X.X. For customers logging into ICB Web Reports Version 2.5.X, an 'ICB 2.5 PRIME' logo will be presented.
P/N 960-100917R_Rev. 1 {EDP #214112} © 2012, Japan CashMachine Co., Limited 1 - 3

Section 1 ICB® Web Reports Program Version 2.X.X Operator Instruction Manual General Information
THIS PAGE INTENTIONALLY LEFT BLANK
P/N 960-100917R_Rev. 1 {EDP #214112} © 2012, Japan CashMachine Co., Limited 1 - 4

ICB® Web Reports Program Version 2.X.X Operator Instruction Manual
S e c t i o n 2
This section provides installation and operating instructions for the ICB Web Reports Software Application (Version 2.X.X Prime). The informa-tion within this Section contains the following features:
• Connecting to Web Reports using the Microsoft® Internet Explorer® SSL Feature
• Connecting to Web Reports using Firefox®
• Working with Scripted Windows.Connecting to Web Reports using the Internet Explorer SSL FeatureWhen Secure Site Certification is a requirement when working with Microsoft® Internet Explorer®, perform the following steps to install using SSL:
1. Launch Internet Explorer® and enter the assigned local Web Site Address for the ICB Web Reports Application into the Browser Address Bar. The Screen shown in Figure 2-1 will appear.
2. Mouse-click on the Red “X” 'Continue to this Website (not recommended)' Radio Button (See Figure 2-1 ).
3. A screen similar to the one shown in Figure 2-2 will appear. Mouse-click on the Red Highlighted ' Certificate Error' Menu Bar selection (See Figure 2-2 ).
4. A ' Mismatched Address' Dialog Box will open as shown in Figure 2-3. Mouse-click on the 'View certificates' Tab located at the bottom of the Dialog Box message (See Figure 2-3 ).
5. A 'Certificate' Dialog Box will open as shown in Figure 2-4. Mouse-click on the 'Install Certifi-cate…' Screen Button (See Figure 2-4 ) to continue.
2 BROWSER SECURITY
Figure 2-1 Continue to this website (not recom-mended) Radio Button Selection
Figure 2-2 Making Certificate Error Selection
Figure 2-3 Making View Certificates Selection
Figure 2-4 Making Install Certificate Selection
P/N 960-100917R_Rev. 1 {EDP #214112} © 2012, Japan CashMachine Co., Limited 2 - 1

P
Section 2 ICB® Web Reports Program Version 2.X.X Operator Instruction Manual Browser Security
6. The 'Certificate Import Wizard' Dialog Box will appear as shown in Figure 2-5. Mouse-click on 'Next>' Screen Button (See Figure 2-5 ).
7. The 'Certificate Store' Dialog Box will appear as shown in Figure 2-6. Mouse-click within the empty Radio Button to select 'Place all cer-tificates in the following store' (See Figure 2-6 ), and then Mouse-click on the 'Browse'
Screen Button (See Figure 2-6 ) once highlighted.
8. The 'Select Certificate Store' Dialog Box will appear as shown in Figure 2-7. Mouse-click on 'Trusted Root Certification Authorities' Folder (See Figure 2-7 ), and then Mouse-click on the 'OK' (See Figure 2-7 ) Screen Button to continue.
9. The 'Certificate Store' Dialog Box should now re-appear and the Radio Button will be Dot marked as indicated by Figure 2-7 . Mouse-click on 'Next>' Screen Button (See Figure 2-7 ) to continue.
10. The 'Completing the Certificate Import Wizard' Dialog Box will appear as shown in Figure 2-9. Mouse-click on the 'Finish' Screen Button (See Figure 2-9 ) to continue.
11. A 'Security Warning' Dialog Box similar to the one shown in Figure 2-10 will appear. Mouse-click on 'Yes' Screen Button to continue (See Figure 2-10 ).
Figure 2-5 Certificate Import Wizard Screen
Figure 2-6 Making the Radio & Browse Button Selections
Figure 2-7 Making the Folder & OK Screen Button Selections
Figure 2-8 Trusted Root Certification Authorities Selected Screen
Figure 2-9 Completing the Certificate Import Wizard Screen
/N 960-100917R_Rev. 1 {EDP #214112} © 2012, Japan CashMachine Co., Limited 2 - 2

Browser Security ICB® Web Reports Program Version 2.X.X Operator Instruction Manual Section 2
12. An 'import was successful' message will appear as shown in Figure 2-11. Mouse-click on the 'OK'
(See Figure 2-11 ) Screen Button to continue.
13. On the 'Certificate' Dialog Box, Mouse-click on its 'OK' (See Figure 2-12 ) Screen Button to end this procedure.
Site Certification is complete. Future program launches will now operate normally and will not require these steps to be performed again.
Connecting to Web Reports using FirefoxWhen Secure Site Certification is a requirement when working with Mozilla® Firefox®, perform the following steps to add a Security Exemption for the ICB Web Reports Application:
1. Launch the Mozilla® Firefox® Internet connec-tion and enter the assigned local Web Site Address for the ICB Web Reports Application into the Browser Address Bar.
2. A window similar to the one shown in Figure 2-13 will appear to indicate that 'This Connection Is Untrusted'. Mouse-click on the 'I Understand the Risks' statement to continue (See Figure 2-13 ).
3. The window will now appear as shown in Figure 2-14. Mouse-click on the 'Add Exception' Screen Button (See Figure 2-14 ) to continue.
4. The Dialog Box shown in Figure 2-15 will pop- up asking for confirmation. Mouse-click on the
Figure 2-10 Security Warning Screen
Figure 2-11 Import Successful Dialog Screen
Figure 2-12 Certificate OK Screen Button Selection
Figure 2-13 Firefox Untrusted Connection Screen
Figure 2-14 Firefox Untrusted Connection Screen
P/N 960-100917R_Rev. 1 {EDP #214112} © 2012, Japan CashMachine Co., Limited 2 - 3

P
Section 2 ICB® Web Reports Program Version 2.X.X Operator Instruction Manual Browser Security
'Confirm Security Exception' Screen Button (See Figure 2-15 ).
Site Certification is complete. Future program launches will now operate normally, and will not require these steps to be performed again.
WORKING WITH SCRIPTED WINDOWSThe ICB Web Reports Application makes frequent use of Scripted Windows. Depending on the Microsoft® Internet Explorer® Browser settings on the Workstation being used, this may cause pop-up messages or flashing alerts to occur in the Toolbar Section such as: "This website is using a scripted window to ask you for information. If you trust the website, click here to allow scripted windows…" (See Figure 2-16 ). The user may then select 'Tem-porarily Allow Scripted Windows' Screen Button in order to continue with the program.In order to avoid having these alert messages appear each time the Scripted Windows feature is used, the user may indicate to Internet Explorer® that this is a 'trusted website'.This request can be done as follows:
1. While in the ICB Web Reports Application, select and Mouse-click on the 'Tools' pull-down Menu located on the Internet Explorer® Toolbar.
2. In the 'Tools' pull-down Menu, select 'Internet Options'. The Internet Options Dialog Box will then open.
3. At the top of the Internet Options Dialog Box, click on the 'Security' Tab.
4. In the tabbed Security area, click on 'Trusted sites'.
5. Click on the 'sites' Screen Button. The Trusted Sites Dialog Box will open.
6. Make sure that the Check-box next to 'Require server verification for all sites in this zone' is unchecked.
7. Verify that the 'Add this website to the zone' Text Field contains the address for the ICB Web Reports Application. If it does, then click on the 'Add' Screen Button. If the Web Reports Address is NOT listed in the Text Field, enter it, and then click on the 'Add' Screen Button.
Figure 2-15 Confirm Security Exception Dialog Screen
Figure 2-16 Allow Scripted Windows Selection Screen
/N 960-100917R_Rev. 1 {EDP #214112} © 2012, Japan CashMachine Co., Limited 2 - 4

ICB® Web Reports Program Version 2.X.X Operator Instruction Manual
S e c t i o n 3
On-Line Help FunctionICB Web Reports features an On-Line HELP Function. Help is available to the user at any time by simply Mouse-clicking on the 'HELP' Tab located at the top of the Application Screen.The HELP function automatically opens an appended copy of this ICB Web Reports Operator Instruction Manual (See Figure 3-1), providing the user with detailed step-by-step instructions for
using all functions within this Version of the Web Reports Application.For ease of use, the HELP function opens the Operators Manual in a separate window, allowing the user to switch back and forth between Web Reports and this Operators Manual as often as required.To exit the HELP function, simply close the Window in which the Manual is displayed.
3 HELP FUNCTION
Figure 3-1 On-Line Help Window Screen
P/N 960-100917R_Rev. 1 {EDP #214112} © 2012, Japan CashMachine Co., Limited 3 - 1

ICB® Web Reports Program Version 2.X.X Operator Instruction Manual
THIS PAGE INTENTIONALLY LEFT BLANK
P/N 960-100917R_Rev. 1 {EDP #214112} © 2012, Japan CashMachine Co., Limited 3 - 2

ICB® Web Reports Program Version 2.X.X Operator Instruction Manual
S e c t i o n 4
Administration ScreenThe ICB Web Reports Software Application (Ver-sion 2.X.X Prime) Administration Screen is selected by Mouse-clicking on the “Administra-tion” Tab located near the top of an active Web Reports Program page (See Figure 4-1 ).
Once selected, seven (7) sub-level Administrative Set-up Functions become available within a pri-mary Four (4) level selection Column located on the left side of the Screen (See Figure 4-1 ).
The various function selections located in the Left Column are described as follows:
• Personal Account/Change Password – When selected, the 'Change Password' Screen will appear allowing the User to change their currently assigned Password. The 'Change Password' Screen appears automatically the first time that a new User (without an assigned Password) logs into the System, and whenever a User's current Password is close to expiration. Refer to page 4-3 for further details concerning revising a User’s Password.
• Users and Roles/Users – The 'Users' Function allows for Adding and Deleting individual Users to and from the Web Reports Application. Language preferences for each User may be set, Roles may be
assigned, Passwords may be reset, and User accounts may be Unlocked. Refer to page 4-5 for further details on setting User options.
• Users and Roles/Roles – When selected, the 'Roles' Screen will appear. This function allows Users to add and delete a Users Role to and from the Web Reports Application. Each Role (once added and defined) consists of one or more System Permissions. The System Permissions contained in each Role determine how much Program access an individual User will have to the various functions, sections, and reports within the ICB Web Reports Application. After being added, Roles will then appear both on the Roles Screen and in the Roles Section of the User’s Screen. Refer to Figure 4-4 on page 4-7 for further details on defining a User’s Roles.
4 ADMINISTRATION
Figure 4-1 Initial Administration Screen
P/N 960-100917R_Rev. 1 {EDP #214112} © 2012, Japan CashMachine Co., Limited 4 - 1

P
Section 4 ICB® Web Reports Program Version 2.X.X Operator Instruction Manual Administration
• Settings/Log In Settings – The Log In Settings Function allows a User to set various Password related variables. These variables include Password Expiration Date, Password Warning Days, Login Attempts until Lockout, Lockout Duration, Minimum Password Length, Strong Password Requirements, and Inactivity Time-out Minutes. Refer to Figure 4-5 on page 4-9 for further details on selecting the Log In Settings.
• Settings/Denomination Settings – The Denomination Settings Function allows a User (if necessary) to define Denomination Tables that the ICB Web Reports Application will recognize. Individual Banknote denominations that make up each Table can be designated, and Currency Symbols can be changed. The Software versions that support each Denomination Table are also indicated here. JCM Personnel will set-up the default settings for this Screen during the initial installation of the Web Reports Application at the Customer’s Site. For most Customers these settings will rarely change. Refer to Figure 4-6 on page 4-12 for further details on modifying Denomination Settings.
• Settings/Product Configuration – The Product Configuration Function allows the User to associate a specific Bill Validator to each BV Software Version found to be in use at the Customer’s site. Refer to Figure 4-7 on page 4-13 for further details on creating Product Configurations.
• Settings/System Settings – The System Settings Function allows a User to set values for several Data and Report related variables. This includes setting the Minimum Allowed Acceptance Rate, the ICB Data Files import location, assigning alternate names to Organizational Headers if desired, specifying error reporting option and setting the ICB Web Reports Cutoff Time. Refer to Figure 4-8 on page 4-14 for further details on modifying any System Settings.
• Admin Reports/Activity Log – The Activity Log Report displays a sequential time-ordered listing of system events that have occurred in the Web Reports Application. The list includes Log-ins, password changes, system parameter changes, User account changes, etc. Refer to Figure 4-9 on page 4-16 for further details on creating Activity Logs.
/N 960-100917R_Rev. 1 {EDP #214112} © 2012, Japan CashMachine Co., Limited 4 - 2

Administration ICB® Web Reports Program Version 2.X.X Operator Instruction Manual Section 4
When the 'Change Password' Function is selected (Review Figure 4-1 ) the 'Change Password' Screen shown in Figure 4-2 will appear. This Screen allows the User to change a currently assigned Password. The Change Password Screen appears automatically the first time a new User, without an assigned Password, logs into the System; and there-after, whenever a User's current Password is close to expiration.
Details concerning Password changing commands are provided below Figure 4-2.
CHANGING A CURRENTLY ASSIGNED PASSWORD:To change a currently assigned Password proceed as follows:
1. On the Administration Page, Mouse-click on the Change Password Function (See Figure 4-2 ) located on the left side Navigation Bar to Green Highlight it. The Change Password Screen will then appear.
2. Enter the Users' old Password into the 'Old Password' text entry Field (See Figure 4-2 ).
3. Enter the desired new Password into the 'New Password' text entry Field (See Figure 4-2 ).
4. Enter the desired new Password a second time into the 'Reenter New Password' text entry Field (See Figure 4-2 ).
5. Mouse-click on the 'Change Password' Screen Button (See Figure 4-2 ). The pass-word will then be updated and the following mes-
sage will appear: 'Your password has been changed successfully'.
CHANGING A PASSWORD THAT'S ABOUT TO EXPIRE:User Passwords expire after a specified time period. The time period is variable and can be set for anywhere from 1 to 9999 days. This value is set by entering the desired number into the 'Password Expiration Days' Text Field (See Figure 4-5 ) on the 'Log In Settings' Screen in Figure 4-5 on page 4-9 of this Section.Prior to any Password expiring, an expiration warn-ing message will be displayed. The number of days prior to the expiration date that the message begins
Personal Account: Change Password
NOTE: This function is not available when the Web Reports Application has been installed in 'Active Directory Mode with Account Synchronization'. For these type of installs, all Password Changes will be controlled by the Users' IT Department.
Figure 4-2 Adding/Changing Password Screen
NOTE: The User may Mouse-click on the 'Clear' Screen Button (See Figure 4-2 ) at any time to clear all of the Password text entry Fields.
P/N 960-100917R_Rev. 1 {EDP #214112} © 2012, Japan CashMachine Co., Limited 4 - 3

P
Section 4 ICB® Web Reports Program Version 2.X.X Operator Instruction Manual Administration
to appear is determined by the value (from 1 to 9999) set in the 'Password Warning Days' Text Field (See Figure 4-5 ) on the 'Log In Settings' Screen in Figure 4-5 on page 4-9 of this Section. When a User attempts to Log In to the System dur-ing the Password expiration warning period, the program will automatically bring up the 'Change Password' Screen (Review Figure 4-2), and the following message will be displayed: ‘Your Password will expire in 'x' days. Please change it to prevent an interruption in service’. To change the password proceed as follows:
1. Enter the Users' old Password into the 'Old Password' text entry Field (See Figure 4-2 ).
2. Enter the desired new Password into the 'New Password' text entry Field (See Figure 4-2 ).
3. Enter the desired new Password a second time into the 'Reenter New Password' text entry Field (See Figure 4-2 ).
4. Mouse-click on the 'Change Password' Screen Button (See Figure 4-2 ).
The password will then be updated and the following message will appear: 'Your password has been changed successfully'.
FIRST TIME LOGIN PASSWORD CHANGE:New Users (those not having a Passwords assigned) can log into the system by entering their 'User Name' into both the 'User Name' and 'Password' Text entry Fields on the Login Screen (ReviewFigure 1-3 in Section 1 of this Operator’s Manual). The program will automatically bring up the 'Change Password' Screen (Review Figure 4-2), and the following message will be displayed: 'Please Change Your Password'. To Add a new password proceed as follows:
1. Enter the User’s ‘User Name’ into the 'Old Pass-word' text entry Field (See Figure 4-2 ).
2. Enter the desired new Password into the 'New Password' text entry Field (See Figure 4-2 ).
3. Enter the desired new Password a second time into the 'Reenter New Password' text entry Field (See Figure 4-2 ).
4. Mouse-click on the 'Change Password' Screen Button (See Figure 4-2 ). The pass-word will then be updated and the following mes-sage will appear: 'Your password has been changed successfully'.
NOTE: The User may Mouse-click on the 'Clear' Screen Button (See Figure 4-2 ) at any time to clear all of the Password text entry Fields.
NOTE: The User may Mouse-click on the 'Clear' Screen Button (See Figure 4-2 ) at any time to clear all of the Password text entry Fields.
/N 960-100917R_Rev. 1 {EDP #214112} © 2012, Japan CashMachine Co., Limited 4 - 4

Administration ICB® Web Reports Program Version 2.X.X Operator Instruction Manual Section 4
When the 'Users' Function is Green Highlight selected (Review Figure 4-1 ) the 'Users' Screen will appear (See Figure 4-3). This Screen allows for Adding and Deleting Users, to and from, the Web Reports Application. Additionally, Language pref-erences for each User may be set, Roles may be assigned, Passwords may be reset, and User accounts may be Unlocked. Details on working
with the User Functions are provided below Figure 4-3.
ADDING A NEW USER TO THE SYSTEMTo add a new User to the System, proceed as follows:
1. Mouse-click on the 'Add New User' Screen Button (See Figure 4-3 ).
2. An entry titled 'New User' will be added to the bottom of the current list of existing Users (See Figure 4-3 ), and will also appear in the User Data/Username Text entry Field (See Figure 4-3 ).
3. Mouse-click highlight the ‘New User’ within the ‘User Data /Username’ Text Field (See Figure 4-3 ), and enter the desired User Name for the new User being added.
Directly below this Field, Mouse-click on the ‘User Name/Email’ Text Field to highlight it.
Enter the desired E-mail Address here for the new User being added.
4. From the User Data/Language Pull-down Menu (See Figure 4-3 ) use the mouse to select the Language the particular User prefers. Available Language options include English, Chinese, Ger-man, Italian, Japanese, and Spanish.
5. The 'Roles' Section of the Screen (See Figure 4-3 ) contains a list of available Roles adjacent to their related Check-boxes . Roles determine how much access, and how many Permissions, the new User will have within the Application once Logged-In. The program provides three pre-defined Roles to start with (Admin Role, Slots Role, and Accounting Role. Additional Roles may be added at any time in the future).
6. Mouse-click select the desired Check-box for each Role the new User is being assigned. As a time saving feature, the 'All' or 'None' Screen Buttons may be used to select all Roles
Users and Roles: Users
NOTE: This function is not available when the Web Reports Application has been installed in 'Active Directory Mode with Account Synchronization'. For these type of installs all Password Changes will be controlled by the Users' IT Department.
Figure 4-3 Users and Roles: Users Screen
NOTE: A commonly used Protocol for User Names is to use the first letter of the Users First Name, followed by their full Last Name. For example, User John Doe would have a User Name of ' jdoe'.
P/N 960-100917R_Rev. 1 {EDP #214112} © 2012, Japan CashMachine Co., Limited 4 - 5

P
Section 4 ICB® Web Reports Program Version 2.X.X Operator Instruction Manual Administration
available, or deselect all Roles presently selected respectively.
7. Mouse-click on the 'Update' Screen Button (See Figure 4-3 ). The new User will be added to the System, and the list of existing Users (See Figure 4-3 ) will be updated to reflect the correct User’s Name.
DELETING A USER FROM THE SYSTEMTo delete a User from the System, proceed as fol-lows:
1. From the list of existing Users (See Figure 4-3 ), Mouse-click select the User Name of the User to be deleted.
2. Mouse-click on the 'Delete User' Screen Button (See Figure 4-3 ). The selected User will be deleted from the Application and their Name will be removed from the Users list.
MAKING CHANGES TO AN EXISTING USERTo change an existing User’s characteristic profile in the System, proceed as follows:
1. 1.From the list of existing Users (See Figure 4-3 ), Mouse-click select on the User Name of the User whose characteristics are to be modified.
2. Modify the data values for the User’s Name (See Figure 4-3 ), Language Preferences (See Figure 4-3 ), and Roles (See Figure 4-3 ) selections as necessary.
3. Mouse-click on the 'Update' Screen Button (See Figure 4-3 ) to have the changes take effect.
RESETTING A USER PASSWORDTo Reset a User’s Password in the System, proceed as follows:
1. From the list of existing Users (See Figure 4-3 ), Mouse-click select the User Name of the User whose Password is being reset.
2. In the 'Reset Password to' Text entry Field (See Figure 4-3 ), enter the new Password for the User.
3. Mouse-click on the 'Update' Screen Button (See Figure 4-3 ) to have the Password change take effect.
UNLOCKING A USER ACCOUNT1. From the list of existing Users (See Figure 4-3
), Mouse-click select the User Name of the User whose account must be unlocked.
2. Mouse-click on the 'Unlock Account' Check-box (See Figure 4-3 ).
3. Mouse-click on the 'Update' Screen Button (See Figure 4-3 ) to have the change take effect.
4. The User Account is now unlocked and the User may Login to the system again.
NOTE: All Roles shown in this section were previously defined on a separate 'Roles' Screen. See Figure 4-4 for information concerning defining and working with various Roles.
NOTE: The new User is now added to the System, but has no Password assigned. During a first time Login, the User must enter their User Name into BOTH the 'User Name' and 'Password' data entry Fields on the Log In Screen. This will cause the Application to activate the Change Password Screen, allowing the User to select and enter a new password at that time.
/N 960-100917R_Rev. 1 {EDP #214112} © 2012, Japan CashMachine Co., Limited 4 - 6

Administration ICB® Web Reports Program Version 2.X.X Operator Instruction Manual Section 4
When the 'Roles' Function is Green highlight selected (Review Figure 4-1 ), the 'Roles' Screen will appear (See Figure 4-4). This function allows Users to add and delete Roles, to and from, the Web Reports Application. Each Role (once added and defined) consists of one or more System Permis-sions. The System Permissions contained in each Role determine how much Program access an individual User will have to the various functions,
sections, and reports within the ICB Web Reports Application. After being added, Roles will then appear both on the Roles Screen (See Figure 4-4) and in the Roles Section of the Users Screen (See Figure 4-3 ) where they can be assigned to individual Users. Details concerning the various Role Functions are provided below Figure 4-4.
ADDING A NEW ROLE TO THE SYSTEMTo add a new Role to the System, proceed as follows:
1. Mouse-click on the 'Add New Role' Screen Button (See Figure 4-4 ).
2. An entry named 'New role' will be added to the list of existing Roles (See Figure 4-4 ), and will also appear in the 'Name' Text Entry Field (See Figure 4-4 ).
3. Mouse-click highlight 'New role' in the 'Name' Text entry Field (See Figure 4-4 ), and then enter the desired name for the new Role being added.
4. In the 'Permissions' area (See Figure 4-4 ) Mouse-click select the desired Check-boxes for each Permission that is to be included in the new Role. The Role may contain as many, or as few, Permissions as desired. As a time saving feature, the 'All' or 'None' Screen But-tons (See Figure 4-4 ) may be used to select all
of the Permissions, or de-select all Permissions respectively.
5. In the 'Users' area (See Figure 4-4 ) Mouse-click select the Check-boxes for each User being assigned to this new Role. As many or as few Users as desired may be selected. As a time saving feature, the 'All' or 'None'
Screen Buttons (See Figure 4-4 ) may be used to select all Users or de-select all Users respectively.
6. Mouse-click on the 'Update' Screen Button (See Figure 4-4 ). The new Role will be added to the System, and the list of existing Roles
Users and Roles: Roles
Figure 4-4 Users and Roles: Roles Screen
NOTE: Versions of Web Reports which support the Email Notifications function will have an additional Checkbox in this area of the Screen labeled 'Email Notifications'. See Appendix A of this Manual for details regarding the E-mail Functions.
P/N 960-100917R_Rev. 1 {EDP #214112} © 2012, Japan CashMachine Co., Limited 4 - 7

P
Section 4 ICB® Web Reports Program Version 2.X.X Operator Instruction Manual Administration
(See Figure 4-4 ) will be updated to reflect the correct Role Name just updated.
DELETING A ROLE FROM THE SYSTEM1. From the list of existing Roles (See Figure 4-4
), Mouse-click select the Role to be deleted.2. Mouse-click on the 'Delete Role' Screen
Button (See Figure 4-4 ). The selected Role will be deleted from the Application and its' name will no longer appear in the list of existing Roles.
MODIFYING AN EXISTING ROLE ON THE SYSTEM1. From the list of existing Roles (See Figure 4-4
), use the Mouse to select the Role that is to be modified.
2. Modify the Name (See Figure 4-4 ), in the 'Permissions' area (See Figure 4-4 ) and the 'Users' area (See Figure 4-4 ) as necessary.
3. Mouse-click on the 'Update' Screen Button (See Figure 4-4 ) to have the changes take effect.
NOTE: The newly added Role will also be available in the Roles Section of the 'Users Screen' (Review Figure 4-3 ).
/N 960-100917R_Rev. 1 {EDP #214112} © 2012, Japan CashMachine Co., Limited 4 - 8

Administration ICB® Web Reports Program Version 2.X.X Operator Instruction Manual Section 4
The Log In Settings function allows a User to set various Password related variables. These variables include the Password Expiration Date, Password Warning Days, Login Attempts until Lockout, Lockout Duration, Minimum Password Length,
Strong Password Requirements, and Inactivity Timeout Minutes.
Details on working with Log In Settings functions are provided as follows:Password Expiration Days: This value deter-mines the length of time (in days) that a User’s Password will be valid. The available range is from 1 to 9999 days. When the specified time has elapsed, the User's Password will expire. The Password Expiration Days value can be set as follows:
1. Mouse-click select and highlight the value cur-rently in the 'Password Expiration Days' data entry Field (See Figure 4-5 ).
2. Enter a value for the number of days the password being provided will be valid.
3. Mouse-click the 'Update' Screen Button (See Figure 4-5 ) to apply the change.
4. The following message will be displayed: 'The update was successful'.
Password Warning Days: This value determines the number of days existing prior to the Password expiration date that the Password’s expiration warning message will be displayed to the User. The available range is from 1 to 9999 days. When a User attempts to Log In to the System dur-ing the Password expiration warning period, the program will automatically bring up the 'Change Password' Screen (Review Figure 4-2), and the fol-lowing message will be displayed: 'Your Password will expire in 'x' days. Please change it to pre-vent an interruption in service'. The Password Warning Days value can be set as follows:
1. Mouse-click select and highlight the value cur-rently in the 'Password Warning Days' data entry Field (See Figure 4-5 ).
Settings: Log In Settings
NOTE: This function is not available when the Web Reports Application has been installed in 'Active Directory Mode with Account Synchronization'. For these type of installs all Password Changes will be controlled by the Users' IT Department.
Figure 4-5 Log In Settings Screen
NOTE: The default value presented on a new system is 365 days.
NOTE: When changing values, the 'Reset' Screen Button (See Figure 4-5 ) may be used to return an altered value back to its original value.
NOTE: The default value presented on a new system is 14 days.
P/N 960-100917R_Rev. 1 {EDP #214112} © 2012, Japan CashMachine Co., Limited 4 - 9
P
Section 4 ICB® Web Reports Program Version 2.X.X Operator Instruction Manual Administration
2. Use the PC Keyboard to enter a numeric value for the number of days prior to Password expiration that the warning message should begin to appear.
3. Mouse-click the 'Update' Screen Button (See Figure 4-5 ) to apply the change.
4. The following message will be displayed: 'The update was successful'.
Login Attempts Until Lockout: This value deter-mines the number of times a User's password may be entered incorrectly before the account is locked out. The available range is from 1 to 99 tries. When the specified number of incorrect Log-ins has been reached, the account will be automatically locked out. The User will normally need to wait until the 'Lockout Duration' time period has passed before being able to Login into the Application again. The 'Login Attempts Until Lockout' value is set as follows:
1. Mouse-click select and highlight the value cur-rently in the 'Login Attempts Until Lockout' data entry Field (See Figure 4-5 ).
2. Use the PC Keyboard to enter a value for the number of incorrect Login attempts being allowed.
3. Mouse-click the 'Update' Screen Button (See Figure 4-5 ) to apply the change.
The following message will be displayed: 'The update was successful'.
Lockout Duration (Minutes): This value deter-mines the amount of time (in minutes) that a User’s account will be locked out from logging in to the Application. The lockout time range can be set from 0 to 999 minutes. Lockout occurs when a User exceeds the number of invalid Login attempts allowed. The User’s Account is then locked out, and the 'Lockout Duration' period begins. The User will normally need to wait until the 'Lockout Dura-tion' time period has passed before proceeding. At that time, the User’s Account will automatically be re-enabled and the User will be able to Log-in again. If immediate access to the Application is required, then the User may contact System Administration Personnel, who can unlock the account ahead of the Lockout Duration period via the 'Unlock Account' function on the Administration Users Screen (Review Figure 4-3 & ). The 'Lockout Duration' value is set as follows:
1. Mouse-click select and highlight the value cur-rently present in the 'Lockout Duration (Minutes)' data box (See Figure 4-5 ).
2. Use the PC Keyboard to enter a value (in min-utes) for the Lockout Duration period desired.
3. Mouse-click the 'Update' Screen Button (See Figure 4-5 ) to apply the change.
4. The following message will be displayed: 'The update was successful'.
Minimum Password Length: This value deter-mines the minimum Password length required for a valid Login Password. The length may be specified from 1 to 99 characters. The minimum Password length value is set as follows:
1. Mouse-click select and highlight the value cur-rently within the 'Minimum Password Length' data entry Field (See Figure 4-5 ).
2. Use the PC Keyboard to enter a value for the Minimum Password Length desired.
3. Mouse-click the 'Update' Screen Button (See Figure 4-5 ) to apply the change.
4. The following message will be displayed: 'The update was successful'.
Strong Password Requirements: By default, Login Password requirements are satisfied as long as the Users' Password meets the 'Minimum Pass-word Length' criteria. If desired, the following Stronger Password Requirements may be added:
At least 1 number: The Users’ Password must contain at least 1 number in order to be valid.At least 1 symbol: The Users’ Password must contain at least 1 Symbol in order to be valid.At least 1 uppercase: The Users’ Password must contain at least 1 Uppercase Character in order to be valid.
Stronger Requirements may be enabled individ-ually, or as any combination of the preceding three selections suggest. The Stronger Requirement does not have to appear at the start of the Password. In each case, the system will 'scan' the User’s Pass-word to verify that each Stronger Requirement (if enabled) is satisfied somewhere within the Pass-word data string.
NOTE: When changing values, the 'Reset' Screen Button (See Figure 4-5 ) may be used to return an altered value back to its original value.
NOTE: The default value presented on a new system is 10 Log In attempts.
NOTE: When changing values, the 'Reset' Screen Button (See Figure 4-5 ) may be used to return an altered value back to its original value.
NOTE: The default value presented on a new system is 15 minutes.
NOTE: When changing values, the 'Reset' Screen Button (See Figure 4-5 ) may be used to return an altered value back to its original value.
NOTE: The default value presented on a new system is 5 Characters.
NOTE: When changing values, the 'Reset' Screen Button (See Figure 4-5 ) may be used to return an altered value back to its original value.
/N 960-100917R_Rev. 1 {EDP #214112} © 2012, Japan CashMachine Co., Limited 4 - 1 0

Administration ICB® Web Reports Program Version 2.X.X Operator Instruction Manual Section 4
Strong Password Requirements may be added as follows:
1. Mouse-click select the Checkbox of each Strong Requirement that is to be enabled (See Figure 4-5 ).
2. Mouse-click the 'Update' Screen Button (See Figure 4-5 ) to apply the change.
3. The following message will be displayed: 'The update was successful'.
Inactivity Timeout Minutes: This value deter-mines the amount of time (in minutes) that the Web Reports Application sits actively idle on a Users' Computer or Workstation before the User is auto-matically logged out. The 'Inactivity Timeout' range
can be set from 1 to 99 minutes. The 'Inactivity Timeout Minutes' value is set as follows:
1. Mouse-click select and highlight the value cur-rently within the 'Inactivity Timeout Minutes' data entry Field (See Figure 4-5 ).
2. Use the PC Keyboard to enter a value (in min-utes) for the 'Inactivity Timeout' period desired.
3. Mouse-click the 'Update' Screen Button (See Figure 4-5 ) to apply the change.
4. The following message will be displayed: 'The update was successful'.
NOTE: The default value is No Strong Requirements (e.g., all three Checkboxes are unchecked).
NOTE: The default value presented on a new system is 5 Minutes.
NOTE: When changing values, the 'Reset' Screen Button (See Figure 4-5 ) may be used to return an altered value back to its original value.
P/N 960-100917R_Rev. 1 {EDP #214112} © 2012, Japan CashMachine Co., Limited 4 - 11

P
Section 4 ICB® Web Reports Program Version 2.X.X Operator Instruction Manual Administration
The Denomination Settings Function allows the User (if necessary) to update the Denomination Tables by using the ICB Web Reports Application. As shown in Figure 4-6 the Denomination Settings Screen displays the symbol for the currency type currently in use, as well as the individual denomi-nations in the active currency set. During normal operation, Web Reports will collect Denomination Settings information from the MDM Cash Box Data Files. For most customers these settings will rarely change. For those times when a change is required, the following instructions will apply:
UPDATING THE 'DEFAULT' DENOMINATION TABLETo update the Default Denomination Table, pro-ceed as follows:
1. In the 'Currency Symbol' area (See Figure 4-6 ),Mouse-click, highlight, and change the Cur-rency Symbol to represent the desired currency set.
2. In the 'Monetary Values' area (See Figure 4-6 ), Mouse-click on, highlight, and change the various Denomination Values as necessary
3. Mouse-click the 'Update' Screen Button (See Figure 4-6 ) to apply the change.
Settings: Denomination Settings
Figure 4-6 Denomination Settings Screen
/N 960-100917R_Rev. 1 {EDP #214112} © 2012, Japan CashMachine Co., Limited 4 - 1 2

P
Section 4 ICB® Web Reports Program Version 2.X.X Operator Instruction Manual Administration
The Product Configuration function is selected by mouse clicking on 'Product Configuration' in the left side navigation panel of the Screen (See Figure 4-7 ). This will reveal the Product Configuration Screen as shown in Figure 4-7 on page 4-13 of this Section. This function allows the User to associate a specific JCM Bill Validator with each Validator
Software Version found to be in use on the Cus-tomer’s Casino Floor. Once an association has been made, the Bill Vali-dator type being used will automatically be dis-played in all Web Reports where the 'Validator Type' Data Field is utilized. Instructions for setting Product Configuration are provided below Figure 4-7.
TO SET PRODUCT CONFIGURATIONSThe list of Software Versions (as read from the MDM ICB Data Stream), and reported to be in use on the Customer’s Casino Floor are shown in the 'Software Versions' Box list (See Figure 4-7 ).
1. Mouse-click select one of the 'Software Versions' listed so that it is background highlighted in Blue.
2. Mouse-click on the 'Validator Type' pull-down Menu (See Figure 4-7 ) and select the type of Bill Validator known to use that Software Ver-sion.
3. Mouse-click on the 'Update' Screen Button (See Figure 4-7 ) to have the association set into the Web Reports Memory.
4. Repeat Steps 1 through 3 until all Software Versions listed have a Bill Validator association.
Settings: Product Configurations
Figure 4-7 Product Configuration Screen
NOTE: In the example shown in Figure 4-7, Version 1.32-19 has been selected.
NOTE: The Bill Validator Types available for selection are: 'BNF', 'iVIZION', 'UBA', 'WBA', and 'Multi'. The 'Multi' selection is available for occurrences where the same Software Version may be in use in more than one Validator Type.
/N 960-100917R_Rev. 1 {EDP #214112} © 2012, Japan CashMachine Co., Limited 4 - 1 3

Administration ICB® Web Reports Program Version 2.X.X Operator Instruction Manual Section 4
The System Settings Function allows the User to set values for several Data and Report related vari-ables. This includes setting a percentage value for the Minimum Allowed Acceptance, specifying the ICB Data File import location, enabling the Error Reporting function, setting Asset display options, and specifying the Cutoff Time for Drop Cycles.
Details on working with System Setting functions are provided below Figure 4-8.
Minimum Allowed Acceptance: For report pur-poses, this value establishes the minimum allowed Banknote Acceptance Rate at which all Validators should be operating. Validators operating at Accep-tance Rates below this value are considered to be "Machines with Poor Acceptance" and are reported in the 'My Home:Summary Report' (See Figure 6-2 on page 6-2 of Section 6 of this Operator’s Manual).
The 'Minimum Allowed Acceptance' Rate may be set or changed as follows:
1. Mouse-click select and highlight the value cur-rently set in the 'Minimum Allowed Acceptance' data entry Field (See Figure 4-8 ).
2. Enter the desired value for the new minimum allowed Acceptance Rate.
3. Mouse-click on the 'Update' Screen Button (See Figure 4-8 ) to apply the change.
4. The following message will be displayed: 'Set-tings saved successfully'.
File Importing: This function allows the User to specify where the Web Reports Application looks to import ICB Data Files needed for operation. The MDM Application (normally used in the Soft Count Room) allows for storing the ICB Data Files it generates at any User specified location (i.e., Host Computer, Host Server, a Network Location, etc.). For Web Reports to work properly, the 'ICB Files Location' needs to be set to look at the same data file storage location as was specified in MDM.
Settings: System Settings
NOTE: Versions of Web Reports that support the 'Email Notifications' Function will have several additional data boxes provided on the System Settings Screen (Review Figure 4-7) under a heading labeled 'Email Configuration'. See Appendix A of this Operator’s Manual for details concerning the enabling and use of the E-mail Function Feature.
Figure 4-8 System Settings Screen
NOTE: The default value on a new System is 97%.
NOTE: When changing values, the 'Restore Saved Settings' Screen Button (See Figure 4-8 ) may be used to return an altered value back to its original value.
P/N 960-100917R_Rev. 1 {EDP #214112} © 2012, Japan CashMachine Co., Limited 4 - 1 4

P
Section 4 ICB® Web Reports Program Version 2.X.X Operator Instruction Manual Administration
The 'ICB Files Location' is set as follows:1. Mouse-click select and highlight the File location
currently specified in the 'ICB Files Location' data entry Field (See Figure 4-8 ).
2. Use the PC Keyboard to enter the desired File location path.
3. Mouse-click on the 'Update' Screen Button (See Figure 4-8 ) to apply the change.
The following message will be displayed: 'Settings saved successfully'.
Asset Display: This function allows a User to change the default caption name for the 'Asset #' data Field. The name may be changed to a value that is more meaningful or appropriate to the indi-vidual Customer or location. Once changed, the new value will be reflected throughout the Web Reports Application, including all displayed Screens, generated Reports, saved Files, and exported Data. Instructions for changing the cap-tion value are provided below: To change the 'Caption for Asset #' value, proceed as follows:
1. Mouse-click select and highlight the value cur-rently within the 'Caption for Asset #' data entry Field (See Figure 4-8 ).
2. Enter the new caption name to be used.
3. Mouse-click on the 'Update' Screen Button (See Figure 4-8 ) to apply the change.
4. The following message will be displayed: 'Set-tings saved successfully'.
Cutoff: This function allows a User to specify the 'Cutoff Time' for the Web Reports Application. For reporting functions, the time specified is used to determine which day (e.g., yesterday or today) the
most recent Drop Cycle data is associated and report related.For Drop Cycles occurring before the 'Cutoff Time' the dropped Data will be reported as having been received 'yesterday'. For drop cycles occurring after the 'Cutoff Time', the dropped Data will be reported as having been received 'today'.The default value for this function is set to '00:00'; which indicates midnight.To change the 'Cutoff Time' value, proceed as follows:
1. Mouse-click select and highlight the value cur-rently in the 'Cutoff Time (hh:mm)' data entry Field (See Figure 4-8 ).
2. Enter a new 'Cutoff Time', using an 'hh:mm' Format to indicate hours and minutes.
3. Mouse-click on the 'Update' Screen Button (See Figure 4-8 ) to apply the change.
4. The following message will be displayed: 'Settings saved successfully'.
Error Reporting: When enabled, this feature allows the Web Reports Application to automati-cally send error and statistics information from the customer site to JCM. The information is useful when trying to help a customer resolve an ICB related problem. To enable Error Reporting pro-ceed as follows:
1. Mouse-click on the 'Automatically send error sta-tistic to JCM' Checkbox (See Figure 4-8 ).
2. Mouse-click on the 'Property Name' data entry Field (See Figure 4-8 ), and enter a property Name or E-mail Address that may be used to contact the Customer.
3. Mouse-click on the 'Update' Screen Button (See Figure 4-8 ) to apply the change.The following message will be displayed: 'Set-tings saved successfully' once the change has been updated.
NOTE: The default File location specified is 'C:\data'.
NOTE: When changing values, the 'Restore Saved Settings' Screen Button (See Figure 4-8 ) may be used to return an altered value back to its original value.
NOTE: When changing values, the 'Restore Saved Settings' Screen Button (See Figure 4-8 ) may be used to return an altered value back to its original value.
NOTE: When changing values, the 'Restore Saved Settings' Screen Button (See Figure 4-8 ) may be used to return an altered value back to its original value.
/N 960-100917R_Rev. 1 {EDP #214112} © 2012, Japan CashMachine Co., Limited 4 - 1 5

P
Section 4 ICB® Web Reports Program Version 2.X.X Operator Instruction Manual Administration
The Activity Log Report (See Figure 4-9) displays a sequential time-ordered listing of System events that have occurred in the Web Reports Application.
The list includes Log-ins, Password changes, System Parameter changes, User Account changes, et-cetera.
The following data is provided on the Activity Log Report Screen:
Summary FieldsAction: This Field displays the various Action Types occurring in the current Activity Report (See Figure 4-9 ). Each listing of an Action Type in this Column indicates one or more occurrences of that action within the 'Action' Data Field of the Report. Examples of Action Types reported here include: Log-ins, System Setting Changes, User Account Changes, Password Changes, et-cetera.Count: For each Action Type listed in the Action Summary Field, an accumulative value (See Figure 4-9 ) indicating the total number of times that particular Action has occurred.
Data FieldsID: Equals the ICB Web Reports internal database Reference Number for this event (See Figure 4-9 ).Action: Lists the type of Action that was per-formed on the System(See Figure 4-9 ).
Action Item 1: Identifies the User and/or Function that received this performed Action (See Figure 4-9 ).Action Item 2: Identifies the User and/or Function that received this performed Action (See Figure 4-9 ). UserID: Identifies the User ID of the logged in User when the Action was performed (See Figure 4-9 ).IP: Identifies the IP Address of the logged in User when the Action was performed (See Figure 4-9 ).Time: The date and time the Action occurred (See Figure 4-9 ).
Admin Reports: Activity Log
Figure 4-9 Typical Activity Log Report Screen
/N 960-100917R_Rev. 1 {EDP #214112} © 2012, Japan CashMachine Co., Limited 4 - 1 6

ICB® Web Reports Program Version 2.X.X Operator Instruction Manual
S e c t i o n 5
The Performance Screen is selected by Mouse-clicking on the Performance Tab located near the top of the active page (See Figure 5-1 ). Once selected, Six (6) or more Performance related Reports are available to the User by simply Mouse-clicking on the desired Report listed in the left Column Selection area (See Figure 5-1 ).
The available Report types are described below Figure 5-1.
Performance Related ReportsThe following explanations define the various Report types listed on the Performance Screen.
Acceptance Rate: The Acceptance Rate Report displays Acceptance Rate information to help in identifying Banknote Validators that may be exhib-iting acceptance problems. This may be the result of dirty Sensors or other maintenance related issues. Refer to Figure 5-15 on page 5-7 for further details regarding Acceptance Rate Report Information.Acceptor Version: The Acceptor Version Report allows the User to track the existing Asset Software upgrades, by reporting which Firmware Version each Acceptor currently contains. Refer to Figure 5-16 on page 5-9 for further details regarding Accep-tor Version Report Information.
Duplicate Asset #: The Duplicate Asset # Report can be used to track when two (2) Assets have been accidentally given the same Asset Number, or if the same Asset has been dropped twice on the same day. Refer to Figure 5-17 on page 5-10 for further details regarding Duplicate Asset # Report Informa-tion.Error Codes: The Error Codes Report provides a breakdown of operational errors reported by indi-vidual Machines. The information is useful to the Slot Repair Department when scheduling and per-forming repairs and/or preventive maintenance on failed components. Refer to Figure 5-18 on page 5-11 for further details regarding Error Code Report Information.
5 PERFORMANCE FUNCTIONSNOTE: Users of Web Reports Version 2.5.X will see additional Reports listed here. See Appendix A of this Operator’s Manual for details concerning the additional Reports listed in the left Column for Version 2.5.X.
Figure 5-1 Performance Screen
P/N 960-100917R_Rev. 1 {EDP #214112} © 2012, Japan CashMachine Co., Limited 5 - 1

P
Section 5 ICB® Web Reports Program Version 2.X.X Operator Instruction Manual Performance Functions
Revenue: The Revenue Report provides a break-down of Revenue Information for all Assets in the current Drop Cycle. Revenue totals are provided for individual Assets as-well-as for all Assets as a whole. Refer to Figure 5-19 on page 5-13 for fur-ther details regarding the Revenue Report Informa-tion.System Log: The System Log Report provides information concerning Data Errors that occur while new data records are added to the database. For each Record in question, the Error Type encountered, as-well-as the erroneous data, and its related Record Data are displayed. Refer to Figure 5-20 on page 5-15 for further details regarding Sys-tem Log Report Information.
Report Display and Output OptionsOne of the strongest features in the ICB Web Reports Application is its ability to generate and display Reports in response to User-selectable Options. Report Options allow a User to tailor the output of any Report to a specific set of data critera. When the User selects a desired report type, the associated Report Data is displayed in the cen-ter portion of the Screen. Information on available Report Options is presented in the upper left Sec-tion of any Report Screen as shown in Figure 5-2.
The information provided, and the options avail-able are described as follows:
Report Type: This area displays the name of the currently selected Report Type (See Figure 5-2 ).Records Returned: This area displays the num-ber of Data Records within the currently selected Report (See Figure 5-2 ). This value changes in response to User-selected Options. If there are no Records to display, the message shown in Figure 5-3 will be displayed.
Time Period: The Time Period Option allows the User to specify the time range that the Report will
cover (Review Figure 5-2 ). The currently selected Time Period is displayed in Green Text. The Time Period Value may be changed by Mouse-clicking on the currently displayed Time Period shown. The User will then be presented with the Report Date Options Text Entry Fields shown in Figure 5-4.The ‘Report Date’ Text Entry Fields contains two (2) User-changeable Options. The first Option (See Figure 5-4 ) allows a User to request a Report based on Equipment or Cash Box Status.
The drop-down Menu shown in Figure 5-5 allows the User to select from the following three (3) avail-able conditions: Date Initialized, Date Docked, or Drop Start Time. Unless changed by the User, the default value is set for “Date Docked”.
The second Option (Review Figure 5-4 ) allows the User to specify the time period range the Report will cover (i.e., day, week, month, etc.) This drop- down Menu (See Figure 5-6) allows the User to select from a variety of available time periods.
After selecting the desired Report Date Time Period, Mouse-click on the 'OK' Screen Button
Figure 5-2 Report Options Screen Area
Figure 5-3 No Records Found Message
Figure 5-4 Report Date Options Screen Area
Figure 5-5 Cash Box Options Select Menu
NOTE: For time periods within a week of the current date, actual dates will be provided in the drop-down list instead (See Figure 5-6 ).
/N 960-100917R_Rev. 1 {EDP #214112} © 2012, Japan CashMachine Co., Limited 5 - 2

Performance Functions ICB® Web Reports Program Version 2.X.X Operator Instruction Manual Section 5
(Review Figure 5-4 ). The Report Date entry Field will close, and the selected Time Frame will be displayed in Green Text (Review Figure 5-2 ).If desired, a Report that starts and ends with a spe-cific set of dates may be created. To do so, select 'Custom Range' from the bottom of the Report Date drop-down Menu (See Figure 5-6).
This action will activate the Custom Range Report Date Text Entry Field shown in Figure 5-7.
By mouse-clicking on the 'Click to change' Screen Button Text within each available Menu Field, the User will be presented with small Pop-up Calen-dars from which the Start and End Dates may be selected. Mouse-click on the 'OK' Screen But-
ton (See Figure 5-7 ) to exit the Report Date Screen and generate the required Report.Filters: The 'Filters' Option is useful when working with Reports containing a large number of records (Review Figure 5-2 ). It allows for the numeric reduction of displayed Records to those only of specific interest to the User. When a Report is first generated, no Filters are in effect, and the 'Filters' Option will indicate 'None' in Green Text. To apply a filter proceed as follows:
1. Mouse-click on 'None' (Review Figure 5-2 ) and the Filter Selection Text Entry Field shown in Figure 5-8 will appear.
2. Mouse-click on the Data Field drop-down Menu (See Figure 5-8 ). A list of available Data Fields will be displayed (See Figure 5-9 ). Select the Data Field desired for use as the filtering base.
Figure 5-6 Time Period Select Menu
Figure 5-7 Custom Range Selection Menu
Figure 5-8 Filter Selection Menus
Figure 5-9 Data Field Selection Menu
NOTE: The Data Fields depicted in Figure 5-9 are meant to serve as an example, with each Report Type being different. The actual Data Fields shown will vary depending on the Report Type selected.
P/N 960-100917R_Rev. 1 {EDP #214112} © 2012, Japan CashMachine Co., Limited 5 - 3

P
Section 5 ICB® Web Reports Program Version 2.X.X Operator Instruction Manual Performance Functions
3. Mouse-click on the “Delimiters” drop-down Menu (Review Figure 5-8 ). A list of available Delimiters will be displayed (See Figure 5-10). Available Delimiters include 'Contains', 'equals', '<', '>', and 'Not Equal To'. Select the appropriate Delimiter required for your particular situation.
4. Mouse-click on the Text Entry Field (Review Fig-ure 5-8 ). At the Cursor prompt, enter an Alpha-numeric Filter Value that the selected Data Field requires.
5. Mouse-click on the 'OK' Screen Button (Review Figure 5-8 ) to exit the “Filters” Menus. The number of Records displayed in the Report will now be reduced to only those which meet the defined Filter Parameters.
As previously mentioned, if a Report is being displayed with no Filters applied, then the word 'None' in Green Text will be displayed (Review Figure 5-2 ). Once a Filter has been applied to the Report, the displayed Text will be updated to indi-cate the words 'in use' and 'Clear' (See Figure 5-11 ).
Mouse-clicking on 'In-Use' will return the User to the “Filters” Text Entry Fields. This is useful if the User wishes to change the Filter Parameters cur-rently in use. Additionally, multiple Filters may be applied to the same Report. This can be done by Mouse-clicking on the '+' or '-' Screen Buttons located on the right side of the Filter Text Entry Fields (See Figure 5-12 ). Each time the '+' (Plus) Screen Button is
clicked, an additional Filter Field will be added immediately below the current existing Field (as illustrated in Figure 5-12). Each time the '-' (Minus) Screen Button is clicked, the Filter Field currently at the bottom of the list will be deleted.
Mouse-clicking on 'Clear' (Review Figure 5-11 ) will remove all currently applied Filters and return the Report to normal with all records displayed.Export: The ICB Web Reports Application offers two data export options: XLS and PDF (Review Figure 5-2 & ).
XLS: This selection allows the user to export the data fields of the currently selected Report into a Microsoft® Excel® (XLS) formatted Spreadsheet (Review Figure 5-2 ).PDF: This selection allows the User to convert the currently selected Report to a professionally for-matted PDF File (Review Figure 5-2 ). Mouse-clicking on 'PDF' will generate and display the reformatted Report. The User may then Print or Save the file in Adobe Acrobat PDF Format.
Figure 5-10 Delimiter Selection Menu
Figure 5-11 Filter In Use Screen
Figure 5-12 Multiple Filter Add/Delete Buttons
NOTE: When working with multiple Filters, the User should realize that any additional Filters will function in a hierarchical order, and are not independent of one other (i.e., Filter # 2 only filters the data that has already being filtered by Filter # 1). Users are advised to carefully consider the order in which multiple filters are applied, so that the end Report will still yield valid data.
/N 960-100917R_Rev. 1 {EDP #214112} © 2012, Japan CashMachine Co., Limited 5 - 4

Performance Functions ICB® Web Reports Program Version 2.X.X Operator Instruction Manual Section 5
For each selected Report, data is displayed in the center portion of this Screen (See Figure 5-13). The following features are common to all Reports:
Report Type: This area displays the name of the currently selected Report Type (See Figure 5-13 ).Report Options: This area displays User available Report Options (See Figure 5-13 ). Information on working with these Options is provided on pages 5-2, 5-3 and 5-4 of this Operator’s Manual.Summary Fields: Depending on the Report type, this area may display one or more Summary Data Fields (examples are shown in Figure 5-13 ). The data displayed represents Sums, calculated Val-ues, or Averages for the selected Report.Asset #'s: The ASSET # Data Field is common to all Reports. Asset Numbers are displayed in Green Text (See Figure 5-13 ). When Mouse-clicked, additional detailed Asset Data will be provided.Data Fields: This selection displays the names of the Data Fields that make up the selected Report
(See Figure 5-13 ). The Data Field that the Report is currently sort on is indicated by an 'up triangle' (▲) or a 'down triangle' (▼) immediately follow-ing the Data Field name (See Figure 5-13 ). The direction of the displayed triangle indicates whether the Records are being sorted in an ascending (▲) or a descending (▼) order. Mouse-clicking the Data Field name will change the Report to the alternate sort criteria. The User may also change the Report so that it sorts on a different Data Field by Mouse-clicking on the Name of the desired Data Field.Vertical Scroll Bar: This Scroll Bar appears when the number of displayed records exceed the Screen’s Vertical size (See Figure 5-13 ). The Bar may be moved up or down in order to view all Records listed in the current Report. Horizontal Scroll Bar: This Scroll Bar appears when the number of Data Fields being displayed exceed the Screen’s Horizontal Size (See Figure 5-13 ). The Bar may be moved left or right to view all Data Fields in the current Report.
Main Report Screen
Figure 5-13 Main Report Screen
P/N 960-100917R_Rev. 1 {EDP #214112} © 2012, Japan CashMachine Co., Limited 5 - 5

P
Section 5 ICB® Web Reports Program Version 2.X.X Operator Instruction Manual Performance Functions
For each Report, numbers in the ASSET # Data Field are displayed in Green Text. (Review Figure 5-13 ). Mouse-clicking any of these numbers will bring up the Asset Data Report Screen, which provides the following additional information directly related to the Asset # selected:
Asset #: This Window displays the currently selected Asset # (See Figure 5-14 ).Acceptor Version History: This Table displays a Record of the various Firmware Versions that have been installed in the Banknote Validator related to the selected Asset (See Figure 5-14 ). Each Record includes the first Docking Date that occurred for the installed Firmware Version.Reject History: This Table displays a Record of Banknote rejections reported by the Validator asso-ciated with the selected Asset (See Figure 5-14 ). Each Record indicates the Reject Description, the number of times the Reject occurred, and the Docking Date when the errors were reported.
Acceptance History: These Bargraphs display the Bill Validator Acceptance Rate for the 10 most recent Drop Cycles for this particular Asset (See Figure 5-14 ).Error History: This Table displays a Record of errors reported by the Banknote Validator associ-ated with the selected Asset (See Figure 5-14 ). Each record indicates the Error Description, the number of times the Error occurred, and the dock-ing date when the errors were reported.Daily Revenue: These Bargraphs display the Daily Revenue Amounts for the 10 most recent Drop Cycles of this Asset (See Figure 5-14 ).
Asset Data Report Screen
NOTE: Asset Data Report Screens are opened and displayed in an active Window separate from the Main Web Reports Application. When finished viewing the displayed Asset Data, simply Mouse-click close the Asset Data Screen to return to the Web Reports Application.
Figure 5-14 Asset Data Report Screen
/N 960-100917R_Rev. 1 {EDP #214112} © 2012, Japan CashMachine Co., Limited 5 - 6

Performance Functions ICB® Web Reports Program Version 2.X.X Operator Instruction Manual Section 5
The Acceptance Rate Report (See Figure 5-15) dis-plays Acceptance Rate information for all Assets in the current Report group. The Report can be used to help identify Validators that may be having Acceptance problems. This may be the result of dirty Sensors or other maintenance related issues. Default sorting for this Report is based on the Acceptance Rate Data Field. Records are listed in ascending order from the lowest Acceptance Rate
to the highest. An Acceptance Rate threshold may be applied to the Report by using the On-Screen 'Filters' Option to select and modify the displayed range value for the Acceptance Rate Data Field. Acceptor Firm-ware Version information is also provided as an aid in determining if an Acceptance Rate drop may be due to an outdated Firmware Version having been installed in a particular Bill Acceptor.
The following data is provided in this Report:SUMMARY FIELDSThe Summary Fields are listed in a Table below the Acceptance Rate Data (See Figure 5-15 ).
Bills Accepted: This Column lists an accumulative Value equal to the Total Number of Banknotes Accepted and Stacked into all Cash Boxes listed in the Report. Bills Inserted: This Column lists an accumulative Value equal to the Total Number of Banknotes inserted into all Validators listed in the Report.Average Acceptance: This Column lists an aver-aged Value representing the Total Average Accep-tance Rate for ALL Records in the Report.
DATA FIELDSThe Data Fields are listed in Columns adjacent to the Acceptance Rate Data (See Figure 5-15 ).
Asset #: This Column lists the ID Name or Asset Number assigned to the related Validator and/or Machine in Green Text (See Figure 5-15 ).Cashbox: This Column lists the internal electronic Identification Serial Number of the related Cash Box (See Figure 5-15 ).Bills Accepted: This Column lists the number of Banknotes accepted into the related Cash Box since the last Drop Cycle occurred (See Figure 5-15 ).Bills Inserted: This Column lists the number of Banknotes inserted into the Validator since the last Drop Cycle occurred (See Figure 5-15 ).Acceptance Rate: This Column represents the per-centage of Banknotes Accepted and Stacked into the CashBox out of the Total Number inserted into the Validator (See Figure 5-15 ).
Performance: Acceptance Rate Report
Hidden
from View
Figure 5-15 Acceptance Rate Report Screen
P/N 960-100917R_Rev. 1 {EDP #214112} © 2012, Japan CashMachine Co., Limited 5 - 7

P
Section 5 ICB® Web Reports Program Version 2.X.X Operator Instruction Manual Performance Functions
Acceptor Version: This Column identifies the Soft-ware Version currently installed in the related Vali-dator (See Figure 5-15 ).Validator Type: This Column identifies the JCM Bill Validator type currently installed in the associ-ated Asset # platform (See Figure 5-15 ). Date Docked: This Column lists the Date and Time the Cash Box was placed onto the Docking Station (See Figure 5-15 ).Center Magnetic Error: This Column indicates an invalid Magnetic reading from the Center Magnetic Sensor. This may also indicate a dirty Roller (See Figure 5-15 ).Sensor Error: This Column indicates an abnormal reading during a Validation process. This may indi-cate a dirty Transportation Path or dirty Sensors (See Figure 5-15 ).Pattern Error: This Column indicates that an invalid Pattern was detected on the Banknote being validated. This could also be due to dirty Sensors. (See Figure 5-15 ). Photo Level Error: This Column indicates a weak reading during a Validation process. This may be
due to dirty Sensors or the insertion of double Banknotes (See Figure 5-15 ).Inhibited: This Column indicates the number of times the Banknote denomination being read during validation was currently disabled; either by Soft-ware command or DIP Switch setting (See Figure 5-15 ).Length: This Column indicates the number of times that a Banknote being validated was either too long or too short in length resulting in an “invalid bill length error”. This may be due to a Validator Trans-port Encoder problem or dirty Sensors (See Figure 5-15 ).Image/Bill Jam Error: This Column indicates that the pattern detected on the Banknote does not match the Software image, or there is a Banknote jammed in the Unit (e.g., in UBA Units only) (See Figure 5-15 ).UV/MagError: For the WBA, this Column indicates invalid Magnetic readings on the left or right side, which may indicate a dirty Roller. For the UBA, this indicates a Counterfeit Pattern has been detected (See Figure 5-15 ).
/N 960-100917R_Rev. 1 {EDP #214112} © 2012, Japan CashMachine Co., Limited 5 - 8

Performance Functions ICB® Web Reports Program Version 2.X.X Operator Instruction Manual Section 5
The Acceptor Version Report (See Figure 5-16) allows the User to track individual Asset Software upgrades by reporting which Firmware Version each related Validator currently has installed. Default sorting for this Report is based on the Asset # Data Field. Records are listed in ascending order from the lowest Asset # to the highest. The following data is provided in this Report:SUMMARY FIELDSThe Summary Fields are listed in a Table below the Acceptance Version Data (See Figure 5-16 ).
Acceptor Version: This Column indicates the vari-ous Software Versions found in use among all Assets listed in the Report.Asset # Count: For each Acceptor Version listed, this Column indicates an accumulative Value indi-
cating the Total Number of Assets having that Soft-ware Version installed.
DATA FIELDSThe Data Fields are listed in Columns adjacent to the Acceptance Version Data (See Figure 5-16 ).
Asset #: This Column lists the ID Name or Asset Number assigned to the related Validator and/or Machine in Green Text (See Figure 5-16 ).Acceptor Version: The Software Version currently installed in the related Validator (See Figure 5-16 ).Validator Type: : Indicates the JCM Bill Validator type installed in the associated Asset # Platform. This data field is filled based on User input pro-vided on the 'Product Configuration' Settings Screen which is accessible via selecting the 'Admin-istration' Tab on any Web Reports Screen (See Figure 5-16 ).
Performance: Acceptor Version Report
Figure 5-16 Acceptor Version Report Screen
P/N 960-100917R_Rev. 1 {EDP #214112} © 2012, Japan CashMachine Co., Limited 5 - 9

P
Section 5 ICB® Web Reports Program Version 2.X.X Operator Instruction Manual Performance Functions
The Duplicate Asset # Report (See Figure 5-17) lists the instances where two separate Cash Boxes reported the same Asset Number. This may be due to a mis-identified Validator, two Assets having been accidentally given the same Asset #, or to an
emergency drop that occurred between Drop Cycles. Default sorting for this Report is on dupli-cate Asset # Data Fields. Records are listed in ascending order from the lowest duplicate Asset # to the highest.
The following data is provided in this Report:DATA FIELDSThe Data Fields are listed in Columns adjacent to the Duplicate Asset # Data (See Figure 5-17 ).
Asset #: This Column lists the ID Name or Asset Number assigned to the related Validator and/or Machine in Green Text (See Figure 5-17 ).Cashbox: This Column lists the internal electronic Identification Serial Number of the related Cash Box (See Figure 5-17 ).Bills Accepted: This Column lists the number of Banknotes accepted into the Cash Box since the last Drop Cycle occurred (See Figure 5-17 ).Date Initialized: This Column lists the Date and Time the Cash Box was cleared in the Count Room prior to this Drop Cycle (See Figure 5-17 ).
Drop Start Time: This Column indicates the Date and Time the Drop Cycle began (See Figure 5-17 ).Date Docked: This Column indicates the Date and Time the Cash Box was placed on the Docking Sta-tion (See Figure 5-17 ).Tickets: This Column lists the number of Barcode Tickets within the Cash Box (See Figure 5-17 ).Date Correction (by Web Reports): This Column lists the number of times a Date Correction created by Web Reports occurred. The error is indicative of a corrupt Initialized Date, Installed Date, or the Removed Date for the Cash Box (See Figure 5-17 ).
Performance: Duplicate Asset Report
Figure 5-17 Duplicate Asset Number Report Screen
/N 960-100917R_Rev. 1 {EDP #214112} © 2012, Japan CashMachine Co., Limited 5 - 1 0

Performance Functions ICB® Web Reports Program Version 2.X.X Operator Instruction Manual Section 5
The Error Code Report (See Figure 5-18) provides a breakdown of Operational Errors reported by individual Assets. The information is useful to the Slot Repair Department when scheduling and per-forming repairs and/or preventive maintenance on
failed components. The default sorting for this Report is on the Asset # Data Field. Records are listed in ascending order from the lowest Asset # to the highest.
The following data is provided in this Report:SUMMARY FIELDSThe Summary Fields are listed in a Table below the Error Codes Data (See Figure 5-18 ).
Box Full: Indicates the total number of times a Cashbox was reported full since the last Drop Cycle for all Assets listed.Stacker Jam: Indicates the total number of Stacker Jams reported since the last Drop Cycle for all Assets listed.Stacker Lever Jam: Indicates the total number of Stacker Lever Jams reported since the last Drop Cycle for all Assets listed.Head Jam: Indicates the total number of Head Jams reported since the last Drop Cycle for all Assets listed.Missing Validator Head: Indicates the total number of Missing Validator Head errors reported since the last Drop Cycle for all Assets listed.Transport Motor Failure: Indicates the total num-ber of Transport Motor Failures reported since the last Drop Cycle for all Assets listed.Solenoid Failure: Indicates the total number of Solenoid Failures reported since the last Drop Cycle for all Assets listed.Pullback Unit Jam: Indicates the number of Pull-back Unit Jams reported since the last Drop Cycle for all Assets listed.
Cashbox Removed: Indicates the number of times the Cash Box was removed from the Validator for all Assets listed.Communication Error: Indicates the number of ICB Communication Errors reported since the last Drop Cycle for all Assets listed.Possible Stringing: Indicates the total number of Possible Stringing faults reported since the last Drop Cycle for all Assets listed.Date Correction (by Web Reports): Indicates the total number of Date Correction by Web Reports errors reported since the last Drop Cycle for all Assets listed.
DATA FIELDSThe Data Fields are listed in Columns adjacent to the Error Code Data (See Figure 5-18 ).
Asset #: This Column lists the ID Name or Asset Number assigned to the related Validator and/or Machine in Green Text (See Figure 5-18 ).Date Docked: This Column indicates the Date and Time the Cash Box was placed on the Docking Sta-tion (See Figure 5-18 ).Box Full: This Column lists the number of times the Cash Box was reported full and was unable to stack any more Banknotes or Tickets (See Figure 5-18 ).Stacker Jam: This Column lists the number of Stacker Jams reported by the Banknote Validator.
Performance: Error Codes Report
HiddenfromView
Figure 5-18 Error Codes Report Screen
P/N 960-100917R_Rev. 1 {EDP #214112} © 2012, Japan CashMachine Co., Limited 5 - 11

P
Section 5 ICB® Web Reports Program Version 2.X.X Operator Instruction Manual Performance Functions
A Stacker Jam occurs when the Stacker is unable to reset to its Home Position (See Figure 5-18 ). Stacker Lever Jam: This Column lists the number of Stacker Lever Jams reported by the Banknote Validator. A Stacker Lever Jam occurs when the Validator is unable to detect movement of the Stacker Lever (See Figure 5-18 ).Head Jam: This Column lists the number of Head Jams reported by the Bill Validator. A Head Jam occurs when the Validator detects a note or other debris being present in the Head Sensor area (See Figure 5-18 ).Missing Validator Head: This Column lists the number of times the Validator Head was not prop-erly seated, not communicating, not detected, or physically removed from the Validator (See Figure 5-18 ).Transport Motor Failure: This Column lists the number of times a Validator’s Transport Motor failed. This may be due to the Transport Motor not responding to commands, or the Motor Speed Sensor not reporting a correct movement (See Figure 5-18 ).Solenoid Failure: This Column lists the number of times a Banknote Validator Solenoid Failure occurred. This may be due to the Solenoid not working, or an error occurring in the Solenoid Lever Sensor Circuit (See Figure 5-18 ).Pullback Unit Jam: This Column lists the number of times a Pullback Unit Jam was reported by the Banknote Validator (See Figure 5-18 ).Cashbox Removed: This Column lists the Total Number of times the Cash Box was removed from the Validator since the last Drop Cycle (See Figure 5-18 ).Communication Error: This Column lists the num-ber of times an ICB Communication Error occurred. The error is usually due to a fault in the ICB Module which prevents proper communication between the Validator and the Cash Box, or between the Cash Box and the Docking Station. The Docking Station LCD Display will indicate a 'Box Data Error' message when this condition occurs (See Figure 5-18 ).Possible Stringing: This Column lists the number of times a Possible Stringing attempt occurred. This describes a fault where the Sensors detect a Bank-note moving in the reverse direction when not com-manded by the Motors (e.g., possibly a Banknote stringing attempt). This is unlikely in a UBA due to its built-in Anti-stringing Hardware, but may indi-cate a faulty Sensor or possible contaminates col-lected in the Transport path blocking a Sensor. This fault shuts down the Banknote Validator and requires a Reset Command (See Figure 5-18 ).Date Correction (by Web Reports): This Column lists the number of times a Date Correction by Web Reports occurred. The error is indicative of a cor-
rupt Initialized Date, Installed Date, or Removed Date for the Cash Box (See Figure 5-18 ).Acceptor Version: This Column indicates the Soft-ware Version currently installed in the related Vali-dator (See Figure 5-18 ).Validator Type: : Indicates the JCM Bill Validator type installed in the associated Asset # Platform. This data field is filled based on User input pro-vided on the 'Product Configuration' Settings Screen which is accessible via selecting the 'Admin-istration' Tab on any Web Reports Screen (See Figure 5-18 ).
/N 960-100917R_Rev. 1 {EDP #214112} © 2012, Japan CashMachine Co., Limited 5 - 1 2

Performance Functions ICB® Web Reports Program Version 2.X.X Operator Instruction Manual Section 5
The Revenue Report (See Figure 5-19) provides a breakdown on income information for all Assets in the current Drop Cycle. Revenue Totals are pro-vided for individual Assets as-well-as for all Assets
as a whole. Default sorting for this Report is on the Asset # Data Field. Records are listed in descend-ing order from the highest Asset # to the lowest.
The following data is provided in this Report:SUMMARY FIELDSThe Summary Fields are listed in a Table below the Revenue Data (See Figure 5-19 ).
Cashboxes Downloaded: Indicates the Total Number of Cash Boxes downloaded in the current Report. The value will vary depending on the length of the Time Period selected.Total Bills Accepted (for all records): Indicates the Total Number of Banknotes accepted for all records in the current Report. The value will vary depend-ing on the length of the Time Period selected.Total Value (for all records): Indicates the Total Monetary Value of ALL Banknotes for all of the Records within the current Report. The value is obtained by summing the 'Total Value' Data Fields together, and will vary depending on the number of Records and the length of the Time Period selected.1's: Indicates the number of Banknotes Accepted for all Records, the count value of which were Ones (1's).
5's: Indicates the number of Banknotes Accepted for all records, the count value of which were Fives (5's).10's: Indicates the number of Banknotes Accepted for all records, the count value of which were Tens (10's).20's: Indicates the number of Banknotes Accepted for all records, the count value of which were Twenty’s (20's).50's: Indicates the number of Banknotes Accepted for all records, the count value of which were Fifty’s (50's).100's: Indicates the number of Banknotes Accepted for all records, the count value of which were Hun-dreds (100's).Total Tickets (number of barcode tickets for all records): The Total Number of Barcode Tickets accepted for ALL Records in the current Report.
Performance: Revenue Report
Figure 5-19 Revenue Report Screen
P/N 960-100917R_Rev. 1 {EDP #214112} © 2012, Japan CashMachine Co., Limited 5 - 1 3

P
Section 5 ICB® Web Reports Program Version 2.X.X Operator Instruction Manual Performance Functions
The value will vary depending on the length of the Time Period selected.
DATA FIELDSThe Data Fields are listed in Columns adjacent to the Revenue Data (See Figure 5-19 ).
Asset #: This Column lists the ID Name or Asset Number assigned to the related Validator and/or Machine in Green Text (See Figure 5-19 ).Cashbox: This Column lists the internal electronic Identification Serial Number of the related Cash Box (See Figure 5-19 ).Bills Accepted: This Column lists the number of Banknotes accepted into the Cash Box since the last Drop Cycle occurred (See Figure 5-19 ).Value: This Column lists the Total Monetary Value of all Banknotes in the Cash Box (See Figure 5-19 ).Drop Start Time: This Column indicates the Date and Time the Drop began (See Figure 5-19 ).Date Docked: This Column indicates the Date and Time the Cash Box was placed onto the Docking Station (See Figure 5-19 ).
1's: This Column lists the Total Number of Ones (1's) in the Cash Box (See Figure 5-19 ).5's: This Column lists the Total Number of Fives (5's) in the Cash Box (See Figure 5-19 ).10's: This Column lists the Total Number of Tens (10's) in the Cash Box (See Figure 5-19 ).20's: This Column lists the Total Number of Twenty’s (20's) in the Cash Box (See Figure 5-19 ).50's: This Column lists the Total Number of Fifty’s (50's) in the Cash Box (See Figure 5-19 ).100's: This Column lists the Total Number of Hun-dreds (100's) in the Cash Box (See Figure 5-19 ).
Tickets This Column lists the total number of Bar-code Tickets in the Cash Box. (See Figure 5-19 ).File Name: This Column lists the name of the MDM Data File that contains the stored data for this Asset Number and the location where it was retrieved (See Figure 5-19 ).
NOTE: This sample Data is for US ($) Dollars in this example. Field size will very when other Country’s Currencies are displayed.
NOTE: This sample Data is for US ($) Dollars in this example. Field size will very when other Country’s Currencies are displayed.
/N 960-100917R_Rev. 1 {EDP #214112} © 2012, Japan CashMachine Co., Limited 5 - 1 4
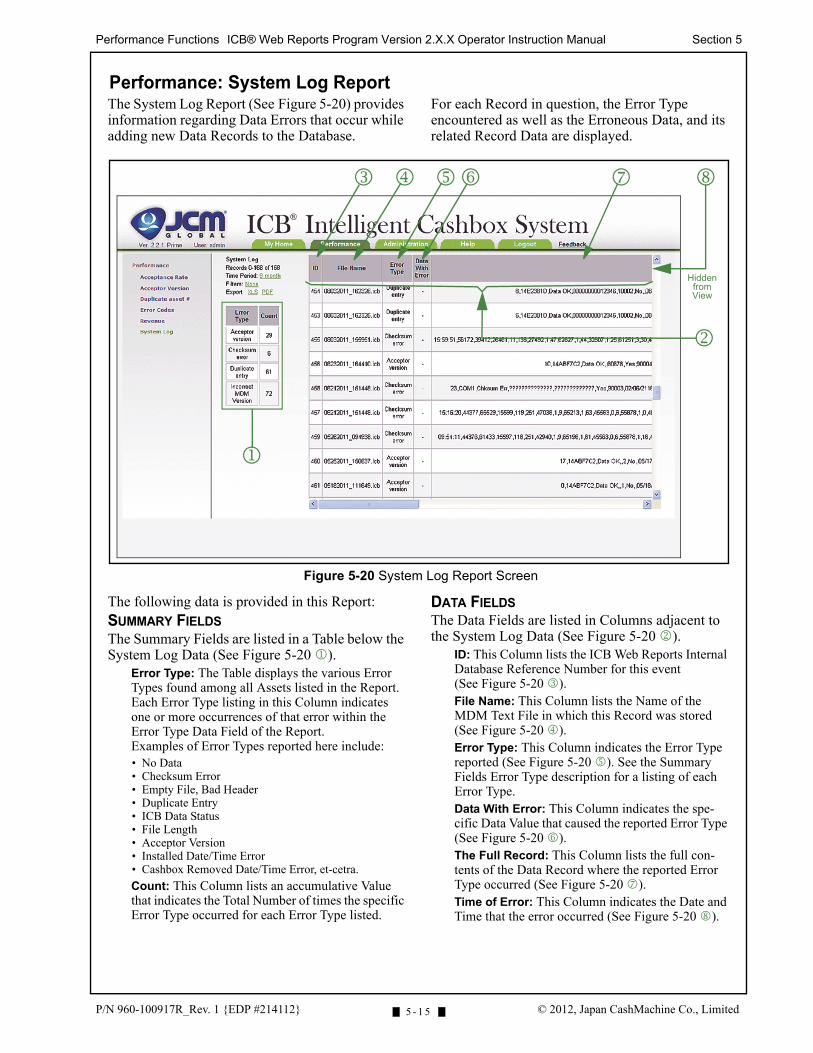
Performance Functions ICB® Web Reports Program Version 2.X.X Operator Instruction Manual Section 5
The System Log Report (See Figure 5-20) provides information regarding Data Errors that occur while adding new Data Records to the Database.
For each Record in question, the Error Type encountered as well as the Erroneous Data, and its related Record Data are displayed.
The following data is provided in this Report:SUMMARY FIELDSThe Summary Fields are listed in a Table below the System Log Data (See Figure 5-20 ).
Error Type: The Table displays the various Error Types found among all Assets listed in the Report. Each Error Type listing in this Column indicates one or more occurrences of that error within the Error Type Data Field of the Report. Examples of Error Types reported here include: • No Data• Checksum Error• Empty File, Bad Header• Duplicate Entry• ICB Data Status• File Length• Acceptor Version• Installed Date/Time Error• Cashbox Removed Date/Time Error, et-cetra.
Count: This Column lists an accumulative Value that indicates the Total Number of times the specific Error Type occurred for each Error Type listed.
DATA FIELDSThe Data Fields are listed in Columns adjacent to the System Log Data (See Figure 5-20 ).
ID: This Column lists the ICB Web Reports Internal Database Reference Number for this event (See Figure 5-20 ).File Name: This Column lists the Name of the MDM Text File in which this Record was stored (See Figure 5-20 ).Error Type: This Column indicates the Error Type reported (See Figure 5-20 ). See the Summary Fields Error Type description for a listing of each Error Type.Data With Error: This Column indicates the spe-cific Data Value that caused the reported Error Type (See Figure 5-20 ).The Full Record: This Column lists the full con-tents of the Data Record where the reported Error Type occurred (See Figure 5-20 ).Time of Error: This Column indicates the Date and Time that the error occurred (See Figure 5-20 ).
Performance: System Log Report
HiddenfromView
Figure 5-20 System Log Report Screen
P/N 960-100917R_Rev. 1 {EDP #214112} © 2012, Japan CashMachine Co., Limited 5 - 1 5

Section 5 ICB® Web Reports Program Version 2.X.X Operator Instruction Manual Performance Functions
THIS PAGE INTENTIONALLY LEFT BLANK
P/N 960-100917R_Rev. 1 {EDP #214112} © 2012, Japan CashMachine Co., Limited 5 - 1 6

ICB® Web Reports ProgramVersion 2.X.XOperator Instruction Manual
S e c t i o n 6
My Home Screen The My Home Screen is selected by Mouse-click-ing on the 'My Home' Tab located near the top of the active page (See Figure 6-1 ).Once selected, the 'Summary Report' will automat-ically be generated and displayed in the center of the Screen. Depending on the version of Web Reports installed, other features may also be listed on the left side of the Screen.
If this is the case, refer to the “My Home Screen” in the “Subscription Version” on page A-1 of Appendix A in this Manual for further explaina-tion of these additional features.
MyHome/Summary Report: The My Home Summary Report provides a quick, dated, snapshot Table view of System Performance that occurred during the two (2) most recent Drop Cycles at the Customer’s location (See Figure 6-1 ). Refer to Figure 6-2 on page 2 for further details regarding the data presented in this Table.
6 MY HOME FUNCTIONS
NOTE: This is the default Screen that exists after Login. All Users who Log-in to the Web Reports Application are automatically brought to this page and presented with the Summary Report.
Figure 6-1 My Home Screen
P/N 960-100917R_Rev. 1 {EDP #214112} © 2012, Japan CashMachine Co., Limited6 - 1

P
Section 6 ICB® Web Reports ProgramVersion 2.X.XOperator Instruction Manual My Home Functions
MY HOME: SUMMARY REPORTThe Summary Report provides a quick, dated, snapshot Table view of overall System Perfor-mance for the two (2) most recent Drop Cycles.
It provides information on Revenue, Average Acceptance Rates, Machines with Poor Accep-tance, and Errors. The following data is provided in this Report:
Two most recent Drop Cycles: Shows the dates of the two (2) most recent Drop Cycles on which the Summary Report Data is based (See Figure 6-2 ).
Revenue: The Total Daily Revenue for both Drop Cycles is indicated for the two (2) most recent Drop Cycles (See Figure 6-2 ). For further details, Mouse-clicking on the Green 'Revenue' text will link to, and open, the related Revenue Report.
Average Acceptance Rate: Shows the Aver-age Acceptance Rate for both Drop Cycles (See Figure 6-2 ). For further details, Mouse-clicking on the Green 'Average Acceptance Rate' text will link to, and open, the related Acceptance Rate Report.
Machines With Poor Acceptance: Shows the number of machines having an Acceptance Rate less than the 'Minimum Allowed Accep-tance' (See Figure 6-2 ). By default, this value is set at 97%. If desired, the User can set or modify the 'Minimum Allowed Acceptance' Value on the Administration System Settings
Screen. For further details regarding this fea-ture, Mouse-click on the Green 'Machines With Poor Acceptance' text and it will link to, and open, the Acceptance Rate Report. Errors: Shows the number of Machines that reported operational and or hardware errors for these two (2) Drop Cycle periods (See Figure 6-2 ). For further details, Mouse-clicking on the Green 'Errors' Text will link to, and open, the Error Codes Report.
Figure 6-2 Summary Report Screen Table
/N 960-100917R_Rev. 1 {EDP #214112} © 2012, Japan CashMachine Co., Limited6 - 2

ICB® Web Reports Program Version 2.X.X Operator Instruction Manual
S e c t i o n 7
To exit out of the ICB Web Reports Application, simply select and Mouse-click on the 'Logout' Tab (See Figure 7-1 ). This may be done at any time,
and from any Screen being displayed. Once selected, the Application will close, and the User will be returned to the Main Login Screen.
7 LOG OUT FUNCTION
Application Logout
Figure 7-1 Application Logout Screen
P/N 960-100917R_Rev. 1 {EDP #214112} © 2012, Japan CashMachine Co., Limited 7 - 1

Section 7 ICB® Web Reports Program Version 2.X.X Operator Instruction Manual Log Out Function
THIS PAGE INTENTIONALLY LEFT BLANK
P/N 960-100917R_Rev. 1 {EDP #214112} © 2012, Japan CashMachine Co., Limited 7 - 2

ICB® Web Reports Program Version 2.X.X Operator Instruction Manual
S e c t i o n 8
8 INDEX
A
Asset Displayfunction allowing defauly caption Asset# name changes… 4-15
C
Communicationscriteria regarding receipt of… 3-1
E
Exportoptions for exporting XLS and PDF files… 5-4
F
Filtersallows Reports with large numbers to be sorted… 5-3
H
Helpinstructions for providing… 3-1
L
Lithium Battery… 1-2
M
Machines With Poor Acceptancea list of Machines exibiting Acceptance Rates less than allowable… 6-2
Minimum Allowed Acceptancemethods for establishing minimum Banknoteacceptance Values… 4-14
N
Navigationwithin manual
procedure for… 1-1
P
Passwordmethedology of creating and/or changing… 4-3
Password Changesadding or removing Users… 4-5for ’Login Setting’ Functions… 4-9
Product Configurationfunctions for associating specific Products to Software… 4-13
R
Revenue Reporta Current Cycle Asset# Revenue information breakdown… 5-13
RFID Circuit… 1-2
S
Safetypictographs indicating
1 to 3 symbols inside boxed area… 1-1
Special Notesitalic text highlights
finger points to… 1-1
Stepssequential numbering of… 1-1
Subscription Versioninformation regarding the… A-1
T
Time Periodallows User to set report time range… 5-2
W
Website ConnectionIE SSL Type
steps required for… 2-1
P/N 960-100917R_Rev. 1 {EDP #214112} © 2012, Japan CashMachine Co., Limited8 - 1

ICB® Web Reports Program Version 2.X.X Operator Instruction Manual Index Index
THIS PAGE INTENTIONALLY LEFT BLANK
P/N 960-100917R_Rev. 1 {EDP #214112} © 2012, Japan CashMachine Co., Limited8 - 2

ICB® Web Reports Program Version 2.X.X Operator Instruction Manual
A p p e n d i x A
The 2.5.X Subscription Version of Web Reports offers several features not found in the 2.X.X Prime Version Application. This Appendix provides details concerning the additional Reports, Features, and differences avail-able in Version 2.5.X.
Start-Up and Log-In The startup and Login procedures for Version 2.5.X are identical to Version 2.X.X, except that the Version 2.X.X Login Screen (See Figure A-1) is replaced with a Version 2.5.X Login Screen (See Figure A-2).
A SUBSCRIPTION VERSION
Figure A-1 Web Reports V2.X.X Log In Screen
Figure A-2 Web Reports V2.5.X Log In Screen
P/N 960-100917R_Rev. 1 {EDP #214112} © 2012, Japan CashMachine Co., Limited A - 1

P
Appendix A ICB® Web Reports Program Version 2.X.X Operator Instruction Manual Subscription Version
The 'Roles' Screen in Version 2.5.X contains an additional Permissions Checkbox labeled 'Email
Notifications. This Checkbox is available for all existing Roles, as-well-as all newly defined Roles, and must be 'Checked' if the User wishes to use the E-mail Notifications feature of Web Reports.
To enable a Role for E-mail Notifications, proceed as follows:
1. In the Roles Section of the Screen (See Figure A-3 ), Mouse-click select the 'Role' (i.e., Admin, Slots, Accounting, New, etc.) to be enabled.
2. In the Permissions Section of the Screen (See Figure A-3 ), Mouse-click on the ‘Email Notifications’ Checkbox so that a Green colored Checkmark is displayed.
3. Mouse-click on the 'Update' Screen Button (See Figure A-3 ) to have the change take effect.
4. Repeat Steps 1 through 3 for each “Role” as desired. E-mail Notifications have now been enabled.
To disable a Role from using E-mail Notifications, proceed as follows:
1. In the Roles section of the Screen (See See Figure A-3 ), Mouse-click select the 'Role' (i.e., Admin, Slots, Accounting, New, etc.) to be disabled.
2. In the Permissions section of the Screen (See Figure A-3 ), Mouse-click on the ‘Email Notifications’ Checkbox so that the Green colored Checkmark disappears and the Checkbox is empty .
Users and Roles: RolesNOTE: Instructions on this page are specific to the Features mentioned. For instructions regarding all other Functions on this Screen, refer to the “Users and Roles: Roles” Screen documentation presented earlier in Figure 4-4 on page 4-7 of this Operator’s Manual.
Figure A-3 Email Notifications Checkbox Locator Screen
NOTE: Once a Role has been selected, the Checkboxes located in the Permissions Section of the Screen (See Figure A-3) will indicate their current status. A Checkbox marked with a Green colored Checkmark , indicates the associated feature or report is available to a User for that Role. An unchecked Checkbox means the associated feature or report is disabled and unavailable to the User.
NOTE: Once a Role has been selected, the Checkboxes located in the Permissions Section of the Screen ( See Figure A-3) will indicate their current status. A Checkbox marked with a Green colored Checkmark , indicates the associated feature or report is available to a User for that Role. An unchecked Checkbox means the associated feature or report is disabled and unavailable to the User.
/N 960-100917R_Rev. 1 {EDP #214112} © 2012, Japan CashMachine Co., Limited A - 2

Subscription Version ICB® Web Reports Program Version 2.X.X Operator Instruction Manual Appendix A
3. Mouse-click on the 'Update' Screen Button (See Figure A-3 ) to have the change take effect.
4. Repeat Steps 1 through 3 for each “Role” as desired. E-mail Notifications have now been disabled.
P/N 960-100917R_Rev. 1 {EDP #214112} © 2012, Japan CashMachine Co., Limited A - 3

P
Appendix A ICB® Web Reports Program Version 2.X.X Operator Instruction Manual Subscription Version
The 'System Settings' Screen in Version 2.5.X con-tains additional data entry Fields which need to be configured at the Customer locations where the 'Email Notifications' Feature will be used. Instructions to accomplish this are provided below Figure A-4.
To setup Web Reports for E-mail Notifications, proceed as follows:
1. In the E-mail Configuration Host Data Text Field (See Figure A-4 ), enter the Name or Location of the local E-mail Server.
2. To send E-mail Reports from the Web Reports Application that contains a part-icular Address in the From field, this address should be entered in the E-mail Configura-tion Sender Address Data Field (See Figure A-4 ).
3. The 'Multiple separate drops per drop day' Checkbox (See Figure A-4 ) is unchecked by default. This works well for most loca-tions where the scheduled Drop is completed in one entire Drop Session. In this case, Web
Reports will respond by sending one E-mail Report for that Drop. In cases where a Customer elects to do several Drop Sessions a day, either for con-venience or for the purpose of separating Drops by Game Type, the User can Mouse-click on, and select the 'Multiple separate drops per drop day' Checkbox (See Figure A-4 ). Web Reports will then send separate E-mail Reports for each Drop Session that occurs within the same 24 hour period.
4. Mouse-click on the 'Update' Screen Button (See Figure A-4 ). Web Reports will then check the information entered, and a Test E-mail will be sent to the desired E-mail Server. If a problem is detected, an error message will appear, allowing the User to correct the problem.
Administration: System SettingsNOTE: Instructions on this page are specific to the Features mentioned. For instructions regarding all other Functions on this Screen, refer to the “System Settings” Screen documentation presented earlier on page 4-14 in this Operator’s Manual (See Figure 4-8).
Figure A-4 Version 2.5.X System Settings Screen
NOTE: Depending on the SMTP Server configuration; the Port, Username, and Password Fields may not be necessary. If additional authentication is required however, then enter the needed information into the additional Port (See Figure A-4 ), Username (See Figure A-4 ), and Password (See Figure A-4 ) Text entry Data Fields.
/N 960-100917R_Rev. 1 {EDP #214112} © 2012, Japan CashMachine Co., Limited A - 4

Subscription Version ICB® Web Reports Program Version 2.X.X Operator Instruction Manual Appendix A
The 'Last Dropped Time Report' is shown in Figure A-5. It is selected by Mouse-clicking on 'Last Dropped Time' text located in the left side Naviga-tion Panel on the Screen (See Figure A-5 ).
For each Asset # listed in the Report, it will indi-cate the Date and Time that the Cash Box from that Asset was last docked onto a Read-Write Tool.
Data FieldsThe Data Fields provided for this Report are as follows:Asset #: This Column lists the ID Name or Asset Number assigned to the related Validator and/or Machine in Green Text (See Figure A-5 ). The default Display will be for 'Todays' Drop. If 'Todays' Drop has not yet occurred or been com-
pleted, then the display will indicate 'Yesterdays' Drop. The number of Asset #'s available for view will vary depending on the 'Time Period' selected by the User.Date Docked: This Column indicates the last Date and Time the Cash Box from the associated Asset # was docked onto a Docking Station (See Figure A-5 ).
Performance: Last Dropped Time Report
Figure A-5 Last Dropped Time Report Screen
P/N 960-100917R_Rev. 1 {EDP #214112} © 2012, Japan CashMachine Co., Limited A - 5

P
Appendix A ICB® Web Reports Program Version 2.X.X Operator Instruction Manual Subscription Version
The 'Email Subscriptions' Option in Web Reports (see Figure A-6) is a Feature that allows a User to have one, or more, Drop Reports automatically sent to their E-mail Address after each Drop Cycle. Users may elect to have an individual E-mail sent for each Report desired, or just a single E-mail sent with all the desired Reports included. This feature is convenient for Users who need to view Web Reports Data on a regular basis, but do not always have access to a Browser enabled PC, or the time to Login to the Web Reports Application.
In this case the selected Reports will be E-mailed to the User and neatly presented in an easy to read Adobe Acrobat PDF Format.
Details on selecting desired Reports is provided below Figure A-6.
To setup Web Reports for E-mail Notifications, proceed as follows:
1. From the My Home Screen, Mouse-click select ‘Email Subscriptions’ (See Figure A-6 ) from the left side column of the Screen.
2. Verify that the User’s E-mail address is dis-played on the Screen (See Figure A-6 ) is correct. This is the E-mail Address where selected Reports will be sent. If an address correction needs to be made, refer to the User Data E-mail Address Data Text entry Field in this Operator’s Manual).
3. From the list of available Reports (See Figure A-6 ), Mouse-click on the
Checkbox related to each Report that is to be E-mailed.
4. Of the two E-mail Options available (See Figure A-6 ), Mouse-click on the desired respective Radio Button to choose whether each selected Report will be sent as its own individual E-mail (One E-mail per Report), or whether all selected Reports will be sent in just one single E-mail (One E-mail Total).
5. Mouse-click on the 'Update' Screen Button (See Figure A-6 ). The desired Web Reports selections will be stored, and
My Home: E-mail Subscriptions
NOTE: The 'Email Subscription' Option (See Figure A-6 ) does not appear and is not available for selection until the SMTP Mail Server Configuration Data (Review Figure A-4) has been entered and verified by Web Reports.
Figure A-6 E-mail Subscriptions Screen
NOTE: The list of available Reports shown in Figure A-6 is an example. The number of Reports available for selection will vary depending on each Users Role and Log- in Permission for using Web Reports.
/N 960-100917R_Rev. 1 {EDP #214112} © 2012, Japan CashMachine Co., Limited A - 6

Subscription Version ICB® Web Reports Program Version 2.X.X Operator Instruction Manual Appendix A
E-mails will be sent following the next com-pleted Drop Cycle.
NOTE: If E-mails do not arrive, check the User’s Role page (Review Figure A-3) to verify that the ‘Email Notifications’ Checkbox (for the respective User’s Role) has been enabled.
P/N 960-100917R_Rev. 1 {EDP #214112} © 2012, Japan CashMachine Co., Limited A - 7

P
Appendix A ICB® Web Reports Program Version 2.X.X Operator Instruction Manual Subscription Version
The Report Designer allows the User to create cus-tom Reports for use with the Web Reports Applica-tion. The User can modify existing Report Types by adding or deleting specific Data Fields. The User may also create entirely new customized Reports from a list of available Data Fields. The Report Designer may be accessed either by Mouse -clicking on 'Report Designer' located in the left
side Column of the My Home Screen (See Figure A-7 ), or by Mouse-clicking on the 'Open in Designer' link located directly below the Export Options Section on applicable Performance Report Screens (Review Figure A-5 ). Details on modi-fying existing Reports, and on creating new Reports are provided below Figure A-7.
Modifying Existing Reports (Refer to Figure A-7)
To modify an existing Report, proceed as follows:1. In the 'Reports' Box (See Figure A-7 )
Mouse-click on the Report Name that is to be modified. The selected Report Name will be highlighted in Blue. In the example shown in Figure A-7, the 'Acceptance Rate' Report has been selected. When a Report is selected, the 'Used Fields' Box (See Figure A-7 ) will display the list of Data Fields currently in use by the selected Report. The 'Unused Fields' Box (See Figure A-7 ) will display a list of Data Fields not currently in use. The Report Name Box (See Figure A-7 ) will display the name of the selected Report.
2. In the 'Used Fields' Box (See Figure A-7 ), Mouse-click select the Data Fields that are to
be removed from the Report. The selected Data Fields will be highlighted in Blue.
3. Mouse-click on the Right Arrow Screen Button (See Figure A-7 ) to move the selected Data Fields to the 'Unused Fields' Box (See Figure A-7 ). Data Fields that are moved to the 'Unused Fields' Box will appear at the bottom of the list.
4. In the 'Unused Fields' Box (See Figure A-7 ), Mouse-click to select Data Fields that are to be added to the Report. Selected Data Fields will be highlighted in Blue.
5. Mouse-click on the Left Arrow Screen Button (See Figure A-7 ) to move the selected Data Fields from the 'Unused
My Home: Report Designer
Figure A-7 Report Designer - Existing Report Screen
NOTE: If desired, hold down the Keyboard 'Ctrl' Key to allow multiple Data Fields to be simultaneously selected.
NOTE: If desired, hold down the Keyboard 'Ctrl' Key to allow multiple Data Fields to be simultaneously selected.
/N 960-100917R_Rev. 1 {EDP #214112} © 2012, Japan CashMachine Co., Limited A - 8

Subscription Version ICB® Web Reports Program Version 2.X.X Operator Instruction Manual Appendix A
Fields' box (See Figure A-7 ) over to the 'Used Fields' Box (See Figure A-7 ). Data Fields that are moved to the 'Used Fields' Box will appear at the bottom of the list.
6. For each Data Field that was moved to the 'Used Fields' Box, Mouse-click to select the Data Field individually, and then use the 'Up'
or 'Down' Screen Buttons (See Figure A-7 ) to move it to the desired position in the 'Used Fields' list.
7. The name of any Data Field in the 'Used Fields' Box (See Figure A-7 ) may be changed if desired. Mouse click on the Data Field to be changed, and its Name will appear in the Data Field Name Box
(See Figure A-7 ). Mouse-click on the text to highlight and change the name. Once the desired Data Field name has been entered, Mouse-click on 'Rename' (See Figure A-7 ) to have the name change take effect.
8. The Name of any Report In the 'Reports' Box (Review Figure A-7 ) may also be changed. To do so, Mouse-click to highlight the Report Name displayed in the 'Report Name' Box (Review Figure A-7 ). Change the Report Name as desired, and then Mouse-click on the 'Rename' Screen Button (Review Figure A-7 ) to have the name change take effect.
NOTE: The position of a Data Field in the 'Used Fields' Box (See Figure A-7 ) determines where it will be displayed on the Report Screen. Data Fields are displayed on the Report Screen from left to right, starting with the Data Field at the top of the 'Used Fields' Box, and then working downwards from that point.
NOTE: Mouse clicking the 'Reset Name' Screen Button (See Figure A-7 ) will restore an altered Data Field Name to its original state.
NOTE: Mouse clicking the 'Reset Report' Screen Button (See Figure A-7 ) will restore an altered Report Name to its original state.
P/N 960-100917R_Rev. 1 {EDP #214112} © 2012, Japan CashMachine Co., Limited A - 9

P
Appendix A ICB® Web Reports Program Version 2.X.X Operator Instruction Manual Subscription Version
To create a New Report, proceed as follows:1. Mouse-click on the 'Add' Screen Button
(See Figure A-8 ). A new title (named 'NewReport') will appear in the list of Reports in the 'Reports’ Box (See Figure A-8 ) and will also appear at the bottom of the 'Reports' Box (See Figure A-8 ) when selected.
2. When a New Report is created, the 'Unused Fields' Box ( See Figure A-8 ) will display
the list of unused Data Fields that may be added to the New Report.
3. In the 'Unused Fields' Box (See Figure A-8 ), Mouse-click select the Data Field that will be added to the new Report. The selected Data Fields will be highlighted in Blue.
4. Mouse-click on the Left Arrow Button (See Figure A-8 ) to move the selected Data Fields from the 'Unused Fields' Box (See Figure A-8 ) over to the 'Used Fields' Box (See Figure A-8 ). Data Fields that are moved to the 'Used Fields' Box will appear at the bottom of the list.
5. For each Data Field that was moved to the 'Used Fields' Box, Mouse-click to select the Data Field individually, and then use the 'Up'
or 'Down' Screen Buttons
(See Figure A-8 ) to move it to the desired position in the 'Used Fields' List.
6. The name of any Data Field in the 'Used Fields' Box (See Figure A-8 ) may be changed if desired. Mouse click on the Data Field to be changed, and its Name will appear in the empty ‘Data Field Name’ Box (See Figure A-8 ). Mouse-click to High-light and change the Name if desired. Once the desired Data Field Name has been entered, Mouse-click on the 'Rename'
Creating New Reports (Refer to Figure A-8)
NOTE: The ''Used Fields' Box (See Figure A-8 ) will automatically show the 'Acceptance Rate' Data Field as being part of the Report. This is done to satisfy a System requirement that each Report contain at least one Data Field when created. If it is not desired to use the 'Acceptance Rate' Data Field in the new Report, it may be moved over to the 'Unused Fields' List after another Data Field has been moved in to replace it.
Figure A-8 Report Designer - New Report Screen
NOTE: If desired, hold-down the Keyboard 'Ctrl' Key to allow multiple Data Fields to be simultaneously selected.
NOTE: The position of a Data Field in the 'Used Fields' Box (See Figure A-8 ) determines where it will be displayed on the Report Screen. Data Fields are displayed on the Report Screen from left to right, starting with the Data Field at the top of the 'Used Fields' Box, and then proceeding downwards from that point.
/N 960-100917R_Rev. 1 {EDP #214112} © 2012, Japan CashMachine Co., Limited A - 1 0

P
Appendix A ICB® Web Reports Program Version 2.X.X Operator Instruction Manual Subscription Version
Screen Button (See Figure A-8 ) to have the Name change take effect.
7. The Name of the new Report being created may be changed if desired. To do so, Mouse -click Highlight the 'NewReport' as dis-played in the 'Report Name' Box (See Figure A-8 ). Change the Report name as desired, and then Mouse-click on the 'Rename' Screen Button (See Figure A-8 ) to have the name change take effect.
8. All New Reports created will have their par-ticular Name displayed in the left side
Column of the Screen under 'My Reports' (See Figure A-8 ). To 'Run' a Report, simply Mouse-click on its Name in the left side Column of the Screen. The Web Reports Application will immed-iately generate and display the Report.
NOTE: Mouse clicking the 'Reset Name' Screen Button (See Figure A-8 ) will restore an altered Data Field Name to its original state.
NOTE: To delete any Report from the Web Reports System, select its Name in the 'Reports' Box (See Figure A-8 ); then Mouse-click on the 'Delete' Screen Button (See Figure A-8 ). The selected Report will be deleted from the System, and will no longer appear in the list of available Reports.
/N 960-100917R_Rev. 1 {EDP #214112} © 2012, Japan CashMachine Co., Limited A - 11

Appendix A ICB® Web Reports Program Version 2.X.X Operator Instruction Manual Subscription Version
THIS PAGE INTENTIONALLY LEFT BLANK
P/N 960-100917R_Rev. 1 {EDP #214112} © 2012, Japan CashMachine Co., Limited A - 1 2

ICB® Web Reports Program Version 2.X.X Operator Instruction Manual
A p p e n d i x B
JCM is committed to providing our Customers with quality products and quality product support. The FAQs provided below address problems that some Customers may encounter when using the ICB Web Reports Program. If a solution for the problem you are experiencing isn't listed below, please call our toll free 24-hour Technical Support Line at (800)-683-7248 for assistance:
Q. I am running ICB Web Reports using Internet Explorer 7. Why is my report not displaying prop-erly?
A. The ICB Web Reports program is not compatible with Internet Explorer 7. The program requires Mozilla Firefox, or Internet Explorer 8 or greater.
Q. I am running ICB Web Reports using Internet Explorer 8 in compatibility mode. Why is my report not displaying properly?
A. ICB Web Reports requires that Internet Explorer 8 be run in Normal Mode in order to display properly. Change the PC from Compatibility Mode back to Normal Mode to correct the display issues.
Q. I am running Internet Explorer 8, and I have the language option in Web Reports set to Japanese. When I log into the program however, I see boxes ( ) instead of Japanese Characters. Why does that happen?
A. Sometimes the Japanese Characters do not dis-play correctly when using Internet Explorer 8. To fix this, do the following:
1. From the PC Desktop, Mouse-click select “Start”, then “Control Panel”, then select “Regional and Lan-guage Options” to choose the Language preferred.
2. Mouse-click to select the “Languages” Tab.
3. Mouse-click select the Check-box to “Install files for East Asian Languages”.
4. Mouse-click on the “OK” Screen Button.
5. Restart the PC Computer.
Q. I used the System Settings page to set a Mini-mum Allowed Acceptance Rate of 97%. When I view the Data for an Acceptance Rate Report however, I see Acceptance Rates both above and below this level. Does the Minimum Allowed Acceptance Rate function work?
A. As currently programmed, the Minimum Allowed Acceptance Rate function is active, and affects the reported Data for the 'Summary' Report. When working with the Acceptance Rate Report, the user may achieve the same functional affect by using the 'Filters' Option, and then modifying the value for the 'Acceptance Rate' Data Field.
B FAQS & TROUBLESHOOTING
P/N 960-100917R_Rev. 1 {EDP #214112} © 2012, Japan CashMachine Co., Limited B - 1

Appendix A ICB® Web Reports Program Version 2.X.X Operator Instruction Manual FAQs & TroubleShooting
THIS PAGE INTENTIONALLY LEFT BLANK
P/N 960-100917R_Rev. 1 {EDP #214112} © 2012, Japan CashMachine Co., Limited B - 2

ICB® Web Reports Program Version 2.X.X Operator Instruction Manual
A p p e n d i x C
C GLOSSARY
A
1 Acceptor – a term used in General Information Section 1 referencing functions sent to, and received from the Banknote Acceptor by Software Commands… See Page 1-12 Activity Log– ICB Web Reports maintains an Activity Log of all functions and/or transactions that occur during System Operation. The log may be viewed and printed as one of the Functions available from the Web Reports Administration Screen … See Page 4-2
B
3 Bill Validator – A device which accepts and validates Paper Currency. During operation, status and error messages from the Bill Validator are fed to, and are reported by, the Web Reports Application. The Bill Validator is referenced to an Asset Number, which may change from time to time depending into which Gaming Machine the Validator is installed… See Page 5-5
C
4 CD-ROM – An Acronym for Compact Disc - Read Only Memory. It is a commonly used medium for data storage and retrieval. The ICB Web Reports Application is provided on CD-ROM prior to installation onto a Host PC… See Page 1-25 CSV – An Acronym for Comma Separated Value. CSV Data Files can be imported to, and exported from, ICB Web Reports. The files are structured so that each Data Value in the file is separated by a Comma… See Page 1-2
E
6 Error Codes Report – A Report that provides a breakdown of Operational Errors reported by individual Assets. The information is useful to the Slot Repair Department when scheduling and performing repairs and/or preventive maintenance on failed components… See Page 5-1
G
7 German – One of five Languages presently supported by the ICB Web Reports Application. Depending on User preferences, the Application may be set to operate in the English, Chinese, German, Japanese, or Spanish Languages… See Page 4-4
H
8 Help – ICB Web Reports features an On-Line HELP Function which is available to the User by simply Mouse-clicking on the 'HELP' Tab located on the program Screen. When selected, the Program will open a PDF Version of the ICB Web Reports Operator’s Manual which the User may reference when working with the Web Reports Application… See Page 3-1
P/N 960-100917R_Rev. 1 {EDP #214112} © 2012, Japan CashMachine Co., Limited C - 1

Appendix C ICB® Web Reports Program Version 2.X.X Operator Instruction Manual I
I
9 ICB – An acronym for Intelligent Cash Box. Intelligent Cash Boxes utilize a Memory Circuit that maintains an active count of the Banknotes and/or Tickets that are stacked to the Cash Box. The function serves as an aid to Casino Accounting Personnel and increases the accuracy and efficiency of Soft Drop and Soft Count procedures… See Page 1-110 ICB Ticket – A Software Application that allows for printing Machine Set tickets from an ICB compatible Printer Station… See Page 1-211 Inactivity Timeout – A feature that automatically Logs a User out of the Web Reports Application after the Program has set actively idle on the User’s terminal for a specified period of time… See Page 4-2
J
12 JCM – an abbreviation for Japan Cash Machine (aka JCM Global) having offices Worldwide, JCM is a leader in Currency handling and Banknote Validation technology, and is also manufacturer and provider of the Intelligent Cashbox System… See Page 1-1
L
13 Lockout Duration – The amount of time (in minutes) that a User Account is locked-out from Log In to the Web Reports Application. The Lockout period is activated when a User exceeds a specified number of invalid Log-in attempts… See Page 4-2
M
14 MDM – An acronym for Multi Drop Module that collects the Transaction Data from the Docking Station (aka. Read/Write Tool) and then writes the Data into a Comma Separated Values (CSV) File, and a Text File… See Page 1-2
P
15 Permissions – A Software based routine, that is usually embedded at strategic points within a larger Application, that allows access control to specific parts of, or to the entire application in general, by means of requiring entry of a User unique Password that is used to validate the authenticity of the User. Password Protection is used for controlling access to the ICB WEB REPORTS Ap- plication… See Page 4-1 & 4-516 Pictograph – Small, internationally recognized, Safety and Attention Symbols placed to the left of Notes, Cautions, and Warnings throughout this Operator’s Manual … See Page 1-1
S
17 Special Notes – Notes provided to alert the Reader to specific information which often affects the operation of the Unit within JCM Operator & Maintenance Manuals. The notes are provided throughout the Manual, and are identified by the Pictograph of a small hand pointing to the word “NOTE”. Special Notes are always written in Italic Text… See Page 1-1
P/N 960-100917R_Rev. 1 {EDP #214112} © 2012, Japan CashMachine Co., Limited C - 2

T ICB® Web Reports Program Version 2.X.X Operator Instruction Manual Appendix C
T
18 Ticket Printer – As used in the Intelligent Cash Box System, Ticket Printers are used to print Machine Number Tickets, Enable Tickets, Disable Tickets, and Barcode Tickets. Ticket Printers available for use include the JCM TSP-02®, the Transact® Epic Model 950 and the PayCheck® Series Units… See Page 1-2
U
19 UBA – An acronym for Universal Bill Acceptor, a JCM Banknote Validator compatible with the (Intelligent Cashbox System (ICB)… See Page 1-220 User Name – In ICB Web Reports, the User Name uniquely identifies each User having access to the Web Reports Application. A typical format used when creating User Names is the first character of the Users First Name, followed by their Last Name. A User Name is required when logging into Web Reports … See Page 1-3
V
21 Validator Head – The part of a Banknote Validator responsible for validating inserted Banknotes or Tickets. The Validator Head contains an array of Optical (and sometimes Magnetic) Sensors used to read each insertion. Information read by the Sensors is compared to reference patterns stored in Memory in order to determine if the inserted Banknotes/Tickets is valid or not… See Page 5-9
W
22 WBA – An acronym for World Bill Acceptor, a JCM Validator compatible with the ICB Intelligent Cashbox System (ICB)… See Page 5-723 Web Browser – A Software Application (i.e., Internet Explorer, Mozilla Firefox, Safari etc.) which allows the User access to the Internet in order to then access and use the ICB Web Reports Application resident on a separate Network based Server… See Page 1-224 Workstation – In general, a term referring to a Personal Computer (PC), or a combination of input devices (e.g., Keyboard and/or Mouse) and a Display Monitor con- nected to a PC. Workstations are often configured for use with specific applications. In the Intelligent Cash Box System, any Workstation contain- ing Internet Explorer (Version 8 or greater) or Mozilla Firefox installed on it is capable of accessing the ICB Web Reports Application via its Application Specific URL… See Page 2-4
P/N 960-100917R_Rev. 1 {EDP #214112} © 2012, Japan CashMachine Co., Limited C - 3

P/N 960-100917R_Rev. 1 {EDP #214112} © 2012, Japan CashMachine Co., Limited C - 4
Appendix C ICB® Web Reports Program Version 2.X.X Operator Instruction Manual W
THIS PAGE INTENTIONALLY LEFT BLANK
P/N 960-100917R_Rev. 1 {EDP #214112} © 2012, Japan CashMachine Co., Limited
ICB® Web Reports Program Version 2.X.X Operator Instruction Manual

ICB® Web Reports Program Version 2.X.X Operator Instruction Manual
P/N 960-100917R_Rev. 1 {EDP #214112} © 2012, Japan CashMachine Co., Limited
Issue #ICB-SME-02-01
Support: http://www.jcmglobal.com/en/contact/default.aspx Web-Site: http://www.jcmglobal.com