Intelligence Operations ICS-209 PROGRAM (NIMS) … · Intelligence Operations ICS-209 PROGRAM...
92
SIT209 Program Intelligence Operations ICS-209 PROGRAM (NIMS) User’s Guide May 28, 2014 Version 2.1
Transcript of Intelligence Operations ICS-209 PROGRAM (NIMS) … · Intelligence Operations ICS-209 PROGRAM...

SIT209 Program
Intelligence Operations
ICS-209 PROGRAM (NIMS)
User’s Guide
May 28, 2014
Version 2.1

Updated 5/28/2014
2 | P a g e
Table of Contents
Table of Contents........................................................................................................................................................... 2
Introduction ................................................................................................................................................................... 6
Background ..................................................................................................................................................................... 6
System Function ............................................................................................................................................................. 7
System Users .................................................................................................................................................................. 7
User Support ................................................................................................................................................................... 7
Troubleshooting ............................................................................................................................................................. 7
FAMWEB Situation Report and 209 Application Overview ............................................................................................. 8
Situation Report: ............................................................................................................................................................ 8
209 .................................................................................................................................................................................. 8
Situation Report and 209................................................................................................................................................ 8
Logging on and off of the Situation Report and 209 Applications................................................................................... 9
Requesting a New Account ............................................................................................................................................. 9
To log into the 209 and Situation Report Applications: ................................................................................ 11
209/SIT Report Application Menu Bar ......................................................................................................................... 11
Navigating 209 Application Tabs and Screens .................................................................................................. 13
209 DATA ENTRY .......................................................................................................................................................... 15
Tips for Effective Data Entry: ........................................................................................................................................ 15
209 Specific Data Entry Instructions ............................................................................................................................. 17
When to submit an 209 ................................................................................................................................. 17
How to Enter Data into the 209 Application ................................................................................................................ 17
To enter 209 information: ............................................................................................................................. 19
To enter information into the 209 application:............................................................................................. 20
Entering Header Information (Blocks 1-11) .................................................................................................................. 21
To add Header information to a new 209: ................................................................................................................... 21
Field Descriptions ......................................................................................................................................................... 22
Block 1. Incident Name * ............................................................................................................................... 22
Block 2. Incident Number * ........................................................................................................................... 22
Block 3. Report Version * .............................................................................................................................. 22
Block 4. Incident Commander(s), & Agency or Organization * ..................................................................... 23
Block 5. Incident Management Organization ................................................................................................ 23
Block 6. Start Date/Time *............................................................................................................................. 23
Block 7. Current Incident Size/Area Involved ................................................................................................ 23
Block 8. Percent (%) Contained or Completed .............................................................................................. 26

Updated 5/28/2014
3 | P a g e
Block 8: Percent (%) of Perimeter to be Contained....................................................................................... 27
Block 9. Incident Type *................................................................................................................................. 28
Block 9. Cause * ............................................................................................................................................. 29
Block 10. Incident Complexity Level .............................................................................................................. 29
Block 11. For Time Period * ........................................................................................................................... 30
To update Header information for a 209: .................................................................................................................... 30
To delete Header information for a 209: ..................................................................................................................... 30
Entering Location Information (Blocks 16-27) .............................................................................................................. 31
To add location information for an incident: ............................................................................................................... 31
Field Descriptions ......................................................................................................................................................... 32
Block 16. State * ............................................................................................................................................ 32
Block 17. County/Parish/Borough * .............................................................................................................. 32
Block 18. City ................................................................................................................................................. 32
Block 19. Unit or Other .................................................................................................................................. 32
Block 20. Incident Jurisdiction ....................................................................................................................... 32
Block 21. Incident Location Ownership * ...................................................................................................... 32
Block 22. Latitude/Longitude * ..................................................................................................................... 33
Block 23. US National Grid Reference ........................................................................................................... 33
Block 24. Legal Description (Public Land Survey System – PLSS) .................................................................. 33
Block 25. Short location or Area Description *.............................................................................................. 33
Block 26. Universal Transverse Mercator (UTM) Coordinates ...................................................................... 34
Block 27. Geospatial Data .............................................................................................................................. 34
To update Location information for a 209: .................................................................................................................. 34
To delete Location information for a 209:.................................................................................................................... 34
Entering Summary Information (Blocks 28-30)............................................................................................................. 35
To add Summary information: ..................................................................................................................................... 35
Field Descriptions ......................................................................................................................................................... 35
Block 28. Observed Fire Behavior or Significant Incident Events for the Time Period Reported * ............... 35
Block 29. Primary Fuel Model, Material, or Hazards involved * ................................................................... 36
Block 30. Damage Assessment Information .................................................................................................. 36
To update Summary information for a 209: ................................................................................................................. 37
To delete Summary information for a 209: .................................................................................................................. 37
Entering Additional Decision Support Information (Blocks 31-47)................................................................................ 38
To add Additional Decision Support information for a 209:......................................................................................... 38
Field Descriptions ......................................................................................................................................................... 39
Block 31. Public Status Summary .................................................................................................................. 39

Updated 5/28/2014
4 | P a g e
Block 32. Responder Status Summary ........................................................................................................... 40
Block 33. Life, Safety, and Health Status/Threat Remarks ............................................................................ 40
Block 34. Life, Safety, and Threat Management * ......................................................................................... 40
Block 35. Weather Concerns ......................................................................................................................... 40
Block 36. Projected Incident Activity, Potential, Movement, Escalation, or Spread * .................................. 40
Block 37. Strategic Objectives ....................................................................................................................... 40
Block 38. Current Incident Threat Summary and Risk Information * ............................................................ 41
Block 39. Critical Resource Needs ................................................................................................................. 41
Block 40. Strategic Discussion ....................................................................................................................... 41
Block 41. Planned Actions for Next Operational Period ................................................................................ 41
Block 42. Projected Final Incident Size/Area ................................................................................................. 42
Block 43. Anticipated Incident Containment or Completion Date ................................................................ 42
Block 44. Projected Significant Resource Demobilization Start Date ............................................................ 42
Block 45. Estimated Incident Costs to Date ................................................................................................... 42
Block 46. Projected Final Incident Cost Estimate .......................................................................................... 42
Block 47. Remarks ......................................................................................................................................... 42
To update Additional Decision Support information for a 209: ................................................................................... 43
To delete Additional Decision Support information for a 209: .................................................................................... 43
Entering Resource Commitment Summary Information (Blocks 48-53) ........................................................................ 44
To enter resource commitment summary information: .............................................................................................. 44
Field Descriptions ......................................................................................................................................................... 45
Block 48. Agency or Organization .................................................................................................................. 45
Block 49 Resources ........................................................................................................................................ 46
Block 50. # of Overhead Personnel ............................................................................................................... 47
Block 51. Total Personnel .............................................................................................................................. 47
Block 52. Total Resources .............................................................................................................................. 48
Block 53. Additional Cooperating and Assisting Organizations Not Listed Above ........................................ 48
To update resource commitment summary information for a 209: ............................................................................ 48
To delete resource commitment summary information for a 209: ............................................................................. 48
Approval and Routing Procedures ............................................................................................................................... 50
Field Descriptions ......................................................................................................................................................... 50
Block 12. Prepared By * ................................................................................................................................. 50
Block 13. Approved By * ................................................................................................................................ 51
Block 14. Date/Time Submitted .................................................................................................................... 51
Block 15. Primary Location, Organization, or Agency Sent To *.................................................................... 51

Updated 5/28/2014
5 | P a g e
Verification .................................................................................................................................................................. 52
Verification Outputs ..................................................................................................................................................... 52
To complete the Verification process: .......................................................................................................................... 53
Troubleshooting .......................................................................................................................................................... 55
Printing Reports: Possible Problems Printing Adobe PDF Files .................................................................................... 55
Additional Information: ................................................................................................................................................ 56
Appendix A: Incident Status Summary ......................................................................................................................... 58

Updated 5/28/2014
6 | P a g e
Introduction
The Incident Status Summary, also known as the “209” is used for reporting specific information on incidents of significance. The report is a critical interagency incident reporting tool giving daily ‘snapshots’ of the wildland fire management situation and individual incident information which include cost, critical resource needs, fire behavior, size, etc. Accurate and timely completion of the 209 is necessary to determine appropriate resource allocation during multiple incident occurrences. In conjunction with other sources of information, the information included on the 209 is used by managers to determine the priority of an incident and allocation of scarce resources. The Sit/209 application (see page 5 for further explanation) is also a system of record for data on incident activity. For further information about the Incident Status Summary, see Appendix A: Incident Status. This document is to be used as a User Guide for the 209 program located on the National Fire and Aviation Management Web Applications site (FAMWEB). The 209 Program is a web-based application that allows for more efficient processing of the Incident Status Summary, Form 209.
Background
In January 2012 the National Wildland Fire Coordinating Group (NWCG) issued an All-Hazards Intent Document defining wildland fire agencies support to all-hazards incidents. The document stated, “The National Incident Management System (NIMS) is the foundation of all response. NWCG principles, procedures, and publications will comply with and support NIMS. NWCG expects that all local, State, and Federal response agencies and organizations will comply with NIMS.” The document further stated that, “NWCG supports the ongoing development and maintenance of wildland fire systems to be adaptable for all-hazards response.”
In part to meet the new NIMS standards, as well as other mandated requirements, in 2012 the Situation Report / 209 (Sit/209) application underwent a significant redesign. The primary goals of the redesign are to meet more stringent federal agency IT and security requirements, as well as to provide users of the application a more functional and robust reporting system. New features have been added to the 209 program, including:
Implementing a design refresh as part of the Software Development Lifecycle Cycle (SDLC) process.
Meeting new and on-going technical and mandated security requirements (for example, user and password management through the NESS integrated LDAP, C&A Self-Assessment, secure coding.) Also, implement the Fire and Aviation Management (F&AM) single sign-on in conjunction with the NESS common user authentication project.
Replacing the existing “canned” Sit/209 reports with the IBM® Cognos® reporting package required by the Forest Service (similar functionality to the ROSS reports software package).
Incorporating the NIMS 209 form into the 209 program. This allows incident management teams and others to better report all-hazard incidents. Additional data fields within the program allow non-fire incidents to be more accurately reported.
Enhancing the application’s capability to integrate with other existing or emerging systems of record, such as IRWIN, WFDSS and other programs.
In order to ensure that the information submitted is as complete as possible, please follow the guidelines in this User’s Guide when completing or reviewing 209s for submission into this database.

Updated 5/28/2014
7 | P a g e
System Function
The intent of the 209 application is for 209 (using the NIMS-209 form) information to be entered at the incident or the dispatch center responsible for the incident. Once incident information is approved, and a final report submitted, it can be accessed and utilized at the local, geographic, and national levels.
209s should be completed according to each Geographic Area’s Mobilization Guide. Please refer to Chapter 20 of your Geographic Area’s Mobilization Guide and the National Interagency Mobilization Guide for more specific information on reporting requirements for 209 reports.
System Users
Typically, local dispatch personnel and incident management teams generate data for the 209s, and agency managers, information officers, and decision-makers access completed reports Agency managers include staff from the Bureau of Land Management (BLM), Bureau of Indian Affairs (BIA), Fish and Wildlife Service (FWS), USDA Forest Service (USFS), National Park Service, state and local agencies.
User Support
Technical support for the 209 program can be found through the National Fire and Aviation Management Web Applications site (FAMWEB), or at the Fire Applications Help Desk. Contact the Help Desk at (866) 224-7677 or via e-mail at: [email protected]. After normal business hours (07:30 am – 4:00 pm Mountain Time) leave a message and the on-call duty officer will return your call.
A program or system outage should be reported immediately to the FAMWEB Help Desk by phone and email. If the outage is affecting fire reporting inform the Help Desk that this is a “fire emergency” and instruct them to immediately elevate the ticket to “Level 2.” More specific instructions on reporting program and system outages are available at: http://www.predictiveservices.nifc.gov/intelligence/How_To_Handle_Sit-209_Outages.pdf.
If you have questions about data entry, what to report, program access, and so forth, contact your local dispatch center or Geographic Area Intelligence Coordinator/Officer.
Troubleshooting
Specific instructions for completing many of the data entry and application tasks are explained in this User’s Guide. Additional troubleshooting instructions are outlined in specific sections of this User’s Guide. Please follow the instructions in this User’s Guide carefully before contacting the Fire Applications Help Desk or GACC.
You should frequently save your ICS 209 data. If you lose Internet connection while in the application, you will not lose any saved data. Just reconnect to the network, and navigate to your last saved point in the application
Updated 5/28/2014
8 | P a g e
FAMWEB Situation Report and 209 Application Overview
The redesigned SIT/209 applications feature a new look and feel and incorporates many new enhancements. If you’re familiar with the previous version of the SIT/209 application and reporting process, the new application will look familiar. However, there are differences in both how the application functions and the information you enter. The major differences between the old application and the new application include:
Situation Report:
The resources page is gone. Other systems (such as ROSS and WildCAD), exist for reporting and tracking committed and available resources.
You can now select report dates other than the present date to view fire data.
You can now enter fires for protection and ownership on the same web page.
The year-to-date fire statistics page displays new fire activity and previously reported fire activity. This allows for more accurate editing of fires by both ownership and protection.
209:
The new National Incident Management System (NIMS) 209 report application is now incorporated with the SIT Report into one larger application. This allows better reporting of non-wildland fire incidents.
A dispatch center can view all 209 reports in one list and can more easily edit multiple reports.
The status of individual 209 reports is visible in the incident 209 list. The list can be sorted by column headers (date, name, number, etc.).
Most information for an incident is carried over from previous 209 reports to the new report.
You can edit different 209 blocks at different times after the header (key) information is entered. No need to complete each section before proceeding to the next section sequentially. Report can be saved frequently, thus reducing the likelihood of significant data loss in the event of a power or data disruption on an incident.
Application enhancements include pop-up calendars for selecting dates and slider bars for some numerical fields (such as percent contained, and so forth.).
More location information options are included, such as UTM, legal description (PLSS), lat/long (either in degrees, minutes and seconds, or degrees, decimal minutes) and US National Grid System. Currently the program cannot convert on the fly from one coordinate system to another. You can enter no more than 21 resource types for an incident and select different resource types for different types of incidents. For example, resources assigned to a hurricane may differ from resources assigned to a wildfire. You choose Resource types from a drop-down list.
A system of checks and balances (within the approval process) verifies key information entered for an incident. This feature helps to prevent reporting errors.
A Wildland fire incident with an existing WFDSS incident record can pull certain data from the WFDSS application.
Situation Report and 209:
Use the Cognos reports application to query the Situation Report and 209 data. Canned reports from the previous application have been converted to the Cognos format (except those that were determined to be obsolete.)

Updated 5/28/2014
9 | P a g e
Logging on and off of the Situation Report and 209 Applications
The 209 (209) application is accessible from the internet through the National Fire and Aviation Management Web Applications site (FAMWEB). Microsoft Internet Explorer (IE) is the preferred browser for completing the SIT Report. Other browsers may be used but note that there may be difficulties and the site could look slightly different when viewed in each browser.
IE is the preferred browser, but users can still use other browsers, including Chrome and FireFox. You can only print IE.
The 209 application shares incident information with the SIT Report application for purposes of data entry, summaries and reports. User names and passwords are assigned to individuals and should be protected.
NOTE: You must NEVER share a user name or password with the public or the media as this is a
government program.
To get to the SIT/209 applications on the FAMWEB site, you must enter the site through the URL-- http://fam.nwcg.gov/fam-web/. The image below is an example of what the main FAMWEB homepage looks like.
Before accessing this application, you must request a new account and obtain a FAMWEB Logon ID and password.
Requesting a New Account
To request a new FAMWEB Logon ID for the SIT/209 applications, click the FAMWEB Logon Request link located on the lower-left menu.
Complete the online registration form. Note the following account tips:
1. User Name: Enter your User Name. Your User Name is case sensitive and must be unique within FAMWEB. A password must be at least three alphanumeric characters in length, but no more than three. Ideally, the User Name should be the person’s first name initial, middle name initial and last name (or portion of last name). A numeral may also be included for very common names to avoid duplication. For example, FredSmith2.

Updated 5/28/2014
10 | P a g e
2. Password: Enter your case sensitive password. The password must be at least 12 characters, but no more than 14. It must also contain three of the following:
a. At least one number. b. One symbol such as ~, #, $, excluding \, (, %, ), /, @, ', or “. c. One upper case letter; one lower case letter; d. Cannot have been used previously.
3. Complete all boxes. This identifies who you are to FAMWEB managers. Incomplete requests may be rejected.
4. Check the box for SIT or 209 access. 5. In the Comment field, describe your tasking with FAMWEB (e.g., what unit you are with and what
organizational data you are responsible for, etc.)
Passwords expire every 60 days. Each user is responsible for managing their password.
Once registered, contact your GACC Intelligence Coordinator to activate your account.
If you need help getting a Logon ID and password, contact the Applications Help Desk at (866) 224-7677 or (360) 326-6002, [email protected].
When you already have access to the FIRESTAT, AMIS, AWSR and ARS applications call your GACC Intelligence Coordinator/Officer to get access to the SIT/209 application. Current application users that move from one location to another and continue to need access to the SIT/209 application for the new area need to call the GACC Intelligence Coordinator/Officer for that area to obtain access.

Updated 5/28/2014
11 | P a g e
To log into the 209 and Situation Report Applications:
1. From the FAMWEB homepage, click Log on. The Logon popup screen appears.
Note: When the pop-up box does not appear, be
sure to turn off pop-up blocker settings for this site in your web browser, and try again.
2. Enter your User Name and Password. 3. Click Log on .
209/SIT Report Application Menu Bar
The SIT/209 application has four tabs on the menu bar:
Home: Select this tab to logon and logoff of the 209, SIT Report, and management Tools applications as described in the previous section.
209: Select this tab to create or modify NIMS 209 information and run a COGNOS Report. Data Entry, Reports and Historic SIT Data. Choose Data Entry to create a Situation Report. Choose Reports to run a Cognos Report. Choose Historic SIT Data to access prior year’s data.

Updated 5/28/2014
12 | P a g e
SIT Report: Select this tab to create or modify SIT information, run a COGNOS Report, and view access to the prior year’s data (Historic SIT Data.)
Tools: This tab is for managers only. Select this tab to manage user accounts, associate units with Dispatch Centers, and other user and system maintenance tasks.

Updated 5/28/2014
13 | P a g e
Navigating 209 Application Tabs and Screens
The first screen of the 209 application is comprised of four panes separated by double lines (shown by the colored boxes
in the example below): 209 report list. All existing 209 reports for a dispatch center during the calendar year display here. Sort the list by clicking the column header (Name, Unit ID, etc.), selecting an incident, and clicking on it. The background color is different for selected incidents.
The selected 209 report appears in this pane. Text fields you can edit appear as white fields. You cannot edit colored text fields in the current version of the report.
The Verification pane is minimized by default. This pane displays report items that need to be corrected (due to an error) or verified as correct by the user.
The Status pane displays program messages usually relating to system performance, processing errors, and user status.
Expand or Minimize panes by dragging the double line spacers left or right (shown by the vertical red lines and double arrows). The 209 report in pane 2 can be expanded to full width (hiding the other panes) by clicking the double arrow icon shown in the red circle below. (See the second graphic below.)
The double arrow functions like a toggle switch. Clicking the double arrow (red circle) once maximizes the 209 view pane. Clicking the double arrow again makes all panes visible again.

Updated 5/28/2014
14 | P a g e
209 application performance depends on your internet connection and browser. When the application is executing a command, opening a report, or retrieving data, a pop-up window displays to indicate that the application is busy. Examples are shown below.

Updated 5/28/2014
15 | P a g e
209 DATA ENTRY
Accurate data entry and timely completion of the 209 is necessary to determine appropriate resource allocation during multiple incident occurrences. In conjunction with other sources of information, the information included on the 209 is used by managers to determine the priority of an incident and allocation of scarce resources. Consult the requirements within your Geographic Area for submission times, frequency, and so forth. After your data is submitted, it is reviewed by your GACC. If there are any problems or questions, they must be resolved by 0200 Mountain Time the following morning, the submission deadline for NICC.
NOTE: Remarks should be professional and discrete. Comments such as “hope we get some fires
soon”, “here comes the overtime”, or “it’s Miller time and I’m out of here” are inappropriate.
GACCs have edit access to the data entered by all offices within their Geographic Area.
Tips for Effective Data Entry:
Save data before leaving each tab in the application by clicking Save. Click Undo Edits to clear any incorrect, unsaved data from that screen.
Note: Save data frequently. Should the program become disconnected from the server, saved data
and reports can be retrieved from the server. Moving to a new tab without saving data brings up this
message:
Press the Tab key on the keyboard (instead of the mouse) to move between data entry fields more easily.
To display or hide the menu top bar, toggle the double triangle icon.
The application alerts you by displaying a red-shaded error message when data is entered in an incorrect format or is not recognized by the application and

Updated 5/28/2014
16 | P a g e
when an alert exclamation point and pop-up boxes appear:
Enter data only in fields with a white background, not in shaded fields.
Colored text areas are updated by the program based on information entered by the user in the white text entry fields.
Fire Danger and Preparedness Level values by Protection Unit carry over from the previous day. Make sure to verify each day whether or not a new value needs to be entered.

Updated 5/28/2014
17 | P a g e
209 Specific Data Entry Instructions
The Incident Status Summary (209) is used to report large wildfires and any other significant events on lands under federal protection or federal ownership. Lands administered by states and other federal cooperators may also report in this manner.
When to submit an 209
The 209 is submitted by the agency that has protection responsibility for the incident, regardless of which agency administers the land. If the protection agency is non-federal and chooses not to meet federal reporting standards, then the federal agency which has administrative jurisdiction will submit the 209. A 209 is required when:
Wildfires are managed for Full Suppression: For full suppression wildfires, a 209 is required when that fire meets large fire criteria. Large fires are classified as being one hundred (100) acres or larger in timber fuel types, three hundred (300) acres or larger in grass or brush fuel types, or when a Type 1 or 2 Incident Management Team (IMT) is assigned. A 209 must be submitted daily until the incident is contained.
Wildfires are managed for Point Zone Protection, Monitor, or Confine strategies: A 209 must be submitted for any wildfire that is expected to remain active for more than 72 hours. The minimum 209 data entry requirements for these types of incidents are:
Completing an initial 209 blocks 1 through 15 and block 42, Remarks.
Completing 209 blocks 45 through 47, Approval Information (required for all 209 reports).
When national shared resources are committed to the incident, completing Block 43, Committed Resources.
Completion of additional reporting blocks to meet the needs of an incident or GACC.
An updated 209 must be submitted weekly (Thursday) if little or no significant event change occurs.
An updated 209 must be submitted more frequently after or in anticipation of a significant change event.
A complete 209 is required daily if a Type 1 or 2 IMT is assigned.
Note: Further guidance for these types of fires can be found
athttp://www.predictiveservices.nifc.gov/intelligence/intelligence.htm
Other significant events: Incidents where a significant commitment of wildland fire resources has occurred or when a Type 1 or 2 Interagency IMT has been assigned.
Note: Refer to the National Mobilization Guide or your Geographic Area Mobilization Guide for additional reporting guidelines.
How to Enter Data into the 209 Application
The 209 application is comprised of six tabs for data entry. The tabs are:
Header tab: Includes key information that identifies an incident, incident type, incident commander, incident number, and other information. For any incident, this tab contains certain information that must be completed before other tabs can be completed.

Updated 5/28/2014
18 | P a g e
Location tab: The location of the incident is entered here, including location description, latitude and longitude, UTM, etc.
Summary tab: Significant events, fuels involved, damage assessment and structure information is entered in this section.
Additional Decision Support: Information about public status, responder status, life safety, weather, incident activity, threats, and other similar information is entered here.
Resource Commitment Summary: Resources assigned are entered in this tab by agency and type.
Approval and Routing: Approval information, such as incident commander signature, prepared by information, and date/time submitted are entered in this tab.
Report management is done using a variety of buttons.
Save: Allows a report to be saved at any time.
Undo Edits: Allows last edits to be deleted. Deletes all edits made since opening the specific tab.
Verify: Validates the information entered into the program by the user. This is used to ensure accuracy and completeness of the report before approval and submission occurs.
Approve: Allows the completed report (after verification) to be submitted in the system.
Double Arrows: Allows report pane to be expanded to full screen width, minimizing the other panes. (For more on this feature, see Managing the 209 Web Page View section above.)
New Incident: Starts a new incident record for the selected dispatch center.
New from WFDSS (Wildland Fire Decisions Support System): Allows certain key information to be imported from WFDSS (if a record for this incident exists in WFDSS).
Open: Allows a pre-existing incident to be opened for viewing, or editing. Any Draft or Approved 209 report can be opened for viewing or editing.
Copy: Creates a copy of an approved 209. Most previous information is carried over to the new draft copy. An existing draft 209 (not yet approved) cannot be copied (Copy button is “grayed out”). There can only be one draft 209 for an incident at one time.
Note: Copy allows the most current Approved 209 report to be used to create a new draft 209
report. Most information from the previous 209 report will be copied to the new draft 209 report.
Delete: Allows a draft report to be deleted. (Final approved reports cannot be deleted from the system.)
Updated 5/28/2014
19 | P a g e
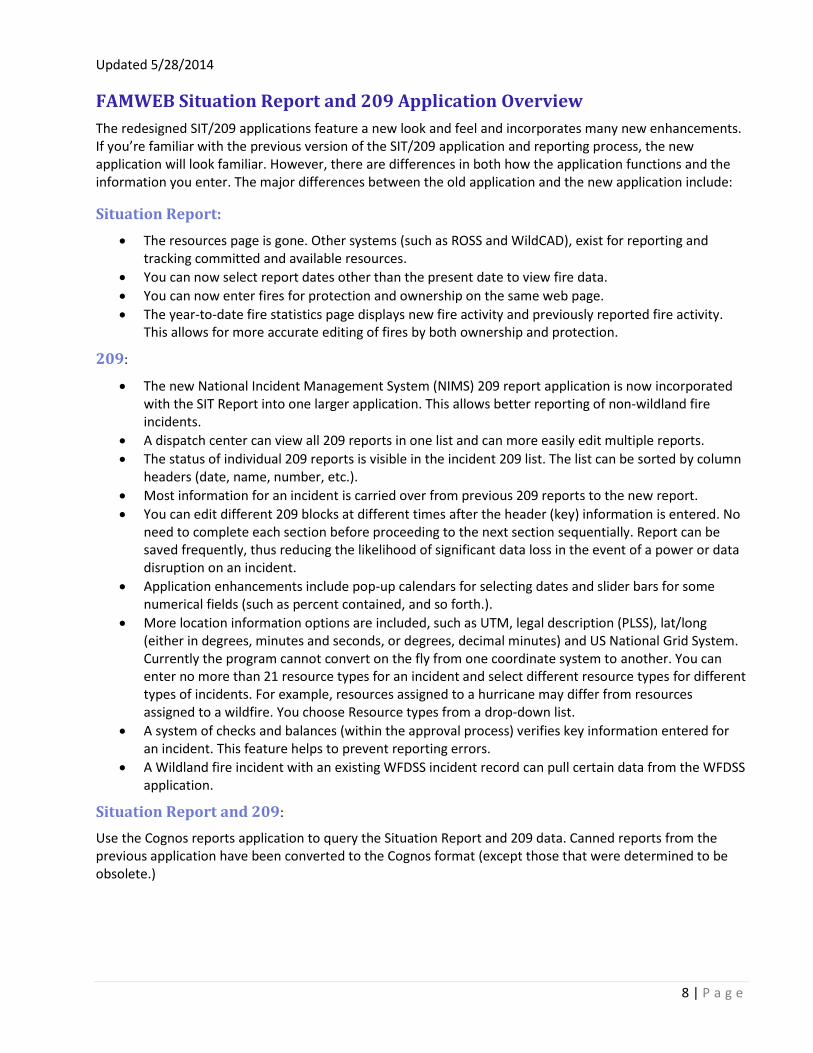
Name: Incident name.
Unit ID: The NWCG unit identifier for the incident managing agency (ID-BOD, etc.).
Number: The unique incident number.
Report from Date: The date that a report was submitted.
Approved?: Status of an incident’s 209 report, either Draft or Approved.
Status: The status of the current 209 report for an incident either Initial, Update, or Approved.
Type: The type of incident (wildfire, hurricane, etc.)
You can sort incidents using any one of the above headers.
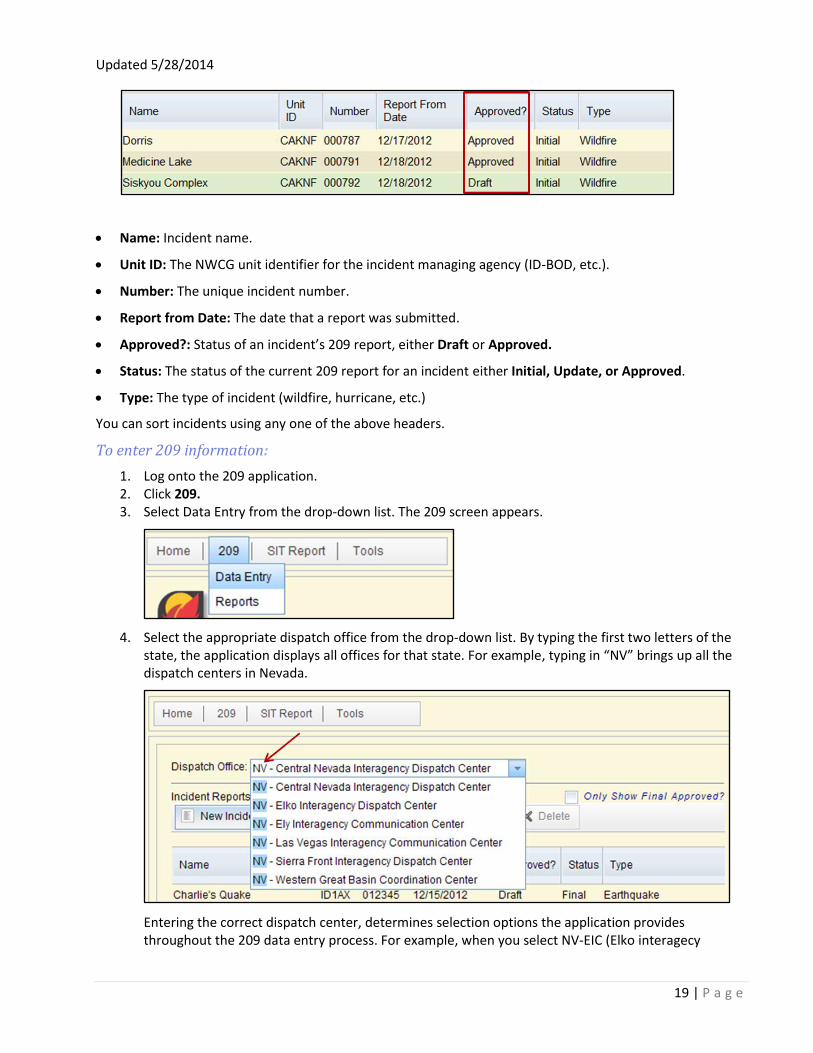
To enter 209 information:
1. Log onto the 209 application. 2. Click 209. 3. Select Data Entry from the drop-down list. The 209 screen appears.
4. Select the appropriate dispatch office from the drop-down list. By typing the first two letters of the state, the application displays all offices for that state. For example, typing in “NV” brings up all the dispatch centers in Nevada.
Entering the correct dispatch center, determines selection options the application provides throughout the 209 data entry process. For example, when you select NV-EIC (Elko interagecy

Updated 5/28/2014
20 | P a g e
Dispatch Center), the application displays only districts, forests, counties, and so forth, within the EIC dispatch zone to be selected later in the 209 program. After you select a dispatch center, all 209 reports for that center appear in the incident list on the left side. If an incident with an existing 209 report does not appear in the incident list, it may be because the incident’s draft 209 report may have been deleted before the report was approved, or there may be a report date/time inconsistency in Block 11 (see specific instructions for Block 11 below).
Click one of the Incident Reports options: New Incident, New from WFDSS, Open, Copy, or Delete.
New Incident: Click this button to start a new 209 report for an incident and this incident does not currently exist in WFDSS, or is not a wildland fire.
New From WFDSS: Click this button when a WFDSS incident does previously exist for this incident. When a WFDSS record exists for this incident, certain information from WFDSS may be imported into the new 209 incident report. You can edit the imported information in the new 209 report.
Open: Click this button to update an existing incident. Select the incident from the menu on the left side of the page (it will be highlighted in blue), then go up to the header tabs and click Open.
Note: Open is active for all 209 reports in the incident list, including those with Draft, Approved and
Final Status.
Delete: Click this button to delete an 209 draft report that hasn’t been approved. You cannot retrieve deleted draft reports from the application.
To enter information into the 209 application:
Each 209 tab contains a series of numbered blocks. Blocks marked with an asterisk (*) require you to enter information into that block in order for the application to accept your incident data. Asterisks are located adjacent to the block number. You should complete all blocks to the best of your ability, regardless of whether they are required.

Updated 5/28/2014
21 | P a g e
Entering Header Information (Blocks 1-11)
Use the Header screen to enter and manage basic information about an incident.
To add Header information to a new 209:
1. From the 209 application, select Header. The Header screen appears to the right. The left-hand pane lists any existing incidents for that Dispatch Office.
2. Click New Incident. 3. Enter the Incident Name as assigned by the jurisdictional agency. Include “Complex” in the incident
name for complexes. 4. Enter the Incident Number assigned by the jurisdictional agency. Select the appropriate unit’s state
and identifier from the drop-down list followed by further descriptive information. 5. Click Initial for the Report Version. 6. Enter the last name of the Incident Commander in the text box. When the incident is under a Unified
command, enter the primary incident commander’s last names, separated by forward slashes and the IC organization in the text box.
7. When appropriate, select the Incident Management Organization from the drop-down list. 8. Select the Start Date and Time (in military format) from the drop-down lists. 9. Enter the Current Incident Size or Area Involved and select the appropriate measure value from the
drop-down list. 10. Click Single for when this 209 is for a single incident, or click Complex when this 209 is for a complex
incident. The Size by Unit and Complex by Incident buttons do no activate until you complete information for Block 10. See Block 7. Current Incident Size/Area Involved for further information.

Updated 5/28/2014
22 | P a g e
11. Using your mouse, move the arrow below the text field to the appropriate Percent Contained or Completed. The application updates the percentage in the text field above. If not applicable for the incident type, leave this block blank.
12. Using your mouse, move the arrow below the text field to the appropriate Incident Perimeter percentage. The application updates the percentage in the text field above. This percentage applies to full suppression, point/zone protection, and confine fires, or any combination of these strategies.
13. Select the Incident Type from the drop-down list. 14. Enter the Incident Description. The number of text characters is limited to the width of the field. 15. Select the Cause that best describes the why the incident occurred from the drop-down list. 16. Enter any supporting information about the incident into the text box. 17. Identify the incident complexity level as determined by Unified/Incident Commanders, if available or
used. Incidents may be typed in order to make decisions about resource requirements. 18. Click Save at the top of the page after you verify the information in Blocks 1-11 is correct. You can
select another tab in the 209 or log off the application.
Field Descriptions
Block 1. Incident Name *
Enter the incident name assigned by the jurisdictional agency. Once a name is assigned to the incident, it should not be changed if at all possible. However, if a name change does occur, be sure to make a note of it in “Remarks” (Block 47).
If the incident is a Complex, it is recommended that the word “Complex” be included in the incident name.
Block 2. Incident Number *
Enter the incident number that has been assigned by the jurisdictional agency. Never use the same incident number for two different incidents in the same calendar year.
The incident number should start with the 2-letter state identifier, followed by the 3- or 4-letter unit
or agency identifier and the incident number. This is usually the incident project order number in Block 3 of the Resource Order (e.g., AZ-ASD-000006, ID-BOF-044681, UT-MLF1-035, WY-YNP-000500, or CO-CRD-R236). Note: Unit identifiers must already exist in the SIT/209 Program in order for the 209 to be entered and saved in the database.
Incident numbers can be changed by those users with GACC access. If an incident number needs to be changed, contact the GACC Intelligence Coordinator/Officer and request the change. Instructions for editing the incident number are located in “Edit Incident Number.”
Block 3. Report Version *
Click Initial, Update, or Final for the current 209 you are entering. This block defaults to Initial for a new entry, and Update for any update. All 209s except for the Initial and Final are marked Update.
Initial - The first 209 created for the incident
Update – Subsequent reports for an existing incident
Final – The last 209 for an incident
Marking an 209 Final removes it from the active incident list the next day. An incident that has been marked as Final can be found via the Previous Final 209 Reports link.
Select Final when the incident lasts one day or is being merged into a Complex. If the incident is being merged into a complex, ensure that is documented in Remarks, Block 47.

Updated 5/28/2014
23 | P a g e
Block 4. Incident Commander(s), & Agency or Organization *
For incidents managed by a single incident commander, enter both the first and last name. If the incident is under unified command, list all primary Incident Commanders by last name separated by a forward slash (e.g., Stam/Vail). If there is an Incident Commander trainee, designate this with a (t) in parenthesis behind the name (e.g. Smith (t)).
Note: Organization in Block 4 is different from Organization in Block 5. In Block 4 organization refers
to agency sub unit, not the incident management structure. For example, BLM, Boise District Office, or Mendocino Unit, Cal Fire.
Block 5. Incident Management Organization
Select the appropriate type of Incident Command Organization assigned from the drop-down list, when the incident is a wildland fire incident.
Block 6. Start Date/Time *
Select the appropriate Start date from the calendar menu. Information from a previously approved 209 report for this incident is carried over to the updated report. Select the date and the time (military time – e.g. 1630) the incident began from the drop-down list. Ensure the Start date and time are correctly entered. This field should always be the same, with the start date and time NOT the operational period.
Block 7. Current Incident Size/Area Involved
For wildland fire incidents, enter the acreage. If a precise figure is not available, use an estimate and note in Block 47 Remarks.
For other incident kinds, select the appropriate descriptive size (square miles, hectares, or square kilometers) from the drop-down list. Enter information on descriptive size in Block 47 Remarks.
Note: The Size by Unit and Complex Incident buttons are activated depending on the complexity
level selected in Block 10. If Single is selected in Block 10, you can only select Size by Unit; and if Complex is selected in Block 10, you can only select Complex by Incident.
Size by Unit
1. When the incident is a single incident, as specified in Block 10, click Size by Unit located beneath the drop-down list area.
The Incident Area Breakout by Unit pop-up window appears. Acreages in this block are listed by ownership.

Updated 5/28/2014
24 | P a g e
2. Manually enter the acreage in the field under the Area header by clicking in the unit field to make it editable (the selected unit fields change color – as shown in green below). To change the “Unit of Measure,” click in the fields below the header.
3. To remove an agency, select the row and click Delete Selected Rows. 4. To add an agency, click + Add Row. The Add Land Management Unit for Breakout pop-up
window appears. Land management units that fall within the selected dispatch zone populate on the right.
5. Select the land management agency whose acres you want to record (previously selected units are grayed out – such as Elko District Office shown in the example above). After selecting a new unit, click Submit. When finished, click Close.
Note: When the incident spreads into a neighboring GACC, state, or dispatch zone, select the new
unit on the left side of the window using the drop-down lists then select the desired land ownership unit(s).
Complexes
1. When the incident is, or becomes a complex, as specified in Block 10, click Complex by Incident located beneath the drop-down list area.

Updated 5/28/2014
25 | P a g e
The following pop-up window appears.
2. To add another existing incident into the complex, click +Add Row. The Add Incident for Complex Breakout window pops-up with a list of existing incidents within the dispatch zone the complex has been created in. Select the incident(s) to include in the complex and click Submit.
Note: An incident only displays on the right side of the window if an 209 already exists for that
particular incident.

Updated 5/28/2014
26 | P a g e
To add existing incidents that are outside the dispatch zone for this complex, use the filters (red arrows above) on the left side of the window. Select the appropriate GACC, state and dispatch office where the appropriate incident(s) exist.
To add a new incident (one where no 209 currently exists) to a complex, click +Add Row.. The Add Incident for Complex Breakout window appears. Click Create Incident The Create Incident pop-up window appears.
In the Create Incident pop-up window, complete all fields, including incident name, number, and incident type. Click the Create button to add the incident to the complex, or click Cancel to close the window without saving the information.
3. To edit an incident in a complex, select the incident, (color changes – as shown by the green for the ‘Work’ incident example above). Select the unit of measure from the drop-down list and then edit the various fields (as shown by the arrows in the example above.)
4. To remove an incident from the complex, select the row and click Delete Selected Rows.
Note: Incident Number is comprised of two parts, agency unit ID (select from the drop-down list),
and the incident number (text field) below.
Block 8. Percent (%) Contained or Completed
To enter the appropriate percentage, enter a value in the text box or use the slider bar with the mouse and move to correct percentage contained to date. If you use the slider bar, the numerical value will automatically update in the text above the slider (as seen in the figure on page 27).

Updated 5/28/2014
27 | P a g e
For wildfire incidents, enter the percent of the incident contained to date. For Full Suppression (100%), the slider bar is moved based on the amount contained up to 100%. For Full Suppression and/or Point-Protection and/or Confine (in any combination as indicated in Block 9), the slider bar should be slid to the point which indicates the percentage contained or completed for the “Percent of Perimeter to be Contained” below. For example, if the “Percent of Perimeter to be Contained” is 70%, the percent contained will be from 0-100% of the 70% initially indicated.
For non-fire incidents, complete only if relevant to the incident.
Block 8: Percent (%) of Perimeter to be Contained
Enter the percent of perimeter to be actively completed for the incident. This entry is appropriate for full suppression, point protection and confine fires, or any combination of these strategies. For wildfires managed entirely under a monitor strategy, this value should read zero percent.
For wildfire incidents, if the incident strategy is full suppression, the slider bar should be slid to 100%. This indicates the plan is to actively complete work around the entire incident area (i.e. inserting a line or completing a line around 100% of the incident).
For full suppression and/or point-protection and/or confine (in any combination as indicated in Block 9), the slider bar should be slid to the point that indicates the percentage of the incident where actions will be taken. For example, if the planned area includes a location where confinement works best (e.g. 30% of the area) and no actions will be taken by the IC, then the percent of perimeter to be actively completed for the incident is 70%. This 70% is where the slider bar should be placed for the initial ICS-209. In general, this value will stay the same throughout the incident, however, there may be times as incident evolves where this may change.
For non-wildfire incidents complete only if relevant to the incident.
Examples:
When a wildfire is managed under both point protection and/or confine and full suppression strategies, where only 80% of the incident perimeter will be actively worked, in the Percent Contained or Completed enter the percentage contained to date for this area. In the Percent of Perimeter to be Contained, enter 80%
When a wildfire is being managed for full suppression, enter the percent contained or completed to date. In the Percent of Perimeter to be Completed, enter 100 percent.
Non-wildfire example: If an oil spill is being managed for 100 percent containment, enter the percentage that has been contained (or cleaned up) in the Percent Contained or Completed field. Select 100 percent in the Percent of Perimeter to be Contained field.
There are two parts to Block 8. The first is Percent Contained or Completed, and the second is Percent of Perimeter to be Contained.

Updated 5/28/2014
28 | P a g e
Block 9. Incident Type *
Fire Suppression Strategy must be completed for wildfire incidents only (it’s grayed out for non-fire incidents – as shown in the flood example below). Select Incident Type, Suppression Strategy and Cause from the drop-down lists.
Incident Type
Select from the drop-down list the incident type. There are 21 types to choose from:
Wildfire
Thunderstorm
Chemical Disaster
Dam Failure
Biological Outbreak
Earthquake
Flood
Foreign Disaster Assistance
Hazardous Materials
Heat Event
Hurricane
Mass Earth Movement / Avalanche
Nuclear Emergency
Civil Unrest / People Gathering
Search and Rescue / Recovery
Terrorism
Tornado
Tsunami
Volcanic Eruption
Winter Storm
Other

Updated 5/28/2014
29 | P a g e
Fire Suppression Strategy (Wildfires only)
From the drop-down list, select the management strategy that best represents the situation for the operational reporting period.
Monitor
Confine
Point or Zone Protection
Full Suppression
You can add further suppression strategy clarification in the Remarks, Block 47. For more information on suppression strategies, go to the national Intelligence web page at http://www.predictiveservices.nifc.gov/intelligence/intelligence.htm,or chapter 20 of the National Mobilization Guide: http://www.nifc.gov/nicc/logistics/references.htm.Block 9. Incident Description
This optional short text field can provide additional incident descriptive information when needed; typically for non-fire incidents. Number of text characters is limited to the width of the field. This field is especially important for incidents classified as Other in Incident Type.
Block 9. Cause *
Select the cause from the drop-down list that best describes the incident cause.
Note: For incidents caused by natural events, use Lightning/Natural for the cause description.
Additional information can be provided in the Remarks, Block 47.
Block 10. Incident Complexity Level
Note: The incident complexity level selection affects the data you can enter in Block 7, Current
Incident Size/Area Involved. Selecting Complex in Block 10 activates the Complex by Incident button in Block 7. Selecting Single in Block 10 activates the Size by Unit button in Block 7. See example below.
Identify the incident complexity level as determined by Unified/Incident Commanders, if available or used. Incidents may be typed in order to make decisions about resource requirements. Incident types are based on the following five levels of complexity (refer to 209 User Guide for more detailed complexity criteria):
Type 5: Typically one or two resources and up to six personnel assigned.
Type 4: Several resources required. Control typically achieved in one operational period.
Type 3: Incident may extend into several operational periods. A Type 3 Team may be assigned. A significant number of resources may be assigned.
Type 2: Exceeds local control capability. May require non-local resources to manage incident. Most Command and General Staff positions are filled. A written IAP is required. Operations personnel usually do not exceed 200 per operational period.
Type 1: Highest complexity incident, requiring national resources to manage incident. All Command and General Staff positions are activated.

Updated 5/28/2014
30 | P a g e
Block 11. For Time Period *
Use the drop-down list to select the appropriate time period for both date and time. The time period should include all time since the last submitted 209 report. The time period may include one or more operations periods based on agency/organizational reporting requirements.
Examples:
When you are submitting an 209 for a monitor fire once a week, the time period in the report should reflect an entire week, or back to the last approved 209 report.
An incident already has a previously approved 209 report with a From Time Period date of 10/31 and time of 1800. If a new 209 for this incident is created and approved with a date of 10/31 and time of 1700, one hour older than the previously approved 209 report, this 209 will not appear in the incident 209 list because it has an older date and time (by one hour).
Note: The application is designed to show only the most recent 209 report (either draft or approved)
created for an incident in the incident list. This is based on the date and time entered in Block 11. When the From Time Period date and time for the new 209 is set prior to the From Time Period date and time of the previously approved 209 report, then the current 209 draft does not appear in the incident list. This application function does not affect draft 209 reports.
To update Header information for a 209:
1. From the 209 application, select Header. The Header screen appears to the right. The left-hand pane lists any existing incidents for that Dispatch Office.
2. Select an incident and click Open. The Header information for the 209 appears. If you change the incident name on the Header tab, note the change in Remarks, Block 47.
3. Click on the appropriate tab to update information. You can update information for all fields that are white.
4. Click Save to save updates before leaving a tab, or click Undo Edits to re-enter information or exit the screen without saving changes.
To delete Header information for a 209:
1. From the 209 application, select Header. The Header screen appears to the right. The left-hand pane lists any existing incidents for that Dispatch Office.
2. Select an incident and click Open. The Header information for the 209 appears. 3. Click on the appropriate tab and delete the appropriate information. You can delete information for
all fields that are white. 4. Click Save to save deletions before leaving a tab, or click Undo Edits to re-enter information or exit
the screen without saving changes.

Updated 5/28/2014
31 | P a g e
Entering Location Information (Blocks 16-27)
Use the Location Information screen to enter and manage incident location information such as latitude/longitude, UTM coordinates, and jurisdiction.
To add location information for an incident:
1. From the 209 application, select a Dispatch Location. The left-hand pane lists any existing incidents for that Dispatch Office.
2. Select an incident and click Open. The incident opens to the Header tab. 3. Click the Location tab. The Location screen appears. 4. Select the state where the fire originated from the drop-down list. When the fire moves to multiple
states, enter the incident’s point of origin, and note the additional states in Remarks, Block 47. 5. Select the County/Parish/Borough from the drop-down list where the incident originated. When the
incident involves multiple states, please note the additional states in Remarks, Block 47. 6. Enter the city that contains the point of origin of the incident. If the point of origin is not within a city
enter the closest city to the point of origin. If the incident involves multiple cites please note the additional cities in Short Location or Area Description, Block 25 or in Remarks, Block 47.
7. Enter the unit, sub-unit, unit identification (ID) number/code (if used), or other information about the primary agency with jurisdiction or responsibility for the incident. This can include police, public works, or another type of organization. This block is grayed out for wildfire incidents.
8. Enter the jurisdiction where the incident originated. This block is grayed out for wildfire incidents. 9. Select the Unit ID from the drop-down list. The incident’s land ownership at the point of origin may
differ from the incident’s jurisdiction. If the Unit ID does not display, verify that the Unit ID exists in the 209 application.
10. Enter the incident’s point of origin Latitude and Longitude in NAD 83 format and click Degrees Minutes Seconds or Degrees Decimal Minutes. You can toggle between the two values as needed.
11. Enter the US National Grid Reference corresponding to the incident’s point of origin as expressed in NAD83 data format.
12. For areas where the Public Land Survey System is used, enter the legal description (section, township, range) of the incident’s point of origin by selecting quarter sections from the drop-down lists. The Principle Meridian value must correspond to that state.

Updated 5/28/2014
32 | P a g e
13. Enter a general description of the incident location (not necessarily the incident point of origin) so readers unfamiliar with the area can quickly identify the general location. The description should include the number of miles from an identifiable town (e.g., “20 miles SE of Jackson, WY”.)
14. Enter the Universal Transverse Mercator (UTM) at the incident’s point of origin using NAD83 data format.
15. When geospatial data is available for the incident, provide:
A general description of the data (a perimeter, a point, area of impact, radius, and so forth),
The data format (.shp, .kml, .kmz, and so forth).
A hyperlink or access to the information if it is online or an FTP site.
Contact information for the individual responsible for the incident’s geospatial information.
Note: A map or other geospatial product may be attached to the printed 209 report.
16. Click Save at the top of the page after you verify the information in Blocks 16-27 is correct. You can select another tab or log off the application.
Field Descriptions
Block 16. State *
The state where the incident originated. When the incident involves multiple states, please note the additional states in Remarks, Block 47.
Block 17. County/Parish/Borough *
The County/Parish/Borough where the incident originated. When the incident involves multiple states, please note the additional states in Remarks, Block 47.
Block 18. City
The city where the incident’s point of origin is located. When the point of origin is not within a city enter the closest city to the point of origin. If the incident involves multiple cites please note the additional cities in Short Location or Area Description, Block 25 or in Remarks, Block 47.
Block 19. Unit or Other
The unit, sub-unit, unit identification (ID) number/code (if used), or other information about the primary agency with jurisdiction or responsibility for the incident. This can include police, public works, or another type of organization.
Note: For wildfire incidents, managing unit information is derived from Block 2, Incident Number,
and does not need to be re-entered here. Text entry in this block is not allowed for wildfire incidents.
Block 20. Incident Jurisdiction
The jurisdiction where the incident originated. The entry may be general, such as federal, city, or state, or may specifically identify agency, such as Warren County, U.S. Coast Guard, Panama City, NYPD).
Note: For wildfire incidents, this block is grayed out. Incident jurisdiction is provided in Block 2,
Incident Number.
Block 21. Incident Location Ownership *
The incident’s land ownership at the point of origin (this may differ from the incident’s jurisdiction) expressed as a Unit ID.

Updated 5/28/2014
33 | P a g e
Note: Unit identifiers must already exist in the Sit/209 application in order to be used when filling
out the 209.
Block 22. Latitude/Longitude *
The Latitude and Longitude of the incident’s point of origin. Make sure the correct Lat/Long format is selected (degrees, minutes and seconds, or degrees decimal minutes). Confirm the Lat/Long entered is expressed in datum NAD83.
Note: Select the correct + / - boxes for the Lat/Long using the check boxes (see example).
Checking the box (see above) selects either north latitude (+), south latitude (-). The gray boxes indicate the current selection (plus or minus). Longitude is the same. Select minus (-) for the western hemisphere, or positive (+) for the eastern hemisphere. Convert from degrees, minutes and seconds to degrees, decimal minutes automatically by checking the adjacent radio button.
In the example above, the same coordinate location is expressed in degrees, decimal minutes (left), and degrees, minutes and seconds (right). Notice the difference in the numbers. It is important to know which format your coordinates are in before entering them into the program.
Block 23. US National Grid Reference
Enter the US National Grid Reference corresponding to the incident’s point of origin as expressed in NAD83 data format.
Block 24. Legal Description (Public Land Survey System – PLSS)
Enter the legal description (section, township, range) of the incident’s point of origin. Principle Meridian must correspond to that state.
Note: The Public Land Survey System is not used in all parts of the U.S.
Block 25. Short location or Area Description *
A general descriptive location of the incident (does not need to be from the incident point of origin). This should be the number of miles from an identifiable town (e.g., “20 miles SE of Jackson, WY”). This

Updated 5/28/2014
34 | P a g e
information is important for readers unfamiliar with the area to be able to quickly identify the general location of the incident on a map.
Block 26. Universal Transverse Mercator (UTM) Coordinates
Enter the UTM at the incident’s point of origin. Confirm the UTM coordinates entered are expressed in NAD83 data format.
Block 27. Geospatial Data
When geospatial data is available for the incident, provide:
A general description of the data (a perimeter, a point, area of impact, radius, and so forth),
The data format (e.shp, .kml, .kmz, and so forth).
A hyperlink or access to the information if it is online or an FTP site.
Contact information for the individual responsible for the incident’s geospatial information. Note: A
map or other geospatial product may be attached to the printed 209 report.
To update Location information for a 209:
1. From the 209 application, select a Dispatch Location. The left-hand pane lists any existing incidents for that Dispatch Office.
2. Select an incident and click Open. The incident opens to the Header tab. 3. Click the Location tab. The Location screen appears. 4. Click on the appropriate text box(es) to update information. You can update information for all fields
that are white. 5. Click Save to save updates before leaving a tab, or click Undo Edits to re-enter information or exit the
screen without saving changes.
To delete Location information for a 209:
1. From the 209 application, select a Dispatch Location. The left-hand pane lists any existing incidents for that Dispatch Office.
2. Select an incident and click Open. The incident opens to the Header tab. 3. Click the Location tab. The Location screen appears. 4. Delete the appropriate information. You can delete information for all fields that are white. 5. Click Save to save deletions before leaving a tab, or click Undo Edits to re-enter information or exit
the screen without saving changes.

Updated 5/28/2014
35 | P a g e
Entering Summary Information (Blocks 28-30)
Use the Summary Information screen to summarize an incident’s fire behavior, significant events, fuel model, material, and other hazards.
To add Summary information:
1. From the 209 application, select a Dispatch Location. The left-hand pane lists any existing incidents for that Dispatch Office.
2. Select an incident and click Open. The incident opens to the Header tab. 3. Click the Summary tab. The Summary screen appears. 4. Describe fire behavior or significant events that have occurred for all the wildland and non-wildland
fire incidents since the last 209report. 5. For wildfire events, select the fuel model that best represents the primary carrier of the fire from
drop down-list, and provide additional information (if necessary) in the text field. For non-wildfire incidents, enter the appropriate primary materials, fuels, chemicals, or other hazards involved in the incident in the text field. This can include type of chemicals, burning materials, infecting agents, or anything else influencing the incident
6. Complete the Structural Summary table as need and document in the text box whether the numbers are estimated or confirmed. See Damage Assessment Information for further details on completing this block.
7. Click Save at the top of the page after you verify the information in Blocks 28-39 is correct. You can select another tab or log off the application.
Field Descriptions
Block 28. Observed Fire Behavior or Significant Incident Events for the Time Period Reported *
Describe fire behavior or significant events since the last 209 report. Do not use this block for anticipated incident events, behavior, or movement.

Updated 5/28/2014
36 | P a g e
Wildland fire incidents: Describe observed fire behavior for the current reporting period using generally accepted terminology. For example: Extreme fire behavior; moderate fire activity; running fire; short or long-range spotting; crown fire; individual or group tree torching; and creeping and smoldering.
Non-wildland fire incidents: Describe significant incident events related to the materials or other causal agents influencing the incident. For example: Movement of a chemical gas cloud over a populated area; movement of flood waters; expansion of civil unrest into previously unaffected areas; additional recurring mud flows caused by heavy rains; radiological leak is affecting larger area than previously reported.
Block 29. Primary Fuel Model, Material, or Hazards involved *
For wildfire events, select the appropriate fuel model from drop down menu, and provide additional information (if necessary) in the text field. Choose the fuel model that best represents the primary carrier of the fire.
1. Short grass (1 foot)
2. Timber(grass and understory)
3. Tall grass (2.5 feet)
4. Chaparral (6 feet)
5. Brush (2 feet)
6. Dormant brush, hardwood slash
7. Southern rough
8. Closed timber litter
9. Hardwood litter
10. Timber (litter and understory)
11. Light logging slash
12. Medium logging slash
13. Heavy logging slash
For non-wildfire incidents, enter the appropriate primary materials, fuels, chemicals, or other hazards involved in the incident in the text field. This can include type of chemicals, burning materials, infecting agents, or anything else influencing the incident.
Note: The Select a Fuel model drop-down list grayed out for non-wildfire incidents (shown in the red
box below).
Block 30. Damage Assessment Information Summarize damage and/or restriction of use/availability to residential/commercial property, natural resources, critical infrastructure and key resources, and so forth. In the text box include:

Updated 5/28/2014
37 | P a g e
Short summary of damage or use/access restrictions/ limitations caused by the incident for the reporting period and cumulatively.
Information on the facility status, if relevant, such as operational status, if it’s evacuated, etc.
Critical infrastructure or key resources damaged/destroyed/impacted by the incident. The type of infrastructure; the extent of the damage and the impact to the community.
Structural Summary
Complete this table as need based on the definitions below. Note in the text box when the numbers you enter are estimated or confirmed. Note that the entries in the table are numerical only.
Definitions:
Single Residences: Standalone single dwellings or homes.
Multiple Residences: Apartment dwellings, duplexes, and so forth.
Mixed Commercial/Residential Property: Real estate zoned for business or industrial use, as well as residential (likely continuous occupation).
Nonresidential Commercial Property: Any commercial property that does not include continuous residential occupation.
Other Minor Structures: Constructed buildings, usually detached from other structures, such as barns, equipment sheds, loafing sheds, outhouses, and so forth. Does not include power poles, fences, pipelines, bridges, and so forth.
To update Summary information for a 209:
1. From the 209 application, select a Dispatch Location. The left-hand pane lists any existing incidents for that Dispatch Office.
2. Select an incident and click Open. The incident opens to the Header tab. 3. Click the Summary tab. The Summary screen appears. 4. Click on the appropriate text box(es) to update information. You can update information for all fields
that are white. 5. Click Save to save updates before leaving a tab, or click Undo Edits to re-enter information or exit the
screen without saving changes.
To delete Summary information for a 209:
1. From the 209 application, select a Dispatch Location. The left-hand pane lists any existing incidents for that Dispatch Office.
2. Select an incident and click Open. The incident opens to the Header tab. 3. Click the Summary tab. The Summary screen appears. 4. Delete the appropriate information. You can delete information for all fields that are white. 5. Click Save to save deletions before leaving a tab, or click Undo Edits to re-enter information or exit
the screen without saving changes.

Updated 5/28/2014
38 | P a g e
Entering Additional Decision Support Information (Blocks 31-47)
Use the Additional Decision Support Information screen to summarize incident-related injuries, illnesses, and fatalities for civilians or the public. The screen displays any numbers entered from the incident’s previous 209, if one exists.
To add Additional Decision Support information for a 209:
1. From the 209 application, select a Dispatch Location. The left-hand pane lists any existing incidents for that Dispatch Office.
2. Select an incident and click Open. The incident opens to the Header tab. 3. Click the Additional Decision Support tab. The Additional Decision Support screen appears. 4. Enter the number of civilian population/general public affected by the incident in the # This
Reporting Period column (other columns and totals are grayed out to prevent data entry.) When you enter a value in the Other row, describe the type of status in Life, Safety, and Health Status/Threat Remarks, Block 33. When you cannot determine accurate numbers at the time of the report provide the best estimates and note this in Safety, and Health Status/Threat Remarks, Block 33.
5. Enter the number of first responders affected by the incident in the # This Reporting Period column (other columns and totals are grayed out to prevent data entry.) When you enter a value in the Other row, describe the type of status in Life, Safety, and Health Status/Threat Remarks, Block 33. When you cannot determine accurate numbers at the time of the report provide the best estimates and note this in Safety, and Health Status/Threat Remarks, Block 33.
6. Enter additional detail about numbers reported in Blocks 31, 32, and 34. 7. Check boxes that apply to any active threat management strategies applied to the incident for this
reporting period. When there are no threats, check No Likely Threat. At least one check box must be checked for the report to be approved. Remember to uncheck the boxes when identified threats no longer exist.
8. Enter a brief summary about how the current weather is affecting the incident and how the anticipated weather will affect the incident. For wildland fire incidents, enter the next operational period’s forecasted wind speed, wind direction, temperature, and relative humidity. For all incidents highlight significant forecasted weather events, such as dry lightning, frontal passages, inversions, and gusty/erratic winds.
9. Enter an estimate of the direction in which the incident is expected to spread, migrate, or expand in the next 12, 24, 48, and 72 hour time frames and provide detailed information about the acreage or area that will be affected and the predicted movement of the fire.
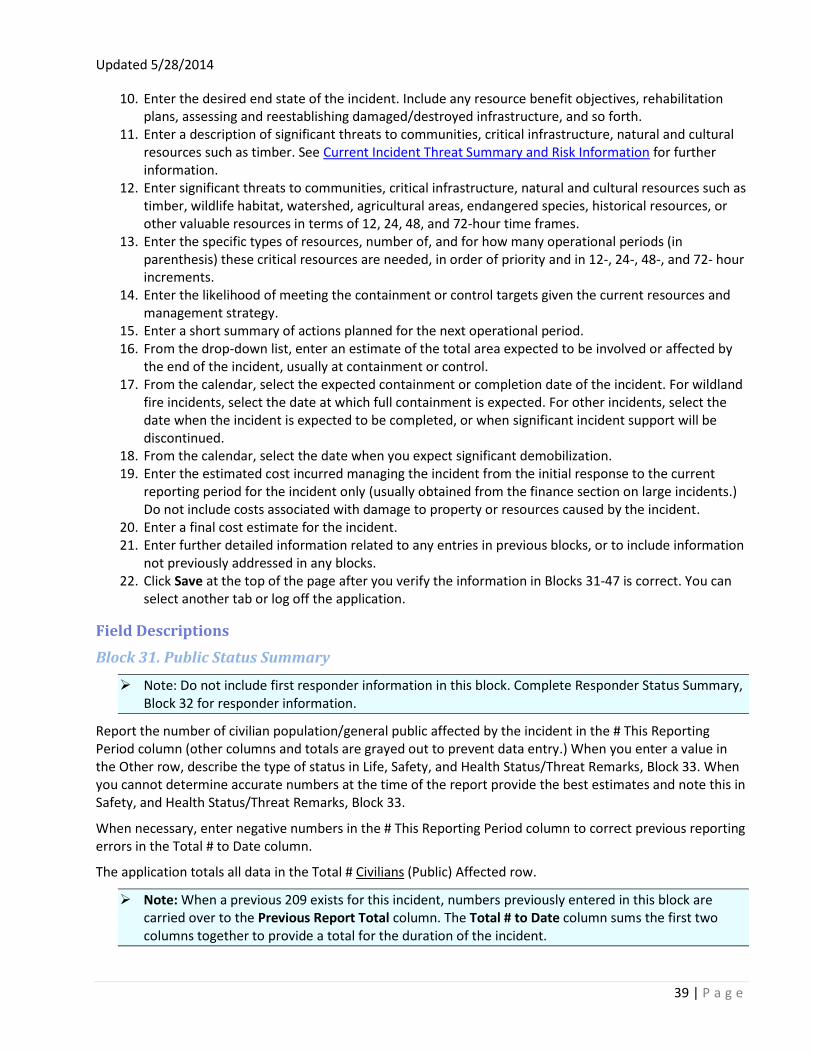
Updated 5/28/2014
39 | P a g e
10. Enter the desired end state of the incident. Include any resource benefit objectives, rehabilitation plans, assessing and reestablishing damaged/destroyed infrastructure, and so forth.
11. Enter a description of significant threats to communities, critical infrastructure, natural and cultural resources such as timber. See Current Incident Threat Summary and Risk Information for further information.
12. Enter significant threats to communities, critical infrastructure, natural and cultural resources such as timber, wildlife habitat, watershed, agricultural areas, endangered species, historical resources, or other valuable resources in terms of 12, 24, 48, and 72-hour time frames.
13. Enter the specific types of resources, number of, and for how many operational periods (in parenthesis) these critical resources are needed, in order of priority and in 12-, 24-, 48-, and 72- hour increments.
14. Enter the likelihood of meeting the containment or control targets given the current resources and management strategy.
15. Enter a short summary of actions planned for the next operational period. 16. From the drop-down list, enter an estimate of the total area expected to be involved or affected by
the end of the incident, usually at containment or control. 17. From the calendar, select the expected containment or completion date of the incident. For wildland
fire incidents, select the date at which full containment is expected. For other incidents, select the date when the incident is expected to be completed, or when significant incident support will be discontinued.
18. From the calendar, select the date when you expect significant demobilization. 19. Enter the estimated cost incurred managing the incident from the initial response to the current
reporting period for the incident only (usually obtained from the finance section on large incidents.) Do not include costs associated with damage to property or resources caused by the incident.
20. Enter a final cost estimate for the incident. 21. Enter further detailed information related to any entries in previous blocks, or to include information
not previously addressed in any blocks. 22. Click Save at the top of the page after you verify the information in Blocks 31-47 is correct. You can
select another tab or log off the application.
Field Descriptions
Block 31. Public Status Summary
Note: Do not include first responder information in this block. Complete Responder Status Summary,
Block 32 for responder information.
Report the number of civilian population/general public affected by the incident in the # This Reporting Period column (other columns and totals are grayed out to prevent data entry.) When you enter a value in the Other row, describe the type of status in Life, Safety, and Health Status/Threat Remarks, Block 33. When you cannot determine accurate numbers at the time of the report provide the best estimates and note this in Safety, and Health Status/Threat Remarks, Block 33.
When necessary, enter negative numbers in the # This Reporting Period column to correct previous reporting errors in the Total # to Date column.
The application totals all data in the Total # Civilians (Public) Affected row.
Note: When a previous 209 exists for this incident, numbers previously entered in this block are
carried over to the Previous Report Total column. The Total # to Date column sums the first two columns together to provide a total for the duration of the incident.

Updated 5/28/2014
40 | P a g e
Block 32. Responder Status Summary
Note: Do not include public or civilian information in this block. Use Public Status Summary, Block 31
for public or civilian information.
Report the number of first responders affected by the incident in the # This Reporting Period column (other columns and totals are grayed out to prevent data entry.) When you enter a value in the Other row, describe the type of status in Life, Safety, and Health Status/Threat Remarks, Block 33. When you cannot determine accurate numbers at the time of the report provide the best estimates and note this in Safety, and Health Status/Threat Remarks, Block 33.
When necessary, enter negative numbers in the # This Reporting Period column to correct previous reporting errors in the Total # to Date column.
The application totals the data that is entered in the bottom row Total # Responders Affected.
Note: If a previous 209 exists for this incident, numbers previously entered in Block 32 are carried
over to the Previous Report Total column. The Total # to Date column sums the first two columns together to provide a total for the duration of the incident.
Block 33. Life, Safety, and Health Status/Threat Remarks
Additional details about the affected public or first responders reported in Blocks 31, 32, and 34. Specify information such as road numbers and duration of closures, how many people or homes are impacted by evacuations, or the amount of material spilled or recovered. Due to the potential sensitivity of the information in Blocks 31, 32, and 34, information should be as accurate as possible in your assessment.
Block 34. Life, Safety, and Threat Management *
Check boxes that apply to any active threat management strategies applied to the incident for this reporting period. When there are no threats, check No Likely Threat. At least one check box must be checked for the report to be approved. Remember to uncheck the boxes when identified threats no longer exist.
Block 35. Weather Concerns
A brief summary about how the current weather is affecting the incident and how the anticipated weather will affect the incident.
For wildland fire incidents, enter the next operational period’s forecasted wind speed, wind direction, temperature, and relative humidity. For all incidents highlight significant forecasted weather events, such as dry lightning, frontal passages, inversions, and gusty/erratic winds.
Block 36. Projected Incident Activity, Potential, Movement, Escalation, or Spread *
An estimate of the direction in which the incident is expected to spread, migrate, or expand in the next 12, 24, 48, and 72 hour time frames. When possible, include an estimate of the acreage or area that will be affected. Emphasize the predicted movement of the fire, not the predicted fire behavior. If possible, include the “why” (conditions affecting fire behavior such as low RH or high winds) and the “where” of the prediction (location, direction and amount of spread).
Block 37. Strategic Objectives
Describe the desired end state of the incident. This could include resource benefit objectives, rehabilitation plans, assessing and reestablishing damaged/destroyed infrastructure, etc. The information in this block should be based on the most up-to-date information, with the understanding that objectives may change throughout the course of the incident.

Updated 5/28/2014
41 | P a g e
Block 38. Current Incident Threat Summary and Risk Information *
Describe significant threats to communities, critical infrastructure, natural and cultural resources such as timber, wildlife habitat, watershed, agricultural areas, endangered species, historical resources, or other valuable resources. Describe these threats in terms of 12, 24, 48, and 72-hour time frames. For example, a ranch house, barns and other outbuildings, located in Division C have the probability of being burned over in about 12 hours. Or a subdivision of 300 homes and businesses northeast of the fire could be impacted within 48 hours. Or, continued civil unrest may spread to neighborhoods beyond city center within 12 hours.
The threats described in this block should coincide with the time frames and projected spread listed in Projected Incident Activity, Potential, Movement, Escalation, or Spread (Block 36).
Block 39. Critical Resource Needs
List the specific types of resources, number of, and for how many operational periods (in parenthesis) these critical resources are needed, in order of priority and in 12-, 24-, 48-, and 72- hour increments. For example:
12 hours: 2 Type 1 helicopters (3 periods), 6 Type 2-IA hand crews (8 periods)
24 hours: 2 Type 1 helicopters (3 operational periods)
48 hours: 5 Type 3 engines with STEN (2 operational periods)
72 hours: 1 Type 2 helicopter with module (6 operational periods).
Note: Additional documentation in other blocks on this tab can help support and justify the need for
critical resources.
Block 40. Strategic Discussion
Give a short assessment of the likelihood of meeting the containment or control targets given the current resources and management strategy. Tie in information related to critical resource needs as expressed in Block 39. If containment is unlikely, explain why, and reflect containment and control targets accordingly in Anticipated Incident Containment or Completion Date, Block43.
Describe safety concerns and control problems such as fuel types, steep terrain, difficult access, adverse weather events, or extreme fire behavior anticipated in the next two to three operational periods. Include social/political/economic concerns or impacts. Relate critical resource needs to the planned actions if critical resource needs are met, and how these resources are going to be utilized to mitigate the situation. Examples:
T-1 engines critical for structure protection of subdivision in anticipated path of the fire (expected to impact subdivision within 24 hours).
IHC crews needed for burnout operation planned for Division D in 48 hours. Difficulty of the terrain and planned burnout operation necessitates use of IHC crews.
Containment unlikely for foreseeable future due to lack of T-1 crews and helicopters needed to contain the fire in the vicinity of Lone Peak. Terrain is too rugged and dangerous for the T-2 crews currently assigned.
Block 41. Planned Actions for Next Operational Period
Provide a short summary of actions planned for the next operational period. For example, incident management team transitions, line construction operations, structure protection, etc.

Updated 5/28/2014
42 | P a g e
Block 42. Projected Final Incident Size/Area
Enter an estimate of the total area that is expected to be involved or affected by the end of the incident, usually at containment or control. From the drop-down list, select the appropriate area measurements: acres, hectares, square kilometers, or square miles.
Block 43. Anticipated Incident Containment or Completion Date
Select the expected containment or completion date of the incident using the pop-up calendar.
For wildland fire incidents, select the date at which full containment is expected.
For other incidents, select the date when the incident is expected to be completed, or when significant incident support will be discontinued.
Block 44. Projected Significant Resource Demobilization Start Date
Select the date from the pop-up calendar when significant demobilization is anticipated.
Block 45. Estimated Incident Costs to Date
Enter the estimated cost incurred managing the incident from the initial response to the current reporting period for the incident only (usually obtained from the finance section on large incidents.)
Note: Do not include costs associated with damage to property or resources caused by the incident.
When incident costs increase or decrease dramatically, provide a brief explanation in Remarks, Block 47.
Note: Block 45 is grayed out (see example below) when the complex button is selected in Block 10
(Incident Complexity Level) of the Header tab. For complexes, the application automatically carries over the total cost of all incidents reported in Block 7.
Fire Code #:
Used for wildland fire incidents only. Enter the financial code assigned to the incident generated from the Fire Code program.
Block 46. Projected Final Incident Cost Estimate
Enter a final cost estimate for the incident. The application automatically enters commas for numbers exceeding 1000 (1,000).
Block 47. Remarks
This block is used to expand on information that has been entered in previous blocks, or to include other pertinent information not previously addressed in other blocks. Key information to include in this block would be:
Incident Command Team transfers command back to the local unit.
Reasons for incident acreage/size or cost reductions.
Injuries that occurred during the reporting period.

Updated 5/28/2014
43 | P a g e
More detailed current or expected weather descriptions affecting the incident.
For complex incidents:
When this incident is a complex (identified in Block 10), it’s recommended to list all fires included in the complex. For example, “Fires in this complex include: Bear (290 ac.), Elk (1004 ac.), Icicle Creek (10 ac.).”
Note: Information in Remarks block is automatically cleared out each day.
To update Additional Decision Support information for a 209:
1. From the 209 application, select a Dispatch Location. The left-hand pane lists any existing incidents for that Dispatch Office.
2. Select an incident and click Open. The incident opens to the Header tab. 3. Click the Additional Decision Support tab. The Additional Decision Support screen appears. 4. Click on the appropriate text box(es) to update information. You can update information for all fields
that are white. 5. Click Save to save updates before leaving a tab, or click Undo Edits to re-enter information or exit the
screen without saving changes.
To delete Additional Decision Support information for a 209:
1. From the 209 application, select a Dispatch Location. The left-hand pane lists any existing incidents for that Dispatch Office.
2. Select an incident and click Open. The incident opens to the Header tab. 3. Click the Additional Decision Support tab. The Additional Decision Support screen appears. 4. Delete the appropriate information. You can delete information for all fields that are white. 5. Click Save to save deletions before leaving a tab, or click Undo Edits to re-enter information or exit
the screen without saving changes.

Updated 5/28/2014
44 | P a g e
Entering Resource Commitment Summary Information (Blocks 48-53)
Use the Resource Commitment Summary screen to report resources assigned to the incident. Do not report civilians or resources not actually assigned to the incident. Enter Volunteer groups or organizations in Block 53.
Recommendation: It is best to add resources to Block 49 before adding new agencies in Block 48. See
caution statements below. The most common resources affiliated with a dispatch office can be preloaded into the program under the Tools menu on the homepage.
Note: You must have Administrator privileges to access the Tools function and change individual
incidents.
Caution:
When you select an agency from the agency drop-down list, you must populate at least one resource
or personnel field for that agency in Block 49 before you save the page. When you save the page, any agency with no resources or personnel assigned is deleted from the page.
When you click Show/Hide Columns to select new resource types, any agency in Block 48 with no
resources assigned is deleted. Be sure each agency listed in Block 48 has at least one resource and/or personnel assigned before adding new resource types to Block 49.
To enter resource commitment summary information:
1. From the 209 application, select a Dispatch Location. The left-hand pane lists any existing incidents for that Dispatch Office.

Updated 5/28/2014
45 | P a g e
2. Select an incident and click Open. The incident opens to the Header tab. 3. Click the Resource Commitment Summary tab. The Resource Commitment Summary screen appears 4. To add an agency, click + Add Row. The Add Agencies for Resource Utilization pop-up window
appears. 5. From the drop-down list, select the appropriate Agency or Organization. See Agency or Organization
for definitions for each agency or organization. 6. Click Submit to submit the information, or click Cancel to leave the pop-up window. 7. For each agency, enter the number of resources in the top row for that agency. In the second row for
that agency, enter the number of personnel assigned to those resources. See Resources for further information about adding and deleting resources into the Resources columns.
8. Enter the number of additional overhead and other personnel by agency or organization were not assigned to a specific resource listed in Resources, Block 49. The application automatically populates Total Personnel, Block 51. This includes the number of personnel associated with assigned resource types (e.g., aircraft or engines), as well as individual overhead personnel. The application also automatically populates Total Resources, Block 52 and includes number of resources (engines, crews, aircraft, etc.).
9. Enter all agencies and organizations involved in the incident that are not listed in Agency or Organization, Block 48. These organizations are not counted by the application, or included in the totals in Blocks 51 and 52.
10. Click Save at the top of the page after you verify the information in Blocks 48-53 is correct. You can select another tab or log off the application.
Field Descriptions
Block 48. Agency or Organization
Utilize the drop-down list under Agency or Organization and select the appropriate agency for reported.
There are several unique agencies listed that require clarification:
DOD: US Department of Defense. Selecting DOD is generic to any military unit or personnel, including National Guard, regular military, reserves, etc. However, there are separate military units listed for Army, Navy, Coast Guard, Air Force, Army Corps of Engineers, National Guard and Air National Guard.

Updated 5/28/2014
46 | P a g e
IA: Interagency Resources
Crews comprised of multi-agency resources
Resources ordered as interagency resources
Individual agencies may be listed in Cooperating Agencies (Block 53).
INTL: International Resources. These are any non-U.S. resources.
LGR and C&L: Used interchangeably by different agencies. Local Government and County and Local resources. These include municipal and county resources, including rural fire departments, fire protection districts, volunteer fire departments and townships.
OES: Office of Emergency Services. State governmental agencies such as the California Governor’s Office of Emergency Services.
OTHR: Assisting agencies that do not fit into any other listed category.
PRI: All private resources, such as contractors and citizen volunteers not affiliated with a formal organization. But it does not include federal CWN (call when needed) and AD (administratively determined) resources because these are always hired or contracted by an agency, and should be reported under that agency.
ST: Generic state agency identifier. Any state resources that cannot be listed under another agency in the list. List these individual state agencies in Cooperating Agencies, Block 53.
Block 49 Resources
Note: Strike teams are no longer counted separately from single resources. These should be counted
as single resources (i.e. a strike team of engines should be entered as 5 engines).
For each agency, enter the number of resources in the top row for that agency. In the second row for that agency, enter the number of personnel assigned to those resources. For example, when there are six BIA Type 1 engine with four personnel assigned, then the BIA row should show “1” in the top row and “4” in the lower row. See example below.
Note: If a value is entered in the Resource row, a value for number of personnel assigned to that
resource you must also enter in the Personnel row below for that resource type (as shown in the example below). If no personnel value is entered for a resource type that has a value, an error message appears.
In the example at right, fields are filled in correctly for dozers and Type 3 and 4 engines. But the Type 5 engine is missing a value for number of personnel assigned to the seven engines. The Type 6 engine is missing a value for the number of resources the six personnel are assigned to. Missing values such as these will result in an error message similar to the one below.

Updated 5/28/2014
47 | P a g e
Adding an agency to Block 49.
1. Click Add Row to select agencies from the pop-up list. You must select each agency individually from the pop-up list. Multiple agency selections are not permitted.
2. Click Submit to save each agency to Block 48. After adding an agency, the pop-up window automatically closes.
Deleting an agency from Block 49 that no longer has resources.
1. Select the agency row. The selected row changes color, such as the green shown in the example above for BIA.
2. Click Delete Selected Rows. A pop-up window appears asking you to confirm the deletion of the selected agency. Click Ok or Cancel.
Numbers you enter in Block 49 are automatically summed in Blocks 51
and 52. Block 51 only tabulates personnel by agency, not resource type
(engine, crew, dozer, etc.). Block 51 tabulates both personnel and
resource numbers by resource type. This allows resources to be tracked
by both agency and type.
Block 50. # of Overhead Personnel
The number of additional overhead and other personnel by agency or organization that are not assigned to a specific resource listed in Resources, Block 49.
Note: Do not count individual personnel assigned to crews, engines, helicopters, or other resources
already listed in Block 49.
Block 51. Total Personnel
This block is automatically summed by the program. It includes the number of personnel associated with assigned resource types (e.g., aircraft or engines), as well as individual overhead personnel.

Updated 5/28/2014
48 | P a g e
Block 52. Total Resources
This block is automatically calculated by the application. It includes the number of resources (engines, crews, aircraft, etc.).
Block 53. Additional Cooperating and Assisting Organizations Not Listed Above
List all agencies and organizations involved in the incident that are not listed in Block 48. These organizations are not counted by the application, or included in the totals in Blocks 51 and 52. Examples may include the Red Cross, utility companies, and so forth.
Note: Do not repeat any resources counted in Blocks 48 – 52, unless explanations are needed for
groupings created under Block 48 Agency or Organization.
To update resource commitment summary information for a 209:
6. From the 209 application, select a Dispatch Location. The left-hand pane lists any existing incidents for that Dispatch Office.
7. Select an incident and click Open. The incident opens to the Header tab. 8. Click the Additional Decision Support tab. The Additional Decision Support screen appears. 9. Click on the appropriate text box(es) to update information. You can update information for all fields
that are white. 10. Click Save to save updates before leaving a tab, or click Undo Edits to re-enter information or exit the
screen without saving changes.
To delete resource commitment summary information for a 209:
6. From the 209 application, select a Dispatch Location. The left-hand pane lists any existing incidents for that Dispatch Office.

Updated 5/28/2014
49 | P a g e
7. Select an incident and click Open. The incident opens to the Header tab. 8. Click the Additional Decision Support tab. The Additional Decision Support screen appears. 9. Delete the appropriate information. You can delete information for all fields that are white. 10. Click Save to save deletions before leaving a tab, or click Undo Edits to re-enter information or exit
the screen without saving changes.

Updated 5/28/2014
50 | P a g e
Approval and Routing Procedures
Use the Approval and Routing to obtain approvals and develop routing procedures for the 209.
All required blocks on this tab must be completed before the 209 can be approved and finalized.
Incomplete information results in an error message similar to the one shown below.
Field Descriptions
Block 12. Prepared By *
On a large incident with Incident Management Team assigned this section would normally be completed by the Situation Unit Leader or the Plans Section Chief. For other incidents it may be a dispatcher in the local dispatch or communications center, or another agency staff person or manager.
The title of the person who prepared the 209 should also be entered if appropriate (e.g. Jane Smith, SITL).
Date/Time Prepared
Select a date and time from the respective drop-down lists once the document is prepared.

Updated 5/28/2014
51 | P a g e
Block 13. Approved By *
On large incidents with Incident Management Teams, this is typically the Planning Section Chief or Incident Commander. For other incidents, it can be the local Dispatch Center Manager, Fire Management Officer, or Agency Administrator. Also include the approver’s title on the 209. For example, Don Jones, ICT2.
Caution: The 209 cannot be viewed from the Reports function of the program until this block is
completed. Use the Print for Signature link to print a draft of the 209 for review and approval by the approving official before final submission to the database. A warning message appears when Blocks 12 and 13 are not completed.
Block 14. Date/Time Submitted
The application automatically generates the date/time stamp when the electronic report is finalized and submitted. This information is not entered by the user and is grayed out. See example above.
Block 15. Primary Location, Organization, or Agency Sent To *
Enter the appropriate dispatch center, Geographic Coordination Center, Emergency Operations Center, or other entity associated with the report. See example above.
Note: When printing a hard copy report, be sure that your printer is compatible with Cognos Reports
program. Some printers may experience problems exporting to Adobe PDF, resulting in a large print file size. Refer to Printing Reports section of this Guide for more information.

Updated 5/28/2014
52 | P a g e
Verification
Before a 209 report can be finalized following approval, information entered in the report must be verified for accuracy, omissions, errors and other discrepancies. This process is similar to making an on-line credit card purchase. After entering your credit information into the web site, a verification process checks the information entered for accuracy. Any inconsistencies or errors are flagged, and must be corrected before the purchase can be finalized.
Verification is done in the SIT/209 Report Not Approved pane of the program. To view this pane, use the computer mouse to grab and slide the divider (shown in the red box below) to the left to maximize, or to the right to minimize a window pane. The verification pane is visible on the right below the blue banner in the example below.
Verification Outputs
The application reports two kinds of output when the SIT209 data is not verified.
Errors are items that must be corrected before a report can be approved. Each error will identify the block number (arrow) where the error occurred. The nature of the error is also noted. Click the blue text link to go to that block and correct the error (see graphic below).
Warnings are discrepancies found in information entered into the program. For example, possibly too many zeroes entered in a field. Warnings simply ask if the information entered in certain key blocks or fields is accurate. If so, then click the check box to the left of the warning statement to indicate that the information entered is accurate (see graphic below). If the information is not accurate, return to that block or field and correct the information. Be sure to save the changed or corrected information before exiting the tab.

Updated 5/28/2014
53 | P a g e
Note: Once errors and warnings have been corrected or validated, click Verify a second time to verify
the changes or corrections made. The program allows the 209 report to be finalized and submitted. A date/time stamp is applied by the program in Block 14.
Note: Corrected Errors disappear from the Verify pane, but Warnings do not disappear (as shown
below). All errors must be fixed, and all warnings checked off before the 209 report can be approved and finalized.
To complete the Verification process:
1. Click Verify (shown above) to perform the 209 information verification check. Verification must be performed
before final approval and submission is allowed by the 209 application. The application performs a data verification process and shows the errors or discrepancies found in the Verify pane – see example below.
2. Correct any reported Errors and/or Warnings when the SIT209 Report is not approved.
3. Click Verify a second time to submit the SIT209 Report.
4. When the report is ready for submission, click Approve.

Updated 5/28/2014
54 | P a g e
After the approved report is submitted, all data fields in the Approval and Routing tab become grayed out. A date/time stamp is applied by the application to Block 14 (as shown below).
The approved 209 report appears stamped Approved in the dispatch center list of incidents (as shown below).
Note: In the Status column above, the approved 209 report is marked Initial. This is the first 209
report submitted for this incident. Subsequent 209 reports display Update or Final.

Updated 5/28/2014
55 | P a g e
Troubleshooting
Printing Reports: Possible Problems Printing Adobe PDF Files
There is an identified problem with some brands of printers that causes very large Adobe PDF files to be created when trying to print a 209 report. This problem is explained at the web site http://www.diebold.com/gssasupaes/helpprintpdf.htm and is excerpted here. If you experience difficulty printing a report from the SIT/209 program, refer to the following solutions outlined below. Solution 2 is often the best option for printing a 209 report.
Issue Solution # and Description Notes When printing to a non-PostScript (i.e., PCL or QuickDraw ) printer, Adobe Acrobat 4.0 viewers generate very large print spool files. For example, if you print a 60K PDF file to a Hewlett-Packard DesignJet, your Acrobat viewer may generate a 298 MB spool file
1. If you're printing in Windows, obtain and install a printer driver from the manufacturer that's specifically designed for that printer; then print using that driver.
Some manufacturers, such as Hewlett-Packard, do not create printer drivers for all of their printers. Instead, they instruct you to use the printer drivers included with Windows for some of their printers. If your printer doesn't have a printer driver designed for it, Acrobat viewers may be unable to print to it without generating large print spool files.
2. Select Print As Image in the Print dialog box. When you select Print As Image in the Print dialog box, your Acrobat viewer prints PDF files as bitmap data. Non-PostScript printer drivers may be able to print this bitmap data without generating unexpectedly large spool files.
3. If you're printing multiple pages, print fewer pages at once. If printing a multiple-page PDF file overloads your printer (and crashes your system) or is excessively slow, try selecting one page at a time for printing, rather than trying to print the entire document at once. Some reports indicate that this is actually faster, as well as less prone to crashing.

Updated 5/28/2014
56 | P a g e
Issue Solution # and Description Notes 4. Deselect the Fit To Page
option in the Print dialog box. The Fit To Page option ensures that PDF pages, whose dimensions are larger than the printer's printable area, do print -- the Acrobat viewer scales them to fit within the printable area. This scaling can result in a larger spool file size. When you deselect this option, the Acrobat viewer doesn't scale PDF pages when printing them.
5. Print to a PostScript printer. When an Acrobat 4.0 viewer prints to a PostScript printer, it sends its own PostScript code. Therefore, it has direct control over how the PostScript spool file is created and how large it is.
Table 1: Printing Issue Troubleshooting Table
Additional Information:
When an Acrobat 4.0 viewer prints to a non-PostScript printer, it uses the printer driver to convert the information to a format the printer can recognize. To aid the conversion, the Acrobat 4.0 viewer sends image data, which is banded, to the printer driver. Banding breaks up a single, large image into smaller, bit-size images that are easier to handle. A non-PostScript printer driver converts this data to driver-specific spool information and then scales and further bands the data. Depending on how the printer driver converts, scales and bands the data, the spool file may be much larger in size than the PDF file the Acrobat viewer is printing. For example, the LaserJet 4000-series printer driver generates multiple copies of the banded images when converting the data, which greatly increases the spool file size. The size of the spool file is unrelated to the size of the PDF file.
Also, when you're printing in Windows, a Microsoft printer driver may enable you to print to a printer for which it wasn't specifically designed, but the driver does not contain printer-specific information (e.g., available memory) that can optimize printing. Therefore, a Microsoft printer driver not designed for a specific printer may generate unexpectedly large print spool files when printing a PDF file from an Acrobat 4.0 viewer. These large spool files can cause PDF files to print slowly or not at all. A printer driver designed specifically for a given printer can usually print a PDF file from an Acrobat 4.0 viewer without creating an unexpectedly large spool file.
In Mac OS, some QuickDraw printer drivers (e.g., Epson Stylus 900) may also generate unexpectedly large spool files because of the way they send information to the printer: These printer drivers generate an image

Updated 5/28/2014
57 | P a g e
for each page, spool the image to the hard disk and then send that image to the printer. These images are usually much larger than the PDF file from which they're being generated. The size of the spool file is unrelated to the size of the PDF file.

Updated 5/28/2014
58 | P a g e
Appendix A: Incident Status Summary
Purpose: To support the needs of the incident, the Incident Status Summary (209) collects basic incident decision support information at the incident level. The 209 is the primary mechanism for reporting incident decision support information above the incident level to incident coordination centers, support organizations, and agency/organizational managers and executives. As such, the 209 contains basic information elements needed to support decision-making at all levels above the incident to support the incident. Decision-makers may include not only the agency having jurisdiction, but also all Multiagency Coordination System (MACS) elements and parties, such as cooperating and assisting agencies/organizations, dispatch centers, emergency operations centers, administrators, elected officials, local, tribal, county, State, and Federal agencies. Once 209 information is submitted from the incident, decision-makers and others at all incident support and coordination points may transmit and share the information (based on its sensitivity and appropriateness) for access and use at local, regional, State, and national levels as it is needed to facilitate support.
Accurate and timely completion of the 209 is necessary to identify appropriate resource needs, determine allocation of limited resources when multiple incidents occur, and secure additional capability when there are limited resources due to constraints of time, distance, or other factors. The information included on the 209 influences the priority of the incident, and thus its share of available resources and incident support.
Use the 209 for reporting information about significant incidents. 209 is not intended for reporting every incident, as most incidents are of short duration and do not require scarce resources, significant mutual aid, or additional support and attention.
The 209 is designed to provide a “snapshot in time” to effectively move incident decision support information where it is needed. It should contain the most accurate and up-to-date information available at the time it is prepared. However, readers of the 209 may have access to more up-to-date or real-time information in reference to certain information elements on the 209. Coordination among communications and information management elements within ICS and among MACS should delineate authoritative sources for more up-to-date and/or real-time information when 209 information becomes outdated in a quickly evolving incident.
Reporting Requirements: The 209 is intended to be used when an incident reaches a certain threshold where it becomes significant enough to merit special attention, require additional resource support needs, or cause media attention, increased public safety threat, and so forth. Agencies or organizations may set their own reporting requirements so verify your jurisdiction’s or discipline’s policies, mobilization guide, or preparedness plans. Units should develop consistent 209 reporting parameters used by jurisdictions or disciplines for consistency over time, documentation, efficiency, trend monitoring, incident tracking, and so forth.
For example, an agency or MAC may require the submission of an initial 209 when a new incident has reached a certain pre-designated level of significance, including when a given number of resources are committed to the incident, when a new incident is not completed within a certain timeframe, or when impacts/threats to life and safety reach a given level.
Typically, 209 forms are completed either once daily or for each operational period – in addition to the initial submission. Jurisdictional or organizational guidance may indicate frequency of 209 submission for particular definitions of incidents or for all incidents. This specific guidance may help determine submission timelines when operational periods are extremely short (e.g., 2 hours) and it is not necessary to submit new 209 forms for all operational periods.

Updated 5/28/2014
59 | P a g e
Any plans or guidelines should also indicate parameters for when it is appropriate to stop submitting 209s for an incident, based upon incident activity and support levels.
Preparation: When an Incident Management Organization (such as an Incident Management Team) is in place, the Situation Unit Leader or Planning Section Chief prepares the 209 at the incident. On other incidents, the 209 may be completed by a dispatcher in the local communications center, or by another staff person or manager. This form should be completed at the incident or at the closest level to the incident with the best possible, currently available, and verifiable information at the time it is completed and signed.
This form is designed to serve incidents impacting specific geographic areas that can easily be defined. It also has the flexibility for use with ubiquitous events, or those events that cover extremely large areas and that may involve many jurisdictions and ICS organizations. For these incidents, it is useful to clarify on the form exactly which portion of the larger incident the 209 is meant to address. For example, a particular 209 submitted during a statewide outbreak of mumps may be relevant only to mumps-related activities in Story County, Iowa. This can be indicated in both the incident name, Block 1, and in the Incident Location Information section in Blocks 16–26.
While most of the Incident Location Information in Blocks 16–26 is optional, the more information that can be submitted, the better. Submission of multiple location indicators increases accuracy, improves interoperability and increases information sharing between disparate systems. Preparers should be certain to follow accepted protocols or standards when entering location information and clearly label all location information. As with other 209 data, geospatial information may be widely shared and utilized, so accuracy is essential.
When electronic data is submitted with the 209, do not attach or send extremely large data files. Incident geospatial data that is distributed with the 209 should be in simple incident geospatial basics, such as the incident perimeter, point of origin, and so forth. Data file sizes should be small enough to be easily transmitted through dial-up connections or other limited communications capabilities when 209 information is transmitted electronically. Any attached data should be clearly labeled as to format content and collection time and should follow existing naming conventions and standards.
Distribution: 209 information should be completed at the closest possible level to the incident (preferably at the incident). Once the 209 is submitted to a dispatch center or MAC group, it may subsequently be transmitted to various incident support and coordination entities based on the support needs and the decisions made within the MAC groups in which the incident occurs.
Coordination with public information system elements and investigative/intelligence information organizations at the incident and within MACS is essential to protect information security and to ensure optimal information sharing and coordination. There may be times in which particular 209s contain sensitive information that should not be released to the public (such as information regarding active investigations, fatalities, etc.). When this occurs, the 209 (or relevant sections of it) should be labeled appropriately, and care should be taken in distributing the information within MACS.
All completed and signed original 209 forms must be given to the incident’s Documentation Unit to
be maintained as part of the official incident record.
Notes: To promote flexibility in the program, only a limited number of 209 blocks are typically
required, and most of those are required only when applicable.

Updated 5/28/2014
60 | P a g e
For the purposes of the 209, responders are those personnel who are assigned to an incident or who
are part of the response community as defined by NIMS. This may include critical infrastructure owners and operators, nongovernmental and nonprofit organization personnel, and contract employees (such as caterers.)
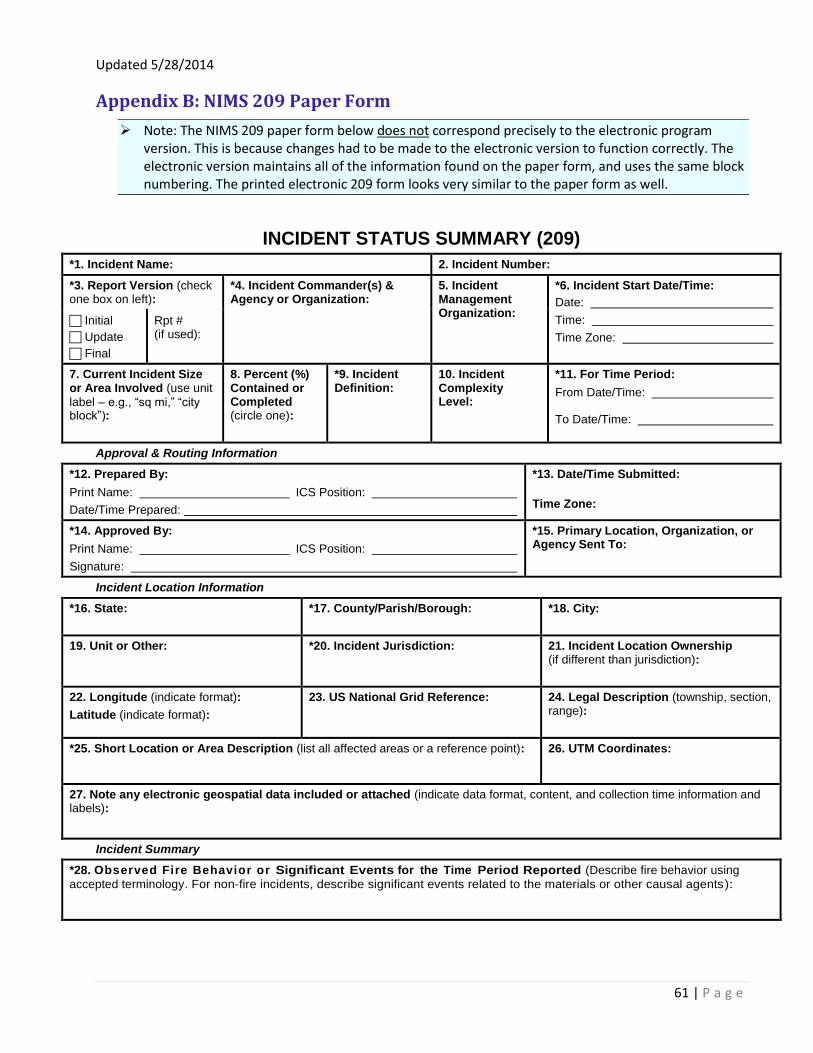
Updated 5/28/2014
61 | P a g e
Appendix B: NIMS 209 Paper Form
Note: The NIMS 209 paper form below does not correspond precisely to the electronic program
version. This is because changes had to be made to the electronic version to function correctly. The electronic version maintains all of the information found on the paper form, and uses the same block numbering. The printed electronic 209 form looks very similar to the paper form as well.
INCIDENT STATUS SUMMARY (209)
*1. Incident Name: 2. Incident Number:
*3. Report Version (check one box on left):
*4. Incident Commander(s) & Agency or Organization:
5. Incident Management Organization:
*6. Incident Start Date/Time:
Date:
Time:
Time Zone:
Initial
Update
Final
Rpt # (if used):
7. Current Incident Size or Area Involved (use unit
label – e.g., “sq mi,” “city block”):
8. Percent (%) Contained or Completed (circle one):
*9. Incident Definition:
10. Incident Complexity Level:
*11. For Time Period:
From Date/Time:
To Date/Time:
Approval & Routing Information
*12. Prepared By:
Print Name: ICS Position:
Date/Time Prepared:
*13. Date/Time Submitted:
Time Zone:
*14. Approved By:
Print Name: ICS Position:
Signature:
*15. Primary Location, Organization, or Agency Sent To:
Incident Location Information
*16. State:
*17. County/Parish/Borough: *18. City:
19. Unit or Other: *20. Incident Jurisdiction:
21. Incident Location Ownership (if different than jurisdiction):
22. Longitude (indicate format):
Latitude (indicate format):
23. US National Grid Reference:
24. Legal Description (township, section, range):
*25. Short Location or Area Description (list all affected areas or a reference point):
26. UTM Coordinates:
27. Note any electronic geospatial data included or attached (indicate data format, content, and collection time information and labels):
Incident Summary
*28. Observed Fire Behavior or Significant Events for the Time Period Reported (Describe fire behavior using
accepted terminology. For non-fire incidents, describe significant events related to the materials or other causal agents):

Updated 5/28/2014
62 | P a g e
29. Primary Materials or Hazards Involved (hazardous chemicals, fuel types, infectious agents, radiation, etc.):
30. Damage Assessment Information (summarize
damage and/or restriction of use or availability to residential or commercial property, natural resources, critical infrastructure and key resources, etc.):
A. Structural Summary
B. # Threatened (72 hrs)
C. # Damaged
D. # Destroyed
E. Single Residences
F. Nonresidential Commercial Property
G. Other Minor Structures
209, Page 1 of ___ * Required when applicable.
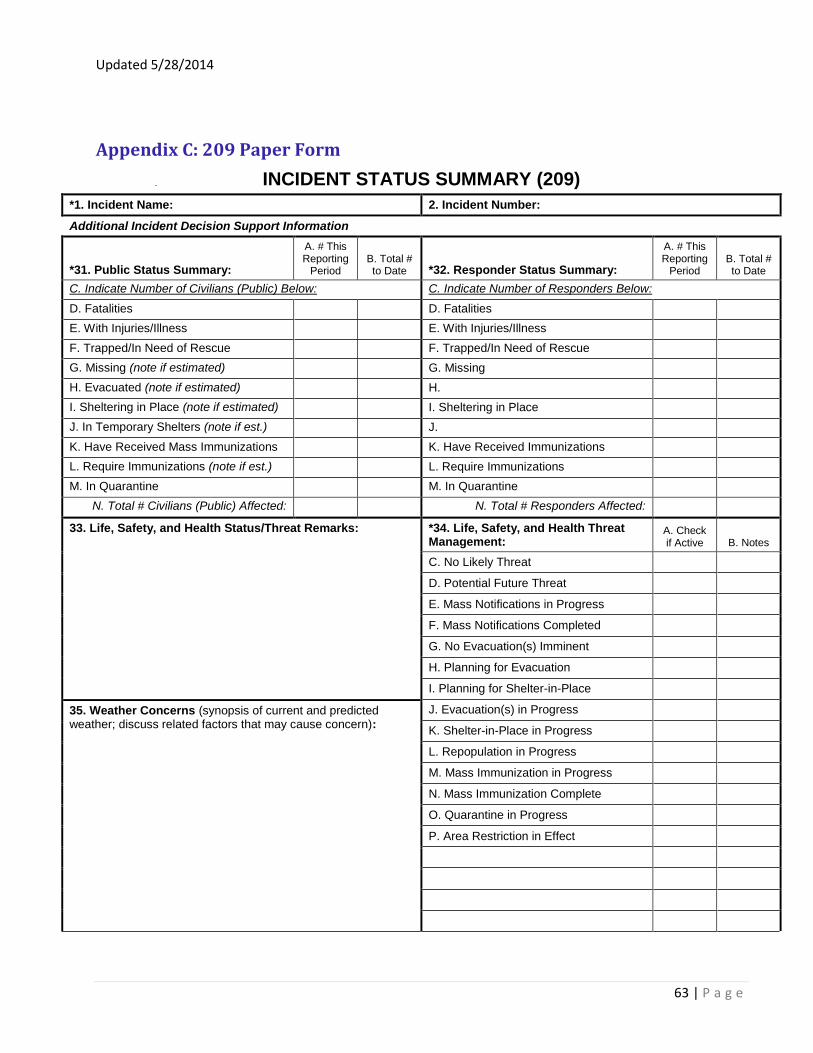
Updated 5/28/2014
63 | P a g e
Appendix C: 209 Paper Form
INCIDENT STATUS SUMMARY (209)
*1. Incident Name: 2. Incident Number:
Additional Incident Decision Support Information
*31. Public Status Summary:
A. # This Reporting
Period B. Total # to Date *32. Responder Status Summary:
A. # This Reporting
Period B. Total # to Date
C. Indicate Number of Civilians (Public) Below: C. Indicate Number of Responders Below:
D. Fatalities D. Fatalities
E. With Injuries/Illness E. With Injuries/Illness
F. Trapped/In Need of Rescue F. Trapped/In Need of Rescue
G. Missing (note if estimated) G. Missing
H. Evacuated (note if estimated) H.
I. Sheltering in Place (note if estimated) I. Sheltering in Place
J. In Temporary Shelters (note if est.) J.
K. Have Received Mass Immunizations K. Have Received Immunizations
L. Require Immunizations (note if est.) L. Require Immunizations
M. In Quarantine M. In Quarantine
N. Total # Civilians (Public) Affected: N. Total # Responders Affected:
33. Life, Safety, and Health Status/Threat Remarks: *34. Life, Safety, and Health Threat Management:
A. Check if Active B. Notes
C. No Likely Threat
D. Potential Future Threat
E. Mass Notifications in Progress
F. Mass Notifications Completed
G. No Evacuation(s) Imminent
H. Planning for Evacuation
I. Planning for Shelter-in-Place
35. Weather Concerns (synopsis of current and predicted weather; discuss related factors that may cause concern):
J. Evacuation(s) in Progress
K. Shelter-in-Place in Progress
L. Repopulation in Progress
M. Mass Immunization in Progress
N. Mass Immunization Complete
O. Quarantine in Progress
P. Area Restriction in Effect

Updated 5/28/2014
64 | P a g e
36. Projected Incident Activity, Potential, Movement, Escalation, or Spread and influencing factors during the next operational
period and in 12-, 24-, 48-, and 72-hour timeframes:
12 hours:
24 hours:
48 hours:
72 hours:
Anticipated after 72 hours:
37. Strategic Objectives (define planned end-state for incident):
209, Page 2 of ___ * Required when applicable.

Updated 5/28/2014
65 | P a g e
INCIDENT STATUS SUMMARY (209)
*1. Incident Name: 2. Incident Number:
Additional Incident Decision Support Information (continued)
38. Current Incident Threat Summary and Risk Information in 12-, 24-, 48-, and 72-hour timeframes and beyond. Summarize
primary incident threats to life, property, communities and community stability, residences, health care facilities, other critical infrastructure and key resources, commercial facilities, natural and environmental resources, cultural resources, and continuity of operations and/or business. Identify corresponding incident-related potential economic or cascading impacts.
12 hours:
24 hours:
48 hours:
72 hours:
Anticipated after 72 hours:
39. Critical Resource Needs in 12-, 24-, 48-, and 72-hour timeframes and beyond to meet critical incident objectives. List resource
category, kind, and/or type, and amount needed, in priority order:
12 hours:
24 hours:
48 hours:
72 hours:
Anticipated after 72 hours:
40. Strategic Discussion: Explain the relation of overall strategy, constraints, and current available information to:
1) critical resource needs identified above,
2) the Incident Action Plan and management objectives and targets,
3) anticipated results.
Explain major problems and concerns such as operational challenges, incident management problems, and social, political, economic, or environmental concerns or impacts.
41. Planned Actions for Next Operational Period:
42. Projected Final Incident Size/Area (use unit label – e.g., “sq mi”):
43. Anticipated Incident Management Completion Date:
44. Projected Significant Resource Demobilization Start Date:
45. Estimated Incident Costs to Date:
46. Projected Final Incident Cost Estimate:

Updated 5/28/2014
66 | P a g e
47. Remarks (or continuation of any blocks above – list block number in notation):
209, Page 3 of ___ * Required when applicable.
INCIDENT STATUS SUMMARY (209)
1. Incident Name: 2. Incident Number:
Incident Resource Commitment Summary
48. Agency or Organization:
49. Resources (summarize resources by category, kind, and/or type; show # of
resources on top ½ of box, show # of personnel associated with resource on bottom ½ of box):
50
. #
of
Pe
rso
nn
el n
ot
assig
ned
to a
reso
urc
e: 51. Total
Personnel
(includes those associated with resources – e.g., aircraft or engines –and individual overhead):

Updated 5/28/2014
67 | P a g e
1. Incident Name: 2. Incident Number:
52. Total Resources
53. Additional Cooperating and Assisting Organizations Not Listed Above:
209, Page ___ of ___ * Required when applicable.

Updated 5/28/2014
68 | P a g e
This page left intentionally blank.

Updated 5/28/2014
69 | P a g e
Appendix D: NIMS 209, Block by Block Instructions
Block Number
Block Title Instructions
*1 Incident Name
Enter the full name assigned to the incident.
Check spelling of the full incident name.
For an incident that is a Complex, use the word “Complex” at the end of the incident name.
If the name changes, explain in Remarks, Block 47.
Do not use the same incident name for different incidents in the same calendar year on the same unit. (“Smith” and “Smith 2” are acceptable.)
*2 Incident Number
Enter the appropriate number based on current guidance. The incident number may vary by jurisdiction and discipline.
For wildland fire, use the incident number.
Examples include:
o A computer-aided dispatch (CAD) number.
o An accounting number.
o A county number.
o A disaster declaration number.
o A combination of the State, unit/agency ID, and a dispatch system number.
o A mission number.
o Any other unique number assigned to the incident and derived by means other than those above.
Make sure the number entered is correct.
Unit identifiers must exist in the database to be valid for entry in this program.
Do not use the same incident number for two different incidents in the same calendar year.
Subordinate incident numbers associated with host jurisdictions or agencies and incident numbers assigned by agencies represented in Unified Command should be listed, or indicated in Remarks, Block 47.
*3 Report Version (check one box)
This indicates the current version of the 209 form being submitted.
If only one 209 will be submitted (for an incident lasting one day), check Final.
Initial Check “Initial” if this is the first 209 for this incident.

Updated 5/28/2014
70 | P a g e
Block Number
Block Title Instructions
Update Check “Update” if this is a subsequent report for the same incident. These can be submitted at various time intervals (see “Reporting Requirements” above).
Final Check “Final” if this is the last 209 to be submitted for this incident (usually when the incident has been declared contained and/or when the incident requires only minor support that can be supplied by the organization having jurisdiction).
An incident being merged into a complex should be marked as “Final” on its last 209. The name and incident number of the complex should be indicated in Remarks, Block 47.
*4 Incident Commander(s)
Enter the last name of the Incident Commander.
If the incident is under a Unified Command, list primary Incident Commanders by last name separated by a slash. Denote the organizations in Remarks. For example:
Lennon / Hendrix
5
Incident Management Organization
Indicate the incident management organization for the incident, which may be a Type 1, 2, or 3 Incident Management Team (IMT), a Unified Command, a Unified Command with an IMT, etc. If no team is assigned, leave blank.

Updated 5/28/2014
71 | P a g e
Block Number
Block Title Instructions
*6 Incident Start Date/Time
This is always the start date and time of the incident (not the report date and time or operational period).
Date Enter the start date (month/day/year).
Time Enter the start time (using 24-hour clock time).
7
Current Incident Size or Area Involved
Enter the appropriate incident descriptive size or area involved (acres, number of buildings, square miles, hectares, square kilometers, etc.).
Enter the total area involved for incident Complexes in this block, and list each sub-incident and size in Remarks (Block 47).
Indicate that the size is an estimate if a more specific figure is not available.
Incident size may be a population figure rather than a geographic figure, depending on the incident definition and objectives.
If the incident involves more than one jurisdiction or a mixed ownership, agencies/organizations may require listing a size breakdown by organization, or including this information in Remarks (Block 47).
The incident may be one part of a much larger event (refer to introductory instructions under “Preparation). Incident size/area depends on the area actively managed within the incident objectives and incident operations and may also be defined by a delegation of authority or letter of expectation outlining management bounds.
Leave blank if not appropriate for incident.
** The 209 program only accepts acres, hectares, square miles and square kilometers. Convert other area measurements to one of these when submitting an electronic 209 report.
8
Percent (%) Contained or Completed
Enter the percent that this incident is completed or contained (e.g., 50%), For example, a spill may be 65% contained, or flood response objectives may be 50% met.
8B. Enter the percent of perimeter left to be contained (if appropriate for the incident).
*9 Incident Type
.
Enter a general definition of the incident in this block.
Example: If incident Type is “Biological Outbreak,” text description might say “Swine Flu epidemic.” Allows more detailed description of the incident.
*9
(cont.)
9C Cause
Drop down menu for
Drop down menu. This is general information. Does not need to be specific. For example, select human for a terrorist event.

Updated 5/28/2014
72 | P a g e
Block Number
Block Title Instructions
cause type:
Lightning
Human
Other
Under Investigation
10
Incident Complexity Level
Identify the incident complexity level as determined by Unified/Incident Commanders, if available or used.
Incident Types
Incidents may be typed in order to make decisions about resource requirements. Incident types are based on the following five levels of complexity. (Source: U.S. Fire Administration).
NIMS incident type descriptions:
Type 5:
The incident can be handled with one or two single resources with up to six personnel.
Command and General Staff positions (other than the Incident Commander) are not activated.
No written Incident Action Plan (IAP) is required.
The incident is contained within the first operational period and often within an hour to a few hours after resources arrive on scene.
Examples include a vehicle fire, an injured person, or a police traffic stop.
Type 4:
Command and General Staff functions are activated only if needed.
Several resources are required to mitigate the incident.
The incident is usually limited to one operational period in the control phase.
The agency administrator may have briefings and ensure the complexity analysis and delegations of authority are updated.
No written Incident Action Plan (IAP) is required but a documented operational briefing will be completed for all incoming resources.
The role of the agency administrator includes operational plans including objectives and priorities.
Type 3:
When capabilities exceed initial attack, the appropriate ICS positions should be added to match the complexity of the incident.
Some or all of the Command and General Staff positions may be activated, as well as Division/Group Supervisor and/or Unit Leader level positions.
A Type 3 Incident Management Team (IMT) or incident command organization manages initial action incidents with a significant number of resources, an extended attack incident until containment/control is achieved, or an expanding incident until transition to a Type 1 or 2 team.
The incident may extend into multiple operational periods.
A written IAP may be required for each operational period.
Type 2:
This type of incident extends beyond the capabilities for local control and is expected to go into multiple operational periods. A Type 2 incident may require the response of resources out of area, including regional and/or

Updated 5/28/2014
73 | P a g e
Block Number
Block Title Instructions
national resources, to effectively manage the operations, command, and general staffing.
Most or all of the Command and General Staff positions are filled.
A written IAP is required for each operational period.
Many of the functional units are needed and staffed.
Operations personnel normally do not exceed 200 per operational period and total incident personnel do not exceed 500 (guidelines only).
The agency administrator is responsible for the incident complexity analysis, agency administrator briefings and the written delegation of authority.
Type 1:
This type of incident is the most complex, requiring national resources to safely and effectively manage and operate.
All Command and General Staff positions are activated.
Operations personnel often exceed 500 per operational period and total personnel will usually exceed 1,000.
Branches need to be established.
The agency administrator will have briefings and ensure that the complexity analysis and delegation of authority are updated.
Use of resource advisors at the incident base is recommended.
There is a high impact on the local jurisdiction, requiring additional staff for office administrative and support functions.
11 For Time Period Enter the time interval for which the form applies. This period should include
all of the time since the last 209 was submitted, or if it is the initial 209, it should cover the time elapsed since the incident started.
The time period may include one or more operational periods, based on agency/organizational reporting requirements.
From Date/Time Enter the beginning date for this reporting period.
Enter the time.
To Date/Time Enter the ending date for which the information in this report is pertinent to (likely will be the current date/time).
Enter the end time.

Updated 5/28/2014
74 | P a g e
Block Number
Block Title Instructions
APPROVAL & ROUTING INFORMATION
*12 Prepared By When an incident management organization is in place, this would be the Situation Unit Leader or Planning Section Chief at the incident. On other incidents, it could be a dispatcher in the local emergency communications center or another staff person or manager.
Print Name Print the name of the person preparing the form. ICS position can be added here, if desired.
Date/Time Prepared Enter the date (month/day/year) and time (using the 24-hour clock) the form was prepared.
*13 Approved By
When an incident management organization is in place, this would be the Planning Section Chief or Incident Commander at the incident. On other incidents, it could be the jurisdiction’s dispatch center manager, organizational administrator, or other manager.
Print Name Print the name of the person approving the form.
Date/time approved. Add this: Program generated date/time stamp – not data entry by user.
(Automatically created when final report is submitted to server.)
Signature Signature of the person approving the 209, typically the Incident Commander, or designee. The original signed 209 should be maintained with other incident documents.
*14 Date/Time Submitted
Program generated date/time stamp – not data entry by user.
*15 Primary Location, Organization, or Agency Sent To
Enter the appropriate primary location or office the 209 was sent, apart from the incident. This most likely is the entity or office that ordered the incident management organization that is managing the incident. This may be a dispatch center or a MACS element such as an emergency operations center. If a dispatch center or other emergency center prepared the 209 for the incident, indicate where it was submitted initially.
INCIDENT LOCATION INFORMATION
Much of the “Incident Location Information” in Blocks 16–26 is optional, but completing as many fields as possible increases accuracy and improves interoperability and information sharing between disparate systems.
As with all 209 information, accuracy is essential because the information may be widely distributed and used in a variety of systems. Location and/or geospatial data may be used for maps, reports and analysis by multiple parties outside the incident.
Be certain to follow accepted protocols, conventions or standards where appropriate when submitting location information and clearly label all location information.
Incident location information is usually based on the point of origin of the incident and the majority of the incident jurisdiction area.
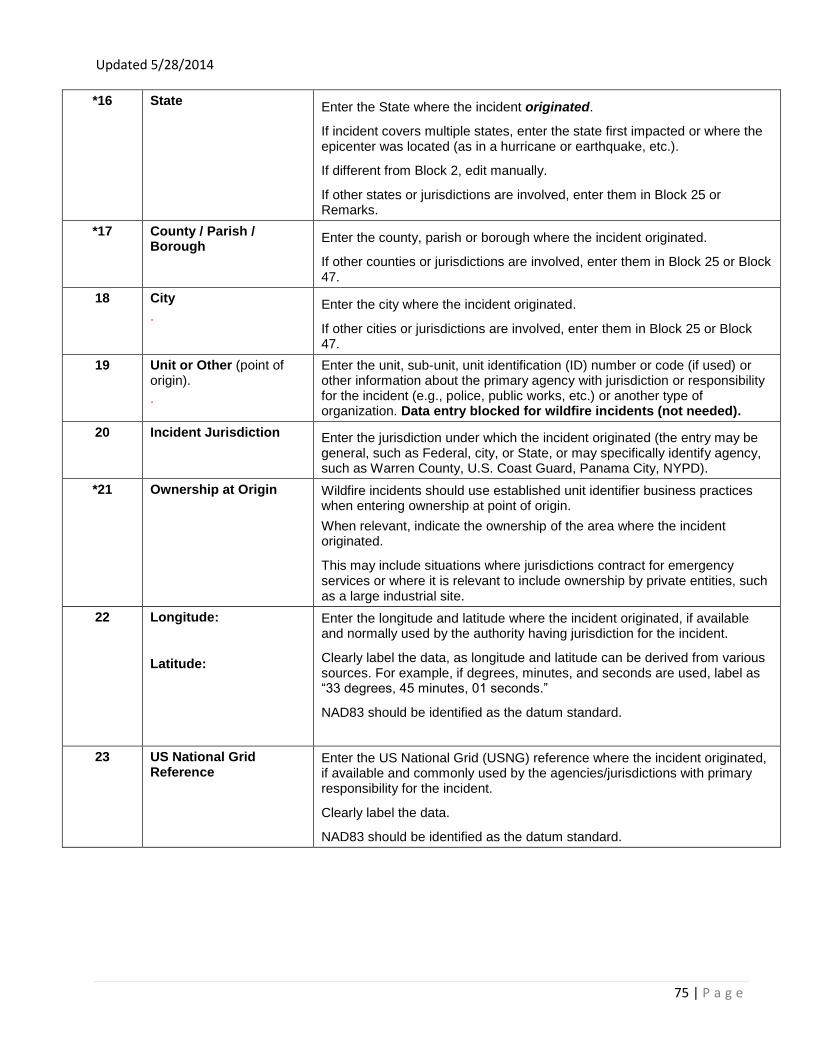
Updated 5/28/2014
75 | P a g e
*16 State Enter the State where the incident originated.
If incident covers multiple states, enter the state first impacted or where the epicenter was located (as in a hurricane or earthquake, etc.).
If different from Block 2, edit manually.
If other states or jurisdictions are involved, enter them in Block 25 or Remarks.
*17 County / Parish / Borough
Enter the county, parish or borough where the incident originated.
If other counties or jurisdictions are involved, enter them in Block 25 or Block 47.
18 City
. Enter the city where the incident originated.
If other cities or jurisdictions are involved, enter them in Block 25 or Block 47.
19
Unit or Other (point of origin).
.
Enter the unit, sub-unit, unit identification (ID) number or code (if used) or other information about the primary agency with jurisdiction or responsibility for the incident (e.g., police, public works, etc.) or another type of organization. Data entry blocked for wildfire incidents (not needed).
20
Incident Jurisdiction
Enter the jurisdiction under which the incident originated (the entry may be general, such as Federal, city, or State, or may specifically identify agency, such as Warren County, U.S. Coast Guard, Panama City, NYPD).
*21 Ownership at Origin Wildfire incidents should use established unit identifier business practices when entering ownership at point of origin.
When relevant, indicate the ownership of the area where the incident originated.
This may include situations where jurisdictions contract for emergency services or where it is relevant to include ownership by private entities, such as a large industrial site.
22 Longitude:
Latitude:
Enter the longitude and latitude where the incident originated, if available and normally used by the authority having jurisdiction for the incident.
Clearly label the data, as longitude and latitude can be derived from various sources. For example, if degrees, minutes, and seconds are used, label as “33 degrees, 45 minutes, 01 seconds.”
NAD83 should be identified as the datum standard.
23 US National Grid Reference
Enter the US National Grid (USNG) reference where the incident originated, if available and commonly used by the agencies/jurisdictions with primary responsibility for the incident.
Clearly label the data.
NAD83 should be identified as the datum standard.

Updated 5/28/2014
76 | P a g e
24 Legal Description (township, section, range)
Enter the legal description where the incident originated, if available and commonly used by the agencies/jurisdictions with primary responsibility for the incident.
Clearly label the data (e.g., N 1/2 SE 1/4, SW 1/4, S24, T32N, R18E).
I don’t think that these coordinates need to be expressed more precisely than a ¼ or a ¼ section. That’s to 40 acres. Any more finite than that and they should be using a GPS and giving us lat/long or UTM coordinates.
Since legal descriptions are most commonly derived from USGS quadrangle maps, most are still published in NAD27 (datum is printed on the quad map). The datum should be provided by the user as either NAD27 or NAD83.
*25 Short Location or Area Description (list all affected areas or a reference point)
List all affected areas as described in instructions for Blocks 16–24 above, OR summarize a general location, OR list a reference point for the incident (e.g., “the southern third of Florida,” “in ocean 20 miles west of Catalina Island, CA,” or “within a 5 mile radius of Walden, CO”).
This information is important for readers unfamiliar with the area (or with other location identification systems) to be able to quickly identify the general location of the incident on a map.
Other location information may also be listed here if needed or relevant for incident support (e.g., base meridian).
26 UTM Coordinates Indicate Universal Transverse Mercator reference coordinates if used by the discipline or jurisdiction.
NAD83 should be identified as the datum standard.
27 Note any electronic geospatial data included or attached (indicate data format, content, and collection time information and labels)
If geospatial data is available, provide the following information:
Provide a general description of the available data. For example, a perimeter, a point, an area of impact, a radius (such as an evacuation zone), or a line or lines (such as a pipeline).
Indicate the data format (e.g., .shp, .kml, .kmz, or .gml file) and any relevant information about projection, etc.
May include a hyperlink or other access information if incident map data is posted online or on an FTP (file transfer protocol) site to facilitate downloading and minimize information requests.
May include a point of contact for getting geospatial incident information.

Updated 5/28/2014
77 | P a g e
INCIDENT SUMMARY
*28
Observed Fire Behavior or Significant Events for the Time Period (summarize significant progress made, evacuations, incident growth, etc.)
For wildfires, use this block for observed fire behavior.
Use to describe fire behavior or significant events since the last report.
Do not use this block for anticipated incident events, behavior or movement.
For Wildland fire incidents: Describe the observed fire behavior for the current reporting period using generally accepted wildland fire terminology.
For Non-wildland fire incidents: Describe significant incident events related to the materials, agents, or people causing the incident.
Provide additional information in Remarks, block 47 (if needed).
*29 Primary Fuel Model, Materials, or Hazards Involved (hazardous chemicals, fuel types, infectious agents, radiation, etc.)
When relevant, enter the appropriate primary materials, fuels, or other hazards involved in the incident that are leaking, burning, infecting, or otherwise influencing the incident.
30 Damage Assessment Information (summarize damage and/or restriction of use or availability to residential or commercial property, natural resources, critical infrastructure and key resources, etc.)
Include a short summary of damage or use/access restrictions/ limitations caused by the incident for the reporting period, and cumulatively.
Include, if needed, any information on the facility status, such as operational status, if it is evacuated, etc. when needed.
Include any critical infrastructure or key resources damaged/destroyed/ impacted by the incident, the kind of infrastructure, and the extent of damage and/or impact and any known cascading impacts.
Refer to more specific or detailed damage assessment forms and packages when they are used and/or are relevant.
A. Structural Summary Complete this table as needed based on the definitions for 30B–G below. Note in text block if numbers entered are estimates or are confirmed.
B. # Threatened (72 hrs) Enter the number of structures potentially threatened by the incident within the next 72 hours, based on currently available information.
C. # Damaged Enter the cumulative number of structures damaged by the incident.
D. # Destroyed Enter the cumulative number of structures destroyed beyond repair by the incident.
E. Single Residences Enter the number of standalone single dwellings or homes impacted in columns 30B–D. Note any specifics in the text block if needed, such as type of residence (single-family homes, etc.).
F. Multiple Residences Apartment dwellings, duplexes, etc. Enter the number of single dwellings/homes/units impacted in columns 30B–D. Note any specifics in the text block if needed, such as type of residence (apartments, condominiums, etc.).
G. Mixed Commercial / Residential
Mixed use structures, such as commercial business and apartments combined. Enter the number of single dwellings/homes/units impacted in Columns 30B–D. Note any specifics in the text block if needed, such as type of residence.

Updated 5/28/2014
78 | P a g e
H. Nonresidential Commercial Properties
Enter the number of buildings or units impacted in Columns 30B–D. This includes any primary structure used for nonresidential purposes, excluding Other Minor Structures. Note any specifics regarding building or unit types in the text block.
I. Other Minor Structures Enter any miscellaneous structures impacted in Columns 30B–D not covered in 30E–F above, including any minor structures such as booths, sheds, or outbuildings.

Updated 5/28/2014
79 | P a g e
ADDITIONAL INCIDENT DECISION SUPPORT INFORMATION
31
Public Status Summary
This section is for summary information regarding incident-related injuries, illness and fatalities for civilians (or members of the public).
Negative values are permitted in column A to correct for over-reporting on a previous 209 report for this incident.
If values are estimated, explain in Block 47 – Remarks.
Explain or describe the nature of any reported injuries, illness or other activities in Life, Safety, and Health Status/Threat in Remarks block.
Illnesses include those that may be caused through a biological event such as an epidemic or an exposure to toxic or radiological substances.
Do not estimate fatality information.
Please use caution when reporting information in this section that may be on the periphery of the incident or change frequently. This information should be reported as accurately as possible as a snapshot in time, as much of the information is subject to frequent change.
Do not complete this block if the incident covered by the 209 is not directly responsible for these actions (such as evacuations, sheltering, immunizations, etc.) even if they are related to the incident.
o Only the authority having jurisdiction should submit reports for these actions in order to mitigate multiple/conflicting reports.
o For example, if managing evacuation shelters is part of the incident operation itself, do include these numbers in Block 31J with any notes in Block 33.
Handling Sensitive Information
Release of information in this section should be carefully coordinated within the incident management organization to ensure synchronization with public information and investigative/intelligence actions.
Thoroughly review the “Distribution” section in the introductory 209 instructions for details on handling sensitive information. Use caution when providing information in any situation involving fatalities, and verify that appropriate notifications have been made prior to release of this information. Electronic transmission of any 209 may make information available to many people and networks at once.
Information regarding fatalities should be cleared with the Incident Commander and/or an organizational administrator prior to submission of the 209.
A. # This Reporting Period Enter the total number of individuals impacted in each category for this reporting period (since the previous 209 was submitted).
B. Total # to Date Enter the total number of individuals impacted in each category for the entire duration of the incident.
This is a cumulative total number that should be adjusted each reporting period.
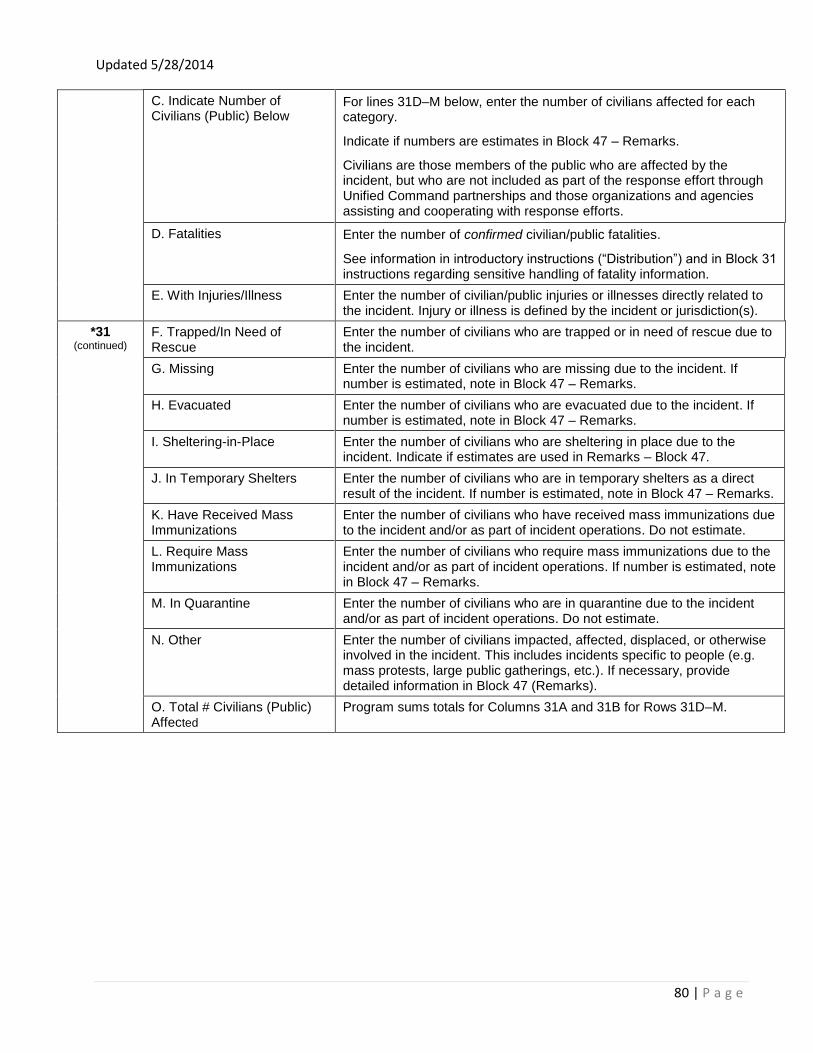
Updated 5/28/2014
80 | P a g e
C. Indicate Number of Civilians (Public) Below
For lines 31D–M below, enter the number of civilians affected for each category.
Indicate if numbers are estimates in Block 47 – Remarks.
Civilians are those members of the public who are affected by the incident, but who are not included as part of the response effort through Unified Command partnerships and those organizations and agencies assisting and cooperating with response efforts.
D. Fatalities Enter the number of confirmed civilian/public fatalities.
See information in introductory instructions (“Distribution”) and in Block 31 instructions regarding sensitive handling of fatality information.
E. With Injuries/Illness Enter the number of civilian/public injuries or illnesses directly related to the incident. Injury or illness is defined by the incident or jurisdiction(s).
*31 (continued)
F. Trapped/In Need of Rescue
Enter the number of civilians who are trapped or in need of rescue due to the incident.
G. Missing Enter the number of civilians who are missing due to the incident. If number is estimated, note in Block 47 – Remarks.
H. Evacuated Enter the number of civilians who are evacuated due to the incident. If number is estimated, note in Block 47 – Remarks.
I. Sheltering-in-Place Enter the number of civilians who are sheltering in place due to the incident. Indicate if estimates are used in Remarks – Block 47.
J. In Temporary Shelters Enter the number of civilians who are in temporary shelters as a direct result of the incident. If number is estimated, note in Block 47 – Remarks.
K. Have Received Mass Immunizations
Enter the number of civilians who have received mass immunizations due to the incident and/or as part of incident operations. Do not estimate.
L. Require Mass Immunizations
Enter the number of civilians who require mass immunizations due to the incident and/or as part of incident operations. If number is estimated, note in Block 47 – Remarks.
M. In Quarantine Enter the number of civilians who are in quarantine due to the incident and/or as part of incident operations. Do not estimate.
N. Other Enter the number of civilians impacted, affected, displaced, or otherwise involved in the incident. This includes incidents specific to people (e.g. mass protests, large public gatherings, etc.). If necessary, provide detailed information in Block 47 (Remarks).
O. Total # Civilians (Public) Affected
Program sums totals for Columns 31A and 31B for Rows 31D–M.

Updated 5/28/2014
81 | P a g e
32
Responder Status Summary
This section is for summary information regarding incident-related injuries, illness and fatalities for responders; see 32C–N.
Illnesses include those that may be related to a biological event such as an epidemic or an exposure to toxic or radiological substances directly in relation to the incident.
Explain or describe the nature of any reported injuries, illness, or other activities in Block 33.
NOTE: Do not estimate any fatality information or responder status information.
NOTE: Please use caution when reporting information in this section that may be on the periphery of the incident or change frequently. This information should be reported as accurately as possible as a snapshot in time, as much of the information is subject to frequent change.
NOTE: Do not complete this block if the incident covered by the 209 is not directly responsible for these actions (such as evacuations, sheltering, immunizations, etc.) even if they are related to the incident. Only the authority having jurisdiction should submit reports for these actions, to mitigate multiple/conflicting reports.
Handling Sensitive Information
Release of information in this section should be carefully coordinated within the incident management organization to ensure synchronization with public information and investigative/intelligence actions.
Thoroughly review the “Distribution” section in the introductory 209 instructions for details on handling sensitive information. Use caution when providing information in any situation involving fatalities, and verify that appropriate notifications have been made prior to release of this information. Electronic transmission of any 209 may make information available to many people and networks at once.
Information regarding fatalities should be cleared with the Incident Commander and/or an organizational administrator prior to submission of the 209.

Updated 5/28/2014
82 | P a g e
32 (continued)
A. # This Reporting Period Enter the total number of responders impacted in each category for this reporting period (since the previous 209 was submitted).
B. Total # to Date Enter the total number of individuals impacted in each category for the entire duration of the incident.
This is a cumulative total number that should be adjusted each reporting period.
C. Indicate Number of Responders Below
For lines 32D–M below, enter the number of responders relevant for each category.
Responders are those personnel included as part of Unified Command partnerships and those organizations and agencies assisting and cooperating with response efforts.
D. Fatalities Enter the number of confirmed responder fatalities.
See information in introductory instructions (“Distribution”) and for Block 32 regarding sensitive handling of fatality information.
E. With Injuries/Illness Enter the number of incident responders with serious injuries or illnesses due to the incident.
For responders, serious injuries or illness are typically those in which the person is unable to continue to perform in his or her incident assignment, but the authority having jurisdiction may have additional guidelines on reporting requirements in this area.
F. Trapped/In Need Of Rescue
Enter the number of incident responders who are in trapped or in need of rescue due to the incident.
G. Missing Enter the number of incident responders who are missing due to incident conditions.
H. Evacuated Enter the number of civilians who are evacuated due to the incident. If number is estimated, note in Block 47 – Remarks.
I. Sheltering in Place
Enter the number of responders who are sheltering in place due to the incident. Once responders become the victims, this needs to be noted in Block 33 or Block 47 and handled accordingly.
J. In Temporary Shelters Enter the number of civilians who are in temporary shelters as a direct result of the incident, noting if the number is an estimate in Block 47.
L. Require Immunizations Enter the number of responders who require immunizations due to the incident and/or as part of incident operations.
M. In Quarantine Enter the number of responders who are in quarantine as a direct result of the incident and/or related to incident operations.
N. Other Enter the number of civilians impacted, affected, displaced, or otherwise involved in the incident. This includes incidents specific to people (e.g. mass protests, large public gatherings, etc.). If necessary, provide detailed information in Block 47 (Remarks).
O. Total # Responders Affected
Program sums totals for Columns 31A and 31B for Rows 31D–M.

Updated 5/28/2014
83 | P a g e
33 Life, Safety, and Health Status/Threat Remarks
Enter any details needed for Blocks 31, 32, and 34. Enter any specific comments regarding illness, injuries, fatalities and threat management for this incident, such as whether estimates were used for numbers given in Block 31.
This information should be reported as accurately as possible as a snapshot in time, as much of the information is subject to frequent change.
Evacuation information can be very sensitive to local residents and officials. Be accurate in the assessment.
Clearly note primary responsibility and contacts for any activities or information in Blocks 31, 32, and 34 that may be caused by the incident, but that are being managed and/or reported by other parties.
Provide additional explanation or information as relevant in Remarks (Block 47).
*34
Life, Safety, and Health Threat Management
Check all that apply (at least one must be checked). If B through N don’t pertain to your incident, check A, No likely Threat.
Note any details in Life, Safety, and Health Status/Threat Remarks (Block 33), and provide additional explanation or information as relevant in Blocks 28, 36, 38, 40, 41, or in Remarks (Block 47).
A. No Likely Threat Check if there is no likely threat to life, health, and safety.
B. Potential Future Threat Check if there is a potential future threat to life, health, and safety.
C. Mass Notifications In Progress
Check if there are any mass notifications in progress regarding emergency situations, evacuations, shelter in place, or other public safety advisories related to this incident.
These may include use of threat and alert systems such as the Emergency Alert System or a “reverse 911” system.
Please indicate the areas where mass notifications have been completed (e.g., “mass notifications to ZIP codes 50201, 50014, 50010, 50011,” or “notified all residents within a 5-mile radius of Gatlinburg”).
D. Mass Notifications Completed
Check if actions referred to in Block 34C above have been completed.
E. No Evacuation(s) Imminent
Check if evacuations are not anticipated in the near future based on current information.
F. Planning for Evacuation Check if evacuation planning is underway in relation to this incident.
G Planning for Shelter-in-Place
Check if planning is underway for shelter-in-place activities related to this incident.
H. Evacuation(s) in Progress Check if there are active evacuations in progress in relation to this incident.
I. Shelter-In-Place in Progress
Check if there are active shelter-in-place actions in progress in relation to this incident.
J. Repopulation in Progress Check if there is an active repopulation in progress related to this incident.
K. Mass Immunization in Progress
Check if there is an active mass immunization in progress related to this incident.
L. Mass Immunization Complete
Check if a mass immunization effort has been completed in relation to this incident.
M. Quarantine in Progress Check if there is an active quarantine in progress related to this incident.
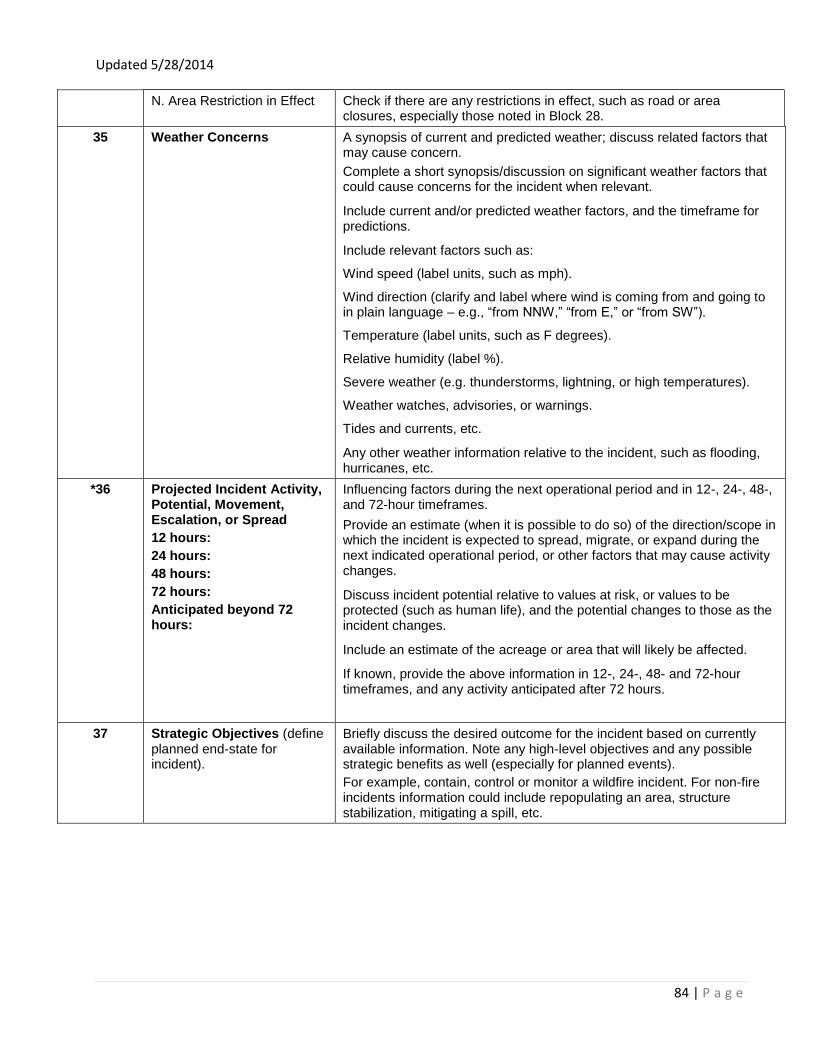
Updated 5/28/2014
84 | P a g e
N. Area Restriction in Effect Check if there are any restrictions in effect, such as road or area closures, especially those noted in Block 28.
35 Weather Concerns
A synopsis of current and predicted weather; discuss related factors that may cause concern.
Complete a short synopsis/discussion on significant weather factors that could cause concerns for the incident when relevant.
Include current and/or predicted weather factors, and the timeframe for predictions.
Include relevant factors such as:
o Wind speed (label units, such as mph).
o Wind direction (clarify and label where wind is coming from and going to in plain language – e.g., “from NNW,” “from E,” or “from SW”).
o Temperature (label units, such as F degrees).
o Relative humidity (label %).
o Severe weather (e.g. thunderstorms, lightning, or high temperatures).
o Weather watches, advisories, or warnings.
o Tides and currents, etc.
Any other weather information relative to the incident, such as flooding, hurricanes, etc.
*36
Projected Incident Activity, Potential, Movement, Escalation, or Spread
12 hours:
24 hours:
48 hours:
72 hours:
Anticipated beyond 72 hours:
Influencing factors during the next operational period and in 12-, 24-, 48-, and 72-hour timeframes.
Provide an estimate (when it is possible to do so) of the direction/scope in which the incident is expected to spread, migrate, or expand during the next indicated operational period, or other factors that may cause activity changes.
Discuss incident potential relative to values at risk, or values to be protected (such as human life), and the potential changes to those as the incident changes.
Include an estimate of the acreage or area that will likely be affected.
If known, provide the above information in 12-, 24-, 48- and 72-hour timeframes, and any activity anticipated after 72 hours.
37 Strategic Objectives (define planned end-state for incident).
Briefly discuss the desired outcome for the incident based on currently available information. Note any high-level objectives and any possible strategic benefits as well (especially for planned events).
For example, contain, control or monitor a wildfire incident. For non-fire incidents information could include repopulating an area, structure stabilization, mitigating a spill, etc.

Updated 5/28/2014
85 | P a g e
*38
Current Incident Threat Summary and Risk Information
Summarize primary incident threats to life, property, communities and community stability, residences, health care facilities, other critical infrastructure and key resources, commercial facilities, natural and environmental resources, cultural resources, and continuity of operations and/or business. Identify corresponding incident-related potential economic or cascading impacts.
12 hours:
24 hours:
48 hours:
72 hours:
Anticipated beyond 72 hours:
Enter threat and risk information for each timeframe.
Summarize major or significant threats due to incident activity based on currently available information. Include a breakdown of threats in terms of 12-, 24-, 48-, and 72-hour timeframes.
39
Critical Resource Needs
12 hours:
24 hours:
48 hours:
72 hours:
Anticipated after 72 hours:
List only resources needed to meet critical incident objectives. List resource category, kind, and/or type, and amount needed, in priority order. Do not use this block for noncritical resources.
List the specific critical resources and numbers needed, in order of priority. Be specific as to the need.
Use plain language and common terminology for resources and indicate resource category, kind, and type (if available or known) to facilitate incident support.
If critical resources are listed in this block, there should be corresponding orders placed for them through appropriate resource ordering channels.
Provide critical resource needs in 12-, 24-, 48- and 72-hour increments. List the most critical resources needed for each timeframe, if needs have been identified for each timeframe. Listing critical resources by the time they are needed gives incident support personnel a “heads up” for short-range planning and assists the ordering process to ensure these resources will be in place when they are needed.
More than one resource need may be listed for each timeframe. For example, a list could include:
o 24 hrs: 3 Type 2 firefighting helicopters, 2 Type I Disaster Medical Assistance Teams
o 48 hrs: Mobile Communications Unit (Law/Fire)
o After 72 hrs: 1 Type 2 Incident Management Team

Updated 5/28/2014
86 | P a g e
40 Strategic Discussion:
Explain the relation of overall strategy, constraints, and current available information to:
1) critical resource needs identified above,
2) the Incident Action Plan and management objectives and targets,
3) anticipated results.
Explain major problems and concerns such as operational challenges, incident management problems and social, political, economic or environmental concerns or impacts.
Wording should be consistent with Block 39 to justify critical resource needs, which should relate to planned actions in the Incident Action Plan.
Give a short assessment of the likelihood of meeting the incident management targets, given the current management strategy and currently known constraints.
Identify when the chosen management strategy will succeed given the current constraints. Adjust the anticipated incident management completion target in Block 43 as needed based on this discussion.
Explain major problems and concerns as indicated.
41
Planned Actions for Next Operational Period
Provide a short summary of actions planned for the next operational period.
Examples:
o “Continue holding Division A.”
o “The current Incident Management Team will transfer command to another IMT.”
o “Continue to review operational/ engineering plan to facilitate removal of the partially collapsed west bridge supports.”
o “Continue refining mapping of the recovery operations and damaged assets using GPS.”
o “Initiate removal of unauthorized food vendors.”
42 Projected Final Incident Size/Area
If known, enter the projected final incident size. Use unit label – e.g., “sq mi.”
Enter an estimate of the total area likely to be involved or affected over the course of the incident.
Label the estimate of the total area or population involved, affected, or impacted with the relevant units such as acres, hectares, square miles, etc.
Note that total area involved may not be limited to geographic area (see previous discussions regarding incident definition, scope, operations, and objectives). Projected final size may involve a population rather than a geographic area.
Units of area include:
Acres, Hectares, Sq. Miles, Sq. Kilometers, City Blocks, etc.
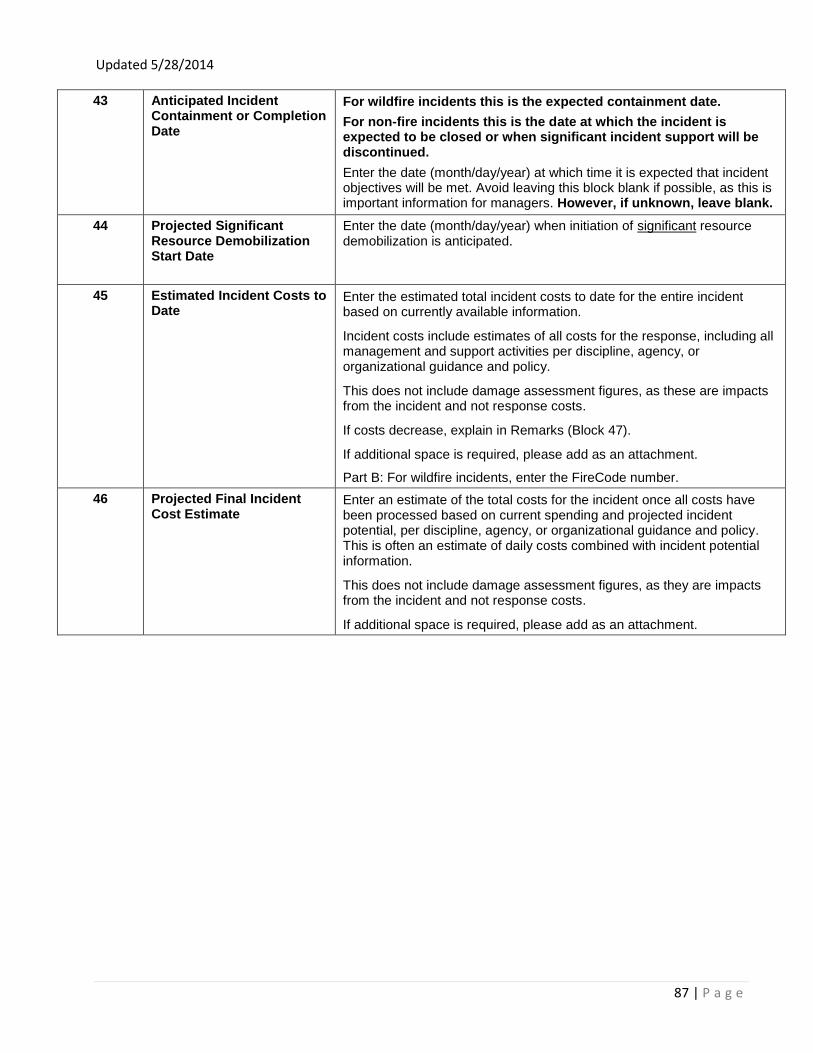
Updated 5/28/2014
87 | P a g e
43 Anticipated Incident Containment or Completion Date
For wildfire incidents this is the expected containment date.
For non-fire incidents this is the date at which the incident is expected to be closed or when significant incident support will be discontinued.
Enter the date (month/day/year) at which time it is expected that incident objectives will be met. Avoid leaving this block blank if possible, as this is important information for managers. However, if unknown, leave blank.
44 Projected Significant Resource Demobilization Start Date
Enter the date (month/day/year) when initiation of significant resource demobilization is anticipated.
45
Estimated Incident Costs to Date
Enter the estimated total incident costs to date for the entire incident based on currently available information.
Incident costs include estimates of all costs for the response, including all management and support activities per discipline, agency, or organizational guidance and policy.
This does not include damage assessment figures, as these are impacts from the incident and not response costs.
If costs decrease, explain in Remarks (Block 47).
If additional space is required, please add as an attachment.
Part B: For wildfire incidents, enter the FireCode number.
46 Projected Final Incident Cost Estimate
Enter an estimate of the total costs for the incident once all costs have been processed based on current spending and projected incident potential, per discipline, agency, or organizational guidance and policy. This is often an estimate of daily costs combined with incident potential information.
This does not include damage assessment figures, as they are impacts from the incident and not response costs.
If additional space is required, please add as an attachment.

Updated 5/28/2014
88 | P a g e
47 Remarks (or continuation of any blocks above – list block number in notation)
Use this block to expand on information that has been entered in previous blocks, or to include other pertinent information that has not been previously addressed.
List the block number for any information continued from a previous block.
Additional information may include more detailed weather information, specifics on injuries or fatalities, threats to critical infrastructure or other resources, more detailed evacuation site locations and number of evacuated, information or details regarding incident cause, etc.
If complex was not checked in Block 9, then complex information may be added in this block. List all sub-incidents included in the Complex, including name, suppression strategy, percent contained, size and costs to date.
List jurisdictional or ownership breakdowns if needed when an incident is in more than one jurisdiction and/or ownership area. Breakdown may be:
o By size (e.g., 35 acres in City of Gatlinburg, 250 acres in Great Smoky Mountains), and/or
o By geography (e.g., incident area on the west side of the river is in jurisdiction of City of Minneapolis; area on east side of river is City of St. Paul jurisdiction; river is joint jurisdiction with USACE).
Explain any reasons for incident size reductions or adjustments (e.g., reduction in acreage due to more accurate mapping).
This section can also be used to list any additional information about the incident that may be needed by incident support mechanisms outside the incident itself. This may be basic information needed through multiagency coordination systems or public information systems (e.g., a public information phone number for the incident, or the incident Web site address).
INCIDENT RESOURCE COMMITMENT SUMMARY
This last/fourth page of the 209 can be copied and used if needed to accommodate additional resources, agencies, or organizations. Write the actual page number on the pages as they are used.
Include only resources that have been assigned to the incident and that have arrived and/or been checked in to the incident. Do not include resources that have been ordered but have not yet arrived.
For summarizing:
When there are large numbers of responders, it may be helpful to group agencies or organizations together. Use the approach that works best for the multiagency coordination system applicable to the incident. For example,
o Group State, local, county, city or Federal responders together under such headings or
o Group resources from one jurisdiction together and list only individual jurisdictions (e.g., list the public works, police, and fire department resources for a city under that city’s name).
On a large incident, it may also be helpful to group similar categories, kinds or types of resources together for this

Updated 5/28/2014
89 | P a g e
summary.
48 Agency or Organization
By agency enter the number of resources in the top row for that agency.
Agencies or organizations should be listed individually.
When resources are grouped together, individual agencies or organizations may be listed below in Block 53.
Indicate in the rows under Block 49 how many resources are assigned to the incident under each resource identified.
o These can listed with the number of resources on the top of the box, and the number of personnel associated with the resources on the bottom half of the box.
.
49
Resources (summarize resources by category, kind, and/or type; show # of resources on top ½ of box, show # of personnel associated with resource on bottom ½ of box)
For each agency enter the number of resources in the top row for that agency. In the second row for that agency, enter the number of personnel assigned to those resources.
For example: If there are three BLM engines with nine personnel assigned, then that row for BLM should show “3” in the top row and “9” in the lower row.
Strike teams must be counted as single resources (i.e. a strike team of engines should be entered as 5 engines).
NOTE: Similar resource types can be aggregated together when it is sensible to do so for the summary.
NOTE: Individual overhead personnel should be included in the Total Personnel sums in Block 51.
50 # of Overhead and Support Personnel
List the number of additional overhead and other personnel by agency or organization that are not assigned to a specific resource listed in Block 49.
Example: If there are nine crewmembers assigned to three Type 4 engines for the BLM, these should be reported in Block 49.
51
Total Personnel
Includes personnel associated with resources (e.g., aircraft or engines), and individual overhead personnel:
NOTE: Personnel are automatically counted by the program. Resources are not manually totaled here by the user.
52 Total Resources
Resources (engines, crews, helicopters, etc.) are automatically calculated by the program. Personnel are not counted here.
53 Additional Cooperating and Assisting Organizations Not Listed Above
List all agencies and organizations involved in the incident that are not listed in Block 48. These organizations WILL NOT be counted by the program, or included in the totals in Blocks 51 and 52.
Examples may include ambulance services, Red Cross, utility companies, etc.
Do not repeat any resources counted in Blocks 48–52, unless explanations are needed for groupings created under Block 48 (Agency or Organization).

Updated 5/28/2014
90 | P a g e

Updated 5/28/2014
91 | P a g e
Block 9. Incident Kind
Wildfire
Prescribed Fire
Burned Area Emergency Rehabilitation
Earthquake
Flood
Hazardous Materials
Hurricane
Law Enforcement
Mass Casualty
Oil Spill
Other
Search and Rescue
Structure Fire
Tornado
Urban Search and Rescue
Wildfire, chemical disaster, dam failure, biological outbreak, earthquake, flood, foreign disaster assistance, haz mat, heat event, hurricane, mass earth movement / avalanche, nuclear emergency, civil unrest / people gathering, search and rescue / recovery, terrorism, thunderstorm, tornado, tsunami, volcanic eruption, winter storm.
Suppression Strategy
** Suppression Option WF Only**
Full Suppression – Perimeter Control
Point/Zone Protection
Confine
Monitor

Updated 5/28/2014
92 | P a g e
Fuels/Material Involved
The Primary Fire Behavior Fuel Models include:
Fuel Model Typical Fuel Complex
Grass and Grass Dominated
1 Short Grass (1 Foot)
2 Timber (Grass and Understory)
3 Tall Grass (2.5 Feet)
Chaparral and Shrub Fields
4 Chaparral (6 Feet)
5 Brush (2 Feet)
6 Dormant Brush, Hardwood Slash
7 Southern Rough
Timber Litter
8 Closed Timber Litter
9 Hardwood Litter
10 Timber (Litter and Understory)
Slash
11 Light Logging Slash
12 Medium Logging Slash
13 Heavy Logging Slash