Intel® Compute Card User Guide · Observe Safety and Regulatory Requirements ... US – United...
11
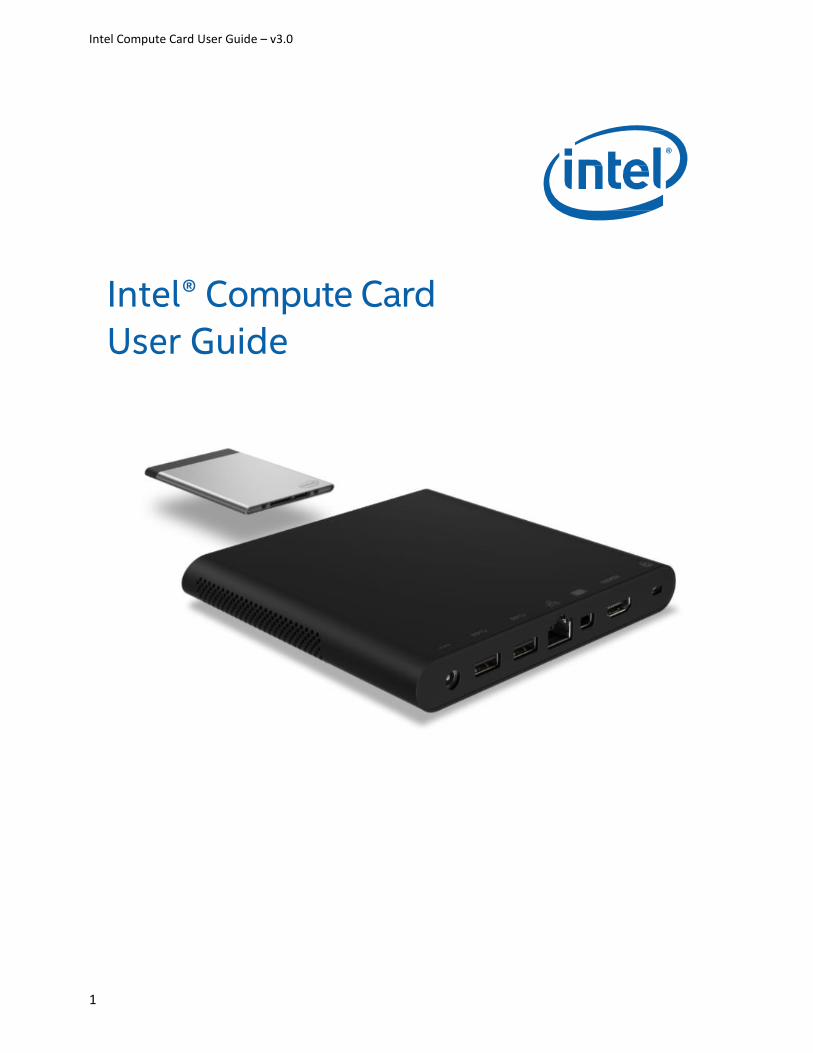
Intel Compute Card User Guide – v3.0 1 Intel® Compute Card User Guide
Transcript of Intel® Compute Card User Guide · Observe Safety and Regulatory Requirements ... US – United...
Intel Compute Card User Guide – v3.0
1
Intel® Compute Card
User Guide

Intel Compute Card User Guide – v3.0
2
Before You Begin
CAUTIONS
The procedures in this user guide assume familiarity with the general terminology associated with
personal computers and with the safety practices and regulatory compliance required for using
and modifying electronic equipment.
Disconnect the computer from its power source and from any telecommunications link or network before
performing any of the procedures described in this guide. Failure to disconnect power,
telecommunications links, or networks before you open the computer or perform any procedures can
result in personal injury or equipment damage. Some circuitry on the board can continue to operate
even though the front panel power button is off.
Follow these guidelines before you begin:
Always follow the steps in each procedure in the correct order.
Set up a log to record information about your computer, such as model, serial numbers,
installed options, and configuration information.
Electrostatic discharge (ESD) can damage components. Perform the procedures described in
this chapter only at an ESD workstation using an antistatic wrist strap and a conductive foam
pad. If such a station is not available, you can provide some ESD protection by wearing an
antistatic wrist strap and attaching it to a metal part of the computer chassis.
Observe Safety and Regulatory Requirements If you do not follow these instructions, you increase your safety risk and the possibility of
noncompliance with regional laws and regulations.

Intel Compute Card User Guide – v3.0
3
This user guide includes setup and usage information for Intel® Compute Cards when
used with the Intel® Compute Card Dock DK132EPJ.
Topics • Product descriptions
• Connect keyboard and mouse
• Connect to a network
• Connect to a display
• Connect power
• Attach the VESA bracket (optional)
• Secure dock with a cable lock
• Install an operating system
• Install driver and BIOS updates
• Locking and ejecting cards
Product Description (Dock)
Symbol Description
Slot Slot for Intel Compute Card
Lock Lock Indicator
Eject Eject Button / Indicator
USB 3.0 One on front and two on back
Power Power Button / Indicator
19V DC Power input jack
LAN Gigabit Ethernet port
Displayport MiniDisplayPort connector
HDMI HDMI (standard size) connector
Security Security cable lock connector
Product Description (Cards)
Top-front view

Intel Compute Card User Guide – v3.0
4
Bottom-back view
Connect a Keyboard and Mouse
Intel Compute Card supports any of the following:
USB wired keyboard and mouse, connected to the ports on the dock
USB wireless keyboard and mouse, using a USB dongle connected to a port on the dock.
Bluetooth* keyboard and mouse. (Follow the instructions that came with the keyboard and mouse
to pair them to the Intel Compute Card’s onboard Bluetooth device. You may need to temporarily
connect a wired mouse/keyboard to the dock in order to pair Bluetooth devices.
Note: Keyboard and mouse are not included.
Find tested keyboards and mice on the Intel® Product Compatibility Tool.
The two wireless antennas are located
inside the black plastic end of the
card.
Intel Compute Card User Guide – v3.0
5
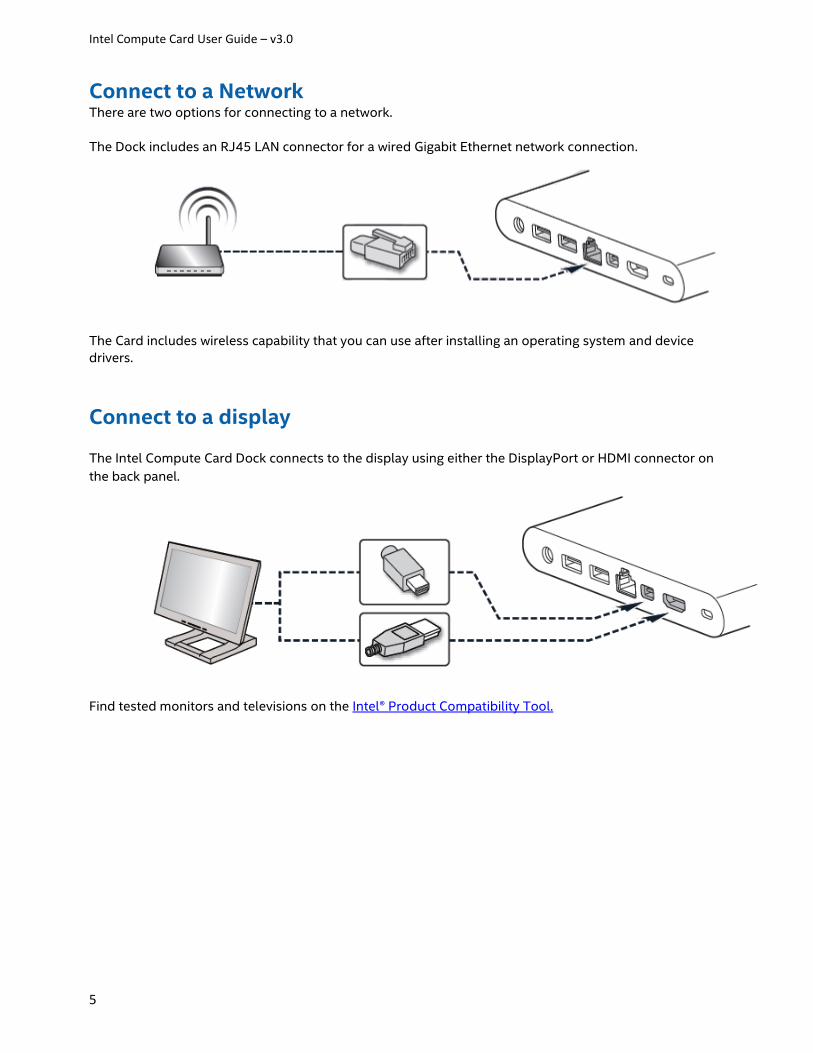
Connect to a Network There are two options for connecting to a network.
The Dock includes an RJ45 LAN connector for a wired Gigabit Ethernet network connection.
The Card includes wireless capability that you can use after installing an operating system and device
drivers.
Connect to a display
The Intel Compute Card Dock connects to the display using either the DisplayPort or HDMI connector on
the back panel.
Find tested monitors and televisions on the Intel® Product Compatibility Tool.

Intel Compute Card User Guide – v3.0
6
Connect Power Country-specific power plug attachments are included in the Intel Compute Card Dock box.
1. Choose the attachment for your region.
US – United States UK – United Kingdom EU – European Union AU - Australia
CN - China IN - India KR – South Korea
2. Slide the attachment (B) onto the power plug, locking it into place (A).

Intel Compute Card User Guide – v3.0
7
3. Connect to AC power.
Insert Intel Compute Card

Intel Compute Card User Guide – v3.0
8
Eject a Card There are two ways to eject a card from the dock.
Hardware eject button on the dock front panel:
After pressing the eject button, the fan in the Dock will cool the Card to a safe temperature level before
ejecting it.
Software eject using the Intel® Compute Card Lock and Eject Tool.
1. Download and install the Intel® Compute Card Lock and Eject Tool.
2. Right-click the tray icon and select Eject.
3. Choose one of the following options:
Hibernate and Eject
Shutdown and Eject
After selecting the eject option, the fan in the Dock will cool the Card to a safe temperature level before
ejecting it.

Intel Compute Card User Guide – v3.0
9
Install an Operating System Refer to Supported Operating Systems for a list of Intel-validated Windows* operating systems.
Refer to Windows* Installation for Intel® Compute Cards for installation steps.
Install Driver and BIOS Updates The table shows the available downloads. Click the product name to go to Download Center for that
product.
Download CD1IV128MK
CD1M3128MK
CD1C64GK
CD1P64GK DK132EPJ
HID Event Filter
x
Intel® Bluetooth Technology x
x x
Intel® Chipset Device Software x
x x
Intel® Gigabit Network Connection x
x x x
Intel® HD Graphics x
x x
Intel® Management Engine (Consumer)
x
Intel® Management Engine (Corporate) x
Intel® Serial IO Host Controller x
x x
Intel® Trusted Execution Engine
x
Intel® Wireless Technology x
x x
System BIOS x
x x
https://www.intel.com/content/www/us/en/support/articles/000024432/mini-pcs/intel-compute-cards.html

Intel Compute Card User Guide – v3.0
10
Attach the VESA Bracket (Optional)
Follow these instructions to attach and use the VESA mount bracket with the Dock.
1. Attach the VESA bracket to the back of the monitor or display, using the four small black screws.
2. Attach the two large black screws that were included in the box to the bottom of the Dock.

Intel Compute Card User Guide – v3.0
11
3. Slide the Dock onto the VESA mount bracket.
Secure Dock with a Cable Lock (optional)