
Integrating SAP CRM With the SAP R3 HR Modules
24
Integrating SAP CRM with the SAP R/3 HR module © 2006 SAP AG The SAP Developer Network: http://sdn.sap.com Page 1 of 24 Applies To: Integrating SAP CRM with the SAP R/3 HR module Summary An organization that has an active HR module, and a SAP CRM system in operation, would be likely to want employee data from R/3 to be maintained in CRM as well. This can be applied in a scenario where an employee of a company is also a business partner to the company in some capacity (purchaser of goods/services, etc). To enable seamless transfer of employee data between the subscribing system (R/3) and the publishing system (CRM), an Application Linking and Enabling (ALE) needs to be setup and maintained between these two systems. The ALE would provide real-time integration of the data transfer process from R/3 to CRM. So, whenever an employee is created or employee details are modified in R/3, the employee record or changes to an existing record will flow to the CRM system. SAP standard IDocs are used as a vehicle for data transfer. This document provides a detailed step-by-step guide of all the transactions and configuration settings that are required for ALE integration of the 2 systems. The following SAP notes have been consulted in preparation of this document – 312090 (Integration HR – EBP/CRM) 550055 (EBP/CRM: New integration for business partner) By: Arijit Kumar Das Company: Roads and Traffic Authority, NSW Date: 08 February 2006 Table of Contents Applies To:........................................................................................................................................ 1 Summary .......................................................................................................................................... 1 Table of Contents ............................................................................................................................. 1 Integrating SAP CRM with the SAP R/3 HR module........................................................................ 2 Introduction ................................................................................................................................... 2 Step 1 – Maintain RFC Destinations, transaction – SM59 (BASIS function) ............................ 2 Step 2 – Ports in IDoc processing, transaction – WE21 (BASIS function) ............................... 5 Step 3 – Define Logical System, transaction – SM30 (BASIS function) ................................... 6 Step 4 – Partner profiles, transaction – WE20 (BASIS function) .............................................. 7
-
Upload
mallikharjuna-kosuru -
Category
Documents
-
view
163 -
download
8
description
SAP CRM HR Integration
Transcript of Integrating SAP CRM With the SAP R3 HR Modules
Integrating SAP CRM with the SAP R/3 HR module
© 2006 SAP AG The SAP Developer Network: http://sdn.sap.com Page 1 of 24
Applies To:
Integrating SAP CRM with the SAP R/3 HR module
Summary
An organization that has an active HR module, and a SAP CRM system in operation, would be likely to want employee data from R/3 to be maintained in CRM as well. This can be applied in a scenario where an employee of a company is also a business partner to the company in some capacity (purchaser of goods/services, etc).
To enable seamless transfer of employee data between the subscribing system (R/3) and the publishing system (CRM), an Application Linking and Enabling (ALE) needs to be setup and maintained between these two systems. The ALE would provide real-time integration of the data transfer process from R/3 to CRM. So, whenever an employee is created or employee details are modified in R/3, the employee record or changes to an existing record will flow to the CRM system. SAP standard IDocs are used as a vehicle for data transfer.
This document provides a detailed step-by-step guide of all the transactions and configuration settings that are required for ALE integration of the 2 systems.
The following SAP notes have been consulted in preparation of this document –
312090 (Integration HR – EBP/CRM)
550055 (EBP/CRM: New integration for business partner)
By: Arijit Kumar Das
Company: Roads and Traffic Authority, NSW
Date: 08 February 2006
Table of Contents
Applies To:........................................................................................................................................1
Summary ..........................................................................................................................................1
Table of Contents .............................................................................................................................1
Integrating SAP CRM with the SAP R/3 HR module........................................................................2
Introduction ...................................................................................................................................2
Step 1 – Maintain RFC Destinations, transaction – SM59 (BASIS function)............................2
Step 2 – Ports in IDoc processing, transaction – WE21 (BASIS function) ...............................5
Step 3 – Define Logical System, transaction – SM30 (BASIS function)...................................6
Step 4 – Partner profiles, transaction – WE20 (BASIS function) ..............................................7

Integrating SAP CRM with the SAP R/3 HR module
© 2006 SAP AG The SAP Developer Network: http://sdn.sap.com Page 2 of 24
Step 5 – Setting up the Distribution Model, transaction – BD64...............................................9
Step 6 – Permitting Multiple Address Subtypes, transaction – SE38 .....................................12
Step 7 – Masking of sensitive data, transactions – BD62, BD79, BD55 ................................13
Step 8 – Setting up of Change Pointers, transactions – BD61, BD50....................................15
Step 9 – Customizing Data in CRM, transactions – SM30, SNRO, BUC2 .............................16
Step 10 – Testing, transactions – PFAL, BD87 ......................................................................20
Step 11 – Process Automation, transactions – SE38, SM36, WE20 (BASIS function) ..........22
Step 12 – Synchronizing Business Partners, transactions – SE38, SM36 (BASIS function) .23
Author Bio.......................................................................................................................................24
Disclaimer & Liability Notice ...........................................................................................................24
Integrating SAP CRM with the SAP R/3 HR module
Introduction
This integration exercise is being demonstrated in a system testing environment. The systems used for the exercise are –
QAS 400 (this is the R/3 system, version 46c), and
CRQ 310 (CRM system, version 4).
Some of the steps are perceived to be predominantly a BASIS task, and should thus be carried out by a member of the BASIS team. Nevertheless, these steps too have been sufficiently illustrated to provide a non-BASIS resource with a fundamental overview.
Some of the steps are non-transportable and thus need to be created in each system and client. Steps that are transportable are carried out in a development environment (R/3 – DEV, CRM – CRD).
Step 1 – Maintain RFC Destinations, transaction – SM59 (BASIS function)
Go to transaction SM59 in the SAP R/3 system.
Click on the Create icon to set up a new RFC destination.
Enter the following values –
RFC destination (we will use CRQ_310),
Connection type as 3,
Description – CRQ_310,
Language (we will use EN as our preferred language).

Integrating SAP CRM with the SAP R/3 HR module
© 2006 SAP AG The SAP Developer Network: http://sdn.sap.com
Client of the target CRM system needs to be entered next. Our client is 310.
Check the Current user checkbox.
Save it.
Now enter the following values (you’ll see that the screen now requires many more fields to be populated) –
Load distribution – No,
Target host (refer to the value stated in the Application Server from the SAP logon pad for the CRM QAS system)
System number – 10,
Currently the Trusted system is set to No (leave it to No for the time being).
Save the entries on the screen.
Now the screen should look similar to Figure 1 –
Figure 1 – Setting the RFC destination for CRM as the target system in R/3
Page 3 of 24

Integrating SAP CRM with the SAP R/3 HR module
© 2006 SAP AG The SAP Developer Network: http://sdn.sap.com
Back out of the screen.
Now that we have created our new RFC destination for the CRM system, we will need to set it up as a trusted system. So, when IDocs are transferred from R/3 to CRM in real-time, the user under whose id the job gets processed will not be prompted to enter a password to authenticate oneself.
From the menu bar go to the following path –
RFC >> Trusted systems
Click on the create icon to set up CRQ_310 as a trusted system.
Enter CRQ_310 as the RFC destination.
On the following screen enter the Client (310), User (Username), and Password.
You should get the following screen as in Figure 2 –
Figure 2 – Setting up the trusted system on the R/3 side
Now, go back to Display and maintain RFC destinations, and double-click on CRQ_310, and set the setting for Trusted system to Yes.
Page 4 of 24

Integrating SAP CRM with the SAP R/3 HR module
© 2006 SAP AG The SAP Developer Network: http://sdn.sap.com Page 5 of 24
Save it.
Now we need to set up the R/3 system as a trusted RFC destination on the CRM system. Repeat the entire Step 1 on the CRM system with the appropriate RFC destination, Target host, System number, and Client values.
In a live environment the security team will have to create a Communication user in both the R/3 and CRM systems to facilitate dialog-free communications via RFC between the systems.
Step 2 – Ports in IDoc processing, transaction – WE21 (BASIS function)
Go to transaction WE21 in the R/3 system.
Select the port type Transactional RFC and click on the create icon.
The system will pop up a window asking to select one of the following –
Generate port name, or
own port name.
You may select either, in this example we will define our own port as CRQ_310.
Continue through the pop up.
Enter a Description for the port as CRM QAS 310.
By default the Version will be defaulted to IDoc record types SAP Release 4.x.
Enter the RFC destination created in the previous step as CRM_310 (either manually or select from the drop down).
Save it.
Your screen should now look similar to Figure 3 –

Integrating SAP CRM with the SAP R/3 HR module
© 2006 SAP AG The SAP Developer Network: http://sdn.sap.com
Figure 3 – Creating a tRFC port in the R/3 system
Now we have a port with the CRM system as the destination on the R/3 side. We also require an R/3 port on the CRM end for the incoming IDocs from R/3. Repeat the above mentioned steps to create a port in CRM. For simplicity, we will call our Port QAS_400, with a Description R/3 QAS 400, and assign QAS_400 as the RFC destination.
Step 3 – Define Logical System, transaction – SM30 (BASIS function)
To distribute data from the R/3 system to CRM, both the systems need to be defined as a logical system in order to communicate with one another.
These entries should be created in the respective development environments and then transported to other systems in the landscape.
Either transaction SM30, with parameters Table/view as V_TBDLS can be used to define a logical system or it can be done through the IMG. Since most of you would already be familiar with how to maintain customizing data in SM30, we will look at how it is done in the IMG using transaction SPRO.
In R/3, follow the following menu path in transaction SPRO –
Basis Components >> Application Link Enabling (ALE) >> Sending and receiving Systems >> Logical Systems >> Define Logical System
Click on New Entries.
Enter CRQ_310 as the Log. System, with Name as CRM QAS 310.
Save it.
Page 6 of 24

Integrating SAP CRM with the SAP R/3 HR module
© 2006 SAP AG The SAP Developer Network: http://sdn.sap.com
Once saved your screen will look like the one in Figure 4 –
Figure 4 – Define a Logical System
Now repeat the above step in the CRM system as well. Define QAS_400 as a new Log. System and give it an appropriate Name.
The menu path differs slightly in the CRM system, it is –
SAP Web Application Server >> Application Link Enabling (ALE) >> Sending and receiving Systems >> Logical Systems >> Define Logical System
Step 4 – Partner profiles, transaction – WE20 (BASIS function)
Go to transaction WE20 in R/3 and select the node Partner Type LS (Logical System).
Click on the Create icon.
We will enter the logical system (CRQ_310) that we created in the previous step as the Partn. number.
Partn. type is already defaulted to LS.
In the Post processing: permitted agent section, enter the following values –
Typ – US,
Agent – User ID of the IDoc administrator (or system administrator),
Lang – EN.
In the Outbound parmtrs. section click on the Create outbound parameter icon.
On the following screen enter HRMD_ABA as the Message type.
Under Outbound options, the Receiver port will be CRQ_310 that we created in Step 2.
Select the option Transfer IDoc immed. as the Output mode.
HRMD_ABA01 is the SAP standard Basic type for HRMD_ABA (table EDIMSG).
The checkbox for Syntax check should already be switched on.
Page 7 of 24

Integrating SAP CRM with the SAP R/3 HR module
© 2006 SAP AG The SAP Developer Network: http://sdn.sap.com
Now Save the details.
Your screen should look identical to Figure 5 –
Figure 5 – Define a Partner Profile
Back out of this screen.
Now create another Outbound parmtrs. with Message type – SYNCH.
Basic type – SYNCHRON.
The Receiver port and Output mode have the same values.
Save it.
Similarly, on the CRM side we define a new partner – QAS_400 for Partner type LS.
Here, the Outbound parmtrs. will be Message type – SYNCH, and HRMD_ABA will be the Inbound parmtrs. with HRMD as the Process code (Receiver port – QAS_400).
Select the option Trigger by background program for Message type HRMD_ABA.
Page 8 of 24

Integrating SAP CRM with the SAP R/3 HR module
© 2006 SAP AG The SAP Developer Network: http://sdn.sap.com Page 9 of 24
Step 5 – Setting up the Distribution Model, transaction – BD64
Please refer to the latest version of OSS note – 312090 for a detailed guide on how to set up the distribution model.
We need to define precisely the infotypes for an employee that message type HRMD_ABA will transfer from the R/3 to the CRM system.
Execute transaction BD64.
Click on Create model view, with Short text – R/3 HR - CRM ALE, and Technical name – HRALECRM, Start date – today’s date, End date – 31.12.9999.
Select R/3 HR - CRM ALE and click on Add message type.
Enter the following values –
Sender – QAS_400
Receiver – CRQ_310
Message type – HRMD_ABA
Expand node R/3 HR - CRM ALE down to the very last level.
Now the following nodes should be visible –
R/3 HR - CRM ALE >> QAS_400 >> CRM QAS 310 >> HRMD_ABA >> No filter set
Double-click on No filter set.
The system will display a pop up for Change filter.
Click on Create filter group (there are 7 filter groups in total) to add the following –
Filter group for relationships
• Infotype – 1001
• Object type – C, S, O
• Type of related object – C, S, O
• Subtype – A002, A007, A008, A012, B002, B007, B008, B012
Filter group for relationships for object S
• Infotype – 1001
• Object type – S
• Type of related object – P
Integrating SAP CRM with the SAP R/3 HR module
© 2006 SAP AG The SAP Developer Network: http://sdn.sap.com Page 10 of 24
• Subtype – A008
Filter group for relationships with the linked object being specified
• Infotype – 1001
• Object type – S, O
• Type of related object – S, O
• Subtype – A003, B003
Filter group for organizational objects
• Infotype – 1000, 1002, 1028, 1032
• Object type – C, S, O
Filter group for employees
• Infotype – 0000, 0001, 0002, 0009
• Object type – P
Filter group for employees
• Infotype – 0006
• Object type – P
• Subtype – 1
Filter group for employees
• Infotype – 0105
• Object type – P
• Subtype – 0001, 0005, 0010, 0020
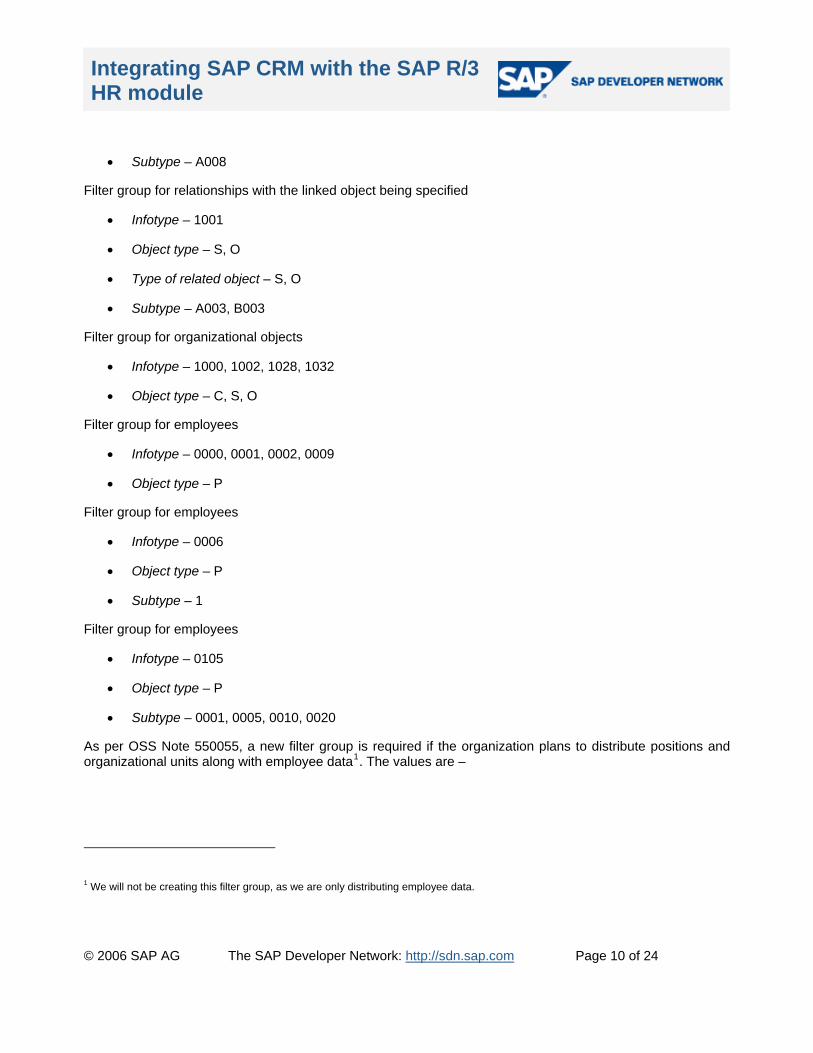
As per OSS Note 550055, a new filter group is required if the organization plans to distribute positions and organizational units along with employee data1. The values are –
1 We will not be creating this filter group, as we are only distributing employee data.
Integrating SAP CRM with the SAP R/3 HR module
© 2006 SAP AG The SAP Developer Network: http://sdn.sap.com
• Infotype – 1001
• Object type – P
• Type of related object – P
• Subtype – B008
Save it.
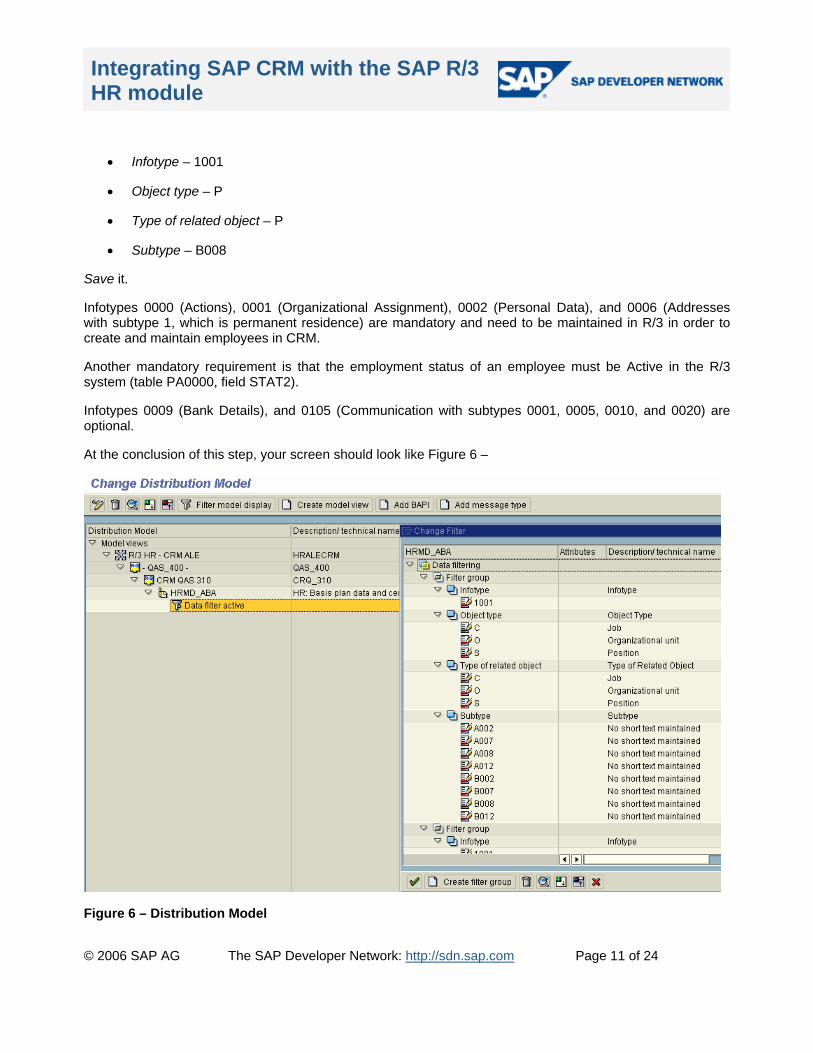
Infotypes 0000 (Actions), 0001 (Organizational Assignment), 0002 (Personal Data), and 0006 (Addresses with subtype 1, which is permanent residence) are mandatory and need to be maintained in R/3 in order to create and maintain employees in CRM.
Another mandatory requirement is that the employment status of an employee must be Active in the R/3 system (table PA0000, field STAT2).
Infotypes 0009 (Bank Details), and 0105 (Communication with subtypes 0001, 0005, 0010, and 0020) are optional.
At the conclusion of this step, your screen should look like Figure 6 –
Figure 6 – Distribution Model
Page 11 of 24

Integrating SAP CRM with the SAP R/3 HR module
© 2006 SAP AG The SAP Developer Network: http://sdn.sap.com Page 12 of 24
This distribution model has to be distributed to the CRM system.
Go to menu –
Edit >> Model view >> Distribute >> select CRM QAS 310 (CRQ_310) as the Logical system >> continue.
You should get a confirmation stating Model view HRALECRM has been changed.
Step 6 – Permitting Multiple Address Subtypes, transaction – SE38
Organizations that employ contractors might not maintain a Permanent address for them. Instead contractors would have their agency’s address in a customized subtype (for e.g. – 90). If this is the case then we will need to make some code changes as the standard IDoc processing program in CRM does not recognize any subtype other than 1. Since subtype 1 is mandatory for infotype 0006, the following code changes need to be made to accommodate additional address subtypes in the system –
Go to transaction SE38 in CRD.
Program – LHRALX00_INTEGRATION_PERSONF50.
CASE <ls_e1pityp>-infty. WHEN '0006'. *** Start Of Deletion *** IF <ls_e1pityp>-subty NE '1'. *** End Of Deletion *** *** Start Of Insertion *** IF <ls_e1pityp>-subty NE '1' and <ls_e1pityp>-subty NE '90'. *** End Of Insertion ***
Program – LHRALX00_INTEGRATION_PERSONF52.
CASE <ls_segment>-segnam. WHEN gc_e1plogi. …………………………………………………… …………………………………………………… WHEN gc_e1pityp. …………………………………………………… …………………………………………………… WHEN '0006'. *** Start Of Deletion *** IF <ls_e1pityp>-subty = '1'. *** End Of Deletion *** *** Start Of Insertion *** IF <ls_e1pityp>-subty = '1' or <ls_e1pityp>-subty = '90'. *** End Of Insertion *** <ls_e1pityp>-infty = '5583'. <ls_e1pityp>-subty = ''. …………………………………………………… ……………………………………………………

Integrating SAP CRM with the SAP R/3 HR module
© 2006 SAP AG The SAP Developer Network: http://sdn.sap.com
Step 7 – Masking of sensitive data, transactions – BD62, BD79, BD55
Organizations might not want sensitive data like an employee’s address (IDoc segment E1P0006), date of birth (IDoc segment E1P0002), bank details (IDoc segment E1P0009) etc to be sent to the CRM system. Such sensitive data needs to be masked before it is transferred to CRM.
If the organization does not distribute positions and organizational units, then the fields ORGEH, PLANS, STELL for IDoc segment E1P0001 need to be masked as well.
We will look at the masking of employee’s date of birth value.
Go to transaction BD62 (Define Segment Conversion Rule).
Click on the Change icon.
Type in BIRTHDATE in the Conversion rule field.
Enter a Description – Mask DOB during data transfer.
Select the appropriate IDoc segment name (in this case it will be E1P0002 for Personal Data).
Save it.
Your screen should now look like Figure 7 –
Figure 7 – Maintain Conversion Rules
Page 13 of 24

Integrating SAP CRM with the SAP R/3 HR module
© 2006 SAP AG The SAP Developer Network: http://sdn.sap.com
Now, go to transaction BD79 (Maintain IDoc Conversion Rules).
Enter the recently created Conversion rule BIRTHDATE, and go into Maintain mode.
Go to Rec. field – GBDAT.
Set ’01.01.1900’ (date format here is in DD/MM/YYYY) as the value in Constant (alternatively, you can double-click to go to the next screen and set the value there).
Repeat the above step for field GBPAS (if this field is maintained in HR).
Assign ‘#’ as the constant for the following fields –
GBJHR, GBMON, and GBTAG.
Save the changes.
Your screen should look like Figure 8 –
Figure 8 – Maintain Conversion Rules for BIRTHDATE
Now this rule needs to be assigned to a message type (this data is transportable, and hence should be performed in the development client DEV).
Go to transaction BD55 (Maintain IDoc Conversion), enter Message type as HRMD_ABA.
Click on New entries.
Page 14 of 24

Integrating SAP CRM with the SAP R/3 HR module
© 2006 SAP AG The SAP Developer Network: http://sdn.sap.com
Enter the Sender as QAS_400, Receiver as CRQ_310, Segment type – E1P0002, and Conversion rule – BIRTHDATE.
Save the record.
The screen should now resemble Figure 9 –
Figure 9 – Overview of Conversion Rules
Now you can mask the address, banking information, and organizational data fields similarly.
Step 8 – Setting up of Change Pointers, transactions – BD61, BD50
This step should be executed in DEV and then transported.
Go to transaction BD61 in R/3.
Switch on the Change pointers activated – generally check box.
Save.
Now activate the change pointer for the specific message type.
Go to transaction BD50.
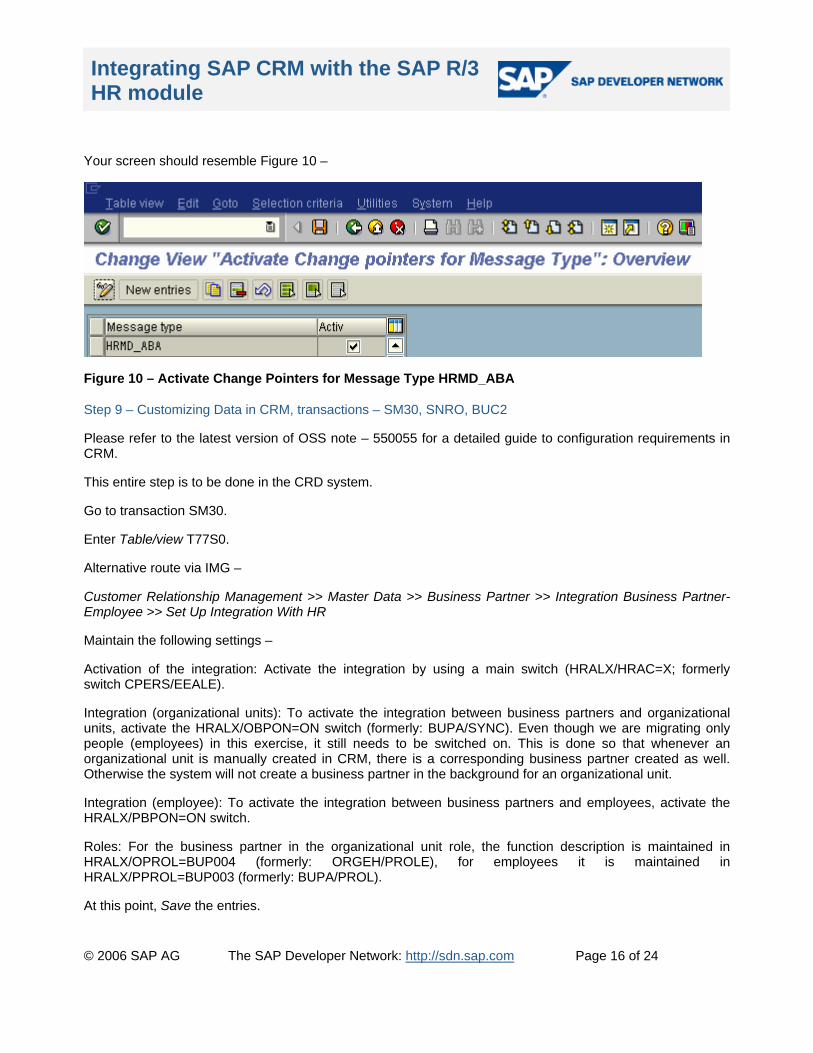
Check Activ for Message type HRMD_ABA.
Save.
Page 15 of 24
Integrating SAP CRM with the SAP R/3 HR module
© 2006 SAP AG The SAP Developer Network: http://sdn.sap.com
Your screen should resemble Figure 10 –
Figure 10 – Activate Change Pointers for Message Type HRMD_ABA
Step 9 – Customizing Data in CRM, transactions – SM30, SNRO, BUC2
Please refer to the latest version of OSS note – 550055 for a detailed guide to configuration requirements in CRM.
This entire step is to be done in the CRD system.
Go to transaction SM30.
Enter Table/view T77S0.
Alternative route via IMG –
Customer Relationship Management >> Master Data >> Business Partner >> Integration Business Partner-Employee >> Set Up Integration With HR
Maintain the following settings –
Activation of the integration: Activate the integration by using a main switch (HRALX/HRAC=X; formerly switch CPERS/EEALE).
Integration (organizational units): To activate the integration between business partners and organizational units, activate the HRALX/OBPON=ON switch (formerly: BUPA/SYNC). Even though we are migrating only people (employees) in this exercise, it still needs to be switched on. This is done so that whenever an organizational unit is manually created in CRM, there is a corresponding business partner created as well. Otherwise the system will not create a business partner in the background for an organizational unit.
Integration (employee): To activate the integration between business partners and employees, activate the HRALX/PBPON=ON switch.
Roles: For the business partner in the organizational unit role, the function description is maintained in HRALX/OPROL=BUP004 (formerly: ORGEH/PROLE), for employees it is maintained in HRALX/PPROL=BUP003 (formerly: BUPA/PROL).
At this point, Save the entries.
Page 16 of 24

Integrating SAP CRM with the SAP R/3 HR module
© 2006 SAP AG The SAP Developer Network: http://sdn.sap.com Page 17 of 24
Number assignment: The business partner number range object is BU_PARTNER. Generally, there are three types of number assignment when business partners are created from the R/3 system.
01 = This is the internal interval of BU_PARTNER.
02 = External number assignment, the system uses the number from a specific internal interval of the object.
03 = The number is transferred from HR and a prefix is added. In this case, a specific external interval, which must be defined as XX00000000 (up to XX99999999), is used (where XX denotes any two letters).
Any one of the three intervals can be set up for HR integration. We will use 02, so that when a business partner is created from employee data, the partner number will be identical to the employee. The value of this interval will equal that of the employee number range interval in R/3.
Also, not all the business partners will be employees from R/3, there would likely to be external partners of various types under various roles other than Employee (for e.g. – Vendor, Bidder, Sold-To, Ship-To etc). These business partners would be present only in the CRM system, and not in the R/3 system. Thus, we require an internal interval as well to create these business partners on the fly.
Go to transaction SNRO.
Alternatively, you can access it via the IMG –
Cross-Application Components >> SAP Business Partner >> Business Partner >> Basic Settings >> Number Ranges and Groupings >> Define Number Ranges
Object is BU_PARTNER.
Click on Number ranges.
Click on Change intervals.
Delete all existing intervals.
Add a new interval, with No – 01.
Set the From number and To number to 1 and 50000 respectively (the size of the interval will need to be decided by the business, and will depend on how many external partners they envisage they will have).
Add another interval 02.
The From number and To number of the BU_PARTNER interval will be set identical to that of RP_PREL (Personnel Administration Number Ranges, in R/3).
Check Ext – ‘X’.
Save the entries.
Back out of the screen.
To create a transport for the number range intervals, follow the following menu path –
Interval >> Transport >> Yes.

Integrating SAP CRM with the SAP R/3 HR module
© 2006 SAP AG The SAP Developer Network: http://sdn.sap.com
Your screen should look like Figure 11 –
Figure 11 – Maintain Number Range Intervals for BU_PARTNER
Switch values in HRALX/ONUMB is used to set the number assignment for organizational units and HRALX/PNUMB is used to set the number assignment for employees, that is which number range interval in BU_PARTNER will be used when an organizational unit or a business partner comes through from R/3 into CRM.
We will be using 2 as the switch value for HRALX/ONUMB and HRALX/PNUMB.
For switch value 1, the system uses the internal standard interval.
For switch values 2 and 3 the interval is defined by the HRALX/OSUBG or HRALX/PSUBG switch. For switch values 2 and 3 a grouping needs to be created (transaction BUC2) to link an interval. For the system to be able to connect the grouping and the number range interval, the name of the grouping must be exactly the same as the name of the corresponding number range interval (the name of the grouping is contained in the first column of the table). If you select type 3 (HRALX/PNUMB = 3 switch) for the number assignment of business partners of the employee role, create the HRALX/PSUBG switch manually in table T77S0.
To create the grouping for the number range interval, go to transaction BUC2.
Alternatively, follow the menu path in the IMG –
Cross-Application Components >> SAP Business Partner >> Business Partner >> Basic Settings >> Number Ranges and Groupings >> Define Groupings and Assign Number Ranges
Delete all existing entries.
Click New entries to create the following –
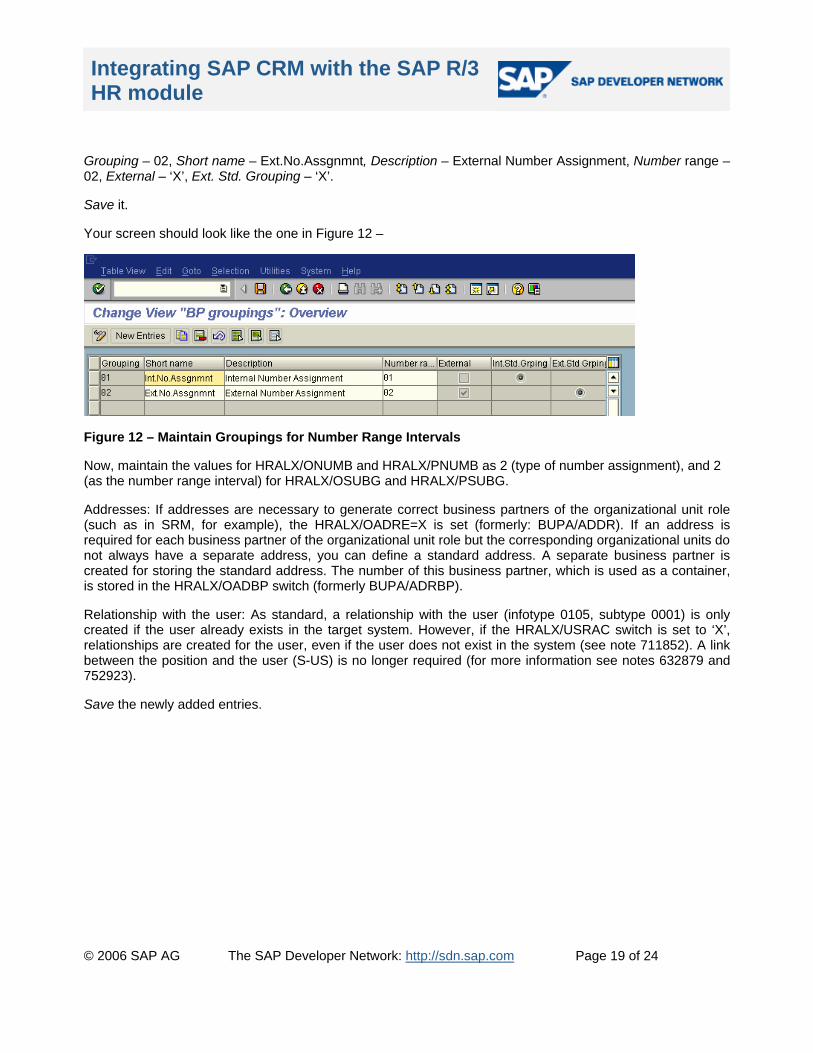
Grouping – 01, Short name – Int.No.Assgnmnt, Description – Internal Number Assignment, Number range – 01, Int. Std. Grouping – ‘X’.
Page 18 of 24
Integrating SAP CRM with the SAP R/3 HR module
© 2006 SAP AG The SAP Developer Network: http://sdn.sap.com
Grouping – 02, Short name – Ext.No.Assgnmnt, Description – External Number Assignment, Number range – 02, External – ‘X’, Ext. Std. Grouping – ‘X’.
Save it.
Your screen should look like the one in Figure 12 –
Figure 12 – Maintain Groupings for Number Range Intervals
Now, maintain the values for HRALX/ONUMB and HRALX/PNUMB as 2 (type of number assignment), and 2 (as the number range interval) for HRALX/OSUBG and HRALX/PSUBG.
Addresses: If addresses are necessary to generate correct business partners of the organizational unit role (such as in SRM, for example), the HRALX/OADRE=X is set (formerly: BUPA/ADDR). If an address is required for each business partner of the organizational unit role but the corresponding organizational units do not always have a separate address, you can define a standard address. A separate business partner is created for storing the standard address. The number of this business partner, which is used as a container, is stored in the HRALX/OADBP switch (formerly BUPA/ADRBP).
Relationship with the user: As standard, a relationship with the user (infotype 0105, subtype 0001) is only created if the user already exists in the target system. However, if the HRALX/USRAC switch is set to ‘X’, relationships are created for the user, even if the user does not exist in the system (see note 711852). A link between the position and the user (S-US) is no longer required (for more information see notes 632879 and 752923).
Save the newly added entries.
Page 19 of 24

Integrating SAP CRM with the SAP R/3 HR module
© 2006 SAP AG The SAP Developer Network: http://sdn.sap.com
Figure 13 lists all the switch values in system table T77S0 –
Figure 13 – Settings in Table T77S0
Section “Reference to related Notes” of note 550055 has a list of useful OSS notes. These notes should be carefully studied and the relevant ones applied so that the integration between an Employee and Business Partner is possible.
Step 10 – Testing, transactions – PFAL, BD87
Now that we have completed setting up the pre-requisite customizing data in both the systems, we need to manually test the process.
Go to transaction PFAL in the R/3 system.
Enter 01 as the Plan version (usually an enterprise sets up 01 as the current plan), and P (Person) for Object type since we are only transferring employees across.
Page 20 of 24

Integrating SAP CRM with the SAP R/3 HR module
© 2006 SAP AG The SAP Developer Network: http://sdn.sap.com
If we were to transfer the complete organizational structure (organizational units, positions, and persons), then Object type would be O (Organization unit), and Evaluation path – O-S-P.
Select an employee you would like to be created in CRM as the Object ID.
Transfer mode should default to Insert (complete transfer: delete in target system, recreate).
Receiver partner no. is CRQ_310 (we set this up in Step 4), and our Message type is HRMD_ABA.
Execute it.
On the next screen you will get a message with green traffic lights stating that CRQ_310 received the IDoc.
Go to your CRM session, run transaction BD87, hit Execute.
You will see a yellow triangle (IDoc ready to be posted to application) as in Figure 14 –
Figure 14 – IDoc Status Monitor
Click on the node HRMD_ABA, and Process.
On the following screen you will be notified if the IDoc has been successfully processed or not by the New status. Double-click on the ALV line to go to the next screen. If the Current status indicator is set to green traffic lights (53), then the IDoc has been successfully processed. Have a look at table TEDS1 for all IDoc status codes and their description.
Now, execute transaction BP, and search for BusPartner with the employee id.
The system should the business partner.
Double-click to examine the details.
Page 21 of 24

Integrating SAP CRM with the SAP R/3 HR module
© 2006 SAP AG The SAP Developer Network: http://sdn.sap.com Page 22 of 24
Repeat this entire step for a few more employees to confirm that all are successfully processed. If your organization has more than one employee group (table T501) and multiple subgroups (table T503K) then prepare a test case to test at least a couple of employees belonging to each subgroup.
Step 11 – Process Automation, transactions – SE38, SM36, WE20 (BASIS function)
If we are satisfied with our test runs we need to automate the above manual step.
Standard program RBDMIDOC creates IDocs from the change pointers for the Message type (HRMD_ABA) specified. The IDocs are then sent to the receiving systems specified in the distribution model. In our case it will be the CRM system (CRQ_310).
In R/3 run transaction SE38 with Program RBDMIDOC.
Enter Message type – HRMD_ABA.
Save as variant with Variant name HR2CRM, Description – Post Employee Data R/3-CRM.
Save it.
Execute transaction SM36 (Define Background Job).
Enter a Job name – RBDMIDOC_BG.
Specify a Job class – A / B / C (depending on the priority). We will use A.
Save.
In the pop up, enter the Communication user (Step 1) as the User.
Click ABAP program.
This opens the fields Name (enter the program RBDMIDOC), Variant – HR2CRM, and Language (already defaulted to the system language).
Save.
You will get a success message Job RBDMIDOC_BG saved with status: Scheduled.
Click on Start condition, then Date/Time.
Enter an appropriate Date and Time.
Switch on Periodic job – ‘X’.
Click Period values, click Other period, set the frequency to 5 Minute(s).
Save four times.
You will get another success message Job RBDMIDOC_BG saved with status: Released.
In CRM, go to transaction WE20.

Integrating SAP CRM with the SAP R/3 HR module
© 2006 SAP AG The SAP Developer Network: http://sdn.sap.com Page 23 of 24
For Partner type LS – QAS_400, Message type HRMD_ABA, change the setting for Processing by function module to Trigger immediately. This will consume the IDoc as soon as it receives it from R/3.
Step 12 – Synchronizing Business Partners, transactions – SE38, SM36 (BASIS function)
Run transaction SE38, Program – HRALXSYNC.
HRALXSYNC synchronizes HR objects – organizational units and central persons, with the business partners in CRM. A business partner is required for each organizational unit and central person in the organization or employee role. Because the data of the business partner is not generally time dependent, any future changes to HR objects cannot automatically be posted in the business partner. You can update the business partner with these changes by regularly running this report. When synchronizing the organizational unit, the basic data (name, description) and address is taken into account. In the case of the central person, the bank data and user assignment is also taken into account.
Schedule HRALXSYNC as a background job to run once every night using the default variant SAP&DEFAULT.

Integrating SAP CRM with the SAP R/3 HR module
© 2006 SAP AG The SAP Developer Network: http://sdn.sap.com
Author Bio
I have been an SAP Techno-functional Specialist for the past 4.5 years. I started my career in SAP with Toyota, Melbourne as a final year Bachelor’s work experience student. After staying with Toyota for close to 4 months, I got my first big break by scoring a full-time position with BOC in Sydney. My main duties were programming and configuring in the logistics area – SD, MM, FI-CO, PP, and PM. I also got a chance to dabble in HR and PS. I remained with BOC for a little more than 3 years. Then I joined the RTA in Sydney (Roads and Traffic Authority). In the past year that I have been with the RTA, I have had customized applications in HR, and
MM. Currently, I’m involved in a CRM 4 implementation. My main areas of responsibility are to configure various bits of the system for Business Partners, Products, and Activities.
Disclaimer & Liability Notice
This document may discuss sample coding or other information that does not include SAP official interfaces and therefore is not supported by SAP. Changes made based on this information are not supported and can be overwritten during an upgrade.
SAP will not be held liable for any damages caused by using or misusing the information, code or methods suggested in this document, and anyone using these methods does so at his/her own risk.
SAP offers no guarantees and assumes no responsibility or liability of any type with respect to the content of this technical article or code sample, including any liability resulting from incompatibility between the content within this document and the materials and services offered by SAP. You agree that you will not hold, or seek to hold, SAP responsible or liable with respect to the content of this document.
Page 24 of 24


![SAP Training] SAP R3 Basic User Guide](https://static.fdocuments.in/doc/165x107/54fb11e54a7959f9348b45d5/sap-training-sap-r3-basic-user-guide.jpg)


