
INT4000 User Guide (Prelim)
92
User Guide INT4000 Cordless Telephone
-
Upload
mark-fisher -
Category
Documents
-
view
61 -
download
0
description
User GuideINT4000 Cordless TelephoneNoticeThis INT4000 Cordless Telephone User Guide is released by INTER-TEL, INC. as a guide for system users and trainers. It provides information necessary to properly install, program, operate, and maintain this product. The contents of this guide, which reflect current Inter-Tel standards, are subject to revision or change without notice. Packages released after the publication of this guide will be documented in addenda to the guide or succeeding issu
Transcript of INT4000 User Guide (Prelim)

User GuideINT4000 Cordless Telephone

Notice
This INT4000 Cordless Telephone User Guide is released by INTER-TEL, INC. as a guidefor system users and trainers. It provides information necessary to properly install,program, operate, and maintain this product.
The contents of this guide, which reflect current Inter-Tel standards, are subject to revisionor change without notice. Packages released after the publication of this guide will bedocumented in addenda to the guide or succeeding issues of the guide.
If additional information is required, please contact your service representative.
If you have any questions or comments regarding this manual or other technical documentation, contact
Inter-Tel’s Technical Publications Department at: [email protected]


INT3000 Cord
Table of Contents
FINDING YOUR WAY . . . . . . . . . . . . . . . . . . . . . . . . . . . . . . . . . . . . . . . 1Welcome . . . . . . . . . . . . . . . . . . . . . . . . . . . . . . . . . . . . . . . . . . . . . . . . . . . 2About This Guide . . . . . . . . . . . . . . . . . . . . . . . . . . . . . . . . . . . . . . . . . . . . 3About Your Phone. . . . . . . . . . . . . . . . . . . . . . . . . . . . . . . . . . . . . . . . . . . . 3
Dialpad and Indicators . . . . . . . . . . . . . . . . . . . . . . . . . . . . . . . . . . . . 4Basic Message Display Functions . . . . . . . . . . . . . . . . . . . . . . . . . . . 5Basic Button Functions. . . . . . . . . . . . . . . . . . . . . . . . . . . . . . . . . . . . 5Display . . . . . . . . . . . . . . . . . . . . . . . . . . . . . . . . . . . . . . . . . . . . . . . . 6
Installing the INT4000 . . . . . . . . . . . . . . . . . . . . . . . . . . . . . . . . . . . . . . . . 7Selecting the Location . . . . . . . . . . . . . . . . . . . . . . . . . . . . . . . . . . . . 7Connecting the Telephone Cord . . . . . . . . . . . . . . . . . . . . . . . . . . . . 7Tone/Pulse Switch . . . . . . . . . . . . . . . . . . . . . . . . . . . . . . . . . . . . . . . 7Connecting Power to the Base and Charger Units. . . . . . . . . . . . . . . 8Wall Mount Installation . . . . . . . . . . . . . . . . . . . . . . . . . . . . . . . . . . . . 9Attaching the Belt Clip to the Handset . . . . . . . . . . . . . . . . . . . . . . . 13Installing the Handset Battery Pack . . . . . . . . . . . . . . . . . . . . . . . . . 14Charging the Handset Battery Pack . . . . . . . . . . . . . . . . . . . . . . . . . 15Low Battery Indicator . . . . . . . . . . . . . . . . . . . . . . . . . . . . . . . . . . . . 15Cleaning Charging Unit Contacts . . . . . . . . . . . . . . . . . . . . . . . . . . . 15
About Telephone System . . . . . . . . . . . . . . . . . . . . . . . . . . . . . . . . . . . . 16About Voice Mail . . . . . . . . . . . . . . . . . . . . . . . . . . . . . . . . . . . . . . . . . . . . 16
GETTING STARTED . . . . . . . . . . . . . . . . . . . . . . . . . . . . . . . . . . . . . . 17Introduction . . . . . . . . . . . . . . . . . . . . . . . . . . . . . . . . . . . . . . . . . . . . . . . 18Starting the Phone . . . . . . . . . . . . . . . . . . . . . . . . . . . . . . . . . . . . . . . . . . 18Setting Up Voice Mail . . . . . . . . . . . . . . . . . . . . . . . . . . . . . . . . . . . . . . . . 19
Initializing Your Mailbox . . . . . . . . . . . . . . . . . . . . . . . . . . . . . . . . . . 19Recording Your Personal Greetings. . . . . . . . . . . . . . . . . . . . . . . . . 20Recording Your Voice Mail Directory Name. . . . . . . . . . . . . . . . . . . 21
Making and Receiving Calls . . . . . . . . . . . . . . . . . . . . . . . . . . . . . . . . . .22Intercom Calls . . . . . . . . . . . . . . . . . . . . . . . . . . . . . . . . . . . . . . . . . 22Outside Calls . . . . . . . . . . . . . . . . . . . . . . . . . . . . . . . . . . . . . . . . . . 23Emergency Calls . . . . . . . . . . . . . . . . . . . . . . . . . . . . . . . . . . . . . . . 24Call Waiting . . . . . . . . . . . . . . . . . . . . . . . . . . . . . . . . . . . . . . . . . . . 24
Placing Calls On Hold . . . . . . . . . . . . . . . . . . . . . . . . . . . . . . . . . . . . . . . 25Muting the Microphone. . . . . . . . . . . . . . . . . . . . . . . . . . . . . . . . . . . . . . . 25Placing Conference Calls . . . . . . . . . . . . . . . . . . . . . . . . . . . . . . . . . . . . 26Transferring Calls . . . . . . . . . . . . . . . . . . . . . . . . . . . . . . . . . . . . . . . . . . 27
To Another Extension. . . . . . . . . . . . . . . . . . . . . . . . . . . . . . . . . . . . 27To Voice Mail . . . . . . . . . . . . . . . . . . . . . . . . . . . . . . . . . . . . . . . . . . 27To an Outside Number . . . . . . . . . . . . . . . . . . . . . . . . . . . . . . . . . . . 27To Pick Up (Reverse Transfer) a Call . . . . . . . . . . . . . . . . . . . . . . . 27
Forwarding Calls . . . . . . . . . . . . . . . . . . . . . . . . . . . . . . . . . . . . . . . . . . . 28
vless Telephone User Guide
FIND
ING
YOU
R W
AY
GETTING
STAR
TED
MOVIN
G O
N
LEARN
ING
MO
RE
CONTENTS PAGE
vi
CONTENTS PAGE
Manual Call Forwarding . . . . . . . . . . . . . . . . . . . . . . . . . . . . . . . . . . 28Redirect Call . . . . . . . . . . . . . . . . . . . . . . . . . . . . . . . . . . . . . . . . . . . 29Automatic System Forwarding . . . . . . . . . . . . . . . . . . . . . . . . . . . . . 29Redialing a Number . . . . . . . . . . . . . . . . . . . . . . . . . . . . . . . . . . . . . . . . . 30Displaying Information on Your Phone . . . . . . . . . . . . . . . . . . . . . . . . . 31
Date, Time, Name, and Extension Number . . . . . . . . . . . . . . . . . . . 31Outside Party’s Name/Number. . . . . . . . . . . . . . . . . . . . . . . . . . . . . 31
Using a Headset . . . . . . . . . . . . . . . . . . . . . . . . . . . . . . . . . . . . . . . . . . . . 32Accessing Your Mailbox . . . . . . . . . . . . . . . . . . . . . . . . . . . . . . . . . . . . . 33Using Voice Mail Messages . . . . . . . . . . . . . . . . . . . . . . . . . . . . . . . . . . . 34
Listening to Messages . . . . . . . . . . . . . . . . . . . . . . . . . . . . . . . . . . . 34Undeleting Messages. . . . . . . . . . . . . . . . . . . . . . . . . . . . . . . . . . . . 36Sending Messages. . . . . . . . . . . . . . . . . . . . . . . . . . . . . . . . . . . . . . 37Canceling Unheard Messages . . . . . . . . . . . . . . . . . . . . . . . . . . . . . 38
Using Do-Not-Disturb Mode . . . . . . . . . . . . . . . . . . . . . . . . . . . . . . . . . .39Using Reminder Messages . . . . . . . . . . . . . . . . . . . . . . . . . . . . . . . . . . . 41
MOVING ON . . . . . . . . . . . . . . . . . . . . . . . . . . . . . . . . . . . . . . . . . . . . . 43Introduction . . . . . . . . . . . . . . . . . . . . . . . . . . . . . . . . . . . . . . . . . . . . . . . . 43Setting Preferences . . . . . . . . . . . . . . . . . . . . . . . . . . . . . . . . . . . . . . . . . 44
Phone Configuration. . . . . . . . . . . . . . . . . . . . . . . . . . . . . . . . . . . . . 44Voice Mail Options . . . . . . . . . . . . . . . . . . . . . . . . . . . . . . . . . . . . . . 45
Speed Dialing . . . . . . . . . . . . . . . . . . . . . . . . . . . . . . . . . . . . . . . . . . . . . . 52Station Speed Dial . . . . . . . . . . . . . . . . . . . . . . . . . . . . . . . . . . . . . . 52System Speed Dial . . . . . . . . . . . . . . . . . . . . . . . . . . . . . . . . . . . . . . 54
Using Record-A-Call . . . . . . . . . . . . . . . . . . . . . . . . . . . . . . . . . . . . . . . . . 54Paging . . . . . . . . . . . . . . . . . . . . . . . . . . . . . . . . . . . . . . . . . . . . . . . . . . . . 55
Making Pages. . . . . . . . . . . . . . . . . . . . . . . . . . . . . . . . . . . . . . . . . . 55Enabling Paging . . . . . . . . . . . . . . . . . . . . . . . . . . . . . . . . . . . . . . . . 55
Performing a “Hookflash” During a Call. . . . . . . . . . . . . . . . . . . . . . . . . 55Programming Your Feature Buttons . . . . . . . . . . . . . . . . . . . . . . . . . . .56Using Account Codes . . . . . . . . . . . . . . . . . . . . . . . . . . . . . . . . . . . . . . . 57Screening Calls . . . . . . . . . . . . . . . . . . . . . . . . . . . . . . . . . . . . . . . . . . . . 58Using the Directories . . . . . . . . . . . . . . . . . . . . . . . . . . . . . . . . . . . . . . . . 58
Phone Directory . . . . . . . . . . . . . . . . . . . . . . . . . . . . . . . . . . . . . . . . 58Voice Mail Directory . . . . . . . . . . . . . . . . . . . . . . . . . . . . . . . . . . . . . 60
Programming Remote Feature Access . . . . . . . . . . . . . . . . . . . . . . . . . 61Remote Access Password . . . . . . . . . . . . . . . . . . . . . . . . . . . . . . . . 61Remote Feature Access. . . . . . . . . . . . . . . . . . . . . . . . . . . . . . . . . . 61Requesting Agent Help . . . . . . . . . . . . . . . . . . . . . . . . . . . . . . . . . . 62
Working in Hunt Group . . . . . . . . . . . . . . . . . . . . . . . . . . . . . . . . . . . . . . 64Hunt Group Calls Enabled/Disabled. . . . . . . . . . . . . . . . . . . . . . . . . 64ACD Hunt Groups . . . . . . . . . . . . . . . . . . . . . . . . . . . . . . . . . . . . . . 64
LEARNING MORE . . . . . . . . . . . . . . . . . . . . . . . . . . . . . . . . . . . . . . . . 67Introduction . . . . . . . . . . . . . . . . . . . . . . . . . . . . . . . . . . . . . . . . . . . . . . . . 67
INT3000 Cordless Telephone User Guide

INT3000 Cord
CONTENTS PAGE
What the Administrators Can Do for You . . . . . . . . . . . . . . . . . . . . . . . . 67Troubleshooting . . . . . . . . . . . . . . . . . . . . . . . . . . . . . . . . . . . . . . . . . . . . 68Frequently Asked Questions (FAQs) . . . . . . . . . . . . . . . . . . . . . . . . . . .69Default Feature Codes . . . . . . . . . . . . . . . . . . . . . . . . . . . . . . . . . . . . . . . 71INDEX . . . . . . . . . . . . . . . . . . . . . . . . . . . . . . . . . . . . . . . . . . . . . . . . . . 75
VOICE MAIL FLOW CHART . . . . . . . . . . . . . . . . . . . . . . . . . . . . . . . . 79
viiless Telephone User Guide
Important Safety Instructions
viii
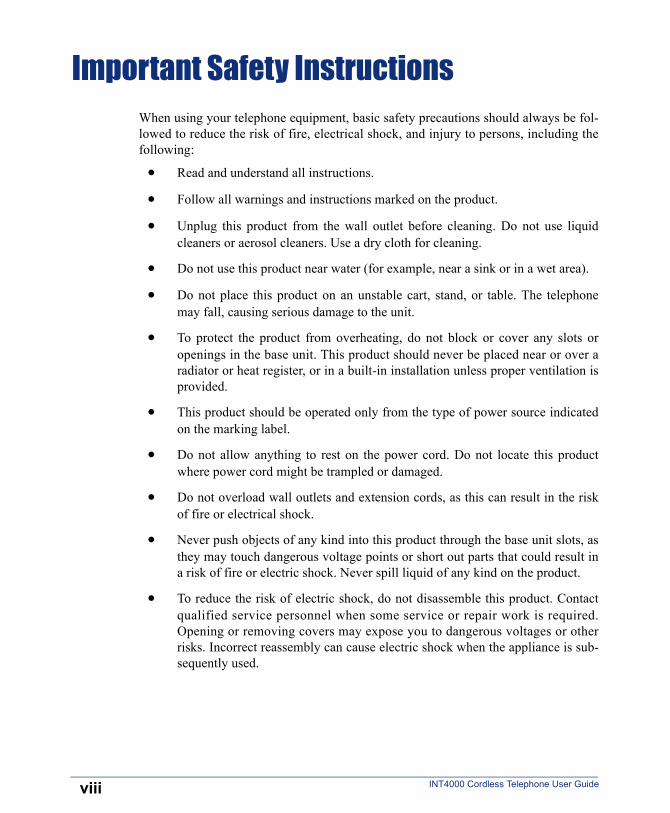
When using your telephone equipment, basic safety precautions should always be fol-lowed to reduce the risk of fire, electrical shock, and injury to persons, including thefollowing:
• Read and understand all instructions.
• Follow all warnings and instructions marked on the product.
• Unplug this product from the wall outlet before cleaning. Do not use liquidcleaners or aerosol cleaners. Use a dry cloth for cleaning.
• Do not use this product near water (for example, near a sink or in a wet area).
• Do not place this product on an unstable cart, stand, or table. The telephonemay fall, causing serious damage to the unit.
• To protect the product from overheating, do not block or cover any slots oropenings in the base unit. This product should never be placed near or over aradiator or heat register, or in a built-in installation unless proper ventilation isprovided.
• This product should be operated only from the type of power source indicatedon the marking label.
• Do not allow anything to rest on the power cord. Do not locate this productwhere power cord might be trampled or damaged.
• Do not overload wall outlets and extension cords, as this can result in the riskof fire or electrical shock.
• Never push objects of any kind into this product through the base unit slots, asthey may touch dangerous voltage points or short out parts that could result ina risk of fire or electric shock. Never spill liquid of any kind on the product.
• To reduce the risk of electric shock, do not disassemble this product. Contactqualified service personnel when some service or repair work is required.Opening or removing covers may expose you to dangerous voltages or otherrisks. Incorrect reassembly can cause electric shock when the appliance is sub-sequently used.
INT4000 Cordless Telephone User Guide
INT4000 Cord
• Unplug this product from the wall outlet and refer servicing to qualified ser-vice personnel under the following conditions: — When the power supply cord is damaged or frayed.— If liquid has been spilled into the product.— If the product has been exposed to rain or water.— If the product does not operate normally when following the operating
instructions. Adjust only those controls that are covered by the operatinginstructions. Improper adjustment of other controls may result in damage,and will often require extensive work by a qualified technician to restorethe product to normal operation.
— If the product has been dropped, or the cabinet has been damaged.— If the product exhibits a distinct change in performance.
• Do not use the telephone to report a gas leak in the vicinity of the leak.
ixless Telephone User Guide

WarningsCAUTION
Changes or modifications to this product not expressly approved by Inter-Tel, oroperation of this product in any way other than as detailed by this user guide,could void your authority to operate this product.
x
Unplug all electrical appliances when you know an electrical storm is approaching.Lightning can pass through your household wiring and damage any device connectedto it. This phone is no exception.
NOTE: Do not attempt to unplug any appliance during an electrical storm.
RangeThe INT4000 cordless phone is designed to achieve the maximum possible range bytransmitting and receiving according to the highest specifications set forth by the FCCand IC. The INT4000 is rated to operate at a maximum distance with the qualificationthat the range depends upon the environment in which the telephone is used. Manyfactors limit range, and it would be impossible to include all the variables in the rat-ing. The maximum range rating of this phone is meant to be used as a means of com-parison against other range claims.
Radio InterferenceRadio interference may occasionally cause buzzing and humming in your cordlesshandset, or clicking noises in the base unit. This interference is caused by externalsources, such as TV, refrigerator, vacuum cleaner, fluorescent lighting, computerequipment, or electrical storm. Your unit is NOT DEFECTIVE. If these noises con-tinue and are too distracting, please check around your office to see what appliancesmay be causing the problem. In addition, we recommend that the base not be pluggedinto a circuit that also powers a major appliance because of the potential for interfer-ence. Be certain that the antenna on the unit is fully extended when needed.In the unlikely event that you consistently hear other voices or distracting transmis-sions on your phone, you may be receiving radio signals from another cordless tele-phone or other source of interference. If you cannot eliminate this type ofinterference, you need to change to a different channel.
NOTICEThe INT4000 is not waterproofed. To reduce the risk of fire, electrical shock, ordamage to the unit, DO NOT expose this unit to rain or moisture.
INT4000 Cordless Telephone User Guide
INT4000 Cord
Finally, it should be noted that some cordless telephones operate at frequencies thatmay cause interference to nearby TVs and VCRs. To minimize or prevent such inter-ference, the base of the cordless telephone should not be placed near or on top of aTV or VCR. If interference is experienced, moving the cordless telephone fartheraway from the TV or VCR will often reduce or eliminate the interference.
More Than One Cordless TelephoneIf you want to use more than one cordless telephone in your office, they must operateon different channels. Press the channel button to select a channel that provides theclearest communication.
PrivacyCordless phones are radio devices. Communications between the handset and baseunit of your cordless telephone are accomplished by means of radio waves which arebroadcast over the open airways. Because of the inherent physical properties of radiowaves, your communications can be received by radio receiving devices other thanyour own cordless telephone unit. Consequently, any communications using yourcordless telephone may not be private.
Base Units and HandsetsThe handsets are programmed to work a specific base unit. You cannot switch to anew handset or a new base unit without having it reprogrammed by Inter-Tel.
Battery PacksThe battery packs contain rechargeable, sealed, Nickel Cadmium batteries. To reducethe risk of fire or injury to persons by the battery, read and follow these instructions:• Use only the appropriate type and size battery pack specified in this user guide.• Do not dispose of the battery pack in a fire. The cell may explode.• Do not open or mutilate the battery pack. Released electrolyte is corrosive and
may cause damage to the eyes or skin. It may be toxic if swallowed.• Exercise care in handling the battery pack in order not to short the battery with
conducting materials such as rings, bracelets, and keys. The battery or conductormay overheat and cause burns.
• Do not charge the battery pack used in this telephone in any charger other thanthe one provided with it. Using another charger may damage the battery, or causethe battery to explode.
• Observe proper polarity orientation between the battery pack and battery charger.• Do not short circuit the battery pack.
xiless Telephone User Guide

xii
INT4000 Cordless Telephone User Guide
FIND
IN
Finding Your Way
G YO
UR
WAY
INT4000 Cord
SECTION CONTENTS PAGEWelcome . . . . . . . . . . . . . . . . . . . . . . . . . . . . . . . . . . . . . . . . . . . . . . . . . . . 2About This Guide . . . . . . . . . . . . . . . . . . . . . . . . . . . . . . . . . . . . . . . . . . . . 3About Your Phone. . . . . . . . . . . . . . . . . . . . . . . . . . . . . . . . . . . . . . . . . . . . 3
Dialpad and Indicators . . . . . . . . . . . . . . . . . . . . . . . . . . . . . . . . . . . . 4Basic Message Display Functions . . . . . . . . . . . . . . . . . . . . . . . . . . . 5Basic Button Functions. . . . . . . . . . . . . . . . . . . . . . . . . . . . . . . . . . . . 5Display . . . . . . . . . . . . . . . . . . . . . . . . . . . . . . . . . . . . . . . . . . . . . . . . 6
Installing the INT4000 . . . . . . . . . . . . . . . . . . . . . . . . . . . . . . . . . . . . . . . . 7Selecting the Location . . . . . . . . . . . . . . . . . . . . . . . . . . . . . . . . . . . . 7Connecting the Telephone Cord . . . . . . . . . . . . . . . . . . . . . . . . . . . . 7Tone/Pulse Switch . . . . . . . . . . . . . . . . . . . . . . . . . . . . . . . . . . . . . . . 7Connecting Power to the Base and Charger Units. . . . . . . . . . . . . . . 8Wall Mount Installation . . . . . . . . . . . . . . . . . . . . . . . . . . . . . . . . . . . . 9Attaching the Belt Clip to the Handset . . . . . . . . . . . . . . . . . . . . . . . 13Installing the Handset Battery Pack . . . . . . . . . . . . . . . . . . . . . . . . . 14Charging the Handset Battery Pack . . . . . . . . . . . . . . . . . . . . . . . . . 15Low Battery Indicator . . . . . . . . . . . . . . . . . . . . . . . . . . . . . . . . . . . . 15Cleaning Charging Unit Contacts . . . . . . . . . . . . . . . . . . . . . . . . . . . 15
About Telephone System . . . . . . . . . . . . . . . . . . . . . . . . . . . . . . . . . . . . 16About Voice Mail . . . . . . . . . . . . . . . . . . . . . . . . . . . . . . . . . . . . . . . . . . . . 16
1less Telephone User Guide

WELCOME
2
Congratulations on your purchase of the Inter-Tel INT4000 cordless telephone. TheINT4000 is designed to work on an Inter-Tel telephone system to provide you withaccess to multiple lines, Caller ID, and other phone system features.To help familiarize you with the features of the INT4000, read this user guide thor-oughly. Your INT4000 includes the following items: • Base Unit • Handset • Telephone Cord • Two AC Adapters • Rechargeable Battery (750 mAh Ni-MH) • Belt Clip • Charging Unit • Charging Unit Wall Mount • Wall Plate Adapter • This User Guide
NOTE: If any of these items are missing or damaged, contact your System Administra-tor. If your INT4000 is not performing to your expectations, try the simple steps listed inthe Troubleshooting section of this user guide. If you are still unable to resolve the prob-lem, contact your System Administrator.
INT4000 Cordless Telephone User Guide

FIND
ABOUT THIS GUIDE
ING
YOU
R W
AY
INT4000 Cord
This guide contains instructions for using the INT4000 cordless telephone on theInter-Tel telephone and voice mail systems. To help you find information morequickly, this guide is divided into four separate sections, as indicated by the tabs.These sections include the following: • Finding Your Way: This section provides installation instructions and illustra-
tions for your phone. It includes figures and general information designed to helpyou find what you need.
• Getting Started: If you need to make a call, this is the section for you. It notonly includes basic phone and voice mail information, but it provides instructionson how to perform everyday tasks, such as answering calls, making calls, access-ing voice mail, etc.
• Moving On: Once you’ve got the basics down, it’s time to move on to theadvanced features. In this section, you’ll learn how to program speed-dial num-bers, use remote messaging, define secondary extensions, and access other help-ful features.
• Learning More: This is the place where the answers are. With a FrequentlyAsked Question (FAQ) section and additional information about the phone andvoice mail systems, you can perform basic troubleshooting and learn more aboutthe system.
In addition, this guide contains an index, a list of default feature codes, and a voicemail flow chart for easy reference.
ABOUT YOUR PHONE
The INT4000 cordless phone has the following features:• Interference avoidance with other 900MHz systems• 900 MHz narrow band FM• Auto scan channel selection• 30 simultaneous conversations• 16-digit, 2-line LCD display• Maximum 7-hour talk time• Maximum 5-day standby time• 3 ring tones and vibrate ringer• Headset jack with belt clip for hands-free operation• Wall mountableThe following pages describe the basic functions of the dialpad buttons and messagedisplay indicators.3less Telephone User Guide
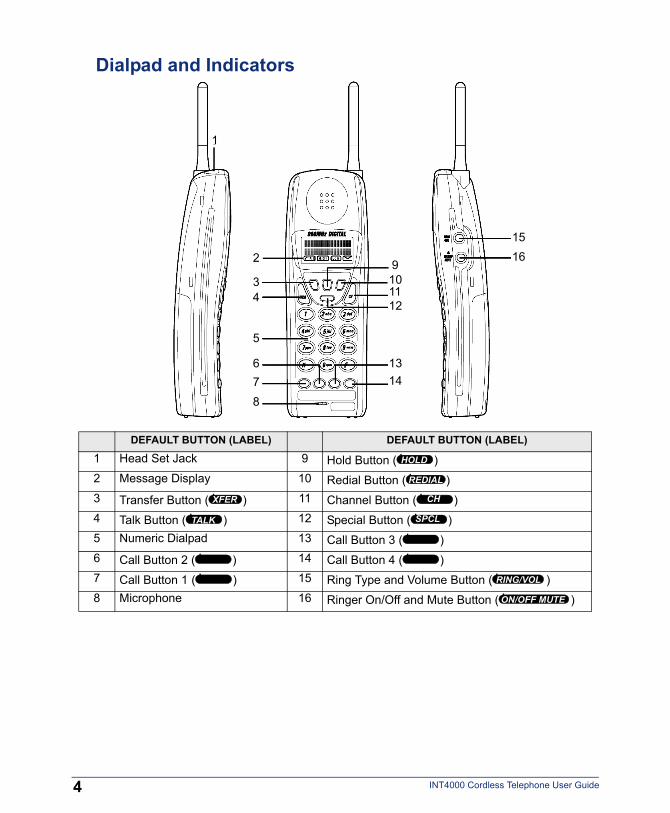
Dialpad and Indicators
DEFAULT BUTTON (LABEL) DEFAULT BUTTON (LABEL)1 Head Set Jack 9 Hold Button ( )2 Message Display 10 Redial Button ( ) 3 Transfer Button ( ) 11 Channel Button ( ) 4 Talk Button ( ) 12 Special Button ( ) 5 Numeric Dialpad 13 Call Button 3 ( )6 Call Button 2 ( ) 14 Call Button 4 ( )7 Call Button 1 ( ) 15 Ring Type and Volume Button ( ) 8 Microphone 16 Ringer On/Off and Mute Button ( )
1
2
34
5
678
9101112
1314
1516
HOLD
REDIAL
XFER CH
TALK SPCL
RING/VOL
ON/OFF MUTE
4 INT4000 Cordless Telephone User Guide
FIND
ING
YOU
R W
AY
Basic Message Display Functions
Basic Button Functions
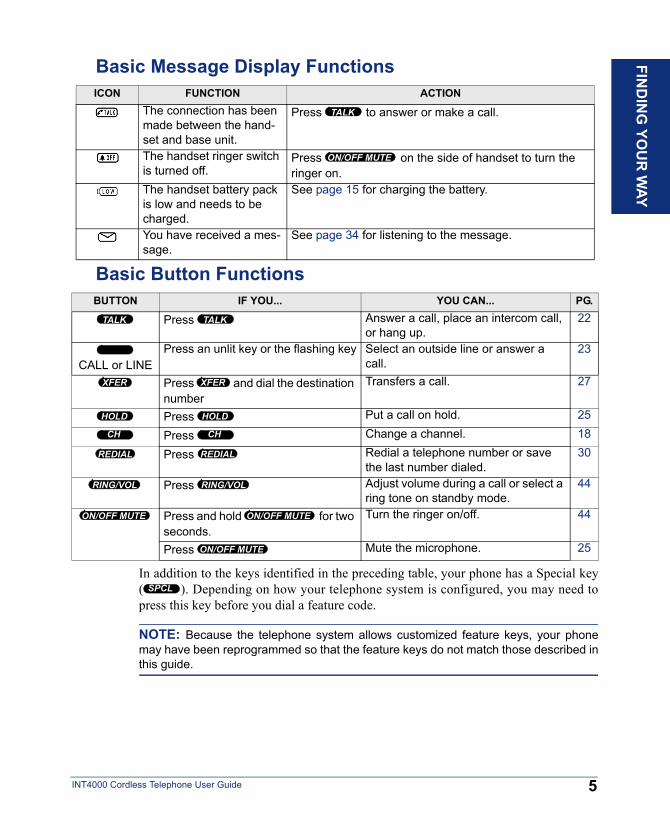
ICON FUNCTION ACTIONThe connection has been made between the hand-set and base unit.
Press to answer or make a call.
The handset ringer switch is turned off.
Press on the side of handset to turn the ringer on.
The handset battery pack is low and needs to be charged.
See page 15 for charging the battery.
You have received a mes-sage.
See page 34 for listening to the message.
BUTTON IF YOU... YOU CAN... PG.
Press Answer a call, place an intercom call, or hang up.
22
CALL or LINEPress an unlit key or the flashing key Select an outside line or answer a
call.23
Press and dial the destination number
Transfers a call. 27
Press Put a call on hold. 25
Press Change a channel. 18
Press Redial a telephone number or save the last number dialed.
30
Press Adjust volume during a call or select a ring tone on standby mode.
44
Press and hold for two seconds.
Turn the ringer on/off. 44
Press Mute the microphone. 25
TALK
ON/OFF MUTE
TALK TALK
XFER XFER
HOLD HOLD
CH CH
REDIAL REDIAL
RING/VOL RING/VOL
ON/OFF MUTE ON/OFF MUTE
ON/OFF MUTE
INT4000 Cord
In addition to the keys identified in the preceding table, your phone has a Special key( ). Depending on how your telephone system is configured, you may need topress this key before you dial a feature code.
NOTE: Because the telephone system allows customized feature keys, your phonemay have been reprogrammed so that the feature keys do not match those described inthis guide.
SPCL
5less Telephone User Guide

Display
6
Your INT4000 has two lines of display with 16 characters per line. When your phoneis idle, this display shows your extension number, your username, the time of day, andthe date. At other times, it may display reminder messages, Do-Not-Disturb (DND)messages, numbers dialed, call sources, elapsed time of calls, current call costs, errormessages, etc.Because the display can only support 16 characters, you may see a few abbreviations.The most commonly used abbreviations are provided in the table below.
ACCT CODE Account CodeCNF ConferenceDEST DestinationDIR DirectoryDND Do-Not-DisturbEXT ExtensionMSG MessageRCL RecallSPKR SpeakerSPKRPHN SpeakerphoneSTN SPD Station Speed DialSYS SPD System Speed DialTFR TransferTG Trunk Group (a group of outside lines)TRNK Trunk (an outside line)
INT4000 Cordless Telephone User Guide

FIND
ING
INSTALLING THE INT4000Selecting the Location
YOU
R W
AY
INT4000 Cord
Select a location for the INT4000 that avoids excessive heat or humidity. The baseunit of your INT4000 can be placed on a desk or tabletop near a standard 120V ACoutlet and telephone line jack. The base unit can also be mounted on a standard wallplate using the included wall plate adapter. Keep the base unit and handset away fromsources of electrical noise (motors, fluorescent lighting, computers).
Connecting the Telephone Cord
Plug the telephone line cord from the base unit into a telephone system port or a stan-dard analog telephone line.TO TELEPHONE JACKBASE UNIT
Tone/Pulse Switch
Ensure that the Tone/Pulse switch on the back of the base unit is in the Tone position.NOTE: Most systems are Tone dialing. Check with your System Administrator if youare not sure whether your system is Tone or Pulse dialing.
BACK OF BASE UNIT
7less Telephone User Guide

Connecting Power to the Base and Charger Units
8
Connect the smaller AC adapter with the yellow ring on the connector to the yellowjack on the back of the battery charger, as shown below.
Connect the other AC adapter to the back of the base unit, as shown below.
NOTE: Route the power cord where it will not create a trip hazard, or where it couldbecome worn and create a fire or other electrical hazard.
BATTERY CHARGER
AC ADAPTER
BASE UNIT
INT4000 Cordless Telephone User Guide

FIND
Wall Mount Installation
ING
YOU
R W
AY
INT4000 Cord
Standard Wall Plate MountingYour INT4000 is designed to be mounted on a standard wall plate. To attach the wall mount stand to the base unit:1. Slide the wall mount stand into the notches at
the top of the base unit, rotate the wall mountstand down and snap it into place, as shown onthe right.
2. If you haven’t done so, plug the AC adapter intothe base unit as previously described.
3. Place the AC adapter cord inside the moldedchannel of the wall mount stand, as shown onthe right.
4. Plug one end of the telephone cord into theLINE jack on the base unit. Then place the tele-phone cord inside the molded channel(s) on thebottom of the wall mount stand.
5. Plug the other end of the telephone cord into themodular wall jack.
6. Place the base unit on the posts of the wall plateand push down until it's firmly seated, as shownon the right.
7. Plug the AC adapter into a standard 120V ACwall outlet.
NOTE: Do not use an outlet controlled by a wallswitch.
WALL MOUNT STAND
9less Telephone User Guide

10
Direct Wall MountingIf you do not have a standard wall plate, you can mount your phone directly on a wall.Before mounting your phone, consider the following: • Select a location away from electrical cables, pipes, or other items behind the
mounting location that could cause a hazard when inserting screws into the wall. • Ensure that the wall material is capable of supporting the weight of the base unit. • Use #10 screws with anchoring devices suitable for the wall material where the
base unit will be placed.To mount the base unit on a wall:1. Insert two mounting screws 3 15/16 inches apart. Allow about 3/
16 of an inch between the wall and screw heads for mounting thephone, as shown on the right.
2. Plug and secure the AC adapter cord by following steps 2 and 3on the previous page.
3. Plug one end of the telephone line cord into the LINE jackon the base unit. Then place the telephone cord inside themolded channel(s) on the bottom of the wall mount stand.
4. Place the base unit on the posts of the wallscrews and push down until it’s firmlyseated, as shown on the right.
5. Plug the other end of the short telephonecord into a telephone wall jack.
6. Plug the AC adapter into a standard 120VAC wall outlet by following step 7 on theprevious page.
INT4000 Cordless Telephone User Guide
FIND
ING
YOU
R W
AY
INT4000 Cord
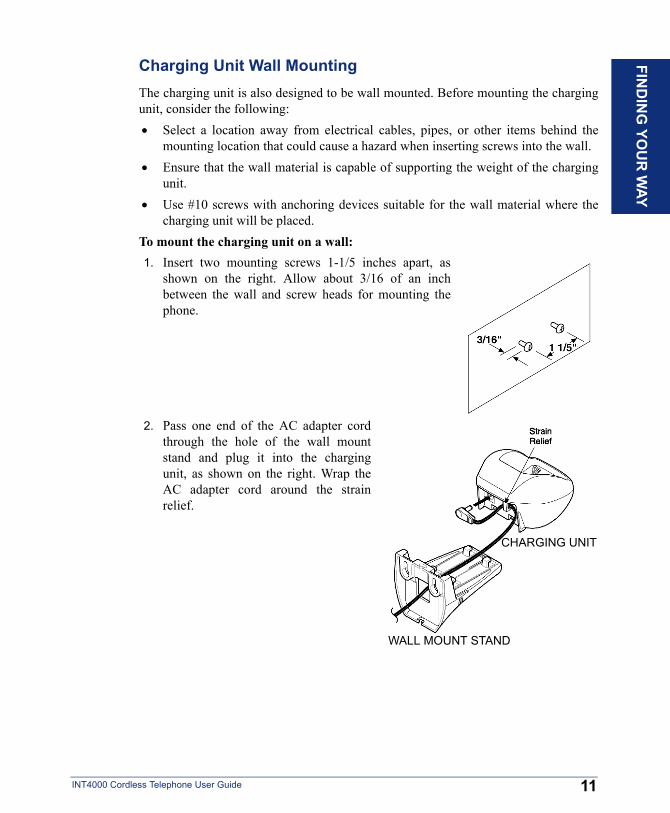
Charging Unit Wall MountingThe charging unit is also designed to be wall mounted. Before mounting the chargingunit, consider the following: • Select a location away from electrical cables, pipes, or other items behind the
mounting location that could cause a hazard when inserting screws into the wall. • Ensure that the wall material is capable of supporting the weight of the charging
unit. • Use #10 screws with anchoring devices suitable for the wall material where the
charging unit will be placed.To mount the charging unit on a wall:1. Insert two mounting screws 1-1/5 inches apart, as
shown on the right. Allow about 3/16 of an inchbetween the wall and screw heads for mounting thephone.
2. Pass one end of the AC adapter cordthrough the hole of the wall mountstand and plug it into the chargingunit, as shown on the right. Wrap theAC adapter cord around the strainrelief.
WALL MOUNT STAND
CHARGING UNIT
11less Telephone User Guide
12
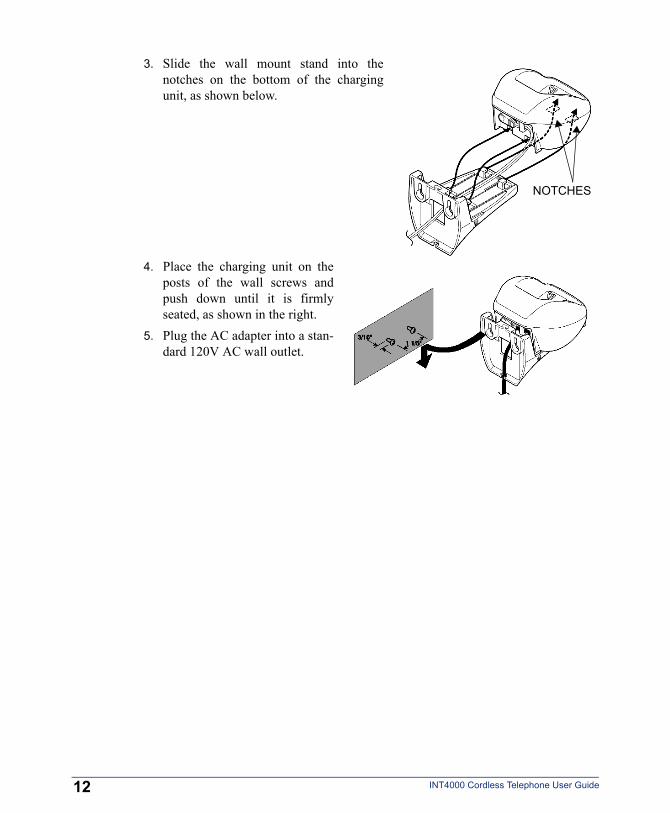
3. Slide the wall mount stand into thenotches on the bottom of the chargingunit, as shown below.
4. Place the charging unit on theposts of the wall screws andpush down until it is firmlyseated, as shown in the right.
5. Plug the AC adapter into a stan-dard 120V AC wall outlet.
NOTCHES
INT4000 Cordless Telephone User Guide
FIND
Attaching the Belt Clip to the Handset
ING
YOU
R W
AY
INT4000 Cord
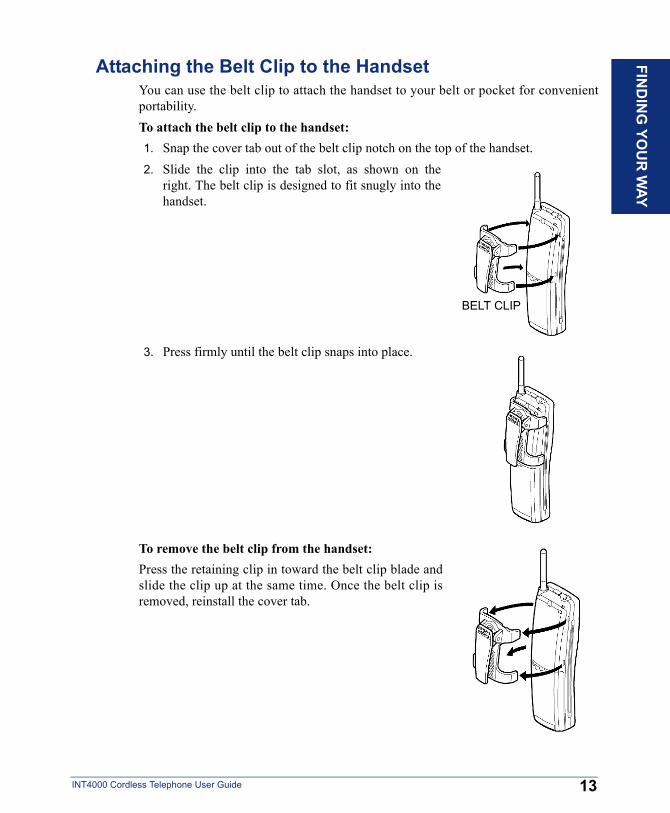
You can use the belt clip to attach the handset to your belt or pocket for convenientportability.To attach the belt clip to the handset:1. Snap the cover tab out of the belt clip notch on the top of the handset.2. Slide the clip into the tab slot, as shown on the
right. The belt clip is designed to fit snugly into thehandset.
3. Press firmly until the belt clip snaps into place.
To remove the belt clip from the handset:Press the retaining clip in toward the belt clip blade andslide the clip up at the same time. Once the belt clip isremoved, reinstall the cover tab.
BELT CLIP
13less Telephone User Guide
Installing the Handset Battery Pack
14
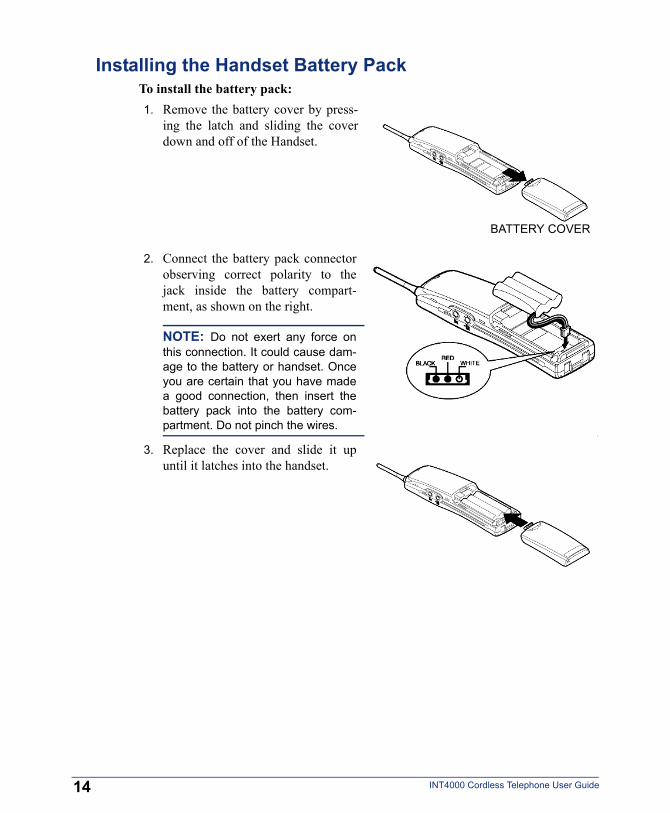
To install the battery pack:1. Remove the battery cover by press-
ing the latch and sliding the coverdown and off of the Handset.
2. Connect the battery pack connectorobserving correct polarity to thejack inside the battery compart-ment, as shown on the right.
NOTE: Do not exert any force onthis connection. It could cause dam-age to the battery or handset. Onceyou are certain that you have madea good connection, then insert thebattery pack into the battery com-partment. Do not pinch the wires.
3. Replace the cover and slide it upuntil it latches into the handset.
BATTERY COVER
INT4000 Cordless Telephone User Guide

FIND
Charging the Handset Battery Pack
ING
YOU
R W
AY
INT4000 Cord
To charge the battery pack:1. Place the handset in the front slot of the battery charger.2. Verify the CHARGE indicator lights. If the CHARGE
indicator does not lit, check to see that the AC adapter isplugged in, and that the handset is making good contactwith the battery charger contacts.
NOTE: If you are using the INT4000 for the first time, fullycharge the rechargeable Ni-MH battery pack for five hours with-out interruption.
CHARGEINDICATOR
Low Battery Indicator
When the battery pack in the handset is low and needs tobe charged, the LOW message appears on the display.The following table shows how to handle the INT4000when the LOW message is displayed.ON A CALL IN STANDBY MODE
All buttons and functions are available. None of the buttons operate.Handset beeps once every three seconds. Handset beeps every 15 seconds for
three minutes.Complete your call as quickly as possible. Cannot make call nor receive a call.Replace battery pack within 20 seconds to continue call.
Replace battery pack before making a call.
Cleaning Charging Unit Contacts
To maintain a good charge, it is important to clean allcharging contacts on the handset and charging unit aboutonce a month. Use a pencil eraser or other contact cleanerto clean the battery charging contacts. Do not use any liq-uids or solvents.15less Telephone User Guide
ABOUT TELEPHONE SYSTEM
16
As you can see, your INT4000 and Inter-Tel telephone system come equipped with alot of “bells and whistles.” To help you understand what everything means, it is rec-ommended that you read the following information before you use your phone: • Your telephone system may be programmed for one or two dial tones. Systems
with two dial tones have one for intercom calls and one for outside calls. • Many features “time out” if you wait too long before performing the next step. If
this happens, you must hang up and start again. • If you hear four fast tones or repeating fast tones, you have pressed an invalid key
combination, tried to select a restricted line, dialed a restricted or invalid number,dialed too slowly between digits, or waited too long before performing the nextstep. Hang up and try again.
ABOUT VOICE MAIL
Voice mail is an application that is part of the Inter-Tel Voice Processor. With thevoice mail application, you and other callers can send and receive recorded messagesfrom any station or touchtone telephone. To use this and other features, each user (youincluded) is assigned a “voice mailbox,” which usually corresponds to a valid exten-sion number. You can, however, have an “unassociated” mailbox that does not corre-spond to an extension. Unassociated mailboxes are typically used for agents or otherpersonnel who don’t have a permanent office.With your voice mailbox, you can use personal or system greetings to let callers knowif you are out of town, on a call, etc. (see page 45). If a caller reaches your voice mail-box, they can leave a message, hang up, or access an attendant.In addition, the Voice Mail Administrator can program the name for “group lists” ofmailboxes. With these lists, you can send a message to a group of people by enteringone number instead of everyone’s individual mailbox number.NOTE: You cannot cancel unheard (unretrieved) messages that are sent using grouplists (see page 36).
INT4000 Cordless Telephone User Guide

Getting Started
GETTIN
G STA
RTED
INT4000 Cord
SECTION CONTENTS PAGEIntroduction . . . . . . . . . . . . . . . . . . . . . . . . . . . . . . . . . . . . . . . . . . . . . . . 18Starting the Phone . . . . . . . . . . . . . . . . . . . . . . . . . . . . . . . . . . . . . . . . . . 18Setting Up Voice Mail . . . . . . . . . . . . . . . . . . . . . . . . . . . . . . . . . . . . . . . . 19
Initializing Your Mailbox . . . . . . . . . . . . . . . . . . . . . . . . . . . . . . . . . . 19Recording Your Personal Greetings. . . . . . . . . . . . . . . . . . . . . . . . . 20Recording Your Voice Mail Directory Name. . . . . . . . . . . . . . . . . . . 21
Making and Receiving Calls . . . . . . . . . . . . . . . . . . . . . . . . . . . . . . . . . .22Intercom Calls . . . . . . . . . . . . . . . . . . . . . . . . . . . . . . . . . . . . . . . . . 22Outside Calls . . . . . . . . . . . . . . . . . . . . . . . . . . . . . . . . . . . . . . . . . . 23Emergency Calls . . . . . . . . . . . . . . . . . . . . . . . . . . . . . . . . . . . . . . . 24Call Waiting . . . . . . . . . . . . . . . . . . . . . . . . . . . . . . . . . . . . . . . . . . . 24
Placing Calls On Hold . . . . . . . . . . . . . . . . . . . . . . . . . . . . . . . . . . . . . . . 25Muting the Microphone. . . . . . . . . . . . . . . . . . . . . . . . . . . . . . . . . . . . . . . 25Placing Conference Calls . . . . . . . . . . . . . . . . . . . . . . . . . . . . . . . . . . . . 26Transferring Calls . . . . . . . . . . . . . . . . . . . . . . . . . . . . . . . . . . . . . . . . . . 27
To Another Extension. . . . . . . . . . . . . . . . . . . . . . . . . . . . . . . . . . . . 27To Voice Mail . . . . . . . . . . . . . . . . . . . . . . . . . . . . . . . . . . . . . . . . . . 27To an Outside Number . . . . . . . . . . . . . . . . . . . . . . . . . . . . . . . . . . . 27To Pick Up (Reverse Transfer) a Call . . . . . . . . . . . . . . . . . . . . . . . 27
Forwarding Calls . . . . . . . . . . . . . . . . . . . . . . . . . . . . . . . . . . . . . . . . . . . 28Manual Call Forwarding . . . . . . . . . . . . . . . . . . . . . . . . . . . . . . . . . . 28Redirect Call . . . . . . . . . . . . . . . . . . . . . . . . . . . . . . . . . . . . . . . . . . . 29
Redialing a Number . . . . . . . . . . . . . . . . . . . . . . . . . . . . . . . . . . . . . . . . . 30Displaying Information on Your Phone . . . . . . . . . . . . . . . . . . . . . . . . . 31
Date, Time, Name, and Extension Number . . . . . . . . . . . . . . . . . . . 31Outside Party’s Name/Number. . . . . . . . . . . . . . . . . . . . . . . . . . . . . 31
Using a Headset . . . . . . . . . . . . . . . . . . . . . . . . . . . . . . . . . . . . . . . . . . . . 32Accessing Your Mailbox . . . . . . . . . . . . . . . . . . . . . . . . . . . . . . . . . . . . . 33Using Voice Mail Messages . . . . . . . . . . . . . . . . . . . . . . . . . . . . . . . . . . . 34
Listening to Messages . . . . . . . . . . . . . . . . . . . . . . . . . . . . . . . . . . . 34Undeleting Messages. . . . . . . . . . . . . . . . . . . . . . . . . . . . . . . . . . . . 36Sending Messages. . . . . . . . . . . . . . . . . . . . . . . . . . . . . . . . . . . . . . 37Canceling Unheard Messages . . . . . . . . . . . . . . . . . . . . . . . . . . . . . 38
Using Do-Not-Disturb Mode . . . . . . . . . . . . . . . . . . . . . . . . . . . . . . . . . .39Using Reminder Messages . . . . . . . . . . . . . . . . . . . . . . . . . . . . . . . . . . . 41
17less Telephone User Guide

INTRODUCTION
18
Now that you know what your INT4000 can do, it’s time to start using it. In this sec-tion, you’ll learn how to make and receive calls, transfer calls, retrieve voice mailmessages, and much more.
STARTING THE PHONE
When you pick up the handset and press , theACQUIRING LINK message appears, as shown on theright.After the connection has been made between the handsetand base unit, the TALK icon appears on the display. Thenthe screen will go into standby mode and the phone isready to use.Or, you may see one of the following: • NO SERVICE: Indicates that there is no connection to the base unit, and you
hear an error tone. • SYSTEM BUSY: Indicates that the channel is busy, and you hear an error tone.You must have a connection between the handset and the base unit to perform anyoperation. If the handset does not respond when you attempt to place a call or enter afeature code, press to acquire a link.
NOTE: If you have more than one cordless telephone in your office, they must operateon different channels. Press to select a channel that provides the clearest com-munication.
TALK
TALK
CH
INT4000 Cordless Telephone User Guide
SETTING UP VOICE MAIL
INT4000 Cord
To begin using your voice mail box you will need to complete a few basic set-up pro-cedures to initialize your mailbox, customize your personal greetings, and record yourvoice mail directory name. See page 16 for additional voice mail options.
Initializing Your Mailbox
GETTIN
G STA
RTED
The first thing you should do is initialize your mailbox. This allows you to: • Change the default password number to a personal password • Record a name to identify yourself in the company directory • Listen to the voice mail introductionTo initialize your mailbox: 1. Dial the voice mail extension number. (You hear the main menu.)
NOTE: If you don’t know what the voice mail extension number is, check with yourSystem Administrator.
2. Press to identify yourself as a subscriber. 3. Enter your mailbox number and default password.
NOTE: Your mailbox number is your default password.
4. If you want a password, enter a new password using digits 0-9 (up to 12 digits).Then press . Voice mail plays back your password.If you do not want to use a password, just press .
5. Press to accept the entry or press to re-enter your password. The sys-tem prompts you to record your directory name.
6. After the tone, record your first and last name. When finished, press . 7. Do one of the following:
• Press again to accept the name. • Press to replay the name you just recorded. • Press to add to your name. • Press to erase and re-record your name.
The system then plays a prompt that introduces you to the basic voice mail features.You can skip this introduction by pressing , if desired.
*
#
#
# 3
#
#
1
2
3
#
19less Telephone User Guide
Recording Your Personal Greetings
20
You can store two different personal greetings in your voice mailbox: a primary andan alternate. You can then select which greeting you want played when a callerreaches your voice mailbox. Because the purpose of this greeting is to tell callers whythey have reached your voice mailbox, you should include the following information:• Whether or not you are in the office and where you can be reached• When you will be returning calls• For callers who do not wish to leave a message, how to exit (press to return
to the operator)The following are some sample greetings to help you plan your message:• Primary Greeting: Hello, this is __________. I am either on another line or
away from my desk and cannot take your call at this time. If you need to speak tosomeone immediately, please dial zero now. Otherwise, please leave a detailedmessage, and I will return your call as soon as possible. Thank you.
• Alternate Greeting: Hello, this is __________. I will be away from the officefrom day/date until day/date. If you need to speak to someone immediately,please dial zero now. Otherwise, please leave a detailed message, and I willreturn your call when I return. Thank you.
To change your personal greeting:1. Access your mailbox as described on page 33. 2. Press to select the Personal Options Menu. 3. Press . 4. Do one of the following:
• Press to record and/or enable your primary greeting. • Press to record and/or enable your alternate greeting. • Press to enable the system default mailbox greeting.
5. If you pressed , continue to the next step.If you pressed or , the current greeting is played (if one exists). You canthen do one of the following: • Press to accept the greeting. • Press to replay the greeting. • Press to add to the greeting. • Press to erase and re-record the greeting. • Press to exit without changing your greeting.
6. Hang up.
0
4
1
1
2
3
3
1 2
#
1
2
3
*
INT4000 Cordless Telephone User Guide

Recording Your Voice Mail Directory Name
GETTIN
G STA
RTE
INT4000 Cord
Your recorded name is used to identify you in the voice mail directory and to verifyyour mailbox number when messages are addressed to you.To change your directory name:1. Access your mailbox as described on page 33.2. Press to select the Personal Options Menu. 3. Press . Your current name is played. (Press to replay your recorded
name.)4. Press to erase and re-record your name.5. When you hear a tone, record your first and last name, then press .6. Do one of the following:
• Press again to accept your recorded name. • Press to replay your recorded name. • Press to add to your name. • Press to erase and re-record your name.
7. Hang up.
4
2 1
3
#
#
1
2
3
D
21less Telephone User Guide
MAKING AND RECEIVING CALLS
22
Making and receiving calls is the basic purpose of any phone. With your INT4000,you can make/receive intercom and outside calls, and make emergency calls.
Intercom Calls
Your extension number allows other people to place intercom calls to you, withoutany extra codes. And, because every phone in your phone system is assigned anextension number, you can call other people in your system quickly and easily.NOTE: Ask your System Administrator for a list of extensions.
Placing Intercom CallsTo place an intercom call: 1. Press and dial an extension number. 2. If your call goes through handsfree to a phone’s speaker, speak after you hear a
double tone.If you hear continuous ringing, wait for the call to be answered.
3. When finished, press .To place a non-handsfree call that will ring at the other phone until answered:Press before dialing the extension number. To program your phone to always send non-handsfree calls using the Ring Inter-com Always feature: Dial . The current status is shown.To leave a message if there is no answer or the phone is busy:Press and dial . Then hang up or wait for their message center toanswer. (See page 34 for more message options.)
NOTE: This option appears only if the called phone has a voice mailbox.
If the phone is busy when you place an intercom call, you can do any of the fol-lowing: • To stay on the line and wait for the phone to become available: Do not hang up.
After a system timer expires, you hear music until the phone is available. (Youcannot do this if the called phone is in DND mode.)
• To request a callback (queue on to the phone): Press and hang up. When thephone is available, your phone rings. (To cancel the queue request before the call-back, press .)
TALK
TALK
#
3 7 7
SPCL 3 6 5
6
6
INT4000 Cordless Telephone User Guide

GETTIN
G ST
INT4000 Cord
• To use the Off-Hook Voice Announce feature (if the called phone is programmedfor it): Do not hang up. After the busy signals stop, you are automatically con-nected and may speak. (If you hear music or if the phone is in DND mode, youroff-hook voice announce call will not go through.) This allows you to talk to thephone user on his or her handsfree speakerphone, even though the user alreadyhas a call in progress on the handset. This feature is not available if your phonehas the Ring Intercom Always feature enabled.
Receiving Intercom CallsTo receive an intercom call:Press or lift the handset out of the battery charger.To redirect a ringing call to another extension or to an outside number: 1. Press and dial . 2. Enter the extension or outside number to which you want to redirect the call. See
page 29 for more information.
TALK
SPCL 3 3 1
AR
T
Outside Calls
ED
With outside calls, you can talk to people who aren’t members of your phone system.When you make an outside call, however, you must dial any area codes or long dis-tance digits that your telephone company requires.
Placing Outside CallsTo place an outside call: 1. If necessary, lift the handset from its battery charger. 2. Press the CALL button. 3. Dial the desired number.
NOTE: If you see a request for an account code and hear a single beep, you mustdial an account code before you can place your call (see page 57).
4. When finished with the call, press .To request a callback (queue on to the line) if all outgoing lines are busy when youtry to call out: 1. When you hear busy signals, press and . 2. When your phone rings, press and wait for the other party to answer.
TALK
6 TALK
TALK
23less Telephone User Guide

24
To cancel the queue request before your phone rings:Press .When dialing the number, you can do one of the following:• Use the speed-dial directory, see page 58.• Use the Station Speed-Dial feature, see page 52.• Use the System Speed-Dial feature, see page 54.• Redial the last number you dialed, see page 30.
Receiving Outside CallsTo receive an outside call:Press or the CALL button. Or, lift the handset out of the battery charger.To redirect a ringing call to another extension or to an outside number:— Press and dial .— Enter the extension or outside number to which you want to redirect the call. See
page 29 for more information.
6
TALK
SPCL 3 3 1
Emergency Calls
To make an emergency call:Press the CALL button and dial to automatically place a call to the pre-set emergency number.9 1 1
Call Waiting
If you receive a call while you are already on another call, you will hear a “call wait-ing” tone and/or you will see a display.To respond to a waiting call:• To end the current call: Press . The waiting call rings in. Answer by press-ing again. • To place the current call on hold: Press . Then press . When the
waiting call rings, press again.• To have the caller hear DND signals: Press and . (See page 39 for
more information about DND mode.)
TALKTALK
HOLD TALKTALK
SPCL 6
INT4000 Cordless Telephone User Guide

PLACING CALLS ON HOLD
GETTIN
G STA
RTED
INT4000 Cord
You can place calls on hold in one of two ways: individual or system. • Individual Hold places the call on hold at one phone. It can then be directly
picked up at that phone or it can be picked up at another phone using the CallPickup (Reverse Transfer) feature (see page 27).
• System Hold places the call on hold in the system. You can then pick up the callat any phone that has a flashing button for the call, including the phone thatplaced it on hold.
NOTE: You cannot place intercom calls on system hold.
To place a call on Individual Hold: 1. Press . 2. Press or place another call.To place an outside call on System Hold: 1. Press and dial . 2. Press or place another call.To return to a call that is on hold:Press or the flashing button.
HOLD
TALK
SPCL 3 3 5
TALK
HOLD
MUTING THE MICROPHONE
To mute the microphone so that you can hear the other party, but they cannothear you (this does not put them on hold):Press . While the microphone is muted the TALK ( ) icon in the dis-play flashes. To return to the call:Press .ON/OFF MUTE
ON/OFF MUTE
25less Telephone User Guide
PLACING CONFERENCE CALLS
26
With the Conference feature, you can establish a conference call with up to threeintercom and/or outside parties (four, including you).To place a conference call: 1. While on the first call, press and to put the call on hold. 2. Place an intercom or outside call. To place the call on hold, press and
. (If necessary, repeat this step to place one more call on hold.) 3. Press to join all of the calls together in the conference.During the conference call, you can do the following:• To place the conference on hold: Press . This places the conference on
hold without disconnecting the parties. To return to the conference, press theflashing button.
• To drop out of the conference: Press and , then hang up. Thisremoves your phone from the conference, but leaves the other parties connected.
• To add additional parties to the conference: Do the following:
a. Press and . This leaves the conference parties connected.b. Place a call to the party to be added to the conference.
c. Press and twice to put yourself and the new party into theconference.
• To end the conference and place all parties on individual hold: Press anddial and then press to place all of the parties on individual hold. Youcan then speak to one party at a time by pressing or a flashing button.
• To mute your microphone: Press . This turns your microphone on or offduring the conference. If mute is enabled, you can hear the conferenced parties,but they cannot hear you.
• To transfer the conference to another extension or to voice mail: Press anddial the desired extension number. Then hang up when you are ready to completethe transfer.
SPCL 5
SPCL
5
5
HOLD
SPCL 5
SPCL 5
SPCL 5
SPCL
5 HOLDHOLD
MUTE
XFER
INT4000 Cordless Telephone User Guide

TRANSFERRING CALLS
INT4000 Cord
Although transferring calls is considered a basic function of a phone, your INT4000has many advanced options for this feature. With your phone, you can transfer toanother extension, voice mail, or even an outside line.
To Another Extension
GETTIN
G STA
RTED
1. EITHER, Press .OR, Press and dial to place the call on hold at the otherphone.
2. Dial the desired extension number. 3. Wait for an answer, announce the call, and then hang up.
If the number is busy, there is no answer, or the transfer is refused, press the flash-ing button to return to the caller.
NOTE: If you are receiving a transferred call and the Transfer-To-Connect option isenabled for your phone, you are automatically connected to the transferred caller oncethe transferring party hangs up. If this option is disabled, you must press toanswer the transferred call.
XFER
SPCL 3 4 6
CALL
To Voice Mail
1. Press . 2. Dial the voice mail extension number and press .OR, dial the specific voice mail mailbox and press .
XFER
TALK
TALK
To an Outside Number
1. Press . 2. Select an outgoing line and dial the desired telephone number. 3. Wait for an answer, announce the call, and then press .If the number is busy, there is no answer, or the transfer is refused, press the flash-ing button to return to the caller.
XFER
TALK
To Pick Up (Reverse Transfer) a Call
1. Press or lift the handset and dial .2. Dial the extension or hunt group number where the call is ringing or holding.(See page 64 for more information about hunt groups.)
TALK 4
27less Telephone User Guide
FORWARDING CALLS
28
With the Forwarding feature, you can have calls follow you (e.g., forwarded to a cellphone), or you can redirect calls to a voice mail or other extension.
Manual Call Forwarding
Manual call forwarding allows you to send incoming calls to another extension num-ber. You can even forward calls to outside numbers, if your phone is programmed toallow this.To forward calls: 1. Dial one of the following feature codes:• (Call Forward All Calls): All incoming calls are forwardedwithout ringing at your phone.
• (Call Forward If No Answer): All incoming calls are for-warded if they are not answered before a timer expires.
NOTE: Only the System Administrator can adjust this timer.
• (Call Forward If Busy): When your phone is busy, all incomingcalls are forwarded without ringing at your phone.
• (Call Forward If No Answer or Busy): All incoming calls areforwarded if your phone is busy or if you do not answer, as described above.
2. Do one of the following: • To forward to an outside telephone number: Select an outgoing line and dial
a telephone number. • To forward to an extension number: Dial the extension number. • To forward to your message center: Press MSG.
To cancel any call forward request:Dial and press .
3 5 5
3 5 6
3 5 7
3 5 8
3 5 5 #
INT4000 Cordless Telephone User Guide
Redirect Call
GETTIN
G STA
INT4000 Cord
NOTE: This feature is available only with versions 5.3 and later software.
The Redirect Call feature allows you to forward any call that is ringing on your phonewithout having to answer the call.
NOTE: You cannot redirect calls to an extension that is in DND or to a restricted out-side number.
To redirect a call to an extension number: 1. Press and dial . 2. Dial the extension number.To redirect a call to an outside telephone number: 1. Press and dial . 2. Enter the outside telephone number.
SPCL 3 3 1
SPCL 3 3 1
RTE
AUTOMATIC SYSTEM FORWARDING
D
Automatic System Forwarding allows your System Administrator to route calls basedon the type of call and the status of your telephone. Although you cannot program thepath of a system forward, you can enable or disable this feature on your phone.To enable or disable System Forwarding:Dial .3 5 429less Telephone User Guide
REDIALING A NUMBER
30
Although most phones redial the last number dialed, your System Administrator canprogram your phone to redial the last number saved. To use the Last Number Dialed feature (if enabled):Press . A line is selected automatically, and the number is dialed.To use the Last Number Saved feature (if enabled):• To save the last number dialed: While the phone is idle or while listening to inter-
com dial tone, press .• To redial the saved number: After selecting a line, press . A line is
selected automatically, and the number is dialed.
NOTE: If there is no redial number available, the display shows NO NUMBER TODIAL.
REDIAL
REDIAL
REDIAL
INT4000 Cordless Telephone User Guide

DISPLAYING INFORMATION ON YOUR PHONE
INT4000 Cord
Your INT4000 has two lines of display where you can view information, such as thedate and time or the outside party’s name/number.
Date, Time, Name, and Extension Number
You can temporarily display the system date and time, your username, and yourextension number at any time.To show the date and time display (while on a call, in DND, etc.):Press and dial .SPCL 3 0 0GET
Outside Party’s Name/Number
TING
STAR
TED
NOTE: This feature is available only in versions 4.4 and later software.
If you are currently connected to an outside caller with Caller ID, you can togglebetween displaying the caller’s name and number.To show the outside party’s name/number:Press and dial .
NOTE: If there is no outside party name available, the display shows CANNOTACCESS FEATURE.
SPCL 3 7 9
31less Telephone User Guide
USING A HEADSET
32
With an electret headset, you can talk on the phone handsfree, without using yourspeaker and microphone.
NOTE: If your headset has a power-saver mode, make sure the System Administratorhas the Headset Connect Tone flag enabled in the telephone system. If this flag is notenabled, you may miss the first few seconds of incoming calls.
To connect a headset:Insert the headset plug into the vacant handset jack.To disconnect a headset:Unplug the headset cord from the handset.
INT4000 Cordless Telephone User Guide

ACCESSING YOUR MAILBOX
GETTIN
G STA
RTED
INT4000 Cord
If you have a message waiting in your mailbox, you must access your voice mailboxto retrieve it.
TIP: Generally speaking, pressing during any voice mail operation will advanceyou to the next step. For example, when leaving a voice mail message for another voicemail user, you can press to skip the person’s introductory message and proceeddirectly to the recording phase. Similarly, while listening to messages, you can press
to skip the system-generated voice prompts and proceed directly to the playbackphase. You can also press to cancel or return to the previous menu at any menulevel.
When you access your mailbox, the system may play one of the following messages: • Mailbox almost full or full: If your mailbox is full, no new messages can be
received until you delete waiting or saved messages. • Message count: The system tells you how many messages are waiting to be
heard, if any, and how many are priority messages. • Remote Messaging: The system will indicate whether primary or alternate
Remote Messaging is selected when the Remote Messaging feature is enabled(see page 61). It will also alert you if a programming error has been detected and/or if it encountered busy system resources when attempting to place a RemoteMessaging call.
To access your mailbox: 1. Dial the voice mail extension number. (You hear the main menu.) 2. During or after the greeting, press to identify yourself as a subscriber. 3. Enter your mailbox number and your personal password (if programmed). Then
press .
NOTE: If you do not have a password, just press . See page 47 for informa-tion on programming passwords.
#
#
#
*
*
#
#
33less Telephone User Guide
USING VOICE MAIL MESSAGES
34
Once you’ve accessed your mailbox, the system will tell you how many new andsaved messages you have. You can then listen to messages, delete messages, savemessages, etc.
Listening to Messages
To listen to messages: 1. Access your mailbox as described on page 33. 2. EITHER, Press to listen to your new messages.OR, Press to listen to your saved messages. 3. While you are listening to a message, you can use the following options:
• Press to skip to the end of the recording. • Press to back up. • Press to pause. Then press to continue. • Press to skip ahead. • Press to lower the volume. • Press to play the message envelope. • Press to raise the volume. • Press to save the new message in your mailbox. • Press to delete the message from your mailbox.
4. When the message has finished playing, you have the following options: • Press to replay the message from the beginning. • Press to reply to the message. If you are using version 5.1 or later soft-
ware, you have the following options (earlier versions only leave voice mailmessages):— Press to leave a voice mail message for the caller.
If the caller had a mailbox number, it will ask you to verify the destina-tion by pressing . If the number was not associated with a mailbox, it will ask you to entera mailbox number. If the message was from an outside caller, you cannot leave a voice mailmessage.
— Press to make a return call. Your call will be transferred automati-cally to the caller’s extension or telephone number, if available. If the extension number is not available, you will have the option ofleaving voice mail.
1
3
#
1
2 #
3
4
5
6
7
9
1
2
1
#
2
INT4000 Cordless Telephone User Guide

GETTIN
INT4000 Cord
If the telephone number is not available, you cannot reply to the mes-sage.
• Press to forward a copy of the message to another subscriber. If youwant to include an introduction, press . If not, press to forward themessage without additional comments.
• Press to listen to the previous message. • Press to play the introductory message envelope (see page 47 for infor-
mation on envelope options). • Press to listen to the next message. • Press to save the new message in your mailbox. • Press to delete the message from your mailbox.
5. Press .
31 #
4
5
6
7
9
TALK
G STA
RTED
35less Telephone User Guide

Undeleting Messages
36
NOTE: This feature is available only in versions 5.1 and later software.
If you accidently delete a voice mail message, you can retrieve it within a specifictime frame (programmed by your System Administrator). Any retrieved messages arethen restored to your saved-message queue. Messages that are not undeleted withinthe programmed time (up to 24 hours) are automatically erased. To recover deleted messages: 1. Access your mailbox as described on page 33. 2. Press for Message Options. 3. Press to access undelete options. Your options are:
• Press to listen to your deleted messages and choose which ones todelete or recover. After each message you can:— Press to replay the message.— Press to reply to the message.— Press to forward the message to another mailbox.— Press to listen to the previous message.— Press to play the message envelope.— Press to listen to the next message.— Press to recover the message.— Press to purge the message from your mailbox.
• Press to recover all of your deleted messages and store them as savedmessages.
• Press to erase all of your deleted messages. 4. Press .
5
2
1
1
2
3
4
5
6
7
9
2
3
TALK
INT4000 Cordless Telephone User Guide

Sending Messages
GETTIN
G STA
RTED
INT4000 Cord
To send a message: 1. Access your mailbox as described on page 33. 2. Press . 3. Dial the desired mailbox number or group list number. 4. Press to accept the subscriber’s name. 5. Record your message after the tone. While recording, you have the following
options: • Press to pause while recording. Then press any button to continue. • Press to erase and re-record your message.
6. When finished recording, hang up or press to access the following options. • Press to send the message and return to the voice mail options. • Press to replay your message. • Press to add to your message. • Press to erase and re-record your message. • Press to use the special delivery options. You can then use one or more
of the following options:— Press to mark the message “private.” (This prevents the recipient
from forwarding it to other subscribers.)— Press to mark the message “certified.” (When the recipient listens
to the message, you will receive a receipt notice.)— Press to mark the message “priority.” (This will place your message
ahead of all other waiting messages in the receiving mailbox.)— Press to cancel delivery options.— Press to deliver the message. (If you want to mark the message cer-
tified, private, and/or priority, you must do so before completing thisstep.) You may choose either of the following options:
• Press and enter another mailbox number to send the messageto another destination.
• Press to exit and return to voice mail options.
7. Press .
2
#
2
3
#
#
1
2
3
9
1
2
3
*#
#
*TALK
37less Telephone User Guide
Canceling Unheard Messages
38
NOTE: This feature is available only in versions 5.1 and later software.
You can cancel unretrieved messages that you have sent to individuals, but not mes-sages that you sent to group lists. To cancel unheard messages: 1. Access your mailbox as described on page 33. 2. While listening to the voice mail main menu, press for Message Options. 3. Press . 4. When prompted, enter the number of the mailbox containing the unheard mes-
sage. 5. Press to confirm the mailbox you are selecting. Voice mail will tell you how
many messages you have waiting at the mailbox and play them for you. Aftereach message, you can: • Press to replay the message. • Press to add to the message. • Press to forward the message to another mailbox. • Press to listen to the previous message. • Press to play the message envelope. • Press to listen to the next message. • Press to save the message in your mailbox. • Press to delete the message.
6. Press .
5
1
#
1
2
3
4
5
6
7
9
TALK
INT4000 Cordless Telephone User Guide
USING DO-NOT-DISTURB MODE
GETTIN
G STA
RTED
INT4000 Cord
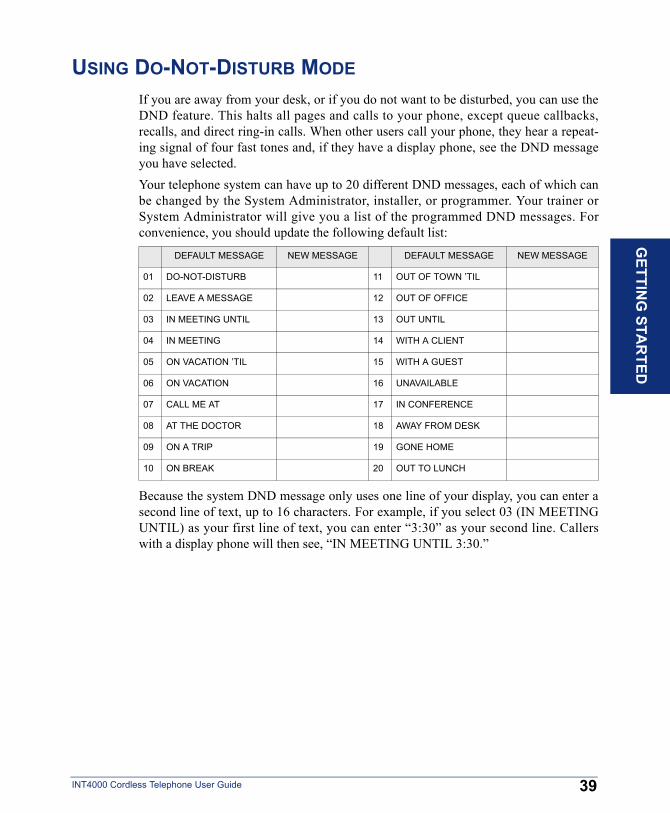
If you are away from your desk, or if you do not want to be disturbed, you can use theDND feature. This halts all pages and calls to your phone, except queue callbacks,recalls, and direct ring-in calls. When other users call your phone, they hear a repeat-ing signal of four fast tones and, if they have a display phone, see the DND messageyou have selected. Your telephone system can have up to 20 different DND messages, each of which canbe changed by the System Administrator, installer, or programmer. Your trainer orSystem Administrator will give you a list of the programmed DND messages. Forconvenience, you should update the following default list:
Because the system DND message only uses one line of your display, you can enter asecond line of text, up to 16 characters. For example, if you select 03 (IN MEETINGUNTIL) as your first line of text, you can enter “3:30” as your second line. Callerswith a display phone will then see, “IN MEETING UNTIL 3:30.”
DEFAULT MESSAGE NEW MESSAGE DEFAULT MESSAGE NEW MESSAGE
01 DO-NOT-DISTURB 11 OUT OF TOWN ’TIL
02 LEAVE A MESSAGE 12 OUT OF OFFICE
03 IN MEETING UNTIL 13 OUT UNTIL
04 IN MEETING 14 WITH A CLIENT
05 ON VACATION ’TIL 15 WITH A GUEST
06 ON VACATION 16 UNAVAILABLE
07 CALL ME AT 17 IN CONFERENCE
08 AT THE DOCTOR 18 AWAY FROM DESK
09 ON A TRIP 19 GONE HOME
10 ON BREAK 20 OUT TO LUNCH
39less Telephone User Guide

40
To enable DND: 1. Dial . 2. Dial the two-digit number corresponding to the message you want to use. 3. If desired, customize the second display line by dialing the desired numbers or
letters as described below: • Remain in numeric mode: Press the dialpad buttons to dial the desired num-
bers. Press for a hyphen (-) or press for a colon (:). Press FOR-WARD once to enter a space, or press BACKSPACE if you need tobackspace.
• Change to alphanumeric mode: Press MSG and then press the dialpad but-tons to enter the desired characters. (Note that letter correspond to the lettersprinted on the buttons 1-9.) The number of times a button is pressed deter-mines which character is entered. For example, 33377744432999 enters“FRIDAY.” When adjoining characters are located under the same button,press FORWARD once to advance to the next character. For example, 6FWD 666 FWD 6632999 enters “MONDAY.” Press FORWARD twice toleave a space or press BACKSPACE if you need to backspace.
NOTE: To use the Backspace button, you must pre-program the feature but-ton (feature code 314) on your phone. Refer to Programming Your FeatureButtons section on page 56 for details on how to program the Backspace but-ton. Also to use the FORWARD, PREVIOUS, NEXT, or MSG button, yourSystem Administrator must program them in Database Programming.
4. Press .To cancel DND mode:Dial .
3 7 2
# *
NUMBER OF TIMES BUTTON IS PRESSED
BUTTON 1 2 3 4 51 - & ( ) 12 A B C ' 23 D E F ! 34 G H I * 45 J K L # or /* 5
6 M N O Ñ or #* 6
7 P Q R S 78 T U V ? 89 W X Y Z 90 @ : . , 0
*The character available depends on the software version.
TALK
3 7 2
INT4000 Cordless Telephone User Guide
USING REMINDER MESSAGES
GETTIN
G STA
RTED
INT4000 Cord
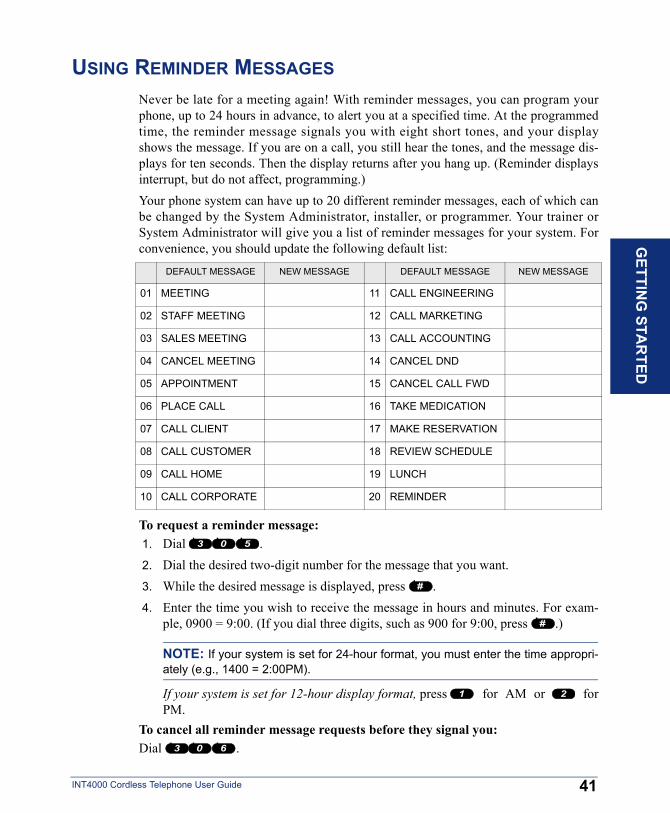
Never be late for a meeting again! With reminder messages, you can program yourphone, up to 24 hours in advance, to alert you at a specified time. At the programmedtime, the reminder message signals you with eight short tones, and your displayshows the message. If you are on a call, you still hear the tones, and the message dis-plays for ten seconds. Then the display returns after you hang up. (Reminder displaysinterrupt, but do not affect, programming.)Your phone system can have up to 20 different reminder messages, each of which canbe changed by the System Administrator, installer, or programmer. Your trainer orSystem Administrator will give you a list of reminder messages for your system. Forconvenience, you should update the following default list:
To request a reminder message: 1. Dial . 2. Dial the desired two-digit number for the message that you want. 3. While the desired message is displayed, press . 4. Enter the time you wish to receive the message in hours and minutes. For exam-
ple, 0900 = 9:00. (If you dial three digits, such as 900 for 9:00, press .)
NOTE: If your system is set for 24-hour format, you must enter the time appropri-ately (e.g., 1400 = 2:00PM).
If your system is set for 12-hour display format, press for AM or forPM.
To cancel all reminder message requests before they signal you:Dial .
DEFAULT MESSAGE NEW MESSAGE DEFAULT MESSAGE NEW MESSAGE
01 MEETING 11 CALL ENGINEERING
02 STAFF MEETING 12 CALL MARKETING
03 SALES MEETING 13 CALL ACCOUNTING
04 CANCEL MEETING 14 CANCEL DND
05 APPOINTMENT 15 CANCEL CALL FWD
06 PLACE CALL 16 TAKE MEDICATION
07 CALL CLIENT 17 MAKE RESERVATION
08 CALL CUSTOMER 18 REVIEW SCHEDULE
09 CALL HOME 19 LUNCH
10 CALL CORPORATE 20 REMINDER
3 0 5
#
#
1 2
3 0 6
41less Telephone User Guide

42
To clear a received reminder message (you hear eight short tones and see a reminder message display):Press .*
INT4000 Cordless Telephone User Guide

Moving On
INT4000 Cord
MO
VING
ON
SECTION CONTENTS PAGEIntroduction . . . . . . . . . . . . . . . . . . . . . . . . . . . . . . . . . . . . . . . . . . . . . . . 43Setting Preferences . . . . . . . . . . . . . . . . . . . . . . . . . . . . . . . . . . . . . . . . . 44
Phone Configuration. . . . . . . . . . . . . . . . . . . . . . . . . . . . . . . . . . . . . 44Voice Mail Options . . . . . . . . . . . . . . . . . . . . . . . . . . . . . . . . . . . . . . 45
Speed Dialing . . . . . . . . . . . . . . . . . . . . . . . . . . . . . . . . . . . . . . . . . . . . . . 52Station Speed Dial . . . . . . . . . . . . . . . . . . . . . . . . . . . . . . . . . . . . . . 52System Speed Dial . . . . . . . . . . . . . . . . . . . . . . . . . . . . . . . . . . . . . . 54
Using Record-A-Call . . . . . . . . . . . . . . . . . . . . . . . . . . . . . . . . . . . . . . . . 54Paging . . . . . . . . . . . . . . . . . . . . . . . . . . . . . . . . . . . . . . . . . . . . . . . . . . . . 55
Making Pages. . . . . . . . . . . . . . . . . . . . . . . . . . . . . . . . . . . . . . . . . . 55Enabling Paging . . . . . . . . . . . . . . . . . . . . . . . . . . . . . . . . . . . . . . . . 55
Performing a “Hookflash” During a Call . . . . . . . . . . . . . . . . . . . . . . . . 55Programming Your Feature Buttons . . . . . . . . . . . . . . . . . . . . . . . . . . .56Using Account Codes . . . . . . . . . . . . . . . . . . . . . . . . . . . . . . . . . . . . . . . 57Screening Calls . . . . . . . . . . . . . . . . . . . . . . . . . . . . . . . . . . . . . . . . . . . . 58Using the Directories . . . . . . . . . . . . . . . . . . . . . . . . . . . . . . . . . . . . . . . . 58
Phone Directory . . . . . . . . . . . . . . . . . . . . . . . . . . . . . . . . . . . . . . . . 58Voice Mail Directory . . . . . . . . . . . . . . . . . . . . . . . . . . . . . . . . . . . . . 60
Programming Remote Feature Access . . . . . . . . . . . . . . . . . . . . . . . . . 61Remote Access Password . . . . . . . . . . . . . . . . . . . . . . . . . . . . . . . . 61Remote Feature Access. . . . . . . . . . . . . . . . . . . . . . . . . . . . . . . . . . 61Requesting Agent Help . . . . . . . . . . . . . . . . . . . . . . . . . . . . . . . . . . 62
Working in Hunt Group . . . . . . . . . . . . . . . . . . . . . . . . . . . . . . . . . . . . . . 64Hunt Group Calls Enabled/Disabled. . . . . . . . . . . . . . . . . . . . . . . . . 64ACD Hunt Groups . . . . . . . . . . . . . . . . . . . . . . . . . . . . . . . . . . . . . . 64
INTRODUCTIONNow that you’ve mastered the basics, it’s time to move on to the advanced features. In
this section, you’ll learn how to program your phone, use directories, access yourvoice mailbox remotely, and perform various other functions.43less Telephone User Guide

SETTING PREFERENCES
44
Your phone and voice mailbox are automatically set to specific defaults. You can,however, configure many of these settings at any time.
Phone Configuration
Customizable features on your phone include changing volume levels, selecting a ringtone, and others.Changing Volume LevelsYou can select a low, medium, high, or maximum volume level.To change a volume level:During a call, press on the side of the handset.
Selecting a Ring ToneThe ability to change your ring tone is helpful in close-quartered environments. Ifyour ring tone is unique, you can quickly identify when a call is ringing on yourphone.To select the type of ring tone for your phone:On standby mode, press on the side of the handset until you hear thedesired ring type. The available ring types are Ring Type A (High or Low), Ring TypeB (High or Low), Ring Type C (High or Low), or Ring Off (vibrate mode).
Turning the Handset Ringer On/OffYou can temporarily turn the handset ringer off.To change a volume level:In standby mode, press and hold on the switch on the side of handset fortwo seconds. The Ring Off ( ) icon appears in the display.
Returning to Default OperationYou can return your phone to default levels at any time. This feature returns volumesto default levels; cancels Do-Not-Disturb, manual call forwarding, background music,and queue requests; and restores handsfree mode, pages, hunt group calls, and systemforwarding all at once.To return your phone to default:Dial .
RING/VOL
RING/VOL
RING/VOL
3 9 4
INT4000 Cordless Telephone User Guide

Voice Mail Options
INT4000 Cord
MO
VING
O
Your voice mailbox contains personal options that allow you to customize your per-sonal greetings, directory name, password, etc.
NOTE: You cannot change your personal options until you have initialized your mail-box (see page 19).
Recording Your Personal Greetings You can store two different personal greetings in your voice mailbox: a primary andan alternate. You can then select which greeting you want played when a callerreaches your voice mailbox. Because the purpose of this greeting is to tell callers whythey have reached your voice mailbox, you should include the following information:• Whether or not you are in the office and where you can be reached.• When you will be returning calls.• For callers who do not wish to leave a message, how to exit. (They can press 0 to
return to the operator.)The following are some sample greetings to help you plan your message:• Primary Greeting: Hello, this is __________. I am either on another line or
away from my desk and cannot take your call at this time. If you need to speak tosomeone immediately, please dial zero now. Otherwise, please leave a detailedmessage and I will return your call as soon as possible. Thank you.
• Alternate Greeting: Hello, this is __________. I will be away from the officefrom day/date until day/date. If you need to speak to someone immediately,please dial zero now. Otherwise, please leave a detailed message, and I willreturn your call when I return. Thank you.
45less Telephone User Guide
N

46
To change your personal greeting: 1. Access your mailbox as described on page 33. 2. Press to select the Personal Options Menu. 3. Press . 4. Do one of the following:
• Press to record and/or enable your primary greeting. • Press to record and/or enable your alternate greeting. • Press to enable the system default mailbox greeting.
5. If you pressed , continue to the next step.If you pressed or , the current greeting is played (if one exists). You canthen do one of the following: • Press to accept the greeting. • Press to replay the greeting. • Press to add to the greeting. • Press to erase and re-record the greeting. • Press to exit without changing your greeting.
6. Press .
Recording Your Voice Mail Directory NameYour recorded name is used to identify you in the voice mail directory and to verifyyour mailbox number when messages are addressed to you.To change your directory name: 1. Access your mailbox as described on page 33. 2. Press to select the Personal Options Menu. 3. Press . Your current name is played. (Press to replay your recorded
name.) 4. Press to erase and re-record your name. 5. When you hear a tone, record your first and last name, then press . 6. Do one of the following: 7. Press again to accept your recorded name. 8. Press to replay your recorded name. 9. Press to add to your name. 10. Press to erase and re-record your name. 11. Press .
4
1
1
2
3
3
1 2
#
1
2
3
*TALK
4
2 1
3
#
#
1
2
3
TALK
INT4000 Cordless Telephone User Guide

INT4000 Cord
MO
VING
ON
Changing Your Mailbox PasswordYour password prevents unauthorized access to your mailbox.To change your password: 1. Access your mailbox as described on page 33. 2. Press to select the Personal Options Menu. 3. Press . 4. If you want to have a password, enter a new password, using up to 12 digits. 5. If you do not want to use a password, skip this step. 6. Press . Voice mail plays back your password if you entered one. 7. Press to accept the password as entered or press to erase and re-enter
your password. 8. Press .
Changing the Voice Mail Message EnvelopeWhenever you receive a voice mail message, voice mail first plays an “envelope” thatcan include the time and date the message was left, the source of the message, and/orthe message length. By default, the envelope contains all of this information, but youcan change your envelope, as described below.To change your message envelope: 1. Access your mailbox as described on page 33. 2. Press to select the Personal Options Menu. 3. Press again. You can then do any of the following:
² Press to enable or disable the time/date option. ² Press to enable or disable the message source option. ² Press to enable or disable the message length option. ² Press to enable all options. ² Press to disable the entire envelope. ² Press to accept the envelope. ² Press to return to the Personal Options menu without changing the
envelope. 4. Press .
4
3
#
# 3
TALK
4
4
1
2
3
4
5
#
*
TALK
47less Telephone User Guide
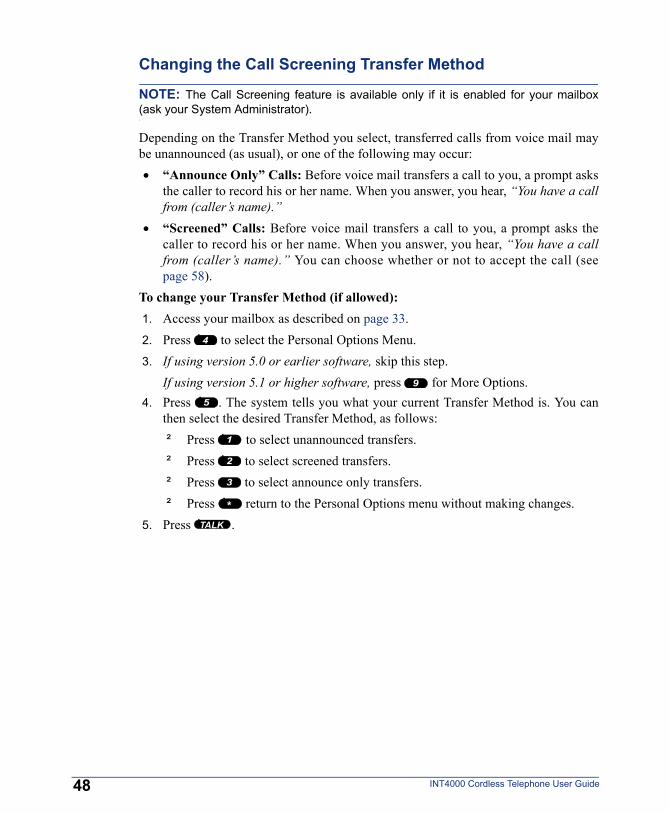
48
Changing the Call Screening Transfer Method
NOTE: The Call Screening feature is available only if it is enabled for your mailbox(ask your System Administrator).
Depending on the Transfer Method you select, transferred calls from voice mail maybe unannounced (as usual), or one of the following may occur: • “Announce Only” Calls: Before voice mail transfers a call to you, a prompt asks
the caller to record his or her name. When you answer, you hear, “You have a callfrom (caller’s name).”
• “Screened” Calls: Before voice mail transfers a call to you, a prompt asks thecaller to record his or her name. When you answer, you hear, “You have a callfrom (caller’s name).” You can choose whether or not to accept the call (seepage 58).
To change your Transfer Method (if allowed): 1. Access your mailbox as described on page 33. 2. Press to select the Personal Options Menu. 3. If using version 5.0 or earlier software, skip this step.
If using version 5.1 or higher software, press for More Options. 4. Press . The system tells you what your current Transfer Method is. You can
then select the desired Transfer Method, as follows: ² Press to select unannounced transfers. ² Press to select screened transfers. ² Press to select announce only transfers. ² Press return to the Personal Options menu without making changes.
5. Press .
4
9
5
1
2
3
*TALK
INT4000 Cordless Telephone User Guide
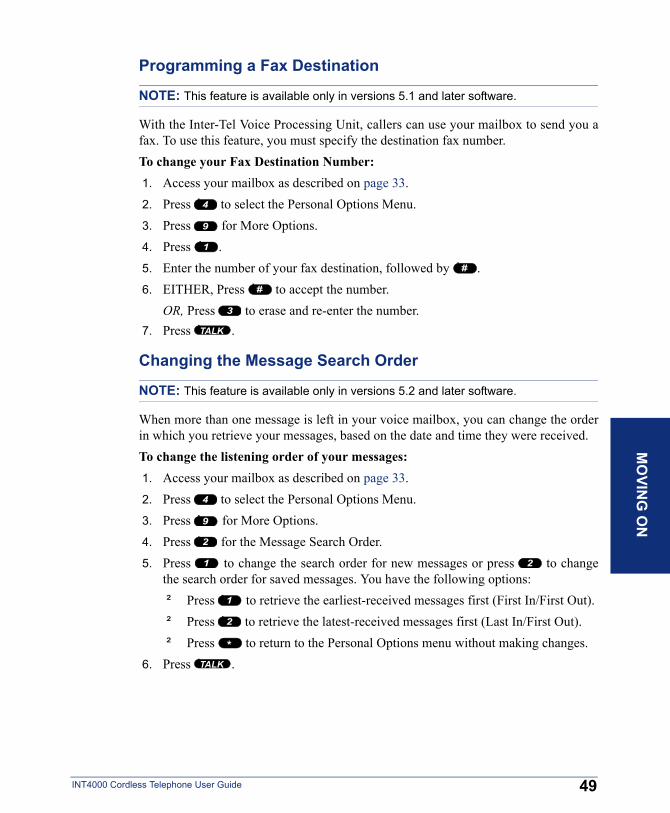
INT4000 Cord
MO
VING
ON
Programming a Fax Destination
NOTE: This feature is available only in versions 5.1 and later software.
With the Inter-Tel Voice Processing Unit, callers can use your mailbox to send you afax. To use this feature, you must specify the destination fax number.To change your Fax Destination Number: 1. Access your mailbox as described on page 33. 2. Press to select the Personal Options Menu. 3. Press for More Options. 4. Press . 5. Enter the number of your fax destination, followed by . 6. EITHER, Press to accept the number.
OR, Press to erase and re-enter the number. 7. Press .
Changing the Message Search Order
NOTE: This feature is available only in versions 5.2 and later software.
When more than one message is left in your voice mailbox, you can change the orderin which you retrieve your messages, based on the date and time they were received.To change the listening order of your messages: 1. Access your mailbox as described on page 33. 2. Press to select the Personal Options Menu. 3. Press for More Options. 4. Press for the Message Search Order. 5. Press to change the search order for new messages or press to change
the search order for saved messages. You have the following options: ² Press to retrieve the earliest-received messages first (First In/First Out). ² Press to retrieve the latest-received messages first (Last In/First Out). ² Press to return to the Personal Options menu without making changes.
6. Press .
4
9
1
#
#
3
TALK
4
9
2
1 2
1
2
*TALK
49less Telephone User Guide
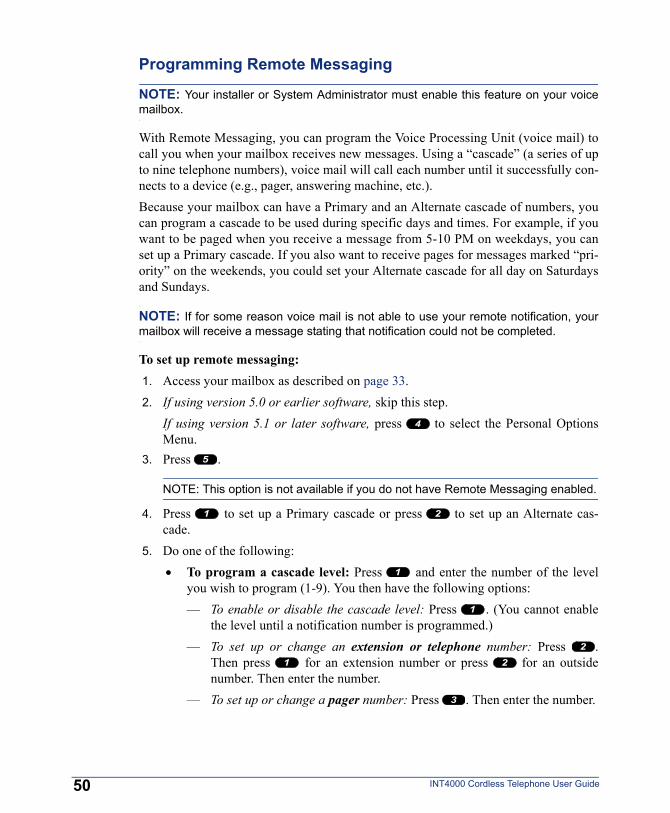
50
Programming Remote Messaging
NOTE: Your installer or System Administrator must enable this feature on your voicemailbox.
With Remote Messaging, you can program the Voice Processing Unit (voice mail) tocall you when your mailbox receives new messages. Using a “cascade” (a series of upto nine telephone numbers), voice mail will call each number until it successfully con-nects to a device (e.g., pager, answering machine, etc.).Because your mailbox can have a Primary and an Alternate cascade of numbers, youcan program a cascade to be used during specific days and times. For example, if youwant to be paged when you receive a message from 5-10 PM on weekdays, you canset up a Primary cascade. If you also want to receive pages for messages marked “pri-ority” on the weekends, you could set your Alternate cascade for all day on Saturdaysand Sundays.
NOTE: If for some reason voice mail is not able to use your remote notification, yourmailbox will receive a message stating that notification could not be completed.
To set up remote messaging: 1. Access your mailbox as described on page 33. 2. If using version 5.0 or earlier software, skip this step.
If using version 5.1 or later software, press to select the Personal OptionsMenu.
3. Press .
NOTE: This option is not available if you do not have Remote Messaging enabled.
4. Press to set up a Primary cascade or press to set up an Alternate cas-cade.
5. Do one of the following: • To program a cascade level: Press and enter the number of the level
you wish to program (1-9). You then have the following options:— To enable or disable the cascade level: Press . (You cannot enable
the level until a notification number is programmed.)— To set up or change an extension or telephone number: Press .
Then press for an extension number or press for an outsidenumber. Then enter the number.
— To set up or change a pager number: Press . Then enter the number.
4
5
1 2
1
1
21 2
3
INT4000 Cordless Telephone User Guide
INT4000 Cord
• To set up time of day for notification: Press . Then enter the time youwant the message notification to start and stop. Enter the times with two dig-its for the hour and two digits for the minutes (e.g., 0900 = 9:00). If enteringthe time in 12-hour format, you are prompted to press for AM or press
for PM.
NOTE: For 24-hour notification, program the starting and ending times to bethe same.
• To set up the days of the week for notification: Press . Then select oneof the following: — Press for Monday-Friday.— Press for all days.— Press to select individual days. You are prompted to press digits 1-7
which correspond to the days Sunday through Saturday. • To select all or priority-only message notification: Press . Then press
for all messages or for priority messages only. 6. Either select another option, as described above, or press to save the settings
and exit.
2
1
2
3
1
2
3
41 2
#
51less Telephone User Guide
MO
VING
ON

SPEED DIALING
52
Speed dialing allows you (and your System Administrator) to store frequently dialednumbers for easy dialing. Each number is stored on your phone (Station Speed-Dial)or in the phone system (System Speed-Dial) and is identified by a location number.Once programmed, you can then quickly dial these numbers by entering a featurecode and dialling the desired location number. Because the Inter-Tel system supportsboth Station and System Speed-Dial numbers, you can have access to over 1000stored numbers.
Station Speed Dial
You can store up to ten personal speed-dial numbers and associated names in StationSpeed-Dial locations 0-9. If you have programmable feature buttons, you can alsocreate Station Speed-Dial buttons for one-touch speed dialing (see page 56).Storing Station Speed-Dial NumbersTo program your Station Speed-Dial locations: 1. Dial . 2. Dial the location code 0-9 to be programmed. 3. Enter the desired name for the speed-dial number, as described below:
• Remain in alphanu-meric mode: Press thedialpad buttons to enterthe desired characters.(See the chart on theright.) The number oftimes a button is presseddetermines which char-acter is entered. Forexample, 533266 enters“JEAN.” When adjoin-i n g c h a r a c t e r s a r elocated under the sameb u t t o n , p r e s s FOR-WARD once to advanceto the next character. For example, 66 FWD 6667776 enters “NORM.” (Notethat letters correspond to the letters printed on dialpad buttons 1-9.) PressFORWARD twice to leave a space. Press BACKSPACE if you need tobackspace.
3 8 3
NUMBER OF TIMES BUTTON IS PRESSED
BUTTON 1 2 3 4 51 - & ( ) 12 A B C ' 23 D E F ! 34 G H I * 45 J K L # or /* 5
6 M N O Ñ or #* 6
7 P Q R S 78 T U V ? 89 W X Y Z 90 @ : . , 0
*The character available depends on the software version
INT4000 Cordless Telephone User Guide

INT4000 Cord
MO
VING
ON
NOTE: To use the Backspace button, you must pre-program the feature but-ton (feature code 314) on your phone. Refer to Programming Your FeatureButtons section on page 56 for details on how to program the Backspace but-ton. Also to use the FORWARD, PREVIOUS, NEXT, or MSG button, yourSystem Administrator must program them in Database Programming.
• Press to save the name. 4. Dial the extension number or telephone number to be stored.
• Change to numeric mode: Press MSG and then press the dialpad buttons todial the desired numbers. Press for a hyphen (-), for a colon (:),FORWARD to leave a space, or BACKSPACE to backspace.If your number includes an asterisk, pound, a hookflash (a quick hang upand release), or a pause, press once for an asterisk, twice for apound, three times for a hookflash, or four times for a pause. (Each pause orhookflash counts as one digit.) You can enter more than one special characterin a row by pressing FORWARD between the characters.
• Press to save the number.
NOTE: To dial outside telephone numbers without first selecting an outgoing line,enter a line access code (such as the Outgoing Call code “8”) before the outsidetelephone number.
To view how your Station Speed-Dial buttons are currently programmed: 1. Dial . 2. Press the desired Station Speed-Dial button. 3. Press to exit.To erase a Station Speed-Dial name and/or number: 1. Dial . 2. Dial the desired location code (0-9). 3. Press BACKSPACE repeatedly until the name is erased. 4. Press to continue. 5. Press BACKSPACE repeatedly until the number is erased. 6. Press to exit.
Dialing Station Speed-Dial NumbersTo dial a Station Speed-Dial number: 1. Select an outgoing line by pressing the CALL button. 2. Dial and the desired Station Speed-Dial location number (0-9).
#
# *
SPCL
#
3 9 6
#
3 8 3
#
#
3 8 2
53less Telephone User Guide
System Speed Dial
54
Your System Administrator can store up to 1000 speed-dial numbers in SystemSpeed-Dial locations 000-999.To view and/or dial System Speed-Dial numbers: 1. Dial 2. Dial the location code (000-999) for the desired number. 3. Press to dial the number.
3 8 1
#
USING RECORD-A-CALLIf your telephone system is equipped with a Voice Processing Unit (voice mail), you
may have access to the Record-A-Call feature. If so, you can record an ongoing callas a mailbox message. You can then retrieve the message, just as you would any othermailbox message.To use the Record-A-Call feature while on a call: 1. Press and dial . 2. If required, dial the desired mailbox number. (Your phone may be programmed toselect the mailbox, or you may be required to dial it.)You hear a confirmation tone when the Record-A-Call feature is activated.
To turn off Record-A-Call: EITHER, Press and dial OR, Press .
SPCL 3 8 5
SPCL 3 8 5
TALK
INT4000 Cordless Telephone User Guide
PAGING
INT4000 Cord
The Paging feature allows you to make an announcement through phone speakers orexternal speakers (if your system is equipped with external paging equipment). Toprevent announcements from transmitting through every phone in the system, this fea-ture uses page zones. Each zone contains a different combination of extensions andexternal paging equipment, and is programmed by your System Administrator. Askyour trainer or System Administrator how the zones are programmed, and list themhere for your convenience
0 _______________________ 5 _______________________ 1 _______________________ 6 _______________________ 2 _______________________ 7 _______________________ 3 _______________________ 8 _______________________ 4 _______________________ 9 _______________________
Making Pages
To make pages: 1. Dial . 2. Dial the desired zone number (0-9). 3. After the tone, make your announcement. 4. Press .7
TALK
MO
Enabling Paging
VING
ON
You can enable or disable page receiving for your phone by using the Page Remove/Replace feature code. If your phone is assigned to more than one page zone, all zonesare removed or replaced at once (you cannot turn off individual zones).To turn paging on and off for your phone:Press and dial .SPCL 3 2 5
PERFORMING A “HOOKFLASH” DURING A CALLCertain telephone service companies may require a timed hookflash (a quick hang up
and release).To generate a hookflash while using a line:Press and dial .SPCL 3 3 0less Telephone User G
55uide
PROGRAMMING YOUR FEATURE BUTTONS
56
Depending on how your system is programmed, some of your feature buttons may be“user-programmable.” If so, you can program them with any of the feature codeslisted in the back of this user guide or with extension numbers. In addition, you cancombine the feature button and Station Speed-Dial functions to program a feature but-ton to dial an outside number.To program a user-programmable feature button: 1. Dial . 2. Press the feature button you want to program. 3. Dial the feature code or extension number you want to store under that button.
(Refer to the back of this guide for default feature codes.)To return all feature buttons to their original default values:Dial .To display the current feature button values: 1. Dial . 2. Press the feature button(s) you want displayed. 3. Press .
3 9 7
3 9 5
3 9 6
TALK
INT4000 Cordless Telephone User Guide
USING ACCOUNT CODES
INT4000 Cord
MO
VING
O
If your telephone system is programmed to use the Station Message Detail Recording(SMDR) feature, you might be required to enter account codes when you place a call.These codes add information to phone record reports that the system will periodicallyprint.There are three types of account codes: • Standard account codes are automatically entered into the SMDR report when-
ever you place a call.• Forced account codes must be dialed before you can place an outside call.• Optional account codes can be entered at any time during a call.
NOTE: Your System Administrator or System Administrator can tell you which types ofaccount codes are used on your telephone system.
To enter an optional account code: 1. Press and dial . 2. Enter the optional account code. If the account code is not immediately accepted,
press .To set an account code for all calls placed from your phone:Dial and then the account code. If the account code is not immediatelyaccepted, press . This code will be used for all calls made from your phone untilit is disabled.To disable the code: Dial and press .
SPCL 3 9 9
#
3 9 1#
3 9 1 #
57less Telephone User Guide
N

SCREENING CALLS
58
NOTE: This feature is available only if your telephone system is equipped with a VoiceProcessing Unit (voice mail).
If your voice mailbox is programmed correctly, you can screen calls that are trans-ferred from voice mail. This allows you to accept and/or refuse specific calls.Depending on the Transfer Method you use, calls from voice mail may be unan-nounced, announce only, or screened calls (see page 48 for details).If your voice mailbox is programmed for screened calls, you have the followingoptions when you receive a transfer:• Press to accept the call.• Press to replay the announcement.• Press to send the call to voice mail.• Press and then enter the extension number to forward the call to another
extension.• Press to refuse the call.
#
1
2
3
*
USING THE DIRECTORIESWith directories, you can use your phone dialpad to find names and numbers. You can
then use the directory information to make calls, access features, or leave voice mailmessages.Phone Directory
The phone directory contains a list of the extension numbers, System Speed-Dialnumbers, feature codes, and their associated names. To search for an item, you canenter the full or partial name. The system will then find the closest match. Once thecorrect match is displayed on your phone, you can dial the number or press a button toaccess that extension or feature.INT4000 Cordless Telephone User Guide

INT4000 Cord
MO
VING
ON
To perform a directory search: 1. Dial . 2. Press for the intercom directory, press for the outside directory, or press
for the feature directory. 3. Enter letters or numbers (up to 10 characters) as described below:
• Remain in alphanumeric mode: Press the dialpad buttons to enter the desiredcharacters. (See the chart below.) The number of times a button is presseddetermines which character is entered. For example, 77776444844 wouldenter SMITH. When adjoining characters are located under the same button,press FORWARD once to advance to the next character. For example, 5666FWD 66337777 would enter JONES. (Note: The letters correspond to theletters printed on dialpad buttons 1-9.) Press FORWARD twice to leave aspace or press BACKSPACE if you need to backspace.
NOTE: To use the Backspace button, you must preprogram the feature but-ton (feature code 314) on your phone. Refer to Programming Your FeatureButtons section on page 56 for details on how to program the Backspace but-ton. Also to use the FORWARD, PREVIOUS, NEXT, or MSG button, your Sys-tem Administrator must program them in Database Programming.
• Change to numeric mode: Press MSG and then press the dialpad buttons toenter an extension number.
4. Press to begin the search. The display will time out if the number is notdialed.
To dial a number or feature code while it is displayed:Press .
3 0 7
1 23
#
#
NUMBER OF TIMES BUTTON IS PRESSED
BUTTON 1 2 3 4 51 - & ( ) 12 A B C ' 23 D E F ! 34 G H I * 45 J K L # or /* 5
6 M N O Ñ or #* 6
7 P Q R S 78 T U V ? 89 W X Y Z 90 @ : . , 0
*The character available depends on the software version
less Telephone User Gu
59ide
Voice Mail Directory
60
Whenever voice mail asks you to enter a mailbox number, you can use the mailboxand extension number directories. You can also use these directories to leave a voicemessage with another user. Like the phone directories, you don’t have to enter the fullname because the system finds the closest match based on your entry.To perform a directory search:When prompted, press the buttons to enter the name. The number of times a button ispressed determines which character is entered, as shown below. When adjoining char-acters are under the same button, press FWD to advance to the next character. Forexample, 5666 FWD 66337777 enters “JONES.”
NOTE: If you need help, press at any time while spelling a name. Voice mail willplay a helpful prompt instructing you how to enter a name.
To use the directory to leave a voice mail message: 1. Dial the voice mail extension number. 2. Press for Directory Services. 3. Enter the desired name, as described above, and press . The selected name is
played. 4. Do one of the following:
• Press to accept the name. • Press to hear the previous name in the directory. • Press to hear additional information for the selected name (if allowed). • Press to hear the next name in the directory. • Press and spell a new name to search for a different name. • Press to switch the first/last name sort order.
NUMBER OF TIMES BUTTON IS PRESSED
BUTTON 1 2 3 4 51 - & ( ) 12 A B C ' 23 D E F ! 34 G H I * 45 J K L # or /* 5
6 M N O Ñ or #* 6
7 P Q R S 78 T U V ? 89 W X Y Z 90 @ : . , 0
*The character available depends on the software version.
0
#
#
#
1
2
3
4
5
INT4000 Cordless Telephone User Guide

PROGRAMMING REMOTE FEATURE ACCESS
INT4000 Cord
If you are away from your desk and forgot to put your phone in DND, don’t worry.With the Remote Feature Access, you can place your phone in DND or forward callsfrom any other phone on the system. And, if you have a special dial-up line, you canaccess your phone features from an outside line.
NOTE: For your convenience, a pocket-sized guide of the Remote Feature Access islocated in the front of this guide.
Remote Access Password
MO
Before you use Remote Feature Access, you should program a password, as describedbelow.To change the password from your phone: 1. Dial . 2. Enter your current password, followed by .
NOTE: Your extension number is your password at default.
3. Enter the new password followed by .You hear a confirmation tone. 4. Enter the new password again for verification followed by . You hear a con-
firmation tone.To change the station password using remote programming, see the following section.
3 9 2
#
#
#
VIN
Remote Feature Access
G O
N
To access your phone from another phone: 1. Dial . 2. Enter your extension number. 3. Enter your password followed by . You can now use any of the following
features.To change the station password using Remote Programming:
a. Dial .
b. Enter the new password, followed by .
c. Enter the new password again for verification, followed by .To turn on DND:
a. Dial .b. Enter message number (01-20) and enter the optional second-line message
text, then press .
3 5 9
#
3 9 2
#
#
3 7 0
TALK
61less Telephone User Guide

62
To turn off DND:Dial , then press .To turn on Call Forward:a. Enter one of the following Call Forward feature codes.
All Calls.........................
If No Answer ..................
If Busy ...........................
If No Answer or Busy .....
b. Enter an extension number or enter an outside line access code followed by atelephone number, then press .
To turn off Call Forward:Dial , then press .
3 7 1 TALK
3 5 5
3 5 6
3 5 7
3 5 8
TALK
3 5 5 TALK
REQUESTING AGENT HELP
Your telephone system may be programmed to support the Agent Help feature, whichallows you to request help from a designated “Agent Help Extension” (usually yoursupervisor) during a call. When your request call rings at the Agent Help Extension,the supervisor can choose to join the call or reject the request.If the Agent Help Extension is a phone, the phone’s microphone is automaticallymuted so that the supervisor cannot be heard unless he or she presses the MUTE but-ton. If the Agent Help Extension is a single-line phone, however, the supervisor canbe heard as soon as the conference is established. In either case, the supervisor canhear all other parties on the call.To use the Agent Help feature while on a call: 1. Press and dial . If you hear repeating tones, the Agent Helpfeature is not available at your phone, you already have four parties in your call,not enough system circuits are currently available, or the Agent Help Extension isin Do-Not-Disturb.
2. Dial the Agent Help Extension number, if required. (Your phone may be pro-grammed to automatically dial the number, or you may be required to dial it.)If the Agent Help Extension accepts the call, you hear the Agent Help tone, if it isenabled, and the supervisor can monitor or join your call.If the Agent Help Extension rejects the call, you hear a confirmation tone, and thedisplay shows AGENT HELP REJECTED.
SPCL 3 7 5
INT4000 Cordless Telephone User Guide
INT4000 Cord
To respond to an Agent Help request at a display phone:When you receive an Agent Help request, your display shows <name> REQUESTSHELP. You can do one of the following:• To accept the call: Answer as usual. Your microphone is muted and you cannot
be heard by either party unless you press .• To reject the call: Dial .
MUTE
3 7 6
63less Telephone User Guide
MO
VING
ON
WORKING IN HUNT GROUP
64
Your system may be programmed with “hunt groups.” Hunt groups are groups ofphones that share a common extension number in addition to having individual exten-sion numbers. This allows someone to call anyone in the group (using the commonextension) or a specific member (using the individual extension). The members ofthese groups and the common extension(s) are programmed by your System Adminis-trator.
Hunt Group Calls Enabled/Disabled
If you are a member of a hunt group, you can enable or halt hunt group calls.To turn on or off hunt group calls: 1. Dial . 2. Press .3 2 4
TALK
ACD Hunt Groups
Some hunt groups use a special feature called Automatic Call Distribution (ACD) thatdistributes the hunt group calls equally among the available members. These huntgroup members are referred to as “agents,” who log in to the ACD hunt group toreceive calls and log out to halt ACD hunt group calls.Distributing CallsCalls are distributed through an ACD hunt group based on Agent IDs or extensions,as described below.• Agent IDs: If the hunt group is programmed to use ACD Agent IDs, each agent
is assigned an Agent ID number to enter during the login procedure (described onthe next page). The hunt group calls are routed to logged-in agents, according totheir Agent ID number instead of their extension number. Because the Agent IDis not associated with any extension, the agent can use any phone in the system tolog in.
• Members: If the hunt group is not programmed to use Agent IDs, it will have apre-programmed list of phones and will send calls to the phones where agents arelogged in.
INT4000 Cordless Telephone User Guide

INT4000 Cord
MO
VING
ON
Logging In and Out of ACD Hunt GroupsAgents can log in to and out of the ACD hunt group at any time. While logged in, theagent receives calls through the ACD hunt group. When the agent is logged out, callsto that ACD hunt group bypass the agent.To log in to all of your ACD hunt groups at once using the ACD Agent Login/Logout feature code: Dial and enter your Agent ID, if necessary. The display shows AGENTLOGGED IN TO ALL ACDS, and you hear a confirmation tone.
NOTE: This feature code acts as a toggle. If you were already logged in, the displayshows AGENT LOGGED OUT OF ALL ACDS, and you hear a confirmation tone.
To log in to one or more hunt groups using the ACD Agent Login feature code: 1. Dial . The display shows AGENT LOGIN ACD NUMBER. 2. EITHER, Enter the desired ACD hunt group number.
OR, Press to log in to all of your ACD hunt groups at once. The displayshows AGENT LOGIN AGENT ID.
NOTE: If you entered an invalid hunt group number, the display shows NOT ANACD HUNT GROUP, and you hear repeating tones.
3. Do one of the following: • To log into ACD hunt group(s) using Agent IDs: Enter your Agent ID.
The display shows AGENT LOGGED INTO ALL ACDS. You are loggedinto the ACD hunt group(s) that you requested that use the Agent ID youentered in this step.
NOTE: If another Agent ID is already logged in at this phone, you hearrepeating tones, and the display shows DIFFERENT AGENT ID ALREADYUSED. You must have the other agent log out before you can use that phone.
• To log into ACD hunt group(s) that do not use Agent IDs: Press .The display shows AGENT LOGGED INTO ALL ACDS. You are loggedinto the ACD hunt group(s) that you requested that do not use Agent IDs.
If you were already logged in, the display shows ALREADY LOGGED INTO<hunt group>.If you are not a member of the entered hunt group, the display shows NOT ANAGENT IN THIS HUNT GROUP, and you hear repeating tones. Start over.
4. Press . Repeat this procedure to log into additional ACD groups, if neces-sary.
3 2 8
3 2 6
#
#
TALK
65less Telephone User Guide

66
When you log in to a group, you may be automatically connected to a call after youhear a short ring burst. If the ACD Agent ID Automatic Connect option is enabled foryour hunt group and you are using a headset, you will be automatically connected. Ifthis option is not enabled for your hunt group, the call will ring until you answer it oruntil it times out to another extension.
NOTE: Even if the ACD Agent ID Automatic Connect option is enabled, the first callyou receive (after you log in or remove your phone from DND while logged in) will ringuntil you answer it. You will, however, be automatically connected to subsequent calls.
To log out of one or more ACD hunt group: 1. EITHER, Dial to log out of all of your ACD hunt groups at once.
The display shows AGENT LOGGED OUT OF ALL ACDS, and you hear a con-firmation tone.OR, Dial . One of the following displays will appear: • If you were logged in to only one hunt group, the display shows AGENT
LOGGED OUT OF <hunt group>. The procedure is complete. • If you were logged in to more than one hunt group, the display shows
AGENT LOGOUT ACD NUMBER. Dial the extension number of thedesired ACD hunt group.
• If you were not logged in to any hunt group, the display shows NOTLOGGED INTO ANY ACD GROUP.
2. Press .
Ending an ACD Hunt Group CallEach time you end an ACD hunt group call, a wrap-up timer is started. Until thistimer expires, you will not receive another call through any ACD hunt group. Youcan, however, end the wrap-up session before this timer expires, as described below.To terminate the ACD Agent wrap-up period before the timer expires:Dial .
NOTE: If you were not logged in to an ACD hunt group, the display shows CANNOTACCESS RESERVED FEATURE.
3 2 8
3 2 7
TALK
3 2 9
INT4000 Cordless Telephone User Guide

Learning More
INT4000 Cord
SECTION CONTENTS PAGE
Introduction . . . . . . . . . . . . . . . . . . . . . . . . . . . . . . . . . . . . . . . . . . . . . . . 67
What the Administrators Can Do for You . . . . . . . . . . . . . . . . . . . . . . . 67Troubleshooting . . . . . . . . . . . . . . . . . . . . . . . . . . . . . . . . . . . . . . . . . . . . 68Frequently Asked Questions (FAQs) . . . . . . . . . . . . . . . . . . . . . . . . . . .69Default Feature Codes . . . . . . . . . . . . . . . . . . . . . . . . . . . . . . . . . . . . . . . 71
INTRODUCTIONIf you want to know more about your phone and voice mail system, this is the section
for you. With additional information and an FAQ, you should be able to find answersto most of your questions.WHAT THE ADMINISTRATORS CAN DO FOR YOUThe administrators are the people to whom you should turn if you have any problems
GETTIN
G STA
RTED
LEAR
NIN
G M
OR
E
with your phone and/or voice mail. They have access to advanced programming fea-tures and can reset certain settings associated with your phone.The types of administrators that can help you with your phone/voice mail are as fol-lows:• System Administrator: Performs certain telephone system functions, including:
— Setting the date and time— Programming System Speed-Dial numbers— Making database changes, such as programming usernames, toll restriction,
DND messages, and extension numbers.• Voice Mail Administrator: Performs tasks associated with the voice mail sys-
tem, including:— Recording a broadcast message that is sent to all mailboxes at once— Performing mailbox maintenance (such as changing your password)— Customizing voice mail prompts
NOTE: Because the telephone system is very flexible and programmable, the proce-dures for using the features might vary slightly from the descriptions in this guide. If so,your trainer or System Administrator can tell you how your system differs and how touse the features.
If you are a System Administrator or if you need additional information not availablein this guide, refer to the Inter-Tel Axxess/Eclipse Administrator’s Guide (part no.550.8001/560.8001).
67less Telephone User Guide

TROUBLESHOOTING
68
If your INT4000 is not performing to your expectations, please try these simple steps.If you are still unable to resolve the problems, contact your System Administrator.
NOTE: Do not attempt to service this unit yourself. All service must be done by quali-fied service personnel.
PROBLEM POSSIBLE SPLUTIONS
Charge light will not come on when handset is placed in battery charger.
• Make sure the AC adapter is plugged into the battery chargerand wall outlet.
• Make sure handset is properly seated in battery charger.• Make sure the battery pack is properly placed in the handset.• Make sure that the charging contacts on the handset and bat-
tery charger are clean.Conversation interrupted fre-quently.
• Make sure that the base unit antenna is fully vertical.• Move closer to the base unit.• Check for LOW BAT warning.
Warning tone and NO SER-VICE message.
Move closer to the base unit.
handset does not ring. • Ringer switch may be set in the OFF position.• Battery may be weak. Charge the battery pack for 8-10 hours.• Make sure the base unit antenna is fully vertical.• The handset may be too far away from the base unit.
INT4000 Cordless Telephone User Guide

FREQUENTLY ASKED QUESTIONS (FAQS)
INT4000 Cord
This section includes some of the most frequently asked questions. If you have prob-lems with your phone or voice mailbox, refer to this section before you contact yourSystem Administrator or your local Inter-Tel dealer.
Q1.
How do I program System Speed-Dial numbers? A1. Only your System Administrator can program System Speed-Dial numbers. You can,however, program up to ten Station Speed-Dial numbers (see page 52).
Q2.
How do I change the time and date on my phone? A2. Only your System Administrator can change the time and date. Contact your SystemAdministrator if you notice that the date and time are incorrect.
Q3.
How can I retrieve messages if I don’t know the password for my voice mail? A3. Try using your extension number, which is your default password. Or, maybe youdon’t have a password, in which case pressing is all you need to do. If theseoptions don’t work, contact your System Administrator, who can change or erase thepassword for you. You can then retrieve your messages and reset the password, ifdesired (see page 33).
#
Q4.
Why can’t I retrieve deleted messages?A4.
Voice mail may have erased your message. After a programmed amount of time haslapsed, up to 24 hours, voice mail automatically erases all deleted messages (seepage 36). If you attempted to undelete a voice mail within this time frame but youwere still unsuccessful, your voice mail system may not have sufficient space pro-grammed to store deleted messages. Or, your telephone system may not be using asoftware version that supports this feature (the “undelete” feature is supported by soft-ware versions 5.3 and later). Contact your System Administrator to determine if thisfeature is available.Q5.
How can I set the number of rings that are allowed before the call is sent to voicemail?GE L
A5. Only your System Administrator can change the number of rings.TTINEA
R
Q6. How can I change the name displayed on my phone?G NIN
A6.
Only your System Administrator can change the usernames assigned to extensions.STAR
TEDG
MO
RE
69less Telephone User Guide

Q7.
70
How do I scroll the display screen?
A7. Press the low end of the Volume button to scroll down or the high end to scroll up.Q8.
Why can’t I program a Station Speed-Dial number to the button I want? It keeps say-ing that the button is non-programmable.A8.
Your System Administrator has programmed that button as a non-programmable key.Because you cannot override system programming from your phone, you must chooseanother key.Q9.
Why can’t I use one of the features described in this guide? A9. There are a few reasons why you might not be able to access the feature. Some possi-ble reasons include:• Your system software version may not support the feature (this guide covers all
versions).• Your System Administrator may not have enabled the feature for your phone.• Your System Administrator may have programmed your phone to block the fea-
ture.
Q10. If I need further assistance, how do I get technical support?A10.
First, contact your System Administrator if you have a question that is not covered inthis user guide. If you need further assistance, contact your local authorized Inter-Teldealer. All Inter-Tel sales, service, and support are handled at the local level.INT4000 Cordless Telephone User Guide
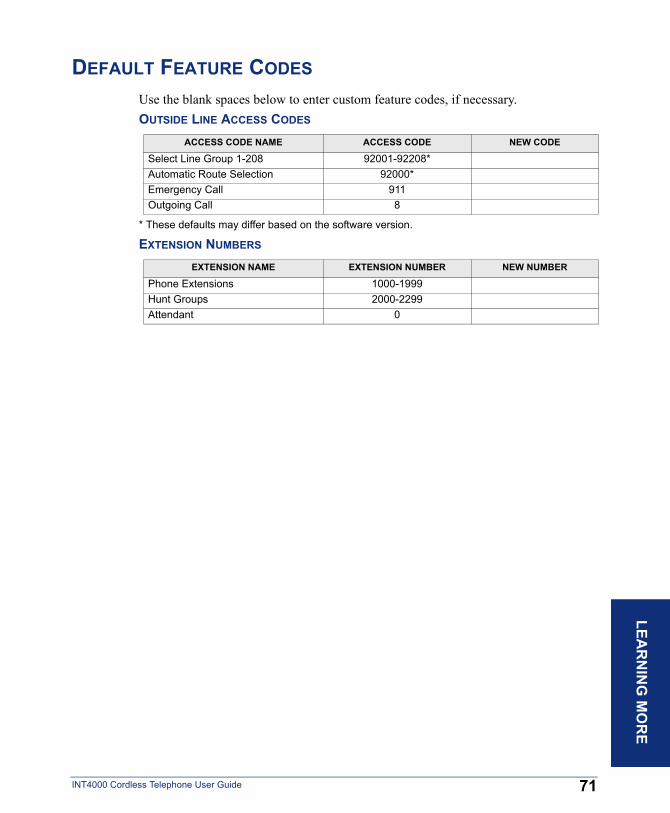
DEFAULT FEATURE CODES
INT4000 Cord
Use the blank spaces below to enter custom feature codes, if necessary.OUTSIDE LINE ACCESS CODES
* These defaults may differ based on the software version.
EXTENSION NUMBERS
ACCESS CODE NAME ACCESS CODE NEW CODE
Select Line Group 1-208 92001-92208*Automatic Route Selection 92000*Emergency Call 911Outgoing Call 8
EXTENSION NAME EXTENSION NUMBER NEW NUMBER
Phone Extensions 1000-1999Hunt Groups 2000-2299Attendant 0
GETTIN
G STA
RTED
LEAR
NIN
G M
OR
E
71less Telephone User Guide

72
GENERAL FEATURE CODES
FEATURE NAME FEATURE CODE NEW CODE
Account Code – Following Calls 391Account Code – Optional 390ACD Agent Log In 326ACD Agent Log Out 327ACD Agent Log In/Out 328ACD Agent Wrap-Up Terminate 329Agent Help Request 375Agent Help Reject 376Answer (Ringing Call) 351Automatic Intercom Access On/Off 361Automatic Line Access On/Off 360Automatic Line Answer 350Background Music On/Off 313Call Forward All Calls 355Call Forward If Busy 357Call Forward If No Answer 356Call Forward No Answer/Busy 358Conference 5Change Language 301Data 340Default Station 394Directory 307Display Time And Date 300Do-Not-Disturb 370Do-Not-Disturb Cancel 371Do-Not-Disturb On/Off 372Do-Not-Disturb Override 373Enhanced Speakerphone Enable 310Feature Key Default 395Group Listen 312 Handsfree On/Off 319Headset On 315Headset Off 316Headset On/Off 317Hold – Individual 336Hold – System 335Hookflash 330Hunt Group Remove 322Hunt Group Replace 323Hunt Group Remove/Replace 324Message 365Message – Cancel Message Left 366Message – Cancel Message On Phone 368
INT4000 Cordless Telephone User Guide
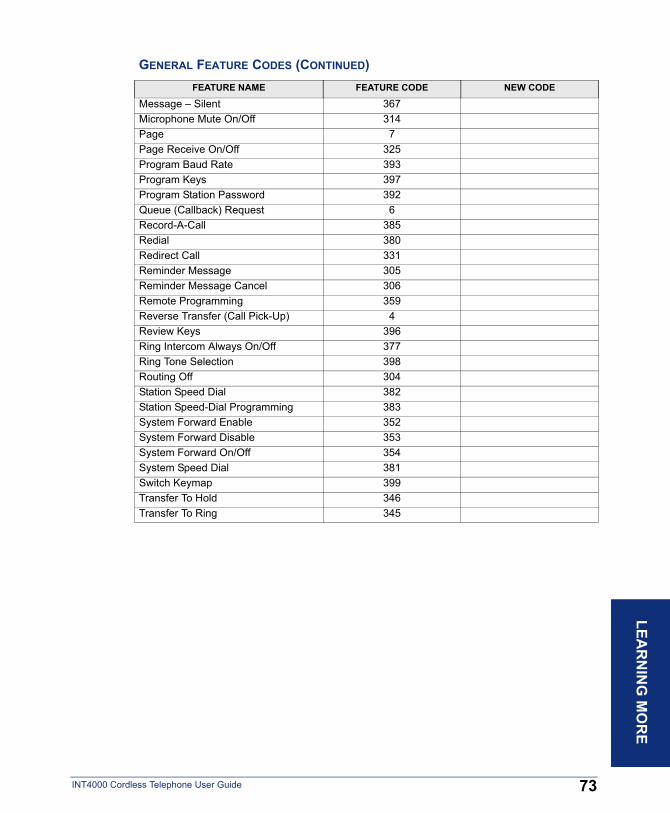
INT4000 Cord
GENERAL FEATURE CODES (CONTINUED)FEATURE NAME FEATURE CODE NEW CODE
Message – Silent 367Microphone Mute On/Off 314Page 7Page Receive On/Off 325Program Baud Rate 393Program Keys 397Program Station Password 392Queue (Callback) Request 6Record-A-Call 385Redial 380Redirect Call 331Reminder Message 305Reminder Message Cancel 306Remote Programming 359Reverse Transfer (Call Pick-Up) 4Review Keys 396Ring Intercom Always On/Off 377Ring Tone Selection 398Routing Off 304Station Speed Dial 382Station Speed-Dial Programming 383System Forward Enable 352System Forward Disable 353System Forward On/Off 354System Speed Dial 381Switch Keymap 399Transfer To Hold 346Transfer To Ring 345
GETTIN
G STA
RTED
LEAR
NIN
G M
OR
E
73less Telephone User Guide

74
INT4000 Cordless Telephone User Guide
IND
EX
IndexA
About This Guide 3About Voice Mail 3, 15About Your Phone 3Accessing Your Phone 61Account Codes 57ACD (Automatic Call Distribution) Hunt Groups 64ACD Agent IDs 64ACD Hunt Group Login 65ACD Hunt Groups 64Administrators 67Agent Help 62Alternate Greeting 20, 45Attaching the Belt Clip to the Handset 13Attaching the belt clip to the Handset 13Automatic Call Distribution (ACD) 64Automatic System Forwarding 29
BBasic Key Functions 5Battery Packs xi
CCall Forwarding 28Call Screening 58Call Transfer 26Call Waiting 24Callback And Call Waiting 26Callbacks 22, 23Calls
enabling/disabling hunt group 64ending ACD 66making emergency 24picking up reverse transfer 27receiving off-hook voice announce 23redirecting 23, 24waiting for called phone 22
Cancelingcallback requests 22unheard messages 38
Canceling Unheard Messages 38Cascade Levels 50Changing
call screening transfer method 48directory name 21, 46
INT4000 Cordless Telephone User Guide
fax destination number 49language 44message envelope 47message search order 49personal greeting 46transfer method 48voice mail message envelope 47voice mailbox password 47volume levels 44
Charging Unit Wall Mounting 11Conference Calls 54Connecting a Headset 32Connecting the AC Adapters 8Connecting the Telephone Cord 7
DDate, Time, Name, and Extension Number Display 31Default Station Operation 44Defaults
do-not-disturb message chart 39mailbox password 19reminder message chart 41
Delivery Options 37Dialing Station Speed-Dial Numbers 53Direct Wall Mounting 10Directories 54
name 19, 21, 46phone 58search 60voice mail 60
Disablingaccount codes 57hunt group calls 64paging 55
Display 6Displaying Information
outside party’s name 31speed-dial key assignments 53
Displaying Information on Your Phone 31Distributing Calls 64Do-Not-Disturb 54
EEmergency Calls 24Enabling
do-not-disturb 40hunt group calls 64paging 55
Ending an ACD Hunt Group Call 66
75

Entering Account Codes 57
FFax Destination Number 49Features
off-hook voice announce 23redirect calls 23, 24ring intercom always 22speed dialing 52
Finding Your Way 1Forced Account Codes 57Forwarding Calls 28
redirect calls 29Frequently Asked Questions (FAQ) 68, 69Full Mailbox 33
GGetting Started 17Greeting 20Greetings 45
HHeadset 32Hold 25Hunt Group Calls Enabled/Disabled 64Hunt Group Remove/Replace 62Hunt Groups 64
IIndividual Hold 25Individual hold 25Initializing Your Mailbox 19Installing the INT4000 7Intercom Calls 21, 22
KKeys
mute 25
LLanguage 44Learning More 67Listening to Messages 34
76
MMailbox Almost Full 33Making and Receiving Calls 20, 21Making Emergency Calls 24Making Pages 55Manual Call Forwarding 28Message
count 33envelope 47notification 51search order 49
Messageslistening 34receiving 34sending 37using do-not-disturb 54
Messaging, Remote 33Moving On 43Multilingual Capability 44Mute Key 25Muting The Microphone 26Muting the Microphone 26
NNotification Days and Times 51
OOff-Hook Voice Announce 23Optional Account Codes 57Outside
party’s name 31Outside Calls 23, 24Outside Party’s Name 31
PPaging 55, 60Passwords 47
changing default 19Performing a “Hookflash” During a Call 55Performing a Directory Search 60Phone Configuration 44
changing language selection 44changing volume levels 44
Phone Directory 58Place On Hold And Mute 24Placing Calls On Hold 25Placing Conference Calls 26
INT4000 Cordless Telephone User Guide

IND
EX
Placing Outside Calls 23Primary Greeting 20, 45Primary Language 44Programming
cascade levels 50fax destination 49feature keys 56notification days and times 51outside number as a feature key 56remote feature access 61remote messaging 50ring intercom always 22secondary extension keys 56
Programming Remote Feature Access 61Programming Your Feature Keys 56
QQueue the Line 22
RReceiving
outside calls 24Receiving Intercom Calls 23Record-A-Call 54Recording Personal Greeting 20Recording Personal Greetings 45Recording Voice Mail Directory Name 21, 46Redialing a Number 30Redirect Call 29Redirect Calls 23, 24Reminder Messages 60Remote Access Password 61Remote Feature Access 61Remote Messaging 50Remote Programming 60, 61Requesting a Callback 22Requesting Agent Help 62Responding to a Waiting Call 24Reverse Transfer 27Ring Intercom Always 22
SScreening Calls 58Search Order 49Searching in the Directories 60Secondary Language 44Selecting the Location 7Sending Messages 37
INT4000 Cordless Telephone User Guide
Setting Account Codes 57Setting Preferences 44Setting Remote Messaging 50SMDR (Station Message Detail Recording) 57Speed Dialing 52Standard account codes 57Standard Wall Plate Mounting 9Station Message Detail Recording (SMDR) 57Station Password 61Station Speed Dialing 52Storing Station Speed-Dial Numbers 52System Administrator 67System Hold 25System Speed Dialing 54
TTerminating the ACD Agent Call 66Timers 22To an Outside Number 27To Another Extension 27To Pick Up (Reverse Transfer) a Call 27To Voice Mail 27Transferring Calls 27Transferring To An Outside Number 27Transferring To Another Extension 27Transferring To Voice Mail 27Troubleshooting 68
UUndeleting Messages 36Using
defaults 19, 39, 41, 44do-not-disturb mode 54feature keys 56headset 32mute key 25off-hook voice announce 23
Using Account Codes 57Using Do-Not-Disturb Mode 39Using Record-a-call 54Using Reminder Messages 41Using the Directories 58Using Voice Mail Messages 34
VViewing Speed-Dial Numbers 53Voice Mail
directory 60directory name 46
77
message envelope 47
password 47
Voice Mail Directory 60Voice Mail Messages 34
canceling unheard messages 38
listening to messages 34
sending Messages 37
Voice Mail Options 45Voice Processing Unit 16Volume Levels 44
78
WWaiting Calls 24Wall Mount Installation 9Welcome 2, 18, 43What the Administrators Can Do for You 67Working in Hunt Group 64Wrap-Up Timer 66
ZZones, Page 55
INT4000 Cordless Telephone User Guide

Voice Mail Flow Chart
ENTERING YOUR MAILBOX
• EITHER, Press and the MSG key to respond to a message from voice mail.OR, Call the voice mail exten-sion number, press , and enter your mailbox number.
• Enter your password and then .
SPCL
*
#
SUBSCRIBER MAILBOX MENUListen to New Message Send A MessageListen to Saved MessagesPersonal OptionsMessage Options
1
2
3
4
5
• Dial the mailbox number, reply to a message, or forward a message.
• Record your message. To pause press To erase press
• Hang up to send OR Press for options.
2
3
#
ReplayAddErase and Re-RecordDelivery Options
1
2
3
9
PrivateCertifiedPrioritySend to Other Mailboxes
Send and Exit
1
2
3
#
TALK
Record GreetingPrimary Greeting
Alternate Greeting
System GreetingAlso see Recording Options
Record Directory NameSee Recording Options
Record PasswordChange Envelope Settings
Time and Date
Message Source
Message Length
All Options
No Options
Remote MessagingPrimary Cascade
Alternate Cascade
More OptionsFax Destination
Message Order
Transfer Method
1
1
2
3
2
3
4
1
2
3
4
5
5
1
2
9
1
2
5
UnannouncedScreenedAnnounce Only
1
2
3
Cancel Unheard MessagesRecover Deleted Messages
Listen
Recover All
Erase All
1
2
1
2
3
Program Cascade LevelEnter cascade level number, then:
Enable/Disable
Enter Personal #
Enter Pager #
Enter Time of DaySet Days of Week
Monday-Friday
All Days
Individual days 1-7
Select Message TypesAll Messages
Priority Messages
1
1
2
3
2
3
1
2
3
4
1
2
New MessagesSaved Messages
1
2
While the message is playing:Back UpPauseMove ForwardLower the VolumePlay the EnvelopeIncrease the VolumeSave the MessageDelete the MessageSkip to the End
After the message:Replay to MessageReply to the Message
Voice Mail Message
Return Call
Forward a CopySee Recording Options
Listen to Previous MessagePlay the EnvelopeListen to Next MessageSave the MessageDelete the Message
1
2
3
4
5
6
7
9
#
1
2
1
2
3
4
5
6
7
9
LISTENING TO MESSAGES
LISTENING TO MESSAGES
PERSONAL OPTIONS
MESSAGE ORDER
TRANSFER METHOD
MESSAGE OPTIONS
SENDING A MESSAGE
RECORDING OPTIONS
DELIVERY OPTIONS
NOTE: At any menu level, you can press to Cancel or return to the Previous Menu or press to Accept.* #

Part No. 935.0357 (UCZZ01790EZ)Issue 1, May 2003
A:46/1468A
©Inter-Tel, Inc. May 2003 Printed in China