Instructor Manual Contents - Wiley€¦ · eGrade Plus Instructor Training Guide Page 1 Welcome to...
91
eGrade Plus Instructor Manual Page i Instructor Manual Contents Welcome to eGrade Plus ............................................................................................................. 1 The Roles Within eGrade Plus ................................................................................................ 1 Master Course Instructor ......................................................................................................... 1 Class Section Instructor ....................................................................................................... 2 Navigating eGrade Plus........................................................................................................... 2 Using the Universal Navigation Elements ........................................................................... 2 Navigating the Sections of eGrade Plus ............................................................................... 4 Accessing eGrade Plus ............................................................................................................ 5 Logging In .......................................................................................................................... 5 The eGrade Plus Tutorial ........................................................................................................ 6 Your Class Home Page ........................................................................................................... 6 Navigating Your Home Page ............................................................................................... 8 Opening Messages, Announcements, Syllabi, and Documents ............................................. 8 Where Do You Go From Here? ............................................................................................... 8 Master Course Instructor Tasks ................................................................................................... 9 Master Course Instructor Course Administration ................................................................... 9 Adding the First Class ....................................................................................................... 10 Course Administration Instructors.................................................................................... 11 Course Administration Classes......................................................................................... 13 Course Administration Master Course Properties ............................................................. 15 Logging In After Classes and Instructors are Added .......................................................... 16 Instructor Tasks ........................................................................................................................ 17 Instructor Course Administration ......................................................................................... 18 Course Administration Roster .......................................................................................... 18 Course Administration Class Home Page ......................................................................... 25 Course Administration Class Properties ........................................................................... 32 Instructor Prepare & Present ................................................................................................ 32 Prepare & Present Resources ........................................................................................... 32 Prepare & Present Presentations ....................................................................................... 38 Instructor Study & Practice .................................................................................................. 43
Transcript of Instructor Manual Contents - Wiley€¦ · eGrade Plus Instructor Training Guide Page 1 Welcome to...

eGrade Plus Instructor Manual Page i
Instructor Manual ContentsWelcome to eGrade Plus.............................................................................................................1
The Roles Within eGrade Plus ................................................................................................1
Master Course Instructor .........................................................................................................1
Class Section Instructor.......................................................................................................2
Navigating eGrade Plus...........................................................................................................2
Using the Universal Navigation Elements ...........................................................................2
Navigating the Sections of eGrade Plus ...............................................................................4
Accessing eGrade Plus ............................................................................................................5
Logging In ..........................................................................................................................5
The eGrade Plus Tutorial ........................................................................................................6
Your Class Home Page ...........................................................................................................6
Navigating Your Home Page...............................................................................................8
Opening Messages, Announcements, Syllabi, and Documents.............................................8
Where Do You Go From Here?...............................................................................................8
Master Course Instructor Tasks...................................................................................................9
Master Course Instructor� Course Administration ...................................................................9
Adding the First Class .......................................................................................................10
Course Administration� Instructors....................................................................................11
Course Administration� Classes.........................................................................................13
Course Administration� Master Course Properties .............................................................15
Logging In After Classes and Instructors are Added ..........................................................16
Instructor Tasks ........................................................................................................................17
Instructor� Course Administration .........................................................................................18
Course Administration� Roster ..........................................................................................18
Course Administration� Class Home Page .........................................................................25
Course Administration� Class Properties ...........................................................................32
Instructor� Prepare & Present ................................................................................................32
Prepare & Present� Resources ...........................................................................................32
Prepare & Present� Presentations.......................................................................................38
Instructor� Study & Practice..................................................................................................43

eGrade Plus Instructor Manual Page ii
Opening the Study & Practice Section...............................................................................44
Navigating the Study & Practice Pages..............................................................................45
Instructor� Assignment..........................................................................................................52
Assignment� Assignment List............................................................................................52
Assignment� Readings/Resources......................................................................................61
Assignment� Questions/Exercises......................................................................................64
Assignment� Create Questions ..........................................................................................70
Instructor� Gradebook ...........................................................................................................83
General Navigation in the Instructor Gradebook................................................................83
Gradebook Operations.......................................................................................................84
Viewing a Student’s Assignments .....................................................................................86
Manually Grading an Assignment .....................................................................................87
Refreshing the Gradebook Content....................................................................................89

eGrade Plus Instructor Training Guide Page 1
Welcome to eGrade PluseGrade Plus is a Web-based product that automates the process of assigning and gradinghomework, quizzes, and exams. It provides you with an integrated suite of teaching and learningresources in one easy-to-use Web site.
eGrade Plus is organized around the essential activities you perform in class:
• Administer Your Course: eGrade Plus can easily be integrated with another coursemanagement system, Gradebook, or other resource you are using in your class, providingyou with the flexibility to build your course, your way. You can build and manage yourclass roster and communicate with the class.
• Prepare & Present: Create class presentations using a wealth of Wiley-providedresources - such as an online version of the textbook, PowerPoint slides and interactivesimulations - making your preparation time more efficient. You may easily adapt,customize, and add to this content to meet the needs of your course.
• Create Assignments: Automate the assigning and grading of homework or quizzes byusing Wiley-provided question banks, or by writing your own. Student results will beautomatically graded and recorded in your Gradebook. eGrade Plus can link homeworkproblems to the relevant section of the online text, providing students with context-sensitive help.
• Study & Practice Textbook Content: Present readings, resources, and practiceproblems materials from the textbook in the online classroom. You can choose specificparts of the book to review.
• Track Student Progress: Keep track of your students’ progress through an instructor’sGradebook, which allows you to analyze individual and overall class results to view theirprogress and assess level of understanding.
The Roles Within eGrade Plus
eGrade Plus includes two levels of access: Master Course Instructor and Class Section Instructor.Your access privileges are identified when you log in to eGrade Plus. For more information onLogging in to eGrade Plus, refer to the section titled “Logging In.”
The student functionality within eGrade Plus is described in a separate guide.
Master Course Instructor
The Master Course Instructor role is a higher level of access that allows designated instructors toperform master course administration and setup. The Master Course Instructor is simply aninstructor with access to additional administrative tools in eGrade Plus. These additional toolsare located primarily in the Course Administration area. The master course instructor may enterthe master course or the class section depending on which functions she would like to perform.For detailed information on the tools available to the Master Course Instructor, refer to thesection of this guide titled “Master Course Instructor Tasks.”

eGrade Plus Instructor Training Guide Page 2
Class Section Instructor
In eGrade Plus, the Class Section Instructor designates presentations and assignments, andcreates exercises and questions for students. Class Section Instructors also have access to CourseAdministration tools that allow them to populate their classes as well as to a Gradebook throughwhich they can monitor the progress students have made in assignments. For detailedinformation on the tools available to the instructor, refer to the section of this guide titled“Instructor Tasks.”
Navigating eGrade Plus
eGrade Plus page includes an assortment of elements that make navigation easy. It is importantto familiarize yourself with the key navigation elements because they are helpful for movingthrough the product.
Using the Universal Navigation Elements
Universal elements are available along the top bar of every eGrade Plus page. They include:Home, My Profile, Help, and Logout.
Home Page
You can click the Home link in the upper right section of any page to return to the class homepage. For details about navigating the class home page, refer to the section in this guide titled“Navigating your Home Page.”
Figure 1. The Instructor Home Page.

eGrade Plus Instructor Training Guide Page 3
Profiles
It’s easy to change the personal information that eGrade plus uses to identify you. The profileincludes information such as name, e-mail address, password, and so on. It is important that therequired profile components are updated to reflect current information. For example, if youraddress is not correct, students may not be able to contact you through the application.
To open a profile, click the My Profile link in the upper right corner of any page. Then, revisethe information and click Update Profile to save it. Even though eGrade plus immediately savesyour profile changes, you may need to logout of eGrade Plus to make sure that the changesdisplay on the pages of your current session.
Figure 2. The My Profile Page
Online Help
You can click the Help link in the upper right corner of every eGrade Plus page to access theonline help system. Online help opens in a separate browser window and provides a search toolfor accessing information on specific functionality. It also includes a table of contents and anindex.
Context-sensitive help is also available from many of the eGrade Plus pages. Simply click a topiclink near the top of the page to open online help that specifically targets the open page.
Logout
Click the Logout link in the upper right corner of every eGrade Plus page to sign out of eGradePlus. After you sign out, you will not be able to access any eGrade Plus component without firstsigning in.
Note: For security reasons, eGrade Plus also has an automatic time out feature. If no activity isdetected for 10 minutes, the system automatically signs you out from the current session. Youmust log in again before you can continue working in eGrade Plus.

eGrade Plus Instructor Training Guide Page 4
Navigating the Sections of eGrade Plus
Each major section within eGrade Plus offers several standard navigational components.
Note: It is important that you use the navigational elements within eGrade Plus. Do not use theBack and Forward buttons in your browser; they may produce unexpected results.
Sections
You can access all of the eGrade Plus sections from any page within the product. Simply clickthe section name at the top part of the page to open the section.
Navigation Bar
Very often, a navigation bar appears near the top left region of the page. You can click anunderlined link in the bar to go back to the specified page. For example, if you click Roster in theNew Student page, you will go back to the Roster page.
Tabs
Some areas of eGrade Plus display tabs that offer access to additional tools that further definematerial on which you are working. Simply click a tab to open a section.
Buttons
All eGrade Plus pages that require input from you also require that you click a button to save thatinput. Button names vary from page to page, depending on context.
Note: If you exit a page without clicking the button on the bottom of the page, eGrade Plus willprobably not save your information.

eGrade Plus Instructor Training Guide Page 5
Accessing eGrade Plus
Each eGrade Plus class has its own URL. Master Course Instructor and Class Section Instructorsfor a class share one URL, while students for the class share another. Access privileges aredefined by the ID and password. The URL is generated when the Master Course Instructorinitiates a class and assigns an instructor. For more information on initiating a class, refer to thesection titled “Adding the First Class.”
Logging In
Whenever you access eGrade Plus, you must log in to the home page using your pre-establishedID and password. Type your e-mail address and password and click Submit. If you would like tosave the Login page as a bookmark in your browser, click the word Bookmark in the Bookmarkthis page sentence near the bottom of the Login page.
Note: The first time an instructor logs in with a new ID and password, an Instructor andDeveloper License Agreement appears. Review the agreement and click Accept. If you click DoNot Accept, you will not be able to open eGrade Plus.
Figure 3. The Login Page.
Forgotten Password
The Login page offers a password recovery tool. Simply click the word password in the Forgotyour password phrase. A screen appears where you can enter the e-mail address you used forregistration. If the e-mail address is valid, a new password will be sent to you immediately.
Generic Login
eGrade Plus also provides a generic URL, http://egradeplus.wiley.com/egradeplus/index.uni, incase you cannot locate your unique home page address. When the generic page opens, simplytype your e-mail address and password and click Submit. All eGrade Plus sites to which youhave access appear. Select the appropriate site to continue to the Login page for your home page.For future access, bookmark the Login page for your class home page.
If you’ve forgottenyour password,you can request anew one.
You can bookmarkthe page for easyaccess later on.

eGrade Plus Instructor Training Guide Page 6
The eGrade Plus Tutorial
You can access a tutorial for eGrade Plus from the Login page that appears when you firstnavigate to the class home page. The tutorial provides easy-to-understand information aboutusing eGrade Plus.
Figure 4. The Instructor Login Page.
Your Class Home Page
Your class home page is the page from which you perform all administrative tasks for your classas well as assign materials for classroom study. It also includes an area where you can reviewdocuments that you have already posted for the class and access messages that pertain to siteadministration.
The home page always offers access to the following five areas:
• Course Administration
• Prepare & Present
• Study & Practice
• Assignment
• Gradebook
A Tutorial link isavailable on yourLogin page.

eGrade Plus Instructor Training Guide Page 7
Figure 5. The Instructors Home Page.
When you log in as a Master Course Instructor, the home page appears slightly different than thehome page for Class Section Instructors. It displays a message indicating you are the MasterCourse Instructor and, for the initial use of the program, displays a Create a class now region.Remember, a Master Course Instructor is simply an instructor with access to additionaladministrative tools in eGrade Plus.
Figure 6. The Master Course Instructor Home Page.
Master Course Instructorsmust define at least oneclass before beginning.
The Course Administrationsection offers additional toolsto a Master Course Instructor.
eGrade Plus Instructor Training Guide Page 8
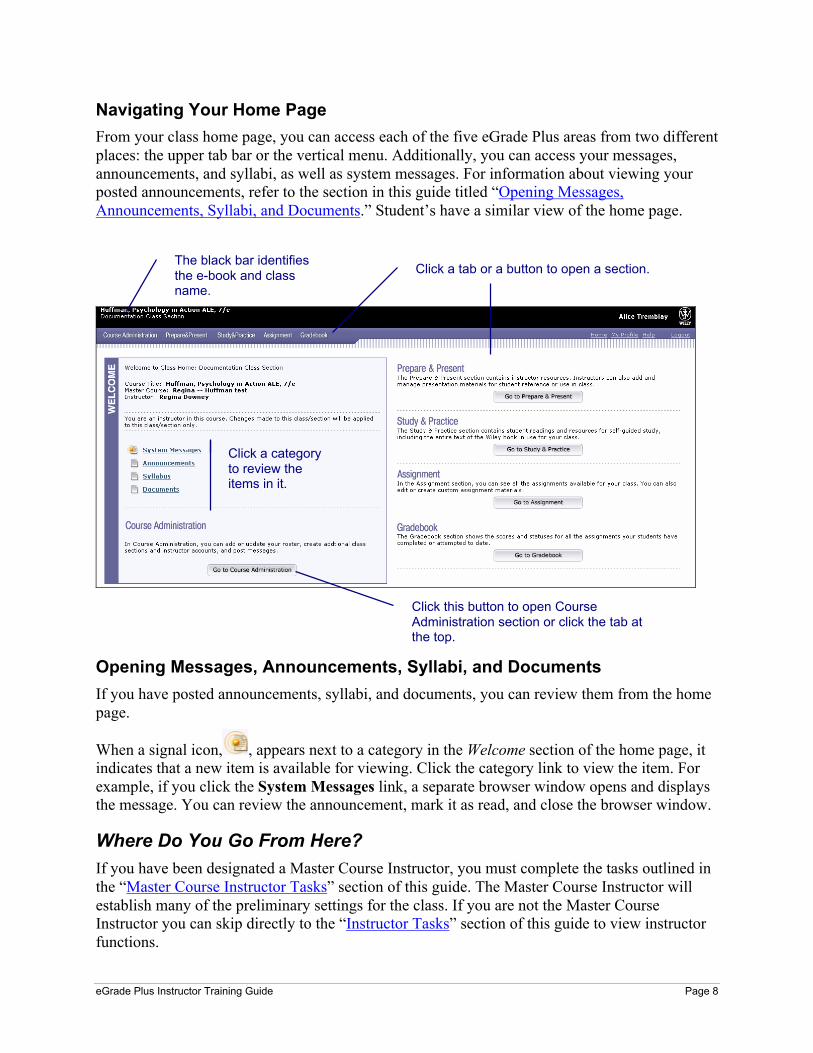
Navigating Your Home Page
From your class home page, you can access each of the five eGrade Plus areas from two differentplaces: the upper tab bar or the vertical menu. Additionally, you can access your messages,announcements, and syllabi, as well as system messages. For information about viewing yourposted announcements, refer to the section in this guide titled “Opening Messages,Announcements, Syllabi, and Documents.” Student’s have a similar view of the home page.
Opening Messages, Announcements, Syllabi, and Documents
If you have posted announcements, syllabi, and documents, you can review them from the homepage.
When a signal icon, , appears next to a category in the Welcome section of the home page, itindicates that a new item is available for viewing. Click the category link to view the item. Forexample, if you click the System Messages link, a separate browser window opens and displaysthe message. You can review the announcement, mark it as read, and close the browser window.
Where Do You Go From Here?
If you have been designated a Master Course Instructor, you must complete the tasks outlined inthe “Master Course Instructor Tasks” section of this guide. The Master Course Instructor willestablish many of the preliminary settings for the class. If you are not the Master CourseInstructor you can skip directly to the “Instructor Tasks” section of this guide to view instructorfunctions.
The black bar identifiesthe e-book and classname.
Click a tab or a button to open a section.
Click this button to open CourseAdministration section or click the tab atthe top.
Click a categoryto review theitems in it.

eGrade Plus Instructor Training Guide Page 9
Master Course Instructor TasksThe Master Course Instructor view includes all sections available to the instructor as well asadditional Course Administration options.
The section that follows describe only the features within the Course Administration section ofthe Master Course Instructor view of eGrade Plus. Specifically, this section discusses thefeatures that differ from the instructor functions, which are available to all instructors.
• To make change to be applied to the whole course, enter as master course owner.
• To make changes to be applied to one particular section, enter as class section instructor.
For details on all other instructor functionality, refer to the section in this guide titled “InstructorTasks.”
Master Course Instructor � Course Administration
There are five main areas in the Course Administration section. The Instructors option and theMaster Course Properties option are available only to Master Course Instructor.
• Roster
• Instructor
• Classes
• Class Home Page
• Master Course Properties
When you log in to eGrade Plus, the Master Course home page opens. The Home page offersaccess to the Course Administration tools. When first entering as a Course Administrator amessage appears on the home page indicating that no classes have been created for the course.
Click here toautomaticallycreate a class.
Click here toaccess atutorial.

eGrade Plus Instructor Training Guide Page 10
Adding the First Class
If no classes exist, you must create at least one.
1. From the Master Course Instructor home page, click Create a class now. The Class SectionDetails page appears. On this page, define the parameters of the class.
Figure 7. The Class Section Details Page.
2. Fill in the fields using the guidelines that follow:
Class Name: This field is required. Enter a title for the class name. If you are managingconcurrent class sections, you will want to use class names that allow them to be easilydistinguished.
Self Registration: Allow students to register for the class on their own. If Denied is selected,the instructor must register students using the Roster section of Course Administration.
Description: Enter a brief explanation of the class.
Status: Select a status for the class. The options are Started or Not Started. The options areStarted or Not Started. You must select started to allow students to enter. Students cannotenter a class that is not started.
Class URL: You cannot edit this field. This is automatically filled in by eGrade Plus.
Accessible: When the box is checked, students can enter this class. To keep students fromaccessing the class section while changes are being made, remove the check from theAccessible box.
Instructors: This shows the instructions assigned to the class. Continue with the steps in thesection titled “Adding an Instructor Name” to add instructors to this course.
See Instructor List: Lists all the available instructors in a course. You can appoint aninstructor to this class section by checking the checkbox under the Appointment column ofthe instructors you would like to assign to the class. You can appoint more than oneinstructor to a class.
Click hereto go tothe MasterCoursepage.

eGrade Plus Instructor Training Guide Page 11
Figure 8. The Instructors Appointment Page.
3. If you clicked See Instructor List, click Submit or the click Class Section Details in thenavigation bar that appears near the top left of the page. The Class Section Details pagereopens. Continue filling in the fields.
Number of Students: This shows the number of students assigned to this class. For detailson adding students, continue with the steps in the section titled “Adding Student Names tothe Roster.”
Inherit from class…: Classes can inherit student and instructor settings from a finishedcourse. When you click Inherit from class, a list of finished classes appears. Select a classsection from which you would like to inherit settings and specify the settings you would liketo inherit.
4. Click Submit when you are finished. The Master Course Class List appears.
Course Administration� Instructors
The Instructors page offers an area where you can add and manage the class instructor list. Itprovides tools to add instructors’ names, update instructors’ profiles, and delete instructors’names.
The Instructor List shows the available instructors for a course and the number of classes towhich each is assigned. For details on assigning an instructor to a class, see step 2 in the sectiontitled “Adding the First Class.”
Click here to go tothe Master Coursepage.
Click acheckbox toappoint aninstructor to aclass.
Click here toadd a newinstructor.
Click an instructor name toedit the settings.

eGrade Plus Instructor Training Guide Page 12
Adding an Instructor Name
You can add instructor’s names to the list by entering them one at a time.
1. Click the Instructors tab at the top of the Course Administration section. The Instructorspage appears and displays the current instructors available for a course.
2. Click New Instructor. The New Instructor Detail page appears. Notice that a navigation barappears near the top left of the page. The bar indicates the path you have taken to arrive at thecurrent page.
Figure 9. The New Instructor Page.
3. Fill in the fields using the guidelines that follow:
First Name: This field is required. Enter the instructor’s first name.
Last Name: This field is required. Enter the instructor’s last name.
E-mail: This field is required. Enter the instructor’s e-mail address.
Phone: Enter the instructor’s telephone number.
Password: This field is required. Type a password for the instructor to use when she initiallyopens eGrade Plus. Consider using the instructor’s first name or a generic term, password,for example. The instructor will change the password that was assigned to her as soon as sheopens eGrade Plus.
Confirm Password: This field is required. Retype the instructor’s password.
4. Click Create Account. The instructor name you created will be added to the instructor’s listand a blank New Instructor page will appear.
5. Continue adding instructor names using the guidelines in step 3. When you are finishedadding names click the Instructors link in the navigation bar to return to the Instructorspage.
The Master Course Instructor must notify the new Class Section Instructor with accessinformation about their class.
Updating an Instructor Profile
On occasion, you may need to change the properties associated with an instructor. For example,you may want to change the e-mail address or phone number for the instructor.
The navigationbar shows thepath you took toget to this page.

eGrade Plus Instructor Training Guide Page 13
1. Click the Instructors tab at the top of the Course Administration section. The InstructorsList page appears. The page displays the current instructors available for a course.
2. In the Full Name column, click the instructor name that you would like to edit. The InstructorProfile page opens and displays the current information for the instructor.
Figure 10. The Instructor Profile Page.
3. Change the information to meet your needs. You can add comments in the Additional Infotext box.
4. Click Update Profile to submit your changes. The Instructors List page reopens.
Deleting an Instructor Name
Removing an instructor name is permanent. Once you remove a name, you cannot recover it.
1. Click the Instructor tab at the top of the Course Administration section. The Instructors pageappears. The page displays the current instructors available for a course.
2. Click Delete in the Actions column for the instructor that you would like to remove. eGradePlus will prompt you for confirmation of the removal.
3. Click OK to remove the instructor. The instructor is deleted and removed from the InstructorList.
Course Administration� Classes
In the Classes area, you can create new classes and review and edit all of the classes assigned toa course.
The Master Class List appears in the Class section. If you would like to rearrange the order theclasses appear in the list, click a column heading. eGrade Plus will rearrange the classes based onthe column heading.
Thenavigationbar showsthe path youtook to getto this page.

eGrade Plus Instructor Training Guide Page 14
Figure 11. The Master Course Page.
Adding New Classes
You can add new class sections to the Master Course by entering them one at a time.
1. Click the Classes tab at the top of the Course Administration section. The Master Class Listpage appears. The page displays the current classes assigned to the course.
2. Click New Student on the Class Operations page. The New Class page appears. Notice that anavigation bar appears near the top left of the page. The bar indicates the path you have takento arrive at the current page.
3. Follow steps 2 through 4 in the section titled “Adding the First Class.”
Editing the Master Class List
On occasion, you may need to change the properties associated with a class. For example, youmay want to change the class name or status of the class.
Note: You can edit only the properties of the class that you have added; you cannot editpredefined properties.
1. Click the Classes tab at the top of the Course Administration section. The Master Class Listpage appears. The page displays the current classes available for a course.
2. Click the title of the class in the Class/Section Name column of the Master Class List thatyou would like to edit. The Class Section Details page opens and displays the current settingsfor the class.
3. Change the settings to meet your needs and click Submit. The Master Class List appearswith the new properties for the class.
Deleting a Class
Removing a class is permanent. After you remove a class, you cannot recover it.
1. Click the Classes tab at the top of the Course Administration section. The Master Class Listpage appears. The page displays the current classes available for a course.
2. Click Delete in the Actions column of the class that you would like to remove. eGrade Pluswill prompt the Master Course Instructor for confirmation of the removal.
Click here todelete aclass.
Click here toadd a class.

eGrade Plus Instructor Training Guide Page 15
3. Click OK to remove the class. The class is deleted and removed from the Master Class List.
Course Administration� Master Course Properties
The Master Course Instructor’s Course Administration section includes a Master CourseProperties area that displays the settings associated with the course. This page does provide acomprehensive list of course properties. You can edit some of the settings from this page,
1. Click the Master Course Properties tab at the top of the Course Administration section.The Master Course Properties page appears. The page displays the current informationavailable for this course.
Figure 12. The Master Course Properties Page.
2. Edit in the fields using the guidelines that follow.
Master Course Name: Enter a title for the course.
Master Course Template: This information is provided by eGrade Plus. You cannot changeit.
Master Course Instructor/Admin: This is the Master Course Instructor’s name. You canedit the name by changing the name setting in the My Profile section.
Master Course URL: This field is automatically generated. You cannot change it.
Time Zone: Select the appropriate time zone.
Local Time: This field displays the current local time.
3. Click Save/Update Settings to submit the changes to the course.
Note: Changes made in the Master Course are applied to all sections. Changes made to ClassSection are applied to that section only. For the most part, you should make course contentchanges and customizations at the Master Course level. Settings and data specific to aparticular class section, such as student rosters and assignments, should be made at the ClassSection level.
Click here to changethe name in theMaster CourseInstructor/Adminfield.

eGrade Plus Instructor Training Guide Page 16
Logging In After Classes and Instructors are Added
After you add class sections, you can enter the course at the master course level and perform thefunctions of the administrator (add classes, instructors, and view Master Course properties). Youcan also enter the course as an instructor.
Figure 13. The Class Selector Page.
After you enter the course, the Class Selector page appears where you can enter the mastercourse or one of the class sections. Click the master course link or a class section link. The homepage opens.
Figure 14. The Master Course Home Page.
Click Go to Course Administration to open the section you picked on the Login screen. Youcan change the section you would like to review by clicking a new section title and then clickingGo to Course Administration.
This is the Master Course.
These are the class sections.
This is the courseselection area

eGrade Plus Instructor Training Guide Page 17
Instructor TasksAfter a Master Course Instructor sets up classes and instructors, you can begin populating theclasses and preparing assignments. When you log in to eGrade Plus, the Class home page opens.
Figure 15. The Class Home Page.
The following flowchart provides the general order in which you will work in eGrade Plus.

eGrade Plus Instructor Training Guide Page 18
Instructor� Course Administration
The Course Administration section of eGrade Plus provides tools that allow you to manage classrosters and properties, student profiles, and to post documents to your class home page.
Click the Course Administration tab. There are three main areas in the Course Administrationsection of eGrade Plus:
• Roster
• Class Home Page
• Class Properties
To begin with the steps in the Course Administration sections that follow, click the CourseAdministration tab.
Course Administration� Roster
The Roster page offers an area you instructors can build and manage your class roster. Itprovides tools for adding student names, importing existing rosters, deleting student names, andsearching for specific student names.
Opening the Roster Operations Tools
The Roster Operations tools allow you to build and manage the class roster. You can show andhide the Roster Operations tools on the Roster page. Obviously, the tools must be visible in orderto access them. Even if you have master course access, it is in most cases more convenient tocreate students/rosters at the class section level.
1. Click the Roster tab on the Course Administration page. The Roster page appears.
2. Click Show Roster Operations on the Roster page. The Roster page expands to displaybuttons you can use for creating and managing the roster.
Click a tab to open a specificCourse Administration area.
Click an underlined columnheading to sort the informationby that heading type.
Click here to accessroster options.

eGrade Plus Instructor Training Guide Page 19
Figure 16. The Roster Page Expanded to Display the Roster Operations
3. Create and manage the roster using the actions described in the following sections.
Add Student Names to the Roster
You can add student names to the roster by entering them one at a time. If you elected to allowstudent self-registration when you set up the class section, then you not need to add students tothe roster. Instead, simply give the students the Class Section URL and tell them that they needto register.
1. Click New Student on the Roster Operations page. The New Student page appears. Noticethat a navigation bar appears near the top left of the page. The bar indicates the path you havetaken to arrive at the current page.
Figure 17. The New Student Page.
2. Fill in the fields using the guidelines that follow:
First Name: This field is required. Enter the student’s first name.
Click a link in thenavigation bar toreturn to thatlocation.
You can select howmany student names todisplay per page.

eGrade Plus Instructor Training Guide Page 20
Last Name: This field is required. Enter the student’s last name.
E-mail: This field is required. Enter the student’s e-mail address.
Phone: Enter the student’s telephone number.
Student ID: Student ID can be any school-specific ID convention that you want to use. It isoptional. If you want students to use this, it is a good idea to mention it to them when yougive them the class URL. Password: This field is required. Type a password for the studentto use when she initially opens eGrade Plus. Consider using the student’s first name or ageneric term, password, for example. The student will change the password you assigned toher as soon as she opens eGrade Plus.
Confirm Password: This field is required. Retype the student password.
3. Click Create Account. The student name you created will be added to the roster and a blankNew Student page will appear.
4. Continue adding student names by following steps 2 and 3. When you are finished addingnames click the Roster link in the navigation bar to return to the Roster page.
5. Click Refresh Roster near the right side of the page to display the names you just added.Review the roster to ensure that the names are correct.
Once the account is created, email notification is automatically sent to the student.
If the instructor creates the student’s account, the student will still need to provide a registrationcode to access the site.
Import an Existing Roster
eGrade Plus allows you to import an existing roster of student names. The import file must be aTXT or CSV file and the names in it must be separated by commas, tabs, or semicolons. Forexample, if you have a class roster in Microsoft® Excel, you can save it as a text file (TXT) orcomma separated value file (CSV) with tabs and then import it into eGrade Plus.
When you import a roster file, the information within it must be in a standard format. All theinformation for one student name must be on one line and the required components—first name,last name, e-mail address, and password—must be separated by a tab, comma, or semicolon. Thefollowing example shows a short roster with the components separated by commas.
Note: The order of the components in the file you upload is important. The file must follow astandard order for required components. If the file does not follow the correct order, eGrade Plusroster fields will be improperly populated or errors will occur.
Correct Field Order for An Imported Roster File
The correct field order for required components is: first name, last name, student ID, e-mailaddress, student password. If you not do include a student password, eGrade Plus will assign oneautomatically. If you would like to add a student telephone number, it should be the last item ineach record.Bikesh,Patel,bpatel,[email protected],password
Dorothy,Wayne,dwayne,[email protected],password
Paul,Birdsong,pbirdsong,[email protected],password

eGrade Plus Instructor Training Guide Page 21
Raoul,Menendez,rmendenez,[email protected],password
Password is not necessary. If you do not provide a password, there will be a system generatedone.
Note: When you import a roster, eGrade Plus reviews the file and identifies errors. If errorsoccur within the mandatory components of a specific student name, instructors will not be able toimport that name as part of the roster. eGrade Plus will display an error message.
1. Click Import Roster File on the Roster Operations page. The Import Roster File pageappears.
Figure 18. The Import Roster File Page.
2. Click Browse and navigate to the roster file that you would like to import. Highlight the fileand click Open. The Choose File box closes and the full path and the filename appear in thePath field on the Import Roster File page.
3. Note: When you click Browse to locate a file, the standard Microsoft® Windows ChooseFile box appears. Navigate as you would in any Windows application.
4. Click Import Roster File. The Import Roster Page appears with the information from theTXT file. Review the eGrade Plus roster to ensure that the fields are populated correctly. Ifthey are not populated correctly, or if eGrade Plus identifies errors, review the source TXT orCSV file, correct the errors, and try again.
5. Note: If a student’s email is already registered with eGrade Plus system, the followingmessage appears in the comment column: “The student is already registered in the systemand will be added to this class with their current profile information.”
Figure 19. The Import Roster Page with the Contents of an Existing TXT Roster.
6. Click Submit. The Roster Operations page reappears.

eGrade Plus Instructor Training Guide Page 22
Figure 20. The Roster Operations Page with Names from the Imported Roster.
7. Click Refresh Roster near the right side of the page to display the names you just added.Review the roster to ensure that the names are correct.
Delete a Student Name
On occasion, you may need to delete a student name from the class roster. For example, if astudent leaves a class prior to a marking period, you may want to remove his name from the classroster. When you delete a student’s name, the student will no longer have access to any of theonline programs associated with the instructor’s eGrade Plus curriculum.
When you delete a student name, it is permanent; you cannot undo the operation. However, ifyou accidentally delete a student name, you can recreate the account manually using the NewStudent button.
1. Locate the student name that you would like to remove on the Roster Operations page.
2. Click the checkbox in the Select column on the right side of the roster for the student nameyou would like to remove.
If you would like to remove all the student names, click the checkbox in the column heading.

eGrade Plus Instructor Training Guide Page 23
Figure 21. The Roster Operations Page with a Student Name Selected.
3. Click the Delete Selected button on the right side of the page. A message appears confirmingthat the selected student account(s) will be deleted.
4. Click OK to permanently remove the account.
5. Click the Refresh Roster button when changes are done.
Search for a Student Name
The Search tool is helpful if you would like to locate student information in an extensive roster.You can perform a search by first name, last name, or e-mail address.
1. Locate the Search Students field on the Roster Operations page.
2. Type an entry for which you would like to search. For example, if you would like to locateall students named Raoul, type Raoul in the Search Students field.
3. Click Apply. eGrade Plus returns the results of the search.
Figure 22. The Search Results Page for the Search Students Entry of Raoul.

eGrade Plus Instructor Training Guide Page 24
4. If the search located the student name you required, review or edit the student informationappropriately.
Edit a Student Profile
You can edit the roster information associated with individual students by editing a student’sstudent profile. For example, if a student’s e-mail address or telephone number has changed,open his student profile and update the appropriate information. It is important to maintainaccurate student profiles.
The Student Profile page also offers an area where you can deactivate or activate a studentaccount. This is helpful if you do not want to permanently remove the student name from theroster but do want to eliminate eGrade Plus access for the student. The page also includesinformation about student registration and offers a link you can click to send e-mail to thestudent.
1. Click a student name on the Roster Operations page. Be sure to click the actual student name,not the column heading. The Student Profile page appears.
Figure 23. The Student Profile Page
2. Review the information in the student profile and update it where necessary.
3. If you would like to send an e-mail to the student, click the Send E-mail link and type yourmessage in the mail window that appears. Notice that the student’s e-mail address has beeninserted for you.
4. When you are finished revising the student profile, click Update Profile. The RosterOperations page reopens with a message at the top indicating that a profile was updated.
eGrade Plus Instructor Training Guide Page 25
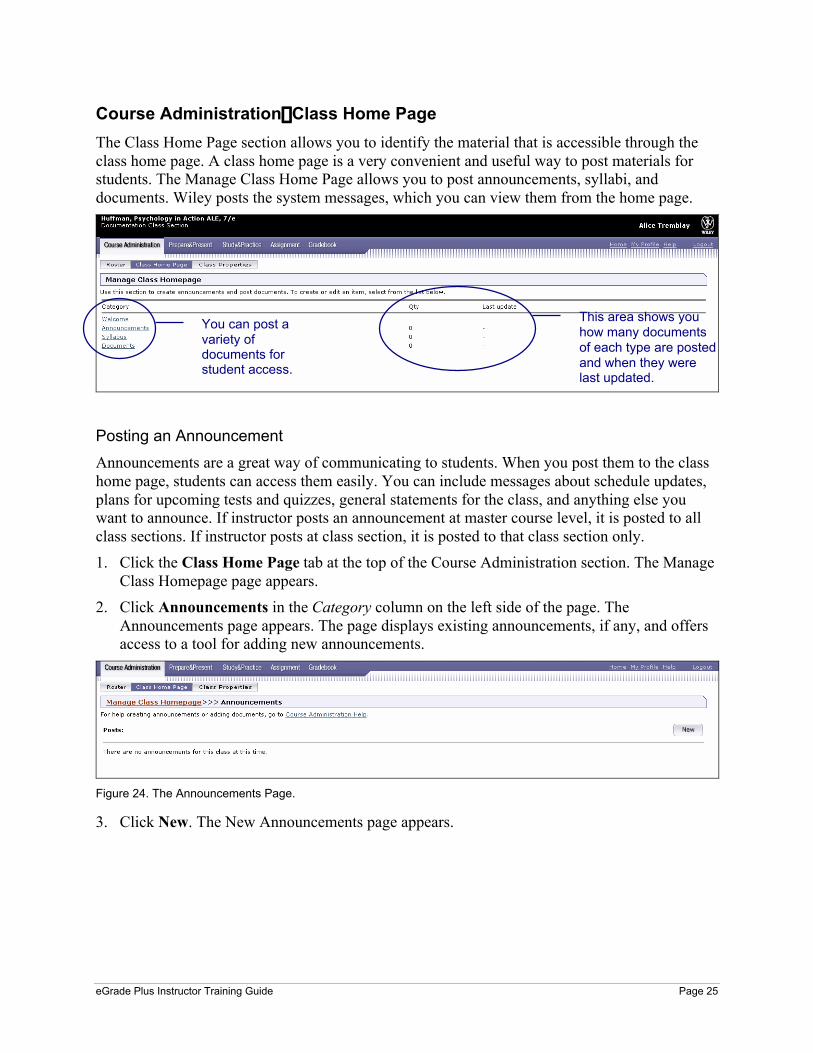
Course Administration� Class Home Page
The Class Home Page section allows you to identify the material that is accessible through theclass home page. A class home page is a very convenient and useful way to post materials forstudents. The Manage Class Home Page allows you to post announcements, syllabi, anddocuments. Wiley posts the system messages, which you can view them from the home page.
Posting an Announcement
Announcements are a great way of communicating to students. When you post them to the classhome page, students can access them easily. You can include messages about schedule updates,plans for upcoming tests and quizzes, general statements for the class, and anything else youwant to announce. If instructor posts an announcement at master course level, it is posted to allclass sections. If instructor posts at class section, it is posted to that class section only.
1. Click the Class Home Page tab at the top of the Course Administration section. The ManageClass Homepage page appears.
2. Click Announcements in the Category column on the left side of the page. TheAnnouncements page appears. The page displays existing announcements, if any, and offersaccess to a tool for adding new announcements.
Figure 24. The Announcements Page.
3. Click New. The New Announcements page appears.
You can post avariety ofdocuments forstudent access.
This area shows youhow many documentsof each type are postedand when they werelast updated.

eGrade Plus Instructor Training Guide Page 26
Figure 24. The New Announcements Page.
4. Fill in the fields using the guidelines that follow:
Priority: Select a priority for the announcement from the dropdown menu. You can selectNormal or Urgent.
Available to students: If you would like to post an announcement that is not available tostudents, click the No button. Click Yes if you would like students to see the announcement.You can create several announcements upfront and then select which ones you wantavailable to the students at any time.
Title: Enter a name for the announcement you are creating. The title can be only as long asthe field permits.
Text: Enter the content of your announcement. You can copy it from another source andpaste it in the region.
URL: If you would like to refer students to a related URL, type the URL in the field. Youcan also copy the URL from your browser and paste it in the field. Type the link, the itemstudents should click from the destination, in the Link title field. If you would like to addmore than one URL, click the add link button and fill in the additional fields.
5. Click Save and Add to List. The Announcements page appears with the announcement youjust added.
Figure 25. The Announcements Page with a Newly Added Announcement.
eGrade Plus Instructor Training Guide Page 27
6. Review the announcement. If you would like to make changes to an announcement or tomake a different announcement active, click Edit near the bottom right of the page. The NewAnnouncements Page appears where you can make changes.
Removing an Announcement
eGrade Plus provides a tool to remove announcements. It is a good idea to removeannouncements that are outdated or obsolete.
Removing an announcement is permanent. Once you remove it, you cannot recover it.Additionally, eGrade Plus does not prompt for confirmation of the removal. When you clickRemove, the announcement is deleted.
1. Click the Class Home Page tab at the top of the Course Administration section. The ManageClass Homepage page appears.
2. Click Announcements in the Category column on the left side of the page. TheAnnouncements page appears. The page displays existing announcements.
3. Scroll through the page to locate the announcement that you would like to remove.
4. Click Remove near the bottom right of the page. eGrade Plus will remove the announcement.
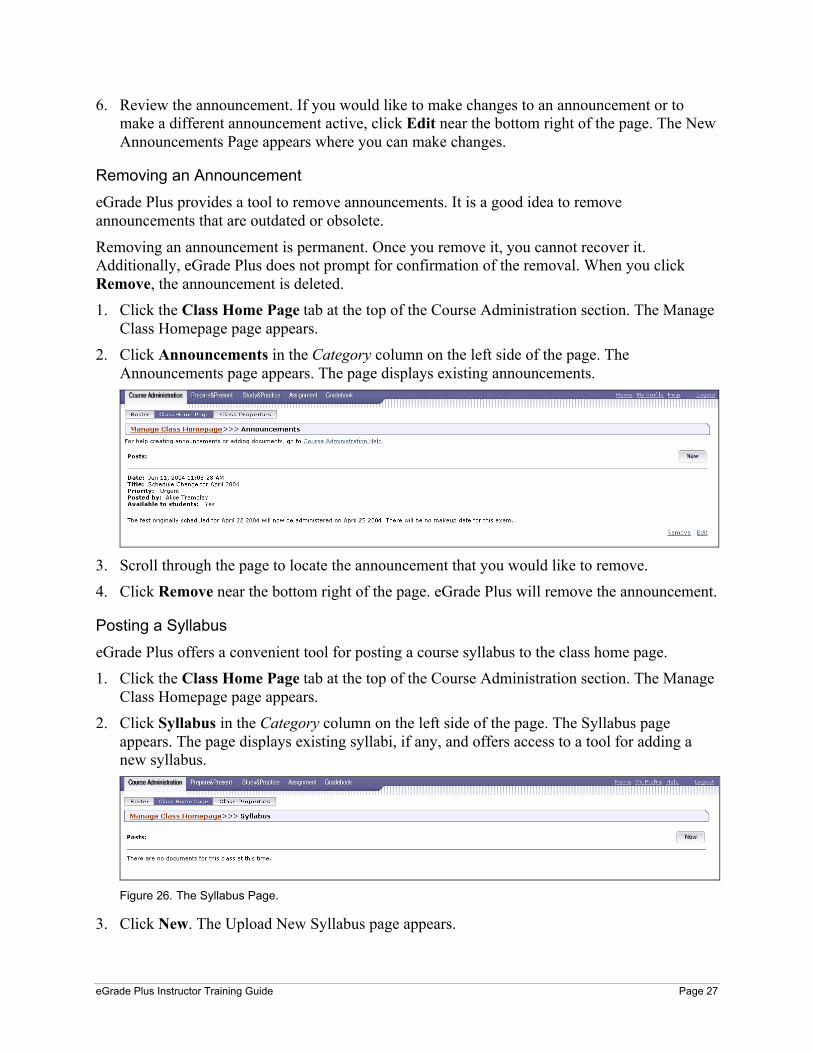
Posting a Syllabus
eGrade Plus offers a convenient tool for posting a course syllabus to the class home page.
1. Click the Class Home Page tab at the top of the Course Administration section. The ManageClass Homepage page appears.
2. Click Syllabus in the Category column on the left side of the page. The Syllabus pageappears. The page displays existing syllabi, if any, and offers access to a tool for adding anew syllabus.
Figure 26. The Syllabus Page.
3. Click New. The Upload New Syllabus page appears.

eGrade Plus Instructor Training Guide Page 28
Figure 27. The Upload New Syllabus Page.
4. Click Browse and navigate to the syllabus that you would like to add to the class home page.Highlight the file and click Open.
5. Click Upload. The New Syllabus page appears.
Figure 28. The New Syllabus Page.
6. Fill in the fields using the guidelines that follow:
Available to students: If you would like to post a syllabus that is not available to students,click the No button. Click Yes if you would like students to see the syllabus.
Title: Enter a name for the syllabus you are creating. The title can be only as long as the fieldpermits.
Note: Add comments or clarifications about the syllabus.
7. Click Preview Document to review the syllabus file you are uploading. Be sure you areuploading the correct syllabus. If the syllabus is correct, continue with the next step. If youwould like to upload a different syllabus, click Syllabus in the navigation bar. Then clickNew and revise the file name.
8. Click Save and Add to List. The Syllabus page appears with the document you just added.

eGrade Plus Instructor Training Guide Page 29
Figure 29. The Syllabus Page with a Newly Added Syllabus.
9. Review the syllabus. If you would like to make changes to it, click Edit near the bottom rightof the page. The New Syllabus Page appears where you can make changes.
Removing a Syllabus
eGrade Plus provides a tool for removing a posted syllabus.
Removing a syllabus is permanent. Once you remove it, you cannot recover it. Additionally,eGrade Plus does not prompt you for confirmation of the removal. When you click Remove, thesyllabus is deleted from the eGrade Plus server. If necessary, you can upload the original fileagain to replace it.
1. Click the Class Home Page tab at the top of the Course Administration section. The ManageClass Homepage page appears.
2. Click Syllabus in the Category column on the left side of the page. The Syllabus pageappears. The page displays existing syllabi.
Figure 30.The Syllabus Page.
3. Scroll through the page to locate the syllabus that you would like to remove.
4. Click Remove near the bottom right of the page. eGrade Plus will remove the syllabus.
Posting a Document
eGrade Plus offers a convenient tool for posting documents to the class home page.
1. Click the Class Home Page tab at the top of the Course Administration section. The ManageClass Homepage page appears.
2. Click Documents in the Category column on the left side of the page. The Documents pageappears. The page displays existing documents, if any, and offers access to a tool for addinga new document.

eGrade Plus Instructor Training Guide Page 30
Figure 31. The Documents Page.
3. Click New. The Upload New Document page appears.
Figure 32. The Upload New Document Page.
4. Click Browse and navigate to the document that you would like to add to the class homepage. Highlight the file and click Open.
5. Click Upload. The New Document page appears.
Figure 33. The New Document Page.
6. Fill in the fields using the guidelines that follow:
Available to students: If you would like to post a document, but not release it for students toview, click the No button. You can return later to make this document available. Click Yes ifyou would like students to see the document.
Title: Enter a name for the document you are creating. The title can be only as long as thefield permits.
Note: Add comments or clarifications about the document.
7. Click Preview Document to review the document file you are uploading. Be sure you areuploading the correct document. If the document is correct, continue with the next step. Ifyou would like to upload a different document, click Documents in the navigation bar. Thenclick New and revise the file name.

eGrade Plus Instructor Training Guide Page 31
8. Click Save and Add to List. The Documents page appears with the document you justadded.
Figure 34. The Documents Page with a Newly Added Document.
9. Review the document. If you would like to make changes to it, click Edit near the bottomright of the page. The New Documents Page appears where you can make changes.
10. There is a 10MB limit on file upload and storage for each instructor account.
Removing a Document
eGrade Plus provides a tool to remove a posted document.
Removing a document is permanent. Once you remove it, you cannot recover it. Additionally,eGrade Plus does not prompt you for confirmation of the removal. When you click Remove, thedocument is deleted from the eGrade Plus server. If necessary, you can upload the original fileagain to replace it.
1. Click the Class Home Page tab at the top of the Course Administration section. The ManageClass Homepage page appears.
2. Click Documents in the Category column on the left side of the page. The Documents pageappears. The page displays existing documents.
Figure 35. The Documents Page.
3. Scroll through the page to locate the document that you would like to remove.
4. Click Remove near the bottom right of the page. eGrade Plus will remove the document.

eGrade Plus Instructor Training Guide Page 32
Course Administration� Class Properties
The Course Administration section includes a Class Properties area that displays the settingsassociated with the class. While you cannot edit the settings from this page, you can view acomprehensive list of class properties.
Instructor� Prepare & Present
The Prepare & Present section of eGrade Plus offers tools that allow you to view and editexisting presentations and resources and to add new presentations and resources.
When you add a presentation, you select from the list of predefined resources. You must haveresources defined before you can identify the correlated presentations. E-book resources aredefined automatically.
There are two main areas in the Prepare & Present section of eGrade Plus:
• Resources
• Presentations
To begin the steps in the Prepare & Present sections that follow, click the Prepare & Presenttab.
Prepare & Present � Resources
The Resource area allows you to edit and define materials that will be used as components in apresentation. You can add resources that you have defined, an Excel® spreadsheet for example,or you can add pre-defined resources from the textbook series. You can even add Web links.
After you define resources, add to them to a presentation using the functionality availablethrough the Presentations tab.
Click an e-mail addressto send an e-mail to thatperson.
Click the URL linkto open the classhome page.
Click a tab to open either thePresentations or Resources area.

eGrade Plus Instructor Training Guide Page 33
Adding a New Document Resource
eGrade Plus allows you to add a variety of resources. When you add resources, they are storedon the eGrade Plus server. You can store a maximum of 10 MB of resources on the eGrade Plusserver.
1. Click the Resources tab at the top of the Prepare & Present section. The Resources List pageappears. The page displays the current resources available for presentations.
Figure 36. The Resource List Page.
2. Click the New Document Resource button near the right side of the page. The NewResources page appears.
Figure 37. The New Resource Page.
3. Click Browse and navigate to the resource document on your computer that you would liketo add. Highlight the file and click Open.
4. Click Upload. The New Resource Properties page appears. It presents fields where you candefine the resource you are adding.
Click an underlined columnheading to sort the informationby that heading type.

eGrade Plus Instructor Training Guide Page 34
Figure 38. The New Resource Properties Page.
5. Fill in the fields using the guidelines that follow:
Resource name: Enter a title for the resource you are creating. Use a descriptive phrase tohelp identify it easily.
Description: Enter a brief explanation of the resource. Describe its contents or its correlationto a textbook section.
Make this resource shareable by other instructors…: Check this box if you would like tomake the resource available to other instructors of the course.
Category: Select a category that further defines the resource. Options include DiscussionTopic, Objective, Lecture Notes, and Other.
Resource type: You cannot edit this field. It identifies the type of resource you areuploading.
File name: You cannot edit this field. It shows the filename of the resource you areuploading.
6. Click Save/Update Settings. The Resources List appears with the new resource you added.
Figure 39. The Resources List with the New Resource.
Adding a New Web Link Resource
eGrade Plus allows you to add Web link resources to your presentations. Students can click thelinks to launch the Web page that you specify.

eGrade Plus Instructor Training Guide Page 35
1. Click the Resources tab at the top of the Prepare & Present section. The Resources List pageappears. The page displays the current resources available for presentations.
Figure 40. The Resource List Page.
2. Click the New Web Link Resource button near the right side of the page. The NewResource page appears.
Figure 41. The New Resource Page for a Web Link.
3. Type the URL for the resource in the field. You can also copy the URL from your browserand paste it in the field.
If you would like to include a link to a secure Web server, select https from the Type URLdropdown menu. You can identify a secure Web page because its address starts with https,rather that http.
4. Click Upload. The New Resource Properties page appears. It presents fields where you candefine the resource you are adding.
Figure 42. New Resource Properties Page for a Web Link.
5. Fill in the fields using the guidelines that follow:
You can specify a link from a secureWeb server by selecting https from thedropdown menu.

eGrade Plus Instructor Training Guide Page 36
Resource name: Enter a title for the Web link resource you are creating. Use a descriptivephrase to help identify it easily.
Description: Enter a brief explanation of the Web link resource. Describe its contents.
Make this resource shareable by other instructors…: Check this box if you would like tomake the resource available to other instructors of the course in your department.
Category: Select a category that further defines the resource. Options include DiscussionTopic, Objective, Lecture Notes, and Other.
Resource type: You cannot edit this field. It identifies the type of resource you areuploading, a Web link.
URL: You cannot edit this field. It shows the URL you specified.
6. Click Save/Update Settings. The Resources List appears with the new Web link resourceyou added.
Figure 43. The Resource List with the New Web Link Resource.
Editing the Properties of a Resource
On occasion, you may need to change the properties associated with a defined resource. Forexample, you may want to change the title or share the resource with other instructors.
Note: You can edit only the properties of resources that you have added; you cannot edit theproperties for predefined resources. You can, however, view the properties of a pre-definedtextbook resource by clicking Properties in the Action column.
1. Click the Resources tab at the top of the Prepare & Present section. The Resources List pageappears. The page displays the current resources available for presentations.

eGrade Plus Instructor Training Guide Page 37
Figure 44. The Resources List with a Resource with Editable Properties.
2. Click Edit in the Actions column of the resource with the properties you would like to edit.The Properties page opens and displays the current settings for the resource.
Figure 45. The Properties Page for an Existing Resource.
3. Change the settings to meet your needs and click Save/Update Settings. The Resources Listappears with the new properties for the resource.
Click to see the non-editable properties ofa predefined resource.

eGrade Plus Instructor Training Guide Page 38
Removing a Resource
From time to time you may wish to remove resources from the eGrade Plus server. You canremove only those resources that you have added; you cannot remove the predefined resourcesassociated with the textbook.
Note: There is no way to edit a resource you have already posted in eGrade Plus. If you need toedit a resource, you must remove the file using the steps that follow. Then, add the editedresource using the New Document Resource or New Web Link Resource button.
Removing a resource is permanent. Once you remove it, you cannot recover it. Additionally,eGrade Plus does not prompt for confirmation of the removal. When you click Remove, theresource is deleted from the eGrade Plus server. If necessary, you can upload the originalresource again to replace it.
1. Click the Resources tab at the top of the Prepare & Present section. The Resources List pageappears. The page displays the current resources available for presentations.
Figure 46. The Resources List with a Resource that You can Remove.
2. Click Remove in the Actions column of the resource that you would like to delete. Theresource is deleted.
Prepare & Present � Presentations
The Presentations area includes tools for you to specify presentations for use by the class. Eachpresentation you assemble can contain separate sub-components or resources. For example, youcan assemble a presentation that contains video clips, written content, and PowerPoint® slides.When a student opens the presentation, she will be presented with a clickable ‘chapter list’identifying each component.
When you assemble the components of a presentation, you can select from pre-developed e-bookcontent associated with the textbook program or you can select a resource that you havedeveloped for classroom use, a PowerPoint presentation for example.

eGrade Plus Instructor Training Guide Page 39
Adding Presentation Components
When you add a presentation, you simply assemble components (resources) so they are availablewithin one presentation.
1. Click the Presentations tab at the top of the Prepare & Present section. The PresentationsList page appears. The page displays the current presentations available for the class.
Figure 47. The Presentations List Page.
2. Click the New Presentation button near the right side of the page. The New Presentationspage appears. It displays three tabs that allow you to name, select, and create a presentation.The first tab, Name/Describe, is active when you open the page.
Figure 48. The New Presentations Page.
3. Fill in the fields using the guidelines that follow:
Presentation name: Enter a title for the presentation you are creating. Use a descriptivephrase to help identify the presentation easily.
Click an underlined columnheading to sort the informationby that heading type.
Click a link in thenavigation bar toreturn to that location.

eGrade Plus Instructor Training Guide Page 40
Description: Enter a brief explanation of the presentation. Describe its contents or itscorrelation to a textbook section.
Make this presentation shareable by other instructors…: Check this box if you wouldlike to make the presentation available to other instructors of the course in your department.
Available to students: If you would like to create a presentation that is not available tostudents, click the No button. Click Yes if you would like students to see the presentation.You can create several presentations up front and then select which ones you want availableto the students at any time.
4. Click the Select Items tab. The Select Items page appears. It displays the presentationcomponents currently available. You can select components from resources that you havecreated or from a correlated electronic book chapter.
Figure 49. The Select Items Page for the My Resources Option.
5. Click My Resources or E-Book Content to identify the source components for thepresentation you are creating. You can select presentation components from each area. Referto the following steps.
My Resources
Click the checkbox next to each resource that you would like to make available. You canreview a resource by clicking the presentation component name.
E-Book Content
When you click the E-book Content button, a presentation selection page appears where youcan choose a correlated e-book component.
Identify the sourceof the presentation.
Click aresource toreview it.

eGrade Plus Instructor Training Guide Page 41
Select a chapter from the Chapter dropdown menu. Then select a component type from thesecond dropdown menu and click Make Selection. All correlated components from thechapter you selected and of the type you selected appear in a list.
Click the checkbox next to each resource that you would like to make available. You canreview the resource by clicking the component name.
6. When you are finished adding presentation components click the Review and Publish tab.The Review and Publish page appears. It displays a list of the components you selected.
Figure 50. The Review and Publish Page.
7. If you would like to review a specific component of the presentation, click its title. Thecomponent will open in a separate browser window.
8. If you would like to rearrange the order that the components appear in the presentation, clickthe Up or Down links in the column on the right side of the table.
9. If you would like to remove a component from a presentation, click Remove on the right sideof the item you would like to take away.

eGrade Plus Instructor Training Guide Page 42
10. If you would like to review the presentation, click Preview Presentation. The presentationwill open in a separate browser window. From that window, you can scroll through thecontents and click a resource item to open it.
11. When you are confident that the presentation contains all the necessary components, clickSave and Add to List. The presentation will be saved.
12. Click the Presentations List link in the navigation bar to return to the Presentations page.
Figure 51. The Presentations List with the Newly Added Presentation.
Editing the Properties of a Presentation
On occasion, you may need to change the properties associated with a defined presentation. Forexample, you may want to adjust the description to make it more intuitive.
Note: You can only edit the properties of presentations that you have added; you cannot edit theproperties for predefined presentations. Click Properties in the Action column to view theproperties of a pre-defined textbook presentation.
1. Click the Presentations tab at the top of the Prepare & Present section. The PresentationsList page appears. The page displays the available presentations.
Figure 52. The Presentations List with a Presentation with Editable Properties.
2. Click Edit in the Actions column of the presentations with the properties you would like toedit. The Properties page opens and displays the current settings for the presentation.

eGrade Plus Instructor Training Guide Page 43
Figure 53. The Properties Page for an Existing Presentation.
3. Change the settings to meet your needs and click Save/Update Settings. The PresentationsList appears with the new properties.
Removing a Presentation
From time to time you may wish to remove presentations from the eGrade Plus server. You canremove only those presentations that you have added; you cannot remove the predefinedpresentations associated with the textbook.
Note: There is no way to edit a presentation you have already posted in eGrade Plus. If you needto edit a presentation, remove the file using the steps that follow. Then can add the editedpresentation using the New Document Resource or New Web Link Resource button.
Removing a presentation is permanent. After you remove it, they cannot recover it. Additionally,eGrade Plus does not prompt for confirmation of the removal. When you click Remove, thepresentation is deleted. If necessary, you can rebuild the presentation to replace it.
1. Click the Presentations tab at the top of the Prepare & Present section. The PresentationsList page appears. The page displays the available presentations.
Figure 54. The Presentations List with a Presentation that You can Remove.
2. Click Remove in the Actions column of the presentation that you would like to delete. Thepresentation is deleted.
Instructor� Study & Practice
The instructor Study & Practice section is exactly the same as the student Study & Practicesection. The Study & Practice section contains readings, resources, and practice instructorproblems from the class textbook. Also, it has student resources that are linked to text. The

eGrade Plus Instructor Training Guide Page 44
material is presented just as it is for the student and includes a multimedia version of the entiretextbook for the class. Instructors can only edit the presentations and not any of the othermaterial in the Study & Practice section.
There are several areas within the Study & Practice section. These include:
• Resources
• Practices
• References
• Presentations
Each section coincides with material you have added through the Prepare & Present section andthe Assignment section or which was predefined with the electronic textbook.
Opening the Study & Practice Section1. Click the Study & Practice tab on the class home page. The Study & Practice page appears.
These sections contain components you addedor which were predefined with the electronictextbook. Click a resource to open it.
This section contains reference items that were predefinedin the electronic textbook. Click a reference to open it.

eGrade Plus Instructor Training Guide Page 45
Figure 55. The Upper Half of the Study & Practice Page
2. From the Chapter dropdown menu, select a chapter for which you would like to displaypractice components. Click View Resources. The components associated with that chapterappear on the Study & Practice page.
Navigating the Study & Practice Pages
There are several navigation tools on the Study & Practice pages. Study & Practice resourcesvary widely from course to course tests, video clips, general content, and so on–– but thenavigation provided is consistent.
The Study & Practice pages present information just as it is presented for students. You cannavigate the content pages, and even take the tests, just as students would.
Note: It is important to remember that the components of Study & Practice pages will differ fromtextbook to textbook. The sample images in this section represent pages from one specifictextbook. The Study & Practice pages in your series will likely differ.

eGrade Plus Instructor Training Guide Page 46
Links
All Study & Practice pages contain links that allow you to move directly to an item or to accessadditional links associated with the item. Simply click a link to open an item.
Most of the time, links appear as underlined text. However, in all cases, the cursor changes to a
hand, , when it is over a link.
Contents Menus
Very often, when you click a link from the Study & Practice page, a Contents menu appearsoffering access to the components of the Study & Practice item they selected. Click any link toopen the item.
Whenever a plus sign, , appears next to a topic, it indicates that the element containssubcomponents. Click any topic with a plus sign to display its subcomponents.
If a minus sign, , displays next to a topic, it indicates either that that the topic is open or thatthere are no subcomponents associated with it. Click the minus sign next to an open folder toclose the folder.
The hand cursor appears whenever youmove the mouse over a link.
The minus sign indicates that this topic menu is open.The shaded area shows the component that iscurrently active. Click any component to open it.
The plus signs indicate that the topics havesubcomponents. Click a topic heading to accessthe subcomponents.
You can click any link to open it.
You can view more of the navigation pane by clicking andholding on the vertical border, then dragging it left or right.
eGrade Plus Instructor Training Guide Page 47
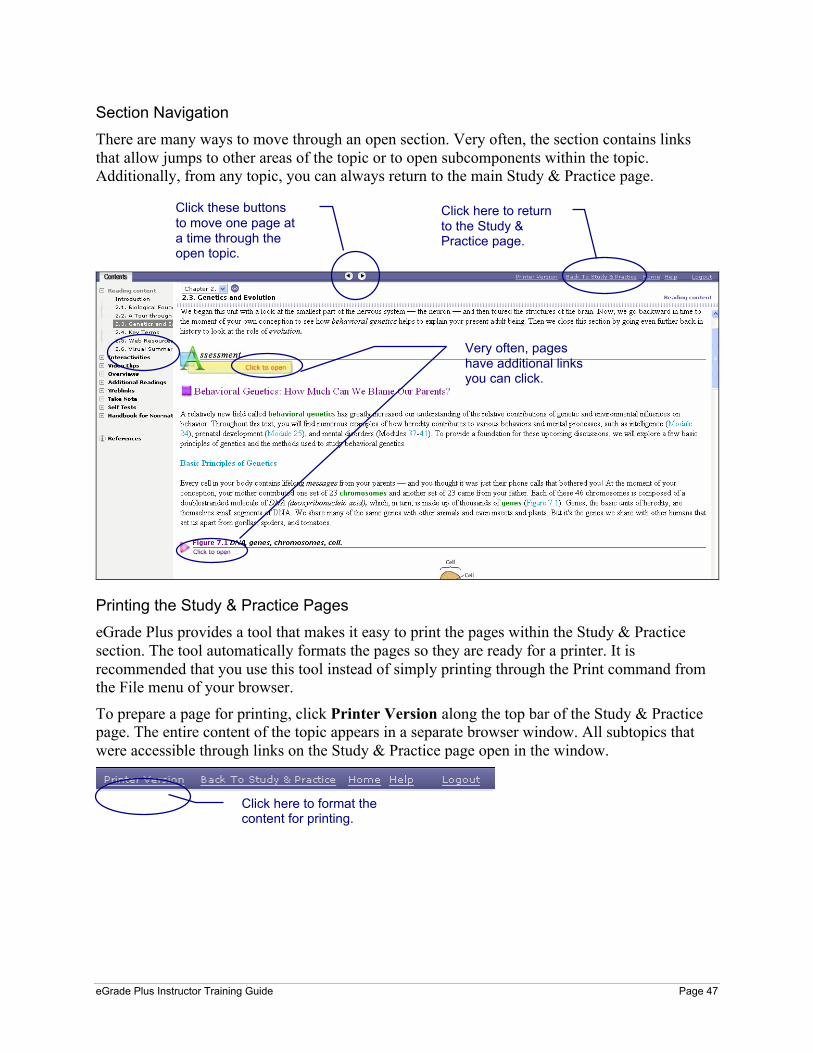
Section Navigation
There are many ways to move through an open section. Very often, the section contains linksthat allow jumps to other areas of the topic or to open subcomponents within the topic.Additionally, from any topic, you can always return to the main Study & Practice page.
Printing the Study & Practice Pages
eGrade Plus provides a tool that makes it easy to print the pages within the Study & Practicesection. The tool automatically formats the pages so they are ready for a printer. It isrecommended that you use this tool instead of simply printing through the Print command fromthe File menu of your browser.
To prepare a page for printing, click Printer Version along the top bar of the Study & Practicepage. The entire content of the topic appears in a separate browser window. All subtopics thatwere accessible through links on the Study & Practice page open in the window.
Click these buttonsto move one page ata time through theopen topic.
Click here to returnto the Study &Practice page.
Very often, pageshave additional linksyou can click.
Click here to format thecontent for printing.

eGrade Plus Instructor Training Guide Page 48
Playing Video Clips
When you open a video clip from the Study & Practice pages, it opens in a video player. Theplayer has controls to play and stop the clip and to adjust the volume.
Note: QuickTime® is the default player for video clips. If a computer is not set with QuickTimeas the default, a message may appear. Click Yes to change the player to QuickTime.
Adjust thevolume.
Play orreplay theclip.
Rewindthe clip.
Go to theend of theclip.
ChangeQuickTimeplayer settings.

eGrade Plus Instructor Training Guide Page 49
Opening Resource References
Resource References are available below the Contents area of each Resource section. Click theReferences link to open all references associated with the resource topics. For example, a seriesof topics may have an index or an appendix associated with them.
When you click the Resource References link, a separate browser window opens with thereference material listed. Click a tab near the top of the window to open a specific reference.Click the Back and Close links near the top right to navigate.
Click here to accessResource References.

eGrade Plus Instructor Training Guide Page 50
Reviewing Self-Tests
The Resources area of the Study & Practice pages often includes self-tests. Self-tests measurestudent comprehension at milestones throughout the curriculum. After students answer a shortgroup of questions, eGrade Plus calculates the results. eGrade Plus will return the results withnotations indicating the questions students answered correctly and incorrectly.
Reviewing Practice Tests
Practice tests offer a forum for various tests, including essay response to questions. Studentsopen the practice tests from the Study & Practice section of the class home page. Tests mayinclude links to Web sites that hold information about a topic. Students simply click a link toopen the site and to research the discussion point. Or, they click the Link to Text button to openthe correlated textbook content.
Then, students type responses to the questions in the fields provided. They click Check Answerto see if they are on the right track with the answer. Or, click Show Answer to view theappropriate answer to the question.
Note: Student work on Practice tests is not recorded in the instructor Gradebook.
Click this link toresearch an answer.
Open thecorrelated
textbooksection.
Enter an answerhere.
Click these to checkyour answer and tosee the correctanswer.

eGrade Plus Instructor Training Guide Page 51
Using a Bibliography
Very often, Study & Practice pages include a bibliography. You can open the bibliographiesfrom the Study & Practice home page. It presents an alphabetical list of resources for the practicecomponent. Select a reference file from the dropdown menu at the top of the page. Navigatethrough the bibliography by clicking a letter link at the top to jump to the start of references thatbegin with that letter. Or, scroll through using the scroll bar on the right.
Click a letter to gothe start of thatsection.
Use the scroll barsto move through thesection.

eGrade Plus Instructor Training Guide Page 52
Instructor� Assignment
The Assignment section allows you to view all the assignments available for your class.Additionally, you can edit or create custom assignments from within the Assignment section.
Click the Assignment tab. There are four main areas in the Assignment section of eGrade Plus:
• Assignment List
• Readings/Resources
• Questions/Exercises
• Create Questions
To begin with the steps in the Assignment sections that follow, click the Assignment tab.
Assignment � Assignment List
The Assignment list displays the assignments that are available to students. From within the list,you can preview each assignment and further define its content, designate its availability, andultimately assign it to the class.
Viewing the List of Assignments
eGrade Plus offers two options for viewing class assignments. You can view the assignmentsthat are available to the class or you can view assignments that are already assigned to the class.With either of those options, you can display the predefined default assignments associated withthe textbook.
1. Click the Assignment List tab on the Assignment page. The Assignment List appears.
Click an underlined column heading tosort the information by that heading type.The yellow arrow indicates which columnis used for sorting.
Select whichassignments you wouldlike to view.
Click a tab to open aspecific Assignmentarea.

eGrade Plus Instructor Training Guide Page 53
Figure 56. The Assignment List Page.
2. Select which assignments you would like to display. Click either View AssignmentsAvailable for this Class or View Assignments Assigned in this Class.
3. If you would like to display default assignments also, click the Show default assignmentscheckbox.
4. Click Apply. The Assignment list refreshes to display the selection of assignments youchose.
Previewing an Assignment or Viewing Its Details
Before you present an assignment to the class, it is a good idea to review its contents. eGradePlus allows you to preview an assignment before you assign it.
1. Click the Assignment List tab on the Assignment page. The Assignment List appears.
Figure 57. The Assignment List Page.
2. In the Assignment Name column, click the assignment that you would like to preview or forwhich you would like to view the details. The Student Access Settings page opens.

eGrade Plus Instructor Training Guide Page 54
Figure 58. The Student Access Settings Page.
3. To preview the assignment, click Preview Assignment. The assignment opens in a separatebrowser window. Review the assignment. If you are satisfied with the assignments content,close the browser window. Then assign the assignment to the class. Refer to the steps thatfollow.
To expand the assignment descriptions, click more >> in the Details section. Additionaldetails become visible. Click less << to hide the additional details.
To show the list of items in the assignment, click show list >>. The items become visible.Click hide items << to remove the items from view.
Assigning an Assignment
Before you present an assignment to the class, you must define the due dates and policiesassociated with the assignment.
1. Click the Assignment List tab on the Assignment page. The Assignment List appears.
Figure 59. The Assignment List Page.
2. In the Assignment Name column, click the assignment that you would like to present to theclass. The Student Access Settings page opens. It offers settings that you can select for theassignment.
You can review the content before youpresent the assignment to the class.
Click a link in thenavigation bar to returnto that location.
Click here to displaymore details.
Click here toshow the items inthe assignment.

eGrade Plus Instructor Training Guide Page 55
Figure 60. The Student Access Settings Page.
3. Select a start date from the Start Date dropdown menu. The class will not be able to beginthe assignment prior to the date.
4. Select a due date from the Due Date dropdown menu. If you would like the assignment to beavailable indefinitely, click the checkbox next to Due Date. The Due Date dropdown menuwill no longer appear.
5. Select an after due date access option for the assignment. If a student submits the assignmentafter the due date, eGrade Plus will enforce the access option you selected.
6. Click Assign to Class. A message appears at the top of the page stating that the assignmentwas successfully assigned.
Changing the Due Date or Access Options of an Assignment
On occasion, you may decide to change the due date of an assignment or alter the way eGradePlus responds to student access to an assignment past the due date.
1. Click the Assignment List tab on the Assignment page. The Assignment List appears.
Figure 61. The Assignment List Page.
2. Click View Assignments Assigned in this Class. The click Apply. The assignment listrefreshes to show the assignments.
3. In the Assignment Name column, click the assignment that you would like to change. TheStudent Access Settings page opens. It offers settings that you can change for the assignment.
These options define accessto the assignment after thedue date.

eGrade Plus Instructor Training Guide Page 56
Figure 62. The Student Access Settings Page for a Previously Assigned Assignment.
4. Select a start date from the Start Date dropdown menu. The class will not be able to beginthe assignment prior to the date. If the assignment was set to start on a past date, you will notbe able to edit the Start Date.
5. Select a due date from the Due Date dropdown menu. If you would like the assignment to beavailable indefinitely, click the checkbox next to Due Date. The Due Date dropdown menuwill no longer appear.
6. Select an after due date access option for the assignment. If a student submits the assignmentafter the due date, eGrade Plus will enforce the access option you selected.
7. Click Apply Changes. A message appears at the top of the page stating that the accesssettings were successfully changed.
Rejecting an Assignment
From time to time you may need to reject an assignment that you previously assigned to theclass. When you reject an assignment, eGrade Plus removes it from your Gradebook and thestudent Gradebook. If a student has already submitted a response to the assignment, the responsewill also be removed.
Note: When you reject an assignment, you do not delete it from your own assignment list. Youdo remove student access to the assignment and remove references to it in student and instructorGradebooks.
1. Click the Assignment List tab on the Assignment page. The Assignment List appears.

eGrade Plus Instructor Training Guide Page 57
Figure 63. The Assignment List Page.
2. Click View Assignments Assigned in this Class. The click Apply. The assignment listrefreshes to show the assignments.
3. In the Assignment Name column, click the assignment that you would like to reject. TheStudent Access Settings page opens.
Figure 64. The Student Access Settings Page for a Previously Assigned Assignment.
4. Click Reject. A message appears stating the implications of the assignment rejection.
Figure 65. The Reject Confirmation Message.
5. Review the message and click OK if you accept the implications of the rejection.
Copying an Existing Assignment
After you establish a group of proven assignments, you may want to copy an existingassignment, and edit it, rather than create a brand new assignment. eGrade Plus provides a toolthat makes it easy to edit an existing assignment and save the copy with a new name.
The Copy and Edit tool within the Student Access area of the Assignment List allows you tomake varying degrees of changes to an existing assignment. For example, you can simply savean existing assignment with a new name or you can add and remove questions and performadditional changes.
Note: When you copy an existing assignment from the Student Access page, eGrade Plustemporarily closes the Assignment List area and opens the Edit Questions/Exercises area withinthe Assignment section. This is the same section as the Questions/Exercises tab section.However, it is already populated with information from the selected assignment. When youfinish the copy procedures for the assignment, the Assignment List area reopens.
Click here toreject theassignment.
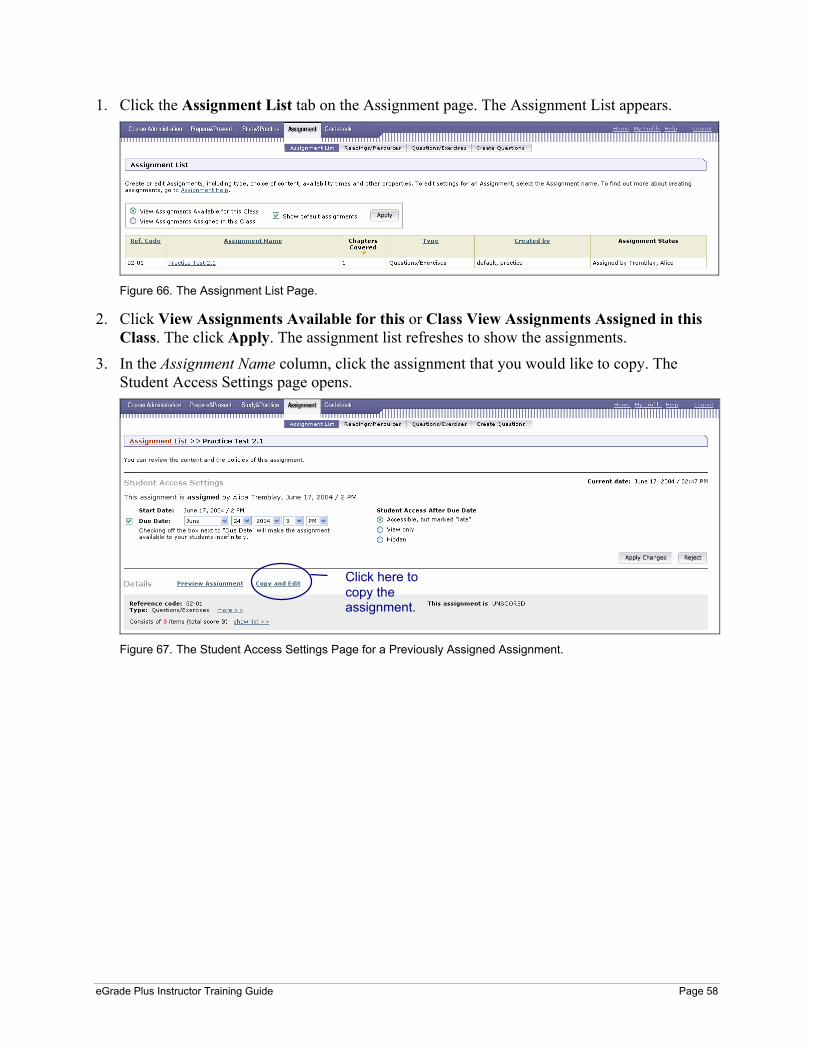
eGrade Plus Instructor Training Guide Page 58
1. Click the Assignment List tab on the Assignment page. The Assignment List appears.
Figure 66. The Assignment List Page.
2. Click View Assignments Available for this or Class View Assignments Assigned in thisClass. The click Apply. The assignment list refreshes to show the assignments.
3. In the Assignment Name column, click the assignment that you would like to copy. TheStudent Access Settings page opens.
Figure 67. The Student Access Settings Page for a Previously Assigned Assignment.
Click here tocopy theassignment.

eGrade Plus Instructor Training Guide Page 59
4. Click Copy and Edit. The Edit Questions/Exercises page appears. The page offers a varietyof tools you can use to edit the assignment. Notice that the fields are filled in withinformation from the assignment you are copying.
Figure 68. The Edit Questions/Exercises Section.
5. Copy and edit the assignment using the actions described in the following sections. Be sureto perform the steps in the order they are presented on the tabs. The first tab, Name/Describealways opens first.
When instructors copy an assignment from the Student Access Settings page, the original name,description, and so on are copied too. Instructors can then change the original information for thecopy they are creating. Continue with the steps in the title “Naming and Describing theQuestions/Exercises”.
When instructors copy an assignment, they may want to select different questions from those thatwere used in the original assignment. The Select Items page offers tools that identify thedifferent questions that are available. If you need to select different questions continue with thesection titled “Selecting Questions for the Question/Exercises Assignment”.
The Set Policies area of the Edit Questions/Exercises section offers settings that instructors canuse to define the rules for the assignment they are creating. When students work in the onlineassignment, the parameters that instructors set will be in place. For example, instructors mayset a policy that ensures that a hint displays after the second incorrect answer for a single item.The settings available on the Set Policies page differ slightly depending on the question type onwhich instructors are working. If you need to set different policies for the new assignment,continue with the steps in the section titled “Setting Policies for the Questions/ExercisesAssignment”.
The Review and Publish area of the Edit Questions/Exercises section allows instructors to reviewthe material they have selected for the assignment and to further organize the questions. Withinthis area, instructors can preview the individual questions they selected and the assignment as awhole. When instructors are satisfied with the assignment they have built, they can assign it tothe class. If you need to review or publish the new assignment, continue with the steps in thesection titled “Reviewing and Publishing the Questions/Exercises Assignment.”
Be sure to open thesetools in the order theyare presented. You donot have to use eachtool.

eGrade Plus Instructor Training Guide Page 60
Editing the Details of a Copied Assignment from the Assignment List
When you open a copied assignment from the Assignment List, two additional links appear onthe Student Access page. Click the Edit Details link to access the page where you can renamethe assignment and refine the description. For information about the second link, Delete fromAssignment List, refer to the section that follows.
For details on using the Name/Describe page, refer to the section in this guide titled “Namingand Describing the Assignment.”
Figure 69. The Student Access Settings Page for a Copied Assignment
Deleting an Assignment from the Assignment List
The second link that appears when you open a copied assignment from the Assignment List isDelete from Assignment List. This link allows you to remove the copied presentation from theAssignment List. When you click Delete from Assignment List, a message appears confirmingthe removal. Click OK. The copied presentation will be removed from the list of availableassignments.
Figure 70. The Student Access Settings Page for a Copied Assignment.
Click here to edit thename and description forthe copied assignment.
Click here to remove thecopied assignment fromthe list.

eGrade Plus Instructor Training Guide Page 61
Assignment � Readings/Resources
The Readings/Resources area of the Assignment section provides the tools necessary to identifyreading and resource assignments. You can select assignments from those included with thetextbook series or from resources that you have created.
When you click Readings/Resources the Name Describe page opens.
Naming and Describing the Readings/Resources Assignment
When you create a reading/resource assignment, you must name it and describe it. Both the nameand the description will help identify the assignment for future reference.
1. Click tab 1, Name/Describe. The Name/Describe page appears.
Figure 71. The Name/Describe Page of the Create Readings/Resources Assignment Section.
2. Fill in the fields using the guidelines that follow.
Assignment name: Type a name for the assignment.
Descriptions/Instructions: Type a description and instructions for the assignment.
Show description to students: Check this box if you would like students to see theassignment description.
You can access areas that furtherdefine the readings/resourcesassignment.

eGrade Plus Instructor Training Guide Page 62
Make this assignment shareable by other instructors…: Check this box if you would liketo make the assignment available to other instructors of the course.
3. Click Save/Update Settings. The name and description information will be saved.
4. Continue with tab 2, Select Items.
Selecting Questions for the Readings/Resources Assignment
After you name the assignment, you must select the components within it. When you selectitems, you define the source of the items—E-book Content or My Resources—as well as identifyquestion types for use. If E-book content is the source, you can also define the chapter you wouldlike to use.
1. Click tab 2, Select Items. The Select Items page appears.
Figure 72. The Select Items Page of the Readings/Resources Assignment Section: E-book Content View.
2. Select a source for the Readings/Resources assignments. Click E-book Content to useselections from the textbook or select My Resources to use resources that you have created.
3. If you selected E-book Content as the source, select a chapter from the Select a Chapterdropdown menu.
4. Select a resource type from the Select resource type dropdown menu. You can choose from avariety of types.
5. Click Make Selection. The Select Items page refreshes to display the resource items thatmatch the selection criteria you used.

eGrade Plus Instructor Training Guide Page 63
Figure 73. The Select Items Page With Items Available for the Readings/Resources Assignment.
6. Check the box next to each item that you would like to include in the assignment you arecreating.
If you would like to review an item that appears in the list, click the title.
7. If you would like to use different criteria to identify additional items for the assignment, clickthe Back to Select Options button. Then repeat steps 2 through 6.
8. Click Save/Update Settings. The assignment selection is saved and the Select Items pagereopens.
9. Continue with tab 3, Review and Publish.
Reviewing and Publishing the Readings/Resources Assignment
The Review and Publish area of the Edit Readings/Resources Assignment section allows you toreview the material you selected for the assignment and to further organize the content. Withinthis area, you can preview the individual resources you selected and the assignment as a whole.When you are satisfied with the assignment you have built, assign it to the class.
1. Click tab 3, Review and Publish. The Review and Publish page appears.
Figure 74. The Review and Publish Page of the Edit Readings/Resources Assignment Section.
2. Review the information on the page and, if necessary, perform the actions described in thefollowing sections.
Assign a Reference Code
eGrade Plus uses a reference code to identify each assignment. The reference code appears inthe instructor Gradebook. Create your own code with a maximum of six characters, includingspaces.
Review an Item in the Assignment
Each item appears as link in the left side of the table in the lower part of the page. Click anyitem within the assignment to open it. After you open an item, you can edit it using the toolsdescribed throughout this section.
Type a reference code.

eGrade Plus Instructor Training Guide Page 64
Rearrange the Readings and Resources
You can shift the items so they appear in a specific order in the assignment. For eachcomponent, click the Up and Down links in the Actions column on the right. The item willmove up or down one row at a time.
Remove a Readings and Resources Component
You can remove any component from the assignment. Simply click the Remove link in theActions column on the right. The item you selected will be removed.
Preview the Full Assignment
Click the Preview Assignment button to open the assignment. The assignment opens in aseparate browser window. The title of each reading/resources component displays on the leftside of the page. Click an item to open it.
Review and Set Student Access Settings
After you are satisfied with the content of the assignment, you should define the due datesand policies associated with the assignment. Click the Assign to Class Details button. TheStudent Access Settings page within the Assignment List section opens. Adjust the settings tomeet your needs. You can return to this page to make adjustments. For more information onthe Student Access Settings page, refer to the section in this guide titled “Changing the DueDate or Access Options of an Assignment.” For details on assigning the assignment, refer tothe section in this guide titled “Assigning an Assignment.”
The Student Access Settings page also provides easy access to a several additional tools withthe Assignment List area of the Assignment section. For information on those tools refer tothe section in this guide titled “Assignment� Assignment List.”
3. Click Save/Update Settings to save the changes to the assignment. The Review and PublishPage reopens with the changes you applied.
Assignment � Questions/Exercises
The Questions/Exercises area of the Assignment section provides the tools necessary to identifyquestions and exercises for use in assignments. You can select questions and exercises fromthose included with the textbook series or from items that you have created.
Note: You must create questions before they are available for selection in theQuestions/Exercises section. For information on creating questions, refer to the section in thisguide titled “Assignment� Create Questions.”

eGrade Plus Instructor Training Guide Page 65
When you click Questions/Exercises the Name Describe page (tab) opens.
Naming and Describing the Questions/Exercises
When you create a reading/resource assignment, you must name it and describe it. Both the nameand the description will help identify the assignment for future reference.
1. If necessary, click tab 1, Name/Describe. The Name/Describe page appears.
Figure 75. The Name/Describe Page of the Questions/Exercises Section.
2. Fill in the fields using the guidelines that follow.
Assignment name: Type a name for the Questions/Exercises assignment you are creating.
Descriptions/Instructions: Type a description and instructions for the question or exercise.
Show description to students: Check this box if you would like students to see the questionor exercise description.
Make this assignment shareable by other instructors…: Check this box if you would liketo make the question or exercise available to other instructors of the course or if you plan toreuse this assignment in later semesters.
3. Click Save/and Add to List. The name and description information for theQuestions/Exercises assignment will be saved.
4. Continue with tab 2, Select Items.
You can access areas that furtherdefine the questions/exercises.

eGrade Plus Instructor Training Guide Page 66
Selecting Questions for the Questions/Exercises Assignment
After you name the assignment, you must select the components within it.
1. Click tab 2, Select Items. The Select Items page appears.
Figure 76. The Select Items Page of the Questions/Exercises Section.
2. Select a source chapter from the Select a Chapter dropdown menu.
3. In the Select question options region, select a difficulty level for the questions from whichyou would like to choose. If you prefer to select from all questions in the chapter, you can setthe Difficulty level to All.
4. In the Select question options region, select the type of questions from which you would liketo choose. If you prefer to select from all question types in the chapter, you can set theRestriction to All.
5. Click Make Selection. The Select Items page refreshes to display the question or exerciseitems that match the selection criteria you used.
Figure 77. The Select Items Page With Items Available for the Questions/Exercises.
6. Check the box next to each item that you would like to include in the assignment you arecreating.
If you would like to review an item that appears in the list, click the title.

eGrade Plus Instructor Training Guide Page 67
7. If you would like to use different criteria to identify additional items for the assignment, clickthe Back to Select Options button. Then repeat steps 2 through 6.
8. Click Save/Update Settings. The assignment selection is saved and the Select Items pagereopens.
9. Continue with tab 3, Set Policies.
Setting Policies for the Questions/Exercises Assignment
The policies area of the Edit Questions/Exercises section offers settings to define the rules for theassignment you are creating. When students work in the online assignment, the parameters thatyou set will be in place. For example, you may set a policy that ensures that a hint displays afterthe second incorrect answer for a given item.
The settings available on the Set Policies page differ slightly depending on the question orexercise type on which you are working.
1. Click tab 3, Set Policies. The Policies page appears. It allows you to set parameters and userestrictions for the assignment.
Figure 78. The Set Policies Page of the Assignment Edit Questions/Exercises Section.
2. Fill in the fields using the guidelines that follow.
Scoring: Select Ungraded Assignment or Graded Assignment. In an ungraded assignment,the student score is not recorded; though, the student can see the results of his work and theirprogress through the assignment is recorded in your Gradebook. When a graded assignmenthas been submitted, the student score is recorded in the instructor Gradebook.
Repetitions: Select the number of times that a student can repeat the question or exercise.
Change Values: If the question or exercise derives its answer from an algorithm, selectwhether you want to use the same values each time the algorithm is run.
You can edit this fieldonly if yourassignment containsNumeric Text EntryQuestions.

eGrade Plus Instructor Training Guide Page 68
Feedback: You can select a variety of feedback options. At any point after adjusting thesettings, you can click Reset to default to return the feedback values to the default valuesassociated with question types.
Show Hints: Select at what point, if any, you would like students to receive hints aboutthe question.
Show Link to Text: Select at what point, if any, you would like a link to appear to thecorrelated textbook chapter. Students can click the link to review the textbook content.
Show Solutions: Select at what point, if any, you would like students to receive viablesolutions for the question.
Show Answer: Select at what point, if any, you would like to display the correct answerto the question or exercise.
Question Controls: Question Controls are available only for Numeric Text Entry questions.Click the Configure Numeric Questions link to open a separate browser window where youcan define values for the answer to the numeric text entry question. When you finishadjusting the values, click Save/Update Settings. The new values are applied. Close thewindow to return to the Set Policies page of the Assignment Edit Questions/Exercisessection.
Figure 79. The Question Controls Window for a Numeric Text Entry Question/Exercise.
3. Click Save/Update Settings to save the changes to the question or exercise assignment. TheSet Policies Page reopens with the changes you applied.
4. Continue with tab 4, Review and Publish.

eGrade Plus Instructor Training Guide Page 69
Reviewing and Publishing the Questions/Exercises Assignment
The Review and Publish area of the Edit Questions/Exercises section allows you to review thematerial you have selected for the assignment and to further organize the content. Within thisarea, you can preview the individual questions or exercises you selected and the assignment as awhole. When you are satisfied with the assignment you have built, assign it to the class.
1. Click tab 4, Review and Publish. The Review and Publish page appears.
Figure 80. The Review and Publish Page of the Assignment Edit Questions/Exercises Section.
2. Review the information on the page and, if necessary, perform the actions described in thefollowing sections.
Assign a Reference Code
eGrade Plus uses a reference code to identify each assignment. The reference code appears inthe instructor Gradebook. Create your own code with a maximum of six characters, includingspaces.
Review an Item in the Assignment
Each item appears as link in the left side of the table in the lower part of the page. Click anyitem within the assignment to open it. After you open an item, you can edit it using the toolsdescribed throughout this section.
Assign a Score for the Question
You can assign a score for each question. For each question, simply select a value from thedropdown menu in the Score column. The total score for all questions and exercises in theassignment is calculated automatically each time you change a value for an individualquestion.
Type a reference code.

eGrade Plus Instructor Training Guide Page 70
Rearrange the Questions or Exercises
You can shift the items so they appear in a specific order in the assignment. For eachcomponent, click the Up and Down links in the Actions column on the right. The item willmove up or down one row at a time.
Remove a Question or Exercise Component
You can remove any component from the assignment. Simply click the Remove link in theActions column on the right. The item you selected will be removed.
Preview the Full Assignment
Click the Preview Assignment button to open the assignment. The assignment opens in aseparate browser window. The title of each question or exercise component displays on theleft side of the page. Click an item to open it.
Review and Set Student Access Settings
After you are satisfied with the content of the assignment, you should define the due datesand policies associated with the assignment. Click the Assign to Class Details button. TheStudent Access Settings page within the Assignment List section opens. Adjust the settings tomeet your needs. You can also assign the assignment from the Student Access Settings page.For more information on the Student Access Settings page, refer to the section in this guidetitled “Changing the Due Date or Access Options of an Assignment.” For details onassigning the assignment, refer to the section in this guide titled “Assigning an Assignment.”
The Student Access Settings page also provides easy access to a several additional tools withthe Assignment List area of the Assignment section. For information on those tools refer tothe section in this guide titled “Assignment� Assignment List.”
3. Click Save/Update Settings to save the changes to the assignment. The Review and PublishPage reopens with the changes you applied.
Assignment � Create Questions
The Create Questions area within the Assignment section allows you to develop your ownquestions for use in student exercises. The questions you develop can complement the questionsthat are included with the e-book chapter content.
You can create several question types. These include multiple choice, true/false, text entry,numeric text entry and essay.
You can also use the Create Questions area to browse through existing questions that you havecreated. Once again, you can search by questions created for each chapter.
After you develop and identify questions, you can assemble them, as well as other content, in anassignment and present the assignment to students. For more information on building questionand exercise assignments, refer to the section in this guide titled“Assignment� Questions/Exercises.”

eGrade Plus Instructor Training Guide Page 71
Browsing for an Existing Question
Before you create a new question, you should browse through the existing bank of questions tosee if there is one that you can use.
1. Click the Create/Questions tab at the top of the Assignment section. The Create Questionspage opens.
Figure 81. The Assignment Create Questions Page.
2. From the Select a Chapter dropdown menu, select a chapter in which to which you wouldlike to browse for questions.
3. From the Define question type dropdown menu, select the question type for which you wouldlike to search.
4. Click Browse Existing. A table with the matching question types appears.
Figure 82. The Create Questions Page with Existing Questions.
You can create avariety of newquestion types…
…or, you select fromquestions you’ve alreadycreated.
You can click an existingquestion to review its content.
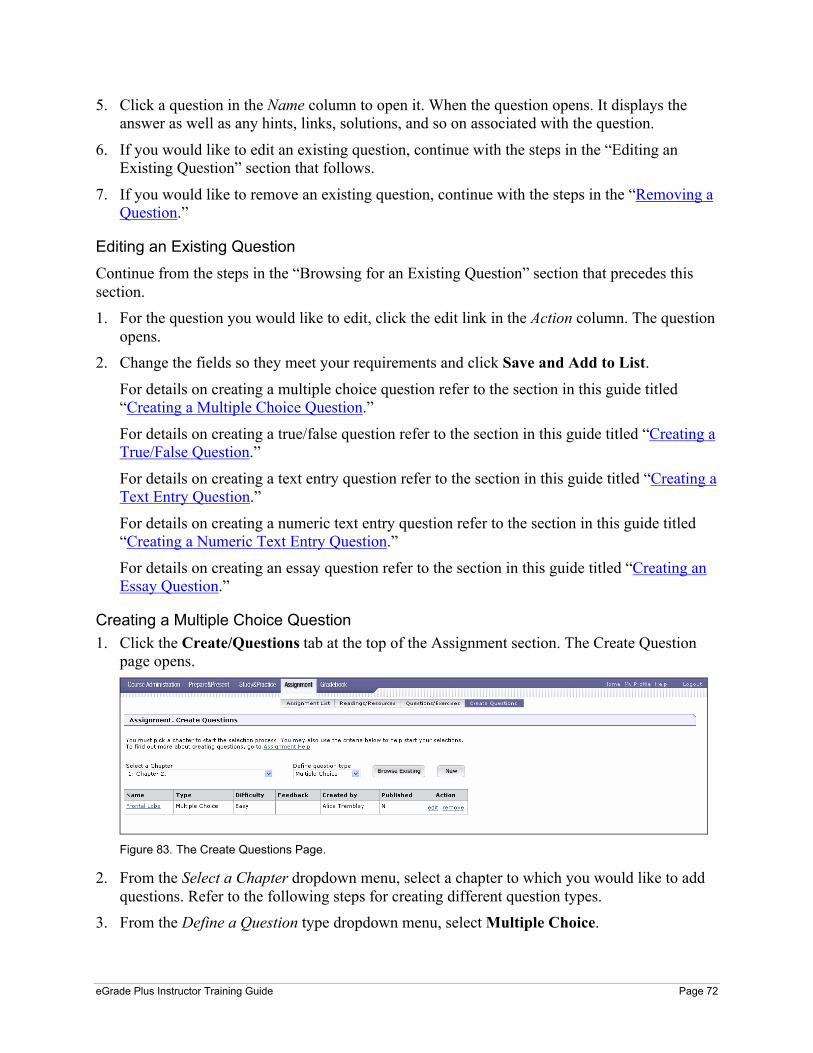
eGrade Plus Instructor Training Guide Page 72
5. Click a question in the Name column to open it. When the question opens. It displays theanswer as well as any hints, links, solutions, and so on associated with the question.
6. If you would like to edit an existing question, continue with the steps in the “Editing anExisting Question” section that follows.
7. If you would like to remove an existing question, continue with the steps in the “Removing aQuestion.”
Editing an Existing Question
Continue from the steps in the “Browsing for an Existing Question” section that precedes thissection.
1. For the question you would like to edit, click the edit link in the Action column. The questionopens.
2. Change the fields so they meet your requirements and click Save and Add to List.
For details on creating a multiple choice question refer to the section in this guide titled“Creating a Multiple Choice Question.”
For details on creating a true/false question refer to the section in this guide titled “Creating aTrue/False Question.”
For details on creating a text entry question refer to the section in this guide titled “Creating aText Entry Question.”
For details on creating a numeric text entry question refer to the section in this guide titled“Creating a Numeric Text Entry Question.”
For details on creating an essay question refer to the section in this guide titled “Creating anEssay Question.”
Creating a Multiple Choice Question
1. Click the Create/Questions tab at the top of the Assignment section. The Create Questionpage opens.
Figure 83. The Create Questions Page.
2. From the Select a Chapter dropdown menu, select a chapter to which you would like to addquestions. Refer to the following steps for creating different question types.
3. From the Define a Question type dropdown menu, select Multiple Choice.

eGrade Plus Instructor Training Guide Page 73
4. Click New. The Create Questions New Multiple Choice page appears.
Figure 84. The Create Questions New (Multiple Choice) Page.
5. Fill in the fields using the guidelines that follow.
Question title: Type a title for the question you are creating.
Question text: Type the actual question text.
6. Because this is a multiple choice question, you need to define the text for each choice. In theChoice column for each answer, click Edit. An Answer box will appear.
Figure 85. The Answer Box for a Multiple Choice Question.
7. Type the answer in the box. Then click Save & Close. The Create Questions New (MultipleChoice) page reopens with the answer you entered.
Click here todefine ananswer.
Click here to addmore possibleanswers.

eGrade Plus Instructor Training Guide Page 74
Figure 86. The Assignment Create Questions New (Multiple Choice) Page with an Answer.
8. Continue adding answers by clicking Edit in the choices column.
9. If you would like to make more multiple choice answers available, click Add Choice nearthe bottom of the answers table. Each time you click Add Choice, a new row will appear inthe answers table.
10. In the Click correct column of the table, select the correct answer for the question.
11. If necessary, select an action from the following steps.
Rearrange the Answers
If you would like to rearrange the order that the answers will appear for the question, clickthe Up or Down links in the Action column. The questions shift one row up or down eachtime you click.
Add or Edit Feedback
Click Add/Edit Feedback in an answer row and type feedback text for the answer in thesmall window that appears. If you like to use the same feedback for all answers, click Copyto all choices. Click Save & Close.
Add or Edit Hints
Click Add/Edit hint below the question table. Type a hint for the question in the smallwindow that appears. Click Save & Close.
Add or Edit the Solutions
Click Add/Edit solution below the question table. Type the solution for the question in thesmall window that appears. Click Save & Close.
Add or Remove a Text Link
Click Add/Remove text link below the question table. Select a textbook link for the questionin the small window that appears. When students answer the question, they will be able toclick the link to access correlated information in the e-book. Click Save & Close.
The answer youtype appears in thetable.

eGrade Plus Instructor Training Guide Page 75
12. From the Difficulty Level dropdown menu, select a difficulty level for the question.
13. Click the Make this question shareable by other instructors… box if you would like tomake the question available to other instructors of the course.
14. Click Save and Add to List. The questions and answers you created are saved and thequestions table reopens.
Creating a True/False Question
1. Click the Create/Questions tab at the top of the Assignment section. The Create Questionspage opens.
Figure 87. The Create Questions Page.
2. From the Select a Chapter dropdown menu, select a chapter in which to which you wouldlike to add questions. Refer to the following steps for creating different question types.
3. From the Define question type dropdown menu, select True/False.
4. Click New. The Create Questions New (True/False) page appears.
Figure 88. The Create Questions New (True/False) Page.
5. Fill in the fields using the guidelines that follow.
Question title: Type a title for the question you are creating.
Question text: Type the actual question text. Be sure it is in the form of a true/false question.
6. In the Click correct column of the table, select the correct answer (true) for the question.

eGrade Plus Instructor Training Guide Page 76
7. If necessary, select an action from the following steps.
Rearrange the Answers
If you would like to rearrange the order that the answers will appear for the question, clickthe Up or Down links in the column on the right side of the table.
Add or Edit Feedback
Click Add/Edit Feedback in an answer row and type feedback text for the answer in thesmall window that appears. If you like to use the same feedback for all answers, click Copyto all choices. Click Save & Close.
Add or Edit Hints
Click Add/Edit hint below the question table. Type a hint for the question in the smallwindow that appears. Click Save & Close.
Add or Edit the Solutions
Click Add/Edit solution below the question table. Type the solution for the question in thesmall window that appears. Click Save & Close.
Add or Remove a Text Link
Click Add/Remove text link below the question table. Select a textbook link for the questionin the small window that appears. When students answer the question, they will be able toclick the link to access correlated information in the e-book. Click Save & Close.
8. From the Difficulty level dropdown menu, select a difficulty level for the question.
9. Click the Make this question shareable by other instructors… box if you would like tomake the question available to other instructors of the course.
10. Click Save and Add to List. The true/false question and answers you created are saved andthe questions table reopens.
Creating a Text Entry Question
1. Click the Create/Questions tab at the top of the Assignment section. The Create Questionspage opens.
Figure 89. The Create Questions Page.
2. From the Select a Chapter dropdown menu, select a chapter in which to which you wouldlike to add questions. Refer to the following steps for creating different question types.

eGrade Plus Instructor Training Guide Page 77
3. From the Define question type dropdown menu, select Text Entry.
4. Click New. The Create Questions New (Text Entry) page appears.
Figure 90. The Assignment Create Questions New (Text Entry) Page.
5. Fill in the fields using the guidelines that follow.
Question title: Type a title for the question you are creating.
Question text: Type the actual question text.
6. If necessary, select an action from the following steps.
Add or Edit Correct Feedback
Click Add/Edit correct feedback and type feedback text for the correct answer in the smallwindow that appears.
Add or Edit Incorrect Feedback
Click Add/Edit incorrect feedback and type feedback text for an incorrect answer in thesmall window that appears.
Add or Edit Hints
Click Add/Edit hint. Type a hint for the question in the small window that appears. ClickSave & Close.
Add or Edit the Solutions
Click Add/Edit solution. Type the solution for the question in the small window thatappears. Click Save & Close.
Add or Remove a Text Link
Click Add/Remove text link. Select a textbook link for the question in the small windowthat appears. When students answer the question, they will be able to click the link to accesscorrelated information. Click Save & Close.

eGrade Plus Instructor Training Guide Page 78
Change the Language Palette
From the View language palette dropdown menu select the alternate language for use bystudents. If you select Spanish, a palette of Spanish characters, with accent marks, appearswith the question. If you do not want to accept an alternate language, select None.
7. From the Difficulty level dropdown menu, select a difficulty level for the question.
8. Click the Make this question shareable by other instructors… box if you would like tomake the question available to other instructors of the course or if you would like to reusethis question in future semesters.
9. Click Save and Add to List. The text entry question you created is saved and the questionstable reopens.
Creating a Numeric Text Entry Question
1. Click the Create/Questions tab at the top of the Assignment section. The Create Questionspage opens.
Figure 91. The Create Questions Page.
2. From the Select a Chapter dropdown menu, select a chapter in which to which you wouldlike to add questions. Refer to the following steps for creating different question types.
3. From the Define question type dropdown menu, select Numeric Text Entry.
4. Click New. The Assignment Create Questions New (Numeric Text Entry) page appears.

eGrade Plus Instructor Training Guide Page 79
Figure 92. The Create Questions New (Numeric Text Entry) Page.
5. Fill in the fields using the guidelines that follow.
Question title: Type a title for the question you are creating.
Question text: Type the actual question text.
Type the answer: Type for the numeric text entry question, ignoring significant digits.
Tolerance: Enter a number to set the percentage range for an acceptable correct numericanswer.
Significant Digit: This field is available only when the Tolerance field is set to Absolute %or Tolerance by SD. Type the range of acceptable answers as it relates to the absolute percentor significant digit you established.
Correct answer when Significant Digits are enabled: If the correct answer is affected bywhether not significant digits are enforced, enter the correct answer with the correct numberof significant digits. If significant digits do not apply to this problem, leave this field blank.
6. If necessary, select an action from the following steps.
Add or Edit Correct Feedback
Click Add/Edit correct feedback and type feedback text for the correct answer in the smallwindow that appears.
Add or Edit Incorrect Feedback
Click Add/Edit incorrect feedback and type feedback text for an incorrect answer in thesmall window that appears.
Add or Edit Hints
Click Add/Edit hint. Type a hint for the question in the small window that appears. ClickSave & Close.

eGrade Plus Instructor Training Guide Page 80
Add or Edit the Solutions
Click Add/Edit solutions. Type the solution for the question in the small window thatappears. Click Save & Close.
Add or Remove a Link
Click Add/Remove text link. Select a textbook link for the question in the small windowthat appears. When students answer the question, they will be able to click the link to accesscorrelated information. Click Save & Close.
7. From the Difficulty level dropdown menu, select a difficulty level for the question.
8. Click the Make this question shareable by other instructors… box if you would like tomake the question available to other instructors of the course, or if you wish to make thisquestion available in later semesters.
9. Click Save and Add to List. The numeric text entry question you created is saved and thequestions table reopens.
Creating an Essay Question
1. Click the Create/Questions tab at the top of the Assignment section. The Assignment CreateQuestion page opens.
Figure 93. The Create Questions Page.
2. From the Select a Chapter dropdown menu, select a chapter in which to which you wouldlike to add questions. Refer to the following steps for creating different question types.
3. From the Define question type dropdown menu, select Essay.
4. Click New. The Create Questions New (Essay) page appears.

eGrade Plus Instructor Training Guide Page 81
Figure 94. The Create Questions New (Essay) Page.
5. Fill in the fields using the guidelines that follow.
Question title: Type a title for the question you are creating.
Question text: Type the actual question text.
6. If necessary, select an action from the following steps.
Add or Edit Hints
Click Add/Edit hint. Type a hint for the question in the small window that appears. ClickSave & Close.
Add or Edit the Solution
Click Add/Edit solution. Type the solution for the question in the small window thatappears. Click Save & Close.
Add or Remove a Link
Click Add/Remove link. Select a textbook link for the question in the small window thatappears. When students answer the question, they will be able to click the link to accesscorrelated information. Click Save & Close.
Change the Language Palette
From the View language palette dropdown menu select the alternate language for use bystudents. If you select Spanish, a palette of Spanish characters, with accent marks, appearswith the question. If you do not want to accept an alternate language, select None.
7. From the Difficulty level dropdown menu, select a difficulty level for the question.
8. Click the Make this question shareable by other instructors… box if you would like tomake the question available to other instructors of the course.
9. Click Save and Add to List. The essay question you created is saved and the questions tablereopens.
Removing a Question
1. Click the Create/Questions tab at the top of the Assignment section. The Create Questionspage opens.

eGrade Plus Instructor Training Guide Page 82
Figure 95. The Create Questions Page.
2. From the Select a Chapter dropdown menu, select a chapter from which to which you wouldlike to remove a question.
3. From the Define question type dropdown menu, select the question type that defines thequestion you would like to remove.
4. Click Browse Existing. A table with the matching question types appears.
Figure 96. The Create Questions Page with Existing Questions.
5. Click a question in the Name column to open it. When the question opens. It displays theanswer as well as any hints, links, solutions, and so on associated with the question. Reviewthe question to ensure you would like to remove it.
6. For the question you would like to remove, click the remove link in the Action column. Thequestion is deleted.
Note: If the question is shared by other tests, you cannot remove it. A message will appearindicating that the question is in use. Click Back to List to return to the questions list.

eGrade Plus Instructor Training Guide Page 83
Instructor� Gradebook
The Gradebook section of eGrade Plus presents the scores and statuses for all the assignmentsthe students have completed or attempted.
You can select an individual student to assess her performance on assignments and you can viewthe progress of the class as a whole.
General Navigation in the Instructor Gradebook
There are several prominent areas within the Gradebook.
Click here toaccess gradebookoptions.
Click a student nameto review thestudent’s work foreach assignment
Click herefor the latestgradebook.

eGrade Plus Instructor Training Guide Page 84
Gradebook Operations
The Gradebook Operations section presents a tool you can use for searching for a specificstudent name and selecting how many student names you would like to display on each page. Italso provides a tool for exporting the Gradebook.
1. Click the Gradebook tab. The Student/Summary table opens.
Figure 97. The Student/Summary Table.
2. Click Show Gradebook Operations. The page expands to display the search tool and theentries per page tool.
Figure 98. The Student/Summary Table Expanded to Display the Gradebook Operations.
3. Manage the Gradebook using the steps in the following sections.
Click here to displayadditional tools.

eGrade Plus Instructor Training Guide Page 85
Searching for a Student Name
The Search tool is helpful if you would like to locate Gradebook information for an individualstudent. You can perform a search by first name, last name, or e-mail address.
Continue from the steps in the “Gradebook Operations” section that precedes this section.
1. Type an entry for which you would like to search.
2. Click Apply. eGrade Plus returns the results of the search.
Figure 99. The Gradebook Search Results for the Letter M.
3. If the search located the student name you required, review the student assignmentinformation.
Exporting a Gradebook
You can export a Gradebook into a CSV text file. A CSV file contains entries that are separatedby commas. After you export the file, you can open it in another application. For example, youcan open a CSV file in Microsoft Excel.
Continue from the steps in the “Gradebook Operations” section that precedes this section.
1. Click the Export button. A page appears describing the operation that will occur.
Figure 100. The Export Message Page.
2. Click the Export button. The Save As box will appear prompting you to specify a name andlocation on your hard drive for the file you are exporting.
Click here to return to the gradebook.

eGrade Plus Instructor Training Guide Page 86
3. Specify a file name and location and click Save. The file is saved in the location youspecified.
4. The Export page reappears. Click Student/Summary table in the navigation bar to return tothe Gradebook.
Viewing a Student’s Assignments
The Gradebook allows you to view individual student results for assignments.
1. Click the Gradebook tab. The Student/Summary table opens.
Figure 101. The Student/Summary Table.
2. Click a student name in the Student column. The assignments for that student will display.
Figure 102. The Assignment Results for an Individual Student.
3. Review the results, scores, and access records for the assignment.
4. If you would like to view the results for a different student, click Student/Summary table inthe navigation bar.
Click here to return to the gradebook.

eGrade Plus Instructor Training Guide Page 87
Manually Grading an Assignment
When students submit essays or other assignments that require your review, you can review andgrade them by accessing them through the Gradebook. The results of the manual review arerecorded in your Gradebook.
1. Click the Gradebook tab. The Student/Summary table opens.
Figure 103. The Student/Summary Table with a To Be Graded Item.
2. Click a student name in the Student column. The assignments for that student will display.
Figure 104. The Assignment Results for an Individual Student.
This student has an item that isnot yet graded.
The student hascompleted theassignment and theinstructor needs tograde it.

eGrade Plus Instructor Training Guide Page 88
3. In the Name column, click an assignment that you would like to grade manually. A resultspage for the student’s assignment opens. It displays each question within the assignment.
Figure 105. The Students Results Page with an Ungraded Assignment.
4. Click the question name in the Question column that you would like to grade manually. Aseparate window opens and displays that student’s answer.
Figure 106. The Student Answer to the Assignment.
5. Review the assignment and select a score from the Manually grade dropdown menu. Typeyour comments for the student in the Comments box.
6. Click Grade. The Students Results page for the assignment reopens. It indicates that youhave scored the assignment.
The G indicates the assignmentmust be graded manually.
Select a grade.
Add yourcomments.

eGrade Plus Instructor Training Guide Page 89
Figure 107. The Students Results Page with a Graded Assignment.
7. When you return to the Gradebook, it will indicate that the item has been graded.
Figure 108. The Student/Summary Table with a Graded Assignment.
Refreshing the Gradebook Content
From time to time, you may need to update your Gradebook. For example, if you have manuallygraded a student’s essay exam, but the Gradebook does not yet show the results of your work,refresh the display to show the most current settings.
Continue from the steps in the “Gradebook Operations” section that precedes this section.
Click the Refresh Gradebook button. The Gradebook will reappear and show the most currentresults.
This shows that theassignment has beenscored.
The gradebookindicates that youhave scored theassignment.