instructions us Spykee Vox - robotshop.com · Certain differences may appear between the...
25
1 INSTRUCTION MANUAL Version 1.1.
Transcript of instructions us Spykee Vox - robotshop.com · Certain differences may appear between the...

1
INSTRUCTION MANUAL Version 1.1.

2
TABLE OF CONTENTS
1. PRECAUTION AND WARNINGS _______________________________________________________________ 4
1.1. Standards and certificates of compliance_______________________________________________ 4
1.2. Non-liability clause ____________________________________________________________________ 4
1.3. Safety instructions _____________________________________________________________________ 4
1.4. Care And Maintenance________________________________________________________________ 4
1.5. Batteries ______________________________________________________________________________ 5
2. INTRODUCTION TO YOUR ROBOT _____________________________________________________________ 5
2.1. Functions _____________________________________________________________________________ 5
2.2. Robot anatomy _______________________________________________________________________ 6
2.3. View of robot chassis from below _______________________________________________________ 6
2.4. View of robot chassis from above ______________________________________________________ 7
3. PREREQUISTES_______________________________________________________________________________ 7
3.1. Minimum required configuration________________________________________________________ 7
3.2. The different Spykee Vox control modes ________________________________________________ 8 3.2.1. Voice activation____________________________________________________________________ 8 3.2.2. The infrared remote control__________________________________________________________ 8
4. BUILDING YOUR ROBOT______________________________________________________________________ 9
5. TURNING SPYKEE VOX ON ___________________________________________________________________ 9
5.1. Turning Spykee Vox on for the first time _________________________________________________ 9
5.2. Hibernation of Spykee Vox _____________________________________________________________ 9
6. AVAILABLE FUNCTIONS _____________________________________________________________________ 10
6.1. Layout of the different menus__________________________________________________________ 10
6.2. Control modes of the different menus __________________________________________________ 10
7. PLAYING WITH SPYKEE VOX USING VOICE RECOGNITION______________________________________ 11
7.1. Moving Spykee Vox __________________________________________________________________ 11
7.2. Attack with Spykee Vox ______________________________________________________________ 12
7.3. Talking with Spykee Vox ______________________________________________________________ 13
7.4. Listening to music and dancing with Spykee Vox _______________________________________ 14 7.4.1. Listening to the music contained in your iPod® or your mp3 player ____________________ 14 7.4.2. Listening to the music contained in your mp3 player _________________________________ 15 7.4.3. Listening to the music included in the robot__________________________________________ 15
7.5. Using Spykee Vox as an universal remote control_______________________________________ 15
7.6. Activating the programmed scenarios _________________________________________________ 17
8. PLAYING WITH SPYKEE VOX USING REMOTE CONTROL_________________________________________ 18
9. PROGRAMMING ___________________________________________________________________________ 19
9.1. Installation of the Spykee Vox application _____________________________________________ 19
9.2. Creating Parameters for Spykee Vox___________________________________________________ 19 9.2.1. Personalising the Interface _________________________________________________________ 19 9.2.2. The Wake-up Alarm________________________________________________________________ 19 9.2.3. Your Birthday ______________________________________________________________________ 19 9.2.4. Choice of Language_______________________________________________________________ 20
9.3. Creating New Scenarios ______________________________________________________________ 20

3
9.4. Scenario Changes____________________________________________________________________ 23
9.5. Synchronisation of the computer with Spykee Vox ______________________________________ 24 9.5.1. Synchronisation for transfer of a Scenario____________________________________________ 24 9.5.2. Synchronisation for the transfer of Alarms ____________________________________________ 24
10. TECHNICAL DATA SHEET__________________________________________________________________ 24
11. AFTER SALES SERVICE ____________________________________________________________________ 24

4
1. PRECAUTION AND WARNINGS
1.1. Standards and certificates of compliance
1- MECCANO hereby declares that this product complies with all requisite standards and other relevant regulations of directive 1999/EC. A copy of the original statement of compliance may be obtained at the following address: MECCANO, 363 avenue de Saint Exupéry 62100 Calais, France. 2- This product must be used indoors.
1.2. Non-liability clause
Certain differences may appear between the description found in the instruction manual and the behavior of the robot.
1.3. Safety instructions
Choose a SAFE location to operate your Spykee Vox. Do not operate it in the street. Do not operate it in sand or in puddles. This could deteriorate its performance. Check the surface conditions through which the robot will move and be aware of obstacles. Avoid all contact with water. The robot cannot climb or go down stairs. Spykee Vox's audio receivers are sensitive instruments. Do not allow the robot to be near a heat source or IN FULL SUN for any prolonged time. Do not leave the robot in humid or damp areas. Do not drop or throw it. Do not paint it.
CAUTION - Risk of injury - keep out of reach of children under 36 months of age. - CHANGES OR MODIFICATIONS NOT EXPRESSLY APPROVED BY THE MANUFATURER MAY VOID THE USER'S RIGHT TO OPERATE THIS DEVICE. - The normal function of the product may be disturbed by Strong Electro Magnetic Interference. If so, simply reset the product to resume normal operation by pressing the “RESET” button located under the chassis. In case the function could not resume, please use the product in other location.
1.4. Care And Maintenance
This robot requires periodic maintenance and cleaning. Clean it with a slightly damp cloth. Handle your Spykee Vox with care and keep it in a clean area, sheltered from dust. Do not attempt to open it or repair your Spykee Vox yourself.
The "barred trashcan" symbol found on your robot means that these products must, at the end of their lifetime, be delivered to special waste collection points: Municipal waste dumps with specific bins for this kind of device Collection bins at the point-of-sale They will be recycled there, thus avoiding the discharge of regulated substances into the environment, and allowing the materials that make up your Spykee Vox to be reused. In member countries of the European Union
These selective collection points are accessible free of charge. All products containing the "barred trashcan" symbol must be delivered to these collection points. In countries that are not members of the European Union
Any equipment marked with the "barred trashcan" should not be disposed of in ordinary trash cans if your country or region has special organizations in place for collection and recycling, and this equipment should be brought to these collection points so that it may be recycled.

5
1.5. Batteries
Spykee Vox operates with 6 AA batteries, 1.5 V for the robot and 2 AAA batteries, 1.5 V for the remote control. (Batteries not included). To change the batteries, follow the building instructions.
Robot (6 batteries AA/LR06) IR remote (2 batteries AAA/LR03))
Do not recharge non-rechargeable batteries. The batteries must be taken out of the toy before being charged if they can be removed. The batteries must only be recharged under adult supervision (if they can be removed). Different types of batteries or new and used batteries should not be used together. Only batteries of the recommended or similar type should be used. Take care to respect the polarity when installing batteries. Used batteries must be removed from the toy. Battery terminals must not be short circuited. Used batteries must be disposed of at a recycling center. Please use Saline or Alkaline batteries. Lithium batteries should not be used in this robot.
2. INTRODUCTION TO YOUR ROBOT
Thank you for your purchase of the Spykee Vox robot!
2.1. Functions
Spykee Vox is an interactive robot you can build that responds to your voice. Spykee Vox is a
robot controlled by voice recognition, but also via IR Remote.
• Spykee Vox understands you and responds to your voice! When you ask it to move, it obeys and moves. Spykee Vox speaks English.
• Spykee Vox has emotions!
When you speak to it, it reacts with different faces, movements, sounds and lights. It has two personalities: Good guy and Bad guy!
• Spykee Vox is compatible with iPod® mobile digital device (iPod touch and iPod nano only) and
other mp3 players.
Activate your iPod® or mp3 player with your voice! Spykee Vox will play your favorite tunes in stereo and will dance!
• Spykee Vox is a programmable robot!
Create new scenarios! Very easy to program.
• Spykee Vox is a war robot!

6
It carries out different attacks: drop bomb, fight enemy etc.
• Spykee Vox is a universal remote control!
If you ask it, it turns on the television and selects your favorite channels (4 programmable channels). Your box contains:
• A Spykee Vox robot to build • An infrared remote control • Activation Instructions • Building instructions • A small card with the voice commands in English.
Build three different models quickly and easily / Compatible with all Erector parts Instructions and tools included / Requires 6 AA batteries and 2 AAA batteries (not included) Quick and easy construction of 3 different robot models / More than 200 parts / Compatible with all Erector parts.
2.2. Robot anatomy
3 microphones
LCD screen
Optical fibers
Stereo speaker
dock for iPod®
2 motors
IR sensor
3 microphones
LCD screen
Optical fibers
Stereo speaker
dock for iPod®
2 motors
IR sensor
2.3. View of robot chassis from below
Batterycompartmentcover
Switch button: Play / Download
Batterycompartmentcover
Switch button: Play / Download
Learning mode buttonLearning mode button
RESET button
RESETBatterycompartmentcover
Switch button: Play / Download
Batterycompartmentcover
Switch button: Play / Download
Batterycompartmentcover
Switch button: Play / Download
Batterycompartmentcover
Switch button: Play / Download
Batterycompartmentcover
Switch button: Play / Download
Batterycompartmentcover
Switch button: Play / Download
Learning mode buttonLearning mode button
RESET button
RESET
Learning mode buttonLearning mode button
RESET button
RESET

7
2.4. View of robot chassis from above
USB plug
iPod connection
Activation button
Mp3 connection
3. PREREQUISTES
3.1. Minimum required configuration
• An Internet connection for downloading the instruction manual and the Spykee Vox
programming software. • Acrobat Reader for reading the instruction manual. You can download it free at the
following address: www.adobe.com/products/acrobat/readstep2.html. • A computer for programming the computer:
o Compatible operating systems: Windows 2000, Windows XP and Windows Vista or higher.
o CPU: Power PC, Intel, AMD CPU with clock 1.8 GB or higher. o Memory: 128 MB minimum, 256 MB recommended.

8
3.2. The different Spykee Vox control modes
3.2.1. Voice recognition
You can control Spykee Vox with your voice. Spykee Vox is a vocally activated robot. When you give it an order it understands and is capable of responding.
IMPORTANT
Voice recognition is a very sensitive technology, therefore here is some advice in order to make the best use of your robot and benefit from its different functions: 1. Noise is likely to disturb the robot’s behavior. Play with your robot in a quiet place. 2. The robot cannot carry out an order and listen to another at the same time.
Wait until the robot makes a “beep” sound after its action before giving it a new vocal command. 3. You can speak to the robot in English. Warning: voice recognition is very sensitive to accent.
You’ll learn how to speak to your robot. 4. We also advise you to speak to the robot in neutral tones without varying your voice.
3.2.2. The infrared remote control
Several functions (movement, music, attack, and hibernation) are also available using the infrared remote control. Infrared technology uses a light wave for sending information between the transmitter (remote control) and the receptor (robot). Make sure that there are no obstacles between the remote control and the robot for optimal utilization.
IMPORTANT
The infrared receptor is on the top of the robot’s head.
For certain actions, the voice and the remote control are complementary.

9
4. BUILDING YOUR ROBOT You have just discovered the functions of your robot. To be able to play with Spykee Vox, choose the model of robot that you prefer among the three available: Nice, Attack, and Shield; and build it! The building instructions, the tools, and the parts are available in your box. If you have lost your building instructions, you can also download them from the web site www.spykeevox.com in the “Installation” section.
5. TURNING SPYKEE VOX ON
5.1. Turning Spykee Vox on for the first time
1. Turn Spykee Vox on by putting the button under the chassis in the “PLAY” position. 2. The Spykee Vox screen turns on, its fiber optics start to flicker and he says “Hey, I’m Spykee Vox.”
This means that he’s on. The robot is now ready to take orders or hear your questions.
If the screen and the optical fibers do not come on after several seconds: check that the button is actually on “PLAY”. If this is the case, the batteries of your robot may be empty, replace them. To do this, please refer to the building instructions contained in the box or available on the web site www.spykeevox.com.
5.2. Hibernation of Spykee Vox
Spykee Vox goes to sleep after 1 minute if you do not give it any order, except when it is playing music. When it goes to sleep, you will hear it snoring and its face turns off. To turn Spykee Vox on again after it goes into hibernation, press the button “button for hibernation and reactivation of Spykee Vox” (cf. Diagram 2.4 View of robot chassis from above).

10
6. AVAILABLE FUNCTIONS 6.1. Layout of the different menus
Movement Move Spykee Vox
Attack Attack with Spykee Vox
Music Control the music: - Dance - Listen to music from my iPod® - Listen to music from the mp3 player - Listen to Spykee Vox’s music
Let’s talk Ask Spykee Vox questions
Remote control Select the television channels of your choice
Program Play the scenarios that you have created with the “Spykee Vox” software
6.2. Control modes of the different menus
You can command your Spykee Vox robot, either using voice activation or using the infrared remote control supplied in the package.
Menus Voice
Command
Infrared remote
control
Movement Yes Yes
Attack Yes Yes
Music
• Activate the iPod® Yes Yes
• Activate the mp3 player Yes Yes
• Make Spykee Vox
dance
Yes No
• Play or pause No Yes
• Change the track No Yes
• Turn the volume
up/down
No Yes
Let’s talk Yes No
Remote control Yes No
Program Yes No
Hibernate No Yes
11
7. PLAYING WITH SPYKEE VOX USING VOICE RECOGNITION In order to attract the robot’s attention, call it by its first name “Spykee Vox”. Spykee Vox will then turn around ready to listen to you. When you activate your robot, it will introduce itself, and will say the word “Spykee Vox”. Be careful to remember the way your robot pronounces its first name because you will need to use these words often.
Information about voice commands:
- The robot cannot carry out an order and listen to another at the same time. Wait until the robot makes a “beep” sound after its action, before giving it a new order.
- When you give no order to the robot for 1 minute, it goes to sleep.
In the rest of this document, you will discover the different menus of your robot and the different voice commands.
There is an important rule:
To activate a menu (Move, attack, let’s talk, music, remote control or program): say “Spykee Vox”.
To exit the menu: say “Spykee Vox” or wait some seconds, it will exit the menu automatically.
Hint: To indicate that your robot is waiting to be called “Spykee Vox” or that it has exited the selected menu, the following face appears:
7.1. Moving Spykee Vox
Spykee Vox is a robot, which obeys your voice. If you ask it, it moves in the way you choose. Stage 1: call the robot Stage 2: choose the movement menu Stage 3: choice of movement
As for entering any menu, first say Spykee Vox, then say the name of the menu Movement, then the name of the chosen action.
Movement
Turn right Turn left Go Forward Back up
Spykee Vox

12
Hint: When the word Move appears on Spykee Vox’s face, this means that the robot has entered the Move menu.
For example, if you want the robot to move backwards:
1. Say Spykee Vox. 2. Wait until it has finished speaking and has made a “beep” sound. 3. Say Movement. 4. Wait until it has finished speaking and has made a “beep” sound. 5. Say Back up. 6. The robot then moves backwards and at the end of its movement makes a “beep” sound. If
you then want it to make another movement, say directly turn right, turn left, go forward, or back up.
Important:
If you wait too long after each beep made by Spykee Vox before giving an order, it goes back into standby mode. Cf. face p.10. It is then necessary to start the process again at stage 1 and say Spykee
Vox.
7.2. Attack with Spykee Vox
Spykee Vox can carry out attacks which include words, sound effects, light effects and movements. Spykee Vox has 5 pre-programmed attacks. To play an attack: Stage 1: call the robot Stage 2: choose the attack menu Stage 3: choice of attack
As for entering any menu, first say Spykee Vox, then say the name of the menu, in this case Attack, then the name of the chosen attack.
Hint: When the word Attack appears on Spykee Vox’s face, this means that the robot has entered the Attack menu, you can go on to stage 3 (choice of attack).
For example, if you want your robot to attack the enemy:
1. Say Spykee Vox. 2. Wait until it has finished speaking and has made a “beep” sound. 3. Say Attack. 4. Wait until it has finished speaking and has made a “beep” sound.
Attack
Shoot target Drop Bomb Fight enemy Fire weapon
Spykee Vox
Destroy target

13
5. Say Fight enemy. 6. The robot then attacks and at the end of its movement makes a “beep” sound. If you want it to
follow on with another attack movement, say directly shoot target, drop bomb, fire weapon or destroy target.
7.3. Talking with Spykee Vox
Spykee Vox is your friend. It has two personalities: good guy or bad guy. You can talk with it and ask it questions. It will answer you in a random manner according to its mood.
Stage 1: call the robot Stage 2: choose the Let’s talk menu Stage 3: choose the question
(1) in order to use this function, you must have entered your date of birth into the Spykee Vox programming software, (see chapter 9.2.3). As for entering any menu, first say Spykee Vox, then say the name of the menu Let’s talk, then ask the chosen question.
Hint: When the words Let’s talk appear on Spykee Vox’s face, this means that the robot has entered the Let’s talk menu, you can go on to stage 3 (ask your question).
For example, if you want to know the number of days before Christmas:
1. Say Spykee Vox. 2. Wait until it has finished speaking and has made a “beep” sound. 3. Say Let’s talk. 4. Wait until it has finished speaking and has made a “beep” sound. 5. Say How many days before X-mas? 6. The robot will answer and then make a “beep” . If you want to ask another question, you can
do so after the “beep” sound.
Let’s talk
How are you?Do you
like me?
What time
is it?
How many
days before
my
birthday? (1)
Spykee Vox
How many
days before
X-mas?

14
7.4. Listening to music and dancing with Spykee Vox
Stage 1: call the robot Stage 2: choose the music menu Stage 3: choose to make robot dance or not Stage 4: choice of music
(1) You can only use this voice command if you possess an iPod® touch or iPod® nano and if you have connected it to the iPod® dock. (2) You can only use this voice command if you possess an mp3 player (other than iPod®). (3) You can use these 3 commands at any time, since the music is included in the robot. As for entering any menu, first say Spykee Vox, then say the name of the Music menu, then select whether the robot is going to dance or not, and finally choose your music.
Hint: When the word Music appears on Spykee Vox’s face, this means that the robot has entered the Music menu.
7.4.1. Listening to the music contained in your iPod® or your mp3 player
Spykee Vox is a product Made for iPod®. It is compatible with iPod® nano and iPod® touch only. Before inserting your iPod® on its dock, make sure that you have assembled the base corresponding to your model. To do this, please refer to the building instructions.
Make sure you use the dock for your iPod® model. Insert your iPod® into the connection dock, it will automatically go into pause.
1. Say Spykee Vox. 2. Wait until it has finished speaking and has made a “beep” sound. 3. Say Music. 4. The robot will ask you if you want it to dance and will make a “beep” sound. 5. Answer it by Yes or No after the “beep” . 6. Wait until it has finished speaking and has made a “beep” sound. 7. Say iPod®. 8. The music of your iPod® is played.
You can now freely listen to your iPod®. If you want to listen to the previous or next track on your playlist, or turn the volume of the music up or down, use the remote control provided (for instructions on how to use the remote control, see chapter 8 of this manual).
Music
iPod® Mp3 player Techno Music Hip Hop Rock’n’roll
yes No
Spykee Vox
(1) (3)(2) (3) (3)

15
7.4.2. Listening to the music contained in your mp3 player
If you want to listen to the music contained in your mp3 player, connect your mp3 player to the robot using the connection lead provided in the box. Turn on your mp3 player manually and put it in play mode.
Please use a strap (not included) for example to avoid damaging your mp3 player if Spykee Vox begins to dance.
1. Say Spykee Vox. 2. Wait until it has finished speaking and has made a “beep” sound. 3. Say Music. 4. The robot will ask you if you want it to dance and will make a “beep” sound. 5. Answer it by Yes or No after the “beep” . 6. Wait until it has finished speaking and has made a “beep” sound. 7. Say mp3 player. 8. The music of your mp3 player will be played.
You can now freely listen to your mp3 player. If you want to turn the volume of the music up or down, use the remote control provided (for instructions on how to use the remote control, see chapter 8 of this manual). To stop your music playing press the Play/Pause button.
7.4.3. Listening to the music included in the robot
1. Say Spykee Vox. 2. Wait until it has finished speaking and has made a “beep” sound. 3. Say Music. 4. The robot will ask you if you want it to dance and will make a “beep” sound. 5. Answer it by Yes or No after the “beep” . 6. Wait until it has finished speaking and has made a “beep” . 7. Say Techno Music or Hip Hop or Rock’N’roll. 8. The robot plays the music of your choice.
You can control the sound using the remote control. If you want to turn the robot’s volume up or down, use the remote control provided (for information on how to use the remote control, see chapter 8 of this manual).
7.5. Using Spykee Vox as a universal remote control
Spykee Vox can be used as a universal remote control to turn the television on or change channel. Before using your robot as a remote control for your television set, you have to teach it the channels for this:
1. Press the “Learning mode” button which is under the chassis and follow the instructions 2. “Please press the mute button”: point your television set’s remote control at the robot’s head
and press the “mute” button. 3. “Please press the power key on your remote control”: point your television set’s remote control
at the robot’s head and press the “power” button. 4. “Please press the key of the Music channel on your remote control”: point your television set’s
remote control at the robot’s head and press the number of your chosen music channel. 5. “Please press the key of the Cartoons channel on your remote control”: point your television
set’s remote control at the robot’s head and press the number of your chosen cartoons channel.
6. “Please press the key of the Sports channel on your remote control”: point your television set’s remote control at the robot’s head and press the number of your chosen sports channel.
7. “Please press the key of the Favorite channel on your remote control”: point your television set’s remote control at the robot’s head and press the number of your favorite channel.
8. At the end of this learning session, Spykee Vox will inform you of the end of the teaching of the channels: “Learning mode finish”.

16
You can now use Spykee Vox as a universal remote control. Stage 1: call the robot Stage 2: choose the Remote Control menu Stage 3: choose the action
As for entering any menu, first say Spykee Vox, then say the name of the Remote control menu, then select the chosen action.
Hint: When the word Remote control appears on Spykee Vox’s face, this means that the robot has entered the Remote control menu.
Here are the effects of the different voice commands:
Television Turns the television on
Mute Mutes or reactivates the sound
Music Spykee Vox zaps to the music channel that you selected
Cartoons Spykee Vox zaps to the cartoons channel that you selected
Sports Spykee Vox zaps to the sports channel that you selected
My favorite Spykee Vox zaps to the favorite channel that you selected
IMPORTANT :
To have Spykee Vox turn your television on, make sure the television is in sleep mode and not
completely turned off.
Example: this is how to get to your favorite television channel when your television is in sleep mode:
1. Say Spykee Vox. 2. Wait until it has finished speaking and has made a “beep” sound. 3. Say Remote Control. 4. Wait until it has finished speaking and has made a “beep” sound. 5. Say Television. The television will then turn on and the sound will be on mute. 6. Wait until it has finished speaking and has made a “beep” sound. 7. Say My favorite. Spykee Vox will then switch to your favorite channel (the one programmed in
the learning step). 8. Say Mute. The sound of your television will be reactivated.
Remote Control
Television Mute Music Cartoons
Spykee Vox
Sports My favorite
17
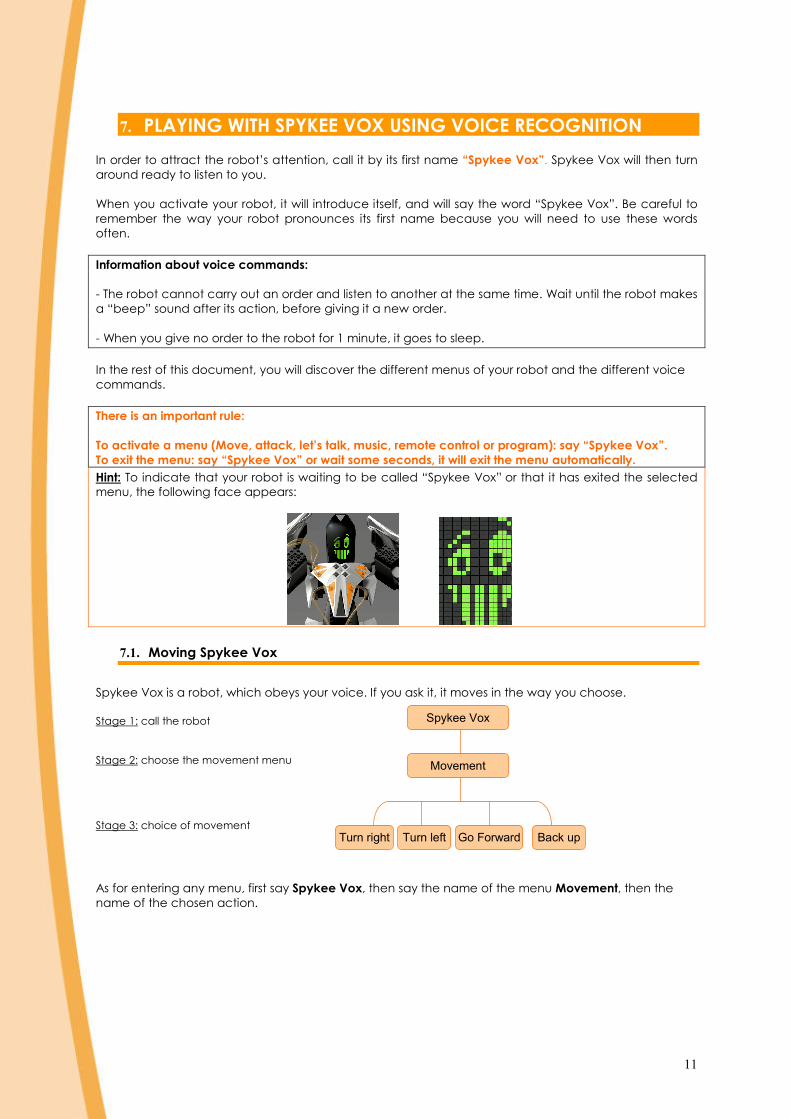
7.6. Activating the programmed scenarios
Spykee Vox is a programmable robot, thanks to the Spykee Vox programming software, suitable for children, you can create your own scenarios. For information on how to create your own scenarios, see chapter 9 of this manual: Programming. Once you have created a scenario, this is how you can activate it: Stage 1: call the robot Stage 2: choose the Programs menu Stage 3: choose the scenario to play
Hint: When the word Program appears on Spykee Vox’s face, this means that the robot has entered the My Programs menu.
For example, in order to play the Alpha program, here is the procedure:
1. Say Spykee Vox. 2. Wait until it has finished speaking and has made a “beep” sound. 3. Say My Programs. 4. Wait until it has finished speaking and has made a “beep” sound. 5. Say Alpha. 6. The robot then runs the Alpha program.
When you want to activate another scenario, you must go through all the above steps again from the beginning.
My Programs
Alpha Beta Gamma Epsilon
Spykee Vox
Omega

18
8. PLAYING WITH SPYKEE VOX USING REMOTE CONTROL
You can use your infrared remote control to control Spykee Vox. Here are your remote control functions:
TURN RIGHT Press once: the robot turns slightly to the right.
Press continuously: the robot turns around to its right.
GO FORWARD Press once: the robot goes forward a few centimeters. Continuous pressure: the robot goes forward as long as the button is held down.
TURN LEFT Press once: the robot turns slightly to the left. Continuous pressure: the robot turns around to its left.
TURBO On pressing the button, the word “TURBO” appears: the robot’s speed is increased. On pressing the button, a snail appears: the robot speed is normal.
BACK UP Press once: the robot goes back a few centimeters. Continuous pressure: the robot goes back as long as the button is held down.
RANDOM ATTACK One press on the button: one of the five pre-programmed attacks (shoot target, drop bomb, fight enemy, fire weapon & destroy target) is carried out in a random way.
SLEEP One press on the button: Spykee Vox goes to sleep, snoring.
PREVIOUS TRACK Press once: the track that is currently being read is rolled back to the beginning. (only for iPod®) Press twice: the previous track is played. (only for iPod®)
INCREASE VOLUME One press increases the volume slightly.
NEXT TRACK Press once: the next track is played. (only for iPod®)
READ/PAUSE First Press: the iPod® nano or touch or the mp3 reader is activated. Second Press: music reading is paused (only for iPod®, for the mp3 reader, this stops the music).
LOWER VOLUME One press lowers the volume slightly.
TURN LEFT
TURBO
BACK UP
GO
FORWARD
TURN RIGHT
INCREASE VOLUME
NEXT TRACK
LOWER VOLUME
PREVIOUS
TRACK
PLAY/PAUSE
RANDOM ATTACK
SLEEP
19
9. PROGRAMMING
9.1. Installation of the Spykee Vox application
You must have the Spykee Vox software downloaded. If did not download the Spykee Vox software on your computer when you first connected to the web site: go to www.spykeevox.com, then go to the “installation” section and register the software on your computer. Installation: 1. Double-click on the spykee.exe icon and follow the installation instructions. 2. When the “Finish” message pops up, that means the Spykee Vox software has been installed:
The program will be installed on your hard drive by default in C:/Program Files/Erector/Spykee Vox, and an icon will also be installed on your desktop.
3. You can now set your robot’s parameters and program him.
9.2. Creating Parameters for Spykee Vox
9.2.1. Personalizing the Interface
Spykee Vox can call you by your first name in the interface program. To personalize your interface:
• Launch the Spykee Vox software. • In the menu, click on “Settings”. • A new window opens. Please enter your name and click on Okay to validate.
9.2.2. The Wake-up Alarm
Spykee Vox can wake you up in the morning if you wish. To activate or deactivate the wake-up alarm function:
• Launch the Spykee Vox software. • In the menu, click on “Alarms”. • Choose “Wake-up”. • Click on “on” to activate or “off” to deactivate the alarm. • If you have chosen “On”:
o Enter the Hour you wish to be woken (hh/mm). o Enter the alarm frequency.
For the frequency, you have a choice between:
• “Once”: Spykee Vox will wake you the next morning. • “Every day”: Spykee Vox will wake you every day. • “Monday to Friday”: Spykee Vox will wake you all week and let you sleep at the weekend!
To validate the alarm parameters, click at the bottom on the right on “OK”. Once you have put in the Alarm parameters, you should synchronize your computer and your Spykee Vox so that the data is taken into account. (see section 9.5.2)
9.2.3. Your Birthday
Spykee Vox wishes you a Happy Birthday. To activate or deactivate the Birthday Greeting alarm:
• Launch Spykee Vox. • In the menu, click on “Alarms”. • Choose “Birthday Alarm” • Click on “on” to activate or “off” to deactivate the alarm.

20
• If you have chosen “On”: o Enter the date of your Birthday (YYYY/MM/DD for example: If you were born on 15th
April 1999, enter the date as: 1999/04/15). o Enter the hour at which Spykee Vox should wish you Happy Birthday.
To validate the Birthday alarm parameters, click at the bottom on the right on “OK”. Once you have put in the Alarm parameters, you should synchronize your computer and your Spykee Vox so that the data is taken into account. ‘(see section 9.5.1.2).
9.2.4. Choice of Language
This function is not available yet. An error message will pop up on the software if you click on the “Languages” button in the Synchronization menu.
9.3. Creating New Scenarios
1. Launch the Spykee Vox application
2. Select “Scenario Program” 3. Click on “Create new Scenario” (#1) and give the scenario a name (#2) (for example TEST), then click on “Create” (#3) to start to create a scenario:
1 2 31 2 3
4. The first step in creating a scenario is the choice of movement. You can choose a maximum of 20
movements per scenario. You can choose between the 9 movements offered (#1) or choose an existing combination in another scenario (#2).
1
2
3
4
5 6 7 8 9
1
2
3
4
5 6 7 8 9
#1: movements brick for choice #2: rolling menu with choice of movement combinations defined in the preceding scenarios (empty after the first scenario created.) #3: zone where the different moves selected are then shown #4: Directional arrows to see all of the movement zone #5: The Erase button allows the last move to be erased. #6: The Read button allows you to see the movements that you have created. #7: The Cancel button cancels your scenario creation. #8: The “Return to previous step” button # 9: The “Go to next step” button.
21
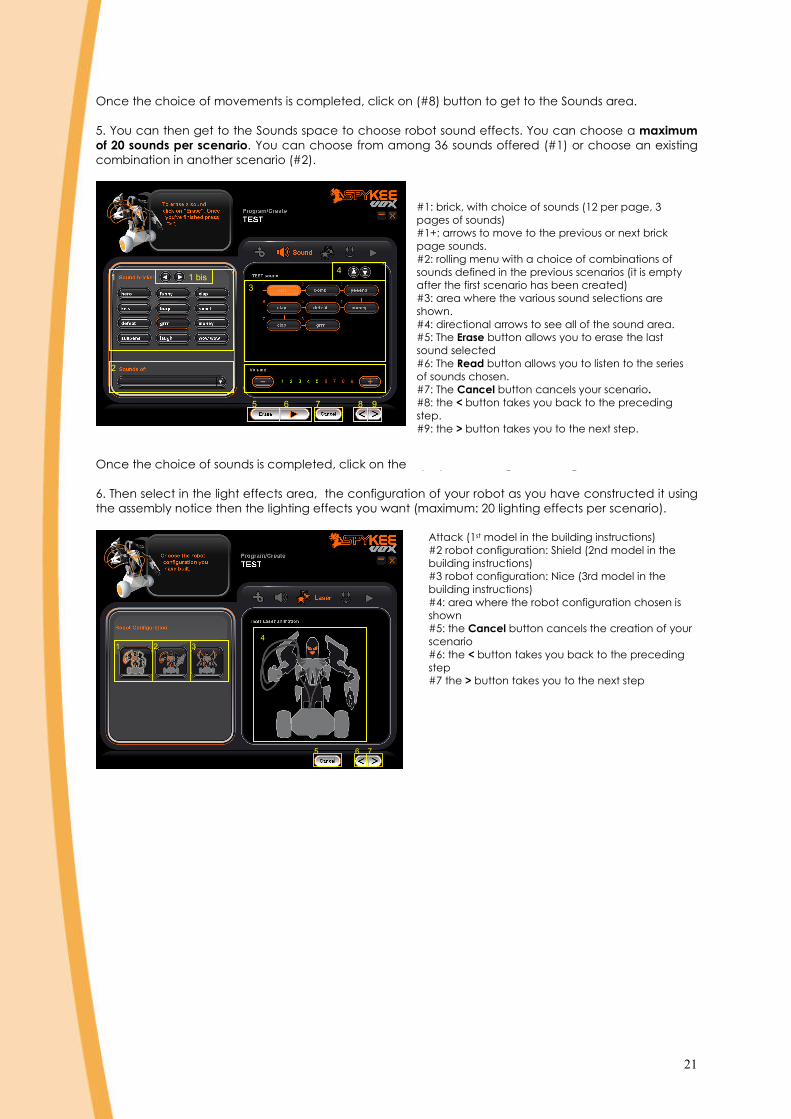
Once the choice of movements is completed, click on (#8) button to get to the Sounds area. 5. You can then get to the Sounds space to choose robot sound effects. You can choose a maximum
of 20 sounds per scenario. You can choose from among 36 sounds offered (#1) or choose an existing combination in another scenario (#2).
1
2
3
4
5 6 7 8 9
1 bis1
2
3
4
5 6 7 8 9
1 bis
.WARE
Once the choice of sounds is completed, click on the > (#8) button to get to the light effects area.
6. Then select in the light effects area, the configuration of your robot as you have constructed it using the assembly notice then the lighting effects you want (maximum: 20 lighting effects per scenario).
14
5 6 7
2 3
#1: brick, with choice of sounds (12 per page, 3 pages of sounds) #1+: arrows to move to the previous or next brick page sounds. #2: rolling menu with a choice of combinations of sounds defined in the previous scenarios (it is empty after the first scenario has been created) #3: area where the various sound selections are shown. #4: directional arrows to see all of the sound area. #5: The Erase button allows you to erase the last sound selected #6: The Read button allows you to listen to the series of sounds chosen. #7: The Cancel button cancels your scenario. #8: the < button takes you back to the preceding step. #9: the > button takes you to the next step.
Attack (1st model in the building instructions) #2 robot configuration: Shield (2nd model in the building instructions) #3 robot configuration: Nice (3rd model in the building instructions) #4: area where the robot configuration chosen is shown #5: the Cancel button cancels the creation of your scenario #6: the < button takes you back to the preceding step #7 the > button takes you to the next step

22
1
2
3
4
5 6 7 8 9
Once the lighting effects have been set up, the choice of faces is to be made. 7. Spykee Vox’s face can be personalized during a scenario. A new face can be drawn for him by clicking on “Drawing” or text can be put on his face by clicking on “Text”. Enter text: The text area is limited to 15 characters (spaces included)
12
3
4
5
6
7 8 9 10 11
#1: space to enter your chosen text (max 15 characters) #2: choice of text colour #3: choice of text size #4: choice of movement of text on the robot’s face #5: rolling menu with a choice of a combination of faces defined in the preceding scenarios (it is empty at the time of creating the first scenario) #6: area to pre-visualise the face text (you need first to press #8 button) #7: the Erase button allows you to Erase the text selected #8: the Read button allows you to see the chosen text #9: the Cancel button cancels the creation of your scenario #10: the < button takes you back to the preceding step #11: the > button takes you to the next step
#1: choice of lighting effects #2: rolling menu with a choice of a combination of lighting effects defined in the preceding scenarios (it is empty at the time of creating the first scenario) #3: area where the combination of lighting effects is shown #4: navigation arrows to see all of the effects chosen #5 the Erase button allows you to erase the last lighting effects selected #6: the Read button allows you to see all of the chosen lighting effects #7: the Cancel button cancels the creation of your scenario #8 the < button takes you back to the preceding step #9 the > button takes you to the next step

23
Draw a series of faces to make an animation: To obtain an animation on the robot’s face, you can draw up to 20 faces as follows:
1
6
10 11 12
8
9
2
3
4
7
5 5
13
1
6
10 11 12
8
9
2
3
4
7
5 5
13
8. Once the choice of faces has been made, click on the #13 button to get to the whole scenario and save it.
1 2 3 4 5
Once you have pressed Save your scenario is complete and you can create others and transfer them to your robot.
9.4. Scenario Changes
In the “Program a Scenario” menu, choose “Modify existing Scenario” ; the list of programs already created appears on the right side of the window. Using the directional arrows, you can select the scenario to modify. Once the scenario has been selected, click on “Go” You can now review your program step by step and make chosen changes.
#1 Drawing area (drawing pixel by pixel) #2: selection of the pencil tool to draw #3: selection of the eraser tool to erase the drawing (pixel by pixel) #4: Choice of face colour (one colour per face) #5: return to previous face or go to next face #6: select one face from amongst 5 predefined faces #7: rolling menu with a choice of a combination of faces defined in the preceding scenarios (it is empty at the time of creating the first scenario) #8: view of faces drawn in chronological order #9: the Erase button allows you to Erase the face selected #10: the Read button allows you to see all of the chosen faces #11: the Cancel button cancels the creation of your scenario #12: the < Button takes you back to the preceding step #13 the > button takes you to the next step
#1: the save button allows you to save the scenario #2: the Read button allows you to hear all of the chosen sound effects #3: the Cancel button cancels the creation of your scenario #4: the < button takes you back to the previous step #5: the > button takes you to the scenario creation/change menu

24
9.5. Synchronization of the computer with Spykee Vox
9.5.1. Synchronization for transfer of a Scenario
1. On the home page, select Synchronization 2. Select scenario download
3. Select a voice order in the list (Alpha, Beta, Gamma, Epsilon, Omega) and link it to a scenario.
For example, to link the TEST scenario to the “Alpha” voice command Click on Alpha Click on the Modify button. The list of available scenarios then appears. Click on this if you wish (in our TEST example) and press Choose to put the TEST scenario in the Alpha voice command. Once you have allocated the chosen scenarios to the voice commands, you can transfer the data to the robot.
4. Click the bottom of the screen on the Sync button. 5. Please connect your computer to the robot via the USB cable supplied in the box. For your
information, look at the layout above the chassis to see where the USB socket is.
6. Please put your robot in DOWNLOAD position (see lay-out below the robot chassis).
7. Click on Sync and wait for the Synchronization bar to be 100% complete. When it is complete it means that the scenarios have been transferred to Spykee Vox. You can now voice-activate them.
9.5.2. Synchronization for the transfer of Alarms
The wake up call and alarm synchronization to wish Happy Birthday is automatic at the time of scenario transfers.
10. TECHNICAL DATA SHEET
. Voice activated system (voice recognition)
. 2 motors for driven wheels
. 3 microphones
. 4 LEDs
. LCD screen 16 x 24 pixels
. Stereo loudspeakers 2x2W / 8 Ω
. Made for iPod® dock (compatible with iPod® nano & iPod® touch, not included)
. Digital music player connection (line in for 3.5mm jack)
. USB plug
. IR remote control: works with 2 AAA (not included)
. works with 6 AA batteries (not included)
11. AFTER SALES SERVICE
Should you have any questions or concerns, please contact our After Sales Service: Meccano S.A. 363 avenue de Saint Exupéry 62100 Calais France

25
Many models and parts are original creations; they are the property of MECCANO and are protected by national legislation on designs and models, trademarks and/or copyright. Please contact MECCANO for information.
MECCANO shall in no way be held liable in the case of an accident occurring subsequent to (I) the noncompliance with the instructions for assembly and use of the robot and software (II) use of parts other than those offered in the guide (III) alteration and modification of parts. The MECCANO company respects children safety: its models have
been tested by children.
Please retain building instructions and packaging. Products and product colors may vary.
MECCANO
363 avenue de Saint Exupéry 62100 Calais – France. © 11/2008 MECCANO
® MECCANO & ERECTOR are exclusive trademarks of MECCANO All rights reserved.
Document non binding. Made in China.
Made for iPod nano and iPod touch only. Apple is not responsible for the operation of this device or its compliance with safety and regulatory standards. Apple & iPod are registered trademarks of Apple Inc., registered in the US and other countries.