Instructions NIKON LRF Aculon - Optics Trade
33
Pt En Fr Es Instruction manual/Manual de instrucciones/ Manuel d’utilisation/Manual de instruções
-
Upload
optics-trade -
Category
Technology
-
view
172 -
download
0
Transcript of Instructions NIKON LRF Aculon - Optics Trade
Pt
En
Fr
Es
Instruction manual/Manual de instrucciones/ Manuel d’utilisation/Manual de instruções

English ......................................... p. 4-18
Español ...................................... p. 19-33
Français ...................................... p. 34-48
Português brasileiro ................. p. 49-63
4 5
En
Fr
Es
Pt
En
Fr
Es
Pt
CONTENTS
English
Cautions before use
Thank you for purchasing the Nikon Laser Rangefinder ACULON.
Use of controls or adjustments or performance of procedures other than those specified herein may result in hazardous radiation exposure.
〇 Before using this product, read thoroughly the “Cautions before use” and instructions on correct usage in this instruction manual (this manual).
〇 Keep this manual within reach for easy reference.〇 Do not disassemble or repair this product by yourself, this may result in a serious problem.
A product that has been disassembled or repaired is not guaranteed by the manufacturer.
● Specifications and design are subject to change without notice.● No reproduction in any form of this manual, in whole or in part (except for brief quotation in
critical articles or reviews), may be made without written authorization from NIKON VISION CO., LTD.
● NIKON VISION CO., LTD. reserves the right to change the contents described in these manuals at any time and without prior notice.
Cautions before use ........................................ 5-8Key features ........................................................... 9Nomenclature/Composition ......................... 10Inserting and Changing battery .................. 11Internal display ................................................... 12Measurement ...................................................... 13Disance display units/Target priority mode/Others ..................................................................... 14Specifications ............................................... 15-16Troubleshooting/Repair ........................... 17-18
6 7
En
Fr
Es
Pt
En
Fr
Es
Pt
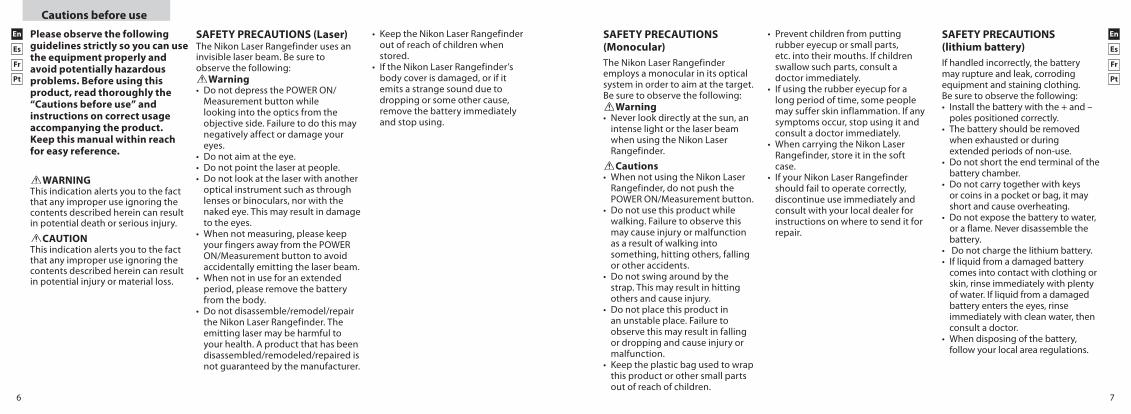
Please observe the following guidelines strictly so you can use the equipment properly and avoid potentially hazardous problems. Before using this product, read thoroughly the “Cautions before use” and instructions on correct usage accompanying the product. Keep this manual within reach for easy reference.
WARNINGThis indication alerts you to the fact that any improper use ignoring the contents described herein can result in potential death or serious injury.
CAUTIONThis indication alerts you to the fact that any improper use ignoring the contents described herein can result in potential injury or material loss.
SAFETY PRECAUTIONS (Laser)The Nikon Laser Rangefinder uses an invisible laser beam. Be sure to observe the following:
Warning• DonotdepressthePOWERON/
Measurement button while looking into the optics from the objective side. Failure to do this may negatively affect or damage your eyes.
• Donotaimatthe eye.• Donotpointthelaseratpeople.• Donotlookatthelaserwithanother
optical instrument such as through lenses or binoculars, nor with the naked eye. This may result in damage to the eyes.
• Whennotmeasuring,please keep yourfingersawayfromthePOWERON/Measurement button to avoid accidentally emitting the laser beam.
• Whennotinuseforanextendedperiod, please remove the battery from the body.
• Donotdisassemble/remodel/repairthe Nikon Laser Rangefinder. The emitting laser may be harmful to your health. A product that has been disassembled/remodeled/repaired is not guaranteed by the manufacturer.
• KeeptheNikonLaserRangefinderout of reach of children when stored.
• IftheNikonLaserRangefinder’sbody cover is damaged, or if it emits a strange sound due to dropping or some other cause, remove the battery immediately and stop using.
SAFETY PRECAUTIONS (lithium battery)If handled incorrectly, the battery may rupture and leak, corroding equipment and staining clothing. Be sure to observe the following:• Installthebatterywiththe+and–
poles positioned correctly.• Thebatteryshouldberemoved
when exhausted or during extended periods of non-use.
• Donotshorttheendterminalofthebattery chamber.
• Donotcarrytogether with keys or coins in a pocket or bag, it may short and cause overheating.
• Donotexposethebatterytowater,or a flame. Never disassemble the battery.
• Donotchargethelithiumbattery.• Ifliquidfromadamagedbattery
comes into contact with clothing or skin, rinse immediately with plenty of water. If liquid from a damaged battery enters the eyes, rinse immediately with clean water, then consult a doctor.
• Whendisposingofthebattery,follow your local area regulations.
• Preventchildrenfromputtingrubber eyecup or small parts, etc. into their mouths. If children swallow such parts, consult a doctor immediately.
• Ifusingtherubbereyecupforalong period of time, some people may suffer skin inflammation. If any symptoms occur, stop using it and consult a doctor immediately.
• WhencarryingtheNikonLaserRangefinder, store it in the soft case.
• IfyourNikonLaserRangefindershould fail to operate correctly, discontinue use immediately and consult with your local dealer for instructions on where to send it for repair.
Cautions before use
SAFETY PRECAUTIONS (Monocular)The Nikon Laser Rangefinder employs a monocular in its optical system in order to aim at the target. Be sure to observe the following:
Warning• Never look directly at the sun, an
intense light or the laser beam when using the Nikon Laser Rangefinder.
Cautions• WhennotusingtheNikonLaser
Rangefinder, do not push the POWERON/Measurementbutton.
• Donotusethisproductwhilewalking. Failure to observe this may cause injury or malfunction as a result of walking into something, hitting others, falling or other accidents.
• Donotswingaroundbythestrap. This may result in hitting others and cause injury.
• Donotplacethisproductinan unstable place. Failure to observe this may result in falling or dropping and cause injury or malfunction.
• Keeptheplasticbagusedtowrapthis product or other small parts out of reach of children.
8 9
En
Fr
Es
Pt
En
Fr
Es
Pt
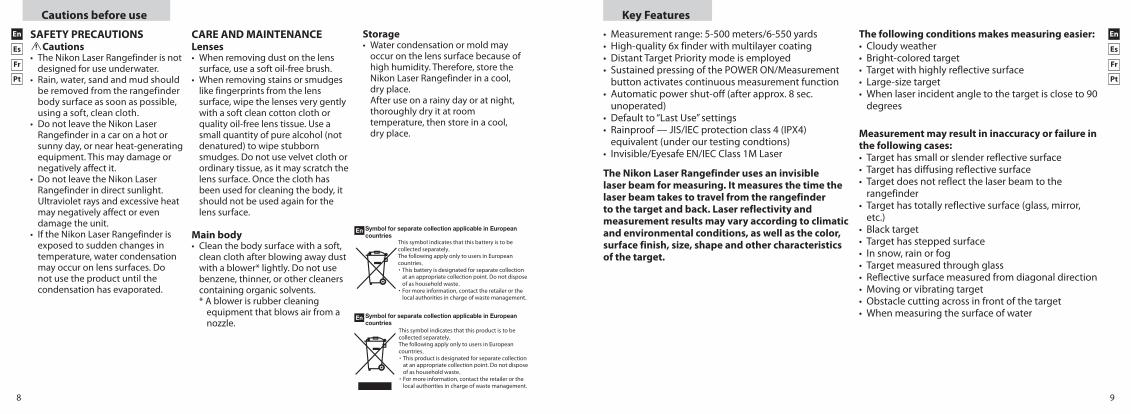
Storage• Watercondensationormoldmay
occur on the lens surface because of high humidity. Therefore, store the Nikon Laser Rangefinder in a cool, dry place.
After use on a rainy day or at night, thoroughly dry it at room temperature, then store in a cool, dry place.
CARE AND MAINTENANCELenses• Whenremovingdustonthelens
surface, use a soft oil-free brush.• Whenremovingstainsorsmudges
like fingerprints from the lens surface, wipe the lenses very gently with a soft clean cotton cloth or quality oil-free lens tissue. Use a small quantity of pure alcohol (not denatured) to wipe stubborn smudges. Do not use velvet cloth or ordinary tissue, as it may scratch the lens surface. Once the cloth has been used for cleaning the body, it should not be used again for the lens surface.
Main body• Cleanthebodysurfacewithasoft,
clean cloth after blowing away dust with a blower* lightly. Do not use benzene, thinner, or other cleaners containing organic solvents.* A blower is rubber cleaning
equipment that blows air from a nozzle.
SAFETY PRECAUTIONSCautions
• TheNikonLaserRangefinderisnotdesigned for use underwater.
• Rain,water,sandandmudshouldbe removed from the rangefinder body surface as soon as possible, using a soft, clean cloth.
• DonotleavetheNikonLaserRangefinder in a car on a hot or sunny day, or near heat-generating equipment. This may damage or negatively affect it.
• DonotleavetheNikonLaserRangefinder in direct sunlight. Ultraviolet rays and excessive heat may negatively affect or even damage the unit.
• IftheNikonLaserRangefinderisexposed to sudden changes in temperature, water condensation may occur on lens surfaces. Do not use the product until the condensation has evaporated.
• Measurementrange:5-500 meters/6-550 yards• High-quality6xfinderwithmultilayercoating• DistantTargetPrioritymodeisemployed• SustainedpressingofthePOWERON/Measurement
button activates continuous measurement function• Automaticpowershut-off(afterapprox.8sec.
unoperated)• Defaultto“LastUse”settings• Rainproof—JIS/IECprotectionclass4(IPX4)
equivalent (under our testing condtions)• Invisible/EyesafeEN/IECClass1MLaser
The Nikon Laser Rangefinder uses an invisible laser beam for measuring. It measures the time the laser beam takes to travel from the rangefinder to the target and back. Laser reflectivity and measurement results may vary according to climatic and environmental conditions, as well as the color, surface finish, size, shape and other characteristics of the target.
The following conditions makes measuring easier:• Cloudyweather• Bright-coloredtarget• Targetwithhighlyreflectivesurface• Large-sizetarget• Whenlaserincidentangletothetargetiscloseto90
degrees
Measurement may result in inaccuracy or failure in the following cases:• Targethassmallorslenderreflectivesurface• Targethasdiffusingreflectivesurface• Targetdoesnotreflectthelaserbeamtothe
rangefinder• Targethastotallyreflectivesurface(glass,mirror,
etc.)• Blacktarget• Targethassteppedsurface• Insnow,rainorfog• Targetmeasuredthroughglass• Reflectivesurfacemeasuredfromdiagonaldirection• Movingorvibratingtarget• Obstaclecuttingacrossinfrontofthetarget• Whenmeasuringthesurfaceofwater
Key FeaturesCautions before use
10 11
En
Fr
Es
Pt
En
Fr
Es
Pt
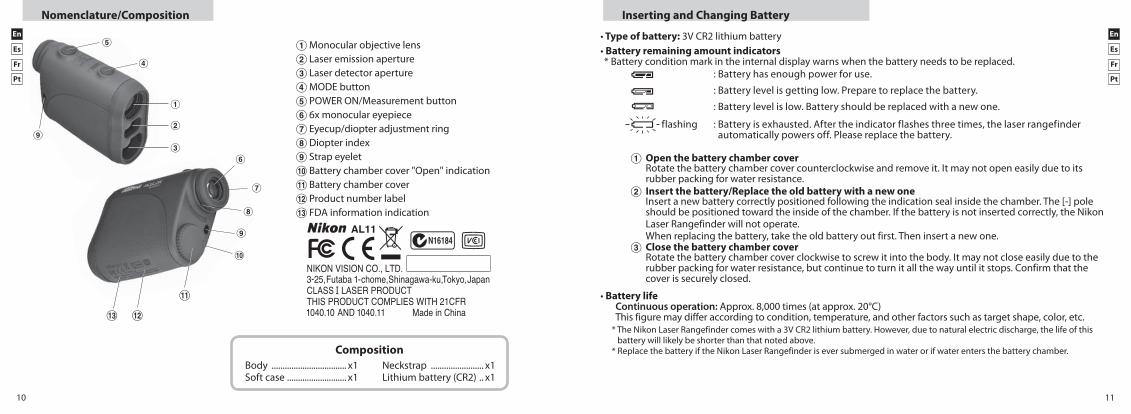
Nomenclature/Composition
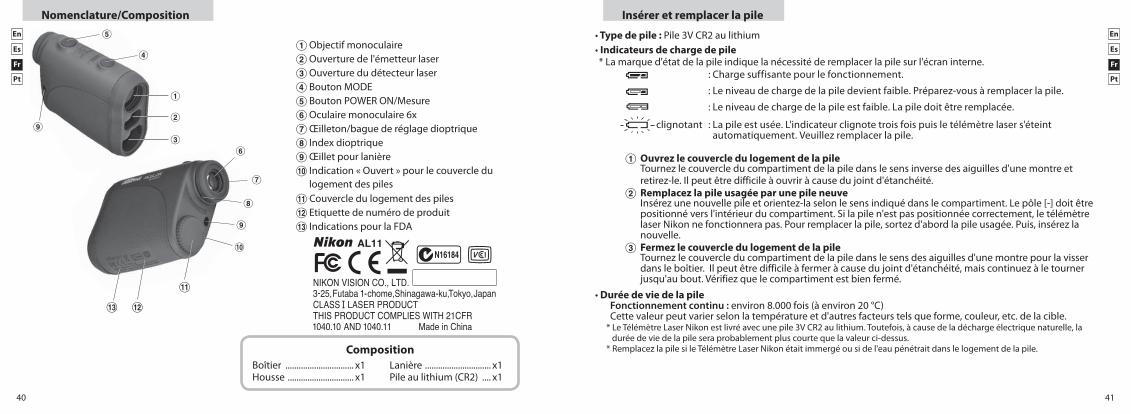
1 Monocular objective lens2 Laser emission aperture3 Laser detector aperture4 MODEbutton5 POWERON/Measurementbutton6 6x monocular eyepiece7 Eyecup/diopteradjustmentring8 Diopter index9 Strap eyelet!p Battery chamber cover "Open" indication!q Battery chamber cover !w Productnumberlabel!e FDA information indication
Inserting and Changing Battery
• Type of battery: 3V CR2 lithium battery• Battery remaining amount indicators* Battery condition mark in the internal display warns when the battery needs to be replaced.
: Battery has enough power for use.
:Batterylevelisgettinglow.Preparetoreplacethebattery.
: Battery level is low. Battery should be replaced with a new one.
flashing : Battery is exhausted. After the indicator flashes three times, the laser rangefinder automaticallypowersoff.Pleasereplacethebattery.
1 Open the battery chamber cover Rotate the battery chamber cover counterclockwise and remove it. It may not open easily due to its
rubber packing for water resistance.2 Insert the battery/Replace the old battery with a new one Insert a new battery correctly positioned following the indication seal inside the chamber. The [-] pole
should be positioned toward the inside of the chamber. If the battery is not inserted correctly, the Nikon Laser Rangefinder will not operate.
Whenreplacingthebattery,taketheoldbatteryoutfirst.Theninsertanewone.3 Close the battery chamber cover Rotate the battery chamber cover clockwise to screw it into the body. It may not close easily due to the
rubber packing for water resistance, but continue to turn it all the way until it stops. Confirm that the cover is securely closed.
• Battery life Continuous operation: Approx. 8,000 times (at approx. 20°C) This figure may differ according to condition, temperature, and other factors such as target shape, color, etc.
*TheNikonLaserRangefindercomeswitha3VCR2lithiumbattery.However,duetonaturalelectricdischarge,thelifeofthisbattery will likely be shorter than that noted above.
* Replace the battery if the Nikon Laser Rangefinder is ever submerged in water or if water enters the battery chamber.
Body .................................. x1Soft case ........................... x1
Neckstrap ........................ x1Lithium battery (CR2) .. x1
Composition
1
2
4
5
3
9
8
6
!q
9
!p
7
!w!e
12 13
En
Fr
Es
Pt
En
Fr
Es
Pt
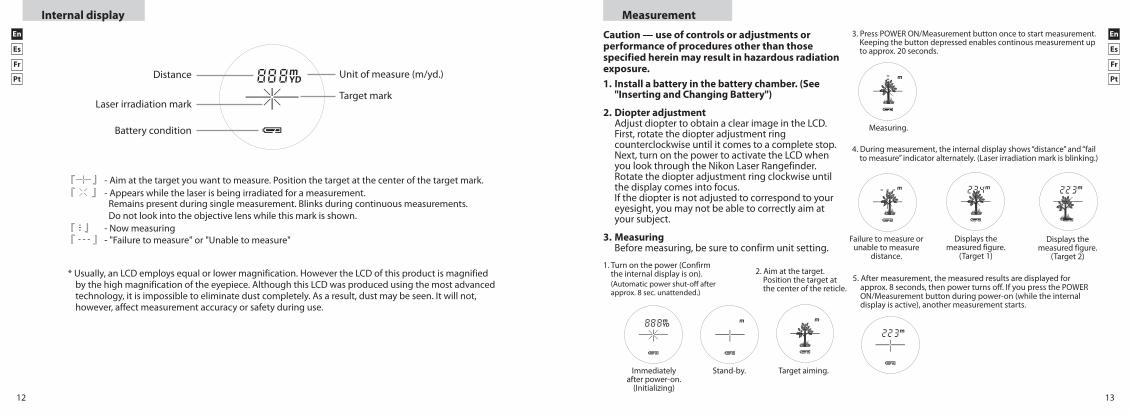
Internal display Measurement
Caution — use of controls or adjustments or performance of procedures other than those specified herein may result in hazardous radiation exposure.1. Install a battery in the battery chamber. (See
"Inserting and Changing Battery")
2. Diopter adjustment Adjust diopter to obtain a clear image in the LCD. First, rotate the diopter adjustment ring
counterclockwise until it comes to a complete stop. Next, turn on the power to activate the LCD when you look through the Nikon Laser Rangefinder. Rotate the diopter adjustment ring clockwise until the display comes into focus.
If the diopter is not adjusted to correspond to your eyesight, you may not be able to correctly aim at your subject.
3. Measuring Before measuring, be sure to confirm unit setting.
Measurement
1. Press the POWER button for power-on.(Power turns off 8 seconds after the last operation.)
Immediately after power-on.(Initializing)
Stand-by. Target focusing.
2. Aim at the target.
3. Press POWER button once to start continuous measurement for 8 seconds. (Single measurement mode is not available with this laser rangefinder.)
Measuring.
4. For 8 seconds, the internal display shows “distance” and “fail to measure” indicator alternately. (Laser irradiation mark is blinking.)
Failure to measure or unable to measure distance.
Displays the measured figure. (Target 1)
Displays the measured figure. (Target 2)
5. After continuous measurement, the measured results are displayed for 8 seconds, then power turns off.If you press the POWER button during power-on (while the internal display is lit), another 8-second measurement starts.
Immediately after power-on.
(Initializing)
Stand-by. Target aiming.
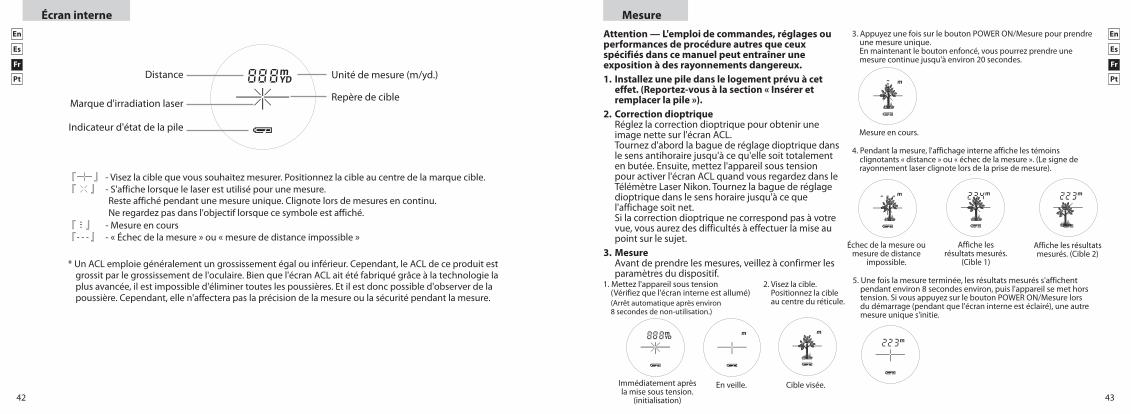
3.PressPOWERON/Measurementbuttononcetostartmeasurement. Keeping the button depressed enables continous measurement up
to approx. 20 seconds.
Measuring.
4. During measurement, the internal display shows “distance” and “fail to measure” indicator alternately. (Laser irradiation mark is blinking.)
Failure to measure or unable to measure
distance.
Displays the measured figure.
(Target 1)
Displays the measured figure.
(Target 2)
Measurement
1. Press the POWER button for power-on.(Power turns off 8 seconds after the last operation.)
Immediately after power-on.(Initializing)
Stand-by. Target focusing.
2. Aim at the target.
3. Press POWER button once to start continuous measurement for 8 seconds. (Single measurement mode is not available with this laser rangefinder.)
Measuring.
4. For 8 seconds, the internal display shows “distance” and “fail to measure” indicator alternately. (Laser irradiation mark is blinking.)
Failure to measure or unable to measure distance.
Displays the measured figure. (Target 1)
Displays the measured figure. (Target 2)
5. After continuous measurement, the measured results are displayed for 8 seconds, then power turns off.If you press the POWER button during power-on (while the internal display is lit), another 8-second measurement starts.
5. After measurement, the measured results are displayed for approx. 8 seconds, then power turns off. If you press the POWERON/Measurement button during power-on (while the internal display is active), another measurement starts.
『 』 -Aimatthetargetyouwanttomeasure.Positionthetargetatthecenterofthetargetmark.『 』 - Appears while the laser is being irradiated for a measurement.
Remains present during single measurement. Blinks during continuous measurements. Do not look into the objective lens while this mark is shown.『 』 - Now measuring『 』 - "Failure to measure" or "Unable to measure"
*Usually,anLCDemploysequalorlowermagnification.HowevertheLCDofthisproductismagnifiedby the high magnification of the eyepiece. Although this LCD was produced using the most advanced technology, it is impossible to eliminate dust completely. As a result, dust may be seen. It will not, however, affect measurement accuracy or safety during use.
Unit of measure (m/yd.)
Target markLaser irradiation mark
Battery condition
Distance
1. Turn on the power (Confirm the internal display is on).(Automatic power shut-off after approx. 8 sec. unattended.)
2. Aim at the target.Positionthetargetatthe center of the reticle.
14 15
En
Fr
Es
Pt
En
Fr
Es
Pt
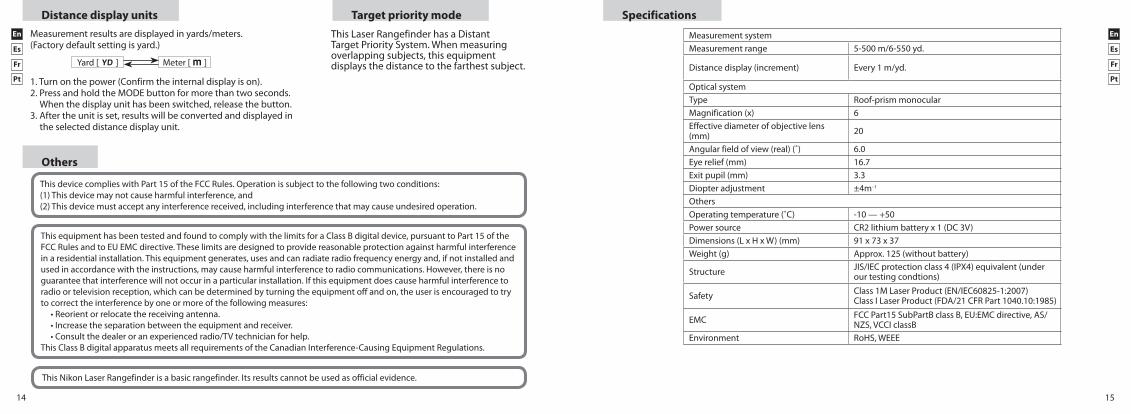
This Laser Rangefinder has a Distant TargetPrioritySystem.Whenmeasuringoverlapping subjects, this equipment displays the distance to the farthest subject.
Specifications
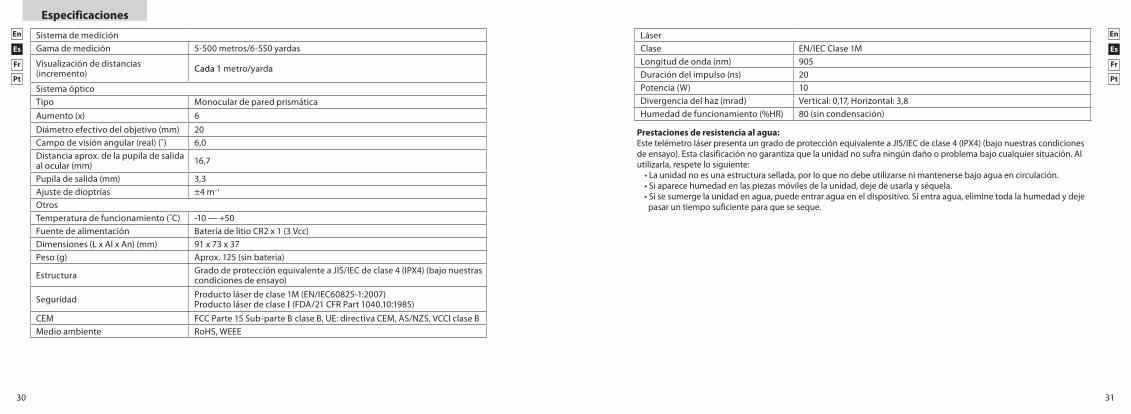
Measurement systemMeasurement range 5-500 m/6-550 yd.
Distance display (increment) Every 1 m/yd.
Optical systemType Roof-prism monocularMagnification (x) 6Effectivediameterofobjectivelens(mm) 20
Angular field of view (real) (˚) 6.0Eyerelief(mm) 16.7Exitpupil(mm) 3.3Diopter adjustment ±4m-1
OthersOperating temperature (˚C) -10—+50Powersource CR2 lithium battery x 1 (DC 3V)Dimensions(LxHxW)(mm) 91 x 73 x 37Weight(g) Approx. 125 (without battery)
Structure JIS/IECprotectionclass4(IPX4)equivalent(underour testing condtions)
Safety Class1MLaserProduct(EN/IEC60825-1:2007) ClassILaserProduct(FDA/21CFRPart1040.10:1985)
EMC FCCPart15SubPartBclassB,EU:EMCdirective,AS/NZS, VCCI classB
Environment RoHS,WEEE
Meter [ ]Yard [ ]
1. Turn on the power (Confirm the internal display is on).2.PressandholdtheMODEbuttonformorethantwoseconds.Whenthedisplayunithasbeenswitched,releasethebutton.
3. After the unit is set, results will be converted and displayed in the selected distance display unit.
Distance display unitsMeasurement results are displayed in yards/meters.(Factory default setting is yard.)
Target priority mode
Others
This Nikon Laser Rangefinder is a basic rangefinder. Its results cannot be used as official evidence.
ThisequipmenthasbeentestedandfoundtocomplywiththelimitsforaClassBdigitaldevice,pursuanttoPart15oftheFCCRulesandtoEUEMCdirective.Theselimitsaredesignedtoprovidereasonableprotectionagainstharmfulinterferencein a residential installation. This equipment generates, uses and can radiate radio frequency energy and, if not installed and usedinaccordancewiththeinstructions,maycauseharmfulinterferencetoradiocommunications.However,thereisnoguarantee that interference will not occur in a particular installation. If this equipment does cause harmful interference to radio or television reception, which can be determined by turning the equipment off and on, the user is encouraged to try to correct the interference by one or more of the following measures:•Reorientorrelocatethereceivingantenna.•Increasetheseparationbetweentheequipmentandreceiver.•Consultthedealeroranexperiencedradio/TVtechnicianforhelp.ThisClassBdigitalapparatusmeetsallrequirementsoftheCanadianInterference-CausingEquipmentRegulations.
ThisdevicecomplieswithPart15oftheFCCRules.Operationissubjecttothefollowingtwoconditions:(1) This device may not cause harmful interference, and(2) This device must accept any interference received, including interference that may cause undesired operation.
16 17
En
Fr
Es
Pt
En
Fr
Es
Pt
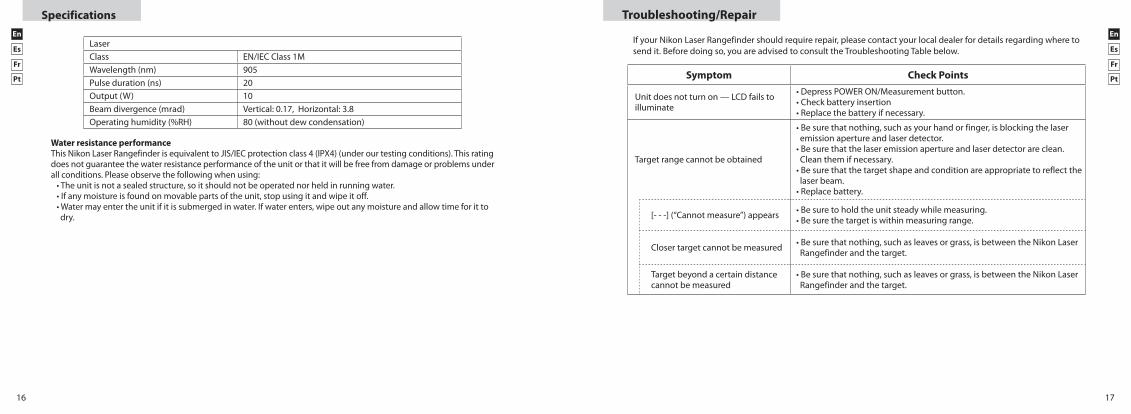
Water resistance performanceThisNikonLaserRangefinderisequivalenttoJIS/IECprotectionclass4(IPX4)(underourtestingconditions).Thisratingdoes not guarantee the water resistance performance of the unit or that it will be free from damage or problems under allconditions.Pleaseobservethefollowingwhenusing:•Theunitisnotasealedstructure,soitshouldnotbeoperatednorheldinrunningwater.•Ifanymoistureisfoundonmovablepartsoftheunit,stopusingitandwipeitoff.•Watermayentertheunitifitissubmergedinwater.Ifwaterenters,wipeoutanymoistureandallowtimeforittodry.
LaserClass EN/IECClass1MWavelength(nm) 905Pulseduration(ns) 20Output(W) 10Beam divergence (mrad) Vertical:0.17,Horizontal:3.8Operatinghumidity(%RH) 80 (without dew condensation)
Specifications Troubleshooting/Repair
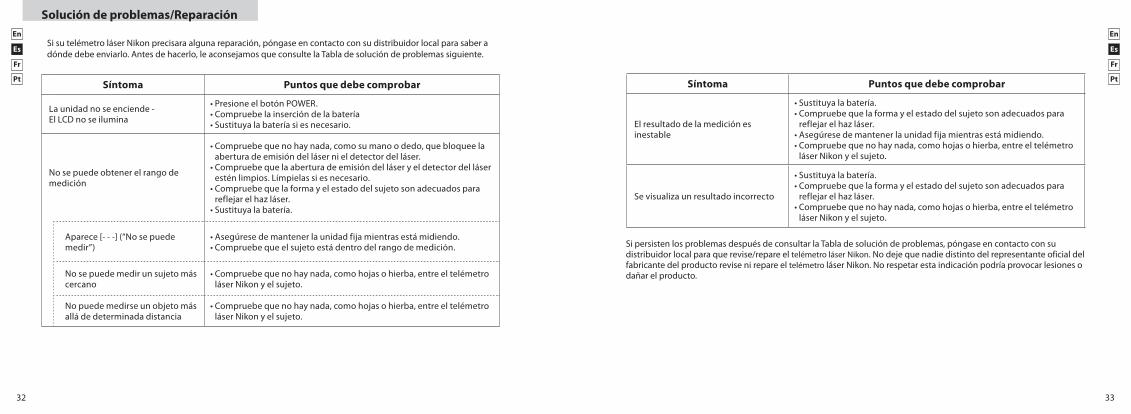
If your Nikon Laser Rangefinder should require repair, please contact your local dealer for details regarding where to send it. Before doing so, you are advised to consult the Troubleshooting Table below.
Symptom Check Points
Unitdoesnotturnon—LCDfailstoilluminate
•DepressPOWERON/Measurementbutton.•Checkbatteryinsertion•Replacethebatteryifnecessary.
Target range cannot be obtained
•Besurethatnothing,suchasyourhandorfinger,isblockingthelaseremission aperture and laser detector.•Besurethatthelaseremissionapertureandlaserdetectorareclean.Clean them if necessary.•Besurethatthetargetshapeandconditionareappropriatetoreflectthelaser beam.•Replacebattery.
[- - -] (“Cannot measure”) appears •Besuretoholdtheunitsteadywhilemeasuring.•Besurethetargetiswithinmeasuringrange.
Closer target cannot be measured •Besurethatnothing,suchasleavesorgrass,isbetweentheNikonLaserRangefinder and the target.
Target beyond a certain distance cannot be measured
•Besurethatnothing,suchasleavesorgrass,isbetweentheNikonLaserRangefinder and the target.
18 19
En
Fr
Es
Pt
En
Fr
Es
Pt
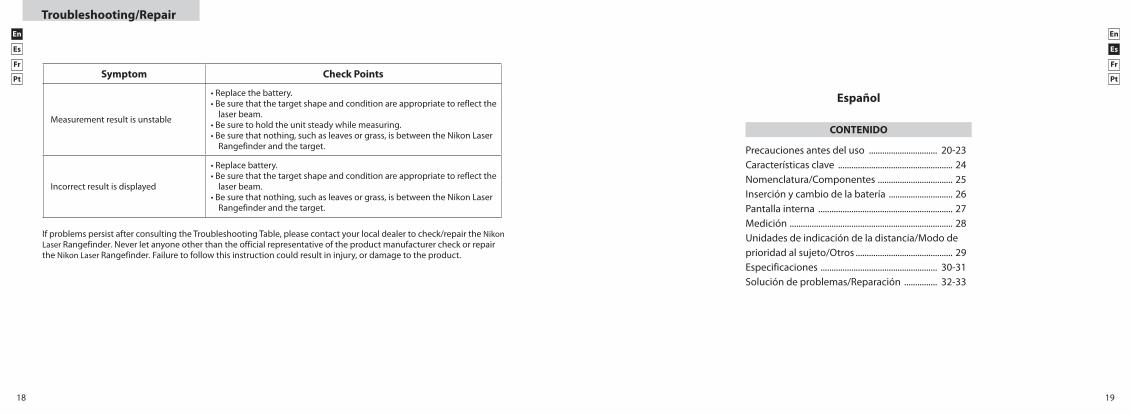
If problems persist after consulting the Troubleshooting Table, please contact your local dealer to check/repair the Nikon Laser Rangefinder. Never let anyone other than the official representative of the product manufacturer check or repair the Nikon Laser Rangefinder. Failure to follow this instruction could result in injury, or damage to the product.
Symptom Check Points
Measurement result is unstable
•Replacethebattery.•Besurethatthetargetshapeandconditionareappropriatetoreflectthe
laser beam.•Besuretoholdtheunitsteadywhilemeasuring.•Besurethatnothing,suchasleavesorgrass,isbetweentheNikonLaser
Rangefinder and the target.
Incorrect result is displayed
•Replacebattery.•Besurethatthetargetshapeandconditionareappropriatetoreflectthe
laser beam.•Besurethatnothing,suchasleavesorgrass,isbetweentheNikonLaser
Rangefinder and the target.
CONTENIDO
Precaucionesantesdeluso ............................... 20-23Características clave .................................................... 24Nomenclatura/Componentes .................................. 25Inserción y cambio de la batería ............................. 26Pantallainterna ............................................................. 27Medición .......................................................................... 28Unidades de indicación de la distancia/Modo de prioridad al sujeto/Otros ............................................ 29Especificaciones ..................................................... 30-31Solución de problemas/Reparación ............... 32-33
Español
Troubleshooting/Repair
20 21
En
Fr
Es
Pt
En
Fr
Es
Pt
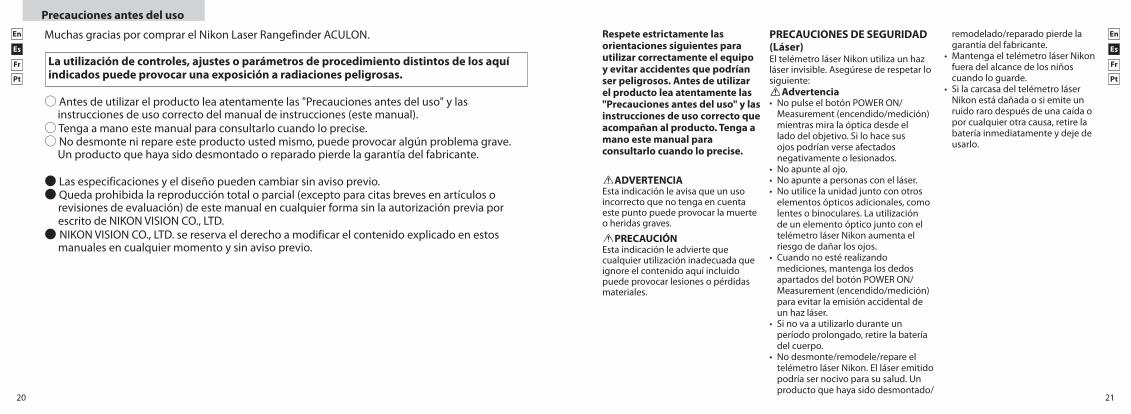
Precauciones antes del usoRespete estrictamente las orientaciones siguientes para utilizar correctamente el equipo y evitar accidentes que podrían ser peligrosos. Antes de utilizar el producto lea atentamente las "Precauciones antes del uso" y las instrucciones de uso correcto que acompañan al producto. Tenga a mano este manual para consultarlo cuando lo precise.
ADVERTENCIAEstaindicaciónleavisaqueunusoincorrecto que no tenga en cuenta este punto puede provocar la muerte o heridas graves.
PRECAUCIÓNEstaindicaciónleadviertequecualquier utilización inadecuada que ignore el contenido aquí incluido puede provocar lesiones o pérdidas materiales.
PRECAUCIONES DE SEGURIDAD (Láser)EltelémetroláserNikonutilizaunhazláserinvisible.Asegúrese de respetar lo siguiente:
Advertencia• No pulse el botón POWERON/
Measurement (encendido/medición) mientras mira la óptica desde el lado del objetivo. Si lo hace sus ojos podrían verse afectados negativamente o lesionados.
• Noapuntealojo.• Noapunteapersonasconelláser.• Noutilicelaunidadjuntoconotros
elementos ópticos adicionales, como lentes o binoculares. La utilización de un elemento óptico junto con el telémetro láserNikonaumentaelriesgo de dañar los ojos.
• Cuando no esté realizando mediciones, mantenga los dedos apartados del botón POWERON/Measurement (encendido/medición) para evitar la emisión accidental de unhazláser.
• Sinovaautilizarloduranteunperíodo prolongado, retire la batería del cuerpo.
• Nodesmonte/remodele/repareeltelémetroláserNikon.Elláseremitidopodría ser nocivo para su salud. Un producto que haya sido desmontado/
remodelado/reparado pierde la garantía del fabricante.
• MantengaeltelémetroláserNikonfuera del alcance de los niños cuando lo guarde.
• Silacarcasadeltelémetro láser Nikonestádañadaosiemiteunruido raro después de una caída o por cualquier otra causa, retire la batería inmediatamente y deje de usarlo.
Muchas gracias por comprar el Nikon Laser Rangefinder ACULON.
La utilización de controles, ajustes o parámetros de procedimiento distintos de los aquí indicados puede provocar una exposición a radiaciones peligrosas.
〇Antesdeutilizarelproductoleaatentamentelas"Precaucionesantesdeluso"ylasinstrucciones de uso correcto del manual de instrucciones (este manual).
〇 Tenga a mano este manual para consultarlo cuando lo precise.〇 No desmonte ni repare este producto usted mismo, puede provocar algún problema grave.
Un producto que haya sido desmontado o reparado pierde la garantía del fabricante.
● Las especificaciones y el diseño pueden cambiar sin aviso previo.● Queda prohibida la reproducción total o parcial (excepto para citas breves en artículos o
revisiones de evaluación) de este manual en cualquier forma sin la autorización previa por escrito de NIKON VISION CO., LTD.
● �NIKON VISION CO., LTD. se reserva el derecho a modificar el contenido explicado en estos manuales en cualquier momento y sin aviso previo.
22 23
En
Fr
Es
Pt
En
Fr
Es
Pt
PRECAUCIONES DE SEGURIDAD (Batería de litio)Si se maneja incorrectamente, la batería pueden romperse y sufrir fugas, corroyendo los equipos y manchando la ropa Asegúrese de respetar lo siguiente:• Montelabateríaconlospolos+y-
orientados correctamente.• Labateríadeberetirarsecuandoestáagotadaoenperíodosprolongados de no utilización.
• Nocortocircuiteelterminaldelextremodelacámaradelabatería.
• Nolallevejunto con llaves o monedas en un bolsillo o bolsa, podría cortocircuitarse y provocar un sobrecalentamiento.
• Noexpongalabateríaalaguaniallamas. Nunca desmonte la batería.
• Norecarguelabateríadelitio.• Siellíquidodeunabateríadañada
entra en contacto con la ropa o la piel,enjuáguelainmediatamentecon mucha agua. Si el líquido de una batería dañada va a parar a los ojos,enjuáguelosinmediatamentecon agua limpia y consulte a un médico.
• Desechelabateríaconformealasregulaciones locales de su zona.
• Nopermitaquelosniñossepongan las ojeras de goma, piezas pequeñas, etc. en la boca. Si un niño se traga alguna de estas piezas, consulte a un médico inmediatamente.
• Siutilizanlasojerasdegomadurante mucho tiempo, algunas personas pueden notar una inflamación de la piel. Si presenta algún síntoma, deje de utilizarlas y consulte inmediatamente a un médico.
• CuandotransporteeltelémetroláserNikon,guárdeloenelestucheflexible.
• SisutelémetroláserNikoncaeofunciona incorrectamente, deje de usarlo de inmediato y consulte a su distribuidor local dónde debe enviarlo para su reparación.
PRECAUCIONES DE SEGURIDAD (Monocular)EltelémetroláserNikonemplea un monocular en su sistema óptico para apuntar al objetivo. Asegúrese de respetar lo siguiente:
Advertencia• Nuncamiredirectamentealsol,aunaluzintensanialhazlásercuando utilice el Nikon Laser Rangefinder.
Precauciones• Cuando no utilice el Nikon
Laser Rangefinder, no pulse el botón POWERON/Measurement(encendido/medición).
• Noutiliceesteproductomientrascamina. Si lo hace podría provocar lesiones o averías como resultado de tropiezos, golpes a otras personas, caídas u otros accidentes.
• Nolobalanceeconlacorrea.Podríagolpearaalguienyherirle.
• Nocoloqueesteproductoenunlugar inestable. No respetar esta indicación puede provocar una caída y causar lesiones o averías.
• Mantengalabolsadeplásticoutilizada para envolver el producto y las piezas pequeñas fuera del alcance de los niños.
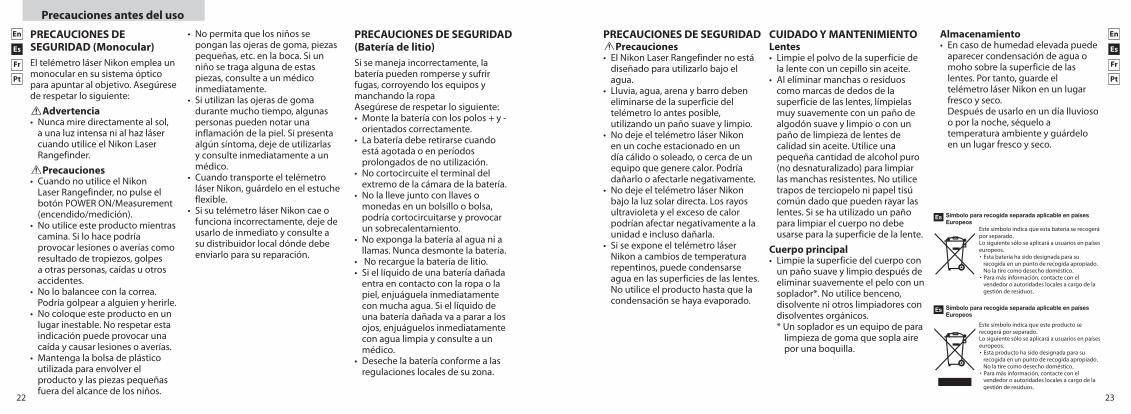
Almacenamiento• Encasodehumedadelevadapuede
aparecer condensación de agua o moho sobre la superficie de las lentes.Portanto,guardeeltelémetroláserNikonenunlugarfresco y seco.
Después de usarlo en un día lluvioso o por la noche, séquelo a temperaturaambienteyguárdeloen un lugar fresco y seco.
CUIDADO Y MANTENIMIENTOLentes• Limpieelpolvodelasuperficiede
la lente con un cepillo sin aceite.• Aleliminarmanchasoresiduos
como marcas de dedos de la superficie de las lentes, límpielas muy suavemente con un paño de algodón suave y limpio o con un paño de limpieza de lentes de calidad sin aceite. Utilice una pequeña cantidad de alcohol puro (no desnaturalizado) para limpiar las manchas resistentes. No utilice trapos de terciopelo ni papel tisú común dado que pueden rayar las lentes. Si se ha utilizado un paño para limpiar el cuerpo no debe usarse para la superficie de la lente.
Cuerpo principal• Limpielasuperficiedelcuerpocon
un paño suave y limpio después de eliminar suavemente el pelo con un soplador*. No utilice benceno, disolvente ni otros limpiadores con disolventesorgánicos.* Un soplador es un equipo de para
limpieza de goma que sopla aire por una boquilla.
PRECAUCIONES DE SEGURIDADPrecauciones
• ElNikonLaserRangefindernoestádiseñado para utilizarlo bajo el agua.
• Lluvia,agua,arena y barro deben eliminarse de la superficie del telémetro lo antes posible, utilizando un paño suave y limpio.
• NodejeeltelémetroláserNikonen un coche estacionado en un díacálidoosoleado,ocercadeunequipoquegenerecalor.Podríadañarlo o afectarle negativamente.
• NodejeeltelémetroláserNikonbajo la luz solar directa. Los rayos ultravioleta y el exceso de calor podrían afectar negativamente a la unidad e incluso dañarla.
• SiseexponeeltelémetroláserNikon a cambios de temperatura repentinos, puede condensarse agua en las superficies de las lentes. No utilice el producto hasta que la condensación se haya evaporado.
Precauciones antes del uso
24 25
En
Fr
Es
Pt
En
Fr
Es
Pt
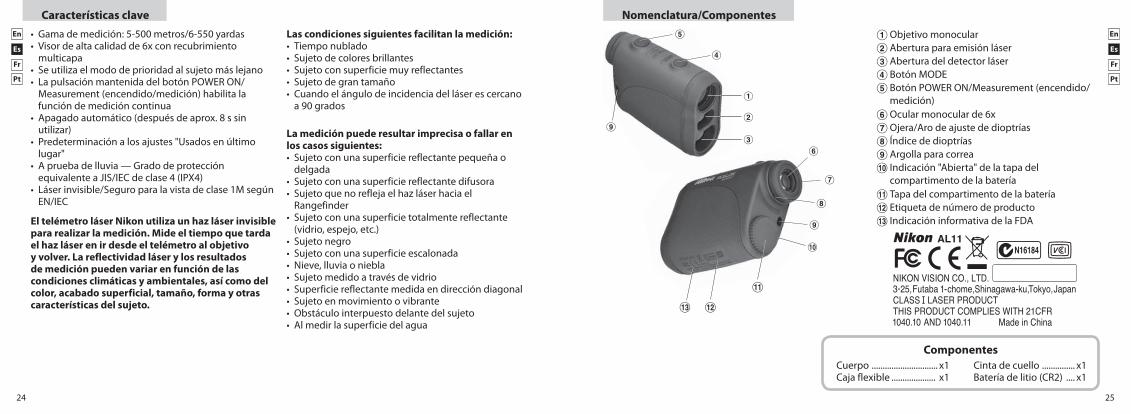
• Gamademedición:5-500metros/6-550yardas• Visordealtacalidadde6xconrecubrimiento
multicapa• Seutilizaelmododeprioridadalsujetomáslejano• LapulsaciónmantenidadelbotónPOWERON/ Measurement (encendido/medición) habilita la
función de medición continua• Apagadoautomático(despuésdeaprox. 8 s sin
utilizar)• Predeterminaciónalosajustes"Usadosenúltimo
lugar"• Apruebadelluvia—GradodeprotecciónequivalenteaJIS/IECdeclase4(IPX4)
• Láserinvisible/Seguro para la vista de clase 1M según EN/IEC
El telémetro láser Nikon utiliza un haz láser invisible para realizar la medición. Mide el tiempo que tarda el haz láser en ir desde el telémetro al objetivo y volver. La reflectividad láser y los resultados de medición pueden variar en función de las condiciones climáticas y ambientales, así como del color, acabado superficial, tamaño, forma y otras características del sujeto.
Las condiciones siguientes facilitan la medición:• Tiemponublado• Sujetodecoloresbrillantes• Sujetoconsuperficiemuyreflectantes• Sujetodegrantamaño• Cuandoelángulodeincidenciadelláserescercano
a 90 grados
La medición puede resultar imprecisa o fallar en los casos siguientes:• Sujetoconunasuperficiereflectantepequeñao
delgada• Sujetoconunasuperficiereflectantedifusora• Sujetoquenoreflejaelhazláserhaciael
Rangefinder• Sujetoconunasuperficietotalmentereflectante
(vidrio, espejo, etc.)• Sujetonegro• Sujetoconunasuperficieescalonada• Nieve,lluviaoniebla• Sujetomedidoatravésdevidrio• Superficiereflectantemedidaendireccióndiagonal• Sujetoenmovimientoovibrante• Obstáculointerpuestodelantedelsujeto• Almedirlasuperficiedelagua
Características clave Nomenclatura/Componentes
1 Objetivo monocular2Aberturaparaemisiónláser3 Aberturadeldetectorláser4 BotónMODE5 BotónPOWERON/Measurement(encendido/
medición)6 Ocular monocular de 6x7 Ojera/Aro de ajuste de dioptrías8 Índice de dioptrías9 Argolla para correa!p Indicación "Abierta" de la tapa del
compartimento de la batería!q Tapa del compartimento de la batería!w Etiquetadenúmerodeproducto!eIndicación informativa de la FDA
Cuerpo .............................. x1Caja flexible .................... x1
Cinta de cuello ............... x1Batería de litio (CR2) .... x1
Componentes
1
2
4
5
3
9
8
6
!q
9
!p
7
!w!e
26 27
En
Fr
Es
Pt
En
Fr
Es
Pt
Inserción y cambio de la batería
• Tipo de batería: Batería de litio CR2 de 3 V• Indicadores de la carga restante de la batería* La marca del estado de la batería en la pantalla interna le avisa cuando esta necesita ser sustituida.
: La batería tiene carga suficiente para usarla.
:Elniveldelabateríaseestáquedandobajo.Prepáreseparasustituirlabatería.
:Elniveldelabateríaesbajo.Debesustituirselabateríaporunanueva.
destellante:Labateríasehaagotado.Elindicadordestellarátresvecesyelrangefinderláserse apagaráautomáticamente.Sustituyalabatería.
1 Abra la tapa del compartimento de la batería Girelatapadelcompartimentodelabateríaenelsentidocontrarioaldelasagujasdelrelojyretírela.
Noesfácildeabrirdebidoasuempaquetaduradegomadeimpermeabilidad.2 Sustituya la batería vieja por otra nueva Introduzca una batería nueva colocada correctamente conforme a la indicación del interior del
compartimento.Elpolo[-]debecolocarsehaciaelinteriordelcompartimento.Sinoseinsertalabateríacorrectamente,elNikonLaserRangefindernofuncionará.Alsustituirlabatería,retireenprimerlugarlabatería usada. A continuación inserte una nueva.
3 Cierre la tapa del compartimento de la batería Girelatapadelcompartimentodelabateríaenelsentidodelasagujasdelrelojparaenroscarlaenel
cuerpo.Puedequecuestedecerrardebidoalagomadelaimpermeabilización,perosigagirándoladeltodo hasta que haga tope. Compruebe que la tapa esté cerrada firmemente.
• Duración de la batería Funcionamiento continuo: Aprox. 8.000 ciclos (a aprox. 20°C) Estacifrapuedevariarenfuncióndelascondiciones, la temperatura y otros factores como forma del sujeto,
color, etc.*EltelémetroNikonseentregaconunabateríadelitioCR2de3V.Noobstante,debidoaladescargaeléctricanatural,suduraciónseráprobablementemenorquelaantesindicada.
*SustituyalabateríasieltelémetroláserNikonsesumergeenaguaosientraaguaenelcompartimentodelabatería.
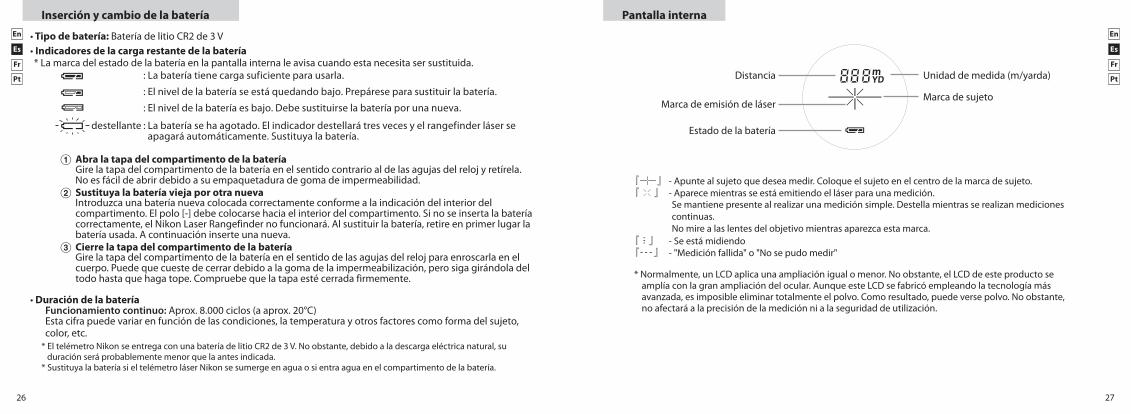
Pantalla interna
『 』 - Apunte al sujeto que desea medir. Coloque el sujeto en el centro de la marca de sujeto.『 』 -Aparecemientrasseestáemitiendoelláserparaunamedición.
Se mantiene presente al realizar una medición simple. Destella mientras se realizan mediciones continuas. No mire a las lentes del objetivo mientras aparezca esta marca.
『 』 -Seestámidiendo『 』 - "Medición fallida" o "No se pudo medir"
* Normalmente, un LCD aplica una ampliación igual o menor. No obstante, el LCD de este producto se amplíaconlagranampliacióndelocular.AunqueesteLCDsefabricóempleandolatecnologíamásavanzada, es imposible eliminar totalmente el polvo. Como resultado, puede verse polvo. No obstante, noafectaráalaprecisióndelamediciónnialaseguridaddeutilización.
Distancia Unidad de medida (m/yarda)
Marca de sujetoMarcadeemisióndeláser
Estadodelabatería
28 29
En
Fr
Es
Pt
En
Fr
Es
Pt
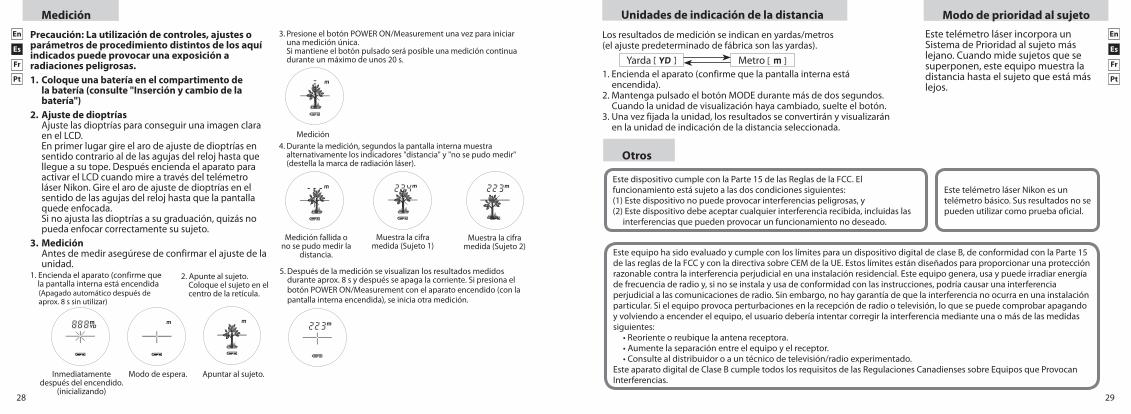
Medición
Precaución: La utilización de controles, ajustes o parámetros de procedimiento distintos de los aquí indicados puede provocar una exposición a radiaciones peligrosas.1. Coloque una batería en el compartimento de
la batería (consulte "Inserción y cambio de la batería")
2. Ajuste de dioptrías Ajuste las dioptrías para conseguir una imagen clara
en el LCD. Enprimerlugargireelarodeajustededioptríasen
sentido contrario al de las agujas del reloj hasta que llegue a su tope. Después encienda el aparato para activar el LCD cuando mire a través del telémetro láserNikon.Gireelarodeajustededioptríasenelsentido de las agujas del reloj hasta que la pantalla quede enfocada.
Sinoajustalasdioptríasasugraduación,quizásnopueda enfocar correctamente su sujeto.
3. Medición Antes de medir asegúrese de confirmar el ajuste de la
unidad.Measurement
1. Press the POWER button for power-on.(Power turns off 8 seconds after the last operation.)
Immediately after power-on.(Initializing)
Stand-by. Target focusing.
2. Aim at the target.
3. Press POWER button once to start continuous measurement for 8 seconds. (Single measurement mode is not available with this laser rangefinder.)
Measuring.
4. For 8 seconds, the internal display shows “distance” and “fail to measure” indicator alternately. (Laser irradiation mark is blinking.)
Failure to measure or unable to measure distance.
Displays the measured figure. (Target 1)
Displays the measured figure. (Target 2)
5. After continuous measurement, the measured results are displayed for 8 seconds, then power turns off.If you press the POWER button during power-on (while the internal display is lit), another 8-second measurement starts.
Measurement
1. Press the POWER button for power-on.(Power turns off 8 seconds after the last operation.)
Immediately after power-on.(Initializing)
Stand-by. Target focusing.
2. Aim at the target.
3. Press POWER button once to start continuous measurement for 8 seconds. (Single measurement mode is not available with this laser rangefinder.)
Measuring.
4. For 8 seconds, the internal display shows “distance” and “fail to measure” indicator alternately. (Laser irradiation mark is blinking.)
Failure to measure or unable to measure distance.
Displays the measured figure. (Target 1)
Displays the measured figure. (Target 2)
5. After continuous measurement, the measured results are displayed for 8 seconds, then power turns off.If you press the POWER button during power-on (while the internal display is lit), another 8-second measurement starts.
Inmediatamente después del encendido.
(inicializando)
Modo de espera. Apuntar al sujeto.
3. PresioneelbotónPOWERON/Measurementunavezparainiciaruna medición única. Simantieneelbotónpulsadoseráposibleunamedicióncontinuaduranteunmáximodeunos20s.
Medición4. Durante la medición, segundos la pantalla interna muestra
alternativamente los indicadores "distancia" y "no se pudo medir" (destellalamarcaderadiaciónláser).
Medición fallida o no se pudo medir la
distancia.
Muestra la cifra medida (Sujeto 1)
Muestra la cifra medida (Sujeto 2)
Measurement
1. Press the POWER button for power-on.(Power turns off 8 seconds after the last operation.)
Immediately after power-on.(Initializing)
Stand-by. Target focusing.
2. Aim at the target.
3. Press POWER button once to start continuous measurement for 8 seconds. (Single measurement mode is not available with this laser rangefinder.)
Measuring.
4. For 8 seconds, the internal display shows “distance” and “fail to measure” indicator alternately. (Laser irradiation mark is blinking.)
Failure to measure or unable to measure distance.
Displays the measured figure. (Target 1)
Displays the measured figure. (Target 2)
5. After continuous measurement, the measured results are displayed for 8 seconds, then power turns off.If you press the POWER button during power-on (while the internal display is lit), another 8-second measurement starts.
5. Después de la medición se visualizan los resultados medidos durante aprox. 8 s y después se apaga la corriente. Si presiona el botónPOWERON/Measurementcon el aparato encendido (con la pantalla interna encendida), se inicia otra medición.
EstetelémetroláserincorporaunSistemadePrioridadalsujetomáslejano. Cuando mide sujetos que se superponen, este equipo muestra la distanciahastaelsujetoqueestámáslejos.
1.Enciendaelaparato(confirmequelapantallainternaestáencendida
2. Apunte al sujeto.Coloque el sujeto en el centro de la retícula.(Apagadoautomáticodespuésde
aprox. 8 s sin utilizar)
Unidades de indicación de la distancia
Metro [ ]Yarda [ ]
Los resultados de medición se indican en yardas/metros(elajustepredeterminadodefábricasonlasyardas).
1.Enciendaelaparato(confirmequelapantallainternaestáencendida).
2.MantengapulsadoelbotónMODEdurantemásdedossegundos.Cuando la unidad de visualización haya cambiado, suelte el botón.
3.Unavezfijadalaunidad,losresultadosseconvertirányvisualizaránen la unidad de indicación de la distancia seleccionada.
Modo de prioridad al sujeto
Otros
EstetelémetroláserNikonesuntelémetrobásico.Susresultadosnosepueden utilizar como prueba oficial.
EsteequipohasidoevaluadoycumpleconloslímitesparaundispositivodigitaldeclaseB,deconformidadconlaParte15delasreglasdelaFCCyconladirectivasobreCEMdelaUE.Estoslímitesestándiseñadosparaproporcionarunaprotecciónrazonablecontralainterferenciaperjudicialenunainstalaciónresidencial.Esteequipogenera,usaypuedeirradiarenergíade frecuencia de radio y, si no se instala y usa de conformidad con las instrucciones, podría causar una interferencia perjudicial a las comunicaciones de radio. Sin embargo, no hay garantía de que la interferencia no ocurra en una instalación particular. Si el equipo provoca perturbaciones en la recepción de radio o televisión, lo que se puede comprobar apagando yvolviendoaencenderelequipo,elusuariodeberíaintentarcorregirlainterferenciamedianteunaomásdelasmedidassiguientes:•Reorienteoreubiquelaantenareceptora.•Aumentelaseparaciónentreelequipoyelreceptor.•Consultealdistribuidoroauntécnicodetelevisión/radioexperimentado.EsteaparatodigitaldeClaseBcumpletodoslosrequisitosdelasRegulacionesCanadiensessobreEquiposqueProvocanInterferencias.
EstedispositivocumpleconlaParte15delasReglasdelaFCC.Elfuncionamientoestásujetoalasdoscondicionessiguientes:(1)Estedispositivonopuedeprovocarinterferenciaspeligrosas,y(2)Estedispositivodebeaceptarcualquierinterferenciarecibida,incluidaslas
interferencias que pueden provocar un funcionamiento no deseado.
30 31
En
Fr
Es
Pt
En
Fr
Es
Pt
Especificaciones
Sistema de mediciónGamademedición 5-500 metros/6-550 yardas
Visualización de distancias (incremento) Cada 1 metro/yarda
Sistema ópticoTipo MonoculardeparedprismáticaAumento (x) 6Diámetroefectivodelobjetivo(mm) 20Campo de visión angular (real) (˚) 6,0Distancia aprox. de la pupila de salida al ocular (mm) 16,7
Pupiladesalida(mm) 3,3Ajuste de dioptrías ±4 m-1
OtrosTemperatura de funcionamiento (˚C) -10—+50Fuente de alimentación Batería de litio CR2 x 1 (3 Vcc)Dimensiones (L x Al x An) (mm) 91 x 73 x 37Peso(g) Aprox. 125 (sin batería)
Estructura GradodeprotecciónequivalenteaJIS/IECdeclase4(IPX4)(bajonuestrascondiciones de ensayo)
Seguridad Productoláserdeclase1M(EN/IEC60825-1:2007) ProductoláserdeclaseI(FDA/21CFRPart1040.10:1985)
CEM FCCParte15Sub-parteB claseB,UE:directivaCEM,AS/NZS,VCCIclaseBMedio ambiente RoHS,WEEE
Prestaciones de resistencia al agua: EstetelémetroláserpresentaungradodeprotecciónequivalenteaJIS/IECdeclase4(IPX4)(bajonuestrascondicionesdeensayo).Estaclasificaciónnogarantizaquelaunidadnosufraningúndañooproblemabajocualquiersituación.Alutilizarla, respete lo siguiente:•Launidadnoesunaestructurasellada,porloquenodebeutilizarsenimantenersebajoaguaencirculación.•Siaparecehumedadenlaspiezasmóvilesdelaunidad,dejedeusarlayséquela.•Sisesumergelaunidadenagua,puedeentraraguaeneldispositivo.Sientraagua,eliminetodalahumedadydejepasar un tiempo suficiente para que se seque.
LáserClase EN/IECClase1MLongitud de onda (nm) 905Duración del impulso (ns) 20Potencia(W) 10Divergencia del haz (mrad) Vertical:0,17,Horizontal:3,8Humedaddefuncionamiento(%HR) 80 (sin condensación)
32 33
En
Fr
Es
Pt
En
Fr
Es
Pt
Solución de problemas/Reparación
Si su telémetroláserNikonprecisaraalgunareparación,póngaseencontactoconsudistribuidorlocalparasaberadónde debe enviarlo. Antes de hacerlo, le aconsejamos que consulte la Tabla de solución de problemas siguiente.
Síntoma Puntos que debe comprobar
La unidad no se enciende - ElLCDnoseilumina
•PresioneelbotónPOWER.•Compruebelainsercióndelabatería•Sustituyalabateríasiesnecesario.
No se puede obtener el rango de medición
•Compruebequenohaynada,comosumanoodedo,quebloqueelaaberturadeemisióndellásernieldetectordelláser.•Compruebequelaaberturadeemisióndelláseryeldetectordelláser
estén limpios. Límpielas si es necesario.•Compruebequelaformayelestadodelsujetosonadecuadosparareflejarelhazláser.•Sustituyalabatería.
Aparece [- - -] (“No se puede medir”)
•Asegúresedemantenerlaunidadfijamientrasestámidiendo.•Compruebequeelsujetoestádentrodelrangodemedición.
Nosepuedemedirunsujetomáscercano
•Compruebequenohaynada,comohojasohierba,entreeltelémetro láserNikonyelsujeto.
Nopuedemedirseunobjetomásalládedeterminadadistancia
•Compruebequenohaynada,comohojasohierba,entreeltelémetro láserNikonyelsujeto.
Si persisten los problemas después de consultar la Tabla de solución de problemas, póngase en contacto con su distribuidor local para que revise/repare el telémetroláser Nikon. No deje que nadie distinto del representante oficial del fabricante del producto revise ni repare el telémetro láserNikon. No respetar esta indicación podría provocar lesiones o dañar el producto.
Síntoma Puntos que debe comprobar
Elresultadodelamediciónesinestable
•Sustituyalabatería.•Compruebequelaformayelestadodelsujetosonadecuadosparareflejarelhazláser.•Asegúresedemantenerlaunidadfijamientrasestámidiendo.•Compruebequenohaynada,comohojasohierba,entreeltelémetro láserNikonyelsujeto.
Se visualiza un resultado incorrecto
•Sustituyalabatería.•Compruebequelaformayelestadodelsujetosonadecuadosparareflejarelhazláser.•Compruebequenohaynada,comohojasohierba,entreeltelémetro láserNikonyelsujeto.
34 35
En
Fr
Es
Pt
En
Fr
Es
Pt
SOMMAIRE
Précautionsavantutilisation ............................. 35-38Caractéristiques principales ..................................... 39Nomenclature/Composition .................................... 40Insérer et remplacer la pile ....................................... 41Écran interne .................................................................. 42Mesure .............................................................................. 43Unités d'affichage de distance/Mode priorité à la cible/Autres ..................................................................... 44Spécifications .......................................................... 45-46Guidededépistagedespannes/ Réparations .............................................................. 47-48
Français
Précautions avant utilisation
Mercid’avoirchoisiletélémètrelaserNikonACULON.
L'emploi de commandes, réglages ou procédures autres que ceux spécifiés dans ce manuel peut entraîner une exposition à des rayonnements dangereux.
〇Avantd’utiliserl'appareil,lisezattentivementles«Précautionsavantutilisation»etlesmanueld'utilisation (ce manuel).
〇 Conservez ces manuel à portée de main pour référence.〇 Ne démontez pas et ne réparez pas cet appareil vous-même, car ceci pourrait engendrer un
problèmesérieux. La garantie constructeur ne s'applique pas aux produits qui ont été démontés ou réparés.
● Les spécifications et la conception sont sujettes à modification sans préavis.● Aucune reproduction totale ou partielle de ce manuel, sous quelque forme que ce soit,
(àl'exceptiondebrèvescitationsdansdesrevuesoumagazines)nepeutêtrefaitesansautorisation écrite de NIKON VISION CO., LTD.
●NIKON VISION CO., LTD. se réserve le droit de modifier le contenu de ces manuels à tout moment sans préavis.
36 37
En
Fr
Es
Pt
En
Fr
Es
Pt
Respectez à la lettre les instructions suivantes pour une utilisation adéquate de votre matériel et pour éviter tout risque d'accident. Avant d’utiliser l'appareil, lisez attentivement les « Précautions avant utilisation » et le mode d’emploi qui accompagnent l'appareil. Conservez ces instructions à portée de main pour référence.
ATTENTIONAvertitdufaitqu’unemploiincorrecten ignorant les points ci-dessous peut se traduire par la mort ou de sérieuses blessures.
PRÉCAUTIONAvertitdufaitqu’unemploiincorrecten ignorant les points ci-dessous peut se traduire par de sérieuses blessures ou des dégâts matériels.
PRÉCAUTIONS DE SÉCURITÉ (Laser)LetélémètrelaserNikoncomporteunfaisceau laser invisible. Veillez à respecter ce qui suit :
Attention• N'appuyezpassurleboutonPOWER
ON/Mesure pendant que vous regardez l'optique à partir du côté objectif. Sinon, vos yeux pourrait être affectés ou endommagés.
• Nevisezpaslesyeux.• Nepointezpaslefaisceaulaservers
d'autres personnes.• N'utilisezpasl'appareilenmême
temps que d'autres instruments d'optique tels que des lentilles ou des jumelles. L'utilisation d'un instrument d'optique en même temps que le Télémètre Laser Nikon augmente les risques de blessures oculaires.
• Si vous n'effectuez pas de mesures, ne placez pas vos doigts à proximité duboutonPOWERON/Mesurepouréviter d'allumer le faisceau laser par accident.
• Sivousnel'utilisezpaspendantunelongue période de temps, veuillez retirer la pile.
• Nepasdémonter/modifier/réparer letélémètrelaserNikon. Le laser émetteur pourrait être nocif pour votre santé. La garantie constructeur ne s'applique pas aux produits qui ont été démontés/modifiés/réparés.
• NelaissezpasletélémètrelaserNikon à la portée des enfants.
• Silecouvercleduboîtierdutélémètrelaserestendommagé,ous'il émet un bruit étrange en raison d'une chute ou d'une autre cause, retirez immédiatement la pile et cessez d'utiliser l'appareil.
Veillez à respecter ce qui suit :• Installezlapilemanièreàcequelespôles+et-soientcorrectementpositionnés.
• Lapiledoitêtreretiréequandelleest déchargée et suite à toute longue période de non-utilisation.
• Necourt-circuitezpaslescontactsdu compartiment à pile.
• Nelatransportezpasà proximité de clefsoudepiècesdansunepocheou un sac, il pourrait y avoir un court-circuit et une surchauffe.
• N'exposezpaslapileàl'eauouauxflammes. Ne démontez jamais la pile.
• Nerechargezjamaislepileaulithium
• Siduliquideprovenantd'unepileendommagées venait à entrer en contact avec un vêtement ou de la peau, rincez immédiatement à l'eau claire. Si du liquide provenant d'une pile endommagées entrait en contact avec les yeux, rincez immédiatement à l'eau claire et consultez un médecin.
• Lorsquevousjetezlapile,conformez-vous aux lois de recyclage locales.
• Nelaissezpaslesacenplastiquequi a servi à emballer ce produit ou d'autrespetitespiècesàlaportéedes enfants.
• Empêchezlesenfantsdeporteràlabouche les œilletons en caoutchouc oud'autrepetitespièces,etc.Sidesenfantsavalaientcetypedepièces,consultez immédiatement un médecin.
• Sivousutilisezl'œilletonencaoutchouc pendant longtemps, ils peuvent provoquer une irritation cutanée. Arrêter d'utiliser l'appareil et consultez immédiatement un médecin si cela se produisait.
• LorsquevoustransportezleTélémètreLaserNikon,veillezàleranger dans sa housse.
• SivotreTélémètreLaserNikonne fonctionne pas correctement, cessez immédiatement de l'utiliser et consultez votre revendeur local pour déterminer la destination de réparation.
PRECAUTIONS DE SECURITE (Pile au lithium)Si elle n'est pas convenablement manipulée, la pile peut se rompre et fuir, provoquant la corrosion de l'appareil et des taches sur les vêtements.
PRÉCAUTIONS DE SÉCURITÉ (Objectif monoculaire)LesystèmeoptiqueduTélémètreLaser Nikon comporte un objectif monoculaire pour viser la cible. Veillez à respecter ce qui suit :
Attention• Neregardezjamaisdirectementlesoleil,unelumièreintenseoulefaisceaulaser,avecletélémètrelaser Nikon.
Précautions• Si vous n'utilisez pas le télémètre
laser Nikon, n'appuyez pas sur le boutonPOWERON/Mesure.
• N'utilisezpasl'appareilenmarchant. Vous pourriez causer des blessures ou une panne en rencontrant un obstacle, en touchant d'autres personnes, en tombant ou par le biais d'autres types d'accidents.
• Nelebalancezpasparlabandoulière.Vouspourrieztoucher et blesser d'autres personnes.
• Neposezpasl'appareildansdesendroits instables. Ceci pourrait causer des chutes et créer des blessures ou des pannes.
Précautions avant utilisation

38 39
En
Fr
Es
Pt
En
Fr
Es
Pt
Stockage• Delacondensationoudes
moisissures peuvent se former sur la surface des lentilles en cas de forte humidité.Pourcetteraison,rangezle télémètre laser Nikon dans un endroit frais et sec.
Aprèsutilisationunjourdepluieoupendant la nuit, laissez le sécher entièrementàtempératureambiante avant de le ranger dans un endroit frais et sec.
SOINS ET ENTRETIENLentilles• Servez-vousd’unpinceaudouxnon
gras pour dépoussiérer la surface des lentilles.
• Pourl'éliminationdetachesousaletés comme les traces de doigts de la surface des lentilles, essuyez doucement avec un chiffon doux et propre ou du papier pour lentilles non gras de bonne qualité. Un peu d’alcoolpur(nondénaturé)peutêtre utilisé pour éliminer les taches tenaces.L’emploideveloursoud’unmouchoir en papiern’estpasrecommandé,parcequ’ilspourraient rayer la surface des lentilles. Un chiffon utilisé pour nettoyerleboîtiernedoitpasêtreréutilisé sur la surface des lentilles.
Boîtier principal• Nettoyezlecorpsavecunchiffondouxetpropreaprèsavoirretirésoigneusementlespoussièresavecunsoufflet*.N'utiliseznibenzène,ni diluant, ni d'autres produits nettoyants contenant des agents organiques.* Un soufflet est un élément de
nettoyage en caoutchouc qui souffle de l'air par une petite buse.
PRECAUTIONS DE SECURITEPrécautions
• LetélémètrelaserNikonn'estpasdestiné à une utilisation sous-marine.
• Lapluie,l'eau,lesableetlabouedoivent être retirés de la surface duboîtierdutélémètredèsquepossible au moyen d'un chiffon doux et propre.
• NelaissezpasleLetélémètrelaserdans une voiture par temps chaud ouensoleillé,ouprèsd’unappareilproduisant de la chaleur. Cela pourrait l'endommager ou affecter son fonctionnement.
• NelaissezpasletélémètreLaserNikonàlalumièredirectedusoleil. Les rayons UV et la chaleur excessive peuvent affecter son fonctionnement, voire l'endommager.
• Encasdechangementdetempératurebrutal,del’eaupeutse condenser sur la surface des lentillesduTélémètreLaserNikon.N'utilisez pas l'appareil tant que la condensation n'a pas disparu.
Précautions avant utilisation• Plagedemesure:5-500mètres/6-550yards• Télémètre6xde qualité supérieure avec traitements
multicouches• Lemodedeprioritéàlacibledistanceestemployé.• UnepressioncontinuesurleboutonPOWERON/
Mesure active la fonction de mesure en continu• Arrêtautomatique(aprèsenviron8secondes de
nonutilisation)• Réglagepardéfautsur«Dernièreutilisation»• Imperméable—Équivalent à une protection de classe 4JIS/IEC(IPX4)
• LaserEN/IECdeClasse1M,invisibleetsansdangerpour les yeux
Le télémètre laser Nikon comporte un faisceau laser invisible. Il mesure la durée d'un aller-retour du faisceau laser de l'appareil à la cible. La portée maximale de l'appareil dépend des conditions environnementales et climatiques, de la couleur, de la finition de surface, de la taille, de la forme et d'autres caractéristiques propres à la cible.
Les conditions suivantes facilitent les mesures :• Tempscouvert• Cibledecouleurvive• Cibleàsurfacetrèsréfléchissante• Cibledegrandetaille• Angled'incidencedulasersurlacibleprochede90
degrés
Les mesures prises dans les cas suivants peuvent s'avérer imprécises ou erronées :• Lacibleaunesurfaceréfléchissanteétroiteoude
petite taille• Lacibleaunesurfaceréfléchissantediffuse• Lacibleneréfléchitpaslerayonlaserautélémètre• Lacibleaunesurfacetotalementréfléchissante
(verre, miroir, etc...)• Ciblenoire• Lacibleaunesurfaceétagée• Tempsdeneige,pluieoubrouillard• Lacibleestviséeàtraversunverre• Lasurfaceréfléchissanteestviséedebiais• Laciblebougeouvibre• Unobstaclesedéplacedevantlacible• Lacibleestunpland'eau
Caractéristiques principales
40 41
En
Fr
Es
Pt
En
Fr
Es
Pt
Nomenclature/Composition
1 Objectif monoculaire2 Ouverture de l'émetteur laser3 Ouverture du détecteur laser4 BoutonMODE5 BoutonPOWERON/Mesure6 Oculaire monoculaire 6x7 Œilleton/bague de réglage dioptrique8 Index dioptrique9 Œilletpourlanière!p Indication«Ouvert»pourlecouvercledu
logement des piles!q Couvercle du logement des piles!w Etiquettedenumérodeproduit!eIndications pour la FDA
Boîtier ............................... x1Housse .............................. x1
Lanière .............................. x1Pileaulithium(CR2) .... x1
Composition
Insérer et remplacer la pile
• Type de pile : Pile3VCR2aulithium• Indicateurs de charge de pile* La marque d'état de la pile indique la nécessité de remplacer la pile sur l'écran interne.
: Charge suffisante pour le fonctionnement.
:Leniveaudechargedelapiledevientfaible.Préparez-vousàremplacerlapile.
: Le niveau de charge de la pile est faible. La pile doit être remplacée.
clignotant :Lapileestusée.L'indicateurclignotetroisfoispuisletélémètrelasers'éteint automatiquement. Veuillez remplacer la pile.
1 Ouvrez le couvercle du logement de la pile Tournez le couvercle du compartiment de la pile dans le sens inverse des aiguilles d'une montre et
retirez-le. Il peut être difficile à ouvrir à cause du joint d'étanchéité.2 Remplacez la pile usagée par une pile neuve Insérez une nouvelle pile et orientez-la selon le sens indiqué dans le compartiment. Le pôle [-] doit être
positionnéversl'intérieurducompartiment.Silapilen'estpaspositionnéecorrectement,letélémètrelaserNikonnefonctionnerapas.Pourremplacerlapile,sortezd'abordlapileusagée.Puis,insérezlanouvelle.
3 Fermez le couvercle du logement de la pile Tournez le couvercle du compartiment de la pile dans le sens des aiguilles d'une montre pour la visser
dansleboîtier.Ilpeutêtredifficileàfermeràcausedujointd'étanchéité,maiscontinuezàletournerjusqu'au bout. Vérifiez que le compartiment est bien fermé.
• Durée de vie de la pile Fonctionnement continu : environ 8.000 fois (à environ 20 °C) Cette valeur peut varier selon la température et d'autres facteurs tels que forme, couleur, etc. de la cible.
* Le Télémètre Laser Nikon est livré avec une pile 3V CR2 au lithium. Toutefois, à cause de la décharge électrique naturelle, la durée de vie de la pile sera probablement plus courte que la valeur ci-dessus.
* Remplacez la pile si le Télémètre Laser Nikon était immergé ou si de l'eau pénétrait dans le logement de la pile.
1
2
4
5
3
9
8
6
!q
9
!p
7
!w!e
42 43
En
Fr
Es
Pt
En
Fr
Es
Pt
Écran interne
『 』 -Visezlaciblequevoussouhaitezmesurer.Positionnezlacibleaucentredelamarquecible.『 』 - S'affiche lorsque le laser est utilisé pour une mesure.
Reste affiché pendant une mesure unique. Clignote lors de mesures en continu. Ne regardez pas dans l'objectif lorsque ce symbole est affiché.
『 』 - Mesure en cours『 』 - «Échec de la mesure » ou «mesure de distance impossible »
* Un ACL emploie généralement un grossissement égal ou inférieur. Cependant, le ACL de ce produit est grossit par le grossissement de l'oculaire. Bien que l'écran ACL ait été fabriqué grâce à la technologie la plusavancée,ilestimpossibled'éliminertouteslespoussières.Etilestdoncpossibled'observerdelapoussière.Cependant,ellen'affecterapaslaprécisiondelamesureoulasécuritépendantlamesure.
Distance Unité de mesure (m/yd.)
RepèredecibleMarque d'irradiation laser
Indicateur d'état de la pile
MesureAttention — L'emploi de commandes, réglages ou performances de procédure autres que ceux spécifiés dans ce manuel peut entraîner une exposition à des rayonnements dangereux.1. Installez une pile dans le logement prévu à cet
effet. (Reportez-vous à la section « Insérer et remplacer la pile »).
2. Correction dioptrique Réglez la correction dioptrique pour obtenir une
image nette sur l'écran ACL. Tournez d'abord la bague de réglage dioptrique dans
le sens antihoraire jusqu'à ce qu'elle soit totalement enbutée.Ensuite,mettezl'appareilsoustensionpour activer l'écran ACL quand vous regardez dans le Télémètre Laser Nikon. Tournez la bague de réglage dioptrique dans le sens horaire jusqu'à ce que l'affichage soit net.
Si la correction dioptrique ne correspond pas à votre vue, vous aurez des difficultés à effectuer la mise au point sur le sujet.
3. Mesure Avant de prendre les mesures, veillez à confirmer les
paramètresdudispositif.Measurement
1. Press the POWER button for power-on.(Power turns off 8 seconds after the last operation.)
Immediately after power-on.(Initializing)
Stand-by. Target focusing.
2. Aim at the target.
3. Press POWER button once to start continuous measurement for 8 seconds. (Single measurement mode is not available with this laser rangefinder.)
Measuring.
4. For 8 seconds, the internal display shows “distance” and “fail to measure” indicator alternately. (Laser irradiation mark is blinking.)
Failure to measure or unable to measure distance.
Displays the measured figure. (Target 1)
Displays the measured figure. (Target 2)
5. After continuous measurement, the measured results are displayed for 8 seconds, then power turns off.If you press the POWER button during power-on (while the internal display is lit), another 8-second measurement starts.
Measurement
1. Press the POWER button for power-on.(Power turns off 8 seconds after the last operation.)
Immediately after power-on.(Initializing)
Stand-by. Target focusing.
2. Aim at the target.
3. Press POWER button once to start continuous measurement for 8 seconds. (Single measurement mode is not available with this laser rangefinder.)
Measuring.
4. For 8 seconds, the internal display shows “distance” and “fail to measure” indicator alternately. (Laser irradiation mark is blinking.)
Failure to measure or unable to measure distance.
Displays the measured figure. (Target 1)
Displays the measured figure. (Target 2)
5. After continuous measurement, the measured results are displayed for 8 seconds, then power turns off.If you press the POWER button during power-on (while the internal display is lit), another 8-second measurement starts.
Immédiatementaprèsla mise sous tension.
(initialisation)
Enveille. Cible visée.
3. Appuyez unefoissurleboutonPOWERON/Mesurepourprendreune mesure unique. Enmaintenantleboutonenfoncé,vouspourrezprendreunemesure continue jusqu'à environ 20 secondes.
Mesure en cours.
4.Pendantlamesure,l'affichageinterneaffichelestémoinsclignotants«distance»ou«échecdelamesure».(Lesignederayonnement laser clignote lors de la prise de mesure).
Échec de la mesure ou mesure de distance
impossible.
Affiche les résultats mesurés.
(Cible 1)
Affiche les résultats mesurés. (Cible 2)
Measurement
1. Press the POWER button for power-on.(Power turns off 8 seconds after the last operation.)
Immediately after power-on.(Initializing)
Stand-by. Target focusing.
2. Aim at the target.
3. Press POWER button once to start continuous measurement for 8 seconds. (Single measurement mode is not available with this laser rangefinder.)
Measuring.
4. For 8 seconds, the internal display shows “distance” and “fail to measure” indicator alternately. (Laser irradiation mark is blinking.)
Failure to measure or unable to measure distance.
Displays the measured figure. (Target 1)
Displays the measured figure. (Target 2)
5. After continuous measurement, the measured results are displayed for 8 seconds, then power turns off.If you press the POWER button during power-on (while the internal display is lit), another 8-second measurement starts.
5. Une fois la mesure terminée, les résultats mesurés s'affichent pendant environ 8 secondes environ, puis l'appareil se met hors tension. Si vous appuyez sur le boutonPOWERON/Mesure lors du démarrage (pendant que l'écran interne est éclairé), une autre mesure unique s'initie.
1. Mettez l'appareil sous tension (Vérifiez que l'écran interne est allumé)
2. Visez la cible.Positionnezlacibleau centre du réticule.(Arrêtautomatiqueaprèsenviron
8 secondes de non-utilisation.)
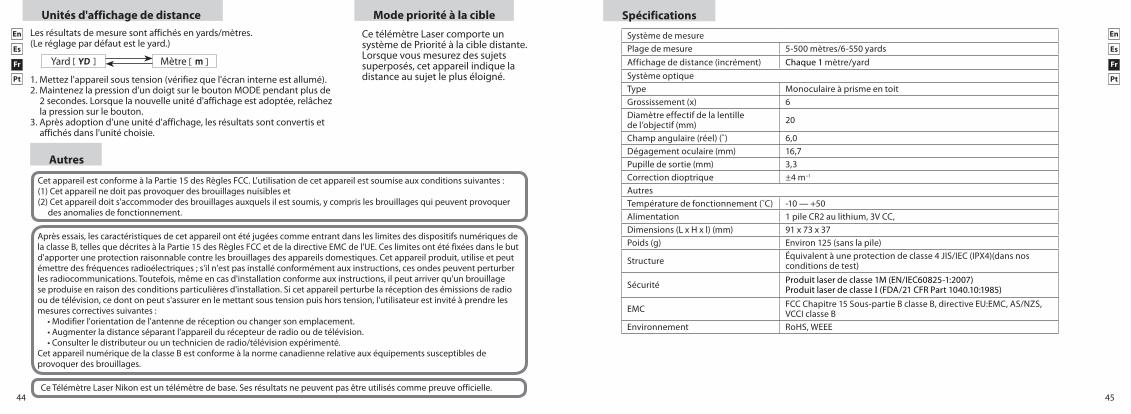
44 45
En
Fr
Es
Pt
En
Fr
Es
Pt
CetélémètreLasercomporteunsystèmedePrioritéàlacibledistante.Lorsque vous mesurez des sujets superposés, cet appareil indique la distance au sujet le plus éloigné.
Unités d'affichage de distance
Mètre [ ]Yard [ ]
Lesrésultatsdemesuresontaffichésenyards/mètres.(Le réglage par défaut est le yard.)
1. Mettez l'appareil sous tension (vérifiez que l'écran interne est allumé).2.Maintenezlapressiond'undoigtsurleboutonMODEpendantplusde
2 secondes. Lorsque la nouvelle unité d'affichage est adoptée, relâchez la pression sur le bouton.
3.Aprèsadoptiond'uneunitéd'affichage,lesrésultatssontconvertisetaffichés dans l'unité choisie.
Mode priorité à la cible Spécifications
SystèmedemesurePlagedemesure 5-500mètres/6-550yardsAffichage de distance (incrément) Chaque 1 mètre/yardSystèmeoptiqueType Monoculaire à prisme en toitGrossissement(x) 6Diamètreeffectifdelalentille del’objectif(mm) 20
Champ angulaire (réel) (˚) 6,0Dégagement oculaire (mm) 16,7Pupilledesortie(mm) 3,3Correction dioptrique ±4 m-1
AutresTempérature de fonctionnement (˚C) -10—+50Alimentation 1 pile CR2 au lithium, 3V CC,Dimensions(LxHxl)(mm) 91 x 73 x 37Poids(g) Environ 125 (sans la pile)
Structure Équivalentàuneprotectiondeclasse4JIS/IEC(IPX4)(dansnosconditions de test)
Sécurité Produitlaserdeclasse1M(EN/IEC60825-1:2007)ProduitlaserdeclasseI(FDA/21CFRPart1040.10:1985)
EMC FCCChapitre15Sous-partieBclasseB,directiveEU:EMC,AS/NZS,VCCI classe B
Environnement RoHS,WEEE
Autres
CeTélémètreLaserNikonestuntélémètredebase.Sesrésultatsnepeuventpasêtreutiliséscommepreuveofficielle.
Aprèsessais,lescaractéristiquesdecetappareilontétéjugéescommeentrantdansleslimitesdesdispositifsnumériquesdelaclasseB,tellesquedécritesàlaPartie15desRèglesFCCetdeladirectiveEMCdel'UE.Ceslimitesontétéfixéesdanslebutd'apporter une protection raisonnable contre les brouillages des appareils domestiques. Cet appareil produit, utilise et peut émettre des fréquences radioélectriques ; s'il n'est pas installé conformément aux instructions, ces ondes peuvent perturber les radiocommunications. Toutefois, même en cas d'installation conforme aux instructions, il peut arriver qu'un brouillage seproduiseenraisondesconditionsparticulièresd'installation.Sicetappareilperturbelaréceptiondesémissionsderadioou de télévision, ce dont on peut s'assurer en le mettant sous tension puis hors tension, l'utilisateur est invité à prendre les mesures correctives suivantes :•Modifierl'orientationdel'antennederéceptionouchangersonemplacement.•Augmenterladistanceséparantl'appareildurécepteurderadiooudetélévision.•Consulterledistributeurouuntechnicienderadio/télévisionexpérimenté.Cet appareil numérique de la classe B est conforme à la norme canadienne relative aux équipements susceptibles de provoquer des brouillages.
CetappareilestconformeàlaPartie15desRèglesFCC.L'utilisationdecetappareilestsoumiseauxconditionssuivantes:(1) Cet appareil ne doit pas provoquer des brouillages nuisibles et(2) Cet appareil doit s'accommoder des brouillages auxquels il est soumis, y compris les brouillages qui peuvent provoquer
des anomalies de fonctionnement.
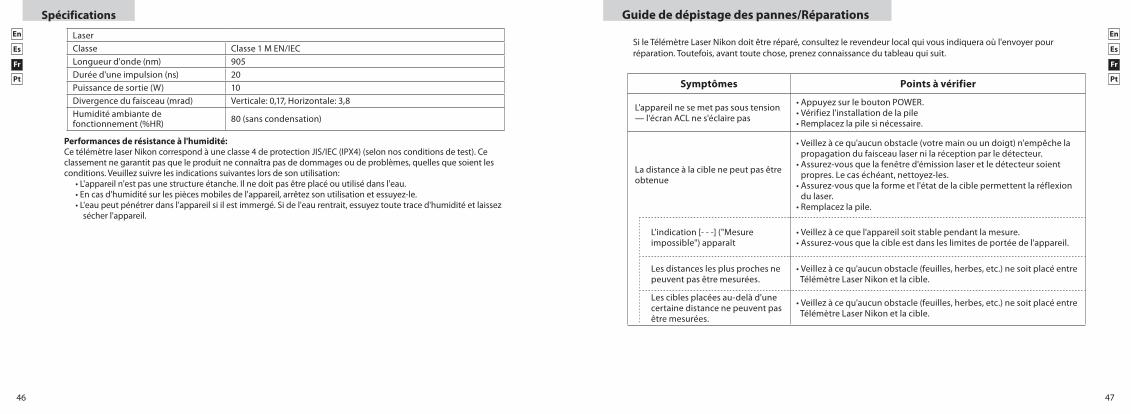
46 47
En
Fr
Es
Pt
En
Fr
Es
Pt
Performances de résistance à l'humidité:CetélémètrelaserNikoncorrespondàuneclasse4deprotectionJIS/IEC(IPX4)(selonnosconditionsdetest).Ceclassementnegarantitpasqueleproduitneconnaîtrapasdedommagesoudeproblèmes,quellesquesoientlesconditions. Veuillez suivre les indications suivantes lors de son utilisation:
•L'appareiln'estpasunestructureétanche.Ilnedoitpasêtreplacéouutilisédansl'eau.•Encasd'humiditésurlespiècesmobilesdel'appareil,arrêtezsonutilisationetessuyez-le.•L'eaupeutpénétrerdansl'appareilsiilestimmergé.Sidel'eaurentrait,essuyeztoutetraced'humiditéetlaissez
sécher l'appareil.
LaserClasse Classe1MEN/IECLongueur d'onde (nm) 905Durée d'une impulsion (ns) 20Puissancedesortie(W) 10Divergence du faisceau (mrad) Verticale:0,17,Horizontale:3,8Humiditéambiantedefonctionnement(%HR) 80 (sans condensation)
Spécifications Guide de dépistage des pannes/Réparations
SileTélémètreLaserNikondoitêtreréparé,consultezlerevendeurlocalquivousindiqueraoùl'envoyerpourréparation. Toutefois, avant toute chose, prenez connaissance du tableau qui suit.
Symptômes Points à vérifier
L'appareil ne se met pas sous tension —l'écranACLnes'éclairepas
•AppuyezsurleboutonPOWER.•Vérifiezl'installationdelapile•Remplacezlapilesinécessaire.
La distance à la cible ne peut pas être obtenue
•Veillezàcequ'aucunobstacle(votremainouundoigt)n'empêchelapropagation du faisceau laser ni la réception par le détecteur.•Assurez-vousquelafenêtred'émissionlaseretledétecteursoient
propres. Le cas échéant, nettoyez-les.•Assurez-vousquelaformeetl'étatdelaciblepermettentlaréflexion
du laser.•Remplacezlapile.
L'indication [- - -] ("Mesure impossible")apparaît
•Veillezàcequel'appareilsoitstablependantlamesure.•Assurez-vousquelacibleestdansleslimitesdeportéedel'appareil.
Les distances les plus proches ne peuvent pas être mesurées.
•Veillezàcequ'aucunobstacle(feuilles,herbes,etc.)nesoitplacéentreTélémètre Laser Nikon et la cible.
Les cibles placées au-delà d'une certaine distance ne peuvent pas être mesurées.
•Veillezàcequ'aucunobstacle(feuilles,herbes,etc.)nesoitplacéentreTélémètre Laser Nikon et la cible.
48 49
En
Fr
Es
Pt
En
Fr
Es
Pt
Sileproblèmepersisteaprèsavoirconsultéletableaudedépistagedespannes,prenezcontactaveclerevendeurpourqu'il vérifie ou répare le TélémètreLaserNikon. Ne confiez à personne d'autre qu'un représentant agréé du fabricant, le soin de vérifier ou de réparer le TélémètreLaserNikon. Faute de respecter cette consigne, vous vous exposez à des blessures ou à une défaillance de l'appareil.
Symptômes Points à vérifier
Les résultats des mesures sont variables
•Remplacezlapile.•Assurez-vousquelaformeetl'étatdelaciblepermettentlaréflexiondu
laser.•Veillezàcequel'appareilsoitstablependantlamesure.•Veillezàcequ'aucunobstacle(feuilles,herbes,etc.)nesoitplacéentreTélémètreLaserNikonetlacible.
Le résultat affiché est incorrect
•Remplacezlapile.•Assurez-vousquelaformeetl'étatdelaciblepermettentlaréflexiondu
laser.•Veillezàcequ'aucunobstacle(feuilles,herbes,etc.)nesoitplacéentreTélémètre Laser Nikon et la cible.
Guide de dépistage des pannes/Réparations
CONTEÚDO
Cuidados antes do uso ........................................ 50-53Principaiscaracterísticas ............................................ 54Nomenclatura/Composição ..................................... 55Inserção e troca de pilhas .......................................... 56Visor interno ................................................................... 57Medição ........................................................................... 58Unidades de visualização de distância/Modo de prioridade de alvo/Outros.......................................... 59Especificações ......................................................... 60-61ProblemaseSoluções/Reparo .......................... 62-63
Português brasileiro
50 51
En
Fr
Es
Pt
En
Fr
Es
Pt
Cuidados antes do uso
Obrigado por comprar o Telêmetro a Laser ACULON da Nikon.
O uso de controles e ajustes ou a execução de procedimentos que não aqueles especificados nestas instruções podem resultar em exposição a radiações perigosas.
〇Antesdeusaresteproduto,leiacuidadosamenteos"Cuidadosantesdouso"easinstruçõessobreousocorretonopresentemanualdeinstruções(essemanual).
〇Mantenhaestemanualàmãoparafácilconsulta.〇 Não desmonte ou repare este produto sem ajuda por um profissional, pois isto pode resultar
em um problema sério. Umprodutoquefoidesmontadooureparadonãoestácobertopelagarantiadofabricante.
●Asespecificaçõeseoprojetoestãosujeitosamudançassemavisoprévio.● Não pode ser feita nenhuma reprodução deste manual, no todo ou em parte (exceto para breve
citaçãoemartigosouanálisescríticas),semautorizaçãoporescritodaNIKONVISIONCO.,LTD.● �A NIKON VISION CO., LTD. se reserve o direito de alterar o conteúdo descrito nesses manuais em
qualquer altura e sem aviso prévio.
Por favor, siga rigorosamente as orientações a seguir, para que possa usar o equipamento de forma adequada e evitar problemas potencialmente perigosos. Antes de usar este produto, leia atentamente os "Cuidados antes do uso" e as instruções sobre o uso correto, que acompanham o produto. Mantenha este manual à mão para fácil consulta.
ADVERTÊNCIAEstaindicaçãoalertavocêparaofatode que qualquer uso inadequado, ignorando o conteúdo descrito neste documento, pode potencialmente resultaremmorteoulesõessérias.
CUIDADOEstaindicaçãoalertavocêparaofatode que qualquer uso inadequado, ignorando o conteúdo descrito neste documento, pode potencialmente resultaremlesõesouperdasmateriais.
PRECAUÇÕES DE SEGURANÇA (Laser)O Telêmetro a Laser Nikon emite um raio laser invisível. Certifique-se de que observa o que segue:
Advertência• Não pressione o botão POWERON/
Medição enquanto estiver olhando para dentro da óptica do lado da objetiva. A falha em fazer isto é poder afetar negativamente ou danificar os olhos.
• Nãodirijaoraiolaserparaosolhos.• Nãoaponteoraioàspessoas.• Nãoopereaunidadecomoutros
elementos ópticos adicionais, como lentes ou binóculos. O uso de um instrumento óptico junto com o Telêmetro a Laser Nikon aumenta o risco de danos aos olhos.
• Se não estiver a medir, mantenha os seus dedos longe do botão POWERON/Medição para evitar a emissão acidental do raio laser.
• Quandonãoestiveremusoporumperíodo prolongado, retire a pilha do corpo.
• Nãodesmonte/reconstrua/repareo Telêmetro a Laser Nikon. O laser emitido pode ser prejudicial à sua saúde. Um produto que foi desmontado/reconstruído/reparado nãoestácobertopelagarantiado
fabricante.• MantenhaoTelêmetroaLaser
Nikon guardado fora do alcance de crianças.
• SeocorpodoTelêmetroaLaserNikon for danificado ou se este emitir um som estranho devido à queda ou por outra causa, retire imediatamente a pilha e pare de usá-lo.

52 53
En
Fr
Es
Pt
En
Fr
Es
Pt
PRECAUÇÕES DE SEGURANÇA (Pilha de lítio)Se manuseada incorretamente, a pilha pode romper-se e vazar, corroendo o equipamento e manchando roupas. Certifique-se de que observa o que segue:• Instaleapilhacomospólos+e–na
posição correta.• Apilhadeveserremovidaquando
vazia ou durante longos períodos de não uso.
• Nãoprovoquecurto-circuitonoterminal do compartimento da pilha.
• Nãotransportejunto com chaves ou moedas em um bolso ou bolsa, pois pode curto-circuitar ou provocar superaquecimento.
• Nãoexponhaapilhaàáguaouachamas. Nunca desmonte a pilha.
• Nãorecarregueapilhadelítio.• Seolíquidodeumapilhadanificadaentraremcontatocomovestuárioouapele,enxágueimediatamentecommuitaágua.Seolíquidodepilhas danificadas entrar nos olhos, enxágueimediatamentecomágualimpa e, em seguida, consulte um médico.
• Nodescartedapilha,sigaosregulamentosdasuaárealocal.
pequenas fora do alcance de crianças.
• Evitequeascriançascoloquema viseira de borracha ou peças pequenas, etc. na boca. Se uma criança engolir estas peças, consulte imediatamente um médico.
• Seasviseirasdeborrachaforemusadas por um longo período de tempo, algumas pessoas podem sofrer inflamação da pele. Se ocorrer qualquer sintoma, consulte imediatamente um médico.
• ParatransportaroTelêmetroaLaserNikon, guarde-o no estojo macio.
• SeoseuTelêmetroaLaserNikonnão funcionar corretamente, interrompa imediatamente o seu uso e consulte o seu distribuidor localparainstruçõessobreparaondeenviá-loparareparação.
PRECAUÇÕES DE SEGURANÇA (Monóculo)O Telêmetro a Laser Nikon usa um monóculo no seu sistema óptico de modo a mirar o alvo. Certifique-se de que observa o que segue:
Advertência• Nuncaolhediretamente
diretamente para o sol ou para o raio laser, ao usar o telęmetro a Laser Nikon.
Cuidados• Quando não usar o Telêmetro
a Laser Nikon, não pressione o botão POWERON/Medição.
• Nãouseesteprodutoaocaminhar. A falha em observar isto é poder causar lesão ou mau funcionamento como resultado de bater em algo, acertar outras pessoas, cair ou outros acidentes.
• Nãobalancepelaalça.Istopodefazer com que acerte outras pessoasecauselesões.
• Nãocoloqueesteprodutoemlocalinstável.Afalhaemobservaristo pode resultar em que ele caia ouodeixecair,provocandolesõesou mau funcionamento.
• Mantenhaabolsaplásticautilizada para embalar este produto ou outras peças
Cuidados antes do usoArmazenagem• Podeocorrercondensaçãodaágua
ou bolor na superfície da lente devidoàelevadaumidade.Poristo,guarde o Telêmetro a Laser Nikon em local fresco e seco.
Após o uso em um dia chuvoso ou à noite, limpe-o cuidadosamente à temperatura ambiente e guarde-o em local fresco e seco.
CUIDADOS E MANUTENÇÃOLentes• Aoremoverapoeiradasuperfície
da lente, use uma escova macia isenta de óleo.
• Aoremovermanchasouborrõescomoimpressõesdigitaisdasuperfície das lentes, limpe as lentes suavemente com um pano de algodão macio e limpo ou um papel de boa qualidade e isento de óleo para limpar lentes. Use uma pequenaquantidadedeálcoolpuro(não desnaturado) para limpar borrõesresistentes.Nãousepanosde veludo ou de tecido comum, pois podem arranhar a superfície das lentes. Se o pano tiver sido usado para limpar o corpo, ele não deve ser usado novamente para a superfície da lente.
Corpo principal• Limpeasuperfíciesdocorpocom
um pano macio e limpo, depois de soprar ligeiramente a poeira com um soprador*. Não use benzeno, solvente ou outros agentes de limpeza que contenham solventes orgânicos.* Um soprador é um equipamento
de limpeza de borracha que sopra ar por um bocal.
PRECAUÇÕES DE SEGURANÇACuidados
• OTelêmetroalaserNikonnãofoiprojetado para o uso submerso.
• Chuva,água,areiaelamadevem ser removidas da superfície do corpo do telêmetro assim que possível, usando-se um pano macio, limpo.
• NãodeixeoTelêmetroaLaserNikon no carro em um dia quente ou ensolarado, ou perto de equipamento gerador de calor. Istopodedanificá-loouafetá-lodeforma negativa.
• NãodeixeoTelêmetroaLaserNikonexposto à luz solar direta. Os raios ultravioleta e o calor excessivo podemafetá-lonegativamenteouaté mesmo danificar a unidade.
• SeoTelêmetroaLaserNikonforexposto a mudanças bruscas de temperatura, pode ocorrer condensaçãodeáguanassuperfícies das lentes. Não use o produto enquanto a condensação não tiver evaporado.
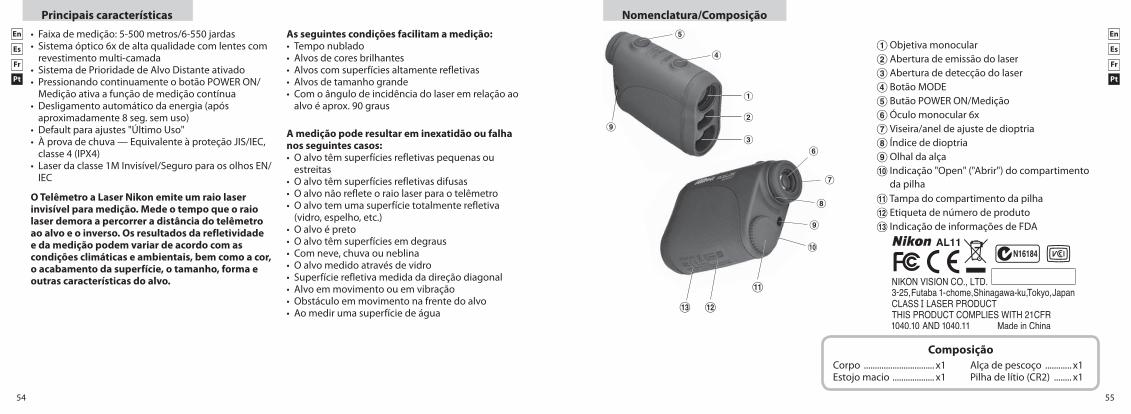
54 55
En
Fr
Es
Pt
En
Fr
Es
Pt
• Faixademedição:5-500metros/6-550jardas• Sistemaóptico6xdealtaqualidadecomlentescom
revestimento multi-camada• SistemadePrioridadedeAlvoDistanteativado• PressionandocontinuamenteobotãoPOWERON/
Medição ativa a função de medição contínua• Desligamentoautomáticodaenergia(após
aproximadamente 8 seg. sem uso)• Defaultparaajustes"ÚltimoUso"• àprovadechuva—EquivalenteàproteçãoJIS/IEC,classe4(IPX4)
• Laserdaclasse1MInvisível/SeguroparaosolhosEN/IEC
O Telêmetro a Laser Nikon emite um raio laser invisível para medição. Mede o tempo que o raio laser demora a percorrer a distância do telêmetro ao alvo e o inverso. Os resultados da refletividade e da medição podem variar de acordo com as condições climáticas e ambientais, bem como a cor, o acabamento da superfície, o tamanho, forma e outras características do alvo.
As seguintes condições facilitam a medição:• Temponublado• Alvosdecoresbrilhantes• Alvoscomsuperfíciesaltamenterefletivas• Alvosdetamanhogrande• Comoângulodeincidênciadolaseremrelaçãoao
alvo é aprox. 90 graus
A medição pode resultar em inexatidão ou falha nos seguintes casos:• Oalvotêmsuperfíciesrefletivaspequenasou
estreitas• Oalvotêmsuperfíciesrefletivasdifusas• Oalvonãorefleteoraiolaserparaotelêmetro• Oalvotemumasuperfícietotalmenterefletiva
(vidro, espelho, etc.)• Oalvoépreto• Oalvotêmsuperfíciesemdegraus• Comneve,chuvaouneblina• Oalvomedidoatravésdevidro• Superfícierefletivamedidadadireçãodiagonal• Alvoemmovimentoouemvibração• Obstáculoemmovimentonafrentedoalvo• Aomedirumasuperfíciedeágua
Principais características Nomenclatura/Composição
1 Objetiva monocular2 Abertura de emissão do laser3 Abertura de detecção do laser4 BotãoMODE5 ButãoPOWERON/Medição6 Óculo monocular 6x7 Viseira/anel de ajuste de dioptria8 Índice de dioptria9 Olhal da alça!p Indicação "Open" ("Abrir") do compartimento
da pilha!q Tampa do compartimento da pilha!w Etiquetadenúmerodeproduto!eIndicaçãodeinformaçõesdeFDA
Corpo ................................ x1Estojomacio ................... x1
Alça de pescoço ............ x1Pilhadelítio(CR2) ........ x1
Composição
1
2
4
5
3
9
8
6
!q
9
!p
7
!w!e
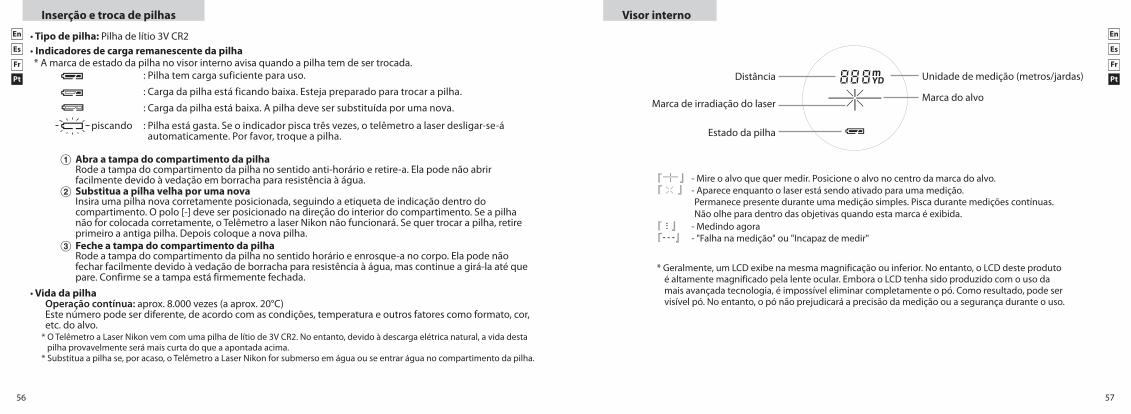
56 57
En
Fr
Es
Pt
En
Fr
Es
Pt
Inserção e troca de pilhas
• Tipo de pilha: Pilhadelítio3VCR2• Indicadores de carga remanescente da pilha* A marca de estado da pilha no visor interno avisa quando a pilha tem de ser trocada.
:Pilhatemcargasuficienteparauso.
:Cargadapilhaestáficandobaixa.Estejapreparadoparatrocarapilha.
:Cargadapilhaestábaixa.Apilhadevesersubstituídaporumanova.
piscando :Pilhaestágasta.Seoindicadorpiscatrêsvezes,otelêmetroalaserdesligar-se-á automaticamente.Porfavor,troqueapilha.
1 Abra a tampa do compartimento da pilha Rodeatampadocompartimentodapilhanosentidoanti-horárioeretire-a.Elapodenãoabrir
facilmentedevidoàvedaçãoemborrachapararesistênciaàágua.2 Substitua a pilha velha por uma nova Insira uma pilha nova corretamente posicionada, seguindo a etiqueta de indicação dentro do
compartimento. O polo [-] deve ser posicionado na direção do interior do compartimento. Se a pilha nãoforcolocadacorretamente,oTelêmetroalaserNikonnãofuncionará.Sequertrocarapilha,retireprimeiro a antiga pilha. Depois coloque a nova pilha.
3 Feche a tampa do compartimento da pilha Rodeatampadocompartimentodapilhanosentidohorárioeenrosque-anocorpo.Elapodenão
fecharfacilmentedevidoàvedaçãodeborrachapararesistênciaàágua,mascontinueagirá-laatéquepare.Confirmeseatampaestáfirmementefechada.
• Vida da pilha Operação contínua: aprox. 8.000 vezes (a aprox. 20°C) Estenúmeropodeserdiferente,deacordocomascondições, temperatura e outros fatores como formato, cor,
etc. do alvo.* O Telêmetro a Laser Nikon vem com uma pilha de lítio de 3V CR2. No entanto, devido à descarga elétrica natural, a vida desta pilhaprovavelmenteserámaiscurtadoqueaapontadaacima.
* Substitua a pilha se, por acaso, o TelêmetroaLaserNikonforsubmersoemáguaouseentraráguanocompartimentodapilha.
Visor interno
『 』 -Mireoalvoquequermedir.Posicioneoalvonocentrodamarcadoalvo.『 』 -Apareceenquantoolaserestásendoativadoparaumamedição.
Permanecepresenteduranteumamediçãosimples.Piscadurantemediçõescontínuas. Não olhe para dentro das objetivas quando esta marca é exibida.
『 』 - Medindo agora『 』 - "Falha na medição" ou "Incapaz de medir"
*Geralmente,umLCDexibenamesmamagnificaçãoouinferior.Noentanto,oLCDdesteprodutoéaltamentemagnificadopelalenteocular.EmboraoLCDtenhasidoproduzidocomousodamais avançada tecnologia, é impossível eliminar completamente o pó. Como resultado, pode ser visívelpó.Noentanto,opónãoprejudicaráaprecisãodamediçãoouasegurançaduranteouso.
Distância Unidade de medição (metros/jardas)
Marca do alvoMarca de irradiação do laser
Estadodapilha
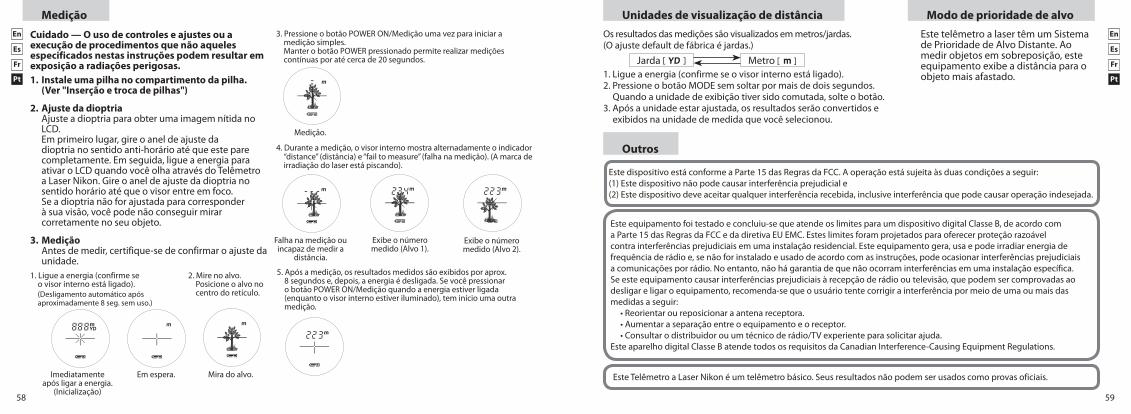
58 59
En
Fr
Es
Pt
En
Fr
Es
Pt
Medição
Cuidado — O uso de controles e ajustes ou a execução de procedimentos que não aqueles especificados nestas instruções podem resultar em exposição a radiações perigosas.1. Instale uma pilha no compartimento da pilha.
(Ver "Inserção e troca de pilhas")
2. Ajuste da dioptria Ajuste a dioptria para obter uma imagem nítida no
LCD. Emprimeirolugar,gireoaneldeajusteda
dioptrianosentidoanti-horárioatéqueesteparecompletamente.Emseguida,ligueaenergiaparaativar o LCD quando você olha através do Telêmetro aLaserNikon.Gireoaneldeajustedadioptrianosentidohorárioatéqueovisorentreemfoco.
Se a dioptria não for ajustada para corresponder à sua visão, você pode não conseguir mirar corretamente no seu objeto.
3. Medição Antes de medir, certifique-se de confirmar o ajuste da
unidade.Measurement
1. Press the POWER button for power-on.(Power turns off 8 seconds after the last operation.)
Immediately after power-on.(Initializing)
Stand-by. Target focusing.
2. Aim at the target.
3. Press POWER button once to start continuous measurement for 8 seconds. (Single measurement mode is not available with this laser rangefinder.)
Measuring.
4. For 8 seconds, the internal display shows “distance” and “fail to measure” indicator alternately. (Laser irradiation mark is blinking.)
Failure to measure or unable to measure distance.
Displays the measured figure. (Target 1)
Displays the measured figure. (Target 2)
5. After continuous measurement, the measured results are displayed for 8 seconds, then power turns off.If you press the POWER button during power-on (while the internal display is lit), another 8-second measurement starts.
Measurement
1. Press the POWER button for power-on.(Power turns off 8 seconds after the last operation.)
Immediately after power-on.(Initializing)
Stand-by. Target focusing.
2. Aim at the target.
3. Press POWER button once to start continuous measurement for 8 seconds. (Single measurement mode is not available with this laser rangefinder.)
Measuring.
4. For 8 seconds, the internal display shows “distance” and “fail to measure” indicator alternately. (Laser irradiation mark is blinking.)
Failure to measure or unable to measure distance.
Displays the measured figure. (Target 1)
Displays the measured figure. (Target 2)
5. After continuous measurement, the measured results are displayed for 8 seconds, then power turns off.If you press the POWER button during power-on (while the internal display is lit), another 8-second measurement starts.
Imediatamente após ligar a energia.
(Inicialização)
Emespera. Mira do alvo.
3. PressioneobotãoPOWERON/Mediçãoumavezparainiciaramedição simples.
ManterobotãoPOWERpressionadopermiterealizarmediçõescontínuas por até cerca de 20 segundos.
Medição.
4. Durante a medição, o visor interno mostra alternadamente o indicador “distance” (distância) e “fail to measure” (falha na medição). (A marca de irradiaçãodolaserestápiscando).
Falha na medição ou incapaz de medir a
distância.
Exibeonúmeromedido (Alvo 1).
Exibeonúmeromedido (Alvo 2).
Measurement
1. Press the POWER button for power-on.(Power turns off 8 seconds after the last operation.)
Immediately after power-on.(Initializing)
Stand-by. Target focusing.
2. Aim at the target.
3. Press POWER button once to start continuous measurement for 8 seconds. (Single measurement mode is not available with this laser rangefinder.)
Measuring.
4. For 8 seconds, the internal display shows “distance” and “fail to measure” indicator alternately. (Laser irradiation mark is blinking.)
Failure to measure or unable to measure distance.
Displays the measured figure. (Target 1)
Displays the measured figure. (Target 2)
5. After continuous measurement, the measured results are displayed for 8 seconds, then power turns off.If you press the POWER button during power-on (while the internal display is lit), another 8-second measurement starts.
5. Após a medição, os resultados medidos são exibidos por aprox. 8 segundos e, depois, a energia é desligada. Se você pressionar obotãoPOWERON/Mediçãoquandoaenergiaestiverligada(enquanto o visor interno estiver iluminado), tem início uma outra medição.
1. Ligue a energia (confirme se ovisorinternoestáligado).
2. Mire no alvo.Posicioneoalvonocentro do retículo.(Desligamentoautomáticoapós
aproximadamente 8 seg. sem uso.)
EstetelêmetroalasertêmumSistemadePrioridadedeAlvoDistante.Aomedir objetos em sobreposição, este equipamento exibe a distância para o objeto mais afastado.
Unidades de visualização de distância
Metro [ ]Jarda [ ]
Osresultadosdasmediçõessãovisualizadosemmetros/jardas.(Oajustedefaultdefábricaéjardas.)
1.Ligueaenergia(confirmeseovisorinternoestáligado).2.PressioneobotãoMODEsemsoltarpormaisdedoissegundos.
Quando a unidade de exibição tiver sido comutada, solte o botão.3. Após a unidade estar ajustada, os resultados serão convertidos e
exibidos na unidade de medida que você selecionou.
Modo de prioridade de alvo
Outros
EsteTelêmetroaLaserNikonéumtelêmetrobásico.Seusresultadosnãopodemserusadoscomoprovasoficiais.
Esteequipamentofoitestadoeconcluiu-sequeatendeoslimitesparaumdispositivodigitalClasseB,deacordocomaParte15dasRegrasdaFCCedadiretivaEUEMC.Esteslimitesforamprojetadosparaoferecerproteçãorazoávelcontrainterferênciasprejudiciaisemumainstalaçãoresidencial.Esteequipamentogera,usaepodeirradiarenergiadefrequênciaderádioe,senãoforinstaladoeusadodeacordocomasinstruções,podeocasionarinterferênciasprejudiciaisacomunicaçõesporrádio.Noentanto,nãohágarantiadequenãoocorraminterferênciasemumainstalaçãoespecífica.Seesteequipamentocausarinterferênciasprejudiciaisàrecepçãoderádiooutelevisão,quepodemsercomprovadasaodesligareligaroequipamento,recomenda-sequeousuáriotentecorrigirainterferênciapormeiodeumaoumaisdasmedidas a seguir:•Reorientaroureposicionaraantenareceptora.•Aumentaraseparaçãoentreoequipamentoeoreceptor.•Consultarodistribuidorouumtécnicoderádio/TVexperienteparasolicitarajuda.EsteaparelhodigitalClasseBatendetodososrequisitosdaCanadianInterference-CausingEquipmentRegulations.
EstedispositivoestáconformeaParte15dasRegrasdaFCC.Aoperaçãoestásujeitaàsduascondiçõesaseguir:(1)Estedispositivonãopodecausarinterferênciaprejudiciale(2)Estedispositivodeveaceitarqualquerinterferênciarecebida,inclusiveinterferênciaquepodecausaroperaçãoindesejada.
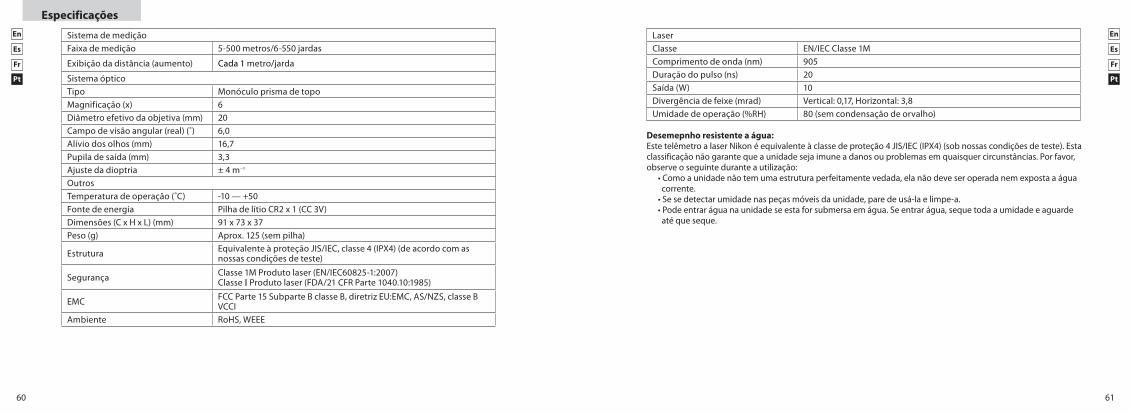
60 61
En
Fr
Es
Pt
En
Fr
Es
Pt
Especificações
Sistema de mediçãoFaixa de medição 5-500 metros/6-550 jardas
Exibiçãodadistância(aumento) Cada 1 metro/jarda
Sistema ópticoTipo Monóculo prisma de topoMagnificação (x) 6Diâmetro efetivo da objetiva (mm) 20Campo de visão angular (real) (˚) 6,0Alívio dos olhos (mm) 16,7Pupiladesaída(mm) 3,3Ajuste da dioptria ± 4 m-1
OutrosTemperatura de operação (˚C) -10—+50Fonte de energia PilhadelítioCR2x1(CC3V)Dimensões(CxHxL)(mm) 91 x 73 x 37Peso(g) Aprox. 125 (sem pilha)
Estrutura EquivalenteàproteçãoJIS/IEC,classe4(IPX4)(deacordocomasnossascondiçõesdeteste)
Segurança Classe1MProdutolaser(EN/IEC60825-1:2007) Classe IProdutolaser(FDA/21CFRParte1040.10:1985)
EMC FCCParte15SubparteBclasseB,diretrizEU:EMC,AS/NZS,classeBVCCI
Ambiente RoHS,WEEE
Desemepnho resistente a água:EstetelêmetroalaserNikonéequivalenteàclassedeproteção4JIS/IEC(IPX4)(sobnossascondiçõesdeteste).Estaclassificaçãonãogarantequeaunidadesejaimuneadanosouproblemasemquaisquercircunstâncias.Porfavor,observe o seguinte durante a utilização:
•Comoaunidadenãotemumaestruturaperfeitamentevedada,elanãodeveseroperadanemexpostaaáguacorrente.•Sesedetectarumidadenaspeçasmóveisdaunidade,paredeusá-laelimpe-a.•Podeentraráguanaunidadeseestaforsubmersaemágua.Seentrarágua,sequetodaaumidadeeaguardeaté que seque.
LaserClasse EN/IECClasse1MComprimento de onda (nm) 905Duração do pulso (ns) 20Saída(W) 10Divergência de feixe (mrad) Vertical:0,17,Horizontal:3,8Umidadedeoperação(%RH) 80 (sem condensação de orvalho)
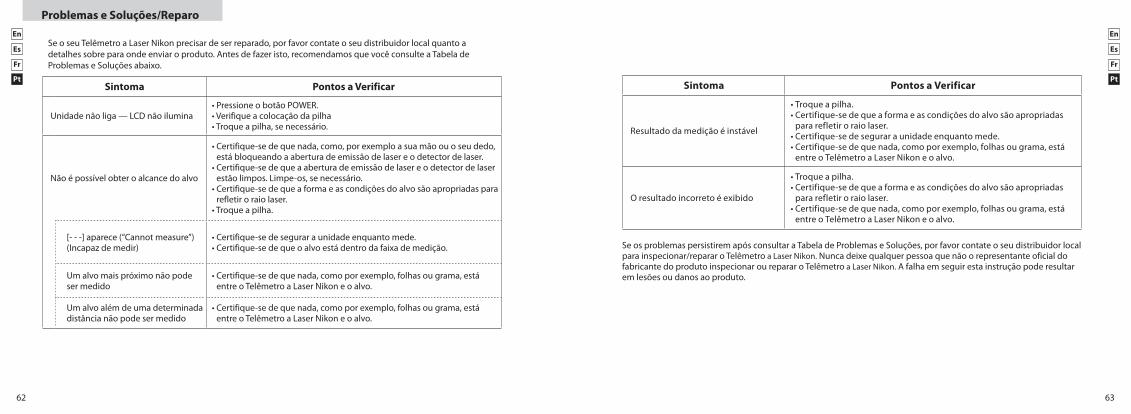
62 63
En
Fr
Es
Pt
En
Fr
Es
Pt
Problemas e Soluções/Reparo
Se o seu Telêmetro a Laser Nikon precisar de ser reparado, por favor contate o seu distribuidor local quanto a detalhes sobre para onde enviar o produto. Antes de fazer isto, recomendamos que você consulte a Tabela de ProblemaseSoluçõesabaixo.
Sintoma Pontos a Verificar
Unidadenãoliga—LCDnãoilumina•PressioneobotãoPOWER.•Verifiqueacolocaçãodapilha•Troqueapilha,senecessário.
Não é possível obter o alcance do alvo
•Certifique-sedequenada,como,porexemploasuamãoouoseudedo,estábloqueandoaaberturadeemissãodelasereodetectordelaser.•Certifique-sedequeaaberturadeemissãodelasereodetectordelaserestãolimpos.Limpe-os,senecessário.•Certifique-sedequeaformaeascondiçõesdoalvosãoapropriadaspara
refletir o raio laser.•Troqueapilha.
[- - -] aparece (“Cannot measure”) (Incapaz de medir)
•Certifique-sedeseguraraunidadeenquantomede.•Certifique-sedequeoalvoestádentrodafaixademedição.
Um alvo mais próximo não pode ser medido
•Certifique-sedequenada,comoporexemplo,folhasougrama,estáentre o Telêmetro a Laser Nikon e o alvo.
Um alvo além de uma determinada distância não pode ser medido
•Certifique-sedequenada,comoporexemplo,folhasougrama,estáentre o Telêmetro a Laser Nikon e o alvo.
SeosproblemaspersistiremapósconsultaraTabeladeProblemaseSoluções,porfavorcontateoseudistribuidorlocalpara inspecionar/reparar o Telêmetro a Laser Nikon. Nunca deixe qualquer pessoa que não o representante oficial do fabricante do produto inspecionar ou reparar o Telêmetro a Laser Nikon. A falha em seguir esta instrução pode resultar emlesõesoudanosaoproduto.
Sintoma Pontos a Verificar
Resultadodamediçãoéinstável
•Troqueapilha.•Certifique-sedequeaformaeascondiçõesdoalvosãoapropriadas
para refletir o raio laser.•Certifique-sedeseguraraunidadeenquantomede.•Certifique-sedequenada,comoporexemplo,folhasougrama,está
entre o Telêmetro a Laser Nikon e o alvo.
O resultado incorreto é exibido
•Troqueapilha.•Certifique-sedequeaformaeascondiçõesdoalvosãoapropriadas
para refletir o raio laser.•Certifique-sedequenada,comoporexemplo,folhasougrama,está
entre o Telêmetro a Laser Nikon e o alvo.

PrintedinChina(262K)1E/1305
NIKON VISION CO., LTD.3-25,Futaba1-chome,Shinagawa-ku,Tokyo142-0043,Japan