INSTRUCTIONS INSTRUCCIONES - The Home Depot SAFETY SEGURIDAD SÉCURITÉ 5 MINI BENCH 6 Mini Bench...
37
glowpear.com Pg 1 MINI SELF WATERING PLANTER RANGE GAMA DE JARDINERAS AUTOREGABLES GAMME DE BOÎTES À AUTO-ARROSAGE BENCH BANCO BANC WALL PARED MURALE RAIL RAMPE INSTRUCTIONS INSTRUCCIONES
Transcript of INSTRUCTIONS INSTRUCCIONES - The Home Depot SAFETY SEGURIDAD SÉCURITÉ 5 MINI BENCH 6 Mini Bench...

glowpear.com Pg 1
MINI SELF WATERING PLANTER RANGEGAMA DE JARDINERAS AUTOREGABLESGAMME DE BOÎTES À AUTO-ARROSAGE
BENCHBANCOBANC
WALL PAREDMURALE
RAILRAMPE
INSTRUCTIONS INSTRUCCIONES

3 SAFETY SEGURIDAD SÉCURITÉ
5 MINI BENCH 6 Mini Bench Parts List 7 Mini Bench Assembly Instructions
5 MINI BANCO 6 Mini Banco Listado de Componentes 9 Mini Banco Montaje e Instrucciones
5 MINI BANC 6 Mini Banco Listado de Componentes 11 Mini Banco Montaje e Instrucciones
13 MINI WALL 14 Mini Wall Parts List 15 Mini Wall Assembly Instructions 21 Mini Wall Mounting Brackets Hole Template
13 MINI PARED 14 Mini Pared Listado de Componentes 17 Mini Pared Montaje e Instrucciones 21 Mini Pared Plantilla de Agujeros para Soportes de Montaje
13 MINI MURAL 14 Liste des pièces du Mini Mural 19 Instructions d’assemblage du Mini Mura 21 PlandesupportsdefixationpourleMiniMural
22 MINI RAIL 23 Mini Rail Parts List 24 Mini Rail Assembly Instructions
22 MINI RAIL 23 Mini Rail Listado de Componentes 26 Mini Rail Instrucciones de Montaje
22 MINI RAMPE 23 Liste des pièces du Mini Rampe 28 Instructions d’assemblage du Mini Rampe
30 MULTIPLE PLANTER ASSEMBLY 31 MONTAJE DE JARDINERA MÚLTIPLE 32 ASSEMBLAGE DE BOÎTES MULTIPLES
33 PLANTING AND WATERING 34 PLANTACIÓN Y RIEGO 35 PLANTATION ET ARROSAGE
36 CARE INSTRUCTIONS INSTRUCCIONES DE CONSERVACIÓN INSTRUCTIONS D’ENTRETIEN
CONTENTS CONTENIDOS TABLE DES MATIÈRES
glowpear.com Pg 2
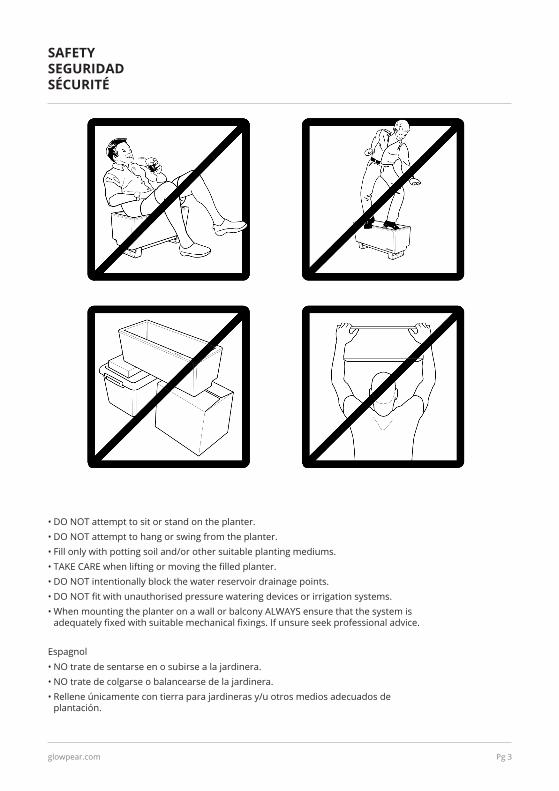
• DO NOT attempt to sit or stand on the planter.• DO NOT attempt to hang or swing from the planter.• Fill only with potting soil and/or other suitable planting mediums.• TAKECAREwhenliftingormovingthefilledplanter.• DO NOT intentionally block the water reservoir drainage points.• DONOTfitwithunauthorisedpressurewateringdevicesorirrigationsystems.• When mounting the planter on a wall or balcony ALWAYS ensure that the system is adequatelyfixedwithsuitablemechanicalfixings.Ifunsureseekprofessionaladvice.
SAFETY SEGURIDAD SÉCURITÉ
• NO trate de sentarse en o subirse a la jardinera.• NO trate de colgarse o balancearse de la jardinera.• Rellene únicamente con tierra para jardineras y/u otros medios adecuados de
plantación.
Espagnol
glowpear.com Pg 3
glowpear.com Pg 4
• CUIDADO al levantar o mover la jardinera llena.• NO bloquee intencionadamente los puntos de drenaje del depósito de agua.• No acople a dispositivos de riego a presión o sistemas de riego no autorizados.• Al montar la jardinera en una pared o balcón, asegúrese SIEMPRE de que el sistema está• adecuadamentefijadoconfijacionesmecánicasapropiadas.Sinoestásegurobusque
ayuda profesional.
• NE TENTEZ PAS de vous asseoir ou de vous tenir debout sur la boîte.• NE TENTEZ PAS de vous pendre ou de vous balancer à partir de la boîte.• Remplissez uniquement de terre de remplissage et autres matières convenable à la
plantation.• FAITES ATTENTION lorsque vous soulevez ou déplacez la boîte une fois remplie.• NE BLOQUEZ PAS intentionnellement les points de drainage de réservoir d’eau.• NE COMBINEZ PAS avec des dispositifs d’arrosage sous pression ou de systèmes
d’irrigation.• Lorsquevousfixezlaboîteàunmurouunbalcon,assurez-vousTOUJOURSquele
système est• fixédefaçonadéquateaveclesfixationsmécaniquesappropriées.Sivousêtes
incertains,• demandez conseil auprès d’un professionnel.
Français
glowpear.com Pg 5
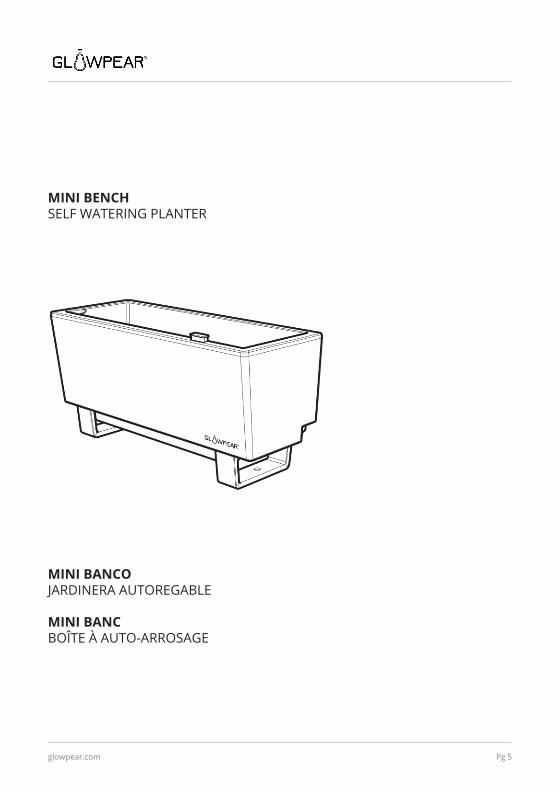
MINI BENCHSELF WATERING PLANTER
MINI BANCO JARDINERA AUTOREGABLE
MINI BANCBOÎTE À AUTO-ARROSAGE
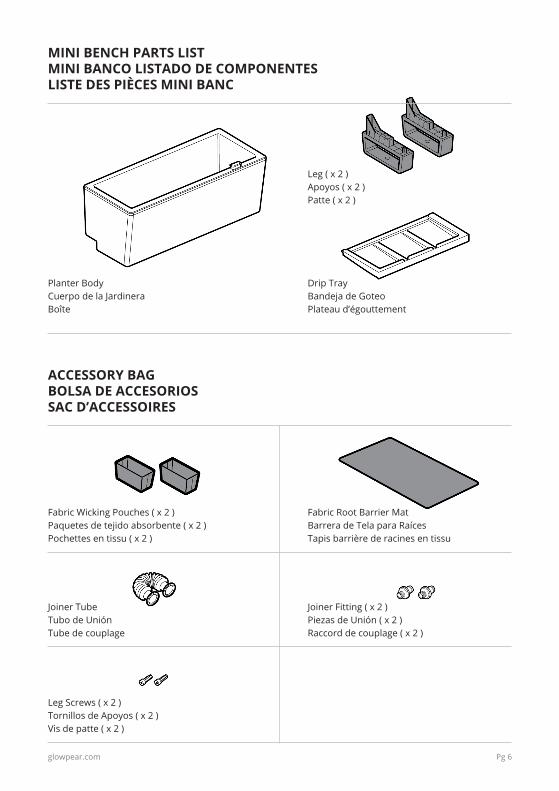
Planter BodyCuerpo de la JardineraBoîte
Drip TrayBandeja de GoteoPlateau d’égouttement
Fabric Root Barrier MatBarrera de Tela para RaícesTapis barrière de racines en tissu
FabricWickingPouches(x2)Paquetesdetejidoabsorbente(x2)Pochettesentissu(x2)
Joiner Tube Tubo de UniónTube de couplage
LegScrews(x2)TornillosdeApoyos(x2)Visdepatte(x2)
JoinerFitting(x2)PiezasdeUnión(x2)Raccorddecouplage(x2)
Leg(x2)Apoyos(x2)Patte(x2)
ACCESSORY BAG BOLSA DE ACCESORIOS SAC D’ACCESSOIRES
MINI BENCH PARTS LISTMINI BANCO LISTADO DE COMPONENTESLISTE DES PIÈCES MINI BANC
glowpear.com Pg 6

glowpear.com Pg 7
Unfold Fabric Wicking Pouches and place them into the pockets in the planter base.
Turn planter over to rest on the Legs and slide DripTrayintoplacefromfront(forindooruse).
Turn Planter Body over and align Legs to locating features.
Using a Phillips head screwdriver, drive one screw per Leg into the central hole. Do not over-tighten.
1 2
43
MINI BENCH ASSEMBLY INSTRUCTIONS
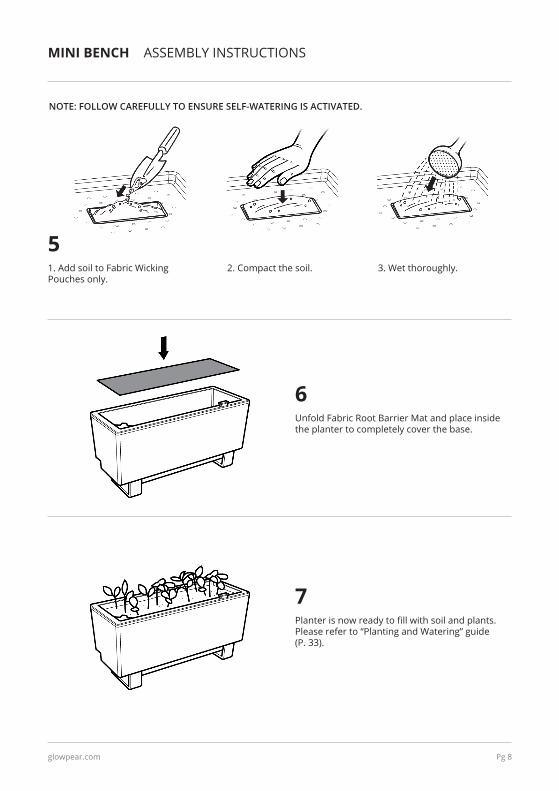
5
glowpear.com Pg 8
6
7
Unfold Fabric Root Barrier Mat and place inside the planter to completely cover the base.
Planterisnowreadytofillwithsoilandplants.Please refer to “Planting and Watering” guide (P.33).
MINI BENCH ASSEMBLY INSTRUCTIONS
NOTE: FOLLOW CAREFULLY TO ENSURE SELF-WATERING IS ACTIVATED.
1. Add soil to Fabric Wicking Pouches only.
2. Compact the soil. 3. Wet thoroughly.
glowpear.com Pg 9
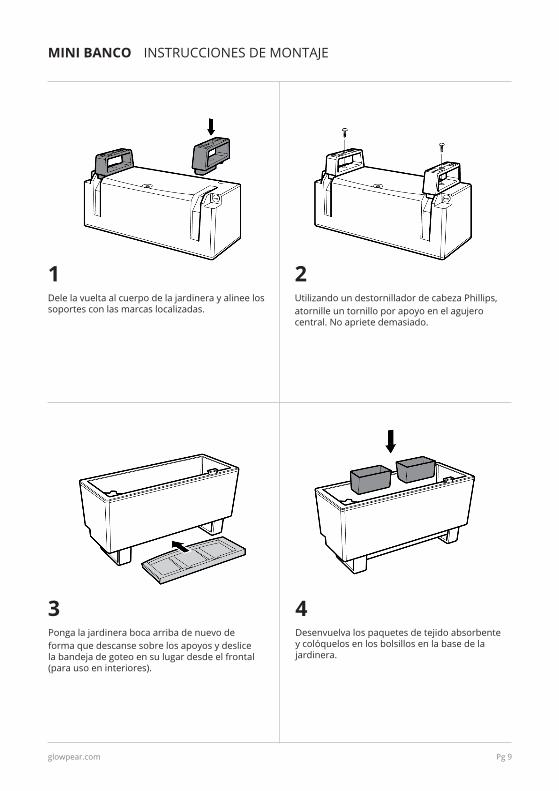
Desenvuelva los paquetes de tejido absorbente y colóquelos en los bolsillos en la base de la jardinera.
Ponga la jardinera boca arriba de nuevo deforma que descanse sobre los apoyos y deslice la bandeja de goteo en su lugar desde el frontal (parausoeninteriores).
Dele la vuelta al cuerpo de la jardinera y alinee los soportes con las marcas localizadas.
Utilizando un destornillador de cabeza Phillips,atornille un tornillo por apoyo en el agujero central. No apriete demasiado.
1 2
43
MINI BANCO INSTRUCCIONES DE MONTAJE

5
glowpear.com Pg 10
6
7
Desenvuelva la Barrera de Tela para Raíces ycolóquela dentro de la jardinera cubriendocompletamente la base.
La jardinera está ahora lista para llenarla detierra y plantas. Por favor mire la guía“PlantaciónyRiego”(P.34).
MINI BANCO INSTRUCCIONES DE MONTAJE
NOTA: SÍGALAS CUIDADOSAMENTE PARA ASEGURAR QUE EL RIEGO AUTOMÁTICO SE ACTIVA.
1. Añada tierra a los paquetes de tejido absorbente solamente.
2. Compacte la tierra. 3. Riegue abundantemente.

glowpear.com Pg 11
Dépliez les pochettes en tissu et placez-les dans les emplacements à la base de la boîte.
Retournezlaboîteafinqu’ellereposesurlespattes et glissez le plateau d’égouttement en placeàpartirdel’avant(pourunusageintérieur).
Retournez la boîte et alignez les trous despattesaveclestrousdefixation.
Àl’aided’untournevisàtêtePhillips,vissezunevisparpattedansletroudefixationcentral.Neserrez pas trop les vis.
1 2
43
MINI BANC INSTRUCTIONS D’ASSEMBLAGE
5
glowpear.com Pg 12
6
7
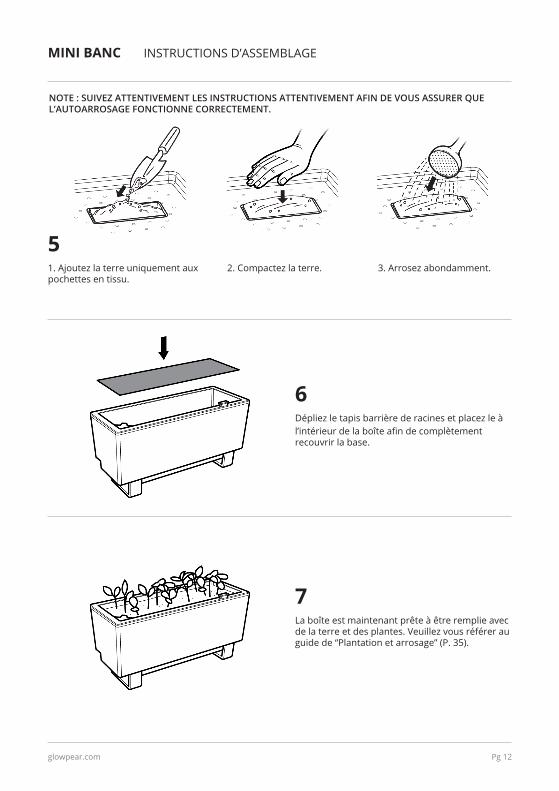
Dépliez le tapis barrière de racines et placez le àl’intérieurdelaboîteafindecomplètementrecouvrir la base.
Laboîteestmaintenantprêteàêtreremplieavecde la terre et des plantes. Veuillez vous référer au guidede“Plantationetarrosage”(P.35).
MINI BANC INSTRUCTIONS D’ASSEMBLAGE
NOTE : SUIVEZ ATTENTIVEMENT LES INSTRUCTIONS ATTENTIVEMENT AFIN DE VOUS ASSURER QUE L’AUTOARROSAGE FONCTIONNE CORRECTEMENT.
1.Ajoutezlaterreuniquementauxpochettes en tissu.
2. Compactez la terre. 3. Arrosez abondamment.
glowpear.com Pg 13
MINI WALLSELF WATERING PLANTER
MINI PARED JARDINERA AUTOREGABLE
MINI MURALBOÎTE À AUTO-ARROSAGE
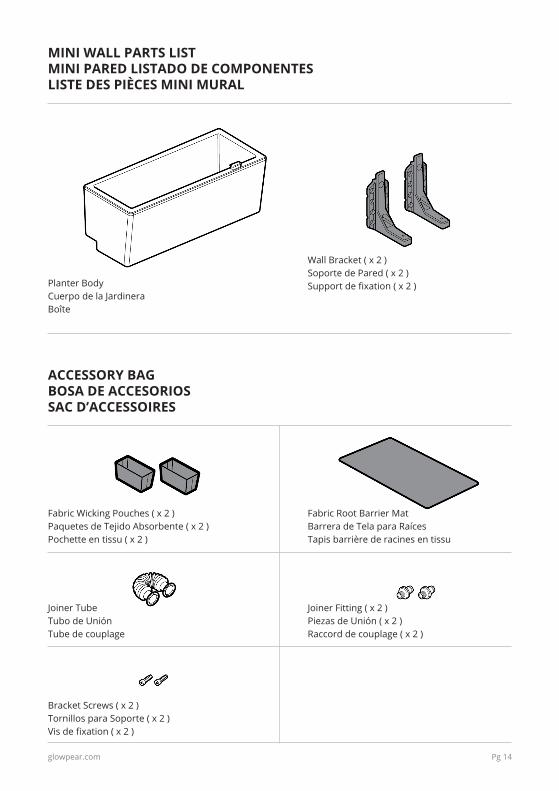
Planter BodyCuerpo de la JardineraBoîte
Fabric Root Barrier MatBarrera de Tela para RaícesTapis barrière de racines en tissu
FabricWickingPouches(x2)PaquetesdeTejidoAbsorbente(x2)Pochetteentissu(x2)
Joiner Tube Tubo de UniónTube de couplage
BracketScrews(x2)TornillosparaSoporte(x2)Visdefixation(x2)
JoinerFitting(x2)PiezasdeUnión(x2)Raccorddecouplage(x2)
WallBracket(x2)SoportedePared(x2)Supportdefixation(x2)
MINI WALL PARTS LISTMINI PARED LISTADO DE COMPONENTESLISTE DES PIÈCES MINI MURAL
ACCESSORY BAGBOSA DE ACCESORIOSSAC D’ACCESSOIRES
glowpear.com Pg 14
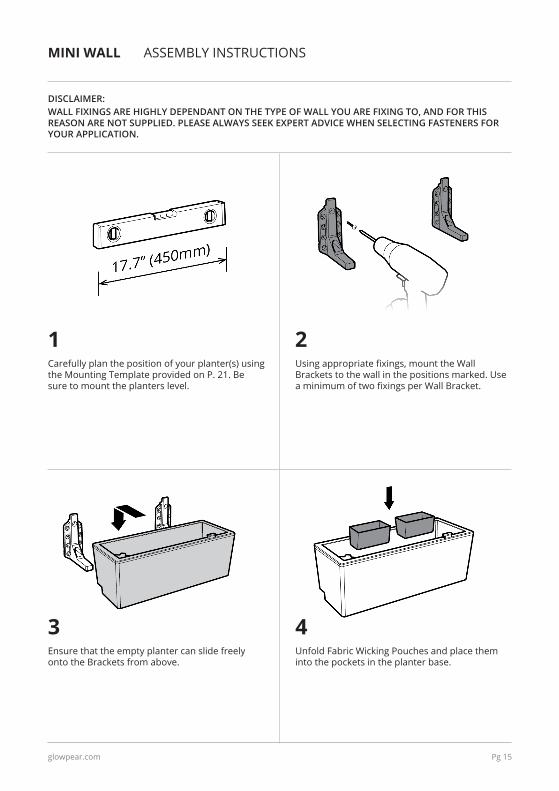
DISCLAIMER: WALL FIXINGS ARE HIGHLY DEPENDANT ON THE TYPE OF WALL YOU ARE FIXING TO, AND FOR THIS REASON ARE NOT SUPPLIED. PLEASE ALWAYS SEEK EXPERT ADVICE WHEN SELECTING FASTENERS FOR YOUR APPLICATION.
3
glowpear.com Pg 15
Unfold Fabric Wicking Pouches and place them into the pockets in the planter base.
Usingappropriatefixings,mounttheWallBrackets to the wall in the positions marked. Use aminimumoftwofixingsperWallBracket.
Ensure that the empty planter can slide freely onto the Brackets from above.
Carefullyplanthepositionofyourplanter(s)usingthe Mounting Template provided on P. 21. Be sure to mount the planters level.
1
4
2
MINI WALL ASSEMBLY INSTRUCTIONS
glowpear.com Pg 16
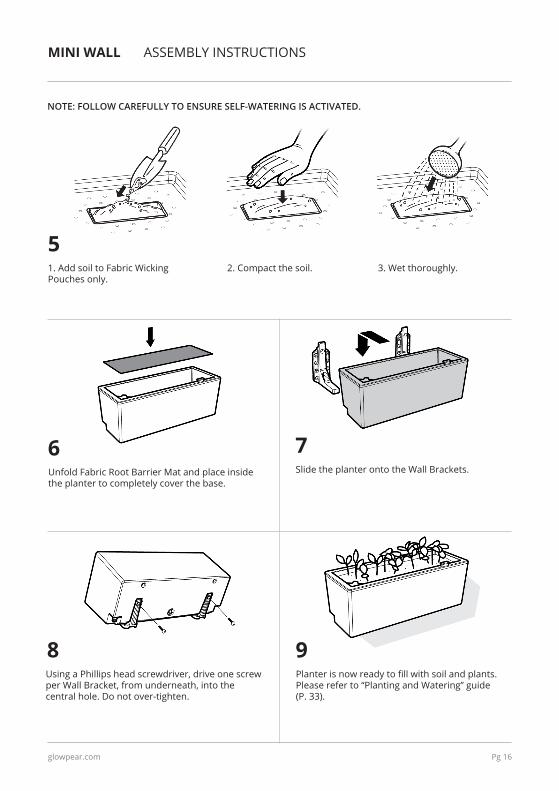
Unfold Fabric Root Barrier Mat and place inside the planter to completely cover the base.
Planterisnowreadytofillwithsoilandplants.Please refer to “Planting and Watering” guide (P.33).
Slide the planter onto the Wall Brackets.
Using a Phillips head screwdriver, drive one screw per Wall Bracket, from underneath, into the central hole. Do not over-tighten.
6
98
7
MINI WALL ASSEMBLY INSTRUCTIONS
5
NOTE: FOLLOW CAREFULLY TO ENSURE SELF-WATERING IS ACTIVATED.
1. Add soil to Fabric Wicking Pouches only.
2. Compact the soil. 3. Wet thoroughly.
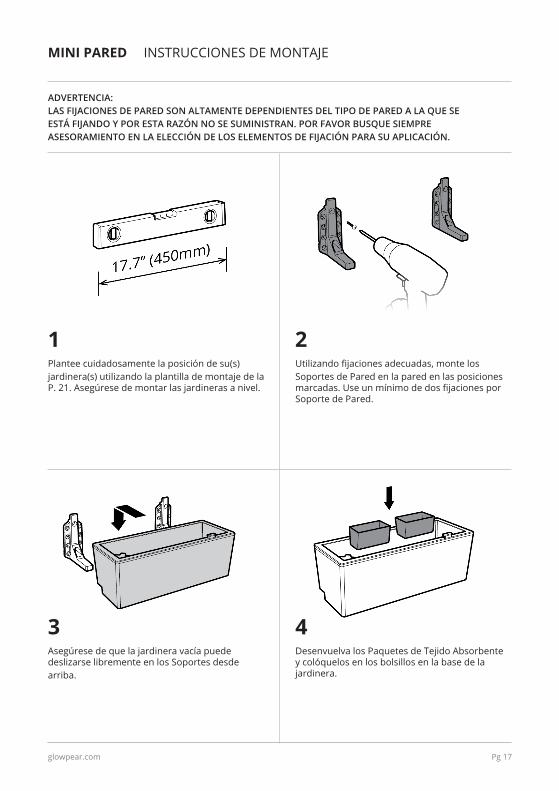
ADVERTENCIA:LAS FIJACIONES DE PARED SON ALTAMENTE DEPENDIENTES DEL TIPO DE PARED A LA QUE SEESTÁ FIJANDO Y POR ESTA RAZÓN NO SE SUMINISTRAN. POR FAVOR BUSQUE SIEMPREASESORAMIENTO EN LA ELECCIÓN DE LOS ELEMENTOS DE FIJACIÓN PARA SU APLICACIÓN.
3
glowpear.com Pg 17
Desenvuelva los Paquetes de Tejido Absorbente y colóquelos en los bolsillos en la base de la jardinera.
Utilizandofijacionesadecuadas,montelosSoportes de Pared en la pared en las posiciones marcadas.UseunmínimodedosfijacionesporSoporte de Pared.
Asegúrese de que la jardinera vacía puede deslizarse libremente en los Soportes desdearriba.
Planteecuidadosamentelaposicióndesu(s)jardinera(s)utilizandolaplantillademontajedelaP. 21. Asegúrese de montar las jardineras a nivel.
1
4
2
MINI PARED INSTRUCCIONES DE MONTAJE

glowpear.com Pg 18
Desenvuelva la Barrera de Tela para Raíces ycolóquela dentro de la jardinera cubriendo completamente la base.
La jardinera está ahora lista para llenarla de tierra y plantas. Por favor mire la guía “Plantación y Riego”(P.34).
Deslice la jardinera en los Soportes para Pared.
Utilizando un destornillador con cabeza Phillips introduzca un tornillo en cada Soporte para Pared desde abajo, en el agujero central. No los apriete demasiado.
6
98
7
MINI PARED INSTRUCCIONES DE MONTAJE
5
NOTA: SÍGALAS CUIDADOSAMENTE PARA ASEGURAR QUE EL RIEGO AUTOMÁTICO SE ACTIVA.
1. Añada tierra a los paquetes de tejido absorbente solamente.
2. Compacte la tierra. 3. Riegue abundantemente.
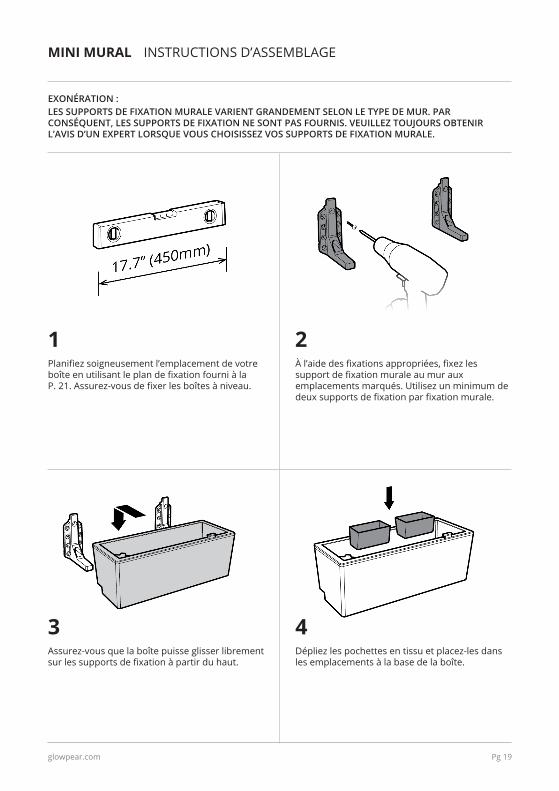
EXONÉRATION :LES SUPPORTS DE FIXATION MURALE VARIENT GRANDEMENT SELON LE TYPE DE MUR. PAR CONSÉQUENT, LES SUPPORTS DE FIXATION NE SONT PAS FOURNIS. VEUILLEZ TOUJOURS OBTENIR L’AVIS D’UN EXPERT LORSQUE VOUS CHOISISSEZ VOS SUPPORTS DE FIXATION MURALE.
3
glowpear.com Pg 19
Dépliez les pochettes en tissu et placez-les dans les emplacements à la base de la boîte.
Àl’aidedesfixationsappropriées,fixezlessupportdefixationmuraleaumurauxemplacements marqués. Utilisez un minimum de deuxsupportsdefixationparfixationmurale.
Assurez-vous que la boîte puisse glisser librement surlessupportsdefixationàpartirduhaut.
Planifiezsoigneusementl’emplacementdevotreboîteenutilisantleplandefixationfourniàlaP.21.Assurez-vousdefixerlesboîtesàniveau.
1
4
2
MINI MURAL INSTRUCTIONS D’ASSEMBLAGE
glowpear.com Pg 20
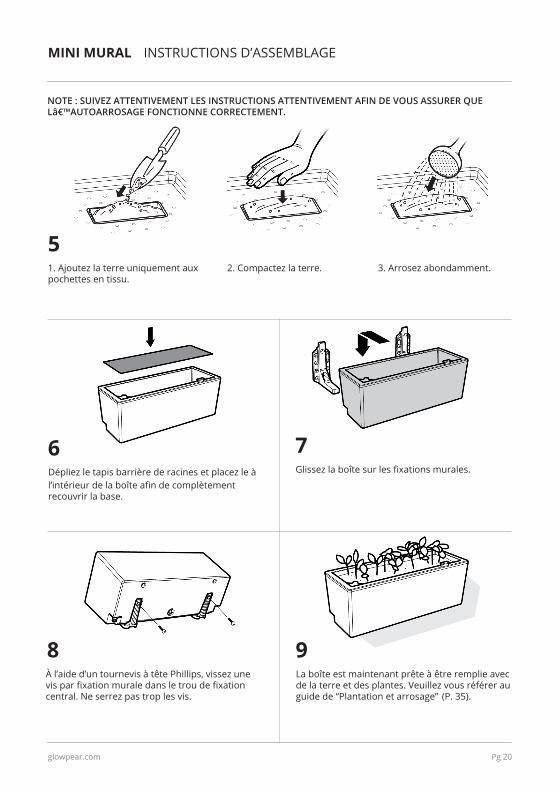
Dépliez le tapis barrière de racines et placez le àl’intérieurdelaboîteafindecomplètementrecouvrir la base.
Laboîteestmaintenantprêteàêtreremplieavecde la terre et des plantes. Veuillez vous référer au guidede“Plantationetarrosage”(P.35).
Glissezlaboîtesurlesfixationsmurales.
Àl’aided’untournevisàtêtePhillips,vissezunevisparfixationmuraledansletroudefixationcentral. Ne serrez pas trop les vis.
6
98
7
5
NOTE : SUIVEZ ATTENTIVEMENT LES INSTRUCTIONS ATTENTIVEMENT AFIN DE VOUS ASSURER QUE L’AUTOARROSAGE FONCTIONNE CORRECTEMENT.
1.Ajoutezlaterreuniquementauxpochettes en tissu.
2. Compactez la terre. 3. Arrosez abondamment.
MINI MURAL INSTRUCTIONS D’ASSEMBLAGE
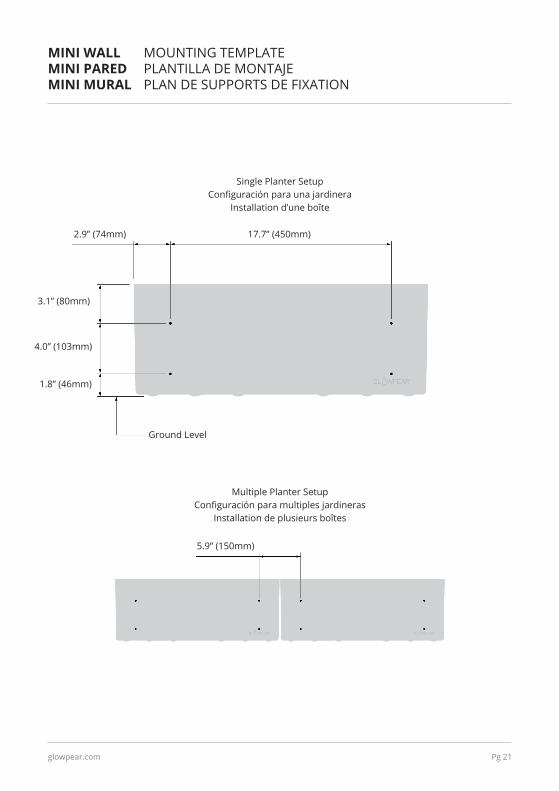
MINI WALL MOUNTING TEMPLATEMINI PARED PLANTILLA DE MONTAJEMINI MURAL PLAN DE SUPPORTS DE FIXATION
5.9”(150mm)
17.7”(450mm)2.9”(74mm)
4.0”(103mm)
1.8”(46mm)
Ground Level
3.1”(80mm)
Multiple Planter SetupConfiguraciónparamultiplesjardineras
Installation de plusieurs boîtes
Single Planter SetupConfiguraciónparaunajardinera
Installation d’une boîte
glowpear.com Pg 21
glowpear.com Pg 22
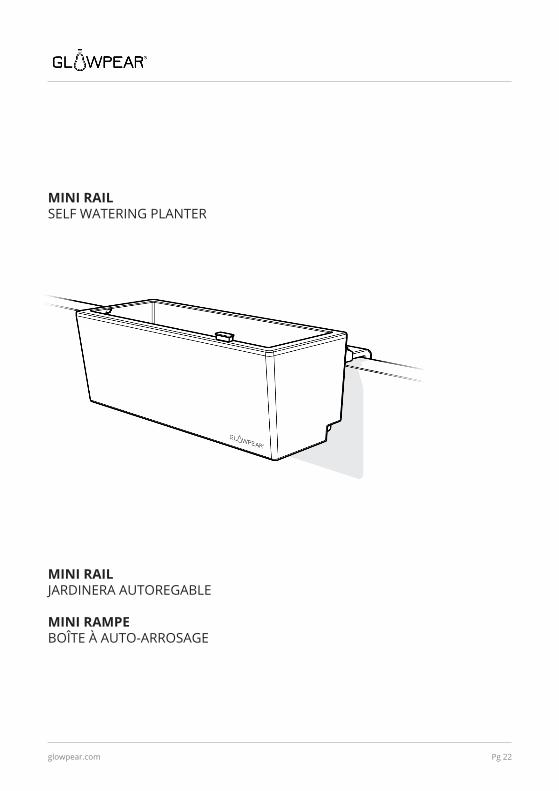
MINI RAILSELF WATERING PLANTER
MINI RAIL JARDINERA AUTOREGABLE
MINI RAMPEBOÎTE À AUTO-ARROSAGE
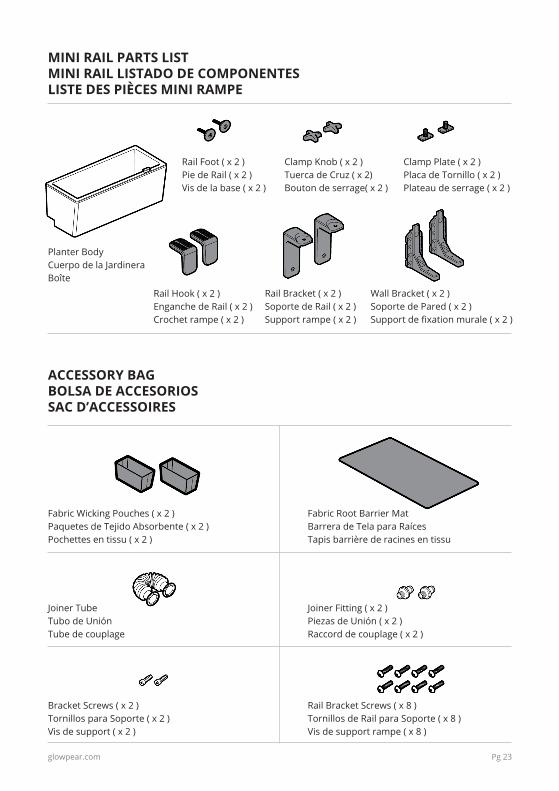
Planter BodyCuerpo de la JardineraBoîte
Fabric Root Barrier MatBarrera de Tela para RaícesTapis barrière de racines en tissu
FabricWickingPouches(x2)PaquetesdeTejidoAbsorbente(x2)Pochettesentissu(x2)
Joiner TubeTubo de UniónTube de couplage
BracketScrews(x2)TornillosparaSoporte(x2)Visdesupport(x2)
RailBracketScrews(x8)TornillosdeRailparaSoporte(x8)Visdesupportrampe(x8)
JoinerFitting(x2)PiezasdeUnión(x2)Raccorddecouplage(x2)
ClampPlate(x2)PlacadeTornillo(x2)Plateaudeserrage(x2)
RailFoot(x2)PiedeRail(x2)Visdelabase(x2)
ClampKnob(x2)TuercadeCruz(x2)Boutondeserrage(x2)
RailBracket(x2)SoportedeRail(x2)Supportrampe(x2)
WallBracket(x2)SoportedePared(x2)Supportdefixationmurale(x2)
RailHook(x2)EnganchedeRail(x2)Crochetrampe(x2)
MINI RAIL PARTS LISTMINI RAIL LISTADO DE COMPONENTESLISTE DES PIÈCES MINI RAMPE
ACCESSORY BAG BOLSA DE ACCESORIOS SAC D’ACCESSOIRES
glowpear.com Pg 23
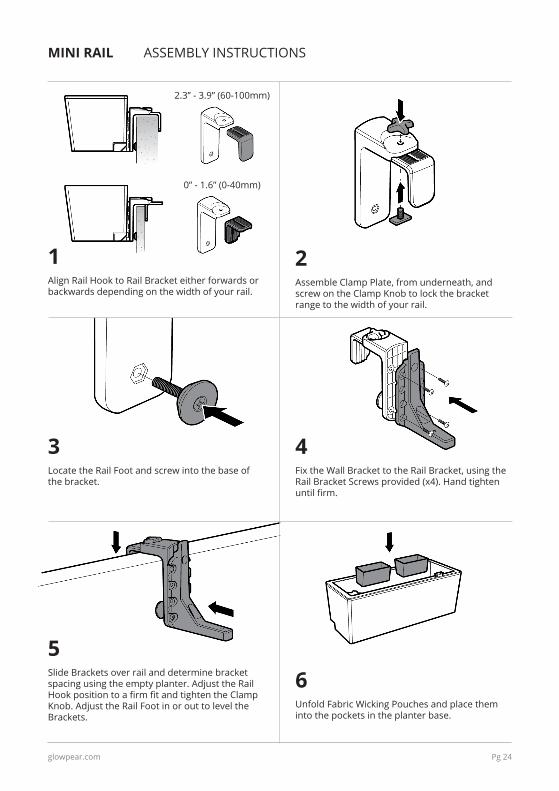
Locate the Rail Foot and screw into the base of the bracket.
Slide Brackets over rail and determine bracket spacing using the empty planter. Adjust the Rail HookpositiontoafirmfitandtightentheClampKnob. Adjust the Rail Foot in or out to level the Brackets.
Unfold Fabric Wicking Pouches and place them into the pockets in the planter base.
FixtheWallBrackettotheRailBracket,usingtheRailBracketScrewsprovided(x4).Handtightenuntilfirm.
Assemble Clamp Plate, from underneath, and screw on the Clamp Knob to lock the bracket range to the width of your rail.
3
56
4
2
MINI RAIL ASSEMBLY INSTRUCTIONS
0”-1.6”(0-40mm)
2.3”-3.9”(60-100mm)
glowpear.com Pg 24
Align Rail Hook to Rail Bracket either forwards or backwards depending on the width of your rail.
1
Unfold Fabric Root Barrier Mat and place inside the planter to completely cover the base.
Planterisnowreadytofillwithsoilandplants.Please refer to “Planting and Watering” guide (P.33).
When ready, slide the planter onto the Rail Bracket Assembly. Using a Phillips head screwdriver, drive one screw per Bracket, from underneath, into the central hole. Do not over-tighten.
8 9
10
MINI RAIL ASSEMBLY INSTRUCTIONS
glowpear.com Pg 25
7
NOTE: FOLLOW CAREFULLY TO ENSURE SELF-WATERING IS ACTIVATED.
1. Add soil to Fabric Wicking Pouches only.
2. Compact the soil. 3. Wet thoroughly.

Coloque el Pie de Rail y atorníllelo a la base del soporte.
Deslice los Soportes por el rail y determinela separación de los soportes utilizando lajardinera vacía. Ajuste la posición del Enganche deRailhastaqueestéfirmeyaprietelaTuercade Cruz. Ajuste el Pie de Rail dentro o fuera para nivelar los soportes.
Desenvuelva los Paquetes de TejidoAbsorbente y colóquelos en los bolsillos en labase de la jardinera.
Fije el Soporte de Pared al Soporte de Rail,utilizando los Tornillos de Rail para Soporte(x4).Apriételosamanohastaqueesténfirmes.
Monte la Placa de Tornillo desde abajo, yatorníllela en la Tuerca de Cruz para bloquearel movimiento del soporte a la anchura de surail.
3
56
4
2
MINI RAIL INSTRUCCIONES DE MONTAJE
0”-1.6”(0-40mm)
2.3”-3.9”(60-100mm)
glowpear.com Pg 26
Alinee el Enganche de Rail con el Soporte de Rail hacia delante o hacia atrás dependiendo de la anchura de su rail.
1
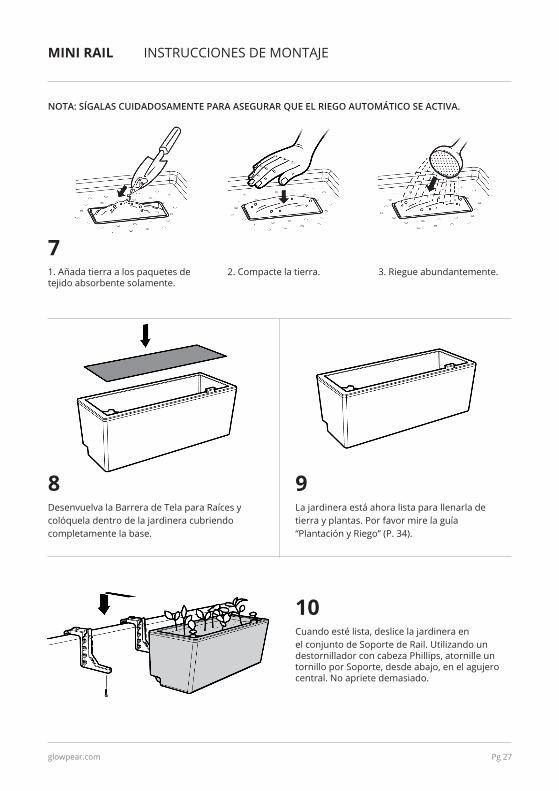
Desenvuelva la Barrera de Tela para Raíces ycolóquela dentro de la jardinera cubriendocompletamente la base.
La jardinera está ahora lista para llenarla detierra y plantas. Por favor mire la guía“PlantaciónyRiego”(P.34).
Cuando esté lista, deslice la jardinera enel conjunto de Soporte de Rail. Utilizando un destornillador con cabeza Phillips, atornille un tornillo por Soporte, desde abajo, en el agujero central. No apriete demasiado.
8 9
10
MINI RAIL INSTRUCCIONES DE MONTAJE
glowpear.com Pg 27
7
NOTA: SÍGALAS CUIDADOSAMENTE PARA ASEGURAR QUE EL RIEGO AUTOMÁTICO SE ACTIVA.
1. Añada tierra a los paquetes de tejido absorbente solamente.
2. Compacte la tierra. 3. Riegue abundantemente.
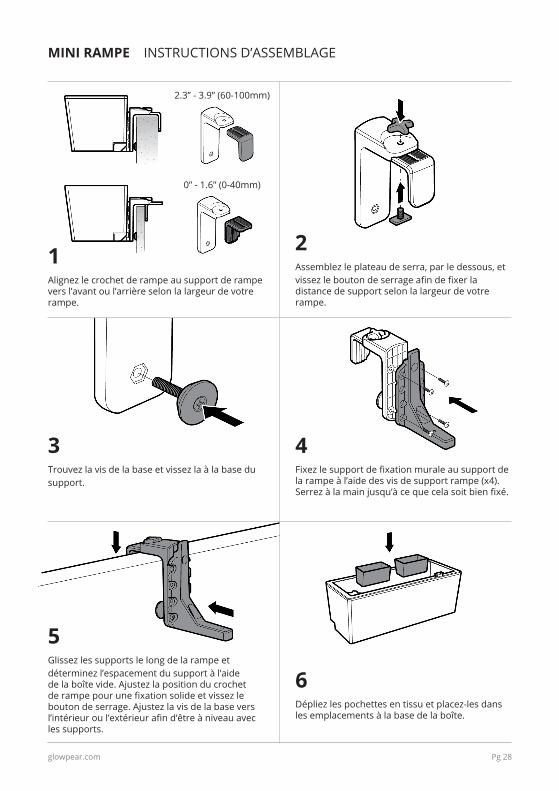
Trouvez la vis de la base et vissez la à la base dusupport.
Glissez les supports le long de la rampe etdéterminez l’espacement du support à l’aide de la boîte vide. Ajustez la position du crochet derampepourunefixationsolideetvissezlebouton de serrage. Ajustez la vis de la base vers l’intérieuroul’extérieurafind’êtreàniveauavecles supports.
Dépliez les pochettes en tissu et placez-les dans les emplacements à la base de la boîte.
Fixezlesupportdefixationmuraleausupportdelarampeàl’aidedesvisdesupportrampe(x4).Serrezàlamainjusqu’àcequecelasoitbienfixé.
Assemblez le plateau de serra, par le dessous, etvissezleboutondeserrageafindefixerladistance de support selon la largeur de votre rampe.
3
5
6
4
2
MINI RAMPE INSTRUCTIONS D’ASSEMBLAGE
glowpear.com Pg 28
0”-1.6”(0-40mm)
2.3”-3.9”(60-100mm)
Alignez le crochet de rampe au support de rampe vers l’avant ou l’arrière selon la largeur de votre rampe.
1
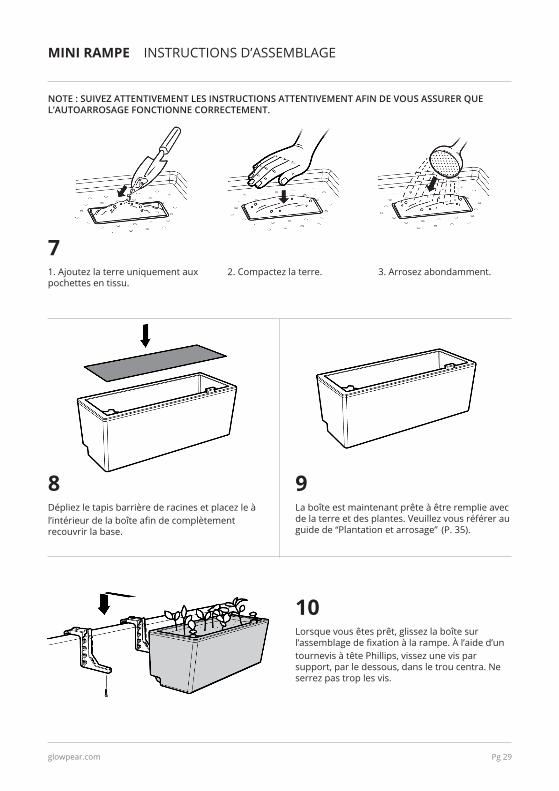
Dépliez le tapis barrière de racines et placez le àl’intérieurdelaboîteafindecomplètementrecouvrir la base.
Laboîteestmaintenantprêteàêtreremplieavecde la terre et des plantes. Veuillez vous référer au guidede“Plantationetarrosage”(P.35).
Lorsquevousêtesprêt,glissezlaboîtesurl’assemblagedefixationàlarampe.Àl’aided’untournevisàtêtePhillips,vissezunevisparsupport, par le dessous, dans le trou centra. Ne serrez pas trop les vis.
8 9
10
MINI RAMPE INSTRUCTIONS D’ASSEMBLAGE
glowpear.com Pg 29
7
NOTE : SUIVEZ ATTENTIVEMENT LES INSTRUCTIONS ATTENTIVEMENT AFIN DE VOUS ASSURER QUE L’AUTOARROSAGE FONCTIONNE CORRECTEMENT.
1.Ajoutezlaterreuniquementauxpochettes en tissu.
2. Compactez la terre. 3. Arrosez abondamment.
glowpear.com Pg 30
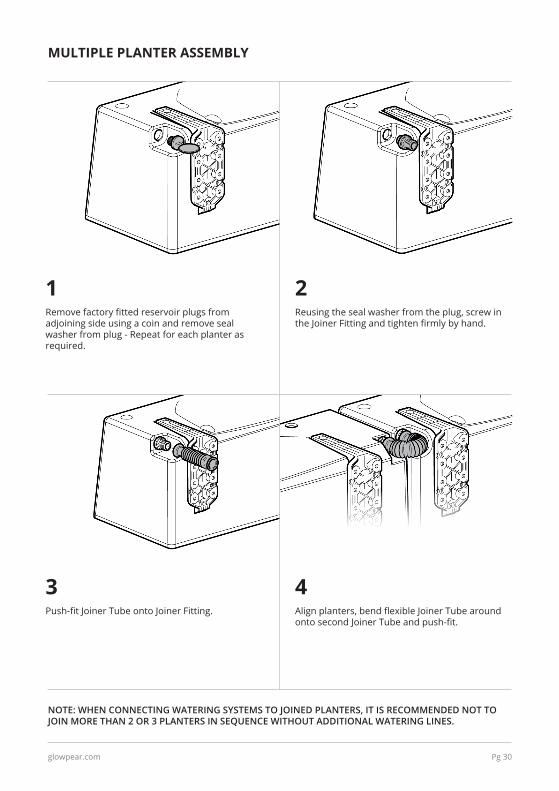
MULTIPLE PLANTER ASSEMBLY
Push-fitJoinerTubeontoJoinerFitting. Alignplanters,bendflexibleJoinerTubearoundontosecondJoinerTubeandpush-fit.
Reusing the seal washer from the plug, screw in theJoinerFittingandtightenfirmlybyhand.
Removefactoryfittedreservoirplugsfromadjoining side using a coin and remove seal washer from plug - Repeat for each planter as required.
3 4
21
NOTE: WHEN CONNECTING WATERING SYSTEMS TO JOINED PLANTERS, IT IS RECOMMENDED NOT TO JOIN MORE THAN 2 OR 3 PLANTERS IN SEQUENCE WITHOUT ADDITIONAL WATERING LINES.
glowpear.com Pg 31
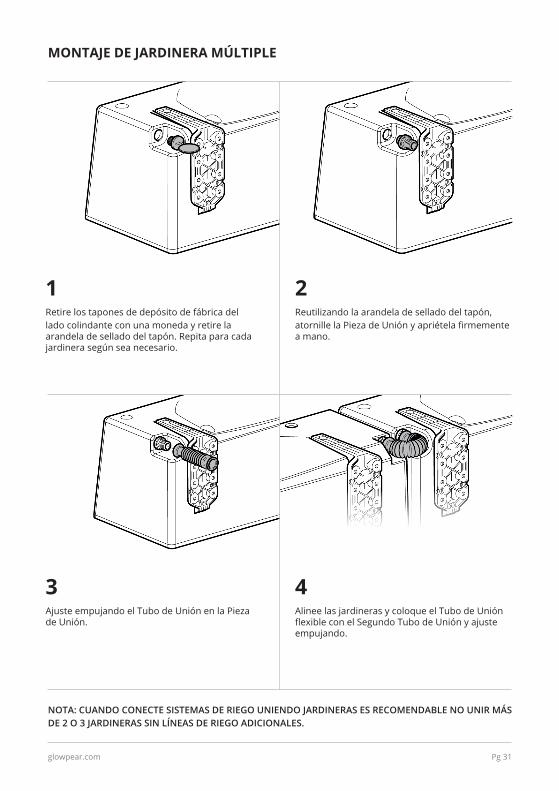
MONTAJE DE JARDINERA MÚLTIPLE
Ajuste empujando el Tubo de Unión en la Pieza de Unión.
Alinee las jardineras y coloque el Tubo de Unión flexibleconelSegundoTubodeUniónyajusteempujando.
Reutilizando la arandela de sellado del tapón,atornillelaPiezadeUniónyapriételafirmementea mano.
Retire los tapones de depósito de fábrica dellado colindante con una moneda y retire la arandela de sellado del tapón. Repita para cada jardinera según sea necesario.
3 4
21
NOTA: CUANDO CONECTE SISTEMAS DE RIEGO UNIENDO JARDINERAS ES RECOMENDABLE NO UNIR MÁSDE 2 O 3 JARDINERAS SIN LÍNEAS DE RIEGO ADICIONALES.
glowpear.com Pg 32
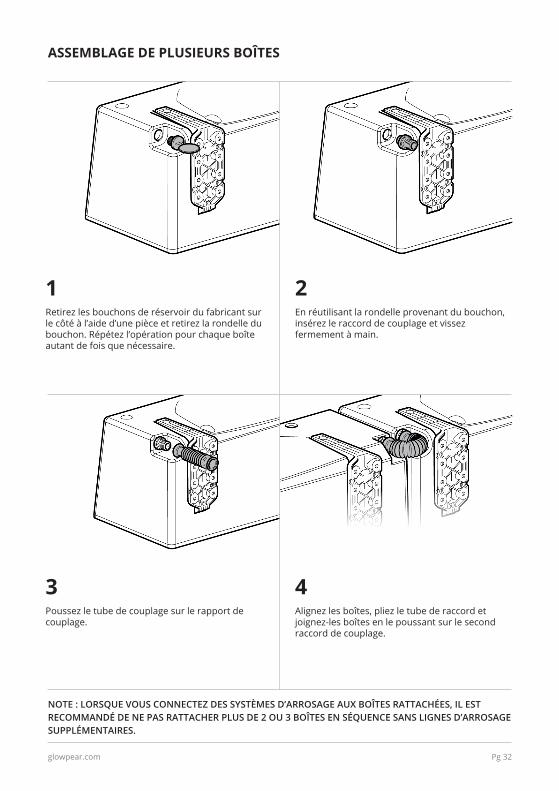
ASSEMBLAGE DE PLUSIEURS BOÎTES
Poussez le tube de couplage sur le rapport de couplage.
Alignez les boîtes, pliez le tube de raccord et joignez-les boîtes en le poussant sur le second raccord de couplage.
En réutilisant la rondelle provenant du bouchon, insérez le raccord de couplage et vissez fermement à main.
Retirez les bouchons de réservoir du fabricant sur le côté à l’aide d’une pièce et retirez la rondelle du bouchon. Répétez l’opération pour chaque boîte autant de fois que nécessaire.
3 4
21
NOTE : LORSQUE VOUS CONNECTEZ DES SYSTÈMES D’ARROSAGE AUX BOÎTES RATTACHÉES, IL ESTRECOMMANDÉ DE NE PAS RATTACHER PLUS DE 2 OU 3 BOÎTES EN SÉQUENCE SANS LIGNES D’ARROSAGESUPPLÉMENTAIRES.
* INDOOR USE - ENSURE DRIP TRAYS ARE FITTED. Take care not to overfill, water reservoir maximum capacity is 1.2 gallons (4.5 litres). Stop watering immediately when level indicator is raised, and regularly check / empty any overflow from Drip Trays.
glowpear.com Pg 33
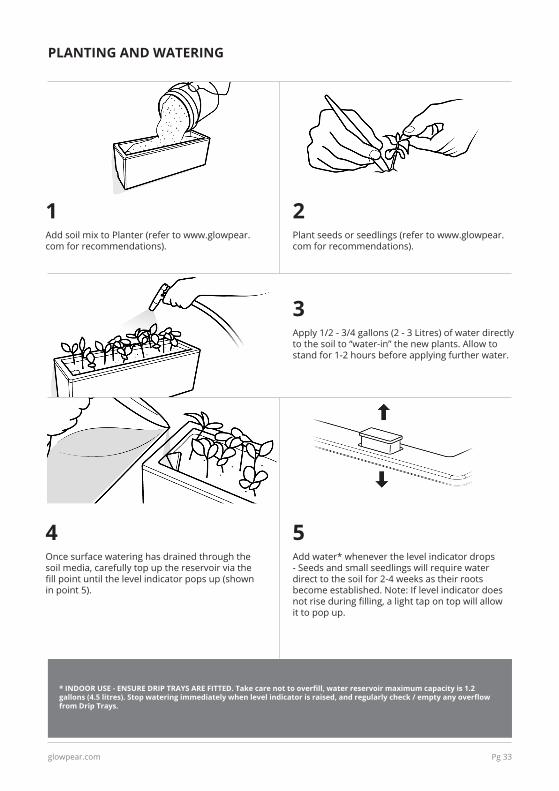
PLANTING AND WATERING
Add water* whenever the level indicator drops - Seeds and small seedlings will require water direct to the soil for 2-4 weeks as their roots become established. Note: If level indicator does notriseduringfilling,alighttapontopwillallowit to pop up.
5Once surface watering has drained through the soil media, carefully top up the reservoir via the fillpointuntilthelevelindicatorpopsup(showninpoint5).
4
Apply1/2-3/4gallons(2-3Litres)ofwaterdirectlyto the soil to “water-in” the new plants. Allow to stand for 1-2 hours before applying further water.
3
AddsoilmixtoPlanter(refertowww.glowpear.comforrecommendations).
Plant seeds or seedlings (refer to www.glowpear.comforrecommendations).
1 2

* USO INTERIOR – ASEGÚRESE DE QUE LAS BANDEJAS DE GOTEO ESTÁN PUESTAS. Tenga cuidado no llenar en exceso el depósito de agua cuya capacidad máxima es de 1,2 galones (4,5 litros). Pare de regar inmediatamente cuando se levante el indicador de nivel y compruebe/vacíe regularmente cualquier exceso de las Bandejas de Goteo.
glowpear.com Pg 34
PLANTACIÓN Y RIEGO
Añada agua* cuando el indicador de nivel caiga.Las semillas y pequeñas plántulas requerirán agua directamente en el suelo durante entre 2 y 4 semanas mientras se asientan sus raíces. Nota: si el indicador no se levanta durante el riego, un golpecito por arriba le permitirá saltar.
5Unavezsehaabsorbidoelaguasuperficial,llene con cuidado el depósito a través del punto de llenado hasta que el indicador de nivel salte (mostradoenelpunto5).
4
Aplique1/2-3/4galones(2-3litros)deaguadirectamente en la tierra para regar las nuevas plantas. Espere entre una y dos horas antes de aplicar más agua.
3
Añada mezcla de tierra a la Jardinera (veawww.glowpear.compararecomendaciones).
Plante semillas o plántulas (vea www.glowpear.compararecomendaciones).
1 2
* USAGE INTÉRIEUR — ASSUREZ-VOUS QUE LES PLATEAUX D’ÉGOUTTEMENT SONT INSTALLÉS. Faites attention de ne pas trop remplir. La capacité maximale du réservoir est de 1,2 gallons (4,5 litres). Arrêtez immédiatement d’arroser lorsque l’indicateur d’eau est surélevé et vérifiez réulièrement les plateaux d’égouttement afin de vider les surplus.
glowpear.com Pg 35
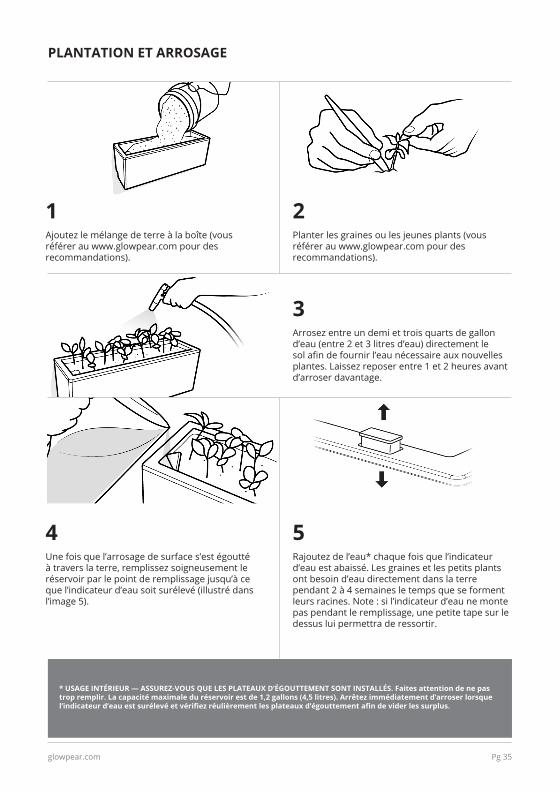
PLANTATION ET ARROSAGE
Rajoutez de l’eau* chaque fois que l’indicateur d’eau est abaissé. Les graines et les petits plants ont besoin d’eau directement dans la terre pendant 2 à 4 semaines le temps que se forment leurs racines. Note : si l’indicateur d’eau ne monte pas pendant le remplissage, une petite tape sur le dessus lui permettra de ressortir.
5Une fois que l’arrosage de surface s’est égoutté à travers la terre, remplissez soigneusement le réservoir par le point de remplissage jusqu’à ce que l’indicateur d’eau soit surélevé (illustré dans l’image5).
4
Arrosez entre un demi et trois quarts de gallon d’eau(entre2et3litresd’eau)directementlesolafindefournirl’eaunécessaireauxnouvellesplantes. Laissez reposer entre 1 et 2 heures avant d’arroser davantage.
3
Ajoutez le mélange de terre à la boîte (vous référer au www.glowpear.com pour des recommandations).
Planter les graines ou les jeunes plants (vous référer au www.glowpear.com pour des recommandations).
1 2
Periodic maintenance and cleaning will allow the product to keep its original look and lengthen the duration of its performance.
The Glowpear Mini planter is made of HDPE plastic resin that has been UV protected so that it survives outdoor environments. You can clean the plastic surfaces of the planter by hand with soap and warm water. For certain hard to lift stains additional cleaning power in the form of a 1/3 bleach and 2/3 water solutionmayberequired.Thissolutionshouldnotaffectproductcolour.DONOTuseothersolvents,chemicals, high heat, high pressure washers, or harsh abrasive scouring pads or brushes.
During times of cooler weather or when used indoors, the planter may use minimal water over an extendedperiodoftime.Insuchcircumstancesyoumayliketoflushthewaterreservoirtopreventtheencapsulatedwaterfrombecomingstagnant.Onceevery3-6monthsshouldbesufficient.Inordertoflushthereservoir,simplyremoveoneplugfromeachendoftheplanter(outside)andallowthecontentsofthereservoirtodrain.Oncedrainingiscomplete,useahoseatoneendtoflushoutthereservoirforaminuteor two, allowing the water to run freely from the opposite end. Once the reservoir has again been allowed todrain,re-applytheplugs(ensuringtheyarefittedtightly),andtheplanterisreadytobere-filledperyournormal watering method.
Espagnol Un mantenimiento y una limpieza periódica permitirán que el producto mantenga su aspecto original y se alargue la duración de su rendimiento.
La jardinera Glowpear Mini está hecha de resina de plástico HDPE que ha sido protegida contra los rayos UVparaqueresistaenambientesalairelibre.Puedelimpiarlassuperficiesdeplásticodelajardineraa mano con agua tibia y jabón. Para algunas manchas difíciles de quitar puede limpiar también con una solución de lejía y agua en proporciones 1/3 y 2/3. Esta solución no debe afectar al color del producto. NO utilizar otros disolventes, productos químicos, calor intenso, lavadoras de alta presión o estropajos abrasivos o cepillos.
Durante las épocas de clima más frío o cuando se utiliza en interiores, la jardinera puede utilizar un mínimo de agua durante un período prolongado de tiempo. En tales circunstancias, es posible que desee vaciar el depósito de agua para evitar que el agua se quede estancada. Una vez cada 3-6 meses debería sersuficiente.Paravaciareldepósito,bastaconquitaruntapóndecadaextremodelajardinera(enelexterior)ypermitirqueelcontenidodeldepósitosedrene.Unavezconcluidoelvaciado,utiliceunamangueraenunextremoparaenjuagareldepósitoduranteunminutoodos,permitiendoqueelaguasalgalibrementeporelextremoopuesto.Unavezqueeldepósitosehapodidovaciar,vuelvaaponerlostapones(asegurándosedequeestánbienajustados),ylajardineraestarálistaparaserllenadadenuevopor el método de riego normal.
Français Un nettoyage et un entretien périodique permettra au produit de conserver son aspect d’origine et prolonger sa durée d’opération.
La boîte Mini de Glowpear est fabriquée à partir de résine plastique PEHD qui a été protégée contre les UVsafindesurvivreauxenvironnementsextérieurs.Vouspouveznettoyerlessurfacesplastiquesdela boîte à la main avec du savon et de l’eau chaude. Pour l’enlèvement de certaines taches tenaces, une puissancedenettoyageadditionnellesousformed’unesolutionuntiersblanchissantetdeuxtiersd’eaupourraitêtrenécessaire.Cettesolutionnedevraitpasaffecterlacouleurduproduit.N’UTILISEZPASd’autres solvants, substances chimiques, de température élevée, de nettoyeur à pression ou de tampons ou de brosses à récurer abrasives.
Pendant les périodes où la température est plus douce ou lorsqu’utilisé à l’intérieur, la boîte peu utiliser
CARE INSTRUCTIONSINSTRUCTIONES DE CONSERVACIÓNINSTRUCTIONS D’ENTRETIEN
glowpear.com Pg 36

glowpear.com Pg 37
une quantité minimale d’eau sur une longue période. Dans de telles circonstances, il se peut que vous vouliezchangerl’eauduréservoirafind’éviterquecelle-cinedeviennestagnante.Unefoistousles3ou6moisdevraitsuffire.Afindevisiterleréservoir,vousn’avezqu’àretirerunbouchondechaqueboutdelaboîte(àl’extérieur)etpermettreaucontenuduréservoirdes’écouler.Unefoisledrainageeffectué,utilisezunboyaud’uncôtéafinderincerleréservoirpouruneminuteoudeux,permettantàl’eaudes’écoulerlibrementàl’autreextrémité.Unefoisledrainageduréservoirunesecondefoiseffectué,replacezlesbouchons(envousassurantqu’ilssoientbienenplace)etlaboîteseraprêteàêtrerempliecommevouslefaites habituellement.