INSTRUCTIONS FOR USE IOS Intraoral
61
IOS Intraoral Scanner INSTRUCTIONS FOR USE
Transcript of INSTRUCTIONS FOR USE IOS Intraoral

GC EUROPE N.V.Head Office
Researchpark Haasrode-Leuven 1240Interleuvenlaan 33B-3001 Leuven
Tel. +32.16.74.10.00Fax. [email protected]
http://www.gceurope.com
9406
23
GC Europe N.V.Interleuvenlaan 33
B-3001 Leuven
AA
DVA
IO
S In
trao
ral S
cann
er -
INST
RU
CT
ION
S FO
R U
SE
IOS Intraoral Scanner
INSTRUCTIONS FOR USE

2
GC AADVA™
IOS
1 Table of Contents
1 Table of Contents ................................................................................................................................... 2
2 Preface ...................................................................................................................................................... 6
3 Manual for AADVA IOS .................................................................................................................... 7
4 Symbols and warnings .................................................................................................................... 7
5 Product description ........................................................................................................................... 7
6 USB port for data storage and Ethernet connection ...................................................... 7
7 Indications ............................................................................................................................................. 8
8 User profile ............................................................................................................................................ 8
9 Limitation of patients ....................................................................................................................... 8
10 Unauthorised parts ...................................................................................................................... 8
11 Inspection, Repairs and Replacement .............................................................................. 9
12 Odontogram used ....................................................................................................................... 10
13 Copyrights ....................................................................................................................................... 10
14 Intellectual Property Rights - IP ........................................................................................ 10
15 Warranty .......................................................................................................................................... 10
16 Limitation of liability ................................................................................................................. 11
17 License manager ......................................................................................................................... 11
18 Installation ..................................................................................................................................... 11
19 GC AADVA IOS components .................................................................................................. 11
20 Warnings, safety regulations and other notes ........................................................... 18
21 Starting, Terminating and Disconnecting the device ............................................. 21
21.1 Starting the device ............................................................................................................................ 21
21.2 Terminating the device ..................................................................................................................... 21
21.3 Disconnecting the device .................................................................................................................. 21
22 Graphical user interface (GUI) ............................................................................................ 21
22.1 Screen layout structure ..................................................................................................................... 21
22.2 Settings ............................................................................................................................................. 24
22.3 Help menu ......................................................................................................................................... 25
22.3.1 Downloads ............................................................................................................................... 26
22.3.2 FAQ .......................................................................................................................................... 26
22.4 User management ............................................................................................................................. 26
22.5 Patient database ............................................................................................................................... 27
22.5.1 New Patient ............................................................................................................................. 27
22.5.2 Existing patient ........................................................................................................................ 27
1
GC Aadva™ IOS

3
GC AADVA™
IOS
22.6 Scan section ...................................................................................................................................... 28
22.7 How to scan ...................................................................................................................................... 29
22.8 Bite scan ............................................................................................................................................ 34
22.9 Margin line definition ........................................................................................................................ 35
22.10 Bite registration............................................................................................................................ 36
22.11 Restoration tab ............................................................................................................................ 39
22.11.1 Patient tab ............................................................................................................................... 39
22.12 Delivery tab .................................................................................................................................. 41
22.13 Attachments tab ........................................................................................................................... 42
22.14 Summary tab ................................................................................................................................ 42
22.15 Data transfer Tab ......................................................................................................................... 44
23 IOS Cleaning and disinfection procedures ................................................................... 44
24 GC AADVA Cradle Inlays ......................................................................................................... 45
24.1 Insertion and removal ....................................................................................................................... 45
24.2 Cleaning and sterilization procedures ............................................................................................... 46
25 Safety / Guidelines / Technology...................................................................................... 48
26 Care with the Unit ....................................................................................................................... 49
27 Information for electromagnetic compatibility (EMC) .......................................... 50
28 Electrostatic discharge (ESD) .............................................................................................. 53
29 Identification plate and labelling ...................................................................................... 56
30 Device specifications and classifications ...................................................................... 56
31 Transport and packaging ........................................................................................................ 58
32 Environment ................................................................................................................................... 59
33 Troubleshooting ........................................................................................................................... 60
34 IOS Customer Service – GC Digital Services Team .................................................. 61
2

4
GC AADVA™
IOS
List of Figures
Figure 1: Monitor movement ..................................................................................................................................................... 13 Figure 2: Hand piece/cradle inlay .............................................................................................................................................. 14 Figure 3 : GC AADVA Cradle Inlay .............................................................................................................................................. 14 Figure 4: Scanner Application Device (Hand Piece) .................................................................................................................... 14 Figure 5: Monitor Arm ............................................................................................................................................................... 15 Figure 6: Transport position ...................................................................................................................................................... 16 Figure 7: Lock/unlock mechanism ............................................................................................................................................. 16 Figure 8: Wheel ......................................................................................................................................................................... 16 Figure 9: Brake mechanism ....................................................................................................................................................... 16 Figure 10: IOS Power switch ...................................................................................................................................................... 17 Figure 11: Back of IOS Cart ........................................................................................................................................................ 17 Figure 12: Ventilation apertures ................................................................................................................................................ 17 Figure 13: Screenshot Log-in ..................................................................................................................................................... 22 Figure 14: Screenshot Log-in 2................................................................................................................................................... 22 Figure 15: Screenshot navigation buttons ................................................................................................................................. 23 Figure 16: Screenshot icons ....................................................................................................................................................... 23 Figure 17: Screenshot action features ....................................................................................................................................... 24 Figure 18: Settings icon ............................................................................................................................................................. 24 Figure 19: 'Admin' and 'Log-out' button .................................................................................................................................... 26 Figure 20: User administration .................................................................................................................................................. 26 Figure 21: Screenshot New Patient ............................................................................................................................................ 27 Figure 22: Screenshot Existing Patient....................................................................................................................................... 28 Figure 23: Screenshot Scan Section ........................................................................................................................................... 29 Figure 24: Ideal distance ........................................................................................................................................................... 30 Figure 25: Scan parallel to occlusal plane .................................................................................................................................. 30 Figure 26: Scan flow for half arch (Single quadrant) ................................................................................................................. 30 Figure 27: Screenshot screen layout .......................................................................................................................................... 31 Figure 28: Screen layout 2 ......................................................................................................................................................... 33 Figure 29: Screenshot layout 3 .................................................................................................................................................. 33 Figure 30: Screenshot Procedure ............................................................................................................................................... 34 Figure 31: Screenshot Bite Scan ................................................................................................................................................. 35 Figure 32: Screenshot Margin Line ............................................................................................................................................ 36 Figure 33: Screenshot Bite Registration ..................................................................................................................................... 37 Figure 34: Screenshot Bite Registration 2 .................................................................................................................................. 38 Figure 35: Screenshot Bite Registration 3 .................................................................................................................................. 38 Figure 36: Screenshot Bite Registration 4 .................................................................................................................................. 39 Figure 37: Screenshot Completing Data .................................................................................................................................... 40 Figure 38: Screenshot Restoration Tab ...................................................................................................................................... 41 Figure 39: Screenshot Delivery Tab ............................................................................................................................................ 41 Figure 40: Screenshot Attachments Tab .................................................................................................................................... 42 Figure 41: Screenshot Summary Tab ......................................................................................................................................... 43 Figure 42: Screenshot PDF form ................................................................................................................................................ 43 Figure 43: Screenshot Data Transfer Tab .................................................................................................................................. 44 Figure 44: Removal of the hand piece ....................................................................................................................................... 45 Figure 45: Removal of cradle inlay ............................................................................................................................................ 46 Figure 46: Identification plate ................................................................................................................................................... 56 Figure 47: Transporting the IOS device ...................................................................................................................................... 59
List of tables
Table 1: Settings General _______________________________________________________________________________ 25 Table 2: Settings Scan __________________________________________________________________________________ 25 Table 3: Settings Model ________________________________________________________________________________ 25
3
GC Aadva™ IOS

5
GC AADVA™
IOS
Table 4: Settings Export ________________________________________________________________________________ 25 Table 5: electromagnetic emissions _______________________________________________________________________ 51 Table 6: electromagnetic immunity _______________________________________________________________________ 52 Table 7: Recommended separation distances between portable and mobile RF communications equipment and the AADVA IOS _________________________________________________________________________________________________ 53 Table 8: Electromagnetic emissions and immunity ___________________________________________________________ 56 Table 9: Device specifications ____________________________________________________________________________ 57 Table 10: Cable specifications ____________________________________________________________________________ 57
4

6
GC AADVA™
IOS
2 Preface
Dear IOS Customer,
Thank you for purchasing AADVA IOS and its related software from GC Europe n.v.
This device and its software enable you to produce computer-assisted dental restorations. Improper use and handling can create hazards and cause damage. Therefore, please read and carefully follow this manual and the relevant operating instructions. Always keep them within easy reach.
These operating instructions, for the AADVA IOS have been compiled with the greatest care and contain information which ensures safe operation and long service life. Ensure that all users read the operating instructions completely and are trained on AADVA IOS.To prevent personal injury or material damage, it is important to read all safety information carefully.
In order to master the system safely, you should train on plaster model without sectioned dies.
Should you discover mistakes and/or a lack of information, GC Europe N.V. would be pleased to hear your feedback.
The begin date of the warranty is the day of activation of the IOS device.
The GC Europe N.V. AADVA IOS Team
5
GC Aadva™ IOS
Dear IOS Customer,
We would like to thank you for purchasing our GC Aadva Intraoral Scanner.
Our GC Aadva IOS allows you to capture 3D dental impressions.
Please carefully read and follow the instructions for use described in this manual in order to safely operate the GC Aadva IOS. Improper use of the device will result in personal injury and hazardous situations.
When multiple users are operating the device, make sure that all users read these instructions and are trained prior to operating the GC Aadva IOS. We advise you, prior to scanning a patient, to scan gypsum models without sectioned dies to fully master our GC Aadva IOS.
Store this manual where you can easily access it when you would need help and/or information.
The begin date of the warranty is the day of activation of your IOS device.
GC Europe N.V.

7
GC AADVA™
IOS
3 Manual for AADVA IOS
The AADVA IOS manual is intended for health professionals (including but not limited to dentists). The completeness and accuracy of this manual have been tested to the best of our knowledge. The information within may be subject to change without prior notice.The unit may be operated only by health professionals (see chapter 8 - "User profile”).
This document is the property and copyright of GC Europe N.V., therefore this manual may not be used in whole or in part, copied or reproduced in any form without the express written permission of GC Europe N.V. The information in this manual is subject to change without notice.
This manual provides information on the proper use of the system, information for the maintenance, handling of the system components, information on cleaning and disinfection as well as safety. In addition, instructions for the operation of the system and for the creation of scans are included. Please thoroughly read and follow all safety information in this manual before and during use of this device. Keep this manual for future reference.
4 Symbols and warnings
WARNING MESSAGE
Indicates a potentially hazardous situation, which could result in death or serious injury if not avoided.
CAUTION
Indicates a potentially hazardous situation, which could result in minor or moderate injury if not avoided.
PLEASE NOTE
Indicates a potentially hazardous situation, which could result in property damage.
5 Product description
The GC AADVA IOS creates 3D images of individual teeth or groups of teeth and generates standard triangulation language (herein after referred to as ‘STL’) files using software for further machine processing in e.g. dental milling machines.
6 USB port for data storage and Ethernet connection
The STL data created can be loaded onto external USB (Universal Serial Bus) storage through the USB 3.0 ports. Any misuse of data, viruses, data corruption etcetera due to the uploading of cases via a USB stick is the sole responsibility of the dental professional.
6

8
GC AADVA™
IOS
The USB ports are not allowed to be used with an external power supply. An Ethernet isolator is included within the system and the Ethernet connection can be used without an additional isolator.
7 Indications
The AADVA IOS is an optical impression system with which the topographical properties of teeth are recorded. The IOS device can record bite scans and can scan single and/or multiple elements up to maximum half arch (such as single quadrant and anterior region).
The obtained scans allow the validation of the preparation, definition of margin lines, evaluation of bite registration and creation of 3D model. The simulated model can then be used to create indirect restorations such as veneers, inlays, on lays, single crowns and bridges of up to 4 elements.
The GC Aadva IOS is not be used to mold or manufacture computer-aided restorations. Aadva IOS merely provides the digital model and transfers the model data to an external tool (not part of Aadva IOS).
Other possible uses and applications contrary to the intended use, changes to the components and/or the installation of unauthorized parts may considerably jeopardize safety, reliability and function of the IOS. Any of the above will cause the warranty provided by GC Europe N.V. to void with immediate effect and will transfer responsibility for personal injury and property damage exclusively to the health professional operating the IOS.
8 User profile
The IOS shall be handled and operated by the health professionals, in compliance with the national applicable legislation. It is assumed that the users are properly trained and have clinical experience with popular handsets in dentistry as well as the prevention of cross-contamination and disinfection procedures.
9 Limitation of patients
AADVA IOS should be used with care for:
• Intubated patients;• Schizophrenia in patients;• Major depressed or manic depressed patients;• Patients affected by severe central nervous system pathologies;• Mentally ill patients;• Patients with serious or unstable medical illness including cardiovascular
diseases.• Neurological disease and immunodepressed patients with generalized anxiety
disorder.
10 Unauthorised parts
Copies of high-quality spare parts and additional components have become increasingly common. Counterfeit devices and/or spare parts are frequently indistinguishable from
7
GC Aadva™ IOS
9
GC AADVA™
IOS
the originals to the naked eye. However, please note that in the case of counterfeit products, the material may not meet the requirements for health and safety.
In case repair and/or replacement is deemed to be necessary, please read chapter 11 –“Inspection, Repairs and Replacement”.
The PC component of the AADVA IOS constitutes an integral part of the AADVA IOS and may not be used for any purposes other than for the functionality of the AADVA IOS itself. No components (whether hardware and/or software) and/or other applications may be changed, added or removed.
GC Europe N.V. and/or the GC Europe dealers/distributors approved and appointed by GC Europe N.V. are responsible for delivering and installing patches, fixes, service packs and software upgrades related to the installed software through the Aadva Digital Service Platform (herein after referred to as ‘DSP’) in order to guarantee the proper functioningof the AADVA IOS during the warranty period or in accordance with the maintenance contract, if the latter is concluded.
GC Europe N.V. is not deemed to have knowledge of or to take into account the specific use that will be made by the IOS Customer of the purchased goods, and thus GC EuropeN.V. cannot be held liable for any misuse by the IOS Customer. The IOS Customer is expected to use the purchased good in accordance with its intended use (See chapter 6 –“Indications”).
11 Inspection, Repairs and Replacement
Daily inspection by the heath professional:
Daily visual inspection of AADVA IOS includes:
• Intactness/integrity of cables;• Intactness/integrity of AADVA IOS;• Unusual running noises, vibrations, etc…• Correct functioning of all parts;• Illuminating power of scanner.
If any of the above items is observed, please contact your local GC Digital Services Team (see chapter 34 – “IOS Customer Service – GC Digital Services Team”)
Maintenance and repair of parts by third parties is forbidden and voids the warranty with immediate effect. Repair and/or replacements needs to be executed exclusively by GC Europe N.V. and/or GC Europe authorized third party dealers.
The expected service life of the device is 10000 hours in operation (5 years).
8

10
GC AADVA™
IOS
WARNING MESSAGE
Upon sending/returning the Aadva IOS to GC Europe, it must be cleaned and disinfected in a correct way. Effective disinfectants consist out of a combination of ethanol and didecyldimethyl-ammonium chloride. (FD 333 and FD 333 wipes from DÜRR Dental AG1 (Bietigheim-Bissingen, Germany).
WARNING MESSAGE
Improper and unauthorized repairs represent considerable danger to the user and will void the warranty with immediate effect. Only the GC Digital Services Team of GC Europe N.V. and/or authorized third parties may service the IOS device.
12 Odontogram used
The software uses the international odontogram (FDI).
13 Copyrights
Copyright © GC Europe n.v. All right reserved.
This document is the property and copyright of GC Europe N.V., therefore this manual may not be used in whole or in part, copied or reproduced in any form without the express written permission of GC Europe N.V. The contents may only be copied for private, in-house use.
14 Intellectual Property Rights - IP
All Intellectual property rights to the GC Aadva IOS (including but not limited to patents and trademarks) are the exclusive property of GC.
Microsoft® , Windows 8® and Windows™ are trademarks of Microsoft Corporation.
15 Warranty
GCE is liable for non-conformity (hard- and software), hidden defects and manufacturing defects to the Aadva IOS that manifest themselves within a period of one year from the activation date by the GCE digital services team. The warranty only covers deliveries made and activations by GCE or an appointed service provider by GCE. Please refer to the Aadva IOS general terms and conditions for further information.
1 FD 333 and FD 333 wipes are products from Dürr Dental. Dürr Dental is not a trademark of GC.
9
GC Aadva™ IOS

11
GC AADVA™
IOS
The user/health professional is solely responsible for the application and the intended use of the product. For any damage to the product that occurs within the warranty period, please refer to the Aadva IOS general terms and conditions.
Notice : Any attempt to open the device or service it yourself may cause damage to the device which may lead to personal injury. Any attempt to open the device or service it yourself also voids the warranty with immediate effect.
16 Limitation of liability
To the extent permitted by law, GC Europe N.V. rejects any liability for any direct, indirect or consequential damages or loss of any kind in connection with this product, regardless of whether the legal demands made are related to assets or liabilities or are of other nature.
17 License manager
The license manager manages the IOS software licence, which will allow the user to access and work on the GC AADVA IOS and the GC AADVA DSP.
Depending on the chosen duration of the license, the license will be active for 1 or 3 years. One month prior to the expiration date, a notice will be given to the user, stating that the license will expire soon. The amount of days left to expiration can be viewed in the settings menu.
The user can extend their license by paying the invoice sent by GC Europe N.V. If the invoice is not paid, certain functions will gradually be disabled until it reaches the phase in which only previous cases can be accessed and viewed.
18 Installation
The AADVA IOS must be installed by IOS experts from GC Europe N.V. or authorized third parties. The software is installed before the device leaves the factory. After the installation the IOS expert will train the user to achieve the best results with the GC AADVA IOS.
The AADVA IOS should be connected only to a power supply of the same voltage as the one indicated on the voltage display, and can only be operated on single-phase AC supply.
WARNING MESSAGE
The IOS device should not be used adjacent to or stacked with other equipment, if this is necessary the IOS device should be observed to perform normally before use onpatients.
19 GC AADVA IOS components
10

12
GC AADVA™
IOS
The AADVA IOS system consists of hardware and embedded software.
WARNING MESSAGE
All components are delivered non-sterile
HARDWARE COMPONENTS:
Hardware components of the AADVA IOS are: the wheeled cart with integrated computer, safety power supply, touch-screen monitor, scanner application device and cradle for the support of the scanner application device.
CART:
The cart consists of a metal base frame with PU coated thermoformed plastic housingwhich is coated with structure lacquer. The cart also includes a vertically movable monitor arm with swivel joint to enable the vertical pivot of the monitor. The monitorarm can be locked in an upright position to put the cart in transport mode. Four wheels with an easily accessible brake system based on a, one-touch technology, allows sufficient mobility and fixation in the dental office respectively.
COMPUTER:
The high-performance computer has a graphics card on which the parallel graphics processes run in real time. Connectivity is provided by an Ethernet port, two USB 3.0 ports and one SD card port. The operating system and user program must not be modified by the user. Software updates are managed by GC Europe N.V.
POWER SUPPLY:
A medical PC power supply is built in accordance with EN60601-1 for the electrical supply to ensure the users' and patients' safety requirements.
TOUCH SCREEN MONITOR:
The monitor is a Touch LCD monitor. The monitor meets the requirements of EN60601-1as well as major international requirements. It is used for the display and control of the acquired images, scans and videos. The touch screen is used to interact with the system software and allows the entry of patient information, assignments, etc.
SCANNER APPLICATION DEVICE (HAND PIECE):
The application device for scanning is an optic-electronic device that captures high-resolution video images in real time during a patient scan. It is connected to the cart via a USB 2.0 high-speed cable for data transfer. The application device comprises of optics and sensor electronics, which detect the real-time images which can then be further processed by the computer.
Caution
11
GC Aadva™ IOS

13
GC AADVA™
IOS
The application device is fragile, please use caution when handling.
CRADLE FOR SCANNER APPLICATION DEVICE
The cradle for the application device for scanning is an open case for the placement of the hand piece in resting position. It contains a heating plate responsible for the maintenance of the temperature of the glass plate at the head of the hand piece in order to avoid fogging when used in the mouth.
Please note
The hand piece may not be actively scanning when placed into the cradle.
FIGURES WITH DESCRIPTIONS
1. Monitor 1.1. Monitor Movement 1.2. Stylus pen1.3. GC AADVA Cradle Inlay
2. Scanner application device (hand piece)3. Monitor arm
3.1. Power button, USB ports (x2),SD Card port (x1)3.2. Monitor arm locking
4. Wheels and brake5. Power switch, LAN connector, power plug and label6. Ventilation apertures
1 Monitor
1.1 Monitor Movement
Figure 1: Monitor movement
The monitor can be easily moved with 2 handles located on the upper and lower side of the monitor (Fig. 1). The system is self-locking and adjusted for a smooth two-hand
12

14
GC AADVA™
IOS
operation within a 160° angle. The upper monitor handle can also be used for transportation of the GC AADVA IOS device in the transport mode with the monitor armin a locked position. (See chapter 31 – “transport and packaging”).
1.2 Stylus Pen
The accessory stylus pen is a useful accessory tool for those who prefer not to work with their finger to manipulate the touch screen. The special-designed head of the stylus pen reacts easily with the monitor. For further information, please see the instructions for use document, accompanied with the acquired stylus pen.
1.3 GC AADVA Cradle Inlay
In between patients, the hand piece (Fig. 4) can be stored in the cradle (Fig. 3.2). The cradle is self-locking and can be easily moved upwards and downwards at +/- 30°. Before mounting the hand piece into the cradle inlay part (Fig. 2), the cradle inlay needs to be mounted into the cradle which is easily done by the locking brackets at the rear lower side of the inlay. When mounting the hand piece into the inlay, two stabilization brackets will support the holding mechanism and the backside of the inlay.
2 Scanner Application Device
The scanner application device (Fig. 4) is working with a stereo-camera system and is based on a real-time scanning system. While scanning, a status LED light is shining on the back of the hand piece, indicating the scan is operational. The scanner automatically starts to scan once the start button is pushed on the GUI (Graphical User Interface, also
Figure 2 : GC AADVA Cradle InlayFigure 3: Hand piece/cradle inlay
Figure 4: Scanner Application Device (Hand Piece)
13
GC Aadva™ IOS
15
GC AADVA™
IOS
referred to as the screen or monitor) or by a simple up-and-down hand gesture. The scanner device is an ergonomic, optimized device with accessibility to move in the mouth for scanning the lower -and upper jaw, and recording the bite registration. After preparing the IOS device for scanning, take out the scanner from the GC AADVA Cradle Inlay and follow the instructions on the GUI (Screen) until the start button needs to be selected. After the scan procedure, clean and disinfect the hand piece (See chapter 23 –“cleaning and disinfection procedures") and place the hand piece back into the cradle.The button, located on top of the scanner application device is redundant and not active in this version of the IOS device.
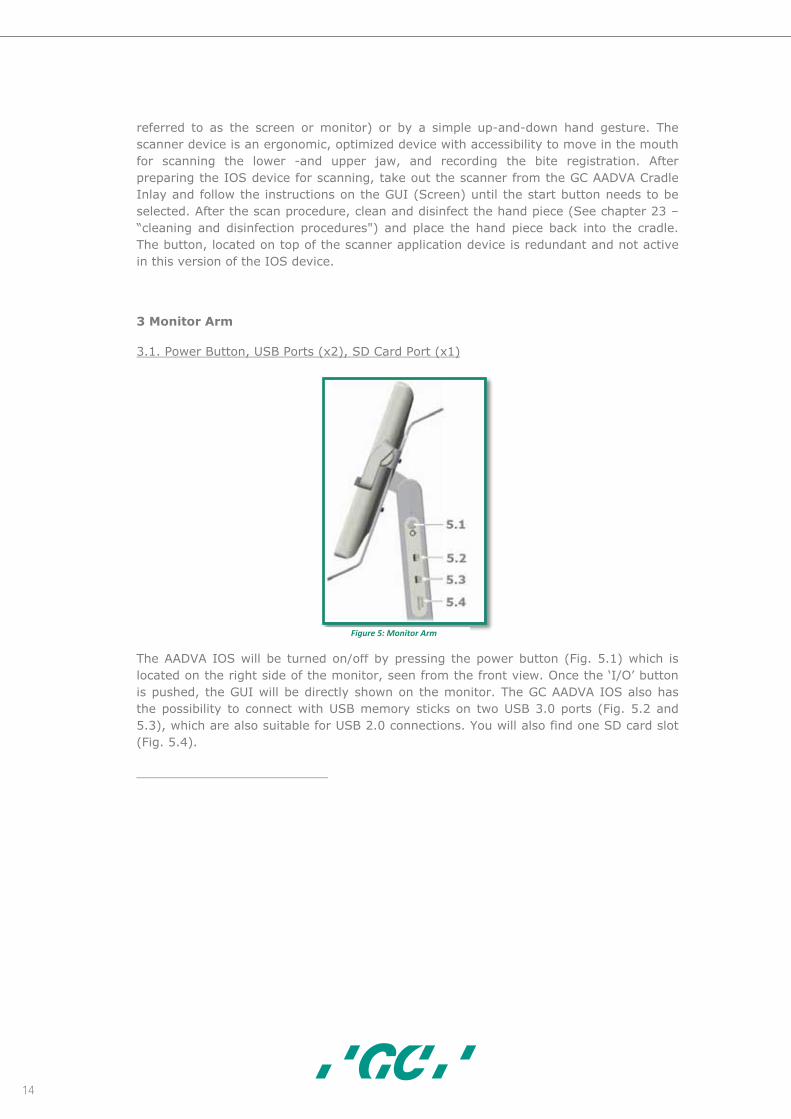
3 Monitor Arm
3.1. Power Button, USB Ports (x2), SD Card Port (x1)
The AADVA IOS will be turned on/off by pressing the power button (Fig. 5.1) which is located on the right side of the monitor, seen from the front view. Once the ‘I/O’ button is pushed, the GUI will be directly shown on the monitor. The GC AADVA IOS also hasthe possibility to connect with USB memory sticks on two USB 3.0 ports (Fig. 5.2 and 5.3), which are also suitable for USB 2.0 connections. You will also find one SD card slot (Fig. 5.4).
Figure 5: Monitor Arm
14

16
GC AADVA™
IOS
3.2. Monitor Arm locking
Before bringing the monitor arm to the transport position, slide the lock button to the left (Fig. 7.1). The lock button is located on the upper side of the front cover. Once the monitor arm is in the correct transport position (5°), release the lock button. Once you have the correct transport position, the red band will disappear which indicates the monitor is locked correctly. When moving the monitor arm to the working position push the lock button again, move the monitor arm forward and release the locking button until the red level disappears.
4 Wheels and Brake
The GC AADVA IOS consists of two radial turning front wheels (Fig. 9.2) for easy movement and turning the device with the touch of your foot. The device also has two back wheels (Fig. 9.1) which are fixed. By pushing the brake lock pedal (Fig. 8.1) with your foot, the back wheels of the IOS will be immovable and the device will have a stable, locked position. By pushing the release button (Fig. 8.2) the brake will be released and the GC AADVA IOS can be moved again. The bottom rubber part is enabling the operator to slightly adjust and fine tune the device into correct position.
Figure 7: Lock/unlock mechanism Figure 6: Transport position
Figure 8: Wheel Figure 9: Brake mechanism
15
GC Aadva™ IOS

17
GC AADVA™
IOS
5 Power Switch, LAN connector, Power Plug and Label
To provide the device with electricity, the accompanied power cable must be connected to the device by connecting the power cable with the power outlet. (Fig. 10.4) The power switch (Fig. 10.3 and 11.1) is located at the backside of the IOS and needs to be flippedto enable the power.
For making a connection to a local area network, the GC AADVA IOS can be connectedthrough a LAN connector, also located on the back of the device (Fig. 10.2). The product label with according technical information can be found on the left side of the power outlet (Fig. 10.1).
6 Ventilation apertures:
For cooling the system, fans are installed inside the GC AADVA IOS device and will blowhot air out of the ventilation apertures on the right and left side of the housing cover.
Figure 11: Back of IOS Cart Figure 10: IOS Power switch
Figure 12: Ventilation apertures
16
18
GC AADVA™
IOS
PLEASE NOTE
Do not cover these areas, do not disturb the cooling process and clean the apertures at least once per month or anytime there is noticeable contamination.
20 Warnings, safety regulations and other notes
WARNING MESSAGES
To reduce the risk of electrical hazards:
• Check the application device and the system (cart screen) for physical damage before each use;
• The AADVA IOS is not to be operated under any circumstances if the power cord, plug or housing is visibly damaged;
• Never attempt to remove the plug from the wall socket or plug it in if your hands are wet;
• The system has 2 available USB ports. Do not connect any other devices, including USB hubs and excluding USB memory sticks, to these connectors;
• If the cart is damaged by a fall or if the cables are damaged, disconnect the AADVA IOS from the power supply before it is repaired;
• Look for loose parts, sharp edges, as well as wear and damage that could affectthe proper use of the scanner;
• If there is any visible damage or if the device is not working properly please consult our customer service: the GC Digital Services Team (see chapter 34 –‘IOS Customer Service – GC Digital Services Team’)
• To ensure safe shutdown and disconnection of the device, first, push the power button at the side, on the flexible arm of the device and secondly, flip the main power switch on the back of the device. Now, the cable can be disconnected from the wall socket and the device. (Please also read chapter 21 – ‘Starting, terminating and disconnecting the device’)
• Do not handle liquids (E.g. beverages of cleaning agents in the immediate vicinity of the GC Aadva IOS. Do not spill liquids on the system as this can result in personal injury (e.g. skin burns, heart rhythm disturbance…)
To reduce the risk of electrical and fire hazards:
• Only use the power cord accompanied with the IOS device. Do not replace this cable yourself, please contact our GC Digital Services Team in case of loss or damage.
• Only use an earthed shockproof wall socket. Do not use extension cords or multiple-socket plugs;
• The electrical components or cables must not be damp or wet;• The scanner must not be connected to an uninterruptible power supply (IJSV).• Do not use an adapter for the power supply;• Do not try to open the cart's housing or perform maintenance on the device
yourself;
17
GC Aadva™ IOS

19
GC AADVA™
IOS
• Always contact the GC Digital Services Team or authorised GC Europe N.V.service personnel
• Do not make any modifications to parts of the AADVA IOS;• Do not place the unit in locations where it is difficult to unplug the power cord
from the outlet.
To reduce the risk of fire hazards:
• Do not use the scanner application device in the presence of a flammable anaesthetic mixture with air, oxygen or nitrous oxide;
• After cleaning and disinfection it is necessary to ensure that the system is completely dry;
• The system is not intended or designed for use in outside areas or humid environments.
To reduce risks of cross-contamination:
• Please read and follow the instructions for cleaning and disinfecting in this Manual;
• Disinfect the application device prior to every use, including the first use. See Cleaning and Disinfection session (see chapter 23 - “Cleaning and Disinfection procedures”)
• After each patient, clean the touch screen, the monitor frame, the housing of the application device and any other parts that may be contaminated.
• Always store the hand piece in the sterilised GC AADVA Cradle Inlay.• Use personal protective equipment (PPE).
PLEASE NOTE
To reduce risks from impacts or pressure:
• The cart must not be exposed to any impacts;• The locking mechanism of the rollers must be enabled when using the system;• The cart must always be moved under control, especially on hard floors;• It may only be lifted up from the base. Lifting of the cart from the side panels,
front or back covers or from the monitor is not permitted;• The trolley is not to be lifted from the handles. The handles are designed to pivot
the monitor or to move it in the transport position;• The system must always be lifted by two people (e.g. in transit over high
thresholds, steps or in vehicles);• The power cord and the connecting cable of the handset must be placed so that
they do not create a tripping hazard.• Position the device in such a way, that all the buttons and switches are easily
handled and are easily accessible. • Do not place the IOS device in a corner.
18

20
GC AADVA™
IOS
Risk reduction of environmental impact:
• Follow the local regulations when disposing of all electronic equipment parts and related spare parts;
• Ensure that the disinfectants used are disposed of in accordance with the applicable law. Please refer to the material safety data of the used disinfectant for more detailed information.
PLEASE NOTE
In order to reduce the risk of damage to the GC AADVA IOS, please read and follow thefollowing instructions.
To prevent damage to the system:
• The device may only be used by qualified personnel (see chapter 8 – “user profile”)
• The power switch may only be operated; or the plug of the GC AADVA IOS may only be removed from the power outlet; after you have logged out and have shut down the system;
• Make sure that the ventilation slots are not covered or otherwise blocked, and do not place items in an enclosure around the device;
• The air intake must not be blocked;• The scanner must not be connected to an uninterruptible power supply (USV).• Existing connections to the GC AADVA IOS may not be interrupted or otherwise
modified;• The start switch on the monitor arm must not be pressed and held;• Do not use any ammonia-based cleaners on the touch screen, the screen frame,
the application device, the associated cable or the cart's surfaces;• Do not pour any liquid on the screen, the screen frame, the application device or
its cable or on the cart's surfaces;• Make sure that the power cord is unplugged before moving the system;• Plugging in the cable and turning on the system are the only performance or
maintenance-related activities carried out by the user for the GC AADVA IOS. If the system does not function properly, please contact IOS Customer Service;
• The installation and use must be carried out in a temperature range from +10 °C to +40 °C.
• During storage and operation of the scanner, ensure that the limits for temperature, humidity and height are observed.
• Make sure that the power cord is connected to the IOS device in a way that the IOS device has the freedom to be moved without pulling out the power cord.
To prevent damage to the application device:
The scanner application device is a high-precision optoelectronic instrument. Improper handling of the scanner application device, e.g. dropping, shaking or bumping can lead to malfunction or damage. Respect the following basic guidelines:
• Always use the scanner application device with great care;• If you are not using the application device, place it in the designated Cradle;
19
GC Aadva™ IOS

21
GC AADVA™
IOS
• Make sure that the cable is not bent on the back of the scanner application device;
• For more information on handling, please see the section on cleaning and disinfection.
• Do not use sharp objects on the surface of the scanner application device neither clean it with an abrasive material as this can damage the device.
21 Starting, Terminating and Disconnecting the device
21.1 Starting the device
1. Plug the appropriate power cable into the power supply;2. Flip the switch on the back of the device to the ‘I’ position.(Fig. 10.3 and 11.1);3. Switch on the device:
3.1. In case the flexible arm is in the lock position (vertical position), pull the lock icon (Fig. 7.1) in the indicated direction to unlock the flexible arm and move the arm forward. The device will turn on automatically.
3.2. In case the flexible arm is in the working position, turn on the device by pushing the power button (Fig. 5.1) on the lateral part of the flexible arm.
4. The graphical user interface will start automatically on the monitor.
21.2 Terminating the device1. Push the power button, located at the side of the flexible arm (Fig. 5.1) 2. Flip the main power switch, located on the back of the device to the ‘O’ position (Fig.
10.3 and 11.1)The main switch is provided to isolate the device from main voltage.
21.3 Disconnecting the deviceWhen all the above steps (21.2) are performed, the power cable can be safely disconnected from the device and wall socket.
22 Graphical user interface (GUI)
22.1 Screen layout structure1. Start screen
The start screen will ask to enter the user name and a 6-digit pin, which will be provided at the installation of the GCAADVA IOS.
20

22
GC AADVA™
IOS
Figure 13: Screenshot Log-in
Figure 14: Screenshot Log-in 2
2. Process menu icons at the top of the screen.The process menu shows the current section of the digital impression process. Sections are “Patient Database”, “Scan”, “Model”, “Export” “General” and an additional help, FAQ and download area. Each of the sections has its dedicated icon and the current position in the process is highlighted in green. The menu bar remains always visible on the screen.
3. Navigation icons on the right side of the screen during scanning.Said features are used to rotate, move, zoom into objects on the screen or reset the view to the default situation. These icons only appear when active in some sessions of the process. When a specific navigation icon is clicked, it is highlighted in green.
21
GC Aadva™ IOS

23
GC AADVA™
IOS
Figure 15: Screenshot navigation buttons
4. Icons on the left side of the screen during scanning.
These icons are used to define different scans: “pre-scan upper”, “pre-scan lower”, “upper”, “lower” and “bite”. By clicking these icons, the following sub menu icons are enabled: “new”, “load” and “delete”. When a scan type is present, it is highlighted in green.
Figure 16: Screenshot icons
5. Action features at the bottom of the screen during scanning.These action icons vary depending on the process sections. Only enabled icons are visible, for example: “start scan”, “pause scan”, “create model”, “save as” and so on.
22

24
GC AADVA™
IOS
Figure 17: Screenshot action features
6. Visualization area in the centre of the screen during scanning.This area is used to visualize various objects and general information.
7. A “settings” icon can be found in the top right corner, to access the settings andhelp menu.
Figure 18: Settings icon
22.2 SettingsIn this section it is possible to define and change the settings of the IOS device.
General
Gesture control Enable or disable the gesture control for initiating scanning
Dentist address – Title Displays title
Dentist Address – First Name Displays first name
Dentist Address – Last Name Displays last name
Dentist Address – Street Displays street
Dentist Address – Zip Code Displays zip code
Dentist address – Country Displays country
Cart ID
Hand piece ID Displays the unique ID of the hand piece
Dental Notation System Choose the dental notation type
Keyboard Layout/Language Choose the keyboard layout
23
GC Aadva™ IOS

25
GC AADVA™
IOS
Language Choose the language
User Management Displays the active or inactive status of the user management
Wi-Fi Connection
Status Displays online or offline status of the Wi-Ficonnection
Hidden Network Name Displays the active or inactive status
Network Name Displays the network name
Wi-Fi Password Displays the Wi-Fi password
Table 1: Settings General
Scan
Acoustic Scan Feedback Activate or inactivate the sound during scanning which indicates the range of focus
Scan Countdown Activate or inactivate the scan countdown before starting to scan
Miniature Support View Activate or inactivate the miniature support view during scanning
Table 2: Settings Scan
Model
Bite Reg. Max Dist. (mm) ‘Bite registration maximum distance’. With this setting, it is possible to change the visualized distance range between the upper and lower jaw after the bite registration. The scale on the left side of the screen will display the chosen value and will be colourized accordingly.
Default Mesh Colour Change the colour of the generated mesh Default Zoom (Model section) Adjust the default zoom setting in the model sectionMaximum Zoom Value Adjust the maximum zoom value in the model
sectionMargin LinePoint Size in % (?) Adjust the size of the added points in the margin line
sectionLine Thickness in % Adjust the line thickness in the margin line section
Table 3: Settings Model
Export
Mesh Export Format Choose between STL or PLY file type to exportAadva DSP – Username Displays the username of the Aadva DSPAadva DSP – Password Displays the password of the Aadva DSPExport ATF Files Activate/deactivate the export of ATF filesExport Log Files Activate/deactivate the export of log filesNetwork Export Path Choose the network path to which you want to
export your filesTable 4: Settings Export
22.3 Help menu Through the help menu you can access the following :
24

26
GC AADVA™
IOS
22.3.1 Downloads
This section will allow the user to download documents such as, the ‘Instructions For Use’ as well as software updates.
22.3.2 FAQ
This area is dedicated to frequently asked questions. You can find the most frequently asked questions and their answers.
22.4 User managementThe user management section is accessed by clicking on the ‘Admin’ button in the upper left corner. This button is located on the left of the ‘Log-out’ button.
The user administration window will allow the user to change their PIN, remove users and add new dentists.
Figure 19: 'Admin' and 'Log-out' button
Figure 20: User administration
25
GC Aadva™ IOS

27
GC AADVA™
IOS
22.5 Patient database
DISCLAIMER
GC Europe n.v. and its Aadva IOS, including the Aadva Digital Service Platform (DSP) comply with the Data Protection Directive 95/46/EC which regulates the processing of personal data and in particular with the Belgian data protection legislation.
GC Europe recommends that the Aadva IOS IOS Customers use abbreviations or referencing instead of patient names and only collect data when necessary. Furthermore we recommend that personal data is transmitted solely within EU.
The IOS Customer is responsible for informing the patient and receiving the free, specific and informed written consent of the patient for the collection, processing and the storage of the personal data, when necessary according the domestic legislation. The IOS Customer is responsible for the compliance with the applicable data protection law and the delegation of data processing. The IOS Customer is responsible for the compliance with the material and formal requirements thereof. GC Europe processes the data on behalf and according to the instructions of the IOS Customer.
The start-up screen shows the patient database and the “patient database” icon is highlighted in green. This screen comprises of two sections:
22.5.1 New Patient
A new patient is defined by entering “First Name”, “Family Name”, “Birth Date”, “Gender”, “Social Security Number” and “Dentist Name”. Once one of these fields is filled out, the “Start Scan” icon appears and can be pressed to move to the “Scan” section.
Figure 21: Screenshot New Patient
22.5.2 Existing patient
In this section, a search frame on the upper part of the screen allows you to search for a previously registered patient by entering first name, family name or case ID. The list of registered patients is available on the left part of the screen. Once a patient is selected all his previously saved scans and other information will appear on the right side of the
26

28
GC AADVA™
IOS
screen. In this section you can edit or delete a scan you have already created or add a new scan.
Figure 22: Screenshot Existing Patient
22.6 Scan section
Caution
Before using the AADVA IOS to scan a patient, it is advised that the dental professional performs a visual inspection of the system. The visual inspection should include checks on the application device and cable, for kinks in the cable, discoloration, deterioration or damage of any kind.
Push the “Start Scan” icon in the “Patient Database Screen” to move to the scan screen. When entering the scan screen, the respective top menu icon is highlighted in green. An “Information Screen” will appear mentioning the following important notes:
1. Use a sterilized GC AADVA Cradle Inlay for each new patient;2. Disinfect the hand piece; (see chapter 23 – “cleaning and disinfectingprocedures”)3. Keep the hand piece into the GC AADVA Cradle Inlay until the heating plate has reached the right temperature. This is indicated when the temperature bar becomes green;4. Use an intraoral retractor to displace soft tissues;
27
GC Aadva™ IOS

29
GC AADVA™
IOS
For isolation purposes we recommend the Optiview2 retractor from Kerr™3;5. Dry the scan area using air flow and keep relative isolation with cotton rolls, cotton pads and suction appliances;6. Take the camera from the GC AADVA Cradle Inlay before triggering the scan mode.7. Start the scan by touching the “OK” icon or by making an up-and-down hand gesturemovement while holding the hand piece (if activated in the settings menu).
8. A timer will count down from 5 to 0 seconds, leaving the health professional the time to position him-or herself before the scan begins.
Figure 23: Screenshot Scan Section
22.7 How to scan1. Starting position and movement of the hand piece
1.1. After touching the “OK” icon or initiating the scan with the horizontal movement mentioned above, the scan will start automatically.
1.2. Move the scanner to the start position like the example shown below. The scan can start at any area of the dental arch as soon as the hand piece glass is kept parallel to the occlusal plan.
1.3. If the scan flow is interrupted, move the scanner to an already scanned position and make some movements. The scan will continue immediately when an already scanned position is found.
2 Optiview is a product from Kerr. 3 Kerr is not a trademark of GC
28

30
GC AADVA™
IOS
15 mm
1.4. For scanning a single quadrant, move the scanner over the tooth surfaces, from buccal to palatal while moving the camera towards the anterior or posterior areas of the arch, as shown in the figure below (Fig. 15). When arrived at the premolar, proceed scanning palatal/lingual. Lift the hand piece and start again scanning at the premolar while proceeding vestibular.
Figure 25: Scan parallel to occlusal plane Figure 24: Ideal distance
Figure 26: Scan flow for half arch (Single quadrant)
29
GC Aadva™ IOS

31
GC AADVA™
IOS
2. Screen layout
The small “Support Window” shows a real time view of the scan. The blue coloured area is what the camera is actually detecting. Grey areas are the ones in which sufficient information was captured to build the 3d image. Areas with insufficient or poor information appear in red and yellow, respectively. The target is to move the hand piecein such a way that it can detect and capture missing areas. In other words, the target is to bring the blue area into the missing areas (red and yellow) until they are all captured (grey areas). On the main screen you see an overview of the whole scan.
The focus distance for scanning varies from 0 to 15 mm. This means you can touch the tooth during the scan without having it interrupted. Touching defined teeth in defined surfaces (like the occlusal area of molars and pre-molars) create very good reference points (‘waypoints’) in case you need to retake the scan when it is interrupted for any reason. On the other hand, moving the camera away from the teeth (up to 15 mm) increases the field of view and consequently the scan speed. This also makes it easier to copy undercuts and difficult areas.
Figure 27: Screenshot screen layout
Touching the “Hide” icon at the lower part of the screen will close the “Support Window”.
When the scan is bad and you want to restart the process use the "Reset Scan" icon. A window will then pop up asking if you want to discard the scan.
Use the "Control" button to pause the scan at any moment. This allows you to move the model to evaluate it using the icons at the right side of the screen as shown and described in the figure and table below, respectively.
3030

32
GC AADVA™
IOS
Rotate: move your finger over the model. It rotates in the all directions according to your command.
Move: move your finger to move the model in different directions.
Zoom in and out: move your finger up or to the left to zoom in. Move your finger down or to the right to zoom out.
Reset view: this icon brings the model back to the start position and size.
Switch View: touch it to change the contrast. This makes it easier to see the preparation lines.
Table 5: Screenshot Buttons
Touch the “Control” icon again to return to the scan mode. Bring the camera to a previously scanned area to retake the scan process. Alternatively, if you are satisfied with the model, use the "Model" icon to create a mesh.
Now you can see the model in a more detailed view and with the non-captured areasfilled in red automatically (figure below). These holes (non-scanned areas) are filled by a highly accurate program that uses the information around the missing area to fill it by interpolation. At this phase you can also move the model with the icons on the right sideas described above.
The ‘fast export’ button is visible and will allow the user to quickly export the existing scans to an external memory stick.
3131
GC Aadva™ IOS

33
GC AADVA™
IOS
Figure 28: Screen layout 2
If there are still important areas which need to be rescanned, touch the "Rescan" icon and subsequently the "Control" icon to continue the scan.
If you are satisfied with your scan, save by touching the "Save" icon. Four new icons will appear. Chose the scan type you have just processed: “pre-scan lower”, “pre-scan upper”, “lower” and “upper”. Note: “pre- scans” are the ones made before preparations.
Figure 29: Screenshot layout 3
32

34
GC AADVA™
IOS
Saving will happen automatically according to the scan type you have chosen. After saving, you are redirected the start screen as shown in the figure below. Note that the scan you have saved will be highlighted in green on the left side indicating that it has been properly processed and saved. You can also make a new scan and overwrite it when you choose the same type by saving the model.
Figure 30: Screenshot Procedure
Proceed with the next scan by clicking the “OK” icon. Otherwise, simply touch the “Skip” icon at the lower right corner in case you do not want to make another scan.
22.8 Bite scanIf you have scanned and saved both upper and lower jaws, a new window will open requesting you to proceed with the “Bite Scan” as shown in the figure below. Touch “OK” to proceed with the bite scan. Make it sure you scan the buccal surface of upper and lower teeth while the patient keeps maximum intercuspation. In case you do not want to proceed with the bite scan, use the "Skip" button to proceed.
33
GC Aadva™ IOS

35
GC AADVA™
IOS
Figure 31: Screenshot Bite Scan
Once the scan types upper, lower and bite are saved, the user is automatically lead to the “Model” section. At this moment, the “Model” icon on the top menu is highlighted in green. Even without having those three scans done, it is always possible to enter the “Model” section by touching the “Model” icon in the top menu.
22.9 Margin line definitionThis function manages the drawing of the margin line of prepared teeth.
• “Add points”: by touching this icon, points can be added around at the margins of the preparation.
• “Undo”: by clicking undo, with each click the last action selected point is removed. A history of 40 points shall be stored
• “Delete points”: after clicking the delete point icon, points can be removed by clicking them in the model view window
• “Hide”: hide position for the support window• “Save”: save function to finish the margin line definition• “Redo”: to start the margin line definition again by deleting all points
34

36
GC AADVA™
IOS
Figure 32: Screenshot Margin Line
The main central area shows the 3D model with the preparation (chosen scan type) and the dentist can view the model from top position.
When touching the model in the main central area, the support window shows a zoom of this specific area. The specific spot which has been touched is highlighted with a cross. This cross can move by subtle movement of the finger touching the screen until it reaches the exact spot to be marked with a point. By releasing the finger, the point is finally added. By clicking the point again and not releasing the finger, it can be moved again. Multiple points can be marked.
When saving a margin line, a pop-up window asks for moving to the next screen or adding the margin line to an additional preparation.
22.10 Bite registrationThe bite registration sets and checks the occlusion between upper, lower and bite scan. Therefore, all three scans are loaded.
35
GC Aadva™ IOS

37
GC AADVA™
IOS
Figure 33: Screenshot Bite Registration
The main model window shows the three 3D-models: upper, bite and lower.
In step one, only the upper and the bite model is visualized in the main model view window. The dentist has to choose “add points” and must set at least three points on the upper scan and the bite scan (Note: The location and the set order must be the same in both scans). The support window zooms the point target location which has been touched with the finger and the dentist can re-locate the points.
The bottom frame icons are:
• “add points”: by clicking this icon, points can be added by clicking the respective model area
• “delete points”: after clicking the delete point icon, points can be removed by clicking them in the model view window
• “Undo”: by clicking undo, with each click the last action selected point is removed.
• “match models”: merge models• “add note”: by clicking this icon, notes can be added
36

28
GC AADVA™
IOS
screen. In this section you can edit or delete a scan you have already created or add a new scan.
Figure 22: Screenshot Existing Patient
22.6 Scan section
Caution
Before using the AADVA IOS to scan a patient, it is advised that the dental professional performs a visual inspection of the system. The visual inspection should include checks on the application device and cable, for kinks in the cable, discoloration, deterioration or damage of any kind.
Push the “Start Scan” icon in the “Patient Database Screen” to move to the scan screen. When entering the scan screen, the respective top menu icon is highlighted in green. An “Information Screen” will appear mentioning the following important notes:
1. Use a sterilized GC AADVA Cradle Inlay for each new patient;2. Disinfect the hand piece; (see chapter 23 – “cleaning and disinfectingprocedures”)3. Keep the hand piece into the GC AADVA Cradle Inlay until the heating plate has reached the right temperature. This is indicated when the temperature bar becomes green;4. Use an intraoral retractor to displace soft tissues;
37
GC Aadva™ IOS

39
GC AADVA™
IOS
colorized with rainbow colours, showing the contact points and the distance between teeth in a range of X mm (X to be configured in the settings menu). A histogram is shown on the left side of the main model window.
By clicking on a model, it is visualized a second time and can be rotated, moved or zoomed via the navigation menu on the right side. By using the “add note” icon, notes can be added.
Figure 36: Screenshot Bite Registration 4
By clicking the “Next” icon, the export section is entered and the “Export” icon in the top menu is highlighted in green.
22.11 Restoration tab
22.11.1 Patient tab
Fill out the remaining fields with the missing patient information in case you have not done it before starting the scan. All empty fields are surrounded by a red contour and must be filled out before you can proceed. After full and successful completion of the patient data, a random case ID is automatically ascribed and visualized on the upper-right area in the screen. The Case ID is unique for each case. When all fields are filled out, the "Next" icon will be activated at the lower right corner so that you can proceed to the “Restoration” tab.
38

40
GC AADVA™
IOS
Figure 37: Screenshot Completing Data
Choose a restoration touching the respective tooth and then the "Add" Button. Select the “Restoration Type”, “Material Type” and “Shade”. When touching each item, a drop down menu will appear so that you can make your choices. Use the icon “Add” to includeadditional prosthetic work. Click on ‘Clone restoration’ to duplicate the specifications on an additional restoration.Note: only Classical Vita Shades4 are available. If you use another shade guide, please add it as a “Note” at the “Attachments” tab.The Restoration will be saved when you push the "Next" Button.
4 ‘Vita shades’ is not a product from GC.
39
GC Aadva™ IOS

41
GC AADVA™
IOS
Figure 38: Screenshot Restoration Tab
22.12 Delivery tabChoose a delivery date by using the "select date" icon. Then choose an already stored address in the field highlighted in green or create a new one touch the icon "New Address" to enter the new delivery address. You can also save this address by using the "Add to Favourites" icon.
Figure 39: Screenshot Delivery Tab
40

42
GC AADVA™
IOS
In case of a different billing address, select the check box (red arrow in the figure below) and enter the billing address. Use the "Next" button for saving and proceeding to the next step.
22.13 Attachments tabAdd external files (from a USB stick or flash card) by using "Add" icon on the left side. An Explorer window will appear so that you can choose the files you want to transfer (digital pictures of patients, for example). All added files will be listed on the left side and will be saved in the folder of the clinical case together with the order form and STL files.Add notes by using the "Add" icon on the right side. Enter a title in the first blank space and the information in the field below it. Minimize the keyboard by pushing the keyboard icon on the right of the “Alt Gr” key. Touch the "Add" icon again to add other notes. Use the "Next" icon to save the attachments and notes and to proceed to the next step.
Figure 40: Screenshot Attachments Tab
22.14 Summary tabThis tab shows a short summary about your entered data including list of annexes, notes, scans and restorations ordered.
41
GC Aadva™ IOS

43
GC AADVA™
IOS
Figure 41: Screenshot Summary Tab
By touching the icon “View PDF Order Form” on the right side of the screen a view of the PDF Order Form is generated with all information which had been input. This PDF will be exported together with the scan data in the next step (Data Transfer).
Figure 42: Screenshot PDF form
After confirming the accuracy and the completeness of the information in the PDF Order Form, check the box on the lower part of the screen and touch the "Confirm" icon.
42

44
GC AADVA™
IOS
22.15 Data transfer TabChoose the data transfer method: USB only, Aadva DSP only, or both USB and AadvaDSP or export to network. When exporting data to an external drive, place a USB memory stick or an SD Card in the respective ports at the side of AADVA IOS flexible arm before selecting the icon “USB only” or “USB and Aadva DSP”. All cases will also be saved at the AADVA IOS hard disk by default. After doing so, wait till the message “Export to USB successful” appears on the screen. After uploading files, a “Close case” icon will appear. By touching it, the case is closed even if uploads are running in the background and the patient input screen is visualized for a new patient case.When choosing the export to Aadva DSP, the estimated time to export will be calculated, this can vary as the time is estimated, assuming the upload speed is 1000KB/s.
Figure 43: Screenshot Data Transfer Tab
Please refer to the DSP Quick guide for further information on how to export to ‘AadvaDSP’.
23 IOS Cleaning and disinfection procedures
NOTICE: • Use only disinfection agents which have been approved by GC Europe N.V. • Before disinfection read the manufacturer’s manual and safety data sheets
carefully.• Wear Personal Protection Equipment (PPE)• Do not use any coloured cloths for cleaning, since they may cause staining of the
surfaces, e.g. in combination with disinfectants. • Never use corrosive cleaning agents or solvents. • Avoid over wet cloth. It can penetrate into the ventilation slots.
43
GC Aadva™ IOS

45
GC AADVA™
IOS
Effective disinfectants consist out of a combination of ethanol and didecyldimethyl-ammonium chloride. (FD 3335 and FD 3336 wipes from DÜRR Dental AG7 (Bietigheim-Bissingen, Germany).
Follow the method below for the disinfection of the application device, screen and other surfaces of the device:1 Rub the surfaces thoroughly for about 30 seconds with disinfection wipes or a dry,
soft, non-abrasive cloth and undiluted cleaning solution according to the manufacturer’s instructions. Then dispose the cloth in a rubbish container with the classification 'Biohazard' following local applicable regulations.
2 Dry the surfaces with a clean, non-abrasive, lint-free cloth and allow it to completely react for 5 min.
3 Examine the application device for visible contamination. If the application device is not completely clean, repeat the cleaning steps 1 to 3.
24 GC AADVA Cradle Inlays
24.1 Insertion and removal To remove the GC AADVA Cradle Inlay, please remove the hand piece scanner first by tilting the arm upwards. This movement will allow the hand piece to easily click out of the GC AADVA Cradle Inlay. (Fig. 16)
Figure 44: Removal of the hand piece
Once the hand piece scanner is removed, you can grasp the two protruding ends of the GC AADVA Cradle
5 FD 333 and FD 333 wipes are products from Dürr Dental 6 FD 333 and FD 333 wipes are products from Dürr Dental 7 Dürr Dental is not a trademark of GC.
44

46
GC AADVA™
IOS
Inlay and gently compress them. Tilt the GC AADVA Cradle Inlay horizontally and downwards. This movement will detach the GC AADVA Cradle Inlay from its cradle. (Fig. 17)
Figure 45: Removal of cradle inlay
24.2 Cleaning and sterilization procedures
Follow the method below for sterilisation of the inlay of the storage station: 1. Rub the surfaces thoroughly for about 30 seconds with disinfection wipes.
Effective disinfectant wipes consist out of a combination between ethanol and didecyldimethyl-ammonium chloride. (FD 333 wipes, DÜRR Dental AG 8 ,Bietigheim-Bissingen, Germany) or a dry, soft, non-abrasive cloth and undiluted cleaning solution (FD 333, DÜRR Dental AG9, Bietigheim-Bissingen, Germany) according to the manufacturer’s instructions. Then dispose the cloth in a rubbish container with the classification 'Biohazard' (dispose of these materials according to local regulations)
2. Dry the surfaces with a clean, non-abrasive, lint-free cloth and allow it to completely react for 5 min.
3. Examine the application device for visible contamination. If the application device is not completely clean, repeat the cleaning steps 1 to 3.
4. Wrap the inlay part in a sterilization foil with sterilization detector and autoclaveit at 121 °C and 1.16 bar damp heat for 18 min plateau time.
5. Store the sterile inlay parts in a clean, dry place.
1 GC AADVA Cradle Inlay can be used and sterilized twenty times. However, it should be immediately replaced if any of the following conditions are observed:
- Roughening of surface - Delamination of surface - Discolouring of the GC AADVA Cradle Inlay- Any other changes on the surface- Dimensional change - Staining
8 FD 333 and FD 333 wipes are products from Dürr Dental, Dürr Dental is not a trademark of GC 9 FD 333 and FD 333 wipes are products from Dürr Dental, Dürr Dental is not a trademark of GC
45
GC Aadva™ IOS

47
GC AADVA™
IOS
- Cracks on the GC AADVA Cradle Inlay- Structural damage
A new GC AADVA Cradle Inlay or sterilized GC AADVA Cradle Inlay is installed by clicking it into the IOS device again in the preformed shape.
WARNING MESSAGE
To reduce risks of cross-contamination: • Disinfect the application device before each use. • Do not clean the application device using ultrasound.
To reduce the risk of electrical and fire hazards:
• The strain relief area (the area where the cable is connected to the application device) must not be held under water or made moist. If this area is held under water or made moist otherwise, it must be wiped dry immediately. The strain relief must first be completely dry before the application device is reconnected.
To reduce the risk of electrical hazards:
• Check the application device and the system (cart, monitor and cable) for physical damage before each use.
To reduce the risk of electrical and fire hazards:
• Only use an earthed electrical outlet• Do not use extension cords or multiple-socket plugs.
CAUTION
Reducing the environmental impact:
Ensure that the disinfectants used are disposed of in accordance with the applicable guidelines.
46

48
GC AADVA™
IOS
25 Safety / Guidelines / Technology
Materials of the device which come into human contact (scanner application device) are certified in regards to the biocompatibility in accordance with ISO 10993-1 and applicable subparts.
The definition of safety and regulatory markings are listed below:
Read the accompanying documents. Proceed according to the Manual.
Only suitable for indoor use.
AC voltage (alternating current).
This equipment is subject to the European WEEE Directive 2002/96/EC. This symbol alerts the user not to dispose of electrical and electronic equipment in accordance with Directive 2012/19/EU WEEE (Waste Electrical and Electronic Equipment) as waste or as unsorted municipal waste, but separately at an appropriate collection.
Weight
This symbol indicates the manufacturer of the medical device in accordance with EU Directive 93/42/EEC.
This symbol indicates "Conformité Européenne"; which directly translates as: 'European Conformity'. This sign is a manufacturer's declaration that the product complies with the essential requirements of applicable European legislation regarding health, safety and environmental protection.
47
GC Aadva™ IOS

49
GC AADVA™
IOS
Serial number
Article number
Date of manufacture
Type BF applied part (Scanner Application Device)
Mechanical hazard Pinch Point – keep hands and fingers clear
Table 6: Symbols
26 Care with the Unit
• Keep the device dust-free and covered when not in use for a long time;• The AADVA IOS can be kept running if necessary, but the device can be turned
off as an energy-saving measure; ensure that you have saved your data before turning off the device.
• Unplug the device and remove any objects adjacent the device prior to routine cleaning and maintenance of the unit;
• Do not attempt to open the hand piece as this may damage the device;• While cleaning the device make sure that the capacitors or other electrical parts
of the AADVA IOS do not come into contact with any moisture;• Do not place any objects on top of or above the scanner, as this may interfere
with the scanning functionality;• Make sure that no liquids could accidentally spill on the device.
WARNING MESSAGE
Do not sit on the cart or monitor or do not put any weight on the cart and monitor as this will result in damage to the device and to personal injury.
48

50
GC AADVA™
IOS
27 Information for electromagnetic compatibility (EMC)
This product has been developed and tested in accordance with the EMC standard IEC 60601-1-2. The documentation contains information and warnings that must be followed by the user to ensure safe operation and to keep the product in a safe condition.
WARNING MESSAGE
The use of accessories, cable and components other than those provided may result increased emissions or decreased immunity of the medical equipment.
WARNING MESSAGE
This IOS device must be installed and put into service according to the EMC information provided.
Guide and manufacturer's declaration - electromagnetic radiation
AADVA IOS is suitable for use in the electromagnetic environment specified below. The IOS Customer or the user of the AADVA I IOS must ensure that the equipment is used in such an environment. Referring to DIN EN 60601-1-2: 2007-12; VDE 0750-1-2: 2007-12Medical electrical equipment - Part 1-2: General requirements for basic safety and essential performance features - Collateral standard: Electromagnetic compatibility -Requirements and tests (IEC 60601-1-2: 2007, modified); German version EN 60601-1-2: 2007
Guidance and manufacturerʼs declaration – electromagnetic emissions
The [AADVA IOS] is intended for use in the electromagnetic environment specified below. The customer or the user of the [AADVA IOS] should assure that it is used in such an environment.
Emissions test Compliance Electromagnetic environment – guidance
RF emissionsCISPR 11
Group 1 The [AADVA IOS] uses RF energy only for its internal function. Therefore, its RF emissions are very low and are not likely to cause any interference in nearby electronic equipment.
RF emissionsCISPR 11
Class B The [AADVA IOS] is suitable for use in all establishments, including domestic establishments and those directly connected to the public low-voltage power supply network that supplies buildings used for domestic purposes.
49
GC Aadva™ IOS
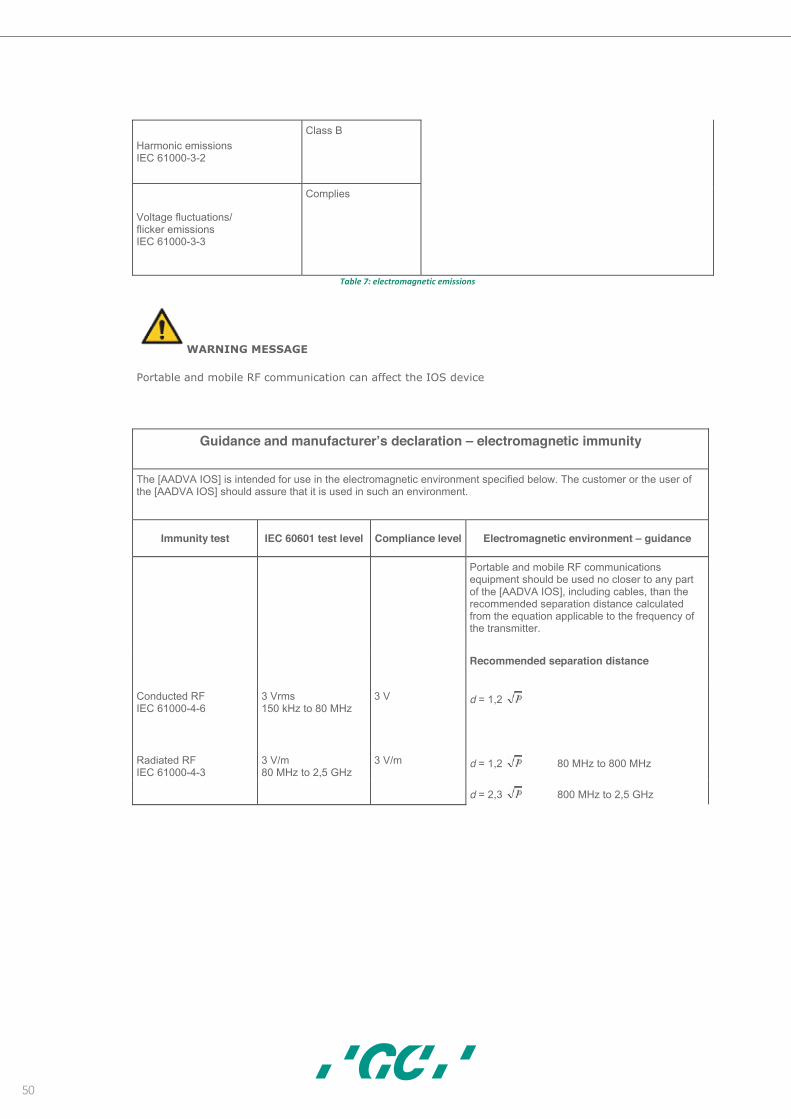
51
GC AADVA™
IOS
Harmonic emissionsIEC 61000-3-2
Class B
Voltage fluctuations/flicker emissionsIEC 61000-3-3
Complies
Table 7: electromagnetic emissions
WARNING MESSAGE
Portable and mobile RF communication can affect the IOS device
Guidance and manufacturerʼs declaration – electromagnetic immunity
The [AADVA IOS] is intended for use in the electromagnetic environment specified below. The customer or the user of the [AADVA IOS] should assure that it is used in such an environment.
Immunity test IEC 60601 test level Compliance level Electromagnetic environment – guidance
Portable and mobile RF communications equipment should be used no closer to any part of the [AADVA IOS], including cables, than the recommended separation distance calculated from the equation applicable to the frequency of the transmitter.
Recommended separation distance
Conducted RFIEC 61000-4-6
3 Vrms150 kHz to 80 MHz
3 V d = 1,2
Radiated RFIEC 61000-4-3
3 V/m 80 MHz to 2,5 GHz
3 V/m d = 1,2 80 MHz to 800 MHz
d = 2,3 800 MHz to 2,5 GHz
50

52
GC AADVA™
IOS
where P is the maximum output power rating of the transmitter in watts (W) according to the transmitter manufacturer and d is the recommended separation distance in metres (m).
Field strengths from fixed RF transmitters, as determined by an electromagnetic site survey,ashould be less than the compliance level in each frequency range.b
Interference may occur in the vicinity of equipment marked with the following symbol:
NOTE 1 At 80 MHz and 800 MHz, the higher frequency range applies.
NOTE 2 These guidelines may not apply in all situations. Electromagnetic propagation is affected by absorption and reflection from structures, objects and people.
a Field strengths from fixed transmitters, such as base stations for radio (cellular/cordless) telephones and land mobile radios, amateur radio, AM and FM radio broadcast and TV broadcast cannot be predicted theoretically with accuracy. To assess the electromagnetic environment due to fixed RF transmitters, an electromagnetic site survey should be considered. If the measured field strength in the location in which the [AADVA IOS] is used exceeds the applicable RF compliance level above, the [AADVA IOS] should be observed to verify normal operation. If abnormal performance is observed, additional measures may be necessary, such as re-orienting or relocating the [AADVA IOS].
b Over the frequency range 150 kHz to 80 MHz, field strengths should be less than 3 V/m.
Table 8: electromagnetic immunity
Recommended separation distances betweenportable and mobile RF communications equipment and the [AADVA IOS]
The [AADVA IOS] is intended for use in an electromagnetic environment in which radiated RF disturbances are controlled. The customer or the user of the [AADVA IOS] can help prevent electromagnetic interference by maintaining a minimum distance between portable and mobile RF communications equipment (transmitters) and the [AADVA IOS] as recommended below, according to the maximum output power of the communications equipment.
Rated maximum output powerof transmitter
W
Separation distance according to frequency of transmitterM
150 kHz to 80 MHz
d = 1,2
80 MHz to 800 MHz
d = 1,2
800 MHz to 2,5 GHz
d = 2,3
0,01 0,12 0,12 0,23
0,1 0,38 0,38 0,73
1 1,2 1,2 2,3
10 3,8 3,8 7,3
51
GC Aadva™ IOS

53
GC AADVA™
IOS
100 12 12 23
For transmitters rated at a maximum output power not listed above, the recommended separation distance d in metres (m) can be estimated using the equation applicable to the frequency of the transmitter, where P is the maximum output power rating of the transmitter in watts (W) according to the transmitter manufacturer.
NOTE 1 At 80 MHz and 800 MHz, the separation distance for the higher frequency range applies.
NOTE 2 These guidelines may not apply in all situations. Electromagnetic propagation is affected by absorption and reflection from structures, objects and people.
Table 9: Recommended separation distances between portable and mobile RF communications equipment and the AADVA IOS
Please note: The separation distance for the higher frequency is applied with 80 MHz and 800 MHz. These instructions may not apply in all situations. The distribution of electromagnetic waves will be affected by the absorption and reflection from structures, objects and people
Field strengths of fixed transmitters, such as base stations for mobile or cordless telephones and mobile radio services (CMR), amateur radio AM and FM radio stations cannot be theoretically predicted with accuracy. An electromagnetic survey should be considered to determine the electromagnetic environment from fixed RF transmitters. If the measured field strength in the location in which the AADVA IOS system is used exceeds the applicable RF compliance level mentioned above, the AADVA IOS system should be monitored for its proper functionality. If a different performance level isdetermined, possible reducing measures such as re-positioning or relocating the AADVA IOS are necessary.
Over the frequency range of 150 kHz to 80 MHz, field strengths should be less than 3 V/m.
28 Electrostatic discharge (ESD)
Protection against electrostatic discharges is of paramount importance when connecting or disconnecting cables from the GC AADVA IOS. Static electricity can build up in your body and damage sensitive switching elements with the discharge. Even small, not noticeable discharges can cause permanent damage to electronic components. To prevent damage to the GC AADVA IOS:
• Make a visual inspection of the work area to ensure that no non-conducting work surfaces and no materials or tools that generate static electricity are present;
• Keep electrostatic discharge sensitive devices at a distance of at least 1 meter away from objects that generate static electricity;
• Non-insulated people must maintain at least a 1 meter distance from this ESD protected area;
• Avoid a build-up of electrostatic charges (e.g. from air conditioning, humidification devices, conductive floor coverings, non-synthetic clothing);
• Discharge your body through contact with the ground or a large metal object.• Only touch the pins marked with the ESD symbol with your fingers or a tool, if
the proper precautions have been followed.
52

54
GC AADVA™
IOS
All users of the GC AADVA IOS should be familiar with the proper ESD procedures before working with the scanner. This training should include at least an introduction to the physics of the electrostatic discharges that occur under normal circumstances, voltage levels and the possible damage to electronic components by contact with an electrostatically charged operator. In addition, methods should be taught to avoid electrostatic charging and on how to earth the body.
If an electrostatic discharge or other electrical anomaly interferes with the operation of the hand piece, the operator should (if possible) just start the scan again or leave the scanning screen and call it up again.
If a transient electrical event interferes with the operation of the monitor, the operator must restart the monitor via the monitor's power switch.
53
GC Aadva™ IOS

55
GC AADVA™
IOS
Guidance and manufacturerʼs declaration – electromagnetic emissionsThe [AADVA IOS] is intended for use in the electromagnetic environment specified
below. The customer or the user of the [AADVA IOS] should assure that it is used in such an environment.
Emissions test Compliance Electromagnetic environment – guidance
RF emissionsCISPR 11
Group 1 The [AADVA IOS] uses RF energy only for its internal function. Therefore, its RF emissions are very low and are not likely to cause any interference in nearby electronic equipment.
RF emissionsCISPR 11
Class B The [AADVA IOS] is suitable for use in all establishments, including domestic establishments and those directly connected to the public low-voltage power supply network that supplies buildings used for domestic purposes.
Harmonic emissionsIEC 61000-3-2
Class B
Voltage fluctuations/flicker emissionsIEC 61000-3-3
Complies
Guidance and manufacturerʼs declaration – electromagnetic immunityThe [AADVA IOS] is intended for use in the electromagnetic environment specified below. The customer or the user of the [AADVA IOS] should assure that it is used in such an environment.
Immunity test IEC 60601 test level Compliance level Electromagnetic environment –Guidance
Electrostaticdischarge (ESD)IEC 61000-4-2
± 6 kV contact
± 8 kV air
± 6 kV contact
± 8 kV air
Floors should be wood, concrete or ceramic tile. If floors are covered with synthetic material, the relative humidity should be at least 30 %.
Electrical fasttransient/burstIEC 61000-4-4
± 2 kV for power supply lines
± 1 kV for input/output lines
± 2 kV for power supply lines
± 1 kV for input/output lines
Mains power quality should be that of a typical commercial or hospital environment.
SurgeIEC 61000-4-5
± 1 kV line(s) to line(s)
± 2 kV line(s) to earth
± 1 kV line(s) to line(s)
± 2 kV line(s) to earth
Mains power quality should be that of a typical commercial or hospital environment.
Voltage dips, shortinterruptions andvoltage variationson power supplyinput linesIEC 61000-4-11
< 5 % UT
(> 95 % dip in UT)for 1/2 cycle
< 5 % UT
(> 95 % dip in UT)for 0,5 cycle
Mains power quality should be that of a typical commercial or hospital environment.
If the user of the [AADVA IOS] requires continued operation during power mains interruptions, it is recommended that the [AADVA IOS] be powered from an uninterruptible power supply or a battery.40 % UT
(60 % dip in UT)for 5 cycles
40 % UT
(60 % dip in UT)for 5 cycles
70% UT
(30 % dip in UT)for 25 cycles
70 % UT
(30 % dip in UT)for 25 cycles
< 5 % UT
(> 95 % dip in UT)for 5 s
< 5 % UT
(> 95 % dip in UT)for 5 s
Power frequency(50/60 Hz)magnetic fieldIEC 61000-4-8
3 A/m 3 A/m Power frequency magnetic fields should be at levels characteristic of a typical location in a typical commercial or hospital environment.
54

56
GC AADVA™
IOS
NOTE UT is the a.c. mains voltage prior to application of the test level.Table 10: Electromagnetic emissions and immunity
29 Identification plate and labelling
The information on the identification plate describes the AADVA IOS and contains the serial number along with the necessary regulatory and safety symbols.
Figure 46: Identification plate
30 Device specifications and classifications
This device is an imaging system.
General specifications and classifications Video capture rate/flash rate
18 frames per second
Size of the touch screen (19”) diagonal 5/4 Dimension of the base of the Cart (footprint)
50 cm x 49 cm
System height (floor to monitor frame) max. 110 cm Monitor - tilt adjustment -30° bis + 45° Input power
100-240 VAC 50/60 Hz, 5A @230AC, 10A @115vAC
Protection against electric shock Class I Protection against harmful water penetration or suspended materials
Cart IP21 Application device IP54 (in vivo part) Application device IP53 (non-in vivo part)
Operating mode Durable Weight Total shipping weight incl. packaging 40,5kg Cart with monitor 32 kg Application device 175g including cable
55
GC Aadva™ IOS

57
GC AADVA™
IOS
Dimensions of the application device Length 210 mm Width of the application device's tip 22.2 mm Height of the application device's tip 19 mm Max. diameter 25.2 mm Cable length of the application device 1.4 m (visible) Calibration No calibration required on site Temperature Operational 10 - 35°C Storage/transport -20°C to +60°C Humidity (ambient) Operational 30-60% relative humidity, non-condensing Storage/transport 10-90% relative humidity, non-condensing Air pressure (ambient) Operational 700-1060 mbar Storage/transport 700-1060 mbar
Table 11: Device specifications
AADVA IOS cable
No. Type Length Description 1 Non-shielded power cable system 2m AC to AADVA IOS 1 Shielded USB cable, exposed
application device to Cart 2m USB 2.0 for
video recording 1 Shielded VGA cable, monitor 1.5m Analog video signal to the monitor 1 Shielded USB cable, monitor 1.5m USB 2.0 for Touch Monitor 3 Shielded USB cable, external media storage 1.5m USB 2.0 USB memory 1 Non-shielded AC power cable, monitor 1.5m 12VDC/10A
Table 12: Cable specifications
WARNING MESSAGE To reduce the risk of electrical hazards: Only use the original power cord provided with the IOS device which is specified for this product and certified for the country you are in.
NOTICE In order to avoid damages of AADVA IOS adopt the following precautions:
• Protect GC AADVA IOS device against direct insolation to avoid overheating while operation.
• Ensure that GC AADVA IOS device is positioned on solid and even surface. • DO not touch the touch screen with sharp or pointed objects. • The GC AADVA IOS components can be damaged by corrosion thus must only be
stored indoors
56
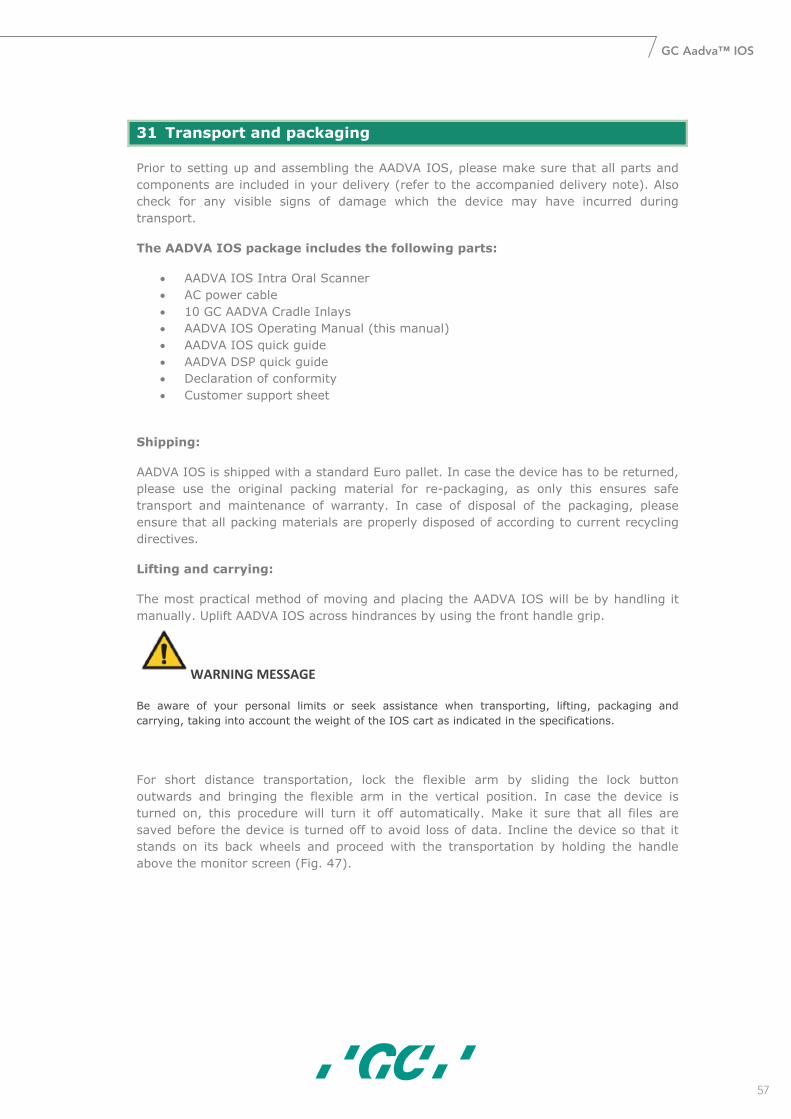
58
GC AADVA™
IOS
31 Transport and packaging
Prior to setting up and assembling the AADVA IOS, please make sure that all parts and components are included in your delivery (refer to the accompanied delivery note). Alsocheck for any visible signs of damage which the device may have incurred during transport.
The AADVA IOS package includes the following parts:
• AADVA IOS Intra Oral Scanner• AC power cable• 10 GC AADVA Cradle Inlays• AADVA IOS Operating Manual (this manual)• AADVA IOS quick guide • AADVA DSP quick guide• Declaration of conformity • Customer support sheet
Shipping:
AADVA IOS is shipped with a standard Euro pallet. In case the device has to be returned, please use the original packing material for re-packaging, as only this ensures safe transport and maintenance of warranty. In case of disposal of the packaging, please ensure that all packing materials are properly disposed of according to current recycling directives.
Lifting and carrying:
The most practical method of moving and placing the AADVA IOS will be by handling itmanually. Uplift AADVA IOS across hindrances by using the front handle grip.
WARNING MESSAGE Be aware of your personal limits or seek assistance when transporting, lifting, packaging and carrying, taking into account the weight of the IOS cart as indicated in the specifications.
For short distance transportation, lock the flexible arm by sliding the lock button outwards and bringing the flexible arm in the vertical position. In case the device is turned on, this procedure will turn it off automatically. Make it sure that all files are saved before the device is turned off to avoid loss of data. Incline the device so that it stands on its back wheels and proceed with the transportation by holding the handle above the monitor screen (Fig. 47).
57
GC Aadva™ IOS

59
GC AADVA™
IOS
Figure 47: Transporting the IOS device
32 Environment
Notice: Do not dispose electric equipment or components together with household waste material.Your product is marked with this symbol for an environmentally responsible recycling/disposal. Do not discard it with normal waste. The black line under the crossed-out waste bin symbol signifies that this product has been put into circulation after 13.08.2005 (see Directive 2012/19/EU and EN 50419:2006).
Please be aware that this product is subject to the European Directive 2012/19/EU (WEEE) and the laws applicable in your country for environmentally responsible recycling/disposal. Help to protect environment. Dispose of all components in accordance with applicable regulations.
Only for EU countries: In observance of European Directive 2002/96/EC on waste electric and electronic equipment and its implementation in accordance with national law, electric equipment that have reached the end of their life must be collected separately and returned to an environmentally compatible recycling facility.
To initiate return of AADVA IOS contact your local IOS expert (see chapter 20 - "IOS Customer Service").
Other countries: Contact your local IOS expert for country-specific information (see chapter 20 - "IOS Customer Service").
58

60
GC AADVA™
IOS
33 Troubleshooting
No power Is the power cable connected? Is the main power switch I/O button on the back of the
device switched to ‘I’? Did you press the power button, situated next to the
USB ports on the support arm of the touch screen? Is the device in transport position or in scan position?
If in a transport position, put it in scan position. Does the device switch on now automatically?
Is the fuse, situated next to the ON/OFF button on the back of the device in place?
If the green GC logo on the device (CART and cradle) is lighted, is the screen switched off?
Are the fans of the PC working, is the device making any noise?
No image appearing on screen Is the device heated up properly, does the thermos indication mention ‘COLD’ or ‘OK’?
Is the hand piece positioned in the cradle? Do you see a small blue LED light when looking into the
camera? Is the light in the camera white or black? When holding your finger against the heating element in
the cradle, does it feel warm? Is the cover glass of the camera not covered and is it
properly cleaned? Is there a scanable object within the scan range of 15
mm?Not possible to enter data into the ‘Patient ID’ field
Did you enter numbers or letters into the patient ID field?
Not possible to transfer data through the Aadva DSP
Is the device connected to internet? Is your GC Connect account still active? Did you transfer the specific data already before? Did you already transfer the specific data to USB? Did you go through the complete validation process and
did you click ‘confirm’ before transferring data?It’s not possible to move the CART Is the brake pedal, on the front of the device, in upward
position?No patients listed in ‘Search patient’ field
Did you log in using your own user name and password?
Case Error message/indication Reason Solution
Wrong PIN"The dentist and password you have entered are not valid."
The PIN was entered incorrectly. Enter correct PIN.
No Temperature visualization
The temperature of the scanner is not visualized.
No hand piece reference files found in the Config folder.Scanner driver not installed correctly.Scanner USB cable is broken.
Copy correct hand piece files in the Config folder.Install the correct scanner driver software.Check the USB cable for any physical damage and call the service
59
GC Aadva™ IOS

6
GC AADVA™
IOS
hotline.
No USB drive found
Export to USB failed, because no USB drive was found. Plug in a USB drive. Retry export?
No USB thumb drive connected or thumb drive not appropriately formatted.
Connect a FAT32 or NTFS formatted USB thumb drive.
Network path not specified
Export to network failed, because no export path was defined. Please set the network export path in the settings.
No network export path was specified in the export settings.
Enter a network export path.
No space left on the USB drive
Export to USB failed. Not enough free memory available.
Not enough memory left on the USB thumb drive, to store the case.
Connect a USB thumb drive with enough memory.
34 IOS Customer Service – GC Digital Services Team
If you have any questions concerning AADVA IOS and/or this operating manual, our local GC Digital Services Team will be pleased to help you. Please refer to the DSP where all local information for support can be found or refer to the separate sheet ‘GC Digital Services Team’ accompanied with the IOS device.
First line of support :
- Creation of support ticket using the DSP- Contacting local branch representatives (using the contact details found on the
DSP or on the separate sheet ‘GC Digital Services Team’)
Second line of support :
Tel. : +32 16 74 26 00
E-mail : [email protected]
60