Instructions for the Mixer Scheduling...
9
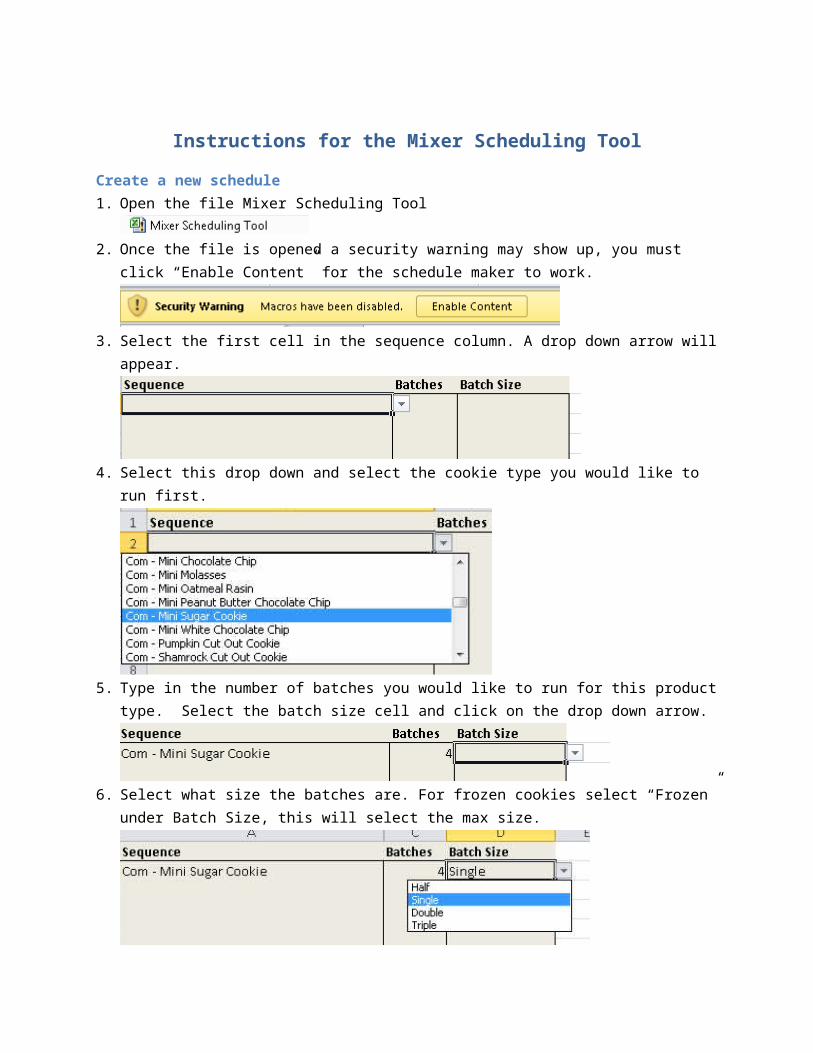
Instructions for the Mixer Scheduling Tool Create a new schedule 1. Open the file Mixer Scheduling Tool 2. Once the file is opened a security warning may show up, you must click “Enable Content” for the schedule maker to work. 3. Select the first cell in the sequence column. A drop down arrow will appear. 4. Select this drop down and select the cookie type you would like to run first. 5. Type in the number of batches you would like to run for this product type. Select the batch size cell and click on the drop down arrow. 6. Select what size the batches are. For frozen cookies select “Frozen” under Batch Size, this will select the max size.
-
Upload
trinhhuong -
Category
Documents
-
view
221 -
download
3
Transcript of Instructions for the Mixer Scheduling...
Instructions for the Mixer Scheduling Tool
Create a new schedule1. Open the file Mixer Scheduling Tool
2. Once the file is opened a security warning may show up, you must click “Enable Content” for the schedule maker to work.
3. Select the first cell in the sequence column. A drop down arrow will appear.
4. Select this drop down and select the cookie type you would like to run first.
5. Type in the number of batches you would like to run for this product type. Select the batch size cell and click on the drop down arrow.
6. Select what size the batches are. For frozen cookies select “Frozen” under Batch Size, this will select the max size.
7. The values shown under cases or packages/ batch is what is considered a single batch. Use this value to find how many batches need to be run and what batch size.
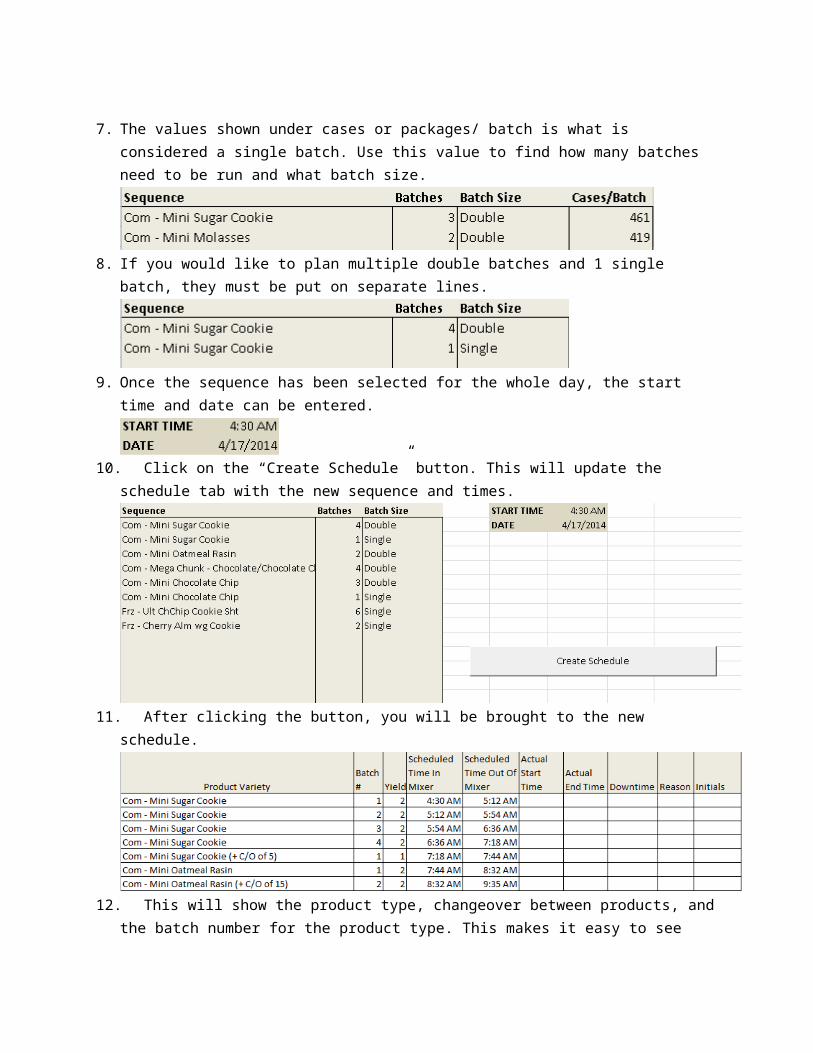
8. If you would like to plan multiple double batches and 1 single batch, they must be put on separate
lines.
9. Once the sequence has been selected for the whole day, the start time and date can be entered.
10. Click on the “Create Schedule” button. This will update the schedule tab with the new sequence and times.
11. After clicking the button, you will be brought to the new schedule.
12. This will show the product type, changeover between products, and the batch number for the product type. This makes it easy to see that there will be 4 double batches and 1 single batch of sugar cookies. The yield shows the batch size: 1 for single batch, 2 for double batch. There is then the scheduled start and scheduled end time. The rest of the table will be filled in by the operator. The operator will complete the actual start and actual end as well as any downtime they experience either while mixing or between batches. The downtime will be recorded in minutes and must always include a reason. The initials will be filled out by all mixers currently working on that batch.
13. If changes are needed, go back to the Schedule Maker Sheet and update the sequence. Be sure to click on the “Create Schedule” button again.
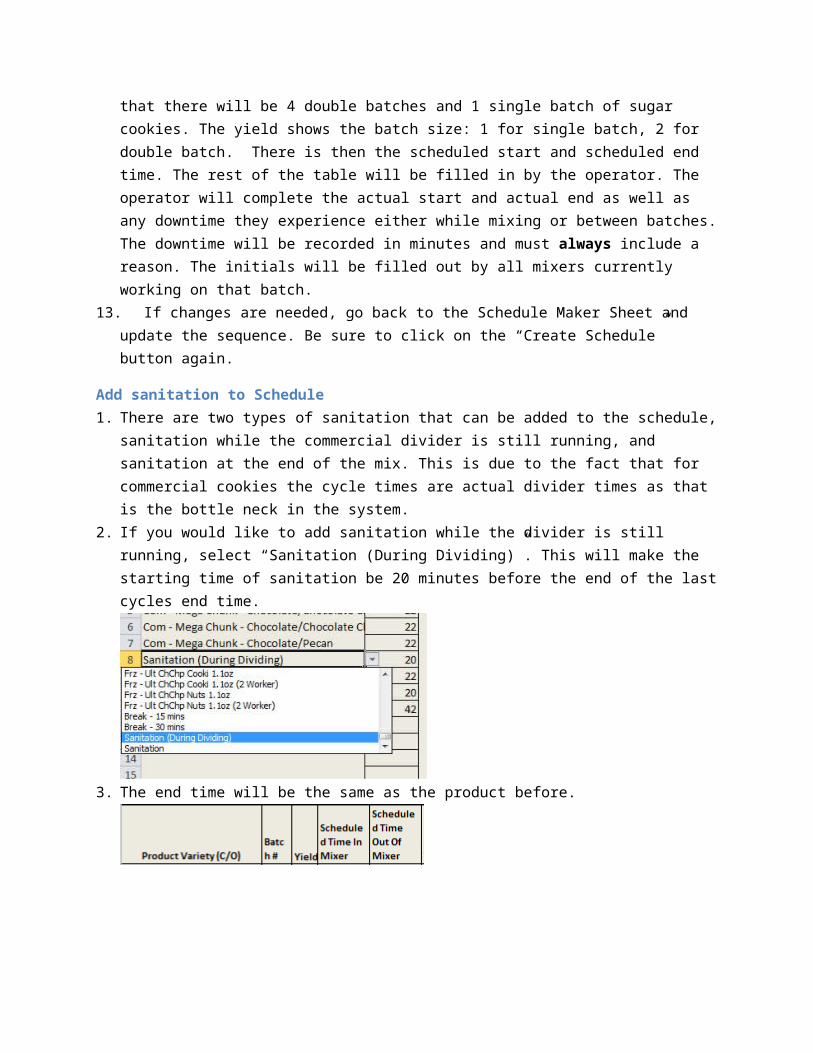
Add sanitation to Schedule1. There are two types of sanitation that can be added to the schedule, sanitation while the
commercial divider is still running, and sanitation at the end of the mix. This is due to the fact that for commercial cookies the cycle times are actual divider times as that is the bottle neck in the system.
2. If you would like to add sanitation while the divider is still running, select “Sanitation (During Dividing)”. This will make the starting time of sanitation be 20 minutes before the end of the last cycles end time.
3. The end time will be the same as the product before.
4. If you would like to add sanitation after the mixer is done running, such as between frozen cookies. Select the “Sanitation” from the drop down.
5. This will add a 20 minute sanitation to the end of the last cycle.
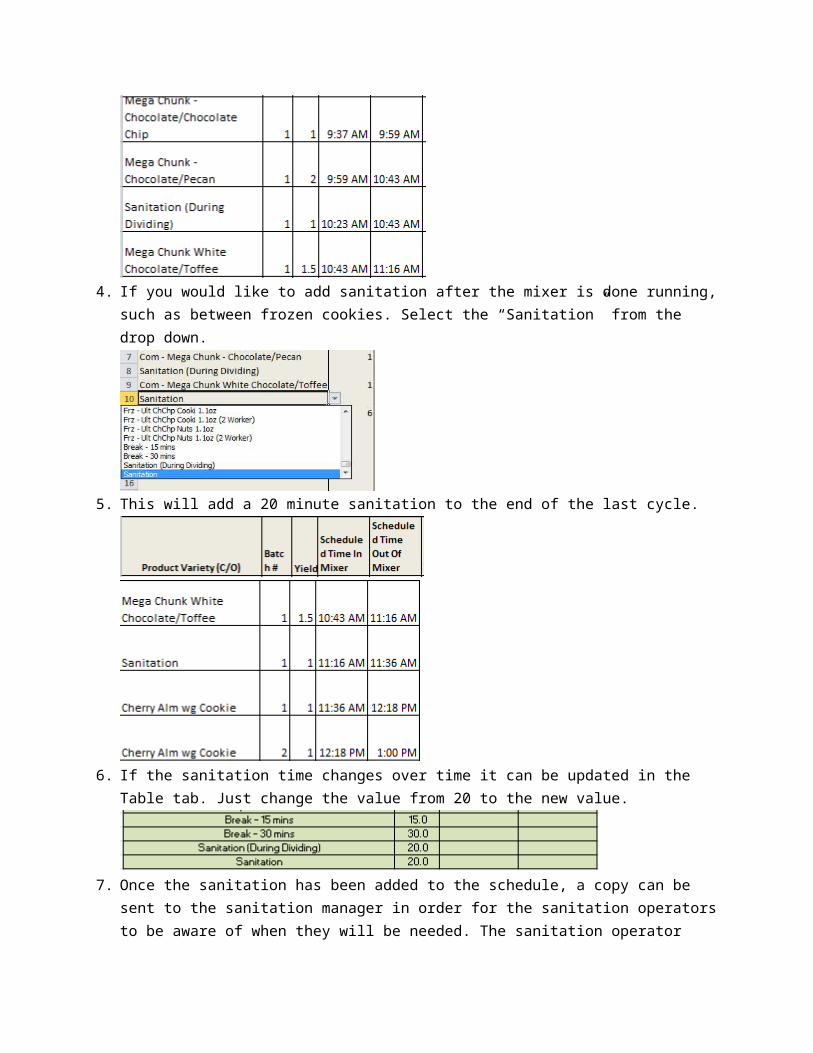
6. If the sanitation time changes over time it can be updated in the Table tab. Just change the value from 20 to the new value.
7. Once the sanitation has been added to the schedule, a copy can be sent to the sanitation manager in order for the sanitation operators to be aware of when they will be needed. The sanitation operator should fill in the actual time they showed up and the actual time they finished cleaning. If there was downtime while they were there, that should be filled out as well.
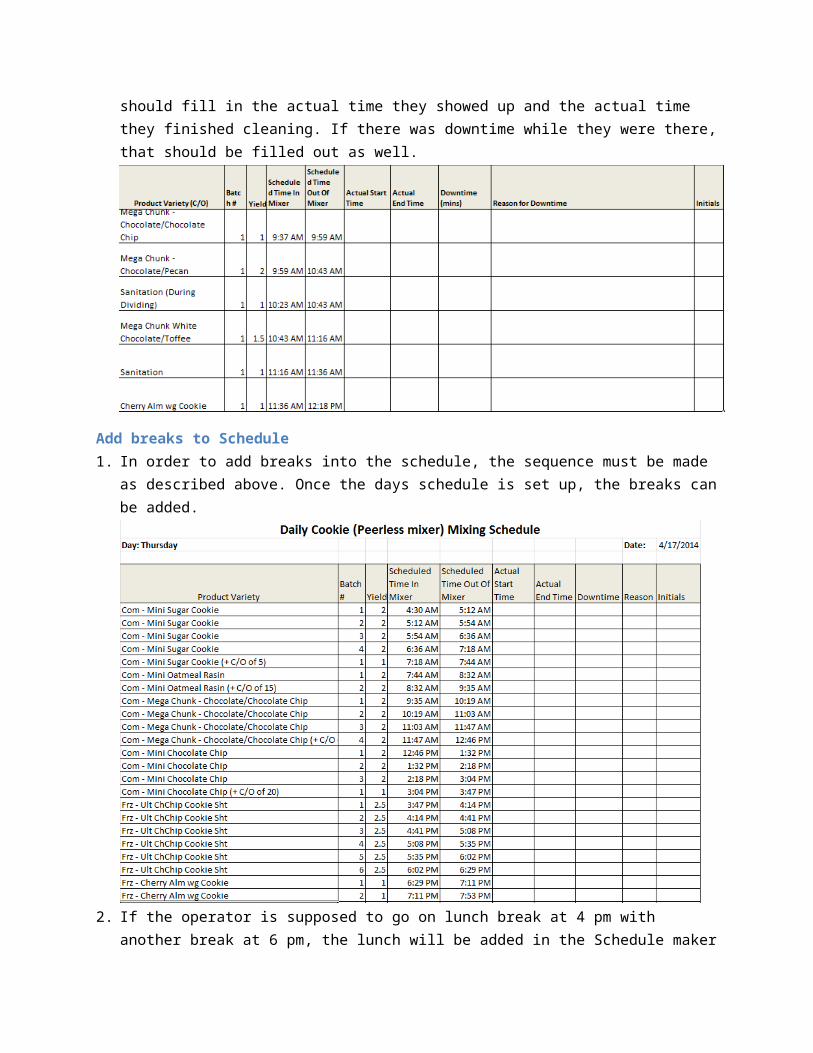
Add breaks to Schedule1. In order to add breaks into the schedule, the sequence must be made as described above. Once the
days schedule is set up, the breaks can be added.
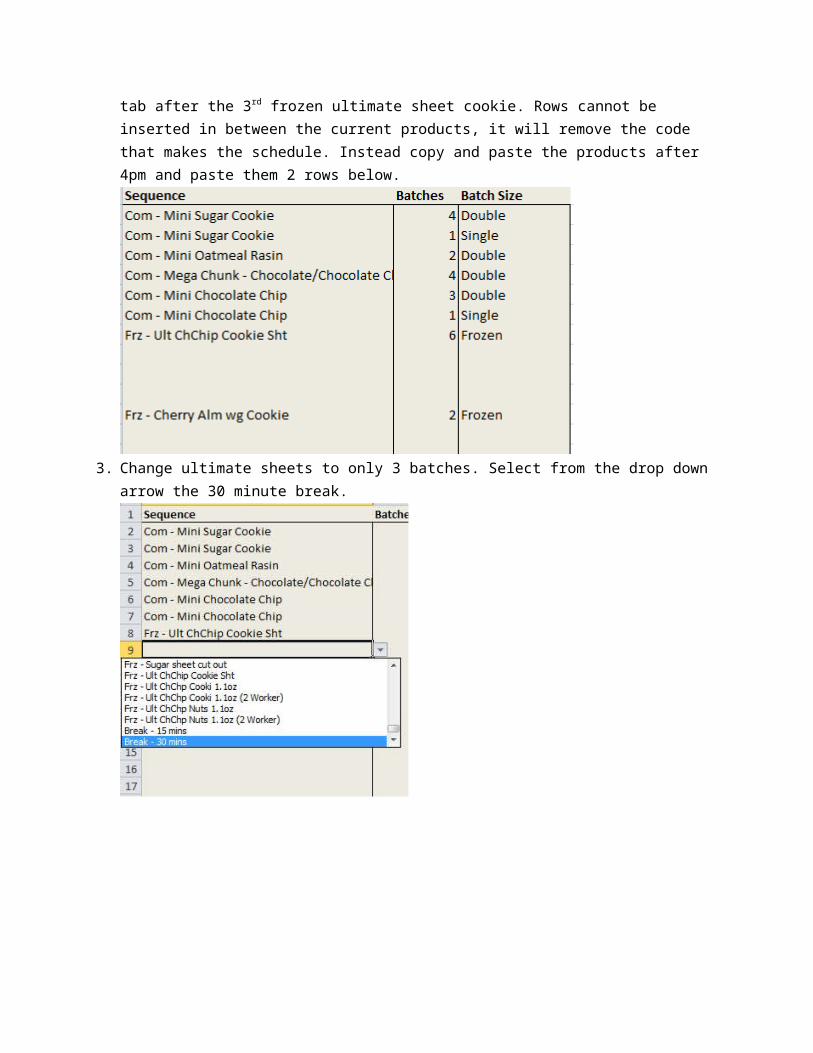
2. If the operator is supposed to go on lunch break at 4 pm with another break at 6 pm, the lunch will be added in the Schedule maker tab after the 3rd frozen ultimate sheet cookie. Rows cannot be inserted in between the current products, it will remove the code that makes the schedule. Instead copy and paste the products after 4pm and paste them 2 rows below.
3. Change ultimate sheets to only 3 batches. Select from the drop down arrow the 30 minute break.
4. Add in the ultimate sheets that you removed earlier, for this example you must add 3 more batches to make the total of 6 batches. Once all cookies are back on the sequence list and the break has been inserted into the correct time, click on the “Create Schedule” button.
5. This will create the new schedule with the break included.
6. This process can then be repeated for the 6 pm break.
Updating the Schedule Later in the Day1. If there are changes to the schedule after the day has already started, you can easily change the
schedule to include these changes.

2. Start by changing the start time to the time the current batch will be done, or the current time.
3. Update the sequence to list only the cookies remaining for the day. Click the “Create Schedule” button.
4. This will help in the decision making for the rest of the day. It will give you a better idea of when the last batch will be and if there will be enough time to complete all the batches in the night. It will also help in the decision of adding more batches to the night, you can determine if there is enough time to add more batches and how many more batches to add.
5. Once the schedule is updated be sure to replace the schedule on the floor, the operator should start filling out this new revision. At the end of the day, be sure to collect all revisions of the schedule that have been filled out.
Add a new cookie type1. If there is a new cookie that needs to be added to the schedule maker, go to the Table tab. 2. When adding a new cookie you must insert the row in the middle of the chart, it cannot be added to
the end of the list or the program will not add it to the list.

3. You can then add the cookie product type, the cycle time for a single batch and how many cases/ batch. If the cookie cycle time is calculated by the oven rate the next column will be the APV oven rate. This rate will then be used to calculate the cycle time using cases/APV rate*60. If adding frozen cookies the last column will be the batch size that is used.
Change cycle times and change over1. If the cycle times for the cookies needs to be updated go to the table tab and find the cookie type
that needs updating. For commercial the cycle time can either be updated or the APV rate can be changed. For frozen cookies the cycle time can be changed.
2. If change over times need to be updated go to the OvenCo tab and update the matrix. If the changeover time between commercial and frozen cookies needs to be updated, change the value on the Schedule Maker tab.
Currently the change over for frozen cookies is 20 minutes between every product type.