Instructions For Setting Up a Typical TP-Link Router on … · Instructions For Setting Up a...
8
Instructions For Setting Up a Typical TP-Link Router on ResNet These instructions explain how to set up a TP-Link router for use on ResNet from factory defaults. If your router is not new, please follow the instructions in the “Factory Reset” section before following the setup Instructions. Your router may come with a set up disk. Please do not use this to set up your router. Note: These instructions are based on the TP-Link Archer C2, while these instructions should work for all models, exact wording or button placement may differ. Home Set Up If possible before arriving in residence, please follow these instructions at home. You may have to temporarily plug your new router in to your home internet to make sure it works. Initial Setup Connect to your router Wireless By default, your router will create a wireless network called TP-LINK_####, where #### are the last 4 digits of your router’s MAC address. This network name can be found on the bottom of your router. Connect to this network as you would any other wireless network. By default, there is no password. Ensure that you are connecting to the correct network! You don’t want to accidentally setup your neighbour’s router! Wired A wired connection requires a computer with an Ethernet port or a USB or Thunderbolt adapter. You will also require an additional Ethernet cable. To connect to your router, plug one end of the Ethernet cable into one of the numbered ports on your router, and the other into your computer. 1
Transcript of Instructions For Setting Up a Typical TP-Link Router on … · Instructions For Setting Up a...

Instructions For Setting Up a Typical TP-Link Router on ResNetThese instructions explain how to set up a TP-Link router for use on ResNet from factory defaults. If your router isnot new, please follow the instructions in the “Factory Reset” section before following the setup Instructions. Yourrouter may come with a set up disk. Please do not use this to set up your router.
Note: These instructions are based on the TP-Link Archer C2, while these instructions should work for all models,exact wording or button placement may differ.
Home Set Up
If possible before arriving in residence, please follow these instructions at home. You may have to temporarily plugyour new router in to your home internet to make sure it works.
Initial Setup
Connect to your router
Wireless
By default, your router will create a wireless network called TP-LINK_####, where #### are the last 4 digitsof your router’s MAC address. This network name can be found on the bottom of your router.
Connect to this network as you would any other wireless network. By default, there is no password. Ensure thatyou are connecting to the correct network! You don’t want to accidentally setup your neighbour’s router!
Wired
A wired connection requires a computer with an Ethernet port or a USB or Thunderbolt adapter. You will alsorequire an additional Ethernet cable. To connect to your router, plug one end of the Ethernet cable into one of thenumbered ports on your router, and the other into your computer.
1

Configure Your Router
1. Open a web browser on your computer and enter 192.168.1.1 in the address bar.
2. You should see this page come up:
3. Log onto your router using: Username: admin Password: admin4. On first run you will be presented with the Quick Setup Wizard.
Set up your network
1. Click Next to start Quick Setup
2
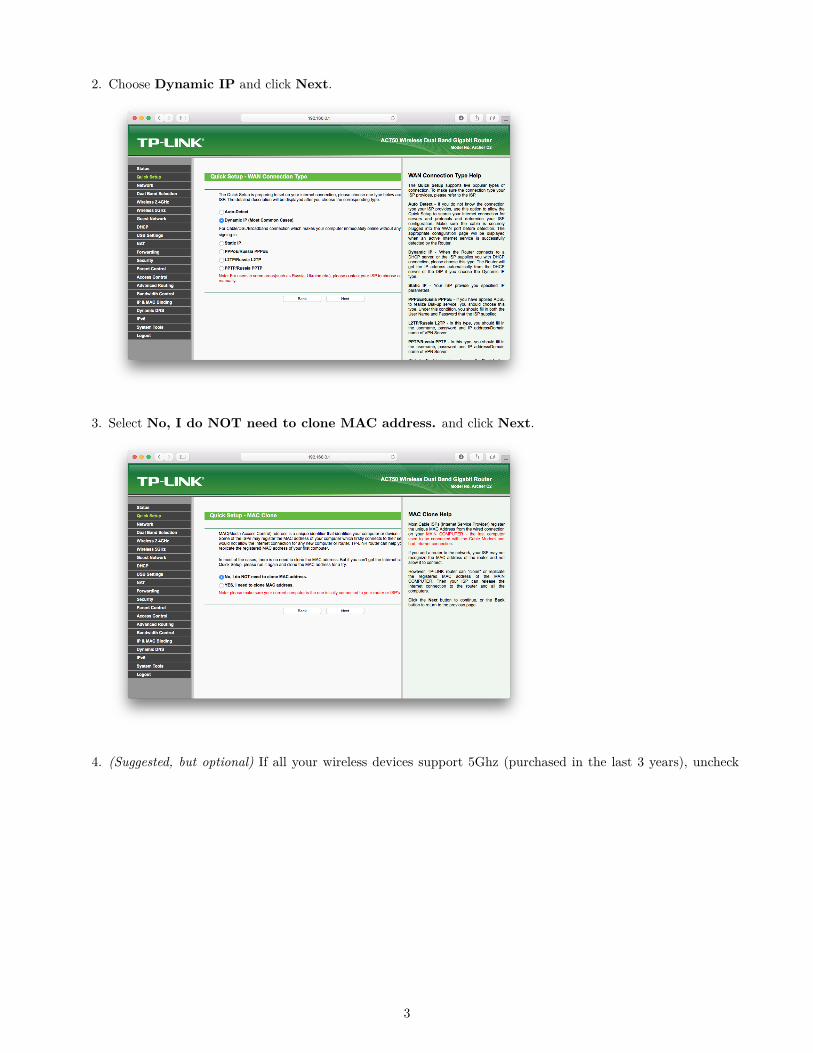
2. Choose Dynamic IP and click Next.
3. Select No, I do NOT need to clone MAC address. and click Next.
4. (Suggested, but optional) If all your wireless devices support 5Ghz (purchased in the last 3 years), uncheck
3

2.4GHz and click Next.
5. Set Wireless Network Name to a name of your choosing.
6. Ensure WPA2-PSK is selected and set the Wireless Password to something secure and memorable.
7. Click Next
4

8. You will be presented with an overview of your settings, click Save to finish.
9. When your router is done configuring, it will present this screen: Click Finish.
Secure your router
Set an administrative password
1. On the left, click System Tools and then Password
5

2. Set a new username and password.
3. You may be prompted to log in again. Use the username and password you set in the previous step.
When You Get to Campus
Plug in to your router
1. Plug one end of an ethernet cable (typically supplied with your router) to the internet port on your router,and plug the other into the jack in your room. Your wall jack will look similar to one of the following:
2. Plug in power to your router. You may have to wait a few moments for your router to fully power on andconnect to ResNet.
Register your Router with NetReg
Once your router is properly configured, you will need to register it in order to access websites outside of the Queen’snetwork.
1. Ensure your computer is connected - wired or wirelessly - to your router.2. Open a web browser and go to netreg.queensu.ca3. Enter your Queen’s NetID and password and click Accept
6

4. When prompted, restart your router. You may need to wait up to 15 minutes for the registration to takeeffect. If after following these instructions you are still unable to browse the internet, please try some of theNetReg troubleshooting steps listed below.
Troubleshooting Steps
TP-Link Factory Reset
If your router is not new, or you have made a mistake in its configuration, it is helpful to reset it to factory defaultsand configure it again.
1. Disconnect all cables except power.2. Locate the WPS/Reset button. It is typically on the back of your router.3. Press and hold the Reset button for 10 seconds. You may need to unplug and replug the power cable.
Router Connection troubleshooting
If you are having difficulty connecting to netreg.queensu.ca or any other website, these instructions may help resolveproblems with your router.
• Check your room for other network jacks, there are typically 2 jacks per bed in a room, though only one ofthese will provide an internet connection.
• Ensure the connection coming from the wall jack is plugged into the Internet or WAN port on your router.• Check the jack for damage. If you think your jack is damaged please call ITS at (613) 533-6666 or submit a
problem report using their website. You will be contacted to schedule an appointment with a technician.• Try using an alternate Ethernet cable.• If your router was previously configured, for example for use at home, follow the Factory Reset instructions
and setup your router again.
NetReg Troubleshooting
These instructions may help clear any issues with NetReg, they assume you are able to access netreg.queensu.ca orother Queen’s websites.
• Try using a different web browser to access NetReg.• Ensure you have waited 15 minutes and restarted your router.• Restart your computer; this helps clear any cached information.
Locating your router’s MAC address
If you are having difficulty with NetReg, it can be helpful to know your routers MAC address before calling theITSC. TP-Link routers typically have their MAC address printed on the bottom of the router, near where thedefault name is printed.
7

If none of these steps help, please call the IT Support Centre at (613) 533-6666 or submit a problem report usingtheir website. If they are unable to assist you over the phone, you will be directed to a router support depot orcontacted to schedule an appointment with a technician.
8