
Instruction of taking out OEM chip to install into brand ...
1
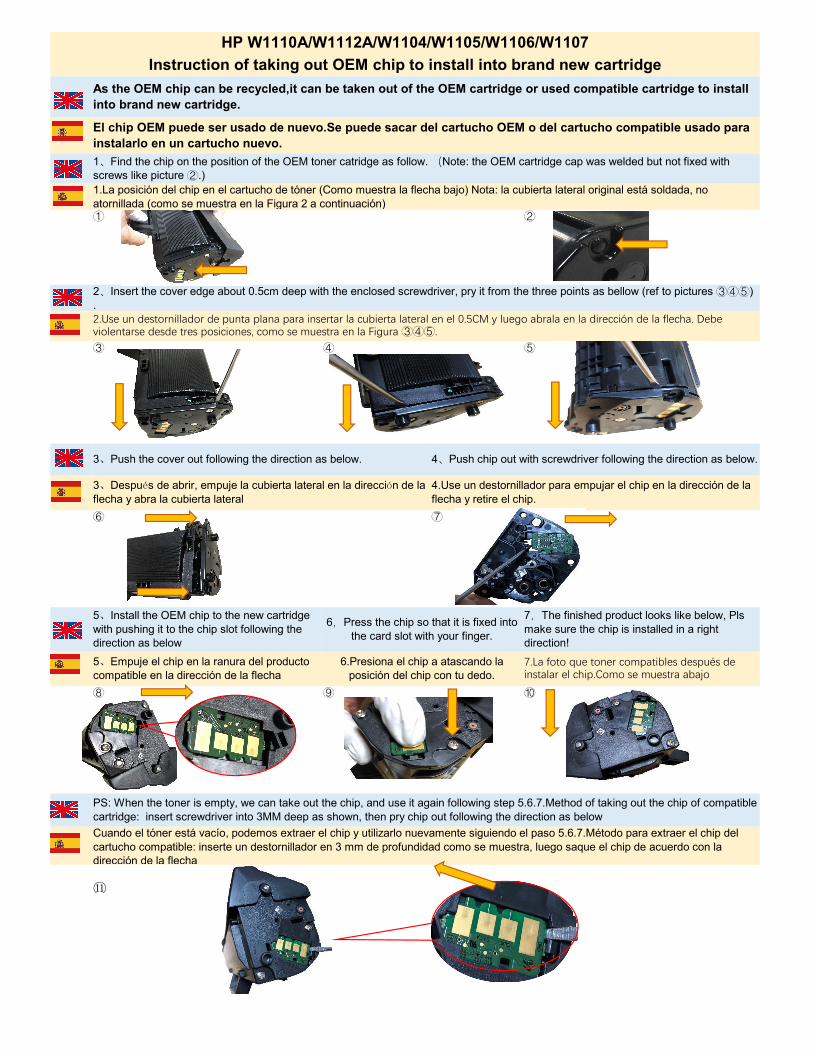
HP W1110A/W1112A/W1104/W1105/W1106/W1107 Instruction of taking out OEM chip to install into brand new cartridge As the OEM chip can be recycled,it can be taken out of the OEM cartridge or used compatible cartridge to install into brand new cartridge. El chip OEM puede ser usado de nuevo.Se puede sacar del cartucho OEM o del cartucho compatible usado para instalarlo en un cartucho nuevo. 1、Find the chip on the position of the OEM toner catridge as follow. (Note: the OEM cartridge cap was welded but not fixed with screws like picture ②.) 1.La posición del chip en el cartucho de tóner (Como muestra la flecha bajo) Nota: la cubierta lateral original está soldada, no atornillada (como se muestra en la Figura 2 a continuación) ① ② 2、Insert the cover edge about 0.5cm deep with the enclosed screwdriver, pry it from the three points as bellow (ref to pictures ③④⑤) . 2.Use un destornillador de punta plana para insertar la cubierta lateral en el 0.5CM y luego abrala en la dirección de la flecha. Debe violentarse desde tres posiciones, como se muestra en la Figura ③④⑤. ③ ④ ⑤ 3、Push the cover out following the direction as below. 4、Push chip out with screwdriver following the direction as below. 3、Después de abrir, empuje la cubierta lateral en la dirección de la flecha y abra la cubierta lateral 4.Use un destornillador para empujar el chip en la dirección de la flecha y retire el chip. ⑥ ⑦ 5、Install the OEM chip to the new cartridge with pushing it to the chip slot following the direction as below 6,Press the chip so that it is fixed into the card slot with your finger. 7,The finished product looks like below, Pls make sure the chip is installed in a right direction! 5、Empuje el chip en la ranura del producto compatible en la dirección de la flecha 6.Presiona el chip a atascando la posición del chip con tu dedo. 7.La foto que toner compatibles después de instalar el chip.Como se muestra abajo ⑧ ⑨ ⑩ PS: When the toner is empty, we can take out the chip, and use it again following step 5.6.7.Method of taking out the chip of compatible cartridge: insert screwdriver into 3MM deep as shown, then pry chip out following the direction as below Cuando el tóner está vacío, podemos extraer el chip y utilizarlo nuevamente siguiendo el paso 5.6.7.Método para extraer el chip del cartucho compatible: inserte un destornillador en 3 mm de profundidad como se muestra, luego saque el chip de acuerdo con la dirección de la flecha ⑪
Transcript of Instruction of taking out OEM chip to install into brand ...
HP W1110A/W1112A/W1104/W1105/W1106/W1107Instruction of taking out OEM chip to install into brand new cartridge
As the OEM chip can be recycled,it can be taken out of the OEM cartridge or used compatible cartridge to install into brand new cartridge.
El chip OEM puede ser usado de nuevo.Se puede sacar del cartucho OEM o del cartucho compatible usado para instalarlo en un cartucho nuevo.1、Find the chip on the position of the OEM toner catridge as follow. (Note: the OEM cartridge cap was welded but not fixed with screws like picture ②.)1.La posición del chip en el cartucho de tóner (Como muestra la flecha bajo) Nota: la cubierta lateral original está soldada, no atornillada (como se muestra en la Figura 2 a continuación)① ②
2、Insert the cover edge about 0.5cm deep with the enclosed screwdriver, pry it from the three points as bellow (ref to pictures ③④⑤) .2.Use un destornillador de punta plana para insertar la cubierta lateral en el 0.5CM y luego abrala en la dirección de la flecha. Debe violentarse desde tres posiciones, como se muestra en la Figura ③④⑤.③ ④ ⑤
3、Push the cover out following the direction as below. 4、Push chip out with screwdriver following the direction as below.
3、Después de abrir, empuje la cubierta lateral en la dirección de la flecha y abra la cubierta lateral
4.Use un destornillador para empujar el chip en la dirección de la flecha y retire el chip.
⑥ ⑦
5、Install the OEM chip to the new cartridge with pushing it to the chip slot following the direction as below
6,Press the chip so that it is fixed into the card slot with your finger.
7,The finished product looks like below, Pls make sure the chip is installed in a right direction!
5、Empuje el chip en la ranura del producto compatible en la dirección de la flecha
6.Presiona el chip a atascando la posición del chip con tu dedo.
7.La foto que toner compatibles después de instalar el chip.Como se muestra abajo
⑧ ⑨ ⑩
PS: When the toner is empty, we can take out the chip, and use it again following step 5.6.7.Method of taking out the chip of compatible cartridge: insert screwdriver into 3MM deep as shown, then pry chip out following the direction as belowCuando el tóner está vacío, podemos extraer el chip y utilizarlo nuevamente siguiendo el paso 5.6.7.Método para extraer el chip del cartucho compatible: inserte un destornillador en 3 mm de profundidad como se muestra, luego saque el chip de acuerdo con la dirección de la flecha
⑪


![INSTALL GUIDE OEM-CH(RS)-CH8-[FLRSCH10]-EN - …images.idatalink.com/corporate/Content/Manuals/RS-CH8/OEM-CH(RS... · patent no. us 8,856,780 ca 2759622 vehicle list - 1 of 1 make](https://static.fdocuments.in/doc/165x107/5c9c486509d3f2472f8b9dc6/install-guide-oem-chrs-ch8-flrsch10-en-rs-patent-no-us-8856780-ca.jpg)
![INSTALL GUIDE OEM-AL(RS)-CH5-[ADS-ALCA]-EN](https://static.fdocuments.in/doc/165x107/6232f6cfcfb9984d5455f8b5/install-guide-oem-alrs-ch5-ads-alca-en.jpg)


![INSTALL GUIDE OEM CH RS CH8 ADS CH7 EN - …images.idatalink.com/.../OEM-CH(RS)-CH8-[ADS-CH7]-EN_20171218.pdfu.s. patent no. 8,856,780 >> 01 02 engine start stop off acc on start 03](https://static.fdocuments.in/doc/165x107/5afb8b667f8b9a32348f384f/install-guide-oem-ch-rs-ch8-ads-ch7-en-rs-ch8-ads-ch7-en20171218pdfus.jpg)

![INSTALL GUIDE OEM AL RS CH4 OL MDB ALL ENimages.idatalink.com/.../OEM-AL(RS)-CH4-[OL-MDB-ALL]-EN_20170119.pdf · U.S. Patent No. 8,856,780 01 02 03 OFF ACC ON START 04 OFF ACC ON](https://static.fdocuments.in/doc/165x107/5be6a94209d3f2580c8de440/install-guide-oem-al-rs-ch4-ol-mdb-all-rs-ch4-ol-mdb-all-en20170119pdf.jpg)


