
INSTRUCTION MANUAL - Sears - Online & In-Store …c.sears.com/assets/own/02018600e.pdf · ... on...
136
INSTRUCTION MANUAL
Transcript of INSTRUCTION MANUAL - Sears - Online & In-Store …c.sears.com/assets/own/02018600e.pdf · ... on...
INSTRUCTION MANUAL
Printed in JapanPart No.AE60SZS0B0A Eng. ’04. 3
CONGRATULATIONS...on the purchase of this new Singer® Computer Sewing Machine. Your new sewing machine is the most innovativemachine ever manufactured. Actually, it is two machines in one... a full featured Standard Sewing Machine and anexclusive featured Embroidery Sewing Machine. For years sewers have dreamed of owning a machine that wouldthread itself, automatically change to a new color thread, never run out of bobbin thread and calculate its own tension re-quirements. Your new sewing machine has all these features and also employs an exclusive operating system of self-evident pictograms (“pictos”).
However, as simple as the machine is to operate, to obtain the most enjoyment and take full advantage of all thefeatures, it is strongly recommended you familiarize yourself with the machine. Following the instruction manual insequential order is the best way to build your skills and understanding of all the machines parts and capabilities.
INSTRUCTION BOOK SINGER® XL-6000The manufacturer reserves the right to change the appearance, design, or
accessories of this sewing machine as considered
necessary without any notification or obligation.
SINGER® is a Registered Trademark of The Singer Company Limited
Copyright 2004 Singer Sewing Company.
All rights reserved throughout the world.
1
“IMPORTANT SAFETY INSTRUCTIONS”“When using an electrical appliance, basic safety precautions should always be followed, including the following:”“Read all instructions before using this sewing machine.”
“DANGER_____To reduce the risk of electric shock:”1. “An appliance should never be left unattended when plugged in. Always unplug this appliance from the electric outlet
immediately after using and before cleaning.”2. “Always unplug before relamping. Replace bulb with same type rated 3 Watts.”
“WARNING_____To reduce the risk of burns, fire, electric shock, or injury to persons:”1. “Do not allow to be used as a toy. Close attention is necessary when this appliance is used by or near children.”2. “Use this appliance only for its intended use as described in this manual. Use only attachments recommended by the
manufacturer as contained in this manual.”3. “Never operate this appliance if it has a damaged cord or plug, if it is not working properly, if it has been dropped or
damaged or dropped into water. Return the appliance to the nearest authorized dealer or service center forexamination, repair, electrical or mechanical adjustment.”
4. “Never operate the appliance with any air openings blocked. Keep ventilation openings of the sewing machine andfoot controller free from the accumulation of lint, dust, and loose cloth.”
5. “Keep fingers away from all moving parts. Special care is required around the sewing machine needle.”6. “Always use the proper needle plate. The wrong plate can cause the needle to break.”7. “Do not use bent needles.”8. “Do not pull or push fabric while stitching. It may deflect the needle causing it to break.”9. “Switch the sewing machine off (“0”) when making any adjustments in the needle area, such as threading needle,
changing needle, threading bobbin, or changing presser foot, and the like.”10. “Always unplug sewing machine from the electrical outlet when removing covers, lubricating, or when making any
other user servicing adjustments mentioned in the instruction manual.”10. “Never drop or insert any object into any opening.”10. “Do not use outdoors.”10. “Do not operate where aerosol (spray) products are being used or where oxygen is being administered.”10. “To disconnect, tum all controls to the off (“0”) position, then remove plug from outlet.”10. “Do not unplug by pulling on cord. To unplug, grasp the plug, not the cord.”
“SAVE THESE INSTRUCTIONS”“This sewing machine is intended for household use only.”
Alphabet patterns
134
Layout grid patterns

Please use following foot control:
“This appliance has a polarized plug (one blade winder than the other). To reduce the riskof electric shock, this plug is intended to fit in a polarized outlet only one way. If the plugdoes not fit fully in the outlet, reverse the plug. If it still does not fit, contact a qualifiedelectrician to install the proper outlet. Do not modify the plug in any way.”
When not in use, be sure to turn power switch OFF and unplug machine.
Do not expose machine to direct sunlight or humid atmosphere.
Do not use thinner or other similar solvents to clean machine.
Be sure to turn power switch OFF before replacingsewing machine needle, or lubricating machine.
2
Sewing machine model number Used with foot controller number
XL-6000 YC-425 (UL, CSA)
Thinner
* While operating sewing machine close face plate cover.* Do not use embroidery unit carriage as handle.* Do not carry sewing machine while embroidery unit is attached.
This sewing machine uses a micro computer and precision electronic circuits consisting of semiconductorcomponents, so please observe the following precautions: * Keep room temperature at 40 F to 100 F. If temperature of room where machine is too low, machine may
present problems such as failure to reach its normal sewing speed.

Automatic threading of sewing machine including
the eye of the needle.Place the thread at a predetermined position,
and the machine will fully and automatically thread itself.
Color Liquid CrystalDisplay and Operating
ScreenOperating the sewing machine
is as easy as seeing andtouching self-evident
pictograms.
Thread Tension is automatically controlled by
computer and provides perfectly balanced stitching
for all sewing functions
Accessories such as presser feet andbobbins are contained in
the Auxiliary Bed.
Operating Buttons that are frequently used during sewingare conveniently positioned for
easier operation.
Introduction to
sewing machine !
3
Wind in Place BobbinThe bobbin winds in place
directly from the top thread to thebobbin during regular sewing.
Buttonholing isaccomplishedautomaticallywith one-step
Automatic Thread Exchanger
(Standard Machine)The sewing machine is able toautomatically rewind thread to
the spool with just a simpletouch of a pictogram. Mastmay also be used for twin
needle sewing.

4
Embroidery Machine is provided with editing function that combines or joins patterns.
* Embroidery Machine is able to sew large area embroidery patterns.Embroidery machine can sew an embroidery pattern as large as 140mm x 240 mm [approximately 6" x 10" ]. Patterns may be sewn withbuilt-in designs or characters, Optional Sew-Ware Cards or Designs from Optional Professional Sew-Ware Software.
* Combination Embroidery provides the ability to combine patterns and letters in a single hoop.
* Multiple Hoop Embroidery provides the capability of neatly and precisely joining parts of a combined pattern orletter string pattern that is larger than a single embroidery hoop and have been divided into parts.
Number of letters that can be sewn at a time is 120 and the number of designs that can be saved is 32 (20 for main sewing machine).
* Time required for sewing an embroidery pattern and thread colors of pattern is shown on LCD screen.LCD screen gives time required for sewing an embroidery pattern and time remaining, during sewing, until completion of sewing. In addition, the screen shows thread color when changing color of embroidery pattern segments.
Sew extra large embroidery designs up to 250mm x 450mm
(nominal 10" x 18") with machine converted to Embroidery Machine
Enjoy professional quality embroidery with alarge selection of built-in patterns and optional
Embroidery Sew-Ware Cards.
THREAD EXCHANGER (Embroidery)
When set to automatic, the Thread Exchanger automatically rewinds thread upon completion of
each embroidery color step.The next staged color thread is then
automatically threaded and the sewing machine automatically starts sewing again.
Endless BobbinWhen the machine runs out of bobbin
thread it stops, automatically refillsthe bobbin and resumes embroidering
the design.
This eliminates the need to stop the
machine, remove the hoopand manually replace the
bobbin.
Important Safety Instructions ...........................................2Introduction to Sewing machine....................................3,4Principal Parts...............................................................7,8Accessories....................................................................8
Connecting machine ........................................................9Running machine .............................................................9Operation switches ..........................................................9Functions of operation keys...........................................10LCD screen adjustment................................................10Automatic Threading of Standard Sewing Machine ......11Thread Exchanger (Standard Machine) ......................12Automatic Wind-In-Place bobbin winding.................13,14Trial Sewing! .............................................................15,16How to select Utility Patterns (color coded green) ..17,18Changing Presser Feet..................................................19How to adjust stitch length (manually) ..........................20How to change Zigzag Width or Needle Position ..........21How to adjust thread tension (manually) ......................22
How to use key .............................................23~26(1) Stitching procedure(2) Use of sewing machine(3) Tips
Fabric, Thread and NeedleTable...................................27How to Remove and Insert Needles..............................27
Straight stitch............................................................28,29Automatic back tacking (reverse stitching) ...................29Changing sewing direction / Sewing overlapping seamallowances / Starting sewing of heavy-weight fabric.....29Free Arm Sewing ...........................................................30Reinforcing stretch stitch................................................30Zigzag stitch...................................................................31Overcasting....................................................................32Basting stitch..................................................................33Multi-stitch zigzag stitch .................................................33Blindstitching..................................................................34Automatic buttonholes .........................................35,36,37
Double bartacking/eyelet buttonholingPurl stitchCorded buttonholes
Bartacking ......................................................................38Setting zipper to side placket of garment ......................39Center zipper insertion...................................................40Zipper insertion for small articles ...................................41Heirloom Sewing (Using wing needle) ..........................42Decorative Topstitching .................................................42Shirring and gathering....................................................43Pin tucks ........................................................................43Flat Fell Seams ..............................................................44Applique .........................................................................44Quilting...........................................................................45Sideway feed (four-direction sewing) ............................45Patch work .....................................................................46Scallop stitch ..................................................................46Button Sewing Foot........................................................47Manual buttonholes........................................................48Rolled Hemming ............................................................49Even Feeding.................................................................49Attaching Cords .............................................................50Twin Needle Sewing ......................................................51How to Select Continuous / Functional Patterns (color coded rose) ....................................................51,52
5
CONTENTS

How to Select Large (X-Y Feed) Patterns (color coded orange) ................................................53
How to Select Small Decorative Patterns......................54Balancing Machine with Trial Sewing Pattern ...............54How to Modify Patterns..................................................55How to select and sew patterns.....................................56How to cut cross-over stitches.......................................56How to Select Alphabet Patterns
(color coded blue) ...............................................57,58Saving / Clearing / Opening patterns........................59,60
Preparation for Embroidery ......................................61,62Thread Exchanger (Embroidery Machine) ..............63,64Endless Automatic Bobbin winding for embroidery..65,66How to Select Floral Embroidery Patterns
(color coded green) .............................................67,68How to Select Large Floral Monogram
(color coded rose) .....................................................68How to Select Letter and Number Patterns
(color coded blue) .....................................................69How to Select Layout Grid Patterns
(color coded orange) .................................................69How to Sew Embroidery...........................................71,72Basic Embroidering Trial Sewing .............................73,74Complete Sequence of Embroidery..........................75,76Moving and Confirming location of patterns and letters.......................................................................................77Rotating..........................................................................78Changing size of patterns and letters............................78Mirror Imaging and Horizontal .......................................79Vertical Orientation ........................................................79Changing space and interval between letters anddividing letters ................................................................80Combination Sewing: combining patterns and letters..................................................................................81,82Multiple Hoop Embroidery [Example 1] ..................83~90Multiple Hoop Embroidery [Example 2] ...................91,92Continuous Embroidery ..........................................93,94Zooming (On Screen Enlargement) function ...............95Power Fail and Temporarily saving patterns and letters .....................................................................................96Storing combined patterns or letters in memory ................................................................................97,98If thread breaks during embroidery.......................99,100
Helpful messages ..............................................101~109Optional Accessories.........................................110~114
Professional Sew-Ware, Embroidery card,Card Converter, Ruffler presser foot, Pintuck foot, Open toe embroidery foot, Darning/embroidery foot, 1/4 inch Quilter’s foot
How to use Optional Settings ............115~117
Update ...................................................................... 118Bobbin winding/placing a bobbin ....................... 119,120Manual threading of machine head ................... 121,122Troubleshooting ................................................. 123,124Specification table......................................................124Replacing lamp ..........................................................125Maintenance of sewing machine ...............................125Stitch patterns table (main unit) .........................126~128Embroidery patterns table .................................129~134
6

Principal Parts
7
Handwheel
LCD Contrast Control Foot Speed Controller Outlet
Embroidery Card Slot
Power Switch
Electric Power Cord
Needle Clamp
Singer Needle (Style 2000)
Presser Foot
Bobbin Case Cover Button
Cover of Endless BobbinWinder for Embroidery
Buttonhole Lever
Needle Threading Lever
Presser Foot Release ButtonPresser Foot ScrewPresser foot Holder
Feed Dog
Needle PlateBobbin Case Cover
Thread Spool Cap
Spool Pin
LCD Pictogram Operation Screen
Operating keys
Cover for Endless Bobbin
Spool pin (for Endless Bobbin Winder bobbinthread)
Cap (for bobbin fill thread winder)
Face Plate Cover
Speed Controller Lever
Thread Trimming Button
Reverse Stitch ButtonThread End Retaining Spring Start/Stop Button
Auxiliary Bed (Accessory Storage)
Presser Foot Lifter
Drop Feed Lever
Foot Speed Controller
RS232C Serial Port
Needle Up/Down Button
Thread Exchanger

Embroidery Unit
Converting machine to free-arm
* Contained in auxiliary bed
Quilt guide
* Standard foot (A) has been factory-attached at the time of delivery.
8
Accessories
Exclusivescrewdriver
Blindstitchpresser foot (D)
Seam ripper
Zipper foot (B)
Overcastingfoot (C)
Bobbin for automaticsewing (3)
Lint brush Eyelet punch
Standard presserfoot (A)
Decorative stitch foot (T)
Buttonholefoot (E)
Embroidery frames(Large, Medium and small)
Embroidery foot (J)
Bobbin winder guide for embroidery thread
Invisible zipper foot (G)
Assistant marker
Bobbinwinder shaft
Bobbin for manualsewing (2)
EmbroideryAccessory Bag
Pull Auxiliary Bed to left.
Thread spool caps(2pcs,each)
Knee Lifter
Singer Needles
Auxiliary spoolpin and felt
Even feed foot Button sewing foot
Rolled hemmingfoot (F)
Transparentbuttonhole foot (I)
Cording foot
(1pcs)
Tweezers
Continuous Embroidery frame
Continuous Embroidery card

Connecting machine / Running machine / Operation switches
Push foot speed controller plug into lower receptacle at rightend of machine.
9
Operation Buttons
Connecting Sewing Machine
Speed LeverSewing machine speed can be adjusted tolimit top speed even during sewing.
Reverse Stitch ButtonSewing machine sews in reverse (tacking)at a low speed as long as Reverse StitchButton is held pressed.
Thread Trimming ButtonWhen button is pressed, thread trimmer will automaticallytrim both needle thread and bobbin thread. Then,machine will stop with its needle up.* After automatic thread trimming, machine is able toimmediately sew even if no bobbin thread appears aboveneedle plate.
Presser foot lifter
NOTE: If LCD window is too bright or dark to see the stitch patterns, adjust LCD brightness control (see page 10).
Push power cord plug [1] into receptacle at right end ofmachine . Plug [2] into electric outlet.
[2]
Running Sewing Machine
Needle Up/Down Button
* When “I” side of power swith is pressed machine will beturned on.* When “O” side of power swith is pressed machine will beturned off.
To run machine press foot speed controller. The harder youpress, the faster machine will sew.To stop machine, remove foot from controller.
[1]
Start/Stop ButtonNote: may be used as an alternative to the Foot Speed controller. When the button is pressed, machine will start running. Another press on the button will cause machine to stop with its needle down.The Button changes its color according to sewing machine preparation status.Green: Sewing machine is ready to
start or is sewing.Red: Sewing machine is not ready to start.Orange: Sewing machine is winding a bobbin.

Functions of operation keys / LCD screen adjustment
10
Patterns shown on LCD screen can be easily selected and sewn.
When this key is pressed, “Stitching procedure” is shown on LCD screen.
Used to save and recall patterns and letter strings.
Used to automatically thread sewing machine.
Used to change thread tension, stitch length, needle position and zigzagwidth.
Used to automatically wind a bobbin.
Used to pause or take a break during embroidery sewing. The machinemay be turned off and the current status will be saved to be used whenreturning to the machine and turning on the power.
Adjust both brightness and contrast of screen through adjusting hole while observing screen.
1. Fit thinnest part of screwdriver supplied as an accessory to cross recess in end face of adjustinghole.
2. To increase brightness ( make lighter), turn screwdriver clockwise. To decrease brightness (make darker), turn it counterclockwise.
Operation Keys
Adjustment of contrast of LCD screen
Increased (lighter)
Decreased(darker)

Automatic Threading of Standard Sewing Machine
11
12
3
4
1 2
4 5
* Check to be sure that Face Plate Cover is closed.* Do not open Face Pate Cover while machine is engaged in threading.
Use both hands to pull threadinto primary thread guide.
Lower presser foot . Press key.
Install Thread spools.
* Align mark on handwheel withmark on sewing machine.
A
Smaller spool
Larger spool
Cap
Cap
* For automatic threading, use a needle of size 11 to 16 (80 to 100).With a needle other than aforementioned one, manually thread machine head.
* When a special-purpose thread (such as invisible thread) is used, machine may fail to perform automatic threading. In such a case, manually thread machine head. (Refer to pages 121, 122 for how to thread sewing machine manually.)
Align mark onhandwheel with markon machine head.
Face Plate Cover
* If thread is left caughton hook, remove threadfrom hook before startingsewing.
Mark
Holding thread with your righthand, thread machine head alonggroove with your left hand. Pull itin direction of arrow and cut itwith thread cutter blade “A”.3
A
6 Press Pictogram.
Now, machine starts automaticthreading from spool throughneedle eye.

12
2
3Stage Threadfor AutomaticThreading .
Install Thread Spools.
1
2
3
1
Install ThreadExchanger.
Largecap
Place thread so thread wrapsaround spool in a clockwisedirection and put large caponto thread spool.
In case of normalthreadspool
Place thread so thread wrapsaround spool in a clockwisedirection and put large caponto thread spool afterinstalling inner cap.
Place thread so threadwraps around spool in aclockwise direction andput small cap ontothread spool.
Largecap
Smallcap
inner cap
Lever
Thread sewing machinealong groove, pull it indirection of arrow and cutit with thread cutter blade. 4 5 6
Lower presser foot.
Press key.
Press rewind switch to automatically rewind thread.
Holding thread with fingers, pullthread so as to stretch thread tight.
Stretchthread tight.
* When sewing embroidery,please see page 63,64.
Thread Exchanger (Standard Machine)
ProjectionGroove
Press pictogram.
In case of largethreadspool
In case of smallthreadspool
Left threadspool
Rightthreadspool
Press picto to rewind thread to left thread spool.
Press picto to rewind thread to right thread spool.
* Press rewind picto after confirming that thread is cut.
* Do not touch needle thread rewind device during rotation.
* When the Thread Exchangerstops during re-winding, turnthe power to the machine off,confirm the setting of thethread and then turn the powerback on.
Thread Cutter Blade
*Occasionally when using small spools of thread, the last 10 ~ 15% of thread will notreel off smoothly. When this occurs, use the Auxiliary Spool Pin. Mount the Spool Pinon the Accessory Bobbin Winder Shaft and install on machine.
13
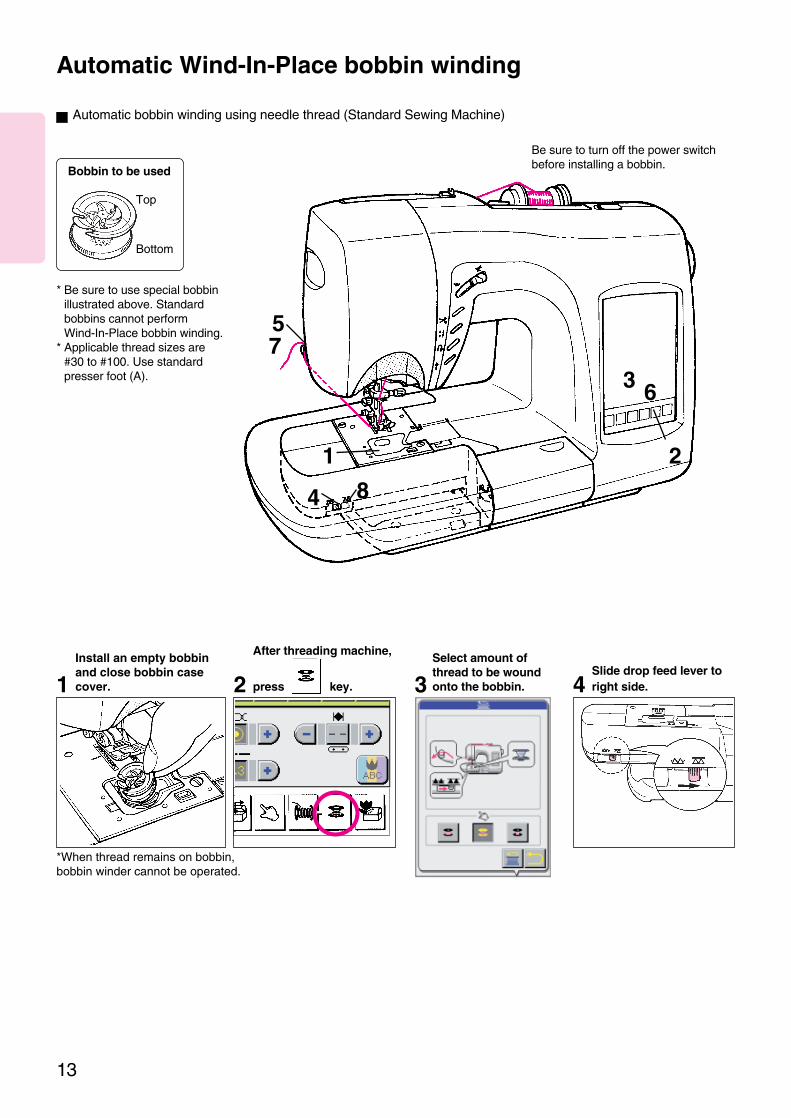
Automatic Wind-In-Place bobbin winding
Automatic bobbin winding using needle thread (Standard Sewing Machine)
2 3 4Select amount ofthread to be woundonto the bobbin.
Slide drop feed lever toright side.
After threading machine,
press key.
1 2
3
4
5
6
Bobbin to be used
1Install an empty bobbinand close bobbin casecover.
* Be sure to use special bobbinillustrated above. Standardbobbins cannot perform Wind-In-Place bobbin winding.
* Applicable thread sizes are #30 to #100. Use standard presser foot (A).
8
Top
Bottom
7
Be sure to turn off the power switch before installing a bobbin.
*When thread remains on bobbin, bobbin winder cannot be operated.

14
5 6
7
Tensing thread, pass itunder presser foot. Lowerpresser foot. Pull threadinto thread end retainingspring.
Upon completion ofbobbin winding, threadis automatically cut.Then, removeremaining thread fromThread End RetainingSpring.
Return drop feed lever toleft side.8
* If sewing machine has failed to correctly wind bobbin, try again from step 1.* With a special-purpose thread, machine may fail to wind bobbin correctly. In such a case, wind bobbin manually. (Refer to pages 119, 120 for how to wind bobbin manually.)
* If needle thread runs out during bobbin winding, check bobbin.
Press pictogram shown on LCD screen.
Thread End Retaining Spring
* If you want to temporarily stopwinding bobbin before completion,press start/stop button.
WHAT DOES THAT HELPFUL PICTOGRAM MEAN?
*The Wind-in-Place Bobbin System shares the winding mechanism with the
Embroidery Endless Bobbin. If you attempt to use the Standard Sewing
Machine Wind-in-Place Feature when the Endless Bobbin Feature is threaded you will re-
ceive a Helpful Pictogram Message instructing you to remove the bottom thread spool.
*When removing the Bottom Thread Spool open the Cover for the Endless Bobbin and cut
the thread at the spool.
*Remove the Spool of Thread.
*Then open the Cover of Endless Bobbin Winder and, with your provided tweezers, grasp
the short thread tail that protrudes from the spring closest to the screw that holds the
Needle Plate in Place.
*Carefully pull the thread out towards the rear of the sewing machine. Do not pull the
thread from the spool end and do not jerk the thread out.
*Finally, make sure that the Winding Mechanism is clear of any thread debris, paying par-
ticular attention to thread scraps that might be caught under the springs.

15
Trial Sewing!
Pull both the needle thread andbobbin thread through andunder the presser foot and tothe back of the machine. Placefabric under foot and lowerPresser Foot.
Adjust sewing speed.Begin sewing.
3 4
5 6
Standard presser foot (A)
The first Utility Patternscreen will appear.2
Straight stitching with leftneedle position will be auto-matically selected.
7 Stop sewing.
12
3
4
7
* Check to be sure that sewingmachine is correctly threaded.(If the machine is not correctlythreaded, it will not operate.)
5
1Turn on power tomachine. Touch LCDWelcome screen.
Check presser foot isinstalled correctly.
For two hand sewing, useKnee Lifter to raise andlower the Presser Foot.
Important: make sure youstop sewing before press-ing lifter with your knee.
6

16
1 32 4
* Cut thick thread or special-purpose thread with a pairof scissors.
Press Thread TrimmingButton. * Raise presser foot lifter.
Needle moves until itsupper position is reached.
Both needle thread andbobbin thread aretrimmed. Now, you cantake out your finishedfabric.
Press Reverse Stitch Button. Begin sewing. Press Reverse Stitch Button.1Seams and stitcheswill not pull apart ifreverse stitches aresewn at the start andend of the sewing.
* Sewing machine will continue reverse stitching as long as reverse stitch button is pressed.* Sewing machine sews reverse stitching at a low speed.* In the case of pattern sewing such as zigzag stitching, machine will perform back tacking.
2 3
Automatic back tacking
Automatic thread trimming after completion of sewing:
Reverse stitching (back tacking)
Fabric
[1]
[2]
[3]
After automatic thread trimming, it is not necessary tobring the bobbin thread up to
the top.
If you have not already tried playing with the Pictogram Pattern Screens...... this would be a great timeto take a quick peek at the vast assortment of Stitch Patterns. Just see and touch the pictograms tochange groupings and select Stitch Patterns. Please note all the stitch patterns are grouped bygeneral function and are color coded for easy identification:* Utitlity Pattern are grouped on 4 screens and are color coded green.* Continuous Functional and Decorative Patterns are grouped on 10 screens and are color codedrose.* Large (X-Y Feed) Decorative Patterns are grouped on 6 screens and are color coded orange.* Small Decorative Patterns are grouped on 4 screens and are color coded purple.* All Alphabet and Numeric Screens are grouped by fonts on 25 screens and are color coded blue.
In the case where machine is operated after pictogram has been pressed, machine will sew reverse stitching (back tacking) of three stitches, then start normal stitching.When seam end is reached, press reverse stitch button. Then, machine will sew reverse stitching(back tacking) of three stitches, automatically cut the thread and stop. (See page 29.)

* Utility patterns are provided on four different screens.* A light touch on welcome screen will automatically select straight stitching with left stitch base line. This
is the stitch pattern that is usually used for straight stitch sewing.* To select another pattern, lightly touch pictogram corresponding to pattern.
Example: will be shown in reverse color as , and selected pattern and presser foot to be
used (pictogram) will appear on LCD screen (above pattern group).
How to select Utility Patterns (color coded green)
* To change thread tension, needle position/zigzag width or stitch length, refer to pages 20, 21, 22.
Major applications of utility patternsButtonholing
Left po-sitionstraightstitch
Large
17
First screen
Centerpositonstraightstitch
Stretch
straightstitch
Overcasting
Zigzag
stitch
Heirloom
andC
ouching
Overcasting
Multi-stitch
zigzag&
Overcasting
Bartacking
Basting
stitch
Sm
all
Medium
Eyelet
buttonholing
Buttonholing
Serpentine
stitch
Lightly (*) touch screen.
Reinforcing stretch
stitch
Blindstitching
Eyelet
buttonholing
(*) Note: A light touch or press on the desired pictogram (picto) is allthat is necessary when selecting a desired stitch or function.

Third screen
18
Straight stitchemblem attaching
Fourth screenSecond screen
Lockstitchbuttonhole
Stretch
buttonholing Zigzag stitchdarning
Decorative T
opS
titches
Darning
These stitches are used fortubular material sewing of trousers orsleeves. They also may be used for
attaching patches, emblems or pockets.
Lateral feed straight stitches.
Lateral feed zigzag stitches.Decorative
Top S
titches
Running
QuiltS
titch
Buttonholing

19
Changing Presser Feet
Presser feet are storedin Auxiliary Bed.
Types of Feed and Their Application
Presser foot
A T G B C D E
Patchw
ork,F
eather Stitch, etc
* Continuous stitching
* Stitch pattern
Standardpresser foot
Overcastingfoot
Zipperfoot
Buttonhole footBlindstitchpresser foot
Select presser foot that matches stitch pattern to be sewn!
Pattern stitch
Overcasting
Multi-stitch zigzag
(elastic stitch)
Zigzag stitch
Applique
Quilting, etc.
Reinforcing stretch stitch
Straight stitch
Quilting
Pintuck
Darning stitch
Bartacking
Autom
atic buttonhol-ing
Zipper setting
Overcasting
(overlocking)
Blindstitching
Be sure to turn off the power switch beforereplacing presser foot.
Marker line
Pin
Lower Presser FootLifter, and foot will snap on.
4
Raise Presser FootLifter.1
Push Presser FootRelease Button.2
Decorativestitch foot
Invisible zippersetting
Invisiblezipperfoot
Needle
(highestposition)
Align presser foot pinwith marker line.3
Stitch pattern
Typical applications

Sewing machine is designed to automatically select an optimum stitch length once a pattern is selected.
How to adjust stitch length (manually)
20
Stitch lengths by stitch pattern that are automatically selected and adjustable ranges
Example of straight stitch
The smaller the number the shorter the stitch length.The larger the number, the longer the stitch length.
* Stitch length of Straight Stitch and ZigZag isManually Adjustable from “0.0” to “5.0”.
* When the stitch length shows ( - - ), the patterncannot be manually adjusted using the stitchlength adjustment.
Stitch pattern
Stitch length
Automatic
Adjusted
Stitch pattern
Automatic
A touch on the pictogram will return thenumeric value to the Automatic Stitch LengthSetting of “2.3.”
For automatic stitch length adjustment,just touch pictogram of desired pattern.
For manual stitch length adjustment
2.3 1.5 2.0 1.0 0.5 0.4 0.6
Stitch length
0.0 ~ 1.0
- -
- -
Stitch Length, Width and Tension show auto-matically on the 4 Utility Screens. For allother screens, stitch length, width andtension will be shown on a “pop-up” screen
accessed by pressing key.
Fabric
Fabric
Fabric
Adjusted
Press to increase stitch length.
Press to decrease stitch length.
10 0.5
0.0 ~ 5.0 0.0 ~1.0
5 ~20
0.5 0.50.6 0.6
0.4
0.0 ~ 1.0 0.0~2.0 2.0~4.0
1.0 2.0

21
How to change Zigzag Width or Needle Position
This function is used to adjust needle entrypoint for blindstitching.
Example of zigzag stitching
The larger the number the wider the zigzagwidth. The maximum width is 7.0 mm.
The smaller the number the narrower the zigzagwidth.
A touch on the pictogram will returnthe numeric value to the Automatic StitchWidth Setting of “5.0.”
For automatic zigzag width adjustment,just touch pictogram of desired pattern.
For manual zigzag width adjustment
1. Zigzag width
3. Needle position for Blindhemming
Example Needle position/zigzag width
In the case where seam does not reach fold:
In the case where seam goes far over crease:
Press to shift needle entry point to right.(Turn handwheel first to checkcurrent needle entry point. Then,raise needle and start adjustingneedle entry point.)
Press to shift needle entry point to left.(Turn handwheel first to checkcurrent needle entry point. Then,raise needle and start adjustingneedle entry point.)
Stitch Length, Width and Tension show auto-matically on the 4 Utility Screens. For all otherscreens, stitch length, width and tension willbe shown on a “pop-up” screen accessed by
pressing key. Fabric
Fabric
Fabric
Press to increase stitch length.
Press to decrease stitch length.
2. Straight Stitch Needle Position
The needle position for straight stitch sewing may be adjusted to any one of 22different positions within the presser foot by use of the Stitch Width Control. Adjustment ranges from full left position (0.0) to full right position (7.0) . The lower the num-ber the further left position. The higher the number the further right.

How to adjust thread tension (manually)The sewing machine has an automatic computer controlled thread metering system that calculates and deliversthe precise amount of thread for each needle penetration to create the optimum appearance of each stitch. Anoverride control is available to allow for individual modification for specialized effects.To change thread tension for special-purpose stitching style, follow procedure described below:
* For straight stitch sewing and most all con-struction sewing, a well balanced tension iswhen the needle thread and the bobbinthread interlace with each other in the middleof the fabric thickness.* For most decorative sewing and embroi-dery sewing the needle thread and thebobbin thread should interlace with eachother on the bottom of the fabric thickness.
When thread tension is increased: When thread tension is decreased:
* For shirring and gathering, manually adjust stitch length and thread tension. (See page 43.)
Bobbin thread appears on right side of fabric. Needle thread appears on wrong side of fabric.
Press to decrease
needle thread tension.
Thread tension decreases in eight steps.
Press to increase
needle thread tension.
Thread tension increases in eight steps.
22
Needle thread
Bobbin thread
Middle of fabricthickness
Fabric (right side)
Fabric (right side)
Fabric (wrongside)
Needle thread
Bobbin thread
Tension shows automatically on the 4 Utility Screens. For all otherscreens, tension will be shown on a “pop-up” screen accessed bypressing key.
__
* To return the thread tension to the automatic setting, press thecenter of the tension pictogram. For exampletouching the -8 will return the machine to automatic tension setting.
Fabric (wrongside)
Fabric (wrongside)
Needle thread
Bobbin thread
Fabric (right side)
Example of Balanced Tension for Sewing Straight Stitch

23
(1) Stitching procedure
1 2 3 4
5 86
Select a stitch pattern.
7
* Your Computerized sewing machine shows basic operations (stitching procedure, use of sewing machine, tips and problems) under the Advise Section of the LCD Screen. This allows a quick way of finding information without the necessity of referring to the Instruction Manual.
Advice that tells stitchingstyles that can be sewnwith pattern shown onscreen.
Press picto, andscreen will appear asshown below:
Press picto, andscreen will appear asshown below:
Every press onpicto will activate thenext screen.
To return to utilitypattern screen,
press picto.
* A press on pictogramwill activate previous screen.
Press advice key.
How to use key

24
Stitching style indication symbols and number of screens
Pin tuckGatheringShirringInvisible zipper setting
Stretch buttonholing
Lockstitch buttonholing
Heirloom / Couching
Overcasting
Buttonholing
Stretch straight stitch
Overcasting
Decorative stitch
Reinforcing stretch stitch
Decorative Top Stitch
Lateral feed: straight stitch, right
Decorative Top Stitch
Lateral feed: straight stitch, lower
Lateral feed: straight stitch, left
Bartacking
Basting stitch Stretch buttonholing
Eyelet buttonholing
Eyelet buttonholing
Eyelet buttonholing
Lockstitch buttonholing
Lockstitch buttonholing
Lockstitch buttonholing
Blindhem stitching
Lateral feed: straight stitch, upper
Lateral feed: zigzag, right
Lateral feed: zigzag, lower
Lateral feed: zigzag, left
Lateral feed: zigzag, upper
Darning
Darning
Decorative Top Stitch
Overcasting
Setting zipper on the side placket
Butt zipper settingZipper setting
for small articles
Buttonholing
Buttonholing
Eyelet buttonholing
Eyelet buttonholing
Eyelet buttonholing
Eyelet buttonholing
Eyelet buttonholing
Eyelet buttonholing
Running Quilt stitch
Decorative Top Stitch
Decorative Top Stitch
Decorative Top Stitch
Decorative Top Stitch
1 screen
1 screen
1 screen
1 screen
1 screen
1 screen
1 screen
1 screen
1 screen
1 screen
1 screen
1 screen
1 screen
1 screen
1 screen
1 screen
9 screens
9 screens
9 screens
9 screens
9 screens
9 screens
9 screens
9 screens
9 screens
9 screens
9 screens
9 screens
9 screens
9 screens
9 screens
1 screen
1 screen9 screens
1 screen
1 screen
9 screens
9 screens
4 screens
1 screen
1 screen
1 screen
1 screen
5 screens
1 screen
1 screen
1 screen
1 screen1 screen
2 screens3 screens3 screens1 screen

25
2) Use of sewing machine
1 3
Example: When you want to know how to perform “automatic needle threading”:
2 Press pictogram.
* A press on pictogram will return to previous screen.
Press advice key.
How to use key
Automatic Threading Screen4Press pictogram.
Press picto.
4-dot adjustment ( Pictogram position adjustment )
Press advice key.2 3 4
5 6 7 8
Press picto.1
Contents of Machine Usage
Manual needle threading
Needle changing
Conversion to Embroidery Machine
Thread Exchanger
4-dot adjustmentPresser foot changing
Automatic bobbin winding
Update (See page 118)
Automatic needle threading Embroidery date transfer through PC Connection (See page 113)
Customize (user) Options (See pages 115 to 117)
Example)In the case screen doesnot react well When pressing picto.
In the case screen does not react well when pressing prescribed picto on screen.(Caution)Do not touch screen other than Red dot
Touch once on left bottom side Reddot With the sharp point of lint brush.
Likewise touch once onright bottom side Red dot.
When touch all 4 Red dots it willInstantly return to below screen.
Touch once on lefttop side Red dot.
Touch once on righttop side Red dot.

26
(3) Tips
Contents of Advice
2
1
3 41
2 3
Example: When you want to know “how to cure looping or poor stitching.”
Example: When thread tension is not adequate:Possible cause of “incor-rect thread tension” andremedy will be shown onLCD screen.
Press pictogram.
Press pictogramfrom among tip items.
Press pictogram repeatedly,and causes and remedies of variousproblems will be shown on LCDscreen.
* To terminate operation,
press pictogram to
return to previous screen.
When thread tension is inadequate or problem has occurred, follow procedure described below:
Seam puckering
Faulty material feed
Automatic Needle Threadingwill not work.
Inadequate thread tension
Needle breaks
Thread breaks or stitch skips
* In the case where there are two or more explanation screen, press pictogram to see thenext “page” (screen).
* To terminate operation, press pictogram to return to previous screen.
Press advice key.
How to use key
Press pictogram.
Combination Embroidery
Continuous Embroidery

* Use with standard sewing thread in bobbin.
Cotton-wrapped polyester core(extra fine)Long fiber polyester (extra fine)
Fabric Needles Thread
Fabric, Thread And Needle TableYour fabric will determine choice of needle and thread. The following table is a practical guide to needle and threadselection. Always refer to it before a new sewing project. And be sure to use same size and type of thread in bobbin asin top thread supply.
Fabric below can be of any fiber, cotton, linen,silk, wool, synthetic, rayon, blends.They are listed as examples of weight.
Very Lightweight-Batiste, Chiffon, Organza, Voile.Also all microfiber or microdenier fabrics.
Lightweight Challis, Chambray, Charmeuse,Crepe de Chine, Gauze, Handkerchief Linen,Silk, Taffeta, Tissue faille.
Medium-weight Broadcloth, Brocade, Chino,Chintz, Corduroy, Flannel, Linen, Poplin, Satin,Synthetic, Suedes, Taffeta, Terry, Velvet.
Medium to heavy-weight Coating, Damask,Denim, Drapery Fabric, Fake Fur, Gabardine,Ticking, Woolens.
Heavy-weight Canvas, Duck, Sailcloth, Upholstery Fabric.
Leather
Knits Jersey, Tricot, Single Knit
Sweatshirt Double Knit, Swimwear, Sweater Knit
Cotton-wrapped polyester core(all purpose)Long fiber polyester (two spun)
Cotton-wrapped polyester core(all purpose)Long fiber polyester (two spun)
Cotton-wrapped polyester core(all purpose)Long fiber polyester (two spun)
Cotton-wrapped polyester core(all purpose)Long fiber polyester (two spun)
Cotton-wrapped polyester core(all purpose)Long fiber polyester (two spun)
Cotton-wrapped polyester core(all purpose)Long fiber polyester (two spun)
Failure to use a Singer brand needlemay result in skipped stitches orpoor sewing performance.
TYPE SIZE
2000red
shank
2000red
shank
9/70 or 11/80orangeband
2001yellowshank
2000red
shank
2000red
shank
2000red
shank
2001yellowshank
2032leather
11/80orangeband
14/90blueband
16/100purpleband
18/110
11/80orangeband
14/90blueband
How to Remove and Insert Needles
Removing needle.* Checking needle
Attaching needle. (Needle cannot beinserted unless it is correctly positioned.)
With a good needle, auniform clearance will beprovided between needleshank and flat plane ofboard over length.Do not use a needle that hasa bent or blunt point.
(1) Lift needle to its upper end.(2) Loosen needle clamp screw.
Press needle against stopper pin with its flat partfaced away from you. Tighten needle clampscrew.
Needle clamp screw
Stopper pin
Flat partshould faceback ofmachine.
Shank
Make sure power/light switch isoff before inserting needle.
Caution
Flat board
Flat part of needle
1 2
27
Note: Singer strongly recommends the use of Singer Needles Type 2000 and 2001. These are Platinum Quality Needles with Special Features to improve Automatic Threading,Sewing and Needle Durability.
28
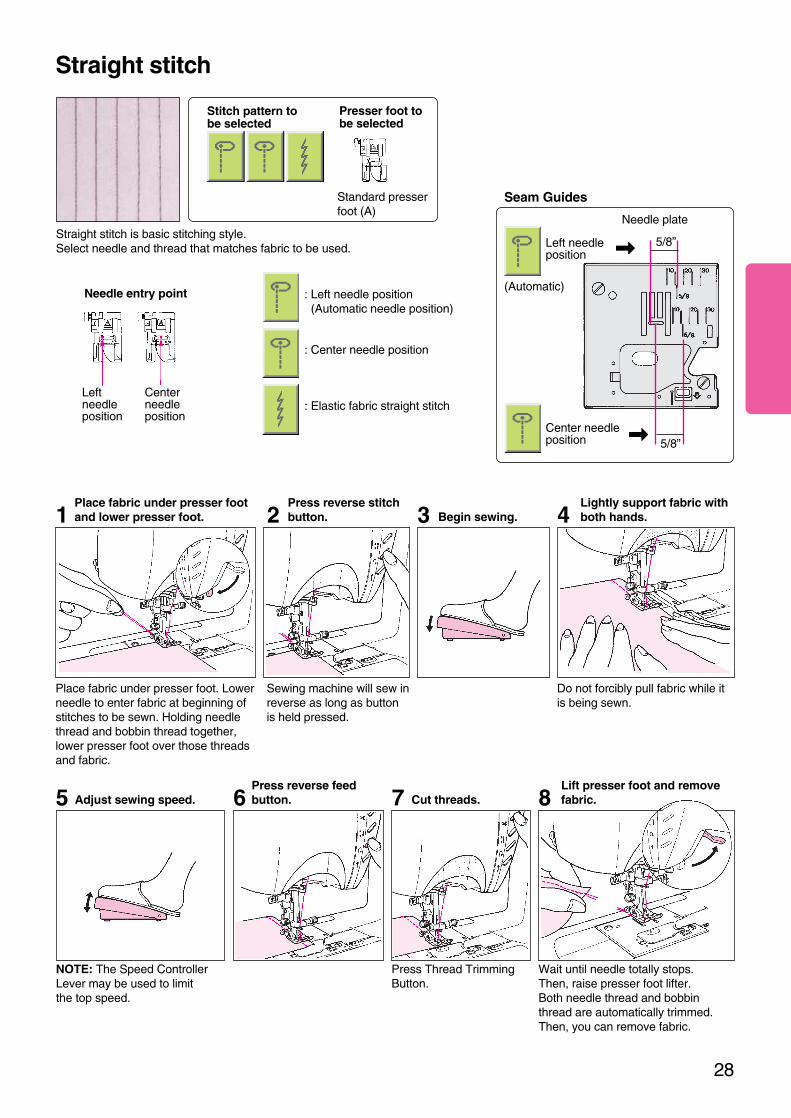
Straight stitch
Straight stitch is basic stitching style.Select needle and thread that matches fabric to be used.
: Left needle position (Automatic needle position)
: Center needle position
: Elastic fabric straight stitch
Stitch pattern tobe selected
Presser foot tobe selected
1 2 3 4
765 8
Place fabric under presser foot. Lowerneedle to enter fabric at beginning ofstitches to be sewn. Holding needlethread and bobbin thread together,lower presser foot over those threadsand fabric.
Begin sewing.Place fabric under presser footand lower presser foot.
Adjust sewing speed.
Do not forcibly pull fabric while itis being sewn.
Lightly support fabric withboth hands.
NOTE: The Speed ControllerLever may be used to limitthe top speed.
Lift presser foot and removefabric.Cut threads.
Press Thread TrimmingButton.
Press reverse stitchbutton.
Sewing machine will sew inreverse as long as buttonis held pressed.
Press reverse feedbutton.
Wait until needle totally stops. Then, raise presser foot lifter.Both needle thread and bobbinthread are automatically trimmed. Then, you can remove fabric.
Left needleposition
Standard presserfoot (A)
Seam Guides
Needle plate
Center needleposition
Needle entry point
Left needle position
Center needle position
(Automatic)
5/8”
5/8”

[1] Select a stitch pattern to besewn. Then, press picto.
[2] Place fabric at beginningposition of sewing and startsewing machine. [3] Press reverse stitch button.
Sewing machine will sew threereverse stitches and will continuesewing in normal direction.
Press reverse stitch button when machine reachespredetermined position of fabric. Machine will sewthree reverse stitches. Then, machine willautomatically stop at predetermined position to trimboth needle thread and bobbin thread.
Changing sewing direction
Sewing overlapping seam allowances
Stop machine in desired position.Lower needle into fabric. Lift presser foot, and turn fabric in desired sewing direction.
Carefully sew overlapping seamallowances while helping fabricfeed with hands.* For a light-weight fabric,carefully sew beginning of seamwhile gently pulling needle threadand bobbin thread in direction offeed.
Overlapping seam allowancesor a part that has a significantdifference in height should besewn in direction illustrated toavoid the foot catching in thefold of the fabric.
Lower presser foot and start sewing.
Example:Straight stitch
Automatic back tacking ( reverse stitching )
29
Starting sewing of heavy-weight fabric
To sew overlapping seam allowances from fabric edge, usethe lock button on Presser Foot A. When you press the lockbutton, presser foot will be temporarily locked parallel to thefabric to ensure smooth sewing.
Select first stitch pattern to
be sewn. Press pictogram.Sewing machine will sew three reversestitches (back tack stitches) both at beginningand end of seam, perform thread trimming ofboth needle thread and bobbin thread at endof seam and stop.
*Automatic back tacking can be resetin three different procedures:
(1) Re-press pictogram.(2) Select another stitch pattern.(3) Turn off, then on power to machine.
pictogram will be shown
in reverse video as .
[2]
[3]
Fabric
Button
Lower presser footwhile fitting button(spring) attached onpresser foot into slit onpresser foot holder.
Note: Use of the Knee LifterAccessory is very useful for
raising and lowering thepresser foot when changing
direction.

30
Draw auxiliary bed to left until it comes off.
Free Arm Sewing
Reinforcing stretch stitch
Reinforcing stretch stitch helps reinforce seams when used forsewing knit fabrics or to reinforce high stress areas such as thecrotch of pants and under-arm seams.
Setting sleeve Crotch of pants Other applications
Reinforcing stretch stitch isused to reinforce theseparts.
Reinforcing stretch stitch isused to reinforce the crotchof pants.
Free arm sewing capability is very useful for sewing circular fabrics suchas cuffs, attaching facing to armhole of sleeveless garment, sewinglower sleeve edge and sewing bottom of trousers.
SideReinforcingstitch
Back
body
Gathering
Attaching cuff BagsAttaching pocket
Joining top and bottomAttaching yoke
Patchedpocket
Setting in sleeves
Hemming
Collar sewing
Small articles
Cuff sewing
Topstitching
In the case where one of the pieces of materials to be joined hasgathers, tucks or pleats (such as joining top and bottom, attachingcuff and attaching yoke), reinforcing stretch stitch can help reinforcethe seam.
Stitch patternto be selected
Presser footto be selected
Standard presserfoot (A)

Zigzag stitch
For overcasting
To sew curved part, selectzigzag stitch pattern (small) or(medium) to produce narrrowwidth and short length stitches.Adjust position of fabric so thatneedle enters slightly outsideapplique parts.
Zigzag width/stitch length of zigzag stitch patterns
31
Position fabric under presserfoot so that needle entersjust fabric edge.
For appliqueSelect a stitch pattern to be sewn and press pictogram.Place fabric at sewing starting position and start machine.
Sewing machine sews threeback tack stitches first, andcontinuously sews thematerial in normal direction.
When predetermined seamend is reached, press reversestitch button. Then, machinewill back tack three stitches,stop at predetermined positionand trim both needle threadand bobbin thread.
Automatic back tacking
Stitch length
Zigzag w
idth(exam
ple)
Manual adjustm
ent range
5
0.2 ~ 4.0 0.2 ~ 4.0 0.2 ~ 4.0
2 3
* Be sure to stop machine with reverse stitch button. If you stopmachine without pressing reverse stitch button and re-start sewing from a different sewing position, machine willstart sewing of previous stitch pattern without performing backtacking (unless you select a different stitch pattern).
Zigzag width, automatic
Automatic stitch length:Manual stitch length: Set a new length by changing stitchlength shown on LCD screen.
To increase stitch length,
press pictogram.
To decrease stitch length,
press pictogram.
Automatic zigzag width:Manual zigzag width: Set a new width by changing zigzagwidth shown on LCD screen.
To change zigzag width,
press or pictograms. 1.51.51.5
Autom
atic
Stitch pattern tobe selected
Presser foot tobe selected
Standard presserfoot (A)
_ _ _
* Adjustable range of zigzag width is 0 to 7 mm.
Zigzag width
Stitch length

32
Overcasting
Overcasting foot (C)
This stitch style is usedto prevent cut edge ofmaterial from fraying.
Overcasting with Special
Overcasting StitchThis stitch style is widely usedfor preventing cut edge of fabricfrom fraying. When using thisfoot, position fabric with cutedge of fabric pressed againstovercasting foot guide.
This pattern is also great foroverlocking two or more layersof fabric together.
Overcasting with zigzag
stitches
This stitch style is used forovercasting cut edge of light-weight material that is likely tocurl up.
* For overcasting light ormedium-weight fabric, decreasezigzag width.
Overcasting with 3-stepzigzag stitches
This stitch style is used forovercasting fabric that is likelyto fray or knit type fabrics.
Standard presser foot (A)
Overcasting foot (C)
Overcasting foot (C) Guide
Caution:Use overcasting foot (C) only for overcasting pattern .
If overcasting foot is used for any other stitch pattern, needle will hit against it.
Stitch pattern tobe selected
Presser foot tobe selected
Standardpresser foot (A)
Decorativestitch foot (T)
There are 4 OvercastingStitches that can be used
for overcasting.
Overcasting with Special
Continuous Overlock StitchThis stitch style is widely usedfor preventing cut edge offabric from fraying.
This pattern is also great foroverlocking two or more layersof fabric together.
Decorative stitch foot (T)
Overcasting foot (C)
Standardpresser foot (A)
Standardpresser foot (A)
Standard presser foot (A)

Select Basting Stitch.
Holding both needle threadand bobbin thread together,draw them under the presserfoot and towards the back ofthe sewing machine.
Start to sew.
33
Basting stitch
The Basting Stitch is used to temporarily secure fabric.
Multi-stitch zigzag stitch
Multi-stitch zigzag stitch is used for attaching elastic tape, stay tape or overcastingcut edge of knit fabric.
Sew elastic tape on body fabric whileslightly stretching it.
This stitch style is used for sewing fabric that is likely to fray or knit fabric.Position the fabric under the presser foot so that the needle enters justthe edge of the material.
Tape attaching with Multi-stitchzigzag stitches
Overcasting with Multi-stitchzigzag stitches
Elastic tape
Stitch patternto be selected
Presser foot tobe selected
Standard presserfoot (A)
Stitch patternto be selected
Presser foot tobe selected
Standard presserfoot (A)
The Basting Stitch automatically is set to 10mmstitch length. It is adjustable
to 5-10-15-20 mm stitchlength.

34
* Refer to page 32 for overcasting.* Refer to page 33 for basting stitch.
Be sure to place fold accu-rately against presser footguide when sewing the blindhem.
* Overcast edge of fabricshould projects 0.5 to 0.6 mmfrom crease.
Fold fabric at basted line.Bast Hem in place.
Turn the fabric to the rightside, straighten and press ifnecessary.
Fabric (wrong side) Bast-
ingstitch
0.5 cm to 0.6 cm0.5 cm to 0.6 cm
Finished line
Finished line
Guide
Blindstitching
The Blindhem Stitch provides an easy and durable way to finish hems on skirts, dresses andpants. It is also useful for Home Decoration with Curtains and Draperies.
1 2 3First overcast raw edge. 4
5 6Position folded edgeagainst guide and sew. Turn fabric over.
The Blindhem Pattern “D” is a Special Stitch designed to work specifically with Presser Foot (D).Instructions for use follow. Your sewing machine has two other Blindhem Patterns: * Blindhem Pattern “A” (on Utility Screen 1) is designed to work with Presser Foot (A) and is fullyadjustable from 2.0 mm to 7.0mm stitch width.* There is also a Stretch Blindhem Pattern located in the lower right hand corner of the Number one screen of Continuous Patterns. This Blindhem Pattern is highly useful with knits.
Adjusting needle entry for
Blindstitching
In the case where seam does not reach fold:
In the case where seam goes far over fold:
Press key to shiftneedle entry point to right.(Turn handwheel first tocheck current needle entrypoint. Then, raise needleand start adjusting needleentry point.)
Press key to shiftneedle entry point to left.(Turn handwheel first tocheck current needle entrypoint. Then, raise needle andstart adjusting needle entrypoint.)
Adjust the needle entry usingwidth pictogram
Stitch patternto be selected
Presser foot tobe selected
Fabric (wrong side)
Fabric (wrong side)
Fabric (wrong side)
Fabric (wrong side)
Finished line Finished line
Fabric (wrong side)
Fabric (wrong side)
Fabric (rightside)
Align mark on handwheelwith mark on machine head.
Mark
Blindstitching foot (D)

35
Draw thread to side ofpresser foot.
Mark button-hole positions.
Lower lever until it will go nofurther.
Lower buttonhole foot so that crosshairof mark is at center of needle in foot.
Lower buttonholing foot to place a button on it.
Place fabric under buttonhole foot.
10 cm
Sliding part
Mark
FabricMark
Buttonhole lever
Once buttonhole length isdetermined, remove buttonfrom buttonhole foot.
Double bartacking / eyelet buttonholingAutomatic buttonholes
Buttonhole foot (E)
1 2 3
Pass needle thread throughand then under presser foot.
The buttonhole length is automatically determined only by placinga button on buttonhole foot. (If a button cannot fit in buttonholefoot, buttonhole length will be “button diameter + buttonthickness.”
Remove button.
After placing a button on buttonholefoot, press sliding part to determinebuttonhole length.
4 5 6 7
Draw marker lineson the fabric atbuttonholepositions with anassistant marker.
Lower buttonhole lever.Lower buttonhole foot at markedposition.
These stitch patterns are used for sewingsmall buttonholes on light-weight fabric(e.g., shirts and blouses).
These stitch patterns are used for sewinglarge buttonholes on heavy-weight fabric(e.g., suits and overcoats).
This stitch pattern is used for sewing largebuttonholes on medium-weight fabric.
These stitch patterns are used for sewinglarge buttonholes on light-weight fabric(e.g., shirts and blouses).
These stitch patterns are used for sewingbuttonholes on knits.
Stitch pattern to be selected Presser foot to beselected

36
After completion ofbuttonhole, trim thethreads.Begin sewing.
*If buttonhole size is wrong or thread has run out during buttonholing, temporarily stopsewing machine, re-select stitch pattern and perform sewing from beginning.
8 9
Press Thread Trimming Button.* From second buttonhole andbeyond, lower buttonhole foot atnext marker line on fabric forsewing buttonholes.
For buttonholing hard-to-sew fabrics such as light-weight fabric or a part near multi-layered portion, install underplate to help create perfect buttonholes.
Underplate
1. Firstly, attach underplate to buttonholefoot. Then, attach buttonhole foot withunderplate installed.
2. Place fabric in space provided betweenbuttonhole foot and underplate.
* As with all buttonholes, sewing a testsample is recommended. With theunderplate installed it may be necessary toincrease thread tension.
Open buttonhole using a seam ripper.
Open buttonhole at center offinished buttonhole with aseam ripper taking care not toallow ripper to cut seam.It is recommended to place astraight pin at bartacked part ofbuttonhole to help preventover-cutting.
10
Place a piece of paperboardunder fabric. Using aneyelet punch to cut out around portion of eyelet.Then, use seam ripper.
EyeletpunchStraight pin
41 652 3 7
BartackingCross-over stitch
Machine automaticallystops at this position
Bartacking * Machineautomaticallystops at thisposition.
Sequence of automatic buttonholing
41 52 3

Sequence of buttonholing is sameas standard buttonholes.
Hook cord at top of underside of buttonholefoot and bring down both ends of the cord andhook them into the two slits at the lower endof the buttonhole foot. Make a knot with bothends of cord on the front side of the foot.Carefully attach buttonhole foot to the ma-chine taking care not to displace the cord.
Cord
(Upside)
37
Needle thread and bobbin thread interlace with each other on right side of fabric tocreate a finished appearance that resembles a hand-sewn buttonhole.
Purl stitch
* For purl stitching, you may need to setthread tension slightly lower than that forstandard buttonholes.
Corded buttonholes Sewing buttonholeswith cord inserted willprevent buttonhole frombeing enlarged andreinforce it.Lace yarn, button holetwist or like can beused as cord.
Routing cord on buttonhole footfor sewing corded buttonholes.
Same as the doublebartacking/eyeletbuttonholing
Select buttonholing pattern
and press pictogram.
pictogram will be
shown in reverse .
(Underside) Pull cord tight intosewn buttonhole andcut off excess
(Medium) (Large)
Tie
Automatic buttonholes
Automatic buttonholes
Stitch pattern tobe selected
Presser foot to beselected
Buttonholefoot (E)
Stitch pattern tobe selected
Presser foot to beselected
Buttonholefoot (E)
Hook cord at this point.

Draw thread to side ofbuttonhole foot.
Machine sews straight stitches untilsewing starting position is reached.Then, machine automaticallyreturns while sewing zigzag stitchesuntil predetermined position isreached.
Place fabric under buttonhole foot.
ButtonholeleverFabric
Start
position
Machine stops after sewing bartacks.
* Bartacking length is determined by pressing reverse stitch button.Maximum number of bartacking stitches is 20. When maximumnumber of stitches is reached, machine will automatically stop andtravel back in opposite direction.* In the case where buttonhole foot is not leveled at multi-layeredportion of fabric, use a filler cloth or cardboard.
38
Start machine with buttonholelever raised.
Bartacking
Bartacking is used to reinforce part of seam that is likely to ravel.
1 2 3
A press on start/stop button will causemachine to start straight stitching.
Pass needle thread through andunder buttonhole foot.
Back
tacking
4 5When predeterminedposition is reached, pressreverse stitch button.
To continuously sew bartacks of same length:First bartacking length is stored in memory.
* Press start/stop button,and machine will automati-cally start, it will thenchange sewing directionwhen predetermined turn-about point is reached andreturn to the starting point.
* When seam end po-sition is reached, pressreverse stitch button.
* To change bartacking length that is stored inmemory, re-select pattern.
When predetermined posi-tion is reached, pressreverse stitch button.
10 cm
Example of application
Trousersand skirts
Bags
Pockets
Stitch pattern tobe selected
Presser foot to beselected
Buttonholefoot (E)
Predeter-
mined
position

39
Begin insertion of zipper withstandard presser foot (A). Attach zipper foot (B) to machine. Open seam allowances.
Sew left part of zipper on seamallowance from bottom ofopening to top.
Turn over front body of skirt toshow right side. Baste zipper tape,seam allowance and front fabric.
Sew reverse stitches at bottom ofopening. Now, sew right part ofzipper to body.
Setting zipper to side placket of garment
Zipper foot (B)
This stitch pattern is used for finishing opening of skirts, slacks and one-piece dresses.
Zipper
(rightside)
Front body ofskirt (wrongside)
Opening
dimension
Opening
end
Teeth
5 cm
0.7 cm to 1 cm
Baste
Openingend(reversestitch)
Baste
Zipper
Front bodyof skirt(wrongside)
Front body ofskirt (right side)
Back bodyof skirt(right side)
Opening dimension ... Basting stitch
(See P.33)
Lockstitch ... Sewing length is automaticallydetermined.
5 cm
Placezipper tapeunder rightportion ofzipper foot.
0.3 cm
Slider
1 2 3
To sew left part of zipper, place zipperunder right portion of zipper foot. To sewright part of zipper, place zipper under leftportion of foot.
Open seam allowances so that seamallowance of back body of skirt extends out0.3 cm from that of front body. Press withan iron to make a crease. Press creaseaccurately against side face of teeth.
4 5 6
Sew zipper on back seam allowance atcenter of projection of 0.3 mm frombottom of opening. Stop sewing at a position that is approxi-mately 5 cm from top of opening. Moveslider to bottom of opening. Then,continue sewing until top end of openingis reached.
* Manually baste fabric and zipper tape. After reverse stitching, fit left edge ofzipper foot just against teeth. Sew zipperat a position approximately 0.7 to 1 cmaway from seamline.Undo basted seam approximately 5 cmaway from top end of opening and moveslider to bottom of opening. Then sewremaining part of zipper.
: Be sure to insert zipperwith straight stitches usingcenter stitch base line.F
rontbodyofskirt
Back
bodyofskirt
Example: Skirt
Slider
0.3 cm
Move slider to topof opening.
Reverse stitch (1 cm)
Opening end
Teeth
1 cm
Slider
Zipper (Right side)
Bottom-end piece
Zipper tape
Opening
dimension
(zipperlength
+1
cm)
Zipper
length
Right Left
Stitch pattern tobe selected
Presser foot to beselected
Placezipper tapeunder leftportion ofzipper foot.

40
Center zipper insertion
Begin installation of zipper withstandard presser foot (A). Baste zipper and garment body.
Sew left part of zipper on seamallowance from bottom of openingto top.
Reinforce bottom end of opening withreverse stitches.Then, sew right part of zipper on seamallowance from bottom to top of openingat position that is 0.7 to 1 cm away fromseamline.
Remove basted stitches only.
This stitch pattern represents zipper inserting method that is used for center frontor center back of garments, bags, cushions and various kinds of covers.
1 2 3
0.7 cm to 1 cm
Open seam allowances. Aligning seamlineand center of teeth of zipper and manuallybaste through zipper, seam allowance andfront fabric. Tilt slider upward.
Zipper (wrong side)
Teeth
Slider
Baste Baste
Fabric (wrong side)
Placezippertape underrightportion ofzipperfoot.
0.7 cm to 1 cm
Fabric (right side)
Zipper tape
Sew right part of zipper.
Sew zipper on seam allowance frombottom to top of opening at position thatis 0.7 to 1 cm away from seamline.
4 65
Opening end (reversestitch)
: Be sure to insert zipperwith straight stitches usingcenter stitch base line.
Stitch pattern tobe selected
Presser foot to beselected
Zipper foot (B)
Opening dimension ... Basting stitch
(See P.33)
Lockstitch ... Sewing length is automaticallydetermined.
Reverse stitch (1 cm)
Opening end
To sew left part of zipper, place zipperunder right portion of zipper foot. To sewright part of zipper, place zipper under leftportion of foot.
Right Left
Attach the zipper foot (B) to machine.
Placezipper tapeunder leftportion ofzipper foot.

Zipper insertion for small articles
With this stitch pattern, zipper tape appears outside. This zipper settingmethod is used for crafts and bags.
Sew other side of fabric inprocedure same with 1 and 2.
Turn sewn zipper so that its right side facesup. Top-stitch zipper in place 0.2 cm awayfrom folded edge.
Place either side of zipper tape facedown (or right side down) on right side offabric 0.5 cm from edge of overcast edgeof fabric. Then, sew at center of zippertape.
Zipper (wrong side)
0.5 cm
Center ofzipper tape
Zipper (right side)
0.2 cm
Fabric (right side)
Align fabric edges.
Fabric (right side)
Fabric (right side)
2 3
4
41
1
To sew left part of zipper, place zipperunder right portion of zipper foot. To sewright part of zipper, place zipper under leftportion of foot.
: Be sure to insert zipperwith straight stitches usingcenter stitch base line.
Zipper foot (B)
Stitch pattern tobe selected
Presser foot to beselected
Right Left
Attach zipper foot (B) to machine.

42
Heirloom Sewing (Using Optional wing needle)
Stitch pattern tobe selected
Make sure power/light switch isoff before inserting needle.
CautionPresser foot tobe selected
Decorativestitch foot (T)
Insert wing needle.Recommended HeirloomPatterns.
IMPORTANTAutomaticneedle threadercannot be used.Use correct presser foot.1 2 3 4
Decorativestitch foot (T)
Press
Press Press
Decorative Topstitching
Stitch pattern tobe selected
Select Running Stitch Pattern.
Thread bobbin with desired topstitching color.
Manually thread machine with invisible or light weightthread which matches fabric and will not show.
Adjust stitch length if desired.
Sew.
123
45
Presser foot tobe selected
Standard presserfoot (A)
There are 9 unique stitch patterns which are perfect for decorativetopstitching and quilting.There patterns are designed to look like hand sewing.
How to Set Machine for Running Quilt Pattern

43
Shirring and gathering
Pin tucks
Pin tucks are are decorative tucks used to embellish garmentsand crafts.
Shirring: For sleeve caps or waistbandsGathering: For sleeve cuff or yoke.
Change stitch length.
Using an iron, pressfolds in the fabric tocreate a crisp foldedline for sewing.
At end of sewing, draw out fabricby 5 cm or more and pressthread trimming button.
After finishing sewing,press pin tucks to oneside.
Decrease needlethread tension.
Shirring
Gathering
1 2 3 4
Thread length at beginningand end shall be approxi-mately 5 cm. Sew twoparallel seams.
Draw bobbin thread of seamto shirr fabric.
1 2 3Sew folds taking care not tostretch them.
Set stitch length at 3.0 to 5.0for gathering and set it at 1.5 to2.0 for shirring.
Gathering
Shirring
Stitch patternto be selected
Presser foot tobe selected
Standard presserfoot (A)
Standard presserfoot (A)
Stitch patternto be selected
Presser foot tobe selected
You can also sew pin tuckswith a twin-needle. Twin needle
tucks are always even as they areformed by two parallel needles.
Increasing the tension will result ina more pronounced pin tuck.

44
Flat Fell Seams
This stitch pattern is used to finish fabric edges neatly withincreased durability.
Applique
Commercially available applique pieces or those of your ownmaking can be easily attached with increased durability.
Secure applique fabricson fabric.
Sew edges of applique pieces followingprocedure similar to those of overcasting. Atbeginning and end of seam, press reversestitch switch to perform back tacking. Forapplique pieces with sharp curves, decreasezigzag width.
Lower the needleat the corner ofapplique piece.Then, raisepresser foot.
With right sides together,align edges of two piecesof fabric and sew themtogether.
Fold wider seam allow-ance around the narrowseam allowance and sewalong folded edge.
Open fabrics at seamlineand press the uncutseam allowance over thecut seam allowance.
Cut away one half ofseam allowance. (On onelayer only).
Fabric (wrong side)
1.5 cm
This is finishedseamline.
Filler cloth
To sew a sharp curve or to change sewingdirection, raise presser foot with needlelowered in applique piece edge.
1 2 3 4
Adhere applique pieces withfusible web, spray adhesive orbaste them on the fabric. Then,place a press cloth over appliquepieces and lightly press with aniron.
1 2
Stitch patternto be selected
Presser foot tobe selected
Stitch patternto be selected
Presser foot tobe selected
Standard presserfoot (A)
Standard presserfoot (A)
Fabric (wrongside)
Fabric (wrongside)
Fabric (wrongside)
Fabric (wrongside)
0.7 cm
Use fusible web orspray adhesive

Quilting
Two piles of fabric are stitched together with batting placed between layers.
Insert quilt guide into hole inpresser holder.
Sew a row of stitching on the fabric. Place thequilt guide on the first row of stitching and useit as a guide to stitch subsequent rows.
Presser holder
Sideway feed (four-direction sewing)
These straight and ZigZag stitch patterns are useful for sewing sideways, forward andbackward without pivoting the fabric or raising the presser foot.
Seam intervaldecreases.
45
Lateral interval between seams can be adjustedas desired with ease.
1 2
Quilt guide
Decorativestitch foot (T)
Straight stitch Zigzag stitch
Starting position
Seam intervalincreases.
(Example: Straight stitch)Determine a starting position.
(1) Press picto to sew straight stitches until nearest corner is reached. Then, stop machine.
(2) Press picto to continue sewing.
(3) Then, press picto to continue sewing.
(4) Finally, press picto to continue sewing until starting position is reached.
Stitch patternto be selected
Presser foot tobe selected
Stitch patternto be selected
Presser foot tobe selected
Standard presserfoot (A)
46
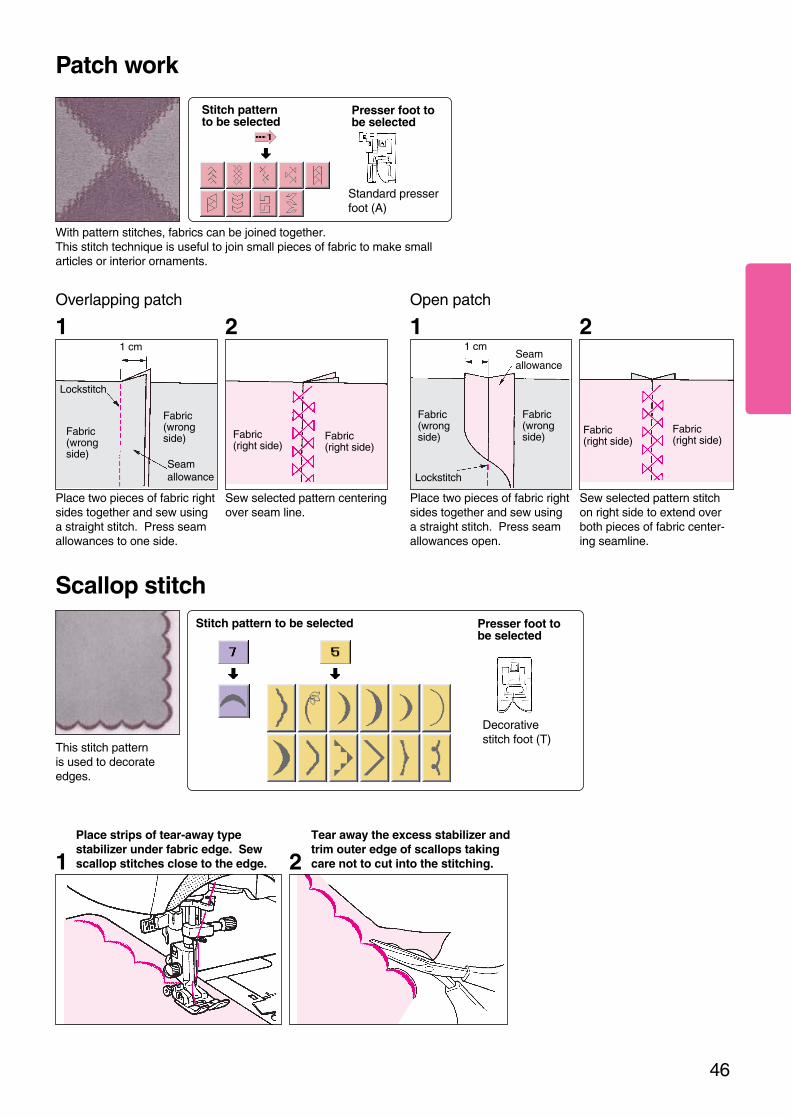
Scallop stitch
This stitch patternis used to decorateedges.
Place strips of tear-away typestabilizer under fabric edge. Sewscallop stitches close to the edge.
Tear away the excess stabilizer andtrim outer edge of scallops takingcare not to cut into the stitching.
Patch work
With pattern stitches, fabrics can be joined together.This stitch technique is useful to join small pieces of fabric to make smallarticles or interior ornaments.
Sew selected pattern stitchon right side to extend overboth pieces of fabric center-ing seamline.
Sew selected pattern centeringover seam line.
Overlapping patch
Fabric(wrongside)
1 cm
Lockstitch
Seamallowance
Place two pieces of fabric rightsides together and sew usinga straight stitch. Press seamallowances to one side.
Place two pieces of fabric rightsides together and sew usinga straight stitch. Press seamallowances open.
Open patch
1 2 1 2
1 2
Fabric(right side)
Stitch patternto be selected
Presser foot tobe selected
Stitch pattern to be selected Presser foot tobe selected
Standard presserfoot (A)
Decorativestitch foot (T)
Fabric(wrongside)
Fabric(wrongside)
1 cm
Lockstitch
Seam allowance
Fabric(wrongside)Fabric
(right side)
Fabric(right side)
Fabric(right side)

47
Button Sewing Foot
The Zigzag stitch is used to attach both 2 and 4-hole buttons.The button-sewing foot must be attached when sewing a button.
Lower feed dogs. Select zigzag stitch pattern.1 2 3
Stitch patternto be selected
Presser foot tobe selected
Button sewingfoot
Attach button-sewing foot.
Press reverse button to sew 5tacking stitches to secure.
Press thread cuttingbutton, trim thread.7 8 9
Slowly press on speedcontroller allowing needle tosew 8 to 10 stitches.
Place fabric on machine, andplace button under buttonsewing foot. Tack thread in place.4 5 6
Measure distancebetween holes inbutton to be sewn.
Press stitch width buttons to match holes inbutton to be sewn.NOTE: 3.0mm width will generally sew allsize buttons.
Turn handwheel by hand toconfirm that needle exactly entersholes in button.
Press reverse button to sew 5tacking stitches to secure.
Caution: Due to irregular shape of some buttons button foot may not clamp securely.Do not attempt to sew these or buttons with a shank using sewing machine.

48
* Automatic foot can make buttonholes up to 11/2: use transparent foot to create larger buttonholes.
* To make ribbon casingsOther uses for Transparent foot I.
* For french machine-sewing: mock whip and roll, pin-tucking and entredeux, are better controlled because there is a groove in buttom of foot.
* For satin stitching.
Mark material to indicate buttonholeplacement.Lower buttonhole foot so that mark is atcenter of needle hole in foot.
Lower buttonhole lever, slightly draw ittoward you and press start button tostart sewing.* Machine will start straight stitching onleft side of buttonhole.
When needle reaches end of mark, slightlypress buttonhole lever away from you. * Machine will start zigzag stitching on leftside of buttonhole in reverse direction.
31 2
4 65
When needle reaches beginning of mark,slightly draw buttonhole lever toward you.* Machine will start straight stitching onright side of buttonhole.
When needle reaches end of mark, pressbuttonhole lever away from you. * Machine will start zigzag stitching onright side of buttonhole in reversedirection.
When needle reaches beginning of mark,slightly draw buttonhole lever toward you.Then, machine will perform bartacking andback tacking, then will stop.
Buttonhole lever
Mark
End ofthe mark
End of the markMark
Stop themachine.
Manual buttonholesStitch patternto be selected
Presser foot tobe selected
Transparent Buttonhole foot (I)
Start sewing while slightlypulling buttonhole lever towardsfront of machine.
CautionTake care not to allow fabric to come in contact with button-hole lever. If buttonhole lever is pressed by mistake, opera-tion mode will be changed to bartacking.

This attachment is generally used for fabrics(such as knits, jersey, vinyl cloth, artificialleather and leather) that are difficult to be fed bysewing machine. It ensures smooth feed offabric while preventing fabric slippage toachieve neatly finished seams. It is also usedfor quilting.
* Sew at low to medium sewing speed.
Remove presser foot holder. Attach even feed foot to machine.Use this attachment onlyfor straight stitching(longitudinal feed).* Do not use attachmentfor lateral feed typestraight stitching, zigzagstitching or pattern sewing.
Lift presser bar, remove presserfoot clamp screw and removepresser foot holder.
Put forked section of actuating leveraround needle clamp, attach to presserbar and securely tighten presser footclamp screw.
1 2
5 mm
Groove 10 cm
Presser footclamp screw
Presserfoot holder
Presserbar
Presserfoot clampscrew Actuat-
inglever
Needleclampscrew
8 mm
Stitch patternsto be used
Fabric
Rolled HemmingStitch patternto be selected
Presser foot tobe selected
Rolled hemmingfoot (F)
Drawing ends of needle and bobbin threads,turn handwheel 3 or 4 turns by hand to guidefabric to hemmer foot.
Cut away a corner of fabric in order to makework easier.Insert fabric into spiral groove in hemmer footuntil needle position is reached.
49
Rolled hemming is an edge finishing technique that rolls the fabric edge.It is used for finishing bottoms of shirts and blouses or finishing edges of frills orhandkerchiefs.
Even Feeding

50
For sewing three cordsPass all cords in cording foot and insert top ends of cordsthrough grooves located on sole of foot. Then, lowercording foot.
For sewing one cordPass cord along left edge of cording foot and pass top ofcord through the groove located on sole of foot. Then,lower cording foot.
Secure cord with zigzag stitches of zigzag width (2).Press reverse stitch button at beginning and end ofsewing to perform back taking.Pull cord onto wrong side of fabric, make a knot andtrim.
Secure cords with Multistitch zigzag stitches. As in thecase of one cord sewing, perform back taking and drawcords onto wrong side of fabric, make a knot and cutcords properly.* For sewing two pieces of cord, pass cords through rightand left grooves located on sole of cording foot.
Cord
Spring
Cord
Spring
Attaching CordsStitch patternto be selected
Presser foot tobe selected
Cording foot (H)
For one cord(Manual zigzag stitch width 1.0~2.0)
For threecords
* Gathering and shirringPlace pearl cotton into center of foot and zig-zag over it. Secure one end of pearl cotton and pull other end to gather. Use same method with elastic threads to create shirring.
* Decorative shirringExperiment with decorative threads, like ribbon thread or metallics. Place cording into slots and stitch using multi-stitch zigzag.
* Applying trims.

51
Twin Needle Sewing
Twin needle sewingproduces two parallelline of closely-spacedstitching.
Stitch pattern to be selected Presser foot tobe selected
Standard presserfoot (A)
* With machine turned off, insert twin needle into needle clamp.* Place the first spool of thread on the left Thread Exchanger Spool Pin A. Place the second spool of thread on the right ThreadExchanger Spool Pin B. *Thread the machine manually with Spool A threaded through the left needle and Spool B through the right needle.
NOTE: * Automatic needle threader and automatic thread cutter cannot be used.* Two colors sewing cannot be performed with twinneedle sewing.
IMPORTANT: Use only Singer branded twin needle style #2025.
Attaching twinneedle. Thread machine.Set spools in place.1 3
How to Select Continuous / Functional Patterns (color coded rose)
How to activate patterns on LCD screen
Presspicto.
Presser foot tobe selected
Decorativestitch foot (T)
2Use correct presserfoot. 4
Use standard presser foot(A) or decorative stitchfoot (T).
Caution: * If sewing with twin needle, never press the elongate or position key (because needle will hit the presser foot).
* Sew at low or medium sewing speed.* Do not use reverse stitch.
Size is or .
Adjust stitchwidth of4.0mm orless.
A quick method to set the proper width for twin needle sewing is to simply press the twin needle pictogram before selecting the desired stitch patterns.

52
1 2 3 4
5 6 7 8
9 10
Press Press Press
Press Press
PressPress
PressPress
This pictogram is used to select straight stitchwith left stitch base. (Also used to return toUtility Pattern Screen.)
Used to activate additional Pattern Groupsand Alphabet / Numerics Screens.
Used to vertically invert a pattern used forcontinuous pattern sewing.
Used to mirror a pattern used for continuouspattern sewing.
Pattern elongate pictogram. Only availableon Screen 1.
Enlarge size pictogram
Regular size pictogram
Reduce size pictogram
Note: When the Stitch Pattern Pictogram
displays a “Targeting Oval”, to select
pattern press gently on the oval only.
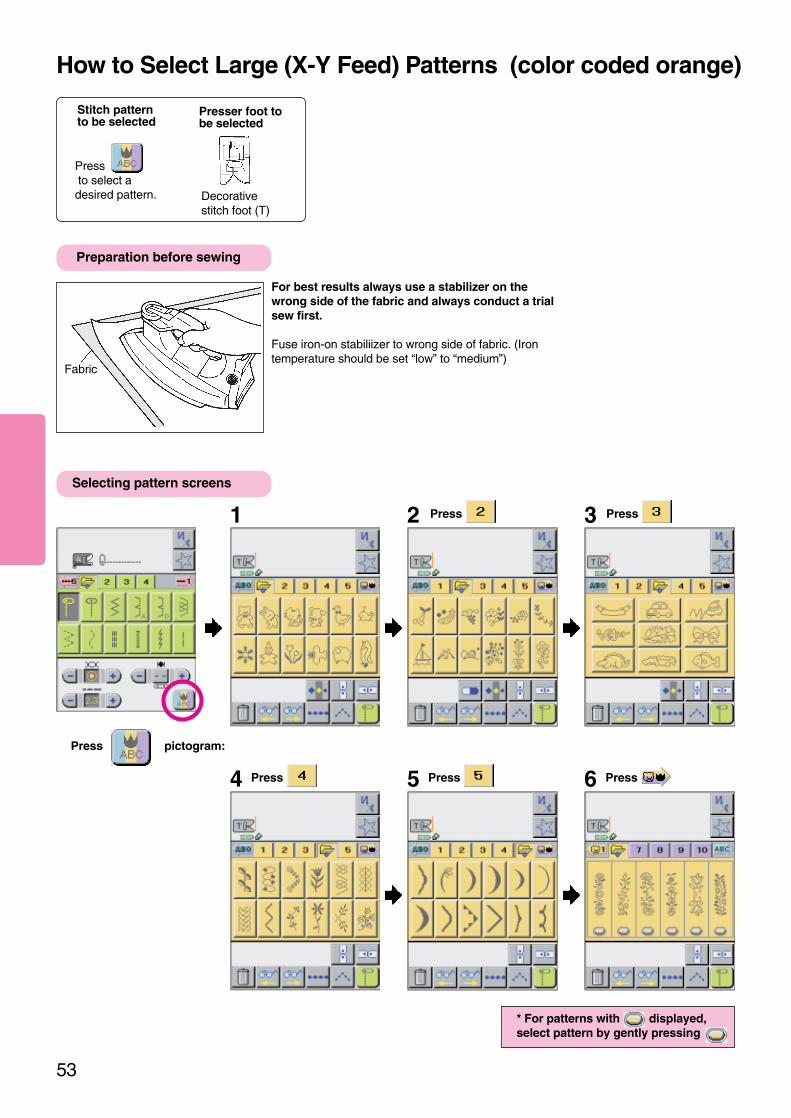
53
For best results always use a stabilizer on thewrong side of the fabric and always conduct a trialsew first.
Fuse iron-on stabiliizer to wrong side of fabric. (Irontemperature should be set “low” to “medium”)
Press pictogram:
How to Select Large (X-Y Feed) Patterns (color coded orange)
Press to select adesired pattern.
Fabric
Selecting pattern screens
Preparation before sewing
Stitch patternto be selected
Presser foot tobe selected
Decorativestitch foot (T)
* For patterns with displayed,select pattern by gently pressing
1 2 3Press Press
4 Press 5 6Press Press

To contract pattern indirection , adjust bypressing .
54
Some Patterns may need to be balanced depending on the thickness and texture of the fabric. Additionally, the type ofinterfacing/stabilizer and thread being used may also effect the balance and appearance of a pattern. It is recommended that atest sample be sewn using the same fabric, interfacing/stablizer and thread before sewing on the final garment. Your sewingmachine provides you with a Trial Sewing Pattern that has been specifically designed for the purpose of balancing the sewingmachine to the selected fabric, thread, etc conditions. Follow the steps below to balance your sewing machine.
Press pictogram.1 Start sewing machine.2 3
4
5
Adjust pattern using according to
finished shape of pattern produced by trial sewing.
Balancing Machine with Trial Sewing Pattern
After completion of adjustment, press pictogramto put your setting into memory.
Sewingdirection
Correctpattern shape
To contract the pattern indirection , adjust bypressing .
To extend the pattern indirection , adjust bypressing .
To extend pattern indirection , adjust bypressing .
7 8Press Press 9 Press 10 Press
How to Select Small Decorative Patterns

Pictogramon screen
Operationkeys
Used for balancing and trial sewing. (Seepage 54.)
Used to clear patterns stored in memory.Pressing it will clear patterns stored inmemory from latest one to earliest one.When key is held for 3 seconds or more, allpatterns stored in memory will be totallycleared.
This key is used to store a selectedpattern in memory.
This key is used to activate screen ofthread tension and stitch length.
Indicatespattern thatcan be sewn intwo differentcolors.
Automatic tie off &thread trimming
Memory indicationPattern will be automaticallystored in memory simply byselecting it.Dot will be added as a newpattern is stored in memory toindicate the current number ofpatterns stored in memory.(Max: 120)
Presser foot to be selected
Decorative stitchfoot (T)
Operation keys
ScreenTouch desired pattern on the LCD Screen.The selected pattern will appear on the topof the screen.Once selected, the pattern can be sewn.
Function of Pictograms shown on screen Function of operation keys
Balancing Patternwill be
shown in reverseonce selected.
55
Cursor: Pattern next to this line can be edited, deleted or modified.To add a new pattern between two existing patterns, move cursor to patterninserting position using pictogram and select pattern to be added.
Pattern that can be sewn Indication onscreen
Function
Example)
Example)
Indicatespattern thatcan be sewn.
How to Modify Patterns
Used to check patterns stored in memory.
Used to return to utility pattern screen.(Straight stitching with left stitch base linewill be selected.)
Additional Pictograms and their functions

56
1. Select a pattern.
2. Press pictogram.
3. Start machine.
1. Select a pattern.
2. Press pictogram.
3. Start machine.4. Machine will sew same pattern in repetition until you
stop it.* To complete last pattern, again press pictogram when
machine has started sewing it. The machine will completethe pattern and will stop.
Select a pattern by gentlypressing the desired patternon the screen.
Place fabric under presserfoot and start machine.
Select a pattern from those illustrated below and use needlethread and bobbin thread that are different in color.
Press pictogram and start machine. Bobbin thread
will appear on right side of fabric to produce a 2-color pattern.
* Combination with other pattern is not possible.* When other pattern is selected, 2-color setting is released.
How to select and sew patterns:
Machine will automatically stop whenpattern or memorized sequence ofpatterns is completed.
1 2
1. Select a pattern.
2. Press pictogram.
3. Start machine.
How to cut cross-over stitch
Cut away unnecessarythread appearing onright side of fabric witha pair of scissors.
2-color pattern sewing Inverted pattern sewing
Mirror pattern sewing
Continuous pattern sewing
Example)
Example) Example)

Press picto
picto.
How to Select Alphabet Patterns (Color coded blue)
Press pictogram
Stitch patternto be selected
Presser foot tobe selected
Decorativestitch foot (T)
1 2 3 4 5
6 7 8 9 10
57
Press Press Press Press
11 12 13 14 15
Press
Press
Press picto
Press
Press
Press
Press
Press
Press
Press picto
Press

Enlarge Size Pictogram
Reduce Size Pictogram
58
16
21
17 18 19 20Press Press Press Press
22 23 24 25Press Press Press Press
Press picto
Example: Combination Pattern and Alphabet
One half SpacePictogram
"Letters surrounded with dotted box have reducedspacing and are used to reduce the spacing betweenkern combinations such as AW."
Full Space Picto-gram

2 4
Press inwhich a pattern to beoverwritten is stored.
59
Saving / Clearing / Opening patterns
When a pattern is shown on upper part of LCD screen, it will be stored in (as many as 120 different patterns). Howev-
er, they will be automatically cleared by turning power off. If you want to save pattern, press Key. With this step of opera-
tion, you can file frequently used patterns.
As many as 120 different patterns (memory capacity) can be saved in one .
Do not turn off power to machine while Helpful Message indicating machine is filing or loading appears on LCD screen.
2 3 4
Press inwhich a pattern is tobe saved. 3 Press pictogram.
Press pictogram and screen will return toprevious one.
Press pictogram.
To save a pattern:
To overwrite a pattern:
1 Press key.
1 Press key.
5Remaining capacity ofmemory is indicated.
Press pictogram, and screen will return toprevious one.
5
Press pictogram.
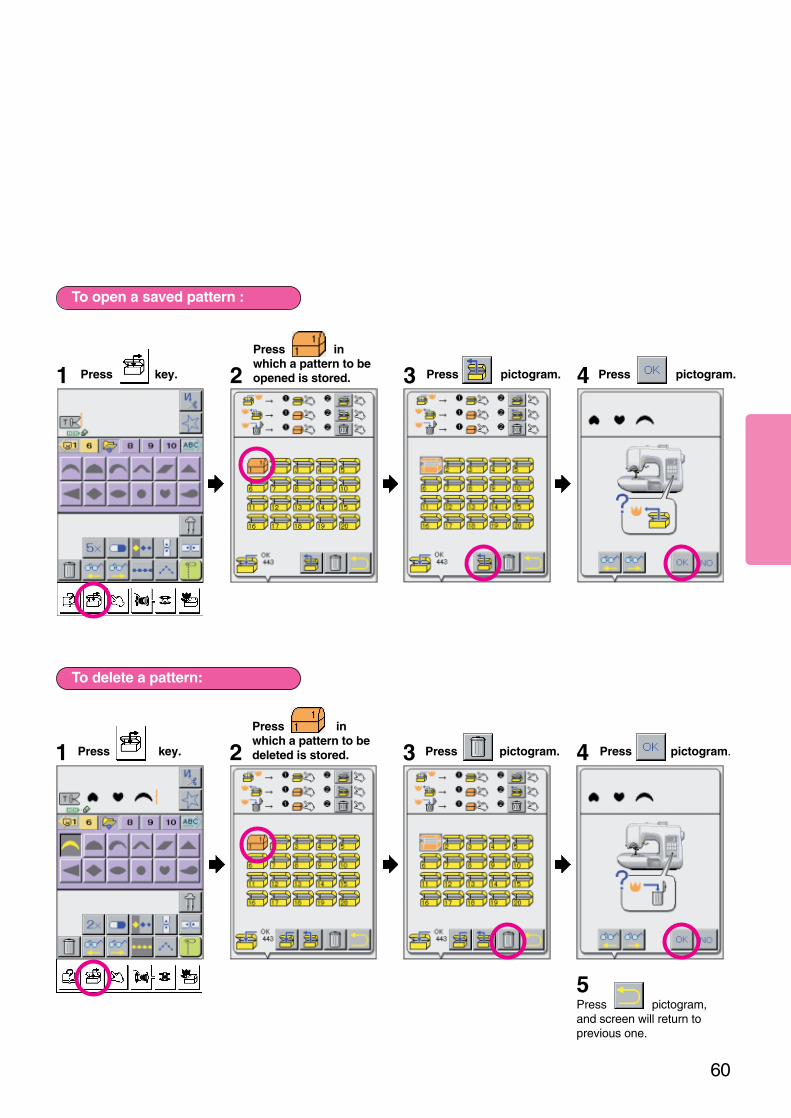
60
2 3Press inwhich a pattern to bedeleted is stored. 4
To delete a pattern:
2
To open a saved pattern :
3Press inwhich a pattern to beopened is stored. 41 Press key.
1
Press pictogram, and screen will return to previous one.
5
Press key.
Press pictogram. Press pictogram.
Press pictogram. Press pictogram.

61
The Embroidery Side of your Computer SewingMachine contains numerous embroidery patternsand characters stored in memory. In addition, Sew-Ware embroidery cards (separately available) maybe used for embroidery. We hope you will enjoyembroidery with these patterns.
The following information relates to the processyou need to fully understand to convert yourStandard Sewing Machine to an Automatic Embroi-dery Machine.
Preparation for Embroidery
Turn off the power to machine.Remove presser foot holder.
Attach embroidery presserfoot (J) in position.
1. Be sure to turn power off to machine before attaching/removingembroidery unit to/from sewing machine.
2. Be sure to keep embroidery cards in original case for storage.
3. If you turn power off to machine during editing or sewing of embroidery,you only have about 10 minutes (Power Fail Function) to turn powerback on and retain the data you were using. If you plan to be away fromthe machine for more than 10 minutes, temporarily save embroidery dataso you may activate screen shown just before turning power off. (See page 96.)
4. Embroidery frame comes in three different sizes. Carefully select anappropriate embroidery frame according to size and sewing position ofpattern.
5. Embroidery designs stored in machine or available on optional Embroidery cards are intended for home use.Copyright Laws strictly prohibit use of designs for business.
1 2
Precautions about Embroidery Machine, Embroidery Unit and Sew-Ware Embroidery cards (optional)
Attaching embroidery foot (J)
* Do not carry your Computer SewingMachine with Embroidery Unit installed as the Embroidery Unit may drop from SewingMachine and break or cause an injury.
* Keep your hands, obstacles or other objectsaway from carriage of embroidery unit whileembroidery frame is moving.
CAUTION
Presser foot holder.
* If you cannot loosen screw by hand,use screwdriver supplied with unit.
Presser footclamp screw

62
Turn power off. Remove Auxiliary Bed.
Slide Embroidery Unit over machinearm. Press lever to rightmost positionuntil it clicks.
Slide the lever of the Embroidery Unit to theleftmost position. Then, slide Embroidery Unitto the left until it comes off sewing machine.
Caution: Do not attach Embroidery Unit by holding the carrage.
1 2 3
Place Computer Sewing Machine on a sturdy level surface.Attach Embroidery Unit by sliding it into place. If any gapexists between Embroidery Unit and Sewing Machine,embroidery patterns may be sewn incorrectly. Be sure tofully push Embroidery Unit onto sewing machine and thenlock it in place.
Caution: Do not remove Embroidery Unit by holding its carriage.
1 2
Attaching embroidery Unit to Machine
Removing Embroidery Unit
Carriage
Lever
Turn power off.

63
4
1
2
3
Thread sewing machine alonggroove, pull it in direction ofarrow and cut it with threadcutter blade. 5
Thread Exchanger (Embroidery Machine)
3
2 Install Thread Spools.1
Place thread so thread wrapsaround spool in a clockwisedirection and put large caponto thread spool.
In case of normalthreadspool
Place thread so thread wrapsaround spool in a clockwisedirection and put large caponto thread spool afterinstalling inner cap.
Place thread so threadwraps around spool ina clockwise directionand put small cap ontothread spool.
Largecap
Smallcap
inner cap
ProjectionGroove
In case of largethreadspool
In case of smallthreadspool
Stage thread for Semi orFully Automatic Threading.
Holding thread with fingers, pull threadso as to stretch thread tight.
Stretchthread tight.
Left threadspool
Rightthreadspool
ThreadCutterBlade
Install ThreadExchanger.
LeverLargecap

Press pictogram to rewind thread to left thread spool.
Press pictogram to rewind thread to right thread spool.
64
6 7Lower presser foot lifter. Press key.
* Align mark on handwheel withmark on machine head.
Place next color (step)thread on Right Spool“B”. Stage threadthrough Step 5 (includingcutting the thread withThread Cutter Blade.)
If it is desired to manu-ally perform threading, press pictogram.
Fully Automatic Thread Exchange
8 Press pictogram.
* Press rewind switch only after confirming that embroidery sewingstep is fully complete and thread is cut.
9
For Semi-Automatic Operation
If you want to stoprewinding manually press pictogram.
At the time of threading bothspools or before sewing iscomplete with first color “A”,to acheive Fully AutomaticThread Exchange, you mustpress pictogram.
After machine has exchanged Spool “A”for Spool “B” and has proceeded to sew,remove used Spool A and replace it withnext color (step). Stage thread through
Step 5 and press pictogram for Auto Thread Exchange.

65
Automatic winding of bobbin with exclusive embroidery thread
2 31
5 6
Press key.Select amount of thread to bewound on bobbin.
Load an empty bobbin andclose bobbin case cover.
Install a spool of Bobbin fill Thread the First Thread guide.
4
56
10
Endless Automatic Bobbin winding for embroidery
4Open cover of Endless Bobbinloading compartment and coverof Automatic Bobbin winder.
1
7
8
[1]
[2]
[3][4]
[5]
9* Be sure to use bobbinillustrated. If not, machinecannot perform Endlessautomatic bobbin winding.* Use Bobbin Fill Thread of90 ~ 100 weight. Heavierweight thread may not windcorrectly.
How the Endless Bobbin Works
*When the bobbin has run out of threadwhile machine is engaged in sewing anembroidery pattern, the machine will re-position the embroidery frame and willstart the Endless Automatic Bobbin Wind-ing Sequence.
*After completion of automatic bobbinwinding, the machine will automatically re-start sewing the embroidery pattern.
*As a manual option to the Endless Auto-matic Bobbin winding, you may choose touse standard bobbins and manually windand insert them in your sewing machine.Refer to pages 119 & 120 for how to windand insert bobbins automatically.
Bobbin to be used
Top
Bottom
How to set up for Endless Bobbin Winding:
Use only large parallel woundspools of Bobbin Fill thread.

66
7 8Install Bobbin Winder Guide. Pass thread along groove.
Remove Bobbin Winder Guide and closecover of Endless Bobbin Compartment.
* To pause and re-start bobbinwinding while machine is engaged inbobbin winding, press start/stopbutton.
Press pictogram locatedon upper part of LCD screen.
Upon completion of winding ofbobbin, bobbin thread is automaticallycut. Now, you can start embroiderywith no additional preparation.
10
1112
* Intially place Guide from its far side.*Press front of guide until it clicks inplace.
Pull thread in direction ofarrow to cut thread.9
Cutter
[1][2]
[3][4][5]
Draw thread toward you, and threadwill be trimmed.
Correct threading
* When Bobbin Fill thread has run out during automatic winding of bobbin, ahelpful message will appear on LCD screen and machine will stop windingbobbin. Make sure bobbin is correctly threaded in bobbin case (refer to page120). Install new spool of bobbin fill thread and follow steps 2 ~ 10.Re-start machine, and it will start sewing remaining part of embroidery. When bobbin thread has run out, machine will automatically wind bobbin.
Follow the Threading Track arround all the turns andthread points [1] though [5]. At numbered positions 1~ 3 lightly pull thread to assure it slips into position. AtPosition 4 pull thread slightly harder to assure threadpasses under final spring. See Step 9 for Step 5Instructions.

67
How to Select Floral Embroidery Patterns (color coded green)
Touch Welcome screen. Press pictogram.21 3
4 5 6 7
How to select a pattern
1 2 3Press
Press and screenwill appear as illustrated instep 4.
: Used to cancel patternselected.
: Used to check patternswhen number of patternsyou have selected exceedsthe number of those canbe shown on single screen.
Note: When the Stitch Pattern Pictogram
displays a “Targeting Oval” , to select
pattern press gently on the oval only.
Press
Press Press Press
Press10 118 9
Press and screen will appearas illustrated in step 9.
Press Press

How to Select Large Floral Monogram (color coded rose)
PressPress
Press and screenwill return to the Step 4Pattern Selection screen.
68
13 14
15 16 17
Press key, and screenwill appear as illustrated in step18.
Press
Press
PressPress18 19 20 21Press
22
Press key, and screen willappear as illustrated in step 23.
Press Press23 24 25
Press key, and screen willappear as illustrated in step 25.
Press26 27 28PressPress
Press and screen will appear as illustrated in step 29.
Example)
Example) 1. Select Frame.2. Select Alphabets.
1. Select Alphabets.2. Select Flowers.
Press and screenwill appear as illustrated instep 13.
Press12

Press andscreen will return to Floral Patternselection screen 1.
Press
69
39 40
41 42 43
Press
Press
Press and screen will appear as illustrated in step 44.
Press
44 45 Press
PressPress
PressPress
Press and screen willappear as illustrated in step 34.
Press
PressPressPress29 30 31 32
33 34 35 36
37
Press and screen willappear illustrated in Step 39.
38
How to Select Letter and Number Patterns (color coded blue)
How to Select Layout Grid Patterns (color coded orange)
Grids can be used as a template when combining patterns or alphabet letters on the Layout Screen. The grids areappropriate for both Combination Embroidery and Multiple Hoop Embroidery.
* Select and enter a grid suitable for combination of your desired layout pattern.* Select and enter desired patterns and alphabet letters and move them into the desired position with the edit
function.* CAUTION: After completing your layout and before actually starting sewing, delete the grid pattern as the grids
are actual sewing patterns and will be sewn if not deleted

70
1 2 3Press
“S” appears on LCD screen. “STAR” appears on LCDscreen.
Example: Selecting “STAR”
Press Press
Patterns stored in embroidery card will appearon LCD screen.
Check contents with
In the case where Sew-Ware Embroidery Card (optional) is used:
Open Embroidery CardSlot Cover and loadembroidery card into slot.
Holding embroidery card withits notch positioned in thelower left, insert it into cardslot until it will go no further.
Be sure to close cover. If coveris left opened, embroidery cardwill be disabled.
1 2 Close cover.
3 Press pictogram.
4 Press
Hold embroidery card with itsnotch positioned lower left.
* Various kinds of optional Sew-WareEmbroidery Cards are available for themachine. Contact your Certified SingerDealer for more information.

Loosen frame adjusting screwand place fabric between innerand outer frames so that markerlines align with raised marks onframe.
Slightly tighten frame adjustingscrew and pull fabric edges toremove slack.
Once fabric is properly positioned inembroidery frame with no slack, securelytighten frame adjusting screw. DO NOTUSE SCREWDRIVER TO TIGHTEN!
Inner frame
1. Slightly tighten screw. TightenLoosen
Frame adjusting screw
Outerframe
1 2 3
71
Fabric, thread and Needle Type of embroidery frames
Installing fabric in embroidery frame
Fabric
Type
ofthread
Needle thread
Bobbin thread
Thread designed for sewing machineembroidery#40 Weight Rayon Thread recommended#30 Weight is acceptable alternative.
Bobbin fill thread
Singer Brand Sewing Machine NeedlesSize #11/80 or Size #14/90.(#11/80 needle is recommended formedium-weight materials.)
How to Sew Embroidery
Small
Embroidery range240 mm (length) x 140mm (width)
114 mm (length)x 114 mm (width)
55 mm (length)x 55 mm (width)
ApplicationUsed for large embroiderypattern such as combinedpatterns and multiple hoopembroidery.
Used for singlepatterns, etc.
Used for smallembroideriessuch as a name on ahandkerchief.
fabric
2. Remove slack from fabric.
Check to be sure that fabric isproperly tensed.
Large Medium
Type of needle
Fuse iron-on stabilizer on wrong side offabric with an iron. (Iron temperatureshould be set to “low” to “Medium.”
Continuous embroidery frame
Use this frame for sewing embroideryinserts and borders that require perfectlymatched repetition.

Fit the edge of frame incorresponding groove inembroidery frame holder.
Fully raise embroidery presser footand place embroidery frame under it.
To remove embroidery frame
1 2
72
Attaching and removing embroidery frame
To embroider small fabric:
Fuse iron-on tear away type stabilizer on fabric before sewing embroidery. After completion of embroidery, tear off stabilizer from fabric.
* Use the small or medium size frame.
To embroider corner of fabric such as handkerchief:
To embroider narrow fabricsuch as ribbon tape:
To embroider small fabric or edge of fabric:
Holdinglever
Pressing holding lever of embroideryframe holder to leftmost position, raiseembroidery frame until it comes offfrom embroidery frame holder.
Pressing far side of embroidery framewith fingers, push frame into slotlocated on embroidery unit untilframe clicks into place.3
Embroideryframe holder

Basic Embroidering Trial Sewing
73
Select desired pattern.(In this case, pansy of“Flower Screen 4”)
Thread machine with firstcolor thread. Pass threadthrough the hole in theembroidery foot and lightlyhold thread with your lefthand to begin sewing.
Re-start machine.
1 5
6 7Lower embroiderypresser foot. Pressstart/stop button. 8
This machine will sewportion “1” of selectedembroidery pattern andautomatically stop.
Sew five or six stitches.Stop machine. Cut awayany excess thread fromedge of stitches.
Upon completion ofsewing, relevantmessage will appearon LCD screen.
Press to clearmessage.
3 4
2
9
Example: For embroidering
Press pictogram.
Press pictogram.
Note: As preparation for this Trial Sewing Example, install stabilized fabric in Medium Embroidery Frameand install frame on Embroidery Unit. Please note the sequence for this exercise has you operate theThread Exchanger Semi-Automatically.

Press
For 3rd to 6th colorthreads, repeat Step 10.Finally, machine will sewportion 6 of selectedembroidery pattern andautomatically stop.
* As you sew each section ofthe color thread sewing orderon upper part of LCD Screenwill shift to the left in se-quence so the current step isalways in the leftmostposition.
74
Refer to instructionsfor thread Exchangeron Pages 63 and 64.Rewind Color Step 1thread and use Semi-Automatic method ofthreading to changethread to 2nd colorthread. Start machine.
10
11
Machine will sew portion “2” ofselected embroidery patternand automatically stop.
12
When the threadinghas been completed,press picto-gram.1 2 3
If thread has broken during sewing, move carriage for easier threading.
4
Embroidering sequence
[1] [2] [3] [4] [5] [6]
Press and screen
will return to initial screen.
* Press pictogram,and screen will return toscreen 1.
For ease in ManualThreading
PressPress pictogram.

75
Turn power off. Install Embroidery Unit.
Touch LCD screen.
Attach embroidery foot (J). Turn power on.
Set Endless Bobbin .
* Refer to pages 63 to 65 forhow to select patterns andalphabet.
Complete Sequence of Embroidery
1 2 3 4
75 6
* See pages 65 and 66for description ofEndless AutomaticBobbin Winding.
Select a desiredpattern.8
Carriage
Even if bobbin thread has run out during sewing, machine will auto-matically wind bobbin with bobbin thread toallow operator to continue sewing without
interrupting sewing.* Properly load Endless Bobbin. Note: For the
Endless Bobbin Feature to function, the AutomaticBobbin Winding Optional Setting must be “ON.”
(See page 117.)* When machine performs
automatic bobbin winding, machinewill move embroidery frame to
remove thread remaining on bobbin.Be careful to not obstruct embroidery
frame movement while machine isengaged in automatic
bobbin winding.
* When Bobbin Fill Spool has run out during automatic winding of bobbin, a HelpfulMessage will appear on LCD screen and machine will stop winding bobbin. Makecertain bobbin is threaded correctly in the Bobbin Case, referring to page 120. Inaddition, install a new spool of Bobbin Fill Thread.Press start and the machine will start to sew where it left off. When bobbin threadruns out of thread once again, the machine will automatically wind bobbin.
Press

76
“Time required for embroidering” and “remaining time”are shown on LCD screen.* If you have selected Slow or Medium Speed, when you usean optional embroidery card , the embroidery time required forembroidering indicated in the Instructions for the embroiderycard will not agree with the time and remaining time shown onthe LCD screen. The time required for embroidering indicated in Instructions forthe embroidery card is calculated for maximum speed.
How to Change Embroidering Speed
Thread Sewing Machine.Lower embroidery foot. Start machine.
Raise embroiderypresser foot. Installembroidery frame withstabilized fabric.10 11 12 13
To use embroidery card (optional)
The embroidery sewingspeed can be set with theSpeed controller to Slow,Medium or MaximumSpeed. Being able to slowthe sewing speed is usefulwhen joining complexMultiple Hoop Patterns orusing a special embroiderythread that is prone tobreakage.
*Refer to pages 63 and64 for description ofautomatic threading ofsewing machine.
9
Holding embroidery card withits notch positioned in thelower left, insert it into cardslot until it will go no further.
Inserting Sew-Ware Embroidery Card
Be sure to close cover. Ifcover is left opened,embroidery card will bedisabled.
See page 77 for how to move pattern to different embroidering location inside embroidery frame.
See page 78 for how to rotate or change size of patterns or letters.
See pages 79 and 80 for how to change orientation of letters stored in memory from horizontal to vertical or change interval between letters.
See pages 81 and 82 for how to combine patterns and letters.
See pages 83 to 90 for how to continuously sew letters using the Multiple Hoop FunctionSee pages 91 and 92 for how to layout and sew a Combination Patterns and Letters Multiple Hoop Design See pages 97 and 98 for how to store letters and patterns in memory.
Hold embroidery card with itsnotch positioned lower left.
At this point before sewing the Pattern or Combination of Patterns, the Screen Layout can be edited.

When is selected, frame
mores as long as is
pressed.
Press each CornerPictogram
Press selectedDirection Arrow
PressPictogram.
77
Moving and Confirming location of patterns and letters
2 3 4
* Hold Arrow to increase moving speed.* Pressing will return to center position.
* For a quick movement, first press pictogram. Thenpress arrow of direction you want pattern to move. The patternwill move to the corner or side of embroidery frame in thedirection corresponding to arrow key pressed.
Embroidery frame will moveand stop at each corner toindicate sewing range.
1 Press pictogram.
32
After completion oflocation changing,
press pictogram.
To change the location within the Frame
41
After completion of rangeconfirmation
press pictogram.
To confirm the location of embroidery on fabric
Press pictogram. Press pictogram.
This will automaticallytake you to the EditingMenu Screen.

To change pattern size in increments of 1 mm, press or (Data setting range: 7 mm to 60 mm)
PressPress pictogramPress
pictogram.
78
Press com-binations of numericpictograms to establishangle of rotation.2 41
To rotate patterns and letters
Rotating/changing size of patterns and letters
3
Every press on key willincrease angle.Example:To obtain Press picto nine
times.
* If pattern is located near theedge of embroidery frame,pattern may not be rotatedaccording to angle of rotationdesired.* In such a case, center locationof embroidery pattern to allowangle setting.
1 2
The limit of letter enlargement differs with number of letters.* Some numbers of letters may be enlarged further by rotating * A letter that is located near the edge of embroidery frame may befurther enlarged (as large as 60 mm) by returning to the centerposition.
1 2
To change size of letters
To change size of pattern
Press one of to change pattern size asdesired.
To change pattern size in increments of 1%, press or .(Data setting range: 90 % to 120 %)The limit of pattern enlargement differs with patterns.* Some patterns may be enlarged further by rotating by .* A pattern that is located near the edge of embroidery frame maybe further enlarged (as large as by 120 %) by returning to thecenter position.
* The size of some Embroidery Card Designs are pre-set and cannot be changed.
Upon completion of changing the letter size, press3
Upon completion of changing the pattern size press3
* In the case where letter size is reduced to less than 15 mm, the letter detail istoo small to show on screen and will be indicated as .
Press
Press
Press one of to change pattern size as desired.

2 3
79
Mirror Imaging and Horizontal / Vertical Orientation
To change orientation from Horizontal to Vertical
1
To Mirror Image Patterns
1 2 3
5 64
To change orientation between portrait and landscape orientations
Press
Press pictogram.
Press pictogram. Press pictogram.
Press pictogram. Press pictogram.
Note: Horizontal and Vertical relates to the
direction of the letters within the screen.Portrait and Landscape relates to the
orientation of the screen itself.
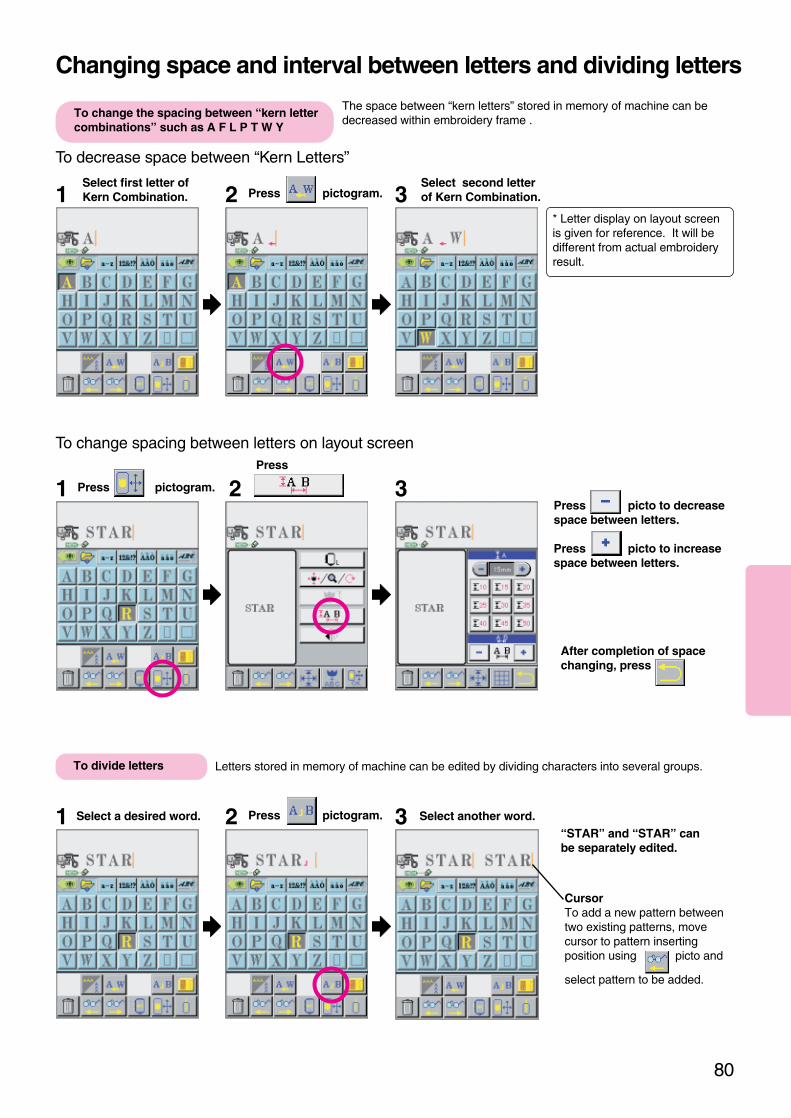
Press pictogram.
80
The space between “kern letters” stored in memory of machine can be decreased within embroidery frame .
1 2 3
Changing space and interval between letters and dividing letters
Select first letter ofKern Combination.1 2
To change spacing between letters on layout screen
3
To decrease space between “Kern Letters”
Letters stored in memory of machine can be edited by dividing characters into several groups.
To change the spacing between “kern lettercombinations” such as A F L P T W Y
To divide letters
1 2 3“STAR” and “STAR” canbe separately edited.
Press picto to decreasespace between letters.
Press picto to increasespace between letters.
After completion of spacechanging, press
CursorTo add a new pattern betweentwo existing patterns, movecursor to pattern inserting position using picto and
select pattern to be added.
* Letter display on layout screenis given for reference. It will bedifferent from actual embroideryresult.
Select second letterof Kern Combination.
Press
Select a desired word. Select another word.
Press pictogram.
Press pictogram.

81
Combination Sewing: combining patterns and letters
1Change location ofpattern.4
85 6
9
2 3
Example)
Select pansy patternof .
7
Press arrow ( ) inrepetition until letter screenappears.
Change location ofletters according topattern location.10
When the Layout is
complete, press
* At this time, press sixtimes if you want to edit thepattern. This will change thesewlction from the letters to thepattern for editing.
Press the Graph pictogram asecond time to clear the grid.
When you presspicto grid lines will appear onLCD screen to use as an aidfor placement.
Press
Press .
Select a desired word.
Press
Press pictogram.
Press pictogram. Press pictogram.

82
Used to set orientation of pattern layout in embroideryframe to “landscape” or “portrait”.
Used to set orientation of characters to Horizontal orVertical orientation.
Used to check letters when a large number ofletters are stored in memory or change specificpattern to be edited. Also used to changesewing order.
Used to move carriage to check sewing range.
Used to combine patterns.
Used to clear letters and patterns designated.Pressing pictogram for three seconds or more willclear all letters and patterns.
Used to return to layout screen.
Used to activate Layout and Editiing Menu screenafter pattern has been entered.
*Used to activate Pictogram that movesCarriage for ease in threading.
*Used when thread has broken during sewing. (See pages 99 and 100)
* Used to move to another embroidery step or to anexact spot within a specific embroidery step.
11 12 Start sewing machine.
When machine has sewn all6 color steps of the pattern itwill stop. Change the needlethread and re-start themachine. Now, machine willembroider the letters.
The pattern and letters willbe embroidered followingthe order of selection. Inthis case, the pattern willbe embroidered first.* To embroider letters first,
press picto to changethe order of sewing frompattern to letters.
Install embroideryframe designated onscreen. Then, press
Function of Pictograms displayed on the LCD screen
Used to indicate graphic layout lines within embroi-dery editing box on screen.
Used to decrease space between “Kern Letter Combinations.”
Used to divide letters into several groups.
Used to switch to Sewing Screen. Note: will onlyswitch after installing specified embroidery frame onmachine.
When you press pictogram all patternsentered and edited onscreen will be shown onLCD screen.
Another press on thepictogram will return thescreen to the previousstate.
For a quick review of all thecolor steps in a pattern pressthe Pictogram on the SewingScreen with the Green, Blue
and Red Thread Spools.

83
Multiple Hoop Embroidery [Example 1]
1
* Referring to the LCD Displayplace fabric in Embroidery Frameso that horizontal and VerticalMarker lines on fabric are placedinside Oval Markers indicated onEmbroidry Frame. Note: TheOval Markers indicate the sewingarea.
2
* This embroidering method is used to divide embroider letterns that stretch beyond a single embroidery frameinto several parts and sew them precisely matching one group of letters to the other.
Example) To embroider a string of letters laid out on upper part of LCD screen
3
Oval Markers
Select desired letters.
9
Designate location ofletters to be sewn first.6 85
4
7
Upon completion of theprocedure,
press Install embroidery frameon machine.
Adjust so that location of lettersto be sewn first is positioned atcenter of embroidery frame.
Press
Press Press
Press pictogram. Press pictogram. Press pictogram.
Press
Press
See top of next page for Preparation of Fabric Instructions

84
1
Touch screen at upperpart of vertical line.This will move embroi-dery frame.
Once needle entry pointis correctly specified onthe Y axis vertical line,press position memory[1] for first point.32 4
Turn handwheel to checkthat needle is positioneddirectly above Y axisvertical line.
1. With Fabric Markerdraw a vertical (Y axis) line on fabric.
3. Install fabric inembroidery frame.
2. Draw a horizontal (X axis) line at rightangles to vertical line within sewing rangeof embroidery frame.
* How to draw alateral line when aTry Square is notavailable:
* Points (Y axis verticalline) must be at least 5cm (2 inches] apart
1
Touch screen at lowerpart of vertical line.This will move embroi-dery frame.
Press needle position directionarrows so that needle point isdirectly above Y axis verticalline. For each needle entrypoint, be sure to turn hand-wheel to lower needle to verifythat needle point is directlyabove Y axis vertical line.
Once needle entry pointis correctly specified onthe Y axis vertical line,press position memory[2] for second point.32 4
Turn handwheel to checkthat needle is positioneddirectly above Yaxisvertical line.
Preparation of fabric
10 Operation of LCD screen for specifying needle entry points “a” “b”and “c”
1. Specifying point “a”
2. Specifying point “b”
Use holes in fourcorners ofembroidery frameinstead of a TrySquare.
a
bc
a
b
Press needle position directionarrows so that needle point isdirectly above Y axis vertical line.For each needle entry point, besure to turn handwheel to lowerneedle to verify that needle pointis directly above Y axis verticalline.
4. Checking needle entry pointsby operating LCD screen,specify needle entry points “a”and “b” on Y axis vertical lineand “c” on lX axis horizontallline.

85
Start machine.11Designate location of patternto be embroidered next.13
14
Sewing machinewill embroiderpattern located in designatedposition.
1
Touch screen at far leftpoint along X-axishorizontal line. This will move embroi-dery frame.
32 4
Turn handwheel to checkthat needle is positioneddirectly above X axishorizontal line.
Press needle positiondirection arrows so thatneedle point is directly aboveX axis horizontal line. Foreach needle entry point, besure to turn handwheel tolower needle to verify thatneedle point is directly aboveX axis horizontal line.
Once needle entry pointis correctly specified onX axis horizontal line,press position memory[1] to enter position of X-axis.
3. Specifying point “c”
* To re-specify needle entry point locations of Y axis (before memorizing X axis) press pictogram.
Press the arrow to position the on-screen frame around the second groupof letters to be sewn.
12
c
Press
After re-hooping the fabric tomatch the LCD Screen
press . Install the embroidery frameonto machine.
Press
See top of next page for Preparation of Fabric Instructions.

86
1. Change position ofembroidery frame.
2. Press the LCD Screen toposition the frame and establishthe needle entry points “d” and“e” on the Y axis Vertical lineand “f” on the X axis horizontalline.
1
Touch screen at upper part of vertical line.This will move embroi-dery frame.
Press needle position directionarrows so that needle point isdirectly above Y axis vertical line.For each needle entry point, besure to turn handwheel to lower needle to verify that needle point is directly above Y axis vertical line.
Once needle entry point is correctly specified on the Y axis vertical line, press position memory[1] for first point32 4
1
Touch screen at lowerpart of vertical line.This will move embroi-dery frame.
Press needle position direction arrows so that needle point is directly above Y axis verticalline. For each needle entrypoint, be sure to turn hand-wheel to lower needle to verifythat eedle point is directlyabove Y axis vertical line.
Once needle entry pointis correctly specified onthe Y axis vertical line,press position memory[2] for second point32 4
Turn handwheel to check that needle is positioned directly above Y axisvertical line.
15 Operation of LCD screen for specifying needle entry points “d” “e”and “f”
1. Specifying point “d”
2. Specifying point “e”
d
e
Preparation of fabric
d
e
f
Turn handwheel to check that needle is positioned directly above Y axis verticalline.
* Points (Y axis verticalline) must be at least 5cm (2 inches] apart

87
Start machine.16 17
1
Touch screen at far leftpoint along X axishorizontal line.This will move embroi-dery frame.
32 4
Turn handwheel to checkthat needle is positioneddirectly above X axishorizontal line.
Press needle positiondirection arrows so thatneedle point is directly aboveX axis horizontal line. Foreach needle entry point, besure to turn handwheel toverify that needle point isdirectly above X axishorizontal line.
Once needle entry pointis correctly specified onX axis line horizontalline, press positionmemory [1] to enterposition of X axis.
Sewing machinewill embroiderpattern located indesignated position.
3. Specifying point “f”
f
* To embroider subsequent part of letter
text, press and repeat data
setting procedure from first step.
Press
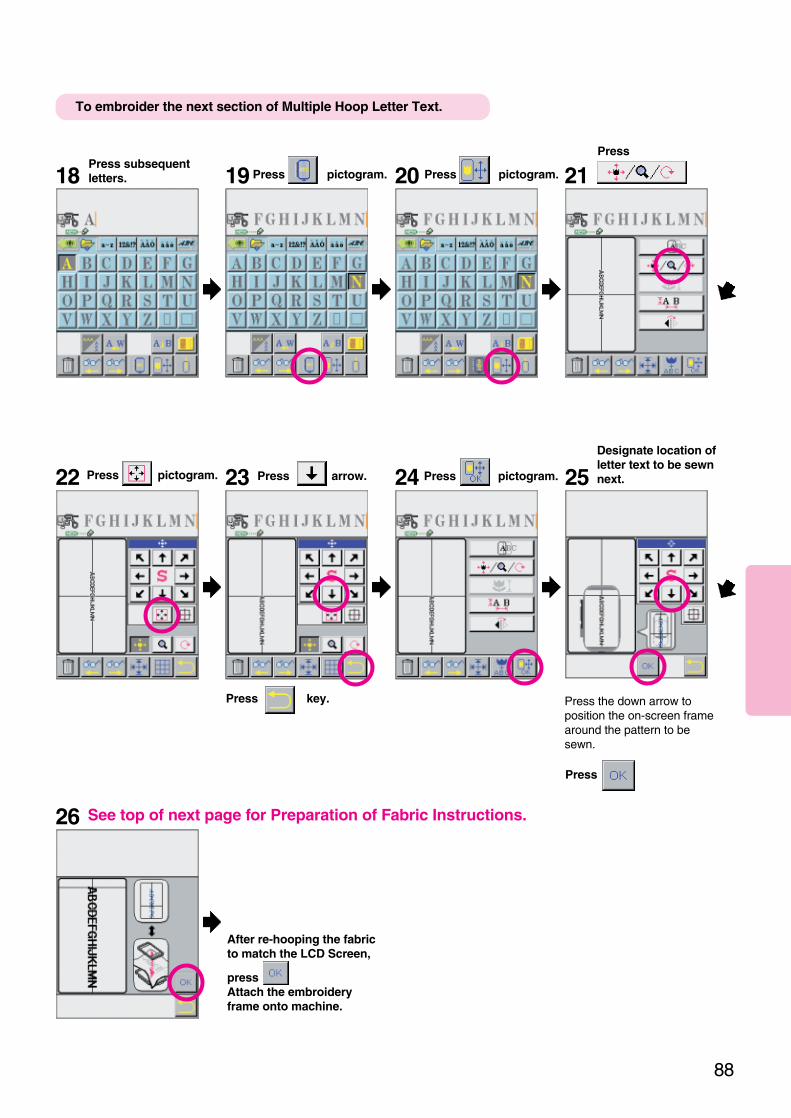
88
18 19 20Press subsequentletters.
26
Designate location ofletter text to be sewnnext.
Press the down arrow toposition the on-screen framearound the pattern to besewn.
23 2522
21
24
To embroider the next section of Multiple Hoop Letter Text.
After re-hooping the fabricto match the LCD Screen,
press Attach the embroideryframe onto machine.
Press pictogram.
Press
Press
Press pictogram.
Press arrow.
Press key.
Press pictogram. Press pictogram.
See top of next page for Preparation of Fabric Instructions.
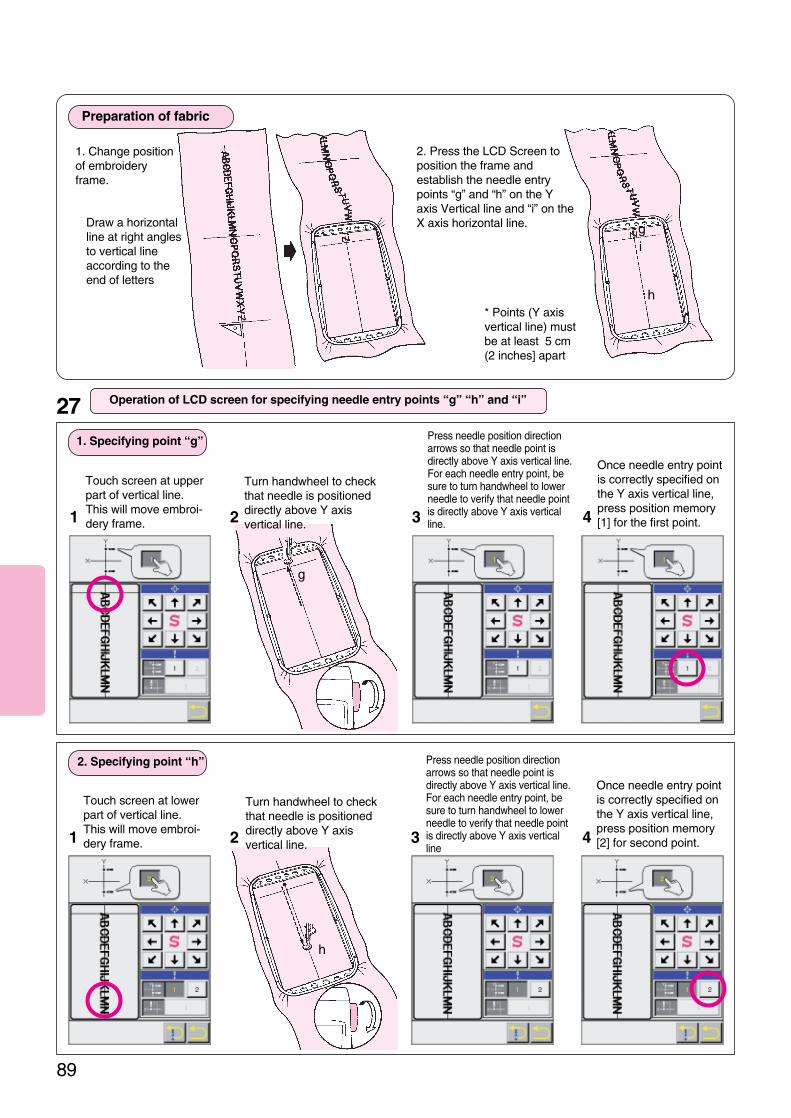
1. Change positionof embroideryframe.
2. Press the LCD Screen toposition the frame andestablish the needle entrypoints “g” and “h” on the Yaxis Vertical line and “i” on theX axis horizontal line.
1
Touch screen at upperpart of vertical line.This will move embroi-dery frame.
Press needle position directionarrows so that needle point isdirectly above Y axis vertical line.For each needle entry point, besure to turn handwheel to lowerneedle to verify that needle pointis directly above Y axis verticalline.
Once needle entry pointis correctly specified onthe Y axis vertical line,press position memory[1] for the first point.32 4
1
Touch screen at lowerpart of vertical line.This will move embroi-dery frame.
Press needle position directionarrows so that needle point isdirectly above Y axis vertical line.For each needle entry point, besure to turn handwheel to lowerneedle to verify that needle pointis directly above Y axis verticalline
Once needle entry pointis correctly specified onthe Y axis vertical line,press position memory[2] for second point.32 4
27 Operation of LCD screen for specifying needle entry points “g” “h” and “i”
1. Specifying point “g”
2. Specifying point “h”
89
Draw a horizontalline at right anglesto vertical lineaccording to theend of letters
g
h
i
g
h
Preparation of fabric
* Points (Y axisvertical line) mustbe at least 5 cm(2 inches] apart
Turn handwheel to checkthat needle is positioneddirectly above Y axisvertical line.
Turn handwheel to checkthat needle is positioneddirectly above Y axisvertical line.

Start machine.28 29
1
Touch screen at far leftpoint along X axishorizontal line.This will move embroi-dery frame.
32 4
Press needle position directionarrows so that needle point isdirectly above X axis horizontalline. For each needle entrypoint, be sure to turn handwheelto lower needle to verify thatneedle point is directly above Xaxis horizontal line.
Once needle entry pointis correctly specified onX axis horizomtal line,press position memory[1] to enter position of Xaxis.
3. Specifying point “i”
90
i
* To embroider subsequent part of letter
text, press and repeat
data setting procedure from first step.
Sewing machinewill embroiderpattern located ondesignated position.
Turn handwheel to checkthat needle is positioneddirectly above X axis onhorizontal line.
1 32 4
How to layout “Multiple Hoop” pattern of optional embroidery card.Adjusting marks (+) are implemented in certain “Multiple Hoop”.In such case, multiple patterns can be easily combined by overlapping adjusting marks on layout screen.
Press pictograms and layout so that the respective parts are roughly combined as one pattern.Press pictogram.
Press pictogram.Press adjusting mark position of the pattern on the screen to display 8 times zooming.
Press and overlap adjusting marks with
pictograms.
Press pictogram.
Press position to set em-broidery frame on thescreen.
Press pictograms and finely adjust the position of embroidery frame. Press pictogram.
Press pictogram.
5
Multiple hoop Embroidery [Example 1] step 96

Multiple hoop embroidery may also be easily sewn by joining 4 or more adjacent hoopings. The following instructions andexample illustrates how to bring together all the elements to create a 250 x 450 mm design. The particular example uses built- inFloral Designs and built-in lettering. However, in actuality a Multiple Hoop Design can be virtually limitless in size and can bemake up of built-in letters, built-in floral, borders and data from optional embroidery cards and unique date created in a Computerwith the optional Professional Sew-Ware Version 2.0.
Example)2
45
1
91
Multiple Hoop Embroidery [Example2]
1 42 3Select pattern of .
Press
Press
Press pictogram.
5 6
Press arrow ( ) inrepetition until screenappears.
Press pictogram.
Press
7 8Select pattern of . Press pictogram .
Preparation of fabric
1. Draw cross lines so that the lines make right angles in the center of fabric.
2. Plan design keeping in mind number of hoopings required.
In this case, 5 hoopings arerequired.
3

92
9 10 11Designate locationof pattern to besewn first.
Press the arrow keys toposition the on-screenframe around the pattern tobe sewn first.
Press
* Follow the sequence offeredby the on-screen helpfulmessages and pictograms. It isimportant to hoop the fabric perthe LCD Screen and to carefullydefine the Y and X axis lines soall portions of the design align.
When instructed,
press key.Install embroidery frameon machine.
Determine first point onY-axis line.
12 Use touch-screen to establish needle entry points.
1Determine second pointon Y-axis line.2
Determine first point onX-axis line.3
Start machine.13
Designate location of the next pattern to beembroidered.15
Sewing machine will embroi-der the pattern located indesignated position.
Press the arrows to position the on-screenframe around the pattern to be sewn next
14
Press
Press
Insert and position “Flower Power” Text
Press pictogram .
This example was abbreviatedas by this point you havelearned enough to easilylayout and sew this simpleMultiple Hoop Design.

93
On the Embroidery screen
press pictogram.
Continuous Embroidery frame
2
Use this frame only for performing Continuous-Embroidery.
#5006 Continuous Embroidery card
Continuous Embroidery
3
The Continuous Embroidery Package consists of Continuous Embroidery frame and Continuous Embroidery card.
For most successful operation:Please read all instructions in the instruction manual and this instruction sheet before using.
Name of parts.
Select pattern.Press pictogram of the pattern that you with to sew.Press pictogram.
Insert the card.1 Built-in patterns.
Insert the Continuous
Embroidery card #5006.
Press pictogram.
Installing the Continuous Embroidery frame
Fully raise embroidery presser foot and place theembroidery frame under it.
Raise the lever and lift the upper frame.Securing fabric in embroidery frame.Loosen the guide screw.Position fold edge against guide.Tighten the guide screw.Lower the lever to lower the upper frame.
Guide
Lever
Screw
4 Setting the fabric

94
At the end of the 1st pattern, themachine will sew a " V " mark.2nd unit of pattern is aligned withthe lower end of the "V " mark. Turn handwheel to drop theneedle on end of "V" MARK.Press the Start/Stop Button.The 2nd pattern is connected andis sewn.
65 Start sewing.
Press pictogram.Lower presser foot andpress start button.
Press pictogram.
Press pictogram.
Location will move to left or right of the embroidery frame.
Press pictogram.
Press pictogram.
Connecting the patterns.
Use the small pattern to adjust the overall length of theContinuous Design.
Press pictogram.Small patterns will be connected automatically within thelimits of the Continuous embroidery frame.
B. Connecting small patterns
Press pictogramThe pattern of two or more colors changes to single color pattern.It can sew without exchange of thread continuously.
D. Monochrome-izing pattern
Explanations of other effective functionsA. Change location of pattern
C. Mirroring patternPattern will be mirrored automatically within thelimits of the Continuous embroidery frame.

Zooming (On-Screen Enlargement) function
This is an on-screen function that is used to visually enlarge patterns and lettters for easypositioning and placement of combination and multiple hoop designs. Embroidery Patterns canbe overlapped or precisely joined using the Zoom function.
1 2 3
5 6 7
Specify size ofpattern or letter tobe displayed onLCD screen.
* This is a visual on-screen function and will not increase the sewn size of the embroidery.
To return to originaldisplay size press pictogram.
95
Press LCD screen atportion of pattern orletter to be enlarged.4
Pattern or letters can bevisually enlarged up tofour times on a singlehoop and up to 8timeson Multiple Hoop.
* Patterns or letters can be edited when enlarged.
A press on will returnscreen to previous one.
Press
To return to original display size,press pictogram
Press pictogram.
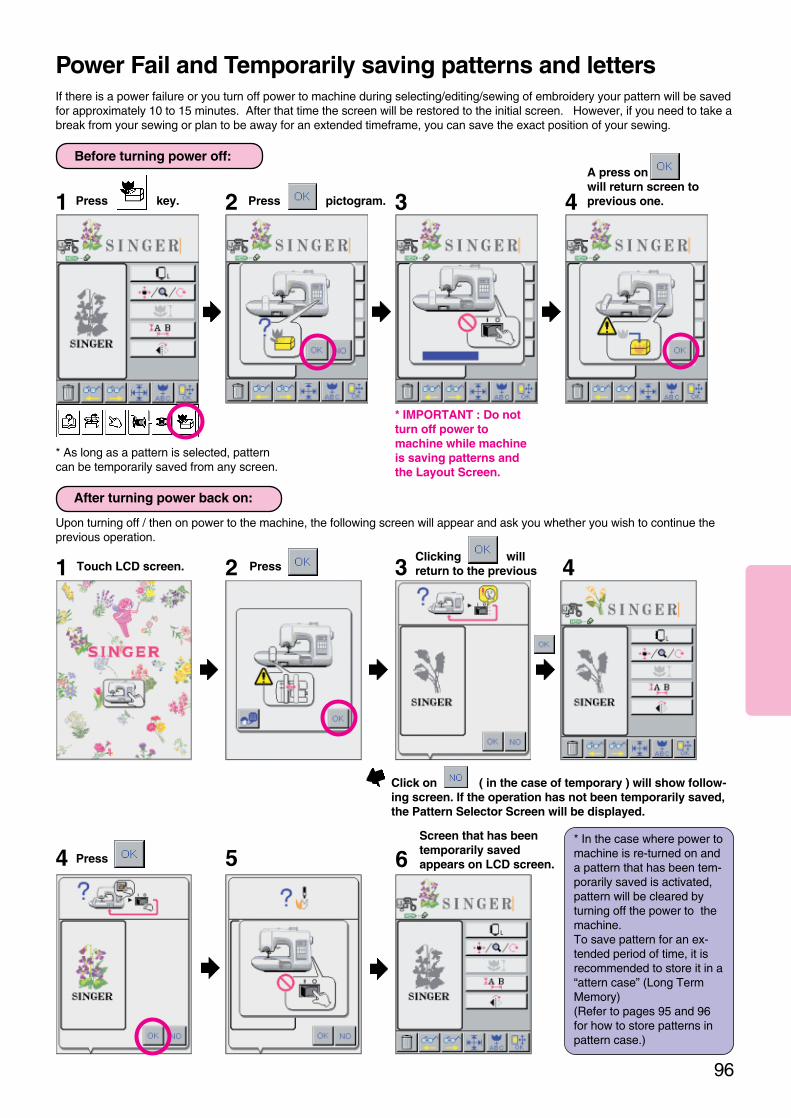
Upon turning off / then on power to the machine, the following screen will appear and ask you whether you wish to continue theprevious operation.
96
Power Fail and Temporarily saving patterns and lettersIf there is a power failure or you turn off power to machine during selecting/editing/sewing of embroidery your pattern will be savedfor approximately 10 to 15 minutes. After that time the screen will be restored to the initial screen. However, if you need to take abreak from your sewing or plan to be away for an extended timeframe, you can save the exact position of your sewing.
1 2 3 4
* As long as a pattern is selected, patterncan be temporarily saved from any screen.
A press on will return screen toprevious one.
Before turning power off:
* IMPORTANT : Do notturn off power tomachine while machineis saving patterns andthe Layout Screen.
Press pictogram.Press key.
Clicking willreturn to the previousoperation.
3
4 5* In the case where power tomachine is re-turned on anda pattern that has been tem-porarily saved is activated,pattern will be cleared byturning off the power to themachine. To save pattern for an ex-tended period of time, it isrecommended to store it in a“attern case” (Long TermMemory) (Refer to pages 95 and 96for how to store patterns inpattern case.)
After turning power back on:
Touch LCD screen.1 2 Press
6Screen that has beentemporarily savedappears on LCD screen.Press
4
Click on ( in the case of temporary ) will show follow-ing screen. If the operation has not been temporarily saved,the Pattern Selector Screen will be displayed.
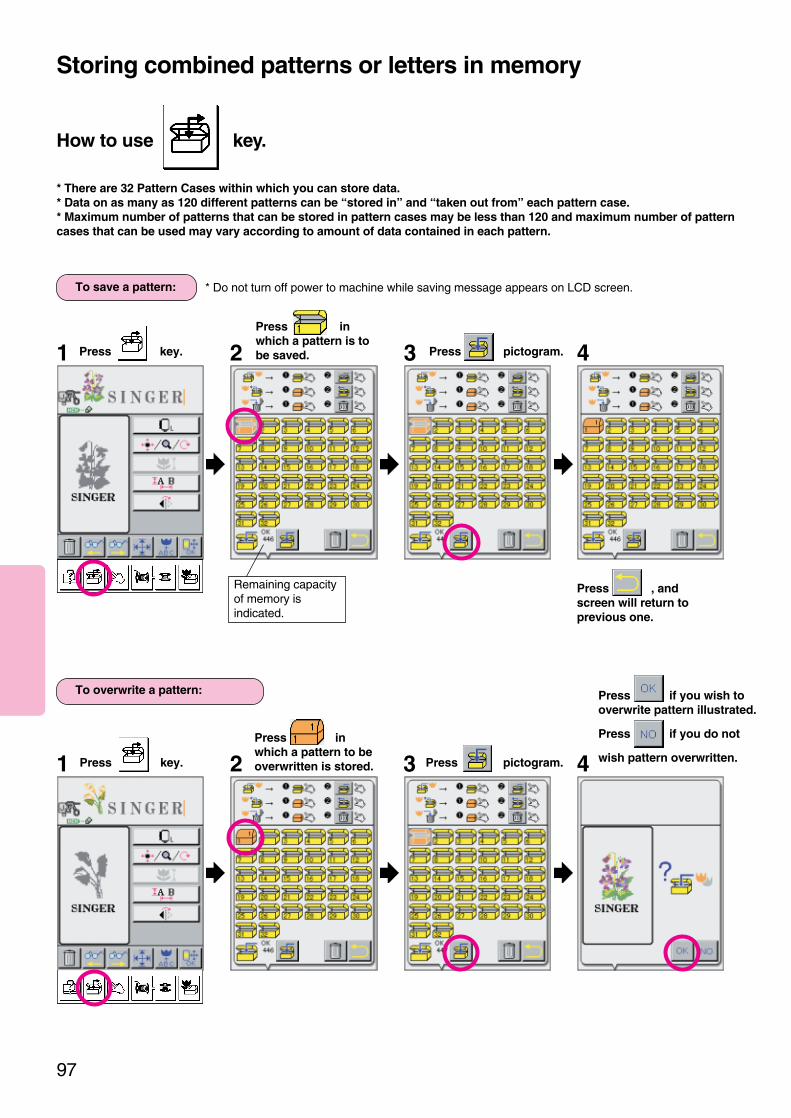
21
Storing combined patterns or letters in memory
How to use key.
* There are 32 Pattern Cases within which you can store data.* Data on as many as 120 different patterns can be “stored in” and “taken out from” each pattern case.* Maximum number of patterns that can be stored in pattern cases may be less than 120 and maximum number of patterncases that can be used may vary according to amount of data contained in each pattern.
* Do not turn off power to machine while saving message appears on LCD screen.
97
3 4
To save a pattern:
1
Press inwhich a pattern is tobe saved.
Press inwhich a pattern to beoverwritten is stored.2 3 4
To overwrite a pattern:
Press , andscreen will return toprevious one.
Remaining capacityof memory isindicated.
Press key. Press pictogram.
Press key. Press pictogram.
Press if you wish tooverwrite pattern illustrated.
Press if you do not
wish pattern overwritten.

98
1
* Do not turn off power to machine while message “Under deleting” appears on LCD screen.To delete a pattern:
2Press inwhich a pattern to bedeleted is stored. 3 4
1 3 4
To open a saved pattern
2Press inwhich a pattern to beopened is stored.
* Data cannot be taken out from pattern case on layout screen. Take it out on selectionscreen.
Press key. Press pictogram. Press
Press key. Press pictogram. Press

If thread breaks during embroidery
99
Stop machine and raise needleand embroidery foot.
Press pictos toreturn needle several stitchesbefore needle breakage point.
Screen returns toprevious screen.
When needle thread has broken, re-thread sewing machine. When bobbin thread has broken, followsteps described below:[1] Cut needle thread and remove
embroidery frame from machine.[2] Re-set bobbin thread and re-install
embroidery frame.
1 2 3
4 5Lower embroidery footand start the machine.6
To re-start embroidery from position at which thread has broken
Press pictogram.
Press pictogram.
This pictogram is used to return/advance needle byratio of the number of stitches with respect to totalnumber of stitches of pattern.Indication of color parts on the opper screenchanges according to %.
Every press on pictogram returns the needlein increments of 10 stitches. Every press onpictogram moves the needle forward in incrementsof 1 stitch. (The number of stitches correspondingto one press on pictogram can be changed.See page 117)
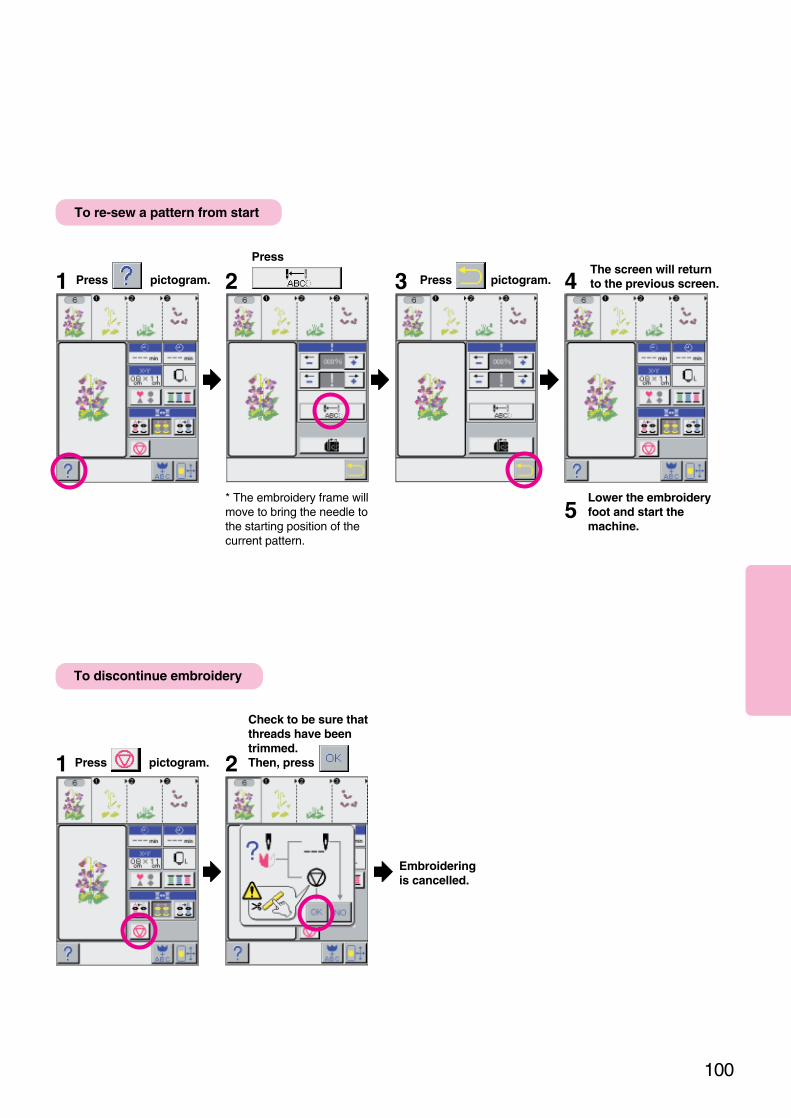
100
1 2 3 4
* The embroidery frame willmove to bring the needle tothe starting position of thecurrent pattern.
The screen will returnto the previous screen.
Lower the embroideryfoot and start themachine.
1 2
Check to be sure thatthreads have beentrimmed. Then, press
To re-sew a pattern from start
Embroideringis cancelled.
Press
Press pictogram. Press pictogram.
Press pictogram.
5
To discontinue embroidery

Helpful messages
101
Press , or ,
and previous screen will be restored.
Messages are given on LCD screen in the case where a faultyoperation is done. Take a corrective measure according torelevant messages.
Prohibit
Check or Caution
Can not or Failed to do something
Need decision of OK or NO
Please wait
: No language icon*
1 2 3
Now saving. * Do not turn power off.
Memory is full.Delete unnecessary box.
Nothing saved in box.
4
Previously selected pattern isremaining. Delete all?
5
Completion of temporarysaving.
6
Now recalling.
1. Saving(file) related
7 8 9
Pattern(s) cannot be saved. Cannot use this pattern. Memory error.Memory is full.
*
*

102
10 11 12
13 14 15
16 17 18
Recall in continuous embroi-dery mode.
Recall in combination embroi-dery mode.
Embroidery frame size isdifferent. Recall pattern(s)?
Power was turned off whilesaving pattern. All setting arelost. Please re-enter settings.
Can not delete pattern(s). Can not recall pattern(s).
Do not turn off power tomachine.
Cannot retrieve temporarysaved pattern.
Delete saved pattern(s).
19 20 21
Delete all patterns? Memory error.Memory is full.
Machine does not accept thisoperation.
2. Pattern sewing related
*
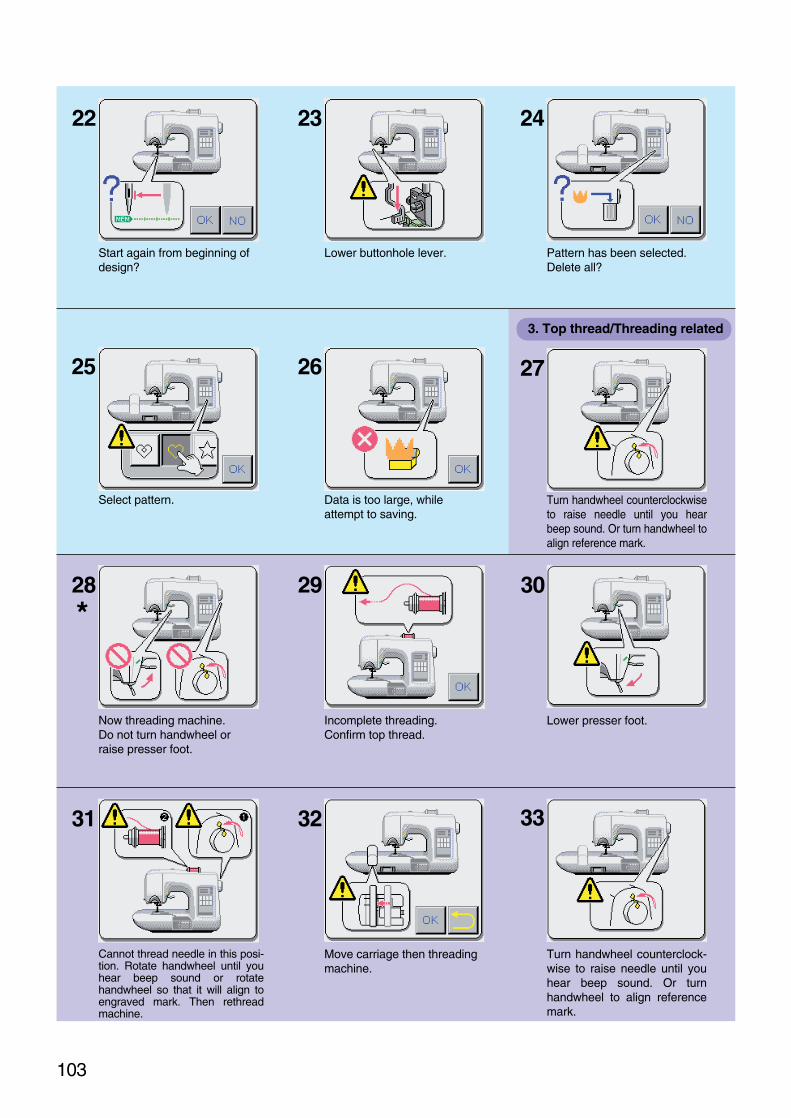
103
22 23 24
25 26
Start again from beginning ofdesign?
Lower buttonhole lever. Pattern has been selected.Delete all?
Select pattern. Data is too large, whileattempt to saving.
33
Turn handwheel counterclock-wise to raise needle until youhear beep sound. Or turnhandwheel to align referencemark.
27
28 29 30
31 32
Turn handwheel counterclockwiseto raise needle until you hearbeep sound. Or turn handwheel toalign reference mark.
Now threading machine.Do not turn handwheel orraise presser foot.
Incomplete threading.Confirm top thread.
Move carriage then threadingmachine.
Cannot thread needle in this posi-tion. Rotate handwheel until youhear beep sound or rotatehandwheel so that it will align toengraved mark. Then rethreadmachine.
Lower presser foot.
3. Top thread/Threading related
*

104
Lower presser foot.
34
4. Presser foot related
35
38
41
Close bobbin winding cover.Rotate handwheel until youhear beep sound.
Bobbin winding failed.Check bobbin thread.
Turn off power to machine,then on again.
5. Bobbin thread related
36
37 39
40 42
43
Check bobbin.
Bobbin winding cover is open.Close bobbin winding cover.
Remove remaining bobbinthread.
Lower spool thread empty.Replace lower thread spool.
Temporarily save data firstand then turn power tomachine off then on again.
Cannot wind bobbin from topspool. Turn off power to ma-chine, then remove bottomthread spool and turn onpower again.
44 45
Place bobbin thread spoolonto bottom spool pin.
Remove bottom thread spool.

105
Embroidery unit is installed.Turn off and on power to ma-chine.
Embroidery Unit has comeloose. Turn off machine, rein-stall embroidery unit and turnon machine.
56 57
Bobbin thread winding completed.
Re-thread machine and windbobbin again.
46
Now winding bobbin thread.
47 48
49 50 51
52
Bobbin thread winding inter-rupted. To continue windingpress start/stop button. Tostop winding press [OK] key.
Re-secure thread so thread istaut.
Be careful.Needle starts to move.
Bobbin thread winding com-pleted. Raise feed dog.
Carriage will move to startingposition.
Touch needle up icon located on the bottom right ofscreen. Be careful as needle willstart to move.
The embroidery unit is not fullyinstalled into main machineslot. Slide the lever to the rightuntil it clicks. Then turn off andturn on the power to machine.
53 54
55
6. Setting embroidery unit

106
59
62
Foot controller is unplugged.
Safety system has been activateddue to temperature rise of motor.Turn off power to machine. Thenwait until machine cools down andturn on power to machine again.
7. Trouble related
(when turn on power machine )
58 60
61
Foot controller is plugged-in.
Motor does not rotate. Turn off power to machine.
63
64
Due to temperature rise machine hasstopped. Save patterns in temporarysaving, then turn off power to ma-chine. Wait until machine cools down,then turn on power to machine again.
Safety system has been activated due totemperature rise of motor. Temporarilysave pattern(s) and turn off power tomachine. Then wait until machine coolsdown and turn on power to machine again.
65
Machine need to be readjust-ed.Call your dealer or servicecenter.
67
Close card slot cover.
8. Card related
68 69
No card is inserted.Insert card.
This card can not be used.Change it to another one.
66
Power was turned off whilesaving pattern. All setting arelost. Please re-enter settings.

107
72
73 74 75
76 77 78
79 80
No more letters can be com-bined.
Can not be rotated to thisangle.
Sewing completed.Press combination key toreturn.
All pattern(s) sewing complet-ed.
Change upper thread to adifferent color.
Do you wish to discontinuesewing? To discontinuesewing press thread cutter keyto secure thread.
When using needle threader,the frame needs to be moved.Touch OK icon to move frame.
Start sewing pattern from in-terrupted point.Press Start switch after check-ing upper and bobbin thread.
There are no patterns to besewn after input 3 points forMulti-Hoop embroidery.
81
Frame was moved. Now threadneedle. Then touch icon to move frame back to originalposition.
71
Pattern located outside ofhoop.Move pattern inside of hoop.
Size of this pattern cannot bechanged.
70
9. Embroidery sewing/ editing

108
Install embroidery frame ontothe machine.
Change setting to installedhoop.
Install selected embroideryframe.
Embroidery frame has comeloose. Reinstall frame.
Does not fit into hoop.Do you wish to change hoop?
Install selected embroidery
frame first, then press key.
To return press key
83 84
85 86 87
88
The cross point of X/Y axislines are not positioned withinframe area.
91
Remove embroidery frame.
82
10. Embroidery frame related
89 90
This pattern can be used forMultiple hoop only. Selectpattern?
The fabric is not properlysecured into frame.
11. Multi-hoop embroidery
“Thread exchanger is not attached”.
Emergency rewinding STOPfunction.
92 93
12. Thread changer

109
Wait 30 second and touch OK.
95
Data is being transferred. Cannot transfer data. The data from PC cannot beused for sewing machine.
96 97 98
13. Download
99 100
101
Version 0.000Begin update process?
Start update process.
Now recalling.Now processing.
15. While in process
Check the exchanger devise.
94
14. Update

110
Optional Accessories
Professional Sew-Ware
Separately available parts recommended to further enjoy your sewing
Embroidery card
Embroidery Cards areavailable to widen applicabilityof embroidery.
Pintuck Foot Open Toe Embroidery Foot
Darning/Embroidery Foot 1/4 inch Quilter’s Foot
Optional Software for creatingof Embroidery Patterns.
Use to sew evenly spacedplain or corded twin needlepintucks.
Use for satin stitching,applique, embroidery sewing.
Use for free motion embroidery, darning &monogramming.
Use to sew perfect 1/4" seamsfor piecing quilt blocks.
Card Converter
Use to convert XL-100, XL-150, XL-1000, XL-5000Optional Embroidery Cards.
Ruffler Presser Foot
Ruffler quickly & easily produces professional looking ruffles on garments and home decorating.

111
Optional Accessories
Ruffling.
* Always use Singer genuine accessory feet. Off brand or generic accessories may cause poor performance, damage to sewing machine or injury.
Ruffler presser foot (Part No.388087)
Attaching ruffler.* Be sure to turn power of before removing/attaching ruffler presser foot.
Ruffler quickly & easily produces professional looking ruffles on garments and home decorating.
[1] Remove presser foot.[2] Raise needle bar to highest position.[3] Fit ruffler fork onto needle clamp screw and attach to presser bar.[4] Tighten presser foot screw with exclusive screwdriver.
**NOTE:
(1)Determine number of ruffles.
Ruffle overlap width increases.
(3)Place fabric under ruffler foot. (4)Lower ruffler presser foot.
(5)Lightly push cloth feed plate towards back of machine.
(6)Turn handwheel counter clockwise to lower needle into fabric until fabric begins to fold.
(7)Start sewing.
Needle clamp screw
Sew test swatch before sewing on project.
Ruffles every stitch.
Straight stitch
Ruffles every six stitches.
Ruffles every 12 stitches.
(2)Adjust overlapping width of ruffles.
Ruffle overlap width decreases.
[2]
[1]
Through 25mm
Put in guide plate.Fabric edge6mm
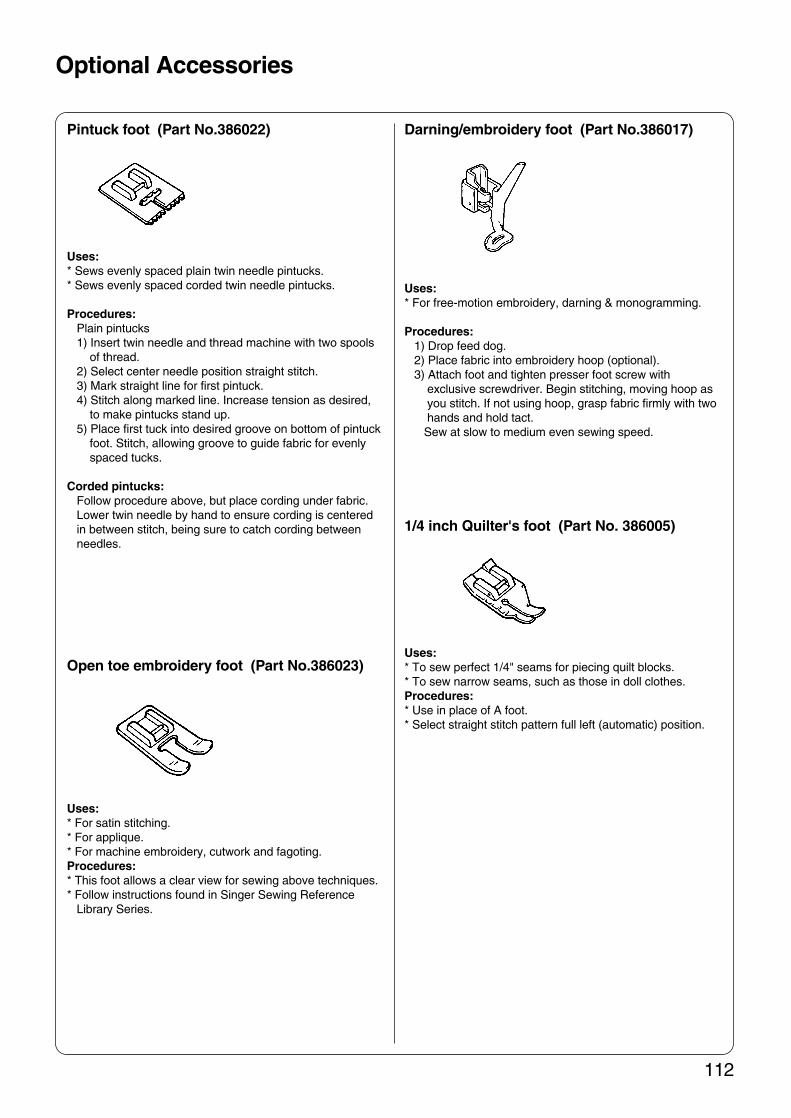
112
1/4 inch Quilter's foot (Part No. 386005)
Uses:* To sew perfect 1/4" seams for piecing quilt blocks.* To sew narrow seams, such as those in doll clothes.Procedures:* Use in place of A foot.* Select straight stitch pattern full left (automatic) position.
Darning/embroidery foot (Part No.386017)
Uses:* For free-motion embroidery, darning & monogramming.
Procedures:1) Drop feed dog.2) Place fabric into embroidery hoop (optional).3) Attach foot and tighten presser foot screw with
exclusive screwdriver. Begin stitching, moving hoop as you stitch. If not using hoop, grasp fabric firmly with two hands and hold tact. Sew at slow to medium even sewing speed.
Open toe embroidery foot (Part No.386023)
Uses:* For satin stitching.* For applique.* For machine embroidery, cutwork and fagoting.Procedures:* This foot allows a clear view for sewing above techniques.* Follow instructions found in Singer Sewing Reference
Library Series.
Pintuck foot (Part No.386022)
Uses:* Sews evenly spaced plain twin needle pintucks.* Sews evenly spaced corded twin needle pintucks.
Procedures:Plain pintucks1) Insert twin needle and thread machine with two spools
of thread.2) Select center needle position straight stitch. 3) Mark straight line for first pintuck.4) Stitch along marked line. Increase tension as desired,
to make pintucks stand up.5) Place first tuck into desired groove on bottom of pintuck
foot. Stitch, allowing groove to guide fabric for evenly spaced tucks.
Corded pintucks:Follow procedure above, but place cording under fabric. Lower twin needle by hand to ensure cording is centered in between stitch, being sure to catch cording between needles.
Optional Accessories

113
Transfer continuous embroidery data.
From above screen (1) indicate continuous EMB screen.
(2) Continuous EMB screen.
Optional Accessories
About PC connection pictogram
This picto is pressed when connecting between PC and sewing machine and transferring embroidery data that was created by PSW (Optional Professional Sew-Ware Ver. 2.00) directly to sewing machine.
DownloadTransfer regular pattern data.
(1) Pattern selector screen.
Press GUIDE key of switchsheet
Set BPM (transfer speed)* One save the setting it is not neccesary to make re-setting.
On PSW side, Click on File Send to machine
* Adjust the machine side BPM (transfer speed)XXXX Bits Per Second
As soon after completion of transfer procedure it will return to GUIDE screen.
1. On PSW side, Click on
2. On machine side, Press
At the time transferred data is selectedit will return to the screen (1) or (2).
With this icon on pattern selector
screen it will go to EDIT step.

114
Affix Applique Piece To Base Fabric
Gluing Technique:Apply small drops of fabric glue to back of applique piece taking care to not get glueclose to edge. Glue applique piece in place on base fabric aligning applique withoutline stitching on base fabric.Iron-on Technique:Peel paper backing off back of applique piece. Place applique piece on base fabricaligning piece on outline stitching of applique. Using (an iron small enough to fitinside embroidery frame) secure applique piece in place by ironing for 3 to 5seconds.
Sew Applique Piece To Base Fabric
Attach embroidery frame to machine, install proper thread color, and continuesewing until applique motif is completed.
31 2Prepare Applique Piece
Affix fusible interfacing to wrong side ofapplique fabric (for gluing technique).orAffix iron-on adhesive to wrong side ofapplique fabric (for iron-on technique).
Install applique fabric into embroideryframe and attach to machine.
Press or then select appliquepattern for your design.
Note: Check figure 1 of these instructionsfor correct number(s) of apprique pattern.
Sew applique pattern, remove appliquefabric and cutout applique shape alongoutline stitch.
31 2Prepare Base Fabric
Affix fusible interfacing to wrong side offabric. Install base fabric into embroi-dery frame and attach to machine.
Sew steps until outline of applique patternis sewn.
Remove embroidery frame from ma-chine keeping base fabric installed inframe.
How To Sew Applique
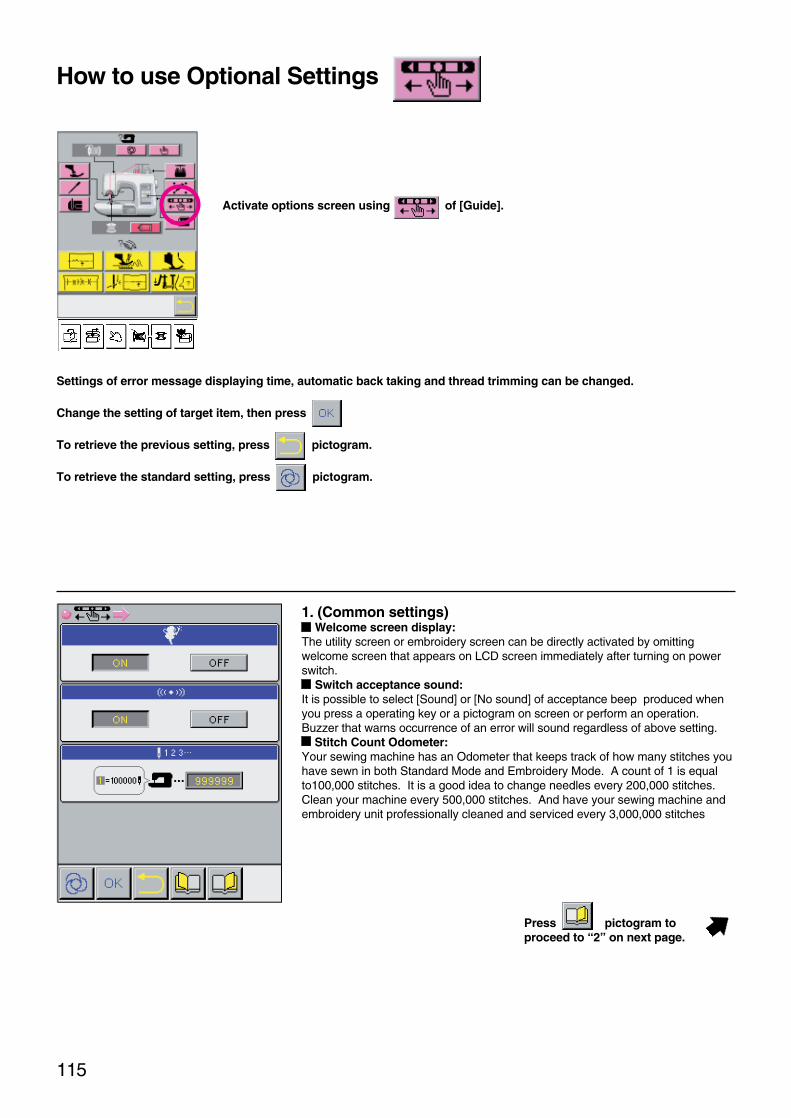
Settings of error message displaying time, automatic back taking and thread trimming can be changed.
Change the setting of target item, then press
To retrieve the previous setting, press pictogram.
To retrieve the standard setting, press pictogram.
1. (Common settings) Welcome screen display:
The utility screen or embroidery screen can be directly activated by omittingwelcome screen that appears on LCD screen immediately after turning on powerswitch.
Switch acceptance sound:It is possible to select [Sound] or [No sound] of acceptance beep produced whenyou press a operating key or a pictogram on screen or perform an operation.Buzzer that warns occurrence of an error will sound regardless of above setting.
Stitch Count Odometer:Your sewing machine has an Odometer that keeps track of how many stitches youhave sewn in both Standard Mode and Embroidery Mode. A count of 1 is equalto100,000 stitches. It is a good idea to change needles every 200,000 stitches.Clean your machine every 500,000 stitches. And have your sewing machine andembroidery unit professionally cleaned and serviced every 3,000,000 stitches
115
How to use Optional Settings
Activate options screen using of [Guide].
Press pictogram toproceed to “2” on next page.

116
4. (Setting for main unit of sewing machine)Automatic back tacking: Initial setting of thread trimming:
It is possible to specify setting method of back tacking and thread trimmingaccording to pattern selected, either automatic setting or manual setting.
Initial setting of thread tension:Default initial setting of thread tension can be established separately for “straightstitch,” “zigzag stitch” and “Others.”
* Re-selecting a pattern after changing setting optionally will make changed settingeffective.
Press pictogram toproceed to “5” on next page.
3. (Setting for main unit of sewing machine)Changing over screen to utility pattern selection screen:
It is possible to specify screen on which utility pattern selection is made, either screen or screen.
Select type of<<pattern>>to be used.
screen screen
Select <<stitchfunction>> tobe used.Pattern thatmatchesselected stitchstyle will beselected.
Press pictogram, and following screen will appear.
2. (Common settings)Setting of message screen language:
Initial setting of message screens (such as error message) language can bespecified.
Press pictogram, and following screen will appear.

117
6. (Setting for embroidery)Setting of automatic winding of exclusive bobbin thread:
It is possible to set whether or not machine automatically winds bobbin whenbobbin thread has run out during embroidery.Additionally, initial setting of bobbin thread winding amount can be specified.* To completely use bobbin thread remaining on bobbin, machine may automatically sew along edge of embroidery frame before winding bobbin.* In the case where automatic bobbin winding is set to “off” machine will stop em-broidery when bobbin thread has run out. In this case, machine will wind bobbinwhen bobbin winding key is pressed.
Setting of Data Transfer Speed from Computer to Sewing Machine.
Press pictogram toproceed to “1” on next page.
Setting of thread trimming:It is possible to set whether or not machine automatically trimming transition threadbetween patterns.
5. (Setting for embroidery)Changing letters size:
Standard size of letters and numbers stored in machine can be specified.
Letter density:Embroidering density of letters stored in machine can be specified.
Setting of number of stitches needle moves back for correcting stitches :The number of stitches needle moves back when faulty stitches need to becorrected can be specified.
Initial setting of thread tension:Initial setting of thread tension for automatic mode can be specified.
Press pictogram, and following screen will appear.

118
Updating machineMachine can be updated with downloaded data from PC via smart media card.
1 2 4
7
Press pictogram.
9
Press pictogram.
Activate update screen using of [Guide].
Turn off and on power to machinewill complete update procedure.
Insert card, then close card cover.5 6
8
3 Press pictogram.
* To cancel operationturn off and on powerto machine.

119
Bobbin winding/placing a bobbin
Open cover of bobbin windingshaft hole.
Small thread spool
Put a spool of thread and spoolcap onto spool pin. Thread the thread guide.1 3
4 5
Bobbin to beused.
Pass thread through hole in bobbin.
Start machine. Push bobbin back to left.
6
7 8 9Push bobbin against bobbinwinding regulator.
Place a bobbin on bobbin windingshaft, then fit in hole.
Cut away excess of thread and take outbobbin.
Bobbin windingregulator
12
4
5 6
7 9
Large thread spool
Cap
Cap
Draw the thread toward you withboth hands.2
3
Endless automatic bobbin winding featureis not designed for manual bobbin. Whenusing manual bobbin for embroidery,please turn OFF “Setting of automaticwinding of exclusive bobbin thread”Edescribed on item 5 (Setting forembroidery) of page 117.

120
Loading bobbin (bobbin thread) in machine
Place bobbin in rotating hookbobbin case holder.
Thread rotating hook bobbincase holder. Close bobbin case cover.1 32
Thread should pull off the bobbin in acounterclockwise direction.
Put thread into groove [1] and out throughgroove [2]. Pull thread toward the back ofthe machine.
Taking out the bobbin
Pull button toward you. Remove cover. Take out bobbin.1 2 3
Be sure to turn off power switch before loading/removing bobbin.
[2][1]
Be sure to turn off power switch before loadingbobbin in machine.
Caution
Caution

Draw thread toward you withboth hands.
Holding end of threadand route it as indicatedwith arrows.
1
4 5
Manual threading of machine head
6 7
2 Open face plate cover.Raise presser foot lifter.
121
1
2
34
5
6
7
Align mark onhandwheel with markon machine head.
Small thread spool
Place a thread spool and spool cap onto spool pin.3
Large thread spool
Cap
Cap
Mark
8
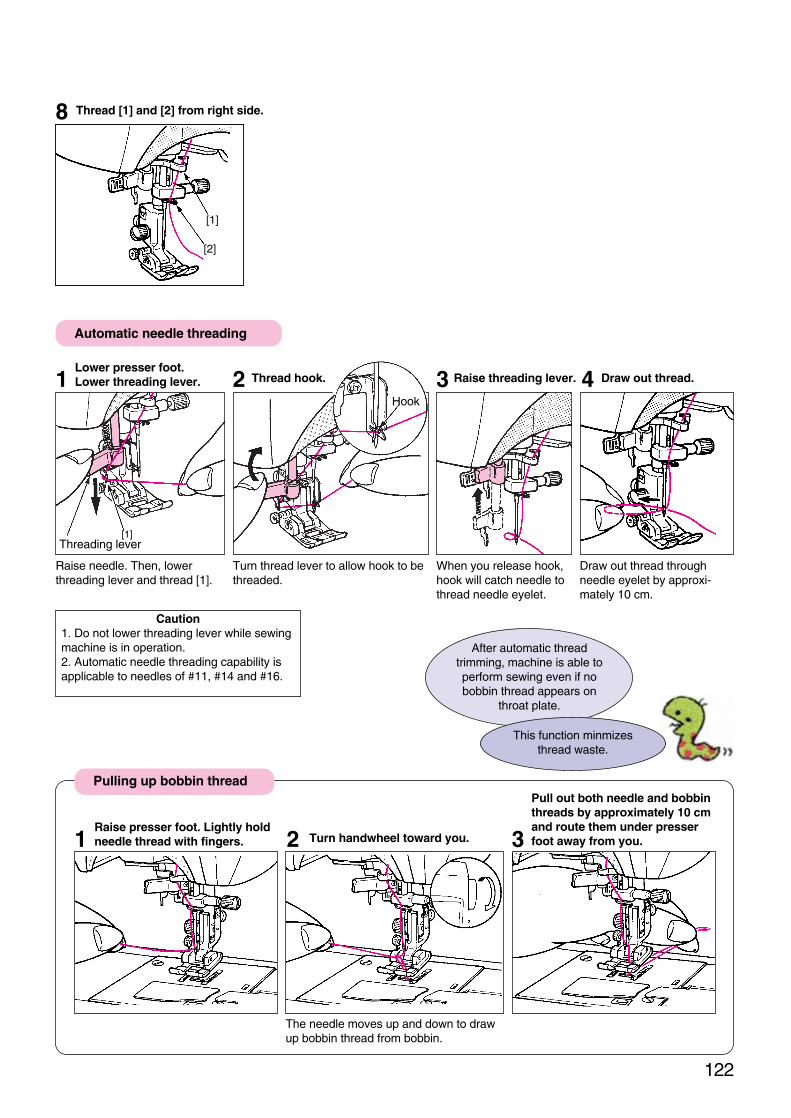
Draw out thread.
Draw out thread throughneedle eyelet by approxi-mately 10 cm.
1 3
Thread [1] and [2] from right side.
Lower presser foot. Lower threading lever. Raise threading lever.2 4
Raise needle. Then, lowerthreading lever and thread [1].
When you release hook,hook will catch needle tothread needle eyelet.
Thread hook.
Turn thread lever to allow hook to bethreaded.
8
Threading lever[1]
Automatic needle threading
Caution1. Do not lower threading lever while sewingmachine is in operation.2. Automatic needle threading capability isapplicable to needles of #11, #14 and #16.
[1]
[2]
Hook
122
Raise presser foot. Lightly holdneedle thread with fingers. Turn handwheel toward you.
Pull out both needle and bobbinthreads by approximately 10 cmand route them under presserfoot away from you.1 2
The needle moves up and down to drawup bobbin thread from bobbin.
3
Pulling up bobbin thread
After automatic thread trimming, machine is able toperform sewing even if nobobbin thread appears on
throat plate.
This function minmizesthread waste.

TroubleshootingIf sewing difficulties occur, make sure instructions are correctly followed. If a problem still exists, reminders below may help.
Problem
Sewing machine will not runeven when it has started.
123
Sewing machine stopsrotating during sewing.* When handwheel can benormally turned by hand.
Sewing machine will not starteven when start/stop button ispressed. (Lamp lights up.)
Needle breaks.
Sewing machine producestoo low/high operating noise.
Needle cannot be threaded.* Needle threading hook doesnot rotate.
Needle threading hook doesnot enter needle eyelet.
Low-speed sewing is per-formed for an extendedperiod of time.* Motor power is automaticallyturned off so as to preventmotor from overheating.
Turn off power switch. Waitfor a while (approximately 20minutes). Then, safety devicewill be reset to enable normaloperation.
Needle thread has run out.
Bobbin winder shaft shifts toleft.
Lever is not lowered at time ofbuttonholing.Thread retaining plate coveris opened.
Properly thread machinehead and press start button.Move bobbin winder shaftfully to left until it will go nofurther.Lower buttonhole lever.
Close thread retaining cover.
Presser foot is improperly installed.As a result, needle comes incontact with presser foot.Sewing machine is startedthough needle has come offand dropped in hook.
Replace presser foot thatmatches stitch patternselected.Remove needle from hook.
Thin needle is used to sewheavy-weight fabric.
Needle is not fully inserted inneedle clamp.Needle clamp screw is not se-curely tightened.Presser foot used does notmatch patterns selected.
Check relation among fabric,sewing thread and sewingneedle.Check how needle isattached.Securely tighten needleclamp screw.Check relation betweenpattern selected and presserfoot used.
Threading lever does notreturn to home position andmachine fails to rotate.* Threading hook remains inneedle eyelet and fails toreturn to home position.
Dust has accumulated in feeddog.Thread waste hasaccumulated in hook.
Perform maintenance of ma-chine.Clean up sewing machine.
Stitch length is set to 0 (zero).
Soft fabric such as towel isused.Drop-feed knob is set to rightposition.
Re-select pattern, and stitchlength that matches patternwill be specified.Set stitch length to 3 to 4.
Set knob to left position.
Needle is not raised.* When needle is not in itsupper position, hook does notrotate to ensure safety.
Needle is not fully inserted inneedle clamp.
Turn handwheel to raiseneedle.
Check how needle isinstalled.
Sewing machine is rotated bymistake with threading leveris in lower position (duringthreading).
Rotate handwheel slightlycounterclockwise (directionopposite to that of normalsewing).
Fabric is not fed.
_
11,12
119
35
66
19
_
27
27
27
19
125
125
20
_
13,14
11,12,121
27
_
Cause (Reason) Action to be taken Page
Does not
return!
Does not move!

124
Sewing machine will not sewwhen start/stop button ispressed.
Thread tension cannot beproperly regulated.
Thread breaks.Stitch skips.
Seam puckering occurs.
Speed controller has beenplugged in.
Unplug speed controller.
Sewing machine is incorrectlythreaded.
Thread used has kinks orknots.Thread tension is not properlyadjusted.
Needle is bent or has blunt tip.
Needle is incorrectly attached.Rotating hook bobbin caseholder is incorrectly threaded.Bobbin fails to smoothly rotatein rotating hook bobbin caseholder.Needle does not match thick-ness of thread used.Thread take-up lever is notthreaded.
Check threading sequenceand re-thread machine headcorrectly.Remove kinks or knots fromthread.Check relation between stitchpattern selected and sewingthread used. Then, properlyadjust thread tension.Replace needle with a normalone.Correctly attach needle.Check threading route ofbobbin thread.Check how bobbin thread iswound round bobbin.
Check relation betweensewing thread and needle.Check threading route ofneedle thread.
Thread detecting thread guideis not threaded.
Sewing machine head is notproperly threaded.Bobbin thread is not properlyrouted.Orientation of thread spoolcap does not match that ofthread spool.
Securely thread thread de-tecting thread guide so thatthread passes deepest part ofguide.Check how machine head isthreaded.Check threading route ofbobbin thread.Attach thread spool cap incorrect orientation withrespect to thread spool.
Stitch length is too large tosew light-weight fabric.Needle has blunt tip.
Decrease (shorten) stitchlength.Replace needle with a normalone.
9
11,12
_
22
27
27120
_
27
11,12,121
11,12,121
11,12,121120
11,12
20
27
Sewing machine fails to auto-matically wind a bobbin.
Main body of sewing machineis not properly threaded.
Retaining plate is not properlythread with (embroidery)thread
Parts related to bobbinwinding is tangled with threadwaste or thread.
Check threading sequence ofmachine head and re-thread itproperly.Open thread retaining coverto check that retaining plate isproperly threaded. Re-threadretaining plate using bobbinwinder guide.Remove thread waste orthread using a pair oftweezers.
13,14
66
_
Specification tableStandard sewing machine Embroidery Unit
Item Specification Item Specification
Dimensions
Dimensions whenattached with case
WeightRatedvoltage/power con-sumptionPower consump-tion of lamp
479 (W) x 324 (H) x 215 (D) mm
495 (W) x 330 (H) x 235 (D) mm
12.4 kg (when attached with case: 13.7 kg)
120/0.9A 60 Hz
13.5V / 3W
Dimensions wheninstalled on sewingmachine
Weight
33.5 (W) x 13.0 (H) x 32.0 (D) cm
59.5 (W) x 32.4 (H) x 33.5 (D) cm
2.3 kg (when installed on sewingmachine: 13.0 kg)
Problem Cause (Reason) Action to be taken
Dimensions
Page

125
Loosen setscrew and removelamp mounting base.
Replacing lamp
Maintenance of sewing machine
Lamp mountingbase
Cleaning to remove lint and dust.Accumulation of lint or dust may cause problems. Always keep your sewingmachine clean.
Remove needle and presser foot, and clean areas around feed dog, throatplate and rotating hook bobbin case holder using brush supplied with yourmachine as an accessory.
If lint or dust accumulated is too much to clear with brush, remove it with avacuum cleaner.
SetscrewFace platecover
1 2 3
* Power consumption of lamp: 3 W (13.5 V)* Please purchase a new lamp from service center orfrom Singer Dealer where you purchased yourmachine.
*Be sure to turn off power switch and detach plug from wall outlet beforereplacing a lamp bulb.*Be sure to replace lamp after it has cooled.
Be sure to turn off power switch and detach plug from wall outletbefore performing maintenance of your machine.
Draw lamp out without twisting it.
Lamp
4
Open face plate cover. Remove lamp mounting base.Remove lamp base from lampmounting base.
Draw out lamp until itcomes off.
Slide lamp into place along narrowgroove on lamp base.
5 Fit a new lamp in place.
* When installing lamp base, aligngroove on lamp base with that onmounting base.
Lamp mountingbase
Lamp base
Caution
Caution

126
Stitch patterns table (main unit)
Utility patterns

127
Large size patterns
Single regular patterns

128
Alphabet patterns

129
Embroidery pattern Stitch List
Floral patterns
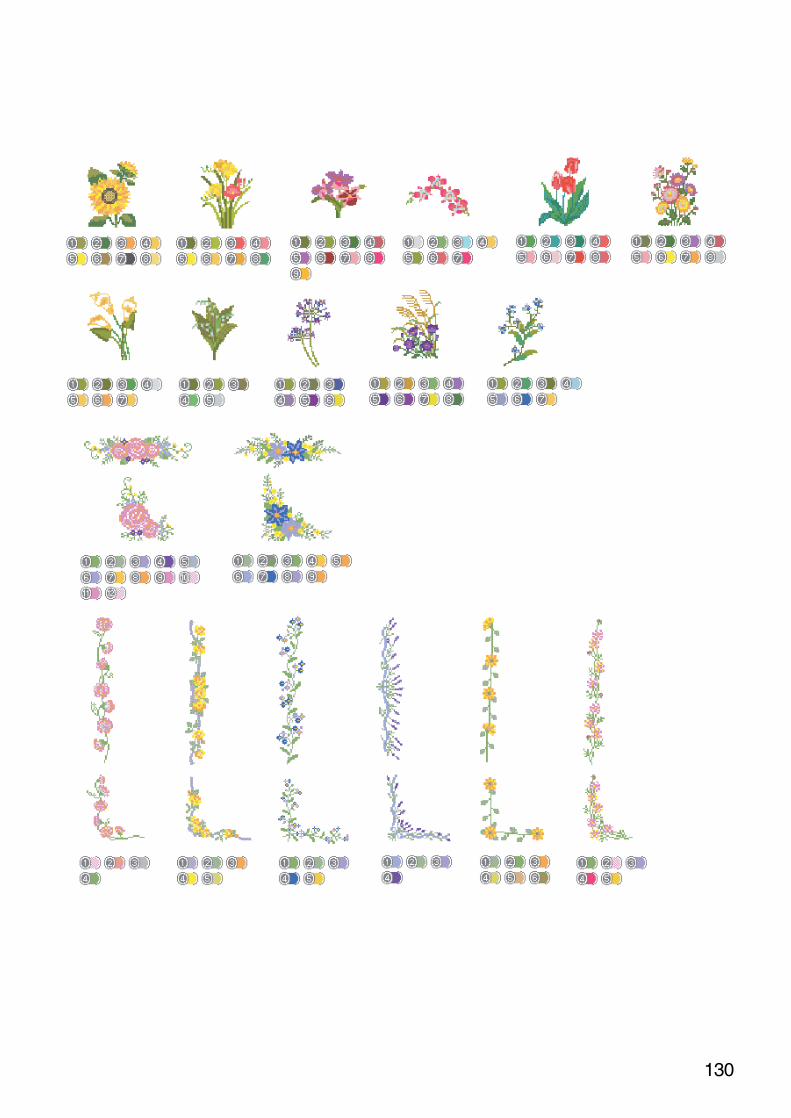
130

131

Monogram patterns
132

133

CONGRATULATIONS...on the purchase of this new Singer® Computer Sewing Machine. Your new sewing machine is the most innovativemachine ever manufactured. Actually, it is two machines in one... a full featured Standard Sewing Machine and anexclusive featured Embroidery Sewing Machine. For years sewers have dreamed of owning a machine that wouldthread itself, automatically change to a new color thread, never run out of bobbin thread and calculate its own tension re-quirements. Your new sewing machine has all these features and also employs an exclusive operating system of self-evident pictograms (“pictos”).
However, as simple as the machine is to operate, to obtain the most enjoyment and take full advantage of all thefeatures, it is strongly recommended you familiarize yourself with the machine. Following the instruction manual insequential order is the best way to build your skills and understanding of all the machines parts and capabilities.
INSTRUCTION BOOK SINGER® XL-6000The manufacturer reserves the right to change the appearance, design, or
accessories of this sewing machine as considered
necessary without any notification or obligation.
SINGER® is a Registered Trademark of The Singer Company Limited
Copyright 2004 Singer Sewing Company.
All rights reserved throughout the world.
1
“IMPORTANT SAFETY INSTRUCTIONS”“When using an electrical appliance, basic safety precautions should always be followed, including the following:”“Read all instructions before using this sewing machine.”
“DANGER_____To reduce the risk of electric shock:”1. “An appliance should never be left unattended when plugged in. Always unplug this appliance from the electric outlet
immediately after using and before cleaning.”2. “Always unplug before relamping. Replace bulb with same type rated 3 Watts.”
“WARNING_____To reduce the risk of burns, fire, electric shock, or injury to persons:”1. “Do not allow to be used as a toy. Close attention is necessary when this appliance is used by or near children.”2. “Use this appliance only for its intended use as described in this manual. Use only attachments recommended by the
manufacturer as contained in this manual.”3. “Never operate this appliance if it has a damaged cord or plug, if it is not working properly, if it has been dropped or
damaged or dropped into water. Return the appliance to the nearest authorized dealer or service center forexamination, repair, electrical or mechanical adjustment.”
4. “Never operate the appliance with any air openings blocked. Keep ventilation openings of the sewing machine andfoot controller free from the accumulation of lint, dust, and loose cloth.”
5. “Keep fingers away from all moving parts. Special care is required around the sewing machine needle.”6. “Always use the proper needle plate. The wrong plate can cause the needle to break.”7. “Do not use bent needles.”8. “Do not pull or push fabric while stitching. It may deflect the needle causing it to break.”9. “Switch the sewing machine off (“0”) when making any adjustments in the needle area, such as threading needle,
changing needle, threading bobbin, or changing presser foot, and the like.”10. “Always unplug sewing machine from the electrical outlet when removing covers, lubricating, or when making any
other user servicing adjustments mentioned in the instruction manual.”10. “Never drop or insert any object into any opening.”10. “Do not use outdoors.”10. “Do not operate where aerosol (spray) products are being used or where oxygen is being administered.”10. “To disconnect, tum all controls to the off (“0”) position, then remove plug from outlet.”10. “Do not unplug by pulling on cord. To unplug, grasp the plug, not the cord.”
“SAVE THESE INSTRUCTIONS”“This sewing machine is intended for household use only.”
Alphabet patterns
134
Layout grid patterns

INSTRUCTION MANUAL
Printed in JapanPart No.AE60SZS0B0A Eng. ’04. 3