
INSTRUCTION MANUAL PHOTOSLIDE GK2 - … · 1 Introduction PhotoSlide GK2 4 ... events in your...
20
Copyright © 2008 GavickPro - http://www.gavick.com This manual cannot be redistributed without permission from GavickPro More info at: http://www.gavick.com GAVICKPRO CREATIVE JOOMLA! DEVELOPMENT STUDIO Copyright © 2008 GavickPro - http://www.gavick.com This manual cannot be redistributed without permission from GavickPro More info at: http://www.gavick.com INSTRUCTION MANUAL PHOTOSLIDE GK2
-
Upload
nguyenthuan -
Category
Documents
-
view
216 -
download
0
Transcript of INSTRUCTION MANUAL PHOTOSLIDE GK2 - … · 1 Introduction PhotoSlide GK2 4 ... events in your...
Copyright © 2008 GavickPro - http://www.gavick.comThis manual cannot be redistributed without permission from GavickPro
More info at: http://www.gavick.com
GAVICKPROC R E A T I V E J O O M L A ! D E V E LO P M E N T S T U D I O
Copyright © 2008 GavickPro - http://www.gavick.comThis manual cannot be redistributed without permission from GavickPro
More info at: http://www.gavick.com
INSTRUCTION MANUAL
PHOTOSLIDE GK2

GAVICKPROC R E A T I V E J O O M L A ! D E V E LO P M E N T S T U D I O
COPYRIGHT DISCLAIMER
GavickPro PHOTOSLIDE GK2 - Joomla!1.5 ComponentInstruction Manual
Copyright © 2008 GavickPro - http://www.gavick.comThis manual cannot be redistributed without permission from GavickPro
More info at: http://www.gavick.comAuthor: Paulo Seichinha - GavickPro
FOR INFO, UPDATES, REQUESTS & CONTACT
Check out Gavick.com, the official website of this Joomla! Component manual and home tohigh quality and professional templates, components and modules.
Keep updated about all templates, components and modules by visiting our update.gavick.com
Copyright © 2008 GavickPro - http://www.gavick.com
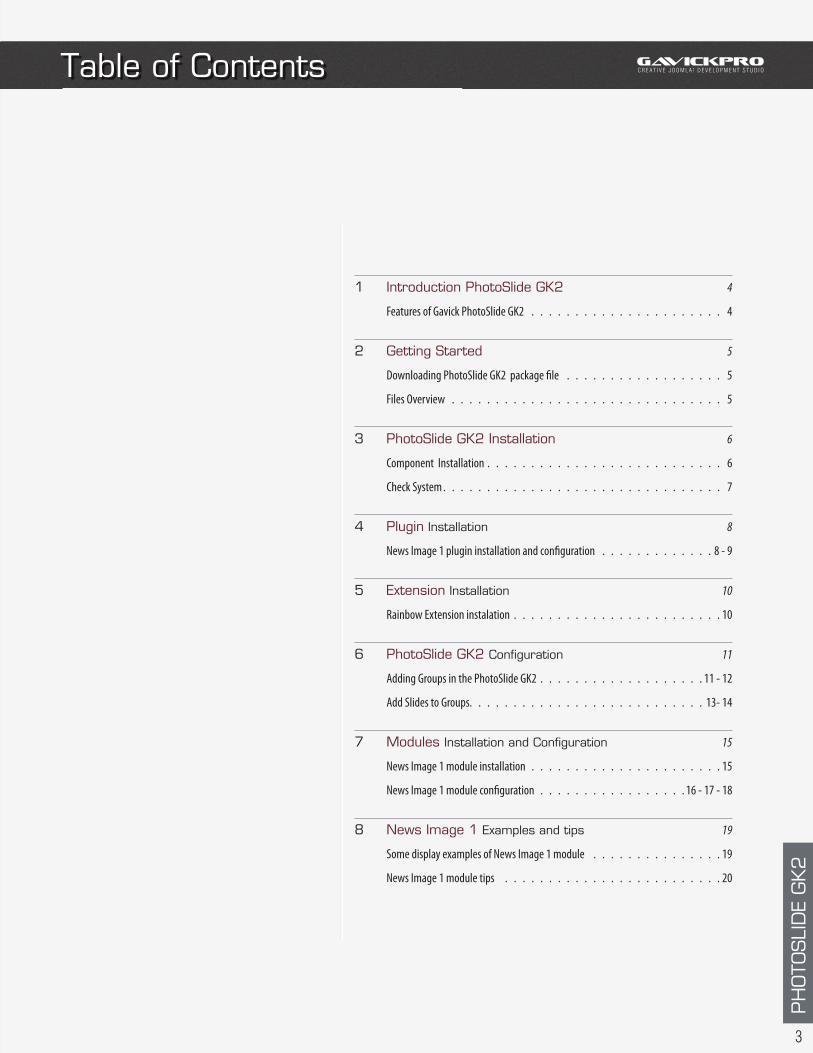
Table of Contents GAVICKPROC R E A T I V E J O O M L A ! D E V E LO P M E N T S T U D I O
1 Introduction PhotoSlide GK2 4
Features of Gavick PhotoSlide GK2 . . . . . . . . . . . . . . . . . . . . . . 4
2 Getting Started 5
Downloading PhotoSlide GK2 package file . . . . . . . . . . . . . . . . . . 5
Files Overview . . . . . . . . . . . . . . . . . . . . . . . . . . . . . . . 5
3 PhotoSlide GK2 Installation 6
Component Installation . . . . . . . . . . . . . . . . . . . . . . . . . . . 6
Check System . . . . . . . . . . . . . . . . . . . . . . . . . . . . . . . . 7
4 Plugin Installation 8
News Image 1 plugin installation and configuration . . . . . . . . . . . . . 8 - 9
5 Extension Installation 10
Rainbow Extension instalation . . . . . . . . . . . . . . . . . . . . . . . . 10
6 PhotoSlide GK2 Configuration 11
Adding Groups in the PhotoSlide GK2 . . . . . . . . . . . . . . . . . . . 11 - 12
Add Slides to Groups. . . . . . . . . . . . . . . . . . . . . . . . . . . 13- 14
7 Modules Installation and Configuration 15
News Image 1 module installation . . . . . . . . . . . . . . . . . . . . . . 15
News Image 1 module configuration . . . . . . . . . . . . . . . . . 16 - 17 - 18
8 News Image 1 Examples and tips 19
Some display examples of News Image 1 module . . . . . . . . . . . . . . . 19
News Image 1 module tips . . . . . . . . . . . . . . . . . . . . . . . . . 20
PH
OTO
SLI
DE
GK2
3
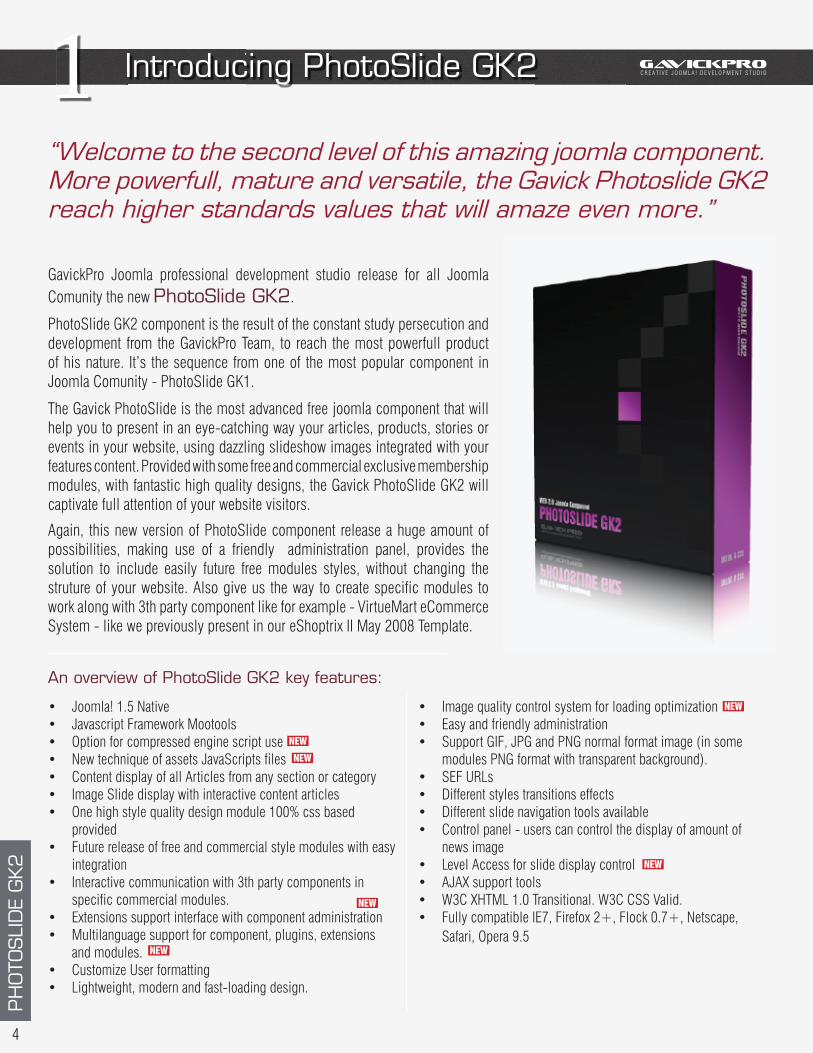
GAVICKPROC R E A T I V E J O O M L A ! D E V E LO P M E N T S T U D I OIntroducing PhotoSlide GK2IntroducIntroduc1
“Welcome to the second level of this amazing joomla component. More powerfull, mature and versatile, the Gavick Photoslide GK2 reach higher standards values that will amaze even more.”
GavickPro Joomla professional development studio release for all Joomla Comunity the new PhotoSlide GK2.
PhotoSlide GK2 component is the result of the constant study persecution and development from the GavickPro Team, to reach the most powerfull product of his nature. It’s the sequence from one of the most popular component in Joomla Comunity - PhotoSlide GK1.
The Gavick PhotoSlide is the most advanced free joomla component that will help you to present in an eye-catching way your articles, products, stories or events in your website, using dazzling slideshow images integrated with your features content. Provided with some free and commercial exclusive membership modules, with fantastic high quality designs, the Gavick PhotoSlide GK2 will captivate full attention of your website visitors.
Again, this new version of PhotoSlide component release a huge amount of possibilities, making use of a friendly administration panel, provides the solution to include easily future free modules styles, without changing the struture of your website. Also give us the way to create specific modules to work along with 3th party component like for example - VirtueMart eCommerce System - like we previously present in our eShoptrix II May 2008 Template.
An overview of PhotoSlide GK2 key features:
PH
OTO
SLI
DE
GK2
4
Joomla! 1.5 Native • Javascript Framework Mootools• Option for compressed engine script use• New technique of assets JavaScripts files• Content display of all Articles from any section or category• Image Slide display with interactive content articles• One high style quality design module 100% css based • providedFuture release of free and commercial style modules with easy • integrationInteractive communication with 3th party components in • specific commercial modules.Extensions support interface with component administration• Multilanguage support for component, plugins, extensions • and modules.Customize User formatting• Lightweight, modern and fast-loading design.•
Image quality control system for loading optimization• Easy and friendly administration• Support GIF, JPG and PNG normal format image (in some • modules PNG format with transparent background).SEF URLs• Different styles transitions effects• Different slide navigation tools available• Control panel - users can control the display of amount of • news imageLevel Access for slide display control• AJAX support tools• W3C XHTML 1.0 Transitional. W3C CSS Valid.• Fully compatible IE7, Firefox 2+, Flock 0.7+, Netscape, • Safari, Opera 9.5
NEW
NEW
NEW
NEW
NEW
NEW

GAVICKPROC R E A T I V E J O O M L A ! D E V E LO P M E N T S T U D I OGetting StartedSSGetting Getting 2
PhotoSlide GK2 - Overview files
The first step to start working with our free Joomla !1.5 Component tool is downloading the Photoslide GK2 package, available for free in our download section. All the files that are included are necessary for the correct funcionality of this great tool. For this release, we choose the News Image I module for this new beginning, but in the future we will also launch other recoded and new modules. The installation is quite simple and it should not be a problem, if you follow correctly this instrutions.
Important! Be sure to unpack the file, before start working on it.
So, let’s get started by showing you a brief overview of the files available inside the PhotoSlide GK2 package. In fact, I will make reference to the files, following the sequence installation order.
com_gk2_photoslide.zipThis file is the Component itself and it’s the heart of the system.
plg_gk_news_image_1.zip“Plugin” - This file contains the respective plugins, that will allow comunication and interface between the Component and the Module. For those who already experience the PhotoSlide GK2 version, you may remember that for the plugin installation, it was necessary to upload the 2 files in XML and PHP extension. In this new version, that is not necessary, because you only need to upload one compressed file, making the process must more easier for the user.
ext_rainbow.zip“Extension” - Here’s one of the new features that PhotoSlide GK2 provides. The use of especific extension tools that will help in the configuration and administration of the Component. For this release, we provide the Rainbox extension, that we will talk later about.
mod_gk_news_image_1.zip“Module” - Finally, the module that will make possible for the frontpage display of your backstage work on the PhotoSlide Component. This is the first module that we work on the beginning of the PhotoSlide component version, so it was almost like an obligation to us by choosing this great module for the PhotoSlide GK2 version release.
After this small description of the files, let’s get to work and results.
PH
OTO
SLI
DE
GK2
5
!
GAVICKPROC R E A T I V E J O O M L A ! D E V E LO P M E N T S T U D I OPhotoSlide GK2 InstallationPhotoSliPhotoSli3
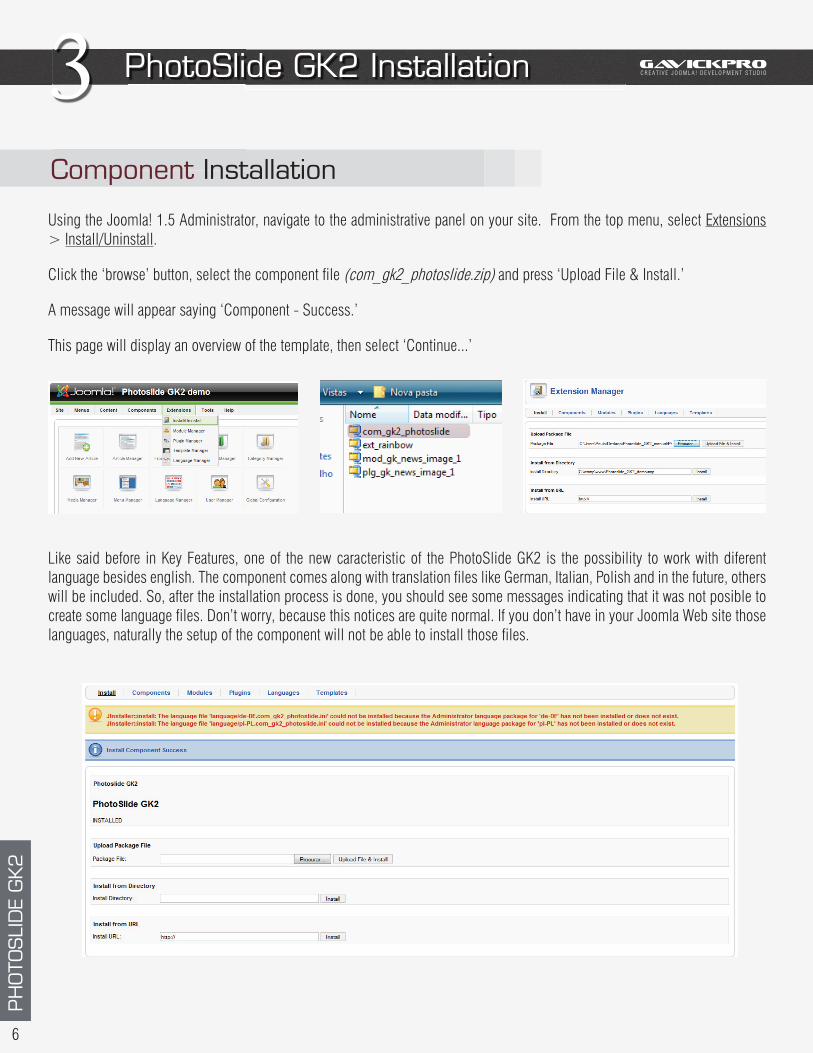
Component Installation
Using the Joomla! 1.5 Administrator, navigate to the administrative panel on your site. From the top menu, select Extensions > Install/Uninstall.
Click the ‘browse’ button, select the component file (com_gk2_photoslide.zip) and press ‘Upload File & Install.’
A message will appear saying ‘Component - Success.’
This page will display an overview of the template, then select ‘Continue...’
Like said before in Key Features, one of the new caracteristic of the PhotoSlide GK2 is the possibility to work with diferent language besides english. The component comes along with translation files like German, Italian, Polish and in the future, others will be included. So, after the installation process is done, you should see some messages indicating that it was not posible to create some language files. Don’t worry, because this notices are quite normal. If you don’t have in your Joomla Web site those languages, naturally the setup of the component will not be able to install those files.
PH
OTO
SLI
DE
GK2
6
GAVICKPROC R E A T I V E J O O M L A ! D E V E LO P M E N T S T U D I O
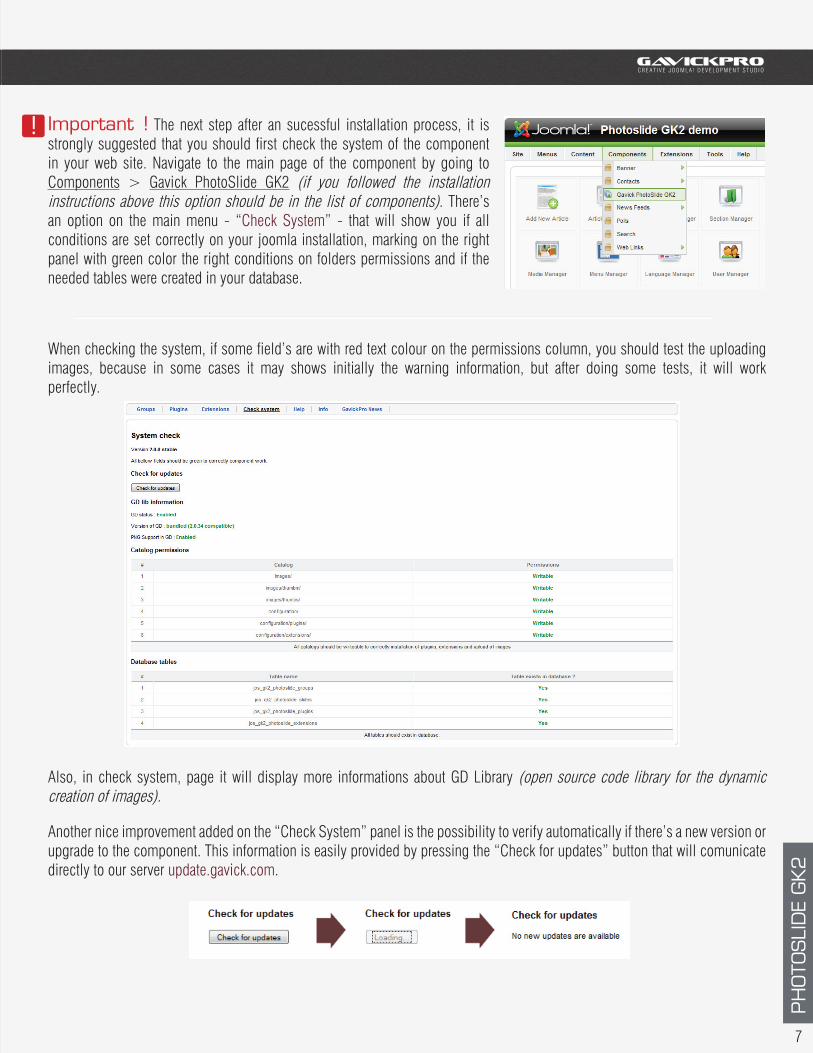
Important ! The next step after an sucessful installation process, it is strongly suggested that you should first check the system of the component in your web site. Navigate to the main page of the component by going to Components > Gavick PhotoSlide GK2 (if you followed the installation instructions above this option should be in the list of components). There’s an option on the main menu - “Check System” - that will show you if all conditions are set correctly on your joomla installation, marking on the right panel with green color the right conditions on folders permissions and if the needed tables were created in your database.
When checking the system, if some field’s are with red text colour on the permissions column, you should test the uploading images, because in some cases it may shows initially the warning information, but after doing some tests, it will work perfectly.
Also, in check system, page it will display more informations about GD Library (open source code library for the dynamic creation of images).
Another nice improvement added on the “Check System” panel is the possibility to verify automatically if there’s a new version or upgrade to the component. This information is easily provided by pressing the “Check for updates” button that will comunicate directly to our server update.gavick.com.
PH
OTO
SLI
DE
GK2
7
!

GAVICKPROC R E A T I V E J O O M L A ! D E V E LO P M E N T S T U D I OPlugin InstallationPlugin InPlugin In4
Important! Before installing any module, it’s absolutely necessary to have installed the respective plugin in the component. It will allow communication interface between the module and component.
Recommendation! If you disable an plugin installed (not UNISTALL) them this plugin is invisible on the list of types of groups when select add group option. If you delete an plugin installed, them all groups, slides and images will be deleted also. So, we strongly recomend to disable the plugins instead of deleting them, if you have unused plugins.
Unlike the previous version of PhotoSlide Component that was necessary to upload/install two files separately in XML and PHP format, in this new version that will not be necessary, because the plugin is provided in one single compressed file and only this one will be upload and install, without any unpack action.
After this brief introduction, let start the installation. Returning to the PhotoSlide GK2 administration panel, select the “Plugins” tab link. You should see the plugins administration panel with the message “Any plugins to load” because there’s none, naturally.
Them select “Install Plugin” option on the right menu, seach the respective plugin file on your computer and upload/install.
News Image 1 plugin - Installation and Configuration (for News Image 1 module)
PH
OTO
SLI
DE
GK2
8
!
News Image 1 pluginNews Image 1 plu - Installation and Configuration
GAVICKPROC R E A T I V E J O O M L A ! D E V E LO P M E N T S T U D I O
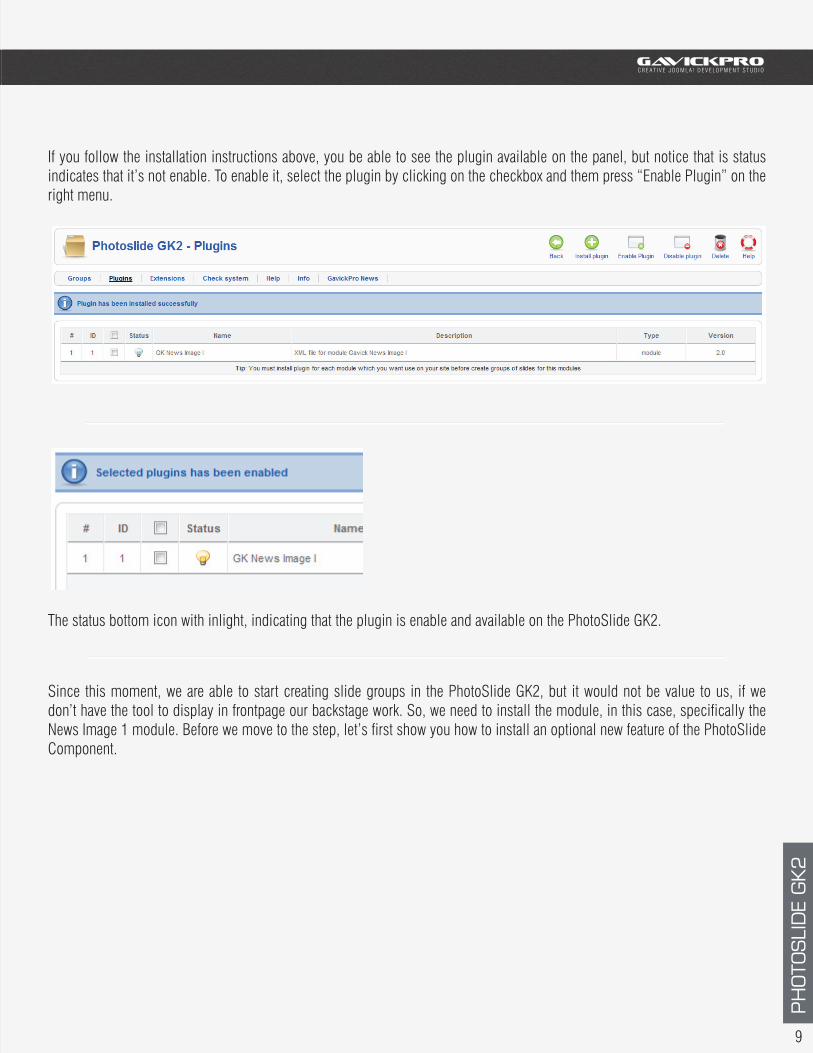
If you follow the installation instructions above, you be able to see the plugin available on the panel, but notice that is status indicates that it’s not enable. To enable it, select the plugin by clicking on the checkbox and them press “Enable Plugin” on the right menu.
The status bottom icon with inlight, indicating that the plugin is enable and available on the PhotoSlide GK2.
Since this moment, we are able to start creating slide groups in the PhotoSlide GK2, but it would not be value to us, if we don’t have the tool to display in frontpage our backstage work. So, we need to install the module, in this case, specifically the News Image 1 module. Before we move to the step, let’s first show you how to install an optional new feature of the PhotoSlide Component.
PH
OTO
SLI
DE
GK2
9
GAVICKPROC R E A T I V E J O O M L A ! D E V E LO P M E N T S T U D I OExtension InstallationExtensioExtensio5
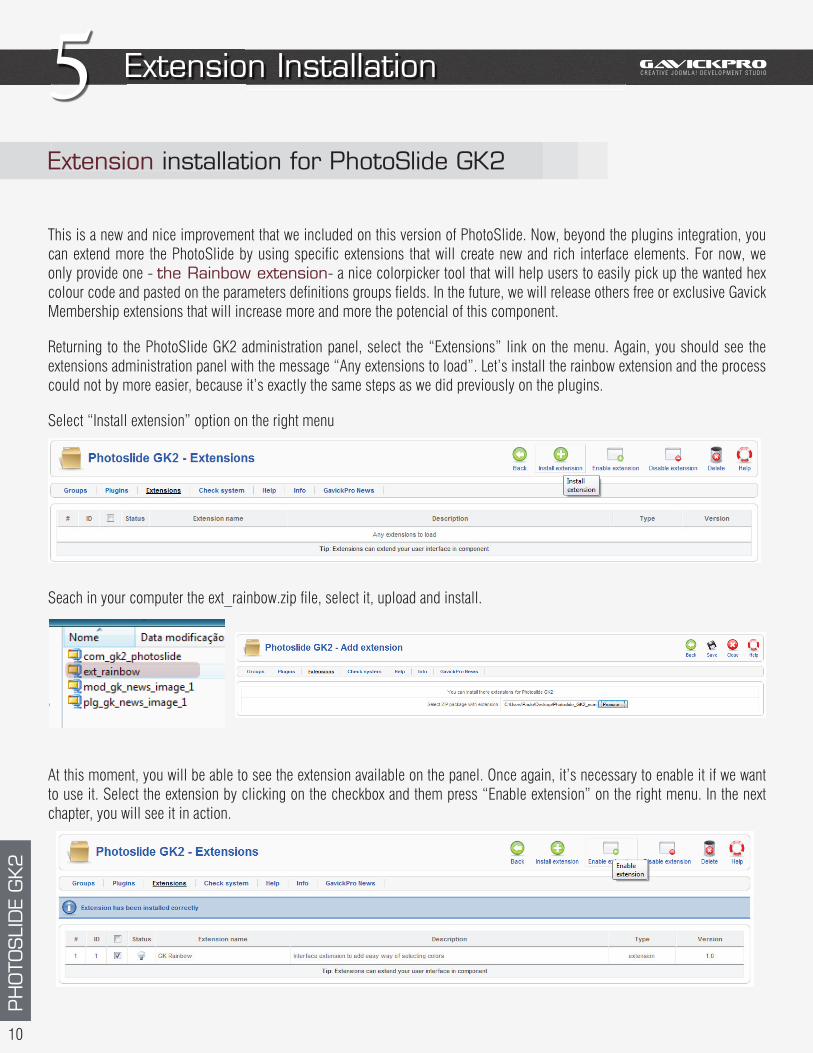
Extension installation for PhotoSlide GK2
This is a new and nice improvement that we included on this version of PhotoSlide. Now, beyond the plugins integration, you can extend more the PhotoSlide by using specific extensions that will create new and rich interface elements. For now, we only provide one - the Rainbow extension- a nice colorpicker tool that will help users to easily pick up the wanted hex colour code and pasted on the parameters definitions groups fields. In the future, we will release others free or exclusive Gavick Membership extensions that will increase more and more the potencial of this component.
Returning to the PhotoSlide GK2 administration panel, select the “Extensions” link on the menu. Again, you should see the extensions administration panel with the message “Any extensions to load”. Let’s install the rainbow extension and the process could not by more easier, because it’s exactly the same steps as we did previously on the plugins.
Select “Install extension” option on the right menu
Seach in your computer the ext_rainbow.zip file, select it, upload and install.
At this moment, you will be able to see the extension available on the panel. Once again, it’s necessary to enable it if we want to use it. Select the extension by clicking on the checkbox and them press “Enable extension” on the right menu. In the next chapter, you will see it in action.
PH
OTO
SLI
DE
GK2
10
GAVICKPROC R E A T I V E J O O M L A ! D E V E LO P M E N T S T U D I OPhotoSlide GK2 administrationiiPhotoSlPhotoSl6
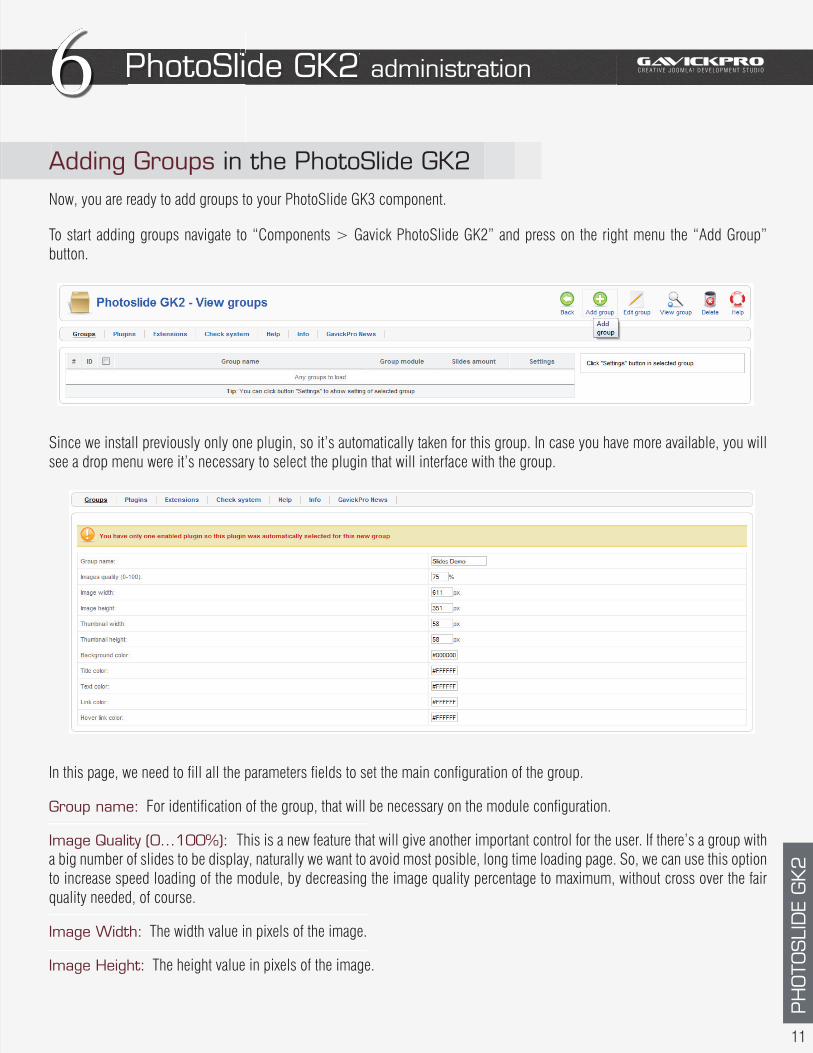
Adding Groups in the PhotoSlide GK2Now, you are ready to add groups to your PhotoSlide GK3 component.
To start adding groups navigate to “Components > Gavick PhotoSlide GK2” and press on the right menu the “Add Group” button.
Since we install previously only one plugin, so it’s automatically taken for this group. In case you have more available, you will see a drop menu were it’s necessary to select the plugin that will interface with the group.
In this page, we need to fill all the parameters fields to set the main configuration of the group.
Group name: For identification of the group, that will be necessary on the module configuration.
Image Quality (0...100%): This is a new feature that will give another important control for the user. If there’s a group with a big number of slides to be display, naturally we want to avoid most posible, long time loading page. So, we can use this option to increase speed loading of the module, by decreasing the image quality percentage to maximum, without cross over the fair quality needed, of course.
Image Width: The width value in pixels of the image.
Image Height: The height value in pixels of the image.
PH
OTO
SLI
DE
GK2
11
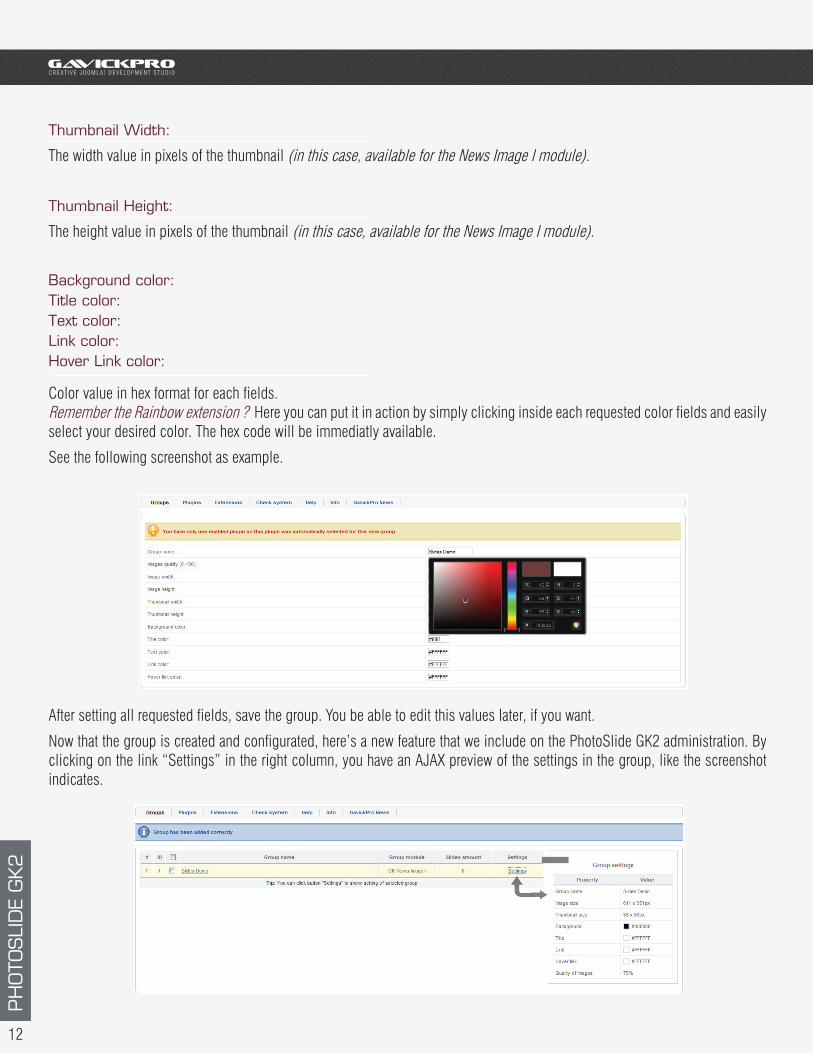
Thumbnail Width:
The width value in pixels of the thumbnail (in this case, available for the News Image I module).
Thumbnail Height:
The height value in pixels of the thumbnail (in this case, available for the News Image I module).
Background color:Title color:Text color:Link color:Hover Link color:
Color value in hex format for each fields.Remember the Rainbow extension ? Here you can put it in action by simply clicking inside each requested color fields and easily select your desired color. The hex code will be immediatly available.
See the following screenshot as example.
After setting all requested fields, save the group. You be able to edit this values later, if you want.
Now that the group is created and configurated, here’s a new feature that we include on the PhotoSlide GK2 administration. By clicking on the link “Settings” in the right column, you have an AJAX preview of the settings in the group, like the screenshot indicates.
PH
OTO
SLI
DE
GK2
12
GAVICKPROC R E A T I V E J O O M L A ! D E V E LO P M E N T S T U D I O
GAVICKPROC R E A T I V E J O O M L A ! D E V E LO P M E N T S T U D I O
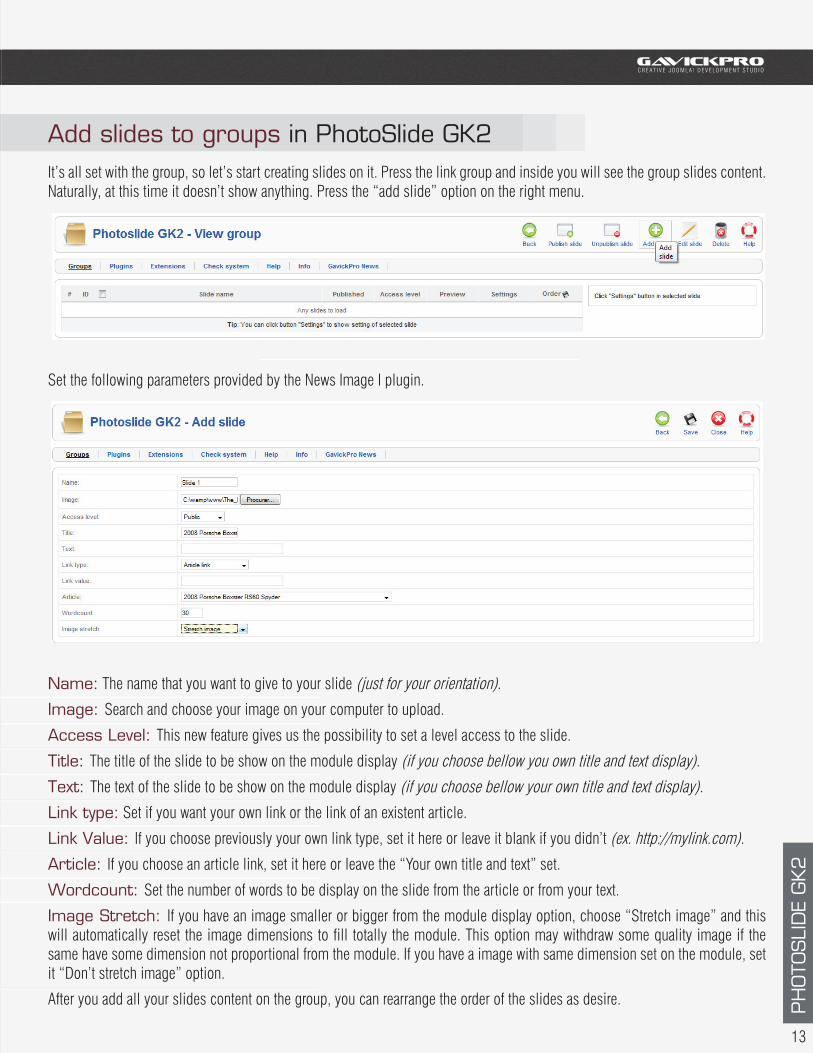
Add slides to groups in PhotoSlide GK2It’s all set with the group, so let’s start creating slides on it. Press the link group and inside you will see the group slides content. Naturally, at this time it doesn’t show anything. Press the “add slide” option on the right menu.
Set the following parameters provided by the News Image I plugin.
Name: The name that you want to give to your slide (just for your orientation).
Image: Search and choose your image on your computer to upload.
Access Level: This new feature gives us the possibility to set a level access to the slide.
Title: The title of the slide to be show on the module display (if you choose bellow you own title and text display).
Text: The text of the slide to be show on the module display (if you choose bellow your own title and text display).
Link type: Set if you want your own link or the link of an existent article.
Link Value: If you choose previously your own link type, set it here or leave it blank if you didn’t (ex. http://mylink.com).
Article: If you choose an article link, set it here or leave the “Your own title and text” set.
Wordcount: Set the number of words to be display on the slide from the article or from your text.
Image Stretch: If you have an image smaller or bigger from the module display option, choose “Stretch image” and this will automatically reset the image dimensions to fill totally the module. This option may withdraw some quality image if the same have some dimension not proportional from the module. If you have a image with same dimension set on the module, set it “Don’t stretch image” option.
After you add all your slides content on the group, you can rearrange the order of the slides as desire. PH
OTO
SLI
DE
GK2
13
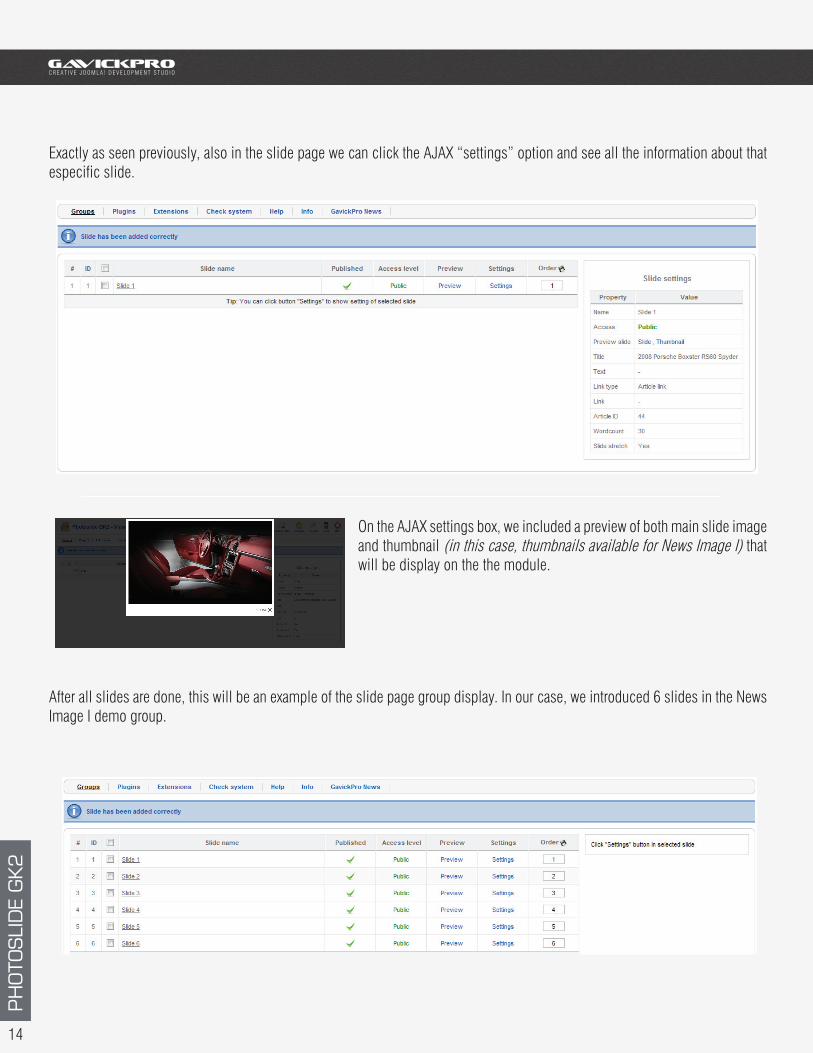
Exactly as seen previously, also in the slide page we can click the AJAX “settings” option and see all the information about that especific slide.
On the AJAX settings box, we included a preview of both main slide image and thumbnail (in this case, thumbnails available for News Image I) that will be display on the the module.
After all slides are done, this will be an example of the slide page group display. In our case, we introduced 6 slides in the News Image I demo group.
PH
OTO
SLI
DE
GK2
14
GAVICKPROC R E A T I V E J O O M L A ! D E V E LO P M E N T S T U D I O
GAVICKPROC R E A T I V E J O O M L A ! D E V E LO P M E N T S T U D I OGAVICC R E A T I V E J O O M L A ! D EModule Installation and ConfigurationModule Module 7
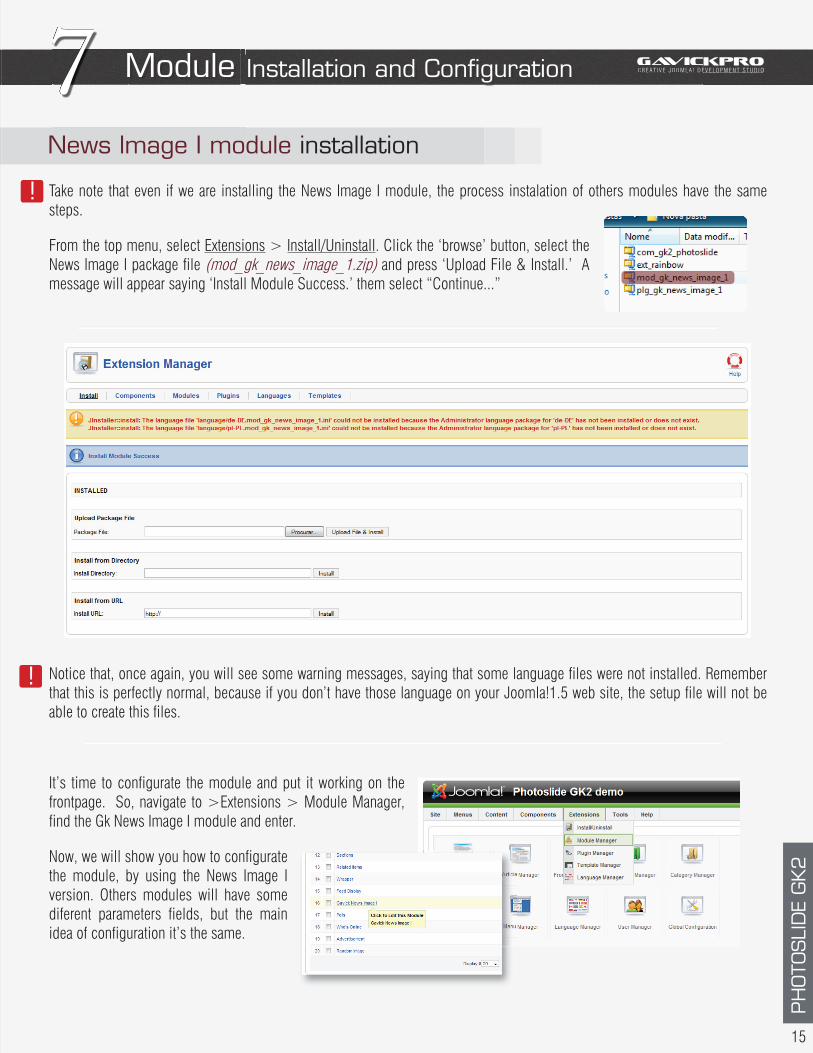
Take note that even if we are installing the News Image I module, the process instalation of others modules have the same steps.
From the top menu, select Extensions > Install/Uninstall. Click the ‘browse’ button, select the News Image I package file (mod_gk_news_image_1.zip) and press ‘Upload File & Install.’ A message will appear saying ‘Install Module Success.’ them select “Continue...”
Notice that, once again, you will see some warning messages, saying that some language files were not installed. Remember that this is perfectly normal, because if you don’t have those language on your Joomla!1.5 web site, the setup file will not be able to create this files.
It’s time to configurate the module and put it working on the frontpage. So, navigate to >Extensions > Module Manager, find the Gk News Image I module and enter.
Now, we will show you how to configurate the module, by using the News Image I version. Others modules will have some diferent parameters fields, but the main idea of configuration it’s the same.
News Image I module installation
PH
OTO
SLI
DE
GK2
15
!
!
News Image I module configuration
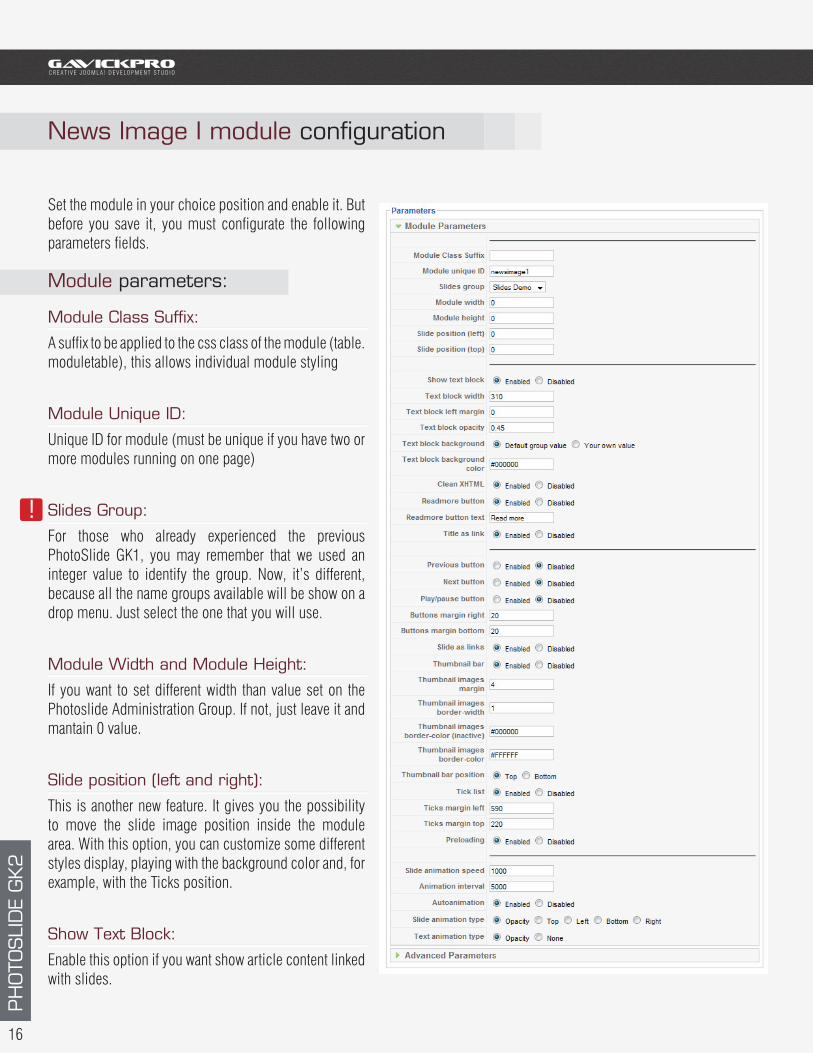
Set the module in your choice position and enable it. But before you save it, you must configurate the following parameters fields.
Module parameters:
Module Class Suffix:
A suffix to be applied to the css class of the module (table.moduletable), this allows individual module styling
Module Unique ID:
Unique ID for module (must be unique if you have two or more modules running on one page)
Slides Group:
For those who already experienced the previous PhotoSlide GK1, you may remember that we used an integer value to identify the group. Now, it’s different, because all the name groups available will be show on a drop menu. Just select the one that you will use.
Module Width and Module Height:
If you want to set different width than value set on the Photoslide Administration Group. If not, just leave it and mantain 0 value.
Slide position (left and right):
This is another new feature. It gives you the possibility to move the slide image position inside the module area. With this option, you can customize some different styles display, playing with the background color and, for example, with the Ticks position.
Show Text Block:
Enable this option if you want show article content linked with slides.
PH
OTO
SLI
DE
GK2
16
!
GAVICKPROC R E A T I V E J O O M L A ! D E V E LO P M E N T S T U D I O
GAVICKPROC R E A T I V E J O O M L A ! D E V E LO P M E N T S T U D I O
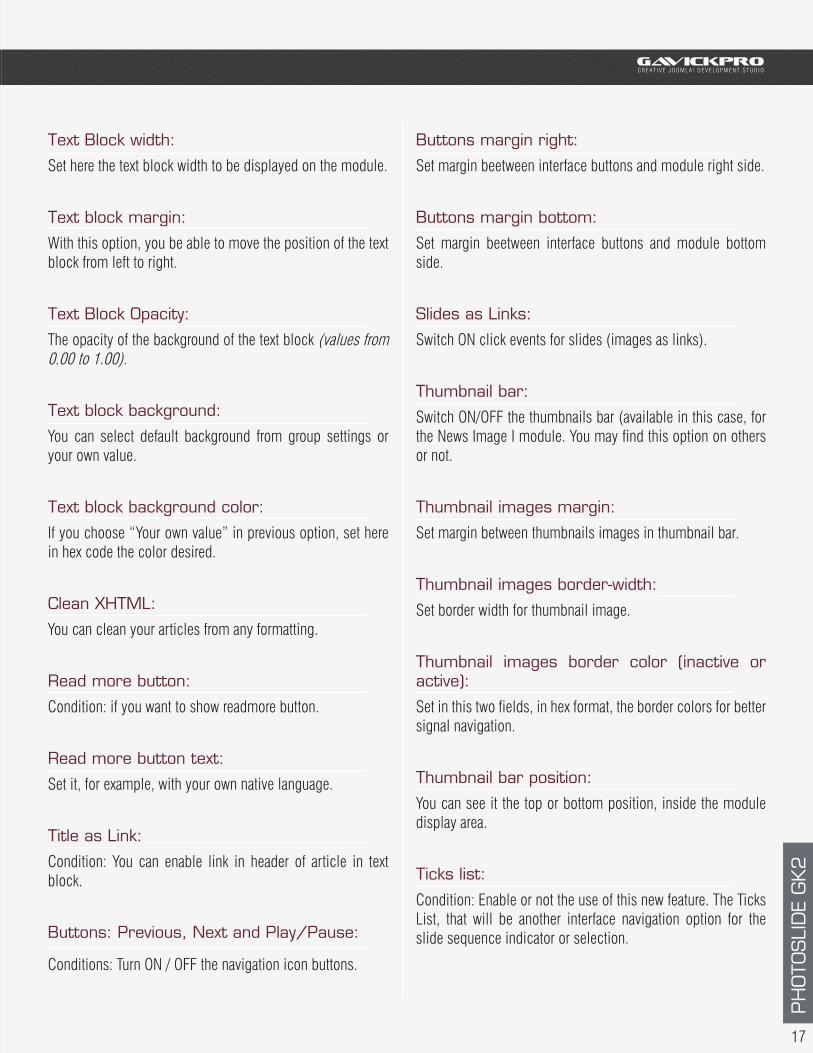
Text Block width:
Set here the text block width to be displayed on the module.
Text block margin:
With this option, you be able to move the position of the text block from left to right.
Text Block Opacity:
The opacity of the background of the text block (values from 0.00 to 1.00).
Text block background:
You can select default background from group settings or your own value.
Text block background color:
If you choose “Your own value” in previous option, set here in hex code the color desired.
Clean XHTML:
You can clean your articles from any formatting.
Read more button:
Condition: if you want to show readmore button.
Read more button text:
Set it, for example, with your own native language.
Title as Link:
Condition: You can enable link in header of article in text block.
Buttons: Previous, Next and Play/Pause:
Conditions: Turn ON / OFF the navigation icon buttons.
Buttons margin right:
Set margin beetween interface buttons and module right side.
Buttons margin bottom:
Set margin beetween interface buttons and module bottom side.
Slides as Links:
Switch ON click events for slides (images as links).
Thumbnail bar:
Switch ON/OFF the thumbnails bar (available in this case, for the News Image I module. You may find this option on others or not.
Thumbnail images margin:
Set margin between thumbnails images in thumbnail bar.
Thumbnail images border-width:
Set border width for thumbnail image.
Thumbnail images border color (inactive or active):
Set in this two fields, in hex format, the border colors for better signal navigation.
Thumbnail bar position:
You can see it the top or bottom position, inside the module display area.
Ticks list:
Condition: Enable or not the use of this new feature. The Ticks List, that will be another interface navigation option for the slide sequence indicator or selection.
PH
OTO
SLI
DE
GK2
17
g
g
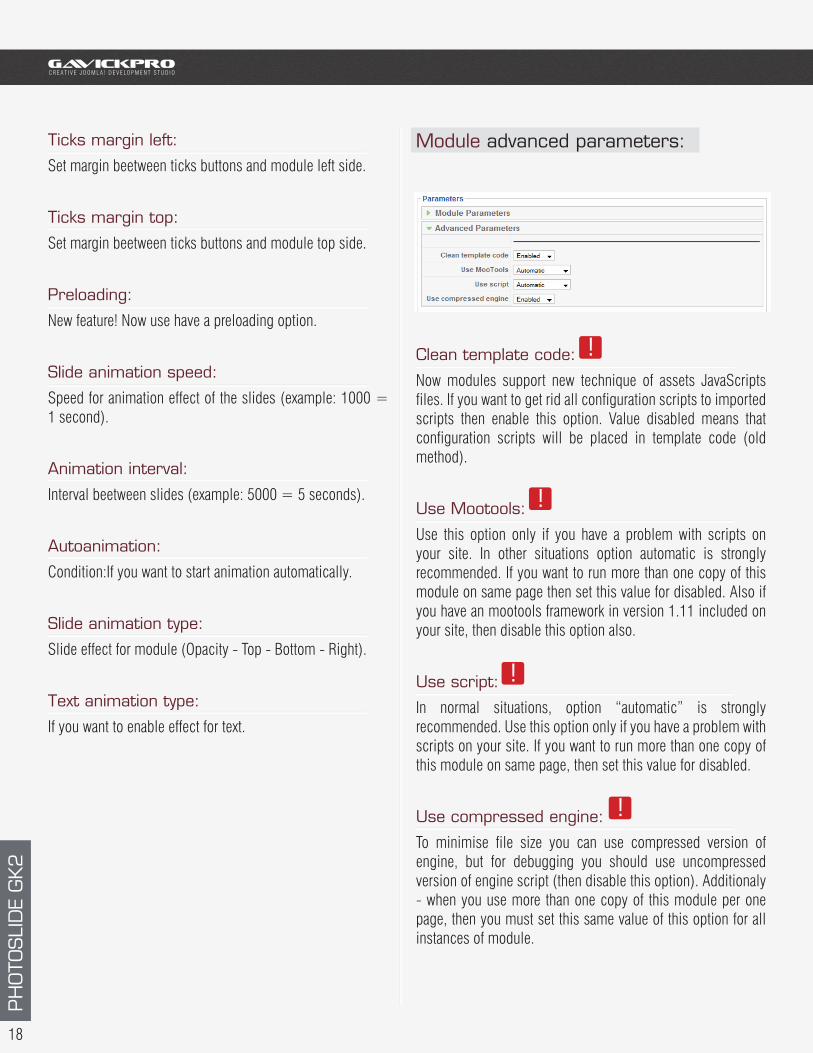
Module advanced parameters:
Clean template code:
Now modules support new technique of assets JavaScripts files. If you want to get rid all configuration scripts to imported scripts then enable this option. Value disabled means that configuration scripts will be placed in template code (old method).
Use Mootools:
Use this option only if you have a problem with scripts on your site. In other situations option automatic is strongly recommended. If you want to run more than one copy of this module on same page then set this value for disabled. Also if you have an mootools framework in version 1.11 included on your site, then disable this option also.
Use script:
In normal situations, option “automatic” is strongly recommended. Use this option only if you have a problem with scripts on your site. If you want to run more than one copy of this module on same page, then set this value for disabled.
Use compressed engine:
To minimise file size you can use compressed version of engine, but for debugging you should use uncompressed version of engine script (then disable this option). Additionaly - when you use more than one copy of this module per one page, then you must set this same value of this option for all instances of module.
Ticks margin left:
Set margin beetween ticks buttons and module left side.
Ticks margin top:
Set margin beetween ticks buttons and module top side.
Preloading:
New feature! Now use have a preloading option.
Slide animation speed:
Speed for animation effect of the slides (example: 1000 = 1 second).
Animation interval:
Interval beetween slides (example: 5000 = 5 seconds).
Autoanimation:
Condition:If you want to start animation automatically.
Slide animation type:
Slide effect for module (Opacity - Top - Bottom - Right).
Text animation type:
If you want to enable effect for text.
PH
OTO
SLI
DE
GK2
18
!
!
!
!
GAVICKPROC R E A T I V E J O O M L A ! D E V E LO P M E N T S T U D I O
GAVICKPROC R E A T I V E J O O M L A ! D E V E LO P M E N T S T U D I OExamples and CSS tipseExam leExample8
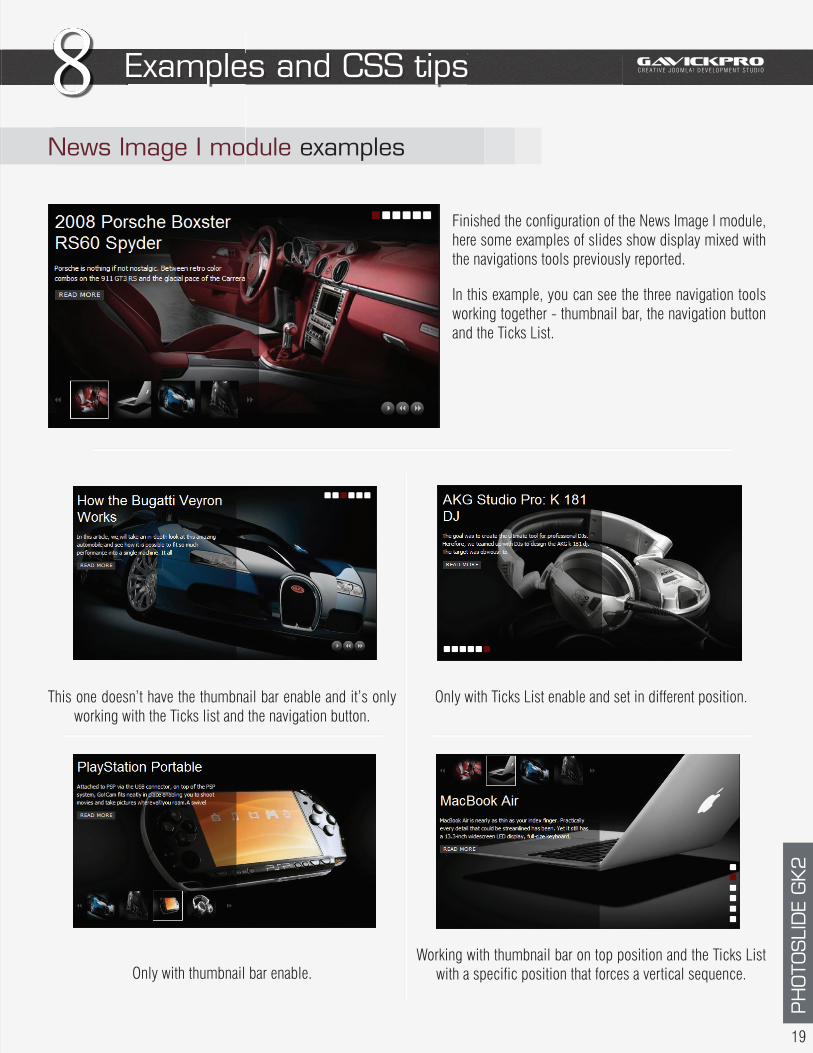
News Image I module examples
Finished the configuration of the News Image I module, here some examples of slides show display mixed with the navigations tools previously reported.
In this example, you can see the three navigation tools working together - thumbnail bar, the navigation button and the Ticks List.
Only with Ticks List enable and set in different position.
Working with thumbnail bar on top position and the Ticks List with a specific position that forces a vertical sequence.
This one doesn’t have the thumbnail bar enable and it’s only working with the Ticks list and the navigation button.
Only with thumbnail bar enable.
PH
OTO
SLI
DE
GK2
19
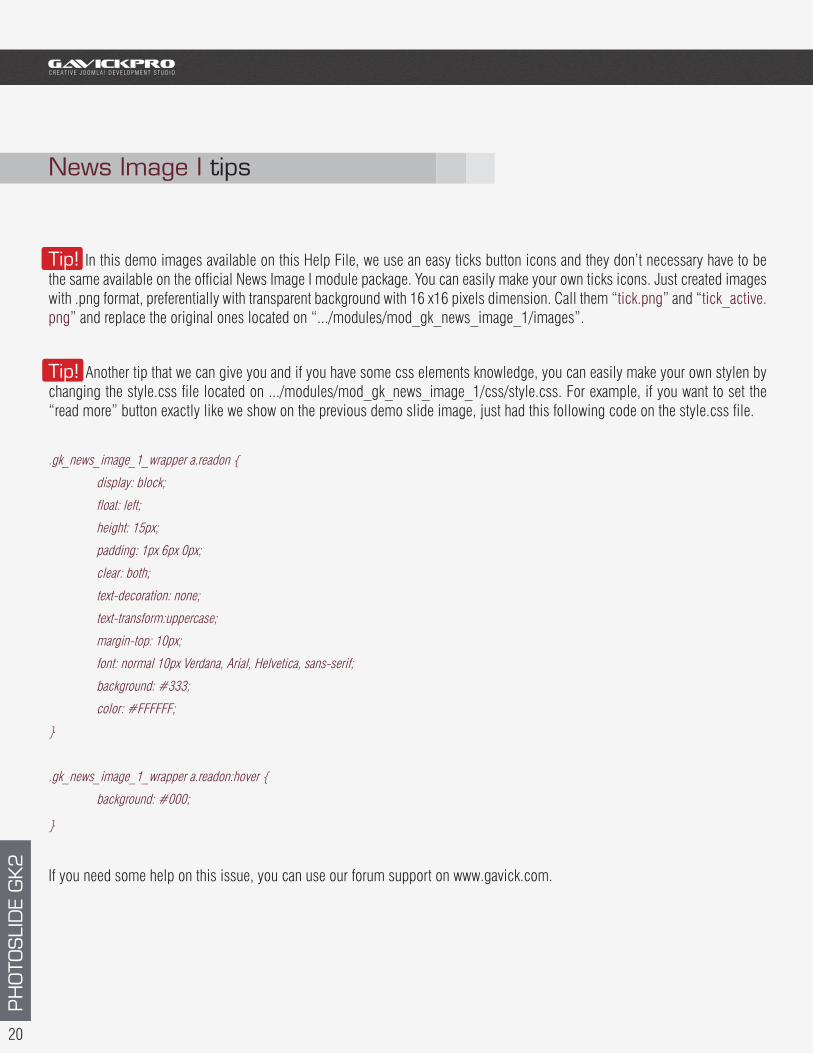
News Image I tips
Tip! In this demo images available on this Help File, we use an easy ticks button icons and they don’t necessary have to be the same available on the official News Image I module package. You can easily make your own ticks icons. Just created images with .png format, preferentially with transparent background with 16 x16 pixels dimension. Call them “tick.png” and “tick_active.png” and replace the original ones located on “.../modules/mod_gk_news_image_1/images”.
Tip! Another tip that we can give you and if you have some css elements knowledge, you can easily make your own stylen by changing the style.css file located on .../modules/mod_gk_news_image_1/css/style.css. For example, if you want to set the “read more” button exactly like we show on the previous demo slide image, just had this following code on the style.css file.
.gk_news_image_1_wrapper a.readon {
display: block;
float: left;
height: 15px;
padding: 1px 6px 0px;
clear: both;
text-decoration: none;
text-transform:uppercase;
margin-top: 10px;
font: normal 10px Verdana, Arial, Helvetica, sans-serif;
background: #333;
color: #FFFFFF;
}
.gk_news_image_1_wrapper a.readon:hover {
background: #000;
}
If you need some help on this issue, you can use our forum support on www.gavick.com.
GAVICKPROC R E A T I V E J O O M L A ! D E V E LO P M E N T S T U D I O
PH
OTO
SLI
DE
GK2
20