Instruction Manual - Hi-Lift® Jack Co. · before using the Hi-Lift® Jack The instruction manual...
28
Meets applicable requirements of ASME/ANSI B30.1 2004 AU/NZS 2693:2007 Instruction Manual Read this instruction manual before using the Hi-Lift ® Jack The instruction manual is also available in Spanish and French at no charge upon request. Operation / Safety / Maintenance
Transcript of Instruction Manual - Hi-Lift® Jack Co. · before using the Hi-Lift® Jack The instruction manual...

Meets applicable requirements of ASME/ANSI B30.1 2004 AU/NZS 2693:2007
Instruction Manual
Read this instruction manual before using the Hi-Lift® Jack
The instruction manual is also available in Spanish and French at no charge upon request.
Operation / Safety / Maintenance


Hi-Lift Jack Components. . . . . . . . . . . . . . . . . . .1
Safety . . . . . . . . . . . . . . . . . . . . . . . . . . . . . . . . . . . . .3
Safety Symbols . . . . . . . . . . . . . . . . . . . . . . . . . . . . .3
Safety Warnings. . . . . . . . . . . . . . . . . . . . . . . . . . . . .4
Handle Safety Decal . . . . . . . . . . . . . . . . . . . . . . . . .5
General Safety. . . . . . . . . . . . . . . . . . . . . . . . . . . . . .6
Operation Instructions . . . . . . . . . . . . . . . . . . . . .7
Raising a Stationary Load. . . . . . . . . . . . . . . . . . . . . .7
Lowering a Stationary Load . . . . . . . . . . . . . . . . . . .10
Clamping or Winching . . . . . . . . . . . . . . . . . . . . . . .11
Maintenance Instructions. . . . . . . . . . . . . . . . . .13
Clean . . . . . . . . . . . . . . . . . . . . . . . . . . . . . . . . . . .13
Binding . . . . . . . . . . . . . . . . . . . . . . . . . . . . . . . . . .13
Storing the Jack. . . . . . . . . . . . . . . . . . . . . . . . . . . .13
Storing the Equipment-Agricultural Jack . . . . . . . . . .13
Inspection . . . . . . . . . . . . . . . . . . . . . . . . . . . . . . .13
Lubrication . . . . . . . . . . . . . . . . . . . . . . . . . . . . . . .14
Repair . . . . . . . . . . . . . . . . . . . . . . . . . . . . . . . . . . .14
Parts . . . . . . . . . . . . . . . . . . . . . . . . . . . . . . . . . . . 16
Specifications . . . . . . . . . . . . . . . . . . . . . . . . . . 18
Limited Warranty. . . . . . . . . . . . . . . . . . . . . . . . 20
Contents

Hi-Lift Jack Company
P.O. Box 228Bloomfield, IN 47424-0228 USA
Toll Free: 800.233.2051Direct: 812.384.4441Fax: 812.384.4592Web: http://www.hi-lift.com
To the Owner / User
Thank you for purchasing this Hi-Lift® Jack. With proper use and care, your jack will give you years of dependable service. You can use the Hi-Lift® Jack in many ways, including:
• Lifting stable loads.
• Winching loads.
• Clamping
• Spreading.
• Raising vehicles or other mobile loads (when properly chocked, blocked and stabilized).
Store these instructions in the handle of your jack. Use only genuine Hi-Lift® replacement parts. Using replacement parts not supplied by Hi-Lift® Jack Com-pany will make the jack unsafe for use and void the warranty.
1
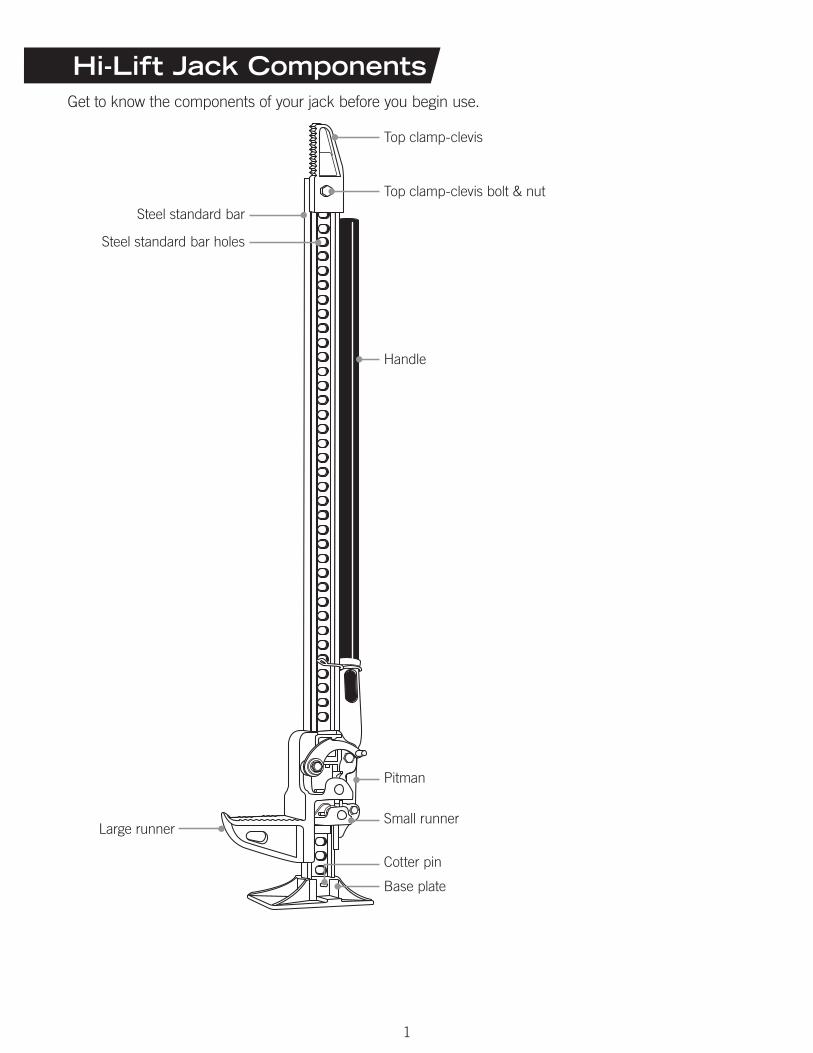
Get to know the components of your jack before you begin use.
Top clamp-clevis
Handle
Steel standard bar
Large runner
Base plate
Steel standard bar holes
Top clamp-clevis bolt & nut
Cotter pin
Pitman
Small runner
Hi-Lift Jack Components
2
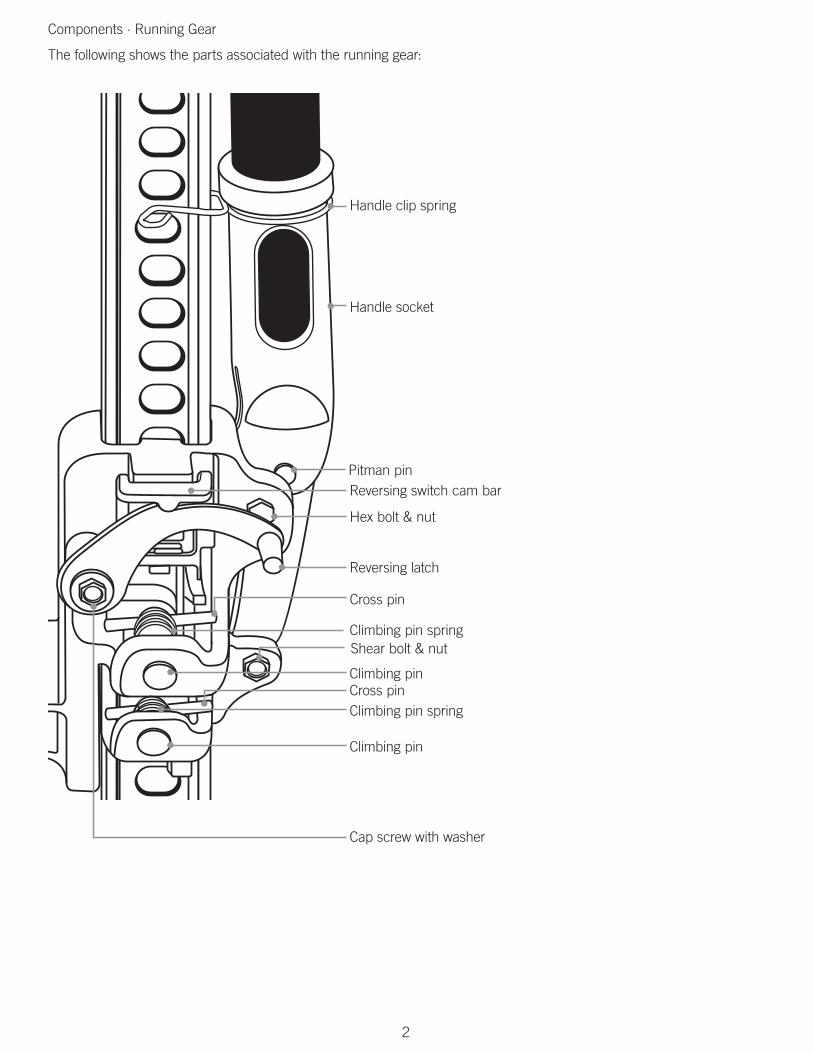
Reversing latch
Handle clip spring
Handle socket
Shear bolt & nut
Cross pin
Pitman pinReversing switch cam bar
Cap screw with washer
Hex bolt & nut
Components · Running Gear
The following shows the parts associated with the running gear:
Climbing pin spring
Climbing pinCross pinClimbing pin spring
Climbing pin
3
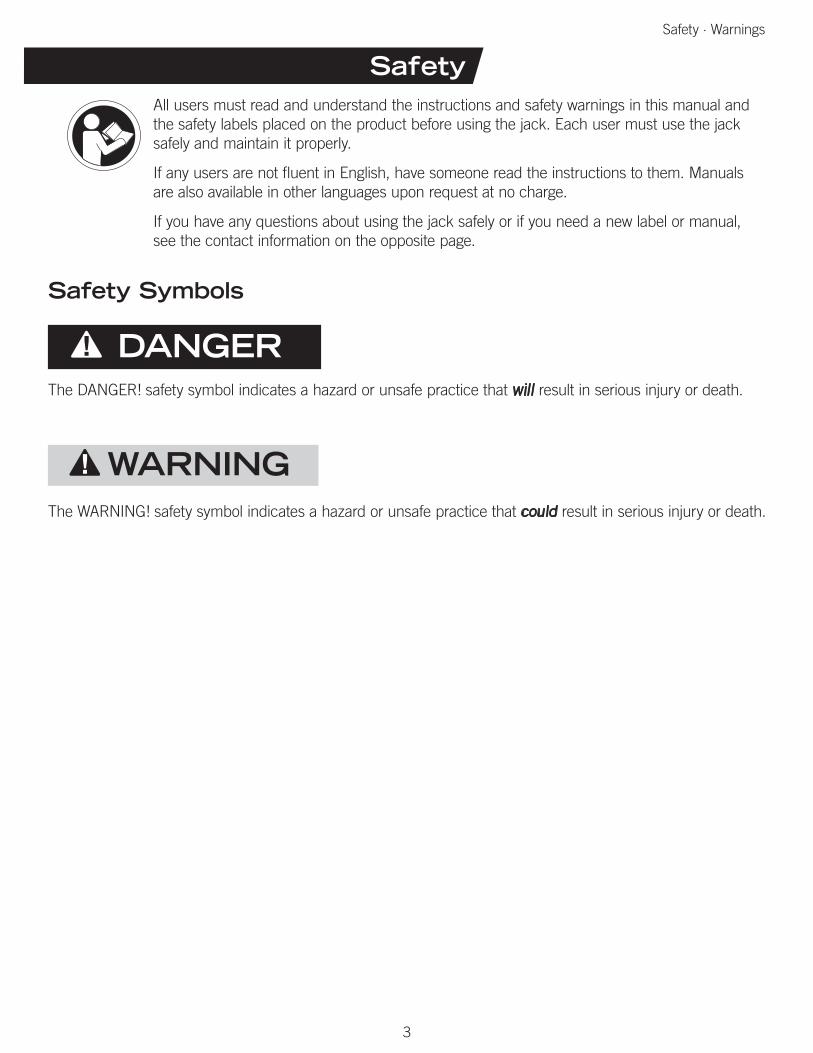
SafetyAll users must read and understand the instructions and safety warnings in this manual and the safety labels placed on the product before using the jack. Each user must use the jack safely and maintain it properly.
If any users are not fluent in English, have someone read the instructions to them. Manuals are also available in other languages upon request at no charge.
If you have any questions about using the jack safely or if you need a new label or manual, see the contact information on the opposite page.
! DANGERThe DANGER! safety symbol indicates a hazard or unsafe practice that will result in serious injury or death.
! WARNING
Safety Symbols
The WARNING! safety symbol indicates a hazard or unsafe practice that could result in serious injury or death.
Safety · Warnings

4
Safety Warnings
! DANGER
DO NOT USE THE JACK TO SUPPORT OR STABILIZE A LOAD. Using the jack to support or stabilize a load may result in unexpected movement and result in serious injury, being crushed and death. Always securely chock and block (stabilize) the load to be lifted. Never place any part of the body under a raised load without properly chocking and supporting the load.
Using the jack on curved or tubular vehicle bumpers will result in the vehicle slipping off the jack and falling, causing serious injury or death. Use the Bumper Lift or Lift-Mate to lift most vehicles with curved bumpers or plastic bumpers.
When using the jack as a winch:
Always use chains or tow straps that have a greater working load than the jack. If a chain or tow strap breaks while winching, the load could shift or the chain or tow strap could snap back.
When used as a winch, the top clamp-clevis will support up to 5,000 lbs. (2273 kg). Going over this limit will result in the top clamp-clevis bending or breaking, causing the load to move or the chain or tow strap to snap back. This will result in serious injury or death.
When using the jack for clamping, the maximum clamping force of the standard top clamp-clevis is 750 lbs. (340 kg). If you exceed this limit, the standard top clamp-clevis could bend or break, resulting in serious injury or death.
Unexpected movement of the jack handle may result in the user being struck causing serious injury or death. Always keep your head away from and out of the jack handle path of movement.
The jack handle may move rapidly when moving the reversing latch and cause serious injury or death. Always place the handle against the steel standard bar with the handle clip spring holding it up before moving the reversing latch. This will prevent the handle from moving up and down rapidly. Securely hold on to the jack handle so your hands do not slip and ensure the handle is not in the horizontal position when moving the reversing latch.
Important! During lifting and lowering, the weight of the load pushes up against the jack’s handle. If your hands slip off the handle, or if the handle is horizontal when you move the reversing latch, it may move up very quickly.
Raising an inflated tire more than 2” (5cm) above the ground or attempting to lift more than one wheel at a time may result in tip over, unexpected movement and serious injury or death. Always raise an inflated tire less than 2” (5cm) and only one tire at a time.
The jack, while standing vertical and unsupported, may tip over and cause serious injury or death. Always support the jack or lay it on it’s side when not in use.
This jack will not operate safely without proper lubrication. Using the jack without proper lubri-cation will result in poor performance and damage to the jack. The jack is not self-lubricating, inspect the jack before use and lubricate when necessary.
WARNING!
5
Safety · Warnings
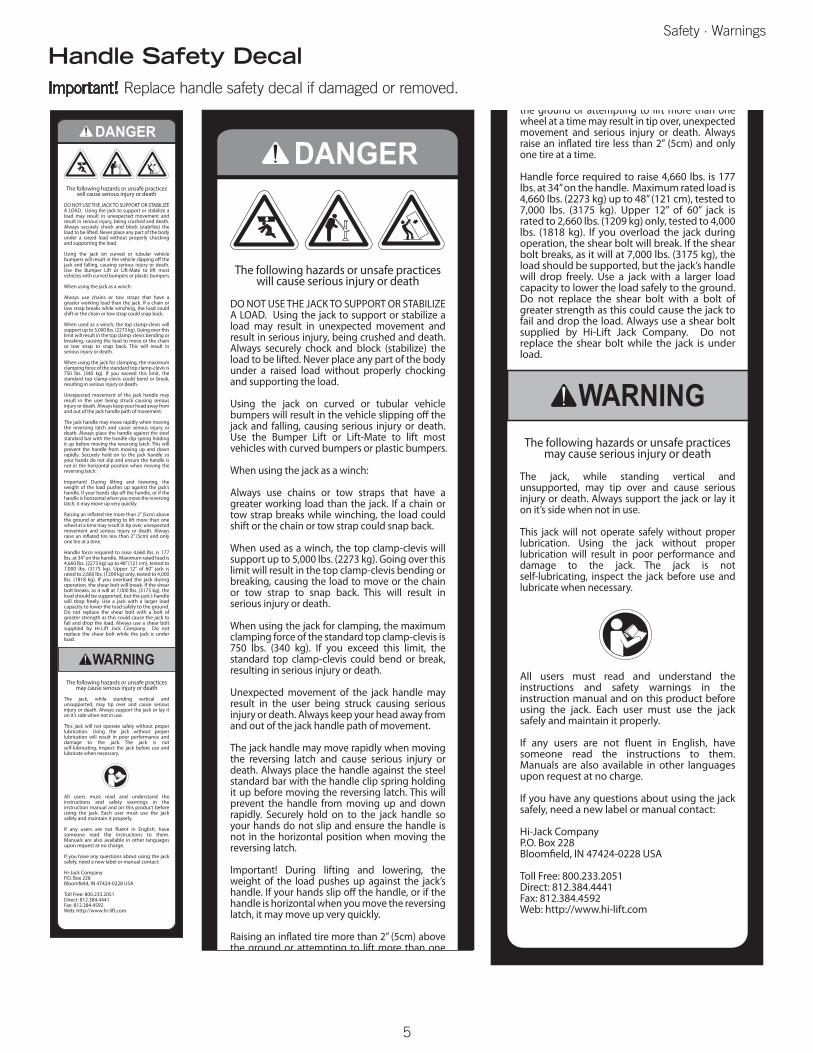
The following hazards or unsafe practices will cause serious injury or death
DO NOT USE THE JACK TO SUPPORT OR STABILIZE A LOAD. Using the jack to support or stabilize a load may result in unexpected movement and result in serious injury, being crushed and death. Always securely chock and block (stabilize) the load to be lifted. Never place any part of the body under a raised load without properly chocking and supporting the load.
Using the jack on curved or tubular vehicle bumpers will result in the vehicle slipping o� the jack and falling, causing serious injury or death. Use the Bumper Lift or Lift-Mate to lift most vehicles with curved bumpers or plastic bumpers.
When using the jack as a winch:
Always use chains or tow straps that have a greater working load than the jack. If a chain or tow strap breaks while winching, the load could shift or the chain or tow strap could snap back.
When used as a winch, the top clamp-clevis will support up to 5,000 lbs. (2273 kg). Going over this limit will result in the top clamp-clevis bending or breaking, causing the load to move or the chain or tow strap to snap back. This will result in serious injury or death.
When using the jack for clamping, the maximum clamping force of the standard top clamp-clevis is 750 lbs. (340 kg). If you exceed this limit, the standard top clamp-clevis could bend or break, resulting in serious injury or death.
Unexpected movement of the jack handle may result in the user being struck causing serious injury or death. Always keep your head away from and out of the jack handle path of movement.
The jack handle may move rapidly when moving the reversing latch and cause serious injury or death. Always place the handle against the steel standard bar with the handle clip spring holding it up before moving the reversing latch. This will prevent the handle from moving up and down rapidly. Securely hold on to the jack handle so your hands do not slip and ensure the handle is not in the horizontal position when moving the reversing latch.
Important! During lifting and lowering, the weight of the load pushes up against the jack’s handle. If your hands slip o� the handle, or if the handle is horizontal when you move the reversing latch, it may move up very quickly.
Raising an in�ated tire more than 2” (5cm) above the ground or attempting to lift more than one wheel at a time may result in tip over, unexpected movement and serious injury or death. Always raise an in�ated tire less than 2” (5cm) and only one tire at a time.
Handle force required to raise 4,660 lbs. is 177 lbs. at 34” on the handle. Maximum rated load is 4,660 lbs. (2273 kg) up to 48” (121 cm), tested to 7,000 lbs. (3175 kg). Upper 12” of 60” jack is rated to 2,660 lbs. (1209 kg) only, tested to 4,000 lbs. (1818 kg). If you overload the jack during operation, the shear bolt will break. If the shear bolt breaks, as it will at 7,000 lbs. (3175 kg), the load should be supported, but the jack’s handle will drop freely. Use a jack with a larger load capacity to lower the load safely to the ground. Do not replace the shear bolt with a bolt of greater strength as this could cause the jack to fail and drop the load. Always use a shear bolt supplied by Hi-Lift Jack Company. Do not replace the shear bolt while the jack is under load.
The following hazards or unsafe practices may cause serious injury or death
The jack, while standing vertical and unsupported, may tip over and cause serious injury or death. Always support the jack or lay it on it’s side when not in use.
This jack will not operate safely without proper lubrication. Using the jack without proper lubrication will result in poor performance and damage to the jack. The jack is not self-lubricating, inspect the jack before use and lubricate when necessary.
All users must read and understand the instructions and safety warnings in the instruction manual and on this product before using the jack. Each user must use the jack safely and maintain it properly.
If any users are not �uent in English, have someone read the instructions to them. Manuals are also available in other languages upon request at no charge.
If you have any questions about using the jack safely, need a new label or manual contact:
Hi-Jack CompanyP.O. Box 228Bloom�eld, IN 47424-0228 USA
Toll Free: 800.233.2051Direct: 812.384.4441Fax: 812.384.4592Web: http://www.hi-lift.com
Handle Safety DecalImportant! Replace handle safety decal if damaged or removed.

6
General Safety Training
• Read this manual before use. Do not allow anyone who has not read this manual, and/or does not under-stand the requirements, use the jack.
Spectators
• Do not allow bystanders around the jack or under the load supported only by the jack.
Inspection
• Inspect the jack carefully before each use. Ensure the jack is not damaged, excessively worn, or missing parts.
• Check the climbing pins to make sure that they are not worn or damaged.
• Check the steel standard bar to make sure that it is straight and that nothing is blocking the steel standard bar holes.
• Do not use the jack unless it is in good clean working condition.
• Do not use the jack unless it is properly lubricated.
• Using a jack that is not in good clean working condition or properly lubricated may cause serious injury (see Lubrication).
Chock and Block (Stabilize)
A chock is a wedge for steadying an object and holding it motionless, or for preventing the movement of a wheel. Chock the wheel opposite the end being lifted.
When you block a load, you secure and support a load that is being lifted. The block(s) or stabilizer(s) should have a weight capacity that is greater than the weight of the load which is being lifted. Do not use the jack to support the load.
Chocks prevent movementBlocks stabilize the load
Safety · General
7
Operation Instructions
Raising a Stationary Load
DO NOT USE THE JACK TO SUPPORT OR STABILIZE A LOAD. Using the jack to support or stabilize a load may result in unexpected movement and result in serious injury, being crushed and death. Always securely chock and block (stabilize) the load to be lifted. Never place any part of the body under a raised load without properly chocking and supporting the load.
Using the jack on curved or tubular vehicle bumpers will result in the vehicle slipping off the jack and falling, causing serious injury or death. Use the Bumper Lift or Lift-Mate to lift most vehicles with curved bumpers or plastic bumpers.
Unexpected movement of the jack handle may result in the user being struck causing serious injury or death. Always keep your head away from and out of the jack handle path of move-ment.
The jack handle may move rapidly when moving the reversing latch and cause serious injury or death. Always place the handle against the steel standard bar with the handle clip spring holding it up before moving the reversing latch. This will prevent the handle from moving up and down rapidly. Securely hold on to the jack handle so your hands do not slip and ensure the handle is not in the horizontal position when moving the reversing latch.
Important! During lifting and lowering, the weight of the load pushes up against the jack’s han-dle. If your hands slip off the handle, or if the handle is horizontal when you move the reversing latch, it may move up very quickly.
Raising an inflated tire more than 2” (5cm) above the ground or attempting to lift more than one wheel at a time may result in tip over, unexpected movement and serious injury or death. Always raise an inflated tire less than 2” (5cm) and only one tire at a time.
Handle force required to raise 4,660 lbs. is 177 lbs. at 34” on the handle. Maximum rated load is 4,660 lbs. (2273 kg) up to 48” (121 cm), tested to 7,000 lbs. (3175 kg). Upper 12” of 60” jack is rated to 2,660 lbs. (1209 kg) only, tested to 4,000 lbs. (1818 kg).
If you overload the jack during operation, the shear bolt will break. If the shear bolt breaks, as it will at 7,000 lbs. (3175 kg), the load should be supported, but the jack’s handle will drop freely. Use a jack with a larger load capacity to lower the load safely to the ground. Do not replace the shear bolt with a bolt of greater strength as this could cause the jack to fail and drop the load. Always use a shear bolt supplied by Hi-Lift Jack Company. Do not replace the shear bolt while the jack is under load.
! DANGER

8
Important!
Keep the handle against steel stan-dard bar with the handle clip spring holding it when not lifting or lowering.
1. Securely chock and stabilize the load to prevent it from rolling or shifting as you lift it (see General Safety: Chock and Block).
2. Place the jack’s base plate securely on a firm, level, and dry surface with the steel standard bar pointing straight up.
3. Lift the reversing latch until it locks in the up position.
4. Pull the handle away from the steel standard bar, releasing the handle clip spring.
5. Grasp the handle or the handle socket and raise the lifting mechanism until the large runner is completely and securely under the load.
3
6
2
4
5
Operation · Raising a Stationary Load
1
6. Grasp the handle firmly with both hands. Carefully pump the handle up and down to raise the load. Do not use an extension on the handle.
The load will be raised on each down stroke of the handle. Watch the load and the jack carefully. Stop lift-ing if either one starts to move. Do not continue until it is safe to do so. When safe, stabilize and block the load.
7. When the load is raised to the desired height, place the handle in the upright position clipped to the steel standard bar.
8. Block the load securely.
9. Lower the load onto the blocks (see Lowering a Stationary Load).
10. Remove the jack from the stabilized load.

9
7
8
9
Additional Instructions For Equipment-Agricultural Jack
1. When attaching the Equipment-Agricultural jack to equipment using tubular mounting brackets, always place lock-pin completely through the holes in the tubular mounting bracket.
2. Always secure the lock-pin in the tubular brackets with the safety cotter pin.
3. Chock the equipment that you have attached the Equipment-Agricultural jack to before lifting with the Equipment-Agricultural jack. Side lift is limited to 2,000 lbs. (907 kg).
After you have properly hooked the raised equipment to a mobile vehicle, lower the lifting mechanism of the Equipment Agricultural jack to its base and move the reversing latch into the up position.
Operation · Raising a Stationary Load
10
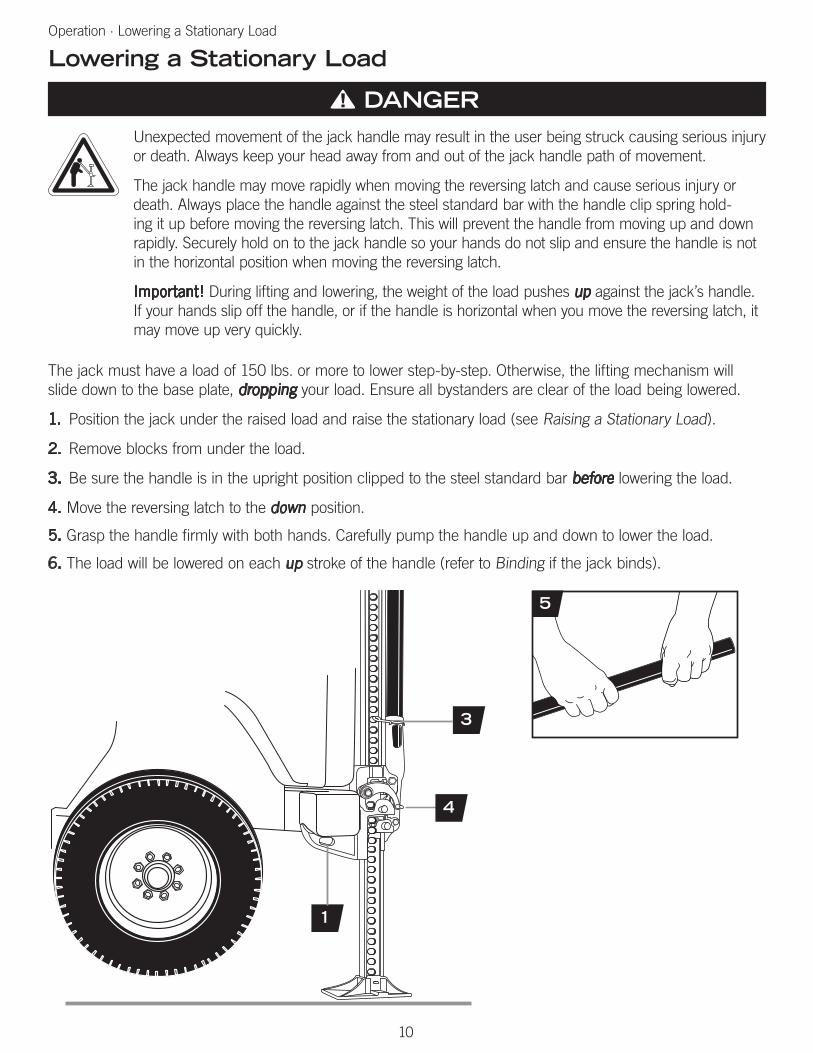
The jack must have a load of 150 lbs. or more to lower step-by-step. Otherwise, the lifting mechanism will slide down to the base plate, dropping your load. Ensure all bystanders are clear of the load being lowered.
1. Position the jack under the raised load and raise the stationary load (see Raising a Stationary Load).
2. Remove blocks from under the load.
3. Be sure the handle is in the upright position clipped to the steel standard bar before lowering the load.
4. Move the reversing latch to the down position.
5. Grasp the handle firmly with both hands. Carefully pump the handle up and down to lower the load.
6. The load will be lowered on each up stroke of the handle (refer to Binding if the jack binds).
Unexpected movement of the jack handle may result in the user being struck causing serious injury or death. Always keep your head away from and out of the jack handle path of movement.
The jack handle may move rapidly when moving the reversing latch and cause serious injury or death. Always place the handle against the steel standard bar with the handle clip spring hold-ing it up before moving the reversing latch. This will prevent the handle from moving up and down rapidly. Securely hold on to the jack handle so your hands do not slip and ensure the handle is not in the horizontal position when moving the reversing latch.
Important! During lifting and lowering, the weight of the load pushes up against the jack’s handle. If your hands slip off the handle, or if the handle is horizontal when you move the reversing latch, it may move up very quickly.
Lowering a Stationary Load
1
3
Operation · Lowering a Stationary Load
5
! DANGER
4

11
Clamping or Winching
When using the jack as a winch:
Always use chains or tow straps that have a greater working load than the jack. If a chain or tow strap breaks while winching, the load could shift or the chain or tow strap could snap back.
When used as a winch, the top clamp-clevis will support up to 5,000 lbs. (2273 kg). Going over this limit will result in the top clamp-clevis bending or breaking, causing the load to move or the chain or tow strap to snap back. This will result in serious injury or death.
When using the jack for clamping, the maximum clamping force of the standard top clamp-clevis is 750 lbs. (340 kg). If you exceed this limit, the standard top clamp-clevis could bend or break, resulting in serious injury or death.
Clamping
1. Loosen the standard top clamp-clevis bolt.
2. Turn the top clamp-clevis 90° to the steel standard bar, and re-tighten the bolt.
Note: You can connect the top clamp-clevis anywhere along the steel standard bar to use the jack as a clamp.
3. Operate the jack as you would for raising a load (see Raising a Stationary Load).
1
2
3
Operation · Clamping or Winching
! DANGER

12
Winching
1. Make sure the top clamp-clevis is in line with the steel standard bar.
2. Install one end of a chain or tow strap securely to the object to be winched. Securely attach the other end of the chain or tow strap to the top clamp-clevis of the jack.
Note: Use a shackle if the chain or tow strap will not fit through the top clamp-clevis of the jack.
3. Take another chain or tow strap and secure one end to a fixed, stable object. Attach the other end of the chain or tow strap to the large runner on the jack (do not attach chain or shackle to bottom hole of the large runner on the jack). If the fixed object is a tree, follow “Tread Lightly” principles and use a tree strap.
4. Operate the jack as you would for raising a load (See Raising a Stationary Load).
12
3
4
Tip: Use the Hi-Lift Off-Road Kit for items you need for winch-ing which includes; custom winch attachments, D-ring shackle, gloves and a tree strap.
Operation · Clamping or Winching
13
Maintenance InstructionsIf you use and maintain your Hi-Lift jack properly, it will give you many years of service. Follow the mainte-nance instructions carefully to keep your jack in good working condition. NEVER PERFORM MAINTENANCE ON THE JACK WHILE IT IS UNDER LOAD. CleaningIf the moving parts of the jack or the standard bar are clogged, use air pressure, water pressure, or a stiff brush to clean. Use a non-flammable cleaning solvent or another good de-greaser to clean the jack. Remove any existing rust, preferably with a penetrating lubricant.
BindingIf the climbing pins start to bind in the holes of the standard bar the jack will not operate properly and safely. Rusty climbing pins, dirt, or worn bar can be causes of binding.
Clean and lubricate the lifting mechanism as indicated in the Lubrication section. Test the jack by lifting it up without a load. If the binding continues, send it to our Factory Service for repair. If the jack binds while under a load, use a jack with equal or larger load capacity to lower the load safely to the ground. After un-binding the jack clean, lubricate and test as described at the start of this paragraph.
Storing the Jack1. Place the handle in the upright clipped position against the steel standard bar.
2. Raise the reversing latch until it locks in the up position.
3. Store in the upright clipped position in a dry location, preferably indoors.
Tip: If the jack is stored outdoors, consider using a Hi-Lift protective cover accessory.
Storing the Equipment-Agricultural Jack1. Pivot the Equipment-Agriculture jack to a horizontal position. Rest the steel handle of the Equipment-Agri-
cultural jack on top of the steel standard bar.
2. Secure the jack in this position with the lock-pin through the holes in the tubular mounting bracket.
3. Secure the lock-pin in the tubular mounting brackets with the safety cotter pin.
InspectionYou should inspect the jack for damage, wear, broken or missing parts (e.g.: climbing pins) and functional-ity before each use (see General Safety: Inspection). Follow lubrication and storage instructions for optimum jack performance.
14
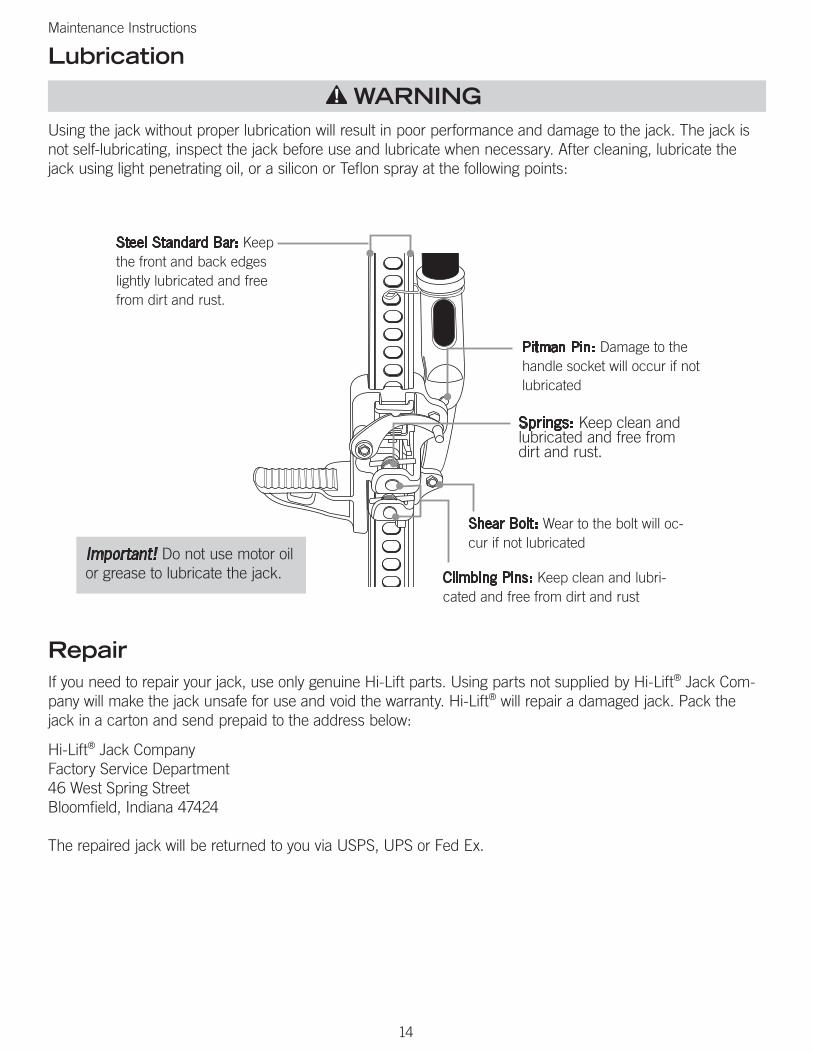
Steel Standard Bar: Keep the front and back edges lightly lubricated and free from dirt and rust.
Pitman Pin: Damage to the handle socket will occur if not lubricated
Shear Bolt: Wear to the bolt will oc-cur if not lubricated
Climbing Pins: Keep clean and lubri-cated and free from dirt and rust
Springs: Keep clean and lubricated and free from dirt and rust.
Important! Do not use motor oil or grease to lubricate the jack.
RepairIf you need to repair your jack, use only genuine Hi-Lift parts. Using parts not supplied by Hi-Lift® Jack Com-pany will make the jack unsafe for use and void the warranty. Hi-Lift® will repair a damaged jack. Pack the jack in a carton and send prepaid to the address below:
Hi-Lift® Jack Company Factory Service Department 46 West Spring Street Bloomfield, Indiana 47424 The repaired jack will be returned to you via USPS, UPS or Fed Ex.
Maintenance Instructions
Lubrication
Using the jack without proper lubrication will result in poor performance and damage to the jack. The jack is not self-lubricating, inspect the jack before use and lubricate when necessary. After cleaning, lubricate the jack using light penetrating oil, or a silicon or Teflon spray at the following points:
WARNING!

15
This Page Intentionally Blank

16
Parts
1
2
3
4
5
6
7
8
9
10
11
13
14
15
16
17 18
19
20
12
21
17
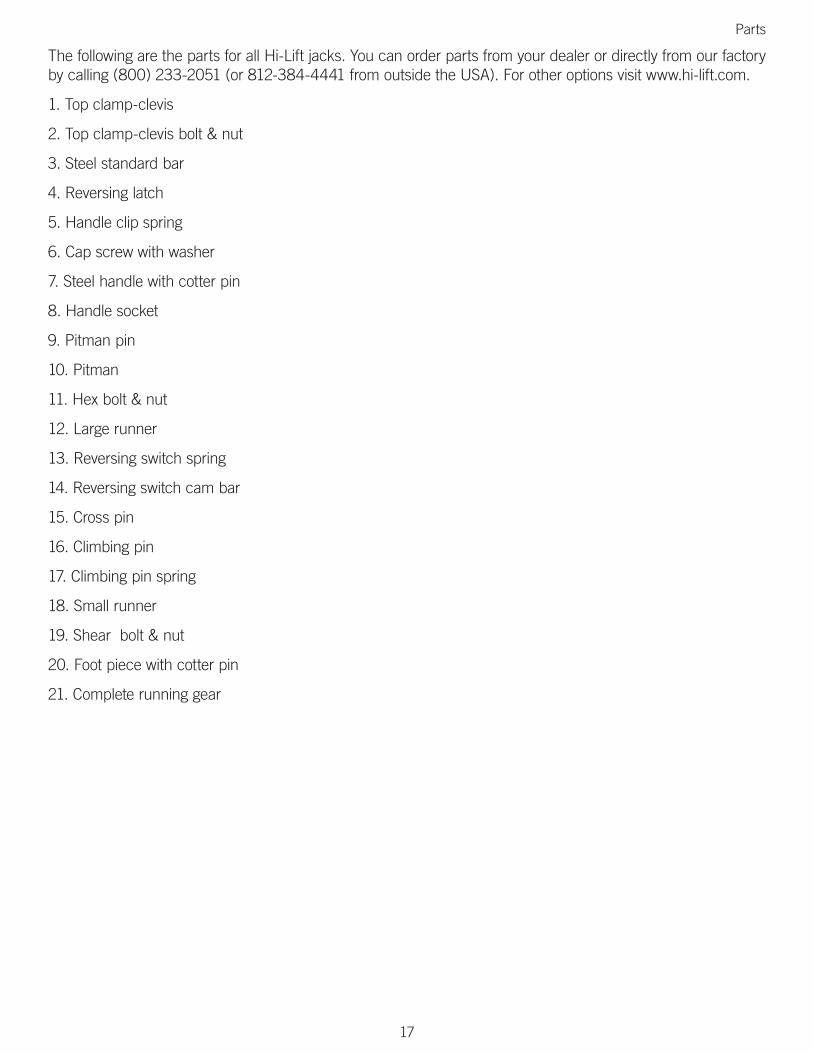
The following are the parts for all Hi-Lift jacks. You can order parts from your dealer or directly from our factory by calling (800) 233-2051 (or 812-384-4441 from outside the USA). For other options visit www.hi-lift.com.
1. Top clamp-clevis
2. Top clamp-clevis bolt & nut
3. Steel standard bar
4. Reversing latch
5. Handle clip spring
6. Cap screw with washer
7. Steel handle with cotter pin
8. Handle socket
9. Pitman pin
10. Pitman
11. Hex bolt & nut
12. Large runner
13. Reversing switch spring
14. Reversing switch cam bar
15. Cross pin
16. Climbing pin
17. Climbing pin spring
18. Small runner
19. Shear bolt & nut
20. Foot piece with cotter pin
21. Complete running gear
Parts

18
Specifications
36”Cast/Steel
42”Cast
42”Cast/Steel
48”Cast
Weight lbs kg
25.02 27.78 26.35 28.16
11.35 12.60 11.95 12.77
Width in cm
5 5 5 5
12.70 12.70 12.70 12.70
Height in cm
41 46 43.5 50.75
104.14 116.84 110.49 128.91
Depth in cm
9.63 9.63 9.63 9.63
24.46 24.46 24.46 24.46
Rated Load lbs kg
4,660 4,660 4,660 4,660
2113.74 2113.74 2113.74 2113.74
Rated Load Upper 12” lbs N/A N/A N/A N/A
kg N/A N/A N/A N/A
Tested Load lbs 7,000 7,000 7,000 7,000
kg 3175.14 3175.14 3175.14 3175.14
Tested Load Upper 12” lbs N/A N/A N/A N/A
kg N/A N/A N/A N/A
Rated Side Load lbs N/A N/A N/A N/A
kg N/A N/A N/A N/A
Clamping lbs 750 750 750 750
kg 340.19 340.19 340.19 340.19
Winching lbs 5,000 5,000 5,000 5,000
kg 2267.96 2267.96 2267.96 2267.96
Max. Lift height at Nose lbs 27 34 32 38.63
cm 68.58 86.36 81.28 98.12
Min. Lift height at Nose lbs 4.5 4.5 4.5 4.5
cm 11.43 11.43 11.43 11.43
Lift Height at Side lbs N/A N/A N/A N/A
cm N/A N/A N/A N/A
Lift Point at Side lbs N/A N/A N/A N/A
cm N/A N/A N/A N/A

19
Specifications
48”Cast/Steel
60”Cast
60”Cast/Steel
EJCast/Steel
Weight lbs kg
27.66 31.31 30.12 25.72
12.55 14.20 13.66 11.67
Width in cm
5 5 5 6.13
12.70 12.70 12.70 15.56
Height in cm
48.75 61.75 59.25 36
123.83 156.85 150.50 91.44
Depth in cm
9.63 9.63 9.63 9.63
24.46 24.46 24.46 24.46
Rated Load lbs kg
4,660 4,660 4,660 4,660
2113.74 2113.74 2113.74 2113.74
Rated Load Upper 12” lbs N/A 2,660 2,660 N/A
kg N/A 1206.55 1206.55 N/A
Tested Load lbs 7,000 7,000 7,000 7,000
kg 3175.14 3175.14 3175.14 3175.14
Tested Load Upper 12” lbs N/A 4,000 4,000 N/A
kg N/A 1814.37 1814.37 N/A
Rated Side Load lbs N/A N/A N/A 2,000
kg N/A N/A N/A 907.18
Clamping lbs 750 750 750 750
kg 340.19 340.19 340.19 340.19
Winching lbs 5,000 5,000 5,000 5,000
kg 2267.96 2267.96 2267.96 2267.96
Max. Lift height at Nose lbs 37.24 49.75 48.25 21.13
cm 94.59 126.37 122.56 53.67
Min. Lift height at Nose lbs 4.5 4.5 4.5 4.5
cm 11.43 11.43 11.43 11.43
Lift Height at Side: lbs N/A N/A N/A 23.75
cm N/A N/A N/A 60.33
Lift Point at Side lbs N/A N/A N/A 7
cm N/A N/A N/A 17.78

Limited Warranty
Hi-Lift® Jack Company warrants the Hi-Lift® jack for 12 months from the date of purchase, only to the original owner, against defective materials and workmanship. Return the jack or parts thereof, transporta-tion prepaid and with proof of purchase, to the Factory Service Department, Hi-Lift® Jack Company, 46 West Spring Street, Bloomfield, IN 47424. This warranty is void if the jack is modified, used beyond rated capacity, if an extender is used on the handle, or if the jack is abused, misused, not maintained properly, or if non-Hi-Lift® replacement parts are used. This warranty replaces all previous warranties and is the only warranty made by the Hi-Lift® Jack Company on this product. No other warranties, either verbal or written, are authorized. This warranty gives you specific legal rights. You may also have other legal rights that vary from state to state.
20
Limited Warranty

21
Warranty Registration
Name (print):
E-mail:
Address:
City: State: Zip:
Phone number:
Is this your first Hi-Lift Jack? YES NO
Date you received Hi-Lift Jack: Month: Day: Year:
Model Number: Purchase Price:
Store Hi-Lift Purchased from: Store Name:
City: State:
Jack will be used:
On Farm Truck
Jeep Car
Off-Road Vehicle In Factory
In Construction Other:
How did you learn about the Hi-Lift Jack?
Brochure Internet:
Retail Store Magazine:
Catalog Friend
Trade Show Other:
Cut
alo
ng d
otte
d lin
e. M
ail r
egis
trat
ion.

Cut along dotted line. M
ail registration.

Notes

Hi-Lift Jack Company
P.O. Box 228Bloomfield, IN 47424-0228 USA
Toll Free: 800.233.2051Direct: 812.384.4441Fax: 812.384.4592Web: http://www.hi-lift.com
See our website at www.hi-lift.com for information on all Hi-Lift products