INSTRUCTION MANUAL HANDLEIDING LUVION Premium … · LUVON Premium Babyproducts 1 LUVION Premium...
37
Elite GRAND ELITE INSTRUCTION MANUAL HANDLEIDING
Transcript of INSTRUCTION MANUAL HANDLEIDING LUVION Premium … · LUVON Premium Babyproducts 1 LUVION Premium...

1LUVION Premium Babyproducts
LUVION Premium Babyproducts
MOD-EL: Grand Elite
G R A N D E L I T E
INSTRUCTION MANUALHANDLEIDING

2
- Keep small parts away from children - This product is not a toy. Do not allow children to play with it. - This product is not intended as a substitute for adult supervision. - Check carefully you use the right power adapter for both the parent –and baby unit. - Only use the original supplied power chargers. - Do not use the product in humid conditions or nearby water. - Only use the product between 10°C en 40°C - Keep the cords of the power adapters always at least 1 meter away from the baby. - Do not try to open the product. This must be done by qualified people.
Batteries - Charge the battery of the parent unit for some hours until it’s fully loaded. The battery is fully loaded when the charging light colours green.
- We advise you always to use the main power for the baby unit. Should there be no main power around, we advise you to use non-rechargable batteries for the baby unit. Should you decide to use rechargeable batteries, make sure that the power adapter is not con-nected to the camera. The baby unit has no charging function.
- To avoid damage to your batteries, please do not expose the baby monitor to temperatures higher than 30°C. Please remove the optional batteries from the baby unit if you do not use the product for more than 1 month.
SAFETY INSTRUCTIONS
SAFETY INSTRUCTIONS 2INTRODUCTION 3CONTENTS OF PACKAGE 3OVERVIEW PARENT UNIT 4OVERVIEW BABY UNIT 5GETTING STARTED 8USING THE SYSTEM 9 MENU OPTIONS 11BABY UNIT PAIRING 16MICRO SD CARD RECORDING AND PLAYING 17TROUBLESHOOTING 18TECHNICAL SPECIFICATIONS 18
LUVIONDelft, The Netherlands
www.luvion.com
TABLE OF CONTENTS
INSTRUCTION MANUAL

3LUVION Premium Babyproducts
Thank you for purchasing the Luvion Grand Elite. Now you can see and hear your baby or even more babies/children by using additional camera’s.
Please retain your original dated sales receipt for your records. For service –and warranty issues you will always be asked for a copy of the receipt. For warranty issues you can contact your Luvion dealer or your local Luvion distributor. More information can be found on www.luvion.com.
This user manual provides you with all information for a safe and easy use of this baby moni-tor. Before using the Luvion Grand Elite we ask you to thoroughly read this user manual. We ask for your special attention for the safety instructions.
INTRODUCTION
CONTENTS OF PACKAGEThe system includes the following components:
- 1 x parent unit (monitor)- 1 x baby unit (camera)- 1 x docking station- 1 x power adapter for the parent unit- 1 x power adapter for the baby unit- 1 x RCA cable for the Television- 1 x wall plugs and screws
Check your package to confirm that you have recieved the complete system, including all components listed above.
Baby unit Parent unit Docking station Power adapters(parent unit & baby unit)
ScrewsRCA cable

4
OVERVIEW PARENT UNIT (MONITOR)
4
15
16
17
18
19
5
6
20
21
10
11
1312
14
21 3
87 9
5LUVION Premium Babyproducts
OVERVIEW BABY UNIT (CAMERA)
5
6
4
11
2
1
73
8
9
10

6
1. Antenna Recieves the video and sound from the baby unit.2. Antenna locking switch Slide the switch to the unlock position, to make the
antenna pop up and improve reception. 3. Record Press this button to start recording, press it again to stop recording. 4. Menu button Press this button to enter the main menu.5. Navigation buttons The navigation buttons can be used when the system is in
normal use and/or when you are in the menu. Normal use • Press left (A) to automatically switch between multiple cameras. The screen changes channel every 3 seconds • Press right (M) to switch manually between multiple cameras Use in the menu Press the buttons to navigate in the menu. To confirm your selection press OK.
6. SCAN When SCAN is pressed, the screen is turned off. During this time the parent unit will continuously scan the baby unit (or multiple baby units). When a sound is detected, the parent unit will become active. Now you can see what happens in the baby room. You can adjust the sound sensitivity for this detection with the rotary knob at the side of the camera. After the parent unit has detected sound it will take about 5 seconds to switch back to the scan mode. Except when the sound is continously detected. In that case the monitor will be activated for another 5 seconds. There are 2 reasons to use the scan button: 1- to prevent you from being disturbed by the bright LCD screen, or 2- to save energy. Press the scan button again to deactivate the scan mode.
7. Coloured LEDs The green LED indicates that the monitor is switched on. The green/red LEDs indicate the volume level of the camera (from low to high).
8. LCD screen Displays the video from the baby unit.9. Microphone Recieves sound from the area around the parent unit and transmits it to
the baby unit. This will only happen when the Talk back button is pressed.10. Alarm button This button enables you to increase or decrease the volume of the
alarm. The alarm is activated when the monitor is switched on by for example the cries of the baby, because it is possible that the cries will not wake you. Note this is not the volume button!
11. Night light Press this button on the parent unit to remotely turn on/off the night light on the baby unit.
12. Charging indication LED The LED is red when the built-in batter is being charged and green when it is fully charged.
13. DC 5V power adapter Connect the included DC 5V power adapter to power and/or charge the parent unit. Note: Use the right DC 5V socket for the power adapter. Do not use the AV- OUT socket.
14. AV/OUT Audio-video socket which allows you to connect a television or monitor to the parent unit, using the RCA cable. When the RCA cable is connected the screen will turn black.
Parent unit

7LUVION Premium Babyproducts
15. Play/Stop button Press this button to start or stop playing a lullaby.16. Next button Play the next lullaby.17. Talk back button Press this button to speak to the baby unit.18. Power switch Switch the parent unit on or off.19. Micro SD card slot Place a Micro SD card in this slot for video recording.20. Speaker Produces the sound from the baby unit.21. DC 5 power adapter To charge the parent unit via the docking staton. The parent
unit needs to be placed correctly into the docking station. Note: When the parent unit is docked and the RCA cable is connected, the screen on the parent unit will be switched off. The screen will turn back on when the RCA cable is disconnected.
Baby unit
1. Temperature sensor Measures the temperature.2. Pair button The pair button is located at the back of the baby unit. It enables you to
reconnect the baby and parent unit or to add additional baby units.3. Camera antenna Sends and recieves signals to/from the parent unit4. Lens / Infrared light These LEDs are automatically activated when the room gets
darker and enable you to monitor the baby under no/low light conditions. The infrared LEDs do use a lot of energy and can therefore empty the batteries more quickly.
5. ON/OFF button Turns the baby unit ON or OFF.6. Microphone Recieves sounds from the area near the baby unit and transmits it to the
parent unit.7. Night light Press this button to turn on the night light. The night light can also be
turned on/off remotely with the parent unit’s night light button.8. Sensitivity To adjust the sensitivity of the camera. A lower sensitivity means that
sounds recieved by the baby unit need to be louder to be transmitted to the parent unit. A higher sensitivity means that at a low sound level the sounds will be transmitted to the parent unit. Note: If you wish to monitor every sound. Go to Menu Auto Mute and select NO. This will activate an “open channel”.
9. ECO switch Allows you to set a lower transmitting power. This will save energy.10. Volume To increase or decrease the volume of the lullabies.11. DC 9V power adapter Enables you to connect the baby unit to the electricity grid.
Note: The baby unit also works on 4 AA batteries (not included). Do not leave the batteries in the baby unit when you use it with the power adapter.

8
GETTING STARTED
Determine whether you will be using the docking station, or connecting the cables directly to the parent unit before installation.
1. Carefully unpack the parent unit.
2. Place the parent unit (in the docking station) in a place that has clear reception with the baby unit.
3. Plug the DC 5V power adapter into the DC 5V input at the side of the parent unit or at the back of the docking station. Plug the power adapter in the wall socket. When using the docking station, place the parent unit in the docking station. The parent unit will start to charge; the charging indication LED will now turn red.
4. Leave the parent unit to charge prior to the first time use until the built-in rechargable battery is fully charged. The charging indication LED will turn green when the battery is fully charged. Note: Do not remove the power adapter during the initial charging process. After the initial charge, charge the parent unit as required. If you wish to view the baby unit video on a larger screen, connect the included RCA cable to a TV or monitor. Connect the Video IN (yellow) and the Audio IN (white) plugs to the TV or monitor. Connect the other plug to the AV OUT input located at the side of the parent unit. Note: The use of the AV output is for convenience only. When it is used in combination with a large screen TV or monitor, the video might be grainy as the camera limits the video resolution to VGA (640 x 480 pixels). This is not a product defect. For the best video quality use the PIP (Picture in Picture) function of your TV or monitor. It enables you to concurrently watch TV and look at the video of the parent unit.
Before installing the baby unit, carefully plan where and how it will be positioned, and where you will route the cable of the power adapter.
Before starting permanent installation, verify the reception of the baby unit video on the parent unit. Verify this when both the baby unit and the parent unit are placed in their preferred positions.
Parent unit
Baby unit
9LUVION Premium Babyproducts
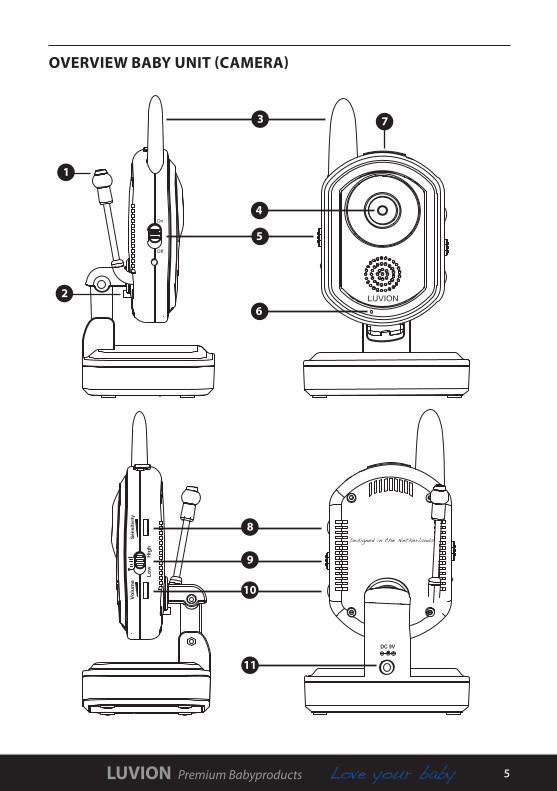
1. Carefully unpack the baby unit. Note: If you are installing baby units that do not come with the initial system (separately sold baby units), please look at the pairing baby units section of this manual for details on installation.
2. Mount the baby unit on the wall or put it on a cabinet, table or shelf. To mount the baby unit on the wall, mark the position of the 2 screw holes on the wall. Drill the holes and insert the included wall plugs and screws. Firmly attach the baby unit on the wall by placing the base over the screws and pushing it downwards.
3. Point the camera of the baby unit towards the area you want to monitor. The baby unit can be powered by the included power adapter or by 4AA batteries (not included). Power adapter Connect the DC 9V power adapter to the DC 9V input at the back of the baby unit. Plug the power adapter in the wall socket. Batteries Remove the battery pack cover off the base of the baby unit. Place 4AA batteries into the battery pack. Make sure to correctly lin up the positive and negative poles of the batteries. Place the battery pack cover back on. Note: We advise you always to use the main power for the baby unit Should there be no main power around, we advise you to use non-rechargable batteries for the baby unit. Should you decide to use rechargeable batteries, make sure that the power adapter is not connected to the camera. The baby unit has no charging function.
USING THE SYSTEMThe video of the baby unit will be displayed on the screen of the parent unit when both are switched on.
1. Signal indicator2. Channel indicator
2
1
Cam1

10
1. Signal indicatorThe signal indicator shows the strength of the signal being recieved from the baby unit. One or no bars indicates a poor signal and 4 bars indicate a strong signal.
Signal strength Indicator Warning
Perfect None
Good None
Fair None
Low Out Of Range
No Signal Out Of Range
2. Channel indicator The channel indicator displays the current channel. Press the button to switch between the available baby units. To automatically switch between the channels press the button.
When the baby unit is positioned too far from the parent unit, the warning message Out of Range will appear on the screen of the parent unit and the video will start to flicker. When there is no connection between the baby and the parent unit, the screen of the parent unit will be black and display the warning message Out of Range.
The baby unit volume can be adjusted by using the buttons when viewing the video of the baby unit.
Press the button to decrease the volume, and press the arrow to increase the volume. When the volume is set
to one bar (lowest setting) the volume is muted.
The volume indicator will be displayed when you change the volume.
Cam1
Cam1
Out Of Range
Cam1
Volume indicator
Out Of Range warning
Adjust the volume

11LUVION Premium Babyproducts
Signal strength Indicator Warning
Perfect None
Good None
Fair None
Low Out Of Range
No Signal Out Of Range
Volume indicator
The main menu contains 4 submenus:
1. Settings In this submenu you can set date and time, brightness, temperature alert parameters, camera volume, image zoom, the TV system for AV output and a screensaver. It is also possible to reset the parent unit to default factory settings.
2. Record In this submenu you can adjust the video recording parameters.
3. Auto Mute Auto mute is a feature where you can choose between a so called “open channel”, or the sound activated option. Using the sound activated mode, you will only hear you baby when there is a certain amount of sound. The sensitivity for this level of sound detection can be adjusted at the side of the baby unit.
4. Pairing Use the pairing menu to add (extra) baby units to the parent unit.
The settings menu contains 10 submenus:
1. Date & Time 2. Brightness3. Temperature Unit 4. Temperature alert5. Camera Volume 6. Zoom7. A/V out 8. Screen saver9. Format 10. Default
MENU OPTIONS
Press the menu button on the parent unit to display the menu on the screen. Use the buttons to navigate through the menu. Press the OK button to confirm a setting.
Main menu
Settings menu
12
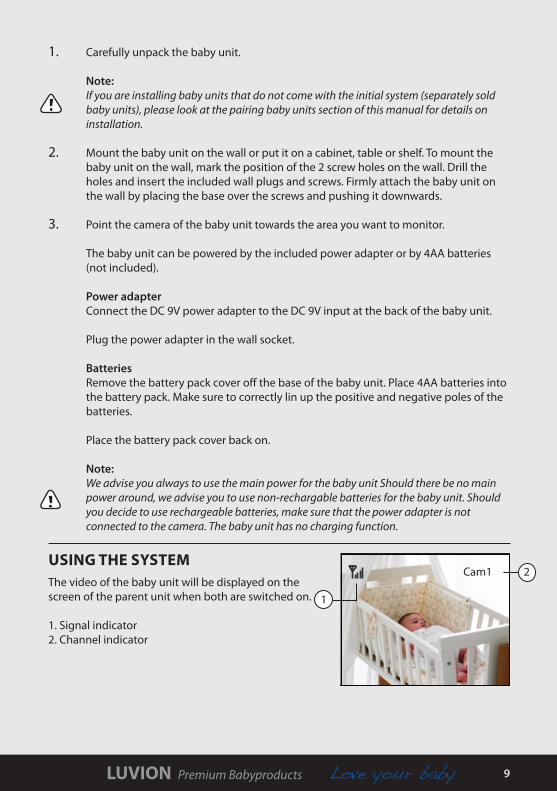
2. BrightnessThe brightness of the screen can be adjusted with the
buttons. The button makes the screen darker and the button makes the screen lighter.
1. Date & TimeYou can display the time on the screen by setting it in this submenu. The date and time have the following value YY/MM/DD HH:MM:SS.
4. Temperature AlertYou can use this menu to set the temperature range of the temperature alert. When the temperature is outside this range, a warning sound will be emitted.
Use the buttons to select the minimum and maximum temperature, then use the buttonsto set the temperature value. After successfully setting the temperature range, select On and then press OK to confirm the settings.
Select OFF to disable the temperature alert.
3. Temperature UnitSelect the temperature unit you want to use. You can choose between degrees Celcius or degrees Fahrenheit.
Note: Because the temperature sensor is located next to the (warm) camera, the measured temperature can deviate slightly from the room temperature. The temperature displayed on the screen is about 1-2 degrees Celcius higher than the room temperature.
2009/01/0400:39:15

13LUVION Premium Babyproducts
5. Camera VolumeYou can speak to the baby unit when pressing the TALK button on the parent unit. This menu is to adjust the volume of your voice on the baby unit.
Press the buttons to increase or decrease the volume.
6. ZoomThe video can be set at the original or double size by selecting zoom 1x of zoom 2x in this menu. When the video is in zoom 2x mode, the buttons can be used to view the parts outside the parent unit screen.
Note:You cannot adjust the volume in the 2x zoom modus.
7. A/V OutThis menu lets you choose the TV system for AV Out. You can choose between NTSC or PAL.
8. Screen SaverFive images are stored in the system. You can select one to display it on the screen of the parent unit in SCAN mode. Or you can select Blank screen to make the screen black in SCAN mode.
9. FormatSelect Yes to format the Micro SD card. Formatting will delete all the data stored on the Micro SD card.
Note:Use with caution!

14
You can set the recording parameters in this menu.
Note:To use the recording function, make sure a Micro SD card is inserted into the Micro SD card slot.
10. DefaultSelect Yes to reset the parent unit to factory default settings. All menu settings will then be reset.
Note:Pairing settings will not be affected by a reset. Baby unit(s) will remain paired with the parent unit.
Record Menu
- QualityThe resolution of the recorded videos can be set in this menu. There are two options: 320 x 240 pixels and 640 x 480 pixels. Recorded videos are much clearer in 640 x 480 pixels but more fluent in 320 x 240 pixels.
- Schedule RecordSet the schedule record time for each day. The time can be set from 00:00 to 23:59. Select ON to enable scheduled recording.
- OverwriteDecide whether to record over earlier recorded files when the memory of the Micro SD card is full.

15LUVION Premium Babyproducts
Auto mute is a feature where you can choose between a so called “open channel”, or for the sound activated option. Using the sound activated mode, you will only hear you baby when there is a certain amount of sound. The sensitivity of for this level of sound detection can be adjusted on the side of the baby unit.
The advantage of the sound activated mode is that you will not hear any background sound and that you will only be alerted if there is certain sound in the babyroom. Should you prefer to hear the sound of the babyroom continuously, a so called “open channel”, then this option can be chosen in this menu by selecting NO.
Auto Mute Menu
Pairing Menu
The system comes with a baby unit that has already been paired met the parent unit. The pairing function gives each baby unit a seperate channel on the parent unit (with a maximum of 4 baby units) this is necessary for configuring additional baby units. Use the buttons to select the desired pairing channel, and press the OK button to begin the pairing process.
Note:It is highly recommended to pair the baby units to the parent unit before permanently mounting them.
16
BABY UNIT PAIRING
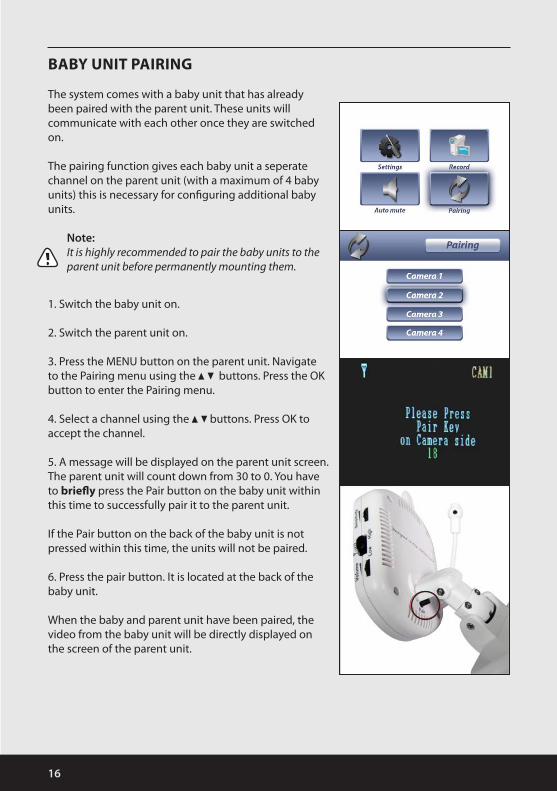
The system comes with a baby unit that has already been paired with the parent unit. These units will communicate with each other once they are switched on.
The pairing function gives each baby unit a seperate channel on the parent unit (with a maximum of 4 baby units) this is necessary for configuring additional baby units.
Note:It is highly recommended to pair the baby units to the parent unit before permanently mounting them.
1. Switch the baby unit on.
2. Switch the parent unit on.
3. Press the MENU button on the parent unit. Navigate to the Pairing menu using the buttons. Press the OK button to enter the Pairing menu.
4. Select a channel using the buttons. Press OK to accept the channel.
5. A message will be displayed on the parent unit screen. The parent unit will count down from 30 to 0. You have to briefly press the Pair button on the baby unit within this time to successfully pair it to the parent unit.
If the Pair button on the back of the baby unit is not pressed within this time, the units will not be paired.
6. Press the pair button. It is located at the back of the baby unit.
When the baby and parent unit have been paired, the video from the baby unit will be directly displayed on the screen of the parent unit.

17LUVION Premium Babyproducts
The system is designed for Micro SD card recording. You can manually record videos or you can schedule it. Before you can start recording video, you need to insert a Micro SD card into the Micro SD slot in the parent unit. The system supports SD cards with a maximum capacity of 16GB.
Manual video recordingPress the Auto record button on the parent unit to start the video recording. Press the button once more to end the recording.
Scheduled video recordingGo to Menu-Record-Schedule Record, to set the start and end time of the recording. Select ON to initiate the the scheduled recording. In this mode the parent unit will record each day during the scheduled time.
Play videosFollow these steps to play the recorded videos:
1. During normal use, press the OK button on the parent unit to play the recorded videos.
2. Press the buttons to select the VIDEO folder and press OK to open it.This folder contains subfolders named after the date on which the video was recorded. For example 090101 means that the folder contains videos from January 1st 2009. When you have recorded a lot of movies; press the button to go to the next page. Press the button to go to the previous page. Select the main folder and press OK to return.
3. Select a folder and press OK to enter the subfolders. For example 101024_1 means that a video is recorded at 10:10:24 on camera 1.
4. When you select a video and press OK, the video will start playing.
MICRO SD CARD RECORDING AND PLAYING

18
Problem Solution
No video from the baby unit
1. Make sure the power adapter is plugged in. 2. Make sure that both the baby and parent unit are switched on.3. Make sure that the baby unit is in range of the parent unit. 4. When you are using batteries, try replacing them.
The parent unit displays “Out of Range”
1. Make sure the baby unit is switched on.2. Make sure the baby unit is in range of the parent unit. 3. Pair the baby unit with the parent unit. See pairing p. 16.
The video is dropping 1. Move the baby unit closer to the parent unit.2. Try repositioning the baby and/or parent unit to improve the
reception.3. Place the antenna of the parent unit in the vertical position.
Audio problems 1. Make sure that the volume on the TV is switched on.2. Make sure that there is sound within range of the baby unit
microphone.3. If the unit emits a loud screeching noise, move the baby and parent
unit further apart.4. Make sure that the parent unit is not zoomed in.
The video is or has become choppy
The video may become choppy when a lower frame rate is experienced (i.e. 10 frames per second instead of 20 frames per second).
1. Try moving the baby unit closer to the parent unit.2. Remove obstructions between the baby and parent unit.3. Place the antenna of the parent unit in the vertical position.
The video appears to be grainy when using the AV out function to view the video on a large screen TV/monitor
The use of the AV output is for convenience only. When it is used in combination with a large screen TV or monitor, the video might be grainy as the camera limits the video resolution to VGA (640 x 480 pixels). This is not a product defect.
1. For the best video quality use the PIP (Picture in Picture) function of your TV or monitor. Check your TV or monitor product manual to see if this feature is available on your TV or monitor.
2. View the video on a smaller screen TV or monitor.
The temperature istoo high
Move the temperature sensor on the baby unit further away from the housing.
The alarm of the parent unit keeps going off.
Turn the alarm off by pressing the - alarm button on the right side of the parent unit (No 10).
TROUBLESHOOTING
TECHNICAL SPECIFICATIONS
Parent unit
Recieving frequency range 2.400GHz ~ 2.482GHz
Data rate 1.5 Mbps
Recieving sensitivity -81dBm

19LUVION Premium Babyproducts
Demodulatie type GFSK met FHSS
Resolution H: 480 V: 240
Viewing angle H: 50° V: 50°
A/V Output / Resolution VGA 640x320 / 15FPS, QVGA 320x240 / 30FPS
Alarm sensitivity 80dB ±10% (1M)
Power requirement 5V DC ±5%
Power consumption 380mA Max without charging800mA with charging
Operating temp range 10° ~ 40° C
Operating humidity 0 ~ 85% RH
Baby unit
Transmit frequency range 2.400GHz~2.485GHz
Data rate 1.5 Mbps
Transmitting power 14dBm (TYP)
Modulation type GFSK with FHSS
Transmitting distance 300m (Line of Sight)
Image sensor type 1/4” Color CMOS Image Sensor
Effective Pixels H: 640 V: 480
Image processing Motion JPEG
Image resolution / frame rate H: 640 V: 480 / 30FPS Max
AES On 1/2000 ~ 1/20 sec
White balance Yes
AGC / Range On / 0dB~24dB
Lens 4.9mm / F2.8
Viewing angle (diagonal) 60°
Minimum illumination 2.5 LUX (IR Off), 0 LUX (IR On)
IR LED / Night vision range 8 LEDs / 850nm, 5m (with IR LED)
Power requirement 9V DC ±5%
Power consumption 330mA MAX (with Night Light)250mA (without Night Light)
Operating temperature 10°C ~ 40°C
Operating humidity 0% ~ 85%
Environmental rating -10° ~ 60° C
NOTEPlease connect the right power adapter to the camera and
monitor, they require a different voltage! Check the white label on the cord of the adapter.

20
LUVIONDelft, The Netherlands
www.luvion.com
VEILIGHEIDSINSTRUCTIES 20VOORWOORD 21PAKKET INHOUD 21OVERZICHT VAN UW OUDER UNIT 22OVERZICHT VAN UW BABY UNIT 23KLAARMAKEN VOOR GEBRUIK 26GEBRUIK 27 MENU OPTIES 29BABY UNIT PAIRING 34MICRO SD KAART OPNAME 35PROBLEEM EN OPLOSSING 36TECHNISCHE SPECIFICATIES 36
VEILIGHEIDSINSTRUCTIES - Houdt kleine onderdelen weg van kinderen. - Dit product is geen speelgoed. Laat kinderen er niet mee spelen. - De babyfoon is geen vervanging van ouderlijk toezicht. - Controleer goed dat u de juiste adapter bij de ouder of baby unit gebruikt. - Gebruik alleen de oorspronkelijk meegeleverde adapters. - Gebruik de babyfoon niet in een vochtige omgeving of nabij water. - Gebruik de babyfoon bij een temperatuur tussen 10°C en 40°C. - Zorg dat de baby unit en het snoer van de adapter altijd minimaal 1 meter van de baby verwijderd zijn.
- Demonteer nooit zelf de ouder of baby unit. Dit dient door gekwalificeerd personeel te gebeuren.
Accu/batterijen - Laad de accu van de ouder unit voor de eerste keer gebruik in het geheel op. Dit duurt enkele uren. De accu is vol als het led-oplaadlampje groen kleurt.
- Indien mogelijk adviseren wij te allen tijde de baby unit met netstroom te gebruiken. Wij adviseren u niet-oplaadbare batterijen te gebruiken voor de baby unit. Indien u oplaadbare batterijen in de baby unit plaatst, zorg dan altijd dat de adapter niet is aangesloten aan de baby unit. De baby unit heeft geen oplaadfunctie.
- Om schade aan de batterijen te voorkomen stelt u de babyfoon niet bloot aan tempera-turen boven de 30°C en haalt u de batterijen uit de baby unit indien u die langer dan 1 maand niet gebruikt.
INHOUDSOPGAVE
HANDLEIDING

21LUVION Premium Babyproducts
VOORWOORD
PAKKET INHOUD
Baby unit Ouder unit Docking station Voedingsadapters(ouder unit & baby unit)
VA kabel Schroeven
Het systeem wordt geleverd met de volgende componenten:
- 1 x de ouder unit (monitor)- 1 x de baby unit (camera)- 1 x docking station- 1 x voedingsadapter voor de ouder unit- 1 x voedingsadapter voor de baby unit- 1 x AV kabel voor de TV- 1 x pluggen en schroeven
Controleert u a.u.b. of bovenstaande items in het pakket aanwezig zijn.
Hartelijk dank voor de aanschaf van deze Luvion Grand Elite beeldbabyfoon. Vanaf nu kunt u uw baby horen én zien en/of zelfs meerdere kinderen monitoren.
Zorgt u ervoor dat u altijd uw originele aankoopbewijs bewaart. Voor garantiegevallen zal u altijd gevraagd worden om een kopie van uw aankoopbewijs. Voor garantiegevallen kunt u contact opnemen met de Luvion dealer, of met de lokale Luvion vertegenwoordiging. Meer informatie vind u op www.luvion.com
Deze handleiding verzorgt alle nodige informatie om veilig en met plezier gebruik te kunnen maken van deze Luvion Grand Elite babyfoon. Voordat u de babyfoon gebruikt adviseren wij u deze handleiding aandachtig door te lezen. Wij vragen uw extra aandacht voor de veilig-heidsinstructies.

22
OVERZICHT VAN UW OUDER UNIT (MONITOR)
4
15
16
17
18
19
5
6
20
21
10
11
1312
14
21 3
87 9

23LUVION Premium Babyproducts
OVERZICHT VAN UW BABY UNIT (CAMERA)
5
6
4
11
2
1
73
8
9
10
24
1. Antenne Ontvangt de beelden en het geluid van de baby unit.2. Antenne vergrendeling Schuif het knopje uit de vergrendeling en de antenne zal
omhoog komen voor een beter ontvangst. Het is normaal dat de antenne niet geheel verticaal komt.
3. Record Druk op deze knop om het opnemen te starten, druk nogmaals om het opnemen te stoppen.
4. Menuknop Druk op deze knop om in het menu te gaan.5. Navigatieknoppen De navigatieknop wordt gebruikt indien u de ouder unit
normaal gebruikt en indien u in het menu zit. Normaal gebruik • Druk links (A) voor het automatisch schakelen tussen meerdere camera’s. Het beeld verspringt om de 3 seconden • Druk rechts (M) voor het handmatig schakelen tussen meerdere camera’s Gebruik bij het menu Gebruik de knoppen om te navigeren in het menu. Om een keuze te bevestigen drukt u op OK.
6. SCAN Wanneer de SCAN knop is ingedrukt wordt het beeld zwart. Gedurende deze tijd scanned de ouder unit continue de baby unit (of meerdere baby units) af. Zodra er bij een baby unit geluid gedetecteerd wordt, wordt de ouder unit geactiveerd en kan er gezien worden wat er bij de baby gebeurt. De geluidsgevoeligheid voor deze detectie kunt u zelf instellen met het draaiknopje aan de zijkant van de camera. Nadat de monitor het geluid heeft gedetecteerd zal na ongeveer 5 seconden de monitor weer terug in scan mode springen tenzij er steeds geluid gedetecteerd wordt. In dat geval wordt de monitor weer 5 seconden geactiveerd. Er zijn 2 redenen om de scan button te gebruiken: 1- omdat u het onplezierig vind een fel licht in de slaapkamer te hebben, 2- omdat u energie wilt besparen. Om de scan mode weer te deactiveren drukt u nogmaals op de scan knop.
7. Gekleurde LED-lampjes Het groene LED-lampje geeft aan dat de monitor aan staat. De groene/rode LED-lampjes geven het geluidsniveau van de camera aan (van laag naar hoog).
8. LCD scherm Geeft het camerabeeld weer.9. Microfoon Ontvangt het geluid rondom de monitor voor het terugspreken naar de
camera. Dit gebeurd alleen indien u de “talk back” knop ingedrukt houdt.10. Alarm knop Met dit knopje kunt u het alarm volume verhogen of verlagen. Dit alarm
wordt gebruikt als extra geluid/alarm indien de monitor bijvoorbeeld geactiveerd wordt door gehuil bij de baby. Het is mogelijk dat u niet gelijk wakker wordt door het gehuil, vandaar een extra alarm. Let op! Dit is niet de volumeknop.
11. Nachtlampje Hiermee kunt u op afstand het nachtlampje op de camera activeren en deactiveren.
12. LED oplaadlampje Het LED lampje is rood wanneer het opgeladen wordt, en wordt groen zodra de monitor volledig is opgeladen.
13. DC 5V voedingsadapter Hiermee kunt u de monitor opladen. Let op: Kies de juiste DC 5V ingang en niet de AV- OUT uitgang.
Ouder unit

25LUVION Premium Babyproducts
14. AV/OUT Audio-video ingang waarmee u connectie met de televisie of een andere monitor door middel van het meegeleverde kabeltje kunt maken. Indien u dit doet wordt het beeld op de ouder unit zwart.
15. Play/Stop knopje Hiermee kunt u slaapliedjes starten en/of stoppen.16. Volgende knopje Hiermee kiest u het volgende liedje.17. Terugspreek knopje Houdt het knopje ingedrukt om te spreken naar de baby unit.18. Power knop Hiermee kunt u de monitor aan- en uitzetten.19. Micro SD kaart ingang Plaats een Micro SD kaart om beelden van uw baby op te
nemen.20. Luidspreker Geeft het geluid weer van de baby unit.21. DC 5 voedingsadapter Hiermee kunt u de monitor via het basisstation opladen. De
monitor dient wel op de juiste manier in het basisstation geplaatst te worden. Let op: Wanneer de monitor in het basisstation is geplaatst, en de AV kabel is eveneens gekoppeld aan de televisie, dan zal het beeld zwart worden.
Baby unit
1. Temperatuursensor Meet de temperatuur.2. Pair knop De pair knop zit achterop de baby unit. Hiermee kunnen de ouder en baby
unit opnieuw verbonden worden, of hiermee kunnen extra baby units aangesloten worden.
3. Camera antenne Zendt en ontvangt naar en van de monitor.4. Lens / Infrarood lampje Deze led lampjes worden automatisch geactiveerd indien
de kamer donkerder wordt. De infraroodlampjes gebruiken in het donker veel energie. Batterijen lopen hierdoor sneller leeg.
5. AAN/UIT knop Hiermee kan de camera aan– en uitgeschakeld worden.6. Microfoon Ontvangt geluid rondom de camera.7. Nachtlampje Druk op deze knop om het nachtlampje te activeren. Dit is eveneens
mogelijk vanaf de monitor.8. Gevoeligheid (sensitivity) Hiermee kunt u de gevoeligheid van de camera instellen.
Bij een lagere gevoeligheid worden geluiden vanuit de babykamer minder snel weergegeven. Bij een hogere gevoeligheid worden geluiden vanuit de babykamer sneller weergegeven. Let op: Indien u wenst dat de monitor altijd ieder geluid weergeeft kiest u in het menu voor Auto mute. Selecteer NO om deze functie uit te schakelen. Hiermee activeert u een “open kanaal”.
9. ECO switch Hier kunt u kiezen voor een lager zendvermogen en minder energieverbruik.
10. Volume Hiermee kan het volume voor de liedjes worden aangepast.11. DC 9V voedingsadapter Hiermee kunt u de baby unit via de adapter aan het
stroomnetwerk koppelen. Let op: De camera kan ook werken op 4xAA batterijen (niet meegeleverd). Laat de batterijen niet in de camera zitten indien de camera via de adapter gebruikt wordt.

26
Beslis of u de ouder unit gaat gebruiken met of zonder het docking station.
1. Neem voorzichtig de ouder unit uit de verpakking.
2. Plaats de ouder unit (eventueel met het docking station) op een plaats waar u goed bereik heeft met de baby unit.
3. Verbindt de DC 5V voedingsadapter met de DC 5V aansluiting aan de zijkant van de ouder unit of de achterkant van het docking station. Stop de stekker van de voedingsadapter in het stopcontact. Wanneer u het docking station gebruikt, dan plaatst u de ouder unit in het docking station. De ouder unit wordt nu opgeladen; het LED oplaadlampje is nu rood.
4. Laad de ouder unit op voordat u het systeem voor de eerste keer gaat gebruiken, zodat de oplaadbare batterij compleet is opgeladen; het LED oplaadlampje is nu groen. Let op: Verwijder tijdens de eerste keer opladen de voedingsadapter niet. Na de eerste keer kunt u de ouder unit opladen zolang en zo vaak u wenst. Wanneer u de beelden van de baby unit op en groter scherm wenst te zien, dan kunt u de bijgesloten AV kabel aansluiten op een TV of monitor. Verbindt de Video IN (geel) en de Audio IN (wit) stekkers met de TV/monitor en sluit de andere stekker aan op AV OUT aansluiting. Deze bevindt zich aan de zijkant van de ouder unit. Let op: Het gebruik van de AV OUT functie is voor uw gemak. Indien u een grote TV/monitor heeft met een hoge resolutie (VGA 640 x 480 pixels) dan zal het beeld licht korrelig zijn. Er is dan niks mis met het product of de TV/monitor. Voor de beste kwaliteit moet u de PIP (Picture in Picture) functie gebruiken. Controleer of uw TV/Monitor deze functie heeft. Zodoende kunt u TV kijken en tegelijkertijd de beelden van de ouder unit zien in een klein scherm op uw TV.
Bepaal eerst goed waar u de baby unit wilt hebben staan en in welke positie, voordat u de unit installeert. Bepaal tevens waar u de snoeren van de voedingsadapter wilt plaatsen. Controleer of de beelden van de camera goed zijn, voordat u de camera permanent installeert. Test dit op de plaats waar u de camera wilt hebben staan. Zet de ouder unit dan op de plaats waar u verwacht deze het meest te gebruiken.
KLAARMAKEN VOOR GEBRUIK Ouder unit
Baby unit

27LUVION Premium Babyproducts
1. Neem voorzichtig de baby unit uit de verpakking Let op: Indien u een baby unit gebruikt die niet in dezelfde verpakking zit als de monitor (apart gekochte baby units) dan dient u deze eerst te ‘pairen’. Kijkt u hiervoor a.u.b. naar het hoofdstuk over ‘pairing’ in deze handleiding.
2. Bevestig de baby unit op een muur of zet deze op een kast, tafel of plank. Voor het bevestigen van de camera op een muur; markeer met een potlood de 2 schroefingangen en boor de gaten in de muur. Plaats de bijgleverde pluggen in de gaten en bevestig de 2 bijgeleverde schroeven. Draai deze schroeven goed aan. Plaats de baby unit op de schroeven en duw de unit naar beneden voor een goede bevestiging.
3. Richt de camera van de baby unit op het gebied dat u wilt monitoren. De baby unit kan zowel worden gevoed door de meegeleverde voedingsadapter, als door 4AA batterijen (niet bijgesloten). Voedingsadapter Verbindt de DC 9V voedingsadapter met de DC 9V aansluiting aan de achterkant van de baby unit. Stop de stekker van de voedingsadapter in het stopcontact. Batterijen Verwijder het klepje van de onderkant van de baby unit. Plaats de 4 AA batterijen in het batterijvak. Zorg ervoor dat u de plus en de minus goed bevestigt. Bevestig het klepje weer aan de onderkant van de baby unit, zodat de batterijen er niet uit kunnen vallen. Let op: Indien mogelijk adviseren wij te allen tijde de baby unit met netstroom te gebruiken. Wij adviseren u niet-oplaadbare batterijen te gebruiken voor de baby unit. Indien u oplaadbare batterijen in de baby unit plaatst, zorg dan altijd dat de adapter niet is aangesloten aan de baby unit. De baby unit heeft geen oplaadfunctie.
GEBRUIKDe camerabeelden van de baby unit verschijnen op het beeldscherm van de ouder unit wanneer beiden zijn ingeschakeld.
1. Signaal indicator2. Kanaal indicator
2
1
Cam1
28
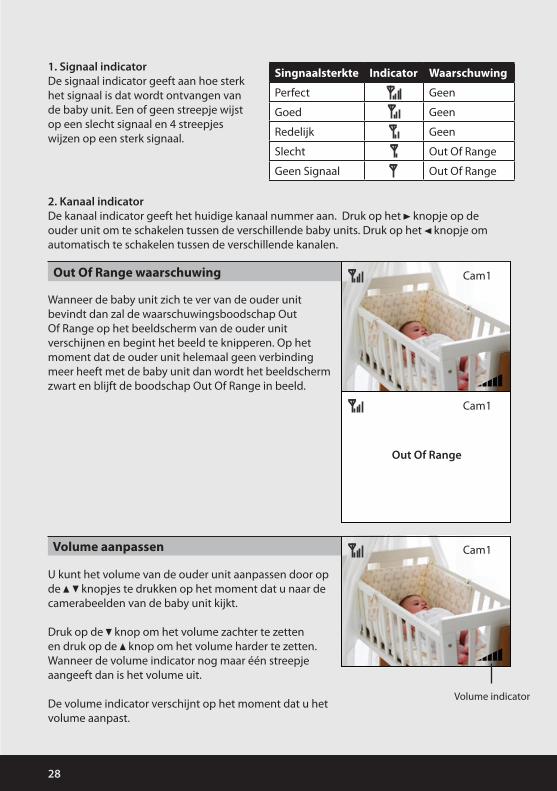
1. Signaal indicatorDe signaal indicator geeft aan hoe sterk het signaal is dat wordt ontvangen van de baby unit. Een of geen streepje wijst op een slecht signaal en 4 streepjes wijzen op een sterk signaal.
Singnaalsterkte Indicator Waarschuwing
Perfect Geen
Goed Geen
Redelijk Geen
Slecht Out Of Range
Geen Signaal Out Of Range
2. Kanaal indicator De kanaal indicator geeft het huidige kanaal nummer aan. Druk op het knopje op de ouder unit om te schakelen tussen de verschillende baby units. Druk op het knopje om automatisch te schakelen tussen de verschillende kanalen.
Wanneer de baby unit zich te ver van de ouder unit bevindt dan zal de waarschuwingsboodschap Out Of Range op het beeldscherm van de ouder unit verschijnen en begint het beeld te knipperen. Op het moment dat de ouder unit helemaal geen verbinding meer heeft met de baby unit dan wordt het beeldscherm zwart en blijft de boodschap Out Of Range in beeld.
U kunt het volume van de ouder unit aanpassen door op de knopjes te drukken op het moment dat u naar de camerabeelden van de baby unit kijkt.
Druk op de knop om het volume zachter te zetten en druk op de knop om het volume harder te zetten. Wanneer de volume indicator nog maar één streepje aangeeft dan is het volume uit.
De volume indicator verschijnt op het moment dat u het volume aanpast.
Cam1
Cam1
Out Of Range
Cam1
Volume indicator
Out Of Range waarschuwing
Volume aanpassen

29LUVION Premium Babyproducts
Het hoofdmenu bevat 4 submenu’s
1. Settings In dit submenu kunt u de tijd en datum, helderheid van het beeldscherm, temperatuur waarschuwingsparameters, camera volume en camera vergroting instellen of het TV systeem voor A/V Output en screensaver kiezen. Ook kunnen de instellingen naar de fabrieksstandaard gezet worden.
2. Record In dit submenu kunt u de opname parameters aanpassen.
3. Auto Mute Auto mute is een functie waarbij u kunt kiezen voor een zgn. “open kanaal” of voor de “geluids activerende optie”. Bij de geluids activerende optie hoort u alleen de baby indien deze een bepaalde hoeveelheid geluid maakt. De hoogte (gevoeligheid) van dit geluid kunt u zelf aan de zijkant van de baby unit bepalen.
4. Pairing Gebruk het pairing menu om (extra) baby units toe te voegen aan de ouder unit.
Het Settings menu bevat 10 submenu’s
1. Date & Time 2. Brightness3. Temperature Unit 4. Temperature alert5. Camera Volume 6. Zoom7. A/V out 8. Screen saver9. Format 10. Default
MENU OPTIES
Druk op de menuknop op de ouder unit om het menu in beeld te brengen. Gebruik de knopjes om te navigeren in het menu. Druk de OK knop in om een verandering op te
slaan.
Hoofdmenu
Settings menu
Singnaalsterkte Indicator Waarschuwing
Perfect Geen
Goed Geen
Redelijk Geen
Slecht Out Of Range
Geen Signaal Out Of Range
Volume indicator
30
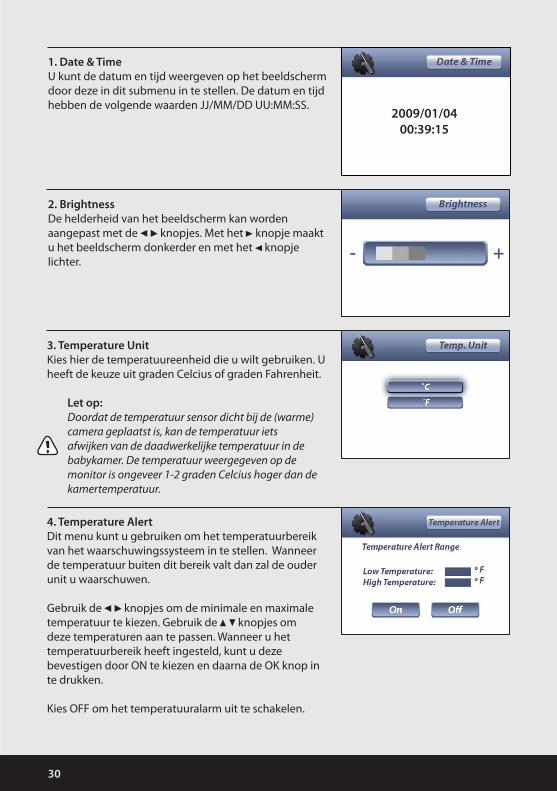
2. BrightnessDe helderheid van het beeldscherm kan worden aangepast met de knopjes. Met het knopje maakt u het beeldscherm donkerder en met het knopje lichter.
1. Date & TimeU kunt de datum en tijd weergeven op het beeldscherm door deze in dit submenu in te stellen. De datum en tijd hebben de volgende waarden JJ/MM/DD UU:MM:SS.
4. Temperature AlertDit menu kunt u gebruiken om het temperatuurbereik van het waarschuwingssysteem in te stellen. Wanneer de temperatuur buiten dit bereik valt dan zal de ouder unit u waarschuwen.
Gebruik de knopjes om de minimale en maximale temperatuur te kiezen. Gebruik de knopjes om deze temperaturen aan te passen. Wanneer u het temperatuurbereik heeft ingesteld, kunt u deze bevestigen door ON te kiezen en daarna de OK knop in te drukken.
Kies OFF om het temperatuuralarm uit te schakelen.
3. Temperature UnitKies hier de temperatuureenheid die u wilt gebruiken. U heeft de keuze uit graden Celcius of graden Fahrenheit.
Let op: Doordat de temperatuur sensor dicht bij de (warme) camera geplaatst is, kan de temperatuur iets afwijken van de daadwerkelijke temperatuur in de babykamer. De temperatuur weergegeven op de monitor is ongeveer 1-2 graden Celcius hoger dan de kamertemperatuur.
2009/01/0400:39:15

31LUVION Premium Babyproducts
5. Camera VolumeU kunt spreken tegen de baby unit wanneer u de TALK knop op de ouder unit ingedruk houdt. Met het camera- volume kunt u het volume instellen waarmee de baby unit dit geluid af speelt.
Druk op de knopjes om het volume hoger of lager te zetten.
6. ZoomHet camerabeeld kan in het originele formaat of dubbel vergroot weergegeven worden. Kies zoom 1x of zoom 2x om de vergroting aan te passen. Wanneer u het beeld dubbel vergroot weergeeft dan kunt u gebruik maken van de knopjes om de delen van het camerabeeld die buiten het beeldscherm vallen te bekijken. In de 2x zoom modus kan het
7. A/V OutMet dit menu kunt u het TV systeem dat u gebruikt om de beelden van de baby unit te bekijken instellen . U heeft de keuze uit NTSC en PAL.
8. Screen SaverVijf afbeeldingen zijn opgeslagen in het systeem. U kunt een van deze afbeeldingen als achtergrond gebruiken in de SCAN modus. Of u kunt Blank Screen kiezen om het beeldscherm donker te maken in de SCAN modus.
9. FormatKies Yes om de Micro SD kaart te formatteren. Formatteren verwijdert alle data van de Micro SD kaart.
Let op:Wees voorzichtig in het gebruik van deze functie.

32
U kunt de opname parameters in dit menu aanpassen.
Let op:Om gebruik te kunnen maken van de opname functie, moet een Micro SD kaart geplaatst worden in de ouder unit.
10. DefaultKies Yes om de fabrieksinstellingen te herstellen. Alle menu instellingen zullen dan gereset worden.
Let op:Pairing instellingen zullen niet gereset worden met deze functie. Alle baby units zullen gepaired blijven met de ouder unit.
Record Menu
- QualityStel de resolutie van de video opname in. U heeft de keuze uit twee resoluties: 320 x 240 pixels en 640 x 480 pixels. Opgenomen videos zijn scherper in de resolutie 640 x 480 pixels maar vloeiender in de resolutie 320 x 240 pixels.
- Schedule RecordStel de opnametijd voor iedere dag in. De tijd kan ingesteld worden tussen 00:00 en 23:59. Selecteer ON om de opnametijd vast te leggen.
- OverwriteHiermee kunt u instellen of eerdere opnames op de SD kaart overschreven dienen te worden op het moment dat de Micro SD kaart vol is.

33LUVION Premium Babyproducts
Auto mute is een functie waarbij u kunt kiezen voor een zgn. “open kanaal” of voor de “geluids activerende optie”. Bij de geluids activerende optie hoort u alleen de baby indien deze een bepaalde hoeveelheid geluid maakt. De hoogte (gevoeligheid) van dit geluid kunt u zelf aan de zijkant van de baby unit bepalen.
Het voordeel van de geluids activerende optie is dat u achtergronden/ruizen niet hoort en alleen iets hoort wanneer er daadwerkelijk geluid wordt gemaakt. Indien u liever alles wilt horen, een zgn. “open kanaal”, dan kan dat ook – u kunt dit in het submenu aanpassen door NO te selecteren.
Auto Mute Menu
Pairing Menu
Het systeem wordt geleverd met een baby unit die al ‘gepaired’ is met de ouder unit. De ‘pairing’ functie geeft iedere baby unit een apart kanaal op de ouder unit (maximaal 4 baby units per ouder unit) dit is noodzakelijk om deze extra baby units te configureren.
Gebruik de knopjes om het gewenste kanaal te selectren. Druk op de OK knop om het ‘pairing’ proces met een baby unit te starten.
Let op:Het wordt aangeraden om de baby unit en de ouder unit met elkaar te ‘pairen’ voordat de baby unit pemanent gefixeerd wordt.

34
BABY UNIT PAIRING
Het systeem wordt geleverd met een baby unit die al ‘gepaired’ is met de ouder unit. Deze units zullen met elkaar communiceren op het moment dat ze ingeschakeld zijn.
De ‘pairing’ functie geeft iedere baby unit een apart kanaal op de ouder unit (maximaal 4 baby units per ouder unit) dit is nodig om extra baby units te kunnen aansluiten.
Let op:Het wordt aangeraden om de baby unit en de ouder unit met elkaar te ‘pairen’ voordat de baby unit pemanent gefixeerd wordt.
1. Schakel de baby unit in.
2. Schakel de ouder unit in.
3. Druk op de MENU knop op de ouder unit. Navigeer naar de Pairing menu opties door op de knopjes te drukken. Druk op OK om het Pairing menu te openen.
4. Selecteer een kanaal door op het knopjes te drukken. Druk op OK om het kanaal te accepteren.
5. Op het beeldscherm zal een boodschap verschijnen. De ouder unit zal aftellen van 30 naar 0. U moet gedurende deze tijd kort op de Pair knop van de baby unit drukken om deze succesvol te ‘pairen’ met de ouder unit.
Als de Pair knop op de baby unit niet ingedrukt wordt dan zal er geen ‘pairing’ plaatsvinden.
6. Druk op de knop Pair. Deze bevindt zich aan de achterkant van de baby unit.
Op het moment dat de ouder en baby unit ‘gepaired’ zijn dan zal het camerabeeld van de baby unit direct verschijnen op het beeldscherm van de ouder unit.
35LUVION Premium Babyproducts
Het systeem is ontworpen voor Micro SD kaart opname. U kunt handmatig video opnamesmaken. Voordat u video opnames kunt maken, dient u een Micro SD kaart in de Micro SDkaart opening te steken. Het systeem ondersteunt SD kaarten met een geheugencapaciteittot 16GB.
Handmatige video-opnameDruk de Auto record knop op de ouder unit om de opname te starten. Druk de knopnogmaals in om de handmatige opname uit te schakelen.
Geplande video-opnameGa naar Menu-Record-Schedule Record, stel de begin en eindtijd van de opname in kiesON om deze in te schakelen. In deze modus zal de ouder unit iedere dag gedurende degeplande tijd een video-opname maken.
Video’s afspelenVolg deze stappen om opgenomen video’s af te spelen:
1. Tijdens normaal gebruik, druk op de OK knop op de ouder unit om de opgenomenvideo’s te bekijken.
2. Druk op de knopjes om de map VIDEO te selecteren en druk op OK om deze te openen.In deze map staan submappen die een datum als naam hebben. Bijvoorbeeld 090101betekent dat de video’s in deze map op 1 Januari 2009 gemaakt zijn. Indien u veel filmpjes heeft opgenomen; druk op het knopje om naar de volgende pagina te gaan. Druk op het knopje om naar de vorige pagina te gaan. Selecteer de hoofd map en druk op OK om terug te gaan.
3. Selecteer een map en druk op OK om de submappen in te gaan. Bijvoorbeeld 101024_1 betekent dat de video is opgenomen om 10:10:24 door camera 1.
4. Door de video te selecteren en op OK te drukken zal de video afgespeeld worden.
MICRO SD KAART OPNAME EN AFSPELEN

36
Probleem Oplossing
Geen camerabeeld 1. Controleer of de voedingsadapter aangesloten is.2. Controleer of zowel de ouder als baby unit zijn ingeschakeld.3. Controleer of de baby unit in het bereik van de ouder unit is.4. Wanneer u batterijen gebruikt, vervang deze.
De ouder unit geeft “Out of Range” aan
1. Controleer of de voedingsadapter aangesloten is.2. Zorg ervoor dat de baby unit binnen het bereik van de ouder unit is. 3. Pair de baby unit met de ouder unit. Zie pairing p. 34.
Het camerabeeld valt weg 1. Plaats de baby unit dichter bij de ouder unit.2. Probeer de baby/ouder unit of beiden te herpositioneren om de
ontvangst te verbeteren.3. Plaats de antenne van de ouder unit in verticale positie.
Audio problemen 1. Controleer of het volume van de TV aan staat.2. Controleer of er geluid binnen het bereik van de microfoon van de
baby unit is. 3. Als de unit een luid geruis maakt, plaats de ouder en baby unit dan
verder uit elkaar.4. Zorg ervoor dat de ouder unit niet ingezoomed is.
Het beeld is schokkerig Het beeld kan schokkerig worden wanneer er een lagere framerate is (bijvoorbeeld 10 frames per seconde in plaats van 20 frames per seconde).
1. Probeer de ouder unit en de baby unit dichter bij elkaar te plaatsen.2. Verwijder eventuele obstructies tussen de ouder en baby unit. 3. Plaats de antenne van de ouder unit in de verticale positie.
Het beeld is korrelig wanneer u de AV Out functie gebruikt om het op een TV of monitor te bekijken
Het gebruik van de AV OUT functie is voor uw gemak. Indien u een grote TV/monitor heeft met een hoge resolutie (VGA 640 x 480 pixels) dan zal het beeld licht korrelig zijn. Er is dan niks mis met het product of de TV/monitor.
1. Gebruik voor een optimale beeldweergave een TV/monitor PIP (Picture in Picture) functie. Kijk in de handleiding van uw TV/monitor of uw apparaat deze functie heeft. 2. Bekijk het beeld op een kleinere TV/monitor.
De temperatuur is te hoog Buig de temperatuur sensor voorzichtig verder van de behuizing van de baby unit af.
Het alarm van de ouder unit blijft af gaan.
Zet het alarm uit door op de - alarm knop te drukken aan de rechter zijkant van de ouder unit (No 10).
PROBLEEM EN OPLOSSING
TECHNISCHE SPECIFICATIES
Ouder unit
Frequentiebereik 2.400GHz ~ 2.482GHz
Data snelheid 1.5 Mbps
Ontvangstgevoeligheid -81dBm
37LUVION Premium Babyproducts
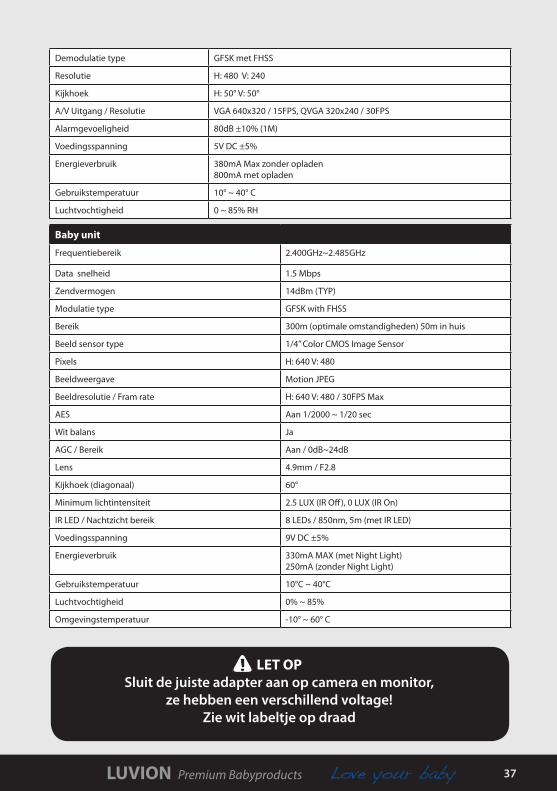
Demodulatie type GFSK met FHSS
Resolutie H: 480 V: 240
Kijkhoek H: 50° V: 50°
A/V Uitgang / Resolutie VGA 640x320 / 15FPS, QVGA 320x240 / 30FPS
Alarmgevoeligheid 80dB ±10% (1M)
Voedingsspanning 5V DC ±5%
Energieverbruik 380mA Max zonder opladen800mA met opladen
Gebruikstemperatuur 10° ~ 40° C
Luchtvochtigheid 0 ~ 85% RH
Baby unit
Frequentiebereik 2.400GHz~2.485GHz
Data snelheid 1.5 Mbps
Zendvermogen 14dBm (TYP)
Modulatie type GFSK with FHSS
Bereik 300m (optimale omstandigheden) 50m in huis
Beeld sensor type 1/4” Color CMOS Image Sensor
Pixels H: 640 V: 480
Beeldweergave Motion JPEG
Beeldresolutie / Fram rate H: 640 V: 480 / 30FPS Max
AES Aan 1/2000 ~ 1/20 sec
Wit balans Ja
AGC / Bereik Aan / 0dB~24dB
Lens 4.9mm / F2.8
Kijkhoek (diagonaal) 60°
Minimum lichtintensiteit 2.5 LUX (IR Off), 0 LUX (IR On)
IR LED / Nachtzicht bereik 8 LEDs / 850nm, 5m (met IR LED)
Voedingsspanning 9V DC ±5%
Energieverbruik 330mA MAX (met Night Light)250mA (zonder Night Light)
Gebruikstemperatuur 10°C ~ 40°C
Luchtvochtigheid 0% ~ 85%
Omgevingstemperatuur -10° ~ 60° C
LET OPSluit de juiste adapter aan op camera en monitor,
ze hebben een verschillend voltage! Zie wit labeltje op draad