Instruction Manual - Escort Shotguns USA
20
DF 12 ESCORT Instruction Manual HATSAN ARMS COMPANY ESCORT Semi Automatic Shotgun Serious. Solid. Impact. Read this manual before using your shotgun.
Transcript of Instruction Manual - Escort Shotguns USA

DF12ESCORT
Instruction Manual
HATSANARMS COMPANY
ESCORTSemi Automatic Shotgun
Serious. Solid. Impact.
Read this manual before using your shotgun.

2
CONTENTS Page
SAFETY MEASURES _____________________________________________________3
NOMENCLATURE _______________________________________________________4
PARTS’ LIST __________________________________________________________5
EXPLODED VIEW ______________________________________________________ 6-7
TECHNICAL FEATURES AND DATA _________________________________________8
EXTERNAL CONTROL PARTS _____________________________________________8
FIRST USE OF THE SHOTGUN _____________________________________________9
LOADING THE SHOTGUN _________________________________________________9
USING MAGAZINE PLUG ________________________________________________ 10
FIRING THE SHOTGUN _________________________________________________ 10
USE OF THE CHOKES ___________________________________________________ 11
UNLOADING THE SHOTGUN _____________________________________________ 12
DISASSEMBLY INSTRUCTIONS ___________________________________________ 13
CARE, CLEANING AND LUBRICATION ______________________________________ 14
ILLUSTRATIONS ______________________________________________________ 15
NOTES ______________________________________________________________ 18

3
Thank you for choosing Hatsan Escort Magnum DF12 semi-automatic shotgun with vertical box magazine. For more information on technical changes, developments and use of accessories packed with your shotgun, please visit our web page www.hatsan.com.tr
WARNING!Read the entire manual very carefully before handling this shotgun. Incorrect handling may result in serious injury or death. Always keep this manual with your shotgun. Make sure you understand all the operational instructions, safety procedures and warnings in this manual before you handle the shotgun. If you sell, lend or give your shotgun to someone, make sure this manual goes with it.
WARNING!Always keep your fingers outside the trigger guard and make sure the safety is fully engaged until you are ready to fire. To fully engage the safety, rotate the safety lever counter clockwise until it stops & locks; and safety lever shows the letter “S” (which stands for SAFE).
SAFETY MEASURES• Always point the muzzle of your shotgun in a safe direction, regardless of whether the firearm is loaded
or unloaded. Never point your shotgun at anything you don’t intend to shoot. Avoid all horseplay while handling a shotgun.
• Keep your fingers away from the trigger when operating any other part of the shotgun’s mechanism.• Keep the safety “ON” until you are actually ready to fire. Treat every shotgun with respect and caution.• Keep your fingers away from the muzzle. Never pull a shotgun towards you by the muzzle.• Make sure the barrel is clear of obstructions, dust and moisture.• Always keep your shotgun unloaded when not in use and never load your shotgun if you will not shoot.• Always aim at a safe target, taking care that it does not conceal any other object. Be sure of your target
and what lies beyond before you pull the trigger. Never shoot at sounds. To avoid ricochets, do not shoot at a flat or hard surface or at water.
• Store shotguns and ammunition separately, out of the reach of children, better if under lock and key. Shotguns should always be unloaded when stored
• Never have loaded firearms in your vehicle, home or camp, many people have been injured or killed in these situations due to this rule being broken.
• Do not climb fences, trees or jump in a ditch with loaded shotgun even if it’s on Safe mode. Each year there are shooters who are shot, usually by their own firearm. Always unload your shotgun when climbing, running or jumping.
• Never rely on any one’s words that the shotgun is “on safe” or unloaded. Always check visually the safety of a shotgun and make sure it’s unloaded when getting your shotgun from storage or someone.
• Avoid alcoholic beverages or drugs before or during shooting.• Always use eye & hearing protection and make sure bystanders are similarly protected.• Even if the shotgun itself does not contain lead, it fires ammunition containing lead or lead containing
compounds which are known to be dangerous for health. Always wash your hands after you contact your shotgun or ammunition. Proper air ventilation is absolutely necessary when shooting indoors.
• Any damage, malfunction, injury, or death resulting from the use of faulty, incorrect, non-standard, remanufactured, hand loaded or reloaded ammunition is the sole responsibility of the user.
• The user is solely responsible for the damage, injuries or death resulting from carelessness or misuse of the shotgun.

4
NOMENCLATURE
Upper Receiver
Lower Receiver (Trigger Receiver)
Bolt
Bolt Handle
Trigger
Box Magazine Release Latch
Bolt Release/Stop Latch
Safety Lever
Box Magazine Retaining Latch
Adjustable Comb Stock
Carry Handle with rear sight Front Sight
Pistol Grip Box Magazine
Forend Muzzle Cap

5
PARTS LIST No. Part Name Part Code No. Part Name Part Code
100 Complete Trigger Group 37-00-100 101 Lower Receiver 37-00-101 102 Receiver Short Pin 37-00-102 103 Stop Pin Of Receiver Short Pin 37-00-103 104 Stop Pin Spring Of Receiver Short Pin 37-00-104 105 Stop Pin Screw Of Receiver Short Pin 37-00-105 106 Receiver Long Pin 37-00-106 107 Stop Pin Of Receiver Long Pin 37-00-107 108 Stop Pin Spring Of Receiver Long Pin 37-00-108 109 Trigger 37-00-109 110 Trigger Spring 37-00-110 111 Sear 37-00-111 112 Sear Spring 37-00-112 113 Trigger Pin 37-00-113 114 Hammer 37-00-114 115 Hammer Bushing Pin 37-00-115 116 Hammer Bushing 37-00-116 117 Hammer Spring 37-00-117 118 Hammer Pin 37-00-118 119 Safety 37-00-119 120 Safety Lever 37-00-120 121 Safety Screw 37-00-121 122 Safety Retaining Pin 37-00-122 123 Safety Retaining Pin Spring 37-00-123 124 Safety Retaining Pin Screw 37-00-124 125 Box Magazine Drop Lever 37-00-125 126 Box Magazine Drop Lever Screw 37-00-126 127 Box Magazine Drop Lever Spring 37-00-127 128 Box Magazine Retaining Latch 37-00-128 129 Bolt Drop Lever 37-00-129 130 Bolt Drop Lever Spring 37-00-130 131 Bolt Drop Lever Screw 37-00-131 132 Pistol Grip 37-00-132 133 Pistol Grip Screw 37-00-133 134 Pistol Grip Screw Washer 37-00-134 135 Pistol Grip Cap 37-00-135 136 Pistol Grip Cap Screw 37-00-136 200 Completed Top Receiver 37-00-200 201 Upper Receiver 37-00-201 202 Upper Receiver Wedge 37-00-202 203 Upper Receiver Damping Wedge 37-00-203 204 Bolt 37-00-204 205 Firing Pin 37-00-205 206 Firing Pin Spring 37-00-206 207 Firing Pin Stop Pin 37-00-207 208 Locking Block 37-00-208 209 Extractor 37-00-209 210 Extractor Pin 37-00-210 211 Extractor Spring 37-00-211 212 Extractor Retaining Pin 37-00-212 213 Action Bar 37-00-213 214 Cocking Handle 37-00-214 215 Cocking Handle Ball 37-00-215 216 Cocking Handle Ball Spring 37-00-216 217 Receiver Screw 37-00-217 218 Carry Handle 37-00-218 219 Carry Handle Screw 37-00-219
220 Carry Handle Nut 37-00-220
300 Complete Barrel 37-00-300
301 Barrel 37-00-301
302 Barrel Nut 37-00-302
303 Action Bar Bushing 37-00-303
304 Action Bar Bushing Extension 37-00-304
305 Piston 37-00-305
306 Piston Retaining Plug 37-00-306
307 Gas Cylinder 37-00-307
308 Gas Cylinder O-Ring 37-00-308
309 Gas Cylinder Retaining Plug 37-00-309
310 Gas Cylinder Nut 37-00-310
311 Inner Choke 37-00-311
312 Barrel Cap 37-00-312
400 Complete Forend 37-00-400
401 Forend 37-00-401
402 Forend Plastic Body 37-00-402
403 Forend Plastic Body Screw 37-00-403
404 Forend Bushing 37-00-404
405 Forend Bushing Screw 37-00-405
406 Forend Bushing Lock Pin 37-00-406
407 Forend Bushing Spring 37-00-407
408 Forend Bushing Pin 37-00-408
409 Front Sight 37-00-409
410 Front Sight Nut 37-00-410
411 Front Sight Screw 37-00-411
412 Swivel 37-00-412
413 Swivel Spring 37-00-413
500 Complete Box Magazine 37-00-500
501 Box Magazine 37-00-501
502 Box Magazine Spring 37-00-502
503 Cartridge Pusher Body 37-00-503
504 Cartridge Pusher Body Latch 37-00-504
505 Cartridge Pusher Body Latch Pin 37-00-505
506 Cartridge Pusher Body Latch Spring 37-00-506
507 Box Magazine Cap 37-00-507
508 Box Magazine Cap Locking 37-00-508
600 Complete Recoil Tube 37-00-600
601 Recoil Tube 37-00-601
602 Recoil Spring 37-00-602
603 Recoil Spindle 37-00-603
604 Recoil Tube Cap 37-00-604
605 Recoil Tube Nut 37-00-605
606 Stock Swivel 37-00-606
607 Stock Swivel Axial Pin 37-00-607
700 Complete Stock 37-00-700
701 Stock 37-00-701
702 Butt Plate 37-00-702
703 Butt Plate Screw 37-00-703
704 Cheekpiece 37-00-704
705 Cheekpiece Adjustment Nut 37-00-705
706 Cheekpiece Adjustment Nut Screw 37-00-706
707 Stock Connection Screw 37-00-707
708 Stock Connection Screw Washer 37-00-708
709 Stock Connection Screw Spring Washer 37-00-709

6
501
503
505
504506
502
508
507
202
217
203
219218
220205
206
207
209
210
211
216
215
208
213
201
204
212
214
310
311
301
302
309
303
304
305
700
600 500
100
200
300
400
312
604
602
603
601
605
606
607
705
703
701
704
708
706
709
707
702
402
403404 408
406
407
405
401
413
412
405
411 409
410
132
135
133
127
125
126
118
113
136
134
108
107106
103105
104
101
102
119
120
121
122
123
124
111
112
110
109
117
114
116
115
131
129130
128
306
307
308
309
EXPLODED VIEWESCORT DF12

7
501
503
505
504506
502
508
507
202
217
203
219218
220205
206
207
209
210
211
216
215
208
213
201
204
212
214
310
311
301
302
309
303
304
305
700
600 500
100
200
300
400
312
604
602
603
601
605
606
607
705
703
701
704
708
706
709
707
702
402
403404 408
406
407
405
401
413
412
405
411 409
410
132
135
133
127
125
126
118
113
136
134
108
107106
103105
104
101
102
119
120
121
122
123
124
111
112
110
109
117
114
116
115
131
129130
128
306
307
308
309

8
TECHNICAL FEATURES AND DATA Fill in the blanks below according to your shotgun:
EXTERNAL CONTROL PARTS(“Left” and “Right” refers to the left and the right sides of the shotgun seen by a shooter while holding it in the firing position. Rear refers to the stock and front refers to the muzzle side of the shotgun)
SAFETY LEVER: • It is located at the rear of the trigger on the trigger housing. • The safety lever is disengaged if it is rotated clockwise in full and locked. In this position the safety
lever points the letter “F” (which stands for FIRE) and the shotgun is ready to fire. (1) • To engage the safety lever, rotate it counter clockwise until it stops & locks; and safety lever shows the
letter “S” (which stands for SAFE).The safety is now ON, blocking the trigger from being pulled. (2)
WARNING!• Always keep the cross button safety “ON” until you are ready to fire and the muzzle pointing at the
target. • Make sure that you understand how all external control parts work before you attempt to load the
shotgun. • Keep the muzzle pointed in a safe direction and your finger off the trigger when operating the safety.
Malfunctions which may cause a shotgun to fire whether the safety is engaged or disengaged are rare but can happen. Even if an accidental firing should occur, nobody will be hurt if you follow this rule.
THREE THINGS TO REMEMBER ABOUT SAFETIES:1. NEVER TOTALLY DEPEND ON A MECHANICAL SAFETY. Like all mechanical devices the safe-
ty is subject to breakage or malfunction and can be defeated by wear, abuse, dirt, corrosion, incorrect assembly of the shotgun, improper adjustment or repair, or lack of maintenance.
2. NO MECHANICAL SAFETY IS “CHILDPROOF” OR “FOOLPROOF”. No safety ever invented can be relied upon to prevent an accidental shooting by a determined child or a grown up idiot “playing” with a shotgun.
3. TREAT EVERY SHOTGUN AS IF YOU EXPECT ITS MECHANICAL SAFETY NOT TO WORK. You will be astounded at how cautious you become, and how little tolerance you will have for the complacency of others.
Box Magazine Retaining Latch: It is located on the left section of the trigger housing .It is used to retain the Box Magazine on the shotgun.
Box Magazine Release Latch: It is located on the right section of the trigger housing. When this is pressed, the Box Magazine detaches from the shotgun.
Bolt Release/Stop Latch: It is located on the left section of the receiver. This button keeps the Bolt locked at rear (when the Box Magazine is on the shotgun). When you press this latch; the bolt releases and closes & locks at front.
Trigger: It is located within the lower receiver. If the Safety is OFF (at F position) and if there is shotshell
Model Serial No Barrel Length Chamber Caliber TypeSemi-automatic shotgun
with detachable Box Magazine

9
in the chamber; pulling the trigger will cause shotgun to fire.
Bolt Cocking Handle: It is on the right side of the shotgun, protruding from the Bolt. It is used to retract the Bolt.
Muzzle Cap: It is located at the barrel muzzle. This cap is screwed (clockwise) on the barrel to securely fasten the Barrel and the Fore-end.
FIRST USE OF THE SHOTGUNYour new Escort DF12 semi-automatic shotgun is packed dismounted in its box. Follow steps below to prepare assemble your shotgun. Before proceeding with the assembly of the shotgun, carefully check the “Nomenclature” and read “Safety Measures” sections.
• Make sure the barrel cap is tightened firmly. If not, rotate it clockwise and tighten it. (3)• Take one the empty box magazines (which come with your shotgun) and insert it in its housing (4). Do
the following checks with the empty magazine.• Insert the bolt handle in the bolt and pull back bolt cocking handle and lock the bolt at the rear. (5)• Press the Bolt Release/Stop Latch so the bolt closes and locks at front. Make sure it is locked to the
barrel. (6)• Now your shotgun is ready for use. You can proceed the “Loading” and “Firing” sections of this
instruction manual.
Before using your shotgun, carefully check and read the “Nomenclature” and read “Safety Measures” sections.
WARNING!Barrel bore and chamber must be clean and there should be no obstructions in them. Look through the chamber and make sure its empty. Assembly process must be done with an empty shotgun
LOADING THE SHOTGUNWARNING!• Always keep your fingers away from the trigger if you do not intend to fire. • Always check cartridge chamber and receiver to see that the shotgun is not already loaded. • While you load the shotgun, always point the barrel in a safe direction. • Always use the correct ammo size, which your shotgun is chambered. • Always keep the safety “ON” while loading your shotgun.
Load the shotgun as follows:• Point the muzzle in a safe direction.• Put the safety “ON”.• By inserting the brass heads of the shotshells first; load shotshells in the magazine. (7)• Carefully insert the loaded magazine into your shotgun. While inserting the magazine, brass heads of
cartridges loaded into the magazine must face the trigger guard. (4) • Retract the bolt cocking handle and release it back so that one shotshell from the magazine feeds into
the barrel. (8)• By doing so, the bolt slides fast to forward and locks in the receiver. (6)
WARNING!Shotgun is now loaded and ready to be fired.

10
USING MAGAZINE PLUGWhen mounted, Magazine Plug reduces the capacity of the Box Magazine from 10 to 2 or from 5 to 2 for safety reasons or regulatıons varying from country to country.PS. Box magazine plug is optional. Consult your dealer about your country’s laws regarding use of the plug.It is recommended to have your box magazine plug assembled by a qualified gunsmith.
Assemble magazine plug as follows:• If loaded, empty the box magazine by pushing out the brass heads of the shotshells. (9)• With a proper pin, press on the magazine cap lock and release it from the magazine cap. (10)• Because of high spring force in the magazine hold the Box Magazine Cap Lock with your fingers; slide
the Box Magazine Cap to the side and carefully remove it. (11)• After removing the Box Magazine Cap, carefully remove the Box Magazine Cap Locking and release the
magazine spring slowly by controlling with your hands. (12)• Insert the magazine plug inside the magazine spring and push the spring into the magazine (13) until
the magazine plug is aligned to the bottom of the magazine. • Keep holding with your hand and slide the magazine cap in its place at the magazine. (14)• With the help of a proper pin; place the locking section of the magazine plug on its housing on the
magazine cap.
NOTE: To dismount the box magazine plug reverse the assembly procedures.
FIRING THE SHOTGUNWARNING!When firing, keep your fingers and other objects away from the path of the bolt and the bolt cocking handle since they move backward and forward with considerable force and velocity. Keep the safety “ON” and your fingers outside the trigger guard until you are actually ready to fire and aimed at your intended target. Bolt will remain open (locked at the rear) after the last cartridge is fired, but never rely on this. Always check with visually to verify that no cartridge is left in the chamber and magazine. Your semi auto shotgun, like other semi auto shotguns, feeds the next cartridge from the magazine into the cartridge chamber each time you fire. Since no mechanical force is necessary to fire another cartridge after the previous one is ejected, always be aware that the shotgun is ready to fire as long as it is loaded.
Fire with your shotgun as follows;• Wear eye and ear protection.• Engage safety and load your shotgun. (see loading section) • Retract the bolt cocking handle and release it back so one shotshell is loaded in the barrel chamber.• Point the barrel at your intended target.• Disengage safety and take aim. • Press the trigger.
WARNING!Do not hold from the magazine while shooting. One hand should hold pistol grip and the other hand should hold forend or foregrip during shooting.
It is not uncommon while loading or firing any semi-automatic shotgun to experience a malfunction in which an unfired cartridge or fired cartridge case becomes jammed between the bolt and the barrel. Clear such a stoppage as follows. Point the muzzle in a safe direction. Put the safety “ON”. Detach the Box Magazine. Pull back the bolt and hold it at the rear (5) and with your other hand pull out the bolt release/

11
stop latch and lock the bolt at the rear (15). The jammed cartridge or case can then be removed by shaking it out, or picking it out with your fingers.
WARNING!Always keep your fingers away from the path of Bolt or Bolt Cocking Handle. Follow the steps below carefully to avoid and injury or damage:• When there is no magazine inserted in the shotgun; pull the Bolt Release/Stop Latch out in full until
it stops. Otherwise you may cause the latch to miss the bolt.• When the magazine is inserted or not; when you lock the bolt at rear; make sure there is no
external force/impact on the bolt release/stop latch. Otherwise the bolt can close without your control.
WARNING!• If the trigger is pulled and a “click” is heard but a chambered cartridge fails to fire, follow the
below instructions:• Point the shotgun in a safe direction. • Engage safety and remove the Box Magazine.• Wait 30 seconds. • Eject the cartridge from the chamber by retracting the bolt. Examine the cartridge primer. If it
has been deeply indented by the firing pin, the cartridge is defective. If it has been indented lightly or not at all, rechamber the cartridge and try again.
• If it still does not fire unload the shotgun and take it to a qualified gunsmith. • When you are firing, if you notice that the sound of any cartridge is considerably louder or softer
than the previous one, stop firing and do not load the shotgun anymore. In such a case, follow the below instructions.
• Point the shotgun in a safe direction. • Engage safety.• Follow the instructions in the “unloading section” and unload the shotgun completely. • With the shotgun unloaded, check the barrel for blockage or damage, and inspect the
mechanical portions and receiver of the shotgun for damage. If you notice any damage or malfunction in the shotgun take it to qualified gunsmith.
USE OF THE “CHOKES”Shotgun choke is a constriction in the end of a shotgun barrel which focuses the shot into a tighter stream- much like a nozzle on the end of a water hose, which does exactly the same thing for exactly the same reason.
There are two different choke-system:1. Screw-in (Inner) Chokes.2. Fixed Cylinder Bore Choke.
1. Screw-in (Inner) Chokes:There are 5 different screw-in (inner) chokes that can be used on your shotgun. (16)• F (Full / )• IM (Improved Modified /// )• M (Modified /// )• IC (Improved Cylinder //// )• Cyl-Skeet (Cylinder-Skeet ///// )
Your shotgun is packed with either 3-choke system or 5-choke system. If your shotgun has the screw-in choke configuration.

12
Choke Constriction (12 Gauge) Pattern PercentageCylinder-Skeet 0-0,12 mm 40% - 53%Improved Cylinder 0.25 mm 57%Modified 0.50 mm 67%Improved Modified 0.75 mm 73%Full 1.00 mm 75%
Most common and preferred 3-choke system is F, M, IC chokes. However different combination3-choke systems are possible depending on the conditions of different countries.5-choke system contains all the inner chokes being F, IM, M, IC, Cyl-Skeet.Check the number and markings on the chokes to find out the inner choke configuration of your shotgun.All screw-in (inner) chokes have one, two, three, four or five notches, which indicate the type of the screw-in choke, i.e. F choke has one, IM has two, M has three, IC has four and Cyl-Skeet has five notches. Please also check the markings on chokes.
NOTE: M, IC and Cyl-Skeet choke tubes are good for steel shot. F, IM Choke tubes are lead shot only!
Above table shows the constriction & pattern percentage versus inner chokes. Pattern percentages are taken at a distance of 36.5 meters (40 yards). The number of pellets striking within a 76 cm (30 inch) circle, drawn so as to encompass as many pellet holes as possible, is counted and compared with the number of pellets contained in an identical unfired shell. The result is expressed as a percentage.As can be seen from above table Full inner choke has the most accuracy and accuracy decreases from Full to Cyl-Skeet inner choke which has the least accuracy. Expansion of the shot pellets within a distance is the least in Full inner choke and it is the most in Cylinder-Skeet inner choke.
Assembly & disassembly of the inner chokes:• To disassemble inner chokes, unscrew (counter-clockwise) by means of choke wrench and remove it.
(17)• To assemble inner chokes, take one of the inner chokes of your choice. Place it inside barrel and by
means of choke wrench; screw (clockwise) it to the end until it is completely tightened. (18)
2. Fixed Cylinder Bore ChokeFixed Cylinder Bore Choke means the choke constriction is pre-machined into the barrel at the factory. No choke adjustments can be made and no interchangeable chokes can be put.
UNLOADING THE SHOTGUNWARNING!Keep your fingers off the trigger and keep the safety “ON”.
Unload your shotgun as follows:• Point the shotgun in a safe direction and engage the safety. (2)• Press the box magazine retaining latch and detach the box magazine. (19)• To remove the cartridges from the magazine push them in the opposite direction of loading. (9)• Retract the bolt cocking handle to eject the cartridge from the chamber.• Keeping your fingers away from the path of the bolt; release the bolt so it closes and locks at front.• Disengage safety and pointing the shotgun in a safe direction (even though it may be unloaded),
depress the trigger to lower the hammer.
13
DISASSEMBLYWARNING!Make sure the shotgun is completely empty and safety is ON before you start disassembling the shotgun.
Disassembly the shotgun as follows:• Unscrew (counter clockwise direction) the barrel cap and remove it from the barrel. (20)• Remove the carry handle or rear sight by unscrewing their screws using cross head screw driver (21).
Then slide them away from the picatinny rail. (22) • Pull out the forend from the barrel. (23)• Pull out the pins holding upper and lower receiver. (24)WARNING!While pulling these pins out, they do not come off entirely from the receiver. Some part of them stay in the lower receiver. While pulling them out; they reach to a point where they sit in their housings located on receiver pins. (25) Do not force them any further as this may damage the pins. Lower and upper receivers will detach from each other when the pins release from upper receiver.
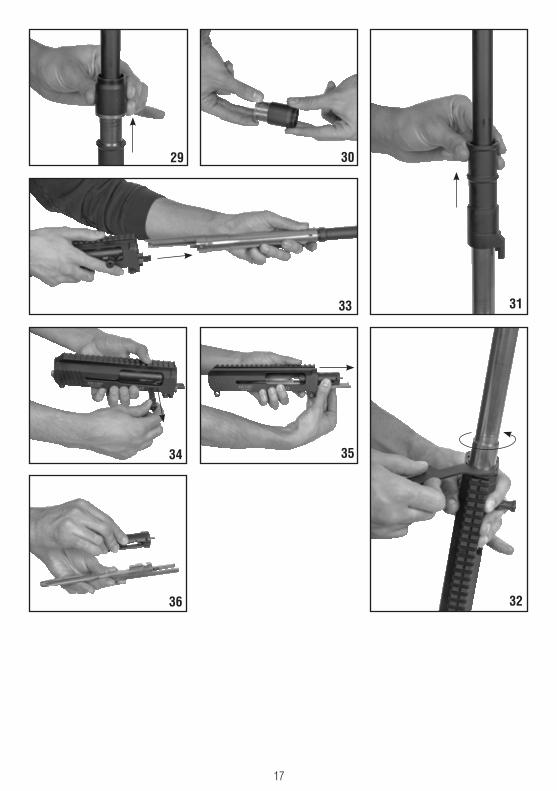
• Detach upper and lower receiver from each other. (26)• Rotate the gas chamber cap counter clockwise and remove it from the gas chamber by pulling it
through the muzzle. (27)• Pull the gas chamber slightly to the rear so you can remove the gas chamber clips.(28)• Pull the gas chamber towards to muzzle and remove it. (29)• If piston came together with the gas chamber; remove the piston from the gas chamber. (30) If piston
stayed on the barrel; pull it towards the muzzle and remove it.• Pull the action bar bushing group towards the muzzle and remove it. (31)• by using the counter nut wrench; rotate the counter nut in counter clockwise direction and remove it by
pulling it towards the muzzle. (32)• Pull the barrel and remove it from the upper receiver. (33)• Pull and remove the bolt cocking handle from the bolt. (34)• Pull and remove the bolt group and action bar from the upper receiver. (35)• Take the bolt group from the top of the action bar. (36) NOTE: To reassemble your shotgun reverse the disassembly procedures..
WARNING!If you wish to disassembly the shotgun right after shooting; be careful as the barrel might have get hot.
NOTE: Do not attempt to disassemble the parts in the lower receiver. Contact your local gunsmith or service department if you need assistance with these parts.
WARNING!If the barrel does not sit properly in the receiver or if the bolt does not lock in front, it means you have not assembled your shotgun properly. In such case, disassemble your shotgun and assemble again by following the instructions in this manual. Take your shotgun to gunsmith if you still cannot assemble your shotgun properly. After you assembled your shotgun or if you are taking it to a gunsmith for help, make sure that you keep the safety “ON”.

14
CARE, CLEANING AND LUBRICATION WARNING!Before cleaning or lubricating the shotgun make sure it is unloaded and the safety is “ON”. It is recommended to disassemble the shotgun to clean and to lubricate it when grease or dirt particles accumulate and combustion residues. To have the best resistance against corrosion, it is necessary to clean and lubricate the shotgun after each use, especially after use in wet and saline environment.
Materials and equipment necessary for cleaning and lubrication; • Cleaning rod • Cotton bore patches • Brass bore brush • Small soft brush • Powder solvent• Good quality shotgun oil
• After use, to remove any powder and lead residue in the bore, scrub the barrel and chamber using the bore brush with powder solvent. Then do not forget to swab the bore and the chamber with oiled cot-ton patches to protect from rust and corrosion.
• Do the general maintenance after daily shots.• At the end of the hunting season or after 100 shots, disassemble the parts explained in ASSEMBLY &
DISASSEMBLY section of this manual and clean it with a soft brush and shotgun oil. Then dry it care-fully with a soft cloth and oil the parts lightly.
• After you remove the bolt group and the action bar; clean inside the upper receiver and lower receiver with soft brush and gun oil.
• Clean the outer surface the magazines with oiled cotton patches. Then dry it carefully with a soft cloth and oil the parts lightly.
• Any powder on the firing wall, barrel, etc. can be cleaned with a brush and powder solvent.• All external surfaces should be wiped down with light coat of rust preventative.

15
1
4
1
8
2
6
9
3
5
2
Safety OFF(F=Fire)
Safety ON(S=Safe)
7
10 11
14
12
13 15
16
21
2823
24
19
22
1817
27
20
25
26
16
17
29 2430
36
3133
34 35
32

18
NOTES
19
NOTES

Esco
rt DF
12 In
struc
tion
Man
ual-M
arch
201
9
Serious. Solid. Impact.
HATSANARMS COMPANY
www.hatsan.com.tr | www.hatsanUSA.com