3 5rollering units d3 5l11 8 d3 5l13 8 d3 5l15 8 d3 5l17 8 d3 5l19 8 d3 5l21 8 d3 5l23 8 d3 5l25 8 d
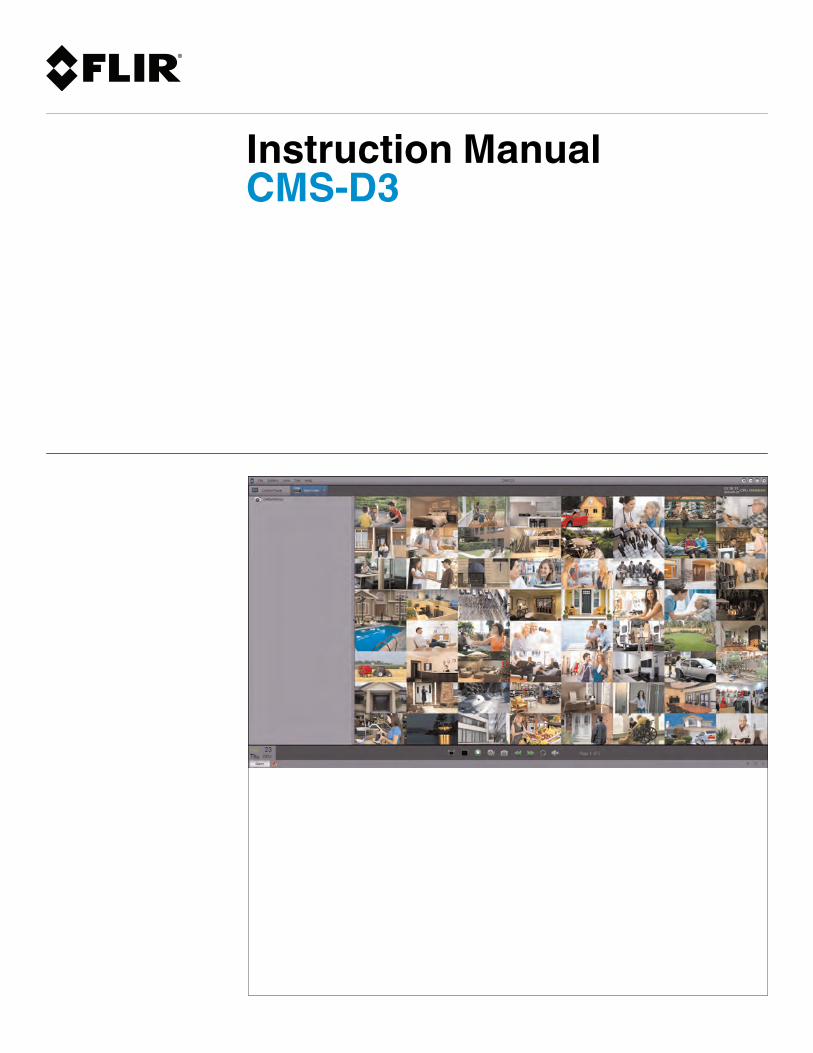
Instruction ManualCMS-D3

Instruction ManualCMS-D3 CENTRALMANAGEMENTSOFTWARE
#LX400017; r. 1.0/14175/14180; en-US iii

Table of contents
1 CMS-D3 CENTRAL MANAGEMENT SOFTWARE.......................................11.1 System Requirements..................................................................11.2 Installing CMS-D3.......................................................................11.3 Adding DVRs .............................................................................2
1.3.1 Adding a DVR from the local area network (LAN) ....................21.3.2 Adding a DVR using a DDNS address...................................6
1.4 Control Panel .............................................................................81.5 Main View .................................................................................9
1.5.1 Using Multiple Windows or Monitors ................................... 111.5.2 Using Sequence Mode .................................................... 121.5.3 Using PTZ Controls ........................................................ 131.5.4 PTZ Controls................................................................. 131.5.5 Using PTZ Presets ......................................................... 141.5.6 Using PTZ Cruise ........................................................... 14
1.6 Remote Playback...................................................................... 141.6.1 Remote Playback Controls ............................................... 161.6.2 Downloading Video Files ................................................. 17
1.7 Group Device Management ........................................................ 181.7.1 Modifying DVRs............................................................. 191.7.2 Deleting DVRs............................................................... 201.7.3 Remotely Configuring DVRs ............................................. 201.7.4 Creating Camera Groups ................................................. 201.7.5 Modifying Camera Groups ............................................... 201.7.6 Deleting Camera Groups ................................................. 21
1.8 Local Log Search...................................................................... 211.8.1 Backing up Logs ............................................................ 22
1.9 Account Management................................................................ 221.9.1 Enabling Passwords for the Admin Account ......................... 231.9.2 Adding User Accounts..................................................... 231.9.3 Modifying User Accounts ................................................. 241.9.4 Deleting User Accounts ................................................... 24
1.10 Using File Management ............................................................. 251.11 Video Player ............................................................................ 26
1.11.1 Video Player Controls...................................................... 271.12 System Configuration ................................................................ 27
1.12.1 General........................................................................ 271.12.2 File ............................................................................. 281.12.3 Alarm Sound ................................................................. 28
#LX400017; r. 1.0/14175/14180; en-US v

CMS-D3 CENTRALMANAGEMENT SOFTWARE
1
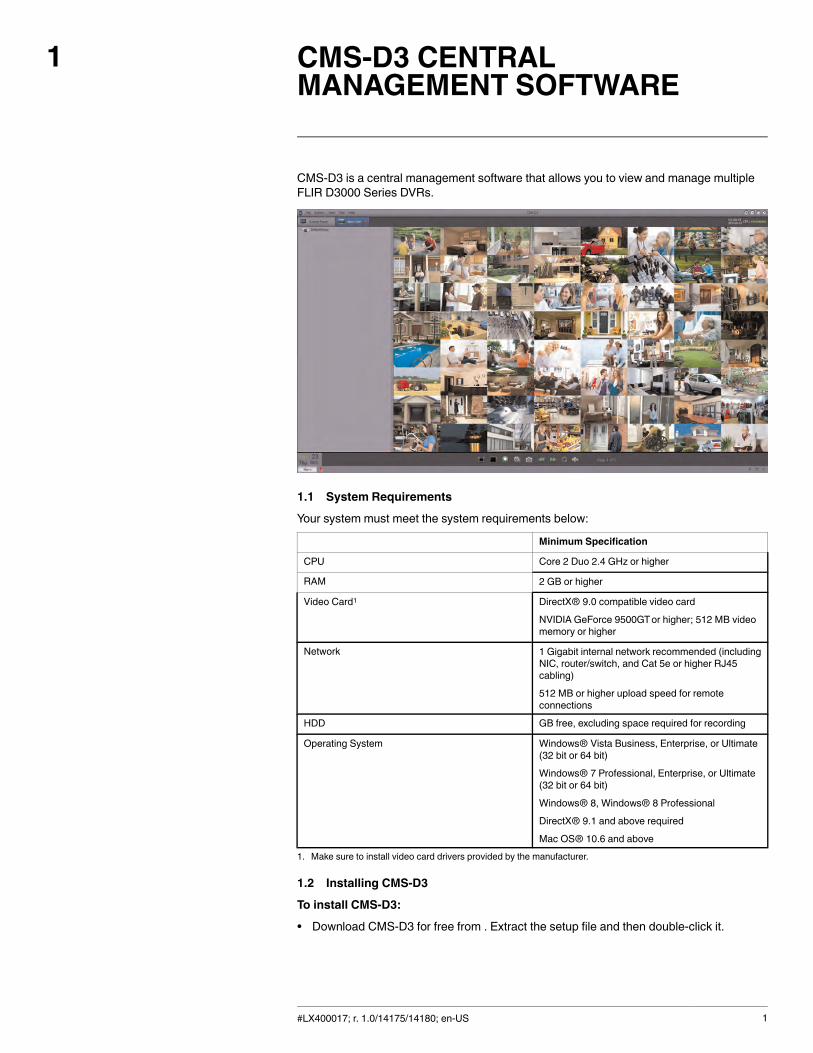
CMS-D3 is a central management software that allows you to view and manage multipleFLIR D3000 Series DVRs.
1.1 System Requirements
Your system must meet the system requirements below:
Minimum Specification
CPU Core 2 Duo 2.4 GHz or higher
RAM 2 GB or higher
Video Card1 DirectX® 9.0 compatible video card
NVIDIA GeForce 9500GTor higher; 512 MB videomemory or higher
Network 1 Gigabit internal network recommended (includingNIC, router/switch, and Cat 5e or higher RJ45cabling)
512 MB or higher upload speed for remoteconnections
HDD GB free, excluding space required for recording
Operating System Windows® Vista Business, Enterprise, or Ultimate(32 bit or 64 bit)
Windows® 7 Professional, Enterprise, or Ultimate(32 bit or 64 bit)
Windows® 8, Windows® 8 Professional
DirectX® 9.1 and above required
Mac OS® 10.6 and above1. Make sure to install video card drivers provided by the manufacturer.
1.2 Installing CMS-D3
To install CMS-D3:
• Download CMS-D3 for free from . Extract the setup file and then double-click it.
#LX400017; r. 1.0/14175/14180; en-US 1
CMS-D3 CENTRAL MANAGEMENT SOFTWARE1
NoteYou may receive installation warnings. This is normal. Accept the security warnings to continue.
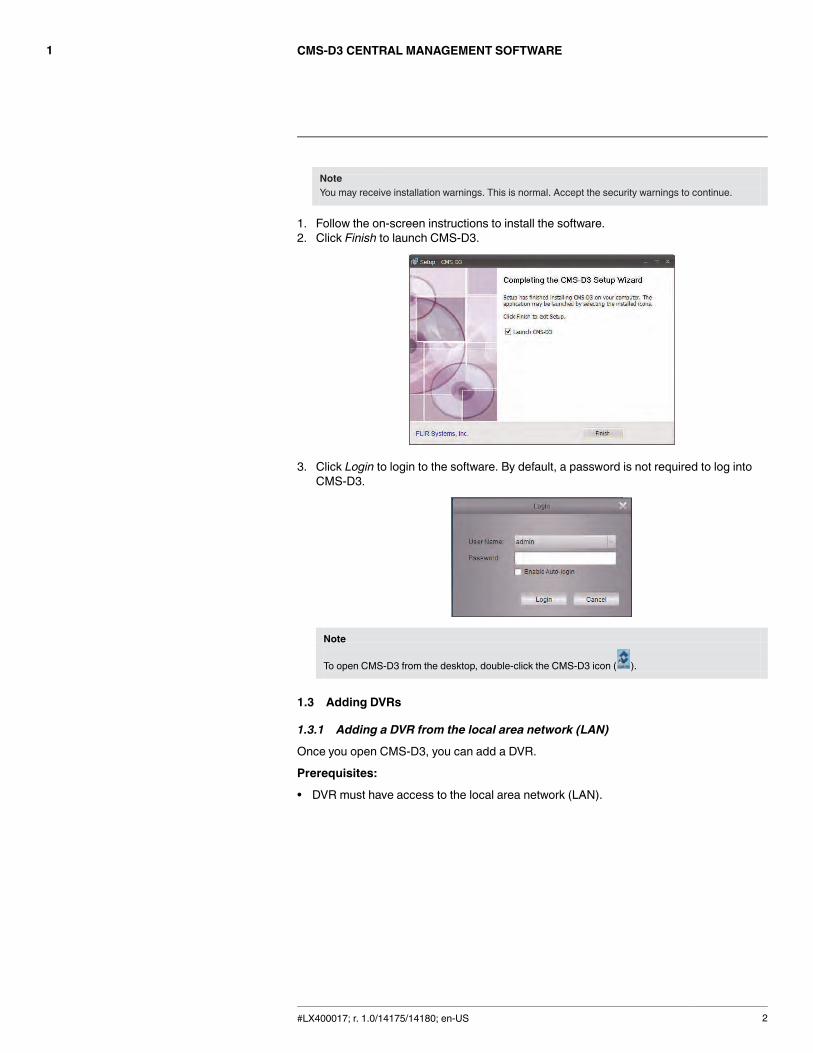
1. Follow the on-screen instructions to install the software.2. Click Finish to launch CMS-D3.
3. Click Login to login to the software. By default, a password is not required to log intoCMS-D3.
Note
To open CMS-D3 from the desktop, double-click the CMS-D3 icon ( ).
1.3 Adding DVRs
1.3.1 Adding a DVR from the local area network (LAN)
Once you open CMS-D3, you can add a DVR.
Prerequisites:
• DVR must have access to the local area network (LAN).
#LX400017; r. 1.0/14175/14180; en-US 2
CMS-D3 CENTRAL MANAGEMENT SOFTWARE1
To add a DVR to CMS-D3:
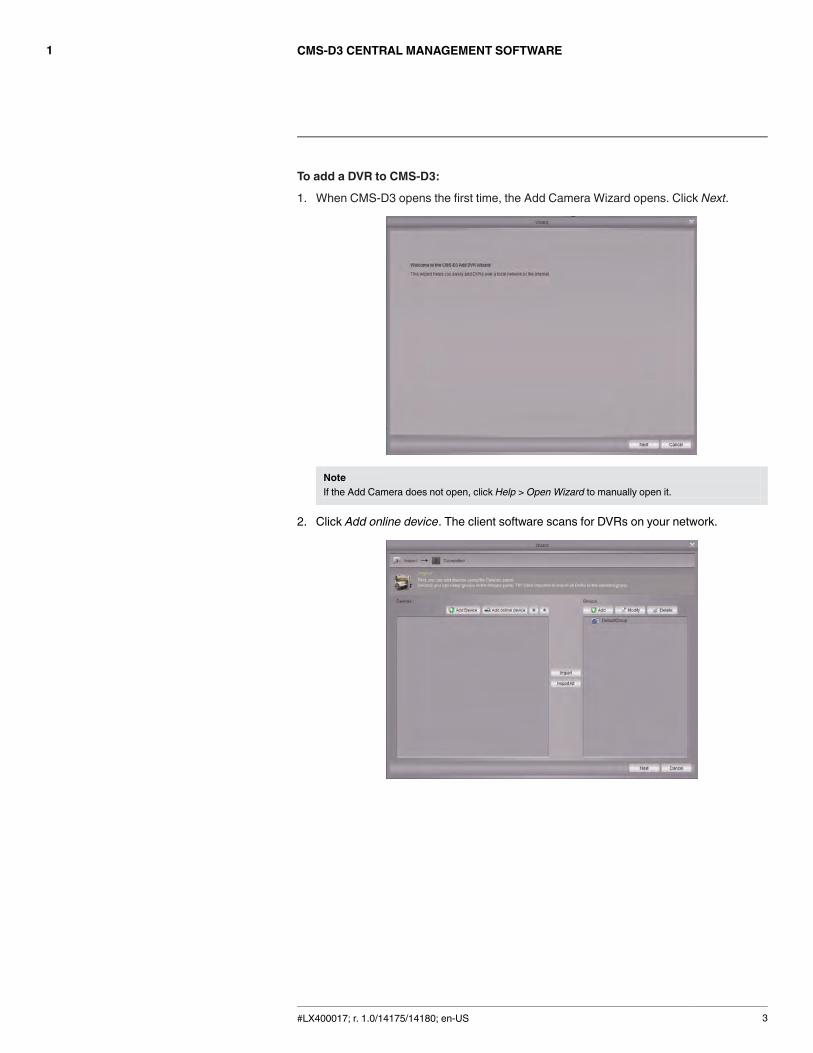
1. When CMS-D3 opens the first time, the Add Camera Wizard opens. Click Next.
NoteIf the Add Camera does not open, click Help > Open Wizard to manually open it.
2. Click Add online device. The client software scans for DVRs on your network.
#LX400017; r. 1.0/14175/14180; en-US 3

CMS-D3 CENTRAL MANAGEMENT SOFTWARE1
3. Click your DVR in the list and click Add Selected Device. The Add Device screenopens and populates the DVR’s IPAddress, Port, and the number of channels.
NoteIf your DVR does not appear in the list, click Exit > Add Device. Then, enter the local IPAddress ofthe DVR.
4. Under Device Name, enter a name for your DVR of your choice (e.g. home, business,etc.).
5. Under User Name, enter the DVR’s user name (default: admin).6. Under Password, enter the DVR’s password (default: 000000).7. Click Add.
#LX400017; r. 1.0/14175/14180; en-US 4

CMS-D3 CENTRAL MANAGEMENT SOFTWARE1
8. Click ImportAll. This adds all DVRs and cameras to the Default group.
9. Click Next then click Finish to complete the Wizard.10. ClickMain View.
#LX400017; r. 1.0/14175/14180; en-US 5
CMS-D3 CENTRAL MANAGEMENT SOFTWARE1
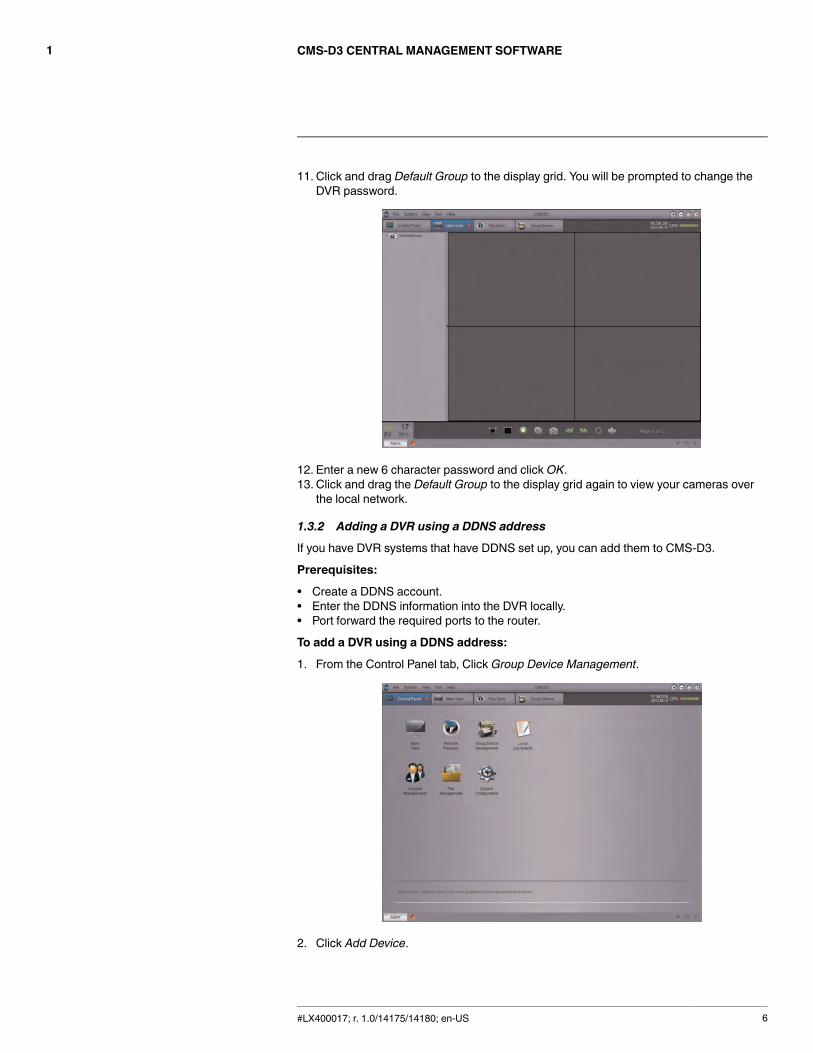
11. Click and drag Default Group to the display grid. You will be prompted to change theDVR password.
12. Enter a new 6 character password and click OK.13. Click and drag the Default Group to the display grid again to view your cameras over
the local network.
1.3.2 Adding a DVR using a DDNS address
If you have DVR systems that have DDNS set up, you can add them to CMS-D3.
Prerequisites:
• Create a DDNS account.• Enter the DDNS information into the DVR locally.• Port forward the required ports to the router.
To add a DVR using a DDNS address:
1. From the Control Panel tab, Click Group Device Management.
2. Click Add Device.
#LX400017; r. 1.0/14175/14180; en-US 6
CMS-D3 CENTRAL MANAGEMENT SOFTWARE1
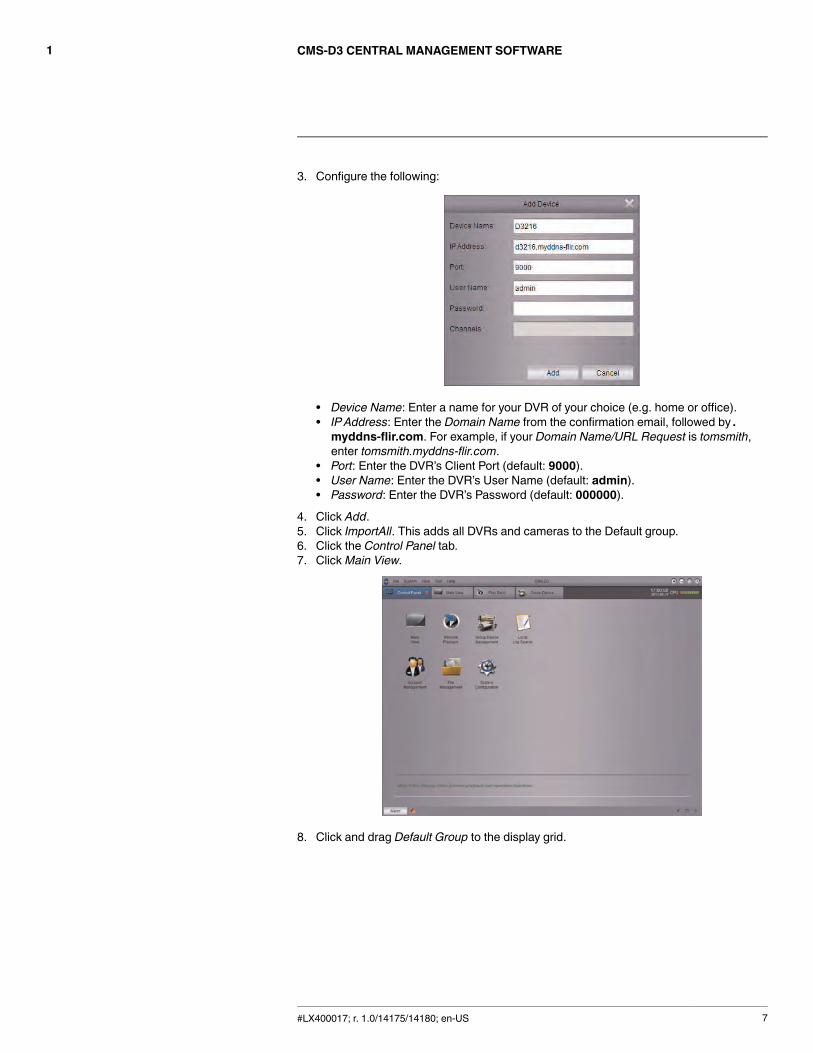
3. Configure the following:
• Device Name: Enter a name for your DVR of your choice (e.g. home or office).• IPAddress: Enter the Domain Name from the confirmation email, followed by .myddns-flir.com. For example, if your Domain Name/URL Request is tomsmith,enter tomsmith.myddns-flir.com.
• Port: Enter the DVR’s Client Port (default: 9000).• User Name: Enter the DVR’s User Name (default: admin).• Password: Enter the DVR’s Password (default: 000000).
4. Click Add.5. Click ImportAll. This adds all DVRs and cameras to the Default group.6. Click the Control Panel tab.7. ClickMain View.
8. Click and drag Default Group to the display grid.
#LX400017; r. 1.0/14175/14180; en-US 7

CMS-D3 CENTRAL MANAGEMENT SOFTWARE1
Result
1.4 Control Panel
You can access your DVRs, including live and recorded video and configuration throughthe Control Panel. You may open the Control Panel at any time by clicking the Control Pan-el tab.
The menus available through the Control Panel are:
• Main View: View live video from your cameras. For details, see 1.5Main View, page 9.• Remote Playback: Playback recorded video from your DVR. For details, see 1.6 Re-mote Playback, page 14.
• Group Device Management: Manage DVRs and camera groups. Remotely configureDVR settings. For details, see 1.7 Group Device Management, page 18.
• Local Log Search: Search for logs on your DVRs. For details, see 1.8 Local Log Search,page 21.
• Account Management: Configure user accounts and passwords for the client software.For details, see 1.9 Account Management, page 22.
• File Management: View or manage screenshots and recorded video files. For details,see 1.6 Remote Playback, page 14.
#LX400017; r. 1.0/14175/14180; en-US 8
CMS-D3 CENTRAL MANAGEMENT SOFTWARE1
• System Configuration: Configure CMS-D3 settings. For details, see 1.12 System Con-figuration, page 27.
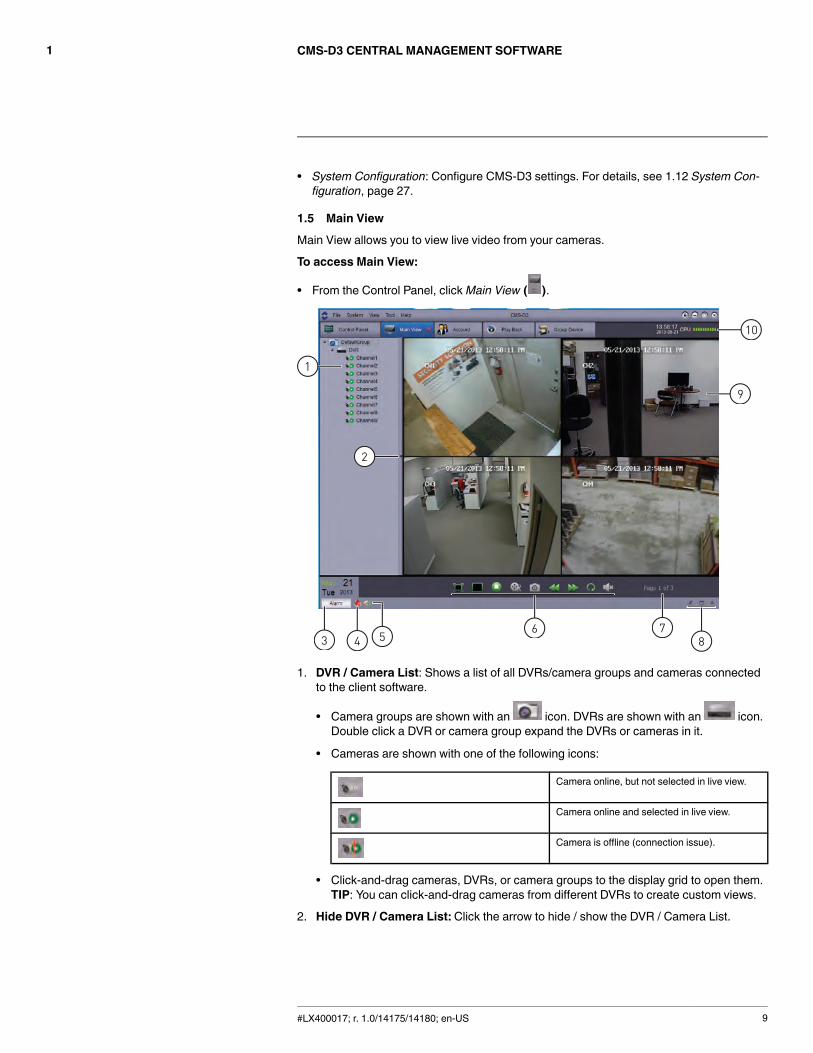
1.5 Main View
Main View allows you to view live video from your cameras.
To access Main View:
• From the Control Panel, clickMain View ( ).
1
2
10
9
3 4 576
8
1. DVR / Camera List: Shows a list of all DVRs/camera groups and cameras connectedto the client software.
• Camera groups are shown with an icon. DVRs are shown with an icon.Double click a DVR or camera group expand the DVRs or cameras in it.
• Cameras are shown with one of the following icons:
Camera online, but not selected in live view.
Camera online and selected in live view.
Camera is offline (connection issue).
• Click-and-drag cameras, DVRs, or camera groups to the display grid to open them.TIP: You can click-and-drag cameras from different DVRs to create custom views.
2. Hide DVR / Camera List: Click the arrow to hide / show the DVR / Camera List.
#LX400017; r. 1.0/14175/14180; en-US 9
CMS-D3 CENTRAL MANAGEMENT SOFTWARE1
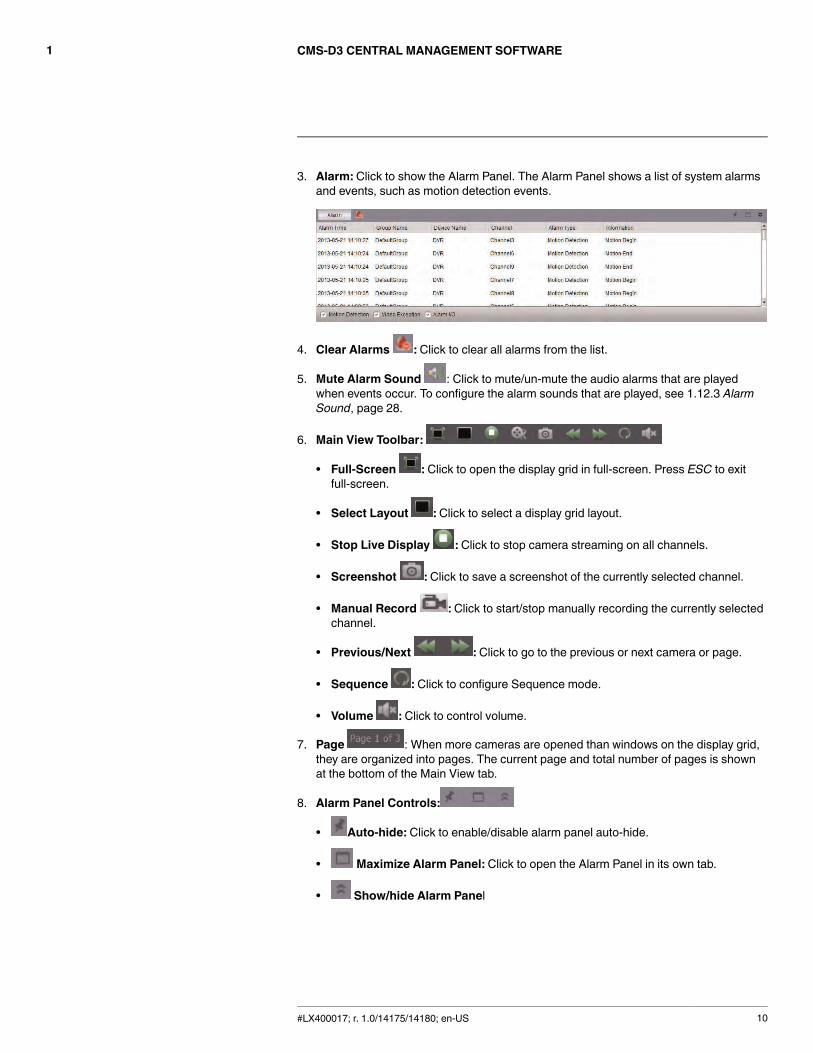
3. Alarm: Click to show the Alarm Panel. The Alarm Panel shows a list of system alarmsand events, such as motion detection events.
4. Clear Alarms : Click to clear all alarms from the list.
5. Mute Alarm Sound : Click to mute/un-mute the audio alarms that are playedwhen events occur. To configure the alarm sounds that are played, see 1.12.3 AlarmSound, page 28.
6. Main View Toolbar:
• Full-Screen : Click to open the display grid in full-screen. Press ESC to exitfull-screen.
• Select Layout : Click to select a display grid layout.
• Stop Live Display : Click to stop camera streaming on all channels.
• Screenshot : Click to save a screenshot of the currently selected channel.
• Manual Record : Click to start/stop manually recording the currently selectedchannel.
• Previous/Next : Click to go to the previous or next camera or page.
• Sequence : Click to configure Sequence mode.
• Volume : Click to control volume.
7. Page : When more cameras are opened than windows on the display grid,they are organized into pages. The current page and total number of pages is shownat the bottom of the Main View tab.
8. Alarm Panel Controls:
• Auto-hide: Click to enable/disable alarm panel auto-hide.
• Maximize Alarm Panel: Click to open the Alarm Panel in its own tab.
• Show/hide Alarm Panel
#LX400017; r. 1.0/14175/14180; en-US 10
CMS-D3 CENTRAL MANAGEMENT SOFTWARE1
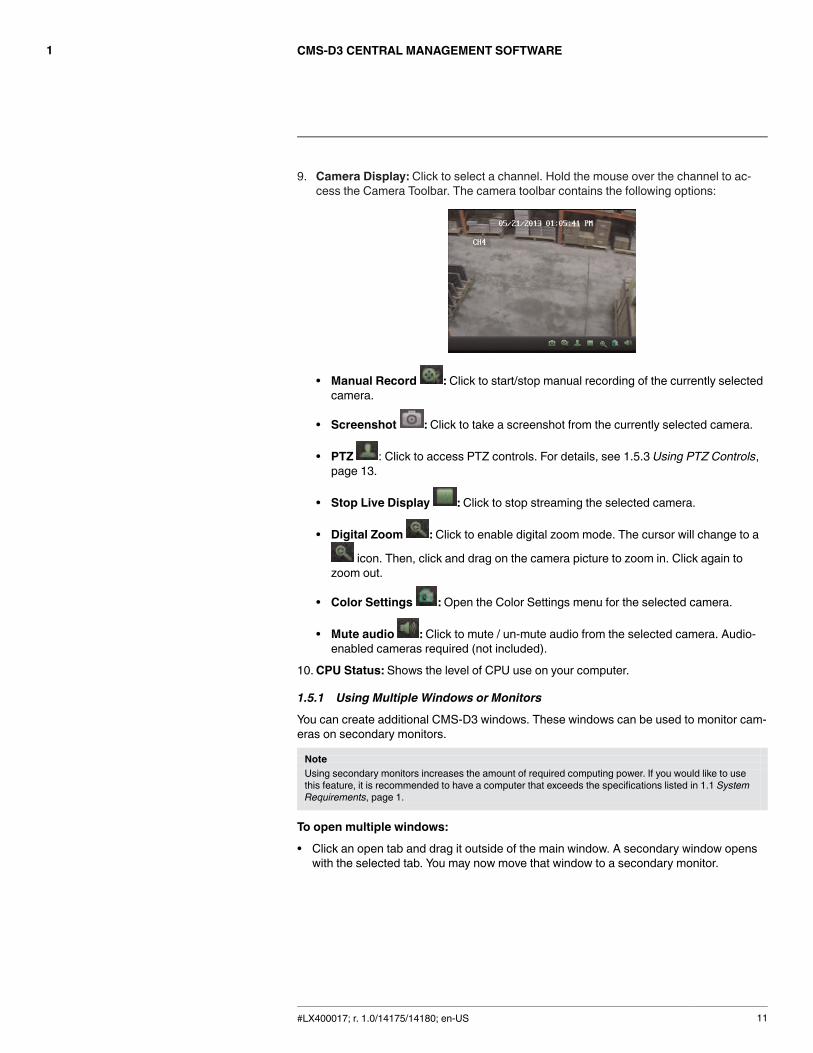
9. Camera Display: Click to select a channel. Hold the mouse over the channel to ac-cess the Camera Toolbar. The camera toolbar contains the following options:
• Manual Record : Click to start/stop manual recording of the currently selectedcamera.
• Screenshot : Click to take a screenshot from the currently selected camera.
• PTZ : Click to access PTZ controls. For details, see 1.5.3 Using PTZ Controls,page 13.
• Stop Live Display : Click to stop streaming the selected camera.
• Digital Zoom : Click to enable digital zoom mode. The cursor will change to a
icon. Then, click and drag on the camera picture to zoom in. Click again tozoom out.
• Color Settings : Open the Color Settings menu for the selected camera.
• Mute audio : Click to mute / un-mute audio from the selected camera. Audio-enabled cameras required (not included).
10.CPU Status: Shows the level of CPU use on your computer.
1.5.1 Using Multiple Windows or Monitors
You can create additional CMS-D3 windows. These windows can be used to monitor cam-eras on secondary monitors.
NoteUsing secondary monitors increases the amount of required computing power. If you would like to usethis feature, it is recommended to have a computer that exceeds the specifications listed in 1.1 SystemRequirements, page 1.
To open multiple windows:
• Click an open tab and drag it outside of the main window. A secondary window openswith the selected tab. You may now move that window to a secondary monitor.
#LX400017; r. 1.0/14175/14180; en-US 11
CMS-D3 CENTRAL MANAGEMENT SOFTWARE1
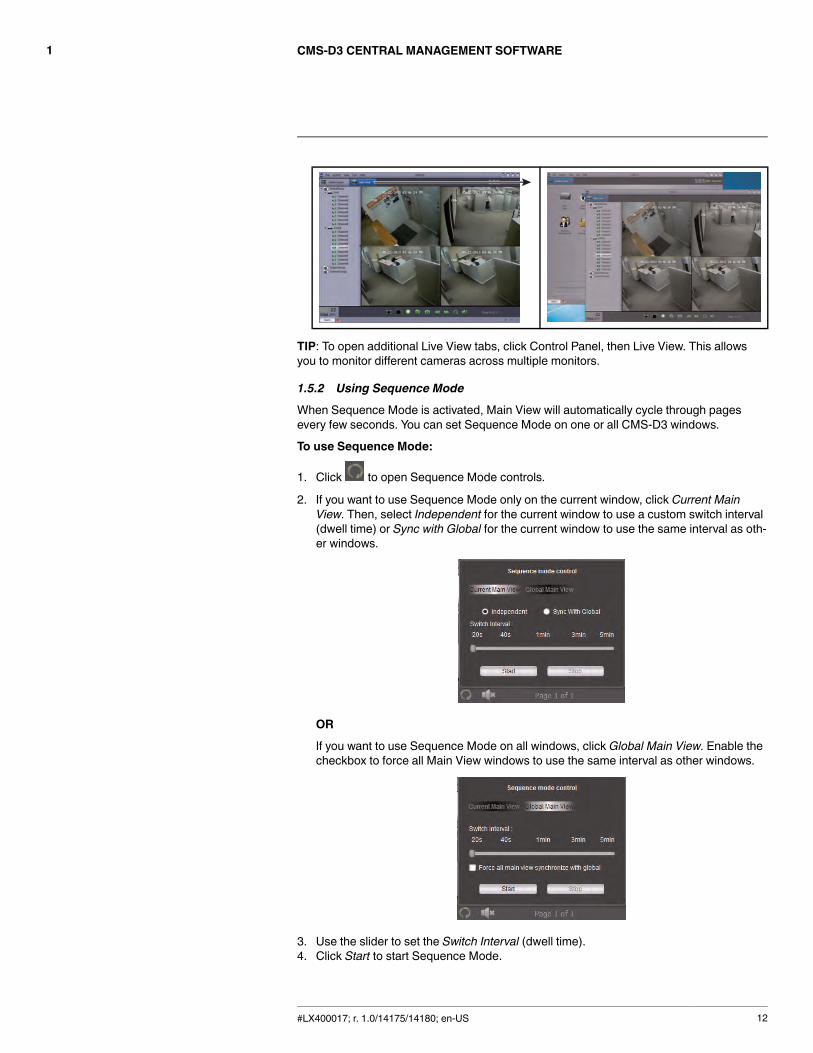
TIP: To open additional Live View tabs, click Control Panel, then Live View. This allowsyou to monitor different cameras across multiple monitors.
1.5.2 Using Sequence Mode
When Sequence Mode is activated, Main View will automatically cycle through pagesevery few seconds. You can set Sequence Mode on one or all CMS-D3 windows.
To use Sequence Mode:
1. Click to open Sequence Mode controls.
2. If you want to use Sequence Mode only on the current window, click Current MainView. Then, select Independent for the current window to use a custom switch interval(dwell time) or Sync with Global for the current window to use the same interval as oth-er windows.
OR
If you want to use Sequence Mode on all windows, click Global Main View. Enable thecheckbox to force all Main View windows to use the same interval as other windows.
3. Use the slider to set the Switch Interval (dwell time).4. Click Start to start Sequence Mode.
#LX400017; r. 1.0/14175/14180; en-US 12
CMS-D3 CENTRAL MANAGEMENT SOFTWARE1
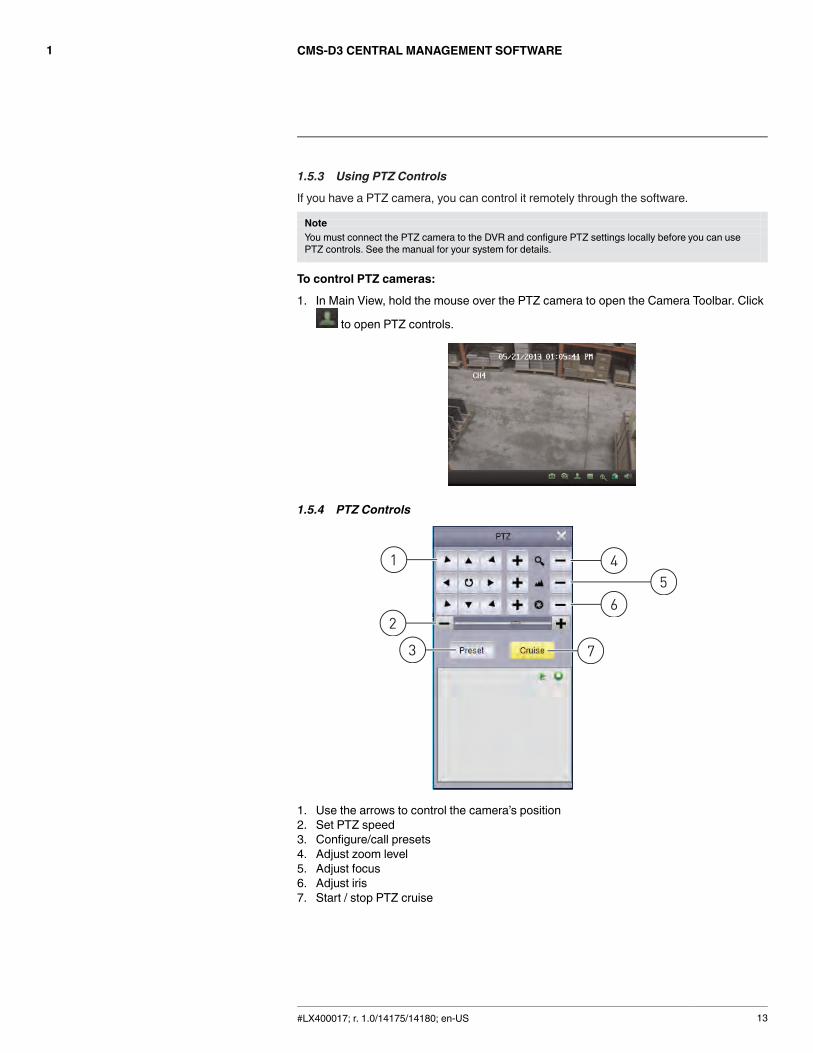
1.5.3 Using PTZ Controls
If you have a PTZ camera, you can control it remotely through the software.
NoteYou must connect the PTZ camera to the DVR and configure PTZ settings locally before you can usePTZ controls. See the manual for your system for details.
To control PTZ cameras:
1. In Main View, hold the mouse over the PTZ camera to open the Camera Toolbar. Click
to open PTZ controls.
1.5.4 PTZ Controls
4
7
6
5
2
1
3
1. Use the arrows to control the camera’s position2. Set PTZ speed3. Configure/call presets4. Adjust zoom level5. Adjust focus6. Adjust iris7. Start / stop PTZ cruise
#LX400017; r. 1.0/14175/14180; en-US 13
CMS-D3 CENTRAL MANAGEMENT SOFTWARE1
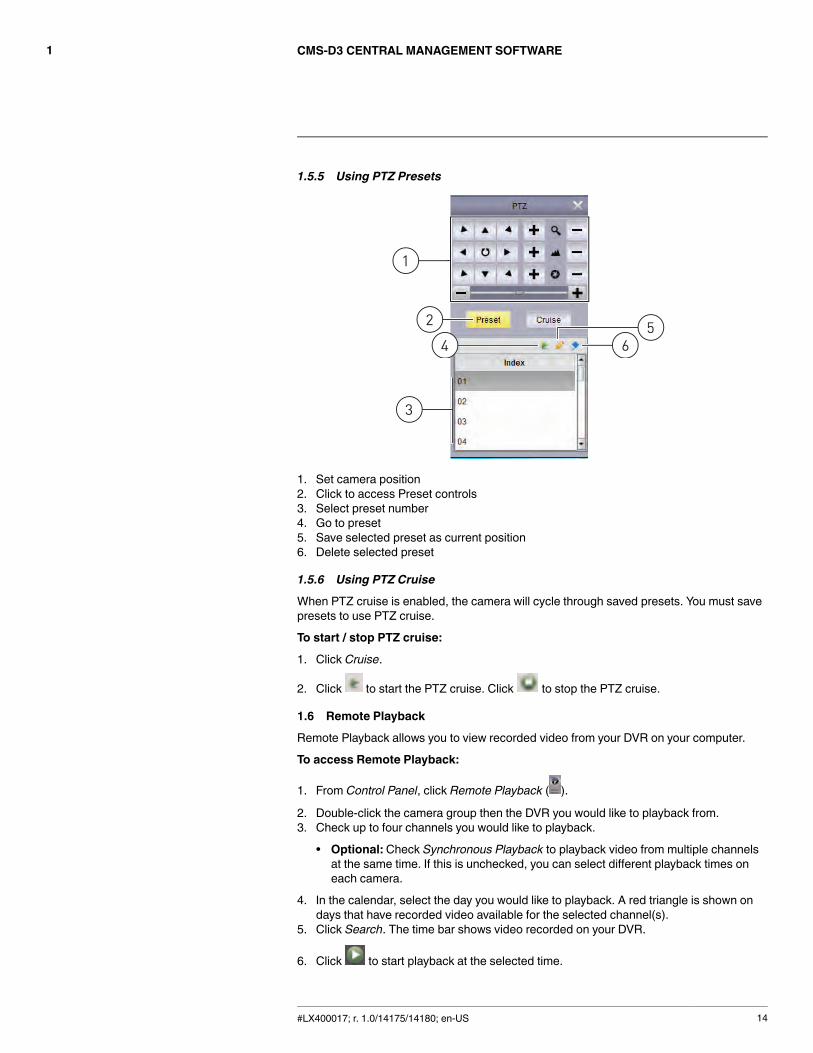
1.5.5 Using PTZ Presets
2
45
6
3
1
1. Set camera position2. Click to access Preset controls3. Select preset number4. Go to preset5. Save selected preset as current position6. Delete selected preset
1.5.6 Using PTZ Cruise
When PTZ cruise is enabled, the camera will cycle through saved presets. You must savepresets to use PTZ cruise.
To start / stop PTZ cruise:
1. Click Cruise.
2. Click to start the PTZ cruise. Click to stop the PTZ cruise.
1.6 Remote Playback
Remote Playback allows you to view recorded video from your DVR on your computer.
To access Remote Playback:
1. From Control Panel, click Remote Playback ( ).
2. Double-click the camera group then the DVR you would like to playback from.3. Check up to four channels you would like to playback.
• Optional: Check Synchronous Playback to playback video from multiple channelsat the same time. If this is unchecked, you can select different playback times oneach camera.
4. In the calendar, select the day you would like to playback. A red triangle is shown ondays that have recorded video available for the selected channel(s).
5. Click Search. The time bar shows video recorded on your DVR.
6. Click to start playback at the selected time.
#LX400017; r. 1.0/14175/14180; en-US 14
CMS-D3 CENTRAL MANAGEMENT SOFTWARE1
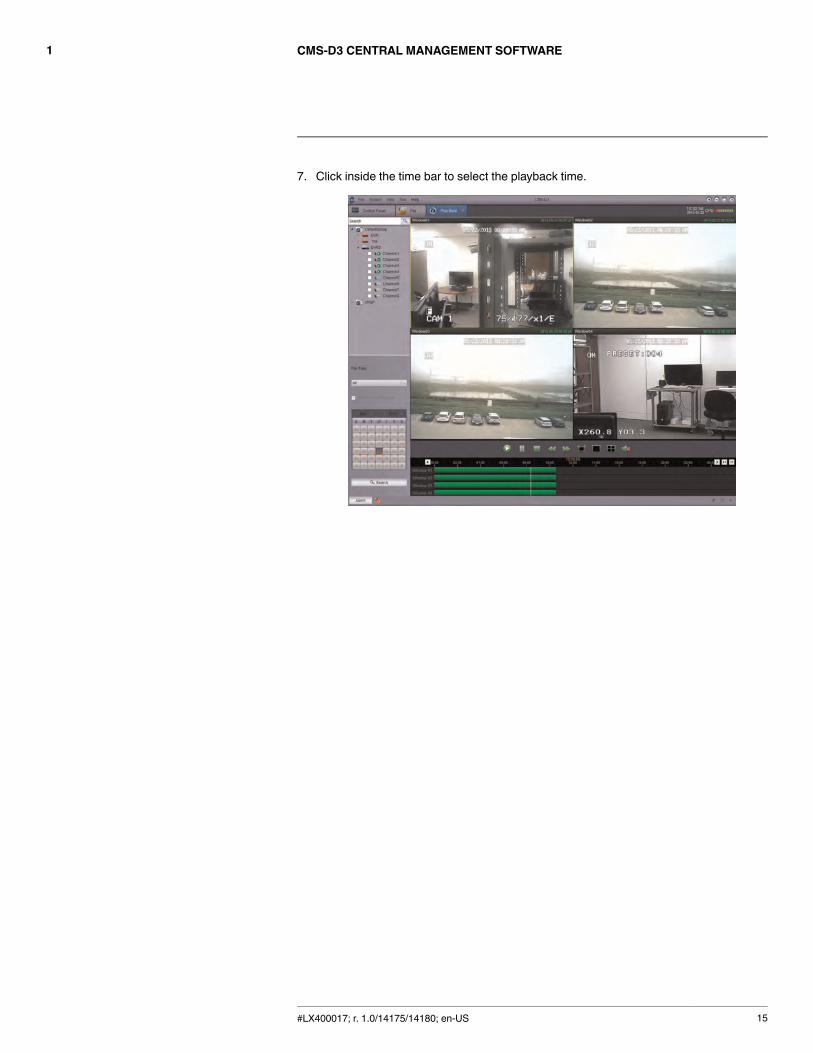
7. Click inside the time bar to select the playback time.
#LX400017; r. 1.0/14175/14180; en-US 15
CMS-D3 CENTRAL MANAGEMENT SOFTWARE1
1.6.1 Remote Playback Controls
1
2
4
5
6
3
7 8
10
9 11
1213 15 17
14 1618 20 22
19 21
2324 26 28
25 27 2930
31
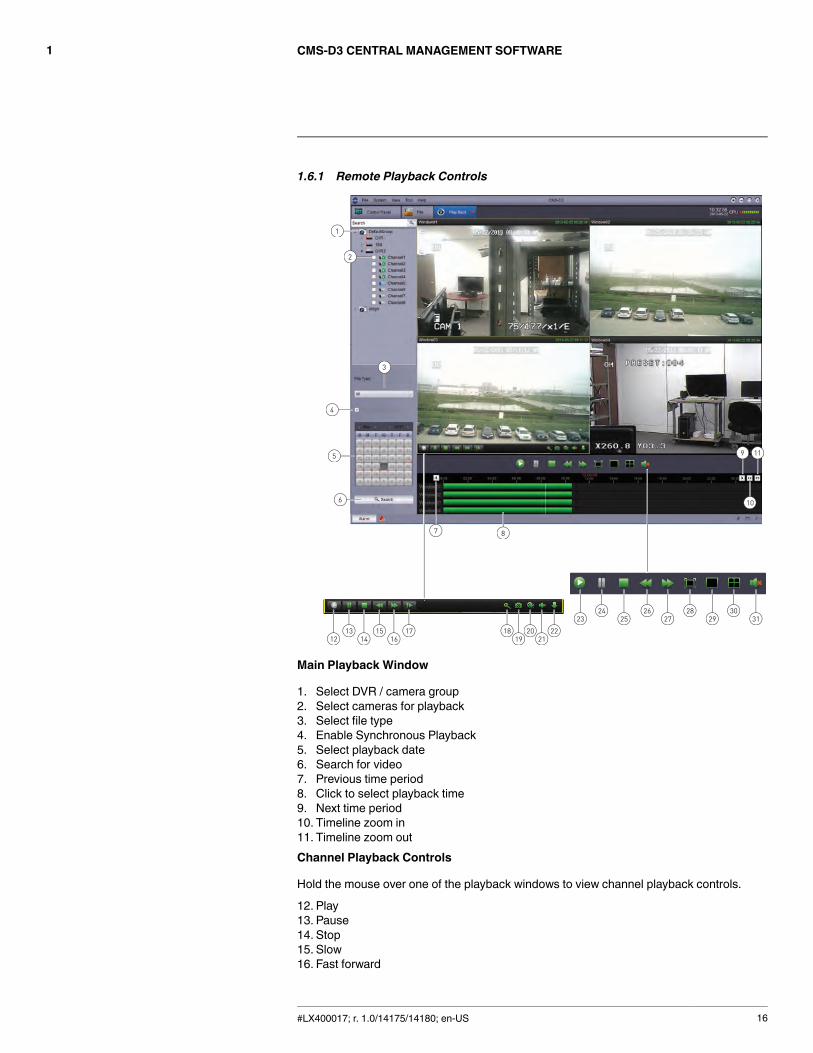
Main Playback Window
1. Select DVR / camera group2. Select cameras for playback3. Select file type4. Enable Synchronous Playback5. Select playback date6. Search for video7. Previous time period8. Click to select playback time9. Next time period10. Timeline zoom in11. Timeline zoom outChannel Playback Controls
Hold the mouse over one of the playback windows to view channel playback controls.
12. Play13. Pause14. Stop15. Slow16. Fast forward
#LX400017; r. 1.0/14175/14180; en-US 16
CMS-D3 CENTRAL MANAGEMENT SOFTWARE1
17. Forward one frame18. Digital zoom19. Screenshot20. Manual record21. Mute22. Download videoMaster Playback Controls
23. Play all24. Pause all25. Stop all26. Slow all27. Fast forward all28. Full-screen29. Single channel30. Quad view31.Mute
1.6.2 Downloading Video Files
You can download video files to your computer using Remote Playback.
To download video files by file:
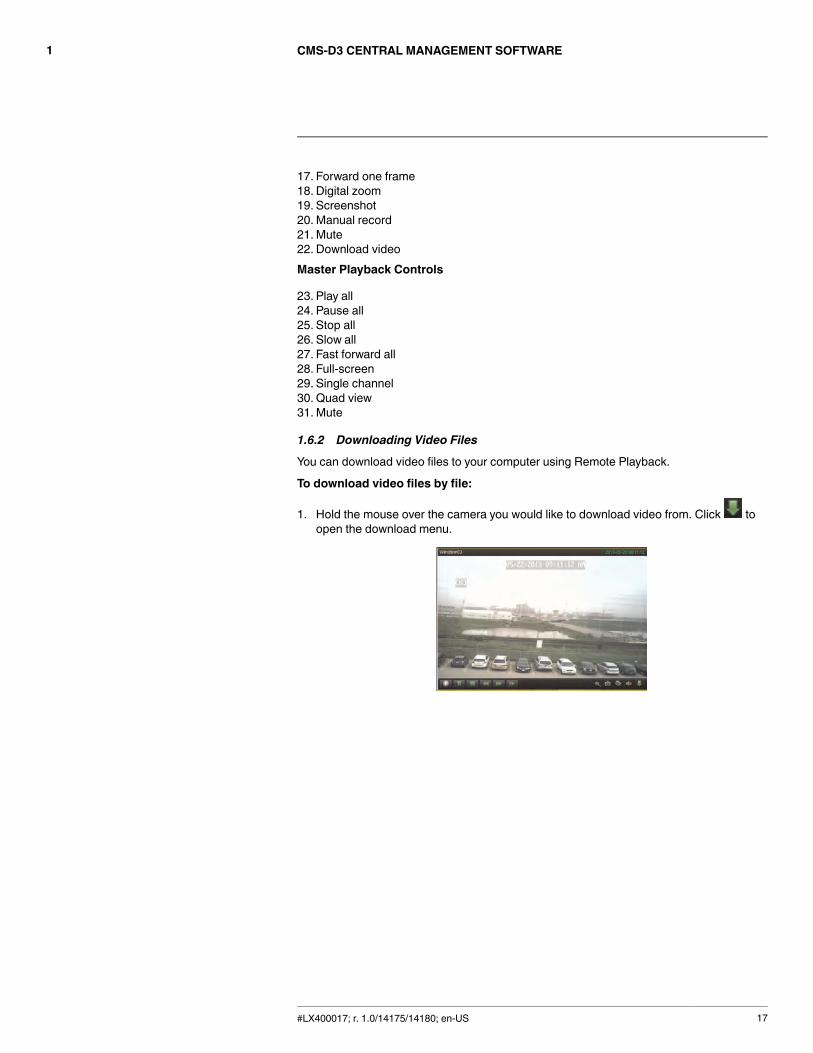
1. Hold the mouse over the camera you would like to download video from. Click toopen the download menu.
#LX400017; r. 1.0/14175/14180; en-US 17
CMS-D3 CENTRAL MANAGEMENT SOFTWARE1
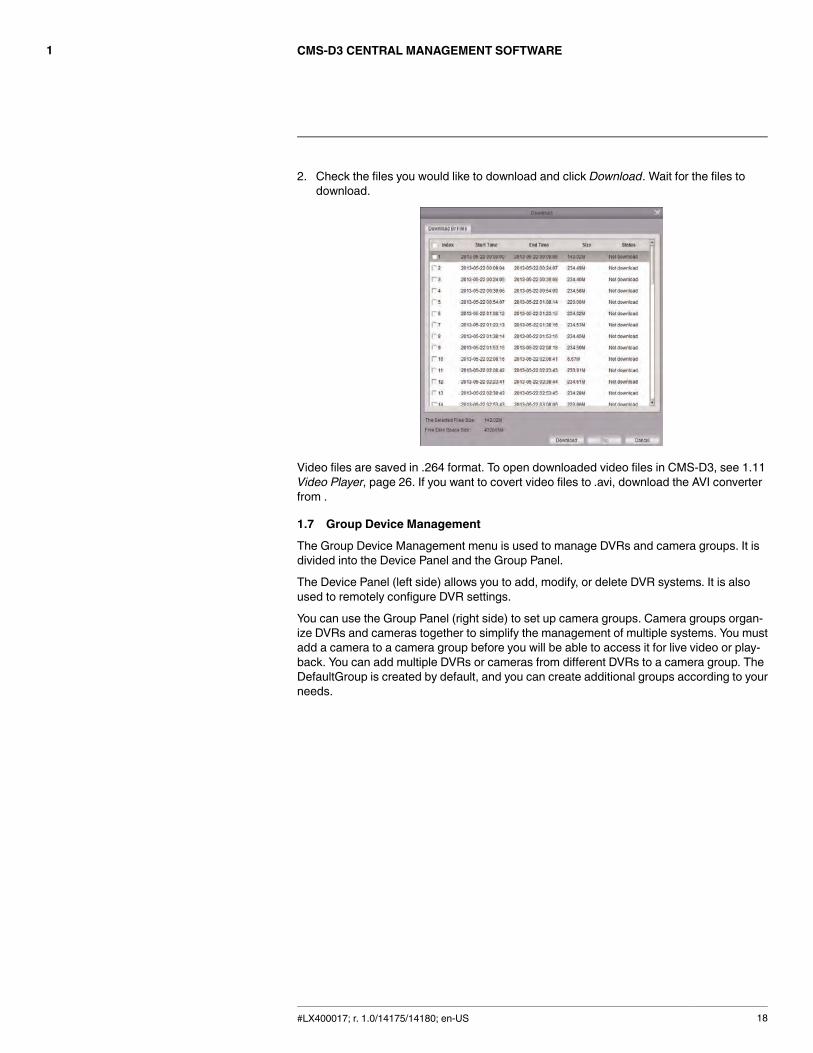
2. Check the files you would like to download and click Download. Wait for the files todownload.
Video files are saved in .264 format. To open downloaded video files in CMS-D3, see 1.11Video Player, page 26. If you want to covert video files to .avi, download the AVI converterfrom .
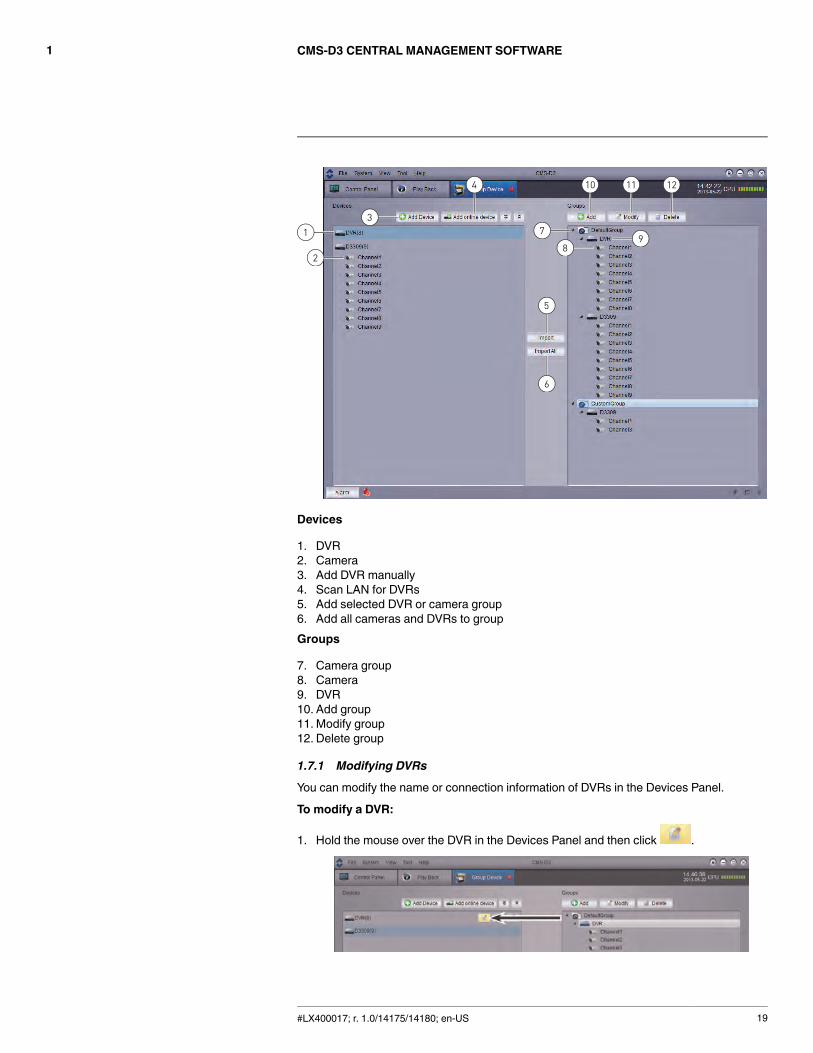
1.7 Group Device Management
The Group Device Management menu is used to manage DVRs and camera groups. It isdivided into the Device Panel and the Group Panel.
The Device Panel (left side) allows you to add, modify, or delete DVR systems. It is alsoused to remotely configure DVR settings.
You can use the Group Panel (right side) to set up camera groups. Camera groups organ-ize DVRs and cameras together to simplify the management of multiple systems. You mustadd a camera to a camera group before you will be able to access it for live video or play-back. You can add multiple DVRs or cameras from different DVRs to a camera group. TheDefaultGroup is created by default, and you can create additional groups according to yourneeds.
#LX400017; r. 1.0/14175/14180; en-US 18
CMS-D3 CENTRAL MANAGEMENT SOFTWARE1
1
2
3
5
10 11 124
7
89
6
Devices
1. DVR2. Camera3. Add DVR manually4. Scan LAN for DVRs5. Add selected DVR or camera group6. Add all cameras and DVRs to groupGroups
7. Camera group8. Camera9. DVR10. Add group11. Modify group12. Delete group
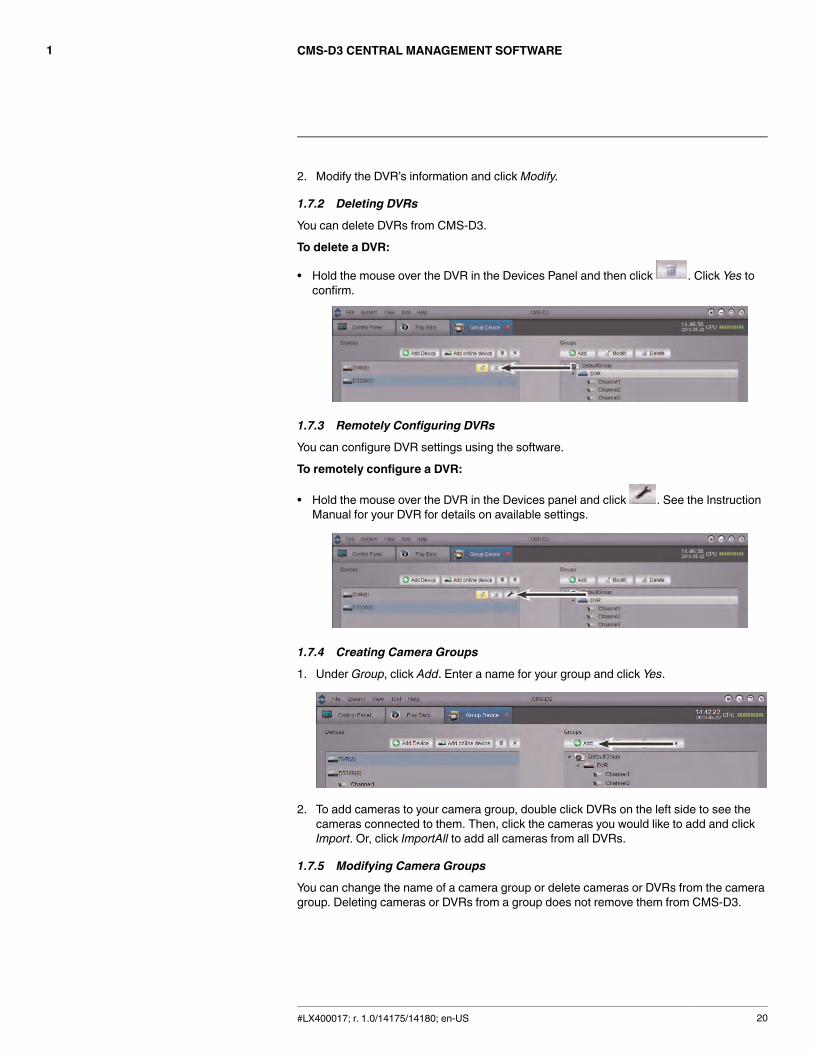
1.7.1 Modifying DVRs
You can modify the name or connection information of DVRs in the Devices Panel.
To modify a DVR:
1. Hold the mouse over the DVR in the Devices Panel and then click .
#LX400017; r. 1.0/14175/14180; en-US 19
CMS-D3 CENTRAL MANAGEMENT SOFTWARE1
2. Modify the DVR’s information and clickModify.
1.7.2 Deleting DVRs
You can delete DVRs from CMS-D3.
To delete a DVR:
• Hold the mouse over the DVR in the Devices Panel and then click . Click Yes toconfirm.
1.7.3 Remotely Configuring DVRs
You can configure DVR settings using the software.
To remotely configure a DVR:
• Hold the mouse over the DVR in the Devices panel and click . See the InstructionManual for your DVR for details on available settings.
1.7.4 Creating Camera Groups
1. Under Group, click Add. Enter a name for your group and click Yes.
2. To add cameras to your camera group, double click DVRs on the left side to see thecameras connected to them. Then, click the cameras you would like to add and clickImport. Or, click ImportAll to add all cameras from all DVRs.
1.7.5 Modifying Camera Groups
You can change the name of a camera group or delete cameras or DVRs from the cameragroup. Deleting cameras or DVRs from a group does not remove them from CMS-D3.
#LX400017; r. 1.0/14175/14180; en-US 20
CMS-D3 CENTRAL MANAGEMENT SOFTWARE1
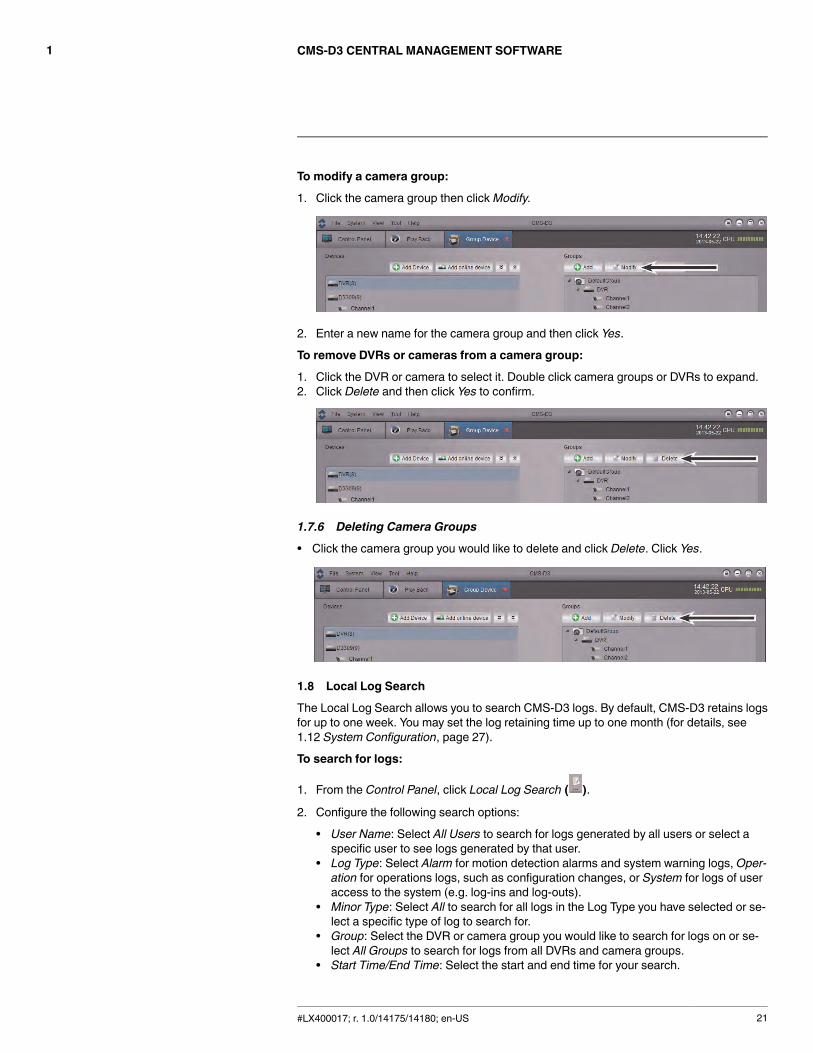
To modify a camera group:
1. Click the camera group then clickModify.
2. Enter a new name for the camera group and then click Yes.
To remove DVRs or cameras from a camera group:
1. Click the DVR or camera to select it. Double click camera groups or DVRs to expand.2. Click Delete and then click Yes to confirm.
1.7.6 Deleting Camera Groups
• Click the camera group you would like to delete and click Delete. Click Yes.
1.8 Local Log Search
The Local Log Search allows you to search CMS-D3 logs. By default, CMS-D3 retains logsfor up to one week. You may set the log retaining time up to one month (for details, see1.12 System Configuration, page 27).
To search for logs:
1. From the Control Panel, click Local Log Search ( ).
2. Configure the following search options:
• User Name: Select All Users to search for logs generated by all users or select aspecific user to see logs generated by that user.
• Log Type: Select Alarm for motion detection alarms and system warning logs, Oper-ation for operations logs, such as configuration changes, or System for logs of useraccess to the system (e.g. log-ins and log-outs).
• Minor Type: Select All to search for all logs in the Log Type you have selected or se-lect a specific type of log to search for.
• Group: Select the DVR or camera group you would like to search for logs on or se-lect All Groups to search for logs from all DVRs and camera groups.
• Start Time/End Time: Select the start and end time for your search.
#LX400017; r. 1.0/14175/14180; en-US 21

CMS-D3 CENTRAL MANAGEMENT SOFTWARE1
3. Click Search. All logs that meet your search parameters appear in the list.
1.8.1 Backing up Logs
You can backup log search results to your computer hard drive or open saved log files inCMS-D3.
To back up logs:
1. Perform a search using the steps above.2. Click Backup.
3. Select a folder and enter a file name. Click Save.
To open saved log files:
1. Click View Backup.
2. Select a log file and click Open.
1.9 Account Management
The Account Management menu allows you to create user accounts for CMS-D3.
The client software has the following types of user accounts:
• Admin: The admin account is logged in by default when you first run the client software.This is a unique account that has full control over all software and DVR functions. Theadmin may add, modify, or delete any user account.
• User: This is a standard user account. User accounts have only the permissions theyare given by the admin and cannot change software settings or change other user ac-counts. Users may change their own password.
To access Account Management:
• From the Control Panel, click Account Management ( ).
#LX400017; r. 1.0/14175/14180; en-US 22
CMS-D3 CENTRAL MANAGEMENT SOFTWARE1
1.9.1 Enabling Passwords for the Admin Account
By default, the password for the admin account is blank, and a password is not required toaccess CMS-D3. Creating a custom password for the admin account will make it so pass-words are required to access the software.
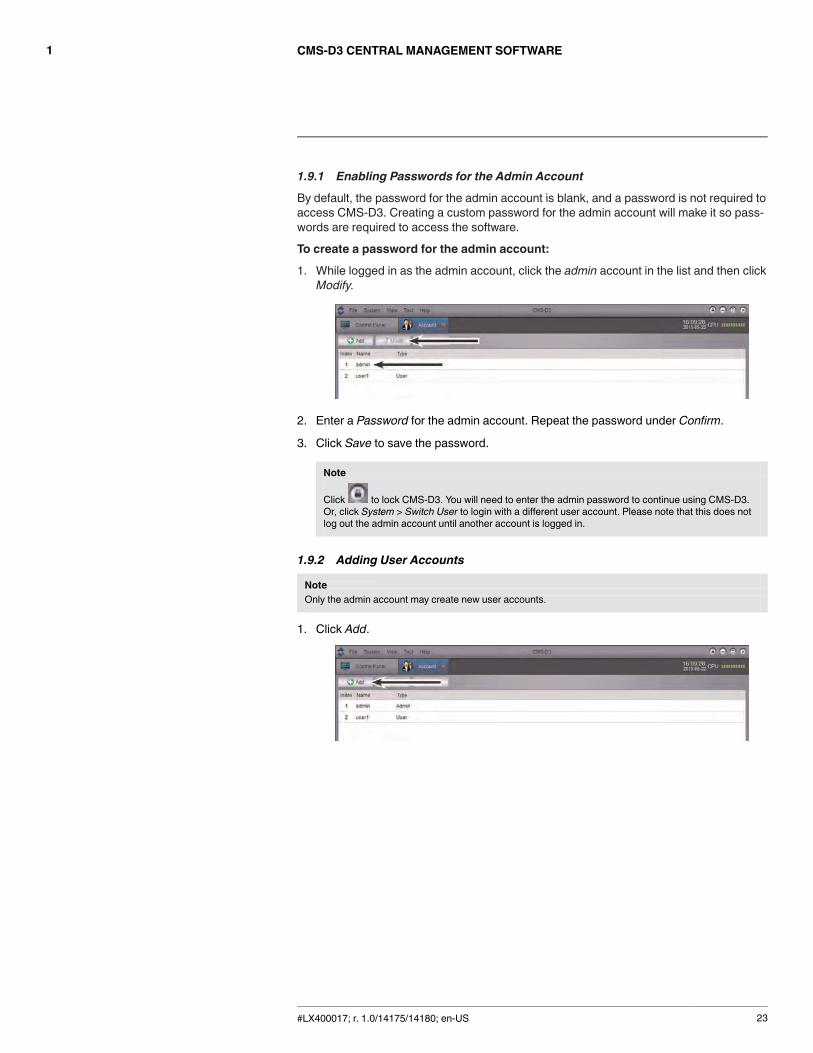
To create a password for the admin account:
1. While logged in as the admin account, click the admin account in the list and then clickModify.
2. Enter a Password for the admin account. Repeat the password under Confirm.
3. Click Save to save the password.
Note
Click to lock CMS-D3. You will need to enter the admin password to continue using CMS-D3.Or, click System > Switch User to login with a different user account. Please note that this does notlog out the admin account until another account is logged in.
1.9.2 Adding User Accounts
NoteOnly the admin account may create new user accounts.
1. Click Add.
#LX400017; r. 1.0/14175/14180; en-US 23
CMS-D3 CENTRAL MANAGEMENT SOFTWARE1
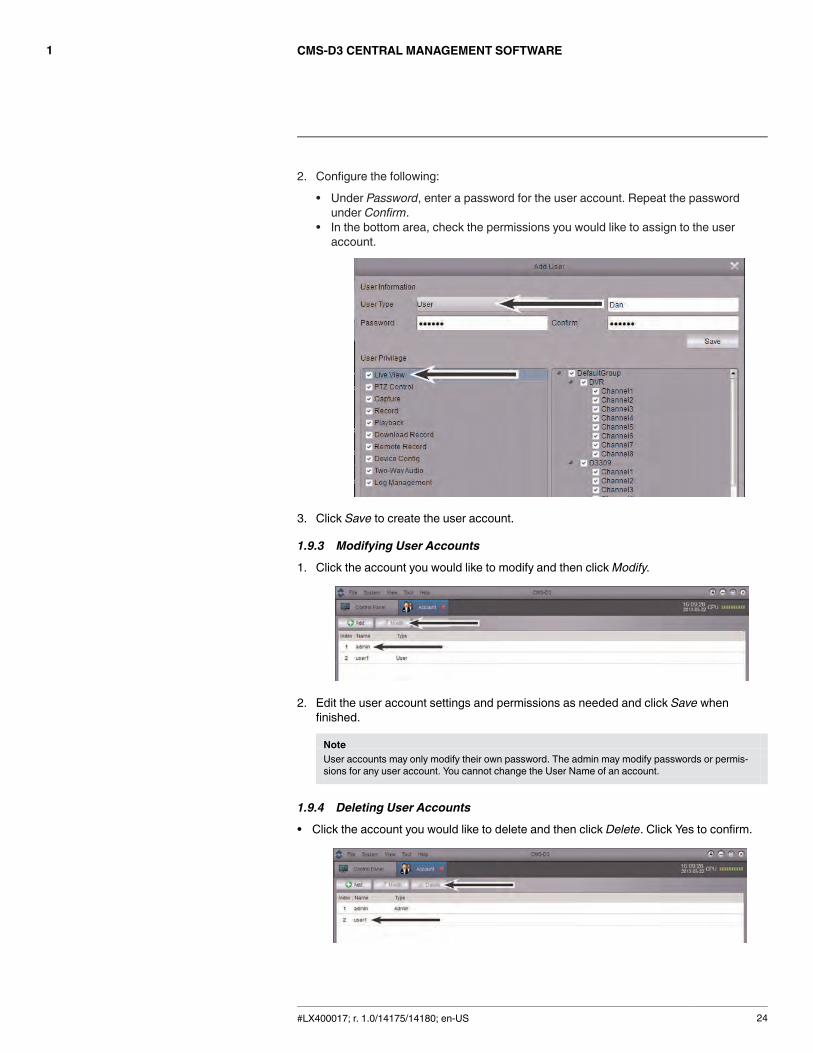
2. Configure the following:
• Under Password, enter a password for the user account. Repeat the passwordunder Confirm.
• In the bottom area, check the permissions you would like to assign to the useraccount.
3. Click Save to create the user account.
1.9.3 Modifying User Accounts
1. Click the account you would like to modify and then clickModify.
2. Edit the user account settings and permissions as needed and click Save whenfinished.
NoteUser accounts may only modify their own password. The admin may modify passwords or permis-sions for any user account. You cannot change the User Name of an account.
1.9.4 Deleting User Accounts
• Click the account you would like to delete and then click Delete. Click Yes to confirm.
#LX400017; r. 1.0/14175/14180; en-US 24
CMS-D3 CENTRAL MANAGEMENT SOFTWARE1
NoteOnly the admin account may delete user accounts.
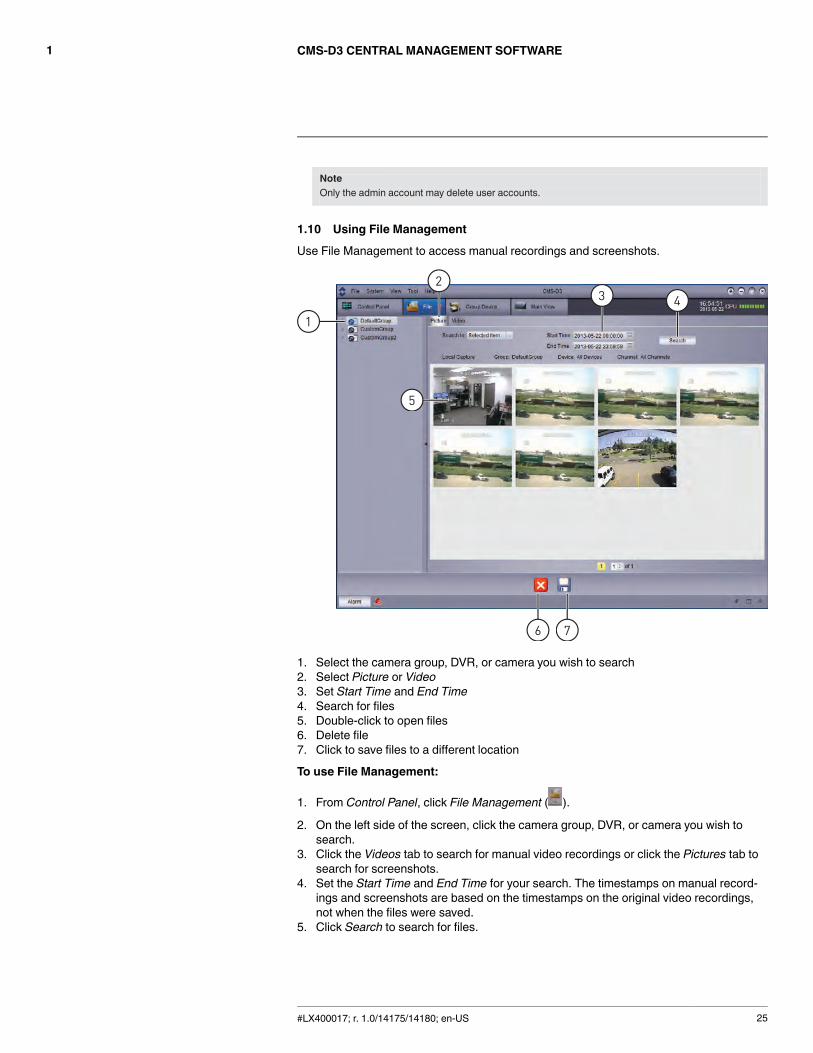
1.10 Using File Management
Use File Management to access manual recordings and screenshots.
1
5
23 4
76
1. Select the camera group, DVR, or camera you wish to search2. Select Picture or Video3. Set Start Time and End Time4. Search for files5. Double-click to open files6. Delete file7. Click to save files to a different location
To use File Management:
1. From Control Panel, click File Management ( ).
2. On the left side of the screen, click the camera group, DVR, or camera you wish tosearch.
3. Click the Videos tab to search for manual video recordings or click the Pictures tab tosearch for screenshots.
4. Set the Start Time and End Time for your search. The timestamps on manual record-ings and screenshots are based on the timestamps on the original video recordings,not when the files were saved.
5. Click Search to search for files.
#LX400017; r. 1.0/14175/14180; en-US 25
CMS-D3 CENTRAL MANAGEMENT SOFTWARE1
6. Double-click to open files or use the controls on the bottom of the screen to delete orsave files to a different location on your computer.
NotePicture files are saved in .png format. Video files are saved in .264 format. If you want to covert videofiles to .avi, download the AVI converter from .
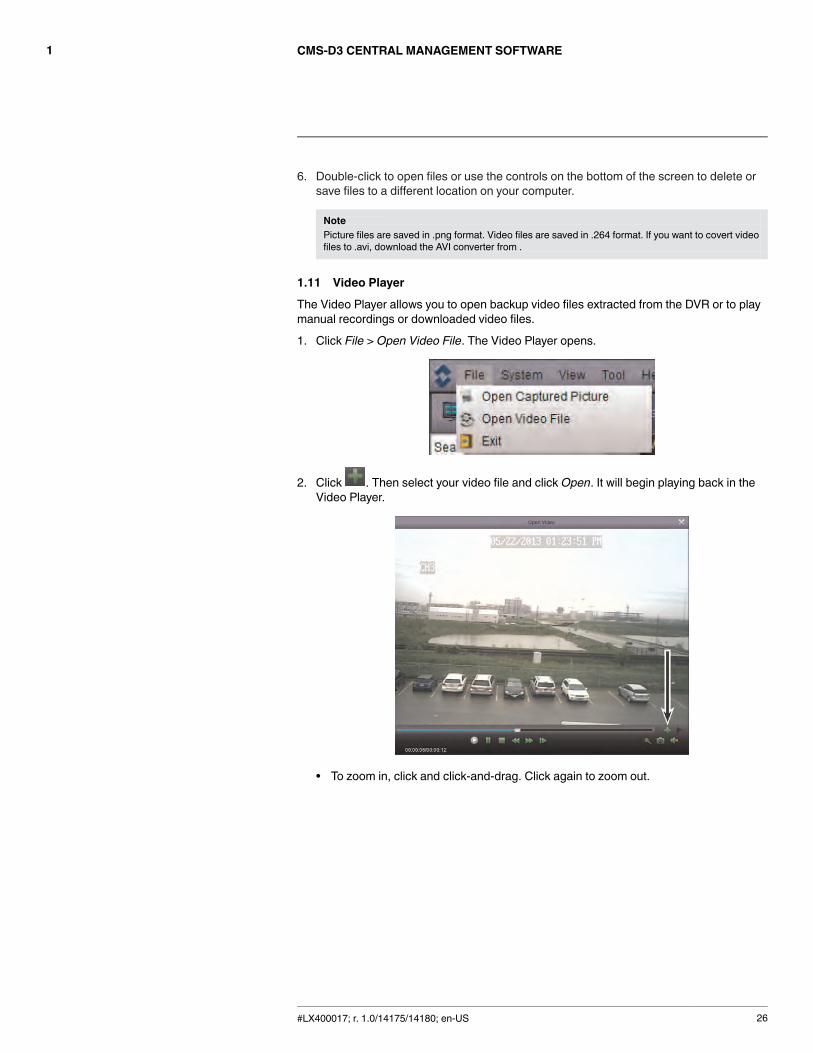
1.11 Video Player
The Video Player allows you to open backup video files extracted from the DVR or to playmanual recordings or downloaded video files.
1. Click File > Open Video File. The Video Player opens.
2. Click . Then select your video file and click Open. It will begin playing back in theVideo Player.
• To zoom in, click and click-and-drag. Click again to zoom out.
#LX400017; r. 1.0/14175/14180; en-US 26
CMS-D3 CENTRAL MANAGEMENT SOFTWARE1
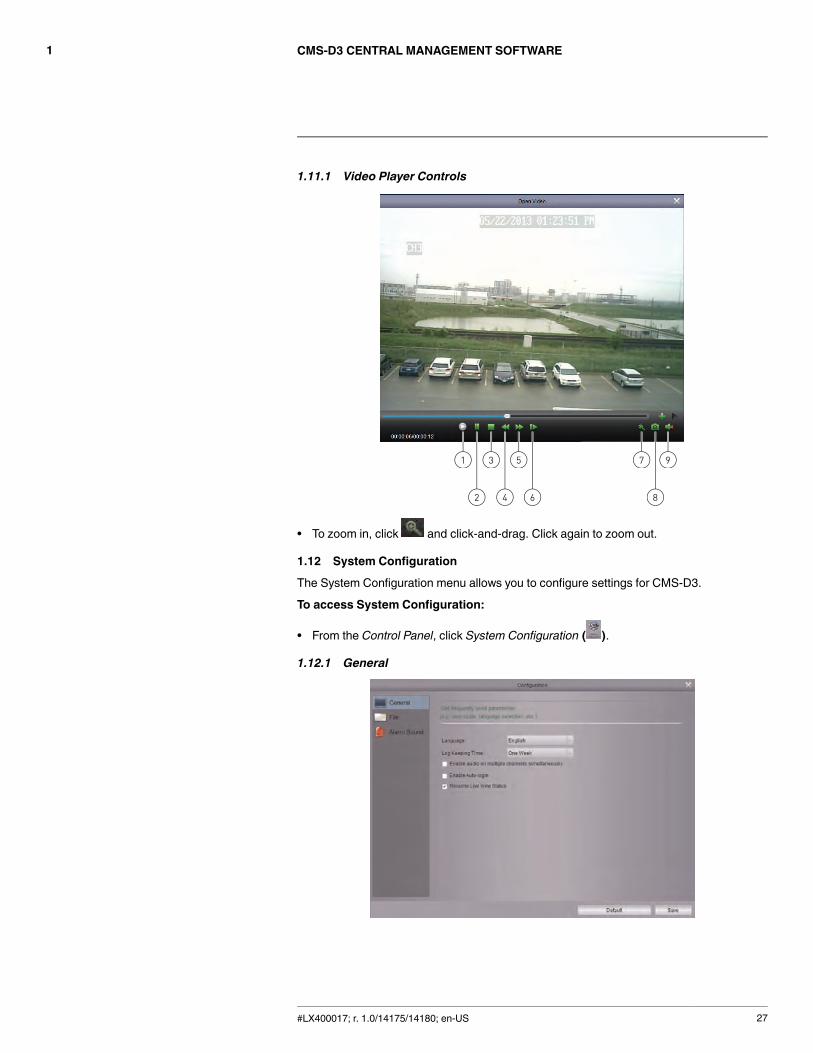
1.11.1 Video Player Controls
1
2
3
4
5
6
7
8
9
• To zoom in, click and click-and-drag. Click again to zoom out.
1.12 System Configuration
The System Configuration menu allows you to configure settings for CMS-D3.
To access System Configuration:
• From the Control Panel, click System Configuration ( ).
1.12.1 General
#LX400017; r. 1.0/14175/14180; en-US 27
CMS-D3 CENTRAL MANAGEMENT SOFTWARE1
To configure General options:
1. Configure the following:
• Language: Select the language.• Log Keeping Time: Select the amount of time the software will retain system logs.• Enable audio on multiple channels simultaneously: Check to allow the software toplay audio on multiple channels at the same time.
• Enable Auto-login: Check to enable auto-login. If Auto-login is checked, passwordswill not be needed to start the software.
• Resume Live View Status: Check for the software to restore the last used view con-figuration after opening.
2. Click Save to save changes.
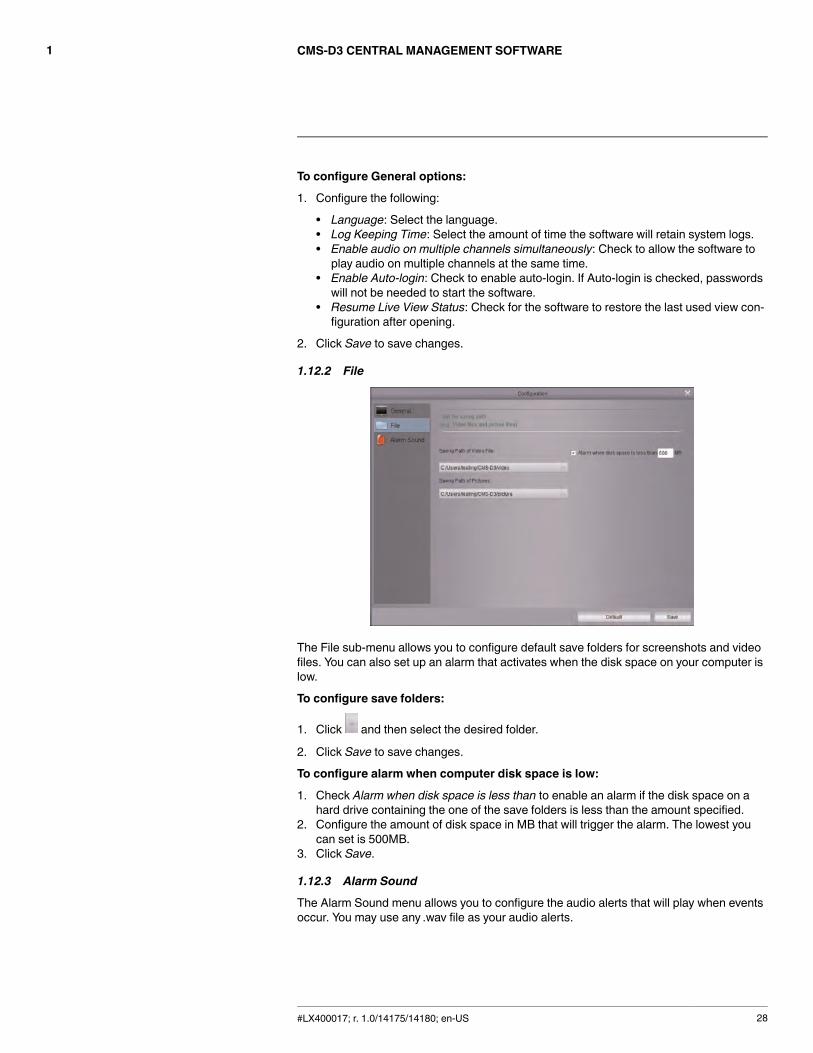
1.12.2 File
The File sub-menu allows you to configure default save folders for screenshots and videofiles. You can also set up an alarm that activates when the disk space on your computer islow.
To configure save folders:
1. Click and then select the desired folder.
2. Click Save to save changes.
To configure alarm when computer disk space is low:
1. Check Alarm when disk space is less than to enable an alarm if the disk space on ahard drive containing the one of the save folders is less than the amount specified.
2. Configure the amount of disk space in MB that will trigger the alarm. The lowest youcan set is 500MB.
3. Click Save.
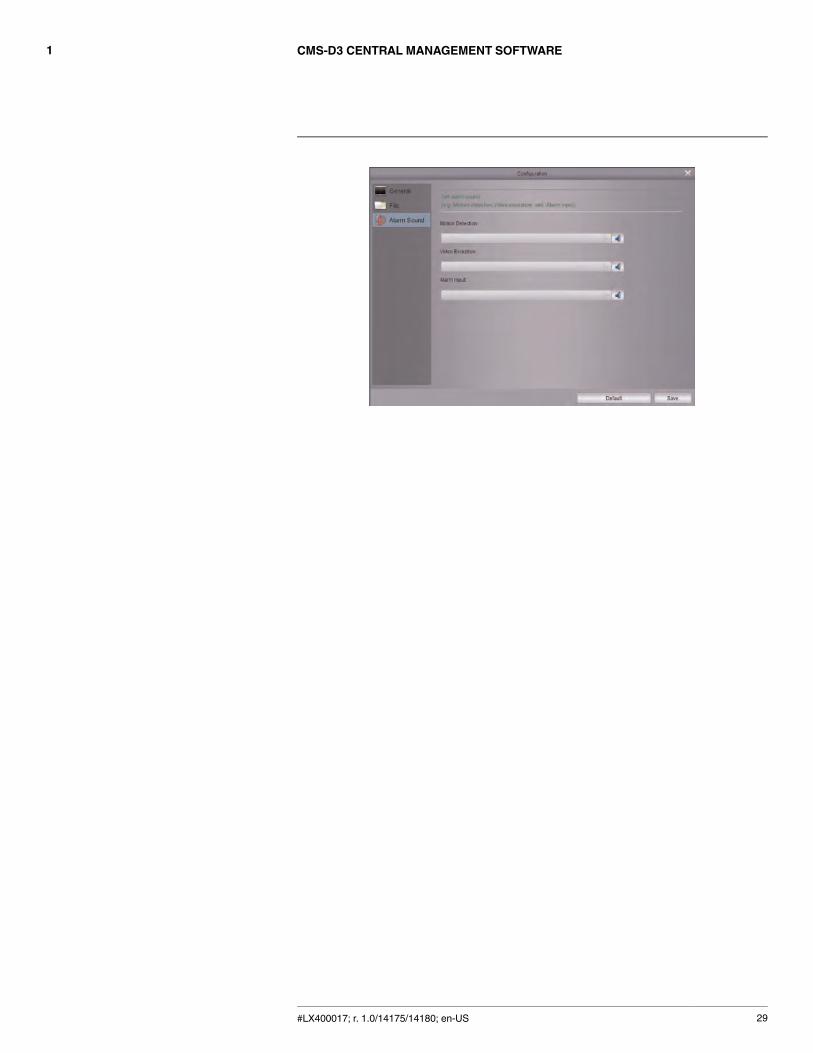
1.12.3 Alarm Sound
The Alarm Sound menu allows you to configure the audio alerts that will play when eventsoccur. You may use any .wav file as your audio alerts.
#LX400017; r. 1.0/14175/14180; en-US 28
CMS-D3 CENTRAL MANAGEMENT SOFTWARE1
#LX400017; r. 1.0/14175/14180; en-US 29


last page
Publ. No.: LX400017Release: 1.0Commit: 14175Head: 14180Language: en-USModified: 2014-05-20Formatted: 2014-05-20
Corporate HeadquartersFLIR Systems, Inc.27700 SW Parkway Ave.Wilsonville, OR 97070USATelephone: +1-503-498-3547Websitehttp://www.flir.comCustomer supporthttp://support.flir.comCopyright© 2014, FLIR Systems, Inc. All rights reserved worldwide.DisclaimerSpecifications subject to change without further notice. Models and accessories subject to regional market considerations. License procedures may apply. Productsdescribed herein may be subject to US Export Regulations. Please refer to [email protected] with any questions.