INSTRUCTION AND MAINTENANCE MANUALmanuals.ggp-group.com/8219-3220-02_GB.pdf · manual (uso previsto...
31
Decespugliatori I Brush cutters GB Débroussailleuses F Freischneider D Desbrozadoras E Bosmaaiers NL Moto-roçadeiras P £·ÌÓÔÎÔÙÈο GR Prima di usare il decespugliatore leggere attentamente questo manuale di istruzioni. This instruction manual must be read thoroughly before the brush cutter is used. Avant d’utiliser la débroussailleuse, lire attentivement ce manuel d’instructions. Vor Inbetriebnahme des Freischneiders die vorliegende Gebrauchsanleitung aufmerksam lesen. Antes de usar la desbrozadora leer atentamente este manual de instrucciones Voordat u de bosmaaier gaat gebruiken dient u eerst deze handleiding aandachtig door te lezen. Antes de usar a moto-roçadeira, ler com atenção este manual de instruções. ¶ÚÈÓ ¯ÚËÛÈÌÔÔÈ‹ÛÂÙ ÙÔ ı·ÌÓÔÎÔÙÈÎfi, ‰È·‚¿ÛÙ ÚÔÛÂÎÙÈο ÙȘ Ô‰ËÁ›Â˜ ¯Ú‹Û˘ Per la vostra sicurezza! For your safety! Pour votre sécurité! Für ihre Sicherheit! Para su seguridad! Voor uw veiligheid! Para a sua segurança! °È· ÙËÓ ·ÛÊ¿ÏÂÈ¿ Û·˜! INSTRUCTION AND MAINTENANCE MANUAL
Transcript of INSTRUCTION AND MAINTENANCE MANUALmanuals.ggp-group.com/8219-3220-02_GB.pdf · manual (uso previsto...

DecespugliatoriI
Brush cuttersGBDébroussailleusesFFreischneiderD
DesbrozadorasE
BosmaaiersNLMoto-roçadeirasP
£·ÌÓÔÎÔÙÈοGR
Prima di usare il decespugliatore leggere attentamente questo manuale di istruzioni.This instruction manual must be read thoroughly before the brush cutter is used.Avant d’utiliser la débroussailleuse, lire attentivement ce manuel d’instructions.
Vor Inbetriebnahme des Freischneiders die vorliegende Gebrauchsanleitung aufmerksam lesen.Antes de usar la desbrozadora leer atentamente este manual de instrucciones
Voordat u de bosmaaier gaat gebruiken dient u eerst deze handleiding aandachtig door te lezen.Antes de usar a moto-roçadeira, ler com atenção este manual de instruções.
¶ÚÈÓ ¯ÚËÛÈÌÔÔÈ‹ÛÂÙ ÙÔ ı·ÌÓÔÎÔÙÈÎfi, ‰È·‚¿ÛÙ ÚÔÛÂÎÙÈο ÙȘ Ô‰ËÁ›Â˜ ¯Ú‹Û˘
Per la vostra sicurezza!For your safety!
Pour votre sécurité!Für ihre Sicherheit!
Para su seguridad!Voor uw veiligheid!Para a sua segurança!°È· ÙËÓ ·ÛÊ¿ÏÂÈ¿ Û·˜!
INSTRUCTION AND MAINTENANCE MANUAL

2
Presentazione
Gentile Cliente,vogliamo anzitutto ringraziarla per la preferenza accordata ai nostri prodotti e ci auguriamoche l’uso di questa sua macchina le riservi grandi soddisfazioni e risponda appieno alleaspettative.Questo manuale è stato redatto per consentirle di conoscere bene la sua macchina e diusarla in condizioni di sicurezza ed efficienza; non dimentichi che esso è parte integrantedella macchina stessa, lo tenga a portata di mano per consultarlo in ogni momento e loconsegni assieme alla macchina il giorno in cui dovesse cederla o prestarla ad altri.
Questa sua nuova macchina è stata progettata e costruita secondo le normative vigenti,risulta sicura ed affidabile se usata nel pieno rispetto delle indicazioni contenute in questomanuale (uso previsto); qualsiasi altro impiego o l’inosservanza delle norme di sicurezzad’uso, di manutenzione e riparazione indicate è considerato come “uso improprio” e com-porta il decadimento della garanzia e il declino di ogni responsabilità del Costruttore, riser-vando sull’utilizzatore gli oneri derivanti da danni o lesioni proprie o a terzi.
Nel caso dovesse riscontrare qualche leggera differenza fra quanto qui descritto e la mac-china in suo possesso, tenga presente che, dato il continuo miglioramento del prodotto, leinformazioni contenute in questo manuale sono soggette a modifiche senza preavviso oobbligo di aggiornamento, fermo restando però le caratteristiche essenziali ai fini della sicu-rezza e del funzionamento. In caso di dubbio contatti il suo rivenditore. Buon lavoro!
Presentation
Dear Customer,Firstly, we would like to thank you for purchasing one of our products. We hope you will besatisfied with its performance and that it meets all your expectations.This manual has been written so that you can learn how to use the brush cutter safely andefficiently; remember that it is an integral part of the machine itself, hence it should be keptat hand for quick and easy reference. If you should ever trade in the machine or lend it tosomeone, the manual should also be handed over.
Your new machine is designed and made in accordance with the laws in force; therefore itis safe and reliable as long as the instructions within this manual are followed carefully(envisaged use); any other use or non-observance of the instructions herein regardingsafety, maintenance or repair is considered to be “improper use” and will invalidate the war-rantee. Furthermore, the manufacturer shall not be liable for any compensation caused bydamage or injury to the user or to others.
If there are any slight differences between the description and the machine in your pos-session, remember that the product is being continuously improved and the information inthis manual may be changed without any prior notice or obligation to update it. However,the essential safety and operational features will remain as they were. In you have anydoubts at all, please contact the reseller. Enjoy using your brush cutter!
I
GB

3
Présentation
Cher Client,Nous désirons avant tout vous remercier de la préférence que vous avez accordée à nosproduits et nous espérons que l’utilisation de cette machine vous donnera entière satisfac-tion et correspondra pleinement à votre attente.Ce manuel a été rédigé pour vous permettre de bien connaître votre machine et de l’utili-ser dans les meilleures conditions de sécurité et d’efficacité; n’oubliez pas qu’il fait partieintégrante de la machine, gardez-le à portée de la main pour pouvoir le consulter à toutmoment et remettez-le avec la machine en cas de vente ou de prêt à une autre personne.
Cette machine a été projetée et construite selon les normes en vigueur, elle est sûre et fia-ble si elle est utilisée en respectant pleinement les indications contenues dans ce manuel(utilisation prévue); toute autre utilisation ou le non-respect des consignes de sécurité four-nies pour l’utilisation, l’entretien et la réparation sont considérés comme “utilisation impro-pre” et comporte la perte de la garantie et le déclin de toute responsabilité de la part duConstructeur, reversant sur l’utilisateur tous les frais et charges dérivant des lésions oudommages personnels ou à des tiers.
Si vous deviez constater de légères différences entre la description et la machine en votrepossession, tenez compte que vu l’amélioration continuelle du produit, les informationscontenues dans ce manuel sont sujettes à des modifications sans préavis ni obligation demise à jour, sans remettre en cause les caractéristiques essentielles aux fins de la sécuri-té et du fonctionnement. En cas de doute, contactez votre revendeur. Bon travail!
Einleitung
Sehr geehrter Kunde,Wir danken Ihnen, dass Sie sich für eines unserer Produkte entschieden haben und hoffen,dass dieses Ihren Bedürfnissen voll entspricht.Die vorliegende Gebrauchsanleitung soll Ihnen dabei helfen, den Betrieb Ihres Geräts zuverstehen und dieses unter Berücksichtigung Ihrer persönlichen Sicherheit zu verwenden.Die Gebrauchsanleitung ist Teil des Geräts: Sie sollten sie daher so aufbewahren, dass Siejederzeit darin nachschlagen können. Sollten Sie das Gerät verleihen oder aus sonstigenGründen an Dritte übergeben, muss die Gebrauchsanleitung ebenfalls übergeben werden.
Das von Ihnen erworbene Gerät wurde den geltenden Vorschriften entsprechend geplantund hergestellt und garantiert Ihnen daher unter den in vorliegender Anleitung beschriebe-nen Bedingungen (Vorgesehener Gebrauch) einen sicheren Betrieb. Jeder andersartigeEinsatz des Geräts, bzw. das Nichtbeachten der Hinweise bezüglich Sicherheit, Wartungund Reparatur ist als unsachgemäßer Gebrauch des Geräts zu verstehen und hat denGültigkeitsverfall der Garantie zur Folge. Der Hersteller kann für Sach- oderPersonenschäden, die Folge eines unsachgemäßen Gebrauch des Geräts sind, nicht haft-bar gemacht werden.
Sollten Sie einige kleine Unterschiede zwischen den Angaben der vorliegenden Anleitungund dem von Ihnen erworbenen Gerät feststellen, so berücksichtigen Sie bitte, dass derHersteller zur technischen Aktualisierung seiner Produkte ohne Vorankündigung Änderun-gen daran vornehmen kann. Die grundlegenden Sicherheits- und Betriebsnormen werdendurch eine derartige Aktualisierung jedoch nicht beeinflusst und sind daher unbedingt zubefolgen. Wenden Sie sich im Zweifelsfall bitte an Ihren Verkäufer. Wir wünschen Ihneneine gute Arbeit.
F
D

Presentación
Estimado Cliente,Deseamos, ante todo, darle las gracias por la haber elegido nuestros productos y le desea-mos que el uso de esta máquina le de grandes satisfacciones respondiendo plenamente asus expectativas.Este manual ha sido redactado para permitirle que conozca a fondo su máquina y que lause en condiciones de plena seguridad y eficiencia; no olvide que éste forma parte inte-grante de la máquina misma, guárdelo al alcance de la mano para consultarlo en cualquiermomento y entréguelo junto a máquina el día que tenga que cederla o prestarla a otras per-sonas.
Su nueva máquina ha sido proyectada y fabricada siguiendo las normas vigentes, resultasegura y fiable si se usa respetando plenamente las indicaciones que se dan en estemanual (uso previsto); cualquier otra utilización o la falta de respeto de las normas de segu-ridad de uso, de mantenimiento y reparación indicadas es considerado como “uso impro-pio” y comporta la anulación de la garantía y la exoneración de toda responsabilidad delFabricante, incurriendo sobre el usuario todos los perjuicios derivados de daños o lesionesa í mismo o a terceros.
En caso de que se encontrara alguna ligera diferencia entre lo que aquí se describe y lamáquina que usted posee, tenga presente que, debido a la continua mejora del producto,las informaciones contenidas en este manual están sujetas a modificaciones sin previoaviso ni obligación de actualización, quedando inalteradas, sin embargo, las característicasesenciales a fines de la seguridad y del funcionamiento. En caso de dudas contacte con surevendedor. ¡Buen trabajo!
Presentatie
Geachte Klant,we willen u allereerst bedanken voor het feit dat u een product van ons hebt uitgekozen enwe hopen dat het werken met deze machine u veel voldoening mag geven en ten volle aanuw verwachtingen mag voldoen.We hebben deze handleiding geschreven om u in de gelegenheid te stellen uw machine teleren kennen en deze veilig en efficiënt te gebruiken; denk eraan dat deze handleiding inte-grerend deel uitmaakt van de machine. Houd deze bij de hand zodat u deze zo nodig kuntraadplegen en geef deze bij met de machine als u hem verkoopt of uitleent aan anderen.
Deze machine is ontworpen en vervaardigd volgens de thans van kracht zijnde voorschrif-ten; hij is veilig en betrouwbaar bij gebruik volgens de aanwijzingen van deze handleiding(gebruik waarvoor de machine bestemd is); elke andere toepassing of het niet nakomen vande veiligheidsvoorschriften bij het gebruik ervan, op het gebied van het onderhoud of repa-ratie wordt beschouwd als “oneigenlijk gebruik” en heeft ten gevolge dat de garantie komtte vervallen en dat de fabrikant elke aansprakelijkheid van de hand wijst waarbij de gebrui-ker verantwoordelijk is voor schade of letsel aan hemzelf of aan derden.
Indien u kleine verschillen mocht vinden tussen wat hier beschreven is en de machine in uwbezit, denk er dan aan dat gezien de voortdurende verbetering van de artikelen, de infor-matie in deze handleiding zonder voorafgaande kennisgeving of verplichting gewijzigd kanworden; natuurlijk blijven de essentiële kenmerken voor veiligheid of gebruik hetzelfde.Neem in geval van twijfel contact op met uw leverancier. Veel succes!
4
E
NL

Presentação
Prezado Cliente,Agradecemos por ter escolhido os nossos produtos e desejamos que a utilização destamáquina lhe dê muita satisfação e atenda plenamente às suas expectativas.Este manual foi redigido para lhes permitir conhecer bem a sua máquina e utilizá-la deforma segura e eficiente. Não se esqueça de que este manual faz parte integrante damáquina; mantenha-o à mão para poder consultá-lo a qualquer momento e entregue-o jun-tamente com a máquina em caso de transferência a outro proprietário ou se a emprestar.
Esta sua nova máquina foi projectada e fabricada segundo as normativas vigentes. É segu-ra e fiável se for utilizada no pleno respeito das instruções que constam deste manual (usoprevisto); todo outra utilização ou a inobservância das normas de segurança de uso, manu-tenção e reparação indicadas é considerado como “uso impróprio” e causa a invalidação dagarantia e a extinção da responsabilidade do Fabricante, recaindo sobre o utilizador osencargos derivantes de danos ou lesões a si próprio ou a terceiros.
Se houver qualquer pequena diferença entre o quanto descrito neste manual e a máquinaem seu poder, tenha em conta que, vista a contínua melhoria do produto, as informaçõescontidas neste manual são sujeitas a modificações sem aviso prévio ou obrigação de actua-lização, ficando inalteradas, porém, as características essenciais para fins de segurança ede funcionamento. Em caso de dúvida, contacte o seu revendedor. Bom trabalho!
¶·ÚÔ˘Û›·ÛË
∞Á·ËÙ¤ ÂÏ¿ÙË,ı¤ÏÔ˘Ì ηٷگ‹Ó Ó· Û·˜ ¢¯·ÚÈÛÙ‹ÛÔ˘Ì ÁÈ· ÙËÓ ÚÔÙ›ÌËÛË Ô˘ ‰Â›Í·Ù ÛÙ· ÚÔ˚fiÓÙ·Ì·˜ Î·È Â˘¯fiÌ·ÛÙÂ Ë ¯Ú‹ÛË ·˘ÙÔ‡ ÙÔ˘ Ì˯·Ó‹Ì·ÙÔ˜ Ó· Û·˜ ÈηÓÔÔÈ‹ÛÂÈ Î·È Ó·ÂÎÏËÚÒÛÂÈ fiϘ Û·˜ ÙȘ ÚÔÛ‰Ô˘.∆Ô ·ÚfiÓ ÂÁ¯ÂÈÚ›‰ÈÔ ¤¯ÂÈ Û˘ÓÙ·¯ı› ÁÈ· Ó· ÌÔÚ¤ÛÂÙ ӷ ÁÓˆÚ›ÛÂÙ ηϿ ÙÔ Ì˯¿ÓËÌ·Û·˜ Î·È Ó· ÙÔ ¯ÚËÛÈÌÔÔț٠ÛÂ Û˘Óı‹Î˜ ·ÛÊ·Ï›·˜ Ì ˘„ËÏ‹ ·fi‰ÔÛË. ªËÓ Í¯ӿÙÂfiÙÈ ·ÔÙÂÏ› ·Ó·fiÛ·ÛÙÔ Ì¤ÚÔ˜ ÙÔ˘ Ì˯·Ó‹Ì·ÙÔ˜, Ê˘Ï¿ÍÙ ÙÔ Û ÚÔÛÈÙfi ÛËÌÂ›Ô ÁÈ·Ó· ÙÔ Û˘Ì‚Ô˘Ï‡ÛÙ ·Ó¿ ¿Û· ÛÙÈÁÌ‹ Î·È ·Ú·‰ÒÛÙ ÙÔ Ì·˙› Ì ÙÔ Ì˯¿ÓËÌ· Â¿Ó ÙÔÔ˘Ï‹ÛÂÙ ‹ ÙÔ ‰·Ó›ÛÂÙ Û ¿ÏÏÔ˘˜.
∆Ô Ó¤Ô Û·˜ Ì˯¿ÓËÌ· ¤¯ÂÈ Û¯Â‰È·ÛÙ› Î·È Î·Ù·Û΢·ÛÙ› Û‡Ìʈӷ Ì ÙÔ˘˜ ÈÛ¯‡ÔÓÙ˜ηÓÔÓÈÛÌÔ‡˜ Î·È Â›Ó·È ·ÛʷϤ˜ Î·È ·ÍÈfiÈÛÙÔ, ·Ó ¯ÚËÛÈÌÔÔÈËı› Û‡Ìʈӷ Ì ÙȘ Ô‰ËÁ›Â˜ÙÔ˘ ·ÚfiÓÙÔ˜ ÂÁ¯ÂÈÚȉ›Ô˘ (ÚÔ‚ÏÂfiÌÂÓË ¯Ú‹ÛË). ∫¿ı ¿ÏÏË ¯Ú‹ÛË ‹ Ë ÌË Ù‹ÚËÛË ÙˆÓÛ˘ÓÈÛÙÒÌÂÓˆÓ Î·ÓfiÓˆÓ ·ÛÊ·ÏÔ‡˜ ¯Ú‹Û˘, Û˘ÓÙ‹ÚËÛ˘ Î·È ÂÈÛ΢‹˜, ıˆÚ›ٷÈ"·Î·Ù¿ÏÏËÏË ¯Ú‹ÛË" Î·È ¤¯ÂÈ Û·Ó Û˘Ó¤ÂÈ· ÙËÓ ·Î‡ÚˆÛË Ù˘ ÂÁÁ‡ËÛ˘ Î·È ÙËÓ ··ÏÏ·Á‹ÙÔ˘ ηٷÛ΢·ÛÙ‹ ·fi οı ¢ı‡ÓË ÁÈ· ‚Ï¿‚˜ ‹ ÙÚ·˘Ì·ÙÈÛÌÔ‡˜, ÁÈ· ÙÔ˘˜ ÔÔ›Ô˘˜ ÌfiÓÔ˜˘Â‡ı˘ÓÔ˜ Â›Ó·È Ô ¯Ú‹ÛÙ˘.
™Â ÂÚ›ÙˆÛË Ô˘ ·Ú·ÙËÚ‹ÛÂÙ οÔȘ ÌÈÎÚ¤˜ ‰È·ÊÔÚ¤˜ ÌÂٷ͇ ÙˆÓ ÂÚÈÁÚ·ÊÒÓ ÙÔ˘ÂÁ¯ÂÈÚȉ›Ô˘ Î·È ÙÔ˘ Ì˯·Ó‹Ì·Ùfi˜ Û·˜, ¤¯ÂÙ ˘fi„Ë fiÙÈ, ÏfiÁˆ Ù˘ Û˘Ó¯ԇ˜ ‚ÂÏÙ›ˆÛ˘ÙÔ˘ ÚÔ˚fiÓÙÔ˜, ÔÈ ÏËÚÔÊÔڛ˜ Ô˘ ÂÚȤ¯ÂÈ ÙÔ ÂÁ¯ÂÈÚ›‰ÈÔ ÌÔÚÔ‡Ó Ó· ·ÏÏ¿ÍÔ˘Ó ¯ˆÚ›˜ÚÔÂȉÔÔ›ËÛË ‹ ˘Ô¯Ú¤ˆÛË ÂÓË̤ڈÛ˘, ‰È·ÙËÚÒÓÙ·˜ fï˜ Ù· ‚·ÛÈο ¯·Ú·ÎÙËÚÈÛÙÈÎ¿Ô˘ ·ÊÔÚÔ‡Ó ÙËÓ ·ÛÊ¿ÏÂÈ· Î·È ÙË ÏÂÈÙÔ˘ÚÁ›·. ™Â ÂÚ›ÙˆÛË ·ÌÊÈ‚ÔÏ›·˜, ·Â˘ı˘Óı›ÙÂÛÙËÓ ∞ÓÙÈÚÔۈ›·. ∫·Ï‹ ‰Ô˘ÏÂÈ¿!
5
P
GR

6
L’etichetta matricola è posizionata sulla parte anterio-re del carter motore, sotto all’albero di trasmissione. L’etichetta matricola è indispensabile per ogni richie-sta di intervento tecnico e per l’ordinazione dei ricam-bi, essa riporta le seguenti indicazioni:
1) Marchio di conformità secondo la direttiva98/37/CE
2) Marchio di certificazione istituto TÜV GS3) Modello di macchina4) Modello di riferimento del costruttore5) Numero di matricola6) Livello di potenza acustica LWA secondo la diretti-
va 2000/14/CE7) Nome ed indirizzo del costruttore
The label bearing the serial number is located on thefront part of the motor casing, under the drive shaft. You will need the serial number label every time youask for technical assistance or order spare parts. Itbears the following data:
1) Kite-mark (compliance with directive 98/37/EC)2) T.U.V. GS institute certification mark3) Machine model 4) Manufacturer’s reference model 5) Serial number 6) Acoustic power level (LWA) in accordance with
directive 2000/14/EC7) Manufacturer’s name and address
L’étiquette matricule est positionnée sur la partie avantdu carter moteur, sous l’arbre de transmission. L’étiquette matricule est indispensable pour toutedemande d’intervention technique et pour la comman-de des pièces de rechange, elle contient les indica-tions suivantes:
1) Marque de conformité selon la directive 98/37/CE2) Marque de certification institut TÜV3) Modèle de machine 4) Modèle de référence du constructeur5) Numéro de matricule6) Niveau de puissance acoustique LWA selon la
directive 2000/14/CE7) Nom et adresse du constructeur
Das Typenschild des Geräts befindet sich vorne aufdem Motorgehäuse, unterhalb der Antriebswelle. Die Angaben des Typenschilds müssen beiErsatzteilbestellungen oder Reparaturen mitgeteiltwerden und umfassen:
1) Symbol der EG-Normung gemäßMaschinenrichtlinie 98/37/EG
2) Normungssymbol TÜV GS3) Gerätemodell4) Bezugsmodell des Herstellers5) Seriennummer6) Schallleistungspegel LWA gemäß Richtlinie
2000/14/EG7) Firmenname und Anschrift des Herstellers
La etiqueta de matrícula está colocada sobre la partedelantera del cárter del motor, por debajo del eje detransmisión. La etiqueta de matrícula resulta indispensable paracualquier solicitud de intervención técnica y para elpedido de los recambios, en ella se dan las siguientesindicaciones:
1) Marca de conformidad según la directriz 98/37/CE2) Marca de certificación GS3) Modelo de máquina4) Modelo de referencia del fabricante5) Número de matrícula6) Nivel de potencia acústica LWA según la directriz
2000/14/CE7) Nombre y dirección del fabricante
Het machineplaatje zit op de voorzijde van het motor-carter onder de aandrijvingsas. Het machineplaatje hebt u nodig bij elk verzoek omtechnische assistentie en voor het bestellen vanonderdelen; er staan de volgende elementen op:
1) Conformiteitskeurmerk volgens Richtlijn 98/37/CE2) Keurmerk instituut TÜV GS3) Model van de machine4) Referentiemodel van de fabrikant5) Serienummer6) GeluidsdrukniveauS.P.L volgens Richtlijn 2000/14/CE7) Naam en adres van de fabrikant
A etiqueta do número de série foi aposta na partedianteira da caixa do motor, sob o eixo de transmis-são. A etiqueta com o número de série é indispensávelpara os pedidos de intervenção técnica e para enco-mendar peças de substituição, pois contém as seguin-tes informações:
1) Marcação de conformidade segundo a directiva98/37/CE
2) Marca de certificação GS3) Modelo da máquina4) Modelo de referência do fabricante5) Número de série6) Nível de potência acústica LWA segundo a direc-
tiva 2000/14/CE7) Nome e morada do fabricante
∏ ÂÙÈΤٷ Ì ÙÔÓ ·ÚÈıÌfi ÛÂÈÚ¿˜ ‚Ú›ÛÎÂÙ·È ÛÙÔ ÂÌÚfi˜Ì¤ÚÔ˜ ÙÔ˘ οÚÙÂÚ ÙÔ˘ ÌÔÙ¤Ú, οو ·fi ÙÔÓ ¿ÍÔÓ·ÌÂÙ¿‰ÔÛ˘. ∏ ÂÙÈΤٷ Ì ÙÔÓ ·ÚÈıÌfi ÛÂÈÚ¿˜, Â›Ó·È ··Ú·›ÙËÙË Áȷοı ·›ÙËÛË Ù¯ÓÈ΋˜ ¤̂·Û˘ Î·È ÁÈ· ÙËÓ·Ú·ÁÁÂÏ›· ÙˆÓ ·ÓÙ·ÏÏ·ÎÙÈÎÒÓ. ∏ ÂÙÈΤٷ ÂÚȤ¯ÂÈ:
1) ™‹Ì· Û˘ÌÌfiÚʈÛ˘ ‚¿ÛÂÈ Ù˘ Ô‰ËÁ›·˜ 98/37/∂∫2) ŒÙÔ˜ ηٷÛ΢‹˜3) ™‹Ì·4) ∂ˆÓ˘Ì›· Î·È ‰È‡ı˘ÓÛË Î·Ù·Û΢·ÛÙ‹5) ªÔÓÙ¤ÏÔ Ì˯·Ó‹Ì·ÙÔ˜6) ªÔÓÙ¤ÏÔ ·Ó·ÊÔÚ¿˜ ÙÔ˘ ηٷÛ΢·ÛÙ‹7) ∞ÚÈıÌfi ÛÂÈÚ¿˜
I
GB
F
D
E
NL
P
GR
1
2 3 4 5 6
7

SIMBOLISYMBOLSSYMBOLESSYMBOLE
SÍMBOLOSSYMBOLENSIMBOLOS™Àªµ√§∞
7
• Attenzione! Pericolo
• Warning! Danger
• Attention! Danger
• Achtung! Gefahr
• Cuidado! Peligro
• Let op! Gevaar
• Atencao! Perigo
• ¶ÚÔÛÔ¯‹ / ∫›Ó‰˘ÓÔ˜
• Prima di usare questa macchina leggere il libretto istruzioni.
• Read the instruction booklet before using this machine.
• Lire le manuel avant d'utiliser cette machine.
• Vor Inbetriebnahme des Geräts die Gebrauchsanleitung aufmerksam lesen.
• Antes de utilizar esta máquina, lea el manual de instrucciones.
• Lees voordat u dit machine in gebruik gaat nemen eerst de gebruiksaanwijzingen.
• Antes de utilizar esta máquina, leia o manual de instruções.
• ¶ÚÈÓ ¯ÚËÛÈÌÔÔÈ‹ÛÂÙ ÙÔ Ì˯¿ÓËÌ·, ‰È·‚¿ÛÙ ÙȘ Ô‰ËÁ›Â˜ ¯Ú‹Û˘.
• Il vostro apparato uditivo è in pericolo di danno irreversibile. Avvisiamo l'operatore addetto diquesta macchina, che usandola in condizioni normali per uso giornaliero continuativo può veniresposto ad un livello di rumore pari o superiore a: 85 dB (A). É obbligatorio indossare l'equi-paggiamento di protezione individuale. Indossare sempre gli occhiali di sicurezza (rischio diproiezioni) e protezioni acustiche come il casco antirumore (rischio di danni all'apparato auditi-vo) durante l'uso della macchina. Nei casi in cui sia presente il rischio di caduta di oggetti,indossare il casco di protezione.
• Your hearing is at risk of irreparable damage. Anyone operating this machine under normal con-ditions during continuous daily use may be exposed to a noise level equal to or exceeding 85dB (A). The operator must wear Personal Protective Equipment (PPE). Whenever the machineis in use, safety goggles must be worn to safeguard against flying objects, as must ear protec-tors, such as a soundproof helmet, in order to protect the operator’s hearing. If the operator isworking in an area where there is a risk of falling objects, a safety helmet must also be worn.
• Votre appareil auditif pourrait être compromis pour toujours. Nous avertissons l’utilisateur decette machine qu’en l’utilisant dans des conditions normales d’usage quotidien continu, il peutêtre soumis à un niveau de bruit égal ou supérieur à : 85 dB (A). Un équipement de protectionindividuelle est obligatoire. Toujours porter des lunettes de sécurité (risque de projections) etdes protections acoustiques comme le casque anti-bruit (risque d’endommager l’appareil audi-tif) pendant l’utilisation de la machine. En présence de risque de chute d’objets, porter un cas-que de protection.
• Ihr Gehör kann bleibend beschädigt werden. Wir weisen den Bediener des Geräts darauf hin,dass er bei normalen Arbeitsbedingungen täglich einer Geräuschbelastung von 85 dB (A) odermehr ausgesetzt ist. Bei der Arbeit mit dem Freischneider müssen entsprechendeSchutzvorrichtungen getragen werden, wie Schutzbrille (Gefahr umherfliegender Teile) undGehörschutz (es besteht Gefahr bleibender Gehörschäden). Sollte während der Arbeit auch dieGefahr herabfallender Gegenstände bestehen, so ist auch ein Schutzhelm zu tragen.
• Su aparato auditivo corre el peligro de sufrir daños irreversibles. Se advierte a los usuarios deesta máquina que al utilizarla en condiciones normales para un uso diario continuativo, su apa-rato auditivo puede exponerse a un nivel de ruido igual o superior a: 85 dB (A). Es obligatoriollevar equipamiento de protección individual. Durante el uso de la máquina póngase siempregafas de seguridad (contra el riesgo de lanzamiento de objetos) y protecciones acústicas comoauriculares contra ruido (riesgo de daños al aparato auditivo). En caso de que exista el peligrode caída de objetos utilice el casco de protección.

8
• Uw gehoor kan blijvende schade oplopen. De mensen die deze machine dagelijks onder nor-male omstandigheden gebruiken zijn blootgesteld aan een geluidsniveau van 85 dB (A). Het isverplicht beschermers te dragen. Draag tijdens het gebruik van de machine altijd een veili-gheidsbril (gevaar voor rondvliegende delen) en oorbeschermers (om beschadiging van hetgehoor te voorkomen). Als er gevaar voor vallende delen bestaat, dient u een veiligheidshelmte dragen.
• O seu ouvido está em perigo de dano irreversível. Advertimos o operador responsável destamáquina que o seu uso contínuo diário em condições normais pode expô-lo a um nível de ruídoigual ou superior a 85 dB (A). É obrigatório utilizar o equipamento de protecção individual. Usarsempre óculos de segurança (risco de projecção) e protecções de ouvido, como o capaceteenvolvente (risco de dano ao ouvido), durante a utilização da máquina. Quando houver riscode queda de objectos, usar o capacete de segurança.
• ∏ ·ÎÔ‹ Û·˜ ÂÎÙ›ıÂÙ·È Û ΛӉ˘ÓÔ ·Ó·ÓfiÚıˆÙ˘ ‚Ï¿‚˘. ¶ÚÔÂȉÔÔÈԇ̠ÙÔ ¯ÂÈÚÈÛÙ‹ ·˘ÙÔ‡ÙÔ˘ Ì˯·Ó‹Ì·ÙÔ˜, fiÙÈ ¯ÚËÛÈÌÔÔÈÒÓÙ·˜ ÙÔ ˘fi Ê˘ÛÈÔÏÔÁÈΤ˜ Û˘Óı‹Î˜ ÁÈ· Û˘Ó¯‹ ηıËÌÂÚÈÓ‹¯Ú‹ÛË, ÌÔÚ› Ó· ÂÎÙÂı› Û ÛÙ¿ıÌË ıÔÚ‡‚Ô˘ ›ÛË ‹ ÌÂÁ·Ï‡ÙÂÚË ·fi: 85 dB (A). ∏ ¯Ú‹ÛË·ÙÔÌÈÎÒÓ ÚÔÛٷ٢ÙÈÎÒÓ Ì¤ÛˆÓ Â›Ó·È ˘Ô¯ÚˆÙÈ΋. ÃÚËÛÈÌÔÔț٠¿ÓÙ· ÚÔÛٷ٢ÙÈοÁ˘·ÏÈ¿ (ΛӉ˘ÓÔ˜ ÂÎÛÊÂÓ‰ÔÓÈÛÌÔ‡) Î·È ÚÔÛٷ٢ÙÈο ·ÎÔ‹˜ fiˆ˜ ÚÔÛٷ٢ÙÈÎfi Î¿Ï˘ÌÌ·(ΛӉ˘ÓÔ˜ ‚Ï¿‚˘ Ù˘ ·ÎÔ‹˜) fiÙ·Ó ÏÂÈÙÔ˘ÚÁ› ÙÔ Ì˯¿ÓËÌ·. ™Â ÂÚÈÙÒÛÂȘ Ô˘ ˘¿Ú¯ÂÈΛӉ˘ÓÔ˜ ÙÒÛ˘ ·ÓÙÈÎÂÈ̤ӈÓ, ¯ÚËÛÈÌÔÔț٠ÚÔÛٷ٢ÙÈÎfi ÎÚ¿ÓÔ˜.
• Portare calzature di protezione e guanti!
• Wear protective footwear and gloves!
• Porter des chaussures de sécurité et des gants!
• Arbeitsschuhe und Schutzhandschuhe tragen!
• Utilice calzado de seguridad y guantes!
• Draag veiligheidsschoeisel en -handschoenen.
• Utilizar calçado de segurança e luvas!
• ÃÚËÛÈÌÔÔț٠ÚÔÛٷ٢ÙÈο ·Ô‡ÙÛÈ· Î·È Á¿ÓÙÈ·!
• Pericolo di proiezioni!Allontanare qualunque persona o animale domestico ad almeno 15m durante l'impiego dellamacchina!
• Danger: objects thrown up by machine!Keep people or animals at least 15 m away from the machine during operation!
• Risque de projections!Écartez toute personne ou animal domestique à 15 m minimum lorsque vous utilisez la machine.
• Gefahr umherfliegender Teile.!Während des Gerätebetriebs dürfen sich in einem Umkreis von 15 m keine Personen oderHaustiere aufhalten!
• ¡Existe riesgo de lanzamiento de objetos!Mantenga alejadas a personas y animales domésticos, a una distancia de 15 metros comomínimo mientras utiliza la máquina.
• Gevaar voor rondvliegende delen!Zorg ervoor dat wanneer de machine gebruikt wordt, mensen en dieren zich op een afstand vantenminste 15 m bevinden machine in gebruik is.
• Risco de projecção de objectos!Durante a utilização da máquina, afaste todas as pessoas e animais domésticos a pelo menos15 m.
• ∫›Ó‰˘ÓÔ˜ ÂÎÛÊÂÓ‰ÔÓÈÛÌÔ‡ ·ÓÙÈÎÂÈ̤ӈÓ!
∞ÔÌ·ÎÚ‡ÓÂÙ ·ÓıÚÒÔ˘˜ ‹ ηÙÔÈΛ‰È· ˙Ò· Û ·fiÛÙ·ÛË 15m fiÙ·Ó ¯ÚËÛÈÌÔÔț٠ÙÔÌ˯¿ÓËÌ·!
15m

9
• Se è presente questo simbolo: non impiegare lame di sega circolare.
• If the machine bears this symbol: do not use circular saw blades
• Si ce symbole est présent: ne pas utiliser de lames de scie circulaire.
• Bei diesem Symbol: der Einsatz von Sägeblättern ist verboten.
• Si se encuentra presente este símbolo: no utilice hojas para sierra circular.
• Als er dit symbool is: gebruik geen cirkelzaagbladen.
• Se estiver aposto este símbolo: não utilizar lâminas de serra circular.
• ∂¿Ó ˘¿Ú¯ÂÈ ·˘Ùfi ÙÔ Û‡Ì‚ÔÏÔ: ÌË ¯ÚËÛÈÌÔÔț٠̷¯·›ÚÈ· ‰›ÛÎÔ˘.
• Frequenza massima di rotazione dell’albero di trasmissione a cui viene fissato il dispositivo ditaglio
• Maximum revolution frequency of the drive shaft to which the cutting tools are fitted
• Fréquence maximum de rotation de l’arbre de transmission auquel est fixé le dispositif decoupe
• Maximale Rotationsfrequenz der Antriebswelle, an der das Schneidewerkzeug befestigt wird.
• Frecuencia máxima de rotación del eje de transmisión a que es fijado el dispositivo de corte
• Maximale draaisnelheid van de aandrijvingsas waaraan het trimelement wordt bevestigd
• Frequência máxima de rotação do eixo de transmissão no qual é fixado o dispositivo de cort
• ª¤ÁÈÛÙË Û˘¯ÓfiÙËÙ· ÂÚÈÛÙÚÔÊ‹˜ ÙÔ˘ ¿ÍÔÓ· ÌÂÙ¿‰ÔÛ˘, ÛÙÔÓ ÔÔ›Ô ÛÙÂÚÂÒÓÂÙ·È ÙÔ Û‡ÛÙËÌ·ÎÔ‹˜
• Indicazione del livello di potenza acustica LWA secondo la direttiva 2000/14/CE
• Acoustic power level LWA in accordance with directive 2000/14/EC.
• Indication de niveau de puissance acoustique LWA selon la directive 2000/14/CE
• Angabe des Schallleistungspegels LWA gemäß Richtlinie 2000/14/EG
• Indicación del nivel de potencia acústica Lwa según la directriz 2000/14/CE
• Aanduiding van het geluidsdrukniveau LWA volgens Richtlijn 2000/14/CE
• Indicação do nível de potência acústica LWA consoante a directiva 2000/14/CE
• ŒÓ‰ÂÈÍË ÛÙ¿ıÌ˘ ·ÎÔ˘ÛÙÈ΋˜ ÈÛ¯‡Ô˜ LWA ‚¿ÛÂÈ Ù˘ Ô‰ËÁ›·˜ 2000/14/∂∫
• Freccia che indica la posizione corretta dell’impugnatura. Tale posizione non deve essere modi-ficata.
• Arrow that indicates the correct gripping position. This position must not be changed
• Flèche indiquant la position correcte de la poignée. Cette position ne doit pas être modifiée.
• Pfeil zur Angabe der korrekten Bügelposition. Diese Stellung darf nicht verändert werden.
• Flecha que indica la posición correcta de la empuñadura. Esta posición no tiene que ser modi-ficada.
• Pijl die de juiste plaats voor de handgreep aangeeft. Deze plaats mag niet gewijzigd worden.
• Seta que indica a posição correcta da pega. Esta posição não deve ser modificada.
• µ¤ÏÔ˜ Ô˘ ˘Ô‰ÂÈÎÓ‡ÂÈ ÙË ÛˆÛÙ‹ ı¤ÛË Ù˘ ¯ÂÈÚÔÏ·‚‹˜. ∏ ı¤ÛË ·˘Ù‹ ‰ÂÓ Ú¤ÂÈ Ó· ·ÏÏ¿˙ÂÈ.
• Pericolo mortale di intossicazione!Durante il funzionamento, il motore produce gas di scarico nocivi. Non utilizzare il decespu-gliatore in locali chiusi o con ventilazione insufficiente. Pericolo mortale di intossicazione.
• Danger: Deadly fumes!During use, the machine produces toxic gases. Do not use the brush cutter in closed or poorlyventilated areas. These fumes are deadly!
min-1
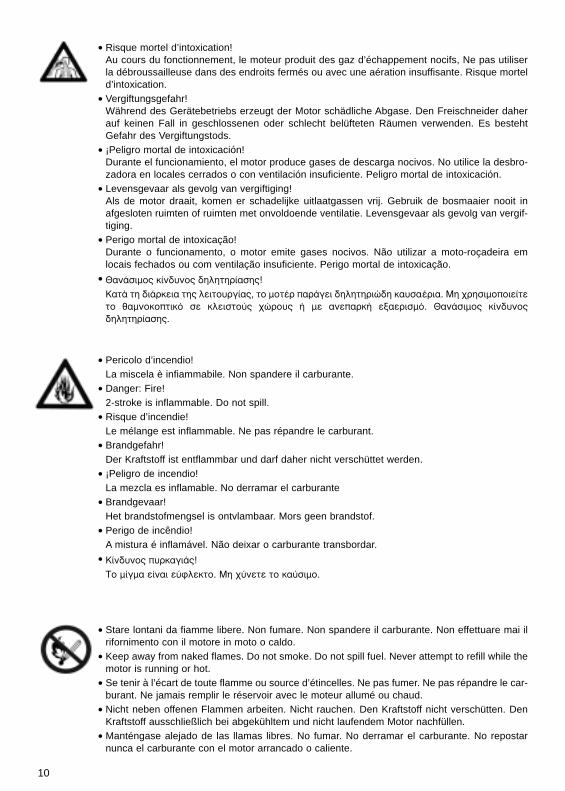
• Risque mortel d’intoxication!Au cours du fonctionnement, le moteur produit des gaz d’échappement nocifs, Ne pas utiliserla débroussailleuse dans des endroits fermés ou avec une aération insuffisante. Risque morteld’intoxication.
• Vergiftungsgefahr!Während des Gerätebetriebs erzeugt der Motor schädliche Abgase. Den Freischneider daherauf keinen Fall in geschlossenen oder schlecht belüfteten Räumen verwenden. Es bestehtGefahr des Vergiftungstods.
• ¡Peligro mortal de intoxicación!Durante el funcionamiento, el motor produce gases de descarga nocivos. No utilice la desbro-zadora en locales cerrados o con ventilación insuficiente. Peligro mortal de intoxicación.
• Levensgevaar als gevolg van vergiftiging!Als de motor draait, komen er schadelijke uitlaatgassen vrij. Gebruik de bosmaaier nooit inafgesloten ruimten of ruimten met onvoldoende ventilatie. Levensgevaar als gevolg van vergif-tiging.
• Perigo mortal de intoxicação!Durante o funcionamento, o motor emite gases nocivos. Não utilizar a moto-roçadeira emlocais fechados ou com ventilação insuficiente. Perigo mortal de intoxicação.
• £·Ó¿ÛÈÌÔ˜ ΛӉ˘ÓÔ˜ ‰ËÏËÙËÚ›·Û˘!
∫·Ù¿ ÙË ‰È¿ÚÎÂÈ· Ù˘ ÏÂÈÙÔ˘ÚÁ›·˜, ÙÔ ÌÔÙ¤Ú ·Ú¿ÁÂÈ ‰ËÏËÙËÚÈÒ‰Ë Î·˘Û·¤ÚÈ·. ªË ¯ÚËÛÈÌÔÔÈ›ÙÂÙÔ ı·ÌÓÔÎÔÙÈÎfi Û ÎÏÂÈÛÙÔ‡˜ ¯ÒÚÔ˘˜ ‹ Ì ·Ó·Ú΋ ÂÍ·ÂÚÈÛÌfi. £·Ó¿ÛÈÌÔ˜ ΛӉ˘ÓÔ˜‰ËÏËÙËÚ›·Û˘.
• Pericolo d’incendio!La miscela è infiammabile. Non spandere il carburante.
• Danger: Fire!2-stroke is inflammable. Do not spill.
• Risque d’incendie!Le mélange est inflammable. Ne pas répandre le carburant.
• Brandgefahr!Der Kraftstoff ist entflammbar und darf daher nicht verschüttet werden.
• ¡Peligro de incendio!La mezcla es inflamable. No derramar el carburante
• Brandgevaar!Het brandstofmengsel is ontvlambaar. Mors geen brandstof.
• Perigo de incêndio!A mistura é inflamável. Não deixar o carburante transbordar.
• ∫›Ó‰˘ÓÔ˜ ˘ÚηÁÈ¿˜!
∆Ô Ì›ÁÌ· Â›Ó·È Â‡ÊÏÂÎÙÔ. ªË ¯‡ÓÂÙ ÙÔ Î·‡ÛÈÌÔ.
• Stare lontani da fiamme libere. Non fumare. Non spandere il carburante. Non effettuare mai ilrifornimento con il motore in moto o caldo.
• Keep away from naked flames. Do not smoke. Do not spill fuel. Never attempt to refill while themotor is running or hot.
• Se tenir à l’écart de toute flamme ou source d’étincelles. Ne pas fumer. Ne pas répandre le car-burant. Ne jamais remplir le réservoir avec le moteur allumé ou chaud.
• Nicht neben offenen Flammen arbeiten. Nicht rauchen. Den Kraftstoff nicht verschütten. DenKraftstoff ausschließlich bei abgekühltem und nicht laufendem Motor nachfüllen.
• Manténgase alejado de las llamas libres. No fumar. No derramar el carburante. No repostarnunca el carburante con el motor arrancado o caliente.
10

• Blijf uit de buurt van open vuur. Rook niet. Mors geen brandstof. Vul de tank nooit als de motorloopt of nog warm is.
• Fique longe de chamas livres. Não fume. Não deixe o carburante transbordar. Nunca encha odepósito com o motor a funcionar ou quente.
• ∫Ú·ÙËı›Ù ̷ÎÚÈ¿ ·fi ÂχıÂÚ˜ ÊÏfiÁ˜. ªËÓ Î·Ó›˙ÂÙÂ. ªË ¯‡ÓÂÙ ÙÔ Î·‡ÛÈÌÔ. ªËÛ˘ÌÏËÚÒÓÂÙ ÔÙ¤ η‡ÛÈÌÔ Ì ÙÔ ÌÔÙ¤Ú Û ÏÂÈÙÔ˘ÚÁ›· ‹ ˙ÂÛÙfi.
• Attenzione alle superfici calde!Durante il funzionamento, e per un certo tempo dopo l’arresto, il silenziatore, il cilindro, il car-ter motore ecc. rimangono caldi. Non toccare le loro superfici fino a quando non si siano raf-freddati: pericolo di ustioni!
• Warning! Hot surfaces.During operation and for a certain time after the machine has been switched off, the silencer,cylinder, motor casing etc. will be hot. Do not touch them until they have cooled down. You riskgetting burned!
• Attention aux surfaces chaudes !Pendant le fonctionnement et pendant un certain temps après l’arrêt, le pot d’échappement, lecylindre, le carter moteur, etc. restent chauds. Ne pas les toucher tant qu’ils ne se sont pasrefroidis: risque de brûlures !
• Achtung: Heiße Oberflächen!Auspuff, Zylinder, Motorgehäuse usw. werden während des Gerätebetriebs erhitzt und bleibenauch bei abgeschaltetem Gerät für einige Zeit lang heiß. Diese Oberflächen nicht berühren, bissie nicht vollkommen abgekühlt sind: Verbrennungsgefahr!
• ¡Cuidado con las superficies calientes!Durante el funcionamiento, y durante cierto tiempo después de pararla, el silenciador, el cilin-dro, el cárter del motor etc. siguen estando calientes. No tocar sus superficies hasta que no sehayan enfriado: peligro de quemaduras!
• Let op hete delen!Als de machine in bedrijf is en ook nog daarna zijn de geluidsdemper, de cilinder, het motor-carter etc. erg warm. Raak ze niet aan voordat ze helemaal afgekoeld zijn: gevaar voor ver-branding!
• Atenção com as superfícies quentes!Durante o funcionamento, e por um certo tempo após a paragem, o silenciador, o cilindro, acaixa do motor, etc. ficam quentes. Não toque as superfícies destes componentes enquantonão estiverem frios: perigo de queimaduras!
• ¶ÚÔÛÔ¯‹ ÛÙȘ ıÂṲ́˜ ÂÈÊ¿ÓÂȘ!
∫·Ù¿ ÙË ‰È¿ÚÎÂÈ· Ù˘ ÏÂÈÙÔ˘ÚÁ›·˜ Î·È ÁÈ· οÔÈÔ ¯ÚÔÓÈÎfi ‰È¿ÛÙËÌ· ÌÂÙ¿ ÙÔ Û‚‹ÛÈÌÔ, ÙÔ ÛÈÏ·ÓÛȤ,Ô Î‡ÏÈÓ‰ÚÔ˜, ÙÔ Î¿ÚÙÂÚ ÙÔ˘ ÌÔÙ¤Ú ÎÏ. ·Ú·Ì¤ÓÔ˘Ó ˙ÂÛÙ¿. ªËÓ ·ÁÁ›˙ÂÙ ·˘Ù¤˜ ÙȘ ÂÈÊ¿ÓÂȘ¤ˆ˜ fiÙÔ˘ ÎÚ˘ÒÛÔ˘Ó: ΛӉ˘ÓÔ˜ ÂÁη˘Ì¿ÙˆÓ!
• Lavorare sempre con la protezione montata!
• Always work with the guard attached!
• Travailler toujours avec la protection montée !
• Nur mit montierter Schutzabdeckung arbeiten!
• ¡Trabajar siempre con la protección montada!
• Zorg er altijd voor dat als u werkt de beveiliging op de machine zit!
• Trabalhe sempre com a caixa de segurança montada!
• ∂ÚÁ¿˙ÂÛÙ ¿ÓÙ· Ì ÙÔÓ ÚÔÊ˘Ï·ÎÙ‹Ú· ÙÔÔıÂÙË̤ÓÔ!
11

• Attenzione ai dispositivi di taglio! Attenzione alle mani. Non infilare le mani sotto il dispositivo diprotezione.
• Warning: Cutting tools! Keep your hands well away. Do not put your hands underneath theguard!
• Attention aux dispositifs de coupe ! Attention aux mains. Ne pas enfiler les mains sous le dis-positif de protection.
• Vorsicht bei den Schneidewerkzeugen! Gefahr von Handverletzungen. Nicht mit den Händenunter die Schutzabdeckung greifen.
• ¡Cuidado con los dispositivos de corte! Cuidado con las manos. No introduzca las manos pordebajo del dispositivo de protección.
• Let op de trimelementen! Let op uw handen. Steek uw handen niet onder het beschermingse-lement.
• Atenção com as ferramentas de corte! Atenção com as mãos. Não coloque as mãos sob acaixa de segurança.
• ¶ÚÔÛÔ¯‹ ÛÙÔ Û‡ÛÙËÌ· ÎÔ‹˜! ¶ÚÔÛÔ¯‹ ÛÙ· ¯¤ÚÈ·. ªË ‚¿˙ÂÙ ٷ ¯¤ÚÈ· οو ·fi ÙÔ Û‡ÛÙËÌ·ÚÔÛÙ·Û›·˜.
• Attenzione ai dispositivi di taglio! Attenzione ai piedi. Non infilare i piedi sotto il dispositivo diprotezione.
• Warning: Cutting tools! Keep your feet well away. Do not put your feet underneath the guard!
• Attention aux dispositifs de coupe ! Attention aux pieds. Ne pas enfiler les pieds sous le dispo-sitif de protection.
• Vorsicht bei den Schneidewerkzeugen! Gefahr von Fußverletzungen. Die Füße dürfen nichtunter die Schutzabdeckung gelangen.
• ¡Cuidado con los dispositivos de corte! Cuidado con las manos. No introduzca las manos pordebajo del dispositivo de protección.
• Let op de trimelementen! Let op uw voeten. Steek uw voeten niet onder het beschermingsele-ment.
• Atenção com as ferramentas de corte! Atenção com os pés. Não coloque os pés sob a caixade segurança.
• ¶ÚÔÛÔ¯‹ ÛÙÔ Û‡ÛÙËÌ· ÎÔ‹˜! ¶ÚÔÛÔ¯‹ ÛÙ· fi‰È·. ªË ‚¿˙ÂÙ ٷ fi‰È· οو ·fi ÙÔ Û‡ÛÙËÌ·ÚÔÛÙ·Û›·˜.
• Aria
• Air
• Air
• Luft
• Aire
• Lucht
• Botão de ar
• ∞¤Ú·˜
• Arricchitore (choke)
• Choke
• Enrichisseur (choke)
• Choke-Knopf
• Enriquecedor (choke)
• Choke
• Controlador de mistura (dispositivo de arranque a frio)
• ∆ÛÔÎ
12
13
Leggere attentamente anche le altre norme di sicurezza contenute in questo libretto.
Read carefully all the other safety measures included in this booklet.
Lire attentivement les autres normes de sécurité figurant dans ce manuel.
Lesen Sie auch die anderen, in vorl iegender Anlei tung beinhaltetenSicherheitsvorschriften aufmerksam durch.
Lea también atentamente las otras normas de seguridad que contiene este manual.
Lees ook alle andere veiligheidsvoorschriften in dit boekje aandachtig door.
Ler também atentamente as demais normas de segurança contidas neste manual.
¢È·‚¿ÛÙ ÚÔÛÂÎÙÈο fiÏÔ˘˜ ÙÔ˘˜ ηÓfiÓ˜ ·ÛÊ·Ï›·˜ ÙÔ˘ ·ÚfiÓÙÔ˜ ÂÁ¯ÂÈÚȉ›Ô˘.
I
GB
F
D
E
NL
P
GR

14
7
17
9
422
5
20
23
3210
81
6
11
1314
16
18
STOP
1
710
21
98
23
54
22
6
32
17
16
11
1314
18
STOP
7 21
19
98
10
17 11
13
15
23
1
612
542223
25
25
25
Descrizione generale IDENTIFICAZIONE DEI COMPONENTI
1 Motore2 Candela3 Maniglia avviamento4 Filtro dell’aria5 Serbatoio del carburante
(miscela)6 Cavo dell’acceleratore7 Carter della frizione8 Maniglia di comando9 Grilletto di comando dell’acce-
lerazione10 Interruttore STOP/START11 Albero di trasmissione12 Flessibile di trasmissione13 Protezione dell’attrezzo14 Scatola di trasmisssione15 Testa da taglio con filo in nylon16 Disco da taglio17 Punta di fissaggio delle cinghie
di sostegno18 Cinghie di sostegno19 Supporto a spalla20 Manubrio21 Maniglia semplice22 Comando starter23 Innesco del carburatore24 Etichetta matricola25 Decompressore
General descriptionCOMPONENT IDENTIFICATION
1 Motor2 Spark plug3 Starter handle4 Air filter5 Fuel tank (2-stroke)6 Throttle cable7 Gearcase8 Control handle9 Throttle lever
10 START/STOP switch11 Drive shaft12 Flexible shaft13 Tool guard14 Clutch housing15 Cutting head (nylon line)16 Cutting disk17 Harness attachment 18 Strap19 Shoulder strap20 Bull handles21 Handle22 Starter control23 Air purge24 Serial number label25 Decompressor
Description générale IDENTIFICATION DES COMPOSANT
1 Moteur2 Bougie 3 Poignée du démarreur4 Filtre à air5 Réservoir mélange d’essence 6 Câble accélérateur 7 Carter embrayage8 Poignée de commande 9 Levier accélérateur
10 InterrupteurMARCHE/ARRÊT11 Arbre de transmission12 Flexible de transmission13 Protection du disque
14 Boîte de transmission 15 Tête de coupe (fil nylon) 16 Disque de coupe17 Point de fixation du harnais18 Sangles de soutien19 Harnais20 Guidon 21 Poignée22 Starter23 Enrichisseur24 Étiquette matricule25 Décompresseur
22
5
18
I
GB
F
FLEX
DUPLEX
MONO

15
Allgemeine BeschreibungIDENTIFIZIERUNG DER KOMPONENTEN
1 Motor2 Zündkerze3 Anreißstarter4 Luftfilter5 Kraftstofftank6 Gasseil 7 Kupplungsgehäuse8 Griff 9 Gashebel
10 START/STOP-Schalter11 Antriebswelle12 Flexible Antriebswelle13 Schutzabdeckung14 Getriebegehäuse15 2-Fadenkopf (Nylonfaden)16 Schneideblatt17 Einhängung für Tragegurt18 Tragegurt 19 Tragegestell 20 Zweihandbügel21 Einfacher Bügel22 Lufthebel23 Choke-Knopf24 Typenschild25 Verdichtungsminderer
Descripción generalIDENTIFICACIÓNDE LOS COMPONENT
1 Motor2 Bujía3 Manilla de arranque4 Filtro del aire5 Deposito de carburante (mezcla)6 Cable del acelerador7 Cárter del embrague8 Empuñadura de mando9 Gatillo de mando del acelerador
10 Interruptor START/STOP11 Eje de transmisión12 Flexible de transmisión13 Protección de la herramienta14 Caja de transmisión15 Cabeza de corte con hilo de
nilón16 Disco de corte17 Punto de fijación de las correas
de sujeción18 Correas de sujeción19 Soporte para los hombros20 Manillar21 Empuñadura simple22 Mando starter23 Cebado del carburante24 Etiqueta matricula25 Descompresor
Algemenebeschrijving generalIDENTIFICATIE VAN DE ONDERDELEN
1 Motor2 Bougie3 Starter4 Luchtfilter5 Benzinetank6 Gashendel7 Carter versnelling8 Bedieningshandgreep9 Gashendel
10 Start/Stopschakelaar11 Aandrijvingsas12 Flexibele aandrijving 13 Bescherming14 Transmissiecarter15 Trimkop (nylondraad)16 Trimblad17 Bevestiging van de riemen 18 Riem19 Schouderriem20 Dubbel handvat21 Enkele handgreep22 Starterbediening23 Choke24 Machineplaatje25 Decompressor
Descrição geralIDENTIFICAÇÃO DOS COMPONENTES
1 Motor2 Vela3 Punho de arranque manual4 Filtro do ar5 Depósito do carburante (mistura)6 Cabo de aceleração7 Caixa da embraiagem8 Pega de comando9 Controle de aceleração
10 Interruptor START/STOP11 Eixo de transmissão12 Cabo de transmissão13 Caixa de segurança14 Caixa de transmissão15 Cabeça de corte com fio de nylon16 Disco de corte17 Engate da alça18 Alça19 Suporte tipo mochila20 Guiador21 Pega simples22 Botão do ar23 Controlador de mistura24 Etiqueta de número de série25 Descompressor
D E NL
P
°ÂÓÈ΋ ÂÚÈÁÚ·Ê‹ ∂•∞ƒ∆∏ª∞∆∞
1 ªÔÙ¤Ú2 ªÔ˘˙›3 §·‚‹ ÂÎΛÓËÛ˘4 º›ÏÙÚÔ ·¤Ú·5 ƒÂ˙ÂÚ‚Ô˘¿Ú η˘Û›ÌÔ˘ (Ì›ÁÌ·)6 ¡Ù›˙· Áη˙ÈÔ‡7 ¡Ù›˙· Û˘ÌϤÎÙË8 ÃÂÈÚÔÏ·‚‹ ÂϤÁ¯Ô˘9 ªÔ¯Ïfi˜ ÂϤÁ¯Ô˘ Áη˙ÈÔ‡10 ¢È·ÎfiÙ˘ STOP/START11 ∞ÍÔÓ·˜ ÌÂÙ¿‰ÔÛ˘12 ∂‡Î·ÌÙÔ˜ ¿ÍÔÓ·˜13 ¶ÚÔÊ˘Ï·ÎÙ‹Ú·˜ ÂÚÁ·Ï›Ԣ14 ∫È‚ÒÙÈÔ Û·ÛÌ¿Ó15 ∫ÂÊ·Ï‹ ÎÔ‹˜ Ì ӿÈÏÔÓ Ó‹Ì·16 ¢›ÛÎÔ˜ ÎÔ‹˜17 ™ËÌÂ›Ô ÛÙÂÚ¤ˆÛ˘ ÈÌ¿ÓÙˆÓ
ÛÙ‹ÚÈ͢18 πÌ¿ÓÙ˜ ÛÙ‹ÚÈ͢
19 ™Ù‹ÚÈÁÌ· ÒÌÔ˘20 ÃÂÈÚÔÏ·‚‹ ηÙ¢ı‡ÓÛˆ˜21 ∞Ï‹ ¯ÂÈÚÔÏ·‚‹22 ∆ÛÔÎr23 ¶Ï‹ÚˆÛË ÙÔ˘ ηÚÌ˘Ú·Ù¤Ú24 ∂ÙÈΤٷ Ì ·ÚÈıÌfi ÛÂÈÚ¿˜25 ∞ÔÛ˘ÌÈÂÛÙ‹˜
GR

16
ba
c
e
d
a
STOP
abd
c
a
b
1A 1B 2A
2B 3 4
5
6
7
8 9 10A

3
21
17
STOP
StopStart
STOP
StopStart min
closed
a
10B 11 12A
12B 12C 13
14 15 16
17 18 19
D

18
B
A
C
30°
30°
OK
1 mm
15
0,5 mm
B
A
C
30°
30°
OK
20 21
22A
22B
23 24
25 26 27
28 29 30

SAFETY MEASURES
Each element of this machine is a potential safetyhazard if used improperly or poorly maintained.We recommend that special attention is paid to thesections starting with the following headings:
WARNING:Indicates the risk of serious personal injury, oreven death, if the instructions are not followed.
PRECAUTION:Indicates the potential risk of serious personalinjury or damage to material if the instructionsare not followed.
TRAINING
A1. Read the instructions in this manual care-fully. Before using the brush cutter, the operatormust be familiar with the controls and knowhow to stop the motor quickly. The operatormust also know how to use it correctly.
A2. Use the brush cutter for the purpose itwas designed for, i.e.:– Cutting grass with a Nylon line (e.g.
around the edges of lawns, flower beds,walls, fences and small grassy areas totidy the areas that have been cut with alawnmower).
– Cutting tall grass or twigs with the help ofmetal or plastic blades.
– If the brush cutter bears the warningsymbol on page 9, the use of a circularsaw blade is forbidden. Using a circularsaw blade with brush cutters bearing thissymbol puts the operator at risk ofserious injury or even death.
– Any other use may be dangerous orresult in the deterioration of the machine.
A3. Never let children or people who have notread the instructions use the brush cutter.Locals laws may set a minimum age for theuser.
A4. Do not use the brush cutter:– When animals or especially children are in
the vicinity. Always ensure that anyother people present are at least 15metres away from the machine. Thebrush cutter is designed for use by oneperson at a time.
– If the user has taken medicine, alcoholor drugs that may slow reflexes, impairalertness and/or vision.
– If the operator is tired or unwell.
– If any of the safety devices, e.g. theequipment guard, are not in place or aredamaged.
– If the safety device is not the specificdevice for that cutting machine. If ahead with a nylon line is used, ensure thatthe line-cutting blade is in place so thatthe line is cut to the correct length.
– For shoulder-mounted brush cutters: witha system or an accessory other than theflexible shaft that comes with the brushcutter.
A5. Do not modify the edge trimmer or thebrush cutter: this may jeopardise operatorsafety by exposing him/her to accidents andserious injury.
A6. The owner or user is responsible for anyaccidents or risks run by third parties or theirpossessions.
PREPARATION
B1. Do not use the brush cutter when bare-foot or wearing sandals. Do not use thebrush cutter with baggy clothes thatcould get caught on branches or in therotating tool. While the machine is in use, the operatormust wear long trousers, boots or safetyshoes with slip-proof soles, goggles or aprotective visor to protect against flyingobjects, gloves, (preferably in leather) andearmuffs or a soundproof helmet. To pro-tect the head, a safety helmet must be wornin areas at risk from falling objects (bran-ches, stones etc.).
B2. The area to be cut must be inspected meti-culously so that all foreign bodies thatcould be thrown up by the machine (sto-nes, pieces of iron, bones, etc.) can be remo-ved.
B3. Petrol is highly inflammable. – Store the fuel in purpose-made canisters.– Fill up the tank outdoors only. Do not
smoke either when performing this opera-tion or any other that involves handlingfuel.
– Never remove the petrol tank cap or fill itup while the motor is in operation orwhile it is still hot.
– Do not start the machine if the tank isoverflowing with fuel: if fuel is spilt,remove the brush cutter from the area anddo not light flames until the fuel has eva-porated and the vapours have dissipated.
– Close the tank and the container properly
31
GB
by ensuring that the caps are on tight.B4. Replace the exhaust silencers if they are
faulty.B5. Each time the machine is used, a general
check must be carried out on the condition ofthe equipment, cutting unit, guards andfasteners before switching it on; this must bedone to ensure that the parts are not worn,damaged or loose. Always check that thethrottle lever and “STOP” button workcorrectly. Check that the lever that blocksthe throttle works correctly; the throttleshould only work when the safety leveron the opposite side to the grip is pressedsimultaneously.
B6. Check that the handles and the harnessattachment are in the correct position andthat the machine is well balanced. Thecorrect positions and adjusting proceduresare explained in the “How to wear the straps”chapter in this manual.
B7. Ensure that the “minimum revs” speed isset correctly so that the machine stopsrunning when the throttle is released.
USE
C1. Do not start the motor indoors or inpoorly ventilated areas where toxic carbonmonoxide fumes can accumulate.
C2. Work in daylight only.C3. Wherever possible, do not use the machi-
ne on wet ground. C4. While the machine is in use, the user must
keep a safe distance away from the blade.This distance depends on the position of theharness attachment.
C5. Always walk. Never run or stand in anunstable position. Be careful of obstaclessuch as stones, tree stumps etc. which theoperator could trip over.
C6. Do not use the machine on slopes thatcould put the operator at risk. Mind yourstep when working on a slope and alwayswork in a stable position. Always use thecutter on the flat. Never use it while walkingup or down a slope.
C7. It is the user’s responsibility to assessthe potential risks of the work area and totake all the necessary precautions toensure his/her safety. This is especiallyimportant when working on slopes, unstable,slippery or moving ground.
C8. If metal cutting tools (e.g. 3-pointed disks,4-pointed disks, circular saw) are used,there is the risk that they will recoil if they
hit a solid object (stones, tree stumps etc.).The brush cutter will be forced in the opposi-te direction to the one in which the tool rota-tes.
C9. Never adjust the motor timing so that itexceeds its standard running speed.
C10. Before starting the motor, ensure thatanyone in the vicinity is at a safe distanceaway (at least 15 metres) from the machi-ne, that the cutting tool is not touchingthe ground and that the machine is stable.
C11. When the tool rotates, it may throw upobjects from the ground. Keep a safe dis-tance of at least 15 metres between themachine and people or animals.Do not use the brush cutter near vehiclesor anything else that might be damagedby flying objects.
C12. Start up the motor carefully in accordancewith the user’s instructions, keeping wellaway from the cutting tool.
C13. Stop the motor and disconnect the sparkplug wire in the following cases: – Before carrying out any work on the cut-
ting system.– Before cleaning, checking, adjusting or
repairing the brush cutter. Only adjust-ments to the carburettor and the minimumsetting are made with the motor running.During this operation, work with the driveshaft fitted, also ensure that the equipmentdoes not come into contact with any objectand that the machine is in a stable posi-tion.
– After hitting an object, inspect the cuttingsystem and the drive shaft to check thatthere is no damage. Make any repairsnecessary before using the machineagain.
– If the brush cutter starts to shake in anirregular manner, look for the cause of thevibrations and find a solution.
C14. Stop the motor in the following cases:– Whenever the brush cutter is left unsuper-
vised.– Before filling with fuel.– During movement from one work area to
another.C15. Always keep the brush cutter attached to the
harness while you are working.
MAINTENANCE AND STORAGE
D1. Ensure that all screws and bolts aretightly fastened so that the machine can
32
GB

be used in safety. Regular maintenance isessential for safety and a consistently highperformance.
D2. Do not use the machine if any parts aredamaged or worn. These parts must bereplaced, not repaired. Use original spareparts. The cutting tools must always bear themanufacturer’s mark as well as the maxi-mum working speed and direction of rotationfor circular saw blades. Spare parts that arenot the same quality may damage the machi-ne and jeopardise safety.
D3. Wear thick gloves to remove and refit thecutting tools.
D4. Never store the brush cutter with fuel inthe tank in an environment where petrolfumes could come into contact with aflame, spark or sources of extreme heat.
D5. Store the brush cutter in a clean and dryenvironment, out of the reach of children.
D6. Let the motor cool down before it is sto-red in any environment.
D7. To reduce the risk of fire, clean any leaves,grass or excess oil from the brush cutter,especially its motor, cooling fins, exhaustpipe and fuel tank.
D8. While it is being stored or transported, coverthe blade with its guard in order to preventaccidental injury.
D9. If the fuel tank has to be drained, do sooutdoors when the motor is cold.
D10. In order to protect the environment, do notthrow used oil or fuel into sewers, downdrains, or directly onto the ground. Your localservice station will be able to recycle the oiland the fuel in complete safety.
ASSEMBLY
The brush cutters are supplied pre-assembled intheir packaging. Nevertheless, the following simpleoperations have to be carried out.
MONO BRUSH CUTTERSFor Mono models with a low motor capacity, it isnecessary fasten the front grip with barrier usingthe bottom cap. Once the grip and the bottom caphave been fitted to the drive pipe, the edge of thegrip has to be positioned on the edge of the labelindicated by the arrow. Fit the screws (with was-hers) into the grip holes and fit the bolts into theirseats. Tighten the screws a little (Fig. 1A). Thentighten the screws completely, ensuring that theyare all fastened equally.
WARNING The grip has to be fastened to thedrive pipe in line with the edge of the label indica-ted by the arrow (label shown on page 9 of thismanual). This position must never been chan-ged.
For Mono models with a high motor capacity, itis necessary to fasten the front grip with barrier tothe plastic housing that covers the drive pipe. Remove the two screws with washer from the hou-sing; position the grip so that the grip holes arelined up with the housing holes; refasten the gripusing the two screws with washer (Fig. 1B).
DUPLEX BRUSH CUTTERSFor Duplex models, a grip with bull handles has tobe fitted. For Duplex models with a low motor capacity,put the grip with the rubber fittings into its seat; fitthe top element and fasten the grip in the workingposition using the screws with washers and thenuts supplied (Fig. 2A). The bull handles can beremoved if the machine has to be transported orstored so as to reduce its dimensions.
WARNING The bull handle support is fastened tothe drive pipe in the position shown by the arrow onthe label on page 9 of this manual. This positionmust never be changed.
For Duplex models with a high motor capacity,the bull handles are fastened with a single screw(Fig. 2B).To fit the bull handles: unfasten the screw, turningit anticlockwise, lift the top clamp and fit the hand-les. Fasten the clamp screw a little, turning itclockwise. Position the handles until they are in theworking position and then fasten the whole unit bytightening the screw completely. The grip can be folded for transportation or stora-ge: loosen the screw until the bull handles turn, thegrip can then be fastened in the new position.
FLEX BRUSH CUTTERSProceed as follows to assemble the Flex shoulder-mounted brush cutters: a) Insert the end of shaft ‘a’ that protrudes from the
drive pipe into square hub ‘b’ connected to themotor (Fig. 3).
b) Press pin ‘c’ and insert coupling ‘d’ of the flexi-ble rubber shaft into the flange hole (Fig. 3).Ensure that the pin comes up and blocks the fle-xible pipe. Pull gently on the metal coupling atthe end of the flexible pipe to check this.
33
GB

c) After the filter lid has been removed by pressingthe top tab, connect the throttle cable. Pass thesteel cable through the hole of the threadedadjusting screw fastened to the carburettor.Then fit the cable in its seat on the throttle lever.
d) Connect the "STOP" cables (‘e’ in Fig. 3) usingthe two connectors.
e) To join the flexible rubber pipe to the rigid drivepipe:Fit the flexible shaft that protrudes from the endof the grip (‘a’ in Fig. 5) into the square hub onthe rigid part of the drive (‘b’ in Fig. 5). After cen-tring reference pin ‘c’ in its seat, tightly fastenring nut ‘d’ (Fig. 5).
f) Fasten the grip firmly to the drive pipe (Fig. 4).Once the grip and the bottom cap have been fit-ted to the drive pipe, the edge of the grip has tobe positioned on the edge of the label indicatedby the arrow. Fit the screws (with washers) intothe grip holes. The rear left screw must also beused to fasten flange ‘a’ in Fig. 4. Insert the nutsinto their seats and tighten the screws a little.Then firmly tighten all the screws equally.
If the dimensions of the brush cutter have to bereduced for transportation or storage, loosen thering nut (‘d’ in Fig. 5) and separate the rigid driveshaft from the flexible shaft. The flexible pipe canalso be separated from the motor by extracting itfrom its seat: to do this, press the pin (‘c’ in Fig. 3)and at the same time remove the shaft from theflange by taking it by the metal coupling. If theshoulder-mounted model is used, put on the back-pack and connect the elastic strap to flange ‘a’ Fig.4.
WARNING The grip has to be fastened in linewith the arrow on the drive pipe. This positionmust never be changed.
FASTENING THE GUARD
Never work without the guard. The guard mustbe fitted with the screws with washers that comewith the machine (Fig. 6). If a 4-pointed disk is fit-ted to the brush cutter, the tool has to be removedbefore the guard is fitted: stop the drive shaft fromrotating by using the torx key (Fig. 8) and thenunfasten the screw by turning it clockwise.The guard must be the correct type both for themachine model and for the cutting tool. When the line head is used, the guard must be fit-ted with a line-cutting blade. If the blade diskguard is not fitted with a line cutter, then the guardhas to be fitted with the bottom band with knife.After the bottom band and its guides have been fit-
ted into the seats, press the band towards theguard so that all the teeth are released (Fig. 7).If the saw disk is used, a suitable guard has tobe fitted.The saw disk must not be used if the machine orthe guard bear the symbol forbidding the use ofthis tool (symbol shown on page of this manual).
WARNING In order to guarantee that the brushcutter is used properly and safely, the assemblyinstructions for the protection and safety com-ponents must be followed meticulously. Themanufacturer shall not be held liable if the brushcutter is used without the aforementioned protec-tion and safety devices.
CUTTING TOOL ASSEMBLY
The use of cutting tools other than the 2-lineheads, metal disks or circular saw blades maycause premature wear or damage the machine.
METAL DISK OR CIRCULAR BLADE DISKASSEMBLYa) Put on a pair of safety gloves before touching
the metal disk. b) Using the key supplied, remove the hexagonal
head screw by turning it clockwise. Remove theelastic washer, fixed housing and ring nut B.
c) Fit the metal disk in between ring nut A and ringnut B, check that the grooves on the ring nutsand the head shaft fit together perfectly.Position the fixed housing and fasten the hexa-gonal screw by turning it anticlockwise.
d) The final safety measure involves blocking theshaft rotation: fit the torx key (or a steel rod) intothe hole (Fig. 8), turn the tool slowly until the keygoes into the hole of the inner ring nut, whichwill stop the tool rotating. Tighten the screw andremove the key from the hole.
WARNING If the brush cutter bears the war-ning symbol on page 9, the circular saw blademust not be used. Using the circular saw bladewith brush cutters bearing this symbol puts theoperator at risk of serious injury or even death.
LINE HEAD ASSEMBLYWith ring nut A already fitted onto the head shaft,turn the line head anticlockwise (the threading isleft-handed) (Fig. 9). If the Tap & Go head is fitted,a protective plate has to be inserted between thehead and the ring nut. The plate must be fitted withthe flat part against the plastic head. The final
34
GB

safety measure involves blocking the shaft rota-tion: fit the torx key (or a steel rod) into the hole(Fig. 9), turn the tool slowly until the key goes intothe hole of the inner ring nut, which will stop thetool rotating. Tighten the head and remove the keyfrom the hole.
HOW TO WEAR THE STRAPS
For Mono brush cutters with a single strap: passthe strap over the left shoulder so that it runs fromtop left to bottom right (Fig. 10A). For Mono brush cutters with double strap and forDuplex models: wear the belt with the padded partand the brush cutter attachment on the right side.The release has to be on the front while the strapsshould cross on the operator’s back (Fig. 10B).Arrange the belts so that the load is evenly distri-buted on the shoulders.For the Flex brush cutters: wear the straps as youwould a normal backpack and fasten the beltaround the waist. Arrange the belts so that the load is evenly distri-buted on the shoulders and adjust the waist. If theshoulder-mounted model is used, put on the back-pack and connect the elastic strap to flange ‘a’ inFig. 4.
In order to work more efficiently and safely, adjustthe straps according to your height and build.
WARNING Always check the rapid releasesystem. It must be used in emergencies when theoperator has to get rid of the machine and out ofthe straps quickly.
PREPARATION FOR USE
In order to use the brush cutter, clothes have to beworn that protect against objects thrown up by thetool (e.g. stones). It is necessary to wear safetyshoes with a slip-proof sole, gloves, safety gog-gles (the visor is on its own does not protect theeyes sufficiently), clothes that are not baggy. Donot wear loose-fitting clothes, scarves, ties, jewel-lery or other dangling objects that could get caughton branches. Long hair must be tied up and cove-red. Ear protection must also be worn, e.g. earmuffs.A safety helmet must be worn while pruning,chopping down trees, brush cutting or any otherwork in places where falling objects are a danger.
WARNING Read the Safety measures chapterof this manual very carefully.
MACHINE INSPECTION
Check that every screw is tightly fastened and thatthe mechanical parts are sufficiently lubricated.Check the blade, ensure it is sharp and that it is notdamaged in any way. Check that the blade diskguard is in place. Check that the air filter is clean.Dirty air filters may jeopardise performance.
REFILLING WITH FUEL
USE A MIXTURE OF PETROL AND SPECIALHIGH-QUALITY OIL (4%) FOR 2-STROKE ENGI-NES.PETROL - OIL PERCENTAGE 25:1= 4% oil
Using lubricants that are purpose-designed by themanufacturer, the percentage has been lowered:for PROF 2T OIL the petrol - oil ratio is 50:1 (2%oil).To prepare the mixture, always use a clean contai-ner that is suitable for storing petrol.The petrol and the oil have to be mixed well. Toachieve a good mixture, proceed as follows: pourhalf the petrol into a suitable container, then add allthe oil needed to make the required amount of 2-stroke. Shake the container well to mix. Add theremaining petrol and mix well by shaking the con-tainer vigorously.
REFILLING THE FUEL TANK
WARNING Pressure may increase in reci-pients containing petrol because of the envi-ronment temperature.Open the lid carefully to avoid it flying off.Store the fuel in a cool place and keep it out ofthe sun.
PRECAUTIONPosition the machine with the tank lid facingupwards. To make things easier, place the machi-ne in the position shown in Fig. 11.Clean the tank lid and the surrounding area to pre-vent foreign bodies entering the tank.Fill the tank with petrol, using a suitable containerthat prevents accidental fuel spillage.Make sure that the machine is in a stable positionto prevent it being knocked over.
WARNING
35
GB

– Petrol is highly inflammable and in cer-tain conditions explosive.
– Refill the tank in a well ventilated areawith the motor switched off. Do notsmoke, do not light flames or makesparks in the environment either wherethe motor is being refilled or in the fuel sto-rage area.
– Do not overfill the tank (there should notbe any fuel in the neck of the tank). Afterrefilling the tank, ensure that the lid ison correctly and safely.
– Take care not to spill any fuel while fillingthe tank. Spilt fuel and its vapours maycatch light. If any fuel has been spilt, makesure the area is dry before the motor isstarted up.
– Avoid prolonged skin contact with thefuel and breathing the vapours.
– Keep the fuel out of the reach of chil-dren.
START UP
Before starting up the machine, ensure that no-oneand nothing are within the start up radius aroundthe machine, as they may be in danger.
WARNING To prevent the throttle starting acci-dentally, the throttle lever is fitted with a safetyswitch: the throttle lever will only work when thesafety lever on the opposite side to the grip is pres-sed down. Before starting the machine, alwaysensure that that safety lever works.
Start up the machine on a flat and stable surface.
– Set the red switch on the front of the thrott-le lever to "START", i.e. the opposite of"STOP" (Fig. 12 A, B, C).
– Set starter ‘a’ in Fig. 13 to "CLOSE", i.e.towards the opposite side of the motor.
– Press the plastic dome "CHOKE" located onthe lower part of the carburettor severaltimes for an injection of fresh petrol (Fig. 14).
– If the machine has a decompressor (D inFig.14), press it so that the motor starts upmore easily. At the first bursts, the decom-pressor closes and returns the button to itsoriginal position. Press it back down if themotor has to be started up again.
– Place one hand on the motor and pushdownwards, with the other gently pull thestart up handle until there is some resi-stance.
– Then pull vigorously until the motor starts(Fig. 15).
– When the motor gives its first bursts, orstarts up, set starter ‘a’ in Fig. 13 to theposition opposite to "CLOSE".
Always pull the start up handle rapidly.A slow pull may not cause a spark and conse-quently not start up the machine.If the motor does not start or does not reach stan-dard running speed, read the Troubleshootingchapter at the end of the manual.
PRECAUTIONDo not pull the start up handle to the full extent ofthe cord.Do not let go of the start up handle suddenly.Release it slowly so as not to damage the start upunit.Do not place your foot or knee on the drive pipe tokeep the machine still: the pipe may bend, thusmaking the machine unusable.
WARNING When the machine starts up, thecutting tool will start turning immediately. Bringthe machine to minimum by pressing and thenfreeing the throttle lever. Check that the cutting tool stops turning whenthe machine is at minimum.
STARTING WHEN HOT
The start up procedure for when the machine is hotis the same as when it is cold, except that there isno need to have the starter in the "CLOSE" posi-tion.
STOPPING THE MOTOR
Bring the motor to its minimum rpm. Move the redSTOP switch located on the top part of the throttlelever to the STOP position.
ADJUSTING THE CARBURETTOR
The carburettor on all the machines is set by themanufacturer.The machines are set individually.Check that the air filter is clean and fitted correctly.The adjusting screw marked "MIN" (Fig. 13) is setin such a way that the tool does not turn when themotor is at minimum. If this does not happen, turnthe screw anticlockwise until the tool stops turning
36
GB

when it is at minimum running speed. The motorshould turn over regularly at this speed. If the carburettor has to be adjusted again, werecommend you contact your reseller or an autho-rised service centre.
BRUSH CUTTER USE
WARNING Read the Safety measures chapterof this manual very carefully.
METAL DISKSThe 4-pointed disks are suitable for cutting resi-stant grass over wide areas. To cut grass, use thebrush cutter as you would a lawnmower: cut thegrass by moving the brush cutter from right to left,then bring it back to the right, keeping it out of thevegetation, and so on. Mow the grass with circularsweeping movements of about 60° - 90° (Fig. 16).The 3-pointed disk is suitable for cutting branchesand small trees with a diameter of 2 cm.In this case, start cutting the vegetation from aboveand bring the cutting head downwards in order tocut the branches into little pieces (Fig. 17)
WARNING Using metal tools runs the risk ofrecoil when the equipment comes into contactwith solid objects (trunks, branches, stones). Ifthe equipment does bounce back, it will be dif-ficult to control and may seriously injure theoperator and damage the machine.
CIRCULAR SAW BLADE
WARNING The circular saw blade can only beused on Duplex brush cutters which do notbear the warning symbol shown on page 9 andare fitted with suitable guards. Using a circularsaw blade with brush cutters that bear this war-ning symbol and/or without suitable guardsexposes the operator to the risk of seriousinjury and even death.
The circular saw blade is suitable for cutting resi-stant hedges, shrubs and small trees with trunksthat do not exceed 6 cm in diameter. The blade must always be sharp. This increasesthe cutting speed and reduces the risk of the bladestopping.When working out which way a tree will fall, alsotake the wind direction into account.We do not recommend you use the right-hand areaof the blade (white area in Fig. 18): using this arearuns a high risk of recoil and the blade stopping.
When the blade is brought closer to the trunk to becut, the motor must be running at full speed.To obtain a good result when cutting down smalltrees, the cut must be made with a rapid sweepingmovement towards the branch or the trunk to becut (Fig. 19).
WARNING Using metal tools runs the risk ofrecoil when the equipment comes into contact withsolid objects (trunks, branches, stones). If theequipment does bounce back, it will be difficult tocontrol and may seriously injure the operator anddamage the machine. Never bring the blade intocontact with the ground.
LINE HEADTo cut grass, use the brush cutter as you would alawnmower: cut the grass by moving the brush cut-ter from right to left, then bring it back to the right,keeping it out of the vegetation, and so on.Proceed with circular sweeping movements of 60°- 90° (Fig. 20).The line head must be held just above the ground.Never press the rotating line against the ground.Do not force the line against hard objects (stones,cement, trees etc.), as this will wear the line downfor no reason.The line bends on contact with obstacles, but maydamage young plants or plants with thin stems.To work efficiently, the line must protrude from thehead by approximately 12 cm. If the line is too long,it should be cut with the line-cutting blade.
If the line is too short, it should be lengthened. 1) If the manual head is fitted, loosen the bottom
knob by about 3 turns in a clockwise direction,pull the two ends of the line until you have therequired length. Refasten the knob by turning itin an anticlockwise direction. If too much line isunwound, it is possible to rewind it: loosen theknob and block the head body, then turn the bot-tom lid in an anticlockwise direction.
2) If a semi-automatic head is fitted: remove the lower part of the line head and turnit one notch anticlockwise (watching the bottompart of the head). Then pull the ends of the line out.Repeat the operation if necessary.
3) If the Tap & Go head is fitted, gently press theline head against the ground when it is at maxi-mum speed and the line comes out automati-cally. Repeat the operation until you have thecorrect length.
WARNING When you use the line head, theguard has to be fitted with a line-cutting blade.
37
GB

Fit the bottom band with knife to the guard. Do notuse very worn heads: some components maycome off and put the operator in danger.
REPLACING THE GRASS-CUTTINGHEAD LINE
To replace the line, follow the instructions enclosedwith the head being used.
WARNING Never replace the nylon line with aline made of any other material (e.g. iron).PRECAUTIONDo not use line with a diameter greater than 3 mm.Line that is too thick may impede the performanceof the motor by generating an excessive load.Line with a diameter lower than 2.4 mm producesmediocre results and wears out rapidly.The flexibility of the line will improve if it is left inwater 1 - 2 days before it is used..
SHARPENING 3- OR 4-POINTED DISKS
Sharpen with a suitable flat file (Fig. 21).Figure 22A and 22B show:
A ) The wrong way to sharpen B) Sharpening limits C) Wrong or unequal angles
All the points have to be sharpened in the sameway.Both sides of the 3- and 4-pointed disks can beused. When one side is worn, the disk can be tur-ned over in order to use the other side.
WARNING Remove the spark plug cap beforesharpening.Put on a pair of gloves before sharpening to avoidcutting yourself. It is important to ensure the machi-ne is correctly balanced even after sharpening.The metal disk must never be repaired: the diskmust be replaced as soon as you notice any brea-kage or if the sharpening limit has been exceeded.
SHARPENING THE SAW DISK
Check that the blade setting is about 1 mm.If necessary, adjust it with pliers (Fig. 23).Sharpen the blade with a 5.5 mm diameter roundfile. Approach the blade with the file as per Fig. 24.Sharpen the left tooth and the right tooth alterna-tely. Sharpen all the teeth equally.If the blade is damaged, the top part of the toothmay also have to be sharpened. Use a suitable flatfile and sharpen all the teeth equally (Fig. 25).The profile of the tooth must not be changed.
WARNING Remove the spark plug cap beforesharpening.Put on a pair of gloves before sharpening to avoidcutting yourself on the blade. The circular saw disk must never be repaired: thedisk must be replaced as soon as you notice anybreakage or if the sharpening limit has been excee-ded.If the blade is not sharpened properly, it may causethe machine to recoil. Furthermore, an insufficient setting will also cause recoil. It is important to ensure the machine is correctlybalanced even after sharpening.
38
GB

39
ELEMENT PROCEDURE
FREQUENCY
MAINTENANCE AND CHECK
Machine complete Visual checkClean
Throttle lever Operational checkOperational check on the safetylever. If it is not pressed, then thethrottle command will not work.
Stop button Operational checkCarburettor Check that the tool does not turn
with the motor at minimum rpmCleanAdjust
Carburettor area CleanCutting tool Visual check (breakage, cracks,
poor alignment, eccentricity etc.)Check tightness
Tank Check forfuel leaksClean
Head with gears area Clean, remove any grassGuard Visual checkHead with gears Lubricate with lithium-based grea-
se. Remove the screw and fill withgrease, turning the head manuallyuntil the grease comes out (Fig.26). Refasten the screw.
Nuts, screws, bolts (not adjusters) Check tightnessAir filter Check
Clean with brush, hot water andsoap or another non-flammableliquid detergent. Leave to dry andthen refit (Fig. 27).
Air vents CleanCylinder fins CleanSpark plug area CleanSpark plug Check and clean the spark plug of
any excess carbon (Fig. 28).Measure the distance between elec-trodes and replace if necessary.
Cables and connections CheckSprings and clutch pads Check and replace if necessaryPetrol filter Check and replace if necessary
(Fig. 29)For flex brush cutters only Remove the flexible shaft from the rubber
sleeve and lubricate the shaft thoroughlywith lithium-based grease (Fig. 30)
At
auth
oris
edw
orks
hops
if ne
cess
ary
Eve
ry 3
0 ho
urs
Eve
ry 1
5 ho
urs
Dai
ly c
heck
Afte
r fil
ling
Bef
ore
star
ting
wor
k
WARNING Read the Safety measures chapter of this manual very carefully.Before carrying out any repairs or maintenance work, remove the spark plug cap.
GB
EXTRAORDINARY MAINTENANCE
Contact your local authorised service centre forany procedures not considered to be ordinary nain-tenance.Repairs carried out by unauthorised servicecentres will invalidate the warrantee.Use original spare parts only.
END OF SEASON STORAGE
When the machine is not required for long periodsat the end of the season, follow the instructionsbelow in order to store the machine in the best con-ditions so that it will resume work easily and effi-ciently.– Completely drain the 2-stroke tank, close the
starter and start the motor in order to use upany 2-stroke that might have been left in thecarburettor or in the fuel supply system.
– Remove the spark plug and put several dropsof oil into the cylinder through the spark plug
hole. Pull the start cable two or three times sothat a protective film forms between the pistonand the cylinder.
– Clean the 2-stroke suction filter and the supplypipe with petrol (Fig. 29).
– Clean the entire machine with a brush andpetrol, dry it thoroughly and lightly grease itwith an oil-soaked cloth.Put it back into its original packaging.
WARNING Read the Safety measures on stora-ge in the first chapter very carefully.
ALL OUR MACHINES ARE EXCELLENT QUA-LITY. THEY ARE PERFECTLY TUNED AND AREDESIGNED SO THAT THE OPERATOR CANWORK IN MAXIMUM SAFETY.
The manufacturer reserves the right to change thetechnical specifications described in this manualwithout any prior notice.
40
GB

41
REMEDY
Fill tank with 2-stroke.
Put it in the START position.
Turn off starter and re-start.If the motor is flooded, see the followingpoint.
Unscrew the spark plug, dry it, pull the startcable several times and replace the sparkplug.
Clean the tank with petrol and then refill it withnew 2-stroke that does not contain water.
Remove the spark plug and use a brush toclean off any excess carbon (Fig. 28).Replace if necessary.
Check the distance between the electrodes(Fig. 28) and correct it.
Clean the filter.
Remove the spark plug and use a brush toclean off any excess carbon (Fig. 28).Replace if necessary
Clean the tank with petrol and then refill itwith new 2-stroke that does not contain con-densation.
Clean the exhaust pipe. If this does not work,then contact an authorised service centre.
Clean the breather pipe.
Clean with brush, hot water and soap or ano-ther non-flammable liquid detergent. Leave todry and then refit (Fig. 27).
Remove the spark plug and use a brush toclean off any excess carbon (Fig. 28).Replace if necessary.
Turn the carburettor minimum screw clockwi-se (Fig. 13). At minimum running speed, thetool should not turn, but the motor shouldremain on.
PROBLEM CAUSE
No fuel in the tank.
The STOP/START button is in the STOPposition.
The starter was not turned off after thefirst burst.
The motor is flooded (the spark plug iswet).
Water or condensation in the tank.
The spark plug is dirty.
The distance between the spark plugelectrodes is wrong.
The air filter is dirty or wet.
The spark plug is dirty.
Condensation in the tank.
The silencer is blocked.
The tank breather pipe is clogged (buildup of impurities around the end of thepipe).
The air filter is dirty.
The spark plug is dirty.
The screw for the carburettor minimum isset incorrectly.
TROUBLESHOOTING
The machine doesnot start
The motor starts butdoes not reachstandard rpm
The motor does nothold the minimumrpm
GB

115
I
GB
F
D
DATI TECNICITECHNICAL DATACARACTÉRISTIQUESTECHNISCHE DATEN
DATOS TÉCNICOSTECHNISCHE GEGEVENSTECHNIQUES DADOS∆∂áπ∫∞ Ã∞ƒ∞∫∆∏ƒπ™∆π∫∞
Per identificare il modello corrispondentealla vostra macchina, leggere l’etichettamatricola (vedere pag. 6 di questo manua-le) o la tabella riportata sulla dichiarazionedi conformità.
To identify the model of your machine,read the serialnumber label (see page 6 ofthis manual) or the table in the declarationof conformity.
Pour identifier le modèle correspondant àvotre machine, lire l’étiquette matricule(voir page 6 de ce manuel) ou le tableaufigurant dans la déclaration de conformité.
Zur Identifikation Ihres Gerätemodells:Typenschild (vgl. Seite 6 dieser Anleitung)oder Tabelle der Konformitätserklärung.
Para identificar el modelo correspondientea su máquina, lea la etiqueta de matrícula(véase pág. 6 de este manual) o la tablareproducida en la declaración de confor-midad.
Om het model van uw machine te wetente komen, dient u het machineplaatje telezen (zie pag. 6 van deze handleiding) ofde tabel op de conformiteitsverklaring.
Para identificar o modelo que correspon-de à sua máquina, leia a etiqueta donúmero de série (consultar a pág. 6 destemanual) ou a tabela da declaração deconformidade.
°È· Ó· ·Ó·ÁÓˆÚ›ÛÂÙ ÙÔ ÌÔÓÙ¤ÏÔ ÙÔ˘Ì˯·Ó‹Ì·Ùfi˜ Û·˜, ‰È·‚¿ÛÙ ÙËÓ ÂÙÈΤٷ ÌÂÙÔÓ ·ÚÈıÌfi ÛÂÈÚ¿˜ (‚Ϥ ÛÂÏ. 6 ÙÔ˘ÂÁ¯ÂÈÚȉ›Ô˘) ‹ ÙËÓ ÈӷΛ‰· Ì ÙË ‰‹ÏˆÛËÛ˘ÌÌfiÚʈÛ˘.
E
NL
P
GR
Tutte le nostre macchine sono soggette acontinuo sviluppo, potranno quindi essereattuate delle modifiche riguardanti lacostruzione, l’entità di fornitura e la dota-zione.Non potranno quindi essere avanzati dirit-ti sui dati e sulle istruzioni contenuti inquesto manuale.
All our machines are being continuouslydeveloped. Consequently, there may besome changes as to how the machinesare manufactured, supplied or to theaccessories.The manufacturer shall accept no claimsregarding the information or the instruc-tions in this manual.
Toutes nos machines sont sujettes à uneamélioration permanente, elles pourrontdonc subir des modifications concernantla construction, l’état de la fourniture etles accessoires.Aucun droit ne pourra donc être revendi-qué en ce qui concerne les données etles instructions figurant dans ce manuel.
Unsere Geräte unterliegen einer konti-nuierlichen Weiterentwicklung. Bauweise,Lieferart und Geräteausstattung könnendaher verändert werden.Die in vorliegender Anleitung beinhaltetenDaten und Hinweise sind nicht verbindlichund geben kein Anrecht aufSchadenersatz.
Todas nuestras máquinas son sometidasestán sometidas a continuo desarrollo,por lo tanto, podrán ser aportadas algu-nas modificaciones de fabricación, tipo desuministro y dotación.No podrán exigirse por consiguientederechos sobre los datos ni sobre lasinstrucciones que contiene este manual.
Alle onze machines worden voortdurendaangepast aan nieuwe ontwikkelingen enkunnen er dus wijzigingen optreden voorwat de bouw en staat van de machinebetreft evenals van de meegeleverdezaken.Er kan dus geen enkel recht wat gege-vens en aanwijzingen in deze handleidingbetreft, ontleend worden.
Todas as nossas máquinas são sujeitas adesenvolvimento contínuo, e poderão serfeitas modificações relativas ao fabrico,condições de fornecimento e acessórios.Portanto, não poderão ser solicitadosdireitos sobre os dados e instruções con-stantes deste manual.
ŸÏ· Ù· Ì˯·Ó‹Ì·Ù¿ Ì·˜ ÂÍÂÏ›ÛÛÔÓÙ·ÈÛ˘Ó¯Ҙ Î·È Î·Ù¿ Û˘Ó¤ÂÈ· ÌÔÚ› Ó·˘¿Ú¯Ô˘Ó ·ÏÏ·Á¤˜ ÛÙËÓ Î·Ù·Û΢‹ ηÈÙÔÓ ÂÍÔÏÈÛÌfi.¢ÂÓ ÌÔÚÔ‡Ó Û˘ÓÂÒ˜ Ó· ‰ÈÂΉÈÎËıÔ‡Ó‰ÈηÈÒÌ·Ù· fiÛÔÓ ·ÊÔÚ¿ Ù· ÛÙÔȯ›· ηÈÙȘ Ô‰ËÁ›Â˜ ÙÔ˘ ·ÚfiÓÙÔ˜ ÂÁ¯ÂÈÚȉ›Ô˘.
I
GB
F
D
E
NL
P
GR

116
* Massa secondo norma ISO 11806 (senza carburante, dispositividi taglio e protezione) • 1sinistra (o anteriore) • 2destra (o poste-riore)
*Earthed in accordance with ISO 11806 (without fuel, cutting andprotection equipment) • 1left (or front) • 2right (or rear)
* Masse selon norme ISO 11806 (sans carburant, dispositifs decoupe et protection) • 1gauche (ou avant) • 2droite (o arrière)
* Gewicht laut ISO 11806 (ohne Kraftstoff, Schneidewerkzeug undSchutzvorrichtungen) • 1links (bzw. vorne) • 2rechts (bzw. hinten)
*Masa según norma ISO 11806 (sin carburante dispositivos decorte y protección • 11izquierda (o delantera) • 2derecha (o tra-sera)
*Gewicht volgens ISO11806 (zonder brandstof, trimelementen ofbeveiligingselementen) • 1links (voor) • 2rechts (achter)
* Peso segundo norma ISO 11806 (sem carburante, dispositivos decorte e caixa de segurança) • 1esquerda (ou anterior) • 2direita(ou posterior)
* B·ÚÔ˜ Û‡Ìʈӷ Ì ÙÔ ÚfiÙ˘Ô ISO 11806 (¯ˆÚ›˜ η‡ÛÈÌÔ,
ÂÍ·ÚÙ‹·Ù· ÎÔ‹˜ Î·È ÚÔÛÙ·Û›·) • 1·ÚÈÛÂÚà (‹ ÌÚÔÛÙà) • 2‰ÂÍ›à
(‹ ›Ûˆ)
GB
F
D
E
NL
P
GR
I
Cod
. 99
6651
2 T
ipog
rafia
Aso
lana
- A
solo
(T
V)