Installing and updating VP ENTERPRISE - visual-planning.com VP... · Hard drive: 200MB of free disk...
43
Installing and updating VP ENTERPRISE STILOG IST, all rights reserved
Transcript of Installing and updating VP ENTERPRISE - visual-planning.com VP... · Hard drive: 200MB of free disk...

Installing andupdating VP
ENTERPRISE
STILOG IST, all rights reserved

Installing and updatingVP ENTERPRISE
STILOG IST, all rights reserved 2

Installing and updatingVP ENTERPRISE
Table of ContentsI. Technical prerequisites .................................................................................................................. 1
1. INTRODUCTION ...................................................................................................................... 12. VISUAL PLANNING ENTERPRISE ......................................................................................... 1
The Workstations ................................................................................................................... 1The Server ............................................................................................................................. 1The Network .......................................................................................................................... 2
3. VPGO ....................................................................................................................................... 2II. Visual Planning Application Architecture ................................................................................... 3
1. INTRODUCTION ...................................................................................................................... 32. ARCHITECTURE ...................................................................................................................... 33. BASE IMPLEMENTATION ....................................................................................................... 44. APPLICATION BRICKS ............................................................................................................ 5
B1 Brick ................................................................................................................................. 5B2 Brick: J2EE Server .......................................................................................................... 6B3 Brick: VPlanning Application ............................................................................................ 6B4 Brick: Database Management System ............................................................................ 6B5 Brick: External Authentication Server (optional) .............................................................. 6
III. Installing VP ENTERPRISE .......................................................................................................... 71. INTRODUCTION ...................................................................................................................... 72. TECHNICAL PREREQUISITES ............................................................................................... 73. INSTALLING THE DBMS ......................................................................................................... 7
MySQL ................................................................................................................................... 7SQLSERVER ......................................................................................................................... 9ORACLE .............................................................................................................................. 11
4. INSTALLING THE APPLICATION SERVER .......................................................................... 12Installing with the complete package .................................................................................. 12Installing on an existing J2EE application server ............................................................... 18
5. Connecting to the DBMS ....................................................................................................... 20SQL Server ........................................................................................................................ 20MySQL ................................................................................................................................. 22Oracle .................................................................................................................................. 23MS Access ........................................................................................................................... 24PostgreSQL ......................................................................................................................... 25MariaDB ............................................................................................................................... 26
6. ACTIVATING THE LICENSES ............................................................................................... 27Correct configuration ........................................................................................................... 29Incorrect configuration ......................................................................................................... 30
IV. Major updates of VP ENTERPRISE .......................................................................................... 311. INTRODUCTION .................................................................................................................... 312. PREREQUISITES ................................................................................................................... 313. MIGRATING FROM 5.X to 6 ................................................................................................. 31
STILOG IST, all rights reserved iii

Installing and updatingVP ENTERPRISE
Migrating with the complete package ................................................................................. 31Migrating from an existing J2EE server .............................................................................. 32
4. MIGRATING FROM 4.X to 6 ................................................................................................. 32V. Minor updates of VP ENTERPRISE ........................................................................................... 34
1. DEFINITION ........................................................................................................................... 342. PREREQUISITES ................................................................................................................... 343. DOWNLOADS ........................................................................................................................ 344. INSTALLATION ....................................................................................................................... 35
VI. Uninstalling VP ENTERPRISE ................................................................................................... 371. INTRODUCTION .................................................................................................................... 372. Uninstalling VP ENTERPRISE ............................................................................................... 37
STILOG IST, all rights reserved iv

Installing and updatingVP ENTERPRISE
Chapter I. Technical prerequisites
1. INTRODUCTIONThis document describes the minimum configurations required to install and use VISUAL PLANNING.
VISUAL PLANNING is a Java application that works in standalone or network modes and uses adatabase.There are several versions of the software available:
■ VISUAL PLANNING ONE for use in standalone mode,■ VISUAL PLANNING ENTERPRISE for use by multiple users on an Internet or Intranet network,■ The VPPORTAL module for thin full web or smartphone clients,■ The VPGO module for thin full smartphone clients.
2. VISUAL PLANNING ENTERPRISEThis version of VISUAL PLANNING is for client / server networks. It requires a server machine andclient workstations.
The Workstations
■ Hardware▪ CPU: 2GHz Intel / AMD processor▪ RAM: 1GB (Windows 7), 2GB (all versions of Windows 10), 4GB (MacOS X or higher)▪ Hard drive: 200MB of free disk space
■ Software▪ Java execution environment version 1.7 or 1.8, which can be downloaded here: http://
www.oracle.com/technetwork/java/javase/downloads/index.html.
The Server
The server machine configuration shown below is for reference only. It must be adapted to the type ofuse and the planned number of simultaneous users.
Please contact VISUAL PLANNING support for more information: [email protected].
■ Hardware▪ CPU: 2GHz Intel / AMD processor▪ OS: 64-bit Windows
STILOG IST, all rights reserved 1

Installing and updatingVP ENTERPRISE
▪ RAM: 4GB (Windows 7, 10 64-bit, Linux), 8GB (Windows 2008 R2 64-bit, Windows 2012/2012 R264-bit, Windows 2016 64-bit)
▪ Hard drive: 500MB of free disk space■ Software
▪ Database management system (DBMS): MySQL 5.x, Microsoft SQL Server 2008 to 2016, Oracle9i/10g/11g/12g, MariaDB 10.2, PostGreSQL 9.3.
▪ The J2EE application server is required for all installations on non-Windows servers, or servers thatdo not use the VPServer package: Tomcat 7.x and 8.x, JOnAS, JBoss, WebSphere, Weblogic 10.3.
The Network
All points of access to the Internet can access VISUAL PLANNING ENTERPRISE.
The bandwidth required for comfortable use depends on the number of users working on the sameconnection simultaneously, the way the planners are used (frequency, etc.), the volumes of data, etc.
The minimum bandwidth required per user is 256kbit/s.
Maximum latency of 100ms.
ADSL access to the planners is recommended.
3. VPGOThe VPGO module is an add-on that requires the installation of VISUAL PLANNING ENTERPRISE.
It requires a smartphone or tablet type terminal (Google Android, Apple iOS).
Android 5.0 or iOS 8.0 or higher must be installed on the terminal.
STILOG IST, all rights reserved 2
Installing and updatingVP ENTERPRISE
Chapter II. Visual Planning ApplicationArchitecture
1. INTRODUCTIONThis document describes the architecture of VPServer application for Visual Planning 6 Enterprise. This document does not describe the installation procedure for VPserver. To install, please refer to theinstallation guide available at https://www.visual-planning.com/en/documentation.
VPServer is the common name of a package that contains:
■ A J2EE application server, limited to the web container, JSP container and Servlet container
■ VPlanning, the pre-deployed Visual Planning client/server application of the Visual Planning softwaresolution.
The J2EE server used by VPServer is based on the "Jakarta Tomcat version 8.5 Embedded" engineand is packaged for a greater ease of administration. The Java Virtual Machine used by VPServer isincluded directly in the package. There is no interaction with any other existing JVM on the server. TheJava version used is JRE 8U121.
The VPServer package was designed to ease the deployment of Visual Planning on Microsoft serversthat have no available instance of a J2EE application server. However, as it is a Java web application,VPlanning may also be deployed directly on any existing J2EE application server that is running Java1.7 or above, such as Tomcat, JBoss, Jonas, Weblogic or Websphere.
2. ARCHITECTUREThe VPlanning application is a n-tier architecture web application. The VPlanning server consistsof a set of "servlets". The VPlanning client uses Java’s reference implementation, "Java WebStart" (www.java.com). This implementation allows a client application to run outside the Web browser,mimicking an applet by using the JNLP protocol (Java Network Launching Protocol). VPlanningcan therefore be considered a “rich” client. (https://docs.oracle.com/javase/tutorial/deployment/deploymentInDepth/jnlp.html)
STILOG IST, all rights reserved 3

Installing and updatingVP ENTERPRISE
3. BASE IMPLEMENTATION
Communication between the VPServer server and client workstations uses the HTTP protocol.
The port used by default is port 80. It is possible to use any other port of your choice if needed. Thedata flow between clients and the server is encrypted (proprietary Blowfish encryption).
VPServer communicates with the database management system via the TCP/IP protocol using theapplicable port. (1433 for SQL Server, 1521 for ORACLE and 3306 for MySQL). Those parameters canbe modified as well.
VPServer uses its own built-in authentication system. This system can be interfaced with a centralizedexternal authentication system such as LDAP, SSO or any other, in case Visual Planning is integratedin an enterprise-scale IT environment.
STILOG IST, all rights reserved 4

Installing and updatingVP ENTERPRISE
4. APPLICATION BRICKS
B1 Brick
a: "VISUAL PLANNING" rich client
The user connects from his workstation to the VPServer server using a W3C browser (IExplorer, MozillaFirefox, Opera, Safari ...). The client application starts through the JavaWebStart module (java 1.7)
STILOG IST, all rights reserved 5

Installing and updatingVP ENTERPRISE
b: "VP Portal" web client
The user connects from his workstation to the VPServer server using a W3C browser (IExplorer, MozillaFirefox, Opera, Safari ...).
c: “VPGO” mobile client
The user connects from a smartphone using the VPGO mobile application, available on Apple & Googleapp stores (Android 5 minimum, iOS 8 minimum).
B2 Brick: J2EE Server
The J2EE server is based on the TOMCAT 8.5 engine with JDK 1.7 or above. It is pre-set to receivethe VPlanning application.
B3 Brick: VPlanning Application
The VPlanning application is the server part of Visual Planning and is pre-deployed on the J2EE server.
B4 Brick: Database Management System
(Can be MySQL 5.6 to 5.7, or Microsoft SQL Server 2008 to 2016, or Oracle 9i and above, orPostgreSQL 9.3, or MariaDB 10.1)
The DBMS server stores data of planners created and managed by VPlanning. The database is solelyused for storage. The application does not use any type of trigger routine or stored procedure. Only theapplication server connects to the DBMS server.
B5 Brick: External Authentication Server (optional)
The Visual Planning Application uses its own management system to authenticate users. However, itis possible to shift the authentication system to external solutions such as LDAP (OpenLDAP, Lotus,Active Directory…) or SSO.
STILOG IST, all rights reserved 6
Installing and updatingVP ENTERPRISE
Chapter III. Installing VP ENTERPRISE
1. INTRODUCTIONVISUAL PLANNING ENTERPRISE is a client / server network version with an n-tier architecture of theVISUAL PLANNING software.
Therefore, the installation is made up of several parts:
■ Installation and/or configuration of the DBMS to be used with VISUAL PLANNING,■ Installation of the application server,■ Connection of the application server to the DBMS,■ Activation of the licenses.
For the procedure for minor updates, refer to Minor updates of VISUAL PLANNING ENTERPRISE.
2. TECHNICAL PREREQUISITESCheck that the following technical prerequisites are met before starting the installation of VISUALPLANNING.
See Technical prerequisites
3. INSTALLING THE DBMSCheck that the selected DBMS is installed and working before starting the installation of VISUALPLANNING.
The DBMS settings are required during the installation procedure.
If there is no DBMS on the server, install the version of MySQL supplied by STILOG I.S.T.
MySQL
There are two ways to install MySQL:
■ using the version of MySQL provided,■ from an existing MySQL server.
Using the version of MySQL provided
Start by running the mysql.exe executable at the address provided by STILOG.
STILOG IST, all rights reserved 7
Installing and updatingVP ENTERPRISE
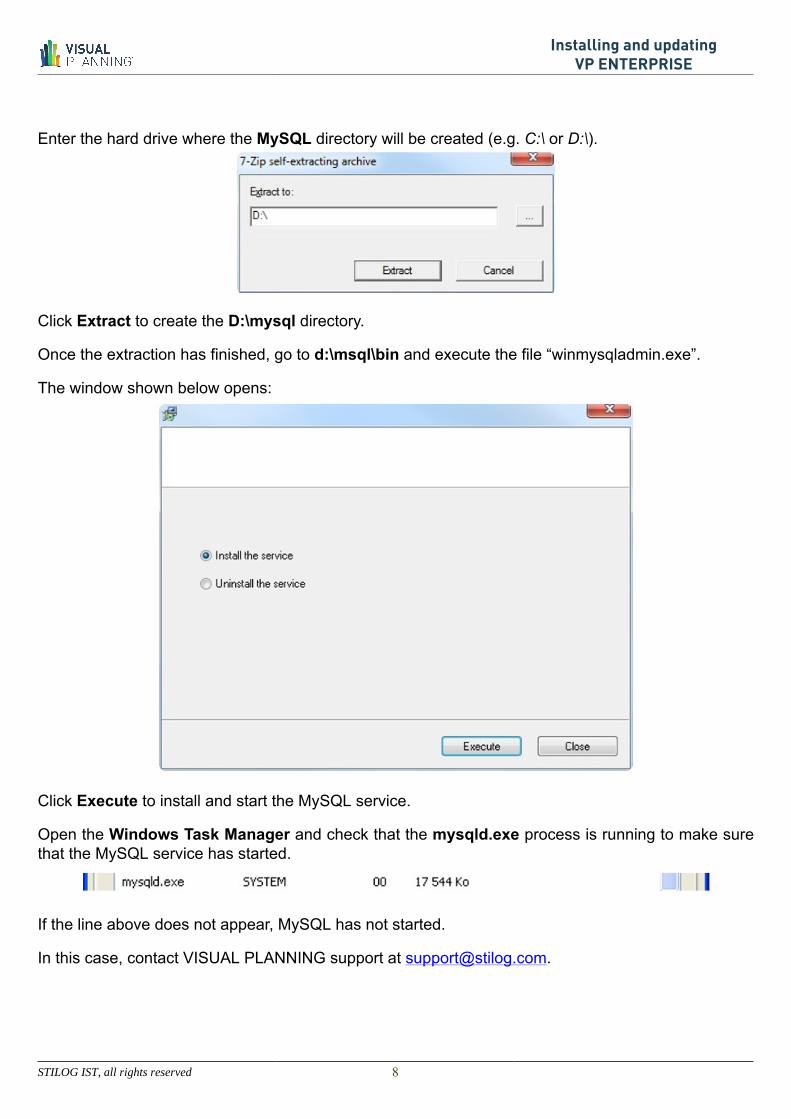
Enter the hard drive where the MySQL directory will be created (e.g. C:\ or D:\).
Click Extract to create the D:\mysql directory.
Once the extraction has finished, go to d:\msql\bin and execute the file “winmysqladmin.exe”.
The window shown below opens:
Click Execute to install and start the MySQL service.
Open the Windows Task Manager and check that the mysqld.exe process is running to make surethat the MySQL service has started.
If the line above does not appear, MySQL has not started.
In this case, contact VISUAL PLANNING support at [email protected].
STILOG IST, all rights reserved 8

Installing and updatingVP ENTERPRISE
From an existing MySQL server
If a version 5.x or higher MySQL server is already installed, you must create a MySQL user dedicatedto VISUAL PLANNING (e.g., vpuser).
Use the script below:
mysql> CREATE USER 'vpuser'@'%' IDENTIFIED BY 'vpuser_password';
mysql> GRANT ALL PRIVILEGES ON *.* TO 'vpuser'@'%' WITH GRANT OPTION;
Replace vpuser_password with the real password of vpuser.
Warning:
Remember this password, because you will need it during the installation procedure and for as long asVISUAL PLANNING is used on your server.
SQLSERVER
VISUAL PLANNING is only compatible with instances of SQL Server in mixed authentication mode.
If SQL Server is in Windows authentication mode, then you must change it.
Proceed as follows:
■ Start the Enterprise Manager application,
■ Right-click on the name of your server,
■ Select the Properties option in the context-sensitive menu,
■ Select the Security tab in the dialog box that opens,
■ Tick the SQL Server and Windows authentication modes,
■ Click OK to confirm the change.
Now create an SQL Server user dedicated to VISUAL PLANNING (e.g., vpuser).
Proceed as follows:
■ Start the Enterprise Manager application,
■ Left-click on the name of your server,
■ Double-click on the Security folder,
■ Right-click on Login,
■ Select the New login option in the context-sensitive menu.
The following dialog box opens:
STILOG IST, all rights reserved 9

Installing and updatingVP ENTERPRISE
On the General tab, proceed as follows:
■ Enter the User name (e.g.: vpuser),
■ Tick the SQL Server Authentication option.
On the Server Roles tab:
■ Tick the Database creator role.
Click OK to confirm.
The dedicated user name and the password will be required when installing the software. Thisinformation is necessary before starting the installation procedure.
If the SQL Server version is higher than SQL Server 2005, check that the TCP/IP protocol of SQLServer is activated.
Start the SQL Server Configuration Manager and activate TCP/IP.
STILOG IST, all rights reserved 10

Installing and updatingVP ENTERPRISE
ORACLE
An instance must be reserved for VISUAL PLANNING (e.g., VPSID).
This instance may exist already, but it is preferable to create one for VISUAL PLANNING.
The disk space values shown below are for reference only. They will be adjusted according to the wayin which VISUAL PLANNING is used.
Objet Nom Taille
TableSpace USERS 700 Mo
TableSpace INDEX 500 Mo
TableSpace SYSTEM 500 Mo
TableSpace TEMP 200 Mo
Then create a user dedicated to VISUAL PLANNING under this instance (e.g., VISUALPLANNING)according to the script shown below:
Sqlplus system/<passwdSystem>@VPSID
CREATE USER <userName> IDENTIFIED BY <passwd>
GRANT CONNECT TO <userName>
GRANT CREATE SESSION TO <userName> WITH ADMIN OPTION
GRANT CREATE TABLE TO <userName> WITH ADMIN OPTION
GRANT UNLIMITED TABLESPACE TO <userName> WITH ADMIN OPTION
GRANT CREATE USER TO <userName>
STILOG IST, all rights reserved 11

Installing and updatingVP ENTERPRISE
GRANT DROP USER TO <userName>
If the Oracle user does not obey this script, VISUAL PLANNING will not function properly.
The names of the tablespaces of the instance for VISUAL PLANNING and the dedicated username and password are required when installing the software. This information is necessarybefore starting the installation procedure.
4. INSTALLING THE APPLICATION SERVERVISUAL PLANNING ENTERPRISE 6 can be installed:
■ using the complete vp6enterprise package,■ using an existing J2EE server.
Installing with the complete package
Start by executing the package vp6enterprise.exe.
The following window appears:
Click Next to continue.
The following window displays the license contract.
STILOG IST, all rights reserved 12

Installing and updatingVP ENTERPRISE
Read the terms of use of the license carefully. The installation procedure will be interrupted if you refusethe terms of use.
Click Next to continue.
STILOG IST, all rights reserved 13

Installing and updatingVP ENTERPRISE
It is preferable to use the installation path proposed by default, especially if you are using MicrosoftWindows 7, 8 or 2008. If you have to change the directory, please keep the directory name “VPServerEnterprise 6”.
Click Next to continue.
If the information in this window is not correct, click “Back” to change it.
Click Next to continue.
STILOG IST, all rights reserved 14

Installing and updatingVP ENTERPRISE
The installer then tries to check whether there is already a web service installed on the server (useof port 80).
If there is, the following window appears.
STILOG IST, all rights reserved 15

Installing and updatingVP ENTERPRISE
If port 81 is already used, enter another port (e.g., 82), etc.
This window only closes if the proposed port N° is not already used by another application.
Click Next to continue.
Then, specify whether there is already an installation of VISUAL PLANNING on the server.
If this is not the case, select No, then Next.
If there is already an installation, select Yes and click Next.
STILOG IST, all rights reserved 16

Installing and updatingVP ENTERPRISE
In this case, enter the location of this installation and click Next.
In both cases, the following window opens:
Click Finish to complete the installation.
STILOG IST, all rights reserved 17

Installing and updatingVP ENTERPRISE
To configure and activate the application, go to Start > All programs > VPServer Enterprise 6.
Click VP Application Portal to open the configuration page.
Installing on an existing J2EE application server
The software is installed by deploying the vplanning.war file that you can request by sending an e-mail to [email protected].
The deployment procedure described below is for the Java Tomcat 5.2 application server.
If other servers, such as JBoss or JOnAS are used, refer to their user manual for the installation ofthe WAR file.
■ The JBoss manual: http://www.jboss.org/jbossportal/docs
■ The JONAS manual: http://jonas.ow2.org/doc/
First, go to the Tomcat server portal.
STILOG IST, all rights reserved 18

Installing and updatingVP ENTERPRISE
Click on Tomcat Manager.
Then:
■ go to the WAR file to deploy section,■ select the file vplanning.war,■ then click Deploy to start the deployment.
Once the deployment is confirmed as deployed, open your web browser and enter the address:
http://VP_server:808/vplanning/
where VP_server is the DNS name of the server machine and 808 is the port used by the Tomcat J2EEserver.
STILOG IST, all rights reserved 19

Installing and updatingVP ENTERPRISE
These settings must be adjusted to the installation.
5. Connecting to the DBMSTo connect VISUAL PLANNING to the installed DBMS, open the VISUAL PLANNING portal.
In Microsoft Windows, go to Start > All Programs > VPServer Enterprise 6 > VP application portal.
The first time you open this portal, the following page appears:
Choose the server language and click Next.
The DBMS connection configuration page opens.
Select the DBMS. The following options are available:
■ SQL Server
■ MySQL
■ Oracle
■ MS Access
■ PostgreSQL
■ MariaDB
SQL Server
When using Microsoft SQL Server, select SQL Server in the list.
STILOG IST, all rights reserved 20

Installing and updatingVP ENTERPRISE
Click Next to continue.
Then enter the information about the SQL Server that has already been installed (see Installing theDBMS):
■ Server Name / IP: to use a particular instance name for VISUAL PLANNING, add it with the IP address of the server (e.g., 127.0.0.1\sqlexpress ) where sqlexpress is the name of the instance,
■ Port: The default value is 1433. If a different port is used, replace 1433 with the value of the port,■ User: see Installing the DBMS■ Password: see Installing the DBMS
Click Next to continue.
STILOG IST, all rights reserved 21

Installing and updatingVP ENTERPRISE
MySQLWhen using MySQL, select MySQL in the list.
Click Next to continue.
Then enter the information about the MySQL server that has already been installed (see Installing theDBMS):
■ Server name / IP: if the version of MySQL supplied by STILOG I.S.T. is used, leave the serveraddress 127.0.0.1. Otherwise, enter the IP address of the MySQL server.
■ Port: The default value is 3306. If a different port is used, replace 3306 with the value of the port,■ User: see Installing the DBMS,■ Password: see Installing the DBMS.
STILOG IST, all rights reserved 22

Installing and updatingVP ENTERPRISE
Click Next to continue.
Oracle
When using Oracle, select Oracle in the list.
Click Next to continue.
STILOG IST, all rights reserved 23

Installing and updatingVP ENTERPRISE
Then enter the information about the Oracle server that has already been installed (see Installing theDBMS):
To avoid problems with uppercase and lowercase, enter all the information (except the password) inUPPERCASE.
■ Server name / IP: see Installing the DBMS,
■ Port: see Installing the DBMS,
■ User: see Installing the DBMS,
■ Password: see Installing the DBMS.
Click Next to continue.
MS Access
Using Microsoft Access is not recommended for configurations with more than five users.
When using MS Access, select MS Access in the list.
Click Next to continue.
STILOG IST, all rights reserved 24

Installing and updatingVP ENTERPRISE
Then enter the information about MS Access that has already been installed (see Installing the DBMS):
■ Directory: the default value is {vp.home}/msadatas, where {vp.home} is the root of the VISUALPLANNING installation. If the data is stored in another director, change this value accordingly.
Click Next to continue.
PostgreSQL
When using PostgreSQL, select PostgreSQL in the list.
Click Next to continue.
STILOG IST, all rights reserved 25

Installing and updatingVP ENTERPRISE
Then enter the information about PostgreSQL that has already been installed (see Installing the DBMS):
■ Server name / IP: see Installing the DBMS,
■ Port: The default value is 5432. If a different port is used, replace 5432 with the value of the port,
■ User: see Installing the DBMS,
■ Password: see Installing the DBMS
Click Next to continue.
MariaDB
When using MariaDB, select MariaDB in the list.
Click Next to continue.
STILOG IST, all rights reserved 26

Installing and updatingVP ENTERPRISE
Then enter the information about the MariaDB server that has already been installed (see Installingthe DBMS):
■ Server name / IP: see Installing the DBMS,
■ Port: The default value is 3306. If a different port is used, replace 3306 with the value of the port,
■ User: see Installing the DBMS,
■ Password: see Installing the DBMS.
Click Next to continue.
6. ACTIVATING THE LICENSESThe following window opens:
STILOG IST, all rights reserved 27

Installing and updatingVP ENTERPRISE
■ Application URL: check that the URL is correct. The licenses are activated using this URL. Therefore,if this URL is modified, the licenses must be re-activated.
■ VP serial number: this is the VISUAL PLANNING serial number. STILOG I.S.T. provides this numberon delivery.
■ VPViewer serial number: this is the serial number of the viewer licenses. This number is alsoprovided on delivery.
Click Next to complete the action.
STILOG IST, all rights reserved 28

Installing and updatingVP ENTERPRISE
Start the ADMIN CENTER to activate VISUAL PLANNING.
Correct configuration
If the configuration is OK, the following screen opens:
Click OK directly, because the admin user does not have a password by default.
The ADMIN CENTER then prompts you to enter the activation key of the license.
Select Get the activation key automatically via Internet, then OK.
If the license cannot be activated by Internet, contact support:
■ by telephone on +33 (0)1 47 29 29 66 (Europe) / +1 (855) 589-9800 Ext. 2 (USA)
■ or by e-mail at [email protected]
STILOG IST, all rights reserved 29

Installing and updatingVP ENTERPRISE
Incorrect configuration
After initializing Java and accepting the launch of the application, if the ADMIN CENTER displays thefollowing message:
The DBMS configuration is incorrect.
In this case, open a web browser and view the log files at the following address:
http://VP_server/vplanning/logs.jsp
Where VP_server is the address of the VISUAL PLANNING installation.
Once the cause of the problem has been identified, repair the configuration by opening the followingpage:
http://VP_server/vplanning/activationen.jsp
Once the configuration is OK, complete the activation procedure. (See Correct configuration)
STILOG IST, all rights reserved 30

Installing and updatingVP ENTERPRISE
Chapter IV. Major updates of VP ENTERPRISE
1. INTRODUCTIONThis document describes the procedure for major updates of VISUAL PLANNING ENTERPRISE.
The procedure is different, depending on the installed version: 4.X or 5.X.
This procedure only applies to major updates. This document does not cover minor updates or builds(see Minor updates of VP ENTERPRISE).
This document does not describe major updates of the ONE versions.
2. PREREQUISITESThe following prerequisites are essential:
■ a VISUAL PLANNING 6 license number■ an infrastructure compatible with VISUAL PLANNING 6 (see Technical prerequisites)
3. MIGRATING FROM 5.X to 6It is possible to migrate from a 5.X version to VISUAL PLANNING ENTERPRISE 6:
■ using the complete vp6enterprise package,■ using an existing J2EE server.
Migrating with the complete package
Whenever possible, it is strongly recommended to perform migration tests in a test environment, beforeproceeding with the migration of the live environment.
The test environment must never use the same database server as the live environment.
Proceed in the following order:
■ Get a VISUAL PLANNING 6 license number■ Backup all the planners currently in use in VPS format■ Stop the vpserver service■ Proceed with a normal installation of version 6 of VISUAL PLANNING ENTERPRISE.
▪ In response to the question “Is this installation an update of a preceding version of VPENTERPRISE installed on this server?”
STILOG IST, all rights reserved 31

Installing and updatingVP ENTERPRISE
▪ Select Yes.
see Installing VISUAL PLANNING ENTERPRISE
■ Uninstall the preceding version and send the uninstall code to our technical support department:[email protected]
See Uninstalling VISUAL PLANNING ENTERPRISE
Migrating from an existing J2EE server
■ Backup all the planners currently in use in VPS format■ Stop the VISUAL PLANNING service.■ Copy the files / directories shown below into a temporary directory
\\webapps\\vplanning\\install.properties
\\webapps\\vplanning\\configuration
\\webapps\\vplanning\\documents
\\webapps\\vplanning\\publipost
\\webapps\\vplanning\\modules
\\webapps\\vplanning\\services
■ Unmount the WAR or EAR of the preceding version of VP.■ Mount the new WAR or EAR of version 6.■ Put the content of the temporary directory in 2- in \\webapps\\vplanning.■ Put the content of the temporary directory in 2- in \\webapps\\vplanning.■ Start the version 6 application.■ Launch the page /activationen.jsp as usual. All the configuration data of the old version is retrieved.
4. MIGRATING FROM 4.X to 6Note that there are a number of functional differences between the 4.X versions and version 6.
For example, all the permissions of the planners must be reconfigured.
Proceed in the following order:
■ Check that the build of the version 4.X is at least in “11mmdd” (e.g., build 151125)■ Backup all the planners currently in use in VPS format. It is not necessary to backup the GDU.
STILOG IST, all rights reserved 32

Installing and updatingVP ENTERPRISE
■ Install version 6.■ Import all the VPS files of the 4.X planners.■ Create or import the users.■ Configure the permissions.■ Uninstall the preceding version and send the uninstall code to our technical support department:
STILOG IST, all rights reserved 33

Installing and updatingVP ENTERPRISE
Chapter V. Minor updates of VP ENTERPRISE
1. DEFINITIONThis document describes the procedure for minor updates or builds of VISUAL PLANNINGENTERPRISE.
This document does not cover major updates. To proceed with a major update, go to: Major updatesof VP ENTERPRISE
Builds are optional and are only available if maintenance is up to date.
To update VISUAL PLANNING, the initial installation must have already been completed. See InstallingVISUAL PLANNING ENTERPRISE
2. PREREQUISITES
■ Version 6 of the VISUAL PLANNING ENTERPRISE is installed (for earlier versions:[email protected])
■ The software is open on a workstation.
3. DOWNLOADSTo download the update, open a web browser and go to the VISUAL PLANNING updates page.
STILOG IST, all rights reserved 34

Installing and updatingVP ENTERPRISE
Enter the serial number. This number is also provided on your VISUAL PLANNING delivery note.
Download the file. The format of the file must be ip_171206.vpu.
Copy the file over to the Update directory on the server to be updated.
Example: C:/stilog/VP Enterprise 6/update
4. INSTALLATIONTo install the update, stop the vpserver6 service using the server’s service manager.
STILOG IST, all rights reserved 35

Installing and updatingVP ENTERPRISE
Check that the VPU file is in the Update directory of the server to be updated.
Example : C:/stilog/VP Enterprise 6/update
Then, simply restart the vpserver6 service using the service manager on your server.
STILOG IST, all rights reserved 36

Installing and updatingVP ENTERPRISE
Chapter VI. Uninstalling VP ENTERPRISE
1. INTRODUCTIONThis document describes the procedure to uninstall VISUAL PLANNING ENTERPRISE.
2. Uninstalling VP ENTERPRISETo uninstall the ENTERPRISE version of VISUAL PLANNING, go to Start > All programs > VPServerEnterprise 6.
Click Uninstall Visual Planning Enterprise to open the uninstall window.
The following window appears:
STILOG IST, all rights reserved 37

Installing and updatingVP ENTERPRISE
Click Next to continue.
The following window displays the uninstall code. Keep this code in a safe place.
Send the uninstall code to our technical support department: [email protected]
STILOG IST, all rights reserved 38

Installing and updatingVP ENTERPRISE
Click Next to continue.
Click Finish to complete the uninstall procedure.
STILOG IST, all rights reserved 39