
Installing and Configuring OpenStack (Kilo) in Oracle® Solaris · Deploying Neutron in a Kernel...
148
Part No: E61044 June 2016 Installing and Configuring OpenStack (Kilo) in Oracle ® Solaris
Transcript of Installing and Configuring OpenStack (Kilo) in Oracle® Solaris · Deploying Neutron in a Kernel...
Part No: E61044June 2016
Installing and Configuring OpenStack(Kilo) in Oracle® Solaris


Installing and Configuring OpenStack (Kilo) in Oracle Solaris
Part No: E61044
Copyright © 2014, 2016, Oracle and/or its affiliates. All rights reserved.
This software and related documentation are provided under a license agreement containing restrictions on use and disclosure and are protected by intellectual property laws. Exceptas expressly permitted in your license agreement or allowed by law, you may not use, copy, reproduce, translate, broadcast, modify, license, transmit, distribute, exhibit, perform,publish, or display any part, in any form, or by any means. Reverse engineering, disassembly, or decompilation of this software, unless required by law for interoperability, isprohibited.
The information contained herein is subject to change without notice and is not warranted to be error-free. If you find any errors, please report them to us in writing.
If this is software or related documentation that is delivered to the U.S. Government or anyone licensing it on behalf of the U.S. Government, then the following notice is applicable:
U.S. GOVERNMENT END USERS. Oracle programs, including any operating system, integrated software, any programs installed on the hardware, and/or documentation, deliveredto U.S. Government end users are "commercial computer software" pursuant to the applicable Federal Acquisition Regulation and agency-specific supplemental regulations. Assuch, use, duplication, disclosure, modification, and adaptation of the programs, including any operating system, integrated software, any programs installed on the hardware, and/ordocumentation, shall be subject to license terms and license restrictions applicable to the programs. No other rights are granted to the U.S. Government.
This software or hardware is developed for general use in a variety of information management applications. It is not developed or intended for use in any inherently dangerousapplications, including applications that may create a risk of personal injury. If you use this software or hardware in dangerous applications, then you shall be responsible to take allappropriate fail-safe, backup, redundancy, and other measures to ensure its safe use. Oracle Corporation and its affiliates disclaim any liability for any damages caused by use of thissoftware or hardware in dangerous applications.
Oracle and Java are registered trademarks of Oracle and/or its affiliates. Other names may be trademarks of their respective owners.
Intel and Intel Xeon are trademarks or registered trademarks of Intel Corporation. All SPARC trademarks are used under license and are trademarks or registered trademarks ofSPARC International, Inc. AMD, Opteron, the AMD logo, and the AMD Opteron logo are trademarks or registered trademarks of Advanced Micro Devices. UNIX is a registeredtrademark of The Open Group.
This software or hardware and documentation may provide access to or information about content, products, and services from third parties. Oracle Corporation and its affiliates arenot responsible for and expressly disclaim all warranties of any kind with respect to third-party content, products, and services unless otherwise set forth in an applicable agreementbetween you and Oracle. Oracle Corporation and its affiliates will not be responsible for any loss, costs, or damages incurred due to your access to or use of third-party content,products, or services, except as set forth in an applicable agreement between you and Oracle.
Documentation Accessibility
For information about Oracle's commitment to accessibility, visit the Oracle Accessibility Program website at http://www.oracle.com/pls/topic/lookup?ctx=acc&id=docacc.
Access to Oracle Support
Oracle customers that have purchased support have access to electronic support through My Oracle Support. For information, visit http://www.oracle.com/pls/topic/lookup?ctx=acc&id=info or visit http://www.oracle.com/pls/topic/lookup?ctx=acc&id=trs if you are hearing impaired.

Référence: E61044
Copyright © 2014, 2016, Oracle et/ou ses affiliés. Tous droits réservés.
Ce logiciel et la documentation qui l’accompagne sont protégés par les lois sur la propriété intellectuelle. Ils sont concédés sous licence et soumis à des restrictions d’utilisation etde divulgation. Sauf stipulation expresse de votre contrat de licence ou de la loi, vous ne pouvez pas copier, reproduire, traduire, diffuser, modifier, accorder de licence, transmettre,distribuer, exposer, exécuter, publier ou afficher le logiciel, même partiellement, sous quelque forme et par quelque procédé que ce soit. Par ailleurs, il est interdit de procéder à touteingénierie inverse du logiciel, de le désassembler ou de le décompiler, excepté à des fins d’interopérabilité avec des logiciels tiers ou tel que prescrit par la loi.
Les informations fournies dans ce document sont susceptibles de modification sans préavis. Par ailleurs, Oracle Corporation ne garantit pas qu’elles soient exemptes d’erreurs et vousinvite, le cas échéant, à lui en faire part par écrit.
Si ce logiciel, ou la documentation qui l’accompagne, est livré sous licence au Gouvernement des Etats-Unis, ou à quiconque qui aurait souscrit la licence de ce logiciel pour lecompte du Gouvernement des Etats-Unis, la notice suivante s’applique:
U.S. GOVERNMENT END USERS. Oracle programs, including any operating system, integrated software, any programs installed on the hardware, and/or documentation, deliveredto U.S. Government end users are "commercial computer software" pursuant to the applicable Federal Acquisition Regulation and agency-specific supplemental regulations. Assuch, use, duplication, disclosure, modification, and adaptation of the programs, including any operating system, integrated software, any programs installed on the hardware, and/ordocumentation, shall be subject to license terms and license restrictions applicable to the programs. No other rights are granted to the U.S. Government.
Ce logiciel ou matériel a été développé pour un usage général dans le cadre d’applications de gestion des informations. Ce logiciel ou matériel n’est pas conçu ni n’est destinéà être utilisé dans des applications à risque, notamment dans des applications pouvant causer des dommages corporels. Si vous utilisez ce logiciel ou matériel dans le cadre d’applications dangereuses, il est de votre responsabilité de prendre toutes les mesures de secours, de sauvegarde, de redondance et autres mesures nécessaires à son utilisation dans desconditions optimales de sécurité. Oracle Corporation et ses affiliés déclinent toute responsabilité quant aux dommages causés par l’utilisation de ce logiciel ou matériel pour ce typed’applications.
Oracle et Java sont des marques déposées d’Oracle Corporation et/ou de ses affiliés. Tout autre nom mentionné peut correspondre à des marques appartenant à d’autres propriétairesqu’Oracle.
Intel et Intel Xeon sont des marques ou des marques déposées d’Intel Corporation. Toutes les marques SPARC sont utilisées sous licence et sont des marques ou des marquesdéposées de SPARC International, Inc. AMD, Opteron, le logo AMD et le logo AMD Opteron sont des marques ou des marques déposées d’Advanced Micro Devices. UNIX est unemarque déposée d’The Open Group.
Ce logiciel ou matériel et la documentation qui l’accompagne peuvent fournir des informations ou des liens donnant accès à des contenus, des produits et des services émanant detiers. Oracle Corporation et ses affiliés déclinent toute responsabilité ou garantie expresse quant aux contenus, produits ou services émanant de tiers, sauf mention contraire stipuléedans un contrat entre vous et Oracle. En aucun cas, Oracle Corporation et ses affiliés ne sauraient être tenus pour responsables des pertes subies, des coûts occasionnés ou desdommages causés par l’accès à des contenus, produits ou services tiers, ou à leur utilisation, sauf mention contraire stipulée dans un contrat entre vous et Oracle.
Accessibilité de la documentation
Pour plus d’informations sur l’engagement d’Oracle pour l’accessibilité à la documentation, visitez le site Web Oracle Accessibility Program, à l’adresse http://www.oracle.com/pls/topic/lookup?ctx=acc&id=docacc.
Accès aux services de support Oracle
Les clients Oracle qui ont souscrit un contrat de support ont accès au support électronique via My Oracle Support. Pour plus d’informations, visitez le site http://www.oracle.com/pls/topic/lookup?ctx=acc&id=info ou le site http://www.oracle.com/pls/topic/lookup?ctx=acc&id=trs si vous êtes malentendant.
5
Contents
Using This Documentation ................................................................................ 11
1 What's New in OpenStack (Kilo) on Oracle Solaris ....................................... 13Core Component Based Features ...................................................................... 13
Cinder Related Features .......................................................................... 13Nova Related Features ........................................................................... 14Neutron Related Features ........................................................................ 14Oracle Solaris Feature Additions .............................................................. 15
Other Information Sources .............................................................................. 16
2 Upgrading to OpenStack 2015.1.2 (Kilo) ....................................................... 17Upgrade Notes .............................................................................................. 17Procedures for Upgrading ............................................................................... 17
▼ How to Upgrade From Havana to Kilo ................................................. 18▼ How to Upgrade From Juno to Kilo .................................................... 19▼ Post Upgrade Tasks .......................................................................... 19
3 Installing Across Multiple Systems for a Multinode OpenStackConfiguration ..................................................................................................... 23
Three-Node Architecture Overview .................................................................. 23Preliminary Steps .......................................................................................... 26
Preparing Host Names, Variables, and Passwords ........................................ 26The Sample Keystone Script ................................................................... 27About Editing Configuration Files ............................................................ 28Optimizing Memory Use ........................................................................ 28
Configuring the NTP Server ............................................................................ 28▼ How to Set Up the NTP Server .......................................................... 29
Configuring the Controller Node ...................................................................... 30Configuring the NTP Client .................................................................... 30Installing MySQL .................................................................................. 31

Contents
6 Installing and Configuring OpenStack (Kilo) in Oracle Solaris • June 2016
Installing Keystone ................................................................................ 32Installing Glance ................................................................................... 33Installing Nova ..................................................................................... 35Installing Horizon .................................................................................. 36Installing Cinder .................................................................................... 37Installing Neutron .................................................................................. 38
Configuring the Compute Node ....................................................................... 41▼ How to Configure the Compute Node .................................................. 41▼ How to Enable Console Access .......................................................... 44
Configuring the Storage Node ......................................................................... 46▼ How to Configure the Block Storage Node ........................................... 46
Configuring Swift Object Storage ..................................................................... 47▼ How to Configure the Swift Proxy Controller Service Node ..................... 47▼ How to Configure an Object Storage Node ........................................... 49
4 Post Installation and Configuration Tasks .................................................... 51Preparing the External Network for OpenStack Projects ....................................... 51
About the Provider Router ...................................................................... 51Creating the External Network ................................................................. 53
Preparing Images for the Glance Repository ....................................................... 59Creating Images .................................................................................... 59Displaying Information About Images ....................................................... 61Using a Glance Image Creation Script ....................................................... 63
5 Using the Cloud ............................................................................................ 65Accessing the OpenStack Dashboard ................................................................ 65
▼ How to Access the OpenStack Dashboard ............................................. 65Exploring the Dashboard ........................................................................ 66
Creating Projects and Users ............................................................................ 68▼ How to Create a Project and Assign Users ............................................ 68▼ How to Populate a Project With Existing Users ...................................... 69
Creating Internal Networks for Projects ............................................................. 70▼ How to Configure a Network for a Project ............................................ 71▼ How to Associate a Floating IP Address with a Project ............................ 73
Creating and Booting a VM Instance ................................................................ 74▼ How to Create an SSH Key Pair ......................................................... 74▼ How to Create a VM Instance ............................................................ 75▼ How to Add Users to the VM Instance ................................................. 78
Managing Flavors .......................................................................................... 79

Contents
7
Displaying Information About Flavors ...................................................... 80Modifying Flavor Specifications .............................................................. 80
Managing VM Instances ................................................................................. 83Migrating and Evacuating VM Instances ................................................... 83Resizing a VM Instance ......................................................................... 85
6 Options for Cinder Configuration and Deployment ....................................... 89Deploying Remote Systems for Storage ............................................................. 89
Configuring the cinder.conf File ............................................................ 90Granting Rights to the Designated User ..................................................... 93Enabling the Remote Host as a Target ....................................................... 93
Specifying Boot Volumes for Compute Nodes .................................................... 94▼ How to Create Root Storage Volumes for Compute Instances .................... 94
Using the Cinder NFS Driver .......................................................................... 95▼ How to Use the Cinder NFS Driver ..................................................... 96
Using OpenStack With Oracle ZFS Storage Appliance ......................................... 97About the Oracle ZFS Storage Appliance .................................................. 97Configuring OpenStack With Oracle ZFSSA .............................................. 98▼ How to Configure Oracle ZFSSA for OpenStack .................................... 99
7 Options for Neutron Deployment ................................................................ 103Deploying Neutron in a Kernel Zone .............................................................. 103
▼ How to Install the Neutron Component in a Kernel Zone ........................ 105Displaying MAC Address and VID Information ................................................ 106
Displaying From Inside the Guest VM .................................................... 106Displaying From the Host ..................................................................... 106
8 Working With Ironic ..................................................................................... 109About the Ironic Component ......................................................................... 109Installing and Configuring Ironic .................................................................... 110
▼ How to Install and Configure Ironic ................................................... 110Overview: Bare Metal Deployment With Ironic ................................................. 114Using Ironic to Deploy Bare Metal ................................................................. 116
▼ How to Deploy Bare Metal From a UAR File ...................................... 116▼ How to Decommission a Node .......................................................... 119
9 Working With Heat ...................................................................................... 121About the Heat Component ........................................................................... 121

Contents
8 Installing and Configuring OpenStack (Kilo) in Oracle Solaris • June 2016
Installing Heat ............................................................................................. 122▼ How to Configure Heat ................................................................... 122
About HOT Templates .................................................................................. 122Using Heat With Cloudbase-Init ..................................................................... 124
▼ How to Automatically Initialize a Guest Image .................................... 124
10 OpenStack Troubleshooting ...................................................................... 127Obtaining Command Line Help ...................................................................... 127Known Limitations ...................................................................................... 128Examining Log Files .................................................................................... 129Investigating and Resolving Problems ............................................................. 131
Network Creation ................................................................................ 132VM Instance Installation and Configuration .............................................. 133Horizon-Related Issue ........................................................................... 135Scalability Issues ................................................................................. 136Dismantling Networks .......................................................................... 137▼ How to Remove the Network Configuration on Neutron ........................ 137▼ How to Remove Vports ................................................................... 138
General Tips and Tricks on Debugging ............................................................ 138Useful Sites ................................................................................................ 138
A Common OpenStack Configuration Files and Services .............................. 139Configuration Files ...................................................................................... 139
Cinder Files ........................................................................................ 139Glance Files ........................................................................................ 139Keystone Files .................................................................................... 139Neutron Files ...................................................................................... 140Nova Files .......................................................................................... 140Horizon Files ...................................................................................... 140Swift Files .......................................................................................... 140
OpenStack SMF Services .............................................................................. 141Cinder ................................................................................................ 141Glance ............................................................................................... 141Keystone ............................................................................................ 141Neutron .............................................................................................. 141Nova * ............................................................................................... 141Swift ................................................................................................. 142
B OpenStackClient Commands ...................................................................... 143

Contents
9
The OpenStackClient (OSC) .......................................................................... 143
Index ................................................................................................................ 145

10 Installing and Configuring OpenStack (Kilo) in Oracle Solaris • June 2016
Using This Documentation 11
Using This Documentation
■ Overview – Describes how to install the current OpenStack version and deploy OpenStackvirtual machines on supported Oracle Solaris systems.
■ Audience – Large installation system administrators.■ Required knowledge – Oracle Solaris network and large system administration. Familiarity
with OpenStack is helpful.
Product Documentation Library
Documentation and resources for this product and related products are available at http://www.oracle.com/pls/topic/lookup?ctx=E65465.
Feedback
Provide feedback about this documentation at http://www.oracle.com/goto/docfeedback.

12 Installing and Configuring OpenStack (Kilo) in Oracle Solaris • June 2016
Chapter 1 • What's New in OpenStack (Kilo) on Oracle Solaris 13
1 ♦ ♦ ♦ C H A P T E R 1
What's New in OpenStack (Kilo) on OracleSolaris
Oracle Solaris 11.3 SRU 9 includes the OpenStack 2015.1.2 (Kilo) version as part of its overallpackage. This chapter lists new features in the Kilo version of OpenStack for this release.
■ “Core Component Based Features” on page 13■ “Other Information Sources” on page 16
Core Component Based Features
This section describes features that were introduced to core components of the Kilo version ofOpenStack.
Cinder Related Features
The following features for Cinder have been added:
■ Use of Remote SAN StorageSupport for storage area networks (SAN) enables you to deploy the Cinder service remotely.For more information, see “Deploying Remote Systems for Storage” on page 89.
■ Support for Volume Backup and Restore OperationsThe Cinder backup SMF service is now enabled in Oracle Solaris. Therefore, unattachedvolumes can be backed up and restored between configured back ends. Currently, Swift isthe only supported back end.
■ Support for Cinder Volume MigrationCinder takes advantage of ZFS operations to migrate Cinder volumes. ZFS send and receiveprocesses enable the migration of volumes between different configured Cinder back ends.If the migration destination resides on the same zpool as the source, then a ZFS renameoperation is used. Currently, cinder volume migration support is limited to a single system.
■ Volume management in Cinder has been enhanced with a manage option so you canimport volumes that were created outside of the Cinder functionality. After these volumes
Core Component Based Features
14 Installing and Configuring OpenStack (Kilo) in Oracle Solaris • June 2016
are imported, you can administer them in the cloud as though they were regular Cindervolumes.Likewise, you can render Cinder volumes invisible with the unmanage option to disableaccess. The option does not delete the volumes. Thus, you can re-enable access to thevolumes by re-importing them.The Manage/Unmanage feature is available both on the Horizon dashboard as well as thecommand line.
■ An updated ZFSSA Cinder driver with a new property is available in the current Kiloimplementation. To adjust your ZFSSA configuration settings in OpenStack, see “PostUpgrade Tasks” on page 19 for instructions.
■ OpenStack Cinder NFS Volume driver support for Solaris is available. You can create avolume of the type nfs. NFS file access is defined with Cinder as user and group. Note,however, that currently, this driver's support is limited to kernel zones.For more information, see “Using the Cinder NFS Driver” on page 95.
■ In a configuration that has multiple backends, you can specify the boot volume for everycompute node that you create. To configure Cinder with this feature, see “Specifying BootVolumes for Compute Nodes” on page 94.
Nova Related FeaturesThe following features for Nova have been added:
■ Secure Live MigrationSupport for live migration, a feature of Oracle Solaris zones, is extended to VM instancesin Nova nodes. For more information about node live migration, see “Migrating andEvacuating VM Instances” on page 83.
■ Support for Instance EvacuationIn the event of host failure or services becoming disabled on the host, you can move aninstance to a different node for recovery by using the nova evacuate command. Notethat support for evacuation is available only if the root devices are on shared storage.Furthermore, evacuation is supported only for kernel zones, not non-global zones.
■ Functionality to Resize VM InstancesYou can resize VM instances by changing their flavors. The new flavors provide the VMinstances with different properties such as CPU capacity, memory, and other resources. Formore information, see “Resizing a VM Instance” on page 85.
Neutron Related FeaturesThe following features for Neutron have been added:
■ Neutron-in-Kernel Zone Capability
Core Component Based Features
Chapter 1 • What's New in OpenStack (Kilo) on Oracle Solaris 15
Support for dynamic MAC addresses and VIDs in zones enable you to installNeutron in a kernel zone. For more information, see “Deploying Neutron in a KernelZone” on page 103.
■ VPN as a ServiceVPN as a service (VPNaaS) is supported through Neutron. In addition, the "Network IPsecManagement" profile is added to the profiles that have already been assigned to Neutron.This profile enables the administrator to manage the IPsec and IKE system managementfacility (SMF) services.
Oracle Solaris Feature AdditionsThese feature additions are enhancements on the driver side of OpenStack for Oracle Solaris.These enhancements have already been implemented on the core upstream project.
Support for cloudbase-init
The cloudbase-init service facilitates the initialization and configuration of guest operatingsystems in the cloud. The tasks include user creation, password generation, static networkingconfiguration, hostname, SSH public keys and user data scripts. The configuration file for theservice is /etc/cloudbase-init.conf.
The Oracle Solaris version of cloudbase-init runs as an SMF service, application/cloudbase-init and is enabled by default. Scripts that are exported through user data typically performsystem and application configuration tasks that require privileged access. Therefore, thecloudbase-init service will run as user root and any user data scripts will also run as root.
The cloudbase-init package is not included in any of the standard group packages. Usersshould install the package only into images that are expressly intended to be deployed in cloudenvironments.
Note - Currently in this OpenStack release, the /etc/cloudbase-init.conf file enables onlythe UserData plugin.
For more information about Cloudbase-Init, go to http://cloudbase-init.readthedocs.io/en/latest/tutorial.html.
Implementation of OpenStackClient
The OpenStackClient (OSC) is a client from the OpenStack community that combines allthe component command sets into a single shell with a uniform command structure. Thus,where previous versions had commands based on components, such as keystone user-list,
Other Information Sources
16 Installing and Configuring OpenStack (Kilo) in Oracle Solaris • June 2016
glance image-show, neutron net-list, and so on, most of these commands are issued withopenstack as the main command, such as openstack user list.
In the current Kilo version, all of the keystone commands are deprecated. Appropriate alertsare generated if you use the keystone command.
For more information about OSC, see http://docs.openstack.org/developer/python-openstackclient/index.html.
For a list of previous commands and their equivalents in OSC, see Appendix B,“OpenStackClient Commands”.
Other Information Sources
Refer also to the information provided by the OpenStack community's Kilo release notes athttps://wiki.openstack.org/wiki/ReleaseNotes/Kilo:
For a list of issues with the current Oracle Solaris implementation of this OpenStack release, seethe OpenStack version's corresponding Readme file in My Oracle Support (https://support.oracle.com).

Chapter 2 • Upgrading to OpenStack 2015.1.2 (Kilo) 17
2 ♦ ♦ ♦ C H A P T E R 2
Upgrading to OpenStack 2015.1.2 (Kilo)
This chapter discusses the steps to upgrade to the Kilo version of OpenStack from a previousversion.
■ “Upgrade Notes” on page 17■ “Procedures for Upgrading” on page 17
Upgrade Notes
Consider the following best practices when upgrading:
■ Create backups, especially if you are only upgrading the OpenStack configuration ratherthan the entire operating system.
■ If you upgrade only the OpenStack configuration, a new boot environment (BE) is createdwith the upgraded OpenStack version. Boot to the new BE when the upgrade is completed.
■ In a multinode configuration, update the controller node first, then the storage node,followed by the rest of the nodes.
■ In Kilo, the default guest user and password settings for RabbitMQ are disabled. If youused the default password setting in the previous OpenStack version, change to a securepassword.
Procedures for Upgrading
The steps for upgrading to Kilo depends on the OpenStack version from where you are starting.A direct upgrade from Havana to Kilo is not supported. If your current version is Havana, youwill need to upgrade to Juno first, then perform another upgrade from Juno to Kilo.
Note - When performing the upgrade, you must use the pkg update command to initiate theoperation. Do not use pkg install.
The upgrade roadmap is as follows:
How to Upgrade From Havana to Kilo
18 Installing and Configuring OpenStack (Kilo) in Oracle Solaris • June 2016
■ From an existing Havana configuration, start from “How to Upgrade From Havana to Kilo”.Then proceed to the “Post Upgrade Tasks”.
■ From an existing Juno configuration, start from “How to Upgrade From Juno to Kilo”. Thenproceed to the “Post Upgrade Tasks”.
How to Upgrade From Havana to Kilo
Use this procedure if your current OpenStack version is Havana that is running on OracleSolaris 11.2 SRU 11 or previous releases.
If your OpenStack configuration is built on multiple nodes, you must perform this procedure oneach of the nodes, beginning with the Controller.
Oracle Solaris upgrades create a new boot environment (BE) for the operating system. After theupgrade is completed, the new BE is activated. Upon reboot, the system boots to the new BE.
1. If the system is running Oracle Solaris 11.2 SRU 11 or previous releases, do thefollowing steps:
a. Upgrade the operating system to at least Oracle Solaris 11.3.
Note - At this point, do not upgrade to Oracle Solaris 11. 3 SRU 9 yet.
The Oracle Solaris 11.3 package includes the OpenStack Juno packages.
For the steps to upgrade to Oracle Solaris 11.3, refer to “How to Update a System Running11.1 or 11.2 to Oracle Solaris 11.3” in Updating to Oracle Solaris 11.3.
b. Check to see whether the information about migrating the Neutron databaseapplies to your setup.See Migrating Neutron Database from sqlite to MySQL for Oracle OpenStack forOracle Solaris. Follow the instructions in the blog entry if the scenario applies to yourconfiguration.
2. Upgrade the operating system to Oracle Solaris 11.3 SRU 9.For instructions on how to update to the Oracle Solaris 11.3 SRU 9 release, log in to your MOSaccount in https://support.oracle.com. From the Oracle Solaris 11.3 Support RepositoryUpdates (SRU) Index (Doc ID 2045311.1), access the the SRU9 Readme file.
3. Boot the system to the new BE.
Next Steps Complete the upgrade process by finishing all the steps in “Post UpgradeTasks” on page 19.
How to Upgrade From Juno to Kilo
Chapter 2 • Upgrading to OpenStack 2015.1.2 (Kilo) 19
How to Upgrade From Juno to Kilo
Use this procedure if your current OpenStack version is Juno.
If your OpenStack configuration is built on multiple nodes, you must perform this procedure oneach of the nodes, beginning with the Controller.
Oracle Solaris upgrades create a new boot environment (BE) for the operating system. After theupgrade is completed, the new BE is activated. Upon reboot, the system boots to the new BE.
1. Upgrade the operating system to Oracle Solaris 11.3 SRU 9.For instructions on how to update to the Oracle Solaris 11.3 SRU 9 release, refer to the release'sReadme file.
2. Proceed to “Post Upgrade Tasks” to complete the upgrade process.
Post Upgrade TasksAfter upgrading to the current Oracle Solaris release, perform these remaining steps to completethe upgrade to OpenStack Kilo.
1. Migrate Horizon customizations to the Kilo version.
a. Transfer the customization settings from /etc/openstack_dashboard/local_settings.py.old to /etc/openstack_dashboard/local_settings.py.
b. Comment out additional lines in the /etc/openstack_dashboard/local_settings.py file if one of the following applies to your configuration:
■ You have a single node OpenStack configuration for evaluation purposes.■ Your Horizon configuration is not using SSL.
See the following example:
# SECURE_PROXY_SSL_HEADER = ('HTTP_X_FORWARDED_PROTOCOL', 'https')
# CSRF_COOKIE_SECURE = True
# SESSION_COOKIE_SECURE = True
c. Copy the sample Horizon Apache configuration fragments to the Apacheconf.d directory.You must copy only the sample fragment that corresponds to the protocol you are using.Issue one of the following commands:
■ If you are using HTTP:
Post Upgrade Tasks
20 Installing and Configuring OpenStack (Kilo) in Oracle Solaris • June 2016
# cp /etc/apache2/2.4/samples-conf.d/openstack-dashboard-http.conf /etc/
apache2/2.4/conf.d
■ If you are using TLS:
# cp /etc/apache2/2.4/samples-conf.d/openstack-dashboard-tls.conf /etc/
apache2/2.4/conf.d
2. If you have a multinode configuration, update /etc/rabbitmq/rabbitmq.config withthe line shown in bold:
% FHC read buffer has been disabled by default in later versions of
%RabbitMQ.
[
{rabbit, [
{fhc_read_buffering, false},
{loopback_users, []}
]}
].
3. Update the Cinder v2 service.Perform these steps on the node where Keystone is running. Sample output is included for eachcommand you issue.
a. Create the v2 Cinder service.
controller# openstack --os-url http://$CONTROLLER_ADMIN_NODE:35357/v2.0 \
--os-token ADMIN \
service create --name cinderv2 \
--description "Cinder Volume Service v2" volumev2+-------------+----------------------------------+
| Field | Value |
+-------------+----------------------------------+
| description | Cinder Volume Service v2 |
| enabled | True |
| id | 2ee6fefbdcdc4f06bcb0e36e0e4dd9c3 |
| name | cinderv2 |
| type | volumev2 |
+-------------+----------------------------------+
b. Create the endpoints.
controller# openstack --os-url http://$CONTROLLER_ADMIN_NODE:35357/v2.0 \
--os-token ADMIN
endpoint create \
--region RegionOne \
--publicurl "http://$CONTROLLER_ADMIN_NODE:8776/v2/\$(tenant_id)s" \
--adminurl "http://$CONTROLLER_ADMIN_NODE:8776/v2/\$(tenant_id)s" \
--internalurl "http://$CONTROLLER_ADMIN_NODE:8776/v2/\$(tenant_id)s" cinderv2
+--------------+------------------------------------------+
Post Upgrade Tasks
Chapter 2 • Upgrading to OpenStack 2015.1.2 (Kilo) 21
| Field | Value |
+--------------+------------------------------------------+
| adminurl | http://controller-node:8776/v2/$(tenant_id)s || id | 1b8cd962b12342429cdedb0c7e5d0440 |
| internalurl | http://controller-node:8776/v2/$(tenant_id)s || publicurl | http://controller-node:8776/v2/$(tenant_id)s || region | RegionOne |
| service_id | 2ee6fefbdcdc4f06bcb0e36e0e4dd9c3 |
| service_name | cinderv2 |
| service_type | volumev2 |
+--------------+------------------------------------------+
c. Verify that cinderv2 exists in the list of endpoints:
controller# openstack --os-url http://$CONTROLLER_ADMIN_NODE:35357/v2.0 --os-token
ADMIN endpoint list+----------------------------------+-----------+--------------+----------------+
| ID | Region | Service Name | Service Type |
+----------------------------------+-----------+--------------+----------------+
| 6891354066f84268968c8498f5f6d51b | RegionOne | neutron | network |
| 03121908d41e4efa98748fde8ca6d057 | RegionOne | heat | orchestration |
| b69e4f0373ff4a8f9560dc2644d891ba | RegionOne | glance | image |
| 1e6c7f52dcd34a27b7ccac98918f19f1 | RegionOne | ec2 | ec2 |
| e3236915a3dd4098b9e8e0853b5a5af2 | RegionOne | keystone | identity |
| fe8870c3e6ac4b529aa7ce7563fc24a4 | RegionOne | heat-cfn | cloudformation |
| aa931a795f2c4c0ca637e0e4c351cf07 | RegionOne | swift | object-store |
| 1b8cd962b12342429cdedb0c7e5d0440 | RegionOne | cinderv2 | volumev2 |
| 618a8edba487417c91d0de7f3bcc786d | RegionOne | cinder | volume |
| 4c79d020189a44d383bdc15033a942c4 | RegionOne | nova | compute |
+----------------------------------+-----------+--------------+----------------+
4. Restart the Apache service.
# svcadm restart apache24
5. Start the IP Filter service if it is not running.
controller# svcadm enable -rs ipfilter
6. If you are using ZFSSA for storage, adjust /etc/cinder.cinder.conf to use a newdriver property.The zfssa_initiator_config property lists multiple initiators, or multiple groups of initiatorsand replaces zfssa_initiator_group which is deprecated in the OpenStack Kilo version.
a. List multiple initiators for the new property by using the following format:
zfssa_initiator_config = {
'init-grp1': [
{'iqn':'iqn1' , 'user':'user' , 'password':'password'}, {'iqn':'iqn2' , 'user':'user' , 'password':'password'} ],
'init-grp2': [

Post Upgrade Tasks
22 Installing and Configuring OpenStack (Kilo) in Oracle Solaris • June 2016
{'iqn':'iqn3' , 'user':'user' , 'password':'password'} ] }
For example, if two groups of initiators, Group A and Group B, are created on the ZFSstorage appliance, you would define these as follows:
zfssa_initiator_config = {
'GroupA':[
{'iqn':'iqn.1986-03.com.sun:01:0a43b9fdcfd5.570d7fd1', 'user':'test1',
'password':'password1234'},
{'iqn':'iqn.1986-03.com.sun:01:0a43b9fdcfd5.570d7fd2', 'user':'',
'password':''}
],
'GroupB':[
{'iqn':'iqn.1986-03.com.sun:01:0a43b9fdcfd5.570d7fd3', 'user':'',
'password':''}
] }
b. Comment out the following deprecated parameters in the file:
■ zfssa_initiator_group
■ zfssa_initiator
c. Restart the Cinder services.
controller# svcadm restart cinder-volume:default
Chapter 3 • Installing Across Multiple Systems for a Multinode OpenStack Configuration 23
3 ♦ ♦ ♦ C H A P T E R 3
Installing Across Multiple Systems for aMultinode OpenStack Configuration
This chapter describes how to install a multinode OpenStack configuration. It covers thefollowing topics:
■ “Three-Node Architecture Overview” on page 23■ “Preliminary Steps” on page 26■ “Configuring the Controller Node” on page 30■ “Configuring the Compute Node” on page 41■ “Configuring the Storage Node” on page 46■ “Configuring Swift Object Storage” on page 47
Three-Node Architecture Overview
Single-node configurations are useful to test OpenStack as a product, and to familiarizeyourself with its features. However, a single-node configuration is not suitable in a productionenvironment. For this environment, you would install and configure OpenStack across multiplesystems or nodes.
Each cloud needs only one dashboard instance, one image store, and one identity service. Eachcloud can have any number of storage and compute instances. Evaluate each component withrespect to your needs for a particular cloud deployment to determine whether that componentshould be installed on a separate node and how many of that type of node you need.
The architecture described in this chapter is deployed on the following three systems:
■ Controller node – node where most of the shared OpenStack services and other tools run.The controller node supplies API, scheduling, and other shared services for the cloud. Thecontroller node has the dashboard, the image store, and the identity service. Additionally,Nova compute management service as well as the Neutron server are also configured in thisnode.
■ Compute node – node where VM instances, also known as Nova compute instances, areinstalled. The node runs the compute daemon that manages these VM instances.
■ Storage node – node that hosts the data.
Three-Node Architecture Overview
24 Installing and Configuring OpenStack (Kilo) in Oracle Solaris • June 2016
This three-node architecture is only one way of deploying OpenStack on multiple systems.Because of its flexibility, you can distribute OpenStack components in other ways than thisarchitecture. Thus, you must plan the cloud configuration before you begin installation. Forinformation that would guide your planning, refer to Planning for an OpenStack Configuration.
Note - To partition a single Oracle SPARC server and configure multinode OpenStack on theserver running OVM Server for SPARC (LDoms), see Multi-node Solaris 11.2 OpenStack onSPARC Servers. The article specifically refers to the Havana version of OpenStack. However,the general steps also apply to the current version.
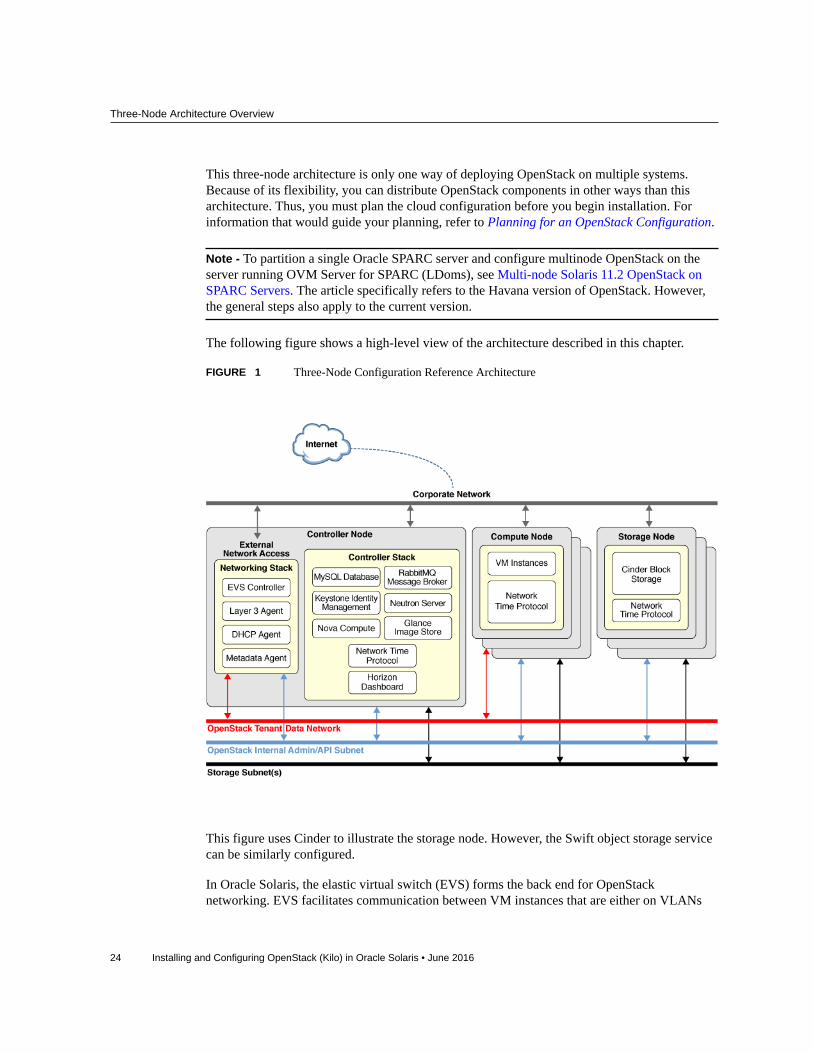
The following figure shows a high-level view of the architecture described in this chapter.
FIGURE 1 Three-Node Configuration Reference Architecture
This figure uses Cinder to illustrate the storage node. However, the Swift object storage servicecan be similarly configured.
In Oracle Solaris, the elastic virtual switch (EVS) forms the back end for OpenStacknetworking. EVS facilitates communication between VM instances that are either on VLANs
Three-Node Architecture Overview
Chapter 3 • Installing Across Multiple Systems for a Multinode OpenStack Configuration 25
or VXLANs. The VM instances can be on the same compute node or across multiple computenodes. For more information about EVS, refer to Managing Network Virtualization andNetwork Resource about Elastic Virtual Switches. This book is in your Oracle Solaris version'slibrary in Operating Systems Documentation.
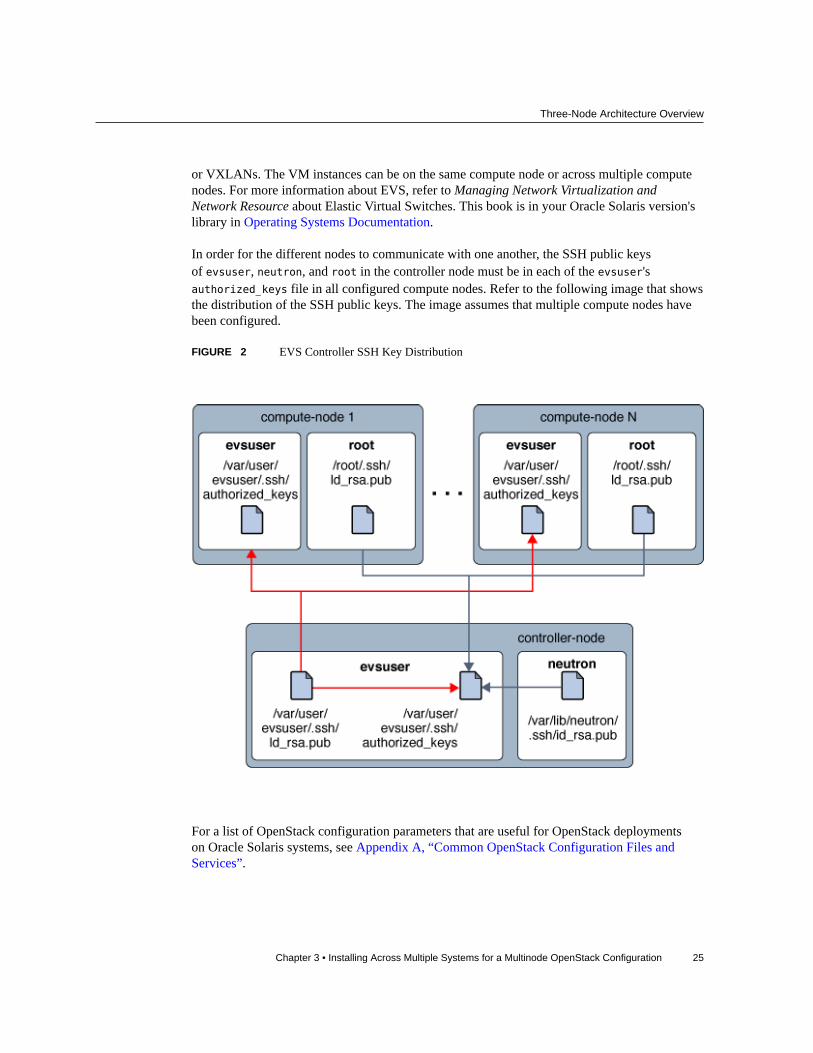
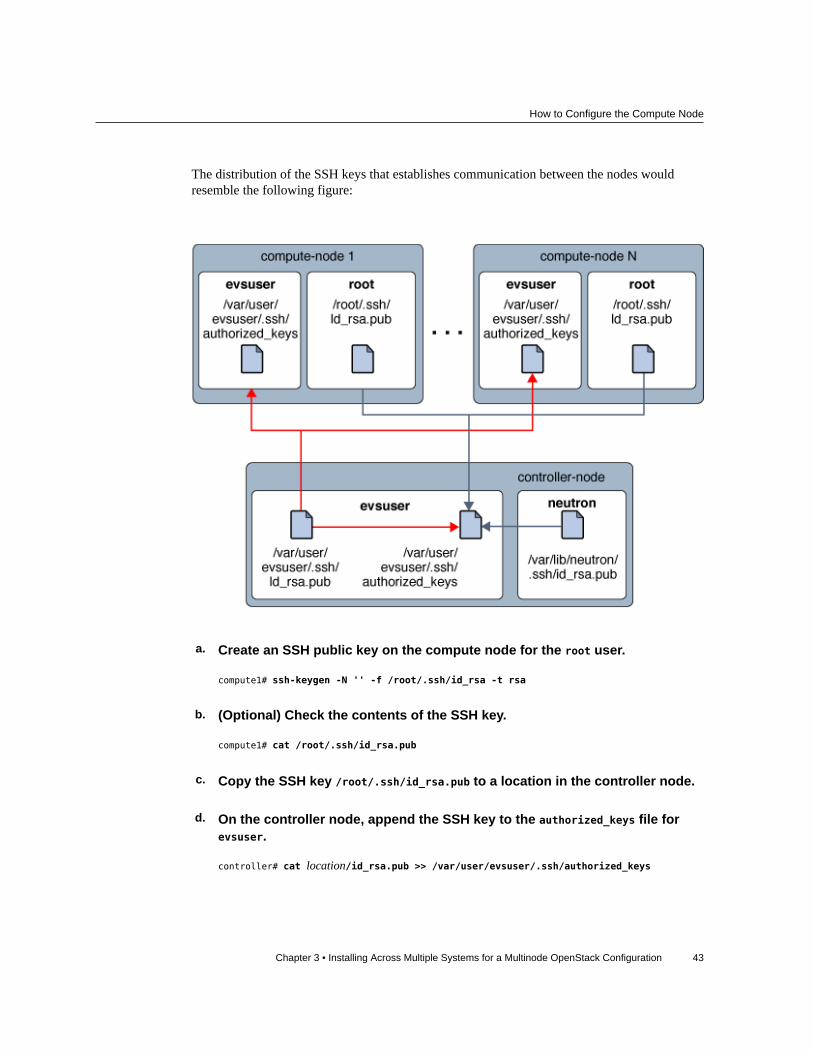
In order for the different nodes to communicate with one another, the SSH public keysof evsuser, neutron, and root in the controller node must be in each of the evsuser'sauthorized_keys file in all configured compute nodes. Refer to the following image that showsthe distribution of the SSH public keys. The image assumes that multiple compute nodes havebeen configured.
FIGURE 2 EVS Controller SSH Key Distribution
For a list of OpenStack configuration parameters that are useful for OpenStack deploymentson Oracle Solaris systems, see Appendix A, “Common OpenStack Configuration Files andServices”.
Preliminary Steps
26 Installing and Configuring OpenStack (Kilo) in Oracle Solaris • June 2016
Preliminary Steps
This section discusses some preliminary considerations before you implement the multinodeOpenStack configuration.
Preparing Host Names, Variables, and PasswordsIn a multinode configuration, you would use multiple network interfaces to service the differentsubnets that you create for the cloud. Ensure that you have prepared host names for theseinterfaces. Include these names and their IP addresses in the systems' /etc/hosts file or in theDNS configuration.
For example, you might create the following host names to handle different types of networktraffic.
■ host-on for the OpenStack network that hosts administrative and API traffic.■ host-tn for the project network that hosts traffic between compute nodes and the L3 router.■ host-en for the external network traffic.
When you configure the OpenStack services in different nodes, create variables to facilitate thetask, such as the following examples:
■ $CONTROLLER_ADMIN_NODE - the host name of the interface or IP address in the controllernode to which OpenStack administrative services are attached.
■ $CONTROLLER_ADMIN_NODE_IP - the IP address of the Controller port that handles theOpenStack administrative services and traffic.
■ $COMPUTE_ADMIN_NODE_IP - the IP address of the Compute port that handles the OpenStackadministrative services and traffic.
■ $VOLUME_IP - the host name of the controller node.
Passwords are also required in the configuration processes. The following is a sample list ofpasswords you need to prepare.
■ Root password for the MySQL database■ Password of user admin■ Database passwords of the OpenStack services:
■ Identity service■ Image service■ Compute service■ Dashboard database■ Block storage database■ Networking database
Preliminary Steps
Chapter 3 • Installing Across Multiple Systems for a Multinode OpenStack Configuration 27
■ Orchestration database■ Passwords of OpenStack service users:
■ glance
■ nova
■ cinder
■ neutron
■ heat
Note - You can also assign a common password for a group of users or services. Whicheversystem you adopt for assigning passwords, ensure that you follow best practices to secure yourenvironment. See Securing Systems and Attached Devices in your Oracle Solaris version'slibrary in Operating Systems Documentation.
The Sample Keystone Script
To quickly populate the Keystone database, you can use a sample script /usr/demo/openstack/keystone/sample_data.sh. The script performs the following basic tasks to help you getstarted:
■ Creates the following initial projects:■ service under which basic or core services are created.■ demo under which the user admin is created with secrete as the default password.
■ Populates the Keystone database.■ Creates the following core services.
■ cinder■ cinder2■ ec2■ glance■ keystone■ neutron■ nova■ swift■ heat
All services have corresponding user names and passwords except for the Keystoneservice, for which no user is created. By default, the user names, passwords, and servicenames are identical. For example, cinder is the user name and password for the Cinderservice, glance for the Glance service, and so on. As an option, you can create customized
Configuring the NTP Server
28 Installing and Configuring OpenStack (Kilo) in Oracle Solaris • June 2016
passwords to replace these default ones in the script. Alternatively, you can also set a singlepassword for all services in the script. Apply all the necessary changes to the script beforeyou run it to bootstrap Keystone.
Note - Make sure that you review the script for more information about parameters that can beset for the environment. Replace default settings in the script according to your preference.
Throughout this document, the procedures assume that except for passwords, the sampledata script is used without revision and all script's default settings are applied to the cloudconfiguration.
About Editing Configuration FilesA major part of OpenStack configuration involves editing the components' configuration files.In this document, only selected parameters are identified for configuration in each *.conf or *.ini file. These selected parameters are the minimum required to make the cloud configurationwork. However, review the entire contents of each configuration file to ensure that all theparameters relevant to your specific cloud setup are properly configured.
Optimizing Memory Use
To better manage memory use between ZFS and applications in Oracle Solaris 11, set theusr_reserve_hint_pct parameter on the node, as shown in the following example:
# echo "set user_reserve_hint_pct=80" >>/etc/system.d/site:kernel-zones-reserve# reboot
where site can refer to your company.
Set this parameter on the different OpenStack nodes as well.
For more information about this parameter, log in to your MOS account in https://support.oracle.com and review Document 1663862.1, Memory Management Between ZFS andApplications in Oracle Solaris 11.2.
Configuring the NTP Server
Installing Network Time Protocol (NTP) is optional but strongly recommended. NTP helpsensure a consistent time of day across all of the service nodes in the cloud. If you enable NTP ina network, configure the service nodes to obtain their time over the network.
How to Set Up the NTP Server
Chapter 3 • Installing Across Multiple Systems for a Multinode OpenStack Configuration 29
■ If IP multicast is enabled on the IP subnets on which the service nodes reside, you canleverage IP multicast to configure NTP.
■ If IP multicast is not enabled on the IP subnets on which the service nodes reside, configureNTP manually.
Using NTP involves configuring the NTP server and the NTP client. Typically, the NTP serveris a separate system from the other systems on which you configure OpenStack. The NTP clientis installed and configured on the nodes or systems that host the OpenStack components.
For more information about NTP, refer to the documentation at http://www.ntp.org/documentation.html.
How to Set Up the NTP Server
The NTP server is on a separate system from OpenStack nodes.
1. Install the NTP package.
ntp-server# pkg install ntp
2. Install the configuration file.
ntp-server# cp /etc/inet/ntp.server /etc/inet/ntp.conf
3. Edit the /etc/inet/ntp.conf file by configuring the server and driftfile keywords.For example:
server 127.127.1.0 prefer
...
driftfile /var/ntp/ntp.drift
Note - 127.127.1.0 is not an IP address. It is a format used to refer to a clock that providesaccurate time to the server. Make sure to read the comments in the ntp.conf file that explainsthe server keyword.
4. Create the /var/ntp/ntp.drift file as you have defined in the previous step.
ntp-server# touch /var/ntp/ntp.drift
5. Start the ntp service.
ntp-server# svcadm enable ntp
Configuring the Controller Node
30 Installing and Configuring OpenStack (Kilo) in Oracle Solaris • June 2016
Configuring the Controller Node
The controller node has one dashboard service, one image store, and one identity service. Thisnode also includes MySQL, RabbitMQ, and compute, block storage, and networking services.
To configure the controller node, install the OpenStack components and services on the systemwith the following command:
controller# pkg install openstack
After the package installation is completed, configure the services that you want to run on thenode. The following list specifies the tasks to configure the controller node:
■ “Configuring the NTP Client” on page 30■ “Installing MySQL” on page 31■ “Installing Keystone” on page 32■ “Installing Glance” on page 33■ “Installing Nova” on page 35■ “Installing Horizon” on page 36■ “Installing Cinder” on page 37■ “Installing Neutron” on page 38
Configuring the NTP Client
You install the NTP client service on each service node in your cloud deployment.
How to Configure the NTP Client
This section assumes that you have already set up the NTP server as explained in “How to SetUp the NTP Server” on page 29.
1. Create the client configuration file.
controller# cp /etc/inet/ntp.client /etc/inet/ntp.conf
2. In the client configuration file, uncomment one or more of the server options andprovide the specific name or the IP address of the NTP server.For example, if the host name of the NTP server you configured is system1, the configurationfile would resemble the following example:
# multicastclient 224.0.1.1
...
How to Install a MySQL Database
Chapter 3 • Installing Across Multiple Systems for a Multinode OpenStack Configuration 31
server system1.example.com iburst
# server server_name2 iburst
# server server_name3 iburst
3. Enable the ntp service.
controller# svcadm enable ntp
Installing MySQL
Many OpenStack services maintain a database to keep track of critical resources, usage, andother information. Especially for multinode configurations, use databases such as MySQLdatabase for storing this information.
How to Install a MySQL Database
1. Enable the RabbitMQ services.
controller# svcadm enable rabbitmq
controller# svcadm restart rad:local
2. (Optional) If you are using a dedicated IP address for administration and APItraffic, add that address in /etc/mysql/5.5/my.cnf:
bind-address=$CONTROLLER_ADMIN_NODE_IP
3. Enable the MySQL service.
controller# svcadm enable mysql
4. Set the MySQL server root password.
controller# mysqladmin -u root password MySQL-root-password
5. Configure MySQL.Create the tables that will be used by OpenStack. Grant privileges to the services on thecontroller node to provide exclusive access to these databases.
controller# mysql -u root -pEnter password: MySQL-root-passwordmysql> drop database if exists nova;
mysql> drop database if exists cinder;
mysql> drop database if exists glance;
mysql> drop database if exists keystone;
mysql> drop database if exists neutron;
mysql> drop database if exists heat;
mysql> create database cinder default character set utf8 default collate utf8_general_ci;
How to Install and Configure Keystone
32 Installing and Configuring OpenStack (Kilo) in Oracle Solaris • June 2016
mysql> grant all privileges on cinder.* to 'cinder'@'$CONTROLLER_ADMIN_NODE' identified
by 'service-password';mysql> create database glance default character set utf8 default collate utf8_general_ci;
mysql> grant all privileges on glance.* to 'glance'@'$CONTROLLER_ADMIN_NODE' identified
by 'service-password';mysql> create database keystone default character set utf8 default collate
utf8_general_ci;
mysql> grant all privileges on keystone.* to 'keystone'@'$CONTROLLER_ADMIN_NODE'
identified by 'service-password';mysql> create database nova default character set utf8 default collate utf8_general_ci;
mysql> grant all privileges on nova.* to 'nova'@'$CONTROLLER_ADMIN_NODE' identified by
'service-password';mysql> create database neutron default character set utf8 default collate
utf8_general_ci;
mysql> grant all privileges on neutron.* to 'neutron'@'$CONTROLLER_ADMIN_NODE' identified
by 'service-password';mysql> create database heat default character set utf8 default collate utf8_general_ci;
mysql> grant all privileges on heat.* to 'heat'@'$CONTROLLER_ADMIN_NODE' identified by
'service-password';mysql> flush privileges;
mysql> quit
Installing Keystone
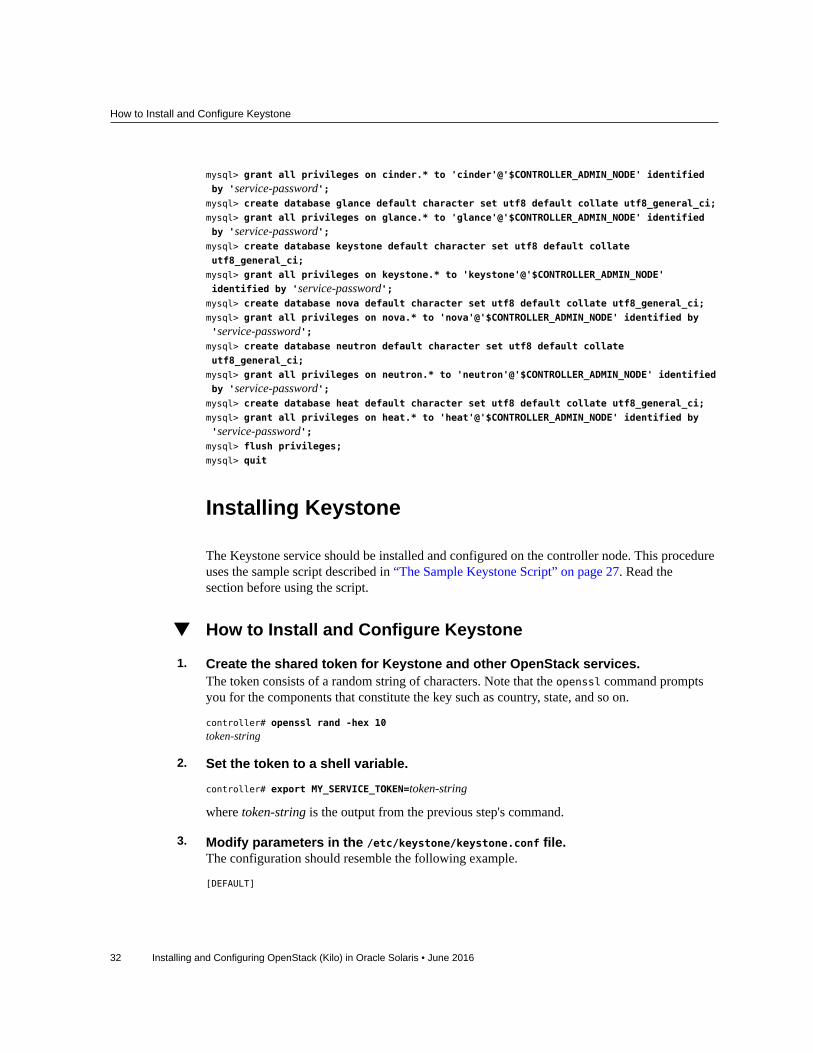
The Keystone service should be installed and configured on the controller node. This procedureuses the sample script described in “The Sample Keystone Script” on page 27. Read thesection before using the script.
How to Install and Configure Keystone
1. Create the shared token for Keystone and other OpenStack services.The token consists of a random string of characters. Note that the openssl command promptsyou for the components that constitute the key such as country, state, and so on.
controller# openssl rand -hex 10token-string
2. Set the token to a shell variable.
controller# export MY_SERVICE_TOKEN=token-string
where token-string is the output from the previous step's command.
3. Modify parameters in the /etc/keystone/keystone.conf file.The configuration should resemble the following example.
[DEFAULT]
How to Install and Configure Glance
Chapter 3 • Installing Across Multiple Systems for a Multinode OpenStack Configuration 33
admin_token = token-string...
[database]
connection = mysql://keystone:service-password@$CONTROLLER_ADMIN_NODE/keystone
[oslo_messaging_rabbit]
rabbit_host=$CONTROLLER_ADMIN_NODE
4. Enable the Keystone SMF service.
controller# svcadm enable keystone
5. Populate the Keystone database by using the Keystone sample script.Make sure that you have reviewed and modified the script to your preference before running thescript. The procedures assume that the sample script is not customized.
controller# CONTROLLER_PUBLIC_ADDRESS=$CONTROLLER_ADMIN_NODE \
CONTROLLER_ADMIN_ADDRESS=$CONTROLLER_ADMIN_NODE \
CONTROLLER_INTERNAL_ADDRESS=$CONTROLLER_ADMIN_NODE \
SERVICE_TOKEN=$MY_SERVICE_TOKEN \
ADMIN_PASSWORD=admin-passwordSERVICE_PASSWORD=service-password/usr/demo/openstack/keystone/sample_data.sh
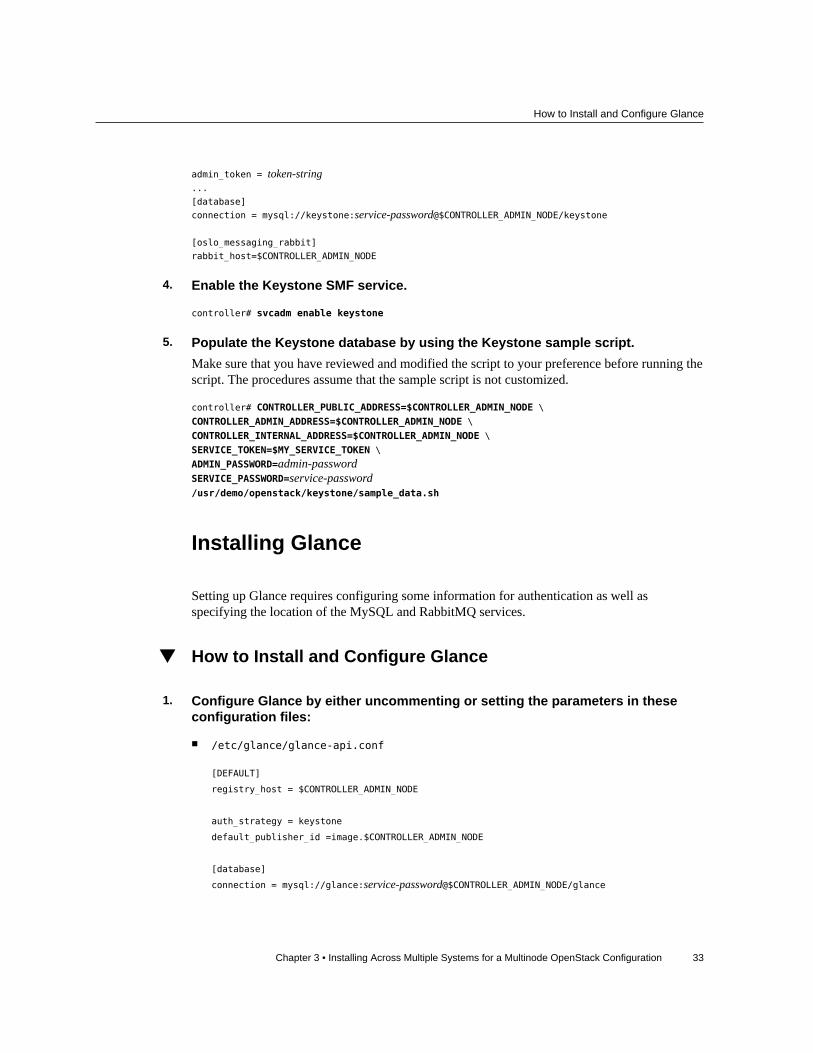
Installing Glance
Setting up Glance requires configuring some information for authentication as well asspecifying the location of the MySQL and RabbitMQ services.
How to Install and Configure Glance
1. Configure Glance by either uncommenting or setting the parameters in theseconfiguration files:
■ /etc/glance/glance-api.conf
[DEFAULT]
registry_host = $CONTROLLER_ADMIN_NODE
auth_strategy = keystone
default_publisher_id =image.$CONTROLLER_ADMIN_NODE
[database]
connection = mysql://glance:service-password@$CONTROLLER_ADMIN_NODE/glance
How to Install and Configure Glance
34 Installing and Configuring OpenStack (Kilo) in Oracle Solaris • June 2016
[keystone_authtoken]
auth_uri= http://$CONTROLLER_ADMIN_NODE:5000/v2.0
identity_uri = http://$CONTROLLER_ADMIN_NODE:35357
admin_user = glance
admin_password = service-passwordadmin_tenant_name = service
[oslo_messaging_rabbit]
rabbit_host=$CONTROLLER_ADMIN_NODE
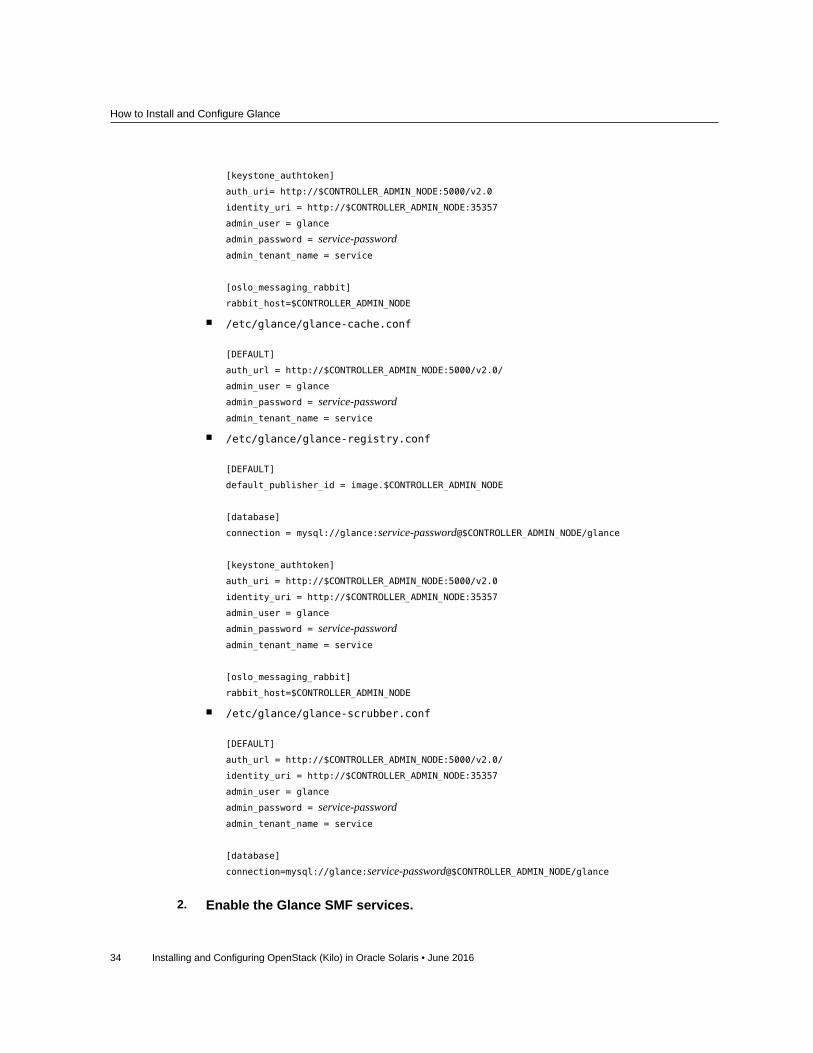
■ /etc/glance/glance-cache.conf
[DEFAULT]
auth_url = http://$CONTROLLER_ADMIN_NODE:5000/v2.0/
admin_user = glance
admin_password = service-passwordadmin_tenant_name = service
■ /etc/glance/glance-registry.conf
[DEFAULT]
default_publisher_id = image.$CONTROLLER_ADMIN_NODE
[database]
connection = mysql://glance:service-password@$CONTROLLER_ADMIN_NODE/glance
[keystone_authtoken]
auth_uri = http://$CONTROLLER_ADMIN_NODE:5000/v2.0
identity_uri = http://$CONTROLLER_ADMIN_NODE:35357
admin_user = glance
admin_password = service-passwordadmin_tenant_name = service
[oslo_messaging_rabbit]
rabbit_host=$CONTROLLER_ADMIN_NODE
■ /etc/glance/glance-scrubber.conf
[DEFAULT]
auth_url = http://$CONTROLLER_ADMIN_NODE:5000/v2.0/
identity_uri = http://$CONTROLLER_ADMIN_NODE:35357
admin_user = glance
admin_password = service-passwordadmin_tenant_name = service
[database]
connection=mysql://glance:service-password@$CONTROLLER_ADMIN_NODE/glance
2. Enable the Glance SMF services.
How to Install and Configure Nova
Chapter 3 • Installing Across Multiple Systems for a Multinode OpenStack Configuration 35
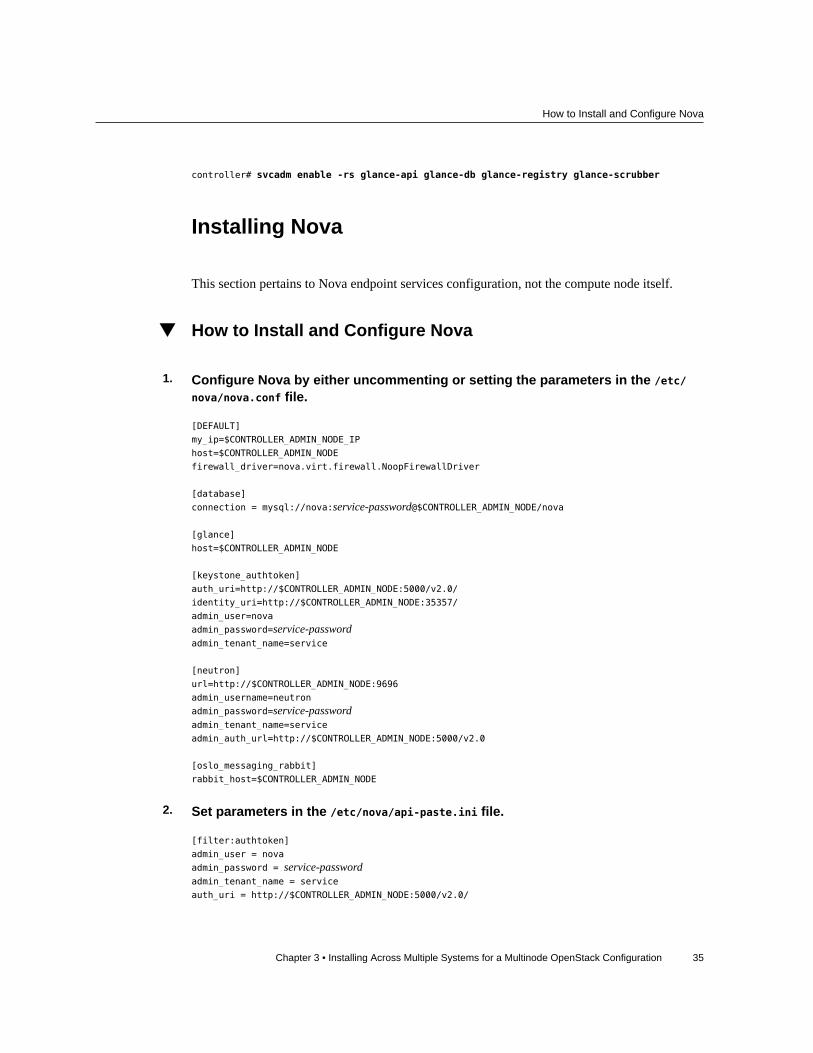
controller# svcadm enable -rs glance-api glance-db glance-registry glance-scrubber
Installing Nova
This section pertains to Nova endpoint services configuration, not the compute node itself.
How to Install and Configure Nova
1. Configure Nova by either uncommenting or setting the parameters in the /etc/nova/nova.conf file.
[DEFAULT]
my_ip=$CONTROLLER_ADMIN_NODE_IP
host=$CONTROLLER_ADMIN_NODE
firewall_driver=nova.virt.firewall.NoopFirewallDriver
[database]
connection = mysql://nova:service-password@$CONTROLLER_ADMIN_NODE/nova
[glance]
host=$CONTROLLER_ADMIN_NODE
[keystone_authtoken]
auth_uri=http://$CONTROLLER_ADMIN_NODE:5000/v2.0/
identity_uri=http://$CONTROLLER_ADMIN_NODE:35357/
admin_user=nova
admin_password=service-passwordadmin_tenant_name=service
[neutron]
url=http://$CONTROLLER_ADMIN_NODE:9696
admin_username=neutron
admin_password=service-passwordadmin_tenant_name=service
admin_auth_url=http://$CONTROLLER_ADMIN_NODE:5000/v2.0
[oslo_messaging_rabbit]
rabbit_host=$CONTROLLER_ADMIN_NODE
2. Set parameters in the /etc/nova/api-paste.ini file.
[filter:authtoken]
admin_user = nova
admin_password = service-passwordadmin_tenant_name = service
auth_uri = http://$CONTROLLER_ADMIN_NODE:5000/v2.0/
How to Configure Horizon
36 Installing and Configuring OpenStack (Kilo) in Oracle Solaris • June 2016
identity_uri = http://$CONTROLLER_ADMIN_NODE:35357
3. Enable the Nova SMF services.
controller# svcadm enable -rs nova-conductor
controller# svcadm enable -rs nova-api-osapi-compute \
nova-cert nova-scheduler
Installing Horizon
Horizon serves as the web portal for OpenStack.
How to Configure Horizon
1. Set the Horizon configuration for SSL/TLS.
a. Generate certificates for use by Horizon.The following commands generate self-signed certificates for use by Horizon and copythe OpenStack dashboard configuration file to the Apache configuration file directory. Formore information about creating self-signed certificates, see the Apache SSL/TLS StrongEncryption: FAQ.
controller# export DASHBOARD=/etc/openstack_dashboard
controller# openssl req -new -x509 -nodes \
-out horizon.crt -keyout horizon.key
At this point, provide the information as prompted such as country, state, city, company,organization, name, and email address. Then proceed with moving the key.
controller# mv horizon.crt horizon.key ${DASHBOARD}
controller# chmod 0644 ${DASHBOARD}/*
controller# chown webservd:webservd ${DASHBOARD}/*
controller# sed \
-e "/SSLCertificateFile/s:/path.*:${DASHBOARD}/horizon.crt:" \
-e "/SSLCACertificateFile/d" \
-e "/SSLCertificateKeyFile/s:/path.*:${DASHBOARD}/horizon.key:" \
< /etc/apache2/2.4/samples-conf.d/openstack-dashboard-tls.conf \
> /etc/apache2/2.4/conf.d/openstack-dashboard-tls.conf
b. In the /etc/apache2/2.4/conf.d/openstack-dashboard-tls.conf file, specifythe site address and server name of the Horizon package on the followingparameters:
RedirectPermanent /horizon https://controller-fqdn/horizon
How to Install and Configure Cinder
Chapter 3 • Installing Across Multiple Systems for a Multinode OpenStack Configuration 37
ServerName controller-fqdn
2. Start the Apache service.
controller# svcadm enable apache24
Installing Cinder
The Cinder configuration must specify at least the following information:
■ Authorization information to authenticate with Keystone.■ The class of volumes to be created.
How to Install and Configure Cinder
The steps in this procedure refer to the configuration of Cinder endpoint services, not the Cinderor volume node.
1. Configure Cinder by either uncommenting or setting the parameters in the /etc/cinder/cinder.conf file.For the volume_driver parameter, multiple drivers are available for you to select. In thefollowing example, only the selected driver for volume_driver is shown. The other availabledrivers that are commented out are excluded.
[DEFAULT]
volume_driver=cinder.volume.drivers.solaris.zfs.ZFSISCSIDriver
my_ip=$CONTROLLER_ADMIN_NODE
[database]
connection = mysql://cinder:service-password@$CONTROLLER_ADMIN_NODE/cinder
[keystone_authtoken]
auth_uri = http://$CONTROLLER_ADMIN_NODE:5000/v2.0
identity_uri = http://$CONTROLLER_ADMIN_NODE:35357
admin_user = cinder
admin_password = service-passwordadmin_tenant_name = service
[oslo_messaging_rabbit]
rabbit_host=$CONTROLLER_ADMIN_NODE
2. Configure parameters in the /etc/cinder/api-paste.ini file.
[filter:authtoken]
How to Install and Configure Neutron
38 Installing and Configuring OpenStack (Kilo) in Oracle Solaris • June 2016
admin_tenant_name = service
admin_user = cinder
admin_password = service-password
3. If iSCSI targets are configured, enable the corresponding SMF services.
controller# svcadm enable iscsi/target stmf
4. Enable the Cinder SMF services.
controller# svcadm enable -rs cinder-db
controller# svcadm enable -rs cinder-api cinder-scheduler
See Also See also How to Build OpenStack Block Storage on ZFS.
Installing Neutron
In the architecture described in this chapter, the Neutron API service runs on the controllernode.
How to Install and Configure Neutron
1. Configure Neutron by either uncommenting or setting the parameters in theseconfiguration files:
■ /etc/neutron/neutron.conf
[DEFAULT]
host=$CONTROLLER_ADMIN_NODE
[keystone_authtoken]
auth_uri = http://$CONTROLLER_ADMIN_NODE:5000/v2.0
identity_uri = http://$CONTROLLER_ADMIN_NODE:35357
admin_user = neutron
admin_password = service-passwordadmin_tenant_name = service
[database]
connection = mysql://neutron:service-password@$CONTROLLER_ADMIN_NODE/neutron
[oslo_messaging_rabbit]
rabbit_host=$CONTROLLER_ADMIN_NODE
■ /etc/neutron/plugins/evs/evs_plugin.ini

How to Install and Configure Neutron
Chapter 3 • Installing Across Multiple Systems for a Multinode OpenStack Configuration 39
[EVS]
evs_controller = ssh://evsuser@$CONTROLLER_ADMIN_NODE
■ /etc/neutron/dhcp_agent.ini
[DEFAULT]
evs_controller = ssh://evsuser@$CONTROLLER_ADMIN_NODE
■ /etc/neutron/l3_agent.ini
evs_controller = ssh://evsuser@$CONTROLLER_ADMIN_NODE
Note - By default, internal networks of projects in the cloud are isolated from each other.A project's networks can communicate only with each other, not with networks of otherprojects. To enable all networks in the cloud to connect with one another regardless of theproject to which they belong, edit the /etc/neutron/l3_agent.ini file with the followingparameter setting:
allow_forwarding_between_networks = true
2. Set up the SSH key pairs to be used.
a. Create SSH key pairs for evsuser, neutron, and root users.
controller# su - evsuser -c "ssh-keygen -N '' \
-f /var/user/evsuser/.ssh/id_rsa -t rsa"
controller# su - neutron -c "ssh-keygen -N '' -f /var/lib/neutron/.ssh/id_rsa -t rsa"
controller# ssh-keygen -N '' -f /root/.ssh/id_rsa -t rsa
b. Combine the SSH keys of the evsuser, neutron and root users in the evsuser'sauthorized_keys file.
controller# cat /var/user/evsuser/.ssh/id_rsa.pub \
/var/lib/neutron/.ssh/id_rsa.pub /root/.ssh/id_rsa.pub >> \
/var/user/evsuser/.ssh/authorized_keys
c. Test the SSH connections to accept the fingerprints which will be stored inthe known_host file.Specify Yes at every prompt for confirmation.
controller# su - evsuser -c "ssh evsuser@$CONTROLLER_ADMIN_NODE true"
controller# su - neutron -c "ssh evsuser@$CONTROLLER_ADMIN_NODE true"
controller# ssh evsuser@$CONTROLLER_ADMIN_NODE true
3. Configure the elastic virtual switch (EVS).
How to Install and Configure Neutron
40 Installing and Configuring OpenStack (Kilo) in Oracle Solaris • June 2016
Note - The following substeps specifically configures EVS for a VLAN-based network.
To configure a VXLAN-based network, go to Managing Network Virtualization and NetworkResources in Oracle Solaris in your Oracle Solaris version's library in Operating SystemsDocumentation. In that book, refer specifically to the section Use Case: Configuring an ElasticVirtual Switch for a Tenant.
For an example of how to configure flat networks, see https://blogs.oracle.com/openstack/entry/configuring_the_neutron_l3_agent.
a. Set the EVS property to specify the location of the EVS controller.
controller# evsadm set-prop -p controller=ssh://evsuser@$CONTROLLER_ADMIN_NODE
b. Configure the l2-type, vlan-range, and uplink-port properties of the EVScontroller.
controller# evsadm set-controlprop -p property=value
As shown in Figure 1, you would typically have multiple network interfaces to serve thedifferent subnets. When you set the uplink-port property, you can split the VLANSacross the multiple network ports that service the subnets.
The following example shows how to set EVS properties, including splitting the VLANs.Optionally, use the final command to display all the EVS properties.
Note - Define the VLAN range first before spreading the VLANs across the network ports.Otherwise, the uplink-port property cannot be configured.
controller# evsadm set-controlprop -p l2-type=vlan
controller# evsadm set-controlprop -p vlan-range=1,200-300
controller# evsadm set-controlprop -p uplink-port=net0,vlan-range=1
controller# evsadm set-controlprop -p uplink-port=net1,vlan-range=200-250
controller# evsadm set-controlprop -p uplink-port=net2,vlan-range=251-300
controller# evsadm show-controlprop -o all
4. Enable IP forwarding.
controller# ipadm set-prop -p forwarding=on ipv4
controller# ipadm set-prop -p forwarding=on ipv6
5. Start the IP Filter service.
controller# svcadm enable -rs ipfilter
6. Enable the Neutron server service.
Configuring the Compute Node
Chapter 3 • Installing Across Multiple Systems for a Multinode OpenStack Configuration 41
controller# svcadm enable -rs neutron-server neutron-dhcp-agent
Configuring the Compute Node
You install VM instances in the compute node as well as the nova-compute daemon. The VMinstances provide a wide range of services such as web applications and analytics. You canconfigure as many compute nodes as necessary for your cloud.
To configure the compute node, install the OpenStack components and services on the systemwith the following command:
compute# pkg install openstack
After the package installation is completed, configure the services that you want to run on thenode.
Note - To better manage memory use between ZFS and applications in Oracle Solaris 11, set theusr_reserve_hint_pct parameter on the node, as shown in the following example:
# echo "set user_reserve_hint_pct=80" >>/etc/system.d/site:kernel-zones-reserve# reboot
where site is a random identifier such as the name of your company.
Set this parameter on the different OpenStack nodes as well.
For more information about this parameter, log in to your MOS account in https://support.oracle.com and review Document 1663862.1, Memory Management Between ZFS andApplications in Oracle Solaris 11.2.
How to Configure the Compute Node1. Configure the NTP client.
See “Configuring the NTP Client” on page 30.
2. Restart the Remote Access Daemon (RAD).Nova uses RAD to communicate with the Oracle Solaris Zones framework.
compute1# svcadm restart rad:local
3. Configure Nova by either uncommenting or setting the following parameters inthe /etc/nova/nova.conf file.
How to Configure the Compute Node
42 Installing and Configuring OpenStack (Kilo) in Oracle Solaris • June 2016
[DEFAULT]
my_ip=$COMPUTE_ADMIN_NODE_IP
host=$COMPUTE_ADMIN_NODE_X
firewall_driver=nova.virt.firewall.NoopFirewallDriver
keystone_ec2_url=http:/$CONTROLLER_ADMIN_NODE:5000/v2.0/ec2tokens
[database]
connection = mysql://nova:service-password@$CONTROLLER_ADMIN_NODE/nova
[glance]
host=$CONTROLLER_ADMIN_NODE
[keystone_authtoken]
auth_uri=http://$CONTROLLER_ADMIN_NODE:5000/v2.0/
identity_uri=http://$CONTROLLER_ADMIN_NODE:35357/
admin_user=nova
admin_password=service-passwordadmin_tenant_name=service
[neutron]
url=http://$CONTROLLER_ADMIN_NODE:9696
admin_username=neutron
admin_password=service-passwordadmin_tenant_name=service
admin_auth_url=http://$CONTROLLER_ADMIN_NODE:5000/v2.0
[oslo_messaging_rabbit]
rabbit_host=$CONTROLLER_ADMIN_NODE
4. Set parameters in the /etc/nova/api-paste.ini file.
[filter:authtoken]
admin_user = nova
admin_password = service-passwordadmin_tenant_name = service
auth_uri = http://$CONTROLLER_ADMIN_NODE:5000/v2.0/
identity_uri = http://$CONTROLLER_ADMIN_NODE:35357
5. Set up EVS on the compute node.
a. Ensure that the EVS package is installed.
compute1# pkg info evs
b. Specify the location of the EVS controller.
compute1# evsadm set-prop -p controller=ssh://evsuser@$CONTROLLER_ADMIN_NODE
6. Configure the communications between the Controller and the compute nodes.
How to Configure the Compute Node
Chapter 3 • Installing Across Multiple Systems for a Multinode OpenStack Configuration 43
The distribution of the SSH keys that establishes communication between the nodes wouldresemble the following figure:
a. Create an SSH public key on the compute node for the root user.
compute1# ssh-keygen -N '' -f /root/.ssh/id_rsa -t rsa
b. (Optional) Check the contents of the SSH key.
compute1# cat /root/.ssh/id_rsa.pub
c. Copy the SSH key /root/.ssh/id_rsa.pub to a location in the controller node.
d. On the controller node, append the SSH key to the authorized_keys file forevsuser.
controller# cat location/id_rsa.pub >> /var/user/evsuser/.ssh/authorized_keys
How to Enable Console Access
44 Installing and Configuring OpenStack (Kilo) in Oracle Solaris • June 2016
e. (Optional) Verify that the SSH key from the compute node has beenappended to the authorized_keys file.
controller# cat /var/user/evsuser/.ssh/authorized_keys
The output should include the contents of /root/.ssh/id_rsa.pub that you generated onthe compute node.
f. Test the compute node's SSH connections to the controller and accept thefingerprints to be stored in the known_host file.Specify Yes at the prompt for confirmation.
compute1# ssh evsuser@$CONTROLLER_ADMIN_NODE true
7. Enable the Nova compute service.
compute1# svcadm enable nova-compute
How to Enable Console Access
Use this procedure to be able to use a VM instance's console from a browser based on a user'srequest.
1. On each compute node, perform the following steps depending on whichscenario applies.
■ If the compute node's IP addresses are accessible from the public facingnetwork, set the following parameters in the [DEFAULT] section of the /etc/nova/nova.conf file.
[DEFAULT]
...
vnc_enabled = true
vncserver_listen = 0.0.0.0
novncproxy_port = 6080
novncproxy_base_url =http://FQDN:6080/vnc_auto.html
novncproxy_host = 0.0.0.0
...
where FQDN represents the fully qualified domain name or the IP address of the computenode.
■ If the compute node is in a private network, set the following parameters inthe [DEFAULT] section of the /etc/nova/nova.conf file.

How to Enable Console Access
Chapter 3 • Installing Across Multiple Systems for a Multinode OpenStack Configuration 45
[DEFAULT]
...
vnc_enabled = true
vncserver_listen = internal-IPnovncproxy_port=6080
novncproxy_base_url = http://public-IP:6080/vnc_auto.htmlvncserver_proxyclient_address = internal-IP
■ internal-IP - IP address of the compute node on the internal network.■ public-IP - public IP address of the Controller host.
2. Perform the following substeps if the IP addresses of the compute node areaccessible from the public facing network. Otherwise, skip to the next step.
a. Enable the nova-novncproxy service.
compute# svcadm enable nova-novncproxy
b. Restart the nova-compute service.
compute# svcadm restart nova-compute
3. On the controller node, perform the following steps depending on whichscenario applies.
■ If the compute node's IP addresses are accessible from the public facingnetwork, enable the nova-consoleauth service.
controller# svcadm enable nova-consoleauth
■ If the compute node is in a private network, perform the following steps:
a. Set the following parameters in the [DEFAULT] section of the /etc/nova/nova.conf file.
novncproxy_base_url=http://public-IP:6080/vnc_auto.html
where public-IP - public IP address of the Controller host.
b. Enable Nova services as follows:
controller# svcadm enable nova-consoleauth
controller# svcadm enable nova-novncproxy
Configuring the Storage Node
46 Installing and Configuring OpenStack (Kilo) in Oracle Solaris • June 2016
Configuring the Storage Node
The controller node is the repository of all the data transacted within the OpenStack setup.
To configure the compute node, install the OpenStack components and services on the systemwith the following command:
storage# pkg install openstack
After the package installation is completed, configure the services that you want to run on thenode.
Note - To better manage memory use between ZFS and applications in Oracle Solaris 11, set theusr_reserve_hint_pct parameter on the node, as shown in the following example:
# echo "set user_reserve_hint_pct=80" >>/etc/system.d/site:kernel-zones-reserve# reboot
where site is a random identifier such as the name of your company.
Set this parameter on the different OpenStack nodes as well.
For more information about this parameter, log in to your MOS account in https://support.oracle.com and review Document 1663862.1, Memory Management Between ZFS andApplications in Oracle Solaris 11.2.
How to Configure the Block Storage Node
This procedure describes a typical configuration of a block storage. For other options toconfigure the storage component, see Chapter 6, “Options for Cinder Configuration andDeployment”.
1. Configure the NTP client.See “Configuring the NTP Client” on page 30.
2. Configure Cinder by either uncommenting or setting the parameters in the /etc/cinder/cinder.conf file.
[DEFAULT]
san_is_local=true
volume_driver=cinder.volume.drivers.solaris.zfs.ZFSISCSIDriver
my_ip=$VOLUME_IP
glance_host=$CONTROLLER_ADMIN_NODE
zfs_volume_base=cinder/cinder
Configuring Swift Object Storage
Chapter 3 • Installing Across Multiple Systems for a Multinode OpenStack Configuration 47
[database]
connection = mysql://cinder:service-password@$CONTROLLER_ADMIN_NODE/cinder
[keystone_authtoken]
auth_uri = http://$CONTROLLER_ADMIN_NODE:5000/v2.0
identity_uri = http://$CONTROLLER_ADMIN_NODE:35357
admin_user = cinder
admin_password = service-passwordadmin_tenant_name = service
[oslo_messaging_rabbit]
rabbit_host=$CONTROLLER_ADMIN_NODE
3. Set parameters in the /etc/cinder/api-paste.ini file.
[filter:authtoken]
admin_tenant_name = service
admin_user = cinder
admin_password = service-password
4. Start the Cinder services.
storage# svcadm enable -rs cinder-db cinder-volume:default cinder-volume:setup
storage# svcadm enable -rs iscsi/target
Configuring Swift Object StorageSwift is the OpenStack object store project. It offers cloud storage software to enable you tostore and retrieve large data with a simple API. The service is ideal for storing unstructured datathat can grow without bounds.
For more information about Swift, refer to the Object Storage Chapter in the OpenStackcommunity's OpenStack Cloud Administrator Guide.
The OpenStack community documentation recommends a minimum of 6 nodes for a Swiftdeployment in production mode. These nodes consist of a Swift proxy controller and 5 Swiftcontroller nodes. This guide, however, describes a 3-node deployment to be consistent with the3-node architecture on which the previous configuration procedures are based. You can addcontroller nodes later as needed.
How to Configure the Swift Proxy ControllerService NodeThis task assumes that you have already installed the OpenStack packages on thenode designated for Swift. See the install command to use in “Configuring the StorageNode” on page 46.
How to Configure the Swift Proxy Controller Service Node
48 Installing and Configuring OpenStack (Kilo) in Oracle Solaris • June 2016
1. Install the Swift packages.
proxy-node # pkg install swift swiftclient
2. Create ZFS datasets.
proxy-node # /usr/sbin/zfs create -o mountpoint=none rpool/export/swift
proxy-node # /usr/sbin/zfs create -o mountpoint=/srv rpool/export/swift/srv
proxy-node # /usr/sbin/zfs create -p rpool/export/swift/srv/node/disk0
proxy-node # /usr/bin/chown -R swift:swift /srv
3. Perform the following octal dumps.Retain the values of the dumps. These two values are referred to as $OD_1 and $OPD_2 insubsequent steps.
proxy-node # od -t x8 -N 8 -A n < /dev/random
proxy-node # od -t x8 -N 8 -A n < /dev/random
4. Edit the /etc/swift/swift.conf file with the following parameters.
[swift-hash]
swift_hash_path_suffix = $OD_1swift_hash_path_prefix = $OD_2
5. Edit the /etc/swift/proxy-server.conf file with the following parameters.
[DEFAULT]
bind_port = 8080
[filter:tempauth]
use = egg:swift#tempauth
operator_roles = admin, swiftoperator
[filter:authtoken]
auth_uri = http://$CONTROLLER_IP:5000/identity_uri = http://$CONTROLLER_IP:35357admin_user = swift
admin_password = swiftpass
admin_tenant_name = service
[filter:cache]
memcache_servers = $CONTROLLER_IP:11211
[oslo_messaging_rabbit]
rabbit_host=$CONTROLLER_ADMIN_NODE
6. Enable the memcached daemon.
proxy-node # svcadm enable -rs memcached
7. Build the rings.
How to Configure an Object Storage Node
Chapter 3 • Installing Across Multiple Systems for a Multinode OpenStack Configuration 49
proxy-node # cd /etc/swift
proxy-node # swift-ring-builder account.builder create 18 3 1
proxy-node # swift-ring-builder container.builder create 18 3 1
proxy-node # swift-ring-builder object.builder create 18 3 1
proxy-node # swift-ring-builder account.builder add r1z1-$STORAGE_IP_1:6002/disk0 100proxy-node # swift-ring-builder container.builder add r1z1-$STORAGE_IP_1:6001/disk0 100proxy-node # swift-ring-builder object.builder add r1z1-$STORAGE_IP_1:6000/disk0 100proxy-node # swift-ring-builder account.builder add r1z1-$STORAGE_IP_2:6002/disk0 100proxy-node # swift-ring-builder container.builder add r1z1-$STORAGE_IP_2:6001/disk0 100proxy-node # swift-ring-builder object.builder add r1z1-$STORAGE_IP_2:6000/disk0 100proxy-node # swift-ring-builder account.builder rebalance
proxy-node # swift-ring-builder container.builder rebalance
proxy-node # swift-ring-builder object.builder rebalance
proxy-node # >chown -R swift:swift /etc/swift
8. Enable the Swift service.
proxy-node # svcadm enable swift-proxy-server
How to Configure an Object Storage Node
Repeat this procedure on each object controller node you want to set up.
1. Install the Swift packages.
storage-node # pkg install swift swiftclient
2. Create ZFS datasets.
storage-node # /usr/sbin/zfs create -o mountpoint=none rpool/export/swift
storage-node # /usr/sbin/zfs create -o mountpoint=/srv rpool/export/swift/srv
storage-node # /usr/sbin/zfs create -p rpool/export/swift/srv/node/disk0
storage-node # /usr/bin/chown -R swift:swift /srv
3. Copy files from the proxy server node as follows:
a. Copy the /etc/swift/swift.conf file from the proxy server node to currentnode's /etc/swift directory.
b. Copy the following files from the proxy server node to the current node's/etc/swift directory.
■ account.ring.gz
■ container.ring.gz
■ object.ring.gz
How to Configure an Object Storage Node
50 Installing and Configuring OpenStack (Kilo) in Oracle Solaris • June 2016
4. Enable the Swift replicator service.
storage-node # svcadm enable swift-replicator-rsync
5. Set the ownership of the current node's /etc/swift directory.
storage-node # chown -R swift:swift /etc/swift
6. Enable all the Swift services.
storage-node # for x in `svcs -a -o SVC | fgrep swift | \
egrep "account|container|object" | sort` \
do \
echo Starting $x \
svcadm enable $x \
done
7. On the controller node, enable users to access and operate the Swift services.
a. Set global shell variables for Swift.
controller# export OS_USERNAME=swift
controller# export OS_PASSWORD=service-passwordcontroller# export OS_PROJECT_NAME=service
controller# export OS_AUTH_URL=http://$CONTROLLER_ADMIN_NODE:5000/v2.0
b. Add the Keystone swiftoperator role.
controller# openstack role create --name swiftoperator
c. Assign the swiftoperator role to authorized users of the Swift services.
controller# openstack user role add --user user-name \ --role swiftoperator --project tenant-ID
Next Steps To enable users to use the cloud, complete the preparations described in Chapter 4, “PostInstallation and Configuration Tasks”.
Chapter 4 • Post Installation and Configuration Tasks 51
4 ♦ ♦ ♦ C H A P T E R 4
Post Installation and Configuration Tasks
This chapter describes procedures to complete the initial OpenStack installation andconfiguration. The chapter covers the following topics:
■ “Preparing the External Network for OpenStack Projects” on page 51■ “Preparing Images for the Glance Repository” on page 59
Preparing the External Network for OpenStack Projects
The external network provides the connection between private networks in the cloud and thepublic network.
About the Provider Router
The router provides connectivity to project VM instances with wider networks. The routeris shared by all the project networks. Because there is only a single router, project networkscannot use overlapping IP addresses.
The router performs bidirectional network address translation (NAT) on the interface thatconnects the router to the external network. Projects can have as many floating IPs (public IPs)as they need or as are allowed by the floating IP quota. These floating IPs are associated withthe VM instances that require outside connectivity.
Creating the router requires configuring the Neutron L3 agent. This agent automatically createsone-to-one NAT mappings between addresses assigned to Nova instances and the floating IPaddresses. The L3 agent also enables communication between private networks.
By default, routing between private networks of the same project is disabled. To changethis behavior, set allow_forwarding_between_networks to True in the /etc/neutron/l3_agent.ini configuration file. Restart the neutron-l3-agent SMF service after setting theparameter.
How to Configure the Router for the External Network
52 Installing and Configuring OpenStack (Kilo) in Oracle Solaris • June 2016
How to Configure the Router for the External Network
This procedure shows how to create the router for the external network. Part of the stepsrequires editing a configuration file. Thus, using the terminal window for this procedure is moreconvenient than the Horizon dashboard.
You perform the following steps on the node where the Neutron service is installed. Thisdocument locates the service on the controller node, based on the sample architecture describedin previous chapters.
Before You Begin Make sure that you have completed the configuration of Neutron as described in “How toInstall and Configure Neutron” on page 38.
1. Start the IP Filter service if it is disabled.
controller# svcadm enable -rs ipfilter
2. Enable IP forwarding if it is disabled on the host.
controller# ipadm set-prop -p forwarding=on ipv4
3. Set the global shell variables for Neutron.
controller# export OS_USERNAME=neutron
controller# export OS_PASSWORD=service-passwordcontroller# export OS_PROJECT_NAME=service
controller# export OS_AUTH_URL=http://$CONTROLLER_ADMIN_NODE:5000/v2.0
4. Create the provider router.
controller# neutron router-create router-name
The command displays the router name with a corresponding ID. Use this ID to update theconfiguration file in the next step.
5. Ensure that the /etc/neutron/l3_agent.ini file contains the following setparameters.
router_id=routerID ID obtained from the previous step.
6. Enable the neutron-l3-agent SMF service.
controller# svcadm enable neutron-l3-agent
7. (Optional) Display information about the router.After you add the external network to the router, more information is added about the router.
controller# neutron router-show router-name
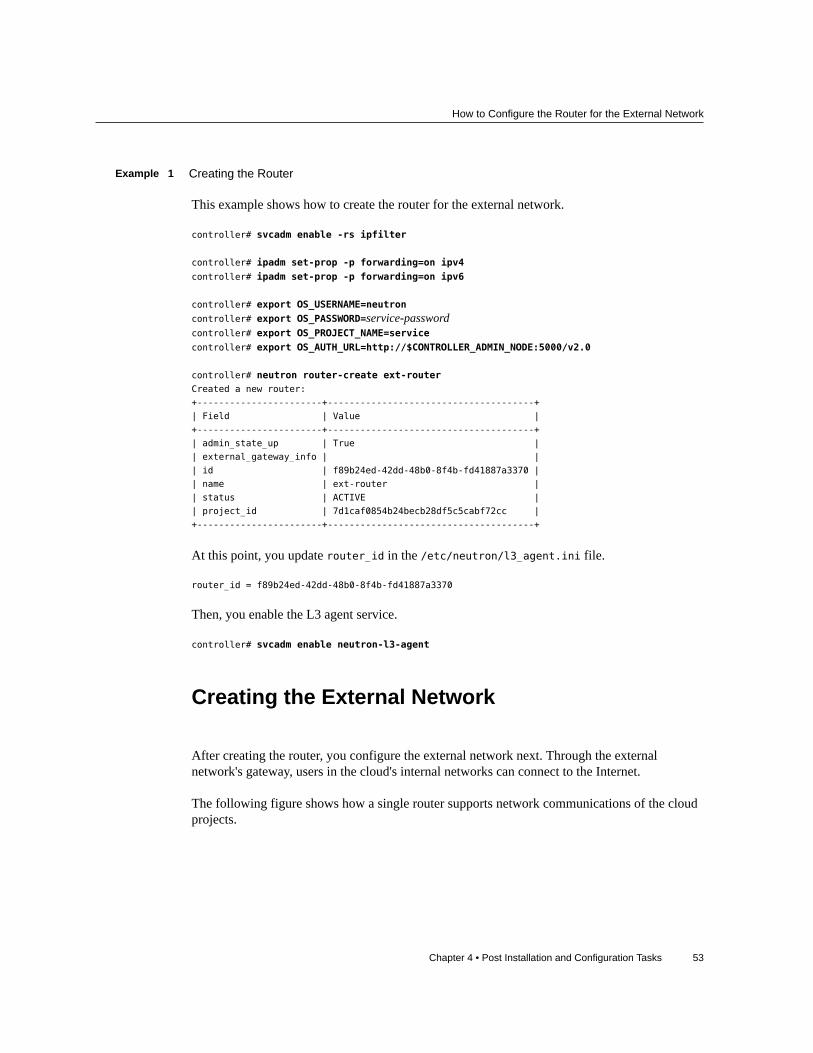
How to Configure the Router for the External Network
Chapter 4 • Post Installation and Configuration Tasks 53
Example 1 Creating the Router
This example shows how to create the router for the external network.
controller# svcadm enable -rs ipfilter
controller# ipadm set-prop -p forwarding=on ipv4
controller# ipadm set-prop -p forwarding=on ipv6
controller# export OS_USERNAME=neutron
controller# export OS_PASSWORD=service-passwordcontroller# export OS_PROJECT_NAME=service
controller# export OS_AUTH_URL=http://$CONTROLLER_ADMIN_NODE:5000/v2.0
controller# neutron router-create ext-routerCreated a new router:
+-----------------------+--------------------------------------+
| Field | Value |
+-----------------------+--------------------------------------+
| admin_state_up | True |
| external_gateway_info | |
| id | f89b24ed-42dd-48b0-8f4b-fd41887a3370 |
| name | ext-router |
| status | ACTIVE |
| project_id | 7d1caf0854b24becb28df5c5cabf72cc |
+-----------------------+--------------------------------------+
At this point, you update router_id in the /etc/neutron/l3_agent.ini file.
router_id = f89b24ed-42dd-48b0-8f4b-fd41887a3370
Then, you enable the L3 agent service.
controller# svcadm enable neutron-l3-agent
Creating the External Network
After creating the router, you configure the external network next. Through the externalnetwork's gateway, users in the cloud's internal networks can connect to the Internet.
The following figure shows how a single router supports network communications of the cloudprojects.
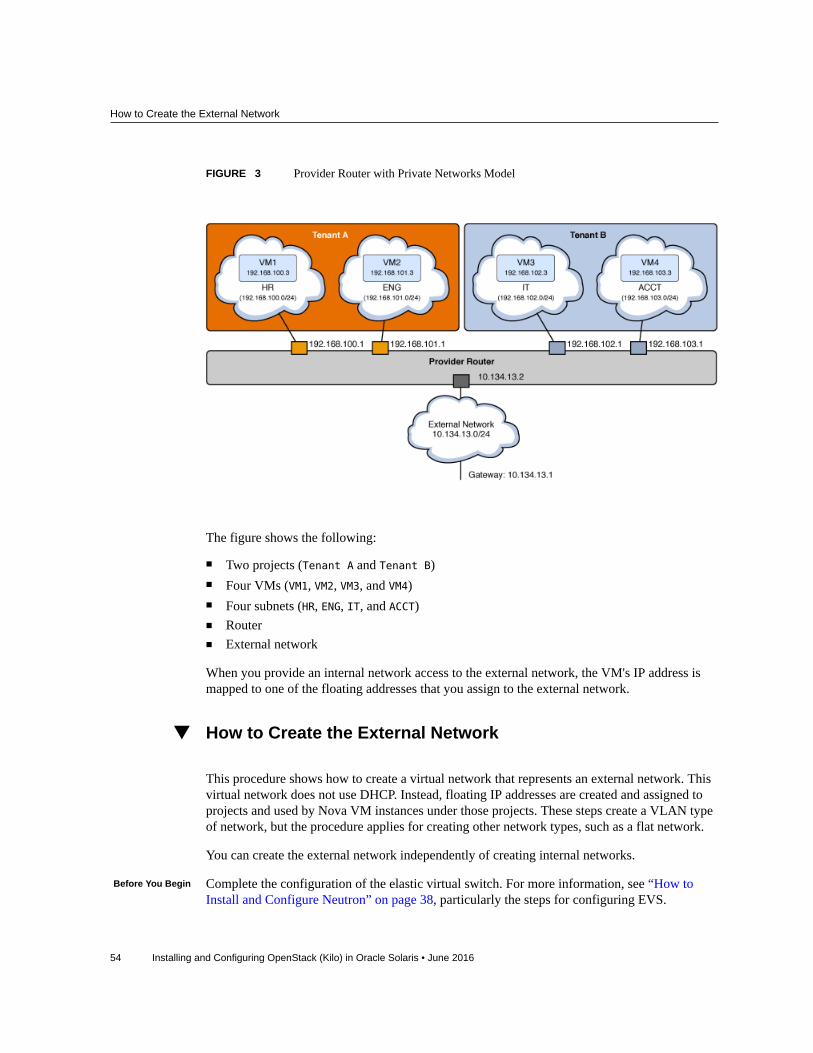
How to Create the External Network
54 Installing and Configuring OpenStack (Kilo) in Oracle Solaris • June 2016
FIGURE 3 Provider Router with Private Networks Model
The figure shows the following:
■ Two projects (Tenant A and Tenant B)■ Four VMs (VM1, VM2, VM3, and VM4)■ Four subnets (HR, ENG, IT, and ACCT)■ Router■ External network
When you provide an internal network access to the external network, the VM's IP address ismapped to one of the floating addresses that you assign to the external network.
How to Create the External Network
This procedure shows how to create a virtual network that represents an external network. Thisvirtual network does not use DHCP. Instead, floating IP addresses are created and assigned toprojects and used by Nova VM instances under those projects. These steps create a VLAN typeof network, but the procedure applies for creating other network types, such as a flat network.
You can create the external network independently of creating internal networks.
Before You Begin Complete the configuration of the elastic virtual switch. For more information, see “How toInstall and Configure Neutron” on page 38, particularly the steps for configuring EVS.

How to Create the External Network
Chapter 4 • Post Installation and Configuration Tasks 55
1. Set the global shell variables for Neutron.
controller# export OS_USERNAME=neutron
controller# export OS_PASSWORD=service-passwordcontroller# export OS_PROJECT_NAME=service
controller# export OS_AUTH_URL=http://$CONTROLLER_ADMIN_NODE:5000/v2.0
2. (Optional) Obtain the VLAN range.
controller# evsadm show-controlprop -p vlan-range
3. Create an external network.
controller# neutron net-create --provider:network_type=vlan \
--provider:segmentation_id=VLAN-nbr \--router:external network-name
This step assumes the creation of a VLAN network based on “How to Install and ConfigureNeutron” on page 38. The segmentation_id is the VLAN ID of the VLAN network, whoserange you defined when you configured EVS.
Note - If you are creating a flat network, you do not need to specify a segmentation ID.
4. Create the subnet of the external network.The allocation pool consists of a range of floating IP addresses that is assigned to the subnet.
controller# neutron subnet-create --name subnet-name --disable-dhcp \ --allocation-pool start=start-IP,end=end-IP \ network-name subnet-IP
5. Add the external network to the router.
controller# neutron router-gateway-set router-name ext-network-ID
Note - By default, SNAT is enabled when you issue this command. With SNAT enabled, theVMs in the private network can access the external network. However, the instances themselvesare inaccessible from outside of the cloud. To disable SNAT, specify the --disable-snatoption with the neutron router-gateway-set subcommand.
6. (Optional) Display information about the router.
controller# neutron router-show router-name
Example 2 Creating the External Network
This example shows how to create the external network to prepare it for use by internalnetworks in the cloud.
How to Create the External Network
56 Installing and Configuring OpenStack (Kilo) in Oracle Solaris • June 2016
To create a flat network, see also the example provided in Section 2 of https://blogs.oracle.com/openstack/tags/juno.
controller# export OS_USERNAME=neutron
controller# export OS_PASSWORD=service-passwordcontroller# export OS_PROJECT_NAME=service
controller# export OS_AUTH_URL=http://$CONTROLLER_ADMIN_NODE:5000/v2.0
controller# evsadm show-controlprop -p vlan-rangePROPERTY PERM VALUE DEFAULT HOST
vlan-range rw 1,200-300 -- --
controller# neutron net-create --router:external \
--provider:network_type=vlan --provider:segmentation_id=1 ext_networkCreated a new network:
+--------------------------+--------------------------------------+
| Field | Value |
+--------------------------+--------------------------------------+
| admin_state_up | True |
| id | 08cf49c8-f28f-49c1-933d-bdb1017e0294 |
| name | ext_network |
| provider:network_type | vlan |
| provider:segmentation_id | 1 |
| router:external | True |
| shared | False |
| status | ACTIVE |
| subnets | |
| project_id | 7d1caf0854b24becb28df5c5cabf72cc |
+--------------------------+--------------------------------------+
controller# neutron subnet-create --name ext_subnet --disable-dhcp \
--allocation-pool start=10.134.10.8,end=10.134.10.254 \
ext_network 10.134.10.0/24Created a new subnet:
+-------------------+---------------------------------------------------+
| Field | Value |
+-------------------+---------------------------------------------------+
| allocation_pools | {"start": "10.134.10.8", "end": "10.134.10.254"} |
| cidr | 10.134.10.0/24 |
| dns_nameservers | |
| enable_dhcp | False |
| gateway_ip | 10.134.13.1 |
| host_routes | |
| id | fce503ff-f483-4024-b122-f2524e3edae1 |
| ip_version | 4 |
| ipv6_address_mode | |
| ipv6_ra_mode | |
| name | ext_subnet |
| network_id | 08cf49c8-f28f-49c1-933d-bdb1017e0294 |
| project_id | 7d1caf0854b24becb28df5c5cabf72cc |
+-------------------+---------------------------------------------------+
controller# neutron router-gateway-set ext-router 08cf49c8-f28f-49c1-933d-bdb1017e0294
How to Provide External Connectivity to Internal Networks
Chapter 4 • Post Installation and Configuration Tasks 57
Set gateway for router ext-router
controller# neutron router-show ext-router+-----------------------+-------------------------------------------------------+
| Field | Value |
+-----------------------+-------------------------------------------------------+
| admin_state_up | True |
| external_gateway_info | {"network_id": "08cf49c8-f28f-49c1-933d-bdb1017e0294",|
| | "enable_snat": true, |
| | "external_fixed_ips": |
| |[{"subnet_id": "fce503ff-f483-4024-b122-f2524e3edae1", |
| |"ip_address": "10.134.10.8"}]} | |
| id | f89b24ed-42dd-48b0-8f4b-fd41887a3370 |
| name | ext-router |
| status | ACTIVE |
| project_id | 7d1caf0854b24becb28df5c5cabf72cc |
+-----------------------+-------------------------------------------------------+
See Also ■ “How to Observe the L3 Agent Configuration” on page 58.■ “Known Limitations” on page 128.
How to Provide External Connectivity to Internal Networks
Use this procedure to enable an internal network to access the wider public network.This procedure assumes that internal networks already exist for specific projects. Tocreate a project internal network using the dashboard, see “Creating Internal Networks forProjects” on page 70.
Before You Begin Before you proceed, obtain the subnet name that needs public access.
1. Set the global shell variables for Neutron.
controller# export OS_USERNAME=neutron
controller# export OS_PASSWORD=service-passwordcontroller# export OS_PROJECT_NAME=service
controller# export OS_AUTH_URL=http://$CONTROLLER_ADMIN_NODE:5000/v2.0
2. Identify the ID of the subnet that requires external access.
controller# neutron subnet-list | grep subnet-name
3. (Optional) Obtain the name of the router.
controller# neutron router-list
4. Add the subnet's ID as an interface to the router.
controller# neutron router-interface-add router-name subnetID
How to Observe the L3 Agent Configuration
58 Installing and Configuring OpenStack (Kilo) in Oracle Solaris • June 2016
Example 3 Connecting an Internal Network to the External Network
This example uses the HR internal network that was created in “How to Configure a Networkfor a Project” on page 71. The HR network, whose subnet is HR_Subnet, requires access tothe public network.
controller# neutron subnet-list | grep HR_Subnet| b6feff42-36aa-4235- | HR_Subnet | 10.132.30.0/24 | {"start": "10.132.30.2", |
| 9fe0-ac5de6b43af3 | | | "end": "10.132.30.254"} |
controller# neutron router-list+--------------------- +------------+--------------------------------+
| id | name | external_gateway_info |
+--------------------- +------------+--------------------------------+
| f89b24ed-42dd-48b0- | ext-router | {"network_id": "6c4c1823-a203- |
| 8f4b-fd41887a3370 | | 43b1-9674-ddb5ff4185fc", |
| | | "enable_snat": true, |
| | | "external_fixed_ips": |
| | | [{"subnet_id": "83d9b40f-cc61- |
| | | 4696-b22e-b4cbc2aa3872", |
| | | "ip_address": "10.132.10.8"}]} |
+---------- -----------+------------+--------------------------------+
controller# neutron router-interface-add ext-router b6feff42-36aa-4235-9fe0-ac5de6b43af3Added interface b6feff42-36aa-4235-9fe0-ac5de6b43af3 to router ext-router.
How to Observe the L3 Agent Configuration
You can use IP filter commands such as ipf, ippool, and ipnat and networking commandssuch as dladm and ipadm to observe and troubleshoot the configuration done by neturon-l3-agent.
1. Show VNICs created by neutron-l3-agent.
network# dladm show-vnicLINK OVER SPEED MACADDRESS MACADDRTYPE VIDS
l3i7843841e_0_0 net1 1000 2:8:20:42:ed:22 fixed 200
l3i89289b8e_0_0 net1 1000 2:8:20:7d:87:12 fixed 201
l3ed527f842_0_0 net0 100 2:8:20:9:98:3e fixed 0
2. Show IP addresses created by neutron-l3-agent.
network# ipadmNAME CLASS/TYPE STATE UNDER ADDR
l3ed527f842_0_0 ip ok -- --
l3ed527f842_0_0/v4 static ok -- 10.134.10.8/24
l3ed527f842_0_0/v4a static ok -- 10.134.10.9/32
l3i7843841e_0_0 ip ok -- --
l3i7843841e_0_0/v4 static ok -- 192.168.100.1/24
l3i89289b8e_0_0 ip ok -- --
Preparing Images for the Glance Repository
Chapter 4 • Post Installation and Configuration Tasks 59
l3i89289b8e_0_0/v4 static ok -- 192.168.101.1/24
3. Show IP filter rules.
network# ipfstat -ioempty list for ipfilter(out)
block in quick on l3i7843841e_0_0 from 192.168.100.0/24 to pool/4386082
block in quick on l3i89289b8e_0_0 from 192.168.101.0/24 to pool/8226578
network# ippool -ltable role = ipf type = tree number = 8226578
{ 192.168.100.0/24; };
table role = ipf type = tree number = 4386082
{ 192.168.101.0/24; };
4. Show IP NAT rules.
network# ipnat -lList of active MAP/Redirect filters:
bimap l3ed527f842_0_0 192.168.101.3/32 -> 10.134.13.9/32
List of active sessions:
BIMAP 192.168.101.3 22 <- -> 10.134.13.9 22 [10.132.146.13 36405]
Preparing Images for the Glance Repository
An image is the foundation of VM instances in the cloud. An image is a single file that containsa virtual disk with a bootable operating system installed on it. The image provides a templatefor the creation of one or more VMs. Thus, to provision a VM on the cloud, you must firstcreate an image.
Glance, the OpenStack image service, provides storage, discovery, registration, and deliveryservices for disk and server images. A registry server is an image service that provides imagemetadata information to clients. The image cache is used by the image service to obtain imageson the local host rather than re-downloading them from the image server each time an image isrequested.
You can upload multiple images to the Glance repository. As a best practice, upload images ofdifferent system types that you would deploy on the cloud. For example, create archived imagesof non-global zones, kernel zones, and global zones. Then you can deploy a VM of one of thesetypes quickly by selecting the appropriate template.
Creating ImagesTo create OpenStack images in Oracle Solaris, you use the Unified Archives feature. With thearchiveadm command, you can create new Unified Archives (UAs) from global, non-global,and kernel zones.
How to Create an Image for OpenStack
60 Installing and Configuring OpenStack (Kilo) in Oracle Solaris • June 2016
The UA can be either a clone archive or a recovery archive. A clone archive is based onthe currently active boot environment. This archive does not include any of the systemconfiguration information from the OS instance such as inactive BEs. Instead, the installersforce the reconfiguration or use configuration information that you provide in a systemconfiguration (SC) profile. A recovery archive includes all boot environments and systemconfiguration information. Thus, if you want to include all of the system's information in a UA,create a recovery archive. For more information about UAs, see Using Unified Archives forSystem Recovery and Cloning. This book is in your Oracle Solaris version's library in SystemsOperation Documentation.
Later, when your configuration is fully operational, you can also create an image by creatinga snapshot of an existing VM instance. For this case, the VM instance is already in the cloud.Thus, the command to use is nova image-create instead of archiveadm. The nova commandtakes a snapshot of a running VM instance to create the image.
You can also use custom images for data backups or to rescue a VM instance. A rescue imageis a special type of image that is booted when a VM instance is placed into rescue mode. Arescue image enables an administrator to mount the file systems for the VM instance to correctthe problem.
In Oracle Solaris, you create an OpenStack image in three phases:
1. Create the zone.2. Create the UA of the zone.3. Upload the UA to Glance.
These phases are combined in the following procedure.
How to Create an Image for OpenStack
Except for the command syntax to create the zone, all the rest of the steps can be used for thecreation and uploading of images of both non-global zones and kernel zones.
In this procedure, the step for the creation of zones provides only the basic commands. Forcomplete instructions in creating zones, see Creating and Using Oracle Solaris Zones aboutinstalling, shutting down, halting, uninstalling, and cloning non-global zones. This book is inyour Oracle Solaris version's library in Operating Systems Documentation.
1. On any system, create, and then log in to the zone.After logging in, provide the information as prompted.
global# zonecfg -z zone-name createglobal# zoneadm -z zone-name installglobal# zoneadm -z zone-name bootglobal# zlogin -C zone-name

How to Create an Image for OpenStack
Chapter 4 • Post Installation and Configuration Tasks 61
Note - This step can take a while to complete.
2. Enable root SSH for OpenStack root login access.
global# zlogin zone-nameroot@zone-name# sed /^PermitRootLogin/s/no$/without-password/ < /etc/ssh/sshd_config > /system/volatile/sed.$$
root@zone-name# cp /etc/ssh/sshd_config /etc/ssh/sshd_config.origroot@zone-name# cp /system/volatile/sed.$$ /etc/ssh/sshd_configroot@zone-name# exit
3. Create the UA for the zone.
global# archiveadm create -z zone-name /var/tmp/archive-name.uar
4. Transfer the UA to the system where Glance is installed.This document assumes Glance is on the controller node.
5. Set the global shell variables for Glance.
controller# export OS_USERNAME=glance
controller# export OS_PASSWORD=service-passwordcontroller# export OS_PROJECT_NAME=service
controller# export OS_AUTH_URL=$CONTROLLER_ADMIN_NODE:5000/v2.0
6. Upload the UA to the Glance repository.
controller# glance --os-image-api-version 2 image-create \
--container-format bare --disk-format raw \
--visibility visibility-mode --name "image-name" \ --property architecture=system-arch \ --property hypervisor_type=solariszones \
--property vm_mode=solariszones --file path-to-archive-file
system-arch System's architecture which can be either x86_64 or sparc64.
visibility-mode Scope of image accessibility which can be either public or private.
Displaying Information About Images
To display image information, you can use either the nova command or the glance command.
$ nova image-list+--------------------------------------+-------------------------+--------+--------+

How to Create an Image for OpenStack
62 Installing and Configuring OpenStack (Kilo) in Oracle Solaris • June 2016
| ID | Name | Status | Server |
+--------------------------------------+-------------------------+--------+--------+
| 4dfbfd4f-2de5-4251-832c-e35a4a4145ee | Solaris Non-global Zone | ACTIVE | |
+--------------------------------------+-------------------------+--------+--------+
The glance image-list command displays additional information, such as the disk format,container format, and size of the different images.
The nova image-show and glance image-show commands display information about specificimage. Each command generates different output about the image.
$ nova image-show 'Solaris Non-global Zone'+--------------------------+--------------------------------------+
| Property | Value |
| OS-EXT-IMG-SIZE:size | 845025280 |
| created | 2015-11-19T14:46:38Z |
| id | 4dfbfd4f-2de5-4251-832c-e35a4a4145ee |
| metadata architecture | x86_64 |
| metadata hypervisor_type | solariszones |
| metadata vm_mode | solariszones |
| minDisk | 0 |
| minRam | 0 |
| name | Solaris Non-global Zone |
| progress | 100 |
| status | ACTIVE |
| updated | 2015-11-19T14:46:42Z |
+--------------------------+--------------------------------------+
$ glance image-show 'Solaris Non-global Zone'+----------------------------+--------------------------------------+
| Property | Value |
+----------------------------+--------------------------------------+
| Property 'architecture' | x86_64 |
| Property 'hypervisor_type' | solariszones |
| Property 'vm_mode' | solariszones |
| checksum | ba9b9eeddb467833d725c8750a46e004 |
| container_format | bare |
| created_at | 2015-11-19T14:46:38 |
| deleted | False |
| disk_format | raw |
| id | 4dfbfd4f-2de5-4251-832c-e35a4a4145ee |
| is_public | True |
| min_disk | 0 |
| min_ram | 0 |
| name | Solaris Non-global Zone |
| owner | 7d1caf0854b24becb28df5c5cabf72cc |
| protected | False |
| size | 845025280 |
| status | active |
| updated_at | 2015-11-19T14:46:42 |
+----------------------------+--------------------------------------+
Note - You can obtain the same image information from the Horizon dashboard.

How to Create an Image for OpenStack
Chapter 4 • Post Installation and Configuration Tasks 63
Using a Glance Image Creation Script
The glance image-create command can upload the image and set all property values at once.The following script shows how to make sure you upload the image with the architectureproperty set to the architecture of the current host:
#!/bin/ksh
# Upload Unified Archive image to glance with proper Solaris decorations
arch=$(archiveadm info -p $1|grep ^archive|cut -d '|' -f 4)
if [[ "$arch" == "i386" ]]; then
imgarch=x86_64
else
imgarch=sparc64
fi
name=$(basename $1 .uar)
export OS_USERNAME=glance
export OS_PASSWORD=glance
export OS_TENANT_NAME=service
export OS_AUTH_URL=http://controller-name:5000/v2.0
glance image-create --name $name --container-format bare --disk-format raw --owner service
--file $1 --is-public True --property architecture=$imgarch --property
hypervisor_type=solariszones
--property vm_mode=solariszones --progress

64 Installing and Configuring OpenStack (Kilo) in Oracle Solaris • June 2016
Chapter 5 • Using the Cloud 65
5 ♦ ♦ ♦ C H A P T E R 5
Using the Cloud
This chapter describes how to perform different administrative tasks on the cloud. You can usethe dashboard or command lines for these tasks. On the dashboard, tasks under the Project tabrequire only the member role while tasks under the Admin tab require administrative privileges.To perform all the tasks for a project in a single log in session on the dashboard, you shouldhave both member and admin role for that project.
The chapter covers the following topics:
■ “Creating Projects and Users” on page 68■ “Creating Internal Networks for Projects” on page 70■ “Creating and Booting a VM Instance” on page 74■ “Managing Flavors” on page 79■ “Managing VM Instances” on page 83
Accessing the OpenStack Dashboard
After completing the installation and post-installation configuration tasks for OpenStack, log into the OpenStack dashboard to view the available resources in the cloud.
How to Access the OpenStack Dashboard1. Log in to any system that can connect to the OpenStack system.
2. Configure your browser.
a. Enable JavaScript.
b. Keep cookies.
3. In the location or address field of the browser, enter the following location:
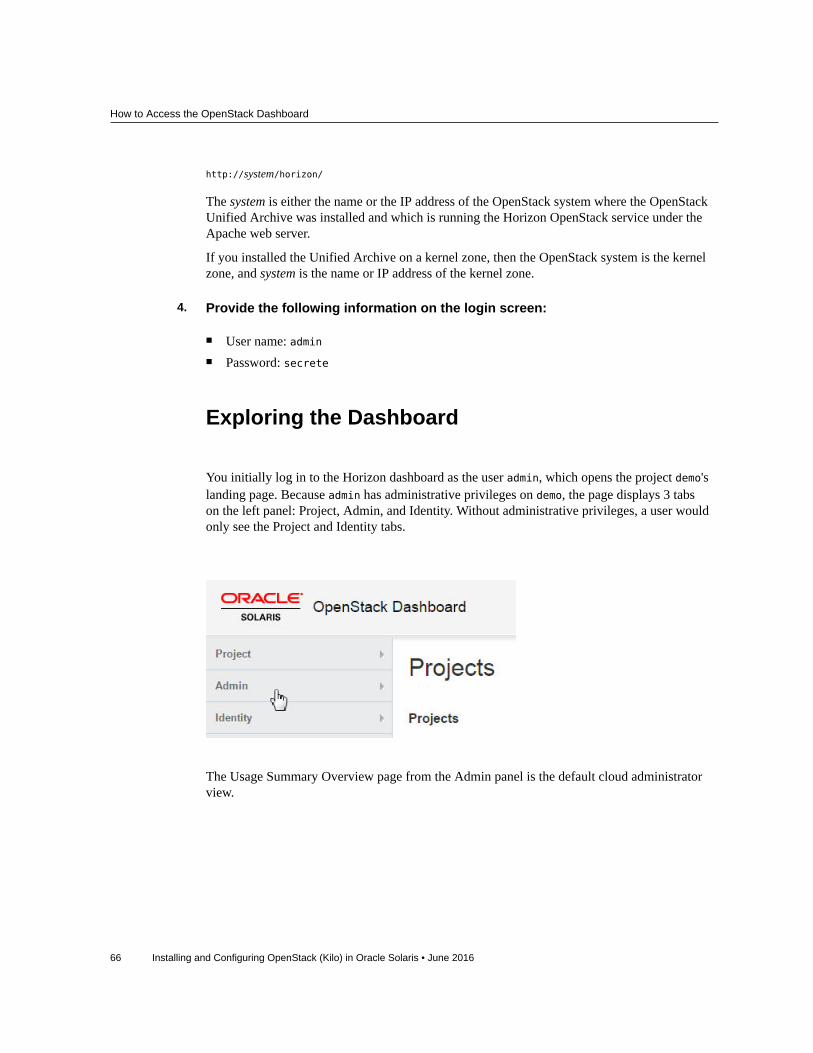
How to Access the OpenStack Dashboard
66 Installing and Configuring OpenStack (Kilo) in Oracle Solaris • June 2016
http://system/horizon/
The system is either the name or the IP address of the OpenStack system where the OpenStackUnified Archive was installed and which is running the Horizon OpenStack service under theApache web server.
If you installed the Unified Archive on a kernel zone, then the OpenStack system is the kernelzone, and system is the name or IP address of the kernel zone.
4. Provide the following information on the login screen:
■ User name: admin■ Password: secrete
Exploring the Dashboard
You initially log in to the Horizon dashboard as the user admin, which opens the project demo'slanding page. Because admin has administrative privileges on demo, the page displays 3 tabson the left panel: Project, Admin, and Identity. Without administrative privileges, a user wouldonly see the Project and Identity tabs.
The Usage Summary Overview page from the Admin panel is the default cloud administratorview.
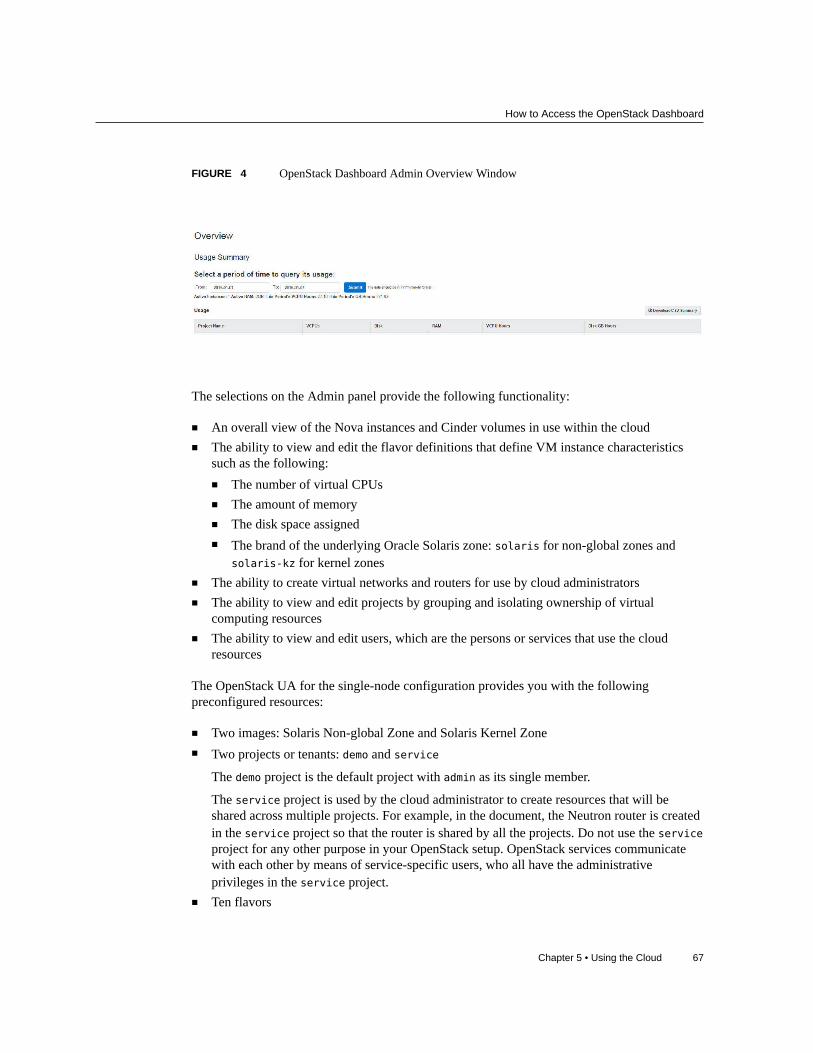
How to Access the OpenStack Dashboard
Chapter 5 • Using the Cloud 67
FIGURE 4 OpenStack Dashboard Admin Overview Window
The selections on the Admin panel provide the following functionality:
■ An overall view of the Nova instances and Cinder volumes in use within the cloud■ The ability to view and edit the flavor definitions that define VM instance characteristics
such as the following:■ The number of virtual CPUs■ The amount of memory■ The disk space assigned■ The brand of the underlying Oracle Solaris zone: solaris for non-global zones and
solaris-kz for kernel zones■ The ability to create virtual networks and routers for use by cloud administrators■ The ability to view and edit projects by grouping and isolating ownership of virtual
computing resources■ The ability to view and edit users, which are the persons or services that use the cloud
resources
The OpenStack UA for the single-node configuration provides you with the followingpreconfigured resources:
■ Two images: Solaris Non-global Zone and Solaris Kernel Zone■ Two projects or tenants: demo and service
The demo project is the default project with admin as its single member.
The service project is used by the cloud administrator to create resources that will beshared across multiple projects. For example, in the document, the Neutron router is createdin the service project so that the router is shared by all the projects. Do not use the serviceproject for any other purpose in your OpenStack setup. OpenStack services communicatewith each other by means of service-specific users, who all have the administrativeprivileges in the service project.
■ Ten flavors

Creating Projects and Users
68 Installing and Configuring OpenStack (Kilo) in Oracle Solaris • June 2016
To view the preconfigured images in the repository that were included in the OpenStack UnifiedArchive, click either one of the following tabs:
■ Admin -> System -> Images tab.■ Project -> Compute -> Images tab.
To list the Oracle Solaris flavors the are automatically available, click the Admin -> System ->Flavors tab.
The following video presentations provide a complete overview of the dashboard:
■ The OpenStack Dashboard - Part 1■ The OpenStack Dashboard - Part 2
For information about tasks you can perform on the dashboard, see Chapter 5, “Using theCloud”.
Creating Projects and Users
Your first OpenStack log in as user admin brings you to the landing page of the demo project.From this project, you can proceed to create other projects.
How to Create a Project and Assign Users
Use this procedure to create new projects or tenants and populate them with new users.
1. On your browser, log in as the cloud administrator on the URL similar to thefollowing link:
http://system/horizon/
The demo project landing page is displayed.
For a brief overview about the dashboard, see “Exploring the Dashboard” on page 66.
2. On the left panel, choose the Identity -> Projects tab.The default projects demo and service are displayed.
3. Click Create Project.
4. On the Project Information tab, specify the name of the project and the project'sdescription.

How to Populate a Project With Existing Users
Chapter 5 • Using the Cloud 69
After its creation, the new project is added to the list of projects.
5. Choose the Identity -> Users tab.The default users for demo and service are displayed.
6. Click Create User.
7. Provide the required information on the appropriate fields.
a. Specify the new user name and the assigned password.
b. From the Primary Project drop-down menu, choose the project to which thenew user would belong.
c. (Optional) From the Role drop-down menu, choose the role for the projectuser.By default, a new user of a project has a member role.
How to Populate a Project With Existing Users
Use this procedure to add existing users to a newly created project.
1. On the left panel of the default screen, choose the Identity -> Projects tab.
2. Click Modify Users for the project to which you want to add existing users.The Edit Project dialog box is displayed.
3. Under the All Users list, click the plus (+) sign to the right of the user name thatyou want to add to the project.By default, the added user has a member role on that project.
Note - Do not add these users of the service project to other projects:
■ glance■ cinder■ swift■ neutron■ nova■ ec2
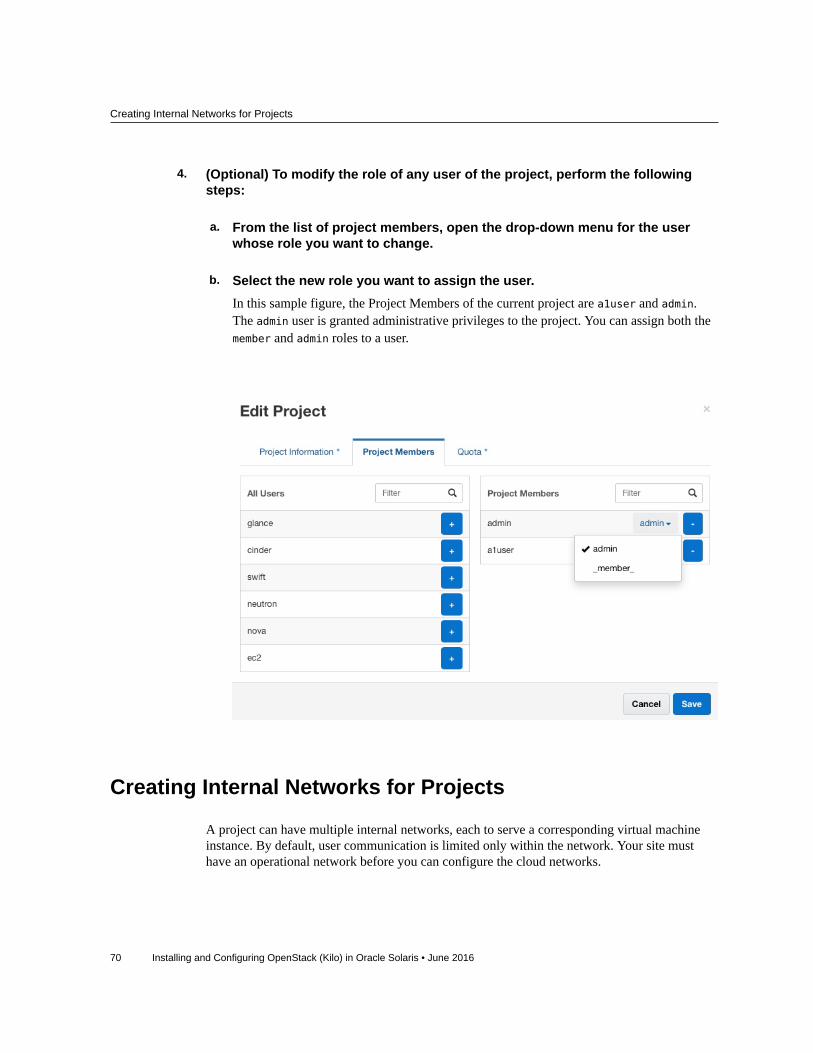
Creating Internal Networks for Projects
70 Installing and Configuring OpenStack (Kilo) in Oracle Solaris • June 2016
4. (Optional) To modify the role of any user of the project, perform the followingsteps:
a. From the list of project members, open the drop-down menu for the userwhose role you want to change.
b. Select the new role you want to assign the user.In this sample figure, the Project Members of the current project are a1user and admin.The admin user is granted administrative privileges to the project. You can assign both themember and admin roles to a user.
Creating Internal Networks for Projects
A project can have multiple internal networks, each to serve a corresponding virtual machineinstance. By default, user communication is limited only within the network. Your site musthave an operational network before you can configure the cloud networks.
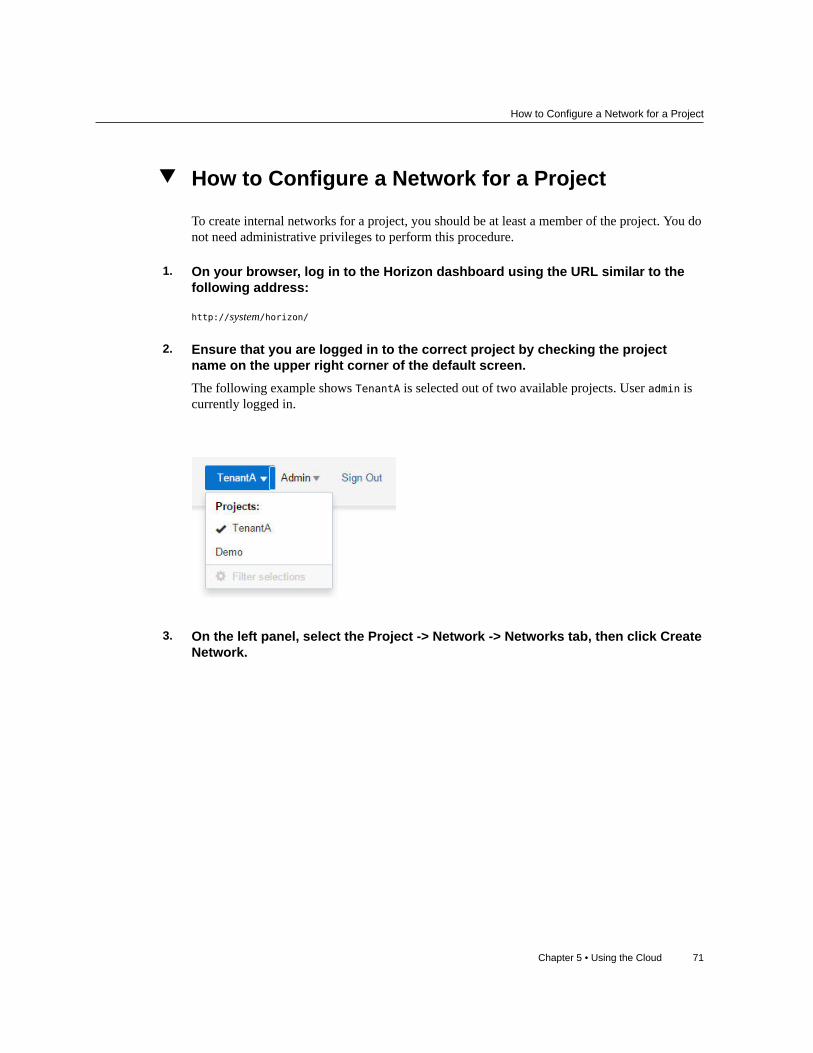
How to Configure a Network for a Project
Chapter 5 • Using the Cloud 71
How to Configure a Network for a Project
To create internal networks for a project, you should be at least a member of the project. You donot need administrative privileges to perform this procedure.
1. On your browser, log in to the Horizon dashboard using the URL similar to thefollowing address:
http://system/horizon/
2. Ensure that you are logged in to the correct project by checking the projectname on the upper right corner of the default screen.The following example shows TenantA is selected out of two available projects. User admin iscurrently logged in.
3. On the left panel, select the Project -> Network -> Networks tab, then click CreateNetwork.
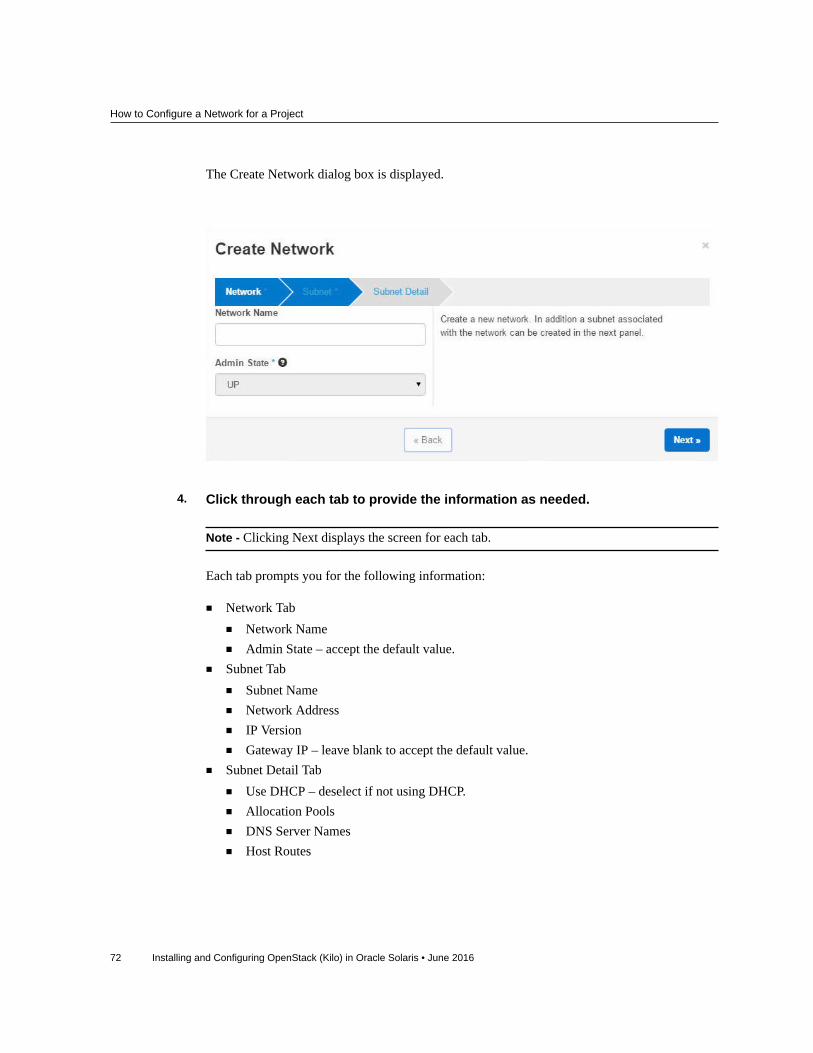
How to Configure a Network for a Project
72 Installing and Configuring OpenStack (Kilo) in Oracle Solaris • June 2016
The Create Network dialog box is displayed.
4. Click through each tab to provide the information as needed.
Note - Clicking Next displays the screen for each tab.
Each tab prompts you for the following information:
■ Network Tab■ Network Name■ Admin State – accept the default value.
■ Subnet Tab■ Subnet Name■ Network Address■ IP Version■ Gateway IP – leave blank to accept the default value.
■ Subnet Detail Tab■ Use DHCP – deselect if not using DHCP.■ Allocation Pools■ DNS Server Names■ Host Routes
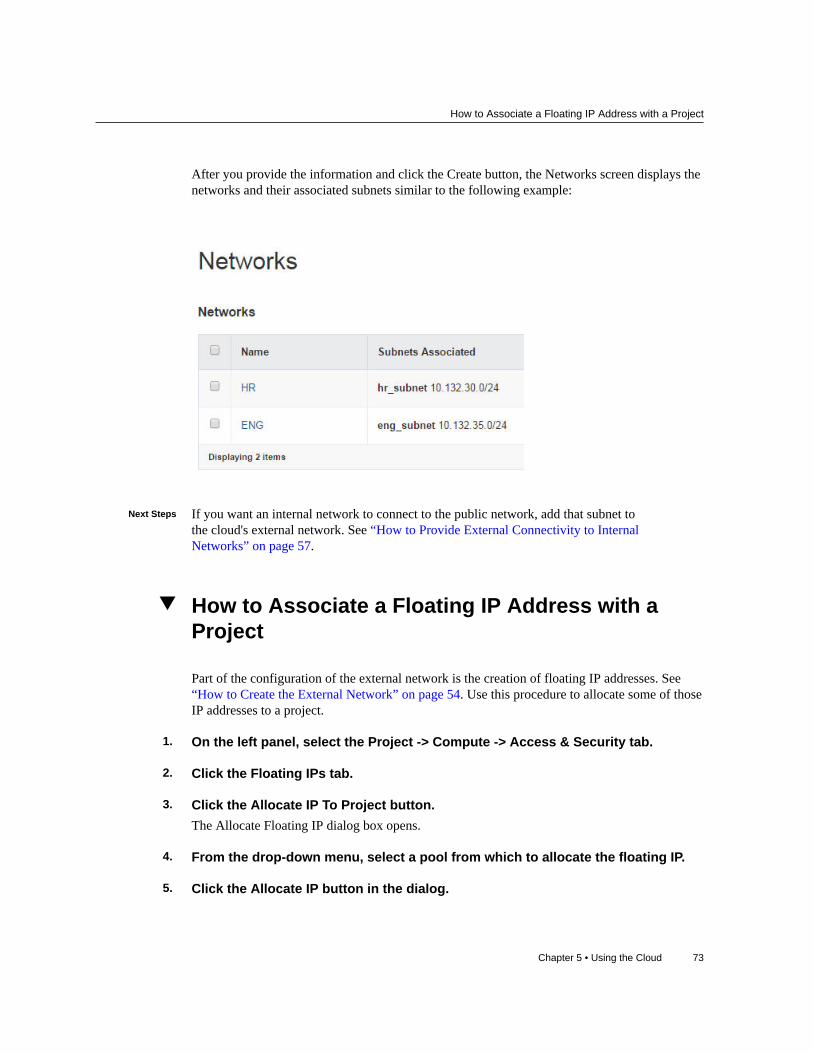
How to Associate a Floating IP Address with a Project
Chapter 5 • Using the Cloud 73
After you provide the information and click the Create button, the Networks screen displays thenetworks and their associated subnets similar to the following example:
Next Steps If you want an internal network to connect to the public network, add that subnet tothe cloud's external network. See “How to Provide External Connectivity to InternalNetworks” on page 57.
How to Associate a Floating IP Address with aProject
Part of the configuration of the external network is the creation of floating IP addresses. See“How to Create the External Network” on page 54. Use this procedure to allocate some of thoseIP addresses to a project.
1. On the left panel, select the Project -> Compute -> Access & Security tab.
2. Click the Floating IPs tab.
3. Click the Allocate IP To Project button.The Allocate Floating IP dialog box opens.
4. From the drop-down menu, select a pool from which to allocate the floating IP.
5. Click the Allocate IP button in the dialog.
Creating and Booting a VM Instance
74 Installing and Configuring OpenStack (Kilo) in Oracle Solaris • June 2016
An IP address is added to the Floating IPs list. You can allocate as many IPs as you want or asallowed by the quota.
Creating and Booting a VM Instance
To perform the procedures in this section, at a minimum you must be a valid member of theproject. You do not need administrative privileges.
How to Create an SSH Key Pair1. On your browser, log in to the Horizon dashboard using the URL similar to the
following address:
http://system/horizon/
2. Ensure that you are logged in to the correct project by checking the projectname on the upper right corner of the default screen.
3. On the left panel, click the Project -> Compute -> Access & Security tab.
4. On the Key Pairs tab, determine whether to create a key pair or import a key pair.
■ Create a key pair.
a. Click the Create Key Pair button.
b. Specify a name on the Key Pair Name field.
c. Click the Create Key Pair button.The new key pair is downloaded automatically. If not, click the provided link todownload the key pair.
The new key pair is listed in the Key Pairs tab of the Access & Security panel.
■ Import a key pair.
a. Click the Import Key pair button.
b. Specify a name on the Key Pair Name field.
How to Create a VM Instance
Chapter 5 • Using the Cloud 75
c. From a terminal window, copy the contents of the root user's .ssh/id_rsa.pub file and paste it on the Public Key field.
d. Click the Import Key Pair button.The new key pair is listed in the Key Pairs tab of the Access & Security panel.
How to Create a VM InstanceBefore You Begin Make sure you have an SSH key pair. See “How to Create an SSH Key Pair” on page 74.
Make sure you have an internal network defined. See “Creating Internal Networks forProjects” on page 70.
1. On your browser, log in to the Horizon dashboard using the URL similar to thefollowing address:
http://system/horizon/
2. Ensure that you are logged in to the correct project by checking the projectname on the upper right corner of the default screen.
3. On the left panel, click the Project -> Compute -> Instances tab, then clickLaunch Instance.
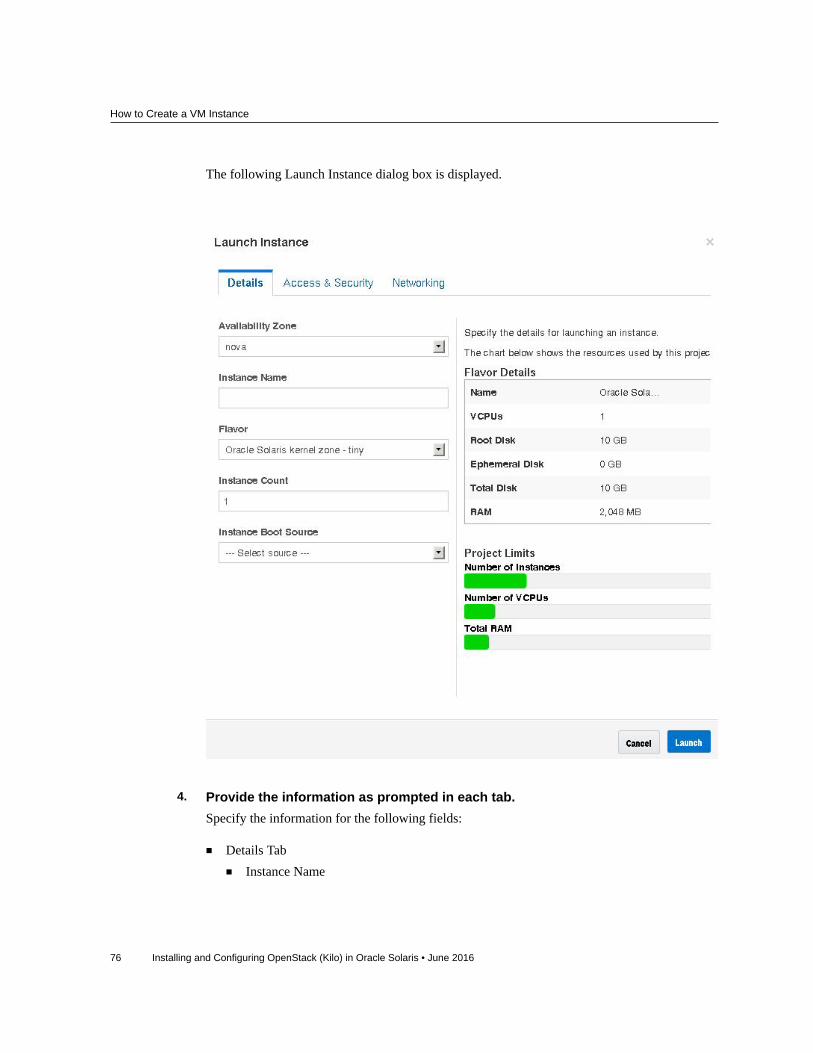
How to Create a VM Instance
76 Installing and Configuring OpenStack (Kilo) in Oracle Solaris • June 2016
The following Launch Instance dialog box is displayed.
4. Provide the information as prompted in each tab.Specify the information for the following fields:
■ Details Tab■ Instance Name
How to Create a VM Instance
Chapter 5 • Using the Cloud 77
■ Flavor – from the drop-down menu, select the appropriate flavor. If this OpenStacksystem is a kernel zone and not a bare-metal system, then you must select a non-globalzone flavor.
■ Instance Boot Source - from the drop-down menu, select Boot from image. Then selectthe image name you want to use. If this OpenStack system is a kernel zone and not abare-metal system, then you must select a non-global zone image.The flavor and the image type must match. For example, if the image is of a non-globalzone, then the flavor must also be a non-global zone.
■ Access and Security Tab – select the keypair to use.■ Networking Tab – from the available networks, select the network to which to attach the
new VM.
5. Click the Launch button at the bottom of the dialog box.The new VM instance is created, installed, and booted.This step takes a while to complete.
6. Associate a floating IP address with the new VM instance.You can do these steps while the new VM instance is installing. The VM instance must have anassociated floating IP address so that users can log into it.
a. From the drop-down menu in the Actions column, select Associate FloatingIP.The Manage Floating IP Associations dialog opens.
b. Select an address from the IP Address drop-down menu.If no IP addresses are available, click the + button. See “How to Associate a Floating IPAddress with a Project” on page 73.
c. Select the port that corresponds to the VM you created.
d. Click the Associate button at the bottom of the dialog box.
Next Steps ■ Click Instances and click the name of the instance to view detailed information about theinstance and view the console log of the instance. Reload the page to view log updates.
■ Click Volumes to view Cinder volumes that have been created.■ Click Network Topology to view a representation of the cloud network including all subnet
segments, virtual routers, and active instances.■ Click Images & Snapshots to view the Unified Archives that have been uploaded into the
Glance image store.■ When the new VM instance has finished installing and reached the Active status, log in to
the instance. The following command logs in to the zone as root using the keypair and thefloating IP address:

How to Add Users to the VM Instance
78 Installing and Configuring OpenStack (Kilo) in Oracle Solaris • June 2016
# ssh root@floating-IP-address
How to Add Users to the VM Instance
In Oracle Solaris, the VM instance uses the Oracle Solaris zones technology to enable you toprovision virtual machines in the cloud. To add users to the VM instance, you need to issuecommands as a zone administrator. The steps are not supported in the dashboard. Therefore,you need to access a terminal window.
Before You Begin Obtain the external network floating IP address to which the VM instance is associated byclicking the dashboard's Admin -> System -> Instances tab.
1. On a terminal window, list the VM instances.
# zoneadm list -cv
Names of VMs in the cloud have the prefix instance.
2. Log in to the specific zone.
# zlogin zonename
3. Create a home directory for the user.
root@zone# mkdir -p /export/home/username
4. Create the user.
root@zone# useradd -d home-dir options
where home-dir is the directory you created for the user. For other options that you can use withthe useradd command, see the useradd(8) man page.
5. To create the user password, issue this command and then follow the prompts.
root@zone# passwd username
6. (Optional) Verify that the password is created.
root@zone# grep username /etc/passwd
7. To create the root password, issue this command and then follow the prompts.
zone# passwd root
8. Exit the zone and then log out.
Managing Flavors
Chapter 5 • Using the Cloud 79
9. Log in with Secure Shell to the virtual machine.
# ssh username@floating-IP
where floating-IP is the VM's associated floating IP address.
Example 4 Adding a User to a VM Instance
In this example, username jsmith is added as a user of VM1.
# zoneadm list -cv ID NAME STATUS PATH BRAND IP
0 global running / solaris shared
6 instance-00000006 running /system/zones/instance-00000006 solaris excl
- myzone installed /system/zones/myzone solaris excl
# zlogin instance-00000006[Connected to zone 'instance-00000006' pts/3]
Last login: Wed Jan 6 14:31:18 2016 on pts/2
Oracle Corporation SunOS 5.11 11.3 September 2015
root@VM1# mkdir -p /export/home/jsmith
root@VM1# useradd -d /export/home/jsmith -m -s /usr/bin/bash jsmith
User jsmith is created with bash as the default shell.
root@VM1# passwd jsmithNew Password: passwordRe-enter new Password: passwordpasswd: password successfully changed for jsmith
root@VM1# passwd rootNew Password: passwordRe-enter new Password: passwordpasswd: password successfully changed for root
root@VM1# exitlogout
[Connection to zone 'instance-00000006' pts/3 closed]
# ssh [email protected]
Managing Flavors
A flavor is a VM instance type, or virtual hardware template. A flavor specifies a set of virtualmachine resources such as the number of virtual CPUs, the amount of memory, and the diskspace assigned to a VM instance. On Oracle Solaris, the flavor also includes the brand of the
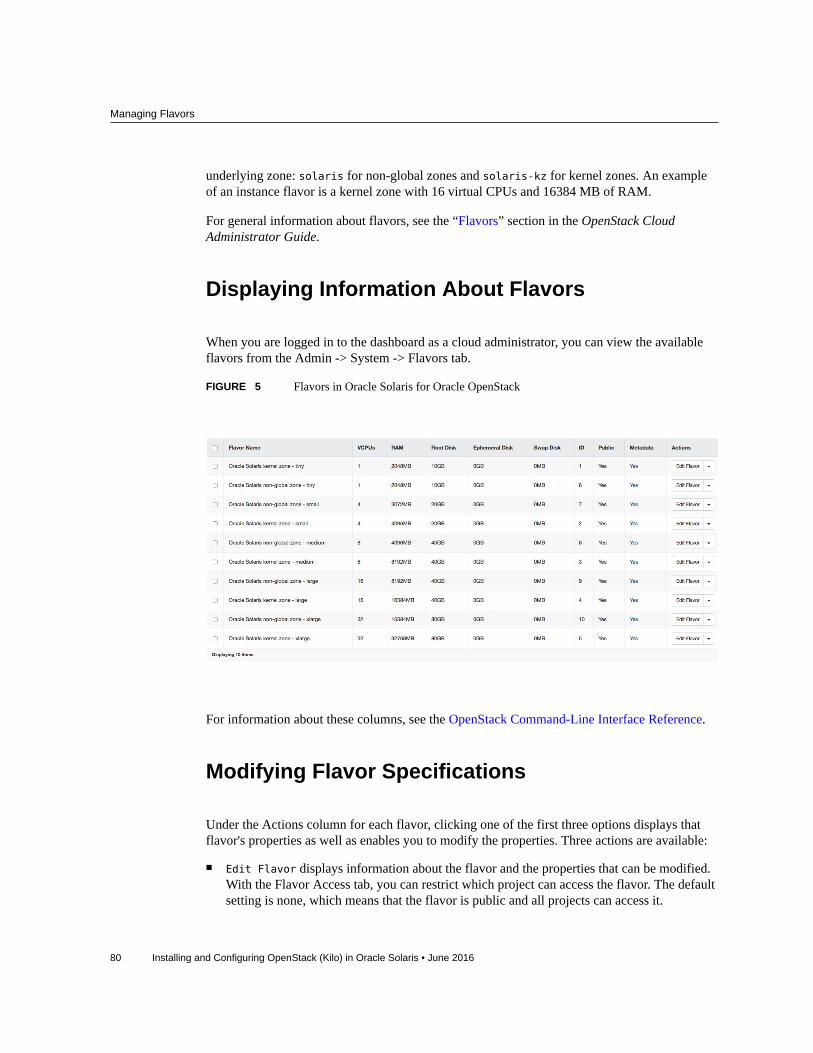
Managing Flavors
80 Installing and Configuring OpenStack (Kilo) in Oracle Solaris • June 2016
underlying zone: solaris for non-global zones and solaris-kz for kernel zones. An exampleof an instance flavor is a kernel zone with 16 virtual CPUs and 16384 MB of RAM.
For general information about flavors, see the “Flavors” section in the OpenStack CloudAdministrator Guide.
Displaying Information About Flavors
When you are logged in to the dashboard as a cloud administrator, you can view the availableflavors from the Admin -> System -> Flavors tab.
FIGURE 5 Flavors in Oracle Solaris for Oracle OpenStack
For information about these columns, see the OpenStack Command-Line Interface Reference.
Modifying Flavor Specifications
Under the Actions column for each flavor, clicking one of the first three options displays thatflavor's properties as well as enables you to modify the properties. Three actions are available:
■ Edit Flavor displays information about the flavor and the properties that can be modified.With the Flavor Access tab, you can restrict which project can access the flavor. The defaultsetting is none, which means that the flavor is public and all projects can access it.

Managing Flavors
Chapter 5 • Using the Cloud 81
■ Modify Access directly opens the flavor's Flavor Access tab so you can modify the accesssetting.
■ Update Metadata enables you to modify the flavor's metadata.
After you modify a flavor's specifications, those modifications apply to all the guests that yousubsequently create that use the modified flavor.
Not all flavor modifications can be performed on the dashboard. For example, the keys of theextra_specs property can only be revised with the command line. The property's keys refer toa set of zone properties that are typically configured with the zonecfg command and which aresupported in OpenStack.
The following keys are supported in both kernel zones and non-global zone flavors:
■ zonecfg:bootargs
■ zonecfg:brand
■ zonecfg:hostid
■ zonecfg:cpu-arch
The following keys are supported only in non-global zone flavors:
■ zonecfg:file-mac-profile
■ zonecfg:fs-allowed
■ zonecfg:limitpriv
For a description of these zone configuration properties, see the zonecfg(8) man page.
Note - Not all zone configuration properties are supported in OpenStack.
The sc_profile key is also modifiable only from the command line. You use this key tospecify a system configuration profile for the flavor.
To modify a flavor from the command line, use the following syntax:
nova flavor-key flavor action key=value [key=value ...]
flavor The name or ID of the flavor.
action set or unset
key=value The key is the name of the spec. The value is the new value for that spec.If the action is unset, specify only the key.
For example, to set a specific system configuration file for the eighth flavor in the flavor list(Oracle Solaris kernel zone - large), you would issue the following command:
$ nova flavor-key 4 set sc_profile=/system/volatile/profile/sc_profile.xml
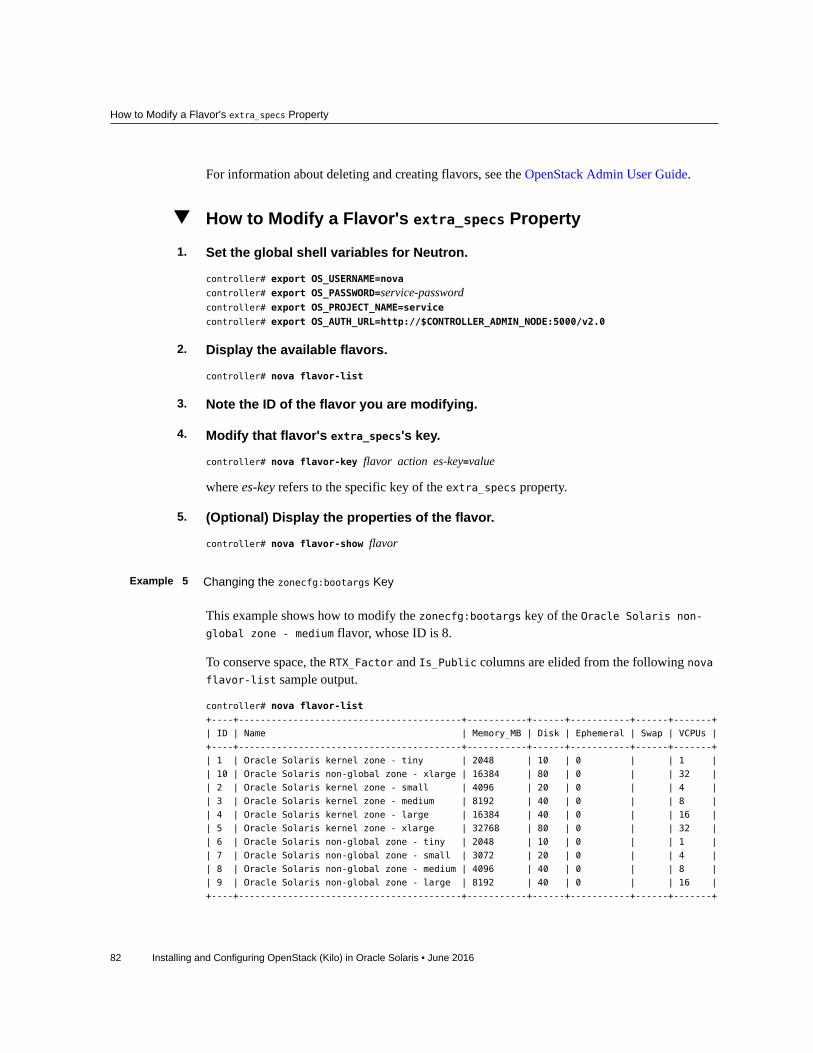
How to Modify a Flavor's extra_specs Property
82 Installing and Configuring OpenStack (Kilo) in Oracle Solaris • June 2016
For information about deleting and creating flavors, see the OpenStack Admin User Guide.
How to Modify a Flavor's extra_specs Property
1. Set the global shell variables for Neutron.
controller# export OS_USERNAME=nova
controller# export OS_PASSWORD=service-passwordcontroller# export OS_PROJECT_NAME=service
controller# export OS_AUTH_URL=http://$CONTROLLER_ADMIN_NODE:5000/v2.0
2. Display the available flavors.
controller# nova flavor-list
3. Note the ID of the flavor you are modifying.
4. Modify that flavor's extra_specs's key.
controller# nova flavor-key flavor action es-key=value
where es-key refers to the specific key of the extra_specs property.
5. (Optional) Display the properties of the flavor.
controller# nova flavor-show flavor
Example 5 Changing the zonecfg:bootargs Key
This example shows how to modify the zonecfg:bootargs key of the Oracle Solaris non-global zone - medium flavor, whose ID is 8.
To conserve space, the RTX_Factor and Is_Public columns are elided from the following novaflavor-list sample output.
controller# nova flavor-list+----+-----------------------------------------+-----------+------+-----------+------+-------+
| ID | Name | Memory_MB | Disk | Ephemeral | Swap | VCPUs |
+----+-----------------------------------------+-----------+------+-----------+------+-------+
| 1 | Oracle Solaris kernel zone - tiny | 2048 | 10 | 0 | | 1 |
| 10 | Oracle Solaris non-global zone - xlarge | 16384 | 80 | 0 | | 32 |
| 2 | Oracle Solaris kernel zone - small | 4096 | 20 | 0 | | 4 |
| 3 | Oracle Solaris kernel zone - medium | 8192 | 40 | 0 | | 8 |
| 4 | Oracle Solaris kernel zone - large | 16384 | 40 | 0 | | 16 |
| 5 | Oracle Solaris kernel zone - xlarge | 32768 | 80 | 0 | | 32 |
| 6 | Oracle Solaris non-global zone - tiny | 2048 | 10 | 0 | | 1 |
| 7 | Oracle Solaris non-global zone - small | 3072 | 20 | 0 | | 4 |
| 8 | Oracle Solaris non-global zone - medium | 4096 | 40 | 0 | | 8 |
| 9 | Oracle Solaris non-global zone - large | 8192 | 40 | 0 | | 16 |
+----+-----------------------------------------+-----------+------+-----------+------+-------+
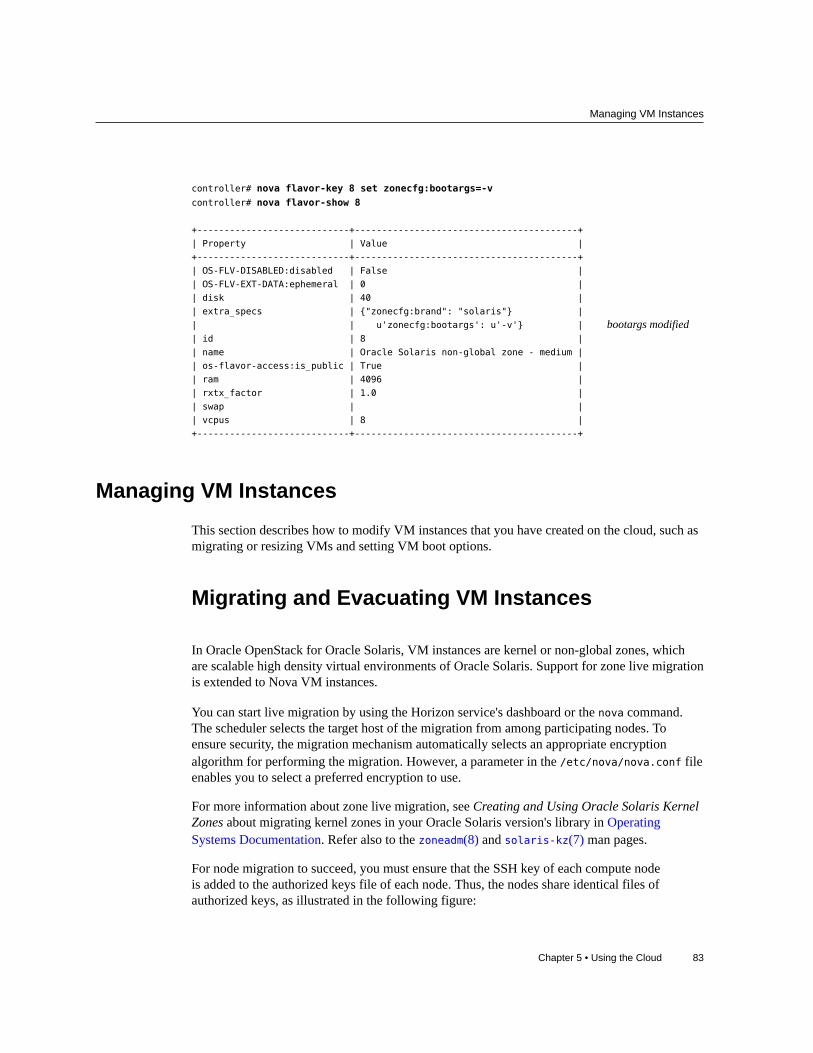
Managing VM Instances
Chapter 5 • Using the Cloud 83
controller# nova flavor-key 8 set zonecfg:bootargs=-v
controller# nova flavor-show 8
+----------------------------+-----------------------------------------+
| Property | Value |
+----------------------------+-----------------------------------------+
| OS-FLV-DISABLED:disabled | False |
| OS-FLV-EXT-DATA:ephemeral | 0 |
| disk | 40 |
| extra_specs | {"zonecfg:brand": "solaris"} |
| | u'zonecfg:bootargs': u'-v'} | bootargs modified| id | 8 |
| name | Oracle Solaris non-global zone - medium |
| os-flavor-access:is_public | True |
| ram | 4096 |
| rxtx_factor | 1.0 |
| swap | |
| vcpus | 8 |
+----------------------------+-----------------------------------------+
Managing VM Instances
This section describes how to modify VM instances that you have created on the cloud, such asmigrating or resizing VMs and setting VM boot options.
Migrating and Evacuating VM Instances
In Oracle OpenStack for Oracle Solaris, VM instances are kernel or non-global zones, whichare scalable high density virtual environments of Oracle Solaris. Support for zone live migrationis extended to Nova VM instances.
You can start live migration by using the Horizon service's dashboard or the nova command.The scheduler selects the target host of the migration from among participating nodes. Toensure security, the migration mechanism automatically selects an appropriate encryptionalgorithm for performing the migration. However, a parameter in the /etc/nova/nova.conf fileenables you to select a preferred encryption to use.
For more information about zone live migration, see Creating and Using Oracle Solaris KernelZones about migrating kernel zones in your Oracle Solaris version's library in OperatingSystems Documentation. Refer also to the zoneadm(8) and solaris-kz(7) man pages.
For node migration to succeed, you must ensure that the SSH key of each compute nodeis added to the authorized keys file of each node. Thus, the nodes share identical files ofauthorized keys, as illustrated in the following figure:
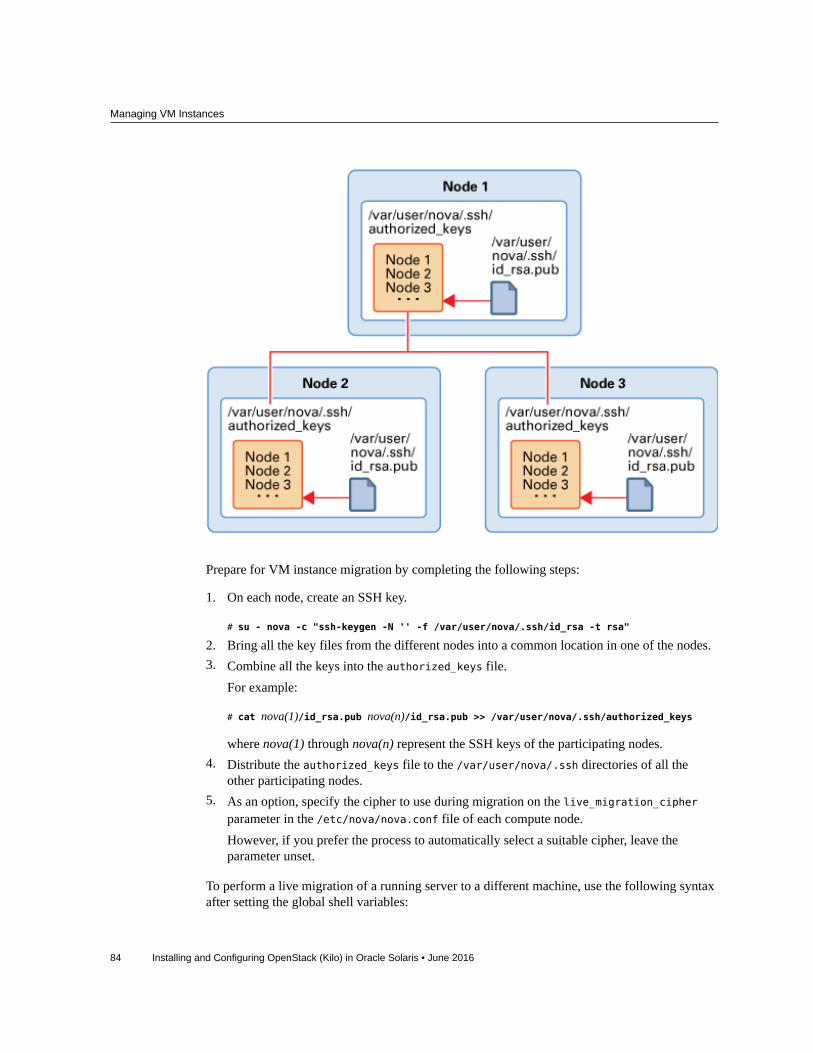
Managing VM Instances
84 Installing and Configuring OpenStack (Kilo) in Oracle Solaris • June 2016
Prepare for VM instance migration by completing the following steps:
1. On each node, create an SSH key.
# su - nova -c "ssh-keygen -N '' -f /var/user/nova/.ssh/id_rsa -t rsa"
2. Bring all the key files from the different nodes into a common location in one of the nodes.3. Combine all the keys into the authorized_keys file.
For example:
# cat nova(1)/id_rsa.pub nova(n)/id_rsa.pub >> /var/user/nova/.ssh/authorized_keys
where nova(1) through nova(n) represent the SSH keys of the participating nodes.4. Distribute the authorized_keys file to the /var/user/nova/.ssh directories of all the
other participating nodes.5. As an option, specify the cipher to use during migration on the live_migration_cipher
parameter in the /etc/nova/nova.conf file of each compute node.However, if you prefer the process to automatically select a suitable cipher, leave theparameter unset.
To perform a live migration of a running server to a different machine, use the following syntaxafter setting the global shell variables:
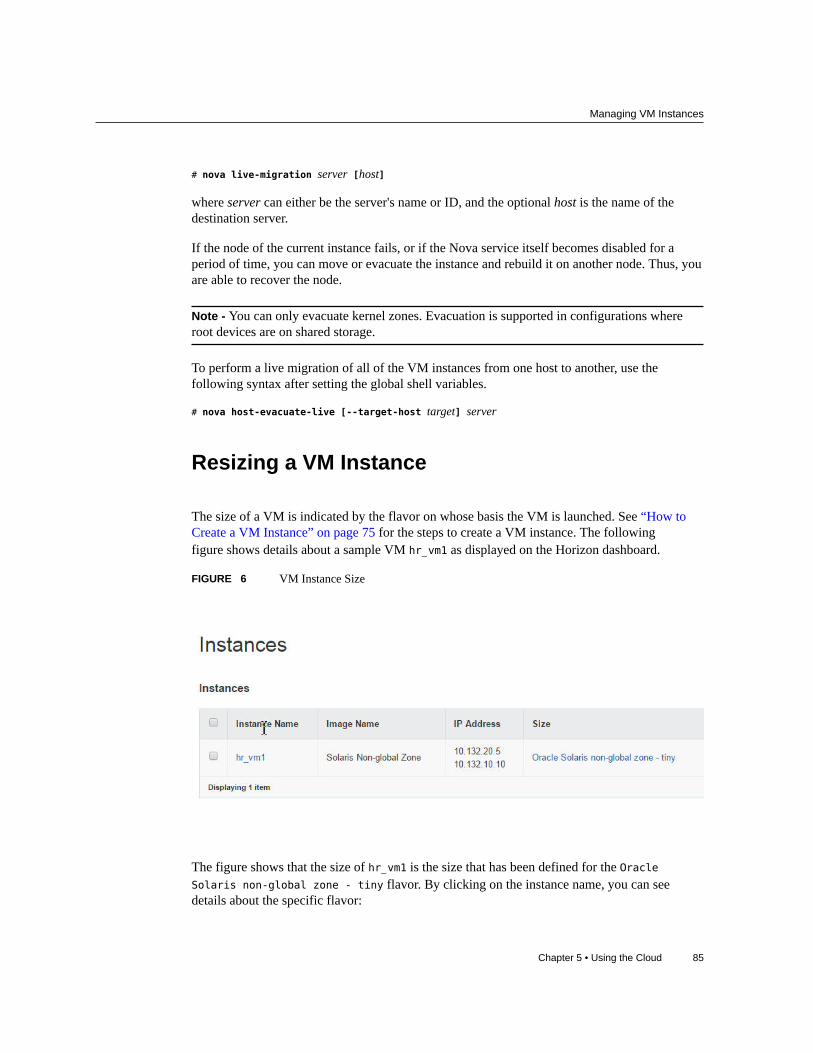
Managing VM Instances
Chapter 5 • Using the Cloud 85
# nova live-migration server [host]
where server can either be the server's name or ID, and the optional host is the name of thedestination server.
If the node of the current instance fails, or if the Nova service itself becomes disabled for aperiod of time, you can move or evacuate the instance and rebuild it on another node. Thus, youare able to recover the node.
Note - You can only evacuate kernel zones. Evacuation is supported in configurations whereroot devices are on shared storage.
To perform a live migration of all of the VM instances from one host to another, use thefollowing syntax after setting the global shell variables.
# nova host-evacuate-live [--target-host target] server
Resizing a VM Instance
The size of a VM is indicated by the flavor on whose basis the VM is launched. See “How toCreate a VM Instance” on page 75 for the steps to create a VM instance. The followingfigure shows details about a sample VM hr_vm1 as displayed on the Horizon dashboard.
FIGURE 6 VM Instance Size
The figure shows that the size of hr_vm1 is the size that has been defined for the OracleSolaris non-global zone - tiny flavor. By clicking on the instance name, you can seedetails about the specific flavor:
How to Resize a VM Instance
86 Installing and Configuring OpenStack (Kilo) in Oracle Solaris • June 2016
■ RAM = 2 GB■ VCPUs = 1 VCPU■ Disk = 10 GB
Resizing an instance means using a different flavor for the instance.
By default, the resizing process creates the newly sized instance on a new node. However, ifyou are resizing to a non-global zone flavor, you must set the resize process to complete in thesame node. Non-global zones require to be of the same version as their original global zone.Resizing to a non-global zone flavor and have the instance created in a different node risksputting the instance in a node that has a different global zone version. To prevent that risk,edit the following parameter in the /etc/nova/nova.conf file which creates the newly sizedinstance in the same node:
allow_resize_to_same_host=true
Note - The risk does not apply to kernel zones. Thus, you can safely resize a kernel zone toanother node.
How to Resize a VM Instance
Before You Begin Know the current size of the VM instance that you want to modify. You can obtain thisinformation from the dashboard. For an example, see Figure 6.
1. Set the global shell variables.
# export OS_USERNAME=nova
# export OS_PASSWORD=service-password# export OS_PROJECT_NAME=service
# export OS_AUTH_URL=http://$CONTROLLER_ADMIN_NODE:5000/v2.0"
2. If you are resizing to a non-global zone flavor, edit the following parameter in the/etc/nova/nova.conf file as follows:
allow_resize_to_same_host=true
3. Display the list of flavors.
# openstack flavor list
4. Note the ID number for the new flavor which you want the VM instance to use.
5. Change the VM instance to use the new flavor by referencing the flavor's IDnumber.
# openstack server resize --flavor flavor-ID instance-name
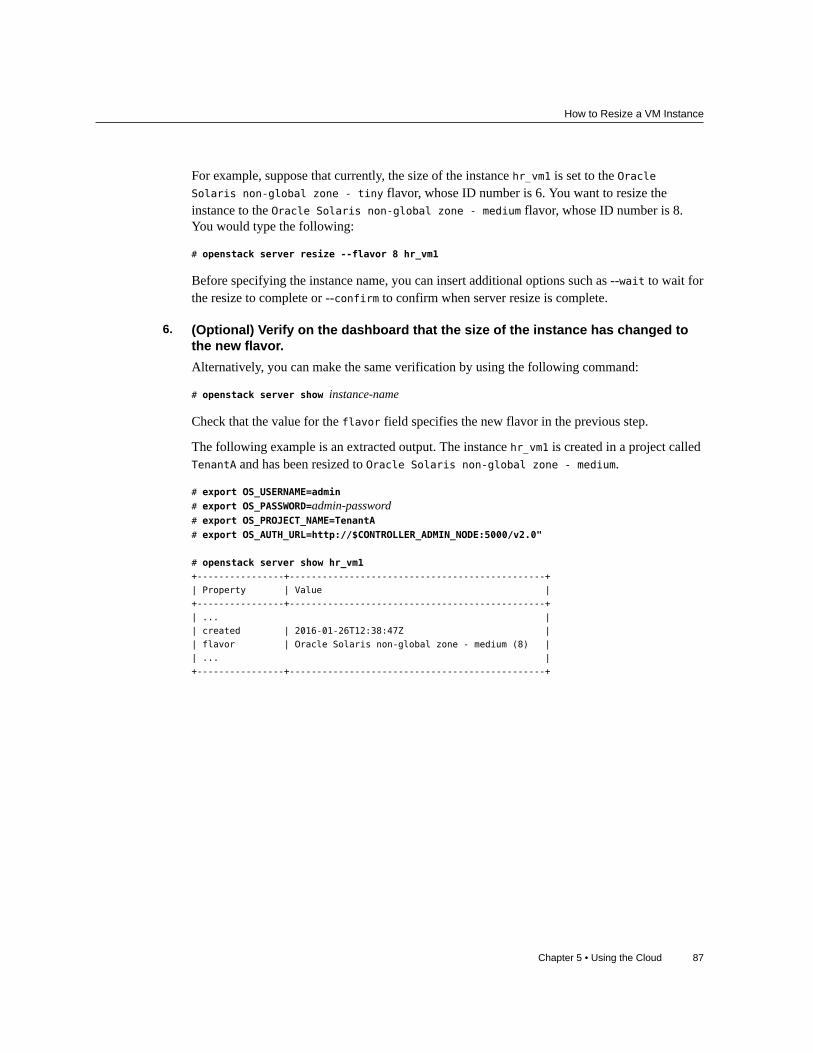
How to Resize a VM Instance
Chapter 5 • Using the Cloud 87
For example, suppose that currently, the size of the instance hr_vm1 is set to the OracleSolaris non-global zone - tiny flavor, whose ID number is 6. You want to resize theinstance to the Oracle Solaris non-global zone - medium flavor, whose ID number is 8.You would type the following:
# openstack server resize --flavor 8 hr_vm1
Before specifying the instance name, you can insert additional options such as --wait to wait forthe resize to complete or --confirm to confirm when server resize is complete.
6. (Optional) Verify on the dashboard that the size of the instance has changed tothe new flavor.Alternatively, you can make the same verification by using the following command:
# openstack server show instance-name
Check that the value for the flavor field specifies the new flavor in the previous step.
The following example is an extracted output. The instance hr_vm1 is created in a project calledTenantA and has been resized to Oracle Solaris non-global zone - medium.
# export OS_USERNAME=admin
# export OS_PASSWORD=admin-password# export OS_PROJECT_NAME=TenantA
# export OS_AUTH_URL=http://$CONTROLLER_ADMIN_NODE:5000/v2.0"
# openstack server show hr_vm1+----------------+-----------------------------------------------+
| Property | Value |
+----------------+-----------------------------------------------+
| ... |
| created | 2016-01-26T12:38:47Z |
| flavor | Oracle Solaris non-global zone - medium (8) |
| ... |
+----------------+-----------------------------------------------+

88 Installing and Configuring OpenStack (Kilo) in Oracle Solaris • June 2016
Chapter 6 • Options for Cinder Configuration and Deployment 89
6 ♦ ♦ ♦ C H A P T E R 6
Options for Cinder Configuration andDeployment
This chapter describes alternative ways you can configure Cinder and the storage component ofyour OpenStack setup.
Note - The procedures in “Configuring the Storage Node” on page 46 to configure blockstorage remains the default method to set up the storage node. The options in this chapter offeralternative ways to deploy the storage component. However, using both the default storageconfiguration and the alternative configuration at the same time to set up Cinder on your cloudframework is not recommended at this time.
This chapter covers the following topics:
■ “Deploying Remote Systems for Storage” on page 89■ “Specifying Boot Volumes for Compute Nodes” on page 94■ “Using the Cinder NFS Driver” on page 95■ “Using OpenStack With Oracle ZFS Storage Appliance” on page 97
Deploying Remote Systems for Storage
In previous OpenStack releases without SAN support, the Cinder volume service had to beconfigured to run on the target host if the ZFS iSCSI driver is used.
With support for storage area networks (SAN) in Cinder, you can use SSH to configure multiplestorage host backends as well as define their volume type. In this type of deployment, theCinder package as well as all of the Cinder services would be installed only on the initiator host,which typically is the host that also functions as the compute node.
You do not need to install the OpenStack package on the remote target hosts. These hostsmerely provide the LUN disks to the initiator host based on COMSTAR.
Properly deploying remote systems for storage has the following requirements:
■ Configuring the /etc/cinder/cinder.conf file.
Deploying Remote Systems for Storage
90 Installing and Configuring OpenStack (Kilo) in Oracle Solaris • June 2016
■ Granting the appropriate rights profile to the designated user.■ Manually installing additional packages.
The following sections discuss these requirements in detail.
Configuring the cinder.conf File
After installing the Cinder package on the initiator host, edit the [DEFAULT] section of the /etc/cinder/cinder.conf file.
Refer to the following example as a guide to understand the definitions in the configuration file.
[DEFAULT]
my_ip = localhost
osapi_volume_workers = 1
auth_strategy = keystone
#num_volume_device_scan_tries = 6
os-volume-api-version = 2
scheduler_driver=cinder.scheduler.filter_scheduler.FilterScheduler
enabled_backends=zfsdriver-1, zfsdriver-2, zfsdriver-3, zfsdriver-4, zfsdriver-5
[zfsdriver-1]
volume_group=zvolumes-1
volume_driver=cinder.volume.drivers.solaris.zfs.ZFSVolumeDriver
volume_backend_name=ZFS_LOCAL
zfs_volume_base = rpool/cinder
san_is_local = True
debug=true
verbose=true
[zfsdriver-2]
volume_group=zvolumes-2
volume_driver=cinder.volume.drivers.solaris.zfs.ZFSISCSIDriver
volume_backend_name=ZFS_REMOTE
zfs_volume_base = rpool/cinder
san_ip = 10.134.13.38
san_login = user-namesan_password = passworddebug=true
verbose=true
[zfsdriver-3]
volume_group=zvolumes-3
volume_driver=cinder.volume.drivers.solaris.zfs.ZFSFCDriver
volume_backend_name=ZFS_REMOTE_FC
zfs_volume_base = rpool/fc
san_ip = 10.134.13.38
san_login = user-namesan_password = passworddebug=true
verbose=true
Deploying Remote Systems for Storage
Chapter 6 • Options for Cinder Configuration and Deployment 91
[zfsdriver-4]
volume_group=zvolumes-4
volume_driver=cinder.volume.drivers.solaris.zfs.ZFSISCSIDriver
volume_backend_name=ZFS_REMOTE
zfs_volume_base = rpool/cinder/zq
san_ip = 10.134.13.38
san_login = user-namesan_password = passworddebug=true
verbose=true
[zfsdriver-5]
volume_group=zvolumes-5
volume_driver=cinder.volume.drivers.solaris.zfs.ZFSISCSIDriver
volume_backend_name=ZFS_REMOTE
zfs_volume_base = rpool/zq
san_ip = 10.134.63.182
san_login = user-namesan_password = passworddebug=true
verbose=true
enabled_backends Lists the enabled backend hosts. In this example, 5 backend hosts aredefined.
The backend hosts use 3 ZFS drivers (ZFSVolumeDriver,ZFSISCSIDriver, ZFSFCDriver) on 3 hosts. Of these hosts, one islocal (localhost) while the others are remote (10.134.13.38 and10.134.63.182).
volume_backend_name Defines a volume type with the specified name. This parameter identifiesthe volume type. However, you must create the volume type manuallywith the following commands:
# cinder type-create vol-type# cinder type-key vol-type set volume_backend_name=backend-name# cinder create --display-name display --volume-type vol-type
These commands respectively execute the following actions:■ Create a new volume type.■ Assign the backend name to the new volume type.■ Create a new volume according to the new volume type.
Based on the previous sample Cinder configuration file, you would typethe following commands:
# cinder type-create type-remote
# cinder type-key type-remote set volume_backend_name=ZFS_REMOTE
# cinder create --display-name t1 --volume-type type-remote
The last command creates the new volume t1 is created on one ofbackends with the name ZFS_REMOTE based on the filtering rules.
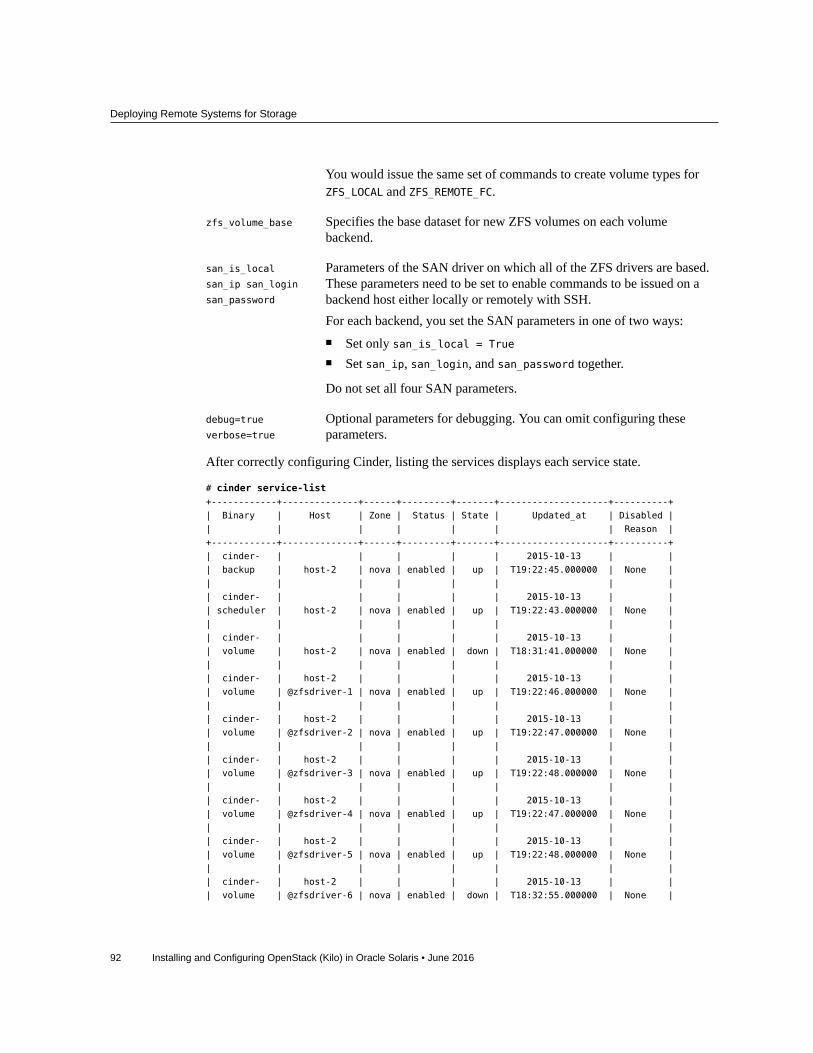
Deploying Remote Systems for Storage
92 Installing and Configuring OpenStack (Kilo) in Oracle Solaris • June 2016
You would issue the same set of commands to create volume types forZFS_LOCAL and ZFS_REMOTE_FC.
zfs_volume_base Specifies the base dataset for new ZFS volumes on each volumebackend.
san_is_local
san_ip san_login
san_password
Parameters of the SAN driver on which all of the ZFS drivers are based.These parameters need to be set to enable commands to be issued on abackend host either locally or remotely with SSH.For each backend, you set the SAN parameters in one of two ways:■ Set only san_is_local = True■ Set san_ip, san_login, and san_password together.
Do not set all four SAN parameters.
debug=true
verbose=true
Optional parameters for debugging. You can omit configuring theseparameters.
After correctly configuring Cinder, listing the services displays each service state.
# cinder service-list+------------+--------------+------+---------+-------+--------------------+----------+
| Binary | Host | Zone | Status | State | Updated_at | Disabled |
| | | | | | | Reason |
+------------+--------------+------+---------+-------+--------------------+----------+
| cinder- | | | | | 2015-10-13 | |
| backup | host-2 | nova | enabled | up | T19:22:45.000000 | None |
| | | | | | | |
| cinder- | | | | | 2015-10-13 | |
| scheduler | host-2 | nova | enabled | up | T19:22:43.000000 | None |
| | | | | | | |
| cinder- | | | | | 2015-10-13 | |
| volume | host-2 | nova | enabled | down | T18:31:41.000000 | None |
| | | | | | | |
| cinder- | host-2 | | | | 2015-10-13 | |
| volume | @zfsdriver-1 | nova | enabled | up | T19:22:46.000000 | None |
| | | | | | | |
| cinder- | host-2 | | | | 2015-10-13 | |
| volume | @zfsdriver-2 | nova | enabled | up | T19:22:47.000000 | None |
| | | | | | | |
| cinder- | host-2 | | | | 2015-10-13 | |
| volume | @zfsdriver-3 | nova | enabled | up | T19:22:48.000000 | None |
| | | | | | | |
| cinder- | host-2 | | | | 2015-10-13 | |
| volume | @zfsdriver-4 | nova | enabled | up | T19:22:47.000000 | None |
| | | | | | | |
| cinder- | host-2 | | | | 2015-10-13 | |
| volume | @zfsdriver-5 | nova | enabled | up | T19:22:48.000000 | None |
| | | | | | | |
| cinder- | host-2 | | | | 2015-10-13 | |
| volume | @zfsdriver-6 | nova | enabled | down | T18:32:55.000000 | None |
Deploying Remote Systems for Storage
Chapter 6 • Options for Cinder Configuration and Deployment 93
+------------+--------------+------+---------+-------+--------------------+----------+
Granting Rights to the Designated User
To enable the user defined by san_login to use the remote targets, the user must be granted aproper rights profile. The following example shows how to create the rights profile for the user.
# useradd -s /usr/bin/pfbash -m jdoe
# passwd jdoe password# profiles -p "Cinder Storage management"
profiles:Cinder Storage management> set desc="Cinder Storage management on target host"
profiles:Cinder Storage management> add profiles="File System Management"
profiles:Cinder Storage management> add auths="solaris.smf.modify.stmf"
profiles:Cinder Storage management> add cmd=/usr/sbin/itadm
profiles:Cinder Storage management:itadm> set euid=0
profiles:Cinder Storage management:itadm> end
profiles:Cinder Storage management> add cmd=/usr/sbin/fcadm
profiles:Cinder Storage management:itadm> set privs=file_dac_read,sys_devices
profiles:Cinder Storage management:itadm> end
profiles:Cinder Storage management> add cmd=/usr/sbin/fcinfo
profiles:Cinder Storage management:itadm> set privs=file_dac_read,sys_devices
profiles:Cinder Storage management:itadm> end
profiles:Cinder Storage management> add cmd=/usr/sbin/stmfadm
profiles:Cinder Storage management:stmfadm> set euid=0
profiles:Cinder Storage management:stmfadm> end
profiles:Cinder Storage management> add cmd=/usr/lib/rad/module/mod_zfsmgr.so.1
profiles:Cinder Storage management:mod_zfsmgr.so.1> set privs={zone}:/system/volatile/*, \
sys_config,sys_mount
profiles:Cinder Storage management:mod_zfsmgr.so.1> end
profiles:Cinder Storage management> add cmd=/usr/sbin/zfs
profiles:Cinder Storage management:zfs> set priv=sys_config,sys_mount
profiles:Cinder Storage management:zfs> end
profiles:Cinder Storage management> exit
# usermod -P "Cinder Storage management" jdoe
For more information about profiles and rights, refer to Securing Users and Processes in OracleSolaris in your Oracle Solaris version's library in Operating Systems Documentation.
Enabling the Remote Host as a Target
To enable the remote host as a target, perform the following steps:
1. Install the package group/feature/storage-server on the remote hosts.
# pkg install storage-server

Specifying Boot Volumes for Compute Nodes
94 Installing and Configuring OpenStack (Kilo) in Oracle Solaris • June 2016
2. Enable the following services on both the initiator and remote hosts:■ svc:/system/stmf:default
■ svc:/network/iscsi/target:default
■ svc:/system/rad:remote
For example:
remote-host# svcadm enable stmf
remote-host# svcadm enable -r svc:/network/iscsi/target:default
remote-host# svcadm enable rad
3. Initialize and set up the Access Control List (ACL) for the defined zfs_volume_base.
For example, suppose that you have the definition zfs_volume_base=rpool/fc in theconfiguration file. Then you must run the following commands:
# chmod A+user:cinder:add_subdirectory:allow /rpool/fc
# zfs allow cinder clone,create,destroy,mount,snapshot rpool/fc
Specifying Boot Volumes for Compute Nodes
In a configuration that uses multiple storage backends, or in a multi-rack or multi-ZFS StorageZS3 environment, you would want to control where to place the root volume for every newinstance that you create. In OpenStack for Oracle Solaris, you have this control through twoparameters in the /etc/nova/nova.conf file.
How to Create Root Storage Volumes for ComputeInstancesNote that this procedure is part of the general task of defining multiple remote backends asdescribed in “Deploying Remote Systems for Storage” on page 89. Thus, this procedureuses the same examples.
1. Define the Cinder backends in the /etc/cinder/cinder.conf file.See the example in “Configuring the cinder.conf File” on page 90, particularly inspecifying enabled_backends as well as the volume name for each backend.
2. If your setup uses a Cinder availability zone, define it also in the Cinderconfiguration file.For example:
[DEFAULT]
Using the Cinder NFS Driver
Chapter 6 • Options for Cinder Configuration and Deployment 95
...
storage_availability_zone=cinder_az
3. For each defined backend in the configuration file, create correspondingvolumes, as shown in the following example:
# cinder type-create type-remote
# cinder type-key type-remote set volume_backend_name=ZFS_REMOTE
You would issue the same set of commands to create other volume types as needed. Thesolariszones driver would then create the actual Cinder boot volume for the Nova instance.
4. On the Cinder node, restart the Cinder service.
# svcadm restart cinder-volume:default
5. In each compute node's /etc/nova/nova.conf file, define one or both of thefollowing parameters based on the Cinder configuration file.
■ boot_volume_type
■ boot_volume_az
For example, based on the previous steps, you would edit the Nova configuration file asfollows:
boot_volume_type=type-remote
boot_volume_az=cinder_az
6. Restart the Nova service on the compute node.
compute-node# svcadm restart nova-compute
Using the Cinder NFS Driver
The Cinder driver for NFS is supported in Oracle Solaris. This driver maps Cinder primitivesand the API to the fundamental backend storage. Specifically, this driver provides NFS asbackend storage.
The Cinder driver is responsible for provisioning and for other administrative manipulation ofthe storage devices only. However, the driver itself is not in the data path for I/O operations.The driver does not allow an instance to access a storage device at the block level. Instead, filesare created on an NFS share and mapped to instances. Each NFS file functions like a blockdevice.
Note - Currently, this driver supports only kernel zones. Do not use this driver in non-globalzones.
How to Use the Cinder NFS Driver
96 Installing and Configuring OpenStack (Kilo) in Oracle Solaris • June 2016
How to Use the Cinder NFS DriverBefore You Begin To use the driver, you must have an existing NFS server to create NFS shares for clients.
Configuring an NFS server is beyond the scope of this document. Refer to other NFSdocumentation to set up the server.
A single NFS server is typically sufficient. However, you can have multiple NFS servers asnecessary.
1. Add the available NFS shares to the /etc/cinder/nfs_shares file.List the NFS shares in the host:share format. For example:
nfs-server-system1:/scratch/volume1
nfs-server-system2:/scratch/volume2
2. Edit the /etc/cinder/cinder.conf file.
a. Specify the NFS driver to use.
volume_driver=cinder.volume.drivers.solaris.nfs.ZfsNfsVolumeDriver
b. Ensure that the nfs_shares_config parameter specifies the file that you usedin Step 1.
nfs_shares_config=/etc/cinder/nfs_shares
c. Configure the other NFS related parameters as needed.
■ nfs_mount_attempts – maximum number of tries to mount a NFS share beforegenerating an error.
■ nfs_mount_point_base – main directory of the NFS share mount points.■ nfs_oversub_ratio – maximum limit of the ratio between allocated volume space and
available space in a volume destination. If the ratio is exceeded, the volume destinationbecomes invalid.
■ nfs_sparsed_volumes – default value of True creates volumes as sparse files.Otherwise, volumes are created as regular files.
■ nfs_used_ratio – percent of actual use of the underlying volume at which newvolumes to the volume destination can no longer be allocated.
■ nfs_round_robin – default value of True schedules round robin across NFS shares.If this parameter is not set, the NFS share with the most free space will be selected forvolume placement.
3. Restart the Cinder service.
# svcadm cinder-volume restart
Using OpenStack With Oracle ZFS Storage Appliance
Chapter 6 • Options for Cinder Configuration and Deployment 97
After the service starts, directories for the NFS shares are added to the main directory of theNFS share mount points.
4. Create volumes.
Note - When using the Cinder NFS driver, creating snapshots is not supported.
a. Define the necessary shell variables.For example:
# export OS_USERNAME=nova
# export OS_PASSWORD=service-password# export OS_PROJECT_NAME=service
# export OS_AUTH_URL=http://$CONTROLLER_ADMIN_NODE:5000/v2.0
b. Create the volume.For example:
# nova volume-create --display-name nfsvol 5
c. (Optional) Display the volume's properties.For example:
# nova volume-show nfsvol
Using OpenStack With Oracle ZFS Storage Appliance
This section describes an OpenStack configuration that uses Oracle ZFS Storage Appliance(ZFSSA) as the backend storage.
About the Oracle ZFS Storage ApplianceThe Oracle ZFS Storage Appliance family of products provides efficient file and block dataservices for network clients as well as a set of data services that can be applied to the datastored on the system including the following technologies:
■ Analytics – Enables you to dynamically observe the behavior of your system in real-timeand to view the data graphically.
■ The ZFS Hybrid Storage Pool – Enables you to manage a variety of devices such as optionalFlash-memory devices, low-power high-capacity disks, and DRAM memory as a single datahierarchy
Using OpenStack With Oracle ZFS Storage Appliance
98 Installing and Configuring OpenStack (Kilo) in Oracle Solaris • June 2016
■ Support for a variety of hardware
The cloud/openstack/cinder package of Oracle OpenStack for Oracle Solaris includes theOracle ZFSSA iSCSI Cinder driver. The driver enables appliance to be used seamlessly asa block storage resource for the Cinder component. Specifically, the driver enables you tocreate iSCSI volumes a Cinder server can allocate to any virtual machine that is instantiatedby the Nova service. To use the Oracle ZFSSA for storage, make sure first that the appliance isrunning at least version 2013.1.2.0 of the ZFSSA software release.
Configuring OpenStack With Oracle ZFSSAThis section does not cover in detail the procedures for setting up Oracle ZFSSA. For moreinformation about the appliance including configuration steps, refer to the following sources:
■ Oracle ZFSSA product documentation in the Oracle Help Center storage documentationpage
■ Using the Oracle ZFS Storage Appliance as Storage Back End for OpenStack Cinder(http://www.oracle.com/technetwork/server-storage/sun-unified-storage/documentation/openstack-cinder-zfssa-120915-2813178.pdf). This white paper detailshow to set up the storage appliance for use in the cloud.
Prior to the procedures to set up OpenStack with Oracle ZFSSA, make sure that you havealready created the subnet that would host data storage traffic. The scenario in this chapteruses Figure 1 as a basis for this starting point but with a difference. Here, storage data traffic ishosted over two subnets, with net2 and net3 as the interfaces for that traffic. The two subnetsensure efficient performance and availability of the data storage service.
On the ZFSSA Side
Oracle ZFSSA uses iSCSI for exchanging SCSI commands over the network. To set upcommunication between iSCSI nodes, you must have the following information available:
■ SCSI node DNS name or IP address. The SCSI node consists of both the initiator and targetnodes.
■ TCP iSCSI Internet port on the target node. By default the port number is 3260.■ iSCSI Qualified Names (IQNs) of both the initiator and target nodes.■ Optional authentication information using Challenge Handshake Authentication Protocol
(CHAP authentication)
To obtain relevant iSCSI information for this preparatory step, use the Oracle Solaris iscsiadmcommand.
This document does not describe the steps to configure the appliance. For procedures to preparethe appliance for operational use, refer to the appropriate release documentation in Oracle'sStorage Documentation.
How to Configure Oracle ZFSSA for OpenStack
Chapter 6 • Options for Cinder Configuration and Deployment 99
On the OpenStack Side
The OpenStack ZFSSA Cinder driver creates and manages volumes by creating the relatedLUNs on the appliance, setting up the appropriate properties of these LUNs, and managing theLUNs' visibility to the OpenStack compute nodes and guest instances on which the volumes arebeing used.
After setting up the Oracle ZFSSA, you can then configure the ZFSSA iSCSI Cinder driver.
How to Configure Oracle ZFSSA for OpenStack
The procedure uses the workflow cinder.akwf which performs the following tasks:
■ Creates the user if the user does not exist.■ Sets role authorizations for performing Cinder driver operations.■ Enables the RESTful service if the service is currently disabled.
Before You Begin Configure a pool on the Oracle ZFS Storage Appliance. You can choose to use a preexistingpool.
1. Run the workflow cinder.akwf by using one of the following methods:
■ Run the workflow from the CLI.
zfssa:maintenance workflows> download
zfssa:maintenance workflows download (uncommitted)> showProperties:
url = (unset)
user = (unset)
password = (unset)
zfssa:maintenance workflows download (uncommitted)> set url= "url-to-cinder.akwf-file" url = "url-to-cinder.akwf-file"zfssa:maintenance workflows download (uncommitted)> commitTransferred 2.64K of 2.64K (100%) ... done
zfssa:maintenance workflows> lsProperties:
showhidden = false
Workflows:
WORKFLOW NAME OWNER SETID ORIGIN
VERSION
workflow-000 Clear locks root false Oracle Corporation
1.0.0

How to Configure Oracle ZFSSA for OpenStack
100 Installing and Configuring OpenStack (Kilo) in Oracle Solaris • June 2016
workflow-001 Configuration for OpenStack Cinder Driver root false Oracle Corporation
1.0.0
zfssa:maintenance workflows> select workflow-001
zfssa:maintenance workflow-001> execute zfssa:maintenance workflow-001 execute (uncommitted)>
zfssa:maintenance workflow-001 execute (uncommitted)> set name=user name = userzfssa:maintenance workflow-001 execute (uncommitted)> set password=password password = passwordzfssa:maintenance workflow-001 execute (uncommitted)> commitUser openstack created.
Note that for user and password, the values are as defined for the san_login andsan_password parameters in the cinder.conf file.
■ Run the workflow from the BUI.
a. Select Maintenance → Workflows, and use the plus icon to upload a newworkflow.
b. Click the Browse button, and select the cinder.akwf file.
c. Click the UPLOAD button to finish uploading the workflow.
d. Click on the new row that appears on the BUI Workflows page to run theCinder driver workflow.The workflow prompts for a user name and password. This user name and passwordwill also be used in the cinder.conf file as san_login and san_password.
2. Set parameters in the /etc/cinder/cinder.conf file.Specify the following required properties in the cinder.conf file:
Note - The following is a partial list. Make sure you review and set all the properties in theconfiguration file that are necessary to make your specific setup work.
■ volume_driver – Make sure cinder.volume.drivers.zfssa.zfssaiscsi.ZFSSAISCSIDriver is uncommented. Make sure the other three selections are commentedout.
■ san_ip – The name or IP address of the ZFSSA management host.■ san_login – The user name of the Cinder user on the ZFSSA.■ san_password – The password of the Cinder user on the ZFSSA.■ zfssa_pool – The pool to be used to allocate volumes.

How to Configure Oracle ZFSSA for OpenStack
Chapter 6 • Options for Cinder Configuration and Deployment 101
■ zfssa_target_portal – The ZFSSA iSCSI target portal (in data-IP:port format). Thedefault port is 3260.
■ zfssa_project – The name of the ZFSSA project. If the project does not exist on theappliance, a project with that name is created by the driver at startup time. This projectcontains all the volumes created by the driver. Additional ZFSSA properties are providedfor setting up volume characteristics (for example, block size) and access (for example,initiators, targets, security).
■ zfssa_initiator_config – A property that lists multiple initiators, or multiple groups ofinitiators. This property replaces the previous zfssa_initiator_group parameter which isdeprecated in the OpenStack Kilo version.To list multiple initiators, use the following format:
zfssa_initiator_config = {
'init-grp1': [
{'iqn':'iqn1' , 'user':'user' , 'password':'password'}, {'iqn':'iqn2' , 'user':'user' , 'password':'password'} ],
'init-grp2': [
{'iqn':'iqn3' , 'user':'user' , 'password':'password'} ] }
For a specific example of how to list the initiators on this property, see Example 6.■ zfssa_target_interfaces – The ZFSSA iSCSI target network interfaces. Use the
following command to see the interfaces:
zfssa:configuration net interfaces> show
Interfaces:
INTERFACE STATE CLASS LINKS ADDRS LABEL
e1000g0 up ip e1000g0 1.10.20.30/24 Untitled Interface
■ connection – Set the parameter as follows:
connection=mysql://cinder:service-password@controller-fqdn/cinder
3. Ensure the ZFSSA iSCSI service is online.If the ZFSSA iSCSI service is not online, use either the BUI or the CLI in the appliance toenable it. The following example shows using the CLI in the appliance:
zfssa:> configuration services iscsi
zfssa:configuration services iscsi> enable
zfssa:configuration services iscsi> showProperties:
<status> = online
...
4. Enable the Cinder volume SMF services.
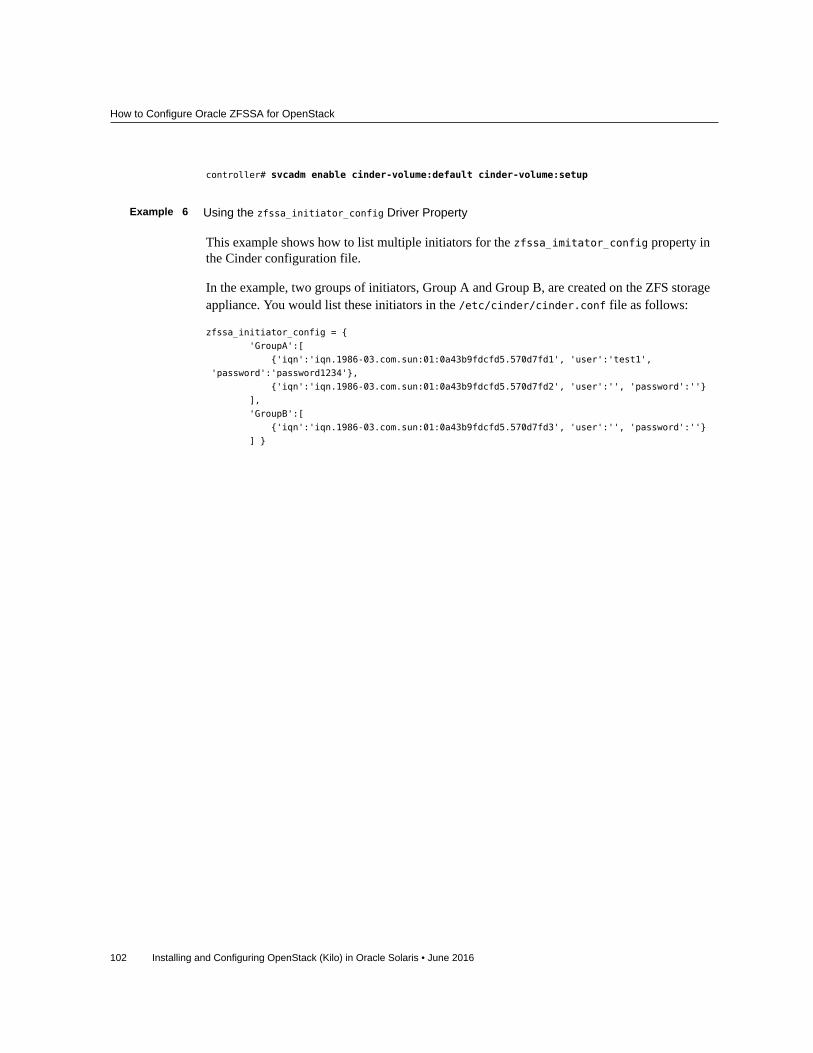
How to Configure Oracle ZFSSA for OpenStack
102 Installing and Configuring OpenStack (Kilo) in Oracle Solaris • June 2016
controller# svcadm enable cinder-volume:default cinder-volume:setup
Example 6 Using the zfssa_initiator_config Driver Property
This example shows how to list multiple initiators for the zfssa_imitator_config property inthe Cinder configuration file.
In the example, two groups of initiators, Group A and Group B, are created on the ZFS storageappliance. You would list these initiators in the /etc/cinder/cinder.conf file as follows:
zfssa_initiator_config = {
'GroupA':[
{'iqn':'iqn.1986-03.com.sun:01:0a43b9fdcfd5.570d7fd1', 'user':'test1',
'password':'password1234'},
{'iqn':'iqn.1986-03.com.sun:01:0a43b9fdcfd5.570d7fd2', 'user':'', 'password':''}
],
'GroupB':[
{'iqn':'iqn.1986-03.com.sun:01:0a43b9fdcfd5.570d7fd3', 'user':'', 'password':''}
] }
Chapter 7 • Options for Neutron Deployment 103
7 ♦ ♦ ♦ C H A P T E R 7
Options for Neutron Deployment
In the 3-node OpenStack configuration model that is used for this documentation, the Neutroncomponent is installed together with the controller node in a single system Figure 1. Thischapter describes how you can install the Neutron component inside a kernel zone in isolationfrom the other core components in the system. It covers the following topics:
■ “Deploying Neutron in a Kernel Zone” on page 103■ “Displaying MAC Address and VID Information” on page 106
Deploying Neutron in a Kernel Zone
In previous Oracle Solaris versions, the inability to assign addresses dynamically preventedNeutron from being installed in kernel zones. Newly introduced zone resource propertiesovercome this limitation.
The following figure shows a kernel zone deployment of Neutron.
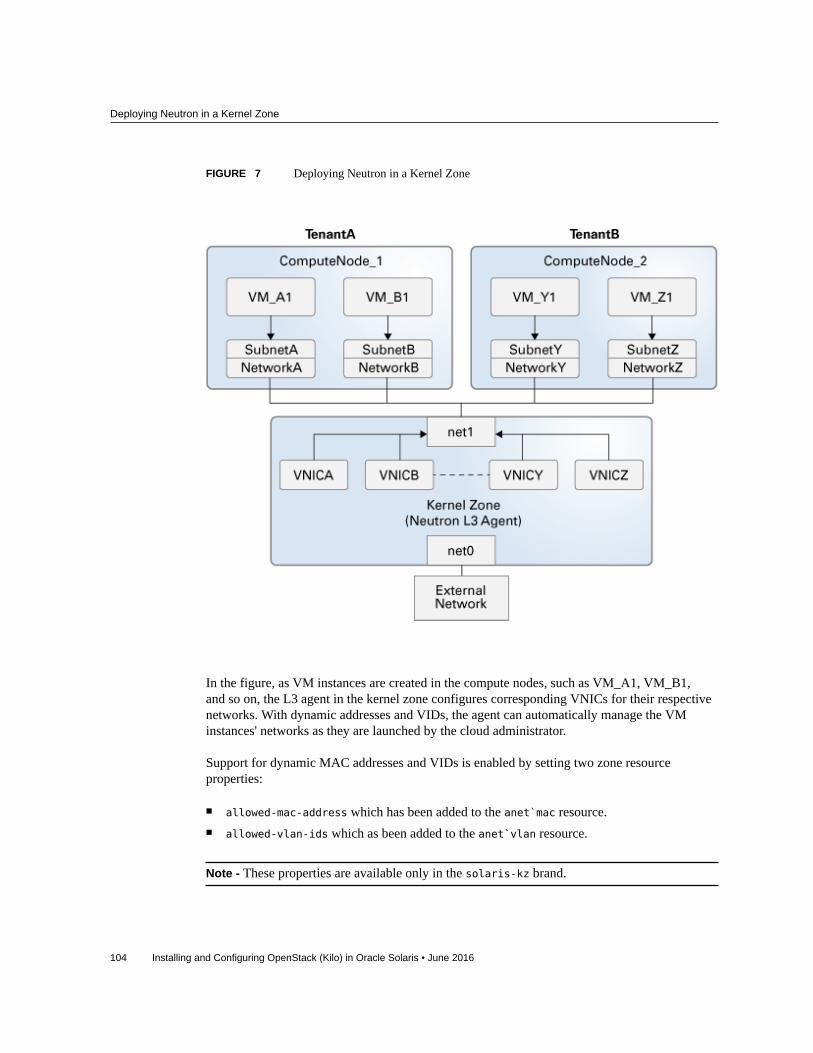
Deploying Neutron in a Kernel Zone
104 Installing and Configuring OpenStack (Kilo) in Oracle Solaris • June 2016
FIGURE 7 Deploying Neutron in a Kernel Zone
In the figure, as VM instances are created in the compute nodes, such as VM_A1, VM_B1,and so on, the L3 agent in the kernel zone configures corresponding VNICs for their respectivenetworks. With dynamic addresses and VIDs, the agent can automatically manage the VMinstances' networks as they are launched by the cloud administrator.
Support for dynamic MAC addresses and VIDs is enabled by setting two zone resourceproperties:
■ allowed-mac-address which has been added to the anet`mac resource.■ allowed-vlan-ids which as been added to the anet`vlan resource.
Note - These properties are available only in the solaris-kz brand.

How to Install the Neutron Component in a Kernel Zone
Chapter 7 • Options for Neutron Deployment 105
How to Install the Neutron Component in a KernelZone
Use this procedure if you want the Neutron component to be in an isolated kernel zone ratherthan sharing the global zone with other OpenStack components.
The steps in this procedure focus only on Neutron related configurations. For more detailedinstructions about kernel zone configuration, refer to the appropriate zones documentation.
1. Complete the steps to create a kernel zone.For the complete instructions, refer to Creating and Using Oracle Solaris Kernel Zonesabout how to configure a kernel zone. This book is in your Oracle Solaris version's library inOperating Systems Documentation.
2. In the kernel zone, assign a list of MAC address prefixes that the L3 agent candynamically assign to VNICs.The prefix length should be from 1 to 5 octets, such as fa:16:3f or fa:80:20:21:22.
Issue a new add command for each prefix. For example:
# zonecfg -z kernel-zonezonecfg:kernel-zone> add anetzonecfg:kernel-zone:anet> add maczonecfg:kernel-zone:anet:mac> add allowed-mac-address prefixzonecfg:kernel-zone:anet:mac> add allowed-mac-address prefix...
zonecfg:kernel-zone:anet:mac> endzonecfg:kernel-zone:anet> endzonecfg:kernel-zone>
3. In the kernel zone, define a range of VLAN IDs that the L3 agent can dynamicallyassign to VNICs.Issue a new add command for each allowed VLAN ID range. For example:
# zonecfg -z kernel-zonezonecfg:kernel-zone> add anetzonecfg:kernel-zone:anet> add vlanzonecfg:kernel-zone:anet:vlan> add allowed-vlan-ids id-rangezonecfg:kernel-zone:anet:vlan> add allowed-vlan-ids id-range...
zonecfg:kernel-zone:anet:vlan> endzonecfg:kernel-zone:anet> endzonecfg:kernel-zone>
Instead of providing a range, you can also specify the keyword any for the allowed-vlan-idsproperty. The L3 agent will then assign any valid VLAN ID to a VNIC the agent creates.
Displaying MAC Address and VID Information
106 Installing and Configuring OpenStack (Kilo) in Oracle Solaris • June 2016
4. In the kernel zone, complete the steps for the installation and configuration ofNeutron.Refer to “How to Install and Configure Neutron” on page 38 for the instructions.
Displaying MAC Address and VID InformationDifferent commands display different MAC address and VID information. The command youcan use also depends on whether you are in the guest VM or on the host.
Displaying From Inside the Guest VM
Inside the VM instance, you can show the range of MAC addresses and VIDs that are availablefor the VM's use by using the dladm show-phys command. To show these properties, you mustuse the -o option with the columns that you want on the output. The column names ALLOWED-ADDRESSES and ALLOWED-VIDS show the ranges of MAC addresses and VIDs. For example:
VM-instance# dladm show-phys -o link,media,device,allowed-addresses,allowed-vidsLINK MEDIA DEVICE ALLOWED-ADDRESSES ALLOWED-VIDS
net0 Ethernet zvnet0 fa:16:3f, 100-199,
fa:80:20:21:22 400-498,500
Displaying From the HostWhen you are outside the VM instance, you can display the range of MAC addresses andVLAN IDs by using either the zonecfg info command or the zonecfg export command.Optionally, you can use the -r option with either command.
The following examples show extracts of the more complete output that would be generated bythe commands.
■ zonecfg info or zonecfg -r info
global-zone# zonecfg -z kernel-zone -r infoanet:
...
mac:
...
allowed-mac-address: fa:16:3f
allowed-mac-address: fa:80:20:21:22
...
vlan:
Displaying MAC Address and VID Information
Chapter 7 • Options for Neutron Deployment 107
...
allowed-vlan-ids: 100-199
allowed-vlan-ids: 400-498
allowed-vlan-ids: 500
...
■ zonecfg export or zone -r export
global-zone# zonecfg -z kernel-zone -r export add anet
...
add mac
add allowed-mac-address: fa:16:3f
add allowed-mac-address: fa:80:20:21:22
...
end
add vlan:
add allowed-vlan-ids: 100-199
add allowed-vlan-ids: 400-498
add allowed-vlan-ids: 500
end
The zone commands show you the range of available MAC addresses or VIDs.
To see which addresses and VIDs are actually being used, issue the dladm show-vnic -mcommand. In the following example, the information of actual addresses and IDs used is basedon the preceding sample output of the zonecfg commands.
global-zone# dladm show-vnic -mLINK OVER SPEED MACADDRESSES MACADDRTYPES IDS
kz1/net0 net0 1000 2:8:20:31:ab:46 random VID:0,100-109
2:8:20:ad:29:e8 random
fa:80:20:21:22:00 random
fa:80:20:21:22:ff random
fa:16:3f:0:0:1 random
fa:16:3f:0:0:2 random
The output shows that 4 VNICs have been created by the agent. Two VNICs use addresses inthe fa:80:20:21:22 range, while two use addresses from the fa:16:3f range. You can also inferthe output that 4 guest VMs currently exist in the compute nodes. The VMs together use tenVIDs.
For more details about the zonecfg and dladm commands, refer to the zonecfg(8) and dladm(8)man pages.

108 Installing and Configuring OpenStack (Kilo) in Oracle Solaris • June 2016
Chapter 8 • Working With Ironic 109
8 ♦ ♦ ♦ C H A P T E R 8
Working With Ironic
This chapter describes Ironic as implemented and supported in Oracle Solaris. It covers thefollowing topics:
■ “About the Ironic Component” on page 109■ “Installing and Configuring Ironic” on page 110■ “Overview: Bare Metal Deployment With Ironic” on page 114■ “Using Ironic to Deploy Bare Metal” on page 116
About the Ironic Component
The previous chapters described the core OpenStack components to create a cloud. Additionalcomponents offer other services that are related to cloud administration. This chapter discussesthe component Ironic that is available in the Kilo release.
While the core components of OpenStack enable you to provision virtual machines or VMinstances, Ironic provides services for registering, provisioning, and decommissioning baremetal instances or nodes. Ironic uses common technologies such as PXE boot and IPMI tosupport a wide range of hardware that you can provision. Additionally, a pluggable drivermechanism enables Ironic to manage and support vendor-specific hardware.
For further information about Ironic and the advantages it offers, refer to the Ironic's developerdocumentation at the OpenStack community web site.
Ironic consists of three primary components. In Oracle Solaris, these components are deliveredas SMF Services. The following table lists and describes these components.
Component Description SMF Service
OpenStack Ironic API Service Service that provides a RESTful API bywhich operators and other services mayinteract with the managed bare metal nodes.
svc:/application/openstack/
ironic/ironic-api
OpenStack Ironic ConductorService
Main controller that performs the actualprovisioning of bare metal nodes byusing the reference and vendor-specific
svc:/application/openstack/
ironic/ironic-conductor
Installing and Configuring Ironic
110 Installing and Configuring OpenStack (Kilo) in Oracle Solaris • June 2016
Component Description SMF Servicedrivers. The conductor and API servicescommunicate by using RPC.
OpenStack Ironic DatabaseService
A transient SMF service for creating andsynchronizing Ironic's back end database.
svc:/application/openstack/
ironic/ironic-db
Installing and Configuring Ironic
You can use Ironic as a stand-alone component without other OpenStack services. Or, youcan deploy it along with other OpenStack components, typically on the compute node. Theconfiguration would depend on how you deploy Ironic.
Provisioning Oracle Solaris bare metal instances requires an Automated Installer (AI). The AIcan be located on the same node as the Ironic service. Alternatively, you can use AI on a remoteserver for operations with Ironic.
For more information about configuring and using AI, see the appropriate installation book inyour Oracle Solaris version's library in Operating Systems Documentation.
How to Install and Configure IronicBefore You Begin If you are deploying Ironic together with the rest of the OpenStack components, make sure that
you configure those core components first. At a minimum, Keystone and Glance configurationsmust be completed before you work on Ironic.
Likewise, ensure that the database for Ironic is set up. This procedure follows the 3-nodereference architecture in Figure 1 where the database is set up on the controller node, togetherwith the rest of the OpenStack databases.
1. Create the Ironic database.
a. Set the global shell variable for the Controller administrator node.
controller# export CONTROLLER_ADMIN_NODE=controller-node
where controller-node can be either the Controller's IP address or the host name. Formore information about setting variables, see “Preparing Host Names, Variables, andPasswords” on page 26.
b. Create the database with the following commands:
controller# mysql -u root -pEnter password: MySQL-root-password
How to Install and Configure Ironic
Chapter 8 • Working With Ironic 111
mysql> create database ironic default character set utf8 default collate
utf8_general_ci;
mysql> grant all privileges on ironic.* to 'ironic'@'$CONTROLLER_ADMIN_NODE'
identified by 'service-password';mysql> flush privileges;
mysql> quit
2. Install the OpenStack Ironic package.
# pkg install ironic ironicclient rabbitmq
# pkg update stevedore stevedore-27
3. Install the AI Server and Administration Tools.Use the same command whether you are installing the AI server package locally with Ironic orremotely on a different host.
# pkg install pkg:/install/installadm
4. If the AI is remotely located, configure the Ironic user on that server.
remote-AI# useradd -d /var/lib/ironic -m -g 88 -u 88 \
-P "Install Service Management" ironic
remote-AI# passwd ironicNew Password: passwordRe-enter new Password: password
Note - If the AI is locally installed with Ironic, the Ironic installation process automaticallycreates the ironic user on the system.
5. Create and administer the SSH key for the Ironic user.
■ If the AI is local with Ironic, issue the following commands on that system:
ironic-localhost# su - ironic
ironic-localhost# mkdir /var/lib/ironic/.ssh
ironic-localhost# ssh-keygen -N '' -t rsa \
-f /var/lib/ironic/.ssh/id_rsa
ironic-localhost# cat /var/lib/ironic/.ssh/id_rsa.pub > \
/var/lib/ironic/.ssh/authorized_keys
■ If the AI is remotely located, perform the following steps:
a. On the remote AI, issue the following commands:
remote-AI# su - ironic
remote-AI# mkdir /var/lib/ironic/.ssh
remote-AI# ssh-keygen -N '' -t rsa \
-f /var/lib/ironic/.ssh/id_rsa
remote-AI# cat /var/lib/ironic/.ssh/id_rsa.pub > \

How to Install and Configure Ironic
112 Installing and Configuring OpenStack (Kilo) in Oracle Solaris • June 2016
/var/lib/ironic/.ssh/authorized_keys
b. On the Ironic host, issue the following commands:
ironic-localhost# mkdir /var/lib/ironic/.ssh
ironic-localhost# scp ironic@AI-server:~/.ssh/id_rsa /var/lib/ironic/.sshironic-localhost# scp ironic@AI-server:~/.ssh/id_rsa.pub /var/lib/ironic/.sshironic-localhost# cat /var/lib/ironic/.ssh/id_rsa.pub > \
/var/lib/ironic/.ssh/authorized_keys
ironic-localhost# chown -R ironic:ironic /var/lib/ironic/.ssh
where AI-server can be either the AI server's IP address or the host name.
6. Edit the /etc/ironic/ironic.conf file.Note the following considerations regarding the configuration of certain parameters in the file:
auth_strategy Under the DEFAULT section, specify noauth if you are using Ironic as astand-alone component. Specify keystone if you are deploying Ironicwith other OpenStack components.
server Under the ai section, specify localhost if the Automated Installer (AI)is local with Ironic. If the AI is remote, specify that server's IP address orhost name.
connection Under the [database] section, specify the connection to the MySQLdatabase.
glance_host Under the glance section, specify the IP address or host name of theGlance server if the auth_strategy parameter is set to keystone.
glance_api_servers Also under the glance section, specify either the host names or IPaddresses with their corresponding port numbers such as 192.168.0.150:9292. Do not specify localhost.
Use the following sample file to guide you in configuring all the required parameters for Ironicto work. Note that in the sample file, the variable glance-serverIP represents the IP address orhost name of the Glance server.
[DEFAULT]
enabled_drivers=solaris
auth_strategy= setting depends on whether Ironic is stand alone or notpybasedir = /usr/lib/python2.6/vendor-packages/ironic
bindir = /usr/lib/ironic
host = ironic
[ai]
server= setting depends on whether AI is local or remoteusername=ironic
How to Install and Configure Ironic
Chapter 8 • Working With Ironic 113
port=22
timeout=10
ssh_key_file=/var/lib/ironic/.ssh/id_rsa
deploy_interval=30
[api]
port=6385
[conductor]
api_url=http://localhost:6385/
heartbeat_timeout=60
heartbeat_interval=60
sync_power_state_interval=300
check_provision_state_interval=120
[database]
connection= mysql://ironic:service-password@$CONTROLLER_ADMIN_NODE/ironic
[solaris_ipmi]
imagecache_dirname = /var/lib/ironic/images
imagecache_lock_timeout = 60
[glance]
glance_host = glance-serverIPglance_port = 9292
glance_protocol = http
glance_api_servers = glance-serverIP:portauth_strategy = for Ironic to use Keystone to interact with Glance, specify keystone
[keystone_authtoken] configure if under DEFAULT, auth_strategy = keystoneauth_host = localhost
auth_uri = http://$CONTROLLER_ADMIN_NODE:5000/v2.0
identity_uri = http://$CONTROLLER_ADMIN_NODE:35357
admin_user = ironic
admin_password = service-passwordadmin_tenant_name = tenantsigning_dir = $state_path/keystone-signing
[neutron]
auth_strategy = for Ironic to use Keystone to interact with Neutron, specify keystone
[oslo_messaging_rabbit]
rabbit_host=$CONTROLLER_ADMIN_NODE
7. Ensure that the SMF services for Ironic are running.
ironic-localhost# svcs -a | grep rabbitmq
ironic-localhost# svcs -a | grep ironic
If Ironic is in stand-alone mode, you might need to manually enable the services.
ironic-localhost# svcadm enable rabbitmq
ironic-localhost# svcadm enable ironic-db
ironic-localhost# svcadm enable ironic-api ironic-conductor

Overview: Bare Metal Deployment With Ironic
114 Installing and Configuring OpenStack (Kilo) in Oracle Solaris • June 2016
8. (Optional) Test the command line utility.
a. Set the global shell variables for Ironic.
■ If the auth_strategy is set to noauth, set the shell variables as follows:
ironic-localhost# export OS_AUTH_TOKEN=fake-tokenironic-localhost# export IRONIC_URL=http://localhost:6385
■ If the auth_strategy is set to keystone, set the shell variables as follows.If the Keystone service is in a different node from Ironic, then for OS_AUTH_URL,specify either the host name or the IP address where Keystone is installed.
ironic-localhost# export OS_AUTH_URL=http://$CONTROLLER_ADMIN_NODE:5000/v2.0
ironic-localhost# export OS_PROJECT_NAME=service
ironic-localhost# export OS_USERNAME=ironic
ironic-localhost# export OS_PASSWORD=service-passwordironic-localhost# export IRONIC_URL=http://localhost:6385/
b. Issue an Ironic command line.
# ironic driver-list+---------------------+----------------+
| Supported driver(s) | Active host(s) |
+---------------------+----------------+
| solaris | ironic |
+---------------------+----------------+
Currently, solaris is the only enabled and tested driver in Ironic. However, you can adddrivers to the list by including their names under the [enabled_drivers] section in the/etc/ironic/ironic.conf file. After adding the drivers, you need to restart the ironic-api and ironic-conductor SMF services.
Overview: Bare Metal Deployment With Ironic
With the Ironic solaris driver, you can provision a bare metal node by using either OracleSolaris's Unified Archive (UAR) feature or its Image Packaging System (IPS). When youcreate a node, you would pass information to the solaris driver by means of configurable nodeelements.
The following table lists the elements for creating nodes. The driver_info/archive_urielement applies to provisioning nodes with a UAR file. The remaining elements in the tableapply to provisioning nodes by using IPS.
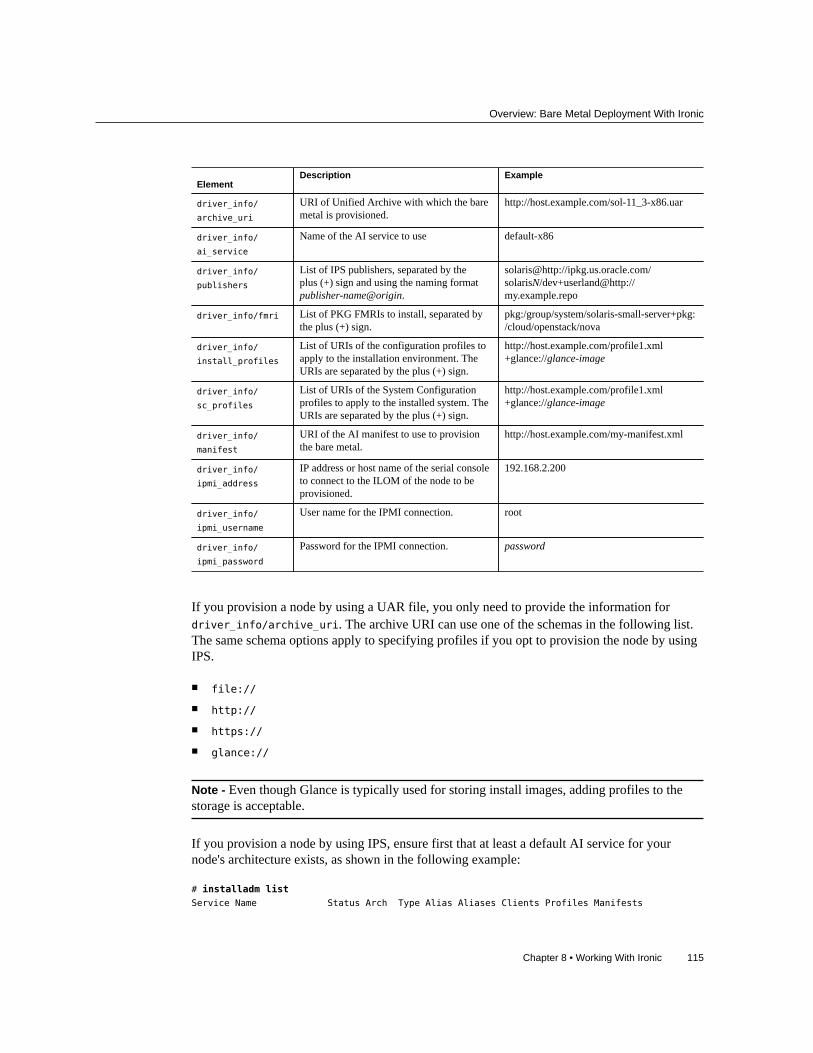
Overview: Bare Metal Deployment With Ironic
Chapter 8 • Working With Ironic 115
ElementDescription Example
driver_info/
archive_uri
URI of Unified Archive with which the baremetal is provisioned.
http://host.example.com/sol-11_3-x86.uar
driver_info/
ai_service
Name of the AI service to use default-x86
driver_info/
publishers
List of IPS publishers, separated by theplus (+) sign and using the naming formatpublisher-name@origin.
solaris@http://ipkg.us.oracle.com/solarisN/dev+userland@http://my.example.repo
driver_info/fmri List of PKG FMRIs to install, separated bythe plus (+) sign.
pkg:/group/system/solaris-small-server+pkg:/cloud/openstack/nova
driver_info/
install_profiles
List of URIs of the configuration profiles toapply to the installation environment. TheURIs are separated by the plus (+) sign.
http://host.example.com/profile1.xml+glance://glance-image
driver_info/
sc_profiles
List of URIs of the System Configurationprofiles to apply to the installed system. TheURIs are separated by the plus (+) sign.
http://host.example.com/profile1.xml+glance://glance-image
driver_info/
manifest
URI of the AI manifest to use to provisionthe bare metal.
http://host.example.com/my-manifest.xml
driver_info/
ipmi_address
IP address or host name of the serial consoleto connect to the ILOM of the node to beprovisioned.
192.168.2.200
driver_info/
ipmi_username
User name for the IPMI connection. root
driver_info/
ipmi_password
Password for the IPMI connection. password
If you provision a node by using a UAR file, you only need to provide the information fordriver_info/archive_uri. The archive URI can use one of the schemas in the following list.The same schema options apply to specifying profiles if you opt to provision the node by usingIPS.
■ file://
■ http://
■ https://
■ glance://
Note - Even though Glance is typically used for storing install images, adding profiles to thestorage is acceptable.
If you provision a node by using IPS, ensure first that at least a default AI service for yournode's architecture exists, as shown in the following example:
# installadm listService Name Status Arch Type Alias Aliases Clients Profiles Manifests
Using Ironic to Deploy Bare Metal
116 Installing and Configuring OpenStack (Kilo) in Oracle Solaris • June 2016
------------ ------ ---- ---- ----- ------- ------- -------- ---------
default-i386 on i386 pkg yes 0 0 0 1
default-sparc on i386 pkg yes 0 0 0 1
ironic-x86 on i386 pkg no 0 0 0 1
ironic-sparc on i386 pkg no 0 0 0 1
# installadm list -vcn ironic-x86 There are no clients configured for service 'ironic-x86'.
# installadm list -vmn ironic-x86Service Name Manifest Name Status Criteria
------------ ------------- ------ --------
ironic-x86 orig_default default none
ironic-sparc orig_default default none
When you use IPS to provision nodes, specifying the driver_info/ai_service is optional. Ifyou omit the name of the AI service, the default AI service for that node's architecture is used.
If you specify custom packages for driver_info/fmri, you must also specify publishers for thedriver_info/publishers element.
Using Ironic to Deploy Bare Metal
The following task provides the basic steps from creating the node to actual deployment.
For more information about using the Unified Archive feature of Oracle Solaris, see UsingUnified Archives for System Recovery and Cloning in Oracle Solaris. This book is in yourOracle Solaris version's library.
How to Deploy Bare Metal From a UAR File
For a concrete example that uses the following steps, see Example 7.
Before You Begin Ensure that the UAR file to use already exists.
1. Create the following variables to facilitate the use of the Ironic command lineutility.
■ IP - the IP address used to connect to the nodes' ILOM.■ USER - typically, the user is root.■ PASS - the root password.■ HOST_MAC - the system's MAC address.

How to Deploy Bare Metal From a UAR File
Chapter 8 • Working With Ironic 117
2. Create the Ironic node.
# ironic node-create options
The properties of the new node are displayed, including the node's UUID.
3. Create a variable for the node's UUID for easy reference.
4. Update the node by specifying the UAR location to install.
# ironic node-update options
5. Create an associated port for this node.
# ironic port-create options
6. (Optional) Validate the fields you specified for the node.
# ironic node-validate options
7. Provision the node.
# ironic node-set-provision-state options
8. (Optional) Display the status of the deployment.
# ironic node-show options
Note - The output would be different if you run the command while provisioning is ongoingthan after the completion of the process.
Example 7 Deploying a Node Using a UAR File
This example assumes the following:
■ The basics of the machine to host the node■ Host name: mynewnode.example.com■ Architecture: x86■ IP address: 1.1.1.1■ MAC address: 01:02:03:04:05:06
■ The basics of the ILOM Host:■ Host name: mynewnode-aa.example.com■ IP address: 2.2.2.2■ User: root■ Password: password
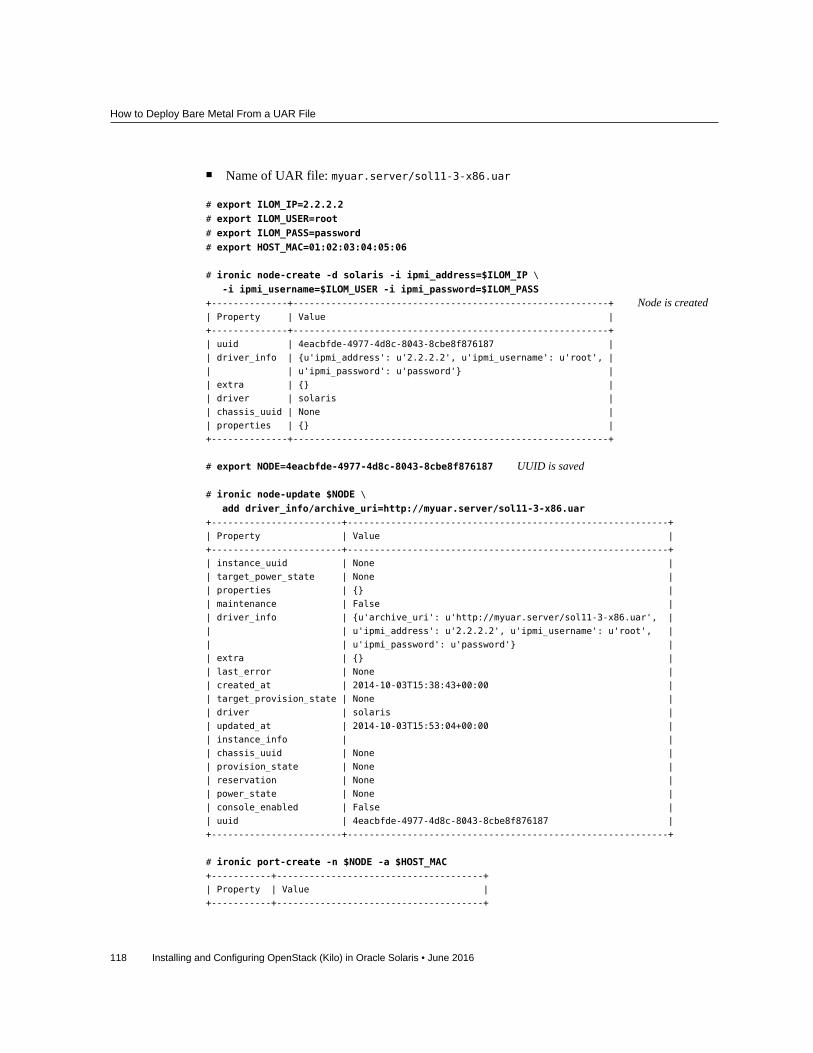
How to Deploy Bare Metal From a UAR File
118 Installing and Configuring OpenStack (Kilo) in Oracle Solaris • June 2016
■ Name of UAR file: myuar.server/sol11-3-x86.uar
# export ILOM_IP=2.2.2.2
# export ILOM_USER=root
# export ILOM_PASS=password
# export HOST_MAC=01:02:03:04:05:06
# ironic node-create -d solaris -i ipmi_address=$ILOM_IP \
-i ipmi_username=$ILOM_USER -i ipmi_password=$ILOM_PASS+--------------+----------------------------------------------------------+ Node is created| Property | Value |
+--------------+----------------------------------------------------------+
| uuid | 4eacbfde-4977-4d8c-8043-8cbe8f876187 |
| driver_info | {u'ipmi_address': u'2.2.2.2', u'ipmi_username': u'root', |
| | u'ipmi_password': u'password'} |
| extra | {} |
| driver | solaris |
| chassis_uuid | None |
| properties | {} |
+--------------+----------------------------------------------------------+
# export NODE=4eacbfde-4977-4d8c-8043-8cbe8f876187 UUID is saved
# ironic node-update $NODE \
add driver_info/archive_uri=http://myuar.server/sol11-3-x86.uar+------------------------+-----------------------------------------------------------+
| Property | Value |
+------------------------+-----------------------------------------------------------+
| instance_uuid | None |
| target_power_state | None |
| properties | {} |
| maintenance | False |
| driver_info | {u'archive_uri': u'http://myuar.server/sol11-3-x86.uar', |
| | u'ipmi_address': u'2.2.2.2', u'ipmi_username': u'root', |
| | u'ipmi_password': u'password'} |
| extra | {} |
| last_error | None |
| created_at | 2014-10-03T15:38:43+00:00 |
| target_provision_state | None |
| driver | solaris |
| updated_at | 2014-10-03T15:53:04+00:00 |
| instance_info | |
| chassis_uuid | None |
| provision_state | None |
| reservation | None |
| power_state | None |
| console_enabled | False |
| uuid | 4eacbfde-4977-4d8c-8043-8cbe8f876187 |
+------------------------+-----------------------------------------------------------+
# ironic port-create -n $NODE -a $HOST_MAC+-----------+--------------------------------------+
| Property | Value |
+-----------+--------------------------------------+
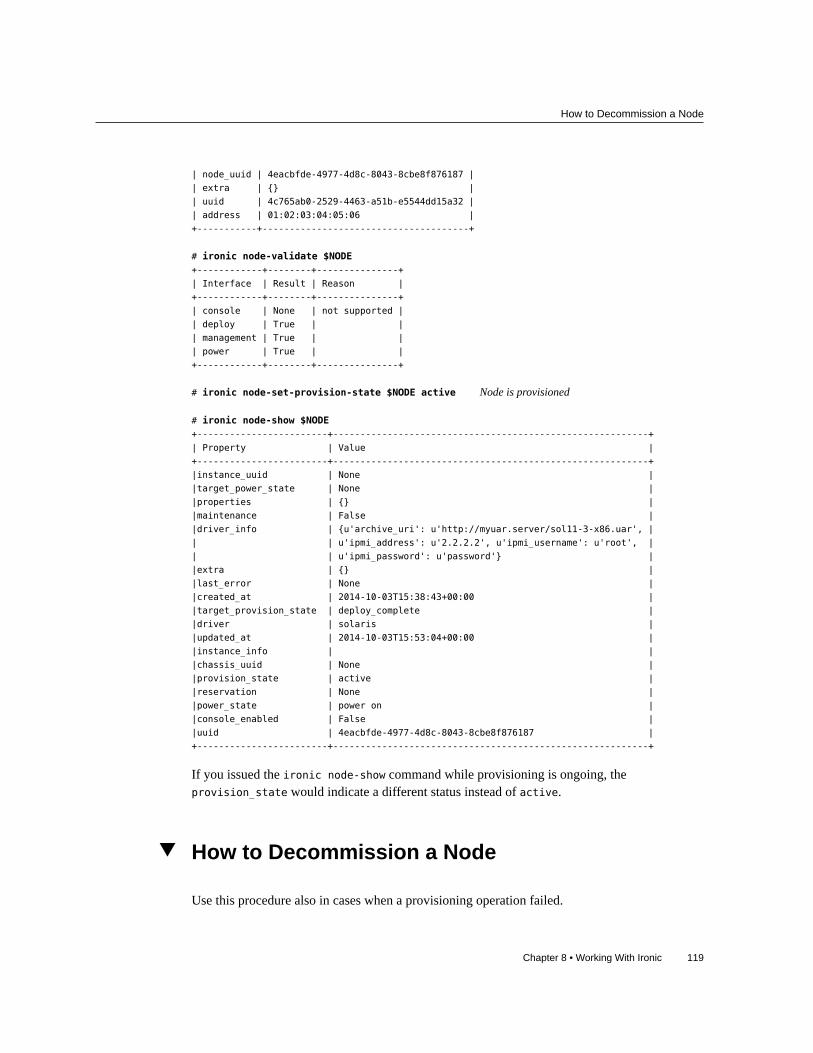
How to Decommission a Node
Chapter 8 • Working With Ironic 119
| node_uuid | 4eacbfde-4977-4d8c-8043-8cbe8f876187 |
| extra | {} |
| uuid | 4c765ab0-2529-4463-a51b-e5544dd15a32 |
| address | 01:02:03:04:05:06 |
+-----------+--------------------------------------+
# ironic node-validate $NODE+------------+--------+---------------+
| Interface | Result | Reason |
+------------+--------+---------------+
| console | None | not supported |
| deploy | True | |
| management | True | |
| power | True | |
+------------+--------+---------------+
# ironic node-set-provision-state $NODE active Node is provisioned
# ironic node-show $NODE+------------------------+----------------------------------------------------------+
| Property | Value |
+------------------------+----------------------------------------------------------+
|instance_uuid | None |
|target_power_state | None |
|properties | {} |
|maintenance | False |
|driver_info | {u'archive_uri': u'http://myuar.server/sol11-3-x86.uar', |
| | u'ipmi_address': u'2.2.2.2', u'ipmi_username': u'root', |
| | u'ipmi_password': u'password'} |
|extra | {} |
|last_error | None |
|created_at | 2014-10-03T15:38:43+00:00 |
|target_provision_state | deploy_complete |
|driver | solaris |
|updated_at | 2014-10-03T15:53:04+00:00 |
|instance_info | |
|chassis_uuid | None |
|provision_state | active |
|reservation | None |
|power_state | power on |
|console_enabled | False |
|uuid | 4eacbfde-4977-4d8c-8043-8cbe8f876187 |
+------------------------+----------------------------------------------------------+
If you issued the ironic node-show command while provisioning is ongoing, theprovision_state would indicate a different status instead of active.
How to Decommission a Node
Use this procedure also in cases when a provisioning operation failed.
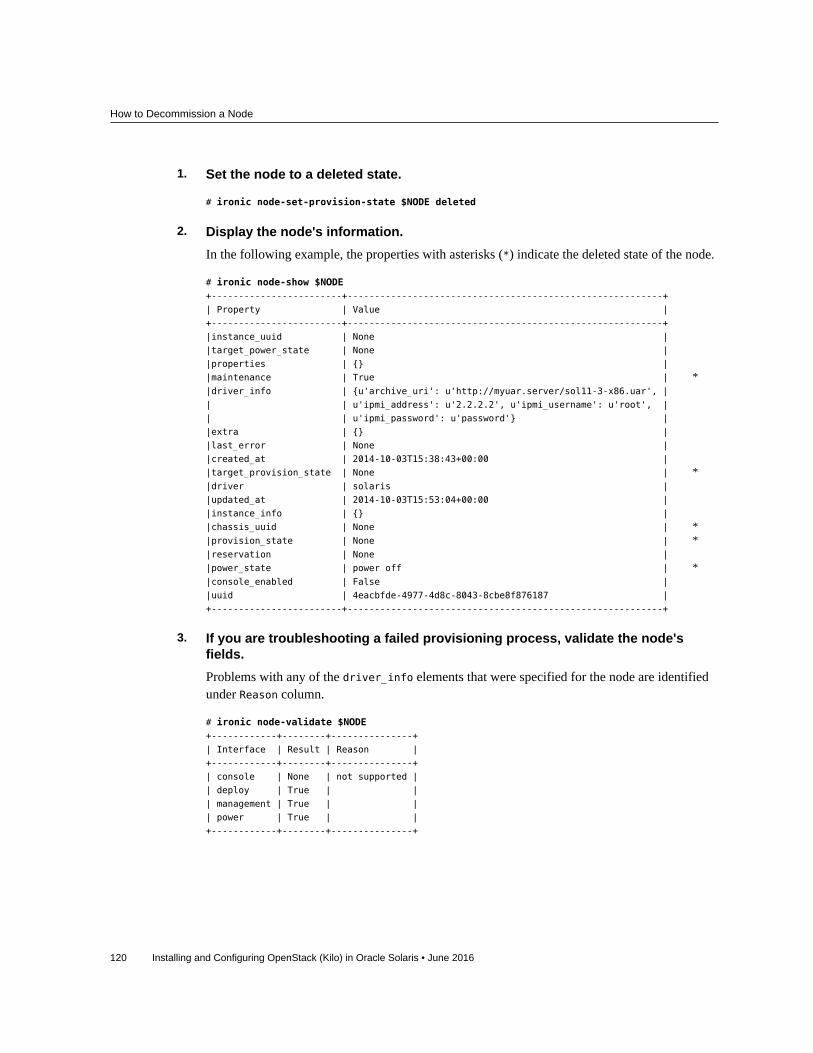
How to Decommission a Node
120 Installing and Configuring OpenStack (Kilo) in Oracle Solaris • June 2016
1. Set the node to a deleted state.
# ironic node-set-provision-state $NODE deleted
2. Display the node's information.In the following example, the properties with asterisks (*) indicate the deleted state of the node.
# ironic node-show $NODE+------------------------+----------------------------------------------------------+
| Property | Value |
+------------------------+----------------------------------------------------------+
|instance_uuid | None |
|target_power_state | None |
|properties | {} |
|maintenance | True | *|driver_info | {u'archive_uri': u'http://myuar.server/sol11-3-x86.uar', |
| | u'ipmi_address': u'2.2.2.2', u'ipmi_username': u'root', |
| | u'ipmi_password': u'password'} |
|extra | {} |
|last_error | None |
|created_at | 2014-10-03T15:38:43+00:00 |
|target_provision_state | None | *|driver | solaris |
|updated_at | 2014-10-03T15:53:04+00:00 |
|instance_info | {} |
|chassis_uuid | None | *|provision_state | None | *|reservation | None |
|power_state | power off | *|console_enabled | False |
|uuid | 4eacbfde-4977-4d8c-8043-8cbe8f876187 |
+------------------------+----------------------------------------------------------+
3. If you are troubleshooting a failed provisioning process, validate the node'sfields.Problems with any of the driver_info elements that were specified for the node are identifiedunder Reason column.
# ironic node-validate $NODE+------------+--------+---------------+
| Interface | Result | Reason |
+------------+--------+---------------+
| console | None | not supported |
| deploy | True | |
| management | True | |
| power | True | |
+------------+--------+---------------+
Chapter 9 • Working With Heat 121
9 ♦ ♦ ♦ C H A P T E R 9
Working With Heat
This chapter describes Heat as implemented and supported in Oracle Solaris. It covers thefollowing topics:
■ “About the Heat Component” on page 121■ “Installing Heat” on page 122■ “About HOT Templates” on page 122■ “Using Heat With Cloudbase-Init” on page 124
About the Heat Component
Heat is OpenStack's orchestration engine that enables you to deploy cloud applications based onHeat Orchestration templates that you create. These templates are also called HOT templates.
With a HOT template, you can create different OpenStack resource types such as instances,floating IPs, volumes, users, and so on. Templates also enable you to deploy advancedfunctionalities such as instance high availability, instance autoscaling, and nested stacks. Thus,with Heat, all OpenStack core projects could receive a larger user base. With templates, Heatprovides a way for you to override the default resource implementation by using instead theparameters which are passed from the template to the engine.
Heat provides its services through a RESTful web services API. As with all OpenStackapplications, Python WSGI interfaces are used and applications are configured together usingPaste. The HTTP endpoints of the application are made up of pipelines of Web Server GatewayInterface (WSGI) middleware. Heat specifically uses two endpoints: Port 8004 for the Heat APIand port 8000 for the Heat Cloud Formation.
Heat's own configuration is controlled by the /etc/heat/heat.conf configuration file. At thistime, no Solaris-specific configuration parameters exist in the primary Heat configuration file.
For more information about the Heat component, refer to the OpenStack community's Heatdocumentation.
Installing Heat
122 Installing and Configuring OpenStack (Kilo) in Oracle Solaris • June 2016
Installing Heat
In a typical configuration, you install the Heat services on the same node as Keystone. The Heatpackage is automatically included if you installed OpenStack on the node with the followingcommand:
# pkg install openstack
How to Configure HeatBefore You Begin You must configure Keystone first as described in the “How to Install and Configure Keystone”
before performing this task.
1. Configure Heat by either uncommenting or setting the parameters in /etc/heat/heat.conf:
[database]
connection = mysql://heat:service-password@$CONTROLLER_ADMIN_NODE/heat
[keystone_authtoken]
auth_uri = http://$CONTROLLER_ADMIN_NODE:5000/v2.0
identity_uri = http://$CONTROLLER_ADMIN_NODE:35357
admin_user = heat
admin_password = service-passwordadmin_tenant_name = tenant
[oslo_messaging_rabbit]
rabbit_host=$CONTROLLER_ADMIN_NODE
2. Enable the heat service.
controller# svcadm enable -rs heat-api heat-db heat-engine \
heat-api-cfn heat-api-cloudwatch
About HOT Templates
To use Heat to orchestrate multiple composite cloud applications on your OpenStackconfiguration, you need to define a Heat Orchestration Template (HOT). A HOT templatecontains specifications that you must fill out. The parameters you provide are read when yourun the process to create resource types and other advanced functionality.
For the HOT template specifications and their descriptions, see http://docs.openstack.org/developer/heat/template_guide/hot_spec.html#hot-spec.
How to Configure Heat
Chapter 9 • Working With Heat 123
For information about how to write a HOT template, see http://docs.openstack.org/developer/heat/template_guide/hot_guide.html#hot-guide.
To deploy a HOT template, use the following command:
# heat stack-create -f template stack-name
template Full path of the template file you are processing.
stack-name Stack you want to create
You can also insert additional parameter values in the command using the format -Pkey1=value1;key2=value2...
The following example shows the contents of a HOT template named stack3 which createsthree private networks with subnets.
Note - The line heat_template_version: 2013-05-23 must appear at the top of the template.
heat_template_version: 2013-05-23
description: Create a few networks.
resources:
heat_net1:
type:OS::Neutron::Net
properties:
name:heat_net1
heat_subnet1:
type:OS::Neutron::Subnet
properties:
name:heat_subnet1
network_id: { get_resource: heat_net1 }
cidr: 192.168.50.0/24
heat_net2:
type:OS::Neutron::Net
properties:
name: heat_net2
heat_subnet2:
type:OS::Neutron::Subnet
properties:
name:heat_subnet2
network_id: { get_resource: heat_net2 }
cidr: 192.168.51.0/24
heat_net3:
type:OS::Neutron::Net
properties:
name: heat_net3
Using Heat With Cloudbase-Init
124 Installing and Configuring OpenStack (Kilo) in Oracle Solaris • June 2016
heat_subnet3:
type:OS::Neutron::Subnet
properties:
name:heat_subnet3
network_id: { get_resource: heat_net3 }
cidr: 192.168.52.0/24
Using Heat With Cloudbase-Init
Cloudbase-Init is a third-party service that automatically initializes new guest images in thecloud such as user creation, password generation, running of scripts, and so on. Oracle SolarisOpenStack supports this service in Kilo but limited only to the UserData plugin.
The Cloudbase-Init package is not included in any of the standard group packages. You shouldinstall this package only on systems whose images are expressly intended to be deployed incloud environments.
How to Automatically Initialize a Guest ImageBefore You Begin You must have completed the following:
■ Created a unified archive (UA) of the system whose image you want to deploy in the cloud.Ensure that the cloudbase-init package is included in that system before you create the UA.For instructions on creating a UA, refer to the chapter Working With Unified Archives inthe Using Unified Archives for System Recovery and Cloning in Oracle Solaris guide. Thisguide is in your Oracle Solaris version's library in Operating Systems Documentation.
■ On the user data section of a Heat template, provide the user data information. Save thetemplate as a *.yaml file.
1. Upload the image that contains the Cloudbase-Init package into Glance.
2. Issue the following command:
# heat stack-create -f yaml-template \ -P key_name=your key name;image=image name\ private_net=name of tenant private network stack-name
Example 8 Heat Template Using Cloudbase-Init
The following example shows a Heat template that will be processed with Cloudbase-Init. Theinformation you need to provide are shown in bold, and the user data information is marked forconvenience. The name of the template is test.yaml.
heat_template_version: 2013-05-23

How to Automatically Initialize a Guest Image
Chapter 9 • Working With Heat 125
description: HOT template to deploy one server into an existing neutron tenant
network and assign a floating IP address so it's routable from the public network.
parameters:
key_name:Server1Key
type: string
description: Name of keypair to assign to server
image:Solaris Non-global Zone
type: string
description: Name of image to use for server
flavor:8
type: string
description: Flavor to use for server
default: 1
public_net:
type: string
description:
Name or ID of public network for which floating IP address will
be allocated
default: oracle
private_net:HR
type: string
description: Name or ID of private network into which server is
deployed
resources:
server1:
type: OS::Nova::Server
properties:
name: { get_param: 'OS::stack_name' }
image: { get_param: image }
flavor: { get_param: flavor }
key_name: { get_param: key_name }
networks:
- port: { get_resource: server1_port }
user_data_format: RAW
---------- Beginning of user data section ---------- user_data:
str_replace:
template: |
#!/bin/ksh
print "This is a test."
server1_port:
type: OS::Neutron::Port
properties:
network: { get_param: private_net }
server1_floating_ip:
type: OS::Neutron::FloatingIP
properties:
floating_network: { get_param: public_net }
port_id: { get_resource: server1_port }
How to Automatically Initialize a Guest Image
126 Installing and Configuring OpenStack (Kilo) in Oracle Solaris • June 2016
outputs:
server1_private_ip:
description: IP address of server1 in private network
value: { get_attr: [ server1, first_address ] }
server1_public_ip:
description: Floating IP address of server1 in public network
value: { get_attr: [ server1_floating_ip, floating_ip_address ] }
To deploy the template, you would type the following:
# heat stack-create -f test.yaml -P key_name=Server1Key \
-P image=Solaris Non-global Zone\
...-P flavor=8
-P private_net=HR teststack
Note that the specific values of each option in the command comes from the information in thetest.yaml template file. The public network is oracle, the default value.
Chapter 10 • OpenStack Troubleshooting 127
10 ♦ ♦ ♦ C H A P T E R 1 0
OpenStack Troubleshooting
This chapter describes OpenStack issues that are associated with the current release. It alsoprovides troubleshooting tips and workarounds to resolve basic problems you might encounterduring configuration. The following topics are covered:
■ “Obtaining Command Line Help” on page 127■ “Known Limitations” on page 128■ “Examining Log Files” on page 129■ “Investigating and Resolving Problems” on page 131■ “General Tips and Tricks on Debugging” on page 138■ “Useful Sites” on page 138
Obtaining Command Line Help
In OpenStack, commands correspond to the OpenStack components. For example, the novacommand applies to compute operations, cinder to storage, and neutron to networking.
To obtain help on the use of these commands such as the correct syntax, supportedsubcommands, possible options, and so on, use the command-component help command, suchas nova help or neutron help. You can filter the list of possible subcommands to use withthe command-component command by using the grep command. For example, to list neutronsubcommands that are related to routers, you would type the following command:
# neutron help | grep router l3-agent-list-hosting-router List L3 agents hosting a router.
l3-agent-router-add Add a router to a L3 agent.
l3-agent-router-remove Remove a router from a L3 agent.
net-gateway-connect Add an internal network interface to a router.
router-create Create a router for a given tenant.
router-delete Delete a given router.
router-gateway-clear Remove an external network gateway from a router.
router-gateway-set Set the external network gateway for a router.
router-interface-add Add an internal network interface to a router.
router-interface-delete Remove an internal network interface from a router.
router-list List routers that belong to a given tenant.
router-list-on-l3-agent List the routers on a L3 agent.
Known Limitations
128 Installing and Configuring OpenStack (Kilo) in Oracle Solaris • June 2016
router-port-list List ports that belong to a given tenant, with specified
router.
router-show Show information of a given router.
router-update Update router's information.
Then, to obtain specific details about a subcommand, such as router-list which identifiesrouters in the cloud, you would type the following command:
# neutron help router-list
Due to the implementation of the OpenStackClient (OSC), certain component based commandshave been deprecated. Instead, you use openstack as the main command together withthe appropriate subcommand. For a brief description of the OSC, see “Implementation ofOpenStackClient” on page 15.
To obtain information about the openstack command and its subcommands, use one of thefollowing commands:
■ openstack help subcommand■ openstack --help
Typing openstack without any subcommands switches to the interactive mode, where you cantype help [subcommand] for information. To exit the interactive mode, type quit.
For more information about OSC, see http://docs.openstack.org/developer/python-openstackclient/index.html.
For a list of previous commands and their equivalents in OSC, see Appendix B,“OpenStackClient Commands”.
Known LimitationsThe following are known issues with OpenStack (Kilo) in Oracle Solaris:
■ Only Nova nodes running Oracle Solaris are fully supported because Neutron supports onlya single plugin for network virtualization.
■ Currently the Cinder volume attachment is not supported in the non-global zones.■ VM instances must be running the current Oracle Solaris version.■ Cinder backup is not supported.
The cinder-backup service is installed when you install the cinder package. However,in a default Cinder deployment such as described in “Configuring the StorageNode” on page 46, the service currently does not work for the backup_volume.
■ On the Launch Instance dialog in the dashboard, only Boot from image is supportedfor the Instance Boot Source. On the Project → Images & Snapshots → Actions menu,UploadToImage is not supported.
Examining Log Files
Chapter 10 • OpenStack Troubleshooting 129
■ VXLAN datalinks are not supported as the value for the external_network_datalinkoption in the /etc/neutron/l3_agent.ini file. If you set a VXLAN datalink as the valuefor the external_network_datalink option, the Neutron L3 agent fails to create and plumba VNIC on the external network.
■ You must use the command line to modify the quota for a network resource for a project.The quota for a network resource cannot be modified from Horizon. You can use theHorizon dashboard to create a project or modify non-network resources of an existingproject. To modify the quota for networks, subnets, ports, routers, or floating IP addresses ofa project, you must use the neutron quota-update command.Even when you modify a non-network resource, you see the following error message. Youcan ignore this message. Contrary to this message, the quota for the non-network resourcehas been applied.
Error: Modified project information and members, but unable to modify project quotas.
■ Service status might be reported differently by SMF and by OpenStack.
The following example shows that the nova-cert service is disabled in OpenStack, eventhough SMF shows the service as online:
root@c190-133:~# nova service-disable c190-133 nova-cert
+----------+-----------+----------+
| Host | Binary | Status |
+----------+-----------+----------+
| c190-133 | nova-cert | disabled |
+----------+-----------+----------+
root@c190-133:~# svcs nova-cert
STATE STIME FMRI
online 21:14:11 svc:/application/openstack/nova/nova-cert:default
Examining Log Files
SMF services and various Oracle Solaris processes produce log files where you can look forerror messages or gather more information about messages that were displayed on the screen.SMF service log files contain valuable debugging information.
Because OpenStack is typically installed across multiple systems, the log files that you need tocheck are also in various locations. For a more systematic troubleshooting, examine logs pernode.
For general help in fixing problems with SMF services, see Managing System Services inOracle Solaris about troubleshooting services problems in your Oracle Solaris version's libraryin Operating Systems Documentation..
Examining Log Files
130 Installing and Configuring OpenStack (Kilo) in Oracle Solaris • June 2016
To view service logs, make sure you have the proper authorization. Assume the appropriateRBAC profile to view OpenStack service log files or to use the pfedit command to modifyOpenStack service configuration files. The following profiles can be assigned:
■ OpenStack Block Storage Management■ OpenStack Compute Management■ OpenStack Identity Management■ OpenStack Image Management■ OpenStack Network Management■ OpenStack Object Storage Management■ OpenStack Management
To troubleshoot, use the following general commands:
■ To find out which OpenStack services are running on a specific node:
# svcs -a | grep openstack
■ To list which services might be in a maintenance mode:
# svcs -x
svc:/application/openstack/swift/swift-replicator-rsync:
default (OpenStack Swift Replication Service)
State: maintenance since Fri May 22 04:06:11 2015
Reason: Start method exited with $SMF_EXIT_ERR_FATAL.
See: http://support.oracle.com/msg/SMF-8000-KS
See: rsync(1)
See: rsyncd.conf(5)
See: /var/svc/log/application-openstack-swift-swift-replicator-rsync:default.log
Impact: This service is not running.
If a service is in maintenance mode, check the service log file.■ To identify the log for a specific OpenStack service:
# svcs -L openstack-service
For example:
# svcs -L neutron-server
/var/svc/log/application-openstack-neutron-neutron-server:default.log
With the proper authorization, you can combine options such as -Lv to list and view the logfor the service.
■ To immediately identify instances of error that are recorded in a specific log, you can usecommon UNIX commands such as grep.
# grep keyword `svcs -L openstack-service`
Investigating and Resolving Problems
Chapter 10 • OpenStack Troubleshooting 131
You can search for the occurrences of error, warning, and other critical keywords todirectly read the error messages.
■ To check EVS properties when troubleshooting networking issues, use the various evsadmsubcommands such as evsadm show-prop.
The following logs often contain information helpful for troubleshooting:
■ nova-compute
■ nova-scheduler
■ cinder-scheduler
■ neutron-server
Aside from the SMF service log files, you can also check logs in the /var/log directory. Justlike other Oracle Solaris processes, OpenStack services also generate their own log files in the/var/log/openstack-service directories.
For example, OpenStack image store log files are in /var/log/glance. Problems with creatingand booting a VM instance might be recorded in the /var/log/zones directory. Messaging logsare stored as /var/log/rabbitmq/[email protected].
Most OpenStack configuration files are under the OpenStack service name in the /etcdirectory. For example, OpenStack networking configuration files are in /etc/neutron.Configuration files for Horizon are in /etc/openstack_dashboard. Those for Nova are in/etc/nova, and so on. You can use these files for troubleshooting a specific service by settingor uncommenting the following parameters in the service's configuration file:
■ debug=true
■ verbose=true
These parameters enable you to see more output from operations affected by that configurationfile. See tables of configuration options in “Common Configuration Parameters for OpenStack”in http://www.oracle.com/technetwork/articles/servers-storage-admin/getting-started-openstack-os11-2-2195380.html and in the OpenStack Configuration Reference onthe OpenStack documentation site.
Note - Individual OpenStack service commands can also take the --debug option. This option isthe equivalent of setting debug=true in a configuration file.
Investigating and Resolving ProblemsThis section describes some problems that you might encounter when you install and configureOpenStack.
Investigating and Resolving Problems
132 Installing and Configuring OpenStack (Kilo) in Oracle Solaris • June 2016
The following example shows error pertaining to the dashboard.
Error: Unauthorized: Unable to retrieve usage information.
Error: Unauthorized: Unable to retrieve quota information.
Error: Unauthorized: Unable to retrieve project list information.
Error: Unauthorized: Unable to retrieve instance list information.
These messages might indicate that the RSA host key has been changed and has not beenpropagated to all the components. For more information on configuring RSA keys, refer to“How to Install and Configure Neutron” and “How to Configure the Compute Node”.
The following error report might be included in the nova-scheduler log.
controller# grep error `svcs -L nova-scheduler`2014-12-03 12:49:19.271 3475 TRACE
nova.openstack.common.rpc.common error: [Errno 32] Broken pipe
A broken pipe error is typically reported when you refresh one OpenStack service and not theothers. If you made any changes in the configuration files on a node, refresh all the serviceson the node. The following command restarts services that are online services but need to berefreshed.
controller# svcs \*openstack\* | grep online \
| awk -e '{print $3}' | xargs svcadm restart
An error can also be due to lack of resources. During the creation of a VM instance, the nova-compute log might display messages similar to the following:
[abc-123-def-456] Build of instance
abc-123-def-456 aborted: Image
xyz-987-uvw-654 is unacceptable: Image query failed.
Possibly invalid or corrupt. Log file location: controller:/tmp/archive_log.4249
Further, the log would also indicate out of space/storage. Use the top command to viewthe resources on the system. If the system has less than 1GB of memory, you might need to addmore.
Network Creation
While configuring an internal network and its components, the following message mightconstantly appear on the console screen:
From: [email protected]
Subject: *** SECURITY information for controller ***
Content-Length: 143
controller: datetime : neutron user NOT in sudoers; TTY = unknown ; PWD=var/lib/neutron;user=ROOT ; COMMAND=command:
Investigating and Resolving Problems
Chapter 10 • OpenStack Troubleshooting 133
To prevent this messages from being generated, edit the /etc/neutron/neutron.conf file asfollows:
1. Uncomment the line for the root_helper option.2. Ensure that the parameter is set to none.
root_helper =
VM Instance Installation and ConfigurationThe issues discussed in this section are specifically related to VM instances.
VM Instance Is in an Error State
One reason a VM instance can be in an error state is that you tried to install a VM instance thatis a different architecture from the host system. In this case, you might not receive an errormessage that specifically indicates an architecture mismatch. To avoid this problem, make sureyou correctly set the architecture property of the image when you upload the image to theglance image store. When you use Horizon to upload an image, you must set properties on theimage after the upload. Alternatively, you can use the command line to upload the image and setproperty values in one glance image-create command. See “Preparing Images for the GlanceRepository” on page 59 for an example.
VM Instance Property Values Do Not Match Zone PropertyValues
Some of the information that OpenStack reports about a VM instance does not match theinformation that Oracle Solaris reports about the corresponding zone. Information displayedin Horizon or displayed by the nova command might not match information displayed by thezoneadm command or other Oracle Solaris commands.
Name The name of a VM instance as shown in Horizon or as shown by thenova list command is the name that you assigned when you created theinstance, such as example-instance. The name of the zone shown by thezoneadm list command is similar to instance-00000001. Use the novashow command to determine which zone is associated with which VMinstance. In the nova show output, the value of the OS-EXT-SRV-ATTR:instance_name property is the name of the zone, and the value of thename property is the name of the VM instance.
UUID The UUID of a VM instance as shown in Horizon or as shown by thenova show command does not match the UUID of the same zone as

Investigating and Resolving Problems
134 Installing and Configuring OpenStack (Kilo) in Oracle Solaris • June 2016
shown by the zoneadm list -p command. The UUID that the zoneadmcommand shows is a different identifier from the identifier used forNova.
CPUs The number of VCPUs for a VM instance as shown in Horizon is thenumber of capped CPUs that are virtualized only to the extent of howmany fractional CPUs can be used by the instance. This number doesnot provide observability inside the instance of what was capped. Thepsrinfo command reports the dedicated CPUs allocated to the zone.
Memory The amount of memory for a VM instance as shown in Horizon might bedifferent from the amount of memory that the prtconf command showswhen you are logged into that VM instance. Horizon shows the amountof memory specified by the flavor used to create the VM instance. Theprtconf command reports all of system memory.
Storage The amount of storage for a VM instance as shown in Horizon might bedifferent from the amount of storage shown when you are logged intothat VM instance, unless the VM instance is a non-global zone usingZones on Shared Storage (ZOSS).
Issues With Credentials
On certain occasions, you might encounter error messages related to incorrect credentials whichprevent you from issuing service commands. For example, when issuing a glance command,the following error message might be generated:
Invalid OpenStack Identity credentials.
The root cause of this message can be different each time. Thus, you must examine the logsto restrict the possible causes. With the glance service as an example, see the contents of theGlance SMF service logs. The /var/log/glance/api.log might report the following:
WARNING keystonemiddleware.auth_token [-] Authorization failed for token
If you have set Debug = True and Verbose = True in the glance configuration files, moredetails are provided in the /var/svc/log/application-openstack-glance-glance-api:default.log such as the following:
DEBUG keystonemiddleware.auth_token [-] Received request from user:
user_id None, project_id None, roles None service: user_id None,
project_id None, roles None
__call__/usr/lib/python2.7/vendor-packages/keystonemiddleware/auth_token.py:821
You can explore the following areas to resolve the issue.
■ Check your service configuration files to ensure that the relevant parameters are correctlydefined.
Investigating and Resolving Problems
Chapter 10 • OpenStack Troubleshooting 135
■ Check that the global shell variables for the service are correctly. For the Glance service, forexample, the following variables should be set:■ OS_USERNAME=glance■ OS_PASSWORD=service-password■ OS_PROJECT_NAME=service■ OS_AUTH_URL=http://$CONTROLLER_ADMIN_NODE:5000/v2.0
If the command continues to fail with the same error messages reported, you might need to re-create the service user to generate new credentials. Study the following example:
# export OS_USERNAME=admin
# export OS_PASSWORD=service-password# export OS_PROJECT_NAME=project# export OS_AUTH_URL=http://$CONTROLLER_ADMIN_NODE:5000/v2.0
# openstack user list
From the output of this command, note the ID number of the corrupted service user. You woulddelete that user and then recreate it with the correct credentials:
# openstack user delete user-ID
# openstack user create --name glance --password service-password# openstack user role add --user=glance --project=service --role=admin
Horizon-Related Issue
After you launch your VM instances, the Horizon dashboard might be inaccessible and the404 Not Found error message is displayed. The log for the Apache services would contain thefollowing entry:
Oct 13 16:13:53 Executing start method (" /lib/svc/method/http-apache24 start"). ]
Apache version is 2.4
(125) Address already in use: AH000/2: make_sock: could not bind to address [::]:80
Oct 13 16:13:55 Method "start" exited with status 0. ]
The log indicates that the address cannot bind to port 80 because the port is busy.
Beginning with the Kilo version, OpenStack uses Apache 2.4 instead of Apache 2.2 of previousOpenStack versions. Ensure that the correct Apache version is enabled and listening on thatport.
To free the port, do the following steps:
1. Obtain the process ID that is currently listening in on the port.
# netstat -uan -f inet | grep "*.80"
Investigating and Resolving Problems
136 Installing and Configuring OpenStack (Kilo) in Oracle Solaris • June 2016
This procedure assumes that the setup is using IPv4 addresses and the processes holdingport 80 is listening on all those addresses. If the process is listening for IPv6 traffic, thecommand might not provide any result.
2. Based on the process ID, identify the actual process or service. You can use one of thefollowing commands:
# svcs -p | egrep "online|pid http" | ggrep -B1 pid
or
# ps -lf -p pid
3. If the wrong Apache version is using the port, disable the service.4. Enable the correct Apache version for the Kilo version.
If the correct Apache version is in maintenance mode, clear the service first before enablingit.
The following example illustrates how to release port 80 and switch to the correct Apacheversion.
# netstat -uan -f inet | grep "*.80"*.80 *.* root 5560 httpd 0 0 128000 0 LISTEN
*.8080 *.* webservd 1124 java 0 0 128000 0 LISTEN
*.8009 *.* webservd 1124 java 0 0 128000 0 LISTEN
# svcs -p | egrep "online|5560 http" | ggrep -B1 5560online Aug_31 svc:/network/http:apache22
Sep_09 5560 httpd
# svcadm disable apache22
# svcadm clear apache24
# svcadm enable apache24
Scalability Issues
By default, RabbitMQ imposes a file descriptor limit of 255. This limit can easily prevent youfrom scaling the cloud further after you have created a few compute nodes. To avoid this block,increase the limit value in the /etc/rabbitmq/rabbitmq-env.conf file:
# Increase soft limit on file descriptors for RabbitMQ
ulimit -n 8192
How to Remove the Network Configuration on Neutron
Chapter 10 • OpenStack Troubleshooting 137
Dismantling Networks
If you encounter problems with configuring Neutron on the network node and might need todismantle the configuration to start over, follow this procedure. Depending on which point youneed to start undoing the configuration, follow the sequence as provided in the procedure.
How to Remove the Network Configuration onNeutron
1. Perform this step on the Horizon dashboard.
a. Disassociate all floating IP addresses.
b. Remove all floating IP addresses.
2. On a terminal window, type the following commands:
# neutron router-gateway-clear router-ID external-network-ID
# neutron router-interface-delete router-ID subnet-ID
a. To remove the router gateway interface, type the following command:
# neutron router-gateway-interface-delete router-ID external-network-ID
b. To remove the remaining router interfaces, type the following command:
# neutron router-interface-delete router-ID subnet-ID
3. Perform the following on the Horizon dashboard.
a. Terminate all VM instances.
b. Delete the subnets.If problems occur while deleting subnets, refer to “How to RemoveVports” on page 138.
c. Delete the network.
How to Remove Vports
138 Installing and Configuring OpenStack (Kilo) in Oracle Solaris • June 2016
How to Remove Vports
Use this procedure if problems occur that prevent you from deleting subnets.
1. Determine which vports are currently in use.
# evsadm
2. Reset the vports being used.
# evsadm reset-vport vport
3. Remove the vports.
# evsadm remove-vport vport
General Tips and Tricks on Debugging
The following general tips can help you get started when troubleshooting issues in OpenStack:
■ Set debug = true and verbose = true in the various configuration files to help youdiagnose problems. On some configuration files, you can look for a placeholder value whichis commented out and which you can toggle to enable verbose logging.
■ When you make changes to a component's configuration file, restart the services for thecomponent to make the changes effective.
■ Use the tail -30 `svcs -L service-name command that provides you with informationfrom the SMF log. If you enabled debugging as well as verbose logging, you might need toincrease the lines that you specify for the tail command.
■ Horizon processes go through Apache. Thus, to diagnose Horizon, enable debug = True inthe /etc/openstack_dashboard/local_settings.py file. Django errors are then generatedon the web page.
■ Nova components are built on top of Oracle Solaris zones. Thus, you can also refer to logsin /var/log/zones to troubleshoot Nova issues.
Useful Sites
Refer to the following sites for troubleshooting tips to resolve different OpenStack issues.
■ https://blogs.oracle.com/openstack/
■ https://ask.openstack.org/en/questions/
■ https://raymii.org/s/tags/openstack.html
Appendix A • Common OpenStack Configuration Files and Services 139
A ♦ ♦ ♦ A P P E N D I X A
Common OpenStack Configuration Files andServices
This appendix lists the typical configuration files of the core OpenStack components as well asOpenStack SMF services.
Configuration Files
Cinder Files
■ /etc/cinder/api_paste.ini
■ /etc/cinder/cinder.conf
Glance Files
■ /etc/glance/glance-api.conf
■ /etc/glance/glance-cache.conf
■ /etc/glance/glance-registry.conf
■ /etc/glance/glance-scrubber.conf
■ /etc/glance/glance-registry-paste.ini
■ /etc/glance/glance-api-paste.ini
Keystone Files
■ /etc/keystone/keystone.conf
■ /etc/keystone/keystone-paste.ini
Configuration Files
140 Installing and Configuring OpenStack (Kilo) in Oracle Solaris • June 2016
Neutron Files
■ /etc/neutron/neutron.conf
■ /etc/neutron/dhcp_agent.ini
■ /etc/neutron/l3_agent.ini
■ /etc/neutron/api-paste.ini
■ /etc/neutron/metadata_agent.ini
■ /etc/neutron/plugins/evs/evs_plugin.ini
Nova Files
■ /etc/nova/nova.conf
■ /etc/nova/api_paste.ini
Horizon Files
■ /etc/openstack_dashboard/local_settings.py
■ /etc/apache2/2.4/httpd.conf
■ /etc/apache2/2.4/conf.d/openstack-dashboard-http.conf
or
/etc/apache2/2.4/conf.d/openstack-dashboard-tls.conf
Swift Files
■ /etc/swift/swift.conf
■ /etc/swift/account-server.conf
■ /etc/swift/container-server.conf
■ /etc/swift/object-server.conf
■ /etc/swift/proxy-server.conf
■ /etc/swift/rsyncd.conf
OpenStack SMF Services
Appendix A • Common OpenStack Configuration Files and Services 141
OpenStack SMF Services
Cindersvc:/application/openstack/cinder/cinder-db:default
svc:/application/openstack/cinder/cinder-backup:default
svc:/application/openstack/cinder/cinder-scheduler:default
svc:/application/openstack/cinder/cinder-api:default
svc:/application/openstack/cinder/cinder-volume:setup
svc:/application/openstack/cinder/cinder-volume:default
Glancesvc:/application/openstack/glance/glance-db:default
svc:/application/openstack/glance/glance-registry:default
svc:/application/openstack/glance/glance-scrubber:default
svc:/application/openstack/glance/glance-api:default
Keystonesvc:/application/openstack/keystone:default
Neutronsvc:/application/openstack/neutron/neutron-server:default
svc:/application/openstack/neutron/neutron-dhcp-agent:default
svc:/application/openstack/neutron/neutron-metadata-agent:default
svc:/application/openstack/neutron/neutron-l3-agent:default
Nova *svc:/application/openstack/nova/nova-objectstore:default
svc:/application/openstack/nova/nova-consoleauth:default
svc:/application/openstack/nova/nova-novncproxy:default
svc:/application/openstack/nova/nova-api-metadata:default
svc:/application/openstack/nova/nova-api-ec2:default
svc:/application/openstack/nova/nova-api-osapi-compute:default
svc:/application/openstack/nova/nova-conductor:default
svc:/application/openstack/nova/nova-cert:default
svc:/application/openstack/nova/nova-compute:default
svc:/application/openstack/nova/nova-scheduler:default

OpenStack SMF Services
142 Installing and Configuring OpenStack (Kilo) in Oracle Solaris • June 2016
* Other Nova services might also be listed depending on the compute node setup.
Swiftsvc:/application/openstack/swift/swift-object-expirer:default
svc:/pplication/openstack/swift/swift-account-reaper:default
svc:/application/openstack/swift/swift-container-replicator:default
svc:/application/openstack/swift/swift-account-replicator:default
svc:/application/openstack/swift/swift-object-auditor:default
svc:/application/openstack/swift/swift-container-updater:default
svc:/application/openstack/swift/swift-container-sync:default
svc:/application/openstack/swift/swift-object-updater:default
svc:/application/openstack/swift/swift-account-auditor:default
svc:/application/openstack/swift/swift-replicator-rsync:default
svc:/application/openstack/swift/swift-container-auditor:default
svc:/application/openstack/swift/swift-object-replicator:default
svc:/application/openstack/swift/swift-container-reconciler:default
svc:/application/openstack/swift/swift-container-server:default
svc:/application/openstack/swift/swift-object-server:default
svc:/application/openstack/swift/swift-proxy-server:default
svc:/application/openstack/swift/swift-account-server:default

Appendix B • OpenStackClient Commands 143
B ♦ ♦ ♦ A P P E N D I X B
OpenStackClient Commands
The OpenStackClient (OSC)
The OpenStackClient brings together the entire command set for Compute, Identity, Image,Object Storage, and Block Storage APIs together in a single shell with a uniform commandstructure. The new command set uses openstack as the main command instead of thecomponent names that were used in previous OpenStack versions. The implementation of theclient began with the Kilo version. This appendix maps previous OpenStack subcommands withthe new client.
Note - The list of equivalents is a partial list.
To obtain information about the openstack command and its subcommands, use one of thefollowing commands:
■ openstack help subcommand■ openstack --help
Typing openstack without any subcommands switches to the interactive mode, where you cantype help [subcommand] for information. To exit the interactive mode, type quit.
For a detailed list of the openstack subcommands, options, and syntax, see http://docs.openstack.org/developer/python-openstackclient/index.html.
TABLE 1 OpenStackClient Command Equivalents
Main Command Subcommand Equivalent Subcommandsfor the openstack MainCommand
Notes
cinder
type-create volume type create
type-key volume type set/volumetype unset
service-list service list
glance

The OpenStackClient (OSC)
144 Installing and Configuring OpenStack (Kilo) in Oracle Solaris • June 2016
Main Command Subcommand Equivalent Subcommandsfor the openstack MainCommand
Notes
image-create image create API version 1 only
image-show image show
keystone
user-list user list
user-role-add user role add
user-role-list user role list
neutron
net-create network create
router-create router create??
router-list router list??
router-show router show??
subnet-list subnet list
nova
flavor-key flavor set/flavor unset in OpenStack Libertyversion
flavor-list flavor list
flavor-show flavor show
image-create image create API version 1 only
image-list image list
image-show image show
migrate server migrate
resize server resize
service-disable compute service
set/compute serviceunset
Keystone version 3 only
show server show
145
Index
Aallowed-mac-address, 104allowed-vlan-ids, 104archiveadm command, 59
Bbare metal, 114
See also Ironicconfigurable node elements, 115decommissioning, 119deploying using UAR, 116deploying with Ironic, 114using UAR and IPS, 115
CCinder
availability zone, 94backup, 128configuration files, 37, 46, 90, 100configuring remote storage systems, 89deployment options, 89installing, 37iSCSI Cinder driver for ZFSSA, 98NFS support, 95SAN support, 89setting up Access Control Lists on remotehosts, 93target storage hosts, 89user rights profile, 93using ZFSSA as backend storage, 99
cloud virtual machine See VM instancesCloudbase-Init, 124cloudbase-init support, 15
compute node, 23See also Novaconfiguring, 41recovering, 85
console access, 44controller node
about, 23configuring, 30
Ddashboard
creating a VM instance, 74creating internal networks, 70displaying flavors, 68, 80listing projects, 67logging in, 65video introduction, 68viewing images, 68
database, 31debugging options, 131deploying bare metal See bare metaldisplaying allowed MAC addresses and VIDs, 106
EElastic Virtual Switch (EVS)
configuring, 42evsadm command, 52, 54SSH keys, 43
Fflat network, 54

Index
146 Installing and Configuring OpenStack (Kilo) in Oracle Solaris • June 2016
flavors, 79See also VM instancesabout, 68extra_specs property, 80modifying properties, 80
floating IP addresses, 73See also network
GGlance
about, 59configuration files, 33creating and uploading script, 63displaying image information, 61installing, 33
Hhardware templates See flavorsHeat
about, 121installing, 122with Cloudbase-Init, 124
Horizonaccessing, 65configure SSL access, 36overview, 66project list, 67video introduction, 68viewing flavors, 80
Iimages, 59
See also VM instancesabout, 68backup, 60displaying information, 61image cache, 59registry server, 59rescue, 60snapshots, 60
installing OpenStack
multinode configuration, 23instance See VM instancesinstance templates See flavorsIronic
/etc/ironic/ironic.conf file, 112AI configuration, 110components, 109decommissioning a node, 119deploying bare metal, 114deploying bare metal from a UAR, 116failures during provisioning, 119installing and configuring, 110service, 109using UAR and IPS, 115
Kkernel zones hosting Neutron, 103Keystone
configuration files, 32installing, 32sample_data.sh script, 27
LL3 agent, 51, 58, 103LDoms, 24live migration, 14, 83
MMAC addresses, dynamic, 105memory optimization, 28migration of Cinder volumes, 13multinode OpenStack installation
3-node reference architecture, 23preparation, 26
MySQL, 31
Nnetwork

Index
147
associating floating IP addresses, 73connecting internal networks to externalnetwork, 57creating external network, 51, 54creating router, 52internal, 70subnets, 70
network address translation (NAT)about, 51disabling secure NAT, 55
Network Time Protocol (NTP)client, 30client configuration file, 30server, 28server configuration file, 29
Neutronconfiguration files, 38creating a router, 52external network, 53in kernel zones, 103installing, 38L3 agent, 51, 58, 103router, 51using dynamic MAC addresses and VIDs, 103
neutron-l3-agent SMF service, 52NFS volumes, 95Nova
boot volume, 94configuration files, 35, 41configuring, 41creating VM instances, 74displaying image information, 61evacuate, 14, 85installing on the controller node, 35migrating instances, 14, 83recovering compute nodes, 85resizing, 85
OOVM Server for SPARC, 24
Pprojects
adding users, 68, 69creating, 68default, 67modifying user role, 69
provider router See Neutron
Rregistry server, 59Remote Access Daemon (RAD), 41remote storage systems, 89
See also CinderAccess Control Lists (ACLs), 93enabling as targets, 93required SMF services, 93
rescue image, 60rights profile for Cinder user, 93router for external network, 52
Ssample_data.sh script, 27SAN storage, 13SAN support in Cinder, 89SC profile, 60, 81scalability, 136script for creating and uploading an image, 63Service Management Facility (SMF)
services required for target hosts, 93single-node OpenStack installation
using OVM Server for SPARC, 24snapshots, 60SPARC, 24SQLite, 31SSH keys
in EVS configuration, 43instance migration, 84
storage nodeabout, 23configuring, 46multiple backend hosts, 89
Swiftabout, 24configuration files, 48
system configuration profile See SC profile

Index
148 Installing and Configuring OpenStack (Kilo) in Oracle Solaris • June 2016
Ttemplates for hardware See flavorstenants See projectsTLS configuration file, 36
UUnified Archives
creating OpenStack images from, 59upgrading
considerations, 17from Havana, 18from Juno, 19
user_reserve_hint_pct, 28
Vvirtual machine (VM) See VM instancesVLAN IDs, dynamic, 105VM instances, 74
See also Novaadding users, 78backup, 60creating, 74flavors, 67, 68, 79images, 59, 68key pairs, 74logging in, 77migrating, 14, 83rescue, 60resizing, 14, 85snapshots, 60
volumebackup and restore, 13migration, 13
ZZFS Storage Appliance (ZFSSA), 97
See also Cinderbackend storage for OpenStack, 97workflow utility, 99
zonecfg:bootargs option, 82
zones framework, 41