
Installing Alloy Wheels - Linn-Benton
10
4 4 Let’s face it: Wheel installation is rarely viewed as a topic deserving of much attention. Most shops tend to zip them off, mount and balance, and bang them back onto the vehi- cle. Basically, wheels are considered by many techs as components that are essentially “in the way” when performing other services such as brake or suspension system jobs. In reality, the wheels, and their means of attachment to the vehicle, are the most important components on any vehicle. After all, if the wheels fall off, it’s never a pretty picture. In this article, we’ll discuss the basics of wheel fasteners and the handling and proper installation of alloy wheels, which deserve even greater attention due to their higher cost and because of the potential for cosmetic damage. WHEEL FASTENERS Instead of referring to these all- critical pieces (the only thing that 4 INSTALLING ALLOY WHEELS This is the correct method of installing any alloy wheel. Use a torque wrench, following correct torque value and the proper criss-cross tightening pattern to avoid stressing or distorting the wheel or hub/rotor. Summer3-13 8/4/04 11:23 AM Page 4
Transcript of Installing Alloy Wheels - Linn-Benton

44
Let’s face it: Wheel installation israrely viewed as a topic deserving ofmuch attention. Most shops tend tozip them off, mount and balance,and bang them back onto the vehi-cle. Basically, wheels are consideredby many techs as components thatare essentially “in the way” whenperforming other services such as
brake or suspension system jobs.In reality, the wheels, and their
means of attachment to the vehicle,are the most important componentson any vehicle. After all, if thewheels fall off, it’s never a prettypicture.
In this article, we’ll discuss thebasics of wheel fasteners and the
handling and proper installation ofalloy wheels, which deserve evengreater attention due to their highercost and because of the potential forcosmetic damage.
WHEEL FASTENERSInstead of referring to these all-
critical pieces (the only thing that
4
INSTALLING ALLOY WHEELS
This is the correct method of installing any alloy wheel. Use a torque wrench, following correct torquevalue and the proper criss-cross tightening pattern to avoid stressing or distorting the wheel or hub/rotor.
Summer3-13 8/4/04 11:23 AM Page 4

clamps the wheel to the hub) gener-ically as “lug nuts,” get into the habitof calling them “wheel fasteners,”since that’s an apt description oftheir task.
Also, although Toyota vehicles usea threaded stud (affixed to the hub)and a nut system to secure thewheels, some vehicles feature femalethreaded holes in their hubs andrequire the use of wheel bolts. Thisis just one reason to use the termwheel fasteners to broadly refer toany wheel-to-hub clamping system.
CHECK FASTENER SIZEAND STYLE
Granted, when you remove anoriginal Toyota wheel and replacethe wheel using the same Toyotanuts, you won’t have a nut-matchingproblem. However, if you’re dealingwith a customer’s vehicle that fea-tures aftermarket wheels, or havebeen requested to change thewheels from OEM to aftermarket,never assume that you already havethe correct style of wheel nut. Checkto make sure that the thread size iscorrect (shank diameter and threadpitch), and make absolutely surethat the fastener’s seat style matchesthat of the wheels. Using an incor-rect seat style will prevent secureclamping of the wheel to the hub,and will certainly result in loosen-ing during operation. Packing/ship-ping mistakes are always possible,so never blindly assume that whatyou have is correct.
Wheel fastener seat styles include60-degree taper/conical seats,radius (also called spherical or ball)seats or mag-style straight shankwith flat washers.
Make sure that the new fasteners
match the seat style required by thewheels at hand. Never mismatch byusing a mag/shank type fastener ona wheel intended for a conical seat,etc. Only the correct, matching typeseat will provide the required wheelclamping. In the case of blind(capped/enclosed) wheel nuts,make absolutely sure that the nutdoes not bottom-out against thestud tip (this can occur if the nut istoo short for the application) Thissituation will prevent full clampingforce, resulting in wheel wobble andalmost-certain failure of the thread-ed studs.
Wheel fastener threads must beclean and in good condition. Do notlubricate threads unless specificallyinstructed to do so by Toyota tech-nical information specific to thevehicle being serviced. Torque val-ues are commonly specified basedon the use of dry threads. The useof lubricants will result in over-clamping and possibly stretchingthe stud beyond its design yieldpoint.
UNDERSTANDINGTHREAD SIZE
Fastener sizing involves selectingthe correct diameter, thread pitchand length for proper threadengagement. Following is a basicoverview.
DIAMETERThis refers to the diameter of the
threaded section of the fastener(outer diameter of a bolt shank orstud; or inner diameter of a nut’sthreaded hole).
Threaded fastener size is referredto with a series of three numbers,which indicate thread diameter,thread pitch and shank length, inthat order. For example, a 1/2 x 20 x4 indicates a bolt or stud that fea-tures a 1/2-inch diameter shank, athread pitch of 20 (20 threads perinch) and a shank length of fourinches. If the fastener is metric, thenumbers refer to the same dimen-sional areas, but are indicated usingmetric dimensions. For example, a14 x 1.5 x 45 refers to a 14mm
T O Y O TA’ S S U P P O RT T O A U T O M O T I V E R E PA I R
INSTALLING ALLOY WHEELS
5
Fastener sizing cards are handy to determine bolt or stud diameter(both inch and metric), as well as bolt or stud shank lengths and nutdiameters.
Summer3-13 8/4/04 11:23 AM Page 5

thread diameter, a thread pitch of1.5mm and a thread length of45mm.
A common mistake some folksmake is to incorrectly identify nutor bolt sizes, confusing hex headsize with thread size. The size of thefastener (thread area diameter)refers to the diameter of the thread-ed area (threaded hole in a nut orthreaded shank on a stud or bolt).The wrench size required to servicethe fastener does not indicate fas-tener size. The width of the hexhead (let’s say a nut requires a 3/4-inch or 19mm socket) has no bear-ing whatsoever on fastener size. Forexample, if the threaded area is
12mm in diameter, the nut or studis a 12mm size, not a 19mm (refer-ring to the size of socket required).When sizing any fastener, ignore theservice end (hex head). It’s only thediameter of the thread area thatindicates the fastener’s size.
THREAD PITCHAll Toyota vehicles feature metric
wheel fasteners. However, simply toprovide a better understanding ofthreaded fasteners, we’ll offer anoverview of both “inch” and metricformats.
When using inch format, thethread pitch number indicates thenumber of threads along a one-inch
length of the shank. For example, a1/2-inch x 20 wheel stud is 1/2-inchin diameter, and has a thread countof 20 threads per inch of shanklength.
When using a metric format, thefirst number indicates the threadshank diameter in millimeters(12mm, 14mm, etc.). However, met-ric thread pitch numbers indicatethe distance between threads. Forexample, a thread pitch of 1.25 indi-cates that the distance between twoadjacent threads is 1.25mm. If thethread pitch is 1.50, the distancebetween threads is 1.5mm. The lastnumber of a stud or bolt size indi-cates length. A size of 14mm x 1.5 x35, for example, indicates a stud orbolt that is 14mm in diameter, athread pitch of 1.5mm and a shanklength of 35mm.
In inch format, the higher thepitch number, the “finer” thethreads (more threads per inch ofshank length). Using a 1/2-inchdiameter fastener as an example, athread pitch of 13 is “coarse,” whilea thread pitch of 20 is considered“fine.” Using a 1/4-inch diameterfastener as an example, a threadpitch of 20 is considered coarse,while a 28 pitch is considered fine.Basically, in inch format, each fas-tener thread diameter size offerstwo choices — coarse or fine. Withregard to wheel fasteners, thethreads are always “fine.” As com-pared to coarse threads, this pro-vides increased bolt strength andpotential clamping load. If a wheelfastener is 7/16-inch diameter, thethread pitch will be 20. If 1/2-inchdiameter, thread pitch will be 20. If9/16-inch diameter, thread pitchwill be 18. In metric format, the
INSTALLING ALLOY WHEELS
6
Thread pitch gauges (available in both inch and metric formats) pro-vide an easy and accurate method of determining the wheel studthread pitch, eliminating any guesswork.
Summer3-13 8/4/04 11:23 AM Page 6

higher the number, the more“coarse” the thread pitch. For exam-ple, a 1.0 pitch is “very fine,” a 1.25pitch is “medium fine,” a 1.5 pitch is“medium” and a 1.75 pitch is“coarse.” Metric wheel fasteners willcommonly either feature a 1.25 or1.5 thread pitch, regardless ofthread diameter.
LENGTHThe amount of thread engagement
between the stud and nut (or wheelbolt to hub) is critical. At the mini-mum, thread engagement lengthmust be equal to or greater than thediameter of the fastener. In otherwords, if the stud is 12mm in diam-eter, the nut must engage onto thestud by at least 12mm. If not, eithera longer stud or longer nut must beused (if a longer nut is needed, thenut must protrude further throughthe wheel hole to meet the stud).Use of longer nuts is possible whenthe nut features an extended shankthat offers greater thread length.This will vary depending on nutstyle. If this isn’t feasible, a longerstud must be used.
When using wheel bolts or capped(enclosed) nuts, care must be takento avoid bottoming the bolt or nut.For example, if the stud offers oneinch of exposed length for nutengagement, but the threaded holein the nut is only 3/4-inch deep, thenut will bottom-out on the stud andwill not clamp the wheel against thehub.
In order to accurately identify thethread diameter, pitch and length ofany wheel fastener, you can handlethis by obtaining a total of threereadily available tools: a combina-tion bolt/nut sizing card (these are
hard plastic and are available tocover both inch and metric sizes)and two thread pitch gauges (oneinch and one metric). That’s all youneed to quickly and accurately readany wheel bolt or nut without anyguesswork.
BOLT CIRCLEThe term “bolt circle” or “bolt pat-
tern” refers to the diameter of thecircle formed by the wheel or hubfastener mounting locations. Toyotamodels use bolt circles of 100mm(3.93 inches), 114.3mm (4.5 inches)and 139.7mm (5.5 inches). A desig-nation of 4x100 indicates a wheelwith four bolt holes, with the holespositioned to create a 100mm circle(when measured through the cen-terline of all holes). A wheel desig-nation of 5x114.3 indicates a five-
bolt wheel that provides a bolt circleof 114.3mm (4.5 inches).
If you want to manually measure abolt circle,here are some easy methods:
1. With a four-bolt or six-bolt pat-tern, measure from the center ofone stud (at the hub) or wheel hole,to the center of an opposing stud orwheel hole.
2. With a five-bolt pattern, orientthe hub or wheel to place one fas-tener location at 12-o’clock.Measure from the center of the 12-o’clock location to a horizontal linedrawn across the bottom of the twobottom studs or wheel holes.
Bolt circle information is usuallyprovided on the wheel (look at therear of the wheel, the informationshould be stamped or cast on the
T O Y O TA’ S S U P P O RT T O A U T O M O T I V E R E PA I R
INSTALLING ALLOY WHEELS
7
A plastic sizing disc provides multiple holes, each labeled for bolt cir-cle reference. Simply align the disc onto the wheel (or onto the hubstuds) until all of the hub or wheel holes align on the disc, and read thenumbers on the disc to identify the bolt circle. For illustrative purpos-es, we’ve marked the holes that align to the wheel shown here. Notethe numbers that we’ve highlighted in black (at upper left of disc), not-ing that this wheel features a 100mm bolt circle.
Summer3-13 8/4/04 11:23 AM Page 7
wheel’s center section, likely on therear of a wheel spoke).
Checking a hub or wheel bolt pat-tern can also be performed with theaid of specialty tools. A bolt circlereference “disc” (these are availablein all bolt circle sizes) offers multi-ple hole patterns, with each holelabeled. Simply drop the disc onto ahub (or place on the rear mountingsurface of the wheel) until all holesalign. Note which holes align (perthe hole labels). Another methodinvolves the use of a specialty slid-ing caliper type tool. Insert the twotapered pins of the tool into twoadjacent wheel holes and note thereading on the tool’s gauge.
WHEEL NUT SEAT STYLESThe contact area between the fas-
tener and the wheel is referred to asthe “seat.” This is the surface areawhere the fastener actually contactsthe wheel and where clamping pres-sure is applied when the fastener is
tightened. It is absolutelyvital that the seat style ofthe fastener matches theseat style of the wheel’sfastener hole entry. Theuse of incorrect seatstyles, even thoughthread pitch and threaddiameter may be correct,can easily result in wheeldamage during tighten-ing, and fastener loosen-ing during vehicle oper-ation. If the fastenersloosen, the wheel will “wobble” as itmoves in relation to the hub.Eventually, this movement, or play,will ruin the wheel’s fasteners holes,resulting in either breaking thewheel or complete loss of thetire/wheel assembly.
Do not confuse the style or shapeof the fastener head with the shapeof the fastener’s seat. If a wheel nutfeatures a radiused head (roundedhead), some folks may call this an
“acorn” nut. However, others willinterpret the term “acorn” as aradiused or ball-style fastener seat.Always make sure that you clearlyunderstand the terminology for seatstyles.
The majority of Toyota wheelsrequire the use of conical (alsocalled tapered) seat-style nuts.However, citing the 1999-2001Avalon, Camry, Solara and Siennamodels as examples, two differentaccessory wheels were offered. Style1 (wheel part number PT351-00990) features a conical seat, whileStyle 2 (wheel part number PT351-00991) features a flat-seat (“mag”)style nut. Each wheel requires theuse of a specific style nut.Attempting to use a conical-stylenut on a wheel that features flatseats (or using a flat-seat nut on awheel that features conical seats)will result in both wheel damageand certain loosening.
AN EXPLANATION OFWHEEL NUT SEAT STYLES
The most commonly employedseat styles include conical, radiusand flat (“mag”). These terms referto the shape of the seat (where the
INSTALLING ALLOY WHEELS
8
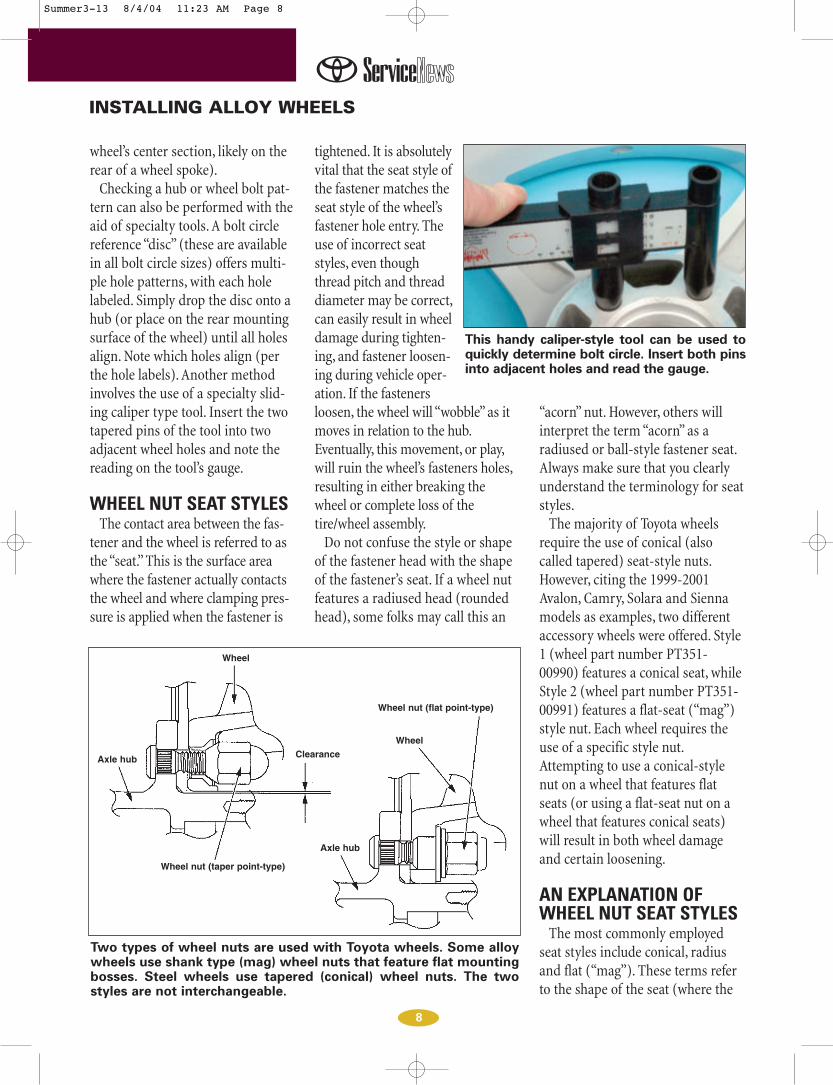
Two types of wheel nuts are used with Toyota wheels. Some alloywheels use shank type (mag) wheel nuts that feature flat mountingbosses. Steel wheels use tapered (conical) wheel nuts. The twostyles are not interchangeable.
This handy caliper-style tool can be used toquickly determine bolt circle. Insert both pinsinto adjacent holes and read the gauge.
Wheel
Wheel
Axle hub
Axle hub
Clearance
Wheel nut (taper point-type)
Wheel nut (flat point-type)
Summer3-13 8/4/04 11:23 AM Page 8
fastener contacts the entry of thefastener hole in the wheel.
CONICALConical seats are also called
“tapered” or “cone” seats. All threeterms refer to a seat that features anangled seat wall, where the dimen-sion of the taper is largest at the top,under the head, and tapers to asmaller diameter where the anglemeets the rear face of the nut (oradjacent to the threaded shank on awheel bolt). The most commonangle of taper is 60 degrees. Themale taper nestles into a taperedrelief pocket at the fastener holeentrance.
RADIUSRadius seats are also called “ball”
seats, with good reason. The rear of
the nut (or base of the head on awheel bolt) is rounded into a ballshape. It’s like a ball that is cut inhalf, with only the radius remain-ing. The male ball seat fastener con-tacts the wheel’s female radiusedball relief.
MAG (FLAT SEAT)The term “mag” refers to a fasten-
er that features a flat contact at thewheel (usually including a thick flatwasher). The generic term “mag” isa holdover from the early days ofcustom wheels, when magnesiumwas sometimes used to make light-weight racing wheels. The mag stylenut also features a smooth outer-walled shank that serves to helpcenter the wheel (the shank dropsthrough the wheel hole, serving as aguide pin to center the wheel’s hole
over the hub’s threaded stud). Theshank length varies depending onwheel thickness and stud length.When using a capped nut (wherethe female threaded hole does notpass all the way through the nut),it’s important to pay attention tothread engagement length.
FASTENER TORQUEWhen tightening any wheel fas-
teners, we need to consider thedegree of tightening in order toachieve proper clamping load. Inaddition, we need to consider thetightening sequence, or pattern, toassure that clamping loads are even-ly distributed across the hub contactarea.
Threaded fasteners, by design, areintended to stretch slightly whenfully tightened to specification. This
T O Y O TA’ S S U P P O RT T O A U T O M O T I V E R E PA I R
INSTALLING ALLOY WHEELS
9
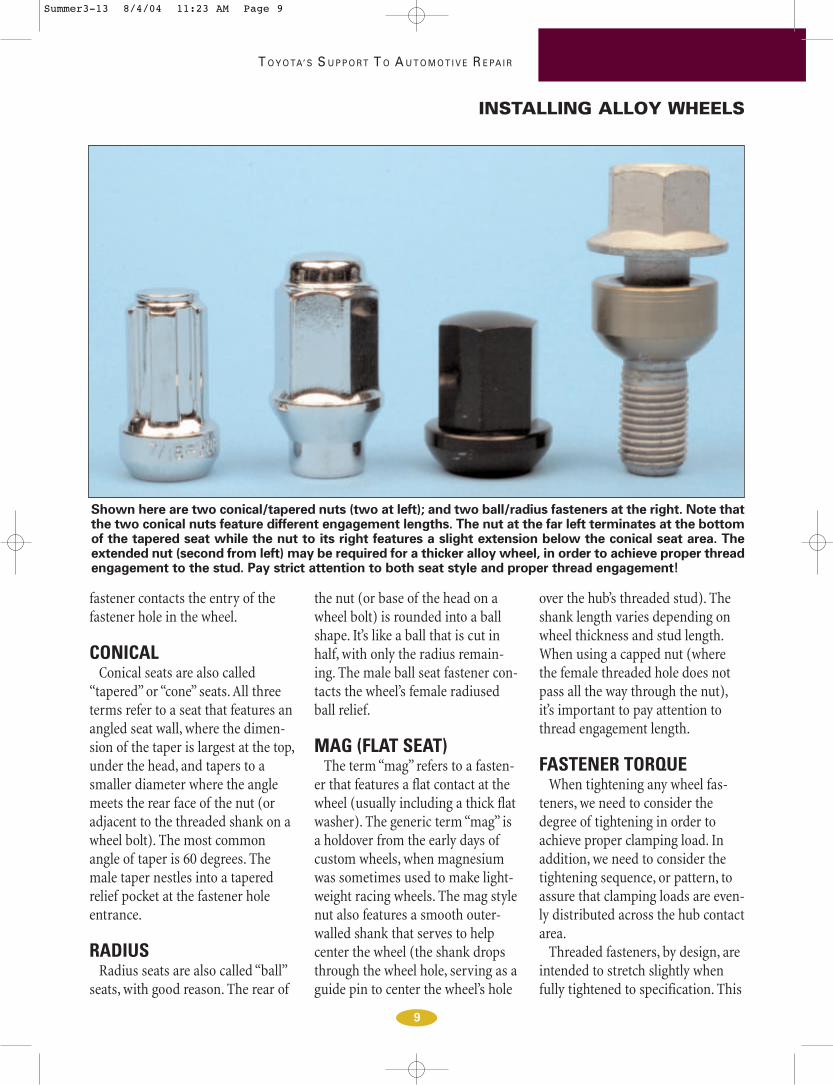
Shown here are two conical/tapered nuts (two at left); and two ball/radius fasteners at the right. Note thatthe two conical nuts feature different engagement lengths. The nut at the far left terminates at the bottomof the tapered seat while the nut to its right features a slight extension below the conical seat area. Theextended nut (second from left) may be required for a thicker alloy wheel, in order to achieve proper threadengagement to the stud. Pay strict attention to both seat style and proper thread engagement!
Summer3-13 8/4/04 11:23 AM Page 9
creates a preload, which is whatserves to clamp the wheel securelyto the hub. If undertightened, thenut (or bolt) can gradually loosen,and we all know the consequencesof that. If overtightened, the stud orbolt can exceed its “elastic” range,and can permanently stretch(fatigue), which destroys its abilityto provide clamping load. If thishappens, the stud or bolt can eitherloosen on its own or can break dur-ing operation. Especially when deal-ing with today’s lightweight alloywheels and sometimes light (andthin) rotor mounting faces, severewheel vibrations under braking canoccur if wheels are improperly orunevenly tightened.
REASONS TO NOT USE AN IMPACT GUN ONALLOY WHEELS
An impact gun (especially wheninstalling wheels) can wreak havocon alloy wheels. Fastener damagecan occur as a result of a socketbanging against a nut’s chrome plat-ing. If aftermarket spline-drive
“tuner” nuts are used, the narrowsplines can be burred. Probably thebiggest area of concern is inaccurateand/or excessive clamping loads,which can distort the wheel and its
mated hub/rotor, leading to vibra-tion complaints. Additional wheelcosmetic damage can result if sock-et-to-fastener recess is minimal, orif a thick-walled socket is used thatminimizes clearance, the outer wallof the socket can abrade against thewheel’s nut recess.
If the socket is dirty, abrasivedamage to both the fastener andwheel are possible. In addition,excessive tightening can cause thenut or bolt seat to pound into thealuminum wheel’s seat pocket,displacing the aluminum (goug-ing/deforming the alloy). This canlead to eventual fastener loosening,since the seat base integrity hasbeen deformed or reduced.Excessive tightening can also stressthe wheel stud, permanentlystretching the threaded shank
INSTALLING ALLOY WHEELS
10
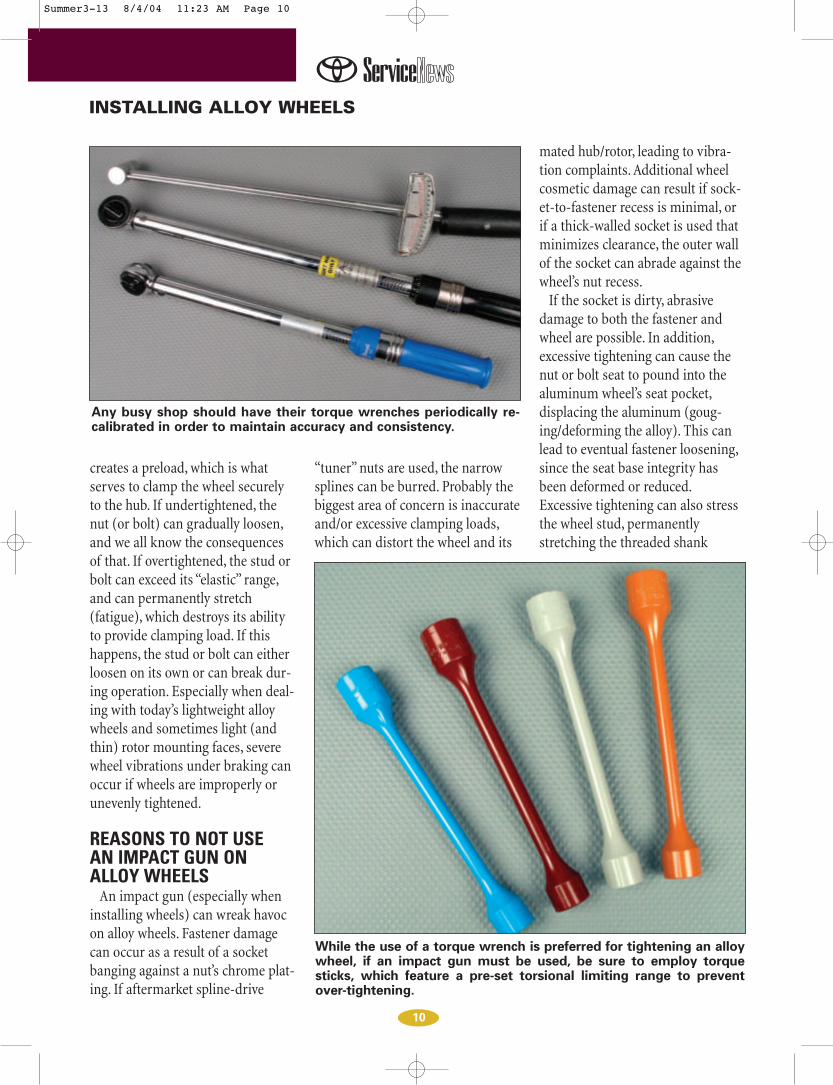
While the use of a torque wrench is preferred for tightening an alloywheel, if an impact gun must be used, be sure to employ torquesticks, which feature a pre-set torsional limiting range to preventover-tightening.
Any busy shop should have their torque wrenches periodically re-calibrated in order to maintain accuracy and consistency.
Summer3-13 8/4/04 11:23 AM Page 10

beyond its elastic point, weakeningthe stud considerably. When thishappens, the stud may eventuallybreak or allow the nut to loosen.
WHEEL FASTENERTORQUE VALUES
Always refer to the Toyota tighten-ing specifications for proper wheelfastener torque values. Listed here isa broad generalization of torquevalues, based on fastener size, forexample only.
TORQUE WRENCHES PREFERRED
While the use of a calibratedtorque wrench is always preferredfor wheel fastener tightening, anoption (if your shop decides that itsimply must use an air gun)involves the use of “torque sticks,”which are available individually orin sets.
Each tool is essentially a short tor-sion bar with a 1/2-inch drive at oneend and a hex socket at the other
end. Using this tool on the air gunallows you to pneumatically tightenthe wheel fastener to within a theo-retically acceptable range. Each“stick” is color coded and labeled interms of its hex size and its torquerange. When the stick is subjectedto its pre-set torque range, the cen-ter section of the tool begins totwist (similar to a torsion barspring), theoretically preventingtightening the fastener beyond thatpre-set range. If you can’t convinceyour shop to take the time to use atorque wrench, at the very least besure to use a torque stick.
CHECK WHEEL CENTERING
Wheels are designed to center ontothe vehicle hubs by one of two meth-ods: lug-centricity or hub-centricity.
A lug-centric wheel relies on cen-tering via the fastener locationsonly. As the lug nuts (or wheel bolts)
are tightened, the wheel is centeredonto the hub, guided by the wheelstuds and the seating of the wheelnuts. This requires precise locationof both wheel bolt holes and the fas-tener locations on the hub.
A hub-centric wheel is centeredonto the hub via the fit of the wheelcenter hole at the hub face. The hubface will feature a center lip thatengages into a recess on the wheel’shub face. Hub-centric designs moreprecisely locate the wheel onto thehub, to minimize the chance forinstalled-radial-runout. All later-model Toyota wheels and hubs aredesigned for hub-centric fitments.However, some earlier Toyotas (1989and older) may feature lug-centricdesigns, wherein the wheel is cen-tered onto the hub as the wheel nutsare tightened.
It’s important to recognize whichtype of centering you have. If thehub design calls for a hub-centric
T O Y O TA’ S S U P P O RT T O A U T O M O T I V E R E PA I R
INSTALLING ALLOY WHEELS
11
If the customer brings in aftermarket wheels, pay attention to thehubcentric fit of the wheel’s center hole to the hub’s center flangelip. Since the vast majority of Toyota vehicles use a hubcentric fit,make sure that the wheel closely centers itself at the hub. Someaftermarket wheels may be made to fit a variety of vehicles, in whichcase the wheel’s center hole may be larger than is required for prop-er fit. In these cases, hubcentric adapter rings will be needed. Here ahubcentric ring is installed onto an aftermarket wheel. The insidediameter of this ring will match the required size for the customer’sToyota vehicle.
VehicleRAV4MR2AvalonCamrySolaraCelicaEchoScion tCPriusSiennaHighlanderScion xBScion xACorollaMatrix4RunnerTacomaTundraSequioaLand Cruiser
Torque76 ft-lbs (103N-m)76 ft-lbs (103N-m)76 ft-lbs (103N-m)76 ft-lbs (103N-m)76 ft-lbs (103N-m)76 ft-lbs (103N-m)76 ft-lbs (103N-m)76 ft-lbs (103N-m)76 ft-lbs (103N-m)76 ft-lbs (103N-m)76 ft-lbs (103N-m)76 ft-lbs (103N-m)76 ft-lbs (103N-m)76 ft-lbs (103N-m)76 ft-lbs (103N-m)83 ft-lbs (110 N-m)83 ft-lbs (110 N-m)83 ft-lbs (110 N-m)83 ft-lbs (110 N-m)97 ft-lbs (131 N-m)
Summer3-13 8/4/04 11:23 AM Page 11

mounting, take a close look at boththe wheel’s hub face and the vehi-cle’s hub face itself. In the case ofToyota wheels, the wheel centeringhole is precisely machined to fit thehub center flange lip.
If an aftermarket alloy wheel is tobe used, a hub-centric ring adaptermay be required in order to attain aproper fit, since the aftermarketwheel may feature a larger centerhole (which makes the wheel adapt-able to various hub center fitments).
When adapter rings have beenused on the vehicle in the past, it ispossible that an old adapter ringhas stuck to the hub. If this ring isnot the correct size for the wheelbeing installed, the wheel may notbe able to seat flush against the hub.This is sometimes easy to miss, soalways check the hub face flangediameter and the diameter of thewheel’s hub face to make sure theymatch before installing the wheels.
The wheel must fit flush againstthe hub, and the wheel must be
centered on the hub. If the wheelrequires rings and none are used,you’ll have an off-center installation.
Caution, if wheel spacers are used,make sure they don’t effect thewheel track and/or the number ofthreads on the wheel studs. If oldrings are stuck to the hub, but thenew wheels don’t need them, or ifyou try to double-up old rings thatare stuck to the hub and new ringson the wheels, the wheels won’tmate flush to the hub, which willcause severe axial runout. Alwayscheck closely.
NOTE: If the aftermarket wheelsthat the customer has chosen includehubcentric ring adapters (these maybe either aluminum or plastic), besure to use them. Even if you feel thatthe fasteners will center the wheel, therings provide a closer-tolerance fit tothe hub center and will allow you tobetter center the wheel during fasten-er tightening.
INSTALLING ALLOY WHEELS
12
A corrosive (electrolysis) reaction can occur between an alloy wheeland a steel hub, resulting in future wheel removal difficulty. To avoidthis, first clean the hub and wheel, and apply a thin coating of ahigh-temperature anti-seize paste onto the hub surface.
Always follow the proper torque sequence and torque values wheninstalling the wheels. The objective when tightening is to evenlyspread the clamping loads across the bolt circle pattern, to avoidisolated and excessive loading. Failure to follow the correct tight-ening sequence can lead to distortion of the wheel and hub/rotor.
Summer3-13 8/4/04 11:23 AM Page 12

TIGHTENING SEQUENCEAlways install ANY wheel by tight-
ening the fasteners in a criss-crosspattern in order to provide evenclamping loads. Uneven tighteningcan easily result in a distorted hubor wheel, leading to vibration com-plaints and brake pedal-bouncecomplaints.
AFTERMARKET WHEELSIf the customer has requested a
change to aftermarket wheelsand/or oversized tires that he or shehas provided, it’s important to verifywheel and tire clearance.
After mounting one tire/wheel, testfit the assembly onto the vehicle.With the vehicle on the lift, check forclearance between fender, suspen-sion and brake components with thetire/wheel in a straight ahead posi-tion and during full turns (lock-to-lock) in each direction. This is espe-cially important when an upgradehas been performed where tire sec-tion width and/or wheel offset andbackspace has changed (as com-pared to original Toyota specifica-tions). Next, lower the vehicle inorder to compress the suspension,and repeat the clearance inspection(have a helper bounce the vehicle aswell, to further inspect for clearanceissues). It’s better to discover aninterference problem at this point ascompared to after all fourwheels/tires have been mounted, bal-anced and installed.
NOTE: If the wheels have beensupplied by the customer, be sure tocheck the wheel’s rated load range.This is especially important if thecustomer has selected a passengercar wheel for a truck or SUV appli-cation. The wheel’s load range
should be visible somewhere on thewheel surface (rim or rear of thecenter section). Use of an alloywheel that is not designed to sup-port the weight of the vehicle athand is to be avoided, since the riskof wheel failure is possible.
TIPS:• Two styles of center caps (if
used) includes the type that popsinto place from the outside of thecenter, and the type that is insertedfrom behind the wheel hub face. Ifthe caps are to be inserted from therear, make sure that the cap flangematches the wheel’s center holechamfer and is below the wheel’smounting surface. If the cap pro-trudes beyond the mounting sur-face, this will create an obstructionthat won’t allow flush seating of thewheel to the hub. This will result infalse torque value readings and cancause an axial runout condition.
• To avoid corrosion that maycause an alloy wheel to “stick” to asteel or iron hub, apply a very thincoating of an anti-seize paste to thehub face where the wheel makescontact. Don’t apply too much, asany excess can sling out as a resultof centrifugal force and can con-taminate the wheel face or brakesurfaces. A thin coating of this com-pound will make it easy to removethe wheels in the future, preventingelectrolysis (corrosive reactionbetween aluminum and steel). Don’tapply lubricant to fastener threads,since fastener torque specificationvalues are based on the use of clean,dry threads. By lubricating thethreads with a slippery substance,inaccurate (usually too high) torquevalues may be obtained.
• After installing a set of customwheels onto the customer’s vehicle,place one-wheel’s set of originalToyota nuts in a Ziploc bag andstore this in the vehicle (in the orig-inal Toyota vehicle tool kit, next tothe spare tire or jack, etc.). If thecustomer ever needs to install theoriginal Toyota spare wheel/tire inan emergency, he or she will havethe correct fasteners, since the fas-teners that are used with the after-market wheels may differ in lengthor style from the OE. Also, the vehi-cle-equipped Toyota lug wrenchmight not fit the new fasteners, asthe aftermarket nut hex size maydiffer from those used by Toyota.
• This brings up a point well worthmentioning. If the aftermarket fas-tener hex size differs from theToyota nut size (let’s say for examplethat the Toyota nuts require a 19mmwrench, but the aftermarket fasten-ers might require an 18mm or11/16-inch wrench), be sure toadvise the customer of the need tocarry an appropriate-sized socketand breaker bar to allow the after-market wheel to be removed duringa roadside tire change. !
T O Y O TA’ S S U P P O RT T O A U T O M O T I V E R E PA I R
INSTALLING ALLOY WHEELS
13
If the customer has aftermarketwheels, check to verify that thewheel load rating is proper forthe weight of the vehicle. Neverinstall a wheel that is under-rated for the vehicle at hand.
Summer3-13 8/4/04 11:23 AM Page 13


![Chapter 5 Recruitment - Linn–Benton Community Collegecf.linnbenton.edu/bcs/bm/godwinm/upload/BA224_mondy_ch05.pdfTitle: Microsoft PowerPoint - BA224_mondy_ch05 [Compatibility Mode]](https://static.fdocuments.in/doc/165x107/5e9e53135e04875a0b593e9a/chapter-5-recruitment-linnabenton-community-title-microsoft-powerpoint-ba224mondych05.jpg)


![Presentation2 - Linn–Benton Community Collegecf.linnbenton.edu/mathsci/bio/waitea/upload/... · Microsoft PowerPoint - Presentation2 [Compatibility Mode] Author: U0076978 Created](https://static.fdocuments.in/doc/165x107/5ec8bc059aa0e7580969d92f/presentation2-linnabenton-community-microsoft-powerpoint-presentation2-compatibility.jpg)


![Presentation1 - Linn–Benton Community Collegecf.linnbenton.edu/mathsci/bio/waitea/upload/Lecture_01_Neurons.pdfMicrosoft PowerPoint - Presentation1 [Compatibility Mode] Author: U0076978](https://static.fdocuments.in/doc/165x107/5f0eb6cd7e708231d44093df/presentation1-linnabenton-community-microsoft-powerpoint-presentation1-compatibility.jpg)
