Installing a CoreStreet® Responder - Secure … · 4 Managed Services Installing a CoreStreet®...
18
Entrust Managed Services PKI™ Installing a CoreStreet® Responder Document issue: 1.0 Date of issue: December 2008
Transcript of Installing a CoreStreet® Responder - Secure … · 4 Managed Services Installing a CoreStreet®...

Entrust Managed Services PKI™
Installing a CoreStreet® Responder
Document issue: 1.0
Date of issue: December 2008
2
Copyright © 2008 Entrust. All rights reserved.
Entrust is a trademark or a registered trademark of Entrust, Inc. in certain countries. All Entrust product names and logos are trademarks or registered trademarks of Entrust, Inc. in certain countries. All other company and product names and logos are trademarks or registered trademarks of their respective owners in certain countries.
This information is subject to change as Entrust reserves the right to, without notice, make changes to its products as progress in engineering or manufacturing methods or circumstances may warrant.
Export and/or import of cryptographic products may be restricted by various regulations in various countries. Export and/or import permits may be required.
Managed Services Installing a CoreStreet® Responder

3
Configuration overview
This document describes how to install and configure the CoreStreet® Online Certificate Status Protocol (OCSP) responder in your local environment for use with the Entrust® Managed Services PKI.
This document assumes you are familiar with OCSP concepts such as requestors, responders, and proofs.
The network topology is illustrated below. The CoreStreet responder in your environment pulls down proofs from the CoreStreet Validation Authority in the Entrust Managed Services PKI environment by way of a Web server. Users then verify certificates against the proofs on the responder in their own environment.

4
Installing and configuring the OCSP responder
The following instructions describe how to install and configure the CoreStreet responder version 5.15 in your environment.
Hardware and software requirementsThe CoreStreet responder is available as an appliance and as a software bundle. If you purchased the software bundle, ensure that the computer where you will be installing the responder meets these requirements:
• hardware requirements
See the CoreStreet documentation for hardware requirements.
• Microsoft® Windows® 2003 Server with the latest patches
Installing the responderFollow the instructions below to install the CoreStreet responder software version 5.15.
Note: If you purchased the CoreStreet responder as an appliance, then the responder is already installed, and you can skip these steps.
To install the CoreStreet responder
1 On the computer where you want to install the CoreStreet responder, log in to Windows as a user with Administrator privileges.
2 Insert the CoreStreet responder CD-ROM. If the installer does not launch automatically, double-click the setupWin32.exe file.
Managed Services Installing a CoreStreet® Responder
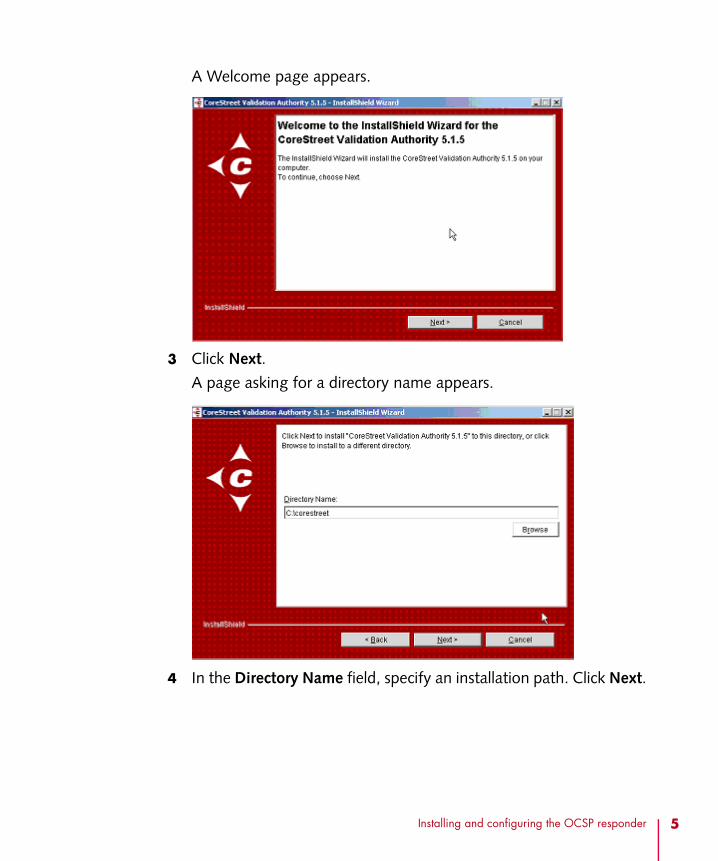
A Welcome page appears.
3 Click Next.
A page asking for a directory name appears.
4 In the Directory Name field, specify an installation path. Click Next.
5Installing and configuring the OCSP responder

6
A page listing CoreStreet features appears.
5 Deselect Authority and select Responder. Click Next.
A summary page appears.
6 Click Install.
Managed Services Installing a CoreStreet® Responder

A completion page appears.
7 Click Finish.
You have now installed the CoreStreet responder.
Installing the latest hotfixesInstall the latest hotfixes for the CoreStreet responder according to the instructions below. The instructions vary depending on whether you are using the appliance or the software version of the product. For more detailed instructions, see the CoreStreet documentation.
• “To install a hotfix (software version)”
• “To install a hotfix (appliance)” on page 8
To install a hotfix (software version)
1 Go to this link:
http://files.corestreet.com/validation-authority/
2 If a login dialog box appears, enter your CoreStreet user name and password and click OK.
3 Click the link to the hotfix.
4 Click the Responder only hotfix.
7Installing and configuring the OCSP responder

8
5 Download and install the hotfix on the CoreStreet responder computer.
To install a hotfix (appliance)
1 Log in to the CoreStreet responder as the rtc user either from the local console or from a remote computer using SSH.
The CoreStreet Responder Appliance Configuration menu appears.
2 Select Configure Appliance settings.
The Responder Appliance Configuration menu appears.
3 Click Get Appliance security patches.
The latest patches for the appliance are downloaded.
Configuring the responderAfter patching the CoreStreet responder, you must configure it to pull proofs from the CoreStreet Validation Authority in Entrust’s environment.
To configure the responder
1 Click Start > Programs > CoreStreet > Validation Authority > Configure Responder.
The Responder Configuration Welcome page appears.
Managed Services Installing a CoreStreet® Responder

2 Click Begin.
The Response List Sources page appears.
3 Under Add a New Source, select Directory from the Source Type drop-down list.
4 In the Source URL field enter:http://ocsp.managed.entrust.com:8080/ocspproofs/
This is the URL from which to obtain proofs.
5 Click Add Source.
6 Click Next.
9Installing and configuring the OCSP responder
10
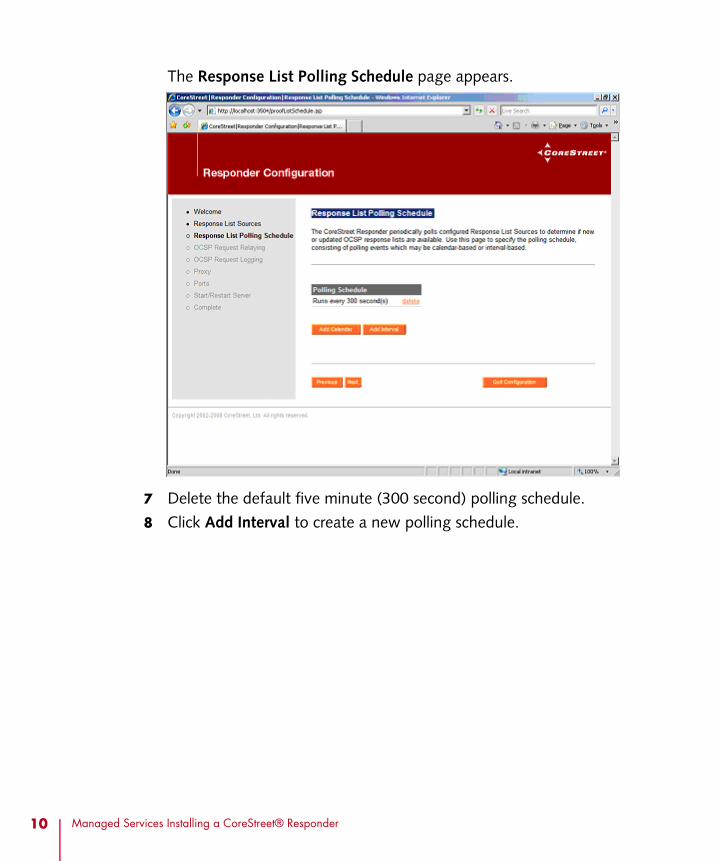
The Response List Polling Schedule page appears.
7 Delete the default five minute (300 second) polling schedule.
8 Click Add Interval to create a new polling schedule.
Managed Services Installing a CoreStreet® Responder

The Add Interval Polling Schedule page appears.
9 Enter 28800 (eight hours) in the field.
Attention: The polling schedule must be set to 28800. This value is what the CoreStreet Validation Authority expects. If you want to use a different value, contact Entrust.
10 Click Add Schedule.
An entry of 28800 seconds appears in the list of polling schedules.
11 Click Next.
11Installing and configuring the OCSP responder
12
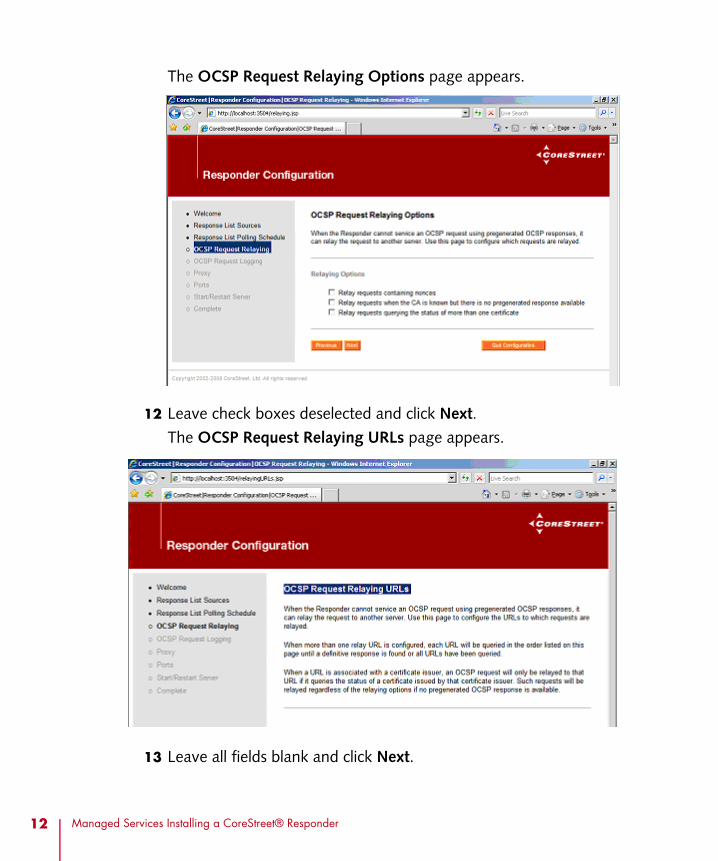
The OCSP Request Relaying Options page appears.
12 Leave check boxes deselected and click Next.
The OCSP Request Relaying URLs page appears.
13 Leave all fields blank and click Next.
Managed Services Installing a CoreStreet® Responder

The OCSP Request Logging page appears.
14 Leave all the defaults and click Next.
13Installing and configuring the OCSP responder

14
The Proxy page appears.
15 If you are using a proxy, specify the proxy server, port, and authentication information in the fields provided. Otherwise, click Next.
Managed Services Installing a CoreStreet® Responder

The Ports page appears.
16 Leave the defaults and click Next.
The Start/Restart Responder page appears.
17 Click Start/Restart.
15Installing and configuring the OCSP responder

16
The Configuration Complete page appears.
18 Click the Responder Status Page link to view the status of the responder.
You have now configure the CoreStreet responder to pull proofs off the Web server in Entrust’s environment.
Testing the configurationTest your configuration by having your client application validate the status of a certificate over OCSP. In order to check a certificate successfully, your client application must meet these requirements:
• The client must be configured as an OCSP requestor.
Entrust Entelligence™ Security Provider for Windows is a product that can add OCSP requestor capabilities to any CryptoAPI-based application. Detailed configuration instructions are available in the Security Provider for Windows Administration Guide.
• The client must have nonces disabled.
A nonce-enabled client does not work in this setup.
If you are using Security Provider to add OCSP capabilities, ensure that Security Provider’s OCSPEnableNonce setting is left at its default value (where nonces are disabled).
Managed Services Installing a CoreStreet® Responder
Forcing an update of proofs
You configured your CoreStreet responder to pull down proofs every eight hours from the CoreStreet Validation Authority. If you need new proofs immediately, you can force a pull-down.
To force a pull-down
1 Open your responder’s status page. See the table below for details.
If you are using... Do this...
the appliance version of the responder
1 Open a browser.
2 Browse to:http://<responder_server>/status
OR
https://<responder_server>/status (if you protected the responder with SSL)
where <responder_server> is the name of your CoreStreet responder server.
the software version of the responder
On the responder computer, click Start > All Programs > CoreStreet > Validation Authority > Responder Status
17Forcing an update of proofs

18
The Status Reports page appears.
3 Click OCSP Response Lists or Proof Lists, whichever is available.
The OCSP Response Lists (or Proof Lists) page appears.
4 Click Force update now.
The responder pulls down the latest proofs.
Managed Services Installing a CoreStreet® Responder


![[MS-OCSPA]: Microsoft OCSP Administration Protocoldownload.microsoft.com/download/9/5/E/95EF66AF-9026-4BB0-A41D... · Microsoft OCSP Administration ... [MS-OCSPA]: Microsoft OCSP](https://static.fdocuments.in/doc/165x107/5b8483987f8b9aea498c7a9e/ms-ocspa-microsoft-ocsp-administration-microsoft-ocsp-administration-.jpg)


![[MS-OCSP]: Online Certificate Status Protocol (OCSP ...download.microsoft.com/download/9/5/E/95EF66AF-9026-4BB0-A41D... · [MS-OCSP]: Online Certificate Status Protocol (OCSP) ...](https://static.fdocuments.in/doc/165x107/5b8483987f8b9aea498c7a92/ms-ocsp-online-certificate-status-protocol-ocsp-ms-ocsp-online-certificate.jpg)