Installation Sheet - DEKOM Page 3 Installation Sheet TANDBERG 8000 MXP 1) Dual Monitor Frame Before...
6
11304801 Page 1 Installation Sheet TANDBERG 8000 MXP The TANDBERG 8000 MXP is shipped in three boxes: Box 1 1. : Base (1), Rear Cover ABS (2), TANDBERG Precision HD Camera (5), Accessories box Box 2 2. : The Dual Monitor Frame (3) Box 3 3. : The Plasma Monitors (4) 3 2 4 5 1
-
Upload
truongtuyen -
Category
Documents
-
view
220 -
download
4
Transcript of Installation Sheet - DEKOM Page 3 Installation Sheet TANDBERG 8000 MXP 1) Dual Monitor Frame Before...

11304801 Page 1
Installation SheetTANDBERG 8000 MXP
The TANDBERG 8000 MXP is shipped in three boxes:
Box 11. : Base (1), Rear Cover ABS (2), TANDBERG
Precision HD Camera (5), Accessories box
Box 22. : The Dual Monitor Frame (3)
Box 33. : The Plasma Monitors (4)
3
2
4
5
1

11304801 Page 2
Installation SheetTANDBERG 8000 MXP
Accessories
4 x Type M4x16
4 x Type 4.3x10.5 Lock Washer
2 x Allen keys (Unbrako keys)
1 x 5mm, 1 x 2,5mm
Cables:
7 x Power Cables•
1 x LAN Cable•
1 x ISDN Bundle Cable•
2 x DVI Cables•
TANDBERG Remote
Control
TANDBERG
Tracker
3 x Microphones
8 x M8x35Wrench
13 mm
User Manuals CD
TANDBERG MXP
User Documentation

11304801 Page 3
Installation SheetTANDBERG 8000 MXP
1) Dual Monitor Frame
Before mounting the monitor frame:
Remove the 4 nuts from the bolts protruding 1.
from the top of the base, using the wrench
found in the accessories box.
Remove 4 bolts by using an Allen key (unbrako 2.
key) found in the accessories box.
Carefully lift the dual monitor frame out of the
box:
Place the dual monitor frame on top of the 1.
base.
Use the 4 nuts and the 4 bolts (which was 2.
removed from the base) to fasten the dual
monitor frame in place.
Installation of TANDBERG 8000 MXP
To install the monitors we recommend that there are 3 people present.
NOTE! Due to the weight of the system, the base should be placed in its permanent location at once.
Open the front screen, fastened by 1.
magnets.
Locate the holes on the monitor 2.
frame for mounting the monitors.
Carefully place the first monitor 3.
inside the dual monitor frame.
Enter bottom first.
Secure the monitor using the four 4.
M8x35 screws by using an Allen
key (unbrako key) found in the
accessories box.
Repeat step 2, 3 and 4 for the 5.
second monitor
Remove the protective plastic film 6.
from the plasma monitor front.
Close the front screen. Make sure 7.
the magnets engage.
2) Plasma Monitors
The front
screen

11304801 Page 4
Installation SheetTANDBERG 8000 MXP
3) TANDBERG Precision HD CameraPlace the camera centrally on top of the Monitor Frame. 1.
Make sure it is placed in parallel to the edge of the front of 2.
the Monitor in order to allow the IR sensor to pick up the
signals from the remote control.
4) Connecting CablesPlease connect the following cables to the monitors:
Use the Allen key and remove the Rear Base Cover from the base.1.
Connect 1.5m DVI-DVI cable marked 2. DIGITAL/RGB IN, Main Monitor to the Input 2 on the right hand monitor (when
viewed from the rear).
Connect 1.5m DVI-DVI cable marked 3. DIGITAL/RGB IN, Dual Monitor to the Input 2 on the left hand monitor.
Connect power to 4. AC IN on both monitors.
Please connect also the cables for microphones, camera and network (ISDN/LAN) cables (for details see the 5.
Administrator Guide > Interfaces & Sockets > Codec 6000 MXP, which is found on the User Manuals CD).
5) Rear PanelsPut on the Rear Base cover and the
Rear Frame cover and ensure that all
cables are stored away correctly.
Screws and lock washers are found
in the accessories box.
6) Turn on the Video SystemTurn the monitors on by pressing the On/Off power switch, 1.
placed at the bottom, in the back of each monitor.
Turn the Codec on by pressing the On/Off power switch on 2.
the codec. The Unit Codec is found in the base.
Rear Frame
cover
Rear Base
cover
Power
On/Off
Power
On/Off
Codec
On/Off
11304801 Page 5
Installation SheetTANDBERG 8000 MXP
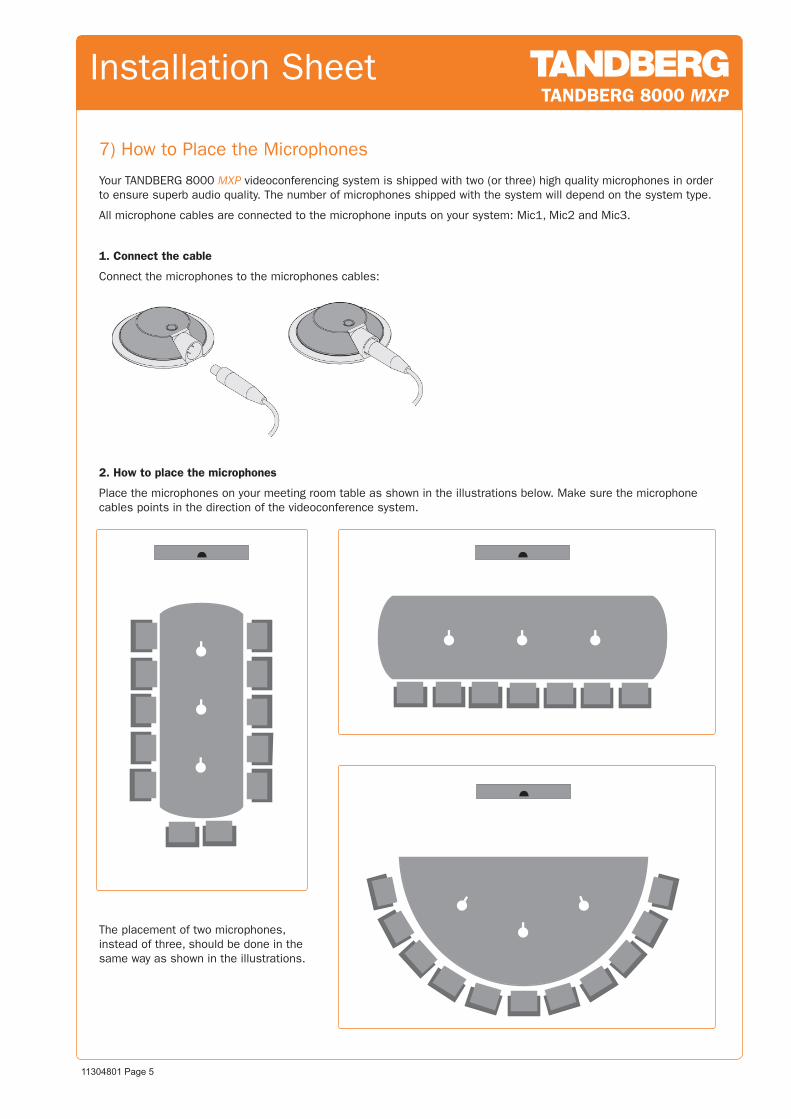
Your TANDBERG 8000 MXP videoconferencing system is shipped with two (or three) high quality microphones in order
to ensure superb audio quality. The number of microphones shipped with the system will depend on the system type.
All microphone cables are connected to the microphone inputs on your system: Mic1, Mic2 and Mic3.
1. Connect the cable
Connect the microphones to the microphones cables:
7) How to Place the Microphones
2. How to place the microphones
Place the microphones on your meeting room table as shown in the illustrations below. Make sure the microphone
cables points in the direction of the videoconference system.
The placement of two microphones,
instead of three, should be done in the
same way as shown in the illustrations.

11304801 Page 6
Installation SheetTANDBERG 8000 MXP
2. Language
Open General menu. Select Language and press save.
3b. ISDN Configuration
Open Network - ISDN/External/Leased E1/T1 and
select ISDN-BRI Settings or ISDN-PRI Settings. Make
the ISDN configuration and press save.
1. Open the Control Panel
Choose Control Panel from the main menu and press
the OK button on the remote control.
8) Video System - Quick Setup
3a. Network Configuration
Open Network > LAN Settings. Configure IP Settings
and H.323 Settings and press save.
Please read the Administrator Guide found on the user manuals CD for further details.
TIP
If the menu is not already present, press the
OK/Menu key on the remote control to open the
menu. Navigate in the menus with arrow keys
and OK button.
OK/Menu
button
NOTE
The TANDBERG Remote Control is available
in two versions; the TRC3 and TRC4. The
illustration above shows the TRC3.
The IR sensors for the remote control are placed at the lower
right of each monitor. Use the TANDBERG Remote Control to
access the video system menus.