
INSTALLATION & OPERATION MANUAL - Broaster...
30
Broaster Company 2855 Cranston Road, Beloit, WI 53511-3991 608/365-0193 broaster.com © 2017 Broaster Company Printed In U.S.A. Smokaroma® is a registered trademark. Be sure ALL installers read, understand, and have access to this manual at all times. Design Certified By: UL, CUL & NSF INSTALLATION & OPERATION MANUAL Bar-B-Q Boss ® Pressure Smoker Models BC71 and BC73 Manual #17896 6/17
Transcript of INSTALLATION & OPERATION MANUAL - Broaster...

Broaster Company2855 Cranston Road, Beloit, WI 53511-3991
608/365-0193 broaster.com
© 2017 Broaster CompanyPrinted In U.S.A.
Smokaroma® is a registered trademark.
Be sure ALL installers read, understand, and have access to this manual at all times.
Design Certified By: UL, CUL & NSF
INSTALLATION & OPERATION MANUALBar-B-Q Boss® Pressure Smoker
Models BC71 and BC73
Manual #17896 6/17


W-1
FOR YOUR SAFETYDo not use or store gasoline or other flammable vapors or liquids in the vicinity of this or any other appliance.
Improper installation, adjustments, alteration, service or maintenance can cause property damage, injury or death. Read the installation, operating and mainte-nance instructions thoroughly before installing or servicing this equipment.
For the sake of safety and clarity, the following words used in this manual are defined as follows:
Indicates an imminently hazardous situation which, if not avoided, could result in serious injury or death.
Indicates a potentially hazardous situation which, if not avoided, could result in serious injury or death.
Indicates a potentially hazardous situation which, if not avoided, could result in minor injury, property damage or both.
All adjustments and repairs shall be made by an authorized Smokaroma representa-tive.
If there is a power failure, turn the timer knob to "0" .
Failure to read and understand this manual
completely could result in serious injury or death. Be sure ALL operators read, understand and have access to this manual at all times.
Rags or paper containing cooking oil can catch fire
if exposed to heat. Laundering will not remove the oil. Dispose of all oil-soiled papers and rags in a trash container that is in a ventilated area away from all cooking equipment or other heat sources such as direct sunlight.
broaster.com Manual #17896 6/17


i
TABLE OF CONTENTS
1. - LIMITED WARRANTY ............................................................................ 1 - 1
2. - OWNER’S RESPONSIBILITY ................................................................ 2 - 1
3. - INSTALLATIONLOCATION ............................................................................................................... 3 - 1VENTILATION .......................................................................................................... 3 - 1
4. - GETTING TO KNOW YOUR BBQ-BOSS PRESSURE SMOKER ........... 4 - 1
5. - ELECTRICAL CONNECTIONSCHARACTERISTICS .............................................................................................. 5 - 1CONNECTIONS ....................................................................................................... 5 - 1WIRE DIAGRAMS ..................................................................................................... 5 - 2
6. - CONTROL PANEL .................................................................................... 6 - 1
7. - OPERATIONMEAT RACK ASSEMBLY .................................................................................. 7 - 1LOADING MEAT RACK ..................................................................................... 7 - 1LOADING FOOD BASKET ................................................................................. 7 - 1COOKING THICK CUTS OF MEAT ................................................................... 7 - 2COOKER OPERATION ...................................................................................... 7 - 2HOT SMOKE ...................................................................................................... 7 - 2COLD SMOKE .................................................................................................... 7 - 4
8. - CLEANING DAILY ....................................................................................................... 8 - 1WEEKLY ................................................................................................................... 8 - 1
broaster.com Manual #17896 6/17


1 - LIMITED WARRANTY Parts and Labor
1-1
Subject to the terms and conditions of this warranty, Broaster Company (Company) warrants that all equipment and parts manufactured or sold by the Company and purchased new from an authorized Company distributor are free from defects in material and workmanship for a period of one year from the date of installation, or two years from the date of manufacture, if installation is made by a qualified installer under supervision by an authorized distributor in accordance with applicable laws and regulations. Warranty coverage is extended to the original purchaser only and is void if the equipment is resold or relocated. If an authorized Company distributor is notified of a warranty claim during the warranty period, the Company will at its option replace, recondition or repair at its factory any part or parts of the equipment which the Company judges defective, provided the equipment has been subjected to normal usage, properly installed, operated and serviced in accordance with Company operating instructions, and there is no evidence of accident, alteration or abuse of the equipment or the use of unauthorized repair methods. All parts replaced under this warranty carry only the unexpired term of the warranty.
Service under this warranty shall be furnished only by an authorized Company distributor. The Company does not send service representatives to furnish warranty service. Your authorized Company distributor should be contacted for warranty service.
This warranty covers on-site labor charges only, at a fixed rate, for one year from date of installation, or two years from date of manufacture, of new equipment only. Transportation charges, trip charges, zone fees, or other expenses in connection with warranty service are the obligation of the owner unless otherwise specified in the original sales contract between the purchaser and the authorized Company distributor from which the equipment is purchased. Please refer to that contract for coverage as to those charges.
This warranty does not apply to consumable items.
The foregoing warranty is made in lieu of all other warranties, express or implied, and the Company specifically disclaims any implied warranties of merchantability or fitness for a particular purpose. The Company’s full obligation under this warranty, and the purchaser’s sole remedy, shall be limited to replacement, reconditioning or repair as specified above.
IN NO EVENT SHALL THE COMPANY BE LIABLE TO THE ORIGINAL OWNER OR ANY OTHER PERSON FOR ANY INCIDENTAL, CONSEQUENTIAL OR SPECIAL DAMAGES RESULTING FROM THE USE OR INABILITY TO USE THE EQUIPMENT COVERED HEREBY, WHETHER ARISING FROM BREACH OF WARRANTY, STRICT LIABILITY OR OTHERWISE.
The Company reserves the right to change or improve its products in any way without obligation to alter products previously manufactured.
Used Company equipment or Company equipment not purchased from an authorized distributor carries no warranty expressed or implied.
broaster.com Manual #17896 6/17


2 - OWNERS RESPONSIBILITY
2-1
It is the owner’s responsibility to:
• Ensure the Bar-B-Q Boss® is properly maintained.
• Ensure all safety devices and warning signs are in their original location and are legible.
• Allow only properly trained personnel to operate, clean and maintain the Bar-B-Q Boss®.
• Retain this manual for future reference.
• Insure main power supply is discon-nected before the unit is serviced.
• When you sell, trade, dispose of or give away your Bar-B-Q Boss®, you must make sure that all safety devices and warning signs are intact and legible and the operation manual is included with the unit.
If you need replacement warning signs or manuals, contact an authorized Smo-karoma representative or Broaster Com-pany at 608-365-0193.
The Customer Service Department at Broaster Company should be contacted at the time of sale or disposal of the Bar-B-Q Boss® Pressure Smoker so records may be updated.
If you are a new owner of a used unit or have relocated your Bar-B-Q Boss® please take a minute to notify us by completing the Equipment Registration page on our web-site. It is NOT a warranty registration.
Go to broaster.com, move your cursor over the Operator Support and a menu will drop down. Click on Equipment Registration and fill out the registration form. When done click on SEND in the lower right corner of the form.
This information enables Broaster Company to better serve you and keep you informed of changes in equipment, condiments, or service bulletins.
broaster.com Manual #17896 6/17


3 - INSTALLATION
3-1
LOCATION:
For convenience and speed, location of the Bar-B-Q Boss® Pressure Smoker should be given careful consideration. If possible, locate the unit so the flow of cooked prod-uct is in a straight line from storage, in and out of the unit and to the customer.
• On the right side of the unit is a holder for the cover when it is not on the cook-ing well. Be sure to leave space to be able to put the cover in the holder.
• Provision must be made to eliminate movement of the unit which might cause strain on electrical connections.
• DO NOT install unit where traffic areas are on either side or in back of unit.
VENTILATION:
Check with state and local building codes for ventilation requirements for this type of product.
broaster.com Manual #17896 6/17


4 - GETTING TO KNOW YOURBar-B-Q Boss® Pressure Smoker
4-1broaster.com Manual #17896 6/17

4-2
Bar-B-Q Boss®
EJECTOR VALVE: When closed it allows pressure to build in the cooking well. Open exhausts pressure from cooking well.
COVER HOLDER: Provides a place to put the cover when not on the cooking well.
DRAIN PAN: This pan catches the drip-pings that miss the drip pan on the bottom of the meat rack when the drain valve is opened,
DRAIN HANDLE: Opens the drain valve to drain the cooking well.
DO NOT open drain valve unless the timer is off and
the ejector valve is OPEN. Hot steam could spray out under pressure causing serious burns.
COVER CLAMP: These clamps hold the cover against the cooking well so pressure can build up in the cooking well.
COVER: Covers the cooking well during the cooking cycle.
SAFETY RELIEF VALVE: Opens if the pressure in the cooking well goes above 17 PSI and automatically resets at 15 PSI.
Keep away from safety relief valve opening
unless wearing heat and steam protec-tive apparel. Escaping steam could cause serious burns.
EXHAUST MUFFLER: Condenses some of the moisture in the steam preventing it from splattering on adjacent equipment.
broaster.com Manual #17896 6/17

5 - ELECTRICAL CONNECTIONS
5-1broaster.com Manual #17896 6/17
SUGGESTED 1 PHASE WIRING CAPAC-ITY TABLE:
SUGGESTED 3 PHASE WIRING CAPAC-ITY TABLE:
ELECTRICAL HOOK-UP
Plug unit into receptacle suitable for 1 phase or 3 phase as shown on specification plate on rear cover of unit.
Ph Volts Amps Wire Breaker or Fuse
1 208 25.5 3 30
1 220 27.0 3 35
1 240 22.5 3 30
Ph Volts Amps Wire Breaker or Fuse
L1 L2 L33 208 7.4 10.3 10.8 4 15
3 220 7.8 10.9 11.4 4 153 240 8.5 7.9 8.5 4 15
ELECTRICAL CHARACTERISTICSThese models are available for either 208 or 240 applied voltage, 60Hz, 1 phase or 3 phase electrical connection in the USA and several voltages for export applications.
Be sure to check the wiring diagram located inside the back panel. It shows electrical circuits and connections. See Access For Hook-Up under ELECTRICAL HOOK-UP.
• All electrical work must conform with the requirements of national, state and local electrical codes.
• When installing or servicing the unit, always check the dataplate located on the rear panel to make certain proper parts are used and the correct service is rendered. DO NOT apply a voltage to any unit other than that shown on the dataplate. If in doubt, consult your local power company.
ELECTRICAL CONNECTIONS
• When installed, the unit must be electri-cally grounded in accordance with local codes, or in absence of local codes, with the National Electrical Code, ANSI/NFPA 70, or for Canada, the Canadian Electrical Code, CSA 22.2, as applicable.
• Use Copper wire only for connections.
• If power run is over 50 feet, use next larger size wire.

5-2broaster.com Manual #17896 6/17
1 phase wiring diagram.
5-3broaster.com Manual #17896 6/17
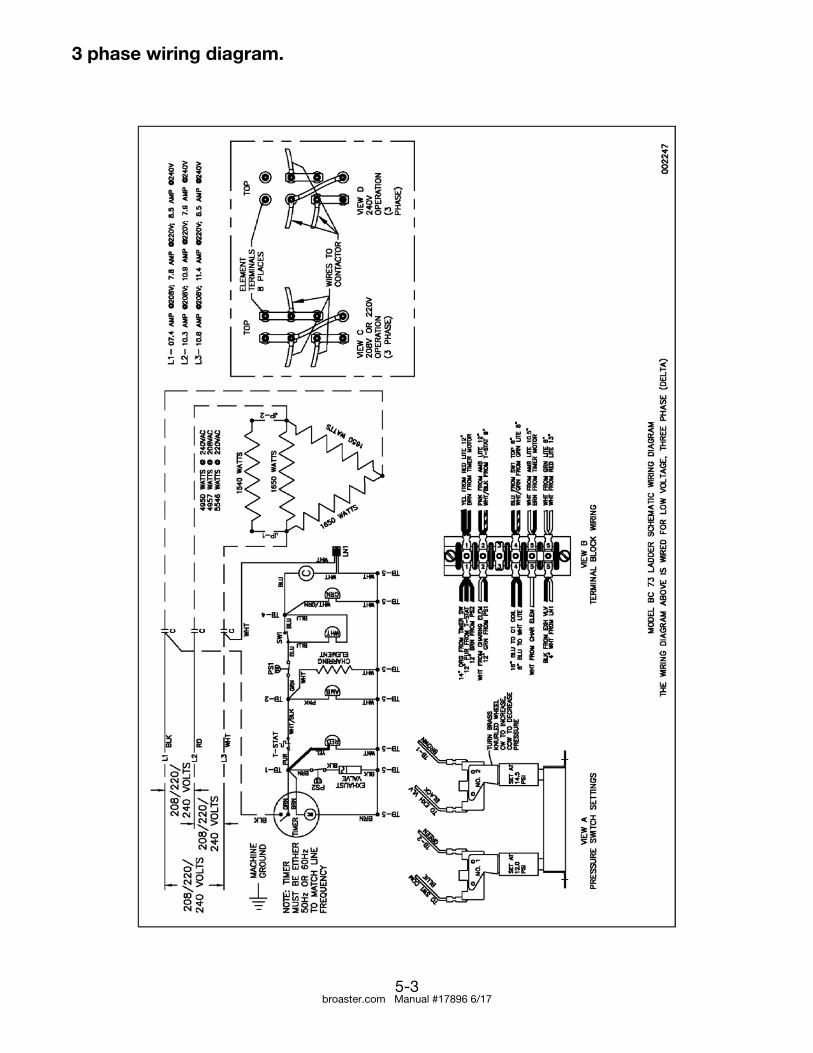
3 phase wiring diagram.


6 - CONTROL PANEL
6-1broaster.com Manual #17896 6/17
THERMOSTAT: Puts the smoker in either BAR-B-Q or HOLD mode.
COLD MODE SWITCH: Puts the smoker into Cold Smoke Mode.
WHITE LIGHT: Illuminates when the TIMER and THERMOSTAT are set and the COLD SMOKE SWITCH is on.
PRESSURE GAUGE: Indicates the pres-sure in the Cooking Well.
GREEN LIGHT: Illuminates when the THERMOSTAT and TIMER are set and the COLD SMOKE SWITCH is off.
AMBER LIGHT: Illuminates when the THERMOSTAT and TIMER are set.
RED LIGHT: Illuminates when the TIMER is set.
TIMER: Sets the product cook time.


7 - OPERATION
7-1Fbroaster.com Manual #17896 6/17
All food should be com-pletely thawed before
cooking, if frozen. Always cook from a refrigerated temperature.
Always prepare food first according to the recipe for that particular food. For small loads, cut up foods or fish, use food basket.
When cooking pork rib slabs, beef rib slabs, or beef briskets use meat rack.
MEAT RACK ASSEMBLY:
1. Slide spit through spit adapter as shown above.
2. Screw spit onto stud in bottom of drip pan.
LOADING MEAT RACKS:
Push the slabs onto the top spit and then pierce the slab with a spit on the spit adapter at a lower point of the slab.
Load (3) slabs on one spit then skip a spit. Continue loading in this manner until (9) slabs are loaded. Then load the skipped spits with 1, 2, or 3 slabs on each spit; whatever the spit will take without crowd-ing.
Take your hand and insert your finger between each slab to separate them. This will allow the smoke to get between and fla-vor each slab.
Load Beef briskets in a similar manner until 3 briskets maximum are loaded.
Approximately 12 slabs of 2 lb. St. Louis trimmed spare ribs or 15 slabs of 2 lb. Loin Ribs may be loaded in this manner. Place loaded meat rack into cooker such that meat does not block smoke or touch side of cooker.
LOADING FOOD BASKET:
Food basket may be used for cooking small pieces of meat such as; cut up chicken, ribs, and shrimp. It is also ideal for fish, and hamburger patties. It also may be used for duck, whole chickens, and half chickens rather than the spit because these items tend to drop off the spit when cooked tender.
Prepare foods according to the recipe.
(cont’d on next page)

7-2
Load food basket. The food basket has eight shelves which are adjustable.
Place drip pan in bottom of cooking well. If cooking well is hot, place drip pan in cooking well by using the spit. Then remove spit by unscrewing counter-clockwise leaving the drip pan in bottom of cooking well.
Place loaded food basket into drip pan. This pan catches drippings and helps to prevent drippings from collecting in the bottom of the cooking well.
COOKING THICK CUTS OF MEAT: The food basket may also be used to cook thick cuts of meat weighing up to 20 lbs. such as hams, turkeys, large roasts, etc.
Place food basket frame with only the bot-tom shelf installed into the drip pan in the bottom of the cooking well. Place one thick cut of meat on bottom shelf of food basket. Insert another shelf above the meet in the bottom and put another thick cut of meet on that shelf.
COOKER OPERATION:
HOT SMOKE:
1. Close drain valve.
2. Place wood shavings or chips into charring cup.
3. Place the charring cup into the small chamber inside of cooking well.
The smoke can be varied by increasing or
decreasing the amount of wood placed in the cup. A charcoal flavor may be obtained by placing a teaspoon of drippings or a small piece of fat in the cup under the wood. With a little experience, the correct amount to please your customers taste will soon be determined.
4. Place prepared meat on the spit and spit adapter with drip pan, or food basket with drip pan into the cooking well and let rest on the bottom of the cooking well.
5. Place cover on cooking well.
broaster.com Manual #17896 6/17

7-3
6. Align cover so that the L shaped slots are at the #1 and #2 position as shown above.
7. Swing up “locking” knobs #1 and #2 into “L” shaped slots.
8. Rotate lid clockwise until it stops. Then swing up remaining knobs and slightly tighten them in the pattern shown above. Continue to tighten until all are securely tightened.
To prevent damage to the clamps, DO NOT use
pliers or any other tools other than your hands to tighten clamps.
It is necessary to tighten clamps in the order
shown to make sure the cover seals to the top of the cooking well. If the clamps are tightened differently then shown above the cover will set unevenly on the cooking well and may leak.
9. Close Ejector valve.
10. Make sure “Cold Smoke” switch is in the “Off” position. (White light off, green light on)
11. Set thermostat knob to “Bar-B-Q” position.
12. Set time on timer to that indicated in recipe depending on number of pounds being cooked.
When cooker is still warm from prior cooking,
deduct 10 minutes from the cooking time for the next cooking cycle. The initial pressure of 12 psi is usually reached in 25 to 30 minutes. This may vary if food is at different temperatures when placed in cooker or a large quantity of food is being cooked. If pressure does not start to rise shortly after timer is set, check for leaks and see that all knobs are securely tightened, the drain valve handle is in the horizontal position, and ejector valve stem is in horizontal position.
The cooker will build pressure. When it reaches 12 psi, the green light will go out indicating the main element is off. The unit will continue to build pressure until approximately 14½ psi has been reached.
The cooker will then exhaust to prevent the pressure from rising above 12 psi. The pressure may fluctuate between 11 psi and 14½ psi as the heat is applied and removed to maintain cooking pressure.
13. When cooking time has expired, pressure will be exhausted automatically.
Do not attempt to remove cover under pressure.
14. Open the ejector valve. When gauge indicates zero pressure, loosen all knobs.
15. Swing knobs 3, 4, 5 & 6 down. Then rotate cover counter-clockwise until it stops. Swing down the remaining two (2) knobs.
broaster.com Manual #17896 6/17

7-4
16. Lift cover and open by tilting the top of the cover toward you to allow steam trapped by cover to be released away from you.
17. Remove food.
Use gloves and wire lift handles to avoid being
burned.
18. Immediately after removing product from the Bar-B-Q Boss®, wipe underside of the cover with a large towel, and place in cover holder on right side of unit.
19. To hold food in a warm position, turn thermostat to “Hold” position and set timer to length of time desired to keep product warm. Place lid on loosely without tightening any knobs.
20. To use cooker as a pressure oven when no smoke is desired, omit wood. Follow instructions using prescribed time.
21. Empty charring cup immediately.
Do not empty charred chips into waste basket
or where they may ignite and cause a fire.
After using cooker, remove charring cup and immediately pour small amount of water on shavings in the cup to prevent them from igniting on exposure to air after removing the cover. They can also be placed in a bucket containing water. If they should ignite in the unit after removal of the top, the flame may be quickly extinguished by placing the cover on the cooking well or by pouring some water on the wood.
COLD SMOKE:
1. Close drain valve.
2. Place wood shavings or chips into charring cup.
3. Place the charring cup into the small chamber inside the cooking well.
The smoke can be varied by increasing or
decreasing the amount of wood placed in the cup. A charcoal flavor may be obtained by placing a teaspoon of drippings or a small piece of fat in the cup under the wood. With a little experience, the correct amount to please your customers taste will soon be determined.
4. Place prepared meat on the spit and spit adapter with drip pan, or food basket with drip pan into the cooking well and let rest on the bottom of the cooking well.
5. Place cover on cooking well.
6. Align cover so that the L shaped slots are at the #1 and #2 position as shown above.
broaster.com Manual #17896 6/17

7-5
7. Swing up “locking” knobs #1 and #2 into “L” shaped slots.
8. Rotate cover clockwise until it stops. Then swing up remaining knobs and slightly tighten them in the pattern shown above. Continue to tighten until all are securely tightened.
To prevent damage to the clamps, DO NOT use
pliers or any other tools other than your hands to tighten clamps.
It is necessary to tighten clamps in the order
shown to make sure the cover seals to the top of the cooking well. If the clamps are tightened differently then shown above the cover will set unevenly on the cooking well and may leak.
9. Close ejector valve.
10. Make sure “Cold Smoke” switch is in the “On” position. (White light on, green light off)
11. Set thermostat knob to “Bar-B-Q” position.
12. Set time on timer to that indicated in recipe, for the product being smoked.
13. When cooking time has expired,
pressure will be exhausted automatically.
Do not attempt to remove cover under pressure.
14. Open the ejector valve. When gauge indicates zero pressure, loosen all knobs.
15. Swing knobs 3, 4, 5 & 6 down. Then rotate cover counter-clockwise until it stops. Swing down the remaining two (2) knobs.
16. Lift cover and open by tilting the top of the cover toward you to allow steam trapped by cover to be released away from you.
17. Remove food.
Use gloves and wire lift handles to avoid being
burned.
18. Immediately after removing product from the Bar-B-Q Boss®, wipe underside of cover with a large towel, and place cover in holder on side of the cooker.
19. To hold food in a warm position, turn thermostat to “Hold” position and set timer to length of time desired to keep product warm. Place cover on loosely without tightening any knobs.
20. To use cooker as a pressure oven when no smoke is desired, omit wood. Follow instructions using prescribed time.
21. Empty charring cup immediately.
Do not empty charred chips into waste basket
or where they may ignite and cause a fire.
After using cooker, remove charring cup and immediately pour small amount of water on shavings in the cup to prevent them from igniting on exposure to air after removing the cover. They can also be placed in a bucket containing water. If they should ignite in the unit after removal of the cover, the flame may be quickly extinguished by placing the cover on the cooking well or by pouring some water on the wood.
broaster.com Manual #17896 6/17


8 - CLEANING
8-1broaster.com Manual #17896 6/17
Always use cleaners ap-proved for use in food ar-
eas.
DO NOT pour water into a hot cooking well.
DO NOT use oven clean-ers or cleaners not ap-
proved for use on aluminum.
NEVER move smoker when under pressure or
when warm with cover in place.
Take care to see that the O-ring is not nicked or scarred which will cause a leak preventing build up of pressure in the cook-ing well.
Check the top of the cooking well where the O-ring seals before each load to remove any debris that might interfere with the seal of the O-ring.
Once a week apply a small amount of food safe lubricant or cooking oil on the top sur-face of the cooking well where the O-ring seals. Also apply a small amount of food safe lubricant or cooking oil on the threads of the clamp down bolts.
CLEANING - DAILY
1. At the end of the day allow the cooking well to cool down and close the drain valve.
2. Place about 1” of water in the bottom of the cooking well and 1 capful of dish wash-ing soap to clean interior of the cooking well.
3. Scour the inside of the cooking well with a maroon 007447ScotchBrite pad.
4. BEFORE opening the drain valve make sure the drain pan is in place under the cooking well.
5. Clean the stainless steel parts of the unit with a mild cleaner and a non-abrasive cloth. For baked on stains, soak in a cleaner and let stand for a few minutes before wip-ing off with a non-abrasive cloth.
6. Unscrew the tube muffler and empty into a drain.
CLEANING - WEEKLY
Place a quart of water and a capful of dish washing soap into the cooking well and place the cover on the cooking well and clamp down. Allow the pressure regulating valve to “pop-off” through the muffler sever-al times. This helps keep the exhaust system clear and clean,
The pan, spit, spit adapter and food basket are all stainless steel and should be cleaned after each use. They may be cleaned using a dish washing detergent or soaked in a solution not harmful to metal or people, and then cleaned in the sink.


Broaster Company2855 Cranston Road, Beloit, WI 53511-3991
608/365-0193broaster.com


![References - INFLIBNETshodhganga.inflibnet.ac.in/bitstream/10603/17896/17/17_referrances... · 310 References [ABD 02] Abdennour A., (2002), “Adaptive Optimal Gain Scheduling for](https://static.fdocuments.in/doc/165x107/5a78af717f8b9ab8768ebe29/references-references-abd-02-abdennour-a-2002-adaptive-optimal-gain.jpg)