Installation & Operation Guide - AJA Video Systems Chapter 4: Capture Operation – AJA CION
25
Installation & Operation Guide Version 2.0 Published: October 9, 2014
Transcript of Installation & Operation Guide - AJA Video Systems Chapter 4: Capture Operation – AJA CION

Installation & Operation GuideVersion 2.0Published: October 9, 2014
AJA CamXchange Application v2.0 www.aja.com2
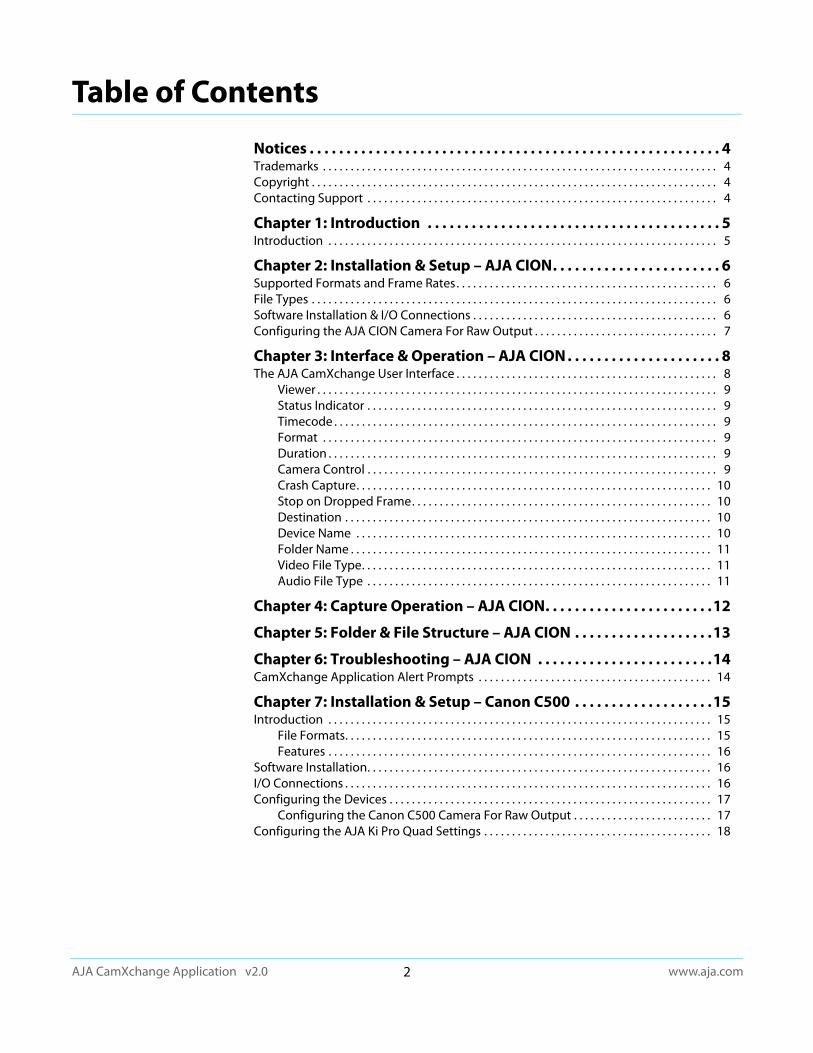
Table of Contents
Notices . . . . . . . . . . . . . . . . . . . . . . . . . . . . . . . . . . . . . . . . . . . . . . . . . . . . . . . . 4Trademarks . . . . . . . . . . . . . . . . . . . . . . . . . . . . . . . . . . . . . . . . . . . . . . . . . . . . . . . . . . . . . . . . . . . . . . . 4Copyright . . . . . . . . . . . . . . . . . . . . . . . . . . . . . . . . . . . . . . . . . . . . . . . . . . . . . . . . . . . . . . . . . . . . . . . . . 4Contacting Support . . . . . . . . . . . . . . . . . . . . . . . . . . . . . . . . . . . . . . . . . . . . . . . . . . . . . . . . . . . . . . . 4
Chapter 1: Introduction . . . . . . . . . . . . . . . . . . . . . . . . . . . . . . . . . . . . . . . . 5Introduction . . . . . . . . . . . . . . . . . . . . . . . . . . . . . . . . . . . . . . . . . . . . . . . . . . . . . . . . . . . . . . . . . . . . . . 5
Chapter 2: Installation & Setup – AJA CION. . . . . . . . . . . . . . . . . . . . . . . 6Supported Formats and Frame Rates. . . . . . . . . . . . . . . . . . . . . . . . . . . . . . . . . . . . . . . . . . . . . . . 6File Types . . . . . . . . . . . . . . . . . . . . . . . . . . . . . . . . . . . . . . . . . . . . . . . . . . . . . . . . . . . . . . . . . . . . . . . . . 6Software Installation & I/O Connections . . . . . . . . . . . . . . . . . . . . . . . . . . . . . . . . . . . . . . . . . . . . 6Configuring the AJA CION Camera For Raw Output . . . . . . . . . . . . . . . . . . . . . . . . . . . . . . . . . 7
Chapter 3: Interface & Operation – AJA CION . . . . . . . . . . . . . . . . . . . . . 8The AJA CamXchange User Interface . . . . . . . . . . . . . . . . . . . . . . . . . . . . . . . . . . . . . . . . . . . . . . . 8
Viewer . . . . . . . . . . . . . . . . . . . . . . . . . . . . . . . . . . . . . . . . . . . . . . . . . . . . . . . . . . . . . . . . . . . . . . . . 9Status Indicator . . . . . . . . . . . . . . . . . . . . . . . . . . . . . . . . . . . . . . . . . . . . . . . . . . . . . . . . . . . . . . . 9Timecode . . . . . . . . . . . . . . . . . . . . . . . . . . . . . . . . . . . . . . . . . . . . . . . . . . . . . . . . . . . . . . . . . . . . . 9Format . . . . . . . . . . . . . . . . . . . . . . . . . . . . . . . . . . . . . . . . . . . . . . . . . . . . . . . . . . . . . . . . . . . . . . . 9Duration . . . . . . . . . . . . . . . . . . . . . . . . . . . . . . . . . . . . . . . . . . . . . . . . . . . . . . . . . . . . . . . . . . . . . . 9Camera Control . . . . . . . . . . . . . . . . . . . . . . . . . . . . . . . . . . . . . . . . . . . . . . . . . . . . . . . . . . . . . . . 9Crash Capture. . . . . . . . . . . . . . . . . . . . . . . . . . . . . . . . . . . . . . . . . . . . . . . . . . . . . . . . . . . . . . . . 10Stop on Dropped Frame. . . . . . . . . . . . . . . . . . . . . . . . . . . . . . . . . . . . . . . . . . . . . . . . . . . . . . 10Destination . . . . . . . . . . . . . . . . . . . . . . . . . . . . . . . . . . . . . . . . . . . . . . . . . . . . . . . . . . . . . . . . . . 10Device Name . . . . . . . . . . . . . . . . . . . . . . . . . . . . . . . . . . . . . . . . . . . . . . . . . . . . . . . . . . . . . . . . 10Folder Name . . . . . . . . . . . . . . . . . . . . . . . . . . . . . . . . . . . . . . . . . . . . . . . . . . . . . . . . . . . . . . . . . 11Video File Type. . . . . . . . . . . . . . . . . . . . . . . . . . . . . . . . . . . . . . . . . . . . . . . . . . . . . . . . . . . . . . . 11Audio File Type . . . . . . . . . . . . . . . . . . . . . . . . . . . . . . . . . . . . . . . . . . . . . . . . . . . . . . . . . . . . . . 11
Chapter 4: Capture Operation – AJA CION. . . . . . . . . . . . . . . . . . . . . . .12
Chapter 5: Folder & File Structure – AJA CION . . . . . . . . . . . . . . . . . . .13
Chapter 6: Troubleshooting – AJA CION . . . . . . . . . . . . . . . . . . . . . . . .14CamXchange Application Alert Prompts . . . . . . . . . . . . . . . . . . . . . . . . . . . . . . . . . . . . . . . . . . 14
Chapter 7: Installation & Setup – Canon C500 . . . . . . . . . . . . . . . . . . .15Introduction . . . . . . . . . . . . . . . . . . . . . . . . . . . . . . . . . . . . . . . . . . . . . . . . . . . . . . . . . . . . . . . . . . . . . 15
File Formats. . . . . . . . . . . . . . . . . . . . . . . . . . . . . . . . . . . . . . . . . . . . . . . . . . . . . . . . . . . . . . . . . . 15Features . . . . . . . . . . . . . . . . . . . . . . . . . . . . . . . . . . . . . . . . . . . . . . . . . . . . . . . . . . . . . . . . . . . . . 16
Software Installation. . . . . . . . . . . . . . . . . . . . . . . . . . . . . . . . . . . . . . . . . . . . . . . . . . . . . . . . . . . . . . 16I/O Connections . . . . . . . . . . . . . . . . . . . . . . . . . . . . . . . . . . . . . . . . . . . . . . . . . . . . . . . . . . . . . . . . . . 16Configuring the Devices . . . . . . . . . . . . . . . . . . . . . . . . . . . . . . . . . . . . . . . . . . . . . . . . . . . . . . . . . . 17
Configuring the Canon C500 Camera For Raw Output . . . . . . . . . . . . . . . . . . . . . . . . . 17Configuring the AJA Ki Pro Quad Settings . . . . . . . . . . . . . . . . . . . . . . . . . . . . . . . . . . . . . . . . . 18

AJA CamXchange Application v2.0 www.aja.com3
Chapter 8: Operation – Canon C500 . . . . . . . . . . . . . . . . . . . . . . . . . . . .19The AJA CamXchange User Interface . . . . . . . . . . . . . . . . . . . . . . . . . . . . . . . . . . . . . . . . . . . . . . 19
Viewer . . . . . . . . . . . . . . . . . . . . . . . . . . . . . . . . . . . . . . . . . . . . . . . . . . . . . . . . . . . . . . . . . . . . . . . 20Status Indicator . . . . . . . . . . . . . . . . . . . . . . . . . . . . . . . . . . . . . . . . . . . . . . . . . . . . . . . . . . . . . . 20Timecode . . . . . . . . . . . . . . . . . . . . . . . . . . . . . . . . . . . . . . . . . . . . . . . . . . . . . . . . . . . . . . . . . . . . 20Format . . . . . . . . . . . . . . . . . . . . . . . . . . . . . . . . . . . . . . . . . . . . . . . . . . . . . . . . . . . . . . . . . . . . . . 20Duration . . . . . . . . . . . . . . . . . . . . . . . . . . . . . . . . . . . . . . . . . . . . . . . . . . . . . . . . . . . . . . . . . . . . . 20Camera Control . . . . . . . . . . . . . . . . . . . . . . . . . . . . . . . . . . . . . . . . . . . . . . . . . . . . . . . . . . . . . . 20Crash Capture Control. . . . . . . . . . . . . . . . . . . . . . . . . . . . . . . . . . . . . . . . . . . . . . . . . . . . . . . . 21Stop on Dropped Frame. . . . . . . . . . . . . . . . . . . . . . . . . . . . . . . . . . . . . . . . . . . . . . . . . . . . . . 21Destination . . . . . . . . . . . . . . . . . . . . . . . . . . . . . . . . . . . . . . . . . . . . . . . . . . . . . . . . . . . . . . . . . . 21Device Name . . . . . . . . . . . . . . . . . . . . . . . . . . . . . . . . . . . . . . . . . . . . . . . . . . . . . . . . . . . . . . . . 21Folder Name . . . . . . . . . . . . . . . . . . . . . . . . . . . . . . . . . . . . . . . . . . . . . . . . . . . . . . . . . . . . . . . . . 21Video File Type. . . . . . . . . . . . . . . . . . . . . . . . . . . . . . . . . . . . . . . . . . . . . . . . . . . . . . . . . . . . . . . 22Audio File Type . . . . . . . . . . . . . . . . . . . . . . . . . . . . . . . . . . . . . . . . . . . . . . . . . . . . . . . . . . . . . . 22
Performing a Capture Using the CamXchange Application. . . . . . . . . . . . . . . . . . . . . . . . . 22Canon Cinema RAW Development Application . . . . . . . . . . . . . . . . . . . . . . . . . . . . . . . . . . . . 23
Index. . . . . . . . . . . . . . . . . . . . . . . . . . . . . . . . . . . . . . . . . . . . . . . . . . . . . . . . .25

AJA CamXchange v2.0 www.aja.com4
Notices
Trademarks
AJA®, lo®, Ki Pro®, KONA®, KUMO®,T-TAP®, Because it matters.® and ROI® are registered trademarks of AJA Video Systems, Inc. in the United States. AJA and Ki Pro are trademarks of AJA Video Systems, Inc. registered in other countries. AJA Control Room™, CION™, Corvid Ultra™, FiDO™, Science of the Beautiful™, TruScale™, TruZoom™, V2Analog™ and V2Digital™ are trademarks of AJA Video Systems, Inc.
AirPort, Apple, Apple logo, AppleShare, AppleTalk, FireWire, iPod, iPod touch, Mac and Macintosh are registered trademarks of Apple Inc. Final Cut Pro, QuickTime and QuickTime logo are trademarks of Apple Inc.
Avid, Avid DNxHD and Media Composer are registered trademarks of Avid Technology, Inc.
HDMI, the HDMI logo and High-Definition Multimedia Interface are trademarks or registered trademarks of HDMI Licensing, LLC.
DVI is a registered trademark of DDWG.
TASCAM is a registered trademark of TEAC Corporation.
Dolby® and the double-D Dolby logo are registered trademarks of Dolby Laboratories Licensing Corporation.
All other trademarks are the property of their respective holders.
Copyright
Copyright © 2014 AJA Video Systems, Inc. All rights reserved. All information in this manual is subject to change without notice. No part of the document may be reproduced or transmitted in any form, or by any means, electronic or mechanical, including photocopying or recording, without the express written permission of AJA Video Systems, Inc.
Contacting Support
When calling for support, have all information at hand prior to calling.
To contact AJA for sales or support, use any of the following methods:
Telephone: +1.530.271.3190
FAX: +1.530.271.3140
Web: http://www.aja.com
Support Email: [email protected]
Sales Email: [email protected]
AJA CamXchange Application v2.0 www.aja.com5
Chapter 1: Introduction
Introduction
The AJA CamXchange capture application is designed to work with the AJA CION camera or the Canon C500 when used with the AJA Ki Pro Quad.
When the CamXchange application is used with the AJA CION, the camera is connected directly to a host computer via Thunderbolt to capture raw output from the camera. Using this mode, the AJA CamXchange application creates Cinema DNG (.dng) raw files and WAV (.wav) audio files.
When the CamXchange application is used with the Canon C500 and the AJA Ki Pro Quad, the Ki Pro Quad needs to be simultaneously connected to the Canon C500 via 3G SDI and a host computer via Thunderbolt to capture the raw output from the camera. Using this mode, the AJA CamXchange application creates .rmf Canon RAW files and WAV audio files.
This manual is divided into dedicated sections. If you are working with the AJA CION, you need only refer to "Installation & Setup – AJA CION" through "Troubleshooting – AJA CION". If you are working with the Canon C500 and the AJA Ki Pro Quad, you need only refer to "Installation & Setup – Canon C500" and "Operation – Canon C500".

AJA CamXchange Application v2.0 www.aja.com6
Chapter 2: Installation & Setup – AJA CION
Supported Formats and Frame Rates
4K: (4096x2160) 23.98/24/25/29.97/30 fps
Ultra HD: (3840x2160) 23.98/24/25/29.97/30 fps
File Types
Raw Files: Capture sequential raw files with the .dng file extension that are compatible with a variety of software applications.
Audio Files: Capture audio to the WAV file format which is compatible with a variety of software applications.
Software Installation & I/O Connections
To use the AJA CION for raw capture, install the following software on your Mac OS 10.9 (or later) Apple Thunderbolt-equipped host computer:
1. Download the CamXchange software from www.aja.com/support/
2. Install the NTV4 driver contained in the AJA CamXchange .dmg. You will be prompted to restart your computer after the software installation completes.
3. Once your computer restarts, re-open the AJA CamXchange .dmg and copy the AJA CamXchange application to your Applications folder.
4. The CamXchange software is now fully installed. Prior to application use, be sure to make all cable connections.
5. Continue to the I/O Connections section below to learn about making the physical connections.
I/O Connections: Follow these steps to connect the AJA CION to the Apple Thunderbolt-equipped host computer:
1. Ensure that all devices are powered off before making your data connections.
2. Connect a Thunderbolt cable between the AJA CION and the Apple Thunderbolt-enabled host computer.
3. Connect a 500MB per second (or faster) Thunderbolt disk array/RAID to the Apple Thunderbolt-enabled host computer.
4. Ensure all power connections for the respective devices have been made and then switch power on for all devices.
AJA CamXchange Application v2.0 www.aja.com7
Configuring the AJA CION Camera For Raw Output
The AJA CION camera can output HD or 2K baseband video, but it can also be configured to output raw data when configured for 4K (4096x2160) or Ultra HD (3840x2160). To use the CION with the CamXchange software application, the camera must be configured for either 4K or Ultra HD. To ensure that the camera is configured so that raw output is possible, review the following settings on the AJA CION camera:
1. Press the FPS button on the AJA CION. To navigate the FPS menu, turn the UI Control Knob until you reach the 23.1 Format menu parameter. The currently selected choice will be displayed in yellow typeface.
2. To configure the 23.1 Format menu parameter, push in on the UI Control Knob. Note that the menu parameter choices will flash during parameter editing. Select either 4K or Ultra HD from the choices. To set the desired selection, press in on the UI Control Knob. The new selection should appear in yellow typeface.
3. To exit the 23.1 Format menu parameter, turn the UI Control Knob until the Exit prompt appears. Push in on the UI Control Knob. You will know that you are no longer in parameter editing because the menu parameter choice will no longer be flashing.
4. To navigate to the 23.2 Frame Rate menu parameter, turn the UI Control Knob until the menu parameter appears.
5. To configure the 23.2 Frame Rate menu parameter, push in on the UI Control Knob. The menu parameter choices will flash during parameter editing. Select either 23.98, 24, 25, 29.97 or 30 from the choices. To set the set the desired selection, press in on the UI Control Knob. The new selection should appear in yellow typeface.
NOTE: 50, 59.94 and 60 frame rate raw capture is not supported due to Thunderbolt bandwidth limitations.
6. To exit the 23.2 Frame Rate menu parameter, turn the UI Control Knob until the Exit prompt appears. Push in on the UI Control Knob. You will know that you are no longer in parameter editing because the menu parameter choice will no longer be flashing.
7. To exit the FPS menu, simply press the FPS button.
NOTE: The CION CONFIG menu parameter 1.6 SDI 1-4 Output should NOT be configured for SDI 1 RAW if you plan to use CamXchange. Raw output from the AJA CION is mutually exclusive for Thunderbolt and SDI outputs.
AJA CamXchange Application v2.0 www.aja.com8
Chapter 3: Interface & Operation – AJA CION
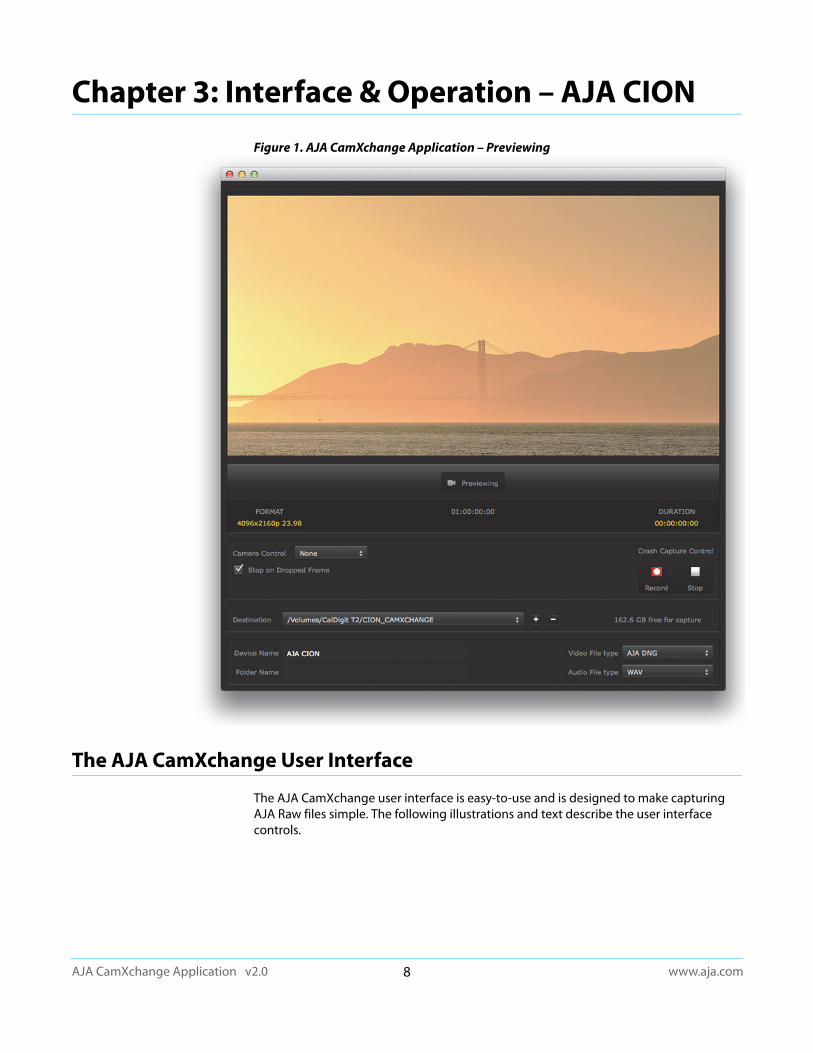
Figure 1. AJA CamXchange Application – Previewing
The AJA CamXchange User Interface
The AJA CamXchange user interface is easy-to-use and is designed to make capturing AJA Raw files simple. The following illustrations and text describe the user interface controls.

AJA CamXchange Application v2.0 www.aja.com9
Viewer The Viewer allows you to see the incoming signal. If you do not see the signal from the AJA CION be sure to review the recommended settings found earlier in this manual for the device.
NOTE: The Viewer does NOT display a realtime image during recording, only during Previewing. During recording, rely on the status and duration indicators to verify recording operation. Also note that the image may appear differently in the preview window of CamXchange when compared with the image on electronic viewfinders or monitors connected to the camera. This is because the image seen in the CamXchange preview window may not account for all of the same gamma adjustments, color corrections, etc. that the baseband video has configured.
Status Indicator Below the viewer, you will notice a Status Indicator. This Status Indicator offers an at-a-glance reference for whether you are previewing or recording. When you are previewing an incoming signal, the word “Previewing” will appear in the Status Indicator in yellow typeface. When you are recording, the Status Indicator will change to the word “Recording” and appear in red typeface.
Timecode The incoming timecode from the AJA CION is shown in the user interface. You can set either a freerun or record-run timecode value on the CION and you will see one of the following:
Freerun Timecode: The value incrementing continuously even when you are not recording.
Record-run: The timecode value increments each time a recording is performed.
If you do not see a timecode value that corresponds to the AJA CION camera, check the settings in the CONFIG 8.0 TC Select menu parameter.
Format The format and frame rate indication will appear on the left hand side of the user interface. The format and frame rate that is auto-detected by the application will be displayed here. Use this area to verify that the expected format and frame rate has been selected on the AJA CION camera.
Duration The duration indicator appears on the right hand side of the user interface. Initially, the duration will display 00:00:00:00. When you begin recording, the duration will begin incrementing. You may use this duration indicator to determine how long a recording has been in progress. When a recording finishes, the duration indicator will be reset to 00:00:00:00.
Camera Control The “None” selection allows you to maintain complete control over when recordings begin and end. The Crash Capture record and stop buttons on the right hand side of the user interface are only enabled if the Camera Control selection is “None”. The “AJA CION” selection allows you to have captures automated by the camera.
NOTE: To use the Camera Control “AJA CION” selection, media must be inserted in the CION and possible to record to; the media must be properly formatted, have available capacity for recording, etc.

AJA CamXchange Application v2.0 www.aja.com10
Crash Capture With the Camera Control selection to “None” and the Crash Capture record and stop controls will be enabled. Like a traditional crash record on a VTR, press the record button to begin recording and hit the stop button to cease recording.
Figure 2. Previewing - Camera Control set to “None” & Camera Control set to “AJA CION”
Stop on Dropped Frame
Typically, you will want this checkbox selected to ensure that you are capturing the true frames-per-second the camera is outputting. However, there are instances when your disk array isn't sufficiently robust and you simply want to obtain a sample raw file for review or testing purposes and so you may elect to un-check this box.
NOTE: For typical, mission-critical recordings, AJA strongly recommends that the checkbox for “Stop on Dropped Frame” be selected.
Destination Before you can begin capturing raw files, you need to select a path to your storage area. Be sure to select a sufficiently fast storage location; a fast disk array or RAID that supports 500MB/second (or faster) is recommended to avoid dropped frames.
NOTE: You can benchmark your storage solution using the free AJA System Test software tool. This software tool can be found on the AJA website at:
http://www.aja.com/en/products/software/
After selecting a destination for your captures, the user interface will report the available capacity of the selected volume. You can use this information to determine if you have sufficient space for the recording(s) you wish to perform.
Device Name The Device Name refers to the CION unit that you are interfacing with via the CamXchange application.

AJA CamXchange Application v2.0 www.aja.com11
Folder Name The Folder Name is the name used for storing your sequential .dng files and the associated WAV file. When the Camera Control selection is set to “None” the folder name will be a combination of the date and time, such as “2013-05-29-16-37-04” (May, 29 2013 16:37:04). When the Camera Control selection is set to “AJA CION” the folder name will be the same as the clip that is being recorded to the CION on-board media, such as “SC1TK1”.
NOTE: Initially the Folder Name will be blank prior to the first recording.
Video File Type The CamXchange application records sequential .dng AJA Raw files that are compatible with a variety of software applications.
Audio File Type The CamXchange application offers support for the creation of WAV audio files.

AJA CamXchange Application v2.0 www.aja.com12
Chapter 4: Capture Operation – AJA CION
Figure 3. AJA CamXchange Application – Recording
These are the questions to answer before performing a capture:
• Does video appear in the CamXchange application viewer?
• Does the format and frame rate being reported match what you are expecting?
• Have you selected a media destination for your recordings?
• Do you have enough disk array/RAID capacity to perform your recording(s)?

AJA CamXchange Application v2.0 www.aja.com13
Chapter 5: Folder & File Structure – AJA CION
For each CamXchange capture, a unique folder will be created. Within each folder, the sequential .dng files and the .wav file will appear.
Figure 4. Example of CamXchange Folder and Files
Third-party applications may work with the entire folder or files individually. Review the manual and operational instructions for your respective third-party application for best practices.

AJA CamXchange Application v2.0 www.aja.com14
Chapter 6: Troubleshooting – AJA CION
CamXchange Application Alert Prompts
As noted earlier in this text, raw capture is only supported for 4K or Ultra HD formats, not 2K or 1080.
Additionally, 4K or Ultra HD 50, 59.94 and 60 frame rates are not supported due to Thunderbolt bandwidth limitations. If you configure the AJA CION camera for an unsupported format or frame rate and you attempt to use the CamXchange application, the following alert prompt will appear:
Figure 5. Example of Format or Frame Rate Error Prompt
Additionally, if you physically disconnect the Thunderbolt cable connection between the AJA CION and the Apple Thunderbolt-equipped computer or switch the AJA CION camera into playback mode, the following prompt will appear:
Figure 6. Example of Disconnection or Playback Mode Error Prompt

AJA CamXchange Application v2.0 www.aja.com15
Chapter 7: Installation & Setup – Canon C500
Introduction
In addition to the AJA CION camera, the AJA CamXchange raw capture application is also designed to work with the AJA Ki Pro Quad tapeless video recorder. The AJA Ki Pro Quad, when simultaneously connected to a camera and a host computer via Thunderbolt, can be used with the AJA CamXchange application to capture RAW output from the camera.
NOTE: At this time, only Apple Thunderbolt enabled computers and the Canon C500 camera's RAW output are supported by the application.
File Formats The AJA CamXchange application creates .rmf Canon RAW files and WAV audio files. The AJA Ki Pro Quad and the CamXchange software offer support for the following formats and frame rates output from the Canon C500 camera:
• Canon RAW 4096x2160 23.98/24/25/29.97fps
• Canon RAW 3840x2160 23.98/24/25/29.97fps

AJA CamXchange Application v2.0 www.aja.com16
FeaturesRAW File Capture: Capture sequential RAW files with the .rmf file extension that are compatible with the
Canon Cinema RAW Development software application. This Canon-supplied software application can be used to process and transcode Canon RAW files.
WAV File Capture: Capture audio to the WAV file format.
Camera Control: The start and stop of captures made by the CamXchange application can be controlled by the start and stop commands issued by the Canon C500 camera.
Software Installation
To use the AJA Ki Pro Quad to capture RAW output from the Canon C500 camera, install the following software on your Mac OS 10.8.2 (or later) Apple Thunderbolt-enabled host computer:
1. Download the CamXchange software from:
www.aja.com/support/
2. Install the NTV4 driver contained in the AJA CamXchange .dmg. You will be prompted to restart your computer after installation completes.
3. Once your computer restarts, re-open the AJA CamXchange .dmg and copy the AJA CamXchange application to your Applications folder.
4. The CamXchange software is now fully installed and ready for use.
5. Continue to the I/O Connections section below to establish the physical connections.
I/O Connections
Follow these steps to connect the Ki Pro Quad, Canon C500, and the Apple Thunderbolt-enabled host computer:
1. Ensure that all devices are powered off before making your video and data connections.
2. Connect a 3G-SDI rated cable between the 3G-SDI 1 output connector of the Canon C500 camera and the SDI 1 In connector of the AJA Ki Pro Quad.
3. Connect a Thunderbolt cable between the AJA Ki Pro Quad and the Apple Thunderbolt-enabled host computer.
4. Connect a 400MB per second (or faster) Thunderbolt disk array/RAID to the Apple Thunderbolt-enabled host computer.
5. Ensure all power connections for the respective devices and then switch power on for all devices.
NOTE: Only one AJA Ki Pro Quad may be connected to an Apple Thunderbolt enabled host computer at a time. “Plug and play” Thunderbolt operation is not supported at this time; if the Thunderbolt cable becomes disconnected, quit the CamXchange application, reconnect the Thunderbolt cable, and restart the CamXchange application.

AJA CamXchange Application v2.0 www.aja.com17
Figure 7. Workflow Components used with AJA CamXchange Application
Configuring the Devices
Configuring the Canon C500 Camera For Raw Output
Figure 8. CANON C500
The Canon C500 camera can output HD or 2K video, but it can also be configured to output RAW when working with 4K (4096x2160) or Quad HD (3840x2160). To use the Canon C500 with the AJA CamXchange software application, the camera must be configured for either 4K or Quad HD RAW output. To configure the camera for RAW output, review the following settings on the Canon C500 camera:
1. Press the Menu button on the Canon C500 and navigate the menu structure using the joystick.
2. Navigate to the 4K/2K/MXF Setup menu.
3. Select System Priority>4K.
4. Select System Frequency>50 Hz or 59.94 Hz (depending on your region and desired Hz/frame rate).
5. Navigate to 4K (4096/3840).
6. Select Mode>RAW.
7. Select Resolution>4096x2160 or 3840x2160 (depending on your desired raster size).
8. Select Frame Rate>23.98 or 24 or 25 or 29.97 (depending on your desired frame rate).
9. Select 3G-SDI Output>On.
10. Select Rec Command>On.
11. Next, you will configure the settings of the AJA Ki Pro Quad.

AJA CamXchange Application v2.0 www.aja.com18
Configuring the AJA Ki Pro Quad Settings
Figure 9. AJA Ki Pro Quad
1. Depress the CONFIG button on the AJA Ki Pro Quad.
2. Use the SELECT up/down buttons to navigate the menu parameters. Use the ADJUST up/down buttons to make choices within the menu parameters.
3. Select the following:
• 1.1 Record Type>Normal.
• 1.4 In Convert>None.
• 2.1 Video Input>SDI 1 RAW.
• 8.0 TC In>SDI RP188.
• 13.1 Camera Data>Canon C500.
Next, you will review the AJA CamXchange application user interface.
AJA CamXchange Application v2.0 www.aja.com19
Chapter 8: Operation – Canon C500
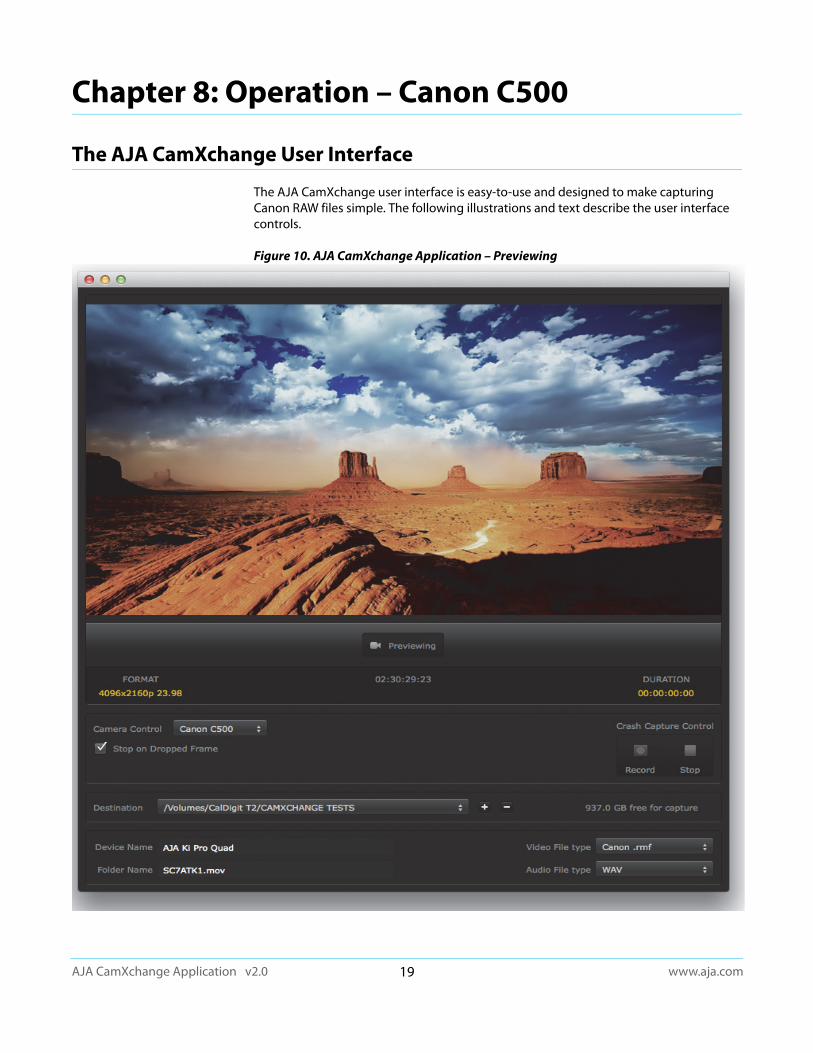
The AJA CamXchange User Interface
The AJA CamXchange user interface is easy-to-use and designed to make capturing Canon RAW files simple. The following illustrations and text describe the user interface controls.
Figure 10. AJA CamXchange Application – Previewing
AJA CamXchange Application v2.0 www.aja.com20
Viewer The viewer allows you to see the incoming signal. If you do not see the signal from the Canon C500 and AJA Ki Pro Quad, be sure to review the recommended settings found earlier in this manual for each device.
NOTE: The viewer does NOT display a realtime image during recording. In these cases, rely on the status and duration indicators to verify recording operation.
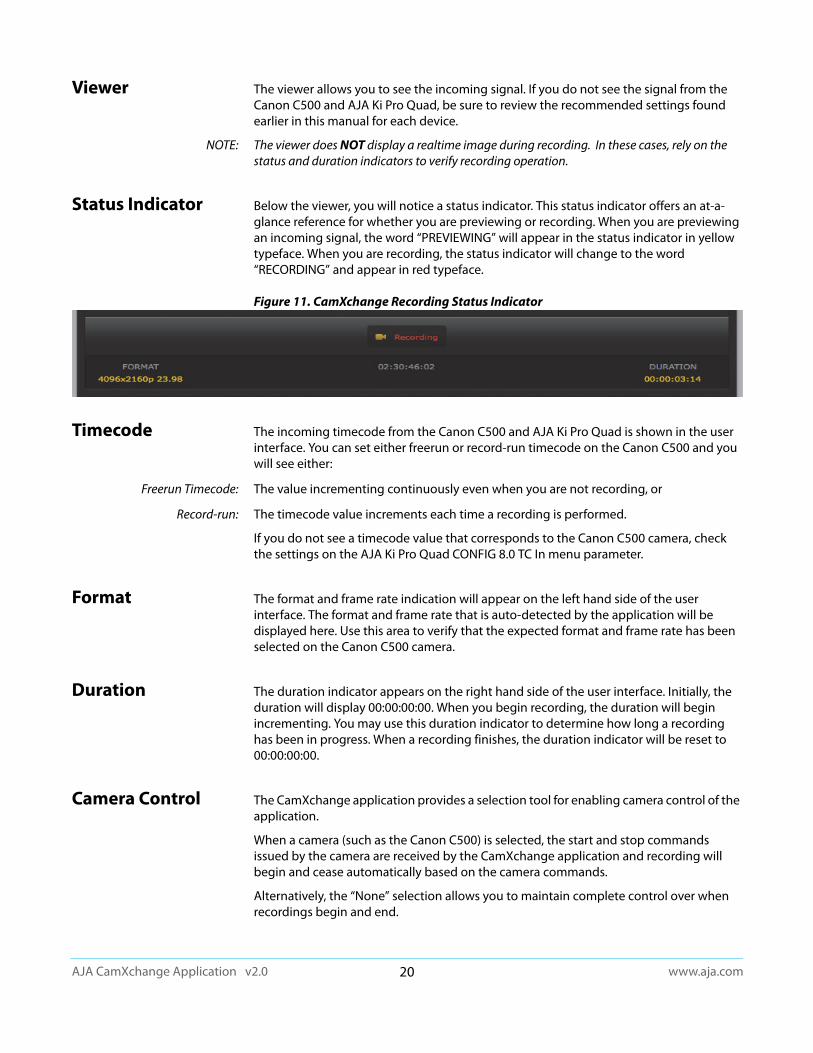
Status Indicator Below the viewer, you will notice a status indicator. This status indicator offers an at-a-glance reference for whether you are previewing or recording. When you are previewing an incoming signal, the word “PREVIEWING” will appear in the status indicator in yellow typeface. When you are recording, the status indicator will change to the word “RECORDING” and appear in red typeface.
Figure 11. CamXchange Recording Status Indicator
Timecode The incoming timecode from the Canon C500 and AJA Ki Pro Quad is shown in the user interface. You can set either freerun or record-run timecode on the Canon C500 and you will see either:
Freerun Timecode: The value incrementing continuously even when you are not recording, or
Record-run: The timecode value increments each time a recording is performed.
If you do not see a timecode value that corresponds to the Canon C500 camera, check the settings on the AJA Ki Pro Quad CONFIG 8.0 TC In menu parameter.
Format The format and frame rate indication will appear on the left hand side of the user interface. The format and frame rate that is auto-detected by the application will be displayed here. Use this area to verify that the expected format and frame rate has been selected on the Canon C500 camera.
Duration The duration indicator appears on the right hand side of the user interface. Initially, the duration will display 00:00:00:00. When you begin recording, the duration will begin incrementing. You may use this duration indicator to determine how long a recording has been in progress. When a recording finishes, the duration indicator will be reset to 00:00:00:00.
Camera Control The CamXchange application provides a selection tool for enabling camera control of the application.
When a camera (such as the Canon C500) is selected, the start and stop commands issued by the camera are received by the CamXchange application and recording will begin and cease automatically based on the camera commands.
Alternatively, the “None” selection allows you to maintain complete control over when recordings begin and end.

AJA CamXchange Application v2.0 www.aja.com21
The Crash Capture record and stop buttons that also appear in the user interface are directly related to the Camera Control selection. If “Canon C500” is selected, the manual Crash Capture record and stop buttons are grayed out since manual control is not offered when the process is being automated by the Camera Control selection.
Crash Capture Control
In some cases, you may want to manually control when RAW recordings are made using the application—not have the process automated by the commands coming from the camera. In these cases, set the Camera Control selection to “None” and the Crash Capture record and stop controls will be enabled. Like a traditional crash record on a VTR, press the record button to begin recording and hit the stop button to cease recording.
Stop on Dropped Frame
The Stop on Dropped Frame feature is enabled by default. Typically, you will want this checkbox selected to ensure that you are capturing the true frames-per-second the camera is outputting. However, there are instances when your disk array isn't sufficiently robust and you simply want to obtain a sample RAW file for review or testing purposes.
NOTE: For typical, mission-critical recordings, AJA strongly recommends that the checkbox for Stop on Dropped Frame be selected.
Destination Before you can begin capturing RAW files, you need to select a path to your storage area. Be sure to select a sufficiently fast storage location; a fast disk array or RAID that supports 400MB/second (or faster) is recommended to avoid dropped frames.
NOTE: You can benchmark your storage solution using the free AJA System Test software tool. This software tool can be found on the AJA website at:
http://www.aja.com/en/products/software/
After selecting a destination for your RAW captures, the user interface will report the available capacity of the selected volume. You can use this information to determine if you have sufficient space for the recording or recordings you wish to perform.
Device Name The Device Name refers to the AJA Ki Pro Quad unit that you are interfacing with via the CamXchange application.
Folder Name The Folder Name is the name used for storing your sequential .rmf files and the associated .xml and WAV files. When the Camera Control selection is set to “Canon C500” and the Ki Pro Quad CONFIG menu parameter 13.1 Camera Data is also set to “Canon C500,” the Folder Name will be the same as the file name being used by the Ki Pro Quad (such as SC1ATK1.mov).
NOTE: Note that initially the Folder Name will be blank prior to the first recording.
When the Camera Control selection is set to “Canon C500,” but the Ki Pro Quad CONFIG menu parameter 13.1 Camera Data menu parameter is not set to “Canon C500,” the folder name will be a combination of the date and time—such as “2013-03-23-16-37-04” (March 23, 2013 16:37:04).
If the Camera Control selection in the CamXchange application is set to “None,” the Folder Name will also be a combination of the date and time.

AJA CamXchange Application v2.0 www.aja.com22
Video File Type The CamXchange application currently only offers support for RAW capture from the Canon C500 camera when used in combination with the AJA Ki Pro Quad. The CamXchange program can record sequential .rmf Canon RAW files that are compatible with the Canon Cinema RAW Development software application.
Audio File Type The CamXchange application currently only offers support for the creation of WAV audio files.
Performing a Capture Using the CamXchange Application
Now that you have familiarized yourself with the CamXchange interface and selections, you can decide how you will perform your RAW captures and create recordings.
With the Canon C500 and the AJA Ki Pro Quad configured as noted earlier in this document, determine or decide the following:
• Are you receiving a signal from the Canon C500/AJA Ki Pro Quad? Does video appear in the application viewer?
• Do you see the timecode value that you expect being reported?
• Does the format and frame rate being reported match what you are expecting to receive from the Canon C500/AJA Ki Pro Quad?
• Have you selected a media destination for your recordings?
• Do you have enough disk array/RAID capacity to perform your recording(s)?
• Do you want to have the camera start/stop commands automate your recordings? Or do you want to manually perform your recordings?
Once you have answered these questions, you are ready to begin making recordings with the CamXchange application.

AJA CamXchange Application v2.0 www.aja.com23
Figure 12. CamXchange Recording Mode
Canon Cinema RAW Development Application
This section discusses using CamXchange RAW recorded files in the Canon Cinema RAW Development software application. The files created by the AJA CamXchange application are compatible with the Canon Cinema RAW Development software application. To locate the files, navigate to the desired folder location using the navigation tools in the Canon Cinema RAW Development application.

AJA CamXchange Application v2.0 www.aja.com24
Figure 13. Canon Cinema Raw Development Application
For details on using the files in the Canon Cinema RAW Development application, refer to that software's documentation. You can find the Canon Cinema RAW Development application and associated documentation at Canon's website:
http://www.usa.canon.com/cusa/professional/products/professional_cameras/cinema_eos_cameras/eos_c500#DriversAndSoftware

AJA CamXchange Application v2.0 www.aja.com25
Index
Symbols.dng files 11.rmf files 15, 22
AAJA Raw files 11alert prompts 14
Bbandwidth limitations 7benchmark 10
Ccamera control
Canon C500 16Canon
RAW files 15Canon Cinema RAW Development 23captures
Canon C500 22CION
FPS menu 7frame rate menu 7parameters 7
Ddevice name
Canon C500 21CION 10
disk array 6, 10
Ffile formats 15folder name
Canon C500 21CION 11
FPS menu 7frame rate error 14frame rate menu 7frame rates
Canon 15CION 6
Hhost computer 5
II/O connections 6
KKi Pro Quad 5
MMac OS 10.9 6
NNTV4 driver 6
Pparameters
CION 7playback mode error 14
RRAID 6raid 10record and stop buttons
Canon C500 21CION 9
Ssoftware installation 6start/stop commands 16stop on dropped frame
Canon C500 21CION 10
system test software tool 10
TThunderbolt 6
WWAV audio files 15
Canon C500 22CION 11