Installation of Oracle CHAPTER Grid/Cloud...
56
Installation of Oracle Grid/Cloud Control 1 Installation of Oracle Grid/Cloud Control CHAPTER 3 Introduction In this chapter we would be covering the installation of Oracle Enterprise Manager 12c Cloud Control version 12.1.0.4 in detail. The installation will be done inside a Virtual machine created within the Oracle Virtual Box version 5.0.16. The operating system version used would be Oracle Linux 6.7. Oracle Virtual Box Oracle Virtual Box is an Oracle virtualization product which is used to create virtual machines where in you can install enterprise software for business and home purposes. Oracle Virtual Box can be downloaded from Oracle Technology Network (OTN) http://www.oracle.com/technetwork/server- storage/virtualbox/downloads/index.html The below figure 3-1 shows the webpage where we can download the Oracle Virtual Box. The operating system version to download can also be selected. For home use, you can select the Microsoft Windows X64 bit version.
-
Upload
truonghanh -
Category
Documents
-
view
219 -
download
0
Transcript of Installation of Oracle CHAPTER Grid/Cloud...

Installation of Oracle Grid/Cloud Control 1
Installation of Oracle Grid/Cloud Control
CHAPTER
3 Introduction In this chapter we would be covering the installation of Oracle Enterprise Manager 12c Cloud Control version 12.1.0.4 in detail. The installation will be done inside a Virtual machine created within the Oracle Virtual Box version 5.0.16. The operating system version used would be Oracle Linux 6.7.
Oracle Virtual Box Oracle Virtual Box is an Oracle virtualization product which is used to create virtual machines where in you can install enterprise software for business and home purposes. Oracle Virtual Box can be downloaded from Oracle Technology Network (OTN) http://www.oracle.com/technetwork/server-storage/virtualbox/downloads/index.html The below figure 3-1 shows the webpage where we can download the Oracle Virtual Box. The operating system version to download can also be selected. For home use, you can select the Microsoft Windows X64 bit version.

Installation of Oracle Grid/Cloud Control 2
Figure 3-1: A OTN page to download Oracle Virtual Box
Installation of Oracle Virtual Box Once the installable files are downloaded, click on the executable file and start with the Oracle Virtual Box installation. The below figure 3-2 depicts the first installation screen for Oracle Virtual Box setup.

Installation of Oracle Grid/Cloud Control 3
figure 3-2: Initial Screen for Oracle Virtual Box Installation
Click on Next button, the next screen shows the VirtualBox Application components that will be installed. The following components are listed as shown in the figure 3-3. All the components are to be selected along with the path where we require the Oracle Virtual Box software to be installed.

Installation of Oracle Grid/Cloud Control 4
Figure 3-3: A Screen for selecting the components of Oracle Virtual Box Installation
Click on Next button, a warning screen is seen as shown in the figure 3-4 below for the network interfaces that will be temporarily disconnected. We need to click on the Yes and proceed with the Oracle Virtual Box installation.

Installation of Oracle Grid/Cloud Control 5
Figure 3-4: A Screen showing a warning during Oracle Virtual Box Installation
The installation of Oracle Virtual Box moves further and the status of the setup is seen as shown in figure 3-5.

Installation of Oracle Grid/Cloud Control 6
figure 3-5: A screen showing the progress of Oracle Virtual Box Setup
For each of the components during the installation, we will get a message asking us if we need to proceed with the installation of those components. The figure 3-6 provides an example of message box asking to go ahead with the installation of these components.

Installation of Oracle Grid/Cloud Control 7
Figure 3-6: A screen showing the message box asking to install the component
After the installation of each one of these components the setup of Oracle Virtual Box is completed and the screen for Finishing the setup is seen as shown in figure 3-7. Click on the Finish button and complete the installation.

Installation of Oracle Grid/Cloud Control 8
figure 3-7: Finish Screen for Oracle Virtual Box Installation
The desktop will show the icon for Oracle VM Virtual Box, when we open the Oracle VM Virtual Box we will see the below Virtual Manager screen as shown in figure 3-8. Using the Virtual manager we would be able to create the Virtual Machines to install various Oracle products.

Installation of Oracle Grid/Cloud Control 9
figure 3-8: A screen showing the Oracle Virtual Manager
Creating a Virtual Machine Once the Oracle Virtual Box is installed and the Oracle Virtual Manager interface is opened, we can create the virtual machine. Let’s see the steps for creating the virtual machine using the Oracle Virtual Manager. Click on New icon in the left corner of the screen, the initial screen is seen as shown in the figure 3-9.

Installation of Oracle Grid/Cloud Control 10
figure 3-9: A screen showing the details of creating virtual machine
Provide the name of the Virtual machine, the type of the operating system and the version. The version here is nothing but the flavor of the operating system that will be used as an operating system for the Virtual Machine. After entering the details, click on Next and proceed with the creation of the Virtual machine. The next step is to allocate the memory for the virtual machine as shown in the figure 3-10.

Installation of Oracle Grid/Cloud Control 11
figure 3-10: A screen showing memory allocation for Oracle Virtual machine
As shown in the above figure the allocation of the memory is around 2 GB as an example. Click on Next button and proceed with creating a virtual hard disk as shown in the figure 3-11.

Installation of Oracle Grid/Cloud Control 12
figure 3-11: A screen showing creating hard disk for Oracle Virtual machine
Select the option Create virtual hard disk now and click on the Create button, the next screen appears as shown in figure 3-12 to choose appropriate Hard Disk File Type.
Installation of Oracle Grid/Cloud Control 13
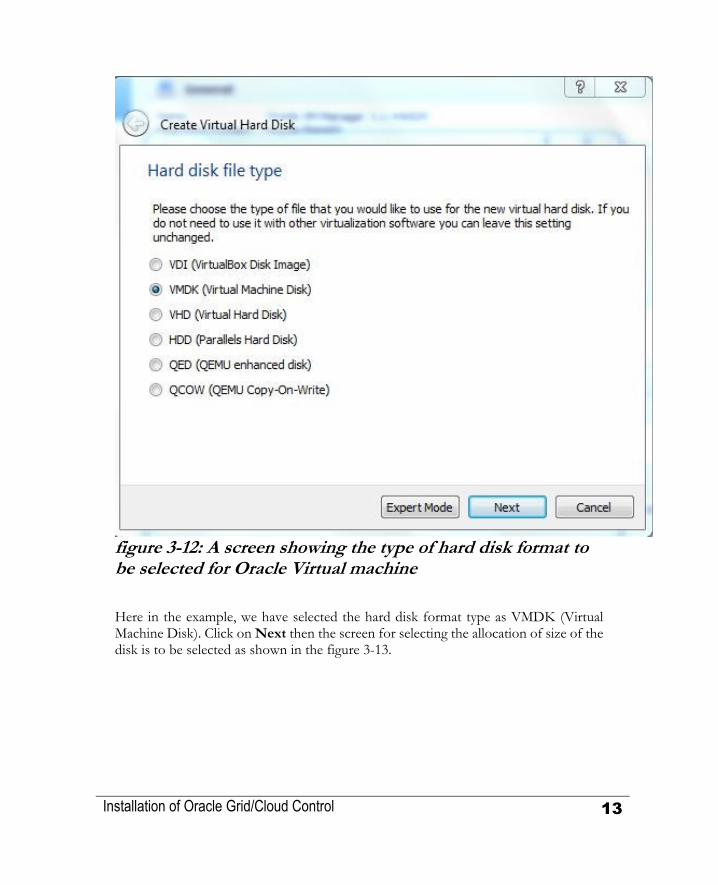
figure 3-12: A screen showing the type of hard disk format to be selected for Oracle Virtual machine
Here in the example, we have selected the hard disk format type as VMDK (Virtual Machine Disk). Click on Next then the screen for selecting the allocation of size of the disk is to be selected as shown in the figure 3-13.

Installation of Oracle Grid/Cloud Control 14
figure 3-13: A screen showing file allocation of Oracle Virtual machine
Here in the example, we have selected the storage for the hard disk to be dynamically allocated. For virtual machines that are going to install Oracle products such as Oracle E-Business Suite we can allocate Fixed size storage as well. Sometimes, we can have multiple files by restricting each .vmdk file to be less than 2GB by selecting the third option above. Once appropriate storage is selected then click on Next to proceed which will show a screen for File location and size, provide those details as shown in figure 3-14.
Installation of Oracle Grid/Cloud Control 15
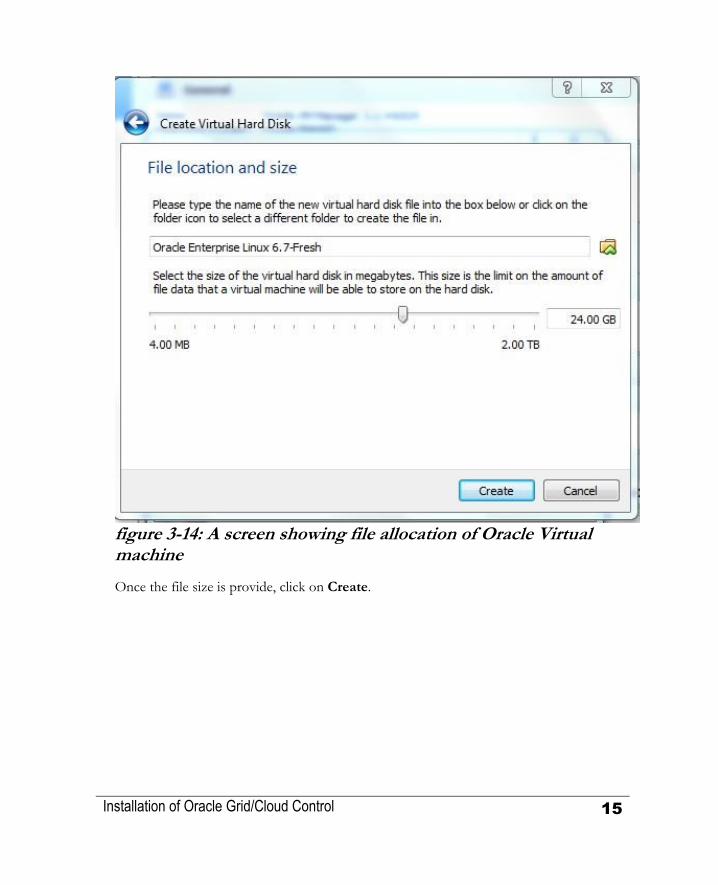
figure 3-14: A screen showing file allocation of Oracle Virtual machine
Once the file size is provide, click on Create.

Installation of Oracle Grid/Cloud Control 16
figure 3-15 A screen showing progress of virtual hard disk creation
Based on the parameters chosen in the previous steps, the virtual hard disk is created thus completing the configuration of the virtual machine. The below figure 3-16 shows the configuration of the Virtual Machine which is created. The left window of the Oracle VM Virtual Box lists the Virtual Machine created

Installation of Oracle Grid/Cloud Control 17
figure 3-16 A screen showing the created Virtual machine
This ends the installation of Oracle Virtual Box and creation of the virtual machine using the Oracle Virtual Manager. We move forward covering the installation of Oracle Linux version 6.7.
Oracle Linux Installation Once the virtual machine is created we would have to install an operating system. In this book we would cover how to install Oracle Linux operating system. Whatever flavor is Linux is chosen the initial way to install the operating system within the Oracle Virtual Box remains the same.

Installation of Oracle Grid/Cloud Control 18
The Oracle Linux ISO image is to be downloaded from Oracle E-Delivery site. Refer previous chapter which will help you to download the .iso files. Once downloaded the following steps are to be performed to install Oracle Linux within the Oracle Virtual machine. Go to the virtual machine and click on settings, then select Controller IDE a message box as shown in the figure 3-17 is shown below.
figure 3-17: A screen showing the way to mount the ISO image in the Oracle Virtual Machine
Click on the Choose existing disk button browse and select the .iso image, the IDE controller will show the ISO disk loaded as referred in the figure 3-18.
Installation of Oracle Grid/Cloud Control 19
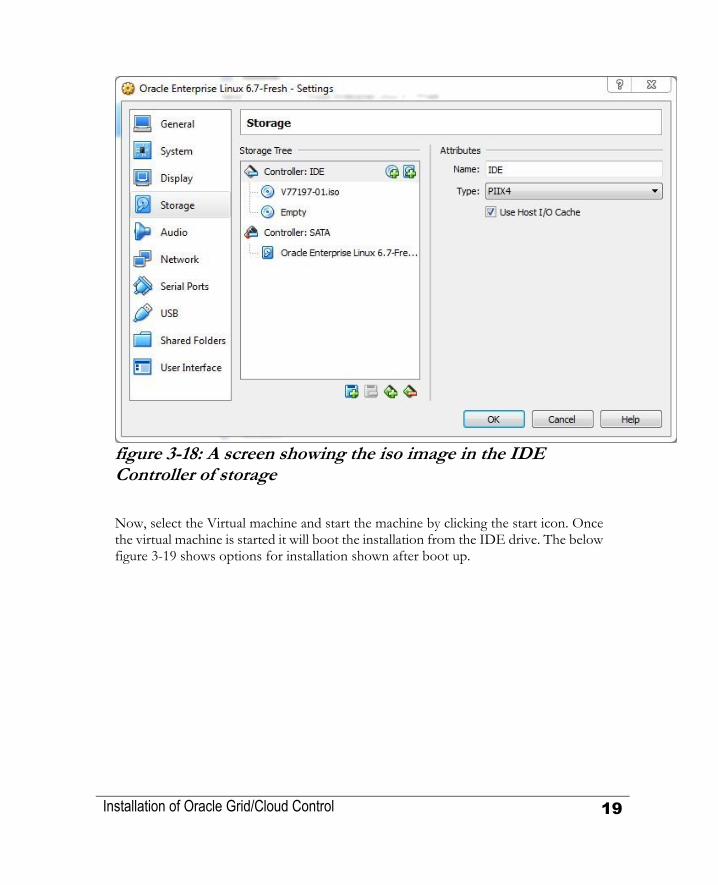
figure 3-18: A screen showing the iso image in the IDE Controller of storage
Now, select the Virtual machine and start the machine by clicking the start icon. Once the virtual machine is started it will boot the installation from the IDE drive. The below figure 3-19 shows options for installation shown after boot up.

Installation of Oracle Grid/Cloud Control 20
figure 3-19: A screen showing options for installing Oracle Linux after boot up
Select the first option Install or upgrade an existing system. Once selected the installation starts, the figure 3-20 shows the installation running.
Installation of Oracle Grid/Cloud Control 21
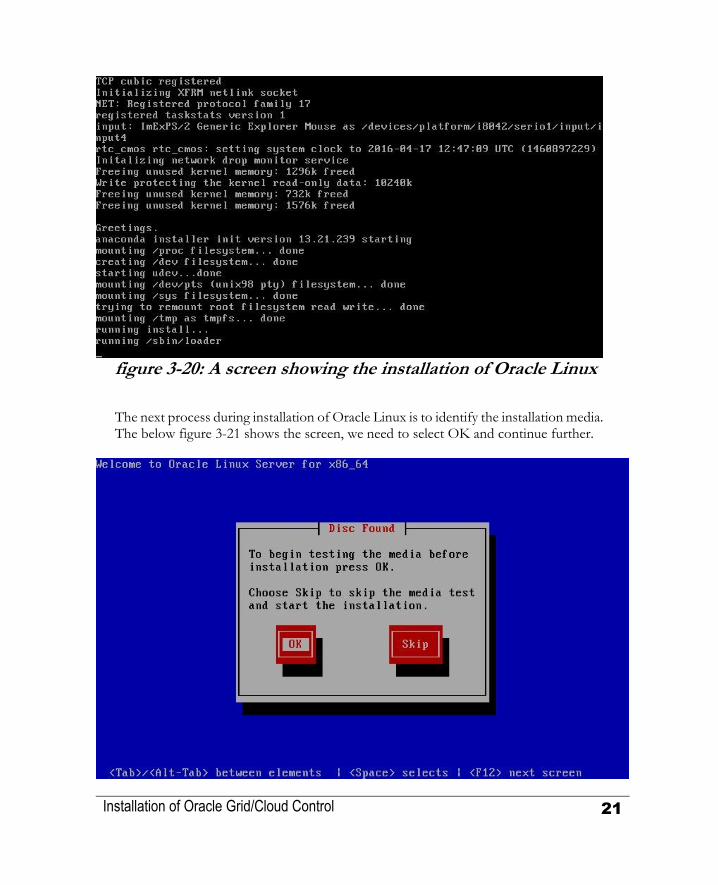
figure 3-20: A screen showing the installation of Oracle Linux
The next process during installation of Oracle Linux is to identify the installation media. The below figure 3-21 shows the screen, we need to select OK and continue further.

Installation of Oracle Grid/Cloud Control 22
figure 3-21: A screen showing the selection criteria to identify the installation media for Oracle Linux
Below figure 3-22 shows the starting of Oracle Linux installation.
figure 3-22: A screen showing the start of the Oracle Linux Installation
The next screen as shown in the figure 3-23 is for the language selection, here we will select English and proceed with the installation.

Installation of Oracle Grid/Cloud Control 23
figure 3-23: A screen showing the selection of the language
Click Next then you get the screen for selecting the type of storage device with the specification helping you to select an appropriate storage device.

Installation of Oracle Grid/Cloud Control 24
figure 3-24: A screen showing the selection for storage device
The below screen is shown as in figure 3-25 when you click Next related to the storage showing the virtual disk details. Just select any of the options and go ahead with the installation by clicking Next button.

Installation of Oracle Grid/Cloud Control 25
figure 3-25: A screen showing the storage device warning
When you click Next, then the screen for providing the hostname. Provide the correct name as shown in figure 3-26. The hostname should be having the name as well as domain name.
figure 3-26: A screen showing the field to enter the hostname along with domain name
Clicking on Next will bring you to the time zone screen as shown in figure 3-27. Select the appropriate time zone according to your country.

Installation of Oracle Grid/Cloud Control 26
figure 3-27 A screen showing the selection of timezone
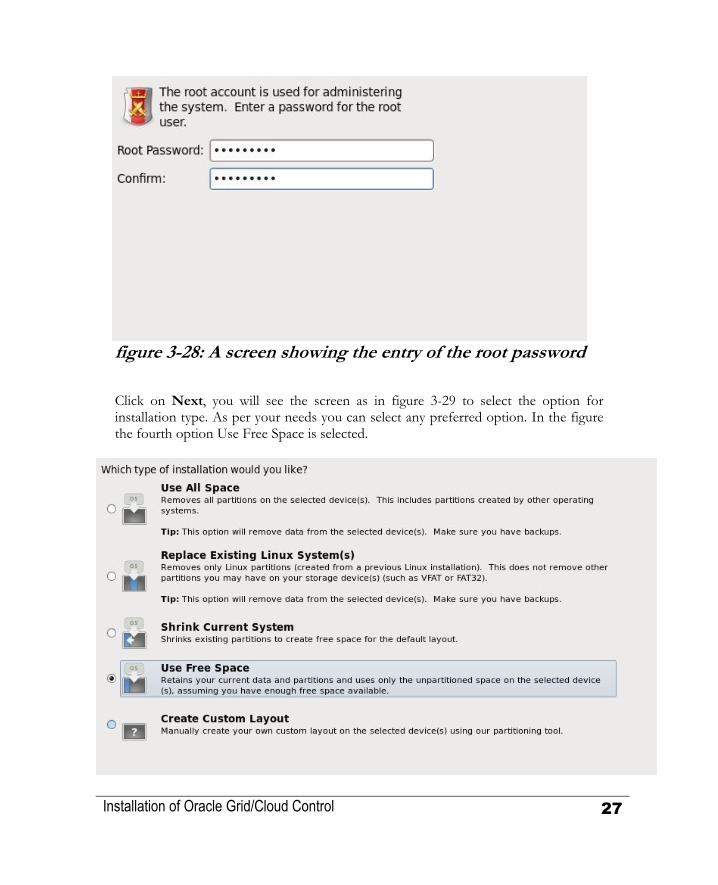
The next screen would be to provide the password for UNIX user root. Provide the same password for both the Root Password and Confirm as shown in figure 3-28.
Installation of Oracle Grid/Cloud Control 27
figure 3-28: A screen showing the entry of the root password
Click on Next, you will see the screen as in figure 3-29 to select the option for installation type. As per your needs you can select any preferred option. In the figure the fourth option Use Free Space is selected.

Installation of Oracle Grid/Cloud Control 28
figure 3-29: A screen showing the installation type to be selected
Click on Next will show you the screen as shown in figure 3-30 giving a message box stating whether the changes as per the installation can be written to the disk. Click on Write Changes to disk and let the installation move forward.
figure 3-30 A screen showing the message box asking to write changes to disk
Click on Next will start the installation of Oracle Linux 6.7 and the progress can be seen as in figure 3-31. The installation will progress by setting up the required Kernel parameters, GUI as well as will install packages.

Installation of Oracle Grid/Cloud Control 29
figure 3-31: A screen showing the Oracle Linux installation progress
The below figure 3-32 shows the progress of the installation packages and whatever installation packages are installed will be shown in the screen you need to monitor the progress till it finishes and note down any errors seen to resolve them later.

Installation of Oracle Grid/Cloud Control 30
figure 3-32: A screen showing the progress of the installation packages
The installation will be completed after the packages are installed. The confirmation of the installation is as shown in figure 3-33.
figure 3-33: A screen showing the completion of the installation
The finishing tasks for the installation would be to accept the Oracle License Agreement, register the Oracle linux installation, create another operating system user

Installation of Oracle Grid/Cloud Control 31
other than root normally we create another user called as oracle as well as provide a password for it. The next screen would be to correct the date and time for the Oracle Linux server. Subsequent screen would show the memory to be allocated. This would end the configuration of the Oracle Linux operating system. It is always recommended to check the operating system installation guide and apply any operating system patches to synch up the servers with updates and bug fixes. Now we go ahead with the installation of Oracle Database for OEM repository. The Oracle database can be downloaded using the Mozilla Firefox within the virtual machine itself. The only important step to do before we download the Oracle database software is to configure the network settings of the virtual machine i.e. it should be set to System eth0. The setting System eth0 shown in the figure 3-34. Once it is selected the virtual machine has access to the network and internet as well.
figure 3-34: A screen showing the network setting to select System eth0
Oracle Database Installation In the last chapter we have covered already how we will download the Oracle Database. Oracle Database software is to be downloaded from Oracle Technology Network (OTN). Once the network is set in virtual machine, the Oracle database as per the operating system platform can be downloaded using the Mozilla Firefox. The downloaded files (File 1 and File 2) are placed in the Downloads folder within the home

Installation of Oracle Grid/Cloud Control 32
directory of the UNIX user from where you would install the Oracle database. The figure 3-35 shows the directory where the Oracle database installation is downloaded.
figure 3-35: A screen showing the directory where the Oracle database is downloaded
Create a folder database inside download and unzip both the downloaded zip files. Then run the Oracle Universal Installer (OUI) which you would find within the database folder. The figure 3-36 shows the screen of the Oracle universal Installer using the command ./runInstaller.sh

Installation of Oracle Grid/Cloud Control 33
figure 3-36: A screen showing the initial screen of the Oracle Universal Installer
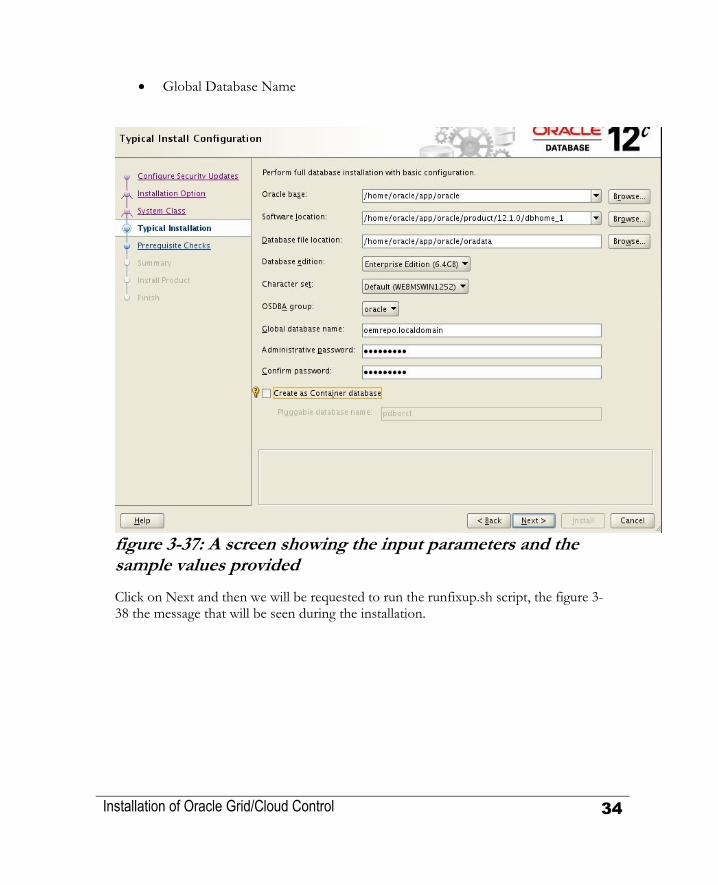
Select appropriate option whether Desktop or Server class, click on Next, the below screen figure 3-37 is seen showing the input parameters that needs to be entered. The following parameters are requested:
Oracle Base Software Location Database file location Database Edition Character set OSDBA Group
Installation of Oracle Grid/Cloud Control 34
Global Database Name
figure 3-37: A screen showing the input parameters and the sample values provided
Click on Next and then we will be requested to run the runfixup.sh script, the figure 3-38 the message that will be seen during the installation.

Installation of Oracle Grid/Cloud Control 35
figure 3-38: A screen showing the message to run the runfixup.sh script
The figure 3-39 shows the execution of the runfixup.sh script.
figure 3-39: A screen showing the execution of runfixup.sh script
Once the fixup script is done the installation continues to perform the pre-requisite checks and the verification result is as shown in figure 3-40.

Installation of Oracle Grid/Cloud Control 36
figure 3-40: A screen showing the verification result of the pre-requisite check
The figure 3-41 shows the configuration details for the Oracle database. These configurations can be saved into a Response File which will be used to create the database again by passing the parameter for response file in runInstaller.

Installation of Oracle Grid/Cloud Control 37
figure 3-41: A screen showing the configuration of the Oracle database
Click on Install to proceed with the Oracle database installation. The figure 3-42 shows the Oracle database installation progress at around 79% you would be prompted to run the configuration scripts oraInstRoot.sh and root.sh, these scripts are to be run as root UNIX user.

Installation of Oracle Grid/Cloud Control 38
figure 3-42: A screen showing the installation progress and configuration scripts to be run
The figure 3-43 showing the execution of the orainstRoot.sh script.
figure 3-43: A screen showing the execution of orainstRoot.sh script

Installation of Oracle Grid/Cloud Control 39
The figure 3-44 showing the execution of root.sh script
figure 3-44: A screen showing the execution of root.sh script
The figure 3-45 shows the progress of the database creation using Database Configuration Assistant (DBCA).

Installation of Oracle Grid/Cloud Control 40
figure 3-45: A screen showing the creation of the database using DBCA
The figure 3-46 shows the completion of the Database Configuration Assistant. The database name for the repository database required for Oracle 12c Cloud Control is oemrepo in the example.

Installation of Oracle Grid/Cloud Control 41
figure 3-46: A screen showing the database configuration assistant completion
Once the installation is 100% completed the finished screen appears as shown in figure 3-47.

Installation of Oracle Grid/Cloud Control 42
figure 3-47: A screen showing the Oracle database installation completed
Now, we will install the Oracle Enterprise Manager 12c Cloud Control in the next section.
Oracle Enterprise Manager 12c Cloud Control The installation files for the Oracle Enterprise Manager 12c Cloud Control version 12.1.0.4 can be downloaded from Oracle Technology Network (OTN) or from Oracle Software Cloud Delivery site (E-Delivery). There would be three zip files as shown in the figure 3-48 which is placed in the Downloads folder

Installation of Oracle Grid/Cloud Control 43
figure 3-48: A screen showing the downloaded zip files
The zip files are to be unzipped in the same folder like we previously discussed for Oracle Database installation. Similarly, run the installation shell script as below to start the installation ./runInstaller.sh The figure 3-49 shows the initial screen of the installation, it asks for email address

Installation of Oracle Grid/Cloud Control 44
figure 3-49: A initial screen showing the installation for Oracle EM 12c Cloud Control
Click on Next will get you to the next screen for Software Updates, you can use your My Oracle Support (MOS) credentials to login and opt for patch updates as shown in figure 3-50.

Installation of Oracle Grid/Cloud Control 45
figure 3-50: A screen for selecting Software Updates option
Click on Next, the screen for pre-requisite check verification is seen as shown in figure 3-51.

Installation of Oracle Grid/Cloud Control 46
figure 3-51: A screen showing pre-requisite checks verification
Click on Next, will display the Installation Type options select Simple or Advanced option according to the requirement. The screen is as shown in figure 3-52.

Installation of Oracle Grid/Cloud Control 47
figure 3-52: A screen showing the installation type to be selected
Click on Next, will provide the screen to enter the Middleware Home Location, Agent Base Directory and hostname as shown in the figure 3-53.

Installation of Oracle Grid/Cloud Control 48
figure 3-53: A screen showing the input parameters required to continue installation
Click on Next, will bring the screen to provide the administrator password. The administrator user for Oracle Enterprise Manager 12c cloud control is sysman. The database connection details for the repository database are to be supplied (refer figure 3-54).

Installation of Oracle Grid/Cloud Control 49
figure 3-54: A screen showing the password information entered and database connection details
Click on Next will show a message for pre-requisite step being failed for two database parameters, click Yes and allow the installation to change the parameters (refer figure 3-55).

Installation of Oracle Grid/Cloud Control 50
figure 3-55: A screen showing the pre-requisite check failure and action to be taken
Click Next will take you to the screen showing the configuration of the installation. Just click in Install to move forward (refer figure 3-56)

Installation of Oracle Grid/Cloud Control 51
figure 3-56: A screen showing the configuration of the installation
The installation will progress as shown in the figure 3-57.

Installation of Oracle Grid/Cloud Control 52
figure 3-57: A screen showing the installation progress
The installation progresses and at one stage it requests running the configuration shell script allroot.sh as root (refer figure 3-58). It is requested to run the shell script as requested otherwise the installation will fail.

Installation of Oracle Grid/Cloud Control 53
figure 3-58: A screen showing the message appearing to run allroot.sh
Once the OK button is clicked this ends the installation of the Oracle Enterprise Manager 12c Cloud Control. Now to see if the installation is fine we can open the Firefox browser and type the URL as below. http://hostname.domain.com:7802/em/ The below screen in figure 3-59 shows the home page of the OEM and this concludes the installation of Oracle Enterprise Manager 12c Cloud Control.
The login credentials used is sysman and the password for the administrator is the same one you would have given during installation.

Installation of Oracle Grid/Cloud Control 54
figure 3-59: A screen showing the login page of Oracle Enterprise 12c Cloud Control
Once the login is successful we will see the home page as shown in the figure 3-60.

Installation of Oracle Grid/Cloud Control 55
figure 3-60: A screen showing the home page after login
We have now gone through the complete installation of Oracle Enterprise Manager 12c Cloud Control. As the book focuses on the aspects related to Oracle ACMP only it is recommended for readers to gather knowledge related to Oracle Enterprise Manager 12c Cloud Control by going through Oracle Documentation mentioned in the below link. https://docs.oracle.com/cd/E24628_01/doc.121/e24473/toc.htm
Summary In this chapter we have covered the installation related to Oracle Virtual Box, Creation of a virtual machine, Oracle Linux installation within the virtual machine, Oracle Database Installation for OEM repository and installation of Oracle Enterprise Manager 12c Cloud Control.

Installation of Oracle Grid/Cloud Control 56
Oracle Virtual Box was covered in the chapter for users to get familiarize with virtualization concepts and software as it currently a technological enhancement mostly used for recent implementations across the globe.