Installation manual Securing What Matters EN - Betafence · - Installation on a base plate is...
41
Securing What Matters Nylofor ® Installation manual EN
Transcript of Installation manual Securing What Matters EN - Betafence · - Installation on a base plate is...

Securing What Matters
Nylofor®
Installation manual
EN

2 28/10/2019 – Nylofor® - Installation manual
Square & rectangular
postsBekafix® Bekafix® Super Quixolid Plus®
Nylofor®
4 post systems

3 28/10/2019 – Nylofor® - Installation manual
0. Contents
1. Components of the fencing systems1. The posts
1. Square posts & rectangular posts2. Bekafix3. Bekafix Super4. Quixolid Plus
2. Fixators and tools1. Square posts & rectangular posts2. Bekafix3. Bekafix Super
3. The Nylofor panels2. Installation of the fencing systems
1. Foundations2. Installation of posts & panels
1. Square posts & rectangular posts2. Bekafix3. Bekafix Super4. Quixolid Plus
3. Options

4 28/10/2019 – Nylofor® - Installation manual
1. The posts1. Square & rectangular posts- Post with section 60x60x1.5mm are available for panels from 0.6
to 2.4 meters- For installations higher than 2.4m, rectangular posts with profile
80x60x2,5mm, or 120x60x3mm are used- The posts are galvanized inside and outside and polyester coated- This type of post can be installed with all Nylofor panels- The posts are equipped with M6 inserts to attach the panels with
clamps and security bolts- Each post is fitted with a PP post cap- Posts with inserts in 2 adjacent sides are available to make
corners- Installation on a base plate is possible in 2 ways: by gluing an
aluminum base plate, or welding a steel base plate to the post
1. Components of the fencing systems
60
60 1.5
*
* Installation on an aluminum base plate is not possible in combination with fillings such as Screeno Line, Collfort…
corner post
M6 insert

5 28/10/2019 – Nylofor® - Installation manual
1. Components of the fencing systems
1. The posts2. Bekafix- Profile 70x44x1.25mm - Posts are available for panels from 0.6 to 2.4 metres- The posts are galvanised inside and outside and polyester coated- This type of post can be installed with Nylofor 3D, 3D Pro,
3D Pro XL, 3D Super, 2D, 2D Super, F panels- Each post has 3 holes for attachment of the clamps with security
bolts. Across the whole length of the post there are perforationsto click the clamps into
- Each post is fitted with a PA post cap. The cap has a hook to hang up the panel during installation
- A base plate can be screwed onto the post
44
70 1.25

6 28/10/2019 – Nylofor® - Installation manual
1. Components of the fencing systems
1. The posts3. Bekafix Super- Profile 100x54,5x2mm- Posts are available for panels from 2 to 4.1 metres- The posts are galvanised inside and outside and polyester
coated- This type of post can be installed with Nylofor 3D, 3D Super,
2D, 2D Super, F panels- Each post has holes every 150 mm for attachment of the
clamps with security bolts. Across the whole length there are perforations to click the clamps into
- Each post is fitted with a PA post cap. The cap has a hook to hang up the panel during installation
- A base plate can be screwed onto the post
54,5
100 2

7 28/10/2019 – Nylofor® - Installation manual
1. Components of the fencing system
1. The posts4. Quixolid Plus- Profile 75x50x1mm (steel S 350)- Post without accessories. After installation, the panel is secured
by the inner folding of the profile (blocks the panel nose)- Posts are available for panels from 0.6 to 2.4 m- The posts are galvanised inside and outside and polyester-
coated- This type of post can be installed with Nylofor 3D, 2D, 2D Super,
F, Bekafor Classic- Each post is fitted with a PA post cap- A base plate can be screwed onto the post – holes are foreseen
in the post- Corners can be made with a standard post

- PA fixators with caps, to be attached with M6 security bolts (ISO 7380)
- Different types are available, depending on the type of panel being installed
– 2D – 3D INT*– 3D Pro INT*
– 2D Super– 3D Super– 3D Pro XL
– F – 2D– 3D – 3D Pro – 3D Pro XL
*INT = intermediate = clamps that are not positioned in a nose
- A bracket (in stainless steel) is used to attach one panel on top of another or for two panels in a sharp angle (only Nylofor 3D)
2. Fixators and tools1. Square posts
8 28/10/2019 – Nylofor® - Installation manual
1. Components of the fencing system

9 28/10/2019 – Nylofor® - Installation manual
1. Components of the fencing systems
2. Fixators and tools2. Bekafix- PA fixator to attach the panel to the post at the
side. PA clamps are clicked into the perforations in the post. There are fixator compatible with Nylofor 3D/ 3D Pro/ 3D Pro XL
- Steel fixators to attach the panel to the post at the side. The clamps are clicked into the perforations in the post. For extra security they can be fixed with M6x50 mushroom head square neck bolts, washer M6 and breaking-off nut M6 (stainless steel). At least 1 bolt connection per panel side is necessary. Two types are available, depending on the type of panel being installed 1. 3D / F / 2D / 3D Pro2. 2D Super / 3D Super
- To position the clamps a Bekafix tong is needed
Type 1
Type 2
10 28/10/2019 – Nylofor® - Installation manual
1. Components of the fencing systems
2. Fixators and tools3. Bekafix Super- Steel fixators to attach the panel to the post at the side.
The clamps are clicked into the perforations in the post. For extra security they can be fixed with M6x60mushroom head square neck bolts, washer M6 and breaking-off nut M6 (stainless steel). At least 1 bolt connection per panel side is necessary. Two types are available, depending on the type of panel being installed
1. 3D / F / 2D / 3D Pro2. 2D Super / 3D Super
- To position the clamps a Bekafix Super tong is needed
Type 1
Type 2

11 28/10/2019 – Nylofor® - Installation manual
1. Components of the fencing systems
3. The Nylofor panels- Range:
Type 3D Pro 3D 2D 3DSuper
F 2DSuper
Height 1,03 –2,43 m
1,03 –2,43 m
1,03 –2,03 m
1,63 –2,43 m
0,63 –2,03 m
1,03 –2,43 m
Width 2,5 m 2,5 m 2,5 m 2,5 m 2,5 m 2,5 m
Wire dia H: 5mm V: 5mm
H: 5mmV: 5mm
H: 2x6mm V: 5mm
H: 8mmV: 5mm
H: 15x6mm V: 5mm
H: 2x8mm V: 6mm
Mesh size 200 x 50mm
200 x 50mm
200 x 50mm
200 x 50mm
200 x 50mm
200 x 50mm
Nose type 1 wire 1 wire none 1 wire none none
Coating GALV+PVC GALV+PES GALV+PES GALV+PES GALV+PES GALV+PES
Type 3D Pro 3D 2D 3DSuper
F 2DSuper
Square X x x x x xBekafix X x x x x xBekafix Super X x x x x x
Quixolid plus X x x x x x

12 28/10/2019 – Nylofor® - Installation manual
2. Installation of the fencing systems
1. Foundations- To obtain the best result, it is advisable to level the ground over the whole length of the fence- For correct positioning, maintain the centre-centre distances. The distance is determined by the
post system and the type of panel being installed
- Align the fence line- To determine the dimensions of the foundations it is advisable to consult a specialised engineer to
evaluate wind load and solar conditions and any other factors requiring specialist opinion (concrete quality directive B30)
- In case of direct installation the post needs to be supported as long as necessary
Post system Panel width
2000 mm 2500 mm 3000 mm
Square 2030 mm 2530 mm 3030 mm
Bekafix 2020 mm 2520 mm 3020 mm
Bekafix Super 2030 mm 2530 mm 3030 mm
Quixolid plus 2040 mm 2540 mm 3040 mm
Centre-centre distance table

13 28/10/2019 – Nylofor® - Installation manual
2. Installation of the fencing systems
2. Installation of posts & panels1. Square posts- Installation principle: when placing square posts, first all the
posts can be placed and then the panels can be attached.
ALIGNING THE POSTS
Installation on an even surface- Place a post before the first post of the fence and another
behind the last post. Connect those posts with two guide ropes
- The lower guide rope should be between 20 and 40 cm above the ground. Now align all inserts with the upper guide rope.
Installation on a sloping surface- Place a guide rope for the same heights. In case of a
difference in height, place a supplementary guide rope at the height of the upper insert.

14 28/10/2019 – Nylofor® - Installation manual
2. Installation of the fencing systems
2. Installation of posts & panels1. Square posts
PLACEMENT OF THE POSTS (USE A TEMPLATE)
- A template makes it much easier to place the posts correctly- The template must be made by the installer and must have 2
recesses into which the posts fit perfectly- Place the posts, correctly aligned (vertically and horizontally)
and with the correct distance between them. For end posts and corner posts the distance is 3 cm smaller

15 28/10/2019 – Nylofor® - Installation manual
2. Installation of the fencing systems
2. Installation of posts & panels1. Square posts
INSTALLATION OF THE PANELS
- Join two panels together on an intermediate post at the correct height
- Place a clamp in the upper insert of the post and tighten the security bolt halfway
- Now place an additional clamp in the lower insert and tighten the security bolt halfway
- Repeat this procedure for all intermediate posts and finish with the corner post
- Now place the bolts into the other clamps and tighten all bolts completely and firmly
- Now cover the clamp holes with a cap
Panel height Number of fixators
630mm 3
1030mm 3
1230mm 4
1430/1530mm 4
1630/1730mm 5
1830/1930mm 5
2030mm 6
2430mm 7
FIXATORS PER POST

16 28/10/2019 – Nylofor® - Installation manual
2. Installation of the fencing systems
2. Installation of posts & panels1. Square posts
MAKING CORNERSRIGHT ANGLE
Place two intermediate posts 50 cm from the corner.
ACUTE/OBTUSE ANGLE Nylofor 3D / 3D Pro

17 28/10/2019 – Nylofor® - Installation manual
2. Installation of the fencing systems
2. Installation of posts & panels1. Square posts
PANELS ON TOP OF EACH OTHER- Connect the panels using
3 brackets per panelSLOPES
- On slopes extra fixators must be placed
- Measure the area accurately compared to the zero level
- Do this in different places
- The zero level can be determined by means of a laser or similar instrument
- Determine all differences in height on the fence line
- For slopes of more than 15%posts must be placed closer together. Shorten the panels and repair the ends with zinc paint and polyester paint

18 28/10/2019 – Nylofor® - Installation manual
2. Installation of the fencing systems
2. Installation of posts & panels1. Square posts
INSTALLATION WITH CONCRETE SLABS - Use concrete slab supports for 60x60 posts (hard PVC)
width 4cm –height 30cm

19 28/10/2019 – Nylofor® - Installation manual
2. Installation of the fencing systems
2. Installation of posts & panels2. Bekafix- Installation principle: Bekafix posts are installed
according to the ‘post-panel-post’ system
ATTACHMENT OF THE CLAMPS- Start by attaching one panel to a post on each side- Hook the panel into the hook caps to help hang it up- To attach the panel the panel is lifted from the hook cap and a polyamide or metal fixator is attached below the upper nose, so that once attached the panel no longer rests on the hook cap. A second fixator is attached above the lower nose of the panel. In between, a few additional fixators are placed. The panel is attached using fixators and the Bekafix tong. (Fastening with the tong is done differently depending on the fixator type - see illustrations below). Position the fixators just below a horizontal wire whenever possible. The lower fixator should be located just above the lower horizontal wire.- For extra security you can bolt the fixators onto the post. Attach at least 1 clamp per panel side
1

20 28/10/2019 – Nylofor® - Installation manual
2. Installation of the fencing systems
2. Installation of posts & panels2. Bekafix PLACING THE POSTS IN CONCRETE
- The panel, mounted onto the 2 posts, is inserted into the foundation holes. Thepanel must be aligned with the fence line. The panel height must also be aligned- Fill the foundation holes with moderately wet concrete (not liquid). The concrete must be pressed firmly. This will allow the panel to stand upright without support (+ align height)- In order to build the rest of the fence the next panel must be hooked into the hook cap. The fastening is done in the same way as before- The next post is placed in the foundation hole and hooked onto the panel
2 3 4

21 28/10/2019 – Nylofor® - Installation manual
2. Installation of the fencing systems
2. Installation of posts & panels2. Bekafix
NUMBER OF FIXATORS PER POST
Panel height # fixators intermediate /corner post
# fixators end post
630mm 4 2
1030mm 4 2
1230mm 4 2
1430/1530mm 6 3
1630/1730mm 6 3
1830/1930mm 8 4
2030mm 8 4
2430mm 8 4

22 28/10/2019 – Nylofor® - Installation manual
2. Installation of the fencing systems
2. Installation of posts & panels2. Bekafix
MAKING CORNERSThe corner posts are placed on the line with the bisector of the right or obtuse angle to be made. For an acute angle the post with the panel making the acute angle is placed into the same foundation hole as the last line post. The panels are attached to the corner post only by means of polyester coated metal clamps.
Nylofor 3D / 3D ProA right or obtuse angle can be made with one post. To make an acute angle 2 posts are needed.
Nylofor FFor all angles 2 posts are needed
RIGHT ANGLE OBTUSE ANGLE ACUTE ANGLE
RIGHT ANGLE OBTUSE ANGLE ACUTE ANGLE

23 28/10/2019 – Nylofor® - Installation manual
2. Installation of the fencing systems
2. Installation of posts & panels2. Bekafix
INSTALLATION ON SLOPES
When building a fence on a slope using the Bekafix post it is best to start at the highest point of the site
Where the site slopes, the next panel should not be hooked into the hook cap; the new panel should just be placed lower according to need

24 28/10/2019 – Nylofor® - Installation manual
2. Installation of the fencing systems
2. Installation of posts & panels2. Bekafix
INSTALLATION WITH CONCRETE SLABS
width 4cm –height 30cm

25 28/10/2019 – Nylofor® - Installation manual
2. Installation of the fencing systems
2. Installation of posts & panels3. Bekafix Super- Installation principle: Bekafix Super posts are installed
according to the ‘post-panel-post’ system
ATTACHMENT OF THE FIXATORS
- Start the installation by attaching posts to both sides of one panel
- Hang the panel on the hook cap to position- Attach the fixators using the Bekafix Super tong- For extra security, place an M6x60 bolt and breaking-off nut
through the fixators and the central hole in the post1
INSIDE
OUTSIDE

26 28/10/2019 – Nylofor® - Installation manual
2. Installation of the fencing systems
2. Installation of posts & panels3. Bekafix Super PLACING THE POSTS INTO CONCRETE
- Place the first 2 posts in the foundation holes and fill them with moderately wet concrete (not liquid). The concrete is pressed firmly, which allows the panel to stand upright without support. Check whether the post is vertical. Keep a distance of approx. 5 cm between the bottom of the panels and the ground
- In order to build the rest of the fence the next panel must be hooked into the hook cap
- The next post is placed in the foundation hole and hooked onto the panel. The panel is attached to both posts with the fixators. For extra securityuse the bolt and breaking-off nut
- Repeat the steps above for the entire fence
2 3 4

27 28/10/2019 – Nylofor® - Installation manual
2. Installation of the fencing systems
2. Installation of posts & panels3. Bekafix Super
NUMBER OF FIXATORS PER POST
Panel height # fixators intermediate/corner post
# fixators end post
2030mm 8 4
2430mm 8 4
3100mm 10 5
3600mm 10 5
4100mm 12 6

28 28/10/2019 – Nylofor® - Installation manual
2. Installation of the fencing systems
2. Installation of posts & panels3. Bekafix Super
MAKING CORNERS
- Corners can always be made by placing 2 posts in the correct angle
- In many cases a single post can be used. Look for your system and desired angle in the description that follows

29 28/10/2019 – Nylofor® - Installation manual
2. Installation of the fencing systems
2. Installation of posts & panels3. Bekafix Super
MAKING CORNERS- Corners shown in the drawing are all possible angles using one single
post. For all other angles 2 posts are needed
Nylofor 2D
Nylofor 2D Super
Nylofor F
INTERIOR ANGLES
EXTERIOR ANGLES
INTERIOR ANGLES
EXTERIOR ANGLES
EXTERIOR ANGLES

30 28/10/2019 – Nylofor® - Installation manual
2. Installation of the fencing systems
2. Installation of posts & panels3. Bekafix Super
MAKING CORNERS- Corners shown in the drawing are all possible angles using one single
post. For all other angles 2 posts are needed
Nylofor 3D Super
INTERIOR ANGLES 90°-150°INTERIOR ANGLES 160°-180°
INTERIOR ANGLES 155°-180° INTERIOR ANGLES 90°-150°
Nylofor 3D / 3D PRO

31 28/10/2019 – Nylofor® - Installation manual
2. Installation of the fencing systems
2. Installation of posts & panels3. Bekafix Super
INSTALLATION ON SLOPES
When building a fence on a slope using the Bekafix Super post it is best to start at the highest point of the site. 25 mm steps are possible
Where the site slopes, the next panel should not be hooked into the hook cap; the new panel should just be placed lower according to need

32 28/10/2019 – Nylofor® - Installation manual
2. Installation of the fencing systems
2. Installation of posts & panels3. Bekafix Super
INSTALLATION WITH CONCRETE SLABS
A concrete slab can be placed in the middle of the Bekafix Super post. The same installation principle applies: post – panel – concrete slab – post – panel – concrete slab …
width 4cm –height 30cm

33 28/10/2019 – Nylofor® - Installation manual
2. Installation of the fencing system
2. Install posts & panels4. Quixolid Plus- The panel is directly secured by the inner folding that
blocks the vertical wire of the panel - Use the tension tool to keep the panels in position while
installing the fence

34 28/10/2019 – Nylofor® - Installation manual
2. Installation of the fencing system
2. Install posts & panels4. Quixolid PlusMAKING CORNERS- Corners between 60° and 180° can be made with one and the
same post
35 28/10/2019 – Nylofor® - Installation manual
2. Installation of the fencing system
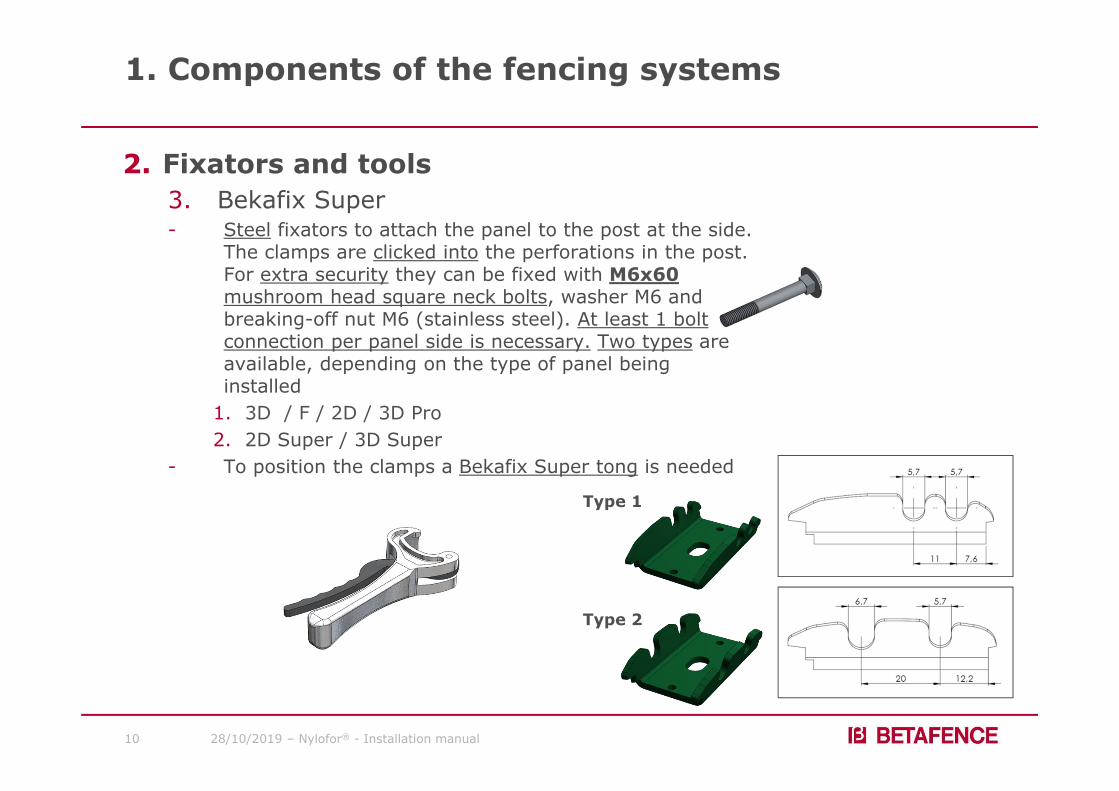
2. Install posts & panels4. Quixolid PlusINSTALLATION ON SLOPES- Slopes are possible with steps of 100mm

36 28/10/2019 – Nylofor® - Installation manual
2. Installation of the fencing system
2. Install posts & panels4. Quixolid PlusINSTALLATION OF THE BASE PLATE
- Holes are already foreseen in the posts
Screw M8x20 – stainless steel - 2x
M8 washer - stainless steel - 4x
M8 nut - stainless steel - 2x
Note: bolts and washers must be ordered separately

37 28/10/2019 – Nylofor® - Installation manual
2. Installation of the fencing system
2. Install posts & panels4. Quixolid Plus
INSTALLATION WITH CONCRETE PLATE– The post can be used to hold the concrete plate, no additional plate holder is required

38 28/10/2019 – Nylofor® - Installation manual
3. Options
1. Square posts
ALUMINIUM CONNECTOR
– For extra security
– For posts 60x60 to connect the vertical part of the post and the bent arm of the security fence
SECURITY PROFILE
– For extra security
– Can be used to attach Nylofor F, 2D or 2D Super onto 60x60 posts
39 28/10/2019 – Nylofor® - Installation manual
3. Options
2. Bekafix
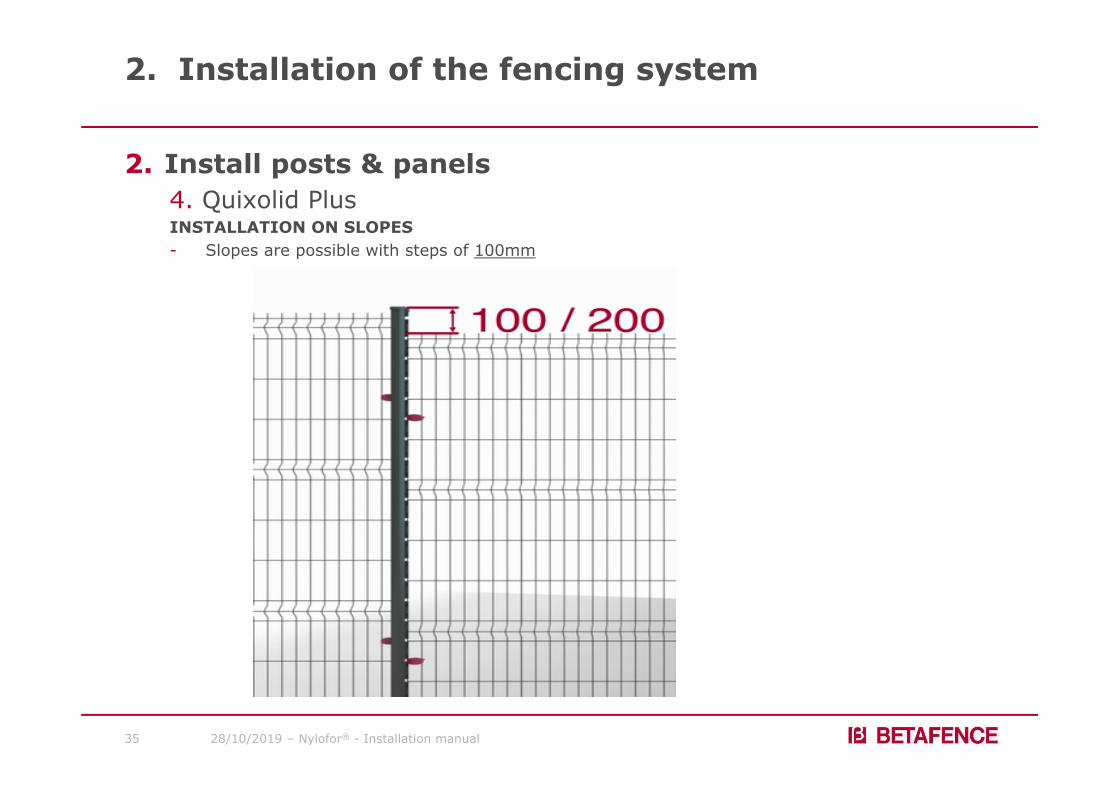
CONNECTOR
– For extra security
– To connect square post with slanting support
– Maximum loading of this piece is 50 kg!
* In case of special requirements, it’s advised to contact a project engineer for strength calculations.
SLANTING SUPPORT
– For extra security
– To attach Concertina
(single or double) orbarb wire

40 28/10/2019 – Nylofor® - Installation manual
3. Options
3. Bekafix Super
SLANTING SUPPORT
– For extra security
– To attach Concertina (single or double) orbarb wire


![POST MOUNTING OPTION: BASE PLATE OPTIONS: 6.0 [152] …optional base plate sizes available see base plate options above. if optional 4” [102] hss outer frame is selected, base plates](https://static.fdocuments.in/doc/165x107/600ccf34e6a4615c5d79b813/post-mounting-option-base-plate-options-60-152-optional-base-plate-sizes-available.jpg)


