Installation Manual - NT- · PDF fileNT-ware assumes no responsibility with regard to the ......
74
Installation Manual uniFLOW V5.4 SR13
-
Upload
duongkhanh -
Category
Documents
-
view
217 -
download
1
Transcript of Installation Manual - NT- · PDF fileNT-ware assumes no responsibility with regard to the ......

Installation Manual uniFLOW V5.4 SR13

Disclaimer NT-ware Systemprogrammierungs-GmbH, all its affiliates, partners and licensors disclaim all warranties,
including, but not limited to, warranties about the accuracy or completeness of statements of this
site's/document's content or the content of any site or external sites for a particular purpose. This
site/document and the materials, information, services, and products at this site/document, including,
without limitation, text, graphics, and links, are provided 'as is' and without warranties of any kind, whether
expressed or implied.
All rights reserved. No parts of this work may be reproduced in any form or by any means - graphic,
electronic, or mechanical, including photocopying, recording, taping, or information storage and retrieval
systems - without the prior written permission of NT-ware Systemprogrammierungs-GmbH (hereinafter
also referred to as NT-ware).
Company and product names mentioned herein are registered or unregistered trademarks of their
respective companies. Mention of third-party products is for information purposes only and constitutes
neither an endorsement nor a recommendation. NT-ware assumes no responsibility with regard to the
performance or use of these products. Also, NT-ware makes no claim to these trademarks. Any use of
trademarks, logo, service marks, trade names, and product names is prohibited without the written
permission of the respective owners.
Adlib, Express and Express Server are either registered trademarks or trademarks of Adlib Publishing
Systems Inc.; Adobe®, Adobe® Reader®, Acrobat®, Distiller®, PostScript® and products of the CREATIVE
SUITE(S) are either registered trademarks or trademarks of Adobe Systems Incorporated in the United
States and/or other countries; Android is a trademark of Google Inc.; Apple®, the Apple® logo, Mac®, Mac
OS®, Macintosh®, iPhone®, iPad® and AirPrint® are trademarks of Apple Inc. registered in the U.S. and other
countries; Box of Box Inc.; Blackboard Transact™ of Blackboard Inc.; CANON, imageRUNNER, imageRUNNER
ADVANCE, MEAP, CPCA, AMS, iW AMS, iW Desktop, iSend, iW SAM are trademarks or registered
trademarks of Canon Inc.; CardSmith® is a trademark of CardSmith LLC; CBORD CS Gold® of the CBORD
Group Inc.; Crystal Reports and other Business Objects products and services mentioned herein as well as
their respective logos are trademarks or registered trademarks of Business Objects Software Ltd. Business
Objects is an SAP company; Dropbox of Dropbox Inc.; eCopy™, eCopy ShareScan® and eCopy ScanStation™
are marks or trademarks of Nuance Communications, Inc.; Evernote® of Evernote Corporation; FileNet® of
IBM Corporation; Foxit®SDK and Foxit® Reader of Foxit Corporation; Google Docs of Google Inc.; Google
Cloud Print™ web printing service is a trademark of Google Inc.; Helix™ Production Workflow is a trademark
of NT-ware Systemprogrammierungs-GmbH; HP, HEWLETT-PACKARD, PCL and LASERJET are registered
trademarks that belong to Hewlett-Packard Development Company; KONICA MINOLTA is a registered
trademark of KONICA MINOLTA Inc.; iOS® of Cisco Technology Inc.; iDRS™ SDK and IRISConnect™ are
unregistered trademarks of I.R.I.S. Group S.A.; JAWS pdf courier™ are trademarks of Global Graphics SA.;
Microsoft®, Windows®, Windows Server®, Internet Explorer®, Internet Information Services, Microsoft®
Word, Microsoft® Excel, Microsoft SharePoint®, Microsoft SharePoint® Online, OneDrive®, One Drive® for
Business, SQL Server®, Active Directory®, Hyper-V® are either registered trademarks or trademarks of
Microsoft Corporation in the United States and/or other countries of Microsoft Corporation; Neevia
Document Converter Pro™ of Neevia Technology; NetWare®, Novell®, Novell eDirectory™ of Novell Inc. are
registered/unregistered trademarks of Novell Inc. in the United States and other countries; MobileIron® of
Mobile Iron Inc., Océ, Océ PlotWave®, Océ ColorWave® and PRISMA are trademarks or registered
trademarks of Océ-Technologies B.V. Océ is a Canon company, OpenOffice.org™ of Oracle Corporation;
PAS™ is a trademark of Equitrac Corp.; PosterJet is copyrighted and an internationally registered trademark
of Eisfeld Datentechnik GmbH & Co. KG; RedTitan EscapeE of RedTitan Limited; NETAPHOR®, SiteAudit™ are

trademarks of NETAPHOR SOFTWARE Inc.; SAMSUNG is a trademark of SAMSUNG in the United States or
other countries; Therefore™, Therefore™ Online of Therefore; UNIX® is a registered trademark of The Open
Group; uniFLOW®, uniFLOW Serverless Secure Printing®, Helix Production Workflow®, MIND®,
microMIND®, MiCard® and uniFLOW Service for AirPrint® are registered trademarks of NT-ware
Systemprogrammierungs-GmbH; pcProx®, AIR ID® are registered trademarks of RFIdeas Inc.Readers;
CASI-RUSCO® is a registered trademark of ID Card Group; Radio Key® is a registered trademark of Secura
Key; GProx™ II is an unregistered trademark of Guardall; HID® ProxHID is a registered trademark of HID
Global Corporation; Indala® is a registered trademark of Motorola; ioProx™ is an unregistered trademark of
Kantech; VMware vSphere® and VMware vSphere® Motion® are registered trademarks of VMware; Xerox,
Xerox and Design, as well as Fuji Xerox and Design are registered trademarks or trademarks of Xerox
Corporation in Japan and/or other countries.
All other trademarks, trade names, product names, service marks are property of their respective owners
and are hereby acknowledged.
While every precaution has been taken in the preparation of this document, NT-ware assumes no
responsibility for errors or omissions, or for damages resulting from the use of information contained in this
document or from the use of programs and source code that may accompany it. NT-ware does not assume
any responsibility or liability for any malfunctions or loss of data caused by the combination of at least one
NT-ware product and the used operation system and/or third-party products. In no event shall NT-ware be
liable for any loss of profit or any other commercial damage caused or alleged to have been caused directly
or indirectly by this document.
In addition, this manual provides links to the sites of affiliated or independent companies and certain other
businesses. NT-ware is not responsible for examining or evaluating, and NT-ware does not warrant the
offerings of, any of these businesses or individuals or the content of their websites. NT-ware does not
assume any responsibility or liability for the actions, product, and content of all these and any other third
parties. You should carefully review their privacy statements and other conditions of use.
Friday, April 27, 2018, Bad Iburg (Germany)
Important Note
Serious problems might occur if you modify the registry of your Windows operating system incorrectly.
These problems might require that you reinstall the operating system. We strongly recommend to always
back up the registry of your Windows operating system before applying changes to it, just in case you do
something wrong. NT-ware does not assume any responsibility or liability for any impact on the
operating system after changing the registry. You understand and accept that you use this information
and modify the registry of your Windows operating system at your own risk.
uniFLOW and corresponding components like Web Submission and Internet Gateway rely heavily on
their SQL databases. We strongly suggest that you refrain from modifying these SQL databases manually
without prior consultation from the NT-ware support team. NT-ware does not assume responsibility or
liability for possible impact on your uniFLOW environment after modifying any of the SQL databases.
Copyright and Contact
NT-ware Systemprogrammierungs-GmbH
Niedersachsenstraße 6
49186 Bad Iburg
Germany

www.nt-ware.com
Tel: +49 - 54 03 - 7243 - 0
Fax: +49 - 54 03 - 78 01 03
Email: [email protected]
Register of Companies: Amtsgericht Osnabrück
No. of entry in Register of Companies: HRB 110944
Chief Executive Officer: Karsten Huster
Responsible according to § 6 MDStV: Karsten Huster
VAT registration no. according to §27 a Umsatzsteuergesetz: DE 230932141
©1998-2018 NT-ware Systemprogrammierungs-GmbH.
Feedback
Should you come across any relevant errors or have any suggestions please contact
[email protected] or use the Send feedback here button of the uniFLOW Online Help.
Technical Support
First technical support services will be provided by your dealer. Before you contact the dealer for technical
support, ensure you have read this document.
How to use this Document
Text Styles
This style is used for text that is displayed on screen.
This style is used for text the user has to type in.
This style is used for hyperlinks to web pages, internal links to other pages in this manual.
This style is used for code examples: XML code, variables or regular expressions.
Pictograms
Important Note: Information that is crucial for the correct functioning of the uniFLOW software.
Further Information: Pointer to additional manuals, installation manuals, white papers or the NT-ware Knowledgebase.
Region Specific Feature: Indicator for uniFLOW features that are not available worldwide.
External Link: Link to an external web page.
Settings: Detailed explanation of configuration settings or operational procedures.
Compass: Path to the menu or configuration page in the software.
Screenshots and Diagrams
This manual contains screenshots of the software, diagrams explaining relations and pictures of products.
Even though all visuals are up-to-date at the time of writing, they are subject to change.
Language and Translations
This document has originally been written in English language. Translations of this document are based on
the English original. Some screenshots, diagrams and pictures in this document may not be translated and
appear in English language only.
Send Feedback
Should you come across any relevant errors or have any suggestions please contact
[email protected] or use the Send feedback here button of the uniFLOW Online Help.

About this Document
This document is delivered as part of the device / the software from NT-ware. Please read this document
before using the device / the software and keep this document or the link to an online version of this
document for future reference. Please make sure that all persons operating the device / the software are
familiar with this document. Please observe all instructions given in this document. Installation,
configuration and maintenance must only be performed by sufficiently qualified personnel. Failure to
comply with this document may void the warranty.
Every effort has been made to ensure that the contents of this manual are accurate. However, NT-ware
reserves the right to make changes without notice.


Installation Manual Contents
I
Contents
1 Introduction ............................................................................................... 1
2 System Requirements ................................................................................. 1
2.1 Operating Systems ........................................................................................................ 1
2.2 Required Software Components .................................................................................... 3
2.3 Optional Third-Party Software ....................................................................................... 4
2.4 Hardware ...................................................................................................................... 5
2.5 Analyzable Printer Languages and Drivers ..................................................................... 6
3 Preparation ................................................................................................ 7
4 IIS Configuration ......................................................................................... 8
4.1 Windows Server 2003 ................................................................................................... 8
4.2 Windows Server 2008 ................................................................................................... 9
4.3 Windows Server 2012/2016 ........................................................................................ 10
5 HTTPS Usage ............................................................................................. 10
6 uniFLOW and SQL 2008 R2 Express ........................................................... 11
7 uniFLOW Only (connecting to an existing SQL database) .......................... 17
8 Starting uniFLOW ..................................................................................... 21
8.1 uniFLOW Evaluation Licenses ...................................................................................... 23
8.1.1 uniFLOW Demo Mode ................................................................................................................. 24
8.1.1.1 uniFLOW ............................................................................................................................................... 24
8.1.1.2 uniFLOW for SMB ................................................................................................................................. 25
8.1.1.3 uniFLOW Capture ................................................................................................................................. 26
8.1.2 Not-for-Resale License ................................................................................................................. 27
8.1.3 Trial License.................................................................................................................................. 27
8.1.4 Extended Trial License ................................................................................................................. 28
9 Access Control and ACL Reset Interface .................................................... 29
10 Certificate Installation on Windows .......................................................... 31
11 Certificate Installation on OS X ................................................................. 33
12 Software Activation .................................................................................. 34
12.1 Automatic ................................................................................................................... 35
12.2 Bulk Licenses ............................................................................................................... 37

Installation Manual Contents
II
12.3 Manual ....................................................................................................................... 39
12.4 Third-Party Software ................................................................................................... 42
13 uniFLOW Update ...................................................................................... 43
13.1 Important Update Considerations ............................................................................... 45
13.2 HTTP/HTTPS Communication ...................................................................................... 46
13.3 RPS V5.1 or Higher ...................................................................................................... 49
13.4 uniFLOW V5.1 or Higher .............................................................................................. 50
13.5 uniFLOW V5.0 ............................................................................................................. 51
13.6 uniFLOW Older than V5.0 ............................................................................................ 53
13.7 RPS Older than V5.0 .................................................................................................... 53
13.8 uniFLOW Clients for Windows and Mac ....................................................................... 54
13.9 Scan Processing Server ................................................................................................ 54
13.10 Update to uniFLOW V5.4 while adding Advanced Device Management (ADM) ............. 54
14 uniFLOW SSP to uniFLOW Upgrade ........................................................... 57
14.1 MEAP Devices ............................................................................................................. 57
14.2 CMFP Devices ............................................................................................................. 58
15 System ID Dongle (USB only) .................................................................... 59
15.1 System ID Dongle Activation ....................................................................................... 60
16 Uninstallation ........................................................................................... 63

Installation Manual
1
1 Introduction uniFLOW is a web-based solution for registering & accounting print jobs and for
optimizing print job management. It has been developed utilizing the latest
future-oriented technologies and is in this way very well suited for the deployment in
heterogeneous environments.
Due to its modular structure, uniFLOW features both, outstanding flexibility and
functionality. uniFLOW is an integrated solution, featuring not only accounting, job
ticketing, secure printing or workflow functionality, but all these items in one
consistent package.
2 System Requirements
For general compatibility questions, please refer to the white paper Software Compatibility List for NT-ware Products (MOMKB-471 (https://web.nt-ware.net/its/browse/MOMKB-471)) in the NT-ware Knowledgebase.
Please note that registration is required in order to access the NT-ware Knowledgebase. Access to the NT-ware Knowledgebase is limited to trained Canon personnel only. If you require the above document and you do not have access to the NT-ware Knowledgebase, please contact your Canon partner.
2.1 Operating Systems
Client Operating System Support
Installations of the uniFLOW server system on client operating systems are supported (since uniFLOW V5.3 with Windows 7 or higher).
However, there are a few limitations which need to be considered. Please refer to the White Paper - Software Compatibility List for NT-ware Products (MOMKB-471 (https://web.nt-ware.net/its/browse/MOMKB-471)), to be found in the NT-ware Knowledgebase.
This white paper explains supported features and known limitations of uniFLOW on a client operating system in detail. Read this white paper before you plan to install uniFLOW on a client operating system.
Please note that registration is required in order to access the NT-ware
Knowledgebase. Access to the NT-ware Knowledgebase is limited to trained Canon
personnel only. If you require the above document and you do not have access to the
NT-ware Knowledgebase, please contact your Canon partner.

Installation Manual
2
uniFLOW and RPS
uniFLOW and the Remote Print Servers (RPS) have to be installed on dedicated systems.
Microsoft Small Business Server, Domain Controller and Microsoft Exchange Server
Installations on Microsoft Small Business Servers (SBS), Active Directory Domain Controllers and Microsoft Exchange Servers are supported, but not by default. For more information, please refer to the white paper Installing uniFLOW on a Microsoft Windows Small Business Server (MOMKB-632 (https://web.nt-ware.net/its/browse/MOMKB-632)) in the NT-ware Knowledgebase.
Please note that registration is required in order to access the NT-ware Knowledgebase. Access to the NT-ware Knowledgebase is limited to trained Canon personnel only. If you require the above document and you do not have access to the NT-ware Knowledgebase, please contact your Canon partner.
Windows Server 2003
Internet Information Services (IIS) 6.0 or higher
Internet Explorer 8
Windows Server 2008
Standard installation with a graphical user interface
Internet Information Services (IIS) 7.0 (prepared for a uniFLOW installation)
Internet Explorer 9
Windows Server 2008 R2
Standard installation with a graphical user interface
Internet Information Services (IIS) 7.5 (prepared for a uniFLOW installation)
Internet Explorer 11
Windows Server 2012
Standard installation with a graphical user interface
Internet Information Services (IIS) 8 (prepared for a uniFLOW installation)
Internet Explorer 10
Windows Server 2012 R2
Standard installation with a graphical user interface
Internet Information Services (IIS) 8.5 (prepared for a uniFLOW installation)
Internet Explorer 11
Installation Manual
3
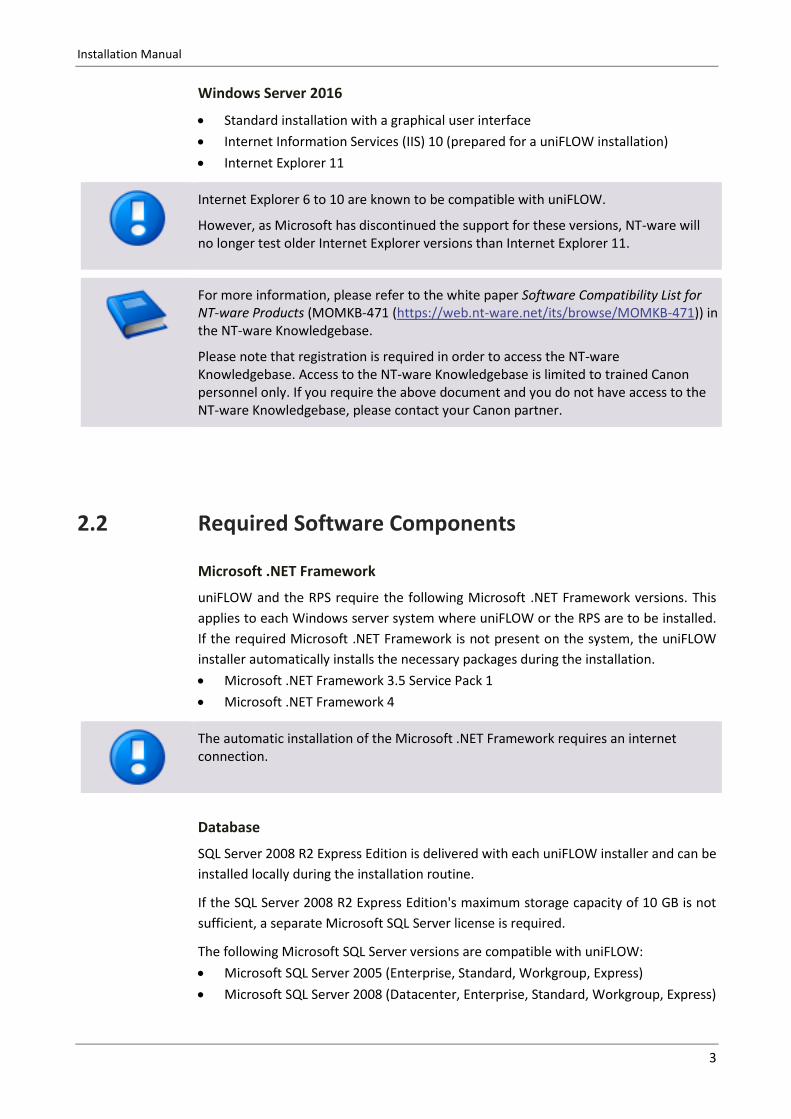
Windows Server 2016
Standard installation with a graphical user interface
Internet Information Services (IIS) 10 (prepared for a uniFLOW installation)
Internet Explorer 11
Internet Explorer 6 to 10 are known to be compatible with uniFLOW.
However, as Microsoft has discontinued the support for these versions, NT-ware will no longer test older Internet Explorer versions than Internet Explorer 11.
For more information, please refer to the white paper Software Compatibility List for NT-ware Products (MOMKB-471 (https://web.nt-ware.net/its/browse/MOMKB-471)) in the NT-ware Knowledgebase.
Please note that registration is required in order to access the NT-ware Knowledgebase. Access to the NT-ware Knowledgebase is limited to trained Canon personnel only. If you require the above document and you do not have access to the NT-ware Knowledgebase, please contact your Canon partner.
2.2 Required Software Components
Microsoft .NET Framework
uniFLOW and the RPS require the following Microsoft .NET Framework versions. This
applies to each Windows server system where uniFLOW or the RPS are to be installed.
If the required Microsoft .NET Framework is not present on the system, the uniFLOW
installer automatically installs the necessary packages during the installation.
Microsoft .NET Framework 3.5 Service Pack 1
Microsoft .NET Framework 4
The automatic installation of the Microsoft .NET Framework requires an internet connection.
Database
SQL Server 2008 R2 Express Edition is delivered with each uniFLOW installer and can be
installed locally during the installation routine.
If the SQL Server 2008 R2 Express Edition's maximum storage capacity of 10 GB is not
sufficient, a separate Microsoft SQL Server license is required.
The following Microsoft SQL Server versions are compatible with uniFLOW:
Microsoft SQL Server 2005 (Enterprise, Standard, Workgroup, Express)
Microsoft SQL Server 2008 (Datacenter, Enterprise, Standard, Workgroup, Express)

Installation Manual
4
Microsoft SQL Server 2008 R2 (Datacenter, Enterprise, Standard, Workgroup,
Express)
Microsoft SQL Server 2012 (Business Intelligence, Enterprise, Standard, Express
Edition)
Microsoft SQL Server 2014 (Business Intelligence, Enterprise, Standard, Express
Edition)
Microsoft SQL Server 2016 (Enterprise, Standard, Express Edition)
For more information, please refer to the white paper Microsoft SQl Server Licensing (MOMKB-261 (https://web.nt-ware.net/its/browse/MOMKB-261)) in the NT-ware Knowledgebase.
Please note that registration is required in order to access the NT-ware Knowledgebase. Access to the NT-ware Knowledgebase is limited to trained Canon personnel only. If you require the above document and you do not have access to the NT-ware Knowledgebase, please contact your Canon partner.
2.3 Optional Third-Party Software
LDAP
The following LDAP servers have been tested in conjunction with uniFLOW and are
recommended by NT-ware. Any other similar software should work with uniFLOW but
has not been tested by NT-ware.
Microsoft Active Directory (LDAP)
Microsoft Active Directory (LDAP over SSL)
Novell NDS
If you plan to use other LDAP software than listed above, NT-ware will need to check the compatibility first. Please create a MOMPS issue in the NT-ware ITS for this.
Document Preview/Conversion
PDF previews and document conversions, for example in workflows for Mobile
Printing, require one of the following software packages listed below, depending on
the desired functionality. More information can be found in the corresponding
chapters.
Neevia Document Converter Pro
OpenOffice
Foxit SDK
Foxit Reader
Adlib Express
Jaws
RedTitan EscapeE

Installation Manual
5
Document Security/Management
iW SAM
Therefore
Document Preparation
Océ PRISMAprepare
Virtualization Platforms
VMware
Hyper-V
Variable Data Printing
Printable FusionPro
For general compatibility questions, please refer to the white paper Software Compatibility List for NT-ware Products (MOMKB-471 (https://web.nt-ware.net/its/browse/MOMKB-471)) in the NT-ware Knowledgebase.
Please note that registration is required in order to access the NT-ware Knowledgebase. Access to the NT-ware Knowledgebase is limited to trained Canon personnel only. If you require the above document and you do not have access to the NT-ware Knowledgebase, please contact your Canon partner.
2.4 Hardware This topic describes the recommended minimum hardware requirements for the
uniFLOW server and the RPS.
Actual requirements will vary based on your system configuration and the applications
and features you choose to install.
For more information, please refer to the white paper uniFLOW Hardware Scoping (MOMKB-788 (https://web.nt-ware.net/its/browse/MOMKB-788)) in the NT-ware Knowledgebase.
Please note that registration is required in order to access the NT-ware Knowledgebase. Access to the NT-ware Knowledgebase is limited to trained Canon personnel only. If you require the above document and you do not have access to the NT-ware Knowledgebase, please contact your Canon partner.
Minimum Hardware Requirements
CPU:
Dual-Core CPU with 3 GHz
RAM:
4 GB
Installation Manual
6
Hard Disk Drive:
500 GB
NT-ware recommends dedicated server hardware.
2.5 Analyzable Printer Languages and Drivers In general the following printer languages are (to a smaller or greater extent)
analyzable by uniFLOW:
PDL (Page Description Languages)
Canon UFR (Ultra Fast Rendering)
o UFR I
o UFR II
GARO (Canon Proprietary, PDL for Inkjet printers)
PostScript
o Level 3 (PS3)
Printer Command Language
o PCL 3 (no color detection supported)
o PCL 5
o PCL 5e
o PCL 5c
o PCL 6
o PCL XL
Hewlett-Packard Graphic Language
o HP-GL
o HP-GL2
Hewlett-Packard Raster Transfer Language
o HP-RTL
Epson Standard Code for Printers
o ESC/P2
Kyocera Printer Driver Language
o KPDL
Quick Page Description Language - used by Samsung, Xerox and others
o QPDL (also known as Samsung SPL2)
Meta Languages
Canon CPCA (Common Peripheral Controlling Architecture)
Printer Job Language (PJL)
Installation Manual
7
Analyzable Printer Driver Data (accounting via GDI/EMF)
CAPT (Canon Advanced Printing Technology)
The information, to what extent job features expressed in a certain page description language by a particular printer driver will be detected by uniFLOW or not, can be retrieved in detail from the DIF (Device Information Files) portal: http://difportal.nt-ware.net (http://difportal.nt-ware.net)
NT-ware will do its best to make uniFLOW compatible with as many devices and
printer drivers as possible. To have a device tested, please contact your Canon partner.
3 Preparation
Please complete the steps below prior to installing uniFLOW. These steps are also lined out in the uniFLOW Pre-ReadMe web page that pops up at installation start, after the display of the uniFLOW License Agreement.
The Pre-ReadMe and Readme files are located under: C:\Program Files (x86)\uniFLOW\ReadMe
Antivirus Software
Configure the antivirus software that is installed on the uniFLOW server, so that it does
not scan the folders (and their subfolders) listed below. We recommend to disable on
access scanning of these folders (and their subfolders) and enable a scheduled scan
during the night instead.
uniFLOW
uniFLOW installation folder:
%ProgramFiles(x86)%\uniFLOW
uniFLOW installation folder:
%CommonProgramFiles(x86)%\NT-ware Shared
Windows spool folder:
%SYSTEMROOT%\System32\spool
SQL Server data folder:
user defined
RPS
RPS installation folder:
%ProgramFiles(x86)%\uniFLOW Remote Print Server
Windows spool folder:
%SYSTEMROOT%\System32\spool

Installation Manual
8
Database
If you use uniFLOW with an external or existing Microsoft® SQL Server 2005 (SP2),
Microsoft® SQL Server 2008/2012/2016 you have to create the uniFLOW database
before you install uniFLOW and not during the installation procedure of uniFLOW.
Install Service Pack 2 for Microsoft® SQL Server 2005.
The above is also necessary, if you would like to connect uniFLOW to an external
Microsoft® SQL Server 2005, 2008, 2012 or 2016 Express Edition.
You can download the database installation script from: http://www.nt-ware.com/mom/sql/momdb.zip (http://www.nt-ware.com/mom/sql/momdb.zip).
4 IIS Configuration Internet Information Services (IIS) is a web server application and set of feature
extension modules created by Microsoft. Setting up the IIS correctly is imperative to
making sure that things run smoothly on the server.
4.1 Windows Server 2003 If you want to install uniFLOW under Windows Server 2003, first make sure that in the
Internet Information Services (IIS) Manager the following Web Service Extensions are
set to Allowed:
Active Server Pages
All Unknown ISAPI Extensions
Server Side Includes
Installation Manual
9
4.2 Windows Server 2008
Windows Server 2008 R2
From Windows Server 2008 R2 on and higher the below described configuration will automatically be done by the Mom InstallShield Wizard i.e. the uniFLOW installer. Prior to the installation, the Mom InstallShield Wizard checks the IIS configuration. Click on Install to trigger an automatic configuration of the IIS role and the IIS services that are required for a uniFLOW installation.
After the IIS configuration has been completed, the uniFLOW installation can be continued.
Windows Server 2008
Proceed as follows to prepare the Microsoft® Windows Server 2008 IIS7 for the
uniFLOW installation:
1. Open the Server Manager (if not open already) and select Roles from the menu.
2. Go to the Web Server (IIS) role and open the Role Services section.
a. Click Add Role Services to open the Select Role Services window.
b. In the Select Role Services window, configure the following:
Under Web Server:
Under Common HTTP features:
Select HTTP Redirection (all other options are usually installed by
default).
Note that Web-DAV-Publishing is only required in case you want to
use the uniFLOW server as target in a Scan-to-WebDAV environment.
Under Application Development:
Select all features except CGI which is not required.
Under Health and Diagnostics:
Ensure HTTP Logging is selected (this option is usually installed by
default).
Ensure Request Monitor is selected (this option is usually installed by
default).
Security:
Select Basic Authentication.
Select Windows Authentication.
Ensure Request Filtering is selected (this option is usually installed by
default).
Performance:
Ensure Static Content Compression is selected(this option is usually
installed by default).
Under Management Tools:
Installation Manual
10
Ensure IIS Management Console is selected (this option is usually
installed by default).
Ensure IIS Management Scripts and Tools is selected.
Ensure IIS 6 Management Compatibility is selected with all of its
sub-options (these options are usually installed by default).
Click Next to continue (this option is grayed out if you made no changes).
c. In the Confirm Installation Selections window, click Install.
d. In the Installation Progress window, wait for the installation to finish. When
Installation completed appears beside the Web Server (IIS) role, click Close to
finish the installation.
We also recommend to install the Print and Document Services server role.
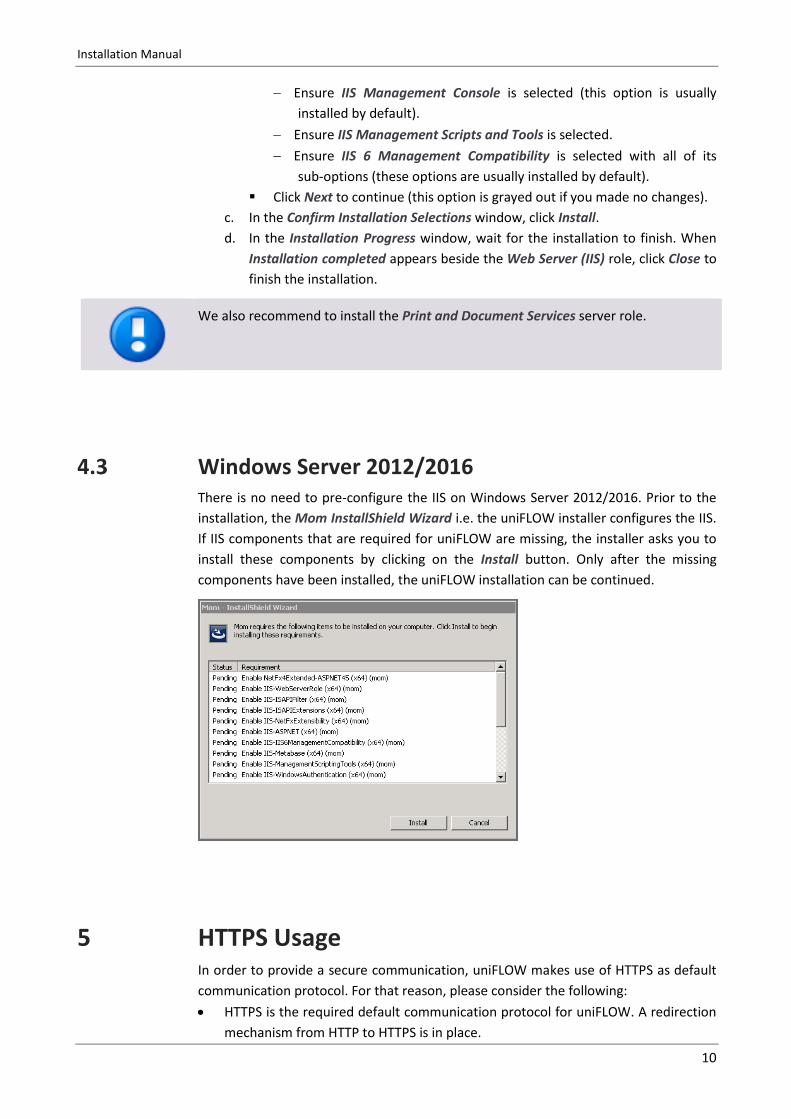
4.3 Windows Server 2012/2016 There is no need to pre-configure the IIS on Windows Server 2012/2016. Prior to the
installation, the Mom InstallShield Wizard i.e. the uniFLOW installer configures the IIS.
If IIS components that are required for uniFLOW are missing, the installer asks you to
install these components by clicking on the Install button. Only after the missing
components have been installed, the uniFLOW installation can be continued.
5 HTTPS Usage In order to provide a secure communication, uniFLOW makes use of HTTPS as default
communication protocol. For that reason, please consider the following:
HTTPS is the required default communication protocol for uniFLOW. A redirection
mechanism from HTTP to HTTPS is in place.

Installation Manual
11
In order to use HTTPS as a communication protocol, a self-signed certificate is
created and installed in the IIS during the installation of uniFLOW. You can replace
the certificate in the IIS afterwards in case a different certificate should be used.
The self-signed certificate is unique to each installation and is valid for 10 years.
Afterwards it needs to be renewed.
We recommend to add this self-signed certificate to the "Trusted Root
Certification Authorities" certificate store, in order to prevent messages like
"There is a problem with this website's security certificate.", when accessing
uniFLOW web pages in a browser (Certificate Installation on Windows (on page
31)). This should be done after the uniFLOW installation.
In case a different certificate shall be used, this has to be manually acquired and
installed in the IIS manager. This may be required for example, if you need a
certificate from a trusted root certification authority. You can get such certificates
for example from VeriSign or others.
In case you need to replace or renew the certificate in the IIS, please refer to the
Microsoft documentation.
For further information about security related settings during the installation
procedure, see chapter uniFLOW and SQL 2008 R2 Express (on page 11).
Updating uniFLOW and HTTPS
In case you want to update uniFLOW using the uniFLOW Update Wizard, please note
that the wizard will not set the "Require Secure Channel" flag in IIS by default.
Otherwise, this would lead to the problem that RPS's and clients which have not yet
been updated are not able to connect to the uniFLOW server anymore. Please refer to
HTTP/HTTPS Communication (on page 46) for details.
For details about upgrading Remote Print Servers, please refer to the respective
subchapter of the uniFLOW Update (on page 43) chapter.
6 uniFLOW and SQL 2008 R2 Express
Windows Firewall
The required Windows Firewall rules are automatically set and configured during the installation. This works as of Windows Server 2008.
When uninstalling the software, these rules are automatically removed.
Run the Mom.Exe application to start the Mom InstallShield Wizard.
In the Choose Setup Language window, select the language for setup.
Installation Manual
12
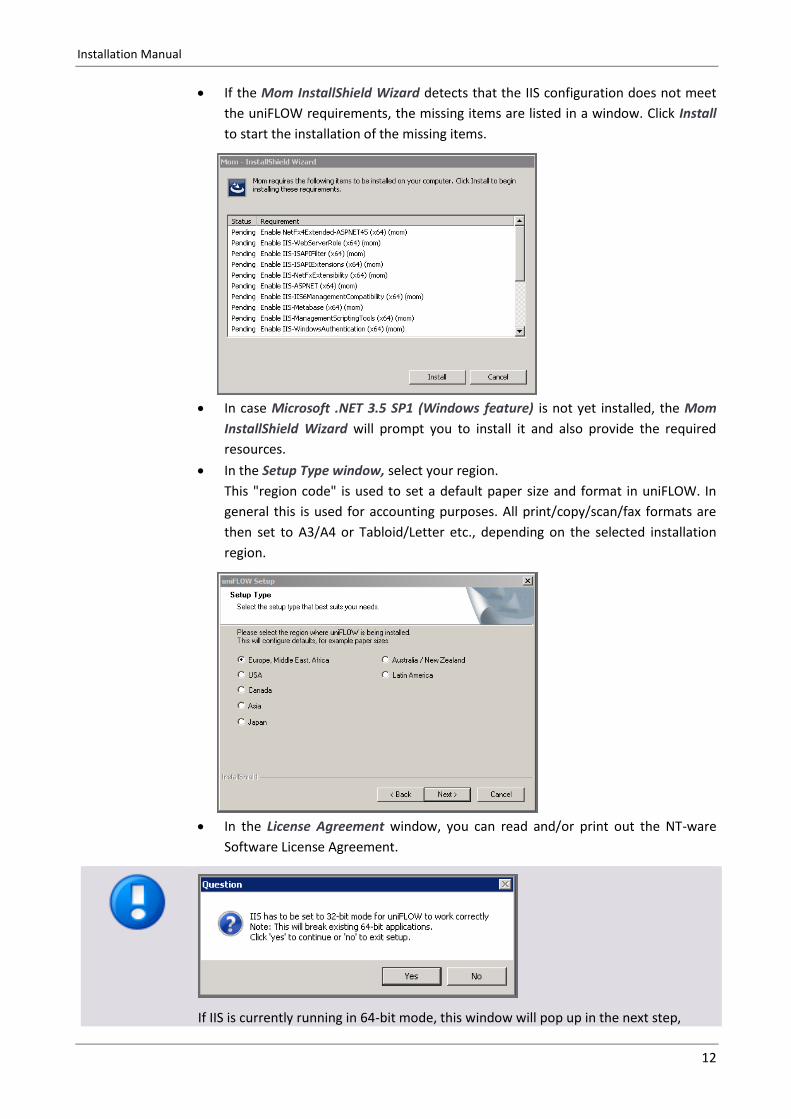
If the Mom InstallShield Wizard detects that the IIS configuration does not meet
the uniFLOW requirements, the missing items are listed in a window. Click Install
to start the installation of the missing items.
In case Microsoft .NET 3.5 SP1 (Windows feature) is not yet installed, the Mom
InstallShield Wizard will prompt you to install it and also provide the required
resources.
In the Setup Type window, select your region.
This "region code" is used to set a default paper size and format in uniFLOW. In
general this is used for accounting purposes. All print/copy/scan/fax formats are
then set to A3/A4 or Tabloid/Letter etc., depending on the selected installation
region.
In the License Agreement window, you can read and/or print out the NT-ware
Software License Agreement.
If IIS is currently running in 64-bit mode, this window will pop up in the next step,

Installation Manual
13
because IIS has to be set to 32-bit mode for uniFLOW to work correctly.
Please choose Yes, if you want uniFLOW setup to automatically set IIS to 32-bit
mode and continue with the installation.
If you choose No, setup will abort without doing anything.
Before clicking Yes, please make sure no other applications requiring IIS in 64-bit mode are running on your system, for setting IIS to 32-bit mode, might break them.
At this stage, the Pre-ReadMe web page will open in your browser, lining out the
steps to carry out before proceeding with the installation.
In the Choose Destination Location window, confirm the installation path, or
select another one.
In the Setup Type window, you can choose one of the following options:
o uniFLOW AND SQL Server 2008 R2 Express
o uniFLOW Only
These different setup types allow you to install uniFLOW with or without the
Microsoft SQL Server.
uniFLOW is based on the Microsoft SQL Server, and is shipped with a license-free
version of the SQL Server, the SQL Server 2008 R2 Express. This database is limited
to 10 GB data and suffices for a normal installation.
For standard installations it is strongly recommended to install uniFLOW AND SQL
2008 R2 Express.
Installation Manual
14
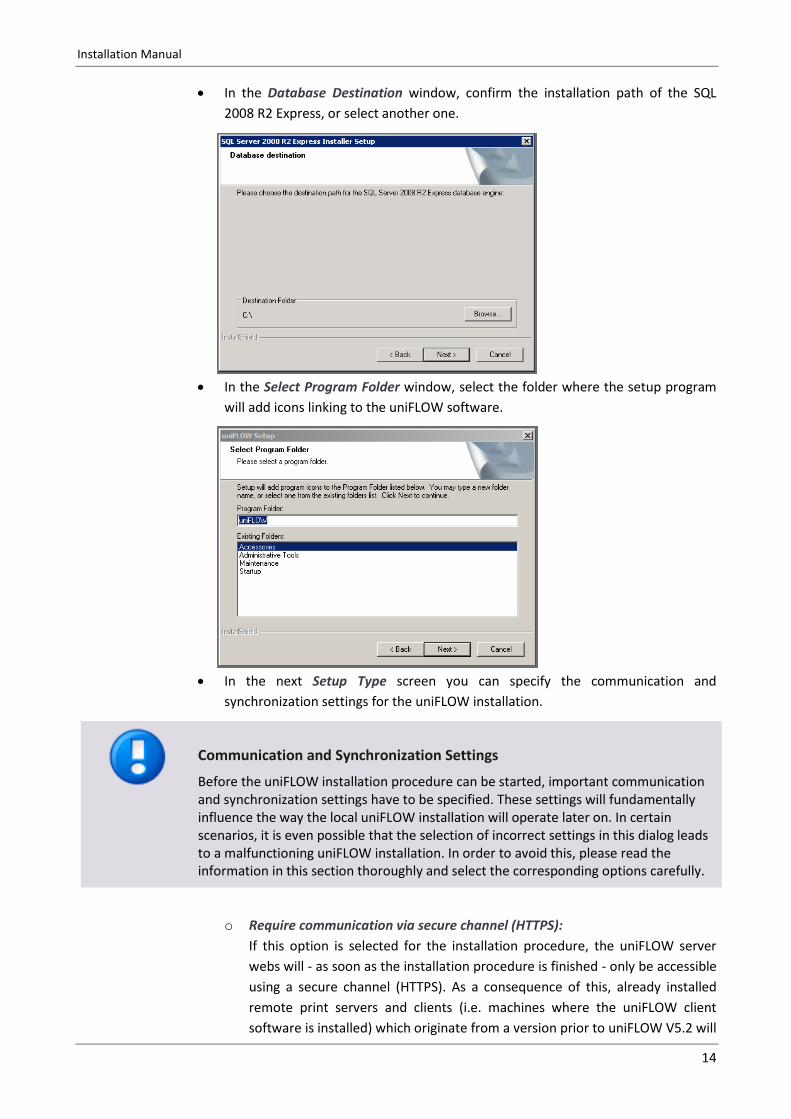
In the Database Destination window, confirm the installation path of the SQL
2008 R2 Express, or select another one.
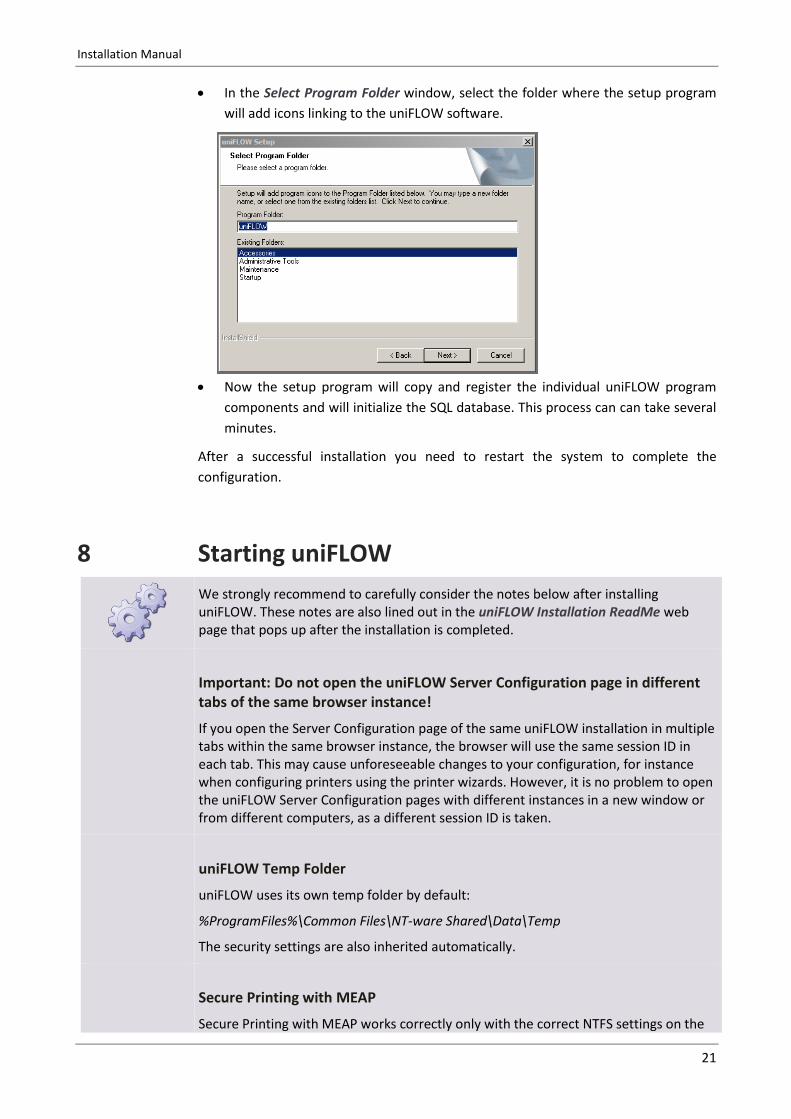
In the Select Program Folder window, select the folder where the setup program
will add icons linking to the uniFLOW software.
In the next Setup Type screen you can specify the communication and
synchronization settings for the uniFLOW installation.
Communication and Synchronization Settings
Before the uniFLOW installation procedure can be started, important communication and synchronization settings have to be specified. These settings will fundamentally influence the way the local uniFLOW installation will operate later on. In certain scenarios, it is even possible that the selection of incorrect settings in this dialog leads to a malfunctioning uniFLOW installation. In order to avoid this, please read the information in this section thoroughly and select the corresponding options carefully.
o Require communication via secure channel (HTTPS):
If this option is selected for the installation procedure, the uniFLOW server
webs will - as soon as the installation procedure is finished - only be accessible
using a secure channel (HTTPS). As a consequence of this, already installed
remote print servers and clients (i.e. machines where the uniFLOW client
software is installed) which originate from a version prior to uniFLOW V5.2 will

Installation Manual
15
not be able to connect to this uniFLOW server any more, as these older
systems can only communicate via HTTP. In order to avoid such
communication problems, only select this option if all remote print servers
and clients which are connected to this uniFLOW server originate from
uniFLOW V5.2 or later.
o Install SSL certificate in IIS:
If this option is selected for the installation procedure, a self-signed SSL
certificate for secure communication will be installed in IIS during the
installation procedure (replacing an existing SSL certificate, if any). In case this
option is deselected but communication via secure channel (HTTPS) is
required, please make sure that an SSL certificate for secure communication is
installed in IIS.
o Require secure RPS synchronization:
In uniFLOW V5.2 and later, the synchronization of connected remote print
servers can be secured with the necessary help of signed communication
packets. With this functionality, the identity of a remote print server is verified
during a synchronization process. Please be aware that this functionality is
completely independent from any HTTPS settings used in an installation. If this
option is selected for the installation procedure, the uniFLOW server will - as
soon as the installation procedure is finished - perform RPS synchronizations
in a secured way, based on signed communication packets. As a consequence
of this, already installed remote print servers which originate from a version
prior to uniFLOW V5.2 will not be able to synchronize correctly with this
uniFLOW server any more. In order to avoid such communication problems,
only select this option if all remote print servers which are connected to this
uniFLOW server originate from uniFLOW V5.2 or later.
In the following Setup Type screen, you can select whether only HTTPS
communication should be allowed for the internal HTTP server.
o Enforce HTTPS for the internal HTTP server:
If this option is selected, only HTTPS requests are allowed for communication
with the internal HTTP server. Please only select this option, if all
communication counterparts are capable of communication via HTTPS.
Installation Manual
16
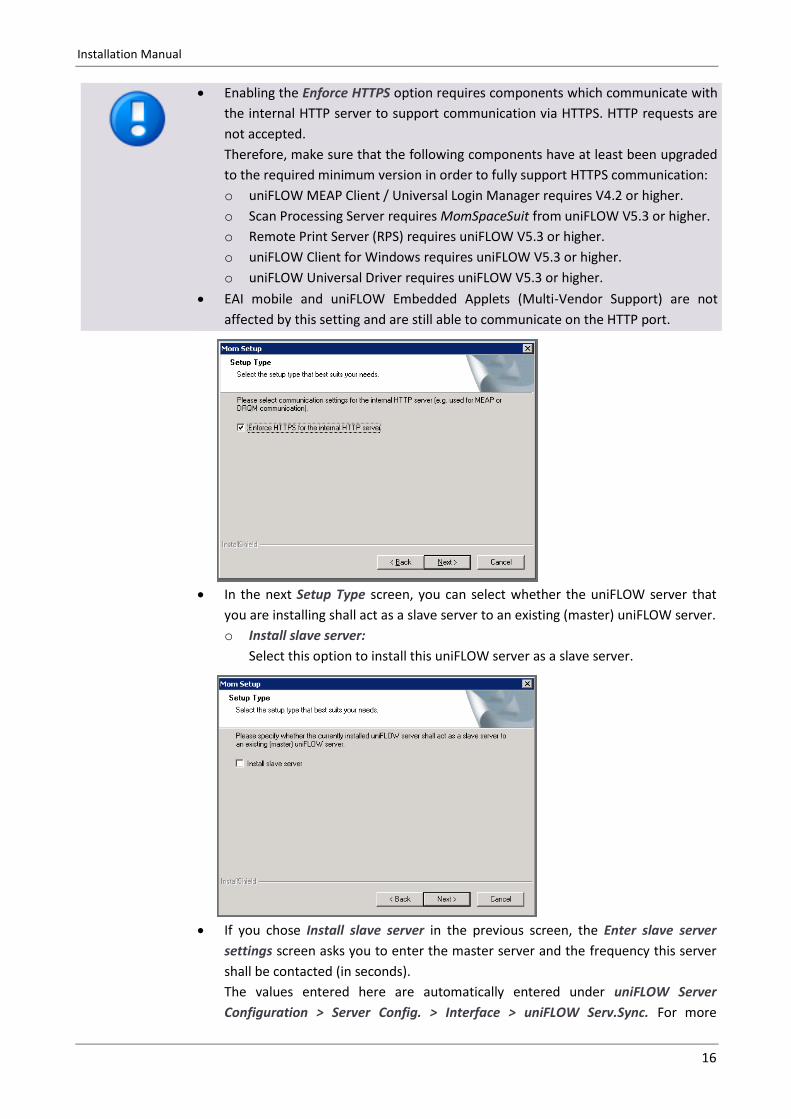
Enabling the Enforce HTTPS option requires components which communicate with
the internal HTTP server to support communication via HTTPS. HTTP requests are
not accepted.
Therefore, make sure that the following components have at least been upgraded
to the required minimum version in order to fully support HTTPS communication:
o uniFLOW MEAP Client / Universal Login Manager requires V4.2 or higher.
o Scan Processing Server requires MomSpaceSuit from uniFLOW V5.3 or higher.
o Remote Print Server (RPS) requires uniFLOW V5.3 or higher.
o uniFLOW Client for Windows requires uniFLOW V5.3 or higher.
o uniFLOW Universal Driver requires uniFLOW V5.3 or higher.
EAI mobile and uniFLOW Embedded Applets (Multi-Vendor Support) are not
affected by this setting and are still able to communicate on the HTTP port.
In the next Setup Type screen, you can select whether the uniFLOW server that
you are installing shall act as a slave server to an existing (master) uniFLOW server.
o Install slave server:
Select this option to install this uniFLOW server as a slave server.
If you chose Install slave server in the previous screen, the Enter slave server
settings screen asks you to enter the master server and the frequency this server
shall be contacted (in seconds).
The values entered here are automatically entered under uniFLOW Server
Configuration > Server Config. > Interface > uniFLOW Serv.Sync. For more

Installation Manual
17
information on uniFLOW master/slave synchronization refer to chapter uniFLOW
Server Synchronization.
Now the setup program will copy and register the individual uniFLOW program
components. This process can take several minutes.
Afterwards, the Microsoft SQL Server 2008 will be installed; this process also can
take several minutes.
After a successful installation you need to restart the system to complete the
configuration.
7 uniFLOW Only (connecting to an existing SQL database)
Requirements
If an existing local or external Microsoft SQL Server is required, ensure that the
System Administrator (SA) account has been created with a password. This
password is mandatory for uniFLOW. If this has not been set up, the uniFLOW
database cannot be created via the uniFLOW setup routine.
On a Microsoft SQL Server 20xx Express installation, ensure that the instance
name is specified as "MSSQLSERVER" and that the TCP/IP protocol is enabled.
Furthermore, make sure that the SQL Server authentication is configured for
"Mixed mode" (Windows Authentication and SQL Server Authentication with
password for the System Administrator (SA) account).
Windows Firewall
The required Windows Firewall rules are automatically set and configured during the installation. This works as of Windows Server 2008.
When uninstalling the software, these rules are automatically removed.

Installation Manual
18
Run the Mom.Exe application to start the Mom InstallShield Wizard.
Please proceed through the installation, until the Setup Type window appears.
If IIS is currently running in 64-bit mode, this window will pop up in the next step, because IIS has to be set to 32-bit mode for uniFLOW to work correctly.
Please choose Yes, if you want uniFLOW setup to automatically set IIS to 32-bit
mode and continue with the installation.
If you choose No, setup will abort without doing anything.
Before clicking Yes, please make sure no other applications requiring IIS in 64-bit mode are running on your system, for setting IIS to 32-bit mode, might break them.
In the Setup Type window, select uniFLOW Only if you want to connect uniFLOW
with an existing local or external SQL Server.
In the next Setup Type select where the database is located.

Installation Manual
19
If you choose External SQL Server on the Network in the previous window, the
SQL Server Name window opens. Enter the IP address or the name of the external
SQL Server and click Next to continue.
The next windows are the same for both connecting to an SQL Server on this
machine or to an external SQL Server on the network.
In the window SQL Server Account Password, please enter the password of the
user "PbaIp" which is used to connect to the database. A preconfigured standard
password appears here by default and only has to be changed, if another
password was chosen in the past.
By clicking on Next, the password and the connection to the SQL Server will be
tested. If the password was correct and the SQL Server initialized properly, the
Select Program Folder will appear . Should this be the case, please go to the last
screenshot of this chapter.
If you entered the wrong password for the user "PbaIP" or the SQL Server you
have specified is not initialized, the Wrong Password or SQL Server uninitialized
window is opened. If you want to try again and enter a different password, please
click Back to return to the previous window. Otherwise, click Next to proceed to
the SQL Server Setup window for initialization.
The SQL Server can be initialized automatically by providing a logon user name
and password that has administrative access to the SQL Server, typically the
System Administrator (SA) account.
Installation Manual
20
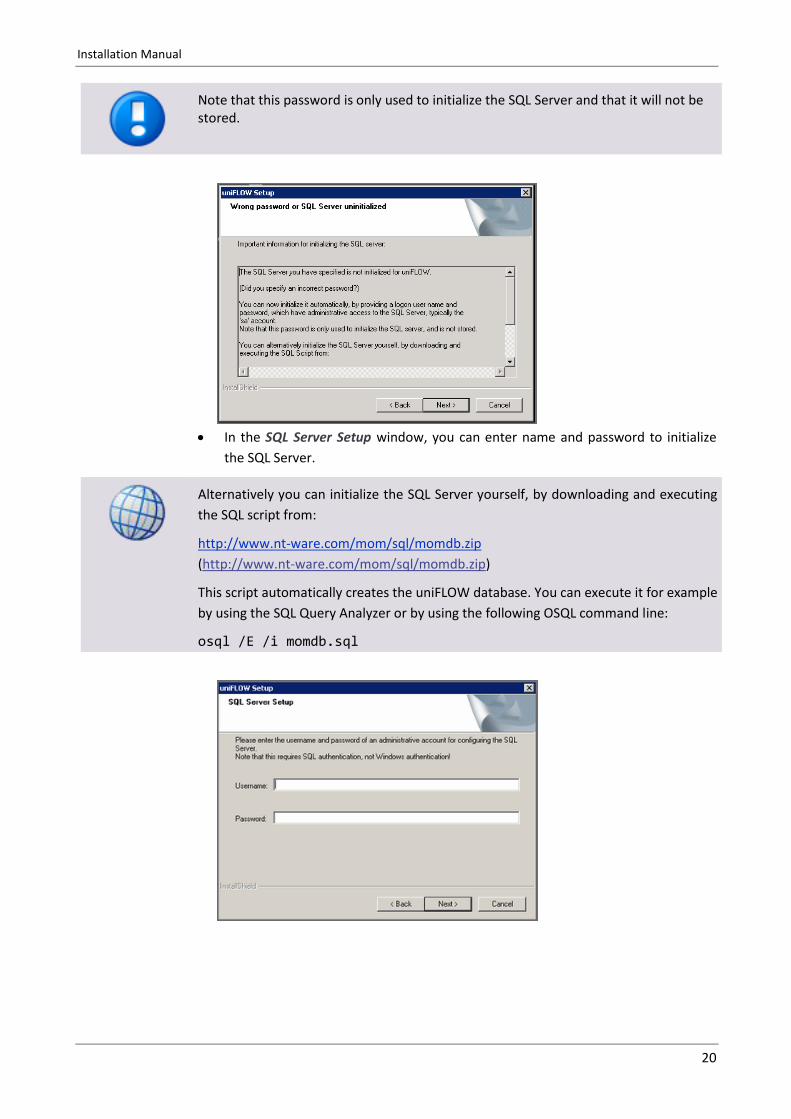
Note that this password is only used to initialize the SQL Server and that it will not be stored.
In the SQL Server Setup window, you can enter name and password to initialize
the SQL Server.
Alternatively you can initialize the SQL Server yourself, by downloading and executing
the SQL script from:
http://www.nt-ware.com/mom/sql/momdb.zip
(http://www.nt-ware.com/mom/sql/momdb.zip)
This script automatically creates the uniFLOW database. You can execute it for example
by using the SQL Query Analyzer or by using the following OSQL command line:
osql /E /i momdb.sql
Installation Manual
21
In the Select Program Folder window, select the folder where the setup program
will add icons linking to the uniFLOW software.
Now the setup program will copy and register the individual uniFLOW program
components and will initialize the SQL database. This process can can take several
minutes.
After a successful installation you need to restart the system to complete the
configuration.
8 Starting uniFLOW
We strongly recommend to carefully consider the notes below after installing uniFLOW. These notes are also lined out in the uniFLOW Installation ReadMe web page that pops up after the installation is completed.
Important: Do not open the uniFLOW Server Configuration page in different tabs of the same browser instance!
If you open the Server Configuration page of the same uniFLOW installation in multiple tabs within the same browser instance, the browser will use the same session ID in each tab. This may cause unforeseeable changes to your configuration, for instance when configuring printers using the printer wizards. However, it is no problem to open the uniFLOW Server Configuration pages with different instances in a new window or from different computers, as a different session ID is taken.
uniFLOW Temp Folder
uniFLOW uses its own temp folder by default:
%ProgramFiles%\Common Files\NT-ware Shared\Data\Temp
The security settings are also inherited automatically.
Secure Printing with MEAP
Secure Printing with MEAP works correctly only with the correct NTFS settings on the
Installation Manual
22
uniFLOW Client Web Interface.
In a default installation the security settings of the folder %ProgramFiles%\uniFLOW\WebClient are inherited by the %systemdrive%. If the uniFLOW server is a Domain Controller, please check if the authenticated users have Read & Execute, List Folder Contents and Read access. If you are installing uniFLOW in another location, the security settings are inherited from the parent folder or parent drive.
User Access Rights
If the uniFLOW server is a stand-alone or a member server, please check if users have Read & Execute, List Folder Contents and Read access. Also, ensure that the IIS security settings for the "pwclient" web site Anonymous Access and Integrated Windows Authentication are checked.
Integration with Therefore
For the integration of uniFLOW with the Therefore™ MFP Connector you may have to manually register the file %CommonFiles%\NT-ware Shared\RSAEncrypt.dll depending on the installed Microsoft.NET Framework version.
To register this file search for regasm.exe (i.e. C:\windows\Microsoft.NET\Framework\v2.0.50727\regasm.exe).
In a command shell call:
C:\windows\Microsoft.NET\Framework\v2.0.50727\regasm.exe "%CommonFiles%\NT-ware Shared\RSAEncrypt.dll"
Integration with Microsoft Exchange Server
For the Workflow Elements Scan To Email and Enter Email Recipients to work correctly when Sending/Searching via Microsoft Exchange Server you have to manually install Microsoft Exchange Server MAPI Client and Collaboration Data Objects 1.2.1
In case you are connecting to Microsoft Exchange from 2007 onwards the following registry key is to be set (note the CDO subkey may need to be created):
Key:
HKEY_LOCAL_MACHINE\SOFTWARE\Microsoft\Windows Messaging
Subsystem\CDO
Value Name:
Ignore No PF
Value Type:
DWORD
Value Data:
1
Download the Microsoft Exchange Server MAPI Client and Collaboration Data Objects
1.2.1 from the Microsoft Download Center:
http://www.microsoft.com/downloads/en/details.aspx?familyid=e17e7f31-079a-43a9-
bff2-0a110307611e&displaylang=en

Installation Manual
23
(http://www.microsoft.com/downloads/en/details.aspx?familyid=e17e7f31-079a-43a9
-bff2-0a110307611e&displaylang=en)
On the Windows desktop you will find several icons linking to the uniFLOW
configuration websites.
If you select the uniFLOW Server Configuration for the very first time, the Internet
Explorer opens with a security message in case you did a fresh installation. This
message informs you about ACL security settings for the uniFLOW Server Configuration
web which are made to secure uniFLOW by default. Refer to chapter Access Control
and ACL Reset Interface (on page 29) for details.
After confirming the Security notes for your new uniFLOW installation message with
OK, the Quick Start page of the Server Configuration opens.
Here you first have to activate your software (see Software Activation (on page 34)).
After that, you can configure all necessary settings and functionalities in the uniFLOW
Server Configuration. The Quick Start page helps you setting up the most important
features in a meaningful order.
8.1 uniFLOW Evaluation Licenses Different uniFLOW evaluation licenses are available for evaluation purposes.
uniFLOW is distributed via Canon Inc. For more information on how to obtain our products in your region, please refer to the Canon contact information page on our website (http://www.nt-ware.com/home/distribution/canon-contact.html).

Installation Manual
24
8.1.1 uniFLOW Demo Mode
For testing purposes you can leave uniFLOW unlicensed and run the software in one of
the following demo modes:
uniFLOW (on page 24) (default)
uniFLOW for SMB (on page 25)
uniFLOW Capture (on page 26)
After 50 jobs (print and/or scan) the uniFLOW Admin Service (uniFLOW Server)
needs to be restarted.
The document output is watermarked.
Change Demo Mode
Go to uniFLOW Server Configuration > Module Config. > Activation.
In section Demo Mode, select the desired uniFLOW Demo Mode:
o uniFLOW
o uniFLOW for SMB
o uniFLOW Capture
Click Change Demo Mode.
8.1.1.1 uniFLOW
The demo mode uniFLOW includes:
uniFLOW base edition functionality.
All optional standard modules.
All additional licenses
o Remote Print Server License
o 1 JCI License
o 2 File Format Conversion Licenses (watermarked)
o 2 PCL Job Conversion Licenses
2 uniFLOW SPP and Scan per Device Licenses for Canon MEAP enabled MFPs
2 uniFLOW SPP Device Licenses for Canon MEAP enabled SFPs
2 Scan Device Licenses for ScanFront
2 Scan Device Licenses for Scan Simulator
2 uniFLOW Device License for ScanFront Network Scanners
2 uniFLOW SPP Device Licenses for Canon CMFPs.
2 uniFLOW SPP Device Licenses for non-Canon MFPs.
Scan volume limited to 5,000 pages per year (if iW SAM or a hotfolder are used)
In total, only 2 of the following licenses can be active at the same time:
MEAP Scan Behavior License
Scan Device License for ScanFront
Scan Device License for Scan Simulator
Installation Manual
25
8.1.1.2 uniFLOW for SMB
The demo mode uniFLOW for SMB includes the following modules/licenses:
Secure Printing
Statistics
2 MEAP Device License
2 MEAP Secure Print Behavior License
2 CMFP Device License
2 Device Upgrade License for MEAP
1 Remote Print Server
1 Job Conversion Instance
2 File Format Conversion License
2 PCL Job Conversion License
2 uniFLOW SPP Device Licenses for Canon MEAP enabled SFPs In addition, the
following modules/licenses can be activated by hand:
2 MEAP Scan Behavior License
2 Scan Device Licenses for ScanFront
2 Scan Device Licenses for Scan Simulator
Rules & Routing
Desktop Accounting
uniFLOW Scan Workflow for ActaNova
uniFLOW Scan Workflow for CMIS
uniFLOW Scan Workflow for ContentServer
uniFLOW Scan Workflow for EasyDocuments
uniFLOW Scan Workflow for FileNet
uniFLOW Scan Workflow for IRISNext
uniFLOW Scan Workflow for ODBC
uniFLOW Scan Workflow for SharePoint
uniFLOW Scan Workflow for Therefore
uniFLOW Scan Workflow for ToolBox
uniFLOW Scan Workflow for iManage Work
Advanced Configuration
2 uniFLOW Device License for ScanFront Network Scanners
5000 Scan Volume / Year (if 2 MEAP Scan Behavior Licenses are activated and if
iW Sam or a hotfolder is used).
Only 2 of the following can be active at the same time:
MEAP Scan Behavior License
Scan Device License for ScanFront
Scan Device License for Scan Simulator
Installation Manual
26
8.1.1.3 uniFLOW Capture
The demo-mode uniFLOW Capture includes the following modules/licenses:
2 MEAP Device License
2 MEAP Scan Behavior License
2 Device Upgrade License for MEAP
1 Remote Print Server
1 Job Conversion Instance
2 File Format Conversion License
2 PCL Job Conversion License
uniFLOW Scan Workflow for ActaNova
uniFLOW Scan Workflow for CMIS
uniFLOW Scan Workflow for ContentServer
uniFLOW Scan Workflow for EasyDocuments
uniFLOW Scan Workflow for FileNet
uniFLOW Scan Workflow for IRISNext
uniFLOW Scan Workflow for ODBC
uniFLOW Scan Workflow for SharePoint
uniFLOW Scan Workflow for Therefore
uniFLOW Scan Workflow for ToolBox
uniFLOW Scan Workflow for iManage Work
5000 Scan Volume / Year if iW Sam or a hotfolder are used.
2 uniFLOW Device License for ScanFront Network Scanners
2 Scan Device Licenses for ScanFront
2 Scan Device Licenses for Scan Simulator
In addition, the following modules/licenses can be activated by hand:
2 MEAP Secure Print Behavior License
2 CMFP Device License
Rules & Routing
Desktop Accounting
Advanced Configuration
Only 2 of the following can be active at the same time:
MEAP Scan Behavior License
Scan Device License for ScanFront
Scan Device License for Scan Simulator

Installation Manual
27
8.1.2 Not-for-Resale License
Not-for-Resale (NFR) Licenses can be ordered for the use in showrooms. The number
of jobs and the running time are unlimited, but each license can only be used by ten
users at a time. Document output is watermarked with this version.
The Not-for-Resale License includes:
1 uniFLOW Workgroup Edition (WE) license
All optional standard modules.
All additional licenses incl.
o 5 Remote Print Server Licenses
o 1 JCI License
o 6 File Format Conversion Licenses (watermarked)
o 6 PCL Job Conversion Licenses
10 uniFLOW SPP per Device Licenses for Canon MEAP enabled MFPs
5 uniFLOW Scan per Device Licenses for Canon MEAP enabled MFPs
5 uniFLOW SPP Device Licenses for Canon MEAP enabled SFPs
5 uniFLOW SPP Device Licenses for Canon CMFPs
5 uniFLOW SPP Device Licenses for non‐Canon MFPs
5 uniFLOW SPP Device Licenses for Océ Large Format Printer Low Volume
5 uniFLOW SPP Device Licenses for Océ Large Format Printer Mid Volume
5 Scan Device Licenses for ScanFront.
5 Scan Device Licenses for Scan Simulator
Scan volume limited to 5,000 pages per year if iW SAM or a hotfolder is used.
The maximum number of NFR licenses that can be activated at a customer is set to 3.
In total, only five of the following licenses can be active at the same time:
MEAP Scan Behavior License
Scan Device License for ScanFront
Scan Device License for Scan Simulator
8.1.3 Trial License
For customer test installations, a package of 10 uniFLOW Trial Licenses of the uniFLOW
Enterprise Edition is available. Trial Licenses expire after 45 days and include:
1 uniFLOW Enterprise Edition (EE) License.
All optional standard modules.
All additional licenses incl.
o 5 Remote Print Server Licenses
o 1 JCI License
o 6 File Format Conversion Licenses (watermarked)
o 6 PCL Job Conversion Licenses
Installation Manual
28
5 uniFLOW SPP Device Licenses for Canon MEAP enabled MFPs
5 uniFLOW Scan per Device Licenses for Canon MEAP-enabled MFPs
5 uniFLOW SPP Device Licenses for Canon MEAP-enabled SFPs
5 uniFLOW SPP Device Licenses for Canon CMFPs
5 uniFLOW SPP Device Licenses for non‐Canon MFPs
5 uniFLOW SPP Device Licenses for Océ Large Format Printer Low Volume
5 uniFLOW SPP Device Licenses for Océ Large Format Printer Mid Volume
5 uniFLOW Scan Device Licenses for ScanFront
5 uniFLOW Scan Device Licenses for Scan Simulator
Scan volume limited to 5,000 pages per year if iW SAM or a hotfolder are used.
The maximum number of trial licenses that can be activated at a customer is set to 3.
In total, only five of the following licenses can be active at the same time:
MEAP Scan Behavior License
Scan Device License for ScanFront
Scan Device License for Scan Simulator
8.1.4 Extended Trial License
The Extended Trial License can be used for 180 days and includes:
1 uniFLOW Enterprise Edition (EE) License
All optional standard module licenses
All additional licenses incl.
o 50 Remote Print Server Licenses
o 2 JCI Licenses
o 51 File Format Conversion Licenses (watermarked)
o 51 PCL Job Conversion Licenses
200 uniFLOW SPP Device Licenses for Canon MEAP enabled MPPs
200 uniFLOW Scan per Device Licenses for Canon MEAP enabled MFPs.
200 uniFLOW SPP Device Licenses for Canon MEAP enabled SFPs.
200 uniFLOW SPP Device Licenses for Canon CMFPs.
200 uniFLOW SPP Device Licenses for non‐Canon MFPs.
5 uniFLOW SPP Device Licenses for Océ Large Format Printer Low Volume
5 uniFLOW SPP Device Licenses for Océ Large Format Printer Mid Volume
200 uniFLOW Scan Device Licenses for ScanFront
200 uniFLOW Scan Device Licenses for Scan Simulator
1 Project Access Pack License.
Scan volume limited to 120,000 pages per year (if iW SAM or a hotfolder are used)
The maximum number of Extended Trial Licenses that can be activated at a customer is set to 3.
In total, only 200 of the following licenses can be active at the same time:
Installation Manual
29
MEAP Scan Behavior License
Scan Device License for ScanFront
Scan Device License for Scan Simulator
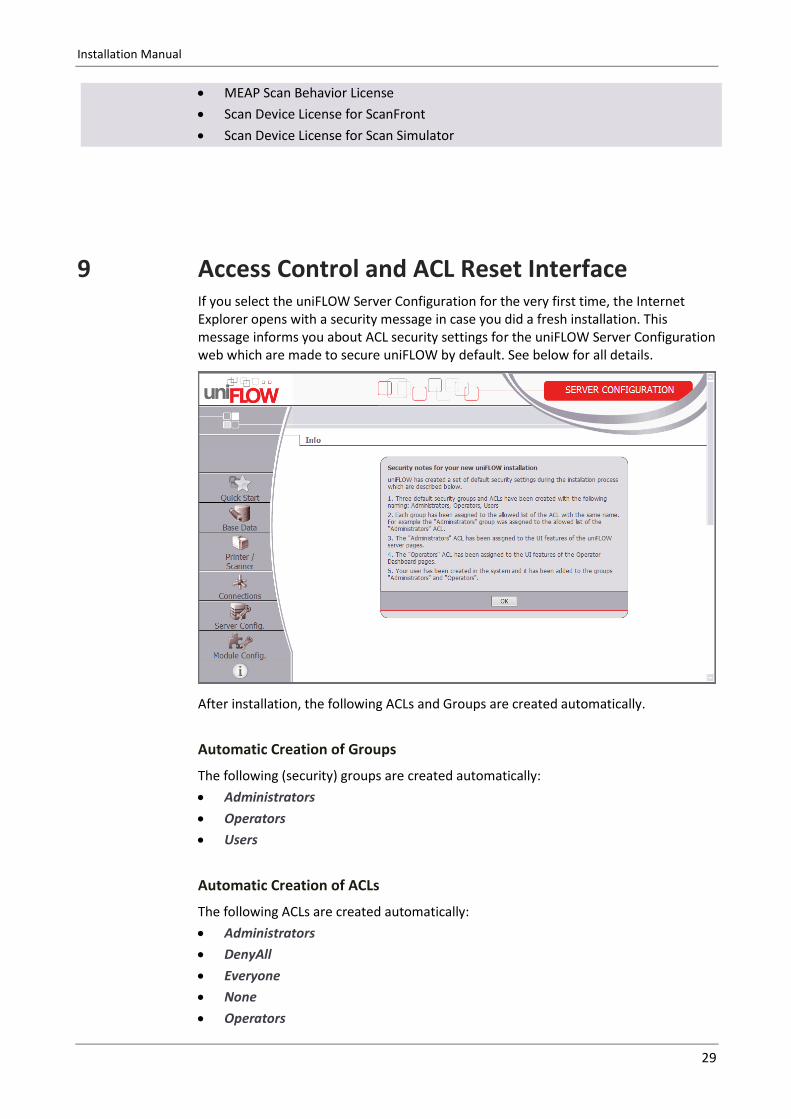
9 Access Control and ACL Reset Interface If you select the uniFLOW Server Configuration for the very first time, the Internet Explorer opens with a security message in case you did a fresh installation. This message informs you about ACL security settings for the uniFLOW Server Configuration web which are made to secure uniFLOW by default. See below for all details.
After installation, the following ACLs and Groups are created automatically.
Automatic Creation of Groups
The following (security) groups are created automatically:
Administrators
Operators
Users
Automatic Creation of ACLs
The following ACLs are created automatically:
Administrators
DenyAll
Everyone
None
Operators

Installation Manual
30
The groups Administrators and Operators will be added to the Access Allowed List of
the ACL with the same name. That is to say the group Administrators will be added to
the Access Allowed List of the ACL called Administrators, and the group Operators will
be added to the Access Allowed List of the ACL called Operators.
The ACL Everyone will be created with the group Everyone in the Access Allowed List.
The pre-configured ACL Everyone allows the access to a feature for everyone.
The ACL Everyone is neither editable, nor can it be added to an Access Denied List.
The pre-configured ACL DenyAll denies the access to all features for everyone.
Features of Automatically Created ACLs
The Administrators ACL will be assigned to the UI features of the uniFLOW server
pages, thus allowing access to the uniFLOW server pages for all users that belong
to the Administrators group.
The user who accesses the uniFLOW Server Configuration website (pwserver) for
the first time will be created in the system and automatically be added to the two
groups Administrators and Operators.
The Operators ACL will be assigned to the UI features of the Operator Dashboard,
thus allowing access to the Operator Dashboard pages for all users that belong to
the Operators group.
If need be, you can change the above mentioned pre-configured ACLs as per your needs.
ACL Reset Interface
In spite of all caution you can unintentionally lock yourself out of the system. In this case you can use the ACL Reset Interface for resetting the ACL system.
The link to this page is: http(s)://<servername>/pwserver/acl_reset.asp
By default, only a dummy page with a message is shown in order to prevent unauthorized access. The real acl_reset.asp is located in the folder C:\Program Files (x86)\Common Files\NT-ware Shared\Scripts and has to be copied to C:\Program Files (x86)\uniFLOW\WebServer before accessing the reset function.
To avoid unauthorized access after a reset, it is advisable to first rename the dummy page before copying the real acl_reset.asp in the above mention folder. That way you can re-activate the dummy page again after a reset by simply renaming it.
In order to come back into the uniFLOW Server Configuration, you can set the feature uniFLOW Server Configuration to - none -.
After saving the settings, you can access the uniFLOW Server Configuration with any account (security risk). Now correct the settings which caused the unintentional lock out and then reconfigure the Access Control under uniFLOW Server Configuration > Access Control > User Interface and set the feature uniFLOW Server Configuration to Administrators (default).

Installation Manual
31
10 Certificate Installation on Windows uniFLOW makes use of HTTPS as default communication protocol. In order to use
HTTPS as a communication protocol, a self-signed certificate is created and installed in
the IIS during the installation of uniFLOW. As this is a self signed certificate generated
by NT-ware and not from a certificate authority such as VeriSign, you will receive a
warning message when opening a uniFLOW website. To overcome this problem, we
recommend to add the self-signed certificate to the "Trusted Root Certification
Authorities" certificate store on each client PC and server which accesses uniFLOW
websites.
For more info about the security certificate, refer to chapter HTTPS Usage (on page
10).
Warning Message
Certificate Installation
1. Open the uniFLOW website by using the server name in the URL. If the server is a
domain member, use the fully-qualified domain name (FQDN).
AS the certificate is bound to the host name of the uniFLOW server,
the certificate installation will not work if you use the server's IP
address.
2. Click on Continue to this website (not recommended).

Installation Manual
32
3. Click on Security report.
4. Click on View certificates.
5. Click on Install Certificate and click Next on the first screen of the Certificate
Import Wizard.
6. Select Place all certificates in the following store.
7. Click on Browse...
Installation Manual
33
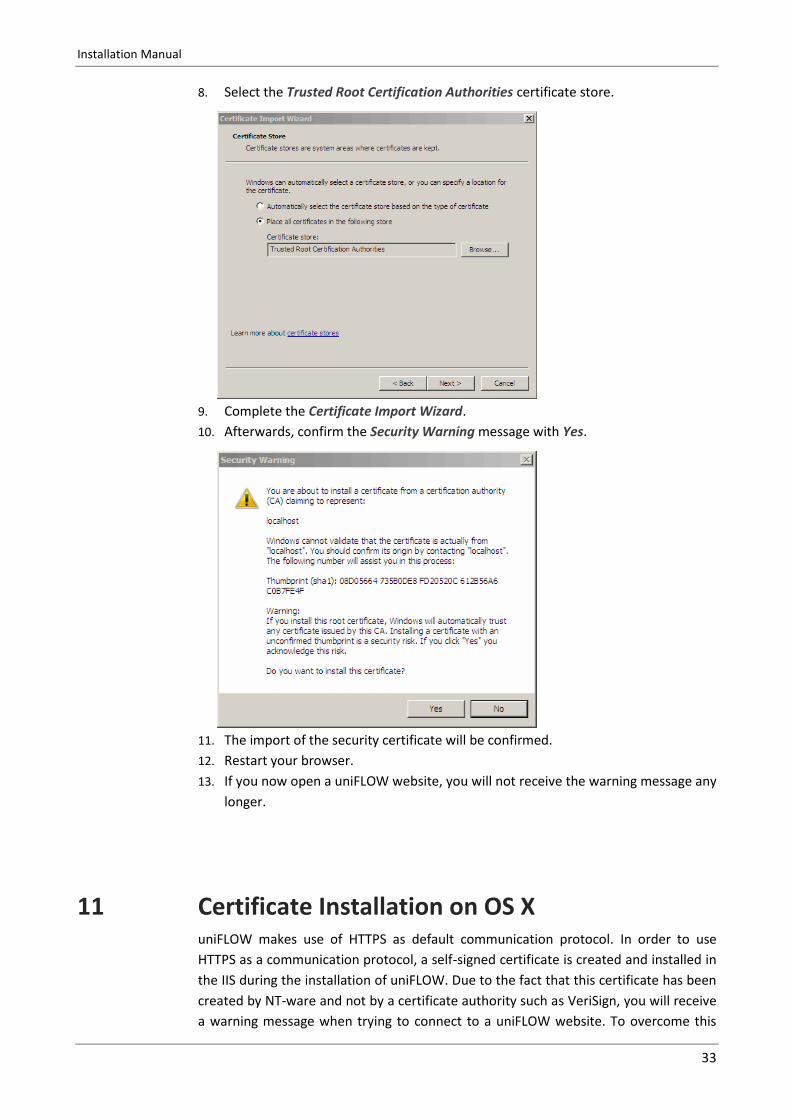
8. Select the Trusted Root Certification Authorities certificate store.
9. Complete the Certificate Import Wizard.
10. Afterwards, confirm the Security Warning message with Yes.
11. The import of the security certificate will be confirmed.
12. Restart your browser.
13. If you now open a uniFLOW website, you will not receive the warning message any
longer.
11 Certificate Installation on OS X uniFLOW makes use of HTTPS as default communication protocol. In order to use
HTTPS as a communication protocol, a self-signed certificate is created and installed in
the IIS during the installation of uniFLOW. Due to the fact that this certificate has been
created by NT-ware and not by a certificate authority such as VeriSign, you will receive
a warning message when trying to connect to a uniFLOW website. To overcome this

Installation Manual
34
problem, we recommend to add the self-signed certificate to the trusted certificates
on your Mac. The following description explains how to add the certificate to the
trusted certificates when using the Safari browser.
Warning message
If the Safari browser displays a warning similar to that in the following screenshot, click
on the Show Certificate button.
Certificate installation
1. Tick the checkbox next to Always trust...
2. Click on Continue.
3. Restart the Safari browser.
4. If you now open a uniFLOW website, no warning message will be shown anymore.
If you need to manipulate a security certificate, or change other security settings use
the Keychain Access application located in the Utilities/Applications folder.
12 Software Activation uniFLOW consists of base editions, optional standard modules and additional licenses.
Modules and licenses can be flexibly combined with the editions to deliver the desired

Installation Manual
35
functionality in one integrated system. This chapter explains the activation of the
respective licenses in uniFLOW.
For a detailed list of all available editions and module licenses, please refer to the uniFLOW Licensing Guide.
After the installation, the software will work without registration in demonstration
mode (after 50 print jobs you will have to restart the services, see uniFLOW Admin
Service). To access the full working version of uniFLOW, you have to activate the
software under uniFLOW Server Configuration > Module Config. > Activation by
means of an activation code. This activation code is a code generated by the NT-ware
licensing portal and is based on the software license code, the system ID of the PC on
which the software is installed and the actual version of the uniFLOW software. To
obtain an activation code, proceed as described in the following.
Activation Order
If you have purchased a uniFLOW base edition (Workgroup-, Business-, Corporate- or
Enterprise Edition) together with one or more uniFLOW modules or licenses, you first
have to activate the uniFLOW base edition and then follow the same procedure for
each module or license separately.
12.1 Automatic 1. To enter the license code, go to uniFLOW Server Configuration > Module Config. >
Activation.
Installation Manual
36
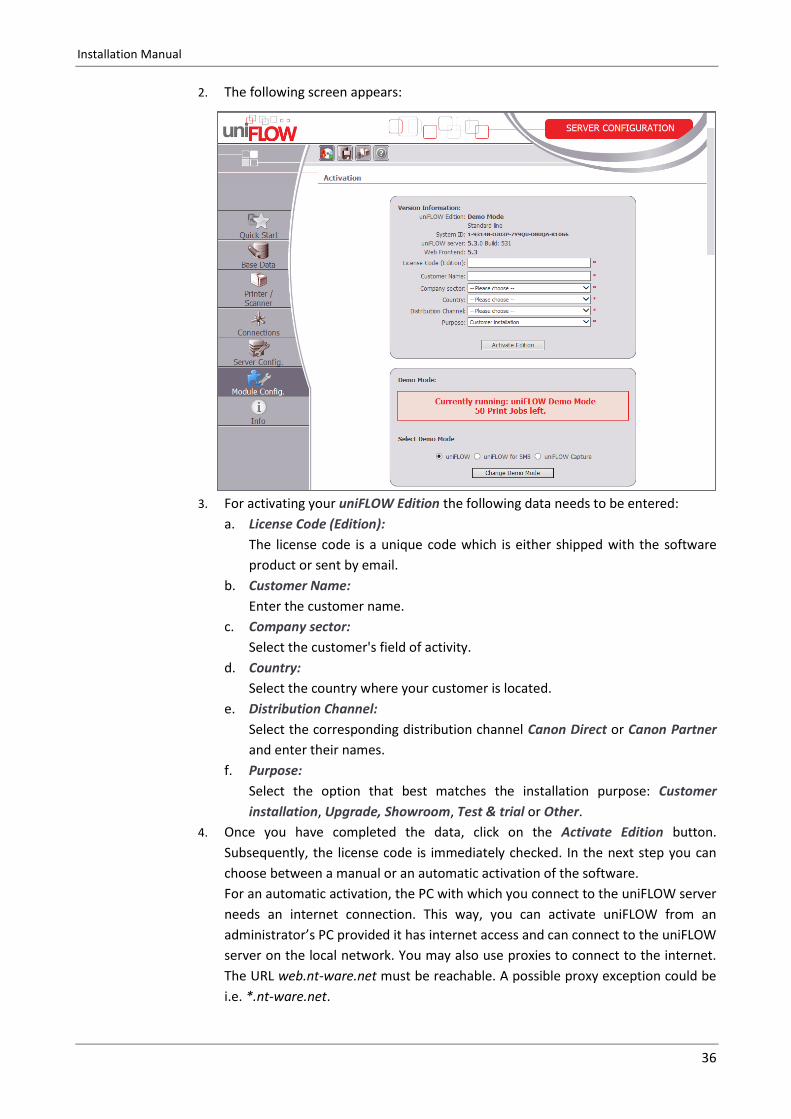
2. The following screen appears:
3. For activating your uniFLOW Edition the following data needs to be entered:
a. License Code (Edition):
The license code is a unique code which is either shipped with the software
product or sent by email.
b. Customer Name:
Enter the customer name.
c. Company sector:
Select the customer's field of activity.
d. Country:
Select the country where your customer is located.
e. Distribution Channel:
Select the corresponding distribution channel Canon Direct or Canon Partner
and enter their names.
f. Purpose:
Select the option that best matches the installation purpose: Customer
installation, Upgrade, Showroom, Test & trial or Other.
4. Once you have completed the data, click on the Activate Edition button.
Subsequently, the license code is immediately checked. In the next step you can
choose between a manual or an automatic activation of the software.
For an automatic activation, the PC with which you connect to the uniFLOW server
needs an internet connection. This way, you can activate uniFLOW from an
administrator’s PC provided it has internet access and can connect to the uniFLOW
server on the local network. You may also use proxies to connect to the internet.
The URL web.nt-ware.net must be reachable. A possible proxy exception could be
i.e. *.nt-ware.net.
Installation Manual
37
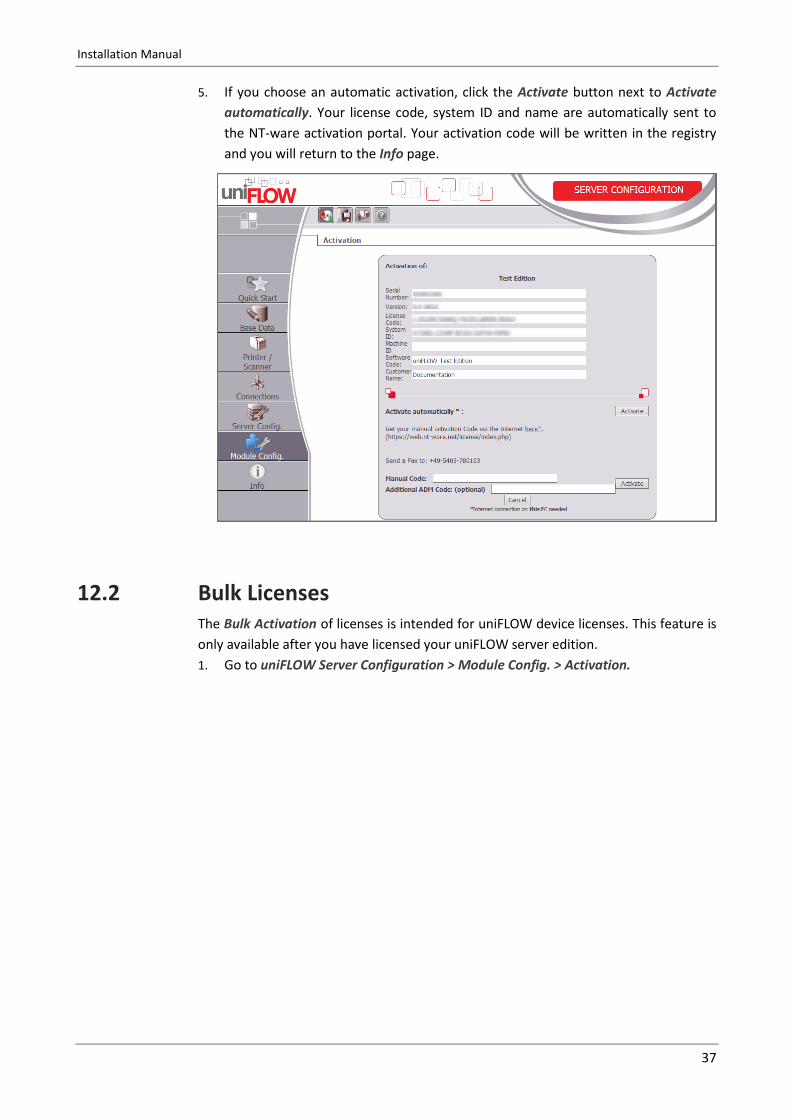
5. If you choose an automatic activation, click the Activate button next to Activate
automatically. Your license code, system ID and name are automatically sent to
the NT-ware activation portal. Your activation code will be written in the registry
and you will return to the Info page.
12.2 Bulk Licenses The Bulk Activation of licenses is intended for uniFLOW device licenses. This feature is
only available after you have licensed your uniFLOW server edition.
1. Go to uniFLOW Server Configuration > Module Config. > Activation.
Installation Manual
38
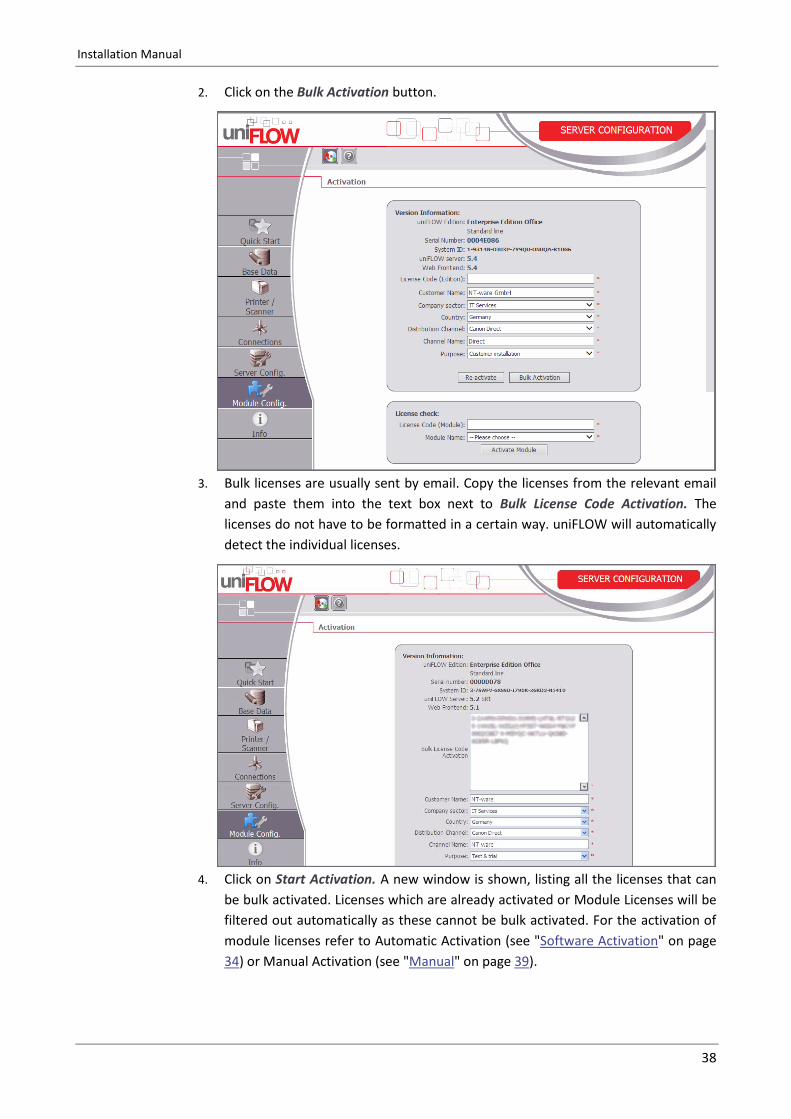
2. Click on the Bulk Activation button.
3. Bulk licenses are usually sent by email. Copy the licenses from the relevant email
and paste them into the text box next to Bulk License Code Activation. The
licenses do not have to be formatted in a certain way. uniFLOW will automatically
detect the individual licenses.
4. Click on Start Activation. A new window is shown, listing all the licenses that can
be bulk activated. Licenses which are already activated or Module Licenses will be
filtered out automatically as these cannot be bulk activated. For the activation of
module licenses refer to Automatic Activation (see "Software Activation" on page
34) or Manual Activation (see "Manual" on page 39).

Installation Manual
39
5. Click on Start Activation. The user interface will inform you about the status of
each license activation. If a license activation fails, you are informed hereof by an
error message.
6. After a successful bulk activation the relevant number of licenses is shown under
Licensed Modules on the start page of the Activation menu.
For a detailed list of all available editions and module licenses, please refer to the NT-ware Licensing Guide which can be found on the NT-ware Partner Site (https://web.nt-ware.net/partner/).
12.3 Manual
A manual software activation is necessary in case the uniFLOW server has no internet access or in case you access the uniFLOW Server Configuration websites using a different computer without internet access.

Installation Manual
40
1. Having clicked Activate Edition in the main screen, you are offered the possibility
to either generate an activation code online or via fax.
2. If you want to use the online possibility, click on here*. Then, your web browser
will open and you will automatically be directed to NT-ware’s licensing website. All
the mandatory fields will already be pre-filled automatically.
3. Click on the Submit button. In the next step you can check your entries. If you click
the Activate button here, the following data is shown:
o Software code
o License code

Installation Manual
41
o Activation code
4. Copy the activation code to your clipboard by clicking the corresponding button or
print this page.
5. Enter the activation code into the Manual Code field on the Activation page.
6. Click the Activate button to finish the software activation process.
Alternative Manual Activation Procedure
Another way to generate an activation code manually consists in opening your browser
and keying in the address of our licensing website:
License Portal (http://lp.nt-ware.net)
The required fields have to be filled in manually. Once you have entered all the
necessary information, click the Submit button. After that, the further activation
procedure is as described above.
If you want to receive your activation code per fax, please send a fax to:
+49-5403-780103.
In the fax, please include the following information:
Serial Number
Version
License Code
System ID
Machine ID
Software Code
Customer Name (please consider NOT using abbreviations or short names)

Installation Manual
42
1. After you have received your activation code, enter it into the Manual Code input
field in the uniFLOW activation screen and click the Activate button to perform
the activation of your software.
2. After the activation you return to the main Info screen.
12.4 Third-Party Software
uniFLOW Server Configuration > Module Config. > Activation
On this page you can also activate third-party software that is automatically installed
with base uniFLOW installs but needs to be registered with NT-ware.
FOXITSDK
FOXITSDK is automatically installed when you install uniFLOW. uniFLOW uses this
software in workflows where file conversion to PDL is required, for instance in Mobile
Print workflows. If you want to use FOXITSDK for file conversion, you should register
the software first. The registration has to be done per each server that uses FOXITSDK.
On pressing the Activate button, the serial no. of your uniFLOW server will be
registered with NT-ware.

Installation Manual
43
Once the activation has been completed, the button text changes to Activated and the
button is greyed-out.
In case you are unsure whether you need file conversion with FOXITSDK in your workflows or you do not need it now but in future, you do not have to activate FOXITSDK now.
All the wizards that include file conversion in their workflows will automatically activate FOXITSDK if it has not been activated on the relevant server yet.
The activation of FOXITSDK for the RPSs is done in uniFLOW Server Configuration > Server Config. > Connections > RPS. In this regard please refer to Connections - RPS in the uniFLOW User Manual. Be aware that you have to activate FOXITSDK on the uniFLOW Server itself as well, in order for you to be able to use all parameters of the Convert PDF to PDL via Foxit Workflow Element in RPS workflows.
At the time of writing FOXIT SDK is the only third-party software that can be activated
here.
For more information on file format conversion please refer to File Format Conversion.
13 uniFLOW Update This chapter describes how to update from an earlier uniFLOW version to uniFLOW
V5.4 and gives important information concerning the limitations of the uniFLOW
Update Wizard. Please read this chapter and all subchapters completely before you
start any update procedure!
Prerequisites
Check whether the system requirements (on page 1) have changed before you
update to the latest version.
Backup your system(s) before you update.
uniFLOW Update Wizard
Th uniFLOW Update Wizard can be used for uniFLOW V5.x.
You can download the newest version of the uniFLOW Update Wizard
(momupdate.exe) in the NT-ware Knowledgebase under uniFLOW and HelixPW
Releases (MOMKB-106 (https://web.nt-ware.net/its/browse/MOMKB-106)).
Please note that registration is required in order to access the NT-ware Knowledgebase. Access to the NT-ware Knowledgebase is limited to trained Canon
Installation Manual
44
personnel only. If you require the above document and you do not have access to the NT-ware Knowledgebase, please contact your Canon partner.
Update Order
We highly recommend updating the uniFLOW server and all Remote Print Servers at the same time. If you have a uniFLOW V5.1 or higher, update the RPS first and the uniFLOW server afterwards. We do not recommend using different versions of the uniFLOW server and the connected Remote Print Servers.
Updating Remote Print Servers at different times is possible but needs a few very
important prerequisites and settings to work. These are explained in the following
subchapters.
Update Versions Overview
uniFLOW/RPS Version Update possibility
V5.1 and higher The uniFLOW Update Wizard can be used. The uniFLOW Update Wizard works with the uniFLOW server and the RPS.
Update RPS V5.1 or Higher (on page 49)
Update uniFLOW V5.1 or Higher (on page 50)
Activate license(s)
V5.0 The uniFLOW Update Wizard can be used only for the uniFLOW server, not for the RPS.
For the RPS, a manual update is possible. For that an uninstallation/installation is required.
Update uniFLOW V5.0 (on page 51)
Activate license(s)
V4.x The uniFLOW Update Wizard cannot be used. However, an update is possible, therefore an uninstallation/installation is required.
Please refer to the respective update white paper Upgrade from uniFLOW V4.0 - V4.1 to uniFLOW V5.4 (MOMKB-827
(https://web.nt-ware.net/its/browse/MOMKB-827)) in the
NT-ware Knowledgebase.
Access to the NT-ware Knowledgebase is limited to trained Canon personnel only. If you require the above document and you do not have access to the NT-ware Knowledgebase, please contact your Canon partner.
Update uniFLOW Older than V5.0 (on page 53)
Update RPS Older than V5.0 (on page 53)
Activate license(s)
V3.x and older The uniFLOW Update Wizard cannot be used.
An uninstallation/installation is required. Note that there is no white paper available. Please contact the NT-ware Support to plan your upgrade.

Installation Manual
45
Cluster installations are different. Please also refer to the respective cluster manual.
13.1 Important Update Considerations
Lock Down the ACL Reset Interface
The chapter Starting uniFLOW (on page 21) covers important security notes for your
new uniFLOW installation. uniFLOW has created a set of default security settings
during the installation process, meaning Access Control Lists are set. However, there is
an ACL Reset Interface in uniFLOW which needs to be locked down via NTFS
permissions. We recommend doing so, right after the installation of uniFLOW.
For details, see Access Control and ACL Reset Interface (on page 29).
Updating uniFLOW and HTTPS
In case you want to update uniFLOW using the uniFLOW Update Wizard, please note
that the wizard will not set the "Require Secure Channel" flag in IIS by default.
Otherwise, this would lead to the problem that RPS's and clients which have not yet
been updated are not able to connect to the uniFLOW server anymore. Please refer to
HTTP/HTTPS Communication (on page 46) for details.
For details about upgrading Remote Print Servers, please refer to the respective
subchapter of the uniFLOW Update (on page 43) chapter.
Uniqueness of Email Addresses
Mobile Printing with uniFLOW is a standard functionality within uniFLOW. As Mobile
Printing requires the uniqueness of email addresses, we recommend setting this up in
uniFLOW. The uniqueness of email addresses is disabled by default for backward
compatibility reasons. For details see Identity Types with Non Unique Values in the
uniFLOW User Manual.
Tweaked Worker Threads
Worker threads allow the various functions within uniFLOW to be processed in
parallel. In the past, the size of the worker thread pools were determined based on a
simple calculation involving the number of CPU cores. The more CPU cores the larger
the worker thread pools. Historically there may have been a requirement to adjust the
size of the automatically determined worker thread pools utilized by the uniFLOW /
Remote Print Server process, for instance in large installations, or in situations where
the uniFLOW process is running on very powerful hardware. Since uniFLOW V5.2,
these settings and tweaks are not necessary anymore as the calculation used to
allocate worker threads is more dynamic and runs constantly. However, if you have

Installation Manual
46
tweaked the worker thread settings of your uniFLOW installation once and it works as
desired, there is no need to change anything, as uniFLOW can continue to use these
settings.
Snapshot Mutation Count
The Snapshot mutation count is configurable in uniFLOW Server Configuration >
Server Config. > General Settings > General > RPS Synchronization Manager, see
chapter RPS Synchronization Manager.
Note that this setting is no longer required with uniFLOW V5.2 and higher. The snapshot threshold is now determined automatically and is based on a calculation. However, the setting is still available for backward compatibility reasons.
In case you have tweaked your system once, you can still use this value with uniFLOW V5.2 if your system runs stable. For fresh installations, there is no need to set this value manually.
If a value is configured, this will become the minimum. Setting this to an excessively high number can have a negative impact.
Database Upgrade
When upgrading from uniFLOW V5.0 to the latest uniFLOW version, the database is updated as well.
Please note that the database update process can take a considerable long time.
As this is dependent on the size of your database, we cannot give an estimation here. Please contact the NT-ware Support Team if you plan to upgrade a bigger installation.
13.2 HTTP/HTTPS Communication Important specifications of communication and synchronization settings during the uniFLOW update procedure:
Before the uniFLOW update procedure can be started, important communication and synchronization settings have to be specified in the uniFLOW Update Wizard. These settings will fundamentally influence the way the local uniFLOW installation will operate later on. In certain scenarios, it is even possible that the selection of incorrect settings in this dialog leads to a malfunctioning uniFLOW installation. In order to avoid this, please read the information in this section thoroughly and select the corresponding options carefully.
Enforce requirement to communicate via secure channel (HTTPS):
If this option is selected for the update procedure, the uniFLOW server webs will -
as soon as the update procedure is finished - only be accessible using a secure
channel (HTTPS). As a consequence of this, already installed remote print servers
and clients (i.e. machines where the uniFLOW client software is installed) which
originate from a version prior to uniFLOW V5.2 will not be able to connect to this
Installation Manual
47
uniFLOW server any more, as these older systems can only communicate via HTTP.
In order to avoid such communication problems, only select this option if all
remote print servers and clients which are connected to this uniFLOW server
originate from uniFLOW V5.2 or later.
Enforce HTTPS communication for the internal HTTP server:
If this option is selected for the update procedure, the internal HTTP server of
uniFLOW/RPS will only allow communication via HTTPS. HTTP requests will not be
accepted. Activating this function will automatically select the option Enforce
requirement to communicate via secure channel (HTTPS) if it has not been
selected and OK is clicked.
Enabling the Enforce HTTPS option requires components which communicate with
the internal HTTP server to support communication via HTTPS. HTTP requests are
not accepted.
Therefore, make sure that the following components have at least been upgraded
to the required minimum version in order to fully support HTTPS communication:
o uniFLOW MEAP Client / Universal Login Manager requires V4.2 or higher.
o Scan Processing Server requires MomSpaceSuit from uniFLOW V5.3 or higher.
o Remote Print Server (RPS) requires uniFLOW V5.3 or higher.
o uniFLOW Client for Windows requires uniFLOW V5.3 or higher.
o uniFLOW Universal Driver requires uniFLOW V5.3 or higher.
EAI mobile and uniFLOW Embedded Applets (Multi-Vendor Support) are not
affected by this setting and are still able to communicate on the HTTP port.
Install SSL certificate in IIS:
If this option is selected for the update procedure, a self-signed SSL certificate for
secure communication will be installed in IIS during the update procedure
(replacing an existing SSL certificate, if any). Please only select this option if
communication via secure channel (HTTPS) is required and additionally there is
either no SSL certificate installed in IIS or the SSL certificate which is currently
installed in IIS can be replaced.

Installation Manual
48
Enforce RPS synchronization compatibility mode:
In uniFLOW V5.2 and later, the synchronization of connected Remote Print Servers
can be secured with the necessary help of signed communication packets. With
this functionality, the identity of a Remote Print Server is verified during a
synchronization process. Please be aware that this functionality is completely
independent from any HTTPS settings used in an installation. If this option is
deselected for the update procedure, the uniFLOW server will - as soon as the
update procedure is finished - perform RPS synchronizations in a secured way,
based on signed communication packets. As a consequence of this, already
installed Remote Print Servers which originate from a version prior to uniFLOW
V5.2 will not be able to synchronize correctly with this uniFLOW server any more.
In order to avoid such communication problems, only deselect this option if all
Remote Print Servers which are connected to this uniFLOW server originate from
uniFLOW V5.2 or later.
Learn more about uniFLOW and the usage of HTTPS in chapter HTTPS Usage (on page 10).
Installation Manual
49
Disable Enforce HTTPS
In case you have unintentionally enabled the Enforce HTTPS option, please refer to the white paper Escalation Requirements uniFLOW (MOMKB-245 (https://web.nt-ware.net/its/browse/MOMKB-245)) in the NT-ware Knowledgebase for information on disabling this option.
Please note that registration is required in order to access the NT-ware Knowledgebase. Access to the NT-ware Knowledgebase is limited to trained Canon personnel only. If you require the above document and you do not have access to the NT-ware Knowledgebase, please contact your Canon partner.
13.3 RPS V5.1 or Higher The following RPS update procedure is valid for RPS versions starting from V5.1,
meaning the uniFLOW Update Wizard has been designed to support an update from
V5.1 or higher.
If you have no RPS running in your installation, you can skip this chapter. To update the
uniFLOW server, go to chapter uniFLOW V5.1 or Higher (on page 50).
With the uniFLOW Update Wizard, there is no need to uninstall the previous version
and manually reinstall a later version. Everything is automatically taken care of by the
uniFLOW Update Wizard.
The uniFLOW Update Wizard works with the uniFLOW server and RPS. The uniFLOW
Update Wizard automatically detects whether the locally installed software is an RPS
installation or a uniFLOW server installation. In both cases the software will be
updated accordingly.
The uniFLOW Update Wizard is available alongside the normal installation package for
each uniFLOW version – they both ship with any new software version and are also
available on the normal download sites – so you can choose, whether you want to do a
new installation or update an existing uniFLOW version with the uniFLOW Update
Wizard.
We highly recommend to update all attached RPSs at the same time and before you update the uniFLOW server.
In case this is not possible, an environment which includes older RPSs (since V5.1) will still work, as long as you do not use any of the new features of the uniFLOW server.
Please note that NT-ware cannot provide any hotfixes for environments where components are not yet on the same versioning level.
Recommended Update Procedure for RPSs
1. Disable the Resource Management on the uniFLOW server, see chapter Disabling
the Resource Management in the uniFLOW User Manual.
Installation Manual
50
2. Make no changes on the uniFLOW Server Configuration until all RPSs are updated.
Note that changing the settings might lead to a malfunction of not yet updated
RPSs.
3. Do not update any MEAP applet until all RPSs are updated.
4. Update all RPSs to V5.4. Use the uniFLOW Update Wizard to update the RPSs.
The uniFLOW Update Wizard requires local administrative rights.
Do not run the uniFLOW Update Wizard with lower privileges.
5. Update the uniFLOW server, see chapter uniFLOW V5.1 or Higher (on page 50).
6. Enable the Resource Management on the uniFLOW server.
7. Restart the uniFLOW server.
8. Update other components, such as the uniFLOW Clients and MEAP applets etc.
9. Proceed configuring the uniFLOW server.
13.4 uniFLOW V5.1 or Higher You can easily update your uniFLOW version from V5.1 onwards to the latest version
by means of the uniFLOW Update Wizard. With the uniFLOW Update Wizard there is
no need to uninstall the previous version and manually reinstall a later version.
Everything is automatically taken care of by the uniFLOW Update Wizard.
The uniFLOW Update Wizard works with the uniFLOW server and RPS. The uniFLOW
Update Wizard automatically detects whether the locally installed software is an RPS
installation or a uniFLOW server installation. In both cases the software is updated
accordingly.
The uniFLOW Update Wizard is available alongside the normal installation package for
each uniFLOW version – they both ship with any new software version and are also
available on the normal download sites – so you can choose, whether you want to do a
new installation or update an existing uniFLOW version with the uniFLOW Update
Wizard.
In environments with RPSs it is recommended to update the RPSs first and then the
uniFLOW server, see chapter RPS V5.1 or Higher (on page 49).
The uniFLOW Update Wizard requires local administrative rights. Do not run the
uniFLOW Update Wizard with lower privileges.
For security reasons, a backup of all affected files is made before the update
starts. Therefore, at least one gigabyte of free hard disk space is necessary in order
to be able to perform an update.
With regards to updating server cluster installations, please note that it is not
possible to use the uniFLOW Update Wizard here. An update to a later version has
to be performed manually. In case the update of a server cluster installation is
attempted with the uniFLOW Update Wizard, the software terminates with a
corresponding warning message.
When upgrading from uniFLOW V5.0 to the latest uniFLOW version, the database is updated as well.
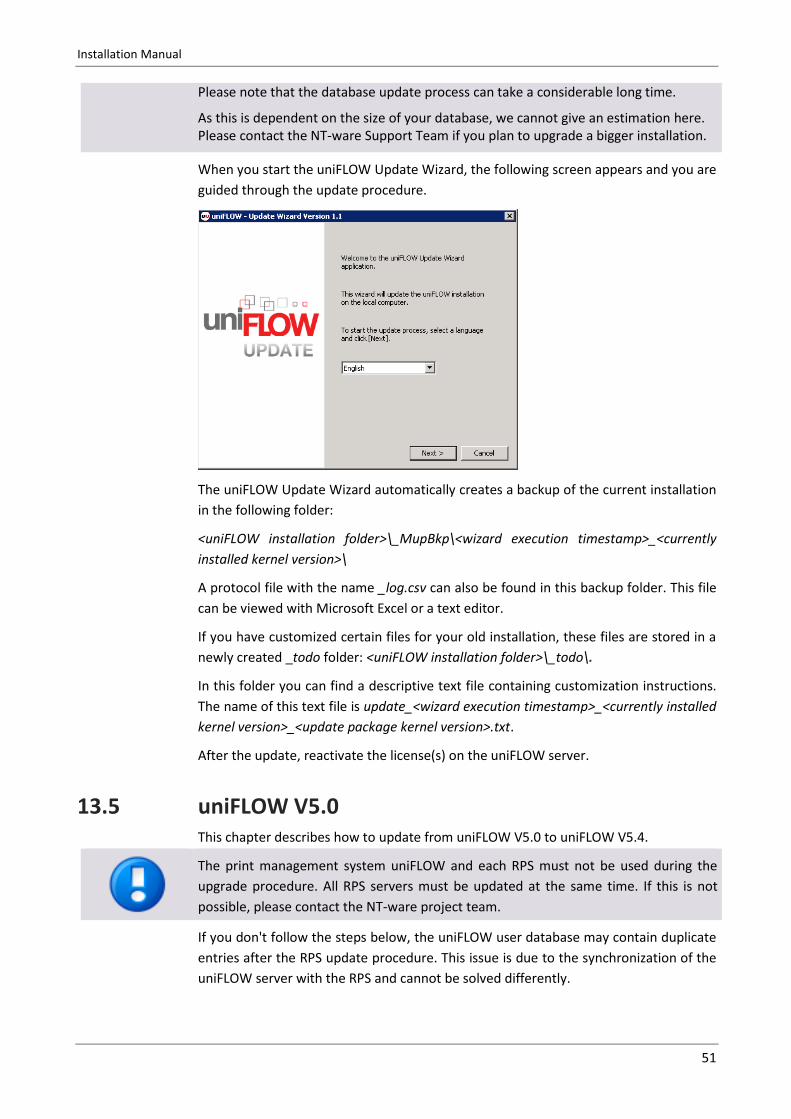
Installation Manual
51
Please note that the database update process can take a considerable long time.
As this is dependent on the size of your database, we cannot give an estimation here. Please contact the NT-ware Support Team if you plan to upgrade a bigger installation.
When you start the uniFLOW Update Wizard, the following screen appears and you are
guided through the update procedure.
The uniFLOW Update Wizard automatically creates a backup of the current installation
in the following folder:
<uniFLOW installation folder>\_MupBkp\<wizard execution timestamp>_<currently
installed kernel version>\
A protocol file with the name _log.csv can also be found in this backup folder. This file
can be viewed with Microsoft Excel or a text editor.
If you have customized certain files for your old installation, these files are stored in a
newly created _todo folder: <uniFLOW installation folder>\_todo\.
In this folder you can find a descriptive text file containing customization instructions.
The name of this text file is update_<wizard execution timestamp>_<currently installed
kernel version>_<update package kernel version>.txt.
After the update, reactivate the license(s) on the uniFLOW server.
13.5 uniFLOW V5.0 This chapter describes how to update from uniFLOW V5.0 to uniFLOW V5.4.
The print management system uniFLOW and each RPS must not be used during the
upgrade procedure. All RPS servers must be updated at the same time. If this is not
possible, please contact the NT-ware project team.
If you don't follow the steps below, the uniFLOW user database may contain duplicate
entries after the RPS update procedure. This issue is due to the synchronization of the
uniFLOW server with the RPS and cannot be solved differently.

Installation Manual
52
Prerequisites
These changes have to be made in the existing installation before the upgrade!
1. Disable LDAP tasks (do not let them run automatically).
2. Set uniFLOW Server Configuration > Server Config. > Interface > User
Identification > Login Name Handling to: non-ascii characters will not be
replaced
Update Procedure
1. Update the uniFLOW server using the MomUpdate.exe.
The uniFLOW Update Wizard requires local administrative rights.
Do not run the uniFLOW Update Wizard with lower privileges.
After the restart of the uniFLOW server the conversion of legacy
properties to multiple identities is processed which may take a
while. Please do not shut down the uniFLOW services during this
process. Check the techsupportlog for the following entry to ensure
the process has finished successfully: Synchronization: Snapshot
file creation finished. Check that the timestamp is 'now'.
2. Reactivate the license(s) on the uniFLOW server.
3. Set all LDAP Import Tasks to Never (note the original value).
4. Stop the uniFLOW services using the uniFLOW Admin Service (uniFLOW Server).
5. Adhere to the white paper Upgrade from uniFLOW V4.0 - V4.1 to V5.4 that can be
found in the NT-ware Knowledgebase in order to back-up all data on the RPS(s),
including CPCA time stamps. You will need the CPCA time stamps for restoring
later.
Please note that registration is required in order to access the NT-ware
Knowledgebase. Access to the NT-ware Knowledgebase is limited to trained Canon
personnel only. If you require the above document and you do not have access to
the NT-ware Knowledgebase, please contact your Canon partner.
6. Uninstall the RPS (on each RPS).
7. Delete the Objectspace.db file on the RPS.
The file is located on the Remote Print Server's harddisk under:
o x32 Bit System: C:\Program Files\uniFLOW Remote Print Server\Data\
o x64 Bit System: C:\Program Files (x86)\uniFLOW Remote Print Server\Data\
8. Install the RPS by executing the MomAps.exe on the RPS.
9. Before you restart the RPS, restore the CPCA time stamps.
10. Repeat steps 4. to 8. on each RPS.
11. Start the uniFLOW services using the uniFLOW Admin Service.
12. After the RPS is synchronized, restart the RPS (on each RPS).
13. Set all LDAP Import Tasks back to the original value.
The transfer of the first snapshot from the uniFLOW server to the RPS may take
some time. Please allow the process to finish and to not abort/restart any services
or server. Once the process is finished the RPS Data folder will not contain any
more OS_{GUID}.BIN files.
The last RPS restart ensures that any settings that are only taking into account
when the service is started, are indeed taken into account.

Installation Manual
53
When upgrading from uniFLOW V5.0 to the latest uniFLOW version, the database
is updated as well. Please note that the database update process can take a
considerable long time. As this is dependent on the size of your database, we
cannot give an estimation here. Please contact the NT-ware Support Team if you
plan to upgrade a bigger installation.
13.6 uniFLOW Older than V5.0 uniFLOW versions older than V5.0 cannot be updated with the uniFLOW Update Wizard. If you want to update from a version older than V5.0, we recommend to uninstall uniFLOW and to install V5.4 afterwards. This is due to the new workflow engine that has been introduced with uniFLOW V5.0.
After the uninstallation and the installation of the new version a server restart is
mandatory. As you will also lose all active print jobs in the system, it is highly
recommended to plan the upgrade procedure accordingly.
For more information, please refer to the white paper Upgrade from uniFLOW V4.0 - V4.1 to uniFLOW V5.4 (MOMKB-827 (https://web.nt-ware.net/its/browse/MOMKB-827)) in the NT-ware Knowledgebase.
Please note that registration is required in order to access the NT-ware Knowledgebase. Access to the NT-ware Knowledgebase is limited to trained Canon personnel only. If you require the above document and you do not have access to the NT-ware Knowledgebase, please contact your Canon partner.
13.7 RPS Older than V5.0 RPS versions older than V5.0 cannot be updated with the uniFLOW Update Wizard.
However, a manual update is possible.
For more information, please refer to the white paper Upgrade from uniFLOW V4.0 - V4.1 to uniFLOW V5.4 (MOMKB-827 (https://web.nt-ware.net/its/browse/MOMKB-827)) in the NT-ware Knowledgebase.
Please note that registration is required in order to access the NT-ware Knowledgebase. Access to the NT-ware Knowledgebase is limited to trained Canon personnel only. If you require the above document and you do not have access to the NT-ware Knowledgebase, please contact your Canon partner.
RPS versions older than V4.0 cannot be updated.

Installation Manual
54
13.8 uniFLOW Clients for Windows and Mac When upgrading to uniFLOW V5.4, it is not mandatory to update all uniFLOW Clients for Windows or Mac, although they communicate via HTTP only. As stated above, the uniFLOW Update Wizard will install a certificate to enable a communication via HTTPS, but does not enable the "Require Secure Channel" flag in the IIS. This makes a communication via HTTP and HTTPS possible. This means that in case you have upgraded uniFLOW, all old uniFLOW Clients for Windows and Mac will still work, although they still communicate via HTTP. In case a secure communication is required, you can upgrade all clients to the new version which communicates via HTTPS by default with a fall-back to HTTP in case they are connected to an RPS. Uninstall the old client before you start installing the new client.
The new uniFLOW Client for Windows and the uniFLOW Client for Mac automatically
check whether uniFLOW web pages can be accessed via HTTP or HTTPS.
13.9 Scan Processing Server If you update your uniFLOW server or RPS running momupdate.exe, the Scan
Processing Server (MomSpaceSuit) will automatically be updated as well.
In case your Scan Processing Server is installed on a different server, you can run
momupdate.exe on this server as well.
See also chapter Scan Processing Server in the uniFLOW User Manual.
13.10 Update to uniFLOW V5.4 while adding Advanced Device Management (ADM) uniFLOW V5.4 ships with the module Advanced Device Management (ADM) / SiteAudit. For the advanced monitoring of third party devices that is part of the ADM module, uniFLOW makes use of an integration with the SiteAudit software. As SiteAudit requires its own database and installation routine, the uniFLOW Update Wizard (MomUpdate.exe) cannot be used. It is of particular importance that you follow the steps below in case you want to update from a former uniFLOW version and want to use the ADM Module.
If you want to upgrade from uniFLOW V5.x and you don't need the ADM module in your new installation you can use the uniFLOW Update Wizard to upgrade to uniFLOW V5.4 (see above).
In case you need the ADM module, please upgrade as described in the following:
Uninstall uniFLOW.
Restart your server.
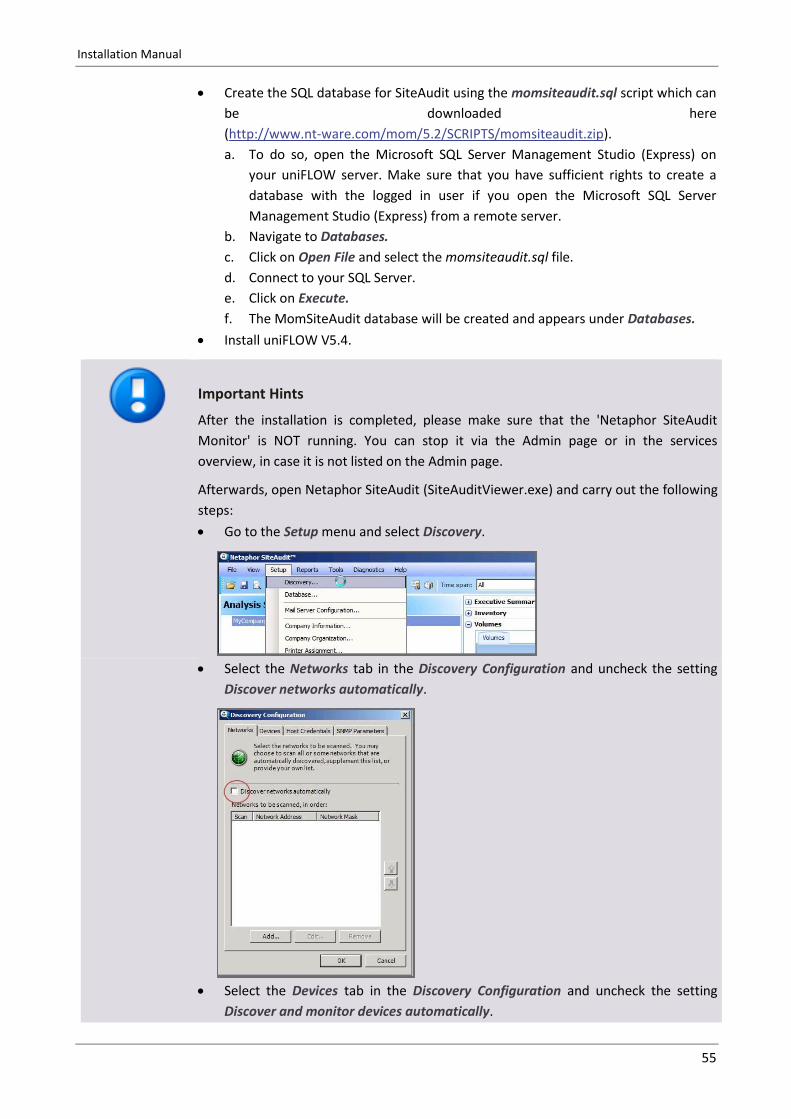
Installation Manual
55
Create the SQL database for SiteAudit using the momsiteaudit.sql script which can
be downloaded here
(http://www.nt-ware.com/mom/5.2/SCRIPTS/momsiteaudit.zip).
a. To do so, open the Microsoft SQL Server Management Studio (Express) on
your uniFLOW server. Make sure that you have sufficient rights to create a
database with the logged in user if you open the Microsoft SQL Server
Management Studio (Express) from a remote server.
b. Navigate to Databases.
c. Click on Open File and select the momsiteaudit.sql file.
d. Connect to your SQL Server.
e. Click on Execute.
f. The MomSiteAudit database will be created and appears under Databases.
Install uniFLOW V5.4.
Important Hints
After the installation is completed, please make sure that the 'Netaphor SiteAudit
Monitor' is NOT running. You can stop it via the Admin page or in the services
overview, in case it is not listed on the Admin page.
Afterwards, open Netaphor SiteAudit (SiteAuditViewer.exe) and carry out the following
steps:
Go to the Setup menu and select Discovery.
Select the Networks tab in the Discovery Configuration and uncheck the setting
Discover networks automatically.
Select the Devices tab in the Discovery Configuration and uncheck the setting
Discover and monitor devices automatically.

Installation Manual
56
When the discovery has already started, because the Netaphor SiteAudit Monitor
was not stopped early enough, you will see printers in the SiteAudit Viewer that
should not be monitored. In this case you might need to delete and recreate the
SiteAudit DB again.
Even if you discard all the collected statistics, the information on already
discovered printers will stay in the database and block the corresponding number
of licenses for printers that should actually be monitored.
Select the Host Credentials tab in the Discovery Configuration and uncheck the
setting Discover and monitor direct-connected devices.
Restart your server
For more information about the ADM module, refer to the chapter Advanced Device Management in the uniFLOW User Manual.

Installation Manual
57
14 uniFLOW SSP to uniFLOW Upgrade This chapter describes how to upgrade from uniFLOW Serverless Secure Printing
(uniFLOW SSP) to uniFLOW V5.x.
14.1 MEAP Devices The upgrade procedure can be split into two steps, the uninstallation of uniFLOW SSP
and the installation of the uniFLOW server.
uniFLOW SSP Uninstallation
SSP PC Client:
Uninstall the uniFLOW SSP PC client from all workstations.
SSP Licenses:
Leave the MEAP applets untouched on each Canon device. The “old” MEAP applet
licenses you have used with uniFLOW SSP can be used in uniFLOW without any
further licensing procedures.
After the installation of uniFLOW has been done, a maximum of five uniFLOW SSP
device licenses can be activated in uniFLOW.
If you use MiCard HID readers in uniFLOW, make sure to enable the Use extended Card
Format.
You find this option on the MEAP Configuration website. Therefore click on in the
ID-Device column on the uniFLOW Server Configuration > Connections > MEAP &
miniMIND > List View page. In the pop-up window click on config - behind Connected
ID Module.
The reason for this is that devices configured with SSP use the extended Card Format.
You need to enable this setting in order to make the new machines compatible in an -
already set up - environment.
uniFLOW Installation
Install the uniFLOW server.
Once uniFLOW has been installed, you can start configuring the secure print
workflows and printers.
The maximum number of former MEAP applet licenses with SSP is five. Up to five
MEAP applets can be used within uniFLOW.
MEAP licenses are not shown on the uniFLOW Info page.
For each additional MEAP enabled Canon device, you will need a separate MEAP
license.
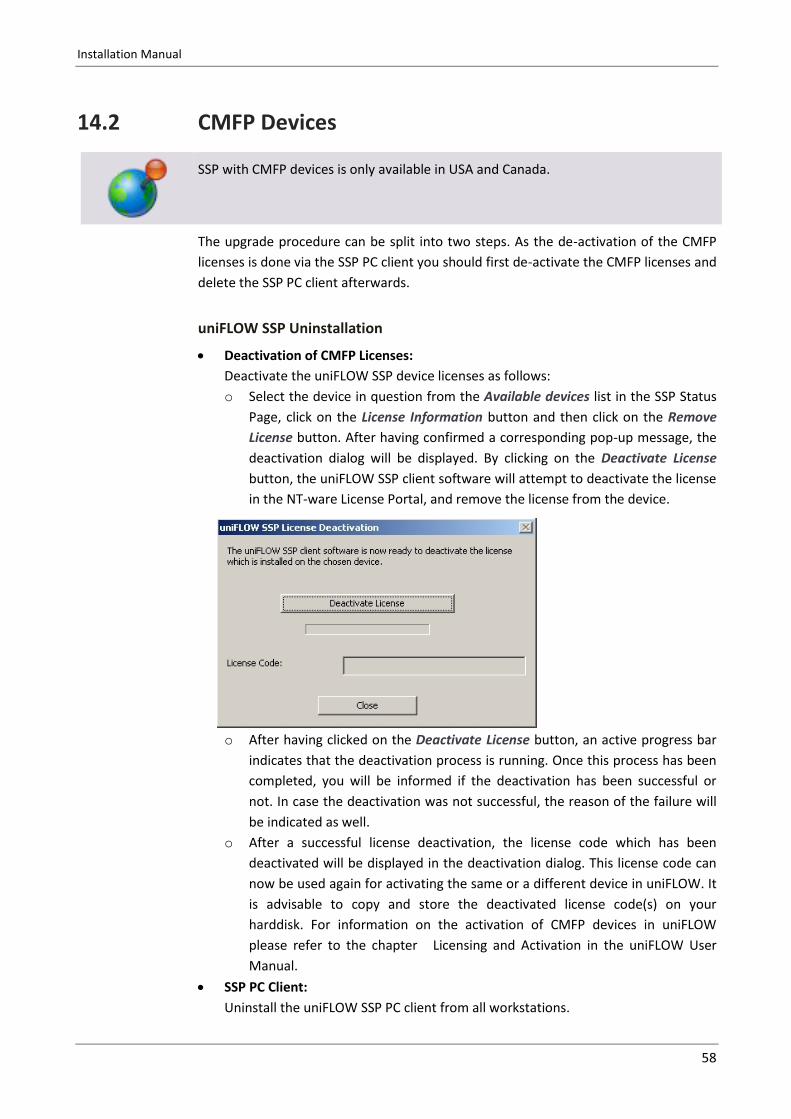
Installation Manual
58
14.2 CMFP Devices
SSP with CMFP devices is only available in USA and Canada.
The upgrade procedure can be split into two steps. As the de-activation of the CMFP
licenses is done via the SSP PC client you should first de-activate the CMFP licenses and
delete the SSP PC client afterwards.
uniFLOW SSP Uninstallation
Deactivation of CMFP Licenses:
Deactivate the uniFLOW SSP device licenses as follows:
o Select the device in question from the Available devices list in the SSP Status
Page, click on the License Information button and then click on the Remove
License button. After having confirmed a corresponding pop-up message, the
deactivation dialog will be displayed. By clicking on the Deactivate License
button, the uniFLOW SSP client software will attempt to deactivate the license
in the NT-ware License Portal, and remove the license from the device.
o After having clicked on the Deactivate License button, an active progress bar
indicates that the deactivation process is running. Once this process has been
completed, you will be informed if the deactivation has been successful or
not. In case the deactivation was not successful, the reason of the failure will
be indicated as well.
o After a successful license deactivation, the license code which has been
deactivated will be displayed in the deactivation dialog. This license code can
now be used again for activating the same or a different device in uniFLOW. It
is advisable to copy and store the deactivated license code(s) on your
harddisk. For information on the activation of CMFP devices in uniFLOW
please refer to the chapter Licensing and Activation in the uniFLOW User
Manual.
SSP PC Client:
Uninstall the uniFLOW SSP PC client from all workstations.

Installation Manual
59
An internet connection is mandatory for the deactivation process to be carried out successfully, because the uniFLOW SSP PC client has to communicate with the NT-ware License Portal.
uniFLOW Installation
Install the uniFLOW server.
Once uniFLOW has been installed, you can start configuring the secure print
workflows and printers. To use the Secure Document Release features of your
CMFP devices you have to re-activate the deactivated SSP licenses in uniFLOW.
The maximum number of former SSP device licenses for CMFP devices is five. For
more information on the activation of CMFP devices in uniFLOW please refer to
the chapter Licensing and Activation in the uniFLOW User Manual.
For each additional CMFP device, you will need a separate CMFP device license.
If you want to use MiCard HID with CMFP devices, the parameter Use extended
Card Format is not available. You have to connect a microMIND and use the
parameter MiCard V2 HID: use extended data on the microMIND configuration
page instead. For more information, see USB Device.
15 System ID Dongle (USB only) The system-ID dongle is no longer available for purchase, but if you purchased one
along with your uniFLOW software in the past, you can still use it.
The system-ID dongle is merely a replacement of the system-ID of the PC for activation
purposes. In this case, the activation code that will be generated by the NT-ware
License Portal is not bound to the ID of the computer, but to the ID of the dongle, thus
allowing you to move the license between different computers.

Installation Manual
60
15.1 System ID Dongle Activation 1. Install the Dongle Software from:
C:\Program Files\uniFLOW\Support\Dongle\SSD5411.32bit.exe
You can also go to Sentinel’s Technical Support Site and download the latest
driver.
2. Having started the execution of the exe-file the first page of the InstallShield
Wizard is displayed and the wizard guides you through the installation.
3. Click on Next to continue the installation.
4. In this screen you have to accept the License Agreement by clicking in the
respective radio button. Select Next to go to the Destination Folder screen.
5. In this screen the default path for the installation of the Sentinel System Driver is
displayed. If you need to change this path, click on the Change button. Then, you
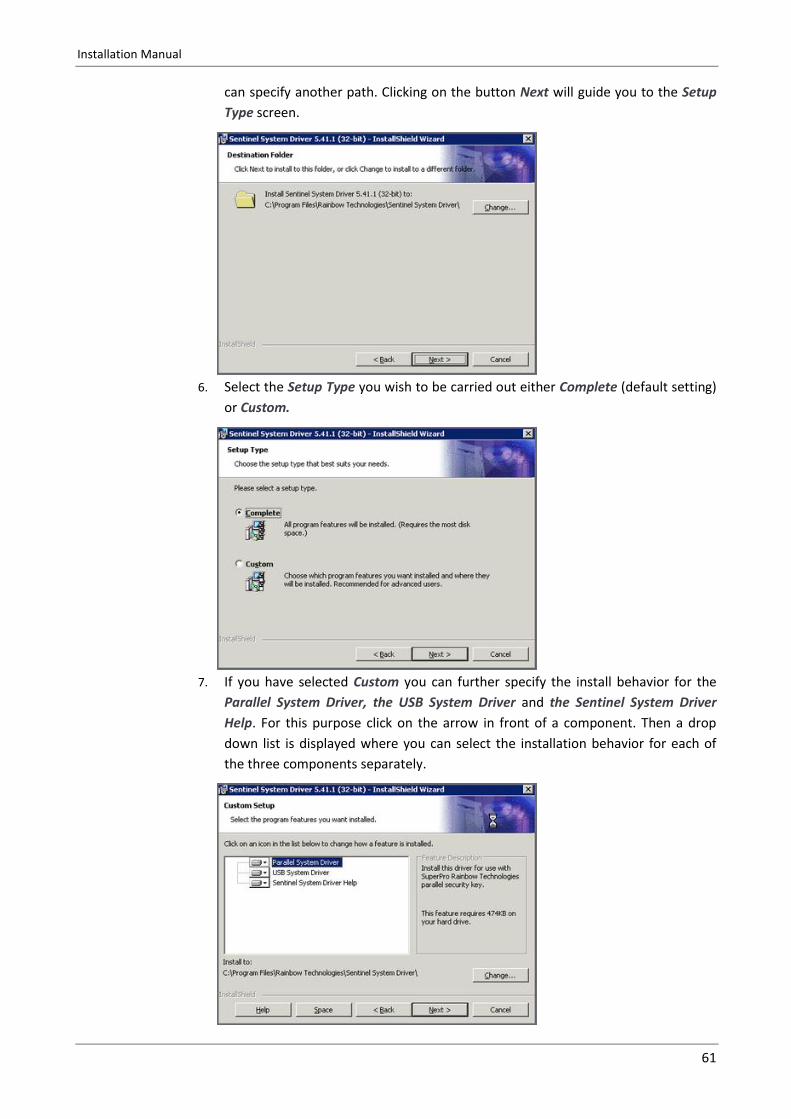
Installation Manual
61
can specify another path. Clicking on the button Next will guide you to the Setup
Type screen.
6. Select the Setup Type you wish to be carried out either Complete (default setting)
or Custom.
7. If you have selected Custom you can further specify the install behavior for the
Parallel System Driver, the USB System Driver and the Sentinel System Driver
Help. For this purpose click on the arrow in front of a component. Then a drop
down list is displayed where you can select the installation behavior for each of
the three components separately.
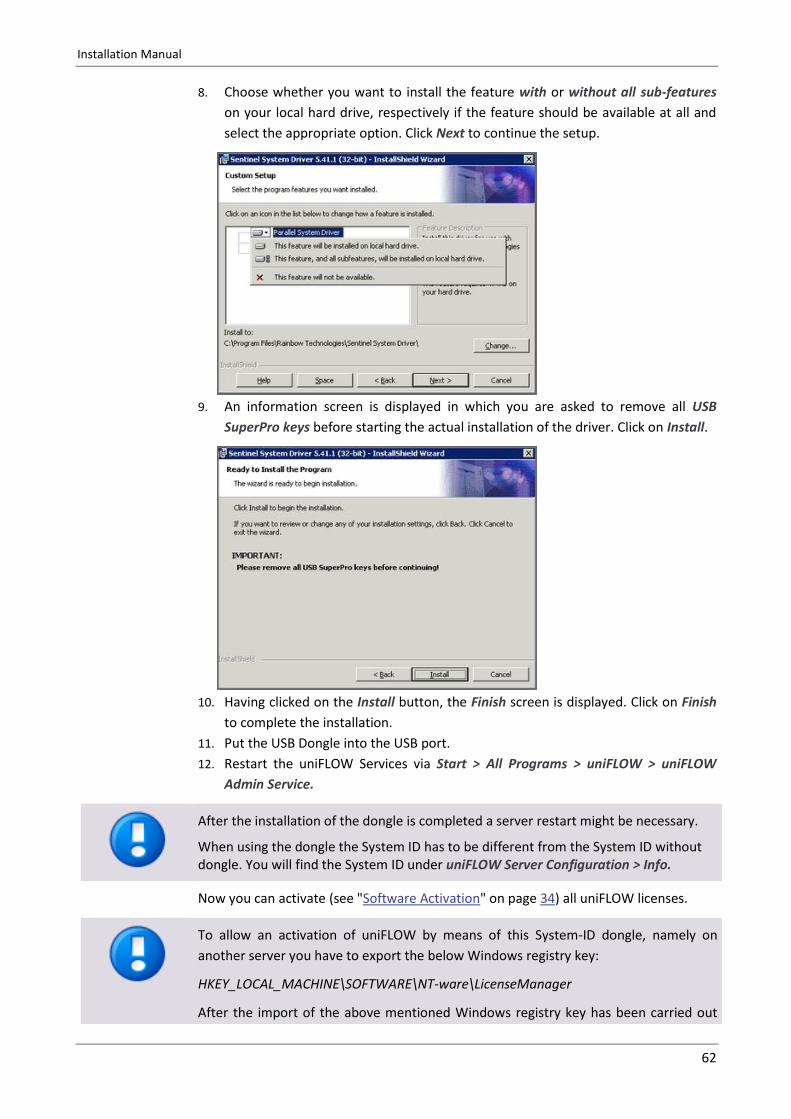
Installation Manual
62
8. Choose whether you want to install the feature with or without all sub-features
on your local hard drive, respectively if the feature should be available at all and
select the appropriate option. Click Next to continue the setup.
9. An information screen is displayed in which you are asked to remove all USB
SuperPro keys before starting the actual installation of the driver. Click on Install.
10. Having clicked on the Install button, the Finish screen is displayed. Click on Finish
to complete the installation.
11. Put the USB Dongle into the USB port.
12. Restart the uniFLOW Services via Start > All Programs > uniFLOW > uniFLOW
Admin Service.
After the installation of the dongle is completed a server restart might be necessary.
When using the dongle the System ID has to be different from the System ID without dongle. You will find the System ID under uniFLOW Server Configuration > Info.
Now you can activate (see "Software Activation" on page 34) all uniFLOW licenses.
To allow an activation of uniFLOW by means of this System-ID dongle, namely on
another server you have to export the below Windows registry key:
HKEY_LOCAL_MACHINE\SOFTWARE\NT-ware\LicenseManager
After the import of the above mentioned Windows registry key has been carried out

Installation Manual
63
you can activate uniFLOW on another server by repeating the steps 1-3 described
above.
16 Uninstallation The standard installation of uniFLOW includes the following software components:
uniFLOW
NT-ware .NET Statistic Engine
Microsoft SQL Server 2008 R2 Express Edition (SQL 2008 R2 Express)
Sentinel Dongle Driver (when a dongle is used)
All these components are listed in the program list and can be uninstalled separately.
The uninstallation routine of uniFLOW does not remove the other software
components which were installed during the uniFLOW installation. For a complete
uninstallation, all software components have to be uninstalled separately.
Previous versions of the uniFLOW Installer also provided the option to install SiteAudit. SiteAudit was part of the module Advanced Device Management (ADM). If SiteAudit was installed with a previous version of the uniFLOW Installer, SiteAudit will automatically be removed when uninstalling uniFLOW.

© NT-ware 2009-2018