Installation manual ARCO mod. multifunction cabins ... · 4) As indicated in the preinstallation...
30
O.T.A.. PRODUCT MANUAL ARCO MULTIFUNCTION CABIN (Standard, Medium and Lux) Reference: LP-0402-MI-EN Date: 15/05/04 Page: Review Date Modified Prepared by Approved by Revised by R.Cuevas J. Aguirre S.Baragaño Installation manual 01 Installation manual ARCO mod. multifunction cabins Standard, Medium and Lux (Technical Service)
Transcript of Installation manual ARCO mod. multifunction cabins ... · 4) As indicated in the preinstallation...

O.T.A..
PRODUCT MANUAL
ARCO MULTIFUNCTION CABIN (Standard, Medium and Lux)
Reference: LP-0402-MI-EN
Date: 15/05/04
Page:
Review Date Modified Prepared by
Approved by
Revised byR.Cuevas
J. Aguirre
S.Baragaño
Installation manual 01
Installation manual ARCO mod. multifunction cabins
Standard, Medium and Lux(Technical Service)

O.T.A..
PRODUCT MANUAL
ARCO MULTIFUNCTION CABIN (Standard, Medium and Lux)
Reference: LP-0402-MI-EN
Date: 15/05/04
Page:
Review Date Modified Prepared by
Approved by
Revised byR.Cuevas
J. Aguirre
S.Baragaño
Contents 01
REVISION
Contents
Front cover. 0. Contents 1. Introduction.
1.1. STANDARD version multifunction cabin components. 1.2. MEDIUM version multifunction cabin components.
1.3 LUX version multifunction cabin components.
2. Material received.
3. Stages of assembly.
4. Electrical connections.
4.1 Electrical connections.
4.2 Equipotential connections.
5. Hydraulic connections.
6. Operating test and adjustments.
6.1 Operating test
6.1.1 General. 6.1.2 Top display. 6.1.3 White light functions (standard), chromatherapy (Medium and
Lux), radio and alarm. 6.1.4 Steam function (STANDARD and MEDIUM versions). 6.1.5 Hot air and steam function (LUX version). 6.1.6 Change from control panel to demo panel. 6.1.7 Hydromassage function. 6.1.8 Pre-recorded programmes. 6.1.9 Change from demo panel to control panel.
6.2 Thermostatic fittings adjustment.
7. Wall fastening.
2
0
0
0
0
0
1
0
0
0
0
0
0
0
00
0000
0
00
0
0
1 15/11/04 Change in step 6 of assembly stages2 20/12/05 Add the Privilege version

O.T.A..
PRODUCT MANUAL
ARCO MULTIFUNCTION CABIN (Standard, Medium and Lux)
Reference: LP-0402-MI-EN
Date: 15/05/04
Page:
Review Date Modified Prepared by
Approved by
Revised byR.Cuevas
J. Aguirre
S.Baragaño
1. Introduction 01
1. Introduction.
This installation dossier provides all the documentation required for the complete assembly of the STANDARD, MEDIUM and LUX versions of the ARCO cabins.
The corresponding preinstallation specified on the preinstallation instruction sheets must have been completed. Once completed, Gala will carry out the assembly and start-up of the ARCO multifunction cabin in Spain.
The protections must be left on the cabin until it has been fully installed in order to prevent possible damage.
When the cabin arrives, check that it is complete in order to issue claims from the transport company as soon as possible.
The assembly process requires two qualified persons to guarantee the assembly and start-up of the cabin in accordance with GALA's instructions.
Before proceeding with its definitive installation, check that none of the cabin parts have been damaged during transport or subsequent handling. Once the installation has been completed, perform the operating test specified at the end of the manual.
During assembly, do not drag the parts. Always hold them by the frame, never by pipes or other parts.
In the sections of this manual that indicate the application of silicone, only LOCTITE 5366 shall be used. A cartridge of this reference is included in the box of accessories.
The following are the parts of the Standard, Medium and Lux versions of the ARCO model cabin.

O.T.A..
PRODUCT MANUAL
ARCO MULTIFUNCTION CABIN (Standard, Medium and Lux)
Reference: LP-0402-MI-EN
Date: 15/05/04
Page:
Review Date Modified Prepared by
Approved by
Revised byR.Cuevas
J. Aguirre
S.Baragaño
LightingRoof
Steam unit with essence tank
Shower head emergency stopcock
Thermostatic taps
Vertical hydromassage
Limescale remover inlet
Bottom pipe
Sprinkler
Speaker, FM/stereo radio
4-panel semi-circular screenDrain valve
Shower tray
Temperature sensor
Control panelMirror
Dorsal hydromassage
Cervical hydromassage
Cascade
1.1. STANDARD version multifunction cabin components 01
Shower head with hidden flexible pipe
Seat panel
Calf hydromassage
1.1. STANDARD version multifunction cabin components.

O.T.A..
PRODUCT MANUAL
ARCO MULTIFUNCTION CABIN (Standard, Medium and Lux)
Reference: LP-0402-MI-EN
Date: 15/05/04
Page:
Review Date Modified Prepared by
Approved by
Revised byR.Cuevas
J. Aguirre
S.Baragaño
Light
Cascade
Bottom water pipe
Dorsal, cervical and calf hydromassage
Steam bath
Radio functions
On-off
Informative display with time and temperature
Sprinkler
Descaling
Hand-held shower
Vertical and calf hydromassage
Regulation functions
Programme functions
Alarm
StopPause
Turbomassage
Reduction value regulation functions and radio / Non-selection hydromassageinjector line.
Increase value regulation functions and radio / Selection hydromassageinjector line.
02
STANDARD version control panel.
1.1. STANDARD version multifunction cabin components

O.T.A..
PRODUCT MANUAL
ARCO MULTIFUNCTION CABIN (Standard, Medium and Lux)
Reference: LP-0402-MI-EN
Date: 15/05/04
Page:
Review Date Modified Prepared by
Approved by
Revised byR.Cuevas
J. Aguirre
S.Baragaño
01
ChromotherapyRoof
Steam unit with essence tank
Vertical hydromassage
Bottom pipe
4-panel semi-circular screenDrain valve Shower tray
Temperature sensor
Control panelMirror
Dorsal hydromassage
Cervical hydromassage
Cascade
Shower head with hiddenflexible pipe
Seat panel
Calf hydromassage
Shower head emergency stopcock
Limescale remover inlet
Speaker, FM/stereo radio
1.2. MEDIUM version multifunction cabin components
Thermostatic taps
1.2. MEDIUM version multifunction cabin components.
Sprinkler

O.T.A..
PRODUCT MANUAL
ARCO MULTIFUNCTION CABIN (Standard, Medium and Lux)
Reference: LP-0402-MI-EN
Date: 15/05/04
Page:
Review Date Modified Prepared by
Approved by
Revised byR.Cuevas
J. Aguirre
S.Baragaño
Lighting
Cascade
Bottom water pipe
Scottish
Steam bath
Radio functions
On-off
Informative display withtime and temperature
Sprinkler
Hand-held shower
Regulation functions
Programme functions
Alarm
StopPauseTurbomassage
Dorsal, cervical and calf hydromassage
Descaling
Verticaland calfhydromassage
Reduction value regulation functions and radio / Non-selection hydromassage injector line.
Increase value regulation functions and radio / Selection hydromassageinjector line.
Chromotherapy
02
MEDIUM version control panel.
1.2. MEDIUM version multifunction cabin components

O.T.A..
PRODUCT MANUAL
ARCO MULTIFUNCTION CABIN (Standard, Medium and Lux)
Reference: LP-0402-MI-EN
Date: 15/05/04
Page:
Review Date Modified Prepared by
Approved by
Revised byR.Cuevas
J. Aguirre
S.Baragaño
01
Roof
Steam unit with essence tank
Vertical hydromassage
Bottom pipe
4-panel semi-circular screenDrain valve Shower tray
Temperature sensor
Control panel
Shower head with hiddenflexible pipe
Mirror
Dorsal hydromassage
Cervical hydromassage
Cascade
Seat panel
Calf hydromassage
Hot air generator system (L)
Shower head emergency stopcock
Limescale remover inlet
Speaker, FM/stereo radio
1.3. LUX version multifunction cabin components
Thermostatic taps
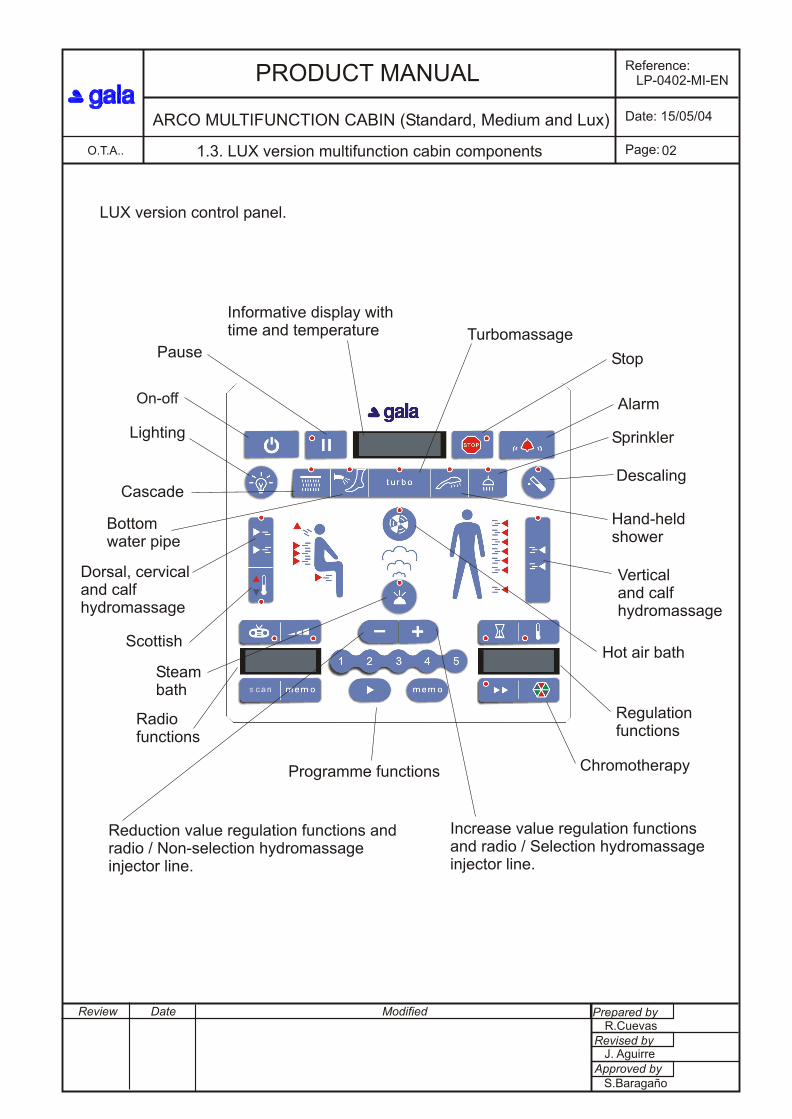
1.3. LUX version multifunction cabin components.
Chromotherapy
Sprinkler
O.T.A..
PRODUCT MANUAL
ARCO MULTIFUNCTION CABIN (Standard, Medium and Lux)
Reference: LP-0402-MI-EN
Date: 15/05/04
Page:
Review Date Modified Prepared by
Approved by
Revised byR.Cuevas
J. Aguirre
S.Baragaño
Lighting
Cascade
Bottom water pipe
Scottish
Steam bath
Radiofunctions
On-off
Informative display with time and temperature
Sprinkler
Descaling
Hand-held shower
Regulation functions
Programme functions
Alarm
StopPauseTurbomassage
Hot air bath
Dorsal, cervical and calf hydromassage
Vertical and calf hydromassage
Reduction value regulation functions and radio / Non-selection hydromassage injector line.
Increase value regulation functionsand radio / Selection hydromassageinjector line.
02
LUX version control panel.
1.3. LUX version multifunction cabin components
Chromotherapy

O.T.A..
PRODUCT MANUAL
ARCO MULTIFUNCTION CABIN (Standard, Medium and Lux)
Reference: LP-0402-MI-EN
Date: 15/05/04
Page:
Review Date Modified Prepared by
Approved by
Revised byR.Cuevas
J. Aguirre
S.Baragaño
2. Material received 01
2. Material received.
The packaging of the ARCO multifunction cabin comprises 2 packages and a screen, which are delivered on a pallet. Once they have been opened, check that they contain the following items:
Shower tray Roof
Panel Air (LUX version only)

O.T.A..
PRODUCT MANUAL
ARCO MULTIFUNCTION CABIN (Standard, Medium and Lux)
Reference: LP-0402-MI-EN
Date: 15/05/04
Page:
Review Date Modified Prepared by
Approved by
Revised byR.Cuevas
J. Aguirre
S.Baragaño
2. Material received 02
4-panel semi-circular screen Box of accessories
User manual, warranty card, declaration of conformity and electrical safety test

O.T.A..
PRODUCT MANUAL
ARCO MULTIFUNCTION CABIN (Standard, Medium and Lux)
Reference: LP-0402-MI-EN
Date: 15/05/04
Page:
Review Date Modified Prepared by
Approved by
Revised byR.Cuevas
J. Aguirre
S.Baragaño
Nut
3. Stages of assembly 01
Frame leg
Frame leg
3. Stages of assembly.
1) Place the tray in the position where it is to be installed, checking that it is level. If it is not level, change the height of the feet by turning them until it is level (a). Finally, tighten the counter-nut (x) of the bases against the frame (b).
2) Aply a continuous line of silicone inside a free end of the corrugated pipe and insert the rigid pipe, fastening it with a bracket and screw. Remove the plastic protection from the shower tray and connect the rigid pipe and the corrugated pipe to the drain body by turning the nut.
Base
Base

O.T.A..
PRODUCT MANUAL
ARCO MULTIFUNCTION CABIN (Standard, Medium and Lux)
Reference: LP-0402-MI-EN
Date: 15/05/04
Page:
Review Date Modified Prepared by
Approved by
Revised byR.Cuevas
J. Aguirre
S.Baragaño
3. Stages of assembly 02
3) Fit the indicated drain parts to the shower tray but do not tighten them.
4) As indicated in the preinstallation manual, the corrugated pipe of the ARCO multifunction cabin (interior diameter of 40 mm) must be connected to the male outlet (exterior diameter of 40 mm) of the wall or the floor. It must fit perfectly. Fully insert the corrugated pipe and tighten the 32-50 screw-bracket (bag No. 4). Check that, with the corrugated drainage pipe connected, the tray can be moved without problem. If necessary, cut the pipe or turn the drain.Fit the drain and check that there are no leaks at this point and that the tray drains perfectly.If the house has a U-bend, remove the drainage siphon (part A).

O.T.A..
PRODUCT MANUAL
ARCO MULTIFUNCTION CABIN (Standard, Medium and Lux)
Reference: LP-0402-MI-EN
Date: 15/05/04
Page:
Review Date Modified Prepared by
Approved by
Revised byR.Cuevas
J. Aguirre
S.Baragaño
3. Stages of assembly 03
ILO
E
SIC
NIL
OE
SIC
N
M10 washer
M10 nut
M10 washer
M10x100 pin
M10 nut
5) Fit the tray in a place where it is easy to assemble the cabin. Apply a line of silicone before positioning the seat panel, as shown in the drawing.
6) Position the four M10x100 connection pins (box of accessories) without tightening between the seat panel and the tray, as shown, with the corresponding M10 nuts and washers (bag No. 1). You should be able to move the panel.
1 15/11/04 Change M10x70 pin for M10x100 (*)

O.T.A..
PRODUCT MANUAL
ARCO MULTIFUNCTION CABIN (Standard, Medium and Lux)
Reference: LP-0402-MI-EN
Date: 15/05/04
Page:
Review Date Modified Prepared by
Approved by
Revised byR.Cuevas
J. Aguirre
S.Baragaño
30mm
CSIL
ON
A
I
30mm
M4 pin
M4 washer
M4 nut
SIC
L
NE
IO
3. Stages of assembly 04
7) Apply a line of silicone in the two corners, as shown, between the panel and the tray.
8) Position the screen on the tray guide rail, fitting the pins fastened to the screen in the seat panel runners. Then position the M4 nuts and washers (bag No. 2) on the pins, as shown, without tightening.
O.T.A..
PRODUCT MANUAL
ARCO MULTIFUNCTION CABIN (Standard, Medium and Lux)
Reference: LP-0402-MI-EN
Date: 15/05/04
Page:
Review Date Modified Prepared by
Approved by
Revised byR.Cuevas
J. Aguirre
S.Baragaño
M5 pinRoof
Screen
3. Stages of assembly 05
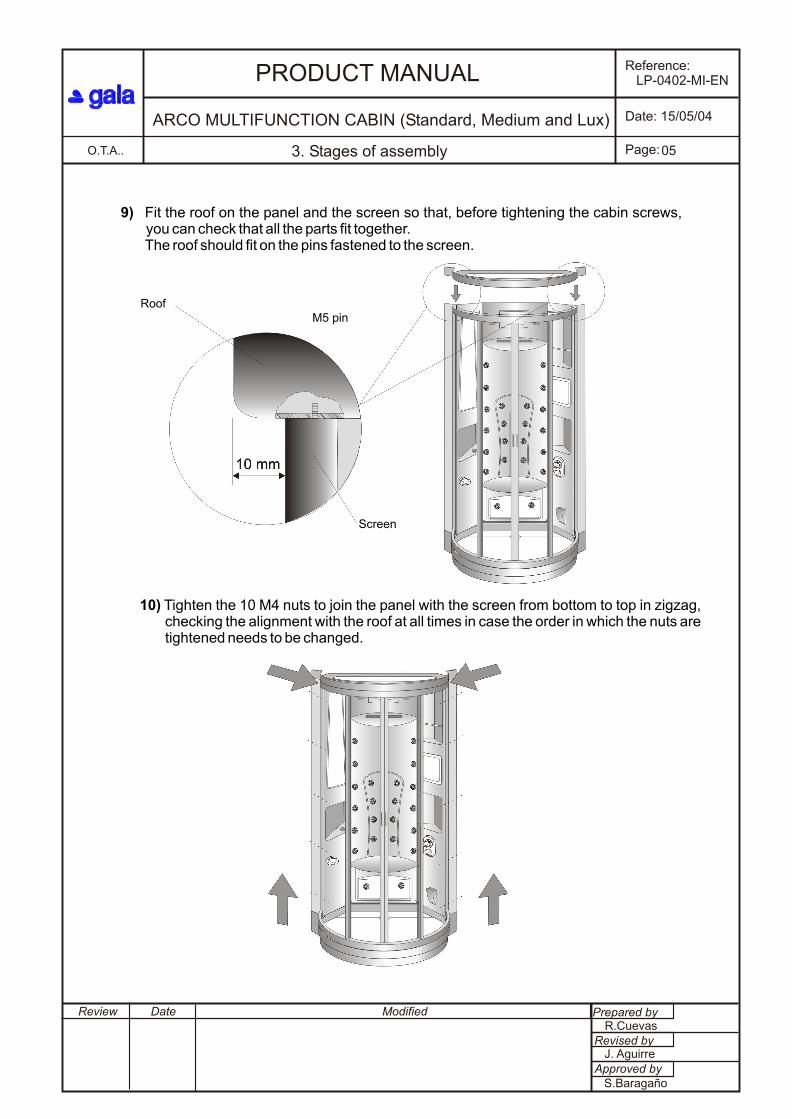
9) Fit the roof on the panel and the screen so that, before tightening the cabin screws, you can check that all the parts fit together.The roof should fit on the pins fastened to the screen.
10) Tighten the 10 M4 nuts to join the panel with the screen from bottom to top in zigzag, checking the alignment with the roof at all times in case the order in which the nuts are tightened needs to be changed.

O.T.A..
PRODUCT MANUAL
ARCO MULTIFUNCTION CABIN (Standard, Medium and Lux)
Reference: LP-0402-MI-EN
Date: 15/05/04
Page:
Review Date Modified Prepared by
Approved by
Revised byR.Cuevas
J. Aguirre
S.Baragaño
M5 wing nutsM6 washer
M5 pinT-shape seal
T-shape seal
3. Stages of assembly 06
11) Join together the panel and the tray, first of all tightening the top nut lightly against the frame, then the bottom nut with the key and, finally, the top nut with the key.
12) Before fastening the roof, raise it slightly and fit two T-seals (bag No. 3) as shown in the spaces between the panel and the screen. Then fit five M5 wing nuts with the corresponding washers (bag No. 3) on the pins fastened to the screen to join the roof.

O.T.A..
PRODUCT MANUAL
ARCO MULTIFUNCTION CABIN (Standard, Medium and Lux)
Reference: LP-0402-MI-EN
Date: 15/05/04
Page:
Review Date Modified Prepared by
Approved by
Revised byR.Cuevas
J. Aguirre
S.Baragaño
3. Stages of assembly 07
13) Fit the 6 clips (bag No. 3) to join the roof to the panel (distribute them evenly).
14) Check that the door frame and the fixed frame are parallel. If not, adjust the eccentrics on the wheels. (Step 16).
ParallelParallel

O.T.A..
PRODUCT MANUAL
ARCO MULTIFUNCTION CABIN (Standard, Medium and Lux)
Reference: LP-0402-MI-EN
Date: 15/05/04
Page:
Review Date Modified Prepared by
Approved by
Revised byR.Cuevas
J. Aguirre
S.Baragaño
(No. 3 Allen key)
Parallel
a
3. Stages of assembly 08
15) Check that the magnet sections of the doors are parallel with each other and that they close completely from top to bottom. If not, adjust the eccentrics on the wheels. (Step 16).
16) To adjust the screen doors, proceed as follows:
1. Unscrew the two eccentrics (a) at the top and check that they can turn a little on both sides.
2. Unscrew the two eccentrics (a) at the bottom and check that they can turn a little on both sides.

O.T.A..
PRODUCT MANUAL
ARCO MULTIFUNCTION CABIN (Standard, Medium and Lux)
Reference: LP-0402-MI-EN
Date: 15/05/04
Page:
Review Date Modified Prepared by
Approved by
Revised byR.Cuevas
J. Aguirre
S.Baragaño
(No. 5 Allen key)
a
a
b
3. Stages of assembly 09
3. Use an Allen key to move the two eccentrics (b) at the top until the fixed and moving panels of the screen are parallel.
5. Fasten the screw (a) on the two eccentrics at the top.
4. Move the eccentrics at the bottom by turning the screw (b) downwards.
6. Fasten the screw (a) on the two eccentrics at the bottom.
17) Connect the shower head to the hidden flexible pipe (box of accessories), as shown.

O.T.A..
PRODUCT MANUAL
ARCO MULTIFUNCTION CABIN (Standard, Medium and Lux)
Reference: LP-0402-MI-EN
Date: 15/05/04
Page:
Review Date Modified Prepared by
Approved by
Revised byR.Cuevas
J. Aguirre
S.Baragaño
Movable ball joint
Seal
Air collector with threaded hoses
Threaded air outlet
Threaded trim
103. Stages of assembly
Roof
18) In the LUX version multifunction cabin, the hot air unit will also be fitted with all its components (box of accessories), as indicated.

O.T.A..
PRODUCT MANUAL
ARCO MULTIFUNCTION CABIN (Standard, Medium and Lux)
Reference: LP-0402-MI-EN
Date: 15/05/04
Page:
Review Date Modified Prepared by
Approved by
Revised byR.Cuevas
J. Aguirre
S.Baragaño
4.1 Electrical connections 01
4. Electrical connections4.1 Electrical connections.
In the ARCO multifunction cabin, the keypad is delivered screwed to the seat panel.
Next, several electrical connections must be made. The connector cable identification must coincide on both ends of each connection.
a) The STANDARD and MEDIUM versions of the ARCO MULTIFUNCTION cabins 3. The antenna with the control box.
5. The light (standard) or chromatherapy (Medium and Lux) from the roof to the power box.
b) In the LUX version, the following must also be connected: 8. The hot air temperature sensor with the power box. 9. The air element supply with the air connection box (diagram on cover of box). 10. The fan supply with the air connection box (diagram on cover of box). 11. The steam connection box communication cable with the air connection box (diagram on cover of box).

O.T.A..
PRODUCT MANUAL
ARCO MULTIFUNCTION CABIN (Standard, Medium and Lux)
Reference: LP-0402-MI-EN
Date: 15/05/04
Page:
Review Date Modified Prepared by
Approved by
Revised byR.Cuevas
J. Aguirre
S.Baragaño
a STANDARD and MEDIUM versions
5
b LUX version
Equipotential connections
Power box
Control box
Air connection box
014.2 Equipotential connections
N.B. Avoid low voltage short-circuits (12 V) on the hydrosauna parts, since they could be seriously damaged. This can occur during assembly and/or testing.
4.2 Equipotential connections.
The ARCO multifunction cabins have an equipotential connection between all the metallic elements. The external terminal on the seat panel frame should be connected to the equipotential connection of the bathroom. Use a cable with a
2section of 2.5 to 6 mm .
O.T.A..
PRODUCT MANUAL
ARCO MULTIFUNCTION CABIN (Standard, Medium and Lux)
Reference: LP-0402-MI-EN
Date: 15/05/04
Page:
Review Date Modified Prepared by
Approved by
Revised byR.Cuevas
J. Aguirre
S.Baragaño
5. Hydraulic connections 01
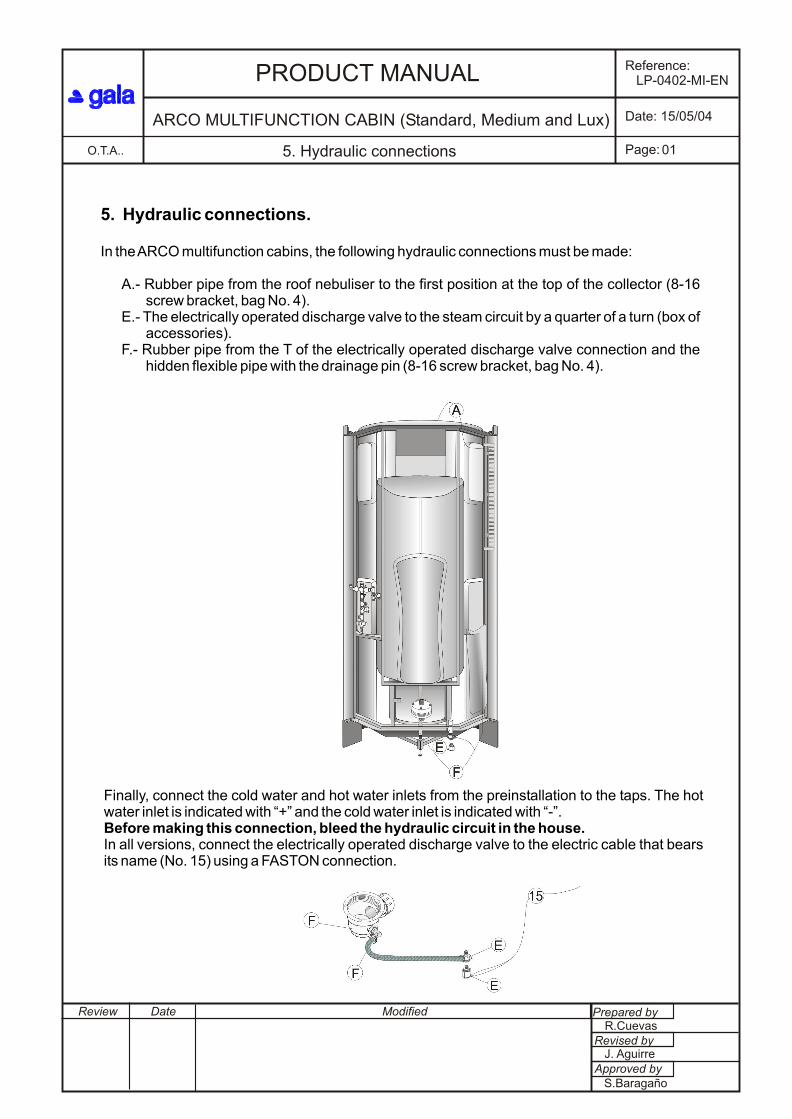
5. Hydraulic connections.
In the ARCO multifunction cabins, the following hydraulic connections must be made:
A.- Rubber pipe from the roof nebuliser to the first position at the top of the collector (8-16 screw bracket, bag No. 4).
E.- The electrically operated discharge valve to the steam circuit by a quarter of a turn (box of accessories).
F.- Rubber pipe from the T of the electrically operated discharge valve connection and the hidden flexible pipe with the drainage pin (8-16 screw bracket, bag No. 4).
Finally, connect the cold water and hot water inlets from the preinstallation to the taps. The hot water inlet is indicated with “+” and the cold water inlet is indicated with “-”. Before making this connection, bleed the hydraulic circuit in the house. In all versions, connect the electrically operated discharge valve to the electric cable that bears its name (No. 15) using a FASTON connection.
O.T.A..
PRODUCT MANUAL
ARCO MULTIFUNCTION CABIN (Standard, Medium and Lux)
Reference: LP-0402-MI-EN
Date: 15/05/04
Page:
Review Date Modified Prepared by
Approved by
Revised byR.Cuevas
J. Aguirre
S.Baragaño
6.1. Operating test 01
6. Operating test and adjustments.6.1 Operating test
After at least one hour from the last application of silicone, perform the following test to check the watertightness of the connections and the correct operation of the various components. Check the dorsal of the mirror walls, the seat and under the tray. Make sure that no water leaks anywhere outside the ARCO multifunction cabin.
6.1.1 General
Check the following points in the order given:
- Open the manual emergency stopcock for the shower head and check that it works correctly, including all the shower head functions. First of all fully open the thermostatic fittings stopcock and try to move the indicator left and right. Check that the pipes, connections and elements involved are watertight.
- Turn off the manual emergency stopcock.- Connect the electrical power of the multifunction cabin through the corresponding
differential and/or circuit breaker.- Turn the keypad on using the ON/OFF button. Check that the top display comes
on and alternates between the time and the temperature. Wait for a minimum of three minutes before starting the steam function check so
that the safety drainage of the steam circuit tank can be completed. Check that the drainage operation is complete at the end of this time. Meanwhile, continue with the test.
6.1.2 Top display
- Check that the time displayed is correct. If not, proceed as indicated in the section for SETTING the clock.
- Check that the temperature shown on the display is within reasonable values. Gently touch the protective capsule of the temperature sensor above the shower bar with your fingers for approximately 10 seconds and check that the value on the display changes.
6.1.3 White light functions (standard), chromatherapy (Medium and Lux), radio and alarm.
- (Standard): Check that the white light works correctly. Turn the light on and off several times.
- (Medium and Lux): Check that the chromatherapy function works correctly. Check all the colours step by step and then the full automatic sequence.
- Turn the radio on. Select a channel using the SCAN. Check that you can increase and lower the volume. Ask the user for the channels you usually listen to and preset stations. If the reception is not correct, change the orientation and position of the antenna.
O.T.A..
PRODUCT MANUAL
ARCO MULTIFUNCTION CABIN (Standard, Medium and Lux)
Reference: LP-0402-MI-EN
Date: 15/05/04
Page:
Review Date Modified Prepared by
Approved by
Revised byR.Cuevas
J. Aguirre
S.Baragaño
6.1. Operating test 02
- Turn off the radio.- Check that the ALARM function works correctly both inside and outside the cabin
if the connection has been made. This function is also compatible with the other hydrosauna functions, as well as
with the automatic preset programmes.
6.1.4 team function (STANDARD and MEDIUM versions).
- The thermostat fittings stopcock must be open for correct operation. - Turn on the STEAM function. Check that it starts to fill to 4 or 5 cm above the
bottom. If not, change the setup steam parameters as explained in the corresponding section.
- Wait for steam to be produced. It should normally occur within two minutes. If not, change the setup parameters as explained in the corresponding section.
- Turn off the STEAM function. Check that it automatically drains in four stages (1 fill – 2 drainage – 3 fill – 4 drainage), draining completely. If not, change the setup parameters as explained in the corresponding section.
6.1.5 Hot air and steam function (LUX version).
- Turn on the STEAM function. Check that it starts to fill to 4 or 5 cm above the bottom. If not, change the setup steam parameters as explained in the corresponding section.
- Wait for steam to be produced. It should normally occur within two minutes. If not, change the setup parameters as explained in the corresponding section.
- Check that when the steam is produced, a little hot air, almost unnoticeable, is blown through the roof nozzles. The air flow and temperature will be less than with the exclusive hot air function described above.
- Turn off the STEAM function. Check that it automatically drains in four stages (1 fill – 2 drainage – 3 fill – 4 drainage), draining the boiler completely. If not, change the setup parameters as explained in the corresponding section.
- Check that when the STEAM function is turned off, the fan also stops immediately.- Turn on the HOT AIR function and check that the fan starts up immediately. -
Check that the air comes out through the movable nozzles. The air blown out should increase in temperature within four minutes.
- Stop the HOT AIR function and check that the fan stops 1 1/2 minutes later. If not, change the setup hot air parameters as explained in the corresponding section.

O.T.A..
PRODUCT MANUAL
ARCO MULTIFUNCTION CABIN (Standard, Medium and Lux)
Reference: LP-0402-MI-EN
Date: 15/05/04
Page:
Review Date Modified Prepared by
Approved by
Revised byR.Cuevas
J. Aguirre
S.Baragaño
6.1. Operating test 03
6.1.6 Change from control panel to demo panel.
To use the demo panel, proceed as follows:a) Turn the control panel off using the ON/OFF button.b) Connect the demo panel to the control panel. To do so, first of all disconnect the
ambient temperature sensor on the control panel. Then connect a watertight terminal to the demo panel on standby.
c) Press the BOTTOM PIPE and TURBO buttons at the same time and hold them down for three seconds on the control panel.
d) The word GALA will appear on the bottom right display of the control panel to indicate that the cabin can be controlled from the demo panel from that moment on.
6.1.7 Hydromassage function.
The hydromassage will be checked directly from the demo panel.For the hydromassage functions, check the correct operation of the regulation variables:- Hydromassage speed. Check that it works by observing the variation of the
frequency with which the jets follow each other after entering changes.- Time remaining. Check the automatic off connector by programming a time
remaining of one minute, for example, using this button.- Temperature. Check that temperature changes can be entered and that they
occur as indicated in section 6.2.- Flow. Visually check or compare the noise of the hydromassage as the flow is
increased or reduced using the stopcock.
In particular, for the MEDIUM and LUX versions, check the SCOTTISH SHOWER function. Simply check a couple of cycles, making sure that the temperature
changes.
The hydromassage functions to be checked are as follows:- VERTICAL HYDROMASSAGE: Press the button twice and check that water comes out of all the jets in pairs from bottom to top, in order. Turn it off.
- DORSAL HYDROMASSAGE: Press the button twice and check that water comes out of all the jets in pairs from bottom to top, in order. Turn it off.
- Check that it is possible to select and deselect the rows of jets using the "-" (cancel) and "+" (activate) buttons for both the VERTICAL and DORSAL hydromassages.

O.T.A..
PRODUCT MANUAL
ARCO MULTIFUNCTION CABIN (Standard, Medium and Lux)
Reference: LP-0402-MI-EN
Date: 15/05/04
Page:
Review Date Modified Prepared by
Approved by
Revised byR.Cuevas
J. Aguirre
S.Baragaño
046.1. Operating test
- TURBO: Press the button twice and check that water comes out of all the jets in pairs from bottom to top. Turn it off.
- BOTTOM PIPE: press the key twice and check that water comes out. Turn it off. - WATERFALL: press the key twice and check that water comes out of all the holes. Turn it off.
- SHOWER HEAD: press the key twice and check that the different water outlet functions work correctly. Turn it off.
- NEBULISER: press the key twice and check that the different water outlet functions work correctly. Turn it off.
- Also check that the PAUSE and STOP functions are effective. After turning off with the STOP key, turn the cabin on with the ON key and then press STOP to unblock.
6.1.8 Preset programmes.
- It is necessary to check that all the preset automatic programmes work correctly. Simply press the PLAY button and then the desired programme number (1 to 5). Check that the programme starts. Then stop it, which can be for a moment, using the PAUSE button or, definitively, pressing the ALARM button or the OFF button.
6.1.9 Change from demo panel to control panel.
Finally, leave the control panel in operation:- With the panel in the OFF position, press the TURBO button for three seconds on the demo panel to return the control to the control panel.- The word GALA will appear on the bottom right display of the control panel to indicate that the cabin can be controlled from the control panel from that moment on.- Disconnect the watertight terminal that connects the demo panel to the control panel and connect the control panel to the ambient temperature sensor terminal.

O.T.A..
PRODUCT MANUAL
ARCO MULTIFUNCTION CABIN (Standard, Medium and Lux)
Reference: LP-0402-MI-EN
Date: 15/05/04
Page:
Review Date Modified Prepared by
Approved by
Revised byR.Cuevas
J. Aguirre
S.Baragaño
6.2 Thermostatic tap adjustment 01
6.2 Thermostatic tap adjustment
To adjust the thermostatic tap manually, the house hot water system must be in operation. Press the BOTTOM PIPE button and water will come out of the bottom nozzle. Set the fittings to 30°C and use a thermometer to check that the water comes out at the correct temperature. If this is not the case, proceed as follows:
1) Remove the crosspiece (X) from the thermostatic tap.2) a- Loosen the setscrew with the Allen key. b- Remove the indicator (Y).3) Adjust the water temperature by turning the ferrule (Z) until it reaches 38°C.4) Once it reaches 38°C, fit the indicator (Y) with the red button pointing to 38°C, as
shown in figure 4 and view X. 5) a- Tighten the setscrew with the Allen key. b- Fit the crosspiece (X) again and make it coincide with 30°C. 6) Check that the stop at 40°C works correctly by turning the crosspiece to the left. It
should stop at 40°C. Press the button to override the stop and then reposition the crossbar at 40°C.

O.T.A..
PRODUCT MANUAL
ARCO MULTIFUNCTION CABIN (Standard, Medium and Lux)
Reference: LP-0402-MI-EN
Date: 15/05/04
Page:
Review Date Modified Prepared by
Approved by
Revised byR.Cuevas
J. Aguirre
S.Baragaño
7. Wall fastening.
Fasten the wall of the multifunction cabin as follows:
a/ Fit the angle pieces to the multifunction cabin without tightening.b/ Place the cabin in its final position against the walls.c/ Mark the position of the holes on the walls. d/ Separate the cabin from the walls and make the holes.e/ Fit the angle pieces to the wall using a screw and plug.f/ Put the cabin in position and fit the angle piece to the cabin in the corresponding position as shown.
7. Wall fastening 01