INSTALLATION INSTRUCTIONS SINGLE PACKAGEB).pdf · Belower Motor - HP/RPM 1l/3 Variabl 1e/2 Variabe...
39
SINGLE PACKAGE HEAT PUMPS Models: PH11242 PH12241 PH11301 PH1230 PH11361 PH1236 PH11422 PH1242 PH10481 PH11481 PH1060 INSTALLATION INSTRUCTIONS © Copyright 2003 Manual : 2100-354B Supersedes: 2100-354A File: Volume II Tab 11 Date: 03-19-03 Bard Manufacturing Company Bryan, Ohio 43506 Since 1914 . . . Moving ahead, just as planned.
Transcript of INSTALLATION INSTRUCTIONS SINGLE PACKAGEB).pdf · Belower Motor - HP/RPM 1l/3 Variabl 1e/2 Variabe...

SINGLE PACKAGEHEAT PUMPS
Models:PH11242 PH12241PH11301 PH1230PH11361 PH1236PH11422 PH1242PH10481 PH11481 PH1060
INSTALLATION INSTRUCTIONS
© Copyright 2003
Manual : 2100-354BSupersedes: 2100-354AFile: Volume II Tab 11Date: 03-19-03
Bard Manufacturing CompanyBryan, Ohio 43506
Since 1914 . . . Moving ahead, just asplanned.
CONTENTS
Getting Other Informations and Publications
General InstructionsImportant ................................................................ 2Shipping Damage .................................................... 2General ................................................................ 2Field-Installed Heater Packages (Optional) ............. 2
InstallationLocation ................................................................ 9Typical Installations ................................................. 9Condensate Drain Trap ......................................... 14Air Filters .............................................................. 14Wiring – Main Power ............................................. 15Wiring – 24V Low Voltage Control Circuit ............. 15Thermostats ........................................................... 16Thermostat Indicator Lamps .................................. 17Emergency Heat Position ...................................... 17Transformer Taps ................................................... 17Compressor Cutoff Thermostat and OutdoorThermostat Wiring ................................................. 17
Start Up and OperationThree Phase Scroll Compressor Start UpInformation ............................................................. 19Sequence of Operation .......................................... 19Defrost Cycle ......................................................... 20
TroubleshootingSolid State Heat Pump ControlTroubleshooting Procedure ................................... 21Troubleshooting Guide .......................................... 21Checking Temperature Sensor Check Out ............ 22Temperature vs. Resistance ofTemperature Sensor Chart .................................... 22
ServiceService Hints ......................................................... 23Pressure Service Ports .......................................... 23Refrigerant Charge ................................................ 23Fan Blade Settings ................................................ 23Suction and Discharge Tube Brazing .................... 24Troubleshooting ECM Blower Motors ............ 25 & 26Pressure Tables ................................................ 27-30
Figures
Figure 1 Unit Dimensional Drawing ....................... 8Figure 2 Slab Mounting at Ground Level ............ 10Figure 3 Airflow and Service Access
Clearances ............................................ 10Figure 4 Roof Top Application .............................. 11Figure 5 Elevated Mounting Platforms ................. 11Figure 6 Prefabricated Rood Curb
Specifications ........................................ 12Figure 7 Field Fabricated Curbing ....................... 13Figure 8 Condensate Drain Trap ......................... 14Figure 9 Low Voltage Wiring ............................... 15Figure 10 Unit 24V Terminal Board (5–10 KW) ..... 17Figure 11 Unit 24V Terminal Board (15–20 KW) ... 18Figure 12 Heat Pump Control Board ..................... 20Figure 13 Fan Blade Setting ................................. 23Figure 14 Brazing Diagram ................................... 24
Tables
Table 1 Rated CFM and ESP .............................. 2Table 2 Electrical Data ......................................... 3Table 2A Electrical Data ......................................... 4Table 2B Electrical Data ......................................... 5Table 3 Optional Field Installed Heater
Packages ................................................ 6Table 4 Electric Heater Table ............................... 7Table 5 Dimensions of Unit .................................. 8Table 6 Roof Curb Dimensions .......................... 12Table 7 Thermostat Wire Size ........................... 13Table 8 Wall Thermostat and Subbase
Combinations .......................................... 9Table 9 Required Filters ..................................... 14Table 10 Thermostat Wire Size ........................... 16Table 11 Compressor Cutoff Thermostat
Wiring (5 - 10 KW) ............................... 18Table 12 Compressor Cutoff Thermostat
Wiring (15 - 20 KW) ............................. 18Table 13 Refrigerant Charge ............................... 23Table 14 Fan Blade Setting Dimensions.............. 23Table 15 Indoor Blower Performance .................. 24Table 16 Pressure Table - Cooling....................... 27Table 17 Pressure Table - Heating ...................... 27Table 18 Pressure Table - Cooling....................... 28Table 19 Pressure Table - Heating ...................... 28Table 20 Pressure Table - Cooling....................... 29Table 21 Pressure Table - Heating ...................... 29Table 22 Pressure Table - Cooling....................... 30Table 23 Pressure Table - Heating ...................... 30

Manual 2100-354Page 1
Getting Other Information and Publications
These publications can help you install the air conditioneror heat pump. You can usually find these at your locallibrary or purchase them directly from the publisher. Besure to consult current edition of each standard.
National Electrical Code ........................... ANSI/NFPA 70
Standard for the Installation .................. ANSI/NFPA 90Aof Air Conditioning andVentilating Systems
Standard for Warm Air .......................... ANSI/NFPA 90BHeating and AirConditioning Systems
Load Calculation for ............................... ACCA Manual JResidential Winter andSummer Air Conditioning
Duct Design for Residential ................... ACCA Manual DWinter and Summer Air Conditioningand Equipment Selection
FOR MORE INFORMATION, CONTACTTHESE PUBLISHERS:
ACCA Air Conditioning Contractors of America1712 New Hampshire Ave. N.W.Washington, DC 20009Telephone: (202) 483-9370Fax: (202) 234-4721
ANSI American National Standards Institute11 West Street, 13th Floor
New York, NY 10036Telephone: (212) 642-4900Fax: (212) 302-1286
ASHRAE American Society of Heating Refrigerating,and Air Conditioning Engineers, Inc.1791 Tullie Circle, N.E.Atlanta, GA 30329-2305Telephone: (404) 636-8400Fax: (404) 321-5478
NFPA National Fire Protection AssociationBatterymarch ParkP.O. Box 9101Quincy, MA 02269-9901Telephone: (800) 344-3555Fax: (617) 984-7057

Manual 2100-354Page 2
GENERAL INSTRUCTIONS
IMPORTANTThe equipment covered in this manual is to be installed bytrained, experienced service and installation technicians.Any heat pump is more critical of proper operating chargeand an adequate duct system than a straight airconditioning unit. All duct work, supply and return ducts,must be properly sized for the design air flow requirementof the equipment. ACCA is an excellent guide to propersizing. All duct work or portions thereof not in theconditioned space should be properly insulated in order toboth conserve energy and prevent condensation ormoisture damage.
SHIPPING DAMAGEUpon receipt of equipment, the carton should be checkedfor external signs of shipping damage. If damage is found,the receiving party must contact the last carrierimmediately, preferably in writing, requesting inspectionby the carrier’s agent.
GENERALThe refrigerant system is completely assembled andcharged. All internal wiring is complete.
The unit is designed for use with or without duct work.Flanges are provided for attaching the supply and returnducts.
These instructions explain the recommended method toinstall the air cooled self-contained unit and the electricalwiring connections to the unit.
These instructions and any instructions packaged with anyseparate equipment required to make up the entire heatpump system should be carefully read before beginning theinstallation. Note particularly “Starting Procedure” andany tags and/or labels attached to the equipment.
While these instructions are intended as a generalrecommended guide, they do not supersede any nationaland/or local codes in any way. Authorities havingjurisdiction should be consulted before the installation ismade.
FIELD INSTALLED HEATER PACKAGES(OPTIONAL)These packaged heat pumps are manufactured withoutsupplementary electric heaters. Supplementary heaters areavailable for simple, fast field installation.
A separate power circuit is required for the supplementaryheaters.
IMPORTANT: Refer to Table 1 when designing ductwork for maximum available static pressure with heaterinstalled.
Refer to electrical data shown in Tables 3 and 4 for properapplication information on all available heatercombinations and what units they can be used with. It alsoshows the applicable circuit ampacities, fuse size, and wiresize for each heater combination.
TABLE 1RATED CFM AND EXTERNAL STATIC PRESSURE (ESP)
NOTE: Motor will adjust to deliver rated airflow.
ledoMdetaRMFC
dednemmoceRegnaRwolfriA
detaRPSE
mumixaMPSE
24211HP 008 088-086 02.0 05.0
14221HP 008 1etoN 01.0 05.0
10311HP 0001 0011-577 03.0 04.0
0321HP 0001 1etoN 51.0 05.0
16311HP 0001 0121-577 02.0 04.0
6321HP 0001 1etoN 51.0 05.0
22411HP 0041 0451-0621 02.0 53.0
2421HP 0041 1etoN 51.0 05.0
18401HP 0551 0071-0041 04.0 05.0
18421HP 0551 1etoN 02.0 05.0
0601HP 0071 0781-0351 02.0 05.0

Manual 2100-354Page 3
* 75 degree C copper wire
** Maximum time delay fuse of HACR type circuit breaker
TABLE 2ELECTRICAL DATA
ledoM 24211HP 10311HP 16311HP B-16311HP C-16311HP 22411HPgnitaRcirtcelE
AtkC-zH06 1-06-802/032 1-06-802/032 1-06-802/032 3-06-802/032 3-06-064 1-06-802/032
egnaRegatoVgnitarepO 352-791 352-791 352-791 352-781 605-414 352-791yticapmAtiucriCmuminiM 71 12 52 81 21 92
CSCB 11 5.31 81 11 6 5.81*eziSeriWdleiF 01 01 8 01 41 8eziSeriWdnuorG 01 01 01 01 41 01
**.xaM-esuFyaleD 52 03 04 52 51 05802-302-spmAtinUlatoT 9.41/9.31 2.71/7.51 7.02/9.81 8.31/2.31 9.6 2.42/8.22AtiucriC-rosserpmoC
epyTrosserpmoC llorcS llorcS llorcS llorcS llorcS llorcSstloV 802/032 802/032 802/032 802/032 064 802/032
spmAdaoLdetaR 11/01 31/5.11 5.61/7.41 6.9/0.9 7.4 5.81/1.71spmAretoRkcoL 45/45 5.27/5.27 88/88 77/77 93 401/401
resnednoCdnarotoMnaFMPR/PH-rotoMnaF 0901-5/1 5701-5/1 5701-5/1 5701-5/1 5701-5/1 528-3/1
spmArotoMnaF 8.1 6.1 6.1 6.1 8.0 5.2MFC/aiDnaF 0561/"02 0002/"02 0002/"02 0002/"02 0002/"02 0592/"42
rotaropavEdnarotoMMPR/PH-rotoMrewolB 5701-3/1 5701-3/1 5701-3/1 5701-3/1 5701-3/1 5701-2/1
spmA-rotoMrewolB 1.2 6.2 6.2 6.2 4.1 2.3
PSE&gnilooCMFC 02.0@008 03.0@0011 02.0@0011 02.0@0011 02.0@0011 02.0@0041
).zo22R(egrahC 88 39 68 68 68 121)sdnuop(thgieWgnippihS 563 563 563 563 563 534

Manual 2100-354Page 4
* 75 degree C copper wire
** Maximum time delay fuse of HACR type circuit breaker
TABLE 2AELECTRICAL DATA
ledoM 18401HP B-18401HP C-18401HP 0601HP B-0601HP C-0601HPgnitaRcirtcelE
AtkC-zH06 1-06-802/032 3-06-802/032 3-06-064 1-06-802/032 3-06-802/032 3-06-064
egnaRegatoVgnitarepO 352-791 352-781 605-414 352-791 352-781 605-414yticapmAtiucriCmuminiM 33 42 21 24 82 41
CSCB 5.12 7.41 1.7 92 81 9*eziSeriWdleiF 8 8 21 8 8 21eziSeriWdnuorG 01 01 01 01 01 21
**.xaM-esuFyaleD 05 53 51 06 54 02802-302-spmAtinUlatoT 2.12/2.52 7.91/3.81 9 5.23/3.03 8.22/3.12 11AtiucriC-rosserpmoC
epyTrosserpmoC llorcS llorcS llorcS llorcS llorcS llorcSstloV 802/032 802/032 064 802/032 802/032 064
spmAdaoLdetaR 5.12/5.91 0.41/6.21 2.6 8.62/6.42 1.71/6.51 2.8spmAretoRkcoL 731/731 19/19 05 841/841 731/731 26
resnednoCdnarotoMnaFMPR/PH-rotoMnaF 058-3/1 058-3/1 058-3/1 058-3/1 058-3/1 058-3/1
spmArotoMnaF 5.2 5.2 2.1 5.2 5.2 2.1MFC/aiDnaF 0003/"42 0003/"42 0003/"42 0003/"42 0003/"42 0003/"42
rotaropavEdnarotoMMPR/PH-rotoMrewolB 5701-2/1 5701-2/1 5701-2/1 5701-2/1 5701-2/1 5701-2/1
spmA-rotoMrewolB 2.3 2.3 6.1 2.3 2.3 6.1
PSE&gnilooCMFC 0551 @ 04.0 0551 @ 04.0 0551 @ 04.0 0071 @ 02.0 0071 @ 02.0 0071 @ 02.0
).zo22R(egrahC 521 521 521 751 751 751)sdnuop(thgieWgnippihS 054 054 054 054 054 054

Manual 2100-354Page 5
* 75 degree C copper wire
** Maximum time delay fuse of HACR type circuit breaker
TABLE 2BELECTRICAL DATA
ledoM 14221HP 0321HP 6321HP B-6321HP 2421HP 18421HP B-18421HPgnitaRcirtcelE
AtkC-zH06 1-06-802/032 1-06-802/032 1-06-802/032 3-06-802/032 1-06-802/032 1-06-802/032 3-06-802/032
egnaRegatoVgnitarepO 352-791 352-791 352-791 352-781 352-791 352-791 352-781
yticapmAtiucriCmuminiM 71 12 62 91 03 33 4.52
CSCB 5.01 5.31 5.61 9.01 81 5.02 7.41
*eziSeriWdleiF 21 01 01 21 01 8 8
eziSeriWdnuorG 01 01 01 01 01 01 01
**.xaM-esuFyaleD 52 03 04 52 54 05 53
802-302-spmAtinUlatoT 9.31/9.21 1.71/6.51 2.12/4.91 6.51/7.41 5.42/5.32 5.72/5.52 3.02/0.91
AtiucriC-rosserpmoC
epyTrosserpmoC llorcS llorcS llorcS llorcS llorcS llorcS llorcS
stloV 802/032 802/032 802/032 802/032 802/032 802/032 802/032
spmAdaoLdetaR 5.01/5.9 0.31/5.11 5.61/7.41 9.01/01 7.71/7.61 5.02/5.81 3.31/0.21
spmAretoRkcoL 45/45 5.27/5.27 88/88 77/77 401/401 731/731 19/19
resnednoCdnarotoMnaF
MPR/PH-rotoMnaF 0901-5/1 5701-5/1 5701-5/1 5701-5/1 528-3/1 528-3/1 528-3/1
spmArotoMnaF 2.1 4.1 4.1 4.1 5.2 5.2 5.2
MFC/aiDnaF 0561/"02 0002/"02 0002/"02 0002/"02 0003/"42 0003/"42 0003/"42
rotaropavEdnarotoM
MPR/PH-rotoMrewolB elbairaV3/1 lebairaV2/1 elbairaV2/1 elbairaV2/1 elbairaV4/3 elbairaV4/3 elbairaV4/3
spmA-rotoMrewolB 2.2 7.2 3.3 3.3 3.4 5.4 5.4
PSE&gnilooCMFC 01.0@008 51.0@0001 51.0@0001 51.0@0001 02.0@0041 02.0@0551 02.0@0551
).zo22R(egrahC 19 99 121 121 331 321 321
)sdnuop(thgieWgnippihS 023 533 543 543 024 044 044

Manual
2100-354P
age6
� Max. KW that can operate with Heat Pump on.
� Max. KW that can operator with Heat Pump on is 10 KW. 15 KW will operate duringemergency heat.
� Max. KW that can operate with Heat Pump on is 9KW. 15 KW will operate during emergency heat
S=Standard application – heater voltage and phase same as basic unit.A=Alternate application – heater voltage and phase different from basic unit.NA=Not approved.
TABLE 3OPTIONAL FIELD INSTALLED HEATER PACKAGES
ONLY TO BE USED WITH THE HEAT PUMP MODELS INDICATED
retaeHegakcaPledoM
dnastloVesahP 24211HP 14221HP 10311HP 0321HP 16311HP B-16311HP C-16311HP 6321HP B-6321HP
nmulocsihTtfelneebsah
knalbyllanoitnetni
50A-BP3HE 1-802/042 S AN S AN S A A AN AN80A-BP3HE 1-802/042 S AN S AN S A A AN AN01A-BP3HE 1-802/042 AN AN S 1 S S 1 A 1 A 1 S AN51A-BP3HE 1-802/042 AN AN S AN S A A AN AN50A-CP3HE 1-802/042 AN S AN S AN AN AN S AN01A-CP3HE 1-802/042 AN S AN AN AN AN AN AN AN51A-CP3HE 1-802/042 AN AN AN S 2 AN AN AN S 2 AN
90B-BP3HE 3-802/042 AN AN A 1 AN A 1 S 1 A 1 AN S51B-BP3HE 3-802/042 AN AN A AN A S A AN S 3
90C-BP3HE 3-084 AN AN A 1 AN A 1 A 1 S 1 AN AN51C-BP3HE 3-084 AN AN A AN A A S AN AN
retaeHegakcaPledoM
dnastloVesahP 22411HP 2421HP 18401HP B-18401HP C-18401HP 18421HP B-18421HP 0601HP B-0601HP C-0601HP
50A-BP5HE 1-802/042 S S S A A S AN S A A01A-BP5HE 1-802/042 S 1 S S 1 A 1 A 1 S AN S 1 A 1 A 1
51A-BP5HE 1-802/042 S S 2 S A A S 2 AN S A A02A-BP5HE 1-802/042 AN AN S A A AN AN S A A
90B-BP5HE 3-802/042 AN AN A 1 S 1 A 1 AN S A 1 S 1 A 1
51B-BP5HE 3-802/042 AN AN A S A AN S 3 A S A81B-BP5HE 3-802/042 AN AN A S A AN AN A S A
90C-CP5HE 3-084 AN AN A 1 A 1 S 1 AN AN A 1 A 1 S 1
81C-CP5HE 3-084 AN AN A A S AN AN A A S

Manual
2100-354P
age7
� Time delay fuses of HACR type circuit breakers must be used for 60 and smaller sizes. Standard fuses or circuit breakers are suitable for sizes 70 andlarger. 480V circuit breakers are not HACR type.
� Based on wire suitable for 75 degree C. Other wiring materials must be rated for marked Minimum Circuit Ampacity or greater.
� Based upon Table 250-95 of N.E.C. 1993. See electric data for basic heat pump for Circuit A wiring specification requirements.
NOTE: While this electrical data is presented as a guide, it is important to electrically connect properly sizedfuses and conductor wires in accordance with the national Electrical Code and all existing local codes.
TABLE 4OPTIONAL FIELD INSTALLED ELECTRIC HEATER TABLE
.gkPretaeH.oNledoM
stloVtinUsesahP&
&WKretaeH@yticapaCstloV042
&WKretaeH@yticapaCstloV802
V802/042retaeHspmA
retaeHlanretnI
esuF
BtiucriC
WK HUTB WK HUTB
.oNdleiFstiucriC
.niMtiucriCyticapmA
1revO.xaMtnerruCnoitcetorP
2dleiFrewoPgniriW
3
dnuorGeziSeriW
50A-BP3HE80A-BP3HE01A-BP3HE51A-BP3HE80A-CP3HE01A-CP3HE51A-CP3HE
1-802/0421-802/0421-802/0421-802/0421-802/0421-802/0421-802/042
58015150151
001,71003,72001,43002,15001,71001,43002,15
57.300.605.752.1157.305.752.11
008,21005,02000,62004,83008,21000,62004,83
1.81/8.028.82/3.332.63/6.141.45/5.261.81/8.022.63/6.141.45/5.26
06/03
06/03
1111111
32/6263/2464/3586/9732/6284/3586/97
52/0304/5405/0607/0852/0305/0607/08
01/0101/018/64/401/018/64/4
010101801018
50A-BP5HE01A-BP5HE51A-BP5HE02A-BP5HE
1-802/0421-802/0421-802/0421-802/042
5015102
001,71001,43002,15002,86
57.305.752.1100.51
008,21000,62004,83002,15
1.81/8.022.63/6.141.45/5.261.27/2.38
06/0306/06
1111
32/6264/3586/9719/401
52/0305/0607/08001/011
01/018/64/43/2
010186
90B-BP3HE51B-BP3HE
3-802/0423-802/042
951
007,03002,15
57.652.11
000,32004,83
7.81/7.122.13/2.63
11
42/8293/64
52/0304/05
01/018/8
0101
90B-BP5HE51B-BP5HE81B-BP5HE
3-802/0423-802/0423-802/042
95181
007,03002,15004,16
57.352.1105.31
000,32004,83001,64
7.81/7.122.13/2.635.73/4.34
111
42/8293/6474/55
52/0304/0505/06
01/018/88/6
010101
90C-BP3HE51C-BP3HE
3-0843-084
951
007,03002,15
62.877.31
002,82000,74
8.010.81
11
5132
5152
4101
4101
90C-BP5HE51C-BP5HE81C-BP5HE
3-0843-0843-084
95181
007,03002,15004,16
62.877.3135.61
002,82000,74004,65
8.010.817.12
111
513282
515203
410101
410101
Manual 2100-354Page 8
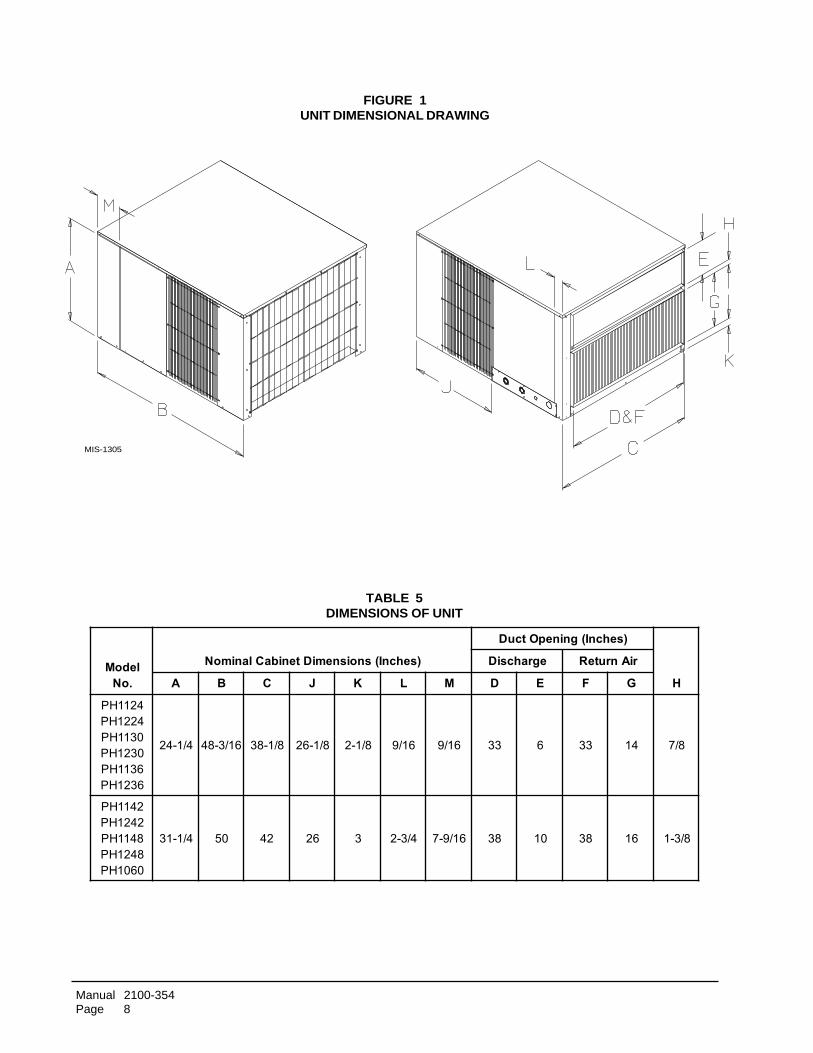
FIGURE 1UNIT DIMENSIONAL DRAWING
MIS-1305
TABLE 5DIMENSIONS OF UNIT
ledoM.oN
)sehcnI(snoisnemiDtenibaClanimoN
)sehcnI(gninepOtcuD
H
egrahcsiD riAnruteR
A B C J K L M D E F G
4211HP4221HP0311HP0321HP6311HP6321HP
4/1-42 61/3-84 8/1-83 8/1-62 8/1-2 61/9 61/9 33 6 33 41 8/7
2411HP2421HP8411HP8421HP0601HP
4/1-13 05 24 62 3 4/3-2 61/9-7 83 01 83 61 8/3-1

Manual 2100-354Page 9
INSTALLATION
LOCATION
GENERAL
The unit must be located outside, or in a well ventilatedarea. It must not be in the space being heated or cooled. Asound absorbing material should be considered if the unitis to be installed in such a position or location that mightcause transmission of sound or vibration to the living areaor adjacent buildings.
SLAB MOUNTING
In areas where winter temperatures DO NOT go below32° F for periods over twelve hours, the unit may be slabmounted at grade level. When installing unit at gradelevel, install on a concrete slab at least four inches abovefinished grade level. Slab should have a slope toleranceaway from the building structure of at lease 1/4 inch perfoot, while being level from side to side. This will preventice buildup under the unit during defrost cycles. Place slabin a location where runoff water from higher ground willnot collect around unit. See Figure 2.
A minimum of 18 inches should be provided between thecoil inlet and any building surfaces. Provide at least fourfeet between coil outlet and any building wall, fences orother vertical structures. Provide a minimum of three feetclearance on the service access side of the unit. SeeFigure 3
ROOF MOUNTING
When a unit is installed in areas where low ambienttemperatures or strong winter winds exist, it should beplaced so prevailing winter winds are not in direct linewith the heat pump coil. If this is not possible, a windbarrier should be constructed. Place barrier 24 inchesfrom the coil inlet side of the unit and in the direction ofprevailing winds. Size barrier at least the same height andwidth as the unit. This may be necessary on ground levelinstallations, also. See Figure 4.
WINTER INSTALLATION BELOW 32°F
In areas where winter conditions go below 32°F forextended periods, the unit must be elevated above themounting surface to prevent snowfall or defrost iceaccumulation from interfering with the operation of theunit. A minimum of twelve inch elevation isrecommended, while greater elevation may be required forareas of high snow accumulation. Poured concrete, steelframework, brick, cement block, etc., can be utilized toconstruct a suitable raised mounting platform. SeeFigure 5.
TYPICAL INSTALLATIONS
1. ROOF MOUNTED – The unit is mounted on asturdy base on the roof of the building. Return air tothe unit is brought through a single return grille (grilleswith built-in filters are best since they enable easyaccess for filter changing). Return air ducts areattached to the lower section of the front panel.Supply air is brought from the unit to attic duct workor to a furred down hall. Supply air duct is attached tothe top of the front panel.
CAUTION: All outdoor duct work must bethoroughly insulated and weatherproofed. Allattic duct work must be thoroughly insulated.Two inch thick insulation with suitable vaporbarrier is recommended for both outdoor andattic runs.
In roof top installation, as in all installations, the heatpump must be level from side to side. However, theunit should have a pitch along the length to assurecomplete external drainage of precipitation and ofdefrost condensate. See Figures 6 and 7, and Tables 6and 7.
2. CRAWL SPACE – Duct work installed in crawlspace must be well insulated and provided with avapor barrier. In addition, the crawl space must bethoroughly ventilated and provided with a good vaporbarrier as a ground cover. It is most desirable to installthe unit outdoors rather than inside the crawl space, sothat it will be readily accessible for service. Inaddition, it is necessary to dispose of the condensatefrom the outdoor coil on the heating cycle, and this isvirtually impossible with the unit installed inside thecrawl space.
3. SLAB MOUNTED AT GROUND LEVEL – Thistype installation is ideal for homes with a slab floorconstruction where a roof mounted unit is not desired.The supply and return duct work can be run through afurred closet space.
4. THROUGH THE WALL – This type installationrequires a suitable framework to be fabricated capableof withstanding the unit weight. Normally the unit willbe insulated so as to minimize supply and return ductwork.

Manual 2100-354Page 10
FIGURE 2SLAB MOUNTING AT GROUND LEVEL
(Above 32°F Outside Temperature)
FIGURE 3AIRFLOW AND SERVICE ACCESS CLEARANCES
MIS-1185

Manual 2100-354Page 11
FIGURE 4ROOF TOP APPLICATION
(May also be required for ground level installations)
MIS-1176
FIGURE 5ELEVATED MOUNTING PLATFORMS
MIS-1183

Manual
2100-354P
age12
FIGURE 6PREFABRICATED ROOF CURB SPECIFICATIONS
HEAVY GAUGE GALVANIZED WITH WOOD NAILING STRIP, WELDED/LEAKPROOFONE PIECE CONSTRUCTION – READY TO INSTALL
TABLE 6ROOF CURB DIMENSIONS
ledoMtinU
fooRdooHledoM
fooRbruCledoM
sliateDbruCfooRA B C D E F G H I J K L
*4211HP*4221HP*0311HP*0321HP*6311HP*6321HP
63-EHR 300-2409 573.08 52.04 52.73 573.83 573.53 24 52.42 521.91 881.84 57.41 521.83 52.83
*2411HP*2421HP*8401HP*8421HP*0601HP
06-EHR 400-2409 573.28 521.44 521.14 573.83 573.53 44 52.13 521.91 05 57.41 24 52.83
* Revision Level
MIS-1177C

Manual 2100-354Page 13
FIGURE 7FIELD FABRICATED CURBING
MIS-1178A
� A separate metal flashing should be installed around wood curbing. Caulk & sealall joints & weatherproof.
TABLE 7DIMENSION “X” FOR FIELD
FABRICATED CURBING
ledoMtinU dooHfooRledoM
noisnemiDX
4211HP4221HP0311HP0321HP6311HP6321HP
63-EHR 14
2411HP2421HP8401HP8421HP0601HP
06EHR 8/7-44

Manual 2100-354Page 14
AIR FILTERSAir filters for the return air side of the system are notprovided as part of the various types of applications forthese models, and must be field supplied and installed aspart of the final installation.
Prior thought should be given to return air location andplacement of the air filter(s). The air filter(s) must be ofadequate size and readily accessible to the operator of theequipment. Filters must be adequate in size and properlymaintained for proper operation. If this is not done,excessive energy use, poor performance, and multipleservice problems will result. It is impossible to oversizeair filters. Generous sizing will result in cleaner air andcoils as well as lower operating costs and extend the timebetween required changes. Table 8 shows minimum filterareas and recommended filter sizes. Actual filter sizes canvary with the installation due to single or multiple returnsutilizing a filter/grille arrangement or being placedimmediately ahead of the indoor coil face in the return airduct.
5. OTHER INSTALLATIONS – Many otherinstallations are possible with the packaged heat pump.No matter what the installation, always consider thefollowing facts:
A. Insure that the discharge air is not obstructed inanyway so as to cause operation difficulties.
B. The indoor coil drain pan is equipped with acoupling that must be piped through a condensatedrain trap to a suitable drain.
C. Always mount the unit is such a position that itmay be easily reached for servicing andmaintenance.
D. Insure that the unit is clear so that proper air flowover the outdoor coil will be maintained.
If this unit is operated in cooling below a 65° outdoorambient temperature, the installation of low ambientcontrols (CMA-6) to unit is required.
CONDENSATE DRAIN TRAPIt is very important to provide a trap in the condensatedrain line to allow a positive liquid seal in the line andassure correct drainage from the coil condensate pan.
Install condensate drain trap shown in Figure 8. Use drainconnection size or larger. Do not operate unit withouttrap. Unit must be level or slightly inclined toward drain.
With a trap installed on a unit located in an unconditionedarea, water in the trap may freeze. It is recommended thatthe trap material be of a type that will allow for expansionof water when it freezes.
FIGURE 8CONDENSATE DRAIN TRAP
MIS-136
NOTE: If roof hood accessory is to be used, informationon air filters may be found under that headingin this manual. Air filters are supplied as partof that package.
TABLE 8FILTERS REQUIRED AND SIZE
.oNledoM aerAretliFmuminiM dednemmoceReziS
4211HP4221HP0311HP0321HP6311HP6321HP
sehcnIerauqS264)teeFerauqS12.3( 1x8/5-03x51
2411HP2421HP8401HP8421HP0601HP
sehcnIerauqS806)teeFerauqS26.4( 1x02x61)2(

Manual 2100-354Page 15
FIGURE 9LOW VOLTAGE WIRING
WIRING – MAIN POWERRefer to the unit rating plate for wire sizing informationand maximum fuse size. Each outdoor unit is marked witha “Minimum Circuit Ampacity”. This means that the fieldwiring used must be sized to carry that amount of current.If field installed heaters are added to the basic unit, asecond separate power supply circuit will be required. Theheater rating plate located adjacent to the basic unit ratingplate will show the appropriate circuit ampacity fuse size,etc. (Also see “Electrical Data” on pages 3, 4 and 5.) Allmodels are suitable for connection with copper wire only.These instructions must be adhered to. Refer to theNational Electrical Code for complete current carryingcapacity data on the various insulation grades of wiringmaterial.
The unit rating plate lists a “Maximum Time Delay Fuse”or “HACR” type circuit breaker that is to be used with theequipment. The correct size must be used for propercircuit protection and also to assure that there will be nonuisance tripping due to the momentary high startingcurrent of the compressor.
WIRING – 24V LOW VOLTAGE CONTROLCIRCUITTen (10 ) wires should be run from thermostat subbase tothe 24V terminal board in the unit. A nine conductor,18 gauge copper, color-coded thermostat cable isrecommended. The connection points are shown inFigure 9.
MIS-1187A

Manual 2100-354Page 16
TABLE 10THERMOSTAT WIRE SIZE
AVremrofsnarT ALF eguaGeriW
mumixaMecnatsiDteeFni
55 3.2
0281614121
5406001061052
THERMOSTATSSee specific wiring information for the different models, heater KWs, and voltages.
IMPORTANT NOTE: Only the thermostat and subbase combinations as shown above will work with thisequipment. The thermostat and subbase MUST be matched, and correct operation can be assured onlyby proper selection and application of these parts. The above combinations incorporate the followingfeatures: Man-Auto fan switch, Off-Heat-Cool-Em. Heat Switch, and two (2) indicator lamps - one foremergency heat and one for compressor malfunction.
�
�
No automatic changeover position – must be manually placed in heat or cool. Reversing valve remainsenergized at all times system switch is in heat position (except during defrost cycle). No pressure equalizationnoise when thermostat is satisfied on either heating or cooling.
Allows thermostat to control both heating and cooling operation when set in “AUTO” position. Reversing valvede-energizes at end of each “ON” heating cycle.
TABLE 9HEAT PUMP THERMOSTATS
TATSOMREHT ESABBUS NOITPIRCSED
540-3048)1671A148T(
fotraPtatsomrehT
revoegnahclaunaM;blubyruceM;taehegats2,loocegats1looC-ffO-taeH-taeHmE:hctiwSmetsyS;nO-otuA:hctiwSnaF
taeHxuA-taeHmE-kcehC:spmaLgnitacidnI
710-3048)9211R478T(
900-40481811L476Q
revoegnahclaunaM;blubyrucreM;taehegats2,loocegats1looC-ffO-taeH-taeHmE:hctiwSmetsyS;nO-otuA:hctiwSnaF
taeHmE-kcehC:spmaLgnitacidnI1
810-3048)4201N478T(
010-40481621F476Q
revoegnahcotuA;blubyrucreM;taehegats2,loocegats1looC-otuA-taeH-taeHmE-ffO:hctiwSmetsyS;nO-otuA:hctiwSnaF
taeHmE-kcehC:spmaLgnitacidnI2
240-3048)0701G1158T(
fotraPtatsomrehT
)deriuqeryrettabon(elbammargorp-nonlatigiD;taehegats2,loocegats1revoegnahclaunamrocitamotuA
taeH/looCrootuA-taeHmE-ffO:hctiwSmetsyS;nO-otuA:hctiwSnaFtaeHxuA-taeHmE:noitacidnIyalpsiDkcehC:spmaLgnitacidnI
940-3048)083-39F1(
fotraPtatsomrehT
;)yad7(elbammargorplatigiD;taehegats2,loocegats2sruoh42repdoirepkcab-tes/pu-tes1;revoegnahclaunamrocitamotuA
yrevocerygrenerorezimonoceroflanimretnoitalitnevelbammargorPtaeH/looCrootuA-taeHmE-ffO:hctiwSmetsyS;nO-otuA:hctiwSnaF
xuA-flaM-pmuP-remE:spmaLgnitacidnI

Manual 2100-354Page 17
THERMOSTAT INDICATOR LAMPSThe red lamp marked “EM. HT.” comes on and stays onwhenever the system switch is placed in Em. Ht. position.The green lamp marked “Check” will come on if there isany problem that prevents the compressor from runningwhen it is supposed to be.
EMERGENCY HEAT POSITIONThe operator of the equipment must manually place thesystem switch in this position. This is done when there is aknown problem with the outdoor section, or when the green“Check” lamp comes on indicating a problem.
TRANSFORMER TAPS230/208V, 1 phase and 3 phase equipment employ dualprimary voltage transformers. All equipment leaves thefactory wired on 240V tap. For 208V operation, reconnectfrom 240V to 208V tap. The acceptable operating voltagerange for the 240 and 208V taps are:
TAP RANGE 240 253 – 216 208 220 – 187
NOTE: The voltage should be measured at the fieldpower connection point in the unit and while theunit is operating at full load (maximumamperage operating condition).
COMPRESSOR CUTOFF THERMOSTATand OUTDOOR THERMOSTAT WIRINGHeat pump compressor operation at outdoor temperaturesbelow 0° F are neither desirable not advantageous in termsof efficiency. Since most equipment at time ofmanufacture is not designated for any specific destinationof the country and most of the equipment is installed inareas not approaching the lower outdoor temperaturerange, the compressor cutoffs are not factory installed.
Outdoor thermostats are available to hold off variousbanks of electric heat until needed as determined byoutdoor temperature. The set point of either type ofthermostat is variable with geographic region and sizing ofthe heating equipment to the structure. Utilization of theHeating Application Data and the heat loss calculation ofthe building are useful in determining the correct setpoints. Refer to Installation Instructions of CMH-14Outdoor Thermostat Kit for more information.
MIS-1188
FIGURE 10UNIT 24V TERMINAL BOARD ( 5 THRU 10 KW)

Manual 2100-354Page 18
COMPRESSOR CUTOFF THERMOSTATWIRING (5 thru 10 KW) (FIGURE 10)
COMPRESSOR CUTOFF THERMOSTATWIRING (15 thru 20 KW ) (FIGURE 11)
TABLE 1215 THRU 20 KW
ledoM WK stloV esahP24211HP 51 032 114221HP 51 032 110311HP 51 032 10321HP 51 032 116311HP 51 032 16321HP 51 032 122411HP 02,51 032 12421HP 51 032 118401HP 02,51 032 1
C-,B-18401HP 81,51 064/032 318421HP 51 032 1B-18421HP 51 032 1
0601HP 02,51 032 1C-,B-0601HP 81,51 064/032 3
TABLE 115 thru 10 KW
ledoM WK stloV esahP24211HP 8,5,0 032 114221HP 01,5,0 032 110311HP 8,5,0 032 10321HP 01,5,0 032 116311HP 8,5,0 032 16321HP 01,5,0 032 122411HP 01,5,0 032 12421HP 01,5,0 032 118401HP 01,5,0 032 1
C-,B-18401hP 9,0 064/032 318421HP 01,5,0 032 1B-18421HP 9,0 032 3
0601HP 01,5,0 032 1C-,B-0601HP 9,0 064/032 3
MIS-1189
FIGURE 11UNIT 24V TERMINAL BOARD ( 15 THRU 20 KW)

Manual 2100-354Page 19
START UP AND OPERATION
THREE PHASE SCROLL COMPRESSORSTART UP INFORMATIONScroll compressors, like several other types ofcompressors, will only compress in one rotationaldirection. Direction of rotation is not an issue with singlephase compressors since they will always start and run inthe proper direction.
However, three phase compressors will rotate in eitherdirection depending upon phasing of the power. Sincethere is a 50-50 chance of connecting power in such a wayas to cause rotation in the reverse direction, verification ofproper rotation must be made. Verification of properrotation direction is made by observing that suctionpressure drops and discharge pressure rises when thecompressor is energized. Reverse rotation also results inan elevated sound level over that with correct rotation, aswell as, substantially reduced current draw compared totabulated values.
Verification of proper rotation must be made at the timethe equipment is put into service. If improper rotation iscorrected at this time there will be no negative impact onthe durability of the compressor. However, reverseoperation for over one hour may have a negative impact onthe bearing due to oil pump out.
NOTE: If compressor is allowed to run in reverserotation for several minutes the compressor’sinternal protector will trip.
All three phase ZR*3 compressors are wired identicallyinternally. As a result, once the correct phasing isdetermined for a specific system or installation, connectingproperly phased power leads to the same Fusite terminalsshould maintain proper rotation direction.
The direction of rotation of the motor may be changed byreversing any two line connections to the unit.
SEQUENCE OF OPERATIONCOOLING – Circuit R-Y makes at thermostat pulling incompressor contactor starting the compressor and outdoormotor. The G (indoor motor) circuit is automaticallycompleted on any call for cooling operation, or can beenergized by manual fan switch on subbase for constant aircirculation.
HEATING – A 24V solenoid coil on reversing valvecontrols heating cycle operation. Two thermostat options,one allowing “AUTO” changeover from cycle to cycle andthe other constantly energizing solenoid coil during heatingseason and thus eliminating pressure equalization noiseexcept during defrost, are to be used. On “AUTO” option,a circuit is completed from R-W1 and R-Y on each heating“On” cycle energizing reversing valve solenoid and pullingin compressor contactor starting compressor and outdoormotor. R-G also make starting indoor blower motor. Heatpump heating cycle now in operation. The secondenergizes the reversing valve solenoid constantly wheneverthe system switch on subbase is placed in “Heat” position,the “B” terminal being constantly energized from R. Athermostat demand for heat completes R-Y circuit, pullingin compressor contactor starting compressor and outdoormotor. R-G also make starting indoor blower motor.

Manual 2100-354Page 20
FIGURE 12HEAT PUMP CONTROL BOARD
MIS-1191
There is also a 5 minute compressortime delay function built into theHPC, This is to protect thecompressor from instances it ishelpful to the service technician tooverride or speed up this timingperiod, and shorting out the speedupterminals for a few seconds can dothis.
DEFROST CYCLEThe defrost cycle is controlled by temperature and time onthe solid state heat pump control. See Figure 12.
When the outdoor temperature is in the lower 40° Ftemperature range or colder, the outdoor coil temperatureis 32° F or below. This coil temperature is sensed by thecoil sensor mounted near the bottom of the outdoor coil.Once coil temperature reaches 30° F or below, the coilsends a signal to the control logic of the heat pump controland the defrost timer will start.
After 30 minutes at 30° F or below, the heat pump controlwill place the system in the defrost mode.
During the defrost mode, the refrigerant cycle switchesback to the cooling cycle, the outdoor motor stops, electricheaters are energized, and hot gas passing through theoutdoor coil melts any accumulated frost. When thetemperature rises to approximately 57° F the coil sensorwill send a signal to the heat pump control which willreturn the system to heating operations automatically.
If some abnormal or temporary condition such as a highwind causes the heat pump to have a prolonged defrostcycle, the heat pump control will restore the system toheating operation automatically after 10 minutes.
There are three settings on the heat pump control – 30minute, 60 minute and 90 minute. Models are shippedwired on the 60 minute setting for greatest operatingeconomy. If special circumstances require a change toanother time, remove wire connected to terminal 60 andreconnect to desired terminal. Refer to Figure 12. Themanufacturer’s recommendation is for 60 minute defrostcycles.
There is a cycle speed up jumper on the control. This canbe used to reduce the time between defrost cycle operationwithout waiting for time to elapse.
Use a small screwdriver or other metallic object, or another1/4 inch QC to short between the SPEEDUP terminals toaccelerate the HPC timer and initiate defrost.
Be careful not to touch any other terminals with instrumentused to short the SPEEDUP terminals. It may take up to10 seconds with the SPEEDUP terminals shorted for thespeedup to be completed and the defrost cycle to start.
As soon as the defrost cycle kicks in remove theshorting instrument from the SPEEDUP terminals.Otherwise the timing will remain accelerated and runthrough the 1 minute maximum defrost length sequence ina matter of seconds and will automatically terminate thedefrost sequence.
There is an initiate defront jumper (sen jump) on thecontrol that can be used at any outdoor ambient during theheating cycle to simulate a 0° coil temperature. This canbe used to check defrost operation of the unit withoutwaiting for the outdoor ambient to fall into the defrostregion.
By placing a jumper across the SEN JMP terminals (a 1/4inch QC terminal works best) the defrost sensor mountedon the outdoor coils is shunted out and will activate thetiming circuit. This permits the defrost cycle to be checkedout in warmer weather conditions without the outdoortemperature having to fall into the defrost region.
In order to terminate the defrost test in the SEN JMPjumper must be removed. If left in place too long thecompressor could stop due to the high pressure controlopening because of the high pressure condition created byoperating in the cooling mode with outdoor fan off.Pressure will rise fairly fast as there is likely no actual froston the outdoor coil in this artificial test condition

Manual 2100-354Page 21
SOLID STATE HEAT PUMP CONTROLTROUBLESHOOTING PROCEDURE1. Turn on AC power supply to indoor and outdoor
units.
2. Turn thermostat blower switch to fan on. The indoorblower should start. (If it doesn’t, troubleshootindoor unit and correct problem.)
3. Turn thermostat blower switch to Auto position.Indoor blower should stop.
4. Set system switch to heat or cool. Adjust thermostatto call for heat or cool. The indoor blower,compressor, and outdoor fan should start.
NOTE: If there is no power to 24 volt transformer, thecompressor and outdoor fan motor will not startfor 5 minutes. This is because of thecompressor short cycle protection.
TROUBLESHOOTING
MOTPMYS SESUACELBISSOP KCEHCOTTAHW RIAPERROKCEHCOTWOH
rotcatnocrosserpmoCezigrenetonseod)gnitaehrognilooc(
gniriwtiucriclortnoC ,tinutanoitcennocRrofkcehCC-RneewtebV42dna
rewopottinuroodtuootnoitcennocRnuRlortnocpmuptaeh
tuokcolrosserpmoC .1
.2
neewtebV42rofkcehClortnocpmuptaehnoC-1L
hgihssorcakcehC.hctiwserusserp
.1
.2
tatsomrehtnrutC-LneewtebegatlovonfIerusserphgihteserotniaganodnaffo
.hctiwstonlliwdnaneposihctiwserusserphgihfI
.hctiwsersserphgihecalper,teser
trohsrosserpmoCnoitcetorpelcyc
C-CCneewtebV42rofkcehClortnocpmuptaehnoC-Ydna
pudeepsrepmuj,C-CCneewtebegatlovonfIdluohsrewopsdnoces01nihtiwdnalanimret
pudeepsevomeR.C-CCneewtebraeppasdnoces01retfarepmuj
lortnocpmuptaeHevitcefed
elbissoprehtollakcehC560-0012launaM.sesuac
lortnocpmuptaehecalpeR
evitcefedrotcatnoC liocdetrohsroneporofkcehCgnidniw
rotcatnocecalpeR
rotomroodtuonaFnurtonseod
gnitaehrognilooc()tsorfedgnirudtpecxe
evitcefedrotoM detrohsroneporofkcehCgnidniwrotom
rotomecalpeR
roticapacrotoMevitcefed
kcehC.gnitarroticapackcehC.roticapacdetrohsroneporof
roticapacecalpeR
lortnocpmuptaeHevitcefed
taehnoyalernafssorcakcehC)CN-moC(lortnocpmup
lortnocpmuptaehecalpeR
seodevlavgnisreveRezigreneton)ylnognitaeh(
evlavgnisreveRevitcefedliocdionelos
liocdetrohsroneporofkcehC liocdionelosecalpeR
lortnocpmuptaeHevitcefed
C-VRneewtebV42rofkcehCC-Bdna
.1
.2gniriwtiucriclortnockcehClortnocpmuptaehecalpeR
otniogtonlliwtinUtsorfed
)ylnognitaeh(
rosneserutarepmeTlortnocpmuptaehro
evitcefed
rosneserutarepmettcennocsiDssorcarepmujdnadraobmorf
nesdnaslanimretpudeepsdluohssihT.slanimretpmujahguorhtogottinuehtesuac.etunimenonihtiwelcyctsorfed
.1
.2
ecalper,elcyctsorfedhguorhtseogtinufIrosneserutarepmet
,elcyctsorfedhguorhtogtonseodtinufI.lortnocpmuptaehecalper
tuoemoctonlliwtinUtsorfedfo
)ylnognitaeh(
rosneserutarepmeTlortnocpmuptaehro
evitcefed
pudeepsssorcarepmuJesuacdluohssihT.slanimrettsorfedfotuoemocottinueht
.etunimenonihtiw
.1
.2
ecalper,elcyctsorfedfotuosemoctinufI.rosneserutarepmret
,elcyctsorfedfotuoemoctonseodtinufI.lortnocpmuptaehecalper
TROUBLESHOOTING

Manual 2100-354Page 22
CHECKING TEMPERATURE SENSORCHECK OUT1. Disconnect temperature sensor from board and from
outdoor coil.
2. Use an ohmmeter and measure the resistance of thesensor. Also use ohmmeter to check for short or open.
3. Check resistance reading to chart of resistance; usesensor ambient temperature. (Tolerance of part is± 10%.)
4. If sensor resistance reads very low, then sensor isshorted and will not allow proper operation of the heatpump control.
5. If sensor is out of tolerance, shorted, open, or readsvery low ohms then it should be replaced.
F R F R F R F R
0.52-0.42-0.32-0.22-0.12-0.02-0.91-0.81-0.71-0.61-0.51-0.41-0.31-0.21-0.11-0.01-0.9-0.8-0.7-0.6-0.5-0.4-0.3-0.2-0.1-0.00.10.20.30.40.50.60.70.80.90.010.110.21
1786919900915853818137719821717845614099519254515539414734416759316594316050319126219802218018112724115750110107014753010620014607918939800199318817358996281210823677032570192707607705868146699346944265650654785
0.310.410.510.610.710.810.910.020.120.220.320.420.520.620.720.820.920.030.130.230.330.430.530.630.730.830.930.040.140.240.340.440.540.640.740.840.940.05
5896548255046351502541505820940957400264558444553459224770148989375783256733856384553545434753343623327130480368992751925538277572328622906238352696420304248332857220512216512989025340269891
0.350.250.350.450.550.650.750.850.950.060.160.260.360.460.560.660.760.860.960.070.170.270.370.470.570.670.770.870.970.080.180.280.380.480.580.680.780.88
47391768815738198971434714896174561221610175101351129414454177141028314743173131018212942138121388111951170311130112670110501742010000106796259992977092688356894480528750896876867
0.980.090.190.290.390.490.590.690.790.890.990.0010.1010.2010.3010.4010.5010.6010.7010.8010.9010.0110.1110.2110.3110.4110.5110.6110.7110.8110.9110.0210.1210.2210.3210.421
705743375617000704863866135638369326890616957285796507556445623580254905289437847674366426544644763447242814390460041293838375738763106362532543
TEMPERATURE F VS RESISTANCE R OF TEMPERATURE SENSOR

Manual 2100-354Page 23
FAN BLADE SETTINGSShown in Figure 13 are the correct fan blade settingdimensions for proper air delivery across the outdoor coil.
Any service work requiring removal or adjustment in thefan and/or motor area will require that the dimensions inTable 14 be checked and blade adjusted in or out on themotor shaft accordingly.
SERVICE
SERVICE HINTS1. Caution homeowner to maintain clean air filters at all
times. Also, not to needlessly close off supply andreturn air registers. This reduces air flow through thesystem which shortens equipment service life as wellas increasing operating costs.
2. Switching to heating cycle at 75°F or higher outsidetemperature may cause a nuisance trip of the manualreset high pressure switch.
3. The heat pump wall thermostats perform multiplefunctions. Be sure that all function switches arecorrectly set for the desired operating mode beforetrying to diagnose any reported service problems.
4. Check all power fuses or circuit breakers to be surethat they are the correct rating.
5. Periodic cleaning of the outdoor coil to permit full andunrestricted airflow circulation is essential.
PRESSURE SERVICE PORTSHigh and low pressure service ports are installed on allunits so that the system operating pressures can beobserved. Pressure tables can be found in Tables 16through 23 in this manual covering all models on bothcooling and heating cycles. It is imperative to match thecorrect pressure table to the unit by model number.
REFRIGERANT CHARGEThe correct system R-22 charge is shown on the unit ratingplate. Optimum unit performance will occur with arefrigerant charge resulting in a suction line temperature(6” from compressor) as shown in Table 13. FIGURE 13
FAN BLADE SETTING
MIS-1190
TABLE 14FAN BLADE SETTING
DIMENSIONS
ledoMnoisnemiD
"A"4211HP4221HP "00.1
0311HP0321HP6311HP6321HP
"57.
22411HP2421HP8401HP8421HP0601HP
"57.1
The above suction line temperatures are based upon80°F dry bulb/67°F wet bulb (50% RH) temperature andrated airflow across the evaporator during cooling cycle.
TABLE 13
ledoMdetaRwolfriA
DO°59erutarepmeT
DO°28erutarepmeT
24211HP 008 75-65 76-5614221HP 008 66-46 96-760311HP 0001 85-65 06-850321HP 0001 85-65 06-856311HP 0011 25-05 45-256321HP 0011 25-05 45-252411HP 0041 65-45 95-752421HP 0041 65-45 95-758401HP 0551 75-55 06-858421HP 0551 75-55 95-750601HP 0071 45-25 95-75

Manual 2100-354Page 24
SUCTION AND DISCHARGE TUBEBRAZINGCompliant Scroll compressors have copper plated steelsuction and discharge tubes. These tubes are far morerugged and less prone to leaks than copper tubes used onother compressors. Due to different thermal properties ofsteel and copper, brazing procedures may have to bechanged from those commonly used.
• To disconnect: heat joint Areas 2 and 3 slowly anduniformly until braze material softens and the tube canbe pulled out of suction fitting. (See Figure 14.)
• To connect:
– Recommended brazing materials: silfos withminimum 5% silver or silver braze material withflux.
– Reinsert tube into fitting.
– Heat tube uniformly in Area 1 moving slowly toArea 2. When joint reaches brazing temperature,apply brazing material. (See Figure 14.)
– Heat joint uniformly around the circumference toflow braze material completely around the joint.
– Slowly move torch into Area 3 to draw brazematerial into joint. (See Figure 14.)
– Do not overheat joint.
MIS-1179
FIGURE 14BRAZING DIAGRAM
TABLE 15INDOOR BLOWER PERFOMANCE
/ niPSE/H20
4211HPlioCteW/yrD
0311HPlioCteW/yrD
6311HPlioCteW/yrD
2411HPlioCteW/yrD
8401HPlioCteW/yrD
0601HPlioCteW/yrD
0.0 /519 009 /0231 0521 /0231 0521 /0561 5261 /0591 0291 /0581 05811.0 /068 538 /0821 5711 /0821 5711 /0051 5251 /0681 0381 /0081 08712.0 /518 008 /0321 0011 /0321 0011 /5341 0041 /0871 0571 /5271 00713.0 /587 057 /0811 0001 /0811 0001 /0431 0131 /0861 0661 /0661 52614.0 /057 017 /0311 059 /0311 059 /0321 0121 /0851 0551 /0851 04515.0 /047 007 /0701 098 /0701 098 /0211 0001 /0051 0841 AN

Manual 2100-354Page 25
TROUBLESHOOTING ECM BLOWER MOTORS
CAUTIONDisconnect power from unit before removing or replacing connectors, or servicing motor. Wait atleast 5 minutes after disconnection power before opening motor.
MOTPMYS ERUDECORP/ESUAC.gnitratsnehwylthgilsskcorrotoM $ MCIrofpu-tratslamronsisihT
tratst'nowrotoM
$ tnemevomoN $ rotomtarewopkcehC
$ rotomta)CotRCAV42(egatlovwolkcehC
$ rotomta)C,R,W,Y,G(snoitcennocegatlovwolkcehC
$ ssenrahrotomnosrotcennocnisnipdetaesnurofkcehC
$ G-RneewtebrepmujyraropmetahtiwtseT
$ tfahsthgitrofrotomkcehC
$ nuR kcehCerutisoM
$ tratst'nowtub,skcorrotoM $ tnuomrotomtnailpmocroesoolrofkcehC
$ tfahsnothgitsileehwrewolberusekaM
gniebelihwnwoddnapusetallicsorotoMrewolbfoffodetset $ .tfahsnodaolonhtiwetallicsootrotomroflamronsitI
$ tenibacforewolbysioN $ .cte,slenap,gnisuohrewolbesoolrofkcehC
$ ?deepsrewolbhgihgnitaerccitatshgiH– ,stcudnismaeshguorhtgniltsihwriarofkcehC
.slenaprostenibac– noitamrofedtcud/tenibacrofkcehC
$ )deeps(MFChgihta"sffup"ro"stnuH" $ ?"gniffup"ecuderretlifrolenapgnivomerseoD
– noitcitserecudeR
– wolfriamumixamecudeR
erutsioMfoecnedivE$ dnaderuccosahnoitcnuflamfoeruliafrotoM
tneserpsierutsiom$ mrofrepdnarotomecalpeR kcehCerutsioM
$ revomriaedisnitneserperutsiomfoecnedivE $ kcehCerutsioMmrofreP
OD T'NOD$ snoitcennocdnagniriw,slortnoc,rotomtuokcehC
rotomgnicalpererofebylhguoroht$ dabsirotomehtemussayllacitamotuA
$ ;nitegt'nacretawosnwodsrotcennoctneirO"spoolpird"llatsni
$ snoitsopksolc'o4dna7evobasrotcennocetacoL
$ srebmunledomlortnocdnarotomdezirohtuaesUtnemecalperrof
$ rehtonahtiwrebmunledomlortnocforotomenoecalpeR)tnemecalperdezirohtuanasselnu(
$ :muminimaoterusserpcitatspeeK $ H"2/1evahemoS.sretlifporderusserphgihesU 2 !pordO
– sretlifcitatswol,ycneiciffehgihdnemmoceR $ snruterdetcirtseresU
– naelcsretlifgnipeekdnemmoceR– ,citatsmuminimrofkrowtcudngiseD
trofmocmumixam– krowtcuddnemmocerdnarofkooL
.tnemecalperni,yrassecenerehw,tnemevorpmi

Manual 2100-354Page 26
MOTPMYS ERUDECORP/ESUACyllacitarresnurtubstratsrotoM
$ tnettimretnironwoddnapuseiraV $ "gas"ronoitairavrofegatlovenilkcehC$ ;rotomta)C,R,W,Y,G(snoitcennocegatlovwolkcehC
srotcennocssenrahrotomnisnipdetaesnu$ deepselbairavni(dnammocMFCcitarrerof"kB"kcehC
snoitacilppa$ ?tatsomreht-slortnocmetsystuokcehC$ mrofreP kcehCerutsioM
$ )deeps(MRChgihta"sffupro"stnuH" $ ?"gniffup"ecuderretlifrolenapgnivomerseoD
– noitcirtserecudeR
– wolfriamumixamecudeR
$ roloocrofllacmetssysetipsedMFCwoltasyatSMFCtaeh
$ snoitcennocdnaseriw)tatsomreht(egatlovwolkcehC
$ siyaledlitnutiaw-edomyaladnitonsinafyfireVetelpmoc
$ rotomtadetcennocton/gnissim"R"kcehctnemecalperlortnoc/rotommrofreP
$ MFChgihtasyatS $ rotomtadetcennocton/gnissim"R"
$ etelpmocemityaledlitnutiaw-?edomyaladninafsI
$ ffotuhst'nowrewolB $ ?WroY,GotnislortnocmorfegakaeltnerruC– etatsdilosrotatsomrehtdehctiwscairTrofkcehC
yaler
NOTPMYS ERUDECORP/ESUACesionevissecxE $ .esionrotomrotcud,tenibac,esionriasitifienimreteD
.yrssecenfiremotsucweivretnI
$ esioNriA $ ?deepsrewolbhgihgnitaerccitatshgiH
– ?ylreporpteswolfriasI– ?nwodwolsotrewolbesuacretlifgnivomerseoD
retlifecalper/kcehC– retlifporderusserpwolesU
– snoitcritsertcudtcerroc/kcehC
OD T'NOD$ ylesiwtnempuqeehteziS $ wolfriawolhtiwetasnepmocnehtmetsysezisrevO$ rotomgnitresnierofebnoitatneirokcehC
srotcennoc$ sdrawkcabrotcennocrewopnigulP
$ sgulpecroF
ERUDECORPKCEHCERUTSIOM ERUDECORPKCEHCTROFMOC
$ "nwod"detneiroerasrotcennoC $ sgnitteswolfriareporpkcehC
$ rotomrednu"poolpird"htiwsessenrahegnarrA $ esiontsewolroferusserpcitatswoL
$ ?deggulpniardetsnednoC $ MFCnafsuounitnocwolteS
$ )yticapactnetalhcumoot(wolfriawolrofkcehC $ stinugniloocdeeps-2dnatatsidimuhesU
$ noitidnocdegrahcrednurofkcehC $ MFCetalugertahtMCIrofdengisedslortnocgninozesU
$ tenibacdnastcudnrtuerniskaelgulpdnakcehC $ ?noitacoldabnitatsomrehT

Manual 2100-354Page 27
PRESSURE TABLES
Low side pressure ± 2 PSIGHigh side pressure ± 5 PSIG
Tables are bused upon rated CFM (airflow across the evaporator coil and should be found under section titled “Refrigerant Charge”elsewhere in manual. If there is any doubt as to correct operating charge being in the system, the charge should be removed, systemevacuated, and recharged to serial plate instructions.
TABLE 16
COOLINGAir Temperature Entering Outdoor Coil Degrees F
ledoMriAnruteRerutarepmeT erusserP 57 08 58 09 59 001 501 011 511
4211HP
BD.ged57BW.ged26
ediSwoLediShgiH
37191
57902
67722
77542
87362
97182
08992
18713
38553
BD.ged08BW.ged76
ediSwoLediShgiH
97691
18512
28332
38252
48072
58882
68703
78523
98443
BD.ged58BW.ged27
ediSwoLediShgiH
58302
78222
88242
98162
09082
19992
29813
39833
59753
0311HP
BD.ged57BW.ged26
ediSwoLediShgiH
37802
47622
67542
77462
97382
18203
28123
48043
58853
BD.ged08BW.ged76
ediSwoLediShgiH
77132
97232
18252
38172
58092
78903
98823
19843
39763
BD.ged58BW.ged27
ediSwoLediShgiH
38022
58042
78062
98082
19003
39023
59043
79063
99083
6311HP
BD.ged57BW.ged26
ediSwoLediShgiH
07902
27722
37542
47262
57082
67892
77513
87333
08153
BD.ged08BW.ged76
ediSwoLediShgiH
57512
77332
87152
97072
08782
18503
28323
38143
58953
BD.ged58BW.ged27
ediSwoLediShgiH
08222
18042
38952
48872
68792
88613
98533
19453
29273
TABLE 17
HEATINGAir Temperature Entering Outdoor Coil Degrees F
ledoM
nruteRriA.pmeT erusserP 0 5 01 51 71 02 52 03 53 04 54 74 05 55 06
4211HP ged07 ediSwoLediShgiH
21392
61391
12002
62702
82012
13412
63122
14922
54632
05342
55052
75352
06752
56462
07272
0311HP ged07 ediSwoLediShgiH
13971
82771
72671
72771
72871
82081
03481
43981
93691
54502
35512
65912
16622
17932
38452
6311HP ged07 ediSwoLediShgiH
14512
33991
82881
52081
42871
42671
42671
72971
23681
93791
84112
25812
95922
27152
78772

Manual 2100-354Page 28
PRESSURE TABLES
Low side pressure ± 2 PSIGHigh side pressure ± 5 PSIG
Tables are bused upon rated CFM (airflow across the evaporator coil and should be found under section titled “Refrigerant Charge”elsewhere in manual. If there is any doubt as to correct operating charge being in the system, the charge should be removed,system evacuated, and recharged to serial plate instructions.
TABLE 18
COOLINGAir Temperature Entering Outdoor Coil Degrees F
ledoMriAnruteRerutarepmeT erusserP 57 08 58 09 59 001 501 011 511
2411HP
BD.ged57BW.ged26
ediSwoLediShgiH
47291
57012
77722
87442
97162
08972
18692
28413
38233
BD.ged08BW.ged76
ediSwoLediShgiH
97791
08512
28332
38052
48862
58682
78403
88223
98043
BD.ged58BW.ged27
ediSwoLediShgiH
58402
68322
88142
98952
09772
19692
49513
59333
69253
8401HP
BD.ged57BW.ged26
ediSwoLediShgiH
17112
37622
57342
67852
77672
87392
97013
08923
18743
BD.ged08BW.ged76
ediSwoLediShgiH
67612
87232
08942
18562
38382
48003
58813
68733
78653
BD.ged58BW.ged27
ediSwoLediShgiH
18422
38042
68852
78472
98292
09113
19923
29943
49863
0601HP
BD.ged57BW.ged26
ediSwoLediShgiH
56991
66612
86532
96452
07272
17192
27903
37823
47543
BD.ged08BW.ged76
ediSwoLediShgiH
07402
17222
27142
37062
57972
67892
77713
87633
97453
BD.ged58BW.ged27
ediSwoLediShgiH
57112
67032
77942
87962
08982
28803
38823
48843
58663
TABLE 19
HEATING Air Temperature Entering Outdoor Coil Degrees F
ledoM
nruteRriA.pmeT erusserP 0 5 01 51 71 02 52 03 53 04 54 74 05 55 06
2411HP ged07 ediSwoLediShgiH
71651
91161
12561
62961
92171
33371
83771
54181
94681
25391
55991
65302
85702
16412
46122
8401HP ged07 ediSwoLediShgiH
52061
72461
92861
13271
23471
43671
63081
83481
04881
74491
45102
65402
06802
76412
37122
0601HP ged07 ediSwoLediShgiH
71651
91461
12271
42081
62381
92781
33591
73302
14112
64912
05622
25032
55432
95342
46052

Manual 2100-354Page 29
PRESSURE TABLES
Low side pressure ± 2 PSIGHigh side pressure ± 5 PSIG
Tables are bused upon rated CFM (airflow across the evaporator coil and should be found under section titled “Refriger-ant Charge” elsewhere in manual. If there is any doubt as to correct operating charge being in the system, the chargeshould be removed, system evacuated, and recharged to serial plate instructions.
TABLE 20
COOLINGAir Temperature Entering Outdoor Coil Degrees F
ledoMriAnruteRerutarepmeT erusserP 57 08 58 09 59 001 501 011 511
4221HP
BD.ged57BW.ged26
ediSwoLediShgiH
37191
57502
67912
87432
97152
08762
18582
28303
38323
BD.ged08BW.ged76
ediSwoLediShgiH
87691
08012
18522
38042
48752
88472
78292
88113
98133
BD.ged58BW.ged27
ediSwoLediShgiH
18302
38712
48332
68842
78662
98482
09203
19223
29343
0321HP
BD.ged57BW.ged26
ediSwoLediShgiH
37802
57222
67732
87452
97072
97882
18703
28623
48643
BD.ged08BW.ged76
ediSwoLediShgiH
87312
08822
18342
38062
48772
58592
78513
88433
09553
BD.ged58BW.ged27
ediSwoLediShgiH
18022
38632
48252
68962
78782
88503
09623
19643
39763
6321HP
BD.ged57BW.ged26
ediSwoLediShgiH
27112
47522
57242
77852
87672
97492
08413
18333
28553
BD.ged08BW.ged76
ediSwoLediShgiH
77612
97132
08842
28562
38382
48203
68223
78243
88463
BD.ged58BW.ged27
ediSwoLediShgiH
08422
28932
38752
58472
68392
78313
98333
09453
19773
TABLE 21
HEATING
Air Temperature Entering Outdoor Coil Degrees F
ledoM
nruteRriA.pmeT erusserP 0 5 01 51 71 02 52 03 53 04 54 74 05 55
4221HP ged07 ediSwoLediShgiH
22471
42281
72091
03891
13102
33502
73312
14122
54922
05732
65542
85842
26352
86162
0321HP ged07 ediSwoLediShgiH
12761
32071
52471
82871
92971
13281
43781
83291
34791
84302
35012
55312
95712
56422
6321HP ged07 ediSwoLediShgiH
42491
52591
62791
82102
82202
03502
33112
73812
24622
74532
35642
65052
06752
86072

Manual 2100-354Page 30
PRESSURE TABLES
Low side pressure ± 2 PSIGHigh side pressure ± 5 PSIG
Tables are bused upon rated CFM (airflow across the evaporator coil and should be found under section titled“Refrigerant Charge” elsewhere in manual. If there is any doubt as to correct operating charge being in the system,the charge should be removed, system evacuated, and recharged to serial plate instructions.
TABLE 22
COOLINGAir Temperature Entering Outdoor Coil Degrees F
ledoMriAnruteRerutarepmeT erusserP 57 08 58 09 59 001 501 011 511
2421HP
BD.ged57BW.ged26
ediSwoLediShgiH
47691
67112
77522
87142
97752
97472
18192
18803
28623
BD.ged08BW.ged76
ediSwoLediShgiH
97102
18612
28132
38742
48462
58182
78892
78613
88433
BD.ged58BW.ged27
ediSwoLediShgiH
28802
48422
58932
68652
78372
88192
09803
09723
19643
8421HP
BD.ged57BW.ged26
ediSwoLediShgiH
27302
47152
67032
77542
97162
08082
18892
38913
48043
BD.ged08BW.ged76
ediSwoLediShgiH
77802
97122
18632
28152
48862
68782
78603
98723
09943
BD.ged58BW.ged27
ediSwoLediShgiH
08512
28922
48442
58062
78772
98792
09713
29833
39163
TABLE 23
HEATING
Air Temperature Entering Outdoor Coil Degrees F
ledoM
nruteRriA.pmeT erusserP 0 5 01 51 71 02 52 03 53 04 54 74 05 55 06
2421HP ged07 ediSwoLediShgiH
62061
62461
82861
03371
13471
23771
63281
04781
44291
94891
55402
85602
26012
96612
77322
8421HP ged07 ediSwoLediShgiH
62561
62661
72861
82071
92171
03371
33771
73281
14781
64491
25102
45402
85902
56712
37722