INSTALLATION INSTRUCTIONS - Magick Woods Elements...What Magick Woods Exports Pvt. Ltd. Will Do...
4
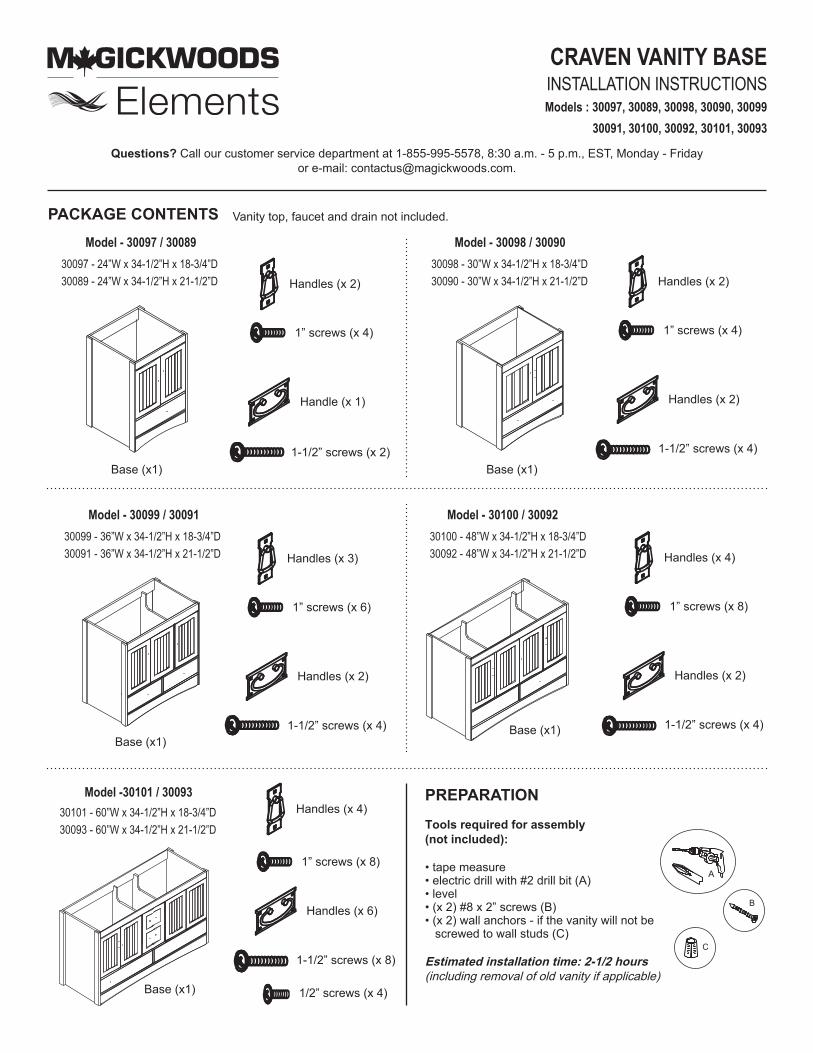
PACKAGE CONTENTS Vanity top, faucet and drain not included. CRAVEN VANITY BASE INSTALLATION INSTRUCTIONS Models : 30097, 30089, 30098, 30090, 30099 30091, 30100, 30092, 30101, 30093 Questions? Call our customer service department at 1-855-995-5578, 8:30 a.m. - 5 p.m., EST, Monday - Friday or e-mail: [email protected]. Base (x1) Base (x1) Base (x1) Base (x1) Base (x1) Tools required for assembly (not included): • tape measure • electric drill with #2 drill bit (A) • level • (x 2) #8 x 2” screws (B) • (x 2) wall anchors - if the vanity will not be screwed to wall studs (C) Estimated installation time: 2-1/2 hours (including removal of old vanity if applicable) PREPARATION Model - 30097 / 30089 30097 - 24”W x 34-1/2”H x 18-3/4”D 30089 - 24”W x 34-1/2”H x 21-1/2”D Model - 30098 / 30090 30098 - 30”W x 34-1/2”H x 18-3/4”D 30090 - 30”W x 34-1/2”H x 21-1/2”D Model - 30099 / 30091 30099 - 36”W x 34-1/2”H x 18-3/4”D 30091 - 36”W x 34-1/2”H x 21-1/2”D Model - 30100 / 30092 30100 - 48”W x 34-1/2”H x 18-3/4”D 30092 - 48”W x 34-1/2”H x 21-1/2”D Model -30101 / 30093 30101 - 60”W x 34-1/2”H x 18-3/4”D 30093 - 60”W x 34-1/2”H x 21-1/2”D Handles (x 2) Handle (x 1) 1-1/2” screws (x 2) 1” screws (x 4) Handles (x 2) Handles (x 2) 1-1/2” screws (x 4) 1” screws (x 4) Handles (x 3) Handles (x 2) 1-1/2” screws (x 4) 1” screws (x 6) Handles (x 4) Handles (x 2) 1-1/2” screws (x 4) 1” screws (x 8) Handles (x 4) Handles (x 6) 1-1/2” screws (x 8) 1” screws (x 8) 1/2” screws (x 4)
Transcript of INSTALLATION INSTRUCTIONS - Magick Woods Elements...What Magick Woods Exports Pvt. Ltd. Will Do...
PACKAGE CONTENTS Vanity top, faucet and drain not included.
CRAVEN VANITY BASEINSTALLATION INSTRUCTIONSModels : 30097, 30089, 30098, 30090, 30099
30091, 30100, 30092, 30101, 30093
Questions? Call our customer service department at 1-855-995-5578, 8:30 a.m. - 5 p.m., EST, Monday - Fridayor e-mail: [email protected].
Base (x1) Base (x1)
Base (x1)Base (x1)
Base (x1)
Tools required for assembly (not included): • tape measure• electric drill with #2 drill bit (A)• level• (x 2) #8 x 2” screws (B) • (x 2) wall anchors - if the vanity will not be screwed to wall studs (C)
Estimated installation time: 2-1/2 hours (including removal of old vanity if applicable)
PREPARATION
Model - 30097 / 3008930097 - 24”W x 34-1/2”H x 18-3/4”D30089 - 24”W x 34-1/2”H x 21-1/2”D
Model - 30098 / 3009030098 - 30”W x 34-1/2”H x 18-3/4”D30090 - 30”W x 34-1/2”H x 21-1/2”D
Model - 30099 / 3009130099 - 36”W x 34-1/2”H x 18-3/4”D30091 - 36”W x 34-1/2”H x 21-1/2”D
Model - 30100 / 3009230100 - 48”W x 34-1/2”H x 18-3/4”D30092 - 48”W x 34-1/2”H x 21-1/2”D
Model -30101 / 3009330101 - 60”W x 34-1/2”H x 18-3/4”D30093 - 60”W x 34-1/2”H x 21-1/2”D
Handles (x 2)
Handle (x 1)
1-1/2” screws (x 2)
1” screws (x 4)
Handles (x 2)
Handles (x 2)
1-1/2” screws (x 4)
1” screws (x 4)
Handles (x 3)
Handles (x 2)
1-1/2” screws (x 4)
1” screws (x 6)
Handles (x 4)
Handles (x 2)
1-1/2” screws (x 4)
1” screws (x 8)
Handles (x 4)
Handles (x 6)
1-1/2” screws (x 8)
1” screws (x 8)
1/2” screws (x 4)

WARNINGS & CAUTIONSWARNING:Two people are required for safe installation. Take extra precautionary measures to ensure a secure grip on the vanity base when lifting.
CAUTION: The bathroom floor and wall must be finished prior to installation of the vanity base.
CARE & MAINTENANCE• To maintain the beauty of the furniture finish, avoid placing the vanity in direct sunlight.• Avoid exposing the vanity to extreme temperatures by installing away from heat and air vents.• Dust frequently with a clean, soft and dry cloth.• Wipe away any water or liquid spills on the vanity base immediately with a clean, soft and dry cloth.
1: Removing old vanity (if applicable): 1) Turn off the water supply and take the drain out. 2) Disconnect the supply lines from the faucet. 3) Remove the old vanity top and vanity. NOTE: If the new vanity is not installed immediately, temporarily stuff a rag into the drain pipe.
2: Using a level, locate any uneven floor and/or wall areas where your vanity will be installed. Unevenness can cause your vanity to become misaligned resulting in twisting of the cabinet. Repair any uneven areas by reducing high spots or shimming low spots.
3: 1) Place the vanity in the desired position taking into account the location of your plumbing. 2) Ensure the vanity is level front to back and at both sides.
4: Attach the handles for the doors by using 1” screws and the handles for the bottom drawers by using 1-1/2” screws. Figure 1. NOTE: For models 30101 and 30093, use the 1/2” screws for the middle drawer handles.
5: Secure the vanity to the wall by inserting (x 2) #8 x 2” screws (B - not included) through the back rail of the vanity. Figure 2. NOTE: It is recommended that the vanity be installed to at least one wall stud. If you are unable to locate wall studs, it is recommended that you use wall anchors (C - not included) to secure the vanity.
6: Install the vanity top, faucet and drain (each not included) as per the instruction sheets provided with those items and ensure that there is no leakage.
INSTALLATION Model 30100 shown in illustrations
TROUBLESHOOTINGProblem:1) Vanity doors or drawers rub against another surface. 2) There is an uneven gap between the doors or
drawers and cabinet.
Possible Cause: Floor or vanity is not level.
Corrective Action:1) Use a shim to ensure the vanity is level.2) Adjust the door hinges or drawer slides.
Figures 3 and 4.
Side adjustment:Using a Phillips screwdriver, rotate screw (1) clockwise to move the door left and counter-clockwise to move the door right. Moves the door up to 2 mm.
Depth adjustment:Using a Phillips screwdriver, rotate screw (2) clockwise to move the door forward and counter- clockwise to move the door backwards. Moves the door up to 2 mm.
Height adjustment:Using a Phillips screwdriver, rotate screw (3) clockwise to move the door upward and counter-clockwise to move the door downward. Moves the door up to 2 mm.
Figure 3 - Adjusting Hinges
Figure 1 Figure 2
C
A
B

Step 1: Release the lever on each drawer slide (push the lever on the left drawer slide downward and the lever on the right drawer slide upward) to release the drawer from the cabinet. NOTE: to remove the drawer, hold the lever in place and firmly pull the drawer out.
Drawer slide
Drawer front
Drawer slide
Drawer slide
Screws
Lever
Step 2: Using a Phillips screwdriver, loosen the screws that fasten the drawer slide to the drawer. Shift the drawer slide as needed (up or down / in or out). Re-tighten the screws and repeat for the opposite side as necessary. To place the drawer back into the cabinet, align the drawer slides with the cabinet slides and push firmly until the drawer is secured into place.
Lever
Figure 4 - Adjusting Drawer Slides
WARRANTYAll products should be checked for defects or damages prior to installation and any defects or damages should be notified to Magick Woods Exports Pvt. Ltd.
What This Warranty Covers: Magick Woods Exports Pvt. Ltd. warrants its products to be free from substantial defects in materials and workmanship from the original date of purchase under normal home use. This warranty is offered only to the original consumer purchaser and may not be transferred. Magick Woods Exports Pvt. Ltd. is only responsible for the actual purchase price.
How Long The Warranty Lasts: Coverage for all vanity cabinets, fixed vanities, drawer banks, bath storage cabinets, linen cabinets, wall hutches, fillers, toe kicks, medicine cabinets, mirrors, and accessories lasts from 3 years from the original date of purchase.
What Magick Woods Exports Pvt. Ltd. Will Do Under The Warranty: During the warranty period, Magick Woods Exports Pvt. Ltd., at its option, will repair or replace any part or product that proves to have substantial defects in materials or workmanship, or Magick Woods Exports Pvt. Ltd. will provide an equivalent replacement product. Magick Woods Exports Pvt. Ltd. reserves the right to change specifications in design and materials without notice and with no obligation to replace products that were previously manufactured.
Implied Warranties: Magick Woods Exports Pvt. Ltd. disclaims any implied warranty of merchantability, and there are no warranties that extend beyond the descriptions on the face hereof.
Wood, Aging and Appearing in Printed Materials: Because of the varying natural characteristics of wood and the effects of aging, product shown in displays and/or printed materials (such as product photos printed in brochures, fliers, catalogs, etc.) will not be an exact match to the cabinetry you will receive. Depending on the wood characteristics, the age of a sample and the environment of the showroom, samples will show some degree of variation from new product. In addition, you should not expect all doors, drawer fronts, trim, or moulding to match exactly in either finish or grain. Variation in wood is normal and unavoidable. In addition, it is not possible to exactly match our colors in printed materials. Therefore, you should view the actual samples when making your color selection.
What This Warranty Does Not Cover: This warranty does not cover any problems or damage which result from improper transportation, improper installation, mishandling, misuse, abuse, neglect, abnormal use, commercial use, improper maintenance, unauthorized repairs, accidents, or acts of God, such as hurricanes, fire, earthquakes or floods. The warranty and any applicable implied warranties do not cover incidental or consequential damages arising from any defects in the product such as labor charges for installation or removal of the product or any associated products. Magick Woods Exports Pvt. Ltd. is not responsible for any installation charges. This warranty does not cover defects or damage caused by normal wear and tear, alterations, environmental conditions, humidity absorption, or mold. In addition, variations in wood grain, finish color, aging, or other natural wood stain characteristics are not considered defects and are not covered by this warranty.
How to Obtain Warranty Service: If you need replacement parts or would like to make a warranty claim, please contact our Customer Service Representative by email, fax, or telephone at the email or telephone/fax numbers listed. All warranty claims must include the model number of the product, copy of the original receipt, and the nature of the problem. In addition, Magick Woods Exports Pvt. Ltd. may at its discretion require inspection of the installation site, photography, or authorize the prepaid return of the claimed defective part. Merchandise not pre-approved for return will not be accepted and the associated claim not accepted. If upon inspection you find your product is damaged or missing parts, it is not necessary to return the unit to the store of purchase. Please contact Magick Woods Exports Pvt. Ltd. Customer Service to obtain a replacement part.
Magick Woods Exports Pvt. Ltd. Customer Service:Phone: 1-855-995-5578 • Fax: 905-738-5579 • Email: [email protected]

CRAVEN COLLECTION
Product Dimensions
• 3 doors with 2 drawers• Matte white finish• Craftsman-inspired doors paired with shaker-style hardware
lend a mission-style charm• Soft-close doors and drawers for smooth and quiet use• Oil rubbed bronze door and drawer pulls included• Vanity top and faucet sold separately
36" 36"
SKU # 605-468236"W X 34-1/2"H X 21-1/2"D
SKU # 605-468936"W X 34-1/2"H X 18-3/4"D
36"W X 34-1/2"H X 18-3/4"D 36"W X 34-1/2"H X 21-1/2"D
36" Craven vanity base
Replacement parts:
1. Left door - R178242. Right door - R178253. Drawer front - R178424. Kick - R178435. Hinge (overlay) - R376286. Hinge (inlay) - R376397. Hinge fixing plate - 376298. Female assembly bracket (kick) - R376149. Male assembly bracket (kick) - R3761510. Handle (door) - 36151 - R3113011. Handle (drawer) - 36152 - R3113112. M4 x 16mm ms pan head screw - (door) - R3113213. M4 x 32mm ms pan head screw - (drawer) - R31134
Product Specifications: