INSTALLATION INSTRUCTIONS & HOME OWNERS MANUAL...
12
INSTALLATION INSTRUCTIONS & HOME OWNERS MANUAL EEMAX ELECTRIC TANKLESS WATER HEATERS IMPORTANT SAFETY INFORMATION When installing or using any high voltage electrical appliance, basic safety precautions should always be followed. Under no circumstances should you attempt to clean, install, inspect, repair, disassemble or otherwise service this water heater, without first shutting off all power to the unit directly at the breaker box. SERIOUS BODILY INJURY OR DEATH COULD OCCUR IF YOU IGNORE THIS WARNING. THIS PRODUCT SHOULD BE INSTALLED BY A QUALIFIED ELECTRICIAN OR PLUMBER IN ACCORDANCE WITH ALL NATIONAL, STATE, PROVINCIAL AND LOCAL ELECTRICAL & PLUMBING CODES. PLEASE READ THESE INSTRUCTIONS THOROUGHLY AND COMPLETELY PRIOR TO INSTALLATION & USE. FAILURE TO DO SO COULD CAUSE PROPERTY DAMAGE, SERIOUS INJURY, OR DEATH. This manual should be given to the homeowner after installation and should be retained for future reference. Tested and certified by the Water Quality Association against NSF/ANSI 372 for lead free compliance.
Transcript of INSTALLATION INSTRUCTIONS & HOME OWNERS MANUAL...

INSTALLATION INSTRUCTIONS & HOME OWNERS MANUAL
EEMAX ELECTRIC TANKLESS WATER HEATERS
IMPORTANT SAFETY INFORMATION
When installing or using any high voltage electrical appliance, basic safety precautions should always be
followed. Under no circumstances should you attempt to clean, install, inspect, repair, disassemble or
otherwise service this water heater, without first shutting off all power to the unit directly at the breaker
box. SERIOUS BODILY INJURY OR DEATH COULD OCCUR IF YOU IGNORE THIS WARNING.
THIS PRODUCT SHOULD BE INSTALLED BY A QUALIFIED ELECTRICIAN OR PLUMBER IN ACCORDANCE
WITH ALL NATIONAL, STATE, PROVINCIAL AND LOCAL ELECTRICAL & PLUMBING CODES.
PLEASE READ THESE INSTRUCTIONS THOROUGHLY AND COMPLETELY PRIOR TO INSTALLATION & USE.
FAILURE TO DO SO COULD CAUSE PROPERTY DAMAGE, SERIOUS INJURY, OR DEATH.
This manual should be given to the homeowner after installation and should be retained for future reference.
Tested and certified by the Water Quality Association against NSF/ANSI 372 for lead free
compliance.


ABOUT YOUR TANKLESS WATER HEATER
Congratulations on the purchase of your Electric Tankless Water Heater! You have purchased the most technologically-advanced electric tankless water heater on the market today.
Your new electric tankless water heater features advanced water flow rate and temperature sensors designed to modulate power to the heating elements to maintain a precise user -selected output water temperature between 80°F and 140°F (subject to incoming water temperature and power of the selected model).
To get the best performance and energy savings from your electric tankless water heater, it is important that it be installed in accordance with our instructions and the electrical and plumbing codes applicable to your area, and that you read this manual thoroughly for important operating instructions and tips.
At any time, if you have any questions, please contact us directly at:
Eemax Inc. 400 Captain Neville Drive, Waterbury, CT 06705
Toll Free: 1-800-543-6163, or 203-267-7890 Fax: 203-267-7975 [email protected]
CONTENTS
1. BEFORE INSTALLATION
2. SELECTING A LOCATION TO INSTALL
3. MOUNTING YOUR WATER HEATER
4. PLUMBING INSTALLATION
5. ELECTRICAL INSTALLATION
6. SIZING GUIDE
7. GENERAL OPERATING INSTRUCTIONS
8. MAINTENANCE
9. TROUBLE SHOOTING GUIDE
10. USER INTERFACE
1- BEFORE INSTALLATION
PLEASE READ THESE INSTRUCTIONS THOROUGHLY AND COMPLETELY PRIOR TO INSTALLATION & USE. FAILURE TO FOLLOW INSTRUCTIONS COULD CAUSE PROPERTY DAMAGE, SERIOUS PERSONAL INJURY, OR DEATH.
By installing this product, you acknowledge the terms of the manufacturer ’s warranty. Once the heater is installed, do not return product to the place of purchase. If you have any questions regarding the warranty or product return policies, please contact Eemax at 800-543-6163.
Inspect all components. The contents of your box should include one of the following units:
EEM24008
EEM24011
EEM24013
EEM24018 EEM24024
EEM24027
EEM24036

2- SELECTING A LOCATION TO INSTALL
This product is designed to be installed indoors only. You may be able to install your unit in an outdoor location as long as it is mounted in a suitable enclosure that protects it from rain, splashed water, direct sunlight, debris, and insects.
DO NOT install this product in a location where it may be subject to freezing temperatures. If the water inside your tankless water heater freezes, it can cause severe and permanent damage that is not covered under your warranty.
DO NOT locate the water heater in a location that is difficult to access.
Make sure that the water heater and hot water outlet pipe are out of the reach of children so they cannot tamper with the temperature controls or injure themselves by touching the hot water outlet pipe. The outlet water pipe can get very hot.
This product does NOT require venting.
Avoid installing your tankless water heater in a location prone to excessive humidity, moisture, or dust, or in an area where it may be splashed with water or other liquids. DO NOT install under water pipes or air conditioning lines that might leak or condense moisture that could then drip onto the heater. DO NOT install above electrical boxes or junctions.
If you plan to install your water heater on a second floor or in a heated attic space, make sure that you follow all code requirements for such installations as required for your area. We recommend that you install a drip pan (connected to a safe drain) below the water heater to avoid property damage in the unlikely event of a leak. Alternatively, you can install an active water leak detector and shutoff valve designed to turn off your water supply in the event that a leak is ever detected.
3- MOUNTING YOUR WATER HEATER
Your tankless water heater should be secured to the mounting surface with 4 screws (minimum 1 inch long) using the built-in mounting brackets on each side of the heater. Make sure that the mounting surface is solid and secure, and ensure that the unit is level prior to securing the screws. For ease of installation and servicing, we recommend that this product be installed in an upright position with the inlet and outlet water connections at the bottom of the unit for the 18, 24, 27, and 36 kW models, and with the inlet and outlet water connections on the left and right sides of the unit for the 8, 11, and 13 kW models.
Recommended Clearances: 12 inches above and below the heater
6 inches in front of and to the sides of the heater
CAUTION: Combustible materials should be kept at least 24 inches away from your water heater and the hot water outlet pipe.

4- PLUMBING INSTALLATION
Please follow all plumbing instructions carefully. We recommend that this product be installed by a licensed and qualified plumber in accordance with all applicable national, state, provincial, and local plumbing codes.
Installation Instructions STEP 1: Connect the HOT WATER line to the water heater marked HOT WATER OUTLET located on the left side of the heater when facing unit. Connect the COLD WATER line to the water heater marked COLD WATER INLET on the right side when facing unit. STEP 2: After tightening both fittings at the water heater, open several hot water faucet s and allow water to run though the water heater for at least 2 to 3 minutes. This process purges all the air from the water lines and MUST be performed prior to turning on the power at the unit. FAILURE TO FOLLOW THIS STEP CAN CAUSE PERMANENT DAMAGE TO THE HEATING ELEMENTS. If any maintenance is performed on the water heater or the home’s plumbing system that may introduce air into the plumbing pipes, it is important to turn the power off to the water heater and purge the air out of the lines before allowing the unit to power up. STEP 3: Carefully inspect all connections, unions, and the pressure relief valve (if installed) for leaks.
IMPORTANT NOTES:
1. Do not solder any pipes with unit connected to pipes – heat from soldering may damage the flow sensor. Doing so will also void the warranty.
2. This Eemax tankless water heater is equipped with both computer-controlled and electro-mechanical auto resetting thermostat switches for high-limited temperature protection. Since this product does not use a storage tank, the use of a temperature pressure relief valve (T&P) is not required for most installations.
UL Standard 499 does NOT require that a pressure relief valve be used. However, a T&P valve may be required to meet installation codes in your area. If one is required, install the pressure relief valve in accordance with local codes and ensure that it operates correctly and that air is purged from the valve prior to installing the water heater. When connecting to Flex or High Temperature CPVC pipe, we recommend that a T&P valve be used for added safety. Please note: Installations in the Commonwealths of Massachusetts and State of Kentucky require a pressure relief valve. Please check your local installation codes for any special requirements.
3. The maximum operating water pressure is 150 PSI. If the water pressure is higher, a pressure reducing
valve must be installed on the main incoming water supply line prior to installing the electric tankless water heater.
4. Flexible water heater hoses can and are recommended to be used with your water heater as part of the installation. When connecting the inlet water pipe to the unit, make sure to use a wrench to hold the units connection, and another wrench to tighten, so the f low sensor on the unit is not loosened or damaged. Serious internal damage to the water heater can occur if the inlet or outlet connections are over tightened or if solder connections were made.
5. We recommend that a manual shut-off valve (ball valve) be installed on the inlet and outlet of the water heater so there is a convenient shut-off point available in the event that future maintenance or servicing is required. Before connecting pipes to the water heater, it is extremely important to flush the lines to eliminate all plumbing paste or residue in the lines caused by any welding or soldering.
We recommend that all the water pipes or hoses within 3 feet of the inlet and outlet connections be rated for high temperature applications with a 150°F minimum.

5- ELECTRICAL INSTALLATION
Eemax recommends that this product be installed by a licensed and qualified electrician in accordance with all applicable national, state, provincial, and local electrical codes. As with all electrical appliances, under no circumstances should you attempt to install, repair or disassemble this water heater without first shutting off all power to the unit directly at the fuse or breaker box. Make sure to shut off all breakers. SERIOUS BODILY INJURY OR DEATH COULD OCCUR IF YOU IGNORE THIS WARNING.
All wiring (wire gauge) and circuit protection (breakers) must comply with the U.S. National Electrical Code (NEC) in the U.S.A., or the Canadian Electrical Code (CEC) in Canada. Failure to do so could result in property damage and/or personal injury, and void your warranty. Note: the Canadian Electrical Code generally requires that all supply wires and corresponding circuit protection used for domestic hot water heating and hydronic heating applications be sized to a minimum of 125% of the maximum current rating of the heater (see model specifications below for details). Before installing this product, ensure that the home has sufficient electrical power available to handle the
maximum amperage load of the applicable model.
IMPORTANT NOTES:
Model EEM24008, EEM24011, and EEM24013 require 1 set of wires and ground (see wiring diagram) Model EEM24018 requires 2 sets of wires and ground (see wiring diagram) Model EEM24024 and EEM24027 require 3 sets of wires and ground (see wiring diagram) Model EEM24036 requires 4 sets of wires and ground (see wiring diagram) Please see required wire gauge on the next page Each set of wires must be connected to its own individual double pole breaker
Installation Instructions STEP 1: Take each wire pair and connect them to one breaker (see wiring diagram). Make sure that each breaker is connected with one black wire and one red wire STEP 2: Using a suitable wire gauge that meets all applicable electrical codes for the size of the breakers used, run the correct sets of wire from the home’s main breaker panel to the tankless water heater.
STEP 3: A separate ground conductor for each incoming circuit is required.
STEP 4: DOUBLE CHECK the electrical connections to make sure they are correct and that all wire connections are tight and secure. Also confirm that the correct breaker size and wire gauge has been used and confirm that the unit has been connected to a ground in accordance with applicable codes.
STEP 5: Confirm that all the air has been purged from the water lines prior to turning on power to the unit. Refer to STEP 2 in the plumbing installation section. CAUTION: Ensure that you have made the correct connections. You must follow the wire connection as shown in ensure proper operation of the unit. If you mix up one set of wires with another, the unit will not operate correctly even though it turns on and otherwise appears to function properly.
The water heater is now installed and ready to use! Follow the General Operating Instructions to complete the set up. We highly recommend that this is done with the homeowner present.
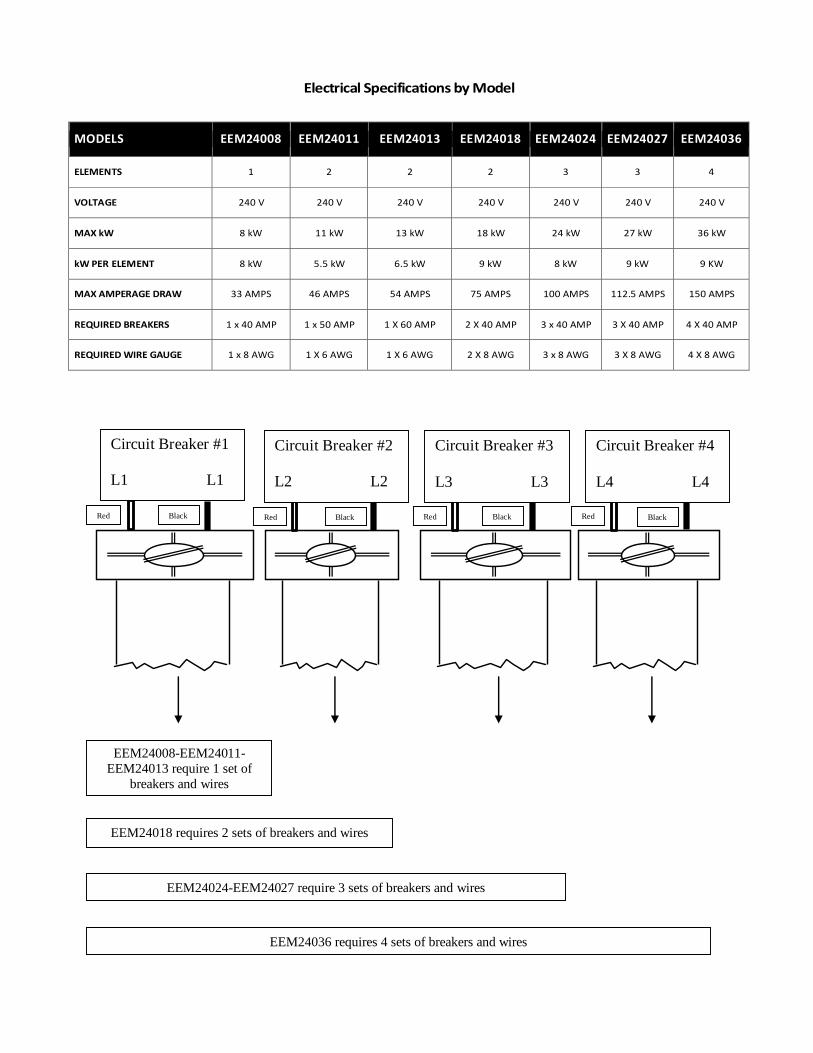
Electrical Specifications by Model
MODELS EEM24008 EEM24011 EEM24013 EEM24018 EEM24024 EEM24027 EEM24036
ELEMENTS 1 2 2 2 3 3 4
VOLTAGE 240 V 240 V 240 V 240 V 240 V 240 V 240 V
MAX kW 8 kW 11 kW 13 kW 18 kW 24 kW 27 kW 36 kW
kW PER ELEMENT 8 kW 5.5 kW 6.5 kW 9 kW 8 kW 9 kW 9 KW
MAX AMPERAGE DRAW 33 AMPS 46 AMPS 54 AMPS 75 AMPS 100 AMPS 112.5 AMPS 150 AMPS
REQUIRED BREAKERS 1 x 40 AMP 1 x 50 AMP 1 X 60 AMP 2 X 40 AMP 3 x 40 AMP 3 X 40 AMP 4 X 40 AMP
REQUIRED WIRE GAUGE 1 x 8 AWG 1 X 6 AWG 1 X 6 AWG 2 X 8 AWG 3 x 8 AWG 3 X 8 AWG 4 X 8 AWG
Circuit Breaker #1
L1 L1
EEM24018 requires 2 sets of breakers and wires
EEM24024-EEM24027 require 3 sets of breakers and wires
EEM24036 requires 4 sets of breakers and wires
EEM24008-EEM24011-
EEM24013 require 1 set of
breakers and wires
Circuit Breaker #2
L2 L2
Circuit Breaker #3
L3 L3
Circuit Breaker #4
L4 L4
Black Red Black
Black Red Black
Black Red Bla
ck
Black Red Black

6- SIZING GUIDE
Please use the chart below to see how many gallons per minute your tankless water heater can produce with your incoming water temperature. The gallons per minute is calculated assuming 105°F outlet temperature.
Incoming Water
Temperature EEM24008 EEM24011 EEM24013 EEM24018 EEM24024 EEM24027 EEM24036
40°F 0.8 1.2 1.4 1.9 2.5 2.8 3.8
45°F 0.9 1.3 1.5 2.0 2.7 3.1 4.1
50°F 1.0 1.4 1.6 2.2 3.0 3.4 4.5
55°F 1.1 1.5 1.8 2.5 3.3 3.7 4.9
60°F 1.2 1.7 2.0 2.7 3.6 4.1 5.5
65°F 1.4 1.9 2.2 3.1 4.1 4.6 6.1
70°F 1.6 2.2 2.5 3.5 4.7 5.3 7.0
75°F 1.8 2.5 3.0 4.1 5.5 6.1 8.2
80°F 2.2 3.0 3.6 4.9 6.6 7.4 9.8
(Gallons per Minute)
FLOW RESTRICTOR – OPTIONAL In order to ensure the optimal temperature output and overall performance of your tankless water heater you may
require a flow restrictor. These flow restrictors are installed on the outlet connection of your tankless water heater and
limit the maximum volume coming out of your unit to a specified flow rate to prevent the exit temperature from
becoming too cool. To learn more about flow restrictors or find out how to purchase one for your tankless water heater
visit us online at Eemax.com or contact us at 1-800-543-6163.
Steps for Choosing a Flow Restrictor
1. Find your model in the chart on the left
2. Choose the column with the inlet water temperature closest to your geographical location
3. Take the GPM or gallons per minute you find and match it with the corresponding flow restrictor on the right
*Selection based on inlet temperature above and outlet temperature of 105°F
Eemax Part Number Maximum Flow Rate Connection Size
EX0063-1.0 IFR 1.0 GPM 1/2" Compression
EX0063-1.5 IFR 1.5 GPM 1/2" Compression
EX0063-2.0 IFR 2.0 GPM 1/2" Compression
EX0064-2.0 IFR 2.0 GPM 3/4" NPT
EX0064-3.0 IFR 3.0 GPM 3/4" NPT
EX0064-4.0 IFR 4.0 GPM 3/4" NPT
EX0064-5.0 IFR 5.0 GPM 3/4" NPT
Inlet Water Temperature
40°F 50°F 60°F 70°F
EEM24008 1.0 1.0 1.0 1.5
EEM24011 1.0 1.0 1.5 2.0
EEM24013 1.0 1.5 2.0 2.0
EEM24018 2.0 2.0 2.0 3.0
EEM24024 2.0 2.0 3.0 4.0
EEM24027 2.0 3.0 4.0 5.0
EEM24036 3.0 4.0 5.0 5.0

7- GENERAL OPERATING INSTRUCTIONS Operating your new tankless water heater is very similar to using any traditional water heating system. However, it is very important that you carefully read all of the set-up procedures and operating instructions and tips to ensure the maximum performance and energy savings from your new water heater. We recommend that all members of the household read these General Operating Instructions.
6- How your new water heater works: Your tankless water heater does not store hot water like a conventional tank-type water heater. It contains very high powered heating elements that are capable of heating water on-demand. As soon as you turn on a hot water faucet, a sophisticated f low sensor recognizes that you have turned on the water. This sensor measures flow rate while another sensor measures the incoming water temperature. This information is transmitted continually to the computer logic controls which decide how much power to send to the heating elements to heat the water to your desired temperature. Once the water faucet is turned off your water heater will turn off as well.
7-
8-
8- MAINTENANCE
To ensure maximum performance of your water heater and to reduce the risk of a water leak, we recommend the following maintenance:
You should inspect the connections on the inlet and outlet of the water heater at least on an annual basis for any signs of damage or failure. Any signs of damage, cracks, leakage or weakness should be address. Take care not to over-tighten the connections. Serious internal damage to your water heater can occur if you over- tighten the water heater connections at the unit.
IMPORTANT NOTES:
As with all electrical appliances, under no circumstances should you attempt to install, repair or disassembled this water heater without first shutting off all power to the unit directly at the fuse or breaker box. SERIOUS BODILY INJURY OR DEATH COULD OCCUR IF YOU IGNORE THIS WARNING.
When any maintenance is performed on the water heater or the home’s plumbing system that may introduce air into the plumbing pipes, it is important to turn the power off to the water heater and purge the air out of the lines before allowing the unit to power up. FAILURE TO DO SO COULD CAUSE PERMANENT DAMAGE TO THE HEATING ELEMENT AND VOID YOUR WARRANTY.
If you have a water supply with a high level of mineralization (hard water), you should increase the frequency of your maintenance.
9- TROUBLE SHOOTING GUIDE
Are you having problems with your water heater?
Please call or email our customer service and technical support team for any help you may need
TOLL FREE 1-800-543-6163

The following table represents some of the most common technical support questions we receive. Before calling us, please read thoroughly to see if your question or problem is addressed.
PROBLEM POSSIBLE CAUSE SOLUTION Water heater is not heating at all (water is flowing
but the unit is not heating at all —the outgoing
water temperature is the same as my cold water
supply) - the digital display does NOT light up.
No power or incorrect wiring. Make sure the breakers at main electrical panel are ON. You
may have a faulty breaker or unit may be wired incorrect.
Flow rate is too low / water pressure is too
low.
Your water heater has an activation flow rate of
approximately 0.3 GPM. If your water flow rate is less than
this level, your unit will not activate. Increase the flow rate.
Water heater is not heating at all (water is flowing
but the unit is not heating at all - the outgoing water
temperature is the same as my cold water supply)
The digital display DOES light up.
Internal part failure. Please call us for technical assistance.
Water heater is heating but the water
temperature is not hot enough.
User temperature setting too low. Turn up the temperature setting on the unit.
Flow rate is too high. Depending on your incoming water temperature and the
power output of your model, your water flow rate may
exceed the physical heating capacity of your water heater.
Reduce the flow rate by installing an Eemax Flow Restrictor.
Use the chart in section 6 to find out which flow restrictor
works best for your particular model.
Crossed wires. If it’s a new installation, have your electrician double check
the wiring. Is possible that the wiring is incorrect.
Voltage less than 240 volts. The heating elements on your water heater are design for
240 volts. When use with a lower voltage, they produce less
heating power. You may need to upgrade to a larger model.
Mixing too much cold water. You do not need to mix as much cold water with your
tankless water heater compared to when you use a
conventional water heater. You may also have an anti-scald
feature on your faucet that is mixing cold water. These
types of faucets can usually be adjusted to reduce the
amount of cold water mixed.
The water temperature at my faucet is less than the
temperature setting of my water heater.
Voltage less than 240 volts. The computer chips in your tankless water heater are
programmed with the expectation that your incoming line
voltage is 240 volts. If you have less than 240 volts, it may
affect the reading on your water heater’s digital display and
cause it to read slightly higher than the actual output
temperature. To compensate for this, increase the setting
on your water heater if you need / want hotter water.
Anti-Scald pressure/balancing valve or
tempering valve.
Your faucet may have an anti-scald feature or a tempering
valve that automatically mixes cold water even when you
turn your control lever or handle to full hot. These devices
are usually adjustable so you can turn off the cold mix
completely. You can compensate for this by increasing the
setting on your water heater if you need/want hotter water.
Thermal loss due to long pipe run As the hot water from the heater runs through the hot
water delivery system to you faucet, some heat will be lost
especially if it has long distance to travel or the pipes are
cold. This is normal. You can compensate for this by
increasing the setting on your water if you need/want
hotter water.

10- USER INTERFACE
Power
Click adjustment stem, the display will turn on
Click the adjustment stem again, the display will turn off
C/F Conversion
Press the stem for 3 seconds, the display will change from Fahrenheit to Celsius or vice versa
Temperature Control
Turning the stem clockwise increases the set output water temperature
Turning the stem counter clockwise decreases the set output water temperature
You can set or adjust your temperature at any time between 80°F – 140°F (4°C – 60°C). The temperature can
be changed to your desired setting. The display will only stay on when the unit is in use or when you are setting
the temperature.
CAUTION – removing the cover to change the temperature set point exposes electrical shock and burn hazards, which can
cause INJURY or DEATH. Adjustment should only be done by a licensed plumber or electrician.
EEM24008 – EEM24011 – EEM24013 EEM24018 – EEM24024 – EEM24027 – EEM24036
1. Hot Water Outlet 5. Adjustment Stem & Temperature Control 9. Electrical Conduit
2. Cold Water Inlet 6. Wire Connection 10. Mounting Bracket (1”)
3. Celsius/Fahrenheit Conversion (Press & Hold 3 sec.) 7. Brass Compression Nut
4. Temperature Set Point Display 8. Brass Compression Ferrule
Model Number Depth Width Height
EEM24008 3.75 inches 9.75 inches 12 inches
EEM24011 3.75 inches 9.75 inches 12 inches
EEM24013 3.75 inches 9.75 inches 12 inches
EEM24018 4.5 inches 14 inches 17.75 inches
EEM24024 4.5 inches 17 inches 17.75 inches
EEM24027 4.5 inches 17 inches 17.75 inches
EEM24036 4.5 inches 21 inches 17.75 inches

Eemax Inc. 400 Captain Neville Drive, Waterbury, CT 06705
Toll Free: 1-800-543-6163 or 203-267-7890 Fax: 203-267-7975 [email protected]