INsTALLATION INsTRUCTIONs FOR AND HYMAX … iron, cast iron and A/C) to ensure proper tight seal....
STEP 1: Prepare the pipe ends. Clean and de-scale each pipe end. Remove any debris or build up on the pipe ends. Clean the outer pipe surface with soapy water. Clean each pipe end to a length at least half the length of the coupling body. For the HYMAX LONG BODY clean each pipe end to cover more than the coupling overlap. Make sure there is no corrosion on the outer pipe ends that could affect the gasket seal. Again, clean each pipe end with soapy water. A suitable gasket lubricant must be used on rough surfaced pipe (uncoated ductile iron, cast iron and A/C) to ensure proper tight seal. STEP 4: Mark each pipe end to a minimum required stab depth of 2.25”. This mark indicates the required stab depth for the coupling. STEP 3: Unpack the coupling. Carefully remove the coupling from its packaging. To prevent a coupling’s damage, move it carefully. Inspect the coupling and end rings for shipping damage and assure that there are no missing parts. Note: Hymax Coupling is a stab-on type coupling. Do not loosen or remove the end rings’ tightening bolts. Note: Bolts are pre-lubricated with a dry coating. Do not lubricate the bolts and nuts. Greasing or lubricating bolts or nuts voids manufacturer’s warranty. STEP 2: Measure the pipe’s outer diameter and make sure the coupling’s size will fit properly. Note: Each coupling’s size range is shown on the product’s label. Assure of pipe end’s roundness, free of scratches, dents, flats or other defects which may interfere with the coupling’s proper seal. The coupling may not fit well or function properly on pipe which is not round or damaged. INSTALLATION INSTRUCTIONS FOR AND HYMAX LONG BODY COUPLINGS 1.5"-12" GENERAL INSTRUCTIONS: The Hymax Coupling is a stab-on type coupling. DO NOT DISASSEMBLE THE COUPLING + DO NOT LUBRICATE THE BOLTS
Transcript of INsTALLATION INsTRUCTIONs FOR AND HYMAX … iron, cast iron and A/C) to ensure proper tight seal....
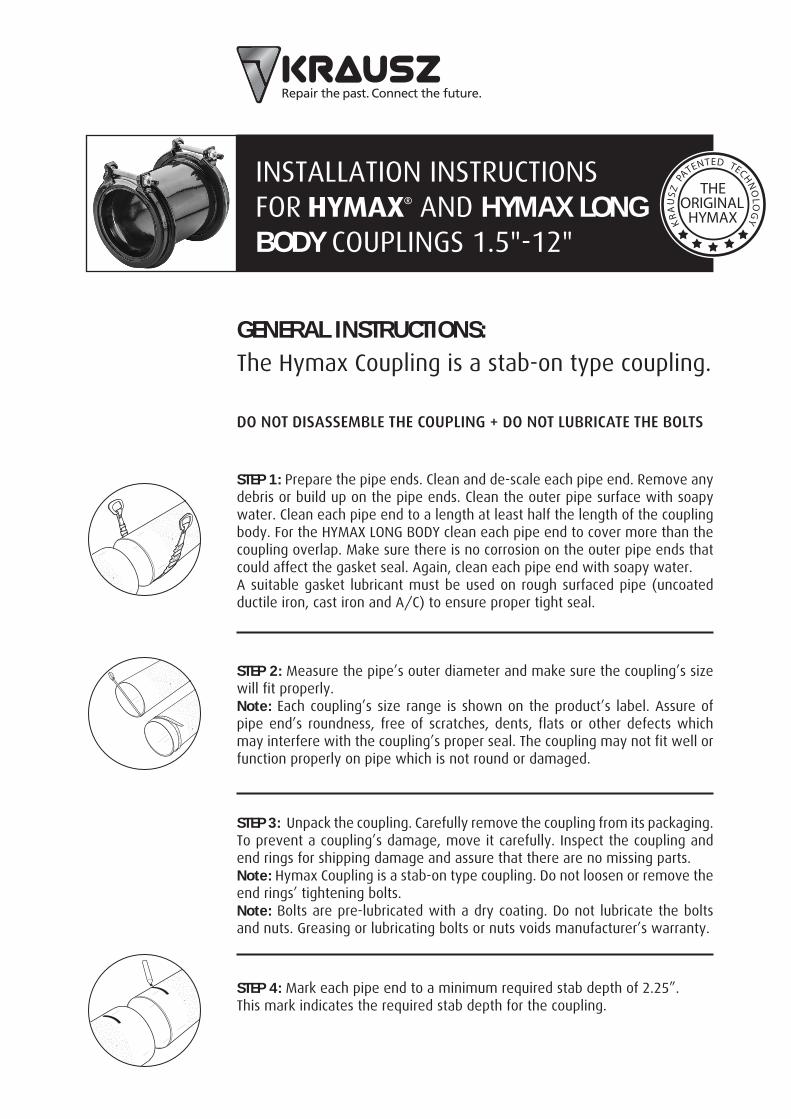
STEP 1: Prepare the pipe ends. Clean and de-scale each pipe end. Remove any debris or build up on the pipe ends. Clean the outer pipe surface with soapy water. Clean each pipe end to a length at least half the length of the coupling body. For the HYMAX LONG BODY clean each pipe end to cover more than the coupling overlap. Make sure there is no corrosion on the outer pipe ends that could affect the gasket seal. Again, clean each pipe end with soapy water.A suitable gasket lubricant must be used on rough surfaced pipe (uncoated ductile iron, cast iron and A/C) to ensure proper tight seal.
STEP 4: Mark each pipe end to a minimum required stab depth of 2.25”.This mark indicates the required stab depth for the coupling.
STEP 3: Unpack the coupling. Carefully remove the coupling from its packaging. To prevent a coupling’s damage, move it carefully. Inspect the coupling and end rings for shipping damage and assure that there are no missing parts.Note: Hymax Coupling is a stab-on type coupling. Do not loosen or remove the end rings’ tightening bolts.Note: Bolts are pre-lubricated with a dry coating. Do not lubricate the bolts and nuts. Greasing or lubricating bolts or nuts voids manufacturer’s warranty.
STEP 2: Measure the pipe’s outer diameter and make sure the coupling’s size will fit properly.Note: Each coupling’s size range is shown on the product’s label. Assure of pipe end’s roundness, free of scratches, dents, flats or other defects which may interfere with the coupling’s proper seal. The coupling may not fit well or function properly on pipe which is not round or damaged.
INsTALLATION INsTRUCTIONs FOR AND HYMAX LONG BODY COUPLINGs 1.5"-12"
GENERAL INSTRUCTIONS:The Hymax Coupling is a stab-on type coupling.
Do Not Disassemble the CoupliNg + Do Not lubriCate the bolts
For more information about HYMAX and other Krausz products visit us at: www.krauszusa.comFor ordering information or to speak with a Krausz representative please contact us at: 855-457-2879 or 855-4KRAUsZ. Fax: 352-304-5787
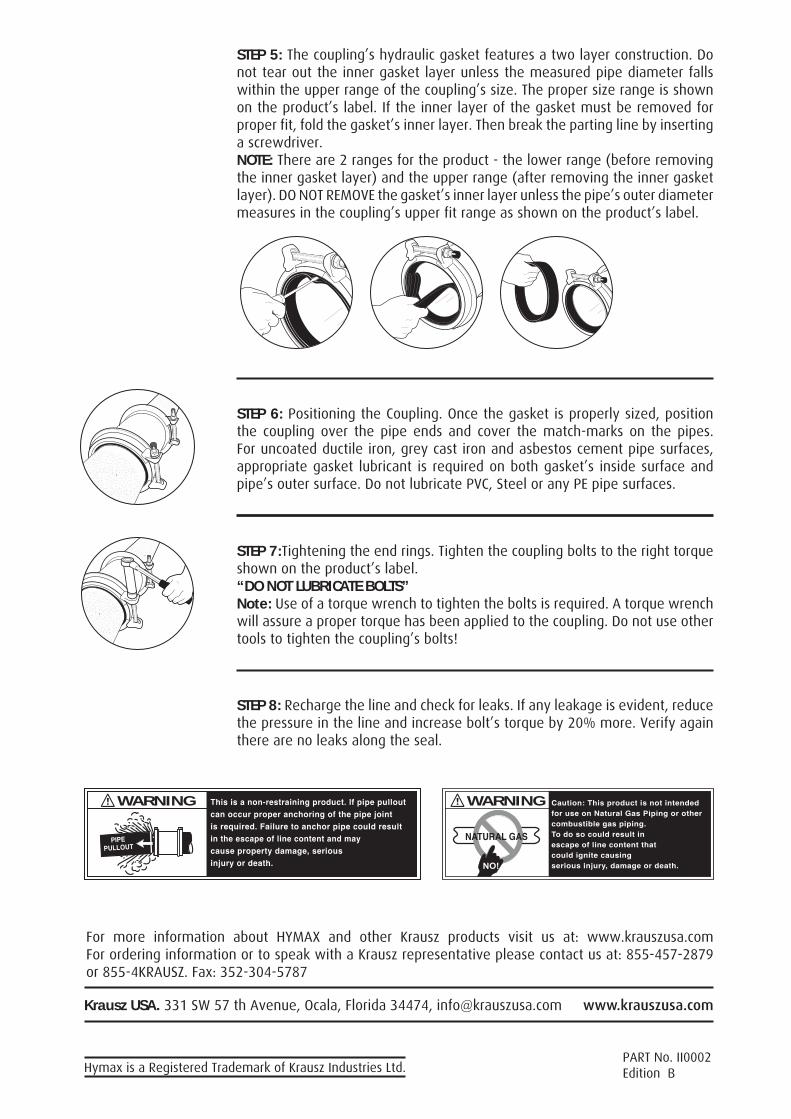
STEP 6: Positioning the Coupling. Once the gasket is properly sized, position the coupling over the pipe ends and cover the match-marks on the pipes. For uncoated ductile iron, grey cast iron and asbestos cement pipe surfaces, appropriate gasket lubricant is required on both gasket’s inside surface and pipe’s outer surface. Do not lubricate PVC, steel or any PE pipe surfaces.
STEP 8: Recharge the line and check for leaks. If any leakage is evident, reduce the pressure in the line and increase bolt’s torque by 20% more. Verify again there are no leaks along the seal.
STEP 7:Tightening the end rings. Tighten the coupling bolts to the right torque shown on the product’s label.“DO NOT LUBRICATE BOLTS”Note: Use of a torque wrench to tighten the bolts is required. A torque wrench will assure a proper torque has been applied to the coupling. Do not use other tools to tighten the coupling’s bolts!
STEP 5: The coupling’s hydraulic gasket features a two layer construction. Do not tear out the inner gasket layer unless the measured pipe diameter falls within the upper range of the coupling’s size. The proper size range is shown on the product’s label. If the inner layer of the gasket must be removed for proper fit, fold the gasket’s inner layer. Then break the parting line by inserting a screwdriver.NOTE: There are 2 ranges for the product - the lower range (before removing the inner gasket layer) and the upper range (after removing the inner gasket layer). DO NOT REMOVE the gasket’s inner layer unless the pipe’s outer diameter measures in the coupling’s upper fit range as shown on the product’s label.
WARNING WARNING
Hymax is a Registered Trademark of Krausz Industries Ltd.
Krausz USA. 331 sW 57 th Avenue, Ocala, Florida 34474, [email protected] www.krauszusa.com
PART No. II0002Edition B