INSTALLATION INSTRUCTIONS FOR 45-1806...
12
INSTALLATION INSTRUCTIONS FOR 45-1806 VERTICAL RECEIVER TRAILER HITCH (Photos from Installation on a 2004 GL1800) (This greatly expanded documentation combines the original installation instructions that come with the product, combined with my own installation experience and photos of my hitch installation – documentation & photos by Steven Butland - “CWOLAW” and is provided solely for the purpose of assisting other GL1800 Owners with their hitch installation process) Well Fellow Winger’s! Here you go! I'm getting more frequent requests for this documentation, so I guess it's helping folks out and word is getting out about it, so I’ve uploaded the file to make it more accessible via FTP Download. Wish I had it when I installed mine! Not that the install was hard, but would have been easier with more piece of mind with these instructions and pics. If you find it useful, just post your kudos in the Wingstuff Reviews! I've offered it up to AO to post on their site for immediate access/download, but never received any response from them. Anyway, attached is the documentation I put together for the AO Hitch. I am still very pleased with it and have been hauling around a fully loaded 2007 Escapade Elite Trailer on my longer trips with absolutely no problems. I've checked all the mounting points every 1K miles or so, and they have never needed any attention. Note the documentation is on a 04' and that I understand there are some slight differences on the 06' ( and possibly later models) that need to be considered. On the 06', * In step 5, there is no screw behind the license plate for 2006. This is filled with a rubber grommet, which makes a very nice place to run out the wires for trailer lights. If you chose to use that hole to run trailer wiring out of it, you can tuck the trailer harness plug behind the plate when not in use and thus keep it out of the weather a bit more. * In step 6, on the 2006 model, the cross-bar may need to be retained since it helps support the electrical box located here. Not sure what exactly is in this box. This makes aligning the bolts a bit more difficult. Some have had to bend the cross bar a bit. It has a V bend anyway to support the box, but you may need to close the angle of the V a bit to get everything back together. Required longer bolts as well which are included in the hitch kit. This feedback was provided by others with different Year Models and their experience with the installation: "From CGaralis - I have an '08... In order to get the arm to go into place I also had to remove all the bolts for the saddle bags. Just to swing them out a bit ... didn't have to fully remove or pull any of the wiring..." R/ Steve HitchInstall.doc
Transcript of INSTALLATION INSTRUCTIONS FOR 45-1806...
INSTALLATION INSTRUCTIONS
FOR 45-1806
VERTICAL RECEIVER TRAILER HITCH
(Photos from Installation on a 2004 GL1800)
(This greatly expanded documentation combines the original installation instructions that come with the product, combined with my own installation experience and photos of my
hitch installation – documentation & photos by Steven Butland - “CWOLAW” and is provided solely for the purpose of assisting other GL1800 Owners with their hitch installation process)
Well Fellow Winger’s! Here you go! I'm getting more frequent requests for this documentation, so I guess it's helping folks out and word is getting out about it, so I’ve uploaded the file to make it more accessible via FTP Download. Wish I had it when I installed mine! Not that the install was hard, but would have been easier with more piece of mind with these instructions and pics. If you find it useful, just post your kudos in the Wingstuff Reviews! I've offered it up to AO to post on their site for immediate access/download, but never received any response from them. Anyway, attached is the documentation I put together for the AO Hitch. I am still very pleased with it and have been hauling around a fully loaded 2007 Escapade Elite Trailer on my longer trips with absolutely no problems. I've checked all the mounting points every 1K miles or so, and they have never needed any attention. Note the documentation is on a 04' and that I understand there are some slight differences on the 06' ( and possibly later models) that need to be considered. On the 06', * In step 5, there is no screw behind the license plate for 2006. This is filled with a rubber grommet, which makes a very nice place to run out the wires for trailer lights. If you chose to use that hole to run trailer wiring out of it, you can tuck the trailer harness plug behind the plate when not in use and thus keep it out of the weather a bit more. * In step 6, on the 2006 model, the cross-bar may need to be retained since it helps support the electrical box located here. Not sure what exactly is in this box. This makes aligning the bolts a bit more difficult. Some have had to bend the cross bar a bit. It has a V bend anyway to support the box, but you may need to close the angle of the V a bit to get everything back together. Required longer bolts as well which are included in the hitch kit. This feedback was provided by others with different Year Models and their experience with the installation: "From CGaralis - I have an '08... In order to get the arm to go into place I also had to remove all the bolts for the saddle bags. Just to swing them out a bit ... didn't have to fully remove or pull any of the wiring..." R/ Steve
HitchInstall.doc
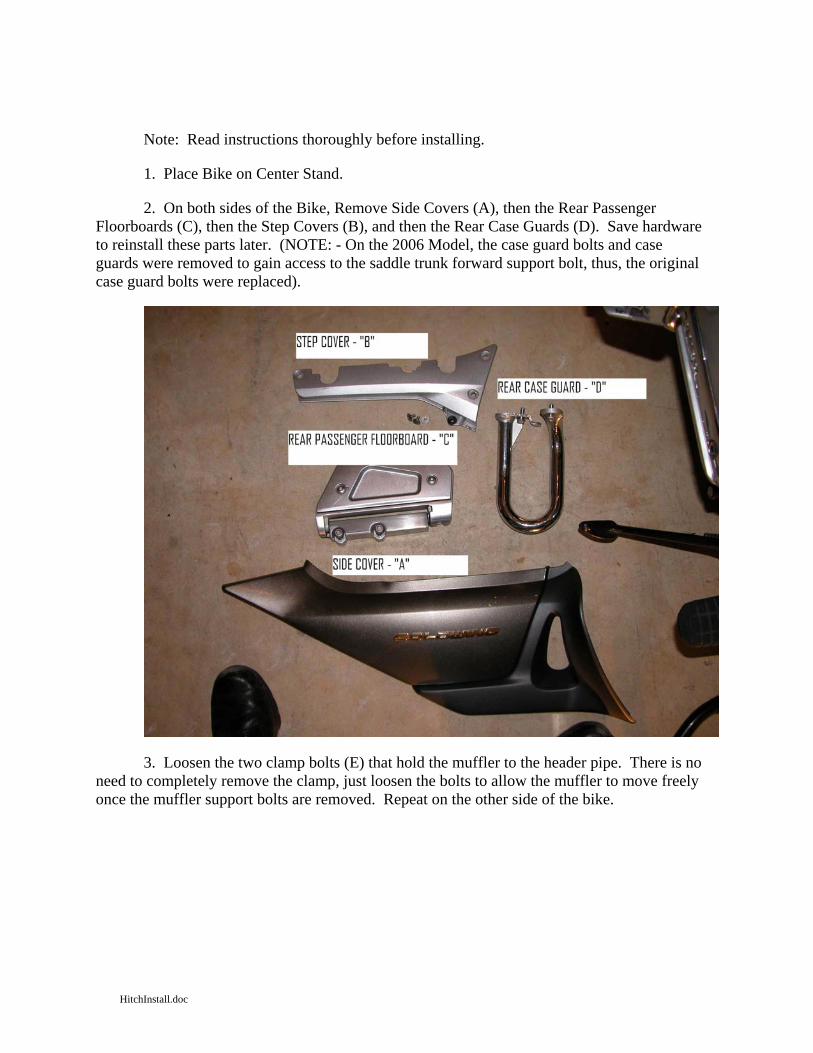
Note: Read instructions thoroughly before installing.
1. Place Bike on Center Stand.
2. On both sides of the Bike, Remove Side Covers (A), then the Rear Passenger Floorboards (C), then the Step Covers (B), and then the Rear Case Guards (D). Save hardware to reinstall these parts later. (NOTE: - On the 2006 Model, the case guard bolts and case guards were removed to gain access to the saddle trunk forward support bolt, thus, the original case guard bolts were replaced).
3. Loosen the two clamp bolts (E) that hold the muffler to the header pipe. There is no need to completely remove the clamp, just loosen the bolts to allow the muffler to move freely once the muffler support bolts are removed. Repeat on the other side of the bike.
HitchInstall.doc

4. Remove the muffler support bolt (F), then let the muffler gently drop down. Repeat on the other side of the bike.
HitchInstall.doc
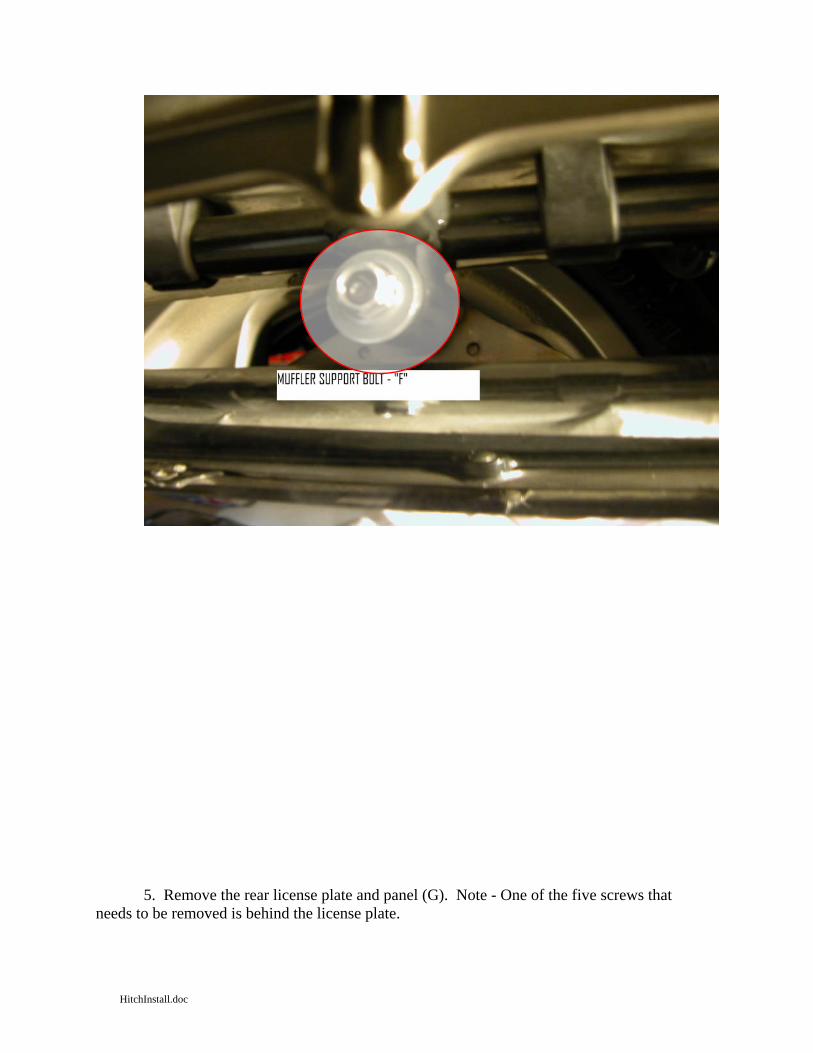
5. Remove the rear license plate and panel (G). Note - One of the five screws that needs to be removed is behind the license plate.
HitchInstall.doc

6. Remove the cross support bar (H). This bar will not be reinstalled, as the “H” Bracket of the trailer hitch system will provide this support function when installed. The
HitchInstall.doc
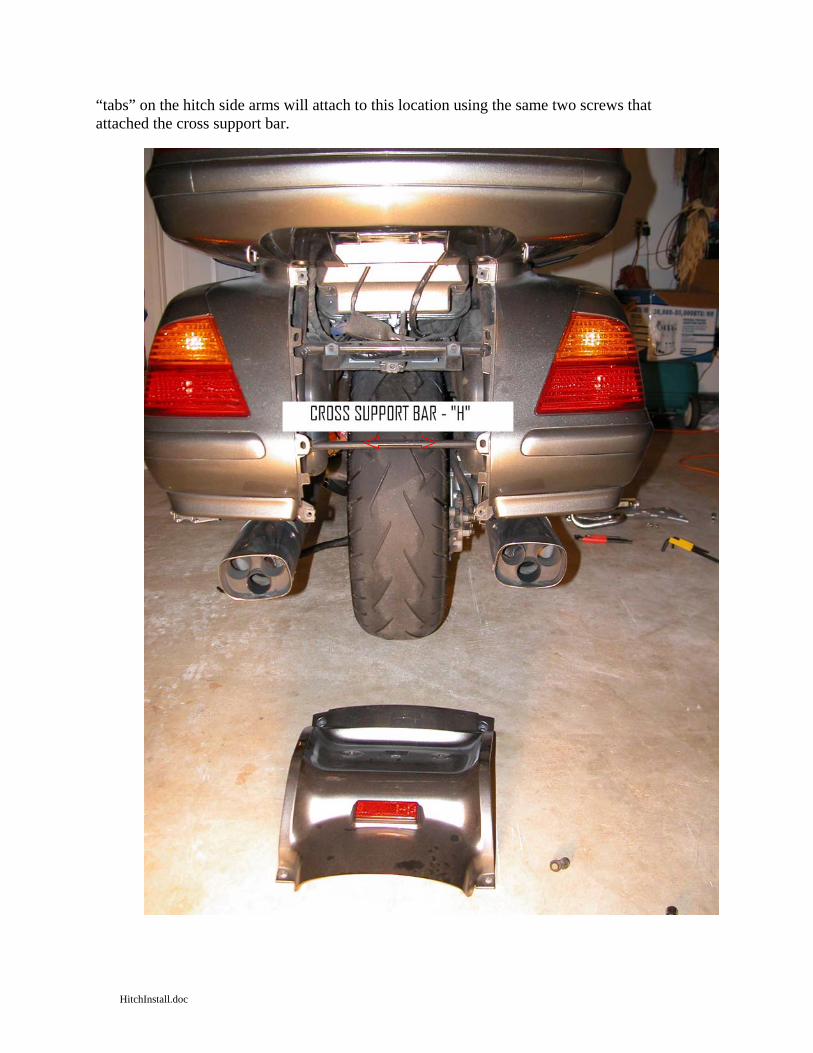
“tabs” on the hitch side arms will attach to this location using the same two screws that attached the cross support bar.
HitchInstall.doc
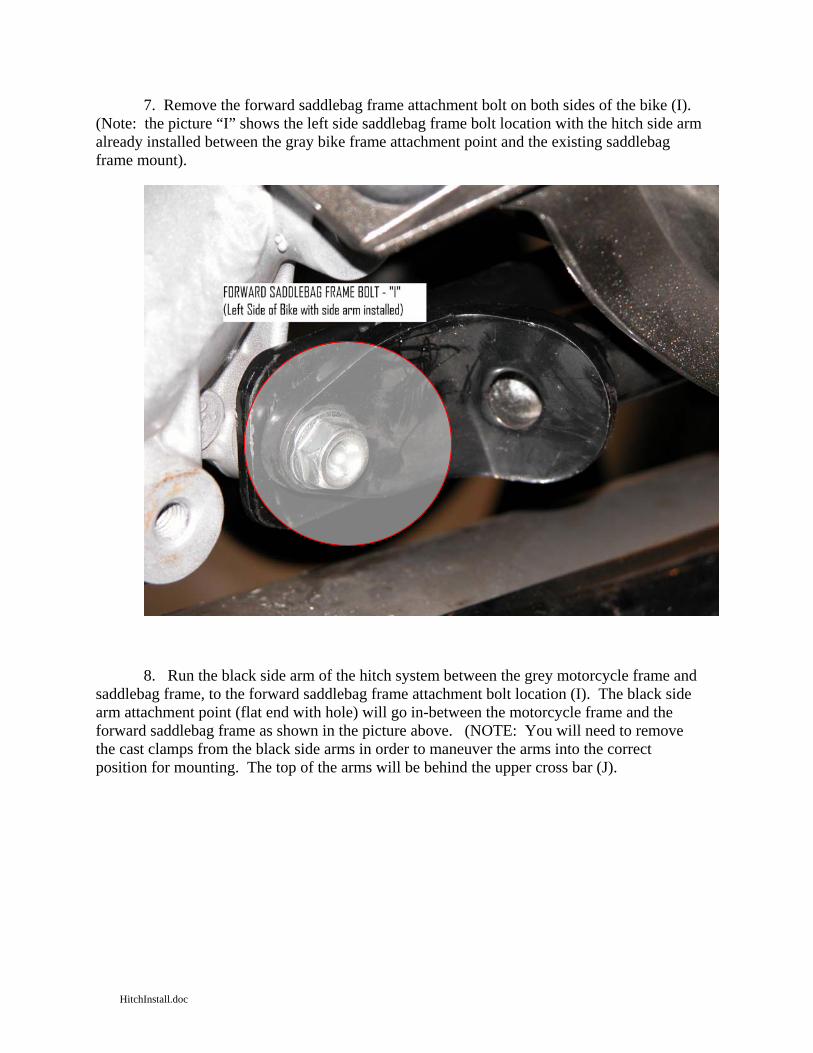
7. Remove the forward saddlebag frame attachment bolt on both sides of the bike (I). (Note: the picture “I” shows the left side saddlebag frame bolt location with the hitch side arm already installed between the gray bike frame attachment point and the existing saddlebag frame mount).
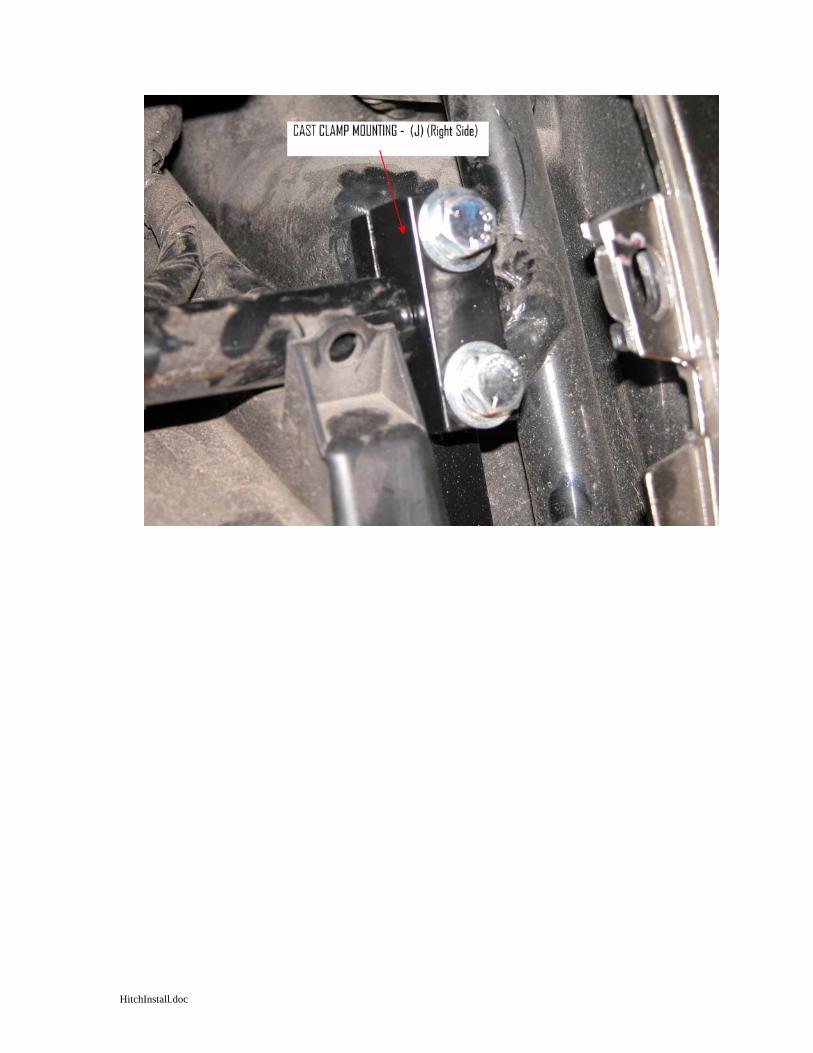
8. Run the black side arm of the hitch system between the grey motorcycle frame and saddlebag frame, to the forward saddlebag frame attachment bolt location (I). The black side arm attachment point (flat end with hole) will go in-between the motorcycle frame and the forward saddlebag frame as shown in the picture above. (NOTE: You will need to remove the cast clamps from the black side arms in order to maneuver the arms into the correct position for mounting. The top of the arms will be behind the upper cross bar (J).
HitchInstall.doc
HitchInstall.doc
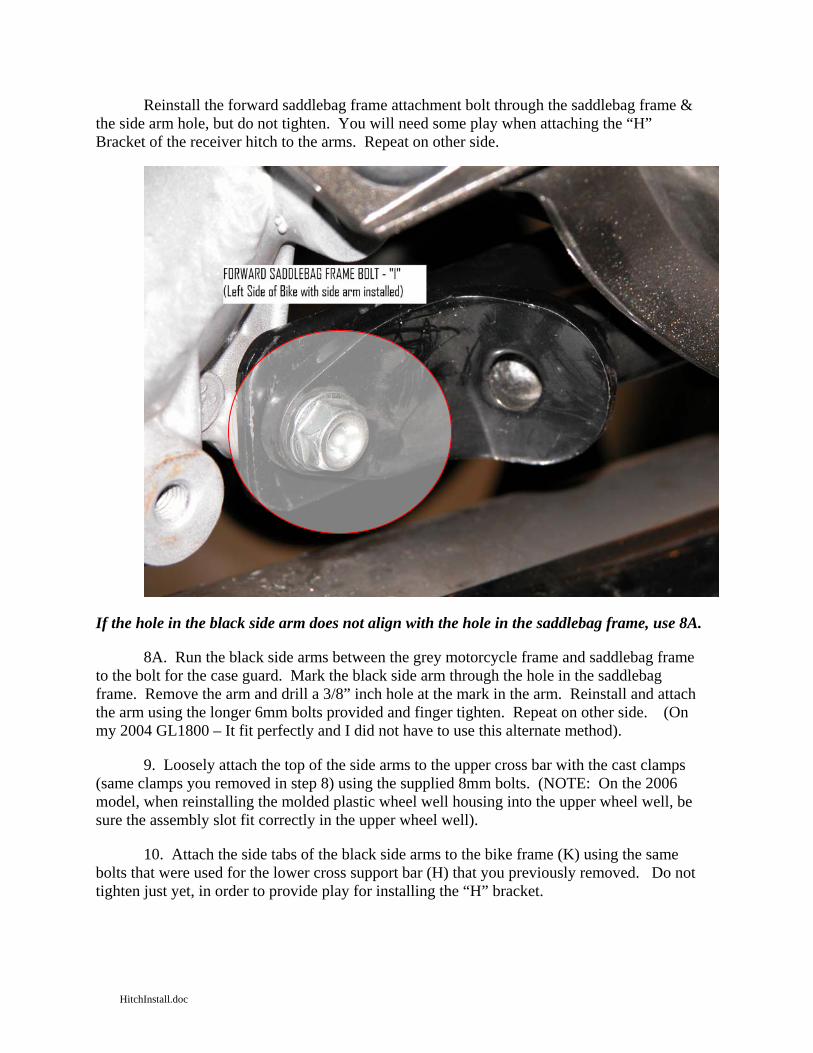
Reinstall the forward saddlebag frame attachment bolt through the saddlebag frame & the side arm hole, but do not tighten. You will need some play when attaching the “H” Bracket of the receiver hitch to the arms. Repeat on other side.
If the hole in the black side arm does not align with the hole in the saddlebag frame, use 8A.
8A. Run the black side arms between the grey motorcycle frame and saddlebag frame to the bolt for the case guard. Mark the black side arm through the hole in the saddlebag frame. Remove the arm and drill a 3/8” inch hole at the mark in the arm. Reinstall and attach the arm using the longer 6mm bolts provided and finger tighten. Repeat on other side. (On my 2004 GL1800 – It fit perfectly and I did not have to use this alternate method).
9. Loosely attach the top of the side arms to the upper cross bar with the cast clamps (same clamps you removed in step 8) using the supplied 8mm bolts. (NOTE: On the 2006 model, when reinstalling the molded plastic wheel well housing into the upper wheel well, be sure the assembly slot fit correctly in the upper wheel well).
10. Attach the side tabs of the black side arms to the bike frame (K) using the same bolts that were used for the lower cross support bar (H) that you previously removed. Do not tighten just yet, in order to provide play for installing the “H” bracket.
HitchInstall.doc
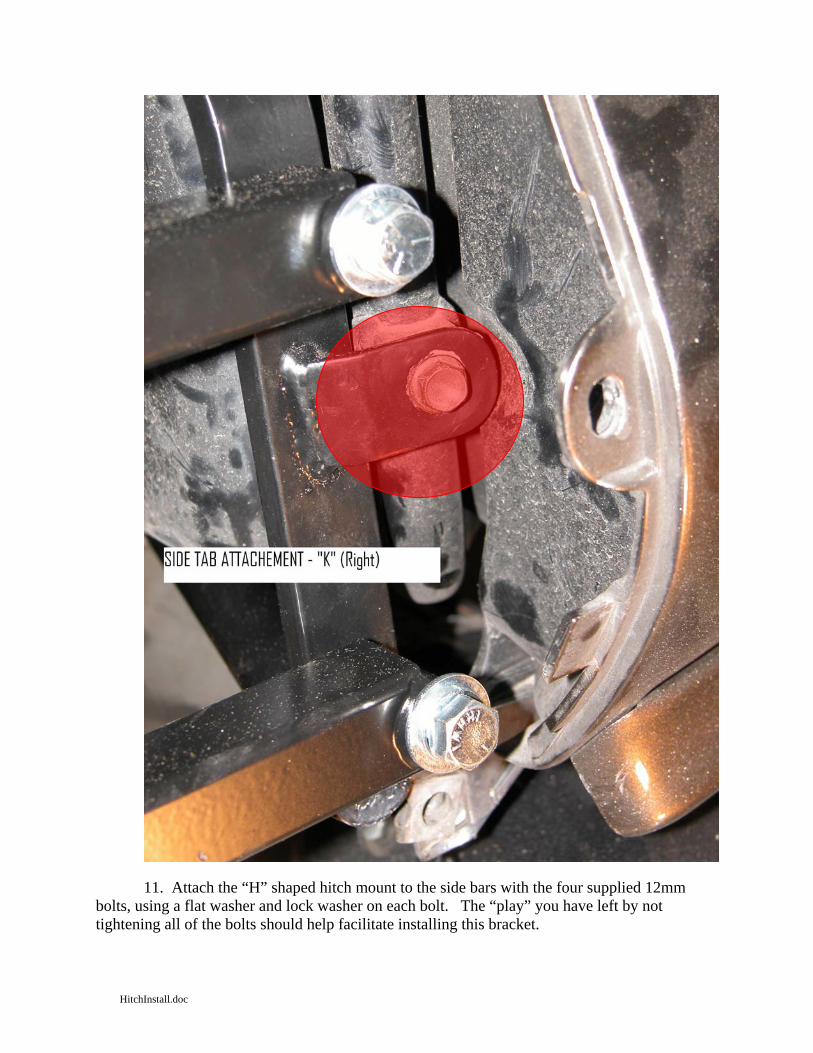
11. Attach the “H” shaped hitch mount to the side bars with the four supplied 12mm bolts, using a flat washer and lock washer on each bolt. The “play” you have left by not tightening all of the bolts should help facilitate installing this bracket.
HitchInstall.doc
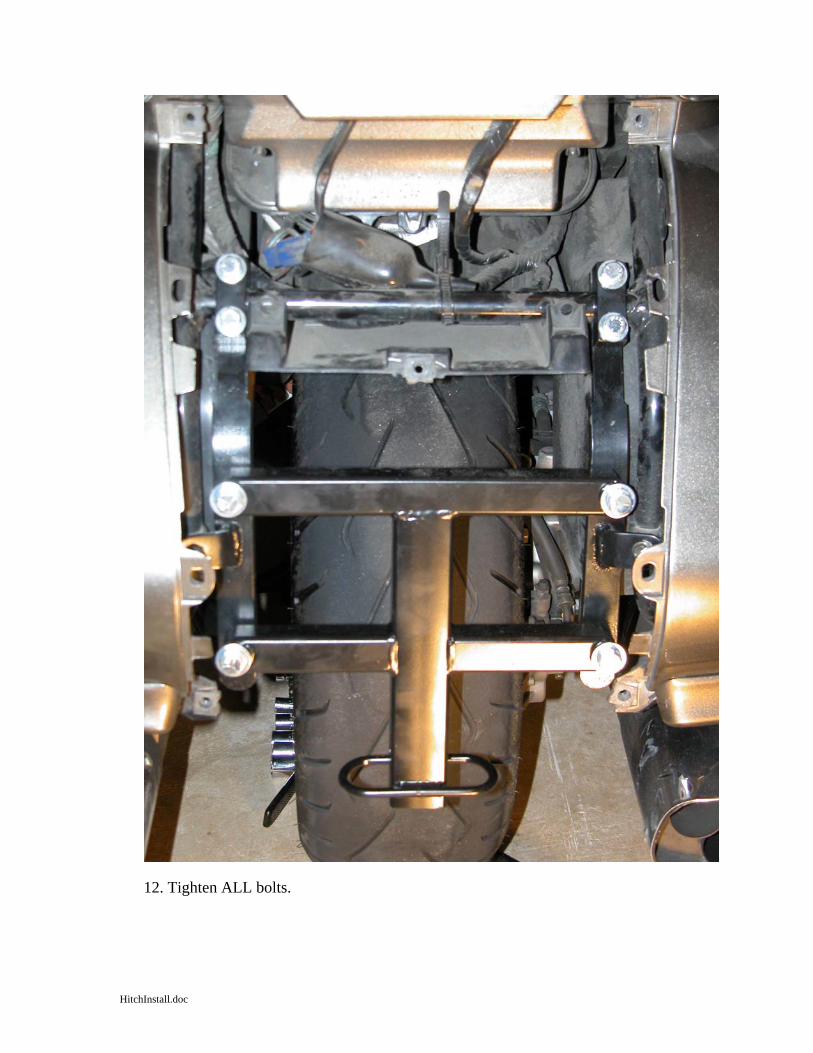
12. Tighten ALL bolts.
HitchInstall.doc
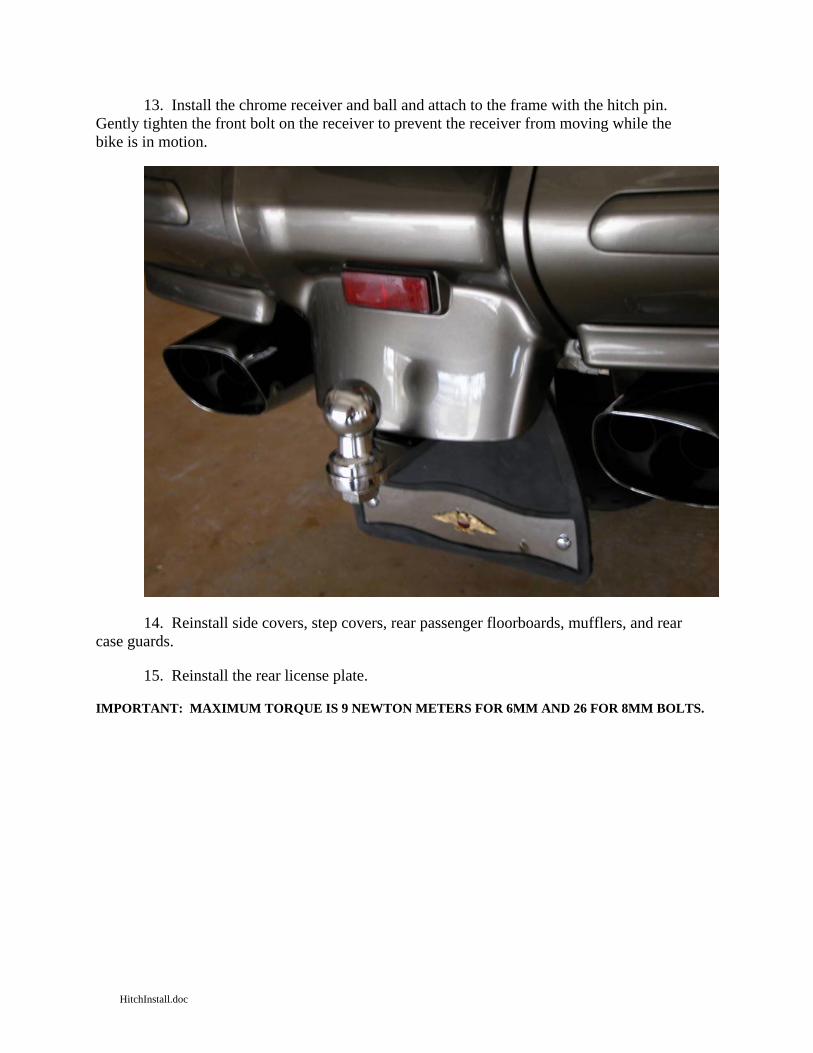
13. Install the chrome receiver and ball and attach to the frame with the hitch pin. Gently tighten the front bolt on the receiver to prevent the receiver from moving while the bike is in motion.
14. Reinstall side covers, step covers, rear passenger floorboards, mufflers, and rear case guards.
15. Reinstall the rear license plate.
IMPORTANT: MAXIMUM TORQUE IS 9 NEWTON METERS FOR 6MM AND 26 FOR 8MM BOLTS.
HitchInstall.doc


![BS 1806 [1989]](https://static.fdocuments.in/doc/165x107/577c7a551a28abe05494c4f5/bs-1806-1989.jpg)