Installation Instructions & Materials List for the
27
© 2013 BrickWood Ovens / US & International Patents Pending Mattone Barile Grande (Insulated) | 1 Installation Instructions & Materials List for the – Mattone Barile Grande with Ceramic Fiber Blanket Insulation When you combine a 4000 year-old design with today’s ceramic fiber blanket technology, you get an extremely efficient wood-fired oven with classic old world charm. These step-by-step instructions show you how to build a low-cost, easy to assemble wood-fired oven with countless finish options! (1050SqIn Cooking Surface) Shown with ½” thick red Thin Brick Veneer finish Materials Shopping List (Quantities are pre-adjusted for 8% overage recommendations) Tools Needed 1 Mattone Barile Grande Foam Form Miter Saw Masonry Blade 75 Standard Size Brick (Frame) 8 x 2 1/4 x 3 5/8 Wheelbarrow Masonry Trowel 140 Tan Firebrick (Oven) Caulking Gun Construction Sponge 50 Tan Firebrick (Cooking Surface) 4’ Level Tape Measure 3 80lb Bag of Stucco or Mortar Mix Rubber Mallet Rubber Gloves 2 100lb Bag Silica Sand 5 Gallon Bucket(s) Glasses & Respirator 2 50lb Bag Portland Cement Wire Cutter Utility Blade 2 50lb Bag Fire Clay 2 50lb Bag Hydrated Lime (Powder) 2 60lb Bag All Purpose Sand 1 50sf Box of Ceramic Fiber Blanket 1 Roll of 2’ x 25’ Chicken Wire 1 Roll of Rebar Wire 1 5lb Bag All Purpose Flour 1 (OPTIONAL) DuraTech 6” Exhaust Kit 1 (OPTIONAL) Barile Series Oven Door High-Temperature Mortar Mix When building the oven, you MUST use a High-Temperature mortar mix. This mix is fabricated to withstand the extreme temperatures the oven will reach. Mix all 4 ingredients with water in a wheelbarrow until it reaches the consistency of oatmeal. 3 Parts - Silica Sand 1 Part - Fireclay 1 Part - Lime 1 Part - Portland Cement Please remember to BUY AMERICAN and purchase your materials from locally owned Landscape and/or Masonry Supplies.
Transcript of Installation Instructions & Materials List for the

© 2013 BrickWood Ovens / US & International Patents Pending Mattone Barile Grande (Insulated) | 1
Installation Instructions & Materials List for the –
Mattone Barile Grande with Ceramic Fiber Blanket Insulation
When you combine a 4000 year-old design with today’s ceramic fiber blanket technology,
you get an extremely efficient wood-fired oven with classic old world charm.
These step-by-step instructions show you how to build a low-cost, easy to assemble
wood-fired oven with countless finish options!
(1050SqIn Cooking Surface) Shown with ½” thick red Thin Brick Veneer finish
Materials Shopping List (Quantities are pre-adjusted for 8% overage recommendations)
Tools Needed
1 Mattone Barile Grande Foam Form Miter Saw Masonry Blade
75 Standard Size Brick (Frame) 8 x 21/4 x 35/8 Wheelbarrow Masonry Trowel
140 Tan Firebrick (Oven) Caulking Gun Construction Sponge
50 Tan Firebrick (Cooking Surface) 4’ Level Tape Measure
3 80lb Bag of Stucco or Mortar Mix Rubber Mallet Rubber Gloves
2 100lb Bag Silica Sand 5 Gallon Bucket(s) Glasses & Respirator
2 50lb Bag Portland Cement Wire Cutter Utility Blade
2 50lb Bag Fire Clay 2 50lb Bag Hydrated Lime (Powder) 2 60lb Bag All Purpose Sand 1 50sf Box of Ceramic Fiber Blanket 1 Roll of 2’ x 25’ Chicken Wire 1 Roll of Rebar Wire 1 5lb Bag All Purpose Flour 1 (OPTIONAL) DuraTech 6” Exhaust Kit 1 (OPTIONAL) Barile Series Oven Door
High-Temperature Mortar Mix
When building the oven, you MUST use a High-Temperature mortar mix. This mix is fabricated to withstand the extreme
temperatures the oven will reach. Mix all 4 ingredients with water in a wheelbarrow until it reaches the consistency of oatmeal.
3 Parts - Silica Sand 1 Part - Fireclay 1 Part - Lime 1 Part - Portland Cement
Please remember to BUY AMERICAN and purchase your materials from locally owned
Landscape and/or Masonry Supplies.

© 2013 BrickWood Ovens / US & International Patents Pending Mattone Barile Grande (Insulated) | 2
What you need to know BEFORE you build your Mattone Barile Series Oven READ ALL INSTRUCTIONS BEFORE YOU BUILD – We worked very hard to bring you the most through, yet simplistic set of DIY wood-fired oven and base instructions on Planet Earth! We HIGHLY encourage you to read both sets of directions before you tear open your first bag of cement.. or at least look at the pictures (guys).. PLACEMENT OF OVEN – First and foremost, ALL BrickWood Ovens are for OUTDOOR & NON-COMMERCIAL USE ONLY! Secondly, the placement of your oven really depends on your local building codes. Many codes & HOA’s state that all “solid-fuel burning devices” be placed within “X” number of feet from any structure. Before you build your oven, check with your local municipalities and/or HOA’s to verify you build to the standards of your code.
In addition, you must remember that no wood burning oven manufacturer can guarantee 100% smoke capture. For this reason, we do not recommend placing your BrickWood Oven within 5 feet of any ceiling or covered structure. We also recommend leaving a distance of 3 feet between the oven and any structure like walls, fences, trees, etc..
Also, make sure that the front / opening of your oven faces the direction of the oncoming wind. If the wind hits the rear of the oven, it can create a small vacuum which will pull the smoke out the front of the oven. TYPES OF FIREBRICK - There are several types of firebrick on the market (Low duty, Medium Duty, High Duty, Red Clay Brick, & Insulating Firebrick). It is HIGHLY RECOMMENDED to use a Low or Medium duty firebrick which is comprised of 35% - 40% Alumina with 45% - 55% Silica and typically weigh 7lb – 8lb each. Low and Medium duty firebrick are the best type of firebrick to use on any brick oven. FIREBRICK COLORS – Red or Tan.. That is the question! Most firebrick dealers stock one color of firebrick and it is usually tan. Sometimes a dealer will stock both red and tan which look great together! The color of the firebrick has absolutely zero effect on the performance of the oven. FIREBRICK SIZES – The Mattone Barile series ovens were designed to accommodate the two most common sizes of firebrick on the market – 9” x 4.5” x 2.5” and 9” x 4.5” x 2.25” . While it is preferred that you use the firebrick that is 2.5” thick, you can use the 2.25” thick brick – your mortar joints will be a little bit wider. In addition to those two common sizes, you can also use the following firebrick sizes –
8.5” x 4.5” x 2.5” 8.75” x 4.5” x 2.5” 9” x 3.5” x 2.5” 9” x 3” x 2.5” 12” x 4.5” x 3” 13.5” x 4.5” x 3” 8.5” x 4.5” x 2.25” 8.75” x 4.5” x 2.25” 9” x 3.5” x 2.25” 9” x 3” x 2.25” 12” x 4.5” x 2.5” 13.5” x 4.5” x 2.5”
If your firebrick is shorter than 9” you will need to mark the foam form to indicate where the “new” edge of the oven will be. For example, if your firebrick is 8.75” in length (as shown below), you will need to lineup the firebrick along the top row and make a line to indicate where the new edge of the foam form will be located. Be sure to leave 1/16” to 1/8” gap between each brick for your mortar. Measure the front-to-back distance and mark that distance on all rows with a marker.
If you want to use a firebrick that isn’t shown on the above chart, you can probably still use it. Just make sure that the width of the brick is between 2.25” and 2.75”. If your brick is wider than 2.5”, you may need to trim the brick guides (the ridges on the foam form) with a razor, or simply press the foam ridges down so they are flush with the main foam body. SAFTEY FIRST!! WEAR GLASSES, RESPIRATOR & GLOVES AT ALL TIMES!! Sunscreen is optional..

© 2013 BrickWood Ovens / US & International Patents Pending Mattone Barile Grande (Insulated) | 3
HIGH-TEMP MORTAR – We provide you with a simple, inexpensive, yet highly functional heat tolerant mortar mix recipe. Most of the materials are readily available in your local Masonry Supply or Landscape Supply. While there are several great brands of pre-mix high-temp mortars on the market, they can add several dollars to the cost of your brick oven. If your budget allows, you can substitute our recommended high-temp mortar blend for pre-mix high-temp mortar, just verify it is weather resistant (rain, snow, etc.). You will need about 400lbs of High-Temp Pre-Mix (DRY) or 550lbs High-Temp Pre-Mix (Wet). RETAINING HEAT – There are three simple ways to retain more heat in your oven and they are fairly inexpensive.
1. Wrap the oven with 2 or 3 inches of Ceramic Fiber Blanket prior to applying the exterior finish. We HIGHLY recommend building your oven with Ceramic Fiber Blanket for improved oven performance. Visit us at BrickWoodOvens.com for step-by-step instructions & information on building this type of oven (and yes, we also sell top quality Ceramic Fiber Blanket in our online store).
2. Close off 40% of the front of the oven with firebrick or clay brick (do not exceed 40%). 3. Close off your oven with one of our doors which are available at BrickWoodOvens.com
STUCCO / MORTAR SHELL – The biggest misconception with the insulated oven occurs with the versatile stucco or mortar shell. This “shell” performs MANY duties and is required when insulating your oven with Ceramic Fiber Blanket.
1. The shell is 2 rock-hard ½” thick layers of STUCCO or MORTAR MIX. While stucco is preferred, it can be regional and hard to find in some areas. If a dry stucco mix is not available, standard Mortar Mix can be used.
2. Stucco is different from mortar mix as it contains synthetic fibers that increase its strength and durability. 3. The stucco is used in conjunction with the metal lathe (chicken wire) to create a reinforced shell around the oven
(think of the metal lathe in stucco like rebar in cement). This shell keeps the ceramic fiber blanket locked in place around the oven and also allows the end user to mortar ANY TYPE of veneer to the oven.
4. The stucco or mortar shell can be painted, but it is preferred that you mortar a finish veneer to the shell. 5. Once you paint the stucco, you cannot apply a veneer using mortar (unless you strip the paint). 6. Only use dry stucco mix. Pre-mixed stucco is cost-prohibitive (you will need about 280lbs of wet / mixed stucco).
HAIRLINE CRACKING – When your oven is heating up, the heat causes the oven to expand or “stretch”. This expansion stresses the weakest point of the oven which is usually where the mortar and firebrick meet. Please remember, HAIRLINE CRACKING IS NORMAL and will happen. To keep the hairline cracking to a minimum:
1. Heat your oven SLOWLY! The slower you heat your oven, the less chance of hairline cracking. 2. Make sure your firebricks are thoroughly saturated with water before applying mortar. Dry firebrick will
absorb the moisture from the mortar and prevent a tight bond between the firebrick and mortar. HERRINGBONE PATTERN COOKING SURFACE – Aside from looking pretty cool, the Herringbone pattern actually serves a purpose. If you lay your cooking surface firebrick in a horizontal / vertical layout and just one firebrick rises 1/16 of an inch, it could stop your pizza peel instantly (and send a nice shock down your arm). By angling the brick at a 45˚ degree angle, your peel will simply glide over the elevated brick. RIDGES ON THE INSIDE OF THE OVEN – Once the foam form is removed, you will notice very small ridges on the inside of the oven. This is due to the ridges on the foam form (used as a firebrick guide). DO NOT FILL THESE RIDGES WITH HIGH-TEMP MORTAR! Since the High-Temp mortar has already hardened, new mortar will not adhere and will eventually fall out. Usually on the slice of pizza your Mother-In-Law is eating. CRUNCH! Also, your new oven will be black on the inside in about 1 week so you will never see the ridges. LOCATING CONSTRUCTION MATERIALS – Depending on where you live, some materials might be difficult to locate. While firebrick, lime and Portland cement are readily available, SILICA SAND, FIRECLAY and VERMICULITE / PERLITE can be elusive. If your local building materials supply store does not carry the materials you need, try these alternatives.. SILICA SAND – Pool Supply stores carry silica sand for pool filters – make sure the bag says “Silica”.
FIRECLAY – Pottery / Ceramic supply stores carry fireclay for making firing kilns. VERMICULITE / PERLITE – Plant Nurseries carry Vermiculite & Perlite for potting soil additives.
CONSTRUCTION OVER MULTIPLE DAYS – If your project extends beyond 24 hours, you will need to remoisten the oven, firebrick, slab, etc.. Dry concrete and firebrick will suck moisture out of new / moist mortar and firebrick (like a sponge). This will leave your new mortar dried out and flaky (i.e. mortar failure). When in doubt, spray it down with water to be on the safe side! SOOT ON OVEN – Sometimes a bit of soot will land on the front of your oven, but don’t fret! Simply get a little dab of dish washing detergent, a small brush and a bucket of water – follow that up with a little elbow grease and that soot comes right off! Good as new with a fresh, clean, lemony scent! METRIC VS. STANDARD – The measurements in our directions are shown using the Standard measurement system. If you are outside of the US, you will need to convert the measurements to Metric. This can easily be done by visiting our conversion page at: www.BrickWoodOvens.com/Conversion

© 2013 BrickWood Ovens / US & International Patents Pending Mattone Barile Grande (Insulated) | 4
CURING THE OVEN AND FIRING THE OVEN - It is VERY important that you cure your oven correctly. It is equally important that you fire up the oven correctly to get the most out of your oven. PLEASE BE SURE TO READ AND FOLLOW BOTH SETS OF DIRECTIONS THAT ARE ON THE LAST 2 PAGES OF THESE INSTRUCTIONS:
HOW TO CURE YOUR OVEN & HOW TO FIRE YOUR OVEN FOR DAILY USE
PRACTICE MAKES PERFECT PIZZA – We know how excited you are to put your first pizza in your oven! We’ve been there! And we also burned the tar out of our first pizza (that took 30 minutes to build from scratch)! We HIGHLY recommend that you purchase 6 or 7 frozen pizzas from your grocers’ freezer (Red Baron / Tombstone) and let them thaw out to room temperature. Practice cooking in your oven with these disposable pizzas and once you have become an Oven Master, go for the good stuff! STRANGERS IN YOUR BACKYARD – Wood-fired ovens tend to attract lots of people. Some you may know and some you may not. These strangers mean no harm! They were just guided to your oven by the wonderful smell of burning wood and the aroma of fresh baked bread in the air. They usually appear during holidays, birthdays, graduations and most Sundays (especially during football season). Usually, you can give them a couple of slices of freshly baked pizza and they will scamper away, but remember, once you feed them food from a wood-fired oven, they come back over and over searching for more! You’ve been warned! HAVE FUN! THAT’S AN ORDER! Anyone can buy a pre-built oven.. and anyone can BUILD an oven! We have taken all of the guess-work out of building your wood-fired oven and base. All you have to do is follow our step-by-step instructions and you will be hosting your first pizza party in no time! Don’t worry about mistakes – masonry is very forgiving. If you do make a mistake, simply wipe off any wet mortar and try again. If it takes 3 times to get it right, it takes 3 times.. no worries!! You just learned how to do it right for the next time!
One last note before you get started.. If you have kids, be sure to let them help in the construction of the oven. Your new oven will last for many, many years and as the time passes quickly (as we all know it does), you and your kids will always remember the fun you had building the oven together as a family. There are no mistakes when building your oven and if an “uh-oh” does occur, just remember that it can easily be fixed with mortar!
- OPTIONAL ACCESSORIES –
(available online at www.BrickWoodOvens.com)
Barile Series Door w/ Red Oak Handles (27.5”W x 19.25”H)
DuraTech 6” Exhaust Kit &
High-Temp Adhesive
American Metalcraft Brush Head / Handle,
Alum Peel & Peel Rack

© 2013 BrickWood Ovens / US & International Patents Pending Mattone Barile Grande (Insulated) | 5
- INSULATED OVEN MEASUREMENTS –
- 47” x 60” INSULATED HEARTH SLAB & BASE MEASUREMEN TS -

© 2013 BrickWood Ovens / US & International Patents Pending Mattone Barile Grande (Insulated) | 6
- Finishing the Barile Series Oven –
Once you have fully assembled your Cortile Barile oven, you MUST apply some sort of finish to protect the firebrick & unfinished stucco / mortar from the elements. The finish can be as simple as a couple of layers of paint on the stucco / mortar shell or an elaborate housing that would make any true Italian proud!
Before you even begin your project, visit your local Masonry and/or Building Supply and look through their various types of masonry veneers. Keep in mind, this oven will last for generations – Make It Awesome !
Painted Stucco Shell Thin Brick Veneer on Stucco Sh ell
Thin Brick Veneer Finish w/ Closed Front Complete B rick Oven Housing
- Basic Types of Masonry Finishes & Veneers –
STUCCO BRICK VENEER
STONE VENEER
NATURAL STONE

© 2013 BrickWood Ovens / US & International Patents Pending Mattone Barile Grande (Insulated) | 7
ST
EP
S
TE
P
ST
EP
S
TE
P 11 11
Make 2 piles of Standard Brick and spray with water until they are saturated. HINT: Place the
better looking bricks in one pile and the not-so-hot bricks in the 2nd pile. Mortar the better looking
brick on the front half of your base..
Haga 2 pilas de ladrillos estándar y spray con agua hasta que se saturan. SUGERENCIA: Coloque los mejores ladrillos que buscan en una pila y los ladrillos no tan caliente en la
segunda pila. Mortero del ladrillo mejor aspecto en la mitad delantera de su base ..
HIG
HH
IGH
HIG
HH
IGH
-- -- TE
MP
MO
RT
AR
MIX
TE
MP
MO
RT
AR
MIX
TE
MP
MO
RT
AR
MIX
TE
MP
MO
RT
AR
MIX
Steps 2 - 29 require a 3:1:1:1 mortar mixture.
3 Gallons - Silica Sand 1 Gallon - Portland Cement 1 Gallon - Fireclay 1 Gallon - Lime
Dry mix the High-Temperature mortar blend in a wheelbarrow, then add enough water to mix the mortar to the consistency of thick oatmeal.
Los pasos 2 - 29 requiere una mezcla de mortero 3:1:1:1.
3 Galones - Arena Silica 1 Galón - Cemento Portland 1 Galón - Chamota 1 Galón - Lime
Seque mezclar la mezcla de mortero de alta temperatura en una carretilla, a continuación,
agregue suficiente agua para mezclar el mortero hasta obtener la consistencia de avena.
ST
EP
S
TE
P
ST
EP
S
TE
P 22 22
STARTING ON THE BACK OF THE SLAB – Mark the location of the CENTER of the slab and
work from the inside to the outside. Mortar the longest side and bottom of the longest side of
each brick with HIGH-TEMP MORTAR and place each brick 3/8” apart (3/8” JOINTS ). MORTAR ALL BRICKS VERTICALLY ON THEIR SIDES!!
ARRANQUE EN LA PARTE POSTERIOR DE LA LOSA - Marque la ubicación del centro de la losa
y trabajar desde el interior hacia el exterior. Mortero el lado más largo y la parte inferior del lado más largo de cada ladrillo con mortero de
alta temperatura y colocar cada ladrillo de 3/8" de separación (3/8" JUNTAS). MORTERO TODOS LOS LADRILLOS EN VERTICAL EN SU LADO!

© 2013 BrickWood Ovens / US & International Patents Pending Mattone Barile Grande (Insulated) | 8
ST
EP
3S
TE
P 3
ST
EP
3S
TE
P 3
Mark the CENTER of the FRONT SLAB and mortar the bricks from the inside to the outside
using the high-temp mortar. KEEP LEVEL. Remember to keep 3/8” joints between each brick
(about the width of a pencil).
Marque el centro de la losa FRONT y mortero de los ladrillos desde el interior hacia el exterior con el mortero de alta temperatura. MANTENGA
NIVEL. Recuerde que debe mantener de 3/8 "juntas entre cada ladrillo (aproximadamente el
ancho de un lápiz).
ST
EP
S
TE
P
ST
EP
S
TE
P 44 44
Mortar the bricks on the hearth slab from the OUTSIDE to the INSIDE. After completing
this step, let the bricks dry for 24 hours.
Mortero de los ladrillos en la losa de solera del exterior hacia el interior. Una vez completado este paso, dejar que los
ladrillos seca durante 24 horas.
ST
EP
S
TE
P
ST
EP
S
TE
P 55 55
Cover the Insulated hearth slab with about 1” – 2” of ALL PURPOSE SAND . This sand is
used to level the cooking surface firebrick with the firebrick frame. DO NOT USE SILICA SAND!!
Cubrir la base con capa de aislamiento de 1” - 2” de toda la ARENA PROPÓSITO . Esta arena se utiliza para nivelar la superficie de cocción de ladrillo refractario con el marco de ladrillo
refractario. NO USE ARENA SILICA!

© 2013 BrickWood Ovens / US & International Patents Pending Mattone Barile Grande (Insulated) | 9
AT
TE
NT
ION
!!A
TT
EN
TIO
N!!
AT
TE
NT
ION
!!A
TT
EN
TIO
N!!
---- CRUCIAL MEASUREMENT CRUCIAL MEASUREMENT CRUCIAL MEASUREMENT CRUCIAL MEASUREMENT ----
In the next two steps, make sure that the cooking surface firebrick (tan shown) is PERFECTLY
LEVEL with the hearth frame brick (red shown).
---- MUCHO CRUCIAL MUCHO CRUCIAL MUCHO CRUCIAL MUCHO CRUCIAL ––––
En los dos pasos siguientes, asegúrese de que la superficie de cocción de ladrillo refractario
(tan ilustrado) está perfectamente nivelada con el marco de ladrillo refractario (rojo muestra).
ST
EP
S
TE
P
ST
EP
S
TE
P 66 66
Place the FIREBRICK in a HERRINGBONE PATTERN*. Each firebrick should be level with the frame brick in height. Add or subtract sand if needed. DO NOT MORTAR FIREBRICK!!
*Herringbone pattern is REQUIRED for surface! Pizza peels will slide smoothly across uneven firebrick when laid at this angle.
Coloque el ladrillo refractario en un archive diseño en espiga*. Cada ladrillo refractario
debe estar a nivel con el ladrillo marco de altura. Sumar o restar arena si es necesario.
NO MORTERO LADRILLO REFRACTARIO!
*Patrón en espiga es OBLIGATORIO para la superficie!
ST
EP
S
TE
P
ST
EP
S
TE
P 77 77
Fill in the remaining voids with firebrick. Cut to size with the miter saw or angle grinder
using masonry blades. DO NOT FILL THE LOOSE JOINTS BETWEEN THE FIREBRICKS !
You will do this on Step 48.
Rellene los huecos restantes con ladrillo refractario. Corte a la medida con la sierra
ingletadora o amoladora angular con palas de albañilería. NO LLENE LAS JUNTAS SUELTOS
ENTRE LOS LADRILLOS REFRACTARIOS! Lo hará en el paso 48.

© 2013 BrickWood Ovens / US & International Patents Pending Mattone Barile Grande (Insulated) | 10
ST
EP
8S
TE
P 8
ST
EP
8S
TE
P 8
Remove the Mattone Barile Grande form from the box and place it on top of the firebrick cooktop.
Remover el Mattone Barile Grande form de su caja y ponerla encima de la base de ladrillo.
ST
EP
9S
TE
P 9
ST
EP
9S
TE
P 9
Carefully slide the legs out of the form body and insert them into the bottom of the form. Center
the form LEFT to RIGHT on the cooking surface.
Deslice con cuidado las piernas fuera del cuerpo forma espuma y los inserta en la parte inferior del formulario. Centre el horno de izquierda a derecha
en la superficie de cocción.
ST
EP
10
ST
EP
10
ST
EP
10
ST
EP
10
Position the BACK of the oven 10.5” from the edge of the rear firebrick.
Acomodar la parte DE ATRAS del horno 10.5” de la orilla del ladrillo de atras.
IMP
OR
TA
NT
IMP
OR
TA
NT
IMP
OR
TA
NT
IMP
OR
TA
NT
IMPORTANTIMPORTANTIMPORTANTIMPORTANT
YOU MUST SOAK ALL FIREBRICK FOR 20 – 30 MINUTES BEFORE CUTTING
AND/OR MORTARING INTO PLACE! KEEP FIREBRICK WET / MOIST AT ALL TIMES!!
IMPORTANTEIMPORTANTEIMPORTANTEIMPORTANTE
USTED DEBE DEJAR EN REMOJO PARA TODOS LADRILLO REFRACTARIO 20 – 30 MINUTOS
ANTES DE CORTAR Y / O MORTEROS EN SU LUGAR! MANTENGA LADRILLO REFRACTARIO
WET / HUMEDO EN TODO MOMENTO!

© 2013 BrickWood Ovens / US & International Patents Pending Mattone Barile Grande (Insulated) | 11
ST
EP
1S
TE
P 1
ST
EP
1S
TE
P 1
22 22
Cut 10 Firebrick in half.
Cortar 10 ladrillos a la mitad.
ST
EP
13
ST
EP
13
ST
EP
13
ST
EP
13
Attach one chimney unit to the other by removing the paper cover from the double-sided tape then press one unit to the other. Remove the paper
cover from both tape squares on bottom.
Adjuntar una unidad chimenea a la otra mediante la eliminación de la cubierta de papel de la cinta de doble cara y presione una unidad a la otra.
Quite la cubierta del papel de ambos cuadrados de cinta en la parte inferior.
ST
EP
1S
TE
P 1
ST
EP
1S
TE
P 1
44 44 CENTER and ATTACH the foam chimney 4.5”
(½ firebrick) from the front of the oven.
CENTRAR y ACOMODAR la chimenea de hielo seco 4.5” (1/2 ladrillo) de la parte
de entrente del horno.
ST
EP
11
ST
EP
11
ST
EP
11
ST
EP
11
Once the brick has soaked for 20 – 30 minutes, you can place them under the cooking slab to shield the bricks from the sun. Occasionally spray the bricks with water to keep moist.
Una vez que el ladrillo ha empapado durante 20 - 30 minutos, se puede colocar debajo de la losa de cocina para proteger el ladrillo del sol. De vez en cuando rociar los ladrillos con
agua para mantener la humedad.

© 2013 BrickWood Ovens / US & International Patents Pending Mattone Barile Grande (Insulated) | 12
ST
EP
15
ST
EP
15
ST
EP
15
ST
EP
15
Starting from the REAR, apply about 3/8” of the
HIGH-TEMPERATURE MORTAR to the bottom of a ½ firebrick. Place the brick FIRMLY against the
foam. DO NOT MORTAR TO THE FOAM!!
Empezando por la parte DE ATRAS y usando 3/8” del CEMENTO DE ALTA TEMPERATURA, acomodar el primer ladrillo FIRMEMENTE contra
el molde de hielo seco. NO PEGAR EL LADRLLO AL MOLDE!!
ST
EP
16
ST
EP
16
ST
EP
16
ST
EP
16
Complete bottom layer, ending with the 9” firebrick.
Terminar la capa de abajo con un ladrillo de 9”.
ST
EP
17
ST
EP
17
ST
EP
17
ST
EP
17
Stagger and mortar the next layer of firebrick.
See Diagram.
Acomodar y pegar cada hilera.
Ver el dibujo.
ST
EP
18
ST
EP
18
ST
EP
18
ST
EP
18
Continue the stager and mortar process for 5 rows.
DO NOT EXCEED 5 ROWS.
Continuar acomodando y pegando por 5 hileras.
NO EXCEDER 5 HILERAS.
ST
EP
19
ST
EP
19
ST
EP
19
ST
EP
19
Switch to the other side.
Cambiarse al otro lado.

© 2013 BrickWood Ovens / US & International Patents Pending Mattone Barile Grande (Insulated) | 13
ST
EP
20
ST
EP
20
ST
EP
20
ST
EP
20
Repeat the STAGGER and MORTAR Process for 8 rows. When you reach
the chimney, continue to the next step.
Repetir el proceso de ACOMODAR y PEGAR por 8 hileras. Cuando llegue a la chimenea,
continuar al siguiente paso.
ST
EP
21
ST
EP
21
ST
EP
21
ST
EP
21
Cut 2 firebricks as shown in the diagram.
Cortar 2 ladrillos como se ve en el dibujo.
ST
EP
22
ST
EP
22
ST
EP
22
ST
EP
22
Mortar the 2 “L” shaped firebricks in FRONT of the foam chimney mold. (Do not apply mortar in
the gap between the foam chimney and firebrick).
Mortero las 2 "L" en forma de ladrillos refractarios en frente de la chimenea del molde de espuma.
(No aplicar el mortero en el hueco entre la chimenea de espuma y ladrillos refractarios).
ST
EP
23
ST
EP
23
ST
EP
23
ST
EP
23
Move to the BACK of the oven.
Ir a la parte DE ATRAS del horno.
ST
EP
2S
TE
P 2
ST
EP
2S
TE
P 2
44 44 On the next two steps, you will be mortaring
the firebrick on the back wall, KEEP YOUR MORTAR JOINTS AS THIN AS POSSIBLE !
En los dos pasos siguientes, se le morteros el ladrillo refractario en la pared trasera,
MANTENGA SUS JUNTAS DE MORTERO LO MÁS FINA POSIBLE!

© 2013 BrickWood Ovens / US & International Patents Pending Mattone Barile Grande (Insulated) | 14
ST
EP
2S
TE
P 2
ST
EP
2S
TE
P 2
55 55
Starting from the center and working outwards, MORTAR THE BOTTOM AND SIDES of each
firebrick. Trim the firebrick on each side to size.
See Diagram.
Comenzando por el centro y trabajando hacia el exterior, MORTEROS EL FONDO Y LADOS de
cada ladrillo refractario. Recorte el ladrillo refractario en cada lado al tamaño.
Vea el diagrama.
ST
EP
2S
TE
P 2
ST
EP
2S
TE
P 2
66 66
STAGGER and MORTAR to the top of the oven.
IMPORTANT! Make sure you mortar the firebrick from the CENTER to the SIDES . This will keep
the outer bricks uniform when you make your cuts.
ACOMODAR y PEGAR hacia la parte de arriba del horno.
IMPORTANTE! Asegurarse de pegar los ladrillos del CENTRO HACIA LOS LADOS. Esto mantendra
los ladrillos uniformes al hacer los cortes.
ST
EP
2S
TE
P 2
ST
EP
2S
TE
P 2
77 77 Move to the FRONT LEFT or RIGHT of the oven.
Moverse a la DERECHA O IZQUIERDA de la parte de enfrente del horno.
ST
EP
2S
TE
P 2
ST
EP
2S
TE
P 2
88 88
ST
EP
25
ST
EP
25
ST
EP
25
ST
EP
25
Surround the foam chimney guide with 4 firebricks that are cut to shape (as shown).
Rodean la guía chimenea espuma con 4 ladrillos refractarios que se cortan para dar forma (como se muestra).

© 2013 BrickWood Ovens / US & International Patents Pending Mattone Barile Grande (Insulated) | 15
If you are attaching the 6” DuraTech Exhaust Kit to your oven, you will need to trim the top layer of firebrick to the dimensions shown below so the 6” DuraTech Anchor Plate can fit snugly into place.
DU
RA
TE
CH
DU
RA
TE
CH
DU
RA
TE
CH
DU
RA
TE
CH
ST
EP
AS
TE
P A
ST
EP
AS
TE
P A
Trim 4 firebricks to the dimensions shown in the diagram.
Recorte 4 ladrillos refractarios a las dimensiones indicadas en el diagrama.
DU
RA
TE
CH
DU
RA
TE
CH
DU
RA
TE
CH
DU
RA
TE
CH
ST
EP
BS
TE
P B
ST
EP
BS
TE
P B
Mortar the 4 firebricks into place with the trimmed section INSIDE and FACING
THE CENTER. See Diagram.
Mortero de los 4 ladrillos de fuego en el lugar con la sección recortada INSIDE y
mirando hacia el centro. Vea el diagrama.
ST
EP
2S
TE
P 2
ST
EP
2S
TE
P 2
99 99 Build the chimney 3 layers high.
ALLOW THE OVEN 24 HOURS TO DRY!
Construir la chimenea 3 capas altas.
DEJE QUE EL HORNO 24 HORAS PARA SECA!
ST
EP
30
ST
EP
30
ST
EP
30
ST
EP
30
Starting 1” behind the front of the unit, wrap the entire oven (including the back) with the ceramic fiber blanket. MAKE SURE YOUR
GLOVES, RESPIRATOR AND EYE PROTECTION ARE ON!
A partir del 1 "detrás de la parte delantera de la unidad, envolver todo el horno (incluyendo
la parte de atrás) con la manta de fibra cerámica. ASEGÚRESE DE QUE SU GUANTES,
RESPIRADOR Y PROTECCIÓN DE LOS OJOS ESTÁN EN!

© 2013 BrickWood Ovens / US & International Patents Pending Mattone Barile Grande (Insulated) | 16
CL
OS
EC
LO
SE
CL
OS
EC
LO
SE
-- -- UP
UP
UP
UP
Start / End the first layer 1” BEHIND the firebrick.
Inicio / Fin de la primera capa de 1" tras el ladrillo refractario.
ST
EP
S
TE
P
ST
EP
S
TE
P 33 33
11 11
Wrap the blanket all the way around the base
of the oven. Cut the blanket 1” behind the front of the oven with scissors or a utility knife.
Envuelva la manta todo el camino alrededor de la base del horno. Corte la manta 1"
detrás de la parte frontal del horno con unas tijeras o un cuchillo.
ST
EP
S
TE
P
ST
EP
S
TE
P 33 33
22 22
Cut the two back corners of the blanket about 2/3 down from the top. Fold the blanket on
either side of the oven onto the oven.
Corte las dos esquinas traseras de la manta de aproximadamente 2/3 hacia abajo desde
la parte superior. Doble la manta en cualquiera de los lados del horno en el horno.
ST
EP
S
TE
P
ST
EP
S
TE
P 33 33
33 33
Trim the corners so the blanket is uniform in size and shape. DO NOT DISCARD THE CORNERS.
Recortar las esquinas por lo que la manta es uniforme en tamaño y forma.
NO TIRE LAS ESQUINAS.
© 2013 BrickWood Ovens / US & International Patents Pending Mattone Barile Grande (Insulated) | 17
ST
EP
S
TE
P
ST
EP
S
TE
P 33 33
44 44
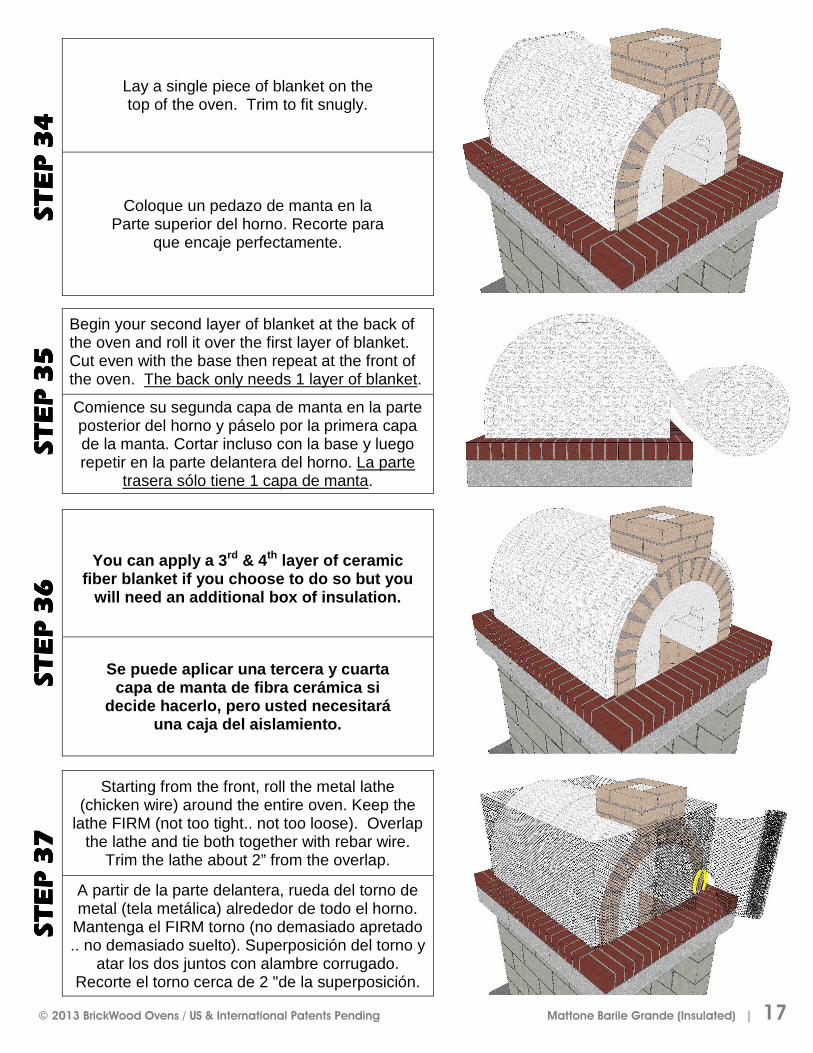
Lay a single piece of blanket on the top of the oven. Trim to fit snugly.
Coloque un pedazo de manta en la Parte superior del horno. Recorte para
que encaje perfectamente.
ST
EP
S
TE
P
ST
EP
S
TE
P 33 33
55 55
Begin your second layer of blanket at the back of the oven and roll it over the first layer of blanket. Cut even with the base then repeat at the front of the oven. The back only needs 1 layer of blanket.
Comience su segunda capa de manta en la parte posterior del horno y páselo por la primera capa de la manta. Cortar incluso con la base y luego repetir en la parte delantera del horno. La parte
trasera sólo tiene 1 capa de manta.
ST
EP
S
TE
P
ST
EP
S
TE
P 33 33
66 66
You can apply a 3 rd & 4 th layer of ceramic fiber blanket if you choose to do so but you
will need an additional box of insulation.
Se puede aplicar una tercera y cuarta capa de manta de fibra cerámica si
decide hacerlo, pero usted necesitará una caja del aislamiento.
ST
EP
3S
TE
P 3
ST
EP
3S
TE
P 3
77 77
Starting from the front, roll the metal lathe (chicken wire) around the entire oven. Keep the
lathe FIRM (not too tight.. not too loose). Overlap the lathe and tie both together with rebar wire.
Trim the lathe about 2” from the overlap.
A partir de la parte delantera, rueda del torno de metal (tela metálica) alrededor de todo el horno.
Mantenga el FIRM torno (no demasiado apretado .. no demasiado suelto). Superposición del torno y
atar los dos juntos con alambre corrugado. Recorte el torno cerca de 2 "de la superposición.

© 2013 BrickWood Ovens / US & International Patents Pending Mattone Barile Grande (Insulated) | 18
ST
EP
3S
TE
P 3
ST
EP
3S
TE
P 3
88 88
Simply FOLD THE LATHE CORNERS over by pressing the lathe against the blanket (you may need to tie down). Then attach the top layer of
lathe and tie into place with rebar wire.
Simplemente DOBLA LAS ESQUINAS TORNO pulsando sobre el torno en contra de la manta (puede que tenga que atar). A continuación,
coloque la capa superior de torno y corbata en su lugar con alambre corrugado.
ST
EP
S
TE
P
ST
EP
S
TE
P 3
93
93
93
9
Starting from the bottom, apply a single ½” thick layer of stucco (or mortar mix). The goal here is to bury the lathe with the mix, but don’t make this
layer too thick! Some lathe WILL stick out and show. We’ll fix that in Step 41.
ALLOW THE STUCCO 24 HOURS TO DRY!
A partir de la parte inferior, se aplica una sola capa de estuco (o mezcla de mortero) alrededor de 1/2
"de espesor. El objetivo aquí es enterrar el torno con la mezcla, pero no hacen esta capa demasiado
gruesa! Algunos Torno se proyectará hacia fuera y / o mostrar. Vamos a arreglar esto en el Paso 41.
PERMITEN LAS ESTUCO 24 HORAS PARA SECAR!
ST
EP
S
TE
P
ST
EP
S
TE
P 4
04
04
04
0
Once the stucco is rock hard, trim the excess wire mesh as close to the stucco as possible. Be careful not to break or fracture the stucco.
It looks dry, but it is still curing.
Una vez que el estuco es el rock duro, recorte el exceso de malla de alambre tan cerca del estuco como sea posible. Tenga cuidado de no romper o fracturar el estuco.
Se ve seca, pero todavía es curado.
ST
EP
41
Press any lathe that is showing firmly against the stucco shell and apply a second ½” coat of mix. Use a damp construction sponge to smooth the outer shell to a factory smooth finish. Allow this
second layer 3-4 days to dry / cure before removing the foam.
Pulse cualquier torno que está mostrando firmeza contra la carcasa estuco y aplicar una segunda ½
"escudo de mezcla. Use una esponja húmeda para la construcción suavizar la cáscara externa de un acabado liso fábrica. Permitir que esta segunda capa de 3-4 días para secar / curar
antes de retirar la espuma.

© 2013 BrickWood Ovens / US & International Patents Pending Mattone Barile Grande (Insulated) | 19
HE
AD
S U
P!
HE
AD
S U
P!
HE
AD
S U
P!
HE
AD
S U
P! Resist the temptation to fill the inside ridges with
high-temp mortar. IT WILL NOT ADHERE AND WILL EVENTUALLY FALL OUT!
Resista la tentación de llenar los bordes en el interior con mortero de alta temperatura. NO SE RESPETAN
Y TARDE O TEMPRANO CAERÁ FUERA!
DU
RA
TE
CH
DU
RA
TE
CH
DU
RA
TE
CH
DU
RA
TE
CH
YOUR CITY &/OR STATE MAY REQUIRE A SPARK ARRESTOR ON THE OVEN. CHECK YOUR LOCAL LAWS TO SEE IF REQUIRED.
DuraTech Kits are available on our website.
LA CIUDAD Y / O ESTADO PUEDE REQUERIR A CHISPAS EN EL HORNO. REVISE SUS
LEYES LOCALES PARA VER SI ES NECESARIO.
Kits disponibles en nuestro sitio web Duratech.
ST
EP
S
TE
P
ST
EP
S
TE
P 44 44
22 22
Apply heat resistant adhesive on the bottom of the anchor plate. Apply liberally to ensure minimal
heat loss. Our DuraTech kits come with a 10oz tube of heat resistant silicone adhesive.
Aplicar el adhesivo resistente al calor sobre la parte inferior de la placa de anclaje. Aplicar generosamente para asegurar la pérdida de calor mínima. Nuestros
kits DuraTech vienen con un tubo de 10 oz de adhesivo de silicona resistente al calor.
WA
RN
ING
!W
AR
NIN
G!
WA
RN
ING
!W
AR
NIN
G!
- REMOVE FOAM FORM-
DO NOT EVEN THINK ABOUT BURNING THE FOAM FORM OR USING HAZARDOUS
CHEMICALS TO REMOVE THE FOAM! DOING SO WILL DESTORY YOUR OVEN!
- RETIRE LA ESPUMA FORM -
INCLUSO NO PIENSE EN QUEMA DEL FORMULARIO DE ESPUMA O USO DE PRODUCTOS QUÍMICOS PELIGROSOS
PARA RETIRAR LA ESPUMA! HACERLO!

© 2013 BrickWood Ovens / US & International Patents Pending Mattone Barile Grande (Insulated) | 20
ST
EP
S
TE
P
ST
EP
S
TE
P 44 44
33 33 Center the anchor plate vertically / horizontally
and press firmly against the firebrick.
Centre la placa de anclaje vertical / horizontal y presione firmemente contra el ladrillo refractario.
ST
EP
S
TE
P
ST
EP
S
TE
P 44 44
44 44
Place the chimney cap on the anchor plate and finish.
ALLOW 5 DAYS TO AIR DRY!!
Coloque el casquillo de la chimenea en el anclaje plato y acabado.
PERMITEN 5 DÍAS SECAR AL AIRE!!
ST
EP
4S
TE
P 4
ST
EP
4S
TE
P 4
55 55
Pour the ½ of the 5lb bag of flour onto the firebrick cooking surface. Using your hand,
spread the flour in between the firebrick joints. Use just enough flour to tighten the bricks.
Verter la mitad de la bolsa de 5 libras de harina sobre la superficie de cocción de ladrillo
refractario. Con la mano, se extendió la harina en medio de las juntas de ladrillos refractarios. Use sólo lo suficiente harina para apretar los ladrillos.

© 2013 BrickWood Ovens / US & International Patents Pending Mattone Barile Grande (Insulated) | 21
- FINISHING THE OVEN & CLOSING OFF THE FRONT - Now that your Stucco (or Mortar) shell is dry and rock solid, you can apply almost ANY type of veneer to the outside of your oven. Most masonry supplies carry a plethora of veneer finishes – from Thin Brick (1/2” thick face brick) to multi-color cultured stone to standard river rock, so be sure to stop by and look at their selection as you design the oven finish. This is where the true artist in you gets to come out, so make sure you choose a veneer that matches your unique style and personality!
While we don’t know the exact type of veneer you are going to use, we do know how much you need to purchase. Listed below is the Materials List to finish the oven - WE HIGHLY RECOMMEND YOU TAKE THESE PRINTED DIRECTIONS TO YOUR LOCAL MASONRY SUPP LY and they can show you their veneer selection and give you first-hand advice and knowledge on the veneer you choose.
Once you have chosen your finish, simply attach the finish to the oven shell with regular, everyday mortar! You don’t need to use high-temp mortar since the Ceramic Fiber Blanket prevents the outside of the oven from getting hot. In the following steps, we show you how to apply Thin Brick to the outside of the oven.
We also show you how to close off 40% off the front of the oven to retain even more heat. This step is optional as many people prefer to keep their ovens open. PLEASE NOTE: If you do chose to close off the front of your oven, be sure to remove the BrickWood Ovens foam form first!
Materials Need for Exterior Veneer Finish (these numbers include the 8% overage recommendatio n)
40sf of Veneer 2 - 60lb Bags of Mortar Mix
ST
EP
AS
TE
P A
ST
EP
AS
TE
P A
Sketch out how you want your finished oven to look. For this example, we are sketching out an oven that is finished with Thin Brick and has the
front of the oven closed off 40%.
Esbozar cómo quiere que su horno de acabado para mirar. Para este ejemplo,
estamos esbozar un horno que está terminado con ladrillo delgado y tiene la parte delantera del horno cerrado 40%.
ST
EP
BS
TE
P B
ST
EP
BS
TE
P B
Make guide lines with your level and a Sharpie (or pencil). This will keep your veneer lines
straight and parallel with the oven.
Asegúrese que las líneas de guía con su nivel y un Sharpie (o un lápiz). Esto mantendrá sus
líneas de chapa recta y paralela con el horno.

© 2013 BrickWood Ovens / US & International Patents Pending Mattone Barile Grande (Insulated) | 22
WIDTH x HEIGHT OPEN ZONE WINDOW ANCHO x ALTO VENTANA DE ZONA SEGURA
(EXAMPLE : 15” X 17 ” = 255in 2)
ST
EP
CS
TE
P C
ST
EP
CS
TE
P C
Mortar the veneer to the back of the oven. Trim the veneer on either side so the edges
are level with the body of the oven.
Mortero de la chapa a la parte posterior del horno. Recortar la chapa a ambos lados para que los Bordes son de nivel con el cuerpo del horno.
ST
EP
DS
TE
P D
ST
EP
DS
TE
P D
Starting from the bottom, attach the veneer to the sides of the oven – keep your eyes on the
guide lines and keep the veneer level!
A partir de la parte inferior, coloque la chapa de las paredes del horno - a mantener sus ojos en las líneas de guía y mantener el nivel de chapa!
ST
EP
ES
TE
P E
ST
EP
ES
TE
P E
Optional Enclosure – NOT ON MATERIALS LIST. You can close off 40% of the face of the oven with brick to retain heat. Mortar the brick VERTICALLY as to allow room for the optional door (6” Depth).
Opcional Enclosure - NO EN LA LISTA DE MATERIALES. Usted puede cerrar 40% de la
cara del horno con ladrillo para retener el calor. Mortero el ladrillo verticalmente como para dejar espacio para la puerta opcional (6" Profundidad).
OP
EN
O
PE
N
OP
EN
O
PE
N Z
ON
EZ
ON
EZ
ON
EZ
ON
E
You can close-off the oven to a MAXIMUM of 240in2 (Open Zone: 240in 2 – 400in2). If your desired WIDTH x HEIGHT is in that Open Zone
window, then you are Golden!
Puede cerrar el horno a un MÁXIMO de 240in2 (Zona Segura: 240in 2 - 400in2). Si la ALTURA
DESEADA x ANCHO se encuentra en la ventana Zona segura, entonces usted es de oro!
240in 2 – 400in 2
0in 2 – 239in 2
© 2013 BrickWood Ovens / US & International Patents Pending Mattone Barile Grande (Insulated) | 23
ST
EP
S
TE
P
ST
EP
S
TE
P FF FF
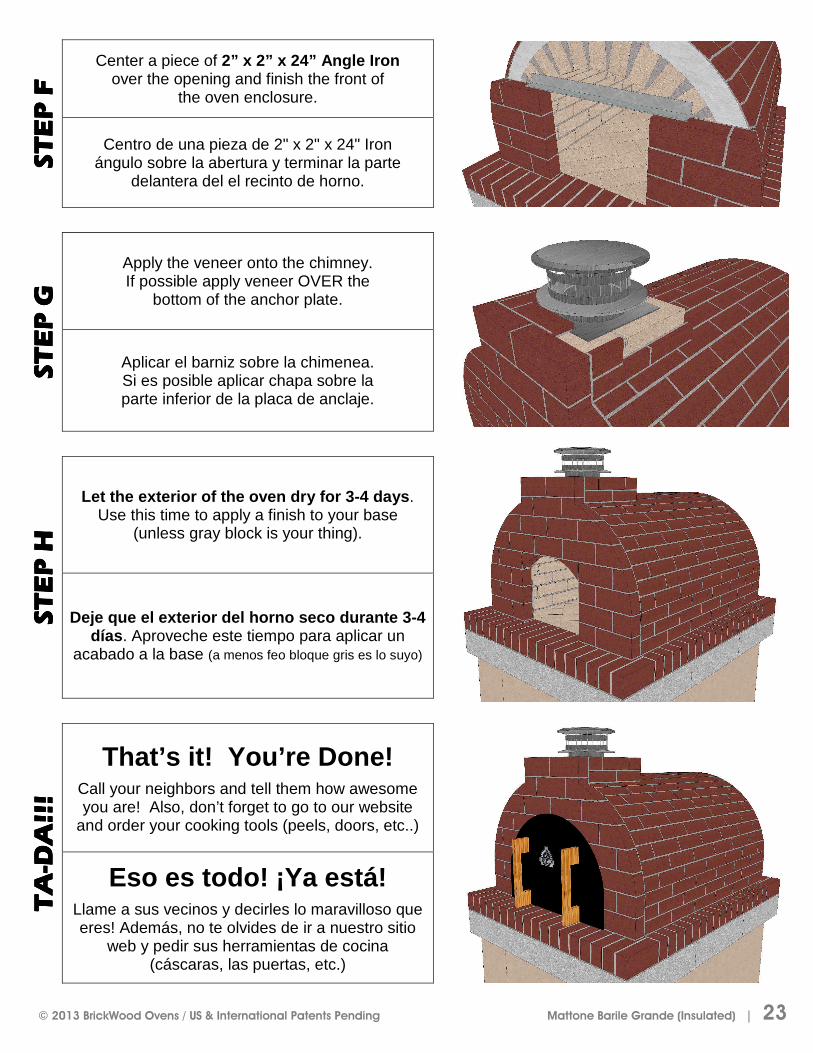
Center a piece of 2” x 2” x 24” Angle Iron
over the opening and finish the front of the oven enclosure.
Centro de una pieza de 2" x 2" x 24" Iron ángulo sobre la abertura y terminar la parte
delantera del el recinto de horno.
ST
EP
S
TE
P
ST
EP
S
TE
P GG GG
Apply the veneer onto the chimney. If possible apply veneer OVER the
bottom of the anchor plate.
Aplicar el barniz sobre la chimenea. Si es posible aplicar chapa sobre la parte inferior de la placa de anclaje.
ST
EP
S
TE
P
ST
EP
S
TE
P HH HH
Let the exterior of the oven dry for 3-4 days . Use this time to apply a finish to your base
(unless gray block is your thing).
Deje que el exterior del horno seco durante 3-4 días . Aproveche este tiempo para aplicar un
acabado a la base (a menos feo bloque gris es lo suyo)
TT TTAA AA
-- -- DD DDAA AA
!! !! !!!! !!!!
That’s it! You’re Done!
Call your neighbors and tell them how awesome you are! Also, don’t forget to go to our website
and order your cooking tools (peels, doors, etc..)
Eso es todo! ¡Ya está!
Llame a sus vecinos y decirles lo maravilloso que eres! Además, no te olvides de ir a nuestro sitio
web y pedir sus herramientas de cocina (cáscaras, las puertas, etc.)

© 2013 BrickWood Ovens / US & International Patents Pending Mattone Barile Grande (Insulated) | 24
Once the BrickWood Ovens foam mold has been removed and the oven has had time to dry for 3-4 days, you can begin the firing process. This is the most important of all directions!
The purpose of a slow cure is to ensure that all moisture in the firebrick and the mortar exits the oven slowly and evenly. Drying the oven too quickly can result in moisture turning into steam
and steam can possibly crack your awesome new oven!!
DAY 1 Place 1 standard size firelog on top of dry kindling. Use paper to
ignite - not chemical igniters.
DAY 2 Place 2 standard size firelogs on top of dry kindling. Use paper to ignite -
not chemical igniters.
DAY 3 Place 3 standard size firelogs on top of dry kindling. Use paper to ignite -
not chemical igniters.
Place 1 firelog on the embers to ignite. Spread embers around cooking surface Place 2 firelogs on the embers to ignite.
Spread embers around cooking surface. Place 3 firelogs on the embers to ignite. Spread embers around cooking surface.
Burn down to embers. Spread embers. Burn down to embers. Spread embers. Burn down to embers. Spread embers.
Place 3 standa rd size firelogs on top of dry kindling.
Place 3 standard size firelogs on top of dry kindling. Place 3 standard size firelogs on top of
dry kindling.
DAY 4 DAY 5 DAY 6
© 2013 BrickWood Ovens / US & International Patents Pending Mattone Barile Grande (Insulated) | 25
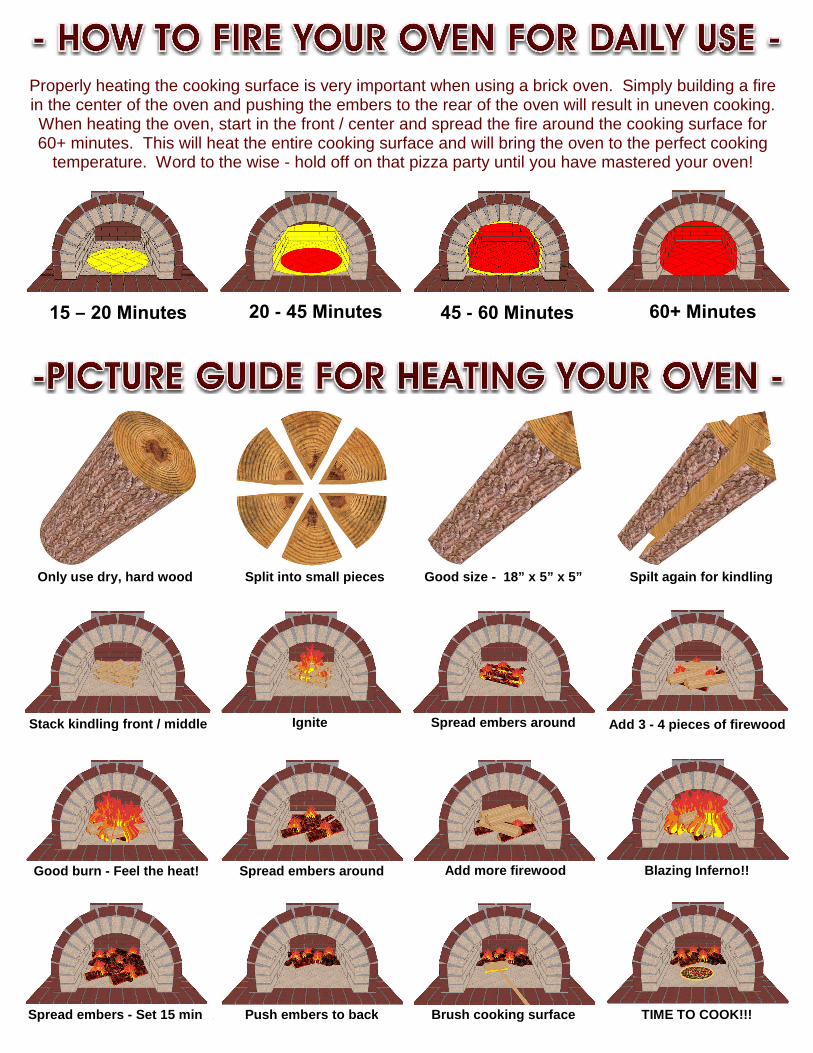
Properly heating the cooking surface is very important when using a brick oven. Simply building a fire in the center of the oven and pushing the embers to the rear of the oven will result in uneven cooking. When heating the oven, start in the front / center and spread the fire around the cooking surface for 60+ minutes. This will heat the entire cooking surface and will bring the oven to the perfect cooking
temperature. Word to the wise - hold off on that pizza party until you have mastered your oven!
15 – 20 Minutes 20 - 45 Minutes 45 - 60 Minutes 60+ Minutes
Spread embers - Set 15 min
Push embers to back
Brush cooking surface TIME TO COOK!!!
Good burn - Feel the heat! Spread embers around Add more firewood Blazing Inferno!!
Stack kindling front / middle Ignite Spread embers around Add 3 - 4 pieces of firewood
Only use dry, hard wood Split into small pieces Good size - 18” x 5” x 5” Spilt again for kindling

© 2013 BrickWood Ovens / US & International Patents Pending Mattone Barile Grande (Insulated) | 26
Before you dig your foundation or lay that first brick, be sure to take several pictures of the area you’re
building your new BrickWood Oven. These pictures will be the first in a series of photos that document
your progress as you construct one of the most rewarding DIY projects at your home.
When taking a good photo, make sure you tidy-up the area around your oven. You want people to see
pictures of your awesome oven - not pictures of yard tools, empty concrete bags or crushed beer cans..
Be sure to use a good quality digital camera and take lots of pictures! Nobody
uses film anymore, so click away and send us your best shots - we want to
show them to the world! You can upload your photos on our website or
simply email them to us as you build your oven. Each customer has their own
picture file and we will store your photos as they come in. Visit our website
for more info or email your 1mb - 2mb pictures to:

© 2013 BrickWood Ovens / US & International Patents Pending Mattone Barile Grande (Insulated) | 27
SELECT YOUR OVEN MODEL
MATTONE BARILE
MATTONE BARILE GRANDE
CORTILE BARILE
30” CUPOLA
36” CUPOLA
40” CUPOLA
46” CUPOLA
CUSTOM DESIGNED OVEN
COMMENTS:
First and foremost, we would like to Thank You for choosing BrickWood Ovens as your wood-fired oven provider! We know there are oven manufacturers aplenty, so having chosen BrickWood Ovens as your
preferred wood-fired oven makes us proud! In our quest for Global DIY Wood-Fired Oven Domination, we do our best to make improvements based on our customers’ feedback. This is your opportunity to let us know your thoughts, ideas, comments, suggestions.. whatever is on your mind after building a BrickWood Oven.
Your comments are VERY important to us, and we do take your comments seriously, so please take a minute or two and fill out the form below. You can then email, fax or mail the form back at your convenience.
THANK YOU!
The BrickWood Ovens FamilyThe BrickWood Ovens FamilyThe BrickWood Ovens FamilyThe BrickWood Ovens Family
CUSTOMER INFORMATION
NAME _______________________________________
CITY _______________________ STATE _______
Email: [email protected]
Fax: 360-547-7777
Mail: 2950 Newmarket Street Suite 101-226 Bellingham, WA 98226