Installation Guide - IOGEAR 14 General Settings 17 Wireless Configuration Federal Communications...
50
GUWIP204 Part No. M1172-a Installation Installation Guide Wireless 4-Port USB Sharing Station
Transcript of Installation Guide - IOGEAR 14 General Settings 17 Wireless Configuration Federal Communications...

1
GUWIP204Part No. M1172-a
InstallationInstallation GuideWireless 4-Port USB Sharing Station

©2011 IOGEAR®. All Rights Reserved. PKG-M1172-a IOGEAR, the IOGEAR logo, MiniView, VSE are trademarks or registered trademarks of IOGEAR. Microsoft and Windows are registered trademarks of Microsoft Corporation. IBM is a registered trademark of International Business Machines, Inc. Macintosh, G3/G4 and iMac are registered trademarks of Apple Computer, Inc. IOGEAR makes no warranty of any kind with regards to the information presented in this document. All information furnished here is for informational purposes only and is subject to change without notice. IOGEAR assumes no responsibility for any inaccuracies or errors that may appear in this document.

Table of Contents
Package Contents 4
System Requirements 5
Product Overview 6
Hardware Installation 7
Windows Software Installation 10
Mac Software Installation 11
Configuration 14
General Settings 17
WirelessConfiguration-WEP 18
WirelessConfiguration-WPA/WPA2 20
AdministratorConfiguration 21
Maintenance 23
ConnecttoanattachedUSBdevice 24
RequesttoConnect 25
DisconnectingaUSBdevice 27
Auto-ConnectPrinter 28
Network Scanner 31
Firmware Upgrade 35
Troubleshooting 38
Limited Warranty 46
Federal Communications Commission (FCC)
Statement 47
CE Statement 48
Contact 49

4 5
Package Contents
1xWireless4-portUSBSharingStation1 x Installation Manual 1 x Installation CD 1 x Warranty / Registration card 1 x Power Adapter
4 5
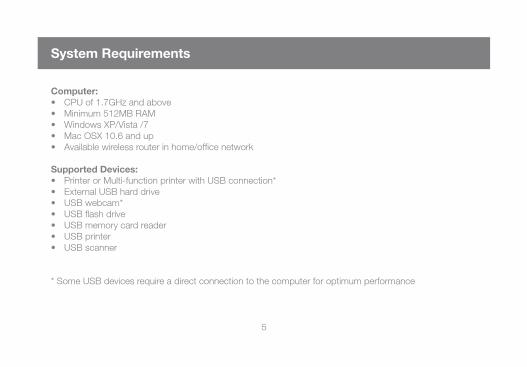
System Requirements
Computer: CPU of 1.7GHz and above •Minimum512MBRAM•Windows XP/Vista /7•Mac OSX 10.6 and up•Availablewirelessrouterinhome/officenetwork •
Supported Devices: PrinterorMulti-functionprinterwithUSBconnection*•External USB hard drive •USBwebcam*•USBflashdrive•USB memory card reader •USB printer •USB scanner •
*SomeUSBdevicesrequireadirectconnectiontothecomputerforoptimumperformance

6 7
USB connection LED1. USB port located on the front2.On/Off Switch3. Power adapter connector4.
Product Overview
1 2 73 4 5
Reset button5. Network port6. USB ports located on the back7. Antenna8.
6 8

6 7
NOTE: Before you connect your USB device to the GUWIP204, please refer to the user manual and install the driver on your computer first, for example the driver for your printer. When the installation is completed, safely disconnect your USB devices from your computer. Disconnect the power source from USB devices.
Connect your USB device to any one of the USB ports on the USB Sharing Station1.
Hardware Installation
USB device (not included)

8 9
ConnecttheGUWIP204totherouterorswitchwiththeincludedEthernetcable.2.
router (not included)

8 9
ConnectthepoweradaptertotheGUWIP204andturnitonusingtheon/offswitch.TheUSBconnectionLEDwill3. turn on indicating that unit is correctly connected to the network. Turn on your USB device.

10
Windows Software Installation
Please insert the driver CD into your Windows based PC. The CD should auto play and bring up the software installer.
Ifyouhavedisabledtheauto-playfunction, please browse the CD and install the driver program manually.
Follow the instructions of the wizard to complete the installation process. Once the installation is complete, click “Finish” to launch the application.
11
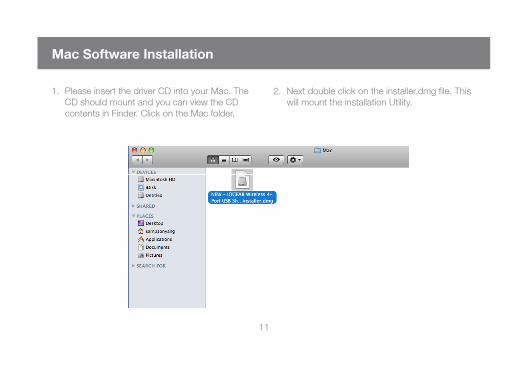
Mac Software Installation
Please insert the driver CD into your Mac. The 1. CD should mount and you can view the CD contents in Finder. Click on the Mac folder.
Nextdoubleclickontheinstaller.dmgfile.This2.will mount the installation Utility.

12 13
Nextdoubleclickontheinstallerfilenamed“IOGEARWireless4-PortUSBSharingStationInstaller”.3.
12 13
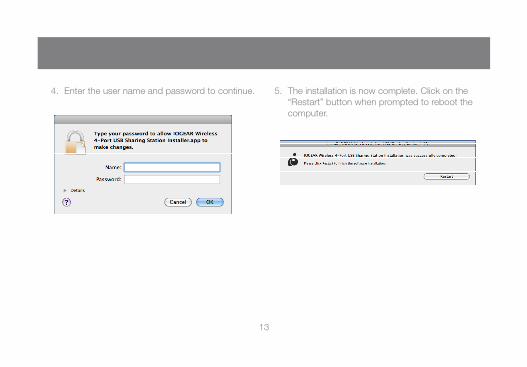
Enter the user name and password to continue.4. The installation is now complete. Click on the 5. “Restart” button when prompted to reboot the computer.

14 15
Configuration
RuntheIOGEARWireless4-PortUSB1. Sharing Station Control Center. It will automaticallysearchtheGUWIP204anddisplay the status.
SelecttheGUWIP204thatyouwantto2.configure.Nextclickonthe“ConfigureServer” icon.

14 15
Thiswillbringuptheconfigurationpageinyourwebbrowser.Click“Config”3.

16 17
Enter the Administrator Username (default: admin) and Password (default: admin) to login. 4. ThiswillbringyoutotheGUWIP204Configurationpage.
16 17
General Settings
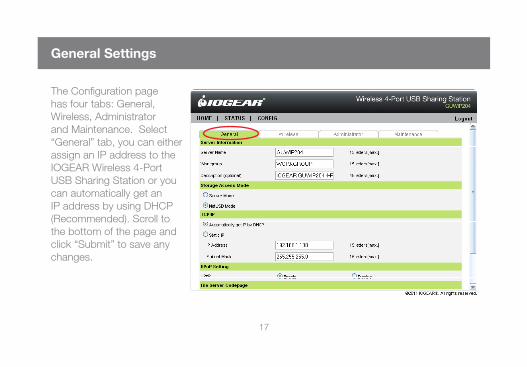
TheConfigurationpagehas four tabs: General, Wireless, Administrator and Maintenance. Select “General” tab, you can either assign an IP address to the IOGEARWireless4-PortUSB Sharing Station or you can automatically get an IP address by using DHCP (Recommended). Scroll to the bottom of the page and click “Submit” to save any changes.

18 19
Wireless Configuration - WEP
Next,configurethewireless1. settings by selecting “Wireless” tab. Scan for your wireless network by clicking the “Enter” button in the Scan AP section.

18 19
Select your wireless network and click the 2.“Set” button.
Next choose the security system and enter key 3. which are suitable fo your AP wireless setting. Once that is complete, scroll to the bottom of the page and click “submit” to complete the wirelessconfiguration.

20 21
Wireless Configuration - WPA/WPA2
Select your Network Type from the drop 1. down menu. Type in the SSID for the wireless network. 2.This is the name of your wireless network. Select your Secuity System between 3. WPAorWPA2.Thiswouldbedeterminedby the type of wireless network security that was setup when the router was configured.ThenchoosetheKeyFormatfor your wireless network password. Then enterthePre-SharedKey,thisisthepasskey for your wireless network. Finally choose the Encryption type that was setup for the pass key. Scroll down and press the Submit. Allow 4. theGWUIP204torestartandcomebacktotheloginscreen.ThentheGUWIP204can be powered off and disconnected
from the hard wired connection. You canthenpowerontheGUWIP204andthe device should recognized by the GUWIP204software.

20 21
Administrator Configuration
By clicking the “Administrator” tabontheConfigurationpage, you can change the administrator user name and password. You can also add users or remove users.

22 23
You can now unplug the Ethernet cable fromtheGUWIP204anditwillautomaticallyconnect to your wireless router. The WAN LED should start blinking.
OpentheIOGEARWireless4-PortUSBSharing Station Utility. You should see the
GUWIP204afewsecondsaftertheutilityisopened.IfyoudonotseetheGUWIP204in the list, you will need to plug the Ethernet cable back in and double check the GUWIP204wirelesssettings.

22 23
Maintenance
Clicking on the “Maintenance” tabontheConfigurationpagewill take you the the maintenance section where you can reset the device, restore to factory settings, orupgradethefirmware.Refertopage35fordetailsonfirmwareupgrade.Forthelatestfirmwareversions, be sure to check the IOGEAR website at http://www.iogear.com.
24 25
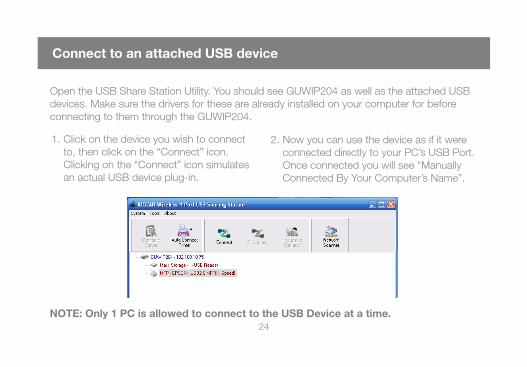
Connect to an attached USB device
OpentheUSBShareStationUtility.YoushouldseeGUWIP204aswellastheattachedUSBdevices. Make sure the drivers for these are already installed on your computer for before connectingtothemthroughtheGUWIP204.
Click on the device you wish to connect 1. to, then click on the “Connect” icon. Clicking on the “Connect” icon simulates anactualUSBdeviceplug-in.
Now you can use the device as if it were 2.connected directly to your PC’s USB Port. Once connected you will see “Manually Connected By Your Computer’s Name”.
NOTE: Only 1 PC is allowed to connect to the USB Device at a time.
24 25
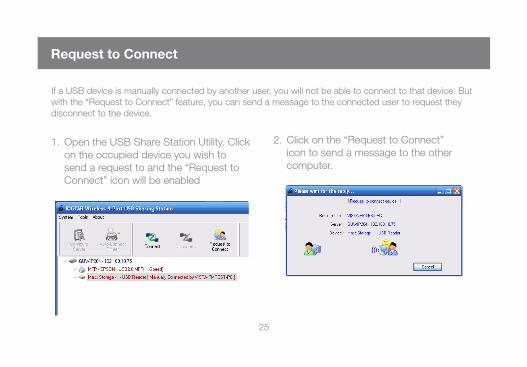
If a USB device is manually connected by another user, you will not be able to connect to that device. But with the “Request to Connect” feature, you can send a message to the connected user to request they disconnect to the device.
Request to Connect
Open the USB Share Station Utility. Click 1. on the occupied device you wish to send a request to and the “Request to Connect” icon will be enabled
Click on the “Request to Connect” 2.icon to send a message to the other computer.

26 27
The other user can either “Accept” or “Reject” your request. If they “Accept”, then they will automatically disconnect from the device and you will automatically be connected. If they “Reject” your request, no changes will be made. They will remain connected to the device.

26 27
Disconnecting a USB device
OnceyouarefinishedusingtheUSBdevice,opentheUSBShareStationUtility.Clickonthedevice you wish to disconnect and click on the “Disconnect” icon. Once disconnected, any of the other users on the network can connect to the device.

28 29
Auto-Connect Printer
Auto-ConnectisafeatureforMulti-FunctionPrintersintheutilitythatautomaticallyconnectsand disconnects so the user doesn’t need to manually do so. Follow the steps below to enabletheAuto-ConnectPrinterfeatureforyourMulti-FunctionPrinter.
Open the USB Share Station Utility and click on the desired printer.1.
28 29
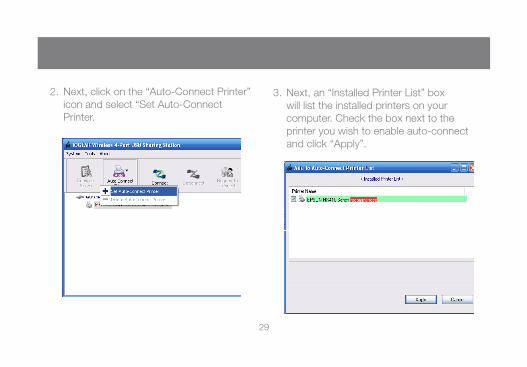
Next,clickonthe“Auto-ConnectPrinter”2.iconandselect“SetAuto-ConnectPrinter.
Next, an “Installed Printer List” box 3. will list the installed printers on your computer. Check the box next to the printeryouwishtoenableauto-connectand click “Apply”.

30 31
Theprintershouldnowshow[Auto-4. Connected Printer]. If you send a print job you will notice the utility will automatically connect to the printer then disconnect.
Note: The utility must be running in the backgroundinorderfortheAuto-Connecttofunction.Theutilityisconfiguredtostartwhen window starts by default

30 31
Network Scanner
TheGUWIP204alsoallowsyoutousetheScannerfunctiononyourMulti-FunctionPrinter.The following steps will show you how to use the Network Scanner feature in the utility.
NOTE: Make sure the drivers for the scanner are already installed on your computer for beforeconnectingtoitthroughtheGUWIP204.
Open the USB Share Station 1. UtilityandclickontheMulti-Function Printer. Next click on the “Network Scanner” icon.

32 33
Next, select the scanner you want to 2.connect to. If you see a TWIAN and WIA version of your scanner, select the recommendedandclick“OK”.

32 33
A“WelcometotheAuto-Connect3. Scanner” window will appear. Enter a namefortheimage,selectthefileformat,and choose a place to save the image. Once completed, click the “Scan” button. Clicking the Scan button will prompt the MFP Scanner software to start the scanning process.

34 35
Once the scan is complete, the 4. “WelcometotheAuto-ConnectScanner” window will appear. You should see a copy of your scan on the right. Your scan is now complete. Click the “Close” button at the bottom to close the window.

34 35
Firmware Upgrade
RuntheIOGEAR4-PortWirelessUSB1. Sharing Station Control Center.Select the server that you want to 2.upgradethefirmwareon.Nextclickonthe“ConfigureServer”icon.
Thiswillbringuptheconfigurationpagein3. yourwebbrowser.Click“Config”

36 37
Enter the Administrator Username 4. (default: admin) and Password (default: admin) to login.
Click on the “Maintenance” tab at the top. 5. Next click on “Download New Firmware”. This will take you to the IOGEAR website. Here you can check to see if there is an upgradedfirmwareavailable.Ifthereis,downloaditandmakenoteofthefilessaved location.Once you have downloaded the latest 6. firmware,clickonthe“FirmwareUpgrade”button.

36 37
Click the “Browse” button and select 7. theupdatedfirmwarefileyoujustdownloaded. Next, click the “Upload” button. A window will appear asking you tostartuploadnow.Click“OK”.
Thiswillstartthefirmwareupgrade8. process. Do not turn off the unit at this time.Oncethefirmwareupgradeiscomplete the device will reboot. This process could take a few minutes.

38 39
Troubleshooting
LED Indicators
Indicators Behavior Description
Power On Power on
Off Power off/System error
Link On Network connected
Off No physical connection to network
Status Blinking Activity on network
Off No activity on network
USB On USB device connected
Blinking Connected USB device error
Off No physical connection to USB device

38 39
Firewall
IfasoftwarefirewallhasbeeninstalledonyourPC,itmayblockthecommunicationbetweenthePCandtheGUWIP204.Tosolvethisproblem,eitherdisablethefirewallorconfigurethefirewalltoallowtheTCPport20005andUDPport7412.

40 41
Factory Default
RuntheIOGEAR4-PortWirelessUSBSharingStationControlCenter.1. Select the server that you want to reset to factory default settings. Next click on the 2.“ConfigureServer”icon.

40 41
Thiswillbringuptheconfigurationpageinyourwebbrowser.Click“Config”.3.

42 43
Enter the Administrator Username (default: admin) and Password (default: admin) to login.4.

42 43
Click on the “Maintenance” tab at the top. Next click on “Factory Default”.5.

44 45
Next, you will be asked if you want to Load the Factory Default. Click “Yes”.6.

44 45
The system will restart. Once it’s complete, it will reset back to the home page. 7. YouwillnowneedtoreconfiguretheGUWIP204foryourwirelessnetwork.
46 47
Limited Warranty
IN NO EVENT SHALL THE DIRECT VENDOR’S LIABILITY FOR DIRECT, INDIRECT, SPECIAL, INCIDENTALORCONSEQUENTIALDAMAGESRESULTINGFROMTHEUSEOFTHEPRODUCT,DISK,OR ITS DOCUMENTATION EXCEED THE PRICE PAID FOR THE PRODUCT.
The direct vendor makes no warranty or representation, expressed, implied, or statutory with respect to the contents or use of this documentation, and especially disclaims its quality, performance, merchantability,orfitnessforanyparticularpurpose.Thedirectvendoralsoreservestherighttoreviseorupdate the device or documentation without obligation to notify any individual or entity of such revisions, or updates. For further inquiries please contact IOGEAR.

46 47
Federal Communications Commission (FCC) Statement
This equipment has been tested and found to comply with the limits for a Class B digital device, pursuant to Part 15 of the FCC Rules. These limits are designed to provide reasonable protection against harmful interference in a residential setting. This product generates, uses, and can radiate radio frequency energy and, if not installed and used as directed, it may cause harmful interference to radio communications. Although this product complies with the limits for a Class B digital device, there is no guarantee that inter-ference will not occur in a particular installation.

48 49
CE Statement
This device has been tested and found to comply with the requirements set up in the council directive on the approximation of the law of member states relating to EMC Directive 89/336/EEC, Low Voltage Directive73/23/EECandR&TTEDirective99/5/EC.
48 49
Contact
IOGEAR19641 Da VinciFoothillRanch,CA92610P949.453.8782 F 949.453.8785Visit us at: www.iogear.com

FUNIOGEAR offers connectivity solutions that are innovative, fun, and stylish, helping people enjoy daily life using our high technology products.
GREENIOGEAR is an environmentally conscious company that emphasizes the importance of conserving natural resources. The use of our technology solutions helps reduce electronic waste.
©2011IOGEAR
About Us