Installation Guide - Installing Fedora 13 on x86, AMD64...
298
Fedora 13 Installation Guide Installing Fedora 13 on x86, AMD64, and Intel 64 architectures Fedora Documentation Project
Transcript of Installation Guide - Installing Fedora 13 on x86, AMD64...
Fedora 13
Installation GuideInstalling Fedora 13 on x86, AMD64, and Intel 64 architectures
Fedora Documentation Project

Installation Guide
Fedora 13 Installation GuideInstalling Fedora 13 on x86, AMD64, and Intel 64 architecturesEdition 1.0
Author Fedora Documentation Project
Copyright © 2010 Red Hat, Inc. and others.
The text of and illustrations in this document are licensed by Red Hat under a Creative CommonsAttribution–Share Alike 3.0 Unported license ("CC-BY-SA"). An explanation of CC-BY-SA is availableat http://creativecommons.org/licenses/by-sa/3.0/. The original authors of this document, and Red Hat,designate the Fedora Project as the "Attribution Party" for purposes of CC-BY-SA. In accordance withCC-BY-SA, if you distribute this document or an adaptation of it, you must provide the URL for theoriginal version.
Red Hat, as the licensor of this document, waives the right to enforce, and agrees not to assert,Section 4d of CC-BY-SA to the fullest extent permitted by applicable law.
Red Hat, Red Hat Enterprise Linux, the Shadowman logo, JBoss, MetaMatrix, Fedora, the InfinityLogo, and RHCE are trademarks of Red Hat, Inc., registered in the United States and other countries.
For guidelines on the permitted uses of the Fedora trademarks, refer to https://fedoraproject.org/wiki/Legal:Trademark_guidelines.
Linux® is the registered trademark of Linus Torvalds in the United States and other countries.
Java® is a registered trademark of Oracle and/or its affiliates.
XFS® is a trademark of Silicon Graphics International Corp. or its subsidiaries in the United Statesand/or other countries.
All other trademarks are the property of their respective owners.
Provides documentation for the installation process.
iii
Preface xi1. Document Conventions ................................................................................................... xi
1.1. Typographic Conventions ..................................................................................... xi1.2. Pull-quote Conventions ........................................................................................ xii1.3. Notes and Warnings ........................................................................................... xiii
2. We Need Feedback! ..................................................................................................... xiii
Introduction xv1. Background ................................................................................................................... xv
1.1. About Fedora ..................................................................................................... xv1.2. Getting Additional Help ....................................................................................... xv
2. About This Document .................................................................................................... xv2.1. Goals ................................................................................................................. xv2.2. Audience ............................................................................................................ xv
1. Quick Start for Experts 11.1. Overview ..................................................................................................................... 11.2. Download Files ............................................................................................................ 11.3. Prepare for Installation ................................................................................................. 21.4. Install Fedora ............................................................................................................... 21.5. Perform Post-installation Steps ..................................................................................... 2
I. Preparing for Installation 3
2. Obtaining Fedora 52.1. Downloading Fedora ............................................................................................ 5
2.1.1. How Do I Download Installation Files? ........................................................ 52.1.2. Which Architecture Is My Computer? .......................................................... 62.1.3. Which Files Do I Download? ...................................................................... 7
2.2. Obtaining Fedora on CD or DVD .......................................................................... 8
3. Making Fedora Media 93.1. Making CD or DVD Discs ..................................................................................... 93.2. Making USB Media ............................................................................................ 10
3.2.1. Making Fedora USB Media on a Windows Operating System ...................... 103.2.2. Making Fedora USB Media in UNIX, Linux, and Similar OperatingSystems ............................................................................................................ 11
4. Steps to Get You Started 174.1. Upgrade or Install? ............................................................................................. 174.2. Is Your Hardware Compatible? ............................................................................ 174.3. RAID and Other Disk Devices ............................................................................ 17
4.3.1. Hardware RAID ...................................................................................... 174.3.2. Software RAID ....................................................................................... 184.3.3. FireWire and USB Disks ......................................................................... 18
4.4. Do You Have Enough Disk Space? ..................................................................... 184.5. Can You Install Using the CD-ROM or DVD? ....................................................... 18
4.5.1. Alternative Boot Methods ......................................................................... 194.5.2. Making an Installation Boot CD-ROM ........................................................ 19
4.6. Preparing for a Network Installation ..................................................................... 204.6.1. Preparing for FTP and HTTP installation ................................................... 214.6.2. Preparing for an NFS install ..................................................................... 21
4.7. Preparing for a Hard Drive Installation ................................................................. 22
Installation Guide
iv
5. System Specifications List 25
II. The installation process 27
6. Booting the Installer 296.1. The Boot Menu .................................................................................................. 306.2. Installing from a Different Source ....................................................................... 316.3. Booting from the Network using PXE .................................................................. 31
7. Installing on Intel® and AMD Systems 337.1. Graphical and Text Interfaces .............................................................................. 337.2. The Graphical Installation Program User Interface ................................................ 34
7.2.1. Screenshots during installation ................................................................. 347.2.2. A Note about Virtual Consoles .................................................................. 34
7.3. The Text Mode Installation Program User Interface ............................................... 357.3.1. Using the Keyboard to Navigate ............................................................... 37
7.4. Starting the Installation Program ......................................................................... 387.4.1. Booting the Installation Program on x86, AMD64, and Intel® 64 Systems ..... 387.4.2. Additional Boot Options ............................................................................ 39
7.5. Selecting an Installation Method .......................................................................... 417.6. Installation Method ............................................................................................. 42
7.6.1. Installing from DVD/CD-ROM ................................................................... 427.6.2. Installing from a Hard Drive ...................................................................... 437.6.3. Performing a Network Installation ............................................................. 447.6.4. Installing via NFS .................................................................................... 457.6.5. Installing via FTP or HTTP ....................................................................... 45
7.7. Verifying Media .................................................................................................. 467.8. Welcome to Fedora ............................................................................................ 467.9. Language Selection ............................................................................................ 477.10. Keyboard Configuration ..................................................................................... 487.11. Storage Devices ............................................................................................... 49
7.11.1. The Storage Devices Selection Screen ................................................... 507.12. Assign Storage Devices ................................................................................... 557.13. Initializing the Hard Disk ................................................................................... 567.14. Upgrading an Existing System ......................................................................... 57
7.14.1. The Upgrade Dialog .............................................................................. 577.14.2. Upgrading Using the Installer ................................................................ 587.14.3. Upgrading Boot Loader Configuration ..................................................... 58
7.15. Setting the Hostname ....................................................................................... 597.16. Time Zone Configuration ................................................................................... 617.17. Set the Root Password ..................................................................................... 627.18. Disk Partitioning Setup ...................................................................................... 647.19. Encrypt Partitions ............................................................................................ 667.20. Creating a Custom Layout or Modifying the Default Layout ................................. 67
7.20.1. Create Storage ..................................................................................... 697.20.2. Adding Partitions .................................................................................... 717.20.3. Create Software RAID .......................................................................... 737.20.4. Create LVM Logical Volume .................................................................. 767.20.5. Recommended Partitioning Scheme ........................................................ 79
7.21. Write changes to disk ....................................................................................... 837.22. x86, AMD64, and Intel® 64 Boot Loader Configuration ........................................ 83
7.22.1. Advanced Boot Loader Configuration ...................................................... 86
v
7.22.2. Rescue Mode ........................................................................................ 877.22.3. Alternative Boot Loaders ........................................................................ 88
7.23. Package Group Selection .................................................................................. 887.23.1. Installing from Additional Repositories ..................................................... 897.23.2. Customizing the Software Selection ........................................................ 91
7.24. Installing Packages ........................................................................................... 937.25. Installation Complete ........................................................................................ 94
8. Troubleshooting Installation on an Intel® or AMD System 958.1. You are unable to boot Fedora ............................................................................ 95
8.1.1. Are You Unable to Boot With Your RAID Card? ......................................... 958.1.2. Is Your System Displaying Signal 11 Errors? ............................................. 95
8.2. Trouble Beginning the Installation ........................................................................ 968.2.1. Problems with Booting into the Graphical Installation .................................. 96
8.3. Trouble During the Installation ............................................................................. 978.3.1. No devices found to install Fedora Error Message .................. 978.3.2. Saving traceback messages without removeable media .............................. 978.3.3. Trouble with Partition Tables ................................................................... 1018.3.4. Using Remaining Space ......................................................................... 1018.3.5. Other Partitioning Problems .................................................................... 1018.3.6. Are You Seeing Python Errors? .............................................................. 101
8.4. Problems After Installation ................................................................................ 1028.4.1. Trouble With the Graphical GRUB Screen on an x86-based System? ......... 1028.4.2. Booting into a Graphical Environment ..................................................... 1028.4.3. Problems with the X Window System (GUI) ............................................. 1038.4.4. Problems with the X Server Crashing and Non-Root Users ....................... 1048.4.5. Problems When You Try to Log In .......................................................... 1048.4.6. Is Your RAM Not Being Recognized? ...................................................... 1058.4.7. Your Printer Does Not Work ................................................................... 1058.4.8. Apache-based httpd service/Sendmail Hangs During Startup .................. 106
III. Advanced installation options 107
9. Boot Options 1099.1. Configuring the Installation System at the Boot Menu .......................................... 109
9.1.1. Specifying the Language ........................................................................ 1099.1.2. Configuring the Interface ........................................................................ 1109.1.3. Updating anaconda ................................................................................ 1109.1.4. Specifying the Installation Method ........................................................... 1109.1.5. Manually Configuring the Network Settings .............................................. 111
9.2. Enabling Remote Access to the Installation System ............................................ 1119.2.1. Enabling Remote Access with VNC ......................................................... 1119.2.2. Connecting the Installation System to a VNC Listener .............................. 1129.2.3. Enabling Remote Access with Telnet ....................................................... 112
9.3. Logging to a Remote System During the Installation ........................................... 1139.3.1. Configuring a Log Server ....................................................................... 113
9.4. Automating the Installation with Kickstart ............................................................ 1149.5. Enhancing Hardware Support ............................................................................ 115
9.5.1. Overriding Automatic Hardware Detection ............................................... 1159.6. Using the Maintenance Boot Modes .................................................................. 116
9.6.1. Loading the Memory (RAM) Testing Mode ............................................... 1169.6.2. Verifying boot media .............................................................................. 117
Installation Guide
vi
9.6.3. Booting Your Computer with the Rescue Mode ........................................ 1179.6.4. Upgrading your computer ....................................................................... 117
10. Installing Without Media 11910.1. Retrieving Boot Files ....................................................................................... 11910.2. Editing the GRUB Configuration ...................................................................... 11910.3. Booting to Installation ...................................................................................... 120
11. Setting Up an Installation Server 12111.1. Setting Up cobbler .......................................................................................... 12111.2. Setting Up the Distribution ............................................................................... 12211.3. Mirroring a Network Location ........................................................................... 12211.4. Importing the Distribution ................................................................................. 12311.5. Manually configure a PXE server ..................................................................... 124
11.5.1. Setting up the Network Server .............................................................. 12411.5.2. PXE Boot Configuration ........................................................................ 12411.5.3. Adding PXE Hosts ............................................................................... 12411.5.4. TFTPD ................................................................................................. 12611.5.5. Configuring the DHCP Server ............................................................... 12611.5.6. Adding a Custom Boot Message ........................................................... 12611.5.7. Performing the PXE Installation ............................................................. 126
12. Installing Through VNC 12712.1. VNC Viewer ................................................................................................... 12712.2. VNC Modes in Anaconda ................................................................................ 128
12.2.1. Direct Mode ......................................................................................... 12812.2.2. Connect Mode ..................................................................................... 128
12.3. Installation Using VNC .................................................................................... 12912.3.1. Installation Example ............................................................................. 12912.3.2. Kickstart Considerations ....................................................................... 13012.3.3. Firewall Considerations ........................................................................ 130
12.4. References ..................................................................................................... 130
13. Kickstart Installations 13313.1. What are Kickstart Installations? ...................................................................... 13313.2. How Do You Perform a Kickstart Installation? ................................................... 13313.3. Creating the Kickstart File ............................................................................... 13313.4. Kickstart Options ............................................................................................ 134
13.4.1. Advanced Partitioning Example ............................................................. 15413.5. Package Selection .......................................................................................... 15513.6. Pre-installation Script ...................................................................................... 156
13.6.1. Example .............................................................................................. 15613.7. Post-installation Script ..................................................................................... 157
13.7.1. Examples ............................................................................................ 15813.8. Making the Kickstart File Available ................................................................... 158
13.8.1. Creating Kickstart Boot Media ............................................................... 15813.8.2. Making the Kickstart File Available on the Network ................................. 159
13.9. Making the Installation Tree Available .............................................................. 16013.10. Starting a Kickstart Installation ....................................................................... 160
14. Kickstart Configurator 16714.1. Basic Configuration ......................................................................................... 16714.2. Installation Method .......................................................................................... 16814.3. Boot Loader Options ....................................................................................... 169
vii
14.4. Partition Information ........................................................................................ 17014.4.1. Creating Partitions ................................................................................ 171
14.5. Network Configuration ..................................................................................... 17514.6. Authentication ................................................................................................. 17614.7. Firewall Configuration ..................................................................................... 176
14.7.1. SELinux Configuration .......................................................................... 17714.8. Display Configuration ...................................................................................... 17714.9. Package Selection .......................................................................................... 17814.10. Pre-Installation Script .................................................................................... 17914.11. Post-Installation Script ................................................................................... 181
14.11.1. Chroot Environment ............................................................................ 18114.11.2. Use an Interpreter .............................................................................. 182
14.12. Saving the File ............................................................................................. 182
IV. After installation 185
15. Firstboot 18715.1. License Agreement ......................................................................................... 18715.2. System User .................................................................................................. 18815.3. Date and Time ............................................................................................... 19015.4. Hardware Profile ............................................................................................. 191
16. Your Next Steps 19316.1. Updating Your System .................................................................................... 19316.2. Finishing an Upgrade ...................................................................................... 19416.3. Switching to a Graphical Login ........................................................................ 195
16.3.1. Enabling Access to Software Repositories from the Command Line ......... 19616.4. Subscribing to Fedora Announcements and News ............................................ 19816.5. Finding Documentation and Support ................................................................ 19916.6. Joining the Fedora Community ........................................................................ 199
17. Basic System Recovery 20117.1. Common Problems ......................................................................................... 201
17.1.1. Unable to Boot into Fedora ................................................................... 20117.1.2. Hardware/Software Problems ................................................................ 20117.1.3. Root Password .................................................................................... 201
17.2. Booting into Rescue Mode .............................................................................. 20117.2.1. Reinstalling the Boot Loader ................................................................. 204
17.3. Booting into Single-User Mode ........................................................................ 20417.4. Booting into Emergency Mode ......................................................................... 204
18. Upgrading Your Current System 20718.1. Determining Whether to Upgrade or Re-Install .................................................. 20718.2. Upgrading Your System .................................................................................. 208
19. Removing Fedora 20919.1. Fedora is the only operating system on the computer ........................................ 20919.2. Your computer dual-boots Fedora and another operating system ........................ 210
19.2.1. Your computer dual-boots Fedora and a Microsoft Windows operatingsystem ............................................................................................................ 21019.2.2. Your computer dual-boots Fedora and Mac OS X ................................... 21419.2.3. Your computer dual-boots Fedora and a different Linux distribution .......... 215
19.3. Replacing Fedora with MS-DOS or legacy versions of Microsoft Windows ........... 219
Installation Guide
viii
V. Technical appendixes 221
A. An Introduction to Disk Partitions 223A.1. Hard Disk Basic Concepts ................................................................................ 223
A.1.1. It is Not What You Write, it is How You Write It ........................................ 223A.1.2. Partitions: Turning One Drive Into Many .................................................. 225A.1.3. Partitions within Partitions — An Overview of Extended Partitions .............. 227A.1.4. Making Room For Fedora ...................................................................... 228A.1.5. Partition Naming Scheme ....................................................................... 232A.1.6. Disk Partitions and Other Operating Systems .......................................... 232A.1.7. Disk Partitions and Mount Points ............................................................ 233A.1.8. How Many Partitions? ............................................................................ 233
B. ISCSI disks 235B.1. iSCSI disks in anaconda .................................................................................. 235B.2. iSCSI disks during start up ............................................................................... 235
C. Disk Encryption 237C.1. What is block device encryption? ..................................................................... 237C.2. Encrypting block devices using dm-crypt/LUKS ................................................. 237
C.2.1. Overview of LUKS ................................................................................ 237C.2.2. How will I access the encrypted devices after installation? (SystemStartup) ......................................................................................................... 238C.2.3. Choosing a Good Passphrase .............................................................. 238
C.3. Creating Encrypted Block Devices in Anaconda ................................................ 238C.3.1. What Kinds of Block Devices Can Be Encrypted? ................................... 239C.3.2. Saving Passphrases .............................................................................. 239C.3.3. Creating and Saving Backup Passphrases .............................................. 239
C.4. Creating Encrypted Block Devices on the Installed System After Installation ........ 239C.4.1. Create the block devices ...................................................................... 239C.4.2. Optional: Fill the device with random data ............................................... 239C.4.3. Format the device as a dm-crypt/LUKS encrypted device ........................ 240C.4.4. Create a mapping to allow access to the device's decrypted contents ....... 240C.4.5. Create filesystems on the mapped device, or continue to build complexstorage structures using the mapped device .................................................... 241C.4.6. Add the mapping information to /etc/crypttab ................................... 241C.4.7. Add an entry to /etc/fstab ................................................................ 241
C.5. Common Post-Installation Tasks ...................................................................... 242C.5.1. Set a randomly generated key as an additional way to access anencrypted block device .................................................................................... 242C.5.2. Add a new passphrase to an existing device .......................................... 242C.5.3. Remove a passphrase or key from a device ........................................... 242
D. Understanding LVM 243
E. The GRUB Boot Loader 245E.1. GRUB .............................................................................................................. 245
E.1.1. GRUB and the x86 Boot Process ........................................................... 245E.1.2. Features of GRUB ................................................................................. 246
E.2. Installing GRUB ............................................................................................... 246E.3. GRUB Terminology ........................................................................................... 247
E.3.1. Device Names ....................................................................................... 247E.3.2. File Names and Blocklists ...................................................................... 248E.3.3. The Root File System and GRUB ........................................................... 249

ix
E.4. GRUB Interfaces .............................................................................................. 249E.4.1. Interfaces Load Order ............................................................................ 250
E.5. GRUB Commands ............................................................................................ 250E.6. GRUB Menu Configuration File ......................................................................... 252
E.6.1. Configuration File Structure .................................................................... 252E.6.2. Configuration File Directives ................................................................... 253
E.7. Changing Runlevels at Boot Time ..................................................................... 254E.8. Additional Resources ........................................................................................ 255
E.8.1. Installed Documentation ......................................................................... 255E.8.2. Useful Websites .................................................................................... 255E.8.3. Related Books ....................................................................................... 255
F. Boot Process, Init, and Shutdown 257F.1. The Boot Process ............................................................................................. 257F.2. A Detailed Look at the Boot Process ................................................................. 257
F.2.1. The BIOS .............................................................................................. 257F.2.2. The Boot Loader .................................................................................... 258F.2.3. The Kernel ............................................................................................ 259F.2.4. The /sbin/init Program ..................................................................... 259F.2.5. Job definitions ........................................................................................ 262
F.3. Running Additional Programs at Boot Time ........................................................ 263F.4. SysV Init Runlevels ........................................................................................... 263
F.4.1. Runlevels .............................................................................................. 263F.4.2. Runlevel Utilities .................................................................................... 264
F.5. Shutting Down .................................................................................................. 265
G. Other Technical Documentation 267
H. Contributors and production methods 269H.1. Contributors ............................................................................................................. 269H.2. Production methods ................................................................................................. 272
I. Revision History 273
Index 275

x

xi
Preface
1. Document ConventionsThis manual uses several conventions to highlight certain words and phrases and draw attention tospecific pieces of information.
In PDF and paper editions, this manual uses typefaces drawn from the Liberation Fonts1 set. TheLiberation Fonts set is also used in HTML editions if the set is installed on your system. If not,alternative but equivalent typefaces are displayed. Note: Red Hat Enterprise Linux 5 and later includesthe Liberation Fonts set by default.
1.1. Typographic ConventionsFour typographic conventions are used to call attention to specific words and phrases. Theseconventions, and the circumstances they apply to, are as follows.
Mono-spaced Bold
Used to highlight system input, including shell commands, file names and paths. Also used to highlightkeycaps and key combinations. For example:
To see the contents of the file my_next_bestselling_novel in your currentworking directory, enter the cat my_next_bestselling_novel command at theshell prompt and press Enter to execute the command.
The above includes a file name, a shell command and a keycap, all presented in mono-spaced boldand all distinguishable thanks to context.
Key combinations can be distinguished from keycaps by the hyphen connecting each part of a keycombination. For example:
Press Enter to execute the command.
Press Ctrl+Alt+F1 to switch to the first virtual terminal. Press Ctrl+Alt+F7 toreturn to your X-Windows session.
The first paragraph highlights the particular keycap to press. The second highlights two keycombinations (each a set of three keycaps with each set pressed simultaneously).
If source code is discussed, class names, methods, functions, variable names and returned valuesmentioned within a paragraph will be presented as above, in mono-spaced bold. For example:
File-related classes include filesystem for file systems, file for files, and dir fordirectories. Each class has its own associated set of permissions.
Proportional Bold
This denotes words or phrases encountered on a system, including application names; dialog box text;labeled buttons; check-box and radio button labels; menu titles and sub-menu titles. For example:
1 https://fedorahosted.org/liberation-fonts/
Preface
xii
Choose System → Preferences → Mouse from the main menu bar to launch MousePreferences. In the Buttons tab, click the Left-handed mouse check box and clickClose to switch the primary mouse button from the left to the right (making the mousesuitable for use in the left hand).
To insert a special character into a gedit file, choose Applications → Accessories→ Character Map from the main menu bar. Next, choose Search → Find… from theCharacter Map menu bar, type the name of the character in the Search field and clickNext. The character you sought will be highlighted in the Character Table. Double-click this highlighted character to place it in the Text to copy field and then click the
Copy button. Now switch back to your document and choose Edit → Paste from thegedit menu bar.
The above text includes application names; system-wide menu names and items; application-specificmenu names; and buttons and text found within a GUI interface, all presented in proportional bold andall distinguishable by context.
Mono-spaced Bold Italic or Proportional Bold Italic
Whether mono-spaced bold or proportional bold, the addition of italics indicates replaceable orvariable text. Italics denotes text you do not input literally or displayed text that changes depending oncircumstance. For example:
To connect to a remote machine using ssh, type ssh [email protected] ata shell prompt. If the remote machine is example.com and your username on thatmachine is john, type ssh [email protected].
The mount -o remount file-system command remounts the named filesystem. For example, to remount the /home file system, the command is mount -oremount /home.
To see the version of a currently installed package, use the rpm -q packagecommand. It will return a result as follows: package-version-release.
Note the words in bold italics above — username, domain.name, file-system, package, version andrelease. Each word is a placeholder, either for text you enter when issuing a command or for textdisplayed by the system.
Aside from standard usage for presenting the title of a work, italics denotes the first use of a new andimportant term. For example:
Publican is a DocBook publishing system.
1.2. Pull-quote ConventionsTerminal output and source code listings are set off visually from the surrounding text.
Output sent to a terminal is set in mono-spaced roman and presented thus:
books Desktop documentation drafts mss photos stuff svnbooks_tests Desktop1 downloads images notes scripts svgs
Notes and Warnings
xiii
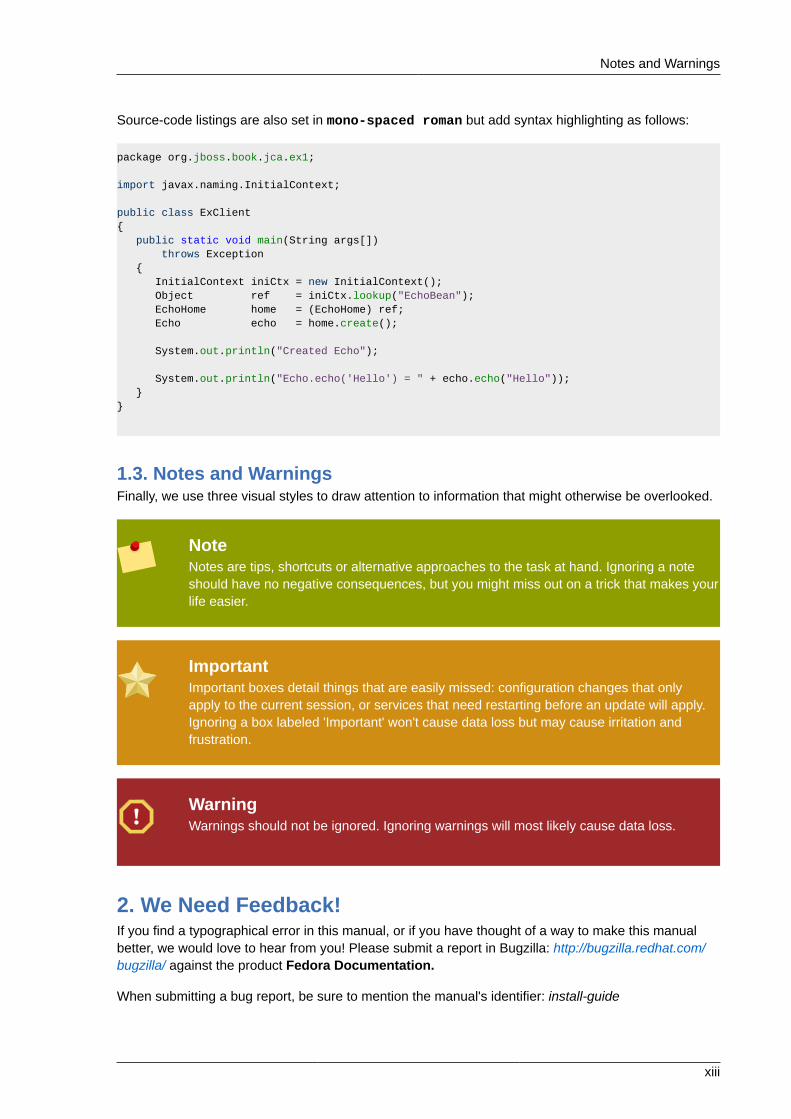
Source-code listings are also set in mono-spaced roman but add syntax highlighting as follows:
package org.jboss.book.jca.ex1;
import javax.naming.InitialContext;
public class ExClient{ public static void main(String args[]) throws Exception { InitialContext iniCtx = new InitialContext(); Object ref = iniCtx.lookup("EchoBean"); EchoHome home = (EchoHome) ref; Echo echo = home.create();
System.out.println("Created Echo");
System.out.println("Echo.echo('Hello') = " + echo.echo("Hello")); }}
1.3. Notes and WarningsFinally, we use three visual styles to draw attention to information that might otherwise be overlooked.
NoteNotes are tips, shortcuts or alternative approaches to the task at hand. Ignoring a noteshould have no negative consequences, but you might miss out on a trick that makes yourlife easier.
ImportantImportant boxes detail things that are easily missed: configuration changes that onlyapply to the current session, or services that need restarting before an update will apply.Ignoring a box labeled 'Important' won't cause data loss but may cause irritation andfrustration.
WarningWarnings should not be ignored. Ignoring warnings will most likely cause data loss.
2. We Need Feedback!If you find a typographical error in this manual, or if you have thought of a way to make this manualbetter, we would love to hear from you! Please submit a report in Bugzilla: http://bugzilla.redhat.com/bugzilla/ against the product Fedora Documentation.
When submitting a bug report, be sure to mention the manual's identifier: install-guide

Preface
xiv
If you have a suggestion for improving the documentation, try to be as specific as possible whendescribing it. If you have found an error, please include the section number and some of thesurrounding text so we can find it easily.
xv
IntroductionThis guide covers installation of Fedora, a Linux distribution built on free and open source software.This manual helps you install Fedora on desktops, laptops, and servers. The installation system iseasy to use even if you lack previous knowledge of Linux or computer networks. If you select defaultoptions, Fedora provides a complete desktop operating system, including productivity applications,Internet utilities, and desktop tools.
This document details the full range of installation options, including those that apply only in limited orunusual circumstances. The Fedora 13 Installation Quick Start Guide provides a much-abbreviatedset of instructions for downloading Fedora, creating an installation disc, and installing Fedora on atypical desktop or laptop computer. The Fedora 13 Installation Quick Start Guide is available fromhttp://docs.fedoraproject.org/installation-quick-start-guide/.
1. Background
1.1. About FedoraTo find out more about Fedora, refer to http://fedoraproject.org/. To read other documentation onFedora related topics, refer to http://docs.fedoraproject.org/.
1.2. Getting Additional HelpFor information on additional help resources for Fedora, visit http://fedoraproject.org/wiki/Communicate.
2. About This Document
2.1. GoalsThis guide helps a reader:
1. Understand how to locate the Fedora distribution online
2. Create configuration data that allows a computer to boot Fedora
3. Understand and interact with the Fedora installation program
4. Complete basic post-installation configuration of a Fedora system
Other Sources of DocumentationThis guide does not cover use of Fedora. To learn how to use an installed Fedora system,refer to http://docs.fedoraproject.org/ for other documentation.
2.2. AudienceThis guide is intended for Fedora users of all levels of experience. However, it treats the installationprocess and its many options in far greater detail than most novice users are likely to require. You do

Introduction
xvi
not need to read and understand this entire document to install Fedora on a computer. This documentis most likely to help experienced users perform advanced and unusual installations.
Chapter 1.
1
Quick Start for ExpertsThis section offers a very brief overview of installation tasks for experienced readers who are eagerto get started. Note that many explanatory notes and helpful hints appear in the following chapters ofthis guide. If an issue arises during the installation process, consult the appropriate chapters in the fullguide for help.
Experts OnlyThis section is intended only for experts. Other readers may not be familiar with some ofthe terms in this section, and should move on to Chapter 2, Obtaining Fedora instead.
1.1. OverviewThe installation procedure is fairly simple, and consists of only a few steps:
1. Download files to make media or another bootable configuration.
2. Prepare system for installation.
3. Boot the computer and run the installation process.
4. Reboot and perform post-installation configuration.
1.2. Download FilesDo any one of the following:
Verify your downloadsDownloads may fail for any number of reasons. Always verify the sha256sum of thedownloaded files.
1. Download the ISO image for a Live image. Create CD media from the ISO file using your preferredapplication. You may also use the livecd-tools package to write the image to other bootable mediasuch as a USB flash disk. To install the distribution to your hard disk, use the shortcut on thedesktop after you log in.
2. Download the ISO images for the full distribution on CD or DVD. Create CD or DVD media fromthe ISO files using your preferred application, or put the images on a Windows FAT32 or Linuxext2/ext3 partition.
3. Download the boot.iso image for a minimal boot CD or USB flash drive. Write the image to theapproriate physical media to create bootable media. The boot media contains no packages butmust be pointed at a hard disk or online repository to complete the installation.
4. Download the netinst.iso image for a reduced-size boot CD. Write the image to theappropriate physical media to create bootable media.
5. Download the vmlinuz kernel file and the initrd.img ramdisk image from the distribution'sisolinux/ directory. Configure your operating system to boot the kernel and load the ramdisk
Chapter 1. Quick Start for Experts
2
image. For further information on installation without media, refer to Chapter 10, Installing WithoutMedia.
For information on setting up a network boot server from which you can install Fedora, refer toChapter 11, Setting Up an Installation Server.
To learn how to turn ISO images into CD or DVD media, refer to Making Fedora Discs available fromhttp://docs.fedoraproject.org/readme-burning-isos/.
1.3. Prepare for InstallationBack up any user data you need to preserve.
Resizing PartitionsThe installation program provides functions for resizing ext2, ext3, ext4, and NTFSformatted partitions. Refer to Section 7.20, “ Creating a Custom Layout or Modifying theDefault Layout ” for more information.
1.4. Install FedoraBoot from the desired media, with any options appropriate for your hardware and installation mode.Refer to Chapter 9, Boot Options for more information about boot options. If you boot from the LiveCD, select the "Install to Hard Disk" option from the desktop to run the installation program. If you bootfrom minimal media or a downloaded kernel, select a network or hard disk resource from which toinstall.
Proceed through all the steps of the installation program. The installation program does not changeyour system until you make a final confirmation to proceed. When installation is finished, reboot yoursystem.
1.5. Perform Post-installation StepsAfter the system reboots, it displays additional configuration options. Make appropriate changes toyour system and proceed to the login prompt.
Refer to Chapter 15, Firstboot or the Firstboot page on the Fedora wiki: http://fedoraproject.org/wiki/FirstBoot for more detail.

Part I. Preparing for InstallationThis part of the Fedora Installation Guide covers decisions that you should make and resources thatyou should gather before installing Fedora, including:
• the decision whether to upgrade an existing installation of Fedora or install a new copy.
• hardware considerations, and hardware details that you may need during installation.
• preparing to install Fedora over a network.

Chapter 2.
5
Obtaining FedoraThis chapter explains how to get the files you need to install and run Fedora on your computer.Concepts in this chapter may be new, especially if this is your first free and open source operatingsystem. If you have any trouble with this chapter, find help by visiting the Fedora Forums at http://www.fedoraforum.org/.
The Fedora Project distributes Fedora in many ways, mostly free of cost and downloaded over theInternet. The most common distribution method is CD and DVD media. There are several types of CDand DVD media available, including:
• A full set of the software on DVD media
• Live images you can use to try Fedora, and then install to your system if you so choose
• Reduced-size bootable CD and USB flash disk images you can use to install over an Internetconnection
• Source code on DVD media
Most users want the Fedora Live image or the full set of installable software on DVD or CDs. Thereduced bootable images are suitable for use with a fast Internet connection and install Fedora on onecomputer. Source code discs are not used for installing Fedora, but are resources for experiencedusers and software developers.
Users with a broadband Internet connection can download ISO images of CD and DVD media orimages of USB flash disks. An ISO image is a copy of an entire disc in a format suitable for writingdirectly to a CD or DVD. A USB flash disk image is a copy of an entire disk in a format suitable forwriting directly to a USB flash disk.
For more information on burning CDs and DVDs, refer to Chapter 3, Making Fedora Media.
If downloading the Fedora ISO images and burning them to CD or DVD is impossible or impracticalfor you, refer to Section 2.2, “Obtaining Fedora on CD or DVD” to learn about other ways that you canobtain Fedora.
2.1. Downloading Fedora
2.1.1. How Do I Download Installation Files?
Download LinksTo follow a Web-based guide to downloading, visit http://get.fedoraproject.org/. Forguidance on which architecture to download, refer to Section 2.1.2, “Which Architecture IsMy Computer?”.
Fedora software is available for download at no cost in a variety of ways.

Chapter 2. Obtaining Fedora
6
2.1.1.1. From a MirrorThe Fedora installation files are freely available from web servers located in many parts ofthe world. These servers mirror the files available from the Fedora Project. If you visit http://download.fedoraproject.org/, you are redirected to a mirror, based on a calculation of which mirroris likely to offer you the best download speed. Alternatively, you can choose a mirror from the listmaintained at http://mirrors.fedoraproject.org/publiclist. This page lists mirrors according to geographiclocation. The mirrors geographically closest to you are likely to provide you with the fastest downloads.If the company or organization that provides your internet access maintains a mirror, this mirror islikely to provide you with the fastest downloads of all.
Mirrors publish Fedora software under a well-organized hierarchy of folders. For example, the Fedora13 distribution normally appears in the directory fedora/linux/releases/13/. This directorycontains a folder for each architecture supported by that release of Fedora. CD and DVD mediafiles appear inside that folder, in a folder called iso/. For example, you can find the file for the DVDdistribution of Fedora 13 for x86_64 at fedora/linux/releases/13/Fedora/x86_64/iso/Fedora-13-x86_64-DVD.iso.
2.1.1.2. From BitTorrentBitTorrent is a way to download information in cooperation with other computers. Each computercooperating in the group downloads pieces of the information in a particular torrent from other peers inthe group. Computers that have finished downloading all the data in a torrent remain in the swarm toseed, or provide data to other peers. If you download using BitTorrent, as a courtesy you should seedthe torrent at least until you have uploaded the same amount of data you downloaded.
If your computer does not have software installed for BitTorrent, visit the BitTorrent home page athttp://www.bittorrent.com/download/ to download it. BitTorrent client software is available for Windows,Mac OS, Linux, and many other operating systems.
You do not need to find a special mirror for BitTorrent files. The BitTorrent protocol ensures that yourcomputer participates in a nearby group. To download and use the Fedora BitTorrent files, visit http://torrent.fedoraproject.org/.
Minimal Boot ImagesMinimal boot CD and USB flash disk images are not available through BitTorrent.
2.1.2. Which Architecture Is My Computer?Releases are separated by architecture, or type of computer processor. Use the following tableto determine the architecture of your computer according to the type of processor. Consult yourmanufacturer's documentation for details on your processor, if necessary.
Processor manufacturer and model Architecture type forFedora
Intel (except Atom 230, Atom 330, Core 2 Duo, Centrino Core2 Duo, andrecent vintage Xeon); AMD (except Athlon 64, Athlon x2, Sempron 64, andOpteron); VIA C3, C7
i386
Which Files Do I Download?
7
Processor manufacturer and model Architecture type forFedora
Intel Atom 230, Atom 330, Core 2 Duo, Centrino Core 2 Duo, and Xeon;AMD Athlon 64, Athlon x2, Sempron64, and Opteron; Apple MacBook,MacBook Pro, and MacBook Air
x86_64
Apple Macintosh G3, G4, G5, PowerBook, and other non-Intel models ppc
Table 2.1. Processor and architecture types
i386 Works for Most Windows Compatible ComputersIf you are unsure what type of processor your computer uses, choose i386.
The exception is if your computer is a non-Intel based Apple Macintosh. Refer toTable 2.1, “Processor and architecture types” for more information.
Intel Atom Processor Architectures VaryThe N and Z Series Atom processors are based on the i386 architecture. The 230and 330 Series Atom processors are based on thex86_64 architecture. Refer to http://ark.intel.com/cpugroup.aspx?familyID=29035 for more details.
2.1.3. Which Files Do I Download?You have several options to download Fedora. Read the options below to decide the best one for you.
Each file available for download in a Fedora distribution includes the architecture type in the filename. For example, the file for the DVD distribution of Fedora 13 for x86_64 is named Fedora-13-x86_64-DVD.iso. Refer to Section 2.1.2, “Which Architecture Is My Computer?” if you are unsure ofyour computer's architecture.
1.Full Distribution on DVDIf you have plenty of time, a fast Internet connection, and wish a broader choice of software onthe install media, download the full DVD version. Once burned to DVD, the media is bootable andincludes an installation program. The DVD version contains a mode to perform rescue operationson your Fedora system in an emergency. You can download the DVD version directly from amirror, or via BitTorrent.
2.Live ImageIf you want to try Fedora before you install it on your computer, download the Live image version.If your computer supports booting from CD or USB, you can boot the operating system withoutmaking any changes to your hard disk. The Live image also provides an Install to HardDisk desktop shortcut. If you decide you like what you see, and want to install it, simply activatethe selection to copy Fedora to your hard disk. You can download the Live image directly from amirror, or using BitTorrent.
3.Minimal Boot MediaIf you have a fast Internet connection but do not want to download the entire distribution, you candownload a small boot image. Fedora offers images for a minimal boot environment on CD. Onceyou boot your system with the minimal media, you can install Fedora directly over the Internet.
Chapter 2. Obtaining Fedora
8
Although this method still involves downloading a significant amount of data over the Internet, itis almost always much less than the size of the full distribution media. Once you have finishedinstallation, you can add or remove software to your system as desired.
Download SizeInstalling the default software for Fedora over the Internet requires more time than theLive image, but less time than the entire DVD distribution. Actual results depend onthe software you select and network traffic conditions.
The following table explains where to find the desired files on a mirror site. Replace arch with thearchitecture of the computer being installed.
Media type File locations
Full distribution on DVD fedora/linux/releases/13/Fedora/arch/iso/Fedora-13-arch-DVD.iso
Live image fedora/linux/releases/13/Live/arch/iso/Fedora-13-arch-Live.iso, fedora/linux/releases/13/Live/arch/iso/Fedora-13-KDE-arch-Live.iso
Minimal CD boot media fedora/linux/releases/13/Fedora/arch/os/images/boot.iso
Table 2.2. Locating files
2.2. Obtaining Fedora on CD or DVDIf you do not have a fast Internet connection, or if you have a problem creating boot media,downloading may not be an option. Fedora DVD and CD distribution media is available from a numberof online sources around the world at a minimal cost. Use your favorite Web search engine to locate avendor, or refer to http://fedoraproject.org/wiki/Distribution.
Chapter 3.
9
Making Fedora MediaUse any of the methods described in this section to turn the ISO image file that you downloaded into abootable DVD, CD, or USB device.
3.1. Making CD or DVD DiscsYou can make a CD or DVD from a distribution image file, a live image file, or a minimal boot mediaimage file using the CD or DVD burning software on your computer.
The exact series of steps that produces a CD from an image file varies greatly from computer tocomputer, depending on the operating system and disc burning software installed. Use this procedureas a general guide. You might be able to omit certain steps on your computer, or might have toperform some of the steps in a different order from the order described here.
Make sure that your disc burning software is capable of burning discs from image files. Although this istrue of most disc burning software, exceptions exist.
In particular, note that the CD burning feature built into Windows XP and Windows Vista cannot burnCDs from images and that earlier Windows operating systems did not have any CD burning capabilityinstalled by default. Therefore, if your computer has a Windows operating system prior to Windows 7installed on it, you need a separate piece of software for this task. Examples of popular CD burningsoftware for Windows that you might already have on your computer include Nero Burning ROMand Roxio Creator. If you use a Windows operating system on your computer and do not have discburning software installed (or you are not sure that the software can burn discs from image files)InfraRecorder is a suitable alternative available from http://www.infrarecorder.org/, and is free andopen-source.
The Disk Utility software installed by default with Mac OS X on Apple computers has the capability toburn CDs from images built into it already. Most widely-used CD burning software for Linux, such asBrasero and K3b, also includes this capability.
1. Insert a blank, writeable CD into your computer's CD or DVD burner. On some computers, awindow opens and displays various options when you insert the disc. If you see a window likethis, look for an option to launch your chosen disc burning program. If you do not see an optionlike this, close the window and launch the program manually.
2. Launch your disc burning program. On some computers, you can do this by right-clicking (orcontrol-clicking) on the image file and selecting a menu option with a label like Copy imageto CD, or Copy CD or DVD image. Other computers might provide you with a menu option tolaunch your chosen disc burning program, either directly or with an option like Open With. Ifnone of these options are available on your computer, launch the program from an icon on yourdesktop, in a menu of applications such as the Start menu on Windows operating systems, or inthe Mac Applications folder.
3. In your disc burning program, select the option to burn a CD from an image file. For example, inNero Burning ROM, this option is called Burn Image and is located on the File menu.
Note that you can skip this step when using certain CD burning software; for example, DiskUtility on Mac OS X does not require it.
4. Browse to the ISO CD image file that you downloaded previously and select it for burning.
5. Click the button that starts the burning process.
Chapter 3. Making Fedora Media
10
For more detail, including step-by-step instructions for various popular disc burning applications, referto Making Fedora Discs available from http://docs.fedoraproject.org/readme-burning-isos/
3.2. Making USB Media
BtrfsThe GRUB bootloader does not support the Btrfs file system. You cannot create bootableUSB media on media formatted as Btrfs.
Unusual USB MediaIn a few cases with oddly formatted or partitioned USB media, image writing may fail.
USB media often comes in the form of flash devices sometimes called pen drives, thumb disks, orkeys; or as an externally connected hard disk device. Almost all media of this type is formatted as avfat file system. You can create bootable USB media on media formatted as ext2, ext3, or vfat.
You can transfer a distribution image file, a live image file, or a minimal boot media image file to USBmedia. Make sure that sufficient free space is available on the device. You require around 4 GB for adistribution DVD image, around 700 MB for a live image or around 200 MB for a minimal boot mediaimage.
3.2.1. Making Fedora USB Media on a Windows Operating System
Note — This Method Is Not DestructiveThis method is not destructive, so existing data on the media is not harmed. Nevertheless,it is always a good idea to back up important data before performing sensitive diskoperations.
The most straightforward way to place a Fedora image on USB media using a Windows operatingsystem is to transfer the Fedora live image to the USB device with the LiveUSB Creator tool.
Note that the dd tool discussed in Section 3.2.2, “Making Fedora USB Media in UNIX, Linux, andSimilar Operating Systems” is also available for Windows. Follow the instructions in that section to usean implementation of dd for Windows operating systems. The instructions in this section assume thatyou will use LiveUSB Creator.
1. Download the LiveUSB Creator program for Windows from http://fedorahosted.org/liveusb-creator.
2. LiveUSB Creator can create live USB media either from an image file that you downloadedpreviously, as described in Section 2.1.3, “Which Files Do I Download?”, or it can download animage file from the Internet. Either:
• click the Browse button under the Use existing LiveCD label, browse to the location whereyou previously downloaded a Fedora Live ISO file, and select that file.

Making Fedora USB Media in UNIX, Linux, and Similar Operating Systems
11
• select a Fedora Live ISO file from the drop-down menu that LiveUSB Creator presents underthe Download Fedora label. Note that image files are large and that it is probably impractical touse LiveUSB Creator to download an image file if you do not have a broadband connection tothe Internet.
3. Click Create Live USB.
3.2.2. Making Fedora USB Media in UNIX, Linux, and SimilarOperating SystemsA graphical tool is available to create Fedora USB media on systems that run Fedora, Red HatEnterprise Linux, or operating systems derived from either of these. To create Fedora USB mediaon other UNIX or Linux operating systems (including Mac OS X), use the command-line methoddescribed in Section 3.2.2.1.3, “Making Fedora USB Media with dd”.
3.2.2.1. Creating Fedora USB Media in Fedora, Red Hat Enterprise Linux,and similar Linux distributionsGraphical and command-line tools are available to create Fedora USB media on computers that runFedora, Red Hat Enterprise Linux, and Linux distributions derived from Red Hat Enterprise Linux.The graphical tool and the works only with the Fedora live image. To create Fedora USB media fromthe distribution image or minimal boot media image, use the command-line method described inSection 3.2.2.1.3, “Making Fedora USB Media with dd”.
3.2.2.1.1. Making Fedora USB Media with a graphical tool
Important — Enable Extra Packages for Enterprise LinuxTo perform this procedure on Red Hat Enterprise Linux and Linux distributions derivedfrom it, enable the Extra Packages for Enterprise Linux (EPEL) repository. Refer to http://fedoraproject.org/wiki/EPEL/FAQ#howtouse for instructions.
Note — This Method Is Not DestructiveThis method is not destructive, so existing data on the media is not harmed. Nevertheless,it is always a good idea to back up important data before performing sensitive diskoperations.
1. Install the liveusb-creator on your system with your graphical package manager, or the followingcommand:
su -c 'yum -y install liveusb-creator'
2. Plug in your USB media.
3. Launch LiveUSB Creator, either from a menu or by entering liveusb-creator on thecommand line. Enter the root password for your system when LiveUSB Creator prompts you forit.
Chapter 3. Making Fedora Media
12
4. LiveUSB Creator can create live USB media either from an image file that you downloadedpreviously, as described in Section 2.1.3, “Which Files Do I Download?”, or it can download animage file from the Internet. Either:
• click the Browse button under the Use existing LiveCD label, browse to the location whereyou previously downloaded a Fedora Live ISO file, and select that file.
• select a Fedora Live ISO file from the drop-down menu that LiveUSB Creator presents underthe Download Fedora label. Note that image files are large and that it is probably impractical touse LiveUSB Creator to download an image file if you do not have a broadband connection tothe Internet.
5. Click Create Live USB.
3.2.2.1.2. Making Fedora USB Media with livecd-tools
Important — Enable Extra Packages for Enterprise LinuxTo perform this procedure on Red Hat Enterprise Linux and Linux distributions derivedfrom it, enable the Extra Packages for Enterprise Linux (EPEL) repository. Refer to http://fedoraproject.org/wiki/EPEL/FAQ#howtouse for instructions.
Note — This Method Is Not DestructiveThis method is not destructive, so existing data on the media is not harmed. Nevertheless,it is always a good idea to back up important data before performing sensitive diskoperations.
1. Install the livecd-tools package on your system with your graphical package manager, or thefollowing command:
su -c 'yum -y install livecd-tools'
2. Plug in your USB media.
3. Find the device name for your USB media. If the media has a volume name, look up the name in/dev/disk/by-label, or use the findfs:
su -c 'findfs LABEL="MyLabel"'
If the media does not have a volume name, or you do not know it, consult the /var/log/messages log for details:
su -c 'less /var/log/messages'
4. Use the livecd-iso-to-disk command to write the ISO image to the media:
su -c 'livecd-iso-to-disk the_image.iso /dev/sdX1'
Making Fedora USB Media in UNIX, Linux, and Similar Operating Systems
13
Replace sdX1 with the device name for the partition on the USB media. Most flash drives andexternal hard disks use only one partition. If you have changed this behavior or have oddlypartitioned media, you may need to consult other sources of help.
3.2.2.1.3. Making Fedora USB Media with dd
These instructions could destroy dataIf you perform this procedure with a disk or USB storage device that already containsdata, this data will be destroyed with no warning. Make sure that you specify the correctdisk or USB storage device, and make sure that this disk or storage device does notcontain any data that you want to keep.
1. Plug in your USB media.
2. Find the device name for your USB media. If the media has a volume name, look up the name in/dev/disk/by-label, or use the findfs:
su -c 'findfs LABEL="MyLabel"'
If the media does not have a volume name, or you do not know it, consult the /var/log/messages log for details:
su -c 'less /var/log/messages'
3. Use the dd command to write the ISO image to the media:
su -c 'dd if=/path/to/image/file/imagefile.iso of=device'
where /path/to/image/file is the location of the image file that you downloaded anddevice is the USB media device.
3.2.2.2. Making Fedora USB Media in other Linux DistributionsTo create Fedora USB media on a computer that uses a Linux distribution other than Fedora, RedHat Enterprise Linux, and those derived from Red Hat Enterprise Linux, use one of the command-lineprocedures detailed in this section.
3.2.2.2.1. Making Fedora USB Media with livecd-tools
Note — This Method Is Not DestructiveThis method is not destructive, so existing data on the media is not harmed. Nevertheless,it is always a good idea to back up important data before performing sensitive diskoperations.
This method works only with the Fedora live image, and only on Linux operating systems.
1. Download a live ISO file for Fedora as shown in Section 2.1.3, “Which Files Do I Download?”
Chapter 3. Making Fedora Media
14
2. Plug in your USB media.
3. Find the device name for your USB media. If the media has a volume name, look up the name in/dev/disk/by-label, or use the findfs:
su -c 'findfs LABEL="MyLabel"'
If the media does not have a volume name, or you do not know it, consult the /var/log/messages log for details:
su -c 'less /var/log/messages'
4. Many Linux distributions automatically mount USB media devices when you connect the deviceto your computer. If this is the case, unmount the device. The specific method to do this varieswidely between Linux distributions and desktops. Some common methods include:
• select File > Unmount if the operating system presents you with a window that displays thecontents of the device.
• right-click on an icon of the device and click Unmount.
• click on an icon that represents ejecting the media — commonly, an upward-pointing triangle.
5. At a command line, type su - to become root, and enter the root password when your systemprompts you.
6. Create a mount point for the live image that you downloaded. For example, to use /tmp/livecdas the mount point, type mkdir /tmp/livecd and press Enter.
7. Mount the live image with the following command: mount -o loop /path/to/image/file/imagefile.iso /path/to/mount/point, where /path/to/image/file is the location ofthe image file that you downloaded, imagefile.iso is the image file, and /path/to/mount/point is the mount point that you just created.
8. Change directory to the LiveOS directory of the image that you just mounted. mount point whereyou just mounted the Fedora live image. For example, cd /tmp/livecd/LiveOS.
9. Run the following command: ./livecd-iso-to-disk /path/to/image/file/imagefile.iso device, where /path/to/image/file is the location of the image file thatyou downloaded, imagefile.iso is the image file, and device is the USB media device.
You have downloaded a Fedora live image, Fedora-13-i686-Live.iso, to a folder namedDownloads in your home directory. You have a USB flash drive plugged into your computer, named /dev/sdc1
Become root:
su -
Make a mount point for the image:
mkdir /mnt/livecd
Mount the image:
Making Fedora USB Media in UNIX, Linux, and Similar Operating Systems
15
mount -o loop /home/Username/Downloads/Fedora-13-i686-Live.iso /mnt/livecd
Change into the LiveOS directory of the live CD image:
cd /mnt/livecd/LiveOS
Run livecd-iso-to-disk to transfer the live image to your flash drive and make the flash drive bootable:
./livecd-iso-to-disk /home/Username/Downloads/Fedora-13-i686-Live.iso /dev/sdc1
Example 3.1. Mounting a Fedora live image file and using livecd-iso-to-disk to create live USB media
3.2.2.2.2. Making Fedora USB Media with dd
These instructions could destroy dataIf you perform this procedure with a disk or USB storage device that already containsdata, this data will be destroyed with no warning. Make sure that you specify the correctdisk or USB storage device, and make sure that this disk or storage device does notcontain any data that you want to keep.
Use this method for the distribution image, the minimal boot media image, or on systems with a UNIXoperating system (including Mac OX X).
1. Plug in your USB media.
2. Find the device name for your USB media. If the media has a volume name, look up the name in/dev/disk/by-label, or use the findfs:
su -c 'findfs LABEL="MyLabel"'
If the media does not have a volume name, or you do not know it, consult the /var/log/messages log for details:
su -c 'less /var/log/messages'
3. Use the dd command to write the ISO image to the media:
su -c 'dd if=/path/to/image/file/imagefile.iso of=device'
where /path/to/image/file is the location of the image file that you downloaded anddevice is the USB media device.

16
Chapter 4.
17
Steps to Get You Started
4.1. Upgrade or Install?For information to help you determine whether to perform an upgrade or an installation refer toChapter 18, Upgrading Your Current System.
4.2. Is Your Hardware Compatible?Hardware compatibility is particularly important if you have an older system or a system that you builtyourself. Fedora 13 should be compatible with most hardware in systems that were factory built withinthe last two years. However, hardware specifications change almost daily, so it is difficult to guaranteethat your hardware is 100% compatible.
The most recent list of supported hardware can be found in the Release Notes for Fedora 13,available at http://docs.fedoraproject.org/release-notes .
At the end of a successful Fedora installation process, the installation program offers you theoption to provide details of your hardware configuration anonymously to the Fedora Project (referto Section 15.4, “Hardware Profile”). You can view the statistics gathered by this method at http://smolt.fedoraproject.org/static/stats/devices.html. Viewing the list of hardware that makes up systemson which other people have successfully installed Fedora might help you determine how suitable yourhardware is.
You can also refer to the LinuxQuestions.org Hardware Compatibility List, available online at:
http://www.linuxquestions.org/hcl/index.php
4.3. RAID and Other Disk Devices
Important — Systems with Intel BIOS RAID setsFedora 13 uses mdraid instead of dmraid for installation onto Intel BIOS RAID sets.These sets are detected automatically, and devices with Intel ISW metadata arerecognized as mdraid instead of dmraid. Note that the device node names of anysuch devices under mdraid are different from their device node names under dmraid.Therefore, special precautions are necessary when you migrate systems with Intel BIOSRAID sets from operating systems or versions of operating systems that use dmraid.
Local modifications to /etc/fstab, /etc/crypttab or other configuration files whichrefer to devices by their device node names will not work in Fedora 13. Before migratingthese files, you must therefore edit them to replace device node paths with device UUIDsinstead. You can find the UUIDs of devices with the blkid command.
4.3.1. Hardware RAIDRAID, or Redundant Array of Independent Disks, allows a group, or array, of drives to act as a singledevice. Configure any RAID functions provided by the mainboard of your computer, or attached

Chapter 4. Steps to Get You Started
18
controller cards, before you begin the installation process. Each active RAID array appears as onedrive within Fedora.
On systems with more than one hard drive you may configure Fedora to operate several of the drivesas a Linux RAID array without requiring any additional hardware.
4.3.2. Software RAIDYou can use the Fedora installation program to create Linux software RAID arrays, where RAIDfunctions are controlled by the operating system rather than dedicated hardware. These functions areexplained in detail in Section 7.20, “ Creating a Custom Layout or Modifying the Default Layout ”.
4.3.3. FireWire and USB DisksSome FireWire and USB hard disks may not be recognized by the Fedora installation system. Ifconfiguration of these disks at installation time is not vital, disconnect them to avoid any confusion.
Post-installation UsageYou can connect and configure external FireWire and USB hard disks after installation.Most such devices are recognized by the kernel and available for use at that time.
4.4. Do You Have Enough Disk Space?Nearly every modern-day operating system (OS) uses disk partitions, and Fedora is no exception.When you install Fedora, you may have to work with disk partitions. If you have not worked with diskpartitions before (or need a quick review of the basic concepts), refer to Appendix A, An Introduction toDisk Partitions before proceeding.
The disk space used by Fedora must be separate from the disk space used by other OSes you mayhave installed on your system, such as Windows, OS/2, or even a different version of Linux. For x86,AMD64, and Intel® 64 systems, at least two partitions (/ and swap) must be dedicated to Fedora.
Before you start the installation process, you must
• have enough unpartitioned1 disk space for the installation of Fedora, or
• have one or more partitions that may be deleted, thereby freeing up enough disk space to installFedora.
To gain a better sense of how much space you really need, refer to the recommended partitioningsizes discussed in Section 7.20.5, “Recommended Partitioning Scheme”.
If you are not sure that you meet these conditions, or if you want to know how to create free diskspace for your Fedora installation, refer to Appendix A, An Introduction to Disk Partitions.
4.5. Can You Install Using the CD-ROM or DVD?There are several methods that can be used to install Fedora.
Installing from a CD-ROM or DVD requires that you have a Fedora 13 CD-ROM or DVD, and you havea DVD/CD-ROM drive on a system that supports booting from it.
Alternative Boot Methods
19
Your BIOS may need to be changed to allow booting from your DVD/CD-ROM drive. For moreinformation about changing your BIOS, refer to Section 7.4.1, “Booting the Installation Program onx86, AMD64, and Intel® 64 Systems”.
4.5.1. Alternative Boot MethodsBoot DVD/CD-ROM
If you can boot using the DVD/CD-ROM drive, you can create your own CD-ROM to boot theinstallation program. This may be useful, for example, if you are performing an installation overa network or from a hard drive. Refer to Section 4.5.2, “Making an Installation Boot CD-ROM” forfurther instructions.
USB pen driveIf you cannot boot from the DVD/CD-ROM drive, but you can boot using a USB device, such as aUSB pen drive, the following alternative boot method is available:
Your BIOS must support booting from a USB device in order for this boot method to work.
Install the livecd-tools package on your system with your graphical package manager, or thefollowing command:
su -c 'yum -y install livecd-tools'
Download the boot.iso image file as described in Section 2.1.3, “Which Files Do I Download?”and use the livecd-iso-to-disk script to copy it to your USB device:
livecd-iso-to-disk /path/to/image/file/boot.iso device
Where /path/to/image/file is the location of boot.iso and device is the USB mediadevice. For example:
livecd-iso-to-disk '/home/username/Downloads/boot.iso' /dev/sdc1
If you use Red Hat Enterprise Linux or a Linux distribution derived from it, you can obtain thelivecd-tools package from the Extra Packages for Enterprise Linux (EPEL) repository. Refer tohttp://fedoraproject.org/wiki/EPEL/FAQ#howtouse for details.
To create bootable USB media from the boot.iso file on a computer that uses MicrosoftWindows or a Linux distribution other than Fedora, Red Hat Enterprise Linux, or those derivedfrom Red Hat Enterprise Linux, you will need to find a tool that works for your chosen operatingsystem.
UNetbootin is a free and open-source graphical tool that can create live USB media from liveimage files on computers that use a wide range of different Linux distributions or MicrosoftWindows. Refer to the documentation accompanying UNetbootin for a complete description of thetool and instructions on how to use it.
4.5.2. Making an Installation Boot CD-ROMThe boot.iso image file is available for download from the same servers that host images of theFedora installation disks — refer to Section 2.1, “Downloading Fedora”. This file is an image of adisc that you can burn to a CD and use to boot the installation program. To use this boot CD, your
Chapter 4. Steps to Get You Started
20
computer must be able to boot from its CD-ROM drive, and its BIOS settings must be configured to doso.
Choose an option to burn a CD from an imageWhen you burn the boot.iso image, make sure that you select the option to burnan image file to disc in your CD burning software. The exact wording of thisoption varies, depending on the software that you use, but should contain the word"image". Note that not all CD burning software includes this option. In particular, theCD burning software built into Microsoft Windows XP and Windows Vista does not offerthis capability. There are many programs available that add this capability to Windowsoperating systems; Infrarecorder is a free and open-source example available from http://www.infrarecorder.org/.
4.6. Preparing for a Network Installation
NoteMake sure an installation CD (or any other type of CD) is not in your system's CD/DVDdrive if you are performing a network-based installation. Having a CD in the drive maycause unexpected errors.
Ensure that you have boot media available on CD, DVD, or a USB storage device such as a flashdrive.
The Fedora installation media must be available for either a network installation (via NFS, FTP, orHTTP) or installation via local storage. Use the following steps if you are performing an NFS, FTP, orHTTP installation.
The NFS, FTP, or HTTP server to be used for installation over the network must be a separatemachine which can provide the complete contents of the installation DVD-ROM or the installation CD-ROMs.
NoteThe Fedora installation program has the ability to test the integrity of the installationmedia. It works with the CD / DVD, hard drive ISO, and NFS ISO installation methods. Werecommend that you test all installation media before starting the installation process, andbefore reporting any installation-related bugs (many of the bugs reported are actually dueto improperly-burned CDs). To use this test, type the following command at the boot:prompt:
linux mediacheck
NoteIn the following examples, the directory on the installation staging server that will containthe installation files will be specified as /location/of/disk/space. The directory that

Preparing for FTP and HTTP installation
21
will be made publicly available via FTP, NFS, or HTTP will be specified as /publicly/available/directory. For example, /location/of/disk/space may be adirectory you create called /var/isos. /publicly/available/directory might be/var/www/html/f13, for an HTTP install.
To copy the files from the installation DVD or CD-ROMs to a Linux machine which acts as aninstallation staging server, perform the following steps:
• Create an iso image from the installation disk(s) using the following command (for DVDs):
dd if=/dev/dvd of=/location/of/disk/space/f13.iso
where dvd refers to your DVD drive device.
For instructions on how to prepare a network installation using CD-ROMs, refer to the instructionson the README-en file in disk1.
4.6.1. Preparing for FTP and HTTP installationExtract the files from the iso image of the installation DVD or the iso images of the installation CDs andplace them in a directory that is shared over FTP or HTTP.
Next, make sure that the directory is shared via FTP or HTTP, and verify client access. You can checkto see whether the directory is accessible from the server itself, and then from another machine on thesame subnet that you will be installing to.
4.6.2. Preparing for an NFS installFor NFS installation it is not necessary to mount the iso image. It is sufficient to make the iso imageitself available via NFS. You can do this by moving the iso image or images to the NFS exporteddirectory:
• For DVD:
mv /location/of/disk/space/f13.iso /publicly/available/directory/
• For CDROMs:
mv /location/of/disk/space/f13-disk*.iso /publicly/available/directory/
In addition the install.img file from within the ISO files must be copied to a directory namedimages
Additionally, if a file called updates.img exists in the location from which you install, it is used forupdates to anaconda, the installation program. Refer to the file install-methods.txt in theanaconda RPM package for detailed information on the various ways to install Fedora, as well as howto apply the installation program updates.
To extract the install.img from the ISO follow the procedure:
mount -t iso9660 /path/to/Fedora13.iso /mnt/point -o loop,ro
Chapter 4. Steps to Get You Started
22
cp -pr /mnt/point/images /path/images/ umount /mnt/point
Ensure that the /publicly/available/directory directory is exported via NFS via an entry in /etc/exports.
To export to a specific system:
/publicly/available/directory client.ip.address
To export to all systems use an entry such as:
/publicly/available/directory *
Start the NFS daemon (on a Fedora system, use /sbin/service nfs start). If NFS is alreadyrunning, reload the configuration file (on a Fedora system use /sbin/service nfs reload).
4.7. Preparing for a Hard Drive Installation
NoteHard drive installations only work from ext2, ext3, or FAT file systems. If you have a filesystem other than those listed here, such as reiserfs, you will not be able to perform ahard drive installation.
Hard drive installations require the use of the ISO (or DVD/CD-ROM) images. An ISO image is a filecontaining an exact copy of a DVD/CD-ROM image. After placing the required ISO images (the binaryFedora DVD/CD-ROMs) in a directory, choose to install from the hard drive. You can then point theinstallation program at that directory to perform the installation.
Ensure that you have boot media available on CD, DVD, or a USB storage device such as a flashdrive.
To prepare your system for a hard drive installation, you must set the system up in one of the followingways:
• Using a set of CD-ROMs, or a DVD — Create ISO image files from each installation CD-ROM, orfrom the DVD. For each CD-ROM (once for the DVD), execute the following command on a Linuxsystem:
dd if=/dev/cdrom of=/tmp/file-name.iso
• Using ISO images — transfer these images to the system to be installed.
The ISO files must be located on a hard drive that is either internal to the computer, or attached tothe machine by USB. In addition the install.img file from within the ISO files must be copied to adirectory named images Use this option to install Fedora on computers that are without a networkconnection or CD/DVD drives.
Verifying that ISO images are intact before you attempt an installation, helps to avoid problems. Toverify the ISO images are intact prior to performing an installation, use an md5sum program (many
Preparing for a Hard Drive Installation
23
md5sum programs are available for various operating systems). An md5sum program should beavailable on the same Linux machine as the ISO images.
NoteThe Fedora installation program has the ability to test the integrity of the installationmedia. It works with the CD / DVD, hard drive ISO, and NFS ISO installation methods. Werecommend that you test all installation media before starting the installation process, andbefore reporting any installation-related bugs (many of the bugs reported are actually dueto improperly-burned CDs). To use this test, type the following command at the boot:prompt:
linux mediacheck
Additionally, if a file called updates.img exists in the location from which you install, it is used forupdates to anaconda, the installation program. Refer to the file install-methods.txt in theanaconda RPM package for detailed information on the various ways to install Fedora, as well as howto apply the installation program updates.
To extract the install.img from the ISO follow the procedure:
mount -t iso9660 /path/to/Fedora13.iso /mnt/point -o loop,ro cp -pr /mnt/point/images /path/images/ umount /mnt/point
Before you begin installation from a hard drive, check the partition type to ensure that Fedora canread it. To check a partition's file system under Windows, use the Disk Management tool. To check apartition's file system under Linux, use the fdisk utility.
Cannot Install from LVM PartitionsYou cannot use ISO files on partitions controlled by LVM (Logical Volume Management).

24
Chapter 5.
25
System Specifications ListThe installation program automatically detects and installs your computer's hardware. Althoughyou should make sure that your hardware meets the minimum requirements to install Fedora (referto Section 4.2, “Is Your Hardware Compatible?”) you do not usually need to supply the installationprogram with any specific details about your system.
However, when performing certain types of installation, some specific details might be useful or evenessential.
• If you plan to use a customized partition layout, record:
• The model numbers, sizes, types, and interfaces of the hard drives attached to the system. Forexample, Seagate ST3320613AS 320 GB on SATA0, Western Digital WD7500AAKS 750 GB onSATA1. This will allow you to identify specific hard drives during the partitioning process.
• If you are installing Fedora as an additional operating system on an existing system, record:
• The mount points of the existing partitions on the system. For example, /boot on sda1, / onsda2, and /home on sdb1. This will allow you to identify specific partitions during the partitioningprocess.
• If you plan to install from an image on a local hard drive:
• The hard drive and directory that holds the image – see Table 7.2, “Location of ISO images fordifferent partition types” for examples.
• If you plan to install from a network location, or install on an iSCSI target:
• The make and model numbers of the network adapters on your system. For example, NetgearGA311. This will allow you to identify adapters when manually configuring the network.
• IP, DHCP, and BOOTP addresses
• Netmask
• Gateway IP address
• One or more name server IP addresses (DNS)
If any of these networking requirements or terms are unfamiliar to you, contact your networkadministrator for assistance.
• If you plan to install from a network location:
• The location of the image on an FTP server, HTTP (web) server, or NFS server – seeSection 7.6.5, “Installing via FTP or HTTP” and Section 7.6.4, “Installing via NFS” for examples.
• If you plan to install on an iSCSI target:
• The location of the iSCSI target. Depending on your network, you might also need a CHAPusername and password, and perhaps a reverse CHAP username and password – seeSection 7.11.1.1, “ Advanced Storage Options ”.
• If your computer is part of a domain:

Chapter 5. System Specifications List
26
• You should verify that the domain name will be supplied by the DHCP server. If not, you will needto input the domain name manually during installation.

Part II. The installation processThis part of the Fedora Installation Guide details the installation process itself, from various methodsof booting the installer up to the point where the computer must restart to finalize the installation. Thispart of the manual also includes a chapter on troubleshooting problems with the installation process.

Chapter 6.
29
Booting the Installer
Important — Booting Older Systems from CD or DVD MediaThe CD and DVD media include boot catalog entries for both BIOS and UEFI firmwareinterfaces. This allows you to boot systems based on either firmware interface from thesame CD or DVD. However, some systems with very old BIOS implementations cannothandle media with more than one boot catalog entry. These systems will not boot from theCD or DVD and you must instead boot them from USB or PXE.
Note that the boot configurations of UEFI and BIOS differ significantly from each other.Therefore, the installed system must boot using the same firmware that was used duringinstallation. You cannot install the operating system on a system that uses BIOS and thenboot this installation on a system that uses UEFI.
To start the installation program from a Red Hat Enterprise Linux CD, DVD, or minimal boot media,follow this procedure:
1. Disconnect any external FireWire or USB disks that you do not need for installation. Refer toSection 4.3.3, “ FireWire and USB Disks ” for more information.
2. Power on your computer system.
3. Insert the media in your computer.
4. Power off your computer with the boot media still inside.
5. Power on your computer system.
You might need to press a specific key or combination of keys to boot from the media. On mostcomputers, a message appears briefly on the screen very soon after you turn on the computer.Typically, it is worded something like Press F10 to select boot device, although the specificwording and the key that you must press varies widely from computer to computer. Consult thedocumentation for your computer or motherboard, or seek support from the hardware manufactureror vendor. On Apple computers, the C key boots the system from the DVD drive. On older Applehardware you might need to press Cmd+Opt+Shift+Del to boot from the DVD drive.
If your computer does not allow you to select a boot device as it starts up, you might need to configureyour system's Basic Input/Output System (BIOS) to boot from the media.
To change your BIOS settings on an x86, AMD64, or Intel® 64 system, watch the instructions providedon your display when your computer first boots. A line of text appears, telling you which key to press toenter the BIOS settings.
Once you have entered your BIOS setup program, find the section where you can alter your bootsequence. The default is often C, A or A, C (depending on whether you boot from your hard drive [C]or a diskette drive [A]). Change this sequence so that the CD-ROM is first in your boot order and thatC or A (whichever is your typical boot default) is second. This instructs the computer to first look atthe CD-ROM drive for bootable media; if it does not find bootable media on the CD-ROM drive, it thenchecks your hard drive or diskette drive.
Save your changes before exiting the BIOS. For more information, refer to the documentation thatcame with your system.
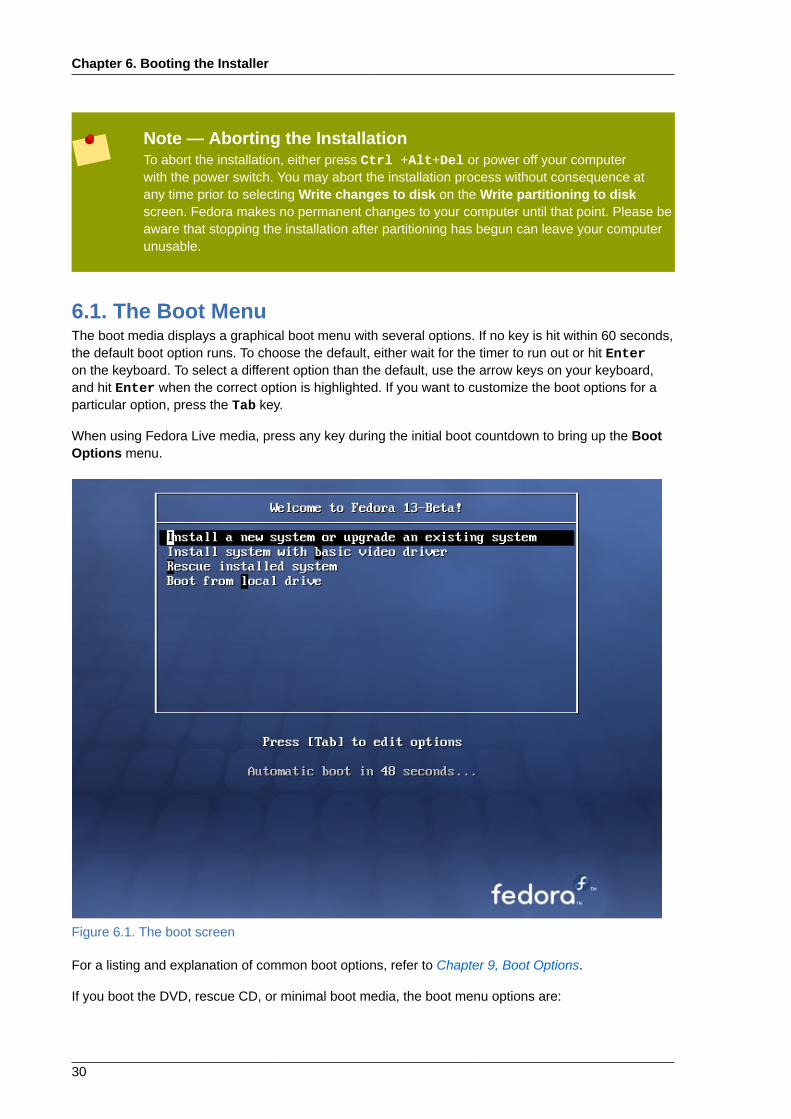
Chapter 6. Booting the Installer
30
Note — Aborting the InstallationTo abort the installation, either press Ctrl +Alt+Del or power off your computerwith the power switch. You may abort the installation process without consequence atany time prior to selecting Write changes to disk on the Write partitioning to diskscreen. Fedora makes no permanent changes to your computer until that point. Please beaware that stopping the installation after partitioning has begun can leave your computerunusable.
6.1. The Boot MenuThe boot media displays a graphical boot menu with several options. If no key is hit within 60 seconds,the default boot option runs. To choose the default, either wait for the timer to run out or hit Enteron the keyboard. To select a different option than the default, use the arrow keys on your keyboard,and hit Enter when the correct option is highlighted. If you want to customize the boot options for aparticular option, press the Tab key.
When using Fedora Live media, press any key during the initial boot countdown to bring up the BootOptions menu.
Figure 6.1. The boot screen
For a listing and explanation of common boot options, refer to Chapter 9, Boot Options.
If you boot the DVD, rescue CD, or minimal boot media, the boot menu options are:
Installing from a Different Source
31
Install or upgrade an existing systemThis option is the default. Choose this option to install Fedora onto your computer system usingthe graphical installation program.
Install system with basic video driverThis option allows you to install Fedora in graphical mode even if the installation program is unableto load the correct driver for your video card. If your screen appears distorted or goes blank whenusing the the Install or upgrade an existing system option, restart your computer and try thisoption instead.
Rescue installed systemChoose this option to repair a problem with your installed Fedora system that prevents you frombooting normally. Although Fedora is an exceptionally stable computing platform, it is still possiblefor occasional problems to occur that prevent booting. The rescue environment contains utilityprograms that allow you fix a wide variety of these problems.
Boot from local driveThis option boots the system from the first installed disk. If you booted this disc accidentally, usethis option to boot from the hard disk immediately without starting the installer.
6.2. Installing from a Different SourceYou can install Fedora from the ISO images stored on hard disk, or from a network using NFS, FTP, orHTTP methods. Experienced users frequently use one of these methods because it is often faster toread data from a hard disk or network server than from a CD or DVD.
The following table summarizes the different boot methods and recommended installation methods touse with each:
Boot method Installation method
DVD DVD, network, or hard disk
Minimal boot CD or USB, rescue CD Network or hard disk
Live CD or USB Install to Hard Disk application
Table 6.1. Boot methods and installation methods
Refer to Section 7.5, “Selecting an Installation Method” for information about installing from locationsother than the media with which you booted the system.
6.3. Booting from the Network using PXETo boot withPXE, you need a properly configured server, and a network interface in your computer that supportsPXE. For information on how to configure a PXE server, refer to Chapter 11, Setting Up an InstallationServer.
Configure the computer to boot from the network interface. This option is in the BIOS, and may belabeled Network Boot or Boot Services. Once you properly configure PXE booting, the computercan boot the Fedora installation system without any other media.
To boot a computer from a PXE server:

Chapter 6. Booting the Installer
32
1. Ensure that the network cable is attached. The link indicator light on the network socket should belit, even if the computer is not switched on.
2. Switch on the computer.
3. A menu screen appears. Press the number key that corresponds to the desired option.
If your PC does not boot from the netboot server, ensure that the BIOS is configured to boot firstfrom the correct network interface. Some BIOS systems specify the network interface as a possibleboot device, but do not support the PXE standard. Refer to your hardware documentation for moreinformation.
Note — Multiple NICs and PXE installationSome servers with multiple network interfaces might not assign eth0 to the first networkinterface as the firmware interface knows it, which can cause the installer to try to use adifferent network interface from the one that was used by PXE. To change this behavior,use the following in pxelinux.cfg/* config files:
IPAPPEND 2APPEND ksdevice=bootif
These configuration options above cause the installer to use the same network interfacethe firmware interface and PXE use. You can also use the following option:
ksdevice=link
This option causes the installer to use the first network device it finds that is linked to anetwork switch.

Chapter 7.
33
Installing on Intel® and AMD SystemsThis chapter explains how to perform a Fedora installation from the DVD/CD-ROM, using thegraphical, mouse-based installation program. The following topics are discussed:
• Becoming familiar with the installation program's user interface
• Starting the installation program
• Selecting an installation method
• Configuration steps during the installation (language, keyboard, mouse, partitioning, etc.)
• Finishing the installation
7.1. Graphical and Text Interfaces
Graphical Interface UsageInstalling in text mode does not prevent you from using a graphical interface on yoursystem once it is installed.
Important — Minimum RAM requirementsIf your system has less than 137 MB of RAM, installation will not continue on anyarchitecture.
Furthermore, installation from a hard drive or a network location requires an image ofstage 2 of the installation program (installer.img) to be stored in memory. Thisadditional requirement increases the minimum RAM required to at least 256 MB for theseinstallation methods.
Fedora 13 supports graphical and text-based installations. Only systems with more than 397 MB ofRAM can use the graphical installer. Systems with less RAM automatically scale back to using thetext-based installer. Note that you must still have a minimum of 137 MB of RAM for installation toproceed even in text mode, and some architectures and installation methods require more RAM thanothers. If you prefer to use the text-based installer, type linux text at the boot: prompt.
If one of the following situations occurs, the installation program uses text mode:
• The installation system fails to identify the display hardware on your computer
• Your computer has less the minimum amount of RAM required for graphical installation on yourarchitecture with your chosen installation method (397 MB at the very least).
• You choose the text mode installation from the boot menu
The text screens provide most of the same functions as the standard screens, although diskpartitioning is simplified, and bootloader configuration and package selection are handledautomatically in text mode. If you choose to install Fedora in text mode, you can still configure your
Chapter 7. Installing on Intel® and AMD Systems
34
system to use a graphical interface after installation. Refer to Section 16.3, “Switching to a GraphicalLogin” for instructions.
7.2. The Graphical Installation Program User InterfaceIf you have used a graphical user interface (GUI) before, you are already familiar with this process;use your mouse to navigate the screens, click buttons, or enter text fields.
You can also navigate through the installation using the keyboard. The Tab key allows you to movearound the screen, the Up and Down arrow keys to scroll through lists, + and - keys expand andcollapse lists, while Space and Enter selects or removes from selection a highlighted item. You canalso use the Alt+X key command combination as a way of clicking on buttons or making other screenselections, where X is replaced with any underlined letter appearing within that screen.
NoteIf you are using an x86, AMD64, or Intel® 64 system, and you do not wish to use the GUIinstallation program, the text mode installation program is also available. To start the textmode installation program, press the Esc key while the Fedora boot menu is displayed,then use the following command at the boot: prompt:
linux text
Refer to Section 6.1, “The Boot Menu” for a description of the Fedora boot menu and toSection 7.3, “The Text Mode Installation Program User Interface” for a brief overview oftext mode installation instructions.
It is highly recommended that installs be performed using the GUI installation program.The GUI installation program offers the full functionality of the Fedora installation program,including LVM configuration which is not available during a text mode installation.
Users who must use the text mode installation program can follow the GUI installationinstructions and obtain all needed information.
7.2.1. Screenshots during installationAnaconda allows you to take screenshots during the installation process. At any time duringinstallation, press Shift+Print Screen and anaconda will save a screenshot to /root/anaconda-screenshots.
If you are performing a Kickstart installation, use the autostep --autoscreenshot option togenerate a screenshot of each step of the installation automatically. Refer to Section 13.3, “Creatingthe Kickstart File” for details of configuring a Kickstart file.
7.2.2. A Note about Virtual ConsolesThe Fedora installation program offers more than the dialog boxes of the installation process. Severalkinds of diagnostic messages are available to you, as well as a way to enter commands from a shellprompt. The installation program displays these messages on five virtual consoles, among which youcan switch using a single keystroke combination.

The Text Mode Installation Program User Interface
35
A virtual console is a shell prompt in a non-graphical environment, accessed from the physicalmachine, not remotely. Multiple virtual consoles can be accessed simultaneously.
These virtual consoles can be helpful if you encounter a problem while installing Fedora. Messagesdisplayed on the installation or system consoles can help pinpoint a problem. Refer to Table 7.1,“Console, Keystrokes, and Contents” for a listing of the virtual consoles, keystrokes used to switch tothem, and their contents.
Generally, there is no reason to leave the default console (virtual console #6) for graphical installationsunless you are attempting to diagnose installation problems.
console keystrokes contents
1 ctrl+alt+f1 installation dialog
2 ctrl+alt+f2 shell prompt
3 ctrl+alt+f3 install log (messages frominstallation program)
4 ctrl+alt+f4 system-related messages
5 ctrl+alt+f5 other messages
6 ctrl+alt+f6 graphical display
Table 7.1. Console, Keystrokes, and Contents
7.3. The Text Mode Installation Program User Interface
NoteGraphical installation remains the recommended method for installing Fedora. If youare installing Fedora on a system that lacks a graphical display, consider performing theinstallation over a VNC connection – see Chapter 12, Installing Through VNC.
If your system has a graphical display, but graphical installation fails, try booting with thexdriver=vesa option – see Chapter 9, Boot Options
The Fedora text mode installation program uses a screen-based interface that includes most of theon-screen widgets commonly found on graphical user interfaces. Figure 7.1, “Installation ProgramWidgets as seen in Boot Loader Configuration”, and Figure 7.2, “Installation Program Widgets asseen in the partitioning screen”, illustrate the screens that appear during the installation process.
The cursor is used to select (and interact with) a particular widget. As the cursor is moved from widgetto widget, it may cause the widget to change color, or the cursor itself may only appear positioned in ornext to the widget.
NoteWhile text mode installations are not explicitly documented, those using the text modeinstallation program can easily follow the GUI installation instructions. However, becausetext mode presents you with a simpler, more streamlined insatallation process, certainoptions that are available in graphical mode are not also available in text mode. Thesedifferences are noted in the description of the installation process in this guide, andinclude:
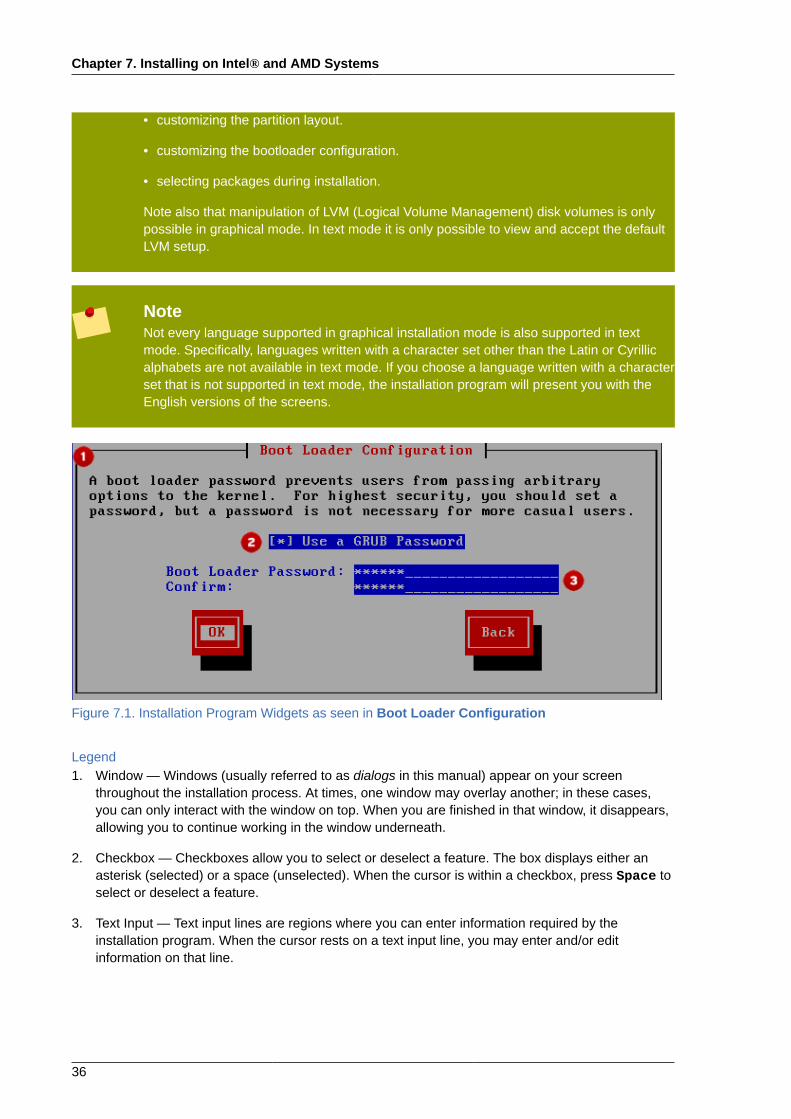
Chapter 7. Installing on Intel® and AMD Systems
36
• customizing the partition layout.
• customizing the bootloader configuration.
• selecting packages during installation.
Note also that manipulation of LVM (Logical Volume Management) disk volumes is onlypossible in graphical mode. In text mode it is only possible to view and accept the defaultLVM setup.
NoteNot every language supported in graphical installation mode is also supported in textmode. Specifically, languages written with a character set other than the Latin or Cyrillicalphabets are not available in text mode. If you choose a language written with a characterset that is not supported in text mode, the installation program will present you with theEnglish versions of the screens.
Figure 7.1. Installation Program Widgets as seen in Boot Loader Configuration
Legend1. Window — Windows (usually referred to as dialogs in this manual) appear on your screen
throughout the installation process. At times, one window may overlay another; in these cases,you can only interact with the window on top. When you are finished in that window, it disappears,allowing you to continue working in the window underneath.
2. Checkbox — Checkboxes allow you to select or deselect a feature. The box displays either anasterisk (selected) or a space (unselected). When the cursor is within a checkbox, press Space toselect or deselect a feature.
3. Text Input — Text input lines are regions where you can enter information required by theinstallation program. When the cursor rests on a text input line, you may enter and/or editinformation on that line.
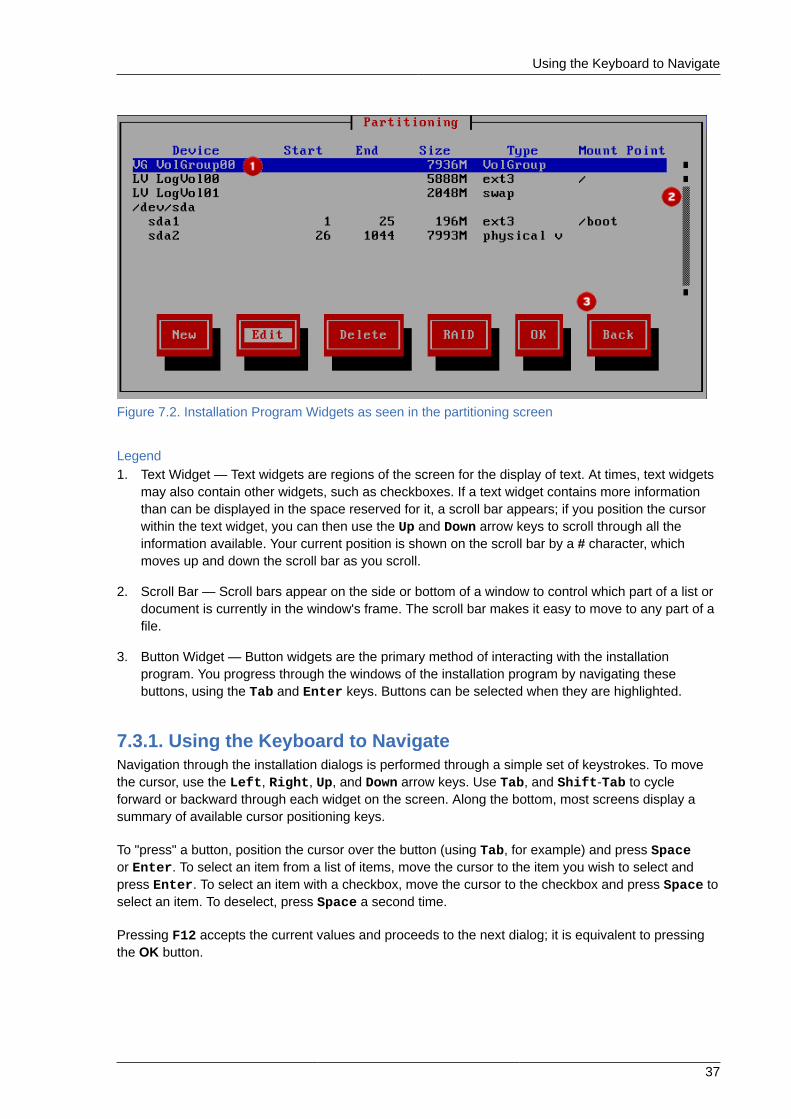
Using the Keyboard to Navigate
37
Figure 7.2. Installation Program Widgets as seen in the partitioning screen
Legend1. Text Widget — Text widgets are regions of the screen for the display of text. At times, text widgets
may also contain other widgets, such as checkboxes. If a text widget contains more informationthan can be displayed in the space reserved for it, a scroll bar appears; if you position the cursorwithin the text widget, you can then use the Up and Down arrow keys to scroll through all theinformation available. Your current position is shown on the scroll bar by a # character, whichmoves up and down the scroll bar as you scroll.
2. Scroll Bar — Scroll bars appear on the side or bottom of a window to control which part of a list ordocument is currently in the window's frame. The scroll bar makes it easy to move to any part of afile.
3. Button Widget — Button widgets are the primary method of interacting with the installationprogram. You progress through the windows of the installation program by navigating thesebuttons, using the Tab and Enter keys. Buttons can be selected when they are highlighted.
7.3.1. Using the Keyboard to NavigateNavigation through the installation dialogs is performed through a simple set of keystrokes. To movethe cursor, use the Left, Right, Up, and Down arrow keys. Use Tab, and Shift-Tab to cycleforward or backward through each widget on the screen. Along the bottom, most screens display asummary of available cursor positioning keys.
To "press" a button, position the cursor over the button (using Tab, for example) and press Spaceor Enter. To select an item from a list of items, move the cursor to the item you wish to select andpress Enter. To select an item with a checkbox, move the cursor to the checkbox and press Space toselect an item. To deselect, press Space a second time.
Pressing F12 accepts the current values and proceeds to the next dialog; it is equivalent to pressingthe OK button.

Chapter 7. Installing on Intel® and AMD Systems
38
WarningUnless a dialog box is waiting for your input, do not press any keys during the installationprocess (doing so may result in unpredictable behavior).
7.4. Starting the Installation Program
Important — Booting Older Systems from CD or DVD MediaThe CD and DVD media include boot catalog entries for both BIOS and UEFI firmwareinterfaces. This allows you to boot systems based on either firmware interface from thesame CD or DVD. However, some systems with very old BIOS implementations cannothandle media with more than one boot catalog entry. These systems will not boot from theCD or DVD and you must instead boot them from USB or PXE.
Note that the boot configurations of UEFI and BIOS differ significantly from each other.Therefore, the installed system must boot using the same firmware that was used duringinstallation. You cannot install the operating system on a system that uses BIOS and thenboot this installation on a system that uses UEFI.
To start, first make sure that you have all necessary resources for the installation. If you have alreadyread through Chapter 4, Steps to Get You Started, and followed the instructions, you should beready to start the installation process. When you have verified that you are ready to begin, boot theinstallation program using the Fedora DVD or CD-ROM #1 or any boot media that you have created.
7.4.1. Booting the Installation Program on x86, AMD64, and Intel®64 SystemsYou can boot the installation program using any one of the following media (depending upon what yoursystem can support):
• Fedora DVD/CD-ROM — Your machine supports a bootable DVD/CD-ROM drive and you have theFedora CD-ROM set or DVD.
• Boot CD-ROM — Your machine supports a bootable CD-ROM drive and you want to performnetwork or hard drive installation.
• USB pen drive — Your machine supports booting from a USB device.
• PXE boot via network — Your machine supports booting from the network. This is an advancedinstallation path. Refer to Chapter 11, Setting Up an Installation Server for additional information onthis method.
To create a boot CD-ROM or to prepare your USB pen drive for installation, refer to Section 4.5.1,“Alternative Boot Methods”.
Insert the boot media and reboot the system.
You might need to press a specific key or combination of keys to boot from the media. On mostcomputers, a message appears briefly on the screen very soon after you turn on the computer.
Additional Boot Options
39
Typically, it is worded something like Press F10 to select boot device, although the specificwording and the key that you must press varies widely from computer to computer. Consult thedocumentation for your computer or motherboard, or seek support from the hardware manufactureror vendor. On Apple computers, the C key boots the system from the DVD drive. On older Applehardware you might need to press Cmd+Opt+Shift+Del to boot from the DVD drive.
If your computer does not allow you to select a boot device as it starts up, you might need to configureyour system's Basic Input/Output System (BIOS) to boot from the media.
To change your BIOS settings on an x86, AMD64, or Intel® 64 system, watch the instructions providedon your display when your computer first boots. A line of text appears, telling you which key to press toenter the BIOS settings.
Once you have entered your BIOS setup program, find the section where you can alter your bootsequence. The default is often C, A or A, C (depending on whether you boot from your hard drive [C]or a diskette drive [A]). Change this sequence so that the CD-ROM is first in your boot order and thatC or A (whichever is your typical boot default) is second. This instructs the computer to first look atthe CD-ROM drive for bootable media; if it does not find bootable media on the CD-ROM drive, it thenchecks your hard drive or diskette drive.
Save your changes before exiting the BIOS. For more information, refer to the documentation thatcame with your system.
After a short delay, a screen containing boot options appears.
As you boot the installation program, be aware of two issues:
• Once the boot: prompt appears, the installation program automatically begins if you take no actionwithin the first minute. To disable this feature, press one of the help screen function keys.
• If you press a help screen function key, there is a slight delay while the help screen is read from theboot media.
Normally, you only need to press Enter to boot. Be sure to watch the boot messages to review if theLinux kernel detects your hardware. If your hardware is properly detected, continue to the next section.If it does not properly detect your hardware, you may need to restart the installation and use one of theboot options provided in Chapter 9, Boot Options.
7.4.2. Additional Boot OptionsWhile it is easiest to boot using a CD-ROM or DVD and perform a graphical installation, sometimesthere are installation scenarios where booting in a different manner may be needed. This sectiondiscusses additional boot options available for Fedora.
To pass options to the boot loader on an x86, AMD64, or Intel® 64 system, use the instructions asprovided in the boot loader option samples below.
NoteRefer to Chapter 9, Boot Options for additional boot options not covered in this section.
• To perform a text mode installation, at the installation boot prompt, type:
Chapter 7. Installing on Intel® and AMD Systems
40
linux text
• ISO images have an md5sum embedded in them. To test the checksum integrity of an ISO image, atthe installation boot prompt, type:
linux mediacheck
The installation program prompts you to insert a CD or select an ISO image to test, and select OKto perform the checksum operation. This checksum operation can be performed on any Fedora CDand does not have to be performed in a specific order (for example, CD #1 does not have to be thefirst CD you verify). It is strongly recommended to perform this operation on any Fedora CD that wascreated from downloaded ISO images. This command works with the CD, DVD, hard drive ISO, andNFS ISO installation methods.
• The boot.iso image file is available for download from the same servers that host images of theFedora installation disks — refer to Section 2.1, “Downloading Fedora”. This file is an image of adisc that you can burn to a CD and use to boot the installation program. To use this boot CD, yourcomputer must be able to boot from its CD-ROM drive, and its BIOS settings must be configured todo so.
• If you need to perform the installation in serial mode, type the following command:
linux console=<device>
For text mode installations, use:
linux text console=<device>
In the above command, <device> should be the device you are using (such as ttyS0 or ttyS1). Forexample, linux text console=ttyS0.
Text mode installations using a serial terminal work best when the terminal supports UTF-8. UnderUNIX and Linux, Kermit supports UTF-8. For Windows, Kermit '95 works well. Non-UTF-8 capableterminals works as long as only English is used during the installation process. An enhancedserial display can be used by passing the utf8 command as a boot-time option to the installationprogram. For example:
linux console=ttyS0 utf8
7.4.2.1. Kernel OptionsOptions can also be passed to the kernel. For example, to apply updates for the anaconda installationprogram from a floppy disk enter:
Selecting an Installation Method
41
linux updates
For text mode installations, use:
linux text updates
This command will prompt you to insert a floppy diskette containing updates for anaconda. It is notneeded if you are performing a network installation and have already placed the updates imagecontents in rhupdates/ on the server.
After entering any options, press Enter to boot using those options.
If you need to specify boot options to identify your hardware, please write them down. Theboot options are needed during the boot loader configuration portion of the installation (refer toSection 7.22, “x86, AMD64, and Intel® 64 Boot Loader Configuration” for more information).
For more information on kernel options refer to Chapter 9, Boot Options.
7.5. Selecting an Installation MethodWhat type of installation method do you wish to use? The following installation methods are available:
DVD/CD-ROMIf you have a DVD/CD-ROM drive and the Fedora CD-ROMs or DVD you can use this method.Refer to Section 7.6.1, “Installing from DVD/CD-ROM”, for DVD/CD-ROM installation instructions.
If you booted the installation from a piece of media other than the installation CD-ROM or DVD,you can specify the CD-ROM or DVD as the installation source with the linux askmethod orlinux repo=cdrom:device:/device boot option, or by selecting Local CD/DVD on theInstallation Method menu (refer to Section 7.6, “Installation Method”).
Hard DriveIf you have copied the Fedora ISO images to a local hard drive, you can use this method. Youneed a boot CD-ROM (use the linux askmethod or linux repo=hd:device:/pathboot option), or by selecting Hard drive on the Installation Method menu (refer to Section 7.6,“Installation Method”). Refer to Section 7.6.2, “Installing from a Hard Drive”, for hard driveinstallation instructions.
NFSIf you are installing from an NFS server using ISO images or a mirror image of Fedora, youcan use this method. You need a boot CD-ROM (use the linux askmethod or linuxrepo=nfs:server :options:/path boot option, or the NFS directory option on theInstallation Method menu described in Section 7.6, “Installation Method”). Refer to Section 7.6.4,“Installing via NFS” for network installation instructions. Note that NFS installations may also beperformed in GUI mode.
URLIf you are installing directly from an HTTP (Web) server or FTP server, usethis method. You need a boot CD-ROM (use the linux askmethod, linuxrepo=ftp://user:password@host/path, or linux repo=http://host/path bootoption, or the URL option on the Installation Method menu described in Section 7.6, “Installation
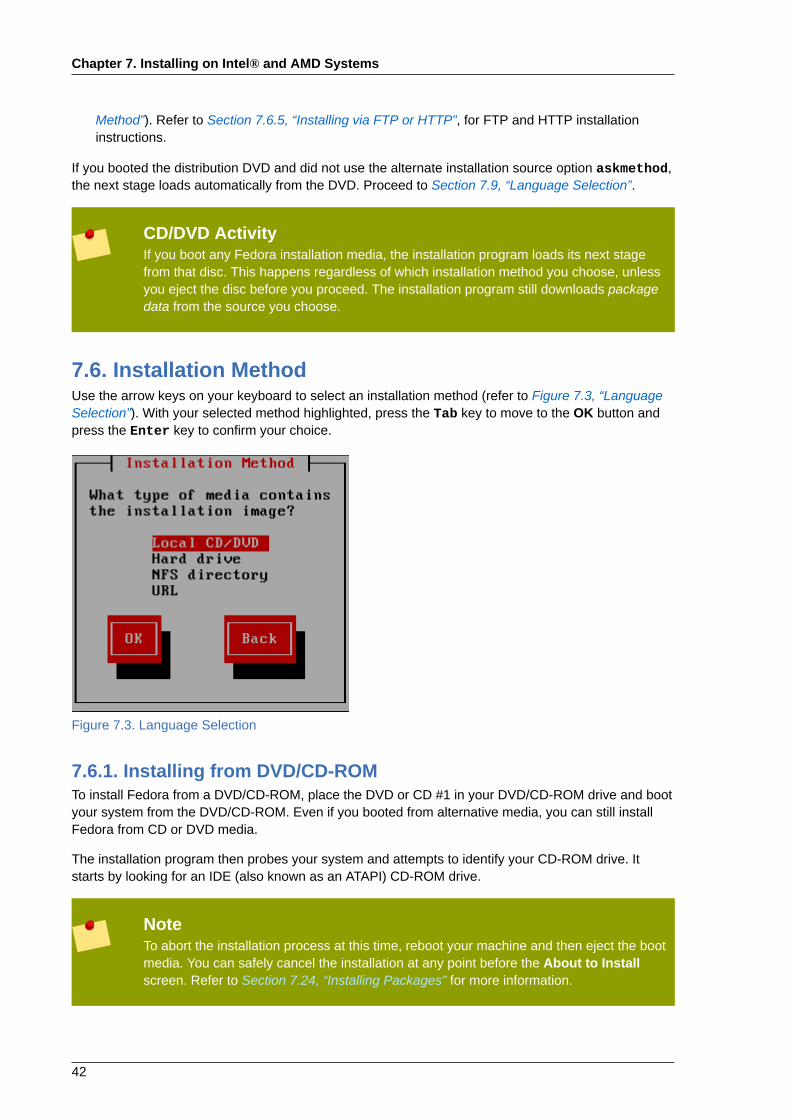
Chapter 7. Installing on Intel® and AMD Systems
42
Method”). Refer to Section 7.6.5, “Installing via FTP or HTTP”, for FTP and HTTP installationinstructions.
If you booted the distribution DVD and did not use the alternate installation source option askmethod,the next stage loads automatically from the DVD. Proceed to Section 7.9, “Language Selection”.
CD/DVD ActivityIf you boot any Fedora installation media, the installation program loads its next stagefrom that disc. This happens regardless of which installation method you choose, unlessyou eject the disc before you proceed. The installation program still downloads packagedata from the source you choose.
7.6. Installation MethodUse the arrow keys on your keyboard to select an installation method (refer to Figure 7.3, “LanguageSelection”). With your selected method highlighted, press the Tab key to move to the OK button andpress the Enter key to confirm your choice.
Figure 7.3. Language Selection
7.6.1. Installing from DVD/CD-ROMTo install Fedora from a DVD/CD-ROM, place the DVD or CD #1 in your DVD/CD-ROM drive and bootyour system from the DVD/CD-ROM. Even if you booted from alternative media, you can still installFedora from CD or DVD media.
The installation program then probes your system and attempts to identify your CD-ROM drive. Itstarts by looking for an IDE (also known as an ATAPI) CD-ROM drive.
NoteTo abort the installation process at this time, reboot your machine and then eject the bootmedia. You can safely cancel the installation at any point before the About to Installscreen. Refer to Section 7.24, “Installing Packages” for more information.
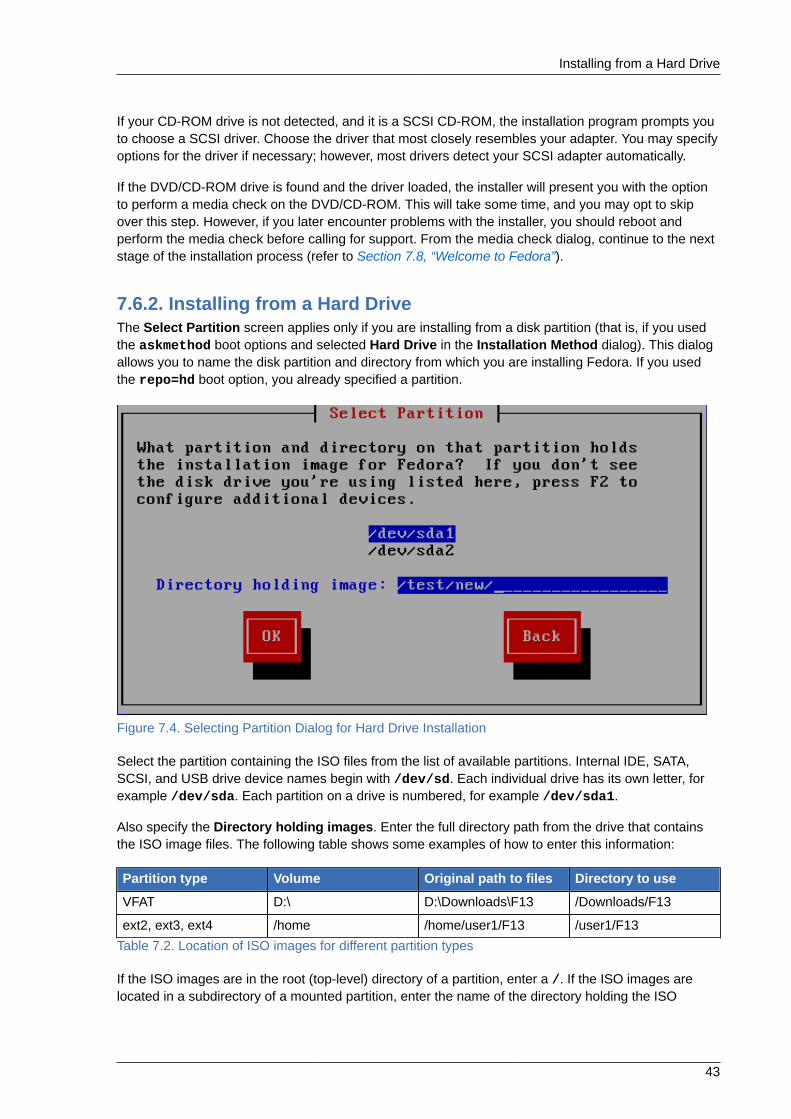
Installing from a Hard Drive
43
If your CD-ROM drive is not detected, and it is a SCSI CD-ROM, the installation program prompts youto choose a SCSI driver. Choose the driver that most closely resembles your adapter. You may specifyoptions for the driver if necessary; however, most drivers detect your SCSI adapter automatically.
If the DVD/CD-ROM drive is found and the driver loaded, the installer will present you with the optionto perform a media check on the DVD/CD-ROM. This will take some time, and you may opt to skipover this step. However, if you later encounter problems with the installer, you should reboot andperform the media check before calling for support. From the media check dialog, continue to the nextstage of the installation process (refer to Section 7.8, “Welcome to Fedora”).
7.6.2. Installing from a Hard DriveThe Select Partition screen applies only if you are installing from a disk partition (that is, if you usedthe askmethod boot options and selected Hard Drive in the Installation Method dialog). This dialogallows you to name the disk partition and directory from which you are installing Fedora. If you usedthe repo=hd boot option, you already specified a partition.
Figure 7.4. Selecting Partition Dialog for Hard Drive Installation
Select the partition containing the ISO files from the list of available partitions. Internal IDE, SATA,SCSI, and USB drive device names begin with /dev/sd. Each individual drive has its own letter, forexample /dev/sda. Each partition on a drive is numbered, for example /dev/sda1.
Also specify the Directory holding images. Enter the full directory path from the drive that containsthe ISO image files. The following table shows some examples of how to enter this information:
Partition type Volume Original path to files Directory to use
VFAT D:\ D:\Downloads\F13 /Downloads/F13
ext2, ext3, ext4 /home /home/user1/F13 /user1/F13
Table 7.2. Location of ISO images for different partition types
If the ISO images are in the root (top-level) directory of a partition, enter a /. If the ISO images arelocated in a subdirectory of a mounted partition, enter the name of the directory holding the ISO

Chapter 7. Installing on Intel® and AMD Systems
44
images within that partition. For example, if the partition on which the ISO images is normally mountedas /home/, and the images are in /home/new/, you would enter /new/.
Use a leading slashAn entry without a leading slash may cause the installation to fail.
Select OK to continue. Proceed with Section 7.8, “Welcome to Fedora”.
7.6.3. Performing a Network InstallationThe installation program is network-aware and can use network settings for a number of functions. Forinstance, if you boot the installer with the askmethod or repo= options, you can install Fedora froma network server using FTP, HTTP, or NFS protocols. You can also instruct the installation program toconsult additional software repositories later in the process.
If you are performing a network installation, the Configure TCP/IP dialog appears. This dialog asks foryour IP and other network addresses. You can choose to configure the IP address and Netmask of thedevice via DHCP or manually.
By default, the installation program uses DHCP to automatically provide network settings. If you usea cable or DSL modem, router, firewall, or other network hardware to communicate with the Internet,DHCP is a suitable option. If your network has no DHCP server, clear the check box labeled Usedynamic IP configuration (DHCP).
Enter the IP address you are using during installation and press Enter.
The installation program supports the IPv4 and IPv6 protocols.
Figure 7.5. TCP/IP Configuration
When the installation process completes, it will transfer these settings to your system.
You can install from a Web, FTP, or NFS server either on your local network or, if you are connected,on the Internet. You may install Fedora from your own private mirror, or use one of the public mirrorsmaintained by members of the community. To ensure that the connection is as fast and reliable aspossible, use a server that is close to your own geographical location.
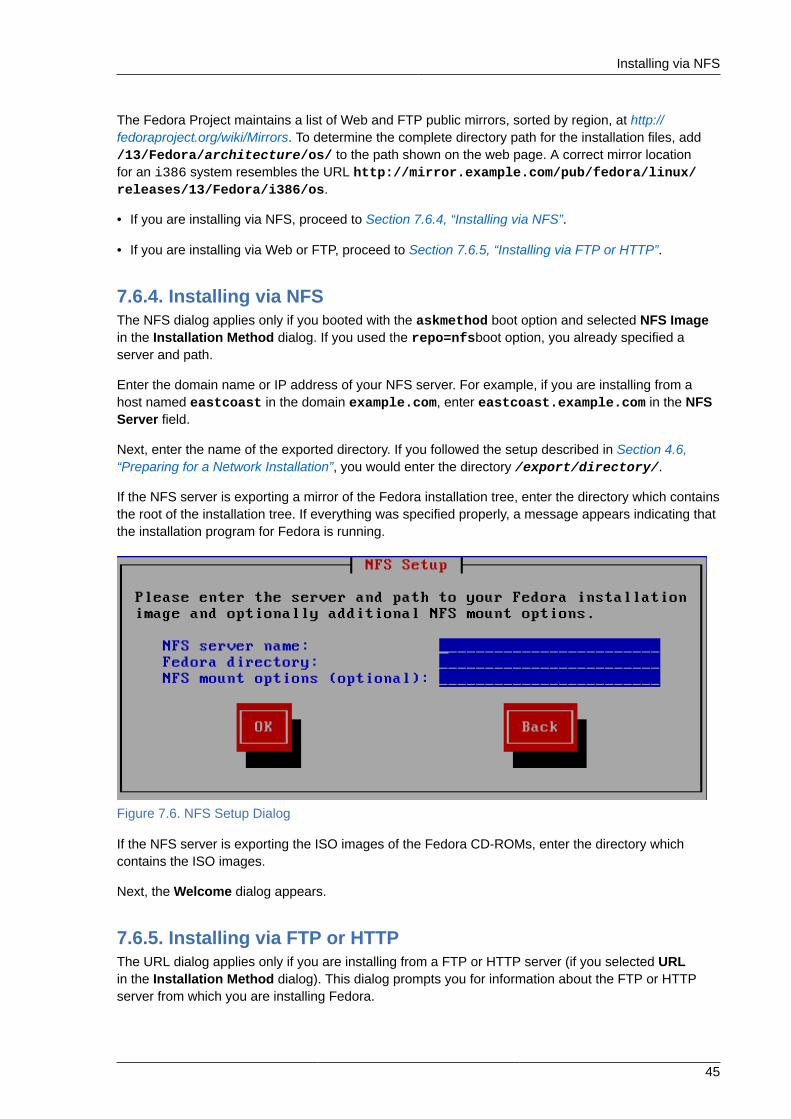
Installing via NFS
45
The Fedora Project maintains a list of Web and FTP public mirrors, sorted by region, at http://fedoraproject.org/wiki/Mirrors. To determine the complete directory path for the installation files, add/13/Fedora/architecture/os/ to the path shown on the web page. A correct mirror locationfor an i386 system resembles the URL http://mirror.example.com/pub/fedora/linux/releases/13/Fedora/i386/os.
• If you are installing via NFS, proceed to Section 7.6.4, “Installing via NFS”.
• If you are installing via Web or FTP, proceed to Section 7.6.5, “Installing via FTP or HTTP”.
7.6.4. Installing via NFSThe NFS dialog applies only if you booted with the askmethod boot option and selected NFS Imagein the Installation Method dialog. If you used the repo=nfsboot option, you already specified aserver and path.
Enter the domain name or IP address of your NFS server. For example, if you are installing from ahost named eastcoast in the domain example.com, enter eastcoast.example.com in the NFSServer field.
Next, enter the name of the exported directory. If you followed the setup described in Section 4.6,“Preparing for a Network Installation”, you would enter the directory /export/directory/.
If the NFS server is exporting a mirror of the Fedora installation tree, enter the directory which containsthe root of the installation tree. If everything was specified properly, a message appears indicating thatthe installation program for Fedora is running.
Figure 7.6. NFS Setup Dialog
If the NFS server is exporting the ISO images of the Fedora CD-ROMs, enter the directory whichcontains the ISO images.
Next, the Welcome dialog appears.
7.6.5. Installing via FTP or HTTPThe URL dialog applies only if you are installing from a FTP or HTTP server (if you selected URLin the Installation Method dialog). This dialog prompts you for information about the FTP or HTTPserver from which you are installing Fedora.
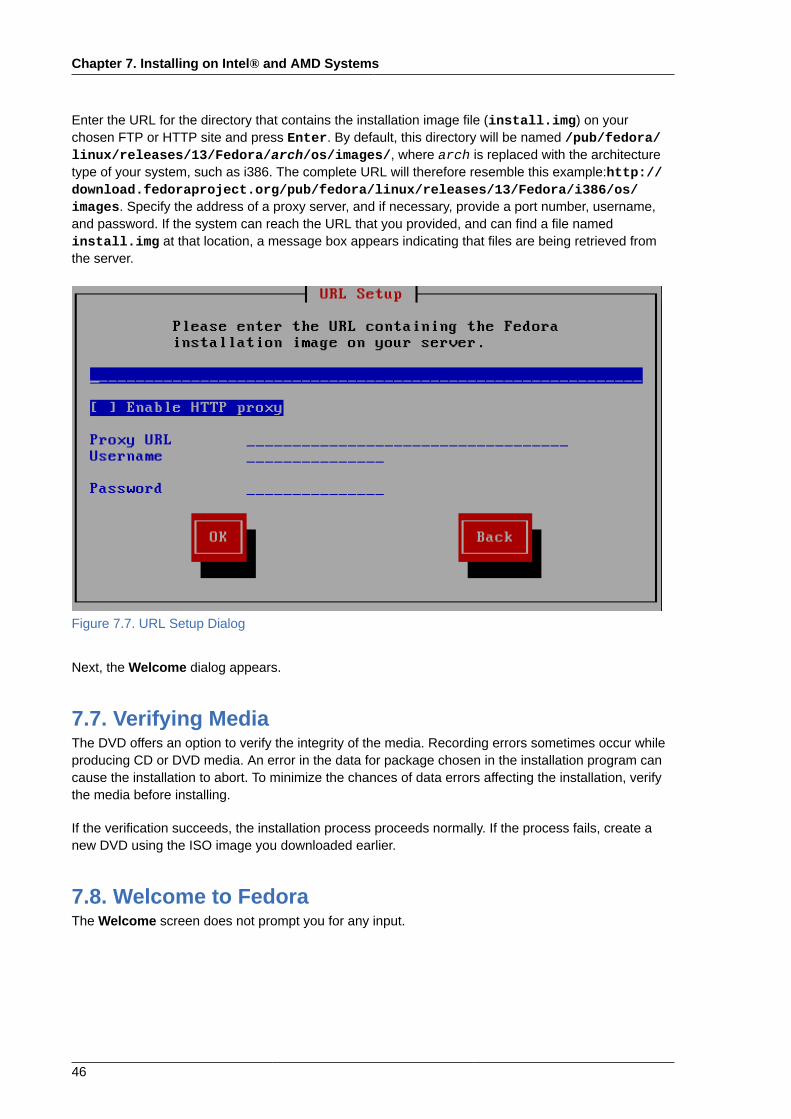
Chapter 7. Installing on Intel® and AMD Systems
46
Enter the URL for the directory that contains the installation image file (install.img) on yourchosen FTP or HTTP site and press Enter. By default, this directory will be named /pub/fedora/linux/releases/13/Fedora/arch/os/images/, where arch is replaced with the architecturetype of your system, such as i386. The complete URL will therefore resemble this example:http://download.fedoraproject.org/pub/fedora/linux/releases/13/Fedora/i386/os/images. Specify the address of a proxy server, and if necessary, provide a port number, username,and password. If the system can reach the URL that you provided, and can find a file namedinstall.img at that location, a message box appears indicating that files are being retrieved fromthe server.
Figure 7.7. URL Setup Dialog
Next, the Welcome dialog appears.
7.7. Verifying MediaThe DVD offers an option to verify the integrity of the media. Recording errors sometimes occur whileproducing CD or DVD media. An error in the data for package chosen in the installation program cancause the installation to abort. To minimize the chances of data errors affecting the installation, verifythe media before installing.
If the verification succeeds, the installation process proceeds normally. If the process fails, create anew DVD using the ISO image you downloaded earlier.
7.8. Welcome to FedoraThe Welcome screen does not prompt you for any input.
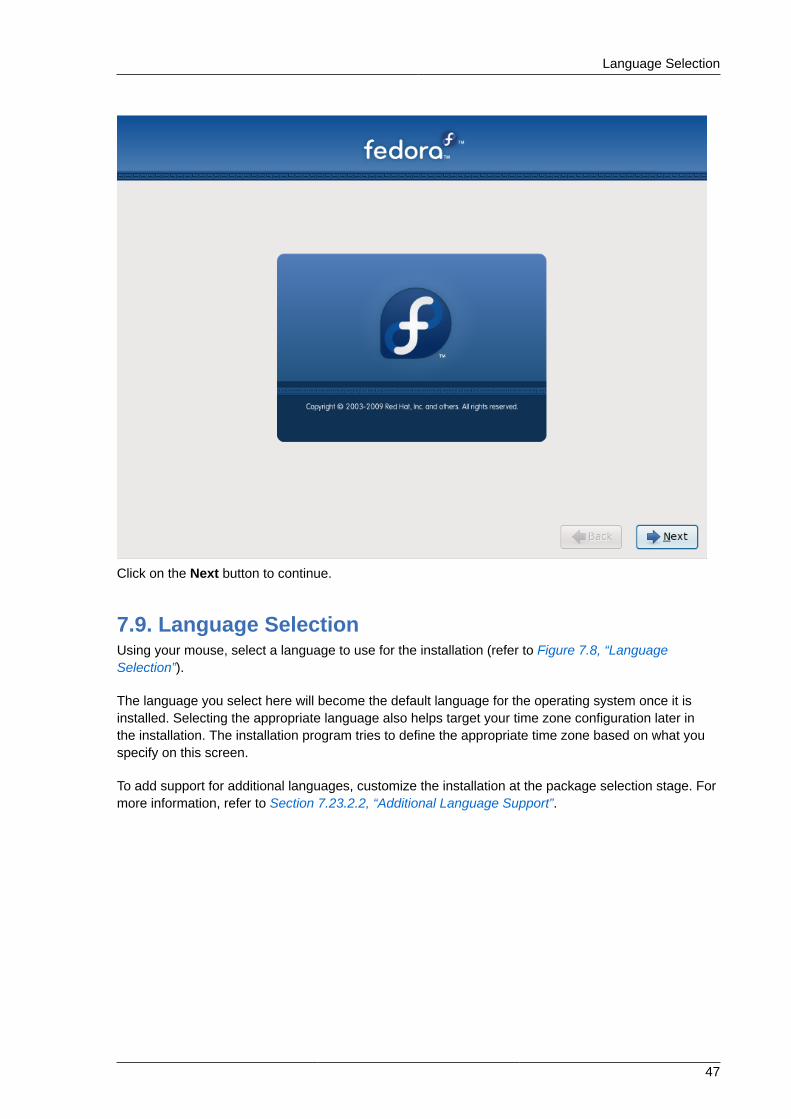
Language Selection
47
Click on the Next button to continue.
7.9. Language SelectionUsing your mouse, select a language to use for the installation (refer to Figure 7.8, “LanguageSelection”).
The language you select here will become the default language for the operating system once it isinstalled. Selecting the appropriate language also helps target your time zone configuration later inthe installation. The installation program tries to define the appropriate time zone based on what youspecify on this screen.
To add support for additional languages, customize the installation at the package selection stage. Formore information, refer to Section 7.23.2.2, “Additional Language Support”.
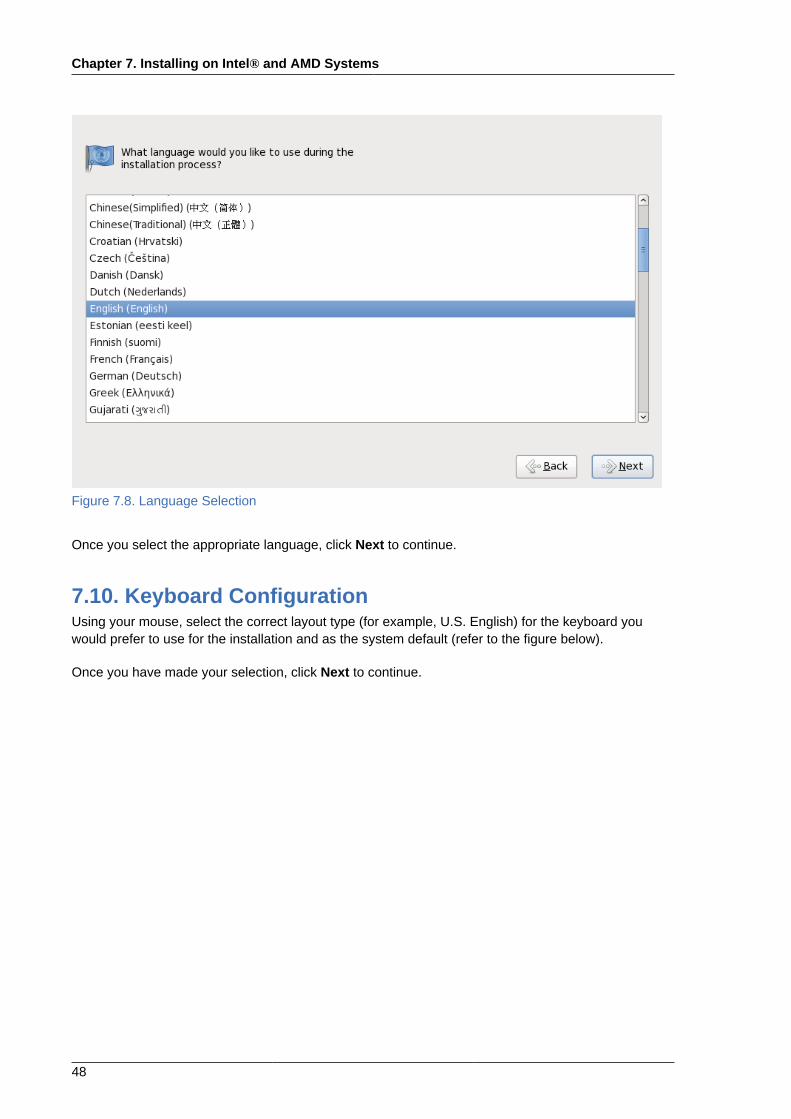
Chapter 7. Installing on Intel® and AMD Systems
48
Figure 7.8. Language Selection
Once you select the appropriate language, click Next to continue.
7.10. Keyboard ConfigurationUsing your mouse, select the correct layout type (for example, U.S. English) for the keyboard youwould prefer to use for the installation and as the system default (refer to the figure below).
Once you have made your selection, click Next to continue.
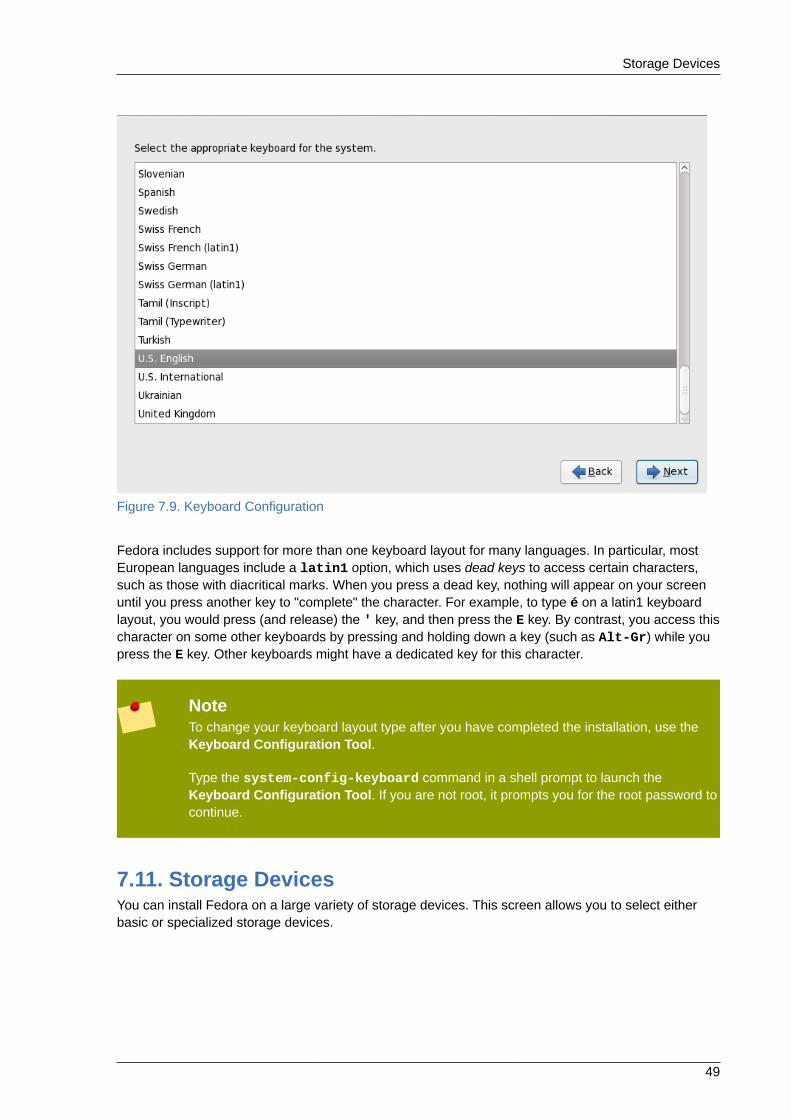
Storage Devices
49
Figure 7.9. Keyboard Configuration
Fedora includes support for more than one keyboard layout for many languages. In particular, mostEuropean languages include a latin1 option, which uses dead keys to access certain characters,such as those with diacritical marks. When you press a dead key, nothing will appear on your screenuntil you press another key to "complete" the character. For example, to type é on a latin1 keyboardlayout, you would press (and release) the ' key, and then press the E key. By contrast, you access thischaracter on some other keyboards by pressing and holding down a key (such as Alt-Gr) while youpress the E key. Other keyboards might have a dedicated key for this character.
NoteTo change your keyboard layout type after you have completed the installation, use theKeyboard Configuration Tool.
Type the system-config-keyboard command in a shell prompt to launch theKeyboard Configuration Tool. If you are not root, it prompts you for the root password tocontinue.
7.11. Storage DevicesYou can install Fedora on a large variety of storage devices. This screen allows you to select eitherbasic or specialized storage devices.
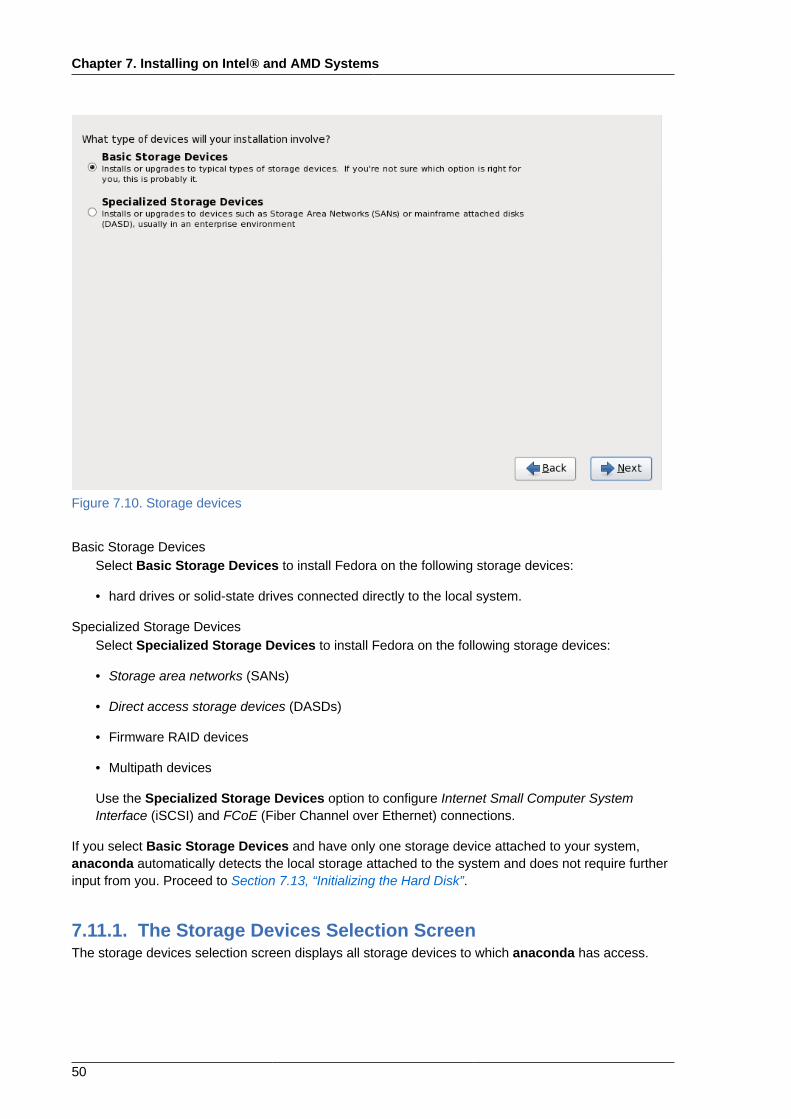
Chapter 7. Installing on Intel® and AMD Systems
50
Figure 7.10. Storage devices
Basic Storage DevicesSelect Basic Storage Devices to install Fedora on the following storage devices:
• hard drives or solid-state drives connected directly to the local system.
Specialized Storage DevicesSelect Specialized Storage Devices to install Fedora on the following storage devices:
• Storage area networks (SANs)
• Direct access storage devices (DASDs)
• Firmware RAID devices
• Multipath devices
Use the Specialized Storage Devices option to configure Internet Small Computer SystemInterface (iSCSI) and FCoE (Fiber Channel over Ethernet) connections.
If you select Basic Storage Devices and have only one storage device attached to your system,anaconda automatically detects the local storage attached to the system and does not require furtherinput from you. Proceed to Section 7.13, “Initializing the Hard Disk”.
7.11.1. The Storage Devices Selection ScreenThe storage devices selection screen displays all storage devices to which anaconda has access.
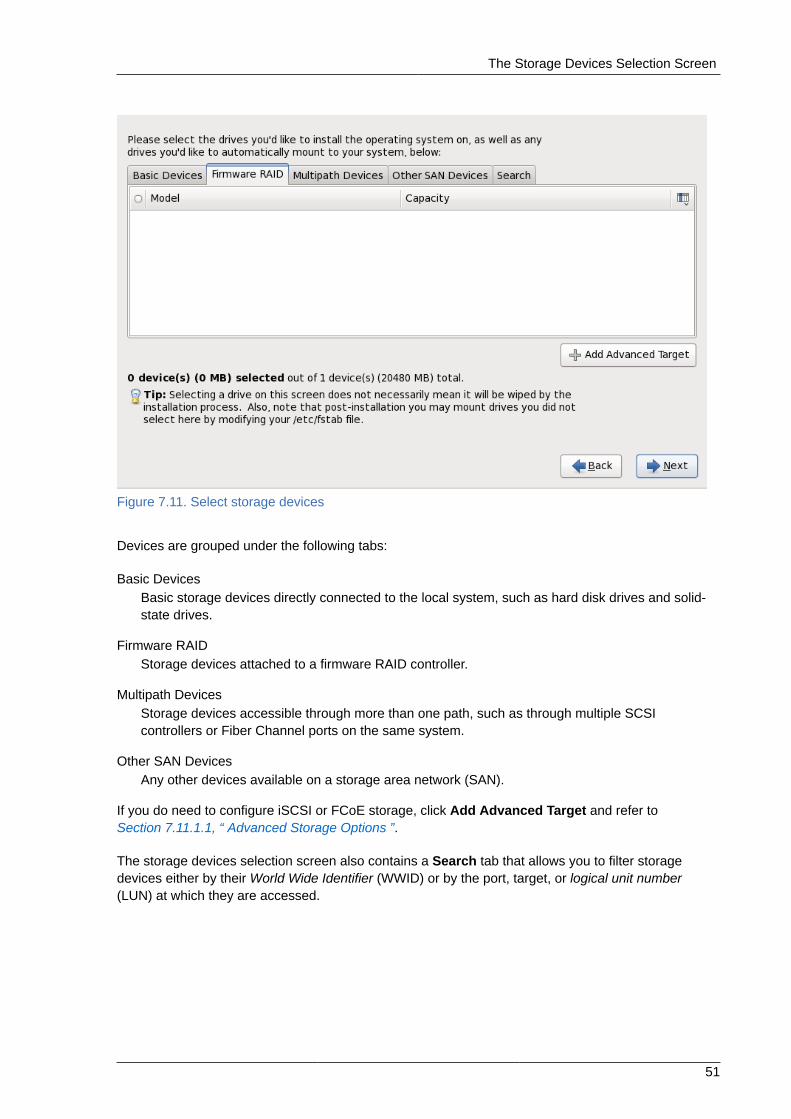
The Storage Devices Selection Screen
51
Figure 7.11. Select storage devices
Devices are grouped under the following tabs:
Basic DevicesBasic storage devices directly connected to the local system, such as hard disk drives and solid-state drives.
Firmware RAIDStorage devices attached to a firmware RAID controller.
Multipath DevicesStorage devices accessible through more than one path, such as through multiple SCSIcontrollers or Fiber Channel ports on the same system.
Other SAN DevicesAny other devices available on a storage area network (SAN).
If you do need to configure iSCSI or FCoE storage, click Add Advanced Target and refer toSection 7.11.1.1, “ Advanced Storage Options ”.
The storage devices selection screen also contains a Search tab that allows you to filter storagedevices either by their World Wide Identifier (WWID) or by the port, target, or logical unit number(LUN) at which they are accessed.
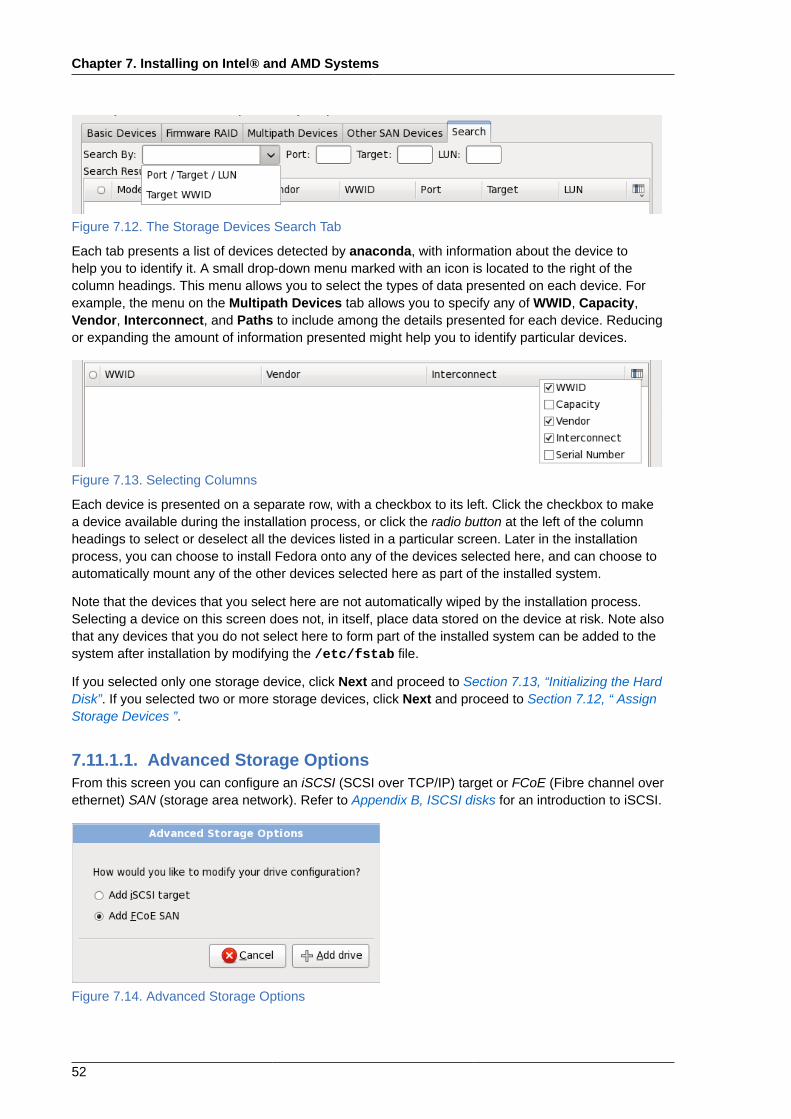
Chapter 7. Installing on Intel® and AMD Systems
52
Figure 7.12. The Storage Devices Search Tab
Each tab presents a list of devices detected by anaconda, with information about the device tohelp you to identify it. A small drop-down menu marked with an icon is located to the right of thecolumn headings. This menu allows you to select the types of data presented on each device. Forexample, the menu on the Multipath Devices tab allows you to specify any of WWID, Capacity,Vendor, Interconnect, and Paths to include among the details presented for each device. Reducingor expanding the amount of information presented might help you to identify particular devices.
Figure 7.13. Selecting Columns
Each device is presented on a separate row, with a checkbox to its left. Click the checkbox to makea device available during the installation process, or click the radio button at the left of the columnheadings to select or deselect all the devices listed in a particular screen. Later in the installationprocess, you can choose to install Fedora onto any of the devices selected here, and can choose toautomatically mount any of the other devices selected here as part of the installed system.
Note that the devices that you select here are not automatically wiped by the installation process.Selecting a device on this screen does not, in itself, place data stored on the device at risk. Note alsothat any devices that you do not select here to form part of the installed system can be added to thesystem after installation by modifying the /etc/fstab file.
If you selected only one storage device, click Next and proceed to Section 7.13, “Initializing the HardDisk”. If you selected two or more storage devices, click Next and proceed to Section 7.12, “ AssignStorage Devices ”.
7.11.1.1. Advanced Storage OptionsFrom this screen you can configure an iSCSI (SCSI over TCP/IP) target or FCoE (Fibre channel overethernet) SAN (storage area network). Refer to Appendix B, ISCSI disks for an introduction to iSCSI.
Figure 7.14. Advanced Storage Options
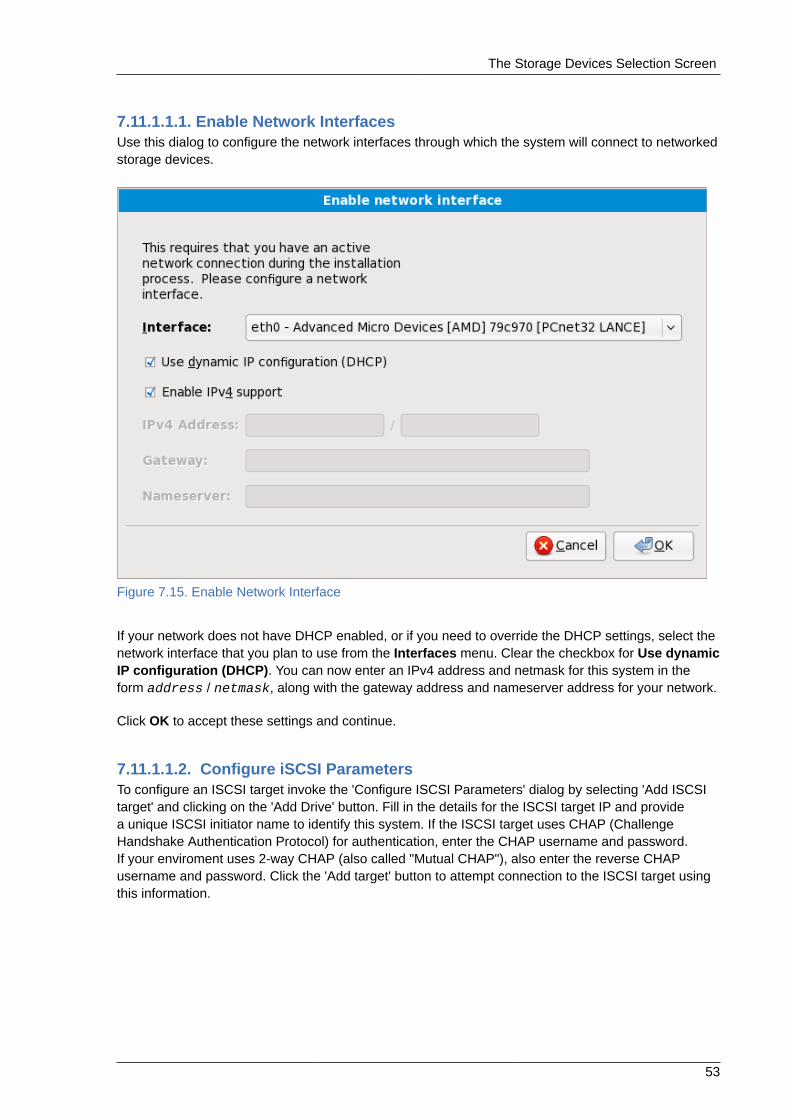
The Storage Devices Selection Screen
53
7.11.1.1.1. Enable Network InterfacesUse this dialog to configure the network interfaces through which the system will connect to networkedstorage devices.
Figure 7.15. Enable Network Interface
If your network does not have DHCP enabled, or if you need to override the DHCP settings, select thenetwork interface that you plan to use from the Interfaces menu. Clear the checkbox for Use dynamicIP configuration (DHCP). You can now enter an IPv4 address and netmask for this system in theform address / netmask, along with the gateway address and nameserver address for your network.
Click OK to accept these settings and continue.
7.11.1.1.2. Configure iSCSI ParametersTo configure an ISCSI target invoke the 'Configure ISCSI Parameters' dialog by selecting 'Add ISCSItarget' and clicking on the 'Add Drive' button. Fill in the details for the ISCSI target IP and providea unique ISCSI initiator name to identify this system. If the ISCSI target uses CHAP (ChallengeHandshake Authentication Protocol) for authentication, enter the CHAP username and password.If your enviroment uses 2-way CHAP (also called "Mutual CHAP"), also enter the reverse CHAPusername and password. Click the 'Add target' button to attempt connection to the ISCSI target usingthis information.
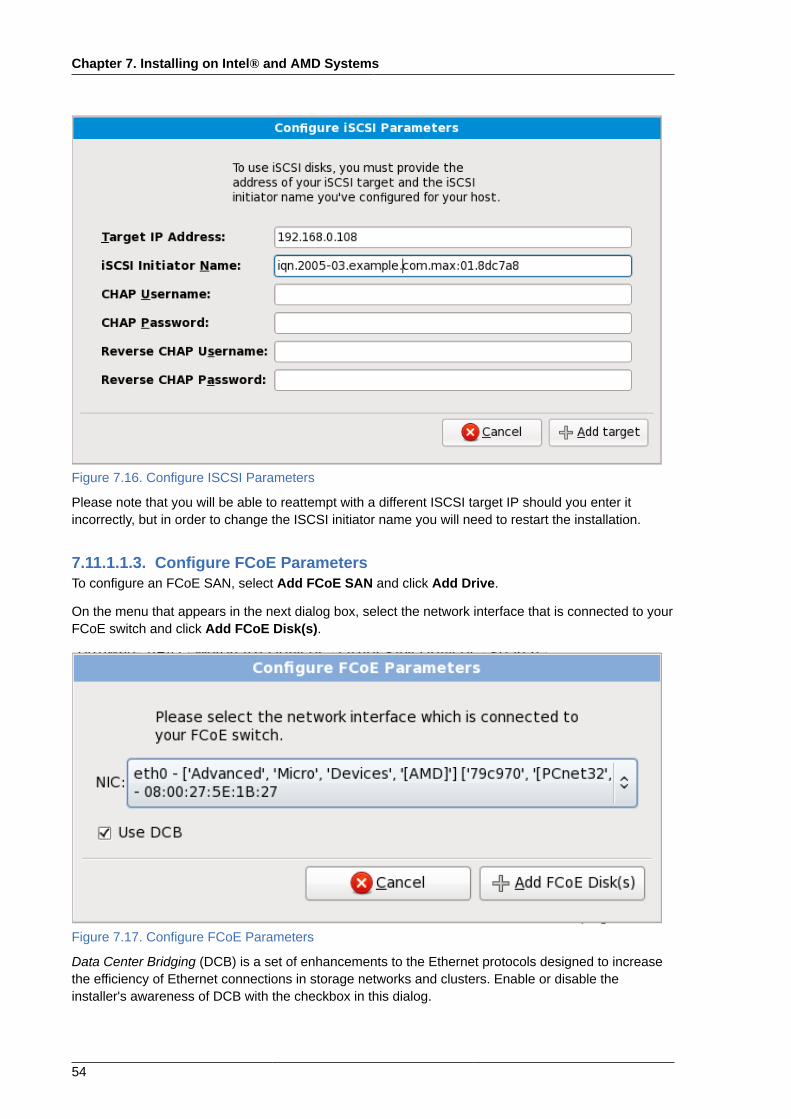
Chapter 7. Installing on Intel® and AMD Systems
54
Figure 7.16. Configure ISCSI Parameters
Please note that you will be able to reattempt with a different ISCSI target IP should you enter itincorrectly, but in order to change the ISCSI initiator name you will need to restart the installation.
7.11.1.1.3. Configure FCoE ParametersTo configure an FCoE SAN, select Add FCoE SAN and click Add Drive.
On the menu that appears in the next dialog box, select the network interface that is connected to yourFCoE switch and click Add FCoE Disk(s).
Figure 7.17. Configure FCoE Parameters
Data Center Bridging (DCB) is a set of enhancements to the Ethernet protocols designed to increasethe efficiency of Ethernet connections in storage networks and clusters. Enable or disable theinstaller's awareness of DCB with the checkbox in this dialog.
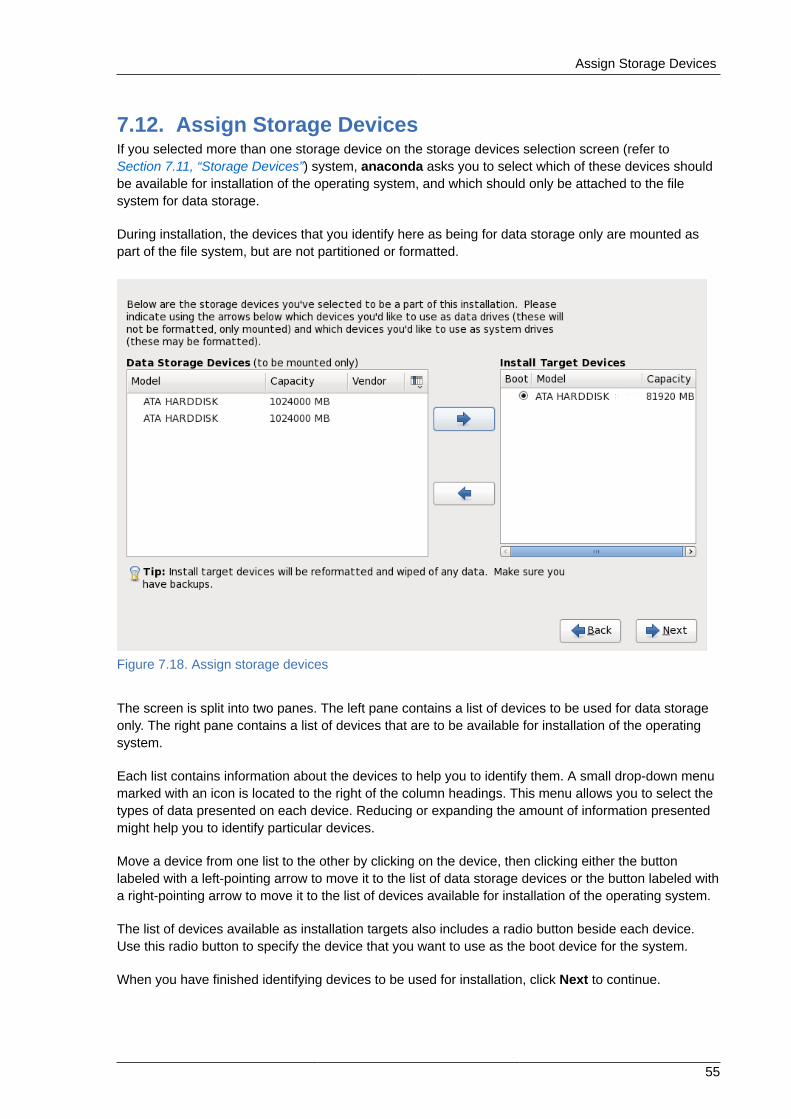
Assign Storage Devices
55
7.12. Assign Storage DevicesIf you selected more than one storage device on the storage devices selection screen (refer toSection 7.11, “Storage Devices”) system, anaconda asks you to select which of these devices shouldbe available for installation of the operating system, and which should only be attached to the filesystem for data storage.
During installation, the devices that you identify here as being for data storage only are mounted aspart of the file system, but are not partitioned or formatted.
Figure 7.18. Assign storage devices
The screen is split into two panes. The left pane contains a list of devices to be used for data storageonly. The right pane contains a list of devices that are to be available for installation of the operatingsystem.
Each list contains information about the devices to help you to identify them. A small drop-down menumarked with an icon is located to the right of the column headings. This menu allows you to select thetypes of data presented on each device. Reducing or expanding the amount of information presentedmight help you to identify particular devices.
Move a device from one list to the other by clicking on the device, then clicking either the buttonlabeled with a left-pointing arrow to move it to the list of data storage devices or the button labeled witha right-pointing arrow to move it to the list of devices available for installation of the operating system.
The list of devices available as installation targets also includes a radio button beside each device.Use this radio button to specify the device that you want to use as the boot device for the system.
When you have finished identifying devices to be used for installation, click Next to continue.
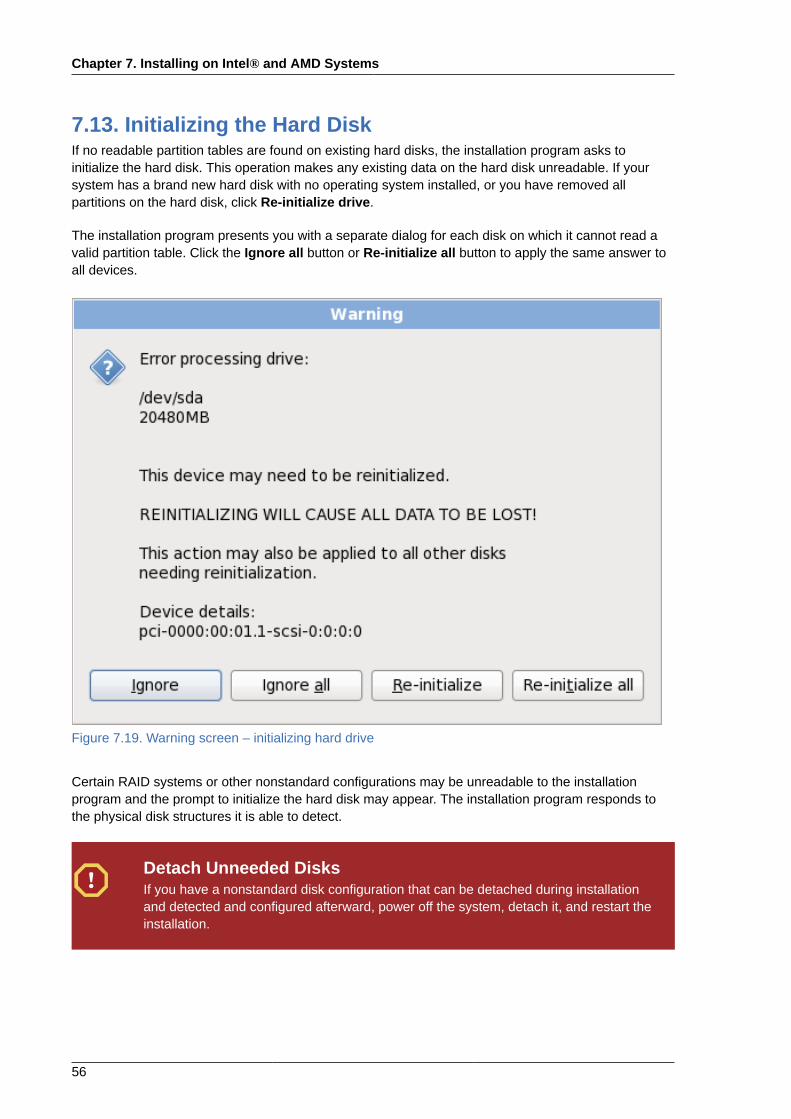
Chapter 7. Installing on Intel® and AMD Systems
56
7.13. Initializing the Hard DiskIf no readable partition tables are found on existing hard disks, the installation program asks toinitialize the hard disk. This operation makes any existing data on the hard disk unreadable. If yoursystem has a brand new hard disk with no operating system installed, or you have removed allpartitions on the hard disk, click Re-initialize drive.
The installation program presents you with a separate dialog for each disk on which it cannot read avalid partition table. Click the Ignore all button or Re-initialize all button to apply the same answer toall devices.
Figure 7.19. Warning screen – initializing hard drive
Certain RAID systems or other nonstandard configurations may be unreadable to the installationprogram and the prompt to initialize the hard disk may appear. The installation program responds tothe physical disk structures it is able to detect.
Detach Unneeded DisksIf you have a nonstandard disk configuration that can be detached during installationand detected and configured afterward, power off the system, detach it, and restart theinstallation.
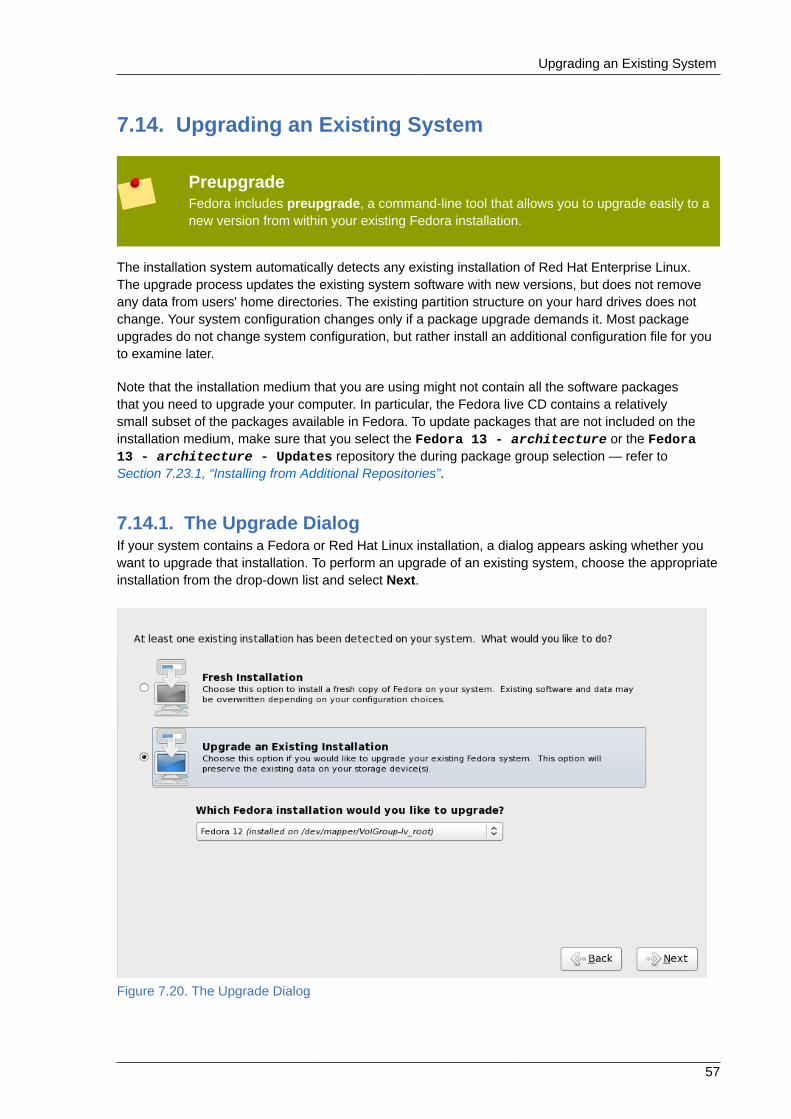
Upgrading an Existing System
57
7.14. Upgrading an Existing System
PreupgradeFedora includes preupgrade, a command-line tool that allows you to upgrade easily to anew version from within your existing Fedora installation.
The installation system automatically detects any existing installation of Red Hat Enterprise Linux.The upgrade process updates the existing system software with new versions, but does not removeany data from users' home directories. The existing partition structure on your hard drives does notchange. Your system configuration changes only if a package upgrade demands it. Most packageupgrades do not change system configuration, but rather install an additional configuration file for youto examine later.
Note that the installation medium that you are using might not contain all the software packagesthat you need to upgrade your computer. In particular, the Fedora live CD contains a relativelysmall subset of the packages available in Fedora. To update packages that are not included on theinstallation medium, make sure that you select the Fedora 13 - architecture or the Fedora13 - architecture - Updates repository the during package group selection — refer toSection 7.23.1, “Installing from Additional Repositories”.
7.14.1. The Upgrade DialogIf your system contains a Fedora or Red Hat Linux installation, a dialog appears asking whether youwant to upgrade that installation. To perform an upgrade of an existing system, choose the appropriateinstallation from the drop-down list and select Next.
Figure 7.20. The Upgrade Dialog
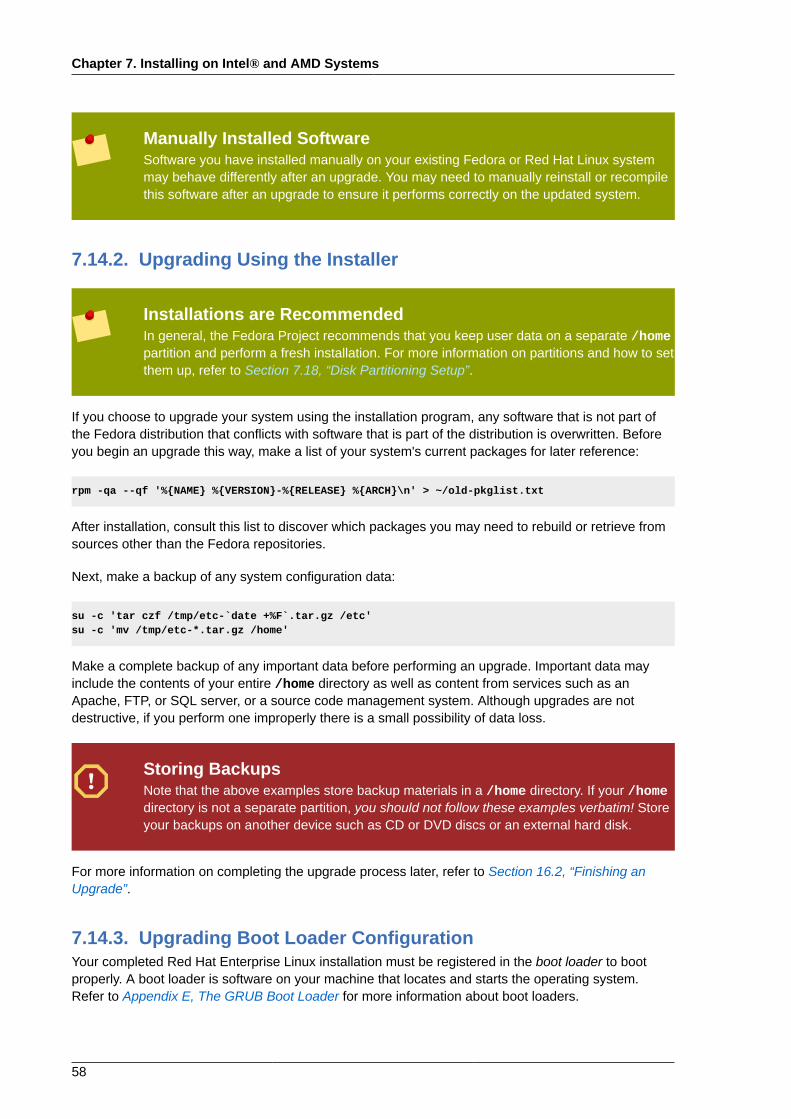
Chapter 7. Installing on Intel® and AMD Systems
58
Manually Installed SoftwareSoftware you have installed manually on your existing Fedora or Red Hat Linux systemmay behave differently after an upgrade. You may need to manually reinstall or recompilethis software after an upgrade to ensure it performs correctly on the updated system.
7.14.2. Upgrading Using the Installer
Installations are RecommendedIn general, the Fedora Project recommends that you keep user data on a separate /homepartition and perform a fresh installation. For more information on partitions and how to setthem up, refer to Section 7.18, “Disk Partitioning Setup”.
If you choose to upgrade your system using the installation program, any software that is not part ofthe Fedora distribution that conflicts with software that is part of the distribution is overwritten. Beforeyou begin an upgrade this way, make a list of your system's current packages for later reference:
rpm -qa --qf '%{NAME} %{VERSION}-%{RELEASE} %{ARCH}\n' > ~/old-pkglist.txt
After installation, consult this list to discover which packages you may need to rebuild or retrieve fromsources other than the Fedora repositories.
Next, make a backup of any system configuration data:
su -c 'tar czf /tmp/etc-`date +%F`.tar.gz /etc' su -c 'mv /tmp/etc-*.tar.gz /home'
Make a complete backup of any important data before performing an upgrade. Important data mayinclude the contents of your entire /home directory as well as content from services such as anApache, FTP, or SQL server, or a source code management system. Although upgrades are notdestructive, if you perform one improperly there is a small possibility of data loss.
Storing BackupsNote that the above examples store backup materials in a /home directory. If your /homedirectory is not a separate partition, you should not follow these examples verbatim! Storeyour backups on another device such as CD or DVD discs or an external hard disk.
For more information on completing the upgrade process later, refer to Section 16.2, “Finishing anUpgrade”.
7.14.3. Upgrading Boot Loader ConfigurationYour completed Red Hat Enterprise Linux installation must be registered in the boot loader to bootproperly. A boot loader is software on your machine that locates and starts the operating system.Refer to Appendix E, The GRUB Boot Loader for more information about boot loaders.
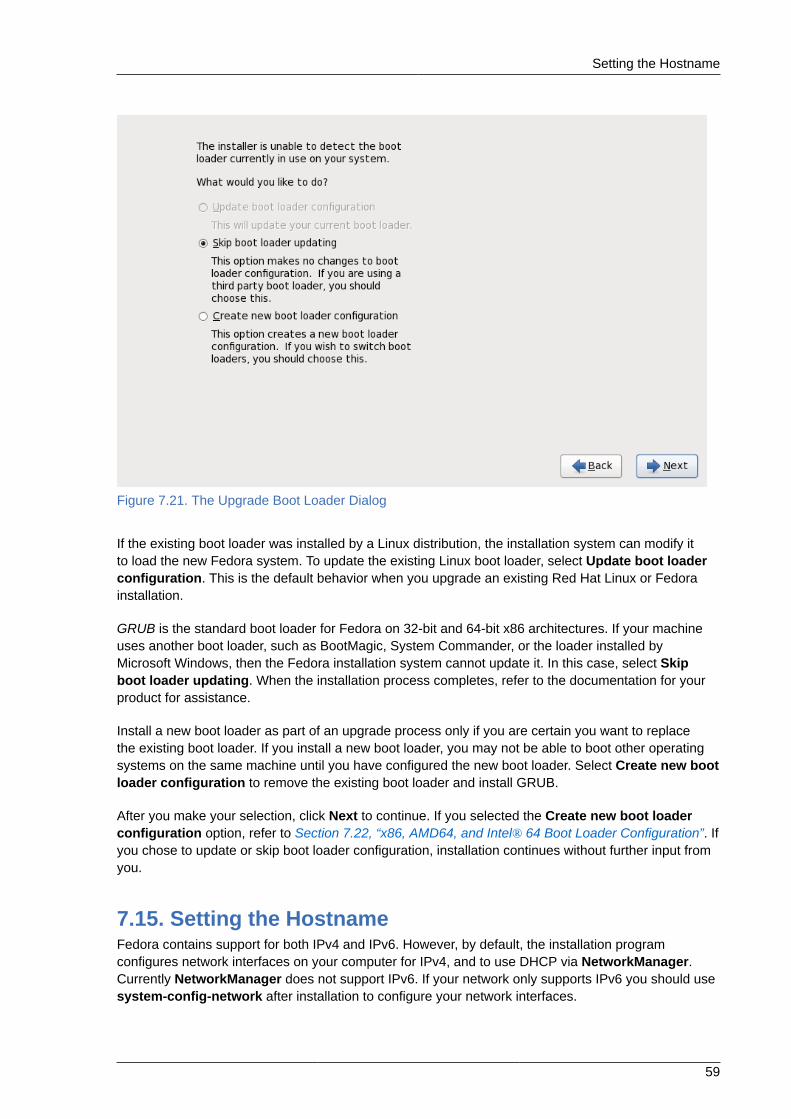
Setting the Hostname
59
Figure 7.21. The Upgrade Boot Loader Dialog
If the existing boot loader was installed by a Linux distribution, the installation system can modify itto load the new Fedora system. To update the existing Linux boot loader, select Update boot loaderconfiguration. This is the default behavior when you upgrade an existing Red Hat Linux or Fedorainstallation.
GRUB is the standard boot loader for Fedora on 32-bit and 64-bit x86 architectures. If your machineuses another boot loader, such as BootMagic, System Commander, or the loader installed byMicrosoft Windows, then the Fedora installation system cannot update it. In this case, select Skipboot loader updating. When the installation process completes, refer to the documentation for yourproduct for assistance.
Install a new boot loader as part of an upgrade process only if you are certain you want to replacethe existing boot loader. If you install a new boot loader, you may not be able to boot other operatingsystems on the same machine until you have configured the new boot loader. Select Create new bootloader configuration to remove the existing boot loader and install GRUB.
After you make your selection, click Next to continue. If you selected the Create new boot loaderconfiguration option, refer to Section 7.22, “x86, AMD64, and Intel® 64 Boot Loader Configuration”. Ifyou chose to update or skip boot loader configuration, installation continues without further input fromyou.
7.15. Setting the HostnameFedora contains support for both IPv4 and IPv6. However, by default, the installation programconfigures network interfaces on your computer for IPv4, and to use DHCP via NetworkManager.Currently NetworkManager does not support IPv6. If your network only supports IPv6 you should usesystem-config-network after installation to configure your network interfaces.
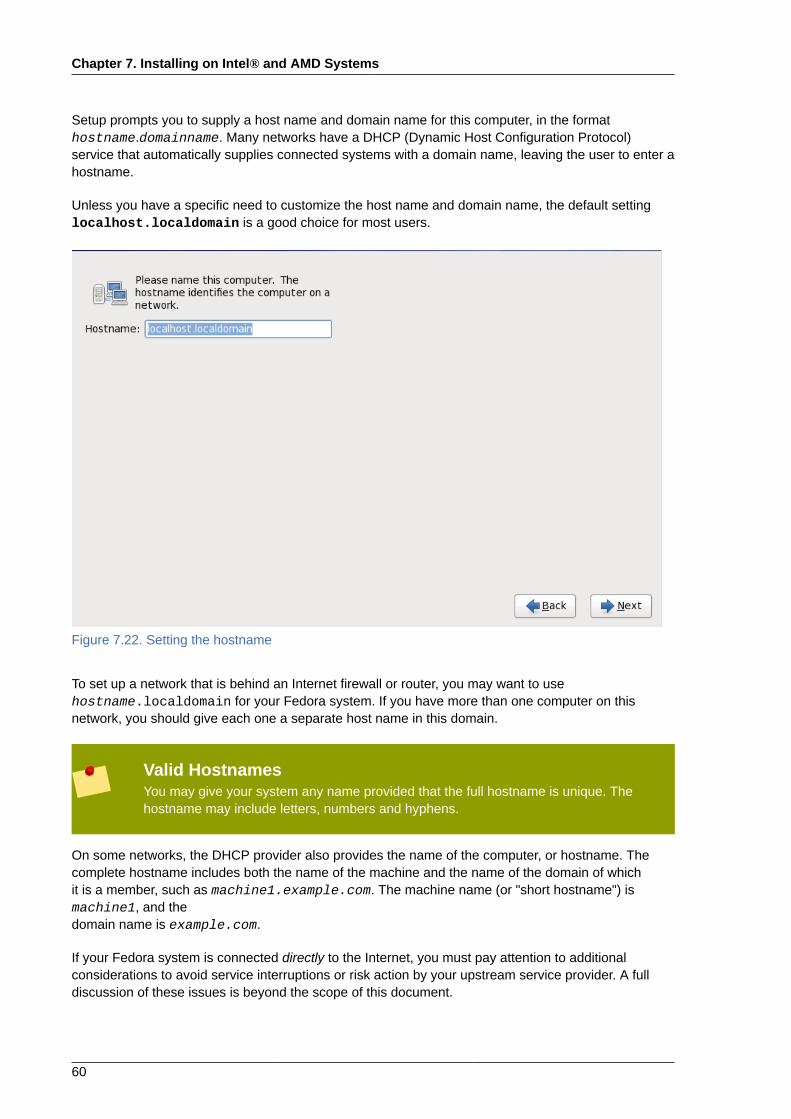
Chapter 7. Installing on Intel® and AMD Systems
60
Setup prompts you to supply a host name and domain name for this computer, in the formathostname.domainname. Many networks have a DHCP (Dynamic Host Configuration Protocol)service that automatically supplies connected systems with a domain name, leaving the user to enter ahostname.
Unless you have a specific need to customize the host name and domain name, the default settinglocalhost.localdomain is a good choice for most users.
Figure 7.22. Setting the hostname
To set up a network that is behind an Internet firewall or router, you may want to usehostname.localdomain for your Fedora system. If you have more than one computer on thisnetwork, you should give each one a separate host name in this domain.
Valid HostnamesYou may give your system any name provided that the full hostname is unique. Thehostname may include letters, numbers and hyphens.
On some networks, the DHCP provider also provides the name of the computer, or hostname. Thecomplete hostname includes both the name of the machine and the name of the domain of whichit is a member, such as machine1.example.com. The machine name (or "short hostname") ismachine1, and thedomain name is example.com.
If your Fedora system is connected directly to the Internet, you must pay attention to additionalconsiderations to avoid service interruptions or risk action by your upstream service provider. A fulldiscussion of these issues is beyond the scope of this document.
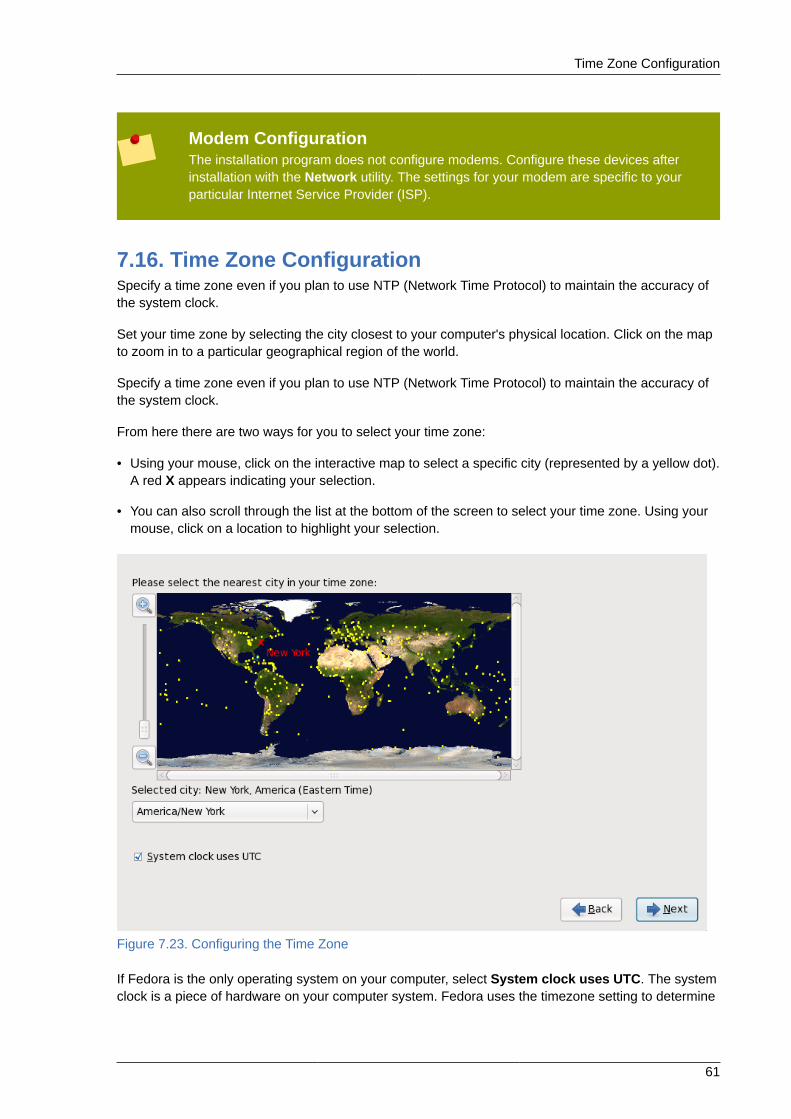
Time Zone Configuration
61
Modem ConfigurationThe installation program does not configure modems. Configure these devices afterinstallation with the Network utility. The settings for your modem are specific to yourparticular Internet Service Provider (ISP).
7.16. Time Zone ConfigurationSpecify a time zone even if you plan to use NTP (Network Time Protocol) to maintain the accuracy ofthe system clock.
Set your time zone by selecting the city closest to your computer's physical location. Click on the mapto zoom in to a particular geographical region of the world.
Specify a time zone even if you plan to use NTP (Network Time Protocol) to maintain the accuracy ofthe system clock.
From here there are two ways for you to select your time zone:
• Using your mouse, click on the interactive map to select a specific city (represented by a yellow dot).A red X appears indicating your selection.
• You can also scroll through the list at the bottom of the screen to select your time zone. Using yourmouse, click on a location to highlight your selection.
Figure 7.23. Configuring the Time Zone
If Fedora is the only operating system on your computer, select System clock uses UTC. The systemclock is a piece of hardware on your computer system. Fedora uses the timezone setting to determine
Chapter 7. Installing on Intel® and AMD Systems
62
the offset between the local time and UTC on the system clock. This behavior is standard for UNIX-likeoperating systems.
Windows and the System ClockDo not enable the System clock uses UTC option if your machine also runs MicrosoftWindows. Microsoft operating systems change the BIOS clock to match local time ratherthan UTC. This may cause unexpected behavior under Fedora.
NoteTo change your time zone configuration after you have completed the installation, use theTime and Date Properties Tool.
Type the system-config-date command in a shell prompt to launch the Timeand Date Properties Tool. If you are not root, it prompts you for the root password tocontinue.
Select Next to proceed.
7.17. Set the Root PasswordSetting up a root account and password is one of the most important steps during your installation.Your root account is similar to the administrator account used on Microsoft Windows machines. Theroot account is used to install packages, upgrade RPMs, and perform most system maintenance.Logging in as root gives you complete control over your system.
NoteThe root user (also known as the superuser) has complete access to the entire system; forthis reason, logging in as the root user is best done only to perform system maintenanceor administration.
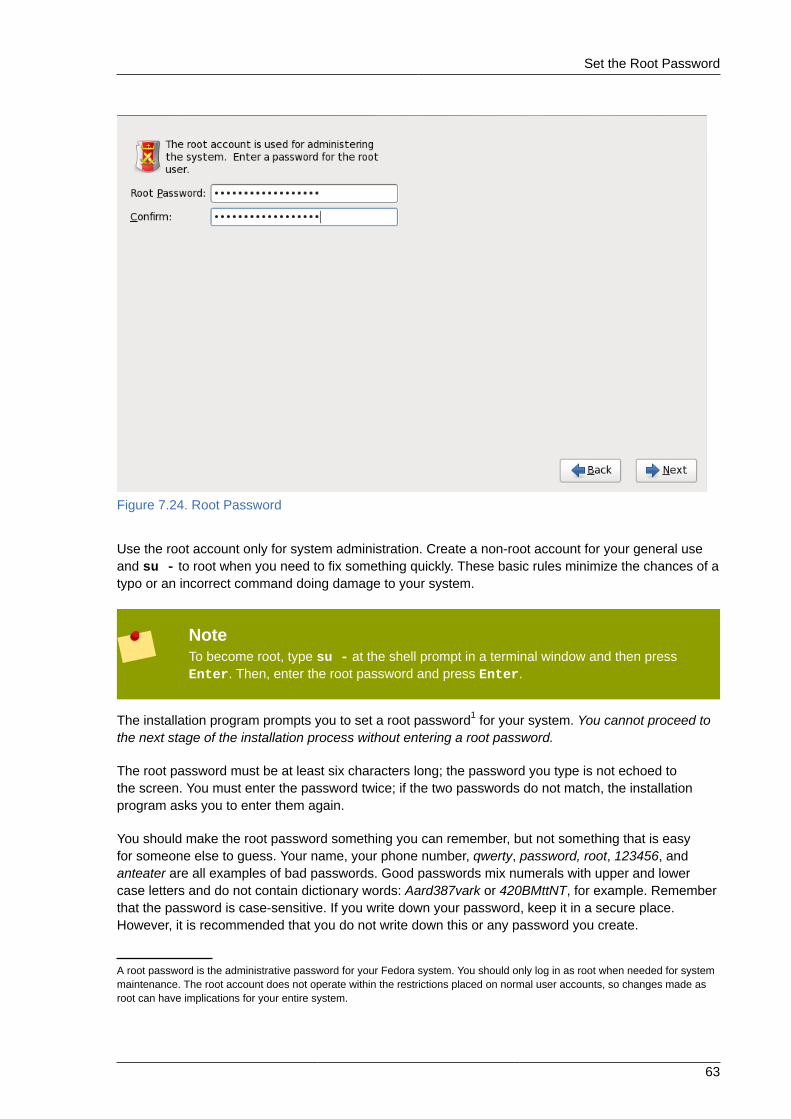
Set the Root Password
63
Figure 7.24. Root Password
Use the root account only for system administration. Create a non-root account for your general useand su - to root when you need to fix something quickly. These basic rules minimize the chances of atypo or an incorrect command doing damage to your system.
NoteTo become root, type su - at the shell prompt in a terminal window and then pressEnter. Then, enter the root password and press Enter.
The installation program prompts you to set a root password1 for your system. You cannot proceed tothe next stage of the installation process without entering a root password.
The root password must be at least six characters long; the password you type is not echoed tothe screen. You must enter the password twice; if the two passwords do not match, the installationprogram asks you to enter them again.
You should make the root password something you can remember, but not something that is easyfor someone else to guess. Your name, your phone number, qwerty, password, root, 123456, andanteater are all examples of bad passwords. Good passwords mix numerals with upper and lowercase letters and do not contain dictionary words: Aard387vark or 420BMttNT, for example. Rememberthat the password is case-sensitive. If you write down your password, keep it in a secure place.However, it is recommended that you do not write down this or any password you create.
A root password is the administrative password for your Fedora system. You should only log in as root when needed for systemmaintenance. The root account does not operate within the restrictions placed on normal user accounts, so changes made asroot can have implications for your entire system.
Chapter 7. Installing on Intel® and AMD Systems
64
NoteDo not use one of the example passwords offered in this manual. Using one of thesepasswords could be considered a security risk.
NoteTo change your root password after you have completed the installation, use the RootPassword Tool.
Type the system-config-rootpassword command in a shell prompt to launch theRoot Password Tool. If you are not root, it prompts you for the root password to continue.
Enter the root password into the Root Password field. Fedora displays the characters as asterisksfor security. Type the same password into the Confirm field to ensure it is set correctly. After you setthe root password, select Next to proceed.
7.18. Disk Partitioning Setup
WarningIt is always a good idea to back up any data that you have on your systems. For example,if you are upgrading or creating a dual-boot system, you should back up any data youwish to keep on your drive(s). Mistakes do happen and can result in the loss of all yourdata.
Installing in text modeIf you install Fedora in text mode, you can only use the default partitioning schemesdescribed in this section. Therefore, although you can choose to use a whole drive,to remove existing Linux partitions, or to use the free space on the drive, you cannotcustomize the partition layout. That is, you cannot add or remove partitions or filesystems beyond those that the installer automatically adds or removes. If you require acustomized layout at installation time, you should perform a graphical installation over aVNC connection or a kickstart installation.
Furthermore, advanced options such as LVM, encrypted filesystems, and resizablefilesystems are available only in graphical mode and kickstart.
Important — Booting from RAIDsIf you have a RAID card, be aware that some BIOSes do not support booting from theRAID card. In cases such as these, the /boot/ partition must be created on a partitionoutside of the RAID array, such as on a separate hard drive. An internal hard drive isnecessary to use for partition creation with problematic RAID cards.
A /boot/ partition is also necessary for software RAID setups.
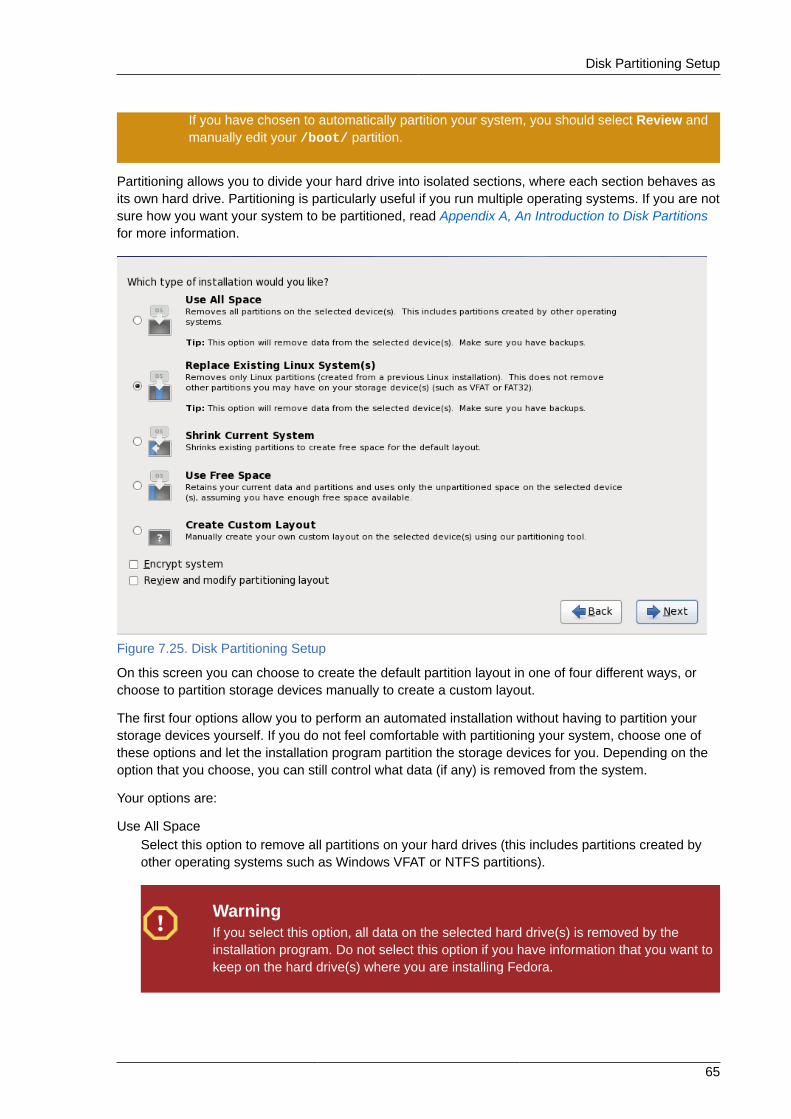
Disk Partitioning Setup
65
If you have chosen to automatically partition your system, you should select Review andmanually edit your /boot/ partition.
Partitioning allows you to divide your hard drive into isolated sections, where each section behaves asits own hard drive. Partitioning is particularly useful if you run multiple operating systems. If you are notsure how you want your system to be partitioned, read Appendix A, An Introduction to Disk Partitionsfor more information.
Figure 7.25. Disk Partitioning Setup
On this screen you can choose to create the default partition layout in one of four different ways, orchoose to partition storage devices manually to create a custom layout.
The first four options allow you to perform an automated installation without having to partition yourstorage devices yourself. If you do not feel comfortable with partitioning your system, choose one ofthese options and let the installation program partition the storage devices for you. Depending on theoption that you choose, you can still control what data (if any) is removed from the system.
Your options are:
Use All SpaceSelect this option to remove all partitions on your hard drives (this includes partitions created byother operating systems such as Windows VFAT or NTFS partitions).
WarningIf you select this option, all data on the selected hard drive(s) is removed by theinstallation program. Do not select this option if you have information that you want tokeep on the hard drive(s) where you are installing Fedora.
Chapter 7. Installing on Intel® and AMD Systems
66
Replace Existing Linux System(s)Select this option to remove only partitions created by a previous Linux installation. This does notremove other partitions you may have on your hard drives (such as VFAT or FAT32 partitions).
Shrink Current SystemSelect this option to resize your current data and partitions manually and install a default Red HatEnterprise Linux layout in the space that is freed.
WarningIf you shrink partitions on which other operating systems are installed, you might notbe able to use those operating systems. Although this partitioning option does notdestroy data, operating systems typically require some free space in their partitions.Before you resize a partition that holds an operating system that you might want touse again, find out how much space you need to leave free.
Use Free SpaceSelect this option to retain your current data and partitions and install Fedora in the unused spaceavailable on the storage drives. Ensure that there is sufficient space available on the storagedrives before you select this option — refer to Section 4.4, “Do You Have Enough Disk Space?”.
Create Custom LayoutSelect this option to partition storage devices manually and create customized layouts. Refer toSection 7.20, “ Creating a Custom Layout or Modifying the Default Layout ”
Choose your preferred partitioning method by clicking the radio button to the left of its description inthe dialog box.
Select Encrypt system to encrypt all partitions except the /boot partition. Refer to Appendix C, DiskEncryption for information on encryption.
To review and make any necessary changes to the partitions created by automatic partitioning, selectthe Review option. After selecting Review and clicking Next to move forward, the partitions createdfor you by anaconda appear. You can make modifications to these partitions if they do not meet yourneeds.
Click Next once you have made your selections to proceed.
7.19. Encrypt PartitionsIf you selected the Encrypt System option, the installater prompts you for a passphrase with which toencrypt the partitions on the system.
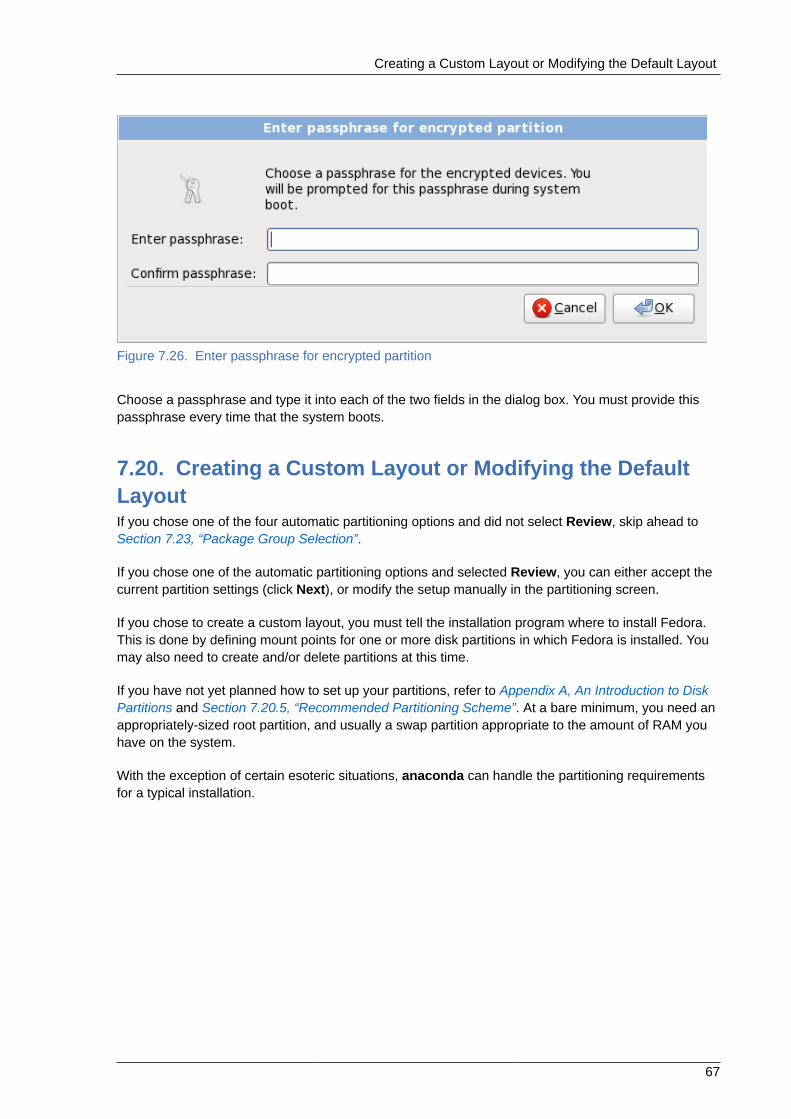
Creating a Custom Layout or Modifying the Default Layout
67
Figure 7.26. Enter passphrase for encrypted partition
Choose a passphrase and type it into each of the two fields in the dialog box. You must provide thispassphrase every time that the system boots.
7.20. Creating a Custom Layout or Modifying the DefaultLayoutIf you chose one of the four automatic partitioning options and did not select Review, skip ahead toSection 7.23, “Package Group Selection”.
If you chose one of the automatic partitioning options and selected Review, you can either accept thecurrent partition settings (click Next), or modify the setup manually in the partitioning screen.
If you chose to create a custom layout, you must tell the installation program where to install Fedora.This is done by defining mount points for one or more disk partitions in which Fedora is installed. Youmay also need to create and/or delete partitions at this time.
If you have not yet planned how to set up your partitions, refer to Appendix A, An Introduction to DiskPartitions and Section 7.20.5, “Recommended Partitioning Scheme”. At a bare minimum, you need anappropriately-sized root partition, and usually a swap partition appropriate to the amount of RAM youhave on the system.
With the exception of certain esoteric situations, anaconda can handle the partitioning requirementsfor a typical installation.
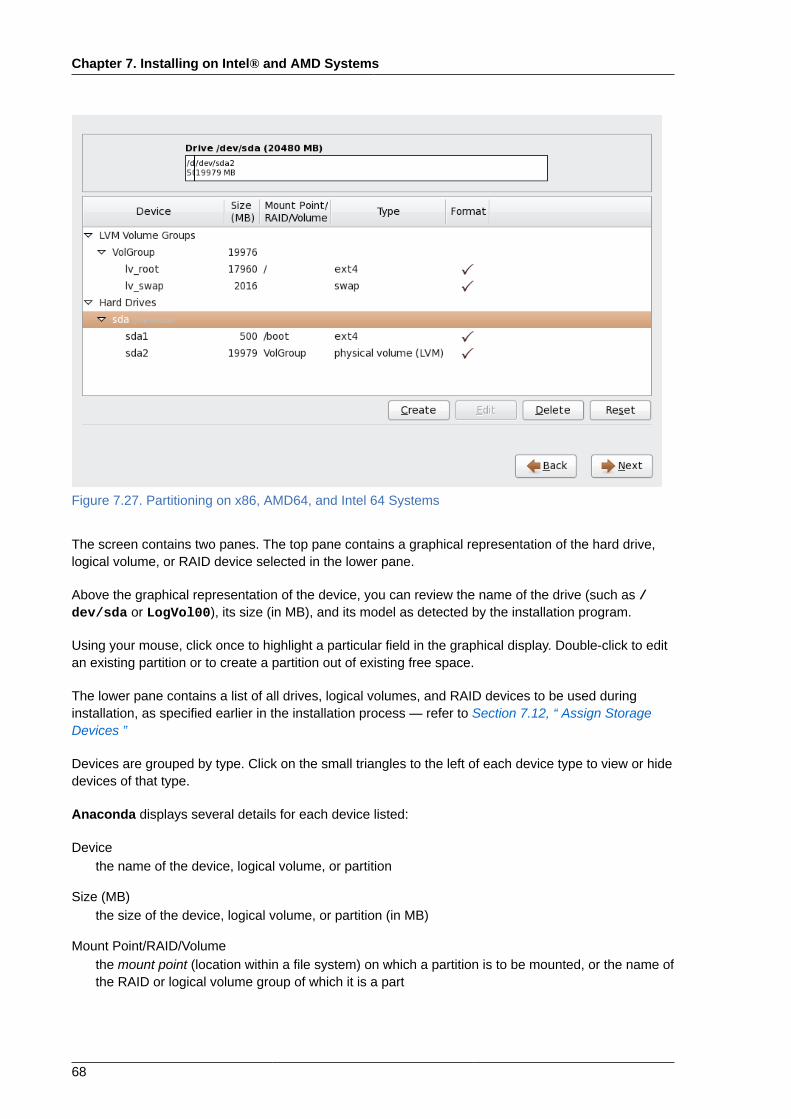
Chapter 7. Installing on Intel® and AMD Systems
68
Figure 7.27. Partitioning on x86, AMD64, and Intel 64 Systems
The screen contains two panes. The top pane contains a graphical representation of the hard drive,logical volume, or RAID device selected in the lower pane.
Above the graphical representation of the device, you can review the name of the drive (such as /dev/sda or LogVol00), its size (in MB), and its model as detected by the installation program.
Using your mouse, click once to highlight a particular field in the graphical display. Double-click to editan existing partition or to create a partition out of existing free space.
The lower pane contains a list of all drives, logical volumes, and RAID devices to be used duringinstallation, as specified earlier in the installation process — refer to Section 7.12, “ Assign StorageDevices ”
Devices are grouped by type. Click on the small triangles to the left of each device type to view or hidedevices of that type.
Anaconda displays several details for each device listed:
Devicethe name of the device, logical volume, or partition
Size (MB)the size of the device, logical volume, or partition (in MB)
Mount Point/RAID/Volumethe mount point (location within a file system) on which a partition is to be mounted, or the name ofthe RAID or logical volume group of which it is a part
Create Storage
69
Typethe type of partition. If the partition is a standard partition, this field displays the type of file systemon the partition (for example, ext4). Otherwise, it indicates that the partition is a physicalvolume (LVM), or part of a software RAID
FormatA check mark in this column indicates that the partition will be formatted during installation.
Beneath the lower pane are four buttons: Create, Edit, Delete, and Reset.
Select a device or partition by clicking on it in either the graphical representation in the upper pane ofin the list in the lower pane, then click one of the four buttons to carry out the following actions:
Createcreate a new partition, logical volume, or software RAID
Editchange an existing new partition, logical volume, or software RAID
Deleteremove a partition, logical volume, or software RAID
Resetundo all changes made in this screen
7.20.1. Create StorageThe Create Storage dialog allows you to create new storage partitions, logical volumes, and softwareRAIDs. Anaconda presents options as available or unavailable depending on the storage alreadypresent on the system or configured to transfer to the system.
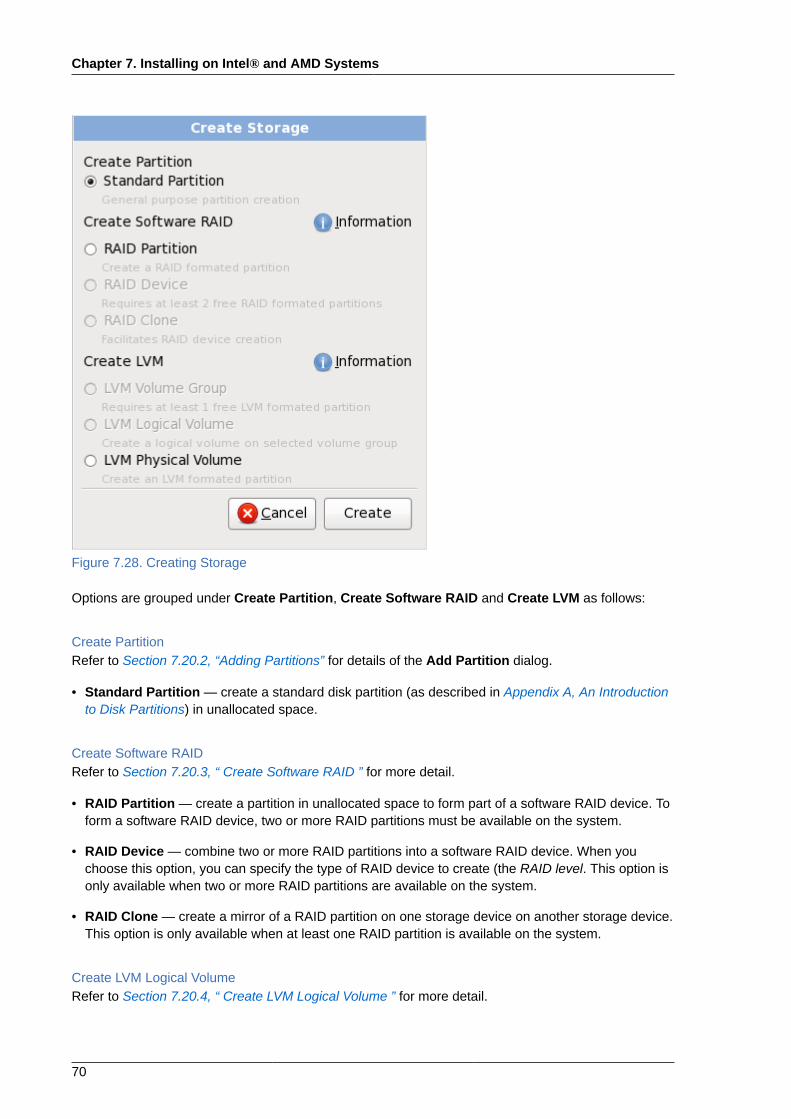
Chapter 7. Installing on Intel® and AMD Systems
70
Figure 7.28. Creating Storage
Options are grouped under Create Partition, Create Software RAID and Create LVM as follows:
Create PartitionRefer to Section 7.20.2, “Adding Partitions” for details of the Add Partition dialog.
• Standard Partition — create a standard disk partition (as described in Appendix A, An Introductionto Disk Partitions) in unallocated space.
Create Software RAIDRefer to Section 7.20.3, “ Create Software RAID ” for more detail.
• RAID Partition — create a partition in unallocated space to form part of a software RAID device. Toform a software RAID device, two or more RAID partitions must be available on the system.
• RAID Device — combine two or more RAID partitions into a software RAID device. When youchoose this option, you can specify the type of RAID device to create (the RAID level. This option isonly available when two or more RAID partitions are available on the system.
• RAID Clone — create a mirror of a RAID partition on one storage device on another storage device.This option is only available when at least one RAID partition is available on the system.
Create LVM Logical VolumeRefer to Section 7.20.4, “ Create LVM Logical Volume ” for more detail.
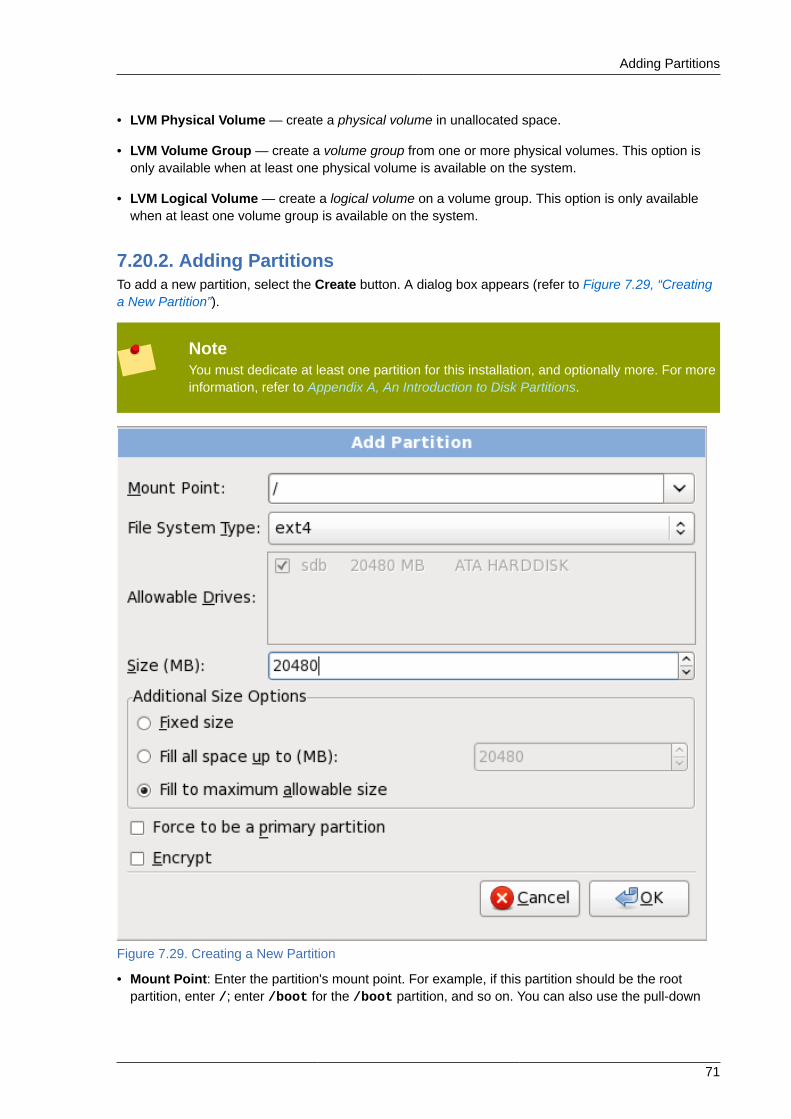
Adding Partitions
71
• LVM Physical Volume — create a physical volume in unallocated space.
• LVM Volume Group — create a volume group from one or more physical volumes. This option isonly available when at least one physical volume is available on the system.
• LVM Logical Volume — create a logical volume on a volume group. This option is only availablewhen at least one volume group is available on the system.
7.20.2. Adding PartitionsTo add a new partition, select the Create button. A dialog box appears (refer to Figure 7.29, “Creatinga New Partition”).
NoteYou must dedicate at least one partition for this installation, and optionally more. For moreinformation, refer to Appendix A, An Introduction to Disk Partitions.
Figure 7.29. Creating a New Partition
• Mount Point: Enter the partition's mount point. For example, if this partition should be the rootpartition, enter /; enter /boot for the /boot partition, and so on. You can also use the pull-down
Chapter 7. Installing on Intel® and AMD Systems
72
menu to choose the correct mount point for your partition. For a swap partition the mount pointshould not be set - setting the filesystem type to swap is sufficient.
• File System Type: Using the pull-down menu, select the appropriate file system type for thispartition. For more information on file system types, refer to Section 7.20.2.1, “File System Types”.
• Allowable Drives: This field contains a list of the hard disks installed on your system. If a harddisk's box is highlighted, then a desired partition can be created on that hard disk. If the box is notchecked, then the partition will never be created on that hard disk. By using different checkboxsettings, you can have anaconda place partitions where you need them, or let anaconda decidewhere partitions should go.
• Size (MB): Enter the size (in megabytes) of the partition. Note, this field starts with 200 MB; unlesschanged, only a 200 MB partition will be created.
• Additional Size Options: Choose whether to keep this partition at a fixed size, to allow it to"grow" (fill up the available hard drive space) to a certain point, or to allow it to grow to fill anyremaining hard drive space available.
If you choose Fill all space up to (MB), you must give size constraints in the field to the right of thisoption. This allows you to keep a certain amount of space free on your hard drive for future use.
• Force to be a primary partition: Select whether the partition you are creating should be one ofthe first four partitions on the hard drive. If unselected, the partition is created as a logical partition.Refer to Section A.1.3, “Partitions within Partitions — An Overview of Extended Partitions”, for moreinformation.
• Encrypt: Choose whether to encrypt the partition so that the data stored on it cannot be accessedwithout a passphrase, even if the storage device is connected to another system. Refer toAppendix C, Disk Encryption for information on encryption of storage devices. If you select thisoption, the installer prompts you to provide a passphrase before it writes the partition to the disk.
• OK: Select OK once you are satisfied with the settings and wish to create the partition.
• Cancel: Select Cancel if you do not want to create the partition.
7.20.2.1. File System TypesFedora allows you to create different partition types, based on the file system they will use. Thefollowing is a brief description of the different file systems available, and how they can be utilized.
• Btrfs — Btrfs is under development as a file system capable of addressing and managing morefiles, larger files, and larger volumes than the ext2, ext3, and ext4 file systems. Btrfs is designed tomake the file system tolerant of errors, and to facilitate the detection and repair of errors when theyoccur. It uses checksums to ensure the validity of data and metadata, and maintains snapshots ofthe file system that can be used for backup or repair.
Because Btrfs is still experimental and under development, the installation program does not offerit by default. If you want to create a Btrfs partition on a drive, you must commence the installationprocess with the boot option btrfs. Refer to Chapter 9, Boot Options for instructions.
Create Software RAID
73
Btrfs is still experimentalFedora 13 includes Btrfs as a technology preview to allow you to experiment with thisfile system. You should not choose Btrfs for partitions that will contain valuable data orthat are essential for the operation of important systems.
• ext2 — An ext2 file system supports standard Unix file types (regular files, directories, symboliclinks, etc). It provides the ability to assign long file names, up to 255 characters.
• ext3 — The ext3 file system is based on the ext2 file system and has one main advantage —journaling. Using a journaling file system reduces time spent recovering a file system after a crashas there is no need to fsck 2 the file system.
• ext4 — The ext4 file system is based on the ext3 file system and features a number ofimprovements. These include support for larger file systems and larger files, faster and moreefficient allocation of disk space, no limit on the number of subdirectories within a directory, fasterfile system checking, and more robust journalling. The ext4 file system is selected by default and ishighly recommended.
• physical volume (LVM) — Creating one or more physical volume (LVM) partitions allows you tocreate an LVM logical volume. LVM can improve performance when using physical disks.
• software RAID — Creating two or more software RAID partitions allows you to create a RAIDdevice.
• swap — Swap partitions are used to support virtual memory. In other words, data is written to aswap partition when there is not enough RAM to store the data your system is processing.
• vfat — The VFAT file system is a Linux file system that is compatible with Microsoft Windows longfilenames on the FAT file system. This file system must be used for the /boot/efi/ partition onItanium systems.
• xfs — XFS is a highly scalable, high-performance file system that supports filesystems up to 16exabytes (approximately 16 million terabytes), files up to 8 exabytes (approximately 8 millionterabytes) and directory structures containing tens of millions of entries. XFS supports metadatajournaling, which facilitates quicker crash recovery. The XFS file system can also be defragmentedand resized while mounted and active.
7.20.3. Create Software RAIDRedundant arrays of independent disks (RAIDs) are constructed from multiple storage devices that arearranged to provided increased performance and — in some configurations — greater fault tolerance.
To make a RAID device, you must first create software RAID partitions. Once you have created two ormore software RAID partitions, select RAID to join the software RAID partitions into a RAID device.
RAID PartitionChoose this option to configure a partition for software RAID. This option is the only choiceavailable if your disk contains no software RAID partitions. This is the same dialog that appearswhen you add a standard partition — refer to Section 7.20.2, “Adding Partitions” for a descriptionof the available options. Note, however, that File System Type must be set to software RAID
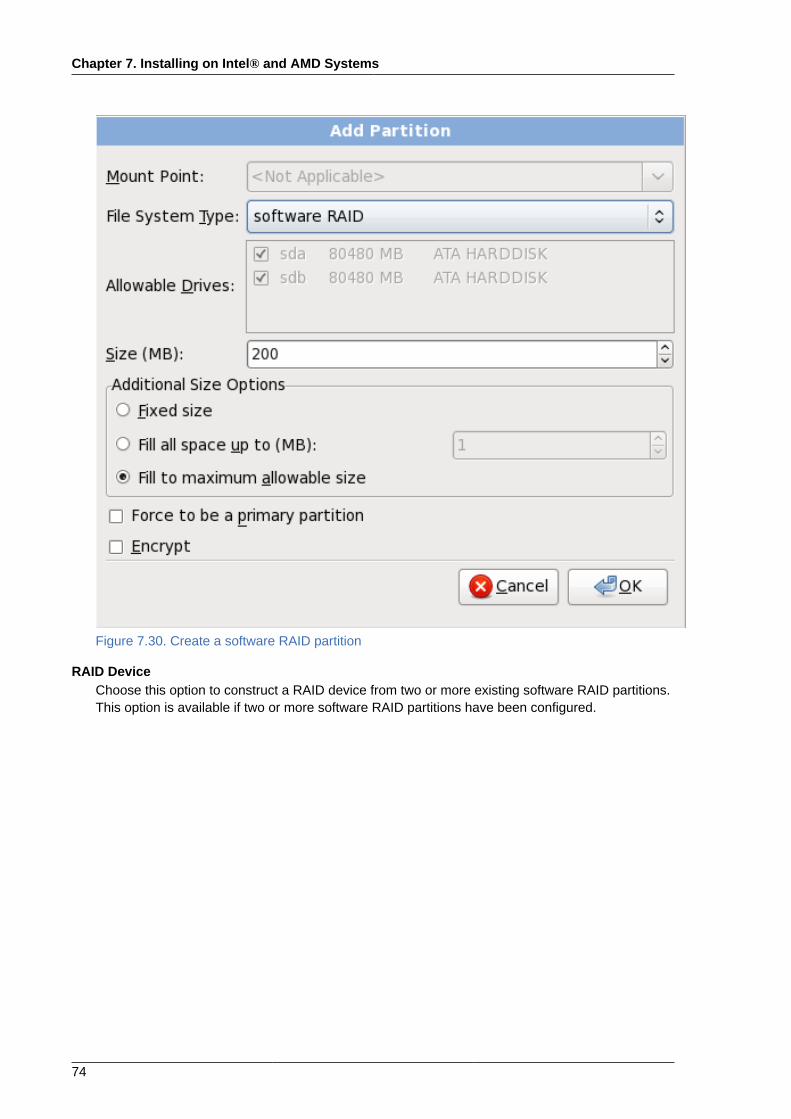
Chapter 7. Installing on Intel® and AMD Systems
74
Figure 7.30. Create a software RAID partition
RAID DeviceChoose this option to construct a RAID device from two or more existing software RAID partitions.This option is available if two or more software RAID partitions have been configured.
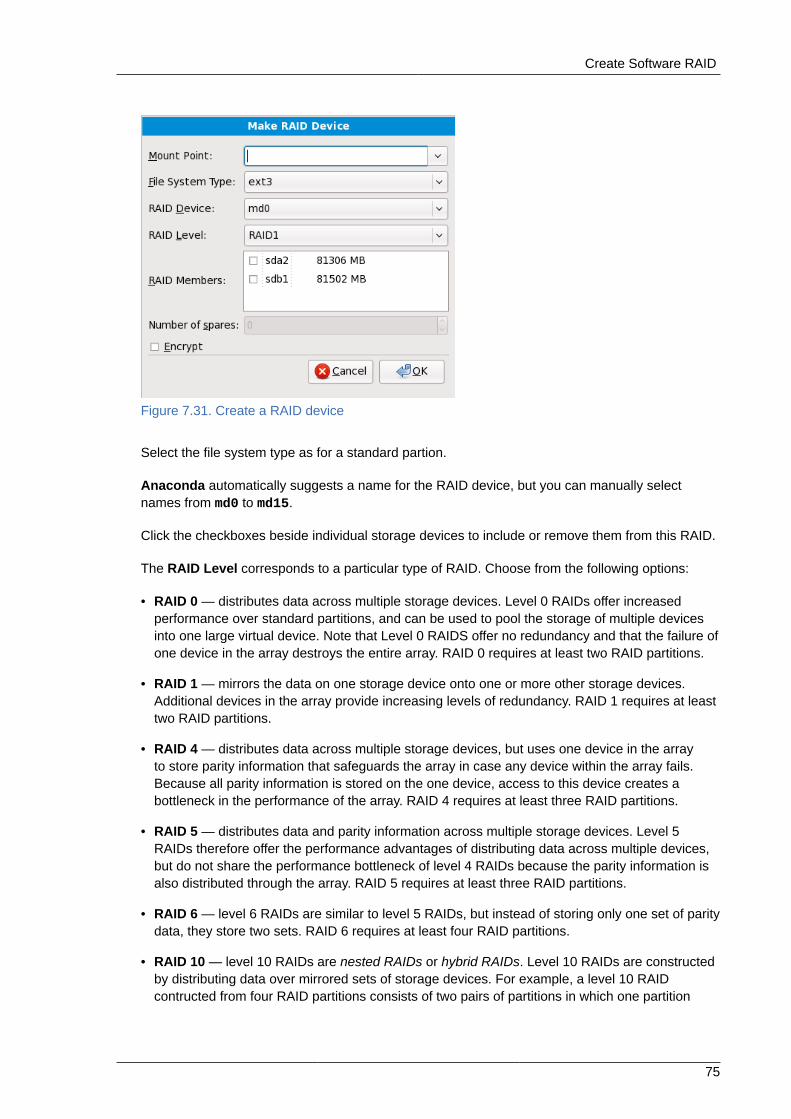
Create Software RAID
75
Figure 7.31. Create a RAID device
Select the file system type as for a standard partion.
Anaconda automatically suggests a name for the RAID device, but you can manually selectnames from md0 to md15.
Click the checkboxes beside individual storage devices to include or remove them from this RAID.
The RAID Level corresponds to a particular type of RAID. Choose from the following options:
• RAID 0 — distributes data across multiple storage devices. Level 0 RAIDs offer increasedperformance over standard partitions, and can be used to pool the storage of multiple devicesinto one large virtual device. Note that Level 0 RAIDS offer no redundancy and that the failure ofone device in the array destroys the entire array. RAID 0 requires at least two RAID partitions.
• RAID 1 — mirrors the data on one storage device onto one or more other storage devices.Additional devices in the array provide increasing levels of redundancy. RAID 1 requires at leasttwo RAID partitions.
• RAID 4 — distributes data across multiple storage devices, but uses one device in the arrayto store parity information that safeguards the array in case any device within the array fails.Because all parity information is stored on the one device, access to this device creates abottleneck in the performance of the array. RAID 4 requires at least three RAID partitions.
• RAID 5 — distributes data and parity information across multiple storage devices. Level 5RAIDs therefore offer the performance advantages of distributing data across multiple devices,but do not share the performance bottleneck of level 4 RAIDs because the parity information isalso distributed through the array. RAID 5 requires at least three RAID partitions.
• RAID 6 — level 6 RAIDs are similar to level 5 RAIDs, but instead of storing only one set of paritydata, they store two sets. RAID 6 requires at least four RAID partitions.
• RAID 10 — level 10 RAIDs are nested RAIDs or hybrid RAIDs. Level 10 RAIDs are constructedby distributing data over mirrored sets of storage devices. For example, a level 10 RAIDcontructed from four RAID partitions consists of two pairs of partitions in which one partition
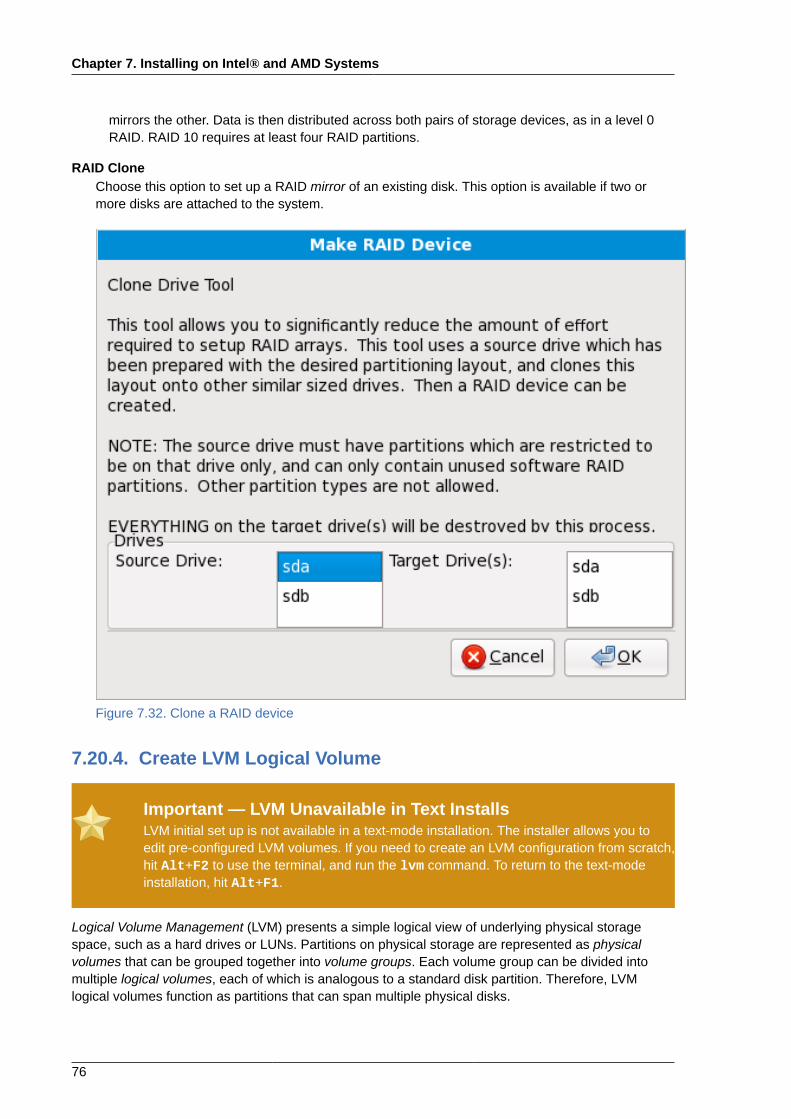
Chapter 7. Installing on Intel® and AMD Systems
76
mirrors the other. Data is then distributed across both pairs of storage devices, as in a level 0RAID. RAID 10 requires at least four RAID partitions.
RAID CloneChoose this option to set up a RAID mirror of an existing disk. This option is available if two ormore disks are attached to the system.
Figure 7.32. Clone a RAID device
7.20.4. Create LVM Logical Volume
Important — LVM Unavailable in Text InstallsLVM initial set up is not available in a text-mode installation. The installer allows you toedit pre-configured LVM volumes. If you need to create an LVM configuration from scratch,hit Alt+F2 to use the terminal, and run the lvm command. To return to the text-modeinstallation, hit Alt+F1.
Logical Volume Management (LVM) presents a simple logical view of underlying physical storagespace, such as a hard drives or LUNs. Partitions on physical storage are represented as physicalvolumes that can be grouped together into volume groups. Each volume group can be divided intomultiple logical volumes, each of which is analogous to a standard disk partition. Therefore, LVMlogical volumes function as partitions that can span multiple physical disks.

Create LVM Logical Volume
77
To read more about LVM, refer to the Red Hat Enterprise Linux Deployment Guide. Note, LVM is onlyavailable in the graphical installation program.
LVM Physical VolumeChoose this option to configure a partition or device as an LVM physical volume. This option isthe only choice available if your storage does not already contain LVM Volume Groups. This is thesame dialog that appears when you add a standard partition — refer to Section 7.20.2, “AddingPartitions” for a description of the available options. Note, however, that File System Type mustbe set to physical volume (LVM)
Figure 7.33. Create an LVM Physical Volume
Make LVM Volume GroupChoose this option to create LVM volume groups from the available LVM physical volumes, or toadd existing logical volumes to a volume group.
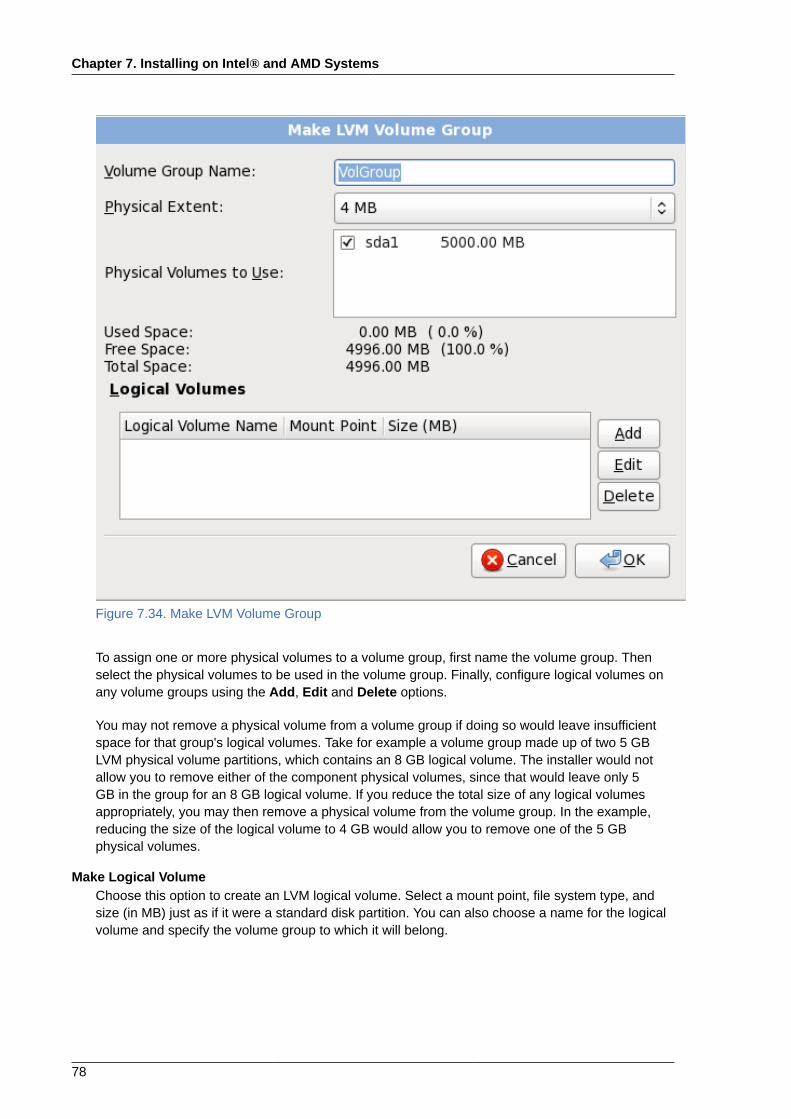
Chapter 7. Installing on Intel® and AMD Systems
78
Figure 7.34. Make LVM Volume Group
To assign one or more physical volumes to a volume group, first name the volume group. Thenselect the physical volumes to be used in the volume group. Finally, configure logical volumes onany volume groups using the Add, Edit and Delete options.
You may not remove a physical volume from a volume group if doing so would leave insufficientspace for that group's logical volumes. Take for example a volume group made up of two 5 GBLVM physical volume partitions, which contains an 8 GB logical volume. The installer would notallow you to remove either of the component physical volumes, since that would leave only 5GB in the group for an 8 GB logical volume. If you reduce the total size of any logical volumesappropriately, you may then remove a physical volume from the volume group. In the example,reducing the size of the logical volume to 4 GB would allow you to remove one of the 5 GBphysical volumes.
Make Logical VolumeChoose this option to create an LVM logical volume. Select a mount point, file system type, andsize (in MB) just as if it were a standard disk partition. You can also choose a name for the logicalvolume and specify the volume group to which it will belong.
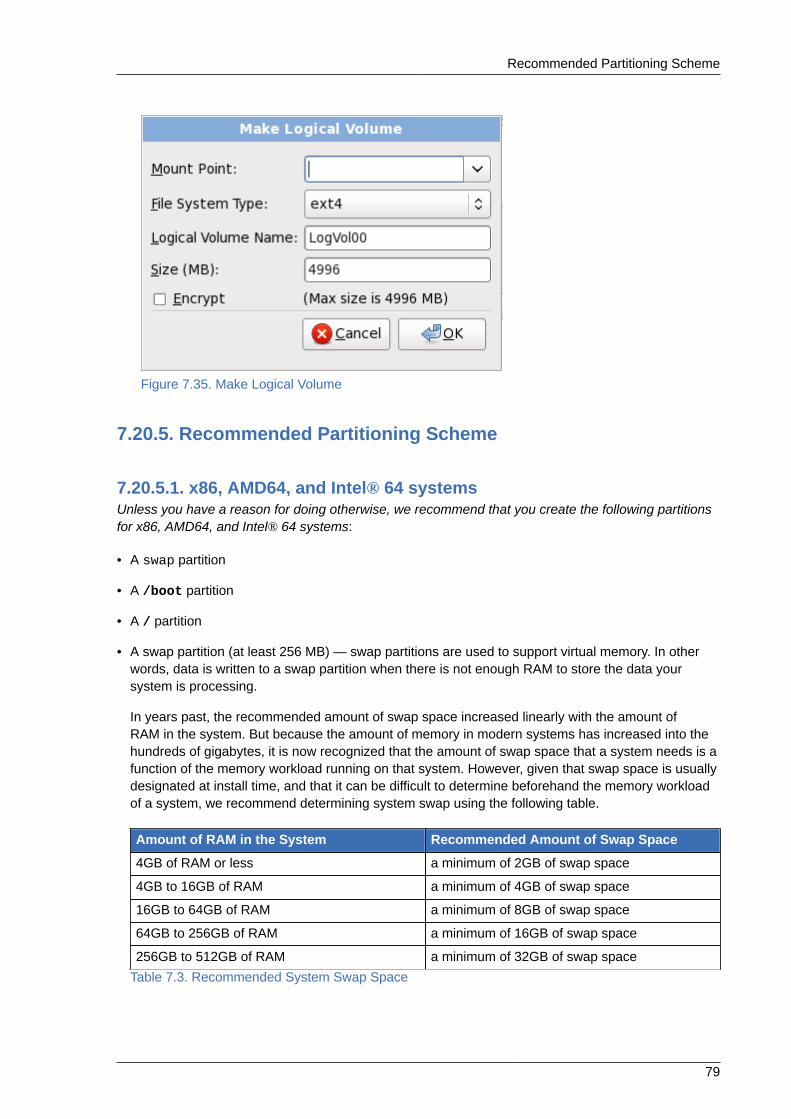
Recommended Partitioning Scheme
79
Figure 7.35. Make Logical Volume
7.20.5. Recommended Partitioning Scheme
7.20.5.1. x86, AMD64, and Intel® 64 systemsUnless you have a reason for doing otherwise, we recommend that you create the following partitionsfor x86, AMD64, and Intel® 64 systems:
• A swap partition
• A /boot partition
• A / partition
• A swap partition (at least 256 MB) — swap partitions are used to support virtual memory. In otherwords, data is written to a swap partition when there is not enough RAM to store the data yoursystem is processing.
In years past, the recommended amount of swap space increased linearly with the amount ofRAM in the system. But because the amount of memory in modern systems has increased into thehundreds of gigabytes, it is now recognized that the amount of swap space that a system needs is afunction of the memory workload running on that system. However, given that swap space is usuallydesignated at install time, and that it can be difficult to determine beforehand the memory workloadof a system, we recommend determining system swap using the following table.
Amount of RAM in the System Recommended Amount of Swap Space
4GB of RAM or less a minimum of 2GB of swap space
4GB to 16GB of RAM a minimum of 4GB of swap space
16GB to 64GB of RAM a minimum of 8GB of swap space
64GB to 256GB of RAM a minimum of 16GB of swap space
256GB to 512GB of RAM a minimum of 32GB of swap space
Table 7.3. Recommended System Swap Space
Chapter 7. Installing on Intel® and AMD Systems
80
Note that you can obtain better performance by distributing swap space over multiple storagedevices, particularly on systems with fast drives, controllers, and interfaces.
• A /boot/ partition (250 MB)The partition mounted on /boot/ contains the operating system kernel (which allows your systemto boot Fedora), along with files used during the bootstrap process. For most users, a 250 MB bootpartition is sufficient.
BtrfsThe GRUB bootloader does not support the Btrfs file system. You cannot use a btrfspartition for /boot.
NoteIf your hard drive is more than 1024 cylinders (and your system was manufactured morethan two years ago), you may need to create a /boot/ partition if you want the / (root)partition to use all of the remaining space on your hard drive.
NoteIf you have a RAID card, be aware that some BIOSes do not support booting from theRAID card. In cases such as these, the /boot/ partition must be created on a partitionoutside of the RAID array, such as on a separate hard drive.
• A root partition (3.0 GB - 5.0 GB)This is where "/" (the root directory) is located. In this setup, all files (except those stored in /boot)are on the root partition.
A 3.0 GB partition allows you to install a minimal installation, while a 5.0 GB root partition lets youperform a full installation, choosing all package groups.
Root and /rootThe / (or root) partition is the top of the directory structure. The /root directory(sometimes pronounced "slash-root") directory is the home directory of the user accountfor system administration.
Many systems have more partitions than the minimum listed above. Choose partitions based on yourparticular system needs. For example, consider creating a separate /home partition on systems thatstore user data. Refer to Section 7.20.5.1.1, “Advice on Partitions” for more information.
If you create many partitions instead of one large / partition, upgrades become easier. Refer to thedescription the Edit option in Section 7.20, “ Creating a Custom Layout or Modifying the Default Layout” for more information.
The following table summarizes minimum partition sizes for the partitions containing the listeddirectories. You do not have to make a separate partition for each of these directories. For instance,
Recommended Partitioning Scheme
81
if the partition containing /foo must be at least 500 MB, and you do not make a separate /foopartition, then the / (root) partition must be at least 500 MB.
Directory Minimum size
/ 250 MB
/usr 250 MB, but avoid placing this on a separatepartition
/tmp 50 MB
/var 384 MB
/home 100 MB
/boot 250 MB
Table 7.4. Minimum partition sizes
Leave Excess Capacity UnallocatedOnly assign storage capacity to those partitions you require immediately. You may allocatefree space at any time, to meet needs as they occur. To learn about a more flexiblemethod for storage management, refer to Appendix D, Understanding LVM.
If you are not sure how best to configure the partitions for your computer, accept the default partitionlayout.
7.20.5.1.1. Advice on PartitionsOptimal partition setup depends on the usage for the Linux system in question. The following tips mayhelp you decide how to allocate your disk space.
• If you expect that you or other users will store data on the system, create a separate partition forthe /home directory within a volume group. With a separate /home partition, you may upgrade orreinstall Fedora without erasing user data files.
• Each kernel installed on your system requires approximately 10 MB on the /boot partition. Unlessyou plan to install a great many kernels, the default partition size of 250 MB for /boot shouldsuffice.
BtrfsThe GRUB bootloader does not support the Btrfs file system. You cannot use a btrfspartition for /boot.
• The /var directory holds content for a number of applications, including the Apache web server. Italso is used to store downloaded update packages on a temporary basis. Ensure that the partitioncontaining the /var directory has enough space to download pending updates and hold your othercontent.
Pending UpdatesBecause Fedora is a rapidly progressing collection of software, many updates maybe available late in a release cycle. You can add an update repository to the sources
Chapter 7. Installing on Intel® and AMD Systems
82
for installation later to minimize this issue. Refer to Section 7.23.1, “Installing fromAdditional Repositories” for more information.
• The /usr directory holds the majority of software content on a Fedora system. For an installation ofthe default set of software, allocate at least 4 GB of space. If you are a software developer or plan touse your Fedora system to learn software development skills, you may want to at least double thisallocation.
Do not place /usr on a separate partitionIf /usr is on a separate partition from /, the boot process becomes much morecomplex, and in some situations (like installations on iSCSI drives), might not work atall.
• Consider leaving a portion of the space in an LVM volume group unallocated. This unallocatedspace gives you flexibility if your space requirements change but you do not wish to remove datafrom other partitions to reallocate storage.
• If you separate subdirectories into partitions, you can retain content in those subdirectories if youdecide to install a new version of Fedora over your current system. For instance, if you intend to runa MySQL database in /var/lib/mysql, make a separate partition for that directory in case youneed to reinstall later.
The following table is a possible partition setup for a system with a single, new 80 GB hard disk and1 GB of RAM. Note that approximately 10 GB of the volume group is unallocated to allow for futuregrowth.
Example UsageThis setup is not optimal for all use cases.
Partition Size and type
/boot 250 MB ext4 partition
swap 2 GB swap
LVM physical volume Remaining space, as one LVM volume group
Table 7.5. Example partition setup
The physical volume is assigned to the default volume group and divided into the following logicalvolumes:
Partition Size and type
/ 13 GB ext4
/var 4 GB ext4
/home 50 GB ext4
Table 7.6. Example partition setup: LVM physical volume
Example 7.1. Example partition setup
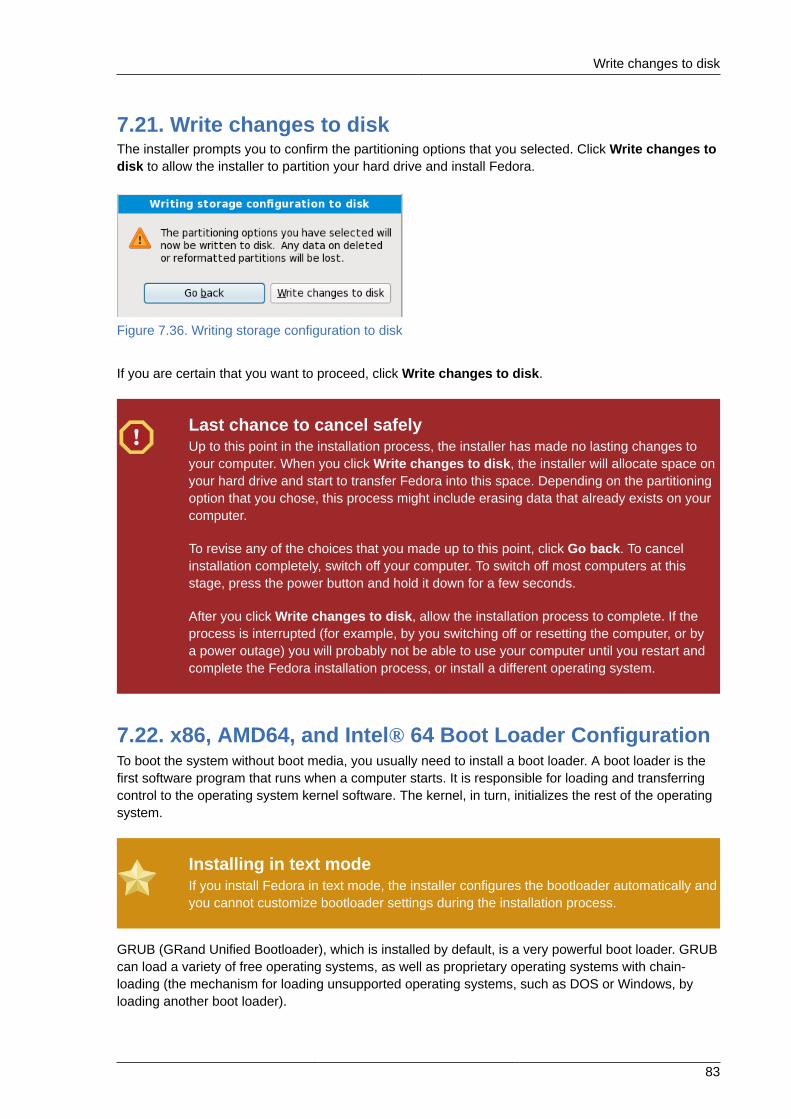
Write changes to disk
83
7.21. Write changes to diskThe installer prompts you to confirm the partitioning options that you selected. Click Write changes todisk to allow the installer to partition your hard drive and install Fedora.
Figure 7.36. Writing storage configuration to disk
If you are certain that you want to proceed, click Write changes to disk.
Last chance to cancel safelyUp to this point in the installation process, the installer has made no lasting changes toyour computer. When you click Write changes to disk, the installer will allocate space onyour hard drive and start to transfer Fedora into this space. Depending on the partitioningoption that you chose, this process might include erasing data that already exists on yourcomputer.
To revise any of the choices that you made up to this point, click Go back. To cancelinstallation completely, switch off your computer. To switch off most computers at thisstage, press the power button and hold it down for a few seconds.
After you click Write changes to disk, allow the installation process to complete. If theprocess is interrupted (for example, by you switching off or resetting the computer, or bya power outage) you will probably not be able to use your computer until you restart andcomplete the Fedora installation process, or install a different operating system.
7.22. x86, AMD64, and Intel® 64 Boot Loader ConfigurationTo boot the system without boot media, you usually need to install a boot loader. A boot loader is thefirst software program that runs when a computer starts. It is responsible for loading and transferringcontrol to the operating system kernel software. The kernel, in turn, initializes the rest of the operatingsystem.
Installing in text modeIf you install Fedora in text mode, the installer configures the bootloader automatically andyou cannot customize bootloader settings during the installation process.
GRUB (GRand Unified Bootloader), which is installed by default, is a very powerful boot loader. GRUBcan load a variety of free operating systems, as well as proprietary operating systems with chain-loading (the mechanism for loading unsupported operating systems, such as DOS or Windows, byloading another boot loader).
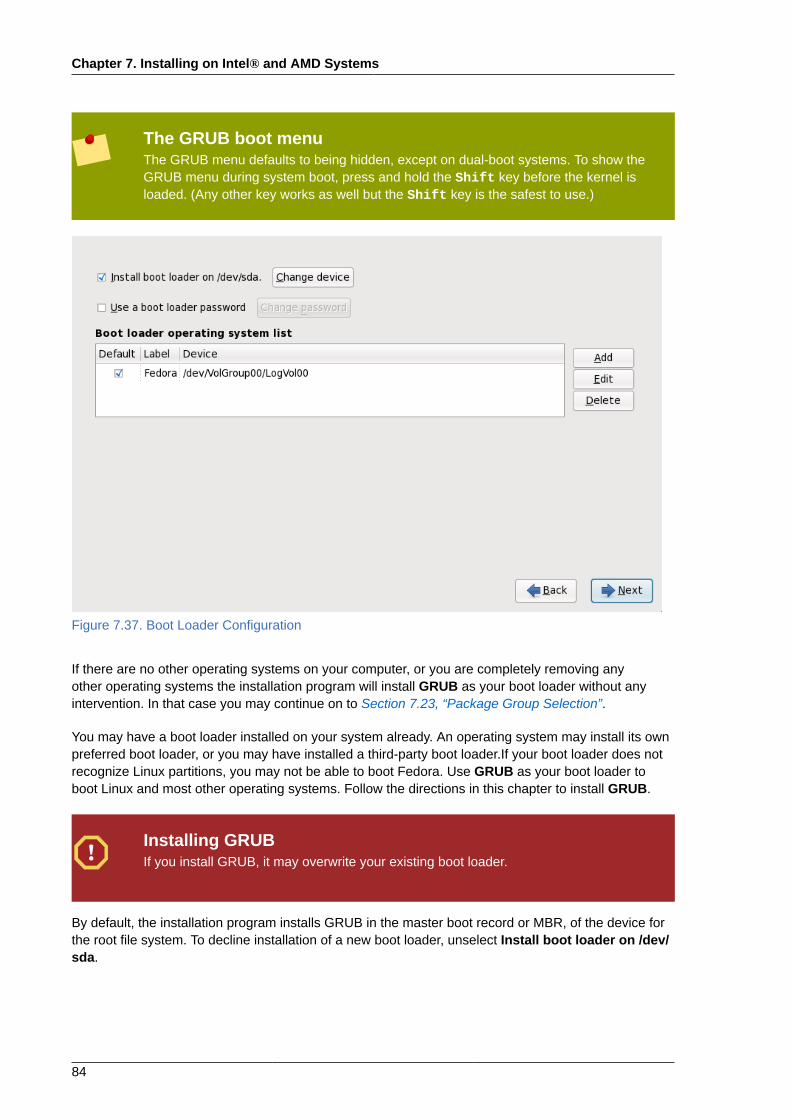
Chapter 7. Installing on Intel® and AMD Systems
84
The GRUB boot menuThe GRUB menu defaults to being hidden, except on dual-boot systems. To show theGRUB menu during system boot, press and hold the Shift key before the kernel isloaded. (Any other key works as well but the Shift key is the safest to use.)
Figure 7.37. Boot Loader Configuration
If there are no other operating systems on your computer, or you are completely removing anyother operating systems the installation program will install GRUB as your boot loader without anyintervention. In that case you may continue on to Section 7.23, “Package Group Selection”.
You may have a boot loader installed on your system already. An operating system may install its ownpreferred boot loader, or you may have installed a third-party boot loader.If your boot loader does notrecognize Linux partitions, you may not be able to boot Fedora. Use GRUB as your boot loader toboot Linux and most other operating systems. Follow the directions in this chapter to install GRUB.
Installing GRUBIf you install GRUB, it may overwrite your existing boot loader.
By default, the installation program installs GRUB in the master boot record or MBR, of the device forthe root file system. To decline installation of a new boot loader, unselect Install boot loader on /dev/sda.

x86, AMD64, and Intel® 64 Boot Loader Configuration
85
WarningIf you choose not to install GRUB for any reason, you will not be able to boot the systemdirectly, and you must use another boot method (such as a commercial boot loaderapplication). Use this option only if you are sure you have another way of booting thesystem!
If you have other operating systems already installed, Fedora attempts to automatically detect andconfigure GRUB to boot them. You may manually configure any additional operating systems if GRUBdoes not detect them.
To add, remove, or change the detected operating system settings, use the options provided.
AddSelect Add to include an additional operating system in GRUB.
Select the disk partition which contains the bootable operating system from the drop-down list andgive the entry a label. GRUB displays this label in its boot menu.
EditTo change an entry in the GRUB boot menu, select the entry and then select Edit.
DeleteTo remove an entry from the GRUB boot menu, select the entry and then select Delete.
Select Default beside the preferred boot partition to choose your default bootable OS. You cannotmove forward in the installation unless you choose a default boot image.
NoteThe Label column lists what you must enter at the boot prompt, in non-graphical bootloaders, in order to boot the desired operating system.
Once you have loaded the GRUB boot screen, use the arrow keys to choose a boot labelor type e for edit. You are presented with a list of items in the configuration file for the bootlabel you have selected.
Boot loader passwords provide a security mechanism in an environment where physical access toyour server is available.
If you are installing a boot loader, you should create a password to protect your system. Without aboot loader password, users with access to your system can pass options to the kernel which cancompromise your system security. With a boot loader password in place, the password must first beentered before selecting any non-standard boot options. However, it is still possible for someone withphysical access to the machine to boot from a diskette, CD-ROM, or USB media if the BIOS supportsit. Security plans which include boot loader passwords should also address alternate boot methods.
GRUB Passwords Not RequiredYou may not require a GRUB password if your system only has trusted operators, or isphysically secured with controlled console access. However, if an untrusted person can

Chapter 7. Installing on Intel® and AMD Systems
86
get physical access to your computer's keyboard and monitor, that person can reboot thesystem and access GRUB. A password is helpful in this case.
If you choose to use a boot loader password to enhance your system security, be sure to select thecheckbox labeled Use a boot loader password.
Once selected, enter a password and confirm it.
GRUB stores the password in encrypted form, so it cannot be read or recovered. If you forget theboot password, boot the system normally and then change the password entry in the /boot/grub/grub.conf file. If you cannot boot, you may be able to use the "rescue" mode on the first Fedorainstallation disc to reset the GRUB password.
If you do need to change the GRUB password, use the grub-md5-crypt utility. For information onusing this utility, use the command man grub-md5-crypt in a terminal window to read the manualpages.
GRUB recognizes only the QWERTY keyboard layoutWhen selecting a GRUB password, be aware that GRUB recognizes only the QWERTYkeyboard layout, regardless of the keyboard actually attached to the system. If you usea keyboard with a significantly different layout, it might be more effective to memorize apattern of keystrokes rather than the word that the pattern produces.
To configure more advanced boot loader options, such as changing the drive order or passing optionsto the kernel, be sure Configure advanced boot loader options is selected before clicking Next.
7.22.1. Advanced Boot Loader ConfigurationNow that you have chosen which boot loader to install, you can also determine where you want theboot loader to be installed. You may install the boot loader in one of two places:
• The master boot record (MBR) — This is the recommended place to install a boot loader, unlessthe MBR already starts another operating system loader, such as System Commander. The MBRis a special area on your hard drive that is automatically loaded by your computer's BIOS, and isthe earliest point at which the boot loader can take control of the boot process. If you install it in theMBR, when your machine boots, GRUB presents a boot prompt. You can then boot Fedora or anyother operating system that you have configured the boot loader to boot.
• The first sector of your boot partition — This is recommended if you are already using another bootloader on your system. In this case, your other boot loader takes control first. You can then configurethat boot loader to start GRUB, which then boots Fedora.
GRUB as a Secondary Boot LoaderIf you install GRUB as a secondary boot loader, you must reconfigure your primary bootloader whenever you install and boot from a new kernel. The kernel of an operatingsystem such as Microsoft Windows does not boot in the same fashion. Most userstherefore use GRUB as the primary boot loader on dual-boot systems.
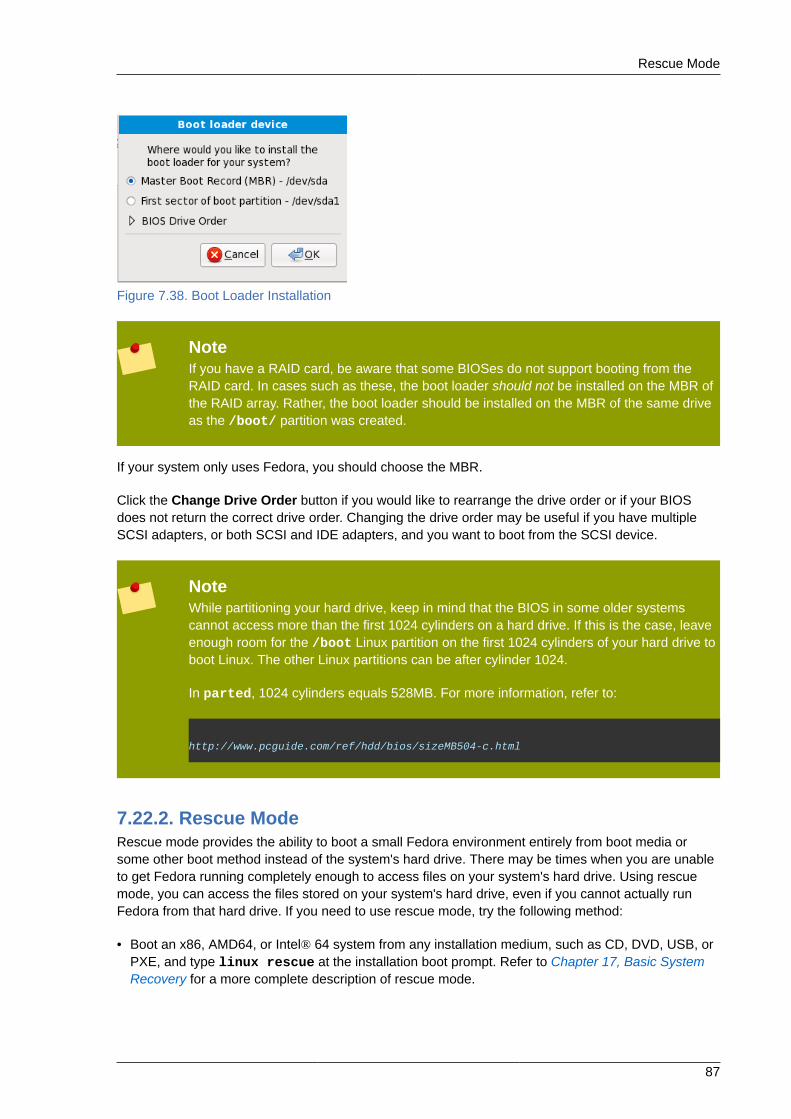
Rescue Mode
87
Figure 7.38. Boot Loader Installation
NoteIf you have a RAID card, be aware that some BIOSes do not support booting from theRAID card. In cases such as these, the boot loader should not be installed on the MBR ofthe RAID array. Rather, the boot loader should be installed on the MBR of the same driveas the /boot/ partition was created.
If your system only uses Fedora, you should choose the MBR.
Click the Change Drive Order button if you would like to rearrange the drive order or if your BIOSdoes not return the correct drive order. Changing the drive order may be useful if you have multipleSCSI adapters, or both SCSI and IDE adapters, and you want to boot from the SCSI device.
NoteWhile partitioning your hard drive, keep in mind that the BIOS in some older systemscannot access more than the first 1024 cylinders on a hard drive. If this is the case, leaveenough room for the /boot Linux partition on the first 1024 cylinders of your hard drive toboot Linux. The other Linux partitions can be after cylinder 1024.
In parted, 1024 cylinders equals 528MB. For more information, refer to:
http://www.pcguide.com/ref/hdd/bios/sizeMB504-c.html
7.22.2. Rescue ModeRescue mode provides the ability to boot a small Fedora environment entirely from boot media orsome other boot method instead of the system's hard drive. There may be times when you are unableto get Fedora running completely enough to access files on your system's hard drive. Using rescuemode, you can access the files stored on your system's hard drive, even if you cannot actually runFedora from that hard drive. If you need to use rescue mode, try the following method:
• Boot an x86, AMD64, or Intel® 64 system from any installation medium, such as CD, DVD, USB, orPXE, and type linux rescue at the installation boot prompt. Refer to Chapter 17, Basic SystemRecovery for a more complete description of rescue mode.
Chapter 7. Installing on Intel® and AMD Systems
88
7.22.3. Alternative Boot LoadersGRUB is the default bootloader for Fedora, but is not the only choice. A variety of open-source andproprietary alternatives to GRUB are available to load Fedora, including LILO, SYSLINUX, AcronisDisk Director Suite, and Apple Boot Camp.
7.23. Package Group SelectionNow that you have made most of the choices for your installation, you are ready to confirm the defaultpackage selection or customize packages for your system.
The Package Installation Defaults screen appears and details the default package set for yourFedora installation. This screen varies depending on the version of Fedora you are installing.
Installing from a Live ImageIf you install from a Fedora Live image, you cannot make package selections. Thisinstallation method transfers a copy of the Live image rather than installing packages froma repository. To change the package selection, complete the installation, then use theAdd/Remove Software application to make desired changes.
Installing in text modeIf you install Fedora in text mode, you cannot make package selections. The installerautomatically selects packages only from the base and core groups. These packages aresufficient to ensure that the system is operational at the end of the installation process,ready to install updates and new packages. To change the package selection, completethe installation, then use the Add/Remove Software application to make desiredchanges.
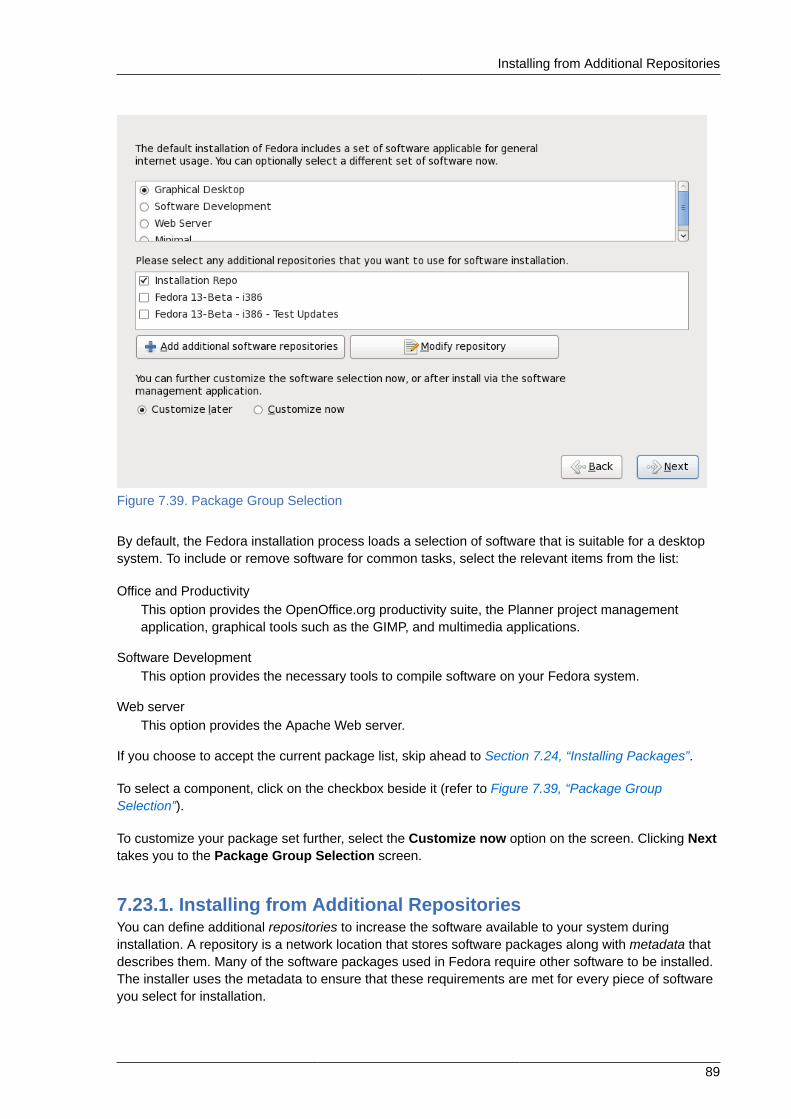
Installing from Additional Repositories
89
Figure 7.39. Package Group Selection
By default, the Fedora installation process loads a selection of software that is suitable for a desktopsystem. To include or remove software for common tasks, select the relevant items from the list:
Office and ProductivityThis option provides the OpenOffice.org productivity suite, the Planner project managementapplication, graphical tools such as the GIMP, and multimedia applications.
Software DevelopmentThis option provides the necessary tools to compile software on your Fedora system.
Web serverThis option provides the Apache Web server.
If you choose to accept the current package list, skip ahead to Section 7.24, “Installing Packages”.
To select a component, click on the checkbox beside it (refer to Figure 7.39, “Package GroupSelection”).
To customize your package set further, select the Customize now option on the screen. Clicking Nexttakes you to the Package Group Selection screen.
7.23.1. Installing from Additional RepositoriesYou can define additional repositories to increase the software available to your system duringinstallation. A repository is a network location that stores software packages along with metadata thatdescribes them. Many of the software packages used in Fedora require other software to be installed.The installer uses the metadata to ensure that these requirements are met for every piece of softwareyou select for installation.
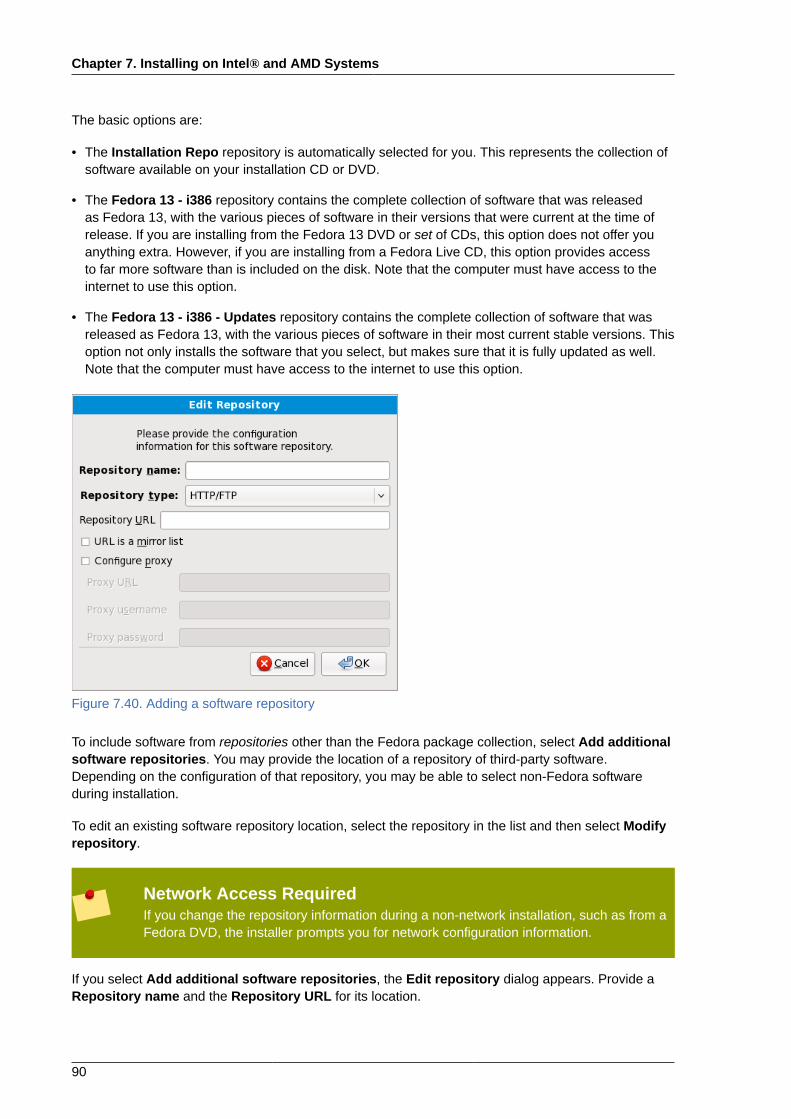
Chapter 7. Installing on Intel® and AMD Systems
90
The basic options are:
• The Installation Repo repository is automatically selected for you. This represents the collection ofsoftware available on your installation CD or DVD.
• The Fedora 13 - i386 repository contains the complete collection of software that was releasedas Fedora 13, with the various pieces of software in their versions that were current at the time ofrelease. If you are installing from the Fedora 13 DVD or set of CDs, this option does not offer youanything extra. However, if you are installing from a Fedora Live CD, this option provides accessto far more software than is included on the disk. Note that the computer must have access to theinternet to use this option.
• The Fedora 13 - i386 - Updates repository contains the complete collection of software that wasreleased as Fedora 13, with the various pieces of software in their most current stable versions. Thisoption not only installs the software that you select, but makes sure that it is fully updated as well.Note that the computer must have access to the internet to use this option.
Figure 7.40. Adding a software repository
To include software from repositories other than the Fedora package collection, select Add additionalsoftware repositories. You may provide the location of a repository of third-party software.Depending on the configuration of that repository, you may be able to select non-Fedora softwareduring installation.
To edit an existing software repository location, select the repository in the list and then select Modifyrepository.
Network Access RequiredIf you change the repository information during a non-network installation, such as from aFedora DVD, the installer prompts you for network configuration information.
If you select Add additional software repositories, the Edit repository dialog appears. Provide aRepository name and the Repository URL for its location.
Customizing the Software Selection
91
Fedora Software MirrorsTo find a Fedora software mirror near you, refer to http://fedoraproject.org/wiki/Mirrors.
Once you have located a mirror, to determine the URL to use, find the directory on the mirror thatcontains a directory named repodata. For instance, the "Everything" repository for Fedora istypically located in a directory tree releases/13/Everything/arch/os, where arch is a systemarchitecture name.
Once you provide information for an additional repository, the installer reads the package metadataover the network. Software that is specially marked is then included in the package group selectionsystem. See Section 7.23.2, “Customizing the Software Selection” for more information on selectingpackages.
Backtracking Removes Repository MetadataIf you choose Back from the package selection screen, any extra repository data you mayhave entered is lost. This allows you to effectively cancel extra repositories. Currentlythere is no way to cancel only a single repository once entered.
7.23.2. Customizing the Software SelectionSelect Customize now to specify the software packages for your final system in more detail. Thisoption causes the installation process to display an additional customization screen when you selectNext.
Installing Support for Additional LanguagesSelect Customize now to install support for additional languages. Refer toSection 7.23.2.2, “Additional Language Support” for more information on configuringlanguage support.
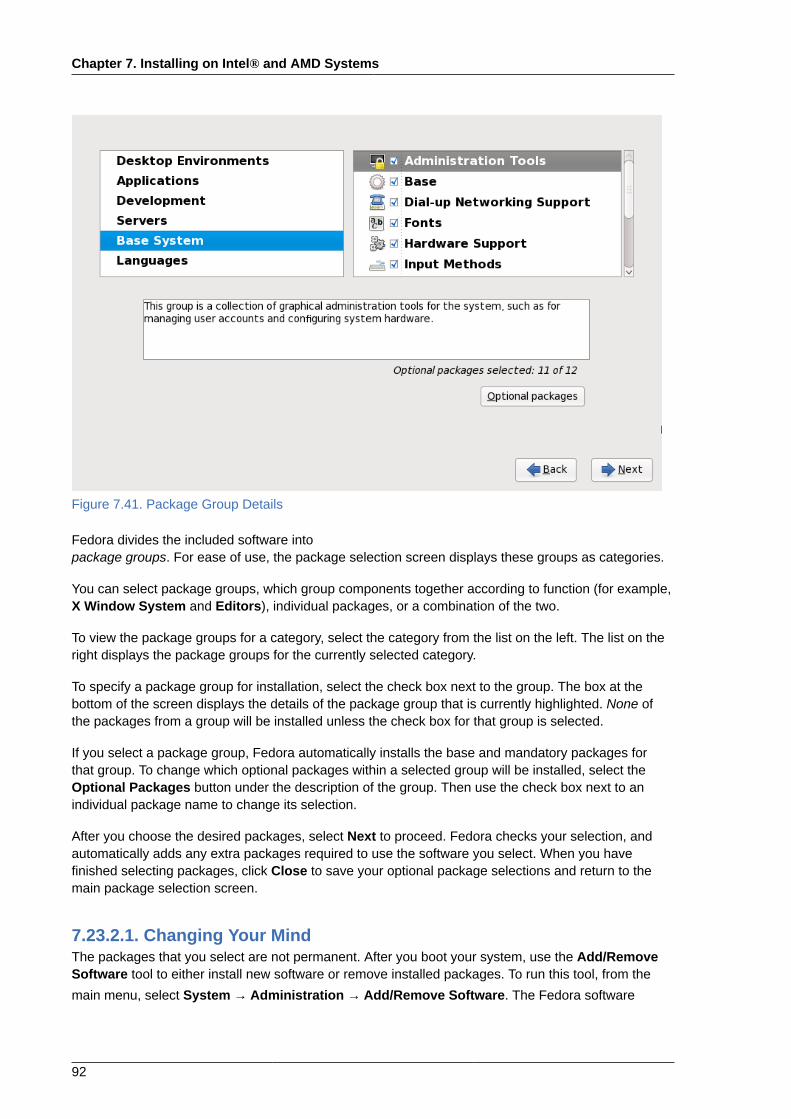
Chapter 7. Installing on Intel® and AMD Systems
92
Figure 7.41. Package Group Details
Fedora divides the included software intopackage groups. For ease of use, the package selection screen displays these groups as categories.
You can select package groups, which group components together according to function (for example,X Window System and Editors), individual packages, or a combination of the two.
To view the package groups for a category, select the category from the list on the left. The list on theright displays the package groups for the currently selected category.
To specify a package group for installation, select the check box next to the group. The box at thebottom of the screen displays the details of the package group that is currently highlighted. None ofthe packages from a group will be installed unless the check box for that group is selected.
If you select a package group, Fedora automatically installs the base and mandatory packages forthat group. To change which optional packages within a selected group will be installed, select theOptional Packages button under the description of the group. Then use the check box next to anindividual package name to change its selection.
After you choose the desired packages, select Next to proceed. Fedora checks your selection, andautomatically adds any extra packages required to use the software you select. When you havefinished selecting packages, click Close to save your optional package selections and return to themain package selection screen.
7.23.2.1. Changing Your MindThe packages that you select are not permanent. After you boot your system, use the Add/RemoveSoftware tool to either install new software or remove installed packages. To run this tool, from the
main menu, select System → Administration → Add/Remove Software. The Fedora software
Installing Packages
93
management system downloads the latest packages from network servers, rather than using those onthe installation discs.
7.23.2.2. Additional Language SupportYour Fedora system automatically supports the language that you selected at the start of theinstallation process. To include support for additional languages, select the package group for thoselanguages from the Languages category.
7.23.2.3. Core Network ServicesAll Fedora installations include the following network services:
• centralized logging through syslog
• email through SMTP (Simple Mail Transfer Protocol)
• network file sharing through NFS (Network File System)
• remote access through SSH (Secure SHell)
• resource advertising through mDNS (multicast DNS)
The default installation also provides:
• network file transfer through HTTP (HyperText Transfer Protocol)
• printing through CUPS (Common UNIX Printing System)
• remote desktop access through VNC (Virtual Network Computing)
Some automated processes on your Fedora system use the email service to send reports andmessages to the system administrator. By default, the email, logging, and printing services do notaccept connections from other systems. Fedora installs the NFS sharing, HTTP, and VNC componentswithout enabling those services.
You may configure your Fedora system after installation to offer email, file sharing, logging, printingand remote desktop access services. The SSH service is enabled by default. You may use NFS toaccess files on other systems without enabling the NFS sharing service.
7.24. Installing PackagesAt this point there is nothing left for you to do until all the packages have been installed. How quicklythis happens depends on the number of packages you have selected and your computer's speed.
Fedora reports the installation progress on the screen as it writes the selected packages to yoursystem. Network and DVD installations require no further action. If you are using CDs to install,Fedora prompts you to change discs periodically. After you insert a disc, select OK to resume theinstallation.
For your reference, a complete log of your installation can be found in /root/install.log onceyou reboot your system.
After installation completes, select Reboot to restart your computer. Fedora ejects any loaded discsbefore the computer reboots.
Chapter 7. Installing on Intel® and AMD Systems
94
Installing from a Live ImageIf you install from a Fedora Live image, no reboot prompt appears. You may continueto use the Live image as desired, and reboot the system at any time to enjoy the newlyinstalled Fedora system.
7.25. Installation CompleteCongratulations! Your Fedora installation is now complete!
The installation program prompts you to prepare your system for reboot. Remember to remove anyinstallation media if it is not ejected automatically upon reboot.

Chapter 8.
95
Troubleshooting Installation on anIntel® or AMD SystemThis section discusses some common installation problems and their solutions.
For debugging purposes, anaconda logs installation actions into files in the /tmp directory. Thesefiles include:
/tmp/anaconda.loggeneral anaconda messages
/tmp/program.logall external programs run by anaconda
/tmp/storage.logextensive storage module information
/tmp/yum.logyum package installation messages
/tmp/sysloghardware-related system messages
If the installation fails, the messages from these files are consolidated into /tmp/anacdump.txt.
8.1. You are unable to boot Fedora
8.1.1. Are You Unable to Boot With Your RAID Card?If you have performed an installation and cannot boot your system properly, you may need to reinstalland create your partitions differently.
Some BIOSes do not support booting from RAID cards. At the end of an installation, a text-basedscreen showing the boot loader prompt (for example, GRUB: ) and a flashing cursor may be all thatappears. If this is the case, you must repartition your system.
Whether you choose automatic or manual partitioning, you must install your /boot partition outsideof the RAID array, such as on a separate hard drive. An internal hard drive is necessary to use forpartition creation with problematic RAID cards.
You must also install your preferred boot loader (GRUB or LILO) on the MBR of a drive that is outsideof the RAID array. This should be the same drive that hosts the /boot/ partition.
Once these changes have been made, you should be able to finish your installation and boot thesystem properly.
8.1.2. Is Your System Displaying Signal 11 Errors?A signal 11 error, commonly know as a segmentation fault, means that the program accessed amemory location that was not assigned to it. A signal 11 error may be due to a bug in one of thesoftware programs that is installed, or faulty hardware.
Chapter 8. Troubleshooting Installation on an Intel® or AMD System
96
If you receive a fatal signal 11 error during your installation, it is probably due to a hardware error inmemory on your system's bus. Like other operating systems, Fedora places its own demands on yoursystem's hardware. Some of this hardware may not be able to meet those demands, even if they workproperly under another OS.
Ensure that you have the latest installation updates and images. Review the online errata to seeif newer versions are available. If the latest images still fail, it may be due to a problem with yourhardware. Commonly, these errors are in your memory or CPU-cache. A possible solution for this erroris turning off the CPU-cache in the BIOS, if your system supports this. You could also try to swap yourmemory around in the motherboard slots to check if the problem is either slot or memory related.
Another option is to perform a media check on your installation CD-ROMs. Anaconda, the installationprogram, has the ability to test the integrity of the installation media. It works with the CD, DVD, harddrive ISO, and NFS ISO installation methods. Red Hat recommends that you test all installation mediabefore starting the installation process, and before reporting any installation-related bugs (many ofthe bugs reported are actually due to improperly-burned CDs). To use this test, type the followingcommand at the boot: prompt:
linux mediacheck
For more information concerning signal 11 errors, refer to:
http://www.bitwizard.nl/sig11/
8.2. Trouble Beginning the Installation
8.2.1. Problems with Booting into the Graphical InstallationThere are some video cards that have trouble booting into the graphical installation program. If theinstallation program does not run using its default settings, it tries to run in a lower resolution mode. Ifthat still fails, the installation program attempts to run in text mode.
One possible solution is to use only a basic video driver during installation. You can do this either byselecting Install system with basic video driver on the boot menu, or using the xdriver=vesaboot option at the boot prompt. Alternatively, you can force the installer to use a specific screenresolution with the resolution= boot option. This option may be most helpful for laptop users.Another solution to try is the driver= option to specify the driver that should be loaded for your videocard. If this works, you should report it as a bug, because the installer failed to detect your video cardautomatically. Refer to Chapter 9, Boot Options for more information on boot options.
NoteTo disable frame buffer support and allow the installation program to run in text mode, tryusing the nofb boot option. This command may be necessary for accessibility with somescreen reading hardware.
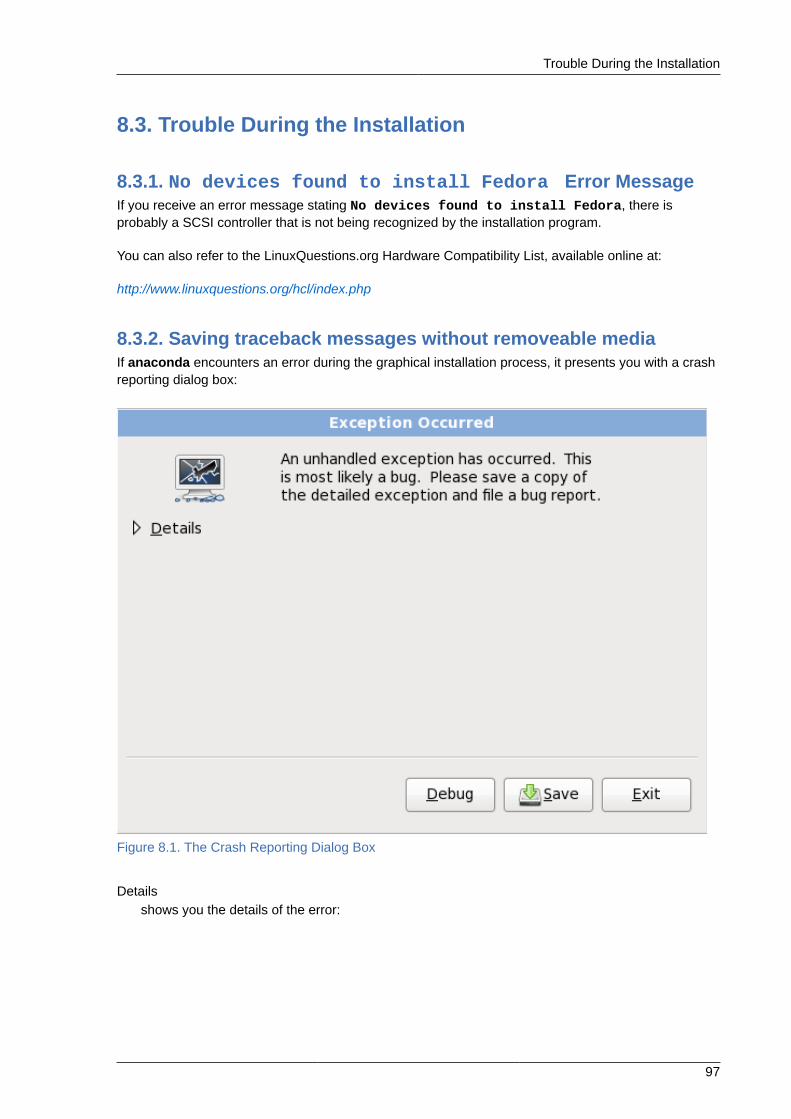
Trouble During the Installation
97
8.3. Trouble During the Installation
8.3.1. No devices found to install Fedora Error MessageIf you receive an error message stating No devices found to install Fedora, there isprobably a SCSI controller that is not being recognized by the installation program.
You can also refer to the LinuxQuestions.org Hardware Compatibility List, available online at:
http://www.linuxquestions.org/hcl/index.php
8.3.2. Saving traceback messages without removeable mediaIf anaconda encounters an error during the graphical installation process, it presents you with a crashreporting dialog box:
Figure 8.1. The Crash Reporting Dialog Box
Detailsshows you the details of the error:
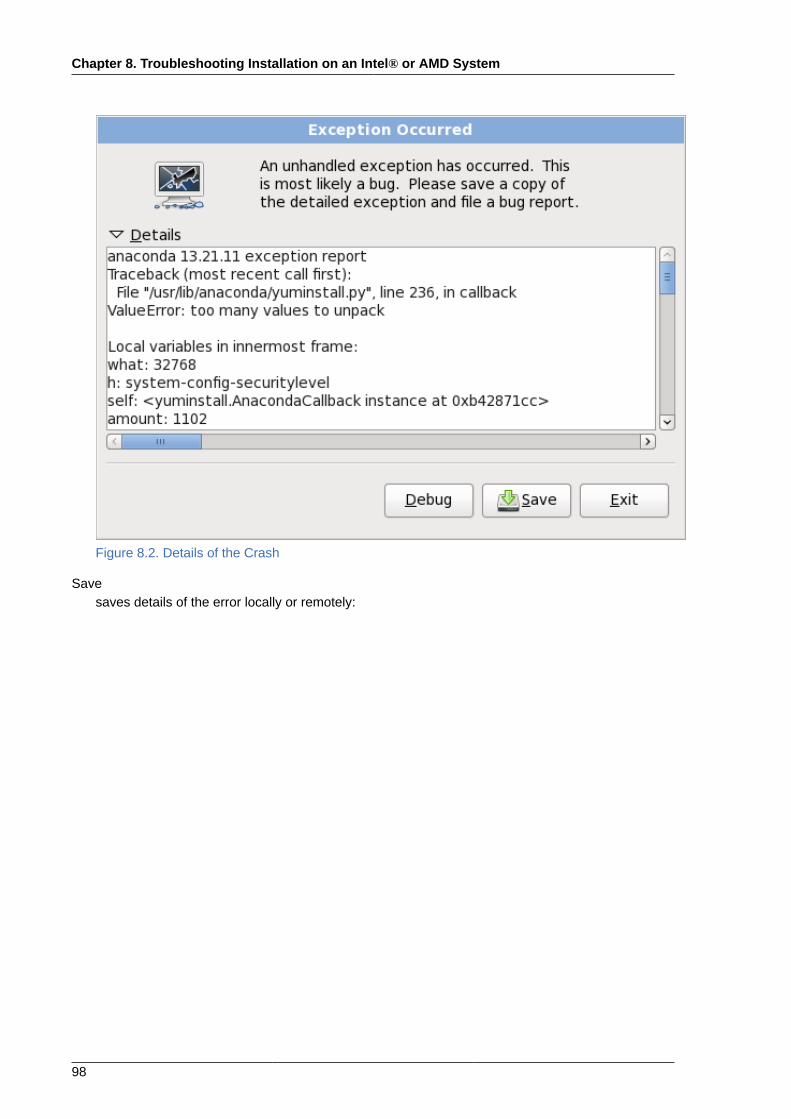
Chapter 8. Troubleshooting Installation on an Intel® or AMD System
98
Figure 8.2. Details of the Crash
Savesaves details of the error locally or remotely:
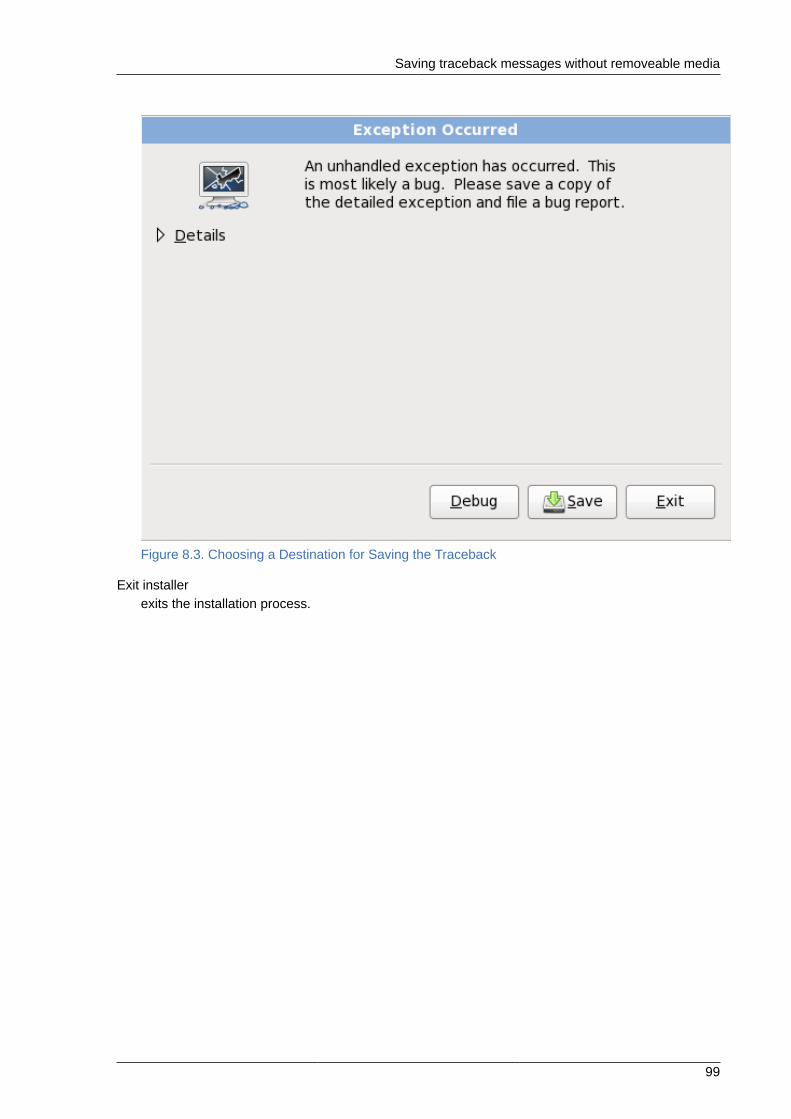
Saving traceback messages without removeable media
99
Figure 8.3. Choosing a Destination for Saving the Traceback
Exit installerexits the installation process.
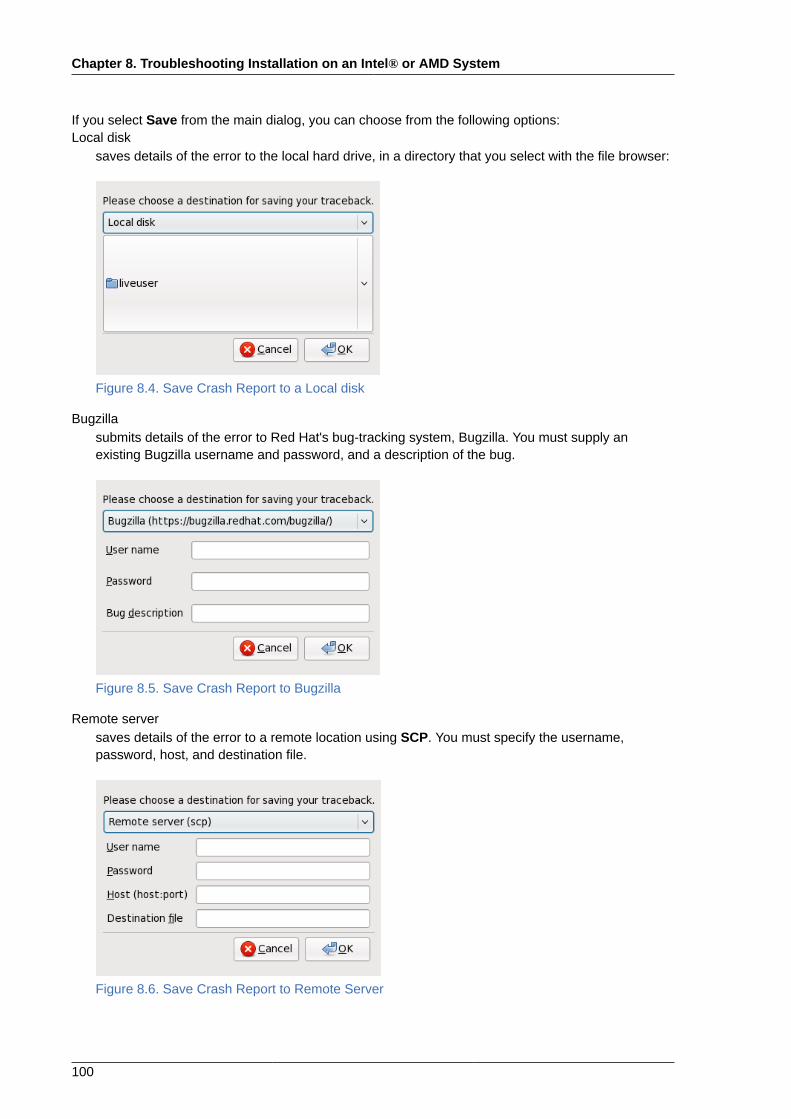
Chapter 8. Troubleshooting Installation on an Intel® or AMD System
100
If you select Save from the main dialog, you can choose from the following options:Local disk
saves details of the error to the local hard drive, in a directory that you select with the file browser:
Figure 8.4. Save Crash Report to a Local disk
Bugzillasubmits details of the error to Red Hat's bug-tracking system, Bugzilla. You must supply anexisting Bugzilla username and password, and a description of the bug.
Figure 8.5. Save Crash Report to Bugzilla
Remote serversaves details of the error to a remote location using SCP. You must specify the username,password, host, and destination file.
Figure 8.6. Save Crash Report to Remote Server
Trouble with Partition Tables
101
8.3.3. Trouble with Partition TablesIf you receive an error at the beginning of the installation process (Section 7.13, “Initializing the HardDisk”) that says something similar to:
Error processing drive sda. Maybe it needs to be reinitialized. YOUWILL LOSE ALL DATA ON THIS DRIVE!
you may not have a partition table on that drive or the partition table on the drive may not berecognizable by the partitioning software used in the installation program.
Users who have used programs such as EZ-BIOS have experienced similar problems, causing datato be lost (assuming the data was not backed up before the installation began) that could not berecovered.
No matter what type of installation you are performing, backups of the existing data on your systemsshould always be made.
8.3.4. Using Remaining SpaceYou have a swap and a / (root) partition created, and you have selected the root partition to use theremaining space, but it does not fill the hard drive.
If your hard drive is more than 1024 cylinders, you must create a /boot partition if you want the /(root) partition to use all of the remaining space on your hard drive.
8.3.5. Other Partitioning ProblemsIf you create partitions manually, but cannot move to the next screen, you probably have not createdall the partitions necessary for installation to proceed.
You must have the following partitions as a bare minimum:
• A / (root) partition
• A <swap> partition of type swap
NoteWhen defining a partition's type as swap, do not assign it a mount point. Anacondaautomatically assigns the mount point for you.
8.3.6. Are You Seeing Python Errors?During some upgrades or installations of Fedora, the installation program (also known as anaconda)may fail with a Python or traceback error. This error may occur after the selection of individualpackages or while trying to save the upgrade log in the /tmp/directory. The error may look similar to:
Traceback (innermost last):File "/var/tmp/anaconda-7.1//usr/lib/anaconda/iw/progress_gui.py", line 20, in runrc = self.todo.doInstall () File "/var/tmp/anaconda-7.1//usr/lib/anaconda/todo.py", line 1468, in doInstall self.fstab.savePartitions () File "fstab.py", line 221, in savePartitions
Chapter 8. Troubleshooting Installation on an Intel® or AMD System
102
sys.exit(0) SystemExit: 0 Local variables in innermost frame: self: <fstab.GuiFstab instance at 8446fe0> sys: <module 'sys' (built-in)> ToDo object: (itodo ToDo p1 (dp2 S'method' p3 (iimage CdromInstallMethod p4 (dp5 S'progressWindow' p6 <failed>
This error occurs in some systems where links to /tmp/ are symbolic to other locations or have beenchanged since creation. These symbolic or changed links are invalid during the installation process, sothe installation program cannot write information and fails.
If you experience such an error, first try to download any available updates for anaconda. Updates foranaconda and instructions for using them can be found at:
http://fedoraproject.org/wiki/Anaconda/Updates
The anaconda website may also be a useful reference and can be found online at:
http://fedoraproject.org/wiki/Anaconda
You can also search for bug reports related to this problem. To search Red Hat's bug tracking system,go to:
http://bugzilla.redhat.com/bugzilla/
8.4. Problems After Installation
8.4.1. Trouble With the Graphical GRUB Screen on an x86-basedSystem?If you are experiencing problems with GRUB, you may need to disable the graphical boot screen. Todo this, become the root user and edit the /boot/grub/grub.conf file.
Within the grub.conf file, comment out the line which begins with splashimage by inserting the #character at the beginning of the line.
Press Enter to exit the editing mode.
Once the boot loader screen has returned, type b to boot the system.
Once you reboot, the grub.conf file is reread and any changes you have made take effect.
You may re-enable the graphical boot screen by uncommenting (or adding) the above line back intothe grub.conf file.
8.4.2. Booting into a Graphical EnvironmentIf you have installed the X Window System but are not seeing a graphical desktop environment onceyou log into your system, you can start the X Window System graphical interface using the commandstartx.
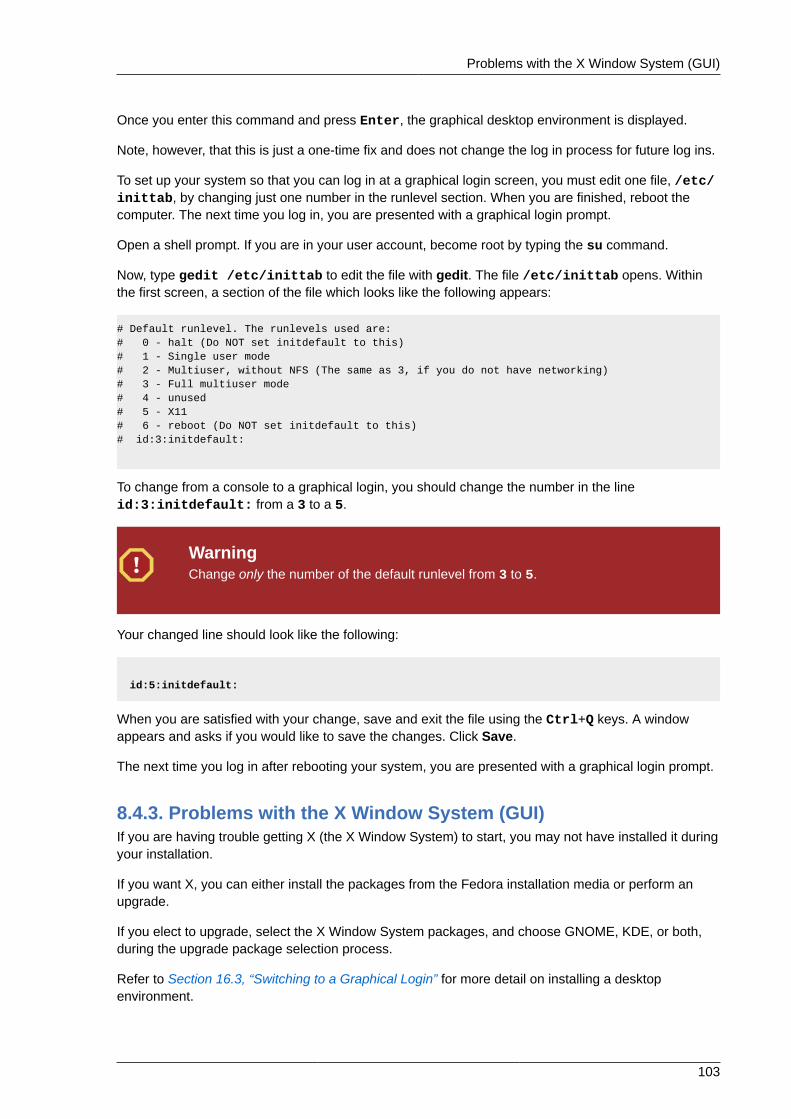
Problems with the X Window System (GUI)
103
Once you enter this command and press Enter, the graphical desktop environment is displayed.
Note, however, that this is just a one-time fix and does not change the log in process for future log ins.
To set up your system so that you can log in at a graphical login screen, you must edit one file, /etc/inittab, by changing just one number in the runlevel section. When you are finished, reboot thecomputer. The next time you log in, you are presented with a graphical login prompt.
Open a shell prompt. If you are in your user account, become root by typing the su command.
Now, type gedit /etc/inittab to edit the file with gedit. The file /etc/inittab opens. Withinthe first screen, a section of the file which looks like the following appears:
# Default runlevel. The runlevels used are: # 0 - halt (Do NOT set initdefault to this) # 1 - Single user mode # 2 - Multiuser, without NFS (The same as 3, if you do not have networking) # 3 - Full multiuser mode # 4 - unused # 5 - X11 # 6 - reboot (Do NOT set initdefault to this) # id:3:initdefault:
To change from a console to a graphical login, you should change the number in the lineid:3:initdefault: from a 3 to a 5.
WarningChange only the number of the default runlevel from 3 to 5.
Your changed line should look like the following:
id:5:initdefault:
When you are satisfied with your change, save and exit the file using the Ctrl+Q keys. A windowappears and asks if you would like to save the changes. Click Save.
The next time you log in after rebooting your system, you are presented with a graphical login prompt.
8.4.3. Problems with the X Window System (GUI)If you are having trouble getting X (the X Window System) to start, you may not have installed it duringyour installation.
If you want X, you can either install the packages from the Fedora installation media or perform anupgrade.
If you elect to upgrade, select the X Window System packages, and choose GNOME, KDE, or both,during the upgrade package selection process.
Refer to Section 16.3, “Switching to a Graphical Login” for more detail on installing a desktopenvironment.
Chapter 8. Troubleshooting Installation on an Intel® or AMD System
104
8.4.4. Problems with the X Server Crashing and Non-Root UsersIf you are having trouble with the X server crashing when anyone logs in, you may have a full filesystem (or, a lack of available hard drive space).
To verify that this is the problem you are experiencing, run the following command:
df -h
The df command should help you diagnose which partition is full. For additional information about dfand an explanation of the options available (such as the -h option used in this example), refer to thedf man page by typing man df at a shell prompt.
A key indicator is 100% full or a percentage above 90% or 95% on a partition. The /home/ and/tmp/ partitions can sometimes fill up quickly with user files. You can make some room on thatpartition by removing old files. After you free up some disk space, try running X as the user that wasunsuccessful before.
8.4.5. Problems When You Try to Log InIf you did not create a user account in the firstboot screens, switch to a console by pressingCtrl+Alt+F2, log in as root and use the password you assigned to root.
If you cannot remember your root password, boot your system as linux single.
If you are using an x86-based system and GRUB is your installed boot loader, type e for edit when theGRUB boot screen has loaded. You are presented with a list of items in the configuration file for theboot label you have selected.
Choose the line that starts with kernel and type e to edit this boot entry.
At the end of the kernel line, add:
single
Press Enter to exit edit mode.
Once the boot loader screen has returned, type b to boot the system.
Once you have booted into single user mode and have access to the # prompt, you must type passwdroot, which allows you to enter a new password for root. At this point you can type shutdown -rnow to reboot the system with the new root password.
If you cannot remember your user account password, you must become root. To become root, type su- and enter your root password when prompted. Then, type passwd <username>. This allows you toenter a new password for the specified user account.
If the graphical login screen does not appear, check your hardware for compatibility issues.Linuxquestions.org maintains a Hardware Compatibility List at:
http://www.linuxquestions.org/hcl/index.php
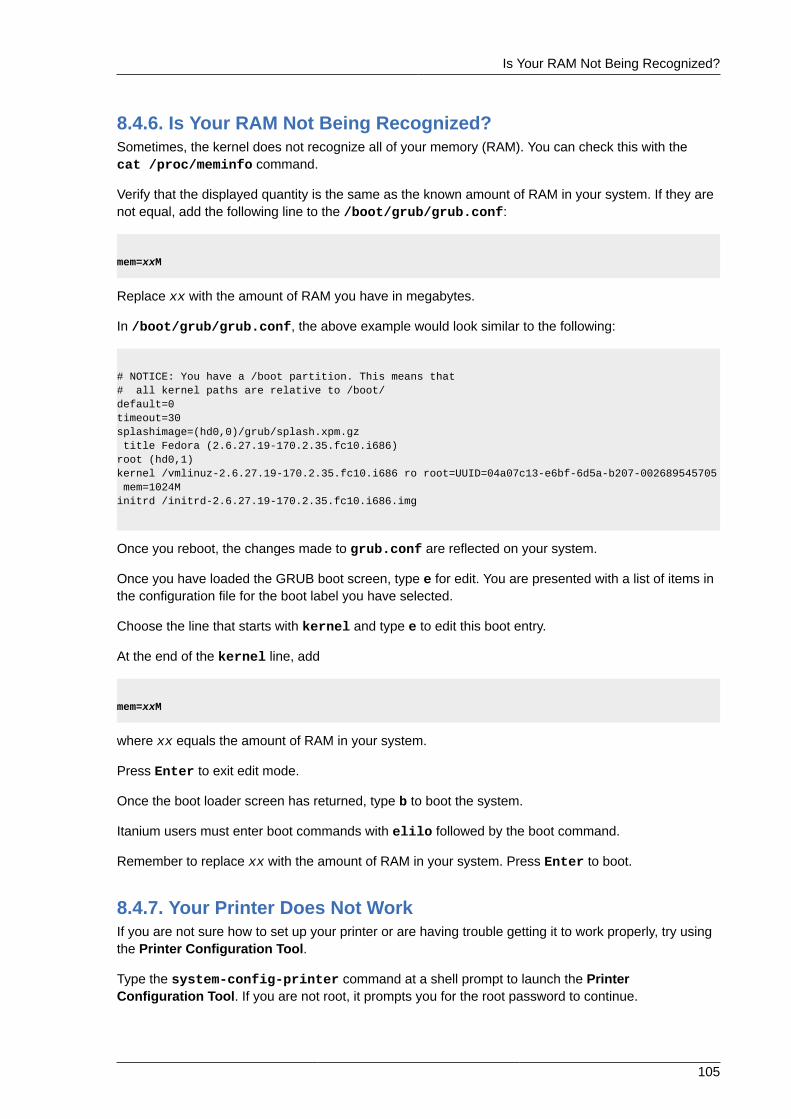
Is Your RAM Not Being Recognized?
105
8.4.6. Is Your RAM Not Being Recognized?Sometimes, the kernel does not recognize all of your memory (RAM). You can check this with thecat /proc/meminfo command.
Verify that the displayed quantity is the same as the known amount of RAM in your system. If they arenot equal, add the following line to the /boot/grub/grub.conf:
mem=xxM
Replace xx with the amount of RAM you have in megabytes.
In /boot/grub/grub.conf, the above example would look similar to the following:
# NOTICE: You have a /boot partition. This means that # all kernel paths are relative to /boot/ default=0 timeout=30 splashimage=(hd0,0)/grub/splash.xpm.gz title Fedora (2.6.27.19-170.2.35.fc10.i686)root (hd0,1)kernel /vmlinuz-2.6.27.19-170.2.35.fc10.i686 ro root=UUID=04a07c13-e6bf-6d5a-b207-002689545705 mem=1024Minitrd /initrd-2.6.27.19-170.2.35.fc10.i686.img
Once you reboot, the changes made to grub.conf are reflected on your system.
Once you have loaded the GRUB boot screen, type e for edit. You are presented with a list of items inthe configuration file for the boot label you have selected.
Choose the line that starts with kernel and type e to edit this boot entry.
At the end of the kernel line, add
mem=xxM
where xx equals the amount of RAM in your system.
Press Enter to exit edit mode.
Once the boot loader screen has returned, type b to boot the system.
Itanium users must enter boot commands with elilo followed by the boot command.
Remember to replace xx with the amount of RAM in your system. Press Enter to boot.
8.4.7. Your Printer Does Not WorkIf you are not sure how to set up your printer or are having trouble getting it to work properly, try usingthe Printer Configuration Tool.
Type the system-config-printer command at a shell prompt to launch the PrinterConfiguration Tool. If you are not root, it prompts you for the root password to continue.

Chapter 8. Troubleshooting Installation on an Intel® or AMD System
106
8.4.8. Apache-based httpd service/Sendmail Hangs During StartupIf you are having trouble with the Apache-based httpd service or Sendmail hanging at startup, makesure the following line is in the /etc/hosts file:
127.0.0.1 localhost.localdomain localhost

Part III. Advanced installation optionsThis part of the Fedora Installation Guide covers more complex and uncommon methods of installingFedora, including:
• boot options.
• installing without media.
• installing through VNC.
• using kickstart to automate the installation process.

Chapter 9.
109
Boot OptionsThe Fedora installation system includes a range of functions and options for administrators. To useboot options, enter linux option at the boot: prompt.
If you specify more than one option, separate each of the options by a single space. For example:
linux option1 option2 option3
Anaconda Boot OptionsThe anaconda installer has many boot options, most are listed on the wiki http://fedoraproject.org/wiki/Anaconda/Options.
Kernel Boot OptionsThe http://fedoraproject.org/wiki/KernelCommonProblems page lists many commonkernel boot options. The full list of kernel options is in the file /usr/share/doc/kernel-doc-version/Documentation/kernel-parameters.txt, which is installed with the kernel-docpackage.
Rescue ModeThe Fedora installation and rescue discs may either boot with rescue mode, or load theinstallation system. For more information on rescue discs and rescue mode, refer toSection 9.6.3, “Booting Your Computer with the Rescue Mode”.
9.1. Configuring the Installation System at the Boot MenuYou can use the boot menu to specify a number of settings for the installation system, including:
• language
• display resolution
• interface type
• Installation method
• network settings
9.1.1. Specifying the LanguageTo set the language for both the installation process and the final system, specify the ISO code for thatlanguage with the lang option. Use the keymap option to configure the correct keyboard layout.
For example, the ISO codes el_GR and gr identify the Greek language and the Greek keyboardlayout:
linux lang=el_GR keymap=gr
Chapter 9. Boot Options
110
9.1.2. Configuring the InterfaceYou may force the installation system to use the lowest possible screen resolution (640x480) with thelowres option. To use a specific display resolution, enter resolution=setting as a boot option.For example, to set the display resolution to 1024x768, enter:
linux resolution=1024x768
To run the installation process intext mode, enter:
linux text
To enable support for aserial console, enter serial as an additional option.
Use display=ip:0 to allow remote display forwarding. In this command, ip should be replaced withthe IP address of the system on which you want the display to appear.
On the system you want the display to appear on, you must execute the command xhost+remotehostname, where remotehostname is the name of the host from which you are running theoriginal display. Using the command xhost +remotehostname limits access to the remote displayterminal and does not allow access from anyone or any system not specifically authorized for remoteaccess.
9.1.3. Updating anacondaYou can install Fedora with a newer version of the anaconda installation program than the onesupplied on your installation media.
The boot option
linux updates
presents you with a prompt that asks you for a floppy disk containing anaconda updates. You do notneed to specify this option if you are performing a network installation and have already placed theupdates image contents in rhupdates/ on the server.
To load the anaconda updates from a network location instead, use:
linux updates=
followed by the URL for the location where the updates are stored.
9.1.4. Specifying the Installation MethodUse the askmethod option to display additional menus that enable you to specify the installationmethod and network settings. You may also configure the installation method and network settings atthe boot: prompt itself.
To specify the installation method from the boot: prompt, use the repo option. Refer to Table 9.1,“Installation methods” for the supported installation methods.
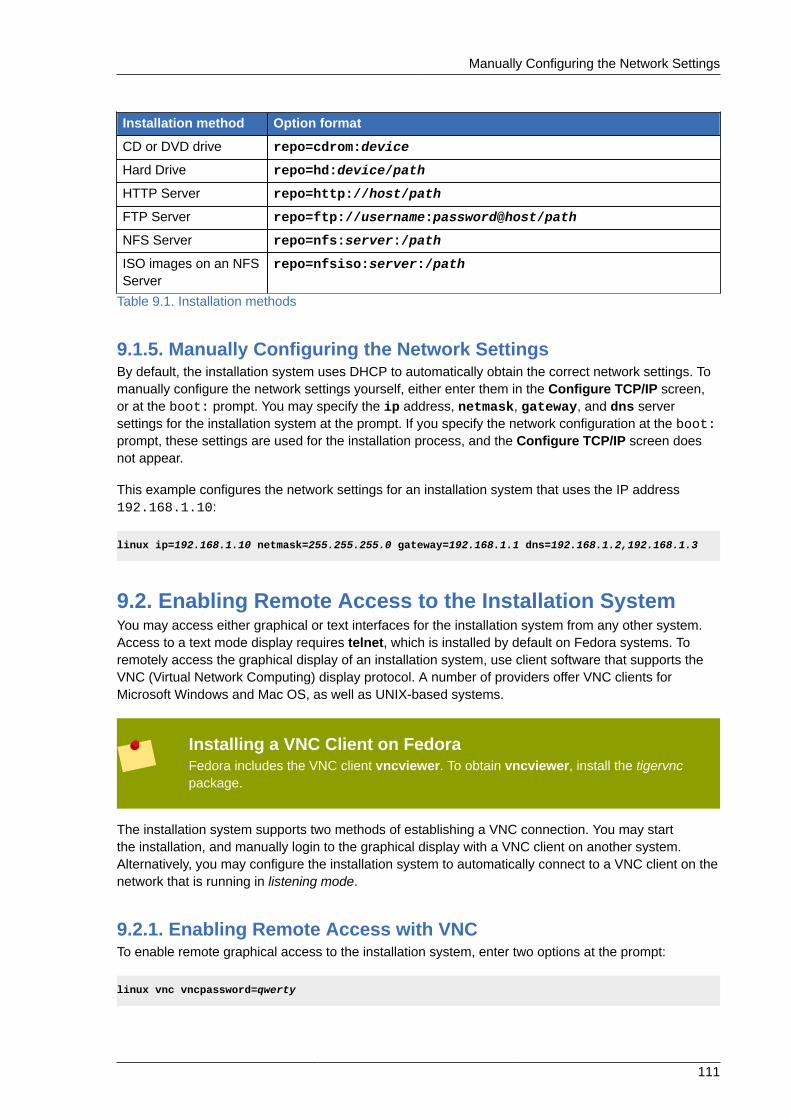
Manually Configuring the Network Settings
111
Installation method Option format
CD or DVD drive repo=cdrom:device
Hard Drive repo=hd:device/path
HTTP Server repo=http://host/path
FTP Server repo=ftp://username:password@host/path
NFS Server repo=nfs:server:/path
ISO images on an NFSServer
repo=nfsiso:server:/path
Table 9.1. Installation methods
9.1.5. Manually Configuring the Network SettingsBy default, the installation system uses DHCP to automatically obtain the correct network settings. Tomanually configure the network settings yourself, either enter them in the Configure TCP/IP screen,or at the boot: prompt. You may specify the ip address, netmask, gateway, and dns serversettings for the installation system at the prompt. If you specify the network configuration at the boot:prompt, these settings are used for the installation process, and the Configure TCP/IP screen doesnot appear.
This example configures the network settings for an installation system that uses the IP address192.168.1.10:
linux ip=192.168.1.10 netmask=255.255.255.0 gateway=192.168.1.1 dns=192.168.1.2,192.168.1.3
9.2. Enabling Remote Access to the Installation SystemYou may access either graphical or text interfaces for the installation system from any other system.Access to a text mode display requires telnet, which is installed by default on Fedora systems. Toremotely access the graphical display of an installation system, use client software that supports theVNC (Virtual Network Computing) display protocol. A number of providers offer VNC clients forMicrosoft Windows and Mac OS, as well as UNIX-based systems.
Installing a VNC Client on FedoraFedora includes the VNC client vncviewer. To obtain vncviewer, install the tigervncpackage.
The installation system supports two methods of establishing a VNC connection. You may startthe installation, and manually login to the graphical display with a VNC client on another system.Alternatively, you may configure the installation system to automatically connect to a VNC client on thenetwork that is running in listening mode.
9.2.1. Enabling Remote Access with VNCTo enable remote graphical access to the installation system, enter two options at the prompt:
linux vnc vncpassword=qwerty
Chapter 9. Boot Options
112
The vnc option enables the VNC service. The vncpassword option sets a password for remoteaccess. The example shown above sets the password as qwerty.
VNC PasswordsThe VNC password must be at least six characters long.
Specify the language, keyboard layout and network settings for the installation system with thescreens that follow. You may then access the graphical interface through a VNC client. The installationsystem displays the correct connection setting for the VNC client:
Starting VNC...The VNC server is now running.Please connect to computer.mydomain.com:1 to begin the install...Starting graphical installation...Press <enter> for a shell
You may then login to the installation system with a VNC client. To run the vncviewer client on
Fedora, choose Applications → Accessories → VNC Viewer, or type the command vncviewer ina terminal window. Enter the server and display number in the VNC Server dialog. For the exampleabove, the VNC Server is computer.mydomain.com:1.
9.2.2. Connecting the Installation System to a VNC ListenerTo have the installation system automatically connect to a VNC client, first start the client inlistening mode. On Fedora systems, use the -listen option to run vncviewer as a listener. In aterminal window, enter the command:
vncviewer -listen
Firewall Reconfiguration RequiredBy default, vncviewer uses TCP port 5500 when in listening mode. To permit connections
to this port from other systems, choose System → Administration → Firewall. SelectOther ports, and Add. Enter 5500 in the Port(s) field, and specify tcp as the Protocol.
Once the listening client is active, start the installation system and set the VNC options at the boot:prompt. In addition to vnc and vncpassword options, use the vncconnect option to specify thename or IP address of the system that has the listening client. To specify the TCP port for the listener,add a colon and the port number to the name of the system.
For example, to connect to a VNC client on the system desktop.mydomain.com on the port 5500,enter the following at the boot: prompt:
linux vnc vncpassword=qwerty vncconnect=desktop.mydomain.com:5500
9.2.3. Enabling Remote Access with TelnetTo enable remote access to a text mode installation, use the
Logging to a Remote System During the Installation
113
telnet option at the boot: prompt:
linux text telnet
You may then connect to the installation system with the telnet utility. The telnet commandrequires the name or IP address of the installation system:
telnet computer.mydomain.com
Telnet Access Requires No PasswordTo ensure the security of the installation process, only use the telnet option to installsystems on networks with restricted access.
9.3. Logging to a Remote System During the InstallationBy default, the installation process sends log messages to the console as they are generated. Youmay specify that these messages go to a remote system that runs asyslog service.
To configure remote logging, add the syslog option. Specify the IP address of the logging system,and the UDP port number of the log service on that system. By default, syslog services that acceptremote messages listen on UDP port 514.
For example, to connect to a syslog service on the system 192.168.1.20, enter the following at theboot: prompt:
linux syslog=192.168.1.20:514
9.3.1. Configuring a Log ServerFedora uses rsyslog to provide a syslog service. The default configuration of rsyslog rejectsmessages from remote systems.
Only Enable Remote Syslog Access on Secured NetworksThe rsyslog configuration detailed below does not make use of any of the securitymeasures available in rsyslog Crackers may slow or crash systems that permit accessto the logging service, by sending large quantities of false log messages. In addition,hostile users may intercept or falsify messages sent to the logging service over thenetwork.
To configure a Fedora system to accept log messages from other systems on the network, edit thefile /etc/rsyslog.conf. You must use root privileges to edit the file /etc/rsyslog.conf.Uncomment the following lines by removing the hash preceding them:
$ModLoad imudp.so $UDPServerRun 514
Restart the rsyslog service to apply the change:
Chapter 9. Boot Options
114
su -c '/sbin/service rsyslog restart'
Enter the root password when prompted.
Firewall Reconfiguration RequiredBy default, the syslog service listens on UDP port 514. To permit connections to this port
from other systems, choose System → Administration → Firewall. Select Other ports,and Add. Enter 514 in the Port(s) field, and specify udp as the Protocol.
9.4. Automating the Installation with KickstartAKickstart file specifies settings for an installation. Once the installation system boots, it can read aKickstart file and carry out the installation process without any further input from a user.
Every Installation Produces a Kickstart FileThe Fedora installation process automatically writes a Kickstart file that contains thesettings for the installed system. This file is always saved as /root/anaconda-ks.cfg.You may use this file to repeat the installation with identical settings, or modify copies tospecify settings for other systems.
Important — Kickstart installations and FirstbootFirstboot does not run after a system is installed from this Kickstart file. Either specify auser with the user option in the Kickstart file before installing additional systems from it(refer to Section 13.4, “Kickstart Options” for details) or log into the installed system with avirtual console as root and add users with the adduser command.
Fedora includes a graphical application to create and modify Kickstart files by selecting the optionsthat you require. Use the package system-config-kickstart to install this utility. To load the
Fedora Kickstart editor, choose Applications → System Tools → Kickstart.
Kickstart files list installation settings in plain text, with one option per line. This format lets you modifyyour Kickstart files with any text editor, and write scripts or applications that generate custom Kickstartfiles for your systems.
To automate the installation process with a Kickstart file, use the ks option to specify the name andlocation of the file:
linux ks=location/kickstart-file.cfg
You may use Kickstart files that are held on either removable storage, a hard drive, or a networkserver. Refer to Table 9.2, “Kickstart sources” for the supported Kickstart sources.
Kickstart source Option format
CD or DVD drive ks=cdrom:/directory/ks.cfg
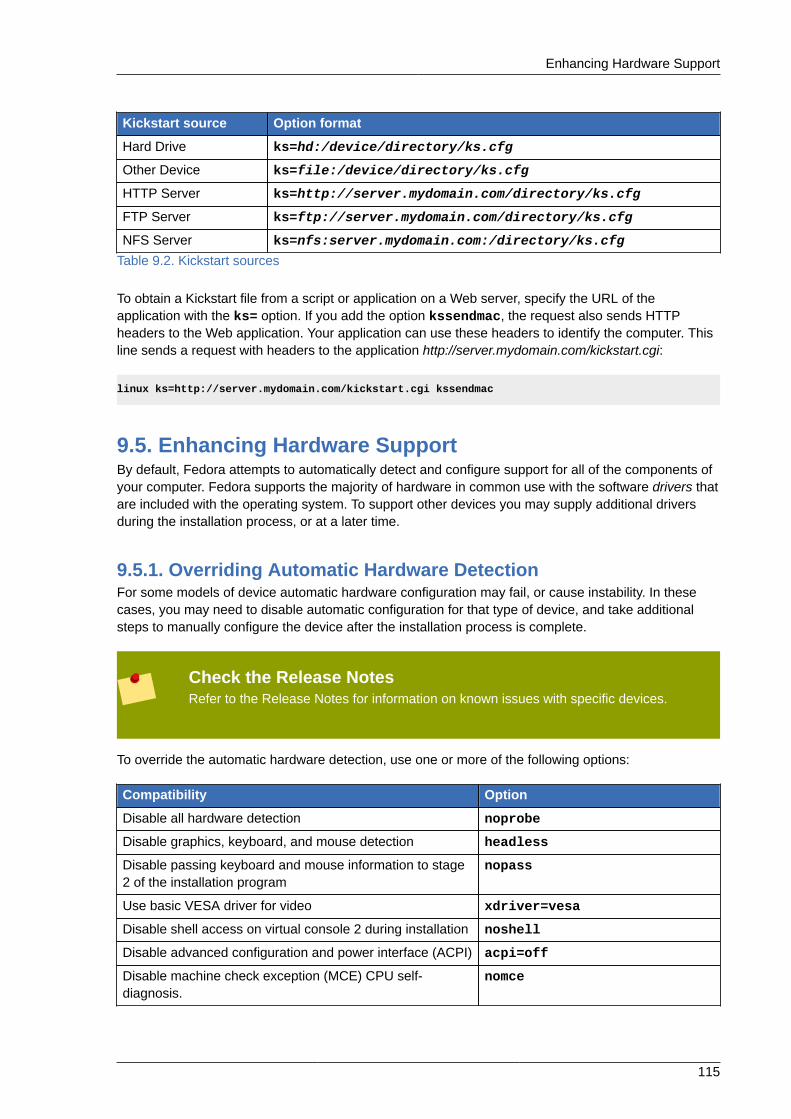
Enhancing Hardware Support
115
Kickstart source Option format
Hard Drive ks=hd:/device/directory/ks.cfg
Other Device ks=file:/device/directory/ks.cfg
HTTP Server ks=http://server.mydomain.com/directory/ks.cfg
FTP Server ks=ftp://server.mydomain.com/directory/ks.cfg
NFS Server ks=nfs:server.mydomain.com:/directory/ks.cfg
Table 9.2. Kickstart sources
To obtain a Kickstart file from a script or application on a Web server, specify the URL of theapplication with the ks= option. If you add the option kssendmac, the request also sends HTTPheaders to the Web application. Your application can use these headers to identify the computer. Thisline sends a request with headers to the application http://server.mydomain.com/kickstart.cgi:
linux ks=http://server.mydomain.com/kickstart.cgi kssendmac
9.5. Enhancing Hardware SupportBy default, Fedora attempts to automatically detect and configure support for all of the components ofyour computer. Fedora supports the majority of hardware in common use with the software drivers thatare included with the operating system. To support other devices you may supply additional driversduring the installation process, or at a later time.
9.5.1. Overriding Automatic Hardware DetectionFor some models of device automatic hardware configuration may fail, or cause instability. In thesecases, you may need to disable automatic configuration for that type of device, and take additionalsteps to manually configure the device after the installation process is complete.
Check the Release NotesRefer to the Release Notes for information on known issues with specific devices.
To override the automatic hardware detection, use one or more of the following options:
Compatibility Option
Disable all hardware detection noprobe
Disable graphics, keyboard, and mouse detection headless
Disable passing keyboard and mouse information to stage2 of the installation program
nopass
Use basic VESA driver for video xdriver=vesa
Disable shell access on virtual console 2 during installation noshell
Disable advanced configuration and power interface (ACPI) acpi=off
Disable machine check exception (MCE) CPU self-diagnosis.
nomce
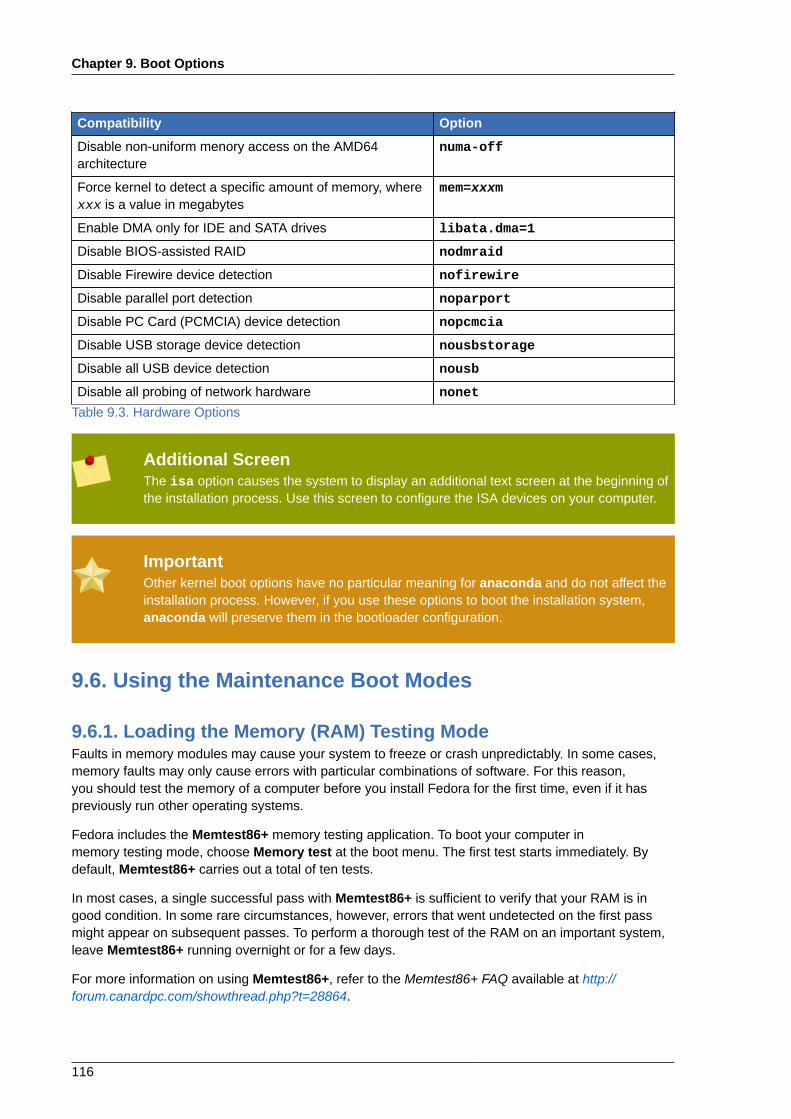
Chapter 9. Boot Options
116
Compatibility Option
Disable non-uniform menory access on the AMD64architecture
numa-off
Force kernel to detect a specific amount of memory, wherexxx is a value in megabytes
mem=xxxm
Enable DMA only for IDE and SATA drives libata.dma=1
Disable BIOS-assisted RAID nodmraid
Disable Firewire device detection nofirewire
Disable parallel port detection noparport
Disable PC Card (PCMCIA) device detection nopcmcia
Disable USB storage device detection nousbstorage
Disable all USB device detection nousb
Disable all probing of network hardware nonet
Table 9.3. Hardware Options
Additional ScreenThe isa option causes the system to display an additional text screen at the beginning ofthe installation process. Use this screen to configure the ISA devices on your computer.
ImportantOther kernel boot options have no particular meaning for anaconda and do not affect theinstallation process. However, if you use these options to boot the installation system,anaconda will preserve them in the bootloader configuration.
9.6. Using the Maintenance Boot Modes
9.6.1. Loading the Memory (RAM) Testing ModeFaults in memory modules may cause your system to freeze or crash unpredictably. In some cases,memory faults may only cause errors with particular combinations of software. For this reason,you should test the memory of a computer before you install Fedora for the first time, even if it haspreviously run other operating systems.
Fedora includes the Memtest86+ memory testing application. To boot your computer inmemory testing mode, choose Memory test at the boot menu. The first test starts immediately. Bydefault, Memtest86+ carries out a total of ten tests.
In most cases, a single successful pass with Memtest86+ is sufficient to verify that your RAM is ingood condition. In some rare circumstances, however, errors that went undetected on the first passmight appear on subsequent passes. To perform a thorough test of the RAM on an important system,leave Memtest86+ running overnight or for a few days.
For more information on using Memtest86+, refer to the Memtest86+ FAQ available at http://forum.canardpc.com/showthread.php?t=28864.
Verifying boot media
117
To halt the tests and reboot your computer, enter Esc at any time.
9.6.2. Verifying boot mediaYou can test the integrity of an ISO-based installation source before using it to install Fedora. Thesesources include CD, DVD, and ISO images stored on a local hard drive or on an NFS server. Verifyingthat the ISO images are instace before you attempt an installation helps to avoid problems that areoften encountered during installation.
Fedora offers you three ways to test installation ISOs:
• select the Verify and Boot option on the Fedora Live CD. To access the Live CD boot menu, pressany key within ten seconds of the splash screen appearing.
• select OK at the prompt to test the media before installation when booting from the Fedoradistribution CD set or DVD
• boot Fedora with the option mediacheck option.
9.6.3. Booting Your Computer with the Rescue ModeYou may boot a command-line Linux system from either arescue disc or an installation disc, without installing Fedora on the computer. This enables you touse the utilities and functions of a running Linux system to modify or repair systems that are alreadyinstalled on your computer.
The rescue disc starts the rescue mode system by default. To load the rescue system with theinstallation disc, choose Rescue installed system from the boot menu.
Specify the language, keyboard layout and network settings for the rescue system with the screensthat follow. The final setup screen configures access to the existing system on your computer.
By default, rescue mode attaches an existing operating system to the rescue system under thedirectory /mnt/sysimage/.
9.6.4. Upgrading your computerA previous boot option, upgrade, has been superceded by a stage in the installation process wherethe installation program prompts you to upgrade or reinstall earlier versions of Fedora that it detects onyour system.
However, the installation program may not correctly detect a previous version of Fedora if the contentsof the /etc/fedora-release file have changed. The boot option upgradeany relaxes the test thatthe installation program performs and allows you to upgrade a Fedora installation that the installationprogram has not correctly identified.

118
Chapter 10.
119
Installing Without Media
Linux RequiredThis procedure assumes you are already using Fedora or another relatively modern Linuxdistribution, and the GRUB boot loader. It also assumes you are a somewhat experiencedLinux user.
PreupgradeIf you have an earlier version of Fedora installed on your system, you might be ableto upgrade to Fedora 13 without making additional physical media by using thepreupgrade tool. Refer to Chapter 18, Upgrading Your Current System for details of usingpreupgrade.
This section discusses how to install Fedora to your system without making any additional physicalmedia. Instead, you can use your existing GRUB boot loader to start the installation program.
10.1. Retrieving Boot FilesTo perform an installation without media or a PXE server, your system must have two files storedlocally, a kernel and an initial RAM disk.
1. Download a Live image or DVD distribution, or to locate an installation mirror, visit http://mirrors.fedoraproject.org/publiclist/Fedora/13/.
2. Locate the isolinux/ folder using one of the following methods:
• If you chose to download an image, open it with the appropriate desktop tool. If you are usingFedora, double-click the file to open it with the Archive Manager. Open the isolinux/ folder.
• If you chose not to download a whole image because you wish to install via the network, locatethe desired release. In general, once you find a suitable mirror, browse to the releases/13/Fedora/arch/os/isolinux/ folder.
Installation Types AvailableIf you download an image, you may then choose a hard disk-based installation or anetwork installation. If you only download selected files from a mirror, you may onlyperform a network installation.
3. Copy the vmlinuz and initrd.img files from the chosen source to the /boot/ directory,renaming them to vmlinuz-install and initrd.img-installYou must have rootprivileges to write files into the /boot/ directory.
10.2. Editing the GRUB ConfigurationThe GRUB boot loader uses the configuration file /boot/grub/grub.conf. To configure GRUB toboot from the new files, add a boot stanza to /boot/grub/grub.confthat refers to them.
Chapter 10. Installing Without Media
120
A minimal boot stanza looks like the following listing:
title Installation root (hd0,0) kernel /vmlinuz-install initrd /initrd.img-install
You may wish to add options to the end of the kernel line of the boot stanza. These options setpreliminary options in Anaconda which the user normally sets interactively. For a list of availableinstaller boot options, refer to Chapter 9, Boot Options.
The following options are generally useful for medialess installations:
• ip=
• repo=
• lang=
• keymap=
• ksdevice= (if installation requires an interface other than eth0)
• vnc and vncpassword= for a remote installation
When you are finished, change the default option in /boot/grub/grub.conf to point to the newfirst stanza you added:
default 0
10.3. Booting to InstallationReboot the system. GRUB boots the installation kernel and RAM disk, including any options you set.You may now refer to the appropriate chapter in this guide for the next step. If you chose to installremotely using VNC, refer to Section 9.2, “Enabling Remote Access to the Installation System” forassistance in connecting to the remote system.
Chapter 11.
121
Setting Up an Installation Server
Experience RequiredThis appendix is intended for users with previous Linux experience. If you are a new user,you may want to install using minimal boot media or the distribution DVD instead.
WarningThe instructions in this appendix configures an automated install server. The defaultconfiguration includes destruction of all existing data on all disks for hosts that install usingthis method. This is often different from other network install server configurations whichmay provide for an interactive installation experience.
Fedora allows for installation over a network using the NFS, FTP, or HTTP protocols. A networkinstallation can be started from a boot CD-ROM, a bootable flash memory drive, or by using theaskmethod boot option with the Fedora CD #1 or DVD. Alternatively, if the system to be installedcontains a network interface card (NIC) with Pre-Execution Environment (PXE) support, it can beconfigured to boot from files on another networked system rather than local media such as a CD-ROM.
For a PXE network installation, the client's NIC with PXE support sends out a broadcast request forDHCP information. The DHCP server provides the client with an IP address, other network informationsuch as name server, the IP address or hostname of the tftp server (which provides the filesnecessary to start the installation program), and the location of the files on the tftp server. This ispossible because of PXELINUX, which is part of the syslinux package.
In the past, administrators needed to perform a great deal of manual configuration to produce aninstallation server. However, if you have a Red Hat Enterprise Linux, CentOS, or Fedora server onyour local network, you can use cobbler to perform these tasks. To configure a PXE server manually,see Section 11.5, “Manually configure a PXE server”.
To perform the tasks in this section, switch to the root account with the command su -. As analternative, you can run a command with the -c option, using the form su -c 'command'.
11.1. Setting Up cobblerTo install cobbler use the following command:
yum -y install cobbler
The cobbler command can check its own settings for validity and report the results. Run thefollowing command to check the settings:
cobbler check
Change the settings in the /etc/cobbler/settings file to reflect the IP address information for theserver. You must change at least the server and next_server options, although these options maypoint to the same IP address.
Chapter 11. Setting Up an Installation Server
122
If you are not already running a DHCP server, you should also change the manage_dhcp optionto 1. If you are running a DHCP server, configure it according to the instructions found in thesyslinux package documentation. For more information, refer to your local files /usr/share/doc/syslinux-version/syslinux.doc and /usr/share/doc/syslinux-version/pxelinux.doc.
11.2. Setting Up the DistributionTo set up a distribution from a full Fedora DVD or ISO image, use this procedure.
Network LocationsTo create a local mirror from an existing network source, skip this section and refer insteadto Section 11.3, “Mirroring a Network Location”.
1. If you are using a DVD disc or ISO image, Create a directory mount point:
mkdir /mnt/dvd
To mount a physical DVD disc, use the following command:
mount -o context=system_u:object_r:httpd_sys_content_t:s0 /dev/dvd /mnt/dvd
To mount a DVD ISO image, use the following command:
mount -ro loop,context=system_u:object_r:httpd_sys_content_t:s0 /path/to/image.iso /mnt/dvd
2. To support NFS installation, create a file /etc/exports and add the following line to it:
/mnt/dvd *(ro,async)
Start the NFS server using the following commands:
/sbin/service rpcbind start /sbin/service nfs start
3. To support HTTP installation, use yum to install the Apache web server if it is not already installed:
yum -y install httpd
Make a link to the mounted disc in the Apache public content area:
ln -s /mnt/dvd /var/www/html/distro
11.3. Mirroring a Network LocationIf you do not have discs or ISO images for a distribution, you can use cobbler to create aninstallation server. The cobbler command can fetch the distribution over the network as part of theimport process.
Importing the Distribution
123
Locate the distribution on the network. The location may be on the local network or reached at aremote site via FTP, HTTP, or rsync protocols. Note the URI, which will be in one of the followingforms:
• http://mirror.example.com/pub/fedora/linux/releases/13/Fedora/arch/os
• ftp://mirror.example.com/pub/fedora/linux/releases/13/Fedora/arch/os
• rsync://mirror.example.com/fedora/linux/releases/13/Fedora/arch/os
11.4. Importing the DistributionTo offer a distribution through more than one installation method, perform additional cobblerimport tasks using a different name for each method. For best results, use the installation method aspart of the name, so it appears in the client's boot menu.
1. To import the DVD disc or ISO distribution into cobbler, run this command:
cobbler import --path=/mnt/dvd --name=distro_name
For distro_name, substitute a meaningful name for the distribution.
To import a local or remote network distribution into cobbler, run this command. Replacenetwork_URI with the URI you found in Section 11.3, “Mirroring a Network Location”, anddistro_name as above:
cobbler import --patch=network_URI --name=distro_name
Importing a SourceWhen cobbler imports a distribution with the commands above, it copies all the filesto the server's local storage, which may take some time.
If you do not want to make local copies of the distribution because clients can already reach itslocation, use the --available-as option.
cobbler import --path=/mnt/dvd --name=distro_name --available-as=network_URIcobbler import --path=network_URI --name=distro_name --available-as=network_URI
For nework_URI, substitute the appropriate network location of the distribution. This URIindicates how the server makes the distribution available to its clients. The examples aboveassume that your cobbler server reaches the mirror location at the same URI as the clients.If not, substitute an appropriate URI for the --path option. The following examples are URIlocations that work if you have been following the procedures in this section, and your server's IPaddress is 192.168.1.1:
• nfs://192.168.1.1:/mnt/dvd
• http://192.168.1.1:/distro
If necessary, replace 192.168.1.1 with the IP address for your cobbler server.
Chapter 11. Setting Up an Installation Server
124
2. Run the command cobbler sync to apply the changes. To check that your cobbler server islistening on the correct ports, use the netstat -lp command.
Firewall ConsiderationsDepending on your server's configuration, you may need to use the system-config-securitylevel command to permit access to some or all of thesenetwork services:
• 67 or bootps, for the DHCP/BOOTP server
• 69 or tftp, for providing the PXE loader
• 80 or http, if the cobbler server is to provide HTTP installation service
• 20 and 21 or ftp, if the cobbler server is to provide FTP installation service
• 111 or sunrpc, if the cobbler server is to provide NFS installation service
11.5. Manually configure a PXE serverThe following steps must be performed to prepare for a PXE installation:
1. Configure the network (NFS, FTP, HTTP) server to export the installation tree.
2. Configure the files on the tftp server necessary for PXE booting.
3. Configure which hosts are allowed to boot from the PXE configuration.
4. Start the tftp service.
5. Configure DHCP.
6. Boot the client, and start the installation.
11.5.1. Setting up the Network ServerFirst, configure an NFS, FTP, or HTTP server to export the entire installation tree for the versionand variant of Fedora to be installed. Refer to Section 4.6, “Preparing for a Network Installation” fordetailed instructions.
11.5.2. PXE Boot ConfigurationThe next step is to copy the files necessary to start the installation to the tftp server so they canbe found when the client requests them. The tftp server is usually the same server as the networkserver exporting the installation tree.
To copy these files, run the Network Booting Tool on the NFS, FTP, or HTTP server. A separate PXEserver is not necessary.
11.5.3. Adding PXE HostsAfter configuring the network server, the interface as shown in Figure 11.1, “Add Hosts” is displayed.
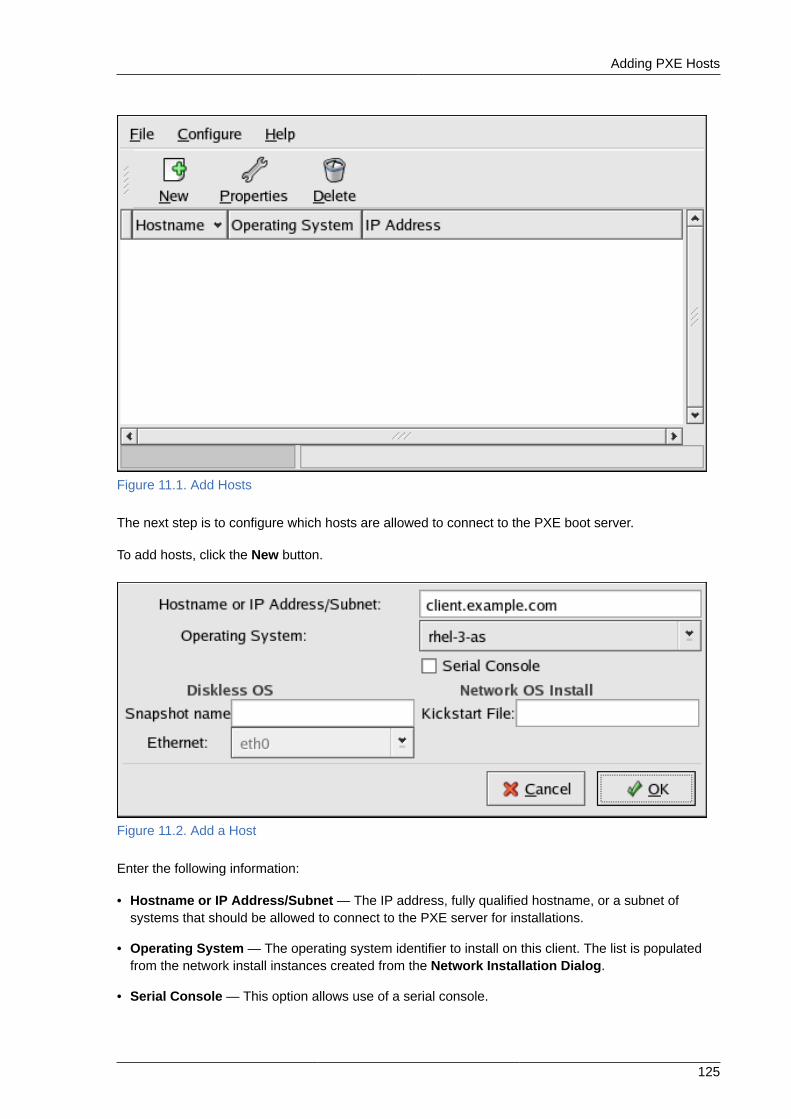
Adding PXE Hosts
125
Figure 11.1. Add Hosts
The next step is to configure which hosts are allowed to connect to the PXE boot server.
To add hosts, click the New button.
Figure 11.2. Add a Host
Enter the following information:
• Hostname or IP Address/Subnet — The IP address, fully qualified hostname, or a subnet ofsystems that should be allowed to connect to the PXE server for installations.
• Operating System — The operating system identifier to install on this client. The list is populatedfrom the network install instances created from the Network Installation Dialog.
• Serial Console — This option allows use of a serial console.
Chapter 11. Setting Up an Installation Server
126
• Kickstart File — The location of a kickstart file to use, such as http://server.example.com/kickstart/ks.cfg. This file can be created with the Kickstart Configurator. Refer toChapter 14, Kickstart Configurator for details.
Ignore the Snapshot name and Ethernet options. They are only used for diskless environments.
11.5.4. TFTPD
11.5.4.1. Starting the tftp ServerOn the DHCP server, verify that the tftp-server package is installed with the command rpm -qtftp-server.
tftp is an xinetd-based service; start it with the following commands:
/sbin/chkconfig --level 345 xinetd on /sbin/chkconfig --level 345 tftp on
These commands configure the tftp and xinetd services to immediately turn on and also configurethem to start at boot time in runlevels 3, 4, and 5.
11.5.5. Configuring the DHCP ServerIf a DHCP server does not already exist on the network, configure one. Refer to the Red HatEnterprise Linux Deployment Guide for details. Make sure the configuration file contains the followingso that PXE booting is enabled for systems which support it:
allow booting; allow bootp; class "pxeclients" { match if substring(option vendor-class-identifier, 0, 9) = "PXEClient"; next-server <server-ip>; filename "linux-install/pxelinux.0"; }
where the next-server <server-ip> should be replaced with the IP address of the tftp server.
11.5.6. Adding a Custom Boot MessageOptionally, modify /tftpboot/linux-install/msgs/boot.msg to use a custom boot message.
11.5.7. Performing the PXE InstallationFor instructions on how to configure the network interface card with PXE support to boot from thenetwork, consult the documentation for the NIC. It varies slightly per card.
If your NIC does not support PXE booting, you can still PXE boot your system by using the gPXEbootloader. The Fedora Project does not distribute gPXE — refer to the Etherboot Project website athttp://etherboot.org/wiki/start for more information.
After the system boots the installation program, refer to the Chapter 7, Installing on Intel® and AMDSystems.
Chapter 12.
127
Installing Through VNCThe Red Hat Enterprise Linux and Fedora installer (anaconda) offers you two interactive modes ofoperation. The original mode is a text-based interface. The newer mode uses GTK+ and runs in theX Window environment. This chapter explains how you can use the graphical installation mode inenvironments where the system lacks a proper display and input devices typically associated witha workstation. This scenario is typical of systems in datacenters, which are often installed in a rackenvironment and do not have a display, keyboard, or mouse. Additionally, a lot of these systems evenlack the ability to connect a graphical display. Given that enterprise hardware rarely needs that abilityat the physical system, this hardware configuration is acceptable.
Even in these environments, however, the graphical installer remains the recommended method ofinstallation. The text mode environment lacks a lot of capabilities found in the graphical mode. Manyusers still feel that the text mode interface provides them with additional power or configuration abilitynot found in the graphical version. The opposite is true. Much less development effort is put in to thetext-mode environment and specific things (for example, LVM configuration, partition layout, packageselection, and bootloader configuration) are deliberately left out of the text mode environment. Thereasons for this are:
• Less screen real estate for creating user interfaces similar to those found in the graphical mode.
• Difficult internationalization support.
• Desire to maintain a single interactive installation code path.
Anaconda therefore includes a Virtual Network Computing (VNC) mode that allows the graphicalmode of the installer to run locally, but display on a system connected to the network. Installing in VNCmode provides you with the full range of installation options, even in situations where the system lacksa display or input devices.
12.1. VNC ViewerPerforming a VNC installation requires a VNC viewer running on your workstation or other terminalcomputer. Locations where you might want a VNC viewer installed:
• Your workstation
• Laptop on a datacenter crash cart
VNC is open source software licensed under the GNU General Public License. Versions exist forLinux, Windows, and MacOS X. Here are some recommended VNC viewers:
• VNC clients are available in the repositories of most Linux distributions. Use your package managerto search for a client for your chosen distribution. For example, on Fedora, install the tigervncpackage:
# yum install tigervnc
• TightVNC is available for Windows at http://www.tightvnc.com/
• MacOS X includes built-in VNC support as of version 10.5. In the Finder, click the Go menu andchoose Connect to Server. In the server address field, you can type vnc://SERVER:DISPLAY,
Chapter 12. Installing Through VNC
128
where SERVER is the IP address or DNS host name of the VNC server you wish to connect to andDISPLAY is the VNC display number (usually 1), and click Connect.
Once you have verified you have a VNC viewer available, it's time to start the installation.
12.2. VNC Modes in AnacondaAnaconda offers two modes for VNC installation. The mode you select will depend on the networkconfiguration in your environment.
12.2.1. Direct ModeDirect mode VNC in anaconda is when the client initiates a connection to the VNC server running inanaconda. Anaconda will tell you when to initiate this connection in the VNC viewer. Direct mode canbe activated by either of the following commands:
• Specify vnc as a boot argument.
• Specify the vnc command in the kickstart file used for installation.
When you activate VNC mode, anaconda will complete the first stage of the installer and then startVNC to run the graphical installer. The installer will display a message on the console in the followingformat:
Running anaconda VERSION, the PRODUCT system installer - please wait...
Anaconda will also tell you the IP address and display number to use in your VNC viewer. At this point,you need to start the VNC viewer and connect to the target system to continue the installation. TheVNC viewer will present anaconda to you in graphical mode.
There are some disadvantages to direct mode, including:
• Requires visual access to the system console to see the IP address and port to connect the VNCviewer to.
• Requires interactive access to the system console to complete the first stage of the installer.
If either of these disadvantages would prevent you from using direct mode VNC in anaconda, thenconnect mode is probably more suited to your environment.
12.2.2. Connect ModeCertain firewall configurations or instances where the target system is configured to obtain a dynamicIP address may cause trouble with the direct VNC mode in anaconda. In addition, if you lack a consoleon the target system to see the message that tells you the IP address to connect to, then you will notbe able to continue the installation.
The VNC connect mode changes how VNC is started. Rather than anaconda starting up and waitingfor you to connect, the VNC connect mode allows anaconda to automatically connect to your view. Youwon't need to know the IP address of the target system in this case.
To activate the VNC connect mode, pass the vncconnect boot parameter:
boot: linux vncconnect=HOST
Installation Using VNC
129
Replace HOST with your VNC viewer's IP address or DNS host name. Before starting the installationprocess on the target system, start up your VNC viewer and have it wait for an incoming connection.
Start the installation and when your VNC viewer displays the graphical installer, you are ready to go.
12.3. Installation Using VNCNow that you have installed a VNC viewer application and selected a VNC mode for use in anaconda,you are ready to begin the installation.
12.3.1. Installation ExampleThe easiest way to perform an installation using VNC is to connect another computer directly to thenetwork port on the target system. The laptop on a datacenter crash cart usually fills this role. If youare performing your installation this way, make sure you follow these steps:
1. Connect the laptop or other workstation to the target system using a crossover cable. If you areusing regular patch cables, make sure you connect the two systems using a small hub or switch.Most recent Ethernet interfaces will automatically detect if they need to be crossover or not, so itmay be possible to connect the two systems directly using a regular patch cable.
2. Configure the VNC viewer system to use a RFC 1918 address with no gateway. This privatenetwork connection will only be used for the purpose of installation. Configure the VNC viewersystem to be 192.168.100.1/24. If that address is in use, just pick something else in the RFC 1918address space that is available to you.
3. Start the installation on the target system.
a. Booting the installation DVD or CD.
If booting the installation media (CD or DVD), make sure vnc is passed as a boot parameter.To add the vnc parameter, you will need a console attached to the target system that allowsyou to interact with the boot process. Enter the following at the prompt:
boot: linux vnc
b. Boot over the network.
If the target system is configured with a static IP address, add the vnc command to thekickstart file. If the target system is using DHCP, add vncconnect=HOST to the bootarguments for the target system. HOST is the IP address or DNS host name of the VNCviewer system. Enter the following at the prompt:
boot: linux vncconnect=HOST
4. When prompted for the network configuration on the target system, assign it an availableRFC 1918 address in the same network you used for the VNC viewer system. For example,192.168.100.2/24.
Chapter 12. Installing Through VNC
130
NoteThis IP address is only used during installation. You will have an opportunity toconfigure the final network settings, if any, later in the installer.
5. Once the installer indicates it is starting anaconda, you will be instructed to connect to thesystem using the VNC viewer. Connect to the viewer and follow the graphical installation modeinstructions found in the product documentation.
12.3.2. Kickstart ConsiderationsIf your target system will be booting over the network, VNC is still available. Just add the vnccommand to the kickstart file for the system. You will be able to connect to the target system usingyour VNC viewer and monitor the installation progress. The address to use is the one the system isconfigured with via the kickstart file.
If you are using DHCP for the target system, the reverse vncconnect method may work better foryou. Rather than adding the vnc boot parameter to the kickstart file, add the vncconnect=HOSTparameter to the list of boot arguments for the target system. For HOST, put the IP address or DNShost name of the VNC viewer system. See the next section for more details on using the vncconnectmode.
12.3.3. Firewall ConsiderationsIf you are performing the installation where the VNC viewer system is a workstation on a differentsubnet from the target system, you may run in to network routing problems. VNC works fine so longas your viewer system has a route to the target system and ports 5900 and 5901 are open. If yourenvironment has a firewall, make sure ports 5900 and 5901 are open between your workstation andthe target system.
In addition to passing the vnc boot parameter, you may also want to pass the vncpasswordparameter in these scenarios. While the password is sent in plain text over the network, it doesprovide an extra step before a viewer can connect to a system. Once the viewer connects to the targetsystem over VNC, no other connections are permitted. These limitations are usually sufficient forinstallation purposes.
ImportantBe sure to use a temporary password for the vncpassword option. It should not be apassword you use on any systems, especially a real root password.
If you continue to have trouble, consider using the vncconnect parameter. In this mode ofoperation, you start the viewer on your system first telling it to listen for an incoming connection. Passvncconnect=HOST at the boot prompt and the installer will attempt to connect to the specified HOST(either a hostname or IP address).
12.4. References• VNC description at Wikipedia: http://en.wikipedia.org/wiki/Vnc

References
131
• TigerVNC: http://tigervnc.sourceforge.net/
• RFC 1918 - Address Allocation for Private Networks: http://www.ietf.org/rfc/rfc1918.txt
• Anaconda boot options: http://fedoraproject.org/wiki/Anaconda/Options
• Kickstart documentation: http://fedoraproject.org/wiki/Anaconda/Kickstart

132
Chapter 13.
133
Kickstart Installations
13.1. What are Kickstart Installations?Many system administrators would prefer to use an automated installation method to install Fedora ontheir machines. To answer this need, Red Hat created the kickstart installation method. Using kickstart,a system administrator can create a single file containing the answers to all the questions that wouldnormally be asked during a typical installation.
Kickstart files can be kept on a single server system and read by individual computers during theinstallation. This installation method can support the use of a single kickstart file to install Fedora onmultiple machines, making it ideal for network and system administrators.
Kickstart provides a way for users to automate a Fedora installation.
All kickstart scriptlets and the log files of their execution are stored in the /tmp directory to assist withdebugging installation failures.
13.2. How Do You Perform a Kickstart Installation?Kickstart installations can be performed using a local CD-ROM, a local hard drive, or via NFS, FTP, orHTTP.
To use kickstart, you must:
1. Create a kickstart file.
2. Create a boot media with the kickstart file or make the kickstart file available on the network.
3. Make the installation tree available.
4. Start the kickstart installation.
This chapter explains these steps in detail.
13.3. Creating the Kickstart FileThe kickstart file is a simple text file, containing a list of items, each identified by a keyword. Youcan create it by using the Kickstart Configurator application, or writing it from scratch. The Fedorainstallation program also creates a sample kickstart file based on the options that you selected duringinstallation. It is written to the file /root/anaconda-ks.cfg. You should be able to edit it with anytext editor or word processor that can save files as ASCII text.
First, be aware of the following issues when you are creating your kickstart file:
• Sections must be specified in order. Items within the sections do not have to be in a specific orderunless otherwise specified. The section order is:
• Command section — Refer to Section 13.4, “Kickstart Options” for a list of kickstart options. Youmust include the required options.
• The %packages section — Refer to Section 13.5, “Package Selection” for details.

Chapter 13. Kickstart Installations
134
• The %pre and %post sections — These two sections can be in any order and are not required.Refer to Section 13.6, “Pre-installation Script” and Section 13.7, “Post-installation Script” fordetails.
• Items that are not required can be omitted.
• Omitting any required item results in the installation program prompting the user for an answer tothe related item, just as the user would be prompted during a typical installation. Once the answer isgiven, the installation continues unattended (unless it finds another missing item).
• Lines starting with a pound (also known as hash) sign (#) are treated as comments and are ignored.
• For kickstart upgrades, the following items are required:
• Language
• Installation method
• Device specification (if device is needed to perform the installation)
• Keyboard setup
• The upgrade keyword
• Boot loader configuration
If any other items are specified for an upgrade, those items are ignored (note that this includespackage selection).
13.4. Kickstart OptionsThe following options can be placed in a kickstart file. If you prefer to use a graphical interface forcreating your kickstart file, use the Kickstart Configurator application. Refer to Chapter 14, KickstartConfigurator for details.
NoteIf the option is followed by an equals mark (=), a value must be specified after it. In theexample commands, options in brackets ([]) are optional arguments for the command.
autopart (optional)Automatically create partitions — 1 GB or more root (/) partition, a swap partition, and anappropriate boot partition for the architecture. One or more of the default partition sizes can beredefined with the part directive.
• --encrypted — Should all devices with support be encrypted by default? This is equivalent tochecking the Encrypt checkbox on the initial partitioning screen.
• --passphrase= — Provide a default system-wide passphrase for all encrypted devices.
• --escrowcert=URL_of_X.509_certificate — Store data encryption keys of allencrypted volumes as files in / (root), encrypted using the X.509 certificate from the URL
Kickstart Options
135
specified with URL_of_X.509_certificate. The keys are stored as a separate file for eachencrypted volume. This option is only meaningful if --encrypted is specified.
• --backuppassphrase= — Add a randomly-generated passphrase to each encrypted volume.Store these passphrases in separate files in / (root), encrypted using the X.509 certificatespecified with --escrowcert. This option is only meaningful if --escrowcert is specified.
ignoredisk (optional)Causes the installer to ignore the specified disks. This is useful if you use autopartition and want tobe sure that some disks are ignored. For example, without ignoredisk, attempting to deploy ona SAN-cluster the kickstart would fail, as the installer detects passive paths to the SAN that returnno partition table.
The ignoredisk option is also useful if you have multiple paths to your disks.
The syntax is:
ignoredisk --drives=drive1,drive2,...
where driveN is one of sda, sdb,..., hda,... etc.
autostep (optional)Similar to interactive except it goes to the next screen for you. It is used mostly for debugging.
• --autoscreenshot — Take a screenshot at every step during installation and copy theimages over to /root/anaconda-screenshots after installation is complete. This is mostuseful for documentation.
auth or authconfig (required)Sets up the authentication options for the system. It is similar to the authconfig command,which can be run after the install. By default, passwords are normally encrypted and are notshadowed.
• --enablemd5 — Use md5 encryption for user passwords.
• --enablenis — Turns on NIS support. By default, --enablenis uses whatever domain itfinds on the network. A domain should almost always be set by hand with the --nisdomain=option.
• --nisdomain= — NIS domain name to use for NIS services.
• --nisserver= — Server to use for NIS services (broadcasts by default).
• --useshadow or --enableshadow — Use shadow passwords.
• --enableldap — Turns on LDAP support in /etc/nsswitch.conf, allowing your system toretrieve information about users (UIDs, home directories, shells, etc.) from an LDAP directory.To use this option, you must install the nss_ldap package. You must also specify a server anda base DN (distinguished name) with --ldapserver= and --ldapbasedn=.
• --enableldapauth — Use LDAP as an authentication method. This enables the pam_ldapmodule for authentication and changing passwords, using an LDAP directory. To use this option,you must have the nss_ldap package installed. You must also specify a server and a base DNwith --ldapserver= and --ldapbasedn=.

Chapter 13. Kickstart Installations
136
• --ldapserver= — If you specified either --enableldap or --enableldapauth, usethis option to specify the name of the LDAP server to use. This option is set in the /etc/ldap.conf file.
• --ldapbasedn= — If you specified either --enableldap or --enableldapauth, use thisoption to specify the DN in your LDAP directory tree under which user information is stored. Thisoption is set in the /etc/ldap.conf file.
• --enableldaptls — Use TLS (Transport Layer Security) lookups. This option allows LDAP tosend encrypted usernames and passwords to an LDAP server before authentication.
• --enablekrb5 — Use Kerberos 5 for authenticating users. Kerberos itself does not knowabout home directories, UIDs, or shells. If you enable Kerberos, you must make users' accountsknown to this workstation by enabling LDAP, NIS, or Hesiod or by using the /usr/sbin/useradd command. If you use this option, you must have the pam_krb5 package installed.
• --krb5realm= — The Kerberos 5 realm to which your workstation belongs.
• --krb5kdc= — The KDC (or KDCs) that serve requests for the realm. If you have multipleKDCs in your realm, separate their names with commas (,).
• --krb5adminserver= — The KDC in your realm that is also running kadmind. This serverhandles password changing and other administrative requests. This server must be run on themaster KDC if you have more than one KDC.
• --enablehesiod — Enable Hesiod support for looking up user home directories, UIDs, andshells. More information on setting up and using Hesiod on your network is in /usr/share/doc/glibc-2.x.x/README.hesiod, which is included in the glibc package. Hesiod is anextension of DNS that uses DNS records to store information about users, groups, and variousother items.
• --hesiodlhs — The Hesiod LHS ("left-hand side") option, set in /etc/hesiod.conf. Thisoption is used by the Hesiod library to determine the name to search DNS for when looking upinformation, similar to LDAP's use of a base DN.
• --hesiodrhs — The Hesiod RHS ("right-hand side") option, set in /etc/hesiod.conf. Thisoption is used by the Hesiod library to determine the name to search DNS for when looking upinformation, similar to LDAP's use of a base DN.
NoteTo look up user information for "jim", the Hesiod library looks upjim.passwd<LHS><RHS>, which should resolve to a TXT record that looks like whathis passwd entry would look like (jim:*:501:501:Jungle Jim:/home/jim:/bin/bash). For groups, the situation is identical, except jim.group<LHS><RHS>would be used.
Looking up users and groups by number is handled by making "501.uid" a CNAMEfor "jim.passwd", and "501.gid" a CNAME for "jim.group". Note that the library doesnot place a period . in front of the LHS and RHS values when performing a search.Therefore the LHS and RHS values need to have a period placed in front of them inorder if they require this.
Kickstart Options
137
• --enablesmbauth — Enables authentication of users against an SMB server (typically aSamba or Windows server). SMB authentication support does not know about home directories,UIDs, or shells. If you enable SMB, you must make users' accounts known to the workstation byenabling LDAP, NIS, or Hesiod or by using the /usr/sbin/useradd command to make theiraccounts known to the workstation. To use this option, you must have the pam_smb packageinstalled.
• --smbservers= — The name of the server(s) to use for SMB authentication. To specify morethan one server, separate the names with commas (,).
• --smbworkgroup= — The name of the workgroup for the SMB servers.
• --enablecache — Enables the nscd service. The nscd service caches information aboutusers, groups, and various other types of information. Caching is especially helpful if youchoose to distribute information about users and groups over your network using NIS, LDAP, orhesiod.
bootloader (required)Specifies how the boot loader should be installed. This option is required for both installations andupgrades.
ImportantIf you select text mode for a kickstart installation, make sure that you specify choicesfor the partitioning, bootloader, and package selection options. These steps areautomated in text mode, and anaconda cannot prompt you for missing information.If you do not provide choices for these options, anaconda will stop the installationprocess.
• --append= — Specifies kernel parameters. To specify multiple parameters, separate them withspaces. For example:
bootloader --location=mbr --append="hdd=ide-scsi ide=nodma"
• --driveorder — Specify which drive is first in the BIOS boot order. For example:
bootloader --driveorder=sda,hda
• --location= — Specifies where the boot record is written. Valid values are the following: mbr(the default), partition (installs the boot loader on the first sector of the partition containingthe kernel), or none (do not install the boot loader).
• --password= — If using GRUB, sets the GRUB boot loader password to the one specifiedwith this option. This should be used to restrict access to the GRUB shell, where arbitrary kerneloptions can be passed.
• --md5pass= — If using GRUB, similar to --password= except the password should alreadybe encrypted.
• --upgrade — Upgrade the existing boot loader configuration, preserving the old entries. Thisoption is only available for upgrades.
Chapter 13. Kickstart Installations
138
clearpart (optional)Removes partitions from the system, prior to creation of new partitions. By default, no partitionsare removed.
NoteIf the clearpart command is used, then the --onpart command cannot be usedon a logical partition.
• --all — Erases all partitions from the system.
• --drives= — Specifies which drives to clear partitions from. For example, the following clearsall the partitions on the first two drives on the primary IDE controller:
clearpart --drives=hda,hdb --all
• --initlabel — Initializes the disk label to the default for your architecture (for examplemsdos for x86). It is useful so that the installation program does not ask if it should initialize thedisk label if installing to a brand new hard drive.
• --linux — Erases all Linux partitions.
• --none (default) — Do not remove any partitions.
cmdline (optional)Perform the installation in a completely non-interactive command line mode. Any prompts forinteraction halts the install. This mode is useful on IBM System z systems with the x3270 console.
device (optional)On most PCI systems, the installation program autoprobes for Ethernet and SCSI cards properly.On older systems and some PCI systems, however, kickstart needs a hint to find the properdevices. The device command, which tells the installation program to install extra modules, is inthis format:
device <type> <moduleName> --opts=<options>
• <type> — Replace with either scsi or eth.
• <moduleName> — Replace with the name of the kernel module which should be installed.
• --opts= — Mount options to use for mounting the NFS export. Any options that can bespecified in /etc/fstab for an NFS mount are allowed. The options are listed in the nfs(5)man page. Multiple options are separated with a comma.
driverdisk (optional)Driver diskettes can be used during kickstart installations. You must copy the driver diskettes'scontents to the root directory of a partition on the system's hard drive. Then you must use thedriverdisk command to tell the installation program where to look for the driver disk.
driverdisk <partition> --source=<url> --biospart=<biospart> [--type=<fstype>]
Alternatively, a network location can be specified for the driver diskette:
Kickstart Options
139
driverdisk --source=ftp://path/to/dd.imgdriverdisk --source=http://path/to/dd.imgdriverdisk --source=nfs:host:/path/to/img
• <partition> — Partition containing the driver disk.
• <url> — URL for the driver disk. NFS locations can be given in the form nfs:host:/path/to/img.
• <biospart> — BIOS partition containing the driver disk (for example, 82p2).
• --type= — File system type (for example, vfat or ext2).
firewall (optional)This option corresponds to the Firewall Configuration screen in the installation program:
firewall --enabled|--disabled [--trust=] <device> [--port=]
• --enabled or --enable — Reject incoming connections that are not in response to outboundrequests, such as DNS replies or DHCP requests. If access to services running on this machineis needed, you can choose to allow specific services through the firewall.
• --disabled or --disable — Do not configure any iptables rules.
• --trust= — Listing a device here, such as eth0, allows all traffic coming from that device togo through the firewall. To list more than one device, use --trust eth0 --trust eth1. DoNOT use a comma-separated format such as --trust eth0, eth1.
• <incoming> — Replace with one or more of the following to allow the specified servicesthrough the firewall.
• --ssh
• --telnet
• --smtp
• --http
• --ftp
• --port= — You can specify that ports be allowed through the firewall using the port:protocolformat. For example, to allow IMAP access through your firewall, specify imap:tcp. Numericports can also be specified explicitly; for example, to allow UDP packets on port 1234 through,specify 1234:udp. To specify multiple ports, separate them by commas.
firstboot (optional)Determine whether the Setup Agent starts the first time the system is booted. If enabled, thefirstboot package must be installed. If not specified, this option is disabled by default.
• --enable or --enabled — The Setup Agent is started the first time the system boots.
• --disable or --disabled — The Setup Agent is not started the first time the system boots.
Chapter 13. Kickstart Installations
140
• --reconfig — Enable the Setup Agent to start at boot time in reconfiguration mode. Thismode enables the language, mouse, keyboard, root password, security level, time zone, andnetworking configuration options in addition to the default ones.
halt (optional)Halt the system after the installation has successfully completed. This is similar to a manualinstallation, where anaconda displays a message and waits for the user to press a key beforerebooting. During a kickstart installation, if no completion method is specified, the reboot optionis used as default.
The halt option is roughly equivalent to the shutdown -h command.
For other completion methods, refer to the poweroff, reboot, and shutdown kickstart options.
graphical (optional)Perform the kickstart installation in graphical mode. This is the default.
install (optional)Tells the system to install a fresh system rather than upgrade an existing system. This is thedefault mode. For installation, you must specify the type of installation from cdrom, harddrive,nfs, or url (for FTP or HTTP installations). The install command and the installation methodcommand must be on separate lines.
• cdrom — Install from the first CD-ROM drive on the system.
• harddrive — Install from a Red Hat installation tree on a local drive, which must be either vfator ext2.
• --biospart=
BIOS partition to install from (such as 82).
• --partition=
Partition to install from (such as sdb2).
• --dir=
Directory containing the variant directory of the installation tree.
For example:
harddrive --partition=hdb2 --dir=/tmp/install-tree
• nfs — Install from the NFS server specified.
• --server=
Server from which to install (hostname or IP).
• --dir=
Directory containing the variant directory of the installation tree.
• --opts=

Kickstart Options
141
Mount options to use for mounting the NFS export. (optional)
For example:
nfs --server=nfsserver.example.com --dir=/tmp/install-tree
• url — Install from an installation tree on a remote server via FTP or HTTP.
For example:
url --url http://<server>/<dir>
or:
url --url ftp://<username>:<password>@<server>/<dir>
interactive (optional)Uses the information provided in the kickstart file during the installation, but allow for inspectionand modification of the values given. You are presented with each screen of the installationprogram with the values from the kickstart file. Either accept the values by clicking Next or changethe values and click Next to continue. Refer to the autostep command.
iscsi (optional)iscsi --ipaddr= [options].
Specifies additional iSCSI storage to be attached during installation. If you use the iscsiparameter, you must also assign a name to the iSCSI node, using the iscsiname parameter. Theiscsiname parameter must appear before the iscsi parameter in the kickstart file.
We recommend that wherever possible you configure iSCSI storage in the system BIOS orfirmware (iBFT for Intel systems) rather than use the iscsi parameter. Anaconda automaticallydetects and uses disks configured in BIOS or firmware and no special configuration is necessaryin the kickstart file.
If you must use the iscsi parameter, ensure that networking is activated at the beginning of theinstallation, and that the iscsi parameter appears in the kickstart file before you refer to iSCSIdisks with parameters such as clearpart or ignoredisk.
• --port= (mandatory) — the port number (typically, --port=3260)
• --user= — the username required to authenticate with the target
• --password= — the password that corresponds with the username specified for the target
• --reverse-user= — the username required to authenticate with the initiator from a target thatuses reverse CHAP authentication
• --reverse-password= — the password that corresponds with the username specified for theinitiator
Chapter 13. Kickstart Installations
142
iscsiname (optional)Assigns a name to an iSCSI node specified by the iscsi parameter. If you use the iscsiparameter in your kickstart file, this parameter is mandatory, and you must specify iscsiname inthe kickstart file before you specify iscsi.
key (optional)Specify an installation key, which is needed to aid in package selection and identify your systemfor support purposes. This command is specific to Red Hat Enterprise Linux; it has no meaning forFedora and will be ignored.
• --skip — Skip entering a key. Usually if the key command is not given, anaconda will pause atthis step to prompt for a key. This option allows automated installation to continue if you do nothave a key or do not want to provide one.
keyboard (required)Sets system keyboard type. Here is the list of available keyboards on i386 and Alpha machines:
be-latin1, bg, br-abnt2, cf, cz-lat2, cz-us-qwertz, de, de-latin1, de-latin1-nodeadkeys, dk, dk-latin1, dvorak, es, et, fi, fi-latin1, fr, fr-latin0, fr-latin1, fr-pc, fr_CH, fr_CH-latin1, gr, hu, hu101, is-latin1, it, it-ibm, it2, jp106, la-latin1, mk-utf, no, no-latin1, pl, pt-latin1, ro_win, ru, ru-cp1251, ru-ms, ru1, ru2, ru_win, se-latin1, sg, sg-latin1, sk-qwerty, slovene, speakup, speakup-lt, sv-latin1, sg, sg-latin1, sk-querty, slovene, trq, ua, uk, us, us-acentos
The file /usr/lib/python2.2/site-packages/rhpl/keyboard_models.py also containsthis list and is part of the rhpl package.
lang (required)
Sets the language to use during installation and the default language to use on the installedsystem. For example, to set the language to English, the kickstart file should contain the followingline:
lang en_US
The file /usr/share/system-config-language/locale-list provides a list of the validlanguage codes in the first column of each line and is part of the system-config-languagepackage.
Certain languages (mainly Chinese, Japanese, Korean, and Indic languages) are not supportedduring text mode installation. If one of these languages is specified using the lang command,installation will continue in English though the running system will have the specified langauge bydefault.
langsupport (deprecated)
The langsupport keyword is deprecated and its use will cause an error message to be printed tothe screen and installation to halt. Instead of using the langsupport keyword, you should now listthe support package groups for all languages you want supported in the %packages section ofyour kickstart file. For instance, adding support for French means you should add the following to%packages:
Kickstart Options
143
@french-support
logvol (optional)
Create a logical volume for Logical Volume Management (LVM) with the syntax:
logvol <mntpoint> --vgname=<name> --size=<size> --name=<name> <options>
The options are as follows:
• --noformat — Use an existing logical volume and do not format it.
• --useexisting — Use an existing logical volume and reformat it.
• --fstype= — Sets the file system type for the logical volume. Valid values are xfs, ext2,ext3, ext4, swap, vfat, and hfs.
• --fsoptions= — Specifies a free form string of options to be used when mounting thefilesystem. This string will be copied into the /etc/fstab file of the installed system andshould be enclosed in quotes.
• --bytes-per-inode= — Specifies the size of inodes on the filesystem to be made on thelogical volume. Not all filesystems support this option, so it is silently ignored for those cases.
• --grow= — Tells the logical volume to grow to fill available space (if any), or up to themaximum size setting.
• --maxsize= — The maximum size in megabytes when the logical volume is set to grow.Specify an integer value here, and do not append the number with MB.
• --recommended= — Determine the size of the logical volume automatically.
• --percent= — Specify the size of the logical volume as a percentage of available space in thevolume group.
• --encrypted — Specifies that this logical volume should be encrypted.
• --passphrase= — Specifies the passphrase to use when encrypting this logical volume.Without the above --encrypted option, this option does nothing. If no passphrase is specified,the default system-wide one is used, or the installer will stop and prompt if there is no default.
• --escrowcert=URL_of_X.509_certificate — Store data encryption keys of allencrypted volumes as files in / (root), encrypted using the X.509 certificate from the URLspecified with URL_of_X.509_certificate. The keys are stored as a separate file for eachencrypted volume. This option is only meaningful if --encrypted is specified.
• --backuppassphrase= — Add a randomly-generated passphrase to each encrypted volume.Store these passphrases in separate files in / (root), encrypted using the X.509 certificatespecified with --escrowcert. This option is only meaningful if --escrowcert is specified.
Create the partition first, create the logical volume group, and then create the logical volume. Forexample:
part pv.01 --size 3000
Chapter 13. Kickstart Installations
144
volgroup myvg pv.01logvol / --vgname=myvg --size=2000 --name=rootvol
logging (optional)
This command controls the error logging of anaconda during installation. It has no effect on theinstalled system.
• --host= — Send logging information to the given remote host, which must be running asyslogd process configured to accept remote logging.
• --port= — If the remote syslogd process uses a port other than the default, it may bespecified with this option.
• --level= — One of debug, info, warning, error, or critical.
Specify the minimum level of messages that appear on tty3. All messages will still be sent to thelog file regardless of this level, however.
mediacheck (optional)
If given, this will force anaconda to run mediacheck on the installation media. This commandrequires that installs be attended, so it is disabled by default.
monitor (optional)
If the monitor command is not given, anaconda will use X to automatically detect your monitorsettings. Please try this before manually configuring your monitor.
• --hsync= — Specifies the horizontal sync frequency of the monitor.
• --monitor= — Use specified monitor; monitor name should be from the list of monitors in /usr/share/hwdata/MonitorsDB from the hwdata package. The list of monitors can also be foundon the X Configuration screen of the Kickstart Configurator. This is ignored if --hsync or --vsyncis provided. If no monitor information is provided, the installation program tries to probe for itautomatically.
• --noprobe= — Do not try to probe the monitor.
• --vsync= — Specifies the vertical sync frequency of the monitor.
mouse (deprecated)
The mouse keyword is deprecated.
network (optional)
Configures network information for the system. If the kickstart installation does not requirenetworking (in other words, it is not installed over NFS, HTTP, or FTP), networking is notconfigured for the system. If the installation does require networking and network information is notprovided in the kickstart file, the installation program assumes that the installation should be doneover eth0 via a dynamic IP address (BOOTP/DHCP), and configures the final, installed system to
Kickstart Options
145
determine its IP address dynamically. The network option configures networking information forkickstart installations via a network as well as for the installed system.
• --bootproto= — One of dhcp, bootp, or static.
It defaults to dhcp. bootp and dhcp are treated the same.
The DHCP method uses a DHCP server system to obtain its networking configuration. As youmight guess, the BOOTP method is similar, requiring a BOOTP server to supply the networkingconfiguration. To direct a system to use DHCP:
network --bootproto=dhcp
To direct a machine to use BOOTP to obtain its networking configuration, use the following linein the kickstart file:
network --bootproto=bootp
The static method requires that you enter all the required networking information in the kickstartfile. As the name implies, this information is static and is used during and after the installation.The line for static networking is more complex, as you must include all network configurationinformation on one line. You must specify the IP address, netmask, gateway, and nameserver.
Note that although the presentation of this example on this page has broken the line, in a realkickstart file, you must include all this information on a single line with no break.
network --bootproto=static --ip=10.0.2.15 --netmask=255.255.255.0 --gateway=10.0.2.254 --nameserver=10.0.2.1
If you use the static method, be aware of the following two restrictions:
• All static networking configuration information must be specified on one line; you cannot wraplines using a backslash, for example.
• You can also configure multiple nameservers here. To do so, specify them as a comma-delimited list in the command line.
Note that although the presentation of this example on this page has broken the line, in a realkickstart file, you must include all this information on a single line with no break.
network --bootproto=static --ip=10.0.2.15 --netmask=255.255.255.0 --gateway=10.0.2.254 --nameserver 192.168.2.1,192.168.3.1
• --device= — Used to select a specific Ethernet device for installation. Note that using --device= is not effective unless the kickstart file is a local file (such as ks=floppy), since theinstallation program configures the network to find the kickstart file. For example:
network --bootproto=dhcp --device=eth0
• --ip= — IP address for the machine to be installed.
Chapter 13. Kickstart Installations
146
• --gateway= — Default gateway as an IP address.
• --nameserver= — Primary nameserver, as an IP address.
• --nodns — Do not configure any DNS server.
• --netmask= — Netmask for the installed system.
• --hostname= — Hostname for the installed system.
• --ethtool= — Specifies additional low-level settings for the network device which will bepassed to the ethtool program.
• --essid= — The network ID for wireless networks.
• --wepkey= — The encryption key for wireless networks.
• --onboot= — Whether or not to enable the device at boot time.
• --class= — The DHCP class.
• --mtu= — The MTU of the device.
• --noipv4 — Disable IPv4 on this device.
• --noipv6 — Disable IPv6 on this device.
multipath (optional)
multipath --name= --device= --rule=
part or partition (required for installs, ignored for upgrades)Creates a partition on the system.
If more than one Fedora installation exists on the system on different partitions, the installationprogram prompts the user and asks which installation to upgrade.
WarningAll partitions created are formatted as part of the installation process unless --noformat and --onpart are used.
ImportantIf you select text mode for a kickstart installation, make sure that you specify choicesfor the partitioning, bootloader, and package selection options. These steps areautomated in text mode, and anaconda cannot prompt you for missing information.If you do not provide choices for these options, anaconda will stop the installationprocess.
For a detailed example of part in action, refer to Section 13.4.1, “Advanced PartitioningExample”.

Kickstart Options
147
• <mntpoint> — The <mntpoint> is where the partition is mounted and must be of one of thefollowing forms:
• /<path>
For example, /, /usr, /home
• swap
The partition is used as swap space.
To determine the size of the swap partition automatically, use the --recommended option:
swap --recommended
The recommended maximum swap size for machines with less than 2GB of RAM is twice theamount of RAM. For machines with 2GB or more, this recommendation changes to 2GB plusthe amount of RAM.
• raid.<id>
The partition is used for software RAID (refer to raid).
• pv.<id>
The partition is used for LVM (refer to logvol).
• --size= — The minimum partition size in megabytes. Specify an integer value here such as500. Do not append the number with MB.
• --grow — Tells the partition to grow to fill available space (if any), or up to the maximum sizesetting.
NoteIf you use --grow= without setting --maxsize= on a swap partition, Anacondawill limit the maximum size of the swap partition. For systems that have less than2GB of physical memory, the imposed limit is twice the amount of physical memory.For systems with more than 2GB, the imposed limit is the size of physical memoryplus 2GB.
• --maxsize= — The maximum partition size in megabytes when the partition is set to grow.Specify an integer value here, and do not append the number with MB.
• --noformat — Tells the installation program not to format the partition, for use with the --onpart command.
• --onpart= or --usepart= — Put the partition on the already existing device. For example:
partition /home --onpart=hda1
puts /home on /dev/hda1, which must already exist.
Chapter 13. Kickstart Installations
148
• --ondisk= or --ondrive= — Forces the partition to be created on a particular disk. Forexample, --ondisk=sdb puts the partition on the second SCSI disk on the system.
• --asprimary — Forces automatic allocation of the partition as a primary partition, or thepartitioning fails.
• --type= (replaced by fstype) — This option is no longer available. Use fstype.
• --fstype= — Sets the file system type for the partition. Valid values are xfs, ext2, ext3,ext4, swap, vfat, and hfs.
• --bytes-per-inode= — Specifies the size of inodes on the filesystem to be made on thepartition. Not all filesystems support this option, so it is silently ignored for those cases.
• --recommended — Determine the size of the partition automatically.
• --onbiosdisk — Forces the partition to be created on a particular disk as discovered by theBIOS.
• --encrypted — Specifies that this partition should be encrypted.
• --passphrase= — Specifies the passphrase to use when encrypting this partition. Without theabove --encrypted option, this option does nothing. If no passphrase is specified, the defaultsystem-wide one is used, or the installer will stop and prompt if there is no default.
• --escrowcert=URL_of_X.509_certificate — Store data encryption keys of allencrypted partitions as files in / (root), encrypted using the X.509 certificate from the URLspecified with URL_of_X.509_certificate. The keys are stored as a separate file for eachencrypted partition. This option is only meaningful if --encrypted is specified.
• --backuppassphrase= — Add a randomly-generated passphrase to each encryptedpartition. Store these passphrases in separate files in / (root), encrypted using the X.509certificate specified with --escrowcert. This option is only meaningful if --escrowcert isspecified.
NoteIf partitioning fails for any reason, diagnostic messages appear on virtual console 3.
poweroff (optional)Shut down and power off the system after the installation has successfully completed. Normallyduring a manual installation, anaconda displays a message and waits for the user to press a keybefore rebooting. During a kickstart installation, if no completion method is specified, the rebootoption is used as default.
The poweroff option is roughly equivalent to the shutdown -p command.
NoteThe poweroff option is highly dependent on the system hardware in use.Specifically, certain hardware components such as the BIOS, APM (advanced powermanagement), and ACPI (advanced configuration and power interface) must be able
Kickstart Options
149
to interact with the system kernel. Contact your manufacturer for more information onyou system's APM/ACPI abilities.
For other completion methods, refer to the halt, reboot, and shutdown kickstart options.
raid (optional)Assembles a software RAID device. This command is of the form:
raid <mntpoint> --level=<level> --device=<mddevice> <partitions*>
• <mntpoint> — Location where the RAID file system is mounted. If it is /, the RAID levelmust be 1 unless a boot partition (/boot) is present. If a boot partition is present, the /bootpartition must be level 1 and the root (/) partition can be any of the available types. The<partitions*> (which denotes that multiple partitions can be listed) lists the RAID identifiersto add to the RAID array.
• --level= — RAID level to use (0, 1, or 5).
• --device= — Name of the RAID device to use (such as md0 or md1). RAID devices rangefrom md0 to md15, and each may only be used once.
• --bytes-per-inode= — Specifies the size of inodes on the filesystem to be made on theRAID device. Not all filesystems support this option, so it is silently ignored for those cases.
• --spares= — Specifies the number of spare drives allocated for the RAID array. Spare drivesare used to rebuild the array in case of drive failure.
• --fstype= — Sets the file system type for the RAID array. Valid values are xfs, ext2, ext3,ext4, swap, vfat, and hfs.
• --fsoptions= — Specifies a free form string of options to be used when mounting thefilesystem. This string will be copied into the /etc/fstab file of the installed system and should beenclosed in quotes.
• --noformat — Use an existing RAID device and do not format the RAID array.
• --useexisting — Use an existing RAID device and reformat it.
• --encrypted — Specifies that this RAID device should be encrypted.
• --passphrase= — Specifies the passphrase to use when encrypting this RAID device.Without the above --encrypted option, this option does nothing. If no passphrase is specified,the default system-wide one is used, or the installer will stop and prompt if there is no default.
• --escrowcert=URL_of_X.509_certificate — Store the data encryption key for thisdevice in a file in / (root), encrypted using the X.509 certificate from the URL specified withURL_of_X.509_certificate. This option is only meaningful if --encrypted is specified.
• --backuppassphrase= — Add a randomly-generated passphrase to this device. Storethe passphrase in a file in / (root), encrypted using the X.509 certificate specified with --escrowcert. This option is only meaningful if --escrowcert is specified.
Chapter 13. Kickstart Installations
150
The following example shows how to create a RAID level 1 partition for /, and a RAID level 5 for/usr, assuming there are three SCSI disks on the system. It also creates three swap partitions,one on each drive.
part raid.01 --size=60 --ondisk=sdapart raid.02 --size=60 --ondisk=sdb part raid.03 --size=60 --ondisk=sdc
part swap --size=128 --ondisk=sda part swap --size=128 --ondisk=sdb part swap --size=128 --ondisk=sdc
part raid.11 --size=1 --grow --ondisk=sda part raid.12 --size=1 --grow --ondisk=sdb part raid.13 --size=1 --grow --ondisk=sdc
raid / --level=1 --device=md0 raid.01 raid.02 raid.03 raid /usr --level=5 --device=md1 raid.11 raid.12 raid.13
For a detailed example of raid in action, refer to Section 13.4.1, “Advanced PartitioningExample”.
reboot (optional)Reboot after the installation is successfully completed (no arguments). Normally, kickstart displaysa message and waits for the user to press a key before rebooting.
The reboot option is roughly equivalent to the shutdown -r command.
NoteUse of the reboot option may result in an endless installation loop, depending on theinstallation media and method.
The reboot option is the default completion method if no other methods are explicitlyspecified in the kickstart file.
For other completion methods, refer to the halt, poweroff, and shutdown kickstart options.
repo (optional)
Configures additional yum repositories that may be used as sources for package installation.Multiple repo lines may be specified.
repo --name=<repoid> [--baseurl=<url>| --mirrorlist=<url>]
• --name= — The repo id. This option is required.
• --baseurl= — The URL for the repository. The variables that may be used in yum repo configfiles are not supported here. You may use one of either this option or --mirrorlist, not both.
Kickstart Options
151
• --mirrorlist= — The URL pointing at a list of mirrors for the repository. The variables thatmay be used in yum repo config files are not supported here. You may use one of either thisoption or --baseurl, not both.
rootpw (required)Sets the system's root password to the <password> argument.
rootpw [--iscrypted] <password>
• --iscrypted — If this is present, the password argument is assumed to already be encrypted.
selinux (optional)Sets the state of SELinux on the installed system. SELinux defaults to enforcing in anaconda.
selinux [--disabled|--enforcing|--permissive]
• --enforcing — Enables SELinux with the default targeted policy being enforced.
NoteIf the selinux option is not present in the kickstart file, SELinux is enabled and setto --enforcing by default.
• --permissive — Outputs warnings based on the SELinux policy, but does not actuallyenforce the policy.
• --disabled — Disables SELinux completely on the system.
For complete information regarding SELinux for Fedora, refer to the Fedora 13 Security-EnhancedLinux User Guide.
services (optional)Modifies the default set of services that will run under the default runlevel. The services listed inthe disabled list will be disabled before the services listed in the enabled list are enabled.
• --disabled — Disable the services given in the comma separated list.
• --enabled — Enable the services given in the comma separated list.
Do not include spaces in the list of servicesIf you include spaces in the comma-separated list, kickstart will enable or disable onlythe services up to the first space. For example:
services --disabled auditd, cups,smartd, nfslock
will disable only the auditd service. To disable all four services, this entry shouldinclude no spaces between services:
services --disabled auditd,cups,smartd,nfslock
Chapter 13. Kickstart Installations
152
shutdown (optional)Shut down the system after the installation has successfully completed. During a kickstartinstallation, if no completion method is specified, the reboot option is used as default.
The shutdown option is roughly equivalent to the shutdown command.
For other completion methods, refer to the halt, poweroff, and reboot kickstart options.
skipx (optional)If present, X is not configured on the installed system.
text (optional)Perform the kickstart installation in text mode. Kickstart installations are performed in graphicalmode by default.
ImportantIf you select text mode for a kickstart installation, make sure that you specify choicesfor the partitioning, bootloader, and package selection options. These steps areautomated in text mode, and anaconda cannot prompt you for missing information.If you do not provide choices for these options, anaconda will stop the installationprocess.
timezone (required)Sets the system time zone to <timezone> which may be any of the time zones listed bytimeconfig.
timezone [--utc] <timezone>
• --utc — If present, the system assumes the hardware clock is set to UTC (Greenwich Mean)time.
upgrade (optional)Tells the system to upgrade an existing system rather than install a fresh system. You must specifyone of cdrom, harddrive, nfs, or url (for FTP and HTTP) as the location of the installationtree. Refer to install for details.
user (optional)Creates a new user on the system.
user --name=<username> [--groups=<list>] [--homedir=<homedir>] [--password=<password>] [--iscrypted] [--shell=<shell>] [--uid=<uid>]
• --name= — Provides the name of the user. This option is required.
• --groups= — In addition to the default group, a comma separated list of group names the usershould belong to. The groups must exist before the user account is created.
• --homedir= — The home directory for the user. If not provided, this defaults to /home/<username>.
Kickstart Options
153
• --password= — The new user's password. If not provided, the account will be locked bydefault.
• --iscrypted= — Is the password provided by --password already encrypted or not?
• --shell= — The user's login shell. If not provided, this defaults to the system default.
• --uid= — The user's UID. If not provided, this defaults to the next available non-system UID.
vnc (optional)Allows the graphical installation to be viewed remotely via VNC. This method is usually preferredover text mode, as there are some size and language limitations in text installs. With no options,this command will start a VNC server on the machine with no password and will print out thecommand that needs to be run to connect a remote machine.
vnc [--host=<hostname>] [--port=<port>] [--password=<password>]
• --host= — Instead of starting a VNC server on the install machine, connect to the VNC viewerprocess listening on the given hostname.
• --port= — Provide a port that the remote VNC viewer process is listening on. If not provided,anaconda will use the VNC default.
• --password= — Set a password which must be provided to connect to the VNC session. Thisis optional, but recommended.
volgroup (optional)Use to create a Logical Volume Management (LVM) group with the syntax:
volgroup <name> <partition> <options>
The options are as follows:
• --noformat — Use an existing volume group and do not format it.
• --useexisting — Use an existing volume group and reformat it.
• --pesize= — Set the size of the physical extents.
Create the partition first, create the logical volume group, and then create the logical volume. Forexample:
part pv.01 --size 3000 volgroup myvg pv.01 logvol / --vgname=myvg --size=2000 --name=rootvol
For a detailed example of volgroup in action, refer to Section 13.4.1, “Advanced PartitioningExample”.
xconfig (optional)Configures the X Window System. If this option is not given, the user must configure X manuallyduring the installation, if X was installed; this option should not be used if X is not installed on thefinal system.
• --driver — Specify the X driver to use for the video hardware.
Chapter 13. Kickstart Installations
154
• --videoram= — Specifies the amount of video RAM the video card has.
• --defaultdesktop= — Specify either GNOME or KDE to set the default desktop (assumesthat GNOME Desktop Environment and/or KDE Desktop Environment has been installedthrough %packages).
• --startxonboot — Use a graphical login on the installed system.
• --resolution= — Specify the default resolution for the X Window System on the installedsystem. Valid values are 640x480, 800x600, 1024x768, 1152x864, 1280x1024, 1400x1050,1600x1200. Be sure to specify a resolution that is compatible with the video card and monitor.
• --depth= — Specify the default color depth for the X Window System on the installed system.Valid values are 8, 16, 24, and 32. Be sure to specify a color depth that is compatible with thevideo card and monitor.
zerombr (optional)If zerombr is specified any invalid partition tables found on disks are initialized. This destroys allof the contents of disks with invalid partition tables.
Note that this command was previously specified as zerombr yes. This form is now deprecated;you should now simply specify zerombr in your kickstart file instead.
zfcp (optional)Define a Fiber channel device (IBM System z).
zfcp [--devnum=<devnum>] [--fcplun=<fcplun>] [--scsiid=<scsiid>] [--scsilun=<scsilun>] [--wwpn=<wwpn>]
%include (optional)Use the %include /path/to/file command to include the contents of another file in thekickstart file as though the contents were at the location of the %include command in thekickstart file.
13.4.1. Advanced Partitioning ExampleThe following is a single, integrated example showing the clearpart, raid, part, volgroup, andlogvol kickstart options in action:
clearpart --drives=hda,hdc --initlabel # Raid 1 IDE config part raid.11 --size 1000 --asprimary --ondrive=hda part raid.12 --size 1000 --asprimary --ondrive=hda part raid.13 --size 2000 --asprimary --ondrive=hda part raid.14 --size 8000 --ondrive=hda part raid.15 --size 1 --grow --ondrive=hda part raid.21 --size 1000 --asprimary --ondrive=hdc part raid.22 --size 1000 --asprimary --ondrive=hdc part raid.23 --size 2000 --asprimary --ondrive=hdc part raid.24 --size 8000 --ondrive=hdc part raid.25 --size 1 --grow --ondrive=hdc
# You can add --spares=x raid / --fstype ext3 --device md0 --level=RAID1 raid.11 raid.21 raid /safe --fstype ext3 --device md1 --level=RAID1 raid.12 raid.22 raid swap --fstype swap --device md2 --level=RAID1 raid.13 raid.23 raid /usr --fstype ext3 --device md3 --level=RAID1 raid.14 raid.24
Package Selection
155
raid pv.01 --fstype ext3 --device md4 --level=RAID1 raid.15 raid.25
# LVM configuration so that we can resize /var and /usr/local later volgroup sysvg pv.01 logvol /var --vgname=sysvg --size=8000 --name=var logvol /var/freespace --vgname=sysvg --size=8000 --name=freespacetouse logvol /usr/local --vgname=sysvg --size=1 --grow --name=usrlocal
This advanced example implements LVM over RAID, as well as the ability to resize various directoriesfor future growth.
13.5. Package SelectionUse the %packages command to begin a kickstart file section that lists the packages you would like toinstall (this is for installations only, as package selection during upgrades is not supported).
Packages can be specified by group or by individual package name, including with globs using theasterisk. The installation program defines several groups that contain related packages. Refer to thevariant/repodata/comps-*.xml file on the first Fedora CD-ROM for a list of groups. Each grouphas an id, user visibility value, name, description, and package list. In the package list, the packagesmarked as mandatory are always installed if the group is selected, the packages marked default areselected by default if the group is selected, and the packages marked optional must be specificallyselected even if the group is selected to be installed.
In most cases, it is only necessary to list the desired groups and not individual packages. Note that theCore and Base groups are always selected by default, so it is not necessary to specify them in the%packages section.
Here is an example %packages selection:
%packages @ X Window System @ GNOME Desktop Environment @ Graphical Internet @ Sound and Video dhcp
As you can see, groups are specified, one to a line, starting with an @ symbol, a space, and then thefull group name as given in the comps.xml file. Groups can also be specified using the id for thegroup, such as gnome-desktop. Specify individual packages with no additional characters (the dhcpline in the example above is an individual package).
You can also specify which packages not to install from the default package list:
-autofs
The following options are available for the %packages option:
--nobaseDo not install the @Base group. Use this option if you are trying to create a very small system.
--resolvedepsThe --resolvedeps option has been deprecated. Dependencies are resolved automatically everytime now.
Chapter 13. Kickstart Installations
156
--ignoredepsThe --ignoredeps option has been deprecated. Dependencies are resolved automatically everytime now.
--ignoremissingIgnore the missing packages and groups instead of halting the installation to ask if the installationshould be aborted or continued. For example:
%packages --ignoremissing
13.6. Pre-installation ScriptYou can add commands to run on the system immediately after the ks.cfg has been parsed. Thissection must be at the end of the kickstart file (after the commands) and must start with the %precommand. You can access the network in the %pre section; however, name service has not beenconfigured at this point, so only IP addresses work.
NoteNote that the pre-install script is not run in the change root environment.
--interpreter /usr/bin/pythonAllows you to specify a different scripting language, such as Python. Replace /usr/bin/pythonwith the scripting language of your choice.
13.6.1. ExampleHere is an example %pre section:
%pre #!/bin/sh hds="" mymedia="" for file in /proc/ide/h* do mymedia=`cat $file/media` if [ $mymedia == "disk" ] ; then hds="$hds `basename $file`" fi done set $hds numhd=`echo $#` drive1=`echo $hds | cut -d' ' -f1` drive2=`echo $hds | cut -d' ' -f2` #Write out partition scheme based on whether there are 1 or 2 hard drives if [ $numhd == "2" ] ; then #2 drives echo "#partitioning scheme generated in %pre for 2 drives" > /tmp/part-include echo "clearpart --all" >> /tmp/part-include echo "part /boot --fstype ext3 --size 75 --ondisk hda" >> /tmp/part-include echo "part / --fstype ext3 --size 1 --grow --ondisk hda" >> /tmp/part-include echo "part swap --recommended --ondisk $drive1" >> /tmp/part-include echo "part /home --fstype ext3 --size 1 --grow --ondisk hdb" >> /tmp/part-include else #1 drive
Post-installation Script
157
echo "#partitioning scheme generated in %pre for 1 drive" > /tmp/part-include echo "clearpart --all" >> /tmp/part-include echo "part /boot --fstype ext3 --size 75" >> /tmp/part-includ echo "part swap --recommended" >> /tmp/part-include echo "part / --fstype ext3 --size 2048" >> /tmp/part-include echo "part /home --fstype ext3 --size 2048 --grow" >> /tmp/part-include fi
This script determines the number of hard drives in the system and writes a text file with a differentpartitioning scheme depending on whether it has one or two drives. Instead of having a set ofpartitioning commands in the kickstart file, include the line:
%include /tmp/part-include
The partitioning commands selected in the script are used.
NoteThe pre-installation script section of kickstart cannot manage multiple install trees orsource media. This information must be included for each created ks.cfg file, as the pre-installation script occurs during the second stage of the installation process.
13.7. Post-installation ScriptYou have the option of adding commands to run on the system once the installation is complete. Thissection must be at the end of the kickstart file and must start with the %post command. This section isuseful for functions such as installing additional software and configuring an additional nameserver.
NoteIf you configured the network with static IP information, including a nameserver, you canaccess the network and resolve IP addresses in the %post section. If you configuredthe network for DHCP, the /etc/resolv.conf file has not been completed when theinstallation executes the %post section. You can access the network, but you can notresolve IP addresses. Thus, if you are using DHCP, you must specify IP addresses in the%post section.
NoteThe post-install script is run in a chroot environment; therefore, performing tasks such ascopying scripts or RPMs from the installation media do not work.
--nochrootAllows you to specify commands that you would like to run outside of the chroot environment.
The following example copies the file /etc/resolv.conf to the file system that was justinstalled.
%post --nochroot cp /etc/resolv.conf /mnt/sysimage/etc/resolv.conf
Chapter 13. Kickstart Installations
158
--interpreter /usr/bin/pythonAllows you to specify a different scripting language, such as Python. Replace /usr/bin/pythonwith the scripting language of your choice.
13.7.1. ExamplesRegister the system to a Red Hat Network Satellite:
%post( # Note that in this example we run the entire %post section as a subshell for logging.wget -O- http://proxy-or-sat.example.com/pub/bootstrap_script | /bin/bash/usr/sbin/rhnreg_ks --activationkey=<activationkey># End the subshell and capture any output to a post-install log file.) 1>/root/post_install.log 2>&1
Run a script named runme from an NFS share:
mkdir /mnt/temp mount -o nolock 10.10.0.2:/usr/new-machines /mnt/temp open -s -w -- /mnt/temp/runme umount /mnt/temp
NoteNFS file locking is not supported while in kickstart mode, therefore -o nolock is requiredwhen mounting an NFS mount.
13.8. Making the Kickstart File AvailableA kickstart file must be placed in one of the following locations:
• On a boot diskette
• On a boot CD-ROM
• On a network
Normally a kickstart file is copied to the boot diskette, or made available on the network. The network-based approach is most commonly used, as most kickstart installations tend to be performed onnetworked computers.
Let us take a more in-depth look at where the kickstart file may be placed.
13.8.1. Creating Kickstart Boot MediaDiskette-based booting is no longer supported in Fedora. Installations must use CD-ROM or flashmemory products for booting. However, the kickstart file may still reside on a diskette's top-leveldirectory, and must be named ks.cfg.
To perform a CD-ROM-based kickstart installation, the kickstart file must be named ks.cfg and mustbe located in the boot CD-ROM's top-level directory. Since a CD-ROM is read-only, the file must beadded to the directory used to create the image that is written to the CD-ROM. Refer to Section 4.5.1,
Making the Kickstart File Available on the Network
159
“Alternative Boot Methods” for instructions on creating boot media; however, before making thefile.iso image file, copy the ks.cfg kickstart file to the isolinux/ directory.
To perform a pen-based flash memory kickstart installation, the kickstart file must be named ks.cfgand must be located in the flash memory's top-level directory. Create the boot image first, and thencopy the ks.cfg file.
Refer to Section 4.5.1, “Alternative Boot Methods” for instructions on creating live USB media usingthe boot.iso image available for download from the same servers that host images of the Fedorainstallation disks — refer to Section 2.1, “Downloading Fedora”.
NoteCreation of USB flash memory pen drives for booting is possible, but is heavily dependenton system hardware BIOS settings. Refer to your hardware manufacturer to see if yoursystem supports booting to alternate devices.
13.8.2. Making the Kickstart File Available on the NetworkNetwork installations using kickstart are quite common, because system administrators can easilyautomate the installation on many networked computers quickly and painlessly. In general, theapproach most commonly used is for the administrator to have both a BOOTP/DHCP server andan NFS server on the local network. The BOOTP/DHCP server is used to give the client system itsnetworking information, while the actual files used during the installation are served by the NFS server.Often, these two servers run on the same physical machine, but they are not required to.
To perform a network-based kickstart installation, you must have a BOOTP/DHCP server on yournetwork, and it must include configuration information for the machine on which you are attempting toinstall Fedora. The BOOTP/DHCP server provides the client with its networking information as well asthe location of the kickstart file.
If a kickstart file is specified by the BOOTP/DHCP server, the client system attempts an NFS mount ofthe file's path, and copies the specified file to the client, using it as the kickstart file. The exact settingsrequired vary depending on the BOOTP/DHCP server you use.
Here is an example of a line from the dhcpd.conf file for the DHCP server:
filename "/usr/new-machine/kickstart/"; next-server blarg.redhat.com;
Note that you should replace the value after filename with the name of the kickstart file (or thedirectory in which the kickstart file resides) and the value after next-server with the NFS servername.
If the file name returned by the BOOTP/DHCP server ends with a slash ("/"), then it is interpreted as apath only. In this case, the client system mounts that path using NFS, and searches for a particular file.The file name the client searches for is:
<ip-addr>-kickstart
The <ip-addr> section of the file name should be replaced with the client's IP address in dotteddecimal notation. For example, the file name for a computer with an IP address of 10.10.0.1 would be10.10.0.1-kickstart.

Chapter 13. Kickstart Installations
160
Note that if you do not specify a server name, then the client system attempts to use the server thatanswered the BOOTP/DHCP request as its NFS server. If you do not specify a path or file name, theclient system tries to mount /kickstart from the BOOTP/DHCP server and tries to find the kickstartfile using the same <ip-addr>-kickstart file name as described above.
13.9. Making the Installation Tree AvailableThe kickstart installation must access an installation tree. An installation tree is a copy of the binaryFedora CD-ROMs with the same directory structure.
If you are performing a CD-based installation, insert the Fedora CD-ROM #1 into the computer beforestarting the kickstart installation.
If you are performing a hard drive installation, make sure the ISO images of the binary Fedora CD-ROMs are on a hard drive in the computer.
If you are performing a network-based (NFS, FTP, or HTTP) installation, you must make theinstallation tree available over the network. Refer to Section 4.6, “Preparing for a Network Installation”for details.
13.10. Starting a Kickstart Installation
Important — Kickstart installations and FirstbootFirstboot does not run after a system is installed from this Kickstart file. Either specify auser with the user option in the Kickstart file before installing additional systems from it(refer to Section 13.4, “Kickstart Options” for details) or log into the installed system with avirtual console as root and add users with the adduser command.
To begin a kickstart installation, you must boot the system from boot media you have made or theFedora CD-ROM #1, and enter a special boot command at the boot prompt. The installation programlooks for a kickstart file if the ks command line argument is passed to the kernel.
CD-ROM #1 and DisketteThe linux ks=floppy command also works if the ks.cfg file is located on a vfat or ext2 filesystem on a diskette and you boot from the Fedora CD-ROM #1.
An alternate boot command is to boot off the Fedora CD-ROM #1 and have the kickstart file on avfat or ext2 file system on a diskette. To do so, enter the following command at the boot: prompt:
linux ks=hd:fd0:/ks.cfg
With Driver DiskIf you need to use a driver disk with kickstart, specify the dd option as well. For example, to bootoff a boot diskette and use a driver disk, enter the following command at the boot: prompt:
linux ks=floppy dd
Starting a Kickstart Installation
161
Boot CD-ROMIf the kickstart file is on a boot CD-ROM as described in Section 13.8.1, “Creating Kickstart BootMedia”, insert the CD-ROM into the system, boot the system, and enter the following command atthe boot: prompt (where ks.cfg is the name of the kickstart file):
linux ks=cdrom:/ks.cfg
Other options to start a kickstart installation are as follows:
askmethodDo not automatically use the CD-ROM as the install source if we detect a Fedora CD in your CD-ROM drive.
autostepMake kickstart non-interactive.
debugStart up pdb immediately.
ddUse a driver disk.
dhcpclass=<class>Sends a custom DHCP vendor class identifier. ISC's dhcpcd can inspect this value using "optionvendor-class-identifier".
dns=<dns>Comma separated list of nameservers to use for a network installation.
driverdiskSame as 'dd'.
expertTurns on special features:• allows partitioning of removable media
• prompts for a driver disk
gateway=<gw>Gateway to use for a network installation.
graphicalForce graphical install. Required to have ftp/http use GUI.
isaPrompt user for ISA devices configuration.
ip=<ip>IP to use for a network installation, use 'dhcp' for DHCP.
keymap=<keymap>Keyboard layout to use. Valid values are those which can be used for the 'keyboard' kickstartcommand.
Chapter 13. Kickstart Installations
162
ks=nfs:<server>:/<path>The installation program looks for the kickstart file on the NFS server <server>, as file <path>.The installation program uses DHCP to configure the Ethernet card. For example, if your NFSserver is server.example.com and the kickstart file is in the NFS share /mydir/ks.cfg, thecorrect boot command would be ks=nfs:server.example.com:/mydir/ks.cfg.
ks=http://<server>/<path>The installation program looks for the kickstart file on the HTTP server <server>, as file <path>.The installation program uses DHCP to configure the Ethernet card. For example, if your HTTPserver is server.example.com and the kickstart file is in the HTTP directory /mydir/ks.cfg, thecorrect boot command would be ks=http://server.example.com/mydir/ks.cfg.
ks=floppyThe installation program looks for the file ks.cfg on a vfat or ext2 file system on the diskette in /dev/fd0.
ks=floppy:/<path>The installation program looks for the kickstart file on the diskette in /dev/fd0, as file <path>.
ks=hd:<device>:/<file>The installation program mounts the file system on <device> (which must be vfat or ext2),and looks for the kickstart configuration file as <file> in that file system (for example,ks=hd:sda3:/mydir/ks.cfg).
ks=bd:<biosdev>:/<path>The installation program mounts the file system on the specified partition on the specified BIOSdevice <biosdev>, and looks for the kickstart configuration file specified in <path> (for example,ks=bd:80p3:/mydir/ks.cfg). Note this does not work for BIOS RAID sets.
ks=file:/<file>The installation program tries to read the file <file> from the file system; no mounts are done.This is normally used if the kickstart file is already on the initrd image.
ks=cdrom:/<path>The installation program looks for the kickstart file on CD-ROM, as file <path>.
ksIf ks is used alone, the installation program configures the Ethernet card to use DHCP. Thekickstart file is read from the "bootServer" from the DHCP response as if it is an NFS serversharing the kickstart file. By default, the bootServer is the same as the DHCP server. The name ofthe kickstart file is one of the following:
• If DHCP is specified and the boot file begins with a /, the boot file provided by DHCP is lookedfor on the NFS server.
• If DHCP is specified and the boot file begins with something other than a /, the boot fileprovided by DHCP is looked for in the /kickstart directory on the NFS server.
• If DHCP did not specify a boot file, then the installation program tries to read the file /kickstart/1.2.3.4-kickstart, where 1.2.3.4 is the numeric IP address of the machinebeing installed.

Starting a Kickstart Installation
163
ksdevice=<device>The installation program uses this network device to connect to the network. For example,consider a system connected to an NFS server through the eth1 device. To perform a kickstartinstallation on this system using a kickstart file from the NFS server, you would use the commandks=nfs:<server>:/<path> ksdevice=eth1 at the boot: prompt.
kssendmacAdds HTTP headers to ks=http:// request that can be helpful for provisioning systems. IncludesMAC address of all nics in CGI environment variables of the form: "X-RHN-Provisioning-MAC-0:eth0 01:23:45:67:89:ab".
lang=<lang>Language to use for the installation. This should be a language which is valid to be used with the'lang' kickstart command.
loglevel=<level>Set the minimum level required for messages to be logged. Values for <level> are debug, info,warning, error, and critical. The default value is info.
lowresForce GUI installer to run at 640x480.
mediacheckActivates loader code to give user option of testing integrity of install source (if an ISO-basedmethod).
method=cdromDo a CDROM based installation.
method=ftp://<path>Use <path> for an FTP installation.
method=hd:<dev>:<path>Use <path> on <dev> for a hard drive installation.
method=http://<path>Use <path> for an HTTP installation.
method=nfs:<path>Use <path> for an NFS installation.
netmask=<nm>Netmask to use for a network installation.
nofallbackIf GUI fails exit.
nofbDo not load the VGA16 framebuffer required for doing text-mode installation in some languages.
nofirewireDo not load support for firewire devices.

Chapter 13. Kickstart Installations
164
noipv6Disable IPv6 networking during installation.
This option is not available during PXE installationsDuring installations from a PXE server, IPv6 networking might become active beforeanaconda processes the Kickstart file. If so, this option will have no effect duringinstallation.
nomountDon't automatically mount any installed Linux partitions in rescue mode.
nonetDo not auto-probe network devices.
noparportDo not attempt to load support for parallel ports.
nopassDon't pass keyboard/mouse info to stage 2 installer, good for testing keyboard and mouse configscreens in stage2 installer during network installs.
nopcmciaIgnore PCMCIA controller in system.
noprobeDo not attempt to detect hw, prompts user instead.
noshellDo not put a shell on tty2 during install.
nostorageDo not auto-probe storage devices (SCSI, IDE, RAID).
nousbDo not load USB support (helps if install hangs early sometimes).
nousbstorageDo not load usbstorage module in loader. May help with device ordering on SCSI systems.
rescueRun rescue environment.
resolution=<mode>Run installer in mode specified, '1024x768' for example.
serialTurns on serial console support.
skipddcSkips DDC probe of monitor, may help if it's hanging system.

Starting a Kickstart Installation
165
syslog=<host>[:<port>]Once installation is up and running, send log messages to the syslog process on <host>, andoptionally, on port <port>. Requires the remote syslog process to accept connections (the -roption).
textForce text mode install.
ImportantIf you select text mode for a kickstart installation, make sure that you specify choicesfor the partitioning, bootloader, and package selection options. These steps areautomated in text mode, and anaconda cannot prompt you for missing information.If you do not provide choices for these options, anaconda will stop the installationprocess.
updatesPrompt for floppy containing updates (bug fixes).
updates=ftp://<path>Image containing updates over FTP.
updates=http://<path>Image containing updates over HTTP.
upgradeanyDon't require an /etc/redhat-release that matches the expected syntax to upgrade.
vncEnable vnc-based installation. You will need to connect to the machine using a vnc clientapplication.
vncconnect=<host>[:<port>]Once installation is up and running, connect to the vnc client named <host>, and optionally useport <port>.
Requires 'vnc' option to be specified as well.
vncpassword=<password>Enable a password for the vnc connection. This will prevent someone from inadvertentlyconnecting to the vnc-based installation.
Requires 'vnc' option to be specified as well.

166
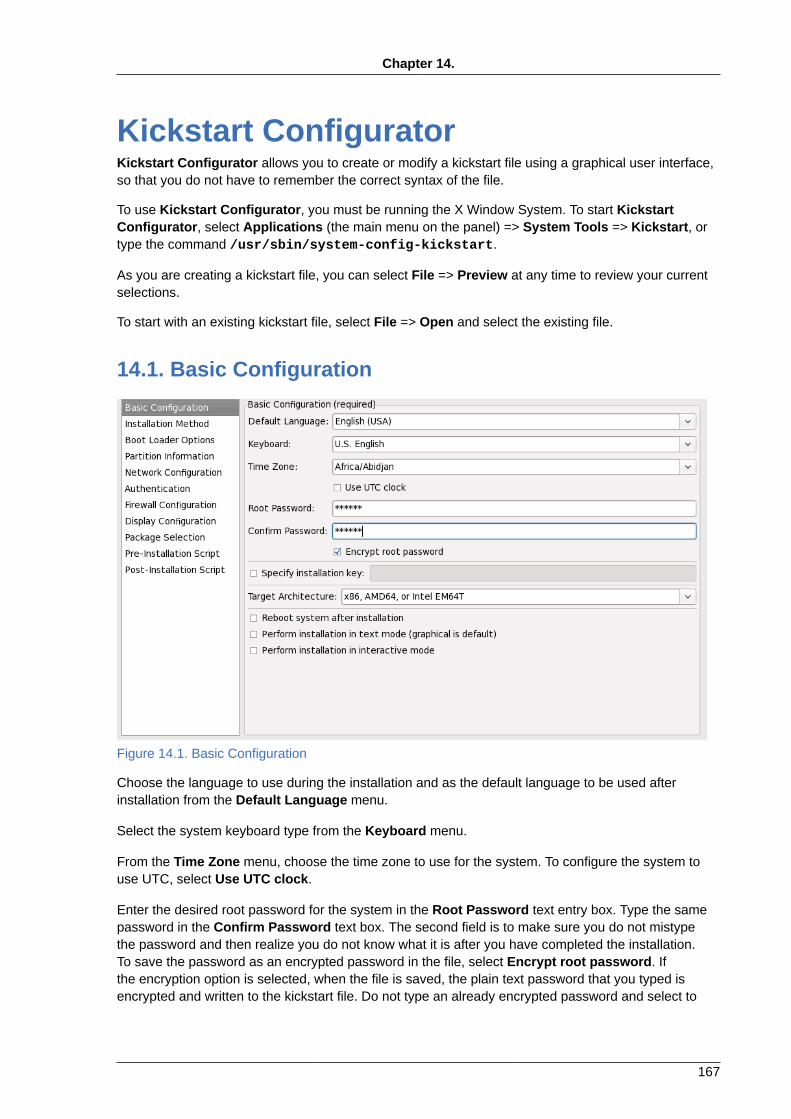
Chapter 14.
167
Kickstart ConfiguratorKickstart Configurator allows you to create or modify a kickstart file using a graphical user interface,so that you do not have to remember the correct syntax of the file.
To use Kickstart Configurator, you must be running the X Window System. To start KickstartConfigurator, select Applications (the main menu on the panel) => System Tools => Kickstart, ortype the command /usr/sbin/system-config-kickstart.
As you are creating a kickstart file, you can select File => Preview at any time to review your currentselections.
To start with an existing kickstart file, select File => Open and select the existing file.
14.1. Basic Configuration
Figure 14.1. Basic Configuration
Choose the language to use during the installation and as the default language to be used afterinstallation from the Default Language menu.
Select the system keyboard type from the Keyboard menu.
From the Time Zone menu, choose the time zone to use for the system. To configure the system touse UTC, select Use UTC clock.
Enter the desired root password for the system in the Root Password text entry box. Type the samepassword in the Confirm Password text box. The second field is to make sure you do not mistypethe password and then realize you do not know what it is after you have completed the installation.To save the password as an encrypted password in the file, select Encrypt root password. Ifthe encryption option is selected, when the file is saved, the plain text password that you typed isencrypted and written to the kickstart file. Do not type an already encrypted password and select to
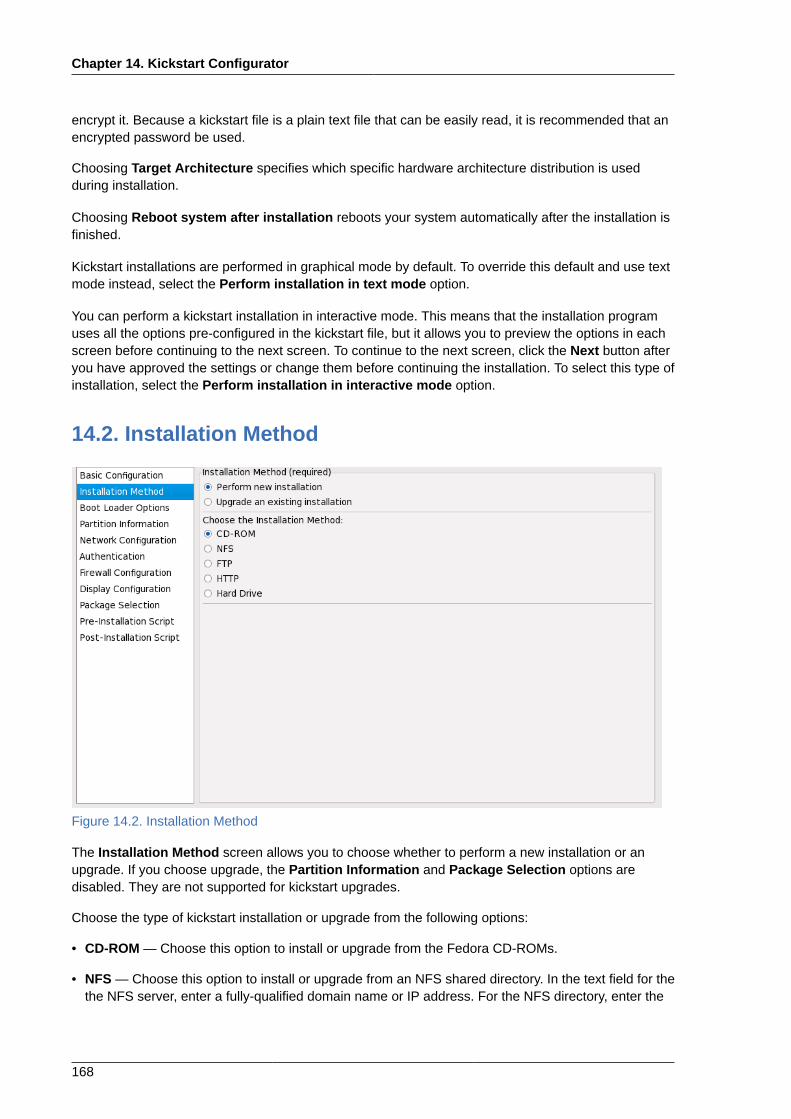
Chapter 14. Kickstart Configurator
168
encrypt it. Because a kickstart file is a plain text file that can be easily read, it is recommended that anencrypted password be used.
Choosing Target Architecture specifies which specific hardware architecture distribution is usedduring installation.
Choosing Reboot system after installation reboots your system automatically after the installation isfinished.
Kickstart installations are performed in graphical mode by default. To override this default and use textmode instead, select the Perform installation in text mode option.
You can perform a kickstart installation in interactive mode. This means that the installation programuses all the options pre-configured in the kickstart file, but it allows you to preview the options in eachscreen before continuing to the next screen. To continue to the next screen, click the Next button afteryou have approved the settings or change them before continuing the installation. To select this type ofinstallation, select the Perform installation in interactive mode option.
14.2. Installation Method
Figure 14.2. Installation Method
The Installation Method screen allows you to choose whether to perform a new installation or anupgrade. If you choose upgrade, the Partition Information and Package Selection options aredisabled. They are not supported for kickstart upgrades.
Choose the type of kickstart installation or upgrade from the following options:
• CD-ROM — Choose this option to install or upgrade from the Fedora CD-ROMs.
• NFS — Choose this option to install or upgrade from an NFS shared directory. In the text field for thethe NFS server, enter a fully-qualified domain name or IP address. For the NFS directory, enter the
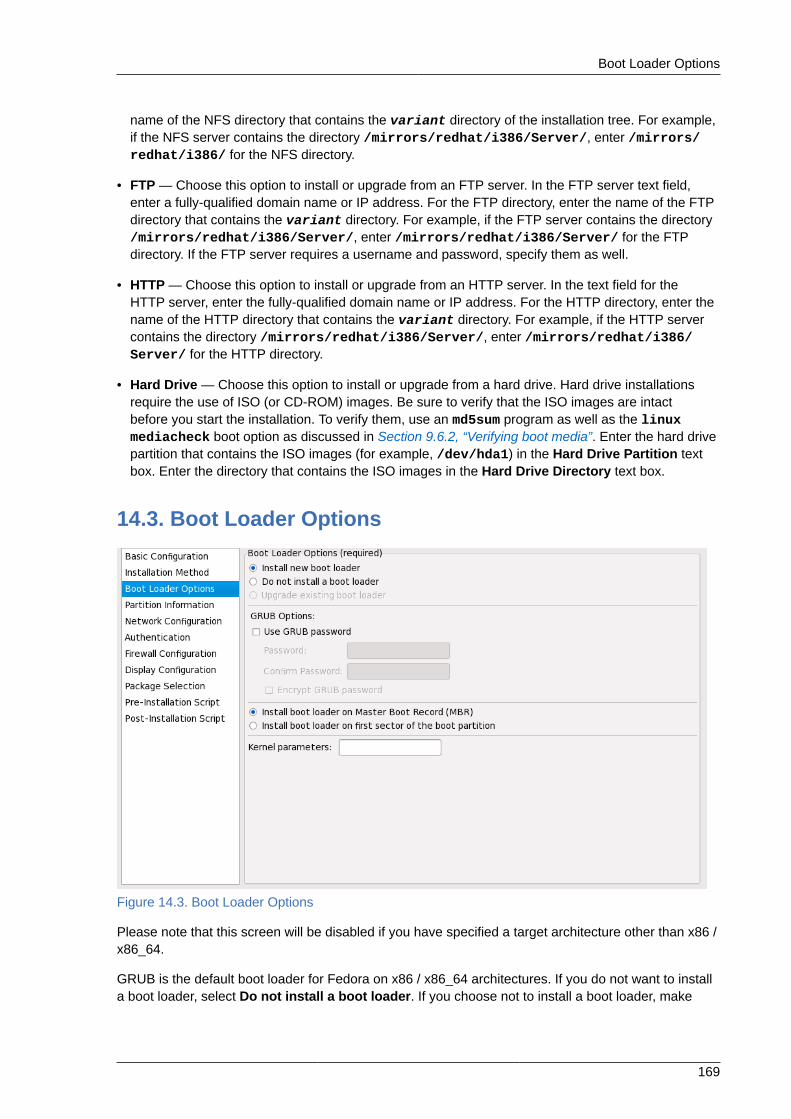
Boot Loader Options
169
name of the NFS directory that contains the variant directory of the installation tree. For example,if the NFS server contains the directory /mirrors/redhat/i386/Server/, enter /mirrors/redhat/i386/ for the NFS directory.
• FTP — Choose this option to install or upgrade from an FTP server. In the FTP server text field,enter a fully-qualified domain name or IP address. For the FTP directory, enter the name of the FTPdirectory that contains the variant directory. For example, if the FTP server contains the directory/mirrors/redhat/i386/Server/, enter /mirrors/redhat/i386/Server/ for the FTPdirectory. If the FTP server requires a username and password, specify them as well.
• HTTP — Choose this option to install or upgrade from an HTTP server. In the text field for theHTTP server, enter the fully-qualified domain name or IP address. For the HTTP directory, enter thename of the HTTP directory that contains the variant directory. For example, if the HTTP servercontains the directory /mirrors/redhat/i386/Server/, enter /mirrors/redhat/i386/Server/ for the HTTP directory.
• Hard Drive — Choose this option to install or upgrade from a hard drive. Hard drive installationsrequire the use of ISO (or CD-ROM) images. Be sure to verify that the ISO images are intactbefore you start the installation. To verify them, use an md5sum program as well as the linuxmediacheck boot option as discussed in Section 9.6.2, “Verifying boot media”. Enter the hard drivepartition that contains the ISO images (for example, /dev/hda1) in the Hard Drive Partition textbox. Enter the directory that contains the ISO images in the Hard Drive Directory text box.
14.3. Boot Loader Options
Figure 14.3. Boot Loader Options
Please note that this screen will be disabled if you have specified a target architecture other than x86 /x86_64.
GRUB is the default boot loader for Fedora on x86 / x86_64 architectures. If you do not want to installa boot loader, select Do not install a boot loader. If you choose not to install a boot loader, make
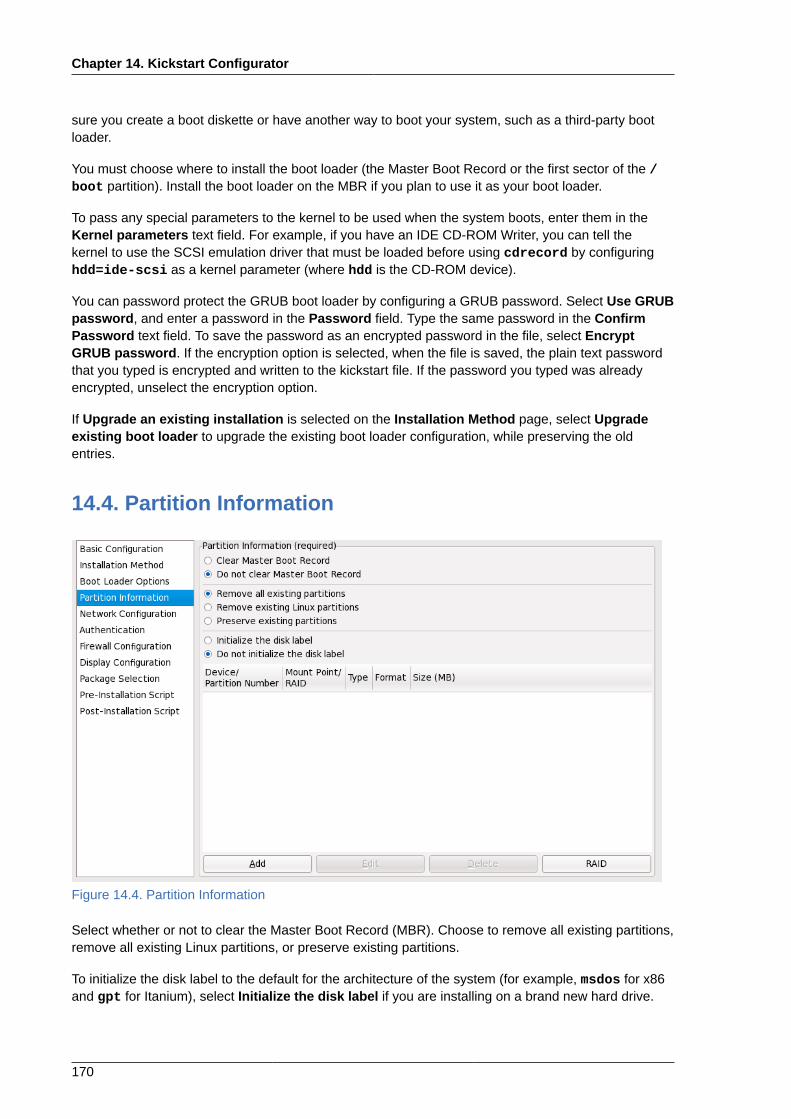
Chapter 14. Kickstart Configurator
170
sure you create a boot diskette or have another way to boot your system, such as a third-party bootloader.
You must choose where to install the boot loader (the Master Boot Record or the first sector of the /boot partition). Install the boot loader on the MBR if you plan to use it as your boot loader.
To pass any special parameters to the kernel to be used when the system boots, enter them in theKernel parameters text field. For example, if you have an IDE CD-ROM Writer, you can tell thekernel to use the SCSI emulation driver that must be loaded before using cdrecord by configuringhdd=ide-scsi as a kernel parameter (where hdd is the CD-ROM device).
You can password protect the GRUB boot loader by configuring a GRUB password. Select Use GRUBpassword, and enter a password in the Password field. Type the same password in the ConfirmPassword text field. To save the password as an encrypted password in the file, select EncryptGRUB password. If the encryption option is selected, when the file is saved, the plain text passwordthat you typed is encrypted and written to the kickstart file. If the password you typed was alreadyencrypted, unselect the encryption option.
If Upgrade an existing installation is selected on the Installation Method page, select Upgradeexisting boot loader to upgrade the existing boot loader configuration, while preserving the oldentries.
14.4. Partition Information
Figure 14.4. Partition Information
Select whether or not to clear the Master Boot Record (MBR). Choose to remove all existing partitions,remove all existing Linux partitions, or preserve existing partitions.
To initialize the disk label to the default for the architecture of the system (for example, msdos for x86and gpt for Itanium), select Initialize the disk label if you are installing on a brand new hard drive.
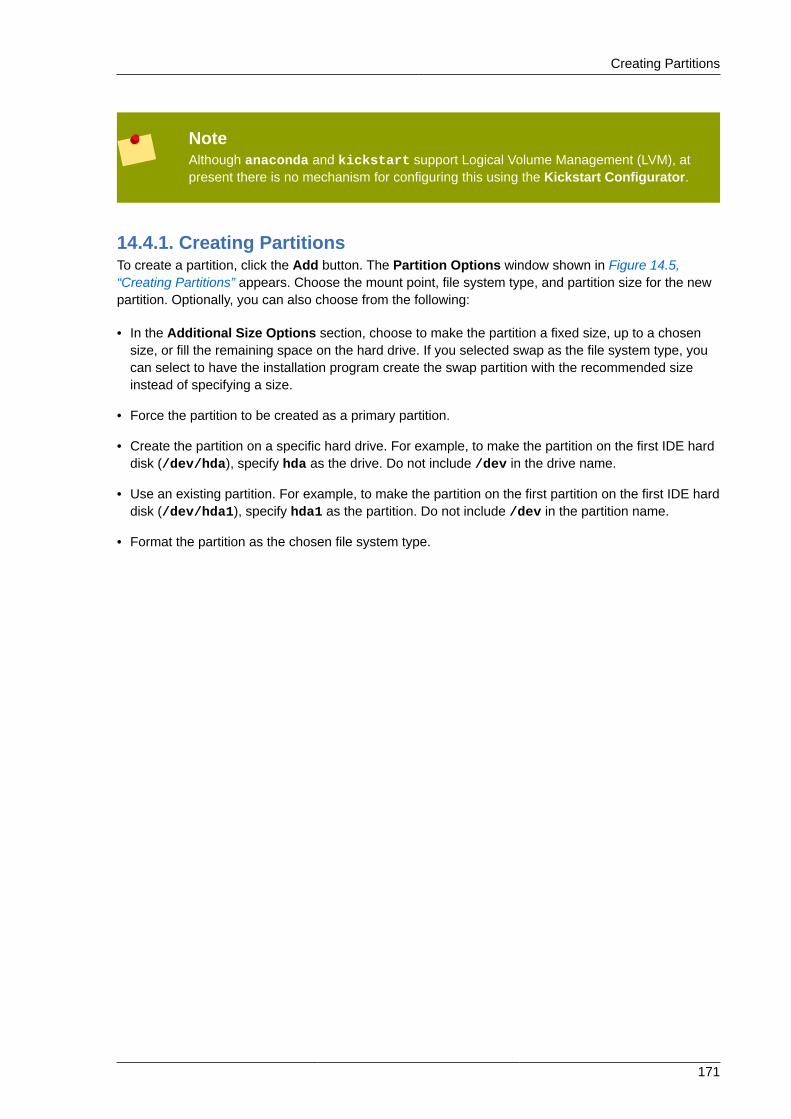
Creating Partitions
171
NoteAlthough anaconda and kickstart support Logical Volume Management (LVM), atpresent there is no mechanism for configuring this using the Kickstart Configurator.
14.4.1. Creating PartitionsTo create a partition, click the Add button. The Partition Options window shown in Figure 14.5,“Creating Partitions” appears. Choose the mount point, file system type, and partition size for the newpartition. Optionally, you can also choose from the following:
• In the Additional Size Options section, choose to make the partition a fixed size, up to a chosensize, or fill the remaining space on the hard drive. If you selected swap as the file system type, youcan select to have the installation program create the swap partition with the recommended sizeinstead of specifying a size.
• Force the partition to be created as a primary partition.
• Create the partition on a specific hard drive. For example, to make the partition on the first IDE harddisk (/dev/hda), specify hda as the drive. Do not include /dev in the drive name.
• Use an existing partition. For example, to make the partition on the first partition on the first IDE harddisk (/dev/hda1), specify hda1 as the partition. Do not include /dev in the partition name.
• Format the partition as the chosen file system type.
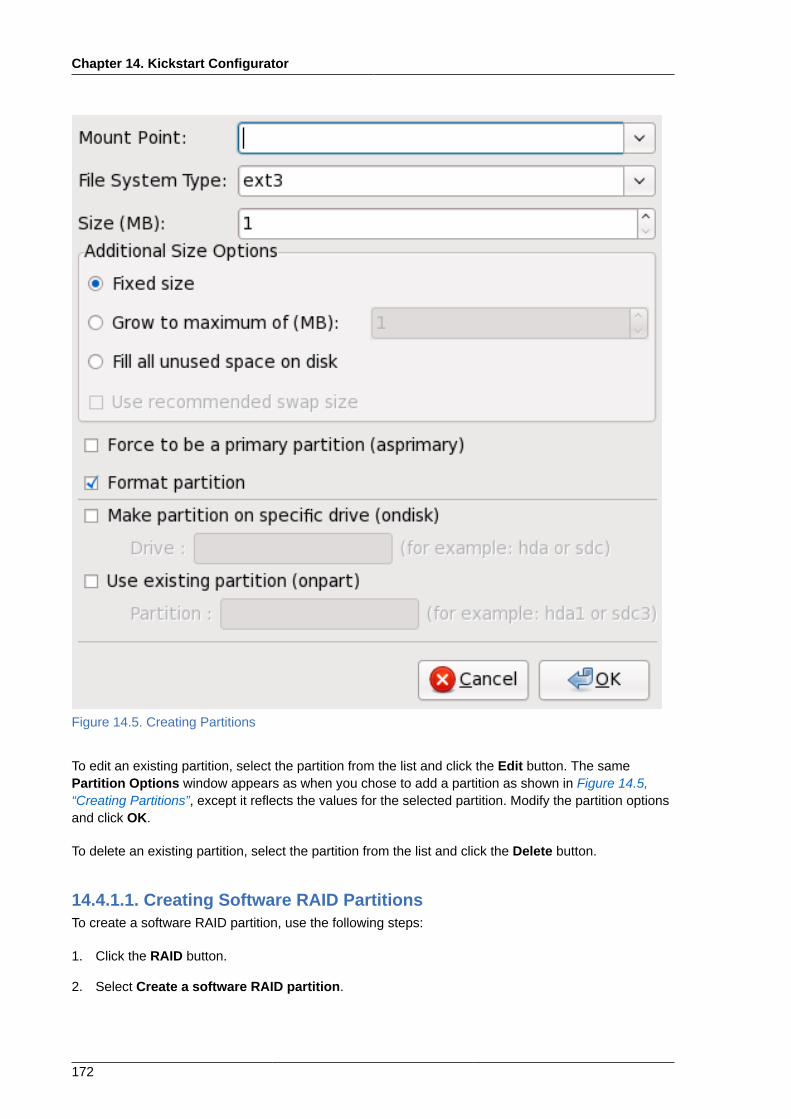
Chapter 14. Kickstart Configurator
172
Figure 14.5. Creating Partitions
To edit an existing partition, select the partition from the list and click the Edit button. The samePartition Options window appears as when you chose to add a partition as shown in Figure 14.5,“Creating Partitions”, except it reflects the values for the selected partition. Modify the partition optionsand click OK.
To delete an existing partition, select the partition from the list and click the Delete button.
14.4.1.1. Creating Software RAID PartitionsTo create a software RAID partition, use the following steps:
1. Click the RAID button.
2. Select Create a software RAID partition.
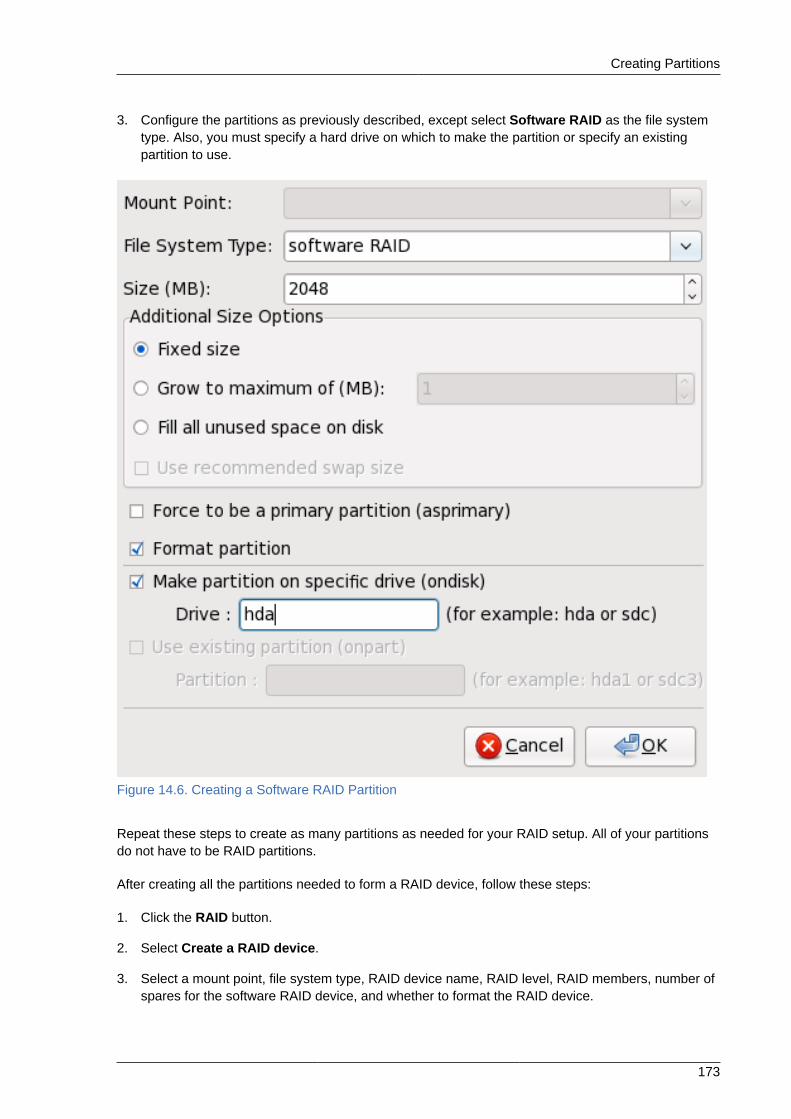
Creating Partitions
173
3. Configure the partitions as previously described, except select Software RAID as the file systemtype. Also, you must specify a hard drive on which to make the partition or specify an existingpartition to use.
Figure 14.6. Creating a Software RAID Partition
Repeat these steps to create as many partitions as needed for your RAID setup. All of your partitionsdo not have to be RAID partitions.
After creating all the partitions needed to form a RAID device, follow these steps:
1. Click the RAID button.
2. Select Create a RAID device.
3. Select a mount point, file system type, RAID device name, RAID level, RAID members, number ofspares for the software RAID device, and whether to format the RAID device.
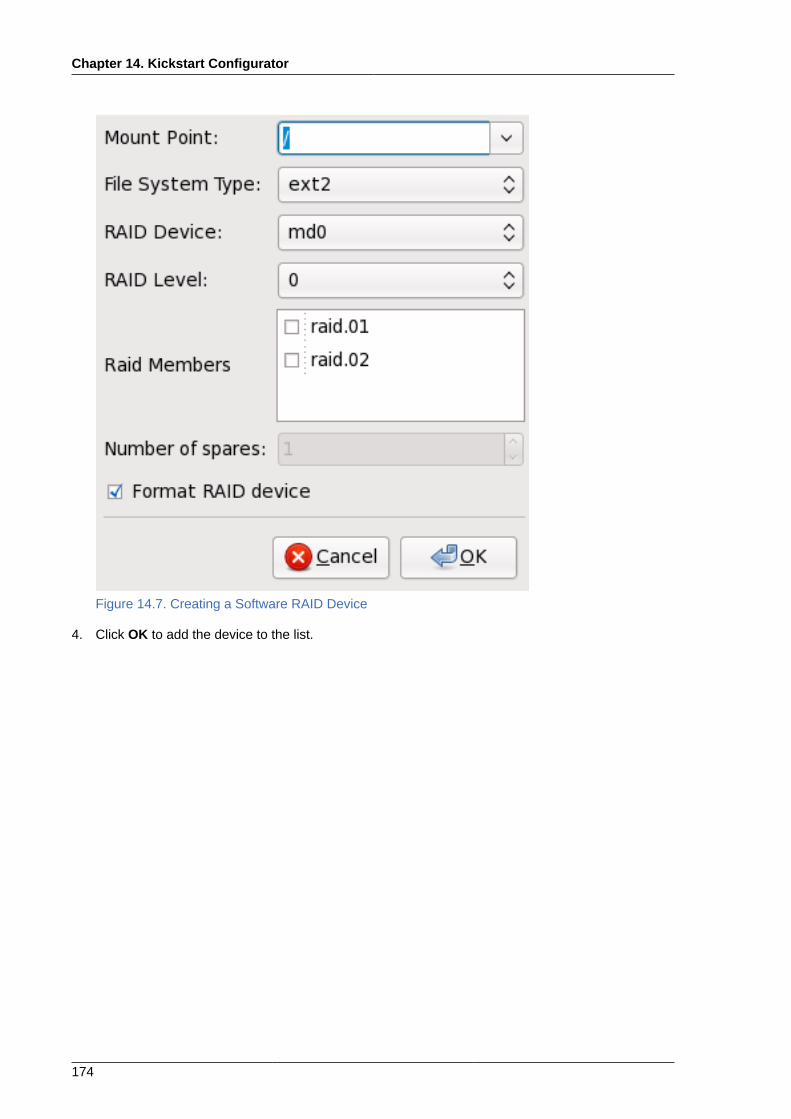
Chapter 14. Kickstart Configurator
174
Figure 14.7. Creating a Software RAID Device
4. Click OK to add the device to the list.
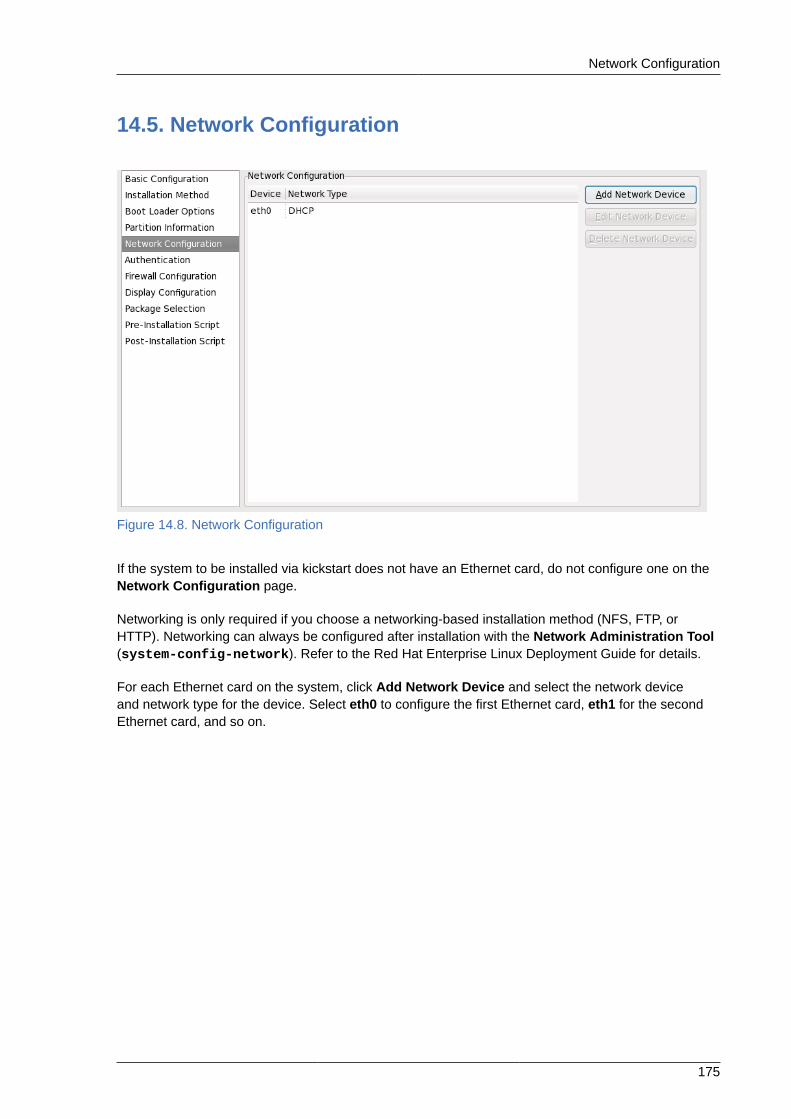
Network Configuration
175
14.5. Network Configuration
Figure 14.8. Network Configuration
If the system to be installed via kickstart does not have an Ethernet card, do not configure one on theNetwork Configuration page.
Networking is only required if you choose a networking-based installation method (NFS, FTP, orHTTP). Networking can always be configured after installation with the Network Administration Tool(system-config-network). Refer to the Red Hat Enterprise Linux Deployment Guide for details.
For each Ethernet card on the system, click Add Network Device and select the network deviceand network type for the device. Select eth0 to configure the first Ethernet card, eth1 for the secondEthernet card, and so on.
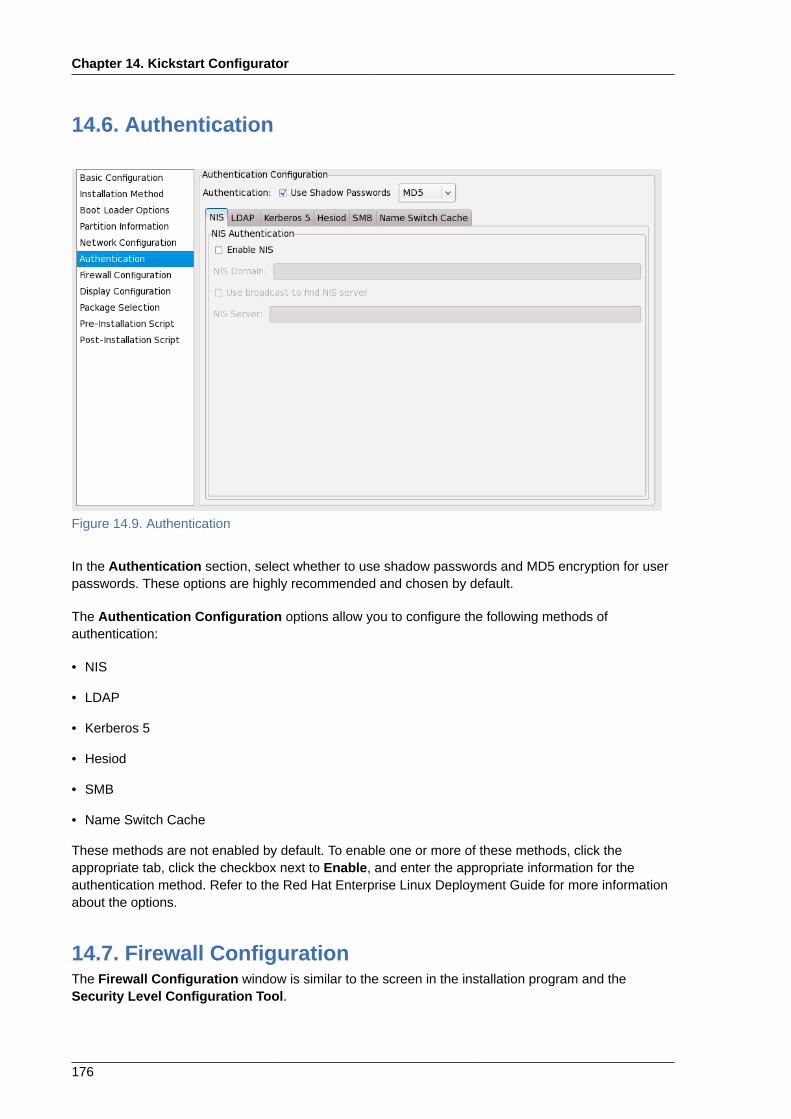
Chapter 14. Kickstart Configurator
176
14.6. Authentication
Figure 14.9. Authentication
In the Authentication section, select whether to use shadow passwords and MD5 encryption for userpasswords. These options are highly recommended and chosen by default.
The Authentication Configuration options allow you to configure the following methods ofauthentication:
• NIS
• LDAP
• Kerberos 5
• Hesiod
• SMB
• Name Switch Cache
These methods are not enabled by default. To enable one or more of these methods, click theappropriate tab, click the checkbox next to Enable, and enter the appropriate information for theauthentication method. Refer to the Red Hat Enterprise Linux Deployment Guide for more informationabout the options.
14.7. Firewall ConfigurationThe Firewall Configuration window is similar to the screen in the installation program and theSecurity Level Configuration Tool.
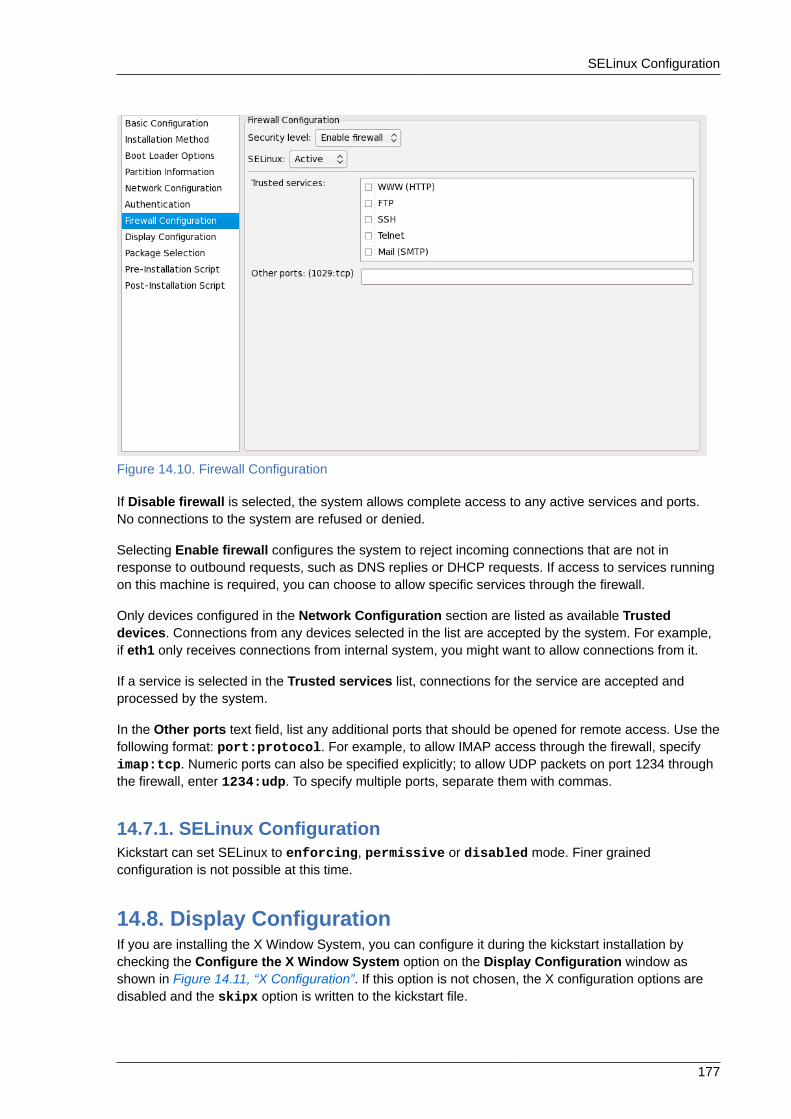
SELinux Configuration
177
Figure 14.10. Firewall Configuration
If Disable firewall is selected, the system allows complete access to any active services and ports.No connections to the system are refused or denied.
Selecting Enable firewall configures the system to reject incoming connections that are not inresponse to outbound requests, such as DNS replies or DHCP requests. If access to services runningon this machine is required, you can choose to allow specific services through the firewall.
Only devices configured in the Network Configuration section are listed as available Trusteddevices. Connections from any devices selected in the list are accepted by the system. For example,if eth1 only receives connections from internal system, you might want to allow connections from it.
If a service is selected in the Trusted services list, connections for the service are accepted andprocessed by the system.
In the Other ports text field, list any additional ports that should be opened for remote access. Use thefollowing format: port:protocol. For example, to allow IMAP access through the firewall, specifyimap:tcp. Numeric ports can also be specified explicitly; to allow UDP packets on port 1234 throughthe firewall, enter 1234:udp. To specify multiple ports, separate them with commas.
14.7.1. SELinux ConfigurationKickstart can set SELinux to enforcing, permissive or disabled mode. Finer grainedconfiguration is not possible at this time.
14.8. Display ConfigurationIf you are installing the X Window System, you can configure it during the kickstart installation bychecking the Configure the X Window System option on the Display Configuration window asshown in Figure 14.11, “X Configuration”. If this option is not chosen, the X configuration options aredisabled and the skipx option is written to the kickstart file.
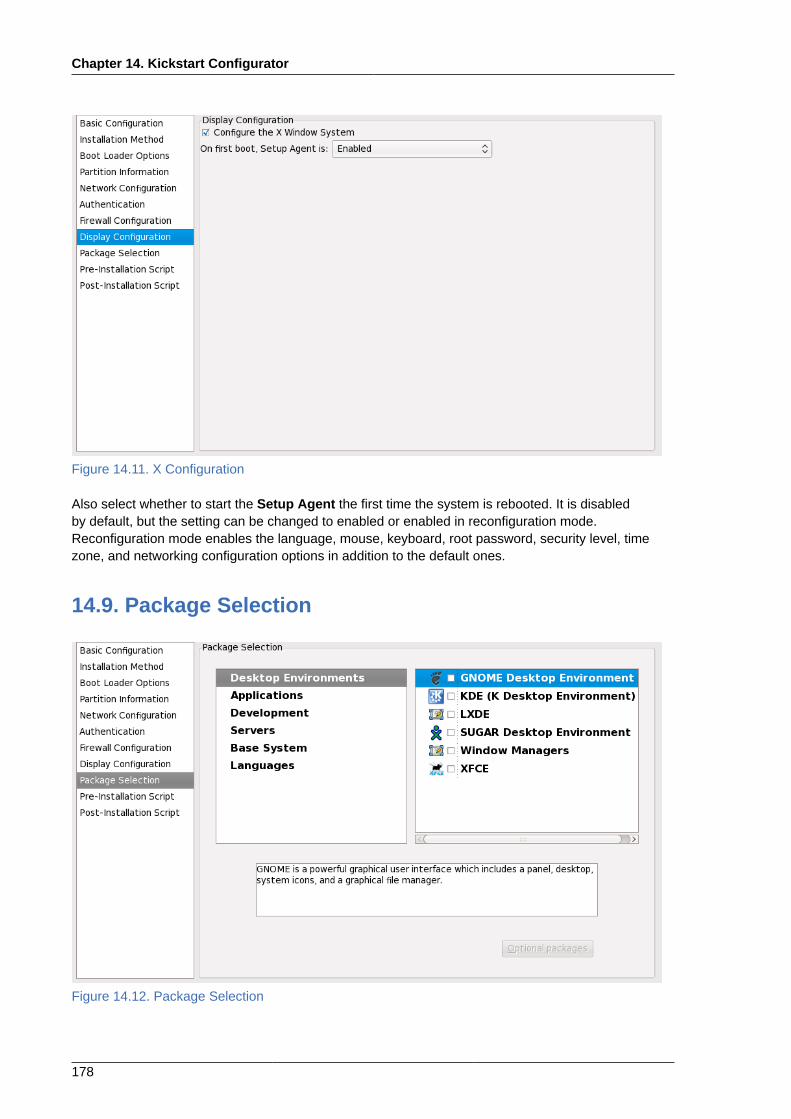
Chapter 14. Kickstart Configurator
178
Figure 14.11. X Configuration
Also select whether to start the Setup Agent the first time the system is rebooted. It is disabledby default, but the setting can be changed to enabled or enabled in reconfiguration mode.Reconfiguration mode enables the language, mouse, keyboard, root password, security level, timezone, and networking configuration options in addition to the default ones.
14.9. Package Selection
Figure 14.12. Package Selection
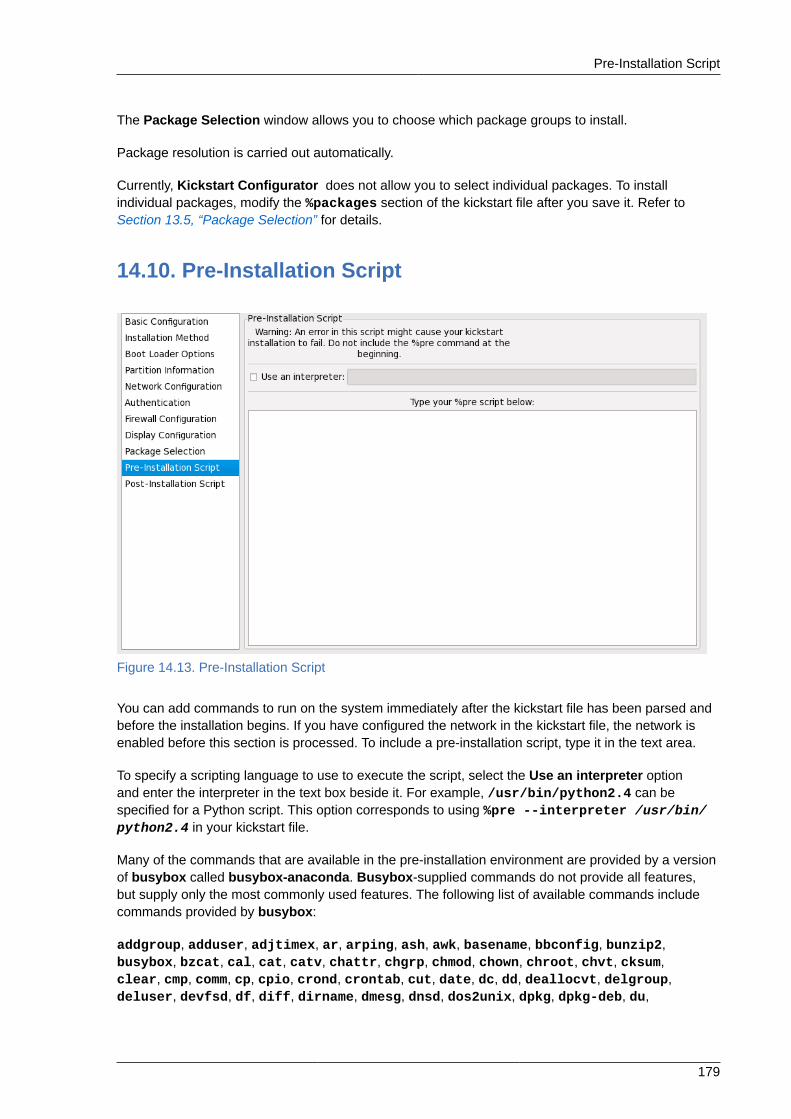
Pre-Installation Script
179
The Package Selection window allows you to choose which package groups to install.
Package resolution is carried out automatically.
Currently, Kickstart Configurator does not allow you to select individual packages. To installindividual packages, modify the %packages section of the kickstart file after you save it. Refer toSection 13.5, “Package Selection” for details.
14.10. Pre-Installation Script
Figure 14.13. Pre-Installation Script
You can add commands to run on the system immediately after the kickstart file has been parsed andbefore the installation begins. If you have configured the network in the kickstart file, the network isenabled before this section is processed. To include a pre-installation script, type it in the text area.
To specify a scripting language to use to execute the script, select the Use an interpreter optionand enter the interpreter in the text box beside it. For example, /usr/bin/python2.4 can bespecified for a Python script. This option corresponds to using %pre --interpreter /usr/bin/python2.4 in your kickstart file.
Many of the commands that are available in the pre-installation environment are provided by a versionof busybox called busybox-anaconda. Busybox-supplied commands do not provide all features,but supply only the most commonly used features. The following list of available commands includecommands provided by busybox:
addgroup, adduser, adjtimex, ar, arping, ash, awk, basename, bbconfig, bunzip2,busybox, bzcat, cal, cat, catv, chattr, chgrp, chmod, chown, chroot, chvt, cksum,clear, cmp, comm, cp, cpio, crond, crontab, cut, date, dc, dd, deallocvt, delgroup,deluser, devfsd, df, diff, dirname, dmesg, dnsd, dos2unix, dpkg, dpkg-deb, du,

Chapter 14. Kickstart Configurator
180
dumpkmap, dumpleases, e2fsck, e2label, echo, ed, egrep, eject, env, ether-wake, expr,fakeidentd, false, fbset, fdflush, fdformat, fdisk, fgrep, find, findfs, fold, free,freeramdisk, fsck, fsck.ext2, fsck.ext3, fsck.ext4, fsck.minix, ftpget, ftpput,fuser, getopt, getty, grep, gunzip, gzip, hdparm, head, hexdump, hostid, hostname,httpd, hush, hwclock, id, ifconfig, ifdown, ifup, inetd, insmod, install, ip, ipaddr,ipcalc, ipcrm, ipcs, iplink, iproute, iptunnel, kill, killall, lash, last, length,less, linux32, linux64, ln, load_policy, loadfont, loadkmap, login, logname, losetup,ls, lsattr, lsmod, lzmacat, makedevs, md5sum, mdev, mesg, mkdir, mke2fs, mkfifo,mkfs.ext2, mkfs.ext3, mkfs.ext4, mkfs.minix, mknod, mkswap, mktemp, modprobe, more,mount, mountpoint, msh, mt, mv, nameif, nc, netstat, nice, nohup, nslookup, od, openvt,passwd, patch, pidof, ping, ping6, pipe_progress, pivot_root, printenv, printf, ps,pwd, rdate, readlink, readprofile, realpath, renice, reset, rm, rmdir, rmmod, route,rpm, rpm2cpio, run-parts, runlevel, rx, sed, seq, setarch, setconsole, setkeycodes,setlogcons, setsid, sh, sha1sum, sleep, sort, start-stop-daemon, stat, strings, stty,su, sulogin, sum, swapoff, swapon, switch_root, sync, sysctl, tail, tar, tee, telnet,telnetd, test, tftp, time, top, touch, tr, traceroute, true, tty, tune2fs, udhcpc,udhcpd, umount, uname, uncompress, uniq, unix2dos, unlzma, unzip, uptime, usleep,uudecode, uuencode, vconfig, vi, vlock, watch, watchdog, wc, wget, which, who, whoami,xargs, yes, zcat, zcip
For a description of any of these commands, run:
busybox command --help
In addition to the aforementioned commands, the following commands are provided in their fullfeatured versions:
anaconda, bash, bzip2, jmacs, ftp, head, joe, kudzu-probe, list-harddrives, loadkeys,mtools, mbchk, mtools, mini-wm, mtools, jpico, pump, python, python2.4, raidstart,raidstop, rcp, rlogin, rsync, setxkbmap, sftp, shred, ssh, syslinux, syslogd, tac,termidx, vncconfig, vncpasswd, xkbcomp, Xorg, Xvnc, zcat
WarningDo not include the %pre command. It is added for you.
NoteThe pre-installation script is run after the source media is mounted and stage 2 of thebootloader has been loaded. For this reason it is not possible to change the source mediain the pre-installation script.

Post-Installation Script
181
14.11. Post-Installation Script
Figure 14.14. Post-Installation Script
You can also add commands to execute on the system after the installation is completed. If thenetwork is properly configured in the kickstart file, the network is enabled, and the script can includecommands to access resources on the network. To include a post-installation script, type it in the textarea.
WarningDo not include the %post command. It is added for you.
For example, to change the message of the day for the newly installed system, add the followingcommand to the %post section:
echo "Hackers will be punished" > /etc/motd
NoteMore examples can be found in Section 13.7.1, “Examples”.
14.11.1. Chroot EnvironmentTo run the post-installation script outside of the chroot environment, click the checkbox next to thisoption on the top of the Post-Installation window. This is equivalent to using the --nochroot optionin the %post section.
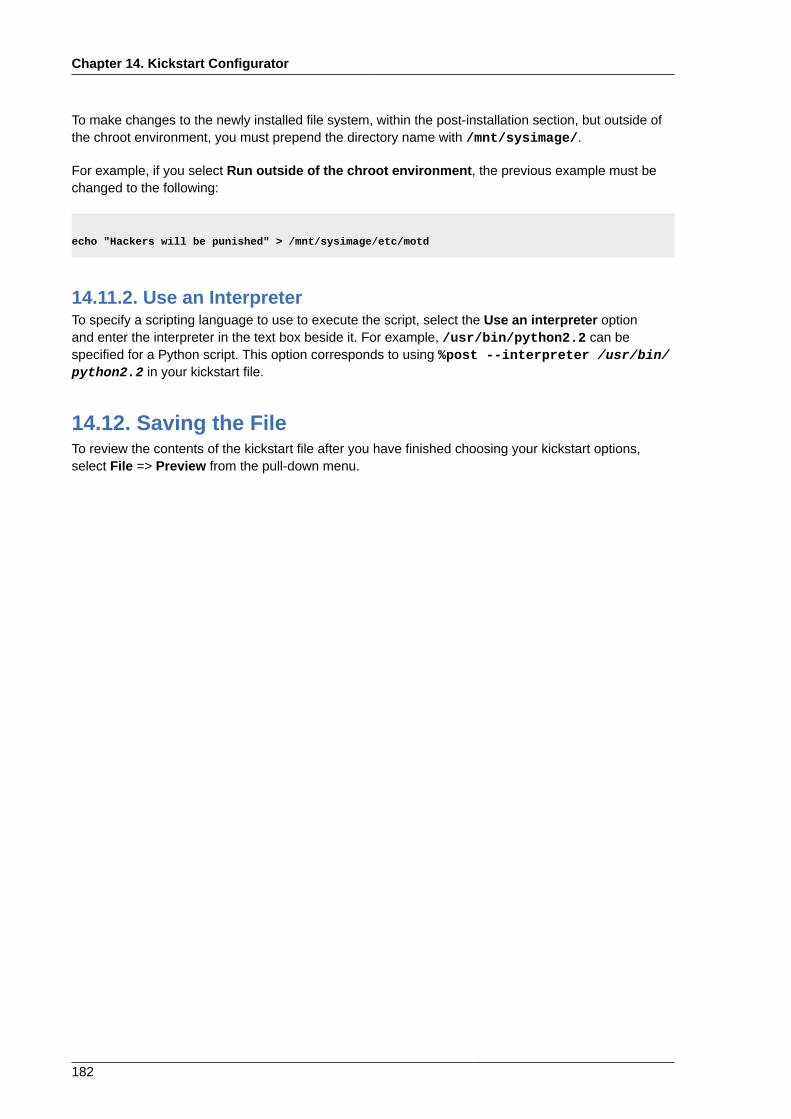
Chapter 14. Kickstart Configurator
182
To make changes to the newly installed file system, within the post-installation section, but outside ofthe chroot environment, you must prepend the directory name with /mnt/sysimage/.
For example, if you select Run outside of the chroot environment, the previous example must bechanged to the following:
echo "Hackers will be punished" > /mnt/sysimage/etc/motd
14.11.2. Use an InterpreterTo specify a scripting language to use to execute the script, select the Use an interpreter optionand enter the interpreter in the text box beside it. For example, /usr/bin/python2.2 can bespecified for a Python script. This option corresponds to using %post --interpreter /usr/bin/python2.2 in your kickstart file.
14.12. Saving the FileTo review the contents of the kickstart file after you have finished choosing your kickstart options,select File => Preview from the pull-down menu.
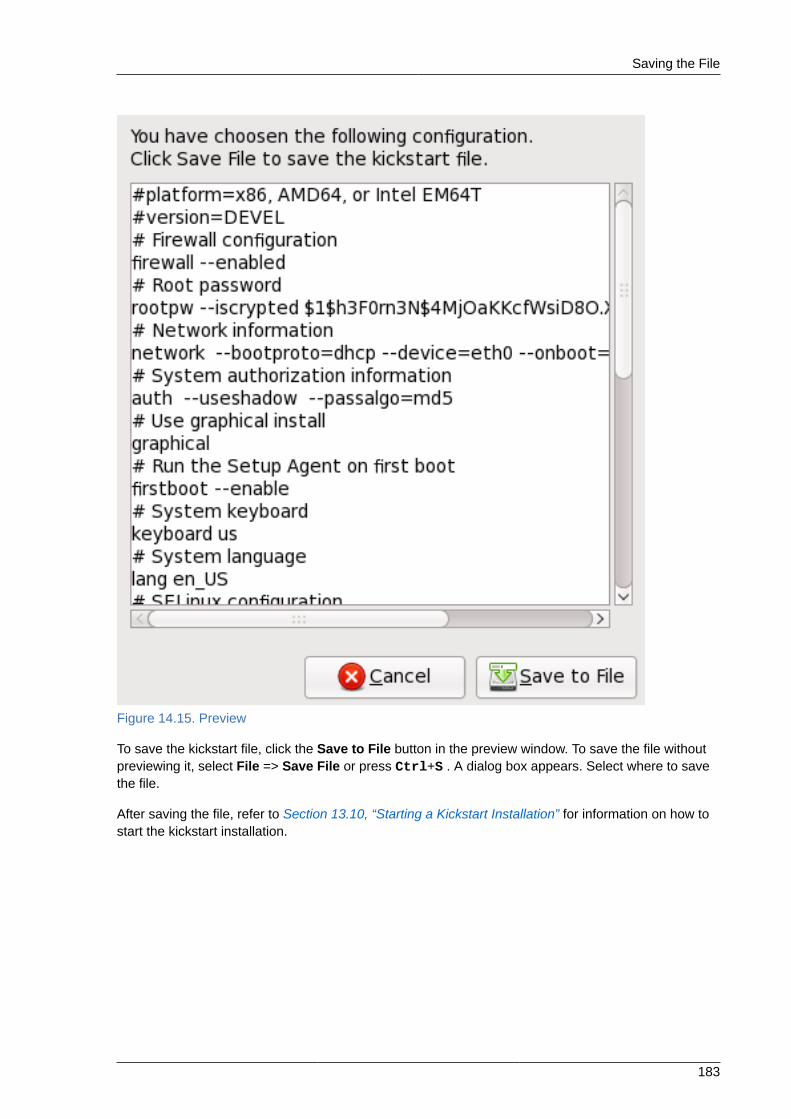
Saving the File
183
Figure 14.15. Preview
To save the kickstart file, click the Save to File button in the preview window. To save the file withoutpreviewing it, select File => Save File or press Ctrl+S . A dialog box appears. Select where to savethe file.
After saving the file, refer to Section 13.10, “Starting a Kickstart Installation” for information on how tostart the kickstart installation.

184

Part IV. After installationThis part of the Fedora Installation Guide covers finalizing the installation, as well as some installation-related tasks that you might perform at some time in the future. These include:
• using a Fedora installation disk to rescue a damaged system.
• upgrading to a new version of Fedora.
• removing Fedora from your computer.

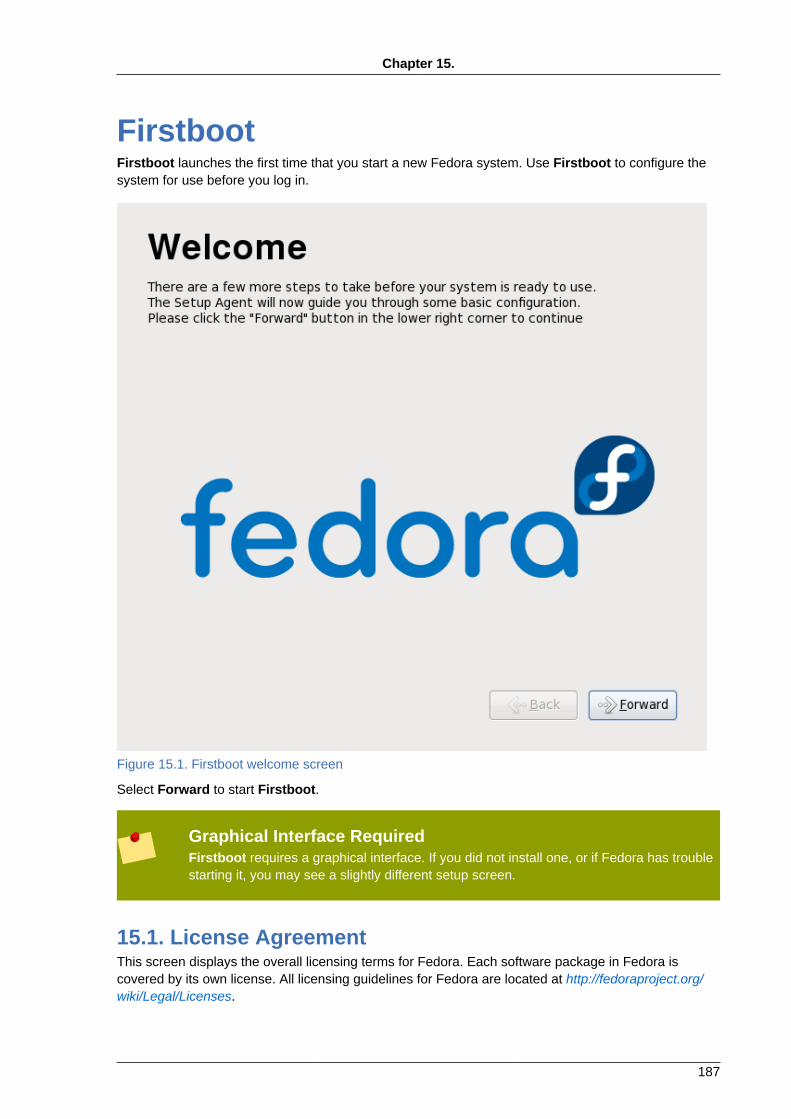
Chapter 15.
187
FirstbootFirstboot launches the first time that you start a new Fedora system. Use Firstboot to configure thesystem for use before you log in.
Figure 15.1. Firstboot welcome screen
Select Forward to start Firstboot.
Graphical Interface RequiredFirstboot requires a graphical interface. If you did not install one, or if Fedora has troublestarting it, you may see a slightly different setup screen.
15.1. License AgreementThis screen displays the overall licensing terms for Fedora. Each software package in Fedora iscovered by its own license. All licensing guidelines for Fedora are located at http://fedoraproject.org/wiki/Legal/Licenses.
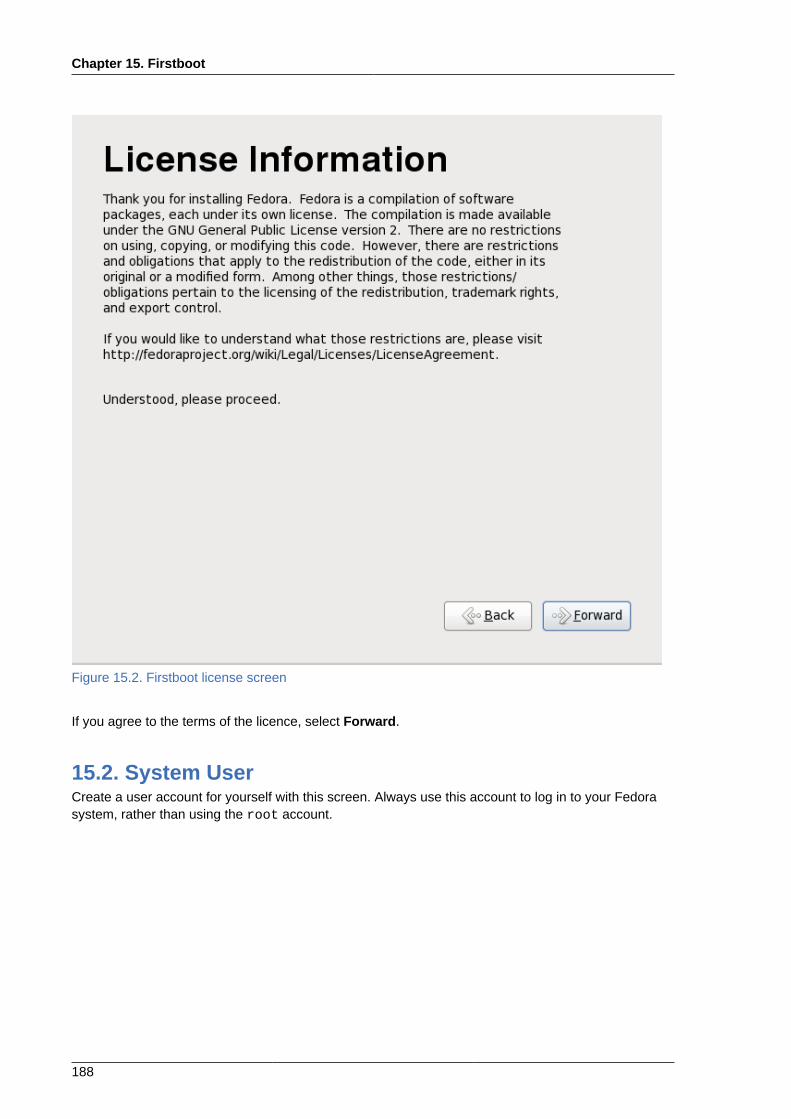
Chapter 15. Firstboot
188
Figure 15.2. Firstboot license screen
If you agree to the terms of the licence, select Forward.
15.2. System UserCreate a user account for yourself with this screen. Always use this account to log in to your Fedorasystem, rather than using the root account.
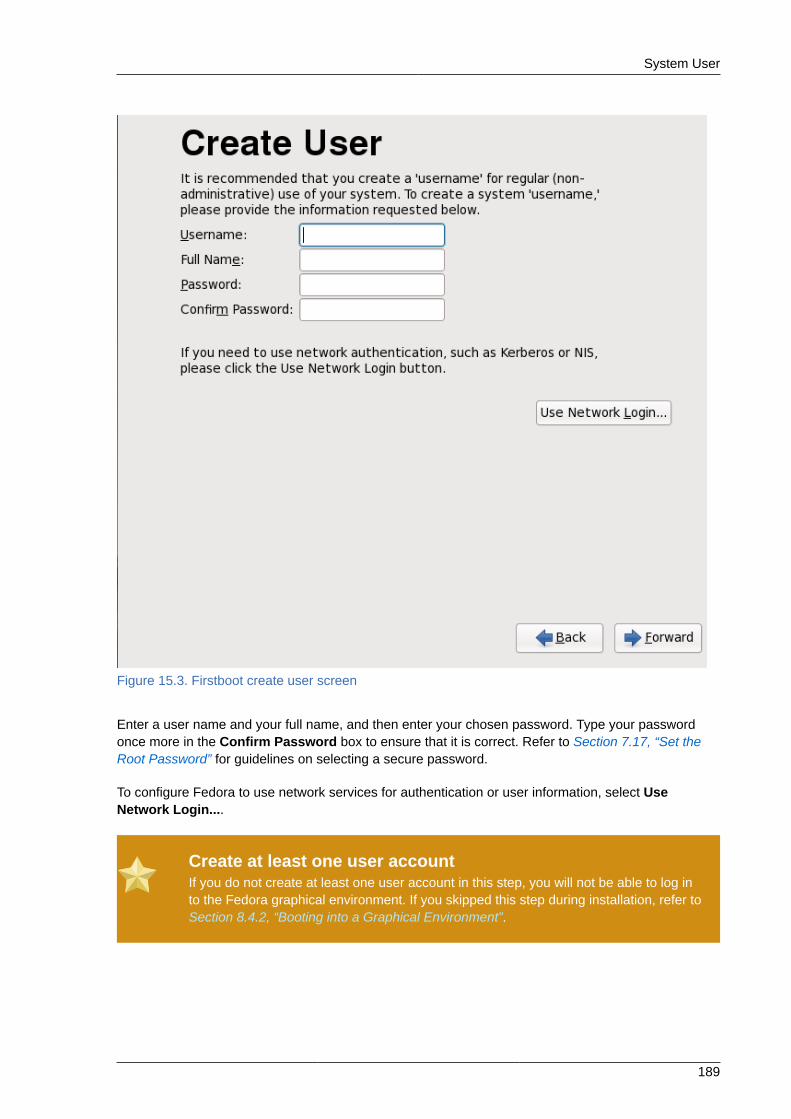
System User
189
Figure 15.3. Firstboot create user screen
Enter a user name and your full name, and then enter your chosen password. Type your passwordonce more in the Confirm Password box to ensure that it is correct. Refer to Section 7.17, “Set theRoot Password” for guidelines on selecting a secure password.
To configure Fedora to use network services for authentication or user information, select UseNetwork Login....
Create at least one user accountIf you do not create at least one user account in this step, you will not be able to log into the Fedora graphical environment. If you skipped this step during installation, refer toSection 8.4.2, “Booting into a Graphical Environment”.

Chapter 15. Firstboot
190
Creating Extra User AccountsTo add additional user accounts to your system after the installation is complete, choose
System → Administration → Users & Groups.
15.3. Date and TimeUse this screen to adjust the date and time of the system clock. To change these settings after
installation, click System → Administration → Date & Time.
Figure 15.4. Firstboot date and time screen
Click the Synchronize date and time over the network checkbox to configure your system touse Network Time Protocol (NTP) servers to maintain the accuracy of the clock. NTP provides timesynchronization service to computers on the same network. Many public NTP servers are available onthe Internet.
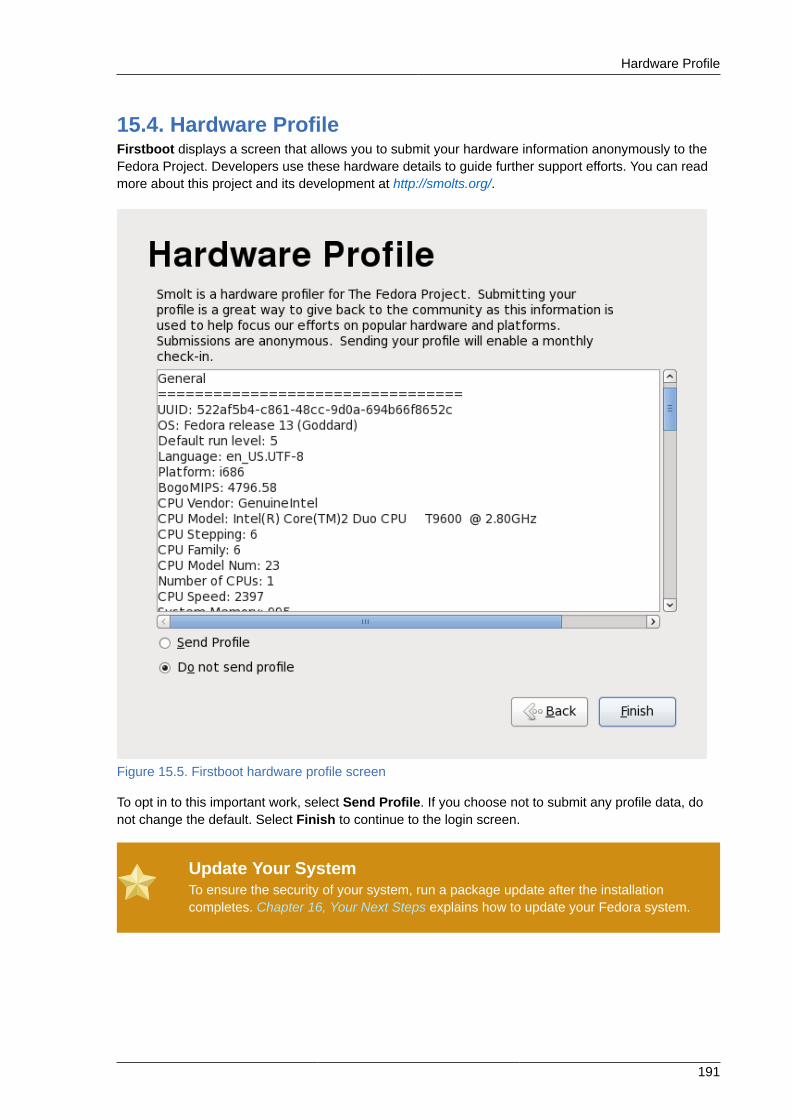
Hardware Profile
191
15.4. Hardware ProfileFirstboot displays a screen that allows you to submit your hardware information anonymously to theFedora Project. Developers use these hardware details to guide further support efforts. You can readmore about this project and its development at http://smolts.org/.
Figure 15.5. Firstboot hardware profile screen
To opt in to this important work, select Send Profile. If you choose not to submit any profile data, donot change the default. Select Finish to continue to the login screen.
Update Your SystemTo ensure the security of your system, run a package update after the installationcompletes. Chapter 16, Your Next Steps explains how to update your Fedora system.

192
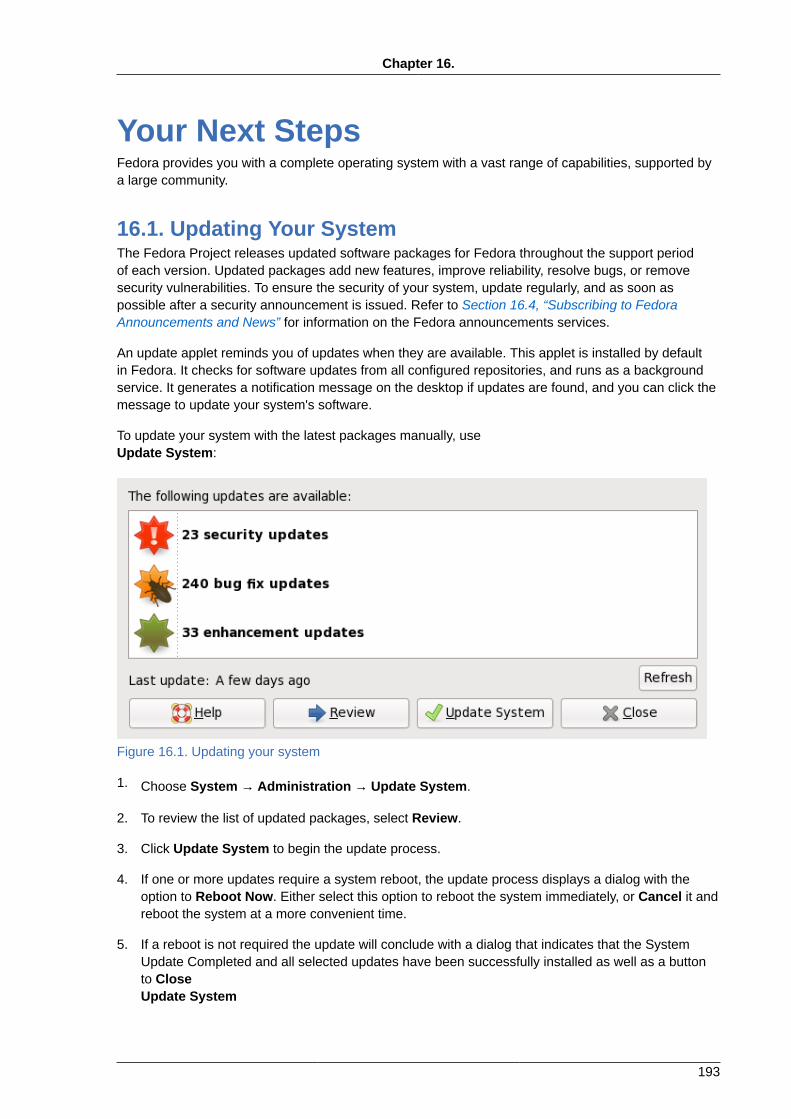
Chapter 16.
193
Your Next StepsFedora provides you with a complete operating system with a vast range of capabilities, supported bya large community.
16.1. Updating Your SystemThe Fedora Project releases updated software packages for Fedora throughout the support periodof each version. Updated packages add new features, improve reliability, resolve bugs, or removesecurity vulnerabilities. To ensure the security of your system, update regularly, and as soon aspossible after a security announcement is issued. Refer to Section 16.4, “Subscribing to FedoraAnnouncements and News” for information on the Fedora announcements services.
An update applet reminds you of updates when they are available. This applet is installed by defaultin Fedora. It checks for software updates from all configured repositories, and runs as a backgroundservice. It generates a notification message on the desktop if updates are found, and you can click themessage to update your system's software.
To update your system with the latest packages manually, useUpdate System:
Figure 16.1. Updating your system
1. Choose System → Administration → Update System.
2. To review the list of updated packages, select Review.
3. Click Update System to begin the update process.
4. If one or more updates require a system reboot, the update process displays a dialog with theoption to Reboot Now. Either select this option to reboot the system immediately, or Cancel it andreboot the system at a more convenient time.
5. If a reboot is not required the update will conclude with a dialog that indicates that the SystemUpdate Completed and all selected updates have been successfully installed as well as a buttonto CloseUpdate System
Chapter 16. Your Next Steps
194
To update packages from the command-line, use theyum utility. Type this command to begin a full update of your system with yum:
su -c 'yum update'
Enter the root password when prompted.
Refer to http://docs.fedoraproject.org/yum/ for more information on yum.
Network Connection RequiredEnsure that your system has an active network connection before you run the UpdateSoftware tool, or the yum utility. The update process downloads information and packagesfrom a network of servers.
If your Fedora system has a permanent network connection, you may choose to enable dailysystem updates. To enable automatic updates, follow the instructions on the webpage http://docs.fedoraproject.org/yum/sn-updating-your-system.html.
16.2. Finishing an Upgrade
System Updates RecommendedOnce you have rebooted your system after performing an upgrade, you should alsoperform a manual system update. Consult Section 16.1, “Updating Your System” for moreinformation.
If you chose to upgrade your system from a previous release rather than perform a fresh installation,you may want to examine the differences in the package set. Section 7.14.2, “ Upgrading Using theInstaller ” advised you to create a package listing for your original system. You can now use that listingto determine how to bring your new system close to the original system state.
You can obtain a list of orphaned packages (that is, packages that are no longer in the repositories)from the package-cleanup tool. Install the yum-utils package and then run package-cleanup --orphans. The tool will show you orphaned packages and packages that are partially uninstalled butfor which the %postun script failed.
Most software repository configurations are stored in packages that end with the term release.Check the old package list for the repositories that were installed:
awk '{print $1}' ~/old-pkglist.txt | grep 'release$'
If necessary, retrieve and install these software repository packages from their original sources on theInternet. Follow the instructions at the originating site to install the repository configuration packagesfor use by yum and other software management tools on your Fedora system.
Then run the following commands to make a list of other missing software packages:
awk '{print $1}' ~/old-pkglist.txt | sort | uniq > ~/old-pkgnames.txt
Switching to a Graphical Login
195
rpm -qa --qf '%{NAME}\n' | sort | uniq > ~/new-pkgnames.txtdiff -u ~/old-pkgnames.txt ~/new-pkgnames.txt | grep '^-' | sed 's/^-//' > /tmp/pkgs-to-install.txt
Now use the file /tmp/pkgs-to-install.txt with the yum command to restore most or all of yourold software:
su -c 'yum install `cat /tmp/pkgs-to-install.txt`'
Missing SoftwareDue to changes in package complements between Fedora releases, it is possible thismethod may not restore all the software on your system. You can use the routines aboveto again compare the software on your system, and remedy any problems you find.
16.3. Switching to a Graphical Login
Important — Access to Software Repositories Might BeRequiredTo switch to a graphical environment, you might need to install extra software from arepository. You can access Fedora repositories through the Internet or use a Fedorainstallation CD or DVD as a repository. Refer to Section 16.3.1, “Enabling Access toSoftware Repositories from the Command Line”.
If you installed using a text login and wish to switch to a graphical login, follow this procedure.
1. If you are not already root, switch users to the root account:
su -
Provide the administrator password when prompted.
2. If you have not already done so, install the X Window System and a graphical desktopenvironment. For example, to install the GNOME desktop environment, use this command:
yum groupinstall "X Window System" "GNOME Desktop Environment"
To install the KDE desktop environment, use:
yum groupinstall "X Window System" KDE
To install the XFCE desktop environment, use:
yum groupinstall "X Window System" XFCE
This step may take some time as your Fedora system downloads and installs additional software.You may be asked to provide the installation media depending on your original installation source.
Chapter 16. Your Next Steps
196
3. Run the following command to edit the /etc/inittab file:
vi /etc/inittab
4. Press the I key to enter insert mode.
5. Find the line that includes the text initdefault. Change the numeral 3 to 5.
6. Type :wq and press the Enter key to save the file and exit the vi text editor.
Reboot the system using the reboot command. Your system will restart and present a graphicallogin.
If you encounter any problems with the graphical login, refer to Chapter 8, Troubleshooting Installationon an Intel® or AMD System or consult one of the help sources listed in Section 1.2, “GettingAdditional Help”.
16.3.1. Enabling Access to Software Repositories from theCommand LineThe usual way to install new software on a Fedora system is through a software repository. Youcan access Fedora repositories through the Internet, or use a Fedora installation CD or DVD as arepository. The software that you access through online repositories is more up-to-date than what isavailable on an installation CD or DVD. Furthermore, configuring a Fedora system to access onlinerepositories is generally easier than configuring the system to use an installation CD or DVD as arepository, as long as you have an existing, wired network connection available.
16.3.1.1. Enabling Access to Software Repositories Through the InternetBy default, every Fedora installation is already configured to access Fedora repositories through theInternet. Therefore, all you must do is ensure that the system can access the Internet. If you have anexisting, wired network connection available, this process is straightforward:
1. If you are not already root, switch users to the root account:
su -
2. Ensure that the system is plugged into your network. Note that your network might be as small astwo devices — a computer and an external modem/router.
3. Run system-config-network. The network configuration tool starts and displays the SelectAction screen.
4. Select Edit a device params and press Enter. The network configuration tool displays theSelect A Device screen with a list of network interfaces present on your system. The firstinterface is named eth0 by default.
5. Select a network interface to configure and press Enter. The network configuration tool takesyou to the Network Configuration screen.
6. You can manually configure a static IP, gateway, and DNS servers on this screen or leave thesefields blank to accept the default values. When you have chosen a configuration, select OK, andpress Enter. The network configuration tool takes you back to the Select A Device screen.
Enabling Access to Software Repositories from the Command Line
197
7. Select Save and press Enter. The network configuration tool takes you back to the SelectAction screen.
8. Select Save&Quit and press Enter. The network configuration tool saves your settings andexits.
9. Run ifup interface, where interface is the network interface that you configured with thenetwork configuration tool. For example, run ifup eth0 to start eth0.
Configuration of dial-up or wireless Internet connections is more complicated and beyond the scope ofthis guide.
16.3.1.2. Using a Fedora Installation CD or DVD as a Software RepositoryYou can use a Fedora installation CD or DVD as a software repository, either in the form of a physicaldisc, or in the form of an ISO image file.
1. If you are using a physical CD or DVD, insert the disc into your computer.
2. If you are not already root, switch users to the root account:
su -
3. Create a mount point for the repository:
mkdir -p /path/to/repo
where /path/to/repo is a location for the repository, for example, /mnt/repo
4. Mount the CD or DVD on the mount point that you just created. If you are using a physical disc,you need to know the device name of your CD or DVD drive. You can find the names of any CDor DVD drives on your system with the command cat /proc/sys/dev/cdrom/info. The firstCD or DVD drive on the system is typically named sr0. When you know the device name, mountthe CD or DVD:
mount -r -t iso9660 /dev/device_name /path/to/repo
For example: mount -r -t iso9660 /dev/sr0 /mnt/repo
If you are using an ISO image file of a disc, mount the image file like this:
mount -r -t iso9660 -o loop /path/to/image/file.iso /path/to/repo
For example: mount -r -o loop /home/root/Downloads/Fedora-13-i386-DVD.iso /mnt/repo
Note that you can only mount an image file if the storage device that holds the image file is itselfmounted. For example, if the image file is stored on a hard drive that it not mounted automaticallywhen the system boots, you must mount the hard drive before you mount an image file stored onthat hard drive. Consider a hard drive named /dev/sdb that is not automatically mounted at boottime and which has an image file stored in a directory named Downloads on its first partition:
mkdir /mnt/temp

Chapter 16. Your Next Steps
198
mount /dev/sdb1 /mnt/tempmkdir /mnt/repomount -r -t iso9660 -o loop mount -r -o loop /mnt/temp/Downloads/Fedora-13-i386-DVD.iso /mnt/repo
If you are not sure whether a storage device is mounted, run the mount command to obtain a listof current mounts. If you are not sure of the device name or partition number of a storage device,run fdisk -l and try to identify it in the output.
5. Edit the /etc/yum.repos.d/fedora.repo and /etc/yum.repos.d/fedora-updates.repo files to use the new repository. In each case:
1. Open the file with the vi text editor. For example:
vi /etc/yum.repos.d/fedora.repo
2. Press the I key to enter insert mode.
3. Type a # character at the start of any line in the file that starts with baseurl or mirrorlist.The # character comments out the line so that the package management software ignores it.
4. Find the [fedora] section of the fedora.repo file or the [updates] section of thefedora-updates.repo file. Note that this section includes a line that now starts #baseurl that you previously commented out.
5. Insert a new line after the line that starts # baseurl:
baseurl=file:///path/to/repo
For example, baseurl=file:///mnt/repo
6. Press the Esc key to exit insert mode.
7. Type :wq and press the Enter key to save the file and exit the vi text editor.
8. After installing or upgrading software from the CD or DVD, edit the /etc/yum.repos.d/fedora.repo and /etc/yum.repos.d/fedora-updates.repo files again to undo thechanges that you made.
16.4. Subscribing to Fedora Announcements and NewsTo receive information about package updates, subscribe to either the announcements mailing list, orthe RSS feeds.
Fedora Project announcements mailing listhttps://www.redhat.com/mailman/listinfo/fedora-announce-list
Fedora Project RSS feedshttp://fedoraproject.org/infofeed/
The announcements mailing list also provides you with news on the Fedora Project, and the Fedoracommunity.
Finding Documentation and Support
199
Security AnnouncementsAnnouncements with the keyword [SECURITY] in the title identify package updates thatresolve security vulnerabilities.
16.5. Finding Documentation and SupportMembers of the Fedora community provide support through mailing lists, Web forums and Linux UserGroups (LUGs) across the world.
The Web site for the formally endorsed forums is http://forums.fedoraforum.org/.
The following resources provide information on many aspects of Fedora:
• The FAQ on the Fedora Project websitehttp://fedoraproject.org/wiki/FAQ/
• The documents available from the Fedora Documentation Project Web sitehttp://docs.fedoraproject.org/
• The Linux Documentation Project (LDP)http://www.tldp.org/
• The Red Hat Enterprise Linux documentation, much of which also applies to Fedorahttp://www.redhat.com/docs/manuals/enterprise/
Many other organizations and individuals also provide tutorials and HOWTOs for Fedora on their Websites. You can locate information on any topic by using Google's Linux search site, located at http://www.google.com/linux.
16.6. Joining the Fedora CommunityThe Fedora Project is driven by the individuals that contribute to it. Community members providesupport and documentation to other users, help to improve the software included in Fedora by testing,and develop new software alongside the programmers employed by Red Hat. The results of this workare available to all.
To make a difference, start here:
http://join.fedoraproject.org/

200
Chapter 17.
201
Basic System RecoveryWhen things go wrong, there are ways to fix problems. However, these methods require that youunderstand the system well. This chapter describes how to boot into rescue mode, single-user mode,and emergency mode, where you can use your own knowledge to repair the system.
17.1. Common ProblemsYou might need to boot into one of these recovery modes for any of the following reasons:
• You are unable to boot normally into Fedora (runlevel 3 or 5).
• You are having hardware or software problems, and you want to get a few important files off of yoursystem's hard drive.
• You forgot the root password.
17.1.1. Unable to Boot into FedoraThis problem is often caused by the installation of another operating system after you have installedFedora. Some other operating systems assume that you have no other operating system(s) on yourcomputer. They overwrite the Master Boot Record (MBR) that originally contained the GRUB bootloader. If the boot loader is overwritten in this manner, you cannot boot Fedora unless you can get intorescue mode and reconfigure the boot loader.
Another common problem occurs when using a partitioning tool to resize a partition or create a newpartition from free space after installation, and it changes the order of your partitions. If the partitionnumber of your / partition changes, the boot loader might not be able to find it to mount the partition.To fix this problem, boot in rescue mode and modify the /boot/grub/grub.conf file.
For instructions on how to reinstall the GRUB boot loader from a rescue environment, refer toSection 17.2.1, “Reinstalling the Boot Loader”.
17.1.2. Hardware/Software ProblemsThis category includes a wide variety of different situations. Two examples include failing harddrives and specifying an invalid root device or kernel in the boot loader configuration file. If eitherof these occur, you might not be able to reboot into Fedora. However, if you boot into one of thesystem recovery modes, you might be able to resolve the problem or at least get copies of your mostimportant files.
17.1.3. Root PasswordWhat can you do if you forget your root password? To reset it to a different password, boot into rescuemode or single-user mode, and use the passwd command to reset the root password.
17.2. Booting into Rescue ModeRescue mode provides the ability to boot a small Fedora environment entirely from CD-ROM, or someother boot method, instead of the system's hard drive.
Chapter 17. Basic System Recovery
202
As the name implies, rescue mode is provided to rescue you from something. During normaloperation, your Fedora system uses files located on your system's hard drive to do everything — runprograms, store your files, and more.
However, there may be times when you are unable to get Fedora running completely enough toaccess files on your system's hard drive. Using rescue mode, you can access the files stored on yoursystem's hard drive, even if you cannot actually run Fedora from that hard drive.
To boot into rescue mode, you must be able to boot the system using one of the following methods1:
• By booting the system from an installation boot CD-ROM or DVD.
• By booting the system from other installation boot media, such as USB flash devices.
• By booting the system from the Fedora CD-ROM #1 or DVD.
Once you have booted using one of the described methods, add the keyword rescue as a kernelparameter. For example, for an x86 system, type the following command at the installation bootprompt:
linux rescue
You are prompted to answer a few basic questions, including which language to use. It also promptsyou to select where a valid rescue image is located. Select from Local CD-ROM, Hard Drive, NFSimage, FTP, or HTTP. The location selected must contain a valid installation tree, and the installationtree must be for the same version of Fedora as the Fedora disk from which you booted. If you used aboot CD-ROM or other media to start rescue mode, the installation tree must be from the same treefrom which the media was created. For more information about how to setup an installation tree on ahard drive, NFS server, FTP server, or HTTP server, refer to the earlier section of this guide.
If you select a rescue image that does not require a network connection, you are asked whether or notyou want to establish a network connection. A network connection is useful if you need to backup filesto a different computer or install some RPM packages from a shared network location, for example.
The following message is displayed:
The rescue environment will now attempt to find your Linux installation and mount itunder the directory /mnt/sysimage. You can then make any changes required to yoursystem. If you want to proceed with this step choose 'Continue'. You can also chooseto mount your file systems read-only instead of read-write by choosing 'Read-only'. Iffor some reason this process fails you can choose 'Skip' and this step will be skippedand you will go directly to a command shell.
If you select Continue, it attempts to mount your file system under the directory /mnt/sysimage/.If it fails to mount a partition, it notifies you. If you select Read-Only, it attempts to mount your filesystem under the directory /mnt/sysimage/, but in read-only mode. If you select Skip, your filesystem is not mounted. Choose Skip if you think your file system is corrupted.
Once you have your system in rescue mode, a prompt appears on VC (virtual console) 1 and VC 2(use the Ctrl-Alt-F1 key combination to access VC 1 and Ctrl-Alt-F2 to access VC 2):
Refer to the earlier sections of this guide for more details.
Booting into Rescue Mode
203
sh-3.00b#
If you selected Continue to mount your partitions automatically and they were mounted successfully,you are in single-user mode.
Even if your file system is mounted, the default root partition while in rescue mode is a temporary rootpartition, not the root partition of the file system used during normal user mode (runlevel 3 or 5). Ifyou selected to mount your file system and it mounted successfully, you can change the root partitionof the rescue mode environment to the root partition of your file system by executing the followingcommand:
chroot /mnt/sysimage
This is useful if you need to run commands such as rpm that require your root partition to be mountedas /. To exit the chroot environment, type exit to return to the prompt.
If you selected Skip, you can still try to mount a partition or LVM2 logical volume manually insiderescue mode by creating a directory such as /foo, and typing the following command:
mount -t ext4 /dev/mapper/VolGroup00-LogVol02 /foo
In the above command, /foo is a directory that you have created and /dev/mapper/VolGroup00-LogVol02 is the LVM2 logical volume you want to mount. If the partition is of type ext2 or ext3replace ext4 with ext2 or ext3 respectively.
If you do not know the names of all physical partitions, use the following command to list them:
fdisk -l
If you do not know the names of all LVM2 physical volumes, volume groups, or logical volumes, usethe following commands to list them:
pvdisplay
vgdisplay
lvdisplay
From the prompt, you can run many useful commands, such as:
• ssh, scp, and ping if the network is started
• dump and restore for users with tape drives
• parted and fdisk for managing partitions
• rpm for installing or upgrading software
• joe for editing configuration files
Chapter 17. Basic System Recovery
204
NoteIf you try to start other popular editors such as emacs, pico, or vi, the joe editor isstarted.
17.2.1. Reinstalling the Boot LoaderIn many cases, the GRUB boot loader can mistakenly be deleted, corrupted, or replaced by otheroperating systems.
The following steps detail the process on how GRUB is reinstalled on the master boot record:
• Boot the system from an installation boot medium.
• Type linux rescue at the installation boot prompt to enter the rescue environment.
• Type chroot /mnt/sysimage to mount the root partition.
• Type /sbin/grub-install bootpart to reinstall the GRUB boot loader, where bootpart isthe boot partition (typically, /dev/sda).
• Review the /boot/grub/grub.conf file, as additional entries may be needed for GRUB tocontrol additional operating systems.
• Reboot the system.
17.3. Booting into Single-User ModeOne of the advantages of single-user mode is that you do not need a boot CD-ROM; however, it doesnot give you the option to mount the file systems as read-only or not mount them at all.
If your system boots, but does not allow you to log in when it has completed booting, try single-usermode.
In single-user mode, your computer boots to runlevel 1. Your local file systems are mounted, butyour network is not activated. You have a usable system maintenance shell. Unlike rescue mode,single-user mode automatically tries to mount your file system. Do not use single-user mode if yourfile system cannot be mounted successfully. You cannot use single-user mode if the runlevel 1configuration on your system is corrupted.
On an x86 system using GRUB, use the following steps to boot into single-user mode:
1. At the GRUB splash screen at boot time, press any key to enter the GRUB interactive menu.
2. Select Fedora with the version of the kernel that you wish to boot and type a to append the line.
3. Go to the end of the line and type single as a separate word (press the Spacebar and thentype single). Press Enter to exit edit mode.
17.4. Booting into Emergency ModeIn emergency mode, you are booted into the most minimal environment possible. The root file systemis mounted read-only and almost nothing is set up. The main advantage of emergency mode over

Booting into Emergency Mode
205
single-user mode is that the init files are not loaded. If init is corrupted or not working, you can stillmount file systems to recover data that could be lost during a re-installation.
To boot into emergency mode, use the same method as described for single-user mode inSection 17.3, “Booting into Single-User Mode” with one exception, replace the keyword single withthe keyword emergency.

206
Chapter 18.
207
Upgrading Your Current SystemThis chapter explains the various methods available for upgrading your Fedora system.
18.1. Determining Whether to Upgrade or Re-InstallWhile upgrading from Fedora 12 is supported, you are more likely to have a consistent experienceby backing up your data and then installing this release of Fedora 13 over your previous Fedorainstallation.
To upgrade from Fedora 12 you should bring your system up to date before performing the upgrade.
This recommended reinstallation method helps to ensure the best system stability possible.
If you currently use Fedora 12, you can perform a traditional, installation program-based upgrade.
However, before you chose to upgrade your system, there are a few things you should keep in mind:
• Individual package configuration files may or may not work after performing an upgrade due tochanges in various configuration file formats or layouts.
• If you have one of Red Hat's layered products (such as the Cluster Suite) installed, it may need tobe manually upgraded after the upgrade has been completed.
• Third party or ISV applications may not work correctly following the upgrade.
Upgrading your system installs updated versions of the packages which are currently installed on yoursystem.
The upgrade process preserves existing configuration files by renaming them with an .rpmsaveextension (for example, sendmail.cf.rpmsave). The upgrade process also creates a log of itsactions in /root/upgrade.log.
WarningAs software evolves, configuration file formats can change. It is very important to carefullycompare your original configuration files to the new files before integrating your changes.
NoteIt is always a good idea to back up any data that you have on your systems. For example,if you are upgrading or creating a dual-boot system, you should back up any data youwish to keep on your hard drive(s). Mistakes do happen and can result in the loss of all ofyour data.
Some upgraded packages may require the installation of other packages for proper operation. Ifyou choose to customize your packages to upgrade, you may be required to resolve dependencyproblems. Otherwise, the upgrade procedure takes care of these dependencies, but it may need toinstall additional packages which are not on your system.
Depending on how you have partitioned your system, the upgrade program may prompt you to add anadditional swap file. If the upgrade program does not detect a swap file that equals twice your RAM, it
Chapter 18. Upgrading Your Current System
208
asks you if you would like to add a new swap file. If your system does not have a lot of RAM (less than256 MB), it is recommended that you add this swap file.
18.2. Upgrading Your SystemIn most cases, the simplest way to upgrade an existing Fedora installation is with the preupgradetool. When a new version of Fedora is available, preupgrade downloads the packages necessary toupgrade your installation, and initiates the upgrade process.
Install preupgrade with your graphical package manager, or type yum install preupgrade at thecommand line and press Enter.
To run preupgrade, type preupgrade at the command line and press Enter.
You can also upgrade a Fedora installation by starting the installation process by any of the methodsdescribed in Chapter 7, Installing on Intel® and AMD Systems. If the installer detects a previousFedora installation on the system, it will ask you whether you want to upgrade that installation — referto Section 7.14.1, “ The Upgrade Dialog ”
The Upgrade Examine screen appears if you have instructed the installation program to perform anupgrade.
NoteIf the contents of your /etc/fedora-release file have been changed from the default,your Fedora installation may not be found when attempting an upgrade to Fedora 13.
You can relax some of the checks against this file by booting with the following bootcommand:
linux upgradeany
Use the linux upgradeany command if your Fedora installation was not given as anoption to upgrade.
To perform an upgrade, select Perform an upgrade of an existing installation. Click Next when youare ready to begin your upgrade.
To re-install your system, select Perform a new Fedora installation and refer to Chapter 7, Installingon Intel® and AMD Systems for further instructions.
Chapter 19.
209
Removing FedoraWe respect your freedom to choose an operating system for your computer. This section explains howto uninstall Fedora.
These instructions may destroy data!If you have data from Fedora that you want to keep, back it up before you proceed. Writeyour data to CD, DVD, external hard disk, or other storage device.
As a precaution, also back up data from any other operating systems that are installed onthe same computer. Mistakes do happen and can result in the loss of all your data.
If you back up data from Fedora to be used later in another operating system, makesure that the storage medium or device is readable by that other operating system. Forexample, without extra third-party software, Microsoft Windows cannot read an externalhard drive that you have formatted with Fedora to use the ext2, ext3, or ext4 file system.
To uninstall Fedora from your x86-based system, you must remove the Fedora boot loader informationfrom your master boot record (MBR) and remove any partitions that contain the operating system. Themethod for removing Fedora from your computer varies, depending on whether Fedora is the onlyoperating system installed on the computer, or whether the computer is configured to dual-boot Fedoraand another operating system.
These instructions cannot cover every possible computer configuration. If your computer is configuredto boot three or more operating systems, or has a highly-customized partition scheme, use thefollowing sections as a general guide to partition removal with the various tools described. In thesesituations, you will also need to learn to configure your chosen bootloader. See Appendix E, TheGRUB Boot Loader for a general introduction to the subject, but detailed instructions are beyond thescope of this document.
Legacy versions of Microsoft operating systemsFdisk, the disk partitioning tool provided with MS-DOS and Microsoft Windows, is unableto remove the file systems used by Fedora. MS-DOS and versions of Windows prior toWindows XP (except for Windows 2000) have no other means of removing or modifyingpartitions. Refer to Section 19.3, “Replacing Fedora with MS-DOS or legacy versionsof Microsoft Windows” for alternative removal methods for use with MS-DOS and theseversions of Windows.
19.1. Fedora is the only operating system on the computerIf Fedora is the only operating system on your computer, use the installation media for thereplacement operating system to remove Fedora. Examples of installation media include the WindowsXP installation CD, Windows Vista installation DVD, Mac OS X installation CDs or DVD, or theinstallation CD, CDs, or DVD of another Linux distribution.
Note that some manufacturers of factory-built computers pre-installed with Microsoft Windows do notsupply the Windows installation CD or DVD with the computer. The manufacturer may instead havesupplied their own "system restore disk", or have included software with the computer that allowed
Chapter 19. Removing Fedora
210
you to create your own "system restore disk" when you first started the computer. In some cases, thesystem restore software is stored on a separate partition on the system's hard drive. If you cannotidentify the installation media for an operating system that was pre-installed on your computer, consultthe documentation supplied with the machine, or contact the manufacturer.
When you have located the installation media for your chosen operating system:
1. Back up any data that you want to keep.
2. Shut down the computer.
3. Boot your computer with the installation disk for the replacement operating system.
4. Follow the prompts presented during the installation process. Windows, OS X, and most Linuxinstallation disks allow you to manually partition your hard drive during the installation process,or will offer you the option to remove all partitions and start with a fresh partition scheme. At thispoint, remove any existing partitions that the installation software detects or allow the installerto remove the partitions automatically. "System restore" media for computers pre-installed withMicrosoft Windows might create a default partition layout automatically without input from you.
WarningIf your computer has system restore software stored on a partition on a hard drive,take care when removing partitions while installing an operating system from othermedia. Under these circumstances, you could destroy the partition holding the systemrestore software.
19.2. Your computer dual-boots Fedora and anotheroperating systemIf your computer is configured to dual-boot Fedora and another operating system, removingFedora without removing the partitions containing the other operating system and its data is morecomplicated. Specific instructions for a number of operating systems are set out below. To keepneither Fedora nor the other operating system, follow the steps described for a computer with onlyFedora installed: Section 19.1, “Fedora is the only operating system on the computer”
19.2.1. Your computer dual-boots Fedora and a Microsoft Windowsoperating system
19.2.1.1. Windows 2000, Windows Server 2000, Windows XP, andWindows Server 2003
WarningOnce you commence this process, your computer may be left in an unbootable stateuntil you complete the entire set of instructions. Carefully read the steps below beforebeginning the removal process. Consider opening these instructions on another computeror printing them so that you have access to them at all times during the process.
Your computer dual-boots Fedora and a Microsoft Windows operating system
211
This procedure relies on the Windows Recovery Console that loads from the Windowsinstallation disk, so you will not be able to complete the procedure without access to thisdisk. If you start this procedure and do not complete it, you could leave your computer in acondition where you cannot boot it. The "system restore disk" supplied with some factory-built computers that are sold with Windows pre-installed on them might not include theWindows Recovery Console.
During the process outlined in these instructions, the Windows Recovery Consolewill prompt you for the Administrator password for your Windows system. Do not followthese instructions unless you know the Administrator password for your system or arecertain that an Administrator password has never been created, even by the computermanufacturer.
1. Remove the Fedora partitions
a. Boot your computer into your Microsoft Windows environment.
b. Click Start>Run..., type diskmgmt.msc and press Enter. The Disk Management toolopens.
The tool displays a graphical representation of your disk, with bars representing each partition.The first partition is usually labeled NTFS and corresponds to your C: drive. At least twoFedora partitions will be visible. Windows will not display a file system type for these partitions,but may allocate drive letters to some of them.
c. Right-click on one of the Fedora partitions, then click Delete Partition and click Yes to confirmthe deletion. Repeat this process for the other Fedora partitions on your system. As you deletepartitions, Windows labels the space on the hard drive previously occupied by those partitionsas unallocated.
2. Enable Windows to use the space on your hard drive vacated by Fedora (optional)
NoteThis step is not required to remove Fedora from your computer. However, if youskip this step, you will leave part of your hard drive's storage capacity unusable byWindows. Depending on your configuration, this might be a a significant portion of thestorage capacity of the drive.
Decide whether to extend an existing Windows partition to use the extra space, or create a newWindows partition in that space. If you create new a Windows partition, Windows will allocate anew drive letter to it and will interact with it as if it is a separate hard drive.
Extending an existing Windows partition
NoteThe diskpart tool used in this step is installed as part of the Windows XP andWindows 2003 operating systems. If you are performing this step on a computer

Chapter 19. Removing Fedora
212
running Windows 2000 or Windows Server 2000, you can download a version ofdiskpart for your operating system from the Microsoft website.
a. Click Start>Run..., type diskpart and press Enter. A command window appears.
b. Type list volume and press Enter. Diskpart displays a list of the partitions on yoursystem with a volume number, its drive letter, volume label, filesystem type, and size. Identifythe Windows partition that you would like to use to occupy the space vacated on your harddrive by Fedora and take note of its volume number (for example, your Windows C: drivemight be "Volume 0").
c. Type select volume N (where N is the volume number for the Windows partition thatyou want to extend) and press Enter. Now type extend and press Enter. Diskpart nowextends your chosen partition to fill the remaining space on your hard drive. It will notify youwhen the operation is complete.
Adding a new Windows partitiona. In the the Disk Management window, right-click on disk space that Windows labels as
unallocated and select New Partition from the menu. The New Partition Wizard starts.
b. Follow the prompts presented by the New Partition Wizard. If you accept the default options,the tool will create a new partition that fills all available space on the hard drive, assigns it thenext available drive letter, and formats it with the NTFS file system.
3. Restore the Windows bootloader
a. Insert the Windows installation disk and restart your computer. As your computer starts, thefollowing message will appear on the screen for a few seconds:
Press any key to boot from CD
Press any key while the message is still showing and the Windows installation software willload.
b. When the Welcome to Setup screen appears, you can start the Windows RecoveryConsole. The procedure is slightly different on different versions of Windows:
• On Windows 2000 and Windows Server 2000, press the R key, then the C key.
• On Windows XP and Windows Server 2003, press the R key.
c. The Windows Recovery Console scans your hard drives for Windows installations, andassigns a number to each one. It displays a list of Windows installations and prompts youto select one. Type the number corresponding to the Windows installation that you want torestore.
d. The Windows Recovery Console prompts you for the Administrator password for yourWindows installation. Type the Administrator password and press the Enter key. If there is noadministrator password for this system, press only the Enter key.
e. At the prompt, type the command fixmbr and press the Enter. The fixmbr tool now restoresthe Master Boot Record for the system.
Your computer dual-boots Fedora and a Microsoft Windows operating system
213
f. When the prompt reappears, type exit and press the Enter key.
g. Your computer will restart and boot your Windows operating system.
19.2.1.2. Windows Vista and Windows Server 2008
WarningOnce you commence this process, your computer may be left in an unbootable stateuntil you complete the entire set of instructions. Carefully read the steps below beforebeginning the removal process. Consider opening these instructions on another computeror printing them so that you have access to them at all times during the process.
This procedure relies on the Windows Recovery Environment that loads from theWindows installation disk and you will not be able to complete the procedure withoutaccess to this disk. If you start this procedure and do not complete it, you could leave yourcomputer in a condition where you cannot boot it. The "system restore disk" supplied withsome factory-built computers that are sold with Windows pre-installed on them might notinclude the Windows Recovery Environment.
1. Remove the Fedora partitions
a. Boot your computer into your Microsoft Windows environment.
b. Click Start then type diskmgmt.msc into the Start Search box and press Enter. The DiskManagement tool opens.
The tool displays a graphical representation of your disk, with bars representing each partition.The first partition is usually labeled NTFS and corresponds to your C: drive. At least twoFedora partitions will be visible. Windows will not display a file system type for these partitions,but may allocate drive letters to some of them.
c. Right-click on one of the Fedora partitions, then click Delete Partition and click Yes to confirmthe deletion. Repeat this process for the other Fedora partitions on your system. As you deletepartitions, Windows labels the space on the hard drive previously occupied by those partitionsas unallocated.
2. Enable Windows to use the space on your hard drive vacated by Fedora (optional)
NoteThis step is not required to remove Fedora from your computer. However, if youskip this step, you will leave part of your hard drive's storage capacity unusable byWindows. Depending on your configuration, this might be a a significant portion of thestorage capacity of the drive.
Decide whether to extend an existing Windows partition to use the extra space, or create a newWindows partition in that space. If you create new a Windows partition, Windows will allocate anew drive letter to it and will interact with it as if it is a separate hard drive.
Chapter 19. Removing Fedora
214
Extending an existing Windows partitiona. In the Disk Management window, right-click on the Windows partition that you want to extend
and select Extend Volume from the menu. The Extend Volume Wizard opens.
b. Follow the prompts presented by the Extend Volume Wizard. If you accept the defaults that itoffers you, the tool will extend the selected volume to fill all available space on the hard drive.
Adding a new Windows partitiona. In the Disk Management window, right-click on disk space that Windows labels as
unallocated and select New Simple Volume from the menu. The New Simple VolumeWizard starts.
b. Follow the prompts presented by the New Simple Volume Wizard. If you accept the defaultoptions, the tool will create a new partition that fills all available space on the hard drive,assigns it the next available drive letter, and formats it with the NTFS file system.
3. Restore the Windows bootloader
a. Insert the Windows installation disk and restart your computer. As your computer starts, thefollowing message will appear on the screen for a few seconds:
Press any key to boot from CD or DVD
Press any key while the message is still showing and the Windows installation software willload.
b. In the Install Windows dialog, select a language, time and currency format, and keyboardtype. Click Next
c. Click Repair your computer.
d. The Windows Recovery Environment (WRE) shows you the Windows installations that itcan detect on your system. Select the installation that you want to restore, then click Next.
e. Click Command prompt. A command window will open.
f. Type bootrec /fixmbr and press Enter.
g. When the prompt reappears, close the command window, then click Restart.
h. Your computer will restart and boot your Windows operating system.
19.2.2. Your computer dual-boots Fedora and Mac OS XThe procedure to remove Fedora from a system that dual-boots Fedora and Mac OS X variesdepending on whether you have installed Boot Camp on your computer:
You are not using Boot Camp on your computer1. Open the Disk Utility in /Applications/Utilities.
2. Select the entry on the left for the disk volume containing Fedora.

Your computer dual-boots Fedora and a different Linux distribution
215
3. Click the Partition tab on the right side of the dialog.
4. Select the Fedora partitions and click the minus button below the partition layout diagram.
5. Resize your OS X partition to include the newly freed space.
You are using Boot Camp on your computer1. Open the Boot Camp Assistant in /Applications/Utilities.
2. Select Create or remove a Windows partition and click Next.
3. If your computer has a single internal disk, click Restore.
4. If your computer has multiple internal disks, select the Linux disk, and then select Restore to asingle Mac OS partition. Click Continue.
19.2.3. Your computer dual-boots Fedora and a different Linuxdistribution
NoteBecause of the differences between the many different Linux distributions, theseinstructions are a general guide only. Specific details will vary according to your chosendistribution and the configuration of your particular computer. This example uses GPartedas a partition editor and gedit as a text editor, but many other tools are available toperform these tasks. To follow these instructions exactly as written, install GParted andgedit.
1. Remove Fedora partitionsa. Boot the Linux version that you want to keep on your computer.
b. Open GParted, either from a desktop menu or by typing gparted at the command line andpressing Enter.
c. GParted displays the partitions that it detects on your computer, both as a graph and as atable.
Right-click the Fedora partitions, then select Delete.
2. Remove Fedora entries from your bootloader
Example onlyThese instructions assume that your system uses the GRUB bootloader. If you usea different bootloader (such as LILO) consult the documentation for that software toidentify and remove Fedora entries from its list of boot targets and to ensure that yourdefault operating system is correctly specified.
a. At the command line, type su - and press Enter. When the system prompts you for the rootpassword, type the password and press Enter.
Chapter 19. Removing Fedora
216
b. Type gedit /boot/grub/grub.conf and press Enter. This opens the grub.conf file inthe gedit text editor.
c. A typical Fedora entry in the grub.conf file consists of four lines:
title Fedora (2.6.27.19-170.2.35.fc10.i686)
root (hd0,1)
kernel /vmlinuz-2.6.27.19-170.2.35.fc10.i686 ro root=UUID=04a07c13-e6bf-6d5a-b207-002689545705 rhgb quiet
initrd /initrd-2.6.27.19-170.2.35.fc10.i686.img
Example 19.1. Example Fedora entry in grub.conf
Depending on the configuration of your system, there may be multiple Fedora entries ingrub.conf, each corresponding to a different version of the Linux kernel. Delete each of theFedora entries from the file.
d. Grub.conf contains a line that specifies the default operating system to boot, in the formatdefault=N where N is a number equal to or greater than 0. If N is set to 0, GRUB will bootthe first operating system in the list. If N is set to 1, it will boot the second operating system,and so forth.
Identify the entry for the operating system that you want GRUB to boot by default and note itsplace in the order within the list.
Make sure that the default= line contains the number one below the number of your chosendefault operating system in the list.
Save the updated grub.conf file and close gedit
3. Make space available to your operating system
NoteThis step is not required to remove Fedora from your computer. However, if you skipthis step, you will leave part of your hard drive's storage capacity unusable by yourother Linux operating system. Depending on your configuration, this might be a asignificant portion of the storage capacity of the drive.
NoteTo carry out this step, you require live media for a Linux distribution, for example, theFedora Live CD or the Knoppix DVD.
The method to make the space freed by removing the Fedora partitions available to your otherLinux operating system differs, depending on whether your chosen operating system is installedon disk partitions configured to use Logical Volume Management (LVM) or not.
Your computer dual-boots Fedora and a different Linux distribution
217
• If you do not use LVMa. Boot your computer from Linux live media, and install gparted if it is not already present.
b. Open GParted, either from a desktop menu or by typing gparted at the command line andpressing Enter.
c. GParted displays the partitions on your system both as a graph and as a table. Click on thepartition that you want to extend to use the space freed by removing Fedora, and click theResize/Move button.
d. A new dialog opens, allowing you to specify a new size for the partition by entering it asnumbers, or by dragging the sides of the graphical representation of the partition so that itfills the available space. Click the Resize/Move button in this dialog to confirm your choice.
e. Back in the main GParted window, click Apply. Take note of the name of the partition thatyou just resized, for example, /dev/sda3.
f. When GParted finishes resizing the partition, type e2fsck partition at a command lineand press Enter, where partition is the partition that you just resized. For example, ifyou just resized /dev/sda3, you would type e2fsck /dev/sda3.
Linux now checks the file system of the newly-resized partition.
g. When the file system check finishes, type resize2fs partition at a command line andpress Enter, where partition is the partition that you just resized. For example, if youjust resized /dev/sda3, you would type resize2fs /dev/sda3.
Linux now resizes your file system to fill the newly-resized partition.
h. Restart your computer. The extra space is now available to your Linux installation.
• If you use LVMa. Boot your computer from Linux live media and install gparted and lvm2 if they are not
already present.
b. Create a new partition in the free space on the diski. Open GParted, either from a desktop menu or by typing gparted at the command line
and pressing Enter.
ii. GParted displays the partitions on your system both as a graph and as a table.The space freed by removing Fedora is labeled unallocated. Right-click on theunallocated space and select New. Accept the defaults and GParted will create a newpartition that fills the space available on the drive.
iii. Click Apply. GParted writes the changes to your hard drive. Take note of the name ofthe partition that you just created, and the name of the device that holds the partition.For example, you may have created /dev/sda3 on device /dev/sda.
c. Change the partition type identifieri. Fdisk is a partitioning tool capable of preparing partitions for LVM. At a command line,
type fdisk device and press Enter, where device is the name of the device onwhich you just created a partition. For example, fdisk /dev/sda.

Chapter 19. Removing Fedora
218
ii. At the prompt Command (m for help):, press T and Enter to use fdisk to changea partition type.
iii. At the prompt Partition number (1-4):, type the number of the partition that youjust created. For example, if you just created partition /dev/sda3, type the number 3and press Enter. This identifies the partition whose type fdisk will change.
iv. At the prompt Hex code (type L to list codes):, type the code 8e and pressEnter. This is the code for a Linux LVM partition.
v. At the prompt Command (m for help):, press W and Enter. Fdisk writes the newtype code to the partition and exits.
d. Expand the volume groupi. At the command prompt, type lvm and press Enter to start the lvm2 tool.
ii. At the lvm> prompt, type pvcreate partition and press Enter, wherepartition is the partition that you recently created. For example, pvcreate /dev/sda3. This creates /dev/sda3 as a physical volume in LVM.
iii. At the lvm> prompt, type vgextend VolumeGroup partition and press Enter,where VolumeGroup is the LVM volume group on which Linux is installed andpartition is the partition that you recently created. For example, if Linux is installedon /dev/VolumeGroup00, you would type vgextend /dev/VolumeGroup00 /dev/sda3 to extend that volume group to include the physical volume at /dev/sda3.
iv. At the lvm> prompt, type lvextend -l +100%FREE LogVol and press Enter,where LogVol is the logical volume that contains your Linux filesystem. For example,to extend LogVol00 to fill the newly-available space in its volume group, VolGroup00,type lvextend -l +100%FREE /dev/VolGroup00/LogVol00.
v. At the lvm> prompt, type exit and press Enter to exit lvm2
e. Type e2fsck LogVol at the command line and press Enter, where LogVol is the logicalvolume that you just resized. For example, if you just resized /dev/VolumeGroup00/LogVol00, you would type e2fsck /dev/VolumeGroup00/LogVol00.
Linux now checks the file system of the newly-resized logical volume.
f. When the file system check finishes, type resize2fs LogVol at a command line andpress Enter, where LogVol is the partition that you just resized. For example, if youjust resized /dev/VolumeGroup00/LogVol00, you would type resize2fs /dev/VolumeGroup00/LogVol00.
Linux now resizes your file system to fill the newly-resized logical volume.
g. Restart your computer. The extra space is now available to your Linux installation.
Replacing Fedora with MS-DOS or legacy versions of Microsoft Windows
219
19.3. Replacing Fedora with MS-DOS or legacy versions ofMicrosoft WindowsIn DOS and Windows, use the Windows fdisk utility to create a new MBR with the undocumentedflag /mbr. This ONLY rewrites the MBR to boot the primary DOS partition. The command should looklike the following:
fdisk /mbr
If you need to remove Linux from a hard drive and have attempted to do this with the default DOS(Windows) fdisk, you will experience the Partitions exist but they do not exist problem. The best wayto remove non-DOS partitions is with a tool that understands partitions other than DOS.
To begin, insert the Fedora CD #1 and boot your system. Once you have booted off the CD, a bootprompt appears. At the boot prompt, type: linux rescue. This starts the rescue mode program.
You are prompted for your keyboard and language requirements. Enter these values as you wouldduring the installation of Fedora.
Next, a screen appears telling you that the program attempts to find a Fedora install to rescue. SelectSkip on this screen.
After selecting Skip, you are given a command prompt where you can access the partitions you wouldlike to remove.
First, type the command list-harddrives. This command lists all hard drives on your system thatare recognizable by the installation program, as well as their sizes in megabytes.
WarningBe careful to remove only the necessary Fedora partitions. Removing other partitionscould result in data loss or a corrupted system environment.
To remove partitions, use the partitioning utility parted. Start parted, where /dev/hda is the deviceon which to remove the partition:
parted /dev/hda
Using the print command, view the current partition table to determine the minor number of thepartition to remove:
The print command also displays the partition's type (such as linux-swap, ext2, ext3, ext4 and soon). Knowing the type of the partition helps you in determining whether to remove the partition.
Remove the partition with the command rm. For example, to remove the partition with minor number 3:
rm 3
Chapter 19. Removing Fedora
220
ImportantThe changes start taking place as soon as you press [Enter], so review the commandbefore committing to it.
After removing the partition, use the print command to confirm that it is removed from the partitiontable.
Once you have removed the Linux partitions and made all of the changes you need to make, typequit to quit parted.
After quitting parted, type exit at the boot prompt to exit rescue mode and reboot your system,instead of continuing with the installation. The system should reboot automatically. If it does not, youcan reboot your computer using Control+Alt+Delete .

Part V. Technical appendixesThe appendixes in this section do not contain instructions that tell you how to install Fedora. Instead,they provide technical background that you might find helpful to understand the options that Fedoraoffers you at various points in the installation process.

223
Appendix A. An Introduction to DiskPartitions
NoteThis appendix is not necessarily applicable to non-x86-based architectures. However, thegeneral concepts mentioned here may apply.
This appendix is not necessarily applicable to non-x86-based architectures. However, the generalconcepts mentioned here may apply.
If you are reasonably comfortable with disk partitions, you could skip ahead to Section A.1.4, “MakingRoom For Fedora”, for more information on the process of freeing up disk space to prepare for aFedora installation. This section also discusses the partition naming scheme used by Linux systems,sharing disk space with other operating systems, and related topics.
A.1. Hard Disk Basic ConceptsHard disks perform a very simple function — they store data and reliably retrieve it on command.
When discussing issues such as disk partitioning, it is important to know a bit about the underlyinghardware. Unfortunately, it is easy to become bogged down in details. Therefore, this appendix usesa simplified diagram of a disk drive to help explain what is really happening when a disk drive ispartitioned. Figure A.1, “An Unused Disk Drive”, shows a brand-new, unused disk drive.
Figure A.1. An Unused Disk Drive
Not much to look at, is it? But if we are talking about disk drives on a basic level, it is adequate. Saythat we would like to store some data on this drive. As things stand now, it will not work. There issomething we need to do first.
A.1.1. It is Not What You Write, it is How You Write ItExperienced computer users probably got this one on the first try. We need to format the drive.Formatting (usually known as "making a file system") writes information to the drive, creating order outof the empty space in an unformatted drive.
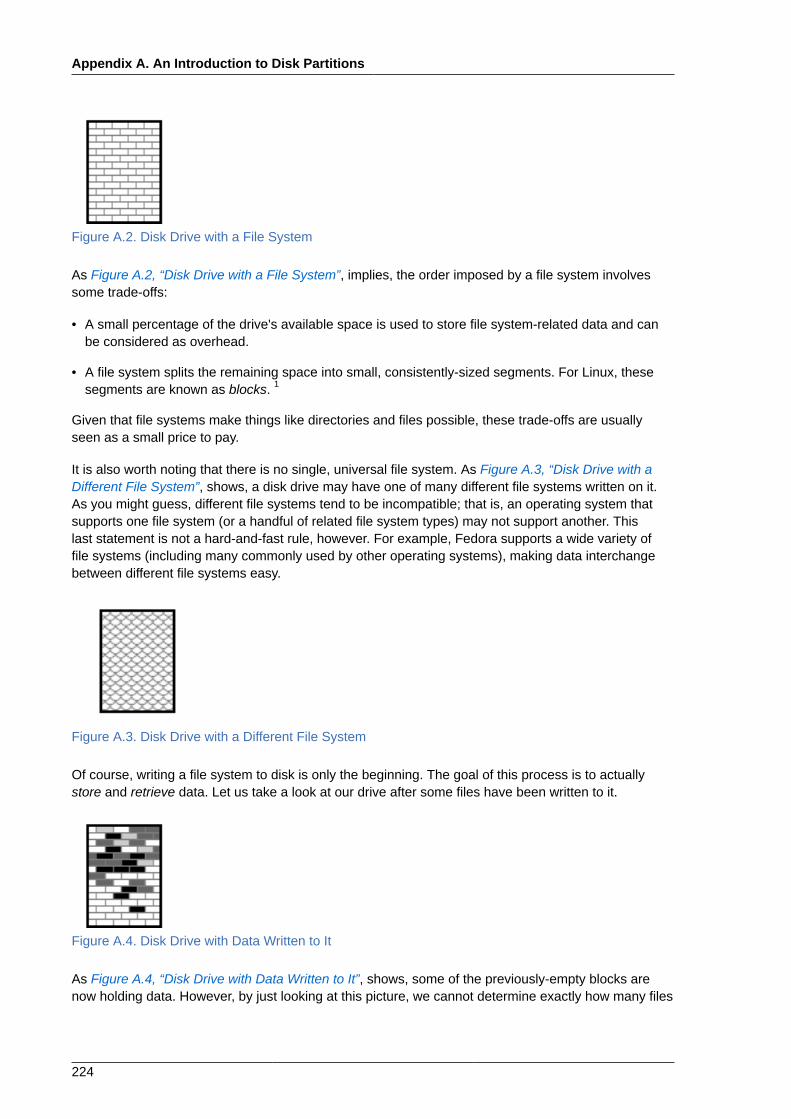
Appendix A. An Introduction to Disk Partitions
224
Figure A.2. Disk Drive with a File System
As Figure A.2, “Disk Drive with a File System”, implies, the order imposed by a file system involvessome trade-offs:
• A small percentage of the drive's available space is used to store file system-related data and canbe considered as overhead.
• A file system splits the remaining space into small, consistently-sized segments. For Linux, thesesegments are known as blocks. 1
Given that file systems make things like directories and files possible, these trade-offs are usuallyseen as a small price to pay.
It is also worth noting that there is no single, universal file system. As Figure A.3, “Disk Drive with aDifferent File System”, shows, a disk drive may have one of many different file systems written on it.As you might guess, different file systems tend to be incompatible; that is, an operating system thatsupports one file system (or a handful of related file system types) may not support another. Thislast statement is not a hard-and-fast rule, however. For example, Fedora supports a wide variety offile systems (including many commonly used by other operating systems), making data interchangebetween different file systems easy.
Figure A.3. Disk Drive with a Different File System
Of course, writing a file system to disk is only the beginning. The goal of this process is to actuallystore and retrieve data. Let us take a look at our drive after some files have been written to it.
Figure A.4. Disk Drive with Data Written to It
As Figure A.4, “Disk Drive with Data Written to It”, shows, some of the previously-empty blocks arenow holding data. However, by just looking at this picture, we cannot determine exactly how many files
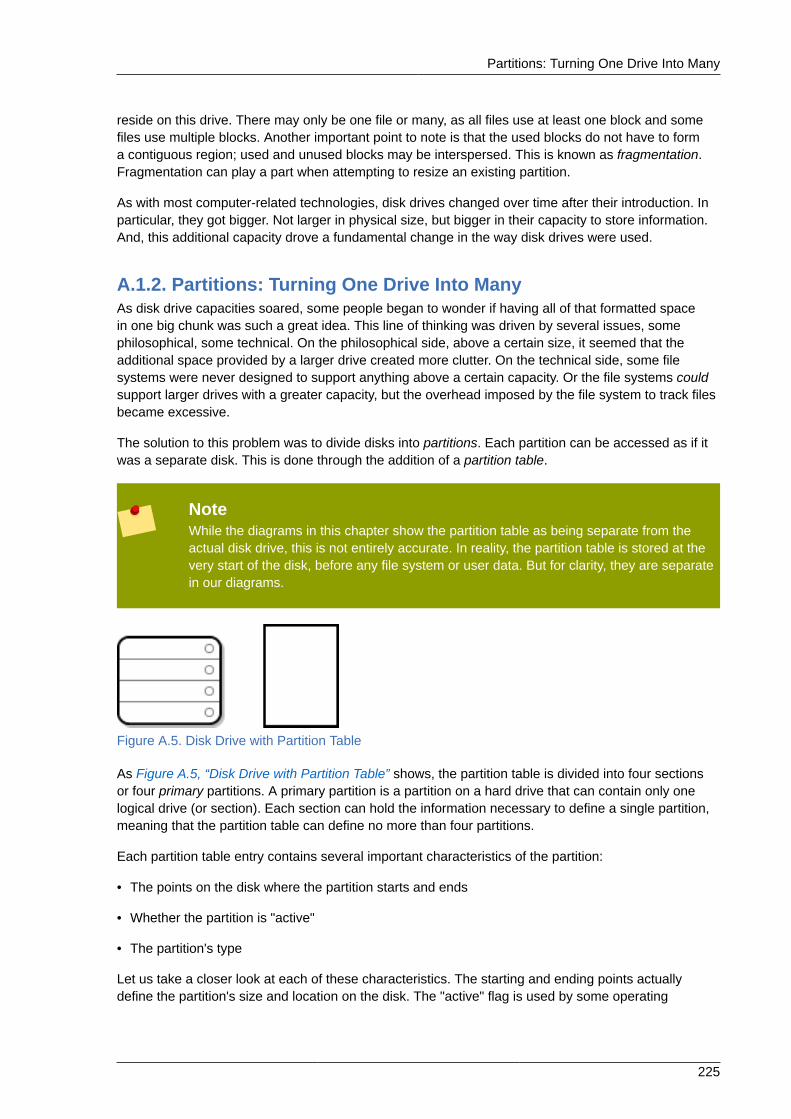
Partitions: Turning One Drive Into Many
225
reside on this drive. There may only be one file or many, as all files use at least one block and somefiles use multiple blocks. Another important point to note is that the used blocks do not have to forma contiguous region; used and unused blocks may be interspersed. This is known as fragmentation.Fragmentation can play a part when attempting to resize an existing partition.
As with most computer-related technologies, disk drives changed over time after their introduction. Inparticular, they got bigger. Not larger in physical size, but bigger in their capacity to store information.And, this additional capacity drove a fundamental change in the way disk drives were used.
A.1.2. Partitions: Turning One Drive Into ManyAs disk drive capacities soared, some people began to wonder if having all of that formatted spacein one big chunk was such a great idea. This line of thinking was driven by several issues, somephilosophical, some technical. On the philosophical side, above a certain size, it seemed that theadditional space provided by a larger drive created more clutter. On the technical side, some filesystems were never designed to support anything above a certain capacity. Or the file systems couldsupport larger drives with a greater capacity, but the overhead imposed by the file system to track filesbecame excessive.
The solution to this problem was to divide disks into partitions. Each partition can be accessed as if itwas a separate disk. This is done through the addition of a partition table.
NoteWhile the diagrams in this chapter show the partition table as being separate from theactual disk drive, this is not entirely accurate. In reality, the partition table is stored at thevery start of the disk, before any file system or user data. But for clarity, they are separatein our diagrams.
Figure A.5. Disk Drive with Partition Table
As Figure A.5, “Disk Drive with Partition Table” shows, the partition table is divided into four sectionsor four primary partitions. A primary partition is a partition on a hard drive that can contain only onelogical drive (or section). Each section can hold the information necessary to define a single partition,meaning that the partition table can define no more than four partitions.
Each partition table entry contains several important characteristics of the partition:
• The points on the disk where the partition starts and ends
• Whether the partition is "active"
• The partition's type
Let us take a closer look at each of these characteristics. The starting and ending points actuallydefine the partition's size and location on the disk. The "active" flag is used by some operating
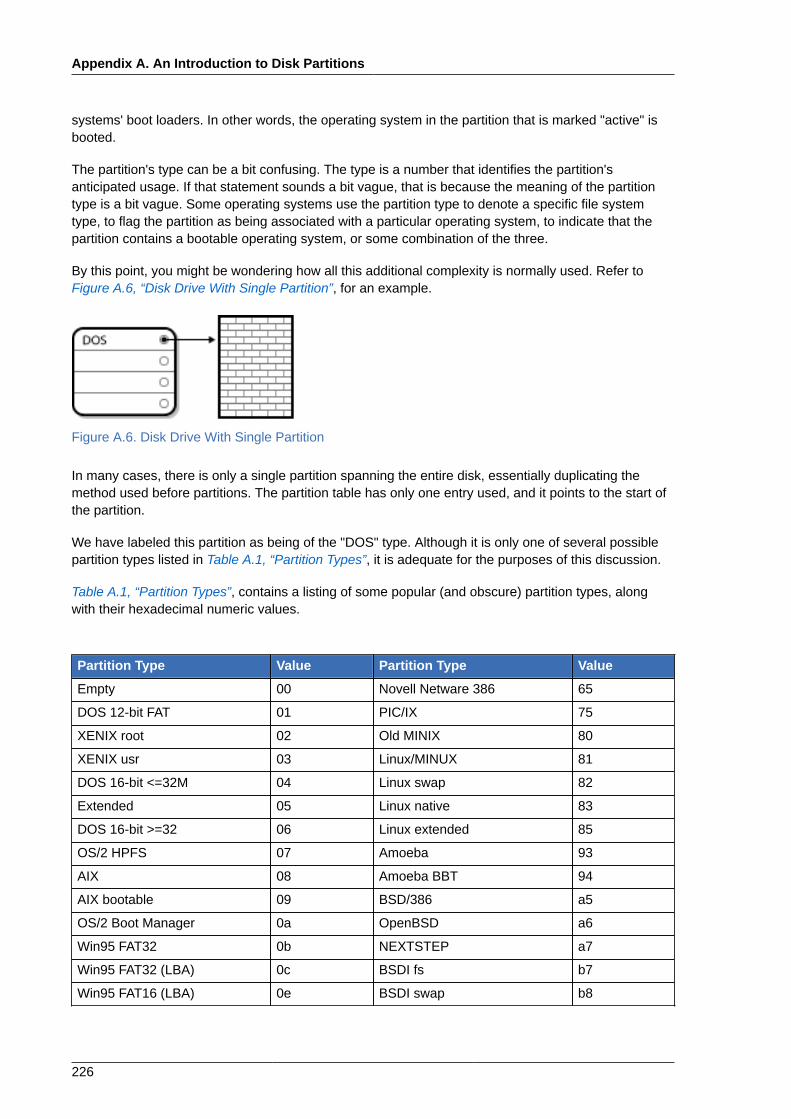
Appendix A. An Introduction to Disk Partitions
226
systems' boot loaders. In other words, the operating system in the partition that is marked "active" isbooted.
The partition's type can be a bit confusing. The type is a number that identifies the partition'santicipated usage. If that statement sounds a bit vague, that is because the meaning of the partitiontype is a bit vague. Some operating systems use the partition type to denote a specific file systemtype, to flag the partition as being associated with a particular operating system, to indicate that thepartition contains a bootable operating system, or some combination of the three.
By this point, you might be wondering how all this additional complexity is normally used. Refer toFigure A.6, “Disk Drive With Single Partition”, for an example.
Figure A.6. Disk Drive With Single Partition
In many cases, there is only a single partition spanning the entire disk, essentially duplicating themethod used before partitions. The partition table has only one entry used, and it points to the start ofthe partition.
We have labeled this partition as being of the "DOS" type. Although it is only one of several possiblepartition types listed in Table A.1, “Partition Types”, it is adequate for the purposes of this discussion.
Table A.1, “Partition Types”, contains a listing of some popular (and obscure) partition types, alongwith their hexadecimal numeric values.
Partition Type Value Partition Type Value
Empty 00 Novell Netware 386 65
DOS 12-bit FAT 01 PIC/IX 75
XENIX root 02 Old MINIX 80
XENIX usr 03 Linux/MINUX 81
DOS 16-bit <=32M 04 Linux swap 82
Extended 05 Linux native 83
DOS 16-bit >=32 06 Linux extended 85
OS/2 HPFS 07 Amoeba 93
AIX 08 Amoeba BBT 94
AIX bootable 09 BSD/386 a5
OS/2 Boot Manager 0a OpenBSD a6
Win95 FAT32 0b NEXTSTEP a7
Win95 FAT32 (LBA) 0c BSDI fs b7
Win95 FAT16 (LBA) 0e BSDI swap b8
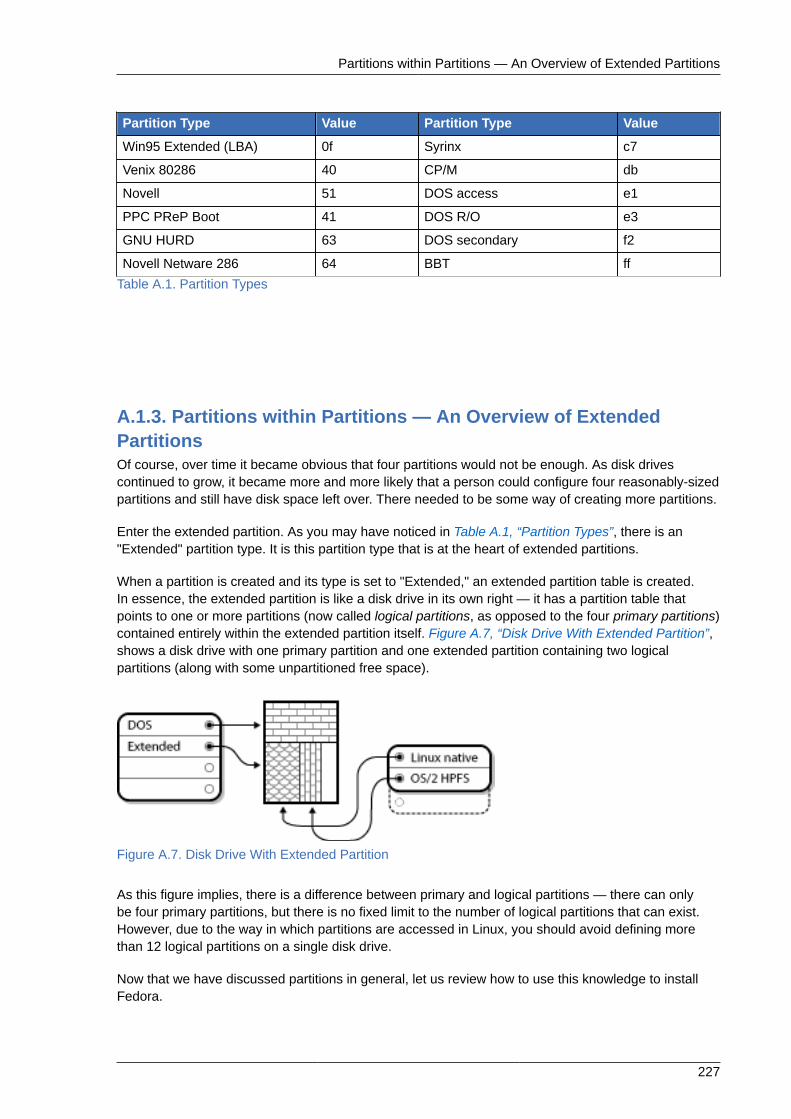
Partitions within Partitions — An Overview of Extended Partitions
227
Partition Type Value Partition Type Value
Win95 Extended (LBA) 0f Syrinx c7
Venix 80286 40 CP/M db
Novell 51 DOS access e1
PPC PReP Boot 41 DOS R/O e3
GNU HURD 63 DOS secondary f2
Novell Netware 286 64 BBT ff
Table A.1. Partition Types
A.1.3. Partitions within Partitions — An Overview of ExtendedPartitionsOf course, over time it became obvious that four partitions would not be enough. As disk drivescontinued to grow, it became more and more likely that a person could configure four reasonably-sizedpartitions and still have disk space left over. There needed to be some way of creating more partitions.
Enter the extended partition. As you may have noticed in Table A.1, “Partition Types”, there is an"Extended" partition type. It is this partition type that is at the heart of extended partitions.
When a partition is created and its type is set to "Extended," an extended partition table is created.In essence, the extended partition is like a disk drive in its own right — it has a partition table thatpoints to one or more partitions (now called logical partitions, as opposed to the four primary partitions)contained entirely within the extended partition itself. Figure A.7, “Disk Drive With Extended Partition”,shows a disk drive with one primary partition and one extended partition containing two logicalpartitions (along with some unpartitioned free space).
Figure A.7. Disk Drive With Extended Partition
As this figure implies, there is a difference between primary and logical partitions — there can onlybe four primary partitions, but there is no fixed limit to the number of logical partitions that can exist.However, due to the way in which partitions are accessed in Linux, you should avoid defining morethan 12 logical partitions on a single disk drive.
Now that we have discussed partitions in general, let us review how to use this knowledge to installFedora.
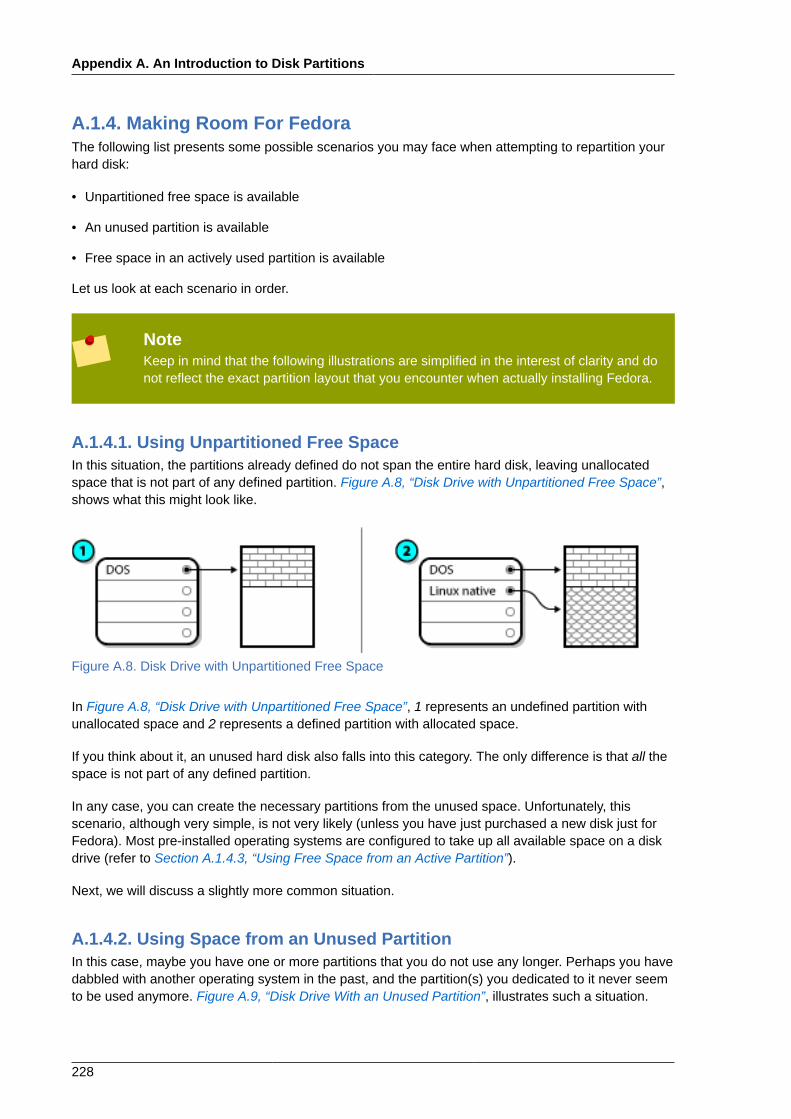
Appendix A. An Introduction to Disk Partitions
228
A.1.4. Making Room For FedoraThe following list presents some possible scenarios you may face when attempting to repartition yourhard disk:
• Unpartitioned free space is available
• An unused partition is available
• Free space in an actively used partition is available
Let us look at each scenario in order.
NoteKeep in mind that the following illustrations are simplified in the interest of clarity and donot reflect the exact partition layout that you encounter when actually installing Fedora.
A.1.4.1. Using Unpartitioned Free SpaceIn this situation, the partitions already defined do not span the entire hard disk, leaving unallocatedspace that is not part of any defined partition. Figure A.8, “Disk Drive with Unpartitioned Free Space”,shows what this might look like.
Figure A.8. Disk Drive with Unpartitioned Free Space
In Figure A.8, “Disk Drive with Unpartitioned Free Space”, 1 represents an undefined partition withunallocated space and 2 represents a defined partition with allocated space.
If you think about it, an unused hard disk also falls into this category. The only difference is that all thespace is not part of any defined partition.
In any case, you can create the necessary partitions from the unused space. Unfortunately, thisscenario, although very simple, is not very likely (unless you have just purchased a new disk just forFedora). Most pre-installed operating systems are configured to take up all available space on a diskdrive (refer to Section A.1.4.3, “Using Free Space from an Active Partition”).
Next, we will discuss a slightly more common situation.
A.1.4.2. Using Space from an Unused PartitionIn this case, maybe you have one or more partitions that you do not use any longer. Perhaps you havedabbled with another operating system in the past, and the partition(s) you dedicated to it never seemto be used anymore. Figure A.9, “Disk Drive With an Unused Partition”, illustrates such a situation.
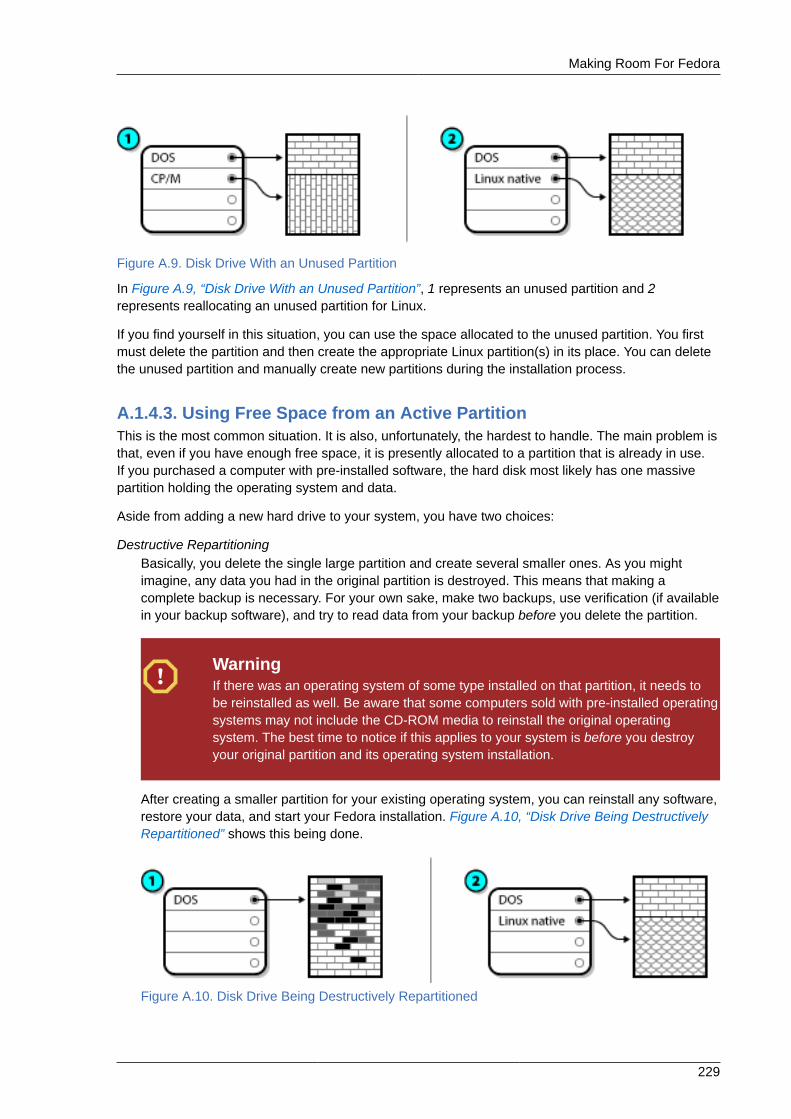
Making Room For Fedora
229
Figure A.9. Disk Drive With an Unused Partition
In Figure A.9, “Disk Drive With an Unused Partition”, 1 represents an unused partition and 2represents reallocating an unused partition for Linux.
If you find yourself in this situation, you can use the space allocated to the unused partition. You firstmust delete the partition and then create the appropriate Linux partition(s) in its place. You can deletethe unused partition and manually create new partitions during the installation process.
A.1.4.3. Using Free Space from an Active PartitionThis is the most common situation. It is also, unfortunately, the hardest to handle. The main problem isthat, even if you have enough free space, it is presently allocated to a partition that is already in use.If you purchased a computer with pre-installed software, the hard disk most likely has one massivepartition holding the operating system and data.
Aside from adding a new hard drive to your system, you have two choices:
Destructive RepartitioningBasically, you delete the single large partition and create several smaller ones. As you mightimagine, any data you had in the original partition is destroyed. This means that making acomplete backup is necessary. For your own sake, make two backups, use verification (if availablein your backup software), and try to read data from your backup before you delete the partition.
WarningIf there was an operating system of some type installed on that partition, it needs tobe reinstalled as well. Be aware that some computers sold with pre-installed operatingsystems may not include the CD-ROM media to reinstall the original operatingsystem. The best time to notice if this applies to your system is before you destroyyour original partition and its operating system installation.
After creating a smaller partition for your existing operating system, you can reinstall any software,restore your data, and start your Fedora installation. Figure A.10, “Disk Drive Being DestructivelyRepartitioned” shows this being done.
Figure A.10. Disk Drive Being Destructively Repartitioned
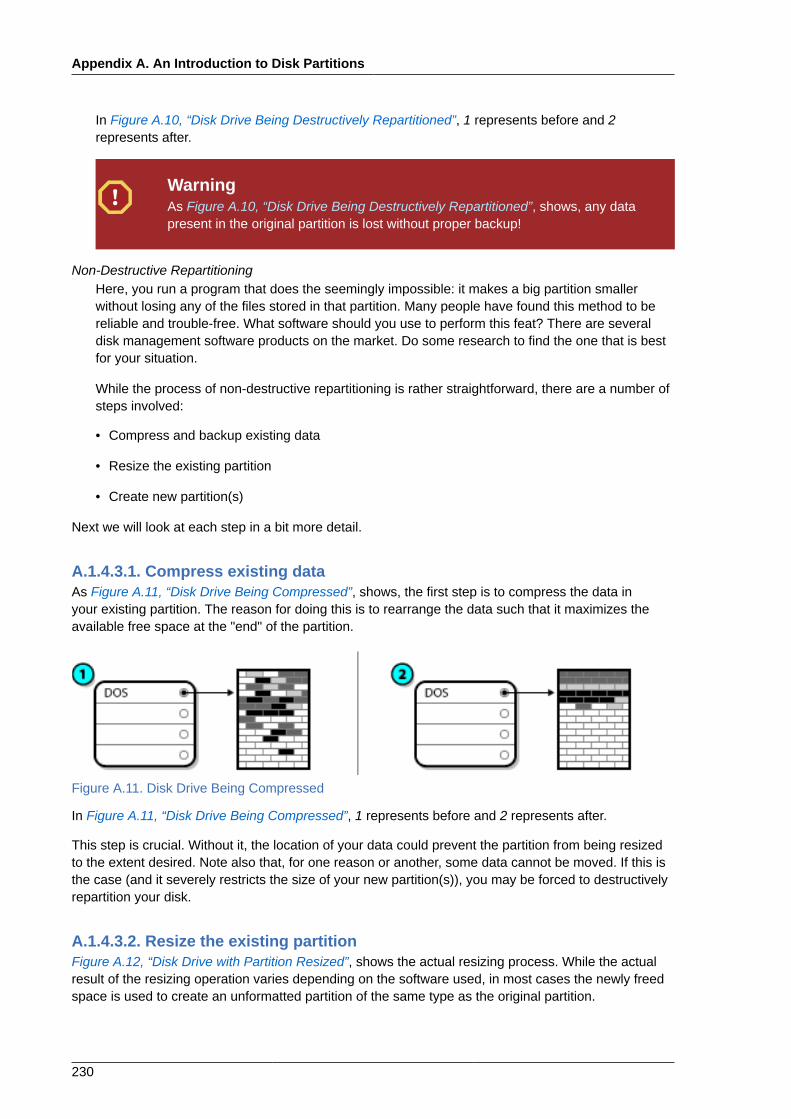
Appendix A. An Introduction to Disk Partitions
230
In Figure A.10, “Disk Drive Being Destructively Repartitioned”, 1 represents before and 2represents after.
WarningAs Figure A.10, “Disk Drive Being Destructively Repartitioned”, shows, any datapresent in the original partition is lost without proper backup!
Non-Destructive RepartitioningHere, you run a program that does the seemingly impossible: it makes a big partition smallerwithout losing any of the files stored in that partition. Many people have found this method to bereliable and trouble-free. What software should you use to perform this feat? There are severaldisk management software products on the market. Do some research to find the one that is bestfor your situation.
While the process of non-destructive repartitioning is rather straightforward, there are a number ofsteps involved:
• Compress and backup existing data
• Resize the existing partition
• Create new partition(s)
Next we will look at each step in a bit more detail.
A.1.4.3.1. Compress existing dataAs Figure A.11, “Disk Drive Being Compressed”, shows, the first step is to compress the data inyour existing partition. The reason for doing this is to rearrange the data such that it maximizes theavailable free space at the "end" of the partition.
Figure A.11. Disk Drive Being Compressed
In Figure A.11, “Disk Drive Being Compressed”, 1 represents before and 2 represents after.
This step is crucial. Without it, the location of your data could prevent the partition from being resizedto the extent desired. Note also that, for one reason or another, some data cannot be moved. If this isthe case (and it severely restricts the size of your new partition(s)), you may be forced to destructivelyrepartition your disk.
A.1.4.3.2. Resize the existing partitionFigure A.12, “Disk Drive with Partition Resized”, shows the actual resizing process. While the actualresult of the resizing operation varies depending on the software used, in most cases the newly freedspace is used to create an unformatted partition of the same type as the original partition.
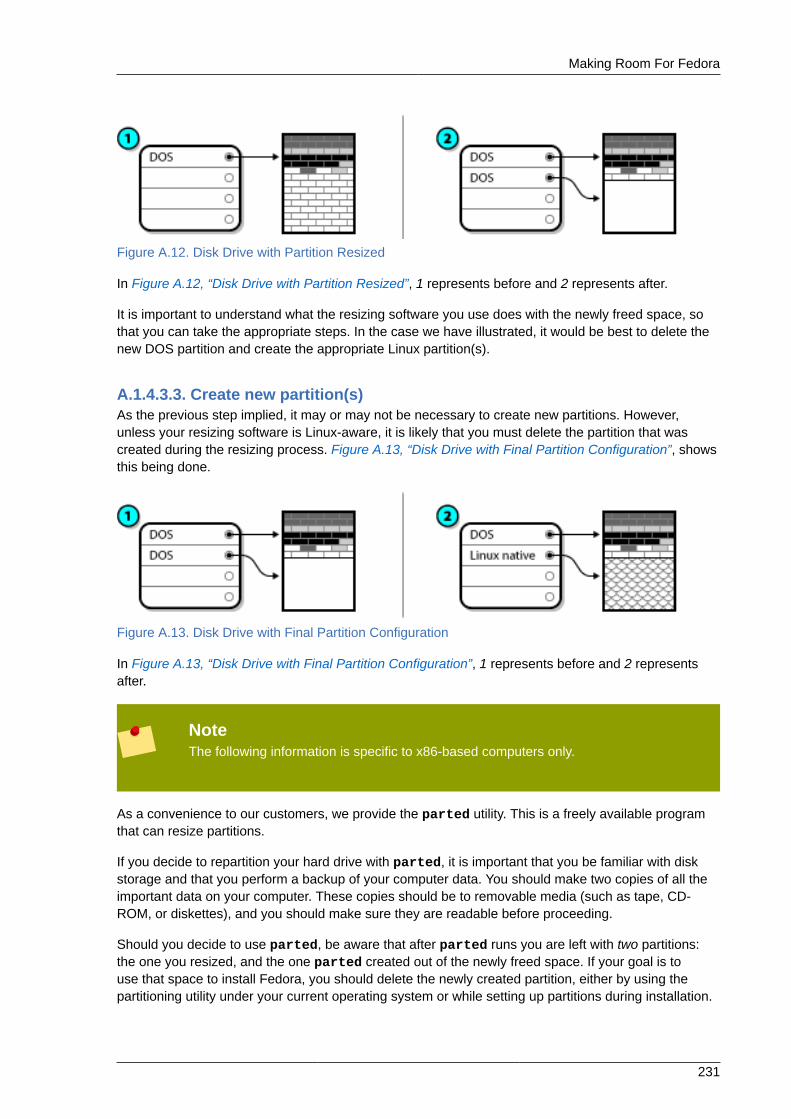
Making Room For Fedora
231
Figure A.12. Disk Drive with Partition Resized
In Figure A.12, “Disk Drive with Partition Resized”, 1 represents before and 2 represents after.
It is important to understand what the resizing software you use does with the newly freed space, sothat you can take the appropriate steps. In the case we have illustrated, it would be best to delete thenew DOS partition and create the appropriate Linux partition(s).
A.1.4.3.3. Create new partition(s)As the previous step implied, it may or may not be necessary to create new partitions. However,unless your resizing software is Linux-aware, it is likely that you must delete the partition that wascreated during the resizing process. Figure A.13, “Disk Drive with Final Partition Configuration”, showsthis being done.
Figure A.13. Disk Drive with Final Partition Configuration
In Figure A.13, “Disk Drive with Final Partition Configuration”, 1 represents before and 2 representsafter.
NoteThe following information is specific to x86-based computers only.
As a convenience to our customers, we provide the parted utility. This is a freely available programthat can resize partitions.
If you decide to repartition your hard drive with parted, it is important that you be familiar with diskstorage and that you perform a backup of your computer data. You should make two copies of all theimportant data on your computer. These copies should be to removable media (such as tape, CD-ROM, or diskettes), and you should make sure they are readable before proceeding.
Should you decide to use parted, be aware that after parted runs you are left with two partitions:the one you resized, and the one parted created out of the newly freed space. If your goal is touse that space to install Fedora, you should delete the newly created partition, either by using thepartitioning utility under your current operating system or while setting up partitions during installation.
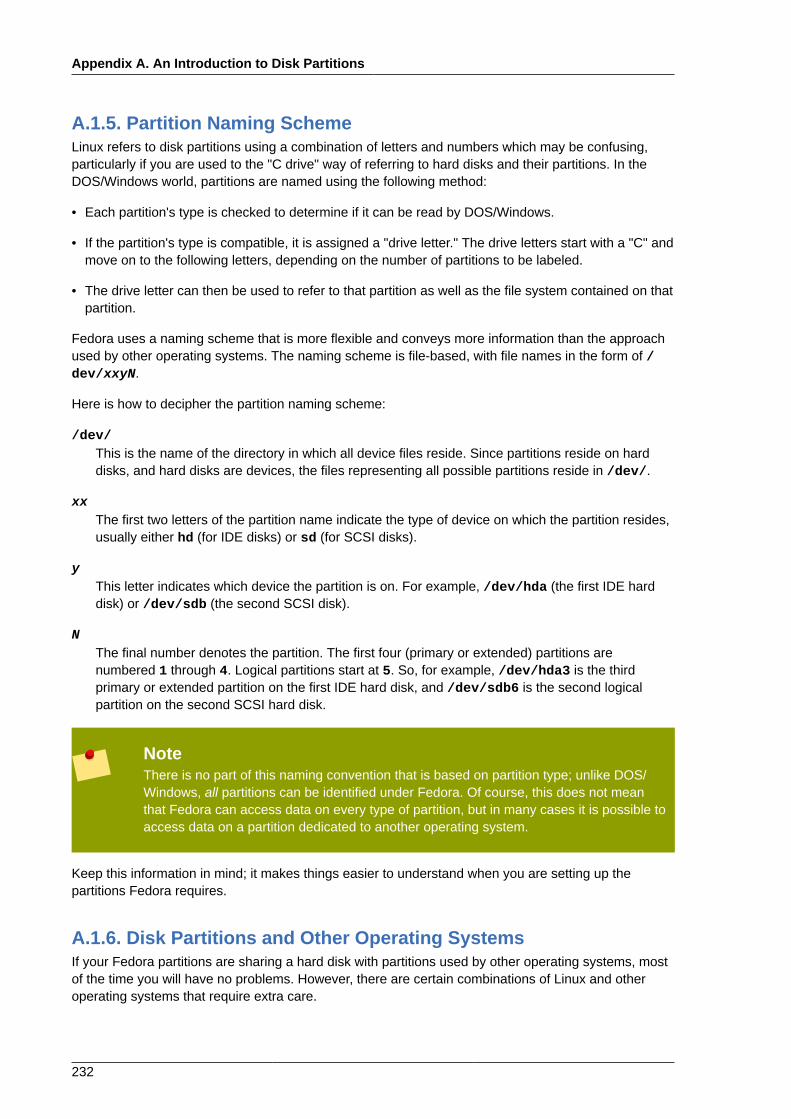
Appendix A. An Introduction to Disk Partitions
232
A.1.5. Partition Naming SchemeLinux refers to disk partitions using a combination of letters and numbers which may be confusing,particularly if you are used to the "C drive" way of referring to hard disks and their partitions. In theDOS/Windows world, partitions are named using the following method:
• Each partition's type is checked to determine if it can be read by DOS/Windows.
• If the partition's type is compatible, it is assigned a "drive letter." The drive letters start with a "C" andmove on to the following letters, depending on the number of partitions to be labeled.
• The drive letter can then be used to refer to that partition as well as the file system contained on thatpartition.
Fedora uses a naming scheme that is more flexible and conveys more information than the approachused by other operating systems. The naming scheme is file-based, with file names in the form of /dev/xxyN.
Here is how to decipher the partition naming scheme:
/dev/This is the name of the directory in which all device files reside. Since partitions reside on harddisks, and hard disks are devices, the files representing all possible partitions reside in /dev/.
xxThe first two letters of the partition name indicate the type of device on which the partition resides,usually either hd (for IDE disks) or sd (for SCSI disks).
yThis letter indicates which device the partition is on. For example, /dev/hda (the first IDE harddisk) or /dev/sdb (the second SCSI disk).
NThe final number denotes the partition. The first four (primary or extended) partitions arenumbered 1 through 4. Logical partitions start at 5. So, for example, /dev/hda3 is the thirdprimary or extended partition on the first IDE hard disk, and /dev/sdb6 is the second logicalpartition on the second SCSI hard disk.
NoteThere is no part of this naming convention that is based on partition type; unlike DOS/Windows, all partitions can be identified under Fedora. Of course, this does not meanthat Fedora can access data on every type of partition, but in many cases it is possible toaccess data on a partition dedicated to another operating system.
Keep this information in mind; it makes things easier to understand when you are setting up thepartitions Fedora requires.
A.1.6. Disk Partitions and Other Operating SystemsIf your Fedora partitions are sharing a hard disk with partitions used by other operating systems, mostof the time you will have no problems. However, there are certain combinations of Linux and otheroperating systems that require extra care.
Disk Partitions and Mount Points
233
A.1.7. Disk Partitions and Mount PointsOne area that many people new to Linux find confusing is the matter of how partitions are used andaccessed by the Linux operating system. In DOS/Windows, it is relatively simple: Each partition gets a"drive letter." You then use the correct drive letter to refer to files and directories on its correspondingpartition.
This is entirely different from how Linux deals with partitions and, for that matter, with disk storagein general. The main difference is that each partition is used to form part of the storage necessaryto support a single set of files and directories. This is done by associating a partition with a directorythrough a process known as mounting. Mounting a partition makes its storage available starting at thespecified directory (known as a mount point).
For example, if partition /dev/hda5 is mounted on /usr/, that would mean that all files anddirectories under /usr/ physically reside on /dev/hda5. So the file /usr/share/doc/FAQ/txt/Linux-FAQ would be stored on /dev/hda5, while the file /etc/gdm/custom.conf would not.
Continuing our example, it is also possible that one or more directories below /usr/ would be mountpoints for other partitions. For instance, a partition (say, /dev/hda7) could be mounted on /usr/local/, meaning that /usr/local/man/whatis would then reside on /dev/hda7 rather than /dev/hda5.
A.1.8. How Many Partitions?At this point in the process of preparing to install Fedora, you must give some consideration to thenumber and size of the partitions to be used by your new operating system. The question of "howmany partitions" continues to spark debate within the Linux community and, without any end to thedebate in sight, it is safe to say that there are probably as many partition layouts as there are peopledebating the issue.
Keeping this in mind, we recommend that, unless you have a reason for doing otherwise, youshould at least create the following partitions: swap, /boot/ (or a /boot/efi/ partition for Itaniumsystems), a /var/ partition for Itanium systems, and / (root).
For more information, refer to Section 7.20.5, “Recommended Partitioning Scheme”.

234
235
Appendix B. ISCSI disksInternet Small Computer System Interface (iSCSI) is a protocol that allows computers to communicatewith storage devices by SCSI requests and responses carried over TCP/IP. Because iSCSI is basedon the standard SCSI protocols, it uses some terminology from SCSI. The device on the SCSI bus towhich requests get sent (and which answers these requests) is known as the target and the deviceissuing requests is known as the initiator. In other words, an iSCSI disk is a target and the iSCSIsoftware equivalent of a SCSI controller or SCSI Host Bus Adapter (HBA) is called an initiator. Thisappendix only covers Linux as an iSCSI initiator: how Linux uses iSCSI disks, but not how Linux hostsiSCSI disks.
Linux has a software iSCSI initiator in the kernel that takes the place and form of a SCSI HBA driverand therefore allows Linux to use iSCSI disks. However, as iSCSI is a fully network-based protocol,iSCSI initiator support needs more than just the ability to send SCSI packets over the network. BeforeLinux can use an iSCSI target, Linux must find the target on the network and make a connection to it.In some cases, Linux must send authentication information to gain access to the target. Linux mustalso detect any failure of the network connection and must establish a new connection, includinglogging in again if necessary.
The discovery, connection, and logging in is handled in userspace by the iscsiadm utility, and theerror handling is also handled in userspace by iscsid.
Both iscsiadm and iscsid are part of the iscsi-initiator-utils package under Fedora.
B.1. iSCSI disks in anacondaAnaconda can discover (and then log in to) iSCSI disks in two ways:
1. When anaconda starts, it checks if the BIOS or add-on boot ROMs of the system support iSCSIBoot Firmware Table (iBFT), a BIOS extension for systems which can boot from iSCSI. If the BIOSsupports iBFT, anaconda will read the iSCSI target information for the configured boot disk fromthe BIOS and log in to this target, making it available as an installation target.
2. The initial partitioning screen presents you with an Advanced storage configuration button thatallows you to add iSCSI target information like the discovery IP-address. Anaconda will probe thegiven IP-address and log in to any targets that it finds. See Section 7.11.1.1, “ Advanced StorageOptions ” for the details that you can specify for iSCSI targets.
While anaconda uses iscsiadm to find and log into iSCSI targets, iscsiadm automatically stores anyinformation about these targets iscsiadm iSCSI database. Anaconda then copies this database to theinstalled system and marks any iSCSI targets not used for / so that the system will automatically login to them when it starts. If / is placed on an iSCSI target, initrd will log into this target and anacondadoes not include this target in start up scripts to avoid multiple attempts to log into the same target.
If / is placed on an iSCSI target, anaconda sets NetworkManager to ignore any network interfacesthat were active during the installation process. These interfaces will also be configured by initrd whenthe system starts. If NetworkManager were to reconfigure these interfaces, the system would lose itsconnection to /.
B.2. iSCSI disks during start upISCSI-related events might occur at a number of points while the system starts:

Appendix B. ISCSI disks
236
1. The init script in the initrd will log in to iSCSI targets used for / (if any). This is done using theiscsistart utility (which can do this without requiring iscsid to run).
2. When the root filesystem has been mounted and the various service initscripts get run, the iscsidinitscript will get called. This script will then start iscsid if any iSCSI targets are used for /, or ifany targets in the iSCSI database are marked to be logged in to automatically.
3. After the classic network service script has been run (or would have been run if enabled) the iscsiinitscript will run. If the network is accessible, this will log in to any targets in the iSCSI databasewhich are marked to be logged in to automatically. If the network is not accessible, this script willexit quietly.
4. When using NetworkManager to access the network (instead of the classic network servicescript), NetworkManager will call the iscsi initscript. See: /etc/NetworkManager/dispatcher.d/04-iscsi
ImportantBecause NetworkManager is installed in /usr, you cannot use it to configurenetwork access if /usr is on network-attached storage such as an iSCSI target.
If iscsid is not needed as the system starts, it will not start automatically. If you start iscsiadm,iscsiadm will start iscsid in turn.

237
Appendix C. Disk Encryption
C.1. What is block device encryption?Block device encryption protects the data on a block device by encrypting it. To access the device'sdecrypted contents, a user must provide a passphrase or key as authentication. This providesadditional security beyond existing OS security mechanisms in that it protects the device's contentseven if it has been physically removed from the system.
C.2. Encrypting block devices using dm-crypt/LUKSLinux Unified Key Setup (LUKS) is a specification for block device encryption. It establishes an on-diskformat for the data, as well as a passphrase/key management policy.
LUKS uses the kernel device mapper subsystem via the dm-crypt module. This arrangementprovides a low-level mapping that handles encryption and decryption of the device's data. User-leveloperations, such as creating and accessing encrypted devices, are accomplished through the use ofthe cryptsetup utility.
C.2.1. Overview of LUKS• What LUKS does:
• LUKS encrypts entire block devices• LUKS is thereby well-suited for protecting the contents of mobile devices such as:
• Removable storage media
• Laptop disk drives
• The underlying contents of the encrypted block device are arbitrary.• This makes it useful for encrypting swap devices.
• This can also be useful with certain databases that use specially formatted block devices fordata storage.
• LUKS uses the existing device mapper kernel subsystem.• This is the same subsystem used by LVM, so it is well tested.
• LUKS provides passphrase strengthening.• This protects against dictionary attacks.
• LUKS devices contain multiple key slots.• This allows users to add backup keys/passphrases.
• What LUKS does not do:• LUKS is not well-suited for applications requiring many (more than eight) users to have distinct
access keys to the same device.
• LUKS is not well-suited for applications requiring file-level encryption.
More detailed information about LUKS is available from the project website at http://code.google.com/p/cryptsetup/.
Appendix C. Disk Encryption
238
C.2.2. How will I access the encrypted devices after installation?(System Startup)During system startup you will be presented with a passphrase prompt. After the correct passphrasehas been provided the system will continue to boot normally. If you used different passphrases formultiple encypted devices you may need to enter more than one passphrase during the startup.
TipConsider using the same passphrase for all encrypted block devices in a given system.This will simplify system startup and you will have fewer passphrases to remember. Justmake sure you choose a good passphrase!
C.2.3. Choosing a Good PassphraseWhile dm-crypt/LUKS supports both keys and passphrases, the anaconda installer only supports theuse of passphrases for creating and accessing encrypted block devices during installation.
LUKS does provide passphrase strengthening but it is still a good idea to choose a good (meaning"difficult to guess") passphrase. Note the use of the term "passphrase", as opposed to the term"password". This is intentional. Providing a phrase containing multiple words to increase the security ofyour data is important.
C.3. Creating Encrypted Block Devices in AnacondaYou can create encrypted devices during system installation. This allows you to easily configure asystem with encrypted partitions.
To enable block device encryption, check the "Encrypt System" checkbox when selecting automaticpartitioning or the "Encrypt" checkbox when creating an individual partition, software RAID array, orlogical volume. After you finish partitioning, you will be prompted for an encryption passphrase. Thispassphrase will be required to access the encrypted devices. If you have pre-existing LUKS devicesand provided correct passphrases for them earlier in the install process the passphrase entry dialogwill also contain a checkbox. Checking this checkbox indicates that you would like the new passphraseto be added to an available slot in each of the pre-existing encrypted block devices.
TipChecking the "Encrypt System" checkbox on the "Automatic Partitioning" screen andthen choosing "Create custom layout" does not cause any block devices to be encryptedautomatically.
TipYou can use kickstart to set a separate passphrase for each new encrypted blockdevice.
What Kinds of Block Devices Can Be Encrypted?
239
C.3.1. What Kinds of Block Devices Can Be Encrypted?Most types of block devices can be encrypted using LUKS. From anaconda you can encrypt partitions,LVM physical volumes, LVM logical volumes, and software RAID arrays.
C.3.2. Saving PassphrasesIf you use a kickstart file during installation, you can automatically save the passphrases used duringinstallation to an encrypted file on the local file system. To use this feature, you must have an X.509certificate available at a location that anaconda can access. To specify the URL of this certificate, addthe --escrowcert parameter to any of the autopart, logvol, part or raid commands. Duringinstallation, the encryption keys for the specified devices are saved in files in / (root), encrypted withthe certificate.
Note that this feature is available only while performing a kickstart installation. Refer to Chapter 13,Kickstart Installations for more detail.
C.3.3. Creating and Saving Backup PassphrasesIf you use a kickstart file during installation, anaconda can add a randomly generated backuppassphrase to each block device on the system and save each passphrase to an encrypted file on thelocal file system. Specify the URL of this certificate with the --escrowcert parameter as described inSection C.3.2, “Saving Passphrases”, followed by the --backuppassphrase parameter for each ofthe kickstart commands that relate to the devices for which you want to create backup passphrases.
Note that this feature is available only while performing a kickstart installation. Refer to Chapter 13,Kickstart Installations for more detail.
C.4. Creating Encrypted Block Devices on the InstalledSystem After InstallationEncrypted block devices can be created and configured after installation.
C.4.1. Create the block devicesCreate the block devices you want to encrypt by using parted, pvcreate, lvcreate and mdadm.
C.4.2. Optional: Fill the device with random dataFilling <device> (eg: /dev/sda3) with random data before encrypting it greatly increases the strengthof the encryption. The downside is that it can take a very long time.
WarningThe commands below will destroy any existing data on the device.
• The best way, which provides high quality random data but takes a long time (several minutes pergigabyte on most systems):
dd if=/dev/urandom of=<device>
Appendix C. Disk Encryption
240
• Fastest way, which provides lower quality random data:
badblocks -c 10240 -s -w -t random -v <device>
C.4.3. Format the device as a dm-crypt/LUKS encrypted device
WarningThe command below will destroy any existing data on the device.
cryptsetup luksFormat <device>
TipFor more information, read the cryptsetup(8) man page.
After supplying the passphrase twice the device will be formatted for use. To verify, use the followingcommand:
cryptsetup isLuks <device> && echo Success
To see a summary of the encryption information for the device, use the following command:
cryptsetup luksDump <device>
C.4.4. Create a mapping to allow access to the device's decryptedcontentsTo access the device's decrypted contents, a mapping must be established using the kernel device-mapper.
It is useful to choose a meaningful name for this mapping. LUKS provides a UUID (Universally UniqueIdentifier) for each device. This, unlike the device name (eg: /dev/sda3), is guaranteed to remainconstant as long as the LUKS header remains intact. To find a LUKS device's UUID, run the followingcommand:
cryptsetup luksUUID <device>
An example of a reliable, informative and unique mapping name would be luks-<uuid>, where<uuid> is replaced with the device's LUKS UUID (eg: luks-50ec957a-5b5a-47ee-85e6-f8085bbc97a8). This naming convention might seem unwieldy but is it not necessary to type it often.
cryptsetup luksOpen <device> <name>
There should now be a device node, /dev/mapper/<name>, which represents the decrypted device.This block device can be read from and written to like any other unencrypted block device.

Create filesystems on the mapped device, or continue to build complex storage structures using the mapped device
241
To see some information about the mapped device, use the following command:
dmsetup info <name>
TipFor more information, read the dmsetup(8) man page.
C.4.5. Create filesystems on the mapped device, or continue tobuild complex storage structures using the mapped deviceUse the mapped device node (/dev/mapper/<name>) as any other block device. To create an ext2filesystem on the mapped device, use the following command:
mke2fs /dev/mapper/<name>
To mount this filesystem on /mnt/test, use the following command:
ImportantThe directory /mnt/test must exist before executing this command.
mount /dev/mapper/<name> /mnt/test
C.4.6. Add the mapping information to /etc/crypttabIn order for the system to set up a mapping for the device, an entry must be present in the /etc/crypttab file. If the file doesn't exist, create it and change the owner and group to root (root:root)and change the mode to 0744. Add a line to the file with the following format:
<name> <device> none
The <device> field should be given in the form "UUID=<luks_uuid>", where <luks_uuid> is the LUKSuuid as given by the command cryptsetup luksUUID <device>. This ensures the correct devicewill be identified and used even if the device node (eg: /dev/sda5) changes.
TipFor details on the format of the /etc/crypttab file, read the crypttab(5) man page.
C.4.7. Add an entry to /etc/fstabAdd an entry to /etc/fstab. This is only necessary if you want to establish a persistent associationbetween the device and a mountpoint. Use the decrypted device, /dev/mapper/<name> in the /etc/fstab file.

Appendix C. Disk Encryption
242
In many cases it is desirable to list devices in /etc/fstab by UUID or by a filesystem label. Themain purpose of this is to provide a constant identifier in the event that the device name (eg: /dev/sda4) changes. LUKS device names in the form of /dev/mapper/luks-<luks_uuid> are basedonly on the device's LUKS UUID, and are therefore guaranteed to remain constant. This fact makesthem suitable for use in /etc/fstab.
TitleFor details on the format of the /etc/fstab file, read the fstab(5) man page.
C.5. Common Post-Installation TasksThe following sections are about common post-installation tasks.
C.5.1. Set a randomly generated key as an additional way to accessan encrypted block deviceThese sections are about generating keys and adding keys.
C.5.1.1. Generate a keyThis will generate a 256-bit key in the file $HOME/keyfile.
dd if=/dev/urandom of=$HOME/keyfile bs=32 count=1 chmod 600 $HOME/keyfile
C.5.1.2. Add the key to an available keyslot on the encrypted device
cryptsetup luksAddKey <device> ~/keyfile
C.5.2. Add a new passphrase to an existing device
cryptsetup luksAddKey <device>
After being prompted for any one of the existing passprases for authentication, you will be prompted toenter the new passphrase.
C.5.3. Remove a passphrase or key from a device
cryptsetup luksRemoveKey <device>
You will be prompted for the passphrase you wish to remove and then for any one of the remainingpassphrases for authentication.
243
Appendix D. Understanding LVMLVM (Logical Volume Management) partitions provide a number of advantages over standardpartitions. LVM partitions are formatted asphysical volumes. One or more physical volumes are combined to form avolume group. Each volume group's total storage is then divided into one or morelogical volumes. The logical volumes function much like standard partitions. They have a file systemtype, such as ext4, and a mount point.
The /boot Partition and LVMThe boot loader cannot read LVM volumes. You must make a standard, non-LVM diskpartition for your /boot partition.
To understand LVM better, imagine the physical volume as a pile of blocks. A block is simply a storageunit used to store data. Several piles of blocks can be combined to make a much larger pile, just asphysical volumes are combined to make a volume group. The resulting pile can be subdivided intoseveral smaller piles of arbitrary size, just as a volume group is allocated to several logical volumes.
An administrator may grow or shrink logical volumes without destroying data, unlike standard diskpartitions. If the physical volumes in a volume group are on separate drives or RAID arrays thenadministrators may also spread a logical volume across the storage devices.
You may lose data if you shrink a logical volume to a smaller capacity than the data on the volumerequires. To ensure maximum flexibility, create logical volumes to meet your current needs, and leaveexcess storage capacity unallocated. You may safely grow logical volumes to use unallocated space,as your needs dictate.
LVM and the Default Partition LayoutBy default, the installation process creates / and swap partitions within LVM volumes, witha separate /boot partition.

244
245
Appendix E. The GRUB Boot LoaderWhen a computer running Linux is turned on, the operating system is loaded into memory by a specialprogram called a boot loader. A boot loader usually exists on the system's primary hard drive (or othermedia device) and has the sole responsibility of loading the Linux kernel with its required files or (insome cases) other operating systems into memory.
This appendix discusses commands and configuration options for the GRUB boot loader included withFedora for the x86 architecture.
BtrfsThe GRUB bootloader does not support the Btrfs file system. You cannot use a btrfspartition for /boot.
E.1. GRUBThe GNU GRand Unified Boot loader (GRUB) is a program which enables the selection of the installedoperating system or kernel to be loaded at system boot time. It also allows the user to pass argumentsto the kernel.
E.1.1. GRUB and the x86 Boot ProcessThis section discusses the specific role GRUB plays when booting an x86 system. For a look at theoverall boot process, refer to Section F.2, “A Detailed Look at the Boot Process”.
GRUB loads itself into memory in the following stages:
1. The Stage 1 or primary boot loader is read into memory by the BIOS from the MBR 1. The primaryboot loader exists on less than 512 bytes of disk space within the MBR and is capable of loadingeither the Stage 1.5 or Stage 2 boot loader.
2. The Stage 1.5 boot loader is read into memory by the Stage 1 boot loader, if necessary. Somehardware requires an intermediate step to get to the Stage 2 boot loader. This is sometimes truewhen the /boot/ partition is above the 1024 cylinder head of the hard drive or when using LBAmode. The Stage 1.5 boot loader is found either on the /boot/ partition or on a small part of theMBR and the /boot/ partition.
3. The Stage 2 or secondary boot loader is read into memory. The secondary boot loader displaysthe GRUB menu and command environment. This interface allows the user to select which kernelor operating system to boot, pass arguments to the kernel, or look at system parameters.
4. The secondary boot loader reads the operating system or kernel as well as the contents of /boot/sysroot/ into memory. Once GRUB determines which operating system or kernel to start,it loads it into memory and transfers control of the machine to that operating system.
The method used to boot Linux is called direct loading because the boot loader loads the operatingsystem directly. There is no intermediary between the boot loader and the kernel.
The boot process used by other operating systems may differ. For example, the Microsoft® Windows®operating system, as well as other operating systems, are loaded using chain loading. Under this
Appendix E. The GRUB Boot Loader
246
method, the MBR points to the first sector of the partition holding the operating system, where it findsthe files necessary to actually boot that operating system.
GRUB supports both direct and chain loading boot methods, allowing it to boot almost any operatingsystem.
WarningDuring installation, Microsoft's DOS and Windows installation programs completelyoverwrite the MBR, destroying any existing boot loaders. If creating a dual-boot system, itis best to install the Microsoft operating system first.
E.1.2. Features of GRUBGRUB contains several features that make it preferable to other boot loaders available for the x86architecture. Below is a partial list of some of the more important features:
• GRUB provides a true command-based, pre-OS environment on x86 machines. This featureaffords the user maximum flexibility in loading operating systems with specified options or gatheringinformation about the system. For years, many non-x86 architectures have employed pre-OSenvironments that allow system booting from a command line.
• GRUB supports Logical Block Addressing (LBA) mode. LBA places the addressing conversion usedto find files in the hard drive's firmware, and is used on many IDE and all SCSI hard devices. BeforeLBA, boot loaders could encounter the 1024-cylinder BIOS limitation, where the BIOS could not finda file after the 1024 cylinder head of the disk. LBA support allows GRUB to boot operating systemsfrom partitions beyond the 1024-cylinder limit, so long as the system BIOS supports LBA mode.Most modern BIOS revisions support LBA mode.
• GRUB can read ext2 partitions. This functionality allows GRUB to access its configuration file, /boot/grub/grub.conf, every time the system boots, eliminating the need for the user to writea new version of the first stage boot loader to the MBR when configuration changes are made.The only time a user needs to reinstall GRUB on the MBR is if the physical location of the /boot/partition is moved on the disk. For details on installing GRUB to the MBR, refer to Section E.2,“Installing GRUB”.
E.2. Installing GRUBIf GRUB was not installed during the installation process, it can be installed afterward. Once installed,it automatically becomes the default boot loader.
Before installing GRUB, make sure to use the latest GRUB package available or use the GRUBpackage from the installation CD-ROMs.
Once the GRUB package is installed, open a root shell prompt and run the command /sbin/grub-install <location>, where <location> is the location that the GRUB Stage 1 boot loadershould be installed. For example, the following command installs GRUB to the MBR of the master IDEdevice on the primary IDE bus:
/sbin/grub-install /dev/hda

GRUB Terminology
247
The next time the system boots, the GRUB graphical boot loader menu appears before the kernelloads into memory.
Important — GRUB and RAIDGRUB cannot construct a software RAID. Therefore, the /boot directory must reside ona single, specific disk partition. The /boot directory cannot be striped across multipledisks, as in a level 0 RAID. To use a level 0 RAID on your system, place /boot on aseparate partition outside the RAID.
Similarly, because the /boot directory must reside on a single, specific disk partition,GRUB cannot boot the system if the disk holding that partition fails or is removed from thesystem. This is true even if the disk is mirrored in a level 1 RAID. The following Red HatKnowledgebase article describes how to make the system bootable from another disk inthe mirrored set: http://kbase.redhat.com/faq/docs/DOC-7095
Note that these issues apply only to RAID that is implemented in software, where theindividual disks that make up the array are still visible as individual disks on the system.These issues do not apply to hardware RAID where multiple disks are represented as asingle device.
E.3. GRUB TerminologyOne of the most important things to understand before using GRUB is how the program refers todevices, such as hard drives and partitions. This information is particularly important when configuringGRUB to boot multiple operating systems.
E.3.1. Device NamesWhen referring to a specific device with GRUB, do so using the following format (note that theparentheses and comma are very important syntactically):
(<type-of-device><bios-device-number>,<partition-number>)
The <type-of-device> specifies the type of device from which GRUB boots. The two mostcommon options are hd for a hard disk or fd for a 3.5 diskette. A lesser used device type is alsoavailable called nd for a network disk. Instructions on configuring GRUB to boot over the network areavailable online at http://www.gnu.org/software/grub/manual/.
The <bios-device-number> is the BIOS device number. The primary IDE hard drive is numbered0 and a secondary IDE hard drive is numbered 1. This syntax is roughly equivalent to that used fordevices by the kernel. For example, the a in hda for the kernel is analogous to the 0 in hd0 for GRUB,the b in hdb is analogous to the 1 in hd1, and so on.
The <partition-number> specifies the number of a partition on a device. Like the <bios-device-number>, most types of partitions are numbered starting at 0. However, BSD partitions arespecified using letters, with a corresponding to 0, b corresponding to 1, and so on.
Appendix E. The GRUB Boot Loader
248
NoteThe numbering system for devices under GRUB always begins with 0, not 1. Failing tomake this distinction is one of the most common mistakes made by new users.
To give an example, if a system has more than one hard drive, GRUB refers to the first hard driveas (hd0) and the second as (hd1). Likewise, GRUB refers to the first partition on the first drive as(hd0,0) and the third partition on the second hard drive as (hd1,2).
In general the following rules apply when naming devices and partitions under GRUB:
• It does not matter if system hard drives are IDE or SCSI, all hard drives begin with the letters hd.The letters fd are used to specify 3.5 diskettes.
• To specify an entire device without respect to partitions, leave off the comma and the partitionnumber. This is important when telling GRUB to configure the MBR for a particular disk. Forexample, (hd0) specifies the MBR on the first device and (hd3) specifies the MBR on the fourthdevice.
• If a system has multiple drive devices, it is very important to know how the drive boot order is setin the BIOS. This is a simple task if a system has only IDE or SCSI drives, but if there is a mix ofdevices, it becomes critical that the type of drive with the boot partition be accessed first.
E.3.2. File Names and BlocklistsWhen typing commands to GRUB that reference a file, such as a menu list, it is necessary to specifyan absolute file path immediately after the device and partition numbers.
The following illustrates the structure of such a command:
(<device-type><device-number>,<partition-number>)</path/to/file>
In this example, replace <device-type> with hd, fd, or nd. Replace <device-number> with theinteger for the device. Replace </path/to/file> with an absolute path relative to the top-level ofthe device.
It is also possible to specify files to GRUB that do not actually appear in the file system, such as achain loader that appears in the first few blocks of a partition. To load such files, provide a blocklistthat specifies block by block where the file is located in the partition. Since a file is often comprisedof several different sets of blocks, blocklists use a special syntax. Each block containing the file isspecified by an offset number of blocks, followed by the number of blocks from that offset point. Blockoffsets are listed sequentially in a comma-delimited list.
The following is a sample blocklist:
0+50,100+25,200+1
This sample blocklist specifies a file that starts at the first block on the partition and uses blocks 0through 49, 100 through 124, and 200.
Knowing how to write blocklists is useful when using GRUB to load operating systems which requirechain loading. It is possible to leave off the offset number of blocks if starting at block 0. As an
The Root File System and GRUB
249
example, the chain loading file in the first partition of the first hard drive would have the followingname:
(hd0,0)+1
The following shows the chainloader command with a similar blocklist designation at the GRUBcommand line after setting the correct device and partition as root:
chainloader +1
E.3.3. The Root File System and GRUBThe use of the term root file system has a different meaning in regard to GRUB. It is important toremember that GRUB's root file system has nothing to do with the Linux root file system.
The GRUB root file system is the top level of the specified device. For example, the image file(hd0,0)/grub/splash.xpm.gz is located within the /grub/ directory at the top-level (or root) ofthe (hd0,0) partition (which is actually the /boot/ partition for the system).
Next, the kernel command is executed with the location of the kernel file as an option. Once theLinux kernel boots, it sets up the root file system that Linux users are familiar with. The original GRUBroot file system and its mounts are forgotten; they only existed to boot the kernel file.
Refer to the root and kernel commands in Section E.5, “GRUB Commands” for more information.
E.4. GRUB InterfacesGRUB features three interfaces which provide different levels of functionality. Each of these interfacesallows users to boot the Linux kernel or another operating system.
The interfaces are as follows:
NoteThe following GRUB interfaces can only be accessed by pressing any key within the threeseconds of the GRUB menu bypass screen.
Menu InterfaceThis is the default interface shown when GRUB is configured by the installation program. A menuof operating systems or preconfigured kernels are displayed as a list, ordered by name. Use thearrow keys to select an operating system or kernel version and press the Enter key to boot it. Ifyou do nothing on this screen, then after the time out period expires GRUB will load the defaultoption.
Press the e key to enter the entry editor interface or the c key to load a command line interface.
Refer to Section E.6, “GRUB Menu Configuration File” for more information on configuring thisinterface.
Appendix E. The GRUB Boot Loader
250
Menu Entry Editor InterfaceTo access the menu entry editor, press the e key from the boot loader menu. The GRUBcommands for that entry are displayed here, and users may alter these command lines beforebooting the operating system by adding a command line (o inserts a new line after the current lineand O inserts a new line before it), editing one (e), or deleting one (d).
After all changes are made, the b key executes the commands and boots the operating system.The Esc key discards any changes and reloads the standard menu interface. The c key loads thecommand line interface.
NoteFor information about changing runlevels using the GRUB menu entry editor, refer toSection E.7, “Changing Runlevels at Boot Time”.
Command Line InterfaceThe command line interface is the most basic GRUB interface, but it is also the one that grantsthe most control. The command line makes it possible to type any relevant GRUB commandsfollowed by the Enter key to execute them. This interface features some advanced shell-likefeatures, including Tab key completion based on context, and Ctrl key combinations when typingcommands, such as Ctrl+a to move to the beginning of a line and Ctrl+e to move to the end ofa line. In addition, the arrow, Home, End, and Delete keys work as they do in the bash shell.
Refer to Section E.5, “GRUB Commands” for a list of common commands.
E.4.1. Interfaces Load OrderWhen GRUB loads its second stage boot loader, it first searches for its configuration file. Once found,the menu interface bypass screen is displayed. If a key is pressed within three seconds, GRUB buildsa menu list and displays the menu interface. If no key is pressed, the default kernel entry in the GRUBmenu is used.
If the configuration file cannot be found, or if the configuration file is unreadable, GRUB loads thecommand line interface, allowing the user to type commands to complete the boot process.
If the configuration file is not valid, GRUB prints out the error and asks for input. This helps the usersee precisely where the problem occurred. Pressing any key reloads the menu interface, where it isthen possible to edit the menu option and correct the problem based on the error reported by GRUB. Ifthe correction fails, GRUB reports an error and reloads the menu interface.
E.5. GRUB CommandsGRUB allows a number of useful commands in its command line interface. Some of the commandsaccept options after their name; these options should be separated from the command and otheroptions on that line by space characters.
The following is a list of useful commands:
• boot — Boots the operating system or chain loader that was last loaded.
• chainloader </path/to/file> — Loads the specified file as a chain loader. If the file islocated on the first sector of the specified partition, use the blocklist notation, +1, instead of the filename.
GRUB Commands
251
The following is an example chainloader command:
chainloader +1
• displaymem — Displays the current use of memory, based on information from the BIOS. This isuseful to determine how much RAM a system has prior to booting it.
• initrd </path/to/initrd> — Enables users to specify an initial RAM disk to use whenbooting. An initrd is necessary when the kernel needs certain modules in order to boot properly,such as when the root partition is formatted with the ext3 or ext4 file system.
The following is an example initrd command:
initrd /initrd-2.6.8-1.523.img
• install <stage-1> <install-disk> <stage-2> p config-file — Installs GRUB to thesystem MBR.
• <stage-1> — Signifies a device, partition, and file where the first boot loader image can befound, such as (hd0,0)/grub/stage1.
• <install-disk> — Specifies the disk where the stage 1 boot loader should be installed, suchas (hd0).
• <stage-2> — Passes the stage 2 boot loader location to the stage 1 boot loader, such as(hd0,0)/grub/stage2.
• p <config-file> — This option tells the install command to look for the menu configurationfile specified by <config-file>, such as (hd0,0)/grub/grub.conf.
WarningThe install command overwrites any information already located on the MBR.
• kernel </path/to/kernel> <option-1> <option-N> ... — Specifies the kernel file to loadwhen booting the operating system. Replace </path/to/kernel> with an absolute path from thepartition specified by the root command. Replace <option-1> with options for the Linux kernel,such as root=/dev/VolGroup00/LogVol00 to specify the device on which the root partition forthe system is located. Multiple options can be passed to the kernel in a space separated list.
The following is an example kernel command:
kernel /vmlinuz-2.6.8-1.523 ro root=/dev/VolGroup00/LogVol00
The option in the previous example specifies that the root file system for Linux is located on thehda5 partition.
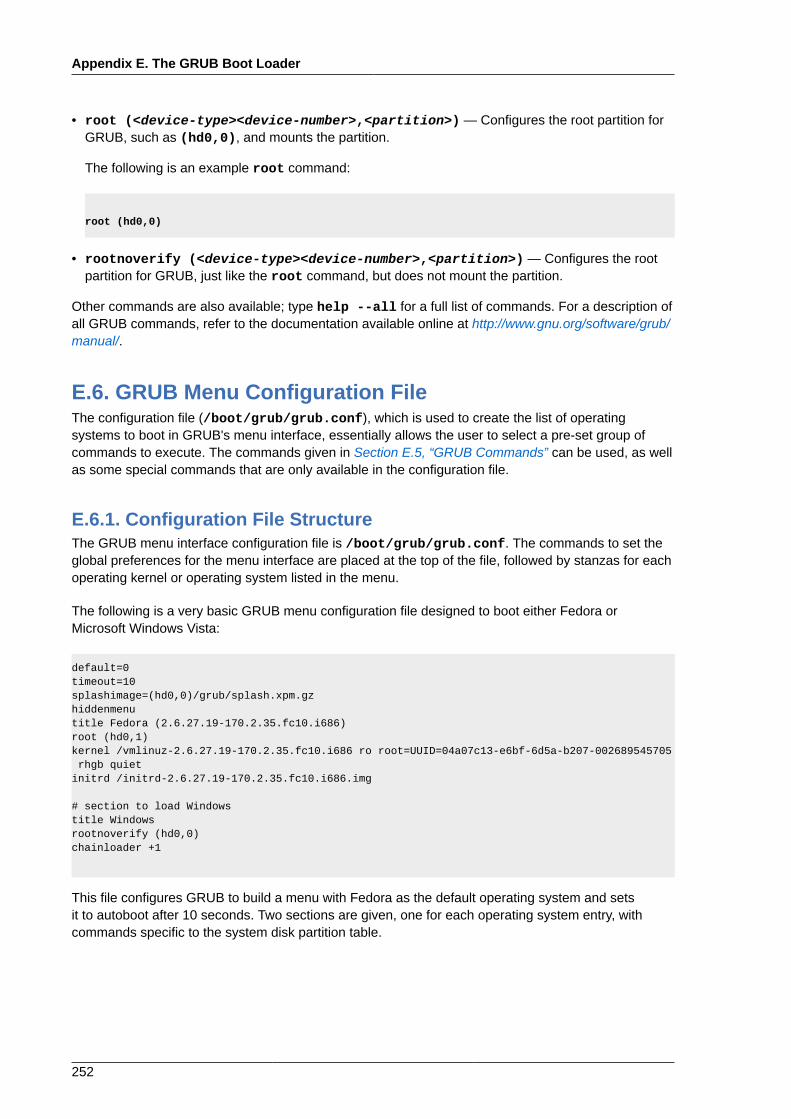
Appendix E. The GRUB Boot Loader
252
• root (<device-type><device-number>,<partition>) — Configures the root partition forGRUB, such as (hd0,0), and mounts the partition.
The following is an example root command:
root (hd0,0)
• rootnoverify (<device-type><device-number>,<partition>) — Configures the rootpartition for GRUB, just like the root command, but does not mount the partition.
Other commands are also available; type help --all for a full list of commands. For a description ofall GRUB commands, refer to the documentation available online at http://www.gnu.org/software/grub/manual/.
E.6. GRUB Menu Configuration FileThe configuration file (/boot/grub/grub.conf), which is used to create the list of operatingsystems to boot in GRUB's menu interface, essentially allows the user to select a pre-set group ofcommands to execute. The commands given in Section E.5, “GRUB Commands” can be used, as wellas some special commands that are only available in the configuration file.
E.6.1. Configuration File StructureThe GRUB menu interface configuration file is /boot/grub/grub.conf. The commands to set theglobal preferences for the menu interface are placed at the top of the file, followed by stanzas for eachoperating kernel or operating system listed in the menu.
The following is a very basic GRUB menu configuration file designed to boot either Fedora orMicrosoft Windows Vista:
default=0 timeout=10 splashimage=(hd0,0)/grub/splash.xpm.gz hiddenmenu title Fedora (2.6.27.19-170.2.35.fc10.i686)root (hd0,1)kernel /vmlinuz-2.6.27.19-170.2.35.fc10.i686 ro root=UUID=04a07c13-e6bf-6d5a-b207-002689545705 rhgb quietinitrd /initrd-2.6.27.19-170.2.35.fc10.i686.img
# section to load Windows title Windows rootnoverify (hd0,0) chainloader +1
This file configures GRUB to build a menu with Fedora as the default operating system and setsit to autoboot after 10 seconds. Two sections are given, one for each operating system entry, withcommands specific to the system disk partition table.
Configuration File Directives
253
NoteNote that the default is specified as an integer. This refers to the first title line in theGRUB configuration file. For the Windows section to be set as the default in the previousexample, change the default=0 to default=1.
Configuring a GRUB menu configuration file to boot multiple operating systems is beyond the scope ofthis chapter. Consult Section E.8, “Additional Resources” for a list of additional resources.
E.6.2. Configuration File DirectivesThe following are directives commonly used in the GRUB menu configuration file:
• chainloader </path/to/file> — Loads the specified file as a chain loader. Replace </path/to/file> with the absolute path to the chain loader. If the file is located on the first sector ofthe specified partition, use the blocklist notation, +1.
• color <normal-color> <selected-color> — Allows specific colors to be used in the menu,where two colors are configured as the foreground and background. Use simple color names suchas red/black. For example:
color red/black green/blue
• default=<integer> — Replace <integer> with the default entry title number to be loaded if themenu interface times out.
• fallback=<integer> — Replace <integer> with the entry title number to try if the first attemptfails.
• hiddenmenu — Prevents the GRUB menu interface from being displayed, loading the defaultentry when the timeout period expires. The user can see the standard GRUB menu by pressingthe Esc key.
• initrd </path/to/initrd> — Enables users to specify an initial RAM disk to use whenbooting. Replace </path/to/initrd> with the absolute path to the initial RAM disk.
• kernel </path/to/kernel> <option-1> <option-N> — Specifies the kernel file to loadwhen booting the operating system. Replace </path/to/kernel> with an absolute path fromthe partition specified by the root directive. Multiple options can be passed to the kernel when it isloaded.
These options include:• rhgb (Red Hat graphical boot) — displays an animation during the boot process, rather than lines
of text.
• quiet — suppresses all but the most important messages in the part of the boot sequencebefore the Red Hat graphical boot animation begins.
• password=<password> — Prevents a user who does not know the password from editing theentries for this menu option.
Appendix E. The GRUB Boot Loader
254
Optionally, it is possible to specify an alternate menu configuration file after thepassword=<password> directive. In this case, GRUB restarts the second stage boot loader anduses the specified alternate configuration file to build the menu. If an alternate menu configurationfile is left out of the command, a user who knows the password is allowed to edit the currentconfiguration file.
For more information about securing GRUB, refer to the chapter titled Workstation Security in theRed Hat Enterprise Linux Deployment Guide.
• map — Swaps the numbers assigned to two hard drives. For example:
map (hd0) (hd3)map (hd3) (hd0)
assigns the number 0 to the fourth hard drive, and the number 3 to the first hard drive. This optionis especially useful if you configure your system with an option to boot a Windows operating system,becausehe Windows boot loader must find the Windows installation on the first hard drive.
For example, if your Windows installation is on the fourth hard drive, the following entry ingrub.conf will allow the Windows boot loader to load Windows correctly:
title Windowsmap (hd0) (hd3)map (hd3) (hd0)rootnoverify (hd3,0)chainloader +1
• root (<device-type><device-number>,<partition>) — Configures the root partition forGRUB, such as (hd0,0), and mounts the partition.
• rootnoverify (<device-type><device-number>,<partition>) — Configures the rootpartition for GRUB, just like the root command, but does not mount the partition.
• timeout=<integer> — Specifies the interval, in seconds, that GRUB waits before loading theentry designated in the default command.
• splashimage=<path-to-image> — Specifies the location of the splash screen image to beused when GRUB boots.
• title group-title — Specifies a title to be used with a particular group of commands used toload a kernel or operating system.
To add human-readable comments to the menu configuration file, begin the line with the hash markcharacter (#).
E.7. Changing Runlevels at Boot TimeUnder Fedora, it is possible to change the default runlevel at boot time.
To change the runlevel of a single boot session, use the following instructions:
• When the GRUB menu bypass screen appears at boot time, press any key to enter the GRUB menu(within the first three seconds).
Additional Resources
255
• Press the a key to append to the kernel command.
• Add <space><runlevel> at the end of the boot options line to boot to the desired runlevel. Forexample, the following entry would initiate a boot process into runlevel 3:
grub append> ro root=/dev/VolGroup00/LogVol00 rhgb quiet 3
E.8. Additional ResourcesThis chapter is only intended as an introduction to GRUB. Consult the following resources to discovermore about how GRUB works.
E.8.1. Installed Documentation• /usr/share/doc/grub-<version-number>/ — This directory contains good information about
using and configuring GRUB, where <version-number> corresponds to the version of the GRUBpackage installed.
• info grub — The GRUB info page contains a tutorial, a user reference manual, a programmerreference manual, and a FAQ document about GRUB and its usage.
E.8.2. Useful Websites• http://www.gnu.org/software/grub/2 — The home page of the GNU GRUB project. This site contains
information concerning the state of GRUB development and an FAQ.
• http://kbase.redhat.com/faq/docs/DOC-6864 — Details booting operating systems other than Linux.
E.8.3. Related Books• Red Hat Enterprise Linux Deployment Guide; Red Hat, Inc. — The Workstation Security chapter
explains, in a concise manner, how to secure the GRUB boot loader.
You can find the current version of the Red Hat Enterprise Linux Deployment Guide at http://www.redhat.com/docs/manuals/enterprise/. In the version of the book for Red Hat Enterprise Linux5, the relevant section is 43.1.2. BIOS and Boot Loader Security: http://www.redhat.com/docs/en-US/Red_Hat_Enterprise_Linux/5/html/Deployment_Guide/ch-sec-network.html#s1-wstation-boot-sec.

256
257
Appendix F. Boot Process, Init, andShutdownAn important and powerful aspect of Fedora is the open, user-configurable method it uses for startingthe operating system. Users are free to configure many aspects of the boot process, includingspecifying the programs launched at boot-time. Similarly, system shutdown gracefully terminatesprocesses in an organized and configurable way, although customization of this process is rarelyrequired.
Understanding how the boot and shutdown processes work not only allows customization, but alsomakes it easier to troubleshoot problems related to starting or shutting down the system.
F.1. The Boot ProcessBelow are the basic stages of the boot process for an x86 system:
1. The system BIOS checks the system and launches the first stage boot loader on the MBR of theprimary hard disk.
2. The first stage boot loader loads itself into memory and launches the second stage boot loaderfrom the /boot/ partition.
3. The second stage boot loader loads the kernel into memory, which in turn loads any necessarymodules and mounts the root partition read-only.
4. The kernel transfers control of the boot process to the /sbin/init program.
5. The /sbin/init program loads all services and user-space tools, and mounts all partitions listedin /etc/fstab.
6. The user is presented with a login screen for the freshly booted Linux system.
Because configuration of the boot process is more common than the customization of the shutdownprocess, the remainder of this chapter discusses in detail how the boot process works and how it canbe customized to suite specific needs.
F.2. A Detailed Look at the Boot ProcessThe beginning of the boot process varies depending on the hardware platform being used. However,once the kernel is found and loaded by the boot loader, the default boot process is identical across allarchitectures. This chapter focuses primarily on the x86 architecture.
F.2.1. The BIOSWhen an x86 computer is booted, the processor looks at the end of system memory for the BasicInput/Output System or BIOS program and runs it. The BIOS controls not only the first step of the bootprocess, but also provides the lowest level interface to peripheral devices. For this reason it is writteninto read-only, permanent memory and is always available for use.
Other platforms use different programs to perform low-level tasks roughly equivalent to those ofthe BIOS on an x86 system. For instance, Itanium-based computers use the Extensible FirmwareInterface (EFI) Shell.

Appendix F. Boot Process, Init, and Shutdown
258
Once loaded, the BIOS tests the system, looks for and checks peripherals, and then locates a validdevice with which to boot the system. Usually, it checks any diskette drives and CD-ROM drivespresent for bootable media, then, failing that, looks to the system's hard drives. In most cases, theorder of the drives searched while booting is controlled with a setting in the BIOS, and it looks on themaster IDE device on the primary IDE bus. The BIOS then loads into memory whatever program isresiding in the first sector of this device, called the Master Boot Record or MBR. The MBR is only 512bytes in size and contains machine code instructions for booting the machine, called a boot loader,along with the partition table. Once the BIOS finds and loads the boot loader program into memory, ityields control of the boot process to it.
F.2.2. The Boot LoaderThis section looks at the default boot loader for the x86 platform, GRUB. For more information aboutconfiguring and using GRUB, see Appendix E, The GRUB Boot Loader.
A boot loader for the x86 platform is broken into at least two stages. The first stage is a small machinecode binary on the MBR. Its sole job is to locate the second stage boot loader and load the first part ofit into memory.
GRUB has the advantage of being able to read ext2 and ext3 1 partitions and load its configuration file— /boot/grub/grub.conf — at boot time. Refer to Section E.6, “GRUB Menu Configuration File”for information on how to edit this file.
BtrfsThe GRUB bootloader does not support the Btrfs file system.
NoteIf upgrading the kernel using the Red Hat Update Agent, the boot loader configuration fileis updated automatically. More information on Red Hat Network can be found online at thefollowing URL: https://rhn.redhat.com/.
Once the second stage boot loader is in memory, it presents the user with a graphical screen showingthe different operating systems or kernels it has been configured to boot. On this screen a user canuse the arrow keys to choose which operating system or kernel they wish to boot and press Enter. Ifno key is pressed, the boot loader loads the default selection after a configurable period of time haspassed.
Once the second stage boot loader has determined which kernel to boot, it locates the correspondingkernel binary in the /boot/ directory. The kernel binary is named using the following format — /boot/vmlinuz-<kernel-version> file (where <kernel-version> corresponds to the kernelversion specified in the boot loader's settings).
For instructions on using the boot loader to supply command line arguments to the kernel, refer toAppendix E, The GRUB Boot Loader. For information on changing the runlevel at the boot loaderprompt, refer Section E.7, “Changing Runlevels at Boot Time”.
GRUB reads ext3 file systems as ext2, disregarding the journal file. Refer to the chapter titled The ext3 File System in the RedHat Enterprise Linux Deployment Guide for more information on the ext3 file system.
The Kernel
259
The boot loader then places one or more appropriate initramfs images into memory. Next, the kerneldecompresses these images from memory to /sysroot/, a RAM-based virtual file system, via cpio.The initramfs is used by the kernel to load drivers and modules necessary to boot the system.This is particularly important if SCSI hard drives are present or if the systems use the ext3 or ext4 filesystem.
Once the kernel and the initramfs image(s) are loaded into memory, the boot loader hands controlof the boot process to the kernel.
For a more detailed overview of the GRUB boot loader, refer to Appendix E, The GRUB Boot Loader.
F.2.3. The KernelWhen the kernel is loaded, it immediately initializes and configures the computer's memory andconfigures the various hardware attached to the system, including all processors, I/O subsystems,and storage devices. It then looks for the compressed initramfs image(s) in a predeterminedlocation in memory, decompresses it directly to /sysroot/, and loads all necessary drivers. Next, itinitializes virtual devices related to the file system, such as LVM or software RAID, before completingthe initramfs processes and freeing up all the memory the disk image once occupied.
The kernel then creates a root device, mounts the root partition read-only, and frees any unusedmemory.
At this point, the kernel is loaded into memory and operational. However, since there are no userapplications that allow meaningful input to the system, not much can be done with the system.
To set up the user environment, the kernel executes the /sbin/init program.
F.2.4. The /sbin/init ProgramThe /sbin/init program (also called init) coordinates the rest of the boot process and configuresthe environment for the user.
When the init command starts, it becomes the parent or grandparent of all of the processes thatstart up automatically on the system. First, it runs the /etc/rc.d/rc.sysinit script, which setsthe environment path, starts swap, checks the file systems, and executes all other steps requiredfor system initialization. For example, most systems use a clock, so rc.sysinit reads the /etc/sysconfig/clock configuration file to initialize the hardware clock. Another example is if there arespecial serial port processes which must be initialized, rc.sysinit executes the /etc/rc.serialfile.
The init command then processes the jobs in the /etc/event.d directory, which describe howthe system should be set up in each SysV init runlevel. Runlevels are a state, or mode, defined by theservices listed in the SysV /etc/rc.d/rc<x>.d/ directory, where <x> is the number of the runlevel.For more information on SysV init runlevels, refer to Section F.4, “SysV Init Runlevels”.
Next, the init command sets the source function library, /etc/rc.d/init.d/functions, for thesystem, which configures how to start, kill, and determine the PID of a program.
The init program starts all of the background processes by looking in the appropriate rc directoryfor the runlevel specified as the default in /etc/inittab. The rc directories are numbered tocorrespond to the runlevel they represent. For instance, /etc/rc.d/rc5.d/ is the directory forrunlevel 5.
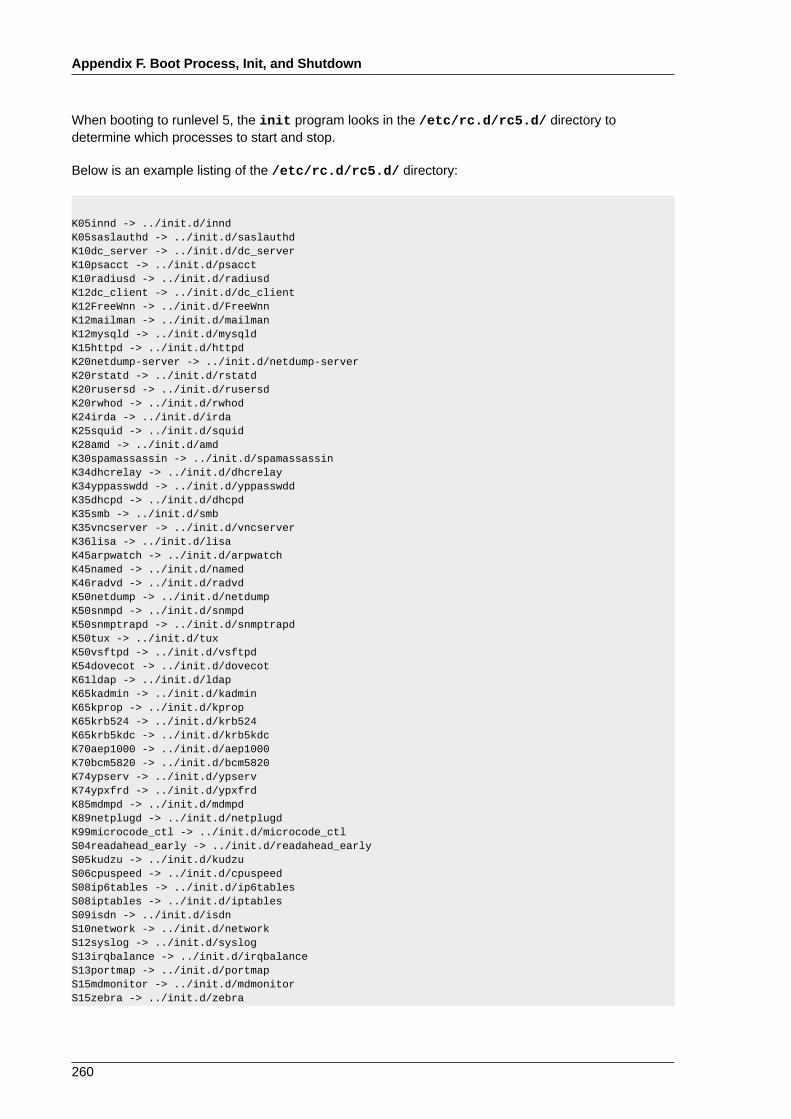
Appendix F. Boot Process, Init, and Shutdown
260
When booting to runlevel 5, the init program looks in the /etc/rc.d/rc5.d/ directory todetermine which processes to start and stop.
Below is an example listing of the /etc/rc.d/rc5.d/ directory:
K05innd -> ../init.d/innd K05saslauthd -> ../init.d/saslauthd K10dc_server -> ../init.d/dc_server K10psacct -> ../init.d/psacct K10radiusd -> ../init.d/radiusd K12dc_client -> ../init.d/dc_client K12FreeWnn -> ../init.d/FreeWnn K12mailman -> ../init.d/mailman K12mysqld -> ../init.d/mysqld K15httpd -> ../init.d/httpd K20netdump-server -> ../init.d/netdump-server K20rstatd -> ../init.d/rstatd K20rusersd -> ../init.d/rusersd K20rwhod -> ../init.d/rwhod K24irda -> ../init.d/irda K25squid -> ../init.d/squid K28amd -> ../init.d/amd K30spamassassin -> ../init.d/spamassassin K34dhcrelay -> ../init.d/dhcrelay K34yppasswdd -> ../init.d/yppasswdd K35dhcpd -> ../init.d/dhcpd K35smb -> ../init.d/smb K35vncserver -> ../init.d/vncserver K36lisa -> ../init.d/lisa K45arpwatch -> ../init.d/arpwatch K45named -> ../init.d/named K46radvd -> ../init.d/radvd K50netdump -> ../init.d/netdump K50snmpd -> ../init.d/snmpd K50snmptrapd -> ../init.d/snmptrapd K50tux -> ../init.d/tux K50vsftpd -> ../init.d/vsftpd K54dovecot -> ../init.d/dovecot K61ldap -> ../init.d/ldap K65kadmin -> ../init.d/kadmin K65kprop -> ../init.d/kprop K65krb524 -> ../init.d/krb524 K65krb5kdc -> ../init.d/krb5kdc K70aep1000 -> ../init.d/aep1000 K70bcm5820 -> ../init.d/bcm5820 K74ypserv -> ../init.d/ypserv K74ypxfrd -> ../init.d/ypxfrd K85mdmpd -> ../init.d/mdmpd K89netplugd -> ../init.d/netplugd K99microcode_ctl -> ../init.d/microcode_ctl S04readahead_early -> ../init.d/readahead_early S05kudzu -> ../init.d/kudzu S06cpuspeed -> ../init.d/cpuspeed S08ip6tables -> ../init.d/ip6tables S08iptables -> ../init.d/iptables S09isdn -> ../init.d/isdn S10network -> ../init.d/network S12syslog -> ../init.d/syslog S13irqbalance -> ../init.d/irqbalance S13portmap -> ../init.d/portmap S15mdmonitor -> ../init.d/mdmonitor S15zebra -> ../init.d/zebra
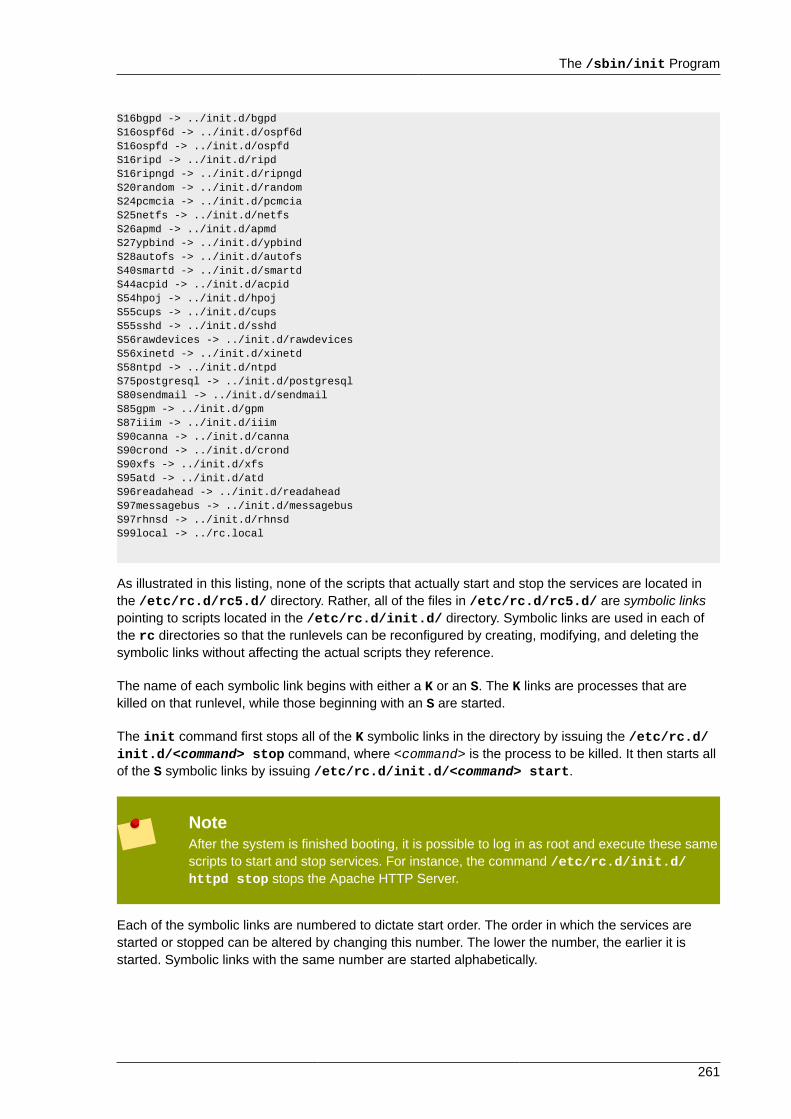
The /sbin/init Program
261
S16bgpd -> ../init.d/bgpd S16ospf6d -> ../init.d/ospf6d S16ospfd -> ../init.d/ospfd S16ripd -> ../init.d/ripd S16ripngd -> ../init.d/ripngd S20random -> ../init.d/random S24pcmcia -> ../init.d/pcmcia S25netfs -> ../init.d/netfs S26apmd -> ../init.d/apmd S27ypbind -> ../init.d/ypbind S28autofs -> ../init.d/autofs S40smartd -> ../init.d/smartd S44acpid -> ../init.d/acpid S54hpoj -> ../init.d/hpoj S55cups -> ../init.d/cups S55sshd -> ../init.d/sshd S56rawdevices -> ../init.d/rawdevices S56xinetd -> ../init.d/xinetd S58ntpd -> ../init.d/ntpd S75postgresql -> ../init.d/postgresql S80sendmail -> ../init.d/sendmail S85gpm -> ../init.d/gpm S87iiim -> ../init.d/iiim S90canna -> ../init.d/canna S90crond -> ../init.d/crond S90xfs -> ../init.d/xfs S95atd -> ../init.d/atd S96readahead -> ../init.d/readahead S97messagebus -> ../init.d/messagebus S97rhnsd -> ../init.d/rhnsd S99local -> ../rc.local
As illustrated in this listing, none of the scripts that actually start and stop the services are located inthe /etc/rc.d/rc5.d/ directory. Rather, all of the files in /etc/rc.d/rc5.d/ are symbolic linkspointing to scripts located in the /etc/rc.d/init.d/ directory. Symbolic links are used in each ofthe rc directories so that the runlevels can be reconfigured by creating, modifying, and deleting thesymbolic links without affecting the actual scripts they reference.
The name of each symbolic link begins with either a K or an S. The K links are processes that arekilled on that runlevel, while those beginning with an S are started.
The init command first stops all of the K symbolic links in the directory by issuing the /etc/rc.d/init.d/<command> stop command, where <command> is the process to be killed. It then starts allof the S symbolic links by issuing /etc/rc.d/init.d/<command> start.
NoteAfter the system is finished booting, it is possible to log in as root and execute these samescripts to start and stop services. For instance, the command /etc/rc.d/init.d/httpd stop stops the Apache HTTP Server.
Each of the symbolic links are numbered to dictate start order. The order in which the services arestarted or stopped can be altered by changing this number. The lower the number, the earlier it isstarted. Symbolic links with the same number are started alphabetically.
Appendix F. Boot Process, Init, and Shutdown
262
NoteOne of the last things the init program executes is the /etc/rc.d/rc.local file. Thisfile is useful for system customization. Refer to Section F.3, “Running Additional Programsat Boot Time” for more information about using the rc.local file.
After the init command has progressed through the appropriate rc directory for the runlevel,Upstart forks an /sbin/mingetty process for each virtual console (login prompt) allocated to therunlevel by the job definition in the /etc/event.d directory. Runlevels 2 through 5 have all six virtualconsoles, while runlevel 1 (single user mode) has one, and runlevels 0 and 6 have none. The /sbin/mingetty process opens communication pathways to tty devices2, sets their modes, prints the loginprompt, accepts the user's username and password, and initiates the login process.
In runlevel 5, Upstart runs a script called /etc/X11/prefdm. The prefdm script executes thepreferred X display manager3 — gdm, kdm, or xdm, depending on the contents of the /etc/sysconfig/desktop file.
Once finished, the system operates on runlevel 5 and displays a login screen.
F.2.5. Job definitionsPreviously, the sysvinit package provided the init daemon for the default configuration. When thesystem started, this init daemon ran the /etc/inittab script to start system processes definedfor each runlevel. The default configuration now uses an event-driven init daemon provided by theUpstart package. Whenever particular events occur, the init daemon processes jobs stored in the /etc/event.d directory. The init daemon recognises the start of the system as such an event.
Each job typically specifies a program, and the events that trigger init to run or to stop the program.Some jobs are constructed as tasks, which perform actions and then terminate until another eventtriggers the job again. Other jobs are constructed as services, which init keeps running until anotherevent (or the user) stops it.
For example, the /etc/events.d/tty2 job is a service to maintain a virtual terminal on tty2 fromthe time that the system starts until the system shuts down, or another event (such as a change inrunlevel) stops the job. The job is constructed so that init will restart the virtual terminal if it stopsunexpecedly during that time:
# tty2 - getty## This service maintains a getty on tty2 from the point the system is# started until it is shut down again.
start on stopped rc2start on stopped rc3start on stopped rc4start on started prefdm
stop on runlevel 0stop on runlevel 1stop on runlevel 6
Refer to the Red Hat Enterprise Linux Deployment Guide for more information about tty devices.Refer to the Red Hat Enterprise Linux Deployment Guide for more information about display managers.
Running Additional Programs at Boot Time
263
respawnexec /sbin/mingetty tty2
F.3. Running Additional Programs at Boot TimeThe /etc/rc.d/rc.local script is executed by the init command at boot time or when changingrunlevels. Adding commands to the bottom of this script is an easy way to perform necessary taskslike starting special services or initialize devices without writing complex initialization scripts in the /etc/rc.d/init.d/ directory and creating symbolic links.
The /etc/rc.serial script is used if serial ports must be setup at boot time. This script runssetserial commands to configure the system's serial ports. Refer to the setserial man page formore information.
F.4. SysV Init RunlevelsThe SysV init runlevel system provides a standard process for controlling which programs initlaunches or halts when initializing a runlevel. SysV init was chosen because it is easier to use andmore flexible than the traditional BSD-style init process.
The configuration files for SysV init are located in the /etc/rc.d/ directory. Within this directory,are the rc, rc.local, rc.sysinit, and, optionally, the rc.serial scripts as well as the followingdirectories:
init.d/ rc0.d/ rc1.d/ rc2.d/ rc3.d/ rc4.d/ rc5.d/ rc6.d/
The init.d/ directory contains the scripts used by the /sbin/init command when controllingservices. Each of the numbered directories represent the six runlevels configured by default underFedora.
F.4.1. RunlevelsThe idea behind SysV init runlevels revolves around the idea that different systems can be used indifferent ways. For example, a server runs more efficiently without the drag on system resourcescreated by the X Window System. Or there may be times when a system administrator may needto operate the system at a lower runlevel to perform diagnostic tasks, like fixing disk corruption inrunlevel 1.
The characteristics of a given runlevel determine which services are halted and started by init.For instance, runlevel 1 (single user mode) halts any network services, while runlevel 3 starts theseservices. By assigning specific services to be halted or started on a given runlevel, init can quicklychange the mode of the machine without the user manually stopping and starting services.
The following runlevels are defined by default under Fedora:
• 0 — Halt
• 1 — Single-user text mode
• 2 — Not used (user-definable)
Appendix F. Boot Process, Init, and Shutdown
264
• 3 — Full multi-user text mode
• 4 — Not used (user-definable)
• 5 — Full multi-user graphical mode (with an X-based login screen)
• 6 — Reboot
In general, users operate Fedora at runlevel 3 or runlevel 5 — both full multi-user modes. Userssometimes customize runlevels 2 and 4 to meet specific needs, since they are not used.
The default runlevel for the system is listed in /etc/inittab. To find out the default runlevel for asystem, look for the line similar to the following near the bottom of /etc/inittab:
id:5:initdefault:
The default runlevel listed in this example is five, as the number after the first colon indicates. Tochange it, edit /etc/inittab as root.
WarningBe very careful when editing /etc/inittab. Simple typos can cause the system tobecome unbootable. If this happens, either use a boot diskette, enter single-user mode, orenter rescue mode to boot the computer and repair the file.
For more information on single-user and rescue mode, refer to the chapter titled BasicSystem Recovery in the Red Hat Enterprise Linux Deployment Guide.
It is possible to change the default runlevel at boot time by modifying the arguments passed by theboot loader to the kernel. For information on changing the runlevel at boot time, refer to Section E.7,“Changing Runlevels at Boot Time”.
F.4.2. Runlevel UtilitiesOne of the best ways to configure runlevels is to use an initscript utility. These tools are designedto simplify the task of maintaining files in the SysV init directory hierarchy and relieves systemadministrators from having to directly manipulate the numerous symbolic links in the subdirectories of/etc/rc.d/.
Fedora provides three such utilities:
• /sbin/chkconfig — The /sbin/chkconfig utility is a simple command line tool for maintainingthe /etc/rc.d/init.d/ directory hierarchy.
• /usr/sbin/ntsysv — The ncurses-based /sbin/ntsysv utility provides an interactive text-basedinterface, which some find easier to use than chkconfig.
• Services Configuration Tool — The graphical Services Configuration Tool (system-config-services) program is a flexible utility for configuring runlevels.
Refer to the chapter titled Controlling Access to Services in the Red Hat Enterprise Linux DeploymentGuide for more information regarding these tools.
Shutting Down
265
F.5. Shutting DownTo shut down Fedora, the root user may issue the /sbin/shutdown command. The shutdown manpage has a complete list of options, but the two most common uses are:
/sbin/shutdown -h now
and
/sbin/shutdown -r now
After shutting everything down, the -h option halts the machine, and the -r option reboots.
PAM console users can use the reboot and halt commands to shut down the system while inrunlevels 1 through 5. For more information about PAM console users, refer to the Red Hat EnterpriseLinux Deployment Guide.
If the computer does not power itself down, be careful not to turn off the computer until a messageappears indicating that the system is halted.
Failure to wait for this message can mean that not all the hard drive partitions are unmounted, whichcan lead to file system corruption.

266
267
Appendix G. Other TechnicalDocumentationThis document provides a reference for using the Fedora installation software, known as anaconda.To learn more aboutanaconda, visit the project Web page: http://www.fedoraproject.org/wiki/Anaconda.
Both anaconda and Fedora systems use a common set of software components. For detailedinformation on key technologies, refer to the Web sites listed below:
Boot LoaderFedora uses theGRUB boot loader. Refer to http://www.gnu.org/software/grub/ for more information.
Disk PartitioningFedora uses parted to partition disks. Refer to http://www.gnu.org/software/parted/ for moreinformation.
Storage ManagementLogical Volume Management (LVM) provides administrators with a range of facilities to managestorage. By default, the Fedora installation process formats drives as LVM volumes. Refer to http://www.tldp.org/HOWTO/LVM-HOWTO/ for more information.
Audio SupportThe Linux kernel used by Fedora incorporatesPulseAudio audio server. For more information about PulseAudio, refer to the projectdocumentation: http://www.pulseaudio.org/wiki/Documentation.
Graphics SystemBoth the installation system and Fedora use theXorg suite to provide graphical capabilities. Components of Xorg manage the display, keyboardand mouse for the desktop environments that users interact with. Refer to http://www.x.org/ formore information.
Remote DisplaysFedora and anaconda includeVNC (Virtual Network Computing) software to enable remote access to graphical displays.For more information about VNC, refer to the documentation on the RealVNC Web site: http://www.realvnc.com/documentation.html.
Command-line InterfaceBy default, Fedora uses the GNU bash shell to provide a command-line interface. The GNU CoreUtilities complete the command-line environment. Refer to http://www.gnu.org/software/bash/bash.html for more information on bash. To learn more about the GNU Core Utilities, refer tohttp://www.gnu.org/software/coreutils/.
Remote System AccessFedora incorporates theOpenSSH suite to provide remote access to the system. The SSH
Appendix G. Other Technical Documentation
268
service enables a number of functions, which include access to the command-line from othersystems, remote command execution, and network file transfers. During the installation processanaconda may use the scpfeature of OpenSSH to transfer crash reports to remote systems. Refer to the OpenSSH Web sitefor more information: http://www.openssh.com/.
Access ControlSELinux provides Mandatory Access Control (MAC) capabilities that supplement the standardLinux security features. Refer to the SELinux Project Pages for more information: http://docs.fedoraproject.org/selinux-guide.
FirewallThe Linux kernel used by Fedora incorporates the netfilter framework to providefirewall features. The Netfilter project website provides documentation for both netfilter, andthe iptables administration facilities: http://netfilter.org/documentation/index.html.
Software InstallationFedora usesyum to manage the RPM packages that make up the system. Refer to http://docs.fedoraproject.org/yum/ for more information.
VirtualizationVirtualization provides the capability to simultaneously run multiple operating systems on the samecomputer. Fedora also includes tools to install and manage the secondary systems on a Fedorahost. You may select virtualization support during the installation process, or at any time thereafter.Refer to http://www.fedoraproject.org/wiki/Tools/Virtualization for more information.

269
Appendix H. Contributors andproduction methods
H.1. Contributors• Fabian Affolter1 (translator - German)
• Amanpreet Singh Alam2 (translator - Punjabi)
• Jean-Paul Aubry (translator - French)
• David Barzilay (translator - Brazilian Portuguese)
• Domingo Becker3 (translator - Spanish)
• Subhransu Behera (translator - Oriya)
• Michał Bentkowski (translator - Polish)
• Rahul Bhalerao (translator - Marathi)
• Runa Bhattacharjee (translator - Bengali (India))
• Teta Bilianou4 (translator - Greek)
• Vitor Vilas Boas (translator - Brazilian Portuguese)
• Lucas Brausch (translator - German)
• Hector Daniel Cabrera 5 (translator - Spanish)
• David Cantrell6 (writer - VNC installation)
• Guido Caruso (translator - Italian)
• Guillaume Chardin (translator - French)
• Nikos Charonitakis7 (translator - Greek)
• Chester Cheng (translator - Chinese (Traditional))
• Tom K. C. Chiu8 (translator - Chinese (Traditional))
• Glaucia Cintra (translator - Brazilian Portuguese)
• Fabien Decroux (translator - French)
• Hans De Goede9 (writer - iSCSI)
• Claudio Rodrigo Pereyra Diaz (translator - Spanish)
• Piotr Drąg10 (translator - Polish)
• Damien Durand11 (translator - French)
Appendix H. Contributors and production methods
270
• Stuart Ellis12 (writer, editor)
• Ali Fakoor13 (translator - Persian)
• Felix I (translator - Tamil)
• Tony Fu (translator - Chinese (Simplified))
• Paul W. Frields14 (writer, editor)
• Paul Gampe (translator - Japanese)
• Sree Ganesh (translator - Telugu)
• Dimitris Glezos15 (translator - Greek)
• Guillermo Gómez16 (translator - Spanish)
• Igor Gorbounov17 (translator - Russian)
• Rui Gouveia18 (translator - Portuguese)
• Kiyoto James Hashida (translator - Japanese)
• Severin Heiniger (translator - German)
• Xi Huang (translator - Chinese (Simplified))
• Ryuichi Hyugabaru (translator - Japanese)
• Jayaradha N (translator - Tamil)
• Chris Johnson (writer)
• Eunju Kim (translator - Korean)
• Michelle J Kim (translator - Korean)
• Miloš Komarčević19 (translator - Serbian)
• Alexey Kostyuk (translator - Russian)
• Daniela Kugelmann (translator - German)
• Rüdiger Landmann20 (writer, editor)
• Magnus Larsson21 (translator - Swedish)
• Christopherus Laurentius22 (translator - Indonesian)
• Florent Le Coz (translator - French)
• Erick Lemon (writer)
• Andy Liu (translator - Chinese (Traditional))
• Wei Liu (translator - Chinese (Simplified))
Contributors
271
• Yelitza Louze (translator - Spanish)
• Gan Lu (translator - Chinese (Simplified))
• Jens Maucher23 (translator - German)
• Igor Miletić24 (translator - Serbian)
• Noriko Mizumoto (translator - Japanese)
• Jeremy W. Mooney (writer)
• Enikő Nagy (translator - Hungarian)
• Igor Nestorović (translator - Serbian)
• David Nalley25 (writer, editor)
• John Nguyen (writer)
• Manuel Ospina (translator - Spanish)
• Janis Ozolins (translator - Latvian)
• Ankit Patel (translator - Gujarati)
• Davidson Paulo26 (translator - Brazilian Portuguese)
• Ani Peter (translator - Malayalam)
• Amitakhya Phukan27 (translator - Assamese)
• Silvio Pierro28 (translator - Italian)
• Micha Pietsch29 (translator - German)
• José Nuno Pires (translator - Portuguese)
• Piotr Podgórski (translator - Polish)
• Yulia Poyarkova (translator - Russian)
• Shankar Prasad (translator - Kannada)
• Rajesh Ranjan (translator - Hindi)
• Tommy Reynolds 30 (writer)
• Tim Richert (translator - German)
• Dominik Sandjaja31 (translator - German)
• Sharuzzaman Ahmat Raslan32 (translator - Malay)
• Mohsen Saeedi33 (translator - Persian)
• Tian Shixiong34 (translator - Chinese (Simplified))
Appendix H. Contributors and production methods
272
• Audrey Simons (translator - French)
• Keld Simonsen (translator - Danish)
• Jared K. Smith35 (writer, editor)
• Espen Stefansen (translator - Norwegian Bokmål)
• Sulyok Péter36 (translator - Hungarian)
• Sümegi Zoltán37 (translator - Hungarian)
• Francesco Tombolini38 (translator - Italian)
• Timo Trinks (translator - German)
• Dimitris Typaldos39 (translator - Greek)
• Göran Uddeborg (translator - Swedish)
• Michaël Ughetto40 (translator - French)
• Francesco Valente (translator - Italian)
• Karsten Wade41 (writer, editor, publisher)
• Sarah Saiying Wang (translator - Chinese (Simplified))
• Geert Warrink42 (translator - Dutch)
• Elizabeth Ann West (editor)
• Tyronne Wickramarathne (translator - Sinhalese)
• Ben Wu (translator - Chinese (Traditional))
• Xiaofan Yang (translator - Chinese (Simplified))
• Yuan Yijun43 (translator - Chinese (Simplified))
• Diego Búrigo Zacarão44 (translator - Brazilian Portuguese)
• Izaac Zavaleta45 (translator - Spanish)
http://docs.fedoraproject.org/install-guide/
H.2. Production methodsWriters produce the Install Guide directly in DocBook XML in a revision control repository. Theycollaborate with other subject matter experts during the beta release phase of Fedora to explain theinstallation process. The editorial team ensures consistency and quality of the finished guide. At thispoint, the team of translators produces other language versions of the release notes, and then theybecome available to the general public as part of Fedora. The publication team also makes the guide,and subsequent errata, available via the Web.

273
Appendix I. Revision HistoryRevision13.0.1
Fri Apr 30 2010 Ruediger [email protected]
Update for F13

274
275
IndexSymbols/boot/ partition
recommended partitioning, 79/root/install.log
install log file location, 93/var/ partition
recommended partitioning, 79
Aadding partitions, 71
file system type, 72anacdump.txt, 95Anaconda, 267anaconda.log, 95architecture, 6
determining, 6array (see RAID)automatic partitioning, 64, 64
BBasic Input/Output System (see BIOS)BIOS
definition of, 257(see also boot process)
BIOS (Basic Input/Output System), 29BitTorrent, 6
seeding, 6boot CD-ROM, 19
creating, 19boot loader, 58, 83
(see also GRUB)configuration, 83GRUB, 83installing on boot partition, 86MBR, 86password, 85upgrading, 58
boot loader password, 85boot loaders, 245
(see also GRUB)definition of, 245
boot methodsboot CD-ROM, 19USB pen drive, 19
boot options, 39boot.iso , 40linux mediacheck , 23mediacheck, 40
serial mode, 40UTF-8, 40
text mode, 39boot process, 257, 257
(see also boot loaders)chain loading, 245direct loading, 245for x86, 257stages of, 257, 257
/sbin/init command, 259BIOS, 257boot loader, 258EFI shell, 257kernel, 259
boot.iso, 19, 40booting
emergency mode, 204installation program
x86, AMD64 and Intel 64, 38rescue mode, 202single-user mode, 204
Ccanceling the installation, 42CD-ROM
ATAPI, 42boot CD-ROM, creating, 19IDE, 42installation from, 42SCSI, 43
CD/DVD mediabooting, 29downloading, 5
(see also ISO images)making, 9
(see also ISO images)chkconfig , 264
(see also services)clock, 61configuration
clock, 61, 61GRUB, 83hardware, 25time, 61time zone, 61
consoles, virtual, 34
DDHCP
diskless environment, 126PXE installations, 126
Index
276
DHCP (Dynamic Host Configuration Protocol), 59Disk Partitioner
adding partitions, 71disk partitioning, 64disk space, 18diskless environment
DHCP configuration, 126domain name, 60
EEFI shell
definition of, 257(see also boot process)
emergency mode, 204Encryption
Backup passphrasesCreating backup passphrases, 239Saving backup passphrases, 239
PassphrasesSaving passphrases, 239
ext2 (see file systems)ext3 (see file systems)ext4 (see file systems)extended partitions, 227Extensible Firmware Interface shell (see EFIshell)
FFCoE
installation, 52feedback
contact information for this manual, xiiifile system
formats, overview of, 223file system types, 72file systems
ext2, 43ext3, 43ext4, 43vfat, 43
firewalldocumentation, 268
Firstboot, 187FTP
installation, 20
GGRUB, 83, 258
(see also boot loaders)additional resources, 255
installed documentation, 255
related books, 255useful websites, 255
alternatives to, 88boot process, 245Changing Runlevels at Boot Time, 254changing runlevels with, 249commands, 250configuration, 83configuration file
/boot/grub/grub.conf , 252structure, 252
definition of, 245documentation, 267features, 246installing, 246interfaces, 249
command line, 249menu, 249menu entry editor, 249order of, 250
menu configuration file, 252directives, 253
role in boot process, 258terminology, 247
devices, 247files, 248root file system, 249
grub.conf , 252(see also GRUB)
Hhalt, 265
(see also shutdown)Hard disk
initializing, 56hard disk
basic concepts, 223extended partitions, 227file system formats, 223partition introduction, 225partition types, 226partitioning of, 223
hard drive installation, 43preparing for, 22
hardwarecompatibility, 17configuration, 25
hostname, 59HTTP
installation, 20, 45

277
Iinit command, 259
(see also boot process)configuration files
/etc/inittab , 263role in boot process, 259
(see also boot process)runlevels
directories for, 263runlevels accessed by, 263SysV init
definition of, 263install log file
/root/install.log , 93installation
aborting, 42can you install with a CD-ROM or DVD, 18CD-ROM, 42disk space, 18FTP, 20GUI
CD-ROM, 33hard drive, 22, 43HTTP, 20, 45keyboard navigation, 37kickstart (see kickstart installations)mediacheck, 40method
CD-ROM, 41hard drive, 41NFS image, 41selecting, 41URL, 41
network, 20NFS, 20, 45
server information, 45partitioning, 67program
graphical user interface, 34starting, 38text mode user interface, 35virtual consoles, 34
serial mode, 40UTF-8, 40
starting, 42text mode, 39
installation mediatesting, 23
installation methodselecting, 42
installation program
x86, AMD64 and Intel 64booting, 38
installing packages, 88IPv4, 59iscsi
installation, 52ISO images
downloading, 1, 5
Kkernel
role in boot process, 259kernel options, 40keyboard
configuration, 48navigating the installation program using, 37
keymapselecting type of keyboard, 48
Kickstart, 114kickstart
how the file is found, 160Kickstart Configurator , 167
%post script, 181%pre script, 179authentication options, 176basic options, 167boot loader, 169boot loader options, 169Display configuration, 177firewall configuration, 176installation method selection, 168interactive, 168keyboard, 167language, 167network configuration, 175package selection, 178partitioning, 170
software RAID, 172preview, 167reboot, 168root password, 167
encrypt, 167saving, 182SELinux configuration, 177text mode installation, 168time zone, 167
kickstart file%include , 154%post, 157%pre, 156auth , 135

Index
278
authconfig , 135autopart , 134autostep , 135bootloader , 137CD-ROM-based, 158clearpart , 138cmdline , 138creating, 134device , 138diskette-based, 158driverdisk , 138firewall , 139firstboot , 139flash-based, 159format of, 133graphical , 140halt , 140ignoredisk , 135include contents of another file, 154install , 140installation methods, 140interactive , 141iscsi , 141iscsiname , 142key , 142keyboard , 142lang , 142langsupport , 142logging , 144logvol , 143mediacheck , 144, 144, 150mouse , 144multipath , 146network , 144network-based, 159, 160options, 134
partitioning examples, 154package selection specification, 155part , 146partition , 146post-installation configuration, 157poweroff , 148pre-installation configuration, 156raid , 149reboot , 150rootpw , 151selinux , 151services , 151shutdown , 152skipx , 152text , 152
timezone , 152upgrade , 152user , 152vnc , 153volgroup , 153what it looks like, 133xconfig , 153zerombr , 154zfcp , 154
kickstart installations, 133CD-ROM-based, 158diskette-based, 158file format, 133file locations, 158flash-based, 159installation tree, 160LVM, 143network-based, 159, 160starting, 160
from a boot CD-ROM, 161from CD-ROM #1 with a diskette, 160
Llanguage
selecting, 47LILO, 258
(see also boot loaders)role in boot process, 258
log files, 95kickstart installations, 133
LVMdocumentation, 267logical volume, 243physical volume, 243understanding, 243volume group, 243with kickstart, 143
Mmaster boot record, 83Master Boot Record, 201 (see MBR)
reinstalling, 204MBR
definition of, 257, 257(see also boot loaders)(see also boot process)
installing boot loader on, 86memory testing mode, 116mirror, 6modem, 59mount points
279
partitions and, 233
Nnetwork
installationsHTTP, 45NFS, 45
network installationperforming, 44preparing for, 20
NFSinstallation, 20, 45
NFS (Network File System)install from, 44
NTFS partitionsresizing, 2
NTP (Network Time Protocol), 61, 190ntsysv , 264
(see also services)
OOpenSSH, 267
(see also SSH)OS/2 boot manager, 86
Ppackage groups, 92packages
groups, 88selecting, 88
installing, 88selecting, 88
parted partitioning utility, 231partition
extended, 227partitioning, 67
automatic, 64basic concepts, 223creating new, 71
file system type, 72destructive, 229extended partitions, 227how many partitions, 225, 233introduction to, 225making room for partitions, 228mount points and, 233naming partitions, 232non-destructive, 230numbering partitions, 232other operating systems, 232primary partitions, 225
recommended, 79types of partitions, 226using free space, 228using in-use partition, 229using unused partition, 228
Partitioning , 67adding partitions
file system type, 72Passphrases
Block device encryption passphrasesCreating backup block device encryptionpassphrases, 239Saving backup block device encryptionpassphrases, 239Saving block device encryptionpassphrases, 239
passwordboot loader, 85setting root, 62
program.log, 95programs
running at boot time, 263PulseAudio, 267PXE (Pre-boot eXecution Environment), 31PXE installations
adding hosts, 124boot message, custom, 126configuration, 124DHCP configuration, 126overview, 124performing, 126setting up the network server, 124
RRAID
hardware, 17kickstart installations, 149
Kickstart Configurator, 172software, 17system unbootable after disk failure, 247trouble booting from drive attached to RAIDcard, 95
rc.localmodifying, 263
rc.serial , 263(see also setserial command)
re-installation, 207removing
Fedora, 209rescue discs, 117rescue mode, 87, 117
Index
280
definition of, 201utilities available, 203
root / partitionrecommended partitioning, 79
root password, 62runlevel 1, 204runlevels (see init command)
changing with GRUB, 249configuration of, 264
(see also services)
Sscp, 268
(see also SSH)screenshots
during installation, 34selecting
packages, 88SELinux
documentation, 268serial console, 110serial ports (see setserial command)services
configuring with chkconfig , 264configuring with ntsysv , 264configuring with Services Configuration Tool ,264
Services Configuration Tool , 264(see also services)
setserial commandconfiguring, 263
Setup Agentvia Kickstart, 139
shutdown, 265(see also halt)
single-user mode, 204SSH (Secure SHell)
documentation, 268starting
installation, 38, 42steps
disk space, 18hardware compatibility, 17installing with CD-ROM or DVD, 18
storage devicesbasic storage devices, 49specialized storage devices, 49
storage.log, 95swap file
upgrade, 208swap partition
recommended partitioning, 79syslog, 95, 113system recovery, 201
common problems, 201forgetting the root password, 201hardware/software problems, 201reinstalling the boot loader, 204unable to boot into Fedora, 201
system-config-kickstart (see KickstartConfigurator )SysV init (see init command)
TTCP/IP configuration, 44Telnet, 113text interface, 110tftp , 126time zone
configuration, 61traceback messages
saving traceback messages withoutremoveable media, 97, 97
troubleshooting, 95after the installation, 102
Apache-based httpd service hangs duringstartup, 106booting into a graphical environment, 102booting into GNOME or KDE, 102booting into the X Window System, 102graphical GRUB screen, 102logging in, 104printers, 105RAM not recognized, 105Sendmail hangs during startup, 106X (X Window System), 103X server crashes, 104
beginning the installation, 96frame buffer, disabling, 96GUI installation method unavailable, 96
booting, 95RAID cards, 95signal 11 error, 95
CD-ROM failureCD-ROM verification, 23, 40
during the installation, 97completing partitions, 101No devices found to install Fedora errormessage, 97partition tables, 101, 101Python errors, 101
281
saving traceback messages withoutremoveable media, 97using remaining hard drive space, 101
Uuninstalling, 209Update System, 193, 193upgrade, 207
adding a swap file, 208USB flash media
downloading, 5making, 9
USB mediabooting, 29
USB pen driveboot methods, 19
user interface, graphicalinstallation program, 34
user interface, text modeinstallation program, 35
Vvfat (see file systems)virtual consoles, 34Virtualization
documentation, 268VNC (Virtual Network Computing), 111
documentation, 267enabling, 111installing client, 111listening mode, 112
XXorg, 267
Yyum, 194
documentation, 268yum.log, 95

282