INSTALLATION GUIDE - WinQS Installation Guide v 1.9.x.x Pg 2 Prior to Installing ®-SQL 1.9.x.x 1....
19
INSTALLATION GUIDE for use with Windows 8 Professional or Windows 7 Professional or Windows Vista Business Service Pack 2 Nov 2012 Version 1.9.x.x
Transcript of INSTALLATION GUIDE - WinQS Installation Guide v 1.9.x.x Pg 2 Prior to Installing ®-SQL 1.9.x.x 1....
INSTALLATION GUIDE
for use with
Windows 8 Professional
or
Windows 7 Professional
or
Windows Vista Business Service Pack 2
Nov 2012
Version 1.9.x.x

WinQS Installation Guide v 1.9.x.x Pg 2
Prior to Installing WWWWiiiinnnnQS®-SQL 1.9.x.x
1. Ensure that the minimum system requirements are met. These are detailed in the “System Requirements” notes on the CD.
2. Restart your system before installation to ensure that the resources for
the installation process are cleared. 3. Login as the Administrator of the PC – this will ensure that you have
all the necessary rights in order to install your software.
You MUST have Administrator RIGHTS on your computer before you can install WWWWiiiinnnnQS®-SQL. If you are not sure about this please contact your Computer or IT administrator.
4. Check that no programs are running in the Start bar .
To determine if any programs / services are running, press ‘CTRL-ALT-DEL’, select Task Manager, & on the Applications tab you will be able to see if anything is open or running.
5. Disable ALL Anti-Virus checking software for the du ration of the
installation only . This is necessary because anti-virus software blocks writing to system files (eg. *.VBX, *.DLL, *.OCX files) & the updating of some of these files may be required during installation. Check with your IT person as to how to do this if unsure.
6. Check for any other SQL database installations :
Go to the CONTROL PANEL > PROGRAMS & FEATURES. If you have “Microsoft SQL Server 2005” database installed, UN-INSTALL it as described on page 3 below .
There are 3 steps to installing WWWWiiiinnnnQS®-SQL on any computer, be it on a Workstation (client) or a Server.
1. Installing WWWWiiiinnnnQS®-SQL Software 2. Connecting & registering the WWWWiiiinnnnQS Key
(Key/Dongle Registration Explained Notes)
3. Follow the ‘1st Time Start-Up, User Code & Libraries ‘ notes. We suggest that you PUT the WWWWiiiinnnnQS Key into your pocket UNTIL you have completed step 1. If you have a WWWWiiiinnnnQS Network Key THEN read the instructions in the “Network Key/Dongle Installation ” notes contained in the Additional Documents link of the initial installation screen.
IMPORTANT NOTE:
Please insert the CD in the ACTUAL COMPUTER where you are installing. It is NOT recommended to install “across” a network. It is RECOMMENDED that a COMPLETE copy of the Installation CD be made onto a public folder on your server.

WinQS Installation Guide v 1.9.x.x Pg 3
WWWWiiiinnnnQS® Installation on Vista/7/8 (& XP) – Troubleshooting prior to Installation Many new computers with Microsoft Windows Vista/7/8 installed also have Microsoft SQL Server 2005 installed If Microsoft Office 2007 is installed (on Vista/7/8 or XP), the BCM & SQL 2005 is installed and MUST BE REMOVED before WWWWiiiinnnnQS
® is installed. WWWWiiiinnnnQS
® cannot work with this version of SQL Server 2005 yet. a. Select Control Panel b. then Program & Features See if any of the following appear on the list of installed Programs:- * BCM (Business Contact Manager from Microsoft)
Note: often installed as part of Microsoft Office 2007 but is generally not used and CAN be installed again after WWWWiiiinnnnQS
®. * Microsoft SQL Server 2005 * Microsoft SQL Server Desktop Engine (MSDE) * WWWWiiiinnnnQS
® -SQL If you are sure that nothing is using these programs (check first with your IT person) then.. c. REMOVE or UN-INSTALL them one at a time
(When Uninstalling the BCM, select to also Uninstall SQL Server 2005 if you are asked)
Once all these have been removed, d. Use ‘My computer’ to Locate the folder C:\Program Files (double click) e. find the folder “Microsoft SQL Server ” f. Rename this folder to “OLD Microsoft SQL Server”
or DELETE this folder (if you are SURE there is no SQL data you may need)
g. NOW Shut down & restart the computer and install WWWWiiiinnnnQS
® -SQL
To successfully install WWWWiiiinnnnQS
® -SQL on a Windows Vista, 7 or 8 computer you must use the WWWWiiiinnnnQS
® -SQL CD version 1900 or greater Using any earlier CD version of the WWWWiiiinnnnQS
® -SQL CD will NOT work.
WinQS Installation Guide v 1.9.x.x Pg 4
Introduction WWWWiiiinnnnQS has established itself as a leading Quantity Surveying/Cost Engineering software system since 1996 & currently has over 3500 users.
Contact Us
If you have any technical questions about WWWWiiiinnnnQS®-SQL then contact:
ACE Solutions cc [email protected] or www.winQS.com Telephone: +27 11 787 5960 (all hours)
OnScreen Help – the Manual
WWWWiiiinnnnQS®-SQL has extensive on-screen Help facility that is ALWAYS accessible within WWWWiiiinnnnQS® by just pressing the F1 key or by selecting the Help>WinQS Help on the main menu bar.
For Windows 7 or 8 please note Step 4 on Page 19 The Package
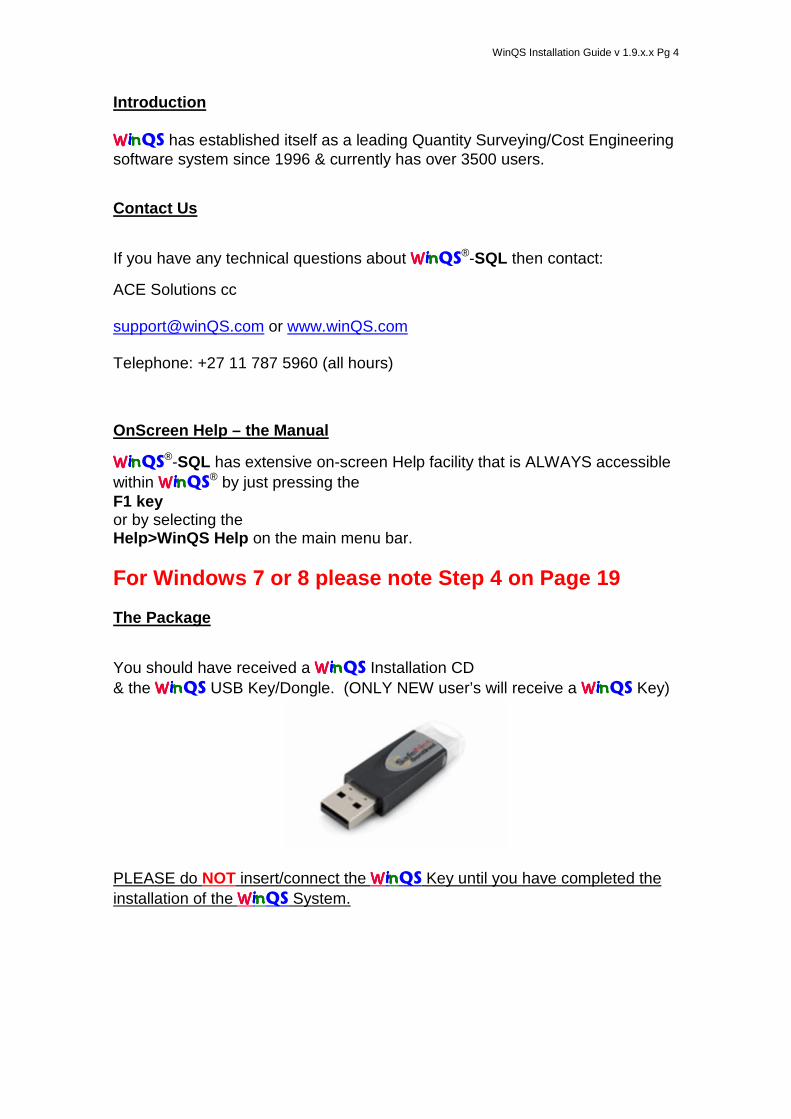
You should have received a WWWWiiiinnnnQS Installation CD & the WWWWiiiinnnnQS USB Key/Dongle. (ONLY NEW user’s will receive a WWWWiiiinnnnQS Key)
PLEASE do NOT insert/connect the WWWWiiiinnnnQS Key until you have completed the installation of the WWWWiiiinnnnQS System.

WinQS Installation Guide v 1.9.x.x Pg 5
WWWWiiiinnnnQS® on Microsoft Windows Vista/7/8 Professional
WWWWiiiinnnnQS® has been installed on Windows Vista, 7 or 8 since it first appeared on the market. With many new built in security features, the normal WWWWiiiinnnnQS®
installation wizard required a few manual steps that had to be done to make it work. We have ONLY tested the installation using Windows Vista, 7 or 8 Professional as this will be the most common version of Windows that most professional consultants will be using. A computer using Windows Vista/ 7/ 8 should have at least 2gig of RAM for the best performance & we have tested on a Core 2 Duo 2.6GHz computer. We have made a few changes to WWWWiiiinnnnQS® in order to make the installation easier & conform to these new security features in Windows Vista/7/8. The WWWWiiiinnnnQS® Installation CD version 1.9.2.4 or greater will be able to install WWWWiiiinnnnQS® on a Windows Vista/7/8 using the installation wizard. NOTE: The Upgrade file from the internet for WWWWiiiinnnnQS® ver.1.7.0.0 DOES NOT conform to these Vista/7/8 installation requirements as it is ONLY an Upgrade from a previous WWWWiiiinnnnQS® installation CD. ONLY a NEW installation from the WWWWiiiinnnnQS® CD version 1.9.2.4 or greater will conform to ALL the Vista/7/8 installation issues. If you do NOT have Administrator rights on the computer, you CANNOT load any new programs! Please contact your IT person should you receive any message preventing you from loading WWWWiiiinnnnQS®.

WinQS Installation Guide v 1.9.x.x Pg 6
Installing WWWWiiiinnnnQS®-SQL Software
When you insert the WWWWiiiinnnnQS®-SQL CD into your CD-Rom drive it should auto-run & display:
The Additional Documents link will display a list of additional WWWWiiiinnnnQS® installation notes that should be read. Please consult these documents for information about installing the different WWWWiiiinnnnQS® options. If you do NOT have the ADOBE Reader installed, you may install it from the WWWWiiiinnnnQS® CD by clicking on the link, ‘Install Adobe Reader’. WWWWiiiinnnnQS® can generate PDF files now & so you will need the Adobe Reader to view these PDF files that are created. Once you have READ all the WWWWiiiinnnnQS® documentation & are ready to proceed then click on the “Install WWWWiiiinnnnQS®-SQL” link. OR If the AutoRun facility does not run then: 1. Select START > RUN (from the Start Bar)
2. Type in “E:\WQS\Setup.Exe ”

WinQS Installation Guide v 1.9.x.x Pg 7
Where “E” is your CD-Rom drive letter. OR
this message may pop up. Just select the Install or run program option & then the WWWWiiiinnnnQS® Installation screen should pop up as above. If however you get the following message:
all that is required is to Right Click on the Autorun.Exe file, in the root folder of the CD, & select “Run as administrator”, then installation should proceed. If that fails, it is a sure indication that you have logged in WITHOUT Administrator rights & need to speak to your IT person so that you log in to Windows correctly with Administrator rights to your computer. Once you have selected the “Install WWWWiiiinnnnQS®-SQL” link then,

WinQS Installation Guide v 1.9.x.x Pg 8
Click on Next
Click on Next

WinQS Installation Guide v 1.9.x.x Pg 9
READ all the terms of the licence agreement & accept these terms by Clicking on the “I accept” portion & Click on Next
PLEASE REMOVE any WWWWiiiinnnnQS® USB Keys from this computer BEFORE you proceed with the installation then Click on Next

WinQS Installation Guide v 1.9.x.x Pg 10
Please complete YOUR information & we suggest that you leave option set to install WWWWiiiinnnnQS® for ANYONE who uses this computer.
Please DO NOT change the Installation type from ‘Stand-Alone’
UNLESS you have read the details on the next page !

WinQS Installation Guide v 1.9.x.x Pg 11
Stand-Alone – RECOMMENDED YOU ALWAYS USE THIS: This will install WWWWiiiinnnnQS®-SQL as a STAND-ALONE system which is the recommended installation type regardless of whether this is a “Workstation” or a “Server” computer. WHY? Because regardless of whether this computer is a “Workstation” or “Server”, you will ALWAYS have access to your WWWWiiiinnnnQS® data whether or not your network connection is active. If you have SQL Server already installed on your Workstation/Server your System Administrator will NEED to do this installation as it requires the SA password. This installs the COMPLETE WWWWiiiinnnnQS®-SQL System on this computer including the MSDE database engine. NOT RECOMMENDED: Workstation ONLY : & Server ONLY : We do NOT recommend the above installation options but should you wish to use them, please contact us for the “Workstation/Server Only Installation” notes.
The wizard now lists all the LOCAL hard drives available onto which WWWWiiiinnnnQS®-SQL can be installed together with the drive’s statistics. You can install WWWWiiiinnnnQS®-SQL onto any drive listed by selecting the drive letter then Click on Next.

WinQS Installation Guide v 1.9.x.x Pg 12
PLEASE NOTE: The MSDE program files WILL ALWAYS be installed on the same drive as your Windows boot drive, normally the C: drive. However all of the WWWWiiiinnnnQS® application & data files will be installed on the selected drive.
Your selected options, then Click Next.
This message will appear on Windows Vista, 7 or 8 ONLY, please just select the ‘Run program’ option.

WinQS Installation Guide v 1.9.x.x Pg 13
The wizard is now installing WWWWiiiinnnnQS®-SQL & will show its progress by installing “The Microsoft SQL Server Desktop Engine (MSDE)” & configuring it as above OR
This INDICATES that the Troubleshooting note on Page 2 has not been followed. PLEASE read Page 3 AGAIN !!

WinQS Installation Guide v 1.9.x.x Pg 14
The wizard may have detected that the MSDE or Microsoft SQL Server has ALREADY been installed by another program onto the computer. There are MANY other programs that can & do use the MSDE database to operate. If this occurs you will need to know the “sa Password” (sa = System Administrator) for this instance of SQL Server. If you do not know this password the installation of WWWWiiiinnnnQS®-SQL CANNOT proceed. Contact your Computer Administrator, IT person or ACE Solutions if you are NOT SURE what to do here. If however you do know this, then float the mouse pointer over the SQL Manager icon in the system tray as displayed below.
↑
This displays the name of the SQL Instance running. THIS example is named “ACE02”, so in the form above the Database Server must be filled in with this name. (DO NOT FILL in the example “ACE02” !). Once the Database Server name is filled in then click on the ‘Windows Authentication’ or if the ‘sa’ password is known then use Login ID of ‘sa’ & type in the Password.
After the installation & connection to the database, the installation will continue

WinQS Installation Guide v 1.9.x.x Pg 15
Click on Finish & the WWWWiiiinnnnQS Key drivers will be loaded as shown below
That completes the WWWWiiiinnnnQS®-SQL software installation & the Desktop will now have NEW WWWWiiiinnnnQS®-SQL icon on it.
That is the END of step 1 to install the WWWWiiiinnnnQS®-SQL System software, BUT continue …… TO COMPLETE THE INSTALLATION…..

WinQS Installation Guide v 1.9.x.x Pg 16
1st Time Start-Up, User Code & Libraries A. Start-Up 1 st Time Start WWWWiiiinnnnQS from the desktop icon & the LOGIN form will be displayed with the current logo. WWWWiiiinnnnQS User Code
This user’s password (there is NO password for the User Code "DEMO")
The SQL Server where the WWWWiiiinnnnQS project data will be located. Here you need to enter your USER Code & password before WWWWiiiinnnnQS will operate correctly. However the Login form will already contain the User Code of ‘DEMO’ & the Server name (that is the WWWWiiiinnnnQS Data Server name) of the computer on which the recommended WWWWiiiinnnnQS-SQL Stand-Alone option was installed. Just press the “ENTER” key (on your keyboard) to lo gin as the user called DEMO. You will be taken directly to the Browse View of a project called "Start-Up". B. Create a User Code To maintain integrity as to who created & who edited data, you MUST create your own Personal User Code to identify who has worked on the project. (Similar to your own handwriting) To do this, ADD your personal User Code as described below: 1 Once WWWWiiiinnnnQS is open, from the Menu Bar select FILE > PARAMETERS >
USERS
2 The list of users is shown on the screen & you should select the ADD button to insert your own User Code Just type the letter “A” on the keyboard)
3 Enter your USER CODE (usually your initials i.e. ‘KJP’ or ‘MA’) TRY NOT to use numbers rather use your initials. Code has a maximum of 6 characters.
4 Enter your USER NAME This would be your first name & surname
5. Select the Green Tick to SAVE this User Code NOW, there will be NO PASSWORD ! (We recommend NO passwords)
WinQS Installation Guide v 1.9.x.x Pg 17
Create a User Code for anyone & everyone who may access WWWWiiiinnnnQS using this computer. You can add as many users as required so that WWWWiiiinnnnQS can track who worked on a project. By default each NEW User Code has NO PASSWORD at all. Ignore the “******” in the Current Password. It is BLANK. IF you must have a password then: Enter your PASSWORD – ONLY IF SPECIFICALLY REQUIRED! It is not obligatory to have a Password. If you do NOT require a Password simply leave the password field blank If you do specify a password you should verify it by retyping the password.
If you use a Password then Please REMEMBER it! AS we do NOT KNOW what it is?
How Do User Codes Affect Working on a Project? · ALL Users may edit data created by themselves or others. The only
EXCEPTION to this is the USER code in a "Child" project "PARENT" & NO USERS ARE ALLOWED TO EDIT any records owned by PARENT
· Each record displays the CREATE User as well as the last EDIT User · All Users may measure all Descriptions · All Users may copy any Descriptions Delete a User Code:
ONLY a WWWWiiiinnnnQS ADMINISTRATOR HAS RIGHTS TO DELETE ANY USER CODES
C. Set the Auto Login User
Select the Menu Bar option of File > Preferences & you can set an Auto Login User preference.
Click on this button & then double click on YOUR USER CODE. Press ENTER & save these settings.
Now close WWWWiiiinnnnQS & open it again. Your User Code will be automatically displayed on the WWWWiiiinnnnQS Login form when starting. You can JUST press ‘ENTER’ to login.

WinQS Installation Guide v 1.9.x.x Pg 18
LIBRARIES Included with the installation are some Standard Libraries for use with WWWWiiiinnnnQS. These libraries (model documents) have been installed into the WWWWiiiinnnnQS Libraries folder “C:\WinQS-SQL\Libraries” as WWWWiiiinnnnQS BackUp files & are named as follows: LIBRARY-1 ASAQS Library - Commonly used trades LIBRARY-2 ASAQS Library - Other trades, e.g. Lateral Support, Piling PRELIMS-2005 JBCC Preliminaries – May 2005 LIBRARY-E ASAQS Electrical Sub-Contract LIBRARY-M ASAQS Mechanical (Refrigeration, A/C etc) LIB-SANS SANS 1200 Library (Civil Engineering Project) SS-LIBRARY Small or Simple Buildings START-UP-VAL Example Project with Sort Keys for Valuation Module These libraries are simply WWWWiiiinnnnQS projects with no quantities (except for the Valuation example project). You have to RESTORE these projects in order to use or view them within WWWWiiiinnnnQS
Select Restore from the WWWWiiiinnnnQS Menu & then change the “Look in:” dialog to select the “WinQS-SQL/Libraries” folder & you can then select which project you wish to restore.
ALL projects that you create with WWWWiiiinnnnQS can also be used as a library.
NOTE: Please check the “downloads page” of the www.winQS.com website, as new & amended library files are available for downloading from the website as & when they become available. STEP 2….. Please now read the ‘Key/Dongle Registration Explained ’ notes from the Additional Documents section of the initial installation screen & REGISTER the WWWWiiiinnnnQS® key. STEP 3…… After installation of WWWWiiiinnnnQS® on Windows Vista 7or 8, please check to see if the WWWWiiiinnnnQS® BackUp & Restore menu options work. If they fail & give a message that : a DLL has not been loaded, then please locate & run the xzip.bat file that has been installed in the WWWWiiiinnnnQS
® folder on the C: drive which will fix the problem.
STEP 4…… WWWWiiiinnnnQS® Help files (& Reference files) are written using a Windows Help File that is NO longer supported when using Windows Vista, 7 or 8. Please click on the link below which will explain how you can download a file that will allow you to use these XP style Help files on Windows Vista, 7 or 8. (we will be converting all the WinQS® Help & Reference Files to work with the newer style of Help files). If you are using 64 bit then choose X64 If you are using 32 bit then choose X86 Windows VISTA link http://download.microsoft.com/download/4/d/5/4d56f3c4-e65a-402b-826f-b87ef81fc31c/Windows6.0-KB917607-x86.msu
WinQS Installation Guide v 1.9.x.x Pg 19
Windows 7 link http://www.microsoft.com/downloads/details.aspx?FamilyID=258aa5ec-e3d9-4228-8844-008e02b32a2c&displaylang=en Windows 8 link http://www.microsoft.com/en-us/download/details.aspx?id=35449 STEP 5……All of the Installation/Notes regarding WWWWiiiinnnnQS® and its use etc. are installed on your computer.
Once WWWWiiiinnnnQS® is installed ALL the notes/guides are available from within WWWWiiiinnnnQS® by using the menu option ‘Help>Read Me Documents ’ which displays a list of all the notes. ‘1st Time Start-Up User Code & Libraries ’ notes regarding how to access WWWWiiiinnnnQS®-SQL for the first time which completes the installation and describes how to make WWWWiiiinnnnQS® connect to the Server so that ALL your WWWWiiiinnnnQS® data now resides on the Server.
If you are changing an existing WWWWiiiinnnnQS® workstation (standalone) installation to now connect to all your WWWWiiiinnnnQS® data on a Server, then please read the ‘How to Move WinQS-SQL Data ’ notes. A basic step-by-step guide to using WWWWiiiinnnnQS® can be found in the 'WinQS-SQL-WalkThru' notes.
What in WWWWiiiinnnnQS® changed to run on Vista or 7 or 8
1. NO writing to Registry Entries, (used to store WWWWiiiinnnnQS® Preferences) so an
‘INI” file is used to store these settings.
2. WWWWiiiinnnnQS® used to read/write to the C:\ or root directory, now it does not.
3. Provision has been made to AUTOMATICALLY convert all WWWWiiiinnnnQS®
projects from the MSDE version of SQL 2000 to the SQL 2008 in the near future.