Installation Guide for Millboard Envello Cladding
33
Installation Guide for Millboard Envello Cladding ®
Transcript of Installation Guide for Millboard Envello Cladding
Installation Guide for Millboard Envello Cladding
®

Easily find your way around the Millboard Envello Cladding installation guide.
1. Intended use (P.3)
2. Limitations (P.3)
3. Storage & handling (P.4)
4. Fire Performance (P.4)
5. Tools & PPE required (P.5)
6. Board options and colours (P.6)
7. Trims, fixings, accessories (P.7)
8. Colour Characteristics (P.11)
9. Cutting / machining (P.11)
10. Ventilation and breather membrane (P.12)
11. Cladding support batten system (P.12)
Contents page
12. Installing Millboard Envello Cladding (P.14)
2a. Corners of the building - Shadow Line
12b. Corners of the building - Board & Batten
12c. Installing Starter Trims
12d. Fixings
12e. Joining Boards
12f. Joining Corner Profiles
12g. Details around windows and doors - Shadow Line
12h. Details around windows and doors - Board & Batten
13. After care (P.16)
Drawings (P.17 - 32):
001-042 - Shadow Line used horizontally
101-142 - Shadow Line used vertically
201-243 - Board & Batten used vertically
301-342 - Board & Batten used horizontally
259F1SHe - 0121
®
2
Contents page

General overview
1) Intended Use1a) Millboard Envello Cladding has been designed
for beauty, longevity and ease of installation on
residential and low-rise buildings. However, to ensure
the best installation and long-term performance, we
recommend that a professional tradesperson carries
out the installation.
1b) Millboard recommend that all cladding designs
are approved by a licensed architect or engineer prior
to installation. It is the property owner’s responsibility
to make sure that your plans meet any relevant local
building regulations before the installation begins.
Millboard Envello Cladding must be supported by
a suitable substructure that is in accordance with
building regulations.
1c) Millboard Envello Cladding is a rainscreen
cladding system which can be described as ‘A wall
comprising an outer skin of cladding boards and
an airtight insulated backing wall separated by a
ventilated cavity. Some water may penetrate into
the cavity but the rainscreen cladding is intended
to provide protection from direct rain. Therefore, a
well ventilated, free draining cavity should always be
included in the detailed design.
1d) It is not recommended to use Millboard Envello
Cladding in structural applications. Millboard Envello
Cladding would need to be fixed to a structural frame
of battens, either made from Plas-Pro or timber.
2) Limitations2a) This installation guide is not exhaustive as
the responsibility for design lies with the specifier
or responsible party for the project, to ensure the
final design meets the requirements of the intended
application and Building regulations.
2b) For designs outside the scope of this installation
guide, specific design must be undertaken by an
architect or designer. If in doubt, we would strongly
recommend contacting Millboard pre-design stage
to arrive at a suitable, robust, efficient solution and to
avoid disappointment.
2c) It is the responsibility of designers, installers, and
owners to ensure that the information in this manual is
current, by checking with Millboard or referring to our
website. As new technology is introduced or industry
standards are altered, Millboard reserves the right
to alter existing specifications and remove products
without notice.
Visit our website on: www.millboard.co.uk
2d) The use of this manual: does not guarantee
acceptance or accreditation of a design, material
or building solution by any entity authorised to do so
under law; does not mean that a design, material or
building solution complies with the building regulation;
or does not absolve the user from complying with any
local, or Government legal requirements.
3
General Overvie
w

3. Storage and Handling3a) Millboard Envello Cladding boards should
always be stored on a flat surface or level bearers a
maximum of 400mm apart and stacked face-to-face,
not back-to-face. The External and Internal Corner
profiles should be fully supported along their length.
3b) When loading and unloading by hand, make
sure that both ends are lifted on the edge to avoid
permanent deformation and/or damage to the
boards. They should only be lifted off the stack, and
not dragged as this could cause abrasion or marking
on the surface.
3c) Only move the pallet if the boards are safely
strapped to it.
3d) Wear gloves and long sleeves when handling
the boards and take care when lifting them. We
recommend that two people carry the boards, they
should be carried on their side for increased rigidity.
3e) We advise that the cladding planks are stored
on site at least 72 hours before installation, to allow the
boards to climatize.
4. Fire Performance4a) Millboard Envello Cladding products carry
no fire rating so should not be used as cladding to
buildings with a storey at least 18m above ground level
in England (11m for buildings in Scotland).
4b) For buildings with storeys less than 18m (11m)
above ground level Millboard Envello Cladding may
be used, however the responsibility for the cladding’s
suitability in the required location is by others (e.g.
client, building control, etc).
4c) For further guidance on fire safety, please
refer to the latest government documentation which
can be found on: https://www.gov.uk/government/
publications/fire-safety-approved-document-b
Tolerances:
There will always be a slight variance in the board’s dimensions due to the fact that we mould from natural oak, and due to the pressure of the moulding process. Despite this, we calibrate the boards to maintain as consistent a profile as possible.
The manufacturing tolerances are: Width: ± 3mm. Length: ± 5mm. Thickness: ± 2mm.
When working with the boards, spacers may be required to help keep the boards running level or upright. (see 12d.iv)
Millboard cannot be held responsible for
damage caused by improper storage and
handling of the product.
4
General Overview

The tools and PPE you will need to install the Millboard Envello Cladding product.
millb
oa
rd.co
.uk
Spirit level
A spirit level is used to ensure
that the battens are upright
and the starter trims are level.
5. Tools & PPE required
Mitre saw/jigsaw/
handsaw
Millboard Envello Cladding
products can be cut with
standard wood cutting
tools (i.e. mitre saw, jigsaw,
handsaw). We recommend
using a carbon-tipped saw
blade. An aluminium cutting
blade should be used for the
metal trims.
Power drill and driver
Standard power drill drivers
can be used to fix the cladding
products. Impact drivers are
not recommended to be used
when using the Durafix fixings.
Personal Protective
Equipment
When handling Millboard
products, it is advised to wear
long sleeves and gloves. When
cutting products it is advised
to wear a FFP3 dustmask, ear
defenders and safety glasses.
Tool set
Standard carpentry tools will
be needed to complete the
installation, including: tape
measure, a pencil, set square,
planer, stanley knife, surform
and a drill bit set.
Laser level/line
If available, a laser level can
be used to ensure the starter
trims are installed level.
5
To
ols a
nd
PP
E
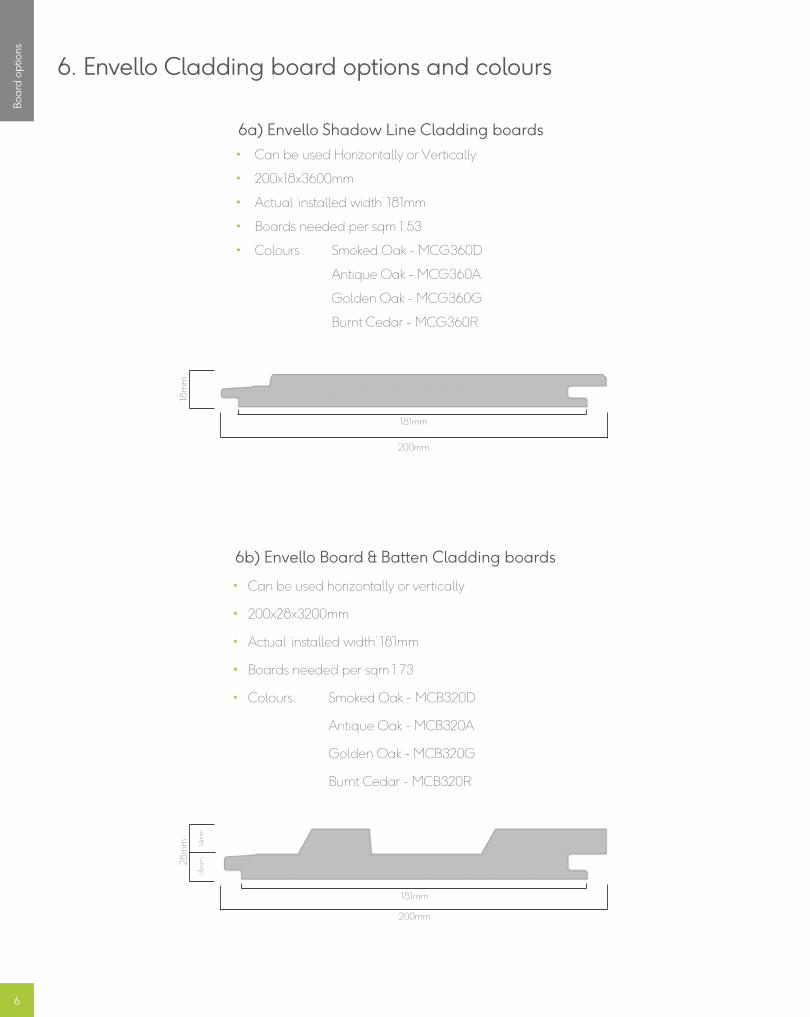
6. Envello Cladding board options and colours
6a) Envello Shadow Line Cladding boards
• Can be used Horizontally or Vertically
• 200x18x3600mm
• Actual ‘installed width’ 181mm
• Boards needed per sqm 1.53
• Colours: Smoked Oak - MCG360D
Antique Oak - MCG360A
Golden Oak - MCG360G
Burnt Cedar - MCG360R
6b) Envello Board & Batten Cladding boards
• Can be used horizontally or vertically
• 200x28x3200mm
• Actual ‘installed width’ 181mm
• Boards needed per sqm 1.73
• Colours: Smoked Oak - MCB320D
Antique Oak - MCB320A
Golden Oak - MCB320G
Burnt Cedar - MCB320R
28mm
200mm
181mm
14mm
14mm
6
Bo
ard
op
tion
s
18mm
200mm
181mm

7. Trims, Fixings, Accessories
7a) External Corner Profile
• 50 x 50 x 3050mm
• Colours: Smoked Oak - MCPE50D
Antique Oak - MCPE50A
Golden Oak - MCPE50G
Burnt Cedar - MCPE50R
Profile used with the Shadow Line boards to finish
off the external corner of a building, fixed with the
perforated closure and 20mm fixings.
7b) Internal Corner Profile
• 38 x 38 x 3050mm
• Colours: Smoked Oak - MCPH38D
Antique Oak - MCPH38A
Golden Oak - MCPH38G
Burnt Cedar - MCPH38R
Profile used with the Shadow Line boards to finish
off the internal corner of a building, fixed with the
perforated closure and 20mm fixings.
7d) Vertical Starter Trim L
• 25 x 13 x 2500mm
• Product code: GT250L
Aluminium trim used to start the cladding at the
bottom, when the cladding is installed vertically,
fixed with the 20mm fixings
7c) Horizontal Starter Trim J
• 25 x 10 x 2500mm
• Product code: GT250J
Aluminium trim used to start the cladding at the
bottom, when the cladding is installed horizontally,
fixed with 20mm fixings.
7
Acce
ssorie
s

7f) Cladding Board Fixings
• 3.5 x 30mm
• Box of 250
• Product code: FC30P250
A2 Stainless Steel fixings used to fix the Envello
cladding boards on to the battens, fixing through the
tongue of the boards
7e) Perforated Closure
• 50 x 25 x 3000mm
• Product code: GP300L
Aluminium closure used to prevent insects/rodents
getting into the ventilated cavity behind the boards,
but allowing airflow. Fixed at the bottom of the
cladding with the starter trim, also at the top on its
own, as well as with the corner profiles - all fixed with
the 20mm fixings.
7g) Cladding Accessories Fixings
• 3.5 x 20mm
• Box of 250
• Product code: FC20P250
A2 Stainless Steel fixings used to fix the corner profiles,
starter trims and perforated closures
7h) Plas-Pro Cladding Batten
• 25 x 50 x 3000mm
• Colour: Black
• Product code: P0205B300
Recycled plastic battens used to fix all of the
components to, including cladding boards, starter
trims, corner profiles and perforated closures.
8
Acc
ess
ori
es
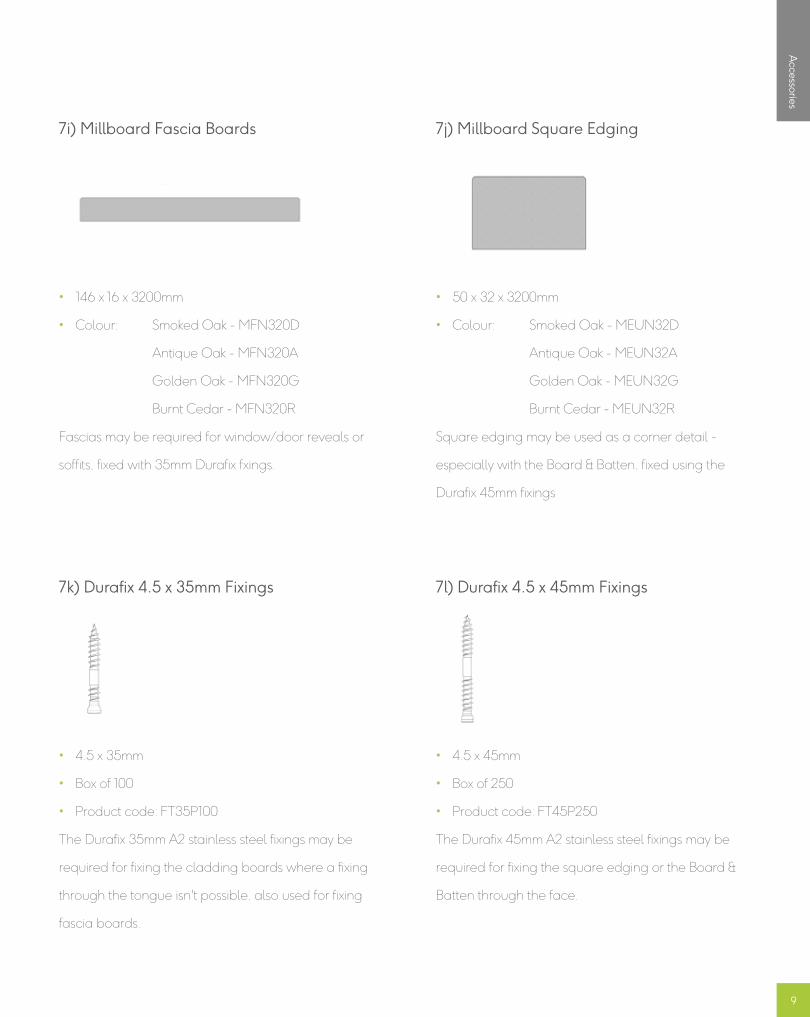
7i) Millboard Fascia Boards
• 146 x 16 x 3200mm
• Colour: Smoked Oak - MFN320D
Antique Oak - MFN320A
Golden Oak - MFN320G
Burnt Cedar - MFN320R
Fascias may be required for window/door reveals or
soffits, fixed with 35mm Durafix fxings.
7j) Millboard Square Edging
• 50 x 32 x 3200mm
• Colour: Smoked Oak - MEUN32D
Antique Oak - MEUN32A
Golden Oak - MEUN32G
Burnt Cedar - MEUN32R
Square edging may be used as a corner detail -
especially with the Board & Batten, fixed using the
Durafix 45mm fixings
7l) Durafix 4.5 x 45mm Fixings
• 4.5 x 45mm
• Box of 250
• Product code: FT45P250
The Durafix 45mm A2 stainless steel fixings may be
required for fixing the square edging or the Board &
Batten through the face.
7k) Durafix 4.5 x 35mm Fixings
• 4.5 x 35mm
• Box of 100
• Product code: FT35P100
The Durafix 35mm A2 stainless steel fixings may be
required for fixing the cladding boards where a fixing
through the tongue isn't possible, also used for fixing
fascia boards.
9
Acce
ssorie
s

7m) Plas-Pro 25 x 100mm
• 25 x 100 x 3000mm
• Colour: Black
• Product code: P0210B300
Plas-Pro 25 x 100mm may be required on the corners
of buildings to provide a greater fixing point for the
cladding boards.
Additional items that may be required (supplied by others):
• Flashing/drip profiles (around windows/doors/openings or at the bottom of the cladding)
• Fixings for installing the battens on to the structure (suitable type of fixing for the structure and battens used)
• Screws for fixing the battens together (suitable type of screw for the location and battens used)
• Clear low-modulus silicone sealant (to help prevent water penetrating through the system)
• Silicone spray (for when using the Durafix fixings)
• Polyurethane wood glue (used when mitring the boards)
• Super glue (used when mitring the boards)
7n) Touch-up Coating
• 500ml
• Colour: Smoked Oak - AP500D
Antique Oak - AP500A
Golden Oak - AP500G
Burnt Cedar - AP500R
Touch-up used for coating any exposed cuts or edges
on the Millboard Envello Cladding boards, edging
profiles, square edge or fascia boards.
10
Acc
ess
ori
es

8. Colour Characteristics8a) Millboard Envello Cladding has been designed
to replicate the natural variances of timber and is
manufactured to have tonal variance in the colour.
8b) Buying all the Millboard you need at the same
time should help to ensure that the colour is consistent
, if you do have multiple batches then it is best to mix
the boards, to create an effective, subtle blend.
8c) Antique Oak boasts more tonal variation per
individual board than any of the other colours in the
Millboard range.
8d) As with all products exposed to the Sunlight
(UV), Millboard will naturally weather and tone down
over time. Slight yellowing especially in the deeper
grain areas and loss of gloss is perfectly normal and
will not affect the performance of the products.
8e) Millboard takes great care ensuring the
performance of its products maintain the timber effect
we seek to portray, and we believe at every stage of
its life Millboard truly reflects this more than any other
timber alternative product, due to being moulded from
real timber and the hand coloured process.
8f) On delivery if you find the colour unacceptable
or believe them to be defective in any way, please
contact us. If there are any foreseen issues with the
boards, this should be highlighted with Millboard
before installing.
9. Cutting9a) Envello products can be cut with standard
wood cutting tools (i.e. mitre saw, jigsaw, handsaw),
we recommend a carbon-tipped saw blade. An
aluminium cutting blade should be used for the metal
trims.
9b) For cutting Plas-Pro, we recommend using a
carbon-tipped ripping/multi-purpose blade.
9c) Dispose of board off-cuts by disposing as
general waste or sending to a municipal incinerator for
energy replenishment, don’t burn them at home.
9d) When cutting the boards, wear an FFP3 dust
mask, safety glasses, long sleeves and protective
gloves.
9e) A dust bag or vacuum must be used on mitre
saws.
9f) Make sure that the boards are adequately
supported when cutting. Boards can be cut face-up or
face-down.
9g) When the board is cut, Touch-up Coating
should be used if the cut will be visible and exposed to
UV..
Tip:If there is a breeze/wind when cutting the boards, locate the saw up wind so that excess dust is blown away from the operator.
11
Co
lou
r & C
uttin
g

10. Preparation and Battening
10a) Ventilation for the control of moisture is a key
element in the design and construction of cladding.
It is a requirement not an option and should not be
overlooked. A continuous airflow from bottom to top is
vital for long term durability.
10b) As a rainscreen system it assumes that the
cladding will always be subject to some moisture
penetration, therefore the surface that the battens will
be fixed to needs to provide the waterproof finish.
10c) Although a breather membrane is necessary for
a timber frame, it may not be required on a masonry
cavity wall.
10d) Where the substrate is an existing building with
solid walls (i.e. no cavity), to prevent water penetration
the wall should be given a waterproof coating or
better still a breathable membrane should be fitted.
10e) Whatever system is used a minimum 19mm
open cavity should always be provided behind the
cladding and a minimum 10mm continuous gap left at
the top and bottom of the system for full ventilation to
dissipate any condensation or drainage at the bottom.
10f) Consideration regarding insect and rodent
invasion should also be considered and a perforated
closure should be used to counter these threats where
there is the required air gap, whilst still maintaining the
required air flow.
11. Cladding support batten11a) The time and care taken on setting/fixing the
support system right will be reflected in the finished
result. Time taken to upright corners and straighten
battens on undulating walls will make the installation
of the cladding a far easier installation and a superior
finished result.
11b) Millboard 25x50mm Plas-Pro Cladding Battens
are recommended to be used for a non-rot solution,
as some moisture may penetrate through the boards
to the battens.
11c) Suitable treated timber battens can be used as
an alternative, we would recommend putting a strip
of DPC, joist tape or EPDM on to the front of the timber
battens that the boards will be attached to.
11d) Batten size requirements:
• Plas-Pro 25x50x3000mm Cladding Batten (main
Cladding batten) or suitable treated timber equivalent
(minimum size of 19x38mm)
• Plas-Pro 25x100x3000mm Support (used for corners)
or suitable treated timber equivalent
11e) For the different cladding profiles, the
maximum support spacing is shown in table 1. For
areas of high wind loading exceeding 1.0kN/m²,
severe weather exposure or where exceptional impact
loading requirements are anticipated (i.e. low-level
applications near pedestrian access, schools, leisure
facilities etc.) batten support spacing should be
reduced to increase the board stiffness, see chart
below.
Product Maximum Support Centres Support Centres for high load areas
Shadow Line 18mm 400mm 300mm
Board & Batten 28mm 600mm 400mm
Table 1:
12
Preparation
up a level line around the building or along the wall
that is to be clad. This line will be the bottom of the
batten/s.
11l) Battens should be fixed to the structural wall
using suitable external grade fixings, for fixing to a
timber frame the battens should preferably be fixed
into the timber studs of the frame. The battens should
be fixed upright, packers may be needed for this if the
wall is undulating.
11m) The Plas-Pro battens should have a minimum
10mm gap between the end butt joints, as well as
being predrilled with an oversized hole to allow for
potential linear expansion.
11n) It is best for the perforated closure to be held
between the back of the battens and the wall, as
shown in drawings X01-X04, X20 & X22. This should
be taken in to consideration when fixing the battens,
alternatively they can be fixed to the front of the
battens using the 20mm Accessories Screw.
11f) There should always be battens attached to
the wall vertically to allow clear ventilation behind the
boards, if the cladding is set horizontally the boards
would be fixed directly to these battens at the centres
shown on table 1. This layout can be seen on drawings
006 & 306.
11g) When installing the boards horizontally we
would recommend that the 25x100mm Plas-Pro profile
is used on the corners, to provide more stability at
these points. This can be seen on drawings 040-042 &
340-341
11h) If the boards are to be set vertically then
horizontal battens should be fixed to the vertical
battens at the centres shown on table 1, if Plas-Pro
25x50mm battens are being used these should be
supported at 400mm centres. This layout can be seen
on drawings 106 & 206.
11i) The batten layout around windows/doors/soffits
should be that it allows the continuous airflow behind
the boards, a 10mm gap should be left between the
underside of the windowsills or soffits and at the head
of windows/doors. This can be seen on drawings X03,
X04, X07, X20, X22 & X24. The battens up the side of
the window/doors should be flush with the opening;
all vertical battens should be upright.
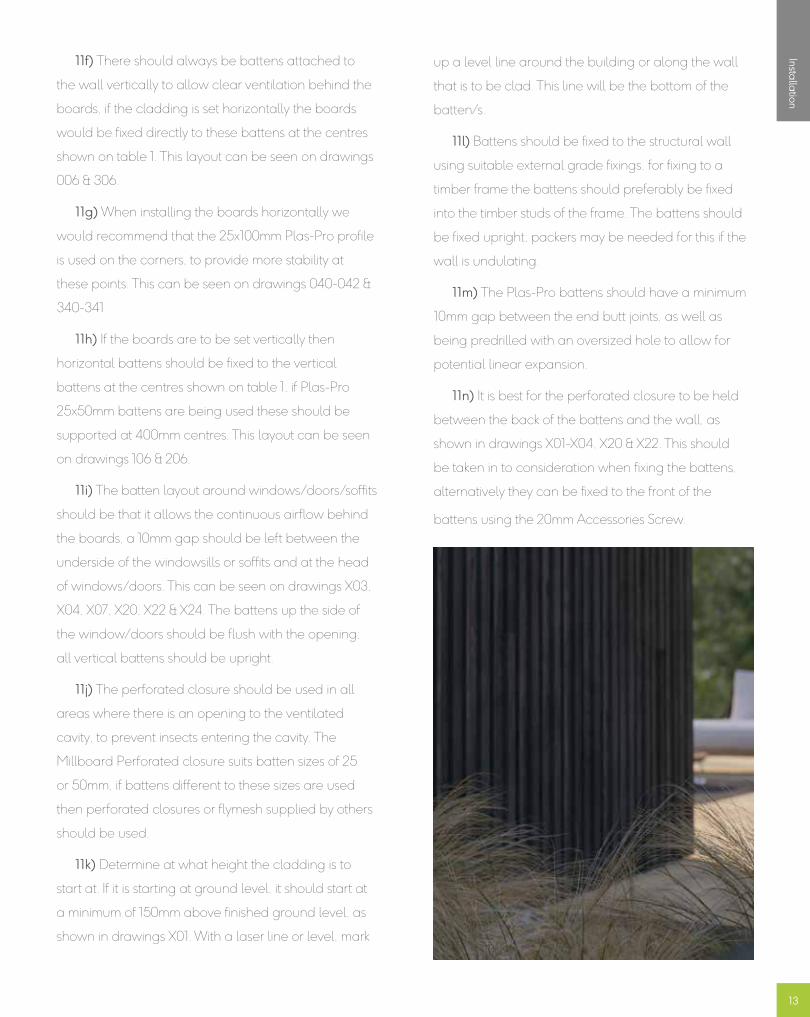
11j) The perforated closure should be used in all
areas where there is an opening to the ventilated
cavity, to prevent insects entering the cavity. The
Millboard Perforated closure suits batten sizes of 25
or 50mm, if battens different to these sizes are used
then perforated closures or flymesh supplied by others
should be used.
11k) Determine at what height the cladding is to
start at. If it is starting at ground level, it should start at
a minimum of 150mm above finished ground level, as
shown in drawings X01. With a laser line or level, mark
13
Installation

12. Installing Millboard Envello Cladding
12a. Corners of the building - Shadow Line
12a.i) When using the Shadow Line Board the
External and Internal Corner Profiles can be used.
These allow the boards to butt up to it and hide any
potential shrinkage. These are shown on drawings –
040, 041, 140 & 141.
12a.ii) If the External Corner profile or Internal
Corner profile are being used with the Shadow Line
boards on the edges of the buildings, these should be
fitted first before the starter trims.
12a.iii) The perforated closure is fitted to the back of
the External or Internal Corner profile using the 20mm
Accessories Screw at 200mm centres, these are then
fixed to the battens on the corner.
12a.iv) These are best to be fixed as shown,
however they can be fixed with the Durafix fixing
through the face but the fixing holes will be visible.
12a.v) Alternatively, the boards can be mitred
to create the external corner, this would also be
applicable if the corner is anything other than 90
degrees. This can be seen in drawing 042 & 142.
12a.vi) When using the boards horizontally it is best
to use the same board around the corner so that the
wood grain, colour tone, and profile match.
12b. Corners of the building: Board & Batten
12b.i) When using the Board & Batten boards the
Square Edge Profile can be used for the external
corners, the internal corners would be the boards
butted up to the square edge – shown on drawings
240, 241, 340 & 341.
12b.ii) When the boards are used vertically it is best
to wait until the second to last board is fixed before
determining which way is best to use the Square Edge.
If the back of the square edge will be visible then this
will need to be coated in Touch-up Coating.
12b.iii) If a Board & Batten board is cut along it’s
length then this could be glued to the back of the
square edge with PU wood glue and superglue. The
square edging and Board & Batten boards will need
to be fixed through the face using Durafix® fixings in
this instance.
12b.iv) Alternatively fascia boards can be mitred
(as seen on drawing 242), or the boards can be
mitred round the corner (as shown on drawing 342) -
all mitres completed following the tip on page 14. The
fascia boards and Board & Batten boards will need to
be fixed through the face using Durafix fixings in this
instance.
Tip for mitre joints:
Mitre and dry fit the boards to make sure the joint fits well, apply polyurethane wood glue to the core of the boards and superglue to the lastane surface.
Bring the joint together with the lastane front edge touching together first, then close the back of the joint and drop into place. If any PU glue bubbles out of the joint, wait until it is semi-dry and remove. Touch-up Coating can be used on any small imperfections on this joint.
14
Installation
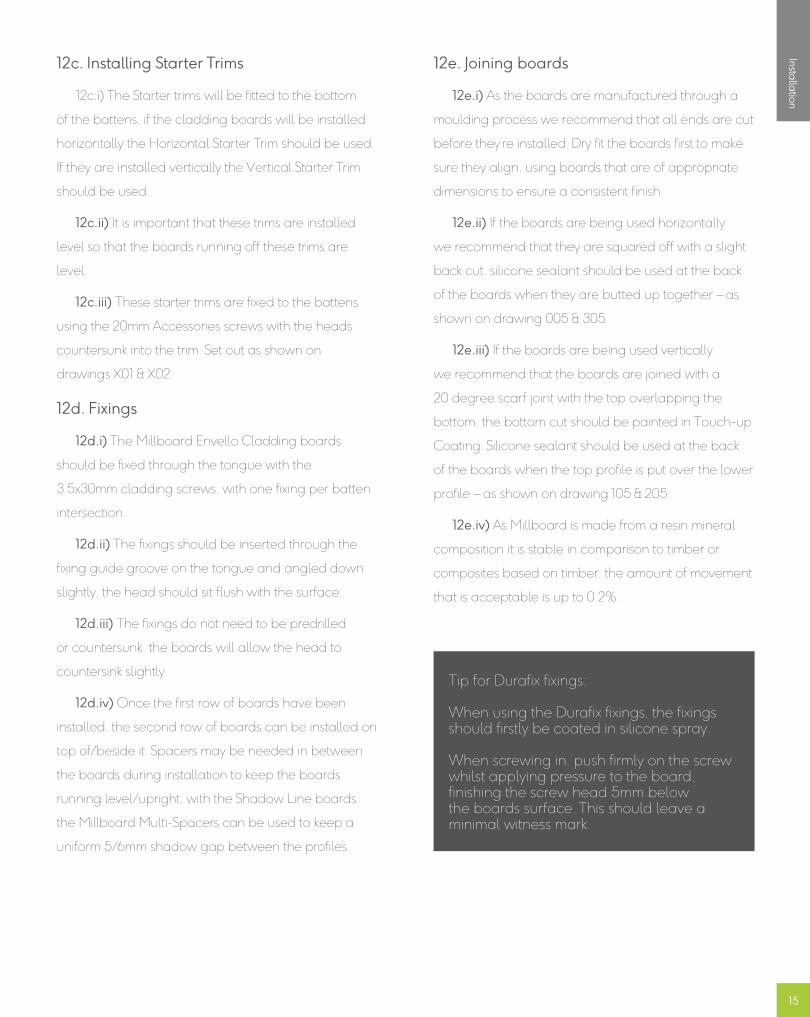
12c. Installing Starter Trims
12c.i) The Starter trims will be fitted to the bottom
of the battens, if the cladding boards will be installed
horizontally the Horizontal Starter Trim should be used.
If they are installed vertically the Vertical Starter Trim
should be used.
12c.ii) It is important that these trims are installed
level so that the boards running off these trims are
level.
12c.iii) These starter trims are fixed to the battens
using the 20mm Accessories screws with the heads
countersunk into the trim. Set out as shown on
drawings X01 & X02.
12d. Fixings
12d.i) The Millboard Envello Cladding boards
should be fixed through the tongue with the
3.5x30mm cladding screws, with one fixing per batten
intersection.
12d.ii) The fixings should be inserted through the
fixing guide groove on the tongue and angled down
slightly, the head should sit flush with the surface.
12d.iii) The fixings do not need to be predrilled
or countersunk, the boards will allow the head to
countersink slightly.
12d.iv) Once the first row of boards have been
installed, the second row of boards can be installed on
top of/beside it. Spacers may be needed in between
the boards during installation to keep the boards
running level/upright, with the Shadow Line boards
the Millboard Multi-Spacers can be used to keep a
uniform 5/6mm shadow gap between the profiles.
12e. Joining boards
12e.i) As the boards are manufactured through a
moulding process we recommend that all ends are cut
before they’re installed. Dry fit the boards first to make
sure they align, using boards that are of appropriate
dimensions to ensure a consistent finish
12e.ii) If the boards are being used horizontally
we recommend that they are squared off with a slight
back cut, silicone sealant should be used at the back
of the boards when they are butted up together – as
shown on drawing 005 & 305.
12e.iii) If the boards are being used vertically
we recommend that the boards are joined with a
20 degree scarf joint with the top overlapping the
bottom, the bottom cut should be painted in Touch-up
Coating. Silicone sealant should be used at the back
of the boards when the top profile is put over the lower
profile – as shown on drawing 105 & 205.
12e.iv) As Millboard is made from a resin mineral
composition it is stable in comparison to timber or
composites based on timber, the amount of movement
that is acceptable is up to 0.2%.
Tip for Durafix fixings:
When using the Durafix fixings, the fixings should firstly be coated in silicone spray.
When screwing in, push firmly on the screw whilst applying pressure to the board, finishing the screw head 5mm below the boards surface. This should leave a minimal witness mark.
15
Installation
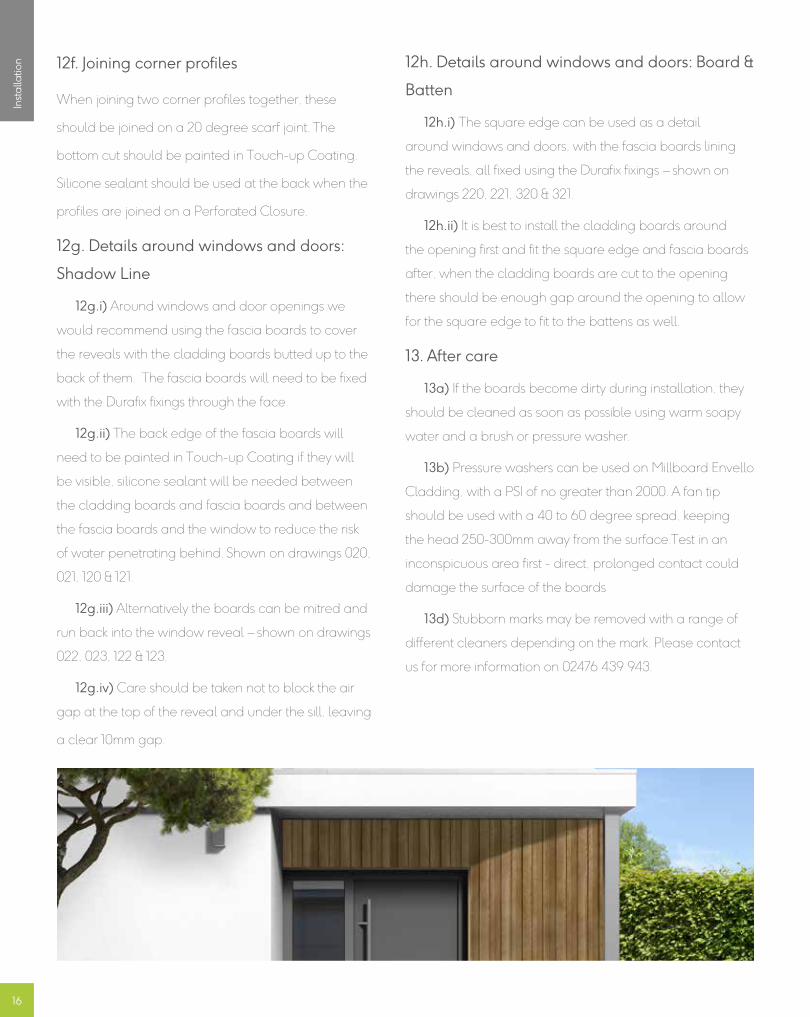
12f. Joining corner profiles
When joining two corner profiles together, these
should be joined on a 20 degree scarf joint. The
bottom cut should be painted in Touch-up Coating.
Silicone sealant should be used at the back when the
profiles are joined on a Perforated Closure.
12g. Details around windows and doors:
Shadow Line
12g.i) Around windows and door openings we
would recommend using the fascia boards to cover
the reveals with the cladding boards butted up to the
back of them. The fascia boards will need to be fixed
with the Durafix fixings through the face.
12g.ii) The back edge of the fascia boards will
need to be painted in Touch-up Coating if they will
be visible, silicone sealant will be needed between
the cladding boards and fascia boards and between
the fascia boards and the window to reduce the risk
of water penetrating behind. Shown on drawings 020,
021, 120 & 121.
12g.iii) Alternatively the boards can be mitred and
run back into the window reveal – shown on drawings
022, 023, 122 & 123.
12g.iv) Care should be taken not to block the air
gap at the top of the reveal and under the sill, leaving
a clear 10mm gap.
12h. Details around windows and doors: Board &
Batten
12h.i) The square edge can be used as a detail
around windows and doors, with the fascia boards lining
the reveals, all fixed using the Durafix fixings – shown on
drawings 220, 221, 320 & 321.
12h.ii) It is best to install the cladding boards around
the opening first and fit the square edge and fascia boards
after, when the cladding boards are cut to the opening
there should be enough gap around the opening to allow
for the square edge to fit to the battens as well.
13. After care
13a) If the boards become dirty during installation, they
should be cleaned as soon as possible using warm soapy
water and a brush or pressure washer.
13b) Pressure washers can be used on Millboard Envello
Cladding, with a PSI of no greater than 2000. A fan tip
should be used with a 40 to 60 degree spread, keeping
the head 250-300mm away from the surface.Test in an
inconspicuous area first - direct, prolonged contact could
damage the surface of the boards
13d) Stubborn marks may be removed with a range of
different cleaners depending on the mark. Please contact
us for more information on 02476 439 943.
16
Installation
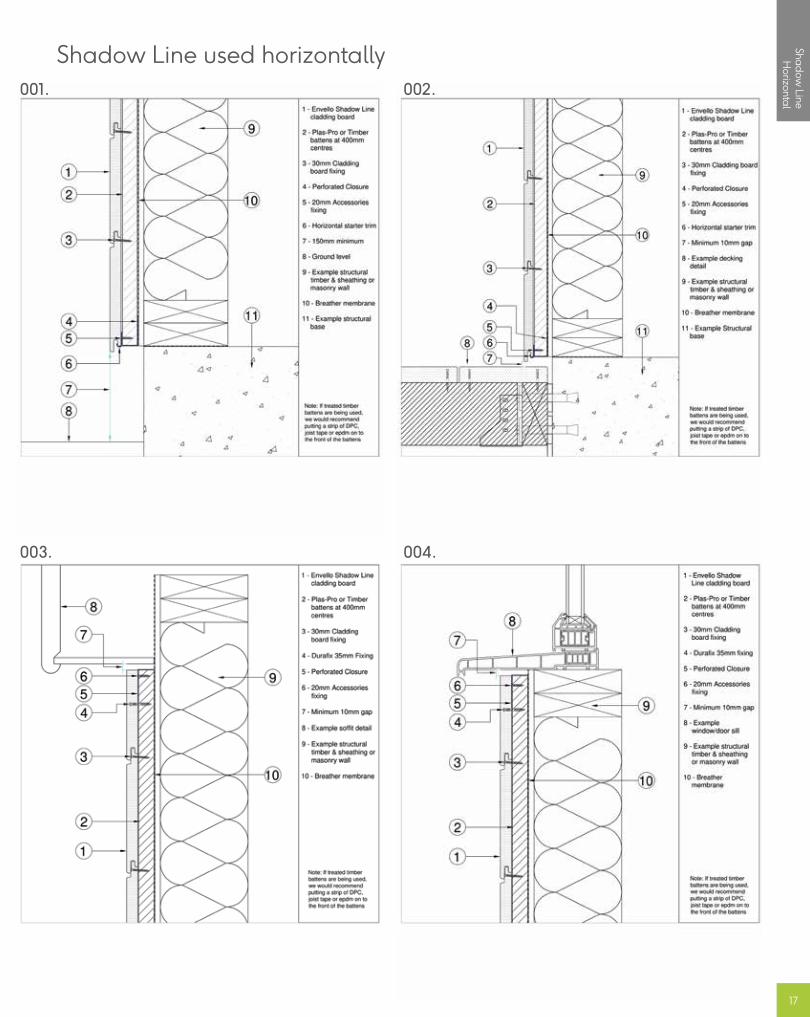
Shadow Line used horizontally
Shadow Line used horizontallyShadow Line used horizontally
17
Shadow Lin
e
Horizo
ntal
001. 002.
003. 004.

Shadow Line used horizontally
18
005. 006.
007. 020.
Shadow Line
Horizontal

Shadow Line used horizontally
19
021. 022.
023. 024.
Shadow Lin
eHorizo
ntal

Shadow Line used horizontally
20
040. 041.
042.
Shadow Line
Horizontal
041.
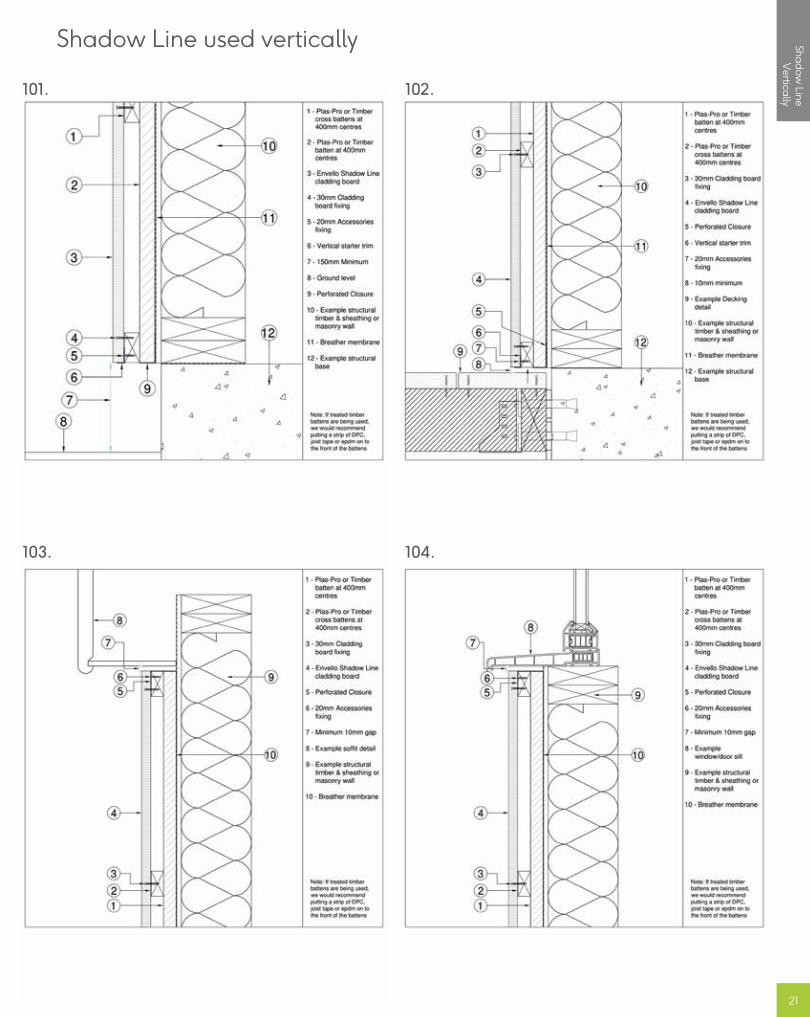
Shadow Line used vertically
21
101. 102.
103. 104.
Shadow Lin
e
Vertica
lly

Shadow Line used vertically
22
105. 106.
107. 120.
Shadow Line
Vertically

Shadow Line used vertically
23
121. 122.
123. 124.
Shadow Lin
e
Vertica
lly

Shadow Line used vertically
24
140. 141.
142.
Shadow Line
Vertically

Board & Batten used vertically
25
201. 202.
203. 204.
Bo
ard
& B
atte
n
Vertica
lly

Board & Batten used vertically
26
205. 206.
207. 220.
Bo
ard
& B
att
en
Vertically

Board & Batten used vertically
27
221. 222.
223. 224.
Bo
ard
& B
atte
n
Ve
rtically D
raw
ing
s

Board & Batten used vertically
28
240. 241.
242. 243.
Bo
ard
& B
att
en
Vertically
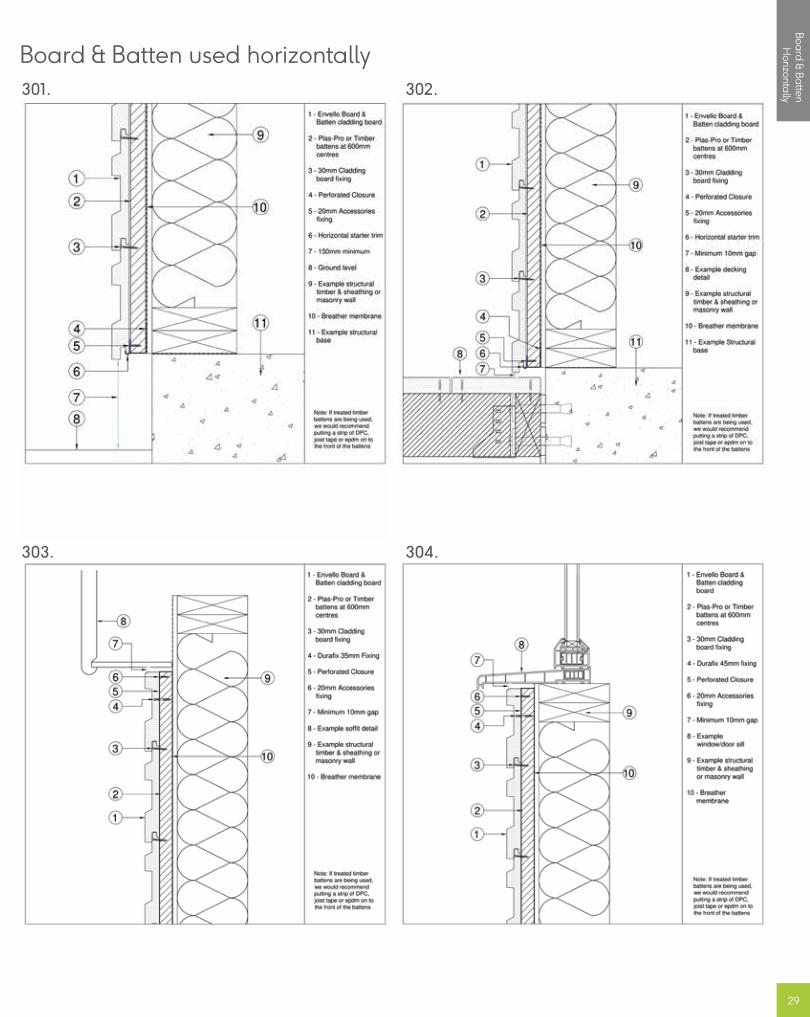
Board & Batten used horizontally
301. 302.
303.
29
304.
Bo
ard
& B
atte
n
Horizo
ntally

305. 306.
307. 320.
Board & Batten used horizontally
30
Bo
ard
& B
att
en
Horizontally
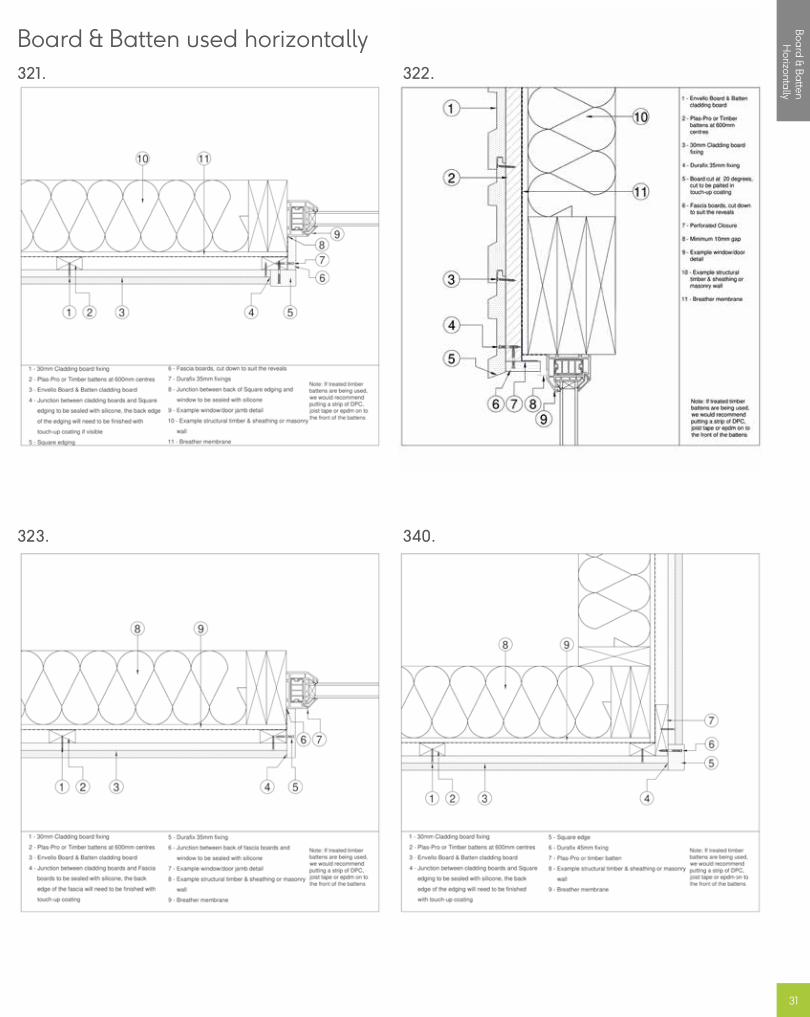
321. 322.
323. 340.
Board & Batten used horizontally
31
Bo
ard
& B
atte
n
Horizo
ntally
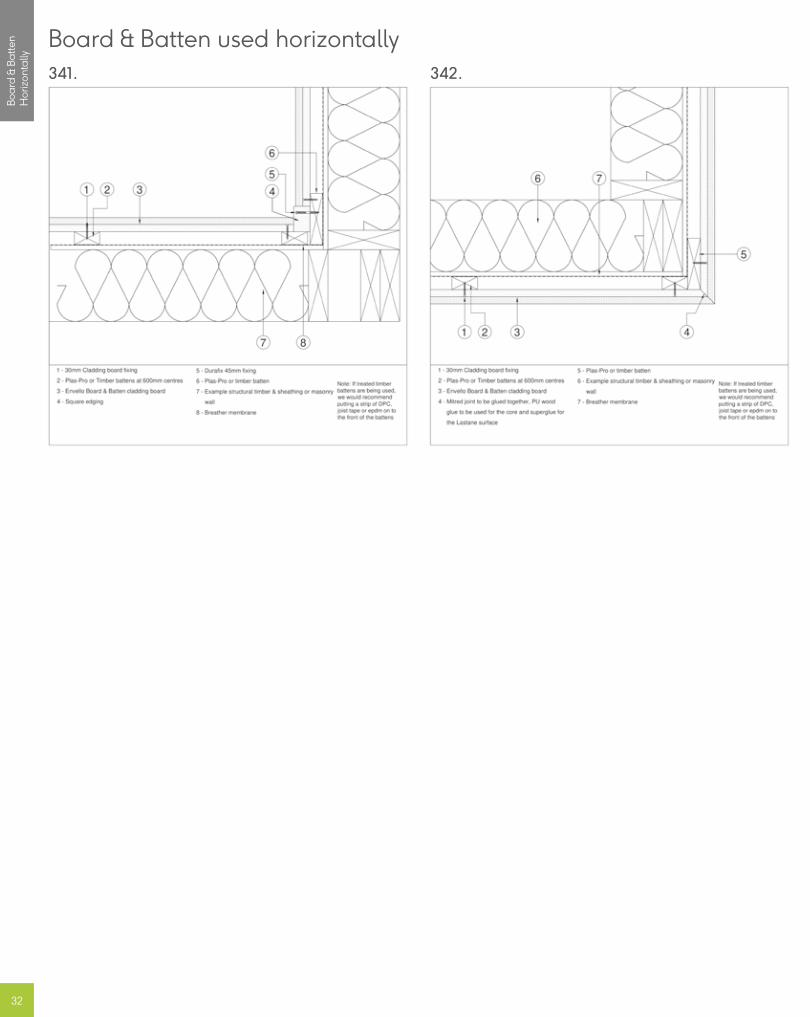
341. 342.
Board & Batten used horizontally
32
Bo
ard
& B
att
en
Horizontally

millboard.co.uk
The Millboard Company LtdUK Head OfficeUnit A, Castle CourtBodmin RoadCoventry CV2 5DB
T +44 (0) 24 7643 9943 F +44 (0) 24 7661 1668E [email protected]
Company registered No. 06061318VAT No: 980 616602
© 2021 The Millboard Company Ltd., Millboard®, Lastane®, Durafix®, Lasta-Grip®, DuoSpan®, DuoLift® Envello® and the phrase "Live. Life. Outside.™” are protected trademarks. Patents and Patents Pending apply to Millboard® products. The company will vigorously defend its patent rights. Due to printing restraints, actual colours may vary from those shown in brochure. This brochure is not to be reproduced or copied without written permission from Millboard directors. Millboard has a policy of continual improvement to specification. Product blend, colours and sizes may change without notice. All sizes and measurements are nominal. Information is correct at time of going to press. Patent numbers include GB 2445714, GB 2449184, USA 8,065,849, CAN 2664329, EU 1951971.